


Kelvinator KSV70CRG, KSD50HRG, KSV80HRG, KSV70HRG, KSV50HRG User Manual
...Inverter Air Conditioner User Manual
KSV25CRG, KSV35CRG, KSV70CRG, KSV25HRG, KSD25HRG, KSV35HRG, KSD35HRG, KSV50HRG, KSD50HRG, KSV70HRG, KSD70HRG, KSV80HRG, KSD80HRG

Congratulations |
Contents |
Congratulations and thank you for choosing our Inverter split system room air conditioner. We are sure you will find
your new air conditioner a pleasure to use. Before you use the air conditioner, we recommend that you read through
the entire user manual, which provides the description of the air conditioner and its functions.
To avoid the risks that are always present when you use an electrical appliance, it is important that the air conditioner
is installed correctly and that you read the safety instructions carefully to avoid misuse and hazards.
We recommend that you keep this instruction booklet for future reference and pass it on to any future owners.
Conditions of use
This appliance is intended to be used in household and similar applications such as :
•staff kitchen areas in shops, offices and other working environments.
•farm houses.
•by clients in hotels, motels and other residential type environments.
•bed and breakfast type environments.
This air conditioner is designed for and intended to be used in normal domestic applications only.
Record model and serial number here:
Model number: ..................................................................................
Serial number: ....................................................................................
environment
Information on disposal for users
•Most of the packing materials are recyclable. Please dispose of those materials through your local
recycling depot or by placing them in appropriate collection containers.
•If you wish to discard this air conditioner, please contact your local authorities and ask for the correct method
of disposal.
 R32 refrigerant warning
This product uses R32 difluoromethane refrigerant, which is a mildly flammable gas class 2.2 according to AS 1677 and must be handled by a refrigeration mechanic with appropriate Australian refrigerant handling licence.
Safety Instructions |
|
Warnings........................................................................................... |
3 |
Product description |
|
Installation drawing......................................................................... |
5 |
Remote control specifications........................................................ |
6 |
Operating instructions |
|
Using the remote control................................................................ |
6 |
Indoor unit display........................................................................... |
7 |
Indicators on LCD.......................................................................... |
10 |
How to use the buttons................................................................ |
11 |
Timer operation............................................................................. |
12 |
Special functions............................................................................ |
14 |
Airflow directional control............................................................. |
15 |
Care and maintenance |
|
Before maintenance...................................................................... |
17 |
Cleaning the unit........................................................................... |
17 |
Cleaning the air filter and air freshening filter............................ |
17 |
Preparation for extended non-operation.................................... |
18 |
Pre season inspection................................................................... |
18 |
Troubleshooting tips |
|
Troubleshooting tips..................................................................... |
19 |
Warranty....................................................................................... |
23 |
2 Contents

Safety instructions
Meanings of symbols used in this manual are shown below:
 warning
This symbol indicates information concerning your personal safety or information on how to avoid damaging the air conditioner
 important
This symbol indicates tips and information about use of the appliance
environment
This symbol indicates tips and information about economical and ecological use of the appliance
 important
•Contact an authorised installer for installation of this unit.
•Installation work must be performed in accordance with the national wiring standards by authorised personnel only.
•This air conditioner may need to be installed on it's own separate circuit. Please refer to AS/NZS3000 and local wiring regulations for requirements.
•Contact an authorised service technician for repair or maintenance of this unit.
•This appliance is not intended for use by persons (including children) with reduced physical, sensory or mental capabilities, or lack of experience and knowledge, unless they have
been given supervision or instruction concerning use of the appliance by a person responsible for their safety.
•Children should be supervised to ensure that they do not play with the air conditioner.
•If the system is to be moved to another location or disposed of, only a suitably qualified person is permitted to undertake such work.
•Take care not to catch fingers on the fan blade when adjusting vertical louvres.
•This air conditioner uses R32 refrigerant.
•Do not use this air conditioner for non-specified special purposes ( e.g. preserving precision devices, food, pets, plants, and art objects). Usage in such a manner could damage your property.
•Always insert the filters securely. Clean the filters every 3 months, or as required.
 warning
•Do not use means to accelerate the defrosting process or to clean, other than those recommended by the manufacturer.
•Do not store the appliance in a room with continuously operating ignition sources (for example open flames, an operating electric heater or an operating gas appliance with a continuously lit pilot flame).
•Do not pierce or burn any part of the air conditioner.
•Be aware that the refrigerant is odourless and any gas leak is not detectable by smell.
•Ensure the unit is properly connected to the power. Excess heat generation caused by incorrect connection may result in an electric shock or fire.
•Do not operate or stop the unit by switching on or off at the power source. This may cause an electric shock or fire due to excess heat generation.
•Do not operate with wet hands or in damp environment. This may cause an electric shock.
•Always ensure that the unit is correctly earthed. No earthing may cause electric shock.
•Do not allow water to run into electric parts. It may cause failure of the unit or electric shock.
•Use a correctly rated circuit breaker or fuse. There is risk of fire or electric shock.
•Disconnect the power if strange sounds, smells, or smoke come from the unit. It may cause fire and electric shock.
•Do not drink water drained from the air conditioner. It may contain contaminants that could make you sick.
•Do not open the unit during operation. It may cause electric shock.
•Ventilate room before operating the air conditioner if there has been or may have been a flammable gas leak from another appliance. It may cause an explosion, fire and burns.
•Do not disassemble or modify unit. It may cause failure and electric shock.
•When the air filter is to be removed, do not touch the metal parts of the unit. It may cause an injury.
•Do not clean the air conditioner with water. Water may enter the unit and degrade the insulation. It may cause an electric shock.
•Ventilate the room well when used together with a stove or other combustion heating device. An oxygen shortage may occur.
•Exposure of direct airflow to occupants, pets or plants for an extended period of time could be a health hazard.
Safety instructions |
3 |
Safety instructions
 warning
•Do not place obstacles around air inlets or inside of air outlet. It may cause failure of appliance or accident.
•Turn off at the main power switch if the unit will not be used for a long period of time. It may cause failure of the unit or fire.
•Do not use strong chemical cleaners such as detergents, abrasive cleaners or thinners, as they may damage the appliance causing scratches, discolouration or deteriorate the surface finish. Use a soft cloth for cleaning.
•Where the airconditioned is installed on an external wall bracket ensure that the installation bracket of the outdoor appliance is not damaged due to prolonged exposure. If bracket is damaged, the unit may fall and damage may occur.
•Use caution when unpacking and installing. Sharp edges could cause injury.
•If water enters the unit, turn the unit off and disconnect the power, contact a qualified service technician.
Troubleshooting
You'll find many answers to common problems in the chart of troubleshooting tips on page 21. If you review the chart of
Troubleshooting Tips first, you may not need to call for service.
Service
For repair and maintenance, contact your authorised service dealer.
Refer to the contact numbers in the warranty section on the back page of this manual.
4 Important safety instructions

Installation drawing
Fig. 1
3
4
Installation plate fixing screw
ST3.9x25(5) 


15cm or more
1
5
Remote control
Before screwing the remote controller holder to the wall, make sure that control signals are properly received by
indoor unit. |
6 |
|
7
2x AAA batteries
12cm or more
Air filter |
200cm or more |
A |
30cm |
or |
more |
2 |
60cm |
|
|
or more |
|||
|
|
|
|
||
|
|
|
|
|
|
|
|
|
|
|
Air |
|
|
|
|
|
outlet |
12cm or more
Additional drain pipe
Wrapping tape (wrap the insulation pipe with the tape from bottom to top)
ormore  30cm
30cm
ormore 
 200cm
200cm
B 


In sites with poor drainage, use block bases for outdoor unit. Adjust its height until the unit is leveled. Otherwise, water leakage or pooling of water may occur.
8 |
9 |
Seal
 Drain elbow
60cm |
or |
|
|
|
|
|
more |
Allow two of A, B and |
|
|
|
|
C |
C directions to be free |
|
|
from obstructions. |
Where there is a danger of the unit falling, use foot bolts to fix.
 Flare nuts
Air Conditioner |
Qty. |
|
|
|
|
1 |
Indoor unit |
1 |
2 |
Outdoor unit |
1 |
|
|
Qty. |
7 |
Battery (AAA 1.5V) |
2 |
8 |
Drain elbow & seal |
1 |
3 |
Indoor unit mounting plate |
1 |
9 |
Flare nuts |
2 |
4 |
Mounting plate fixing screws, ST3.9x25 |
5 |
10 |
Installation Manual |
1 |
5 |
Remote controller |
1 |
11 |
User manual |
1 |
6 |
Remote controller holder (optional) |
1 |
|
|
|
NOTE: Appearance of outdoor unit and indoor unit may differ from some models. The actual shape shall prevail.
Installation drawing |
5 |
Remote control specifications
Rated voltage |
3.0V (2x 1.5V AAA) |
|||||||||||||||||||||||||
Signal receiving range |
8m |
|||||||||||||||||||||||||
|
|
|
|
|
|
|
|
|
|
|
|
|
|
|
|
|
|
|
|
|
|
|
|
|
|
|
|
|
|
|
|
|
|
|
|
|
|
|
|
|
|
|
|
|
|
|
|
|
|
|
|
|
|
|
|
|
|
|
|
|
|
|
|
|
|
|
|
|
|
|
|
|
|
|
|
|
|
|
|
|
|
|
|
|
|
|
|
|
|
|
|
|
|
|
|
|
|
|
|
|
|
|
|
|
|
|
|
|
|
|
|
|
|
|
|
|
|
|
|
|
|
|
|
|
|
|
|
|
|
|
|
|
|
|
|
|
|
|
|
|
|
|
|
|
|
|
|
|
|
|
|
|
|
|
|
|
|
|
|
|
|
|
|
|
|
|
|
|
|
|
|
|
|
|
|
|
|
|
|
|
|
|
|
|
|
|
|
|
|
|
|
|
|
|
|
|
|
|
|
|
|
|
|
|
|
|
|
|
|
|
|
|
|
|
|
|
|
|
|
|
|
|
|
|
|
|
|
|
|
|
|
|
|
|
|
|
|
|
|
|
|
|
|
|
|
|
|
|
|
|
|
|
|
|
|
|
|
|
|
|
|
|
|
|
|
|
|
|
|
|
|
|
|
|
|
|
|
|
|
|
|
|
|
|
|
|
|
|
|
|
|
|
|
|
|
|
|
|
|
|
|
|
|
|
|
|
|
|
|
|
|
|
|
|
|
|
|
|
|
|
|
|
|
|
|
|
|
|
|
|
|
|
|
|
|
|
|
|
|
|
|
|
|
|
|
|
|
|
|
|
|
|
|
|
|
|
|
|
|
|
|
|
|
|
|
|
|
|
|
|
|
|
|
|
|
|
|
ON/OFF |
SILENCE |
|
FP |
MODE |
TIMER |
|
ON |
TEMP |
|
FAN |
TIMER |
OFF |
|
SLEEP |
SWING DIRECT |
TURBO SELF CLEAN |
LED FOLLOW ME |
Using the remote control
Location of the remote controller
•Use the remote controller within a distance of 8 meters from the appliance, pointing it towards the receiver. Reception is confirmed by a beep.
 caution
•The air conditioner will not operate if curtains, doors or other materials block the signals from the remote controller to the indoor unit.
•Prevent any liquid from falling into the remote controller. Do not expose the remote controller to direct sunlight or heat.
•If the infrared signal receiver on the indoor unit is exposed to direct sunlight, the air conditioner may not function properly.
•Use curtains to prevent the sunlight from falling on the receiver.
•If other electrical appliances react to the remote controller, either move these appliances or consult your local dealer.
•Do not drop the remote controller. Handle with care.
•Do not place heavy objects on the remote controller, or step on it.
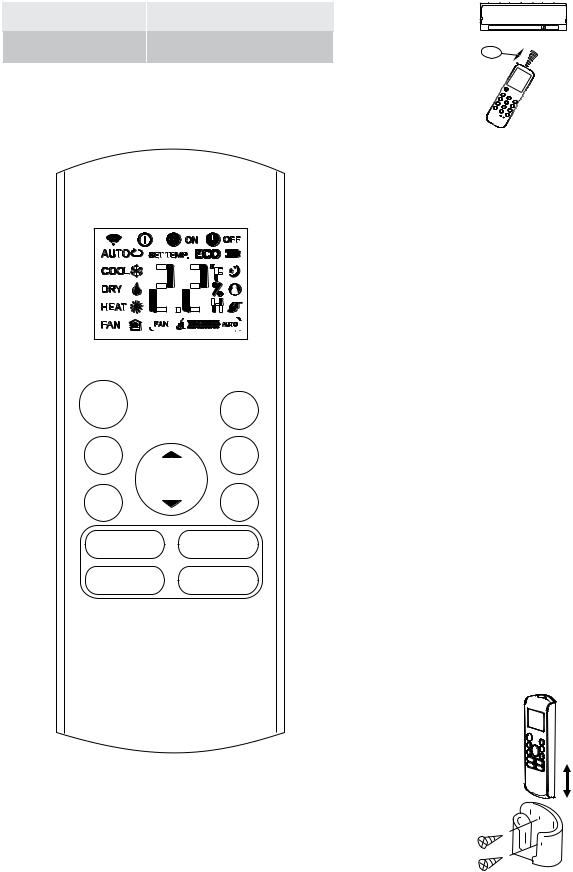
Location of the remote controller
•The remote controller can be attached to a wall or pillar by using a remote controller holder (not supplied, purchased separately).
•Before installing the remote controller, check that the air conditioner receives the signals properly.
•Install the remote controller holder with two screws.
•For installing or removing the remote controller, move it up or down in the holder.
6 Remote control specifications
Indoor unit display
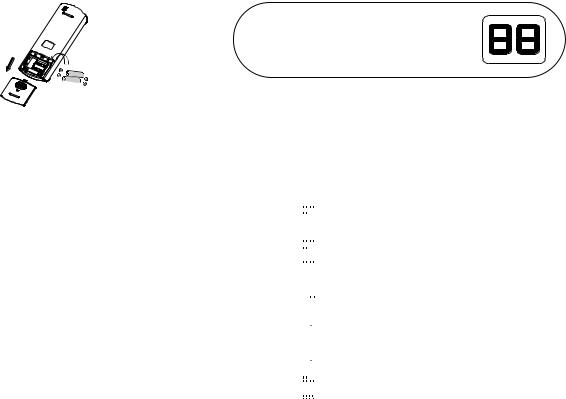
Replacing batteries
The following cases signify exhausted batteries.
Replace old batteries with new ones.
•Receiving beep is not emitted when a signal is transmitted.
•Indicator fades away.
The remote controller is powered by two dry batteries (2x AAA 1.5V)housed in the back rear part and protected by a cover.
1.Remove the cover in the rear part of the remote controller.
2.Remove the old batteries and insert the new batteries, placing the(+) and (-) ends correctly.
3.Put the cover back on.
NOTE: When the batteries are removed, the remote controller erases all programming. After inserting new batteries, the remote controller must be reprogrammed.
 warning
•Do not mix old and new batteries or batteries of different types.
•Do not leave the batteries in the remote controller if they are not going to be used for 2 or 3 months.
•Do not dispose batteries as unsorted general waste. Collection of such waste separately for special treatment
is necessary.
Digital display
•Displays the temperature settings when the air conditioner is operational.
•Displays the room temperature in FAN mode.
•Displays the self-diagnostic codes.
•Displays '


 ' for three seconds when Timer ON, Swing, Turbo or Silence feature is activated.
•Displays '


 ' for three seconds when Timer OFF is set.
•Displays '


 ' for three seconds when Swing, Turbo or Silence feature is cancelled.
•Displays '


 ' under defrosting operation.
•Displays '


 ' when anti-cold air feature is activated under heating mode.
•Displays '


 ' during self clean operation (if applicable).
•Displays '

 ' during self clean operation (if applicable).
•Displays '

 ' under 8°C heating operation (if applicable).
•If you want to turn off the indoor unit display (for example to make the room dark for sleeping), press the LED button on the remote control.
Using the remote control |
7 |
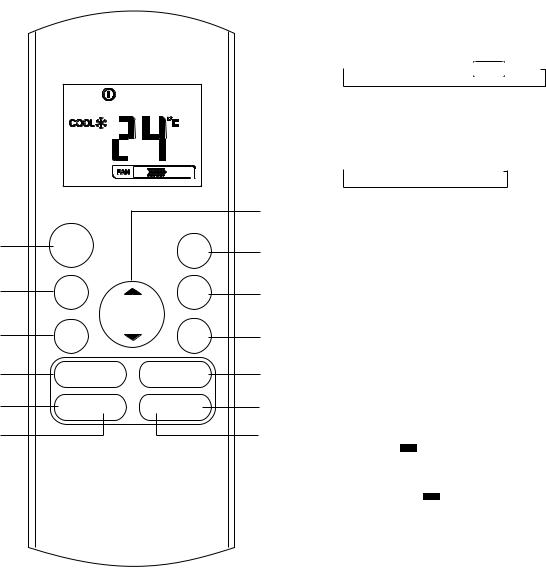
Operation of buttons
|
|
|
|
7 |
1 |
ON/OFF |
|
SILENCE |
8 |
|
|
|
FP |
|
|
|
|
|
|
2 |
MODE |
|
TIMER |
9 |
|
ON |
|||
|
|
|
||
|
|
|
|
|
|
TEMP |
|
|
|
3 |
FAN |
|
TIMER |
10 |
|
OFF |
|||
|
|
|
|
|
4 |
SLEEP |
SWING DIRECT |
11 |
|
5 |
TURBO SELF CLEAN |
LED |
FOLLOW ME |
12 |
6 |
|
|
|
13 |
1.ON/OFF Button
This button turns the air conditioner ON and OFF.
2.MODE Button
Press this button to modify the air conditioner mode in a sequence of following:
 AUTO > COOL > DRY >
 HEAT
HEAT > FAN
> FAN
NOTE: Please do not select HEAT mode if the machine you purchased is cooling only type. Heat mode is not supported by the cooling only appliance.
3.FAN Button
Used to select the fan speed in four steps:
 AUTO > LOW > MED > HIGH
NOTE: You can not switch the fan speed in AUTO or DRY mode.
4.SLEEP Button
•Active/Disable sleep function. It can maintain the most comfortable temperature and save energy. This function is available on COOL, HEAT or AUTO mode only.
•For the detail , see sleep operation on page.
NOTE: While the unit is running under SLEEP mode, it will be cancelled if MODE, FAN SPEED or ON/OFF button is pressed.
5.TURBO Button
Active/Disable Turbo function. Turbo function enables the unit to reach the preset temperature at cooling or heating operation in the shortest time.
6.SELF CLEAN Button Active/Disable Self Clean function
7.UP Button (  )
)
Push this button to increase the indoor temperature setting in 1°C increments to 30°C.
DOWN Button (  )
)
Push this button to decrease the indoor temperature setting in 1°C increments to 17°C.
8SILENCE/FP Button (FP frost protection - when selected prevents the room temperature from dropping below 8°C)
•Active/Disable SILENCE function. If pushing more than 2 seconds, the FP function will be activated, pushing more than 2 seconds again to disable.
•When the Silence function is activated, the compressor will operate at low frequency and the indoor unit will bring faint breeze, which will reduce the noise to the lowest level and create a quiet and comfortable room for you. Due to low frequency operation of compressor, it may result in insufficient cooling and heating capacity.
•The FP function can only be activated during the heating operation (only when the setting mode is HEAT). The unit will operate at a setting temperature of 8°C. The display window of indoor unit will display FP. Press the buttons of ON/OFF, SLEEP, FP, MODE, FAN SPEED,UP or DOWN while operating will cancel the FP function.
8 Operation of buttons
 Loading...