


Inverter Split System Room Air Conditioner
User Manual
KSV26CRE, KSV26HRE, KSV35CRE, KSV35HRE,
KSV53HRE, KSV62HRE, KSV70CRE, KSV70HRE,
KSV80HRE
Refrigerant R32

Congratulations |
Contents |
Congratulations and thank you for choosing our Inverter split system room air conditioner. We are sure you will find
your new air conditioner a pleasure to use. Before you use the air conditioner, we recommend that you read through the entire user manual, which provides the description of the air conditioner and its functions.
To avoid the risks that are always present when you use an electrical appliance, it is important that the air conditioner is installed correctly and that you read the safety instructions carefully to avoid misuse and hazards.
We recommend that you keep this instruction booklet for future reference and pass it on to any future owners.
After unpacking the air conditioner please check it is not damaged. If in doubt, do not use the air conditioner but contact your local Electrolux Customer Care Centre.
 environmental tip
Information on disposal for users
•Most of the packing materials are recyclable.
Please dispose of those materials through your local recycling depot or by placing them in appropriate collection containers.
•If you wish to discard this air conditioner, please contact your local authorities and ask for the correct method
of disposal.
 refrigerant warning
This unit uses refrigerant R32 and must be disposed of by a licensed refrigeration mechanic with knowledge of appropriate gas reclamation methods.
 caution
•The air conditioner is not intended for use by young children or infirm persons without supervision.
•Young children should be supervised to ensure that they do not play with the air conditioner.
•Contact an authorised installer for installation of this unit.
•Contact an authorised service technician for repair or maintenance of this unit.
•If the power cord is to be replaced, replacement work shall be performed by authorised personnel only.
•Installation work must be performed in accordance with the national wiring Standards by authorised personnel only.
Safety Instructions |
|
Warnings........................................................................................ |
3 |
Prior to operation......................................................................... |
4 |
Product description |
|
Diagram......................................................................................... |
5 |
Indoor display unit........................................................................ |
6 |
Remote control............................................................................. |
7 |
First use.......................................................................................... |
9 |
How to operate the air conditioner |
|
Automatic operation.................................................................. |
10 |
Cooling/Heating/Fan only operation....................................... |
10 |
Dehumidifying operation.......................................................... |
10 |
Setting the clock......................................................................... |
11 |
Timer operation.......................................................................... |
12 |
Eco operation.............................................................................. |
13 |
Emergency operation................................................................ |
15 |
Operating temperature............................................................. |
15 |
Maintenance |
|
Cleaning the filters..................................................................... |
16 |
Operating tips |
|
Operation tips............................................................................. |
18 |
Troubleshooting tips.................................................................. |
19 |
Warranty |
|
Warranty instructions................................................................. |
23 |
2 Contents Kelvinator Air Conditioning
Safety instructions
•Contact an authorised installer for installation of this unit.
•Contact an authorised service technician for repair or maintenance of this unit.
•The socket outlet required to supply power must be connected and commissioned by a licensed contractor.
•This appliance is not intended for use by persons
(including children) with reduced physical, sensory or mental capabilities, or lack of experience and
knowledge, unless they have been given supervision or instruction concerning use of the appliance by a person responsible for their safety.
•Young children should be supervised to ensure that they do not play with the air conditioner.
•If the power cord is to be replaced, replacement work shall be performed by authorised personnel only.
•Installation work must be performed in accordance with the national wiring standards and the electricity suppliers service rules by authorised personnel only.
•If the system is to be moved to another location or disposed of, only a suitably qualified person is permitted to undertake such work.
•Take care not to catch fingers on the fan blade when adjusting vertical louvres.
•This air conditioner uses R32 refrigerant.
How to properly use and maintain your air conditioner
Just a little preventative care on your part can save you a great deal of time and money over the life of your air
conditioner. You'll find many answers to common problems in the chart of troubleshooting tips. If you review the chart of Troubleshooting Tips first, you may not need to call
for service.
Meanings of symbols used in this manual are shown below:
 warning
This symbol indicates information concerning your personal safety
 caution
This symbol indicates information on how to avoid damaging the appliance
 tips and information
This symbol indicates tips and information about use of the appliance
 environmental tip
This symbol indicates tips and information about economical and ecological use of the appliance
This symbol indicates always do this
This symbol indicates never to do this
 warning
Do not use means to accelerate the defrosting process or to clean, other than those recommended by the manufacturer.
Do not store the appliance in a room with continuously operating ignition sources (for example open flames, an operating electric heater or an operating gas appliance with a continuously lit pilot flame).
Do not pierce or burn.
Be aware that the refrigerant may be odourless.
Ensure the unit is properly connected to the power.
Excess heat generation caused by incorrect connection may result in an electric shock or fire.
Do not operate or stop the unit by switching on or off at the power source.
This may cause an electric shock or fire due to excess heat generation.
Do not damage or use an unspecified power cord.
This may cause an electric shock or fire.
Do not modify power cord length or share the outlet with other appliances.
This may cause an electric shock or fire due to excess heat generation.
Do not operate with wet hands or in damp environment.
This may cause an electric shock.
Do not direct airflow at room occupants only.
This could damage your health.
Always ensure that the unit is correctly earthed.
No earthing may cause electric shock.
Do not allow water to run into electric parts.
It may cause failure of the unit or electric shock.
Always install circuit breaker and a dedicated power circuit.
Improper installation may cause fire and electric shock.
Disconnect the power if strange sounds, smells, or smoke come from the unit.
It may cause fire and electric shock.
Do not drink water drained from air conditioner.
It contains contaminants and could make you sick.
Do not open the unit during operation.
It may cause electric shock.
Use correctly rated circuit breaker or fuse.
There is risk of fire or electric shock.
Do not use the power cord close to heating appliances.
It may cause fire and electric shock.
Do not use the power cord near flammable gas or combustibles, such as gasoline, benzene, thinner, etc.
It may cause an explosion or fire.
Ventilate room before operating air conditioner if there is a gas leakage from another appliance.
It may cause explosion, fire and burns.
Do not disassemble or modify unit.
It may cause failure and electric shock.
Kelvinator Air Conditioning Important safety instructions 3

Safety instructions
 caution
When the air filter is to be removed, do not touch the metal parts of the unit.
It may cause an injury.
Do not clean the air conditioner with water.
Water may enter the unit and degrade the insulation. It may cause an electric shock.
Ventilate the room well when used together with a stove, etc.
An oxygen shortage may occur.
Do not put a pet or house plant where it will be exposed to direct air flow.
This could injure the pet or plant.
Do not use for special purposes.
Do not use this air conditioner to preserve precision devices, food, pets, plants, and art objects. It may cause deterioration of quality, etc.
Stop operation and close the window in storm or hurricane.
Operation with windows open may allow rain inside, soaking carpets and furniture.
Do not place obstacles around air-inlets or inside of air-outlet.
It may cause failure of appliance or accident.
Turn off at the main power switch if the unit will not be used for a long period of time.
It may cause failure of the unit or fire.
Do not use strong detergent such as wax or thinner. Use a soft cloth for cleaning.
Appearance may be deteriorated due to change of product colour or scratching of its surface.
Ensure that the installation bracket of the outdoor appliance is not damaged due to prolonged exposure.
If bracket is damaged, the unit may fall and damage may occur.
Always insert the filters securely. Clean filter once every two weeks.
Operation without filters may cause failure.
Do not place heavy object on the power cord and take care so that the cord is not compressed.
There is danger of fire or electric shock.
Use caution when unpacking and installing.
Sharp edges could cause injury.
If water enters the unit, turn the unit off and disconnect the power, contact a qualified service technician.
Hold the plug by the head of the power plug when taking it out.
Failure to do so may cause electric shock and damage.
Prior to Operation
1Contact an installation specialist for installation.
2Plug in the power plug properly.
3Do not use a damaged or non-standard power cord.
4Do not share the same outlet with other appliances.
5Do not use an extension cord.
6Do not start/stop operation by plugging /unplugging the power cord.
Usage
1Exposure to direct airflow to occupants, pets or plants for an extended period of time could be hazardous to your health.
2Due to the possibility of oxygen deficiency, ventilate the room when used together with stoves or other heating devices.
3Do not use this air conditioner for non-specified special purposes ( e.g. preserving precision devices, food, pets, plants, and art objects). Usage in such a manner could harm your property.
Cleaning and maintenance
1Do not touch the metal parts of the unit when removing the filter. Injuries can occur when handling sharp
metal edges.
2Do not use water to clean inside the air conditioner. Exposure to water can destroy the insulation, leading to possible electric shock.
3When cleaning the unit, first make sure that the power and circuit breaker are turned off.
Service
For repair and maintenance, contact your authorised service dealer.
4 Important safety instructions Kelvinator Air Conditioning
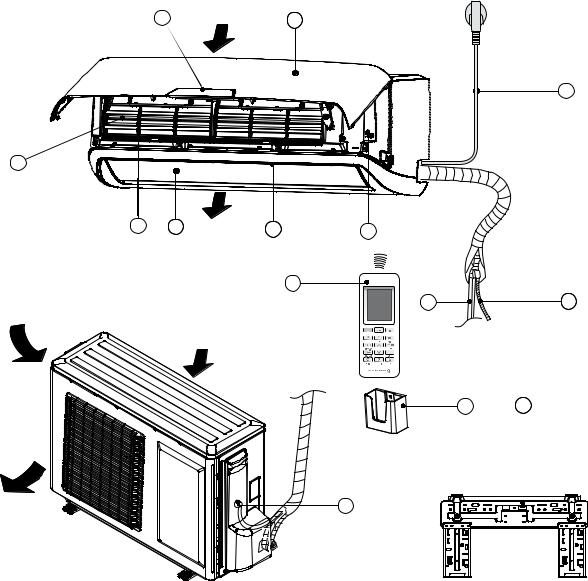
Product Description
Indoor unit |
2 |
Air inlet |
1 |
|
12
3 |
|
|
|
|
4 |
5 Air outlet |
6 |
7 |
|
Outdoor unit |
|
|
8 |
|
Air inlet |
|
|
10 |
11 |
(side) |
Air inlet |
|
|
|
|
|
|
|
|
|
(rear) |
|
|
|
9 13
Air outlet |
14 |
|
1. |
Front panel |
10. |
Refrigerant pipe (if applicable) |
2. |
Digital display |
11. |
Drain hose (if applicable) |
3. |
Air filter (behind the dust filter) |
12 |
Power cable (if applicable) |
4. |
Pre-dust filter |
13 |
Mounting plate |
5. |
Horizontal louvres |
14 |
Connecting cable (if applicable) |
6. |
Vertical louvres |
NOTE: All the pictures in this manual are for explanation |
|
|
|
||
7. |
Manual control button |
purpose only. Your air conditioner may be slightly different. |
|
8. |
Remote control |
The actual shape shall prevail. |
|
|
|
||
9.Remote control holder
Kelvinator Air Conditioning Product description 5
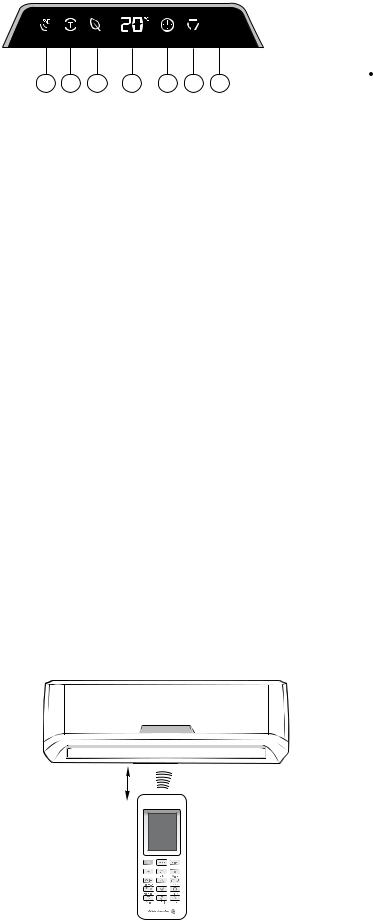
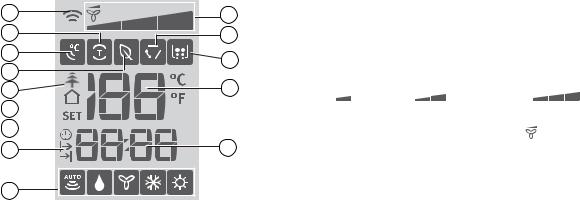
Indoor display unit
1 |
2 |
3 |
4 |
5 |
6 |
7 |
1I feel indicator
Lights when the 'I feel' function is activated.
2Turbo indicator
Lights when the 'TURBO' function is activated.
3Eco (economy) indicator
Lights when the 'ECO' function is activated.
4Temperature indicator
Displays the temperature settings when the air conditioner is in operation.
5Timer indicator
Lights when the 'TIMER' function is set to
ON or OFF.
6Swing indicator
Lights when the 'SWING' function is activated.
7Signal receiver
Receives signal from the remote control.
Remote control
Location of the remote control
•Keep the remote control where its signal can reach the receiver of the indoor unit (a distance of up to 8m is allowed).
•When you select the timer operation, the remote control automatically transmits a signal to the indoor unit at the specified time.
•If you keep the remote control in a position that hinders proper signal transmission, a time lag of up to 15 minutes may occur.
up to 8 metres
•When the remote control sends out a signal, the symbol
 will blink for about 1 second on the display of the remote control.
 caution
•The air conditioner will not operate if curtains, doors or other materials block the signals from the remote control to the indoor unit.
•Prevent any liquid from entering the remote control.
Do not expose the remote control to direct sunlight or heat.
•If the infrared signal receiver on the indoor unit is exposed to direct sunlight, the air conditioner may not function properly. Use curtains to prevent the sunlight from falling on the receiver.
•If other electrical appliances react to the remote control, either move these appliances or consult your local dealer.
Replacing batteries
The remote control uses two AAA dry cell batteries.
1Slide the cover of the battery compartment off according to the arrow direction, then replace the old batteries with new ones.
2Insert the new batteries making sure that the (+) and (-) of the batteries are installed correctly.
3Reattach the cover by sliding it back into position. The remote control clock will need to be reset after replacing the batteries.
NOTE: Do not dispose batteries as unsorted municipal waste. Collection of such waste separately for special treatment is necessary.
 tips and information
•When changing batteries use only new and matching batteries, otherwise, it may cause problems with the remote control.
•If the remote control is not used for a long time, remove the batteries as old batteries may leak or corrode and damage the remote control.
•The battery life during normal use is about six months.
•If the remote control does not operate normally, please remove and refit the batteries. If abnormal operation continues, replace with new batteries.
6 Indoor display unit Kelvinator Air Conditioning
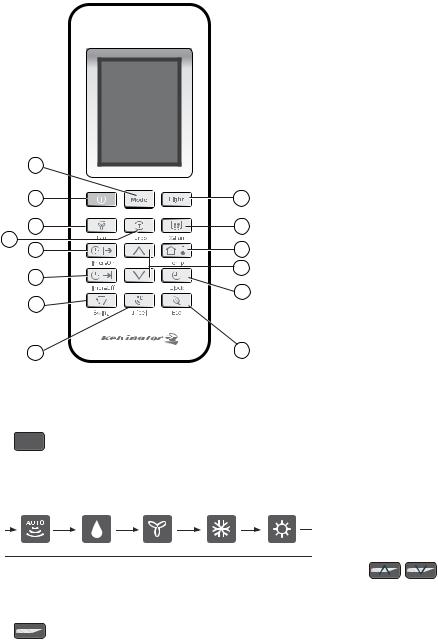
Remote control
2 |
|
|
1 |
3 |
|
4 |
6 |
|
5 |
13 |
|
7 |
||
8 |
11 |
|
12 |
||
9 |
||
|
||
10 |
14 |
1 ON/OFF Button
Push this button to start or stop operation.
2Mode MODE Select Button
Each time you push the button, a mode is selected in a sequence that goes from AUTO, DEHUMIDIFY, FAN, COOL and HEAT, as the following figure indicates:
AUTO |
DEHUMIDIFY |
FAN |
COOL |
HEAT |
NOTE: Cooling Only models have no HEAT mode.
3 |
Light LIGHT Button |
Press this button to switch the indicating lights of the indoor unit ON or OFF. The normal condition at start up is ON.
4 FAN Button
By pressing this button, Auto, Low, Medium and High speed can be progressively selected. When the unit is turned on, Auto fan speed is the default.
In DEHUMIDIFY mode, the fan speed is fixed at
Low speed.
5 TURBO Button
Press this button in COOL or HEAT mode to put the fan into the high speed Turbo mode and the air conditioner will work at maximum power.
Press again to cancel this function.
6X-Fan Function
Press the  X-FAN button to activate the X-FAN function.
After the unit is turned off, the indoor fan will continue to operate for 10 minutes to remove all moisture from the indoor unit and prevent bacteria and mildew from growing.
7 TIMER ON Button
Press this button to set the start time.
8 TIMER OFF Button
Press this button to set the start time.
9 SWING Button
Press this button to change the swing angle of the louvre. The angle of the horizontal louvre will adjust by 6 degrees with each press of the button. If you keep pressing the button for 2 or more seconds, the louvre will swing up and down automatically.
10 I feel Button
Push this button to initiate the I feel feature,
the remote displays the temperature at its location. The remote control will send this signal to the air conditioner in 3 minute intervals until you press the I feel button again. The air conditioner will automatically cancel the I feel feature if it does not receive the signal during any 7 minute interval.
NOTE: The I feel feature is not available under
DRY and FAN mode. Shifting the operating mode or turning off the unit will cancel the I feel feature automatically. The remote control needs to be within 8m reach of the indoor unit for the I feel mode to work appropriately.
11CONTROL Buttons
Press the  button to increase the temperature setting. Press the
  button to decrease the temperature setting.
In Timer On/Off or Clock functions, use these buttons to adjust the timer or set the clock.
12 CLOCK Button
Press this button and the Clock symbol  will blink.
You can press Control buttons and
and  to set the time you want.
13 TEMP (Temperature) Button
Press this button to change the remote control display of the set temperature to the room temperature.
14 ECO (Economy) Button
Press this button to go into the Energy-Saving operating mode. Press it again to cancel. This function is ideal for maintaining a comfortable sleeping temperature.
Kelvinator Air Conditioning Using the remote control 7
Remote control display indicator
1 |
9 |
|
2 |
10 |
|
3 |
11 |
|
4 |
||
|
||
5 |
12 |
6 
7 
8 |
13 |
14
1Transmission Indicator
Displays when the remote control transmits signals to the indoor unit.
2Turbo Display
Displays when Turbo function is active.
3I feel Display
Displays when the I feel function is active.
4Eco Display
Displays when Eco function is active.
5Active Plasma Display (Active Plasma models only)
Displays when Active Plasma function is selected. This function is not available for this range of air conditioners.
6Room Temperature Display
Displays when the temperature shown on the LCD screen is room temperature. It can be switched on/off by pressing the Temp button.
7Programmed Temperature Display
Lights up when the remote control displays the set temperature. It can be switched on/off by pressing the Temp button.
8Timer On/Off Display
Displays when the Timer On/Off function is activated.
9Fan Speed Display
Displays the selected fan speed in the following sequence:
LOW |
MEDIUM |
HIGH |
and AUTO. In Auto speed, only the |
symbol |
|
is displayed. |
|
|
10SWING Display
Displays when the Swing function is selected.
11X-Fan Display
Displays when the X-Fan function is activated by pressing Turbo and Healthy buttons at the same time (for models with active plasma function) or by pressing X-Fan button (for models without active plasma function).
12Temperature Display
Displays the room or set temperature in °C or ºF. No display in Fan mode.
13TIME Display
Displays the Clock time (must be set) and/or the on/off time of the timer.
14MODE Display
Displays the current operation mode, including
Auto ( ), Dehumidify (
 ), Fan (
  ), Cool (
 ) and Heat (
 ).
).
NOTE: The Cool model does not offer a Heating option.
8 Using the remote control Kelvinator Air Conditioning
 Loading...