

Page 1

Visit us at www.TestEquipmentDepot.com
Model 6517B Electrometer
User’s Manual
6517B-900-01 Rev. A / June 2008
99 Washington Street
Melrose, MA 02176
Phone 781-665-1400
Toll Free 1-800-517-8431
A GREATER MEASURE OF CONFIDENCE
Page 2

WARRANTY
Test Equipment Depot - 800.517.8431 - 99 Washington Street Melrose, MA 02176
TestEquipmentDepot.com
Keithley Instruments, Inc. warrant s this product to be free from defect s in ma terial a nd wor kmanship for a period of
one (1) year from date of shipment.
Keithley Instruments, Inc. warrants the following items for
software, rechargeable batteries, diskettes, and documentation.
During the warranty period, Keithley Instruments will, at it
to be defective.
To exercise this warranty, write or call your local Keithley Instruments representative, or contact
Keithley Instruments headquarters
Send the product, transportation prepaid, to the indicated service facility. Repairs will be made and the product
returned, transportation prepaid. Repaired or replaced products are warranted for the balance of the original
warranty period, or at least 90 days.
in Cleveland, Ohio. You will be given prompt assistance and return instructions.
90 days from the date of shipment: probes, cables,
s option, either repair or replace any product that proves
LIMITATION OF WARRANTY
This warranty does not apply to defects resulting from product modification without Keithley Instruments’ express
written consent, or misuse of any product or part. This warranty also does not apply to fuses, software,
non-rechargeable batteries, damage from batter y leakag
instructions.
THIS WARRANTY IS IN LIEU OF ALL OTHER WARRANTIES, EXPRESSED
IMPLIED WARRANTY OF MERCHANTABILITY OR FITNESS FOR A PARTICULAR USE. THE REMEDIES
PROVIDED HEREIN ARE BUYER’S SOLE AND EXCLUSIVE REMEDIES.
NEITHER KEITHLEY INSTRUMENTS, INC. NOR ANY OF ITS EMP
DIRECT, INDIRECT, SPECIAL, INCIDENTAL, OR CONSEQUENTIAL DAMAGES ARISING OUT OF THE USE
OF ITS INSTRUMENTS AND SOFTWARE, EVEN IF KEITHLEY INSTRUMENTS, INC. HAS BEEN ADVISED IN
ADVANCE OF THE POSSIBILITY OF SUCH DAMAGES. SUCH EXCLUDED DAMAGES SHALL INCLUDE, BUT
ARE NOT LIMITED TO: COST OF REMOVAL AND INSTALLATION, LOSSES SUSTAINED AS THE RESULT OF
INJURY TO ANY PERSON, OR DAMAGE TO PROPERTY.
e, or problems arising from normal wear or failure to follow
OR IMPLIED, INCLUDING ANY
LOYEES SHALL BE LIABLE FOR ANY
3/07
Page 3

Test Equipment Depot - 800.517.8431 - 99 Washington Street Melrose, MA 02176
TestEquipmentDepot.com
Page 4

Model 6517B
Any unauthorized reproduction, photocopy, or use the information herein, in whole or in part, without the prior written
approval of Keithley Instruments, Inc. is strictly prohibited.
TSP, TSP-Link, and TSP-Net are trademarks of Keithley Instruments, Inc.
All Keithley Instruments product names are trademarks or registered trademarks of Keithley Instruments, Inc.
Other brand names are trademarks or registered trademarks of their respective holders.
Test Equipment Depot - 800.517.8431 - 99 Washington Street Melrose, MA 02176
TestEquipmentDepot.com
Electrometer
User’s Manual
Page 5

Test Equipment Depot - 800.517.8431 - 99 Washington Street Melrose, MA 02176
TestEquipmentDepot.com
Page 6

Test Equipment Depot - 800.517.8431 - 99 Washington Street Melrose, MA 02176
TestEquipmentDepot.com
The following safety precautions should be observed before using this product an d any associated instrumentation. Although some
instruments and accessories would normally be used with non-hazardous voltages, there are situations where hazardous conditions may
be present.
Safety Precautions
This product is intended for use by qualified personnel who recog
to avoid possible injury. Read and follow all installation, operation, and maintenance information carefully before using the product. Refer
to the user documentation for complete product specifications.
If the product is used in a manner not
The types of product users are:
Responsible body is
operated within its specifications and operating limits, and for ensuring that operators are adequately trained.
Operators use
They must be protected from electric shock and contact with hazardous live circuits.
Maintenance personnel pe
replacing consumable materials. Maintenance procedures are described in the user documentation. The procedures explicitly state if the
operator may perform them. Otherwise, they should be performed only by service personnel.
Service personnel are traine
personnel may perform installation and service procedures.
Keithley Instruments products are designed for use with electrical sig
Category II, as described in the International Electrotechnical Commission (IEC) Standard IEC 60664. Most measurement, control, and
data I/O signals are Measurement Category I and must not be directly connected to mains voltage or to voltage sources with high transient
over-voltages. Measurement Category II connections require protection for high transient over-voltages often associated with local AC
mains connections. Assume all measurement, control, and data I/O connections are for connection to Category I sources unless otherwise
marked or described in the user documentation.
the individual or group responsible for the use and maintenance of equipment, for ensuring that the equipment is
the product for its intended function. They must be trained in electrical safety procedures and proper use of the instrument.
rform routine procedures on the product to keep it operating properly, for example, setting the line voltage or
d to work on live circuits, perform safe installations, and repair products. Only properly trained service
specified, the protection provided by the product warranty may be impaired.
nize shock hazards and are familiar with the safety precautions required
nals that are rated Measurement Category I and Measurement
Exercise extreme caution when a shock hazard is prese
American National Standards Institute (ANSI) states that a shock hazard exists when voltage levels greater than 30V RMS, 42.4V peak,
or 60VDC are present. A good safety practice is to expect that hazardous voltage is present in any unknown circuit before measuring.
Operators of this product must be protected from ele
prevented access and/or insulated from every connection point. In some cases, connections must be exposed to potential human contact.
Product operators in these circumstances must be trained to protect themselves from the risk of electric shock. If the circuit is capable of
operating at or above 1000V, no conductive part of the circuit may be exposed.
Do not connect switching cards directly to unlimited power circuit
connect switching cards directly to AC mains. When connecting sources to switching cards, install protective devices to limit fault current
and voltage to the card.
Before operating an instrument, ensure that the line cord is con
cables, test leads, and jumpers for possible wear, cracks, or breaks before each use.
nt. Lethal voltage may be present on cable connector jacks or test fixtures. The
ctric shock at all times. The responsible body must ensure that operators are
s. They are intended to be used with impedance-limited sources. NEVER
nected to a properly-grounded power receptacle. Inspect the connecting
11/07
Page 7

When installing equipment where access to the main power cord is restricted, such as rack mounting, a separate main input power
!
Test Equipment Depot - 800.517.8431 - 99 Washington Street Melrose, MA 02176
TestEquipmentDepot.com
disconnect device must be provided in close proximity to the equipment and within easy reach of the operator.
For maximum safety, do not touch the product, test cables, or any other instrument
AL W AYS remove power from the entire test system and discharge any capacitors before: connecting or disconnecting cables or jumpers,
installing or removing switching cards, or making internal changes, such as installing or removing jumpers.
Do not touch any object that could provide a current path to the co
make measurements with dry hands while standing on a dry, insulated surface capable of withstanding the voltage being measured.
The instrument and accessories must be used in
equipment may be impaired.
Do not exceed the maximum signal levels of the
and as shown on the instrument or test fixture panels, or switching card.
When fuses are used in a product, replace with the same type an
Chassis connections must only be used as shield connections for me
If you are using a test fixture, keep the lid closed while power is applied to the device under test. Safe operation requires th
interlock.
If a screw is present, connect it to safety earth ground
The symbol on an instrument indicates that the user should refe r to the operating instructions located in the user documentation.
The symbol on an instrument shows that it can source or measure 10
common mode voltages. Use standard safety precautions to avoid personal contact with these voltages.
accordance with its specifications and operating instructions, or the safety of the
instruments and accessories, as defined in the specifications and operating information,
mmon side of the circuit under test or power line (earth) ground. Always
d rating for continued protection against fire hazard.
asuring circuits, NOT as safety earth ground connections.
using the wire recommended in the user documentation.
00V or more, including the combined effect of normal and
s while power is applied to the circuit under test.
e use of a lid
The symbol on an instrument shows that
The symbol indicates a connection terminal to the equipment frame.
If this symbol is on a product, it indicates that mercury is present in the display lamp. Please note that the lamp must be properly
disposed of according to federa
The WARNING heading in the user documentation explains dangers that might result in personal injury or death. Always read the
associated information very carefully before performing the indicated procedure.
The CAUTION h
warranty.
Instrumentation and accessories shall not be connected to humans.
Before performing any maintenance, disconnect the line cord and all test cables.
T o maintain protection from electric shock and fire, replacement compon
and input jacks - must be purchased from Keithley Instruments. Standard fuses with applicable national safety approvals may be used if
the rating and type are the same. Other components that are not safety-related may be purchased from other suppliers as long as they
are equivalent to the original component (note that selected parts should be purchased only through Keithley Instruments to maintain
accuracy and functionality of the product). If you are unsure about the applicability of a replacement component, call a Keithley Instruments
office for information.
To clean an instrument, use a damp cloth or mild, water-based clea
directly to the instrument or allow liquids to enter or spill on the instrument. Products that consist of a circuit board with no case or chassis
(e.g., a data acquisition board for installation into a computer) should never require cleaning if handled according to instructions. If the
board becomes contaminated and operation is affected, the board should be returned to the factory for proper cleaning/servicing.
eading in the user documentation explains hazards that could damage the instrument. Such damage may invalidate the
l, state, and local laws.
the surface may be hot. Avoid personal contact to prevent burns.
ents in mains circuits - including the power transformer, test leads,
ner. Clean the exterior of the instrument only. Do not apply cleaner
Page 8

Table of Contents
Test Equipment Depot - 800.517.8431 - 99 Washington Street Melrose, MA 02176
TestEquipmentDepot.com
Section Topic Page
1 Introduction............................................................................................. 1-1
Overview....
Capabilities and features overview...
Options and accessories..
Specifications...
Unpacking and inspection...
Inspection for damage..
Handling precautions ...
Shipment contents ............................................................................... 1-5
Documentation.
Repacking for shipment....
2 Getting Started....................................................................................... 2-1
Introduction...
Front and rear p
Front panel summary...
Rear panel summary............................................................................ 2-4
Power-up ...
Line power connection.
Power-up procedure..
Display........................................................................................................ 2-6
Primary display line...
Secondary display line .
Bench defaults.
Restoring bench defaults..
Function default settings...................................................................... 2-7
3 Basic Measurements ............................................................................ 3-1
Introduction...
Changing functions.
Voltage measurements.
Guarding ...
Current measurements.
Resistance measurements.
Auto V-Source..
Amps Rel...
Resistivity measurements ...
Charge measurements .
Auto discharge .
Temperature and humidity measurements ............................................... 3-10
Connections.
Measurement control ...
Temperature units...
Display reading options....
4 Measurement Options.......................................................................... 4-1
Introduction...
Multiple displays .
Menus.
Navigating menus ..
................................................................................................. 1-2
.................................................... 1-2
.................................................................... 1-3
.................................................................................... 1-5
........................................................................ 1-5
........................................................................ 1-5
........................................................................ 1-5
.................................................................................... 1-5
.................................................................... 1-6
.............................................................................................. 2-2
anel familiarization............................................................ 2-2
........................................................................ 2-2
................................................................................................. 2-6
........................................................................ 2-6
........................................................................... 2-6
........................................................................... 2-6
........................................................................ 2-7
........................................................................................... 2-7
.................................................................... 2-7
.............................................................................................. 3-2
.................................................................................... 3-2
.............................................................................. 3-2
........................................................................................... 3-3
.............................................................................. 3-4
........................................................................ 3-5
.................................................................................... 3-6
........................................................................................... 3-6
........................................................................ 3-7
.............................................................................. 3-9
.................................................................................. 3-10
...................................................................................... 3-10
...................................................................... 3-11
............................................................................ 3-11
.................................................................. 3-12
.............................................................................................. 4-3
........................................................................................ 4-3
........................................................................................................ 4-5
.............................................................................. 4-6
Page 9

Table of Contents Model 6517B Electrometer User’s Manual
Test Equipment Depot - 800.517.8431 - 99 Washington Street Melrose, MA 02176
TestEquipmentDepot.com
Section Topic Page
Voltage source ............................................................................................ 4-7
Connections..
Basic operation..................................................................................... 4-9
Configuring V-Source...
Relative..
..................................................................................................... 4-9
Configuring rel .
Zero check ................................................................................................ 4-10
Zero correct..
Triggering ..
................................................................................................... 4-11
Idle...
Control sources ..
Device action...
Output trigger...................................................................................... 4-12
Counters....
Bench default setup...
Speed ..
...................................................................................................... 4-13
Configuring speed ..
Resolution.
Configuring resolution...
Filter.
......................................................................................................... 4-13
Filter types.
Filter modes........................................................................................ 4-14
Median filter..
Configuring filters....
Buffer (data store) ..................................................................................... 4-15
Storing readings..
Math.
......................................................................................................... 4-16
Selecting and configuring math.
Enabling math..
Additional math operations................................................................. 4-18
Test sequences...
Configuring test sequences.
Connections..
Running a test .................................................................................... 4-21
Internal scanning .
Configure internal scanner ..
Perform the scan....
Close/open channels.
External scanning...
Trigger connections...
Configure external channels...
Perform the scan....
5 Remote Operation.................................................................................. 5-1
Overview...
Software support.
LabView driver.
Remote interfaces..
IEEE-488 bus ..
RS-232 interface.
Common commands.
SCPI commands.
SCPI command syntax.
SCPI signal-oriented commands..
SCPI subsystem commands ..
Program examples.
Changing function and range .
One-shot triggering.
Continuous triggering #1 .
Continuous triggering #2 .
........................................................................................ 4-7
........................................................................ 4-9
................................................................................... 4-10
............................................................................................. 4-10
................................................................................................ 4-10
................................................................................ 4-12
................................................................................... 4-12
......................................................................................... 4-12
......................................................................... 4-12
............................................................................ 4-13
................................................................................................ 4-13
...................................................................... 4-13
......................................................................................... 4-14
...................................................................................... 4-14
............................................................................ 4-15
................................................................................ 4-15
......................................................... 4-17
................................................................................... 4-18
...................................................................................... 4-19
............................................................... 4-19
...................................................................................... 4-20
...................................................................................... 4-21
............................................................... 4-21
............................................................................ 4-21
......................................................................... 4-22
................................................................................... 4-22
......................................................................... 4-23
............................................................ 4-23
............................................................................ 4-23
.................................................................................................. 5-2
........................................................................................ 5-2
..................................................................................... 5-2
..................................................................................... 5-2
..................................................................................... 5-2
.................................................................................. 5-3
.................................................................................. 5-5
........................................................................................ 5-5
........................................................................ 5-6
........................................................ 5-8
.............................................................. 5-8
................................................................................... 5-13
............................................................ 5-13
............................................................................ 5-14
................................................................... 5-15
................................................................... 5-15
ii 6517B-900-01 Rev. A / Jun 2008
Page 10

Model 6517B Electrometer User’s Manual Table of Contents
Test Equipment Depot - 800.517.8431 - 99 Washington Street Melrose, MA 02176
TestEquipmentDepot.com
Section Topic Page
Generating SRQ on buffer full ............................................................ 5-16
Storing readings in the buffer.............................................................. 5-17
Taking readings with the scanner card...
Test sequence: Staircase sweep ..
Index ............................................................................................................................ I-1
............................................ 5-18
...................................................... 5-19
6517B-900-01 Rev. A / Jun 2008 iii
Page 11

Table of Contents Model 6517B Electrometer User’s Manual
Test Equipment Depot - 800.517.8431 - 99 Washington Street Melrose, MA 02176
TestEquipmentDepot.com
This page left blank intentionally.
iv 6517B-900-01 Rev. A / Jun 2008
Page 12

List of Figures
Test Equipment Depot - 800.517.8431 - 99 Washington Street Melrose, MA 02176
TestEquipmentDepot.com
Section Figure Title Page
2 Figure 2-1 Model 6517B front panel................................................................ 2-2
2 Figure 2-2 Model 6517B rear panel ..
3 Figure 3-1 Voltage measurements.
3 Figure 3-2 Current measurements.
3 Figure 3-3 Resistance measurements .
3 Figure 3-4 Resistivity measurements...
3 Figure 3-5 Charge measurements.
3 Figure 3-6 External temperature and humidity measurements...
4 Figure 4-1 Main menu display.
4 Figure 4-2 Independent V-Source connections.
4 Figure 4-3 FVMI connections..
4 Figure 4-4 Basic trigger model (s
4 Figure 4-5 Advanced trigger model (simplified) ....
4 Figure 4-6 Filter response/noise window .
4 Figure 4-7 Combining math calculations..
4 Figure 4-8 Typical FVMI connections...
4 Figure 4-9 Trigger connections using trigger link..
5 Figure 5-1 IEEE-488 connections ..
5 Figure 5-2 Hierarchy of the example SENSe1 commands ...
.............................................................. 2-4
................................................................. 3-3
................................................................. 3-4
........................................................... 3-6
........................................................... 3-9
............................................................... 3-10
.................. 3-11
........................................................................ 4-5
.............................................. 4-8
........................................................................ 4-8
implified).................................................... 4-11
........................................ 4-11
..................................................... 4-14
..................................................... 4-18
......................................................... 4-20
........................................ 4-23
................................................................. 5-3
.......................... 5-6
Page 13

List of Figures Model 6517B Electrometer User’s Manual
Test Equipment Depot - 800.517.8431 - 99 Washington Street Melrose, MA 02176
TestEquipmentDepot.com
This page left blank intentionally.
vi 6517B-900-01 Rev. A / Jun 2008
Page 14

List of Tables
Test Equipment Depot - 800.517.8431 - 99 Washington Street Melrose, MA 02176
TestEquipmentDepot.com
Section Table Title Page
4 Table 4-1 Multiple displays by function.......................................................... 4-3
4 Table 4-2 Main menu summary.
4 Table 4-3 Configuration settings for each measurement function....
4 Table 4-4 Configuration settings for instrument operations.
4 Table 4-5 Menu summary...
.................................................................... 4-5
............. 4-6
.......................... 4-6
........................................................................... 4-7
Page 15

List of Tables Model 6517B Electrometer User’s Manual
Test Equipment Depot - 800.517.8431 - 99 Washington Street Melrose, MA 02176
TestEquipmentDepot.com
This page left blank intentionally.
viii 6517B-900-01 Rev. A / Jun 2008
Page 16

In this section:
Test Equipment Depot - 800.517.8431 - 99 Washington Street Melrose, MA 02176
TestEquipmentDepot.com
Topic Page
Overview ................................................................................................. 1-2
Unpacking and inspection....................................................................... 1-5
Section 1
Introduction
Capabilities and features overview ................................................. 1-2
Options and accessories................................................................. 1-3
Specifications.................................................................................. 1-5
Inspection for damage .................................................................... 1-5
Handling precautions ...................................................................... 1-5
Shipment contents.......................................................................... 1-5
Repacking for shipment .................................................................. 1-6
Page 17

Section 1: Introduction Model 6517B Electrometer User’s Manual
Test Equipment Depot - 800.517.8431 - 99 Washington Street Melrose, MA 02176
TestEquipmentDepot.com
Overview
This section contains general information about the Keithley Instrument s Model 6517B
Electrometer.
If you have any questions after reviewing this info
Instruments representative or call one of our applications engineers at 1-888-KEITHLEY
(1-888-534-8453) within the U.S. and Canada. You can also contact us through our website at
www.keithley.com.
rmation, please contact your local Keithley
Capabilities and features overview
The Model 6517B is a 6½-digit electrometer/high-resistance test and measurement system with
the following measurement capabilities:
• DC voltage measurements from 1μV to
• DC current measurements from 10aA to 21mA.
• Charge measurements from 10fC to 2.1μC.
• Resistance measurements from 10Ω t
• Surface resistivity measurements.
• Volume resistivity measurements.
• External temperature measurements from -25°C to 150°C using the supplied Model
517-TP thermocouple.
6
• Relative humidity measurements (0 to 100%) using the optional Model 6517-RH probe.
Some additional capabilities of the Model
• Built-in V-Source. The 100V range provides u
provides up to ±1000V at 1mA.
• Data storage (50,000 points).
• Single button zeroing (REL).
• Built-in math functions.
• Filtering, averaging, and median.
• Built-in test sequences.
• Remote operation using the IEEE-488 (GPIB) bus or the RS
• Scan (measure) channels of an external scanner.
• Scan (measure) channels of an internal scanne
Model 6521 or Model 6522) installed in the option slot.
210V.
o 210PΩ.
6517B include:
p to ±100V at 10mA, while the 1000V range
-232 interface.
r card (for example, Keithley Instruments
1-2 Return to Section Topics 6517B-900-01 Rev. A / Jun 2008
Page 18

Model 6517B Electrometer User’s Manual Section 1: Introduction
Test Equipment Depot - 800.517.8431 - 99 Washington Street Melrose, MA 02176
TestEquipmentDepot.com
Options and accessories
The following options and accessories are available from Keithley Instruments for use with the
Model 6517B Electrometer:
NOTE Check the Keithley Instruments website (www.keith
accessories that may have been added to the Keithley Instruments product line for use
with the Model 6517B Electrometer.
ley.com) for additional options and
Cables and adapters
Model 237-ALG-2 Triax Cable: This is a 2-meter (6.6ft) low-noise triax cable terminated with a
3-slot male triax connector on one end and 3 alligator clips on the other.
Model 237-BNC-TRX Adapter:
disconnected). It is used to terminate a triax cable with a BNC plug. Su itable for use with the M odel
6517B V-Source in high voltage applications.
Model 237-TRX-T Adapter: Th
7078-TRX triax cables. Suitable for use with the Model 6517B V-Source in high voltage
applications.
Model 237-TRX-TBC Connector:
assembly of custom panels and interface connections. Suitable for use with the Model 6517B
V-Source in high voltage applications.
Model 6517B-ILC-3 Interlock Cable: This is a 3 me
Phoenix connector on one end and a 4 pin Switchcraft connector on the other end.
Model 7078-TRX-BNC Adapter: This is
lets you connect a BNC cable to the triax input of the Model 6517B. Suitable for use with the Mod el
6517B in high voltage applications.
This is a male BNC to 3-lug female triax adapter (guard
is is a 3-slot male to dual 3-lug female triax tee adapter for use with
This is a 3-lug female triax bulkhead connector with cap for
ter (6.6 ft) cable terminated with a 4 pin
a 3-slot male triax to female BNC adapter. This adapter
Models 7078-TRX-3, 7078-TRX-10 and 7078-TRX-20 Triax Cables: Th
cables terminated at both ends with 3-slot male triax connectors. The Model 7078-TRX-3 is 3ftft
(0.9m) in length, the Model 7078-TRX-10 is 10f t (3m) in length, and the Model 7078-TRX-20 is 20f t
(6m) in length.
Model 7078-TRX-TBC Connector: This is
assembly of custom panels and interface connections. Suitable for use with the Model 6517B
V-Source in high voltage applications.
Models 7007-1 and 7007-2 Shielded IEEE-488 Cables: Conn
IEEE-488 bus using shielded cables and connectors to reduce electromagnetic interference (EMI).
The Model 7007-1 is one meter long; the Model 7007-2 is two meters long.
Models 8501-1 and 8501-2 Trigger Link Cables: Con
with Trigger Link connectors (for example, Model 7001 Switch System). The Model 8501-1 is one
meter long; the Model 8501-2 is two meters long.
Model 8502 Trigger Link Adapter: A
instruments that use the standard BNC (In/Out) external trigg er ing tech n iqu e.
Model 8606 High Performance Probe Tip Kit: C
two spring hook test probes (the spade lugs and alligator clips are rated at 30V RMS, 42.4V peak;
the test probes are rated at 1000V). These components are designed to be used with high
performance test leads terminated with banana plugs, such as the Model 8607 High Performance
Banana Cables.
a 3-lug female triax bulkhead connector with cap for
ect the Model 6517B to the
nect the Model 6517B to other instruments
llows you to connect the Trigger Link of the Model 6517B to
onsists of two spade lugs, two alligator clips, and
ese are low noise triax
6517B-900-01 Rev. A / Jun 2008 Return to Section T o pics 1-3
Page 19

Section 1: Introduction Model 6517B Electrometer User’s Manual
Test Equipment Depot - 800.517.8431 - 99 Washington Street Melrose, MA 02176
TestEquipmentDepot.com
Model 8607 High Performance Banana Cables: Consists of two high voltage (1000V) banana
cables. The cables are terminated with banana plugs that have retractable sheaths.
CS-751 Barrel Adapter:
together. Both ends of the adapter are terminated with 3-lug female triax connectors.
This is a barrel adapter that allows you to connect two triax cables
Case and rack mount kits
Model 1050 Padded Carrying Case: A carrying case for a Model 6517B. Includes handles and
shoulder strap.
Model 4299-1 Single Fixed Rack Mount Kit: M
rack.
Model 4299-2 Side-by-side Rack Mount Kit: Mou
19-inch rack.
Model 4288-4 Side-by-side Rack Mount Kit: Mou
side-by-side in a standard 19-inch rack.
ounts a single Model 6517B in a st andard 19-in ch
nts two instruments side-by-side in a standard
nts a Model 6517B and a 5.25-inch instrument
Probes
Model 6517-RH Humidity Probe with Cable: This sensor allows the Model 6517B to make
relative humidity measurements (0 to 100%). Also included is an extension cable (part number
CA-129-1).
Model 6517-TP Thermocouple with Leads: This t
6517B to make external temperature measurements from –190°C to 1350°C.
ype K thermocouple sensor allows the Model
Scanner cards
Model 6521 Low Current Scanner Card: This 10-channel low current scanner card is terminated
with BNC connectors and plugs into the option slot of the Model 6517B.
Model 6522 Low Current/Low Voltage Scanner Card: Th
scanner card is terminated with triax connectors and plugs into the option slot of the Model 6517B.
is 10-channel low current/low voltage
T est fixture
Model 8009 Resistivity Test Fixture: This is a guarded test fixture for measuring volume and
surface resistivities. It can accommodate sheet samples 64 to 102mm (2 -1/2 to 4 in.) in diameter
and up to 3.175mm (1/8 in.) thick.
Software
Model 6524 Hi-R Software Package: Desig ned to ai d in making more r epeat able hig h resist ance/
resistivity measurements. Four windows-driven programs increase measurement precision, ease
download and analysis of Hi-R data, and allow cross-correlation of environmental factors.
1-4 Return to Section Topics 6517B-900-01 Rev. A / Jun 2008
Page 20

Model 6517B Electrometer User’s Manual Section 1: Introduction
Test Equipment Depot - 800.517.8431 - 99 Washington Street Melrose, MA 02176
TestEquipmentDepot.com
Specifications
Full Model 6517B specifications are included in the Model 6 517B Refere nce Man ual, Ap pendix A.
Check the Keithley Instruments website at www.keithley.com for the latest updates to the
specifications.
Unpacking and inspection
Inspection for damage
The Model 6517B was carefully inspected electrically and mechanically before shipment. After
unpacking all items from the shipping carton, check fo r any obvio us signs of p hysical damage that
may have occurred during transit (there may be a protective film over the display lens, which can
be removed). Report any damage to the shipping agent immediately. Save the original packing
carton for possible future shipment. Before removing the Model 6517B from the anti-static bag,
observe the following handling precautions.
Handling precautions
• Always grasp the Model 6517B by the covers.
• After removing the Model 6517B from its anti-static bag, inspect it for any obvious signs
of physical damage; report any such damage to the shipping agent immediately.
• When the Model 6517B is not installed and connected, keep the unit in its anti-static
bag and store it in the original packing carton.
Shipment contents
The following items are included with every Model 6517B order:
• Model 6517B Electrometer with line cord
• Protective Triax Shield/C
• 237-ALG-2 Triax Cable terminated with alligator clip
• Accessories as ordered
• Certificate of calibration
• CD containing complete documentation and requ ired software
ap (CAP-28-1)
s on one end
Documentation
A CD-ROM containing this User’s Manual, a Re ference Manual, and r equired sof tware is included
with each Model 6517B. Check the Keithley Instruments website at www.keithley .com for the latest
versions of the manuals. The latest manuals can be downloaded (in PDF format) from the website.
6517B-900-01 Rev. A / Jun 2008 Return to Section T o pics 1-5
Page 21

Section 1: Introduction Model 6517B Electrometer User’s Manual
Test Equipment Depot - 800.517.8431 - 99 Washington Street Melrose, MA 02176
TestEquipmentDepot.com
Repacking for shipment
Should it become necessary to return the Model 6517B for repair, carefully pack the unit in its
original packing carton or the equivalent, and follow these instructions:
• Call the repair department toll-free at 1-888-KEITHLEY (1-888-534-8453), within the U.S.
a
nd Canada, to obtain a Return Material Authorization (RMA) number.
• Advise as to the warranty status of the Model 6517B.
• Write ATTENTION REPAIR DEPARTMENT and
• Complete and include the Service Form
located at the back of this manual.
the RMA number on the shipping label.
1-6 Return to Section Topics 6517B-900-01 Rev. A / Jun 2008
Page 22

In this section:
Test Equipment Depot - 800.517.8431 - 99 Washington Street Melrose, MA 02176
TestEquipmentDepot.com
Topic Page
Introduction ....................................... .......................................... ............ 2-2
Front and rear panel familiarization......................................................... 2-2
Power-up ....................................................................... ......................... 2-6
Display .................................................................................................... 2-6
Section 2
Getting Started
Front panel summary ................................. ........... ........ ............ ...... 2-2
Rear panel summary ...................... ... ............................................. 2-4
Line power connection ................................................................... 2-6
Power-up procedure ....................................... ................................ 2-6
Primary display line ........................................................................ 2-6
Secondary display line ................................................................... 2-7
Bench defaults .................................... ... ................................................. 2-7
Restoring bench defaults ................................................................ 2-7
Function default settings ................................................................ 2-7
Page 23

Section 2: Getting Started Model 6517B Electrometer User’s Manual
VOLTAGE
SOURCE
OPERATE
6517B ELECTROMETER/HIGH RESIST
ANCE METER
EDIT ERR REM TALK LSTN SRQ REAR REL FILT MATH 4W AUTO ARM TRIG SMPL
1 2 3 4 5 6 7 8 9 10 1 2 3 4 5 6 7 8 9 10
PREV
NEXT
DISPLAY
Z-CHK REL
FILTER
MATH TRIG SEQ
INFO
LOCAL STORE
RECALL
CONFIG
MENU
EXIT
ENTER
VI R
Q
CARD OPER
OPTION
VOLTAGE SOURCE
POWER
AUTO
RANGE
RANGE
5
19
273864
Secondary display line
Primary display line
Test Equipment Depot - 800.517.8431 - 99 Washington Street Melrose, MA 02176
TestEquipmentDepot.com
Introduction
This section contains identification and descriptions of controls and components of the Keithley
Instruments Model 6517B Electrometer and det ailed informatio n for powering up the Model 6517B.
Front and rear panel familiarization
Front panel summary
The front panel of the Model 6517B is shown in Figure 2-1. The descriptions of the front panel
controls follow Figure 2-1.
Figure 2-1
Model 6517B front panel
1 ANNUNCIATORS
EDIT Editing voltage source values
ERR Questionable reading
REM In remote
TALK Addressed to talk
LSTN Addressed to listen
SRQ Service Request
REL Relative reading displayed
FILT Digital filter enabled
MATH Math calculation enabled
AUTO Autoranging enabled
ARM Trigger armed; not in idle
*(asterisk) Reading being stored
2-2 Return to Section Topics 6517B-900-01 Rev. A / Jun 2008
Page 24

Model 6517B Electrometer User’s Manual Section 2: Getting Started
Test Equipment Depot - 800.517.8431 - 99 Washington Street Melrose, MA 02176
TestEquipmentDepot.com
2 F UNCTION KEYS
Select measurement function; volts (V), amps (I), resistivity (R) or coulombs (Q).
3 RAN GE KEYS
Moves to higher range; increments digit.
Moves to lower range; decrements digit.
AUTO Enables/disables autorange.
4 HANDLE
Pull out and rotate to desired position.
5 DISPLAY KEYS
PREV/NEXT Scroll through multiple displays of a function.
6 OPERATION KEYS
Z-CHK Enables/disables zero check: enable zero check before changing functions.
REL Enables/disables relative reading.
FILTER Displays digital filter status for presen
MATH Displays math calculation and toggles math on/off if configured.
TRIG Triggers unit.
SEQ Performs selected test sequence.
t function and toggles filter on/off.
and Moves cursor among data entry digits, menu selections, and information displays.
INFO Shows context-sensitive information about the present display.
LOCAL Cancels remote operation.
STORE Enables data storage.
RECALL Displays reading data (reading, number, ti
maximum, minimum average, sta
CONFIG Configures functions and operations.
MENU Saves/restores instrument conditions; sets up communications; performs calibration
and self-tests; defines limits, digital outpu
EXIT Cancels selection, moves back within menu structure.
ENTER Holds reading, enters selection, moves down within menu structure.
me). Use PREV/NEXT DISPLAY for
ndard deviation.
t, and other miscellaneous operations.
7 VOLTAGE SOURCE KEYS
OPER Toggles V-source between operate and standby.
and Adjusts V-source value.
8 VO LTAGE SOURCE OPERATE
Indicator light is on when in operation, off in standby.
9 OPTION CARD KEY
Use to program and operate an optional feature. Also use to view external scanner channels.
6517B-900-01 Rev. A / Jun 2008 Return to Section T o pics 2-3
Page 25
Section 2: Getting Started Model 6517B Electrometer User’s Manual
8
9101112131415
Input high
Input low
Chassis ground
Unguarded (guard off)
Input high
Guard
Chassis ground
Guarded (guard off)
OPTION SLOT
250VDC MAX
MADE IN
U.S.A
LINE RATING
50-60 Hz
100 VA MAX.
LINE
WARNING:
NO INTERNAL OPERATOR SERVICABLE PARTS, SERVICE BY QUALIFIED PERSONNEL ONLY.
CAUTION:
FOR CONTINUED PROTECTION AGAINST FIRE HAZARD, REPLACE FUSE WITH SAME TYPE AND RATING.
1250Vpk
PREAMP
OUT
1000VDC
MAX
FUSE
630mAT
315mAT
100V
120V
220V
240V
COMMON 2V OUT
LO HI
V SOURCE
TRIGGER LINK RS-232
DIGITAL I/O
HUMIDITY
TEMP
TYPE K
INTERLOCK
IEEE-488
2VDC MAX
1234567
Test Equipment Depot - 800.517.8431 - 99 Washington Street Melrose, MA 02176
TestEquipmentDepot.com
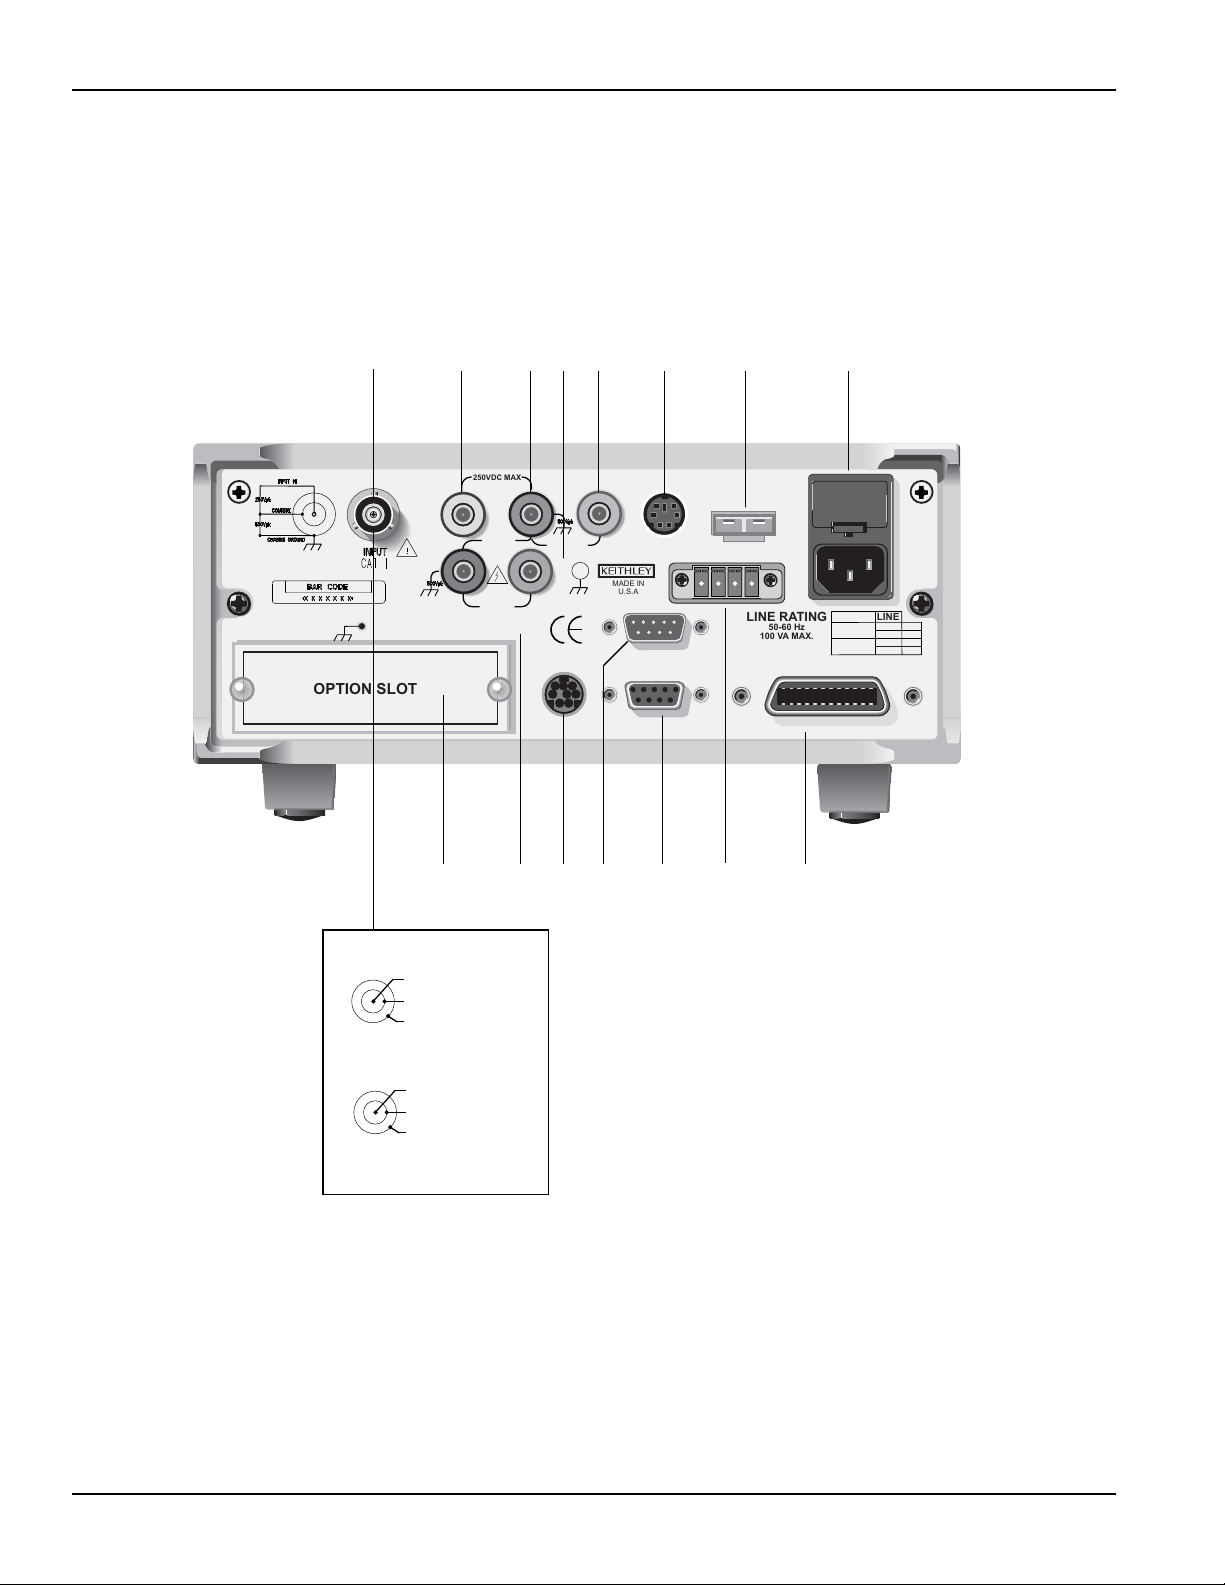
Rear panel summary
The rear panel of the Model 6517B is shown in Figure 2-2. The descriptions of the rear panel
components follow Figure 2-2.
Figure 2-2
Model 6517B rear panel
1 INPUT CONNECTOR
Unguarded Configuration Disable GUARD for amps, ohms, coulombs
and unguarded voltage measurements.
Guarded Configuration Enable GUARD for gua
rded voltage measurements.
2PREAMP OUT
Follows the signal amplitude applied to the INPUT terminal. With GUARD on, PREAMP OUT is connected
to the inner shell of the INPUT triax connector to configure the input for guarded voltage measurements.
Referenced to COMMON. See the Model 6517B Reference Manual for more information.
2-4 Return to Section Topics 6517B-900-01 Rev. A / Jun 2008
Page 26

Model 6517B Electrometer User’s Manual Section 2: Getting Started
Test Equipment Depot - 800.517.8431 - 99 Washington Street Melrose, MA 02176
TestEquipmentDepot.com
3COMMON
Connector that is internally connected to INPUT low.
4 CHASSIS GROUND
Attached cable that connects the chassis to ground through the power line cord. COMMON can be
connected to chassis ground by plugging the cable into COMMON. For floating measurements, make sure
the ground cable connection between COMMON and Chassis Ground is open.
5 2V ANALOG OUTPUT
Connector provides a scaled 0 to 2V output that is referenced to COMMON. It is typically connected to a
measuring device such as a chart recorder. See the Model 6517B Reference Manual for more information.
6 HUMIDITY
Connect the optional Keithley Instruments Model 6517-RH probe for relative humidity measurements.
7 TEMP TYPE K
Connect the Keithley Instruments Model 6517-TP type K thermocouple for temperature measurements.
8 POWER LINE INPUT MODULE
Provides connections for power line input and contains the line fuse. If the fuse needs to be replaced, refer
to the procedure in Section 2 of the Model 6517B Reference Manual.
9 IEEE-488 CONNECTOR
Connects the Model 6517B to the IEEE-488 (GPIB) bus. Use shielded IEEE-488 cables.
10 INTERLOCK
Connects the safety interlock to a test fixture using an appropriate cable. Interlock is automatically enabled
when the appropriate interlock cable is connected to the 6517B. Rated at 50-60 Hz, 140 VA max. The
interlock’s CS-1305 connector includes four pins (left to right as viewed from rear of the 6517B):
• Pin 1: Interlock safe
• Pin 2: Ground
• Pin 3: +5 VDC output
• Pin 4: Surface/volume select (low = volume, high = surface)
11 RS-232
DB-9 connector for the RS-232 interface. Use a standard RS-232 cable.
12 DIGITAL I/O
A male DB-9 connector for the four TTL-compatible digital output lines.
13 TRIGGER LINK
An 8-pin micro DIN connector for sending and receiving trigger pulses to and from other instruments.
14 V-SOURCE HI and LO
Safety banana jacks for the voltage source.
15 OPTION SLOT
An option card, such as the Keithley Instruments Model 6521 or Model 6522 scanner card, can be installed
in this slot.
6517B-900-01 Rev. A / Jun 2008 Return to Section T o pics 2-5
Page 27

Section 2: Getting Started Model 6517B Electrometer User’s Manual
Test Equipment Depot - 800.517.8431 - 99 Washington Street Melrose, MA 02176
TestEquipmentDepot.com
Power-up
Line power connection
Follow the procedure below to connect the Model 6517B to line power and turn on the instrument.
CAUTION Operating the instrument on an incorrect line voltage may cause damage to
he instrument, possibly voiding the warranty.
t
1. Before plugging in the power cord, make sure that th
(O) position. Be sure that line input voltage is set to the cor rect range for the power supply
being used to power the Model 6517B.
NOTE L
2. Connect the female end of the supplied power cord to the AC receptacle on the rear panel.
WARNING The power cord supplied with the Model 6517B contains a separate ground
ine voltage is pre-set at the factory, but may be reset in the field by adjusting the voltage
selector behind the left ear. To access the voltage selector, first remove the handle then
remove the left mounting ear. The current voltage setting is the marking closest to the
small circle.
nect the other end of the power cord to a grounded AC outlet.
Con
wire for use with grounded outlets. When proper connections are made,
instrument chassis is connected to power line ground through the ground
wire in the power cord. Failure to use a grounded outlet may result in personal
injury or death due to electric shock.
e front panel power switch is in the off
Power-up procedure
1. Turn on the instrument by pressing the front panel power switch to the on (I) position.
2. During power-up, the Model 6517B performs self-tests on its memory elements. If a failure
occurs, the instrument momentarily displays an error message and turns on the ERR
annunciator. If the instrument passes the self-tests, the firmware revision level and bus
interface information are displayed. For complete information on the power-up sequence,
see Section 2 in the Model 6517B Reference Manual.
Display
As shown in the Model 6517B front panel illustration (see Figure 2-1), the front panel has three
lines of display information: the primary display line, the secondary display line, and annunciators.
Primary display line
The top line displays readings along with units. It can also display mea surement type, “hold,” math
operating type, channel number, menu headings, and messages. Status and error messages are
listed in Section 2 of the Reference Manual.
2-6 Return to Section Topics 6517B-900-01 Rev. A / Jun 2008
Page 28

Model 6517B Electrometer User’s Manual Section 2: Getting Started
Test Equipment Depot - 800.517.8431 - 99 Washington Street Melrose, MA 02176
TestEquipmentDepot.com
Secondary display line
The bottom line displays the range, V - Source value, menu items, messages, and multiple displays
(see Section 4). Longer text strings are indicated by arrows
the cursor keys ( and ) to display the additional information.
on either end of the display line. Use
Bench defaults
The Model 6517B can save ten user setups in non-volatile me mory. You can select one of the user
setups as the power-on default or have the instrument power up to either of the two factory
defaults (optimized for “BENCH” or “GPIB” operation). For more information on saving and
restoring user setups, see Section 2 in the Model 6517B Reference Man ual.
Restoring bench defaults
Since the basic measurement procedures in this manual assume the BENCH defaults, reset the
instrument from the SAVESETUP item of the MAIN MENU by performing the following steps:
1. Press the MENU
MAIN MENU
SAVESETUP COMMUNICATION CAL TEST LIMITS STATUS-MSG GENERAL
2. If the SAVESETUP option is not blinking, press the key until it is blinking and then press
ENTER to view the setup menu:
SETUP MENU
SAVE RESTORE POWERON RESET
3. Select the RESET option using the cursor keys ( and ) and press ENTER to view the
reset menu:
RESET ORIGINAL DFLTS
BENCH GPIB
4. Select the BENCH option using the cursor keys ( and ) and press ENTER. The following
message is displayed:
RESETTING INSTRUMENT
Press ENTER to confirm, EXIT to abort.
5. Press ENTER to confirm.
and auto-range disabled.
key to display the main menu:
The display will go to the volts function with zero check enabled
Function default settings
Other BENCH default settings for each function include:
• Triggers: Continuous measurements
• Measurement speed (integration time):
• Digital filter: Enabled, averaging, 10 readings
• Median filter: Enabled, rank 1
• Display resolution: 5½ digits
Normal, 1 power line cycle
enus for more information.
See M
6517B-900-01 Rev. A / Jun 2008 Return to Section T o pics 2-7
Page 29

Section 2: Getting Started Model 6517B Electrometer User’s Manual
Test Equipment Depot - 800.517.8431 - 99 Washington Street Melrose, MA 02176
TestEquipmentDepot.com
This page left blank intentionally.
2-8 Return to Section Topics 6517B-900-01 Rev. A / Jun 2008
Page 30

In this section:
Test Equipment Depot - 800.517.8431 - 99 Washington Street Melrose, MA 02176
TestEquipmentDepot.com
Topic Page
Introduction ............................................................................................. 3-2
Changing functions ................................................................................. 3-2
Voltage measurements............................................................................ 3-2
Current measurements............................................................................ 3-4
Resistance measurements...................................................................... 3-6
Section 3
Basic Measurements
Guarding ......................................................................................... 3-3
Auto V-Source................................................................................. 3-6
Amps Rel......................................................................................... 3-6
Resistivity measurements ....................................................................... 3-7
Charge measurements ............................................................................ 3-9
Auto discharge................................................................................ 3-10
Temperature and humidity measurements.............................................. 3-10
Connections.................................................................................... 3-10
Measurement control ...................................................................... 3-11
Temperature units ........................................................................... 3-11
Display reading options................................................................... 3-12
Page 31

Section 3: Basic Measurements Model 6517B Electrometer User’s Manual
Test Equipment Depot - 800.517.8431 - 99 Washington Street Melrose, MA 02176
TestEquipmentDepot.com
Introduction
This section provides information on taking basic measurements. For more detailed information,
see Section 4 and the Keithley Instruments Model 6517B Reference Manual.
Changing functions
To avoid erratic operation, always enable zero ch eck (“ZeroCheck” displayed) before selecting on e
of the other measurement functions (V, I, R, or Q). The Z-CHK key controls zero check (see Ze
check fo
r more information)
ro
V olt age measurements
Assuming “BENCH” reset conditions, the basic procedure is as follows:
1. With zero check enabled (“ZeroCheck” displayed), select the volts function by pressing V.
Th
e Z-CHK key is used to enable and disable zero check.
2. Enable or disable guard as needed (see Guarding for more information). Note that with
guard enabled (ON), the “Grd” message is displayed. However, if zero correct is already
enabled (“ZCor” displayed), then “Grd” will not be displayed.
3. To achieve optimum accuracy for low voltage measurements, zero correct the Model
6517B. To do this, use the RANGE key to select the lowest measurement range (2V)
and press REL. With zero correct enabled, the REL indicator is on. Note that with zero
correct enabled, the “ZCor” message is displayed. However, if guard is already enabled
(“Grd” displayed), then “ZCor” will not be displayed.
4. Select a measurement range or use autoranging:
a. To automatically select the most sensitive range, enable autorange. The AUTO key
enables and disables autorange. When enabled, the AUTO annunciator is on.
b. For manual ranging, use the RANGE and keys to select a measurement range
consistent with the expected voltage.
5. Connect the test cable(s) to the voltage to be measured. Figure 3-1A shows connections for
unguarded measurements, and Figure 3-1B shows connections for guarded
measurements.
WARNING Hazardous voltage may be present on the inner shield of the triax cable when
GUARD is on. A safety shield connected to safety earth ground (as shown in
Figure 3-1B) sh
ould be used for voltage measurements at or above 30V.
CAUTION Do not apply more than 250V peak (DC to 60Hz) to the input or instrument
damage may occur.
6. Press Z-CHK to disable zero check and take a reading from the display.
3-2 Return to Section Topics 6517B-900-01 Rev. A / Jun 2008
Page 32

Model 6517B Electrometer User’s Manual Section 3: Basic Measurements
Red (HI)
Black (LO)
6517B
Shield (Optional)
Vs
Measured
Voltage
+
-
Red (HI)
LO
6517B
Safety
Shield
Vs
+
-
Safety
Earth
Ground
Measured
Voltage
Triax
Cable
A. Unguarded (GUARD off)
Triax
Cable
Guard
Black
Green
B. Guarded (GUARD on)
OPTION SLOT
250VDC MAX
MADE IN
U.S.A
LINE RATING
50-60 Hz
100 VA MAX.
LINE
WARNING: NO INTERNAL OPERATOR SERVICABLE PARTS, SERVICE BY QUALIFIED PERSONNEL ONLY.
CAUTION: FOR CONTINUED PROTECTION AGAINST FIRE HAZARD, REPLACE FUSE WITH SAME TYPE AND RATING.
1250Vpk
PREAMP
OUT
1000VDC
MAX
FUSE
630mAT
315mAT
100V
120V
220V
240V
COMMON 2V OUT
LO HI
V SOURCE
TRIGGER LINK RS-232
DIGITAL I/O
HUMIDITY
TEMP
TYPE K
INTERLOCK
IEEE-488
2VDC MAX
Test Equipment Depot - 800.517.8431 - 99 Washington Street Melrose, MA 02176
TestEquipmentDepot.com
Figure 3-1
Voltage measurements
Guarding
Guarding should be used for high impedance (>109Ω) voltage measurements and for voltage
measurements when using long input cables. In a high impedance circuit, guarding greatly
reduces leakage currents. When using long input cab les, guarding cancels the effects of cable
capacitance that can significantly slow down the measurement response time.
When GUARD is enabled, the INPUT triax connector
to the inner shell of the INPUT triax connector . With this configu ratio n, the COM MON banana ja ck
is used for input low. Figure 3-1 shows both the guarded and unguarded configurations for the
INPUT connector.
1. Press CONFIG an
2. Use the and keys to place the cursor (blinking menu item) on GUARD and press
3. Place the cursor on the desired selection (OFF to disable or ON to enable) and press
4. Use the EXIT key to back out of the menu.
6517B-900-01 Rev. A / Jun 2008 Return to Section T o pics 3-3
Perform the following steps to enable or disable guard:
ENTER.
d then V to display the volts configuration menu.
ENTER.
is reconfigured to apply the guard potential
Page 33

Section 3: Basic Measurements Model 6517B Electrometer User’s Manual
Red (HI)
Black (LO)
6517B
Shield
(Recommended
below 1mA)
I
s
Input low
connected
to shield
CAUTION: Maximum Input = 250V peak (DC to
60Hz) ; 10s per minute maximum on
mA ranges.
Measured
Current
Triax
Cable
OPTION SLOT
250VDC MAX
MADE IN
U.S.A
LINE RATING
50-60 Hz
100 VA MAX.
LINE
WARNING: NO INTERNAL OPERATOR SERVICABLE PARTS, SERVICE BY QUALIFIED PERSONNEL ONLY.
CAUTION: FOR CONTINUED PROTECTION AGAINST FIRE HAZARD, REPLACE FUSE WITH SAME TYPE AND RATING.
1250Vpk
PREAMP
OUT
1000VDC
MAX
FUSE
630mAT
315mAT
100V
120V
220V
240V
COMMON 2V OUT
LO HI
V SOURCE
TRIGGER LINK RS-232
DIGITAL I/O
HUMIDITY
TEMP
TYPE K
INTERLOCK
IEEE-488
2VDC MAX
Test Equipment Depot - 800.517.8431 - 99 Washington Street Melrose, MA 02176
TestEquipmentDepot.com
Current measurements
Assuming “BENCH” reset conditions, the basic procedure is as follows:
1. With zero check enabled (“ZeroCheck” displayed
), select the amps function by pressing I.
The Z-CHK key is used to enable or disable zero check.
2. To achie ve optimum accuracy for low current measur ements, zero correct the Model 6517 B.
To do this, use the RANGE key to select the lowest measurement range (20pA) and
press REL. With zero correct enabled, the REL indicator is on, and the message “ZCor” is
displayed.
3. Select a measurement range or use autoranging:
a. To automatically select the most sensitive range, enable autorange. The AUTO key
enables and disables autorange. When enabled, the AUTO annunciator is on.
b. For manual ranging, use the RANGE and keys to select a measurement range
consistent with the expected current.
4. Connect the instrument to the current to be measured as shown in Figure 3-2.
CAUTION Do not apply more than 250V peak (DC to 60Hz; 10 seconds per minute
ranges), or instrument damage may occur.
5. Press Z-
maximum on mA
CHK to disable zero check and take a reading from the display. To disable zero
correct, enable zero check and then press REL.
Figure 3-2
Current measurements
3-4 Return to Section Topics 6517B-900-01 Rev. A / Jun 2008
Page 34

Model 6517B Electrometer User’s Manual Section 3: Basic Measurements
Test Equipment Depot - 800.517.8431 - 99 Washington Street Melrose, MA 02176
TestEquipmentDepot.com
Resistance measurement s
NOTE Accurate high resistance measurements require the use of a low-leakage test fixture.
The following procedure requires “BEN
more information).
1. With zero check enabled (“ZeroCheck” displaye
2. Select Auto V-Source ohms. In this mode, the V-Source is automatically set to a voltage
(nominally 40V or 400V) that optimizes measurement accuracy (see Auto V-Source for
more information). Note that default “BENCH” settings selects Manual V-Source ohms. In
this mode, you must manually set the V-Source level for the measurement. See Section 4
for details on using the V-Source.
WARNING Selecting Auto V-Source ohms may set the V-Source to 400V. Hazardous
voltages may be present on the output and guard terminals that could cause
personal injury or death.
3. Select a measurement range or use autoranging:
b. For manual ranging, use the RANGE and
4. Connect the Model 6517B to the test fixture. Generic connections are shown in Figure 3-3.
5. Disable zero check by pressing OPER, then press Z-CHK to source voltage to the test
6. Take a reading from the display.
7. Place the V-Source in standby when finished by again pressing OPER.
a. To automatically select the most sensitive range, enable autorange. The AUTO key
enables and disables autorange. When enabled, the AUTO annunciator is on.
consistent with the expected resistance.
Note that this connection scheme requires that ammeter LO be internally connected to
V-Source LO (see Configuring V-Source for more information). For optimum accuracy,
leakage currents in the test fixture can be cancelled by performing REL on the current
component of the measurement (see Amps Rel for more information).
fixture device under test (DUT).
CH” default settings (see Restoring bench defaults for
d), select the ohms function by pressing R.
keys to select a measurement range
6517B-900-01 Rev. A / Jun 2008 Return to Section T o pics 3-5
Page 35

Section 3: Basic Measurements Model 6517B Electrometer User’s Manual
Red
Black
6517B
Shield
R
X
LO connected
to shield
Triax
Cable
Note: V-Source low internally
connected to electrometer low.
Test fixture
Measured
Resist
ance
OPTION SLOT
250VDC MAX
MADE IN
U.S.A
LINE RATING
50-60 Hz
100 VA MAX.
LINE
WARNING: NO INTERNAL OPERATOR SERVICABLE PARTS, SERVICE BY QUALIFIED PERSONNEL ONLY.
CAUTION: FOR CONTINUED PROTECTION AGAINST FIRE HAZARD, REPLACE FUSE WITH SAME TYPE AND RATING.
1250Vpk
PREAMP
OUT
1000VDC
MAX
FUSE
630mAT
315mAT
100V
120V
220V
240V
COMMON 2V OUT
LO HI
V SOURCE
TRIGGER LINK RS-232
DIGITAL I/O
HUMIDITY
TEMP
TYPE K
INTERLOCK
IEEE-488
2VDC MAX
Test Equipment Depot - 800.517.8431 - 99 Washington Street Melrose, MA 02176
TestEquipmentDepot.com
WARNING Hazardous voltages may be present on the output and guard terminals. To
prevent electrical shock that could cause injury or death, NEVER make or
break connections to the Model 6517B while the output is on. Power off the
equipment from the front panel or disconnect the main power cord from the
rear of the Model 6517B before handling cables connected to the outputs.
Putting the equipment in standby mode does not guarantee that th e outputs
are not powered if a hardware or software fault occurs.
Figure 3-3
Resistance measurements
Auto V -Source
With Auto V-Source selected, the V-Source is automatically set for either 40V or 400V. For the
2MΩ through 200GΩ ranges, the V-Source is set to 40V. For the 2TΩ through 200TΩ ranges, a
400V test voltage is used. With Manual V-Source selected, you can manually set the voltage level
of the V-Source.
Perform the following steps to select the V-Source mode for the ohms function:
1. Press CONFIG an
2. Use the and keys to place the cursor (blinking menu item) on VSOURCE and press
ENTER.
3. Place the cursor on AUTO (Auto V-Source ohms) or on MANUAL (Manual V-Sou rce ohms)
and press ENTER.
4. Use the EXIT key to back out of the menu.
Amps Rel
1. With the V-Source in standby, remove the DUT from the test fixture.
2.
3-6 Return to Section Topics 6517B-900-01 Rev. A / Jun 2008
Amps Rel is used to cancel leakage current in a test fixture for ohms measurements. This
procedure assumes that steps 1 through 4 o f the Resist ance Measurement s proce dure have been
performed. Perform the following steps:
Select the Amps (I) function and disable zero check. Make sure REL is disabled.
d then R to display the ohms configuration menu.
Page 36

Model 6517B Electrometer User’s Manual Section 3: Basic Measurements
Test Equipment Depot - 800.517.8431 - 99 Washington Street Melrose, MA 02176
TestEquipmentDepot.com
3. Place the V-Source in operate by pressing OPER. The VOLTAGE SOURCE OPERATE
indicator is on when in operate.
4. Select the lowest possible measurement range to display the leakage current in the test
fixture.
5. Enable relative (REL annunciator on) by pressing REL. This zeroes the display, canceling
the leakage current reading.
6. Press OPER to place the V-Source in standby and enable zero check.
7. Perform the following steps to establish the amp s Rel value for the ohms function.
a. Press CONFIG and then R to display the ohms configuration menu.
b. Use the and keys, place the cursor (blinking menu item) on AMPSREL and press
ENTER.
c. Place the cursor on YES and press ENTER to use the amps Rel value for the ohms
measurement.
d. Use the EXIT key to back out of the menu.
8. Re-install the DUT in the test fixture.
9. Select the ohms (R) function and proceed to step 5 of the Resistance Measurement
procedure.
Resistivity measurements
NOTE The following procedure to measure resistivity (surface or volume) requires the use of the
Keithley Instruments Model 8009 Resistivity Test Fixture. Refer to the Model 8009 Instruction
Manual for details on using the test fixture.
The following procedure requires “BENCH” reset conditions (see Restoring bench defaults for
more information).
1. With zero check enabled (“ZeroCheck” displaye
d), select the ohms function by pressing R.
2. Select Auto V-Source ohms. In this mode, the V-Source is automatically set to a voltage
(nominally 40V or 400V) that optimizes measurement accuracy (see Auto V-Source for
more information). Note that “BENCH” reset conditions selects Manual V-Source ohms. In
this mode, you must manually set the V-Source level for the measurement (see Voltage
source for more information).
WARNING Selecting Auto V-Source ohms may set the V-Source to 400V. Hazardous
voltages may be present on the output and guard terminals that could cause
personal injury or death.
3. Select a measurement range or use autoranging:
a. To automatically select the most sensitive range, enable autorange. The AUTO key
enables and disables autorange. When enabled, the AUTO annunciator is on.
b. For manual ranging, use the RANGE keys ( and ) to select a measurement range
consistent with the expected resistance.
4. Connect the Model 6517B to the Model 8009 test fixture as shown in Figure 3-4, and set the
switch on the test fixture to the desired measurement type (Surface or Volume).
5. Select the resistivity measurement mode as follows:
a. Press the CONFIG and then R to display the ohms configuration menu.
b. Use the cursor keys ( and ) to place the cursor (blinking menu ite m) on MEAS-TYPE
and press ENTER.
6517B-900-01 Rev. A / Jun 2008 Return to Section T o pics 3-7
Page 37

Section 3: Basic Measurements Model 6517B Electrometer User’s Manual
Test Equipment Depot - 800.517.8431 - 99 Washington Street Melrose, MA 02176
TestEquipmentDepot.com
c. Place th e cu rso r on RESISTIVITY and press ENTER.
d. Cursor position (SURFACE or VOLUME menu item blinking) indicates the selected
measurement type. The Model 6517B senses the switch position (surface or volume)
on the Model 8009 through the interlock cable, and automatically configures the
instrument for that measurement type:
• SURFACE: If Surface is the selected measurement type, you do not have to
proceed any further into the menu structure. Use the EXIT key to exit from the menu.
• VOLUME: If Volume is the selected measurement type, proceed as follows to
specify the thickness of the sample:
1) With the cursor on VOLUME, press ENTER to display the parameters menu for
volume.
2) Place the cursor on THICKNESS and press ENTER. The present thickness
parameter for the sample will be displayed.
3) Use the cursor keys ( and ) and the RANGE keys ( and ) to specify the
thickness (in millimeters) of the sample, and then press ENTER.
4) Use the EXIT key to back out of the menu structure.
6. Disable zero check by pressing Z-CHK.
7. Press OPER to source voltage to the DUT and, af ter an appropriate electr ification time, take
a reading from the display. Typically, an electrification time of 60 seconds is used.
8. Place the V-Source in standby when finished by again pressing OPER.
WARNING Hazardous voltages may be present on the output and guard terminals. To
prevent electrical shock that could cause injury or death, NEVER make or
break connections to the Model 6517B while the output is on. Power off the
equipment from the front panel or disconnect the main power cord from the
rear of the Model 6517B before handling cables connected to the outputs.
Putting the equipment in standby mode does not guarantee that th e outputs
are not powered if a hardware or software fault occurs.
3-8 Return to Section Topics 6517B-900-01 Rev. A / Jun 2008
Page 38

Model 6517B Electrometer User’s Manual Section 3: Basic Measurements
Warning: Connect of fixture to
safety earth ground using
safety ground wire.
Triax Cable
Interlock Cable
METER SOURCE
LID
INTERLOCK
TRIAX
250 MAX
HI-LO
MAX INPUT
1100V
!
Banana Plug
Cables
Model 8009
Model 6517B
OPTION SLOT
250VDC MAX
MADE IN
U.S.A
LINE RATING
50-60 Hz
100 VA MAX.
LINE
WARNING:
NO INTERNAL OPERATOR SERVICABLE PARTS, SERVICE BY QUALIFIED PERSONNEL ONLY.
CAUTION:
FOR CONTINUED PROTECTION AGAINST FIRE HAZARD, REPLACE FUSE WITH SAME TYPE AND RATING
.
1250Vpk
PREAMP
OUT
1000VDC
MAX
FUSE
630mAT
315mAT
100V
120V
220V
240V
COMMON 2V OUT
LO HI
V SOURCE
TRIGGER LINK RS-232
DIGITAL I/O
HUMIDITY
TEMP
TYPE K
INTERLOCK
IEEE-488
2VDC MAX
Test Equipment Depot - 800.517.8431 - 99 Washington Street Melrose, MA 02176
TestEquipmentDepot.com
Figure 3-4
Resistivity measurements
Charge measurements
Assuming “BENCH” reset conditions, the basic procedure is as follows:
1. With zero check enabled (“ZeroCheck” display
Q.
2. Select a measurement range or use autoranging:
a. To automatically select the most sensitive range, enable autorange. The AUTO key
b. For manual ranging, use the RANGE keys ( and ) to select a measurement range
3. Connect the test cable (see Figure 3-5) to the input of the Model 6517B. With the input
4. Connect the instrument to the charge to be measured as shown in Figure 3-5.
CAUTION Do not apply more than 250V peak (DC to 60Hz) or instrument damage may
5. Take a reading from the display. The reading can be reset to zero by ena bling zero check. If
6517B-900-01 Rev. A / Jun 2008 Return to Section T o pics 3-9
enables and disables autorange. When enabled, the AUTO annunciator is on.
consistent with the expected charge reading.
open, disable zero check. If needed, press REL to zero the display.
cur.
oc
wish to have the reading reset to zero when a spe cified charge level is r eached, enable
you
Auto Discharge as explained in the following paragraph.
ed), select the coulombs function by pressing
Page 39

Section 3: Basic Measurements Model 6517B Electrometer User’s Manual
Red (HI)
Black (LO)
6517B
Shield (Optional)
Q
s
Measured
Charge
Input low connected
to shield
Triax
Cable
OPTION SLOT
250VDC MAX
MADE IN
U.S.A
LINE RATING
50-60 Hz
100 VA MAX.
LIN
WARNING: NO INTERNAL OPERATOR SERVICABLE PARTS, SERVICE BY QUALIFIED PERSONNEL ONLY.
CAUTION: FOR CONTINUED PROTECTION AGAINST FIRE HAZARD, REPLACE FUSE WITH SAME TYPE AND RATING.
1250Vpk
PREAMP
OUT
1000VDC
MAX
FUSE
630mAT
315mAT
10
12
22
24
COMMON 2V OUT
LO HI
V SOURCE
TRIGGER LINK RS-232
DIGITAL I/O
HUMIDITY
TEMP
TYPE K
INTERLOCK
IEEE-488
2VDC MAX
Test Equipment Depot - 800.517.8431 - 99 Washington Street Melrose, MA 02176
TestEquipmentDepot.com
Auto discharge
When enabled, Auto Discharge is used to automatically reset the charge reading to zero when the
specified charge level is reached. After the integrator resets, the charge measurement process
simply restarts at zero. Perform the following steps to enable or disable Auto Discharge.
1. Press the CONFIG key and
then Q to display the coulombs configuration menu.
2. Use the cursor keys ( and ) to place the cursor (blinking menu item) on AUTO-
DISCHARGE and press ENTER.
3. Perform step a to enable Auto Discharge or perform step b to disable it:
a. Enable Auto Discharge: Place the cursor on ON and press ENTER to dis play the
present discharge level. Use the cursor keys ( and ) and the RANGE keys ( and
) to set a different discharge level and press ENTER.
b. Disable Auto Discharge: Place the cursor on OFF and press ENTER.
4. Use the EXIT key to exit from the menu.
Figure 3-5
Charge measurements
T emperature and humidity measureme nts
The Model 6517B can make external temperature measurements from –25°C to 150°C using the
Keithley Instruments Model 6517-TP type K thermocouple (which is a supplied accessory).
The Model 6517B can make relative humidity measur
Instruments Model 6517-RH humidity probe (which is available as an option).
Connections
The Model 6517-TP (thermocouple) and Model 6517-RH (humidity probe) connect to the rear
panel connectors labeled “TEMP TYPE K” and “HUMIDITY” as shown in Figure 3-6.
NOTE Keith
3-10 Return to Section Topics 6517B-900-01 Rev. A / Jun 2008
ley Instruments recommends that the thermocouple junction of the Model 6517-TP
be electrically insulated from ground and voltage potentials. Erroneous readings will
result if the thermocouple comes in contact with ground or a voltage potential.
ements (0 to 100%) using the Keithley
Page 40

Model 6517B Electrometer User’s Manual Section 3: Basic Measurements
6517B
Model
6517-TP
Thermocouple
Model 6517-RH
Humidity Probe
OPTION SLOT
250VDC MAX
MADE IN
U.S.A
LINE RATING
50-60 Hz
100 VA MAX.
LINE
WARNING:
NO INTERNAL OPERATOR SERVICABLE PARTS, SERVICE BY QUALIFIED PERSONNEL ONLY.
CAUTION:
FOR CONTINUED PROTECTION AGAINST FIRE HAZARD, REPLACE FUSE WITH SAME TYPE AND RATING
.
1250Vpk
PREAMP
OUT
1000VDC
MAX
FUSE
630mAT
315mAT
100V
120V
220V
240V
COMMON 2V OUT
LO HI
V SOURCE
TRIGGER LINK RS-232
DIGITAL I/O
HUMIDITY
TEMP
TYPE K
INTERLOCK
IEEE-488
2VDC MAX
Test Equipment Depot - 800.517.8431 - 99 Washington Street Melrose, MA 02176
TestEquipmentDepot.com
Figure 3-6
External temperature and humidity measurements
Measurement control
BENCH reset disables temperature and humidity measurements. These measurements can be
enabled from the front panel as follows:
1. Press MENU to
display the main menu.
2. Use the cursor keys ( and ) to place the cursor (blinking menu item) on GENERAL and
press ENTER to display the menu items of the general menu.
3. Place the cursor on A/D-CONTROLS and press ENTER to display the A/D controls menu.
4. Place the cursor on DATA-STAMP and press ENTER. The present control state for
temperature and humidity will be displayed. OFF indicates that the measurement is
disabled, while ON indicates that the measurement is enabled.
5. To change the control state for temperature and humidity, place the cursor on the
appropriate menu item and use the the RANGE keys ( and ) to toggle the control
state. With the desired states for temperature and humidity displayed (ON or OFF), press
ENTER.
6. Use the EXIT key to back out of the menu.
T emperature unit s
All temperature readings by the Model 6517B can be displayed in Celsius (°C), Fahrenheit (°F), or
Kelvin (K). BENCH reset selects Celsius (°C) measurement units. Perform the following steps to
change units:
1. Press MENU to
2. Use the cursor keys ( and ) to place the cursor (blinking menu item) on GENERAL and
3. Place the cursor on DISPLAY and press ENTER to display the SET READING DISPLAY
4. Place the cursor on TEMP-UNITS and press ENTER. The blinking cursor indicates the
5. To change temperature units, place the cursor on the desired selection (°C, K, or °F) and
6. Use the EXIT key to back out of the menu.
6517B-900-01 Rev. A / Jun 2008 Return to Section T o pics 3-11
press ENTER to display the menu items of the general menu.
menu.
present temperature units selection.
press ENTER.
display the main menu.
Page 41

Section 3: Basic Measurements Model 6517B Electrometer User’s Manual
Test Equipment Depot - 800.517.8431 - 99 Washington Street Melrose, MA 02176
TestEquipmentDepot.com
Display reading options
Temperature and humidity readings are available as multiple (NEXT) displays. Using multiple
displays, temperature and humidity readings can accompany each normal A/D measurement, and
they can be included as data storage elements for each reading stored in the buffer (see Multiple
displays fo
r more information).
External temperature and humidity are selected a
configuration menu (see Buffer
(data store) for more information).
s data store elements from the data store
3-12 Return to Section Topics 6517B-900-01 Rev. A / Jun 2008
Page 42

In this section:
Test Equipment Depot - 800.517.8431 - 99 Washington Street Melrose, MA 02176
TestEquipmentDepot.com
Topic Page
Introduction ............................................................................................. 4-3
Multiple displays...................................................................................... 4-3
Menus ..................................................................................................... 4-5
Voltage source......................................................................................... 4-7
Relative ................................................................................................... 4-9
Section 4
Measurement Options
Navigating menus ........................................................................... 4-6
Connections.................................................................................... 4-7
Basic operation ............................................................................... 4-9
Configuring V-Source...................................................................... 4-9
Configuring rel................................................................................. 4-10
Zero check .............................................................................................. 4-10
Zero correct............................................................................................. 4-10
Triggering ................................................................................................ 4-10
Idle .................................................................................................. 4-11
Control sources............................................................................... 4-12
Device action .................................................................................. 4-12
Output trigger.................................................................................. 4-12
Counters ......................................................................................... 4-12
Bench default setup ........................................................................ 4-12
Speed...................................................................................................... 4-13
Configuring speed........................................................................... 4-13
Resolution ............................................................................................... 4-13
Configuring resolution..................................................................... 4-13
Filter ........................................................................................................ 4-13
Filter types ...................................................................................... 4-14
Filter modes.................................................................................... 4-14
Median filter .................................................................................... 4-14
Configuring filters............................................................................ 4-15
Buffer (data store) ................................................................................... 4-15
Storing readings.............................................................................. 4-15
Page 43

Section 4: Measurement Options Model 6517B Electrometer User’s Manual
Test Equipment Depot - 800.517.8431 - 99 Washington Street Melrose, MA 02176
TestEquipmentDepot.com
Topic Page
Math........................................................................................................ 4-16
Selecting and configuring math ...................................................... 4-17
Enabling math................................................................................. 4-18
Additional math operations............................................................. 4-18
Test sequences....................................................................................... 4-19
Configuring test sequences............................................................ 4-19
Connections.................................................................................... 4-20
Running a test ................................................................................ 4-21
Internal scanning .................................................................................... 4-21
Configure internal scanner.............................................................. 4-21
Perform the scan ............................................................................ 4-21
Close/open channels...................................................................... 4-22
External scanning ................................................................................... 4-22
Trigger connections........................................................................ 4-23
Configure external channels........................................................... 4-23
Perform the scan ............................................................................ 4-23
4-2 Return to Section Topics 6517B-900-01 Rev. A / Jun 2008
Page 44

Model 6517B Electrometer User’s Manual Section 4: Measurement Options
6517B ELECTROMETER/HIGH RESISTANCE METER
Time, day, and date: This display provides the time, day of
week, and the date. The time, date, and format (12-hour or 24hour) are set from the CLOCK option of the GENERAL MENU
(see Menus for more information).
6517B ELECTROMETER/HIGH RESISTANCE METER
Bar graph: The bar graph is a graphical representation of the
reading with zero at the left end. Each full segment of the bar
represents approximately 4% of the range limit.
Test Equipment Depot - 800.517.8431 - 99 Washington Street Melrose, MA 02176
TestEquipmentDepot.com
Introduction
This section describes the details of taking meas urements. Configura tion options, triggers, reading
storage, and scanning are just a few of the topics discussed. You will find this information useful
whether operating the Model 6517B from the front panel or IEEE-488 bus.
Multiple displays
Each measurement function and some operations provide multiple displays by using the bottom
line of the front panel. These multiple displays provide multiple type measurements, show a
reading in a different form, or give additional information about the reading.
Multiple displays are summarized in this
The NE
XT and PREV (previous) DISPLAY keys scroll through the multiple displays for the
section. All the multiple displays are shown in Table 4-1.
selected function or operation. The multiple display mode can be cancelled by pressing and
holding in either key.
Table 4-1
Multiple displays by function
Function Next display
All Time, day, and date
Bar graph
Zero-centered bar graph
Maximum and minimum values
Relative and actual values
Calculated and actual values
Limits bar graph
Relative humidity and external temperature
Change from calibration temperature
Ohms (R) Source (V) and measure (I) values
Buffer Relative humidity and external temperature,
V-Source value, maximum reading,
minimum reading, average reading,
standard deviation, and print buffer data
6517B-900-01 Rev. A / Jun 2008 Return to Section T o pics 4-3
Page 45

Section 4: Measurement Options Model 6517B Electrometer User’s Manual
6517B ELECTROMETER/HIGH RESISTANCE METER
Zero-centered bar graph: The zero-centered bar graph is a
graphical representation of the reading using plus/minus limits
with zero in the center. Each full segment represents 10% of the
limit.
6517B ELECTROMETER/HIGH RESISTANCE METER
Maximum and minimum: This display shows the maximum and
minimum readings that have occurred since the display was
entered. Maximum and minimum values are reset by pressing the
present function key or by leaving the display.
6517B ELECTROMETER/HIGH RESISTANCE METER
Relative and actual: This display is used with the REL (relative)
feature. While the top line shows the result of the rel operation,
the bottom line shows the actual (raw) reading.
6517B ELECTROMETER/HIGH RESISTANCE METER
Calculated and actual: This display is used with a math
calculation. While the top line provides the result of the math
calculation, the bottom line provides the raw reading.
6517B ELECTROMETER/HIGH RESISTANCE METER
Limits: This display provides the result of the limit test. The
graphical representation of the reading is shown on a
zero-centered bar graph. If the reading is between the specified
high and low limits, the PASS message is displayed. If the
reading is outside of the limits, the FAIL message is displayed.
Limits are set and enabled from the LIMITS option of the Main
Menu.
6517B ELECTROMETER/HIGH RESISTANCE METER
Relative humidity and external temperature: This display is
used to display the relative humidity and external temperature
readings. Note that the appropriate op tion (se e Se ctio n 1 of the
Reference Manual) must be connected and enabled.
6517B ELECTROMETER/HIGH RESISTANCE METER
Change from cal temp: With temperature readings enabled, this
display indicates the difference between the present internal
temperature and the internal temperature when the instrument
was last calibrated.
Test Equipment Depot - 800.517.8431 - 99 Washington Street Melrose, MA 02176
TestEquipmentDepot.com
4-4 Return to Section Topics 6517B-900-01 Rev. A / Jun 2008
Page 46

Model 6517B Electrometer User’s Manual Section 4: Measurement Options
6517B ELECTROMETER/HIGH RESISTANCE METER
Measure/source: This display is used to display the measured
current and the V-Source level for ohms measurements.
6517B ELECTROMETER/HIGH RESISTANCE METER
6517B ELECTROMETER/HIGH RESISTANCE METER
Buffer: When in RECALL, there are seven displays for buffer
readings:
Relative humidity (RH) and temperature (ET)
V-Source value
Maximum reading (shown at left)
Minimum reading
Average reading (shown at left)
Standard deviation
Print buffer data
Test Equipment Depot - 800.517.8431 - 99 Washington Street Melrose, MA 02176
TestEquipmentDepot.com
Menus
There are two basic menu structures used by the Mode l 6517 B: The ma in men u and the CONFIG
menus. The main menu accesses items for which th er e ar e no dedica te d ke ys. The CONFIG
menus are used to configure measurement functions and other instrument operations.
Table 4-2 su
mmarizes main menu selections. Table 4-3 and Table 4-4 show configuration settings
for the measurement functions an
Figure 4-1
Main menu display
Table 4-2
Main menu summary
Option Description
SAVESETUP Save and restore setups stored in memory, set power-on
defaults, and return unit to default conditions.
COMMUNICATION Select and configure interface (GPIB or RS-232).
CAL Calibrate the Model 6517B, perform offset adjustments, and
check calibration date.
TEST Perform self-tests (see Reference Manual).
LIMITS Configure unit to perform limit tests.
STATUS-MSG Enable/disable status message mode.
GENERAL Control output lines of digital output port, check serial
6517B-900-01 Rev. A / Jun 2008 Return to Section T o pics 4-5
number of unit and firmware revision levels, control
line-sync, limit control and data stamp, configure
timestamp, set reading display, and set real-time clock.
d instrument operations.
Page 47

Section 4: Measurement Options Model 6517B Electrometer User’s Manual
Test Equipment Depot - 800.517.8431 - 99 Washington Street Melrose, MA 02176
TestEquipmentDepot.com
Table 4-3
Configuration settings for each measurement function
Autorange
Function Speed Filter Resolution
Volts
Amps
Ohms
Coulombs
**Resistance or resistivity
**Auto or manual
•
•
•
•
•
•
•
•
•
•
•
•
limit
•
•
•
•
Table 4-4
Configuration settings for instrument operations
Option Description
CONFIG REL
CONFIG FILTER
CONFIG MATH
CONFIG TRIG
CONFIG SEQ
CONFIG STORE
CONFIG VOLTAGE SOURCE*
CONFIG CARD
CONFIG NEXT
CONFIG Z-CHK
Set rel (relative) value and enable.
Select and configure averaging, and median filters.
Select and configure math calculation: polynomial, percent, percent
deviation, ratio or log10.
Select and configure basic or advanced trigger model.
Select and configure test sequence.
Configure data store: set count, control, timestamp, elements and
display, and clear buffer.
Configure V-Source: range, V-limit, resistive I-limit, and meter connect.
Select and configure internal or external scanning.
Change the scale for the zero-center bar graph.
Set whether readings are shown in Zero-Check mode.
s Damping Guard
••
•
•
External
feedback
Amps
rel
Meas
type*V-Source**
•• •
Auto
discharge
•
*To access the V-Source menu, press CONFIG and then any one of the VOLTAGE SOURCE keys.
Navigating menus
Use the following rules to navigate through the menu structures. Table 4-5 summarizes the front
panel keys used for navigation.
1. From the instrument’s normal state of
• View a configuration menu by pressing CONFIG and then the desired function or
operation key.
• View the top level of the main menu by pressing the MENU key.
2. The unit is returned to the normal reading display by:
•Pressing EXIT or MENU from the top level of the main menu.
•Pressing EXIT from the top level of a configuration menu.
• Pressing a measurement function key from within a menu.
3. Pressing the ENTER key selects an item and, if further definition is needed, moves down
within the menu structure. Pressing the EXIT key backs up within a menu structure.
4. The cursor position is denoted by a blinking menu item or parameter. The cursor is moved
from one item to the next using the cursor keys ( and
the cursor, then press ENTER.
5. A displayed arrow ( or ) on the bottom line indicates there is more information or
additional menu items to select from. When is displayed, use the cursor key. The cursor
keys have an auto-repeat feature.
displaying readings, you can:
). To select an item, highlight it with
4-6 Return to Section Topics 6517B-900-01 Rev. A / Jun 2008
Page 48

Model 6517B Electrometer User’s Manual Section 4: Measurement Options
Test Equipment Depot - 800.517.8431 - 99 Washington Street Melrose, MA 02176
TestEquipmentDepot.com
6. A numeric parameter is keyed in by placing the cursor on the digit to be changed, and
pressing the RANGE keys ( and ) to increment or decrement the digit.
7. A change is only executed when the ENTER key is pressed. Entering an invalid parameter
generates an error, and the entry is ignored. Changes are also ignored if an EXIT is
performed.
8. The INFO key can be used anywhere in a menu to display helpful information messages
concerning operation. To cancel an information message and remain in the menu, press
INFO a second time, EXIT, or ENTER. Pressing a function key cancels INFO and the menu,
and returns the instrument to a reading displa y.
Table 4-5
Menu summary
Action Description
CONFIG-(function)
MENU
RANGE
RANGE
ENTER
EXIT
INFO
V olt age source
The built-in, bipolar , 1W volt age source can output up to ±1000V. With the instrument in the normal
measurement mode, the programmed V-Source level is shown on the bottom line of the display.
Connections
or
Press the CONFIG key , then a function k ey (for ex ample,
V) to view the top level of a function configuration
menu.
Press the MENU key to view the top level of the main
menu; the operations that have no corresponding
key are included in the main menu.
Use the cursor keys to move the highlighted cursor
among menu selections, or the digits of a parameter
value, or change channels on the scanner.
Use the RANGE keys to increment and decrement digits
of a parameter value.
Accepts menu selection or data entry.
Cancels menu selection changes and returns to the
display of the previous menu level.
Displays context-sensitive information about the present
menu level; toggles information message on/off.
WARNING Hazardous voltages may be present on the output and guard terminals. To
prevent electrical shock that could cause injury or death, NEVER make or
break connections to the Model 6517B while the output is on. Power off the
equipment from the front panel or disconnect the main power cord from the
rear of the Model 6517B before handling cables connected to the outputs.
Putting the equipment in standby mode does not guarantee that the outputs
are not powered if a hardware or software fault occurs.
If used as an independent source, voltage is availa
the rear panel (see Figure 4-2). If used as an FVMI (force voltage measure current) source,
V-Source LO can be internally connected to amm
the CONFIGURE V-SOURCE menu (see C
shows the connections for this configuration.
6517B-900-01 Rev. A / Jun 2008 Return to Section T o pics 4-7
ble at the V-SOURCE HI and LO terminals on
eter LO from the METER CONNECT option of
onfiguring V-Source for more information). Figure 4-3
Page 49

Section 4: Measurement Options Model 6517B Electrometer User’s Manual
HI
LO
V-Source Out
V-Source
R
L
LO HI
A. Basic Connections
B. Equivalent Circuit
R
L
INPUT
250V
HI
L
V SOURCE
OUT
Note: V-SOURCE LO connected to ammeter input
LO via METER-CONNECT option of
CONFIGURE V-SOURCE Menu.
R
V-Source
R
HI
HI
A
LO
Ammeter
Test Equipment Depot - 800.517.8431 - 99 Washington Street Melrose, MA 02176
TestEquipmentDepot.com
Figure 4-2
Independent V-Source connections
Figure 4-3
FVMI connections
4-8 Return to Section Topics 6517B-900-01 Rev. A / Jun 2008
Page 50

Model 6517B Electrometer User’s Manual Section 4: Measurement Options
Test Equipment Depot - 800.517.8431 - 99 Washington Street Melrose, MA 02176
TestEquipmentDepot.com
Basic operation
Basic operation simply consists of setting the V-Source level and placing the V-Source in
OPERA TE to output the volt age. Other V-Sou rce operations are p erformed from the CONFIGURE
V-SOURCE menu (see Con
1000V), set voltage limit, select resistance current limit, and control the LO-to-LO connection
etween the V-Source and the ammeter.
b
figuring V-Source for more information) to select range (100V or
Setting V-Source level: The
mode. The VOLTAGE SOURCE and key s, and the cursor keys ( and ) are used to
adjust the voltage level. Pressing any one of these four k
The flashing digit on the V-Source display indicates the cursor position. Use the cursor keys to
place the cursor on the desired digit, and use the VOLTAGE SOURCE and keys to adjust
the level. Polarity can be changed by placing th
VOLTAGE SOURCE and .
Sourcing voltage:
instrument is placed in operate by pressing the OPER key. In operate, the VOLTAGE SOURCE
OPERATE indicator is on. Pressing OPER a second time places the V-Source in standby.
The displayed voltage level is applied to the output termin als when the
V-Source level is set with the instrument in the normal measurement
eys will enable the V-Source edit mode.
e cursor on the polarity sign, and pressing
Configuring V-Source
Perform the following steps to configure the V-Source:
1. Press the CONFIG key and
configuration menu:
RANGE: Select th
V-LIMIT:
RESISTIVE LIMIT: Co
METER CONNECT: Contr
2. Use the menu items to configure the V-Source. A menu item is selected by placing the
cur
Parameter values are changed using the cursor keys
(
3. Use the EXIT key to back out of the menu structure.
Control (on/off) and set a voltage limit (absolute value).
ammeter LO.
sor on it and pressing ENTER. Options for a menu item are selected in the same way.
and ), and then pressing ENTER.
e 100V range or 1000V range.
one of the VOLTAGE SOURCE keys to display the following
ntrol (on/off) the resistive (1MΩ) current limit.
ol (on/off) the internal connection between V-Source LO and
( and ) and the RANGE keys
Relative
Rel subtracts a reference value from actual readings. When rel is en abled, the instrument use s the
present reading as a relative value. Subsequent readings will be the difference between the actual
input value and the rel value.
Actual Input – Reference = Displayed Reading
The rel (relative) operation is en
Pressing REL a second time disables rel. You can also enter and enable a rel value from the
CONFIG-REL display.
A rel value can be established for each measuremen t functio n. Th e state and value of rel for each
asurement function are saved when changing functions. Once a rel value is established for a
me
measurement function, the value is the same for all ranges.
6517B-900-01 Rev. A / Jun 2008 Return to Section T o pics 4-9
abled by pressing the REL key (REL annunciator turns on).
Page 51

Section 4: Measurement Options Model 6517B Electrometer User’s Manual
Test Equipment Depot - 800.517.8431 - 99 Washington Street Melrose, MA 02176
TestEquipmentDepot.com
Configuring rel
To check or change a rel value for a measurement function, perform the following steps:
1. Select the desired measurement function.
2.
3. Use the cursor keys
Press the CONFIG key and then the REL key to display the present rel value.
( and ) and the RANGE keys ( an d ) to change the rel value
and press ENTER. The instrument will return to the normal display state with rel enabled.
Zero check
With zero check enabled (“ZeroCheck” displayed), the input signal is routed to low through a high
impedance shunt. For volts, amps, and ohms me asurement s, zero check should be enabled when
connecting or disconnecting input signals. For charge measurements, zero check should be
disabled. If left enabled, the charge will dissipate through the 10MΩ shunt.
The Z-CHK key is used to enable and disable zero check.
enable zero check before changing functions (V, I, R, or Q).
To ensure proper operation, always
Zero correct
The Z-CHK and REL keys work together to cancel (zero correct) any internal offsets that might
upset accuracy for voltage and current measurements.
Perform the following steps to zero correct the volt
1. Select the V or
2. Enable Zero Check.
3. Select the range that will be used for the measurement, or select the lowest range.
4. Press REL to zero correct the instrument. The REL indicator turns on and the “ZCor”
message is displayed. For the volts function, the “ZCor” message will not be displayed if
guard was already enabled (“Grd” displayed).
5. Press Z-CHK to disable zero check.
6. Readings can now be taken in the normal manner. The instrument will remain zeroed even
if the instrument is upranged. If downranged, re-zero the instrument.
7. To disable zero correct, first enable zero check and then press REL.
I function.
s or amps function:
Triggering
The following overview is intended to acquaint you with triggering. For a complete explan ation, see
the Model 6517B Reference Manual. Tr iggering is configured fro m the T rigger Configuratio n menu
which is accessed by pressing CONFIG and then TRIG.
There are two trigger modes for the Model 6517B; ba
are summarized by the simplified trigger models shown in Figure 4-4 and Figure 4-5. As shown in
the drawings, the basic trigger model uses one laye r of ope ra tion, while the advanced trigger
del uses three layers to provide more trigger options.
mo
4-10 Return to Section Topics 6517B-900-01 Rev. A / Jun 2008
sic and advanced. These two trigger modes
Page 52

Model 6517B Electrometer User’s Manual Section 4: Measurement Options
Continuous
One
Shot
Output Trigger
Device
Action
Event
Detection
MODE
Idle
Arm
Layer
Scan
Layer
Measure
Layer
Yes
Yes
Yes
No
No
No
Arm
Count
Scan
Count
Measure
Count
Idle
Measure
Event
Device
Action
Output
Trigger
Arm
Event
Scan
Event
Another
Measure-
ment
?
Another
Scan
?
Another
Arm
?
Test Equipment Depot - 800.517.8431 - 99 Washington Street Melrose, MA 02176
TestEquipmentDepot.com
Figure 4-4
Basic trigger model (simplified)
Figure 4-5
Advanced trigger model (simplified)
Idle
6517B-900-01 Rev. A / Jun 2008 Return to Section T o pics 4-11
The instrument is in idle whenever it is not within one of the layers of the trigger model. When the
Model 6517B is taken out of idle by pressing TRIG (or sending :INIT or :INIT:CONT ON over
the bus), the ARM indicator turns on and operation proceeds in the trigger model.
Page 53

Section 4: Measurement Options Model 6517B Electrometer User’s Manual
Test Equipment Depot - 800.517.8431 - 99 Washington Street Melrose, MA 02176
TestEquipmentDepot.com
Control sources
With advanced triggering and basic one-shot triggering, operation is controlled by control sources
which hold up operation until the programmed event occurs. Basic one-shot triggering uses one
control source, while advanced triggering uses three control sources. The control sources are
described below.
•Immediat
•Exter
•Ma
•GP
•T
•TIMER: Event de
•Hold: With this
If continuous basic triggering is being used, then operation byp asses the control sour ce (as shown
in Figure 4-4) and performs a device action.
nual: Event detection is satisfied by pressing the TRIG key.
IB: Event detection is satisfied when a bus trigger (GET or *TRG) is received.
rigLink: Event detection is satisfied when an input trigger via the trigger link
e: Event detection is immediately satisfied, allowing oper at ion to continue.
nal: Event detection is satisfied when an input trigger via the EXT TRIG IN
connector is received.
connector is received. Not available for basic triggering.
Each subsequent detection is satisfied
elapses. Not available in the Arm Layer of the advanced trigger model.
source events and operation is paused. Not available for basic triggering.
Device action
The primary device action is a measurement. However, the device action could include a function
change and a channel scan (if scanner is enabled). A channel is scanned (closed) before a
measurement is made. When scanning internal channels, the previous channel opens and the
next channel closes (break-before-make). Also included in the device action is the internal settling
time delay for the relay.
tection is immediately satisfied on the initial pass through the layer.
when the programmed timer interval
selection, event detection is not satisfied by any of the above control
Output trigger
After each measurement (device action), an output trigger p ulse occurs and is available at the r ear
panel of the Model 6517B. When used with an external scanne r, each output trigger is used to
select the next channel in a scan (see Ex
Counters
All three layers of the advanced trigger model use programmable counters that allow operation to
return to or stay in the respective layer. For example, programming the measure layer counter to
infinite keeps operation in the measure layer. After each device action, operation loop s back to the
trigger layer control source. A counter resets when operation loops back to a higher layer (or idle).
Bench default setup
The bench default setup selects advanced triggering and takes the Model 6517B out of idle, sets
the control sources of all layers to Immediate, and sets the measure layer counter to infinite. With
this trigger model setup, operation simply falls into the measure layer (and stays there) to make
continuous measurements.
ternal scanning for more information).
4-12 Return to Section Topics 6517B-900-01 Rev. A / Jun 2008
Page 54

Model 6517B Electrometer User’s Manual Section 4: Measurement Options
Test Equipment Depot - 800.517.8431 - 99 Washington Street Melrose, MA 02176
TestEquipmentDepot.com
Speed
SPEED sets the integration time of the A/D converter, the period of time the input signal is
measured. The SPEED can be set for each measurement function. The integration time is
specified in parameters based on a number of power line cycles (NPLC), where one PL C for 60Hz
is 16.67msec and one PLC for 50Hz and 400Hz is 20msec.
In general, the fastest integration time (0.01 PLC) result
usable resolution, while the slowest integration time (10 PLC) provides the best common-mode
and normal-mode rejection. In-between settings are a compromi se between speed and noise.
s in increased reading noise and less
Configuring speed
Each measurement function can have a unique integration time. Speed is set from the configure
function menu structures. The procedure is summarized as follows:
1. Press the CONFIG key and
2. Use the cursor keys to select SPEED and press ENTER to display the following speed
options:
NORMAL: Sets the integration time to 1 PLC.
FAST: Sets the integration time to 0.01 PLC.
MEDIUM: Sets the integration time to 0.1 PLC.
HIACCURACY: Sets the integration time to 10 PLC.
SET-SPEED-EXACTLY: This options prompts you to enter a PLC value (0.01 to 10)
SET-BY-RESOLUTION: Automatically optimizes the integration time for the present
3. Use the menu items to configure speed. A menu item is selected by placing the cursor
(blinking menu item) on it and pressing ENTER. Parameter values are changed using the
cursor keys and the RANGE keys, and then pressing ENTER (see Menus for more
information on navigating through the menu structure).
For more information, see Section 4 of the Reference Manual.
then the desired function key.
resolution setting (see Section 4 of the Refere nce Ma nu a l).
Resolution
All functions can operate from 3½ to 6½ digits of resolution. Each functio n can have a unique
resolution setting.
Configuring resolution
Perform the following steps to set resolution for a measurement function:
1. Press the CONFIG key and
2. Using the cursor keys, select RESOLUTION and press ENTER to display the following
resolution options:
a. 3.5 to 6.5d: Select one of these options to set the display resolution.
b. AUTO: This option automatically optimizes the reso lut i on for the pr esent integration
time (speed) setting (see Section 5 of the Reference Manual).
3. Set resolution by placing the cursor on the menu option and pressing ENTER.
then the desired function key.
Filter
Filtering stabilizes noisy measurements. The Model 6517B uses a digital filter and a median filter.
When a filter is enabled by pressing FILTER (FILT ann unciator turns on), the selected filter for that
measurement function is in effect. Pressing FILTER a second time disabl es the filter.
6517B-900-01 Rev. A / Jun 2008 Return to Section T o pics 4-13
Page 55

Section 4: Measurement Options Model 6517B Electrometer User’s Manual
Value displayed
with filtering
Response with the noise
window turned on shifts
when the input signal moves
beyond the specified range
Response with
no noise window
Limits of the
user-specified
noise window
Input signal
Test Equipment Depot - 800.517.8431 - 99 Washington Street Melrose, MA 02176
TestEquipmentDepot.com
Filter types
The Model 6517B has two types of digital filters: averaging and advanced. Both types are a simple
average of 1 to 100 reading conversions. The difference is a user-programmed “noise window” for
the advanced filter . The noise window (expressed as a percentage of range) allows a faster
response time to large signal step changes (see Figure 4-6). See Section 9 of the Reference
Manual for complete information on filter types.
Figure 4-6
Filter response/noise window
Filter modes
There are two filter modes: moving or repeating. The moving filter uses a first-in, first-out stack.
When the stack becomes full, the measurement conversions are averaged, yielding a reading. For
each subsequent conversion, the new conversion is placed into the st ack, the oldest conver sion is
discarded, and a new reading is averaged.
For the repeating filter , th e st ack is fil led and the co
stack is then cleared and the process starts over. See Section 9 of the Reference Manual for
complete information on filter modes.
Median filter
Median filtering uses the middlemost reading from a group of sample readings arranged in
ascending order. For example, assume the following readings:
They are then arranged in ascending order as follows:
The median (middlemost) reading from the above sample group is 3V.
The number of sample readings is determin
Sample readings = (2 ×
Where: R is the selected rank (1 to 5)
For example, a rank of 4 will use the
+ 1 = 9.
(2 × 4)
Each new reading replaces the oldest reading, and the median is then determined from the
u
pdated sample group of readings.
R) + 1
nversions are averaged to yield a reading. The
20V, 1V, 3V
1V, 3V, 20V
ed by the specified rank as follows:
last nine readings to determine the median;
4-14 Return to Section Topics 6517B-900-01 Rev. A / Jun 2008
Page 56

Model 6517B Electrometer User’s Manual Section 4: Measurement Options
Test Equipment Depot - 800.517.8431 - 99 Washington Street Melrose, MA 02176
TestEquipmentDepot.com
Configuring filters
Each measurement function has its own filter configuration. Perform the following steps to
configure filter:
1. Select the measurement function.
2.
3. The menu structure for the two filters (averaging and median) is shown as follows:
a. AVERAGING (digital) filter options (TYPE is used to select the digital filter type):
•NONE: Disables the digital filter.
•AVERAGING: Selects the averaging filter and prompts you to enter
•ADVANCED: Selects the advanced filter and prompts you to enter.
b. MEDIAN filter options:
4. Use the menu items to configure a filter . A men u item is selected by placing the cursor on it
Press CONFIG and then FILTER to display the following menu items:
AVERAGING:This item is used to control and configure the digital filter
MEDIAN:This item is used to control and configure the median filter
the number of readings to average (stack size).
the number of readings to average (stack size); after entering the
stack size, you are then prompted to enter the noise tolerance level (0
to 100%).
AVERAGING-MODE is used to select the filter mode; either
MOVING or REPEAT.
DISABLE: Disables the median filter.
ENABLE: Enables the median filter and prompts you to enter the range (1 to 5).
and pressing ENTER. Parameter values are changed using the cursor keys
the RANGE (
and ) keys, and then pressing ENTER.
( and ) and
Buffer (data store)
The Model 6517B has a buffer that can store from one to 15,70 6 readings. The actual number of
readings that can be stored in the buffer depends on how many optional data elements are
included for each reading (see Section 8 of the Refe re nce Manual).
The basic data elements include the re ading, unit
underflow). In addition to these items, recalled data also includes statistical information such as
minimum, maximum, average, and standard deviation, which are part of the NEXT displays (see
Multiple displays
Optional data elements include timestamp, humidity, external temperature, channel number (for
scann
ing) and the V-Source level.
for more information).
Storing readings
The following procedure to store readings uses a typical data store configuration: a user-defined
number of readings will be stored in the buffer (fill-and-stop). All aspects of data store configuration
and operation are detailed in Section 8 of the Reference Manual.
1. Set up the instrument for the desired measurements (function or range).
2. Configure the data store as follows. A menu item is selected by placing the cursor on it and
pressing ENTER. Parameters are changed using the RANGE (
pressing ENTER (see Menus for more information on navigating through the menu
structure).
a. Press CONFIG.
b. Press STORE.
c. Select CONTROL.
s, reading number, and status (overflow or
and ) keys and
6517B-900-01 Rev. A / Jun 2008 Return to Section T o pics 4-15
Page 57

Section 4: Measurement Options Model 6517B Electrometer User’s Manual
Ya2()X2a1()Xa0()++=
Percent
Input Reading
Target Value
--------------------------------- -
100×=
PD
XY–()
Y
-----------------
100×=
Test Equipment Depot - 800.517.8431 - 99 Washington Street Melrose, MA 02176
TestEquipmentDepot.com
d. Select FILL-AND-STOP.
e. Select ELEMENTS (y = enable, n = disable).
f. Select COUNT.
g. Select ENTER-COUNT (enter buffer size).
h. If you enabled the TIMESTAMP data element, continue on to configure the timestamp.
Otherwise, press EXIT to back out of the menu structure.
i. Select TIMESTAMP.
j. Select TYPE.
k. Select REAL-TIME.
l. Select FORMAT.
m. Select ABSOLUTE.
n. Use the EXIT key to back out of the menu structure.
3. Press STORE. The presently programmed buffer size (number of readings to store) is
displayed. If desired, use the cursor keys
( and ) and the RANGE keys ( and ) to
change the buffer size (incrementing the most significant digit sets the buffer size to
maximum).
4. Press ENTER to start storing readings. The asterisk (*) annunciator turns on to indicate a
data storage operation.
5. To recall stored readings, press RECALL. Use the RANGE keys (
and ) to scroll
through the buffer.
Math
The MA TH key let s you perform math operations on single rea dings and display the result. The six
math calculations that are configured from the CONFIGURE MATH menu structure are:
Polynomial:
Where: X is the normal display reading
a2, a1, and a0 are user-entered constants
Y is the displayed result
Percent:
Where: Input Reading is the normal display reading
Target Value is a user-entered constant
Percent is the displayed result
Percent Deviation:
Where: X is the normal display reading
Y is the user-entered reference value
PD is the displayed result (percent deviation)
4-16 Return to Section Topics 6517B-900-01 Rev. A / Jun 2008
Page 58

Model 6517B Electrometer User’s Manual Section 4: Measurement Options
Deviation
XY–()
Y
-----------------=
Ratio
X
Y
---=
Test Equipment Depot - 800.517.8431 - 99 Washington Street Melrose, MA 02176
TestEquipmentDepot.com
Deviation:
Where: X is the normal display reading
Y is the user-entered reference value
Deviation is the displayed result
Ratio:
Where: X is the normal display reading
Y is the user-entered reference value
Ratio is the displayed result
Log10 (logarithmic):
log
X = Y
10
Where: X is the input reading
Y is the logarithmic result
Selecting and configuring math
The procedure to select and configure a math calculation is summarized as follows:
1. Press CONFIG an
NONE: Sele
POLYNOMIAL:
PERCENT: Sele
% DEV: Sele
DEVIATION: Sele
RATIO: Sele
LOG10: Selec
2. Use the menu items to select and configure m
cursor on it and pressing ENTER. Parameter values are changed using the cursor keys
( and ) and the RANGE keys ( and ), and then pressing ENTER.
d then MATH to display the following math filter menu options:
cts no calculation when the MATH key is pressed.
Selects the polynomial calculation and enters the constants (a2, a1,
and a0).
cts the percent calculation and enters the target value (reference).
cts the percent deviation calculation.
cts the deviation calculation.
cts the ratio calculation.
ts the logarithmic calculation.
ath. A menu item is selected by placing the
6517B-900-01 Rev. A / Jun 2008 Return to Section T o pics 4-17
Page 59

Section 4: Measurement Options Model 6517B Electrometer User’s Manual
Math
Polynomial,
Percent,
Percent Deviation,
Ratio, Logarithmic
Value Displayed
Raw
Measurement
Multiple Displays
MAX, MIN
Test Equipment Depot - 800.517.8431 - 99 Washington Street Melrose, MA 02176
TestEquipmentDepot.com
Enabling math
The selected math calculation is enabled by simply pressing the MATH key. When enabled, the
MATH annunciator turns on and the calculation type (NONE, POLY, %, or % DEV) is displayed.
Also, one of the following messages is briefly displayed:
Math Enabled
Display = NONE (reading)
Math Enabled
Display = POLY (reading)
Math Enabled
Display = % (reading)
Math Enabled
Display = % DEV (reading)
Math Enabled
Display = DEV (reading)
Math Enabled
Display = RATIO (reading)
Math Enabled
Display = LOG10 (reading)
Math is disabled by pressing MATH a second time.
Additional math operations
In addition to the math performed on single readings described above, the Model 6517B has these
math operations:
• Math performed on buffered readings (maximum and minimum values, average, and
st
andard deviation).
• Math performed on single readings as part of a pass/fail limits test.
Complete information on MATH is provided in Section 9 of the Reference Manual.
Figure 4-7
Combining math calculations
4-18 Return to Section Topics 6517B-900-01 Rev. A / Jun 2008
Page 60

Model 6517B Electrometer User’s Manual Section 4: Measurement Options
Test Equipment Depot - 800.517.8431 - 99 Washington Street Melrose, MA 02176
TestEquipmentDepot.com
T est sequences
The following information summarizes the built-in test sequences of the Model 6517B. Detailed
information on test sequences can be found in the Reference Manual.
Configuring test sequences
A test sequence is selected and configured from the CONFIGURE SEQUENCE menu as follows:
1. Press CONFIG an
2. Place the cursor on APPLICATIONS and press ENTER. Select and configure a test from
the test sequence menu structure. To select a menu item, place the cursor on it and press
ENTER. To change a parameter value, use the cursor and RANGE keys (
press ENTER.
DEV-CHAR
Use to select a device characterization test:
DIODE: Diod
CAPACITOR: Cap
CABLE: Cab
RESISTOR:
RESISTIVITY
Use to select a resistivity test:
SURFACE: Sur
VOLUME:
d then SEQ to display the sequence configuration menu.
and ), and
e leakage current test. Specify start voltage, stop voltage, step
voltage, and delay.
acitor leakage current test. Specify bias voltage, bias time, and
discharge time.
le insulation resistance test. Specify bias voltage and bias time.
Resistor voltage coefficient test. Specify source 1 voltage, delay 1,
source
2 voltage, and delay 2.
face resistivity test. Specify pre-discharge time, bias voltage, bias
time, measure voltage, measure time, and discharge time.
Volume resistivity time. Specify pre-discharge time, bias voltage, bias
time, measure voltage, measure time, and discharge time.
SIR
Surface insulation resistance test: Use to select the
measure voltage, and measure time.
SWEEP: Use t
SQUARE-WAVE: Squ
STAIRCASE: S
3. Press EXIT to
CONFIGURE SEQUENCE
Applications Control
4. Place the cursor on CONTROL and press ENTER to display the control sources that can be
used to start the test. Place the cursor on the desired control source and press ENTER.
MANUAL:
IMMEDIATE: T
LID-CLOSURE: T
GPIB: T
6517B-900-01 Rev. A / Jun 2008 Return to Section T o pics 4-19
display the following menu:
Pressing the TRIG key will start the test.
est will start immediately after it is armed.
est will start when the lid of the Model 8009 test fixture is closed.
est will start when a bus trigger (*TRG or GET) is received by the Model
6517B.
o select a sweep test:
are wave sweep test. Specify high-level voltage, time at high
level, low-level voltage, time a
taircase sweep test. Specify start voltage, stop voltage, step
voltage, and step time.
SIR test. Specify bias volt age, bias time,
t low level, and cycle count.
Page 61

Section 4: Measurement Options Model 6517B Electrometer User’s Manual
HI
LO
6517B
Shield
A
+
-
6517B
Ammeter
7078-TRX
Cable
Note: Ammeter LO internally connected to
V-source LO (see V-Source).
HI
LO
HI
LO
Shield
DUT
DUT
6517B
V-Source
OPTION SLOT
250VDC MAX
MADE IN
U.S.A
LINE RATING
50-60 Hz
100 VA MAX.
WARNING:
NO INTERNAL OPERATOR SERVICABLE PARTS, SERVICE BY QUALIFIED PERSONNEL ONLY.
CAUTION:
FOR CONTINUED PROTECTION AGAINST FIRE HAZARD, REPLACE FUSE WITH SAME TYPE AND RATING
.
1250Vpk
PREAMP
OUT
1000VDC
MAX
FUSE
630mAT
315mAT
COMMON 2V OUT
LO HI
V SOURCE
TRIGGER LINK RS-232
DIGITAL I/O
HUMIDITY
TEMP
TYPE K
INTERLOCK
IEEE-488
2VDC MAX
Test Equipment Depot - 800.517.8431 - 99 Washington Street Melrose, MA 02176
TestEquipmentDepot.com
EXTERNAL: Test will start when a trigger pulse (via EXT TRIG IN connector) is received
by the Model 6517B.
TRIGLINK: T
est will start when a trigger pulse (via TRIG LINK connector) is received by
the Model 6517B. You will also be prompted to s
elect the input line for the
trigger.
Connections
WARNING Hazardous voltages may be present on the output and guard terminals. To
Test sequences use the force voltage measure current (FVMI) technique as shown in Figure 4-8.
This connection scheme assumes that V-Source LO is
connection is controlled from the METER CONNECT option of the CONFIGURE V-SOURCE
menu (see V-Source). Note that Figure 4-8 does not meet the exact conne ction requirements for
all the tests. It is only intended
are provided in the Reference Manual.
prevent electrical shock that could cause injury or death, NEVER make or
break connections to the Model 6517B while the output is on. Power off the
equipment from the front panel or disconnect the main power cord from th e
rear of the Model 6517B before handling cables conne cted to the outputs.
Putting the equipment in standby mode does not guarantee that the outputs
are not powered if a hardware or software fault occurs.
internally connected to ammeter LO. This
to show the general concept. More specific connection diagrams
Figure 4-8
Typical FVMI connections
4-20 Return to Section Topics 6517B-900-01 Rev. A / Jun 2008
Page 62

Model 6517B Electrometer User’s Manual Section 4: Measurement Options
Test Equipment Depot - 800.517.8431 - 99 Washington Street Melrose, MA 02176
TestEquipmentDepot.com
Running a test
After a test is selected, configured, and connected, perform the following steps to run the test:
1. Press the SEQ key
2. Press ENTER to arm the test. The blinking “SEQ” message will be displayed. The test will
start when the selected control source event occurs. Note that if the Immediate control
source is selected, the test will start as soon as it is armed. After the test is armed, the TRIG
key can be used to start the test regardless of which control source is selected.
3. When the test is finished, the “SEQ” display message is removed and the V-Source goes
into standby.
4. Use the RECALL key to read the data from the buffer. Use the RANGE keys (
to scroll through the data points.
. The display message will indicate the selected test.
an d )
Internal scanning
The Model 6517B can be used with a scanner card (such as the Keithley Instr ument s Model 6521
or Model 6522) installed in the option slot of the instrument. This section provides basic
information for scanning internal channels. If the scanner card is not already installed, refer to the
scanner card instruction manual.
For complete information on scanning (internal and exter
manuals. The scanner card must be installed in the option slot in order to access the menus to
configure and run an internal scan.
Configure internal scanner
Perform the following steps to configure an internal scan:
nal), refer to the scanner card instruction
1. Press CONFIG an
2. Place the cursor on INTERNAL and press ENTER to display the menu items for the internal
scanner.
3. Use the following menu structure to configure the internal scanner. To select a menu item,
place the cursor on it and press ENTER. Parameter values are changed using the cursor
( and ) and the RANGE keys ( and ).
keys
CHANNELS: Sele
indicates that the channel will be included in the scan, while OFF indicates that the channel
will not be included in the scan. To change the status of a channel(s), place the cursor on
that channel and press a RANGE key (
SCAN-MODE: Use
faster and can be used when break-before-make switching is not required.
VSRC-LIMIT: Use this menu item to enable (YES
The ±200V limit is used to protect the scanner card. Note that a V-Source limit (0 to
±1000V) may also be set from the Configure V-Source menu (see V-SOURCE).
SETTLING-TIME: Use
channel. Be sure to press ENTER after changing the time period.
4. Use the EXIT
d then CARD to display the scanning options (internal or external).
cting this menu item displays the status (on or off) for each channel. ON
and ). When finished, press ENTER.
this menu item to set the scan mode. The VOLTAGE scan mode is
) or disable (NO) the 200V V-Source limit.
this menu item to set a settling time (0 to 999.999 seconds) for each
key to back out of the menu structure.
Perform the scan
Perform the following steps to scan internal channels. Note that menu items are selected by
placing the cursor on it and pressing ENTER. Parameter values are changed using the cursor and
RANGE keys and pressing ENTER.
6517B-900-01 Rev. A / Jun 2008 Return to Section T o pics 4-21
Page 63

Section 4: Measurement Options Model 6517B Electrometer User’s Manual
Test Equipment Depot - 800.517.8431 - 99 Washington Street Melrose, MA 02176
TestEquipmentDepot.com
1. Set up the Model 6517B for the desired measurement (for example, function, range, filter.
2. Press CARD to display the internal scanner options (close channel or perform scan).
3. Select PERFORM-SCAN to display the scan types (internal or external).
4. Select INTERNAL to display the scan count; the scan count indicates the number of times
the scan will be repeated.
5. If desired, change the scan count and press ENTER.
6. You will then be asked if you wish to use the timer to provide a time interval between scans:
a. To use the timer, select YES. The present interval (in seconds) will be displayed. If
desired, change the interval. Press ENTER to continue.
b. If you do not wish to use the timer, select NO.
7. You will then be asked if you wish to store the readings in the buffer:
a. To use the buffer, select YES. A message indicating the number of readings that will be
stored in the buffer will be displayed. Press ENTER to continue.
b. If you do not wish to use the buffer, select NO.
8. With the message “Press ENTER to begin” displayed, press ENTER to start the scan.
9. After the scan is finished, the following options are available:
a. Recall data: If readings were stored in the buffer, select RECALL-DATA to display the
stored readings. Use the RANGE keys (
b. Scan again: If you wish to repeat the scan(s), select SCAN-AGAIN. Press ENTER to
start the scan.
c. Exit: To return to the normal measurement mode, select EXIT. Note that stored readings
can still be displayed by pressing the RECALL key.
and ) to scroll through the data points.
Close/open channels
Perform the following steps to open or close a channel on an internal scanner card:
1. Press the CA
2. Place the cursor on CHANNEL-CLOSURES and press ENTER.
3. The following channel closure options are available:
a. T o close a channel, place the cur sor on CLOSE-CHANNEL and press ENTER. Use the
RANGE keys (
ENTER. The number of the closed channel will be displayed along with the reading.
b. To open all channels on the scanner ca rd, place the cursor on OPEN-ALL-CHANNELS
and press ENTER.
RD key to display the internal scanner options (close channel or pe rform scan)
and ).to display the channel that you wish to close and press
External scanning
The Model 6517B can be used with a scanner card installed in an external scanning mainfr ame
(for example, the Keithley Instruments Model 7001 or 7002 Switch System). With the use of
external triggering, the Model 6517B can measure and store each scanned channel.
For complete information on scanning (internal and e
Manual, and the switch system and scanner card instruction manual.
The following steps assume that the Model 6517B is
and the Model 7001/7002 is set to the RESET default conditions (see Restor
more information).
xternal), refer to Section 10 of the Reference
set to the BENCH reset default conditions
ing bench defaults for
4-22 Return to Section Topics 6517B-900-01 Rev. A / Jun 2008
Page 64

Model 6517B Electrometer User’s Manual Section 4: Measurement Options
WARNING:
NO INTERNAL OPERATOR SERVICABLE PARTS,SERVICE BY QUALIFIED PERSONNEL ONLY.
CAUTION:
FOR CONTINUED PROTECTION AGAINST FIRE HAZARD,REPLACE FUSE WITH SAME TYPE AND RATI
MADE IN USA
Model 7001 or 7002 Switch System
6517B Electrometer
OUT
IN
Trigger
Link
Trigger Link Cable (8501)
OPTION SLOT
250VDC MAX
MADE IN
U.S.A
LINE RATING
50-60 Hz
100 VA MAX.
LINE
WARNING:
NO INTERNAL OPERATOR SERVICABLE PARTS, SERVICE BY QUALIFIED PERSONNEL ONLY.
CAUTION:
FOR CONTINUED PROTECTION AGAINST FIRE HAZARD, REPLACE FUSE WITH SAME TYPE AND RATING
.
1250Vpk
PREAMP
OUT
1000VDC
MAX
FUSE
630mAT
315mAT
100V
120V
220V
240V
COMMON 2V OUT
LO HI
V SOURCE
TRIGGER LINK RS-232
DIGITAL I/O
HUMIDITY
TEMP
TYPE K
INTERLOCK
IEEE-488
2VDC MAX
Trigger
Link
Test Equipment Depot - 800.517.8431 - 99 Washington Street Melrose, MA 02176
TestEquipmentDepot.com
T rigger connections
Connect the Model 6517B to the switch system as shown in Figure 4-9. Detailed information on
triggers is provided in Section 7 of the Reference Manual.
Figure 4-9
Trig ger connections using trigger link
Configure external channels
The scanner configuration menu is used to specify the numbe r of channels (external inp uts) for the
scan. If a scanner card is installed in the option slot of the Model 6517B, use procedure A. If the
option slot is empty, use procedure B.
Procedure A
Scanner installed in option slot of Model 6517B:
1. Press CONFIG an
d then CARD to display the scanner configuration menu.
2. Place the cursor on EXTERNAL and press ENTER.
3. You will then be prompted to enter the number of external inputs (channels) for the scan.
Use cursor keys
( and ) and the RANGE keys ( and ) to change the number (1 to
400). Press ENTER to continue.
4. Press EXIT to return to the normal measurement display.
Procedure B
Option slot of Model 6517B empty:
1. Press CONFIG an
d then CARD to display the scanner configuration menu.
2. You will then be prompted to enter the number of external inputs (channels) for the scan.
Use cursor keys
( and ) and the RANGE keys ( and ) to change the number (1 to
400).
3. Press ENTER to return to the normal measurement display.
Perform the scan
Perform the following steps to scan external channels. Note that menu items are selected by
placing the cursor on it and pressing ENTER. A parameter value is changed by using the RANGE
keys (
1. On the Model 6517B, press the C
a. Place the cursor on PERFORM-SCAN and press ENTER to display the scan types
b. Place the cursor on EXTERNAL and press ENTER.
2. On the Switch System, if not already done, reset the Model 7001/2 as follows:
a. Press MENU.
6517B-900-01 Rev. A / Jun 2008 Return to Section T o pics 4-23
and ). and pressing ENTER.
the Model 6517B, perform steps a and b. If the option slot is empty, proceed to step 2.
(internal or external).
ARD key . If a scanner ca rd is insta lled in the option slot of
Page 65

Section 4: Measurement Options Model 6517B Electrometer User’s Manual
Test Equipment Depot - 800.517.8431 - 99 Washington Street Melrose, MA 02176
TestEquipmentDepot.com
b. Select SAVESETUP.
c. Select RESET.
d. Select ENTER.
e. Select ENTER.
f. Use the EXIT key to back out of the menu structure.
3. On the Model 6517B, press ENTER to display the next message: “CONFIG EXT
SCANNER; set CHAN COUNT to infinite.”
4. On the Switch System, set the channel count to infinite as follows:
a. Press SCAN.
b. Select SELECT-CONTROL > NUMBER-OF-CHANS > CHAN-COUNT > INFINITE.
Note: Do not exit from the menu structure after selecting an infinite channel count.
5. On the Model 6517B, press ENTER to display the next message (“SELECT TRIG
SOURCE”), and select the appropriate trigger source. If using the Trigger Link, select
TRIGLINK. If you are instead using conventional external triggering, select EXTERNAL.
The “CONFIG EXT SCANNER” message to set channel spacing for the Switch System will
then be displayed.
6. On the Switch System, set channel spacing as follows. Note that the message on the Model
6517B tells you which channel spacing option to select:
a. Select CHANNEL-SPACING.
b. Select TRIGLINK or EXTERNAL.
c. Use the EXIT key to back out of the menu structure.
7. On the Model 6517B, press ENTER. The display will prompt you to define the scan list for
the Switch System.
8. Use the Switch System to define the scan list.
9. On the Model 6517B, press ENTER to display “CONFIG EXT SCANNER; STEP scanner to
first channel.”
10. On the Switch System, press STEP to close the first channel in the scan.
11. On the Model 6517B, press ENTER to display the currently programmed scan count. The
scan count specifies the number of scans to be performed. To change the scan count, use
the cursor keys
( and ) and the RANGE keys ( and ). Press ENTER to continue.
12. On the Model 6517B, you will be asked if you wish to use the scan timer. The timer is used
to provide a time interval between each scan. If you select YES, enter the interval (in
seconds).
13. You will then be asked if you wish to store the readings in the buffer. If you select YES, a
message indicating the total number of readings to be stored in the buffer will be displayed.
Press ENTER to continue.
14. With the message “Press ENTER to begin” displayed, press ENTER to start the scan
process.
15. After the scan is completed, options to recall readings or repeat the scan will be displayed:
a. RECALL-DATA: Select this option to recall readings. Use the cursor keys and the
range keys to scroll through the buffer. When finished, press EXIT to return to the
post-scan options.—
b. SCAN-AGAIN: Use this option to repeat the scan.
c. EXIT: Use this option to disable the scan.
4-24 Return to Section Topics 6517B-900-01 Rev. A / Jun 2008
Page 66

In this section:
Test Equipment Depot - 800.517.8431 - 99 Washington Street Melrose, MA 02176
TestEquipmentDepot.com
Topic Page
Overview ................................................................................................. 5-2
Software support..................................................................................... 5-2
Remote interfaces................................................................................... 5-2
Common commands............................................................................... 5-5
SCPI commands ..................................................................................... 5-5
Section 5
Remote Operation
LabView driver ................................................................................ 5-2
IEEE-488 bus.................................................................................. 5-2
RS-232 interface............................................................................. 5-3
SCPI command syntax.................................................................... 5-6
SCPI signal-oriented commands..................................................... 5-8
SCPI subsystem commands........................................................... 5-8
Program examples.................................................................................. 5-13
Changing function and range.......................................................... 5-13
One-shot triggering ......................................................................... 5-14
Continuous triggering #1................................................................. 5-15
Continuous triggering #2................................................................. 5-15
Generating SRQ on buffer full......................................................... 5-16
Storing readings in the buffer.......................................................... 5-17
Taking readings with the scanner card............................................ 5-18
Test sequence: Staircase sweep..................................................... 5-19
Page 67

Section 5: Remote Operation Model 6517B Electrometer User’s Manual
Test Equipment Depot - 800.517.8431 - 99 Washington Street Melrose, MA 02176
TestEquipmentDepot.com
Overview
For remote operation, the Keithley Instruments Model 6517B can use the IEEE-488 interface or
the RS-232 interface. Common commands and Standard Commands for Programmable
Instrumentation (SCPI) can be used with either interface.
For IEEE-488 operation, you can select the device de
In this mode, you use DDCs instead of common commands and SCPI commands. This mode
allows you to use the Model 6517B as an easy replacement for the Model 617 Electrometer. The
6517B can use existing programs written for the Mo d el 617 with o ut an y co de modi fic at ion s.
Appendix G of the Reference Manual lists the DDCs for the Model 6517B.
Software support
LabView driver
This driver allows you to use the Model 6517B with the National Instruments LabView package
and is free upon request. Contact the Keithley Instruments applications group for details at
1-888-KEITHLEY (1-888-534-8453) within the U.S. and Canada.
Remote interfaces
IEEE-488 bus
Standards
For remote operation, the Model 6517B can use the IEEE-488 bus for communication between
instrumentation and the controller (computer). The IEEE-488 bus is also known as the General
Purpose Interface Bus (GPIB).
pendent command (DDC) language mode.
In addition to conforming to the IEEE-488-1978 and IEEE-488.1-1987 st
also conforms to the IEEE-488.2-1987 standard and the SCPI 1994 standard. These two
standards allow most instrument operations to be performed with the use of comm on commands
and SCPI commands.
andards, the Model 6517B
IEEE-488 bus connections
The Model 6517B is connected to the IEEE-488 bus using a cable terminated with standard
IEEE-488 connectors. Figure 5-1 shows a typical connection scheme for a multi-unit test syst em .
Note that connectors can be stacked to a
To minimize interference caused by electromagnetic radiation,
such as the Keithley Instruments Model 7007-1 and Model 7007-2.
ccommodate the parallel connection scheme.
only use shielded IEEE-488 cables,
5-2 Return to Section Topics 6517B-900-01 Rev. A / Jun 2008
Page 68

Model 6517B Electrometer User’s Manual Section 5: Remote Operation
Instrument
Computer
6517B
Instrument
Test Equipment Depot - 800.517.8431 - 99 Washington Street Melrose, MA 02176
TestEquipmentDepot.com
Figure 5-1
IEEE-488 connections
Address and language selection
The Model 6517B is shipped from the factory with the IEEE-488 bus selected, the primary address
set to 27 and the SCPI language mode selected. The primar y address is displayed on po we r up if
the IEEE-488 bus is the selected interface.
Perform the following steps to select the IEEE-488
bus interface, check and change the primary
address, and check and change the language mode:
1. Press MENU
to display the MAIN MENU.
2. Place the cursor on COMMUNICATION and press ENTER. The interface options (GPIB
and RS-232) are displayed.
3. Place the cursor on GPIB and press ENTER to select the IEEE-488 bus interface. If the
RS-232 interface was previously selected, the unit will exit from the MAIN MENU when you
select GPIB. In that event, repeat steps 1, 2, and 3 to continue in the menu structure.
4. Perform the following steps if you wish to check and change the primary address:
a. Place the cursor on ADDRESSABLE and press ENTER to display the addressable
menu items (ADDRESS and LANGUAGE).
b. Place the cursor on ADDRESS and press ENTER to display the primary address.
c. To change the address, use the cursor keys ( and ) and the RANGE keys
( and ) to display the desired address, then press ENTER. Each device on the
bus must have a unique address. Typically, the computer uses address 0 or 21.
5. Perform the following steps if you wish to check and change the language mode:
a. Place the cursor on LANGUAGE and press ENTER to disp lay the language options
(SCPI or DDC). Cursor position indicates the present language mode.
b. Place the cursor on the desired language and press ENTER. Changing the language
mode causes the unit to exit from the MAIN MENU. If you did not change the language,
then use the EXIT key to back out of the menu structure.
RS-232 interface
RS-232 standard
For remote operation, the Model 6517B can use the RS-232 serial port for communication
6517B-900-01 Rev. A / Jun 2008 Return to Section T o pics 5-3
between instrumentation and the contro ller (computer). All commands, excep t DDCs, can be used
over this serial port. The serial port is based o n the electrica l and mechanical characteristics of the
RS-232-C standard.
Page 69

Section 5: Remote Operation Model 6517B Electrometer User’s Manual
Test Equipment Depot - 800.517.8431 - 99 Washington Street Melrose, MA 02176
TestEquipmentDepot.com
RS-232 connections
The RS-232 serial port of the Model 6517B can b e connected to the serial port of a computer using
a standard, straight-through (not null modem) RS-232 cable terminated with DB-9 connectors. The
serial port is located on the rear panel of the Model 6517B and is labeled “RS232.”
If your computer uses a DB-25 connector for the R
S-232 interface, you will need a cable or an
adapter with a DB-25 connector on one end and a DB-9 connector on th e other end . Ag ain , make
sure you use a straight through (not null modem) cable.
Interface selection and configuration
Perform steps below to select, check, and change the RS-232 interface settings for the Model
6517B. The RS-232 settings (baud rate, data bits, parity, and stop bits) of the Model 6517B must
tch the RS-232 settings of the communications package for your computer.
ma
1. Press MENU
2. Place the cursor on COMMUNICATION and press ENTER. The interface options (GPIB
and RS-232) will then be displayed.
3. Place the cursor on RS-232 and press ENTER to select the RS-232 interface. If the GPIB
interface was previously selected, the unit will exit from the MAIN MENU when you select
RS-232. In that event, repeat steps 1, 2, and 3 to continue in the menu structure.
4. Perform the following steps if you wish to check and change the baud rate:
a. Place the cursor on BAUD and press ENTER to display the available baud rates.
Cursor position indicates the present baud rate setting. T o retain the present baud rate
setting, press ENTER or EXIT.
b. To change the baud rate, place the cursor on the desired setting and press ENTER.
5. Perform the following steps if you wish to check and change the number of data bits:
a. Place the cursor on BITS and press ENTER to display the available number o f dat a bits
(7 or 8). Cursor position indicates the present setting. To retain the present setting,
press ENTER or EXIT.
b. T o change the number of d ata bit s, place the cursor on the alternate selection and press
ENTER.
6. Perform the following steps if you wish to check and change parity:
a. Place the cursor on PARITY and press ENTER to display the parity options (NONE,
ODD or EVEN). Cursor position indicates the present setting. To retain the present
setting, press ENTER or EXIT.
b. To change parity, place the cursor on the desired selection and press ENTER.
7. Perform the following steps if you wish to check and change the number of stop bits:
a. Place the cursor on STOP and press ENTER to display the available number of stop
bits (1 or 2). Cursor position indicates the present setting. To retain the present setting,
press ENTER or EXIT.
b. T o change the number of stop bit s, place the cursor on the alternate selection and press
ENTER.
8. Use the EXIT key to back out of the menu structure.
to display the MAIN MENU.
5-4 Return to Section Topics 6517B-900-01 Rev. A / Jun 2008
Page 70

Model 6517B Electrometer User’s Manual Section 5: Remote Operation
Test Equipment Depot - 800.517.8431 - 99 Washington Street Melrose, MA 02176
TestEquipmentDepot.com
Common commands
Common commands are common to all IEEE-488 devices on the bus. The following information
summarizes the common commands that ar e us ed mo st often. For c omp let e de tails, refer to
Section 11 of the Reference Manual.
*CLS (clear status)
Clears all event registers and Error Queue. After clearing an event register, you can monitor the
register for a bit to set, indicating that an event (such as the buffer becoming full) has occurred.
*RCL <NRf> (recall)
Returns the instrument to the instrument setup saved at the specified memory location. Example:
To recall the setup saved at memory location 0, send *RCL 0.
*RST (reset)
Returns the instrument to the *RST defaults and places the instrument in the idle state (ARM
indicator off).
*SAV <NRf> (save)
Saves the instrument setup to the specified memory location (0 to 9). Example: To save the setup
to memory location 0, send *SAV 0.
*TRG (trigger)
When a trigger model control source is set for BUS, event detection is sa tisfied by sending this bus
trigger. F or example, if instrument operation is waiting at the measure (trigger) la yer control source
and it is programmed for BUS events, *TRG will provide the required event, resulting in a device
action (measurement).
*WAI (wait to continue)
This delay is used to allow the *TRG or an initiate command (:INIT or :INIT:CONT ON) to finish
before processing any further commands. An INITiate command is no t considered finished until
instrument operation returns to the idle state.
SCPI commands
In the Model 6517B, you are given access to control settings that are hidden on other instrument s.
Because the instrument has more control points available, it requires more commands than its
counterparts to perform comparable tasks. To accommodate this, the instrument incorporates the
SCPI command set.
This introduction to the SCPI command set has three goals:
• Describe the syntax of SCPI commands. Include
default nodes, which help reduce the amount of data sent to the instrument.
• Provide some simple programs to perform c
• Describe the SCPI commands used in the example programs so you can modify the
rograms to suit your needs.
p
d are descriptions of short forms and
ommonly used tasks.
6517B-900-01 Rev. A / Jun 2008 Return to Section T o pics 5-5
Page 71

Section 5: Remote Operation Model 6517B Electrometer User’s Manual
:REFerence
SENSe1
:D ATA? :FUNCtion :VOLTage
[:DC]
:RANGe
:ACQuire[:UPPer] :AUTO :STATe
Test Equipment Depot - 800.517.8431 - 99 Washington Street Melrose, MA 02176
TestEquipmentDepot.com
SCPI command syntax
Tree structure
SCPI commands are organized in a tree structure, similar to disk directories in computer operating
systems. Each subdirectory is called a subsystem . Fo r ex am p le, part of the SENSe1 subsystem is
listed below and shown in Figure 5-2.
[SENSe[1]]
:DATA?
:FUNCtion <name>
:VOLTage
[:DC]
:RANGE
[:UPPer] <n>
:AUTO <Boolean> | ONCE
:REFerence <n>
:STATe <Boolean>
:ACQuire
Figure 5-2
Hierarchy of the example SENSe1 commands
A command summary table is a way of documenting SCPI comm
complete command names. A complete command is formed by joining the components. For
example, the complete :STATe command in the example is:
SENSe1:VOLTage[:DC]:REFerence:STATe
Note that square brackets are not part of the command; they indicate optional parts of the
command.
This hierarchical approach permits the same comm
many subsystems contain a :STATe command, but each one is unique because the complete
command is unique. This is analogous to having a file named INDEX.TXT, for example, in each
directory of your computer's hard disk. Although the files have the same name, they are unique
because they are each in a different directory.
Long and short form commands
Every SCPI command has a short form, and most also have a long form. The notation used in
documentation shows the short form in upper case, with the re mainder of the na me, which creates
the long form, shown in lower case. There are no intermediate forms of the command name. You
must send the exact short or long for m. However, you do not have to use the mixed capitalization.
The Model 6517B accepts commands in any combination of upper and lower case. For example,
all of the following are valid forms of the SENSe1:VOLTage[:DC]:REFerence command:
sense1:voltage[:dc]:reference:state
sens1:volt[:dc]:ref:stat
SENS1:volt[:DC]:rEFErENCe:STat
ands, but it does not show
and to be used many times. For example,
5-6 Return to Section Topics 6517B-900-01 Rev. A / Jun 2008
Page 72

Model 6517B Electrometer User’s Manual Section 5: Remote Operation
Test Equipment Depot - 800.517.8431 - 99 Washington Street Melrose, MA 02176
TestEquipmentDepot.com
Query commands
With few exceptions, every SCPI command has a corresponding query. A command sets a control
point in the instrument; a query determines the present setting of the control point. The query is
simply the command name with a question mark (?) attached.
Some commands are actions rather than control poin
t settings. These commands have no query
form. For example,
SENSe1:VOLTage[:DC]:REFerence:ACQuire
is an action command, not a setting, and so has no query form.
There are some queries that have no
corresponding command. For example, SENSe1:DATA?
causes the instrument to return the latest reading. Of course, there is no corresponding command
to send a reading value to the instrument.
Default nodes
SCPI uses the concept of default nodes. Consider the example comma nd tree shown previously in
Figure 5-2. What is within square brackets is not necessary to send to the instrument, but the
instrument will accept it if you
send it. Consider the :UPPer command, which sets the
measurement range. To set the Model 6517B to measure 15VDC, any of the following commands
works:
SENSe1:VOLTage[:DC]:RANGe:UPPer 15
SENSe:VOLTage[:DC]:RANGe:UPPer 15
SENSe1:VOLTage[:DC]:RANGe 15
VOLTage[:DC]:RANGe:UPPer 15
VOLTage[:DC]:RANGe 15
These are shown in long form, but short forms could also be used.
Command syntax
Notice in the preceding examples that there is no colon character at the beginning of the
commands. A leading colon instructs the Model 6517B to interpret the command starting at the
root (highest level) of the command tree. Since the Model 6517B also starts at the root each time
you send it a new command, the leading colon is not needed (although the instrument will accept it
if you send it).
You can send multiple commands in a single messag
e. Separate the commands with a semicolon
character. When the Model 6517B encounters a command following a semicolon, it attempts to
interpret the command starting at the level of the previous command, unless you precede the
second command with a colon. For example, either of the following command strings programs
the Model 6517B to the 20V range and uses 5V as a rela tive v alue (with the REFerence
commands):
volt[:dc]:rang 20;ref 5;ref:stat on
volt[:dc]:rang 20;:volt[:dc]:ref 5;:volt[:dc]:ref:stat on
The two command strings are treated identically by the Model 6517B. In the first string when the
instrument encounters ";ref 5", it notices the following:
• It is not the first command in the string
• There is no leading colon on the command
• The previous command was at the VOLTage[:DC] level
Therefore, it interprets the co
mmand as if it were at the VOLTage[:DC] level.
6517B-900-01 Rev. A / Jun 2008 Return to Section T o pics 5-7
Page 73

Section 5: Remote Operation Model 6517B Electrometer User’s Manual
Test Equipment Depot - 800.517.8431 - 99 Washington Street Melrose, MA 02176
TestEquipmentDepot.com
SCPI signal-oriented commands
Signal-oriented commands are used to acquire readings using a set of high-level instructions to
control the measurement process. The two most commonly used commands are :FETCh? and
:MEASure?.
Details on all signal-oriented commands are covered in Section 14 of the Reference Manual.
:FETCh?
This query command is used to request the latest post-processed reading. After sending this
command and addressing the Model 6517B to talk, the reading will be sent to the computer. This
command does not trigger a measurement, it simply requests the last available reading.
:MEASure[:<function>]?
In general, this command places the instrument in the “one-shot” measurement mode (ARM
indicator off), triggers a single measurement, and then performs a :FETCh? command.
If you include the measurement function with
specified function and then perform the one-shot measurement and query, as follows:
:MEASure? Currently selected function
:MEASure:VOLTage[:DC]? Volts function
:MEASure:CURRent[:DC]? Amps function
:MEASure:RESistance? Ohms function
:MEASure:CHARge? Coulombs function
SCPI subsystem commands
Detailed information on all SCPI commands is covered in Section 14 of the Reference manual. In
this section, only the commands used for basic operation are summarized.
Defaults
:SYSTem SYSTem subsystem
:PREset Set th
:POSetup <name> Selec
Fresh readings
this command, the instrument will first go to the
e 6517B to the system preset defaults. Some of the
selected defaults include: volts, continuous triggers, normal
speed (1.0 PLC), and auto range.
t power on setups: RST, PRESet, or SAV0 through SAV9.
Instrument will power up to the *RST or system present
defaults, or one of the *SAV0 – *SAV9 setups.
[:SENSe[1]] SENSe subsystem
:DATA:FRESh? Request
same reading twice. If a new reading has already been
triggered, this command will wait until the new reading is
available.
:CALCulate[1] CALCulate subs
:DATA:FRESh? Req
5-8 Return to Section Topics 6517B-900-01 Rev. A / Jun 2008
uests a new calculated reading. When CALC1 is enabled,
SENS:DATA:FRES? is the reading before calculation and
CALC:DATA:FRES? is the reading after calculation. When
CALC1 is disabled, the readings are the same.
s a new reading. This command will not request the
ystem
Page 74

Model 6517B Electrometer User’s Manual Section 5: Remote Operation
Test Equipment Depot - 800.517.8431 - 99 Washington Street Melrose, MA 02176
TestEquipmentDepot.com
Function configuration
[:SENSe[1]] SENSe subsystem
:FUNCtion <name> Se
lect measurement function:
<name>='VOLTage[
:DC]' Volts function
'CURRent[:DC]' Amp
'RESistance' Oh
ms function
'CHARge' Coulo
s function
mbs function
:VOLTage[:DC] Path to configure
:NPLC <n> Set sp
:AUTO <b> Ena
eed: 0.01 to 10 PLC
ble or disable auto NPLC
:RANGe Path to configu
[:UPPer] <n> S
:AUTO <n> En
:REFerence <n> S
:STATe <b> Ena
:ACQuire Use
:DIGits <n> S
:AUTO <b> En
pecify expected reading to select range
able or disable auto range
pecify reference (rel): -210 to +210
ble or disable reference (rel)
input signal as reference (rel)
pecify measurement resolution
able or disable auto resolution
AVERage Path to contr
:TYPE <name> Selec
:TCONtrol <name> Sele
:COUNt <n> S
:ADVanced Pa
:NTOLerance <n> S
[:STATe] <b> Ena
t filter (NONE, SCALar or ADVanced)
ct averaging method (REPeat, or MOVing)
pecify filter count (1 to 100)
th to configure advanced filter:
pecify noise tolerance (0 to 100%)
ble or disable digital filter
volts:
re measurement range:
ol digital filter:
:MEDian Path to control median filt
:RANK < n> S
[:STATe] <b> Ena
:GUARd <b> Ena
:CURRent:DC Path to configure
pecify rank for filter (1 to 5)
ble or disable median filter
ble or disable guard
Amps:
(Volts commands)The same commands as Volts (except
:GUARd)
:DAMPing <b> Ena
apply
ble or disable damping
er:
:RESistance Path to configure
[:AUTO] Path to configure
:RANGe Path to set
[:UPPer] <n> Sele
:AUTO <b> En
:MANual Path to configu
:CRANge Path to set
[:UPPer] <n> Sele
:AUTO <b> En
:VSOurce Path to contr
[:AMPLitude] <n> S
:RANGe <n> Set ra
:OPERate <b> Ena
:IREFerence <b> En
:DAMPing <b> Ena
:VSControl <name> Sele
:MSELect <name> Sele
6517B-900-01 Rev. A / Jun 2008 Return to Section T o pics 5-9
Ohms:
(Volts commands)The same commands as Volts (except
:GUARd)
apply
Auto V-Source Ohms:
measurement range:
ct range (0 to 100e18)
able or disable auto range
re Manual V-Source Ohms:
measurement range:
ct range (0 to 100e18)
able or disable auto range
ol the V-Source
pecify V-Source level (0 to 1000)
nge; <100 = 100V range, >100 = 1000V range
ble or disable V-Source output
able or disable amps reference
ble or disable damping
ct ohms V-Source mode (MANual or AUTO)
ct ohms type (NORMal or RESistivity)
Page 75

Section 5: Remote Operation Model 6517B Electrometer User’s Manual
Test Equipment Depot - 800.517.8431 - 99 Washington Street Melrose, MA 02176
TestEquipmentDepot.com
:RESistivity Path to configure resistivity
:STHickness <NRf> V
olume: Specify sample thickness; 0.0001 to 99.9999
(mm)
:FSELect <name> Selec
:M8009 Path to qu
:RSWitch? Q
:USER Path to configure us
:RSELect <name> Selec
:KSURface <NRf> Sur
:KVOLume <NRf> V
t test fixture (M8009 or USER)
ery Model 8009 test fixture:
uery switch setting (SURFace or VOLume)
er test fixture
t test type (SURFace or VOLume)
face: Specify Ks; 0.001 to 999.999
olume: Specify Kv; 0.001 to 999.999
:CHARge Path to configu
re Coulombs:
(Volts commands)The same commands as Volts (except
:GUARd)
:ADIScharge Path to contr
:LEVel <NRf> Set level (-
[:STATe] <b> En
apply
ol auto discharge
2.2e6 to 2.2e6)
able or disable auto discharge
V -Source
:SOURce SOURce subsystem
:VOLTage <n> S
:RANGe <n> Sele
:LIMit Path
[:AMPLitude] <n> S
pecify V-Source level (0 to ±1000V)
ct range; <100 = 100V range, >100 = 1000V range
for voltage limit:
pecify voltage limit; 0 to 1000 (V)
:STATe <b> Enable or disable limit
:MCONnect <b> Ena
:CURRent Path for
ble or disable V-Source LO to ammeter LO connection
current limit:
:RLIMit Path to control res
:STATe <b> Enable or disable res
:LIMit <b> Path to check
[STATe]? <b> Qu
ery state of current compliance
Data store (Buffer)
:TRACe TRACe subsystem
:ELEMents <name> Sele
:POINts <n> S
:FEED Path to control buf
:CONTrol <name> Sele
:DATA? Read all readings in buf
ct reading elements :TSTamp, HUMidity, CHANnel,
ETEMperature, VSOurce, NONE
pecify buffer size
ct control mode and enable buffer: NEVer, NEXT,
ALWays, or PRETrigger
istive current limit:
istive I-limit
current compliance:
fer:
fer
Open/close channels and scan
:ROUTe ROUTe subsystem
:CLOSe <list> Close specified
:STATe? Qu
:OPEN <list> Op
:OPEN:ALL Op
:SCAN Path to contr
[:INTernal] <list> S
ernal <list> Specify external scan list: 1 to 400 channels
:EXT
:SMEThod <name> S
:LSELect <name> En
5-10 Return to Section Topics 6517B-900-01 Rev. A / Jun 2008
en specified channel
en all channels
pecify internal scan list: 2 to 10 channels
pecify settling time for internal card; 0 to 99999.9999 (sec.)
able the specified scan: INTernal, EXTernal or NONE
channel
ery the closed channel
ol scanning:
Page 76

Model 6517B Electrometer User’s Manual Section 5: Remote Operation
Test Equipment Depot - 800.517.8431 - 99 Washington Street Melrose, MA 02176
TestEquipmentDepot.com
T rigger model
Performing a system preset (:SYSTem:PRESet) configures the advanced trigge r model for typical
instrument operation. After a system preset, many advanced operations can be accomplished
using the initiate commands, :ABORt, and the trigger (measure) layer commands.
:INITiate
[:IMMediate] T
:CONTinuous <b> Ena
ake the instrument out of idle (ARM indicator on)
ble or disable continuous initiation
:ABORt Reset t
rigger system; instrument stays in idle if continuous
initiation is disabled (off)
:TRIGger Path to configu
:SOURce <name> Sel
ect control source: IMMediate, TIMer, MANual, BUS,
re the advanced trigger layer:
TLINk, EXTernal or HOLD
:TIMer <n> Set tim
:DELay <n> Set
er interval (sec): 0.001 to 9999999.999
delay between measurements (sec) 0 to 999999.999
:SYSTem
:MACRo
:TRIGger Path to configure ba
[:EXECute] Sel
:MODE <name> S
:SOURce <name> S
ect basic triggering
pecify trigger mode (CONTinuous or ONEShot)
pecify source (IMMediate, MANual, BUS,
EXTernal or TIMer)
:TIMer <n> S
pecify timer interval; 0.001 to 99999.999 (sec.)
T est sequences
:TSEQuence TSEQuence subsystem
:ARM Arm
:ABORt S
:TYPE <name> S
:TSOurce <name> S
:TLINe <NRf> Sp
DLEakage Diod
:STARt <NRf> S
:STOP <NRf> S
:STEP <NRf> S
:MDELay <NRf> S
:CLEakage Cap
:SVOLtage <NRf> S
:STIMe <NRf> S
:DTIMe <NRf> S
:CIResistance Cable insulat
:SVOLtage <NRf> S
:STIMe <NRf> S
:RVCoefficient Resist
:SVOLtage[1] <NRf> S
:MDELay[1] <NRf> S
:SVOLtage2 <NRf> S
:MDELay2 <NRf> S
:SRESistivity Surface res
s selected test sequence
tops a test sequence in process
pecify test; DLEakage, CLEakage, CIResistance,
RVCoefficient, SRESistivity, VRESistivity,
SIResistivity, SQSWeep, STSWeep
pecify trigger source; MANual, IMMediate, BUS,
TLINk, EXTernal, LCLosure
ecify TLINK line; 1 to 6
e leakage test path:
pecify start voltage; -1000 to 1000
pecify stop voltage; -1000 to 1000
pecify step voltage; -1000 to 1000
pecify measure delay; 0 to 99999.9s
acitor leakage test path:
pecify bias voltage (-1000 to 1000)
pecify bias time; 0 to 99999.9s
pecify discharge time; 0 to 9999.9s
ion resistance test path:
pecify bias voltage; -1000 to 1000
pecify bias time; 0 to 99999.9s
or voltage coefficient test path:
pecify source voltage 1; -1000 to 1000
pecify measure delay 1; 0 to 99999.0s
pecify source voltage 2; -1000 to 1000
pecify measure delay 2; 0 to 99999.9s
istivity test path:
sic triggering
6517B-900-01 Rev. A / Jun 2008 Return to Section T o pics 5-11
Page 77

Section 5: Remote Operation Model 6517B Electrometer User’s Manual
Test Equipment Depot - 800.517.8431 - 99 Washington Street Melrose, MA 02176
TestEquipmentDepot.com
:PDTime <NRf> Specify pre-discharge time; 0 to 99999.9s
:SVOLtage <NRf> S
:STIMe <NRf> S
:MVOLtage <NRf> S
:MTIMe <NRf> S
:DTIMe <NRf> S
:VRESistivity V
:PDTime <NRf> S
:SVOLtage <NRf> S
:STIMe <NRf> S
:MVOLtage <NRf> S
:MTIMe <NRf> S
:DTIMe <NRf> S
:SIResistance Sur
:SVOLtage <NRf> S
:STIMe <NRf> S
:MVOLtage <NRf> S
:MTIMe <NRf> S
:SQSWeep Square w
:HLEVel <NRf> S
:HTIMe <NRf> S
:LLEVel <NRf> S
:LTIMe <NRf> S
:COUNt <NRf> S
:STSWeep S
:STARt <NRf> S
:STOP <NRf> S
:STEP <NRf> S
:STIMe <NRf> S
pecify bias voltage; -1000 to 1000
pecify bias time; 0 to 99999.9
pecify measure voltage; -1000 to 1000
pecify measure time; 0 to 99999.9s
pecify discharge time; 0 to 99999.9s
olume resistivity test path:
pecify pre-discharge time; 0 to 99999.9s
pecify bias voltage; -1000 to 1000
pecify bias time; 0 to 99999.9s
pecify measure voltage; -1000 to 1000
pecify measure time; 0 to 99999.9s
pecify discharge time; 0 to 99999.9s
face insulation resistance test path:
pecify bias voltage; -1000 to 1000
pecify bias time; 0 to 99999.9s
pecify measure voltage; -1000 to 1000
pecify measure time; 0 to 99999.9s
ave sweep test path:
pecify high-level voltage; -1000 to 1000
pecify high-level time; 0 to 99999.9s
pecify low-level voltage; -1000 to 1000
pecify low-level time; 0 to 99999.9s
pecify number cycles
taircase sweep test path:
pecify start voltage; -1000 to 1000
pecify stop voltage; -1000 to 1000
pecify step voltage; -1000 to 1000
pecify step time; 0 to 99999.9s
Status register
The status register structure of the Model 6517B lets you monitor and act upon numerous events
that occur. Many programming decisions can be made by monitoring the measurement event
register and the operation event register. See Section 14 of the User’s Manual for details of the
status registers.
:STATus S
:MEASurement Path for
[:EVENt]? Use
:OPERation Path for
[:EVENt]? Use to
When an event register is read, a decimal value is sent to the computer. The binary equivalent
de
termines which bits in the register are set. For example, a decimal value of 33 indicates that bits
B0 and B5 are set. An event register is cleared when it is read. Sending *CLS clears all event
registers.
TATus subsystem
measurement status registers:
to read the measurement event register
operation status registers:
read the operation event register
5-12 Return to Section Topics 6517B-900-01 Rev. A / Jun 2008
Page 78

Model 6517B Electrometer User’s Manual Section 5: Remote Operation
Test Equipment Depot - 800.517.8431 - 99 Washington Street Melrose, MA 02176
TestEquipmentDepot.com
Some of the more useful bits of these event registers are summarized as follows:
Measurement event register Operation event register
Bit B0 set = reading overflow
Bit B5 set = reading available Bit B10 set = idle
Bit B7 set = buffer available Bit B11 set = sequence test running
Bit B8 set = buffer half full
Bit B9 set = buffer full
Bit B14 set = V-source compliance
Program examples
All examples presume QuickBASIC version 4.5 or higher and a Keithley Instruments KPC-488.2 or
CEC IEEE-488 interface card with CEC driver version 2.11 or higher, with the Model 6517B at
address 27 on the IEEE-488 bus.
Changing function and range
The Model 6517B has independent controls for each of its measurement functions. This means,
for example, that autorange can be turned on for volts while leaving it off for amps.
Another difference is in the r ange command p aramete r. In older instrument s, a single numbe r was
us
ed to denote each range. The parameter of the SCPI RANGe command is given as “the
maximum value to measure.” The instrument interprets this pa rameter and goes to the appropriate
range. When you query the range with RANGe? the instrument sends back the full-scale value of its
present range.
Bit B9 set = calculating
The following example program illus
trates changing function and range. It sets the range for
several functions, then takes readings on each of those functions.
Note that the Model 6517B rounds the range p
arameter to an integer before choosing the
appropriate range. Sending VOLTage:DC:RANGe 20.45 will set the Model 6517B to the 20V
range.
'Example program that demonstrates changing function and range,
'taking readings on various functions
'For QuickBASIC 4.5 and KPC-488.2/CEC interface card
'Edit the following line to where the QuickBASIC
'libraries are on your computer
'$INCLUDE: 'c:\qb45\ieeeqb.bi'
'Initialize the interface as address 21
CALL initialize(21, 0)
'Reset the SENSe1 subsystem settings, along with the trigger
'model, each READ? will cause one trigger
CALL SEND(27, "*rst", status%)
'Set range for each function to measure
CALL SEND(27, "volt:dc:rang 10", status%)
CALL SEND(27, "curr:dc:rang 0.003", status%)
CALL SEND(27, "res:rang 10e6", status%)
'Switch to volts and take reading
CALL SEND(27, "func 'volt:dc';:read?", status%)
reading$ = SPACE$(80)
CALL ENTER(reading$, length%, 27, status%)
6517B-900-01 Rev. A / Jun 2008 Return to Section T o pics 5-13
Page 79

Section 5: Remote Operation Model 6517B Electrometer User’s Manual
Test Equipment Depot - 800.517.8431 - 99 Washington Street Melrose, MA 02176
TestEquipmentDepot.com
PRINT reading$
'Switch to current and take reading
CALL SEND(27, "func 'curr:dc';:read?", status%)
reading$ = SPACE$(80)
CALL ENTER(reading$, length%, 27, status%)
PRINT reading$
'Switch to 2-wire ohms and take reading
CALL SEND(27, "func 'res';:read?", status%)
reading$ = SPACE$(80)
CALL ENTER(reading$, length%, 27, status%)
PRINT reading$
One-shot triggering
Older instruments generally have two types of triggering: one-shot and continuous. In one-shot,
each activation of the selected trigger source causes one reading. In continuous, the instrument is
idle until the trigger source is activated, at which time it begins taking readings at a specified rate.
Typical trigger sources for non-SCPI instruments are:
• IEEE-488 talk
• IEEE-488 Group Execute T
• “X” command
• External trigger (rear panel BNC)
rigger (GET)
Arming the instrument to respond to triggers
is implicit in the non-SCPI instruments. Simply
sending a command to a non-SCPI instrument to change any of the trigger controls causes the
instrument to arm itself for triggers.
The SCPI trigger model implemented in the Model 6517B gives you:
• Explicit control over th
e trigger source (the TRIGger subsystem)
• A two-level control for arming the instrument
• A way to completely disable triggers
Changing any of the settings in the TRIGger subsyste
6517B for triggers.
The following program sets up the Model 6517B to take one reading each time it receives an
ex
ternal trigger pulse.
'Example program that demonstrates one-shot external triggering
'For QuickBASIC 4.5 and KPC-488.2/CEC interface card.
'Edit the following line to where the QuickBASIC
'libraries are on your computer
'$INCLUDE: 'c:\qb45\ieeeqb.bi'
'Initialize the interface as address 21
CALL initialize(21, 0)
'Reset controls in INIT, ARM;LAY1, ARM:LAY2, and TRIG subsystems
'and put trigger model in IDLE state
CALL SEND(27, "*rst", status%)
for triggers
m does not automatically arm the Model
CALL SEND(27, "trig:sour ext;coun inf", status%)
'start everything
CALL SEND(27, "init", status%)
5-14 Return to Section Topics 6517B-900-01 Rev. A / Jun 2008
Page 80

Model 6517B Electrometer User’s Manual Section 5: Remote Operation
Test Equipment Depot - 800.517.8431 - 99 Washington Street Melrose, MA 02176
TestEquipmentDepot.com
After the Model 6517B receives the INITiate command, it stops in the TRIGger layer of the
trigger model, waiting for a pulse on the external trigger jack. Each time a pulse arrives on the
external trigger jack, the Model 6517B takes one readin g. Because TRIGger:COUNt has been set
to INFinity, the trigger model never exits from the TRIGger layer. You can send the ABORt
command to put the trigger model in the idle state, disabling triggers until another INITiate
command is sent.
Continuous triggering #1
The following example program sets up th e Mo del 651 7B to take readings as fast as it can once it
receives an external trigger. The actual reading rate will depend upon other factors, such as A/D
integration time, autorange on/off, and so on.
'Example program to demonstrate continuous triggering
'For QuickBASIC 4.5 and KPC-488.2/CEC interface card
'Edit the following line to where the QuickBASIC
'libraries are on your computer
'$INCLUDE: 'c:\qb45\ieeeqb.bi'
'Initialize the interface as address 21
CALL initialize(21, 0)
'Reset controls in INIT, ARM;LAY1, ARM:LAY2, and TRIG subsystems
'and put trigger model in IDLE state
CALL SEND(27, "*rst", status%)
'*RST sets TRIG:SOUR to IMM
CALL SEND(27, "arm:lay2:sour ext", status%)
CALL SEND(27, "trig:coun inf", status%)
'start everything
CALL SEND(27, "init", status%)
After the Model 6517B receives the INITiate command, it stops in ARM:LAYer2 of the trigger
model, waiting for a pulse on the external trigger jack. After the external trigger signal occurs, the
Model 6517B moves to the TRIGger layer. Since TRIGger:SOURce is set to IMMediate, a
reading is triggered immediately, with a subsequent reading trig gered as soon as th e previous one
is finished.
Continuous triggering #2
The following example program sets up the Model 6517B to take readings continuously after an
external trigger is received. The trigger rate is set to one reading every 50ms.
'Example program to demonstrate continuous triggering
'at a specified rate
'For QuickBASIC 4.5 and KPC-488.2/CEC interface card
'Edit the following line to where the QuickBASIC
'libraries are on your computer
'$INCLUDE: 'c:\qb45\ieeeqb.bi'
'Initialize the interface as address 21
CALL initialize(21, 0)
'Reset controls in INIT, ARM;LAY1, ARM:LAY2, and TRIG subsystems
'and put trigger model in IDLE state
CALL SEND(27, "*rst", status%)
6517B-900-01 Rev. A / Jun 2008 Return to Section T o pics 5-15
Page 81

Section 5: Remote Operation Model 6517B Electrometer User’s Manual
Test Equipment Depot - 800.517.8431 - 99 Washington Street Melrose, MA 02176
TestEquipmentDepot.com
'*RST sets TRIG:SOUR to IMM
CALL SEND(27, "arm:lay2:sour ext", status%)
CALL SEND(27, "trig:coun inf;sour tim;tim .05", status%)
'start everything
CALL SEND(27, "init", status%)
After the Model 6517B receives the INITiate command, it stops in ARM:LAYer2 of the trigger
model, waiting for a pulse on the external trigger jack. After the external trigger signal occurs, the
Model 6517B moves to the TRIGger layer. Since TRIGger:SOURce is set to TIMer, a reading is
triggered immediately, with a subsequent reading every 50ms. Because TRIGger:COUNt has
been set to infinity, the trigger model never exits from the TRIGger layer.
Generating SRQ on buffer full
When your program must wait until the Model 6517B has completed an operation, it is more
efficient to program the Model 6517B to assert the IEEE-488 SRQ line when it is finished, rather
than repeatedly serial polling the instrument. An IEEE-488 controller will typically address, then
unaddress the instrument to talk each time it performs a serial poll. Repeated polling of the Model
6517B will generally reduce its overall reading throughput. Therefore, use the srq%() function
call.
The Model 6517B provides a status bit for near
ly every operation it performs. It can be
programmed to assert the IEEE-488 SRQ line whenever a status bit becomes true or false. The
IEEE-488 controller (your computer) can examine the state of the SRQ line without performing a
serial poll, thereby detecting when the 6517B has completed its task without interrupting it in the
process.
The following example program segment sets up the Model 6517B to assert SRQ when the
eading buffer has completely filled, then arms the reading buffer, initiates readings, and waits for
r
the Model 6517B to indicate that the buffer is full.
This is not a complete program. Not shown are th
e commands to configure the trigger model and
the reading buffer (see the next example). The example shown here can be modified for any event
in the Model 6517B status reporting system.
'Reset STATus subsystem (not affected by *RST)
CALL SEND(27, "stat:pres;*cls", status%)
CALL SEND(27, "stat:meas:enab 512", status%)
'Enable BFL
CALL SEND(27, "*sre 1", status%)'enable MSB
CALL SEND(27, "trac:feed:cont next", status%)
'Start everything
CALL SEND(27, "init", status%)
WaitSRQ:
IF (NOT(srq%)) THEN GOTO WaitSRQ
CALL SPOLL(27, poll%, status%)
IF (poll% AND 64)=0 THEN GOTO WaitSRQ
Notice that after the program has detected an asserted SRQ line, it serial polls the Model 6517B to
determine if it is the device requesting service. This is necessary for two reasons:
• Serial polling the Model 6517B causes it to quit asserting the SRQ line
• In test systems that have more than one IEEE-488 instrument programmed to
your program must determine which instrument is actually requesting service
5-16 Return to Section Topics 6517B-900-01 Rev. A / Jun 2008
assert SRQ,
Page 82

Model 6517B Electrometer User’s Manual Section 5: Remote Operation
Test Equipment Depot - 800.517.8431 - 99 Washington Street Melrose, MA 02176
TestEquipmentDepot.com
Once an event register has caused a service request, it cannot cause another service request until
you clear it by reading it (in this case using STATus:MEASurement[:EVENt]?) or by sending the
*CLS command.
Storing readings in the buffer
The reading buffer in the Model 6517B is flexible and capable. It has three controls, which are
found in the TRACe subsystem. There are command s to cont ro l:
• The size of the buffer (in readings):
TRACe:POINts <NRf>
• Whether or not extra data is stored with each reading (for example, channel number, timestamp); storing extra data reduces the maximum size of the buffer:
TRACe:ELEMents <name> Specify additional reading ele m en ts; TSTamp,
HUMidity, CHANnel, ETEMperature, VSOurce,
or NONE
• Select buffer control mode:
TRACe:FEED:CONTrol NEVer Immediately stop storing readings
TRACe:FEED:CONTrol NEXT Start now, stop when buffer is full
TRACe:FEED:CONTrol ALWays Start now, never stop
TRACe:FEED:CONTrol PRETrigger Start now, stop when pretrigger is satisfied
The following example program sets up the Model 6517B to take 20 readings as fast as it can into
the buf
fer, then reads the data back after the buffer has filled. The readings will be stored with the
timestamp and other information, but the program reads back only the reading values and
timestamp.
'Example program to demonstrate the reading buffer
'For QuickBASIC 4.5 and KPC-488.2/CEC interface card
'Edit the following line to where the QuickBASIC
'libraries are on your computer
'$INCLUDE: 'c:\qb45\ieeeqb.bi'
'Initialize the interface as address 21
CALL initialize(21, 0)
'Reset controls in INIT, ARM;LAY1, ARM:LAY2, and TRIG subsystems
'and put trigger model in IDLE state
CALL SEND(27, "*rst", status%)
'Reset STATus subsystem (not affected by *RST)
CALL SEND(27, "stat:pres;*cls", status%)
CALL SEND(27, "stat:meas:enab 512", status%)'enable BFL
CALL SEND(27, "*sre 1", status%)'enable MSB
CALL SEND(27, "trig:coun 20", status%)
'TRACe subsystem is not affected by *RST
CALL SEND(27, "trac:poin 20;elem none", status%)
CALL SEND(27, "trac:feed:cont next", status%)
'Start everything
CALL SEND(27, "init", status%)
'Initialize reading$ while the 6517B is busy taking readings
reading$ = SPACE$(4000)
WaitSRQ:
6517B-900-01 Rev. A / Jun 2008 Return to Section T o pics 5-17
Page 83

Section 5: Remote Operation Model 6517B Electrometer User’s Manual
Test Equipment Depot - 800.517.8431 - 99 Washington Street Melrose, MA 02176
TestEquipmentDepot.com
IF (NOT(srq%) THEN GOTO WaitSRQ
CALL SPOLL(27, poll%, status%)
IF (poll% AND 64)=0 THEN GOTO WaitSRQ
CALL SEND(27, "trac:data?", status%)
CALL ENTER(reading$, length%, 27, status%)
PRINT reading$
T aking readings with the scanner card
The Model 6521 and Model 6522 are optional 10-channel scanner cards for the Model 6517B.
Only one channel can be closed at a time. If you close a channel while another is already closed,
the first one opens with break-before-make operation.
You can use the scanner card two ways. One is to issue a command to close a particular channel
efore sending other commands to take readings. The other way is to program the scan list, and
b
let the meter take care of closing a channel before taking a reading.
The following example program measures voltage on chan nel 1, amps on channel 2, and
esistance on channel 3, using the ROUTe:CLOSe command.
r
'Example program to demonstrate taking readings on different
'scanner channels
'For QuickBASIC 4.5 and KPC-488.2/CEC interface card
'Edit the following line to where the QuickBASIC
'libraries are on your computer
'$INCLUDE: 'c:\qb45\ieeeqb.bi'
'Initialize the interface as address 21
CALL initialize(21, 0)
'Reset controls in INIT, ARM;LAY1, ARM:LAY2, and TRIG subsystems
'and put trigger model in IDLE state, set function to volts
CALL SEND(27, "*rst", status%)
'Close channel 1, take voltage reading
CALL SEND(27, "rout:clos (@1);:read?", status%)
reading$ = SPACE$(80)
CALL ENTER(reading$, length%, 27, status%)
PRINT reading$
'Close channel 2, take current reading
CALL SEND(27, "func 'curr:dc'", status%)
CALL SEND(27, "rout:clos (@2);:read?", status%)
reading$ = SPACE$(80)
CALL ENTER(reading$, length%, 27, status%)
PRINT reading$
'Close channel 3, take ohms reading
CALL SEND(27, "func 'res'", status%)
CALL SEND(27, "rout:clos (@3);:read?", status%)
reading$ = SPACE$(80)
CALL ENTER(reading$, length%, 27, status%)
PRINT reading$
The following example program sets up the Model 6517B u sing a scan list to measure DC volt age
on channels 1, 2, and 3. The meter takes ten sets of readings, with each set spaced 15 seconds
apart, and each of the three readings in each group taken as fast as possible. The Model 6517B
5-18 Return to Section Topics 6517B-900-01 Rev. A / Jun 2008
Page 84

Model 6517B Electrometer User’s Manual Section 5: Remote Operation
Test Equipment Depot - 800.517.8431 - 99 Washington Street Melrose, MA 02176
TestEquipmentDepot.com
stores the readings in the buffer, and asserts SRQ when the buffer is full. The program waits for
the SRQ, then reads the readings from the buffer.
'Example program to demonstrate using the scan list
'For QuickBASIC 4.5 and KPC-488.2/CEC interface card
'Edit the following line to where the QuickBASIC
'libraries are on your computer
'$INCLUDE: 'c:\qb45\ieeeqb.bi'
'Initialize the interface as address 21
CALL initialize(21, 0)
'Reset controls in INIT, ARM;LAY1, ARM:LAY2, and TRIG subsystems
'and put trigger model in IDLE state, set function to DCV
CALL SEND(27, "*rst", status%)
'Reset STATus subsystem (not affected by *RST)
CALL SEND(27, "stat:pres;*cls", status%)
CALL SEND(27, "stat:meas:enab 512", status%) 'enable BFL
CALL SEND(27, "*sre 1", status%) 'enable MSB
'*RST sets TRIG:SOUR to IMM
CALL SEND(27, "trig:coun 3", status%)
CALL SEND(27, "arm:lay2:sour tim;tim 15", status%)
CALL SEND(27, "arm:lay2:coun 10", status%)
'TRACe subsystem is not affected by *RST
CALL SEND(27, "trac:poin 30;elem none", status%)
CALL SEND(27, "trac:feed sens1;feed:coun next", status%)
' now the buffer is armed
CALL SEND(27, "rout:scan (@1:3)", status%)
CALL SEND(27, "rout:lsel init", status%)
'Start everything
CALL SEND(27, "init", status%)
'Initialize reading$ while the 6517B is busy taking readings
reading$ = SPACE$(2500)
WaitSRQ:
IF (NOT(srq%()) THEN GOTO WaitSRQ
CALL SPOLL(27, poll%, status%)
IF (poll% AND 64)=0 THEN GOTO WaitSRQ
CALL SEND(27, "form:elem read,time,chan", status%)
CALL SEND(27, "trac:data?, status%)
CALL ENTER(reading$, length%, 27, status%)
PRINT reading$
T est sequence: St aircase sweep
The following program performs a staircase sweep. Using the source voltage measure current
(FVMI) method, this test will measure the current through a DUT at eleven voltage steps (0V
through 10V) (see Figure 4-3). The eleven readings are stored in the buffer and displayed on the
computer CRT at the conclusion
'Quick Basic 4.5, KPC-488.2/CEC card
6517B-900-01 Rev. A / Jun 2008 Return to Section T o pics 5-19
of the test.
Page 85

Section 5: Remote Operation Model 6517B Electrometer User’s Manual
Test Equipment Depot - 800.517.8431 - 99 Washington Street Melrose, MA 02176
TestEquipmentDepot.com
'
'$INCLUDE: 'ieeeqb.bi'
CALL initialize(21, 0)
CLS
CALL send(27, "*rst", status%)
CALL send(27, "*CLS", status%)
CALL spoll(27, KIspoll%, status%)
'Configure status model to SRQ on Buffer Full:
CALL send(27, "stat:meas:enab 512", status%)
CALL SEND(27, "*sre 1", status%)
'Select autoranging amps:
CALL send(27, ":SENS:FUNC 'CURR'", status%)
CALL send(27, ":SENS:CURR:RANG:AUTO ON", status%)
'Configure Staircase Sweep from 0V to 10V in 1V steps:
CALL send(27, ":TSEQ:TYPE STSW", status%)
CALL send(27, ":TSEQ:STSW:STAR 0", status%)
CALL send(27, ":TSEQ:STSW:STOP 10", status%)
CALL send(27, ":TSEQ:STSW:STEP 1", status%)
CALL send(27, ":TSEQ:STSW:STIM 0.3", status%)
CALL send(27, ":TSEQ:TSO imm", status%)
'Wait for commands to complete processing:
DATA1$ = SPACE$(600)
CALL send(27, "*OPC?", status%)
CALL enter(DATA1$, length%, 27, status%)
' Start Test Sequence:
CALL send(27, ":TSEQ:ARM", status%)
'Wait for SRQ (buffer full):
WaitSRQ
IF (NOT (srq%)) THEN GOTO WaitSRQ
CALL spoll(27, poll%, status%)
If (poll% AND 64) = 0 THEN GOTO WaitSRQ
'Dump buffer readings to computer CRT:
CALL send(27, ":TRACE:DATA?", status%)
CALL enter(DATA1$, length%, 27, status%)
A = 1
FOR I = 1 TO 11
r$ = MID$(DATA!$, A, 13)
PRINT r$
A = A + 14
NEXT I
END
5-20 Return to Section Topics 6517B-900-01 Rev. A / Jun 2008
Page 86

Index
Test Equipment Depot - 800.517.8431 - 99 Washington Street Melrose, MA 02176
TestEquipmentDepot.com
A
Accessories ..............................................1-3
Addenda, manual
Additional math operations
Amps Rel
Annunciators
Auto discharge
Auto V-source
.....................................1-3
.....................4-18
..................................................3-6
............................................2-2
.......................................3-10
...........................................3-6
B
Basic operation .........................................4-9
Buffer (Data Store)
.................................4-15
C
Cables and adapters ................................1-3
Capabilities
Changing function and range
Changing functions
Charge measurements
Close/Open channels
Common commands
Configure external channels
Configure internal scanner
Configure resolution
Configuring filters
Configuring rel
Configuring speed
Configuring V-Source
Connections
Connectors
Continuous triggering #1
Continuous triggering #2
Control sources
Counters
Current measurements
...............................................1-2
.................5-13
...................................3-2
.............................3-9
.............................4-22
................................5-5
...................4-23
.....................4-21
...............................4-13
...................................4-15
........................................4-10
..................................4-13
...............................4-9
........................ 3-10, 4-7, 4-20
2V Analog Output
Chassis Ground
Common
Digital I/O
Guard
Humidity
IEEE-488
Input
Interlock
Preamp Out
RS-232
Temp Type K
Trig Link
V-Source HI and LO
...........................................2-5
...............................................2-5
...........................................2-5
.................................................2-4
............................................2-5
.............................................2-5
...........................................2-5
.............................2-5
...............................2-5
.........................................2-5
..........................................2-5
......................................2-4
....................................2-5
.........................2-5
........................5-15
........................5-15
......................................4-12
.................................................4-12
.............................3-4
D
Data store (Buffer) .................................5-10
Default nodes
Defaults
Bench
Function settings
Restoring
Device action
Display
Secondary
Display reading options
........................................... 5-7
.................................................... 5-8
............................................... 2-7
.............................. 2-7
......................................... 2-7
.........................................4-12
..................................................... 2-6
........................................ 2-7
.......................... 3-12
E
External scanning ..................................4-22
F
Features ................................................... 1-2
Filter
....................................................... 4-13
Configuring
Median
Modes
Types
Fresh readings
Front panel summary
Function configuration
.................................... 4-15
........................................... 4-14
............................................ 4-14
............................................. 4-14
......................................... 5-8
............................... 2-2
.............................. 5-9
G
Generating SRQ on buffer full ................ 5-16
Guarding
.................................................. 3-3
H
Handle ..................................................... 2-3
Handling precautions
Humidity measurements
............................... 1-5
........................ 3-10
I
Idle ......................................................... 4-11
IEEE-488 Bus
Address selection
IEEE-488 bus
Connections
Language selection
Standards
IEEE-488 bus standards
Inspection
Instruction manual
Internal scanning
................................................ 1-5
............................ 5-3
.....................................5-2
.......................... 5-3
........................................ 5-2
.......................... 5-2
.................................... 1-5
.................................... 4-21
6517B-900-01 Rev. A / Jun 2008 I-1
K
Keys
Page 87

Index Model 6517B Electrometer User’s Manual
Test Equipment Depot - 800.517.8431 - 99 Washington Street Melrose, MA 02176
TestEquipmentDepot.com
Display ..............................................2-3
Function
Operation
Range
Voltage source
............................................2-3
..........................................2-3
...............................................2-3
.................................2-3
L
LabView driver ..........................................5-2
Line power connection
Line voltage
Input module
..............................2-6
.....................................2-5
M
Manual addenda .......................................1-3
........................................................4-16
Math
Enabling
Selecting and configuring
Measurement control
Median filter
Menus
Navigating
Multiple displays
.........................................4-18
...............4-17
..............................3-11
............................................4-14
.......................................................4-5
........................................4-6
............................ 4-3, 4-24
N
Navigating menus .....................................4-6
O
One-shot triggering .................................5-14
Open/close channels and scan
Option slot
Options
Output trigger
Overview
................................................2-5
............................................ 1-3, 1-5
..........................................4-12
...................................................5-2
..............5-10
P
Perform the scan ......................... 4-21, 4-23
Phone number
Power switch
Power-up
Probes
Program examples
................................. 1-2, 1-6
............................................2-2
..................................................2-6
......................................................1-4
.................................5-13
Q
Query commands .....................................5-7
R
Rack mount kits ........................................1-4
Rear panel summary
.....................................................4-9
Relative
Remote interfaces
Repacking for shipment
Resistance measurements
Resistivity measurements
Resolution
RS-232 interface
Running a test
...............................................4-13
Configuration
Connections
Selection
Standard
................................2-4
....................................5-2
............................1-6
.......................3-4
.........................3-7
.......................................5-3
....................................5-4
.....................................5-4
...........................................5-4
...........................................5-3
........................................4-21
S
Safety symbols and terms ........................ 1-5
Scanner cards
SCPI commands
Default nodes
Long and short form
Queries
Syntax
Tree structure
SCPI signal oriented commands
SCPI subsystem commands
Selecting and configuring a test sequence
Service form
Software
Software support
Speed
Status register
Storing readings
Storing readings in buffer
..........................................1-4
...................................... 5-5
...................................5-7
.........................5-6
............................................5-7
......................................5-6, 5-7
...................................5-6
.............. 5-8
....................5-8
.............................................1-6
...................................................1-4
......................................5-2
..................................................... 4-13
........................................5-12
.....................................4-15
.......................5-17
T
Taking readings with the scanner card ..5-18
Temperature measurements
Temperature units
Test fixture
Test Sequence — staircase sweep
Test sequences
Trigger connections
Trigger model
Triggering
Bench default setup
Control sources
Counters
Device action
.................................................4-11
Idle
Output trigger
..................................3-11
...............................................1-4
............................4-19, 5-11
................................4-23
.........................................5-11
...............................................4-10
........................................4-12
.................................4-12
.................................4-12
.................. 3-10
.......................4-12
..............................4-12
U
Unpacking ................................................ 1-5
V
Voltage measurements ............................ 3-2
Voltage source
Basic operation
Configuring
Connections
V-Source
......................................... 4-7
................................4-9
.......................................4-9
.....................................4-7
................................................ 5-10
Z
Zero check .............................................4-10
Zero correct
............................................ 4-10
4-19
........5-19
I-2 6517B-900-01 Rev. A / Jun 2008
Page 88

Service Form
Test Equipment Depot - 800.517.8431 - 99 Washington Street Melrose, MA 02176
TestEquipmentDepot.com
Model No. Serial No. Date
Name and Telephone No.
Company
List all control settings, describe problem and check boxes that apply to problem.
o Intermittent o Analog output follows display o Particular range or function bad; specify
o IEEE failure o Obvious problem on power-up o Batteries and fuses are OK
o Front panel operational o All ranges or functions are bad o Checked all cables
Display or output (check one)
o Drifts o Unable to zero
o Unstable o Will not read applied input
o Overload
o Calibration only o Certificate of calibration required
o Data required
(attach any additional sheets as necessary)
Show a block diagram of your measurement system
or not). Also, describe signal source.
including all instruments connected (whether power is turned on
Where is the measurement being performed? (factory
What power line voltage is used? Ambient temperature?°F
Relative humidity? Other?
Any additional information. (If special modifications have
Be sure to include your name and phone number on this service form.
, controlled laboratory, out-of-doors, etc.)
been made by the user, please describe.)
12/06
Page 89

Test Equipment Depot - 800.517.8431 - 99 Washington Street Melrose, MA 02176
TestEquipmentDepot.com
Page 90

12/06
Test Equipment Depot - 800.517.8431 - 99 Washington Street Melrose, MA 02176
TestEquipmentDepot.com
 Loading...