


®
SAFE & EASY
FILTER
OWNERS MANUAL
037402
This Owner’s Guide provides specific operating instructions for your model.
Use the Safe & Easy Filter only as instructed in this Service Guide.
Versión en español
Si desea obtener una copia en español de este Manual de el Usuario,
sirvase escribir a la dirección que se incluye a continuación.
1-800-KEATING
www.keatingofchicago.com

READ AND SAVE THIS MANUAL FOR FUTURE REFERENCE
Record the Model No. and Serial No. (located on the back of the motor housing) of this
Safe & Easy Filter in the space provided below.
Serial No. ____________________________________________________________
Model No. ____________________________________________________________
Keep these numbers for future reference
IMPORTANT: Keep a copy of your bill of sale. The date on the bill establishes the warranty period
should service be required. If service is performed, it is in your interest to obtain and keep all
receipts. Keating commercial fryers are intended for other than household use.
CONTENTS
SECTION A - Preparing the Filter Drawer
Removing the Filter ..................................................1
Installing Components ..............................................1
Connecting the Tub ..................................................1
Connecting the Filter Assembley ..........................1-2
SECTION B - Preparing the Oil for Filtration
Oil Temperature ........................................................2
Removing the Screen................................................3
SECTION C - Filtration
Draining Oil ..............................................................2
Returning the Oil ....................................................2-3
Rinsing the Fryer....................................................2-3
SECTION D - Clean Up
Instructions ................................................................3
Drain Valve Handle Placement ................................3
SECTION E - Discarding the Oil
Preparing the Filter....................................................3
:
Connecting the Discard Hose ................................3-4
Instructions ................................................................4
Filter Side View ........................................................4
SECTION F - Quick Hits
Do’s & Don’ts ............................................................4
SECTION G
Parts List ..................................................................5
SECTION H - Self Help Guide
Problem/Solutions ..................................................6-7
Preventative Maintenance ........................................7
SECTION I
Wiring Diagram ........................................................8
SECTION J
Warranty Information ................................................9
This Owner
’s Guide provides specific operating instructions for your model. Use the Safe & Easy
Filter only as instructed in this Service Guide.
SAFE & EASY®FILTER
OPERATING INSTRUCTIONS
A. PREPARING THE FILTER-DRAWER
CAUTION
WATER IN ANY FORM & HOT OIL DON'T MIX!
NOTE: Operator should be outfitted with proper
protective attire: safety goggles, oil and heat
resistant gloves, apron and footwear
Filter assembly inside of cabinet:
1. Pull the handle marked “Pull to Release Filter”
(top of filter panel).
2. Remove the entire assembly from the cabinet by rolling it
forward.
3. Pull the handle marked “Pull to Release Tub”
(bottom of panel)
4. Slide the tub back, lift up and remove from cart.
Ensure all component
5.
(NOTE: Filter tub and components are dishwasher safe).
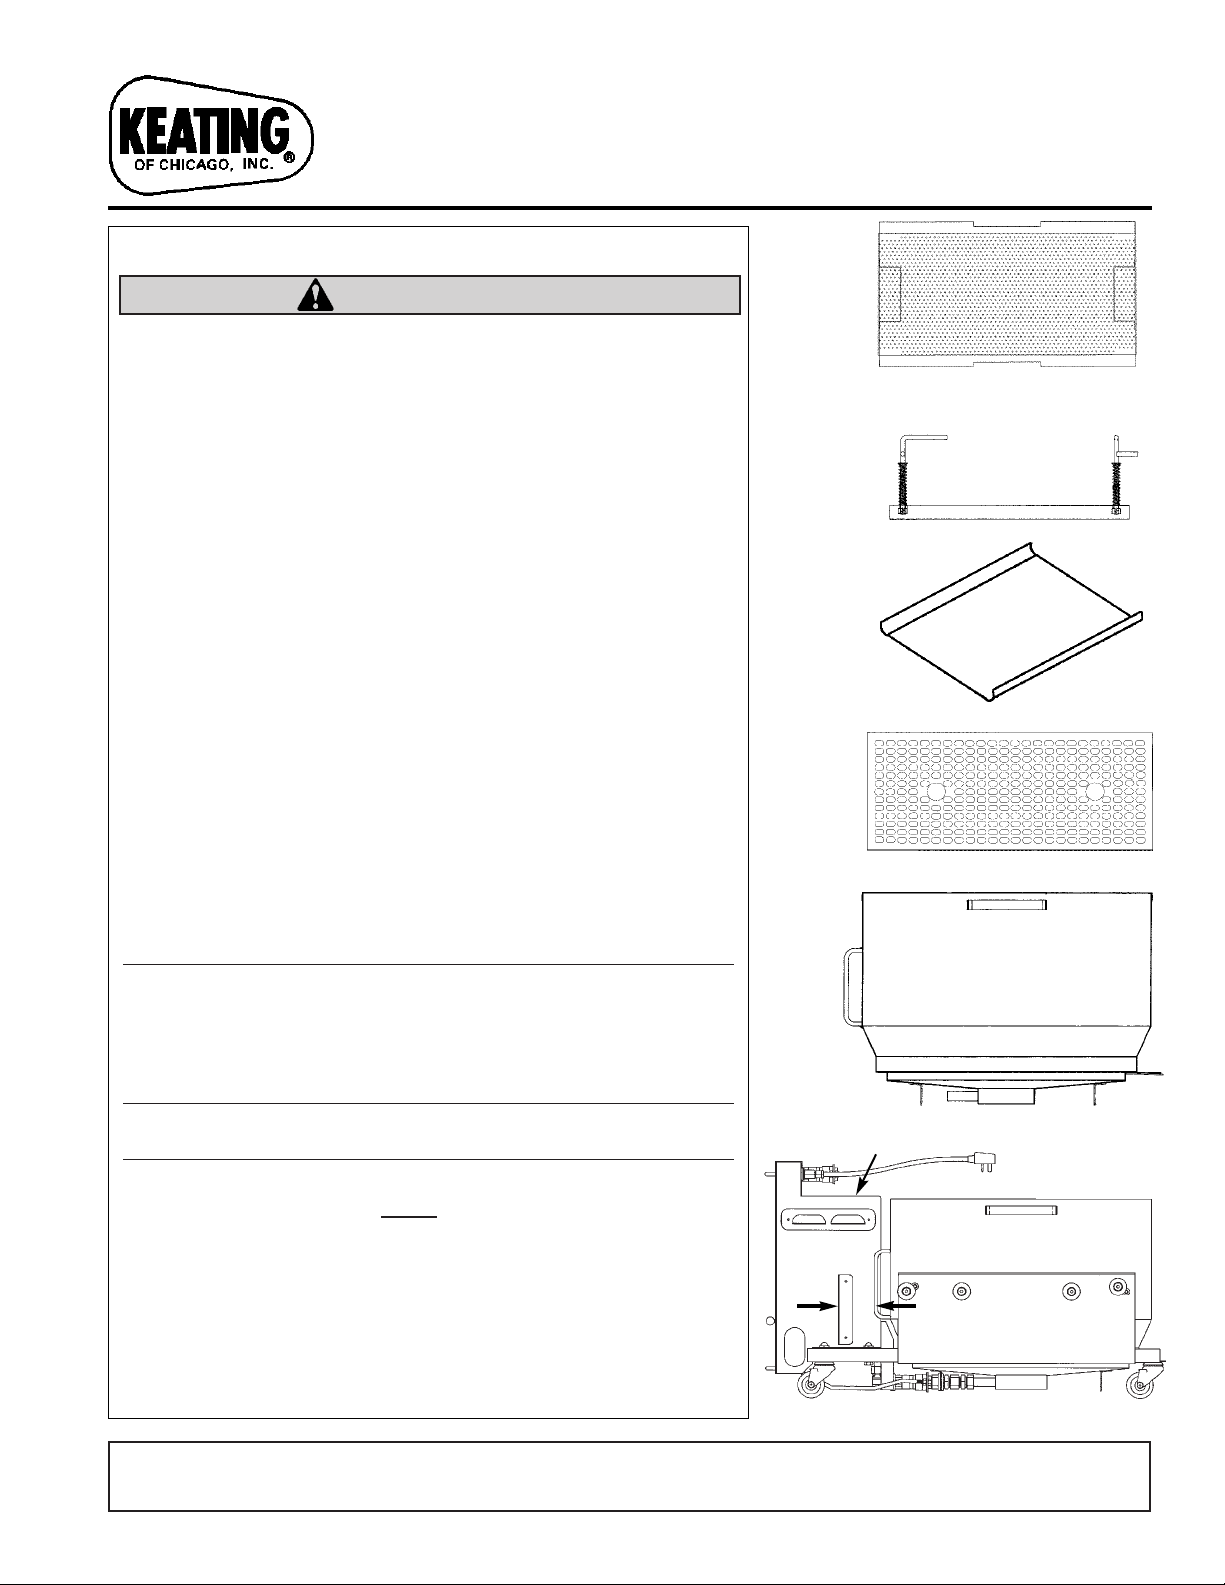
Install components into tub as follows:
6.
a. Sump screen
b. Filter p
aper
c. Hold down ring (Note 1)
d. Acidox (1 package per 40lbs oil) (Note 2)
e. Crumb basket
NOTE 1: Hold down ring makes a gasket-like seal on filter
paper. Filter paper must be placed edge to edge from front to
back, overlapping on sides. Filter Paper must be smooth and
flat under hold down ring to get a proper seal. Lock the two
tension arms into place by pushing down and rot
NOTE 2: One p
ackage of
pounds of oil.
Place entire tub assembly onto the cart (NOTE: Ensure
7.
the lip on the tub goes
Reconnect the tub to the motor by pulling together the
8.
handles on the front of the tub and the handles on the
side of the motor housing.
NOTE: Push on the front of the tub to verify connection. If tub
moves, repeat step
s 7-8.
s are clean
See Figure 1
ating 90°.
Acidox is needed for every 40
under
the cart frame in the rear).
See Figure 2
CRUMB
BASKET
HOLD
DOWN RING
FILTER
PAPER
SUMP
SCREEN
FILTER
TUB
Motor Housing
Pull handles
to connect
tub to
pump
SPRINKLE ACIDOX EVENLY ON PAPER
FIGURE 1.
FIGURE 2.
KEEP THIS MANUAL FOR TRAINING NEW PERSONNEL
– 1–
9. Sprinkle Keating Acidox Powder evenly over the paper.
1
0. Replace crumb basket and push drawer fully into cabinet.
Ensure the connection on top of the housing mates with the
connection inside the cabinet.
Pull the front of the filter system lightly to verify proper
connection
NOTE: Cabinet door should be closed during filtration.
NOTE: For best results, new filter paper and Acidox Powder
must be used for each fryer.
B. PREPARING OIL FOR FILTRATION
NOTE: Oil in fryer must be between 250° - 350°F.
1. Turn fryer completely off.
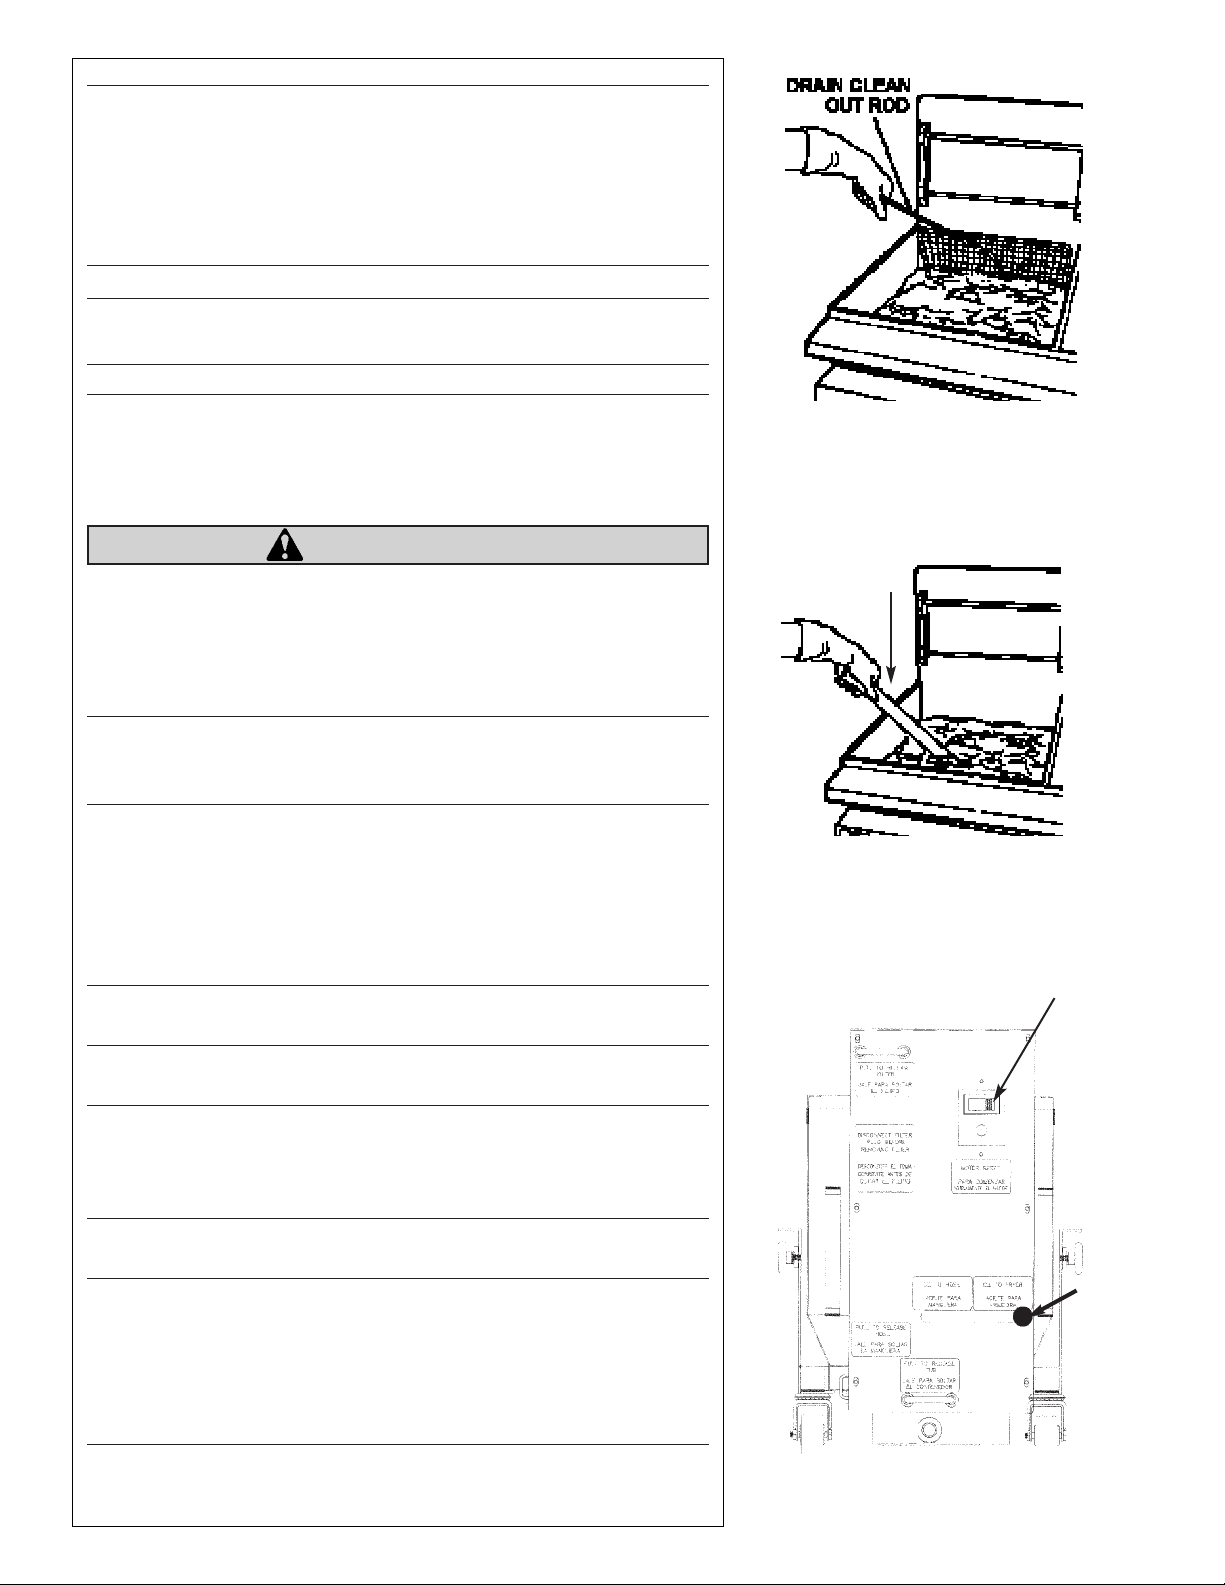
2. Remove screen from over tubes/element with tongs or a
Drain Clean Out Rod. Refer to Figure 3.
CAUTION
Screen over tubes will be very hot and should be moved to
a safe place.
3. Use spoon provided to stir oil. Bubbling will occur until all
water is removed. Failure to do so will clog the filter paper.
Refer to Figure 4.
NOTE: W
water is not removed, the filter paper absorbs the water
preventing the oil from passing through it.
C. FILTRATION
1. On filter assembly, have handle with the black knob set to
2.
NOTE: A Drain Clean Out Rod may be needed to loosen any
solid residue. Use it only when valve is fully open.
3. Wipe crumbs from splashdeck while fryer is empty. Plug
NOTE: On units with more than one fryer or a separate cabinet
for the filter system, you must open the return valve handle
(small black knob next to drain handle) by pulling it forward. This
will allow the oil to pump into the correct fryer.
4. On the filter panel, turn the pump switch to the “ON” position.
NOTE: If oil does not return to fryer, check the following:
5. Let the pump run with drain valve open to remove crumbs
ater settles in the cooler oil in the Cold Zone. If the
oil to fryer. Refer to Figure 5.
Open the drain valve slowly by lifting and then pulling the
drain valve handle and drain fryer (handle with largest black
knob).
the filter unit into the outlet.
The green light will illuminate. Refer to Figure 5.
1. Filter tub setup (See Fig. 1)
2. Tub to motor connection (See Fig. 2)
3. Water may have clogged the p
aper (See Fig. 4)
4. Return valve for units with more than one fryer or
separate filter cabinet is not opened.
and residue from the bottom of fryer and the drain lines.
FIGURE 3.
REMOVE SCREEN OVER
TUBES/ELEMENTS
SPOON
FIGURE 4.
STIR WITH SPOON PROVIDED TO
REMOVE WATER
ON/OFF
Switch
Knob must
be in this
position
when hose
is not used
FIGURE 5.
FRONT VIEW OF FILTER
– 2–

F
ailure to do so may cause the drain lines to clog up.
NOTE: If the pump shuts down, turn it off and let the motor cool.
P
ush the motor reset button located on the filter panel. Check
filtering procedure or clean tub and paper if needed.
6. Let swirling action rinse down fryer.
7. Fully drain fryer.
NOTE: Pump should be run for at least 30 seconds after
crumbs are removed from fryer. This will help prevent blockage
in the drain lines.
8. Close drain valve by pushing in the large black knob and
locking it into place and completely refill fryer. Refer to
Figure 6.
NOTE: The drain valve handle controls fryer’s Main Power
Switch. If drain valve is not fully closed and locked, fryer
will not operate. See Figure 6.
9. Turn pump switch to the “OFF” position. Close return valve
by pushing in the small black knob completely, after turning
OFF the pump switch (for units with more than one fryer or
central filter). See Figure 7.
D. CLEAN UP
FIGURE 6.
WARNING
Filter drawer and pipes will remain hot following filtration.
Allow the unit to cool down before clean up. Failure to do
so may result in serious injury to the operator.
See 1-4 on page 1.
Remove crumb basket.
5.
6. Push down on the 2 tension arms on the hold down ring,
rotate 90°, and remove.
7. Remove the used filter paper and discard.
8. Remove sump screen.
Throughly clean the entire filter tub and all components.
9.
NOTE: Tub and components are diswasher safe.
10. Prepare drawer for next use (see section A “Preparing the
Filter Drawer”).
NOTE: Instructions for cleaning the fryer are in the Operating
Section of the Fryer Service Manual.
E. DISCARDING THE OIL
NOTE:
be used to discard the oil ONLY. DO NOT use the filter
assembly to transport hot oil. DO NOT remove filter tub
containing hot oil!
1. Prepare the filter drawer (see section A).
NOTE: Acidox is
2. Prepare the oil (see section B).
3. Connect the hose to the right side of the filter assembly in
The 6 foot hose provided with the filters should
not needed when discarding the oil.
the front. See Figure 8.
Return valve (small
black knob) must
be pulled to open
when filtering and
pushed closed
when complete.
BATTERY OF 2 FRYERS WITH SAFE & EASY
FILTER. NOTE: ONLY 1 FRYER CAN BE
FIGURE 7.
TERED AT A TIME
FIL
– 3–

4. Push the small black knob on the filter panel to the left
(“Oil to Hose”).
5
. Place the nozzle of the hose in an approved discard
container.
6. Drain the oil.
7. Plug the filter into the receptacle.
8. Turn the motor switch ON (the green light will illuminate).
CAUTION
A KEATING FRYER OR FILTER SHOULD BE DRAINED
ONLY UNDER THE SUPERVISION OF PROPERLY
TRAINED PERSONNEL. WHEN DISCARDING OIL, A
COVERED RECEPTACLE APPROVED FOR USE WITH
HOT OIL SHOULD BE USED. USE OF A NON-APPROVED
RECEPTACLE OR METHOD OF DRAINING THE OIL
COULD JEOPARDIZE THE SAFETY OF THE OPERATOR.
NOTE: Keep the pump turned “ON” until bubbles occur
in the discard receptacle. Allow the pump to run an
additional 15 seconds to clear all pipes.
9. Turn the motor switch “OFF”.
Push the small black knob on the filter p
10.
right (“Oil to Fryer”).
11. Close drain valve of the fryer (large black knob).
Hose can be removed by pulling the handle on the left
12.
of the motor housing.
13. Prepare filter tub for next useage (see section A).
Clean excess oil from wand and quick disconnect on the
14.
hose.
anel to the
CAUTION
To avoid damaging the fryer, do not power wash, spray
or hose it down while cleaning it.
Pump must be primed with oil after boil-out with water.
Failure to lubricate pump may cause severe damage to Filter
System and void the warranty
.
Connect hose here to discard oil
FIGURE 8.
CAUTION
HOT FLU ID. DO NOT FILL
BEYOND MAXIMUM FILL LINE
LOCATED IN TH E FRYER VESSEL.
Do’s
1. Read and follow the filtering procedure.
Always verify
2.
when filtering.
• Quick disconnect under the tub to the
motor housing.
• Quick disconnect on top of the motor
housing to the fryer or central filter quick
disconnect.
3. Stir the oil completely before draining.
4. Place the sump screen under
5. Change the filter paper for each
2
connections are engaged
the filter paper.
fryer filtered.
Quick Hits
s
Don’t
1. Run water through the pump.
Filter oil without wearing the proper attire.
2.
Filter cold oil (must be between 250°- 350°).
3.
4. Use the 6 foot hose to clean the fry tank (hose
should only
5. Powerwash, spray, or hose down the motor
housing area, as electrical components are
present.
– 4–
be used to discard the oil).

SAFE & EASY®FILTER PARTS LIST
Front View
Motor & Pump Assembly
4
Motor & Pump Assembly
14
15
16
17
055173
OR
5A
6
Front View
052982
Description Part No.
1. Quick Connect Coupler 052573
ompression Fitting Straight
C
Female 011087
2. Caster Swivel 2" 054919
3
/8-16 Acorn Nut 011763
12
3
/8 Split Lockwasher 009085
3. Quick Connect Nipple Male 052572
4. Motor & Pump 052982
4A. Motor & Pump 055173
11
5. Three Way Valve 030792
5A. Valve Handle 053233
6. Knob Black 031532
10
7. Filter Tub Only 14" 053444
18" 053172
20" 053123
9
24" 054173
8. Sump Screen 14" 059279
18" 053195
20" 053128
24" 054331
9. Filter Paper SE 14" 058779
8
18" 058780
20" 058780
24" 058781
5
10. Hold Down Ring 14" 052227
18" 053200
20" 053133
24" 054315
11. Hold Down Ring Handle 052817
7
Spring 006656
Collar 000512
12. Crumb Basket 14" 052662
053197
053130
21
18"
20"
24" 054313
13. Hose Assembly 6' 054031
14. Quick Connect Handle 052647
15. ON/OFF switch (Not Shown) 015119
16. Quick Connect Handle to Hose
(Not Shown)
3
20
Acorn Nut 015159
053438
17. Quick Connect Handle 052613
For Replacement Tubing, please
18.
19
call Keating
19. Roller 000520
18
20.
Fitting
Fitting
5
/8
1
/2 ×3/8 HEX 013743
CC ×
1
/2
FPT
01
1837
21. Power Cord 055240
2
1
Recept
acle
055227
13
– 5–

Self-Help Guide
PROBLEM PROBABLE SOLUTION
CAUSE (Follow Sequentially)
Motor runs but will not
pump oil.
Tub not set up properly.
Tub not connected to the motor
housing properly
Place components in tub per the following:
1. Sump screen on the very bottom
. Filter paper over sump screen (Lie it flat
2
on the bottom, creasing the sides).
3. Hold down ring (ensure paper is not
folded, lock hold down ring into place
ensuring a tight seal).
4. Sprinkle Acidox powder evenly over filter
paper (1bag per 40 lbs. of oil).
5. Crumb basket for large debris.
1. Remove tub from the filter cart
completely by pulling the release handle
located on the bottom of the filter control
panel.
2. Place the tub onto the filter cart by first
inserting the rear lip under the filter cart
frame and then laying down the front of
the tub flat onto the cart.
3. Connect the tub to the motor housing by
pulling together the handles on the tub
and the handles on the motor housing
(NOTE: Verify tight connection by pushing
back on the tub).
Filter not connected inside of
cabinet
alve not switched to “Oil to Fryer”
V
If there’s more than one fryer,
return valve not open.
1. Ensure filter assembly is rolled straight
onto the rails inside of the cabinet.
2. Push filter assembly back as far as
possible
3. Ensure quick disconnect fitting on top of
filter connects automatically with quick
connect fitting inside of cabinet.
4. Pull on filter lightly to ensure a tight
connection
1. Set the black knob in the middle of the
filter control panel to the far right.
2. Try to filter again.
1. Open the door of the fryer you wish to
filter.
2. Pull the return valve handle (small black
knob) out as far as possible.
3. Attempt to filter again. When completed,
push the black knob in as far as possible
to close.
– 6–

Self-Help Guide (Continued)
PROBLEM PROBABLE SOLUTION
CAUSE (Follow Sequentially)
Motor runs but will not
pump oil.
Motor not making any
noise
Oil not pumping through
the hose
Oil has not penetrated the filter
paper
Not plugged in
Motor has overheated
Valve not switched to “Oil to Hose”
1. Let oil sit in the filter pan for
approximately 2 minutes and try again
1. Plug filter into the receptacle inside of
cabinet
2. Turn ON/OFF switch to ‘ON’.
1. Allow motor to cool for approximately 10
minutes.
2. Press the reset button near the ON/OFF
switch on the filter control panel and try
again.
1. Set the black knob in the middle of the
filter control panel to the far left.
PREVENTIVE MAINTENANCE: Familiarize yourself with the proper filtering procedure prior to
attempting to filter
1. To remove water, stir oil until bubbling stops; water will clog filter paper pores.
2. V
erify all connections, especially quick disconnects (under tub and inside fryer or CF cabinet) are
tight; not leaking oil or sucking air.
3. Use only one sheet of filter paper properly sealed under hold down ring.
4. Use a drain clean out rod if p
artial or full blockage in fryer drain is suspected.
5. If filter was used for fryer boil out, run oil through filter to lubricate motor/pump.
6. Clean filter and all components after each use. Do not permit oil to remain in filter drawer; it will clog
the pump.
7. Verify all lights and controls operate.
8. Adhere to operating instructions in sequence given for proper filtration.
9. Prep
are filter for next use by using new filter paper and Acidox Powder for each fryer.
– 7–

WIRING DIAGRAM
NOTE: Use this diagram with motor/pump
part # 052982 (See parts list)
NOTE: Use this diagram with motor/pump
part # 055173 (See parts list)
If you have any questions regarding filtering
procedures or need assist
1-800-KEATING.
ance, call:
– 8–
est 50th Street, McCook, Illinois 60525-6001
W
8901
oll Free 1-800-KEA
T
KEATING OF CHICAGO, INC.
Tel. 708-246-3000 • Fax 708-246-3100
TING (In U.S. and Canada)
www.keatingofchicago.com
Safe N Easy Filter 0107
9/07

REFILE/warranty 8/07
, Custom Pasta Systems, Top-Side™ Cookers, Computer Timers, Fryer &
®
.COM
TINGOFCHICAGO
KEA
duct or part be shipped to Keating for repair or replacement, as appropriate. Any defective part subject to a
WWW.
WARRANTY
EXCLUSIONS
LIMITED WARRANTY
& PASTA VESSEL WARRANTY
LENGTH OF WARRANTY
FRYER
61-72 months 80%
73-84 months 60%
85-96 months 40%
13-60 months 100%
97-108 months 20%
Time from Installation Date Fryer Vessel Warranty Credit
LIMITATIONS OF LIABILITY
OTHER TERMS AND CONDITIONS
109-120 months 10%
ime, Monday through Friday). When calling, please have the following information available: (1) name, address and
O SECURE WARRANTY SERVICE
T
duct, if different; (3) name, model number and serial number of the product; (4) installation date; and (5) description of defect. Keating will then issue a service
arranty must be authorized by Keating or performed at Keating. Authorization may be obtained by calling 1-800-KEATING within the Continental United States, Alaska, Hawaii,
TING
KEATING
NC., 1-800-KEA
, I
CHICAGO
OF
TING
EA
K
arranty must be shipped freight prepaid to Keating for testing and examination. Keating's decision as to the cause and nature of any defect under this Limited Warranty shall be final.
days from the date of installation. Fryer & Pasta Vessels are warranted as described below.
Pasta Vessels, and Keating replacement parts ("products") installed after June 1, 1994 to be free to defects in material or workmanship, subject to the following terms and conditions.
Keating Of Chicago, Inc. ("Keating”) warrants to the original purchaser. ("Customer"), all new Keating Fryers, Filter Systems, Griddles, Keep Krisp
All products other than Fryer & Pasta Vessels and replacement parts shall be warranted for a period of one year from the date of original equipment installation. Keating replacement parts are warranted for a period of ninety
Fryers purchased after June 1, 1994 carry a prorated vessel warranty on defects in materials or workmanship to the Customer based on the following scale:
The credit for the defective fryer & pasta vessel shall be applied against the cost of the replacement vessel, utilizing Keating's then current price, upon return of the vessel to Keating, (Freight to be paid by Keating within
the first 2 months only), only during the first 60 months as described above, subject to the limitations described below.
hour, labor costs of more than one person, overtime rates, truck charges, difference between ground and other mode of transportation, and holiday charges. Any repair or replacement under this Limited Warranty does not
at the expense of Keating except that the Customer shall pay the following expenses: all freight and labor expense for Keating replacement parts for all other products, mileage exceeding 50 miles or travel more than one
In the event of warranty claim or otherwise, the sole obligation of Keating shall be the repair and/or replacement at the option of Keating of the product or component or part thereof. Such repair or replacement shall be
constitute an extension of the original warranty for any period for the product or for any component or part thereof. Parts to be replaced under this Limited Warranty will be repaired at the option of Keating with new or
THE LIABILITY OF KEATING ON ANY CLAIM OF ANY KIND, INCLUDING CLAIMS BASED ON WARRANTY, EXPRESSED OR IMPLIED, CONTRACT, NEGLIGENCE, STRICT LIABILITY OR ANY
functionally operative parts. Keep Krisps and Computer Timers must be returned to Keating for warranty repair or replacement. Field repairs of those items are not authorized.
SPECIFICALLY RENOUNCES ANY RIGHTS TO RECOVER, SPECIAL, INCIDENTAL, CONSEQUENTIAL OR OTHER INJURIES TO PERSONS OR DAMAGE TO PROPERTY, LOSS OF PROFITS OR
OTHER THEORIES SHALL BE SOLELY AND EXCLUSIVELY THE REPAIR OR REPLACEMENT OF THE PRODUCT AS STATED HEREIN, AND SUCH LIABILITY SHALL NOT INCLUDE, AND CUSTOMER
ANTICIPATED PROFITS, OR LOSS OF USE OF THE PRODUCT.
WARRANTY OF MERCHANTABILITY OR FITNESS FOR PARTICULAR PURPOSE OR WARRANTY AGAINST LATENT DEFECTS.
THIS LIMITED WARRANTY IS EXCLUSIVE AND IS IN LIEU OF ALL OTHER WARRANTIES WHETHER WRITTEN, ORAL, STATUTORY OR IMPLIED, INCLUDING BUT NOT LIMITED TO ANY
statement with regard to warranties.
If any oral statements have been made regarding the Keating products, such statements do not constitute warranties and are not part of the contract sale. This Limited Warranty constitutes the complete, final and exclusive
workmanship. Proper installation and maintenance are the responsibility of the installer and Customer, respectively. Proper installation and maintenance procedures are prescribed by the Keating Service Manual.
The warranties provided by Keating of Chicago, Inc. do not apply in the following instances:
1. Defects arising out of or resulting from improper installation or maintenance, abuse, misuse, modification or alteration by unauthorized service personnel, or any other condition not attributable to a defect in material or
2. In the event that the product was damaged after leaving the factory due to flood, fire, other acts of God or accident, damage during shipment should be reported to the carrier and is not the responsibility of Keating.
calibrations are the responsibility of the installer. Proper installation procedures are prescribed by the Keating Service Manual.
4. On parts which would normally be worn or replaced under normal conditions, including but not limited to electric bulbs, fuses, interior and exterior finishes, gaskets and radiants.
6. In the event of unauthorized repairs or alterations to the Keating product.
5. With regard to adjustments and calibrations such as leveling, tightening of fasteners or plumbing connections, improper gas pressure or improper electrical supply, the checking of and changes in adjustment and
3. In the event the serial number or rating plate has been removed from the product or altered.
This Limited Warranty is valid in the 50 United States, its territories, and Canada, and is void elsewhere.
Keating products are sold for commercial use only. If any Keating product is sold as a component of another product or used as a consumer product, such Keating product is sold As Is without any warranty.
The Customer must provide proof of purchase from Keating.
7. With the use of sodium chloride in pasta vessels or harsh chemicals in fryer or pasta vessels.
If any provision of this Limited Warranty is held to be unenforceable under the law of any jurisdiction, such provision shall be inapplicable in such jurisdiction, and the remainder of the warranty shall remain unaffected.
Further in such event, the maximum exclusion or limitation allowable under applicable law shall be deemed substituted for the unenforceable provision.
This Limited Warranty shall be governed by and construed in accordance with the laws of the State of Illinois.
Puerto Rico and Canada during normal business hours (7:00 a.m. through 6:00 p.m. Central T
telephone number of the Customer; (2) location of pro
All repair services under this Limited W
authorization work order number to one of its approved independent servicing organizations, or request the pro
claim under this Limited W

SERVICE INFORMATION
If you have a service related question call 1-800-KEATING.
Please state the nature of the call; it will ensure speaking with the appropriate person.
Have your serial and model number available when ordering parts.
KEATING OF CHICAGO, INC.
8901 West 50th Street, McCook, Illinois 60525-6001
Phone: (708) 246-3000 FAX: (708) 246-3100
Toll Free 1-800-KEATING (In U.S. and Canada)
www.keatingofchicago.com
*As continuous product improvement occurs, specifications may be changed without notice.
KEATING LIMITED WARRANTY CARD
PLEASE COMPLETE AND MAIL AT ONCE–WARRANTY IS NOT IN EFFECT UNTIL CARD IS RETU RNED
COMPANY: __________________________________________________________________________________________________________________________
ADDRESS: __________________________________________________________________________________________________________________________
CITY: ______________________________________________________________________________ STATE: ________________ ZIP: ____________________
DEALER: ____________________________________________________________________________________________________________________________
DATE OF PURCHASE: ________________________________________________________________ INVOICE NUMB ER: ____________________________
SERIAL NUMBER:________________________________________ q FRYER q FILTER SYSTEM q GRIDDLE
REMARKS: ______________________________________________ q TOP-SIDE COOKER q HOT PLATE q PASTA PLUS
I HAVE READ THE INSTALLATION AND OPERATION INSTRUCTIONS.
SIGN ED: __________________________________________________________________________________ DATE: __________________________________
 Loading...