

Page 1
K DP110
Owner’s Manual
Preparation Before Use
Playing the Piano
Internal Songs
Recorder
Settings
Appendix
Page 2

Thank you for purchasing this Kawai digital piano.
This owner’s manual contains important information regarding the usage and operation of the KDP110 digital piano.
Please read all sections carefully, keeping this manual handy for future reference.
Page 3

Preface
About this Owner’s Manual
Before attempting to play this instrument, please read the Preparation Before Use section from page 10 of this owner’s manual.
This section explains the name and function of each part, how to connect the power cable, and how to turn on the power.
The Playing the Piano section (page 12) provides an overview of the instrument’s most commonly used functions, allowing
the KDP110 digital piano to be enjoyed almost immediately after being connected, while the Internal Songs section (page 17)
includes information regarding the built-in demonstration songs, Concert Magic songs, and Lesson function.
The Recorder section (page 27) provides instructions on how to record and play back pieces stored in the instrument’s internal
memory, and the Settings section (page 29) details the settings that can be used to adjust a number of sound and keyboard
characteristics, as well as basic MIDI functionality.
Finally, the Appendix section (page 40) includes listings for all demo, Concert Magic, and Lesson function songs, a
troubleshooting guide, assembly instructions, MIDI reference information, and full specication details.
KDP110 Feature Highlights
Responsive Hammer Compact II (RHC II) weighted-key keyboard action
The new Responsive Hammer Compact II (RHC II) action has been developed to reproduce the distinctive touch of an
acoustic grand piano. The weight of the keyboard is appropriately graded to mirror the heavier bass and lighter treble
hammers of acoustic pianos, with a smooth matte texture applied to each black and white key for enhanced playability.
As with other Kawai digital piano keyboard actions, Responsive Hammer Compact II utilises triple sensor hammer velocity
detection, and features a springless mechanism that delivers a smooth and natural piano playing experience.
Despite its lightweight, compact design, the RHC II action allows experienced pianists to perform with condence,
playing fortissimo with power and certainty, while delicately controlling the softest, most gentle pianissimo passages.
Harmonic Imaging™ (HI) sound technology, 88-key piano sampling
The KDP110 digital piano captures the beautiful sound of Kawai’s highly acclaimed hand-built concert grand piano, with
all 88 keys of this exceptional instrument meticulously recorded, analysed and faithfully reproduced using proprietary
Harmonic Imaging™ technology. This unique process accurately recreates the broad dynamic range of the original grand
piano, aording pianists an extraordinary level of expressiveness ranging from the softest pianissimo to the strongest,
boldest fortissimo.
Additional reverberation eects that simulate the acoustic environment of a room, lounge, small hall, concert hall, live hall
or cathedral are also applied, resulting in a rich, vibrant piano tone that delivers breathtaking realism and authenticity.
Integrated Bluetooth® MIDI connectivity
In addition to standard MIDI jacks for connecting to other instruments, the KDP110 digital piano also boasts integrated
Bluetooth MIDI technology that allows the instrument to communicate with supported smart devices wirelessly. Once
connected to a phone, tablet, or laptop, KDP110 digital piano owners can enjoy a wide variety of exciting music-related
apps that enhance their learning and playing experience without additional cables.
* Availability of Bluetooth function dependent on market location.
Internal Song recorder, Built-in Lesson Function
The KDP110 digital piano features a three song recorder, allowing performances to be recorded to internal memory and
played back at the touch of a button.
In addition, the convenient lesson feature allows aspiring pianists to learn the piano using a built-in collection of etudes
from Beyer, Czerny and Burgmüller, or songs from the popular Alfred course books. The left and right hand parts for each
piece can be practiced separately, while adjusting the tempo allows more dicult passages to be perfected.
3
Page 4
WARNING
The product should be connected to
an AC outlet of the specied voltage.
● If you are going to use an AC power cord,
make sure that its has the correct plug shape
and conforms to the specied power voltage.
● Failure to do so may result in re.
120V 240V230V
Indicates a potential hazard that could result in death or
serious injury if the product is handled incorrectly.
Do not insert or disconnect the power
cord plug with wet hands.
Doing so may cause electric shock.
WARNING - When using electric products, basic precautions should always be followed, including the following.
The product is not completely disconnected from the
power supply even when the power switch is turned
o. If the product will not be used for a long time,
unplug the AC power cord from the AC outlet.
● Failure to do so may cause re in case of
lightning.
● Failure to do so may over-heat the product,
resulting in re.
Do not disassemble, repair or modify
the product.
Doing so may result in product breakdown, electric
shock or short-circuit.
This product may be equipped with a polarized line plug (one blade wider
than the other). This is a safety feature.
If you are unable to insert the plug into the outlet, contact an electrician to
replace your obsolete outlet.
Do not defeat the safety purpose of the plug.
When disconnecting the AC power cord's
plug, always hold the plug
and pull it to remove it.
● Pulling the AC power cord itself may damage
the cord, causing a re, electric shock or
short-circuit.
Doing so may cause the product to fall over,
resulting in injury.
Do not lean against the keyboard.
When using the headphones, do not
listen for long periods of
time at high volume levels.
Doing so may result in hearing problems.
It is a good practice to have the instrument near the AC outlet and the power cord plug in a position
so that it can readily be disconnected in an emergency because electricity is always charging
while the plug is in the AC outlet even in a power switch o condition.
The chair must be used properly (it must be
used only when playing the product).
● Do not play with it or stand on it.
● Only one person is allowed to sit on it.
● Do not sit on it when opening the lid.
● Re-tighten the bolts occasionally.
Doing so may cause the chair to fall over or your
ngers to be trapped, resulting in injury.
Entry of water, needles or hair pins may result
in breakdown or short-circuit.
The product shall not be exposed to dripping or
splashing. No objects lled with liquids, such as
vases, shall be placed on the product.
Take care not to allow any foreign
matter to enter the product.
Important Safety Instructions
Important Safety Instructions
SAVE THESE INSTRUCTIONS
INSTRUCTIONS PERTAINING TO A RISK OF FIRE, ELECTRIC SHOCK, OR INJURY TO PERSONS
CAUTION
RISK OF ELECTRIC SHOCK
DO NOT OPEN
AVIS : RISQUE DE CHOC ELECTRIQUE - NE PAS OUVRIR.
TO REDUCE THE RISK OF ELECTRIC SHOCK, DO NOT OPEN THE AC ADAPTOR.
NO USER-SERVICEABLE PARTS INSIDE. REFER SERVICING TO QUALIFIED SERVICE PERSONNEL.
Examples of Picture Symbols
The lighting ash with arrowhead symbol, within
an equilateral triangle, is intended to alert the user
to the presence of uninsulated "dangerous
voltage" within the product's enclosure that may
be of sucient magnitude to constitute a risk of
electric shock to persons.
denotes that care should be taken.
The example instructs the user to take care not to allow ngers to be trapped.
WARNING
TO REDUCE THE RISK OF FIRE
OR ELECTRIC SHOCK, DO NOT
EXPOSE THIS PRODUCT TO
RAIN OR MOISTURE.
The exclamation point within an equilateral
triangle is intended to alert the user to the
presence of important operating and maintenance
(servicing) instructions in the leterature
accompanying the product.
Read all the instructions before using the product.
1) Read these instructions.
2) Keep these instructions.
3) Heed all warnings.
4) Follow all instructions.
5) Do not use this apparatus near water.
6) Clean only with dry cloth.
7) Do not block any ventilation openings. Install in
accordance with the manufacturer's instructions.
8) Do not install near any heat sources such as radiators,
heat registers, stoves, or other apparatus (including
ampliers) that produce heat.
9) Do not defeat the safety purpose of the polarized or
grounding-type plug. A polarized plug has two
blades with one wider than the other. A grounding
type plug has two blades and a third grounding
prong. The wide blade or the third prongs are
provided for your safety. If the provided plug does
not t into your outlet, consult an electrician for
replacement of the obsolete outlet.
denotes a prohibited operation.
The example instructs that disassembly of the product is prohibited.
denotes an operation that should be carried out.
The example instructs the user to remove the power cord plug from the AC outlet.
10) Protect the power cord from being walked on or
pinched particularly at plugs, convenience
receptacles, and the point where they exit from the
apparatus.
11) Only use attachments/accessories specied by the
manufacturer.
12) Use only with the cart, stand, tripod, bracket, or table
specied by the manufacturer, or
sold with the apparatus. When a cart is used,
use caution when moving the cart/apparatus
combination to avoid injury from tip-over.
13) Unplug this apparatus during lightning storms or
when unused for long periods of time.
14) Refer all servicing to qualied service personnel.
Servicing is required when the apparatus has been
damaged in any way, such as power-supply cord or
plug is damaged, liquid has been spilled or object
have fallen into the apparatus, the apparatus has
been exposed to rain or moisture, does not operate
normally, or has been dropped.
4
Page 5
WARNING - When using electric products, basic precautions should always be followed, including the following.
WARNING
The product should be connected to
an AC outlet of the specied voltage.
Do not insert or disconnect the power
cord plug with wet hands.
Take care not to allow any foreign
matter to enter the product.
The chair must be used properly (it must be
used only when playing the product).
● Do not play with it or stand on it.
● Only one person is allowed to sit on it.
● Do not sit on it when opening the lid.
● Re-tighten the bolts occasionally.
When using the headphones, do not
listen for long periods of
time at high volume levels.
Indicates a potential hazard that could result in death or
serious injury if the product is handled incorrectly.
120V 240V230V
● If you are going to use an AC power cord,
make sure that its has the correct plug shape
and conforms to the specied power voltage.
● Failure to do so may result in re.
Doing so may cause electric shock.
Entry of water, needles or hair pins may result
in breakdown or short-circuit.
The product shall not be exposed to dripping or
splashing. No objects lled with liquids, such as
vases, shall be placed on the product.
Doing so may cause the chair to fall over or your
ngers to be trapped, resulting in injury.
Doing so may result in hearing problems.
Do not lean against the keyboard.
Do not disassemble, repair or modify
the product.
When disconnecting the AC power cord's
plug, always hold the plug
and pull it to remove it.
The product is not completely disconnected from the
power supply even when the power switch is turned
o. If the product will not be used for a long time,
unplug the AC power cord from the AC outlet.
Doing so may cause the product to fall over,
resulting in injury.
Doing so may result in product breakdown, electric
shock or short-circuit.
● Pulling the AC power cord itself may damage
the cord, causing a re, electric shock or
short-circuit.
● Failure to do so may cause re in case of
lightning.
● Failure to do so may over-heat the product,
resulting in re.
This product may be equipped with a polarized line plug (one blade wider
than the other). This is a safety feature.
If you are unable to insert the plug into the outlet, contact an electrician to
replace your obsolete outlet.
Do not defeat the safety purpose of the plug.
It is a good practice to have the instrument near the AC outlet and the power cord plug in a position
so that it can readily be disconnected in an emergency because electricity is always charging
while the plug is in the AC outlet even in a power switch o condition.
5
Page 6
CAUTION
Indicates a potential hazard that could result in injury or
damage to the product or other property if the product
is handled incorrectly.
Do not use the product in the following areas.
● Areas, such as those near windows, where the product is
exposed to direct sunlight
● Extremely hot areas, such as near a heater
● Extremely cold areas, such as outside
● Extremely humid areas
● Areas where a large amount of sand or dust is present
● Areas where the product is exposed to excessive
vibrations
Use only the AC adaptor included with this instrument to power the instrument.
● Do not use other AC adaptors to power this instrument.
● Do not use the included AC adaptor or AC power cord to power other equipment.
When you close the keyboard cover,
close it gently.
Before connecting cords, make sure
that the power to this product
and other devices is turned
OFF.
Do not drag the product on the oor.
Take care not to drop the product.
OFF
Using the product in such areas may result in
product breakdown.
Use the product only in moderate climates (not
in tropical climates).
Closing it roughly may trap your ngers,
resulting in injury.
Failure to do so may cause breakdown of this
product and other devices.
Please lift up the product when moving it.
Please note that the product is heavy and must
be carried by more than two persons.
Dropping the product may result in breakdown.
Do not place the product near electrical
appliances such as TVs and radios.
When connecting the AC power cord
and other cords, take care
not to get them tangled.
Do not wipe the product with benzene
or thinner.
Do not stand on the product or exert
excessive force.
Do not place naked ame, such as lighted
candles on the product.
● Doing so may cause the product to generate
noise.
● If the product generates noise, move the
product suciently away from the electrical
appliance or connect it to another AC outlet.
Failure to do so may damage them, resulting in
re, electric shock or short-circuit.
● Doing so may result in discoloration or deformation
of the product.
● When cleaning the product, put a soft cloth in
lukewarm water, squeeze it well, then wipe the
product.
● Doing so may cause the product to become
deformed or fall over, resulting in breakdown
or injury.
Doing so may cause the illumination to fall over,
resulting in re.
Ensure that the ventilation is not
impeded by covering the ventilation
openings with items, such as newspaper,
table-cloths, curtains, etc.
The product should be located so that its location or position does not interfere with its proper ventilation. Ensure a
minimum distance of 5cm around the product for sucient ventilation.
Failure to do so may over-heat the product,
resulting in re.
6
Page 7
The product should be serviced by qualied service personnel when:
● The power supply cord or the plug has been damaged.
● Objects have fallen, or liquid has been spilled into the product.
● The product has been exposed to rain.
● The product does not appear to operate normally or exhibits a marked change in performance.
●The product has been dropped, or the enclosure damaged.
Notes on Repair
Should an abnormality occur in the product, immediately turn the power OFF, disconnect the power cord plug, and then contact the shop from which
the product was purchased.
CAUTION:
To prevent electric shock, match wide blade of plug to wide slot, fully insert.
ATTENTION:
Pour éviter les chocs électriques, introduire la lame la plus large de la che dans la borne correspondante de la prise et pousser jusqu'au fond.
An information on Disposal for users
If your product is marked with this recycling symbol it means that, at the end of its life, you must dispose of it separately by taking it to an
appropriate collection point.
You should not mix it with general household waste. Disposing of this product correctly will prevent potential negative eects on the environment
and human health which could otherwise arise due to inappropriate waste handling.
For further details, please contact your local authority.
(European Union only)
Instruction for AC power cord (U.K.)
IMPORTANT
THE WIRES IN THIS MAINS LEAD ARE COLOURED IN ACCORDANCE WITH THE FOLLOWING CODE.
BLUE : NEUTRAL
BROWN : LIVE
As the colours of the wires in the mains lead of this apparatus may not correspond with the coloured markings identifying the terminals in your plug,
proceed as follows:
The wire which is coloured BLUE must be connected to the terminal which is marked with the letter N or coloured BLACK.
The wire which is coloured BROWN must be connected to the terminal which is marked with the letter L or coloured RED.
Do not plug either terminal of the power cord to the the ground od AC outlet on the wall.
Canadian Radio Interference Regulations
This instrument complies with the limits for a class B digital apparatus, pursuant to the Radio Interference Regulations, C.R.C., c. 1374.
FCC Information (U.S.A)
CAUTION : Changes or modications not expressly approved by the party responsible for compliance could void the user’s authority to operate the
equipment.
NOTE : This equipment has been tested and found to comply with the limits for a Class B digital device, pursuant to Part 15 of the FCC Rules. These limits are
designed to provide reasonable protection against harmful interference in a residential installation. This equipment generates, uses and can radiate radio
frequency energy and, if not installed and used in accordance with the instructions, may cause harmful interference to radio communications. However, there
is no guarantee that interference will not occur in a particular installation. If this equipment does cause harmful interference to radio or television reception,
which can be determined by turning the equipment o and on, the user is encouraged to try to correct the interference by one or more of the following
measures:
• Reorient or relocate the receiving antenna.
• Increase the separation between the equipment and receiver.
• Connect the equipment into an outlet on a circuit dierent from that to which the receiver is connected.
• Consult the dealer or an experienced radio/TV technician for help.
The nameplate label is located on
the
Declaration of Conformity
Products : Electronic Piano
Model Number : KDP110
Responsible Party Name : Kawai America Corporation
Address : 2055 East University Drive Rancho
Dominguez, CA 90220
Telephone 310-631-1771
This device complies with Part 15 of the FCC Rules.
Operation is subject to the following two conditions:
(1) this device may not cause harmful interference, and
(2) this device must accept any interference received,
including interference that may cause undesired operation.
underside of the instrument, as
indicated below.
Nameplate
This applies only to products distributed by Kawai America Corporation.
About Bluetooth
• The Bluetooth® word mark and logos are registered trademarks owned by the Bluetooth SIG, Inc. and any
use of such marks by Kawai Musical Instruments Mfg. Co., Ltd. is under license. Other trademarks and trade
names are those of their respective owners.
• Frequency Band of Radio: 2400~2483.5 MHz Maximum Transmit Power: 2.5 mW
• Availability of Bluetooth function dependent on market location.
7
Page 8

Page 9

Table of Contents
Preface ............................................3
Important Safety Instructions ..................4
Table of Contents ................................9
Preparation Before Use
Part Names and Functions .....................10
Setting Up the Piano ............................11
Playing the Piano
Selecting Sounds ................................12
Using the Pedals ................................13
Dual Mode .......................................14
Four Hands Mode ...............................15
Metronome ......................................16
Settings
Keyboard and Sound Settings .................29
1. Damper Resonance ............................30
2. Reverb ........................................31
3. Touch .........................................32
4. Tuning ........................................33
5. Trans pose .....................................34
6. Brilliance ......................................34
7. Virtual Technician (Smart Mode) ...............35
8. Spatial Headphone Sound .....................36
9. Phones Type ..................................37
Auto Power O ..................................38
Bluetooth® MIDI .................................39
Internal Songs
Demo Songs .....................................17
Concert Magic ...................................18
Concert Magic demo modes .....................19
Concert Magic Mode ............................20
Concert Magic song arrangement types ..........21
Concert Magic song list ..........................22
Lesson Function .................................23
1. Selecting a lesson book/song ..................23
2. Listening to the selected lesson song ..........24
3. Practicing left and right-hand parts separately ...25
Recorder
Appendix
Connecting to Other Devices ..................40
USB MIDI (USB to Host connector). . . . . . . . . . . . .41
Troubleshooting ................................42
Assembly Instructions ..........................43
Demo Song List .................................47
Concert Magic Song List ........................47
Lesson Function Song Lists ....................48
Specications ....................................50
Recorder .........................................27
1. Recording a song ..............................27
2. Playing back a song ...........................28
3. Erasing recorded songs ........................28
9
Page 10
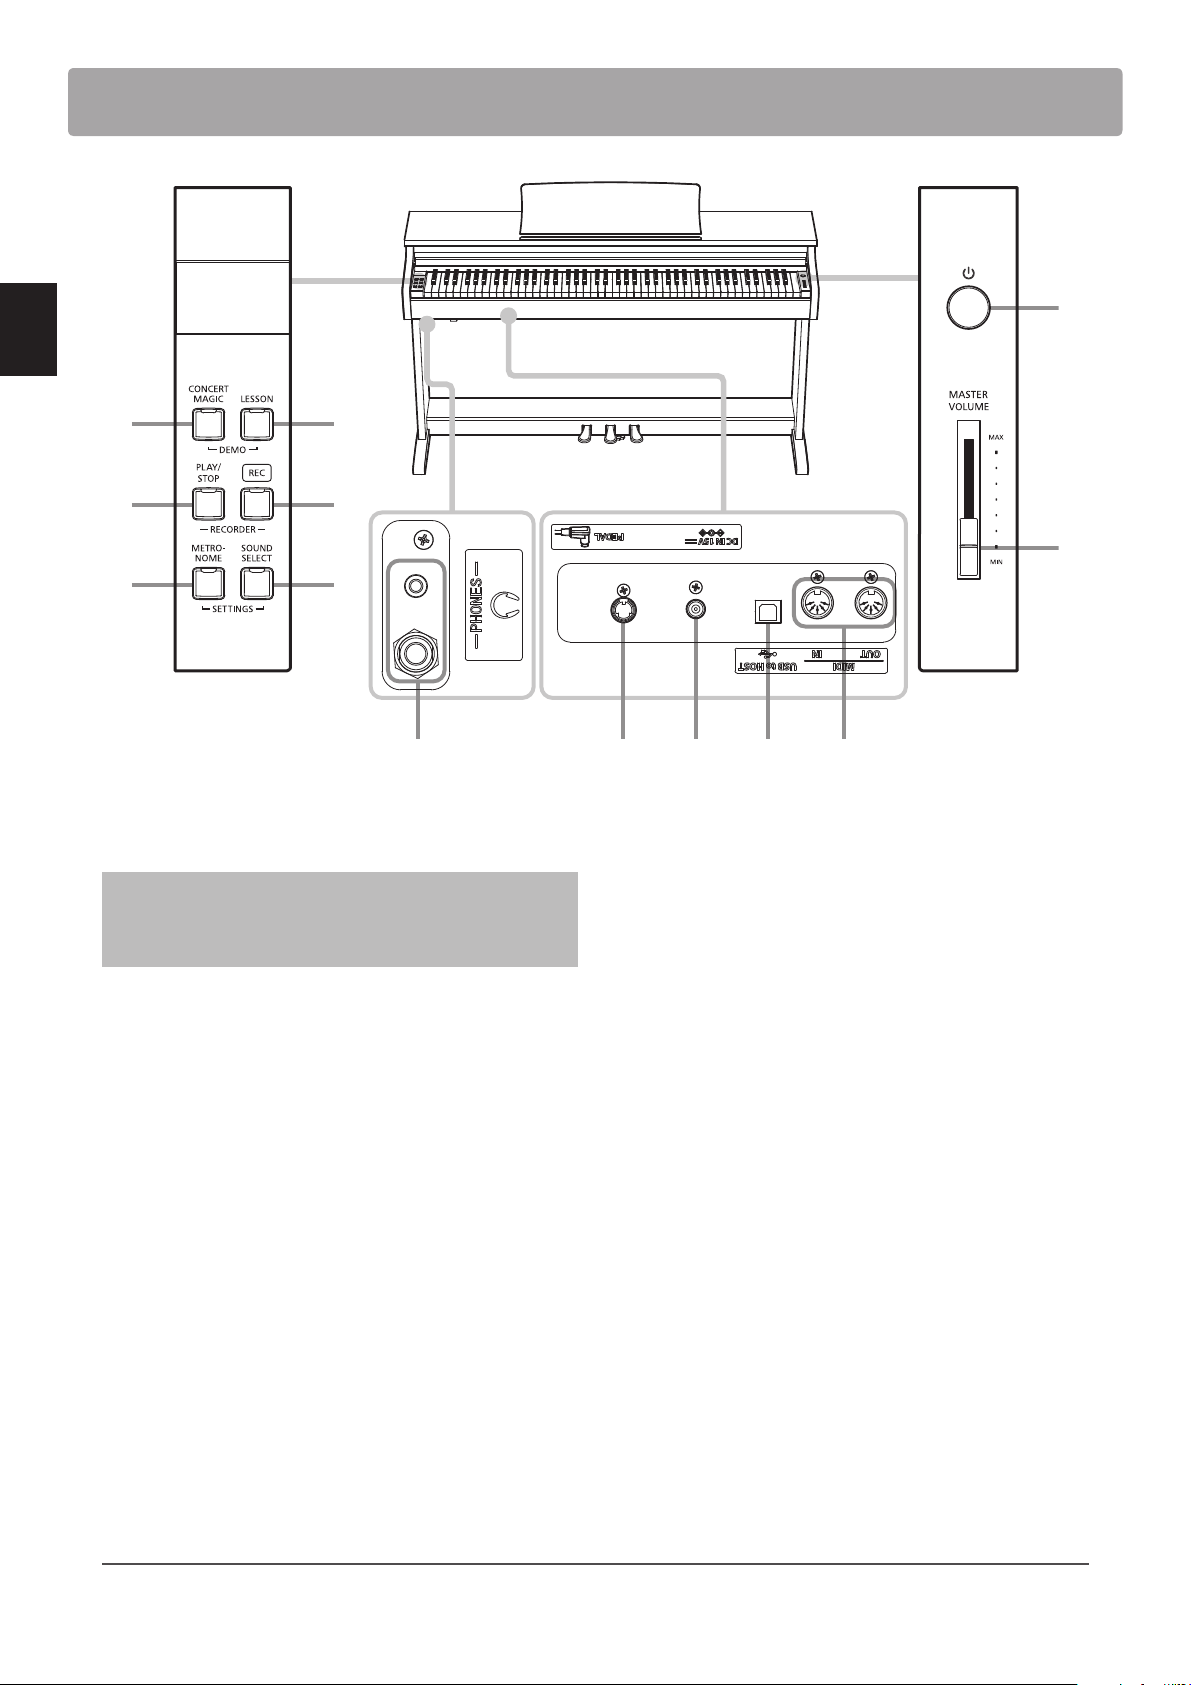
Part Names and Functions
DIGITAL PIANO
KDP110
dc
a
Preparation Before Use
e
f
g h
a POWER switch
This switch is used to turn the KDP110 digital piano on/o.
Be sure to turn o the instrument after playing.
To prevent data loss when turning o the instrument, do
not disconnect the power cable until all LEDs go o after
all LEDs ash on and o.
b MASTER VOLUME slider
This slider controls the master volume level of the KDP110
digital piano’s built-in speakers or headphones, if connected.
b
i j k lm
g METRONOME button
This button is used to turn the metronome function on/o, and
also to adjust its tempo, time signature, and volume settings.
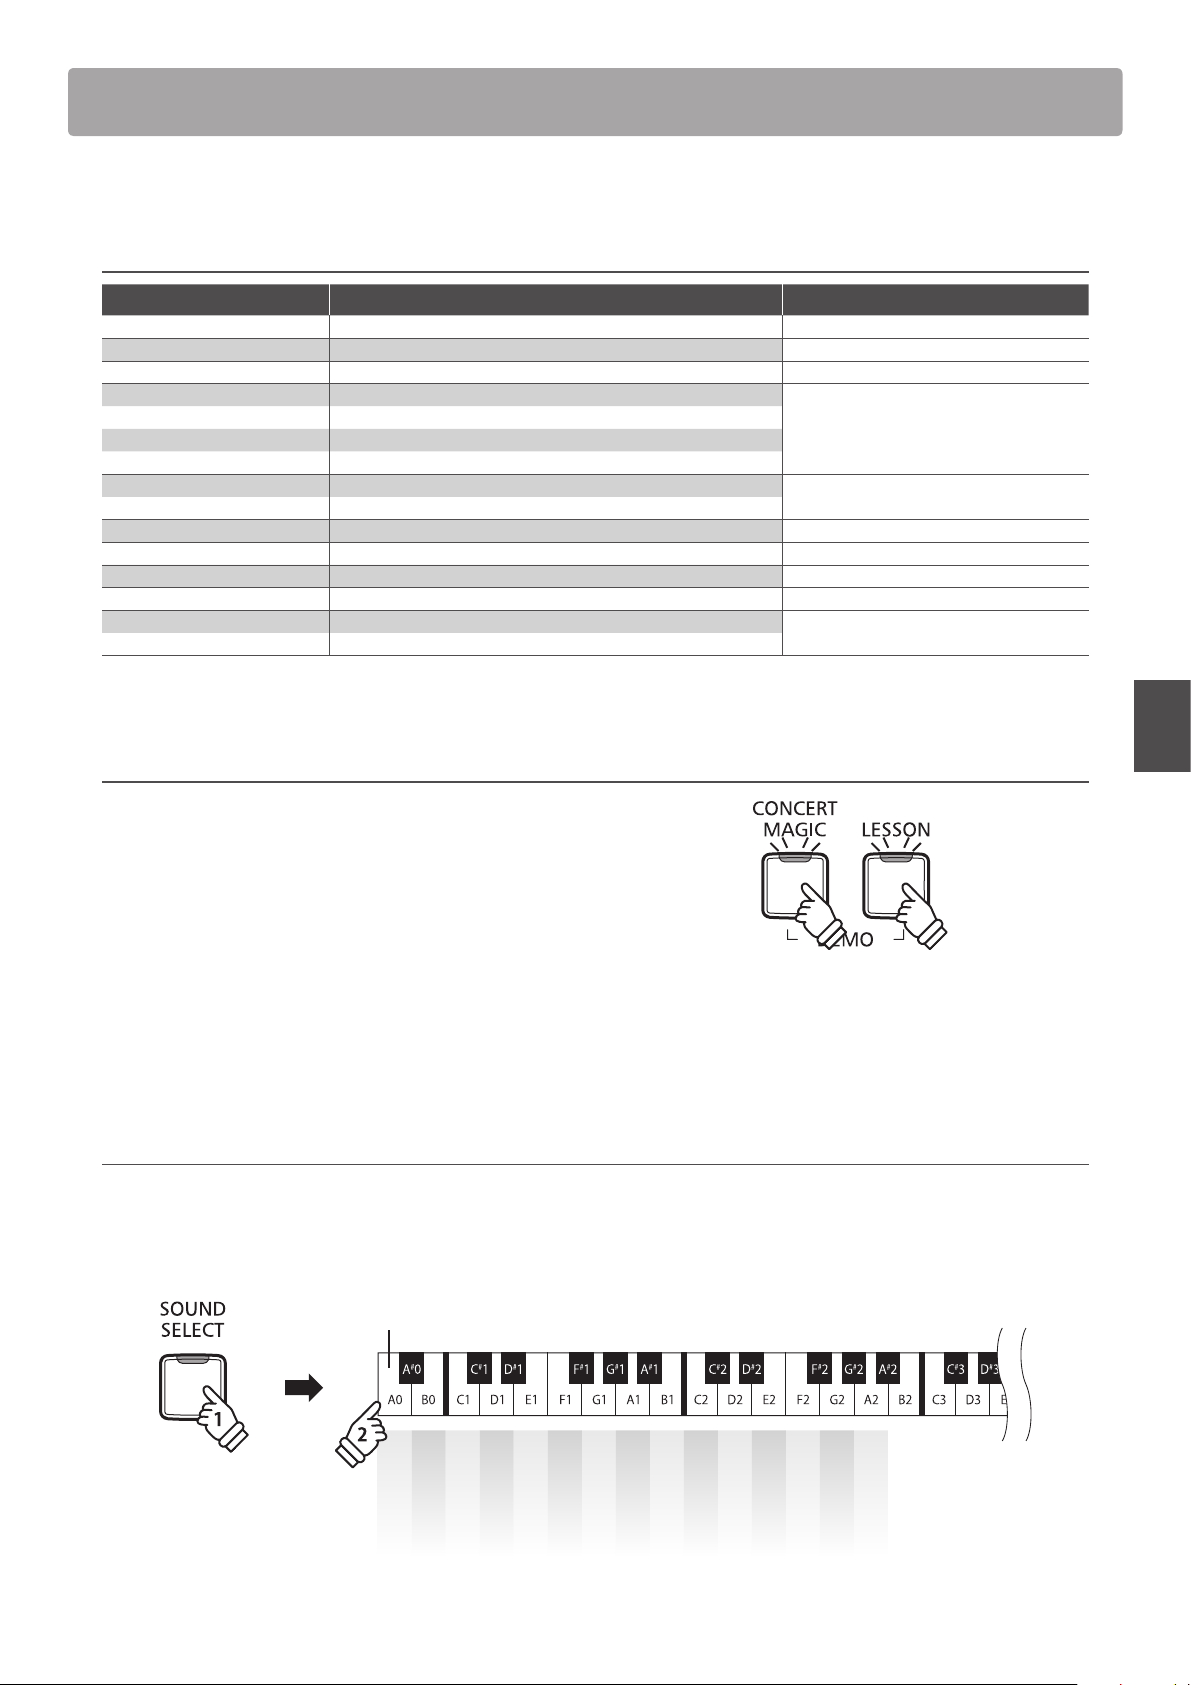
h SOUND SELECT button
This button is used to select the sound(s) that will be heard
when the keys are pressed.
i PEDAL connector
This connector is used to connect the KDP110 digital piano’s
pedal board to the instrument.
c CONCERT MAGIC button
This button is used to start/stop playback of the KDP110 digital
piano’s built-in Concert Magic songs.
d LESSON button
This button is used to select the KDP110 digital piano’s built-in
Lesson songs.
e PLAY / STOP button
This button is used to start/stop the playback of Recorder
songs stored in memory and KDP110 digital piano’s built-in
Lessons songs.
f REC button
This button is used to record performances to the KDP110
digital piano’s internal memory.
Operation Gu ide
The separate Operation Guide provides a convenient overview of the KDP110 digital piano’s various button and keyboard controls.
This sheet is also reprinted in the Appendix section of this owner’s manual.
j DC IN jack
This jack is used to connect the AC adaptor.
k USB to Host port
This port is use to connect the instrument to a computer using
a USB ‘B to A’ type cable in order to send and receive MIDI data.
l MIDI IN / OUT jacks
These jacks are used to connect the KDP110 digital piano to
external MIDI devices, such as other musical instruments or a
computer, in order to send and receive MIDI data.
m PHONES jacks
These jacks are used to connect stereo headphones to
the KDP110 digital piano. Two pairs of headphones can be
connected and used simultaneously.
10
Page 11
Setting Up the Piano
1. Connecting the power adaptor
Connect the AC power adaptor to the DC IN terminal located
on the underside of the instrument, as indicated below.
3. Turning on the power
Press the POWER switch, located on the right hand side of the
instrument’s front panel.
2. Connecting the power adaptor to an outlet
Connect the AC power adaptor to an AC outlet.
4. Adjusting the volume
Move the MASTER VOLUME slider up and down to increase
and decrease the volume level of the instrument’s speakers, or
headphones if connected.
Adjust the volume to a
comfortable listening level
- the middle is often a good
starting point.
Increase
volume
Preparation Before Use
The LED indicator for the SOUND SELECT button will turn on
and the Concert Grand sound will be selected automatically.
To prevent data loss when turning o the instrument, do
not disconnect the power cable until all LEDs go o after
all LEDs ash on and o.
Using headphones
Use the jacks located beneath the keyboard on the left hand
side, to connect stereo headphones to the KDP110 digital
piano.
Decrease
volume
Adjusting the pedal support bolt
A pedal support bolt is attached at the base of the pedal board
to aid stability when the pedals are pushed. Turn the bolt anticlockwise until it makes contact with the oor and supports
the pedals rmly.
Up to two pairs of headphones can be connected and used
simultaneously. When a pair of headphones is connected,
sound will not be produced by the speakers.
When moving the instrument, always adjust or
remove the pedal support bolt, then readjust
when the instrument is in its new position.
11
Page 12
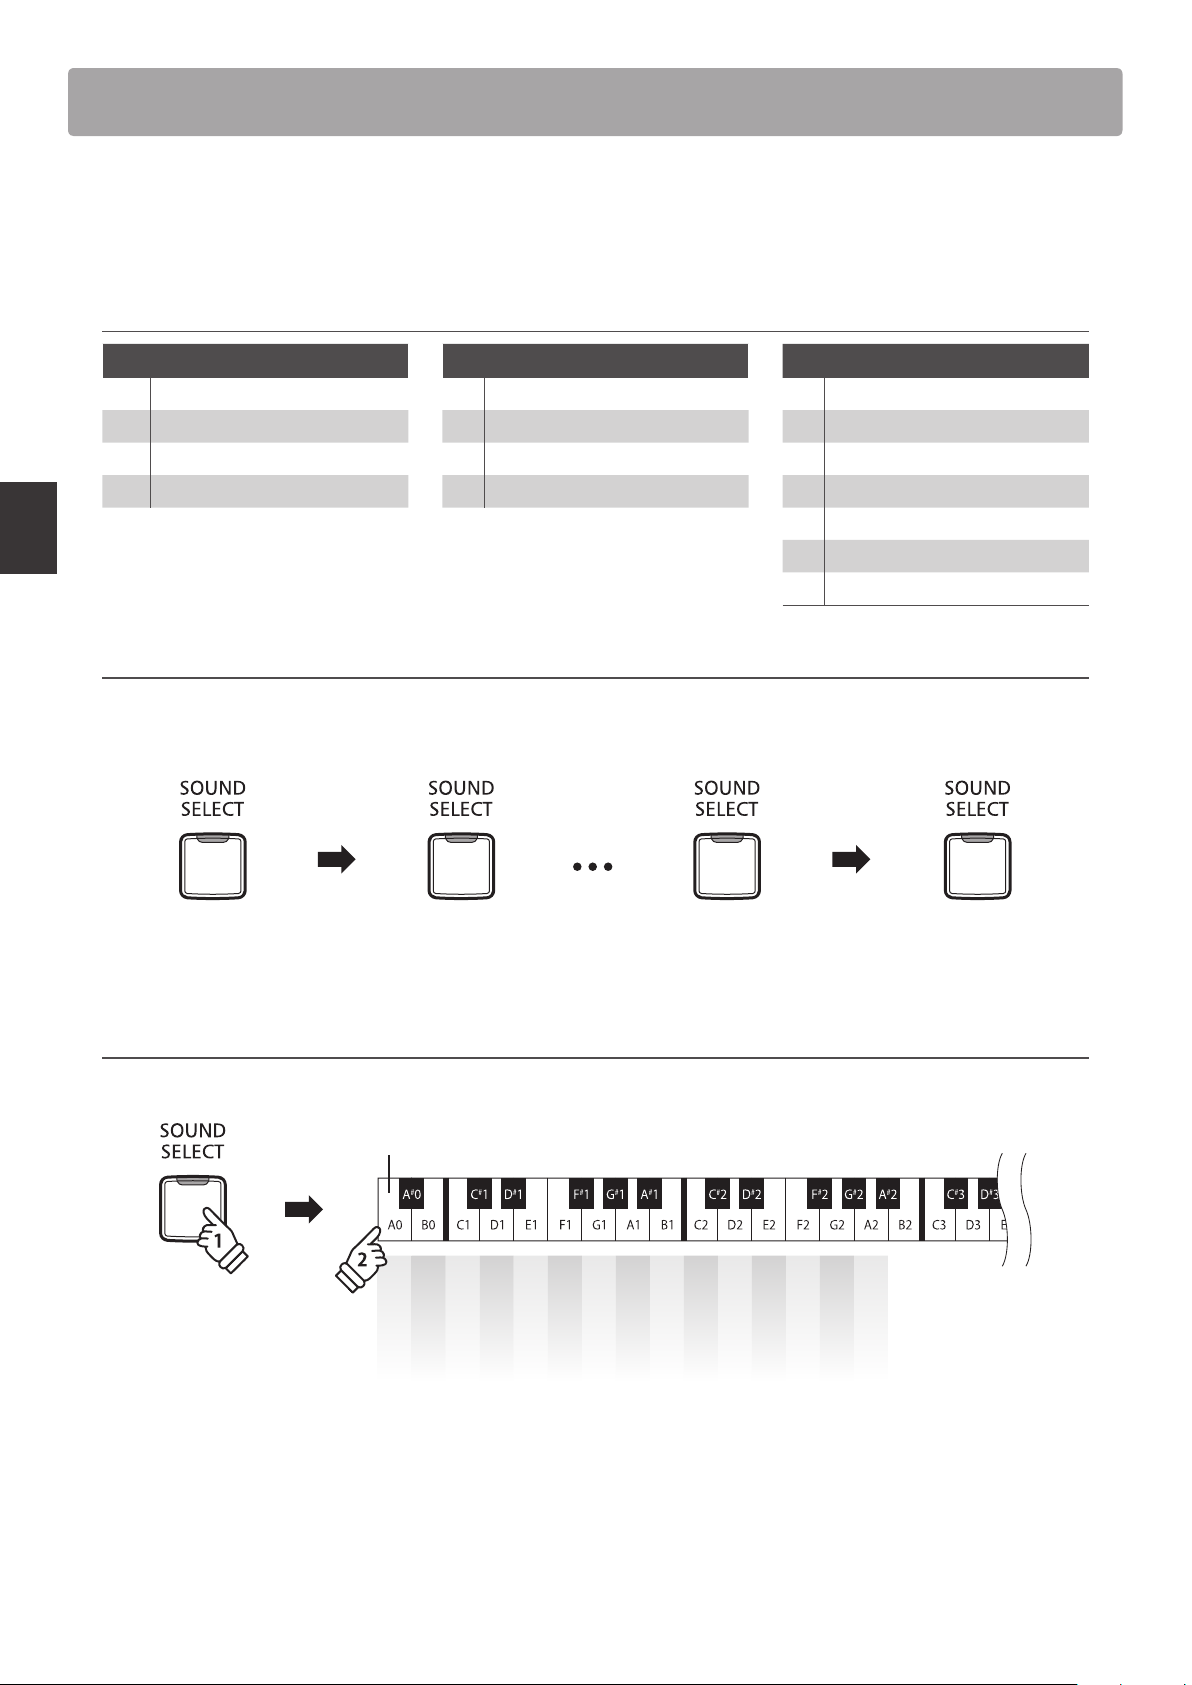
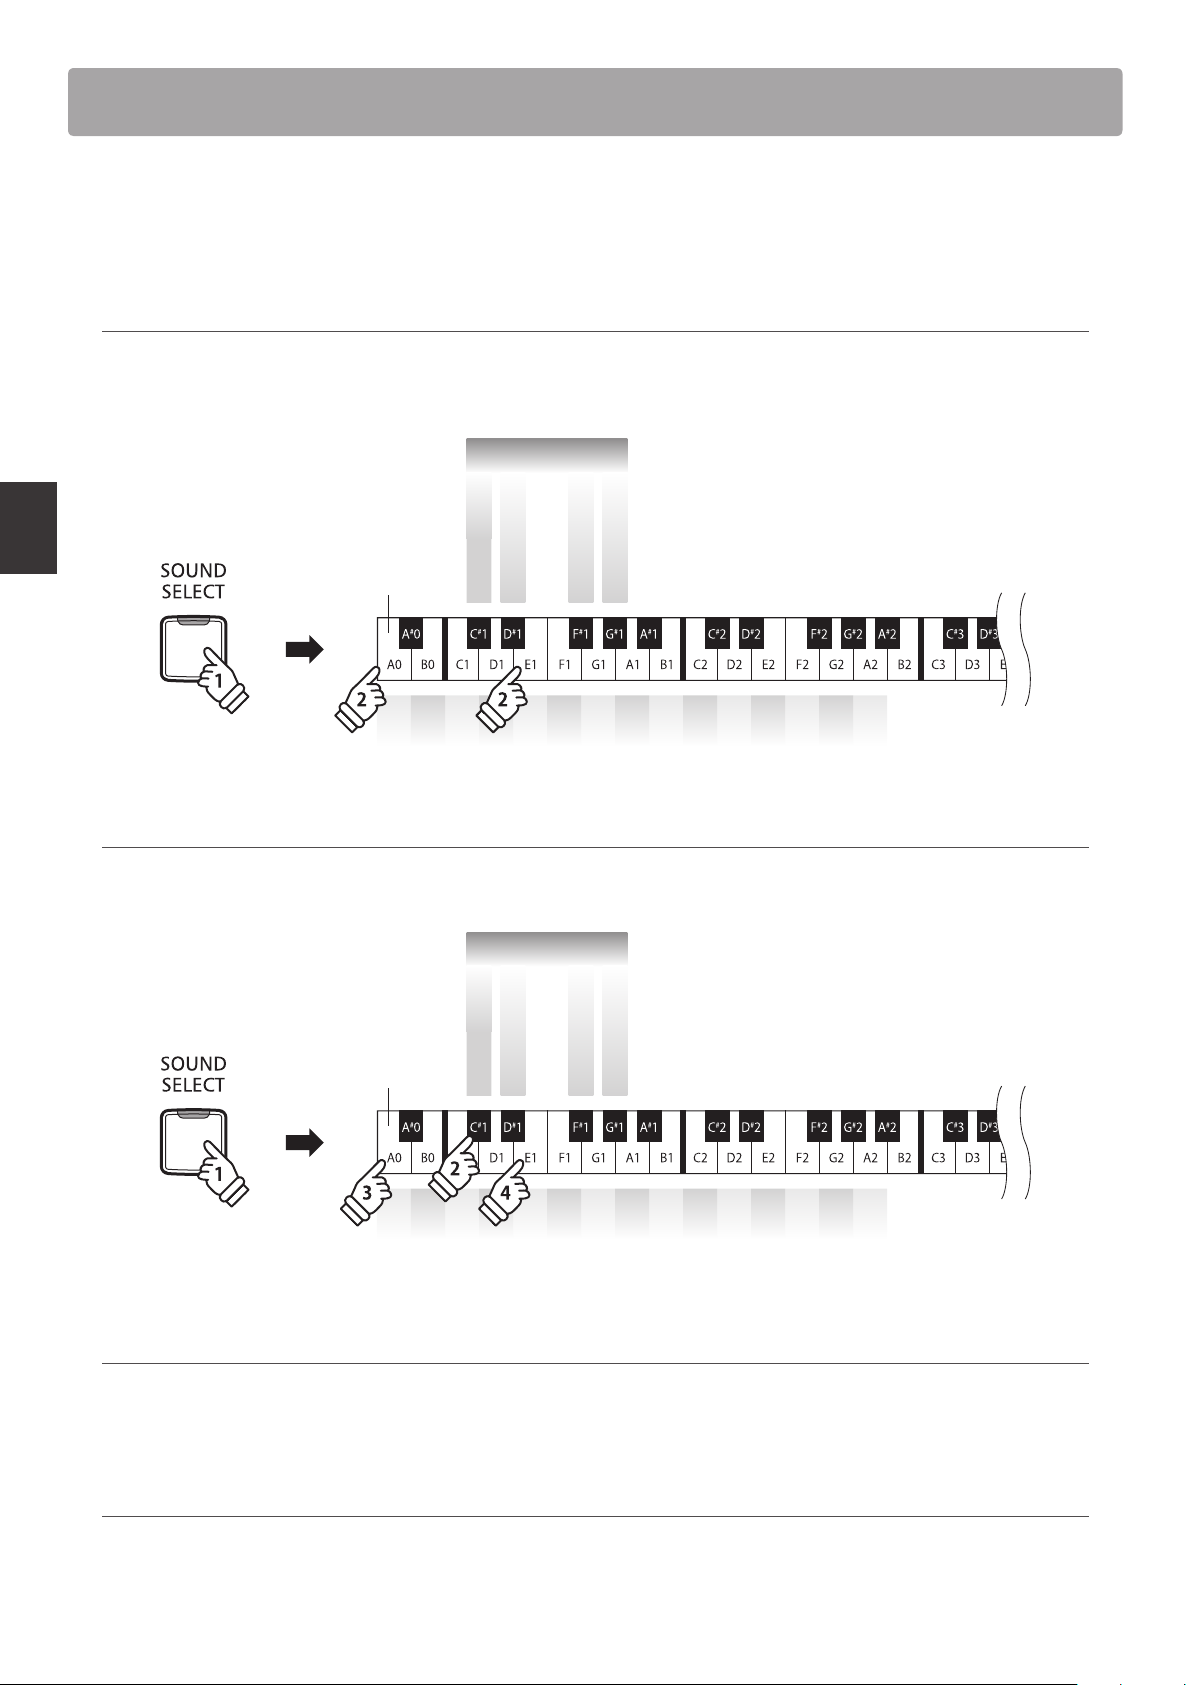
Selecting Sounds
The KDP110 digital piano features 15 dierent instrument sounds, which can be selected in one of two ways.
By default the ‘Concert Grand’ sound will be selected automatically when the instrument is turned on.
Instrument Sounds
PIANO E.PIANO / ORGAN OTHERS
1 Concert Grand 1 Classic E.Piano 1 Harpsichord
2 Studio Grand 2 Modern E.Piano 2 Vibraphone
3 Mellow Grand 3 Jazz Organ 3 String Ensemble
4 Modern Piano 4 Church Organ 4 Slow Strings
5 Choir
6 New Age Pad
7 Atmosphere
Selecting a sound: Method 1
Playing the Piano
Press the SOUND SELECT button repeatedly to cycle through the 15 available instrument sounds.
[Power On]
Press once Press 13 times Press once
Concert Grand Concert GrandStudio Grand Atmosphere
Selecting a sound: Method 2
Press and hold the SOUND SELECT button, then press one of the lowest 15 white keys to select the desired instrument sound.
Lowest key
Concert Grand
Studio Grand
Mellow Grand
Modern Piano
Classic E.Piano
Modern E.Piano
Jazz Organ
Church Organ
Harpsichord
Vibraphone
String Ensemble
Slow Strings
Choir
New Age Pad
Atmosphere
hold
12
Page 13
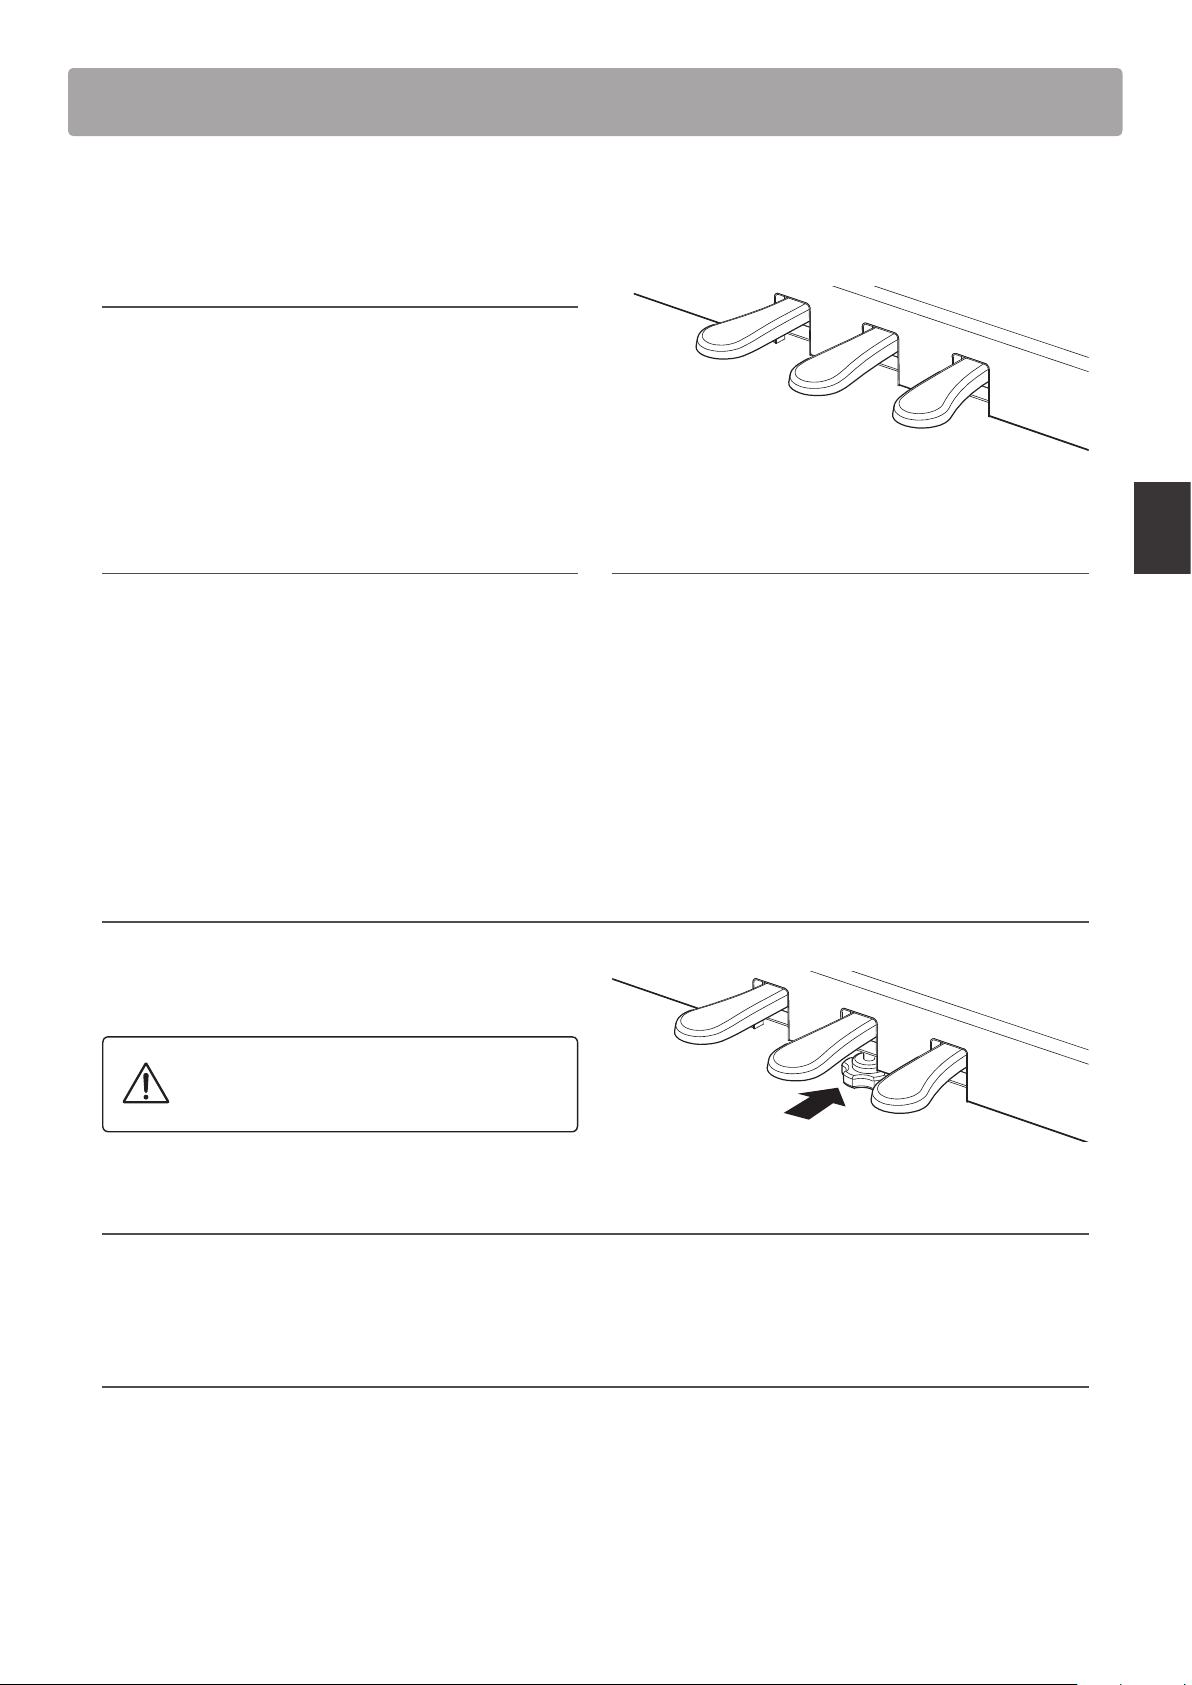
Using the Pedals
As with a grand piano, the KDP110 digital piano features three pedals: sustain, sostenuto, and soft.
Sustain pedal (right pedal)
Depressing this pedal sustains the sound after one’s hands
have been lifted from the keyboard - greatly enriching the
piano sound, while also assisting smooth ‘legato’ passages.
Soft pedal
The sustain pedal is capable of responding to half pedaling.
Soft pedal (left pedal)
Depressing this pedal softens the sound, reducing its volume.
When the Jazz Organ sound is selected, the soft pedal is also
used to alternate the speed of the rotary speaker simulation
between ‘Slow’ and ‘Fast’ eect modes.
Pedal support bolt
If the pedal support bolt does not make contact with the oor,
the pedal board may become damaged. Ensure that this bolt is
fully extended and supports the pedals rmly.
Sostenuto pedal
Sustain pedal
Sostenuto pedal (centre pedal)
Depressing this pedal after playing the keyboard and before
releasing the keys, sustains the sound of only those notes that
have been played. Any keys that are subsequently played after
the sostenuto pedal is depressed will not be sustained.
Playing the Piano
When moving the instrument, always adjust or
remove the pedal support bolt, then readjust
when the instrument is in its new position.
Caring for the pedals
If the surface of the pedals becomes dirty, clean the pedals using a dry dish-washing sponge.
Do not attempt to clean the pedals using rust-removing solvents, abrasives or les.
Grand Feel pedal system
The KDP110 digital piano features the new Grand Feel pedal system, which replicates the sustain, soft, and sostenuto pedal
weighting of Kawai’s SK-EX Concert Grand piano.
13
Page 14
Dual Mode
The Dual Mode function allows two sounds to be layered together, creating a more complex sound.
For example, a piano sound layered with strings, or an electric piano combined with a harpsichord etc.
Enabling Dual Mode : Method 1
Press and hold the SOUND SELECT button, then press two of the lowest 15 white keys simultaneously.
The sounds corresponding to the two keys will be layered together.
Dual
Dual Bala nce Reset
Dual Balance
Dual Mod e On
Dual Balance
Playing the Piano
Lowest key
hold
Enabling Dual Mode : Method 2
Press and hold the SOUND SELECT button, then press the C#1 key.
While still holding the SOUND SELECT button, press two of the lowest 15 white keys in order.
Lowest key
1 2 3 4 5 6 7 8 9 10 11 12 13 14 15
Dual
Dual Bala nce Reset
Dual Mod e On
+
–
Dual Balance
Dual Balance
+
–
hold
Adjusting the volume balance
Press and hold the SOUND SELECT button, then press the F#1 or G#1 keys repeatedly to decrease or increase the volume balance
between the two sounds, or the D#1 key to reset the volume balance.
Exiting Dual Mode
Press the SOUND SELECT button.
The Concert Grand sound will be selected automatically and the instrument will return to normal operation.
1 2 3 4 5 6 7 8 9 10 11 12 13 14 15
14
Page 15
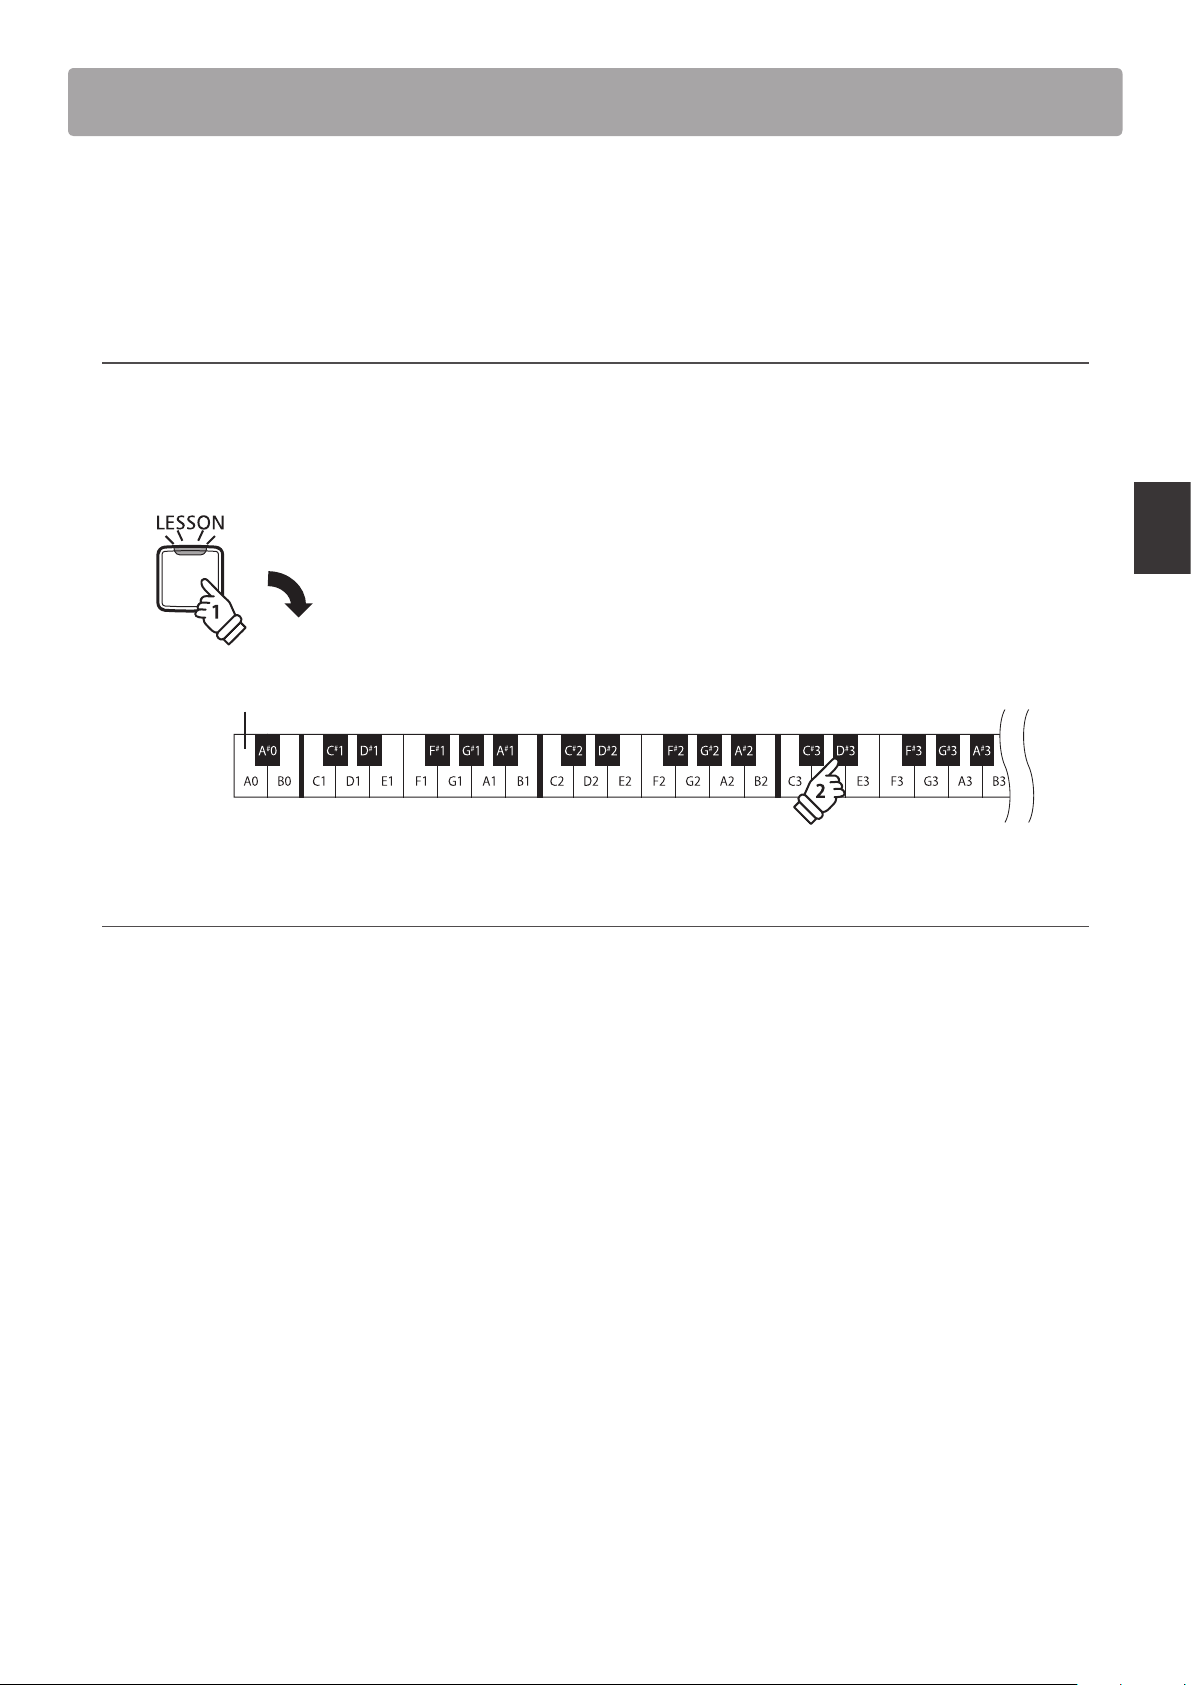
Four Hands Mode
The Four Hands Mode function divides the keyboard into two sections, with the sustain (right) and soft (left)
pedal acting as independent sustain pedals for each section. The oc tave/pitch of each section is also adjusted,
allowing two people to perform piano duets within the same key range using a single instrument.
Enabling Four Hands Mode
Press and hold the LESSON button, then press the D#3 key, as shown in the illustration below.
The LED indicators for the LESSON button will start to ash, indicating that Four Hands Mode is enabled.
* The selected keyboard sound can still be changed when Four Hands Mode is enabled.
hold
Lowest key
Exiting Four Hands Mode
Press the LESSON button.
The instrument will return to normal operation.
* With the Four Hands Mode activated, selecting a dierent sound will aect both the left and right sections.
* The Split Point for the Four Hands Mode is set to F4, and cannot be adjusted.
* The sostenuto pedal will aect the right section sound only.
Playing the Piano
15
Page 16
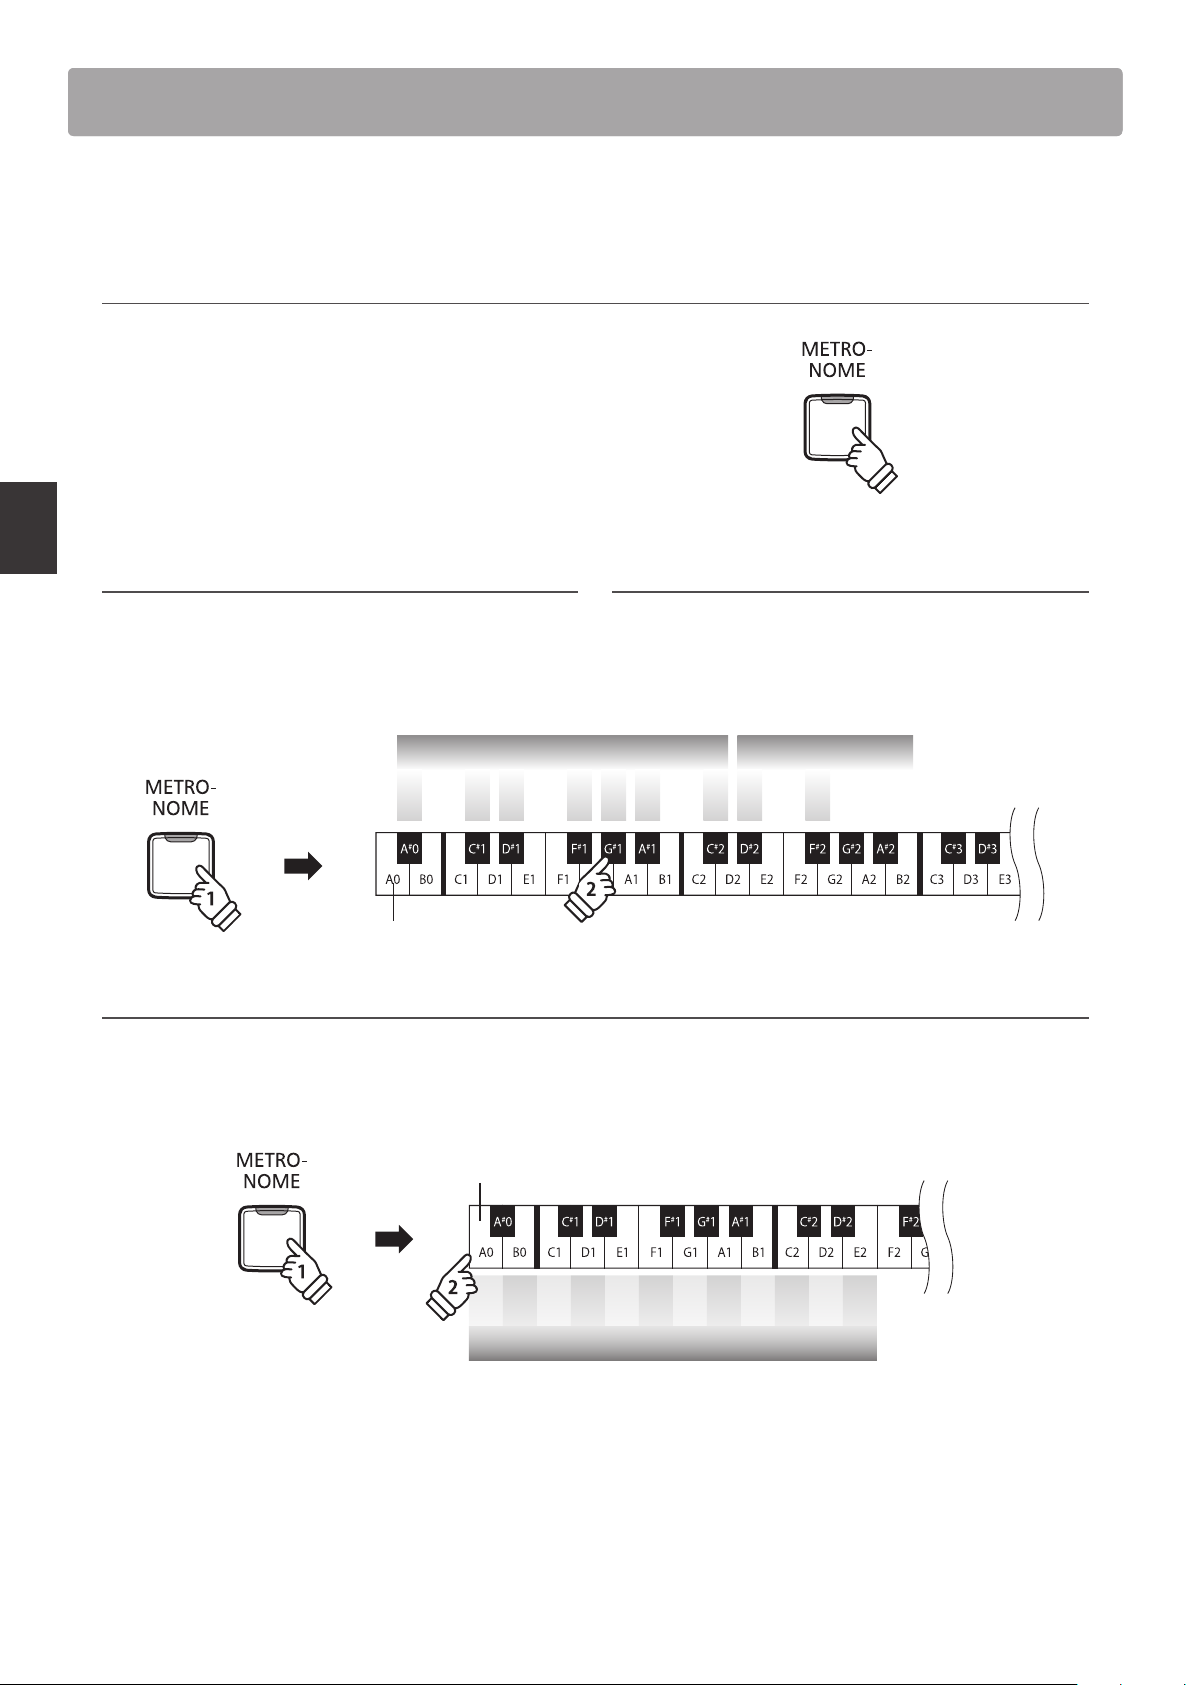
Metronome
The Metronome function provides a steady beat to aid practicing the piano at a consistent tempo.
The time signature, volume, and tempo of the metronome can be freely adjusted.
Turning the metronome on/o
Press the METRONOME button.
The metronome will start to count and the LED indicator for
the METRONOME button will turn on, indicating that the
metronome is in use.
* By default the metronome will count with a 1/4 beat at 120 bpm.
Press the METRONOME button again to stop the metronome.
Playing the Piano
Changing the metronome time signature
Press and hold the METRONOME button, then press one of the
7 lowest black keys, as shown in the illustration below.
* The metronome can be set to one of seven time signatures:
* 1/4, 2/4, 3/4, 4/4, 5/4, 3/8, and 6/8.
Metronome Time Signature
hold
Adjusting the metronome tempo
Press and hold the METRONOME button, enter the desired tempo using the lowest 12 white keys marked below, then release the
METRONOME button.
* The metronome tempo can be adjusted within the range of 10-300 bpm.
* The metronome tempo can be entered precisely, or decreased and increased gradually.
Lowest key
Adjusting the metronome volume
Press and hold the METRONOME button, then press the keys
marked -/+ in the illustration below.
Metronome Volume
5/44/43/42/41/4 6/83/8
+-
Lowest key
hold
Method 1:
While pressing the METRONOME button, press keys 1, 5, and 0 to set the tempo to 150 bpm, or keys 8 and 5 to set the tempo to 85 bpm.
Method 2:
While pressing the METR ONOME button, press the - / + keys repeatedly to gradually decreas e or increase the tempo in 2 bpm increments.
It is also possible to conveniently set the metronome tempo to correspond with musical terms such as Allegro or Andante.
Method 3:
While pressing the METRONOME button, press keys C3~E5 to select the desired tempo.
– + 1 2 3 4 5 6 7 8 9 0
Metronome Tempo
16
Page 17
Demo Songs
The KDP110 digital piano includes a selection of demonstration songs to introduce each internal sound.
Demo songs
Sound name Song name Composer
Concert Grand La Campanella Liszt
Studio Grand Original Kawai
Mellow Grand Sonata No.30 Op.109 Beethoven
Modern Piano Original
Classic E.Piano Original
Modern E.Piano Original
Jazz Organ Original
Church Organ Chorale Prelude “Wachet auf, ruft uns die Stimme.”
Harpsichord French Suite No.6
Vibraphone Original Kawai
String Ensemble Le quattro stagioni: la “Primavera” Vivaldi
Slow Strings Original Kawai
Choir Londonderry Air Irish folk song
New Age Pad Original
Atmosphere Original
* Kawai regret that sheet music for Kawai original demo songs is not available.
Kawai
Bach
Kawai
1. Playing the demo songs
Press the CONCERT MAGIC and LESSON buttons simultaneously.
The LED indicators for the CONCERT MAGIC and LESSON
buttons will start to ash, and the demo song for the Concert
Grand sound will start to play.
* When the Concert Grand demo song has nished, another demo song
will be selected at random. This process will continue until all of the
demo songs have been played.
Press either the CONCERT MAGIC or LESSON buttons to stop
the demo.
2. Selecting a demo song
While the demo is playing:
To listen to the demo song for a particular sound, press and hold the SOUND SELECT button, then press one of the lowest 15 white
keys assigned to the desired sound.
Lowest key
Internal Songs
Concert Grand
Studio Grand
Mellow Grand
Modern Piano
Classic E.Piano
Modern E.Piano
Jazz Organ
Church Organ
Harpsichord
hold
Alternatively, press the SOUND SELECT button to skip to the next demo song.
Vibraphone
String Ensemble
Slow Strings
Choir
New Age Pad
Atmosphere
17
Page 18

Concert Magic
The Concert Magic function allows complete beginners to enjoy playing the piano by simply selecting one
of the 40 pre-programmed songs, then tapping the keyboard with a steady rhythm and tempo.
The Concert Magic songs are categorised by group and assigned to the lowest 40 keys of the keyboard.For a
complete listing of available Concert Magic songs, please refer to page 22 of this owner’s manual.
Selecting a Concert Magic song
Press and hold the CONCERT MAGIC button, then press the key assigned to the desired Concert Magic song.
The LED indicator for the CONCERT MAGIC button will turn on, indicating that Concert Magic playing mode is in use.
Concert Magic song no.
Lowest key
2 5 10 14 ...7 12
Internal Songs
hold
Listening to the selected Concert Magic song
Press the PLAY/STOP button.
The LED indicator for the PLAY/STOP button will turn on and
the selected Concert Magic song will start to play.
* The selected song will play repeatedly until it is stopped.
* To listen to a dierent Concert Magic song simply repeat the above step.
Press either the PLAY/STOP or CONCERT MAGIC buttons again
to stop the song.
Performing the selected Concert Magic song
Press keys on the keyboard.
The song will advance with every key that is pressed.
1 3 4 6 8 9 11 13 15 ...
Concert Magic song no.
Pressing the keys gently will produce a soft sound, while
pressing heavily will produce a loud sound.
Similarly, pressing the keys quickly will increase the tempo of
the song, while pressing slowly will decrease the tempo.
Exiting Concert Magic playing mode
Press the CONCERT MAGIC button.
The LED indicator for the CONCERT MAGIC button will turn o
and the instrument will return to normal operation.
18
Page 19

Concert Magic demo modes
The Concert Magic demo modes allow the Concert Magic songs to be listened to in one of three ways:
All Play, Category Play, and Random Play
All Play
Press the CONCERT MAGIC button, then press the PLAY/STOP
button.
The LED indicator for the PLAY/STOP button will turn on and
the Concert Magic songs will start to play in numerical order.
Press either the CONCERT MAGIC or PLAY/STOP buttons again
to stop song playback.
Category Play
Press and hold the CONCERT MAGIC button, then press the key assigned to the desired Concert Magic song.
While still holding the CONCERT MAGIC button, press the LESSON button.
Concert Magic song no.
Lowest key
2 5 10 14 ...7 12
hold
The selected Concert Magic song will start to play.
* When the selected song nishes, the next song in the same category will start to play automatically.
Random Play
Press the CONCERT MAGIC button and then press the LESSON
button.
The KDP110 digital piano will play back the rst Concert Magic
song, followed by the remaining 39 Concert Magic songs in
random order.
1 3 4 6 8 9 11 13 15 ...
Concert Magic song no.
Internal Songs
19
Page 20

Concert Magic
Concert Magic Mode
The Concert Magic Mode setting changes the Concert Magic playing mode, allowing all Concert Magic songs
to be played by simply tapping any key with a constant steady beat, regardless of the song arrangement
type.
Concert Magic Mode
Concert Magic Mode Description Pedal
Normal Concert Magic songs will be performed according to their arrangement type. Soft
Steady Beat All Concert Magic songs will be performed by tapping the key with a constant beat. Sostenuto
Changing the Concert Magic Mode
Press and hold the CONCERT MAGIC button, then press the pedal assigned to the desired Concert Magic Mode.
Internal Songs
To select Normal mode, press and hold the CONCERT MAGIC button, then depress the Soft pedal.
To select Steady Beat mode, press and hold the CONCERT MAGIC button, then depress the Sostenuto pedal.
The selected Concert Magic Mode type will be applied immediately.
* When the instrument is turned on, the Concert Magic Mode setting will return to the default type of ‘Normal’.
20
Page 21

Concert Magic song arrangement types
Concert Magic songs are divided into three dierent arrangement types: Easy Beat (EB), Melody Play (MP),
and Skillful (SK). Each arrangement type requires a dierent level of skill to be performed correctly.
Easy Beat EB
These are the easiest songs to play. To perform them, simply tap out a constant, steady beat on any key of the keyboard.
For example, when playing the piece ‘Für Elise’, a constant, steady rhythm should to be maintained throughout the song.
Key on: X X X X X X X X X XX X X X X X X X X X
Melody Play MP
These songs are also relatively easy to play, especially if they are familiar to the player. To perform them, tap out the rhythm of the
melody on any key of the keyboard. Singing along as the rhythm is tapped can be helpful.
For example, when playing the piece ‘Twinkle, Twinkle, Little Star’, the rhythm of the melody should be played.
* When performing fast Concert Magic songs, it may be easier to press dierent keys with two alternating ngers in order to achieve greater speed.
Key on: X X X X X X X X X X X X X X
Skillful SK
These songs range in diculty from moderately dicult to dicult. To perform them, tap out the rhythm of both the melody and
the accompaniment notes on any key of the keyboard.
For example, when playing the piece ‘Waltz of the Flowers’, the rhythm of both the melody and the accompaniment should be
played.
Key on: X X X X X X X X X X X X X
Internal Songs
21
Page 22

Concert Magic
Concert Magic song list
Internal Songs
No. Song Name Typ e
Children’s Songs
1 Twinkle, Twinkle, Little Star MP
2 I’m A Little Teapot MP
3 Mary Had A Little Lamb MP
4 London Bridge MP
5 Row, Row, Row Your Boat MP
6 Frère Jacques MP
7 Old MacDonald Had A Farm MP
Christmas Songs
8 Hark The Herald Angels Sing MP
9 Jingle Bells MP
10 Deck The Halls MP
11 O Come All Ye Faithful MP
12 Joy To The World MP
13 Silent Night MP
14 We Wish You A Merry Christmas MP
American Classics
15 Battle Hymn Of The Republic MP
16 Yankee Doodle MP
17 Londonderry Air EB
18 Clementine MP
19 Auld Lang Syne MP
20 Oh Susanna SK
21 The Camptown Races MP
22 When The Saints Go Marching In EB
23 The Entertainer SK
No. Song Name Typ e
Classical Selections
24 William Tell Overture SK
25 Andante from Symphony No.94 (Haydn) MP
26 Für Elise EB
27 Clair De Lune SK
28 Skater’s Waltz SK
29 Blue Danube Waltz SK
30 Gavotte (Gossec) SK
31 Waltz Of The Flowers SK
Special Occasions
32 Bridal Chorus MP
33 Wedding March SK
34 Pomp And Circumstance SK
International Songs
35 When Irish Eyes Are Smiling EB
36 Chiapanecas SK
37 Santa Lucia SK
38 Funiculì Funiculà SK
39 Romance De L’amour EB
40 My Wild Irish Rose EB
22
Page 23

Lesson Function
The Lesson function allows budding pianists to practice the piano using a selection of built-in song books.
The left and right hand parts for each piece can be practiced separately, while adjusting the tempo allows
dicult passages to be perfected.
For a complete listing of available Lesson Function songs, please refer to page 48 of this owner’s manual.
Built-in lesson function song books
US, Canada, Australasia Rest of the World
Book 1
Book 2
Book 3
Book 4
Book 5
1
Alfred’s Basic Piano Library Lesson Book Level 1A Beyer 106 (Vorschule im Klavierspiel, Opus 101)
Alfred’s Basic Piano Library Lesson Book Level 1B Burgmüller 25 (25 Etudes Faciles, Opus 100)
Beyer 106 (Vorschule im Klavierspiel, Opus 101) Czerny 30 (Etudes de Mécanisme, Opus 849)
Burgmüller 25 (25 Etudes Faciles, Opus 100) Alfred’s Basic Piano Library Lesson Book Level 1A
Czerny 30 (Etudes de Mécanisme, Opus 849) Alfred’s Basic Piano Library Lesson Book Level 1B
* Lesson books sold separately - please refer to page 49 of this owner’s manual for more information.
Selecting a lesson book/song
1. Entering lesson mode
Press the LESSON button.
The LED indicator for the LESSON but ton will turn on, indicating
that lesson mode is enabled, and the Concert Grand sound will
be selected automatically.
2. Selecting a lesson book
Internal Songs
While holding down the LESSON button, press the black key assigned to the desired lesson book.
3. Selecting a lessson song
While holding down the LESSON button, enter the piece number by pressing the corresponding white keys in sequence (e.g. to
select piece no.25, press D1 followed by G1). Then, release the LESSON button.
Selecting the Beyer variation
The Beyer lesson book includes 106 exercises. Exercise no.1
consists of 12 variations, while exercise no.2 consists of 8
variations.
To select the variation for the no.1 and no.2 exercises, rst press
and hold the LESSON button and press the corresponding
black key to select the Beyer lesson book.
While holding down the LESSON button, press the C1 or D1
key to select the no.1 or no.2 exercise, then nally press the B0
key (+) multiple times to select the desired variation.
Listing of Beyer’s pieces
No. 1 Theme
1-1 to 1-12 Variations
No. 2 Theme
2-1 to 2-8 Variations
No. 3 Theme
No. 4 Theme
No. 106 Theme
Theme
23
Page 24

Lesson Function
2
Listening to the selected lesson song
This page will explain how to play and stop the selected lesson song, and adjust the tempo.
Playing the lesson song
After selecting a lesson book and song:
Press the PLAY/STOP button.
The LED indicator for the PLAY/STOP button will turn on, and
a one bar count-in will be heard before the song starts to play.
While the lesson song is playing, press the METRONOME
button to turn the metronome on/o.
* The metronome time signature and tempo will automatically be set to
that of the currently selected lesson song.
Internal Songs
Adjusting tempo of the lesson song
While the lesson song is playing:
Press and hold the METRONOME button, enter the desired tempo using the lowest 12 white keys marked below, then release the
METRONOME button.
* The lesson song tempo can be adjusted within the range of 10-300 bpm.
* The lesson song tempo can be entered precisely, or decreased and increased gradually.
Lowest key
hold
Method 1:
While pressing the METRONOME button, press keys 1, 5, and 0 to set the tempo to 150 bpm, or keys 8 and 5 to set the tempo to
85 bpm.
Method 2:
While pressing the METRONOME button, press the - / + keys repeatedly to gradually decrease or increase the tempo in 2 bpm
increments.
– + 1 2 3 4 5 6 7 8 9 0
Lesson Song Tempo
Stopping the lesson song
While the lesson song is playing:
Press the PLAY/STOP button again to stop the lesson song.
The LED indicator for the PLAY/STOP button will turn o.
24
Page 25

3
Practicing left and right-hand parts separately
This page will explain how to mute/activate the left and right-hand parts of the selected lesson song,
allowing each part to be practiced separately.
The LED indicators for the METRONOME and SOUND SELECT buttons are used to indicate which part (left or
right-hand) of the selected lesson song is muted/active.
METRONOME button LED SOUND SELECT button LED Lesson song playback
On On Left and Right-hand parts
On O Left-hand part only
O On Right-hand part only
Muting/activating lesson song parts 1
After selecting a lesson book and song:
Press the SOUND SELECT button.
(default playing mode)
The LED indicator for the SOUND SELECT button will turn o
(the LED indicator for the METRONOME button will remain
turned on), indicating that only the left-hand part of the lesson
song is active (i.e. the right-hand part will be muted).
Press the SOUND SELECT button again.
The LED indicator for the SOUND SELECT button will turn on
and the LED indicator for the METRONOME button will turn
o, indicating that only the right-hand part of the lesson song
is active (i.e. the left-hand part will be muted).
Press the SOUND SELECT button once again.
The LED indicator for the SOUND SELECT button will remain
turned on and the LED indicator for the METRONOME button
will also turn on, indicating that both the left and right-hand
parts of the lesson song are active.
Press once:
Left-hand only
Press twice:
Right-hand only
Press 3 times:
Left and Right-hand
Internal Songs
25
Page 26

Lesson Function
Muting/activating lesson song parts 2
Select a part directly. While holding down the LESSON button,
press the part button you want to replay.
To restore the normal replay, exit the lesson mode and then
enter the lesson mode again.
hold
Internal Songs
Exiting lesson mode
Press the LESSON button.
The LED indicator for the LESSON button will turn o, and the
instrument will return to normal operation.
Left-hand part Right-hand part
26
Page 27

Recorder
The KDP110 digital piano allows up to 3 dierent songs to be recorded, stored in internal memory, and
played back at the touch of a button.
1
Recording a song
1. Entering song recorder mode
Press the REC button.
The LED indicator for the REC button will start to ash, to
indicate that the piano is in recording standby mode.
2. Selecting a song memory
Press and hold the REC button, then press the C1, D1 or E1 keys to select the desired song memory.
* Selecting a song memory that has already been used to record a song will automatically erase the previously recorded song.
Lowest key
hold
3. Starting the song recorder
Press a key on the keyboard.
The LED indicators for the REC and PLAY/STOP buttons will
turn on, and recording will start.
* Recording can also be started by pressing the PLAY/STOP button,
allowing a rest period or empty bar to be inserted at the beginning of
the song.
4. Stopping the song recorder
Song 1
Song 2
Song 3
Song Memory
Recorder
Press the PLAY/STOP button.
The LED indicators for the PLAY/STOP and REC buttons will turn o.
* The maximum recording capacity is approximately 10,000 notes, with button and pedal presses also counted as one note.
If the maximum recording capacity is reached during recording, the recorder will stop automatically.
* Recorder songs will remain in memory after the power is turned o.
To prevent data loss when turning o the instrument, do
not disconnect the power cable until all LEDs go o after
all LEDs ash on and o.
27
Page 28

Recorder
2
Playing back a song
1. Playing the recorded song
Press the PLAY/STOP button.
The LED indicator for the PLAY/STOP button will turn on, and
the recorded song will start to play.
2. Playing a song stored in another memory
Press and hold the PLAY/STOP button, then press the C1, D1 or E1 keys to play the desired song memory.
* The selected song will start to play when the PLAY/STOP button is released.
Lowest key
Song 1
Song 2
Song 3
hold
Song Memory
3
Erasing recorded songs
Warning: This process will erase all three songs stored in internal memory, and cannot be undone.
Recorder
Erasing the recorder songs
Press and hold the PLAY/STOP and REC buttons simultaneously, then turn the instrument’s power on.
All recorder songs stored in memory will be erased.
28
hold
hold
Page 29

Keyboard and Sound Settings
The KDP110’s keyboard and sound settings allow various aspects of the instrument to be adjusted.
Keyboard and Sound Settings
Setting name Explanation Default setting
Damper Resonance Adjust the resonance that is heard when depressing the damper pedal. Medium
Reverb Change the type of reverberation added to the sound. On
Tou ch Change the touch sensitivity of the keyboard. Normal
Tuning Increase or decrease the pitch of the keyboard in 0.5 Hz steps. 440.0Hz
Transp ose Increase or decrease the pitch of the keyboard in semi-tone steps. 0
Brilliance Adjust the brightness of the sound. 0
Virtual Technician Select the tuning from 10 preset styles. O
Spatial Headphone Sound Select the desired Spatial Headphone Sound mode. Normal
Phones Type Select the type of headphones to be used with the instrument. Normal
29
Settings
Page 30

Keyboard and Sound Settings
1
Damper Resonance
Depressing the sustain pedal of an acoustic piano raises all dampers, allowing the strings to vibrate freely.
When a note or chord is played on the piano with the sustain pedal depressed, not only will the strings of
the notes played vibrate, but also the strings of other notes, vibrating in sympathetic resonance.
The KDP110 digital piano recreates this phenomenon, with the Damper Resonance setting allowing the
volume of this resonance to be changed.
Damper Resonance
Sounds aected by Damper Resonance
Concert Grand
Studio Grand
Mellow Grand
Modern Piano
Settings
Damper Resonance type
Damper Resonance type Description Key
O Disables the damper resonance eect. C#2
On (Re)Enables the damper resonance eect. D#2
Small Piano sounds produce a small amount of damper resonance. F#2
Medium (default) Piano sounds produce a medium amount of damper resonance. G#2
Large Piano sounds produce a large amount of damper resonance. A#2
Changing the Damper Resonance type
Press and hold the SOUND SELECT button, then press the key assigned to the desired Damper Resonance type.
* To disable/enable the damper resonance eect, press the key assigned to the o/on function.
* If the damper resonance eect is disabled, it will be turned on automatically upon selecting a damper resonance type.
Damper Resonance
Medium
Lowest key
Off
On
Small
Large
30
hold
Page 31

2
Reverb
The Reverb setting adds reverberation to the sound, simulating the acoustic environment of a recital room,
stage, or concert hall. The most suitable reverb type is applied automatically when selecting each sound,
however it is also possible to select a dierent reverb type manually if desired.
Reverb type
Reverb type Description Key
O Disables the reverb eect. C#3
On (Re)Enables the reverb eect. D#3
Room Simulates the ambiance of a small rehearsal room. C3
Lounge Simulates the ambience of piano lounge. D3
Small Hall Simulates the ambiance of a small hall. E3
Concert Hall Simulates the ambiance of a concert hall or theater. F3
Live Hall Simulates the ambiance of a live hall or stage. G3
Cathedral Simulates the ambiance of a large cathedral. A3
Changing the Reverb type
Press and hold the SOUND SELECT button, then press the key assigned to the desired Reverb type.
* To disable/enable the reverb eect, press the key assigned to the ‘o/on’ function.
* If the reverb eect is disabled, it will be turned on automatically upon selecting a reverb type.
hold
hold
Lowest key
Room
Reverb
Off
Lounge
On
Small Hall
Concert Hall
Live Hall
Cathedral
Settings
Reverb
31
Page 32

Keyboard and Sound Settings
3
Touch
As with an acoustic piano, the KDP110 digital piano produces a louder sound when the keys are struck with
force, and a softer sound when the keys are played gently. The volume and tonal character change in relation
to the strength and speed of playing - on a digital piano this system is referred to as ‘touch sensitivity’.
The Touch setting allows the touch sensitivity of the keyboard to be conveniently adjusted. There are four
dierent preset touch settings available.
Touch type
Tou ch type Description Key
O
Light
Normal
Heavy
Press and hold the SOUND SELECT button, then press the key assigned to the desired touch type.
(default) Reproduces the standard touch sensitivity of an acoustic piano. G#4
Changing the Touch type
A constant volume is produced regardless of how hard the keys are struck.
This setting is recommended for sounds that have a xed dynamic range such as organ and harpsichord.
A louder volume is produced even when playing with a soft touch.
This setting is recommended for children and organ players, or for those still developing nger strength.
Requires a heavier touch to produce a loud volume.
This setting is recommended to those with stronger ngers.
Tou ch
Normal
Off
Light
Heavy
C#4
F#4
A#4
Settings
hold
32
Page 33

4
Tuning
The Tuning setting allows the overall pitch of the KDP110 digital piano to be raised and lowered in 0.5 Hz
steps, and may therefore prove useful when playing with other instruments.
Adjusting the Tuning setting: Method 1
Press and hold the METRONOME and SOUND SELECT buttons,
then enter the desired pitch using the number keys indicated
below.
* The keyboard pitch can be adjusted within the range of 427 - 453 Hz.
* To reset the pitch to 440.0Hz, press the Reset key indicated below.
Example A=441.5 Hz
Enter 4, 4, 1, then press the + key.
Tuning
440.0Hz
Lowest key
hold
hold
1 2 3 4 5 6 7 8 9 0
Tuning
Adjusting the Tuning setting: Method 2
Press and hold the METRONOME and SOUND SELECT buttons,
then press the keys assigned -/+ to lower or raise the keyboard
pitch in 0.5 Hz steps.
+0.5Hz
-0.5Hz
33
Settings
Page 34

Keyboard and Sound Settings
5
Transpose
The Key Transpose setting allows the pitch of the KDP110 digital piano keyboard to be raised or lowered in
semi-tone steps. This is particularly useful when accompanying instruments with dierent tones, or when
a song learned in one key must be played in another key. When transposed, the song can be played in the
original key, yet heard in a dierent key.
Adjusting the Transpose setting
Press and hold the METRONOME and SOUND SELECT buttons, then press the keys assigned -/+ to lower or raise the keyboard pitch
in semi-tone steps.
* The transpose setting can be adjusted within the range of –6 - +5 semi-tones.
* To disable/enable the transpose setting, press the key assigned to the ‘o/on’ function.
Transpose
Lowest key
hold
6
Brilliance
The Brilliance setting allows the brightness of the KDP110 digital piano’s sound to be adjusted.
Adjusting the Brilliance setting
Press and hold the SOUND SELECT button, then press the F#5 or G#5 keys repeatedly to decrease or increase the brightness of
the sound.
* The Brilliance setting can be adjusted within the range of -10~+10, with +10 being the brightest setting.
* To reset the Brilliance eect, press the C#5 key.
hold
Off
On
- +
Settings
34
hold
hold
Brilliance
Off
- +
Highest key
Page 35

7
Virtual Technician (Smart Mode)
An experienced piano technician is essential to fully realise the potential of a ne acoustic piano. In
addition to meticulously tuning each note, the technician also performs numerous regulation and voicing
adjustments that allow the instrument to truly sing.
The KDP110 digital piano’s Virtual Technician simulates these renements digitally, with ten preset
congurations that intelligently adjust various characteristics of the grand piano sound to match dierent
musical styles.
Virtual Technician type
Virtual Technician type
O
(default) The default piano sound without additional adjustments. C6
Noiseless A piano adjusted to minimise additional damper resonance. D6
Deep Resonance A piano adjusted to emphasise damper resonance. E6
Light Resonance A piano adjusted to reduce damper resonance. F6
Soft
Brilliant A piano adjusted by hardening the hammers in order to produce a brighter tone for modern pieces. A6
Clean A piano adjusted by hardening the hammers and reducing the damper resonance. C#6
Strong
Dark
Rich A piano adjusted by lightening the touch weight of the keyboard and increasing damper resonance. G#6
Classical A piano adjusted for romantic, classical music, with a bright, open tone. A#6
Selecting the Virtual Technician type
Press and hold the SOUND SELECT button, then press the key assigned to the desired Virtual Technician type.
Description Key
A piano adjusted by softening the hammers and increasing the touch weight of the keyboard in
order to produce a softer tone that is suitable for slow, quiet pieces.
A piano adjusted to emphasise dynamics with a lightened keyboard touch and powerful damper resonance.
A piano adjusted by hardening the hammers and increasing the touch weight of the keyboard, in
order to produce a dark, gloomy tone.
Virtual Technician
Strong
Clean
Dark
Classical
Rich
Highest key
G6
D#6
F#6
Off
Noiseless
Deep Resonance
Light Resonance
Soft
Brilliant
hold
Virtual Technician
Virtual Technician Advanced Mode (iPad app)
In addition to changing the piano’s sound by selecting dierent Virtual Technician presets, it is also possible to adjust individual
characteristics using the dedicated Virtual Technician iPad app. This app gives the player full control over every aspect of the
piano’s conguration, allowing precise adjustments to be made to voicing, damper resonance and various other acoustic
characteristics, from a convenient touchscreen interface.
* For more information about the Virtual Technician iPad app, please visit the AppStore: https://itunes.apple.com/app/id948579667
Settings
35
Page 36

Keyboard and Sound Settings
8
Spatial Headphone Sound
Spatial Headphone Sound is a special feature of the KDP110 digital piano that enhances the depth and
realism of the acoustic piano sound when listening through headphones or earphones.
The Spatial Headphone Sound setting allows the player to select from one of three dierent acoustic presets
that adjust the spatial positioning of the sound, while also helping to reduce auditory fatigue when using
earphones or headphones for extended periods of time.
Spatial Headphone Sound type
Spatial Headphone Sound type Description Key
O Disable the Spatial Headphone Sound feature. C#7
Forward Front focused, somewhat narrow spatial positioning. F#7
Normal
Wide Wide, very open spatial positioning. A#7
(default) Naturally balanced spatial positioning that is neither forward nor wide. G#7
Settings
Setting the Spatial Headphone Sound system
Press and hold the SOUND SELECT button, then press the key assigned to the desired Spatial Headphone Sound type.
Spatial Headphone Sound
Forward
Normal
Wide
Off
hold
Highest key
36
Page 37

9
Phones Type
The Phones Type setting optimises the sound of the KDP110 digital piano when listening through dierent
types of headphones or earphones.
* This setting does not aect the speaker sound.
Phones ty pe
Phones type Description Key
Normal
Open Optimises the sound for open type headphones. D7
Semi-open Optimises the sound for semi-open type headphones. E7
Closed Optimises the sound for closed type headphones. F7
Inner-ear Optimises the sound for inner-ear type headphones. G7
Canal Optimises the sound for canal-type headphones A7
Press and hold the SOUND SELECT button, then press the key assigned to the desired Phones type.
(default) Disables headphone optimisation. C7
Phones Type setting
Highest key
Normal
Open
Semi Open
Closed
Inner-ear
Canal
hold
Phones Type
Settings
37
Page 38

Auto Power O
The KDP110 digital piano features a power saving function that can be used to automatically turn o the
instrument after a specied period of inactivity.
Auto Power O settings
Auto Power O Explanation Key
O The Auto Power O function is disabled. G7
15 min. The instrument will turn o automatically after 15 minutes of inactivity. A7
60 min. The instrument will turn o automatically after 60 minutes of inactivity. B7
120 min. The instrument will turn o automatically after 120 minutes of inactivity. C8
Selecting the Auto Power O setting
Press and hold the METRONOME and SOUND SELECT buttons simultaneously, then press the key assigned to the desired Auto
Power O setting.
* The Auto Power O setting will be stored automatically, and recalled every time the instrument is turned on.
hold
hold
Highest key
Off
15 min.
60 min.
Auto Power Off
120 min.
Settings
38
Page 39

Bluetooth® MIDI
The Bluetooth MIDI setting is used to enable/disable the KDP110 digital piano’s Bluetooth MIDI function.
When enabled, the KDP110 digital piano can be connected to smart phones, tablets, and other smart devices
to facilitate wireless MIDI communication, allowing a wide range of music-related apps to be enjoyed using
the instrument.
* Availability of Bluetooth function dependent on market location.
Bluetooth MIDI settings
Bluetooth MIDI Description Key
O Disables the instrument’s Bluetooth MIDI function. G#5
On (default) Enables the instrument’s Bluetooth MIDI function. A#5
Enabling/disabling Bluetooth MIDI
Press and hold the METRONOME and SOUND SELECT buttons, then press the G#5 key to disable Bluetooth MIDI, or the A#5 key to
enable Bluetooth MIDI.
hold
Connecting the KDP110 digital piano to a smart device using Bluetooth MIDI
After enabling the Bluetooth MIDI function of the KDP110 digital piano, enable Bluetooth communications on the smart device.
After a few moments the KDP110 digital piano should appear in the app’s device list. Tap the KDP110 entry to connect the
instrument to the smart device. It should now be possible for MIDI apps to communicate with the KDP110 digital piano.
* When the KDP110 digital piano is connected to a smart device via Bluetooth MIDI, the USB MIDI and MIDI IN/OUT connectors will be disabled.
* Please check for Bluetooth MIDI compatibility with the smart device manufacturer and app developer.
* For a list of potential issues and recommended solutions when using Bluetooth communications, please refer to page 42 of this owner’s manual.
* For more detailed instructions regarding Bluetooth pairing, please refer to the Bluetooth support pages of the Kawai Global website:
http://www.kawai-global.com/support/bluetooth/
hold
Bluetooth
Off
On
Highest key
Settings
39
Page 40

Connecting to Other Devices
Front
Underside
Back
a
Headphones
External
MIDI Device
c
b
d
Pedal Cable
USB type ‘A’
Computer
Tablet
a PHONES jacks (1/4” & 1/8” phone jacks)
These jacks are used to connect stereo headphones to the
KDP110 digital piano. Headphones can be connected and used
simultaneously. When a pair of headphones is connected,
sound will not be produced by the speakers.
c MIDI IN/OUT jacks
These jacks are used to connect the KDP110 digital piano to
external MIDI devices, such as a sound module, or a computer
with a MIDI interface.
d USB to Host port (‘B’ type)
b PEDAL connector
This port is used to connect the KDP110 digital piano to a
This connector is used to connect the pedal board to the
KDP110 digital piano (see page 46).
Appendix
computer using an inexpensive USB cable. When connected,
the instrument can be used as a standard MIDI device, allowing
it to send and receive MIDI data. Connect a ‘B’ type USB
connector to the instrument, and an ‘A’ type USB connector
to the computer.
With additional conversion adaptors, this port may also be
used to connect the KDP110 digital piano to tablets such as
the Apple iPad and other mobile devices.
40
Page 41

USB MIDI (USB to Host connector)
The KDP110 digital piano features a ‘USB to Host’ type connector, allowing the instrument to be connected
to a computer using an inexpensive USB cable and utilised as a MIDI device. Depending on the type of
computer and operating system installed, additional driver software may be required for USB MIDI
communication to function correctly.
USB MIDI driver
Operating System USB MIDI Driver Support
Windows Vista (SP1, SP2)
Windows Vista 64-bit (SP1, SP2)
Windows 7 Windows 7 64-bit
Windows 8 Windows 8 64-bit
Windows 8.1 Windows 8.1 64-bit
Windows 10 Windows 10 64-bit
Windows Vista (no SP)
Windows Vista 64-bit (no SP)
Windows 98 SE
Windows 2000
Windows ME
Windows XP (no SP, SP1, SP2, SP3)
Windows XP 64-bit
Mac OS X
Mac OS 9
USB MIDI information
The standard (built-in) Windows USB-MIDI driver is used. This driver will be installed
automatically when the instrument is connected to the computer. To enable MIDI
communication between the application software and the instrument, select “USB-MIDI”
as an MIDI device.
USB-MIDI is not supported. Please upgrade to Service Pack 1 or Service Pack 2.
Windows XP or earlier versions are not supported. Please use a third-party MIDI interface
for MIDI connection.
Additional USB MIDI driver software NOT required.
The standard (built-in) Mac OS X USB MIDI driver will be installed automatically when the
instrument is connected to the computer.
USB MIDI is not supported.
Please use the standard MIDI IN/OUT connectors.
If the instrument’s MIDI IN/OUT jacks and USB MIDI port are
both connected simultaneously, the USB MIDI port will be
given priority.
Ensure that the instrument is turned OFF before attempting
to connect the USB MIDI cable.
When connecting the instrument to a computer using
the USB MIDI port, there may be a short delay before
communications begin.
If the instrument is connected to a computer via a USB hub
and USB MIDI communication becomes unreliable/unstable,
please connect the USB MIDI cable directly to the one of the
computer’s USB ports.
* ‘MIDI’ is a registered trademark of the Association of Manufacturers of Electronic Instruments (AMEI).
* ‘Windows’ is registered trademark of Microsoft Corporation.
* ‘Macintosh’ and ‘iPad’ are registered trademark of Apple Inc.
* Other company names and product names mentioned referenced herein may be registered trademarks or trademarks of respective owners.
* Bluetooth® word marks and logos are registered trademarks owned by Bluetooth SIG, Inc. Kawai uses these marks and logos under the license. Other
trademarks and trade names belong to their respective owners.
* Bluetooth (Ver 4.1 GATT compatible) / Bluetooth Low Energy MIDI Specication is supported.
Disconnecting the USB MIDI cable suddenly, or turning the
instrument on/o while using USB MIDI may cause computer
instability in the following situations:
– while installing the USB MIDI driver
– while starting up the computer
– while MIDI applications are performing tasks
– while the computer is in energy saver mode
If there are any further problems experienced with USB MIDI
communication while the instrument is connected, please
double-check all connections and relevant MIDI settings in
the computer’s operating system.
Appendix
41
Page 42

Troubleshooting
Problem Possible Cause and Solution Page no.
The instrument does not turn on.
Power
The instrument turns itself o
after a period of inactivity.
The instrument is turned on,
however no sound is produced
when the keys are played.
The sound distorts when playing
at very loud volume levels.
Sound
Strange sounds or noises are
heard when playing with piano
sounds.
Check that the power cable is rmly attached to the instrument,
and connected to an AC outlet.
Check that the ‘Auto Power O’ function is not enabled. p. 38
Check that the MASTER VOLUME slider is not set to the lowest
position.
Check that a pair of headphones (or headphone adaptor plug) are
not connected to the PHONES jack.
Check that Local Control is enabled in the MIDI Settings menu.
Check that the MASTER VOLUME slider is set to an appropriate
level, reducing the volume if excessive distortion is heard.
The KDP110 digital piano attempts to reproduce the rich variety
of tones created by an acoustic grand piano as accurately as
possible. This includes damper resonances and other subtle
eects that contribute to the overall piano playing experience.
While these additional eects are intended to enhance
the realism of the instrument, it is possible to reduce their
prominence, or disable them altogether using the sound settings.
p. 11
p. 11
p. 11
“MIDI Settings
Manual” p. 5
p. 11
p.30
p. 31
The pedals are unreliable or do
not function at all.
When depressing a pedal, the
pedal board exes and is not
rm.
Pedals
The top 18 notes of the
keyboard sustain for longer than
neighbouring notes, even when
the damper pedal is not pressed.
The instrument is connected to
the computer using a USB cable
(or a USB-MIDI adaptor), however
the software does not respond
to key presses.
The instrument cannot connect
to the smart device/app via
USB MIDI, MIDI, Bluetooth® MIDI
Bluetooth.
Check that the pedal cable is rmly connected to the instrument. p. 46
Check that the pedal support bolt is fully extended. p. 46
This is the correct behaviour, and intended to reproduce the
undamped notes (typically the top two octaves) of an acoustic
grand piano.
Check that a USB MIDI driver is installed on the computer.
Check that ‘USB Audio Device’ or ‘KAWAI USB MIDI’ is selected in
the software’s input/output device settings.
Check that the instrument is not connected to a smart device
using Bluetooth MIDI.
Check that the instrument’s Bluetooth MIDI function is turned On.
Ensure that the mobile device’s Bluetooth function is turned On.
Try deleting the instrument’s Bluetooth connection using the
mobile device’s ‘Forget Device’ function.
—
p. 41
p. 41
p. 39
p. 39
Appendix
Try turning the instrument O and then On, and/or restarting the
mobile device.
42
Page 43

Assembly Instructions
Please read these assembly instructions thoroughly before attempting to assemble the KDP110 digital piano.
Please ensure that two or more people work on assembling the KDP110 digital piano, especially when
lifting the main body of the instrument onto the stand in step 3.
Included par ts
Before attempting to assemble the KDP110 digital piano, ensure that all parts below are included.
A Phillips-head screwdriver (not included) will also be required in order to assemble the instrument.
a Main body
d Pedal board
Pedal support bolt
Screw set
g Screw (with at washer and spring washer) x 4
h Tapping screw (long, black, 4 x 30 mm) x 2 *
b Side panel
(left, right)
Headphone hook x 1 Mounting screw x 2
c Back board
f Power cablee AC/DC Adaptor
k Headphone hook set x 1
i Tapping screw (short, black, 4 x 20 mm) x 4 *
j Tapping screw (silver, 4 x 16 mm) x 4
* For Satin White nished instruments, black screws will
be replaced with silver screws.
Appendix
43
Page 44

Assembly Instructions
1. Assembling the side panels b,
and pedal board d
Unfasten and extend the pedal connection cable attached to
the bottom of the pedal board d.
Attach the pedal board d to the left and right side panels b
using the alignment screws located on either end of the pedal
board. Ensure that the correct side panel is used for the left
and right side.
Ensure that the pedal board and side panels make close
contact, and that there are no large gaps between the
assembled parts.
Insert the four short silver tapping screws j into the holes as
shown, and securely fasten the pedal board to the and left and
right side panels.
b
d d
gap
b
2. Attaching the back board c
Allow the assembled pedal board and side panels to stand
upright (vertically) on the oor.
* Ensure that the adjustor bolt is attached to the pedal board.
Temporarily x the back board c to the left and right side
panels using the two long black tapping screws h*, leaving a
tightening allowance of approximately 1-2 mm.
Then attach the bottom of the back board to the pedal board
using the four short black tapping screws i*.
* For Satin White nished instruments, black screws will be replaced with
silver screws.
b
d
b
Pedal cable
b
j
j
Alignment screw
d
b
d
Unfasten
d
b
b
h
i
c
i
b
h
i
i
not aligned
d
Appendix
44
Page 45

3. Mounting the main body a
Ensure that two or more people undertake the
following step of the assembly process.
Lift the main body a and carefully place it onto the stand.
Position the main body towards the front of the stand, so that
the metal tting holes are visible when viewed from above.
Gently slide the main body backwards until the base engages
with the xings inside the side panels and locks into place.
When lifting the main body onto the stand, be
careful not to catch/trap hands and ngers.
1
Secure the main body to the stand from below, using the four
screws (with the at washer and spring washer) g.
Tighten all screws securely to ensure that the
main body is rmly attached to the stand.
Failing to do so may result in serious injury.
Front view
a
a a
bb
a
2
a
b
a
b
c
b
d
b
a
g
g
b
Appendix
45
Page 46

Assembly Instructions
4. Connecting the pedal cable and
AC/DC adaptor
Connect the pedal cable to the PEDAL terminal located on the
underside of the main body.
Connect the AC/DC adaptor e to the DC IN terminal.
Use the binders to x the cables in place.
Binder
6. Adjusting the pedal support bolt
Turn the pedal support bolt anti-clockwise until it makes
contact with the oor and supports the pedals rmly.
When moving the instrument, always adjust or
remove the pedal support bolt, then readjust
when the instrument is in its new position.
* Note the direction
5. Attaching the headphone hook (optional)
If desired, attach the headphone hook to the underside of the
main body using the two tapping screws provided.
a
k
b
Appendix
46
Page 47

Demo Song List
Key No. Sound Name (Song Title) Composer
A0 1 Concert Grand (La Campanella) Liszt
B0 2 Studio Grand (Original) Kawai
C1 3 Mellow Grand (Sonata No.30 Op.109) Beethoven
D1 4 Modern Piano (Original)
E1 5 Classic E.Piano (Original)
F1 6 Modern E.Piano (Original)
G1 7 Jazz Organ (Original)
A1 8 Church Organ (Chorale Prelude “Wachet auf, ruft uns die Stimme.”)
B1 9 Harpsichord (French Suite No.6)
C2 10 Vibraphone (Original) Kawai
D2 11 String Ensemble (Le quattro stagioni: la “Primavera”) Vivaldi
E2 12 Slow Strings (Original) Kawai
F2 13 Choir (Londonderry Air) Irish folk song
G2 14 New Age Pad (Original)
A2 15 Atmosphere (Original)
Concert Magic Song List
Kawai
Bach
Kawai
Key No. Song name Composer
A0 1 Twinkle, Twinkle, Little Star French folk song
A#0 2 I’m A Little Teapot Traditional
B0 3 Mary Had A Little Lamb American folk song
C1 4 London Bridge Traditional
C#1 5 Row, Row, Row Your Boat American folk song
D1 6 Frère Jacques French folk song
D#1 7 Old MacDonald Had A Farm American folk song
E1 8 Hark The Herald Angels Sing Mendelssohn
F1 9 Jingle Bells Traditional
F#1 10 Deck The Halls Welsh Air
G1 11 O Come All Ye Faithful J.Reading
G#1 12 Joy To The World Traditional
A1 13 Silent Night Traditional
A#1 14 We Wish You A Merry Christmas British folk song
B1 15 Battle Hymn Of The Republic Traditional
C2 16 Yankee Doodle American folk song
C#2 17 Londonderry Air Irish folk song
D2 18 Clementine American folk song
D#2 19 Auld Lang Syne Scottish folk song
E2 20 Oh Susanna S.C.Foster
F2 21 The Camptown Races S.C.Foster
F#2 22 When The Saints Go Marching In American folk song
G2 23 The Entertainer S.Joplin
G#2 24 William Tell Overture Rossini
A2 25 Andante from Symphony No.94 (Haydn) Haydn
A#2 26 Für Elise Beethoven
B2 27 Clair De Lune Debussey
C3 28 Skater’s Waltz E.Waldteuful
C#3 29 Blue Danube Waltz Strauss
D3 30 Gavotte (Gossec) Gossec
D#3 31 Waltz Of The Flowers Tchaikovsky
E3 32 Bridal Chorus Wagner
F3 33 Wedding March Mendelssohn
F#3 34 Pomp And Circumstance Elgar
G3 35 When Irish Eyes Are Smiling E.R.Ball
G#3 36 Chiapanecas Mexican folk song
A3 37 Santa Lucia Naplish folk song
A#3 38 Funiculì Funiculà L.Denza
B3 39 Romance De L’amour Spanish folk song
C4 40 My Wild Irish Rose Chauncy Alcote
Appendix
47
Page 48

Lesson Function Song Lists
Alfred’s Basic Piano Library Lesson Book Level 1A
No.
1 Right & Left 1 Step Right Up!
2 Left & Right 2 The Carousel
3 Merrily We Roll Along/O’er the Deep Blue Sea 3 Hail to Thee, America!
4 Hand-Bells 4 Brother John
5 Jolly Old Saint Nicholas 5 Good Sounds
6 Old MacDonald 6 The Cuckoo
7 Batter Up! 7 Money Can’t Buy Ev’rything!
8 My Clever Pup 8 Ping-Pong
9 The Zoo 9 Grandpa’s Clock
10 Playing in a New Position 10 When the Saints Go Marching In
11 Sailing 11 G’s in the “BAG”
12 Skating 12 Join the Fun
13 Wishing Well 13 Oom-Pa-pa!
14 Rain, Rain! 14 The Clown
15 A Happy Song 15 Thumbs on C!
16 Position C 16 Waltz Time
17 A Happy Song 17 Good King Wenceslas
18 See-Saws 18 The Rainbow
19 Just a Second! 19 Yankee Doodle
20 Balloons 20 The Windmill
21 Who’s on Third? 21 Indians
22 Mexican Hat Dance 22 New Position G
23 Rock Song 23 Pedal Play
24 Rockets 24 Harp Song
25 Sea Divers 25 Concert Time
26 Play a Fourth 26 Music Box Rock
27 July the Fourth! 27 A Cowboy’s Song
28 Old Uncle Bill 28 The Magic Man
29 Love Somebody 29 The Greatest Show on Earth!
30 My Fifth 30 The Whirlwind
31 The Donkey 31 The Planets
32 Position G 32 C Major Scale Piece
33 Jingle Bells! 33 G Major Scale Piece
34 Willie & Tillie 34 Carol in G Major
35 A Friend Like You 35 The Same Carol in C Major
36 My Robot 36 French Lullaby
37 Rockin’ Tune 37 Sonatina
38 Indian Song 38 When Our Band Goes Marching By!
39 Raindrops
40 It’s Halloween!
41 Horse Sense
Alfred’s Basic Piano Library Lesson Book Level 1B
No.
Appendix
48
Page 49

Burgmüller 25 (25 Etudes Faciles, Opus 100) Czerny 30 (Etudes de Mécanisme, Opus 849)
No.
1 La candeur No. 1 to No. 30
2 Arabesque
3 Pastorale
4 Petite réunion No. 1 (1-1 to 1-12)
5 Innocence No. 2 (2-1 to 2-8)
6 Progrès No. 3 to No. 106
7 Courant Limpide
8 La gracieuse
9 La chasse
10 Tendre eur
11 La bergeronnette
12 Adieu
13 Consolation
14 La styrienne
15 Ballade
16 Douce plainte
17 Babillarde
18 Inquiétude
19 Ave Maria
20 Tarentelle
21 Harmonie des anges
22 Barcarolle
23 Retour
24 L’hirondelle
25 La chevaleresque
Beyer 10 6
Lesson Function song book availability
Alfred’s Basic Piano Library, Burgmüller: Etudes Faciles, Czerny: Etudes de Mécanisme, and Beyer lesson song books are sold separately.
Please check your local dealer for more information. Alfred’s international oces may also be contacted directly:
USA / Canada Australia
Alfred Music Publishing Alfred Publishing Australia
PO Box 10003 PO Box 2355
Van Nuys, CA 91410 Taren Point NSW 2229
Tel: +1 (800) 292-6122 Tel: +61 (02) 9524 0033
Email: sales@alfred.com Email: sales@alfredpub.com.au
Website: http://www.alfred.com
Appendix
49
Page 50

Specications
Kawai KDP110 digital piano
Keyboard
Sound Source
Internal Sounds Concert Grand, Studio Grand, Mellow Grand, Modern Piano, Classic E.Piano, Modern E.Piano,
Polyphony
Reverb
Internal Recorder
Lesson Function
Metronome
Demo Songs
Keyboard Modes
Virtual Technician
88 weighted keys
Responsive Hammer Compact II (RHC II) action
Harmonic Imaging™ (HI), 88-key piano sampling
Jazz Organ, Church Organ, Harpsichord, Vibraphone, String Ensemble, Slow Strings, Choir,
New Age Pad, Atmosphere
max. 192 notes
Room, Lounge, Small Hall, Concert Hall, Live Hall, Cathedral
3 song recorder - approximately 10,000 note memory capacity
Alfred, Burgmüller, Czerny and Beyer lesson songs
Beat: 1/4, 2/4, 3/4, 4/4, 5/4, 3/8, 6/8
Tempo: 10-300 bpm
15 songs
Dual Mode (with adjustable volume balance)
Four Hands Mode
Smart Mode: 10 presets
Advanced Mode:
(adjustable via iPad app)
Touch Curve, Damper Resonance, Key-o Eect, Hammer Delay,
Topboard Simulation, Decay Time, Minimum Touch, Stretch Tuning,
Temperament, Temperament Key, User Key Volume, Half-Pedal Adjust,
Soft Pedal Depth
Other Functions Damper Resonance, Reverb, Touch, Tuning, Transpose, Brilliance, Spatial Headphone Sound,
Phones Type, Auto Power O, Bluetooth MIDI, Transmit Program Change Number, MIDI Channel,
Local Control, Multi-timbral mode
Bluetooth *
Pedals
Jacks
Speakers
Output Power
Power Consumption
Key Cover
Dimensions
Weight
Bluetooth (Ver. 4.0; GATT compatible)
Bluetooth Low Energy MIDI Specication compliant
Sustain (with half-pedal support), Soft, Sostenuto
MIDI (IN/OUT), Headphones × 2, USB to HOST
12 cm × 2
20 W × 2
11 W
Sliding type
1360 (W) × 405 (D) × 855 (H) mm (folding Music Rack)
39 kg
Specications are subject to change without notice.
* Availability of Bluetooth function dependent on market location.
Appendix
50
Page 51

MODELO: MBH7BLZ07
IFETEL: NYCE/CT/1083/16/TS
For USA, Canada
DA107248
Complies with
IMDA Standards
C-17079
®
更頻率、加大功率或變更原設計之特性及功能。
應立即停用,並改善至無干擾時方得繼續使用。前項合法通信,指依電信法規定作
業之無線電通信。低功率射頻電機須忍受合法通信或工業、科學及醫療用電波輻射
性電機設備之干擾。
1. ■ 使用频率:2.4 - 2.4835 GHz
■ 等效全向辐射功率(EIRP):天线增益<10dBi 时:≤100 mW 或≤20 dBm
■ 最大功率谱密度:天线增益<10dBi 时:≤20 dBm / MHz(EIRP)
For Taiwan
第十二條 經型式認證合格之低功率射頻電機,非經許可,公司、商號或使用者均不得擅自變
第十四條 低功率射頻電機之使用不得影響飛航安全及干擾合法通信;經發現有干擾現象時,
For China
Information about Bluetooth
天线或改用其它发射天线;
即停止使用,并采取措施消除干扰后方可继续使用;
的辐射干扰;
■ 载频容限:20 ppm
■ 帯外发射功率(在2.4-2.4835GHz 頻段以外)≤-80 dBm / Hz (EIRP)
■ 杂散发射(辐射)功率(对应载波±2.5 倍信道带宽以外):
≤-33 dBm / 100 kHz (2.4 - 2.4835 GHz)
2. 不得擅自更改发射频率、加大发射功率(包括额外加装射频功率放大器),不得擅自外接
3. 使用时不得对各种合法的无线电通信业务产生有害干扰;一旦发现有干扰现象时,应立
4. 使用微功率无线电设备,必须忍受各种无线电业务的干扰或工业、科学及医疗应用设备
5. 不得在飞机和机场附近使用。
수없습니다
1. 해당 무선설비는 전파혼신 가능성이 있으므로 인명안전과 관련된 서비스는 할
2. B 급 기기(가정용 방송통신기자재)
이 기기는 가정용(B급)전자파적합기기로서 주로 가정에서 사용하는 것을
목적으로 하며, 모든 지역에서 사용할 수 있습니다.
3. 인증을받은 상표 KAWAI
이름:
4. 기자재 명칭: 특정소출력 무선기기(무선데이터통신시스템용 무선기기)
For Korea
TA-2016/2398
APPROVED
5. 모델명: MBH7BLZ07
6. 제조년 월: 제품에 붙어있는 라벨을 확인하시기 바랍니다.
7. 제조자: Kawai Musical Instruments Manufacturing Co., Ltd.
8. 원산지: 일본
For Argentina For Singapore
Marca: KAWAI
Modelo: MBH7BLZ07
cause undesired operation of the device.
(1) This device may not cause interference; and
(2) This device must accept any interference, including interference that may
Le présent appareil est conforme aux CNR d’Industrie Canada applicables aux
appareils radio exempts de licence. L’exploitation est autorisée aux deux
This device complies with Industry Canada’s licence-exempt RSSs. Operation is
It is strictly forbidden to use antenna except designated. This equipment must
not be co-located or operated in conjunction with any other antenna or
transmitter.
subject to the following two conditions:
For Canada
conditions suivantes :
même si le brouillage est susceptible d’en compromettre le fonctionnement.
(1) l’appareil ne doit pas produire de brouillage;
(2) l’utilisateur de l’appareil doit accepter tout brouillage radioélectrique subi,
PIANO DIGITAL
MARCA: KAWAI
(1) es posible que este equipo o dispositivo no cause interferencia perjudicial y
(2) este equipo o dispositivo debe aceptar cualquier interferencia, incluyendo la
La operación de este equipo está sujeta a las siguientes dos condiciones:
For Mexico
Este equipamento opera em caráter secundário, isto é, não tem
direito a proteção contra interferência prejudicial, mesmo de
estações do mesmo tipo e não pode causar interferência a
sistemas operando em caráter primário.
Para consultas, visite: www.anatel.gov.br
que pueda causar su operación no deseada.
04349-16-10021
For South Africa
For Brazil
Page 52

Page 53

Page 54

KDP110 Owner’s Manual
818863
KPSZ-0954 R101
OW 1110E-S 180 9
Printed in IndonesiaCopyright © 2018 Kawai Musical Instruments Mfg. Co.,Ltd. All Rights Reserved.
 Loading...