

Page 1

Concert Performer Series Digital Piano
Owner’s Manual
Model: CP115
Page 2

All descriptions and specifications in this manual are subject to change without notice.
II
Page 3
Important Safety Instructions
SAVE THESE INSTRUCTIONS
INSTRUCTIONS PERTAINING TO A RISK OF FIRE, ELECTRIC SHOCK, OR INJURY TO PERSONS
WARNING
CAUTION
RISK OF ELECTRIC SHOCK
DO NOT OPEN
AVIS : RISQUE DE CHOC ELECTRIQUE
TO REDUCE THE RISK OF ELECTRIC SHOCK, DO NOT REMOVE COVER (OR BACK).
NO USER-SERVICEABLE PARTS INSIDE. REFER SERVICING TO QUALIFIED SERVICE PERSONNEL.
The lighting flash with arrowhead symbol, within
an equilateral triangle, is intended to alert the user
to the presence of uninsulated "dangerous voltage"
within the product's enclosure that may be of
sufficient magnitude to constitute a risk of electric
shock to persons.
TO REDUCE THE RISK OF
FIRE OR ELECTRIC
SHOCK, DO NOT EXPOSE
THIS PRODUCT TO RAIN
OR MOISTURE.
- NE PAS OUVRIR.
The exclamation point within an equilateral triangle
is intended to alert the user to the presence of
important operating and maintenance (servicing)
instructions in the leterature accompanying the
product.
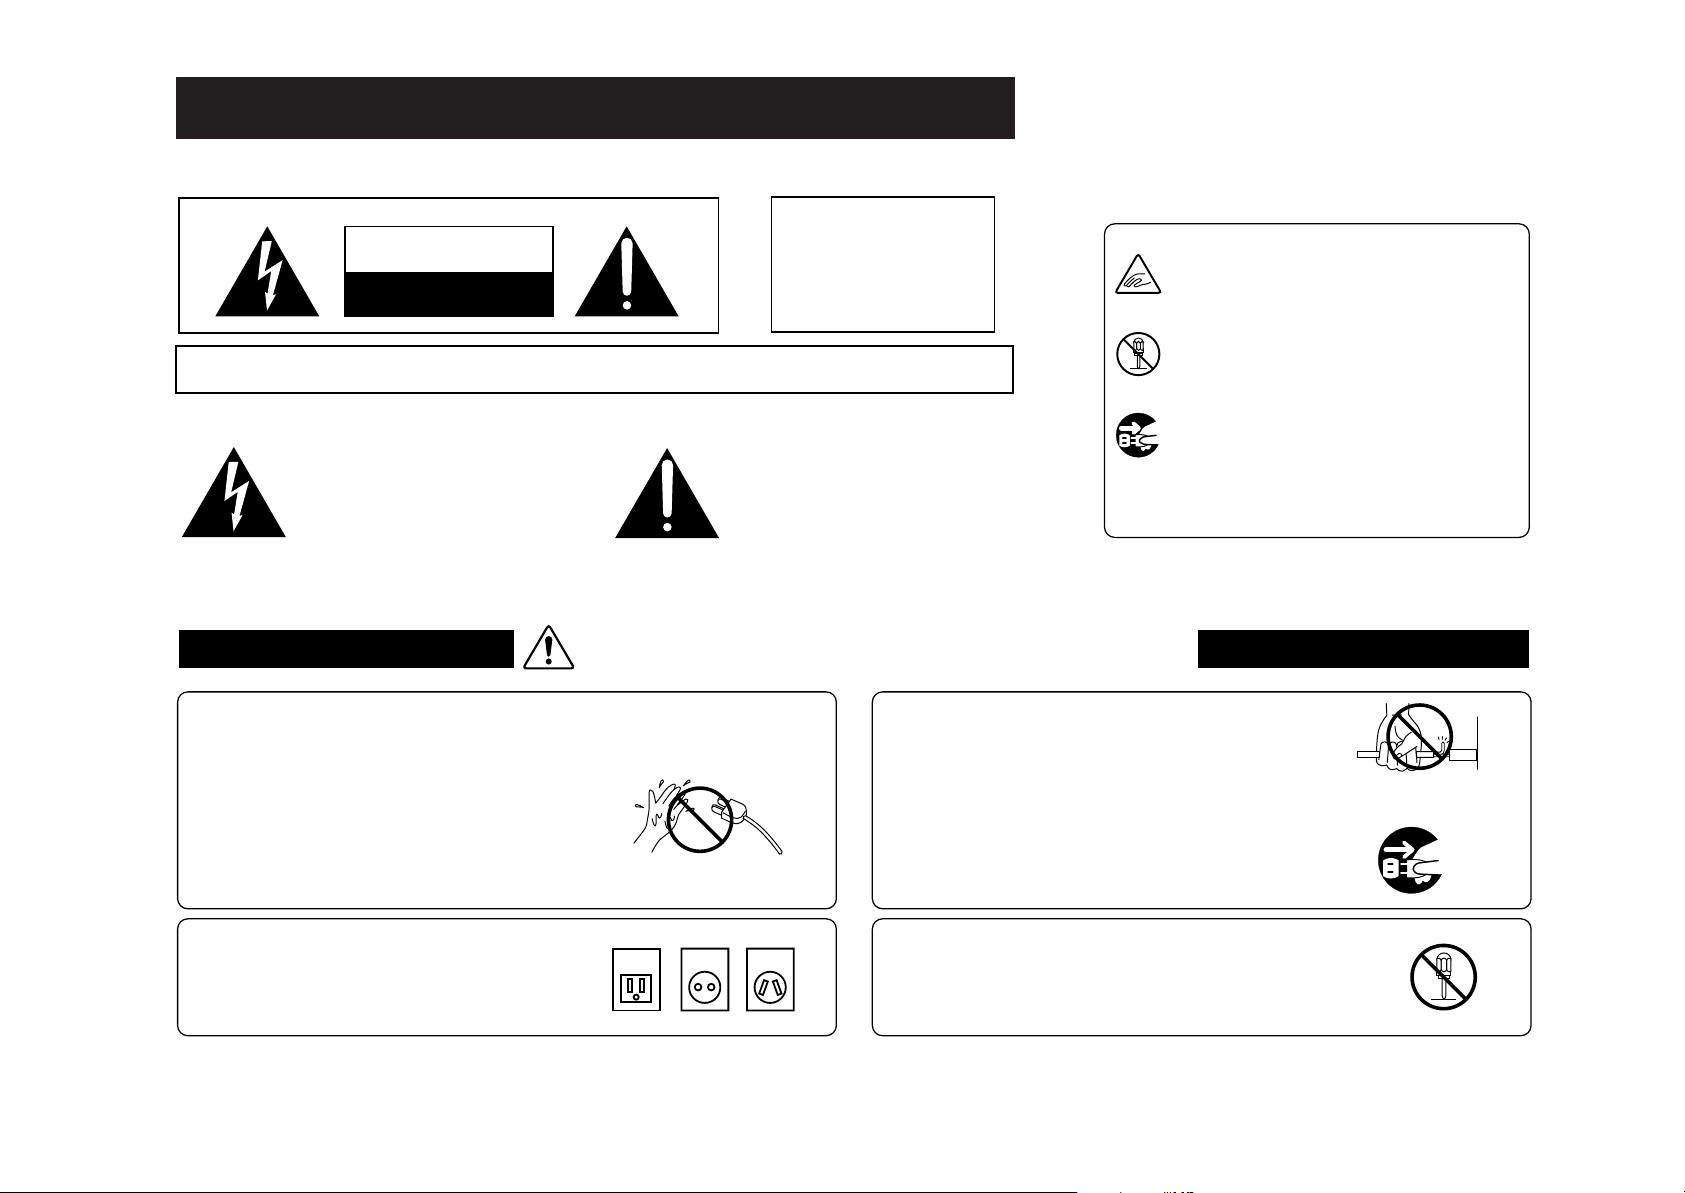
Examples of Picture Symbols
denotes that care should be taken.
The example instructs the user to take care
not to allow fingers to be trapped.
denotes a prohibited operation.
The example instructs that disassembly of
the product is prohibited.
denotes an operation that should be
carried out.
The example instructs the user to remove the
power cord plug from the AC outlet.
Read all the instructions before using the product.
WARNING - When using electric products, basic precautions should always be followed, including the following.
Indicates a potential hazard that could result in death
WARNING
Do not use this product near water - for example, near a bathtub,
washbowl, kitchen sink, in a wet basement, or near a swimming
pool, or the like.
or serious injury if the product is handled incorrectly.
Pulling the AC power cord itself may damage
the cord, causing a fire, electric shock or
short-circuit.
Do not touch the power plug with wet
hands. There is a risk of electrical shock.
Treat the power cord with care as well.
Stepping on or tripping over it can break
or short-circuit the wire inside.
The product should be connected to a
power supply only of the type described
in the operatiing instructions or as
marked on the product.
120V 240V230V
When disconnecting the AC power cord's plug,
always hold the plug and pull it to remove it.
Do not attempt to service the product beyond that
described in the user-maintenance instructions. All
other servicing should be reffered to qualified
service personnel.
III
Page 4
This product in combination with an amplifier
and headphones or speakers, may be capable
or producing sound level that could cause
permanent hearing loss. Do not operate for a
long period of time at a high volume level or at
a level that is uncomfortable. If you experience
any hearing loss or ringing in the ear, you
should consult an audiologist.
CAUTION
This product may be equipped with a polarized
line plug (one blade wider than the other). This
is a safety feature.
If you are unable to insert the plug into the
outlet, contact an electrician to replace your
obsolete outlet.
Do not defeat the safety purpose of the plug.
Indicates a potential hazard that could result in injury or damage to
the product or other property if the product is handled incorrectly.
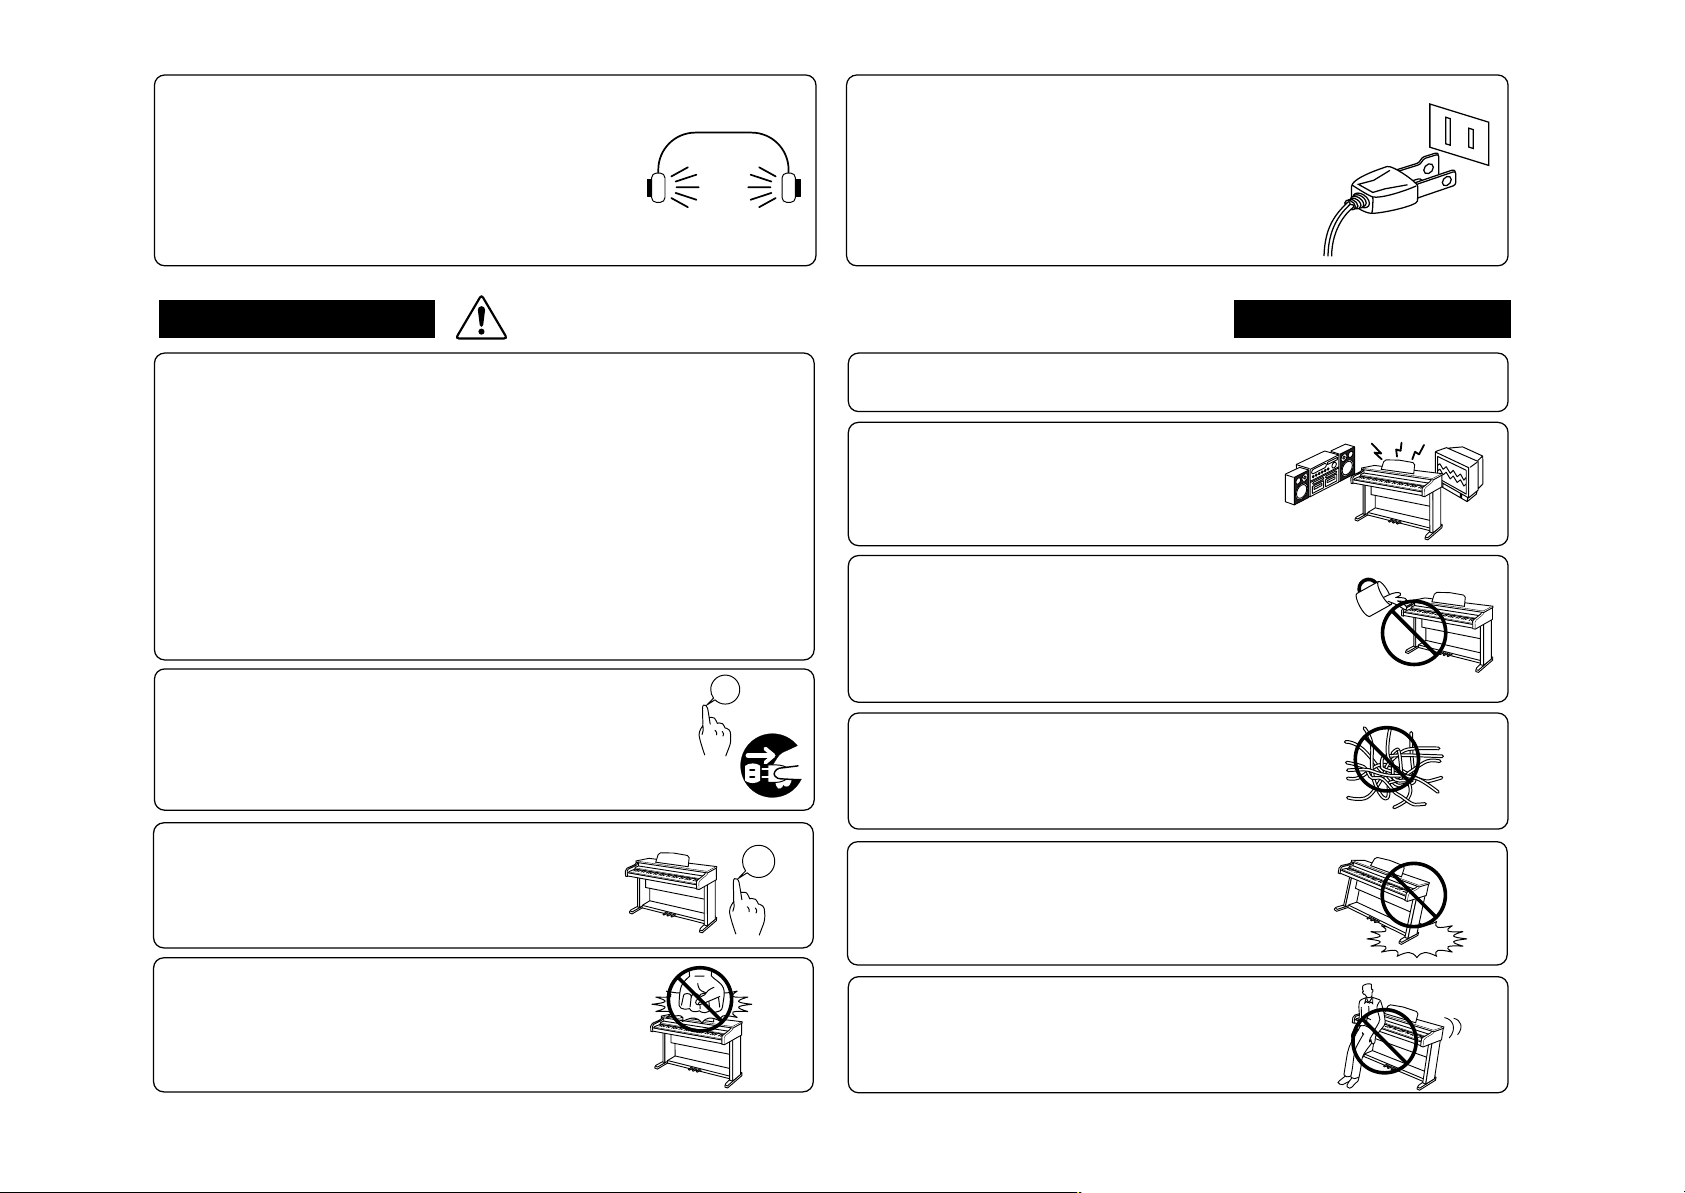
Do not use the product in the following areas.
● Areas, such as those near windows, where the product is
exposed to direct sunlight
● Extremely hot areas, or close to heat sources such as
radiators, heat registers, or other products that produce heat.
● Extremely cold areas, such as outside
● Extremely humid areas
● Areas where a large amount of sand or dust is present
● Areas where the product is exposed to excessive vibrations
Using the product in such areas may result in product
breakdown.
Always turn the power off when the instrument is not in
OFF
use. The product is not completely disconnected from
the power supply even when the power switch is
turned off. The power supply cord of the product
should be unplugged from the outlet when left unused
for a long period of time.
Before connecting cords, make sure that
the power to this product and other devices
is turned OFF.
Failure to do so may cause breakdown of
this product and other devices.
Do not stand on the product or exert
excessive force.
Doing so may cause the product to become
deformed or fall over, resulting in breakdown
or injury.
OFF
The product should be located so that its location or position
does not interfere with its proper ventilation.
Keep the instrument away from electrical
motors, neon signs, fluorescent light
fixture, and other sources of electrical
noises.
Care should be taken so that objects do not
fall and liquids are not spilled into the
enclosure through openings. The product shall
not be exposed to dripping or splashing. No
objects filled with liquids, such as vases, shall be
placed on the product.
When connecting the AC power cord and
other cords, take care not to get them tangled.
Failure to do so may damage them, resulting
in fire, electric shock or short-circuit.
Take care not to drop the product.
Please note that the product is heavy and
must be carried by more than one person.
Dropping the product may result in
breakdown.
Do not lean against the keyboard.
Doing so may cause the product to fall
over, resulting in injury.
IV
Page 5
Do not wipe the product with benzene or thinner.
Doing so may result in discoloration or deformation of
the product.
When cleaning the product, put a soft cloth in
lukewarm water, squeeze it well, then wipe the
product.
To reduce the risk of injury, close supervision is necessary
when a product is used near children.
The product should be serviced by qualified service personnel
when:
●
The power supply cord or the plug has been damaged.
●
Objects have fallen, or liquid has been spilled into the product.
●
The product has been exposed to rain.
●
The product does not appear to operate normally or exhibits a
marked change in performance.
●
The product has been dropped, or the enclosure damaged.
This product should be used only with the stand that is
provided by the manufacturer.
CAUTION:
To prevent electric shock, match wide blade of plug to wide slot, fully
insert.
ATTENTION:
Pour viter les chocs lectriques, introduire la lame la plus large de
la fiche dans la borne correspondante de la prise et pousser jusqu’au
fond.
Instruction for AC power cord (U.K.)
Do not plug either terminal of the power cord to the ground of the AC
outlet on the wall.
Should an abnormality occur in the product, immediately turn
the power OFF, disconnect the power cord plug, and
then contact the shop from which the product was purchased.
FCC Information
This equipment has been tested and found to comply with the limits for a Class B
digital device, pursuant to Part 15 of the FCC Rules. These limits are designed to
provide reasonable protection against harmful interference in a residential
installation. This equipment generates, uses and can radiate radio frequency
energy and, if not installed and used in accordance with the instructions, may
cause harmful interference to radio communications.
If this equipment does cause harmful interference to radio or television reception,
which can be determined by turning the equipment off and on, the user is
encouraged to try to correct the interference by one or more of the following
measures:
- Reorient or relocate the receiving antenna.
- Increase the separation between the equipment and receiver.
- Connect the equipment into an outlet on a different electrical circuit from the
receiver.
- Consult the dealer or an experienced radio/TV technician for help.
Canadian Radio Interference Regulations
This instrument complies with the limits for a class B digital apparatus, pursuant to
the Radio Interference
Regulations, C.R.C., c. 1374.
V
Page 6

Introduction
Thank you for purchasing the Kawai Concert Performer
(CP) Series Ensemble Digital Piano.
The CP Series piano has been designed to provide you with
the ultimate musical experience, no matter your skill level.
Featuring superbly realistic instrument tones and the most finely
crafted keyboard in its class, the CP is a unique musical instrument
resulting from the combination of Kawai’s seventy-plus years
experience in making acoustic pianos, along with cutting-edge
digital music technologies.
With over 600 different instrument and drum sounds at your
disposal, you will have the flexibility to perform any kind of music
ranging from traditional to contemporary. The AutoAccompaniment Styles provide the enjoyment of playing rich, fully
orchestrated music in hundreds of musical genres. Thanks to
the Song Stylist feature, you will never have to worry about finding
the best sounds and style to perform a particular song.
The Concert Performer incorporates many professional
features, such as a 16-track Recorder and a 3.5-inch Floppy Disk
Drive. For the non-player, Kawai’s unique Concert Magic feature
creates the thrill of being a performing musician simply by tapping
any key on the keyboard.
The Concert Performer offers tremendous opportunities
for anyone who is interested in learning, playing, and listening to
music. Please read this manual thoroughly and keep it handy as
a reference so that you can get the most out of this incredible
instrument.
We hope you enjoy every moment that you spend with your
Concert Performer.
Table of Contents
Parts and Names . . . . . . . . . . . . . . . . . . . . . . . . . . . . . 2
Overview
LCD Screen . . . . . . . . . . . . . . . . . . . . . . . . . . . . . . . 6
Select Buttons . . . . . . . . . . . . . . . . . . . . . . . . . . . . . . 6
Dial . . . . . . . . . . . . . . . . . . . . . . . . . . . . . . . . . . . . . . 8
Basic Controls
Selecting a Part to Play . . . . . . . . . . . . . . . . . . . . . 9
Splitting the keyboard. . . . . . . . . . . . . . . . . . . . . . 10
Selecting Sounds . . . . . . . . . . . . . . . . . . . . . . . . . 11
Mixer . . . . . . . . . . . . . . . . . . . . . . . . . . . . . . . . . . 13
Effects . . . . . . . . . . . . . . . . . . . . . . . . . . . . . . . . . . 15
Effect Types . . . . . . . . . . . . . . . . . . . . . . . . . . . . . . 19
Effect Priority Guidelines . . . . . . . . . . . . . . . . . . . 20
Transpose and Octave Shift . . . . . . . . . . . . . . . . 22
Metronome . . . . . . . . . . . . . . . . . . . . . . . . . . . . . . 24
Piano Only . . . . . . . . . . . . . . . . . . . . . . . . . . . . . . 25
Using a Style
Selecting and Playing a Style . . . . . . . . . . . . . . . 26
Fill-In and Variation . . . . . . . . . . . . . . . . . . . . . . . 28
Auto Accompaniment System . . . . . . . . . . . . . . . 28
Bass Inversion . . . . . . . . . . . . . . . . . . . . . . . . . . . . 29
1-2 Play . . . . . . . . . . . . . . . . . . . . . . . . . . . . . . . . 30
Registration . . . . . . . . . . . . . . . . . . . . . . . . . . . . . 31
Registration Groups . . . . . . . . . . . . . . . . . . . . . . . 31
Style Lock . . . . . . . . . . . . . . . . . . . . . . . . . . . . . . . . 35
Song Stylist . . . . . . . . . . . . . . . . . . . . . . . . . . . . . 36
Harmony . . . . . . . . . . . . . . . . . . . . . . . . . . . . . . . 40
Recording a Song
Easy Recording . . . . . . . . . . . . . . . . . . . . . . . . . . 42
Part Status . . . . . . . . . . . . . . . . . . . . . . . . . . . . . . . 44
Saving the song . . . . . . . . . . . . . . . . . . . . . . . . . . . 45
Erasing the song . . . . . . . . . . . . . . . . . . . . . . . . . . 45
Advanced Recording . . . . . . . . . . . . . . . . . . . . . . 47
Real-time Recording . . . . . . . . . . . . . . . . . . . . . . . 48
Mixer . . . . . . . . . . . . . . . . . . . . . . . . . . . . . . . . . . . 49
Track Settings . . . . . . . . . . . . . . . . . . . . . . . . . . . . 51
Loop Settings . . . . . . . . . . . . . . . . . . . . . . . . . . . . . 52
Style Paste . . . . . . . . . . . . . . . . . . . . . . . . . . . . . . . 53
VI
Kawai Concert Performer Series Digital Piano
Page 7

Punch-In Recording . . . . . . . . . . . . . . . . . . . . . . . 54
Song Edit . . . . . . . . . . . . . . . . . . . . . . . . . . . . . . . . 57
Bar Editing . . . . . . . . . . . . . . . . . . . . . . . . . . . . . . 58
Event Edit . . . . . . . . . . . . . . . . . . . . . . . . . . . . . . . 71
Creating Your Own Styles
Conductor . . . . . . . . . . . . . . . . . . . . . . . . . . . . . . 74
Making a New Style . . . . . . . . . . . . . . . . . . . . . . . 77
Auto-accompaniment System . . . . . . . . . . . . . . . . 82
Making a Style with Phrase Combination . . . . . 84
Editing Sounds
Editing the Preset Effect Settings . . . . . . . . . . . . 88
Playing Songs from a Floppy Disk
About songs on Floppy Disk . . . . . . . . . . . . . . . . 90
Selecting a Song from Disk . . . . . . . . . . . . . . . . . 91
Controlling Playback of a Song . . . . . . . . . . . . . . 93
Playing with Concert Magic
Selecting a Concert Magic Song . . . . . . . . . . . . . 96
Performing a Concert Magic Song . . . . . . . . . . . 97
Concert Magic Song Arrangements . . . . . . . . . . 101
Creating a Concert Magic Song . . . . . . . . . . . . 102
System Menu . . . . . . . . . . . . . . . . . . . . . . . . . . . . . . 104
Tuning . . . . . . . . . . . . . . . . . . . . . . . . . . . . . . . . . 106
Touch Curve . . . . . . . . . . . . . . . . . . . . . . . . . . . . . 107
Virtual Voicing . . . . . . . . . . . . . . . . . . . . . . . . . . 108
Resonance . . . . . . . . . . . . . . . . . . . . . . . . . . . . . . 109
Concert Magic Sound . . . . . . . . . . . . . . . . . . . . . 110
Pedal Assign . . . . . . . . . . . . . . . . . . . . . . . . . . . . . 111
Fill-in Mode . . . . . . . . . . . . . . . . . . . . . . . . . . . . . 114
Effect for Sound . . . . . . . . . . . . . . . . . . . . . . . . . . 115
Temperament . . . . . . . . . . . . . . . . . . . . . . . . . . . . 116
MIDI Menu . . . . . . . . . . . . . . . . . . . . . . . . . . . . . . 120
Power Up Settings . . . . . . . . . . . . . . . . . . . . . . . . 125
Soft Reset . . . . . . . . . . . . . . . . . . . . . . . . . . . . . . . 126
Software Version . . . . . . . . . . . . . . . . . . . . . . . . . 127
Screen Hold . . . . . . . . . . . . . . . . . . . . . . . . . . . . . 128
Floppy Disk Operations
Disk Menu . . . . . . . . . . . . . . . . . . . . . . . . . . . . . 130
Saving Data to a Floppy Disk . . . . . . . . . . . . . . 131
Loading Data from a Floppy Disk . . . . . . . . . . 134
Erasing Data from a Floppy Disk . . . . . . . . . . . 137
Formatting a Floppy Disk . . . . . . . . . . . . . . . . . 138
Getting Assistance: Using Help and Demo
Using the Help . . . . . . . . . . . . . . . . . . . . . . . . . . 140
Using the Demonstrations . . . . . . . . . . . . . . . . . 142
Appendices
Preset Sounds . . . . . . . . . . . . . . . . . . . . . . . . . . 144
Preset Styles . . . . . . . . . . . . . . . . . . . . . . . . . . . . 149
Song Stylists . . . . . . . . . . . . . . . . . . . . . . . . . . . . 151
Concert Magic Songs . . . . . . . . . . . . . . . . . . . . . 156
Table of Chord Types . . . . . . . . . . . . . . . . . . . . . 160
Example of Connection . . . . . . . . . . . . . . . . . . . 162
USB . . . . . . . . . . . . . . . . . . . . . . . . . . . . . . . . . . . 164
Program Change Numbers . . . . . . . . . . . . . . . . 166
Drum/SFX Kit Mapping . . . . . . . . . . . . . . . . . . . 172
MIDI Implementation Chart . . . . . . . . . . . . . . . 174
Specifications . . . . . . . . . . . . . . . . . . . . . . . . . . 175
Introduction
VII
Page 8
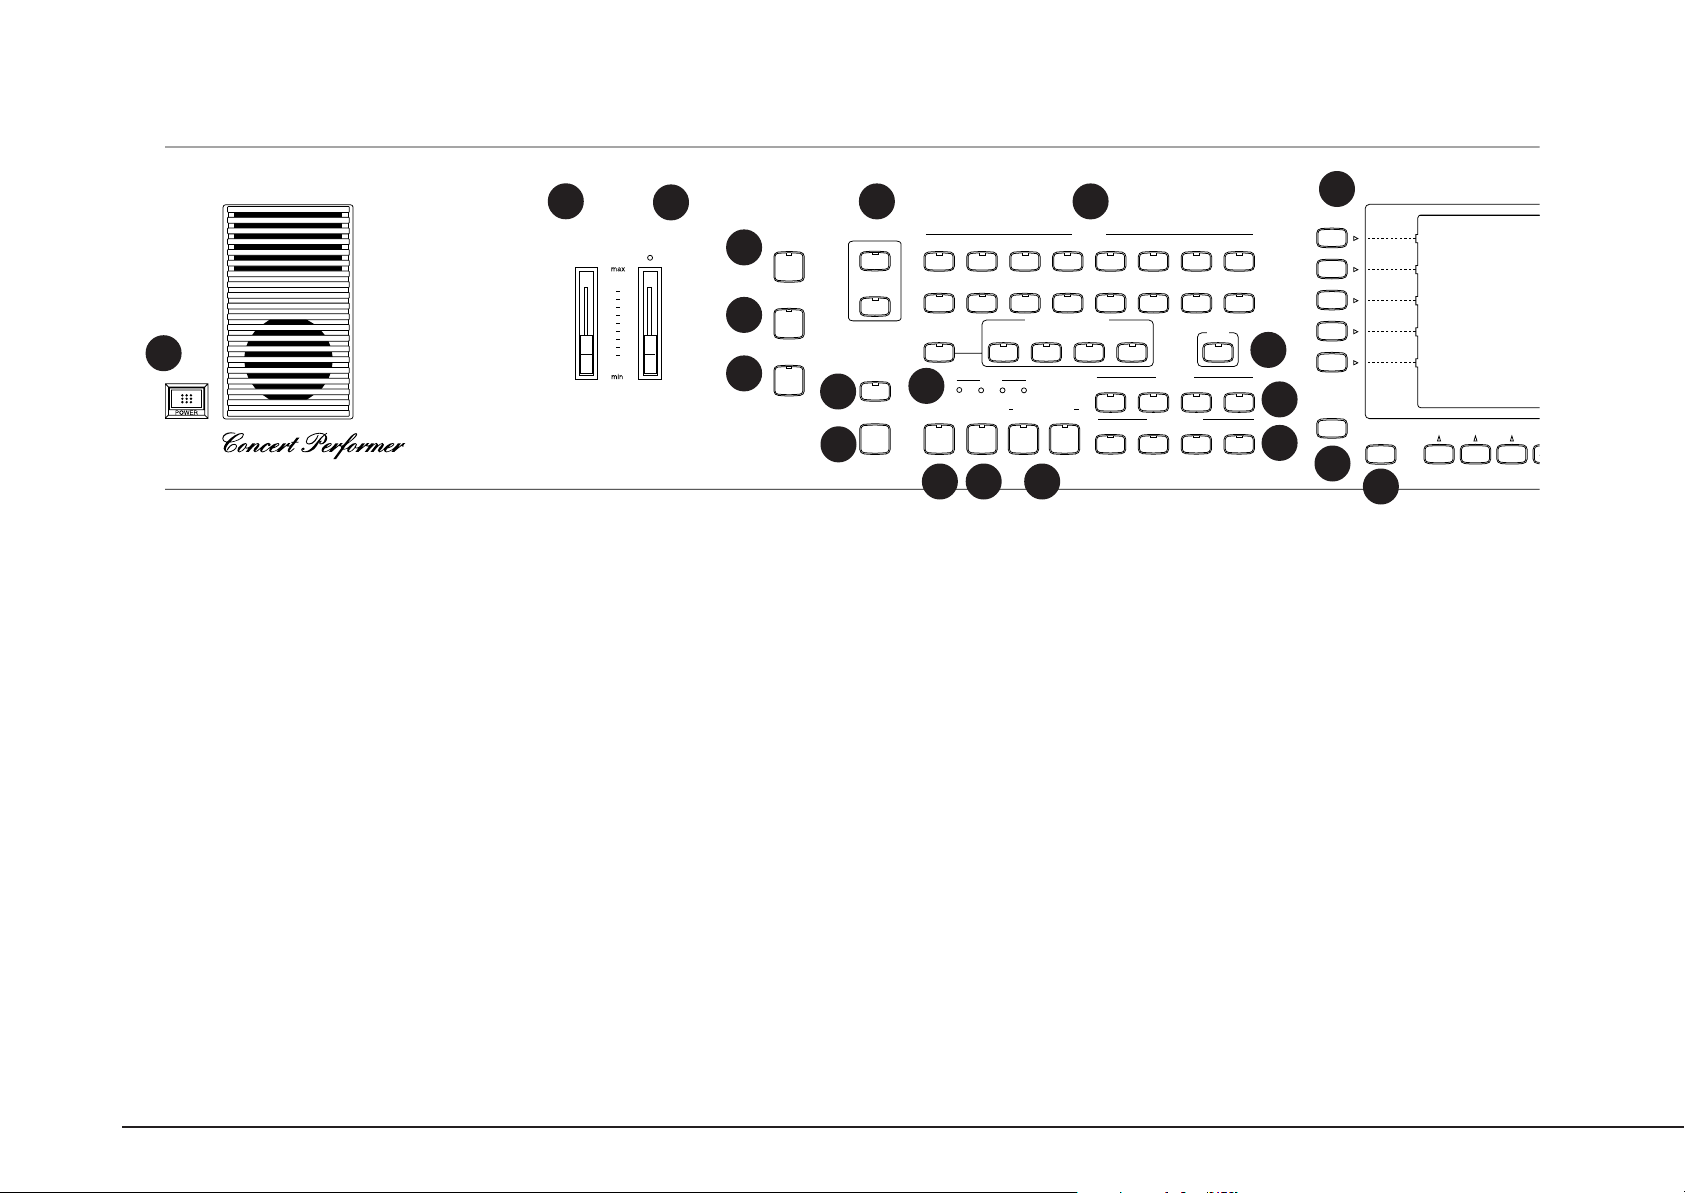
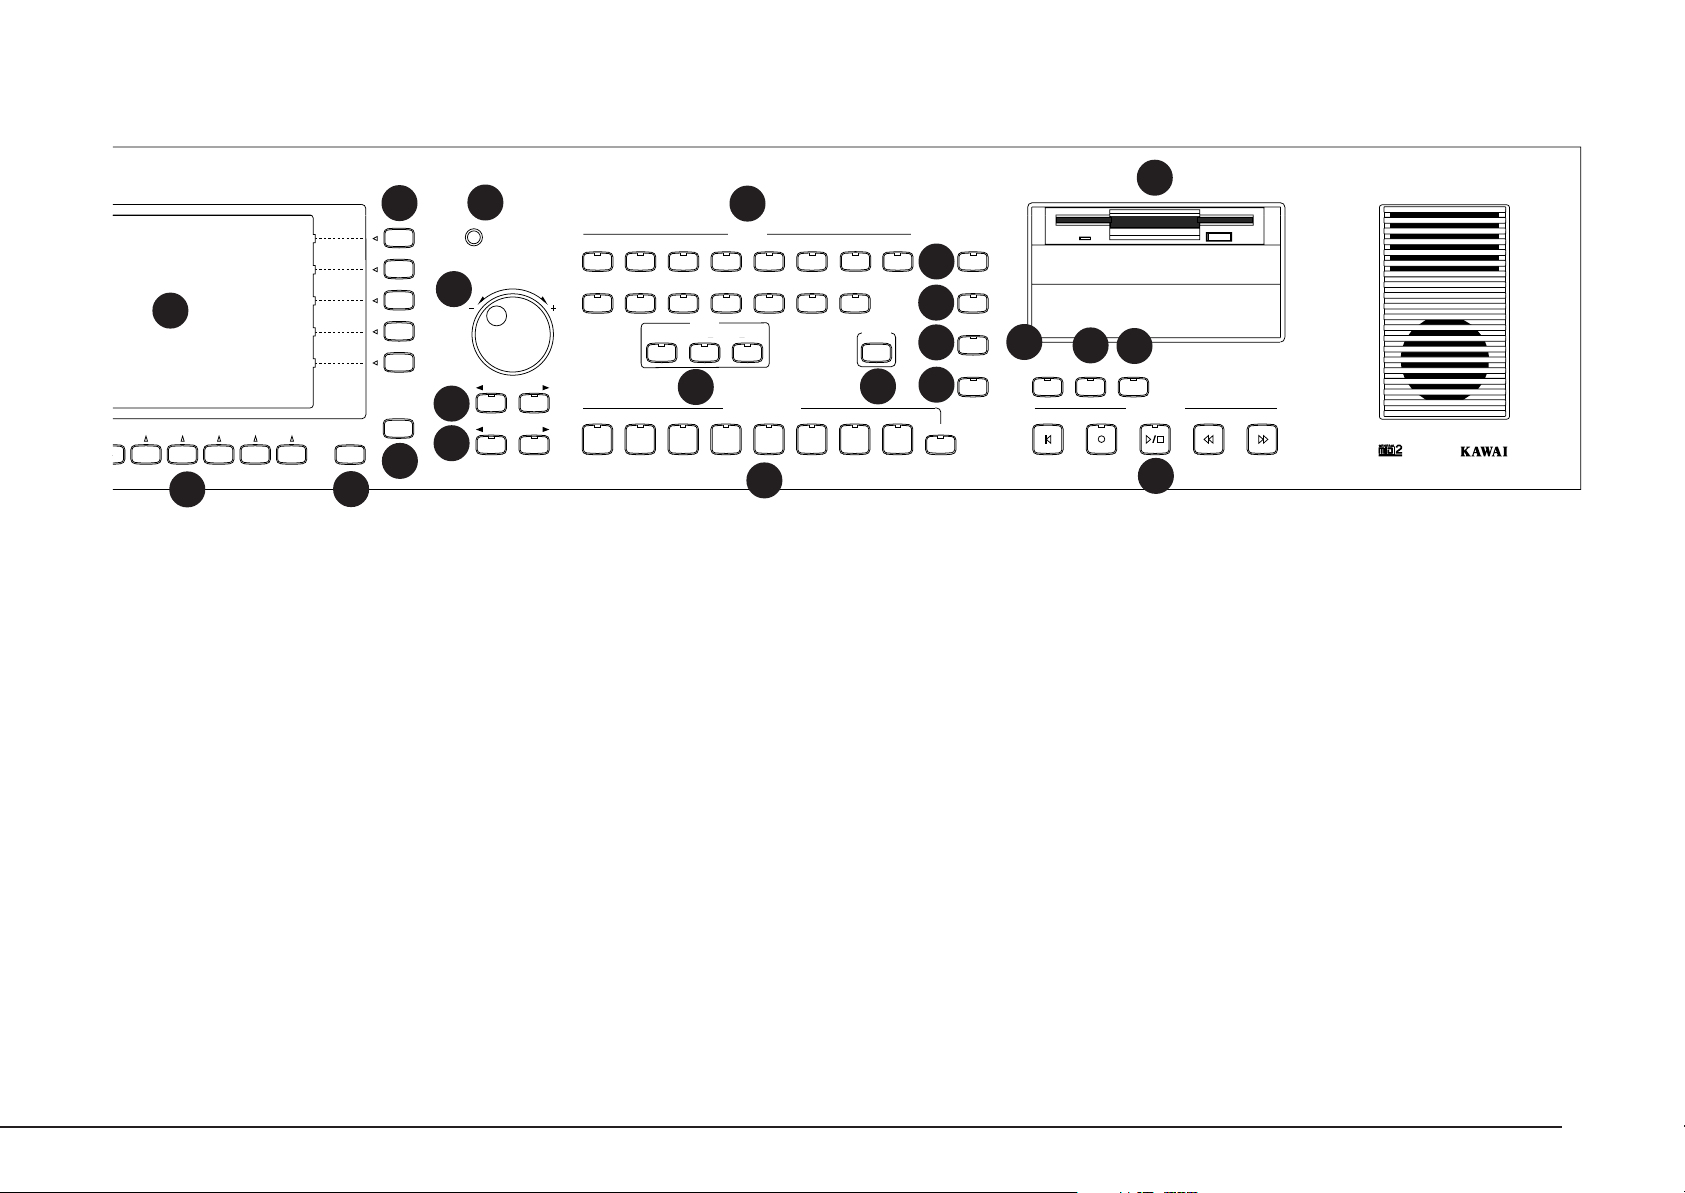
Parts and Names
2
MASTER
VOLUME
ACCOMP/SONG
VOLUME
3
4
5
1
6
CP115
1. Power
Turns the piano on/off.
2. Master Volume Slider
This slider is used to adjust the overall volume level of the instrument.
3. Accomp/Song Volume Slider
This slider is used to adjust the volume level of the Auto Accompaniment Styles.
Also used to adjust the volume level of a song played from the CP Recorder or directly
from a floppy disk. This slider does not affect the Master Volume Slider setting.
SPECIAL
DEMO
CONCERT
MAGIC
SONG
STYLIST
7 8
CONDUCTOR
RESET
EDIT
SWING &
BIG BAND
CLASSIC
PIANO
ACC ON/OFF
50’S
SOLO
PIANO
BASS
INVER
60’S
JAZZ &
CONTEMP
STYLE
POP
LATIN &
ISLAND
ACCOMPANIMENT
FULL
FINGERED
KBD
ROCK
TRADITIONAL
ONE
FINGER
BALLAD
WALTZ
COUNTRY
BROADWAY
PLAY
1-2
BLUES &
GOSPEL
USER
21
10
11
12
METRONOME
TAP TEMPO
9
SYNC /
FADE OUT
START/
STOP
BEAT
INTRO/ENDING
1 2
FILL IN
3
2
1
VARIATION
1
2
4
16
3
4
17
HELP
EXIT
18
13 14 15
19
9. Accompaniment (page 28)
These buttons are used to turn the Auto-Accompaniment function on/off, and select
the Auto-Accompaniment mode.
10. 1-2 Play (page 30)
This button is used to automatically choose an appropriate sound and setup for the
selected style.
11. Metronome (page 24)
This button is used to turn the Metronome on/off.
4. Demo (page 142)
This button is used to select the built-in demo songs and function demos which
explain important features of the CP piano.
5. Concert Magic (page 96)
This button is used to select the built-in Concert Magic songs.
6. Song Stylist (page 36)
This button is used to select the Song Stylist Registrations.
7. Style Conductor (page 74)
These buttons are used to modify or create your own Accompaniment Styles.
8. Style (page 26)
These buttons are used to select an Accompaniment Style to play along with.
P. 2
12. Tap (page 24, 26)
This button is used to tap in the desired tempo for a song or Style.
13. Sync/Fade out (page 27)
When active, the accompaniment style will start as soon as you play a note or chord
on the keyboard. Press this button while a Style is playing to fade in or out of the
Style.
14. Start/Stop (page 27)
This button is used to start and stop the accompaniment style.
15. Intro/Ending (page 27)
These buttons are used to play an intro section that leads into the style. If you
press this button while the stye is playing an ending section will be played before
stopping.
Kawai Concert Performer Series Digital Piano
Page 9
20
21
SAVE
REGIST
22
21
REGIST
GROUPS
23
25
26
27
24
CONTRAST
TEMPO / VALUE
TRANSPOSE
OCTAVE SHIFT
28
PAR T
2
SOUND
STRING
SPECIALTY
1
RIGHT
PIANO
HARPSI &
MALLET
DRAWBAR ORGAN
VOCAL &
SYNTH
PAD
LEFT/
SPLIT
29
REGISTRATION
123 78
456
BRASS
SPECIALTY
1
WOOD-
WIND
DRUM &
2
PERC.
GUITAR
SFX
PIANO
ONLY
BASS
30
31
32
33
34
35
STYLE LOCK
REVERB
CHORUS
EFFECT
HARMONY
36
ADVANCED
RECORDER
RESET
37
SYSTEM
REC
40
38
DISK
RECORDER
PLAY/STOP
39
RWD
FWD
16. Fill-in (page 28)
These buttons are used to select one of the four short fill-in sections that embellish
the style and lead into the different variation sections of the Style.
17. Variation (page 28)
These buttons are used to select one of the four variation sections within the chosen
Style.
18. Help (page 140)
These buttons are used to access Help menus which contain explanations of the CP
piano’s features.
19. Exit
This button is used to back up to the next-higher screen level. Repeatedly pressing
the Exit button from any screen on the CP will bring you back to the CP’s main play
screen.
20. LCD Screen
Displays information about the CP’s current sound selections, settings, options,
etc.
21. Select Buttons
These buttons are used to select items displayed on the LCD screen.
22. Save Regist
This button is used to save up to 80 of your own favorite panel settings.
23. Regist Groups (page 31)
This button is used to select one of the 10 groups of preset and user sound
registrations.
24 Contrast
Adjusts the contrast of the LCD screen for easier viewing.
25. Tempo/Value Dial (page 8)
This dial is used to adjust tempo, scroll through different selections, and adjust data
values for items on the LCD screen.
26. Transpose (page 22)
This button is used to change the overall pitch of the CP in half-note steps.
27. Octave Shift (page 22)
These buttons are used to change the overall pitch of the CP in octave steps.
28. Sound Selection (page 11)
These buttons are used to select the desired sound category. Use the SELECT buttons
or the DIAL to select a sound within the category.
29. Part (page 9)
Selects which of the three parts (Left/Split, Right 1, Right 2) are active and
ready to be played with the sounds assigned to them.
Basic Controls
P. 3
Page 10
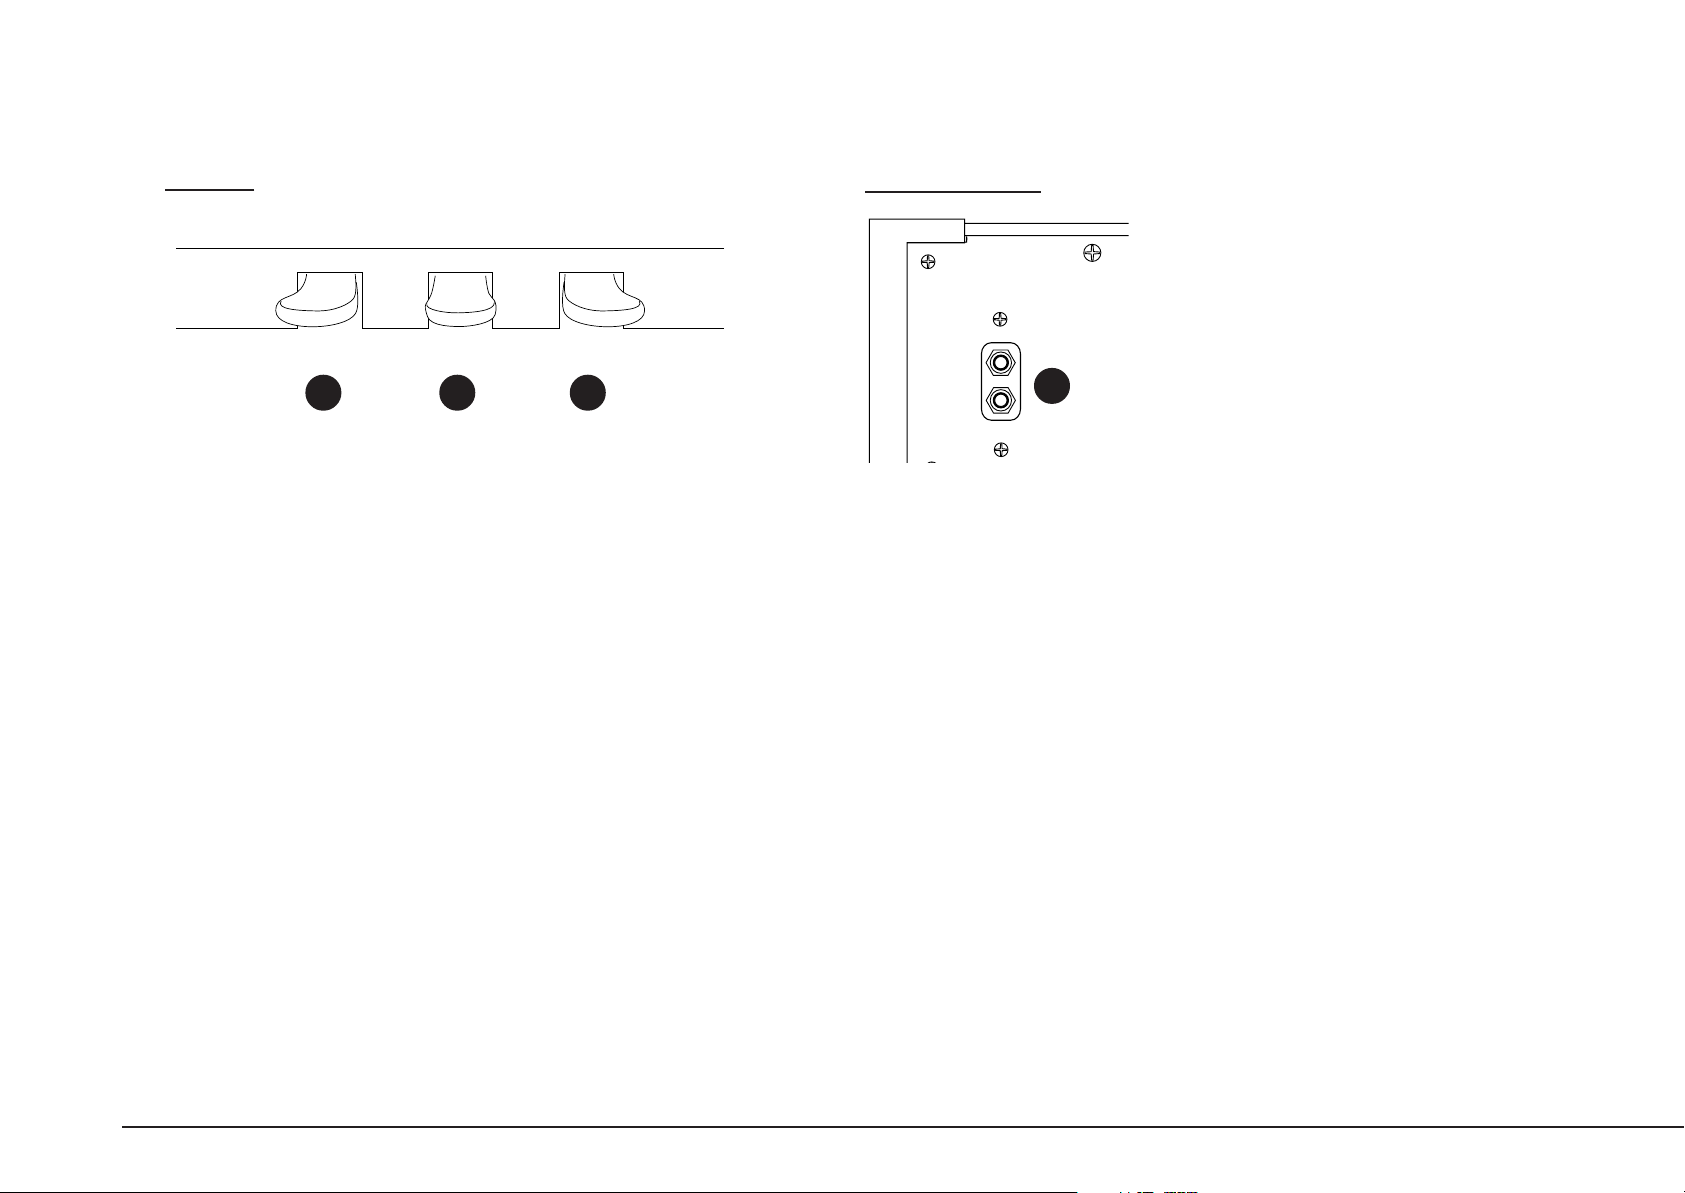
Pedals
Botttom View
41 42 43
30. Piano Only (page 25)
This button is used to automatically assign the Concert Grand sound to the Right 1
part.
31. Registrations (page 31)
These buttons are used to recall one of the eight panel settings available in the
currently selected Registration group.
32. Reverb (page 15)
This button turns on/off the Reverb. Press and hold the button to select the Reverb
settings menu.
33. Chorus (page 16)
This button turns on/off the Chorus. Press and hold the button to select the Chorus
settings menu.
34. Effects (page 18)
This button turns on/off the Effects. Press and hold the button to select the Effect
settings menu.
35. Harmony (page 40)
This button turns on/off the Harmony for the instrument sounds. Press and hold the
button to select the Harmony settings menu.
44
36. Advanced Recorder (page 47)
This button is used to access the Advanced Recorder functions.
37. System (page 104)
This button is used to access the system settings menu.
38. Disk (page 90, 130)
This button is used to access the Floppy Disk functions..
39. Recorder (page 42)
Used to record and play back a song.
40. Disk Drive
Reads and writes data to a standard 3.5” floppy disk..
41. Soft Pedal
Depressing this pedal softens the sound and reduces its volume. This pedal can
also be assigned to control other functions. (See page 111)
42. Sostenuto Pedal
Depressing this pedal after playing the keyboard and before releasing the keys
sustains the sound of only the keys just played. This pedal can also be assigned
to control other functions. (See page 111)
P. 4
Kawai Concert Performer Series Digital Piano
Page 11
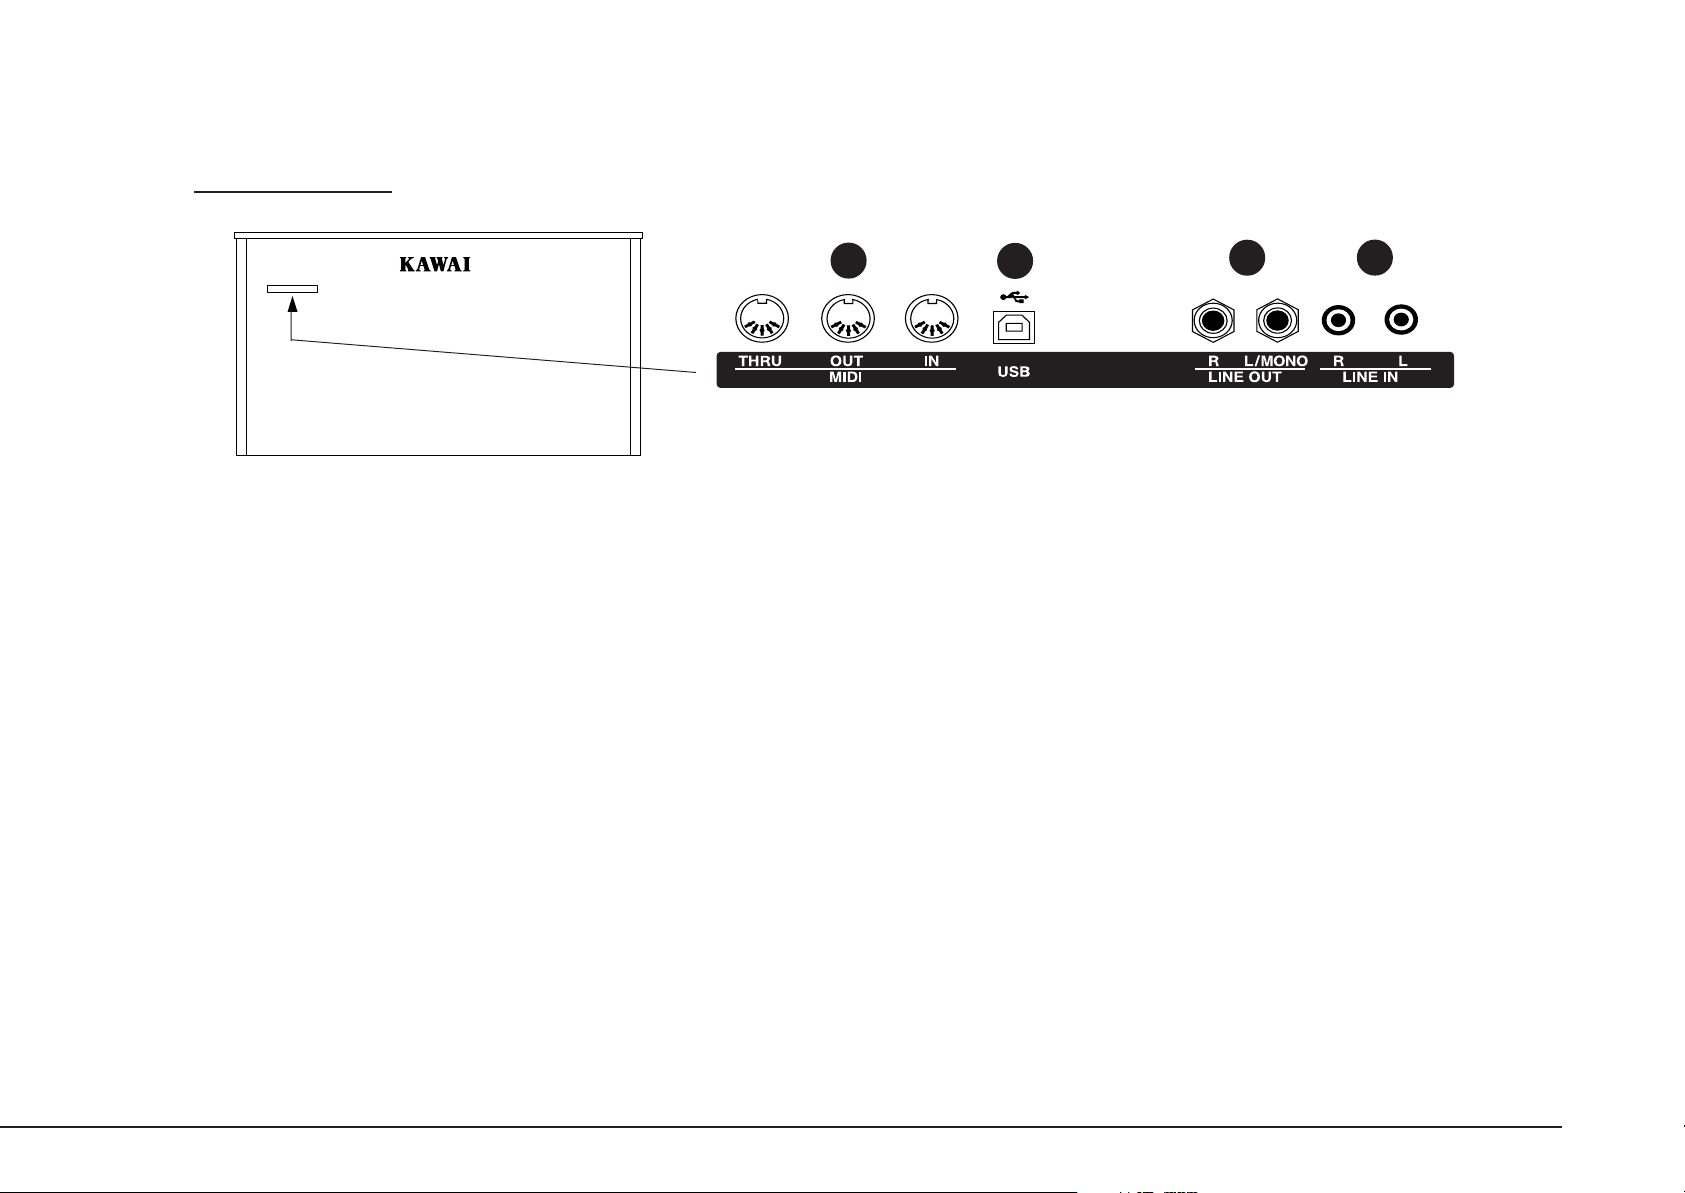
Rear Terminals
43. Sustain Pedal
Sustains the sound after lifting your hands from the keyboard. The sustain
pedal is capable of responding to half pedaling.
44. Headphone Jacks
There are two jacks for headphones provided at the left end on the bottom of the
piano. These jacks are used to connect up to two headphones to the CP piano.
45. MIDI Jacks
These jacks are used to connect external MIDI devices to the CP. Enabled only
when the MIDI is selected in the System menu. (See page 121)
45
46
these jacks bypasses the CP’s volume control.
47 48
46. USB Jack
This jack is used to connect a personal computer to the CP. Enabled only when the
USB is selected in the System menu. (See page 121)
47. Line Out Jacks
These jacks are used to provide stereo output of the CP’s sound to amplifiers,
tape recorders or similar equipment. The audio signal coming through the LINE
IN jacks is also routed to these jacks.
48. Line In Jacks
These jacks are used to connect stereo outputs from other audio equipment or
electronic instruments to the CP’s speakers. The audio signal coming through
Basic Controls
P. 5
Page 12

Overview
This manual provides you with all the information you will need in
order to take full advantage of the Concert Performer’s potential.
Before you begin learning how to use the specific features, it is
important to understand some of the basic ideas behind the
instrument’s design.
The Concert Performer has been designed to have an easy and
intuitive user interface. However, the instrument has so many
LCD Screen
The LCD Screen is the window through which the Concert Performer communicates with you. The
large display size allows many items to be clearly displayed at the same time, allowing for not only
words but graphics to be shown as well.
Select Buttons
Most of the buttons on the front panel are used to directly select a function on the CP that you
would like to work with. In most cases, the specific function name is printed on the front panel
directly above the button. For example, there are buttons labeled 1-2 PLAY, FILL-IN, and so on. In
this manual, references to these buttons are always printed in capital letters for clarity. Most of
these buttons have an LED Indicator (small light) on them. This Indicator will be turned ON when
a function is in use so that you can quickly see if that function is active.
features that it is simply impractical to have a dedicated button for
every single one. As a result, many features and functions are
selected by choosing them from lists, or “menus”, that are presented
to you on the CP’s large display screen. Often times selecting an
item from a menu may access another “sub-menu” of options
specific to that item. This system of menus and sub-menus keeps
everything logical and straightforward and becoming familiar with
how to make your way through them is very easy.
P. 6
There are 17 SELECT buttons surrounding the LCD screen that do not have labels printed next to
them because they do not have predetermined functions. Instead, they are used to select whatever
items are currently displayed next to them on the LCD screen. For example, a SELECT button
might be used to select an instrument sound on one screen, while on another screen the same
SELECT button might serve to activate a feature related to Floppy Disk.
Kawai Concert Performer Series Digital Piano
Page 13
To keep things simple, this manual will refer to the five SELECT buttons along the left side of the
LCD screen as L1-L5. Likewise, the five SELECT buttons along the right side of the screen will be
referred to as R1-R5. The seven SELECT buttons along the bottom of the screen, which are also
known as function buttons, will be referred to as F1-F7.
In some cases when you see an item displayed on the screen and press the L or R button next to it,
that item on the screen will become highlighted (shown in reverse color) to indicate you have
selected that item. Sometimes a submenu screen relating to that item will be displayed and present
you with further options.
When you press one of the F buttons, the corrosponding function on the LCD screen will be
highlighted to indicate that it has been selected.
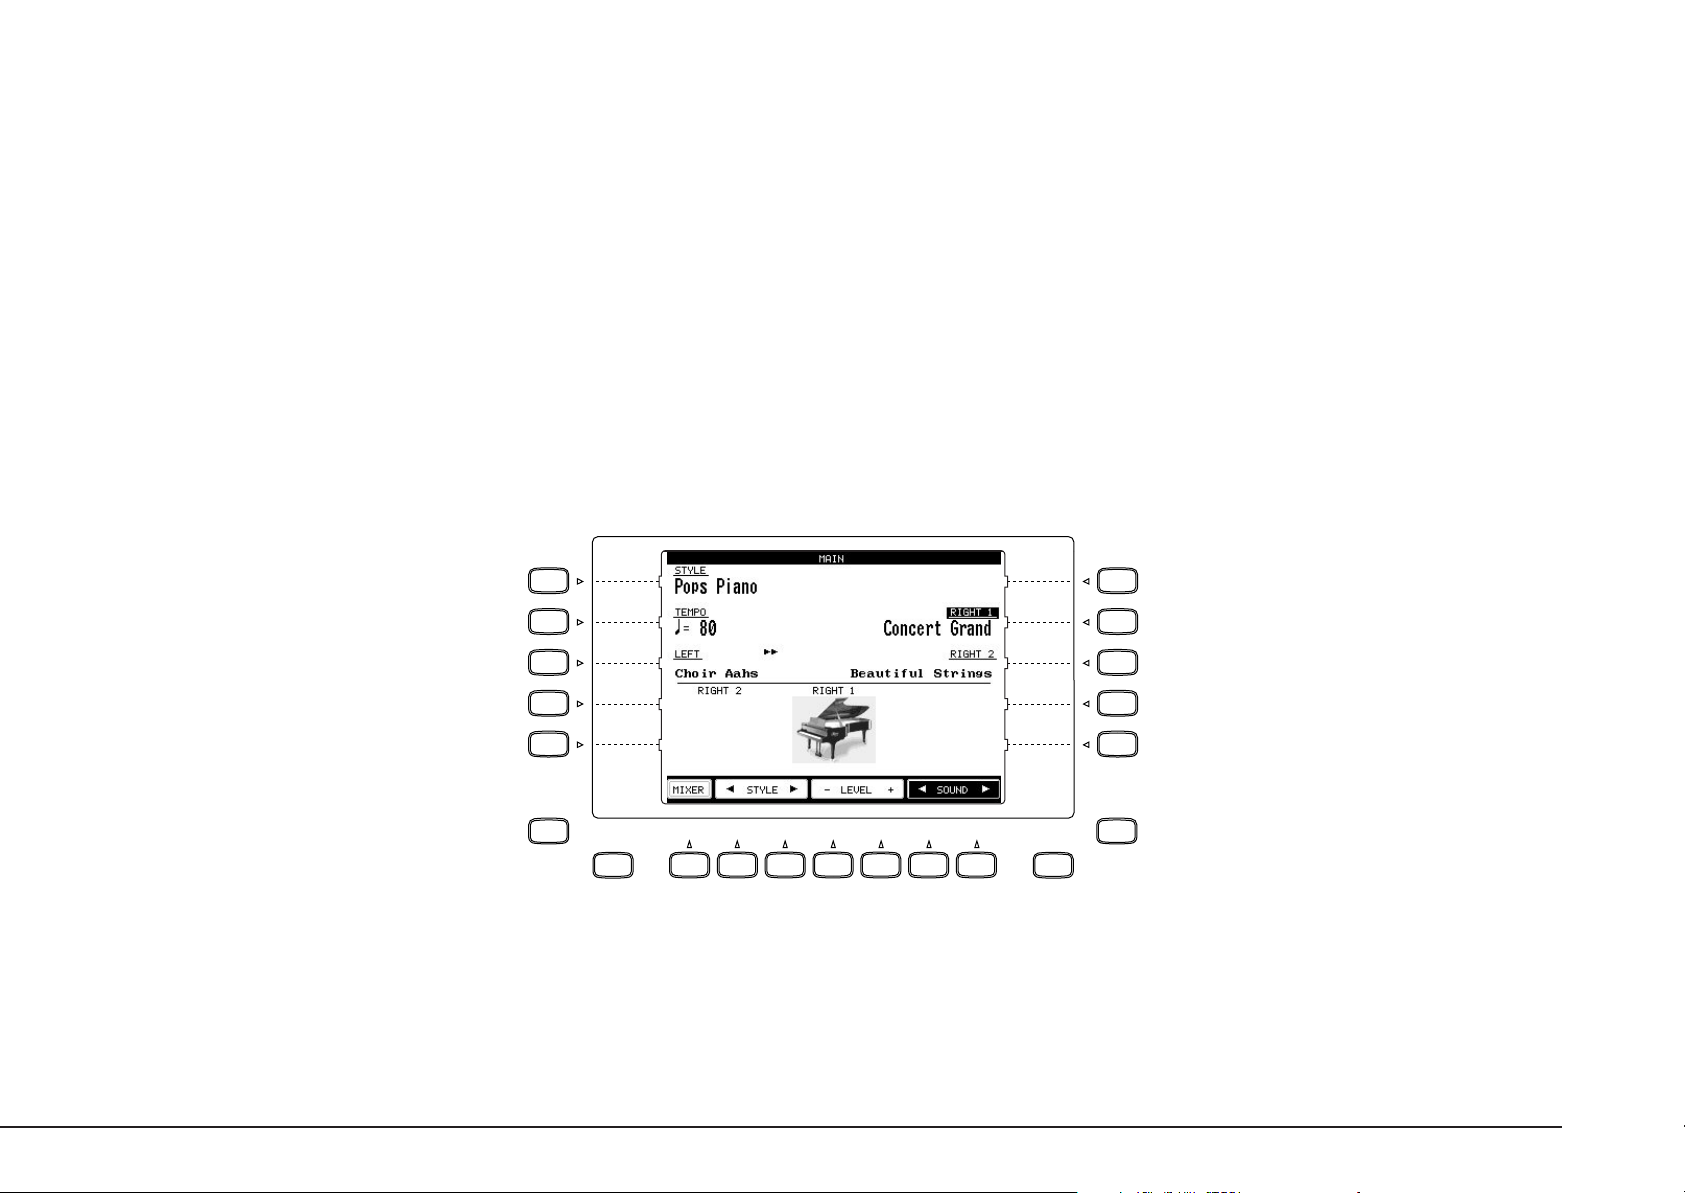
L1 Selects Style. Use the F2,F3
buttons, Style buttons, or the Dial
to change the active Style.
L2 Selects Tempo. Use the Dial or the
TAP TEMPO button to change the
Tempo
L3 Selects the LEFT Part. Use the F6,
F7buttons, Sound buttons, or the
Dial to change the Sound.
No functions are assigned to the L4 and L5
buttons on this screen.
HELP
EXIT
F1 Takes you to the MIXER settings screen.
F2, F3 Selects a Style.
F4, F5 Adjusts the volume level for the Part currently selected.
F6, F7 Selects a sound for the selected Part. "Sound" is highlighted
to indicate this graphic button is active.
SAVE
REGIST
REGIST
GROUPS
R2 Selects the RIGHT1 Part. Use the F6, F7
buttons, Sound buttons, or the Dial to
change the Sound.
R3 Selects the RIGHT2 Part. Use the F6,
F7buttons, Sound buttons, or the Dial to
change the Sound.
No functions are assigned to the R1, R4 and R5
buttons on this screen.
"RIGHT 1" is highlighted to indicate that this Part
is now selected.
Basic Controls
P. 7
Page 14

TEMPO / VALUE
Dial
The Dial is used to change data values and scroll through options that are displayed on the LCD
screen.
When you turn the Dial, you will notice that whatever item on the LCD screen is currently selected
(highlighted) will be affected. Or in some cases when the screen presents you with a list of choices,
turning the Dial will allow you to quickly scroll through the list until you arrive at your choice. It
can also be used instead of the L, R, and F buttons as another way of selecting or changing an item
or value on the LCD screen.
P. 8
Kawai Concert Performer Series Digital Piano
Page 15
Basic Controls
This chapter discusses the basic operations that are used to play
the Concert Performer, such as sound selection, Part configuration
and effect settings.
Selecting a Part to Play
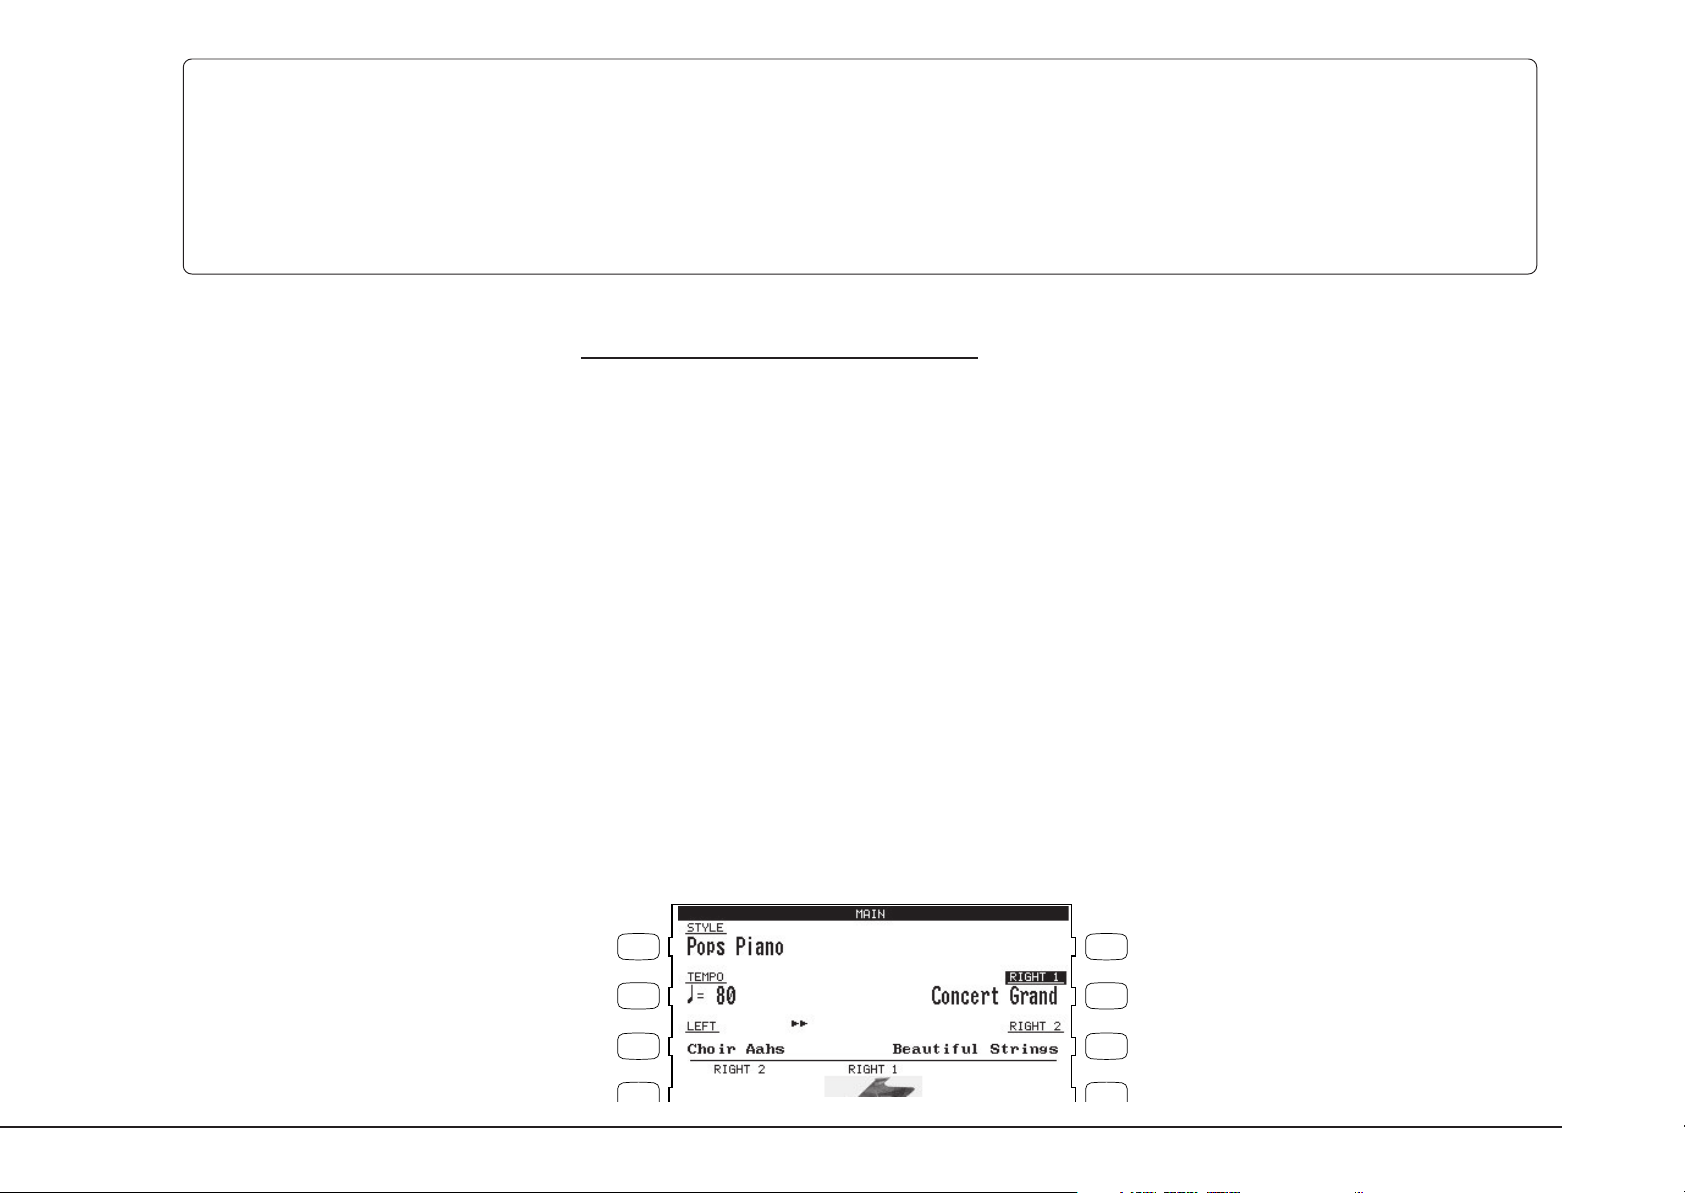
When the CP’s main play screen is displayed (For example, when the CP is first turned on), you are
presented with three sound Parts that can be played from the keyboard. These three Parts are
named LEFT/SPLIT, RIGHT 1 and RIGHT 2, and each one has an instrument sound assigned to it.
You can selectively turn on/off any combination of these three Parts, allowing you to have up to
three different sounds at the same time across the keyboard.
Sounds assigned to Parts RIGHT 1 and RIGHT 2 will be layered on top of each other when both
Parts are active at the same time. Activating the LEFT/SPLIT Part automatically splits the keyboard
so that only the sound that is assigned to the LEFT/SPLIT Part is heard when you play in the lower
octave keys. Each Part has a dedicated button on the front panel that selects and turns on/off that
Part. You can also select a Part by pressing the appropriate L or R button.
Selecting a Part is easy:
Basic Controls
1) Press the PART button for the Part you wish to activate. The PART button LED will light.
2) Press the PART button again to turn that Part off.
• If the LCD screen is currently showing the main play screen, you can tell which Parts are active
by looking at the name of the sound assigned to it. If the name of a sound is in large typeface,
then the Part it is assigned to is active. If the sound name is displayed in small typeface, then the
Part is not active.
L 1
L 2
L 3
L 4
R 1
R 2
R 3
R 4
This example indicates:
RIGHT1 is currently active
RIGHT2, LEFT are inactive.
P. 9
Page 16
Splitting the keyboard.
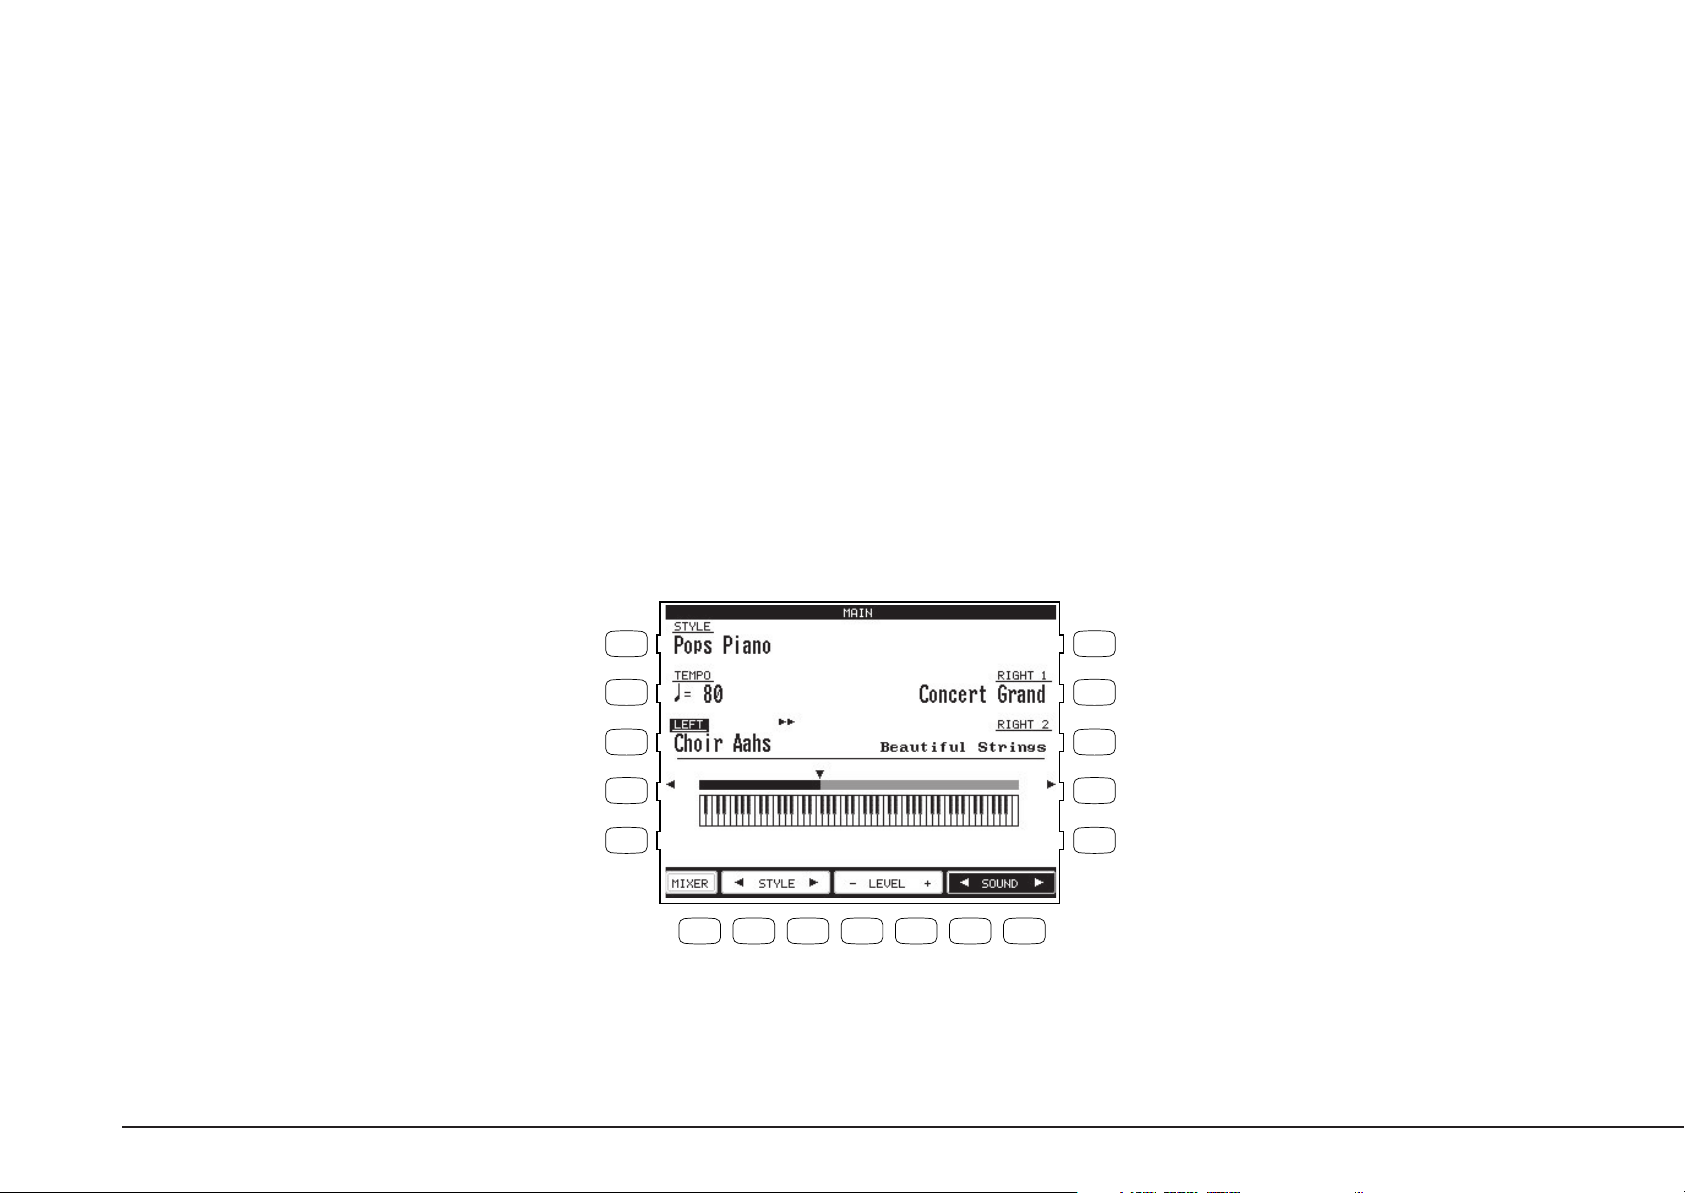
When the LEFT/SPLIT Part is activated, the CP automatically splits the keyboard and only the
sound assigned to the LEFT/SPLIT Part will be heard when you play below a specified key (split
point) on the keyboard. The default split point is between F2 and F#2 but you can freely change the
split point to any key on the keyboard.
To change the split point:
1) Press the LEFT/SPLIT button to activate the LEFT/SPLIT Part. The LEFT/SPLIT button LED will light
and the LCD screen will display a diagram of the CP’s 88 note keyboard.
2) Press the LEFT/SPLIT button again, and while holding it down, press the desired key on the keyboard
that you want to serve as the split point. The key you press will become the lowest note the Right
hand Parts will play (RIGHT1 and RIGHT2). The LEFT/SPLIT sound will be heard when keys below
the split point are played.
You may also use the L4 and R4 buttons to move the split point. On the LCD screen the split point
marker will move across the 88 note keyboard diagram as you press these buttons.
P. 10
L4 Lowers the split point.
L 1
L 2
L 3
L 4
L 5
F 1 F 2 F 3 F 4 F 5 F 6 F 7
R 1
R 2
R 3
R 4
R 5
R4 Raises the split point.
• Moving the split point completely to the LEFT end of the keyboard will allow the LEFT/SPLIT
Part to function as a layer with the two right hand Parts. In this manner you can create a threepart layer across the entire keyboard.
Kawai Concert Performer Series Digital Piano
Page 17
Selecting Sounds
The Concert Performer has over 600 instrument and drum sounds available from the front panel.
You can freely assign any of these sounds to the three Parts. Remember that there is always a sound
assigned to each of the Parts, even if some of the Parts are not currently active.
The sounds span a tremendous variety of instruments, ranging from traditional acoustic sounds to
modern electronic tones. To help you quickly find the sound that you want, the sounds have been
organized into 15 categories. Each category has a dedicated Sound Selection button on the front
panel.
To select a Sound:
1) In the main play screen, select the Part to which you wish to assign a new sound using the L3, or R2R3 buttons. The selected Part will become highlighted.
Basic Controls
PIANO
HARPSI &
MALLET
DRAWBAR ORGAN
VOCAL &
PAD
SYNTH
SOUND
STRING
SPECIALTY
1
SPECIALTY
BRASS
2
WOOD-
WIND
DRUM &
PERC.
GUITAR
SFX
BASS
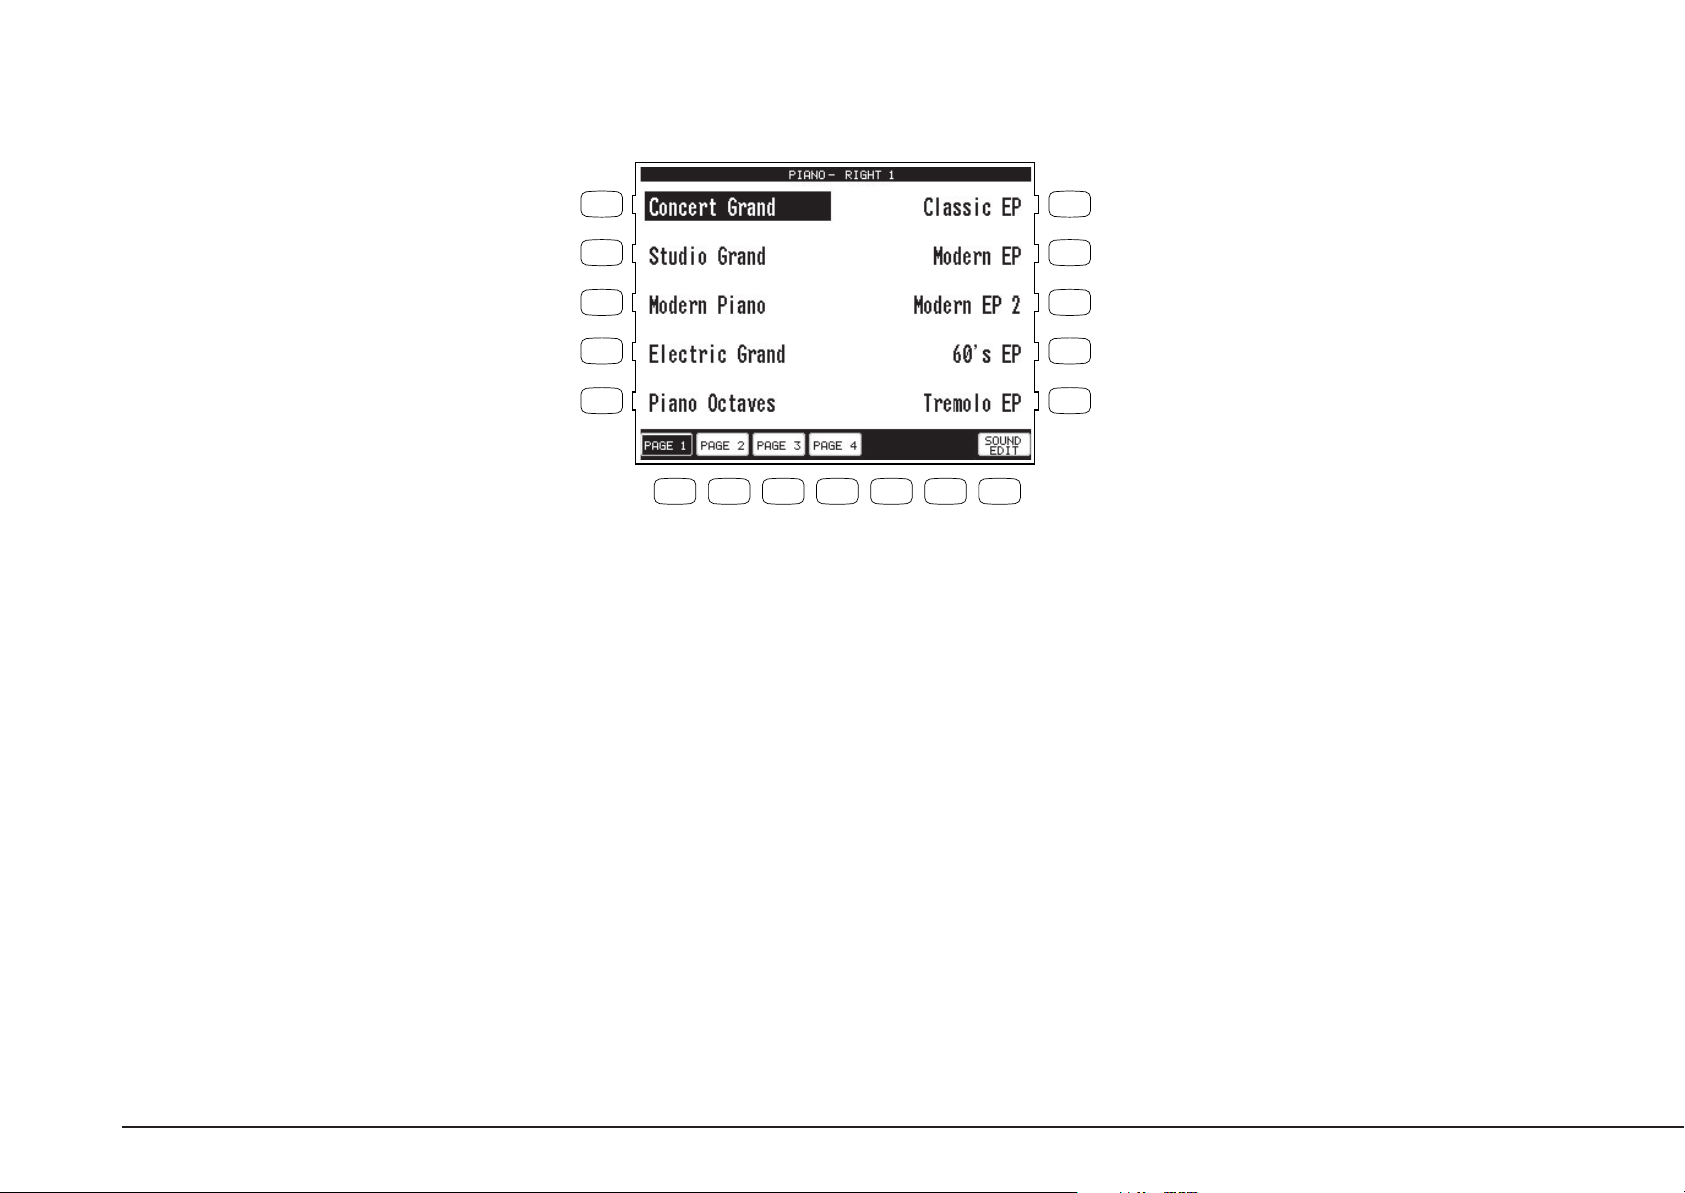
2) Press the SOUND button for the sound category that you are interested in. The first page of sounds in
that category will be displayed. There are at least three pages of sounds in each category. Use the
F1-4 buttons to view the other pages in a category.
3) Select a sound by pressing the L or R button that is next to the displayed name.
4) Press the F1-F4 buttons to show the Sounds on the other pages for the same category.
5) You can also use the Dial to scroll through all of the categories and sounds one by one.
P. 11
Page 18
L 1
R 1
Use the L or R buttons to select your desired Sound.
L 2
L 3
L 4
L 5
F 1 F 2 F 3 F 4 F 5 F 6 F 7
F1-F4 Selects the different pages of Sounds within a category.
F7 Takes you to the Sound Edit menu. (See "Editing Sounds"
on page 88.)
R 2
R 3
R 4
R 5
P. 12
Kawai Concert Performer Series Digital Piano
Page 19
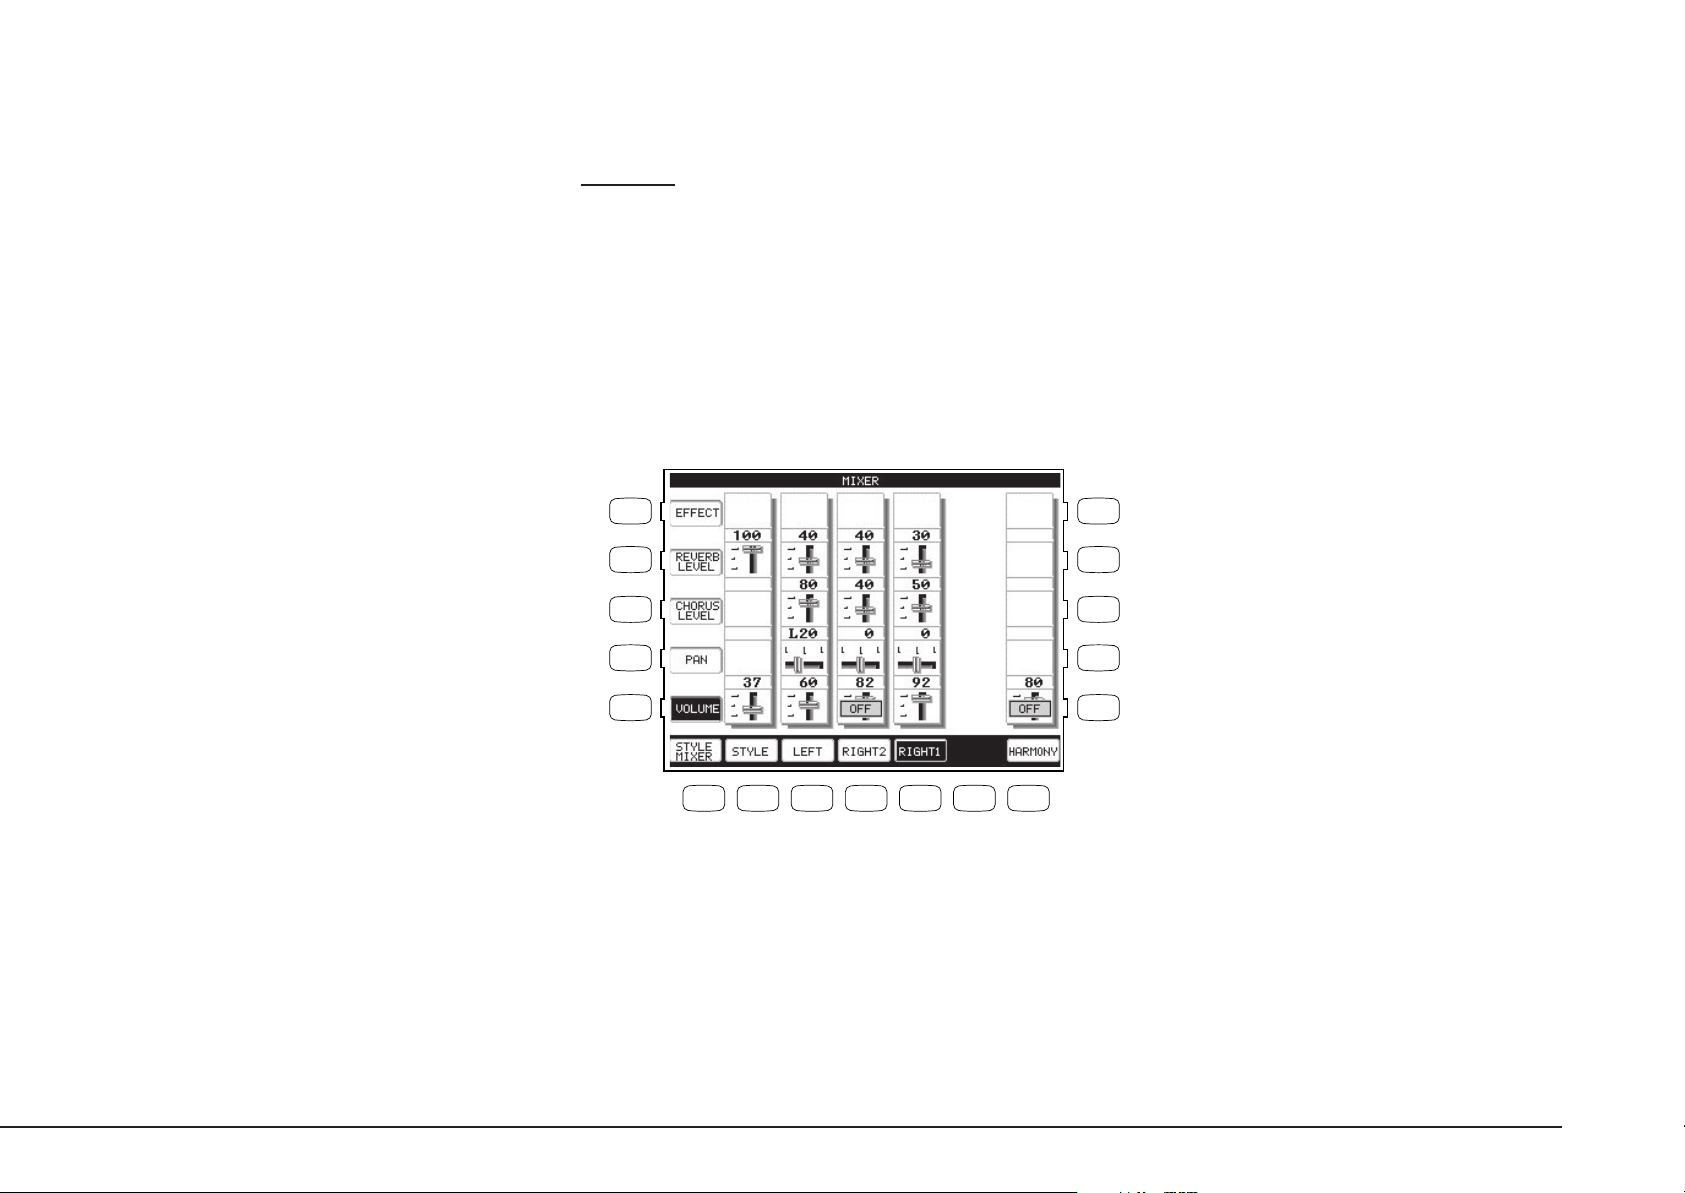
Mixer
This Mixer screen allows you to change the volume, panning, reverb and chorus levels, as well as
turn the effect on/off for each Part.
To use the Mixer:
1) Press the MIXER button (F1) while on the main play screen.
2) Use the F2–F5 and F7 buttons to select which Part you wish to adjust.
3) Use the L and R buttons to select a setting to change.
4) Use the Dial to change the value.
L1 Selects the Effect On and Off.
L2 Selects reverb level.
L3 Selects chorus level.
L4 Selects Panning.
L5 Selects volume level.
After you make your desired selection, use the Dial to
change the value.
L 1
L 2
L 3
L 4
L 5
F 1 F 2 F 3 F 4 F 5 F 6 F 7
F1 Takes you to the next page of the Mixer.
F2–F5 Selects the part to change.
F7 Adjusts the volume level for the Harmony.
R 1
R 2
R 3
R 4
R 5
• Volume level can be also adjusted from the main play screen, using the VOLUME buttons (F4,
F5).
Basic Controls
P. 13
Page 20
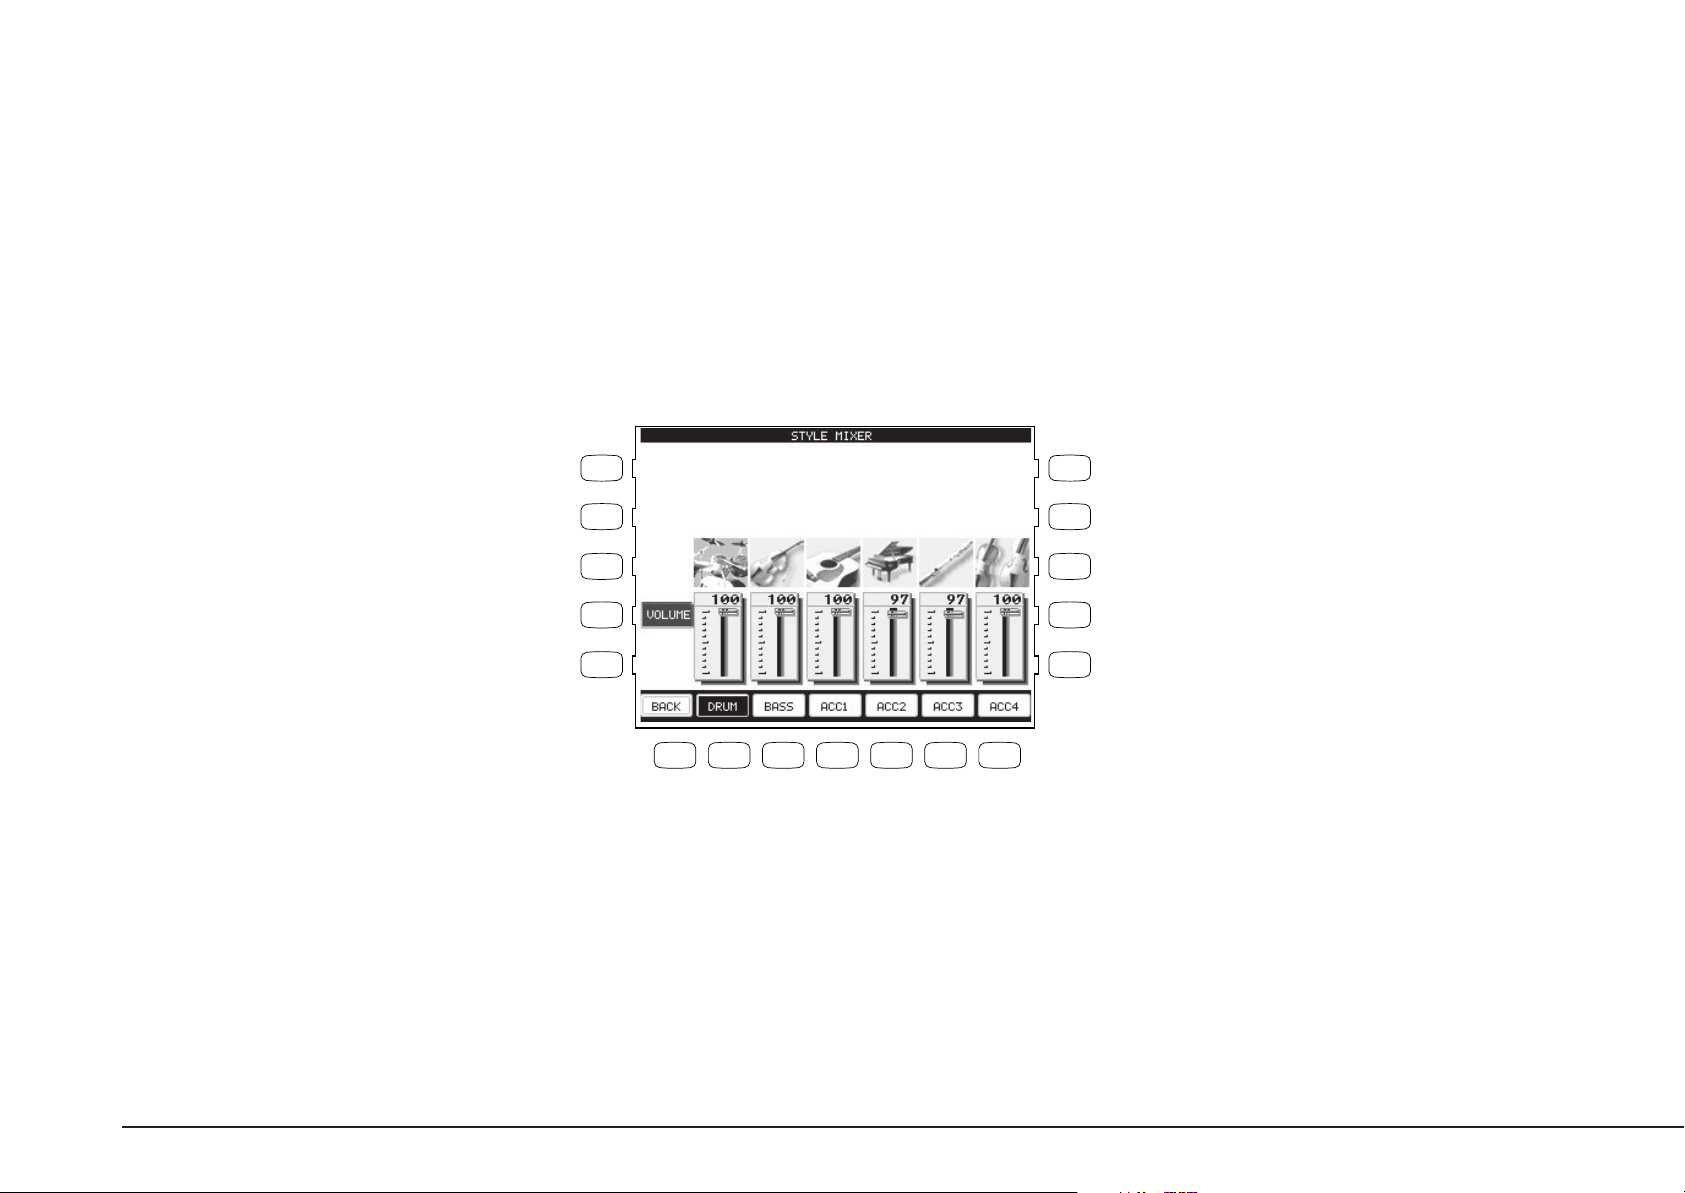
The Mixer not only lets you set the overall volume level for the Style, but set individual volume
levels for the 6 Sections within a Style.
To adjust the individual Section level:
1) On the Mixer screen, press the STYLE MIXER button (F1). The Style Mixer screen will be selected.
2) Use the F2–F7 buttons to choose a Section, then use the Dial to change the volume.
3) Press the BACK button (F1) to go back the previous Mixer screen, or press the EXIT button to go back
to the main play screen.
L 1
L 2
L 3
L 4
L 5
F 1 F 2 F 3 F 4 F 5 F 6 F 7
F1 Takes you to the previous Mixer screen.
F2–F7 Selects the Section that you wish to change.
R 1
R 2
R 3
R 4
R 5
P. 14
Kawai Concert Performer Series Digital Piano
Page 21

REVERB
CHORUS
EFFECT
Effects
You might have noticed that when you select some of the sounds, the LED indicator for the REVERB,
CHORUS, or EFFECTS button is turned on. The reason for this is some of the sounds are set up
with one or more of these effects on as part of their initial setting.
Adding an effect to the sound enhances tonal quality and improves acoustical realism. The CP
piano is provided with three separate groups of effects. The first is REVERB, the second is CHORUS,
and third group EFFECTS contains other useful effects such as Delay, Phaser, Rotary Speaker etc.
There is a dedicated button on the front panel for each Effects group and each of the three Effect
groups can be turned on/off separately or used in combination for each part. The Concert Performer
has a selection of 27 different Reverb, Chorus, and Effect types that can be used to enhance or even
dramatically alter the instrument sounds. Each of the over 600 instrument and drum sounds has
already been assigned a REVERB and CHORUS setting and an additional EFFECT that suits that
particular type of instrument. For example, a moderate Delay effect is used on the Church Organ to
recreate the sense of being in a large church, and a Rotary speaker effect is used on the Drawbar
organ to give it an authentic, vintage feel.
If you wish, you can change any of these effect settings to suit your tastes separately for each sound
save them as the new Preset effect settings for that Sound (See Sound Edit on page 88). In addtion,
by setting the Effect For Sound function in the System to “Panel” the CP will ignore the preset
effect settings for each Sound (see Effect For Sound on page 115).
(The CP piano can also remember your Effect settings as part of a Registration. See Registration on
page 31.)
Basic Controls
To add Reverb:
1) Press the REVERB button. The REVERB button LED will light.
2) If you wish to edit the settings, hold down the REVERB button for a moment until the Reverb Settings
screen is displayed.
3) Use the F3-F7 buttons to select the Part you want to edit.
4) Use the L2-L4 buttons to select the specific setting that you wish to change.
5) Use the Dial to change the value.
6) Press the EXIT button to leave the Reverb Settings menu.
7) If you wish to turn the reverb effect off, press the REVERB button again.
P. 15
Page 22
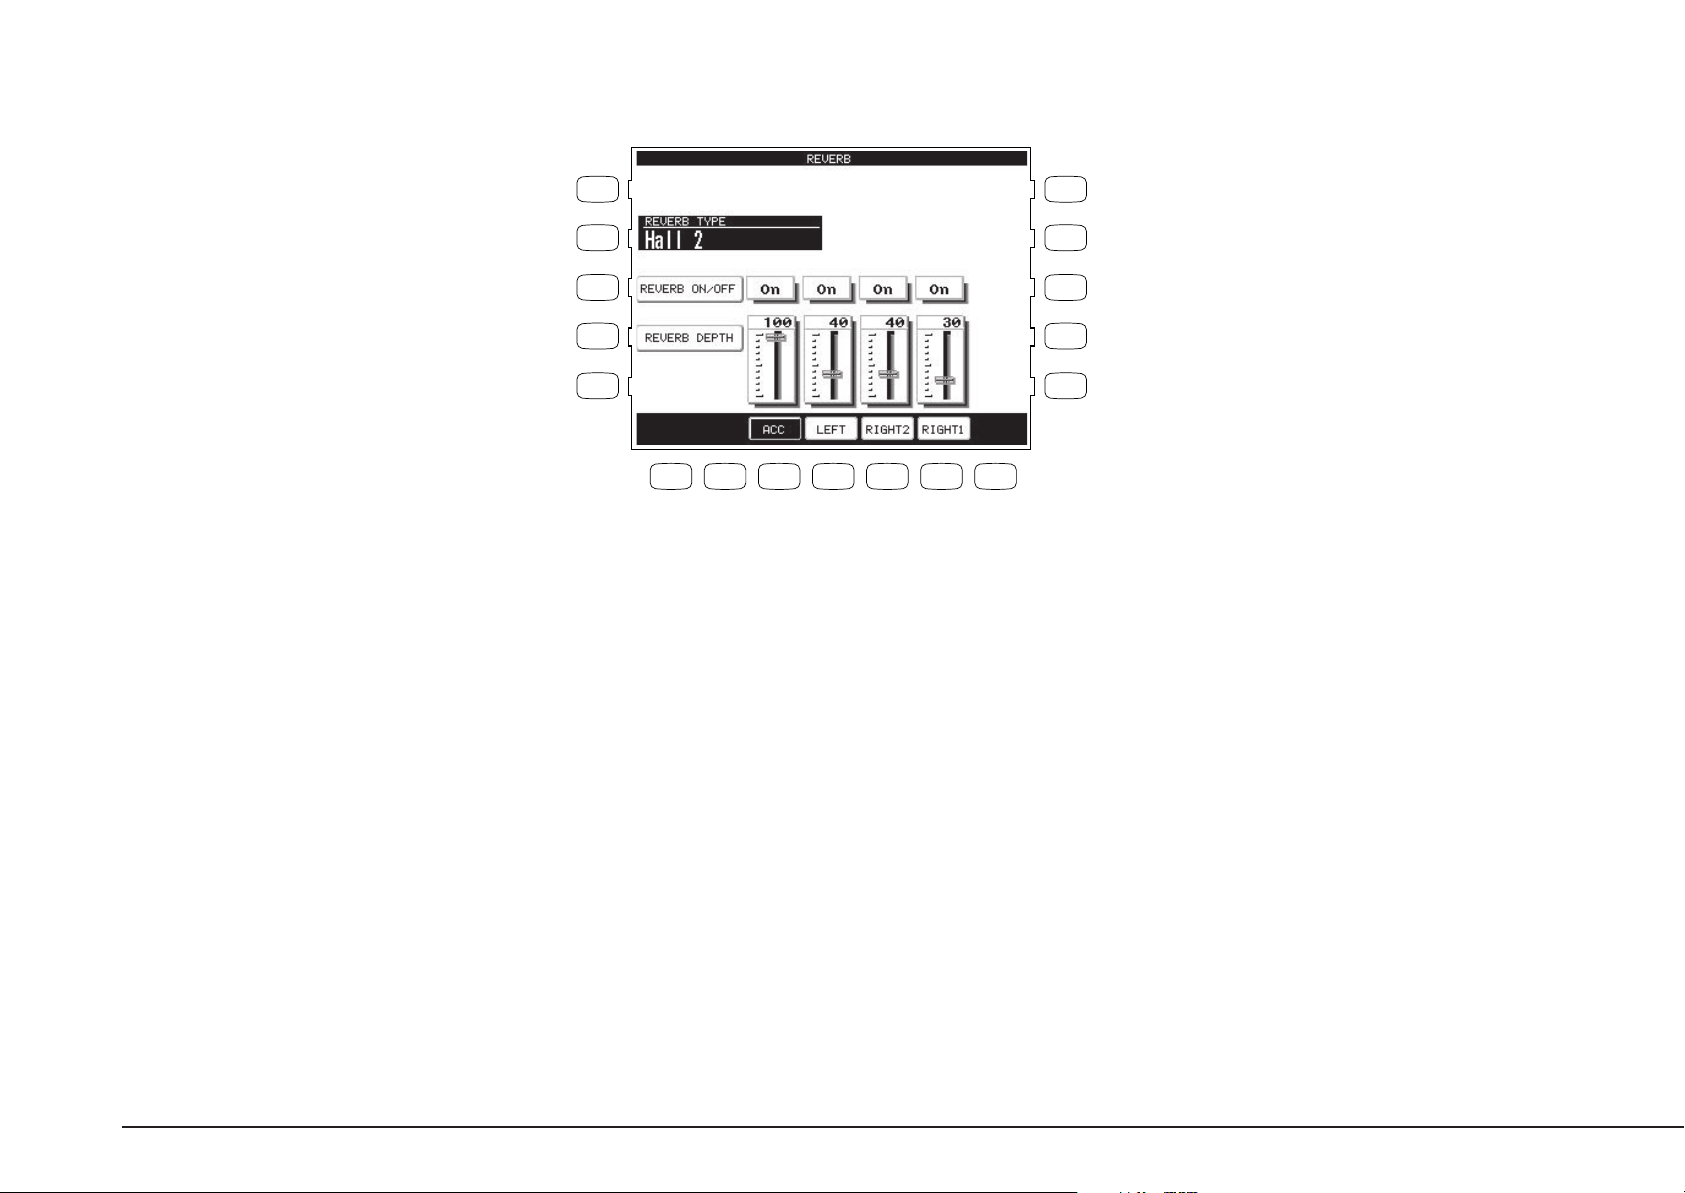
L 1
R 1
L2 Selects the Reverb type. Use the Dial to choose
one of the 7 Reverb types.
L3 Selects Reverb on/off. Use the Dial to turn the
Reverb on/off for the selected Part.
L4 Selects Reverb depth. Use the Dial to change
the Reverb depth for the selected Part.
L 2
L 3
L 4
L 5
F 1 F 2 F 3 F 4 F 5 F 6 F 7
F3–F6 Selects the Part you want to change. Repeatedly pressing
the appropriate button also turns the Reverb on/off for
that Part.
R 2
R 3
R 4
R 5
Type of Reverb
Hall 1, Hall 2 Simulates the ambiance of a concert hall or theater.
Stage 1, Stage 2 Simulates the ambiance of a small hall or live house.
Room 1, Room 2 Simulates the ambiance of a living room or small rehearsal room.
Plate Simulates the sound of a metallic plate reverb.
P. 16
• The LED Indicator on the REVERB button will be lit whenever Reverb is turned on for the any
Part except ACC (regardless of each part’s Effect Priority). See “Effect Priority Guidelines” later
in this chapter for an explanation of Effect Priority.
To add Chorus:
1) Press the CHORUS button. The CHORUS button LED will light.
2) If you wish to edit the settings, hold down the CHORUS button for a moment until the Chorus Settings
screen is displayed.
3) Use the F3–F5 buttons to select the Part you want to edit
4) Use the L2–L4 buttons to select the specific setting that you wish to change.
Kawai Concert Performer Series Digital Piano
Page 23
5) Turn the Dial to change the value.
6) Press the EXIT button to leave the Chorus Settings menu.
7) If you wish to turn the chorus off, press the CHORUS button again.
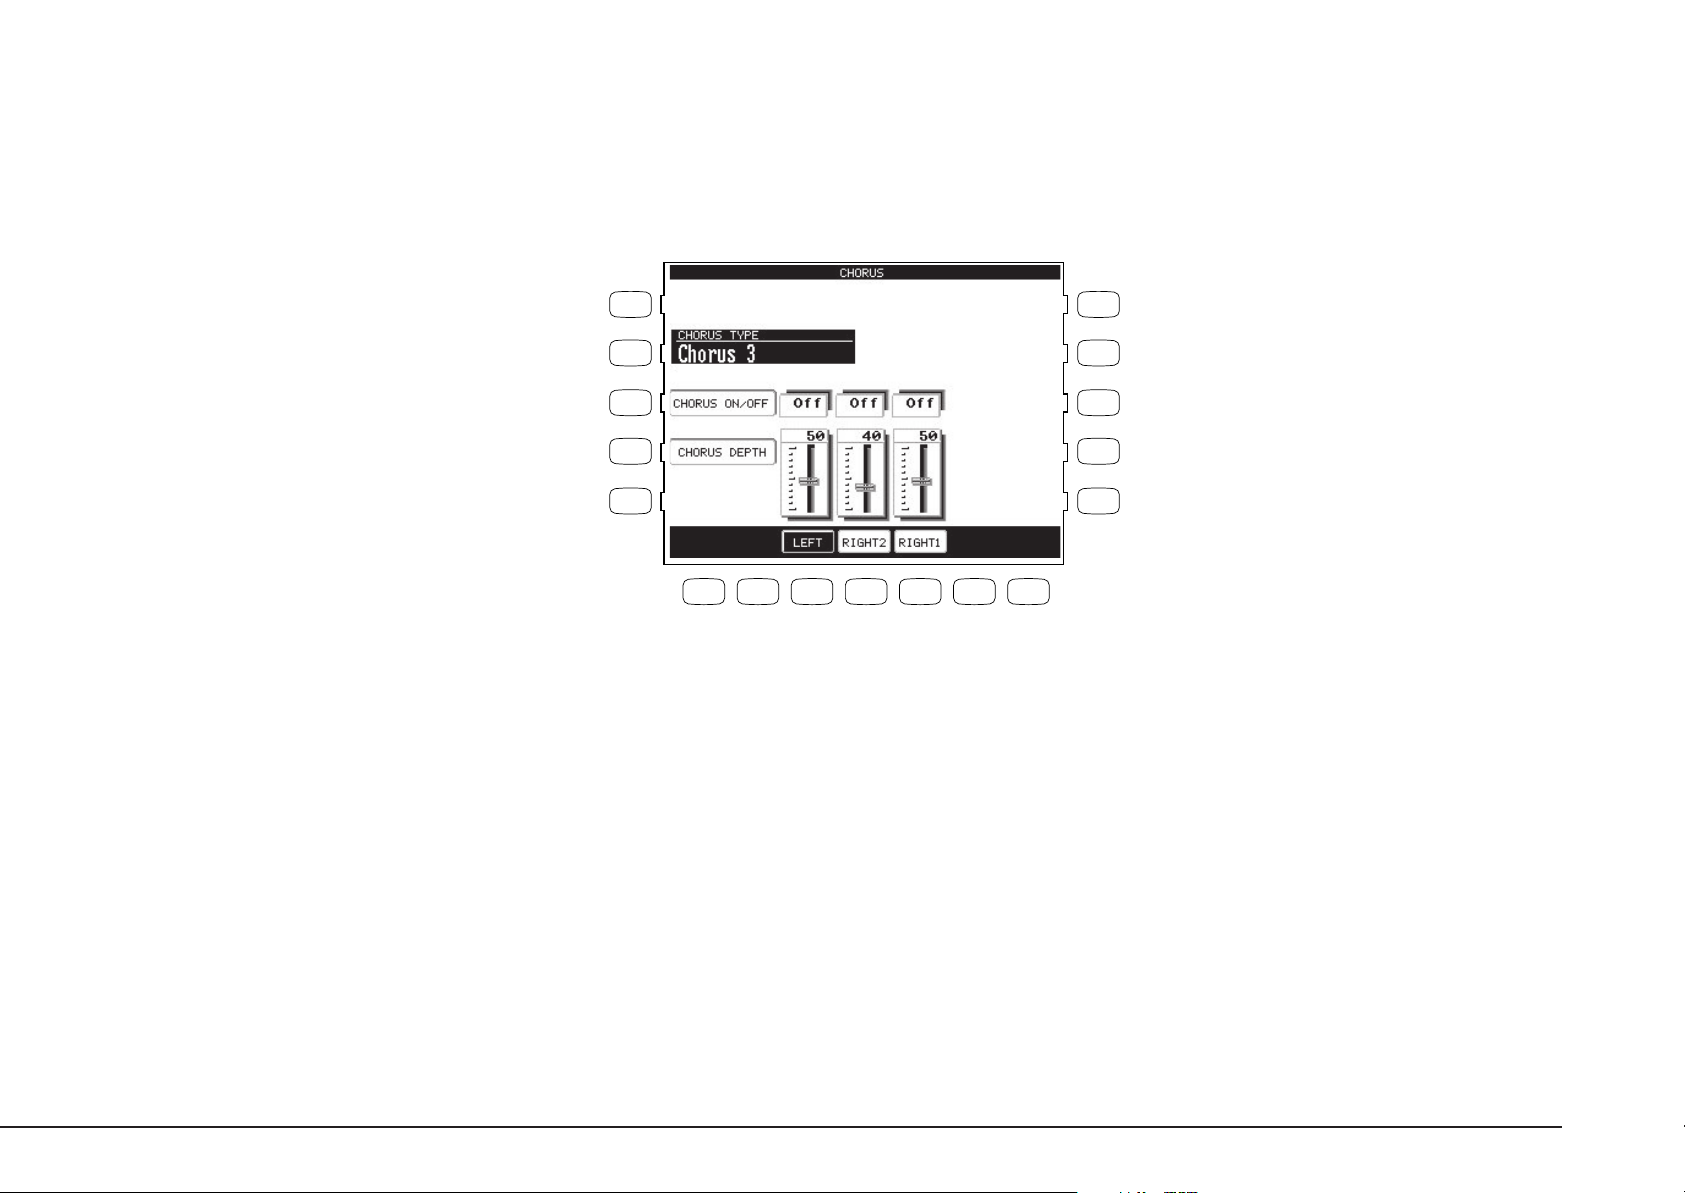
L2 Selects the Chorus type. Use the Dial to choose
one of the 4 Chorus types.
L3 Selects Chorus on/off. Use the Dial to turn the
Chorus on/off for the selected Part.
L4 Selects Chorus depth. Use the Dial to change
the Chorus depth for the selected Part.
L 1
L 2
L 3
L 4
L 5
F 1 F 2 F 3 F 4 F 5 F 6 F 7
R 1
R 2
R 3
R 4
R 5
F3–F5 Selects the Part you want to change. Repeatedly pressing the
appropriate button also turns the Chorus on/off for that Part.
• The Indicator light on the CHORUS button will be lit only when Chorus is turned on for the
active “Priority Part”. See “Effect Priority Guidelines” later in this chapter for an explanation of
this.
• You can select from four chorus types when in the Chorus Settings menu. There is a fifth chorus
type which is assigned as an Effect from the Effect Settings menu. In this way, you can actually
have two chorus effects active if so desired.
Basic Controls
P. 17
Page 24
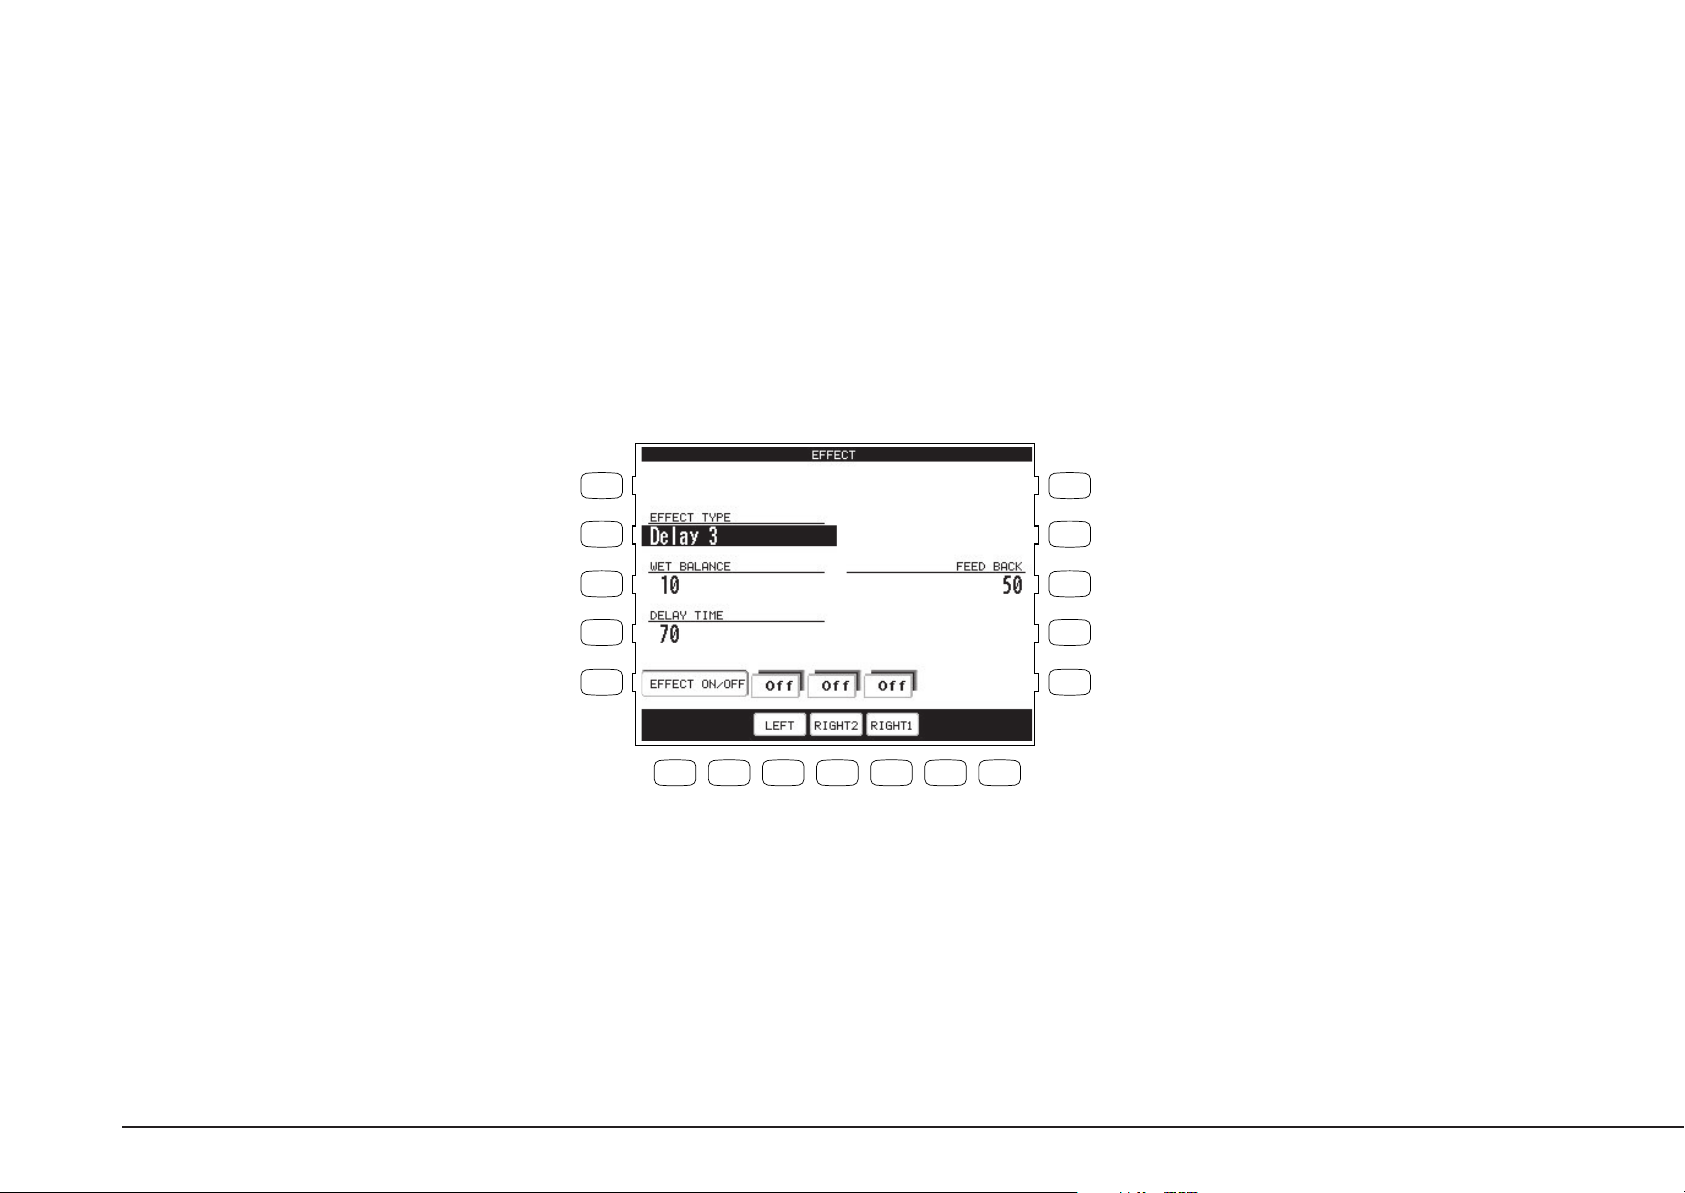
To add an Effect:
1) Press the EFFECT button. The EFFECT button LED will light.
2) If you wish to edit the settings, hold down the button for a moment until the Effect Settings screen is
displayed.
3) Use the F3–F5 button to turn ON/OFF the Effect for each part.
4) Use the L2–L5, R3 buttons to select the specific setting that you wish to change.
5) Turn the Dial to change the value.
6) Press the EXIT button to leave the Effect Settings screen.
7) If you wish to turn the Effect off, push the EFFECTS button again.
L2 Selects Effect type. Use the Dial to choose one
of the 16 Effect types.
L3 Selects Wet Balance. Use the Dial to change the
value.
L4 Selects a different editable setting for each Effect
type. Use the Dial to change the value.
L 1
L 2
L 3
L 4
L 5
F 1 F 2 F 3 F 4 F 5 F 6 F 7
F3–F5 Turns the Effect on/off for each Part.
R 1
R 2
R 3
R 4
R 5
R3 Selects a different editable setting for
each Effect type. Use the Dial to
change the value.
P. 18
Kawai Concert Performer Series Digital Piano
Page 25

Effect Types
Chorus Simulates the rich character of a vocal choir or string ensemble, by layering a
slightly detuned version of the sound over the original to enrich it.
Flanger Creates a shifting comb-filter, which adds motion and a “hollow” tone to the
sound.
Celeste A three-phase chorus without modulation.
Ensemble A three-phase chorus with a slight modulation to each phase.
Delay 1-3 Adds echoes to the sound. The three types differ in the length of time between
the echoes.
Auto Pan Moves the sound left and right across the stereo field at a variable rate.
Tremolo Modulates the volume of the sound. This is a vibrato type effect.
Tremulant A combination of Tremolo and Vibrato. It simulates the tremulant pipes of a
church organ.
Basic Controls
Phaser Creates a phase change, adding motion to the sound.
Rotary 1-2 This effect simulates the sound of the Rotary Speaker cabinet commonly used
with electric organs. Rotary 2 adds distortion. The soft pedal is used to change
the speed of the rotor between SLOW and FAST.
Auto Wah Sweeps a tone filter up and down at the beginning of a note, recreating the popular
vintage wah wah pedal sound.
Enhancer Emphasizes high frequencies to make a sound more easily discernible in a mix.
Distortion Adds frequencies that were not present in the original sound, resulting in a “fuzzy”
or warmer tone.
P. 19
Page 26

Effect Priority Guidelines
Reverb and Chorus are global effects. In other words, all of the Parts and the Accompaniment Style
must share the same Reverb and Chorus type. However each of these Parts can have a different
amount of Reverb and Chorus applied to them. In addition Reverb and Chorus can be independently
turned on/off for each part. However, since the CP’s EFFECT section can only have one Effect
turned on at a time (in addition to the REVERB and CHORUS), what happens if you have two (or
more) Parts active, with entirely different sounds, each with a different Effect setting?
In these cases, the CP’s Effects section can only use the Effect settings for one of the Parts. The
EFFECT section chooses which Effect settings to use based upon a predetermined priority order
for each of the Parts. The Priority order is RIGHT 1> RIGHT 2 > LEFT/SPLIT. The preset effect
settings for the Priority Part will be used and the other Parts will either share these settings or may
have their Effects automatically turned off.
This “Priority Part” depends on the current situation. If you only have one Part active, regardless
of which Part it is, the preset effect settings for that sound will be used. If you have two or more
Parts active, then the CP will treat one of them as the Priority Part, and ignore the settings of the
other(s).
If the Effect For Sound is set to “Panel” in the System then the Preset effect settings for each Sound
will be ignored and the Part Priority will be ignored. (See Effect For Sound on page 115).
Here are some guidelines for Effect Priority:
P. 20
• Priority is given to the Parts in the following order: RIGHT1>RIGHT2>LEFT. This means that
anytime the RIGHT1 Part is active, its Effect settings will be used, not only for its sound but for
any sound in any other Part, that you want to add effects to. Likewise, the only time an active
LEFT Part’s settings will be applied is if the other 2 Parts are inactive.
• Unlees you change them, the Effect settings will only change in response to a change in the
Priority Part being activated/deactivated, or a new sound is assigned to an active Priority Part.
In the latter case, the new Effect settings will reflect the Preset effect settings for the new
sound.
• When the Effect settings change for the Piority Part, the Effects will be automatically turned off
for the other Parts. (This is so that your Flute sound on RIGHT2 doesn’t suddenly get effected
by the Distortion settings of the Electric Guitar that you’ve just assigned to the RIGHT1 Part!)
• You can, however, turn the effect on for any Part by adjusting the Effect On/Off option in the
display for that Part.
Kawai Concert Performer Series Digital Piano
Page 27

• The LED Indicator on the EFFECT and CHORUS buttons will be on only when the active Priority
Part has these effects turned on.
Example
Assume that your CP is set up according to the following chart:
RIGHT1 RIGHT 2 LEFT INDICATOR
Part Inactive Active Active
Effect On On On On
If you then select a different sound for RIGHT2, the Effect setting for the RIGHT1, LEFT will be
turned off automatically. This is because RIGHT2 is the Priority Part (note that the RIGHT1 Part is
NOT the Priority Part because it was inactive).
The chart would now look like this:
RIGHT1 RIGHT 2 LEFT INDICATOR
Part Inactive Active Active
Effect Off On Off On
Even if you now assign a new sound to the RIGHT1 Part, the Effect settings for the other Parts
won’t change, because RIGHT1 is still inactive, so therefore would not have priority.
Once you make the RIGHT1 Part active, however, it would now be considered the Priority Part.
The Effect settings for the other Parts will again be turned off. The Indicator light on the EFFECT
button will now reflect the Effect status for the sound assigned to RIGHT1.
Basic Controls
RIGHT1 RIGHT 2 LEFT INDICATOR
Part Active Active Active
Effect Off Off Off Off
At this point, if the Effect that has been called up along with the RIGHT1 sound is one that you’d
like to use for the other Parts, simply select Effect On in the LCD display for those Parts.
P. 21
Page 28

Transpose and Octave Shift
Transpose raises or lowers the CP’s pitch in half- step increments. Octave Shift does the same but
in octave increments.
TRANSPOSE
OCTAVE SHIFT
Transpose can be especially useful when you have learned a song in one key and have to play it in
another key. The transpose feature allows you to play the song in the original key, but hear it in
another key. You can transpose the Concert Magic songs, the Accompaniment Styles, any songs
played back by the Easy/Advanced Recorder and any of the over 600 instrument and drum sounds
available in the CP.
Octave shift can be very useful when you are playing multiple sounds across the keyboard. You
may want to use the octave shift to adjust a bass sound assigned to the LEFT/SPLIT Part to play in
the proper pitch range, or to set one sound in a layer to play in a different octave so that it mixes
well with other sounds in the layer. Octave shift is only available for the three Parts: LEFT/SPLIT,
RIGHT1 and RIGHT 2.
To Transpose:
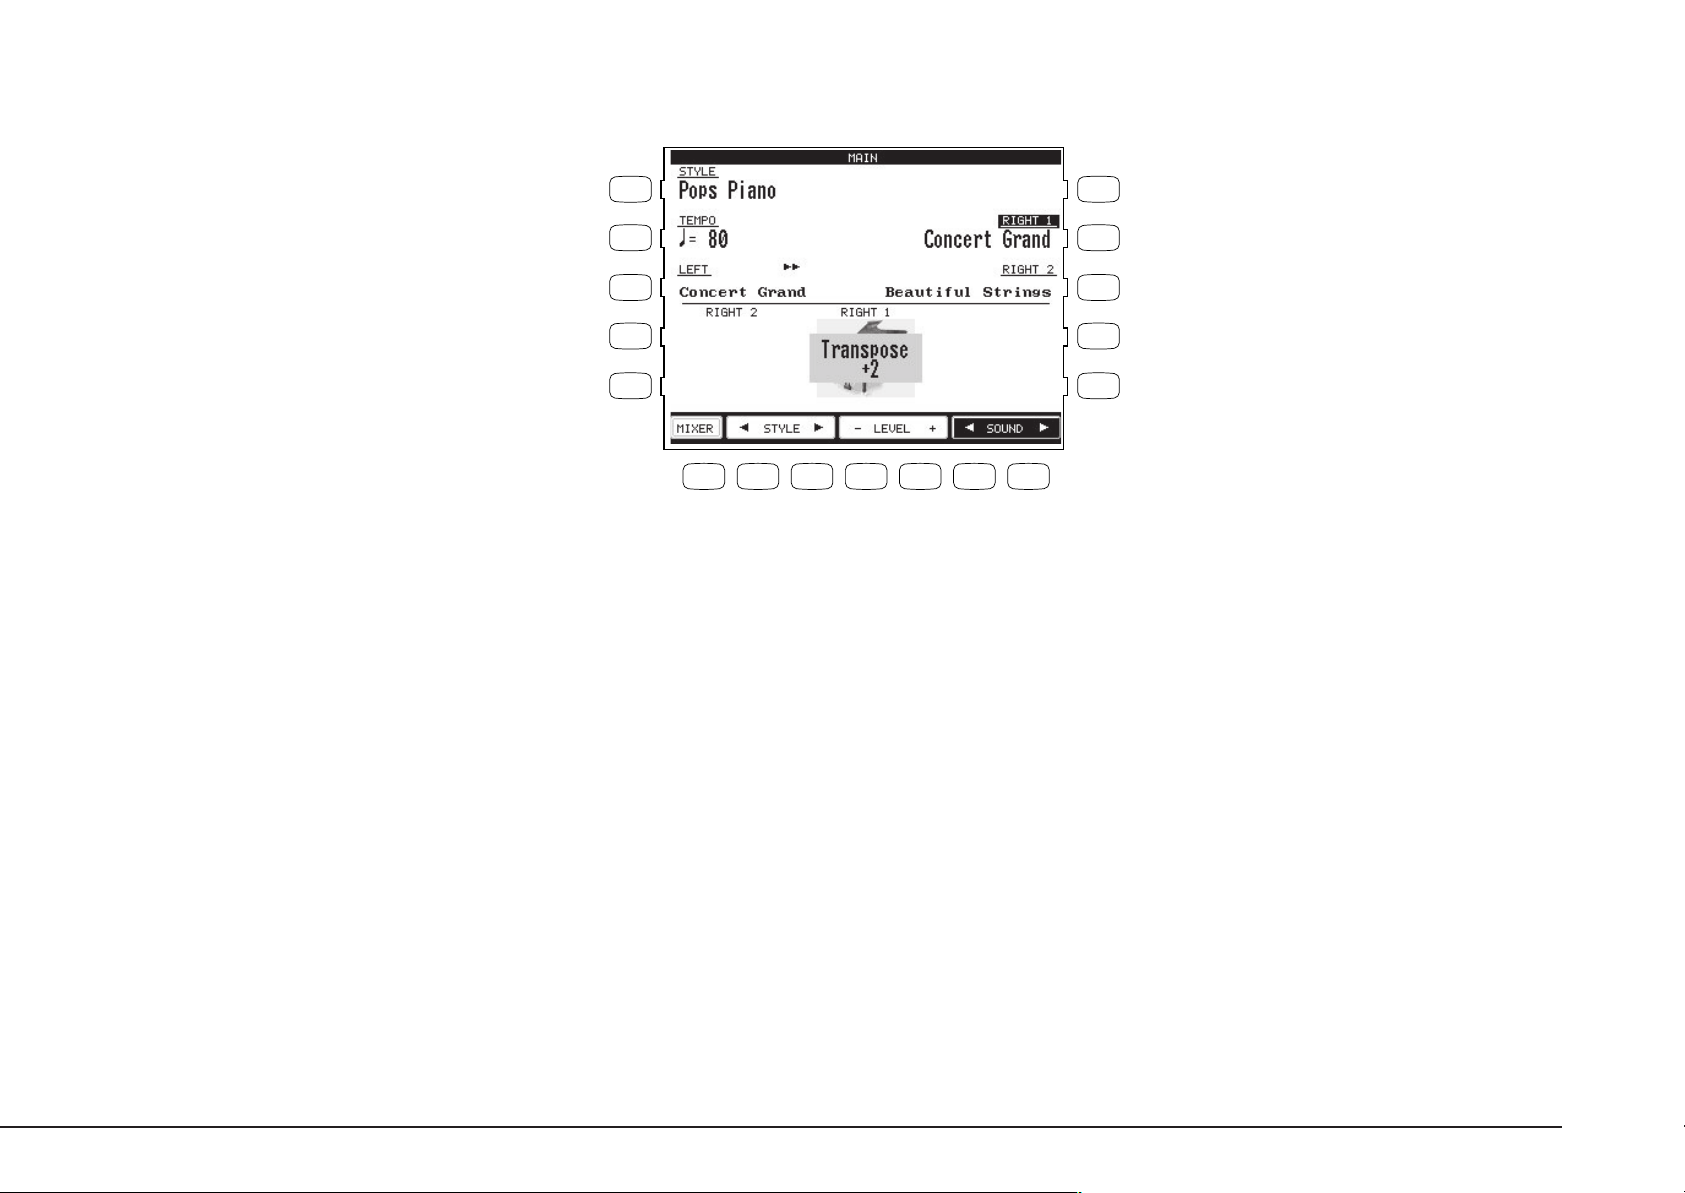
1) Press either the ß or † TRANSPOSE buttons. The LCD screen shows you a number telling you how
many half steps up or down you have transposed the piano. -5, for example, represents a transposition
that is 5 half steps lower.
2) To cancel the Transpose setting, press both the ß and † buttons at the same time. The transpose
amount will disappear from the LCD screen, indicating that the CP is now back to its original setting.
To use the Octave Shift:
P. 22
1) Select the Part that you would like to apply the shift to.
2) Press either the ß or † OCTAVE SHIFT buttons. The number of shifted octaves (up or down) will be
displayed with an “ß” in the LCD screen.
3) To cancel the octave shift, press both the ß and † buttons at the same time. The symbols will
disappear from the screen, indicating that the selected Part is back to its normal octave range.
Kawai Concert Performer Series Digital Piano
Page 29
L 1
R 1
L3 Selects the LEFT Part to be Transposed or Octave
Shifted.
L 2
R 2
R2 Selects the RIGHT1 Part to be Transposed
or Octave Shifted.
L 3
R 3
R3 Selects the RIGHT2 Part to be Transposed
L 4
L 5
R 4
R 5
or Octave Shifted.
The number of octaves shifted is represented by
the number of triangles shown above the sound
name for each Part.
Transpose amount is shown at the bottom of the
F 1 F 2 F 3 F 4 F 5 F 6 F 7
screen.
• The Octave Shift has a range of four octaves in each direction. However, some on board sounds
may have a limited range in which they play properly. If you shift too far out of this range, the
instrument may sound strange or may not play at all. This has no affect on the CP’s proper
function though, and you should feel encouraged to use this feature as a means of getting
interesting tonal variations out of the preset Sounds.
Basic Controls
P. 23
Page 30
Metronome
Rhythm is one of the most important elements when learning music. It is important to practice
playing the piano at the correct tempo and with a steady rhythm. The CP piano’s metronome is a
tool that helps you to achieve this by providing a steady beat for you play along with.
METRONOME
TAP TEMPO
To use the Metronome:
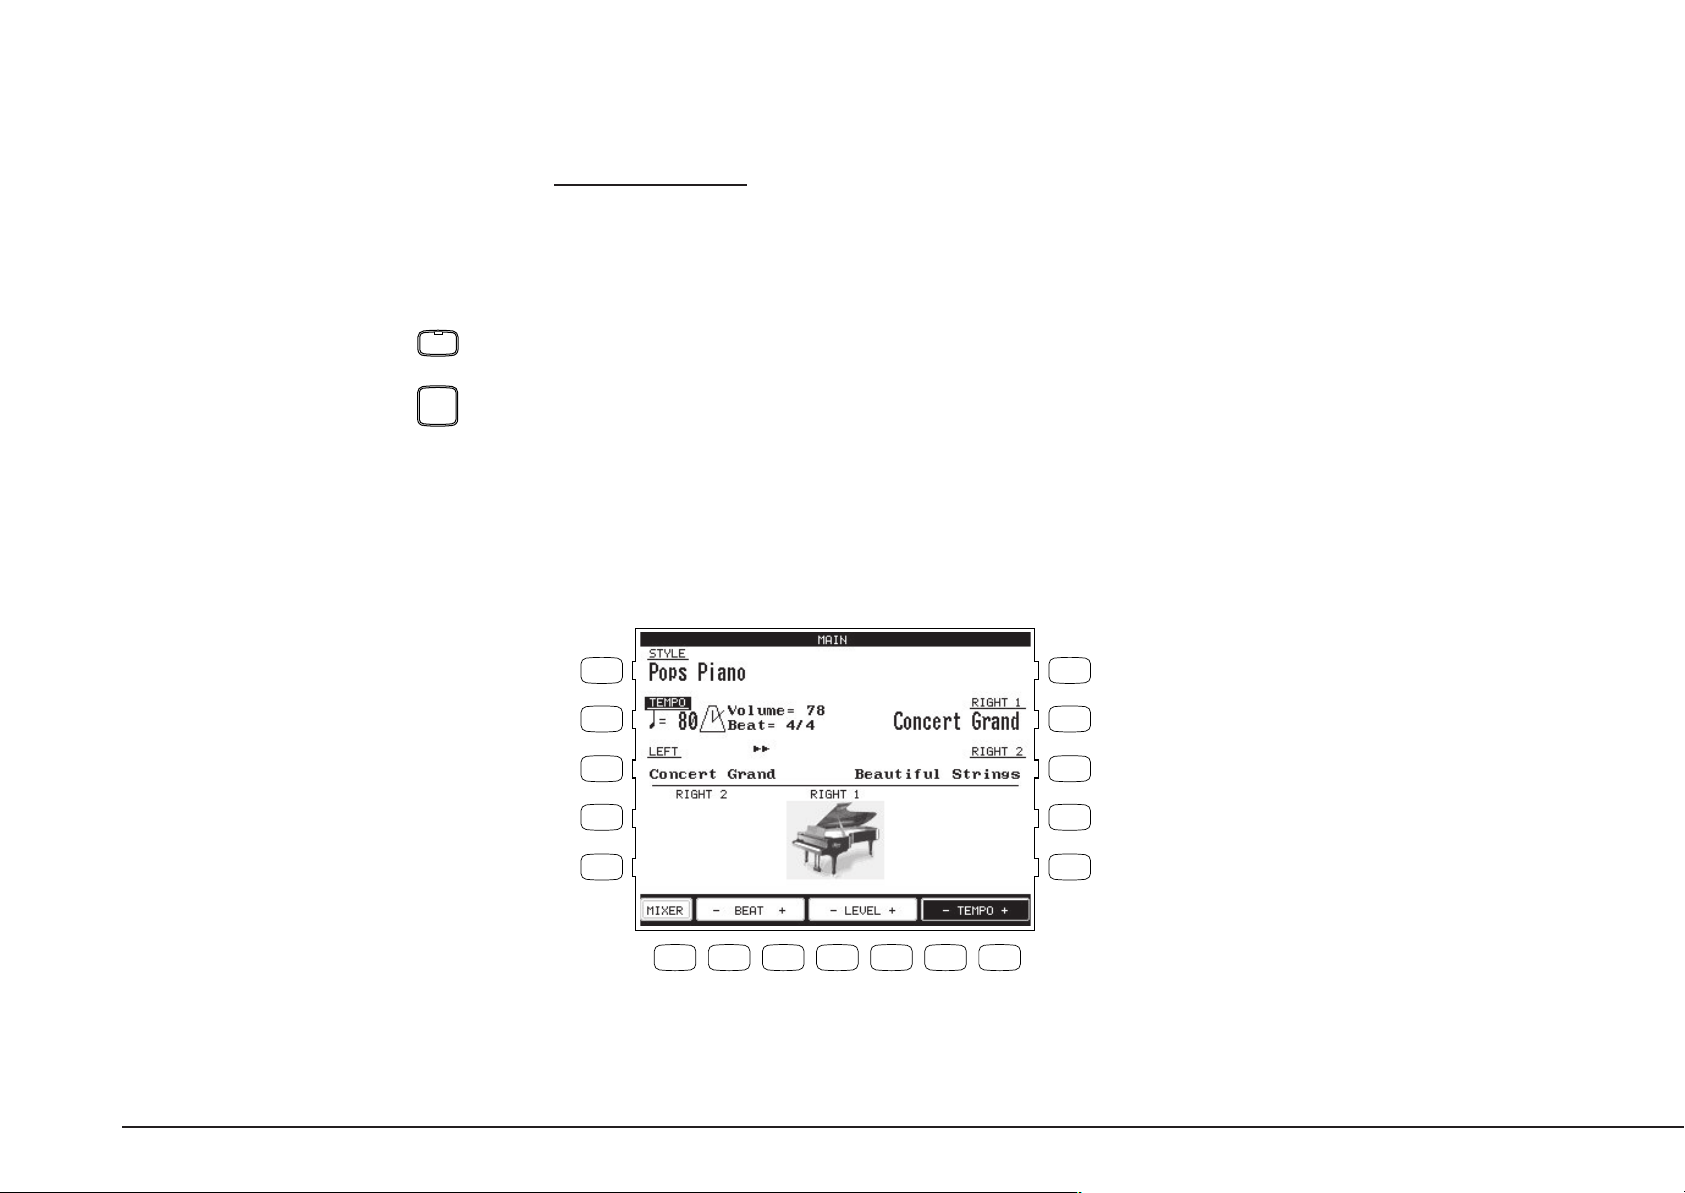
1) Press the METRONOME button. The CP piano will start counting with an audible steady beat. You
will see Volume level, Beat (time signature), as well as the Metronome icon appear in the LCD
screen next to the Tempo value.
2) Use the BEAT, VOLUME, or TEMPO buttons (F2–F7) to select the setting you wish to change.
3) Use the F buttons (F2-F7) or the Dial to change the values.
You can also adjust the tempo by tapping on the TAP TEMPO button. Simply tap on the button with
your finger three or more times at the desired tempo, and the CP will automatically translate that
into a tempo value on the screen!
4) To stop the metronome, press the METRONOME button again.
L 1
L 2
L 3
L 4
L 5
R 1
R 2
R 3
R 4
R 5
P. 24
F 1 F 2 F 3 F 4 F 5 F 6 F 7
F1 Takes you to the Mixer menu.
F2, F3 Changes the Beat. Choose from 1/4, 2/4, 3/4, 4/4, 5/4,
6/8, 7/8, 9/8 and 12/8 time signatures.
F4, F5 Adjusts the volume level.
F6, F7 Adjusts the tempo.
Kawai Concert Performer Series Digital Piano
Page 31

Piano Only
The Piano Only button provides a way to quickly set the Concert Performer up to play the Concert
Grand piano sound. Pressing the Piano Only button immediately turns off all Parts except the Right
1 part and sets the Right 1 sound to Concert Grand.
PIANO
ONLY
The Piano Only button also turns off all auto-accompaniment functions and stops the Easy/Advanced
Recorder. Additionally, pressing the Piano Only button will cause the CP to exit any function or
editing screen (except for Concert Magic) and immediately return to the Main Screen.
When you are using Concert Magic, pressing the Piano Only button will change the Concert Magic
song’s preset sounds to Concert Grand piano.
• You can also use the Piano Only button as a “panic button” to immediately stop any unintended
accompaniment style or recording, or to quickly exit any confusing situation and return to a
familiar piano sound.
To use Piano Only:
Press the PIANO ONLY button. The Main Screen is displayed and the Concert Grand sound is assigned
to RIGHT1.
Basic Controls
P. 25
Page 32

Using a Style
The Concert Performer contains 150 built-in Styles for you to play
along with, covering a wide variety of musical genres. You can
choose from a simple drum or percussion accompaniment or add
in a fully orchestrated arrangement. In addition to the Full Styles
which provide a full musical arrangement including Drums, Bass,
and other accompanying instruments, there are Intimate Styles with
Selecting and Playing a Style
The Styles are organized into 15 categories, each with a dedicated STYLE SELECT button on the
front panel.
To select a Style:
1) Press the STYLE button for the category of your choice. The LCD screen will display the first Style
Selection page for that category.
2) Press the L or R button next to the on-screen name of the Style you wish to select.
3) Each Style category has two pages of styles. If you don't see your desired Style on the currently
displayed page, you can use the F1- F2 buttons to select the other page. Press another STYLE button
to jump to another category, or turn the Dial to scroll through all the Styles one by one.
4) If you wish play the selected Style, press either
the START/STOP button to start the Style playing immediately,
or the INTRO/ENDING button to start the Style with an Intro pattern.
You can also press the SYNC/FADE OUT button before starting a Style or pressing the INTRO/ENDING
buttons. When the SYNC/FADE OUT button is pressed, the Style will not start until you play a note or
chord on the keyboard.
5) To adjust the tempo of the Style, select Tempo on the main play screen and use the Dial to change the
Tempo.
You can also use the TAP TEMPO button. Tap the button three or more times at the desired tempo,
and the CP will automatically translate your taps into an on-screen Tempo value.
6) To stop the Style, press either,
the START/STOP button to stop the Style immediately,
or the INTRO/ENDING button to stop with an ending pattern,
You can also press the SYNC/FADE OUT button and have the Style fade out gradually.
Solo Piano Styles if you just want to play along with a piano
accompaniment. If the on board variety of styles is not enough, or
if you have creative ideas of your own, the CP contains other
features such as Style Maker and Conductor to help you edit or
create your own custom Styles. These features are explained in
the section of this manual “Creating Your Own Styles”, page 74.
P. 26
Kawai Concert Performer Series Digital Piano
Page 33

L 1
R 1
Use the L or R buttons to select your desired Style.
L 2
L 3
L 4
L 5
F 1 F 2 F 3 F 4 F 5 F 6 F 7
F1, F2 Select the different pages within a Style category.
SYNC /
FADE OUT
When this button is pressed before starting a Style or before pressing the
INTRO/ENDING button, the Style will not start until you play a note or chord
on the keyboard. When this button is pressed while the Style is running the
Style will gradually fade out. When this button is pressed during a fade out
the Style will gradually fade back in and you may resume playing the Style.
You can press the SYNC/FADE OUT button at any time while any of the
patterns (Intro, Variation, Ending) in the Style are running to fade in or out
START/
STOP
of the Style.
Starts or stops the Style immediately.
R 2
R 3
R 4
R 5
Basic Controls
When one of these buttons is pressed to start a Style the selected Intro
INTRO/ENDING
1 2
pattern will be played before the selected Variation pattern plays. There are
both major and minor versions for each Intro. The Auto-accompaniment
System will decide which Intro to use based upon the first Chord you play
(major or minor). The LCD screen will display a countdown in bars to show
how many bars you have until the variation begins playing. When one
of these buttons is pressed while the Style is running the selected Ending
pattern will be played before the Style stops. There are major and minor
versions for each Ending.
• When you are in the main play screen, you can select a Style by just using the Dial. Press the L1
button or F2–F3 (STYLE) and “Style” will become highlighted. Use the Dial or press the F2–F3
button to select another Style.
P. 27
Page 34

• The CP remembers the last Style selection that you made within each category while the power
is on. When you press a STYLE button, the CP will automatically select the Style previously
chosen in the same category.
• When you switch from one Style to another while it is running, the new Style will wait until the
beginning of the next measure before it begins to play.
Fill-In and Variation
Each Style is made of four Variation patterns and four Fill-in patterns.
ACC ON/OFF
1
1
BASS
INVER
2
VARIATION
2
FILL IN
3
3
ACCOMPANIMENT
FULL
FINGERED
KBD
4
4
FINGER
ONE
Fill-ins are short patterns that temporarily embellish the Style. Fill-ins can add excitement and
rhythmic change to the Style and be used as a musical lead in between the Variations. To use a Fillin, just press one of the FILL IN buttons. You will hear the fill-in begin playing immediately from a
musically appropriate spot.
Fill-ins can also be used as a short intro. First press the SYNC/FADE OUT button then press one of
the FILL-IN buttons to select a desired Fill-in. Press any key on the keyboard to start the style. After
the Fill-in plays, the selected Variation will play.
To select a Variation, press one of the four VARIATION buttons to select the desired Variation. The
Selected VARIATION button LED will light.
• You can set the CP to automatically play a Fill-in anytime you press a VARIATION button as you
switch from one Variation to another. Select your preferred option in the Fill-in mode. (See page
114)
Auto Accompaniment System
The Auto-accompaniment System (ACC) is a powerful feature that determines how the Styles will
interact with you as you play. The ACC System analyzes your playing and adjusts the notes the
Style plays to follow the Chords that you play on the keyboard. The ACC System is capable of
recognizing single finger as well as more complex chord voicings. The CP recognizes 61 chord
types as well as most of their inversions. (See page 160 for a chord table.) There are three modes of
key recognition—One Finger, Fingered, and Full Keyboard. Your choice of which mode to use
depends on your skill level and the selected musical style.
P. 28
Kawai Concert Performer Series Digital Piano
Page 35

Fingered The player must play at least three notes of a chord below the split point (LEFT/
SPLIT Part) before the ACC System will recognize the chord type. (See page 198
for chord table.)
One Finger Uses a simplified chord method that allows beginners to specify a chord type by
playing only one or two notes below the split point. The types of chords that can
be recognized in this manner are limited to Major, Minor, 7th and Major 7th.
While the player can trigger basic chords with as little as one finger, the ACC
System will recognize more complex chord types if you play them, even you are
in the One Finger mode.
Full Keyboard The player must play at least three notes of a chord anywhere across the 88 keys
before the ACC System will recognize the chord type. This mode is similar to
Fingered however, Full Keyboard recognizes chord types from three or more
notes played anywhere across the 88 keys not just below the split point.
Bass Inversion
When Bass Inversion is on, the Bass Section of the Style will follow the lowest note of the chord
voicing played on the keyboard. With Bass Inversion on it is possible to specify a chord over a
certain bass note by the chord voicing you play. For example, a C chord over a G bass, or a Bb7
chord over a C Bass. Bass Inversion will work with all three key recognition modes but when in
One Finger mode, you play at least two notes of a chord for Bass Inversion to function.
Basic Controls
To turn Auto-accompaniment (ACC) on:
1) Select a Style that you would like to play.
2) Press one of the ACCOMPANIMENT buttons to select the Key Recognition mode. The selected Key
recognition mode will be displayed at the bottom of the LCD screen if you're on the main play screen.
3) Press the BASS INVERSION button if you would like to turn it on.
4) Press the ACC ON/OFF button to activate the Auto-accompaniment System (ACC).
5) Press the START/STOP button to start the Style, and play some chords in the LEFT/SPLIT Part. You
will hear the Style start and also change keys and chord types as you play different chords.
6) If you want to cancel or stop the Auto-accompaniment, press the ACC ON/OFF button again. If you
turn the ACC off without stopping the Style the drum rhythms will continue to play.
P. 29
Page 36

• When you play along with the Auto-accompaniment using the Fingered or Full Keyboard modes,
you may hear two sounds playing the chords: one is selected by the front panel and the other is
pre programmed for the Style. This is because the sounds used by the Auto-accompaniment
Style are independent of the Left and Right Part sound settings. Therefore you will hear the
instrument sounds played by your hand as well as those generated by the accompaniment.
In most cases, these are just duplicate notes being played using different sounds. In some cases
however, you may hear different notes or an unexpected chord inversion. If the overall musical
effect is undesirable, try turning the LEFT/SPLIT Part off and let the accompaniment play alone.
• You can use the Auto-accompaniment (ACC) System without the Style running. In this way you
can make use of the chord recognition without having the pre programmed rhythms or patterns
playing. Just turn the ACC on and play without starting the Style. You will hear the bass and
chord parts only. This may be useful when you play a musical piece that is not played with
drums. The accompaniment sounds are pre programmed to best suit the different Styles, and
you cannot alter them. When playing in One Finger mode, however, you can replace the chord
sound with the sound chosen for the LEFT/SPLIT Part. Assign your preferred sound and make
the LEFT/SPLIT Part active.
You can also start a Style without the ACC on. In this way you can have just drums and percussion
accompany you.
P. 30
1-2
PLAY
1-2 Play
If you want to play using an Accompaniment Style, but have no idea as to what sounds you should
use for the right and left-hand parts, try using the 1-2 Play feature. This feature gives you a
preprogrammed panel setup with appropriate sounds and settings for the Style you have chosen.
To use 1-2 Play:
1) Select the Style you would like to play.
2) Press the 1-2 PLAY button. The 1-2 Play indicator will become lit, and the words “1-2 Play” are
displayed in the Main Screen. The SYNC/FADE OUT button is activated as well.
3) Activate one of the INTO/ENDING buttons if you want the Style to begin with an introduction. Start the
Style by playing a key on the left side of the keyboard, or by pressing the START/STOP button.
4) Press the 1-2 PLAY button again to turn it off.
Kawai Concert Performer Series Digital Piano
Page 37

• Among the settings contained in the 1-2 Play setting are the Sounds assigned to the keyboard
Parts (Right 1/2, Left), Tempo, and Mixer settings.
Registration
A Registration is a setup that remembers the panel settings along with many other performance
functions so that you can recall them at the touch of a button. This lets you begin to play quickly
instead of spending a lot of time programming all the settings and values manually.
There are 8 Registration buttons on the panel of the Concert Performer. Each button contains a
different registration. Pressing any of the Registration buttons activates the setup stored there.
Pressing another Registration button changes to the registration stored in that button. Pressing the
active Registration button again deactivates the registration and returns you to the original panel
setup.
Registration Groups
There are 10 Registration Groups in the Concert Performer. Each group contains settings for the 8
Registration buttons on the panel. Each group represents a “family” of settings for the CP. The
sound and performance capability of the Concert Performer is remarkable, and each registration
group is designed to take full advantage of certain types of sounds available in the instrument.
Switching from one Registration Group to another instantly changes the Registration buttons from
Pipe Organ settings to Orchestra settings, for example.
Basic Controls
REGIST
GROUPS
• The default Registration Group is “American Pop”, a family of registrations designed to play
popular music from the 1940’s through today.
With 8 Registration buttons and 10 Registration Groups, you have a total of 80 preprogrammed
Registrations available. Plus, you can overwrite any registration with your own unique setups.
To use a Registration:
1) Press the REGIST GROUPS button. Ten Registration Groups will be displayed.
2) Highlight any Group from the list by using the L and R buttons.
3) Press one of the eight REGISTRATION buttons to activate a Registration from your selected Registration
Group.
4) To return to the Main Screen, press the EXIT button.
P. 31
Page 38

L 1
L 2
R 1
R 2
Use the L and R buttons to select the Group. Then
press one of eight REGISTRATION buttons to call
the desired setup.
L 3
L 4
L 5
F 1 F 2 F 3 F 4 F 5 F 6 F 7
R 3
R 4
R 5
F6, F7 Takes you to the Registration Group Name screen.
• The CP remembers how the front panel was setup before you chose a Registration so that after
exiting the Registration, the prior settings will be restored.
• It is not necessary to always begin with the REGIST GROUPS button when selecting a Registration.
If the group you want to use is already selected, pressing one of the REGISTRATION buttons will
activate a setup from that group. The CP will remember the Registration Group last chosen as
long as the power remains on.
• You cannot use the 1-2 Play function and Registrations at the same time. Choosing one always
cancels the other.
P. 32
Kawai Concert Performer Series Digital Piano
Page 39

To create your own Registration:
S
1) Set up the panel and functions in the way that you’d like to save them.
2) Press the SAVE REGIST button. Use the R1 – R5 buttons to select the Registration Group in which to
save your setup. Use the F1 – F2 buttons to view the 10 Registration Groups in sets of five.
3) Press one of the 8 REGISTRATION buttons to specify which location you’d like to save your Registration
to.
L 1
L 2
L 3
L 4
L 5
F 1 F 2 F 3 F 4 F 5 F 6 F 7
REGISTRATION
123 78
456
R 1
R 2
R 3
R 4
R 5
R1–R5 Selects the Registration Group to save in.
Press the F1-F2 buttons to display the Registration
Groups on the other pages.
Press the specific REGISTRATION button where
you’d like to save to.
• The following settings can be stored in a Registration:
Sounds (Right1, Right2, Left), Split Point, Style and Variation, Fill-in mode, Tempo,
Accompaniment settings, Mixer settings, Chorus settings, Effect settings, Harmony settings,
Voicing, Detune, Resonance and Left Pedal functions.
Basic Controls
• You can save your Registrations on a floppy disk and load them into the CP later. (See page 130.)
P. 33
Page 40

To rename the Registration Group:
1) Press the REGIST GROUPS button.
2) Use the L and R buttons to select the Group to rename.
3) Press the NAME (F6, F7) button.
L 1
L 2
L 3
L 4
L 5
F 1 F 2 F 3 F 4 F 5 F 6 F 7
R 1
R 2
R 3
R 4
R 5
Use the L and R buttons to select the Group to rename.
4) In the Registration Group Name screen, use the CURSOR (F2, F3) buttons and the CHARACTER (F4,
F5) buttons to change the name. You can also use the Dial to change the characters.
5) Press the SAVE (F6, F7) button to confirm the name.
P. 34
Kawai Concert Performer Series Digital Piano
Page 41

L 1
R 1
STYLE LOCK
L 2
L 3
L 4
L 5
F 1 F 2 F 3 F 4 F 5 F 6 F 7
R 2
R 3
R 4
R 5
F1 Takes you to the previous menu.
F2, F3 Moves the cursor over the characters in the name.
F4, F5 Selects a character.
F6, F7 Saves the name
Style Lock
Pressing the STYLE LOCK button keeps the current Style, even if another Registration is selected.
This allows you to change Sounds and settings by the Registration button while keeping the Style
as-is. As long as the STYLE LOCK button is on, changing registrations will not change the style.
However, you can always manually change the style, even if the Style Lock is on.
Basic Controls
Press the STYLE LOCK button again to turn it off.
P. 35
Page 42

SONG
STYLIST
Song Stylist
With over 600 Sounds and 150 Styles, it can sometimes be difficult to decide the best settings with
which to play a song. Even if you are very familiar with the Concert Performer, you may want a
quick way to change the CP’s setup to play another song. The Song Stylist feature was created to
handle this situation for you. You simply pick the name of the song you want to play and the
Concert Performer sets up everything for you.
The Song Stylist contains a list of 500 popular song titles. In the Song Stylist, there is an appropriate
setup for each of those songs. You may search for your favorite title either alphabetically by song
name, or by category of musical genre. Once you’ve found the song you want to play, simply press
one button and the CP is immediately setup for that song and ready for you to begin.
• The Song Stylist contains no prerecorded music, only the setup to play the chosen song. You
must play the actual music yourself.
To use the Song Stylist:
1) Press the SONG STYLIST button. The Category list appears, showing the different musical genres for
the SONG STYLIST.
2) Use the SEARCH BY CATEGORY buttons (F1, F2) to display the Category choices on the other page.
When you have found the category you want, use the L and R buttons to select it. A list of songs
within that musical category appears.
P. 36
Kawai Concert Performer Series Digital Piano
Page 43

L 1
L 2
R 1
Use the L, R buttons to select your desired category.
R 2
L 3
L 4
L 5
F 1 F 2 F 3 F 4 F 5 F 6 F 7
F1, F2 Shows the other categories.
F3, F4 Shows the song list in alphabetical order.
F6 Searches for a title from a floppy disk.
R 3
R 4
R 5
Basic Controls
P. 37
Page 44
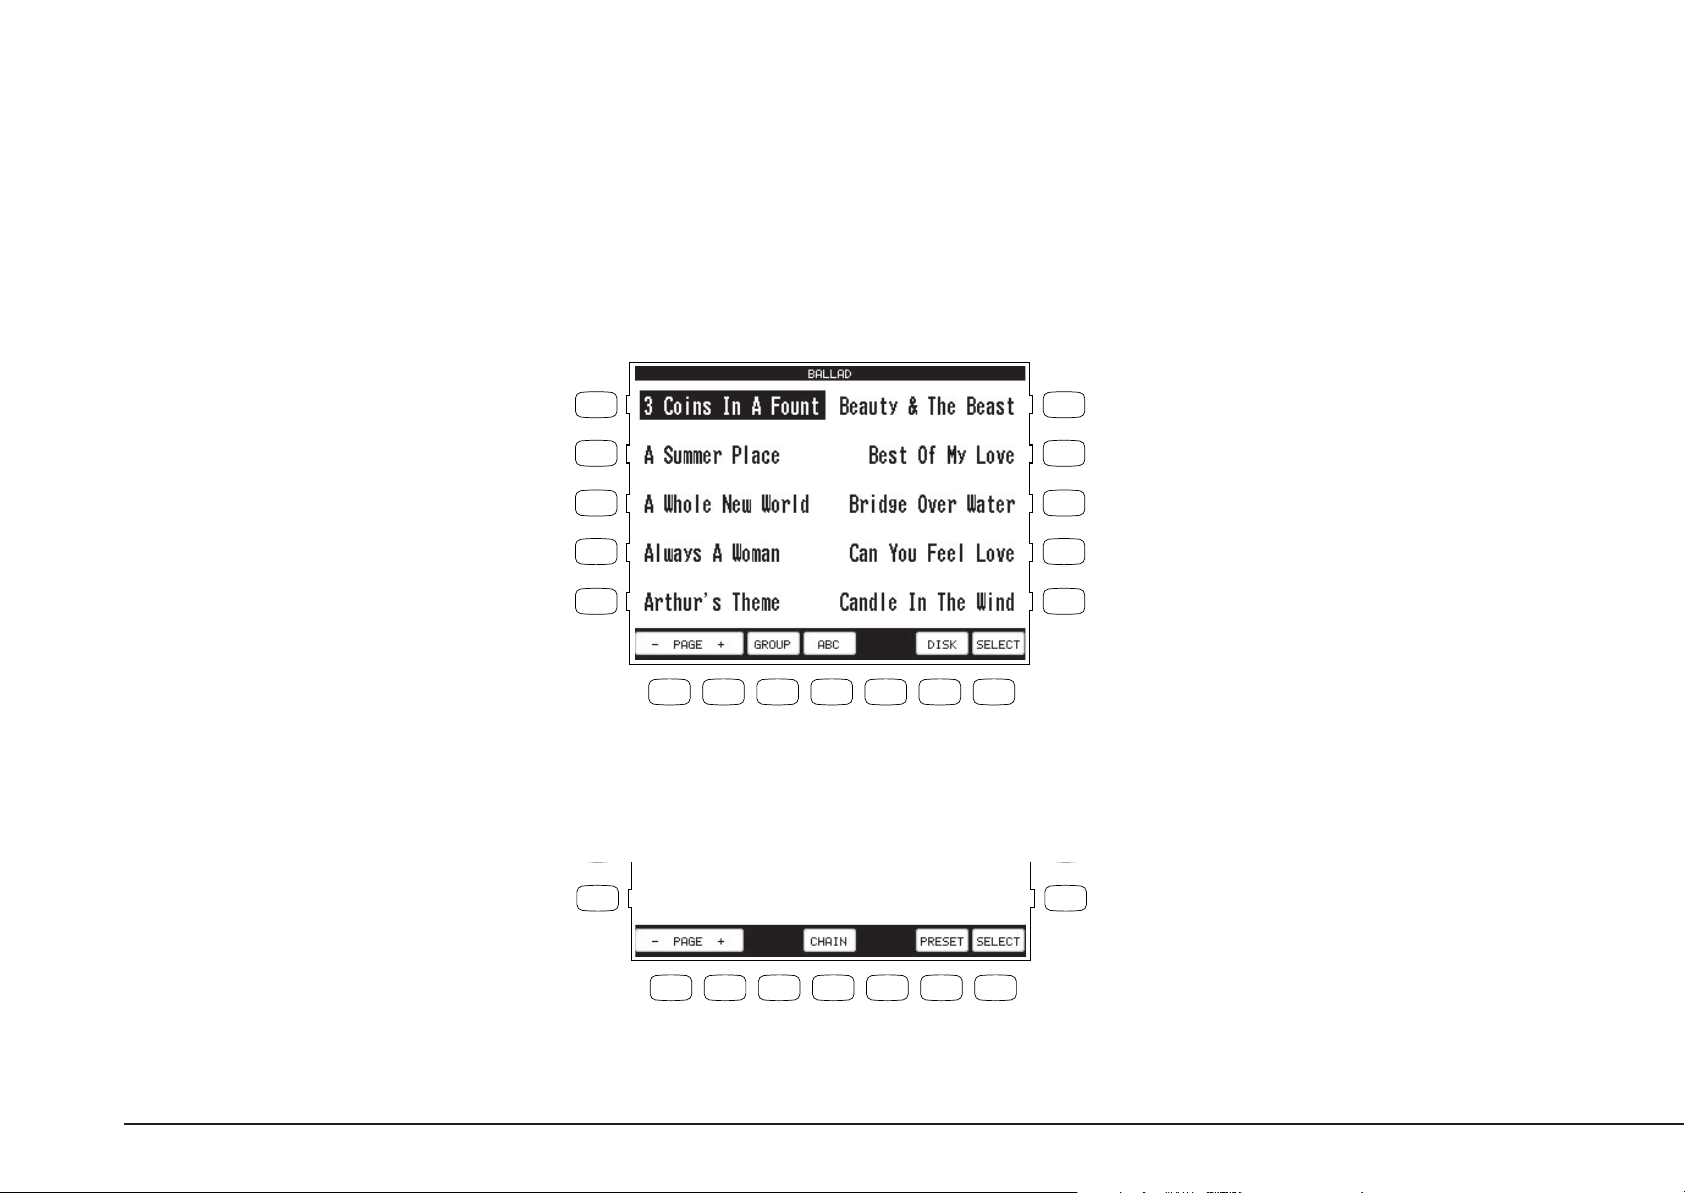
3) Use the PAGE buttons (F1, F2) to display the Song Titles on the other pages in the same category.
4) Use the L and R buttons to select one of the ten songs displayed in the screen. The CP automatically
returns to the Main Screen ready with all of the settings for that song.
5) You may start and play the song in your usual manner. You can operate the CP normally and make
any changes to the Song Stylist setup that you wish.
6) To play another song, press the Songlist (F7) button. To exit, press the SONG STYLIST button again
or press the EXIT button.
Selecting a song from a floppy disk.
L 1
L 2
L 3
L 4
L 5
F 1 F 2 F 3 F 4 F 5 F 6 F 7
F1, F2 Searches for a title on the other pages.
F3 Jumps to the Song Stylist Category menu.
F4 Searches for a title in alphabetical order.
F6 Searches for a title from a floppy disk.
F7 Selects the Song.
L 5
R 1
R 2
Use the L or R buttons to select your desired song.
R 3
R 4
R 5
R 5
P. 38
F 1 F 2 F 3 F 4 F 5 F 6 F 7
F1, F2 Searches for a title on the other pages.
F4 Starts the Chain Play.
F6 Searches for a title from the internal presets.
F7 Selects the song.
Kawai Concert Performer Series Digital Piano
Page 45

L1 Highlights the Style.
L 1
R 1
L2 Adjusts the Tempo.
L3 Highlights the LEFT Part.
L4 Changes the split point.
L 2
L 3
L 4
L 5
F 1 F 2 F 3 F 4 F 5 F 6 F 7
F1, F2 Turns on the Auto Chord Progression (if available).
F3, F4 Turns on the Melody part (if available).
F5, F6 Adjusts the volume level for the sound.
F7 Takes you back to the Song Stylist menu.
R 2
R 3
R 4
R 5
R2 Highlights the RIGHT 1 Part.
R3 Highlights the RIGHT 2 Part.
R4 Changes the split point.
• You may use different Sounds, Styles, Tempo and other settings to customize to your taste.
• When choosing a Song Stylist created by you (or someone else) and saved to floppy disk, there
may be a recorded melody and chord track available. The chord track, called the Auto Chord
Progression, will provide you with the chord changes to the song.
You may also find a song title by searching the list alphabetically.
Basic Controls
To search the Song Stylist by Song Title:
1) Press the SONG STYLIST button. The Category list appears, showing the different musical genres for
the SONG STYLIST.
2) Press the SEARCH BY NAME (F3, F4) buttons. In the Name Menu, press the L or R buttons to take you
to the first letter of the name of the song. For example, if your song title starts with “G”, press the L4
button.
3) Use the PAGE (F1, F2) to search for the name of your song. When you find the song, press the
corresponding L or R button. The CP automatically returns to the Main Screen ready with all of the
settings for that song.
P. 39
Page 46

HARMONY
Harmony
When the Auto-Accompaniment is on, you can use Harmony function. The Harmony function
automatically adds notes to your right hand (melody) part to help you sound more professional.
This function analyzes the notes you play and automatically adds notes from the Accompaniment
chord (shown in the Main Screen when the Accompaniment is on), creating a “harmony” part (even
if you are only playing single notes in the left and right hands).
There are 10 types of Harmony.
Block Adds three or four notes based on the chord.
Open Adds three or four notes based on the chord. Harmony notes may extend over one
octave below the lowest right-hand note.
Jazz Adds three or four notes based on the chord.
Rockn’ Adds a note at a fifth (or fourth) interval to the lowest note played in the RIGHT
Part.
Dynamic Adds three or four notes based on the chord. Harmony notes are played within
one octave below the lowest note played in the right hand.
P. 40
Duet Adds a note according to the lowest note played in the right hand and based on the
chord.
Octave Takes the highest note played in the right hand and doubles it an octave down.
Octave Duet Adds an Octave note and a Duet note.
Vocal 1 Adds a single note above the top note of the right hand based on the chord.
Vocal 2 Adds three notes based on the chord. The lowest note will always be the root of
the chord.
Kawai Concert Performer Series Digital Piano
Page 47

To use Harmony:
1) Press the HARMONY button. The button will be lit to show that it is active. The Harmony symbol will
also appear in the Main Screen.
2) To change the Harmony type, hold down the Harmony button for a moment until the Harmony Select
menu is displayed.
3) Choose the Harmony type using the L and R buttons.
4) Press the EXIT button to leave the Harmony Select menu.
5) To turn off the Harmony, press the HARMONY button again.
L 1
L 2
L 3
L 4
L 5
F 1 F 2 F 3 F 4 F 5 F 6 F 7
R 1
R 2
R 3
R 4
R 5
Use the L or R buttons to select your desired
Harmony type.
• The additional notes created by Harmony are added to the RIGHT 1 Part, if that part is on. If the
RIGHT 1 Part is off, the additional notes are added to the RIGHT 2 Part. If both parts are off,
there will be no Harmony even though the HARMONY button is lit. The Harmony notes are
played with the same sound as the part they are added to.
• You can volume mix the Harmony separately in the MIXER screen.
• If the Accompaniment in not on, you will not be able to activate Harmony.
Basic Controls
P. 41
Page 48

Recording a Song
The CP has built-in recording capabilities that allow you to record
and play back your performances. Since the CP records your
performances as digital data, not audio data, you can easily edit
your performances after recording them. There are two ways to
use the CP’s recording feature:
Easy Recorder records your playing much like a tape recorder and
is just as easy to use. The CP will record all of your playing as well
as any changes you make to the front panel settings during the
recording.
Advanced Recorder is useful for creating more complex recordings.
Advanced Recorder gives you the ability to record on up to 16
Easy Recording
The Easy Recorder will record all of your playing as well as any settings you have made on the front
panel or in the mixer screen at the touch of a button. Simply press the REC button and the CP will
begin recording with the first note you play. You can also record a Style along with your playing if
you like. Before you begin recording its a good idea to select your desired sound(s) and make any
panel settings you would like to record.
independent tracks separately. In addition, with Advanced
Recorder you can edit your recorded data one measure or even
one note at a time.
Song data created on other instruments in the Standard MIDI File
format (SMF) can also be loaded into the CP’s recorder to be played
or edited. The CP’s recorder can read both Type 1 and 0 SMF files.
Please read the following sections carefully to learn more about
the capabilities of the Easy and Advanced recorder.
RESET
P. 42
REC
RECORDER
PLAY/STOP
RWD
FWD
To record:
1) Press the REC button. The REC button LED will blink and the LCD screen will show Rec Ready. If you
want to, you can still change sounds or panel settings before proceeding.
2) Start recording in one of the following ways:
A. Play the keys and the CP will automatically start recording with the first note you play.
B. If you are recording with a Style, press the START/STOP button to start the recorder with the Style.
Pressing the INTRO/ENDING button will include an Intro phrase at the beginning of the recording.
C. You can also press the SYNC button to begin recording the Style and your own playing together.
D. Press the PLAY/STOP button to start with a 2-bar countdown to help you get ready.
3) When you are finished recording, press the PLAY/STOP button.
You may resume recording from the point where you stopped by repeating these steps from step 2.
Kawai Concert Performer Series Digital Piano
Page 49

The current bar number is displayed.
L 1
L 2
R 1
R 2
You can make changes to the panel settings before
and during recording using the L and R buttons.
RESET
REC
RECORDER
PLAY/STOP
RWD
FWD
L 3
L 4
L 5
F 1 F 2 F 3 F 4 F 5 F 6 F 7
R 3
R 4
R 5
F1 Takes you to the Mixer menu.
F2 Deletes the recorded song data
F3-F6 Changes the part status.
• You may resume recording from the bar where you stopped by repeating these steps. You can
also change sounds, tempo, and make other changes to the panel settings before you continue
recording.
• To Re-record or make other changes to a previously recorded section of a song, please read the
section titled “Re-recording or adding another Part” on page 44.
To play back the recorded song:
Recording a Song
1) Press the RESET button in the RECORDER section of the front panel to return to the first bar of the
song.
2) Press the PLAY/STOP button to play back the song.
3) Press the PLAY/STOP button again to stop at any time.
4) Pressing the PLAY/STOP button again resumes the playback from the bar where you stopped.
5) Use the RWD or FWD buttons to rewind or fast-forward through the recording.
P. 43
Page 50

Part Status
The playback and record status for the RIGHT/ LEFT Parts and the Style are displayed at the bottom
of the LCD screen. Whether you are in the process of recording or playing back your song it is
helpful to know the status for each of these Parts.
The LCD screen will show the following Part status messages at the bottom of the screen:
REC This Part is ready to be recorded. This message is only displayed after the REC button has
been pressed.
PLAY This Part has been recorded and will be heard both on playback and while recording.
MUTE This Part has been recorded but will be silent both on playback and while recording.
– – – This part has not been recorded.
After you have recorded a song you can change the status for a Part by pressing the appropriate
button, F3-6 below the LCD screen. Pressing the F buttons during playback will select PLAY or
MUTE. REC can only be selected after you press the REC button but before you begin recording.
During recording you can however set any Part to PLAY or MUTE by pressing the appropriate F
button.
You can record all RIGHT/LEFT Parts as well as the Style simultaneously or only certain Parts as
you choose. When you first record a song all Parts and the Style will be automatically set to REC
but only the active Parts and the Style will be recorded. When you are finished recording the status
for any active Parts and the Style will automatically change from REC to PLAY. After recording, the
status for any RIGHT/LEFT Parts that were not active during recording will be automatically changed
to - - - to show they have not been recorded yet.
P. 44
When you press the PLAY/STOP button to listen to your song any Parts set to PLAY status will be
heard.
Re-recording or adding another Part
After you have recorded a song you can Re-record a Part or add (overdub) other Parts if you like
with the following procedure. Re-recording a Part completely erases the previous performance for
that Part automatically.
To Re-record or add a Part:
1) Make sure the Part(s) you wish to Re-record are active, then select any sounds or change panel
settings as desired.
Kawai Concert Performer Series Digital Piano
Page 51

2) Press the REC button.
3) Press the appropriate F button(s) below the LCD screen to set the desired Part(s) to REC.
4) Begin recording by following step 2 in the “To Record” section on page 42.
Remember Re-Recording a Part completely erases the previously recorded performance for that
Part. You can Re-record or add any of the RIGHT/LEFT Parts as many times as you like but you can
only have one performance/sound for each RIGHT/LEFT Part.
Saving the song
Once you finish recording a song you should save it to disk before you turn the power OFF. Once
the power is turned OFF your song data will be lost.
See the section titled “Saving Data to a Floppy Disk” on page 131.
• If you press the EXIT button to get out of the Easy Recorder, the CP will automatically prompt
you to save your work.
Erasing the song
Whenever a Part is selected for recording, the new performance is written right over any existing
one that may be there for that Part. In this sense, the Easy Recorder is just like a tape machine. A
new song will simply erase the old song during the recording process.
Recording a Song
However, if you wish to simply erase all the Parts and the Style in a song at once you can use the
Delete function.
To delete a song:
1) Press the DELETE button (F2) while the Recorder is not recording or currently ready to record. The
CP will ask if you are sure.
2) Use either the YES (F7) button to proceed or NO (F1) to cancel.
P. 45
Page 52

L 1
R 1
L 2
L 3
L 4
L 5
F 1 F 2 F 3 F 4 F 5 F 6 F 7
R 2
R 3
R 4
R 5
F1 Cancels erasing the song.
F7 Proceeds with erasing the song.
• DELETE erases all of the performance data for all Parts and the Style in the song. The panel
setup, such as Style, Tempo, and Sound settings are not erased by the DELETE function.
P. 46
Kawai Concert Performer Series Digital Piano
Page 53

ADVANCED
RECORDER
Advanced Recording
The Advanced Recorder is a full featured sixteen track MIDI recorder that includes many of the
same professional features found on dedicated MIDI sequencing (recording) devices. In addition
to sixteen MIDI tracks the CP Advanced recorder provides a separate Style, chord, and tempo track
for even more flexibility.
Even though you can create recordings of great musical complexity using the Advanced recorder
you will find that it is still very straightforward and easy to use.
Using the Advanced Recorder allows you much greater control over the recording and compositional
process than that offered by the Easy Recorder. However, songs created using the Easy Recorder
can also be edited using the Advanced Recorder by simply pressing the ADVANCED RECORDER
button.
To go to the Advanced Recorder Menu:
Press the ADVANCED RECORDER button. The recording options will be displayed on the screen.
L1 Change the Reverb, Effect, Panning, Volume level
and Chorus for each of the 16 tracks.
L2 Prepares the track for real-time recording.
L3 Re-record specific measures within your song.
L4 Select the sound to be assigned to each of the
16 tracks, and change the track's recording and
play back status.
L5 Edit loop settings for the song.
Recording a Song
L 1
L 2
L 3
L 4
L 5
F 1 F 2 F 3 F 4 F 5 F 6 F 7
F1 Converts recorded Style data into MIDI note data that can then
be edited in the Advanced Recorder. Style Paste will only be
displayed if the current song was recorded using a Style.
R 1
R 2
R 3
R 4
R 5
R1 Edit the general settings for the song.
R2 Edit the song by bars.
R3 Edit the song by MIDI events.
R4 Create your own new user Style.
P. 47
Page 54

L1 Selects the track on which you want to record.
There are 16 Instrument tracks, 1 Tempo track,
and 1 Style track.
L2 Selects the sound or Style that you want to
record with.
L3 Shows the current bar and beat number.
L4 Selects the starting bar for the Loop feature. This
function is a available only when Loop is turned
ON.
Real-time Recording
With Real-time record, the CP records your performance as you are playing it, in real-time. You can
select any of the sixteen instrument tracks or the Style and tempo tracks to record, but you can
only record on one track at a time. Since the Advanced Recorder only records on one track at a
time, only the RIGHT 1 Part is active in the Advanced Recorder. Any other active Parts are
automatically turned OFF when the ADVANCED RECORDER button is pressed. In addition to
selecting the desired track to record, the Real-time recording screen provides many other useful
Real-time recording functions.
To use Real-time recording:
1) From the Advanced Recorder menu, press the L2 button to select “Real Time REC”, or simply press
the REC button. The REC button LED will blink and the LCD screen will display the “Real Time REC”
screen.
2) Use the F, L and R buttons to select a function to edit. Use the Dial to change the values.
3) If necessary, you can go to the Mixer and Track Settings screens by pressing the appropriate F
buttons.
L 1
L 2
L 3
L 4
L 5
R 1
R 2
R 3
R 4
R 5
R1 Changes the time signature.
R2 Changes the tempo.
R3 Selects the recording mode. REPLACE
erases the previous data and records the
new data in its place. OVERDUB mixes the
new data with the previous data so that both
are heard together. Repeatedly pressing the
R3 button switches between the REPLACE
and OVERDUB.
P. 48
R4 Selects the ending bar for the Loop feature.
F 1 F 2 F 3 F 4 F 5 F 6 F 7
F1 Cancels the real-time recording setup and returns you to the Advanced
Recorder menu.
F2 Takes you to the Mixer menu.
F4, F5 Takes you to the Track Settings menu.
F6 Turns the Loop feature on/off
Kawai Concert Performer Series Digital Piano
This function is available only when Loop
is turned on.
Page 55

4) Start recording by pressing the PLAY/STOP button while the REC button LED is blinking. There is an
automatic two bar count in before the CP begins recording. If you are recording on the Style track you
must press the START/STOP or INTRO buttons instead of the PLAY/STOP button. When recording a
Style there is no two bar count in, recording begins immediately.
You can cancel recording at anytime by pressing the REC button again or by pressing the F1 button to
return to the Advanced Recorder menu.
• When you select a Style to record the default tempo for that Style is ignored. The Style will use
the current tempo setting for the song instead. You can set the desired tempo on the Real-time
record screen before recording or change the tempo after you have recorded in Song Edit or on
the tempo track in Event Edit.
• When you are recording on the Style track only the Style will be recorded. The style track will
record any chords (to the chord track) you play but the actual notes you are playing will not be
recorded.
• When the recording is done, the Mixer screen will automatically be displayed.
To play back the recorded song:
1) Press the RESET button in the RECORDER section of the front panel to return to the first bar of the
song.
2) Press the PLAY/STOP button to play back the song.
3) Press the PLAY/STOP button again to stop at any time.
4) Pressing the PLAY/STOP button again resumes the playback from the bar where you stopped.
5) Use the RWD or FWD buttons to rewind or fast-forward through the recording.
Recording a Song
Mixer
On the Mixer screen, you can change the following settings for each of the 16 tracks: Reverb level,
Chorus level, Effect on/off, Panning, Track mute, Volume level.
To use the Mixer:
1) Use the TRACK buttons (F2, F3) to select which of the 16 tracks you wish to make changes to.
2) Use the L1 and L5 buttons to choose the track setting that you want to change.
3) Use the Dial to change the value.
P. 49
Page 56

4) At this point, you can start recording or go to another menu to continue setting up.
• You can make changes on the Mixer screen at any time except while the CP is busy recording.
The Mixer screen is accessible from the Advanced Recorder menu, Track Settings screen and
Real-time Rec screen.
• You can save any changes you have made to the settings on the Mixer screen at any bar or beat
in your song. Simply play back the song or press the FWD/RWD buttons until you reach the
exact bar and beat where you want to make changes to the Mixer settings and stop the song.
Make any changes on the Mixer screen, then press the SAVE button (F7). You can do this as
many times and in as many places within your song as you wish.
Note
“Saving” here only means any changes you made on the Mixer screen were saved as part of the
song. Once you finish recording a song or after you make any important changes you should save
it to disk before you turn the power OFF. Once the power is turned OFF your song data and any
changes you have made will be lost.
See the section titled “Saving Data to a Floppy Disk” on page 131.
L1, L5 Used to select the track setting you want to
change. Use the Dial to change the value.
P. 50
L 1
L 2
L 3
L 4
L 5
F 1 F 2 F 3 F 4 F 5 F 6 F 7
F1 Returns you to the Advanced Recorder menu.
F2, F3 Selects the track that you wish to edit.
F4, F5 Takes you to the Track Settings menu.
F6 Turns Loop ON/OFF.
F7 Saves the Mixer settings as part of the song.
R 1
R 2
R 3
R 4
R 5
Kawai Concert Performer Series Digital Piano
Page 57

Track Settings
The Track Settings screen shows you the Play, Record, and Mute status for each track. In addition
it shows you what sound is assigned for the sixteen instrument tracks. You can change the track
status or select a different sound for each track.
The Track Status screen will show the following Status messages.
Rec This track is ready to be recorded.
Play This track has been recorded and will be heard both on playback and while recording.
MIDI Rec MIDI Rec enables the CP to record incoming MIDI data from an external MIDI
instrument connected to the MIDI jacks. You can set more than one track to MIDI
Rec, enabling the CP to record on several tracks simultaneously over MIDI.
Mute This track has been recorded but will be silent both on playback and while recording.
Empty This track has not been recorded.
After you have recorded a song you can change the status for a track by pressing the STATUS
button (F3) below the LCD screen. Pressing the STATUS button during playback will select Play or
Mute. Pressing the STATUS button after entering Real-time record but before recording begins, will
select Play, MIDI Rec, or Mute. Rec can only be selected from the Real-time Record screen. The
Track settings screen cannot be accessed during recording.
To use the Track Settings screen:
Recording a Song
1) Press the TRACK SETTINGS button (L4) on the Advanced Recorder menu.
2) Press the L3 and L4 buttons to select the track that you wish to edit. If you wish to select tracks 1016, the Style, or Tempo tracks, press the L5 button to jump to these tracks. Press the L2 button to
return to tracks 1-9.
3) Press the STATUS button (F3) to change the status to PLAY, MUTE or MIDI REC.
4) If you wish to change the sound assigned to the track, press the SOUND buttons (F5, F6). You can
also select sounds by pressing any of the SOUND buttons.
5) When you are finished, press the MENU button (F1) to return to the Advanced Recorder menu or
press the MIXER button (F2) to go to the Mixer menu.
P. 51
Page 58

L2 Jumps to tracks 1-9.
L 1
L 2
R 1
R 2
R1 Changes the tempo. Use the Dial to change
the value.
L3, L4 Selects the tracks one at a time.
L5 Jumps to tracks 10-16, Tempo, and Style.
L 3
L 4
L 5
F 1 F 2 F 3 F 4 F 5 F 6 F 7
F1 Returns you to the Advanced Recorder menu.
F2 Takes you to the Mixer.
F3 Changes the track’s status.
F5, F6 Selects a different sound for the track.
F7 Saves the Track settings as part of the song.
R 3
R 4
R 5
• As discussed in the above section, MIDI Rec enables the CP to record incoming MIDI data from
an external MIDI instrument connected to the MIDI jacks. You can set more than one track to
MIDI REC, enabling the CP to record on several tracks simultaneously over MIDI. Each MIDI
Rec track will record on the incoming MIDI channel that corresponds to its track number. Track
1 records MIDI channel 1 and so on.
Loop Settings
The Loop function lets you specify certain bars or your entire song to repeat over and over. Loop is
a global function and all tracks will be looped equally. You cannot have different loop settings for
each track.
P. 52
To set the Loop:
1) Go to the Loop Settings screen by pressing the L5 button in the Advanced Recorder menu.
2) Use the L2–L4 buttons to select the different settings, then use the Dial to change the values.
3) Press the L2 button to turn the Loop ON/OFF.
4) Press the L3 button to specify the bar where you want the Loop to start.
Kawai Concert Performer Series Digital Piano
Page 59

5) Press the L4 button to specify the bar where you want the Loop to end.
6) Press the MENU button (F1) to return to the Advanced Recorder menu when you are finished.
L2 Turns the Loop ON/OFF.
L3 Specifies the starting bar.
L4 Specifies the ending bar.
L 1
L 2
L 3
L 4
L 5
F 1 F 2 F 3 F 4 F 5 F 6 F 7
F1 Takes you back to the Advanced Recorder menu.
R 1
R 2
R 3
R 4
R 5
• You can turn looping on and off in the Mixer menu. However, you still have to set the Start and
End Bar from the Loop Settings menu.
• You can set up looping for recording in the Real-time REC menu as well. In the Real-time REC
menu, when you turn on the looping, the Start Bar and End Bar information will be automatically
copied from the Loop Settings menu.
Recording a Song
Style Paste
When you record a Style as part of your song, the Style data is automatically recorded on the Style
track. This data is unique to the CP, and cannot be used with any other musical instruments.
Additionally the instrument tracks that are part of the Style cannot be edited individually.
Style Paste converts any Style data recorded on the Style track into MIDI note and event data and
places it on separate tracks (Trks 9-16). Once the Style data is converted into actual note data, you
can view and edit the individual Style tracks as if you had recorded the data yourself. Also your
song including the Style can now be played back by any other MIDI instrument that reads Standard
MIDI File (SMF) format song data.
P. 53
Page 60

• Before you use Style Paste, you need to make sure Tracks 9-16 are empty or don’t contain important
data. When the Style is pasted, the data from the Style track will be pasted into these tracks and
will replace any existing data.
To use Style Paste:
1) Press the STYLE PASTE button (F1) while you are in the Advanced Recorder menu. The LCD screen
will prompt you for confirmation.
2) If you would like to proceed, press the YES button (F7), or press the NO button (F1) to cancel.
L 1
L 2
L 3
L 4
L 5
F 1 F 2 F 3 F 4 F 5 F 6 F 7
F1 Cancels the Style Paste.
F7 Proceeds with Style Paste.
R 1
R 2
R 3
R 4
R 5
Punch-In Recording
Punching In means being able to automatically start recording right in the middle of a track that is
playing back, continue recording new data on that track for a specified number of measures, and
then automatically stop recording at a specific measure and hear the rest of the track play to the
end. This tool is very valuable if you wish to record over some misplayed notes in the middle of a
track, but would like to preserve the music in the measures leading up to, and following, the trouble
spot.
P. 54
Kawai Concert Performer Series Digital Piano
Page 61

To use Punch-in recording:
1) Select Punch In/Out in the Advanced Recorder menu.
2) Use the L and R buttons to select the options and change their values using the Dial. Select AUTO
with the R5 button to have the CP automatically handle the punching in/out while you play.
3) Press the REHEARSAL button (F4, F5) to listen to the song for rehearsal. If you need to adjust mixing
or if you would like to loop the song, use the MIXER (F2) or LOOP ON/OFF (F6) button.
4) When you are ready to record, press the REC button and then the PLAY button. The music will start
immediately from the Start Bar that you have chosen. Once the song reaches the Punch In Bar, any
notes that you play on the keyboard will be recorded.
Recording will stop when the song reaches the Punch-Out Bar, but the CP will keep playing back the
song to the end unless you press the STOP button.
You can repeat the punch-in/out section by turning the looping on with the F6 button.
5) Listen to what you have recorded and re-record if necessary.
L1 Selects the track to Punch in on.
L3 Selects the measure in the song from where you
want the CP to start playing.
L4 Selects the measure where the CP will punch-in
and start recording.
L5 Selects the measure where the CP will punch-
out and stop recording.
Recording a Song
L 1
L 2
L 3
L 4
L 5
F 1 F 2 F 3 F 4 F 5 F 6 F 7
F1 Takes you to the Advanced Recorder menu.
F2 Takes you to the Mixer Settings menu.
F4, F5 Plays the song for rehearsal.
F6 Turns Loop on/off.
R 1
R 2
R 3
R 4
R 5
R1 Changes the time signature.
R2 Changes the tempo.
R3 Selects the recording mode. REPLACE
erases the previous data and records the
new data in its place. OVERDUB mixes the
new data with the previous data so that both
are heard together. Repeatedly pressing the
R3 button switches between the REPLACE
and OVERDUB.
R5 Selects the Punch-in method, Auto or Pedal.
Repeatedly pressing the R5 button switches
between the Auto and Pedal.
P. 55
Page 62

• If you set the CP to Punch-In at the very first measure of the song, the metronome will
automatically play a two-measure intro to assist you with the timing. These “ticks” will not be
recorded as part of the track.
Punch-In recording using the pedal
Instead of specifically setting an automatic Punch-In and Punch-Out Bar, you can use the center
pedal to manually Punch In and Out.
• You can punch in and out with pedal one time for each pass over the track that you make.
To use the pedal to Punch-In/Out:
1) Use the R5 button to select Pedal in the Punch In/Out menu.
2) Use the L and R buttons to set up other recording options.
3) Press the REC button to start. The song will start playing.
4) When the song reaches the bar where you wish to punch in, press the center pedal and play the
keyboard.
5) When you reach the bar where you wish to punch out, press the pedal again to stop recording. Notice
that the song keeps playing to the end (it’s just no longer recording) or until you press STOP.
L1 Selects the track to Punch in.
L3 Selects the measure in the song from where you
want the CP to start playing.
P. 56
L 1
L 2
L 3
L 4
L 5
F 1 F 2 F 3 F 4 F 5 F 6 F 7
F1 Takes you to the Advanced Recorder menu.
F2 Takes you to the Mixer Settings menu.
F4, F5 Plays the song for reharsal.
F6 Turns Loop on/off.
R 1
R 2
R 3
R 4
R 5
R1 Changes the time signature.
R2 Changes the tempo.
R3 Selects the recording mode. REPLACE
erases the previous data and records the new
data in its place. OVERDUB mixes the new
data with the previous data so that both are
heard together. Repeatedly pressing the R3
button switches between the REPLACE and
OVERDUB.
R5 Selects Auto or Pedal as the Punch-In
method. Repeatedly pressing the R5 button
switches between the Auto and Pedal.
Kawai Concert Performer Series Digital Piano
Page 63

Song Edit
Song Edit lets you name, transpose, and change initial tempo settings for your song.
To edit the song:
1) Select Song Edit from the Advanced Recorder menu. The Song Edit screen is displayed.
2) Use the L and R buttons to select the setting that you wish to change, then use the Dial to change the
value.
3) To name to the song, use the F2 and F3 buttons to move the cursor over the characters in the name,
then use the Dial to select characters.
4) Press the L3 button to set the transpose amount. You can transpose your song +/- 24 in half step
increments.
5) Press L4 to change the initial tempo setting of the song.
6) When you are finished, press the MENU button (F1) to return to the Advanced Recorder menu.
L2 Names the song.
L3 Adjusts transposition.
L4 Sets the initial tempo of the song.
Recording a Song
L 1
L 2
L 3
L 4
L 5
F 1 F 2 F 3 F 4 F 5 F 6 F 7
F1 Takes you to the Advanced Recorder menu.
F2, F3 Moves the cursor over the characters when naming the song.
R 1
R 2
R 3
R 4
R 5
P. 57
Page 64

Bar Editing
Bar Edit contains many useful editing functions. You can edit your song one bar or any number of
bars at a time.
To use Bar Edit:
1) In the Advanced Recorder menu select Bar Edit (R2). The Bar Edit screen will be displayed.
2) Use the L and R buttons to select the desired editing function. The editing screen for that function
will be displayed.
L 1
L 2
L 3
L 4
L 5
F 1 F 2 F 3 F 4 F 5 F 6 F 7
F1 Takes you to the Advanced Recorder menu.
R 1
R 2
R 3
R 4
R 5
Use the L and R buttons to select the desired edit
function.
P. 58
Kawai Concert Performer Series Digital Piano
Page 65

Quantize
Quantize automatically shifts the timing of a note. This can be used to correct imperfect timing in
a performance by shifting notes that were played either too early or too late so they will fall exactly
on the correct beat. For example, you can accurately align any out of time notes to the nearest 8thor 16th-note beat depending on the type of song you are quantizing. Sometimes quantizing all of
your notes to exactly the same beat can make your playing sound too stiff. The Advanced Recorder
quantize function allows you to set a quantize “Range” so only the notes that were very early or late
are quantized. Notes that were almost perfect are not quantized thus keeping more of the original
feeling in your music.
L1 Selects the track that you wish to quantize.
L2, L3 Selects the bar range that you want to quantize.
Use the Dial to set the bar numbers.
L4 Selects the lowest note that you want to quantize.
Use the Dial to change the note value.
L5 Selects the highest note that you want to
quantize. Use the Dial to change the note value.
L 1
L 2
L 3
L 4
L 5
F 1 F 2 F 3 F 4 F 5 F 6 F 7
F1 Returns you to the Advanced Recorder menu.
F2 Undoes the quantization which was just applied. This option
is not always available.
F7 Applies the quantization to your recording.
R 1
R 2
R 3
R 4
R 5
R2 Selects the note Resolution for quantization.
Use the Dial to change the value.
R3, R4 Sets the Low and High Range for
quantization. Use the Dial to change the
value.
• Resolution determines the timing value the quantize function will use to shift the notes you want
to quantize. For example, setting a quarter note resolution will shift all of the quantized notes to
the nearest quarter beat. Setting an eighth note resolution will shift all of the quantized notes to
the nearest eighth beat and so on. In the Advanced Recorder, quantize values are expressed in
note values and as a number that indicates how many clock beats each note value contains. The
Advanced Recorder divides each beat in a bar into 96 smaller clock beats. A Quarter note is 96
clock beats, an eighth note is 48 clock beats, and a sixteenth note is 24 clock beats and so on.
The quantize resolution range is from quarter notes (96 clocks), to 64th note triplets (4 clocks).
Recording a Song
P. 59
Page 66

• Range sets up timing “borders” around the Resolution value you specify. Notes within these
borders will not be quantized and notes outside the borders will be moved to the nearest beat
specified by the resolution value (Quarter note, Eighth note, etc.). The negative value represents
the placement of the “border” before the beat, and the positive value represents the placement
the “border” after the beat. Together, these two “borders” form a timing “range” around the
specified beat.
Resolution
24 Beat 12 Beat 12
○○○○○○○○○
○○○○○○○○○
○○○○○○○○○
Selecting zero Range results in no
“range”, and all notes are shifted
to the precise beat.
The notes that fall beyond the
Range are moved to the closest
“border” of the Range.
The notes that fall inside the Range
are not shifted at all.
Range
0, 0
« » «
» « «
Resolution
24 Beat 12 Beat 12
○○○○○○○○○
Range
-3, 3
«
Resolution
48 Beat 24 Beat 24
○○○○○○○○○
Range
2, 10
«
○○○○○○○○○
»
○○○○○○○○○
»
○○○○○○○○○
○○○○○○○○○
P. 60
By experimenting with Resolution and Range settings, you can correct the timing of the notes in your
recording while still allowing for a natural, human feel.
Kawai Concert Performer Series Digital Piano
Page 67

Copy
The Copy function allows you to copy a section or all of the data on a track to another location.
The destination may be on the same track, or it can be on another track.
• The destination of the copied data must either be:
1) A location that already has data in it.
2) The first blank bar after the end of a track (Bar 1 if the destination track is empty).
For example, if a track only has 10 bars in it, you cannot copy data onto bar 20. You can, however,
copy data to bars 1 through 11.
• Copied data replaces any current data that may be at the destination.
L2 Selects the track to be copied. Use the Dial to
select the track numbers 1-16, Tempo, or Chord.
L3 Selects the bar where the data that you are
copying starts. Use the Dial to change the bar
number.
L4 Selects the bar where the data that you are
copying ends. Use the Dial to change the bar
number.
L 1
L 2
L 3
L 4
L 5
F 1 F 2 F 3 F 4 F 5 F 6 F 7
F1 Returns you to the Advanced Recorder menu.
F2 Undoes the copying. This option is not always available.
F7 Proceed with copying.
R 1
R 2
R 3
R 4
R 5
R2 Selects the destination track. Use the Dial
to select the track number 1-16, Tempo, or
Chord.
R3 Selects the bar in the destination track where
the copied data will be placed.
Recording a Song
P. 61
Page 68

Delete
Delete completely erases and removes the bars that you specify.
L2 Selects the track to be deleted. Use the Dial to
choose 1-16, Tempo, Chord or All.
L3 Selects the first bar that has the data you want
to delete. Use the Dial to change bars.
L4 Selects the last bar that contains the data that
you want to delete. Use the Dial to change bars.
L 1
L 2
L 3
L 4
L 5
F 1 F 2 F 3 F 4 F 5 F 6 F 7
F1 Returns you to the Advanced Recorder menu.
F2 Undoes the deletion. This option is not always available.
F7 Proceed with the deletion.
R 1
R 2
R 3
R 4
R 5
P. 62
Kawai Concert Performer Series Digital Piano
Page 69

Insert
The Insert function duplicates data from specified bars and copies it to a certain location. However,
the current data at the destination is not erased, but instead is pushed back to make room for the
copied data.
L2 Selects the track that contains the data you wish
to duplicate. Choose from 1-16, Tempo, Chord
or All.
L3 Selects the first bar that has the data you want
to duplicate.
L4 Selects the last bar that has the data you want to
duplicate.
L 1
R 1
R2 Selects the destination track where you want
L 2
R 2
this data inserted. Choose from 1-16,
Tempo, Chord or All.
L 3
R 3
R3 Selects the bar in the destination track where
L 4
L 5
R 4
R 5
F 1 F 2 F 3 F 4 F 5 F 6 F 7
you want this data inserted.
F1 Takes you to the Advanced Recorder menu.
F2 Undoes the Insert. This option is not always available.
F3, F4 Takes you to the Insert Bar menu.
F7 Proceeds with the Insert.
• If you just wish to insert empty bars into a track, select INSERT BAR (F3 or F4), and a sub-menu
will be displayed. You can insert empty bars into a track between bars that have data, or at the
first blank bar at the end of the track.
Recording a Song
P. 63
Page 70

L 1
R 1
L2 Selects the number of empty bars you wish to
insert. Use the Dial to change the value.
L3 Selects the time signature for the bars that are
going to be inserted. Use the Dial to change the
value.
L 2
L 3
L 4
L 5
F 1 F 2 F 3 F 4 F 5 F 6 F 7
F1 Takes you to the previous menu.
F2 Undoes the Insert. This option is not always available.
F7 Proceeds with the Insert.
R 2
R 3
R 4
R 5
R2 Selects the track where the empty bars are
going to be inserted. Choose 1-16, Tempo,
Chord or All.
R3 Selects the location in the destination track
where you want the empty bars inserted.
Use the Dial to choose the location.
P. 64
Kawai Concert Performer Series Digital Piano
Page 71

Erase
Erases data in the bars that you specify, and leaves them as empty bars.
L2 Selects the track that has the bars you want to
erase. Choose 1-16, Tempo or Chord.
L3 Selects the first bar to be erased. Use the Dial to
change the bar.
L4 Selects the last bar to be erased. Use the Dial to
change the bar.
L 1
L 2
L 3
L 4
L 5
F 1 F 2 F 3 F 4 F 5 F 6 F 7
F1 Takes you to the Advanced Recorder menu.
F2 Undoes the Erase. This option is not always available.
F7 Proceeds with the Erase.
R 1
R 2
R 3
R 4
R 5
Recording a Song
P. 65
Page 72

Merge
Merge combines data from two tracks. You can make complex musical phrases using several tracks,
then combine them together on one track. Remember that there can only be one instrument sound
assigned to each track, so the resulting merged track will play all the combined data using one
instrument sound. Merge can be useful for making rhythm patterns by first recording different
drum/ percussion parts using the same drum kit on several tracks for easy editing of each instrument,
or recording the right and left hand parts of a piano piece and combining them later on one track to
free up extra tracks for more recording.
• Merge does not automatically erase the track from where you copied the data.
L2 Selects the track from where you want to copy
data. Choose 1-16.
L 1
L 2
L 3
L 4
L 5
F 1 F 2 F 3 F 4 F 5 F 6 F 7
F1 Takes you to the Advanced Recorder menu.
F2 Undoes the Merge. This option is not always available.
F7 Proceed with the Merge.
R 1
R 2
R 3
R 4
R 5
R2 Select the track where you want this data
merged to. Choose 1-16.
P. 66
Kawai Concert Performer Series Digital Piano
Page 73

Gate Time Modify
Gate time refers to the length of a note as a percentage. Whatever the length of a note is when it is
first recorded, this value is considered as its Gate time of 100%. By editing the length of the note,
you can shorten it to 10% or lengthen it to 300% of the original value.
L2 Selects the track in which you want to modify
Gate times. Use the Dial to choose the track.
L3 Selects the first bar of the data that you want to
modify Gate times for. Use the Dial to change
bars.
L4 Selects the last bar of the data that you want to
modify Gate times for. Use the Dial to change
bars.
L 1
L 2
L 3
L 4
L 5
F 1 F 2 F 3 F 4 F 5 F 6 F 7
F1 Takes you to the Advanced Recorder menu.
F2 Undoes the Gate time adjustment. This option is not always
available.
F7 Proceeds with applying the Gate time adjustment.
R 1
R 2
R 3
R 4
R 5
R2 Adjusts the Gate time in 10% increments.
Use the Dial to select a value from 10%300%.
Recording a Song
P. 67
Page 74

Velocity Modify
Velocity refers to how hard a key is struck, which translates into the dynamics of how loud the
produced sound is.
A note’s Velocity is a numerical value from 1-127. When editing the note Velocities in your recording,
you can change them within a +/-100 range of their original values.
L2 Selects the track in which you want to adjust
Velocity.
L3 Selects the bar where the data you want to adjust
starts.
L4 Selects the bar where the data you want to adjust
ends.
L 1
L 2
L 3
L 4
L 5
F 1 F 2 F 3 F 4 F 5 F 6 F 7
F1 Takes you to the Advanced Recorder menu.
F2 Undoes the Velocity adjustment. This option is not always
available.
F7 Proceeds with adjusting the Velocity values.
R 1
R 2
R 3
R 4
R 5
R2 Adjusts Velocity from -100 to +100 of their
current values.
P. 68
Kawai Concert Performer Series Digital Piano
Page 75

Clock Move
In the Resolution section of this manual we learned that the CP Advanced recorder divides each
beat in a bar into 96 clock beats, also expressed as a quarter note. Therefore there are 48 clocks per
eighth note, and 24 clocks per sixteenth note and so on. This relationship holds true regardless of
the song’s tempo.
On the CP, you can shift the timing of all notes in a track by shifting the entire track ahead (negative
values) or behind (positive values) the beat by a certain clock value. Clock move is useful for
adjusting the overall timing of a track. For example, if a certain sound you recorded responds
slowly and sounds behind the beat, you could shift the timing of the notes ahead of the beat to
compensate for the sounds slow response and make its timing feel more natural.
L2 Selects the track that you wish to move. Choose
from 1-16.
L 1
L 2
L 3
L 4
L 5
F 1 F 2 F 3 F 4 F 5 F 6 F 7
F1 Takes you to the Advanced Recorder menu.
F2 Undoes the clock move. This option is not always available.
F7 Proceeds with applying the clock move.
R 1
R 2
R 3
R 4
R 5
R2 Sets how many clocks you wish to move the
track. Choose from –999 to +999.
Recording a Song
P. 69
Page 76
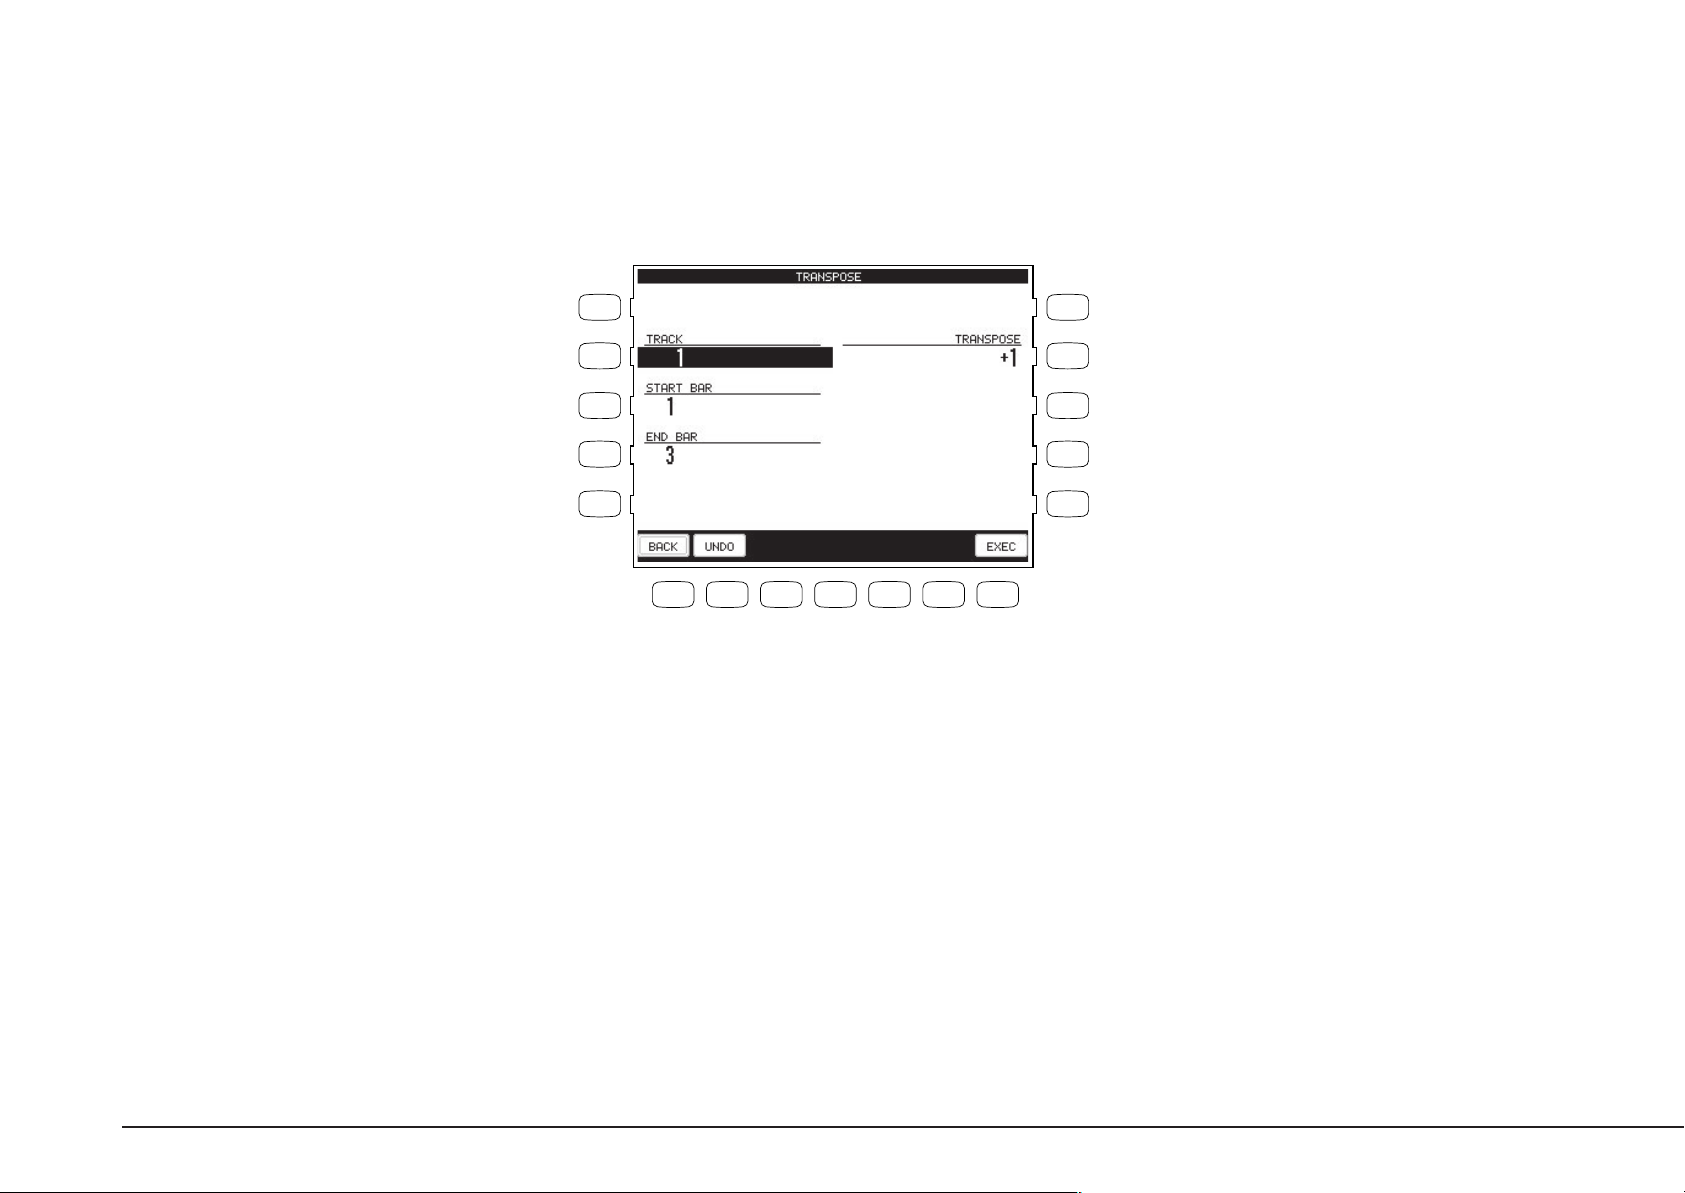
Transpose
This will transpose the notes within a specified bar(s) up or down in half-step increments.
L2 Selects the track that has the notes you want to
transpose. Choose from 1-16.
L3 Selects the bar where the notes you want to
transpose start.
L4 Selects the bar where the notes you want to
transpose end.
L 1
L 2
L 3
L 4
L 5
F 1 F 2 F 3 F 4 F 5 F 6 F 7
F1 Takes you to the Advanced Recorder menu.
F2 Undoes the transposition. This option is not always available.
F7 Proceeds with applying the transposition.
R 1
R 2
R 3
R 4
R 5
R2 Adjusts transposition amount in half-step
increments from -24 to 24.
P. 70
Kawai Concert Performer Series Digital Piano
Page 77

Event Edit
Event Edit enables you to examine and edit your performance note by note.
To use Event Edit:
1) Select Event Edit in the Advanced Recorder menu. The Event Edit screen will be displayed.
2) Choose the track that you want to edit using the TRACK buttons (F3, F4). Note that Style, Chord, and
Tempo track can be edited as well.
3) Use the L buttons to scroll up or down the event list until you find the specific event that you want to
edit. You can also use the Dial to scroll through the event list. You will hear the individual events
being played as you scroll over them.
4) Use the CURSOR buttons (F5, F6) buttons to determine how you want to scroll through the event list.
Selecting Bar scrolls through the event list bar by bar, selecting Beat scrolls through the event list
beat by beat and so on. The selection will become highlighted.
L2 Moves the cursor to the previous bar.
L3 Moves the cursor up the event list.
L4 Moves the cursor down the event list.
L5 Moves the cursor to the next bar.
Recording a Song
L 1
L 2
L 3
L 4
L 5
F 1 F 2 F 3 F 4 F 5 F 6 F 7
F1 Takes you to the Advanced Recorder menu.
F3, F4 Selects the track to work with.
F5, F6 Moves the cursor across the columns in the event list.
F7 Starts playing the Track.
R 1
R 2
R 3
R 4
R 5
R1 Removes the selected event.
R2 Creates a new event.
R3 Modifies the existing event.
P. 71
Page 78

5) Select the function that you would like to apply to this event. You can select DELETE (R1) to remove
the event, INSERT (R2) to create a new event at any specified location, or REPLACE (R3) to change
the existing event. Enter new values in the pop up Entry Box when you select INSERT or REPLACE.
When Inserting or Replacing an event, use the CURSOR buttons to select the specific part of the
event you want to edit. Use the Dial to change the value.
6) Press the EXEC (F7) button to proceed, or press CANCEL (F2). The CP will prompt you for confirmation.
7) Use the MENU button (F1) to return to the Advanced Recorder menu when you are done editing.
L 1
L 2
L 3
L 4
L 5
F 1 F 2 F 3 F 4 F 5 F 6 F 7
FI Takes you to the Advanced Recorder Menu.
F2 Cancel the edit.
F5, F6 Moves the cursor across the columns in the event list.
R 1
R 2
R 3
R 4
R 5
P. 72
Kawai Concert Performer Series Digital Piano
Page 79

Recording a Song
P. 73
Page 80

Creating Your Own Styles
The Concert Performer contains 150 built-in Styles covering a wide
variety of musical genres. There are two powerful features that
allow you to edit any of these Styles to better suit your musical
tastes, or even create your own Style entirely from scratch! These
are the Conductor and the Style Maker.
Conductor
The Conductor is used to edit Preset data.
Easy Style Edit This is an easy way to edit the Style data. The CP built-in styles are comprised
The Conductor allows you to edit the Style data and personalize it
to your taste.
The Style Maker allows you to create Styles of your own.
There are three ways of using this feature: Make a New Style, Edit
an Existing Style, and Phrase Combination.
three different types, Full, Intimate, and Solo Piano Styles. A Full Style
consists of six instrument tracks called Sections. These are the Drums,
Bass, and four Accompaniment tracks. The Intimate Styles have four
Sections, Drum, Bass, And Two Accompaniment tracks. The Solo piano
Styles have two Accompaniment Tracks (Right and Left hand) and no Drum
or Bass tracks.
When you play a Style, each of these sections plays a musical Phrase
composed for that type of instrument. Each section can play one of four
different musical phrases, one for each of the four variations within a Style.
Easy Edit lets you assign which of these four Phrases will be played by each
section for each of the four variations within the style. This means you can
mix and match the different phrases for each section to create your own
unique arrangements. Once you are satisfied with your edits, you can save
your Easy Style edits to the PRESET STYLE.
P. 74
Kawai Concert Performer Series Digital Piano
Page 81

To use Easy Edit:
CONDUCTOR
EDIT
RESET
USER
L2–L5 Selects a Phrase for the Section.
1) Select the Style and the Variation (1–4) that you would like to edit.
2) Press the EDIT button. The LCD screen will display the Easy Style Edit screen.
3) Use the F2–F7 buttons to select a Section to edit.
4) Use the L buttons to select the desired Phrase (1-4) for each Section. You can edit while the Style is
running to hear your changes.
5) To mute a Section, press the corresponding F button. Pressing the F button again will un-mute the
section.
6) If you would like to save your edits, press the SAVE TO PRESET (R1) button. The saved contents will
be written to the PRESET STYLE. If you don’t save your edits, they will be lost when you turn the
power OFF.
7) Press the EXIT button to leave the Easy Style Edit screen.
L 1
L 2
L 3
L 4
R 1
R 2
R 3
R 4
R1 Saves the changes to the Preset Style.
Creating Your Own Styles
L 5
F 1 F 2 F 3 F 4 F 5 F 6 F 7
F2–F7 Selects which Section is being changed. Pressing again will
mute the Section.
R 5
P. 75
Page 82

• Pressing the SAVE button will save all Styles at one time. You cannot save individually.
• For Intimate Styles the ACC 3/4 Sections are not used and cannot be edited.
• For Solo Piano Styles the Drum, Bass, and ACC 3/4 Sections are not used and cannot be edited.
Resetting the Style
The CP always remembers the original Preset Style settings. If you wish to restore those factory
settings before saving your edits, simply press the RESET button in the Conductor.
• If you would like to revert all Styles back to their original factory settings, after you have pressed
the SAVE button, use reset Conductor on the Soft Reset screen. See the section titled “Soft
Reset” on page 126.
Note:
Easy Edit doesn’t allow you to edit the Intro, Ending and Fill-ins. However, muting a Section in the
Style will result in automatic muting of the same Section in the Intro, Ending and Fill-ins. If you
mute a certain Section, you need to consider what effect it will have on the overall Style.
P. 76
Kawai Concert Performer Series Digital Piano
Page 83

Making a New Style
This is the most flexible way to create a new Style.
You can make a completely new style from scratch or edit an existing style. First, read the explanation
below about the configuration of a style and understand how a style is made.
Configuration of a Style
A complete Style consists of the following patterns:
Basic pattern 4 patterns (Variation 1–4) Max 16 measures
Fill-in 4 patterns (Fill-In 1–4) 1 or 2 measures
Intro Major 2 patterns Max 16 measures
Intro Minor 2 patterns Max 16 measures
Ending Major 2 patterns Max 16 measures
Ending Minor 2 patterns Max 16 measures
• Each of these patterns in a Full Style is made up of six Sections—Drum, Bass, ACC1, ACC2,
ACC3 and ACC4. In an Intimate Style there are four Sections—Drum, Bass, ACC1, ACC2. In a
Solo Piano Style there are two Sections— ACC1, ACC2. You can use up to six sections in a User
Style but you don’t necessarily have to use all of the sections to create a Style. For example, just
like the Intimate and Solo Piano Styles you may not need to use some Variations or Sections to
accomplish your musical idea. These unused sections or variations may be left blank.
Creating Your Own Styles
• The different Sections can be of varying bar lengths as long as they stay within the limit. Having
them all the same length may make the Style easier to use in a song, but you may find that having
uneven bar lengths among the Sections can create interesting musical results.
• For simplicity’s sake it is advisable to record your new style in the key of C.
To create a Style:
1) Press the ADVANCED RECORDER button. The LCD screen will display the Advanced Recorder menu.
2) In the Advanced Recorder menu, press the Style Maker button (R4). The LCD screen will display the
first Style Maker screen.
3) To make a completely new Style, press the Make New Style button (L1) and use the Dial to select the
time signature for the style you are going to make. To edit an existing style, press the Edit Existing
Style button (L3) and use the Dial to select the style you want to edit.
P. 77
Page 84

4) Press the ENTER button (F7). The Style Maker Record screen will be displayed.
L1 Selects Make New Style.
L3 Selects Edit Existing Style.
L5 Selects Phrase Combination.
L 1
L 2
L 3
L 4
L 5
F 1 F 2 F 3 F 4 F 5 F 6 F 7
R 1
R 2
R 3
R 4
R 5
R1 Changes the Time Signature.
R3 Selects the Style you want to edit.
R5 Selects the Initial Style.
F1 Go to the Advanced Recorder menu.
F7 Enters the selected Style Maker menu.
5) Use the L and R buttons to select which pattern to record.
6) Press the Bar Length button (R1) and use the Dial to change the bar length of the pattern.
7) Press the REC button (F7). The Style Maker Record screen will be displayed.
L 1
L 2
R 1
R 2
R1 Changes the bar length.
L3 Selects an Intro and Ending to record.
L4 Selects a Variation and Fill-in to record
L5 Copies a phrase from another pattern.
P. 78
L 3
L 4
L 5
F 1 F 2 F 3 F 4 F 5 F 6 F 7
F1 Takes you to the Style Maker menu.
F7 Takes you to Style Maker Record screen.
R 3
R 4
R 5
R3 Selects an Intro and Ending to record.
R4 Selects a Variation and Fill-in to record.
R5 Saves the new Style to User Style.
Kawai Concert Performer Series Digital Piano
Page 85

8) Use the L, R and F buttons to select the different record functions. Use the Dial to change the values.
9) Press the REC START button (R4) to start recording. There will be an automatic 2-bar count in.
10) Start playing on the keyboard. The recording is looping, which means when it comes to the end of
the last bar, it automatically goes back to the beginning of the first bar. In the Edit Existing Style, the
existing style will play.
L1 Selects the Part to be recorded.
L2 Sets the recording tempo.
L5 Takes you to the Detail Setting menu.
L 1
R 1
R1 Selects the Sound for the selected Part.
L 2
L 3
L 4
R 2
R2 Selects the Quantize resolution. This is input
R 3
R 4
Quantize and your playing will automatically be
Quantized as you play.
R4 Starts the recording.
L 5
R 5
R5 Saves the Style to User Style.
F 1 F 2 F 3 F 4 F 5 F 6 F 7
F1 Takes you to the Style Maker menu.
F2-F7 Switches between Play and Mute for the recorded Part.
Note:
Press the Detail Setting button (L5) to edit the detail settings for the Auto-accompaniment system.
See page 82 for an explanation of the Detail Settings.
Creating Your Own Styles
P. 79
Page 86

11) To erase any unnecessary or incorrect notes, use the ERASE (F1) button. While the pattern is still
recording the notes will be erased as long as you press and hold the button.
12) When finished recording, press the REC STOP button (R4).
13) Follow the above procedure to record any other desired patterns as needed.
14) To save the recorded Style, press the SAVE button (R5). The Style Save screen will be displayed.
L 1
L 2
L 3
L 4
L 5
F 1 F 2 F 3 F 4 F 5 F 6 F 7
F1 Erases the recorded notes.
R 1
R 2
R 3
R 4
R 5
R4 Stops the recording.
P. 80
Kawai Concert Performer Series Digital Piano
Page 87

15) Press the PRESET TEMPO button (L1) and use the dial to set the default tempo for the style.
16) Press the SAVE TO button (L3) and use the Dial to select the location to save your new Style.
17) Press the NAME button (L4). Use the F2 and F3 buttons to move the cursor and use the F4 and F5
buttons or the Dial to select the characters to name the style.
18) Press the SAVE button (F7).
L1 Sets the default tempo for the style.
L3 Selects the location to be saved.
L4 Names the style.
L 1
L 2
L 3
L 4
L 5
F 1 F 2 F 3 F 4 F 5 F 6 F 7
F1 Takes you to the Style Maker Record screen.
F2, F3 Moves the cursor.
F4, F5 Selects the characters.
F7 Saves the style to User Style.
R 1
R 2
R 3
R 4
R 5
Creating Your Own Styles
P. 81
Page 88

Auto-accompaniment System
The Concert Performer Auto-Accompaniment System (ACC) analyzes your playing and adjusts the
note data recorded in the different Phrases in a pattern to match the root key and chord type you
are playing. The ACC System also shifts the octave for each phrase to keep each section playing
within its musically useful range. To get the most out of this System, any new Style you create can
benefit from some fine tuning of these settings.
When you press the DETAIL SETTINGS button (L5) on the Style Maker Record screen, the Style
Maker Detail Settings screen will be displayed.
Accompaniment Type (ACC Type)
This setting determines how Phrases being played by a particular section in a pattern will be analyzed
by the Auto-accompaniment (ACC) System. There are Two Accompaniment Types: Chordal and
Scalic (melodic). Chordal Phrases usually consist of block chords or arppegiated chords. You
should set this kind Phrase to Chordal. Scalic Phrases usually play melodic phrases that serve to
add interest to the style as well as provide counter melodies and riffs. Melodic Phrases or Phrases
that contain chromatic passages should be set to Scalic. Scalic Phrases can also contain chords but
they will be analyzed differently than chords in a Chordal Phrase. The Bass section is automatically
set to Scalic since it will rarely if ever play chords.
The terms Open and Close apply to Chordal Phrases, and refer to how the CP will regulate the
voicing of a Chordal Phrase. Setting a Section to Open will allow for open-voiced chords, which
might be good for guitar and string sounds. Setting a Section to Close maintains closed voiced
chords, which are better suited to piano parts and other chording or comping instruments.
P. 82
Range
This determines the chord inversions that a Chordal Phrase will play.
The term “range” here has nothing to do with the span of actual chord notes. It selects which note
in the chord will serve as the basis of the chord inversion.
HI is the initial setting and is recommended as a starting point. MID plays an inversion based on the
next lower note in relation to HI, while LO plays an inversion based two-notes lower.
Crossover
This determines the point where a Scalic Phrase will be transposed to keep the notes in a musically
useful range. When notes in a Scalic Phrase fall below the Crossover point you select they will be
transposed up one octave by the Accompaniment System. For example if you set the Crossover
Kawai Concert Performer Series Digital Piano
Page 89

point to E, the Phrase would begin to be transposed up one octave whenever you play a chord with
an E as the root.
Experiment with the different Chordal and Scalic settings to find the one that works best with each
Phrase.
Bass Limit
This is an option for the Bass section and sets the limit for the lowest note the Bass will play. If a
note in a Bass Phrase falls below the limit, it will automatically be transposed up an octave.
To adjust the auto-accompaniment system:
1) Use the L2-L4 buttons to select the setting you wish to change.
2) Use the F3-F7 buttons to select the Section.
3) Use the Dial to select or change a value.
4) When done, press the BACK button (F1) to go back the previous menu. Then save the Style if necessary.
L2 Changes ACC Type.
L3 Changes RANGE.
L4 Changes CROSS OVER.
L5 Changes BASS LIMIT.
Creating Your Own Styles
L 1
L 2
L 3
L 4
L 5
F 1 F 2 F 3 F 4 F 5 F 6 F 7
F1 Takes you to the previous menu.
F2 Plays the style.
F3-F7 Selects the Section.
R 1
R 2
R 3
R 4
R 5
P. 83
Page 90

Making a Style with Phrase Combination
Phrase Combination is similar to Easy Style Edit in the Conductor. Phrase Combination however,
lets you not only combine Phrases from within the selected Style but you can also combine Phrases
from any of the Styles in the CP to create a new Style. Additionally you can edit Fill-ins and basic
patterns (Variations).
• You cannot change the Intro and Ending Phrases. These will remain the same as in your selected
Style.
To use Phrase Combination:
1) In the Advanced Recorder menu, press the Style Maker button (R5). The LCD screen will display the
first Style Maker screen.
2) Press the Phrase Combination button (L5) and use the dial to select the initial style.
3) Press the ENTER button (F7) to proceed to the next screen.
4) Use the L2 and L3 buttons to select which of the four Fill-ins and Variations you would like to change.
5) Use the L3 and L5 buttons to select the Section to change.
6) Use the F4 and F5 buttons to move the cursor between the Style and Phrase column.
7) Use the Dial to change the current Style or Phrase. You can jump to the desired Style category by
pressing the Style select buttons directly.
8) Press the PLAY button (F2) to listen to the new Style.
9) Press the SAVE button (F7) to save the new Style.
P. 84
Kawai Concert Performer Series Digital Piano
Page 91

L 1
R 1
L2 Selects the pattern to change. Choose Variation
1–4 or Fill-in 1–4.
L3, L5 Selects the Section to be modified.
L 2
R 2
R2 Selects the pattern to change. Choose
Variation 1–4 or Fill-in 1–4.
L 3
L 4
L 5
F 1 F 2 F 3 F 4 F 5 F 6 F 7
R 3
R 4
R 5
F1 Takes you to the previous menu.
F2 Plays the new style.
F4, F5 Moves the cursor between the Style and Phrase columns.
F7 Saves the modified data as a new Style.
10) Press the PRESET TEMPO button (L1) and use the dial to set the default tempo for the style.
11) Press the SAVE TO button (L3) and use the Dial to select the location to be saved.
12) Press the NAME button (L4). Use the F2 and F3 buttons to move the cursor and use the F4 and F5
buttons or the Dial to select the characters to name the style.
13) Press the SAVE button (F7).
Creating Your Own Styles
P. 85
Page 92

L1 Sets the default tempo for the style.
L 1
R 1
L3 Selects the location to be saved.
L4 Names the style.
L 2
L 3
L 4
L 5
F 1 F 2 F 3 F 4 F 5 F 6 F 7
F1 Takes you to the Style Maker Record screen.
F2, F3 Moves the cursor.
F4, F5 Selects the characters.
F7 Saves the style to User Style.
R 2
R 3
R 4
R 5
P. 86
Kawai Concert Performer Series Digital Piano
Page 93

Creating Your Own Styles
P. 87
Page 94
Editing Sounds
Even though the Concert Performer has over 600 high quality
instrument and drum sounds built-in, there may be times when you
would like to change some of the qualities of a sound to really get
the tonal character that you have in mind. The CP allows you edit
certain settings for individual sounds.
Editing the Preset Effect Settings
Each of the CP instrument Sounds has preset Chorus and Effect settings that are applied automatically
whenever that sound is selected.
You can change these settings to suit your tastes and save them so they become the preset settings
for that Sound.
To adjust the settings:
1) Select the sound you want to edit and press the SOUND EDIT button (F7). The Preset Sound Settings
screen will be displayed.
2) Press the L1 button and then turn the Dial to select which preset sound you wish to modify.
3) Use the L and R buttons to select the different effect settings and use the Dial to change their value.
4) When you are finished, press the SAVE button (F7) to save your settings.
P. 88
Kawai Concert Performer Series Digital Piano
Page 95

L1 Selects the preset sound to edit.
L 1
R 1
L2 Turns the Chorus on/off.
L3 Turns the Effect on/off.
L4 Selects an effect type.
L5 Adjusts the effect setting.
L 2
L 3
L 4
L 5
R 2
R 3
R 4
R 5
F 1 F 2 F 3 F 4 F 5 F 6 F 7
R2 Adjusts the chorus level.
R4, R5 Adjusts the effect setting.
F1 Takes you to the previous menu.
F7 Saves the settings.
• Pressing the SAVE (F7) button will save all changes made in the Preset Effect Settings menu. If
you exit the Preset Effect Settings menu without saving your changes, the settings will remain
unchanged.
Editing Sounds
P. 89
Page 96

Playing Songs from a Floppy Disk
The Concert Performer’s floppy disk drive provides a convenient
way to playback songs recorded in the CP’s Internal Format or
Standard MIDI File (SMF) format. Songs in the CP’s internal format
typically are ones that you have recorded on your own instrument.
There are many sources of SMF songs, including disks for sale from
professional musicians and publishers, songs shared among
musicians and hobbyists, and Internet sites that feature SMF songs
available for download.
About songs on Floppy Disk
If you will use a blank disk to store and play your own compositions made on the Concert Performer,
there isn’t much to worry about. The CP can format the disk (if it isn’t already formatted), and the
CP’s internal song format remembers everything about your song, including which sounds to use
with the recorded tracks. However, if you wish to purchase a disk of songs from your music store
or publisher, play a disk given to you by someone else, or play songs downloaded from the Internet,
you will need to remember a few simple points:
• The CP reads only DOS formatted disks, either double-sided double-density (720KB) or high
density (1.4MB). These are the most commonly used disk formats in both computers and musical
instruments.
If you wish to play a song without any intentions to make permanent
changes or additional recordings, you can use the CP’s Disk Song
Play function to load the song very quickly for playback. Using the
disk drive in this way makes the Concert Performer an enjoyable
source of entertainment for parties and other social events, as well
as a great tool for the professional musician or music educator.
P. 90
• The CP recognizes song files written in the Standard MIDI File format as long as they have DOS
file names ending with “.MID”. There are two types of Standard MIDI File formats, Format 0 and
1. The CP can read the song data of both formats, however it will only display the lyrics of a song
written as format 0.
• Songs that have been composed with the General MIDI (GM) standard will sound fine without
any additional work, because data in the files will inform the CP as to what sounds to use when
playing the song. If the song was not composed to the GM standard, you may find it necessary to
edit the song to assign the correct sounds to the various tracks. Fortunately, almost all
commercially available MIDI files adhere to the General MIDI standard.
Kawai Concert Performer Series Digital Piano
Page 97

DISK
• The CP can also recognize most songs formatted for the PianoDisc player piano system and
songs formatted for Yamaha’s Disk Orchestra Collection. (Please check with your Kawai dealer
or distributor for further information).
Selecting a Song from Disk
A single floppy disk can store dozens of song files at one time, depending on the length of the songs.
To select a song:
1) Put the disk in the Floppy Disk Drive and press the DISK button. In the Disk menu, select Song Play
(R3). After the CP searches the disk it will display the first ten available songs. If there are more
than ten songs on the disk, use the SEARCH buttons (F2, F3) to list the additional songs.
2) Use the L and R buttons to select the song you want to hear. You can also select a song by using the
Dial.
3) Once your desired song is highlighted, press PLAY/STOP to have the CP load the song and automatically
start playing. You may also press SELECT (F7) to have the CP load the data and wait for you to start
it manually.
4) Press the SONG CHAIN (F4, F5) buttons to have the CP automatically play all songs, one after another.
5) When your selected song is ready to play, the Disk Song Play screen is displayed. Use the Recorder
control buttons on the left side of the panel to control the playback of the song.
Playing Songs From a Floppy Disk
P. 91
Page 98

L 1
L 2
R 1
R 2
The L and R buttons select the song you want to
hear.
L 3
L 4
L 5
F 1 F 2 F 3 F 4 F 5 F 6 F 7
F1 Takes you to the Disk menu.
F2, F3 Lists the next or previous ten titles.
F4, F5 Starts the Chain Play.
F7 Selects the song and takes you to the Disk Song Play screen.
R 3
R 4
R 5
P. 92
Kawai Concert Performer Series Digital Piano
Page 99

Controlling Playback of a Song
As the song plays, you can adjust the tempo, play or sing along with on the keyboard, and even turn
on/off the different instrument parts (tracks) in the song.
The status of the song parts is displayed at the bottom of the LCD screen. You will see the parts
referred to as the CP’s three Parts + Style if the song was created on the CP, or as Channels (ch 1-16)
if the song is a MIDI file. Displayed above each part is its current status:
PLAY The part will be heard when you play the song.
MUTE The part has data, but it won’t be heard when you play the song.
– – – – The part has no data to play.
• Transpose and Octave Shift are available when a song is playing. Octave Shift affects only the
notes you play “live” on the keyboard, not the music playing from the song file. Transpose can
be applied separately to the keyboard sound and the song sounds. This lets you play the keyboard
in your preferred key along with a song recorded in a different (or more difficult) key.
Use the front panel’s dedicated TRANSPOSE buttons to affect the keyboard sound. Use the
Song Transpose option (R4 and R5) in the Disk Song Play menu to affect the song data.
• The Song Transpose option is available only for the song data in Standard MIDI file.
To make adjustments to the song:
Playing Songs From a Floppy Disk
1) In the Disk Song Play screen, use the R1, R2, R3, and L3 buttons to highlight and assign sounds to
the CP’s four keyboard Parts. These will be the sounds that you can play live from the keyboard as
the song is playing. Once a Part is highlighted, press any of the Sound category buttons to select a
new sound.
2) Use the F buttons to play and mute any of the song’s instrument parts.
3) Press the L4 button to use the Mixer to make adjustments to the song’s instrument parts. (See page
49 for the Mixer function.)
4) Use the R4 and R5 buttons to transpose the song data.
5) Use the panel TRANSPOSE and OCTAVE SHIFT buttons to adjust the CP’s keyboard Parts.
6) Press the PLAY/STOP button to start the song.
7) To adjust the tempo, press the L2 button and use the Dial to change values.
8) Press the PLAY/STOP button again to stop the song.
P. 93
Page 100

L 1
R 1
L2 Adjusts the song’s tempo.
L3 Highlights the LEFT Part.
L4 Takes you to the Mixer screen.
L5 Displays the song’s lyrics (if available in the data).
L 2
L 3
L 4
L 5
F 1 F 2 F 3 F 4 F 5 F 6 F 7
F1 Takes you to the Disk Song Select menu.
F2-F5 Turns the song part on/off.
F6, F7 Displays the status of the next set of 4 song parts. (Ch 5–8,
Ch9–12, Ch 13–16).
R 2
R 3
R 4
R 5
R2 Highlights the RIGHT1 Part.
R3 Highlights the RIGHT2 Part.
R4, R5 Transposes the song (but not the keyboard).
P. 94
Kawai Concert Performer Series Digital Piano
 Loading...