

Page 1
WV 50
English 2
Français 8
Español 14
59633640 07/09
Page 2
Window Cleaner OPERATOR MANUAL
Specifications
Proper use
Customer Support USA and Canada
Customer Support Mexico
IMPORTANT SAFETY INSTRUC-
TIONS
Start up
Description of the Appliance
Charge the battery
Start working
Interrupting the work
Emptying the reservoir during opera-
tion
Finish up your work / clean appliance
Troubleshooting
Disposal of Appliances
Remove battery pack and dispose of
Specifications
Type of protection IP X4
Volume of dirt water reservoir 3,3 oz.
Operating time with full
charge
Rated power of appliance 12 W
Charging current for empty
battery
Rated charger voltage 4 V
Nominal current of charger 600 mA
Weight 1,5 lbs
Battery type Li-Ion
Nominal battery voltage 3,6 V
Power Input
Part No. 1.633-109.0
Subject to technical modifications!
20 min
3,0 h
120-127 V
60 Hz
2
2
– Use this battery operated appliance
2
2
3
4
4
5
5
5
5
6
6
7
7
only for personal use, for cleaning
moist, smooth surfaces such as windows, mirrors or tiles. Not meant for the
vacuum of dust.
– The appliance is not intended to vacu-
um up larger amounts of fluids from horizontal surfaces, such as from a tipped
drinking glass (max. 0,8 oz.).
– Only use this appliance with conven-
tional window cleaners (no spirit, no
foam cleaners).
– Please use this appliance only with ac-
cessories and spare parts approved by
KÄRCHER.
Any use extending beyond what is listed
above is not considered as proper use. The
manufacturer is not liable for any losses resulting from improper use.
Proper use
Customer Support
USA and Canada
To register this product, please visit:
www.karcher-register.com
For technical support, go to:
www.karcher-help.com
If you need to file a warranty claim, please
call: 1-800-537-4129
You will need to fax or email your receipt to
a customer service agent. All other information can be found at:
www.karcherresidential.com
Customer Support
Mexico
Call: 01-800-024-13-13 for help or visit our
website: www.karcher.com.mx
2 English
Page 3

IMPORTANT SAFETY INSTRUCTIONS
When using this product basic precautions
should always be followed, including the
following:
1 DO NOT LEAVE appliance unattended
when plugged in. Unplug from outlet
when not in use and before servicing.
2 DO NOT USE outdoors or on wet sur-
faces.
3 DO NOT ALLOW to be used as a toy.
Close attention is necessary when used
by or near children.
4 USE ONLY as described in this manual.
Use only manufacturer’s recommended
attachments.
5 DO NOT USE with damaged cord or
plug.
6 DO NOT pull or carry by the cord, do not
use cord as a handle, do not close a
door on the cord, or pull cord around
sharp edges or corners. DO NOT run
appliance over cord. Keep cord away
from heated surfaces.
7 DO NOT unplug by pulling cord. To un-
plug, grasp plug.
8 DO NOT handle plug or appliance with
wet hands.
9 DO NOT put any objects into openings.
Do not use if openings are blocked;
keep free of dust, lint, hair, and anything
that may reduce air flow.
10 KEEP HAIR, LOOSE CLOTHING, FIN-
GERS, and all parts of the body away
from openings and moving parts.
11 TURN OFF all controls before unplug-
ging.
12 USE EXTRA CARE when cleaning on
stairs.
13 DO NOT USE to pick up flammable or
combustible liquids, such as gasoline,
or use in areas where they may be
present.
Information regarding the battery
Short circuit hazard! Do not insert
conductive objects (such as screwdrivers or similar) into the charger plug.
You may recharge the battery using
only the original charger provided with
the appliance or a charger approved by
KÄRCHER.
Tips for using the battery charger
In case of visual damage, replace the
charger with original manufacturer suggested parts.
The voltage indicated on the type plate
must correspond to the supply voltage.
Only use and store the charger in dry
rooms, ambient temperature 41 104 °F (5 - 40 °C).
Never touch the mains plug with wet
hands.
Information regarding the transport
The battery has been tested as per the
relevant directives for international
transport and can be transported/
shipped.
English 3
Page 4
Start up
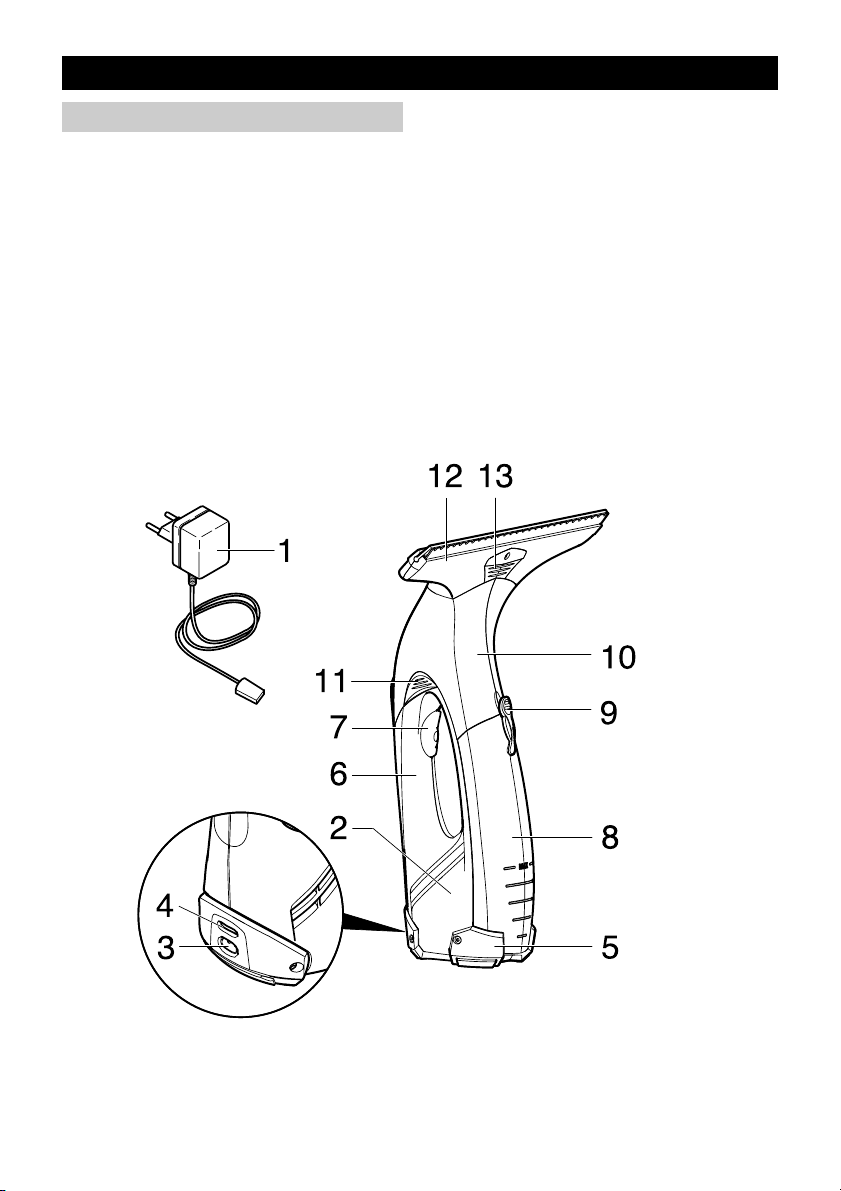
Description of the Appliance
When unpacking the product, make sure
that no accessories are missing and that
none of the package contents have been
damaged. If you detect any transport damages please contact your retailer.
1 Charger with charging cable
2 Basic appliance
3 Charging box
4 Charge/operations display
5 Support leg
6 Handle
7 ON/OFF switch for appliance
8 Dirt water reservoir, removable
9 Lock, dirt water reservoir
10 Suction head
11 Release, suction head
12 Attachment with removable lips
13 Release, attachment
For household use only!
4 English
Page 5
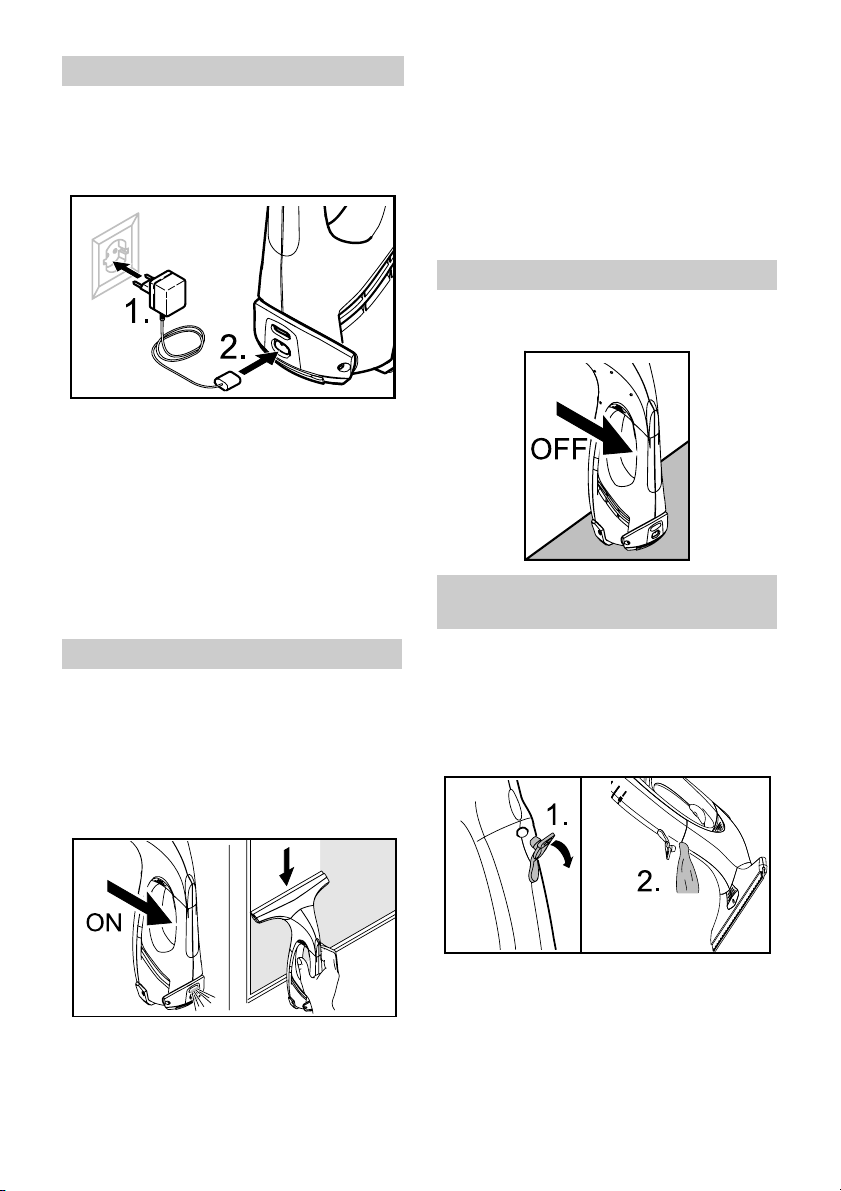
Charge the battery
Î Insert the charger delivered with the ap-
pliance into a proper socket.
Î Insert the charging cable plug to the
back of the appliance.
Note: During the charging process, the
charge/operating display blinks. Once the
battery is fully charged, it will be permanently illuminated.
Î We recommend unplugging the charg-
ing plug and the charger after the
charging process is complete (after approx. 3 hours).
Recharge the battery after finishing
your work.
Start working
Î Apply conventional window cleaner to
cleaning area.
Î Switch the appliance on, the charge/op-
erations display will illuminate.
Î Pull the appliance from the top to the
bottom to vacuum up the cleaning solution residue.
Notes:
If the battery is losing its performance, the
charge/operations display will begin to blink
slowly and the appliance will shut off after a
certain time. In this case, recharge the battery.
Switch the appliance off after each cleaned
surface. This will increase your operating
time per battery charge.
Interrupting the work
Î Set the appliance on the support leg
(parking position) and switch it off.
Emptying the reservoir during oper-
ation
Once the max. fill level (mark) of the dirt
water reservoir is reached, please empty
the tank.
Î Turn off the appliance.
Î Pull off the lock of the dirt water reser-
voir and empty the tank.
Note: Hard to reach areas can be vacuumed vertically or horizontally (limited areas).
Î Close the dirt water reservoir.
English 5
Page 6
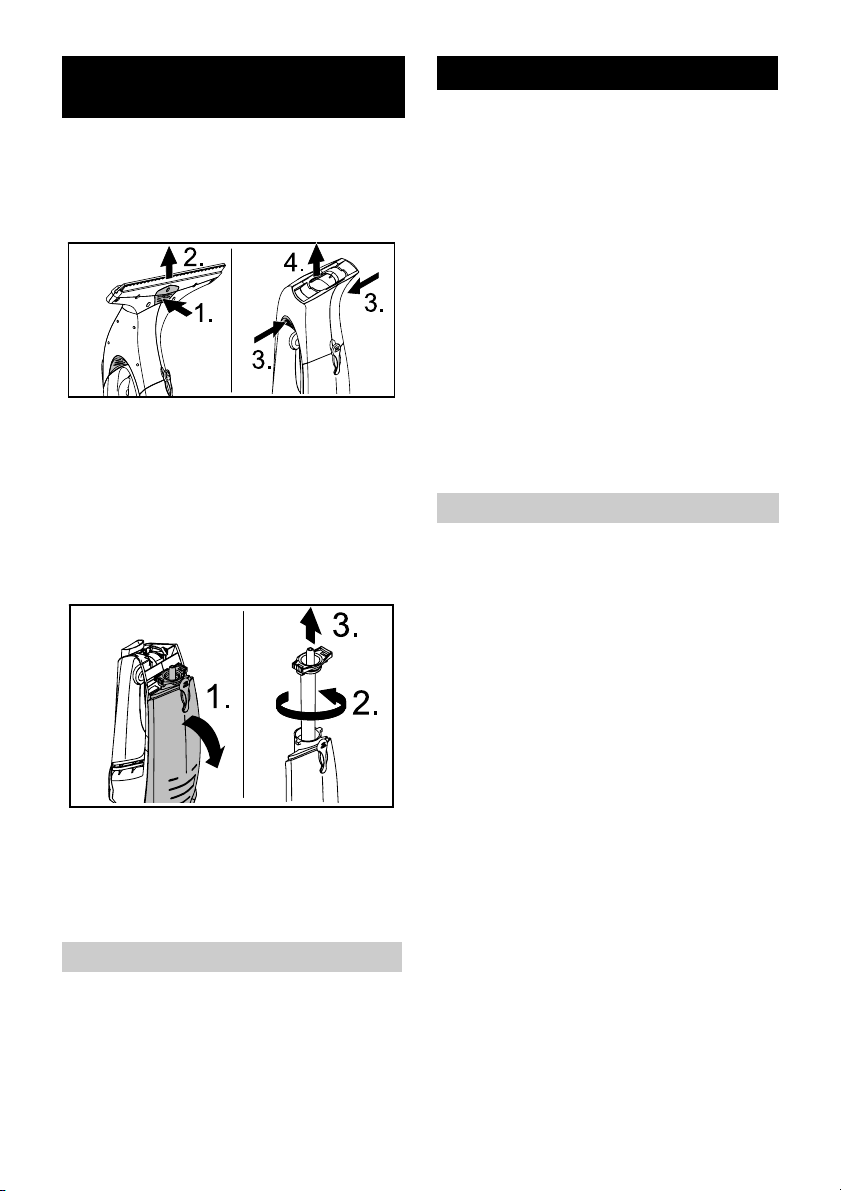
Finish up your work / clean
appliance
Î Turn off the appliance.
Î First, release the attachment with the
pull-off lips and remove it from the suction head, then release the suction
head and remove.
Î Clean the suction head and the attach-
ment with the pull-off lips under running
water (do not wash in dishwater).
Caution: The basic appliance contains
electrical components. Do not clean this
under running water!
Î Remove the dirt water reservoir, rotate
the lock and pull out.
Troubleshooting
Machine does not start
Check the charge/operations display:
Î No signal or slowly blinking signal:
Charge the battery.
Î With a rapidly blinking signal: Inform
your dealer.
Streaks while cleaning
Î Clean the pull-off lip.
Î Turn the upper pull-off lip around by
pulling it out to the side, turning it
around and reinserting it.
Î Replace pull-off lip if required.
Î Adjust the dosing of cleaning solution.
Water is leaking from the air louvers
Î Empty the dirt water reservoir (max.
3,3 oz. content).
Replacement parts
To purchase replacement parts please visit
www.buykarcher.com
Î Empty the reservoir and rinse with clear
water. Close the reservoir again.
Î Let the cleaned appliance dry prior to
assembly.
Î Charge the battery.
Storing the Appliance
Î Store the appliance upright in a dry
room.
6 English
Page 7

Disposal of Appliances
This appliance includes a built-in battery
pack; please remove this battery pack before disposing of the old appliance.
Remove battery pack and dispose
of
Î The appliance may only be opened in
order to dispose of the battery pack.
Caution when opening the appliance
avoid short circuits.
Î Remove the battery pack and dispose
of properly (at a collection site or the
dealer).
몇 Warning
Do not open the battery, as there is a
risk of an electrical short; also, irritating
or caustic vapors can escape.
Do not expose the battery to direct
sunlight, heat or fire, there is a risk of
explosion.
English 7
Page 8

INSTRUCTIONS DE SERVICE Lave-vitre
Caractéristiques techniques 8
Utilisation conforme 8
Service client USA et Canada 8
Assistance Mexique 8
CONSIGNES DE SECURITE IMPOR-
TANTES
Mise en service 10
Description de l’appareil 10
Charger l'accumulateur 11
Commencer le travail 11
Interrompre le travail 11
Vider la cuve durant le travail 11
Terminer le travail / nettoyer l'appareil 12
Service de dépannage 12
Elimination de l’appareil hors d'usage 13
Démonter la batterie et l'éliminer 13
Caractéristiques techniques
Type de protection IP X4
Volume réservoir d'eau sale 100 ml
Durée de service avec charge d'accumulateur totale
Puissance nominale de
l'appareil
Temps de charge d'un
accumulateur vide
Tension nominale chargeur 4 V
Intensité nominale chargeur 600 mA
Poids 0,7 kg
Type d'accumulateur Li-Ion
Tension nominale accumulateur
Alimentation électrique 120-127 V
N° de pièce 1.633-109.0
Sous réserve de modifications
techniques !
20 min
12 W
3,0 h
3,6 V
60 Hz
Utilisation conforme
– Utiliser cette appareil fonctionnant avec
accumulateur uniquement à des fins
privées, pour le nettoyage de surfaces
9
humides et lisses comme les fenêtres,
les miroirs ou le carrelage. L'appareil ne
doit pas aspirer de poussières.
– L'appareil n'est pas adapté pour l'aspi-
ration de grandes quantités de liquides
sur des surfaces horizontales, par ex.
du liquide provenant d'un verre renver-
sé (max. 25 ml).
– Utiliser cet appareil uniquement en
liaison avec des nettoyants à vitre cou-
rants dans le commerce (par d'essen-
ce, pas de détergent moussant).
– Seuls des accessoires et des pièces de
rechange d’origine autorisés par
Kärcher
Toute utilisation sortant du cadre donné est
considérée comme non conforme. Le cons-
tructeur décline toute responsabilité pour
des dommages en résultant, seul l'utilisateur en assume le risque.
®
doivent être utilisés.
Service client
USA et Canada
Pour enregistrer ce produit, veuillez visiter :
www.karcher-register.com
Pour l'assistance technique, aller à :
www.karcher-help.com
Pour faire valoir une demande en garantie,
appeler : 1-800-537-4129
Il vous faudra faxer votre reçu, ou l'envoyer
par courriel, à un agent du service aprèsvente. Tous les autres informations sont
disponibles sous :
www.karcherresidential.com
Assistance Mexique
Appeler : 01-800-024-13-13 pour obtenir
de l'aide ou visiter notre site Web :
www.karcher.com.mx
8 Français
Page 9

CONSIGNES DE SECURITE IMPORTANTES
En utilisant ce produit, toujours observer
une certaine prudence élémentaire, incluant notamment:
1 NE PAS LAISSER l'appareil sans sur-
veillance lorsqu'il est branché. Débrancher l'appareil lorsqu'il n'est pas utilisé
et avant de procéder à l'entretien.
2 NE PAS UTILISER en extérieur ou sur
des surfaces humides.
3 NE PAS PERMETTRE une utilisation
comme jouet. Ne jamais le laisser sans
surveillance attentive lorsqu'il est utilisé
par ou à proximité d'enfants.
4 RESPECTER IMPERATIVEMENT les
consignes d'utilisation de ce manuel.
Utiliser uniquement les accessoires recommandés par le fabricant.
5 NE PAS METTRE l'appareil en service
en cas d'endommagement du cordon
ou de la prise.
6 NE PAS tirer ou transporter l’appareil
par le cordon électrique ou se servir de
ce dernier comme d’une poignée.
Veiller à ne pas coincer le cordon dans
une porte et éviter de le tirer sur des
bords ou des coins tranchants. NE PAS
laisser l'appareil rouler sur le cordon.
Tenir le cordon à l'écart des surfaces
chaudes.
7 NE PAS tirer sur le cordon électrique
pour débrancher l'appareil. Pour débrancher, saisir la fiche électrique.
8 NE PAS manipuler l’appareil ou la fiche
électrique avec les mains mouillées.
9 NE RIEN introduire dans les orifices.
Ne pas utiliser l’appareil si les orifices
sont obstrués. Protéger les orifices de
la poussière, des peluches, des cheveux et autres matières susceptibles de
réduire le débit d'air.
10 Veiller à ne pas approcher les cheveux,
vêtements larges, doigts ou toute autre
partie du corps des orifices et compo-
sants mobiles de l’appareil.
11 DESACTIVER toutes les commandes
avant de débrancher l'appareil.
12 FAIRE PARTICULIEREMENT ATTEN-
TION lors du nettoyage d'escaliers.
13 NE PAS aspirer de liquides inflamma-
bles ou combustibles, tels que de l’es-
sence avec l'appareil. Ne pas utiliser ce
dernier dans des zones susceptibles de
contenir de tels produits.
Remarques relatives à l'accumulateur
Risque de court-circuit ! Ne pas enfi-
cher d'objets conducteurs (par ex. tour-
nevis ou équivalent) dans la douille de
chargement.
Le chargement de l'accumulateur n'est
permis que avec l'appareil de charge
original ci-joint ou avec l'appareil de
charge autorisé par Kärcher®.
Remarques relatives au chargeur
Remplacer le chargeur avec le câble de
chargement cas d'endommagement
immédiatement par des pièces d'origi-
ne.
La tension indiquée sur la plaque signa-
létique doit correspondre à la tension
d'alimentation.
Utiliser et entreposer le chargeur uni-
quement dans des locaux secs, à une
température ambiante comprise entre 5
et 40° C.
Ne jamais saisir le câble d’alimentation
avec des mains mouillées.
Instructions relatives au transport
L'accu a été contrôlé dans le respect
des directives qui s'appliquent pour le
transport international et peut être
transporté / expédié.
Français 9
Page 10

Mise en service
Description de l’appareil
Contrôler le matériel lors du déballage pour
constater des accessoires manquants ou
des dommages. Si des dégâts dus au
transport sont constatés, il faut en informer
le revendeur.
Appareil de charge avec câble de charge
1
2 Appareil de base
3 Prise de charge
4 Affichage de charge / de service
5Pied
6 Poignée
7 Interrupteur MARCHE/ARRET
8 Réservoir d'eau sale, amovible
9 Verrou, réservoir d'eau sale
10 Tête d'aspiration
11 Déverrouillage, tête d'aspiration
12 Extension avec lèvres extensibles
13 Déverrouillage, extension
A usage domestique seulement !
10 Français
Page 11

Charger l'accumulateur
Î Brancher le chargeur dans une prise de
courant réglementairement.
Î Brancher le connecteur du câble de
charge sur le côté arrière de l'appareil.
Remarque : L'indicateur de charge / de
service clignote pendant le processus de
charge. Lorsque l'accumulateur est complètement chargé, l'indicateur est allumé en
continu.
Î Il est recommandé de débrancher le
connecteur de charge et le chargeur
une fois le processus de charge achevé
(env. 3 h).
Recharger l'accumulateur après la fin
du travail.
Commencer le travail
Î Appliquer le détergent selon les indica-
tions du fabricant de la manière habituelle et décoller la saleté.
Î Mettre l'appareil en service, l'indicateur
de charge / de service est allumé en
continu.
Î Pour aspirer le détergent, tirer l'appareil
du haut vers le bas.
manière transversale que par la tête (quantité limitée).
Remarque :
Lorsque la charge de l'accumulateur a diminué, l'indicateur de charge / de service
commence à clignoter lentement et l'appareil se met au bout d'un certain temps hors
service ; dans ce cas, charger l'accumulateur.
Mettre l'appareil hors service après chaque
surface nettoyée, la durée de service par
charge d'accumulateur augmente sensiblement.
Interrompre le travail
Î Ranger l'appareil sur son pied (position
de rangement) et mettre hors service.
Vider la cuve durant le travail
Si le niveau de remplissage maximal (repère) du réservoir d'eau sale est atteint, vider
le réservoir.
Î Mettre l’appareil hors tension.
Î Tirer le verrou du réservoir d'eau sale et
vider le réservoir.
Remarque : Les surfaces difficiles à atteindre peuvent être aspirées aussi bien de
Î Fermer le réservoir d'eau sale.
Français 11
Page 12

Terminer le travail / nettoyer
l'appareil
Î Mettre l’appareil hors tension.
Î Déverrouiller en premier l'extension
avec des lèvres extensibles et la retirer
de la tête d'aspiration, puis déverrouiller
la tête d'aspiration et l'enlever.
Î Nettoyer la tête d'aspiration et l'exten-
sion avec les lèvres extensibles à l'eau
courante (pas adapté pour le lavage au
lave-vaisselle).
Attention : l'appareil de base contient des
composants électriques, ne pas le nettoyer
à l'eau courante !
Î Retirer le réservoir d'eau sale, tourner
le verrou et le sortir.
Service de dépannage
L'appareil ne démarre pas.
Contrôler l'affichage de charge / de service:
Î Pas de signal ou signal clignotant lente-
ment : Charger l'accumulateur.
Î Si le signal clignote rapidement : Con-
tacter le revendeur.
Stries pendant le nettoyage
Î Nettoyer la lèvre extensible
Î Retourner la lèvre extensible supérieu-
re, tirer pour cela la lèvre en caoutchouc vers l'extérieur et la réinsérer.
Î Si nécessaire, remplacer la lèvre exten-
sible.
Î Contrôler le dosage du détergent.
De l'eau s'échappe des fentes d'aération
Î Vider le réservoir d'eau sale (contenan-
ce max. 100 ml)
Accessoires en option
Pour acquérir des pièces de rechange,
veuillez visiter www.buykarcher.com
Î Vidanger le réservoir et le rincer à l'eau.
Refermer le réservoir.
Î Laisser sécher l'appareil nettoyé avant
de le remonter.
Î Charger l'accumulateur.
Ranger l’appareil
Î Entreposer l’appareil dans des locaux
secs.
12 Français
Page 13

Elimination de l’appareil hors
d'usage
Cet appareil contient une batterie intégrée
qui doit être démontée avant l'élimination
de l'appareil mis au rebut.
Démonter la batterie et l'éliminer
Î L'ouverture de l'appareil est autorisée
exclusivement pour l'élimination de la
batterie.
Précaution, Eviter les courts-circuits
à l'ouverture de l'appareil.
Î Enlever la batterie et l'éliminer dans le
respect de l'environnement (points col-
lecteurs ou revendeur).
몇 Avertissement
Ne pas ouvrir l'accumulateur, il existe
un risque de court-circuit ; il est en outre
possible que des vapeurs irritantes
s'échappent ou des fluides agressifs
fuient.
Ne pas soumettre l'accumulateur à
un fort rayonnement du soleil, à la
chaleur ainsi qu'au feu, il existe un ris-
que d'explosion.
Français 13
Page 14

Limpiador de ventanas MANUAL DEL OPERARIO
Datos técnicos 14
Uso previsto 14
Ayuda a clientes EE.UU. y Canadá 14
Soporte México 14
INSTRUCCIONES DE SEGURIDAD
IMPORTANTES
Puesta en marcha 16
Descripción del aparato 16
Cargar la batería 17
Comenzar con el trabajo 17
Interrumpir el trabajo 17
Vaciar el recipiente durante el trabajo 17
Terminar el trabajo / limpiar el aparato 18
Subsanación de averías 18
Desecho del aparato usado 19
Desmontar y eliminar la batería 19
15
Datos técnicos
Categoria de protección IP X4
Volumen del depósito de
agua sucia
Tiempo de servicio con la ba-
tería totalmente cargada
Potencia nominal del aparato 12 W
Tiempo de carga cuando la
batería esté vacía
Potencia nominal, cargador 4 V
Corriente nominal, cargador 600 mA
Peso 0,7 kg
Tipo de batería Li-Ion
Área de tensión de la batería 3,6 V
Entrada de energía 120-127 V
Nº de pieza 1.633-109.0
Reservado el derecho a realizar modificaciones técnicas.
100 ml
20 min
3,0 h
60 Hz
Uso previsto
– Utilice este aparato que funciona con
batería exclusivamente para fines particulares, para limpiar superficies húmedas, lisas como ventanas, espejos o
azulejos. Está prohibido aspirar polvo.
– El aparato no es apto para aspirar can-
tidades de líquido grandes de superficies horizontales, p. ej. de un vaso de
bebida que se haya caído (máx. 25 ml).
– Utilice este aparato únicamente en
combinación con limpiaventanas convencionales (no usar alcohol ni limpiadores en espuma).
– Utilice este aparato sólo con los acce-
sorios y repuestos autorizados por
KÄRCHER.
Cualquier uso diferente a éstos se considererá un uso no previsto. El fabricante no se
hace responsable de los daños causados
por un uso no previsto; el usuario será el
único que correrá con este riesgo.
Ayuda a clientes
EE.UU. y Canadá
Para registrar este producto, visite:
www.karcher-register.com
Para ayuda técnica, visite:
www.karcher-help.com
Si necesita presentar un reclamación de la
garantía, llame a: 1-800-537-4129
Tendrá que enviar su recibo por fax o correo electrónico a un agente de atención al
cliente. Encontrará toda la información en:
www.karcherresidential.com
Soporte México
Llame al: 01-800-024-13-13 si necesita
ayuda o visite nuestra página Web:
www.karcher.com.mx
14 Español
Page 15

INSTRUCCIONES DE SEGURIDAD IMPORTANTES
Al utilizar este producto, tome siempre las
precauciones básicas, incluidas las siguientes:
1 NO ABANDONAR la unidad mientras
esté enchufada. Desenchufar cuando
no esté en uso y antes de revisar.
2 NO USAR en exteriores o sobre super-
ficies húmedas.
3 NO PERMITA que se use como jugue-
te. Prestar mucha atención cuando sea
usado por y cerca de niños.
4 USAR EXCLUSIVAMENTE como se
describe en este manual. Usar sola-
mente con los complementos recomen-
dados por el fabricante.
5 NO USAR con el cable o la clavija da-
ñados.
6 NO tirar del cable ni transportar el apa-
rato cogido por el cable, no cerrar una
puerta sobre el cable, ni pasar el cable
por bordes o esquinas afiladas. NO pa-
sar el aparato por el cable. Mantener el
cable alejado de superficies calientes.
7 NO tirar del cable para desenchufar el
aparato. Para desenchufar, coger el en-
chufe.
8 NO manipular la clavija ni el aparato
con las manos mojadas.
9 NO introducir objetos en los orificios.
No usar con cualquiera de los orificios
bloqueados; mantener sin polvo, pelu-
sa, pelo y cualquier otra cosa que pue-
da reducir el flujo de aire.
10 MANTENER EL CABELLO, LA ROPA
FLOJA, LOS DEDOS y todas las partes
del cuerpo alejadas de los orificios y
partes móviles.
11 AGAGAR los mandos de control antes
de desenchufar.
12 USAR CON ESPECIAL CUIDADO
cuando limpie escaleras.
13 NO USAR para recoger líquidos infla-
mables o combustible, como gasolina,
ni utilizar el aparato en áreas donde
puedan estar presentes.
Indicaciones sobre la batería
Puede provocar un cortocircuito! No
inserte ningún objeto conductor (p.ej.
destornillador o similar) en clavija de
carga.
Sólo está permitido cargar la batería
con el cargador original suministrado o
con el cargador autorizado por KÄRCHER.
Indicaciones sobre el cargador
Sustituir inmediatamente el cargador
con el cable por una pieza original si se
aprecia algún tipo de daño.
La tensión de alimentación tiene que
coincidir con la indicada en la placa de
características.
Usar y almacenar el cargador solamen-
te en lugar seco, temperatura ambiente
5 - 40 ºC.
No toque nunca la clavija con las ma-
nos mojadas.
Indicaciones sobre transporte
La batería ha sido sometida a ensayos
en conformidad con las disposiciones
relevantes para transporte internacional y puede ser transportada / enviada.
Español 15
Page 16

Puesta en marcha
Descripción del aparato
Cuando desempaque el contenido del paquete, compruebe si faltan accesorios o si
el aparato presenta daños. Informe a su
distribuidor en caso de detectar daños ocasionados durante el transporte.
1 Cargador con cable
2 Equipo básico
3 Clavija de carga
4 Indicador de carga/funcionamiento
5 Base de apoyo
6 Mango
7 Interruptor del aparato (ON / OFF)
8 Depósito de agua sucia, extraíble
9 Cierre, depósito de agua sucia
10 Cabezal de aspiración
11 Desbloqueo, cabezal de aspiración
12 Accesorio adicional con labios de ex-
tracción
13 Desbloqueo, accesorio adicional
Sólo para uso doméstico.
16 Español
Page 17

Cargar la batería
Î Introducir el cargador en el enchufe de
forma correcta.
Î Introducir el enchufe del cable de recar-
ga en la parte posterior del aparato.
Indicación: Durante el proceso de carga el
indicador de carga / funcionamiento parpadea. Si la batería está completamente cargada, luce continuamente.
Î Se recomienda extraer la clavija de car-
ga y el cargador una vez finalizado el
proceso de carga (aprox. 3 h).
Tras finalizar el trabajo recargar la batería.
Comenzar con el trabajo
Î Administrar el detergente de modo con-
vencional según instrucciones del fabri-
cante y eliminar la suciedad.
Î Conectar el aparato, indicador de carga
/ funcionamiento luce continuamente.
Î Para aspirar el líquido limpiador estirar
el aparato de arriba hacia abajo.
Notas:
Cuando la batería comienza a descargarse
el indicador de carga / funcionamiento empieza a parpadear lentamente y el aparato
se desconecta después de cierto tiempo,
en este caso cargar la batería.
Desconectar el aparato después de limpiar
cada superficie, de este modo se eleva claramente el tiempo de servicio por cada carga de batería.
Interrumpir el trabajo
Î Colocar el aparato en la base de apoyo
(posición de estacionamiento) y desconectar.
Vaciar el recipiente durante el
trabajo
Si se ha alcanzado el máximo nivel de llenado (marca) del depósito de agua sucia,
vaciar el depósito.
Î Desconexión del aparato
Î Destapar el cierre del depósito de agua
sucia y vaciar el depósito.
Indicación: Las superficies de difícil acceso se puede aspirar en diagonal o boca
abajo (cantidad limitada).
Î Cerrar el depósito de agua sucia.
Español 17
Page 18

Terminar el trabajo / limpiar el
aparato
Î Desconexión del aparato
Î Primero desbloquear accesorio adicio-
nal con labios de extracción y retirar del
cabezal de aspiración, después desblo-
quear y retirar el cabezal de aspiración
Î Limpiar el accesorio adicional y el cabe-
zal de aspiración con los labios con
agua corriente (no apto lavavajillas).
Atención: El equipo básico contiene com-
ponentes eléctricos. No limpiar estos con
agua corriente.
Î Retirar depósito de agua sucia, girar
cierre y sacar.
Subsanación de averías
El aparato no se pone en marcha
Comprobar indicador de carga/funcionamiento:
Î No hay señal o señal con lenta intermi-
tencia: Cargar la batería.
Î En caso de señal con rápida intermiten-
cia: Contactar al distribuidor.
Franjas al limpiar
Î Limpiar los labios de extracción.
Î Usar labio de extracción superior, para
ello estirar el labio de goma lateralmente hacia afuera, dar la vuelta y volver a
desplazar hacia dentro.
Î Renovar el labio de extracción si es ne-
cesario.
Î Comprobar la dosificación del deter-
gente.
Sale agua de las ranuras de ventilación
Î Vaciar el depósito de agua sucia (máx.
100 ml contenido).
Accesorios especiales
Para comprar piezas de repuesto, visite
www.buykarcher.com
Î Vaciar el depósito y enjuagar con agua.
Cerrar de nuevo el depósito.
Î Dejar secar el aparato limpio antes de
ensamblarlo.
Î Cargar la batería.
Almacenamiento del aparato
Î Almacenar el aparato de pie en un lugar
seco.
18 Español
Page 19

Desecho del aparato usado
Este aparato contiene una batería integrada, debe desmontarse antes de eliminar el
aparato usado.
Desmontar y eliminar la batería
Î El aparato solo debe abrirse para elimi-
nar la batería.
Abrircon cuidado el aparato, para evi-
tar cortocircuitos al desmontar la ba-
tería.
Î Extraer la batería y eliminarla ecológi-
camente (en puntos de recogida o en el
distribuidor).
몇 Advertencia
No abrir la batería, hay peligro de que
se produzca un cortocircuito, adicional-
mente puede producirse la salida de
vapores irritantes o líquidos corrosivos.
No exponer la batería a intensa ra-
diación solar, calor o fuego, hay peli-
gro de explosción.
Español 19
Page 20

59633640 (07/09)
 Loading...