

Page 1
K 3.000
English 2
Español 17
Français 32
®
8.753-831.0 03/14
Page 2
HIGH PRESSURE WASHER OPERATOR MANUAL
Model Overview 3
Important Safety Instructions 4
Assembly Instructions 5
Operating Instructions 7
Using the Accessories 8
Working With Detergents 9
Taking a Break 10
Shutting Down & Clean-Up 10
Winterizing and Long-Term Storage 11
Care and Maintenance Instructions 11
Cleaning Tips 12
Optional Cleaning Accessories 13
Troubleshooting 15
Specifi cations
K 3.000
Max Pressure 1800 PSI
Water Volume 1.3 GPM
Amp Draw 13 AMPS
Voltage
Part No.
Serial No.
For household use only!
120 V
1.418-050.0
1.418-052.0
Safety Alert Symbols
DANGER
Indicates an imminently hazardous situation which,
if not avoided, will result in death or serious
WARNING
Indicates a potentially hazardous situation which, if
not avoided, could result in death or injury.
CAUTION
Indicates a potentially hazardous situation which, if
not avoided, may result in minor or moderate injury
or in property damage incidents.
injury.
Owner/User Responsibility
The owner and/or user must have an understanding of the manufacturer’s operating instructions
and warnings before using this pressure washer.
Warning information should be emphasized and
understood.
If the operator is not fl uent in English, the manufacturer’s instructions and warnings shall be read to
and discussed with the operator in the operator’s
native language by the purchaser/owner, making
sure that the operator comprehends its contents.
Owner and/or user must study and maintain for
future reference the manufacturer's instructions.
Kärcher Customer Support USA/
Canada
In the U.S. or Canada, please call
1-800-537-4129 for warranty issues and visit
www.karcher-help.com for technical support
and product assistance.
Please take a moment to register your pressure
washer online at www.karcher-register.com.
Be sure to save your purchase receipt, it will be
required for repairs covered by warranty.
2 English
Page 3
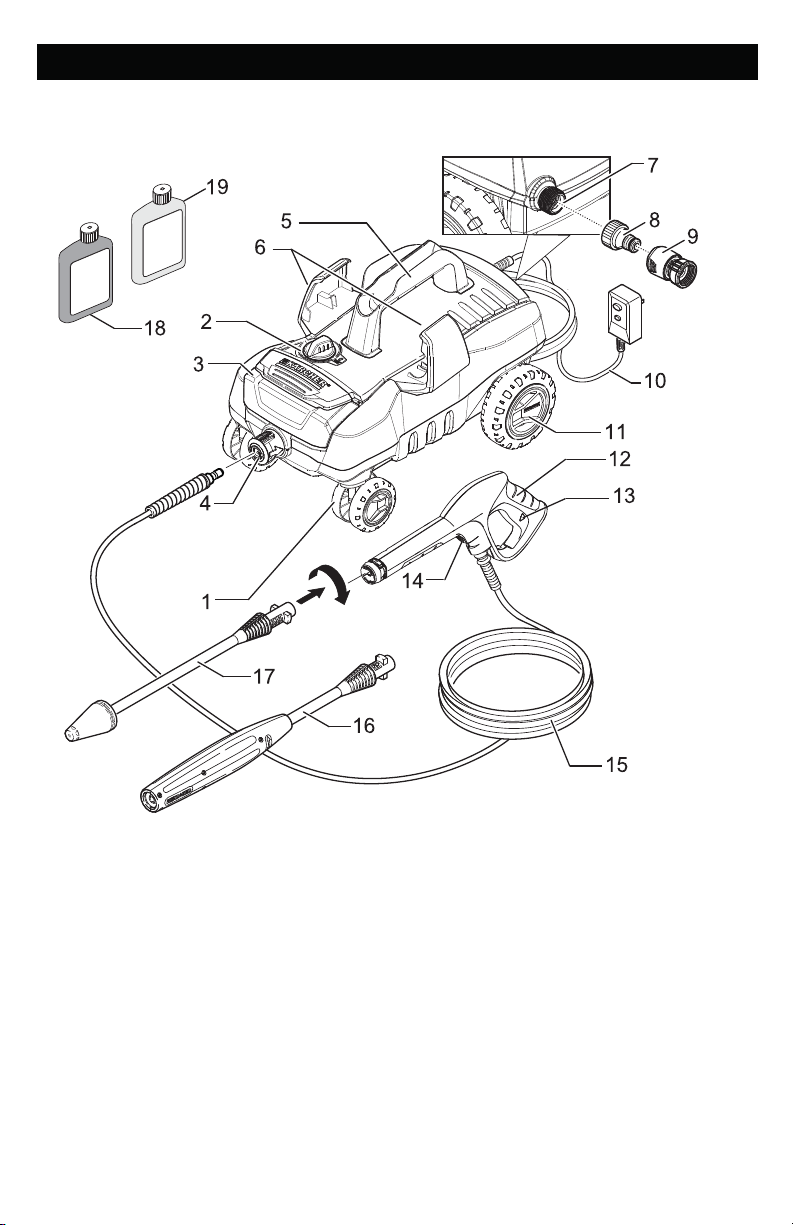
MODEL OVERVIEW
1 Swivel casters
2 ON/OFF switch
3 Detergent tank (removable)
4 High pressure outlet
5 Handle
6 Spray wand and Hp-hose storage
7 Water inlet
8 Water inlet connector
9 Garden hose connector (female)
10 Power cord with Ground Fault Circuit Inter-
rupter (GFCI)
11 Wheels
12 Trigger gun
13 Trigger gun safety lock
14 Quick connect for high pressure hose
15 High pressure hose
16 Vario power spray wand
17 Dirtblaster ® (Rotary spray wand)
18
Vehicle Wash & Wax Detergent
1.418-052.0 model only)
(For
19 Multipurpose Cleaner Detergent
1.418-052.0 model only)
(For
English 3
Page 4
IMPORTANT SAFETY INSTRUCTIONS
SAVE THESE INSTRUCTIONS
WARNING
When using this product, basic precautions
should always be followed, including the following:
■ Read all the instructions before using the
product.
■ To reduce the risk of injury, close supervision
is necessary when a product is used near
children.
■ Know how to stop the product and bleed pressures quickly. Be thoroughly familiar with the
controls.
■ Stay alert – watch what you are doing.
■ Do not operate the product when fatigued or
under the infl uence of alcohol or drugs.
■ Keep operating area clear of all persons.
■ Do not overreach or stand on unstable sup-
port. Keep good footing and balance at all
times.
■ Follow the maintenance instructions specifi ed
in the manual.
■ This product is provided with a Ground Fault
Circuit Interrupter built into the power cord
plug. If replacement of the plug or cord is
needed, use only identical replacement parts.
WARNING
Risk of Injection or Injury – Do Not Direct
Discharge Stream At Persons.
■ High pressure jets can be dangerous if misused. The jet must not be directed at persons,
animals, electrical devices, or the unit itself.
■ Wear safety goggles.
WARNING
Risk Of Explosion – Do not spray fl ammable
liquids.
■ Do not use acids, solvents, or any fl ammable
or alkaline material in this product. These
products can cause physical injuries to the
operator and irreversible damage to the machine.
4 English
WARNING
Risk of Electrocution
■ Inspect cord before using – Do not use if cord
is damaged.
■ Keep all connections dry and off the ground.
■ Do not touch plug with wet hands.
■ Do not use extension cord with this product.
■ Connect to individual branch circuit only.
CAUTION
This unit has been designed for use with
cleaning detergents recommended by the
manufacturer. The use of other cleaning
detergents may affect the operation of the
machine and void the warranty.
CAUTION
Gun Kicks Back – Hold with both hands.
■ The Spray Gun Safety Lock prevents the
spray from accidentally being engaged. This
safety feature DOES NOT lock spray in the
ON position.
WARNING
■ Do not spray electrical apparatus and wiring.
■ Do not use with fl ammable liquids or toxic
chemicals.
■ High pressure – keep clear of nozzle.
■ Injection hazard – equipment can cause se-
rious injury if the spray penetrates the skin.
Do not point the gun at anyone or any part of
the body. In case of injury seek medical aid
immediately.
■ This system is capable of producing high
pressure to avoid rupture and injury, do not
operate this pump with accessories rated less
than the stated maximum pressure (including
but not limited to spray guns, hoses and hose
connections).
■ Before servicing, cleaning or removing any
parts, shut off power and relieve pressure.
■ If connection is made to a potable water system, the system shall be protected against
back fl ow.
Page 5
SERVICING OF A
DOUBLE-INSULATED PRODUCT
In a double-insulated product, two systems of
insulation are provided instead of grounding. No
grounding means is provided on a double-insulated
product, nor should a means for grounding be
added to the product. Servicing a double insulated
product requires extreme care and knowledge of
the system, and should be done only by qualifi ed service personnel. Replacement parts for a
double-insulated product must be identical to the
parts they replace. A double-insulated product is
marked with the words “DOUBLE INSULATION” or
“DOUBLE INSULATED”. The symbol “
be marked on the product.
” may also
GROUND-FAULT
CIRCUIT-INTERRUPTER PROTECTION
This pressure washer is provided with a groundfault circuit-interrupter (GFCI) built into the plug
of the power-supply cord. This device provides
additional protection from the risk of electric shock.
Should replacement of the plug or cord become
necessary, use only identical replacement parts
that include GFCI protection.
WATER SUPPLY
(COLD WATER ONLY)
CAUTION
When connecting the water inlet to the water supply mains, local regulations of your water company
must be observed. In some areas the unit must not
be connected directly to the public drinking water
supply. This is to ensure that there is no feedback
of chemicals into the water supply. Direct connection via a receiver tank or backfl ow preventer, for
example, is permitted.
Dirt in the feed water will damage the unit. To avoid
this risk, we recommend fi tting a water fi lter.
■ Garden hose must be at least 1/2 inch or 5/8
inch (13 mm or 16 mm) in diameter.
■ Flow rate of water supply must not fall below
2 GPM (gallons per minute) (7.6 L/min.).
■ Flow rate can be determined by running the
water for one minute into an empty 5 gallon
(20 litre) container.
■ The water supply temperature must not exceed 40°C/104°F.
■ Never use the pressure washer to draw in
water contaminated with solvents, e.g. paint
thinners, gasoline, oil, etc.
■ Always prevent debris from being drawn into
the unit by using a clean water source.
ASSEMBLY INSTRUCTIONS
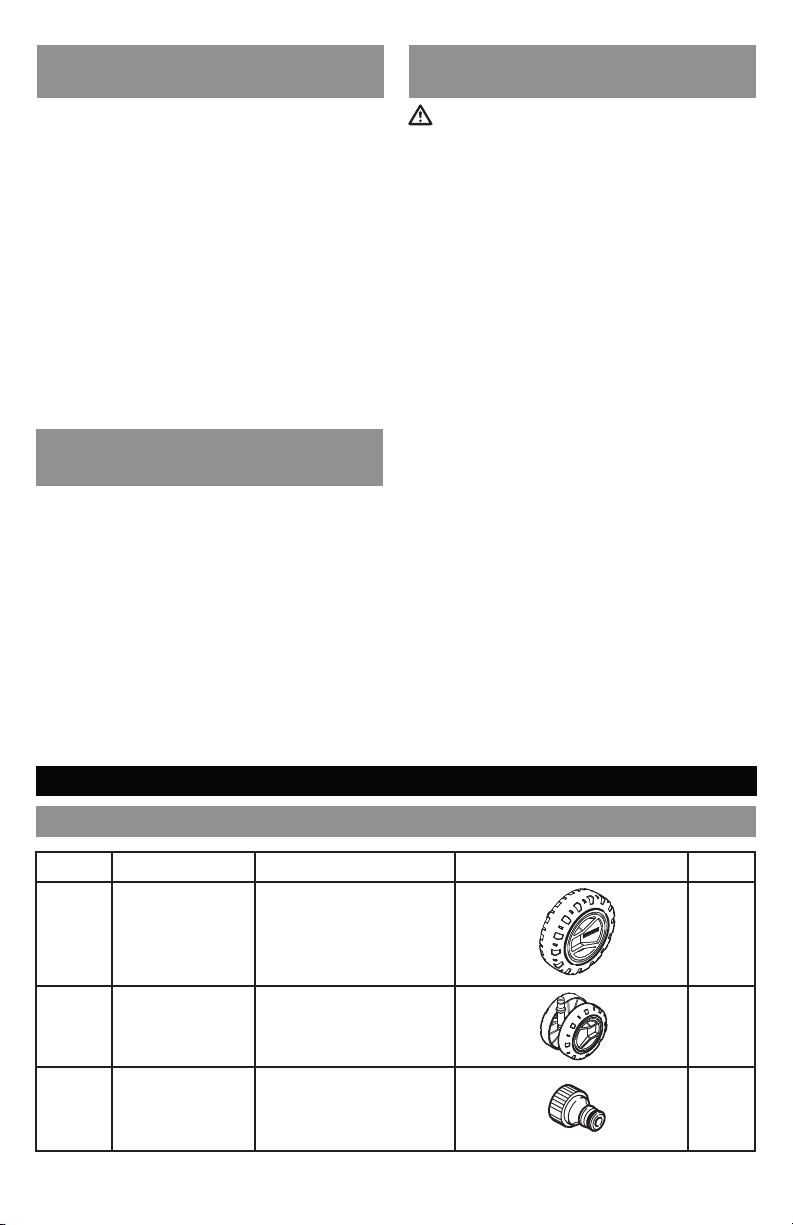
Hardware (included)
Item Description Purpose Illustration Qty
A
B
C
Rear Wheel Roll Assembly 2
Steering
Roller
Adapter Water Inlet Connec-
Roll Assembly 2
tion Assembly
1
English 5
Page 6
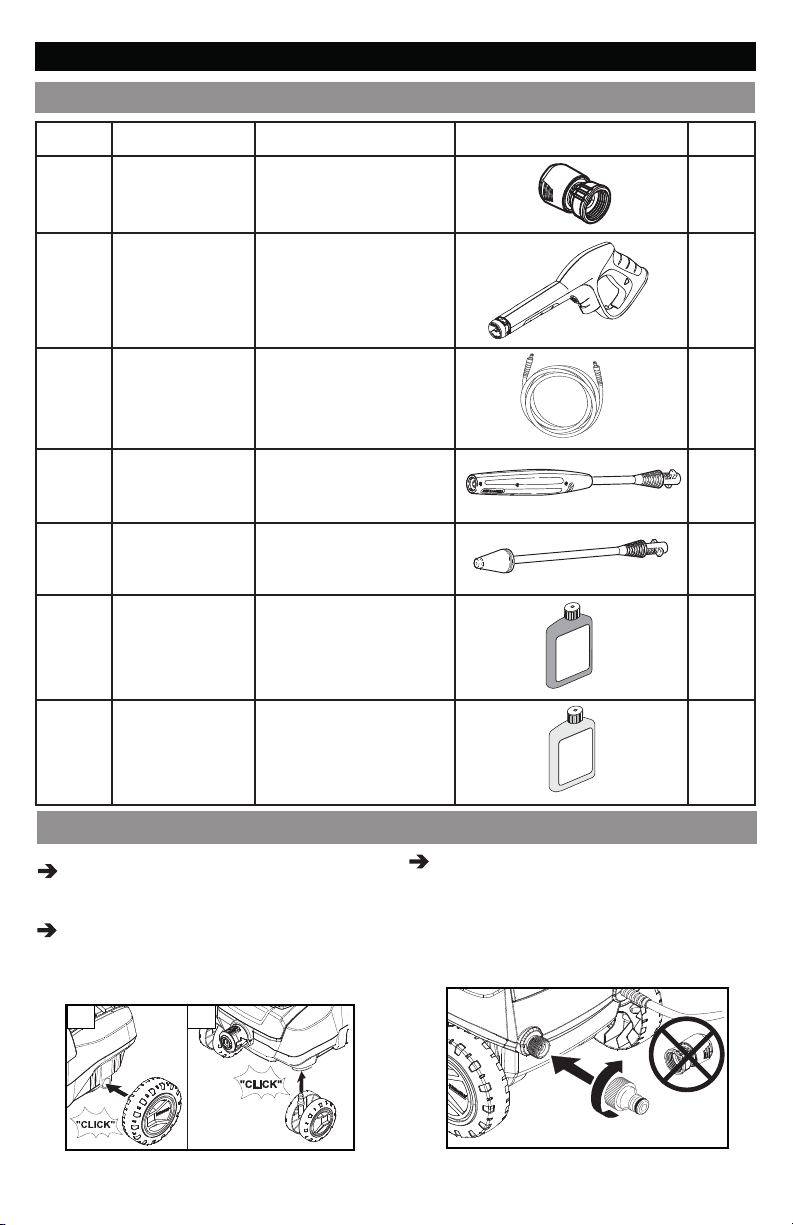
ASSEMBLY INSTRUCTIONS
Hardware (included)
Item Description Purpose Illustration Qty
D
Garden Hose
Connector
Water Inlet Connection Assembly
1
E
F
G
H
I
J
Gun Spray Gun Assembly 1
High Pressure
Hose
Vario Power
Spray Wand
Dirtblaster ® Spray Gun Assembly 1
Vehicle Wash
& Wax
(For 1.418-052.0
model only)
Multipurpose
Cleaner
(For 1.418-052.0
model only)
Spray Gun Assembly 1
Spray Gun Assembly 1
Working with
Detergents
Working with
Detergents
Assembling
STEP 1:
Insert rear wheels into the body of the unit.
STEP 2:
Insert the steering rollers and push until they
click in place.
1 2
1
1
STEP 3:
Install the supplied adaptor to the unit’s water
inlet.
Note: Never attach the garden hose connec-
tor to the unit’s water inlet!
6 English
Page 7
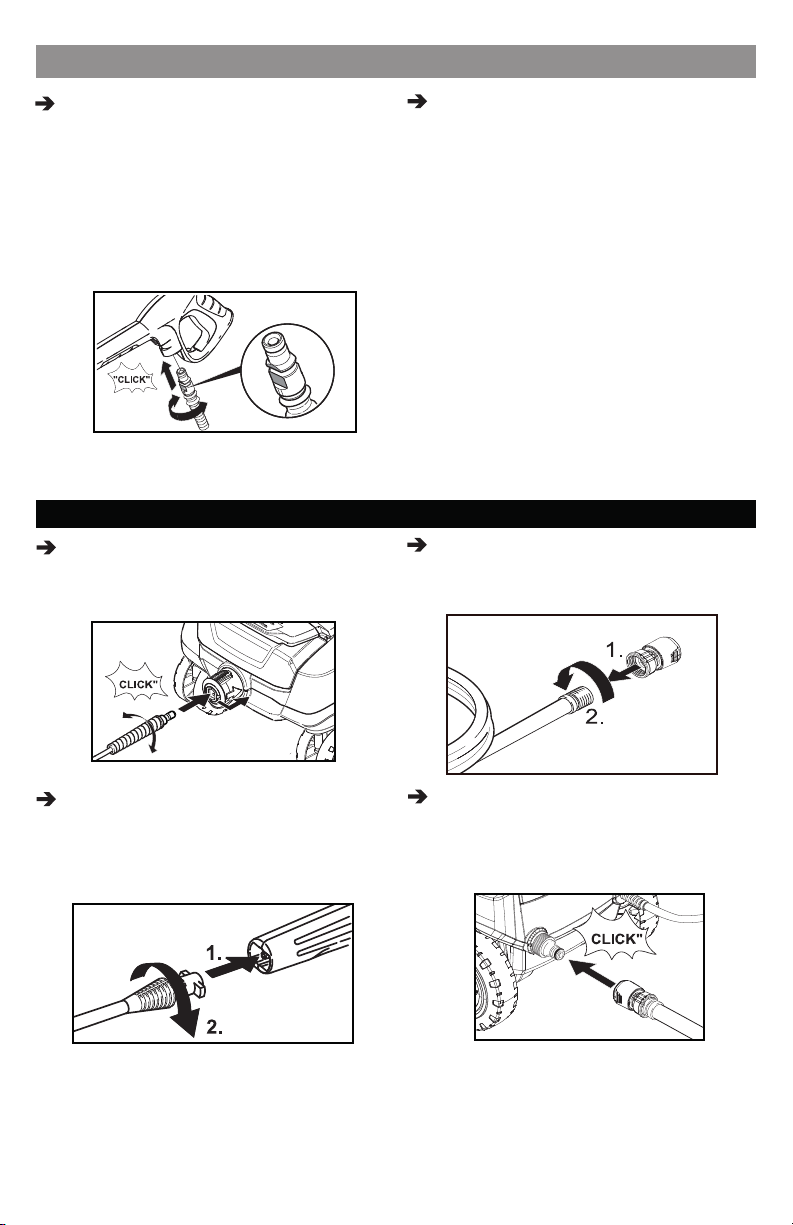
Assembling
STEP 4:
Push the high pressure hose into the trigger
gun until it locks audibly.
Note: Make sure the connector is aligned
correctly.
Check the secure connection by pulling on
the high pressure hose.
OPERATING INSTRUCTIONS
STEP 1:
Connect the high pressure hose to the unit’s
high pressure outlet.
Disconnect:
Press the disconnect key on the trigger gun
and remove the high pressure hose from the
trigger gun.
STEP 3:
Screw the supplied garden hose connector
on to the end of your garden hose.
STEP 2:
Insert the spray wand of your choice into the
trigger gun. Press in against the spring tension and twist into locked position.
STEP 4:
Push the garden hose connector on to the
water inlet connector and make sure you hear
it click into place before proceeding.
English 7
Page 8
OPERATING INSTRUCTIONS
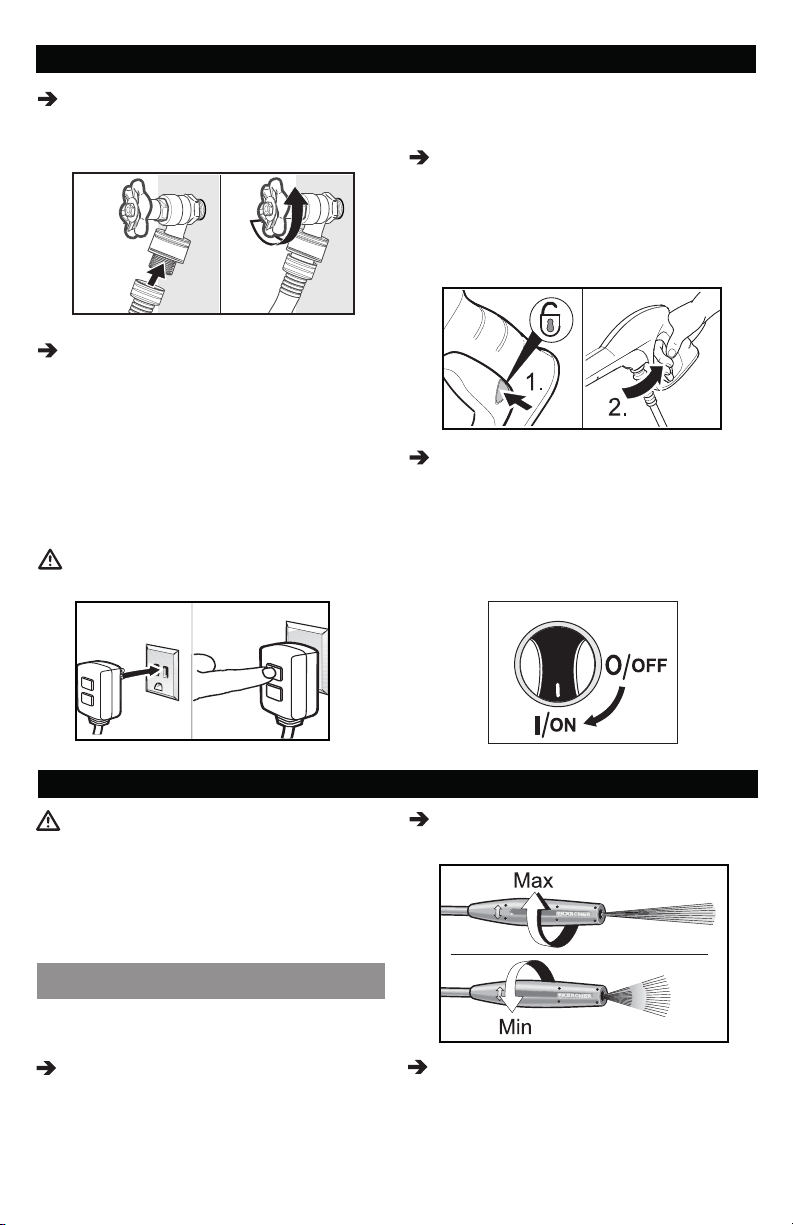
STEP 5:
Connect garden hose to the cold water source
and turn water on completely.
STEP 6:
Plug the Ground Fault Circuit Interrupter
(GFCI) into a working outlet.
We recommend that you test the GFCI as part
of your startup procedure each time you use
your pressure washer. Plug the GFCI into the
outlet, press the reset button, press the test
button and then press the reset button again.
WARNING
Do not use if above test fails.
Note: The actual appearance of the GFCI may
be different from this illustration.
STEP 7:
Unlock the trigger gun safety lock. Trigger the
gun to eliminate trapped air, then wait for a
steady fl ow of water to emerge from the spray
nozzle.
STEP 8:
Turn on the high pressure washer by turning
the switch to the (I / ON) position.
The motor runs only while the trigger of the
gun is pulled and shuts off when the trigger
is released.
USING THE ACCESSORIES
WARNING
To avoid serious injury, never point spray
nozzle at yourself, other persons or animals.
Always test an inconspicuous area before
cleaning with high pressure.
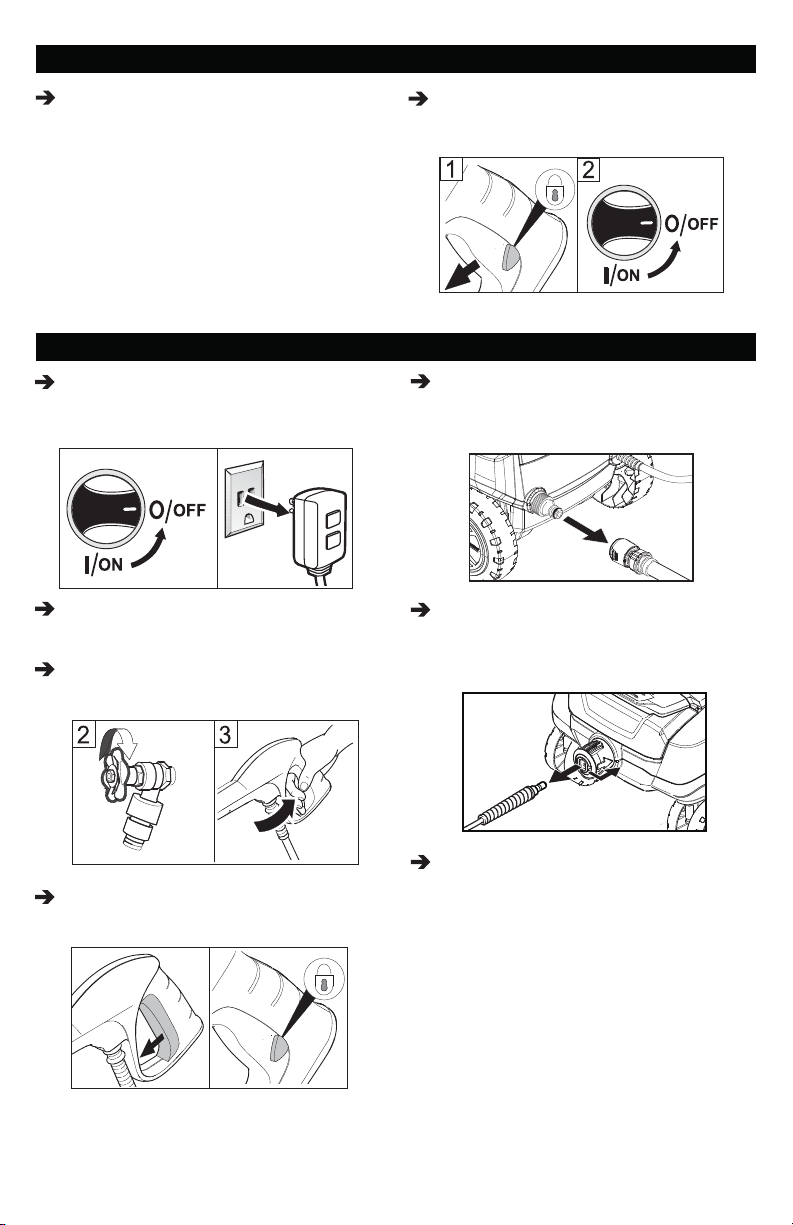
Vario Power Spray Wand
The Vario Power Spray Wand allows you to adjust
the cleaning pressure.
To clean at maximum pressure, the wand must
be positioned to the high pressure setting
(Max).
8 English
For lower pressure turn the wand collar in the
minus (Min) direction.
To apply detergent, the wand must be posi-
tioned to the lower pressure setting (Mix).
Page 9
USING THE ACCESSORIES
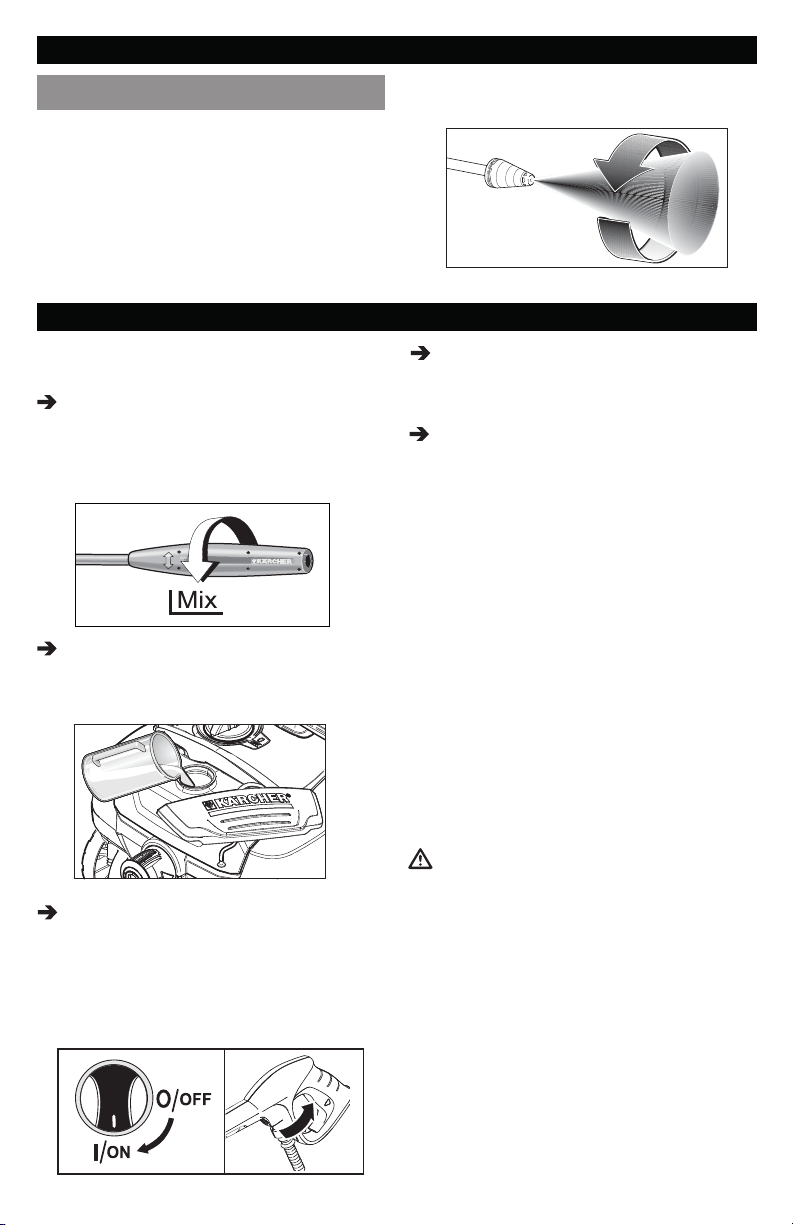
Dirtblaster®
■ This nozzle features a 0º pencil jet which
rotates 360º for maximum dirt cutting action,
effectively increasing cleaning performance
up to 80%.
This nozzle combines the cleaning perfor-
mance of a 0º pencil jet with the surface
coverage of a wide angle nozzle.
WORKING WITH DETERGENTS
Detergents can only be applied at low pres-
sure setting (Mix).
STEP 1:
Install the Vario Power Spray Wand.
Set the spray wand to the low pressure setting
(Mix).
STEP 2:
Fill the Detergent Tank with the selected
detergent.
STEP 3:
Turn on the pressure washer (I). Pull trigger
to operate unit. Liquid detergent is drawn into
the unit and mixed with water. Apply detergent
to work area. Do not allow detergent to dry
on surface.
Not recommended for soft materials, sid-
ing, painted surfaces, decks or autos.
STEP 4:
To rinse, move the VPS out of "Mix" position
and pull trigger to operate unit.
STEP 5:
Cleaning up: Always draw fresh water through
the detergent tank or siphon tube when done
to fl ush any remaining detergents from the
injection system.
For best results see Cleaning Tips for specifi c
information on how to clean different surfaces.
Always Use Kärcher ® Detergent for Best
Results.
Kärcher ® biodegradable detergents are specially
formulated to protect the environment and your
pressure washer. The special formula won’t clog
the suction tube fi lter and will protect the internal
parts of the pressure washer for a longer life. For
Kärcher ® detergents, check your retailer or visit
our website:
www.buykarcher.com
CAUTION
Never use:
– Bleach, Chlorine products and other corrosive
chemicals
– Liquids containing solvents (i.e., paint thinners,
gasoline, oils)
– Tri-sodium phosphate products
– Ammonia products
– Acid-based products
These chemicals will harm the unit and will damage
the surface being cleaned.
Use of these items will void the warranty.
English 9
Page 10
TAKING A BREAK ... fi ve minutes or more
STEP 1:
Release trigger and engage gun safety lock.
SHUTTING DOWN & CLEAN-UP
STEP 1:
Turn the switch to 0/OFF position and unplug
cord from outlet.
STEP 2:
Turn off the water source.
STEP 3:
Press trigger to release water pressure.
STEP 2:
Turn pressure washer to 0/OFF position
STEP 5:
Disconnect the garden hose from the water
inlet on the unit.
STEP 6:
Disconnect the high pressure hose from the
high pressure outlet.
STEP 4:
Release trigger and engage gun safety lock.
10 English
STEP 7:
Insert the spray wands in their compartments
and store the coiled power cord and coiled
high pressure hose as shown in "WINTERIZING AND LONG-TERM STORAGE".
Page 11
WINTERIZING AND LONG-TERM STORAGE
1 Disconnect all water connections.
2 Turn the machine on for a few seconds, until
the water which had remained in the pump
exits, then turn off immediately.
3 Do not allow high pressure hose to become
kinked.
4 Store the accessories on the machine as
shown in the picture below, in the following
order:
a. Vario Power Spray Wand and Dirtblaster®.
b. Power cord
c. High Pressure Hose
d. Gun
d
c
b
a
5 Store the machine and accessories in a room
which does not reach freezing temperatures.
DO NOT store near furnace or other sources
of heat as it may dry out the pump seals.
CAUTION
Failure to follow the above directions will result
in damage to the pump assembly and accessories and will void the warranty. Kärcher®
also recommends the regular practice of
using a pump protector like Kärcher® Pump
Guard (9.558-998.0) to prevent cold weather
damage during storage in the winter months.
a
CARE AND MAINTENANCE INSTRUCTIONS
Cleaning the water inlet fi lter
STEP 1:
Disconnect the connector from the water inlet.
STEP 2:
Pull out water inlet fi lter with needle-nose
pliers.
STEP 3:
Rinse out water inlet fi lter in warm water.
STEP 4:
Reinsert water inlet fi lter into the water inlet.
Maintenance
The unit is maintenance-free.
English 11
Page 12

CLEANING TIPS
CAUTION
■ Before cleaning any surface, an inconspicuous area should be cleaned to test spray
pattern and distance for maximum cleaning
results.
■ If painted surfaces are peeling or chipping,
use extreme caution as pressure washer may
remove the loose paint from the surface.
■ When using on surfaces which might come in
contact with food, fl ush surfaces with plenty
of drinking water.
■ For additional cleaning tips and a complete
video library, visit our website:
www.karcherresidential.com
Deck Cleaning
(with or without detergent) Pre-rinse deck and
surrounding area with fresh water. If using detergent, apply to surface at low pressure. For best
results, limit your work area to smaller sections of
approximately 25 sq. ft. (2.3 m²). Allow detergent
to remain on surface 1-3 minutes. Do not allow
detergent to dry on surface. Rinse at high pressure in a long sweeping motion, keeping the spray
nozzle approximately 3-6 in. (7.5-15 cm) from the
cleaning surface. Always clean from top to bottom
and from left to right. When moving on to a new
section of the cleaning surface, be sure to overlap
the previous section to eliminate stop marks and
ensure a more even cleaning result.
Cement Patios, Brick and Stone
(with or without detergent) Pre-rinse cleaning
surface with fresh water. If using detergent or
degreaser, apply to surface at low pressure. For
best results, limit your work area to smaller sections
of approximately 25 sq. ft. (2.3 m²). Allow detergent
or degreaser to remain on surface 1-3 minutes. Do
not allow detergent to dry on surface. Rinse at high
pressure in a sweeping motion, keeping the spray
nozzle approximately 3-6 in. (7.5 - 15 cm) from the
cleaning surface. Always clean from top to bottom
and from left to right. For removing extremely stubborn stains, use the Dirtblaster ® Nozzle.
Cars, Boats and Motorcycles
(with or without detergent) Pre-rinse vehicle with
fresh water. If using detergent, apply to surface at
low pressure. For best results, clean one side of
vehicle at a time and always apply detergent from
bottom to top. Do not allow detergent to dry on
surface. If needed, use a rotating wash brush (not
included) to remove stubborn dirt. Rinse at high
pressure in a sweeping motion, keeping the spray
nozzle approximately 6-8 in. (15-20 cm) from the
cleaning surface (distance should increase when
rinsing pin-striping or other sensitive surfaces).
Always clean from top to bottom and from left
to right. For best results, wipe surface dry with a
chamois or soft dry cloth.
House Siding
(with or without detergent) Pre-rinse cleaning
surface with fresh water. If using detergent, apply
to surface at low pressure. For best results, limit
your work area to sections of approximately 6 ft.
(1.8 m) and always apply detergent from bottom
to top. Allow detergent to remain on surface 1-3
minutes. Do not allow detergent to dry on surface.
If surface appears to be drying, simply wet down
surface with fresh water. If needed, use special
rotating wash brush (not included) to remove
stubborn dirt. Rinse at high pressure from top to
bottom in an even sweeping motion, keeping the
spray nozzle approximately 6 ft. (1.8 m) from the
cleaning surface.
12 English
Barbecue Grills, Outdoor Power
Equipment and Gardening Tools
(with or without detergent) Pre-rinse cleaning
surface with fresh water. If using detergent or
degreaser, apply at low pressure. Allow detergent
or degreaser to remain on surface 1-3 minutes. Do
not allow detergent or degreaser to dry on surface.
Rinse at high pressure, keeping the spray nozzle
approximately 3-6 in. (7.5-15 cm) from the cleaning
surface. For removing extremely stubborn dirt, it
may be necessary to move the spray nozzle even
closer to the surface for greater dirt cutting action.
Page 13

CLEANING TIPS
Patio and Lawn Furniture
(with or without detergent) Pre-rinse furniture
and surrounding area with fresh water. If using
detergent, apply to surface at low pressure. Allow
detergent to remain on surface 1-3 minutes. Do
not allow detergent to dry on surface. If needed,
OPTIONAL CLEANING ACCESSORIES
Optional accessories are available to further
enhance your cleaning capabilities. These accessories are accurate as of the printing date of this
manual.
Please check karcherresidential.com for pricing
and up-to-date information.
Pump Guard
Specially formulated to protect your pressure
washer from freezing, corrosion and premature
wear. The Pump Guard also adds lubrication to
valves and seals to prevent sticking. Highly recommended for all Kärcher ® pressure washers!
Part No. 9.558-998.0
7.5 m (25 ft.) Extension High-
Pressure Hose
Extension Hose for Kärcher ® quick connect high
pressure washers between the original equipment
hose and gun up to 2000 PSI.
Part No. 2.642-588.0
1.67 m (66 in.) Extension Wand
(four-piece)
Need to clean second story windows or other high
areas? Increase the reach of your pressure washer
by up to 66 in. (1.67 m) with this extension kit.
Includes 4 aluminum sections for variable length.
66 in. (1.67 m) fully assembled. Fits most Kärcher®
pressure washers up to 2300 PSI.
Part No. 2.640-746.0
use rotating wash brush (not included) to remove
stubborn dirt. Rinse at high pressure in a sweeping
motion, keeping the spray nozzle approximately
3-6 in. (7.5-15 cm) from the cleaning surface. For
best results, clean from top to bottom and from
left to right.
Rotating Wash Brush
For more effortless cleaning of all smooth surfaces
(painted, glass and plastic) try the Kärcher ®
Rotating Wash Brush. Use it on your automobile,
house siding or windows. The water pressure from
your pressure washer causes the inner brushes to
gently spin, making your cleaning job much easier.
Excellent for the application of detergent. A musthave accessory designed for Kärcher ® pressure
washers up to 2300 PSI.
Part No. 2.642-786.0
Soft Clean Washing Brush
Made with soft bristles that will not harm painted
surfaces. Easily attaches directly to the trigger
gun. Ideal for stubborn dirt on cars, boats, patio
furniture and other surfaces. Great for applying
detergent. Fits most Kärcher ® pressure washers
up to 2300 PSI.
Part No. 2.642-859.0
7.5 m (25 ft.) Pipe Cleaning Kit
Need to clean blocked pipes, drains or downspouts? The Kärcher ® pipe cleaning kit is the
answer! The pipe cleaner propels itself forward
while simultaneously fl ushing out debris. For example, insert the cleaning nozzle in the base of a
downspout, pull the trigger on the pressure washer
gun and watch as the nozzle shoots out leaves
and other debris while climbing upward. Connects
directly to the trigger gun of most Kärcher ® pressure washers up to 2300 PSI.
Part No. 2.642-183.0
English 13
Page 14

OPTIONAL CLEANING ACCESSORIES
Wet Sandblasting Kit
Why spend hours stripping old paint and rust by
hand using harsh chemicals? Let the Kärcher ®
Wet Sandblasting Kit do the work! Attach the kit
to your pressure washer, add abrasive material
and attack the rust and paint with our ecofriendly
alternative. Fits most Kärcher ® pressure washers
up to 2300 PSI.
Part No. 2.638-792.0
Detergent Foamer Attachment
Ideal for applications which require a thick foam.
Simply fi ll the resevoir cup with liquid pressure
washer detergent to generate a foam spray. Connects directly to the trigger gun. Fits most Kärcher
® pressure washers up to 2300 PSI.
Part No. 2.641-848.0
T 250 Deck/Driveway Cleaner
For cleaning surfaces such as patios, terraces and
driveways without splashback, there is no better
solution than the Kärcher ® T 250. It saves time
by cleaning a 1 ft. (30 cm) wide area gently as it
hovers, providing consistent, streak-free cleaning.
When you fi nish cleaning the patio and driveway,
remove the wand and use the handle to clean
garage doors and other vertical surfaces. Includes
two nozzles which spin at high speed for optimum
results. Our top selling accessory for Kärcher ®
pressure washers up to 2300 PSI.
Part No. 2.642-451.0
14 English
Page 15

TROUBLESHOOTING
WARNING
Disconnect the unit from the power source
before making any repair.
Symptom Cause Solution
Motor will not
start
Unit does not
reach high
pressure
Output pressure
varies high and
low
On/Off switch is in the
“OFF” (0) position.
Power cord is not plugged
in.
Electrical outlet does not
supply adequate power.
Tripped GFCI plug. Press “RESET” button on GFCI plug.
Tripped internal circuit
breaker.
Diameter of garden hose is
too small.
Water supply is restricted. Check garden hose for kinks, leaks and block-
Not enough inlet water
supply.
Water inlet fi lter is clogged. Remove fi lter and rinse out in warm water.
Not enough inlet water
supply.
Pump is sucking air. Check that hoses and fi ttings are air tight.
Water inlet fi lter is clogged. Remove fi lter and rinse out in warm water.
Discharge nozzle is obstructed.
Turn switch to the “ON” (I) position
Plug in power cord.
Try a different outlet.
Switch off pressure washer. The reset comes
automatically once the temperature of the unit
drops.
Replace with a 5/8 inch (16mm) or larger
garden hose.
age.
Open water source full force.
Turn water on full force. Check garden hose
for kinks, leaks or blockage.
Turn off machine and purge pump by squeezing trigger gun until a steady fl ow of water
emerges through the nozzle.
Clean high-pressure nozzle: Remove dirt and
debris from the nozzle bore, using a needle
and rinse through with water from the front.
English 15
Page 16

Symptom Cause Solution
Detergent not
dispensing
Detergent siphon tube not
properly connected to the
Check connection.
machine.
Detergent is too thick. Dilute detergent, for best results use Kärcher
detergent.
Filter on detergent siphon
tube is clogged.
Damaged or clogged detergent siphon tube.
Vario Spray Wand not set
to low/mix setting
Discharge nozzle is ob-
Run warm water through fi lter to remove
debris.
Remove obstruction or replace detergent
siphon tube.
Change setting on Vario Power Spray Wand
to "low" or "mix"
Blow out or remove debris with fi ne needle.
structed.
Garden hose connection leaks
Loose fi ttings. Tighten fi ttings.
Missing/worn rubber
Insert new washer.
washer.
Spray wand leaks.
Spray wand not properly
attached.
Insert the spray wand into the trigger gun.
Carefully press in against the spring tension
and twist into the locked position.
Broken o-ring or plastic
Call Customer Support
insert.
Pump is noisy
Pump is sucking air. Check that hoses and fi ttings are air tight.
Turn off machine and purge pump by squeezing trigger gun until a steady fl ow of water
emerges through the nozzle.
Water leaks from
Loose fi ttings. Check that all fi ttings are tight.
pump (up to 10
drops per minute
is permissible)
Oil drip
Water seals are damaged
or worn.
Oil seals are damaged or
Call Customer Support
Call Customer Support
worn.
®
If you encounter any additional diffi culties not
listed, please visit our website.
USA / Canada:
www.karcher-help.com
16 English
Page 17

MANUAL DEL OPERADOR PARA LA HIDROLAVADORA DE ALTA PRESIÓN
Descripción general del modelo 18
Instrucciones importantes de seguridad 19
Instrucciones de montaje 20
Instrucciones de funcionamiento 22
Uso de los accesorios 23
Trabajo con detergentes 24
Tomarse un descanso 25
Apagar & recoger 25
Preparación para el Invierno y Almacenaje
de Largo Plazo 26
Instrucciones de cuidado y mantenimiento 26
Consejos de limpieza 27
Accesorios de limpieza opcionales 28
Ayuda en caso de avería 30
Especifi caciones
K 3.000
Presión Máxima 1800 PSI
Volumen de agua 1.3 GPM
Consumo de corriente
en amperes 13 AMPS
Voltaje
N° de parte
N° de serie
¡Para uso doméstico únicamente!
120 V
1.418-050.0
1.418-052.0
Símbolos de alertas de seguridad
PELIGRO
Indica un peligro inminente que, de no evitarse,
resultará en muerte o lesión
ADVERTENCIA
Indica una situación que puede ser peligrosa y que,
de no evitarse, podría resultar en muerte o lesión.
PRECAUCIÓN
Indica una situación peligrosa que, de no evitarse,
podría resultar lesiones menores o moderadas o
en incidentes de daños a la propiedad.
grave.
Responsabilidad del propietario/
usuario
El propietario y/o usuario debe tener una comprensión de las instrucciones de funcionamiento
y avisos de precaución suministrados por el fabricante antes de usar esta hidrolavadora a presión.
La información de precaución debe enfatizarse y
comprenderse correctamente.
Si el operador no habla español, las instrucciones
y precauciones del fabricante deberán leerse y
discutirse junto con el operador en su idioma nativo
por el comprador/propietario, asegurándose de
que el operador comprenda todo el contenido de
las instrucciones.
El propietario y/o usuario deben estudiar las
instrucciones del fabricante y guardarlas para
referencia en el futuro.
Soporte al cliente de Kärcher en
Estados Unidos/Canadá
Si usted se encuentra en E.E.U.U o en Canadá,
por favor llame al 1-800-537-4129 para asuntos
relacionados con la garantía y visite
www.karcher-help.com si requiere soporte
técnico y ayuda relativa al producto.
Por favor, tómese un momento para registrar su
hidrolavadora a presión en línea en
www.karcher-register.com.
Asegúrese que guardar su recibo de compra ya
que será necesario presentarlo para las reparaciones que cubra la garantía.
Español 17
Page 18

DESCRIPCIÓN GENERAL DEL MODELO
1 Rueditas giratorias
2 Interruptor encendido/apagado (ON/OFF)
3 Tanque para el detergente (extraíble)
4 Salida de alta presión
5 Agarradera
6 Lanza de agua y almacenamiento de la man-
guera de alta presión
7 Entrada de agua
8 Pieza de acoplamiento para conexión de agua
9 Conector para manguera de jardín (hembra)
10 Cable de alimentación con Interruptor de Cir-
cuito con Falla a Tierra (GFCI, por sus siglas
en inglés)
18 Español
11 Ruedas
12 Pistola pulverizadora manual
13 Bloqueo de seguridad de la pistola pulveriza-
dora manual
14 Conexión rápida para manguera de alta pre-
sión
15 Manguera de alta presión
16 Lanza de agua Vario Power
17 Dirtblaster ® (Lanza de agua giratoria)
18 Detergente para lavado de vehiculo con cera
(Solo para el modelo 1.418-052.0)
19 Detergente limpiador multiusos
(Solo para el modelo 1.418-052.0)
Page 19

INSTRUCCIONES IMPORTANTES DE SEGURIDAD
GUARDE ESTAS INSTRUCCIONES
ADVERTENCIA
Al usar este producto, deberá seguir en todo
momento ciertas precauciones básicas,
incluidas las siguientes:
■ Lea todas las instrucciones antes de usar el
producto.
■ A fi n de reducir el riesgo de lesiones, será
necesario mantener una supervisión cercana
cuando el producto se use cerca de niños.
■ Sepa cómo detener el producto y descargar
la presión rápidamente. Familiarícese plenamente con los controles.
■ Permanezca alerta –vigile lo que esté haciendo.
■ No opere el producto cuando esté muy cansado o bajo la infl uencia de alcohol o drogas.
■ Mantenga el área de operación despejada
sin personas.
■ No trate de llegar más allá de sus límites y no
se pare sobre un apoyo inestable. Mantenga
sus pies fi rmes en el suelo y equilibrados en
todo momento.
■ Siga las instrucciones de mantenimiento
especifi cadas en este manual.
■ Este producto se proporciona con un Interruptor de circuito con pérdida a tierra integrado
al cable de alimentación. Si llegara a requerir
reemplazar el enchufe o el cable, use únicamente piezas de recambio idénticas.
ADVERTENCIA
Riesgo de inyección o lesión: No dirija el
chorro de descarga hacia las personas.
■ Los chorros de alta presión pueden ser
peligrosos si se usan incorrectamente. El
chorro no debe apuntarse hacia las persona,
animales, dispositivos eléctricos o al propio
aparato.
■ Use lentes de seguridad.
ADVERTENCIA
Riesgo de explosión: No rocíe líquidos infl a-
mables.
■ No use ácidos, solventes ni ningún otro material infl amable o alcalino en este producto.
Estos productos pueden causar lesiones
físicas al operador y daños irreversibles a la
máquina.
ADVERTENCIA
Riesgo de electrocución.
■ Inspeccione el cable antes de usarlo. No lo
use si el cable está dañado.
■ Mantenga todas las conexiones secas y
alejadas del suelo.
■ No toque con las manos mojadas.
■ No use un cable de extensión con este pro-
ducto.
■ Conecte a una derivación individual únicamente.
PRECAUCIÓN
La unidad está diseñada para usarse con de-
tergentes para limpieza recomendados por el
fabricante. El uso de otros detergentes para
limpieza podrían afectar el funcionamiento
de la máquina y anular la garantía.
PRECAUCIÓN
La pistola retrocede. Sostenga con ambas
manos.
■ El seguro de la pistola pulverizadora evita que
el rociado se active accidentalmente. Esta
característica de seguridad NO bloquea el
rociado en la posición ON.
ADVERTENCIA
■ No rocíe aparatos eléctricos ni cableado.
■ No use con líquidos infl amables o químicos
tóxicos.
■ Alta presión: aléjese de la boquilla.
■ Riesgo de inyección: el equipo puede causar
lesiones graves si el rociado penetra la piel.
No apunte la pistola a ninguna persona ni a
ninguna parte del cuerpo. En caso de lesión,
busque atención médica inmediatamente.
■ Este sistema tiene la capacidad de producir
una alta presión para evitar ruptura y lesión,
no opere esta bomba con accesorios cuya
clasifi cación sea menor a la presión máxima
declarada (incluyendo a título enunciativo
mas no limitativo, pistolas pulverizadoras,
mangueras y conectores de mangueras).
■ Antes de reparar, limpiar o extraer cualquier
pieza, apague y deje salir la presión.
■ Si se hace una conexión a un sistema de
agua potable, el sistema debe contar con
protección contra el fl ujo de retorno.
Español 19
Page 20

MANTENIMIENTO DE UN
PRODUCTO CON DOBLE
AISLAMIENTO
En los productos con doble aislamiento, se proporcionan dos sistemas de aislamiento en vez de una
puesta a tierra. No se suministra puesta a tierra en
un producto de doble aislamiento y tampoco deberán añadirse medios de puesta a tierra al producto.
La reparación de un producto de doble aislamiento
requiere de extremos cuidados y conocimiento del
sistema, y debería llevarse a cabo únicamente
por personal cualifi cado. Las piezas de repuesto
de un producto con doble aislamiento deben ser
idénticas a las piezas que reemplazan. Un producto
de doble aislamiento está marcado con las palabras "DOBLE AISLAMIENTO" o "DOBLEMENTE
AISLADO". El símbolo “
marcado sobre este producto.
” también podría estar
PROTECCIÓN DEL
INTERRUPTOR DE CIRCUITO CON
FALLA A TIERRA
Esta hidrolavadora a presión se suministra con
un interruptor de circuito con falla a tierra (GFCI,
por sus siglas en inglés) integrado en el enchufe
o cable de alimentación. Este dispositivo proporciona protección adicional contra el riesgo de
shock eléctrico. Si llegara a requerir reemplazar
el enchufe o el cable, use únicamente piezas de
recambio que incluyan una protección GFCI.
INSTRUCCIONES DE MONTAJE
SUMINISTRO DE AGUA
(AGUA FRÍA ÚNICAMENTE)
PRECAUCIÓN
Al conectar la pieza de acoplamiento para conexión de agua a las tomas de suministro de agua,
deberán observarse las normativas locales de su
compañía de agua. En algunas zonas, la unidad
no debe conectarse directamente a un suministro
de agua potable público. Esto es para asegurar
que no se dé retroalimentación de químicos hacia
el suministro de agua. La conexión directa por
medio de un tanque receptor o un desconector,
por ejemplo, sí está permitida.
La suciedad en el suministro de agua dañará la
unidad. Para evitar este riesgo, recomendamos
acoplar un fi ltro de agua.
■ El diámetro de la manguera del jardín debe
ser de 1/2 pulgada o 5/8 pulgadas (13 mm o
16 mm).
■ La tasa del fl ujo del suministro de agua no
debe caer por debajo de 2 GPM (galones por
minuto) (7.6 L/min.).
■ La tasa de fl ujo se puede determinar dejando
correr el agua durante un minuto dentro de
un contenedor vacío de 5 galones (20 litros).
■ La temperatura del suministro de agua no
debe exceder 40°C/104°F.
■ No use nunca la hidrolavadora a presión
para aspirar agua con solventes, por ejemplo
disolventes para pintura, gasolina, aceite, etc.
■ Evite siempre que la unidad jale restos o
escombros, use siempre una fuente de agua
limpia.
Hardware (incluido)
Artículo Descripción Propósito Ilustración Cantidad
A
B
C
20 Español
Rueda trasera Montaje para rodaje 2
Rueda
giratoria
Adaptador Montaje de co-
Montaje para rodaje 2
nexión de entrada
de agua
1
Page 21

INSTRUCCIONES DE MONTAJE
Hardware (incluido)
Artículo Descripción Propósito Ilustración Cantidad
D
Conector de
la manguera
de jardín
Montaje de conexión de entrada
de agua
1
E
F
G
H
I
J
Pistola Montaje de pistola
pulverizadora
Manguera de
alta presión
Lanza de
agua Vario
Power
Dirtblaster ® Montaje de pistola
Detergente
para lavado de
vehiculo con
cera
(Solo para el modelo 1.418-052.0)
Detergente
limpiador
multiusos
(Solo para el modelo 1.418-052.0)
Montaje de pistola
pulverizadora
Montaje de pistola
pulverizadora
pulverizadora
Trabajo con detergentes
Trabajo con detergentes
1
1
1
1
1
1
Montaje
PASO 1:
Inserte las ruedas traseras en el cuerpo de
la unidad.
PASO 2:
Inserte las ruedas giratorias hasta que se
oiga un sonido indicando que están en su
lugar.
1 2
PASO 3:
Instale el adaptador suministrado en la en-
trada de agua del aparato.
Nota: ¡No acople nunca un conector de
manguera de jardín a la entrada de agua de
la unidad!
Español 21
Page 22

Montaje
PASO 4:
Empuje la manguera de alta presión insertán-
dola en la palanca de la pistola hasta que se
escuche el bloqueo.
Nota: Asegúrese de que la boquilla conectora
esté alineada correctamente.
Verifi que que la conexión esté asegurada
jalando la manguera de alta presión.
INSTRUCCIONES DE FUNCIONAMIENTO
PASO 1:
Conecte la manguera de alta presión a la
salida de alta presión.
Desconectar:
Presione la tecla de desconexión de la pistola
pulverizadora manual y retire la manguera
de alta presión de la pistola pulverizadora
manual.
PASO 3:
Atornille el conector de la manguera de jardín
a la parte fi nal de su manguera de jardín.
PASO 2:
Inserte la lanza de rociado de su elección en
la pistola pulverizadora manual. Presione
contra la tensión del resorte y gire hasta que
quede en posición bloqueada.
22 Español
PASO 4:
Empuje el conector de la manguera de jardín
al conector de entrada de agua y asegúrese
de escuchar el sonido que indica la correcta
colocación antes de continuar.
Page 23

INSTRUCCIONES DE FUNCIONAMIENTO
PASO 5:
Conecte la manguera de jardín a la fuente de
agua fría y encienda el agua completamente.
PASO 6:
Conecte el interruptor de circuito con falla
a tierra (GCFI) a una toma de corriente en
funcionamiento.
Le recomendamos que verifique el fun-
cionamiento del GFCI como parte de su
procedimiento de arranque cada vez que se
disponga a usar su hidrolavadora a presión.
Conecte el GFCI a la toma, presione el botón
de reinicio, presione el botón de prueba y
fi nalmente presione el botón de reinicio de
nuevo.
ADVERTENCIA
No use el aparato si la prueba anterior falla.
Nota: La apariencia real del GFCI podría
diferir de la que se muestra en esta ilustración.
PASO 7:
Quite el seguro de la palanca de la pistola.
Accione la pistola para eliminar el aire atrapado, luego espere que salga un fl ujo estable
de agua de la boquilla del chorro.
PASO 8:
Encienda la hidrolavadora de alta presión
colocando el interruptor en la posición (I / ON).
El motor funciona únicamente al jalar la pa-
lanca de la pistola y deja de funcionar al
soltar la palanca.
USO DE LOS ACCESORIOS
ADVERTENCIA
Para evitar lesiones graves, no apunte nunca
la boquilla pulverizadora hacia usted mismo,
otras personas o animales.
Realice siempre una prueba previa en una
zona apenas visible antes de limpiar con alta
presión.
Lanza de agua Vario Power
La lanza de agua Vario Power le permite ajustar
la presión de limpieza.
Para limpiar a una presión máxima, la lanza
debe estar puesta en el ajuste de alta presión
(Max).
Para presión más baja ajuste la lanza en la
dirección mínima (Min).
Para aplicar el detergente, la lanza deber
estar posicionada en el ajuste de presión baja
(Mix).
Español 23
Page 24

USO DE LOS ACCESORIOS
Dirtblaster®
■ Esta boquilla tiene un chorro de agua concentrado de 0º con 360º de rotación para una
acción máxima contra la suciedad, aumentando el desempeño de limpieza efectivamente
hasta un 80%.
Esta boquilla combina el desempeño de
limpieza de un chorro de agua concentrado
de 0° con el recubrimiento de superfi cies de
una boquilla de amplio ángulo.
TRABAJO CON DETERGENTES
Los detergentes solo pueden aplicarse con
el ajuste de baja presión (Mix).
PASO 1:
Instale la lanza de agua Vario Power.
Coloque la lanza de agua en el ajuste de baja
presión (Mix).
PASO 2:
Llene el tanque de detergente con el deter-
gente seleccionado.
PASO 3:
Encienda la lavadora a presión (I). Apriete la
palanca para operar el aparato. El detergente líquido se aspira hacia el interior del aparato y se mezcla con agua. Aplique detergente a la zona de trabajo. No permita que el
detergente se seque en la superfi cie.
No recomendado para materiales suaves,
pasillos y senderos, superfi cies pintadas,
terrazas o automóviles.
PASO 4:
Para enjuagar, cambie la posición "Mix" del
VPS y jale la palanca para operar el aparato.
PASO 5:
Limpiar: Aspire siempre agua fresca al tanque
de detergente o al tubo sifón cuando haya terminado para enjuagar el detergente restante
del sistema de inyección.
Para mejores resultados, vea los Consejos de
limpieza donde encontrará información específi ca sobre cómo limpiar diferentes superfi cies.
Use siempre Detergente Kärcher ® para obtener los mejores resultados.
Los detergentes biodegradables de Kärcher ®
están formulados específi camente para proteger
el medioambiente y su hidrolavadora a presión.
La fórmula especial no tapará el fi ltro del tubo
de succión y protegerá las piezas internas de la
lavadora a presión para alargar la vida del aparato.
Para adquirir Detergentes Kärcher ®, verifi que
disponibilidad con su vendedor local o visite
nuestro sitio web:
www.buykarcher.com
PRECAUCIÓN
No use nunca:
– Cloro, productos con cloro y otros químicos
corrosivos
– Líquidos que contengan solventes (por ej. disol-
ventes de pintura, gasolina, aceites)
– Productos con fosfato trisódico
– Productos con amoniaco
– Productos a base de ácido
Estos químicos dañarán el aparato y dañarán la
superfi cie que se pretende limpiar.
El uso de estos artículos anulará la garantía.
24 Español
Page 25

TOMARSE UN DESCANSO...de cinco minutos o más
PASO 1:
Libere la palanca y active el bloqueo de la
pistola pulverizadora manual.
APAGAR Y RECOGER
PASO 1:
Coloque el interruptor en la posición 0/OFF
y desconecte el cable de la toma.
PASO 2:
Apague la fuente de suministro de agua.
PASO 3:
Presione la palanca para liberar la presión
del agua.
PASO 2:
Apague la lavadora a presión poniéndola en
la posición 0/OFF
PASO 5:
Desconecte la manguera de jardín de la
entrada de agua del aparato.
PASO 6:
Desconecte la manguera de alta presión de
la salida de alta presión.
PASO 4:
Libere la palanca y active el bloqueo de la
pistola pulverizadora manual.
PASO 7:
Inserte las lanzas de agua en sus compar-
timientos y guarde el cable de alimentación
enrollado así como la manguera de alta presión también enrollada tal como se muestra
en "PREPARACIÓN PARA EL INVIERNO Y
ALMACENAMIENTO A LARGO PLAZO".
Español 25
Page 26

PREPARACIÓN PARA EL INVIERNO Y ALMACENAMIENTO A LARGO PLAZO
1 Desconecte todas la conexiones de agua.
2 Encienda la máquina por unos cuantos
segundos, hasta que el agua que se haya
quedado en las bombas salga, y luego apague inmediatamente.
3 No permita que la manguera de alta presión
se enrolle.
4 Almacene los accesorios en la máquina tal
como se muestra en la imagen abajo, en el
siguiente orden:
a. Lanza de agua Vario Power y Dirtblaster®.
b. Cable de alimentación
c. Manguera de alta presión
d. Pistola
d
c
b
a
5 Guarde la máquina y los accesorios en un
cuarto que no alcance temperaturas de congelación. NO almacene cerca de un horno
u otras fuentes de calor ya que podría secar
los sellos de la bomba.
PRECAUCIÓN
El incumplimiento de las directrices anteriores
resultará en daño al montaje de la bomba y
a los accesorios, y anulará la garantía. Kärcher® también recomienda la práctica regular
de usar un protector para la bomba como el
Protector de Bomba Kärcher® (9.558-998.0)
a fi n de evitar daños por clima frío durante el
almacenamiento en los meses de invierno.
a
INSTRUCCIONES DE CUIDADO Y MANTENIMIENTO
Limpiar el fi ltro de entrada de agua
PASO 1:
Desconecte el conector de la entrada de
agua.
PASO 2:
Extraiga el fi ltro de la entrada de agua con
alicates de punta de aguja.
26 Español
PASO 3:
Enjuague el fi ltro de la entrada de agua con
agua tibia.
PASO 4:
Vuelva a insertar el fi ltro de la entrada de agua.
Mantenimiento
Este aparato no necesita mantenimiento.
Page 27

CONSEJOS PARA LA LIMPIEZA
PRECAUCIÓN
■ Antes de limpiar cualquier superfi cie, debería
limpiar una pequeña zona no visible para
evaluar el patrón de pulverizado y la distan-
cia para lograr los máximos resultados de
limpieza.
■ Si las superfi cies pintadas se están descasca-
rando o fragmentando, extreme los cuidados
ya que la presión del agua podría quitar la
pintura suelta de la superfi cie.
■ Al usar sobre superfi cies que puedan entrar
en contacto con la alimentación, limpie las
superfi cies con abundante agua potable.
■ Si desea más consejos de limpieza y acceso
a una biblioteca de video completa, visite
nuestro sitio web:
www.karcherresidential.com
Limpieza de terrazas
(con o sin detergente) Pre-enjuague la terraza y
las zonas de alrededor con agua fresca. Si usa
detergente, aplique a la superfi cie a baja presión.
Para mejores resultados, limite su zona de trabajo
a secciones más pequeñas de aproximadamente
25 pies cuadrados (2.3 m²) Permita que el detergente permanezca en la superfi cie de 1 a 3
minutos. No permita que el detergente se seque
en la superfi cie. Enjuague a alta presión con largos
movimientos de barrido, manteniendo la boquilla
pulverizadora a una distancia de aproximadamente
3-6 pulgadas (7.5 a 15 cm) de la superfi cie que se
está limpiando. Limpie siempre de arriba a abajo y
de izquierda a derecha. Al moverse a una nueva
sección de la superfi cie de limpieza, asegúrese de
solapar la sección previa para eliminar las marcas
de división y asegurar un resultado de limpieza
más homogéneo.
Limpieza de pasillos y senderos
del hogar
(con o sin detergente) Pre-enjuague las superfi cies que se van a limpiar con agua fresca. Si usa
detergente, aplique a la superfi cie a baja presión.
Para mejores resultados, limite su zona de trabajo
a secciones de aproximadamente 6 pies (1.8 m)
y siempre aplique detergente de abajo hacia arriba. Permita que el detergente permanezca en la
superfi cie de 1 a 3 minutos. No permita que el detergente se seque en la superfi cie. Si la superfi cie
parece estarse secando, simplemente humedézcala con agua fresca. En caso necesario, use un
cepillo de lavado rotativo (no incluido) para eliminar
la suciedad más difícil. Enjuague a alta presión de
arriba hacia abajo con movimientos uniformes de
barrido, manteniendo la boquilla pulverizadora a
una distancia de aproximadamente 6 pies (1.8 m)
de la superfi cie que se está limpiando.
Patios de cemento, ladrillo y piedra
(con o sin detergente) Pre-enjuague las superfi cies
que se van a limpiar con agua fresca. Si usa detergente o desengrasante, aplique a la superfi cie
a baja presión. Para mejores resultados, limite
su zona de trabajo a secciones más pequeñas
de aproximadamente 25 pies cuadrados (2.3
m²) Permita que el detergente o desengrasante
permanezcan en la superfi cie de 1 a 3 minutos.
No permita que el detergente se seque en la superfi cie. Enjuague a alta presión con movimientos
de barrido, manteniendo la boquilla pulverizadora
a una distancia de aproximadamente 3-6 pulgadas
(7.5 a 15 cm) de la superfi cie que se está limpiando.
Limpie siempre de arriba a abajo y de izquierda a
derecha. Para eliminar manchas extremadamente
difíciles, use la boquilla Dirtblaster ®.
Coches, barcos y motocicletas
(con o sin detergente) Pre-enjuague el vehículo
con agua fresca. Si usa detergente, aplique a la
superfi cie a baja presión. Para mejores resultados,
limpie un lado del vehículo a la vez y aplique siempre detergente de abajo hacia arriba. No permita
que el detergente se seque en la superfi cie. En
caso necesario, use un cepillo de lavado rotativo
(no incluido) para eliminar la suciedad más difícil.
Enjuague a alta presión con un movimiento de
barrido, manteniendo la boquilla pulverizadora a
una distancia de aproximadamente 6-8 pulgadas
(15 a 20 cm) de la superfi cie que se está limpiando
(la distancia siempre debería aumentar al enjuagar
superfi cies rayadas u otras superfi cies sensibles).
Limpie siempre de arriba a abajo y de izquierda
a derecha. Para mejores resultados, seque la
superfi cie con una gamuza o un paño suave seco.
Asadores, equipo eléctrico para
exteriores y herramientas de
jardinería
(con o sin detergente) Pre-enjuague las superfi cies que se van a limpiar con agua fresca. Si usa
detergente o desengrasante, aplique a baja presión. Permita que el detergente o desengrasante
permanezcan en la superfi cie de 1 a 3 minutos.
No permita que el detergente o el desengrasante
se seque en la superfi cie. Enjuague a alta presión,
manteniendo la boquilla pulverizadora a una dis-
Español 27
Page 28

CONSEJOS PARA LA LIMPIEZA
tancia de aproximadamente 3-6 pulgadas (7.5 a
15 cm) de la superfi cie que se está limpiando. Para
eliminar la suciedad extremadamente difícil, podría
ser necesario mover la boquilla pulverizadora incluso más cerca de la superfi cie para una acción
removedora de suciedad incluso mayor.
Muebles para exteriores y para el
jardín
(con o sin detergente) Pre-enjuague los muebles
y las zonas de alrededor con agua fresca. Si
usa detergente, aplique a la superfi cie a baja
presión. Permita que el detergente permanezca
ACCESORIOS DE LIMPIEZA OPCIONALES
Accesorios opcionales están disponibles para
mejorar incluso más su potencial de limpieza.
Estos accesorios son tan precisos como la fecha
de impresión de este manual.
Por favor visite karcherresidential.com para información de precios y otra información actualizada.
Protector de bomba
Especialmente formulado para proteger su hidrolavadora a presión de congelación, corrosión
y desgaste prematuro. El protector de bomba
también añade lubricación a las válvulas y sellos para prevenir que se adhieran. ¡Altamente
recomendado para todas las hidrolavadoras a
presión Kärcher ®!
N° de Parte 9.558-998.0
Extensión de 7.5 m (25 pies) para man-
guera de alta presión
Extensión de manguera para Kärcher ® se conecta
rápidamente a las hidrolavadoras de alta presión
entre la manguera del equipo original y la pistola
de hasta 2000 PSI.
N° de Parte 2.642-588.0
Extensión para la lanza (cuatro piezas)
de 1.67 m (66 pulgadas)
en la superfi cie de 1 a 3 minutos. No permita que
el detergente se seque en la superfi cie. En caso
necesario, use un cepillo de lavado rotativo (no
incluido) para eliminar la suciedad más difícil.
Enjuague a alta presión con movimientos de barrido, manteniendo la boquilla pulverizadora a una
distancia de aproximadamente 3-6 pulgadas (7.5
a 15 cm) de la superfi cie que se está limpiando.
Para mejores resultados, limpie de arriba a abajo
y de izquierda a derecha.
Cepillo de lavado rotativo
Para una limpieza con menor esfuerzo de todas las
superfi cies lisas (pintadas, vidrio y plástico) pruebe
el Cepillo de lavado rotativo Kärcher ®. Úselo en
su automóvil, pasillos y senderos o ventanas de
su hogar. La presión del agua de su hidrolavadora
a presión causa que los cepillos internos giren
suavemente, haciendo que su trabajo de limpieza
sea mucho más fácil. Excelente para la aplicación
de detergente. Un accesorio que no puede dejar
de tener, diseñado para hidrolavadoras a presión
de Kärcher ® de hasta 2300 PSI.
N° de Parte 2.642-786.0
Cepillo suave de lavado
Hecho con cerdas suaves que no dañarán las superfi cies pintadas. Se anexa fácilmente a la pistola
pulverizadora manual. Ideal para suciedad difícil
en coches, barcos, muebles de exteriores y otras
superfi cies. Estupendo para aplicar detergente. Se
ajusta a la mayoría de hidrolavadoras a presión de
Kärcher ® de hasta 2300 PSI.
N° de Parte 2.642-859.0
¿Necesita limpiar ventanas del segundo piso u
otras zonas de altura? Aumente el alcance de su
hidrolavadora a presión en hasta 66 pulgadas (1.67
m) con este kit de extensión. Incluye 4 secciones
de aluminio para una longitud variable. 66 pulgadas
(1.67 m) completamente montadas. Se ajusta a la
mayoría de hidrolavadoras a presión de Kärcher
® de hasta 2300 PSI.
N° de Parte 2.640-746.0
28 Español
Page 29

ACCESORIOS DE LIMPIEZA OPCIONALES
Kit de limpieza de tuberías de 7.5 m
(25 pies)
¿Necesita limpiar alguna tubería, drenaje o bajante
pluvial obstruido? ¡El kit de limpieza de tuberías de
Kärcher ® es la solución! El limpiador de tuberías
se propulsa hacia adelante mientras, de forma
simultánea, desaloja los restos o escombros. Por
ejemplo, inserte la boquilla limpiadora en la base
de un bajante pluvial, apriete la palanca de la pistola pulverizadora manual de hidrolavadora a presión
y vea como la boquilla dispara empujando hacia
arriba y hacia afuera las hojas y otros restos. Se
conecta directamente a la palanca de la pistola de
la mayoría de hidrolavadoras a presión de Kärcher
® de hasta 2300 PSI.
N° de Parte 2.642-183.0
Kit de hidroarenado
¿Por qué pasar horas quitando pintura vieja y óxido
a mano con químicos agresivos? ¡Deje que el Kit
de hidroarenado de Kärcher ® haga el trabajo!
Conecte el kit a su hidrolavadora a presión, añada
material abrasivo y ataque el óxido y la pintura
con nuestra alternativa ecológica. Se ajusta a la
mayoría de hidrolavadoras a presión de Kärcher
® de hasta 2300 PSI.
N° de Parte 2.638-792.0
Acoplamiento espumador de
detergente
Ideal para aplicaciones que requieren una espuma
densa. Simplemente lleve la tasa del tanque con
un detergente para hidrolavadora a presión líquido
a fi n de generar un spray de espuma. Se conecta
fácilmente a la pistola pulverizadora manual. Se
ajusta a la mayoría de hidrolavadoras a presión
de Kärcher ® de hasta 2300 PSI.
N° de Parte 2.641-848.0
T 250 Limpiador de terrazas y caminos
de acceso vehicular
Para limpiar superfi cies como patios, terrazas y
caminos de acceso vehicular sin salpicaduras, no
hay mejor solución que el Kärcher ® T 250. Ahorra
tiempo limpiando suavemente una zona amplia de
1 pie (30 cm) mientras se cierne, proporcionando
una limpieza consistente, libre de manchas. Al
fi nalizar la limpieza del patio y el acceso vehicular, retire la lanza y use la manija para limpiar las
puertas del garaje y otras superfi cies verticales.
Incluye dos boquillas que giran a alta velocidad
para resultados óptimos. Nuestro accesorio más
vendido para hidrolavadoras a presión de Kärcher
® de hasta 2300 PSI.
N° de Parte 2.642-451.0
Español 29
Page 30

AYUDA EN CASO DE AVERÍA
ADVERTENCIA
Desconecte el aparato de la fuente de alimen-
tación eléctrica antes de realizar cualquier
reparación.
Síntoma Causa Solución
El motor no enciende
El interruptor de encendido
y apagado, On/Off, está en
la posición “OFF” (0).
El cable de alimentación no
está conectado.
Ponga el interruptor en la posición “ON” (I).
Conecte el cable de alimentación.
El aparato no
alcanza una alta
presión
La presión de
salida
varía entre alta
y baja
La toma de corriente eléctrica no provee la potencia
adecuada.
El enchufe GFCI está
saltado.
El interruptor de circuito
interno está saltado.
El diámetro de la manguera de jardín es demasiado
pequeño.
El suministro de agua está
restringido.
No hay sufi ciente suministro de agua en la entrada.
El fi ltro de entrada de agua
está tapado.
No hay sufi ciente suministro de agua en la entrada.
La bomba está succionando aire.
El fi ltro de entrada de agua
está tapado.
Dispare la boquilla si está
obstruida.
Intente una toma diferente.
Presione el botón de reinicio "RESET" sobre
el enchufe GFCI.
Apague la hidrolavadora a presión. El reinicio
se activa automáticamente después de que la
temperatura de la unidad desciende.
Reemplácelo con una manguera de jardín
más grande 5/8 pulgadas (16 mm).
Verifi que que la manguera de jardín no esté
torcida, no tenga fugas o algún bloqueo.
Abra al máximo la fuerza de salida de la
fuente de agua.
Retire el fi ltro y enjuague con agua tibia.
Abra al máximo la fuerza de salida del agua.
Verifi que que la manguera de jardín no esté
torcida, no tenga fugas o algún bloqueo.
Verifi que que las mangueras y los ajustes
estén cerrados herméticamente. Apague la
máquina y vacíe la bomba apretando la palanca de la pistola hasta que emerja un fl ujo
constante de agua a través de la boquilla.
Retire el fi ltro y enjuague con agua tibia.
Limpie la boquilla de alta presión: Retire
la suciedad y los residuos del orifi cio de la
boquilla con un alfi ler y enjuague con agua
desde el frente.
30 Español
Page 31

Síntoma Causa Solución
El detergente no
se dispersa
El tupo de sifón de detergente no está correctamente conectado a la máquina.
Verifi que la conexión.
El detergente es demasiado espeso.
El fi ltro del sifón de detergente está tapado.
El sifón de detergente está
dañado u obstruido.
La lanza de agua Vario
no está confi gurada en el
ajuste bajo/mix
Dispare la boquilla si está
obstruida.
El conector de
la manguera de
jardín tiene una
fuga
La lanza de agua
pulverizadora
tiene una fuga.
La bomba hace
mucho ruido.
Hay una fuga de
agua de la
bomba (hasta 10
gotas por minuto
es permisible)
Goteo de aceite
Si usted se encuentra con difi cultades adicionales a las que aquí están listadas, por favor visite
nuestro sitio web.
Estados Unidos / Canadá:
www.karcher-help.com
Accesorios sueltos. Accesorios apretados.
Lavadora de hule ausente
o desgastada.
La lanza de agua no está
correctamente conectada.
Arandela o inserción de
plástico rotos.
La bomba está succionando aire.
Accesorios sueltos. Verifi que que los ajustes estén apretados.
Los sellos de agua están
dañados o desgastados.
Los sellos de aceite están
dañados o desgastados.
Diluya el detergente; para mejores resultados
use detergente Kärcher®
Haga correr agua tibia por el fi ltro para eliminar los residuos.
Retire la obstrucción o cambie el sifón de
detergente.
Cambie el ajuste de la lanza de agua Vario
Power a "bajo" o "mix"
Sople o retire los residuos con una aguja fi na.
Inserte una nueva lavadora.
Inserte la lanza pulverizadora de su elección
en la pistola pulverizadora manual. Presione
cuidadosamente contra la tensión del resorte
y gire hasta que quede en posición bloqueada.
Llame a Soporte al cliente
Verifi que que las mangueras y los ajustes
estén cerrados herméticamente. Apague la
máquina y vacíe la bomba apretando la palanca de la pistola hasta que emerja un fl ujo
constante de agua a través de la boquilla.
Llame a Soporte al cliente
Llame a Soporte al cliente
Español 31
Page 32

GUIDE DE FONCTIONNEMENT DE LA MACHINE DE LAVAGE À HAUTE PRESSION
Aperçu du modèle 33
Consignes de sécurité importantes 34
Instructions d'assemblage 35
Instructions de fonctionnement 37
Utilisation des accessoires 38
Utilisation de détergents 39
Prendre une pause 40
Arrêt et nettoyage 40
Préparation pour l'hiver et
entreposage à long terme 41
Soins et entretien 41
Astuctes de nettoyage 42
Accessoires de nettoyage optionnels 43
Symboles d'alertes de sécurité
DANGER
Indique une situation éminemment dangereuse qui,
si elle n'est pas évitée, aura comme conséquence
la mort ou des blessures graves.
AVERTISSEMENT
Indique une situation potentiellement dangereuse
qui, si elle n'est pas évitée, pourrait avoir comme
conséquence la mort ou des blessures.
ATTENTION
Indique une situation potentiellement dangereuse
qui, si elle n'est pas évitée, pourrait avoir comme
conséquence des blessures mineures ou modérées
ou causer des dégâts matériels.
Dépannage 45
Responsabilité du propriétaire ou
Fiche technique
de l'utilisateur
K 3.000
Maximum
pression
Débit d'eau
Consommation
électrique
Tension 120 V
Nº d'article
Nº de série
Pour usage domestique seulement
1800 PSI (12,4 MPa)
1,3 GPM (4,9 l/min)
13 A
1.418-050.0
1.418-052.0
Le propriétaire ou l'utilisateur doit avoir une
compréhension des consignes d'utilisation et des
avertissements du fabricant avant d'employer cette
machine de lavage à pression.
L'accent doit être mis sur les informations d'avertissement qui doivent être parfaitement comprises.
Si l'opérateur n'est pas à l'aise en anglais, les
instructions et les avertissements du fabricant
devront être lus à et discutés avec l'opérateur dans
la langue maternelle de l'opérateur par l'acheteur/
propriétaire, afi n que l'opérateur comprenne son
contenu.
Le propriétaire ou l'utilisateur doit étudier les
instructions du fabricant et les conserver pour
référence future.
Service à la clientèle de Kärcher É.-U/
Canada
Pour les questions de garantie aux É.-U ou au
Canada, veuillez composer le 1-800-537-4129 et
pour le soutien technique et l'aide sur le produit
visitez notre site www.karcher-help.com.
Veuillez prendre un moment pour enregistrer
votre laveuse à pression en ligne au www.
karcher-register.com.
Conservez votre reçu d'achat, car il sera exigé
pour les réparations couvertes par la garantie.
32 Français
Page 33

APERÇU DU MODÈLE
1 Roulettes pivotantes
2 Commutateur marche/arrêt
3 Réservoir à détersif (amovible)
4 Sortie pour boyau à haute pression
5 Poignée
6 Logement pour le boyau de jet et le boyau HP
7 Entrée d'eau
8 Raccord pour l'entrée d'eau
9 Raccord de boyau d'arrosage (femelle)
10 Cordon d'alimentation avec disjoncteur de
fuite de terre (GFCI)
11 Roues
12 Pistolet à gâchette
13 Verrou de sécurité pour le pistolet à gâchette
14 Raccord rapide pour le boyau à haute pression
15 Boyau à haute pression
16 Tube rallonge Vario de réglage de pression
17 Dirtblaster ® (Tube rallonge de pulvérisation
rotative)
18 Détergent lavage & cire
(Uniquement pour le modèle 1.418-052.0)
19 Détergent universel
(Uniquement pour le modèle 1.418-052.0)
Français 33
Page 34

CONSIGNES DE SÉCURITÉ IMPORTANTES
CONSERVEZ CES INSTRUCTIONS
AVERTISSEMENT
Lors de l’utilisation de ce produit, prenez toujours
les précautions de base, comprenant ce qui suit :
■ Lisez toutes les instructions avant d'employer le
produit.
■ Pour réduire le risque de blessure, une surveil-
lance étroite est nécessaire lorsqu'un appareil
est employé près des enfants.
■ Sachez comment arrêter l'appareil et le dépres-
suriser rapidement. Familiarisez-vous complète-
ment avec les commandes.
■ Restez alerte – surveillez ce que vous faites.
■ Si vous êtes fatigué ou sous l'infl uence de l'alcool
ou de drogues, ne faites pas fonctionner l'appa-
reil.
■ Gardez les gens hors du secteur d'utilisation.
■ Ne tentez pas d'atteindre des endroits trop
élevés ou de vous tenir sur un appui instable.
Toujours garder les deux pieds au sol et un bon
équilibre.
■ Suivez les directives d'entretien indiquées au
présent guide.
■ Cet appareil est équipé d'un disjoncteur de
fuite à la terre intégré dans la fi che du cordon
d'alimentation. Si le remplacement de la fi che ou
du cordon est nécessaire, employez seulement
des pièces de rechange identiques.
AVERTISSEMENT
Risque de pénétration sous la peau ou de bles-
sure – ne dirigez pas le jet de haute pression
sur les gens.
■ Si ce produit est utilisé à mauvais escient, le
jet à haute pression peut constituer une source
de danger. Le jet ne doit pas être dirigé vers
des personnes, des animaux, des dispositifs
électriques, ou vers l'appareil lui-même.
■ Porter des lunettes de sécurité.
AVERTISSEMENT
Risque d'explosion – ne pulvérisez pas de
liquides infl ammables.
■ N'employez pas d'acides, de solvants, ou tout
autre produit infl ammable ou alcalin dans cet
appareil. Ces produits peuvent causer des bles-
sures à l'opérateur et endommager l'appareil de
façon irréversible.
AVERTISSEMENT
Risque d'électrocution
■ Inspectez le cordon avant l'utilisation – n'utilisez
pas l'appareil si le cordon est endommagé.
■ Gardez toutes les jonctions de raccordement au
sec et hors terre.
■ Ne touchez pas la fi che avec les mains mouillées.
■ N'employez pas de rallonge électrique avec cet
appareil.
■ Reliez-le à un circuit individuel seulement.
ATTENTION
Cet appareil a été conçu pour être utilisé avec
les détergents de nettoyage recommandés
par le fabricant. L'utilisation d'autres agents de
nettoyage peut affecter le fonctionnement de la
machine et en annuler la garantie.
ATTENTION
Le pistolet donne un contrecoup – tenez-le à
deux mains.
■ Le verrou de sécurité du pistolet prévient la
pulvérisation accidentelle. Cette caractéristique
de sécurité NE verrouille PAS le jet en position
de FONCTIONNEMENT.
AVERTISSEMENT
■ Ne pulvérisez pas l'appareil et le câblage électrique.
■ N'employez pas avec des liquides infl ammables
ou des produits chimiques toxiques.
■ Haute pression – gardez-vous à l'écart de la
buse.
■ Danger d'incision de la peau – l'équipement peut
causer des blessures graves si le jet pénètre la
peau. Ne dirigez pas le pistolet sur personne ou
sur n'importe quelle partie de votre corps. En cas
de blessure, recherchez immédiatement de l'aide
médicale.
■ Ce système est capable de produire une haute
pression. Pour éviter toutes ruptures et blessures, ne faites pas fonctionner cette pompe
avec des accessoires fabriqués pour une pression moindre que le maximum indiqué (y compris
notamment des pistolets de pulvérisation, des
boyaux et des raccords de boyau).
■ Avant toute intervention d'entretien, de nettoyer
ou pour déposer toute pièce de l'appareil,
débranchez l'alimentation électrique et libérez
la pression.
■ Si l'alimentation en eau est connectée à un
système d'eau potable, le système devra être
protégé contre le refoulement d'eau.
34 Français
Page 35

RÉPARATION
D'APPAREILS À DOUBLE ISOLATION
Dans un appareil à double isolation, on trouve deux
systèmes d'isolation au lieu d'une mise à la terre. Il
n'y a aucune mise à la terre sur un appareil à double
isolation, et aucune ne devrait y être ajoutée non
plus. La réparation d'un appareil à double isolation
exige un soin extrême, une connaissance approfondie du système et ne devrait être effectuée que par
du personnel qualifi é. Les pièces de rechange pour
un appareil à double isolation doivent être identiques
à celles remplacées. Un produit à double isolation
est identifi é par les mots ISOLATION DOUBLE ou
DOUBLEMENT ISOLÉ. (« DOUBLE INSULATION »
ou « DOUBLE INSULATED »). Le symbole «
également être marqué sur le produit.
» peut
PROTECTION PAR DISJONCTEUR
DE FUITE À LA TERRE
Cette laveuse à pression est équipé d'un disjoncteur de
fuite à la terre (GFCI) intégré dans la prise du cordon
d'alimentation. Ce dispositif assure une protection
supplémentaire contre le risque de décharge électrique. Si le remplacement de la prise ou du cordon
est nécessaire, employez seulement des pièces de
rechange équipées d'une protection de disjoncteur
de fuite de terre (GFCI).
ALIMENTATION EN EAU
(EAU FROIDE SEULEMENT)
ATTENTION
En reliant l'entrée d'eau aux canalisations d'approvi-
sionnement en eau, on doit observer des règlements
locaux de votre service public d'approvisionnement
en eau. Dans certaines régions, afi n de s'assurer qu'il
n'y a aucune rétroaction des produits chimiques dans
l'approvisionnement en eau, l'appareil ne doit pas être
branché directement à votre service public d'approvisionnement en eau potable. La liaison directe par
l'intermédiaire d'un réservoir de récupération ou d'un
obturateur de refoulement, est par contre autorisée.
L'appareil sera endommagé par les saletés dans l'eau
d'alimentation. Pour éviter ce risque, nous recommandons d'installer un fi ltre à eau.
■ Le boyau d'arrosage doit être au moins de 13
millimètres ou 16 millimètres (1/2 ou 5/8 pouce)
de diamètre.
■ Le débit de l'approvisionnement en eau ne doit
pas tomber en dessous de 7,6 l/min. (2 gallons
par minute)
■ Le débit peut être déterminé en laissant l'eau
couler pendant une minute dans un récipient
vide de 20 litres (5 gallons).
■ La température de l'eau ne doit pas dépasser
40°C/104°F.
■ N'employez jamais la laveuse à pression pour
tirer de l'eau contaminée par des solvants, par
exemple diluants pour peinture, essence, huile,
etc.
■ Empêchez toujours les débris d'être aspirés dans
l'appareil en utilisant une source d'eau propre.
INSTRUCTIONS D'ASSEMBLAGE
Quincaillerie (incluse)
Article Description Objet Illustration Quantité
A
B
C
Roue arrière Pour ensemble
roulant avant
Roue pivotante
de direction
Adaptateur Pour raccorde-
Pour ensemble
roulant avant
ment d'alimentation d'eau
2
2
1
Français 35
Page 36

INSTRUCTIONS D'ASSEMBLAGE
Quincaillerie (incluse)
Article Description Objet Illustration Quantité
D
Raccord de
boyau d'arrosage
Pour raccordement d'alimentation d'eau
1
E
F
G
H
I
J
Pistolet Pour ensemble de
pulvérisation
Boyau à haute
pression
Tube rallonge
Vario de
réglage de
pression
Buse
Dirtblaster ®
Détergent
lavage & cire
(Uniquement
pour le modèle
K3.000 Det)
Détergent
universel
(Uniquement
pour le modèle
K3.000 Det)
Pour ensemble de
pulvérisation
Pour ensemble de
pulvérisation
Pour ensemble de
pulvérisation
Utilisation de
détergents
Utilisation de
détergents
1
1
1
1
1
1
Assemblage
1ère ÉTAPE :
Insérez les roues arrière au corps de l'appareil.
2e ÉTAPE :
Insérez les roulettes de direction et appuyez
jusqu'à ce qu'elles s'enclenchent en place.
1 2
36 Français
3e ÉTAPE :
Installez l'adaptateur fourni sur l'entrée d'eau de
l'appareil.
Remarque : N'attachez jamais le raccord du
boyau d'arrosage sur l'entrée d'eau de l'appareil !
Page 37

Assemblage
4e ÉTAPE :
Poussez le boyau à haute pression dans le
pistolet à gâchette jusqu'à ce qu'il s'enclenche
de façon audible.
Remarque : Assurez-vous de bien les aligner.
Confi rmez un raccordement sûr en tirant sur le
boyau à haute pression.
INSTRUCTIONS DE FONCTIONNEMENT
1ère ÉTAPE :
Reliez le boyau à haute pression à la sortie pour
boyau à haute pression de l'appareil.
Débranchement :
Appuyez sur la touche de débranchement du
pistolet à gâchette et retirez le boyau à haute
pression du pistolet à gâchette.
3e ÉTAPE :
Vissez le raccord du boyau d'arrosage fourni à
l'extrémité de votre boyau d'arrosage.
2e ÉTAPE :
Insérez le tube rallonge à jets de votre choix
dans le pistolet à gâchette. Enfoncez contre le
ressort de tension et tournez en position verrouillée.
4e ÉTAPE :
Raccordez le boyau d'arrosage muni de son
raccord rapide au raccord d'entrée d'eau et assurez-vous d'entendre le clic d'enclenchement
avant de poursuivre.
Français 37
Page 38

INSTRUCTIONS DE FONCTIONNEMENT
5e ÉTAPE :
Reliez le boyau d'arrosage à la source d'eau
froide et ouvrez complètement le robinet.
6e ÉTAPE :
Branchez la fi che à disjoncteur de fuite de terre
(GFCI) à une prise fonctionnelle.
Nous recommandons de vérifi er le disjoncteur de
fuite de terre (GFCI) en tant qu'élément de votre
procédure de démarrage chaque fois que vous
employez votre laveuse à pression. Branchez la
fi che à disjoncteur de fuite de terre (GFCI) à la
prise, appuyez sur le bouton de réinitialisation,
appuyez sur la touche d'essai et puis appuyez
encore une fois sur le bouton de réinitialisation.
AVERTISSEMENT
Si l'essai ci-dessus échoue, n'utilisez pas l'appa-
reil.
Remarque : L'aspect réel du disjoncteur de
fuite de terre (GFCI) peut être différent de cette
illustration.
7e ÉTAPE :
Déverrouillez le cran de sécurité du pistolet à
gâchette Déclenchez le pistolet à gâchette pour
éliminer l'air emprisonné, puis attendez qu'un
fl ux d'eau régulier sorte de la buse de pulvérisation.
8e ÉTAPE :
Activez la laveuse à haute pression en tournant
le commutateur à la position de fonctionnement
(I/ON).
Le moteur fonctionne seulement lorsque la gâ-
chette du pistolet est actionnée et se coupe
lorsqu'elle est relâchée.
UTILISATION DES ACCESSOIRES
AVERTISSEMENT
Pour éviter des blessures graves, ne dirigez
jamais la buse de pulvérisation vers vous-même,
d'autres personnes ou des animaux.
Toujours faire un essai dans une zone moins en
évidence avant de nettoyer à haute pression.
Tube rallonge Vario de réglage de
pression
Le tube rallonge Vario permet d'ajuster la pression de
nettoyage.
Pour nettoyer à la pression maximum, le tube
rallonge doit être placé au réglage à haute
pression (maximum).
38 Français
Pour une plus basse pression, tournez le collier
du tube rallonge en direction (minimum)
moindre.
Pour utiliser du détergent, le tube rallonge
doit être placé au réglage à basse pression
(mélange).
Page 39

UTILISATION DES ACCESSOIRES
Dirtblaster®
■ Cette buse comporte un jet concentré à 0º rotatif
sur 360º pour une suppression maximale de la
saleté, augmentant effectivement la performance
de nettoyage jusqu'à 80%.
Cette buse combine la performance de nettoyage
d'un jet concentré à 0º avec la couverture étendue d'une buse à grand angle.
UTILISATION DE DÉTERGENTS
Les détergents peuvent seulement être appli-
qués au réglage à basse pression (mélange).
1ère ÉTAPE :
Installation du tube rallonge à réglage de pres-
sion.
Réglez le tube rallonge de pulvérisation au ré-
glage à basse pression (mélange).
2e ÉTAPE :
Remplissez le réservoir de détersif avec le déter-
gent sélectionné.
3e ÉTAPE :
Mettez la laveuse à pression en marche (I).
Actionnez la gâchette afi n de mettre l'appareil
en marche. Le détergent liquide est aspiré dans
l'appareil et mélangé avec l'eau. Appliquez du
détergent sur la surface à nettoyer. Ne laissez
pas le détergent sécher sur la surface.
Non recommandé pour les matériaux mous,
le parement, les surfaces peintes, les plateformes ou les automobiles.
4e ÉTAPE :
Pour rincer, déplacez le VPS hors de la position
« Mix » et actionnez la gâchette pour faire fonctionner la machine.
5e ÉTAPE :
Nettoyage : Toujours mettre de l'eau fraîche dans
le réservoir à détergent ou le tube de siphon
lorsque l'utilisation est terminée afi n de rincer
tout détergent restant du système d'injection.
Pour de meilleurs résultats, voir les astuces de
nettoyage et des informations précises sur la
façon nettoyer différentes surfaces.
Pour de meilleurs résultats, employez toujours le
détergent de Kärcher ® .
Les détergents biodégradables de Kärcher ® sont
particulièrement formulés pour protéger l'environnement et votre laveuse à pression. La formule spéciale
n'obstruera pas le fi ltre du tube d'aspiration et protégera les parties internes de la laveuse à pression pour
une plus longue durée de vie. Pour vous procurer les
détergents de Kärcher ®, communiquez avec votre
détaillant ou visitez notre page Web :
www.buykarcher.com
ATTENTION
N'utilisez jamais :
– de produits d'agent de blanchiment, de chlore et
d'autres produits chimiques corrosifs
– liquides contenant des solvants (c.-à-d., diluants
pour peinture, essence, huiles)
– produits de phosphate trisodique
– produits d'ammoniaque
– produits à base d'acide
Ces produits chimiques endommageront l'appareil et
les surfaces à nettoyer.
L'utilisation de ces produits annulera la garantie.
Français 39
Page 40

PRENDRE UNE PAUSE… de cinq minutes ou plus
1ère ÉTAPE :
Relâchez la gâchette et engagez le verrou de
sécurité du pistolet.
ARRÊT ET NETTOYAGE
1ère ÉTAPE :
Tournez le commutateur à la position d'arrêt (0/
OFF) et débranchez le cordon de la prise.
2e ÉTAPE :
Fermez l'entrée d'eau.
3e ÉTAPE :
Appuyez sur la gâchette afi n de relâcher la
pression d'eau.
2e ÉTAPE :
Tournez le commutateur de la laveuse à pression
à la position arrêt (0/OFF)
5e ÉTAPE :
Débranchez le boyau d'arrosage de l'entrée
d'eau de l'appareil.
6e ÉTAPE :
Débranchez le boyau à haute pression de la
prise à haute pression.
4e ÉTAPE :
Relâchez la gâchette et engagez le verrou de
sécurité du pistolet.
40 Français
7e ÉTAPE :
Insérez les tubes rallonge de pulvérisation dans
leurs compartiments et rangez le cordon d'alimentation et le tuyau à haute pression enroulés
en suivant les indications de la « PRÉPARATION
POUR L'HIVER ET ENTREPOSAGE À LONG
TERME ».
Page 41

PRÉPARATION POUR L'HIVER ET ENTREPOSAGE À LONG TERME
1 Débranchez toutes les connexions d'eau.
2 Mettez la machine en marche pendant quelques
secondes, jusqu'à ce que l'eau restante dans la
pompe sorte, puis arrêtez la machine sans délai.
3 Ne laissez pas le boyau à haute pression se
nouer.
4 En suivant les indications de la photo ci-dessous,
rangez les accessoires sur l'appareil, dans
l'ordre suivant :
a. Tube rallonge de réglage de pression et la
buse Dirtblaster®.
b. Cordon d'alimentation.
c. Boyau à haute pression
d. Pistolet
d
c
b
a
5 Rangez l'appareil et les accessoires dans une
pièce où la température ambiante ne descend
pas sous le point de congélation. Ne rangez
pas près d'un appareil de chauffage central ou
d'autres sources de chaleur puisque cela peut
dessécher les joints de la pompe.
ATTENTION
Ne pas suivre les indications ci-dessus pourrait
conséquemment endommager l'ensemble de
pompe et les accessoires et en annuler la garantie. Kärcher ® recommande également l'utilisation régulière d'un protecteur de pompe comme
le protège pompe Pump Guard de Kärcher ®
(9.558-998.0) pour empêcher les dommages
durant l'entreposage par temps froid durant les
mois d'hiver.
a
SOINS ET ENTRETIEN
Nettoyage du fi ltre de la prise d'eau
1ère ÉTAPE :
Débranchez le raccord de l'entrée d'eau.
2e ÉTAPE :
Retirez le fi ltre d'entrée d'eau avec des pinces à
becs pointus.
3e ÉTAPE :
Rincez le fi ltre d'entrée d'eau dans l'eau chaude.
4e ÉTAPE :
Réinsérez le fi ltre d'entrée d'eau dans l'entrée
d'eau.
Entretien
Cet appareil ne nécessite aucun d'entretien.
Français 41
Page 42

ASTUCES DE NETTOYAGE
ATTENTION
■ Avant de nettoyer toute surface, toujours faire
un essai dans une zone moins en évidence afi n
d'évaluer le scénario et la distance de jets pour
obtenir des résultats de nettoyage maximaux.
■ Si les surfaces peintes s'écaillent ou s'ébrèchent,
faites extrêmement attention, car la laveuse à
pression peut enlever la peinture non consolidée
de la surface.
■ En l'employant sur des surfaces qui pourraient
être en contact avec la nourriture, rincer les
surfaces avec beaucoup d'eau potable.
■ Pour des astuces supplémentaires de nettoyage
et une vidéothèque complète, visitez notre site
Web :
www.karcherresidential.com
Nettoyage de plate-forme
Rincer préalablement la plate-forme et la surface
environnante à l'eau fraîche (avec ou sans détergent).
Si vous employez du détergent, appliquez-le à basse
pression sur la surface. Pour de meilleurs résultats,
limitez votre zone de manœuvre à de plus petites
sections d'environ 2,3 m² (25 pi carrés). Laissez le
détergent agir sur la surface pendant 1 à 3 minutes. Ne
laissez pas le détergent sécher sur la surface. Rincez
à haute pression avec un mouvement rapide, gardez
la buse de pulvérisation à une distance approximative
de 7,5 à 15 cm (3 à 6 po) de la surface à nettoyer.
Toujours nettoyer de haut en bas et de gauche à droite.
En passant à une nouvelle section de la surface à nettoyer, assurez-vous de recouvrir la section précédente
pour éliminer les marques d'arrêt et pour assurer un
résultat de nettoyage plus uniforme.
Parement de maison
Rincer préalablement la surface à nettoyer à l'eau
fraîche (avec ou sans détergent). Si vous employez
du détergent, appliquez-le à basse pression sur la
surface. Pour de meilleurs résultats, limitez votre zone
de manœuvre à des sections d'environ 1,8 m (6 pi) et
toujours appliquez le détergent à partir du bas jusqu'au
dessus. Laissez le détergent agir sur la surface
pendant 1 à 3 minutes. Ne laissez pas le détergent
sécher sur la surface. Si la surface semble sécher,
mouillez simplement la surface avec de l'eau fraîche.
Si nécessaire, employez une brosse de nettoyage
rotative (non incluse) pour enlever la saleté tenace.
Rincez à haute pression avec un mouvement régulier
de haut en bas en gardant la buse de pulvérisation
à une distance approximative de 1,8 m (6 pi.) de la
surface de nettoyage.
Patios en ciment, en brique et en
pierre
Rincer préalablement la surface à nettoyer à l'eau
fraîche (avec ou sans détergent). Si vous employez du
détergent/dégraissant, appliquez-le sur la surface en
utilisant la basse pression. Pour de meilleurs résultats,
limitez votre zone de manœuvre à de plus petites
sections d'environ 2,3 m² (25 pi carrés). Laissez le
détergent/dégraissant agir sur la surface pendant 1 à
3 minutes. Ne laissez pas le détergent sécher sur la
surface. Rincez à haute pression avec un mouvement
rapide, gardez la buse de pulvérisation approximativement à une distance de 7,5 à 15 cm (3 à 6 po) de la
surface de nettoyage. Toujours nettoyer de haut en bas
et de gauche à droite. Pour enlever les taches extrêmement tenaces, employez la buse de Dirtblaster ® .
Voitures, bateaux et motos
Rincer préalablement le véhicule à nettoyer à l'eau
fraîche (avec ou sans détergent). Si vous employez
du détergent, appliquez-le à basse pression sur la
surface. Pour de meilleurs résultats, nettoyez un côté
de véhicule à la fois et appliquez toujours le détergent à
partir du bas jusqu'au dessus. Ne laissez pas le détergent sécher sur la surface. Si nécessaire, employez
une brosse de nettoyage rotative (non incluse) pour
enlever la saleté tenace. Rincez à haute pression avec
un mouvement rapide, gardez la buse de pulvérisation
approximativement à une distance de 15 à 20 cm (6 à
8 po) de la surface à nettoyer.(augmenter la distance
de rinçage pour les bandes décoratives ou d'autres
surfaces délicates) Toujours nettoyer de haut en bas
et de gauche à droite. Pour de meilleurs résultats,
asséchez la surface avec un chamois ou un chiffon
sec doux.
Grils de barbecue, équipements
motorisés pour l'extérieur et outils de
jardinage
Rincer préalablement la surface à nettoyer à l'eau
fraîche (avec ou sans détergent). Si vous employez du
détergent/dégraissant, appliquez-le sur la surface en
utilisant la basse pression. Laissez le détergent agir
sur la surface pendant 1 à 3 minutes. Ne laissez pas
le détergent/dégraissant sécher sur la surface. Rincez
à haute pression en gardant la buse de pulvérisation
à une distance approximative de 7,5 à 15 cm (3 à 6
po) de la surface de nettoyage. Pour dégager la saleté
extrêmement tenace, il peut être nécessaire de placer
la buse de pulvérisation plus près de la surface pour
une plus meilleure action de nettoyage.
42 Français
Page 43

ASTUCES DE NETTOYAGE
Mobilier de patio et de jardin
Rincer préalablement le mobilier et la surface environnante à l'eau fraîche (avec ou sans détergent). Si
vous employez du détergent, appliquez-le à basse
pression sur la surface. Laissez le détergent agir
sur la surface pendant 1 à 3 minutes. Ne laissez pas
le détergent sécher sur la surface. Si nécessaire,
ACCESSOIRES DE NETTOYAGE OPTIONELS
Des accessoires facultatifs sont disponibles pour
améliorer davantage votre potentiel de nettoyage.
Ces accessoires sont à jour à la date d'impression
du présent manuel.
Pour obtenir les prix et les informations à jour, veuillez
vous référer au site Internet : karcherresidential.com .
Protège pompe Pump Guard
Particulièrement formulée pour protéger votre laveuse
à pression contre le gel, la corrosion et l'usure prématurée. Le protège pompe Pump Guard ajoute également de la lubrifi cation aux soupapes et aux joints
pour empêcher le collage. Fortement recommandé
pour toutes les laveuses à pression Kärcher ®!
Pièce nº 9.558-998.0
Rallonge de boyau à haute pression de
7,5 m (25 pi)
Boyau de rallonge pour machines de lavage à haute
pression Kärcher ® jusqu'à 13,8 MPa (2 000 PSI) à
raccordement rapide, à placer entre le boyau original
et le pistolet.
Pièce nº 2.642-588.0
Tube rallonge de 1,67 m (66 po) - en
quatre sections
Vous devez nettoyer les fenêtres du deuxième étage
ou d'autres zones élevées? Augmentez la portée de
votre laveuse à pression jusqu'à 1,67m (66 po) avec
cet ensemble rallonge. Comprend quatre tubes en
aluminium pour régler la longueur. Longueur de 1,67m
(66 po) lorsque tous utilisés. Convient à la plupart des
laveuses à pression Kärcher ® de moins de 15,8 MPa
(2 300 PSI).
Pièce nº 2.640-746.0
employez une brosse de nettoyage rotative (non
incluse) pour enlever la saleté tenace. Rincez à haute
pression avec un mouvement rapide, gardez la buse
de pulvérisation approximativement à une distance
de 7,5 à 15 cm (3 à 6 po) de la surface de nettoyage.
Pour de meilleurs résultats, nettoyez de haut en bas
et de gauche à droite.
Brosse de nettoyage rotative
Pour un meilleur nettoyage de toutes les surfaces
douces (peintes, verre et plastique) en ménageant
vos efforts, essayez la brosse de nettoyage rotative
de Kärcher ®. Employez-la sur votre automobile, les
parements de maison ou les fenêtres. La pression
d'eau de votre laveuse à pression fait tourner doucement les brosses intérieures, facilitant de beaucoup
votre travail de nettoyage. Excellent pour l'application
du détergent. Un accessoire incontournable conçu
pour la laveuse à pression Kärcher ® de moins de
15,8 MPa (2 300 PSI).
Pièce nº 2.642-786.0
Brosse de nettoyage douce
Fait de poils doux qui n'endommageront pas les
surfaces peintes. S'attache facilement au pistolet à
gâchette. Idéal pour la saleté tenace des voitures, des
bateaux, des meubles de patio et d'autres surfaces.
Parfaite pour appliquer le détergent. Convient à la
plupart des laveuses à pression Kärcher ® de moins
de 15,8 MPa (2 300 PSI).
Pièce nº 2.642-859.0
Ensemble de nettoyage de tuyaux de
7,5 m (25 pi)
Vous devez nettoyer des tuyaux, drains ou gouttières
bloqués? L'ensemble de nettoyage de tuyaux Kärcher
® est la solution! Le nettoyeur de tuyaux se propulse
de lui-même tout en rinçant les débris hors de la canalisation. Par exemple, insérez la buse de nettoyage dans
la base d'une gouttière, appuyez sur la gâchette du
pistolet et voyez l'accessoire monter dans la gouttière
tout en y évacuant feuilles et débris. Se raccorde
directement au pistolet de la plupart des laveuses
à pression Kärcher ® jusqu'à 15,8 MPa (2 300 PSI).
Pièce nº 2.642-183.0
Français 43
Page 44

ACCESSOIRES DE NETTOYAGE OPTIONELS
Ensemble de décapage au jet de sable
humide
Pourquoi passez les heures pour décaper à la main
la vieille peinture et la rouille en utilisant des produits
chimiques agressifs? Laissez l'ensemble de décapage
au jet jet de sable humide Kärcher ® faire le travail!
Attachez l'ensemble à votre laveuse à pression,
ajoutez du matériel abrasif et attaquez la rouille et la
peinture avec notre variante écologique. Convient à la
plupart des laveuses à pression Kärcher ® de moins
de 15,8 MPa (2 300 PSI).
Pièce nº 2.638-792.0
Accessoire de formation de
mousse
Idéal pour les applications qui requièrent une mousse
riche. Remplissez simplement le réservoir de détergent liquide pour laveuses à pression afi n de produire
un embrun de mousse. S'attache facilement au pistolet
à gâchette. Convient à la plupart des laveuses à pression Kärcher ® de moins de 15,8 MPa (2 300 PSI).
Pièce nº 2.641-848.0
Nettoyeur de patios et d'allées d'accès
au garage T250
Pour nettoyer des surfaces comme des patios,
terrasses et les allées d'accès au garage sans éclaboussures, il n'y a aucune meilleure solution que le
Kärcher ® T 250. Il épargne du temps en couvrant une
largeur de 30 cm (1 pi), et par survol et avancement
lent procure un nettoyage uniforme sans lignes de
démarcation. Quand vous fi nissez de nettoyer le patio
et l'allée, enlevez le tube rallonge et utilisez la poignée
pour nettoyer les portes de garage et d'autres surfaces
verticales. Comprend deux buses qui tournent à une
grande vitesse pour des résultats optimaux. Notre
accessoire le plus populaire pour les laveuses à
pression Kärcher ® de moins de 15,8 MPa (2 300 PSI).
Pièce nº 2.642-451.0
44 Français
Page 45

DÉPANNAGE
AVERTISSEMENT
avant d'effectuer toute réparation, débranchez
l'appareil de sa source d'alimentation.
Symptôme Cause Solution
Le moteur ne se
met pas en marche
L'appareil n'atteint
pas une haute
pression
La pression de
sortie
oscille de haute à
basse pression
Le commutateur marche/
arrêt est en position ARRÊT
(0).
Le cordon d'alimentation
n'est pas branché.
La prise électrique ne fournit
pas la puissance suffi sante.
Le disjoncteur de fuite
de terre de la fi che s'est
déclenché.
Protecteur interne déclenché. Coupez l'alimentation de l'appareil. La réinitiali-
Le diamètre du boyau d'arrosage est trop petit.
L'approvisionnement en eau
est restreint.
L'approvisionnement en eau
est insuffi sant.
Le fi ltre d'entrée d'eau est
obstrué.
L'approvisionnement en eau
est insuffi sant.
La pompe aspire de l'air . Assurez-vous que les boyaux et les accessoires
Le fi ltre d'entrée d'eau est
obstrué.
La buse de décharge est
obstruée.
Tournez le commutateur à la position de
MARCHE (I)
Branchez le cordon d'alimentation.
Essayez une autre prise.
Appuyez sur le bouton de RÉINITIALISATION
(« RESET ») sur le disjoncteur de fuite de terre
de la fi che électrique.
sation se fera automatiquement aussitôt que la
température de l'appareil baissera.
Remplacez-le par un boyau d'arrosage de 16mm
(5/8 pouce) ou plus.
Examinez le boyau d'arrosage pour déceler les
nœuds, les fuites et les obstructions.
Ouvrir le robinet d'alimentation au maximum.
Enlevez le fi ltre et rincez-le à l'eau chaude.
Ouvrir le robinet d'alimentation au maximum.
Examinez le boyau d'arrosage pour déceler tout
nœud, fuite ou obstruction.
soient parfaitement étanches. Arrêtez la machine
et purgez la pompe en actionnant la gâchette
du pistolet jusqu'à ce qu'un fl ux d'eau stable
s'écoule de la buse.
Enlevez le fi ltre et rincez-le à l'eau chaude.
Nettoyez la buse à haute pression : En utilisant
une aiguille, enlevez la saleté et les débris du
trou de la buse, et rincez sous le robinet en
circulation inverse dans la buse.
Français 45
Page 46

Symptôme Cause Solution
Le détergent
n'arrive pas
Le tube du siphon de détersif
n'est pas correctement relié
Vérifi ez le branchement.
à la machine.
Le détergent est trop épais. Diluez le détergent, pour de meilleurs résultats,
Le fi ltre du tube de détersif
du siphon est obstrué.
Le tube de détersif du siphon
est endommagé ou obstrué.
Le tube rallonge Vario de
réglage de pression n'est
pas réglé au niveau bas pour
mélange.
La buse de décharge est
obstruée.
Fuites au raccord
du boyau d'arrosage
Le tube rallonge de
pulvérisation fuit.
Les raccords sont desserrés. Resserrez les raccords
Rondelle en caoutchouc
usée ou manquante
Le tube rallonge de pulvérisation n'est pas correctement
fi xé.
Joint torique ou pièce d'insertion en plastique brisée.
La pompe est
La pompe aspire de l'air . Assurez-vous que les boyaux et les accessoires
bruyante
Il y a des fuites
Les raccords sont desserrés. Assurez-vous que les accessoires soient parfai-
d'eau
à partir de la
pompe (jusqu'à 10
gouttes par minute
Les sceaux à eau sont
endommagés ou usés.
permises)
Égouttement
d'huile
Les sceaux pour l'huile sont
endommagés ou usés.
Si vous rencontrez d'autres problèmes non énumérées, veuillez visiter notre site Internet.
É-U/Canada :
www.karcher-help.com
®
utilisez le détersif Kärcher
.
Passez le fi ltre sous eau chaude courante pour
enlever les débris.
Débouchez ou remplacez le tube de détersif du
siphon.
Placez le réglage du tube Vario à « Low » ou
« Mix ».
Souffl ez ou enlevez les débris avec une aiguille.
Insérez une nouvelle rondelle.
Insérez le tube rallonge à jets dans le pistolet à
gâchette. Enfoncez-le bien contre le ressort de
tension et tournez en position verrouillée.
Téléphonez au service d'assistance à la clientèle
soient parfaitement étanches. Arrêtez la machine
et purgez la pompe en actionnant la gâchette
du pistolet jusqu'à ce qu'un fl ux d'eau stable
s'écoule de la buse.
tement serrés.
Téléphonez au service d'assistance à la clientèle
Téléphonez au service d'assistance à la clientèle
46 Français
 Loading...