

Page 1

Compact Size Vibration Meter
MODEL 4200
Instruction Manual
KANOMAX JAPAN INC.
Page 2

Composition of this Instruction Manual
This Instruction Manual explains the function and the operation method, etc. of Compact size
Vibration Meter MODEL4200. Be sure to read the handling description of the apparatus
concerned, when constructing with other apparatus and measuring.
Moreover, be sure to read notes about the safety indicated after the following page.
This Instruction Manual consists of each following chapter.
Overview
It describes for the outline of a main body.
Names and functions of various parts
It describes for the name and function of a switch or a terminal in each panel
briefly.
Screen
It describes for the LCD in a front panel.
Preparation
It describes for battery installation, connection of a code, and attachment of a
pickup are explained.
Setting
It describes for the time and sensitivity of setup.
Measurement
It fundamental describes for measurement.
Reference
It describes for the Velocity(VEL) frequency range and JIS, relation between indicated
value and AC output.
Option
It describes for connection method with AC adapter of an option, a printer, and a personal
computer..
Specification
It describes for the specification of a main body.
*Generally the company name and brand name in this instruction manual are the trademark or
registered trademark of each company.
― 1 ―
Page 3

Safety precautions
To prevent bodily injury or damage to property, the following safety precautions must be
observed.
This manual contains important safety and operating instructions for Compact Size Vibration
Meter MODEL 4200.
Read all instructions, before using the instrument.
After reading all instructions, keep this manual for quick reference
1....Expressions of safety instructions
!!!!
WARNING
Calls attention to a procedure, practice, or condition that could possibly cause death or bodily
injury.
!!!!
CAUTION
Calls attention to a procedure, practice, or condition that could possibly cause bodily injury or
damage to instrument.
― 2 ―
Page 4

2....Important safety instructions
!!!! WARNING
●●●● Stop using the instrument, when producing smoke, bad smell or noise. It causes fire or
shock hazard. Turn off the POWER switch and unplug the AC adapter (optional) from
outlet as soon as possible. To reduce risk of injury, take it to a qualified serviceman when
service or repair is required. Please contact us or the dealer when service or repair is
required.
●●●● Do not substitute parts or modify instrument. It causes bodily injury, fire or shock hazard.
●●●● Do not use the AC power adapter except the optional AC-1046.
Other type of adapter may cause damage to the instrument.
●●●● Do not touch the plug of AC adapter (AC-1046) with wet hands. It causes shock hazard.
Stop using the instrument, when an object or liquid falls/spills into the instrument.
It causes fire or shock hazard. Turn off the POWER switch and unplug AC adapter
(optional) from outlet as soon as possible.
To reduce risk of injury, take it to a qualified serviceman when service or repair is
required.
Please contact us or the dealer when service or repair is required.
3....Cautions for usage
To prevent bodily injury or damage to the instrument, the following cautions must be observed.
!!!! CAUTION
● Keep the instrument away from the children. If the instrument falls down, it is very
dangerous.
●●●● Do not place it on an unstable place (shaky table or sloping place). If the instrument falls
down, it is very dangerous.
●●●● Do not use and storage the place which moisture or dust, and where a bad influence place
which salt, sulfur, chemicals, Gas etc.. It causes fire or shock hazard.
●●●● Do not put heavy objects on the instrument. It causes damage to the instrument.
●●●● Connect cable properly, it is instructed in this manual. Wrong connection causes fire
hazard.
●●●● Connect cable properly, it is instructed in this manual. Wrong connection causes fire
hazard.
●●●● Before you move the instrument to other place, turn off the POWER switch and remove all
wiring.
●●●● Do not put the instrument on the vibrating place. If the instrument falls down, it is very
dangerous.
●●●● For avoiding liquid spill, remove alkaline dry batteries when you don’t use for long period of
time. It is recommended to remove alkaline dry batteries after each use.
●●●● Please be sure undergo periodic inspection main body and pickup 1 or 2 times in an year.
(Second calibration Sensitivity is Charge)
●●●● Please don’t push a liquid crystal display screen with a finger or a pen. It become the cause
of defective display or malfunction.
●●●● The connection connector of a main body and a curl cable is an one-touch type BNC
connector. Please don’t turn a part of connector at time connection or after connection.
It become the cause of failure or malfunction.
●●●●
A magnet is very powerful
and attaching to a measurement subject. Moreover, what is influenced of magnetic should release a
magnetic card etc. enough. It may destroy and break down.
●●●● If it break down, please contact us to a store or an agency, without adding a hand.
(adsorptive power 100N). Be fully careful not injured, when detaching
― 3 ―
Page 5

Contents
S
AFETY PRECAUTIONS
1.Expressions of safety instructions ............................................................................................................... 2
2.Important safety instructions ...................................................................................................................... 3
3.Cautions for usage ........................................................................................................................................ 3
C
ONTENTS
............................................................................................................................4
..........................................................................................................2
OVERVIEW........................................................................................................................5
Features .............................................................................................................................................................. 5
NAMES AND FUNCTIONS OF VARIOUS PARTS....................................................6~~~~13
Front.................................................................................................................................................................... 6
Base..................................................................................................................................................................... 8
Background......................................................................................................................................................... 9
Accelerometer ................................................................................................................................................... 10
Description of Screen ....................................................................................................................................... 11
Standard screen................................................................................................................................................ 11
Menu screen...................................................................................................................................................... 13
PREPARATION.........................................................................................................14~~~~17
Power................................................................................................................................................................. 14
Connection of a connection code...................................................................................................................... 16
Attachment of an acceleration pickup ............................................................................................................ 17
SETTING...................................................................................................................20~~~~21
Setting mode..................................................................................................................................................... 20
Calendar adjustment ....................................................................................................................................... 20
LCD contrast adjustment ................................................................................................................................ 21
MEASUREMENT......................................................................................................22~~~~28
Power ON.......................................................................................................................................................... 22
Measurement of acceleration (ACC)............................................................................................................. 23
Measurement the velocity(VEL)................................................................................................................. 23
Measurement the Displacement(DISP) ..................................................................................................... 24
Data Recording................................................................................................................................................. 25
Data call............................................................................................................................................................ 26
Data deletion .................................................................................................................................................... 27
Output signal.................................................................................................................................................... 28
REFERENCE 1 ................................................................................................................29
HANDLING OF AN OPTION ARTICLE ..................................................................30~~~~37
AC adaptor AC-1046 ........................................................................................................................................ 30
Connection with a printer................................................................................................................................ 31
Set up of RS-232C ............................................................................................................................................ 31
Connection with a PC....................................................................................................................................... 34
Detail Specification of Communication Command ........................................................................................ 35
Data managed software ................................................................................................................................... 37
SPECIFICATION
Accelerometer MODEL 7812B specification................................................................................................... 38
Specification...................................................................................................................................................... 38
............................................................................................................38
REFERENCE 2.............................................................................................................39~~~~40
Relation between indicated value and AC output.......................................................................................... 39
A trouble and the processing method.............................................................................................................. 40
How to connect/disconnect the cable 41~~~~42
― 4 ―
Page 6

Overview
Vibration Meter “MODEL4200” is super mine-size like a cellular phone.
It offers, just like a “machinery doctor”, high precision monitoring of various industrial machinery
by using the optional headphone or auscultation stick
It offers a simple way of making medical chart for your machine
The “data hold” function has highly promoted the easy observation of the numerical data
In addition, maintenance or examination of the existing machine, or experiment for a new facility
under development, has been greatly promoted by fixing and numbering the measuring points on a
large-scale target machinery, or by improving the mobility of the measurement based on the “single
point” scheme stated above
Features
● Vibration can be actually heard with your own ear, aiming at the pinpoint spot in question
This is the time of the maintenance of facilities, by watching, hearing and measuring the
vibration
● Compact design, light weight i.e., approx.130 g (Including batteries), that demonstrates
power on the site of the measurement
● Single hand operation is possible just like a cellular phone
● Built in Memory for max.256 data.
● Built-in serial interface, enabling rapid data processing on your PC
● Restart the measurement with the last condition set up and stored just before the power-off
● The output to an exclusive printer is possible.
●●●● Energy-saving design allows continuous measurement longer the 12 hours straight with
only 4 dry battery cells, LR03.
Guarantee
Term for guarantee is twelve months after delivery.
Within this term repair is provided for free should a fault occur while the apparatus is
being used in the manner prescribed by the manufacturer.
Otherwise, a repair fee will be charged.
― 5 ―
Page 7

Names and functions of various parts
Front
Input terminal
Display
Light
Input terminal
It is the terminal which connects pickup MODEL 7812B in attached connection code.
Display
The setting status of measured value and various switches are displayed.
Power
Power
Power Power
Long-pressing this switch for 1 sec or more turns on the power.
Long-pressing it again turns off the power.
Save/Set
Save/Set
Save/Set Save/Set
Record at the time measurement, this is the setting button used when the Menu screen is
operated.
Light Power
Light Light
MENU
MENU Save/Set
MENU MENU
Power
Power Power
Cursor button
Save/Set
Save/Set Save/Set
Hand strap
― 6 ―
Page 8

Names and functions of various parts
Menu
Menu
Menu Menu
It pushes, when setting up measurement conditions. Calendar adjustment etc. There are
three Menu screens to 1/3-3/3. If it pushes 4 times, it will return to a standard screen.
****
**** is a setting value at the time of factory shipments.
********
Menu 1/3 Meas :Manu ;Measurement
Mem Clr ;Memory data clearance
Mem Call ;Memory data call
I/O :OFF ;The data output OFF
to external apparatus
Printer ;Output to a printer
PC ;Output to a PC
Date :2000////01////01 ;year/month/day
Time :00::::00::::00 ;hour:minute:second
Menu 2/3 Range :200,20(In the case of displacement 2000,200)
Mode :m/s2(Acceleration),mm/s(Velocity),μm(Displacement)
Filter :OFF(Acceleration),1kHz(Velocity),300Hz(Displacement)
※Mode and linkage(An single setup is impossible)
Conv :RMS,EQPP(EQp-p Only displacement)
EQPK(EQPeak),PEAK
Disp Time :1s
1s ;Indication period(Data display) display it every 1second
1s1s
2s ;Indication period(Data display) display it every 2seconds
Menu 3/3 Moni/Level :AC ;Waveform output
Level ADJ ;Portable headphone output
-3,-2,-1,0,+1,+2,+3
AutoPwrOff :OFF ;Continuation operation
ON ;Automatic power is turned off after about
1 minute.
LCD cont :**** ;LCD contrast adjustment
* ・・・light
*****・・・deep
Baud rate :4800,9600,19200 baud rate setup
Light
Light
Light Light
Lighting and putting out lights of a LCD back light.
Whenever it pushes, lighting and putting out lights are repeated.
Even if the light stays on, it automatically goes out in approx. 30 seconds
Cursor button
This is buttons for cursor operation, such as Mode/range, such as measurement conditions and
change.
<Change of the Measurement mode>
It changes ; m/s
m/s
m/sm/s
2222
(ACC)
(ACC) → mm/s(VEL)
(ACC)(ACC)
mm/s(VEL) → μμμμm(DISP)
mm/s(VEL)mm/s(VEL)
m(DISP) → m/s
m(DISP)m(DISP)
2222
m/s
(ACC)
(ACC) → mm/s(VEL)
m/sm/s
(ACC)(ACC)
mm/s(VEL)
mm/s(VEL)mm/s(VEL)
<Change of the Measurement Range>
Number on the right of a bar it changes; 200 → 20 → 200.
(In the case of displacement 2000 → 200)
<Change of the Display mode>
It changes ; RMS → Peak → EQPeak → (In the case of displacement, EQp-p → )
Hand strap
When you have the main part of model4200 in hand, please let a hand pass to a hand strap
for fall prevention.
― 7 ―
Page 9

Base
Mating connector
AC Adaptor terminal
Type:MP-121WH
Manufacturer:MARUSHIN ELECTRIC MFG. CO.,LTD
Plug Type:φ3.4×1.4
Polarity;Outside+
Interface connector
AC/Headphone output terminal
AC Adapter Terminal (External Power Source Contact Terminal; EXT/DC)
Connect to AC Adapter AC-1046(Option)
Names and functions of various parts
!!!! CAUTION
● AC adapter of an option Please do not use it except AC-1046. If AC adapter besides
specification is used, it will become the cause of failure, incorrect operation, an electric
shock, and a fire.
●●●● AC adapter AC-1046 should not take out and insert a power supply plug by the wet hand.
It becomes the cause of an electric shock.
Interface Connector (I/O)
Connect to Printer(BS-80TSL) or Personal Computer with Interface cable(with Converter
Adapter)BC-0026
AC/Portable Headphone Output Terminal
A waveform signal is outputted when Menu 3/3 Moni / Level is “AC”. Moreover, you can act as
the monitor of the vibration value which plug adapter PC-260MS connect with portable
headphone ATH-FC5 BK of an option at the time of a level ADJ "-3 and –2・・・・+3".
― 8 ―
Page 10

Names and functions of various parts
Background
Name plate
Battery holder
(2 Alkaline dry cells typeLR03)
Name plate
You can see a name, Type, Serial No. and Date of Manufacture etc..
Battery holder
2 Alkaline dry cells type LR03.
― 9 ―
Page 11

Accelerometer
BNC Connector
BNC Connector
Connect to Input Terminal of Main Body MODEL4200
Names and functions of various parts
Curl Cable
Type F Connector
Accelerometer
MODEL 7812B
!!!! CATUION
●●●● The connection connector of a main body and a curl cable is an one-touch type BNC
connector. Please do not turn by the connector part the time of connection, or after
connection. It becomes the cause of failure or incorrect operation.
Type F connector
Connect to Output Terminal of MODEL 7812B
Accelerometer MODEL 7812B
Detect vibration and change it into an electric signal and fix it with screw stoppers in
un-measurement.
(Reference to P. 18 ~P. 19 How to fix)
― 10 ―
Page 12

Description of Screen
Standard screen
① AC
⑧
② m/s
③
④ 0000 Range
⑤ 000/000
⑥ ⑦
①①①① Output Mode
Display the Output mode of Headphone output terminal on the base.
AC :Waveform output
Level ADJ :Headphone output -3,-2,-1,0,+1,+2,+3
A waveform signal is outputted when Menu 3/3 Moni / Level is “AC”. Moreover, you can act as
the monitor of the vibration value which plug adapter PC-260MS connect with portable
headphone ATH-FC5 BK of an option at the time of a level ADJ "-3 and –2・・・・+3".
②②②② Data display
Displays the present value by digital value in intervals of approx.1second or 2seconds.
Select with Menu 3/2 Disp Time.
③③③③ Bar display
Displays the present momentary value with a bar.
The bar displays the value of the displayed data in intervals of approx. 0.1 seconds.
④④④④ Range display
Displays the range set with the Range key.0 ― 20,0 ―200(Displacement Mode ; 0 ― 200,
0 ―2000).
⑤⑤⑤⑤ The number of the record data display
Displays the number of the record data 001~256.
⑥⑥⑥⑥ Selected Mode display of cursor button
Displays the variable mode by cursor button
Range :Change Level Range
0 ― 20,0 ―200(Displacement Mode ; 0 ― 200,0 ―2000)
Peak/RMS :Change Display Mode
RMS ;True Effective value
Peak ;waveform amplitude value
EQPeak ;RMS×√2
EQp-p ;RMS×√2×2(only Displacement)
Mode :Changes Measurement Mode
m/s2 ;Acceleration(ACC)
mm/s ;Velocity(VEL)
μm ;Displacement(DISP)
AC
ACAC
2222
m/s
⑨
136.0
136.0
136.0136.0
Range 200
Range Range
000/000 RMS
000/000000/000
m/sm/s
200
200 200
RMS ⑩
RMSRMS
― 11 ―
Page 13

Description of Screen
⑦⑦⑦⑦ Display of state
no display :Normal display
Ov :Blinking Over display
Hold :Blinking Data save
Memory :Blinking Memory display mode
Save :Blinking Turn off after selected cursor button
⑧⑧⑧⑧ Display the condition of the batteries
Display the condition of the batteries. Reference to Battery installation P14 ~ 15.
⑨⑨⑨⑨ Display Measurement Mode
Measurement Mode
m/s2 :Acceleration(ACC)
mm/s :Velocity(VEL)
μm :Displacement(DISP)
⑩⑩⑩⑩ Change Display Mode
Peak/RMS :Change Display Mode
RMS ;True Effective value
Peak ;waveform amplitude value
EQPeak ;RMS×√2
EQp-p ;RMS×√2×2(only Displacement)
― 12 ―
Page 14

Description of Screen
Menu screen
It pushes, when setting up measurement conditions. There are three Menu screens.
If it pushes 4 times, it will return to a standard screen.
****
**** is a setting value at the time of factory shipments.
********
Menu 1/3
<Menu>
Meas
Meas ::::Manu
MeasMeas
Mem Clr
Mem Call
I/O
I/O ::::OFF
I/OI/O
Printer
PC
Date
TTTTime
Date ::::2000
DateDate
ime ::::00
imeime
Menu 2/3
Range
Mode
Filter
Conv
Disp Time
Range ::::200,,,,20
RangeRange
Mode ::::m/s
ModeMode
Filter :OFF
FilterFilter
Conv :RMS
ConvConv
Disp Time :1s
Disp TimeDisp Time
2s ;Indication period(Data display) display it every 2seconds
Menu 3/3
Moni/Level
Moni/Level ::::AC
Moni/LevelMoni/Level
Level ADJ ;Portable headphone output
AutoPwrOff
AutoPwrOff ::::OFF
AutoPwrOffAutoPwrOff
ON
LCD cont
LCD cont ::::**** ;LCD contrast adjustment
LCD contLCD cont
* ・・・thin
*****・・・deep
BBBBaud rate
aud rate ::::4800
aud rateaud rate
<Menu> 1/3
<Menu><Menu>
Meas
Meas :Manu
MeasMeas
I/O
I/O :OFF
I/OI/O
Date
Date :00/00/00
DateDate
Time
Time :00:00:00
TimeTime
1/3
1/3 1/3
:Manu
:Manu:Manu
:OFF
:OFF:OFF
:00/00/00
:00/00/00:00/00/00
:00:00:00
:00:00:00:00:00:00
Manu ;Measurement
ManuManu
Mem Clr ;Memory data clearance
Mem ClrMem Clr
Mem Call ;Memory data call
Mem CallMem Call
OFF ;Output OFF of the data is carried out to
OFFOFF
an outer instrument.
Printer ;Output to a printer
PrinterPrinter
PC ;It data-outputs to a PC
PCPC
2000////01
20002000
00::::00
0000
<Menu>
<Menu> 2/3
<Menu><Menu>
Range
Range :20
RangeRange
Mode
Mode :m/s
ModeMode
Filter
Filter :OFF
FilterFilter
Conv
Conv :EQPK
ConvConv
Disp Time
Disp Time :1s
Disp TimeDisp Time
01////01
01 ;year/month/day
0101
0101
00::::00
00 ;hour:minute:second
0000
0000
2/3
2/3 2/3
:20
:20:20
2222
:m/s
:m/s:m/s
:OFF
:OFF:OFF
:EQPK
:EQPK:EQPK
:1s
:1s:1s
20(In the case of displacement 2000
2020
2222
m/s
(Acceleration),mm/s
m/sm/s
mm/s(Velocity),μμμμmmmm(Displacement)
mm/smm/s
2000,200
20002000
200)
200200
(A Filter also interlocks)
OFF(Acceleration),1kHz
OFFOFF
1kHz(Velocity),300Hz
1kHz1kHz
300Hz(Displacement)
300Hz300Hz
(An independent setup is impossible)
RMS,EQPP
EQPP(EQp-p Only displacement)EQPK
RMSRMS
EQPPEQPP
1s ;Indication period(Data display) display it every 1second
1s1s
<Menu>
<Menu> 3/3
<Menu><Menu>
Moni/Level
Moni/Level :AC
Moni/LevelMoni/Level
AutoPwrOff
AutoPwrOff :OFF
AutoPwrOffAutoPwrOff
LCD cont
LCD cont :*
LCD contLCD cont
BBBBaud rate
aud rate :9600
aud rateaud rate
3/3
3/3 3/3
:AC
:AC:AC
:OFF
:OFF:OFF
:*
:*:*
:9600
:9600:9600
EQPK(EQPeak),PEAK
EQPKEQPK
AC ;Waveform output
ACAC
----3333,----2222,-1111,0000,+1
OFF ;Continuation operation
OFFOFF
ON ;Power is turned off after about 1 minite.
ONON
4800,9600
48004800
9600,19200
96009600
19200 baud rate setup
19200 19200
+1,+2
+2,+3
+1+1
+2+2
+3
+3+3
PEAK
PEAKPEAK
― 13 ―
Page 15

Preparation
The required matter is indicated before beginning measurement.
Please do at a position of power switch is off at the time of set the battery and connection cords.
Power
It operates by two alkaline dry cells type LR03 or AC adapter AC-1046 (option).
Battery installation
When the unit is in operation, turn off the power by pressing the Power
1)Slide the battery cover of the back to the lower direction while pressing down on the cover.
To a direction with aggressiveness
3)Insert two AAA dry cell batteries in the direction indicated in the battery case and close the
battery cover.
The battery life is changed by environment to be used.
It is possible to continuation use for about 12hours in case of two alkali dry cells AAA.
Power switch.
PowerPower
!!!! CAUTION
● Please be sure to remove a dry cell AAA, when there is no schedule used for a week or
more.
It may become the cause of failure by liquid leak.
● Please put in correctly polar "+" and "-" of a dry cell not to mistake.
● Moreover, please put in the new dry cell of the kind with four [ same ] at the time of
exchange. A different kind and use of old and new is cause failure.
― 14 ―
Page 16

3)Long-press the Power
Power
Type
Start Screen
The indicator is shown battery remaining capacity on the upper right of a display screen.
AC
Battery remaining capacity
m/s
0000 Range
000/000
The following displays tell you the condition of the batteries.
Full
When LCD display tells low battery, install new batteries.
For long-term measurement, install new batteries in advance.
Power button for 1 sec or more.
PowerPower
Type 4200
Type Type
AC
ACAC
136.0
136.0
136.0136.0
Range 200
Range Range
000/000 RMS
000/000000/000
4200
42004200
Ver.1.2
Ver.1.2
Ver.1.2Ver.1.2
2000/01/01
2000/01/01
2000/01/012000/01/01
00:00:00
00:00:00
00:00:00 00:00:00
2222
m/s
m/sm/s
200
200 200
RMS
RMSRMS
Power
Power Power
EMPTY
Replace batteries
Preparation
― 15 ―
Page 17

Connection of a connection code
1)When the unit is in operation, turn off the power by pressing the Power
Acceleration pickup MODEL 7812B and Compact size vibration meter MODEL4200 are
connected
by curl cable as shown in the following figure.
2)The BNC connector of a curl cable is connected to the input terminal of a main part.
Mark( ) of the BNC connector(a input terminal) projection portion by the side of a main
body and the BNC connector of a curl cable is united, and it pushes in straightly.
It draws out straightly at the time of removal.
Projection portion
Mark
Power switch.
PowerPower
Preparation
!!!! CAUTION
● The connection connector of a main part and a curl cable is one-touch type BNC connector.
Please do not turn by the connector part at the time of connection, or after connection.
It becomes the cause of failure or incorrect operation.
3)Accelerometer connect to Connector of F TYPE.
This portion is turned
clockwise and put in.
BNC CONNECTOR
Input connector
Curl cable
F TYPE CONNECTOR
Accelerometer
MODEL7812B
― 16 ―
Page 18

10000
A Contact pin
A Contact pin
Magnet
Magnet
((Standard
Standard
)
)
A Strong Magnet
A Strong MagnetA Strong Magnet
A Strong Magnet
Screw stop
Screw stop
Double-stick tape
Double-stick tape
Attachment of an acceleration pickup
There are some methods of attachment to the measurement subject of Accelerometer.
Contact resonance frequency * changes with the attachment methods of an Accelerometer
sharply.
Please perform suitable attachment in consideration of the advantage and fault of each
attachment method
*Contact resonant frequency and the high region characteristic
If an Accelerometer is attached in a measurement subject, one vibration system will be
formed and the peculiar resonance frequency of the system will be decided.
This is called contact resonance frequency.
Contact resonant frequency is boiled variously and changes with the fixed method of
Accelerometer and measurement subject, or contact states.
A lower figure shows change of the high region characteristic by the attachment
method. Therefore, the suitable attachment method of Accelerometer is chosen, and in
order to remove the influence of Contact resonant frequency further, it is necessary to
choose the frequency range.
]:
An example of change that high frequency response by the Accelerometer attachment
method is shown below.
20
15
10
5
Re s p ons e
Preparation
(dB)
0
-5
-10
-15
-20
10 100 1000
Frequency (Hz)
― 17 ―
Page 19

Preparation
Fixation with a screw
The usage which fixes an acceleration pickup with a screw is the most fundamental method,
and its oscillation characteristic is the best
Accelerometer
MODEL 7812B
0.4a~1.6a
Attachment screw
M6、P=1
Please make 0.4a-1.6a to the surface of an
attachment side.
Please fasten the bolting torque with an
Accelerometer, an attachment screw, and
a measurement subject by 1 - 1.5 N-m.
Accelerometer is a product made from an
aluminum alloy. Please apply a thin of
silicon grease to the screw parts and you
can mount smoothly.
Fixation with a Magnet
Although a magnet can be used when the measurement subject is made of the metal which sticks to
a magnet, since contact resonant frequency falls, it is restricted to measurement for middle and low
frequency.
Please fasten the bolting torque of a
Accelerometer and a magnet by 1 - 1.5
N-m.
Accelerometer is a product made from an
Accelerometer
MODEL 7812B
aluminum alloy.
Please apply a thin of silicon grease to the
screw parts and you can mount smoothly.
Magnet
!!!! CUTION
●●●● A magnet is very powerful (adsorption power 100N).
Please be careful not to be hurt enough, when attaching and detaching to a measurement
subject. Moreover, what is influenced of magnetic should release a magnetic card etc.
enough. It may destroy and break down.
― 18 ―
Page 20
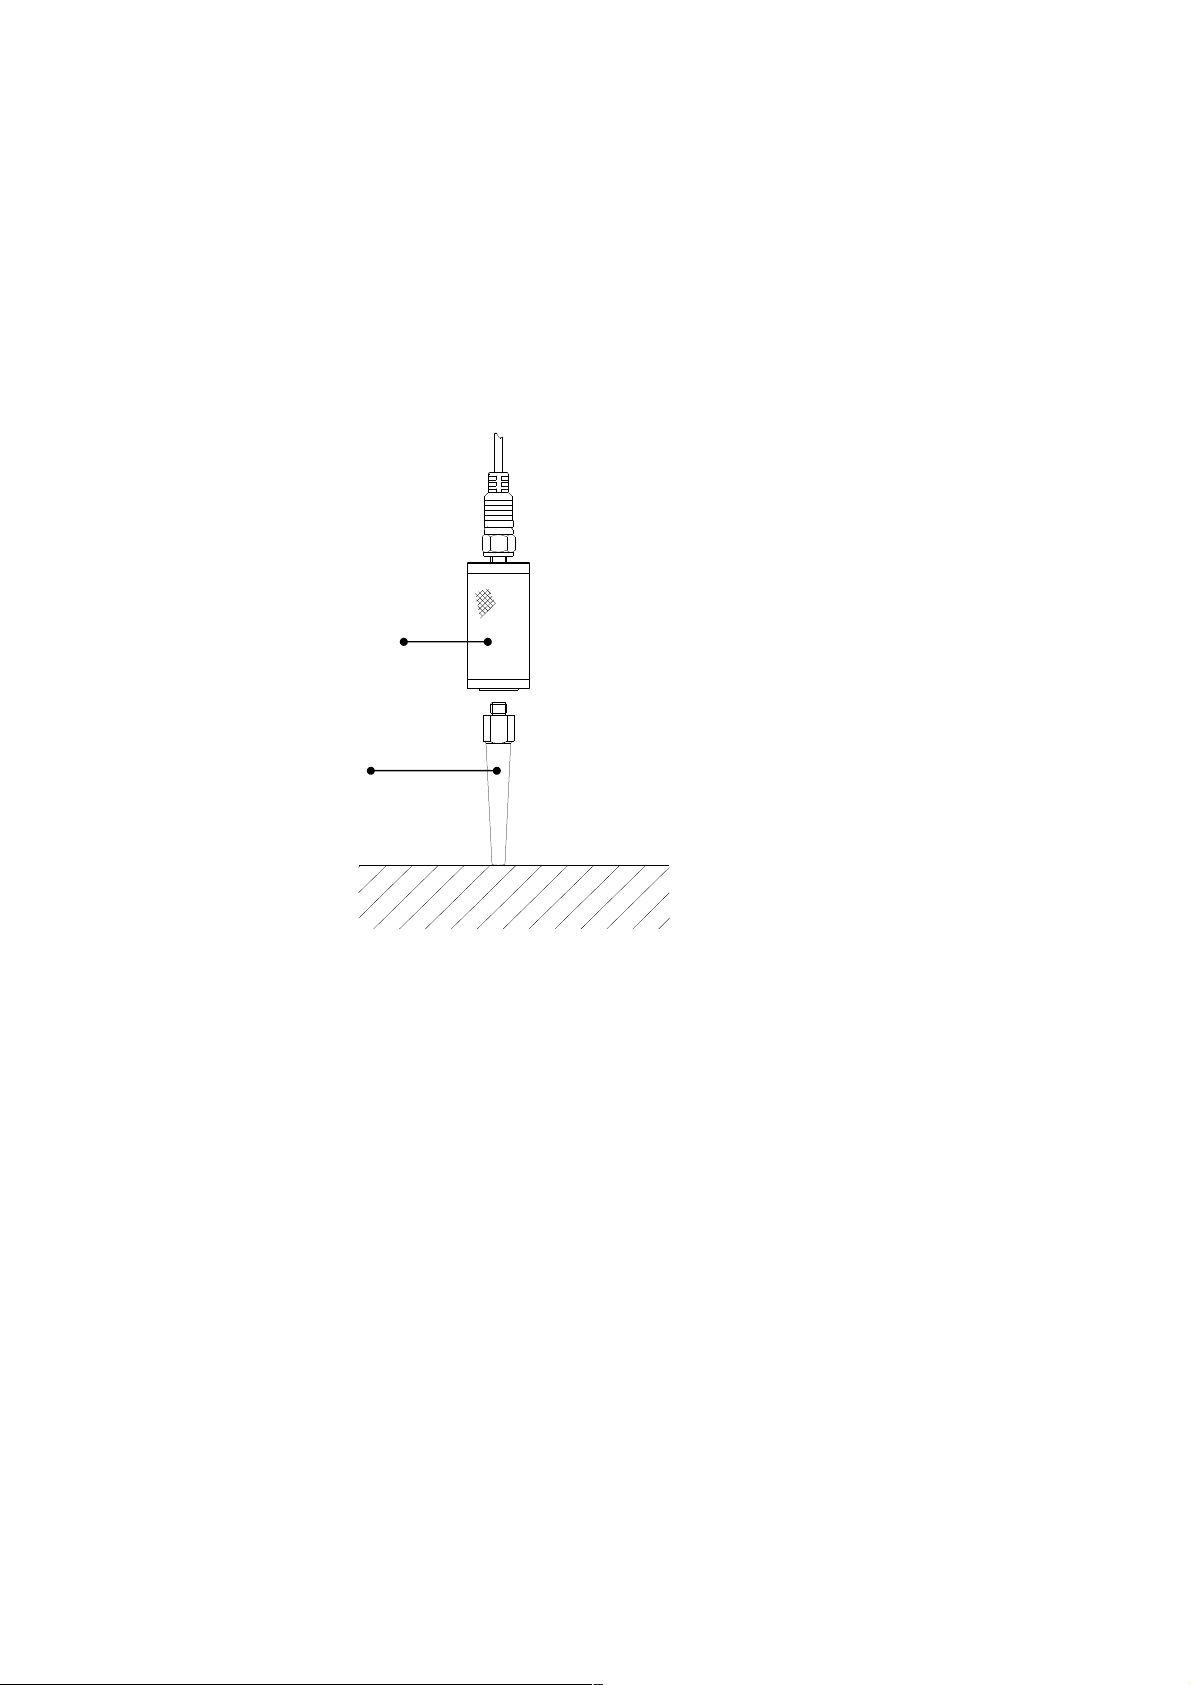
Forcing by the contact pin
Measure in the place of an unfixable narrow place or a thin pipe where does not have sufficient
contact surface product using a contact pin.
Although it is the easiest method, 500 or more Vibration measurement cannot be performed
because Contact Resonant Frequency falls very much,
Please fasten the bolting torque of an
Accelerometer and Contact pin by 1 - 1.5
N-m.
Accelerometer
MODEL 7812B
An Accelerometer is a product made from
an aluminum alloy.
Please apply a thin of silicon grease to the
screw parts and you can mount smoothly.
Contact pin
Fixation a double-sided tape
When Vibration frequency is low, and amplitude is small, it can fix with double-sided adhesive
tape.
Preparation
― 19 ―
Page 21

Setting
Setting mode
Whenever it pushes a Menu
MENU 2/3
MENU 2/3 → MENU 3/3
MENU 2/3MENU 2/3
MENU 3/3 → standard screen ( measurement screen ) it changes.
MENU 3/3MENU 3/3
Menu
Menu
Menu Menu
Calendar adjustment
To adjust the calendar (time), operate as follows.
You can adjust calendar in the [Menu] mode in the same way as LCD adjustment.
【【【【Calendar adjustment】】】】
1) When you press the Menu
2) Select Date with Cursor button , then move the cursor rightward with cursor button .
3) Set the year/month/day with cursor button and select numerical value with cursor
button , then press Save/Set
the setting.
After pressing Save/Set
4) If you want to go back to the measurement mode, pressing it three times returns to the
Menu
Menu button.
MenuMenu
Menu button, standard screen ( measurement screen ) → MENU 1/3
MenuMenu
The four directions of cursor button
<Menu>
<Menu>
<Menu><Menu>
Meas
Meas :Manu
MeasMeas
I/O
I/O :OFF
I/OI/O
Date
Date ::::00
DateDate
Time
Time :00:00:00
TimeTime
Menu button the following screen <<<<Menu 1/3
MenuMenu
1/3
1/3
1/3 1/3
:Manu
:Manu:Manu
:OFF
:OFF:OFF
00/0
/00/00
0000
/0/0
:00:00:00
:00:00:00:00:00:00
0/00
0/000/00
Date adjustment
Time adjustment
Menu 1/3>>>> appears.
Menu 1/3Menu 1/3
<Menu>
<Menu>
<Menu><Menu>
Meas
Meas :Manu
MeasMeas
I/O
I/O :OFF
I/OI/O
Date
Date ::::00
DateDate
Time
Time :00:00:00
TimeTime
Save/Set button to save
Save/SetSave/Set
Save/Set button, the cursor moves to leftward.
Save/SetSave/Set
1/3
1/3
1/3 1/3
:Manu
:Manu:Manu
:OFF
:OFF:OFF
00/00/00
/00/00
0000
/00/00/00/00
:00:00:00
:00:00:00:00:00:00
MENU 1/3 →
MENU 1/3MENU 1/3
― 20 ―
Page 22

Setting
【【【【Time adjustment】】】】
1) When you press the Menu
Menu button the following screen appears.
MenuMenu
2) Select time with Cursor button , then move the cursor rightward with cursor button .
<Menu>
<Menu>
<Menu><Menu>
Meas
Meas :Manu
MeasMeas
I/O
I/O :OFF
I/OI/O
Date
Date ::::00
DateDate
Time
Time ::::00
TimeTime
1/3
1/3
1/3 1/3
:Manu
:Manu:Manu
:OFF
:OFF:OFF
00/0
/00/00
0000
/0/0
00:00:00
:00:00
0000
:00:00:00:00
0/00
0/000/00
3) Set the hour : minute : second with cursor button , then press Save/Set
Save/Set button to save
Save/SetSave/Set
the setting.
After pressing Save/Set
Save/Set button , the cursor moves leftward.
Save/SetSave/Set
4)If you want to go back to the measurement mode, pressing it three times returns to the
Menu
Menu button.
MenuMenu
LCD contrast adjustment
You can adjust LCD contrast, when the batteries were low, or when the new batteries were
installed. The procedure is as follows.
Menu
Menu
MenuMenu
1) When you press the Menu
Menu button three to return to the following screen appears.
MenuMenu
2)Select LCD cont with Cursor button , then move the cursor rightward with cursor button.
<Menu>
<Menu> 3/3
<Menu><Menu>
Moni/Level
Moni/Level :AC
Moni/LevelMoni/Level
AutoPwrOff
AutoPwrOff :OFF
AutoPwrOffAutoPwrOff
LCD cont
LCD cont :*
LCD contLCD cont
3/3
3/3 3/3
:AC
:AC:AC
:OFF
:OFF:OFF
:*
:*:*
BBBBaud rate
aud rate :9600
aud rateaud rate
:9600
:9600:9600
3)Adjust the LCD contrast with cursor button , then press Save/Set
the setting.
After pressing Save/Set
4)Press the Menu
Save/Set button, the cursor moves to leftward.
Save/SetSave/Set
Menu button one to return to the measurement screen.
MenuMenu
The four directions of cursor button
Save/Set
LCD adjustment
Save/Set button to save
Save/SetSave/Set
― 21 ―
Page 23

Measurement
Power ON
1) Long-press the Power
following screen is displayed:
Power
Type 4200
Start Screen
Power button for 1 sec or more. Immediately after the power goes on, the
PowerPower
Power
Power Power
Type 4200
Type 4200 Type 4200
Ver. 1.2
Ver. 1.2
Ver. 1.2Ver. 1.2
2000/01/01
2000/01/01
2000/01/012000/01/01
00:00:00
00:00:00
00:00:00 00:00:00
After about 5 seconds
AC
136.0
136.0
136.0136.0
0 Range 200
000/000
m/s2
RMS
― 22 ―
Page 24

Change the mode
Select
C
hange the mode
Select
Measurement
Measurement of acceleration (ACC)
Just after power supply on, it starts with the acceleration measurement mode mentioned above.
The current value is displayed in digital form at an interval of 2 sec and a bar at an interval of 0.1
seconds.
m/s
m/sm/s
2222
→ mm/s
AC
136.0
136.0
136.0136.0
0 Range 200
000/000 RMS
000/000000/000
000/000 RMS
Display of command
mm/s)
mm/smm/s
RMS/PEAK)、display the "Peak/RMS
RMS/PEAKRMS/PEAK
RMS → Peak
RMSRMS
Peak → EQPeak
PeakPeak
m/s2
Display of a state
EQPeak → RMS
EQPeak EQPeak
RMS
RMS RMS
RMS.
RMSRMS
Measurement value Mode
Measurement Range
Detector characteristics
Peak/RMS" by
Peak/RMSPeak/RMS
and the value
The command
000/000
<<<< Change of the Measurement mode >>>>
1)Select the command with cursor button , the Range change to Mode.
2)Mode is [m/s2] with cursor button .
(It changes ; m/s
<<<< Change of the Measurement Range >>>>
1)Select the command with cursor button again, the Range change to Mode.
2)Operated so that a level may become a legible value with cursor button .
(Number on the right of a bar It change with 200 → 20 → 200.)
Since [OV] (Overload) is displayed when a value is large, a range is adjusted.
<<<< Change of the Detector >>>>
1)When you want to change the mode and measure,(RMS/PEAK
the command selection cursor button , and changes by the cursor button .
Whenever it pushes, the mode changes with RMS
2)It is pressing cursor button and display can be Hold(ed) to fix a display value.
A key is pressed again to acquire the value again.
Display of command
2222
m/s
→ mm/s
m/sm/s
mm/s → μμμμmmmm → m/s
mm/smm/s
Measurement the velocity((((VEL))))
The current value is displayed in digital form at an interval of 2 sec and a bar at an interval of
0.1 seconds.
00
and the value
The command
Display of command
― 23 ―
AC
136.0
136.0
136.0136.0
0 Range 200
000/000
0/000 RMS
0000
0/0000/000
000/000 RMS
Display of command
m/s2
RMS
RMS RMS
Display of a state
Measurement value Mode
Measurement Range
Detector characteristics
Page 25

Change the mode
Select
Measurement
<<<< Change the measurement mode
Change the measurement mode >>>>
Change the measurement mode Change the measurement mode
1)Select the command with cursor button , he Range change to Mode.
2)Mode is mm/s
(m/s
mm/s with cursor button .
mm/smm/s
2222
m/s
→ mm/s
m/sm/s
mm/s → μμμμmmmm → m/s
mm/smm/s
m/s
m/sm/s
2222
→ mm/s
mm/s)
mm/smm/s
The operation method of a measurement range and display mode data recording is the same as
acceleration (ACC).
Measurement the Displacement((((DISP))))
The current value is displayed in digital form at an interval of 2 sec and a bar at an interval of 0.1
seconds.
AC
and the value
The command
000/000
136.0
136.0
136.0136.0
m/s2
0 Range 200
000/000 RMS
000/000000/000
000/000 RMS
RMS
RMS RMS
Measurement value Mode
Measurement Range
Detector characteristics
<<<< Change the measurement mode
Change the measurement mode >>>>
Change the measurement mode Change the measurement mode
Display of command
Display of command
Display of a state
1)Select the command with cursor button , the Range change to Mode.
2)Mode is μμμμmmmm with cursor button .
(m/s
m/s
m/sm/s
2222
→ mm/s
mm/s → μμμμmmmm → m/s
mm/smm/s
m/s
m/sm/s
2222
→ mm/s
mm/s )
mm/smm/s
The operation method of a measurement range and display mode data recording is the same as
acceleration (ACC).
― 24 ―
Page 26

Data Recording
It is inputting Save/Set
AC
Cursor button
m/s
0000 Range
016/016
Save/Set
1)Push the Save/Set
2)Select the recording number with cursor button .
016/016
Total data
The recording number
3)It will be recorded if Save/Set
016/016
016/016016/016
If Save/Set
Save/Set is pushed continuously, it will be recorded on the newest number. Movement
Save/Set Save/Set
with cursor button is restricted to a number [ finishing / record ].
Save/Set and can record at any time to record data.
Save/SetSave/Set
AC
ACAC
136.0
136.0
136.0136.0
Range 200
Range Range
Save/Set
Save/Set Save/Set
Save/Set blinks Save
Save/Set Save/Set
Save.
SaveSave
Save/Set is pushed again (a Save display disappears).
Save/Set Save/Set
016/016 Save
016/016016/016
Save RMS
Save Save
The recording number
2222
m/s
m/sm/s
200
200 200
RMS
RMS RMS
Display of a state
Measurement
― 25 ―
Page 27

Measurement
Data call
You can see the recorded data with Meas of Menu 1/3 is set to Mem Call.
01/01
Cursor button m/s
Menu
016/016
Save/Set
1) When you press the Menu
2) Select Meas with Cursor button , then move the cursor rightward with cursor button .
<Menu>
3) Set the Mem Call
After pressing Save/Set
4)If you want to go back to the measurement mode, pressing it three times returns to the
Menu
Menu button.
MenuMenu
5)If you select a Recoding Number with cursor button , a data display.
013/016
Total data
The recording number
Menu 0000 Range
Menu Menu
Save/Set
Save/Set Save/Set
Menu button the following screen appears.
MenuMenu
<Menu> 1/3
<Menu><Menu>
Meas
Meas ::::Manu
MeasMeas
I/O
I/O :OFF
I/OI/O
Date
Date :00/00/00
DateDate
Time
Time :00:00:00
TimeTime
Mem Call with cursor button , then press Save/Set
Mem CallMem Call
Save/Set button , the cursor moves leftward.
Save/SetSave/Set
013/016
013/016013/016
1/3
1/3 1/3
Manu
ManuManu
:OFF
:OFF:OFF
:00/00/00
:00/00/00:00/00/00
:00:00:00
:00:00:00:00:00:00
01/01 12
01/01 01/01
136.0
136.0
136.0136.0
Range 200
Range Range
016/016 Memory
016/016016/016
The recording number
Save/Set button to save the setting.
Save/SetSave/Set
12::::01
01
12 12
0101
m/s
m/sm/s
200
200 200
Memory RMS
Memory Memory
RMS
RMS RMS
Display of a state
2222
― 26 ―
Page 28

Measurement
Data deletion
You can see the recorded data with Meas of Menu 1/3 is set to Mem Clr.
01/01
Cursor button m/s
Menu
016/016
Save/Set
1) When you press the Menu
2) Select Meas with Cursor button , then move the cursor rightward with cursor button .
<Menu>
3) Set the Mem Clr
4) It delete the data with Save/Set
5) If you want to go back to the measurement mode, pressing it three times returns to the
Menu
Menu button.
MenuMenu
6)The recording number / Total data becomes 000/000.
000/000
Total data
The recording number
Menu 0000 Range
Menu Menu
Save/Set
Save/Set Save/Set
Menu button the following screen appears.
MenuMenu
<Menu> 1/3
<Menu><Menu>
Meas
Meas ::::Men Clr
MeasMeas
I/O
I/O :OFF
I/OI/O
Date
Date :00/00/00
DateDate
Time
Time :00:00:00
TimeTime
Mem Clr with cursor button , then press Save
Mem ClrMem Clr
Clear
Clear
ClearClear
Save/Set Key
Save/Set Key
Save/Set KeySave/Set Key
Save/Set .
Save/Set Save/Set
000/000
000/000000/000
1/3
1/3 1/3
Men Clr
Men ClrMen Clr
:OFF
:OFF:OFF
:00/00/00
:00/00/00:00/00/00
:00:00:00
:00:00:00:00:00:00
01/01 12
01/01 01/01
136.0
136.0
136.0136.0
Range 200
Range Range
016/016 Memory
016/016016/016
The recording number
Save/Set
SaveSave
12::::01
12 12
Memory RMS
Memory Memory
Display of a state
/Set button to save the setting.
/Set/Set
01
0101
2222
m/s
m/sm/s
200
200 200
RMS
RMS RMS
― 27 ―
Page 29

Measurement
Output signal
Using AC / Portable headphone output terminal which is the bottom of a main part can observation
and record output signal.
AC / Portable headphone output terminal
A waveform signal is output when Menu 3/3 Moni/Level is AC.
AC output mode
AC
Cursor button m/s
Menu
016/016
Save/Set
1) When you press the Menu
2) Select Moni/Level
button .
3) Set the AC
After pressing Save/Set
4) If you want to go back to the measurement mode, pressing it a time returns to the
Menu
Menu button.
MenuMenu
Menu 0000 Range
Menu Menu
Save/Set
Save/Set Save/Set
Menu button the following screen appears.
MenuMenu
Moni/Level with Cursor button , then move the cursor rightward with cursor
Moni/LevelMoni/Level
<Menu>
<Menu> 3/3
<Menu><Menu>
Moni/Level
Moni/Level :AC
Moni/LevelMoni/Level
AutoPwrOff
AutoPwrOff :OFF
AutoPwrOffAutoPwrOff
LCD cont
LCD cont :*
LCD contLCD cont
BBBBaud rate
aud rate :9600
aud rateaud rate
AC with cursor button , then press Save/Set
ACAC
Save/Set button , the cursor moves leftward.
Save/SetSave/Set
3/3
3/3 3/3
:AC Output selection
:AC:AC
:OFF
:OFF:OFF
:*
:*:*
:9600
:9600:9600
AC
ACAC
2222
m/s
136.0
136.0
136.0136.0
Range 200
Range Range
016/016 Save
016/016016/016
Save/Set button to save the setting.
Save/SetSave/Set
Save RMS
Save Save
m/sm/s
200
200 200
RMS
RMS RMS
― 28 ―
Page 30

Reference 1
Velocity((((VEL))))Frequency characteristics JIS Standards
5
0
-5
R
e
-10
s
p
レ
-15
o
ス
n
ポ
s
ン
-20
ス
e
(dB)
-25
-30
-35
-40
1 10 100 1000 10000
周波数(Hz)
Fre q u e ncy ( H z )
*This inside of a dotted line with a velocity of 10-1kHz satisfies the frequency range
about mechanical vibration of rotating for vibration severity of JIS B0907~1989.
― 29 ―
Page 31

Handling of an option article
AC adaptor AC-1046
When you use a main body by AC adapter AC-1046 (option), please connect, as shown in the
following figure.
Please connect it you should check that the power supply of a main part is turned off.
AC adaptor terminal
AC adaptor
AC-1046
!!!! CAUTION
●●●● Stop using the instrument, when producing smoke, bad smell or noise. It causes fire or
shock hazard. Turn off the POWER switch and unplug the AC adapter (optional) from
outlet as soon as possible. To reduce risk of injury, take it to a qualified serviceman when
service or repair is required. Please contact us or the dealer when service or repair is
required.
●●●● Do not substitute parts or modify instrument. It causes bodily injury, fire or shock hazard.
●●●● Do not use the AC power adapter except the optional AC-1046.
Other type of adapter may cause damage to the instrument.
●●●● Do not touch the plug of AC adapter (AC-1046) with wet hands. It causes shock hazard.
Stop using the instrument, when an object or liquid falls/spills into the instrument.
It causes fire or shock hazard. Turn off the POWER switch and unplug AC adapter
(optional) from outlet as soon as possible.
To reduce risk of injury, take it to a qualified serviceman when service or repair is
required.
Please contact us or the dealer when service or repair is required.
― 30 ―
Page 32

Handling of an option article
Connection with a printer
Connect a main body and printer BS-80TSL with the interface cable BC-0026 as shown in the
following figure.
Interface connector
Interface cable
BC-0026
Set up of RS-232C
Set up the RS-232C by Menu 3/3 baud rate of a main body.
1)It is made a screen. <Menu 3/3
Cursor button 4 direction
Menu
Menu Save/Set
Menu Menu
2) Select baud rate with Cursor button , then move the cursor rightward with cursor
button .
3) Set the 9600 with cursor button , then press Save/Set
<Menu 3/3>
<Menu 3/3<Menu 3/3
> with push 3 times Menu
> >
<Menu>
<Menu> 3/3
<Menu><Menu>
Moni/Level
Moni/Level :AC
Moni/LevelMoni/Level
AutoPwrOff
AutoPwrOff :OFF
AutoPwrOffAutoPwrOff
LCD cont
LCD cont :*
LCD contLCD cont
baud rate
baud rate ::::9600
baud ratebaud rate
Menu .
MenuMenu
Save/Set
Save/Set Save/Set
3/3
3/3 3/3
:AC
:AC:AC
:OFF
:OFF:OFF
:*
:*:*
9600
96009600
Save/Set button to save the setting.
Save/SetSave/Set
― 31 ―
Page 33

Handling of an option article
The printing method
Refer to the handling description of a printer for the printer operation method.
1)The power supply of a printer is turned ON.
2)A setup of a printer is set up as follows.
(Please refer to the handling description P.12 of a printer for details.)
◇A setup of an international character = Japan
◇A setup of printing concentration = 100(%)
◇A setup of head operation = -> Both sides <-
◇The number of printing beams of one line = Graphic(28)
◇A setup of half size / full-size character = Full(28)
◇Auto line feed setup = Invalidity(OFF)
◇SELECT switch use = Available(ON)
◇RS232C Baud rate setup = 9600bps
◇RS232C Data bit length setup = 8bit
◇RS232C Parity setup = Non
◇RS232C Control system = Xon/Xoff
3)SELECT Light Emitting Diode of a printer is made lighting.
4. Menu
Menu It pushes and is <Menu 1/3>
MenuMenu
<Menu 1/3>. It is made a screen.
<Menu 1/3><Menu 1/3>
Cursor button 4 direction
Menu
Menu Save/Set
Menu Menu
Save/Set
Save/Set Save/Set
2)Select I/O Cursor button and cursor is moved to a right item by .
<Menu>
<Menu> 1/3
<Menu><Menu>
Meas
Meas :Manu
MeasMeas
I/O
I/O ::::OFF
I/OI/O
Date
Date :00/00/00
DateDate
Time
Time :00:00:00
TimeTime
1/3
1/3 1/3
:Manu
:Manu:Manu
OFF
OFFOFF
:00/00/00
:00/00/00:00/00/00
:00:00:00
:00:00:00:00:00:00
3)Select Printer by Cursor button and Save/Set
Save/Set by Cursor button .
Save/SetSave/Set
Print
Print
PrintPrint
Save/Set Key
Save/Set Key
Save/Set KeySave/Set Key
3) Save/Set
Save/Set Printing is started.
Save/SetSave/Set
― 32 ―
Page 34

Handling of an option article
The example of printing of a printer
The example of printing of a printer is shown below.
Address No
Measurement time:year / month / day
hour:minute
Measurement value
― 33 ―
Page 35

Handling of an option article
Connection with a PC
When connecting a main part and a personal computer by BC-0026 and conversion connector
A12-25F-9F (option) as shown in the following figure.
Interface cable
BC-0026
Conversion connector
A12-25F-9F
Interface connector
― 34 ―
Page 36

Detail Specification of Communication Command
1111....Interface
RS-232C(asynchronous)
Data size ;8bit
Stop bit ;1it
Parity check ;non
Transfer Speed ;4800,9600,19200bps
Flow control ;non
2222....Data Specification
All the data are outputted in ASC II format.
The PC software needs ‘Time Out’ function.
① 001/256 + LF :Measurement No.
② 05/07/05□16:15 + LF :Measurement date
③ 120.2m/s2□RMS+LF + LF :Data
・
・
① 002/256 + LF
② 05/07/05□16:15 + LF
③
02.02m/s2□RMS+LF + LF
<<<<Explanation>>>>
① Measurement No.・Saving measurement data
(Maximum number of saving measurement data:256) → (001/256 ~256/256)
ex) In the case of ten data : 001/010 Starting with -- 002/010
・
・
010/010 ,and ends.
② Calendar for Measuring Time and Date
year/month/day hour:minute
③ Data mode
<Numeric data>
2000
200.0
20.00
<Measurement mode>
2
m/s
(Acceleration)
μm (Displacement)
mm/s(Velocity)
<Data mode>
Peak
RMS
EQPaek
EQ
P-P
→Selected in MODEL 4200
□ :Space (20)
+LF :Line feed code(0A)
Handling of an option article
― 35 ―
Page 37

Handling of an option article
2222....Communication timing
4200 PC
The data are outputted automatically by operating ‘Menu’
① First, start PC application.
② Turn on the switch ‘Communication’ (to wait for data), and click ‘Cancel’ to
terminate the sequence.
③ Set the type of I/O and PC listed in ‘Menu’ of MODEL 4200
④ Save the data to PC by Save/Set key.
⑤ Confirm the completion of data transfer by checking the last data No.
ex) 001/256 ・・・256/256(as in the case of 256 data)
MODEL 4200 will finish by itself (No handshake)
⑥ In the case of data error, cancel the program.
― 36 ―
Page 38

Handling of an option article
Data managed software
It is possible to manage the data on your PC by using the data handling software.
● Operating system software:Microsoft Windows 2000/XP
● Data sampling and vibration data display for Vibration meter MODEL 4200 through
serial data communication.
● The data is stored in CVS form, corresponding to data processing of spreadsheet
software.
― 37 ―
Page 39

Specification
Accelerometer MODEL 7812B specification
1)Sensor
2)TYPE
3)Sensitivity
4)Transverse Sensitivity
5)Frequency characteristics
6)Constant-current supply
7)Temperature range
8)Size and Weight
:Voltage output type( built-in pre-amplifier)
:7812B
:5.0mV/m/s
:5% or less
:1Hz~8kHz
:DC7V0.5~4mA
:-10~+60℃
:24φ×50 Approx.60g
2
(49.1mV/G)±3% at 100Hz
Specification
Measurement range
Acceleration (ACC) :0.02~200m/s
Velocity (VEL) :0.02~200mm/s RMS
Displacement (DISP) :2~2000μm EQp-p
Frequency range
Acceleration (ACC) :3Hz~10kHz
Velocity (VEL) :10Hz~1kHz(Compliant with JIS B0907-1989)
Displacement (DISP) :10Hz~400Hz
Measurement range
Acceleration (ACC) :20, 200m/s2 RMS
Velocity (VEL) :20, 200mm/s RMS
Displacement (DISP) :200, 2000μm EQ p-p
Display characteristics
Acceleration (ACC) :RMS, EQ Peak, Peak
Velocity (VEL) :RMS, EQ Peak, Peak
Displacement (DISP) :RMS, EQ Peak, EQ p-p Peak
EQ Peak=RMS× 2,EQ p-p=EQ Peak×2
Dynamic characteristic (Time constant):RMS, EQ Peak, EQ p-p;1s
Peak;50msec (rise) / 3s (decay)
Liquid crystal display
Display :LCD with backlight 128×64 dot
Hold :Data hold
Digital display :4digets, Display Period;1s or 2s (selectable)
(Average of 10 data at 100ms, 1s
or 20 data at 100ms, 2s)
Bar - graph :0~100%
Warning (Overload) :[Over] is displayed for full scale
Battery :4-level residual display
Data memory :Max.256, 4kB
Output Terminal :AC on a Menu screen/Portable Headphone Change selection
AC Output :Output Voltage ;1Vrms(FS)
Load resistance ;more than 100kΩ
Headphone Output :Vibration sound monitor by exclusive Portable Headphone
With Volume function
Display precision :±5% (at 9.81m/s2 159.1Hz)
I/O Terminal :Data output for PC and Direct output to printer
Interface ;RS-232C
Operating Temperature :Temperature ;-10~+50℃
Range Humidity ;30%~90%(no condensing)
Battery Type and Life :2 Alkaline dry cells type LR03, Approx.12 hours or AC adapter
Consumption current;When AC adaptor is used ;Approx.1.3VA
Size and Weight :145(H)×48(W)×23.5(D) Approx.130g(Include Batteries)
2
RMS
― 38 ―
Page 40

Reference 2
Relation between indicated value and AC output
The relation between full scale indicated value and AC output voltage at output terminal, in
each Measurement mode and Range, are shown as in the following table.
Measurement
mode
Range Data mode
Full scale
indicating value
RMS 200.0
200 m/s2
ACC
20 m/s2
EQpeak 282.8
PEAK 282.8
RMS 20.00
EQpeak 28.28
PEAK 28.28
RMS 200.0
200 mm/s
VEL
20 mm/s
EQpeak 282.8
PEAK 282.8
RMS 20.00
EQpeak 28.28
PEAK 28.28
RMS 707
2000μm
DISP
200μm
EQpeak 1000
EQ p-p 2000
PEAK 1000
RMS 70.7
EQpeak 100.0
EQ p-p 200.0
PEAK 100.0
Indicated value and output voltage are in linear relationship.
2
ex1) In the case of indicated value 10 m/s
RMS in Range “ACC 20m/s2:
Output voltage=10(m/s2)÷20(m/s2)×1(Vrms)=0.500(Vrms)
2
ex2) In the case of indicated value 5 m/s
EQpeak in Range “ACC 20m/s2:
Output voltage=5(m/s2)÷28.28(m/s2)×1(Vrms)=0.177(Vrms)
ex3) In the case of indicated value 15 μm RMS in Range “DISP 200μm:
Output voltage=15(μm)÷70.7(μm)×1(Vrms)=0.212(Vrms)
Output Voltage
(Vrms)
1.000
― 39 ―
Page 41

A trouble and the processing method
【Power】
Trouble Cause The processing method
The battery is exhausted. Exchange Batteries.
The polarity of a battery is set
conversely.
This meter does not operate,
even if it pushes a switch.
【Display】
Trouble Cause The processing method
A display value is
【The others】
In addition to this The processing method
Key operation cannot be
performed at all.
Data and operation are
It was not long-pressing the
Power button.
After battery replacement, if the meter does not operate normally,
remove the batteries and insert them again after 5 minutes or more.
The cable is not connected
correctly.
The Accelerometer is not set
correctly.
Turned off a switch and long-pressing the power button again.
Reset Batteries correctly.
Long-pressing the
Power button.
Connect the cable is correctly.
Set Accelerometer correctly.
― 40 ―
Page 42

How to connect/disconnect the cable
First, when the unit is in operation, turn off the power by pressing the Power
1))))How to connect/disconnect BNC one-touch connector of the curl cable to/from the input
terminal of 4200 main body.
Input terminal of main body
<Connection>
<Disconnection>
③ Hold up 4200 main body and the mark portion of BNC one-touch connector of curl cable.
④ Draw out straight BNC one-touch connector.
①
① Hold up 4200 main body and BNC one-touch connector of curl cable to fit mark
of BNC connector to the boss of the main body.
② Push straight the BNC one-touch connector into the main body unit it clicks.
③
Part of boss
BNC one-touch connector
Accordion portion
Curl cable
Mark
②
④
Power switch.
Power Power
※※※※The connector is one-touch type BNC connector. Do try to hold up the mark portion
todisconnect, not the accordion portion or the curl cable itself.
Also, during/after connection, make sure you do not try to rotate the connector itself,
which may leads failure or malfunction of any type.
2))))How to connect/disconnect F-type connector of curl cable.
― 41 ―
Page 43

<Connection>
① Hold up Accelerometer and F-type connector of curl cable to fit each other.
② Hold up only F-type connector to turn it clockwise into the Accelerometer.
<Disconnection>
③④ Hold up the Accelerometer and turn F-type connector of curl cable counterclockwise
※※※※Do try to turn only F-type connector without causing damage to the cable, not to turn
Accelerometer
MODEL 7812B
Hold up only F-type connector to turn it clockwise
into the Accelerometer.
① ②
③
until they come free.
or pull the accordion portion or curl cable, which may leads failure or malfunction
brought about the breaking of wire.
F-type Connector
Accordion portion
Curl cable
④
― 42 ―
 Loading...