

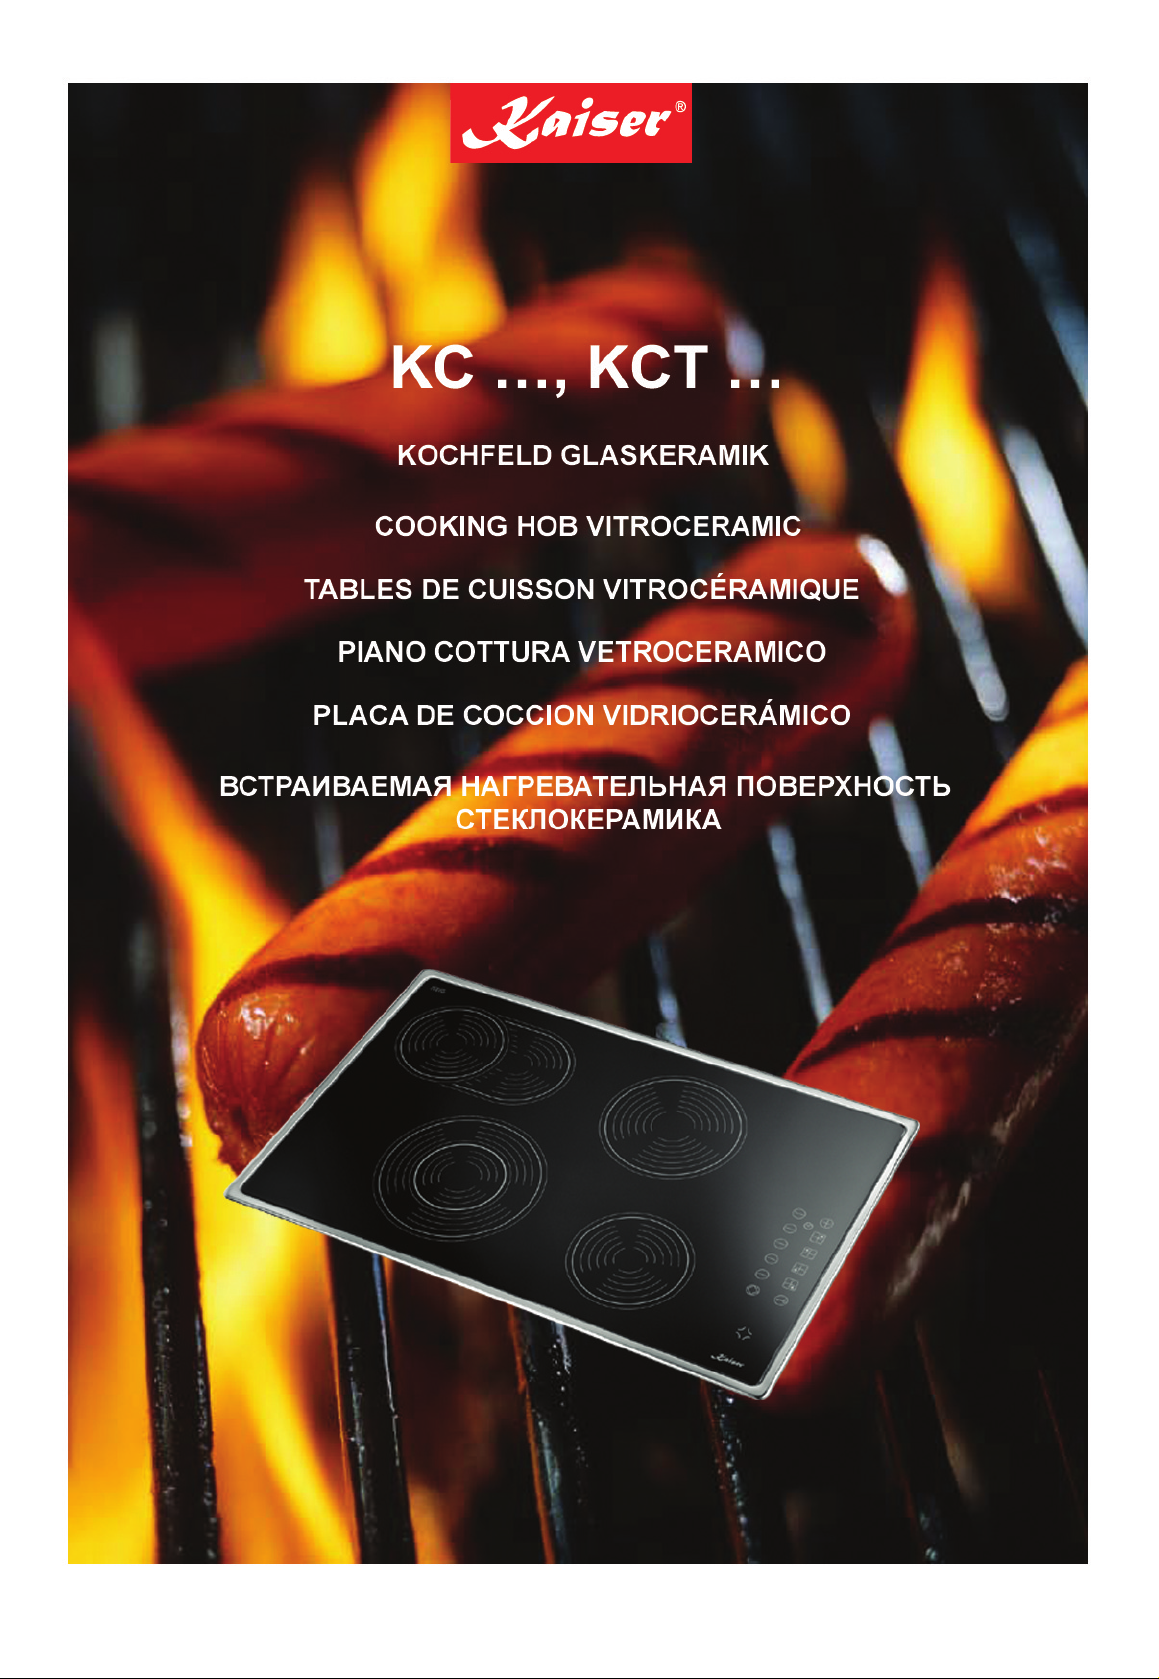
Page 1
Page 2

DE GB
Sehr geehrter Kunde,
wir danken Ihnen und beglückwünschen uns für
Ihre Wahl.
Dieses neue Produkt, sorgfältig entworfen und mit
erstklassigen Materialien
hergestellt, wurde genau
geprüft um alle Ihre Forderungen an ein perfektes Kochen zu erfüllen.
Wir bitten Sie deshalb die
einfachen Anweisungen zu
lesen und einzuhalten,
damit von der ersten
Anwendung an
ausgezeichnete Ergebnisse
erreicht werden können.
Mit diesem modernen
Apparat wünschen wir
Ihnen das Beste.
Dear customer,
We thank you and congratulate you on your
choice.
This new carefully designed
product, manufactured with
the highest quality materials, has been carefully
tested to satisfy all your
cooking demands.
We would therefore request
you to read and follow
these easy instructions
which will allow you to
obtain excellent results
right from the start.
May we wish you all the
very best with your modern
appliance!
OLAN-Haushaltsgeräte
Berlin, Germany
OLAN-Haushaltsgeräte
Berlin, Germany
2
Page 3
ITFR
ES RU
Cher client,
merci et sincères félicitations
pour le choix que vous avez
fait.
Ce nouveau produit,
développé avec soin et
fabriqué avec des matières de
toute première qualité, a été
soigneusement rodé pour
satisfaire toutes Vos exigences d’une cuisson parfaite.
Veuillez lire attentivement les
instructions simples portées
sur cette notice qui vous
permettront d’obtenir
d’excellents résultats dès la
première utilisation.
Nous vous souhaitons une
entière et pleine satisfaction
quant à l’utilisation de cet
appareil moderne.
Caro Cliente,
sentitamente La ringraziamo e ci congratuliamo
per la scelta da Lei fatta.
Questo nuovo prodotto,
accuratamente progettato e
costruito con materiali di
primissima qualità, è stato
accuratamente collaudato
per poter soddisfare tutte le
Sue esigenze di una perfetta
cottura.
La preghiamo pertanto di
leggere e rispettare le facili
istruzioni che Le permetteranno di raggiungere
eccellenti risultati sin dalla
prima utilizzazione.
Con questo moderno apparecchio Le formuliamo i
nostri più vivi auguri.
Estimado Cliente,
le agradecemos mucho y le
felicitamos por su elección.
Este nuevo producto,
cuidadosamente estudiado y
construido con materiales
de primera calidad, ha sido
probado esmeradamente
para poder satisfacer todas
sus exigencias de una
perfecta cocción.
Por lo tanto le rogamos lea
y respete las fáciles instrucciones que le permitirán llegar a resultados excelentes desde la primera
utilización.
Con este moderno aparato
le expresamos nuestras
mejores felicitaciones.
Edf;ftvsq gjregfntkm>
мы благодарим Вас за Ваш
выбор и поздравляем с
удачной покупкой. Этот
новый продукт, тщательно
разработанный и
изготовленный из
первоклассных материалов,
был основательно опробован,
чтобы учесть все Ваши
требования к
совершенствованию процесса
приготовления блюд.
Поэтому мы просим Вас
внимательно прочитать это
руководство по эксплуатации
и соблюдать простые
указания, что позволяет с
самого начала применения
устройства достичь отличных
результатов. С этим
современным аппаратом мы
желаем Вам всего самого
наилучшего.
OLAN-Haushaltsgeräte
Berlin, Germany
OLAN-Haushaltsgeräte
Berlin, Germany
OLAN-Haushaltsgeräte
Berlin, Germany
Kaiser
OLAN-Haushaltsgeräte Berlin,
Germany
3
Page 4

DE GB
Inhaltsverzeichnis
Anweisungen
für den Benutzer
Installation 6
Anwendung 6
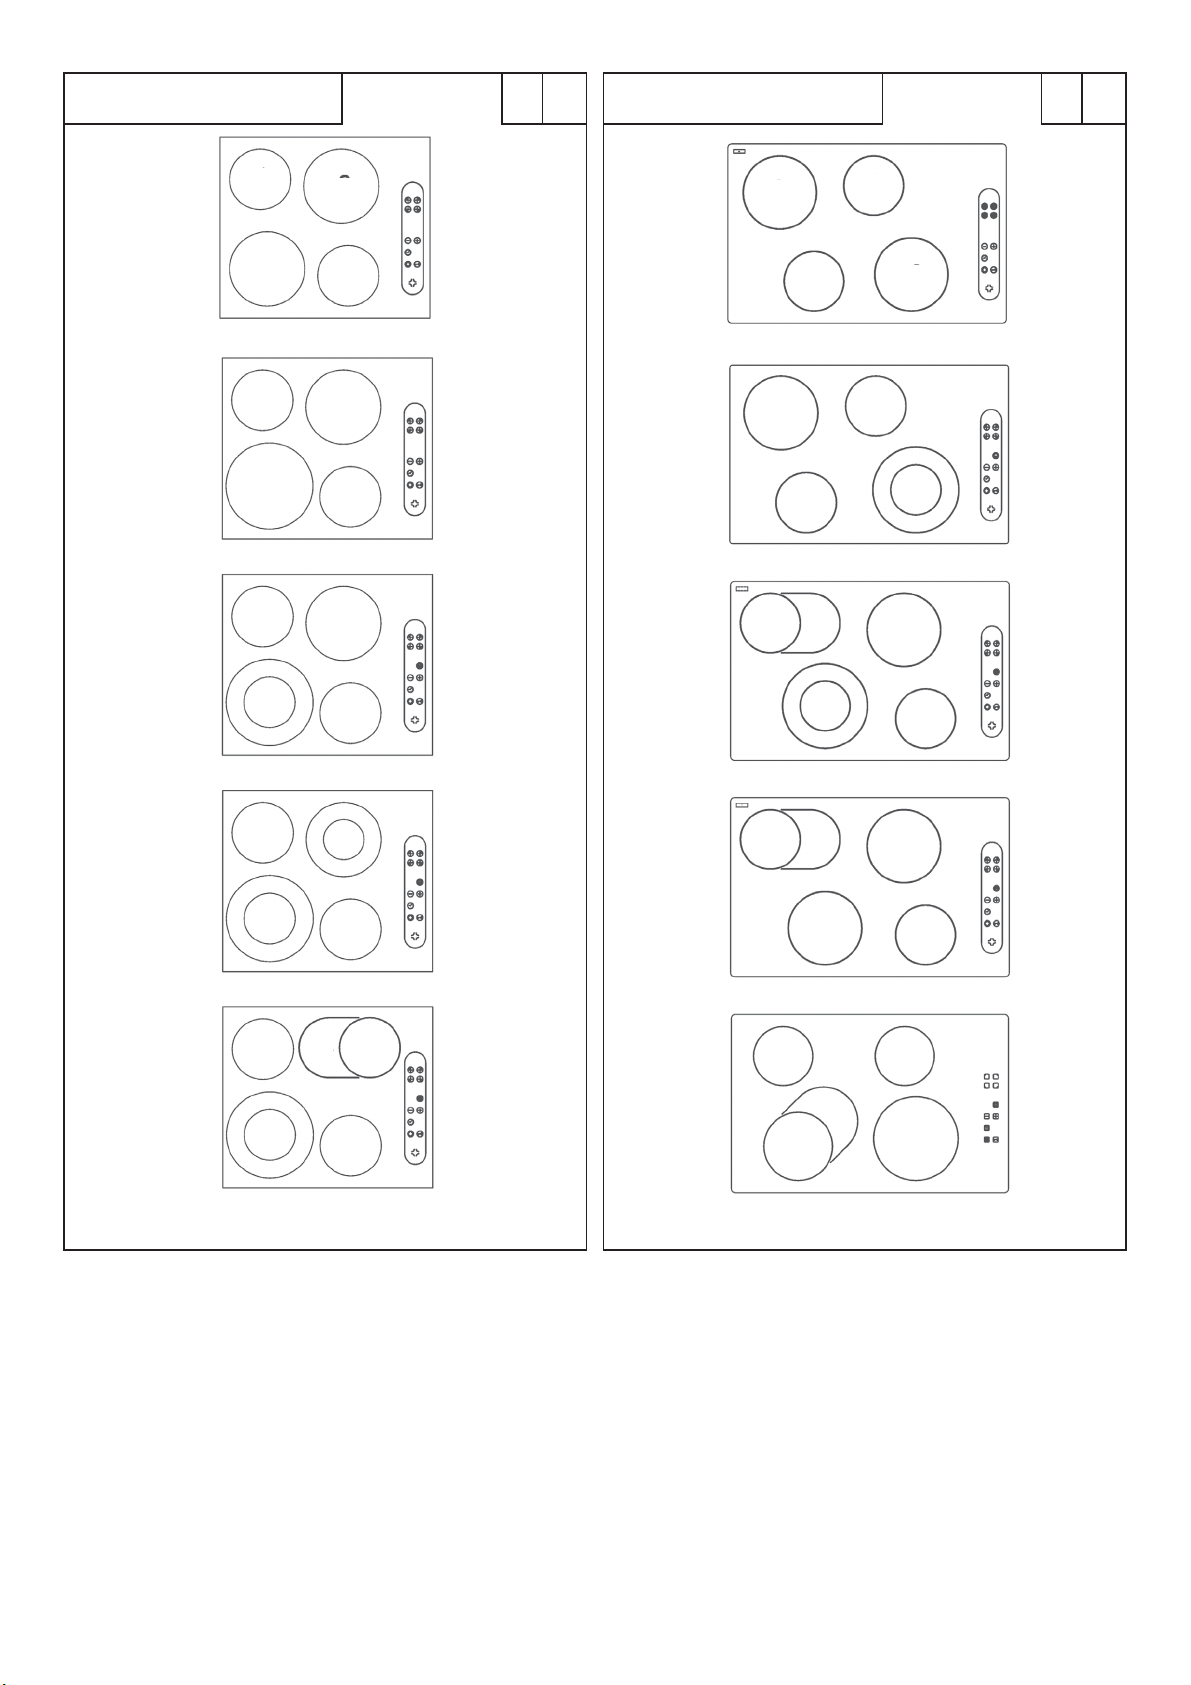
Modelle
KC 40.60..., KC 40.77... 6
Modelle KC 69...,
KCT 69..., KCT 79... 28
Modelle KC 20.29...,
KC 40.60..., KC 39... 52
Instandhaltung 58
Anweisungen
für den Installateur
Index
Instructions
for use
installation 6
use 6
Models
KC 40.60..., KC 40.77... 6
Models KC 69...,
KCT 69..., KCT 79... 28
Models KC 20.29...,
KC 40.60..., KC 39... 52
maintenance 58
Instructions for the
installation technician
Installation 60
Aufstellung 60
elektrischer Anschluß
60
Heizelemente 64
DIESES PRODUKT IST ALS HAUS
HALTSGERÄT GEDACHT. FÜR SCHADEN
SACHEN ODER PERSONEN, DIE AUF
AN
FALSCHE
UNGEEIGNETEN GEBRAUCH ODER
MISSBRAUCH
ÜBERNIMMT DER HERSTELLER
KEINERLEI
INSTALLATION BZW
ZURÜCKZUFÜHREN SIND
VERANTWORTUNG
-
.
,
.
installation 60
positioning 60
electrical connection 60
heating elements 64
THIS APPLIANCE IS CONCEIVED FOR
DOMESTIC
MANUFACTURER
BE
WAY
WHATEVER
ARE
INSTALLATION
WRONG OR ABSURD USE
USE ONLY. THE
SHALL NOT IN ANY
HELD RESPONSIBLE FOR
INJURIES OR DAMAGES
CAUSED BY INCORRECT
OR BY
UNSUITABLE
.
,
4
Page 5

ESITFR
RU
Index
Notice
d’emploi
installation 7
emploi 7
Modèle
KC 40.60..., KC 40.77... 7
Modèle KC 69...,
KCT 69..., KCT 79... 29
Modèle KC 20.29...,
KC 40.60..., KC 39... 53
entretien 59
Modalités
d’installation
Indice
Istruzioni
per l’utente
installazione 7
uso 7
Modelli
KC 40.60..., KC 40.77... 7
Modelli KC 69...,
KCT 69..., KCT 79... 29
Modelli KC 20.29...,
KC 40.60..., KC 39... 53
manutenzione 59
Istruzioni
per l’installatore
Indice
Instrucciones
para el usuario
instalación 7
utilización 7
Modelo
KC 40.60..., KC 40.77... 7
Modelo KC 69...,
KCT 69..., KCT 79... 29
Modelo KC 20.29...,
KC 40.60..., KC 39... 53
mantenimiento 59
Instrucciones
para el instalador
Оглавление
Указания
для пользователя
Сборка
Эксплуатация
Модели KC 40.60... , KC
40.77... 7
Модели KC 69… , KCT
69… , KCT 79… 29
Модели KC 20.29... , KC
40.60... ,KC 39... 53
Уход 59
Указания для монтёра
7
7
installation 61
positionnement 61
branchement électrique61
élements de chauffe 65
CE PRODUIT EST CONÇU
EXCLUSIVEMENT
DOMESTIQUE
DÉCLINE
POUR
CAUSÉES
INCORRECTE
IMPROPRE
TOUTE RESPONSABILITÉ
DOMMAGES ET BLESSURES
PAR UNE INSTALLATION
POUR USAGE
. LE CONSTRUCTEUR
OU PAR UN USAGE
, ERRONÉ OU ABSURDE.
installazione 61
posizionamento 61
collegamento elettrico 61
elementi riscaldanti 65
QUESTO PRODOTTO È STATO
CONCEPITO
DOMESTICO
DECLINA
CASO
PERSONE
CORRETTA
IMPROPRIO
PER UN IMPIEGO DI TIPO
. IL
OGNI RESPONSABILITÀ NEL
DI
EVENTUALI DANNI A COSE O
DERIVANTI DA UNA NON
INSTALLAZIONE O DA USO
,
ERRONEO OD ASSURDO
COSTRUTTORE
.
instalación 61
colocación 61
conexión eléctrica 61
elementos calefactores 65
ESTE PRODUCTO FUE CONCEBIDO
UN
PARA
CONSTRUCTOR
RESPONSABILIDAD
DAÑOS
PERSONAS
INSTALACIÓN
USO
USO DE TIPO DOMÉSTICO. EL
DECLINA CUALQUIER
EN EL
EVENTUALES A COSAS O
QUE DERIVEN DE UNA
INCORRECTA O DE UN
IMPROPIO, ERRADO O ABSURDO
CASO DE
.
Сборка 61
Установка 61
Подключение к
электросети 61
Нагрввательные элементы 65
ЭТОТ ПРИБОР СОЗДАН ДЛЯ
ИСПОЛЬЗОВАНИЯ ТОЛЬКО В
ДОМАШНЕМ ХОЗЯЙСТВЕ.
ФИРМА ИЗГОТОВИТЕЛЬ НЕ
НЕСЕТ НИКАКОЙ
ОТВЕТСТВЕННОСТИ ЗА УЩЕРБ,
НАНЕСЕННЫЙ ЛИЦАМ, ИЛИ
ИМУЩЕСТВУ, ВОЗНИКАЮЩИЙ В
РЕЗУЛЬТАТЕ НЕПРАВИЛЬНОЙ
УСТАНОВКИ ИЛИ
ИСПОЛЬЗОВАНИЯ УСТРОЙСТВА.
5
Page 6
DE GB
ANWEISUNGEN
FÜR DEN BENUTZER
Installation
Alle Operationen hinsichtlich der
Installation (elektrischer Anschluß)
müssen vom zugelassenen
Fachpersonal gemäß den geltenden
Bestimmungen ausgeführt werden.
Für die spezifischen Anweisungen
siehe die dem Installateur vorbehaltene Seite.
Anwendung
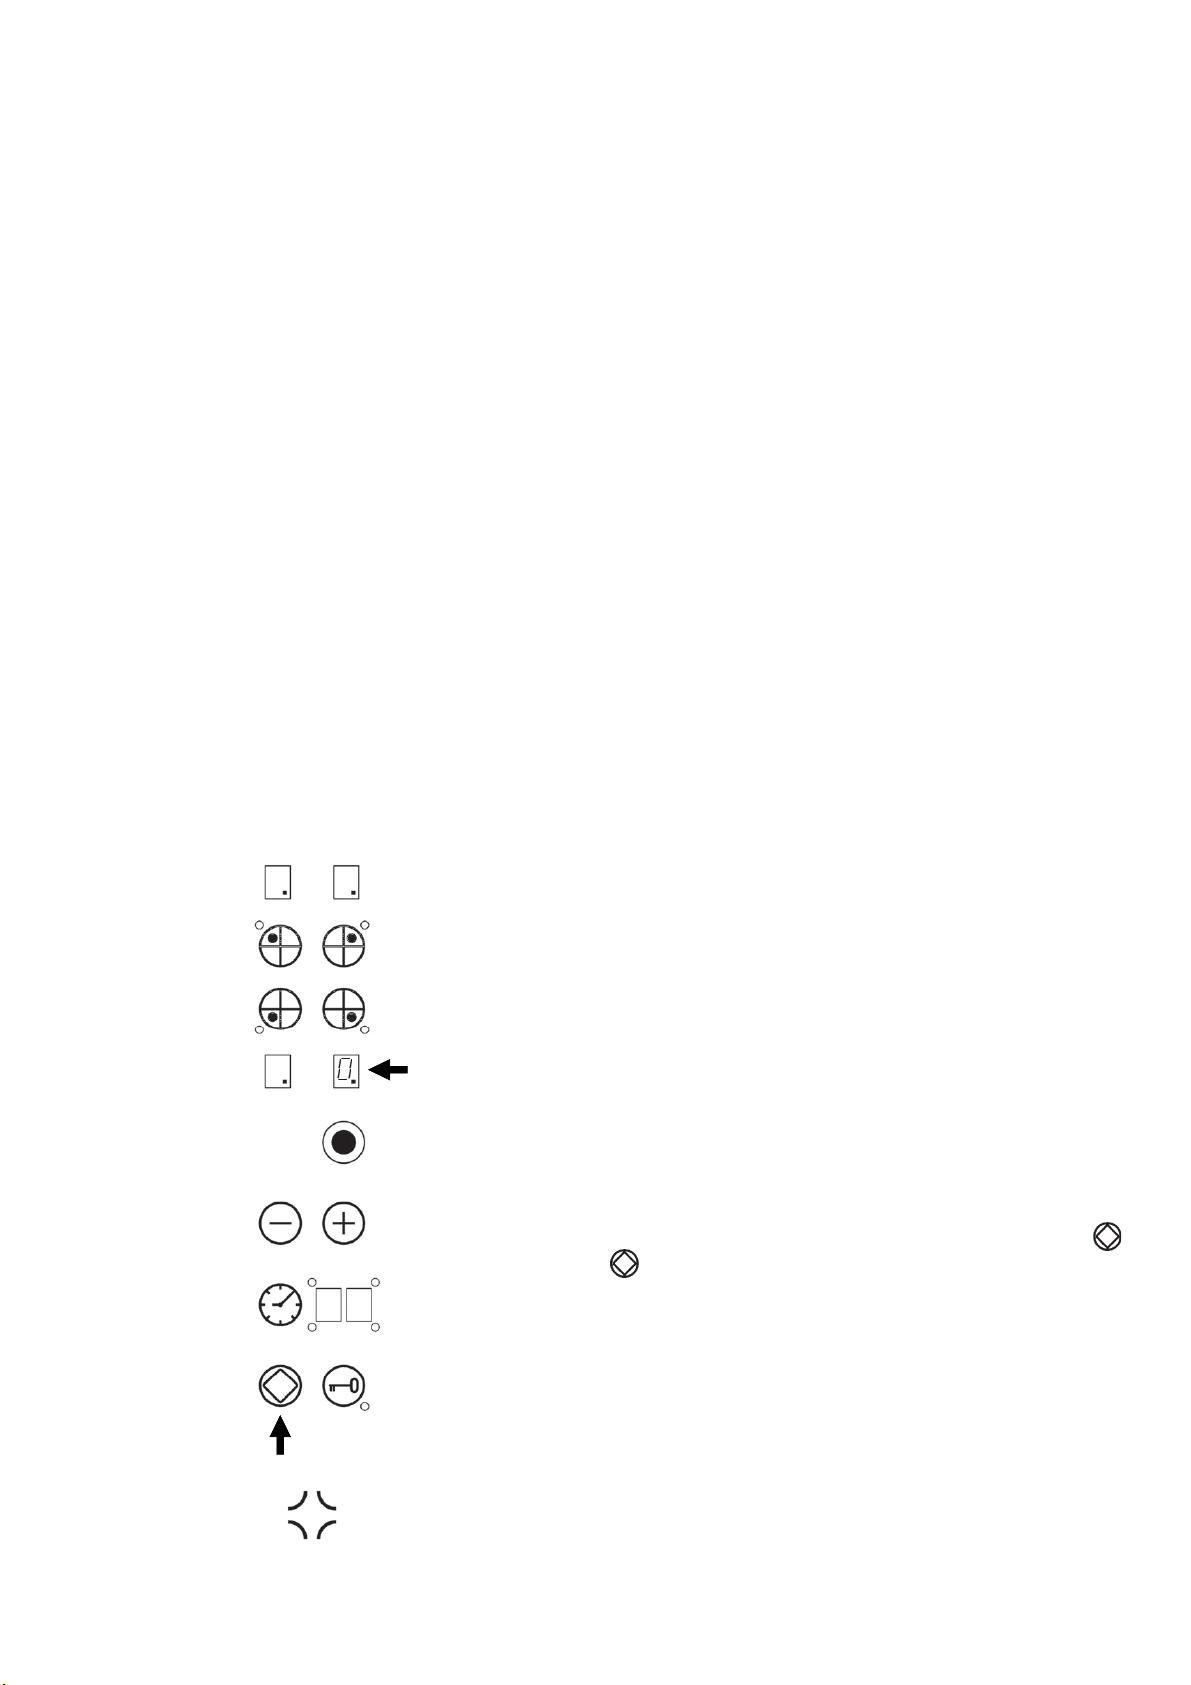
HEIZELEMENTE
TOUCH CONTROL
(Abb. 1)
INSTRUCTIONS
PERTAINING TO USER
Installation
All operations relative to
installation (electric
connection) should be carried
out by skilled personnel in
conformity with the rules in
force.
As for the specific instructions
see part pertaining to installer.
Use
TOUCH CONTROL
HEATING ELEMENTS
(Figs. 1)
Berührungstasten
Alle Funktionen können über
Berührungstasten (kapazitive
Sensoren) auf der Frontpartie der
Bedienungsblende eingeschaltet
werden; jeder Taste entspricht eine
Anzeige.
Jede Betätigung wird von einem
Signalton quittiert.
Modelle
KC 40.60..., KC 40.77...
Ein- und Ausschalten
Einschalten des Geräts
1.Die berührungssensitive Taste
( )
für die Dauer von 2
Sekunden berühren.
Die Steuerung wird aktiviert: Die
Anzeigen der Einstellstufen (3)
zeigen “0” an und die
Dezimalstellen (13) blinken.
Der nächste Vorgang muss
innerhalb von 10 Sekunden
erfolgen, sonst schaltet sich das
Gerät automatisch aus.
Touch sensitive keys
All operations can be
performed using touch
sensitive keys (capacitive
sensors) located on the front
of the control board; each key
has a corresponding display.
All actions are confirmed by
an audible signal.
Models
KC 40.60..., KC 40.77...
Switching the appliance on and off
Switching on the appliance
1. Touch the touch key ( )
for 2 seconds.
The control is powered on: the
power level indicators (3)
show “0” and the decimal
points (13) flash.
The next operation must be
performed within 10 seconds
or the appliance will
automatically switch off.
Einschalten der Kochzone
Beim Einschalten des Geräts mit
Switching on a cooking zone
After switching on the
6
Page 7

ESITFR
RU
INSTRUCTIONS
POUR L’UTILISATEUR
Installation
Toutes les opérations relatives à
l’installation (raccordement
électrique) doivent être faites
par un personnel qualifié, en
conformité avec les normes en
vigueur.
En ce qui concerne les
instructions spécifiques voir la
ISTRUZIONI
PER L’UTENTE
Installazione
Tutte le operazioni relative
all’installazione (allacciamento
elettrico) devono essere eseguite
da personale qualificato
secondo le norme vigenti.
Per le istruzioni specifiche vedi
la parte riservata all’installatore.
partie réservée à l’installateur.
Emploi
ÉLÉMENTS CHAUFFANTS
TOUCH CONTROL
(Fig. 1)
Uso
ELEMENTI RISCALDANTI
TOUCH CONTROL
(Fig. 1)
INSTRUCCIONES
PARA EL USUARIO
Instalación
Todas las operaciones relativas
a la instalación (conexión
eléctrica) tienen que ser
efectuadas por personal
cualificado según las normas
vigentes.
Para las instrucciones específicas véase la parte reservada
al instalador.
Utilización
ELEMENTOS CALENTADORES
TOUCH CONTROL
(Figuras 1)
Указания для
пользователя
Сборка
Все работы по сборке
(подключение к эл. сети)
должны проводиться
специально обученным
персоналом в
соответствии с
действующими
Соответствующие
специфические указания
приведены в разделе для
монтёра.
НАГРЕВАТЕЛЬНЫЕ
ПОВЕРХНОСТИ С
СЕНСОРНЫМ
УПРАВЛЕНИЕМ
(Рис. 1)
нормативами.
Touches à effleurement
Toutes les opérations peuvent
être effectuées à l’aide des
touches à effleurement
(capteurs capacitifs), situés sur
le panneau avant de la carte ; à
chaque touche correspond un
display. Toute activité sera
confirmée par un signal sonore.
Modèle
KC 40.60..., KC 40.77...
Mise en marche et arrêt.
Allumage du dispositif
1. Toucher la touche à
effleurement
( )
pendant 2
secondes.
Le contrôle est activé : les
indicateurs de niveau de
réglage (3) affichent « 0 » et les
décimales (13) clignotent.
L’opération suivante doit être
faite dans les 10 secondes,
sinon le dispositif s’éteint
automatiquement.
Allumage de la zone de cuisson
Lors de la mise en route du
Tasti a sfioramento
Tutte le operazioni possono essere
compiute tramite tasti a
sfioramento (sensori di tipo
capacitivo) posti sulla faccia
frontale della scheda; ad ogni
tasto corrisponde un display.
Ogni attività viene confermata da
un segnale acustico.
Modelli
KC 40.60..., KC 40.77...
Accensione e spegnimento
Accensione del dispositivo
1. Premere il tasto a
sfioramento (
Il controllo viene attivato: gli
indicatori di livello di
regolazione (3) mostrano “0”
ed i punti decimali (13)
lampeggiano.
La prossima operazione deve
essere compiuta entro 10
secondi, altrimenti il dispositivo
si spegne automaticamente.
Accensione della zona di cottura
All’accensione del dispositivo
) per 2 secondi.
Tecla de presión leve
Todas las operaciones pueden ser
ejecutadas a través de teclas de
presión leve (sensores de tipo
capacitivo) puestas sobre la superficie frontal de la tarjeta; a
cada tecla corresponde un display. Cada actividad es confirmada por una señal acústica.
Modelo
KC 40.60..., KC 40.77...
Encendido y apagamiento
Encendido del dispositivo
1. Tocar la tecla de membrana
( )
durante 2 segundos.
El control es activado: los
indicadores de nivel de regulación (3) muestran “0” y los puntos decimales (13) parpadean.
La próxima operación debe ser
realizada dentro de 10 segundos,
sino el dispositivo se apaga
automáticamente.
Encendido de la zona de cocción
Cuando se enciende el dispositi-
Сенсорные кнопки
Все функции
поверхности включаются
нажтием кнопок на
панели управления
(ёмкостные сенсоры)
Каждой кнопке
соответствует свой
цифровой индикатор.
Каждое действие
сопровождается звуковым
сигналом.
МОДЕЛИ KC 40.60...,
KC 40.77...
Включение и
Включение поверхности:
1. Коснуться пальцем
символа в течение 2
секунд. При этом
активируется управление:
цифровой индикатор (З)
соответствующего поля
показывает "0", а точка на
индикаторе (13) начинает
мигать.
Следующее действие
должо быть произведено
в течение 10 сек., иначе
нагревательная
поверхность отключится
автоматически.
Включение
нагревательного поля:
.
выключение
7
Page 8

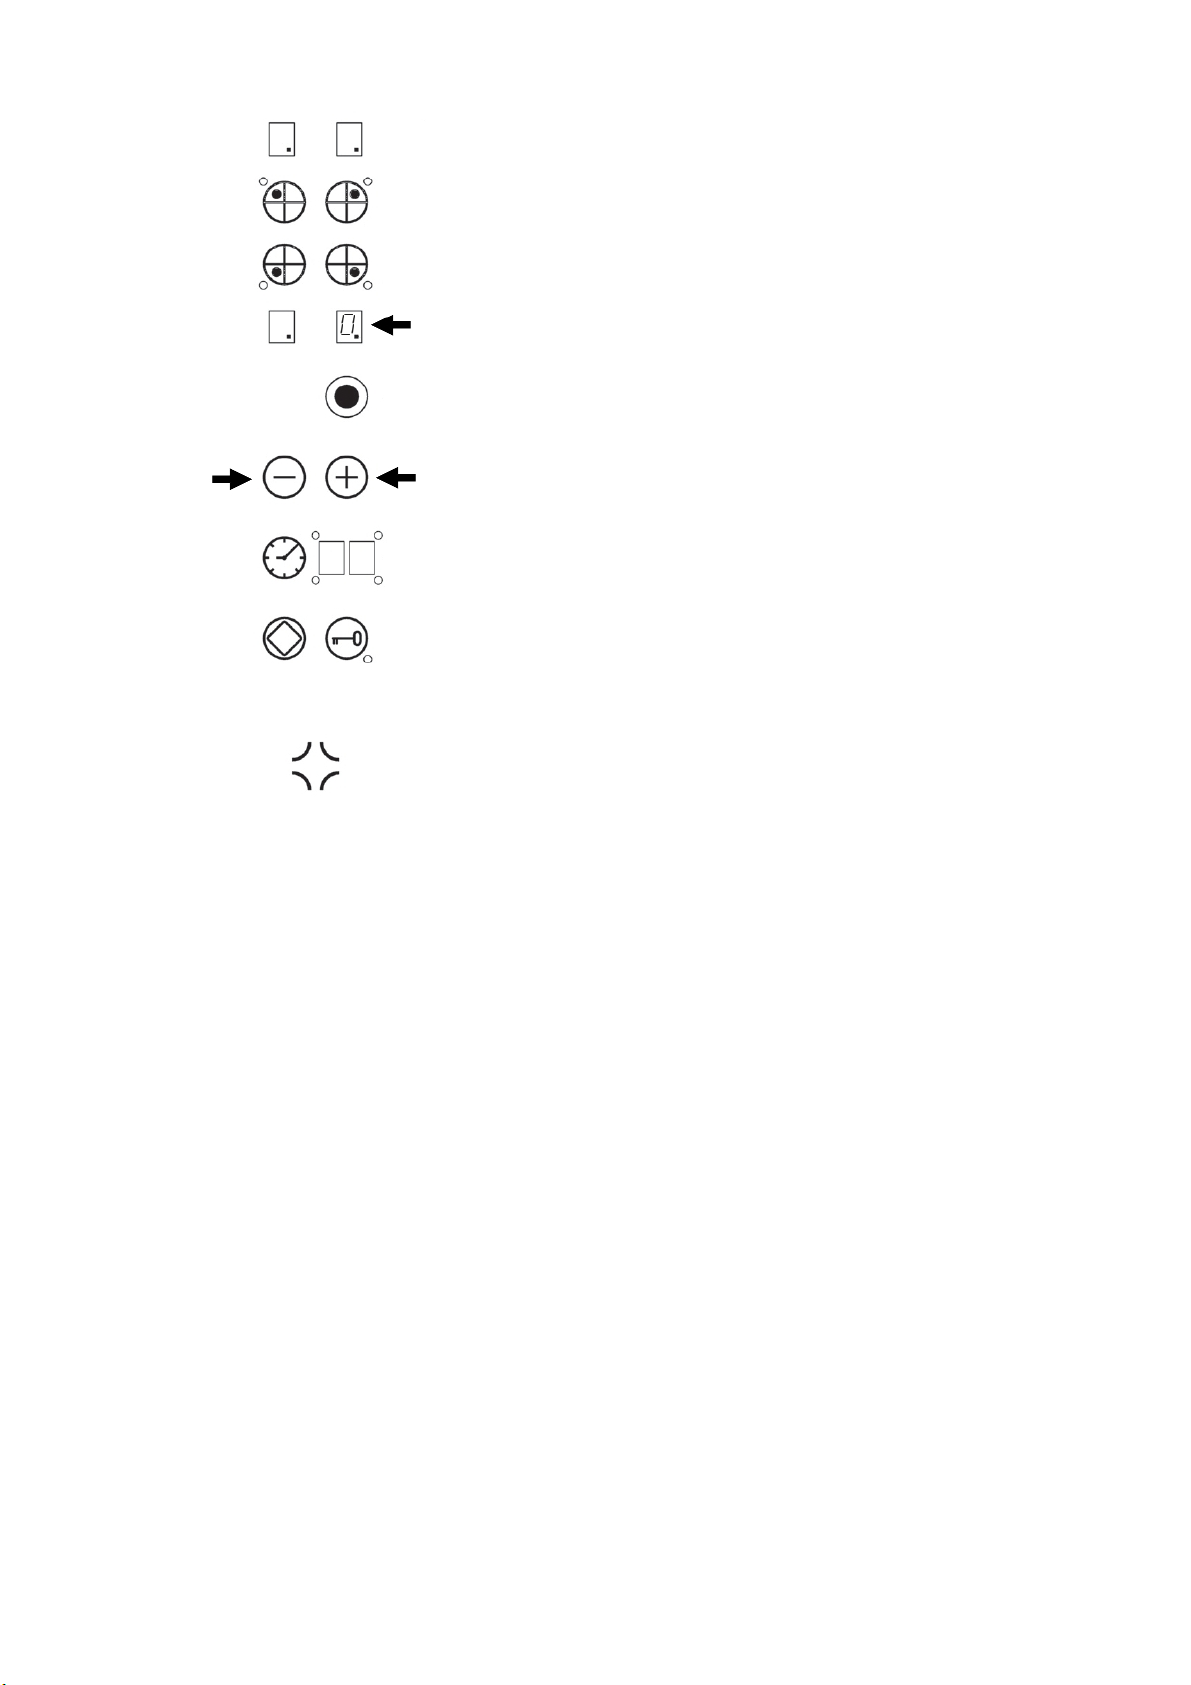
TOUCH CONTROL
DE GB
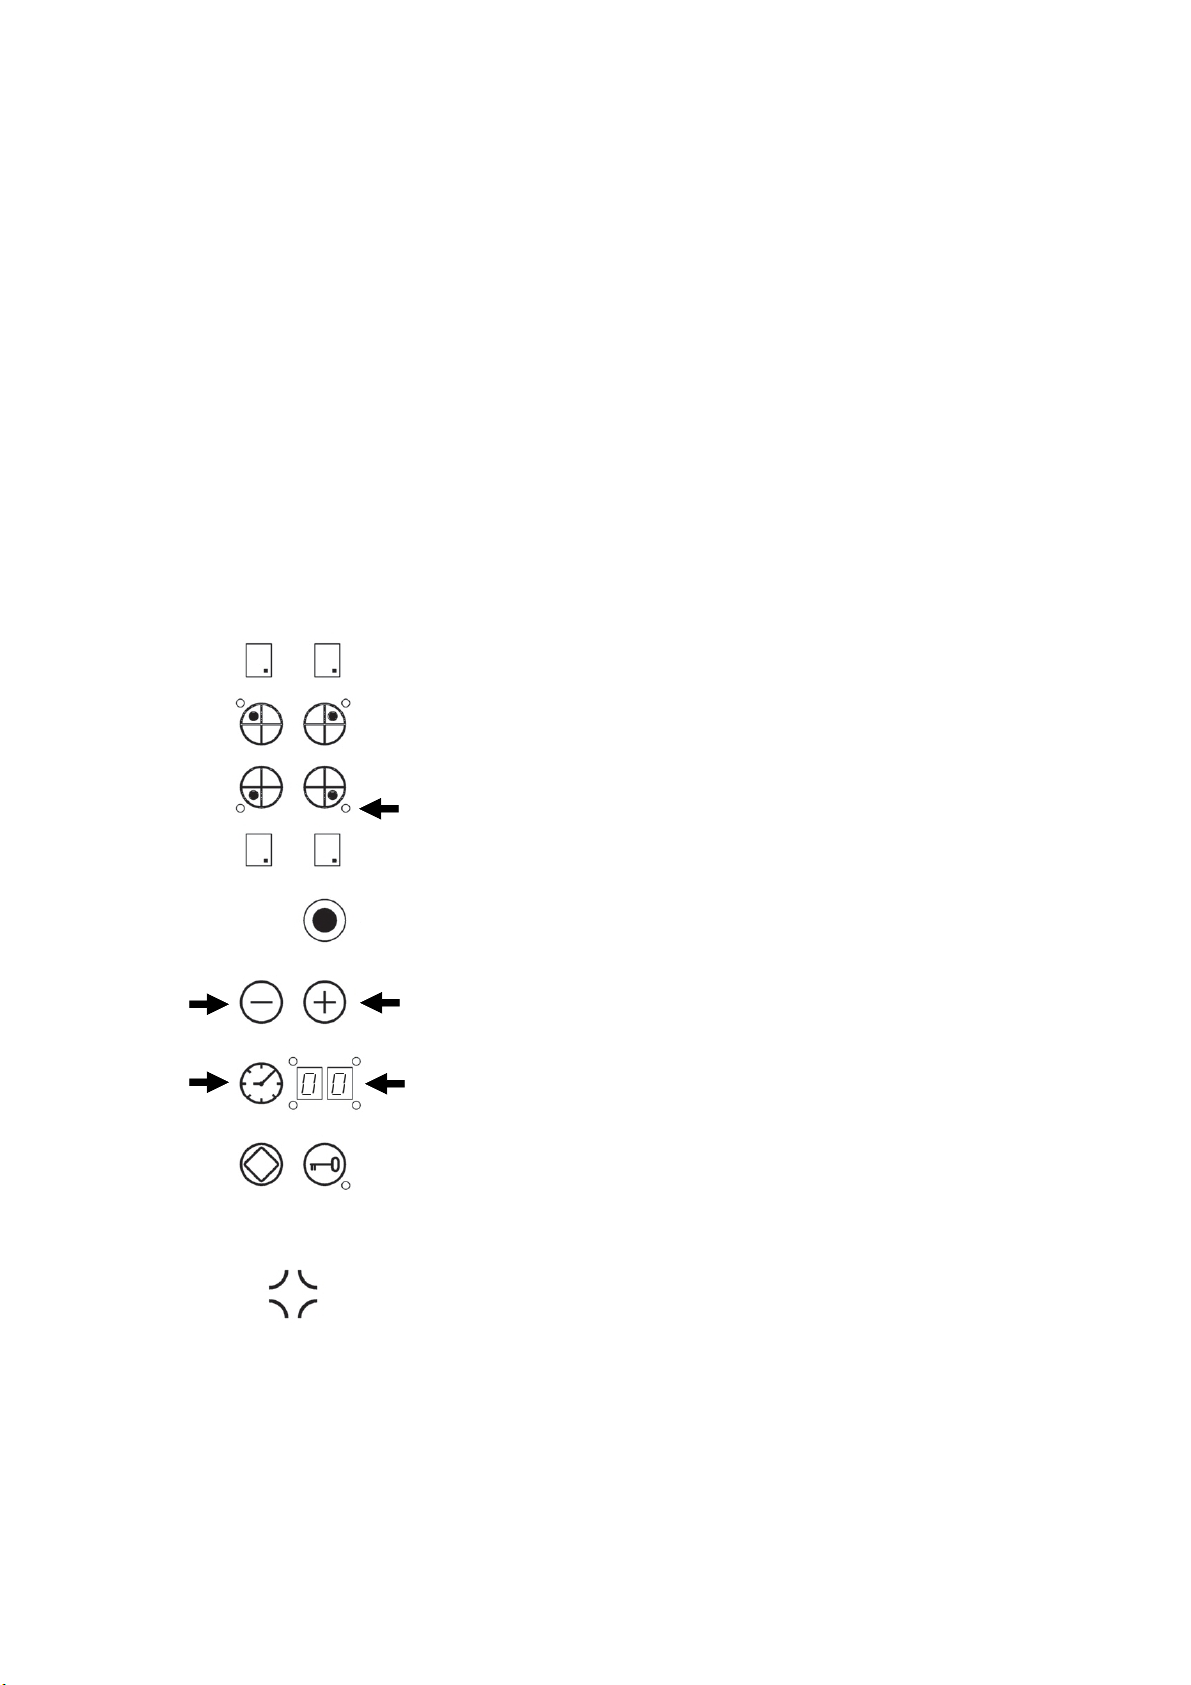
1 Ein / Aus Taste
2 Kochzone
3 Anzeige eingestellter Wert
4 Minus
5 Plus
6 Doppelter Heizkreis
7 Timer
8 Anzeige Timer
9 Sperre
10 Warnleuchte doppelter Heizkreis
11 Timer-Warnleuchten
12 Warnleuchte Sperre
13 Dezimalpunkt
1 Accensione/Spegnimento ON / OFF
2 zona cottura
3 display valore impostato
4 meno
5 più
6 doppio circuito
7 timer
8 display timer
9 blocco
10 spia doppio circuito
11 spie timer
12 spia blocco
13 punto decimale
1 Power ON/ Power OFF
2 cooking zone
3 setting display
4 minus
5 plus
6 dual circuit
7 timer
8 timer display
9lock function
10 dual circuit indicator light
11 timer indicator lights
12 lock indicator light
13 decimal point
Encendido/Apagado ON / OFF
1
2 zona de cocción
3 display valor programado
4 menos
5 más
6 circuito doble
7 timer
8 display timer
9 bloqueo
10 piloto circuito doble
11 pilotos timer
12 piloto bloqueo
13 punto decimal
1 Marche/Arrêt ON / OFF
2 Zone cuisson
3 Display de la valeur programmée
4Moins
5 Plus
6 Double circuit
7Minuterie
8 Display minuterie
9 Arrêt
10 Témoin du double circuit
11 Témoin de la minuterie
12 Témoin d’arrêt
13 Point décimal
1 включение
2 выбор поля нагрева
3 индикатор установленного
значения
4 минус
5 плюс
6 двойное поле нагрева
7 таймер
8 индикатор таймера
9 блокировка
10 индикация внешнего кольца
11 индикация запрограммир. поля
12 индикация блокировки
13 сигнальная точка
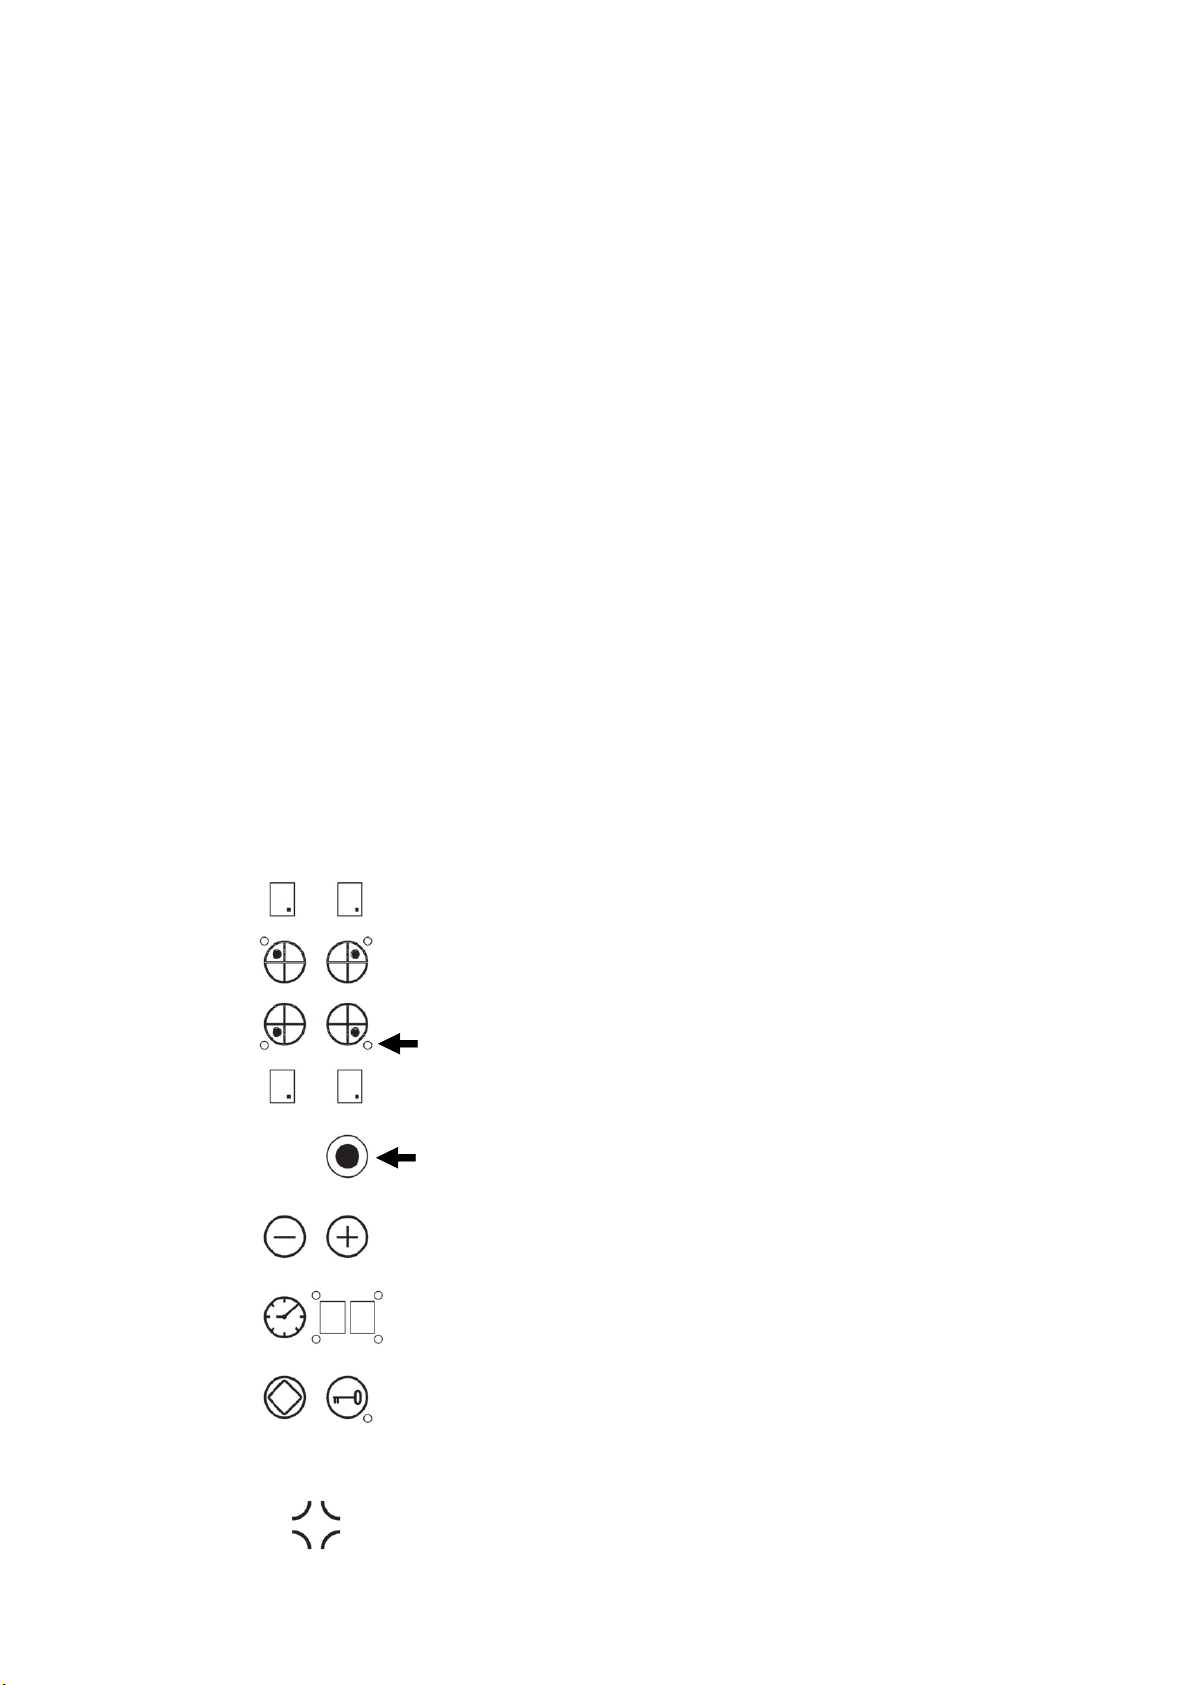
Abb. 1 - Fig. 1 - Рис. 1
8
Page 9
TOUCH CONTROL
ITFR
A 1
TOUCH CONTROL
ES RU
B 1
Abb. 2a - Fig. 2a - Рис. 2a
Abb. 2b - Fig. 2b - Рис. 2b
9
Page 10
DE GB
der Taste (1), muss eine der
Kochzonen innerhalb von 10
Sekunden auf folgende Weise
eingeschaltet werden.
1. Die Taste (2) der betreffenden
Kochzone drücken. Auf der
Anzeige erscheint eine “0”. Der
Dezimalpunkt der Anzeige (13)
leuchtet auf und zeigt damit an,
dass dieser Bereich aktiv ist.
2. Die gewünschte Stufe (zwischen
1 und 9) mit den Tasten “+” und “” (5/4) einstellen.
Die Tasten “+” und “-“ haben eine
Wiederholungsfunktion. Hält man
eine dieser Tasten gedrückt, so
wird der eingestellte Wert alle 0,3
Sekunden um eine Einheit erhöht
oder verringert.
Nur ein Bereich kann jeweils aktiv
sein; deshalb kann nur ein
Dezimalpunkt aufleuchten.
cooking zone must be
switched on within 10 seconds
as follows:
1. Press the key (2)
corresponding to the cooking
zone. The relative display will
show “0”. The decimal point
of display (13) will light up,
indicating that the zone is now
on.
2. Set the power level (1 to 9)
using the keys “+” and “-” (5/
4).
The keys “+” and “-“ have a
repeater function, i.e. holding
these keys pressed will
increase or reduce the setting
by one unit every 0.3 seconds.
Only one cooking zone may
be switched on at a time, so
only one decimal point is lit
up.
Ausschalten der Kochzone
1. Die Kochzone muss aktiviert
sein. Der Dezimalpunkt (13) der
entsprechenden Zone muss
leuchten.
2. Den eingestellten Wert mit Hilfe
der Taste (4) auf “0” einstellen.
Nach 3 Sekunden schaltet sich die
Kochzone automatisch aus.
Schnellaabschalten:
1. Die gewünschte Kochzone muss
aktiviert werden und der
Dezimalpunkt (13) dieses Bereichs
muss aufleuchten.
2. Berührt man gleichzeitig die
Tasten “+” und “-“ (5/4), so
schaltet sich die Zone sofort aus.
Switching off a cooking zone
1. The cooking zone must be
on. The corresponding
decimal point (13) must be lit
up.
2. Reduce the power level to
“0” by pressing (4). After 3
seconds the cooking zone will
switch off automatically.
Rapid switch off:
1. The cooking zone must be
on and the corresponding
decimal point (13) must be lit
up.
2. Press keys “+” and “-“ (5/4)
simultaneously and the zone
will switch off immediately.
10
Restwärmeanzeige
Wenn die Temperatur der
Kochzone noch sehr hoch ist und
Verbrennungen verursachen kann,
so erscheint auf der Anzeige der
Residual heat indicators.
While the cooking zone is still
hot enough to cause burns, the
corresponding display shows
the symbol “H” (residual
Page 11

ITFR
ES RU
dispositif à l’aide de la touche
(1), la zone de cuisson doit être
allumée dans les 10 secondes de
la façon qui suit.
1. Presser la touche (2)
correspondant à la zone de
cuisson voulue. Le display
correspondant affiche « 0 ». Le
point décimal du display (13)
s’allume tout en indiquant la
zone active.
2. Régler le niveau (de 1 à 9) à l’aide
des touches « + » et « - » (5/4).
Les touches « + » et « - » sont
munies d’une fonction de
répétition. Si on maintient la
pression sur une de ces touches,
la valeur programmée
augmente ou diminue d’une
unité toutes les 0,3 secondes.
Une seule zone de cuisson peut
être active à la foi ; ainsi donc,
un seul point décimal sera
con il tasto (1), l’accensione di
una zona di cottura deve
avvenire entro i 10 secondi nel
seguente modo.
1. Premere il tasto (2) relativo
alla zona di cottura interessata.
Sul display relativo compare
uno “0”. Il punto decimale del
display (13) si accende, facendo
così vedere che quella zona è
attiva.
2. Regolare il livello (da 1 a 9)
mediante i tasti “+” e “-” (5/4).
I tasti “+” e “-“ sono dotati di
funzione di ripetizione. La
pressione continua su uno di
questi tasti determina l’aumento
o la diminuzione del valore
impostato di un’unità ogni 0.3
secondi.
Può essere attiva solo una zona
alla volta, pertanto può risultare
acceso solo un punto decimale.
allumé.
vo con la tecla (1), el encendido
de una zona de cocción debe producirse dentro de 10 segundos de
la siguiente manera.
1. Apretar la tecla (2) relativa a
la zona de cocción interesada. En
el display relativo aparece un
“0”. El punto decimal del display
(13) se enciende, mostrando así
que aquella zona es activa.
2. Regular el nivel (desde 1 a 9)
a través de las teclas “+” y “-”
(5/4). Las teclas “+” y “-“ están
dotadas con función de repetición. La presión continua sobre
una de estas teclas determina el
aumento o la disminución del valor programado de una unidad
cada 0.3 segundos.
Puede ser activa sólo una zona
por vez, por lo tanto puede resultar encendido solamente un punto decimal.
После включения
поверхности кнопкой (1)
нужно в течение 10 сек.
включить следующим
образом
нагревательное поле.
1. Нажть кнопку (2)
соответствующего поля.
Цифровой индикатор
соответствующего поля
показывает "0". Точка на
индикаторе (13)
загорается и показывает
этим,
что это поле активно.
2. Выбрать желаемую
степень нагрева (между 1 и 9)
кнопками "+" и "-" (5 / 4).
Кнопки "+" и "-" имеют
функцию повторения. Если
держать эти кнопки
нажатыми, то значение
степени нагрева будет
увеличиваться или
уменьшаться каждые 0,3
сек. на одну единицу.
Только одно поле можо
включить за один раз,
поэтому только одна точка на
индикаторе может гореть.
Arrêt de la zone de cuisson
1. La zone de cuisson doit être
allumée. Le point décimal (13)
de la zone correspondante doit
être allumé.
2. Porter la valeur programmée
sur « 0 » à l’aide de la touche
(4). Après 3 secondes, la zone
de cuisson s’éteint
automatiquement.
Spegnimento della zona di
cottura
1. La zona di cottura deve
essere attivata. Il punto
decimale (13) della zona
corrispondente deve essere
acceso.
2. Portare il valore impostato a
“0” mediante il tasto (4). Dopo
3 secondi la zona di cottura si
spegne automaticamente.
Arrêt rapide
1. La zone de cuisson voulue
doit être allumée et le point
décimal (13) de cette zone doit
être allumé.
2. Effleurer en même temps les
touches « + » et « - » (5/4) : la
zone de cuisson s’éteint
automatiquement.
Spegnimento rapido:
1. La zona di cottura richiesta
deve essere attivata ed il punto
decimale (13) di quella zona
deve essere acceso.
2. Toccando
contemporaneamente i tasti “+”
e “-“ (5/4), la zona si spegne
immediatamente.
Apagamiento de la zona de cocción
1. La zona de cocción debe ser
activada. El punto decimal (13)
de la zona correspondiente debe
estar encendido.
2. Llevar el valor programado a
“0” a través de la tecla (4). Después de 3 segundos la zona de
cocción se apaga
Выключение
нагревательного поля
1. Соответствующее поле
нагрева должно быть
включено. Точка на
индикаторе (13)
соответствующего поля
нагрева должа гореть.
2. Значение индикатора
выставить на "0" нажатием
кнопки (4). Через 3 сек.
нагревательное поле
отключится автоматически.
automáticamente.
Apagamiento rápido:
1. La zona de cocción pedida
debe ser activada y el punto decimal (13) de aquella zona debe
estar encendido.
2. Tocando contemporáneamente
las teclas “+” y “-“ (5/4), la zona
se apaga inmediatamente.
Быстрое выключение:
1. Соответствующее поле
нагрева должо быть
включено. Точка на
индикаторе (13)
соответствующего поля
нагрева должа гореть.
2. Одновременно нажать
кнопки"+" и "-" (5 / 4),
нагревательное поле сразу
отключится.
Indicateurs de chaleur
résiduelle
Lorsque la température de la
zone de cuisson est encore
élevée et qu’elle peut provoquer
Indicatori di calore residuo
Quando la temperatura sulla
zona di cottura è ancora
elevata, al punto tale da causare
ustioni, il display relativo a
Indicadores de calor residual
Cuando la temperatura en la
zona de cocción todavía es elevada, a tal punto de causar quemaduras, el display relativo a
Индикатор остаточного
тепла
Если температура
нагревательного поля еще
очень высока, то цифровой
индикатор
соответствующего поля
11
Page 12
DE GB
entsprechenden Zone das Symbol
“H” (Restwärme). Die Anzeige
verschwindet erst, wenn keine
Gefahr mehr besteht (bei 60 °C).
Die Anzeige zeigt “0” an, solange
die Temperatur unterhalb von 60
°C bleibt. Überschreitet die
Temperatur den Wert von 60 °C,
so erscheint “H” auf der Anzeige.
Um Strom zu sparen, schalten Sie
die Kochzone früher aus, um die
Restwärme zu nutzen.
Die Restwärmeanzeige “H” geht
bei einem Stromausfall von über 3
Sekunden verloren.
Ausschalten des Geräts
Das Gerät kann in jedem
Augenblick mit Hilfe der
Einschalttaste (1) abgeschaltet
werden.
heat). The symbol only
disappears when the
temperature falls below 60° C
and there is no longer any risk
of burns.
The display shows “0” as long
the temperature remains
below 60°C, switching to “H”
only when the temperature
rises above 60°C.
To save energy, switch off the
cooking zone before cooking
is completed in order to make
use of the residual heat.
The residual heat indicator
“H” will go out if the power
supply is interrupted for more
than 3 seconds.
The appliance may be
switched off at any time by
pressing the power key (1).
Kochzonen mit doppeltem
Heizkreis
Zwei Kochzonen können mit einem
zweiten Heizkreis ausgestattet
werden: z. B. besteht die Bereich
aus einer zentralen Scheibe und aus
einem Außenkranz. Es ist möglich,
nur den zentralen Bereich
einzuschalten oder beide Bereiche.
Man kann so die Wärmezone dem
verwendeten Kochgeschirr
anpassen.
Einschalten einer Zone mit
doppeltem Heizkreis
1. Die Kochzone mit doppeltem
Heizkreis muss aktiviert werden. Auf
der entsprechenden Anzeige muss
der Dezimalpunkt aufleuchten (13).
2. Die gewünschte Stufe auswählen
(1÷9).
3. Den zweiten Heizkreis mit Hilfe
der Taste des zweiten Heizkreises
einschalten (6).
Dual circuit cooking zone.
Two cooking zones may be
equipped with a dual circuit,
e.g., a central disc and an
outer ring. You can either use
the central zone alone or both
zones together and thus adapt
the cooking area to suit the
size of the pan.
Switching on a dual circuit
zone.
1. The relative zone must be
on. The decimal point (13) on
the corresponding display
must be lit up.
2. Select the desired power
level (1 to 9).
3. Switch on the second
circuit by pressing the dual
circuit key (6).
12
Page 13

ITFR
ES RU
des brûlures, le display
correspondant de la zone en
question affiche le symbole « H
» (chaleur résiduelle).
L’indication disparaît lorsqu’il
n’y a plus de danger (à 60 °C).
Le display affiche « 0 » si la
température est en dessous de
60 °C, tandis qu’il affiche « H »
lorsqu’elle est supérieure à 60
°C.
Pour économiser de l’énergie, il
est conseillé d’éteindre la zone
de cuisson un peu avant, afin
d’exploiter la chaleur
résiduelle.
L’indication de la chaleur
résiduelle « H » est perdue à la
suite d’une interruption de la
quella zona mostra il simbolo
“H” (calore residuo).
L’indicazione scompare solo
quando non vi è più alcun
pericolo (a 60° C).
Il display mostra “0” fintanto
che la temperatura rimane sotto
i 60°C, mentre mostra “H”
quando la temperatura supera i
60°C.
Per risparmiare energia
spegnere la zona di cottura in
anticipo, al fine di sfruttare il
calore residuo.
La segnalazione di calore
residuo “H” viene persa a
seguito di interruzione di
tensione di rete superiore a 3
secondi.
tension de réseau pendant plus
de 3 secondes.
Spegnimento dell’apparato
L’apparato può essere spento in
Arrêt de l’appareil
On peut éteindre l’appareil à
qualsiasi momento mediante il
tasto di accensione (1).
n’importe quel moment à l’aide
de la touche de mise en route (1).
aquella zona muestra el símbolo
“H” (calor residual). La indicación desaparece sólo cuando no
existe más peligro (a 60° C).
El display muestra “0” mientras
que la temperatura permanece
por debajo de los 60°C, mientras
muestra “H” cuando la temperatura supera los 60°C.
Para ahorrar energía apagar la
zona de cocción con anticipación,
para aprovechar el calor residual.
La señalización de calor residual
“H” se pierde después de una interrupción de la tensión de red superior a 3 segundos.
Apagamiento del aparato
El aparato puede ser apagado en
cualquier momento a través de la
tecla de encendido (1).
показывает символ "Н"
(остаточное тепло).
Индикация исчезает при
понижении температуры
ниже 60° С, с устранением
опасности ожога.
Пока температура остаётся
ниже 60° С , на дисплее
высвечивается "0". При
превышении значения 60° С
на дисплее высвечивается
"H".
Чтобы экономить
электричество, Вы можте
отключить поле нагрева
раньше, и использовать
дальше остаточное тепло.
Показатель остаточного
тепла прекращает
показывать символ "Н", если
электропитание отключается
более чем на 3 сек.
Выключение поверхности
Поверхность можно в любой
момент отключить нажатием
кнопки (1).
Zones de cuisson à double
circuit
Deux zones de cuisson peuvent
être munies d’un deuxième
circuit ; par exemple, la zone est
formée d’un disque central et
d’une couronne. On peut allumer
uniquement la zone centrale ou
les deux. Ceci permet d’adapter
la zone chauffante à la casserole
utilisée.
Zone di cottura a doppio
circuito
Due zone di cottura posssono
essere dotate di secondo
circuito: per esempio la zona si
compone di un disco centrale e
di una corona esterna. E’
possibile accendere la sola zona
centrale oppure entrambe. Ciò
consente l’adattamento
dell’area riscaldante alla
pentola utilizzata.
Allumage d’une zone à double
circuit
1. La zone à double circuit doit
être activée. Sur le display
correspondant à la zone en
question, le point décimal (13)
doit être allumé.
2. Sélectionner le niveau désiré
(1÷9).
3. Allumer le deuxième circuit à
l’aide de la touche du double
Accensione di una zona a
doppio circuito
1.La zona a doppio circuito deve
essere attivata. Sul display
relativo alla zona, deve essere
acceso il punto decimale (13).
2. Selezionare il livello
desiderato (1÷9).
3. Accendere il secondo circuito
mediante il tasto di doppio
circuito (6).
Zonas de cocción de doble circuito
Dos zonas de cocción pueden estar provistas de un segundo circuito: por ejemplo la zona está
compuesta de un disco central y
de una corona externa. Es posible encender sólo la zona central
o ambas. Esto permite la adapta-
Поля нагрева сдвоенные
Два поля нагрева могут быть
оснащены вторым кругом
нагрева: нагр. поле состоит
из центрального круга
нагрева и внешего кольца.
Можо включать, как только
центральный круг, так и оба
вместе. Таким образом можо
подбирать диаметр зоны
нагрева под диаметр
применяемой посуды.
ción del área calentadora a la
olla utilizada.
Encendido de una zona a doble
circuito
1. La zona de doble circuito debe
ser activada. En el display relativo a la zona, debe estar encendido el punto decimal (13).
2. Seleccionar el nivel deseado
(1÷9).
3. Encender el segundo circuito
a través de la tecla de doble cir-
Включение сдвоенного поля
нагрева
1. Сдвоенное поле нагрева
должо быть активировано.
На соответствующем
индикаторе поля нагрева
должа загореться точка (13).
2. Выбрать желаемую
степень нагрева (1 - 9).
3. С помощью кнопки
включения-выключения
внешего кольца (6)
активировать его.
cuito (6).
13
Page 14
DE GB
Die dem ausgewählten Bereich
entsprechende Warnleuchte (10)
leuchtet auf; der zweite Heizkreis
wird zusammen mit dem ersten
Heizkreis eingeschaltet.
Ausschalten des zweiten
Heizkreises einer Kochzone
1. Die Zone mit doppeltem
Heizkreis muss aktiviert werden.
Auf der entsprechenden Anzeige
muss der Dezimalpunkt
aufleuchten (13).
2. Die Taste des doppelten
Heizkreises (6) berühren.
Die Warnleuchte (10) erlischt und
der zweite Heizkreis der Kochzone
schaltet sich aus.
Sperrfunktion des Geräts oder
der Kochzone
The indicator light (10) of the
selected zone will illuminate;
the second circuit is switched
on together with the first.
Switching off the second
circuit of a dual circuit zone.
1. The dual circuit zone must
be on. The decimal point (13)
on the corresponding display
must be illuminated.
2. Touch the dual circuit key
(6).
The indicator light (10) goes
out and the second circuit is
switched off.
Appliance lock function and
automatic safety switch off
Appliance lock function
Sperrfunktion des Geräts
Das gesamte Gerät kann mit der
Sperrtaste (9) blockiert werden,
um unerwünschte Benutzung zu
vermeiden. Die Funktion dient
ebenfalls als Kindersicherheit.
Wird die Sperrfunktion nicht vor
dem Ausschalten des Geräts
deaktiviert, so ist sie beim
nächsten Wiedereinschalten immer
noch aktiviert.
Solange die Sperrfunktion aktiv
ist, können die Tasten nicht
betätigt werden.
Sicherheitsabschalten
Bleibt eine oder mehrere
Kochzonen unbeabsichtigt
eingeschaltet, so stellt die
Gerätesteuerung sie nach einer
gewissen Zeit automatisch aus.
The entire appliance may be
locked to prevent
unintentional operation by
pressing the lock key (9). This
also serves a child safety
function.
If the lock function is not
deactivated before the
appliance is switched off, it
will still be active when the
appliance is next switched on.
While the lock function is
activated, operating the keys
will have no effect.
Automatic safety switch off
If one or more of he cooking
zones is left on by mistake,
the control will automatically
switch them off after a certain
time limit.
14
Bei automatischer
Sicherheitsabschaltung wird das
Symbol “H” angezeigt.
Um das vollautomatische
Abschalten zu verhindern genügt
es, die Auswahltaste der Kochzone
In the event of automatic
safety switch off, the symbol
“H” is displayed.
To prevent automatic switch
off, simply touch the zone
selection key or the “+” and “-
Page 15

ITFR
ES RU
circuit (6).
Le témoin (10) correspondant à
la zone sélectionnée s’allume ;
le deuxième circuit s’allume en
La spia (10) relativa alla zona
selezionata si accende; il
secondo circuito si accende
assieme a quello primario.
même temps que le premier.
Arrêt du deuxième circuit d’une
zone de cuisson
1. La zone à double circuit doit
être activée. Sur le display
correspondant à la zone en
question, le point décimal (13)
doit être allumé.
2. Effleurer la touche du double
circuit (6).
Le témoin (10) et le deuxième
circuit de la zone de cuisson
s’éteignent.
Blocage de l’appareil ou de la
zone de cuisson
Spegnimento del secondo
circuito di una zona di cottura
1. La zona a doppio circuito
deve essere attivata. Sul display
relativo alla zona, deve essere
acceso il punto decimale (13).
2. Toccare il tasto di doppio
circuito (6).
La spia (10) si spegne e si
spegne inoltre il circuito
secondario della zona di
cottura.
Blocco dell’apparato o della
zona di cottura
El piloto (10) relativo a la zona
seleccionada se enciende; el segundo circuito se enciende junto
con el principal.
Apagamiento del segundo circuito de una zona de cocción
1. La zona de doble circuito debe
ser activada. En el display relativo a la zona, debe estar encendido al punto decimal (13).
2. Tocar la tecla de doble circuito (6).
El piloto (10) se apaga y se apaga también el circuito secundario de la zona de cocción.
Bloqueo del aparato o de la zona
de cocción
Сигнальная лампочка (10),
соответствующая
выбранному полю нагрева
должа светиться,
центральный круг вместе с
внешним кольцом работают
полностью.
Выключение внешего кольца
сдвоенного поля нагрева
1. Сдвоенное поле нагрева
должо быть активировано.
На соответствующем
индикаторе поля нагрева
должа гореть точка (13).
2. Прикоснитесь к кнопке
включения-выключения
внешнего кольца (6).
Сигнальная лампочка (10)
погаснет и внешее кольцо
выключится.
Блокировка поверхности
или поля нагрева
Blocage de l’appareil
Le fonctionnement de tout
l’appareil peut être bloqué à
l’aide de la touche de blocage
(9), afin d’empêcher toute
opération involontaire. La
fonction sert également de
sécurité pour les enfants.
Si cette fonction de blocage
n’est pas désactivée avant
d’éteindre l’appareil, celle-ci
sera encore activée lors de la
mise en marche successive.
Tant que la fonction de blocage
est active, l’action sur les
Blocco dell’apparato
L’intero apparato può essere
bloccato con il tasto di blocco
(9), al fine di impedire
operazioni non intenzionali. La
funzione serve anche come
sicurezza per i bambini.
Se la funzione di blocco non
viene disattivata prima di
spegnere l’apparato, alla
successiva riaccensione questa
risulterà ancora attivata.
Fintanto che la funzione di
blocco è attiva, l’azione sui tasti
non ha alcun effetto.
touches n’a aucun effet.
Arrêt de sécurité
Si une ou plusieurs zones de
cuisson restent allumées sans le
vouloir, le contrôle les éteint
automatiquement après un
certain temps.
Spegnimento di sicurezza
Se una o più zone di cottura
rimangono inavvertitamente
accese, il controllo provvede a
spegnerle automaticamente
dopo un certo periodo di tempo.
Bloqueo del aparato
Todo el aparato puede ser bloqueado con la tecla de bloqueo
(9), para impedir operaciones no
intencionales. La función también
sirve como seguridad para los
niños.
Si la función de bloqueo no es
desactivada antes de apagar el
aparato, en el sucesivo encendido ésta resultará activada todavía.
Mientras la función de bloqueo
es activa, la acción sobre las te-
Блокировка поверхности
Во избежание
нежелательного
пользования поверхность
может быть полностью
з
блокировки (9). Эта
функция служит в любом
случае для блокировки
плиты от детей.
Если блокировка перед
выключением плиты не
была деактивирована, то
при последующем
включении она останется
активированной.
До тех пор пока плита
з
кнопками невозможно.
clas no tiene ningún efecto.
Apagamiento de seguridad
Si una o más zonas de cocción inadvertidamente permanecen encendidas, el control provee a apagarlas automáticamente después
de un cierto período de tiempo.
Автоматическое
аварийное отключение
Если одно или несколько
нагревательных полей
случайно остались
включенными, то после
определенного времени они
отключатся.
аблокирована кнопкой
аблокирована, управление
Si l’appareil s’est éteint
automatiquement, le display
affiche le symbole « H ». Pour
éviter l’arrêt automatique, il
suffit d’effleurer la touche de
sélection de la zone ou les
Nel caso di spegnimento
automatico di sicurezza, viene
visualizzato il simbolo “H”.
Per evitare lo spegnimento
automatico è sufficiente toccare
il tasto di selezione della zona o
En el caso de apagamiento automático de seguridad, se visualiza
el símbolo “H”.
Para evitar el apagamiento automático es suficiente tocar la tecla de selección de la zona o las
В случае автоматического
отключения на индикаторе
появится символ "Н". Для
предотвращения
автоматического
отключения плиты
достаточно нажть кнопку
15
Page 16
DE GB
oder die Tasten “+” und “-” zu
betätigen, bevor der Zeitlimit
abläuft.
Automatisches Vorwärmen
Dieser Automatismus vereinfacht
den Garvorgang, da während des
Garzyklus keine Aufsicht
erforderlich ist.
Die Funktion bewirkt das
Vorwärmen der Kochzone bei
maximaler Leistung, um die
Kochtemperatur so schnell wie
möglich zu erreichen. Nach einer
gewissen Zeit kehrt die
Leistungsstufe spontan auf den
eingestellten Wert zurück.
” keys before the time limit
expires.
Automatic preheating
This function simplifies the
cooking process as it obviates
the need for human
intervention.
The cooking zone is first
preheated at maximum power
to rapidly bring the zone up to
the cooking temperature, after
which the power is
automatically reduced to the
preset level.
Einschalten der automatischen
Vorwärmfunktion
Die gewünschte Kochzone mit
Hilfe der Taste (2) auswählen.
Stufe 9 mit Hilfe der Taste “-“
auswählen; Stufe 9 mit Hilfe der
Taste “+” auswählen. Dann die
gewünschte Leistungsstufe, z. B.
die Stufe 6, mit der Taste “-”
auswählen.
Bei eingeschalteter automatischer
Vorwärmfunktion zeigt die
Anzeige der entsprechenden
Kochzone abwechselnd die
eingestellte Stufe (“6” ) und das
Symbol “A” an.
Ändern der Leistungsstufe
während des automatischen
Vorwärmens
1. Die entsprechende Kochzone
muss aktiviert sein. Der
Dezimalpunkt (13) der
entsprechenden Zone muss
aufleuchten.
2. Leistungsstufe mit Hilfe der
Tasten “+” und “-“ ändern.
Wird die Leistungsstufe erhöht,
wird die neue Vorwärmzeit unter
Berücksichtigung der mit der
vorherigen Einstellung
Activating the automatic
preheating function.
Select the cooking zone by
pressing key (2).
Select power level 9 using the
“-“key, then select level 9
using the “+” key. Now select
the desired power level, e.g.
6, using the “-” key.
In automatic preheating
mode, the cooking zone
display will alternately show
the set level (“6”) and the
symbol “A”.
Changing the power level
setting during automatic
preheating
1. The relative cooking
zone must be on. The
decimal point (13) on the
corresponding display must
be lit up.
2. Change the power level
using the keys “+” and “-“.
If the level is increased, the
new preheating time will be
calculated taking account
the time elapsed since the
16
Page 17

ITFR
ES RU
touches « + » et « - » avant la
fin du temps limite.
Préchauffage automatique
Cet automatisme simplifie le
processus de cuisson, étant
donné qu’on peut s’absenter
durant tout le cycle de cuisson.
Cette fonction lance le
préchauffage de la zone de
cuisson à la puissance
maximum, de façon à porter
rapidement la zone en question
à la température de régime.
Après un certain temps, le
niveau de puissance revient
spontanément à celui qui a été
programmé.
i tasti “+” e “-” prima dello
scadere del tempo limite.
Preriscaldamento automatico
Questo automatismo semplifica
il processo di cottura in quanto
non è richiesta la presenza
umana durante tutto il ciclo di
cottura.
La funzione determina un
preriscaldamento della zona di
cottura alla massima potenza, in
modo da portare velocemente la
zona alla temperatura di
regime. Dopo un certo tempo, il
livello di potenza ritorna
spontaneamente a quello
impostato.
teclas “+” y “-” , antes de que
termine el tiempo límite.
Precalentamiento automático
Este automatismo simplifica el
proceso de cocción porque no es
necesario la presencia humana
durante todo el ciclo de cocción.
La función determina un
precalentamiento de la zona de
cocción a la máxima potencia,
para llevar rápidamente la zona
a la temperatura de régimen.
Después de un cierto tiempo, el
nivel de potencia vuelve a aquel
programado espontáneamente.
выбора или кнопоки "+" и "-"
до истечения времени
отключения.
Автоматический
предварительный нагрев
Эта функция упрощает
приготовление,
поскольку не требует
наблюдения за провесом
варки.
Для того, чтобы как можо
быстрее достичь
необходимой температуры,
предварительный нагрев
поля нагрева начинается при
максимальной мощности. По
истечении определенного
времени мощность нагрева
самостоятельно
уменьшается до
установленной величины.
Mise en marche du
préchauffage automatique
Sélectionner la zone de cuisson
voulue à l’aide de la touche (2).
Sélectionner le niveau 9 à l’aide
de la touche « - », puis
sélectionner le niveau 9 à l’aide
de la touche « + ». Sélectionner
alors le niveau de puissance
désiré, par exemple, le niveau 6,
à l’aide de la touche « - ».
Avec la modalité « préchauffage
automatique », le display de la
zone de cuisson correspondante
affiche alternativement le
niveau programmé (« 6 ») et le
symbole « A ».
Modification du niveau de
puissance durant le
préchauffage automatique
1. La zone concernée doit être
activée. Le point décimal (13)
de la zone correspondante doit
être allumé.
2. Modifier le niveau de
puissance à l’aide des touches «
+ » et « - ».
Si le niveau est plus élevé, le
nouveau temps de préchauffage
sera calculé en fonction du
temps écoulé à partir de la
Attivazione del
preriscaldamento automatico
Selezionare la zona di cottura
interessata tramite il tasto (2).
Selezionare il livello 9
medianter il tasto “-“; quindi
selezionare il livello 9 con il
tasto “+”. Selezionare allora il
livello di potenza desiderato, ad
esempio il livello 6, con il tasto
“-”.
Nella modalità di
preriscaldamento automatico, il
display della relativa zona di
cottura mostra alternativamente
il livello impostato (“6” ) ed il
simbolo “A”.
Modifica del livello di potenza
durante il preriscaldamento
automatico
1. La zona interessata deve
essere attivata. Il punto
decimale (13) della rispettiva
zona deve essere acceso.
2. Cambiare livello tramite i
tasti “+” e “-“.
Se il livello viene aumentato, il
nuovo tempo di
preriscaldamento viene
calcolato considerando quello
già intercorso con la precedente
Activación del precalentamiento
automático
Seleccionar la zona de cocción
interesada a través de la tecla (2).
Seleccionar el nivel 9 a través de
la tecla “-“; luego seleccionar el
nivel 9 con la tecla “+”. Seleccionar entonces el nivel de potencia deseado, por ejemplo el nivel
6, con la tecla “-”.
En la modalidad de
precalentamiento automático, el
display de la zona de cocción relativa muestra alternativamente
el nivel programado (“6” ) y el
símbolo “A”.
Modificación del nivel de potencia durante el precalentamiento
automático
1. La zona interesada debe ser
activada. El punto decimal (13)
de la zona respectiva debe estar encendido.
2. Cambiar nivel a través das
teclas “+” y “-“.
Si el nivel es aumentado, el
tiempo nuevo de
precalentamiento se calcula
considerando aquel ya transcurrido con la programación pre-
Включение
автоматического
предварительного нагрева
С помощью кнопки (2)
выбрать жлаемое поле
нагрева.
С помощью кнопки "-"
выбрать положение 9, также
с помощью кнопки "+"
выбрать положение 9.
Затем кнопкой "-" выбрать
желаемую мощность, напр.
положение 6. При
включенной функции
автоматического
предварительного нагрева на
индикаторе
соответствующего поля
нагрева высвечиваются
поочерёдно, установленное
положние ("6") и символ "А".
Изменение мощности
нагрева во время
автоматического
предварительного нагрева
1.
нагрева должо быть
включено. Точка на
индикаторе (13)
соответствующего поля
нагрева должна загореться.
2. Измените с помощью
кнопок "+" и "-" мощность
нагрева.
Если мощность нагрева
будет увеличена, изменится
новое время
предварительного нагрева с
учетом истекшего времени
предварительного нагрева
Соответствующее поле
17
Page 18
DE GB
verstrichenen Zeit berechnet.
Beispiel: Die Stufe 1 wird
ausgewählt, der eine Vorwärmzeit
von 1 Minute entspricht.
Nach 30 Sekunden wählt man die
Leistungsstufe 4 aus. Die
Vorwärmzeit beträgt bei dieser
Leistungsstufe 6,5 Minuten.
Nach der Veränderung der
Leistungsstufe dauert das
automatische Vorwärmen noch
weitere 6 Minuten (6,5 Min. - 30
Sek.).
Ausschalten der automatischen
Vorwärmfunktion.
Mit dem Symbol “A” auf der
Anzeige der Kochzone:
1. Die entsprechende Kochzone
muss aktiviert sein. Der
Dezimalpunkt (13) der
entsprechenden Zone muss
leuchten;
2. Taste “-” (4) innerhalb von 10
Sekunden nach Einschalten der
Funktion drücken.
previous setting.
Example: Level 1 is first
selected, corresponding to a
preheating time of 1’.
After 30”, the power level
is increased to 4, which
requires a preheating time
of 6’30”.
After changing the level,
the automatic preheating
will last a further 6’ (6’30”
– 30”).
Deactivating the automatic
preheating function.
With the zone display
showing the symbol “A”:
1. the relative zone must be
on. The decimal point (13) on
the corresponding display
must be lit up;
2. press “-” (4) after the
function has been activated
for at least 10 seconds.
Timer-Funktion
Auch dieser Automatismus
vereinfacht den Garvorgang, da
während des Garzyklus keine
Aufsicht erforderlich ist. Die
Kochzone wird nach Ablauf der
eingestellten Zeit automatisch
ausgeschaltet.
Wenn keine Zone ausdrücklich
programmiert wird, dient die
Timer-Funktion wie eine einfache
Kochuhr (siehe Kapitel “TimerFunktion als Kochuhr” ).
Einschalten der Timer-Funktion
1. Die entsprechende Kochzone
muss aktiviert sein. Der
Dezimalpunkt (13) der
entsprechenden Zone muss
aufleuchten.
Timer Function
This automatic function also
obviates the need for human
intervention during the entire
cooking cycle. The cooking
zone is automatically switched
off after the set time period.
If none of the zones is
specifically programmed for
this function, the timer
operates as a simple minute
counter (see section “Using
the timer function as a minute
counter”).
Activation of the timer
function.
1. the zone to be programmed
must be on. The decimal point
(13) on the corresponding
display must be lit up;
18
Page 19

ITFR
ES RU
précédente programmation.
Exemple : Le niveau 1, auquel
correspond un temps de
préchauffage de 1 mn, a été
sélectionné.
Après 30 s, on augmente le
niveau jusqu’à 4. A ce point, le
temps de préchauffage est de 6
mn 30 s.
Par suite de la modification du
niveau, le préchauffage
automatique durera encore 6
mn (résultat de la soustraction :
6 mn 30 s - 30 s).
Arrêt de la fonction de
préchauffage automatique
Lorsque le symbole « A » est
affiché sur le display de la zone :
1. la zone concernée doit être
activée. Le point décimal (13)
de la zone correspondante doit
être allumé ;
2. presser la touche « - » (4) au
moins 10 s après l’activation de
la fonction.
impostazione.
Esempio: Viene selezionato il
livello 1, al quale corrisponde
un tempo di preriscaldamento di
1’.
Dopo 30”, si aumenta il livello
fino a 4. A questo livello il
tempo di preriscaldamento è di
6’30”.
In seguito alla modifica del
livello, il preriscaldamento
automatico durerà ancora 6’
(risultato della sottrazione
6’30” – 30”).
Disattivazione della funzione di
preriscaldamento automatico.
Con il simbolo “A” mostrato sul
display della zona:
1. la zona interessata deve
essere attivata. Il punto
decimale (13) della rispettiva
zona deve essere acceso;
2. premere il tasto “-” (4) dopo
almeno 10 secondi dall’attiva-
zione della funzione.
cedente.
Ejemplo: Se selecciona el nivel
1, al que corresponde un tiempo de precalentamiento de 1’.
Después de 30”, se aumenta el
nivel hasta 4. En este nivel, el
tiempo de precalentamiento es
de 6’30”.
Luego de la modificación del nivel, el precalentamiento automático durará todavía 6’ (resultado de la resta de 6’30” –
предыдущей установки.
Пример: Выбираем
положение 1, которому
соответствует время
предварительного нагрева 1
мин. Через 30 секунд
устанавливаем положение
нагрева 4. При этом
положении время
предварительного нагрева
составляет 6,5 минут. После
изменения мощности нагрева
автоматический
предварительный нагрев
будет длиться еще 6 минут
(6,5 мин. - 30 сек.).
30”).
Desactivación de la función de
precalentamiento automático.
Con el símbolo “A” mostrado en
el display de la zona:
1. la zona interesada debe ser
activada. El punto decimal (13)
de la respectiva zona debe estar
encendido;
2. apretar la tecla “-” (4) después
de al menos 10 segundos de la activación de la función.
Отключение функции
автоматического
предварительного нагрева.
С показанием символа "А" на
индикаторе поля нагрева:
1. Соответствующее поле
нагрева должо быть
включено. Точка на
индикаторе (13)
соответствующего поля
нагрева должа гореть.
2. В течение 10 секунд
после включения функции
нажать кнопку "-" (4).
Fonction minuterie
Cet automatisme simplifie
également le processus de
cuisson, puisqu’il évite d’être
présent pendant tout le cycle de
cuisson. La zone de cuisson
s’éteindra automatiquement à la
fin du temps programmé.
Si aucune zone n’est
programmée, la fonction
minuterie fonctionne tout
simplement comme minuteur
(voir le chapitre spécifique «
Fonction minuterie utilisée
comme minuteur »).
Funzione Timer
Anche questo automatismo
semplifica il processo di cottura
in quanto non è richiesta la
presenza umana durante tutto il
ciclo di cottura. La zona di
cottura verrà spenta
automaticamente all’esaurirsi di
un tempo impostato.
Se nessuna zona viene
esplicitamente programmata,
allora la funzione di timer
funziona semplicemente da
contaminuti (si veda il capitolo
specifico “funzione timer come
contaminuti” ).
Activation de la fonction
minuterie
1. La zone concernée doit être
activée. Le point décimal (13)
de la zone correspondante doit
être allumé.
Attivazione della funzione timer
1. la zona interessata deve
essere attivata. Il punto
decimale (13) della rispettiva
zona deve essere acceso.
2. Selezionare un livello tra 1 e 9.
Función Timer
Este automatismo también simplifica el proceso de cocción porqué no es necesario la presencia
humana durante todo el ciclo de
cocción. La zona de cocción será
apagada automáticamente al terminar un tiempo programado.
Si ninguna zona es programada
explícitamente, entonces la función de timer funciona simplemente como cuentaminutos (véase el capítulo específico “función
Функция таймер
Эта функция упрощает также
приготовление, поскольку не
требует наблюдения за
процессом варки. По
истечении установленного
времени поле нагрева
автоматически выключится.
Если функция таймер ни
для какого поля нагрева
специально
запрограммирована не будет,
она может быть
использована в качестве
обычного минутника (смотри
раздел "Функция таймер в
качестве минутника").
timer como cuentaminutos”).
Activación de la función timer
1. la zona interesada debe ser
activada. El punto decimal (13)
de la respectiva zona debe estar
encendido.
2. Seleccionar un nivel entre 1 y 9.
Включение функции
таймер
1. Соответствующее поле
нагрева должо быть
включено. Точка на
индикаторе (13)
соответствующего поля
нагрева должна гореть.
19
Page 20
DE GB
2. Eine Leistungsstufe zwischen 1
und 9 auswählen.
3. Die Taste des Timers berühren
(7): auf der Timer-Anzeige
erscheint nun “00”.
4. Kochzeit (zwischen 0 und 99
Minuten) mit Hilfe der Tasten “+”
und “-“ (5 und 4) auswählen.
Die Timer-Funktion schaltet sich
nach wenigen Sekunden ein.
Die Warnleuchte (11), die der mit
der Timer-Funktion
programmierten Kochzone
entspricht, leuchtet auf.
Zum raschen Einstellen der
Kochzeit, die Taste “+” oder “-“
gedrückt halten.
Die Timer-Funktion bezieht sich
auf eine Kochzone.
2. Select a level between 1
and 9.
3. Press the timer key (7): the
timer display will show “00”.
4. Select the cooking time
(from 0 to 99 minutes) using
keys “+” and “-“ (5 and 4).
The timer function is
automatically activated within
a few seconds.
The indicator light (11)
corresponding to the
programmed zone illuminates.
To rapidly adjust the cooking
time, hold pressed the “+” or
“-“ keys.
The timer function applies to
one cooking zone.
Ändern der eingestellten
Kochzeit
Die Kochzeit kann in jedem
Augenblick verändert werden.
1. Die entsprechende Kochzone
muss aktiviert sein. Der
Dezimalpunkt (13) der
entsprechenden Zone muss
aufleuchten.
2. Die Timer-Taste berühren (7).
3. Die neue Zeit mit den Tasten
“+” und “-“ (5 und 4) eingeben.
Zum raschen Einstellen der
Kochzeit, die Taste “+” oder “-“
gedrückt halten.
Ausschalten der Timer-Funktion
Nach Ablauf der eingestellten Zeit
ertönt 2 Minuten lang ein
Signalton.
Um den Signalton zu
unterbrechen, irgendeine Taste
berühren.
Die Kochzone ist nun
ausgeschaltet.
Changing a previously set
cooking time.
The programmed cooking
time may be changed at any
time.
1. the relative zone must be
on. The decimal point (13) on
the corresponding display
must be lit up.
2. Press the timer key (7).
3. Set a new cooking time
using the keys “+” and “-“ (5
and 4).
To rapidly adjust the cooking
time, hold pressed the “+” or
“-“ keys.
Deactivating the timer
function.
When the set cooking time has
elapsed, an audible signal
sounds for 2 minutes.
To interrupt the signal, simply
press any key.
The cooking zone is now
switched off.
20
Page 21

ITFR
ES RU
2. Sélectionner un niveau entre
1 et 9.
3. Effleurer la touche du
minuterie (7) : le display du
minuterie affiche « 00 ».
4. Sélectionner le temps de
cuisson (de 0 à 99 mn) à l’aide
des touches « + » et « - » (5 et
4).
La fonction minuterie se met en
route automatiquement après
quelques secondes.
Le témoin (11) correspondant à
la zone programmée avec la
fonction minuterie s’allume.
Pour programmer rapidement
le temps de cuisson, maintenir
pressée la touche « + » ou « - ».
La fonction minuterie
3. Toccare il tasto di timer (7):
il display del timer visualizza
ora “00”.
4. Selezionare il tempo di
cottura (da 0 a 99 minuti) per
mezzo dei tasti “+” e “-“ (5 e
4).
La funzione di timer si avvia
automaticamente entro pochi
secondi.
La spia (11) corrispondente alla
zona programmata con la
funzione timer, si illumina.
Per impostare rapidamente il
tempo di cottura, mantenere
costantemente premuto il tasto
“+” o “-“.
La funzione timer si applica ad
una zona di cottura.
s’applique à une seule zone de
cuisson.
3. Tocar la tecla del timer (7): el
display del timer visualiza la hora
“00”.
4. Seleccionar el tiempo de cocción (desde 0 a 99 minutos) por
medio de las teclas “+” y “-“ (5
y 4).
La función de timer se pone en
marcha automáticamente en pocos segundos.
El piloto (11) correspondiente a
la zona programada con la función timer, se ilumina.
Para programar rápidamente el
tiempo de cocción, tener apretada la tecla “+” o “-“ constantemente.
La función timer se aplica a una
zona de cocción.
2. Выбрать мощность нагрева
между 1 и 9.
3. Нажть кнопку включения
таймера (7): на индикаторе
таймера загорится показание
"00".
4. С помощью кнопок "+" и "-
" (5 и 4) выбрать время
приготовления (в интервале
между 0 и 99 мин.).
Функция таймер включится
автоматически через
несколько секунд.
Вместе с этим загорится
соответствующая
запрограммированному полю
нагрева сигнальная
лампочка (11).
Для ускорения установки
времени на таймере держите
кнопки "+" или "-"
нажатыми.
Функция таймер относится к
одному полю
нагрева.
Modification du temps de
cuisson programmé
A tout instant, on peut modifier
le temps de cuisson.
1. La zone concernée doit être
activée. Le point décimal (13)
de la zone correspondante doit
être allumé.
2. Effleurer la touche de la
minuterie (7).
3. Programmer le nouveau
temps de cuisson à l’aide des
touches « + » et « - » (5 et 4).
Pour programmer rapidement
le temps de cuisson, maintenir
pressée la touche « + » ou « - ».
Arrêt de la fonction minuterie
Lorsque le laps de temps est
écoulé, l’appareil émet un
signal sonore pendant 2 mn.
Pour interrompre ce signal
sonore, il suffit d’effleurer une
touche quelconque.
La zone de cuisson est
maintenant éteinte.
Modifica del tempo di cottura
già impostato
Il tempodi cottura può essere
modificato in qualsiasi
momento.
1. la zona interessata deve
essere attivata. Il punto
decimale (13) della rispettiva
zona deve essere acceso.
2. Toccare il tasto di timer (7).
3. Impostare il nuovo tempo con
i tasti “+” e “-“ (5 e 4).
Per impostare rapidamente il
tempo di cottura, mantenere
costantemente premuto il tasto
“+” o “-“.
Disattivazione della funzione
timer
Quando il tempo è scaduto,
viene emesso un segnale
acustico per la durata di 2
minuti.
Per interrompere in anticipo la
segnalazione acustica è
sufficiente toccare un tasto
qualunque.
La zona di cottura è ora spenta.
Modificación del tiempo de cocción ya programado
El tiempo de cocción puede ser
modificado en cualquier momento.
1. la zona interesada debe ser
activada. El punto decimal (13)
de la respectiva zona debe estar
encendido.
2. Tocar la tecla del timer (7).
3. Programar el tiempo nuevo con
las teclas “+” y “-“ (5 y 4).
Para programar rápidamente el
tiempo de cocción, tener apretada constantemente la tecla “+”
Изменение
установленного времени
приготовления
Запрограммированное время
приготовления может быть
изменено в любой момент.
1. Соответствующее поле
нагрева должо быть
включено. Точка на
индикаторе (13)
соответствующего поля
нагрева должна гореть.
2. Нажть кнопку включения
таймера (7).
3. Кнопками "+" и "-" (5 и 4)
установить новое время.
Для ускорения установки
времени на таймере
держите кнопки "+" или "-"
нажатыми.
o “-“.
Desactivación de la función
timer
Cuando el tiempo termina, se
emite una señal acústica de una
duración de 2 minutos.
Para interrumpir con anticipación la señal acústica es suficiente tocar cualquier tecla.
Отключение функции
таймер
По истечении
установленного времени в
течение 2 минут подается
звуковой сигнал.
Чтобы звуковой сигнал
прервать коснитесь любой
кнопки.
Поле нагрева будет теперь
отключено.
La zona de cocción ahora está
apagada.
21
Page 22

DE GB
Soll der Timer vor dem Ablaufen
der eingestellten Zeit ausgeschaltet
werden:
1. Die entsprechende Kochzone
muss aktiviert sein. Der
Dezimalpunkt (13) der
entsprechenden Zone muss
aufleuchten.
2. Die Timer-Taste berühren (7).
3. Die eingestellte Zeit auf Null
stellen, indem man die Taste “-“
(4) gedrückt hält.
Die Timer-Funktion ist nun
ausgeschaltet, aber die Kochzone
bleibt so lange eingeschaltet, bis
sie manuell ausgeschaltet wird.
Schnellabschalten:
1. Die entsprechende Kochzone
muss aktiviert sein. Der
Dezimalpunkt (13) der
entsprechenden Zone muss
aufleuchten.
2. Bei gleichzeitigem Drücken der
Tasten “+” und “-“ (5 und 4) wird
die Kochzone sofort ausgeschaltet.
Auf diese Weise wird auch der
Timer ausgeschaltet.
If you want to interrupt the
timer before the programmed
time period has elapsed:
1. the relative zone must be
on. The decimal point (13) on
the corresponding display
must be lit up.
2. Press the timer key (7).
3. Zero the time by pressing ““ (4).
The timer is now deactivated
but the cooking zone will
remain on until it is switched
off manually.
Rapid switch off:
1. the relative zone must be
on. The decimal point (13) on
the corresponding display
must be lit up
2. Press keys “+” and “-“ (5
and 4) simultaneously; the
cooking zone is switched off
immediately. The timer will
also be deactivated.
Timer-Funktion als Kochuhr
Wird die Funktion nicht für eine
bestimmte Kochzone verwendet,
kann sie wie eine einfache
Kochuhr verwendet werden.
Einstellen der Kochuhr
Bei ausgeschaltetem Kochgerät:
1. Einschalttaste (1) berühren;
2. Timer-Taste berühren (7);
3. Die gewünschte Zeit mit den
Tasten “+” und “-“ einstellen.
Bei eingeschaltetem Kochgerät
und einer aktivierten Kochzone:
1. Kochzone durch Berühren der
entsprechenden Auswahltaste
abwählen (2): Der Dezimalpunkt
(13) erlischt;
2. Timer-Taste berühren (7);
3. Die gewünschte Zeit mit den
Using the timer function as a
minute counter
If the timer function is not
being used to program a
specific cooking zone, it may
be used as a simple minute
counter.
Setting the minute counter
If the appliance is switched
off:
1. press the power key (1);
2. press the timer key (7);
3. set the required time using
“+” and “-“.
If the appliance is switched on
and one of the cooking zones
is also on:
1. deselect the zone by pressing
the relative key (2): the
decimal point(13) will go out;
22
Page 23

ITFR
ES RU
Pour arrêter la minuterie avant
la fin :
1. La zone concernée doit être
activée. Le point décimal (13)
de la zone correspondante doit
être allumé.
2. Effleurer la touche de la
minuterie (7).
3. Mettre à zéro le temps en
maintenant pressée la touche « » (4).
La fonction minuterie est
arrêtée, mais la zone de cuisson
Se si vuole interrompere il timer
prima del suo scadere:
1. la zona interessata deve
essere attivata. Il punto
decimale (13) della rispettiva
zona deve essere acceso.
2. Toccare il tasto di timer (7).
3. Azzerare il tempo tenendo
premuto il tasto “-“ (4).
La funzione timer è ora
disattivata ma la zona di cottura
rimane accesa, fintanto che non
la si spegne manualmente.
reste allumée jusqu’à ce qu’on
ne l’éteigne manuellement.
Spegnimento rapido:
1. la zona interessata deve
Arrêt rapide
1. La zone concernée doit être
activée. Le point décimal (13)
de la zone correspondante doit
être allumé.
2. Presser simultanément les
touches « + » et « - » (5 et 4) ;
la zone de cuisson s’éteint
essere attivata. Il punto
decimale (13) della rispettiva
zona deve essere acceso.
2. Premendo simultaneamente i
tasti “+” e “-“ (5 e 4), la zona
di cottura si spegne
immediatamente. In tal modo
viene disattivato anche il timer.
immédiatement. La minuterie
aussi est arrêtée.
Si se quiere interrumpir el timer
antes de que termine:
1. la zona interesada debe ser
activada. El punto decimal (13)
de la respectiva zona debe estar
encendido.
2. Tocar la tecla timer (7).
3. Poner a cero el tiempo teniendo apretada la tecla “-“ (4).
La función timer ahora está
desactivada pero la zona de cocción permanece encendida, hasta que non se la apaga manualmente.
Apagamiento rápido:
1. la zona interesada debe ser
activada. El punto decimal (13)
de la respectiva zona debe estar
encendido.
2. Apretando simultáneamente las
teclas “+” y “-“ (5 y 4), la zona
de cocción se apaga inmediatamente. De esta manera también
se desactiva el timer.
Если таймер должен быть
выключен до истечения
установленного времени:
1. Соответствующее поле
нагрева должно быть
включено. Точка на
индикаторе (13)
соответствующего поля
нагрева должа гореть.
2. Нажать кнопку включения
таймера (7).
3. Удерживая кнопку "-" (4)
нажатой сбросить
установленное время на
ноль.
Функция таймер будет
теперь отключена, однако
поле нагрева остается
включенным, пока оно не
будет выключено вручную.
Быстрое отключение:
1. Соответствующее поле
нагрева должно быть
включено. Точка на
индикаторе (13)
соответствующего поля
нагрева должна гореть.
2. При одновременном
нажтии кнопок "+" и "-" (5 и
4) поле нагрева отключается
сразу. Таким же образом
отключится и таймер.
Fonction minuterie utilisée
comme minuteur
Si la fonction n’est pas utilisée
pour une zone de cuisson
spécifique, elle peut être
employée comme simple
minuteur.
Programmation du minuteur
Si l’appareil est éteint :
1. Effleurer la touche
d’allumage (1).
2. Effleurer la touche de la
minuterie (7).
3. Programmer le temps désiré à
La funzione timer usata come
contaminuti
Se la funzione non viene usata
per una zona di cottura
specifica, essa può essere
impiegata come semplice
contaminuti.
Impostazione del contaminuti
Se il dispositivo è spento:
1. toccare il tasto di accensione
(1);
2. toccare il tasto di timer (7);
3. impostare il tempo desiderato
con i tasti “+” e “-“.
l’aide des touches « + » et « - ».
Se il dispositivo è acceso ed una
S
i l’appareil est allumé et une
zone de cuisson est active :
1. Désélectionner la zone en
effleurant la touche de sélection
correspondante (2) : le point
zona di cottura è attiva:
1. deselezionare la zona
toccando il relativo tasto di
selezione (2): il punto decimale
(13) si spegne;
La función timer usada como
cuentaminutos
Si la función no es usada para
una zona de cocción específica,
ésta puede ser utilizada como un
simple cuentaminutos.
Programación del cuentaminutos
Si el dispositivo está apagado:
1. tocar la tecla de encendido (1);
2. tocar la tecla de timer (7);
3. programar el tiempo deseado
con las teclas “+” y “-“.
Si el dispositivo está encendido y
una zona de cocción es activa:
1. quitar la selección a la zona
tocando la tecla relativa de selección (2): el punto decimal (13) se
apaga;
2. tocar la tecla del timer (7);
3. programar el tiempo deseado
Функция таймер в
качестве минутника
Если эта функция не
используется для
определенного поля нагрева,
то она можт быть
использована в качестве
обычного минутника.
Установка минутника
При выключенной
поверхности:
1. Нажть кнопку включения
(1);
2. Нажть кнопку включения
таймера (7);
3. Кнопками "+" и "-" (5 и 4)
установить желаемое время.
При включенной
поверхности и включенном
поле нагрева:
1. Нажатием кнопки (2)
отменить выбор поля
нагрева: точка на
индикаторе (13) должна
погаснуть;
2. Нажать кнопку
включения таймера (7);
3. Кнопками "+" и "-" (5 и 4)
23
Page 24

DE GB
Tasten “+” und “-“ einstellen.
Ausschalten der Kochuhr-Funktion
Nach Ablauf der eingestellten Zeit
ertönt 2 Minuten lang ein
Signalton.
Um den Signalton zu
unterbrechen, irgendeine Taste
berühren.
Soll der Timer vor dem Ablaufen
der eingestellten Zeit ausgeschaltet
werden:
1. Timer-Taste berühren (7);
2. Die eingestellte Zeit auf Null
stellen, indem man die Taste “-“
(4) gedrückt hält.
2. press the timer key (7);
3. set the required time using
“+” and “-“.
Switching off the minute
counter function.
When the set time period
has elapsed, an audible
signal sounds for 2 minutes.
To interrupt the audible
signal simply press any of
the keys.
If you want to interrupt the
timer before the set time
period has expired:
1. press the timer key (7);
2. zero the time by pressing
“-“ (4).
Schnellabschalten:
1. Die Tasten “+” und “-“ (5 und
4) gleichzeitig drücken; der Timer
wird ausgeschaltet.
Rapid switch off:
1. on pressing the keys “+”
and “-“ (5 and 4)
simultaneously, the timer is
deactivated.
24
Page 25

ITFR
ES RU
décimal (13) s’éteint.
2. Effleurer la touche de la
minuterie (7).
2. toccare il tasto di timer (7);
3. impostare il tempo desiderato
con i tasti “+” e “-“.
3. Programmer le temps désiré à
l’aide des touches « + » et « - ».
Arrêt de la fonction minuteur
Lorsque le laps de temps est
écoulé, l’appareil émet un
signal sonore pendant 2 mn.
Pour interrompre ce signal
sonore, il suffit d’effleurer une
touche quelconque.
La zone de cuisson est
maintenant éteinte.
Pour arrêter la minuterie avant
la fin :
1. Effleurer la touche de la
minuterie (7).
2. Mettre à zéro le temps en
maintenant pressée la touche « - »
Spegnimento della funzione
contaminuti
Quando il tempo è scaduto,
viene emesso un segnale
acustico per la durata di 2
minuti.
Per interrompere in anticipo la
segnalazione acustica è
sufficiente toccare un tasto
qualunque.
Se si vuole interrompere il timer
prima del suo scadere:
1. toccare il tasto di timer (7);
2. azzerare il tempo tenendo
premuto il tasto “-“ (4).
(4).
con las teclas “+” y “-“.
Apagamiento de la función
cuentaminutos
Cuando el tiempo termina, se
emite una señal acústica con
una duración de 2 minutos.
Para interrumpir con anticipación la señal acústica es suficiente tocar cualquier tecla.
Si se quiere interrumpir el
timer antes de que termine:
1. tocar la tecla timer (7);
2. Poner a cero el tiempo teniendo apretada la tecla “-“
(4).
установите желаемое время.
Отключение функции
минутник
По истечении
установленного времени в
течение 2 минут подается
звуковой сигнал. Чтобы
звуковой сигнал прервать
коснитесь любой кнопки.
Если таймер должен быть
выключен до истечения
установленного времени:
1. Нажть кнопку включения
таймера (7);
2. Удеривая кнопку "-" (4)
нажатой сбросить
установленное время на
ноль.
Arrêt rapide
1. Presser simultanément les
touches « + » et « - » (5 et 4) :
la minuterie est arrêtée.
Spegnimento rapido:
1. premendo simultaneamente i
tasti “+” e “-“ (5 e 4), il timer
viene disattivato.
Apagamiento rápido:
1. apretando simultáneamente las
teclas “+” y “-“ (5 y 4), el timer
Быстрое отключение:
1. Одновременно нажть
кнопки "+" и "-" (5 и
4) – таймер выключится.
se desactiva.
25
Page 26

TOUCH CONTROL
DE GB
1 Ein / Aus Taste
2 Kochzone +
3 Kochzone 4 Doppelter Heizkreis
5 Timer
6 Anzeige eingestellter Wert
7 Anzeige Timer
8 Warnleuchte doppelter Heizkreis
9 Timer-Warnleuchten
1 Accensione/Spegnimento ON / OFF
2 Zona cottura +
3 Zona cottura 4 doppio circuito
5 timer
6 display valore impostato
7 display timer
8 spia doppio circuito
9 spie timer
1 Power ON/ Power OFF
2 Cooking zone +
3 Cooking zone 4 dual circuit
5 timer
6 setting display
7 timer display
8 dual circuit indicator light
9 timer indicator lights
Encendido/Apagado ON / OFF
1
2 Zona de cocción +
3 Zona de cocción 4 circuito doble
5 timer
6 display valor programado
7 display timer
8 piloto circuito doble
9 pilotos timer
1 Marche/Arrêt ON / OFF
2 Zone cuisson +
3 Zone cuisson 4 Double circuit
5Minuterie
6 Display de la valeur programmée
7 Display minuterie
8 Témoin du double circuit
9 Témoin de la minuterie
1
Rzjgrf Drk.xtzj
2 Zfuhtdfntkmzjt gjkt +
3 Zfuhtdfntkmzjt gjkt -
Ldjqzjt gjkt
4
5 Nfqvth
6 Lbcgktq ecnfzjdktzzjq cnegtzb zfuhtdf
7 Lbcgktq nfqvthf
8 Bzlbrfnjhzfy kfvgf ldjqzjuj gjky
9 Bzlbrfnjhzfy kfvgf nfqvthf
/
Dsrk.xtzj DRK
/
DSRK
26
Abb. 3 - Fig. 3 - Рис. 3
Page 27

TOUCH CONTROL B 2
ITFR
ES RU
Abb. 4 - Fig. 4 - Рис. 4
27
Page 28

DE GB
Modelle KC 69...,
KCT 69..., KCT 79...
1.1 EIN/AUS-Schalten der
Touch Control
(Abb. 3)
Nach Anlegen der Netzspannung
initialisiert sich die Steuerung für ca.
1 Sekunde bevor sie betriebsbereit
ist. Nach einem Reset leuchten für 1
Sekunde alle Anzeigen und LED´s.
Nach Ablauf dieser Zeit werden alle
Anzeigen und LED´s wieder
ausgeschaltet, und die Steuerung
befindet sich im Stand-by Zustand.
Die Steuerung kann nun durch
Betätigen der EIN/AUS-Taste in den
Ein-Zustand geschaltet werden.
Auf den Kochstellenanzeigen
erscheint statisch die “0“. Sollte eine
Kochstelle den Status “Heiss“
besitzen, wird an Stelle der “0“ ein
statisches “H“ angezeigt. Der Punkt
rechts unten blinkt auf allen
Kochstellenanzeigen in einem 1Sekunden-Takt zum Anzeigen, dass
momentan keine Kochstelle
selektiert ist.
Die Elektronik bleibt nach dem
Einschalten für 20 Sekunden
aktiviert. Findet innerhalb dieser Zeit
keine Kochstellen- oder
Timeranwahl statt, geht die
Elektronik selbständig wieder in den
Stand-by Zustand.
ß
Die Steuerung lä
den Ein-Zustand einschalten, wenn
lediglich die EIN/AUS-Taste von
der Elektronik als betätigt erkannt
wurde. Sollte eine beliebige weitere
Taste ebenfalls als betätigt erkannt
werden, bleibt die Steuerung im
Stand by-Zustand.
Sollte zum Zeitpunkt des
Einschaltens die Kindersicherung
noch aktiv sein, wird auf allen
Kochstellen ein “L“ wie LOCKED
angezeigt (siehe auch 1.9). Falls
Kochstellen den Status “Heiss“
besitzen, wird das “L“ im Wechsel
mit dem “H“ angezeigt.
Durch Betätigung der EIN/AUSTaste im EIN-Zustand der Steuerung
t sich nur dann in
Models KC 69...,
KCT 69..., KCT 79...
1.1 Switching the Touch
Control ON/OFF
(Fig. 3)
After mains voltage is applied
the control initialises for
approx. 1 second before it is
ready for operation. After a reset
all displays and LEDs glow for
approx. 1 second. When this
time is over all displays and
LEDs extinguish and the
control is in the stand-by
mode.
By operating the ON/OFF key
the control can be turned into
the ON-mode. The cooking
zone displays show a static “0“.
If a cooking zone is in the “hot“
status, the display shows a static
“H“ instead of “0“. The bottom
right dot is blinking in 1 second
intervals on all cooking zone
displays to indicate that no
cooking zone is selected at the
moment.
After switching-ON the
electronic control remains
activated for 20 seconds. If no
cooking zone or timer selection
follows within this period of
time, the electronic control
automatically switches back
into the stand-by-mode.
The control can only be
switched-ON if it identifies the
ON/OFF key alone being
operated. Should it recognize
key activation other than that,
the control remains in the standby-mode.
If the child safety feature is
active when switching on, all
cooking zones show “L“,
(LOCKED). (also refer to 1.9).
If the cooking zones are in a
“hot“ status, the display shows
“L“ and “H“ in alternation.
When the Touch Control is ON
it can be switched-OFF at any
time by operating the ON/OFF
28
Page 29

ESITFR
RU
Modèle KC 69...,
KCT 69..., KCT 79...
1.1 Marche/arrêt de la
commande sensitive
(Fig. 3)
Après la mise sous tension, il
faut environ 1 seconde à la
commande sensitive pour être
prête à fonctionner. Après la
réinitialisation de tous les
afficheurs, les LEDS clignotent
pendant 1 seconde environ. Puis
les afficheurs et les LEDS
s’éteignent et la commande
sensitive se met en stand-by.
La commande sensitive peut être
activée avec la touche
d’alimentation. Les afficheurs
des foyers indiquent “0“. Le
“0“ est remplacé par un “H“
quand le foyer est chaud. Le
point en bas à droite de tous les
afficheurs des foyers clignote
toutes les secondes pour
indiquer qu’aucun foyer n’a été
sélectionné.
Après la mise en marche, la
commande sensitive reste active
pendant 20 secondes. Si on ne
sélectionne ni un foyer ni le
minuteur, la commande
sensitive se remet en stand-by
automatiquement.
On ne peut mettre en marche la
commande sensitive qu’avec la
touche d’alimentation. Si on
appuie en même temps sur la
touche d’alimentation et sur
d’autres touches, la commande
sensitive reste en stand-by.
Si la sécurité enfants est active
lors de la mise sous tension, tous
les afficheurs des foyers
indiquent “L“, (locked/
verrouillé) (voir 1.9). Si les
foyers sont chauds, les
afficheurs indiquent
alternativement “L“ et “H“
(hot/chaud).
La commande sensitive peut être
Modelli KC 69...,
KCT 69..., KCT 79...
1.1 Accensione/spegnimento
del Touch Control
(Fig. 3)
Dopo l’accensione, il touch
richiede circa 1 secondo prima di
essere pronto al funzionamento.
Dopo il reset tutti i displays e i
LED lampeggiano per ca.1
secondo. Passato questo tempo
tutti i displays e i LED si spengono
e il touch è in posizione di stand-
by.
Modelo KC 69...,
KCT 69..., KCT 79...
1.1 Encendido/apagado del
Touch Control
(Fig. 3)
Después del encendido, se requerirá
aproximadamente un segundo para
que el touch pueda funcionar.
Después del reset todos los displays
y los LEDS centellean durante
aproximadamente un segundo. Una
vez transcurrido este lapso todos los
displays y los LEDS se apagan y el
touch queda en posición de stand-by.
Para encender el touch se debe
Il touch può essere acceso
azionando il tasto di
alimentazione. I displays delle
zone cottura mostrano uno “0“.
Se una zona cottura “scotta”, il
display mostra “H“ invece di
“0“. Il punto in basso a destra su
tutti i displays dei punti cottura
lampeggia ad intervalli di un
secondo per indicare che al
momento non è stato selezionato
alcun piano cottura.
Dopo l’accensione il touch
rimane attivo per 20 secondi. Se
non si seleziona né una zona
cottura né il timer il touch ritorna
nello stato di stand-by
automaticamente.
presionar la tecla de alimentación.
Los displays de las zonas de cocción
muestran un “0“. En caso de que una
zona de cocción “queme” (alta
temperatura), en el display
aparecerá “H“ en lugar de “0“. El
punto situado en la parte inferior
derecha de todos los displays de las
zonas de cocción centellea con
frecuencia de un segundo para
indicar que hasta ese momento no se
ha seleccionado ninguna encimera.
Después del encendido el touch
permanece activado durante 20
segundos. En caso de no
seleccionarse ni una zona de cocción
ni el temporizador, el touch retorna
automáticamente al estado de standby.
Il touch si accende esclusivamente
azionando il tasto di
alimentazione da solo. La
pressione del tasto di
alimentazione in concomitanza
con altri tasti non produce alcun
effetto e il touch rimane in stand-
by.
Se la sicurezza per bambini è
attiva durante l’accensione, tutti
i display delle zone cottura
mostrano “L“, (locked/bloccato).
(fare riferimento a 1.9). Se le zone
cottura “scottano” i displays
mostreranno “L“ ed “H“ (hot/
caldo) alternativamente.
Il touch control può essere spento
in qualsiasi momento azionando
El touch se enciende presionando
únicamente la tecla de alimentación.
En caso de presionarse la tecla de
alimentación simultáneamente con
otras teclas no se obtendrá ningún
efecto y el touch permanecerá en
stand-by. Si el dispositivo de
seguridad para niños está activado
durante el encendido, en los displays
de todas las zonas de cocción se
visualizará “L“ (locked/bloqueado)
(véase 1.9). Si las zonas de cocción
“queman” en los displays se
visualizarán alternativamente “L“ y
“H“ (hot/caliente).
El touch control puede apagarse en
cualquier momento mediante la tecla
de alimentación. Ello es válido
МОДЕЛИ KC 69… ,
KCT 69… , KCT 79…
1.1 Включение /
Выключение
(рис. 3)
После подключения к сети
сенсорный программатор
инициализируется
примено 1 сек., прежде
чем он готов к
эксплуатации. После
включения все
контрольные лампы горят
примерно 1 сек. По
истечении этого времени
все дисплеи и
контрольные лампы гаснут
и программатор переходит
в режим ожидания Stand-
by. Программатор может
быть включен посредством
кнопки ВКЛ/ВЫКЛ. На
дисплеях нагр. полей
высветится "0". Если
какое-либо поле горячее,
высветится "Н" вместо "0".
Мигающая в 1-секундном
такте точка, справа внизу
на дисплеях всех полей,
указывает на то что в
данный момент не
выбрано никакое нагр.
поле. Электроника
остается активированной в
течении 20 секунд после
включения. Если в течении
этого времени не
происходит выбора
нагревательного поля или
таймера, программатор
автоматически снова
переходит в режим
ожидания (Stand-by).
Программатор включается
только при воздействии на
кнопку ВКЛ/ВЫКЛ. Если
одновременно
производится воздействие
на какую-либо другую
кнопку, программатор
остается в режиме
ожидания. Если во время
включения плиты
активирована блокировка
от детей, на всех полях
высветится "L", (locked/
заблокировано), (см. также
п. 1.9). Если поля
горячие, попеременно
будут высвечиваться "L" и
"Н" (hot / горячо).
Посредством воздейсвия
на кнопку ВКЛ/ВЫКЛ при
включенном
программаторе,
нагревательную
поверхность можно в
любой момент выключить.
Это действительно даже
при включений блокировке
от детей. Кнопка
ВКЛ/ВЫКЛ имеет
приоритет при
выключении.
29
Page 30

DE GB
läßt sich die Touch Control jederzeit
wieder ausschalten. Dies gilt auch
dann, wenn die Steuerung verriegelt
wurde (Kindersicherung aktiviert).
Die EIN/AUS-Taste hat in der
Ausschalt-Funktion immer Vorrang.
1.2 Automatisches Ausschalten
Die Steuerung schaltet sich aus dem
Ein-Zustand nach 20s selbsttätig
aus, wenn in dieser Zeit keine
Kochstelle aktiviert oder eine
Selektatste betätigt wurde. Die
automatische Abschaltzeit, im Falle
einer Kochstellenselektion, setzt sich
zusammen aus, 10s Deselektionszeit
für eine Kochstelle, die auf
Kochstufe “0“ steht und 10s
Ausschaltzeit.
key. This is also valid if the
control has been locked
(activated child safety feature).
The ON/OFF key has always
priority in the switch-OFF
function.
1.2 Automatic switch-OFF
When the control is ON it
automatically switches-OFF
after 20 seconds if no cooking
zone or select key has been
operated within this period of
time. If case of a cooking zone
selection, the automatic switchOFF time is composed of 10
seconds deselection time for a
cooking zone at setting“0“ and
10 seconds switch-OFF time.
1.3 Einschalten/Ausschalten einer
Kochstelle
Befindet sich die Steuerung im Ein-
Zustand kann durch Betätigen einer
Kochstellen-Selekttaste (= PLUSTaste der entsprechenden
Kochstelle) die zugehörige
Kochstelle selektiert werden. Es
leuchtet statisch in der
entsprechenden Anzeige der
Anzeigenpunkt und anstelle des “H“,
falls die Kochstelle den Staus
“Heiss“ besitzt, erscheint eine “0“.
Auf allen anderen Kochstellen
erlischt der blinkende Punkt in den
Anzeigen. Anschließend wird durch
nochmaliges Betätigen der
Kochstellenselekttaste oder
MINUS-Taste eine Kochstufe
eingestellt und die Kochstelle
beginnt zu heizen. Um die
Kochstellenwahltaste als Plus-Taste
verwenden zu können, muß die
Kochstelle nach der Selektion für
0,3s als losgelassen erkannt worden
sein.
Nach der Selektion einer Kochstelle
kann die Kochstufe durch
kontinuierliches Drücken der PLUSTaste, beginnend bei Stufe „1“, alle
0,4 s um 1 Stufe erhöht. Nach
Erreichen der Kochstufe “9“ wird
1.3 Switching a cooking zone
ON and OFF
If the control is ON the
respective cooking zone can be
selected by operating a
cooking-zone-select-key (=
PLUS-key of the respective
cooking zone). There is a static
dot indication in the respective
display. If the cooking zone is
hot “0” is displayed instead of
“H” . On all other cooking zone
displays the blinking dot
extinguishes. Then a setting will
be chosen by a renewed
operation of the cooking- zoneselect-key or the MINUS-key
and the cooking zone begins to
heat up. In order to use the
cooking-zone-select-key as a
PLUS-key the control has to
recognize that after the selection
the cooking zone has been
released for 0,3 seconds.
After selection of a cooking
zone the setting can be
increased by continously
pressing the PLUS-key,
starting at step “1” it is
increased by 1 step every 0,4
seconds. When setting “9” is
30
Page 31

ITFR
ES RU
coupée à tout moment par la
touche d’alimentation, même si
la commande a été verrouillée
par la sécurité enfants. La
touche d’alimentation est
toujours prioritaire dans la
fonction d’arrêt.
1.2 Arrêt automatique
La commande sensitive s’arrête
automatiquement après 20
secondes d’inactivité. Après la
sélection d’un foyer, le délai
d’arrêt automatique se divise en
deux temps : au bout de 10
secondes le foyer est
désélectionné, 10 secondes
après, la commande sensitive
s’arrête.
il tasto di alimentazione. Questo
è valido anche se il comando è
stato bloccato con la sicurezza
bambini. Il tasto di alimentazione
ha sempre priorità maggiore nella
funzione di spegnimento.
1.2 Spegnimento automatico
Una volta acceso, il touch si
spegne automaticamente dopo 20
secondi di inattività. Dopo la
selezione di una zona cottura il
tempo di spegnimento automatico
si suddivide in 10 secondi dopo il
quale viene deselezionata la zona
e, 10 secondi dopo, il touch si
spegne.
incluso en caso de que el mando haya
sido bloqueado mediante el
dispositivo de seguridad para niños.
La tecla de alimentación goza
siempre de prioridad en la función
de apagado.
1.2 Apagado automático
Una vez encendido, el touch se apaga
de modo automático después de 20
segundos de inactividad. Después de
haber seleccionado una zona de
cocción, el tiempo de apagado
automático se subdivide en 10
segundos, transcurridos los cuales se
deselecciona la zona y, después de
otros 10 segundos, el touch se apaga.
1.2 Автоматическое
выключение
Программатор
автоматически
выключается через 20 с,
если за это время не было
активировано никакое
поле или выбрана какая-
либо кнопка. В случае если
поле выбрано, но
находится в положении
"0", через 10 с. происходит
деактивация поля, а еще
через 10 с. поверхность
выключается.
1.3 Marche/arrêt d’un foyer
Si la commande sensitive est
active, le foyer peut être
sélectionné avec la touche de
sélection (touche PLUS de la
zone correspondante). Un point
s’allume sur l’afficheur du foyer
pour confirmer la sélection. Si
le foyer est chaud, l’afficheur
indique alternativement “H” et
“0”. Le voyant de sélection
clignotant s’éteint sur tous les
autres afficheurs. Pour
sélectionner la puissance,
appuyer à nouveau sur la touche
PLUS ; le foyer commence à
chauffer. Quand la sélection est
terminée, relâcher la touche
PLUS pendant 0,3 seconde
avant de procéder au choix de
la puissance avec la même
touche.
Quand le foyer a été sélectionné,
maintenir la pression sur la
touche PLUS pour sélectionner
la puissance : à partir du niveau
1, la puissance augmente d’une
unité toutes les 0,4 secondes. La
puissance maximale est atteinte
au niveau 9.
Si le foyer est sélectionné avec
1.3 Accensione/spegnimento di
una zona cottura
Con il touch acceso, la zona
cottura può essere selezionata
attivando il tasto di selezione
(tasto PIU’ della rispettiva zona).
Un punto acceso nel display della
zona indica la selezione. Se l’area
“scotta” una “H” verrà
visualizzata alternativamente allo
“0”. Su tutti gli altri displays il
punto di selezione lampeggiante
si spegne. Azionando nuovamente
il tasto PIU’, si può selezionare
un livello di potenza e la zona
inizia a riscaldare. Dopo la
selezione bisogna rilasciare il
tasto PIU’ per 0,3 secondi prima
di poter procedere alla scelta
della potenza con lo stesso.
Selezionata la zona cottura, la
scelta del livello di potenza può
essere effettuata tenendo premuto
il tasto PIU’, partendo dal livello
1 viene incrementato di una unità
ogni 0,4 secondi. Al
raggiungimento del livello 9 non
è possibile effettuare ulteriori
incrementi.
Se la zona cottura è selezionata
tramite il tasto MENO, il livello
iniziale è il “9” (massimo livello).
1.3 Encendido/apagado de una zona
de cocción
Con el touch encendido, será posible
seleccionar la zona de cocción
operando con la tecla de selección
(tecla MÁS de la respectiva zona).
Un punto encendido en el display de
la zona indica que la misma se
encuentra seleccionada. Si el área
“quema” se visualizarán
alternativamente “H” y “0”. En
todos los restantes displays se apaga
el punto de selección centelleante.
Presionando nuevamente la tecla
MÁS, será posible seleccionar un
nivel de potencia y la zona
comenzará a calentar. Una vez
efectuada la selección deberá
soltarse la tecla MÁS durante 0,3
segundo antes de poder seleccionar
la potencia operando con esta misma
tecla.
Una vez seleccionada la zona de
cocción, podrá seleccionarse el nivel
de potencia manteniendo presionada
para ello la tecla MÁS ; partiendo
desde el nivel 1 se incrementa en la
medida de una unidad cada 0,4
segundo. Al alcanzarse el nivel 9 no
será posible efectuar otros
incrementos.
Si la zona de cocción ha sido
1.3
Включение/Выключен
ие нагревательного поля
Когда управление
включено, любое нагр.
поле может быть выбрано
посредством касаяния
кнопки выбора("+") этого
поля. На дисплее нагр.
поля постоянно светится
точка, а символ "H"(если
поле горячее) сменяется
на "0". На дисплеях других
полей мигающая точка
гаснет. Затем кнопками"+"
или"-" устанавливается
нужная ступень нагрева и
поле начинает
нагреваться. Чтобы кнопку
выбора применить как
кнопку ПЛЮС, нужно после
выбора нагр. поля
отпустить ее минимум на
0,3 с. После выбора
какого-либо нагр. поля
ступень нагрева может
быть увеличена начиная
со ступени "1", каждые 0,4
секунды на 1 ступень,
посредством
непрерывного нажатия
кнопки "+". По достижении
ступени "9", изменение
ступени нагрева не
происходит. Если после
выбора поля ступень
нагрева устанавливается
кнопкой МИНУС, установка
начинается с макс, ступени
"9". Если кнопка остается
нажатой, значение ступени
нагрева
убывает каждые 0,4
секунды на 1 ступень. По
достижении ступени "0",
дальнейшего изменения
не происходит. Нужно
отпустить и снова
нажать"+" или"-".
31
Page 32

DE GB
keine weitere Veränderung der
Kochstufe vorgenommen
(Endanschlag).
Wird nach der Selektion der
Kochstelle die Kochstelle mittels der
MINUS Taste eingeschaltet, so
startet die Kochstelle mit der
maximalen Kochstufe „9“(„links
herum Einschalten). Bleibt die Taste
betätigt, wird die alle 0,4 s um 1
Stufe heruntergezählt. Bei Erreichen
der Kochstufe “0“ wird keine
weitere Veränderung der Kochstufe
vorgenommen (Endanschlag). Erst
eine erneute Betätigung der MinusTaste (oder Plus-Taste) verändert die
Kochstufe.
Ausschalten einer einzelnen
Kochstelle:
Zum Ausschalten einer einzelnen
Kochstelle muss die Kochstelle mit
der Kochstellenwahltaste (= PLUS)
selektiert werden. Die Selektion
wird angezeigt durch den stehenden
Punkt in der entsprechenden
Kochstellenanzeige. Werden
anschliessend die PLUS- (die
Kochstellenwahl arbeitet als PlusTaste) und die MINUS-Taste
gemeinsam als betätigt erkannt, wird
die Kochstufe der selektierten
Kochstelle direkt auf “0“
zurückgesetzt. Alternativ kann mit
der Minus-Taste, die Kochstufe bis
auf “0“ herunter gezählt werden.
Wenn alle Kochstellen auf “0“
gestellt sind, blinken alle
Dezimalpunkte in den
Kochstellenanzeigen. Sollte eine
Kochstelle den Status “Heiss“
besitzen, wird anstelle der “0“ ein
“H“ angezeigt.
reached the setting will not be
changed further (end stop).
If the selected cooking zone will
be switched ON by means of the
MINUS key, the cooking zone
starts at the maximum setting
“9“ (“reverse switching-ON”).
When the key is continuously
operated, it decreases by 1 step
every 0,4 seconds. When setting
“0” is reached, there will be no
further setting changed (end
stop). Only a renewed operation
of the MINUS (or PLUS) key
changes the setting.
Switching OFF an individual
cooking zone
To switch off an individual
cooking zone, the respective
cooking zone has to be selected
with the cooking-zone-selectkey (= PLUS). The selection is
indicated with the static dot in
the respective cooking zone
display. If the control
recognizes that the PLUS(cooking-zone-select-key is the
PLUS-key) and the MINUSkey have been activated
simultaneously the setting of
the selected cooking zone will
be put back to “0“.
Alternatively, the MINUS-key
can be used to count down the
setting to “0“.
If all cooking zones are at “0”,
all decimal points in the
cooking zone displays are
blinking. If a cooking zone is
“hot”, “H” will be displayed
instead of “0”.
32
Ausschalten aller Kochstellen:
Das sofortige Ausschalten aller
Kochstellen ist jederzeit mit der
EIN/AUS-Taste möglich. Im Standby-Zustand erscheint ein “H“ in
allen Kochstellen, die den Status
“Heiss“ besitzen. Die anderen
Kochstellenanzeigen sind dunkel.
Switching-OFF all cooking
zones:
Immediate switching-OFF of
all cooking zones can be
achieved anytime by means of
the ON/OFF key. In the standby-mode an “H“ appears on
all cooking zones which are
“hot“. All other cooking zone
displays are not illuminated.
Page 33

ITFR
ES RU
la touche MOINS, le niveau
initial est le niveau “9”
(maximum). Si on maintient la
pression sur la touche, la
puissance diminue d’une unité
toutes les 0,4 secondes. En
dessous du niveau 0, la
puissance ne peut plus être
diminuée. La programmation ne
peut être modifiée qu’en
appuyant de nouveau sur la
touche MOINS (ou PLUS).
Arrêt d’un foyer
Sélectionner le foyer à éteindre
avec la touche de sélection
(PLUS). Un voyant s’allume sur
l’afficheur du foyer
correspondant pour confirmer
la sélection. Si on appuie en
même temps sur les touches
PLUS et MOINS, la puissance
programmée pour ce foyer est
0. On peut aussi utiliser la
touche MOINS pour diminuer la
puissance jusqu’à 0.
Si la puissance de tous les foyers
est réglée sur “0”, les points
décimaux clignotent sur les
afficheurs. Quand un foyer est
chaud, “H” s’affiche à la place
de “0”.
Tenendo premuto il tasto, il livello
attivo decresce di una unità ogni
0,4 secondi. Raggiunto il livello
0 non è possibile effettuare
ulteriori decrementi. Solamente
una nuova attivazione del tasto
MENO (o PIU’) può modificare
l’impostazione.
seleccionada mediante la tecla
MENOS, el nivel inicial es el “9”
(nivel máximo). Manteniendo
presionada la tecla, el nivel activo
decrece en la medida de una unidad
cada 0,4 segundo. Una vez
alcanzado el nivel 0 no será posible
efectuar ulteriores decrementos. Sólo
presionando nuevamente la tecla
MENOS (o MÁS) será posible
modificar la predisposición.
Spegnimento di una zona cottura
Selezionare la zona da spegnere
con il tasto di selezione (PIU’). La
selezione è indicata con il punto
nel display della relativa zona.
Attivando il tasto PIU’ e MENO
contemporaneamente, il livello di
potenza della zona viene
impostato a 0. In alternativa il
tasto MENO può essere utilizzato
per decrementare il livello di
potenza fino a 0.
Se tutte le zone cottura sono a
livello di potenza “0”, i punti
decimali nei displays
lampeggiano. Se una zona cottura
“scotta”, apparirà una “H”
anziché lo “0”.
Apagado de una zona de cocción
Seleccionar la zona que se desea
apagar mediante la tecla de
selección (MÁS). La selección es
indicada mediante el punto en el
display de la respectiva zona.
Presionando las teclas MÁS y
MENOS de modo simultáneo, el nivel
de potencia de la zona es
predispuesto en 0. Como alternativa
la tecla MENOS puede utilizarse
para reducir el nivel de potencia
hasta 0.
En caso de que todas las zonas de
cocción se encuentren en nivel de
potencia “0”, los puntos decimales
presentes en los displays
centellearán. Si una zona de cocción
“quema”, aparecerá una “H” en
lugar del “0”.
Выключение одного поля
Для выключения одного
поля, оно сначала должно
быть выбрано кнопкой
выбора (ПЛЮС). На
дисплее выбранного поля
появляется не мигающая
точка. Если одновременно
нажать на кнопки ПЛЮС и
МИНУС ступень нагрева
установится сразу на "0".
Альтернативно можно
также установить ступень
нагрева на "0" нажимая
кнопку МИНУС. Если все
поля установлены на "0"
мигают точки на дисплеях
всех полей. Если какое-
либо поле еще горячее,
вместо "0" высвечивается
"Н".
Arrêt de tous les foyers :
Pour obtenir l’arrêt immédiat
de tous les foyers, appuyer sur
la touche d’alimentation. En
mode stand-by, “H“ s’affiche
pour tous les foyers qui sont
chauds. Tous les autres
afficheurs sont éteints.
Spegnimento di tutte le zone
cottura:
Lo spegnimento immediato di
tutte le zone può essere ottenuto
in qualsiasi momento tramite il
pulsante di alimentazione. In
modalità stand-by una “H“
appare per tutte le zone cottura
che “scottano”. Tutti gli altri
displays saranno spenti.
Apagado de todas las zonas de
cocción:
Presionando la tecla de alimentación
podrá obtenerse en cualquier
momento el apagado inmediato de
todas las zonas. En modalidad standby aparecerá una “H“ respecto de
todas las zonas de cocción que
“queman”. Todos los restantes
displays estarán apagados.
Выключение всех полей:
Немедленное выключение
всех полей всегда
возможно кнопкой
ВКЛ/ВЫКЛ. В режиме
ожидания (Stand-by), на
дисплеях всех горячих
полей высвечивается "Н".
Дисплеи всех остальных
полей остаются темными.
33
Page 34

DE GB
1.4 Leistungsstufen
Die Leistung der Kochstellen ist in
9 Stufen einstellbar und wird durch
die Ziffern „1“ bis „9“ mittels LEDSieben-Segment-Anzeigen
angezeigt.
1.5 Ankochautomatik
(auswählbar)
Bei aktivierter Ankochautomatik
wird für eine, von der gewählten
(Fort-) Kochstufe abhängigen
Ankochzeit, die Leistung der
Kochstelle auf 100% ED geschaltet.
Nach dem Ablauf der Ankochzeit
wird auf die vorgewählte
Fortkochstufe zurückgeschaltet.
1.4 Wattage settings
The output of the cooking zones
can be set in 9 steps which are
indicated by the figures “1“ thru
“9“ by means of LED sevensegment-displays.
1.5 Automatic heat-up
function (selectable)
When the automatic heat-up
function is activated the wattage
of the cooking zone is at 100 %
ED for a certain heat-up time
which is dependent on the
selected (continious) setting.
At the end of the heat-up time
the electronic control switches
back to the preselected
simmering setting.
Ablauf um die Ankochautomatik zu
starten:
-Steuerung ist eingeschaltet und
eine Kochstelle wird selektiert.
- Die Ankochautomatik wird nach
dem Einstellen der Kochstufe “9“,
durch nochmaliges betätigen der
Plus-Taste, aktiviert.
-Mit der PLUS- und der MINUSTaste wird die gewünschte
Fortkochstufe eingestellt, es
erscheint die gewünschte
Kochstufe in der Anzeige.
- 3s nach der letzten
T astenbetätigung
(Kochstufeneinstellung) und
innerhalb von 16s nach
Aktivierung der Ankoch-Funktion
erscheint das Symbol “A“ für
Ankochstoß im Wechsel mit der
eingestellten Kochstufe in der
Anzeige.
-Wird nach dem Erscheinen des
Symbols „A“ mit der MINUSTaste noch eine kleinere
Fortkochstufe gewählt, so wird die
Ankochautomatik abgeschaltet.
- Es kann mit der PLUS-Taste eine
höhere Fortkochstufe gewählt
werden, hierbei wird die
Ankochdauer automatisch an die
Starting process of the
automatic heat-up:
- Control is ON and a cooking
zone will be selected
- The automatic heat-up will be
activated by operating the
PLUS-key for a second time.
- The requested continious
setting will be selected with
the PLUS- and MINUS-key,
the chosen setting appears in
the display.
-3 seconds after the last key
operation (selection of the
setting) and within 16 seconds
after activation of the heat-up
function, the symbol “A“
(which stands for the heat-up
boost) appears on the display,
in alternation with the chosen
setting.
- If a lower setting will be
selected with the MINUS-key
after the “A” has appeared in
the display, the automatic
heat-up function will be
interrupted.
- By means of the PLUS-key a
higher continious setting can
be chosen, here the duration
34
Page 35

ITFR
ES RU
1.4 Puissance
Il existe 9 niveaux de puissance
pour chaque foyer : ils sont
indiqués par des repères
gradués de “1“ à “9“ sur les
afficheurs à LEDs de sept
segments.
1.5 Chauffe automatique (sur
sélection)
Quand la fonction de chauffe
automatique est active, la
puissance du foyer est à 100 %
pendant une durée qui varie
selon la puissance sélectionnée.
À la fin du temps de chauffe, la
commande sensitive revient à la
puissance sélectionnée.
1.4 Livello di potenza
La potenza della zona cottura può
essere impostata in 9 livelli che
sono indicati dai simboli da “1“
a “9“ tramite i displays a LED
di sette segmenti.
1.5 Funzione di riscaldamento
automatico (su selezione)
Quando la funzione di
riscaldamento automatico è
attivata, la potenza della zona
cottura è al 100 % per un
determinato periodo di
riscaldamento che dipende dal
livello di potenza selezionato. Alla
fine del tempo di riscaldamento il
touch ritorna al livello di potenza
preselezionato.
1.4 Nivel de potencia
La potencia de la zona de cocción
dispone de 9 niveles que aparecen
indicados con los símbolos de “1“ a
“9“ mediante los displays de LED
de siete segmentos.
1.5 Función de calentamiento
automático (mediante selección)
Encontrándose activada la función
de calentamiento automático, la
potencia de la zona de cocción se
mantiene en 100 % por un
determinado lapso de calentamiento,
cuyo valor depende del nivel de
potencia seleccionado. Al concluirse
el tiempo de calentamiento el touch
retorna al nivel de potencia
preseleccionado.
1.4 Ступени мощности
Мощность полей нагрева
состоит из 9 ступеней и
показывется цифрами от
"1" до "9" на дисплее,
посредством семи-
сегментных светодиодов.
1.5 Автоматическое
регулирование степени
нагрева (выбираемо)
При активированном
автоматическом
регулировании, нагр. поле
при включении
устанавливается на 100%
мощности, до окончания
времени нагрева
зависящем от выбранной
ступени. По окончании
времени нагрева
мощность поля
автоматическиуменьшаетс
я до установленной.
Départ du processus de chauffe
automatique :
- la commande sensitive est
allumée et un foyer est
sélectionné ;
- quand la puissance 9 est
atteinte, appuyer encore une
fois sur la touche PLUS pour
activer la chauffe
automatique;
- pour sélectionner la puissance,
appuyer sur les touches PLUS
et MOINS, l’afficheur indique
la puissance sélectionnée;
- trois secondes après la
dernière pression des touches
(sélection de la puissance) et
16 secondes après l’activation
de la fonction de chauffe
automatique, le symbole “A”
(qui signale l’augmentation de
la puissance) et la puissance
sélectionnée apparaissent
alternativement sur
l’afficheur;
- si on utilise la touche MOINS
pour sélectionner une
puissance plus basse alors que
Inizio del processo di
riscaldamento automatico:
- Il touch è acceso e una zona
Inicio del proceso de calentamiento
automático:
- Con el touch encendido se
cottura viene selezionata.
- Raggiunto il livello di potenza
- Una vez alcanzado el nivel de
9, il riscaldamento automatico
è attivato tramite un’ulteriore
pressione del tasto PIU’.
- Il livello di potenza richiesto
- El nivel de potencia requerido se
viene selezionato agendo sui
tasti PIU’ e MENO, il display
mostra il livello scelto.
- Tre secondi dopo l’ultima
- Tres segundos después de la última
pressione dei tasti (selezione del
livello di potenza) ed entro 16
secondi dopo l’attivazione della
funzione di riscaldamento
automatico, il simbolo “A” (che
segnala l’incremento di potenza)
appare sul display
alternativamente al livello di
potenza selezionato.
- Se un livello più basso viene
- En caso de seleccionarse un nivel
selezionato con il tasto MENO,
dopo che la “A” è apparsa sul
display, la funzione di
riscaldamento automatico verrà
interrotta.
Последовательность
включения
автоматического
регулирования нагрева:
- Программатор включен и
selecciona una zona de cocción.
potencia 9, el calentamiento
automático se activa mediante
ulterior presión de la tecla MÁS.
selecciona operando con las teclas
MÁS y MENOS; en el display se
visualiza el nivel seleccionado.
presión de las teclas(selección del
nivel de potencia) y dentro de los
16 segundos sucesivos a la
activación de la función de
calentamiento automático, el
símbolo “A” (que señala el
incremento de potencia) aparece en
el display alternativamente al nivel
de potencia seleccionado.
inferior con la tecla MENOS, una
vez que en el display haya
aparecido la “A”, se interrumpirá
la función de calentamiento
automático.
выбрано одно поле
нагрева.
- Для активирования
автоматического
регулирования нужно
установить ступень
нагрева "9", а затем еще
раз нажать на кнопку
ПЛЮС.
- Кнопками"+" и"-"
установить нужную
последующую ступень
нагрева. Она высветится
на дисплее этого поля.
- В течении трех секунд
после последнего нажания
кнопки и 16 секунд после
"
активирования
автоматического
регулирования нагрева, на
дисплее высвечивается
А", поочередно с
установленной ступенью
нагрева.
- Если после
высвечивания символа "А"
на дисплее, выбрать с
помощью кнопки МИНУС
более низкую ступень
нагрева, авт.
регулирование нагрева
отключится.
-С помощью топки ПЛЮС
может быть выбрана
более высокая ступень
нагрева. Время разогрева
в этом случае будет
постраивание под новую
ступень нагрева.
35
Page 36

DE GB
aktuell gewählte Fortkochstufe
angepasst.
Nach Ablauf der Ankochzeit wird
die eingestellte (Fort-) Kochstufe
angezeigt.
1.6 Restwärmeanzeige
Der Benutzer soll auf auf eine
gefährliche Berührtemperatur auf
der Glaskeramik im Bereich einer
Kochstelle hingewiesen werden. Die
Tempertur wird über ein
mathematisches Modell berechnet
und verbliebene Restwärme mittels
eines „H“ auf dem entsprechenden
7-Segment-Display angezeigt.
Das Aufheizen und Abkühlen wird
in Abhängigkeit der
· gewählter Leistungsstufe („0“ bis
„9“)
· Ein/Aus-Zeit des Relais
rechnerisch ermittelt.
Nach Ausschalten der Kochstelle
zeigt die zugehörige Anzeige so
lange ein „H“, bis die zugeordnete
Kochstellentemperatur rechnerisch
unter einem ungefährlichen Niveau
liegt (≤ 60°C).
of the heat-up boost will be
automatically adapted to the
actual selected setting.
- When the heat-up time is over,
the selected (continious)
setting will be indicated on the
display.
1.6 Residual heat indicator
It is meant to indicate to the user
that the glass ceramic has a
dangerous touch temperature in
the circumference of a cooking
zone. The temperature will be
determined following a
mathematical model and the
remaining residual heat will be
indicated by means of “H” on
the corresponding 7-segmentdisplay.
Heating-up and cooling down
will be calculated dependent on
· the selected setting („0“ to „9“)
· the ON/OFF time of the relays
After switching-OFF the
cooking zone the respective
display shows “H” until the
assigned cooking zone
temperature is mathematically
in a uncritical level. (≤ 60°C).
36
1.7 Abschaltautomatik
(Betriebsdauerbegrenzung)
Abhängig von der eingestellten Kochstufe
wird jede Kochstelle individuell nach einer
bestimmten, maximalen Betriebsdauer
abgeschaltet, falls innerhalb dieser Zeit
keine Bedienung der zugeordneten
Kochstelle erfolgt ist.
Jedes Verändern des Kochstellenzustandes
mit den zugeordneten Tasten (PLUS-,
MINUS-, gegebenenfalls Zweikreis-Taste
für die entsprechende Kochstelle) setzt die
maximale Betriebsdauer dieser Kochstelle
wieder auf den Startwert der
Betriebsdauerbegrenzung zurück.
1.7 Automatic power OFF
function (operating time
limitation)
Dependent on the selected setting,
every cooking zone will be
switched-OFF after a defined
maximum operation time if no
operation of the assigned cooking
zone follows within this time period.
Every change of the cooking zone
condition (by means of the PLUS-,
MINUS- or dual-circuit key for the
respective cooking zone) puts back
the maximum operation time of this
cooking zone to the initial value of
the operating time limitation.
Page 37

ITFR
ES RU
l’afficheur a déjà indiqué “A”,
la fonction de chauffe
automatique s’interrompt ;
- il est possible de sélectionner
une puissance plus élevée avec
la touche PLUS. Dans ce cas,
le temps de chauffe
automatique s’adapte à la
puissance sélectionnée.
- quand le temps de chauffe est
écoulé, l’afficheur indique la
- Con il tasto PIU’ è possibile
selezionare un livello di potenza
più alto, in tal caso il tempo di
riscaldamento automatico sarà
adattato all’impostazione
selezionata.
- Quando il tempo di
riscaldamento è terminato, il
livello di potenza selezionato
precedentemente sarà indicato
nel display.
puissance préalablement
sélectionnée.
1.6 Indicateur de chaleur résiduelle
Il signale à l’utilisateur que le
verre est chaud et peut présenter
un danger en cas de contact avec
la surface située autour du foyer.
La température est déterminée à
partir d’un modèle mathématique.
La chaleur résiduelle est indiquée
par la lettre “H” sur l’afficheur
à sept segments correspondant.
Le chauffage et le refroidissement
sont calculés en fonction :
· de la puissance sélectionnée (de
“0“ à “9“)
· de la durée d’activation des
relais
Après avoir éteint le foyer,
l’afficheur correspondant indique
“H” jusqu’à ce que la
température du foyer redescende
en dessous du niveau critique (≤
60°C) sur la base du modèle
mathématique.
1.6 Indicatore di calore residuo
Serve a indicare all’utente che il
vetro è ad una temperatura
pericolosa in caso di contatto con
tutta l’area sovrastante la zona
cottura. La temperatura viene
determinata seguendo un modello
matematico e un eventuale calore
residuo viene indicato con una
“H” dal corrispondente display
a sette segmenti.
Il riscaldamento e il
raffreddamento sono calcolati in
relazione a:
· Il livello di potenza selezionato
(da “0“ a “9“)
· Il periodo di attivazione dei relè
Dopo aver spento la zona cottura,
il corrispondente display mostra
“H” fino a che la temperatura
della zona non scende al di sotto
del livello critico (≤ 60°C)
secondo il modello matematico.
- Presionando la tecla MÁS es
posible seleccionar un nivel de
potencia superior, en tal caso el
- По окончании времени
разогрева высвечивается
выбранная ступень
мощности.
tiempo de calentamiento
automático será adaptado a la
predisposición seleccionada.
- Una vez concluido el tiempo de
calentamiento , en el display
aparecerá el nivel de potencia
precedentemente seleccionado.
1.6 Indicador de calor residual
Indica al usuario que el vidrio se
encuentra a una temperatura
peligrosa en caso de contacto con el
área situada sobre la zona de
cocción. La temperatura es
determinada según un modelo
matemático y en caso de presencia
de calor residual, ello es indicado con
una “H” por el correspondiente
display de siete segmentos.
El calentamiento y el enfriamiento se
calculan sobre la base de:
· El nivel de potencia seleccionado
(entre “0“ y “9“)
· El período de activación de los relés.
Después de haber apagado la zona
de cocción, el correspondiente
display mostrará “H” hasta que la
1.6 Индикатор
остаточного тепла
Пользователь должен
быть предупрежден об
опасности прикосновения к
горячей в районе
нагревательных полей
керамической
поверхности. Температура
определяется посредсвом
математичекой модели и
остаточный нагрев
сигнализируется
посредством символа "Н"
на 7-сегментном дисплее.
Нагрев и охлаждение
полей определяется
просчетом, в зависимости
от выбраных ступеней
нагрева(от "0" до "9") и
времени
включения/выключения
реле. После выключения
поля на дисплее
высвечивается символ "Н",
до тех пор пока
математически
температура поля не
опустится до безопасного
уровня(<= 60°С).
temperatura de la zona haya
descendido por debajo del nivel
crítico (≤ 60ºC) según el modelo
matemático.
1.7 Arrêt automatique
(durée limite de
fonctionnement)
En fonction la puissance
choisie, chaque foyer s’éteint
après un temps établi si aucune
opération n’est exécutée.
Chaque intervention sur le foyer
(avec les touches PLUS et
MOINS ou avec le double circuit
éventuel du foyer) rétablit la
durée limite de fonctionnement
du foyer à sa valeur initiale.
1.7 Funzione di spegnimento
automatico (lim. del tempo di
funzionamento)
In relazione al livello di potenza,
ogni zona cottura viene spenta
dopo un tempo massimo
predefinito, se non si esegue
alcuna operazione.
Ogni operazione sulla zona
cottura (tramite i tasti PIU’ e
MENO o il doppio circuito della
zona dove presente) resetta il
tempo massimo di operazione
della zona al suo valore iniziale.
1.7 Función de apagado
automático (lím. del tiempo
de funcionamiento)
En relación con el nivel de potencia,
en caso de no efectuarse ninguna
operación, cada zona de cocción se
apaga después de un tiempo máximo
preestablecido.
Cada operación en la zona de
cocción (mediante las teclas MÁS y
MENOS o el doble circuito de la zona
en que está presente) reinicializa el
tiempo máximo de operación de la
zona devolviéndolo a su valor inicial.
1.7 Функция
автоматического
отключения (ограничение
времени работы)
В зависимости от
установленной ступени
мощности, каждое поле
нагрева отключается по
истечении определенного
времени, если за это
время поле не
регулировалось. Каждое
изменение состояния поля
соответствующими
кнопками (кнопки ПЛЮС,
МИНУС и кнопка
включения двойного поля),
ведет к тому, что
ограничение времени
работы снова переходит
в стартовую позицию.
37
Page 38

DE GB
1.8 Schutz gegen unbeabsichtigtes
Einschalten
· Bei einer erkannten
Dauerbetätigung von Tasten für
etwa 10 Sekunden schaltet die
Elektronik selbsttätig ab. Die
Steuerung gibt für die Zeit von 10s
der Störung ein akustisches
Fehlersignal aus, damit der Benutzer
den vermutlich über der Bedienung
abgestellten Gegenstand entfernen
kann.Auf den Anzeigen wird der
Fehlercode “E R 0 3“ blinkend
angezeigt. Liegt der Fehler länger als
10s an, wird nur noch der Fehler “ER
03“ blinkend ausgegeben und zwar
so lange wie die Störung als
vorhanden erkannt wird. Sollte die
Kochstelle den Status “Heiss“
besitzen, wird das “H“ im Wechsel
mit der Fehlermeldung ausgegeben.
· Wird nach dem EIN-Schalten
mittels der Power-Taste nicht
innerhalb von 20 s eine Kochstelle
aktiviert, so verfällt die Steuerung
vom EIN-Zustand wieder in den
Stand-By-Modus. (siehe Punkt 1.2).
· Die Ein/Aus-Taste hat im
eingeschaltetem Zustand Vorrang
bei der Ausführung vor allen anderen
Tasten, so dass auch bei Mehrfachoder Dauerbetätigung von Tasten die
Steuerung jederzeit ausgeschaltet
werden kann.
· Im Stand-by Zustand wird eine
Dauerbetätigung nicht signalisiert.
Allerdings müssen alle Tasten
wieder als unbetätigt erkannt
werden, bevor die Steuerung wieder
eingeschaltet werden kann.
1.8 Protection against
unintended switching-ON
· If the electronic control realizes
a continuous operation of keys
for approx. 10 seconds, it switches
OFF automatically. The control
sends out an audible failure signal
for 10 seconds, so that the user can
remove the object which has been
mistakingly placed onto the
operation surface. The displays
show the failure code “ E R 0 3 “
. If the failure carries on for more
than 10 seconds, only the code “
E R 0 3 “ will be displayed as long
as the failure will be recognized
by the electronic control. If the
cooking zone is in the “hot” status,
“H“ will appear on the display in
alteration with the failure notice.
· If no cooking zone will be
activated within 20 seconds after
switching-ON by means of the
Power-key, the control switches
back from the ON-condition into
the stand-by-mode. (also see
paragraph 1.2)
· When the control is switchedON the ON/OFF-key has priority
over all other keys, so that the
control can be switched-OFF
anytime, even in case of multiple
or continous operation of keys.
· In the stand-by mode a continous
operation will not be signalized.
However, before the electronic
control can be switched-ON
again, it has to recognize that all
keys are not operated.
38
Page 39

1.8 Protection contre la mise en
marche involontaire
· Si le contrôle électronique
détecte l’activation continue
d’une touche pendant environ
10 secondes, il provoque un
arrêt automatique. Le contrôle
émet un signal sonore d’erreur
de 10 secondes pour avertir
l’utilisateur de la présence d’un
objet sur les capteurs. Les
afficheurs indiquent le code
d’erreur “ E R 0 3 “ tant que le
contrôle électronique signale
l’erreur. Si le foyer est chaud,
l’afficheur indique
alternativement “H“ et le signal
d’erreur.
· Si aucun foyer n’est activé
pendant 20 secondes après la
mise en marche de la commande
sensitive, le contrôle revient en
mode stand-by (voir
paragraphe 1.2).
· Quand le contrôle est actif, la
touche ON/OFF est prioritaire
sur toutes les autres touches : le
contrôle peut être coupé à tout
moment même en cas
d’activation multiples ou
continue des touches.
· En mode stand-by, l’ activation
continue des touches ne produit
aucun effet. Avant que le
contrôle électronique puisse être
remis en marche, il doit
s’assurer qu’aucune touche
n’est active.
ITFR
1.8 Protezione in caso di
accensione involontaria.
· Se il controllo elettronico
verifica un’attivazione continua
di un tasto per ca. 10 sec. si
spegne automaticamente. Il
controllo emette un segnale
acustico di errore per 10 secondi
che avverte l’utente della
presenza di un oggetto sui sensori.
I displays mostrano il codice di
errore “ E R 0 3 “, che verrà
visualizzato sul display fintanto
che il controllo elettronico avverte
l’errore. Se la zona di cottura
“scotta”, una “H“ apparirà sul
display alternativamente al
segnale di errore.
· Se nessuna zona cottura verrà
attivata entro 20 secondi
dall’accensione del Touch, il
controllo ritorna alla modalità
stand-by. (Vedi anche
paragrafo1.2)
· Quando il controllo è acceso il
tasto ON/OFF ha priorità su tutti
gli altri tasti, cosicché il controllo
può essere spento in qualsiasi
momento anche in caso di
attivazione multipla o continua di
tasti.
· Nella modalità stand-by
un’attivazione continua di tasti
non avrà alcun effetto.
Comunque, prima che il controllo
elettronico possa essere acceso
nuovamente, deve riconoscere che
non ci sia alcun tasto attivato.
1.8 Protección en caso de encendido
involuntario
· En caso de que el control
electrónico verifique la presión
continua de un tecla por aprox. 10
s, se apagará automáticamente. El
control emite una señal acústica de
error durante 10 segundos para
advertir al usuario que los sensores
han detectado la presencia de un
objeto. Los displays muestran el
código de error “ E R 0 3 “,que
permanecerá expuesto hasta que el
control electrónico advierta el error.
Si la zona de cocción “quema”,
aparecerá una “H“ en el display
alternativamente con la señal de
error.
· En caso de no activarse ninguna
zona de cocción dentro de los 20
segundos sucesivos al encendido del
Touch, el control retornará a la
modalidad stand-by (véase también
el apartado 1.2).
· Cuando el control se encuentra
encendido la tecla ON/OFF tiene
prioridad respecto de todas las
restantes teclas, a fin de que el
control pueda ser apagado en
cualquier momento incluso en caso
de presión múltiple o continua de
teclas.
· En modalidad stand-by una presión
continua de teclas no producirá
ningún efecto. En cualquier caso,
para poder encender nuevamente el
control electrónico éste deberá haber
detectado que ninguna tecla se
encuentre presionada.
ES RU
1.8 Защита от
непроизвольного
включения
- При длительном
воздействии на кнопки
(более 10 с.) электроника
автоматически отключает
нагрев. Программатор
издает акустический
сигнал длительностью 10
с, чтобы пользователь
убрал предмет, возможно
стоящий на сенсоре. На
дисплее появится
мигающий код ошибки "ER
03 ". Если помеха не
устраняеся более 10 с, код
ошибки мигает пока
ошибка имеет место. Если
поле горячее, код ошибки
мигает по очереди с "Н".
- Если после включения
кнопкой ВКЛ/ВЫКЛ, в
течении 20 с. не
активировано никакое
поле, программатор
переходит в режим Stand-
by. (см. пункт 1.2)
- Во включенном
состоянии кнопка
ВКЛ/ВЫКЛ имеет
приоритет над другими
кнопками, поэтому даже
при многократном или
длительном нажатии
кнопок программатор
может быть в любое время
выключен.
- В режиме Stand-by
длительное нажатие
кнопок не сигнализируется.
Однако прежде чем
программатор может быть
снова включен, все кнопки
должны быть свободны от
какого-либо воздействия.
39
Page 40

DE GB
1.9 Verriegelung
(Kindersicherung)
◊ Funktion Kindersicherung:
Verriegeln:
Nach dem Einschalten der Steuerung
kann die Kindersicherung aktiviert
werden. Hierzu ist es notwendig, die
Kochstellenwahltaste der Kochstelle
vorne rechts (VR) - und die MINUSTaste gemeinsam zu betätigen und
anschließend noch einmal die
Kochstellenwahltaste (VR) zu
drücken. Auf allen Anzeigen
erscheint ein “L“ wie LOCKED (=
Kindersicherung gegen
unbeabsichtigtes EIN-Schalten).
Sollte eine Kochstelle den Status
“Heiss“ besitzen wird im Wechsel
das “L“ und “H“ angezeigt.
Dieser Bedienungsablauf muß
innerhalb von 10s stattfinden und es
darf keine andere Taste als die oben
beschrieben bedient werden.
Andernfalls wird die Eingabe als
nicht vollständig abgebrochen und
das Kochfeld ist nicht verriegelt.
Die Elektronik bleibt bis zur
Entriegelung im verriegelten
Zustand, auch wenn die Steuerung
zwischenzeitlich Aus- und wieder
Eingeschaltet wurde. Auch ein Reset
(nach spannungslosen Zustand) der
Steuerung hebt die Verriegelung
nicht auf.
1.9 Key lock (child safety
feature)
◊ Child safety feature:
Key lock:
After switching-ON the control
the child safety feature can be
activated. To achieve this it is
necessary to simultaneously
operate the front right cookingzone-select-key and the
MINUS-key and then press the
front right cooking-zone-selectkey again. There will be an “L”
, meaning LOCKED (child
safety feature against
unintended switching-ON). If a
cooking zone is in the “hot”
condition, “L” and “H” will be
displayed in alternation.
This course of operation has to
take place within a period of 10
seconds, no other key than
described above may be
operated. Otherwise the input
will be interrupted because of
incompleteness, the cooktop
will not be locked then.
The electronic control remains
in a locked condition until it
gets unlocked, even if the
control has been switched-OFF
and -ON in the meantime. Also
a reset of the control (after a
voltage drop) does not cancel
the key lock.
40
Entriegeln zum Kochen:
Für das Entriegeln und
Bereitschalten der Steuerung ist es
notwendig, die
Kochstellenwahltaste (VR) - und die
MINUS-Taste gleichzeitig,
gemeinsam zu betätigen. Das “L“ für
LOCKED in der Anzeige erlischt
und auf allen Kochstellen wird die
“0“ mit blinkendem Punkt angezeigt.
Sollte eine Kochstelle den Status
“H“ besitzen wird Anstelle der
statischen “0“ das “H“ angezeigt.
Nach dem Ausschalten der
Steuerung ist die Kindersicherung
wieder aktiv.
Unlocking for cooking
purposes:
To unlock and operate the
control it is required to operate
the front right cooking-zoneselect-key and the MINUS-key
simultaneously. “L“
(LOCKED) in the display
extinguishes and all cooking
zones show “0“ with a blinking
dot. Should a cooking zone be
“hot”, “H” is displayed instead
of the static “0”. After switchingOFF the control, the child safety
feature is active again.
Page 41

ITFR
ES RU
1.9 Verrouillage des touches
(sécurité enfants)
◊ Sécurité enfants :
Ve rrouillage des touches :
pour activer la sécurité enfants,
mettre en marche la commande
sensitive en appuyant
simultanément sur la touche de
sélection du foyer en bas à
droite et sur la touche MOINS.
Appuyer à nouveau sur la
touche de sélection du foyer en
bas à droite. L’afficheur indique
“L” pour LOCKED (sécurité
enfants contre l’allumage
involontaire). Si le foyer est
chaud, l’afficheur indique
alternativement “L” et “H”.
Cette opération s’effectue
normalement en 10 secondes,
aucune autre touche (en dehors
de celles qui viennent d’être
indiquées) ne doit être activée.
Dans le cas contraire, la
séquence est interrompue et la
table de cuisson est verrouillée.
Le contrôle électronique reste
verrouillé jusqu’à ce que
l’utilisateur le débloque, même
si, entre temps, il est arrêté et
remis en marche. Même une
réinitialisation de la commande
sensitive (après une chute de
tension) ne débloque pas les
touches.
1.9 Blocco dei tasti (sicurezza per
bambini)
◊ Sicurezza per bambini:
Blocco dei tasti:
La sicurezza per bambini può
essere attivata dopo aver acceso
il Touch premendo
simultaneamente il tasto di
selezione della zona in basso a
destra e il tasto MENO e poi
premendo di nuovo il tasto di
selezione zona in basso a destra.
Apparirà una “L” che sta per
LOCKED (sicurezza per bambini
per accensione involontaria). Se
la zona di cottura “scotta” la “L”
e “H” saranno visualizzate
alternativamente.
Lo svolgimento di questa
operazione deve avvenire entro 10
secondi, nessun altro tasto oltre a
quelli descritti sopra, deve essere
attivato. In caso contrario la
sequenza verrà interrotta e il
piano cottura non sarà bloccato.
Il controllo elettronico rimane
bloccato finché non viene
sbloccato dall’utente, anche se
nel frattempo è stato spento e
riacceso. Anche un reset del touch
(dopo una caduta di tensione) non
rimuove il blocco tasti.
1.9 Bloqueo de las teclas (dispositivo
de seguridad para los niños)
◊ Dispositivo de seguridad para niños:
Bloqueo de las teclas:
Para activar el dispositivo de
seguridad niños después de haber
encendido el Touch se deberán
presionar simultáneamente la tecla
de selección de la zona inferior
derecha y la tecla MENOS y, a
continuación, presionar nuevamente
la tecla de selección zona inferior
derecha. Aparecerá una “L” que
significa LOCKED (dispositivo de
seguridad para niños contra
encendido involuntario). En caso de
que la zona de cocción “queme” la
“L” y la “H” serán expuestas de
modo alternado.
Esta operación deberá tener lugar
dentro de los 10 segundos sucesivos;
no deberá presionarse ninguna otra
tecla además de aquéllas indicadas.
En caso contrario, la secuencia será
interrumpida y la encimera no será
bloqueada.
El control electrónico permanece
bloqueado mientras no sea
desbloqueado por el usuario, incluso
aunque mientras tanto haya sido
apagado y reencendido. Ni siquiera
una reinicialización del touch
(después de una caída de tensión)
interrumpirá el bloqueo de las teclas.
1.9 Блокировка кнопок
(защита от детей)
Функция зашиты от детей:
Включение блокировки
После включения
программатора можно
активировать блокировку
кнопок. Для этого нужно
нажать одновременно
кнопку выбора ("+")
переднего правого поля и
кнопку ("-"), а затем еще
раз нажать кнопку ("+")
переднего правого поля.
На всех дисплеях появится
"L", от LOCKED
(блокировка от
непроизвольного
включения). Если какое-
либо поле горячее,
попеременно будут
высвечиваться "L" и "Н".
Эта последовательность
должна быть выполнена в
течении 10 с, в это время
нельзя нажимать никаких
кнопок кроме описанных
выше. В противном случае
процесс будет прерван как
не полный и поверхность
не будет заблокирована.
Программатор остается
заблокирован до
разблокирования, даже
если между тем
поверхность будет
выключена и снова
включена. Даже Reset
(после обесточенного
состояния) не снимает
блокировки.
Déverrouillage des touches
pour cuisiner :
pour déverrouiller la commande
sensitive, appuyer en même
temps sur la touche de sélection
du foyer en bas à droite et sur
la touche MOINS. Le “L“
(LOCKED/verrouillé) sur
l’afficheur disparaît ; tous les
foyers indiquent “0“ avec un
voyant clignotant. Si un foyer est
chaud, l’afficheur indique “H”
et “0”. Quand la commande
sensitive est arrêtée, la sécurité
enfants s’active à nouveau.
Sblocco dei tasti per cucinare:
Per sbloccare il touch attivare
contemporaneamente il tasto di
selezione zona cottura in basso a
destra e il tasto MENO. La “L“
(LOCKED/bloccato) sul display
scompare e tutte le zone cotture
mostrano “0“ con un punto
lampeggiante. Se una zona
cottura dovesse “scottare”, viene
visualizzata la “H” anziché “0”.
Dopo aver spento il touch, la
sicurezza per bambini è di nuovo
attiva.
Desbloqueo de las teclas para
cocinar:
Para desbloquear el touch presionar
simultáneamente la tecla de
selección zona cocción, situada en
la parte inferior derecha y la tecla
MENOS. La “L“ (LOCKED/
bloqueado) desaparece del display y
en todas las zonas de cocción
aparece “0“ con un punto
centelleante. En caso de que una
zona de cocción “queme”, aparecerá
la “H” en lugar del “0”. Una vez
apagado el touch, el dispositivo de
seguridad para niños será
nuevamente activado.
Разблокирование для
приготовления пищи:
Для снятия блокировки
нужно одновременно
нажать кнопку выбора ("+")
переднего правого поля и
кнопку ("-"). На дисплее
исчезнет символ "L"
(LOCKED/ заблокировано)
и высветится "0" с
мигающей точкой. Если
какое-либо поле горячее,
вместо "0" высветится "Н".
После выключения
программатора блокировка
кнопок снова активируется.
41
Page 42

DE GB
Verriegelung aufheben:
Nach dem Einschalten der Steuerung
kann die Kindersicherung
deaktiviert werden. Hierzu ist es
notwendig, die
Kochstellenwahltaste (VR) – und die
MINUS-Taste erst gemeinsam und
anschließend die MINUS-Taste
noch einmal alleine zu betätigen.
Wenn alle Schritte in der richtigen
Reihenfolge und innerhalb von 10
Sekunden durchgeführt wurden, ist
die Verriegelung aufgehoben und die
Steuerung befindet sich im AUS–
Zustand. Ansonsten wird die
Eingabe als nicht vollständig
interpretiert und die Steuerung bleibt
im verriegelten Zustand und schaltet
nach 20s ab.
Nach erneuten Einschalten der
Steuerung mit der EIN/AUS-Taste
erscheint auf allen Anzeigen die “0“
,die Anzeigen-Punkte blinken und
die Steuerung kann zum Kochen
bedient werden. Sollte eine
Kochstelle den Status “H“ besitzen
wird Anstelle der statischen “0“ das
“H“ angezeigt.
Cancelling the key lock:
After switching-ON the control
the child safety feature can be
deactivated. Here it is necessary
to simultaneously operate the
front right cooking-zone-selectkey and the MINUS-key and
then operate the MINUS-key
alone. If all steps have been
carried out in the right order
within 10 seconds the key lock
gets cancelled and the control
is OFF. Otherwise the input
will be considered incomplete,
the control remains locked and
switches-OFF after 20 seconds.
After a renewed switching-ON
by means of the ON/OFF key
all displays show „0“, the
display dots are blinking and the
control is ready for cooking. If
a cooking zone is “hot“ , “H“
will be displayed instead of the
static „0“.
1.10 Mehrkreis-Abschaltung
Mit der Touch Control können je
nach Ausführung Zweikreis-, bzw.
Dreikreis- Strahlheizkörper bedient
werden.
Beim Einschalten eines
mehrkreisigen Heizkörpers werden
immer alle Heizkreise gemeinsam
eingeschaltet. Möchte der Bediener
nur die inneren Heizkreise benutzen,
so können mittels der Mehrkreistaste
der bzw. in Einzelschritten die
äusseren Heizkreise abgeschaltet
werden.
Durch Betätigen der Mehrkreistaste,
kann bei einer aktivierten Kochstelle
der zugehörige Außenkreis der
entsprechenden Kochstelle jederzeit
abgeschaltet werden. Ein aktivierter
Außenkreis wird durch eine
zusätzliche LED angezeigt. Das
erneute Betätigen der Mehrkreistaste
schaltet den/die Außenkreis/e
1.10 Multi-circuit cut-off
Depending on the design it is
possible to operate dual- or
triple-circuit radiant heating
elements with the Touch
Control.
When a multi-circuit heating
element is put into operation, all
heating circuits are switchedON at the same time. If only the
inner heating circuits should be
used, the outer heating circuit
can be switched-OFF by means
of the multi-circuit key or in
individual steps.
By operating the multi-circuit
key the respective outer circuit
of the assigned active cooking
zone can be cut-off anytime. An
activated outer circuit will be
indicated by an additional LED.
A renewed operation of the
multi-circuit key will add the
42
Page 43

ITFR
ES RU
Suppression du verrouillage
des touches :
quand la commande sensitive
fonctionne, la sécurité enfants
peut être désactivée. Appuyer en
même temps sur la touche de
sélection du foyer en bas à droite
de la table et sur la touche MOINS
puis seulement sur la touche
MOINS. Si toutes les opérations
sont exécutées dans l’ordre, les
touches se déverrouillent dans les
10 secondes qui suivent et la
commande sensitive s’éteint.
Dans le cas contraire, la séquence
est considérée comme incomplète
et la commande sensitive reste
verrouillée. Elle est coupée au
bout de 20 secondes.
Si on remet en marche la
commande sensitive avec la
touche ON/OFF, tous les
afficheurs indiquent “0”, les
Eliminazione del blocco tasti:
Dopo aver acceso il touch la
sicurezza per bambini può essere
disattivata. E’ necessario attivare
contemporaneamente il tasto di
selezione zona cottura in basso a
destra e il tasto MENO e poi
attivare il tasto MENO da solo.
Se vengono eseguiti tutti i
passaggi nell’ordine giusto entro
10 secondi il blocco dei tasti viene
cancellato e il touch sarà spento.
In caso contrario la sequenza
verrà considerato incompleto, il
touch rimarrà bloccato e si
spegnerà dopo 20 secondi.
Accendendo di nuovo il touch con
il tasto ON/OFF tutti i display
mostreranno “0”, i punti decimali
lampeggeranno e il touch sarà
pronto per la cottura. Se una zona
cottura “scotta”, sarà mostrata
“H” invece che “0”.
points décimaux clignotent ; la
commande sensitive est prête pour
la cuisson. Si un foyer est chaud,
l’afficheur indique “H” au lieu de
“0”.
Eliminación del bloqueo de las
teclas:
Después de encender el touch podrá
ser desactivado el dispositivo de
seguridad para niños. Es necesario
presionar de modo simultáneo la
tecla de selección zona cocción
situada en la parte inferior derecha
y la tecla MENOS y, a continuación,
únicamente la tecla MENOS. Si se
ejecutan todas las operaciones en el
orden previsto dentro de los
sucesivos 10 segundos, el bloqueo de
las teclas será anulado y el touch
será apagado. En caso contrario, la
secuencia será considerada como
incompleta, el touch permanecerá
bloqueado y se apagará después de
20 segundos.
Encendiendo nuevamente el touch
Снятие блокировки:
После включения
программатора блокировка
может быть снята. Для
этого нужно сначала
одновременно нажать
кнопку выбора ("+")
переднего правого поля и
кнопку ("-"), а затем еще
раз нажать только кнопку
("-"). Если все шаги, в
правильной
последовательности
выполнены в течении 10 с,
блокировка снимается и
программатор
выключается. В противном
случае процесс считается
незаконченым и
программатор остается
заблокированным, а через
20 с. отключается.
При последующем
включении кнопкой
ВКЛ/ВЫКЛ, на всех
дисплеях высветится "0" и
мигающие точки, а плита
будет готова к
использованию. Если
какое-либо поле горячее,
вместо "0" высветится "Н".
mediante la tecla ON/OFF todos los
displays mostrarán “0”, los puntos
decimales centellearán y el touch
quedará listo para efectuar la
cocción. En caso de que una zona de
cocción “queme”, aparecerá “H” en
lugar de “0”.
1.10 Arrêt des circuits
multiples
Le contrôle Touch, selon la
version, permet de contrôler
les tables à double ou triple
circuit.
Quand une table à radiants
multiples est mise en marche,
tous les circuits sont activés
en même temps. Pour mettre
en marche uniquement le
circuit situé vers l’intérieur,
arrêter les circuits externes
avec la touche
correspondante.
Les circuits externes du foyer
actif peuvent être désactivés
à tout moment avec la touche
circuit multiple. Les circuits
externes actifs sont indiqués
par une LED supplémentaire
spécifique. Pour réactiver les
circuits externes, appuyer à
nouveau sur la touche circuit
1.10 Spegnimento dei circuiti
multipli
Utilizzando il controllo Touch,
a seconda della versione, è
possibile controllare piastre
con circuito doppio o triplo.
Quando una radiante multipla
viene attivata, vengono accesi
tutti i circuiti
contemporaneamente. Se si
vuole accendere solamente il
circuito più interno, i circuiti
esterni possono essere spenti
con il tasto apposito.
Azionando il tasto di circuito-
multiplo i circuiti più esterni
della zona cottura attiva
possono essere disattivati in
qualsiasi momento. Un
circuito esterno attivo viene
indicato da un LED
addizionale apposito. Una
nuova attivazione del tasto di
circuito-multiplo attiva
1.10 Apagado de los circuitos
múltiples
Utilizando el control TouchLite,
según la versión, es posible
controlar placas con circuito
doble o triple.
De modo simultáneo con la
activación de una radiante
múltiple se encenderán todos los
circuitos. Si se desea encender
sólo el circuito situado en la
posición más interna, los
circuitos externos pueden ser
apagados mediante la respectiva
tecla.
Presionando la tecla de circuitomúltiple, los circuitos más
externos de la zona de cocción
activada podrán ser desactivados
en cualquier momento. La
activación de un circuito externo
1.10 Выключение
двойного поля
Программатор может, в
зависимости от
исполнения, управлять
двойными или тройными
полями. При включении
сложных полей всегда
включаются сразу все
сектора. Если
пользователь хочет
использовать только
внутренний сектор, можно
ступенчато отключить
внешние сектора кнопкой
двойного поля.
Нажатием кнопки двойного
поля можно, при
активированном
нагревательном поле, в
любое время отключить
внешний сектор
соответствующего поля.
Активированный внешний
сектор сигнализируется
посредсвом LED,
Повторным нажатием
кнопки двойного поля
можно в любое время
снова включить внешний/е
сектор/а.
Тогда LED снова
загорится.
es indicada mediante un LED
adicional específico.
Presionando nuevamente la tecla
43
Page 44

DE GB
jederzeit wieder zu, die
zugeordneten LED´s leuchten
wieder (Toggel-Funktion).
Sollte eine andere Kochstelle, als die
auf der der Mehrkreis vorhanden ist,
selektiert sein, so wird nach
Betätigen der Mehrkreistaste der
Mehrkreisstatus geändert und alle
Kochstellen deselektiert (der
Dezimalpunkt erlischt).
Verhalten der
Zweikreisabschaltung:
Ist der anzusteuernde Heizkörper
ein Dreikreisheizkörper, so wird
folgender Ablauf eingehalten:
· Ein erstes Betätigen der
Mehrkreistaste schaltet die äußere
Zone aus und die obere LED
erlischt.
· Ein zweites Betätigen der
Mehrkreistaste schaltet den
mittleren Kreis ab (auch die untere
LED wird dunkel geschaltet).
· Ein drittes Betätigen schaltet den
mittleren Kreis wieder zu. Ein
weiteres Betätigen schaltet den
dritten Kreis ebenfalls wieder zu
und die entsprechenden LEDs
wieder hell.
outer circuit(s) at any time, the
assigned LED´s glow again
(toggle-function).
If a cooking zone other than the
one with multi-circuit function
will be selected, the multicircuit status will be changed
and all cooking zones will be
deselected (the decimal point
extinguishes).
Behaviour of dual-circuit cutOFF:
If the heating element to be
controlled is a triple-circuit
heating element, the course of
action is as follows:
· The first activation of the
multi-circuit key cuts-off the
outer heating circuit and the top
LED extinguishes.
· A second activation of the
multi-circuit-key cuts-off the
middle heating circuit. (also the
bottom LED extinguishes.)
·
A third activation adds the
middle heating circuit again. A
further activation adds the third
heating circuit as well and the
assigned LEDs glow again.
44
1.11 Akustische Rückmeldung
(Summer)
Folgende Aktivitäten während des
Betriebes der Steuerung werden
akustisch über einen Summer
rückgemeldet:
· regulärer Tastendruck durch kurzen
Ton
· Dauerbetätigung von Tasten über
eine längere Zeit hinaus (> 10 s )
durch längeren, intermittierender
Ton.
1.12 Timer-Funktion (optional)
Die Timer-Funktion ist in zwei
Ausführungen realisiert:
1.11 Audible signal (buzzer)
While the control is in operation
the following activities will be
signaled by means of a buzzer:
· normal key activation with a
short sound signal.
· continous operation of keys
over a longer period of time (>
10 seconds ) with a longer,
intermittend sound signal.
1.12 Timer function (optional)
The timer function is realized
in two versions:
Page 45

ITFR
ES RU
multiple. Les LEDS
correspondantes s’allument.
Comportement d’un circuit
triple
Si l’élément contrôlé est un
radiant à circuit triple :
· la première pression sur la
touche circuit multiple coupe le
circuit externe et la LED située
en haut de l’afficheur.
· la seconde pression sur la
touche circuit multiple coupe le
circuit du milieu et la LED
située en bas de l’afficheur.
· la troisième pression réactive
le circuit du milieu. Une
pression supplémentaire ajoute
le troisième circuit et la LED
correspondante.
nuovamente i circuiti esterni
e i LED assegnati si
accendono.
de circuito-múltiple se activarán
una vez más los circuitos
externos, con encendido de los
respectivos LEDS.
Comportamento di un circuito
triplo:
Se l’elemento da controllare è una
radiante a triplo circuito, avviene
quanto segue:
· La prima attivazione del tasto di
circuito-multiplo spegne il
circuito più esterno e il LED in
alto del display.
· Una seconda attivazione del
tasto di circuito-multiplo spegne
il circuito mediano e il LED in
basso del display.
· Una terza attivazione riaccende
il circuito mediano. Una ulteriore
attivazione aggiunge il terzo
circuito e il rispettivo LED.
Comportamiento de un circuito
triple:
Si el elemento a controlar es una
radiante de circuito triple, se
verifica lo siguiente:
· La primera presión sobre la tecla
de circuito-múltiple apaga el
circuito más externo y el LED
situado en la parte superior del
display.
· Una segunda presión de la tecla
de circuito-múltiple apaga el
circuito mediano y el LED situado
en la parte inferior del display.
· Ejerciendo presión por tercera
vez, se reenciende el circuito
mediano. Una ulterior presión
enciende el tercer circuito y el
respectivo LED.
Включение тройного
поля:
Если управляемое поле -
тройное поле, соблюдать
следующую
последовательность:
- Первое нажатие кнопки
двойного поля выключает
внешний сектор и верхний
LED гаснет.
- Второе нажатие кнопки
двойного поля выключает
средний сектор (нижний
LED тоже гаснет).
- Третье нажатие снова
включает средний сектор.
- Дальнейшее нажатие
включает внешний сектор
и загораются
соответствующие LED.
1.11 Signal sonore (vibreur)
Pendant le fonctionnement, le
vibreur signale les activités
suivantes :
· activation normale des touches
(son bref).
· activation continue des touches
pendant plus de 10 secondes
(son prolongé intermittent).
1.12 Fonction temporisation
(en option)
La fonction temporisation existe
en deux versions :
1.11 Segnale acustico (cicalino)
Durante l’utilizzo le seguenti
attività vengono segnalate tramite
un cicalino:
· Normale attivazione dei tasti con
un suono breve.
· Attivazione continua dei tasti per
più di 10 sec con un suono lungo
intermittente.
1.12 Funzione di Timer
(opzionale)
La funzione timer è realizzata in
due versioni:
1.11 Señal acústica (zumbador)
Durante el uso las siguientes
actividades son señaladas mediante
un zumbador:
· Presión normal sobre las teclas con
un sonido breve.
· Presión continua sobre las teclas
durante más de 10 s con un sonido
largo intermitente.
1.12 Función de Temporizador
(opcional)
La función temporizador es realizada
en dos versiones:
1.11 Акустический сигнал
(зуммер)
Следующие действия во
время работы
сопровождаются
акустическим сигналом:
- Нормальное нажатие
кнопки - коротким тоном.
- Длительное нажатие
кнопки (более 10 с.) -
длинным, прерывистым
тоном.
1.12 Функция таймера
(опционально)
Функция таймера
реализована в двух
исполнениях:
- Автономный таймер от 1
до 99 мин.:
45
Page 46

DE GB
· Stand Alone-Timer 1- 99 min:
akustisches Signal bei Zeitablauf
(=„Eieruhr“). Diese Funktion steht
nur im ausgeschalteten Betrieb zur
Verfügung, also solange auf dem
Kochfeld nicht gekocht wird.
· Kochstellen-Timer 1- 99 min:
akustisches Signal bei Zeitablauf,
vier abzuschaltende Kochstelle sind
frei programmierbar.
Timer als Eieruhr (Stand-Alone):
· Ist die Steuerung im Auszustand,
kann durch Betätigen der TimerTaste der Stand-Alone-Timer
aktiviert werden. In der TimerAnzeige wird “00“ angezeigt. Durch
Betätigen der Power-Taste wird die
Steuerung in den Stand-by Zustand
geschaltet und der Stand-AloneTimer abgeschaltet.
· Einstellbereich (0-99min),
Einstellmöglichkeit in 1er Schritten
über eine beliebige Taste beginnend
mit 1 aufwärts bis 99 (Endanschlag)
oder Minus-Taste beginnend mit 99
abwärts bis 0 (Endanschlag)
· Bei kontinuierlicher Betätigung der
Plus- oder Minus-Taste erfolgt eine
dynamische Erhöhung der
Verstellgeschwindigkeit bis zu
einem Maximalwert ohne Signalton.
· Nach einem zwischenzeitlichen
Loslassen der Plus- oder MinusTaste beginnt die
Ve rstellgeschwindigkeit wieder von
einem (niedrigen) Anfangswert.
· Einstellung erfolgt durch dauernd
gedrückt halten der Plus- oder
Minus-Taste oder im Tipp-Betrieb
(mit Signalton)
Nach der Timer-Einstellung beginnt
läuft die Zeit ab der zuletzt
vorgenommenen Einstellung an
zurückzuzählen. Nach dem Ablauf
der Zeit erfolgt ein akustisches
Signal und die Timeranzeige blinkt.
Das akustische Signal wird
· Stand-alone timer 1-99 min:
sound signal when the time is
over (= minute minder). This
function is only available when
the cooktop is not in operation,
i.e. when there is no cooking.
· Cooking zone timer 1-99 min:
sound signal when the time is
over, four cooking zones can be
programmed independently.
Timer as minute minder
(stand-alone):
· If the control is OFF the standalone-timer can be operated by
activating the timer key. The
timer display shows “00”.
Operation of the
the control back into the stand-by
mode and the stand-alone-timer will
be cut-off.
· Adjustment range (0-99min), it can
be set in 1-minute steps with any
key, starting at 1 up to 99 (end stop)
with the minus-key starting at 99
down to 0 (end stop)
· Continuous activation of the plusor minus-key results in a dynamic
increase of the adjustment speed up
to maximum value without sound
signal.
· when the plus- or minus key
is released in the meantime, the
adjustment speed starts again
from a (low) initial value.
· adjustment can be made with
a continously activated plus- or
minus-key or by tip-operation
(with sound signal)
After the timer is set the time
runs down according to the
adjustment.
When the time is over there is a
sound signal and the timer
display blinks.
The sound signal will be stopped
Power-key puts
46
Page 47

ITFR
ES RU
· minuteur autonome 1-99 min :
signal sonore indiquant que le
temps programmé est écoulé.
Cette fonction est disponible
uniquement pendant
l’utilisation de la table de
cuisson.
· Minuteur pour foyers 1-99
min. : signal sonore indiquant
que le temps de cuisson est
écoulé ; les quatre foyers
peuvent être programmés
indépendamment.
Minuteur autonome
· Si la commande sensitive est
coupée, pour utiliser le
minuteur autonome appuyer sur
la touche minuteur.
L’afficheur indique “00”.
Quand on appuie sur la touche
de mise en marche, la
commande sensitive revient en
mode stand-by et le minuteur est
coupé.
· Modifications de la valeur (099 min) : elles peuvent être
réglées par paliers d’une minute
avec n’importe quelle touche
PLUS de 0 à 99 et avec la touche
MOINS de 99 à 0.
· L’activation continue des
touches PLUS ou MOINS
entraîne une incrémentation
dynamique de la vitesse de
variation jusqu’à une valeur
maximale (pas de signal
sonore).
· Si la touche PLUS (ou MOINS)
est relâchée, la vitesse
d’incrémentation (diminution)
repart de la valeur initiale.
· La programmation du
minuteur s’effectue par pression
continue des touches PLUS et
MOINS ou par pressions
successives (signal sonore).
Le compte à rebours commence
après la programmation du
minuteur. L’écoulement de la
durée programmée sera indiqué
par un signal sonore et par le
· Timer autonomo 1-99 min:
segnale sonoro quando il tempo è
scaduto.
Questa funzione è disponibile solo
quando non si sta utilizzando il
piano cottura.
· Timer per zone cottura 1-99 min:
segnale sonoro quando il tempo è
scaduto, le quattro zone cottura
possono essere programmate
indipendentemente.
· Temporizador autónomo entre 1 y
99 min: señal sonora que indica
conclusión del respectivo lapso. Esta
función se encuentra disponible sólo
mientras no se esté utilizando la
encimera.
· Temporizador para zonas cocción
entre 1 y 99 min: señal sonora que
indica que el lapso previsto se ha
concluido; las cuatro zonas de
cocción pueden ser programadas de
modo independiente.
Timer autonomo:
· Se il touch è spento il timer
autonomo può essere utilizzato
attivando il tasto di timer.
Il display mostra “00”. Attivando
il tasto di accensione, il touch
ritorna in modalità di stand-by e
il timer viene spento.
· Modifiche del valore (0-99min),
possono essere effettuate con
incrementi di un minuto con
qualsiasi dei tasti PIU’ da 0 a 99
e con il tasto MENO da 99 a 0.
· Un’attivazione continua del tasto
PIU’ o MENO danno luogo a un
incremento dinamico della
velocità di variazione fino ad un
valore massimo, senza segnali
sonori.
Temporizador autónomo:
· Si el touch está apagado el
temporizador autónomo puede ser
utilizado presionando la tecla de
temporizador.
En el display aparece “00”.
Presionando la tecla de encendido,
el touch retorna a la modalidad de
stand-by y el temporizador es
desactivado.
· Modificaciones del valor (0 - 99
min) pueden efectuarse con
incrementos de un minuto
procediendo con una cualquiera de
las teclas MÁS de 0 a 99 y con la
tecla MENOS de 99 a 0.
· Presionando de modo continuo la
tecla MÁS o MENOS se obtendrá un
incremento dinámico de la velocidad
de variación hasta alcanzar un valor
· Se il tasto PIU’ (o MENO) viene
rilasciato, la velocità di
incremento (decremento) inizia
nuovamente dal valore iniziale.
· L’impostazione del timer può
essere fatta sia con attivazioni
continue dei tasti PIU’ e MENO
sia con attivazioni a tocchi
successivi (con segnale sonoro).
Dopo che il timer è stato
impostato inizia il conto alla
rovescia. Lo scadere del tempo
verrà notificato da un segnale
sonoro e dal lampeggiare del
display del timer.
máximo, sin señales sonoras.
· Al soltar la tecla MÁS (o MENOS),
la velocidad de incremento
(decremento) partirá nuevamente
desde el valor inicial.
· La programación del temporizador
puede efectuarse tanto mediante
presiones continuas de las teclas
MÁS y MENOS como mediante
presiones intermitentes (con señal
sonora).
Una vez que el temporizador ha sido
programado comienza la cuenta
regresiva. El cumplimiento del lapso
será notificado mediante una señal
sonora y el centelleo del display del
Il segnale sonoro si fermerà
temporizador.
· Automaticamente dopo 2 minuti
акустический сигнал по
истечению времени. Эта
функция возможна только
при выключенном
состоянии, когда на плите
ничего не готовится.
- Таймер нагревательных
полей от 1 до 99 мин.:
акустический сигнал по
истечению времени.
Четыре отключаемых
нагревательных поля
свободно
программируются.
Автономный таймер:
- Когда программатор
выключен, нажатием
кнопки таймера можно
активировать автономный
таймер.На дисплее
таймера появится "00".
Нажатием на кнопку
ВКЛ/ВЫКЛ программатор
переводится в Stand-by и
таймер выключается.
- Диапазон установки (0-99
мин.), устанавливать
можно любой кнопкой
ПЛЮС начиная с 1 до 99
или кнопкой МИНУС
начиная с 99 до 0.
- При непрерывном
нажатии на кнопку ПЛЮС
или МИНУС происходит
динамическое увеличение
скорости установки до
максимальной без
сигнального тона.
- После промежуточного
отпускания кнопки ПЛЮС
или МИНУС, скорость
установки начинается с
начального (медленного)
значения.
- Установка
осуществляется путем
длительного держания
нажатыми кнопок ПЛЮС
или МИНУС или
многократного короткого
нажатия (с сигнальным
тоном).
После установки таймера
время начинает
отсчитываться в обратную
сторону от последнего
установленного значения.
По истечении времени
раздается сигнал и
дисплей таймера мигает.
Акустический сигнал
прекращается:
- Автоматически через 2
минуты и / или
- Нажатием любой кнопки.
Выключение / измение
таймера
47
Page 48

DE GB
· automatisch nach 2 Minuten und/
oder
· durch Betätigung einer beliebigen
Taste beendet.
Danach wird das Blinken der
Timeranzeige beendet und die
Anzeige erlischt.
Ausschalten/Verändern des Timers
· Der Timer kann jederzeit durch
Betätigen der Plus- oder MinusTaste (mit Signalton) verändert oder
abgeschaltet werden. Abgeschaltet
wird der Timer, indem man ihn über
die Minus-Taste auf “0“ herabzählt
oder indem man über das
gemeinsame Betätigen der Plus und
Minus-Taste den Timer direkt auf
“0“ setzt. Die Timeranzeige bleibt
für 6s auf Null stehen, bevor dieser
abgeschaltet wird.
· Sollte die Steuerung über die
Powertaste eingeschaltet werden,
wird der Stand-Alone ebenfalls
abgeschaltet.
· automatically after 2 minutes
and/or
· by operating any key.
Then the blinking of the timer
display stops and the display
extinguishes.
Switching-OFF/changing the timer
· The timer can be changed or
switched-off anytime by
operating the plus- or minus key
(with sound signal). The timer
will be switched off by counting
down to “0” with the minus-key
or by operating the plus- and
minus-key together, which sets
the timer directly to “0”. For 6
seconds the timer display
remains at “0“ before it will be
switched-off.
· If the control will be switchedON by means of the Power-key,
the stand-alone timer will be
switched-off also.
·Timerprogrammierung auf
Kochstellen
Wird die Steuerung eingeschaltet,
kann für jede Kochstelle ein
unabhängiger Timer programmiert
werden.
· Durch die Betätigung (Selektieren)
einer Kochstellenselekt-Taste sowie
nach Einstellung einer Kochstufe
läßt sich durch anschlie
Betätigung der Timer- Selekt
–Taste, der Timer als
Abschaltfunktion auf eine
Kochstelle programmieren. Um den
Timer herum sind vier LED´s
angeordnet. Diese Anzeigen
signalisieren für welche Kochstelle
der Timer aktiviert wurde.
· Sobald der Timer selektiert wurde,
blinkt die entsprechende Timer-LED
und der Punkt in der Timeranzeige
leuchtet. Wird anschließend wieder
eine Kochstellenselektaste betätigt,
erlischt der Punkt in der
ß
· Timer programming on
cooking zones
When the control is switchedON an independent timer can be
programmed for every cooking
zone.
· By selecting a cooking zone
with the cooking-zone-selectkey, then selecting the setting
and finally activating the timer-
ende
select-key, the timer can be
programmed as a switch-off
function for a cooking zone.
Around the timer four LEDs are
arranged. These indicate for
which cooking zone the timer
has been activated.
· As soon as the timer has been
selected, the assigned timerLED blinks and the dot in the
timer display glows. If a
cooking-zone-select-key will be
operated, the dot in the timer
48
Page 49

clignotement de l’afficheur du
minuteur.
Le signal sonore s’arrête
· automatiquement au bout de 2
minutes
· par pression d’une touche
quelconque
L’afficheur cesse de clignoter et
s’éteint.
Éteindre/régler le minuteur
· Le minuteur peut être réglé ou
éteint à tout moment en
appuyant sur les touches PLUS
et MOINS (signal sonore). Pour
couper le minuteur, sélectionner
“0” avec la touche MOINS ou
avec les touches PLUS et
MOINS simultanément qui
placent immédiatement le
minuteur sur “0”. Le minuteur
reste sur “0” pendant 6
secondes avant de s’éteindre.
· Si la commande sensitive est
activée (avec la touche
d’alimentation), le minuteur
autonome s’éteint.
ITFR
· Azionando un tasto qualsiasi
Il display smette di lampeggiare
e si spegne.
Spegnere / modificare il timer
· Il timer può essere modificato
o spento in qualsiasi momento
azionando i tasti PIU’ e MENO
(con segnale sonoro). Il timer si
spegne portando il tempo a “0”
con il tasto MENO o azionando
i tasti PIU’ e MENO
contemporaneamente, che porta
il timer direttamente a “0”. Per
6 secondi il timer rimane a “0”
prima di spegnersi.
· Se il touch viene acceso
(utilizzando il tasto di
alimentazione), il timer
autonomo si spegne.
ES RU
Cesará la señal sonora
· Automáticamente después de 2
minutos.
· Presionando una cualquiera de las
teclas.
El display cesa de centellear y se
apaga.
Apagar / modificar el temporizador
· El temporizador puede ser
modificado o apagado en cualquier
momento presionando las teclas
MÁS y MENOS (con señal sonora).
El temporizador se apaga situando
el tiempo en “0” mediante la tecla
MENOS o presionando de modo
simultáneo las teclas MÁS y
MENOS, con lo cual el temporizador
es dispuesto directamente en “0”.
Durante 6 segundos el temporizador
permanece en “0” y a continuación
se apaga.
· Al encender el touch (presionando
la tecla de alimentación) se apaga
el temporizador autónomo.
- Таймер может быть в
любой время выключен
или изменен кнопками "+"
или "-". Выключить его
можно установив на "0"
нажатием кнопки "-" или
прямой установкой на "0"
путем одновременного
нажатия кнопок ПЛЮС и
МИНУС. На дисплее
таймера остается стоять
"0" в течении 6 с. прежде
чем таймер выключится.
Если программатор
включить при помощи
кнопки ВКЛ/ВЫКЛ, тогда
автономный таймер
выключится.
· Programmation du minuteur
pour chaque foyer
La commande sensitive permet
de programmer un minuteur
indépendant pour chaque foyer.
· Sélectionner le foyer avec la
touche de sélection ;
programmer la puissance ;
enfin, appuyer sur la touche du
minuteur pour régler la durée
de fonctionnement dufoyer.
Autour de l’afficheur du
minuteur, il y a autant de LEDS
que de foyers. Ils indiquent les
foyers pour lesquels le minuteur
est activé.
· Quand le minuteur est
sélectionné, l’afficheur
correspondant clignote et les
LEDS qui l’entourent
s’allument. Quand un foyer est
sélectionné, les LEDS du
minuteur s’éteignent et
l’afficheur ne clignote plus.
· Programmazione del timer per
le zone cottura
Accendendo il touch si può
programmare un timer
indipendente per ogni zona
cottura.
· Selezionando la zona cottura con
il tasto di selezione zona,
impostando successivamente il
livello di potenza ed infine
attivando il tasto di timer, si può
impostare un conto alla rovescia
per spegnere la zona cottura.
Intorno al display del timer sono
posizionati tanti LED quante sono
le zone cottura per indicare per
quali zone è stato attivato il timer.
· Quando il timer viene
selezionato il relativo display
lampeggia e i LEDs intorno al
display si accendono. Se una zona
cottura viene selezionata, i LED
del timer si spengono e il display
non lampeggia più.
· Programación del temporizador
para las zonas de cocción
Encendiendo el touch es posible
programar un temporizador
independiente para cada zona de
cocción.
· Seleccionando la zona de cocción
mediante la tecla de selección zona,
programando a continuación el nivel
de potencia y, por último,
presionando la tecla de
temporizador, será posible
programar una cuenta regresiva a fin
de apagar la zona de cocción. En
torno al display del temporizador
está situado un número de LEDS
igual al número de zonas de cocción,
que indican para cuáles zonas ha
sido activado el temporizador.
· Al seleccionar el temporizador
centelleará el respectivo display y se
encenderán los LEDS situados en
torno al display. Al seleccionar una
zona de cocción, se apagarán los
Программирование
таймера на
нагревательных полях
Когда программатор
включен, для каждого поля
может быть независимо
запрограммирован таймер.
- После выбора
нагревательного поля и
установки нужной ступени
нагрева, путем нажатия
кнопки выбора таймера,
можно запрограммировать
отключение поля. Вокруг
таймера расположены
четыре светодиода (LED).
Они показывают для
какого поля активирован
таймер. Когда таймер
выбран, мигает
соответсвующий LED
таймера и горит точка на
дисплее таймера.
- Если затем снова будет
нажата кнопка выбора
поля, точка на дисплее
гаснет и LED перестает
мигать.
- При переключении с
одного поля на другое, на
дисплее таймера всегда
показывается актуальное
для данного поля
49
Page 50

DE GB
Timeranzeige und die LED blinkt
nicht mehr.
· Beim Umschalten von einer
Kochstelle auf eine andere, wird in
der Timeranzeige immer der aktuelle
Timerwert der jeweiligen Kochstelle
dargestellt. Die durch den Benutzer
eingestellten Timer anderer
Kochstellen bleiben aber aktiv.
· Das weitere Einstellverhalten
entspricht dem STAND-ALONETIMER. Zum Erhöhen der
eingestellten Zeit muss jedoch die
PLUS-Taste der betroffenen
Kochstelle verwendet werden.
· Nach Ablauf des Timers erfolgt ein
akustisches Signal die Timeranzeige
zeigt statisch “00.“ , die zugehörige
Timer-Kochstellen-LED blinkt. Die
programmierte Kochstelle wird
abgeschaltet und es wird ein “H“,
wenn sie heiß ist oder der Balken in
der Kochstellenanzeige angezeigt.
Das akustische Signal und das
blinken der Timer-Kochstellen LED
wird
· automatisch nach 2 Minuten und/
oder
· durch Betätigung einer beliebigen
Taste beendet.
Die Timeranzeige erlischt.
· Das Grundverhalten des Timers
entspricht dem unter “Eieruhr
(Stand-Alone-Timer)“
beschriebenen Verhalten.
displays extinguishes and the
LED does not blink any longer.
· When switching-over from
one cooking zone to another, the
timer display always shows the
present timer value of the
respective cooking zone.
However, the programmed
timers of other cooking zones
remain active.
· The further setting behaviour
corresponds to the STANDALONE-TIMER. For
increasing the adjusted time, the
PLUS-key of the respective
cooking zone has to be used.
· When the timer has run down,
there is a sound signal and the
timer display shows “00“
statically, the assigned cooking
zone timer LED blinks. The
programmed cooking zone will
be cut off and „H“ will be
displayed if the coking zone is
hot, otherwise a stroke will
show in the cooking zone
display.
The sound signal and the
blinking of the timer LED will
be stopped
· automatically after 2 minutes
· by operating any key.
The timer display extinguishes.
· The basic behaviour follows
the description of the “minute
minder” (stand-alone-timer).
50
Page 51

ITFR
ES RU
· Si on modifie la sélection des
foyers l’un après l’autre,
l’afficheur du minuteur indique
la valeur du minuteur associé à
chaque foyer. Les minuteurs
programmés pour chaque foyer
restent actifs.
· Les autres caractéristiques du
minuteur correspondent à celles
du minuteur autonome. Pour
augmenter la valeur, utiliser la
touche de sélection du minuteur.
· L’écoulement du délai
programmé est indiqué par un
signal sonore et par les chiffres
“00” sur l’afficheur : la LED du
foyer correspondant au
minuteur clignote. Le foyer
s’éteint et “H” s’affiche si le
foyer “brûle. Dans le cas
contraire, l’afficheur du foyer
montre un trait.
Le signal sonore et le
clignotement de l’afficheur
s’interrompent
· automatiquement au bout de 2
minutes.
· par pression d’une touche
quelconque.
L’afficheur du minuteur s’éteint.
· Les fonctions de base
correspondent à celles du
minuteur autonome.
· Modificando la selezione da una
zona all’altra, il display del timer
mostra il valore del timer
associato alla zona. I timer
programmati per ogni zona
cottura rimangono comunque
attivi.
· Ulteriori comportamenti del
timer corrispondono a quelli del
timer autonomo. Per
incrementare il valore deve essere
utilizzato il tasto di selezione
timer.
· Lo scadere del tempo viene
notificato da un segnale acustico
e da “00” sul display, il LED della
zona cottura assegnata al timer
lampeggia. La zona cottura viene
spenta e una “H” viene mostrata
se la zona “scotta”, altrimenti il
display della zona mostra un
trattino.
Il segnale sonoro e il
lampeggiamento del display si
interromperanno
· Automaticamente dopo 2 minuti.
· Azionando uno dei tasti.
LEDS del temporizador y el display
dejará de centellear.
· Cambiando la selección de una a
otra zona, el display del
temporizador mostrará el valor del
temporizador que está asociado a la
zona. Los temporizadores
programados para cada zona de
cocción permanecen igualmente
habilitados.
· Ulteriores comportamientos del
temporizador corresponden a
aquéllos del temporizador
autónomo. Para incrementar el valor
deberá presionarse la tecla de
selección temporizador.
· El cumplimiento del lapso es
notificado mediante una señal
acústica y la aparición de “00” en
el display, mientras que el LED de
la zona de cocción asignada al
temporizador comenzará a
centellear. La zona de cocción se
apagará y aparecerá una “H” en
caso de que la zona “queme”; en
caso contrario, el display de la zona
mostrará un guión.
Se interrumpirán la señal sonora y
Il display del timer si spegne.
el centelleo del display
· Automáticamente después de 2
· Le funzionalità di base ricalcano
la descrizione del timer
minutos.
· Accionando una de las teclas.
autonomo.
El display del temporizador se
apaga.
значение оставшегося
времени. Установленный
пользователем таймер для
других нагревательных
попей тоже остается
активным.
- Остальной порядок
установки такой же как на
АВТОНОМНОМ ТАЙМЕРЕ.
Однако для увеличения
установленного времени
должна применяться
кнопка"+"
соответствующего поля.
- По истечении
установленного времени
раздается акустичекий
сигнал, дисплей таймера
показывает "00" и мигает
LED соответствующего
поля.
Запрограммированное
поле отключится и на
дисплее высветится "Н",
если поле горячее.
Акустический сигнал и
мигание светодиодов
полей на таймере будут:
- Отключены
автоматически через 2
мин.
- Отключены нажатием
любой кнопки.
Дисплей таймера погаснет.
- Основное поведение
таймера соответствует
описанному в разделе
АВТОНОМНЫЙ ТАЙМЕР.
· Las funciones de base son análogas
a aquéllas del temporizador
autónomo.
51
Page 52

DE GB
Modelle KC 20.29...,
KC 40.60..., KC 39...
Heizkörper - Handbedienung
(Abb. 5).
Den Schaltknopf in die für das
Kochen erforderliche Stellung drehen und darauf achten, daß eine
höhere Zahl einer höheren Wärmeversorgung entspricht. Siehe Tabelle “Anwendung der Heizkörper”.
Die Kontrolleuchten zeigen an:
A - Die daß ein bzw. mehrere
Heizelemente eingeschaltet sind.
B - Die Temperatur der
betreffenden Heizkörper liegt über
50°C.
Das Fortbestehen eines leichten
Nachleuchtens ist bei
bestimmten Kontrolleuchten
auch nach Abschaltung des
Apparats allerdings als normal
zu betrachten.
Models KC 20.29...,
KC 40.60..., KC 39...
Heating elements manual
control (Fig. 5)
Rotate the knob concerned to
the position correspondant to
the needs of cooking taking
into conside-ration that to a
higher number a higher heat
supply corresponds, see table
“use of heating elements”.
When pilot lights are lit, they
indicate.
A - one or more heating
elements are switched on.
B -the top temperature at the
indicated spot is higher than
50° C.
Some types of pilot lights
will maintain some slight
luminescence even after
disconnection. That is quite
normal.
52
Page 53

ESITFR
RU
Modèle KC 20.29...,
KC 40.60..., KC 39...
Eléments de chauffe commande manuelle (Fig. 5).
Amener le bouton de commande
dans la position correspondante
à la puissance souhaitée ,
sachant qu’au numéro le plus
élevé correspond le maximum
de puissance (voir notre tableau
“utilisation des élements de
Modelli KC 20.29...,
KC 40.60..., KC 39...
Elementi riscaldanti - comando
manuale (Fig. 5)
Ruotare la manopola sulla
posizione corrispondente alle necessità di cottura tenendo
presente che a numero maggiore
corrisponde maggiore
erogazione di calore, vedi tabella
“utilizzo elementi riscaldanti”.
chauffe”).
Les voyants lumineux allumés
indiquent.
A - le branchement d’un ou plus
éléments de chauffe
B - que la température au point
indiqué de l’élément de chauffe
est supérieure à 50°C.
Pour de certains types de
voyants lumineux la
permanence d’une légère
luminiscence même à
commandes déconnectées est
tout à fait normale.
Le lampade spia accese
indicano:
A - inserimento di uno o più
elementi riscaldanti.
B - che nella zona
dell’elemento riscaldante
indicato la temperatura del
piano è superiore a 50°C.
Va comunque considerato normale, per certi tipi di lampada,
il permanere di una leggera
luminescenza anche a comandi
disinseriti.
Modelo KC 20.29...,
KC 40.60..., KC 39...
Elementos calentadores - mando
manual (Fig. 5).
Girar el puño en la posición que
corresponda a las necesidades
de cocción, teniendo en cuenta
que a un número mayor corresponde mayor erogación de calor, véase tabla “utilización
elementos calentadores”.
Las lámparas indicadoras
encendidas indican:
A - inserción de uno o más
elementos de calentamiento.
B - que en la zona del elemento
calentador indicado la
temperatura es superior a 50°C.
De todas maneras se considera
МОДЕЛИ KC 20.29...,
KC 40.60... ,KC 39...
Ручное управление
полями нагрева (Рис. 5)
Повернуть переключатель
в нужное для
приготовления положение,
при этом имея ввиду, что
большее чсло
соответствует большей
степени нагрева. См.
таблицу „Нагревательные
элементы“.
Контрольные индикаторы
указывают на то, что:
A – включено одно или
несколько полей нагрева
B – температура
соответствующего поля
больше 50 °С.
Остаточное лёгкое
свечение определённого
индикатора после
выключения
поверхности является
нормальным.
normal para ciertos tipos de
lámpara, la persistencia de una
luminiscencia ligera aún con
los mandos desconectados.
53
Page 54

DE GB
Abb. 5 - Fig. 5 - Рис. 5
GRILL
GRILL
54
Page 55

ITFR
touch control intensità calore
touch control heat intensity
commande à touche intensité chaleur
Tipptasten Hitze
touch control intensidad calor
cnegtzb ghjuhfvvfnjhf
bzntzcbdzjcnm zfuhtdf
ES RU
Abb. 6 - Fig. 6 - Рис. 6
1
2-3
4
5-6
7-8
9
tenue
- weak -
schwach -
dolce -
medio -
sehr stark -
mild -
lento
- slow -
mässig -
medium
mittel -
forte -
stark -
vivo -
gentle
moderada -
strong
bright
faible -
tenue-
- doux -
lent -
lenta -
- moyen -
media -
- fort -
fuerte -
- vif -
viva -
ckf,j
vyurj
evthtzzj
chtlzt
cbkmzj
jxtzm cbkmzj
NO
NO
NON
NEIN
NO
нет
Abb. 7 - Fig. 7 - Рис. 7
NO
NO
NON
NEIN
NO
нет
SÌ
YES
OUI
JA
SÌ
да
Abb. 8 - Fig. 8 - Рис. 8
Abb. 9 - Fig. 9 - Рис. 9
55
Page 56

Abb. 10 - Fig. 10 - Рис. 10
DE GB
A 1
B 1
B 2
56
Fig. 11 - Abb. 11 - Afb. 11
Page 57

ITFR
A 1
ES RU
B 2
Abb. 12 - Fig. 12 - Рис. 12
H05RR-F3x2.5*
B 1
H05RR-F4x1.5*
H05RR-F4x1.5*
H05RR-F5x1.5*
* Tenendo conto del fattore di contemporaneità
* Considering contemporaneity factor
* En tenant compte du coefficient de simultaneité
* Bei Gleichzeitigkeitsfaktor
* Tomando en cuenta el factor de simultaneidad
Ghb afrnjht jlzjdhtvtzzjcnb
*
Abb. 13 - Fig. 13 - Рис. 13
57
Page 58

DE GB
N.B. - Für den Gebrauch der
Heizelemente empfehlen sich
Töpfe mit geradem Boden
(Abb. 7) und gleichem oder nur
wenig größerem Durchmesser;
- Vermeiden Sie das Überlaufen
von Flüssigkeiten, indem Sie
nach Erreichen des Siedepunkts
oder Erhitzen der Flüssigkeit die
Wärmezufuhr zurückschalten;
- lassen Sie die Heizelemente
nicht ohne Topf oder mit leeren
Töpfen eingeschaltet.
Sobald ein Rib in der
Oberfläche sichtbar wird,
ist das Gerät sofort vom
Versorgungsnetz zu
trennen.
N.B.: - When one makes
use of heating elements, we
advise receptacles with flat
bottom (Fig. 7) having
same diameter or lightly
higher than that of the hot
area.
- Avoid overflows of liquid,
therefore when boiling has
happened, or in any case
when liquid is heated,
reduce the heat supply.
- Don’t leave the heating
elements on without receptacles
on the top or with void pots and
pans.
In the event of even a
slight fracture on the
cooking surface,
disconnect the electric
power supply
immediately.
Instandhaltung
(Abb. 8) Vor allem Essensreste
und Fettspritzer von der Kochoberfläche mit einem Schaber
entfernen. Danach die warme
Fläche mit Sidol oder Stahlfix
und Küchenpapier säubern, dann
mit Wasser abwaschen und
einem sauberen Lappen
trocknen. Spuren von Aluminiumfolie, Plastikgegenständen,
Zucker oder stark zuckerhaltigen
Speisen müssen sofort von der
warmen Kochfläche mit einem
Schaber entfernt werden um
mögliche Schäden der Plattenoberfläche zu vermeiden. Auf
keinen Fall Schwämme oder
Scheuerlappen verwenden; den
Gebrauch von aggressiven chemischen Putzmitteln wie Fornospray oder Fleckenreinigern vermeiden.
Maintenance
(Fig. 8) First of all remove stray
food bits and grease drops from
the cooking surface with the
special scraper. Then clean the
hot area as best as possible with
SIDOL, STAHLFIX or other
similar products with a papertowel, then rinse again with
water and dry with a clean cloth.
Pieces of aluminum foil and
plastic material which have inadvertently melted or sugar remains or highly sacchariferous
food have to be removed immediately from the hot cooking area
with the special scraper. -This is
to avoid any possible damage to
the surface of the top.
Under no circumstances should
abrasive sponges or irritating
chemical detergents be used such
as oven sprays or spot removers.
58
Page 59

ITFR
ES RU
N.B.: - Nous recommandons
l’utilisation de recipients à
fond plat (Fig. 7) d’un
diamètre égal ou légérement
supérieur à celui de la zone
chaude;
- Eviter les débordements
de liquide; réduire la
puissance une fois
l’ebullition atteinte;
- Ne pas laisser fonctionner
les éléments de chauffe à
vide ou avec un recipient
vide.
Si vous constatez l’apparition d’une fissure, même
légère, sur la surface du
plan de cuisson,
débranchez immédiatement
l’appareil.
N.B.: - Nell’uso degli
elementi riscaldanti si
consigliano recipienti a
fondo piatto (Fig. 7) con
diametro uguale o
leggermente superiore a
quello indicato sul piano;
- evitare trabocchi di
liquido; pertanto ad
ebollizione avvenuta o
comunque a liquido
riscaldato ridurre
l’erogazione di calore;
- non lasciare inseriti gli
elementi riscaldanti a vuoto
o con pentole o tegami
vuoti.
Al verificarsi di una anche
minima frattura della superficie del piano di
cottura disinserire
immediatamente l’ali-
mentazione elettrica.
N.B. - En el uso de los
elementos calentadores se
aconseja utilizar recipientes
con fondo plano (Fig. 7) de
diámetro igual o
ligeramente superior a
aquel indicado por la
serigrafía.
- Evitar desbordamientos
de líquido. Por lo tanto, a
ebullición completa o de
todas formas una vez que
esté caliente el líquido,
reducir la potencia;
- No dejar encendidas los
elementos calentadores vacíos o con ollas o cacerolas
vacías.
Al verificarse la más leve
fractura del vidrio,
desconectar de inmediato
la alimentación eléctrica.
Примечание:
- рекомендуется
применение посуды с
плоским дном (Рис. 7) и
размером одинаковым или
лишь незначительно
большм, чем сам
нагревательный элемент;
- Избегайте выбегания
жидкости, уменьшая по
мере ее закипания степень
нагрева элемента;
- Не оставляйте
включенным
нагревательный элемент без
посуды или со стоящей на
нем пустой кастрюлей;
В случае, если Вы
заметите даже
незначительную трещину на
стеклокерамической
поверхности, тотчас
отключите плиту от
электросети.
Entretien
(Fig. 8) Avant tout enlever
les restes de nourriture et
les giclées de graisse de la
surface de cuisson avec une
paillette métallique.
Nettoyer ensuite dans la
zone chaude avec Sidol ou
Stahfix et du papier de
cuisine, rincer par de l’eau
et essuyer avec un chiffon
propre.
Les traces d’aluminium,
d’objets en plastique, de
sucre ou de nourriture très
riche en sucre doivent être
enlevés instamment da la
zone chaude de cuisson par
l’aide d’une paillette métallique pour éviter de possible
dégâts à la surface du plan.
N’utiliser absolument pas
d’éponges ou de torchons abrasifs; éviter aussi l’emploi
de détergents chimiques
agressifs comme Fornospray ou de dégraisseurs.
Manutenzione
(Fig. 8) Prima di tutto
rimuovere residui di cibo e
spruzzi di grasso dalla
superficie di cottura con un
raschietto. Successivamente
pulire nella zona calda con
Sidol o Stahlfix con carta
da cucina, indi risciacquare
con acqua e asciugare con
uno straccio pulito.
Tracce di fogli di alluminio,
di oggetti di plastica,
zucchero o cibi fortemente
saccariferi devono essere
rimosse immediatamente
dalla zona calda di cottura
con un raschietto per evitare possibili danni alla
superficie del piano.
In nessun caso usare spugne o strofinacci abrasivi;
evitare anche l’uso di detersivi chimici aggressivi come
Fornospray o smacchiatori.
Mantenimiento
(Fig. 8) Antes de todo
quitar los residuos de
comida y las salpicaduras
de grasa de la superficie de
cocción con una raedera.
Luego limpiar en la zona
caliente con Sidol o Stahifix
con papel de cocina. Luego
aclarar con agua y secar
con un trapo limpio.
Trazas de papel de aluminio, de objetos de plástico,
azucar o comidas muy sacaríferas tienen que ser
quitadas inmediatamente de
la zona caliente de cocción
con una raedera para evitar
posibles daños a la
superficie de cocción.
En ningún caso utilicen esponjas o estropajos; eviten
también utilizar detergentes
químicos agresivos como
Fornospray o quitamanchas.
Уход
(Рис.8) Прежде всего
удалить с поверхности
скребком остатки пищи и
капли жира, затем очистить
салфеткой, смоченной в
теплом моющем растворе
SIDOL или STAHLFIX,
обмыть чистой водой и
протереть насухо чистой
мягкой тряпкой. Следы
алюминиевой фольги,
пластика, сахара или
сахаросодержащей пищи
должы быть немедленно
удалены скребком ещё с
тёплой поверхности, чтобы
избежать возможые
повреждения поверхности
поверхности. Ни в коем
случае не используйте для
этих целей мочалки или
грубые тряпки. Избегайте
применения химически
активных чистящих средств
как, например,
пятноудалитель.
59
Page 60

DE GB
ANWEISUNGEN
FÜR DEN
INSTALLATEUR
Installation
Die angegebenen Anweisungen
sind an den zugelassenen
Installateur als Richtlinie für
die Installation, Regelung und
Instandhaltung, gemäß den geltenden Gesetzen und Normen,
gerichtet. Die Eingriffe dürfen
nur bei ausgeschaltetem Apparat vorgenommen werden.
Aufstellung
(Abb. 9-10-11)
Der Apparat ist für den
Einbau in eine Arbeitsplatte
vorgesehen. Siehe
Abbildung. Auf den ganzen
Perimeter der Platte die mitgelieferte Dichtmasse
verteilen.
INSTRUCTIONS FOR
THE INSTALLATION
TECHNICIAN
Installation
These Instructions are for
the qualified technician, as
a guide to the installation,
adjustment and
maintenance, according to
the laws and standards in
force. Any of these
operations must always be
carried out when the
appliance has been
disconnected from the
electric system.
Positioning
(Fig. 9-10-11)
The appliance can be fitted
into a working area as illustrated on the figure. Apply
the seal supplied over the
whole perimeter of the
working area.
Elektrischer Anschluß
(Abb. 12-13)
Vor dem Anschluß an das
elektrische Netz sich davon
überzeugen, daß:
-die Eigenschaften der Anlage mit denen auf dem
unter der Ofenplatte
angebrachten Leistungsschild übereinstimmen;
-die Anlage mit einem
wirksamen Erdanschluß
gemäß den geltenden
Normen und Gesetzbestimmungen versehen
ist. Der Erdanschluß ist
gemäß Gesetz verbindlich.
Falls der Apparat nicht mit
einem Kabel und/ oder mit
einem entsprechenden
Stecker ausgerüstet ist, muß
gleichwertiges Material zur
Stromentnahme, wie auf
dem Leistungsschild angegeben, und für die Ar-
Electrical connection
(Fig. 12-13)
Prior to carrying out the
electrical connection, please
ensure that:
- the plant characteristics
are such as to follow what
is indicated on the matrix
plate placed at the bottom
of the working area;
-that the plant is fitted with
an efficient earth connection, following the
standards and law provisions in force. The earth
connection is compulsory
in terms of the law.
Should there be no cable and/or
plug on the equipment, use
suitable absorption material for
the working temperature as well,
as indicated on the matrix plate.
Under no circumstance must the
cable reach a temperature above
50°C of the ambient tempera-
60
Page 61

ITFR
ES RU
MODALITÉS
D’INSTALLATION
Installation
Ces instructions sont faites
pour le technicien spécialisé comme guide à l’installation, au réglage e à l’entretien suivant les lois et les
normes en vigueur.
Les interventions doivent
toujours être effectuées
quand l’appareil est débranché.
Positionnement
(Fig. 9-10-11)
L’appareil est prévu pour
être encastré dans une table
de travail comme indiqué
dans le dessin spécial.
Préparer la colle pour
seller ci-jointe sur tout le
périmètre du plan.
ISTRUZIONI PER
L’INSTALLATORE
Installazione
Le presenti istruzioni sono
rivolte all’installatore qualificato quale guida all’installazione, regolazione e
manutenzione secondo le
leggi e le normative in vigore.
Gli interventi devono sempre essere effettuati ad apparecchiatura disinserita
elettricamente.
Posizionamento
(Fig. 9-10-11)
L’apparecchio è previsto
per essere incassato in un
piano di lavoro come
illustrato nell’apposita
figura. Predisporre su tutto
il perimetro del piano il sigillante a corredo.
INSTRUCCIONES
Руководство для
монтёра
PARA EL
INSTALADOR
Instalación
Las presentes instrucciones
están dirigidas al instalador como guía para la instalación, regulación y
mantenimiento según las
leyes y las normas vigentes.
Las intervenciones tienen
que ser efectuadas siempre
con el aparato desenchufado.
Colocación
(Fig. 9-10-11)
El aparato ha sido estudiado
para ser empotrado en un
tablero de trabajo como
ilustrado en la relativa figura.
Preparar sobre todo el perímetro
de la superficie la masilla impermeable en dotación.
Сборка
Сборка, регулировка и
уход должы проводиться
специально обученным
персоналом в
соответствии с
действующими нормами и
правилами. Все работы
должы проводиться
только при отключенном
от сети устройстве.
Установка
(Рис. 9-10-11)
Прибор предусмотрен для
встройки в рабочую
поверхность, как это
изображно на
иллюстрации. Вдоль
внешнего контура
встраиваемой поверхности
прокладывается
прилагаемый в комплекте
уплотнительный материал.
Branchement électrique
(Fig. 12-13)
Avant d’effectuer le
branchement électrique,
s’assurer que:
-les caracteristiques de
l’installation soient de nature à satisfaire toutes les
indications portées sur la
plaque signalétique située
sous l’appareil;
- que l’installation dispose
d’un raccordement à la
terre secon les normes et
les dispositions en vigueur.
La mise à terre est
obligatoire aux termes de la
loi. Si l’appareil n’a pas de
câble et /ou de prise correspondante, utiliser de la
matière apte à l’absorption
indiquée sur la plaque signalétique et à la température de travail. Le câble ne
devra jamais atteindre une
Collegamento elettrico
(Fig. 12-13)
Prima di effettuare
l’allacciamento elettrico
accertarsi che:
- le caratteristiche
Conexión eléctrica
(Fig. 12-13)
Antes de efectuar la
conexión eléctrica comprobar que:
-las características de la
dell’impianto siano tali da
soddisfare quanto indicato
sulla targa matricola
applicata sul fondo del
piano;
- che l’impianto sia munito di
un efficace collegamento di
terra secondo le norme e le
disposizioni di legge in
vigore. La messa a terra è
obbligatoria a termini di
legge.
Nel caso che l’apparecchiatura non sia munita di cavo
e/o di relativa spina utilizzare
materiale idoneo per
l’assorbimento indicato in
targa matricola e per la
temperatura di lavoro. Il cavo
En el caso de que el aparato no tenga el cable y/o el
relativo enchufe utilizar
material apto para la absorción indicado en la placa matrícula y para la temperatura de trabajo. El cable en ningún punto tendrá
instalación satisfagan
cunato indicado en la placa matrícula colocada
sobre el fondo de la superficie de cocción;
que la instalación tenga una
eficaz conexión de tierra
según las normas y las
prescripciones de ley
vigentes. La puesta a tierra
es obligatoria por ley.
Подключение к эл. сети
(Рис. 12-13)
Прежде чем подключать
прибор к электросети,
убедитесь, что:
данные, указанные в
-
руководстве по
эксплуатации плиты,
соответствуют данным в
табличке на нижей части
самого прибора.
Прибор заземлен
-
надлежщим образом в
соответствии с
действующими нормами и
правилами. Заземление
является необходимым
условием правильной
эксплуатации.
Если в комплекте не
прикладывается кабель
и/или штекер, применяйте
только материалы,
соответствующие
данным, указанным в
табличке на нижей части
нагревательной
поверхности, которые
могут функционировать в
рабочем режиме
температур.
61
Page 62

DE GB
beitstemperatur verwendet
werden. Das Kabel darf an
keiner Stelle eine
Temperatur von mehr als
50°C über der
Raumtemperatur erreichen.
Falls ein direkter Anschluß
an das Stromnetz gewünscht wird, ist es notwendig einen allpoligen
Schalter mit einer
Mindestöffnung von 3mm
zwischen den Kontakten,
gemäß Leistungsschild, zu
legen und den geltenden
Normen entsprechen. (Das
gelbgrüne Erdkabel darf
nicht vom Schalter
ausgeschaltet werden). Die
Steckdose oder der
allpolige Schalter müssen
bei dem installierten
Apparat leicht zu erreichen
sein.
ture.
Should a direct connection to the
network be required, it will be
necessary to interpose an omnipolar switch with minimum
aperture between the 3 mm. contacts, dimensioned to bear the
plate load and it must follow the
standards in force (the yellow/
green earth cable must not be
interrupted by the switch). The
plug or omnipolar switch must
be easily reached on the installed
equipment.
Der Hersteller lehnt jede
Verantwortung ab falls
oben genannte Ausführungen und die üblichen
Unfallnormen nicht eingehalten werden.
The manufacturers decline any
responsibility in the event of
non-compliance with what is described above and the accident
prevention norms not being respected and followed.
62
Page 63

ITFR
ES RU
température supérieure de
50°C à celle ambiante.
Si on désire une connexion
directe au réseau, il faut
prévoir un dispositif de
coupure omnipolaire avec
une distance d’ouverture
entre les contacts de 3 mm
dimensionné à la puissance
de plaque et qui suit les
normes en vigueur (le fil de
terre de couleur jaune/vert
ne doit pas être coupé par
l’interrupteur). La prise ou
l’interrupteur omnipolaire
doivent être facilement
accessibles après la mise en
place de l’appareil.
in nessun punto dovrà
raggiungere una temperatura
superiore di 50 °C a quella
ambiente.
Desiderando un collega-mento
diretto alla rete, è necessario
interporre un interruttore
onnipolare con apertura
minima fra i contatti di 3 mm
dimensionato per il carico di
targa e rispondere alle norme
in vigore (il cavo di terra
giallo/verde non deve essere
interrotto dall’interrut-tore). La
presa o l’interruttore onnipolare devono essere
facilmente raggiungibili con
l’apparecchiatura installata.
que llegar a una temperatura superior de 50°C a
la temperatura ambiente.
Si se quiere una conexión
directa a la red, es necesario interponer un interruptor omnipolar con abertura
mínima entre los contactos
de 3 mm dimensionado para la carga de placa y responder a las normas vigentes (el cable de tierra amarillo/verde no tiene que
ser interrumpido por el interruptor). El enchufe o el
interruptor omnipolar tienen que ser fácilmente alcanzables con el aparato
instalado.
Кабель ни в коем случае
не должен нагреваться
выше температуры,
больше, чем на 50°С
превышающей
комнатную. В случае
подсоединения
непосредственно к эл.
сети, необходимо
использовать
специальный
всеполярный
выключатель с открытием
контактов не менее 3 мм,
соответственно
техническим данным
действующих
предписаний (желто-
зеленый кабель
заземления должен
быть подключен к
выключателю). Штекер
или всеполярный
выключатель на
правильно
установленном приборе
должн быть всегда легко
досягаем.
Le Constructeur décline
toute responsabilité au cas
où ces normes et les autre
normes contre les accidents
ne seraient pas observées.
N.B.: - Il costruttore declina
ogni responsabilità nel caso
che quanto sopra e le usuali
norme antiinfortunistiche non
vengano rispettate.
El constructor declina
cualquier responsabilidad
en el caso de que lo dicho
arriba y las usuales normas
contra los infortunios no
sean respetadas.
Изготовитель не несет
никакой ответственности,
если при установке
прибора не соблюдаются
все вышеприведенные
предписания.
63
Page 64

ELEMENTI RISCALDANTI - HEATING ELEMENTS - ELEMENTS DE CHAUFFE
V tipo - type - type Wregolazione - regulation -réglage
triplo circuito radiante Ø 145 1200 commutatore 0+6
triple-circuit radiant Ø 145 1200 commutator 0+6
triple circuit radiant Ø 145 1200 commutateur 0+6
triplo circuito radiante Ø 180 - Ø 195 1700 - 1900 commutatore 0+6
triple-circuit radiant Ø 180 - Ø 195 1700 - 1900 commutator 0+6
triple circuit radiant Ø 180 - Ø 195 1700 - 1900 commutateur 0+6
triplo circuito radiante Ø 210 2100 commutatore 0+6
triple-circuit radiant Ø 210 2100 commutator 0+6
triple circuit radiant Ø 210 2100 commutateur 0+6
monocircuito radiante Ø 145 1200 regolatore d’energia 0+11
single-circuit radiant Ø 145 1200 energy regulator 0+11
monocircuit radiant Ø 145 1200 doseur d’energie 0+11
monocircuito radiante Ø 180 - Ø 195 1700 - 1900 regolatore d’energia 0+11
single-circuit radiant Ø 180 - Ø 195 1700 - 1900 energy regulator 0+11
monocircuit radiant Ø 180 - Ø 195 1700 - 1900 doseur d’energie 0+11
monocircuito radiante Ø 210 2100 regolatore d’energia 0+11
single-circuit radiant Ø 210 2100 energy regulator 0+11
monocircuit radiant Ø 210 2100 doseur d’energie 0+11
DE GB
misto alogeno/radiante Ø 145 1200 regolatore d’energia 0+11
mixed-circuit radiant/halogen
mixte halogène/
misto alogeno/radiante Ø 180 1800 regolatore d’energia 0+11
mixed-circuit radiant/halogen
230 V
~
doppio circuito radiante ovale 145x250 1800 regolatore d’energia 0÷11
mixte halogène/
doppio circuito radiante Ø 210/120 2100 regolatore d’energia 0÷11
double circuit radiant Ø 210/120 2100 energy regulator 0÷11
double circuit radiant Ø 210/120 2100 doseur d’energie 0÷11
double circuit oval radiant 145x250 1800 energy regulator 0÷11
double circuit ovale radiant 145x250 1800 doseur d’energie 0÷11
doppio circuito radiante ovale 145x250 1800 commutatore 0+4
double circuit oval radiant 145x250 1800 commutator 0+4
double circuit ovale radiant 145x250 1800 commutateur 0+4
monocircuito radiante 185x305 1500 regolatore d’energia 0÷11
single-circuit radiant 185x305 1500 energy regulator 0÷11
monocircuit radiant 185x305 1500 doseur d’energie 0÷11
monocircuito radiante Ø 100 600 regolatore d’energia 0+11
single-circuit radiant Ø 100 600 energy regulator 0+11
monocircuit radiant Ø 100 600 doseur d’energie 0+11
doppio circuito radiante Ø 230/140 2500 regolatore d’energia 0÷11
double circuit radiant Ø 230/140 2500 energy regulator 0÷11
double circuit radiant Ø 230/140 2500 doseur d’energie 0÷11
radiant Ø 145 1200 doseur d’energie 0+11
radiant Ø 180 1800 doseur d’energie 0+11
Ø 145 1200 energy regulator 0+11
Ø 180 1800 energy regulator 0+11
64
doppio circuito radiante Ø 180/80-100-120 1700 regolatore d’energia 0÷11
double circuit radiant Ø 180/80-100-120 1700 energy regulator 0÷11
double circuit radiant Ø 180/80-100-120 1700 doseur d’energie 0÷11
doppio circuito radiante ovale 170x265 2200 regolatore d’energia 0÷11
double circuit oval radiant 170x265 2200 energy regulator 0÷11
double circuit ovale radiant 170x265 2200 doseur d’energie 0÷11
doppio circuito radiante rettangolare 140x240 200 regolatore d’energia 0÷11
double circuit rectangular radiant 140x240 200 energy regulator 0÷11
double circuit rectangulaire radiant 140x240 200 doseur d’energie 0÷11
Page 65

HEIZELEMENTE - ELEMENTOS CALEFACTORES
ES RUITFR
- нагревательные элементы
V Typ - tipo - тип W
dreifacher Strahlungskreis Ø 145 1200 Umschalter 0+6
норм. с тpoйной спиралью
норм. с тpoйной спиралью
норм. с тpoйной спиралью
норм. с одинарной спиралью
норм. с одинарной спиралью
норм. с одинарной спиралью
gemischter Halogen-/Strahlungskreis Ø 145 1200 Energieregler 0+11
kомб. гaлoгeн co спиралью
Triple circuito radiante Ø 145 1200 conmutador 0+6
Ø 145 1200
dreifacher Strahlungskreis Ø 180 - Ø 195 1700 - 1900 Umschalter 0+6
Triple circuito radiante Ø 180 - Ø 195 1700 - 1900 conmutador 0+6
Ø 180 - Ø 195 1700 - 1900
dreifacher Strahlungskreis Ø 210 2100 Umschalter 0+6
Triple circuito radiante Ø 210 2100 conmutador 0+6
Ø 210 2100
Einzel-Strahlungskreis Ø 145 1200 Energieregler 0+11
Monocircuito radiante Ø 145 1200 regulador de energía 0+11
Ø 145 1200
Einzel-Strahlungskreis Ø 180 - Ø 195 1700 - 1900 Energieregler 0+11
Monocircuito radiante Ø 180 - Ø 195 1700 - 1900 regulador de energía 0+11
Ø 180 - Ø 195 1700 - 1900
Einzel-Strahlungskreis Ø 210 2100 Energieregler 0+11
Monocircuito radiante Ø 210 2100 regulador de energía 0+11
Ø 210 2100
Mixto/halógeno/radiante Ø 145 1200 regulador de energía 0+11
Ø 145 1200
Einstellung - regulación
-
регулирование
пepekлючaтeль
пepekлючaтeль
пepekлючaтeль
регулятор энергии
регулятор энергии
регулятор энергии
регулятор энергии
0+6
0+6
0+6
0+11
0+11
0+11
0+11
230 V
~
gemischter Halogen-/Strahlungskreis Ø 180 1800 Energieregler 0+11
kомб. гaлoгeн co спиралью
норм. с двойной спиралью
норм. овальн. с двойной спиралью
норм. овальн. с двойной спиралью
норм. с oдйнapной спиралью
норм. с oдйнapной спиралью
норм. с двойной спиралью
норм. с двойной спиралью
Mixto/halógeno/radiante Ø 180 1800 regulador de energía 0+11
Doppelstrahlungskreis Ø 210/120 2100 Energieregler 0÷11
Doble circuito radiante Ø 210/120 2100 regulador de energía 0÷11
ovaler Doppelstrahlungskreis 145x250 1800 Energieregler 0÷11
Doble circuito radiante oval 145x250 1800 regulador de energía 0÷11
ovaler Doppelstrahlungskreis 145x250 1800 Umschalter 0+4
Doble circuito radiante oval 145x250 1800 conmutador 0+4
Einzel-Strahlungskreis 185x305 1500 Energieregler 0÷11
Monocircuito radiante 185x305 1500 regulador de energía 0÷11
Einzel-Strahlungskreis Ø 100 600 Energieregler 0+11
Monocircuito radiante Ø 100 600 regulador de energía 0+11
Doppelstrahlungskreis Ø 230/140 2500 Energieregler 0÷11
Doble circuito radiante Ø 230/140 2500 regulador de energía 0÷11
Doppelstrahlungskreis Ø 180/80-100-120 1700 Energieregler 0÷11
Doble circuito radiante Ø 180/80-100-120 1700 regulador de energía 0÷11
Ø 180/80-100-120 1700
Ø 180 1800
Ø 210/120 2100
145x250 1800
145x250 1800
185x305 1500
Ø 100 600
Ø 230/140 2500
регулятор энергии
регулятор энергии
регулятор энергии
регулятор энергии
регулятор энергии
регулятор энергии
регулятор энергии
регулятор энергии
0+11
0÷11
0÷11
0+4
0÷11
0+11
0÷11
0÷11
ovaler Doppelstrahlungskreis 170x265 2200 Umschalter 0+11
норм. овальн. с двойной спиралью
прямoуг. с тpoйной спиралью
Doble circuito radiante oval 170x265 2200 conmutador 0+11
Rechteckig Doppelstrahlungskreis 140x240 200 Umschalter 0+11
Doble circuito radiante rectangular 140x240 200 conmutador 0+11
170x265 2200
140x240 200
пepekлючaтeль
пepekлючaтeль
0+11
0+11
65
Page 66

Page 67

УСЛОВИЯ ГАРАНТИИ
1. Гарантия на исправное действие прибора действительна на период 12 месяцев со дня покупки прибора
(подтверждена оттиском печати пункта розничной продажи и подписью продавца).
2. Фирма - изготовитель обеспечивает безвозмездный ремонт в случае обнаружения в гарантийный период заводских
дефектов (несоответствующая конструкция, монтаж, дефектные материалы и исполнение).
3. Данная гарантия распространяется только на изделия использующиеся в некоммерческих, личных, семейных
или домашних целях. В противном случае, гарантийный срок составляет 4 месяца с момента приобретения.
4. Гарантийный ремонт выполняется бесплатно ( включая стоимость работ, материалов и, при необходимости и с
учетом действующего законодательства, перевозки) уполномоченной сервисной компанией на дому у потребителя
или в мастерской, по усмотрению сервисной компании.
5. Любые претензии по качеству изделия рассматриваются только после проверки качества изделия уполномоченной
сервисной компанией и при необходимости выдачи последней соответствующего заключения.
6. Обмен прибора на свободный от дефектов в течение гарантийного срока осуществляется только в том случае,
если на основании заключения эксперта невозможно произвести ремонт или если после 3-х ремонтов прибор
остаётся неисправным.
7. Обмен прибора на исправный производит только организация, продавшая товар.
8. Ответственность по настоящей гарантии ограничивается, если иное неопределено законом, указанным в настоящем
документе, обязательствами.
ГАРАНТИЯ НЕ РАСПРОСТРАНЯЕТСЯ:
1. На изделия, отказы и неисправности которых вызваны транспортными повреждениями, неправильной установкой,
небрежным обращением или плохим уходом, подключением к неправильному напряжению питания, использования
не рекомендованных чистящих и моющих средств несоблюдением прилагаемой инструкции по эксплуатации или
если изделие подвергалось ремонту или конструктивным изменениям неуполномоченными лицами, или если
удален, не разборчив или изменен серийный номер изделия.
2. На изделия, эксплуатировавшиеся с неустраненными недостатками или проходившие техническое обслуживание
в компаниях, не являющихся нашими уполномоченными сервисными компаниями.
3. На неисправности, которые вызваны независящими от производителя причинами, такими как: перепады
напряжения питания, явления природы и стихийные бедствия, пожар, домашние и дикие животные, насекомые и
т. п.
4. На стеклянные. и керамические поверхностей, а также внешние элементы из пластмасс в случае, если дефект
наступил по вине пользователя, после подписания потребителем акта приёмки—сдачи.
5. На царапины, трещины и аналогичные механические внешние повреждения, возникшие в процессе эксплуатации.
6. На такие повреждения деталей, вероятность которых существенно выше обычной по характеру их эксплуатации
или которые произошли в результате естественного износа, ( включая расходные материалы) таких как: лампы,
фильтры и т. п., перемещаемые вручную пластмассовые детали.
7. На такие виды работ как регулировка, чистка и прочий уход за изделием, оговоренный в Инструкции по
эксплуатациию.
8. А также по другим причинам, возникшим по вине покупателя и не вызванными заводом-изготовителем - могут
устраняться исключительно за счёт покупателя.
Незаземленное оборудование является потенциально опасным.
Производитель не несет ответственность за ущерб здоровью и
собственности, если оно вызвано несоблюдением норм
установки, использованием неисправного оборудования
1
Page 68

ГАРАНТИЙНЫЙ ТАЛОН
(Nr. соответствует номеру аппарата, смотри на задней обложке настоящей инструкции)
Данные гарантийные обязательства не ограничивают определенные законом права потребителей
Поздравляем Вас с приобретением бытовой техники отличного качества!
Пожалуйста ознакомьтесь с настоящим гарантийным свидетельством и проследите чтобы оно было правильно
заполнено и имело штамп магазина. При отсутствии штампа и даты продажи гарантийный срок исчисляется с
момента изготовления изделия. Тщательно проверьте внешний вид изделия, все претензии по внешнему виду
предъявляйте продавцу при принятии товара. Сохраняйте гарантийный талон и чек на проданное изделие. По
Для установки, подключения и по всем вопросам, связанным с техническим обслуживанием, обращаться
только в авторизированные сервисные центры. Подробная информация об уполномоченных на
обслуживание и ремонт сервисных центрах прилагается отдельным списком
Мы сохраняем за собой право вносить изменения в конструкцию или технологию изготовления. Таковые
изменения не влекут обязательств по изменению или улучшению ранее выпущенных изделий
вопросам неполного комплекта изделия и его замены обращайтесь в торговую организацию.
ОТМЕТКА О ПРОДАЖЕ:
7Электрическая плита 7Холодильник
ИЗДЕЛИЕ: 7Газовая плита 7Стиральная машина
7Встраиваемая поверхность 7Посудомоечная машина
7Встраиваемая духовка 7Вытяжка
7Микроволновая печь
Модель:..............................................................................................................................................................................................
Заводской №:.......................................................................................................................................................................
Название магазина:.............................................................................................................................................................
Телефон:..........................................................................................................................................................................................
Дата продажи:”_____”_______________200___г.
СВЕДЕНИЯ ОБ УСТАНОВКЕ:
Установлено:”_____”_______________200___г.
Владелец (фамилия, имя, отчество)..........................................................................................................................................................
Адрес, телефон.............................................................................................................................................................................
Подпись владельца.....................................................................................................................................................................
Мастер
(фамилия, имя, отчество)...............................................................................................................................................................
Орг. установщик............................................................................................................................................................................
Подпись..........................................................................................................................................................................................
Изделие продано в заводской упаковке или проверено в моем присутствии, Инструкция по эксплуатации получена. С правилами эксплуатации
ознакомлен. Претензий по внешнему виду и комплектности не имею.
Подпись покупателя.......................................................................................................................................................................
2
Page 69

Представительство «Каisеr» в России по сервисному обслуживанию:
тел/ Наш адрес в Интернете: www.kaiser.ru.
Почтовый факс: (095) 488-75-10, 488-76-10; е-mail: service@kaiser.ru.
адрес: 127238, Москва, а/я 46.
Адреса и телефоны авторизированных сервисных центров, обеспечивающих гарантийное и послегарантийное
обслуживание техники «Kaiser»:
1. Москва
Подключение и ремонт электрических плит, газовых плит, встраиваемых духовок и поверхностей,
микроволновых печей, вытяжек, стиральных и посудомоечных машин:
ООО «Кайзер-сервис», тел.: 488-75-10, 488-76-10. Адрес: 127238, Москва, а/я 46
Ремонт холодильников и подключение газовых плит:
«Евросервис», тел.: 737-78-04, ул. Автозаводская, д.5
2. Санкт-Петербург
Подключение и ремонт электрических плит, встраиваемых духовок, поверхностей и вытяжек:
ООО «Олан Спб», тел.: (812) 227-60-46, 227-60-36, Ириновский пр-т, д.2
Подключение и ремонт газовых плит, стиральных и посудомоечных машин, холодильников:
ООО «Мойдодыр специалист», тел.: (812) 326-05-83, Ленинский проспект, дом 153, офис 227
3. Альметьевск: ООО «Триумф-Сервис», тел.: (8553) 32-74-92, 23-78-12, ул. М. Джалиля, д.47
4. Ангарск: ПБОЮЛ Бровкин, тел.: (3951) 55-05-36, 18 мкр, д.1, кв.262
5. Архангельск: Сервис-центр «Мир», тел.: (8182) 276066, ул Гагарина , дом 1
ООО «Сервис-Быт», тел.: (8182) 64-54-91, ул. Галушина, д.24, к.1
6. Астрахань: ЧП Кузнецов, тел.: (8512) 39-82-16, 36-83-37, ул. Яблочкова, 1-В
ЧП Савин, тел.: (8512) 38-28-67, 38-35-84, 25-12-32, ул. Сен-Симона, 42-46
7. Барнаул: ООО «Промэкс», тел.: (3852) 77-23-23, 75-44-97, пр-т Калинина, д.24а
8. Белгород: ООО «Выбор-Сервис», тел.: (0722) 32-65-92, пр-т Ленина, д.32
ООО «Универмаг Торггарант», тел.: (0722) 32-93-47, ул.Попова, 36
9. Бийск: ООО «Семь ключей», тел.: (3854) 33-52-16, 32-70-02, ул. Озерная, д.6-Б
10. Биробиджан: ООО «Реал Электроник», тел.: (42622) 22-0-24, 22-0-25, ул.Димитрова, 3
11. Благовещенск: ООО «Олакс», тел.: (4162) 522-000. 524-000, 520-500, ул. Ленина, д.27
СЦ «РадиоСвязьСервис», тел.: (4162) 533-671, ул.Горького, 182/1
12. Братск: СЦ «Смарт», тел.: (3953) 47-92-59, ул. Южная, д.103
13. Брянск: ООО «МТК-сервис», тел.: (0832) 75-69-00, 75-68-42, ул. Красноармейская, д.170
ООО «Рембытаппарат», тел.: (0832) 64-57-16, ул. Крапивницкого, д.27
14. Великий Новгород: ЧП Смирнов, тел.: (816-2) 11-20-03, 11-52-22, ул. Великая, д.22, д.81А
15. Владивосток: ЧП Занегин , тел.: (4232) 292-001, ул Невельского, 1-112
Сервисный центр «ЧП Корнейчук», тел.: (4232) 41-30-12, ул. Бестужева, д.40
16. Владикавказ: ООО «Альда-сервис», тел.: (8672) 54-82-02, ул. Кутузова, д.82
ОАО «Люкс», тел.: (8672) 53-23-03, 54-83-99, ул. Ватутина, д. 120
17. Владимир: «Рост-сервис», тел.: (0922) 30-50-55, ул. Юбилейная, д.60
ООО «Домовой сервис», тел.: (0922) 32-23-09, ул. Урицкого, д.26
18. Волгоград: ООО «Фирма Мир видео 1», тел.: (8442) 23-41-36, проспект Ленина, д.58а
ООО «Классика Сервис», тел.: (8442) 97-50-10, ул Елецкая, д.173
19. Вологда: ООО «Скерцо-СВ», тел.: (8172) 21-79-90, ул. Ленинградская, д.134
20. Воронеж: ООО «Технопрофсервис», тел.: (0732) 46-31-79, ул. Проспект Труда, д.91
21. Глазов: ООО «Служба сервиса «Ваш дом», тел.: (34141) 4-07-37, ул. Калинина, д.6
22. Екатеринбург: ООО «Норд-сервис», тел.: (343) 335-74-05, 334-08-28, 335-25-92, ул. Донская, д.31
ТТЦ «Kaiser», тел.: (343) 260-48-15, 260-48-16, ул. Машинная, д.38
23. Иваново: ООО «Луч», тел.: (0932) 47-29-84, ул. Заводская, 13
24. Ижевск: Сервисный центр «Ваш дом», тел.: (3412) 75-33-77, 75-34-64, Ключевой поселок, д.6За
ООО «Аргус-сервис», тел.: (3412) 78-76-85, 78-04-64, ул. М. Горького, д.76
ЗАО «ДС», тел.: (3412) 431-662, ул. К.Маркса, 393
25. Иркутск: ЧП Побежимов П.П., тел.: (3952) 25-82-02, ул. Советская, д.82А
«Комту-Сервис», тел.: (3952) 222-699, 222-732, ул. Сведлова, д.40
ООО «НПФ «ТИС», тел.: (3952) 51-36-93, 51-31-09, 33-38-59, ул.Партизанская, 149
26. Йошкар-Ола: СЦ «Мидас», тел.: (8362) 21-39-10, 45-73-68, ул.Советская, 173
27. Калиниград: ООО «Вестер Сервис», ул.Горького, 50 тел.: (0112) 27-34-32, 27-31-51, 27-20-54
ОАО «БАЛТ-АКТОР», тел.: (0112 44 81 65), ул. Новикова, 14
28. Казань: ООО «Александр и К
0
», тел.: (8432)915-900, ул. 10 лет Октября, 3
29. Калуга: ООО ТТЦ «Лана-сервис», тел.: (0842) 54-86-05,72-82-46, переулок Чечерина, 24
30. Кемерово: ООО «Сибирская Сервисная Компания», тел.: (3842) 36-12-22, ул. Н. Островского, 12А
31. Киров: ООО «Вятка Сервис», тел.: (8332) 27-34-66, ул. Производственная, 24
32. Кимры: СЦ «Престиж сервис», тел.: (08236) 3-21-38, ул. Урицкого, д.9
33. Комсомольск на Амуре: АСЦ «Айс-сервис», тел.: (42172) 6-62-09, пр. Копылова, д.48 кор.2
34. Кострома: ЗАО «Аксон-сервис», тел.: (0942) 22-36-28, ул. Сутырина, д.5,
35. Краснодар: ООО «ТОП ЧЭНП Лтд», тел.: (8612) 59-55-73, ул. Чапаева, д.94
36. Красноярск: Сервисный центр «Близнецов», тел.: (3912) 27-67-20, 65-34-41, ул. Дудинская, д.12а
37. Курск: ЧП Сунцов, тел.: (0712) 52-13-40, 53-35-97, ул. Льва Толстого, д.9
38. Липецк: ООО «Оптима ЛТД», тел.: (0742) 77-89-81, ул. Площадь Коммунальная, д.9а
3
Page 70

39. Магадан: ЧП «Шантиленко», тел.: (41322) 7-58-44, ул. Парковая, 21
40. Махачкала: АСЦ «Техник ISE», тел.: (8722) 64-71-33, 64-28-95, пр-т Шамиля, д.20
41. Майкоп: ЗАО з-д «Рембыттехника», тел.: (87722) 3-28-48, 3-91-74 ул. Курганная, д.328
42. Междуреченск: ООО «РТА Сервис», тел.: (38475) 2-11-25, 2-82-00, пр.Строителей, 67
43. Минеральные Воды: ООО «КЛЕН», тел.: (87922) 7-61-45, 7-65-18, ул. Московская, 29А
44. Мурманск: ООО «СиПиЭс-Мурманск Технический, центр», тел.: (8152) 45-50-31,45-09-49, ул. С. Перовской, д.37
ООО «БМ – мастер», тел.: (8152) 700-769, 443-519, ул. Книповича, д.47, офис 54
45. Набережные Челны: ООО «Бизнес Центр ВС», тел.: (8552) 52-92-54, пр-т Х. Туфана, д.26
46. Нальчик: ИП Мирзоева, тел.: (8662) 443-086, пр. Ленина, д.24
47. Нефтеюганск: ООО «Юганскрембыттехника», тел.: 3-23-00, 1 мкр, д. 2 Д/б «Силуэт»
48. Нижневартовск: ЗАО «Ланкорд», тел.: (3466) 61-23-71, ул Ленина, 10П
ЗАО «Техэлектробыт», тел.: (3466) 61-32-66, проспект Победы, 24
49. Нижний Новгород: ЧП Грешнихина И.Э.б АСЦ «Гарант-сервис », тел.: (6312) 12-36-01, 12-00-29,
16-31-41, ул. Заярская, д.18
50. Новосибирск: ООО «ДэСибсервис», тел.: (3832) 51-81-13, ул. Выставочная, д.40
ООО «Сибирский Сервис», тел.: (3832) 92-47-12, 43-16-38, ул. Плахотного, д.39
51. Новый Уренгой: ООО «Бризант», тел.: (34949) 4-61-45, ул. 26-го съезда КПСС, д.10Б
52. Норильск: Сервис центр «Тайсервис», тел.: (3919) 49-12-12, ул. Ленинградская, д.22, оф.43
ПБОЮЛ «Спирин», тел.: (3919) 48-10-43, ул. Комсомольская, д.48
53. Обнинск: ООО «Радиотехника», тел.: (08439) 6-44-14, пл. Треугольная, д.1
54. Омск: ООО «Бытовая техника», тел.: (3812) 57-95-40, 57-24-47, пр-т Космический, д.99/2
ЧП Масютенко, тел.: (3812) 24-02-09, ул. Семиреченская, 93
55. Орел: ООО «Металлоремонт», тел.: (0862) 41-17-97, ул. Игнатова, д.31
56. Оренбург: ООО «Ком Инком», тел.: (3532) 62-77-01, 62-68-88, ул. Брестская, д.7
ООО ТЦ «Ликос Сервис», тел.: (3532) 77 55 05, 77 65 54, ул. Невельского, 8А
57. Пенза: ЗАО «Техсервис», тел.: (8412) 49-16-10, ул. Коммунистическая, д.28
ООО «Техносервис», тел.: (8412) 544-301, ул. Пушкина, д.10
ПБОЮЛ Васильев, тел.: (8412) 59-72-09, ул. Антонова, д. 11, кв. 117
58. Петропавловск-Камчатский: ЗАО «Элита Сервис», тел.: (4152) 191-100, 191-111, пр-т 50 лет Октября, 23/1
59. Пермь: ООО «Мария-М», тел.: (3422) 630-222, 631-116, ул. Тургенева, д. 21 оф. 440
60. Петрозаводск: ЧП «Хоршунов», тел.: (8142) 70-23-42, ул. Мурманская, д.25Б
61. Ростов на Дону: ООО «Диана и К», тел.: (86350) 5-51-59, 5-51-58, (8632) 47-09-55,
Ростовская обл., г. Аксай, ул. Ленина, 49
62. Рязань: ООО «Фирма Фонограф», тел.: (0912) 72-17-12, пл. 50-летия Октября, д.1
63. Самара: ООО «Фирма Сервис-Центр», тел.: (8462) 34-94-63, 34-94-28, ул. Мичурина, д.15, офис 307
64. Саратов: ООО «Аэлита», тел.: (8452) 50-69-24, 52-37-74, ул. Московская, 134/146
65. Саяногорск: ООО «МБТ», тел.: (39042) 7-78-18, Енисейский мкр., д.36
66. Северодвинск: ЧП Березин, тел.: (8184) 52-97-30, ул. Карла Маркса, 48
67. Смоленск: СЦ «Гарант», тел.: (0812) 647-111, ул. Ленина, д.22/6
68. Ставрополь: ООО «Т-Сервис», тел.: (8652) 94-41-13, 94-42-13, ул. Ленина, 468
69. Старый Оскол: ООО «Техномаркет», тел.: (0725) 44-10-82, 24-45-84, микрорайон Рудничный, д.24
70. Сургут: Техцентр «Интер-Сервис», тел.: (3462) 25-25-63, 25-69-70, Комсомольский пр-т, д.44
71. Сыктывкар: ИП Антипов Н.Н., тел.: (8212) 21-15-32, Сысольское шоссе, д. 1/3
ООО «Атлант Сервис», тел.: (8212) 20-02-86, ул. Южная, 7
72. Тамбов: ООО ТТЦ «Атлант-Сервис», тел.: (0752) 72-63-46, 72-75-85, ул. Московская, д.23А
73. Тверь: ООО «Стеко-сервис», тел.: (0822) 32-00-23, пр-т Чайковского, д.100
74. Тольятти: ООО «Элро Сервис», тел.: (8482) 20-72-56, 70-44-06, Приморский б-р, 2, офис 5
75. Томск: ООО «Академия Сервис», тел.: (3822) 49-15-80, 25-98-08, Академический пр-т, д.1, блок А, оф.204
ООО «СБ-сервис», тел: (3822) 52-77-72, 52-77-87, ул. Никитина, д.37А
ООО «ГлавбытСервис», тел.: (3822) 26-64-62, 44-03-07, ул. Некрасова, д.12
76. Тула: Сервисный центр «Профит», тел.: (0872) 30-95-65, 30-94-64, ул. Вересаева, д.1
77. Тюмень: ООО «Аверс-Сервис», тел.: (3452) 39-12-18, 39-12-29, ул. Мельникайте, д.131 „А”
78. Улан-Удэ: ООО «Кондор-сервис», тел.: (3012) 44-23-44, ул. Гагарина, д.15
79. Ульяновск: ООО «Мастер-Сервис», тел.: (8422) 32-07-33, ул. Минаева, д.42
80. Уссурийск: Сервисный центр «ПОЛУКС», тел.: (4234) 32-10-35, 33-92-59, ул. Советская, д.29
81. Уфа: Сервисный центр «Техно», тел.: (3472) 22-99-18, 51-20-55, ул. Чернышевского, д.88
82. Ухта: ООО «АВВА», тел.: (82147) 6-36-13, ул. Семяшкина, д.8А
83. Хабаровск: ООО «Контур-сервис», тел.: (4212) 701-000, 752-137, ул. Ким-Ю-Чена, 43
84. Чебоксары: ЧП «Мельник», тел.: (8352) 42-09-46, 42-09-00, Московский пр-т, д.З
85. Челябинск: ООО ТТЦ «Рембыттехника», тел.: (3512)49-30-33, ул. Производственная 8-Б
86. Чита: СЦ «Славянский Электроник», тел.: (3022) 32-55-22, 35-26-26, ул. Ингодинская, 35
87. Ярославль: ЗАО «Фирма ТАУ», тел.: (0852) 79-66-77, 79-66-78, 79-66-79, ул. Свободы д.101
( 03.2005)
4
Page 71

Die Herstellerfirma übernimmt keinerlei Verantwortung für eventuell in dieser Broschüre enthaltene
Ungenauigkeiten, die auf Druckfehler zurückzuführen sind und behält sich das Recht vor an ihren
Produkten alle für notwendig erachteten Änderungen anzubringen, ohne die wesentlichen
Eigenschaften zu beeinflussen.
The manufacturer declines all responsibility for possible inaccuracies contained in this pamphlet, due
to printing or copying errors. We reserve the right to make on our own products those changes to be
considered necessary or useful, without jeopardizing the essential characteristics.
Dans un souci constant d’amélioration qualitative, le constructeur se réserve la possibilité d’apporter à
ses produits les modifications utiles, sans compromettre ses caractéristiques essentielles.
Le constructeur décline toutes responsabilité pour d’eventuelles inexactitudes contenues dans cette
notice, imputables à des erreurs d’impression ou de transcription.
La Casa costruttrice declina ogni responsabilità per le possibili inesattezze contenute nel presente
opuscolo, imputabili ad errori di stampa o di trascrizione. Si riserva il diritto di apportare ai propri
prodotti quelle modifiche che ritiene necessarie o utili, senza pregiudicare le caratteristiche essenziali.
El constructor declina toda responsabilidad por las posibles inexactitudes contenidas en el presente
documento, imputables a errores de impresión o relacionadas. El constructor se reserva el derecho de
aportar a sus propios productos aquellas modificaciones que se considere necesarias o útiles, sin
perjudicar las características esenciales.
Abhvf bpujnjdbntkm yt ytctn ybrfrjq jndtncndtyyjcnb pf djpvj;yj cjlth;fobtcz d 'njq ,hji/ht
ytnjxyjcnb> rjnjhst vjuen ,snm cktlcndbtv jgtxfnjr nbgjuhfabb> b cj[hfyztn pf cj,jq ghfdj dyjcbnm d
lbpfqy b ecnhjqcndj cdjtq ghjlerwbb dct ytj,[jlbvst bpvtytybz> rjnjhst yt jrfpsdf/n ceotcndtyyjuj
dkbzybz yf gjnht,bntkmcrbt rfxtcndf b cdjqcndf ghjlernf.
Page 72

COD. 1.003.78.0
OLAN-Haushaltsgeräte, Berlin Germany
www.kaiser-olan.de
 Loading...