

Page 1
English
MICRO COMPONENT SYSTEM
SISTEMAS DE MICROCOMPONENTES
SISTEMA DE MICRO COMPONENTES
UX-H330
UX-H300
–Consists of CA-UXH330 and SP-UXH330
–Consists of CA-UXH300 and SP-UXH300
Español
Português
INSTRUCTIONS
MANUAL DE INSTRUCCIONES
INSTRUÇÕES
LVT1193-011A
[UW]
Page 2

Warnings, Cautions and Others
Avisos, precauciones y otras notas
Advertências, precauções e outras notas
CAUTION— (STANDBY/ON) button!
Disconnect the mains plug to shut the power off completely (all
lamps and indications go off). The (STANDBY/ON) button in
any position does not disconnect the mains line.
• When the unit is on standby, the STANDBY lamp lights red.
• When the unit is turned on, the STANDBY lamp goes off.
The power can be remote controlled.
PRECAUCIÓN—Botón (en espera/encendido)
Desconecte el enchufe tomacorriente para desconectar la
alimentación completamente (se apagan todas las lámparas e
indicaciones). Ninguna posición del botón (en espera/
encendido) conseguirá desconectar la red de alimentación
eléctrica.
• Cuando la unidad está en espera, la lámpara STANDBY se
enciende en rojo.
• Cuando la unidad está encendida, la lámpara STANDBY se
apaga.
La alimentación puede controlarse mediante control remoto.
CUIDADO—botão (standby/on) !
Desligue a ficha da tomada da parede para desligar
completamente a alimentação (todas as luzes e indicadores
apagam-se). O botão (standby/on), quer esteja premido ou
solto, não desliga a alimentação principal.
• Quando a unidade estiver em standby, a luz STANDBY fica
vermelha.
• Quando a unidade estiver ligada, a luz STANDBY apaga-se.
A alimentação pode ser controlada à distância.
G-1
Page 3

CAUTION
To reduce the risk of electrical shocks, fire, etc.:
1. Do not remove screws, covers or cabinet.
2. Do not expose this appliance to rain or moisture.
PRECAUCIÓN
Para reducir riesgos de choques eléctricos, incendio, etc.:
1. No extraiga los tornillos, los cubiertas ni la caja.
2. No exponga este aparato a la lluvia o a la humedad.
PRECAUÇÃO
Para reduzir riscos de choques elétricos, incêndio, etc.:
1. Não remova parafusos e tampas ou desmonte a caixa.
2. Não exponha este aparelho à chuva nem à umidade.
CAUTION
• Do not block the ventilation openings or holes.
(If the ventilation openings or holes are blocked by a
newspaper or cloth, etc., the heat may not be able to get
out.)
• Do not place any naked flame sources, such as lighted
candles, on the apparatus.
• When discarding batteries, environmental problems must be
considered and local rules or laws governing the disposal of
these batteries must be followed strictly.
• Do not expose this apparatus to rain, moisture, dripping or
splashing and that no objects filled with liquids, such as
vases, shall be placed on the apparatus.
PRECAUCIÓN
• No obstruya las rendijas o los orificios de ventilación.
(Si las rendijas o los orificios de ventilación quedan tapados
con un periódico, un trozo de tela, etc., no se podrá disipar
el calor).
• No ponga sobre el aparato ninguna llama al descubierto,
como velas encendidas.
• Cuando tenga que descartar las pilas, tenga en cuenta los
problemas ambientales y observe estrictamente los
reglamentos o las leyes locales sobre disposición de las
pilas.
• No exponga este aparato a la lluvia, humedad, goteos o
salpicaduras. Tampoco ponga recipientes conteniendo
líquidos, como floreros, encima del aparato.
PRECAUÇÃO
• Não obstrua as aberturas e orifícios de ventilação.
(Se os orifícios ou aberturas de ventilação estiverem
obstruídos por qualquer papel ou tecido, não haverá
circulação do ar quente.)
• Não coloque nenhum objeto com chamas, como velas
acesas, sobre o aparelho.
• Ao descartar as baterias, leve em consideração os
problemas que possam ser causados ao meio ambiente e
os regulamentos e leis locais e governamentais sobre
recolhimento dessas baterias devem ser rigorosamente
seguidos.
• Não exponha este aparelho à chuva, umidade, pingos ou
esguichos de água, nem coloque em cima do mesmo
qualquer tipo de recipiente que contenha líquidos, como por
exemplo vasos.
G-2
Page 4

CAUTION: Proper Ventilation
10 cm
15 cm
1 cm
15 cm
15 cm
1 cm
15 cm
15 cm
To avoid risk of electric shock and fire, and to prevent damage, locate the apparatus as follows:
1 Front: No obstructions and open spacing.
2 Sides/ Top/ Back: No obstructions should be placed in the areas shown by the dimensions below.
3 Bottom: Place on the level surface. Maintain an adequate air path for ventilation by placing on a stand with a height of
10 cm or more.
PRECAUCIÓN: Ventilación correcta
Para evitar el riesgo de descargas eléctricas e incendio y prevenir posibles daños, instale el equipo en un lugar que cumpla los
siguientes requisitos:
1 Parte frontal: Sin obstrucciones, espacio abierto.
2 Lados/parte superior/parte posterior:
3 Parte inferior: Sitúe el equipo sobre una superficie nivelada. Mantenga un espacio adecuado para permitir el paso del aire y
No debe haber ninguna obstrucción en las áreas mostradas por las dimensiones de la siguiente figura.
una correcta ventilación, situando el equipo sobre un soporte de 10 o más cm de allura.
PRECAUÇÃO: Ventilação adequada
Para evitar riscos de choques elétricos e incêndios, e prevenir avarias, instale o aparelho como segue:
1 Parte frontal: Sem obstruções e espaços abertos.
2 Partes laterais/ Tampa/ Posterior:
Nenhuma obstrução deverá ser colocada entre as áreas cujas dimensões são indicadas abaixo.
3 Parte inferior: Instale-o sobre uma superfície plana. Deverá ser mantido espaço suficiente para a ventilação se este for
instalado numa posição que tenha uma altura de 10 cm ou mais.
Front view
Vista frontal
Vista frontal
UX-H330/UX-H300
Side view
Vista lateral
Vista lateral
UX-H330/UX-H300
G-3
Page 5

IMPORTANT FOR LASER PRODUCTS
CAUTION - INVISIBLE LASER RADIATION WHEN OPEN AND INTERLOCKS
DEFEATED. AVOID EXPOSURE TO BEAM.
VORSICHT ! UNSICHTBARE LASERSTRAHLUNG TRITT AUS, WENN DECKEI.
GEÖFFNET UND WENN SICHERHEITSVERRIEGELUNG ÜBERBRÜCKT
IST. NICHT DEM STRAHL AUSSETZEN!
VARNING - OSYNLIG LASERSTRÄLNING NÄR DENNA DEL ÄR ÖPPNAD OCH
SPÄRR ÄR URKOPPLAD STRÅLEN ÄR FARLIG.
ADVARSEL -USYNLIG LASERSTRÅLING VED ÅBNING NÅR
SIKKERHEDSAFBRYDERE ER UDE AF FUNKTION. UNDGÅ
UDSÆTTELSE FOR STRÅLING.
IMPORTANTE PARA PRODUCTOS LÁSER
1. CLASS 1 LASER PRODUCT
2. CAUTION: Do not open the top cover. There are no user
serviceable parts inside the unit; leave all servicing to qualified
service personnel.
3. CAUTION: Visible and invisible laser radiation when open and
interlock failed or defeated. Avoid direct exposure to beam.
4. REPRODUCTION OF LABEL: CAUTION LABEL, PLACED
INSIDE THE UNIT.
PARA PRODUTOS LASER, IMPORTANTE
1. PRODUTO LASER DE CLASSE 1
2. PRECAUÇÃO: não abrir a cobertura superior. Dentro da unidade
não existem partes cuja manutenção tenha de ser feita pelo
usuário; deixe qualquer manutenção a cargo do pessoal de
serviço qualificado.
3. PRECAUÇÃO: radiação laser visível e invisível quando se abre e
com a conexão interna em falha ou frustrada. Evite a exposição
direta ao raio.
4. REPRODUÇÃO DE ETIQUETA: ETIQUETA DE AVISO SITUADA
NO INTERIOR DA UNIDADE.
1. PRODUCTO LÁSER CLASE 1
2. PRECAUCIÓN: No abra la tapa superior. En el interior de la
unidad no hay piezas que pueda reparar el usuario; encargue el
servicio a personal técnico cualificado.
3. PRECAUCIÓN: Radiación láser visible e invisible en caso de
apertura o con interbloqueo averiado o defectuoso. Evite la
exposición directa a los haces.
4. RREPRODUCCIÓN DE LA ETIQUETA: ETIQUETA DE
PRECAUCIÓN, COLOCADA EN EL INTERIOR DE LA UNIDAD.
G-4
Page 6

Introduction
English
We would like to thank you for purchasing one of our JVC products.
Before operating this unit, read this manual carefully and thoroughly to
obtain the best possible performance from your unit, and retain this manual
for future reference.
About This Manual
This manual is organized as follows:
• This manual mainly explains operations using the
buttons on the remote control.
You can use the buttons both on the remote control and
on the unit for the same operations if they have the
same or similar names (or marks), unless mentioned
otherwise.
• Basic and common information that is the same for many
functions is grouped in one place, and is not repeated for
each procedure. For instance, we do not repeat the
information about turning on/off the unit, setting the
volume, changing the sound effects, and others, which are
explained in the section “Common Operations” on pages 9
and 10.
• The following symbols are used in this manual:
Gives you warning and caution to prevent
damage or risk of fire/electric shock.
In addition, we put information here about
conditions which will prevent getting the best
possible performance from the unit.
Gives you information and hints you need to
know.
Power sources
• When unplugging the unit from the wall outlet, always pull
on the plug, not the AC power cord.
DO NOT handle the AC power cord with wet
hands.
Moisture condensation
Moisture may condense on the lenses inside the unit in the
following cases:
• After starting to heat the room.
• In a damp room.
• If the unit is brought directly from a cold to a warm place.
Should this occur, the unit may malfunction. In this case,
leave the unit turned on for a few hours until the moisture
evaporates, unplug the AC power cord, then plug it in again.
Others
• Should any metallic object or liquid fall into the unit,
unplug the AC power cord and consult your dealer before
operating any further.
• If you are not going to operate the unit for an extended
period of time, unplug the AC power cord from the wall
outlet.
• Rating label is placed on the exterior of the bottom.
DO NOT disassemble the unit since there are no
user serviceable parts inside.
Precautions
Installation
• Install in a place which is level, dry and neither too hot nor
too cold—between 5˚C and 35˚C.
• Install the unit in a location with adequate ventilation to
prevent internal heat buildup.
• Leave sufficient distance between the unit and the TV.
• Keep the speakers away from the TV to avoid interference
with TV.
DO NOT install the unit in a location near heat
sources, or in a place subject to direct sunlight,
excessive dust or vibration.
1
If anything goes wrong, unplug the AC power cord and
consult your dealer.
Page 7

Contents
English
Location of the Buttons and Controls ............................. 3
Main Unit .................................................................................. 3
Remote Control ......................................................................... 5
Getting Started .................................................................. 6
Unpacking ................................................................................. 6
Connecting AM and FM Antennas ............................................ 6
Connecting Speakers ................................................................. 6
Connecting Other Equipment .................................................... 7
Adjusting the Voltage Selector .................................................. 7
Putting the Batteries into the Remote Control .......................... 8
Common Operations ......................................................... 9
Setting the Clock ....................................................................... 9
Turning On the Power ............................................................... 9
Turning Off the Unit Automatically (Auto Standby) ................ 9
Selecting the Source ................................................................ 10
Adjusting the Volume .............................................................. 10
Fade-Out Muting (FADE MUTING) ...................................... 10
Selecting the Sound Modes ..................................................... 10
Reinforcing the Bass Sound .................................................... 10
Checking the Clock Time During Play ................................... 10
Playing Back Discs .......................................................... 11
Playing Back the Entire Disc—Normal Play .......................... 11
Basic Disc Operations ............................................................. 12
Programming the Track Playing Order—Program Play.......... 12
Repeating Tracks—Repeat Play .............................................. 13
Playing at Random—Random Play ......................................... 14
Displaying the Remaining Time during Playback................... 14
Playing Back Tapes.......................................................... 15
Playing Back a Tape ................................................................ 15
Listening to FM and AM Broadcasts ............................. 16
Setting the Tuner Interval Spacing .......................................... 16
Tuning in to a Station .............................................................. 16
Presetting Stations ................................................................... 16
Tuning in to a Preset Station ................................................... 17
Using an External Equipment ........................................ 17
Listening to the External Equipment ....................................... 17
Recording ......................................................................... 18
Recording on a Tape ................................................................ 18
Recording Discs—Disc Synchronized Recording .................. 19
Using the Timers.............................................................. 20
Using Daily Timer and Recording Timer ................................ 20
Using Snooze Timer ................................................................ 21
Using Sleep Timer ................................................................... 22
Maintenance..................................................................... 23
Troubleshooting ............................................................... 24
Specifications ................................................................... 24
2
Page 8

Location of the Buttons and Controls
OPEN
COMPACT
DIGITAL AUDIO
DAILY TIMER/SNOOZE
1
3
2
COMPACT
DIGITAL AUDIO
STANDBY
CD
PHONES DOWN
4
#/8
7¢
UP AUX
PUSH OPEN
TAPE FM/AM AUX
VOLUME
+—
MICRO COMPONENT SYSTEM
AUTO REVERSE
REC
4
5
6
7
8
p
9
q
w
e
r
t
English
Become familiar with the buttons and controls on your unit.
Main Unit
Top view
Front view
3
Page 9

Display window
SOUND
BASS
ON
DAILY 123
OFF
ALL GR. TOTAL REMAIN
MHz
k
Hz
SLEEP SNOOZEREC ST MP3MONO
SOUND BASS REC
A.STANDBYPRGM RANDOM
452316789pq
i
uy
t
a;o
r
w
e
See pages in parentheses for details.
Continued
English
Main unit
1 Disc cover (11)
2 ) OPEN (disc cover open) (11)
3 DAILY TIMER/SNOOZE button (21)
4 Remote sensor (5)
5 STANDBY lamp (9)
6 (STANDBY/ON) button (9)
7 Source buttons
• CD #¥8, TAPE ¤‹, FM/AM, AUX
Pressing one of these buttons also turns on the unit.
8 PHONES jack (10)
9 Multi control buttons
• DOWN 4, 7, UP ¢
p Cassette holder (15, 18, 19)
q Display window
w VOLUME + / – control (10, 16)
e AUX jack (7, 17)
r REC button (18, 19)
t PUSH OPEN button (15, 18)
Display window
1 DAILY 1/2/3 (timer number) indicators
2 (timer) indicator
3 ON/OFF (timer on-time/off-time) indicators
4 REC (recording timer) indicator
5 (group folder) indicator
6 SLEEP indicator
7 SNOOZE indicator
8 FM mode indicators
• MONO, ST (stereo)
9 MP3 indicator
p
q
w REC (recording) indicator
e 2 3 (tape direction) indicator
r Repeat indicators
t (reverse mode) indicator
y PRGM (program) indicator
u RANDOM indicator
i Main display
o Remain indicators
; A.STANDBY indicator
a Frequency indicators
indicator
indicator
• , ALL, GR. (group)
• TOTAL, REMAIN
• MHz, kHz
4
Page 10

REC
STANDBY/ON
SLEEP
123
456
7809
CLOCK
/TIMER
PRESET
GROUP
UP
DOWN
PRESET
GROUP
SET
CANCEL
CD
RANDOM
TAPE
PROGRAM
FM/AM
REPEAT
AUX
OVER
REMAIN
SOUND/HBS BEAT CUT REV.MODE FADE MUTING
VOLUME
DISPLAY FM MODE A. STANDBY
3/8
w
e
y
u
i
;
1
2
3
4
5
7
9
p
t
8
q
a
r
6
o
English
Remote Control
See pages in parentheses for details.
1 STANDBY/ON button (9, 21)
2 SLEEP button (22)
3 CLOCK/TIMER button (9, 20)
4 SET button (9, 16, 20, 21)
5 CANCEL button (20, 21)
6 Source buttons
• CD 3¥8, TAPE 2 3, FM/AM, AUX
Pressing one of these buttons also turns on the unit.
7 RANDOM button (14)
8 PROGRAM button (12, 13)
9 Multi control buttons
• PRESET GROUP /UP, PRESET GROUP /DOWN
• 4, 7, ¢
p SOUND/HBS button (10)
q BEAT CUT button (18)
w DISPLAY button (10)
e A. (auto) STANDBY button (9)
r FM MODE button (16)
t Number buttons (12, 17)
y OVER button (12, 17)
u REMAIN button (14)
i REPEAT button (13)
o VOLUME + / – buttons (10, 21)
; FADE MUTING button (10)
a REV. (reverse) MODE button (15, 18, 19)
COMPACT
DIGITAL AUDIO
STANDBY
PHONES DOWN
CD
#/8
4
TAPE FM/AM AUX
UP AUX
7¢
VOLUME
+—
When using the remote control, point it at the
remote sensor on the front panel.
5
Page 11

Getting Started
AM LOOP
FM ANTENNA
1
2,3
Ò
Â
Unpacking
Do not connect the AC power cord until all other
connections have been made.
Connecting Speakers
Continued
English
After unpacking, check to be sure that you have all the
following items.
The number in parentheses indicates the quantity of each
piece supplied.
• AM loop antenna (1)
• AC plug adaptor (1)
• Remote control (1)
• Batteries (2)
If any item is missing, consult your dealer immediately.
Connecting AM and FM Antennas
AM loop antenna
1
(supplied)
You can connect the speakers using the speaker cords.
Red
Black
Red
Speaker
cord
Black
Speaker
cord
2
FM antenna
1
Connect the supplied AM loop antenna to the
AM LOOP terminal.
Place the antenna away from the unit and adjust its
position for the best reception.
2
Adjust the position for the FM antenna for
the best reception.
For better reception of both FM and AM
• Make sure the antenna conductors do not touch any other
terminals or connecting cords.
• Keep the antennas away from metallic parts of the unit,
connecting cords, and the AC power cord.
Right speaker
1
Hold the clamp of the speaker terminal.
2
Insert the end of the speaker cord into the
terminal.
Match the polarity of the speaker terminals: red cord to
ª and black cord to ·.
3
Release your finger from the clamp.
IMPORTANT:
• Use only speakers with the same speaker impedance as
indicated by the speaker terminals on the rear of the unit.
• DO NOT connect more than one speaker to one
speaker terminal.
Left speaker
6
Page 12

L
R
AUX
Do not connect the AC power cord until all other connections have been made.
AC 110-127V
VOLTAGE SELECTOR
AC 220-240V
English
To remove the speaker grilles
The speaker grilles are removable as the illustration below.
Holes
To remove the speaker grille, insert your fingers around the
projection at the top of the speaker grille, then pull gently
towards you while holding the side.
Do the same for the rest of projections one at a time.
Projections
Speaker grille
When the audio equipment has pin jacks for audio output:
Be sure that the pin plugs of the audio cords are colored—
white plugs and jacks are for left audio signals, and red ones
for right audio signals.
Adjusting the Voltage Selector
Before plugging in the unit, set the correct voltage for your
area with the voltage selector on the rear of the unit.
Use a screwdriver to move the voltage selector so the voltage
number is the same as the voltage where you are plugging in
the unit. (See the back cover page.)
To attach the speaker grille, put the projections of the
speaker grille into the holes of the speaker.
Connecting Other Equipment
To connect an audio equipment
You can connect audio equipment—used only as a playback
device.
• DO NOT connect any equipment while the
power is on.
• DO NOT plug in any equipment until all
connections are complete.
For playing other equipment through this unit,
connect between the audio output jacks on the other
equipment and AUX jack by using audio cords with mini
plugs (not supplied).
To audio output
7
OR
To audio output
To
Audio equipment
Page 13

Putting the Batteries into the Remote Control
Insert the batteries—AAA/UM-4/R03—into the remote
control by matching the polarity (+ and –) on the batteries
with the + and – marking on the battery compartment.
When the remote control can no longer operate the unit,
replace both batteries at the same time.
1
English
• DO NOT use an old battery together with a new
one.
• DO NOT use different types of batteries together.
• DO NOT expose batteries to heat or flame.
• DO NOT leave the batteries in the battery
compartment when you are not going to use the
remote control for an extended period of time.
Otherwise, the remote control will be damaged
from battery leakage.
NOW you are ready to plug in the unit.
IMPORTANT:
Be sure to check that all connections have been made
before plugging in the power cord.
2
AAA/UM-4/R03
3
8
Page 14
Common Operations
CLOCK
/TIMER
PRESET
GROUP
UP
DOWN
PRESET
GROUP
SET
PRESET
GROUP
UP
DOWN
PRESET
GROUP
SET
CLOCK
/TIMER
STANDBY/ON
A. STANDBY
English
Setting the Clock
To adjust the clock
Before operating the unit any further, first set the unit’s clock.
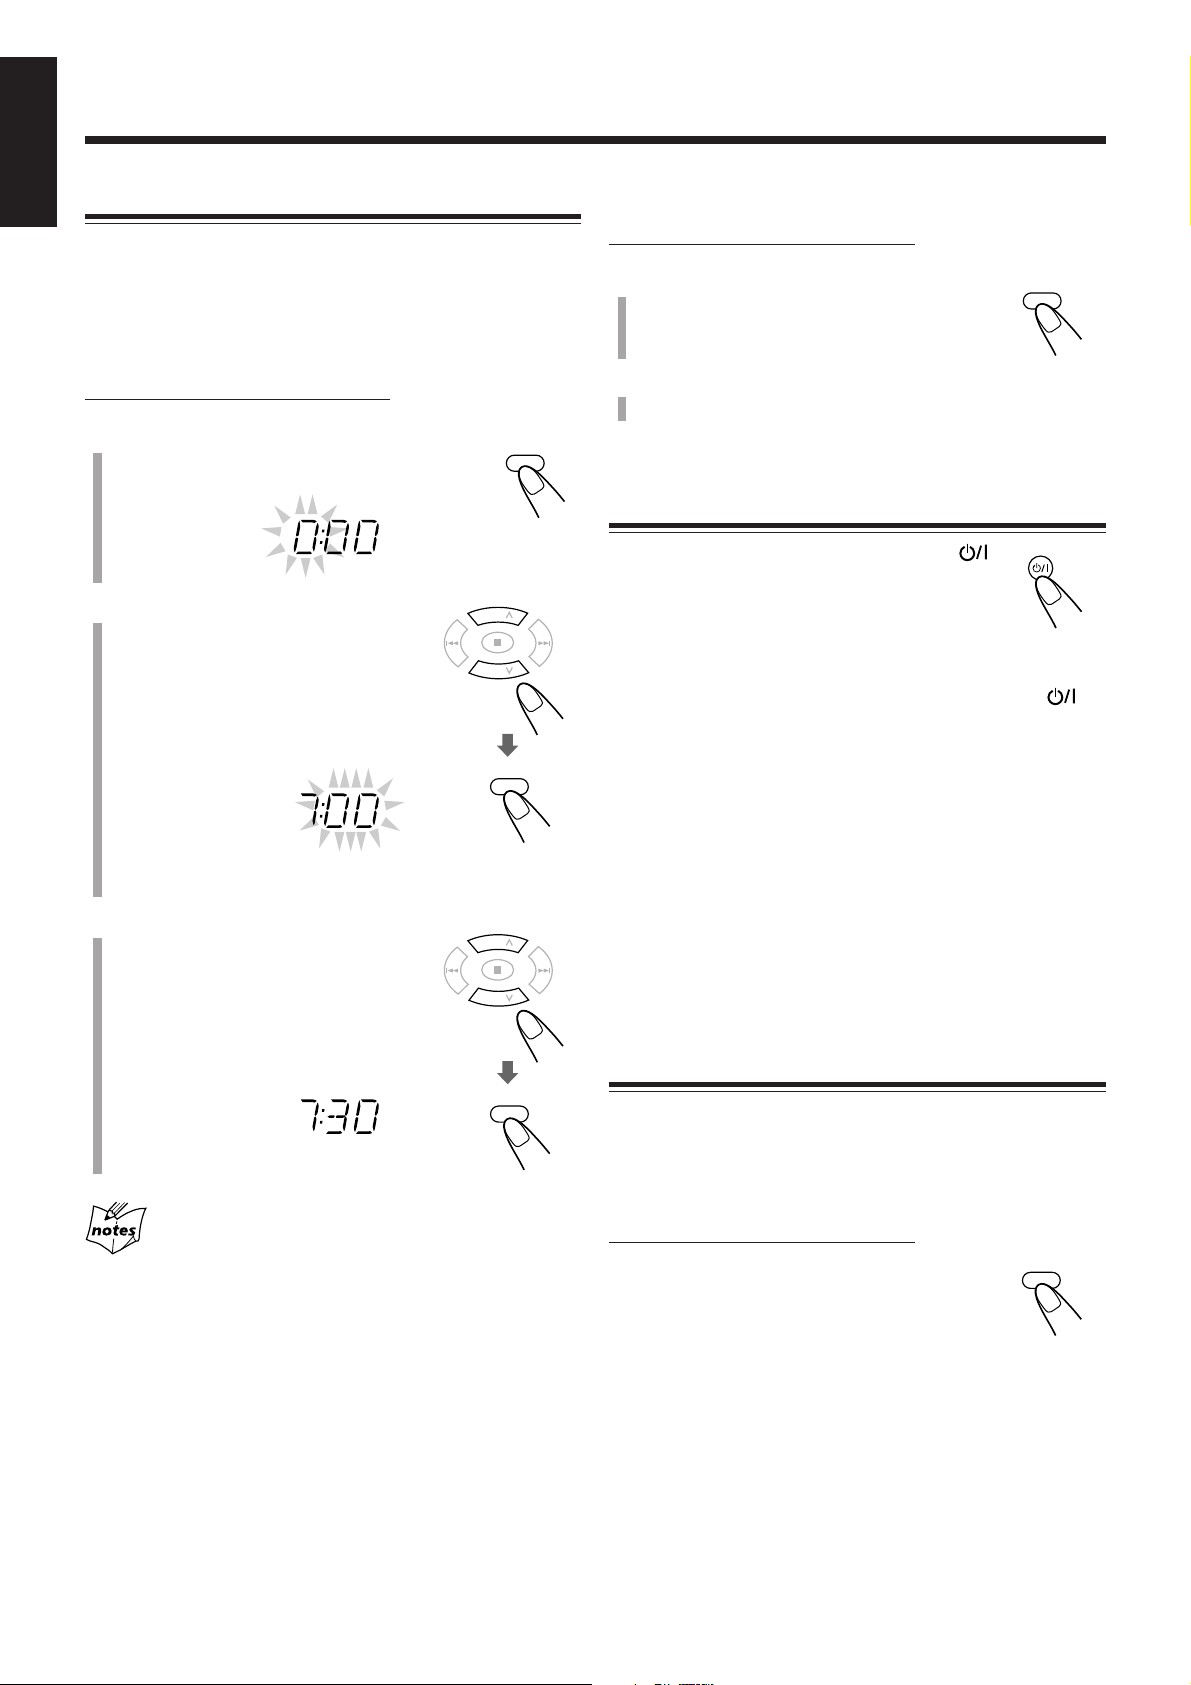
When you plug in the power cord, “0:00” starts flashing on
the display.
You can set the clock when the unit is either turned on or in
standby mode.
On the remote control ONLY:
1
Press CLOCK/TIMER.
The hour indication starts flashing.
2
Press UP or DOWN to adjust
the hour, then press SET.
• When you press and hold UP or
DOWN, the hour indication changes
continuously.
The minute indication starts flashing.
• The clock is working even while setting.
On the remote control ONLY:
1
Press CLOCK/TIMER repeatedly
to show the current time indication.
The hour indication starts flashing.
2
Repeat steps 2 and 3 on the left column.
Turning On the Power
To turn on the unit, press STANDBY/ON .
The STANDBY lamp on the unit goes off.
• When you press the source button—CD 3/8,
TAPE 2 3, FM/AM and AUX, the unit
automatically turns on.
To turn off the unit (standby), press STANDBY/ON
again.
The STANDBY lamp on the unit lights red.
•“0:00” flashes on the display until you set the built-in
clock. After setting the clock, the clock time will appear on
the display while the unit is in standby mode.
• A little power is always consumed even while the unit is in
standby mode.
3
Press UP or DOWN to adjust
the minute, then press SET.
• When you press and hold UP or
DOWN, the minute indication
changes continuously.
The built-in clock starts.
• When you unplug the AC power cord or if a power failure
occurs
The clock is reset to “0:00.” If this happens, set the clock again.
• The clock may gain or lose 1 to 2 minutes per month
If this happens, reset the clock.
To switch off the power supply completely, unplug the AC
power cord from the AC outlet.
Turning Off the Unit Automatically
(Auto Standby)
Using Auto Standby, the unit automatically turns itself off (on
standby) about 3 minutes after playing back a disc or a tape.
• You can also turn off the unit automatically by using the
Sleep Timer. (See page 22.)
On the remote control ONLY:
To activate Auto Standby, press A.STANDBY.
The A.STANDBY indicator appears on the
display.
• When the playback is stopped, the
A.STANDBY indicator starts flashing on the
display.
To deactivate Auto Standby, press A.STANDBY again.
The A.STANDBY indicator goes off.
9
Page 15

Selecting the Source
VOLUME
FADE MUTING
SOUND/HBS
SOUND
SOUND/HBS
BASS
SOUND
BASS
DISPLAY
ROCK
JAZZ
FLAT
CLASSIC
POP
English
Selecting the Sound Modes
To select the source, press CD 6, TAPE 2 3, FM/AM, or
AUX .
• When you select CD as the source, playback starts
automatically.
To operate the CD player, see pages 11 to 14.
To operate the tape deck, see page 15.
To operate the tuner (FM or AM), see pages 16
and
17.
To record on a tape, see pages 18 and 19.
To use an external equipment, see page 17.
Adjusting the Volume
You can adjust the volume level only while the unit is turned
on. The volume level can be adjusted between “VOL MIN,”
“VOL 1” – “VOL 29,” and “VOL MAX.”
• The volume level has no effect on recording.
To increase the volume, press VOLUME + (or
turn VOLUME + / – control clockwise on the
unit).
To decrease the volume, press VOLUME – (or
turn VOLUME + / – control counterclockwise
on the unit).
• When you press and hold either button, you can change the
volume level continuously.
You can select one of the 4 sound modes.
• This function also affects the sound from headphones.
• This function only affects the playback sound, and does not
affect your recording.
On the remote control ONLY:
To select the sound modes, press SOUND/HBS
repeatedly.
• Each time you press the button, the sound mode
changes as follows:
(Canceled)
ROCK: Powerful sound emphasizing treble and bass.
POP: More presence in the vocals and midrange.
CLASSIC: Enriched sound with fine treble and ample bass.
JAZZ: Accented lower frequencies for jazz-type music.
FLAT: Equalizer effect is canceled.
When the sound mode is activated, the
up on the display.
indicator lights
For private listening
Connect a pair of headphones to the PHONES jack. No sound
comes out of the speakers. Be sure to turn down the volume before
connecting or putting on the headphones.
DO NOT turn off (standby) the unit with the volume
set to an extremely high level; Otherwise, the
sudden blast of sound can damage your hearing,
speakers and/or headphones when you turn on the
unit or start playing any source.
REMEMBER you cannot adjust the volume level
while the unit is in standby mode.
Fade-Out Muting (FADE MUTING)
On the remote control ONLY:
Press FADE MUTING.
The volume level decreases to “VOL MIN,” and
“MUTING” appears on the display.
To release muting, press FADE MUTING again. The
volume level resumes to the previous level.
Reinforcing the Bass Sound
You can boost the bass sound.
• This function only affects the playback sound, and does not
affect your recording.
On the remote control ONLY:
Press and hold SOUND/HBS.
• Each time you press and hold the SOUND/
HBS, HBS turns on and off.
When the HBS is activated, the
the display.
indicator lights up on
Checking the Clock Time During Play
On the remote control ONLY:
Press DISPLAY.
• Each time you press the button, the display
changes the clock indication and the normal
indication alternately. After changing the
display to the clock indication, operating any button or
control also changes the display to the normal indication.
10
Page 16
Playing Back Discs
MP3
MP3
CD
3/8
PRESET
GROUP
PRESET
GROUP
UP
DOWN
English
This unit has been designed to play back the following
discs—CD, CD-R, and CD-RW.
You can play back the discs containing the tracks in music
CD format or MP3 files in ISO 9660 format.
• In this instruction, we call a disc recorded MP3 files “MP3
disc,” and “file” is also referred to as “track.”
When playing CD-Rs or CD-RWs
• Before playing CD-Rs or CD-RWs, read their instructions
or cautions carefully.
• User-edited CD-Rs (CD-Recordable) and CD-RWs (CDReWritable) can be played only if they are already
“finalized.”
• This unit supports “multi-session” discs (up to 5 sessions).
• This unit cannot play “packet write” discs.
• Some CD-Rs or CD-RWs may not play on this unit because
of their disc characteristics, damage or stain on them, or if
the player’s lens is dirty.
• CD-RWs may require a longer readout time. This is
because the reflectance of CD-RWs is lower than for
regular discs.
Playing Back the Entire Disc—Normal Play
1
Press ) OPEN on top of the unit.
The disc cover opens.
• You can insert a disc while listening to another source.
2
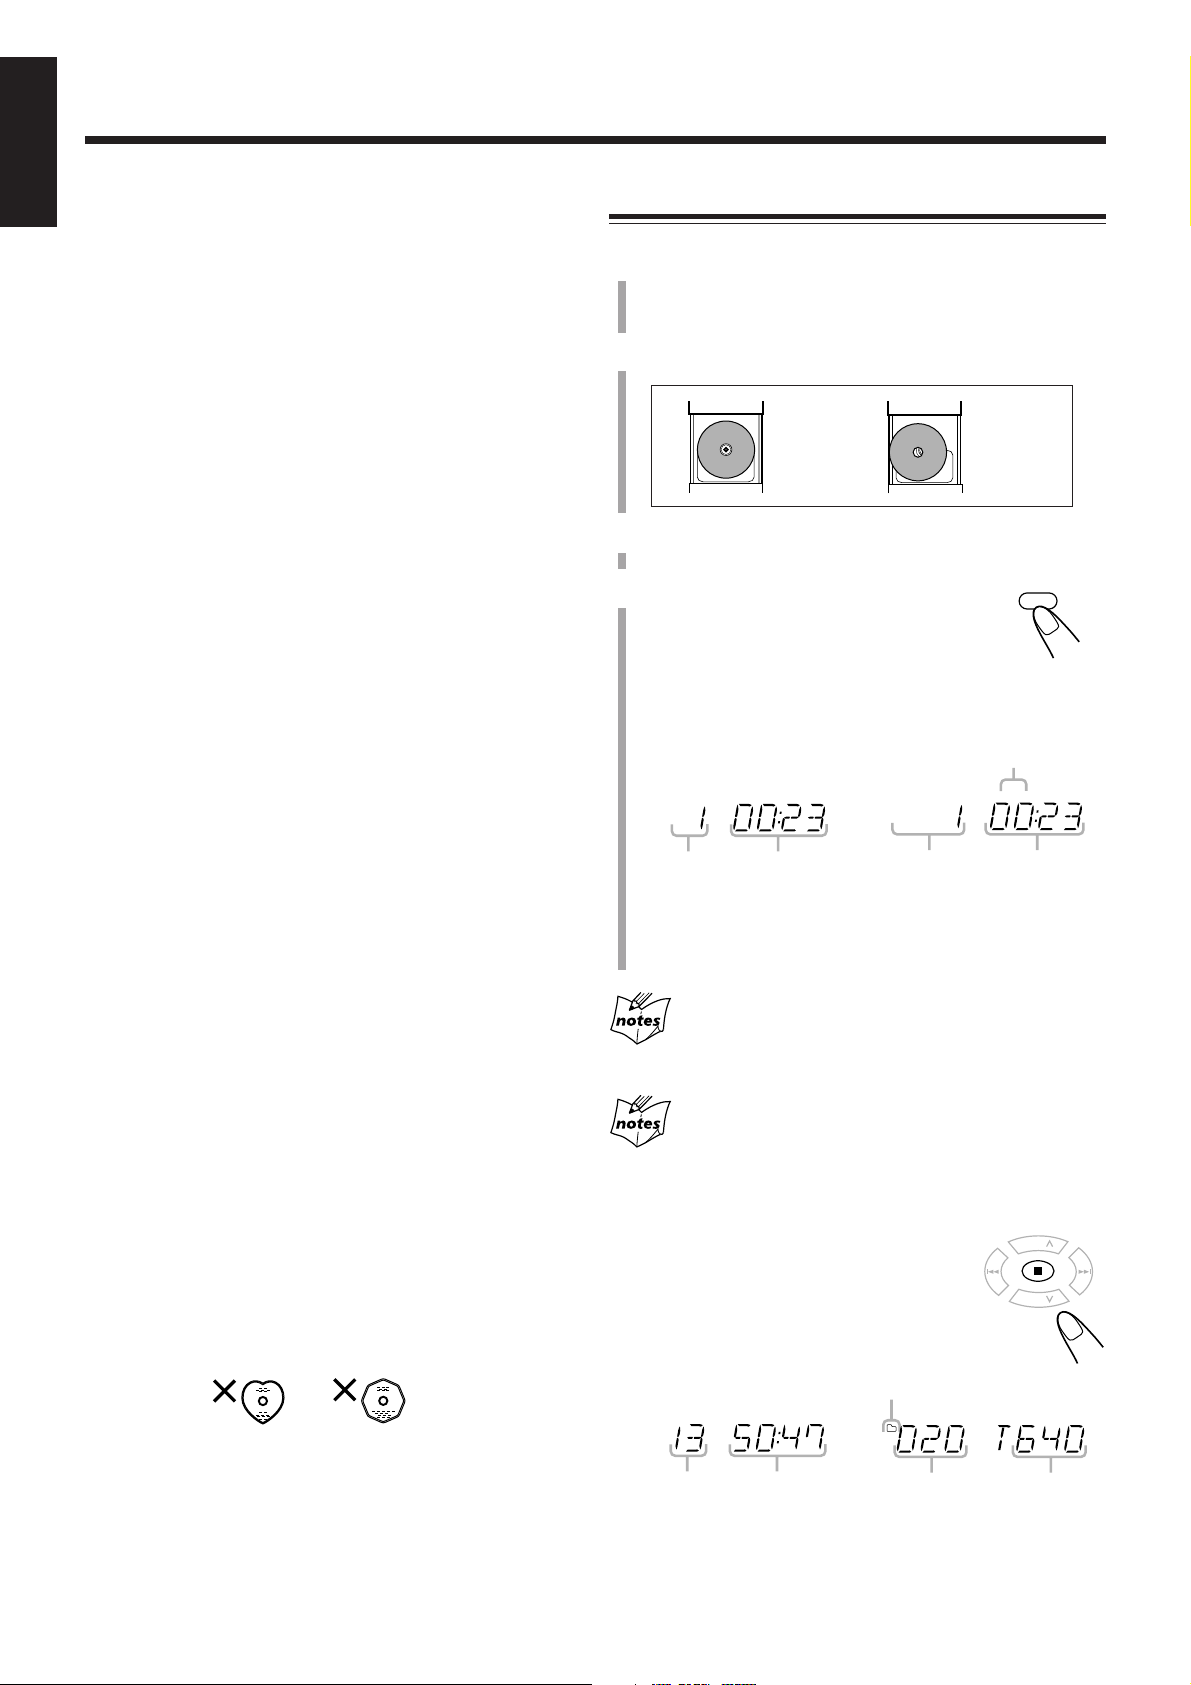
Place a disc correctly with its label side up.
Good Not good
3
Close the disc cover gently.
4
Press CD 6.
The unit automatically turns on and the source
changes to the CD player.
After loading the disc, the first track of the disc
starts playing.
Notes for MP3 files
• The player can only recognize files with “MP3” or “mp3”
as the extensions, which can be in any combination of
upper and lower case. The file name needs to be up to 20
characters.
• This unit recognizes files and folders on a disc in the
following conditions:
– up to 640 MP3 files.
– up to 256 folders (including the root folder).
– up to 8th layers (including the root folder).
• It is recommended that you record your material at a 44.1
kHz sampling rate, using the 128 kbps data transfer rate.
• Some MP3 files or discs may not be played back because
of their characteristics or recording conditions.
• MP3 discs requires a longer readout time than normal discs
because of the complexity of the folder/file configuration.
• MP3i and MP3 Pro are not available.
General notes
In general, you will have the best performance by keeping
your discs and the mechanism clean.
• Store discs in their cases, and keep them in cabinets or on
shelves.
• Keep the unit’s disc cover closed when not in use.
• Continued use of irregular shape discs (heart-shape,
octagonal, etc.) can damage the unit.
When playing
audio CD:
Current track
number
Elapsed
playing time
When playing MP3 disc:
MP3 indicator
Current track
number
Elapsed
playing time
• The disc automatically stops when the last track has
finished playing.
While “READING” appears on the display
You cannot make any operation until the unit finishes reading the
disc.
While playing back an MP3 disc
ID3 Tag information (the name of the title, artist, and album up to 30
characters) will be shown on the display. When the name is too long
to be displayed at once, it is scrolled.
To stop playing, press 7.
The total track (or group) number and total
playing time appear on the display.
When stop playing
audio CD:
When stop playing
MP3 disc:
Group folder indicator
Total track
number
• Total playing time does not appear when MP3 disc is
Total playing
time
Total group
number
Total track
number
loaded.
11
Page 17
CD
3/8
PRESET
GROUP
PRESET
GROUP
UP
DOWN
123
456
7809
OVER
PRESET
GROUP
PRESET
GROUP
UP
DOWN
PROGRAM
PRESET
GROUP
PRESET
GROUP
UP
DOWN
PROGRAM
123
456
7809
OVER
PRGM
PRGM
Continued
To remove the disc, press ) OPEN on the unit, then take out
the disc by holding it at the edges while pressing the unit’s
pivot lightly.
• If the disc cannot be read correctly (because it is scratched,
for example) or an unreadable CD-R or CD-RW is inserted
Playback will not start.
• If no disc is inserted
“NO DISC” appears on the display.
DO NOT open the disc cover by hand as it will be
damaged.
Basic Disc Operations
While playing a disc, you can do the following operations.
To stop playing for a moment
During play, press CD 3/8.
While pausing, current track number and elapsed
playing time flash on the display.
To resume playing, press CD 3/8 again.
To go to another track
Before or during play, press ¢ or 4 (or
UP ¢ or DOWN 4 on the unit)
repeatedly.
To locate a particular point in a track
During play, press and hold ¢ or 4 (or
UP ¢ or DOWN 4 on the unit).
• ¢ (UP ¢): Fast-forwards the
tracks.
• 4 (DOWN 4): Fast-reverses the
tracks.
While playing back an MP3 disc
This function is not available.
Programming the Track Playing Order
—Program Play
You can arrange the order in which tracks play before you
start playing. You can program up to 40 tracks.
On the remote control ONLY:
1
Place a disc.
• If the current source is not the CD player, press
CD 6, then 7 before going to the next step.
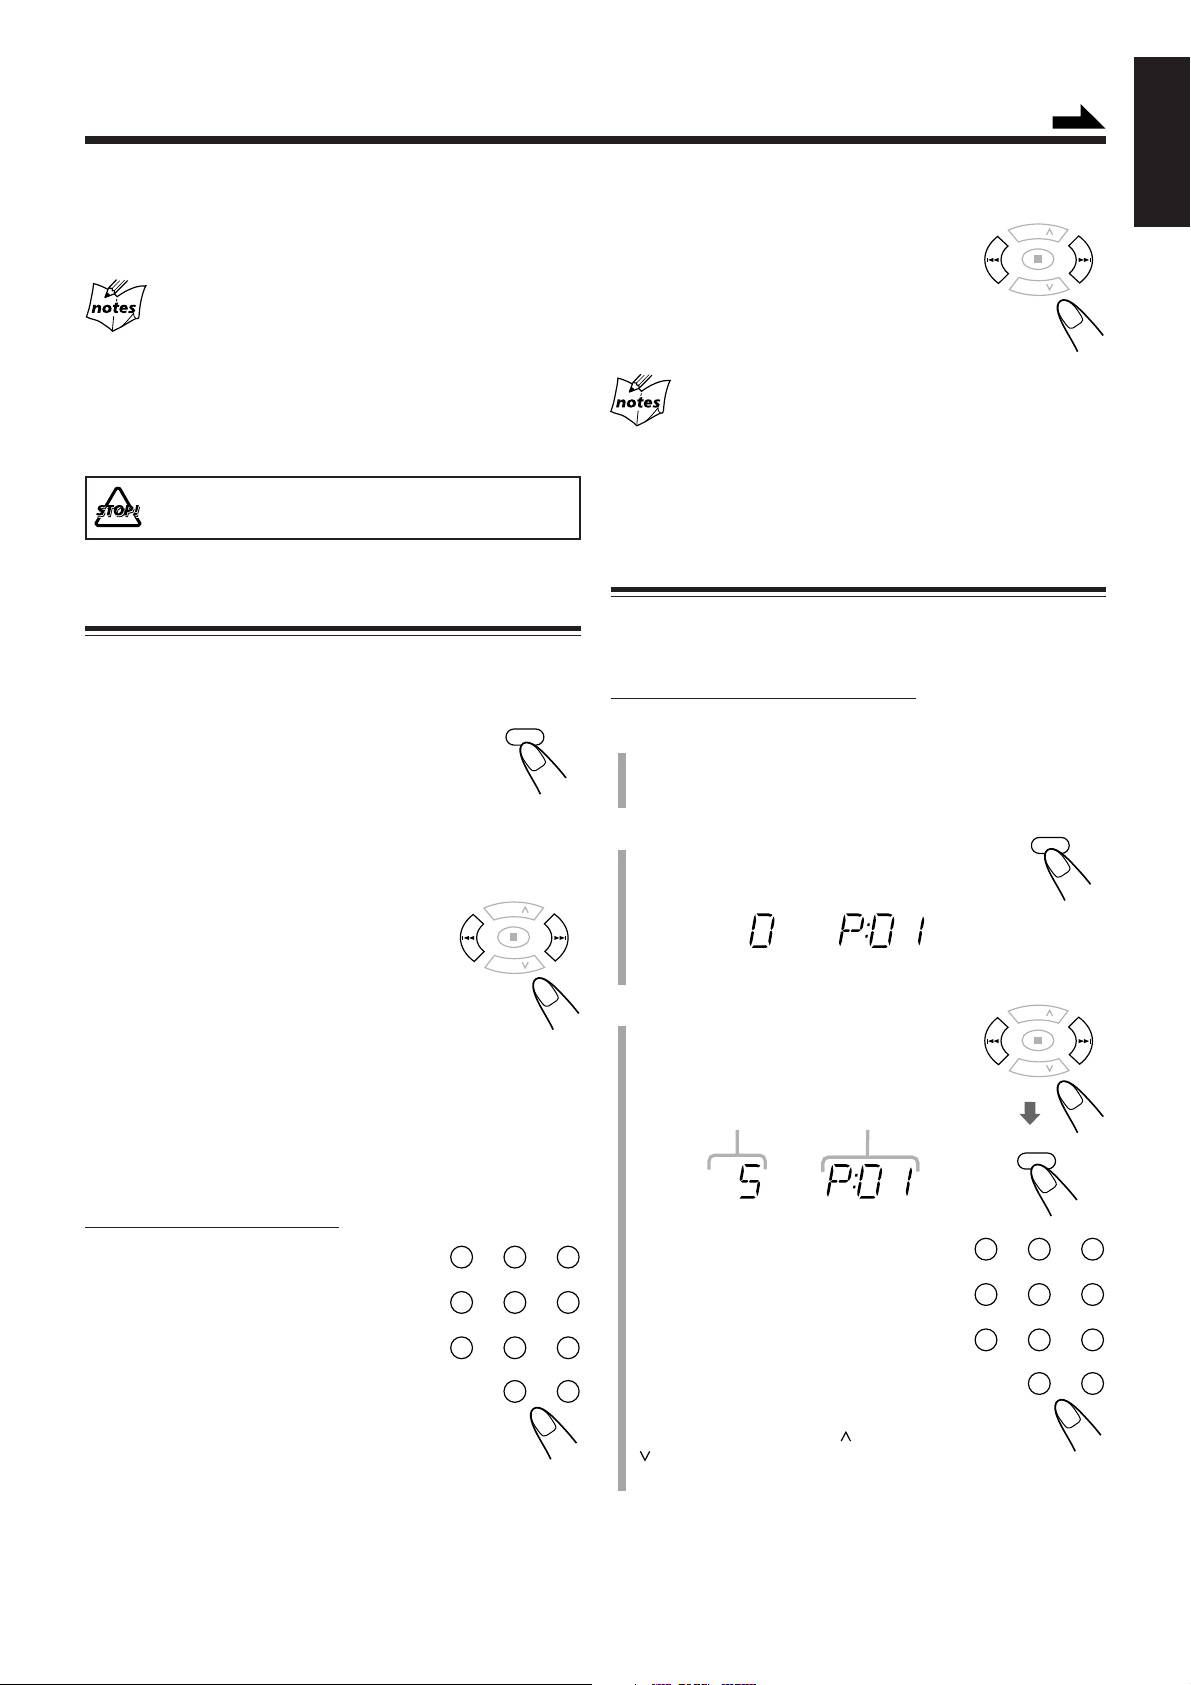
2
Press PROGRAM.
The PRGM (program) indicator appears on the
display.
English
• ¢ (UP ¢): Skips to the beginning
• 4 (DOWN 4): Goes back to the beginning of the
To go to another track directly using the number
buttons
On the remote control ONLY:
Pressing the number button(s) before or
during play allows you to start playing the
track number you want.
Ex.: For track number 5, press 5.
For track number 15, press OVER,
then press 1, 5.
For track number 20, press OVER,
then press 2, 0.
(For MP3 disc only)
For track number 20, press OVER, then
press 0, 2, 0.
For track number 156, press OVER, then press 1, 5, 6.
of the next or succeeding
tracks.
current or previous tracks.
3
Press ¢ or 4 to select the
track number, then press
PROGRAM.
Track number
You can also use the number button(s)
to select a track number.
• For the operation of the number
buttons, see “To go to another track
directly using the number buttons”
on the left column.
When you are programming from MP3 disc
Pressing PRESET GROUP
selects the first track of each group.
Program step
number
or PRESET GROUP
12
Page 18
English
PROGRAM
PRESET
GROUP
PRESET
GROUP
UP
DOWN
REPEAT
ALL
ALL
ALL GR.
PROGRAM
CD
3/8
PRESET
GROUP
PRESET
GROUP
UP
DOWN
PROGRAM
REPEAT
4
Repeat step 3 to program other tracks you
want.
5
Press CD 3/8.
The tracks are played in the order you have
programed.
If you try to program a 41st track
“– – FULL – –” will appear on the display.
To stop playing, press 7.
To check the program contents
You can check the program contents by pressing
PROGRAM repeatedly before or after playback.
Repeating Tracks—Repeat Play
You can have all the tracks, the program or individual track
currently playing, repeat as many times as you like.
On the remote control ONLY:
Press REPEAT repeatedly before or
during playback.
• Each time you press the button, Repeat Play
changes as follows, and the following repeat
indicators light up on the display:
Repeat indicators
When playing back audio CD:
Canceled
To modify the program
Press PROGRAM repeatedly until the program
step number you want to modify appears. Then
follow step 3 of the programming procedure.
• Pressing 0 deletes the selected step.
To add tracks in the program, press
PROGRAM repeatedly until “0” appears as the
track number. Then follow step 3 of the
programming procedure.
To clear the program
Press 7 before or after playback.
The PRGM indicator disappears from the
display and all the memory contents will be
erased (resumes to Normal Play).
• The programmed tracks are also erased in the
following cases:
– Pressing ) OPEN to open the disc cover.
– Turning off the unit.
– Changing the source.
ALL: In Normal Play, repeats all the tracks.
In Program Play, repeats all the tracks in the
program.
: Repeats one track.
When playing back MP3 disc:
Canceled
ALL: In Normal Play, repeats all the tracks.
In Program Play and Random Play, repeats all
the tracks in the program.
GR.: In Normal Play, repeats all the tracks in a
group.
In Program Play and Random Play, this
function is not available.
: Repeats one track.
In Random Play, this function is not available.
To cancel Repeat Play, press REPEAT
repeatedly until the repeat indicator goes off.
During Program Play
Auto Standby function does not take effect.
13
Page 19
REMAIN
Playing at Random—Random Play
RANDOM
RANDOM
REMAIN TOTAL REMAIN*
TOTAL REMAIN
You can play the tracks at random.
On the remote control ONLY:
Press RANDOM.
The RANDOM indicator lights up on the display.
To exit from Random Play, press 7 or RANDOM.
The RANDOM indicator goes off.
• It is not possible to activate the Random Play function
during Program Play.
English
Displaying the Remaining Time during
Playback
You can display the remaining time of the current track/disc
and the elapsed time of the current track/disc during playing.
On the remote control ONLY:
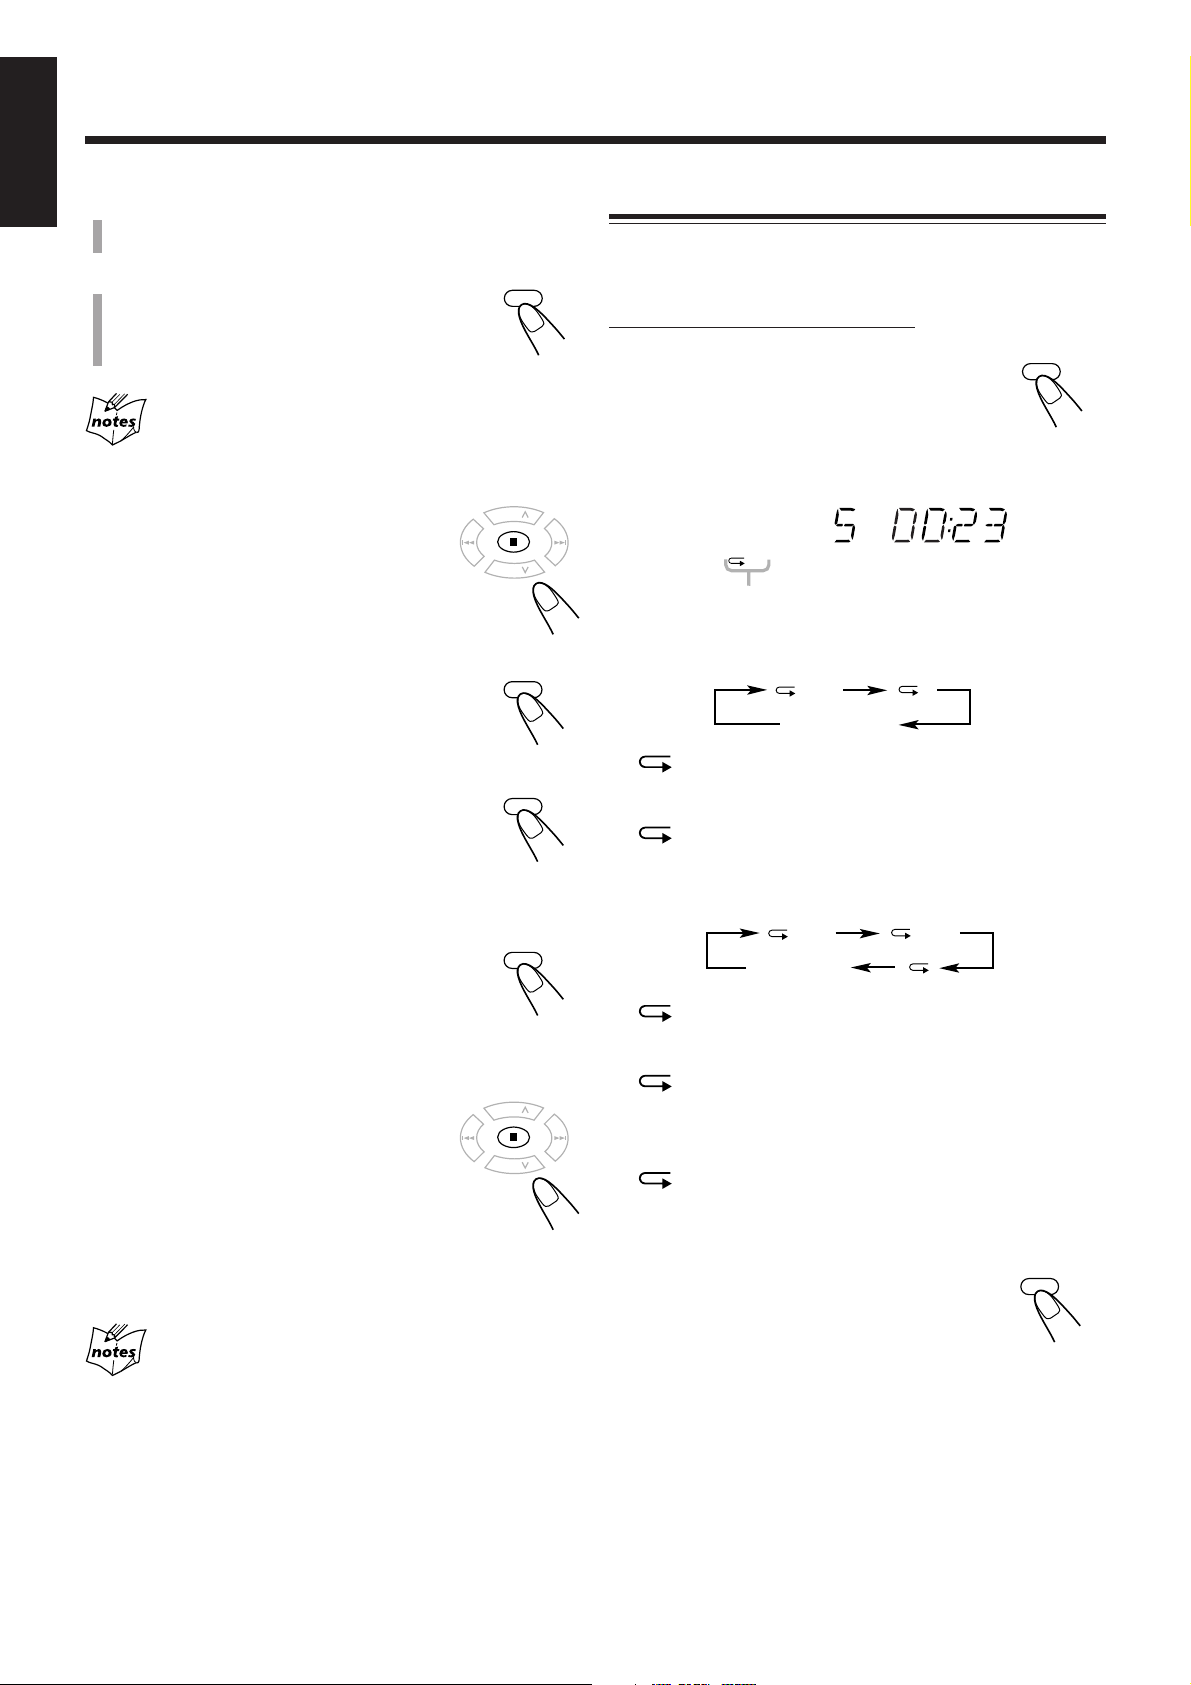
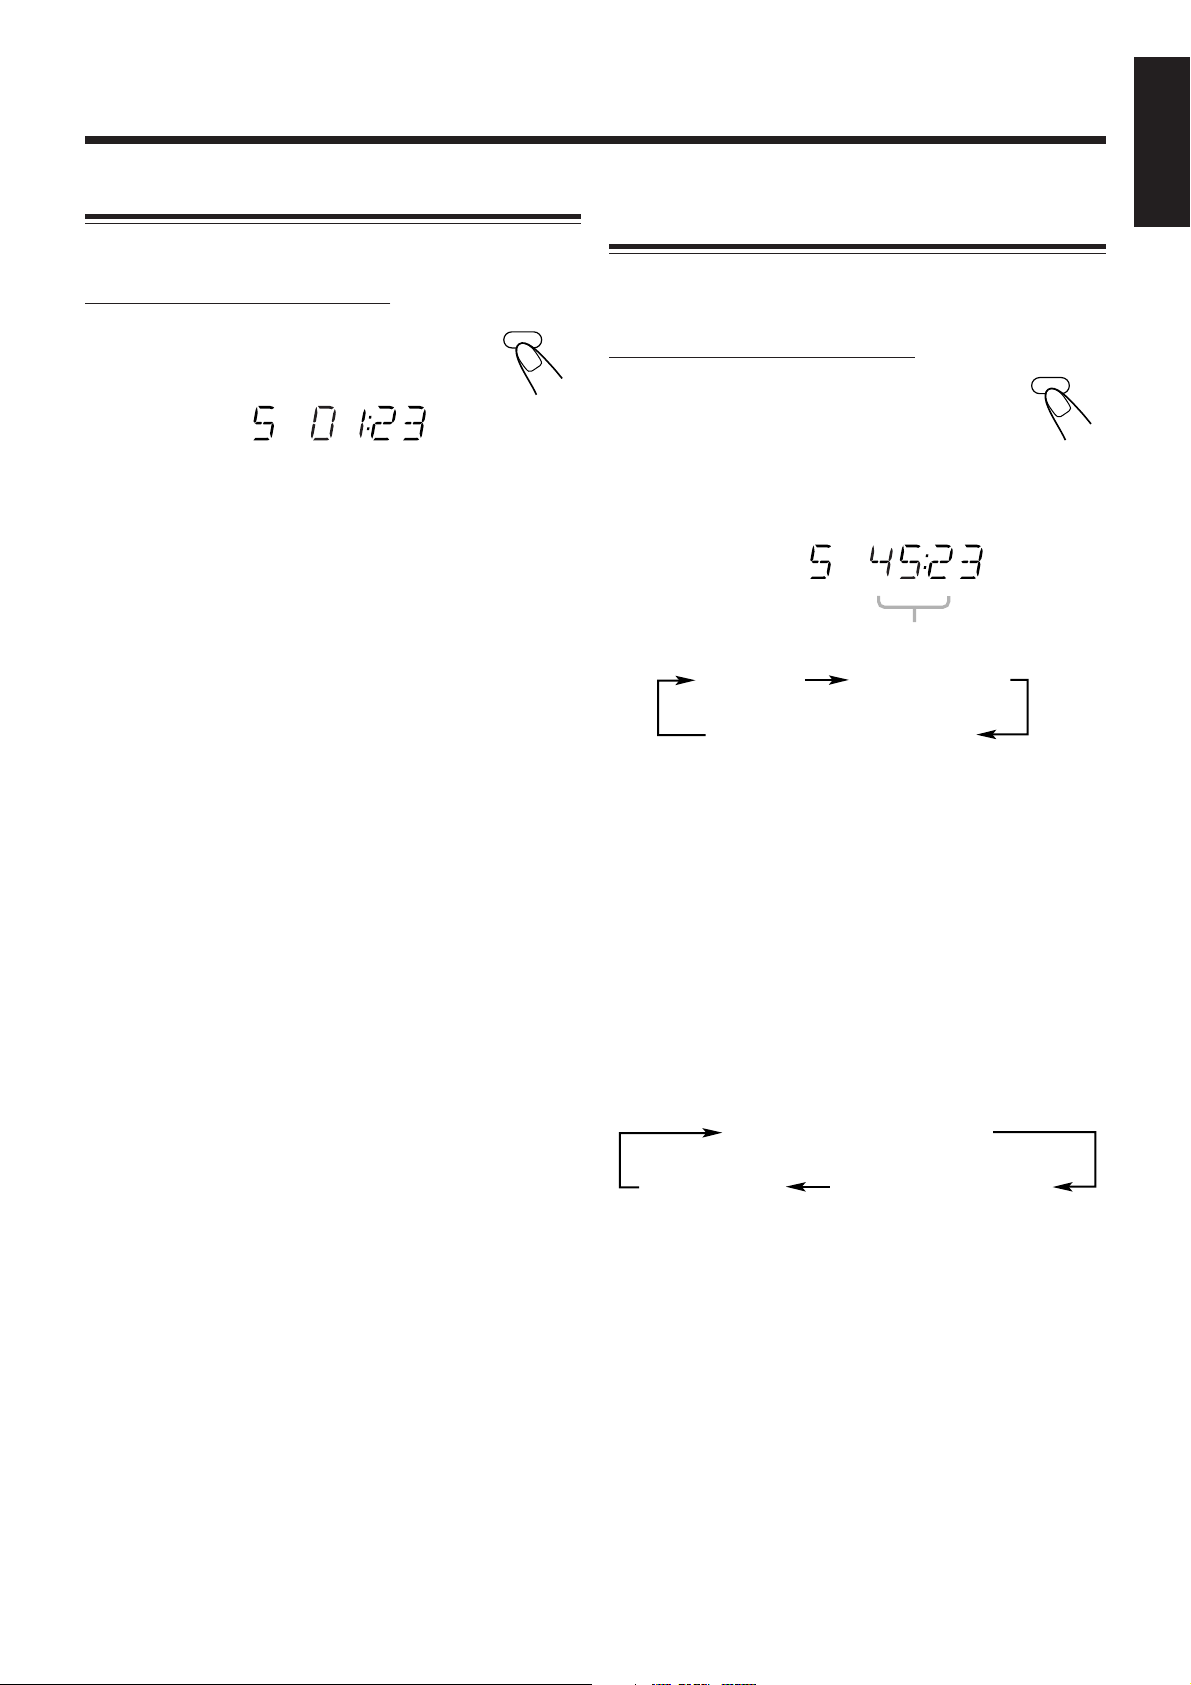
Press REMAIN repeatedly.
When playing back audio CD:
• Each time you press the button, the display changes as
follows, and the following remain indicators light up on the
display:
Remain indicators
(No Indication)
REMAIN: Shows the remaining time of the current
track.
TOTAL REMAIN: Shows the remaining time of the disc.
No indication: Shows the elapsed time of the current
track.
* Remaining time of the disc (TOTAL REMAIN) will not be
displayed in the following cases:
– During Random Play.
– During Program Play.
When playing back MP3 disc:
• Each time you press the button, the display changes as
follows:
ID3 Tag information*
Normal
indication
Folder name**/file name
* ID3 Tag information shows the name of the title, artist,
and album in sequence.
If the file does not have any information, “NO INFO”
appears.
** When a file does not belong in any folder, “ROOT”
appears.
14
Page 20
Playing Back Tapes
PUSH OPEN
DOWN
4 7 ¢
UP
DOWN
4 7 ¢
UP
PUSH OPEN
REV.MODE
TAPE
PRESET
GROUP
PRESET
GROUP
UP
DOWN
PRESET
GROUP
PRESET
GROUP
UP
DOWN
English
Playing Back a Tape
You can play back type I tapes only.
1
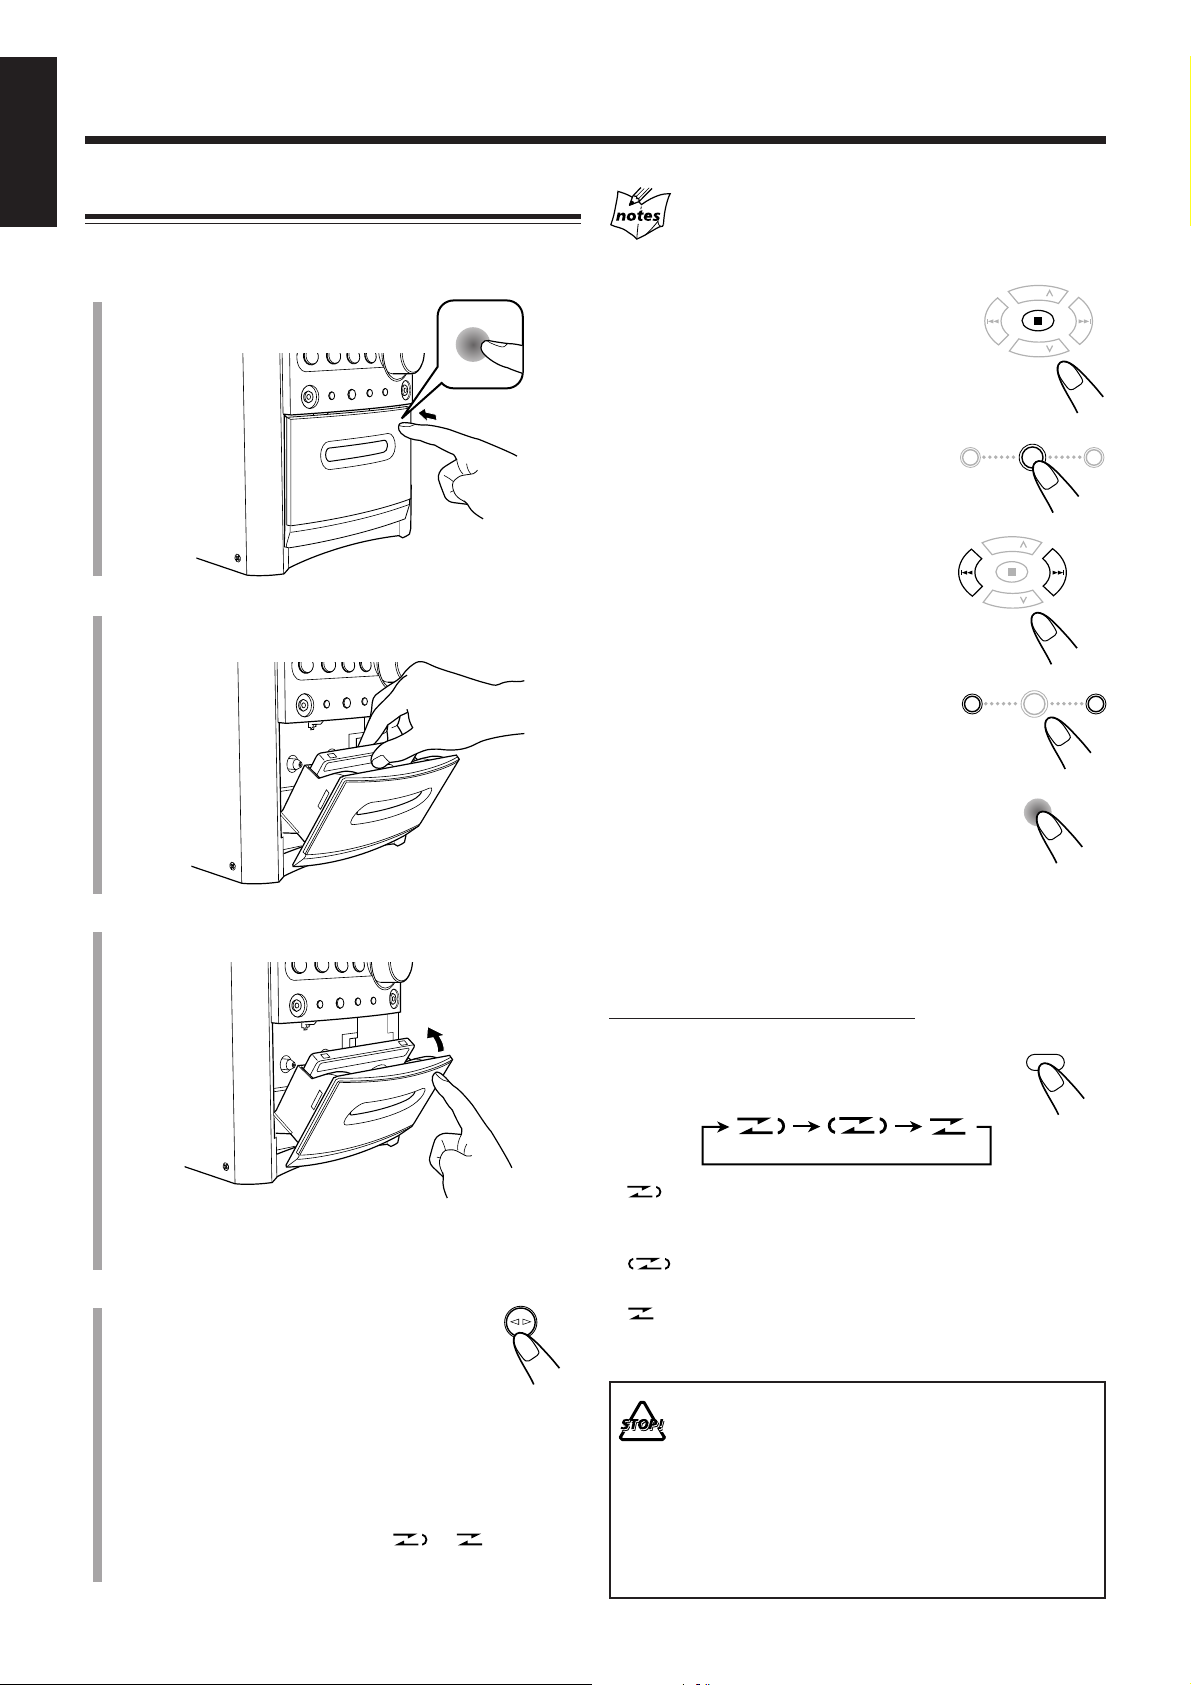
Press PUSH OPEN.
The cassette holder opens.
2
Put a cassette in with the exposed part of the
tape down.
If no cassette is inserted when you press TAPE ¤ ‹
“NO TAPE” appears on the display.
To stop playing, press 7.
To fast-wind to the left or to the right,
press ¢ or 4 (or UP ¢ or
DOWN 4 on the unit).
The tape direction indicator ( 3 or 2 ) starts
flashing rapidly on the display.
3
Close the cassette holder gently.
• When a tape is inside of the cassette holder, the tape
4
Press TAPE ¤ ‹.
Playback starts (if the unit has been on
standby, the unit automatically turns on).
The tape direction indicator ( 3 or 2 ) starts
flashing slowly on the display.
• Each time you press the button, the tape direction
When the tape plays to the end, the deck automatically
stops if the Reverse Mode is set to or . (See “To
play both sides—Reverse Mode.”)
15
direction indicator ( 3 ) lights up on the display.
changes:
3: plays the front side.
2: plays the reverse side.
To remove the cassette, press PUSH OPEN
on the unit while playback is stopped.
To play both sides—Reverse Mode
You can set the deck to play just one side of a tape, both sides
once, or both sides continuously.
On the remote control ONLY:
Press REV.MODE (reverse mode).
• Each time you press the button, the Reverse
Mode changes as follows:
: The deck automatically stops after playing both
sides of the tape. Stops when playback in the 2
directions are finished.
: The deck continues to play both sides of the tape 10
times, then stops playback automatically.
: The deck automatically stops after playing one side
of the tape.
• DO NOT turn off the unit while playing back or
recording a tape. The cassette deck or tapes
may be damaged.
• The use of C-120 or longer tape is not
recommended, since characteristic deterioration
may occur and this tape easily jams in the pinch
rollers and the capstans.
• This unit is not compatible with type II and type
IV tapes.
Page 21
Listening to FM and AM Broadcasts
FM/AM
PRESET
GROUP
PRESET
GROUP
UP
DOWN
MHz
FM MODE
FM/AM
DOWN
4 7 ¢
UP
VOLUME
SET
MHz
PRGM
Continued
Setting the Tuner Interval Spacing
You can only change the FM or AM tuner interval spacing
while tuning in to a FM or AM station.
On the unit ONLY:
1
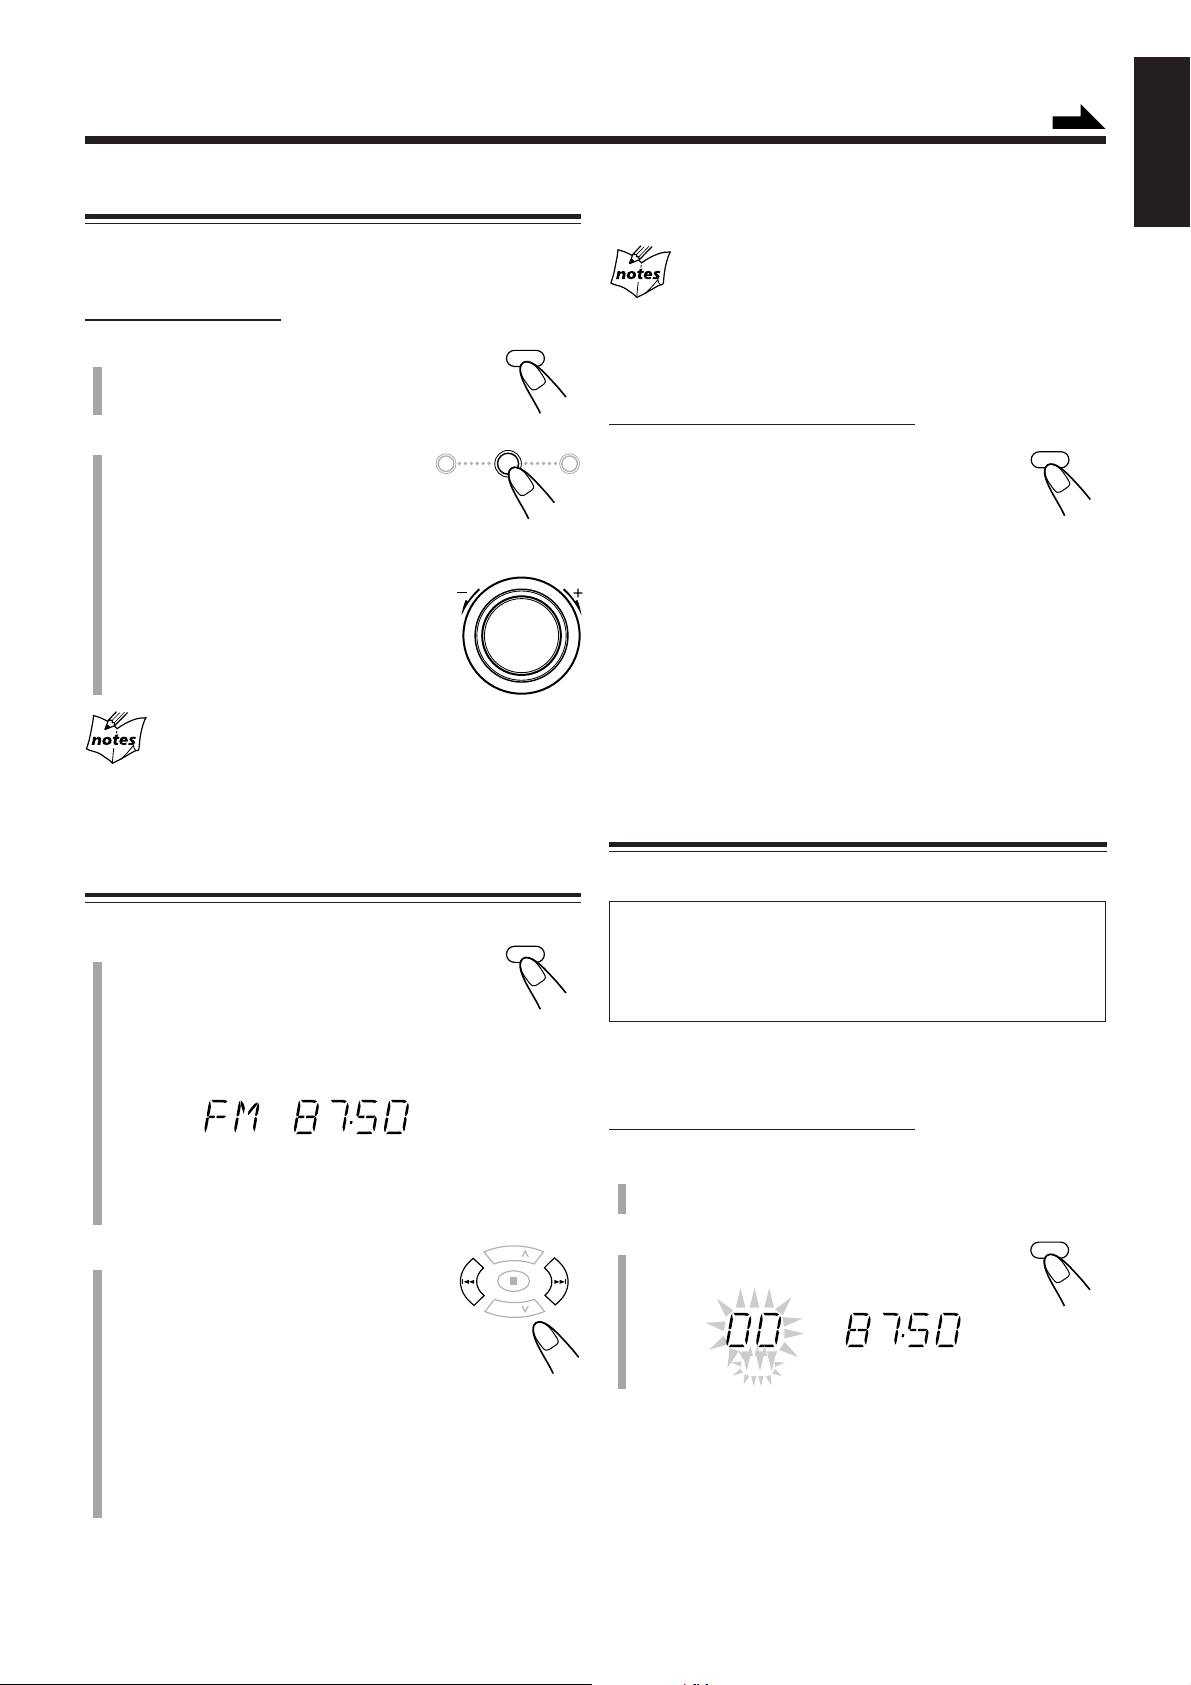
Press FM/AM to select either “FM”
or “AM.”
2
Turn the VOLUME + / –
control while pressing and
holding 7.
As you turn the VOLUME + / –
control, the interval spacing for the
selected band alternates as follows:
• For FM: 50 kHz and 100 kHz*
• For AM: 9 kHz and 10 kHz*
* Initial setting
When you change the setting
The preset stations for both FM and AM are erased. You will need to
preset the stations again. (See the right column.)
+
To stop during searching, press ¢ or 4 (or UP ¢ or
English
DOWN 4 on the unit).
When you repeatedly press ¢ or 4 (or UP ¢ or
DOWN 4 on the unit)
The frequency changes step by step.
To change the FM reception mode
On the remote control ONLY:
When an FM stereo broadcast is hard to
receive or noisy, press FM MODE so that the
“MONO” appears on the display. The MONO
indicator also lights up. Reception will improve.
To restore the stereo effect, press FM MODE again so that
“STEREO” appears on the display and the MONO indicator
goes off. In stereo mode, you can hear stereo sound when a
stereo program is broadcast.
The stereo effect also restores when:
• Changing the band (FM or AM).
• Changing the station frequency.
• Changing the playing source.
• Turning off (or on) the unit.
Presetting Stations
Tuning in to a Station
1
Press FM/AM to select either “FM”
or “AM.”
The unit automatically turns on and tunes in to
the previously received station—either FM or AM.
• Each time you press the button, the band alternates
between FM and AM.
• If the station previously selected is stored in a preset
number, the preset number will appear instead of “FM”
or “AM.”
2
Press and hold ¢ or 4 (or
UP ¢ or DOWN 4 on the
unit) for more than 1 second.
• ¢ (UP ¢): Increases the frequencies.
• 4 (DOWN 4): Decreases the frequencies.
The unit starts searching for stations and stops when a
station of sufficient signal strength is tuned in.
• If an FM program is broadcast in stereo, the ST (stereo)
indicator lights up on the display (only when the
reception is good).
You can preset 25 FM and 15 AM stations manually.
In some cases, test frequencies have been already stored
for the tuner since the factory examined the tuner preset
function before shipment. This is not a malfunction. You
can preset the stations you want into memory by following
the presetting method.
• There is a time limit in doing the following steps. If the
setting is canceled before you finish, start again from step 2.
On the remote control ONLY:
1
Tune in to the station you want to preset.
• See “Tuning in to a Station” on the left column.
2
Press SET.
“00” starts flashing on the display.
16
Page 22

English
123
456
7809
OVER
FM/AM
PRESET
GROUP
PRESET
GROUP
UP
DOWN
AUX
123
456
7809
OVER
PRESET
GROUP
PRESET
GROUP
UP
DOWN
MHz
PRGM
3
Press PRESET GROUP or
PRESET GROUP
preset number, then press SET.
The preset station is stored in memory.
• Even if you do not press SET, the station
will automatically be stored on the selected
preset number 5 seconds later.
You can also use the number button(s)
to select a preset number.
• In this case, you do not have to press
SET.
Ex.: To select a preset number 5, press
5.
To select a preset number 15, press
OVER, then press 1, 5.
To select a preset number 20, press OVER,
then press 2, 0.
4
To preset more stations, repeat steps 1 to
above, allocating a different preset number to
each station.
• Storing a new station on an already assigned number
erases the previously stored one.
When you unplug the AC power cord or if a power
failure occurs
The preset stations will remain in the unit.
to select a
Tuning in to a Preset Station
On the remote control ONLY:
1
Press FM/AM to select either “FM”
or “AM.”
The unit automatically turns on and tunes in to
the previously received station—either FM or AM.
• Each time you press the button, the band alternates
between FM and AM.
2
Press PRESET GROUP or
PRESET GROUP repeatedly
to select a preset number.
To tune in to a preset station directly using the number
buttons
On the remote control ONLY:
3
Pressing the number button(s) allows you
to select the preset number you want.
Ex.: For preset number 5, press 5.
For preset number 15, press OVER,
then press 1, 5.
For preset number 20, press OVER,
then press 2, 0.
Using an External Equipment
Listening to the External Equipment
You can listen to the external equipment such as MD
recorder, cassette deck, or other auxiliary.
• First, make sure that the external equipment is properly
connected to the unit. (See page 7.)
1
Set the volume level to the minimum position.
2
Press AUX.
“AUX” appears on the display.
17
3
Start playing the external equipment.
4
Adjust the volume level to the level you want
to listen to.
To exit AUX mode, select other source.
For operation of the external equipment
Refer to its instructions.
Page 23

Recording
REC
REC
PUSH OPEN
REV.MODE
MHz
REC
DOWN
4 7 ¢
UP
TAPE
BEAT CUT
IMPORTANT:
• It may be unlawful to record or play back copyrighted
material without the consent of the copyright owner.
• The recording level is automatically set correctly, so it is
not affected by the other sound settings. Thus, during
recording you can adjust the sound you are actually
listening to without affecting the recording level.
• If recordings you have made have excessive noise or static,
the unit may be too close to a TV. Increase the distance
between the TV and the unit.
• You can only use type I tape for recording.
• DO NOT turn off the unit while playing back or
recording a tape. The cassette deck or tapes
may be damaged.
• DO NOT use type II and type IV tapes since the
unit is not compatible with such tapes.
• The use of C-120 or longer tape is not
recommended, since characteristic deterioration
may occur and this tape easily jams in the pinch
rollers and the capstans.
At the start and end of cassette tapes
There is leader tape which cannot be recorded onto. Thus, when
recording from discs, FM/AM broadcasts, or external equipment,
wind the leader tape first to ensure that the recording will be made
without losing any music.
Continued
3
Start playing the source—FM, AM, or
auxiliary equipment connected to AUX jack.
• When the source is FM or AM, tune in to the station you
want to record.
• When recording from discs, see “Recording Discs—
Disc Synchronized Recording” on page 19.
4
Press REC (recording).
• The REC indicator appears and 3 indicator
lights up on the display.
5
Press TAPE ¤ ‹.
3 indicator starts flashing and the recording
starts.
• If no cassette is inserted when you press REC
“NO TAPE” appears on the display.
• If a protected tape is inserted when you press REC
“PROTECT” appears on the display.
To stop recording for a moment, press REC.
The recording is paused. To resume recording,
press TAPE ¤ ‹.
English
To protect your recordings
Cassettes have two small tabs on the back to protect against
unexpected erasure or re-recording.
To protect your recording, remove these tabs.
To re-record on a protected tape, cover the holes with
adhesive tape.
Recording on a Tape
On the unit ONLY:
1
Put a recordable cassette in with the exposed
part of the tape down.
• See also page 15.
2
Close the cassette holder gently.
To stop recording, press 7.
The recording stops.
To remove the cassette, press PUSH OPEN
while recording is stopped.
To record on both sides—Reverse Mode
Adhesive tape
On the remote control ONLY:
Press REV.MODE (reverse mode) until
or is lit.
• When using the Reverse Mode for recording,
lights up and start recording in the forward
( 3 ) direction first.
To cancel the Reverse Mode, press REV.MODE repeatedly
until is lit.
To reduce the beat—Beat Cut
On the remote control ONLY:
If the beats are heard while recording an AM
broadcast, press BEAT CUT repeatedly until the
beats are reduced.
• Each time you press the button, the display
alternates between “CUT-1” and “CUT-2.”
18
Page 24
English
REC
REC
REV.MODE
REC
REC
CD
#/8
TAPE
DOWN
4 7 ¢
UP
DOWN
4 7 ¢
UP
Recording Discs
—Disc Synchronized Recording
You can start disc play and recording at the same time.
On the unit ONLY:
1
Put a recordable cassette in with the exposed
part of the tape down.
• See also page 15.
2
Close the cassette holder gently.
3
Press CD ‹/8 to select the CD
player as the source.
4
Press 7 to stop the disc
playback.
• You can make a program (see page
12) if you want.
5
Press REC (recording).
3 indicator lights up on the display.
To stop recording for a moment, press REC.
Both the CD playback and tape recording are
paused. To resume recording, press TAPE ¤ ‹.
To stop recording, press 7.
The recording stops and the CD
playback is paused.
To record on both sides—Reverse Mode
On the remote control ONLY:
Press REV.MODE (reverse mode)
repeatedly until or is lit.
• When using the Reverse Mode for Disc
Synchronized Recording, lights up and the
recording starts in the forward ( 3 ) direction first. When
the tape reaches its end, the CD playback is paused until
the tape recording changes to the reverse direction, then the
recording continues.
To cancel the Reverse Mode, press REV.MODE repeatedly
until is lit.
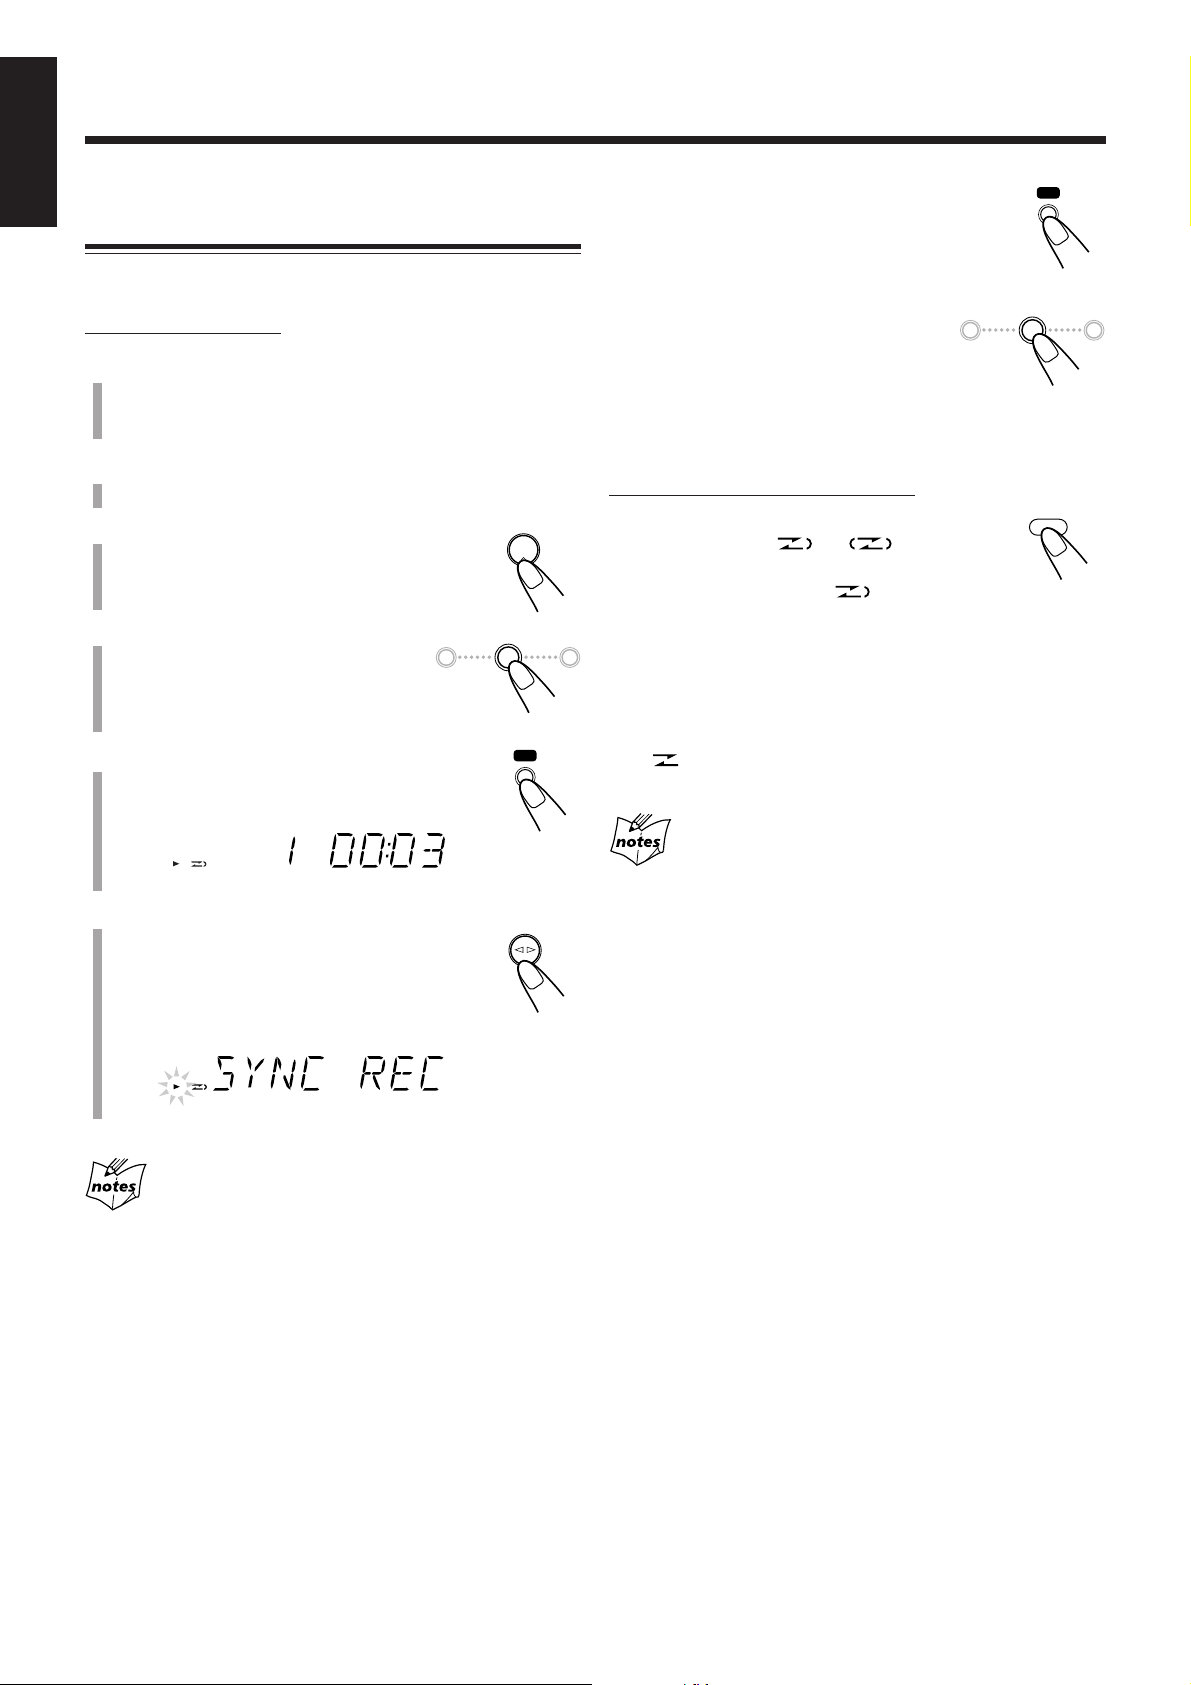
6
Press TAPE ¤ ‹.
“SYNC REC” appears and 3 indicator starts
flashing slowly on the display.
CD playback and tape recording starts
automatically.
• If no cassette is inserted when you press REC
“NO TAPE” appears on the display.
• If a protected tape is inserted when you press REC
“PROTECT” appears on the display.
When making Sleep Timer settings while doing Disc
Direct Recording
Set enough time to allow for the disc to finish playing; otherwise,
the power will go off before recording is completed.
19
Page 25

Using the Timers
CLOCK
/TIMER
SET
ON
DAILY 1
ON
DAILY 2
ON
DAILY 3
ON
REC
PRESET
GROUP
UP
DOWN
PRESET
GROUP
Continued
There are four timers available—Daily Timer, Recording
Timer, Snooze Timer, and Sleep Timer.
• Before using these timers, make sure the built-in clock is
set correctly (see page 9).
Using Daily Timer and Recording Timer
You can set the timer whether the unit is on or off.
How the Timer actually works
When the on-time comes, the unit automatically turns on (the
[timer] indicator flashes and continues flashing while the
timer is operating). Then, when the off-time comes, the unit
automatically turns off (standby). The timer setting remains
in memory until you change it.
• When the (timer) and DAILY 1, 2, or 3 indicators are lit
on the display, the timer acts as the Daily Timer. Once the
timer has been set, it will be activated at the same time and
automatically turns off (standby) after 60 minutes everyday
until the timer is deactivated.
• When the (timer) and the REC indicators are lit on the
display, the timer acts as the Recording Timer. After the
timer-recording finishes, the details of the setting remain
stored but the timer is turned off.
On the remote control ONLY:
1
Press CLOCK/TIMER repeatedly to
select the timer you want to adjust
and activate—Daily 1, Daily 2, Daily
3, or Rec.
The timer setting and hour indication start flashing on the
display.
Each time you press the button, the display changes as
follows:
Daily 1 Timer
Daily 2 Timer
Daily 3 Timer
English
Before you start...
When using “TUNER” as the source to play, make sure to
select the desired station before turning off the power.
• There is a time limit in doing the following steps. If the
setting is canceled before you finish, start again from step 1.
Rec Timer
Clock setting
Normal indication
2
Set the on-time you want the
unit to turn on.
(1) Press UP or DOWN to set the hour,
then press SET.
(2) Press UP or DOWN to set the minute,
then press SET.
If you want to change the time setting,
press CANCEL.
• If you are setting the Daily Timer, the
source name starts flashing on the display.
\ Go to step 4.
• If you are setting the Recording Timer,
the OFF indicator and hour indication start flashing on
the display.
20
Page 26

English
PRESET
GROUP
UP
DOWN
PRESET
GROUP
TUNER
TAPE
CD
SET
VOLUME
STANDBY/ON
DAILY 1
DAILY 1 DAILY 2 DAILY 3
REC
OFF
REC
3
For the Recording Timer ONLY:
Set the off-time you want the unit to turn off.
To deactivate the timer, press and
hold DAILY TIMER/SNOOZE.
• Each time you press and hold the button,
the timer setting changes as follows:
Canceled
(1) Press UP or DOWN to set the hour, then press SET.
(2) Press UP or DOWN to set the minute, then press SET.
If you want to change the time setting, press
CANCEL.
• The Recording Timer is activated. The (timer) and
REC indicators light up. The display returns to the
normal indication.
\ Go to step 7.
4
Press UP or DOWN to select the
source to play.
Each time you press the button, the source changes as
follows:
• Make sure the playing source (either a cassette tape or a
disc) is inside when you select “TAPE” or “CD.”
If you want to change the time setting, press CANCEL
repeatedly to return step 2.
5
Press SET.
The (timer) and active daily timer number
indications lights up. The display returns to the
normal indication.
6
Press VOLUME +/– to adjust the
volume for the on-time.
7
Press STANDBY/ON to turn
off the unit if you have set the
timer with the unit turned on.
1
To change the timer, repeat steps
to 6 on pages 20 and this
page.
• To activate the Daily Timer again without changing the
setting, press DAILY TIMER/SNOOZE on the unit
repeatedly to select the timer number you want.
When there is no playing source (either a cassette tape
or a disc) inside when you select “TAPE” or “CD”
The source to play is changed to “TUNER” when the on-time
comes.
If the unit is already turned on when the timer on-time
comes
The timer does not work.
When you unplug the AC power cord or if a power
failure occurs
The timer setting remains. Set the built-in clock and activate the
timer again.
Using Snooze Timer
The Snooze Timer turns off the unit (standby) only for 5
minutes while Daily Timer is in operation.
• You can set the Snooze Timer only while the Daily Timer is
in operation.
On the unit ONLY:
Press DAILY TIMER/
SNOOZE while Daily Timer
is in operation.
The unit turns off (standby) and the SNOOZE indicator
appears on the display.
After 5 minutes, the unit automatically turns on with the
source you selected in step 4 on the left column.
On the unit ONLY:
To activate the timer, press and hold
DAILY TIMER/SNOOZE on the unit
repeatedly to select the timer number you
want.
21
If the unit is turned on when the Snooze Timer is
working
Both Snooze Timer and Daily Timer will be canceled.
If you set the Snooze Timer when there is less than 5
minutes until the Daily Timer off-time
The unit will not turn on even when 5 minutes passed.
When you unplug the AC power cord or if a power
failure occurs
The timer will be canceled. You need to set the clock first, then the
timer again.
Page 27

Using Sleep Timer
10 20
120
30 60
90
OFF
SLEEP
SLEEP
With Sleep Timer, you can fall asleep to your favorite music
or radio program.
• You can set Sleep Timer only when the unit is turned on.
• You can also turn off the unit automatically by using Auto
Standby. (See page 9.)
How the Sleep Timer actually works
The unit automatically turns off after the specified length of
time passes.
On the remote control ONLY:
1
Press SLEEP.
The SLEEP indicator starts flashing on the
display.
• Each time you press the button, the length of time
changes as follows:
English
When you set the Sleep Timer after the Daily Timer
starts playing the selected source
The unit turns off with either timer having an earlier shut-off time.
If you set the Sleep Timer while playing back or
recording a tape
Do not shut the unit off with the Sleep Timer while a tape is running.
If the unit turns off while playing back or recording a tape, the
cassette deck or tapes may be damaged.
(canceled)
2
Wait for about 5 seconds after specifying the
length of time.
The SLEEP indicator remains lit on the display.
To check the remaining time until shut-off time, press
SLEEP once. The remaining time until shut-off time appears
for about 5 seconds.
To change the shut-off time, press SLEEP repeatedly until
the length of time you want appears.
To cancel the setting, press SLEEP repeatedly until the
SLEEP indicator goes off and display returns to the normal
indication.
• Turning off the unit also cancels the Sleep Timer.
22
Page 28

Maintenance
English
To get the best performance of the unit, keep your discs, tapes and mechanism clean.
General Notes
In general, you will have the best performance by keeping
your discs, tapes and the mechanism clean.
• Store discs and tapes in their cases, and keep them in
cabinets or on shelves.
Cleaning the unit
• Stains on the unit
Should be wiped off with a soft cloth. If the unit is heavily
stained, wipe it with a cloth soaked in water-diluted neutral
detergent and wrung well, then wipe clean with a dry cloth.
• Since the unit may deteriorate in quality, become
damaged or have its paint peel off, be careful about the
following:
– DO NOT wipe it with a rough cloth.
– DO NOT wipe it too vigorously.
– DO NOT wipe it with thinner or benzine.
– DO NOT apply any volatile substance such as an
insecticide to it.
– DO NOT allow any rubber or plastic to remain in contact
with it for a long time.
Handling discs
• Remove the disc from its case by
holding it at the edge while pressing
the center hole lightly.
• Do not touch the shiny surface of the
disc, or bend the disc.
• Put the disc back in its case after use
to prevent warping.
• Be careful not to scratch the surface
of the disc when placing it back in
its case.
• Avoid exposure to direct sunlight,
temperature extremes, and moisture.
Handling cassette tapes
• If the tape is loose in its cassette, take up the
slack by inserting a pencil in one of the reels
and rotating.
• If the tape is loose, it may get stretched, cut,
or caught in the cassette.
• Be careful not to touch the tape surface.
• Avoid storing tapes in any of the following
places:
– In dusty places
– In direct sunlight or heat
– In moist areas
– On a TV or speaker
– Near a magnet
To keep the best recording and playback sound quality
You need to clean the heads.
• Clean the heads after every 10 hours of use with
a wet-type head cleaning tape (available at electronic and
audio shops).
When the head becomes dirty, the following symptoms will
occur:
– Sound quality is reduced.
– Sound level decreases.
– Sound drops out.
• Do not play dirty or dusty tapes.
• Do not touch the highly-polished head with any metallic or
magnetic tools.
Capstan
23
To clean the disc
Wipe the disc with a soft cloth in a
straight line from center to edge.
DO NOT use any solvent—such as conventional
record cleaner, spray, thinner, or benzine—to clean
the disc.
Head
Pinch Roller
To demagnetize the head
Turn off the unit, and use a head demagnetizer (available at
electronic and audio shops).
Page 29

Troubleshooting
If you are having a problem with your unit, check this list for a possible solution before calling for service.
If you cannot solve the problem from the hints given here, or the unit has been physically damaged, call a qualified person,
such as your dealer for service.
Symptom
Power does not come on.
No sound is heard.
Hard to listen to broadcasts because of
noise.
The disc does not play.
Impossible to record.
Operations are disabled.
Unable to operate the unit by the remote
control.
The power cord is not connected to an
AC outlet.
• Connections are incorrect or loose.
• A pair of headphones is connected.
• MP3 disc is recorded with “packet
writing.”
• Antennas are disconnected.
• The AM loop antenna is too close to
the unit.
• The FM antenna is not properly
extended and positioned.
The disc is upside down.
Small tabs on the back of the cassette are
removed.
The built-in microprocessor has
malfunctioned due to external electrical
interference.
• The path between the remote control
and the remote sensor on the unit is
blocked.
• The batteries are exhausted.
• You are using the remote control too
far from the unit.
Possible Cause
Action
Insert the plug into the socket.
• Check all connections and make
corrections. (See pages 6 and 7.)
• Unplug the headphones from the
PHONES jack.
• It cannot be played. Replace the disc.
• Reconnect the antenna correctly and
securely.
• Change the position and direction of
the AM loop antenna.
• Extend FM antenna and orient to the
best reception position.
Put the disc in with the label side up.
Cover the holes with adhesive tape.
Unplug the AC power cord then plug it
back in.
• Remove the obstruction.
• Replace the batteries. (See page 8.)
• Signals cannot reach the remote
sensor. Move closer to the unit.
English
Specifications
Amplifier Section
Output Power:
15 W per channel, min. RMS, driven into 4 Ω at 1 kHz with
no more than 10% total harmonic distortion. (IEC268-3)
Audio input sensitivity/Impedance (at 1 kHz)
AUX: 500 mV/50 kΩ
Speakers/Impedance: 4 Ω – 16 Ω
Tuner
FM tuning range:
100 kHz intervals: 87.5 MHz—108.0 MHz
50 kHz intervals: 87.50 MHz—108.00 MHz
AM tuning range:
10 kHz intervals: 530 kHz—1 710 kHz
9 kHz intervals: 531 kHz—1 710 kHz
CD player
Dynamic range: 85 dB
Signal-to-noise ratio: 85 dB
Wow and flutter: Immeasurable
Cassette deck
Frequency response:
Normal (type I): 100 Hz—10 000 Hz
Wow and flutter: 0.35% (WRMS)
Design and specifications are subject to change without notice.
General
Power requirement: AC 110 V—127 V / AC 220 V—
240 V (adjustable with the
voltage selector), 50 Hz / 60Hz
Power consumption: 40 W (at operation)
2 W (on standby)
Dimensions (W/H/D) (approx.):
152 mm x 233 mm x 292 mm
Mass (approx.): 3.9 kg
Supplied accessories
See page 6.
Speaker Section
Type: Full range, bass-reflex type
Speakers: 10 cm cone x1
Power handling capacity: 15 W
Impedance: 4 Ω
Frequency range: 100 Hz—15 kHz
Dimensions (W/H/D) (approx.):
147 mm x 233 mm x 189 mm
Mass (approx.): 1.9 kg each
24
Page 30

Introducción
Muchas gracias por adquirir uno de nuestros productos JVC.
Como primer paso, por favor lea detenidamente este manual para
comprender a fondo todas las instrucciones y obtener un máximo disfrute
de esta unidad. Guarde este manual para futuras consultas.
Acerca de este manual
Español
Este manual está organizado de la siguiente manera:
• Este manual explica principalmente las operaciones
utilizando los botones del control remoto.
A menos que se especifique de otro modo, podrá usar
los botones y controles del control remoto y de la unidad
para las mismas operaciones, si llevan nombres (o
marcas) iguales o similares.
• La información básica y común para las diversas funciones
está agrupada en un lugar, y se evita su repetición en cada
procedimiento. Por ejemplo, la información sobre el
encendido/apagado de la unidad, el ajuste de volumen, el
cambio de los efectos de sonido y otros no se repite, por
haberse explicado en la sección “Operaciones comunes” en
las páginas 9 y 10.
• En este manual se utilizan las siguientes marcas:
Proporciona advertencias y precauciones para
evitar daños o riesgos de incendio/descargas
eléctricas.
También proporciona información útil para
obtener el mejor rendimiento posible de la
unidad.
Proporciona información y sugerencias útiles.
Fuente de alimentación
• Para desenchufar el cable de alimentación de CA del
tomacorriente mural, siempre tire del enchufe, no del cable.
NO toque el cable de alimentación de CA con las
manos mojadas.
Condensación de humedad
Podría condensarse humedad en la lente del interior de la
unidad, en los siguientes casos:
• Después de encender la calefacción de la habitación.
• En una habitación húmeda.
• Si lleva la unidad directamente desde un lugar frío a otro
cálido.
Si se produce condensación, la unidad podría no funcionar
correctamente. En tal caso, deje la unidad encendida durante
algunas horas hasta que se evapore la humedad, desenchufe el
cable de alimentación de CA y vuélvalo a enchufar.
Otros
• Si llegara a entrar líquido o algún objeto metálico dentro de
la unidad, desenchúfela y consulte con su proveedor antes
de volverla a usar.
• Si no va a utilizar la unidad por un tiempo prolongado,
desenchufe el cable de alimentación de CA del
tomacorriente.
• La placa de características está fijada en la parte exterior de
la base.
Precauciones
Instalación
• Instale la unidad en un sitio nivelado, seco, que no sea ni
muy frío ni muy caluroso—entre 5˚C y 35˚C.
• Instale la unidad en un sitio bien ventilado para evitar que
se genere calor dentro de la misma.
• Deje un espacio suficiente entre la unidad y el televisor.
• Para evitar interferencias, mantenga los altavoces alejados
del televisor.
NO instale la unidad cerca de fuentes de calor, en
ambientes polvorientos, o en sitios expuestos a la
luz directa del sol o a las vibraciones.
1
NO desarme la unidad; en el interior no hay piezas
que pueda reparar el usuario.
Si hay alguna condición anormal, desenchufe el cable de
alimentación de CA y consulte con su proveedor.
Page 31

Contenido
Ubicación de los botones y controles ............................... 3
Unidad principal ........................................................................ 3
Control remoto .......................................................................... 5
Primeros pasos ................................................................... 6
Desembalaje .............................................................................. 6
Conexión de las antenas AM y FM ........................................... 6
Conexión de los altavoces ......................................................... 6
Conexión de otro equipo ........................................................... 7
Ajuste del selector de tensión .................................................... 7
Colocación de las pilas en el control remoto ............................. 8
Operaciones comunes........................................................ 9
Ajuste del reloj .......................................................................... 9
Conexión de la alimentación ..................................................... 9
Desactivado automático de la unidad (espera automática)........ 9
Selección de la fuente .............................................................. 10
Ajuste del volumen .................................................................. 10
Desvanecimiento del sonido (FADE MUTING) ..................... 10
Selección de los modos de sonido ........................................... 10
Refuerzo de los sonidos graves ............................................... 10
Verificación de la hora del reloj durante la reproducción ....... 10
Español
Reproducción de discos................................................... 11
Reproduciendo el CD entero—Reproducción normal ............ 11
Operaciones básicas de disco .................................................. 12
Programación del orden de reproducción de las pistas
—Reproducción programada ............................................. 12
Repetiendo las pistas—Reproducción repetitiva ..................... 13
Para reproducir al azar—Reproducción aleatoria ................... 14
Visualización del tiempo restante durante la reproducción ..... 14
Reproducción de las cintas ............................................. 15
Reproducción de una cinta ...................................................... 15
Escuchando radiodifusiones en FM y AM .................... 16
Cómo ajustar el intervalo entre frecuencias del sintonizador ...
Cómo sintonizar una emisora .................................................. 16
Cómo preajustar las emisoras .................................................. 16
Cómo sintonizar una emisora preajustada ............................... 17
16
Uso de un equipo externo................................................ 17
Cómo escuchar un equipo externo .......................................... 17
Grabación......................................................................... 18
Grabación en una cinta ............................................................ 18
Grabación de los discos
—Grabación sincronizada de los discos ............................ 19
Uso de los temporizadores .............................................. 20
Uso de los temporizadores de ajuste diario y de grabación .... 20
Utilización del temporizador Snooze ...................................... 21
Uso del temporizador de apagado (“Sleep”) ........................... 22
Mantenimiento................................................................. 23
Localización de averías ................................................... 24
Especificaciones ............................................................... 24
2
Page 32

Ubicación de los botones y controles
OPEN
COMPACT
DIGITAL AUDIO
DAILY TIMER/SNOOZE
1
3
2
COMPACT
DIGITAL AUDIO
STANDBY
CD
PHONES DOWN
4
#/8
7¢
UP AUX
PUSH OPEN
TAPE FM/AM AUX
VOLUME
+—
MICRO COMPONENT SYSTEM
AUTO REVERSE
REC
4
5
6
7
8
p
9
q
w
e
r
t
Familiarícese con los botones y controles de su unidad.
Unidad principal
Vista superior
Español
Vista delantera
3
Page 33

Ventanilla de visualización
SOUND
BASS
ON
DAILY 123
OFF
ALL GR. TOTAL REMAIN
MHz
k
Hz
SLEEP SNOOZEREC ST MP3MONO
SOUND BASS REC
A.STANDBYPRGM RANDOM
452316789pq
i
uy
t
a;o
r
w
e
Para los detalles, consulte las páginas entre paréntesis.
Continúa
Español
Unidad principal
1 Cubierta del disco (11)
2 ) OPEN (apertura de la cubierta del disco) (11)
3 Botón DAILY TIMER/SNOOZE (21)
4 Sensor de control remoto (5)
5 Lámpara STANDBY (9)
6 Botón (STANDBY/ON) (9)
7 Botones de fuente
• CD #¥8, TAPE ¤‹, FM/AM, AUX
Pulsando uno de estos botones también se enciende la
unidad.
8 Jack PHONES (10)
9 Botones de control múltiple
• DOWN 4, 7, UP ¢
p Compartimiento de cassette (15, 18, 19)
q Ventanilla de visualización
w Control VOLUME + / – (10, 16)
e Jack AUX (7, 17)
r Botón REC (18, 19)
t Botón PUSH OPEN (15, 18)
Ventanilla de visualización
1 Indicadores DAILY 1/2/3 (número de temporizador)
2 Indicador (temporizador)
3 Indicadores ON/OFF (hora de activación/desactivación
por temporizador)
4 Indicador REC (temporizador de grabación)
5 Indicador (carpeta de grupo)
6 Indicador SLEEP
7 Indicador SNOOZE
8 Indicadores del modo FM
• MONO, ST (estéreo)
9 Indicador MP3
p Indicador
q Indicador
w Indicador REC (grabación)
e Indicador 2 3 (dirección de la cinta)
r Indicador de repetición
• , ALL, GR. (grupo)
t Indicador (modo de inversión)
y Indicador PRGM (programación)
u Indicador RANDOM
i Pantalla principal
o Indicadores de tiempo restante
• TOTAL, REMAIN
; Indicador A.STANDBY
a Indicadores frecuencia
• MHz, kHz
4
Page 34

REC
STANDBY/ON
SLEEP
123
456
7809
CLOCK
/TIMER
PRESET
GROUP
UP
DOWN
PRESET
GROUP
SET
CANCEL
CD
RANDOM
TAPE
PROGRAM
FM/AM
REPEAT
AUX
OVER
REMAIN
SOUND/HBS BEAT CUT REV.MODE FADE MUTING
VOLUME
DISPLAY FM MODE A. STANDBY
3/8
w
e
y
u
i
;
1
2
3
4
5
7
9
p
t
8
q
a
r
6
o
Control remoto
Para los detalles, consulte las páginas entre paréntesis.
Español
1 Botón STANDBY/ON (9, 21)
2 Botón SLEEP (22)
3 Botón CLOCK/TIMER (9, 20)
4 Botón SET (9, 16, 20, 21)
5 Botón CANCEL (20, 21)
6 Botones de fuente
• CD 3¥8, TAPE 2 3, FM/AM, AUX
Pulsando uno de estos botones también se enciende la
unidad.
7 Botón RANDOM (14)
8 Botón PROGRAM (12, 13)
9 Botones de control múltiple
• PRESET GROUP /UP, PRESET GROUP /DOWN
• 4, 7, ¢
p Botón SOUND/HBS (10)
q Botón BEAT CUT (18)
w Botón DISPLAY (10)
e Botón A. (automático) STANDBY (9)
r Botón FM MODE (16)
t Botones numéricos (12, 17)
y Botón OVER (12, 17)
u Botón REMAIN (14)
i Botón REPEAT (13)
o Botones VOLUME + / – (10, 21)
; Botón FADE MUTING (10)
a Botón REV. (inversión) MODE (15, 18, 19)
COMPACT
DIGITAL AUDIO
STANDBY
PHONES DOWN
CD
#/8
4
TAPE FM/AM AUX
UP AUX
7¢
VOLUME
+—
Utilice el control remoto apuntándolo hacia el
sensor remoto del panel frontal.
5
Page 35

Primeros pasos
AM LOOP
FM ANTENNA
1
2,3
Ò
Â
No conecte el cable de alimentación de CA hasta que
se hayan realizado todas las demás conexiones.
Continúa
Desembalaje
Después de abrir el paquete, asegúrese de haber recibido
todos los elementos siguientes.
El número entre paréntesis indica la cantidad de piezas
suministradas.
• Antena de cuadro de AM (1)
• Adaptador para clavija de CA (1)
• Control remoto (1)
• Pilas (2)
Si hay alguna pieza faltante, consulte inmediatamente con su
proveedor.
Conexión de las antenas AM y FM
Antena de cuadro de
1
AM (suministrada)
Conexión de los altavoces
Podrá conectar los altavoces usando los cables de altavoz.
Rojo
Negro
Rojo
Cable de
altavoz
Negro
Cable de
altavoz
Español
Antena de FM
2
Altavoz derecho
1
Conecte la antena de cuadro AM
suministrada al terminal AM LOOP.
Coloque la antena lejos de la unidad y posiciónela de
manera que se obtenga la mejor recepción.
2
Ajuste la posición de la antena FM para
obtener la mejor recepción.
Para una mejor recepción tanto en FM como AM
• Asegúrese de que los conductores de la antena no hagan contacto
con otros terminales y cables de conexión.
• Mantenga las antenas alejadas de las partes metálicas de la
unidad, cables de conexión y cable de alimentación de CA.
1
Sostenga la abrazadera del terminal de altavoz.
2
Inserte el extremo del cable del altavoz en el
terminal.
Haga coincidir la polaridad de los terminales de altavoz:
cable de rojo con ª y cable de negro con ·.
3
Aparte su dedo de la abrazadera.
IMPORTANTE:
• Utilice solamente altavoces que tengan la misma
impedancia que la indicada por los terminales de
altavoz en la parte posterior de la unidad.
• NO conecte más de un altavoz a cada terminal de
altavoz.
Altavoz izquierdo
6
Page 36

L
R
AUX
No conecte el cable de alimentación de CA hasta que se hayan realizado
AC 110-127V
VOLTAGE SELECTOR
AC 220-240V
todas las demás conexiones.
Para retirar las rejillas de los altavoces
Las rejillas de los altavoces son desmontables, tal como se
indica en la ilustración de abajo.
Orificios Salientes
Español
Rejilla del
altavoz
Para desmontar la rejilla del altavoz, inserte sus dedos
alrededor del saliente de la parte superior de dicha rejilla y
tire suavemente hacia sí, mientras sujeta el lateral.
Proceda de la misma manera para el resto de los salientes,
uno tras otro.
Para fijar la rejilla del altavoz, introduzca los salientes de la
rejilla en los orificios del altavoz.
Cuando el equipo de audio dispone de jacks miniatura para
salida de audio:
Asegúrese de que los jacks miniatura de los cables de audio
sean de color—las clavijas y los jacks blancos son para las
señales de audio del lado izquierdo, y los rojos para las
señales de audio del lado derecho.
Ajuste del selector de tensión
Antes de enchufar la unidad, ajuste el selector de tensión de
la parte posterior de la unidad a la tensión correcta de su área.
Utilice un destornillador para ajustar el selector de tensión al
número de tensión correspondiente al sitio de conexión de la
unidad. (Véase la página de la contracubierta).
Conexión de otro equipo
Para conectar un equipo de audio
Podrá conectar un equipo de audio, para utilizarlo sólo como
dispositivo de reproducción.
• NO conecte ningún otro equipo mientras la
alimentación está conectada.
• NO enchufe ningún equipo antes de finalizar
todas las conexiones.
Para accionar el otro equipo a través de esta unidad,
efectúe la conexión entre los jacks de salida de audio del otro
equipo y el jack AUX utilizando cables de audio con
miniclavijas (no suministrados).
A salida de audio
O
A salida de audio
Al
equipo de audio
7
Page 37

Colocación de las pilas en el control remoto
Coloque las pilas—AAA/UM-4/R03—dentro del control
remoto, haciendo coincidir sus polaridades (+ y –) con las
marcas + y – del compartimiento de las pilas.
Cuando la unidad deje de responder al control remoto,
cambie ambas pilas al mismo tiempo.
• NO combine una pila usada con otra nueva.
• NO utilice conjuntamente diferentes tipos de
pilas.
• NO exponga las pilas al calor o a las llamas.
• NO deje las pilas dentro del compartimiento de
las pilas si no va a usar la unidad por un tiempo
prolongado. De lo contrario, se producirían
daños debido al ácido de las pilas.
Español
1
AHORA, ya está preparado para
enchufar la unidad.
IMPORTANTE:
Asegúrese de comprobar que se han realizado todas las
conexiones antes de enchufar el cable de alimentación.
2
AAA/UM-4/R03
3
8
Page 38

Operaciones comunes
CLOCK
/TIMER
PRESET
GROUP
UP
DOWN
PRESET
GROUP
SET
PRESET
GROUP
UP
DOWN
PRESET
GROUP
SET
CLOCK
/TIMER
STANDBY/ON
A. STANDBY
Ajuste del reloj
Antes de continuar, primero ponga en hora el reloj de la
unidad. Al enchufar el cable de alimentación, “0:00”
comienza a parpadear en la pantalla.
Es posible poner el reloj en hora con la unidad encendida o
en espera.
Español
En el control remoto SOLAMENTE:
1
Pulse CLOCK/TIMER.
La indicación de la hora comienza a parpadear.
2
Pulse UP o DOWN para
ajustar la hora, y luego pulse
SET.
• Al pulsar y mantener pulsado UP o
DOWN, la indicación de la hora
cambia continuamente.
La indicación de los minutos comienza
a parpadear.
• El reloj funciona incluso durante el ajuste.
3
Pulse UP o DOWN para
ajustar los minutos, y luego
pulse SET.
• Al pulsar y mantener pulsado UP o
DOWN, la indicación de los minutos
cambia continuamente.
El reloj incorporado empieza a
funcionar.
Para ajustar el reloj
En el control remoto SOLAMENTE:
1
Pulse repetidamente CLOCK/TIMER
para que aparezca la indicación de la
hora actual.
La indicación de la hora comienza a parpadear.
2
Repita los pasos 2 y 3 de la columna
izquierda.
Conexión de la alimentación
Para encender la unidad, pulse STANDBY/ON
.
La lámpara STANDBY de la unidad se apaga.
• Al pulsar el botón de fuente—CD 3/8, TAPE 2 3,
FM/AM y AUX, la unidad se enciende automáticamente.
Para apagar la unidad (en espera), pulse de nuevo
STANDBY/ON .
La lámpara STANDBY de la unidad se enciende en rojo.
•“0:00” parpadea en la pantalla hasta que se ajuste el reloj
incorporado. Después de ajustar el reloj, se indicará la hora
en la pantalla mientras la unidad se encuentre en el modo
de espera.
• Una pequeña cantidad de energía se consume siempre,
aunque la unidad se encuentre en el modo de espera.
Para desactivar completamente la fuente de alimentación,
desenchufe el cable de alimentación CA de la toma de CA.
Desactivado automático de la unidad
(espera automática)
Utilizando la función de espera automática, la unidad se
desactivará automáticamente (en espera) aproximadamente
3 minutos después de haber reproducido un disco o una cinta.
• La unidad también se podrá apagar automáticamente
utilizando el temporizador de apagado (“Sleep”). (Consulte
la página 22).
• Si desenchufa el cable de alimentación de CA o se produce
una interrupción de la energía eléctrica
El reloj se reposiciona a “0:00”. Si así sucede, vuelva a poner el
reloj en hora.
• El reloj puede adelantarse o retrasarse uno o dos minutos al
mes
Si así sucede, ajustar el reloj otra vez.
9
En el control remoto SOLAMENTE:
Para activar la espera automática, pulse
A.STANDBY.
El indicador A.STANDBY aparece en la pantalla.
• Cuando se detiene la reproducción, el
indicador A.STANDBY comienza a parpadear
en la pantalla.
Para desactivar la espera automática, pulse de nuevo
A.STANDBY.
El indicador A.STANDBY se apaga.
Page 39

VOLUME
FADE MUTING
SOUND/HBS
SOUND
SOUND/HBS
BASS
SOUND
BASS
DISPLAY
ROCK
JAZZ
FLAT
CLASSIC
POP
Selección de la fuente
Selección de los modos de sonido
Para seleccionar la fuente, pulse CD 6, TAPE 2 3,
FM/AM o AUX.
• Al seleccionar CD como fuente, la reproducción se inicia
automáticamente.
Para operar el reproductor de CD, consulte las páginas 11
a 14.
Para operar la platina de cassette, consulte la página 15.
Para operar el sintonizador (FM o AM), consulte las
páginas 16 a 17.
Para grabar en una cinta, consulte las páginas 18 y 19.
Para utilizar un equipo externo, consulte la página 17.
Ajuste del volumen
El nivel de volumen sólo se podrá ajustar estando conectada
la alimentación de la unidad. Puede ajustar el nivel del
volumen entre “VOL MIN”, “VOL 1” – “VOL 29” y
“VOL MAX”.
• El nivel de volumen no tiene ningún efecto en la grabación.
Para aumentar el volumen, pulse VOLUME +
(o gire el control VOLUME + / – de la unidad en
el sentido de las agujas del reloj).
Para disminuir el volumen, pulse VOLUME –
(o gire el control VOLUME + / – de la unidad en
el sentido contrario a las agujas del reloj).
• Pulse y mantenga pulsado uno u otro botón para que el
nivel de volumen cambie continuamente.
Podrá seleccionar uno de los 4 modos de sonido.
• Esta función también afecta al sonido de los auriculares.
• Esta función afecta solamente al sonido de reproducción,
pero no al de grabación.
En el control remoto SOLAMENTE:
Para seleccionar los modos de sonido, pulse
repetidamente SOUND/HBS.
• Cada vez que pulsa el botón, el modo de sonido
cambia de la siguiente manera:
(Cancelado)
ROCK: Sonido potente que enfatiza los graves y los
agudos.
POP: Mayor presencia de vocales y de frecuencias
medias.
CLASSIC: Sonido enriquecido con agudos más finos y
graves más amplios.
JAZZ: Frecuencias bajas acentuadas para música tipo
jazz.
FLAT: Se cancela el efecto ecualizador.
Cuando se activa el modo de sonido, el indicador
enciende en la pantalla.
se
Español
Conecte un par de auriculares al jack PHONES. No se escuchará
sonido a través de los altavoces. Asegúrese de bajar el volumen antes
de conectar o de ponerse los auriculares.
Para una audición privada
NO apague la unidad (en espera) con el volumen
ajustado a un nivel extremadamente alto; de lo
contrario, la sobrecarga acústica repentina podría
dañar su audición o producir daños a los
altavoces y/o auriculares cuando vuelva a
encender la unidad o cuando inicie la reproducción
de alguna fuente.
TENGA EN CUENTA que no podrá ajustar el nivel
de volumen mientras la unidad se encuentre en el
modo de espera.
Desvanecimiento del sonido (FADE MUTING)
En el control remoto SOLAMENTE:
Pulse FADE MUTING.
El nivel de volumen disminuye a “VOL MIN”,
y aparece “MUTING” en la pantalla.
Para cancelar el silenciamiento, pulse de nuevo FADE
MUTING. El nivel de volumen vuelve al nivel anterior.
Refuerzo de los sonidos graves
Podrá reforzar los sonidos graves.
• Esta función afecta solamente al sonido de reproducción,
pero no al de grabación.
En el control remoto SOLAMENTE:
Pulse y mantenga pulsado SOUND/HBS.
• Cada vez que pulsa y mantiene pulsado SOUND/
HBS, HBS se activa y desactiva.
Cuando se activa HBS, el indicador
pantalla.
se enciende en la
Verificación de la hora del reloj durante la
reproducción
En el control remoto SOLAMENTE:
Pulse DISPLAY.
• Cada vez que pulsa el botón, la pantalla cambia
alternativamente entre indicación del reloj e
indicación normal. Después que cambiar la
pantalla a indicación del reloj, la operación de cualquier
botón o control permitirá cambiar a la indicación normal.
10
Page 40

Reproducción de discos
MP3
MP3
CD
3/8
PRESET
GROUP
PRESET
GROUP
UP
DOWN
Esta unidad ha sido diseñada para reproducir los siguientes
Reproduciendo el CD entero—Reproducción normal
discos—CD, CD-R y CD-RW.
Podrá reproducir discos conteniendo pistas en formato CD de
1
música o archivos MP3 en formato ISO 9660.
• En esta instrucción, los discos grabados con archivos MP3
se llamarán “discos MP3”, y los “archivos” también se
llamarán “pistas”.
Español
Cuando se reproducen CD-Rs o CD-RWs
Pulse ) OPEN en la parte superior de la unidad.
La cubierta del disco se abre.
• Es posible insertar un disco mientras se está escuchando
otra fuente.
2
Coloque correctamente el disco, con el lado
de la etiqueta hacia arriba.
• Antes de reproducir los CD-Rs o CD-RWs, lea atentamente
sus correspondientes instrucciones o precauciones.
• Los CD-Rs (CD-regrabables) y los CD-RWs (CDreescribibles) editados por el usuario sólo se pueden
Correcto
Incorrecto
reproducir si ya están “finalizados”.
• Esta unidad soporta discos “multisesión” (hasta 5 sesiones).
• Esta unidad no puede reproducir discos “packet write”
(escritura por paquetes).
• Puede suceder que algunos CD-Rs o CD-RWs no se
puedan reproducir en esta unidad debido a las
características de los discos, a daños o manchas en los
mismos, o a suciedad en el lente del reproductor.
• Los CD-RWs pueden requerir mayor tiempo de lectura.
Esto se debe a que el factor de reflexión de los CD-RWs es
menor que el de los discos comunes.
3
Cierre suavemente la cubierta del disco.
4
Pulse CD 6.
La unidad se enciende automáticamente y la
fuente cambia al reproductor de CD.
Después de cargar el disco, se empezará a reproducir
la primera pista del disco.
Cuando se reproduce
un CD de audio:
Cuando se reproduce
un disco MP3:
Indicador MP3
Notas sobre los archivos MP3
• El reproductor puede reconocer solamente archivos con las
extensiones “MP3” o “mp3”, en cualquier combinación de
mayúsculas y minúsculas. El nombre del archivo debe ser
de hasta 20 caracteres.
• Esta unidad puede reconocer archivos y carpetas de un
disco que cumpla con las siguientes condiciones:
– hasta 640 archivos MP3.
– hasta 256 carpetas (incluyendo la carpeta raíz).
Número de
pista actual
Tiempo de
reproducción
transcurrido
• El disco se para automáticamente cuando se termina de
reproducir la última pista.
Número de
pista actual
Tiempo de
reproducción
transcurrido
– hasta la 8ª capa (incluyendo la carpeta raíz).
• Se recomienda grabar su material a una frecuencia de
muestreo de 44,1 kHz, utilizando una velocidad de
transferencia de datos de 128 kbps.
No podrá realizar ninguna operación hasta que la unidad termine de
leer el disco.
Mientras se visualiza “READING” en la pantalla
• Es posible que algunos archivos o discos MP3 no se puedan
reproducir debido a sus propias características o
condiciones de grabación.
• Los discos MP3 requieren mayor tiempo de lectura que los
discos normales debido a una mayor complejidad en la
configuración de la carpeta/archivo.
• MP3i y MP3 Pro no están disponibles.
La información de la etiqueta ID3 (nombre del título, del artista y
del álbum de hasta 30 caracteres) será mostrada en la pantalla.
Cuando el nombre sea demasiado largo para visualizarse de una sola
vez, se efectuará el desplazamiento.
Para parar la reproducción, pulse 7.
Mientras se reproduce un disco MP3
En la pantalla aparecerán el número total de pistas
Notas generales
(o grupos) y el tiempo de reproducción total.
En general, podrá obtener un buen rendimiento manteniendo
los discos y el mecanismo limpios.
• Ponga los discos en sus estuches, y guárdelos en los
armarios o estantes.
• Mantenga cerrada la cubierta del disco de la unidad cuando
Cuando se para la
reproducción de
un CD de audio:
Cuando se para la
reproducción de un
disco MP3:
Indicador de carpeta de grupo
no la utilice.
• El uso continuo de discos de forma irregular (forma de
corazón, octogonal, etc.), puede dañar la unidad.
Número total
de pistas
Tiempo de
reproducción
total
Número total
de grupos
Número total
de pistas
• El tiempo de reproducción total no aparece cuando se carga
un disco MP3.
11
Page 41

CD
3/8
PRESET
GROUP
PRESET
GROUP
UP
DOWN
123
456
7809
OVER
PRESET
GROUP
PRESET
GROUP
UP
DOWN
PROGRAM
PRESET
GROUP
PRESET
GROUP
UP
DOWN
PROGRAM
123
456
7809
OVER
PRGM
PRGM
Continúa
Para sacar el disco, pulse ) OPEN en la unidad, y luego
extráigalo sujetándolo por los bordes mientras ejerce una
ligera presión sobre el pivote de la unidad.
• Si el disco no puede ser leído correctamente (debido a que está
rayado, por ejemplo) o se ha insertado un CD-R o CD-RW no
legible
La reproducción no se iniciará.
• Si no hay un disco insertado
Aparece “NO DISC” en la pantalla.
NO intente abrir la cubierta del disco con la mano
pues podrían producirse daños.
Operaciones básicas de disco
Mientras reproduce un disco, podrá realizar las operaciones
siguientes.
Para detener la reproducción momentáneamente
Durante la reproducción, pulse CD 3/8.
Mientras está en pausa, el número de pista actual y
el tiempo de reproducción transcurrido parpadean
en la pantalla.
Para continuar con la reproducción, pulse CD 3/8 otra
vez.
Para desplazarse a otra pista
Antes o durante la reproducción, pulse
repetidamente ¢ o 4 (o UP ¢ o
DOWN 4 en la unidad).
• ¢ (UP ¢): Salta al comienzo de la
pista siguiente o posteriores.
• 4 (DOWN 4): Retrocede al comienzo de la pista
actual o anteriores.
Para localizar un punto determinado en una pista
Durante la reproducción, pulse y mantenga
pulsado ¢ o 4 (o UP ¢ o DOWN
4 en la unidad).
• ¢ (UP ¢): Búsqueda hacia
adelante a alta
velocidad.
• 4 (DOWN 4): Búsqueda hacia atrás
a alta velocidad.
Mientras se reproduce un disco MP3
Esta función no está disponible.
Programación del orden de reproducción de
las pistas—Reproducción programada
Antes de iniciar la reproducción, podrá programar el orden de
reproducción de las pistas. Se pueden programar hasta 40
pistas.
En el control remoto SOLAMENTE:
1
Ponga un disco.
• Si la fuente de reproducción actual no es el reproductor
de CD, pulse CD 6 y luego 7 antes de avanzar al
paso siguiente.
2
Pulse PROGRAM.
El indicador PRGM (programa) aparece en la
pantalla.
3
Pulse ¢ o 4 para seleccionar
el número de pista, y luego pulse
PROGRAM.
Número de pista
Número de paso
del programa
Español
Para ir directamente a otra pista usando los botones
numéricos
En el control remoto SOLAMENTE:
Pulsando el (los) botón(es) numérico(s)
antes o durante la reproducción, se podrá
empezar a reproducir el número de pista
deseado.
Ej.: Para el número de pista 5, pulse 5.
Para el número de pista 15, pulse
OVER, y luego pulse 1, 5.
Para el número de pista 20, pulse
OVER, y luego 2, 0.
(Sólo para discos MP3)
Para el número de pista 20, pulse OVER, y luego 0, 2, 0.
Para el número de pista 156, pulse OVER, y luego pulse
1, 5, 6.
También podrá usar el(los) botón(es)
numérico(s) para seleccionar un
número de pista.
• En cuanto a la operación de los
botones numéricos, véase “Para ir
directamente a otra pista usando los
botones numéricos” en la columna
izquierda.
Cuando está programando desde el disco MP3
Pulsando PRESET GROUP
se seleccionará la primera pista de cada grupo.
o PRESET GROUP
12
Page 42

PROGRAM
PRESET
GROUP
PRESET
GROUP
UP
DOWN
REPEAT
ALL
ALL
ALL GR.
PROGRAM
CD
3/8
PRESET
GROUP
PRESET
GROUP
UP
DOWN
PROGRAM
REPEAT
4
Repita el paso 3 para programar las otras
pistas que desea.
Repetiendo las pistas
—Reproducción repetitiva
5
Pulse CD 3/8.
Las pistas se reproducen en el orden
programado por usted.
Español
Si intenta programar la pista 41ª
Aparecerá “– – FULL – –” en la pantalla.
Para parar la reproducción, pulse 7.
Para verificar el contenido de la programación
Podrá verificar el contenido de la programación
pulsando repetidamente PROGRAM antes o después
de la reproducción.
Para modificar la programación
Pulse repetidamente PROGRAM hasta que
aparezca el número de paso de la programación
que desea modificar. Luego realice el paso 3 del
procedimiento de programación.
• Pulsando 0 se borra el paso seleccionado.
Para añadir pistas a la programación, pulse
repetidamente PROGRAM hasta que aparezca
“0” como número de pista. Luego realice el paso
del procedimiento de programación.
Para cancelar la programación
Pulse 7 antes o después de la reproducción.
El indicador PRGM desaparece de la pantalla
y se borra todo el contenido de la memoria (se
reanuda la reproducción normal).
• Las pistas programadas también se borran en
los casos siguientes:
– Pulsando ) OPEN para abrir la cubierta del disco.
– Apagando la unidad.
– Cambiando la fuente.
Durante la reproducción programada
La función de espera automática no tiene efecto alguno.
Usted podrá efectuar la reproducción repetida de todas las
pistas, del programa o de una sola pista actual, tantas veces
como lo desee.
En el control remoto SOLAMENTE:
Pulse repetidamente REPEAT antes o
durante la reproducción.
• Cada vez que pulsa el botón, la reproducción
repetida cambia de la siguiente manera, y los
indicadores de repetición siguientes se encienden en la
pantalla:
Indicadores de repetición
Cuando se reproduce un CD de audio:
Cancelado
ALL: Con reproducción normal, se repiten todas las
pistas.
Con reproducción programada, se repiten
todas las pistas de la programación.
: Se repite una sola pista.
Cuando se reproduce un disco MP3:
3
Cancelado
ALL: Con reproducción normal, se repiten todas las
pistas.
Con reproducción programada y reproducción
aleatoria, se repiten todas las pistas de la
programación.
GR.: Con reproducción normal, se repiten todas las
pistas de un grupo.
Con reproducción programada y reproducción
aleatoria, esta función no está disponible.
: Se repite una sola pista.
Con reproducción aleatoria, esta función no
está disponible.
13
Para cancelar la reproducción repetida, pulse
repetidamente REPEAT hasta que el indicador de
repetición se apague.
Page 43

REMAIN
RANDOM
RANDOM
REMAIN TOTAL REMAIN*
TOTAL REMAIN
Para reproducir al azar
—Reproducción aleatoria
Visualización del tiempo restante durante la
reproducción
Podrá reproducir las pistas de forma aleatoria.
En el control remoto SOLAMENTE:
Pulse RANDOM.
El indicador RANDOM se enciende en la pantalla.
Para salir de la reproducción aleatoria, pulse 7 o
RANDOM.
El indicador RANDOM se apaga.
• La función de reproducción aleatoria no se puede activar
durante la reproducción programada.
Durante la reproducción, podrá visualizar el tiempo restante
de la pista/disco actual y el tiempo transcurrido de la pista/
disco actual.
En el control remoto SOLAMENTE:
Pulse repetidamente REMAIN.
Cuando se reproduce un CD de audio:
• Cada vez que pulsa el botón, la pantalla cambia de la
manera indicada a continuación, y los siguientes
indicadores se encienden en la pantalla:
Indicadores de tiempo restante
(Sin indicación)
REMAIN: Muestra el tiempo restante de la pista
actual.
TOTAL REMAIN: Muestra el tiempo restante del disco.
Sin indicación: Muestra el tiempo transcurrido de la pista
actual.
Español
* El tiempo restante del disco (TOTAL REMAIN) no
aparecerá en los casos siguientes:
– Durante la reproducción aleatoria.
– Durante la reproducción programada.
Cuando se reproduce un disco MP3:
• Cada vez que pulsa el botón, la pantalla cambia de la
siguiente manera:
Información de la etiqueta ID3*
Indicación
normal
Nombre de la carpeta**/
nombre del archivo
* La información de la etiqueta ID3 muestra el nombre del
título, del artista y del álbum, en orden secuencial.
Si no hay ninguna información en el archivo, aparecerá
“NO INFO”.
** Cuando el archivo no pertenece a ninguna carpeta,
aparecerá “ROOT”.
14
Page 44

Reproducción de las cintas
PUSH OPEN
DOWN
4 7 ¢
UP
DOWN
4 7 ¢
UP
PUSH OPEN
REV.MODE
TAPE
PRESET
GROUP
PRESET
GROUP
UP
DOWN
PRESET
GROUP
PRESET
GROUP
UP
DOWN
Reproducción de una cinta
Puede reproducir cintas del tipo I.
1
Pulse PUSH OPEN.
El portacassette se abre.
Español
2
Introduzca un cassette, con el lado expuesto
de la cinta hacia abajo.
Si no hay un cassette insertado al pulsar TAPE ¤ ‹
Aparece “NO TAPE” en la pantalla.
Para parar la reproducción, pulse 7.
Para pasar rápidamente la cinta hacia
la izquierda o la derecha, pulse ¢ o
4 (o UP ¢ o DOWN 4 en la
unidad).
El indicador de dirección de la cinta
( 3 o 2 ) comienza a parpadear
rápidamente en la pantalla.
3
Cierre suavemente el portacassette.
• Cuando hay una cinta dentro del portacassette, el
4
Pulse TAPE ¤ ‹.
Se inicia la reproducción (si la unidad estaba en
espera, se encenderá automáticamente).
El indicador de dirección de la cinta ( 3 o 2 )
comienza a parpadear lentamente en la pantalla.
• Cada vez que pulsa el botón, la dirección de
Cuando la cinta se reproduce hasta el final, la platina se
detiene automáticamente si el modo de inversión está
ajustado a o . (Consulte “Para reproducir ambos
lados—Modo de inversión”).
15
indicador de dirección de la cinta ( 3 ) se enciende en la
pantalla.
la cinta cambia:
3: reproduce el lado delantero.
2: reproduce el lado inverso.
Para sacar el cassette, presione PUSH OPEN
en la unidad mientras la reproducción se
encuentra detenida.
Para reproducir ambos lados—Modo de inversión
Usted puede ajustar la platina para que se reproduzca un solo
lado de la cinta, ambos lados una vez, o ambos lados de
manera continua.
En el control remoto SOLAMENTE:
Pulse REV.MODE (modo de inversión).
• Cada vez que pulsa el botón, el modo de
inversión cambia de la siguiente manera:
: La platina se para automáticamente una vez
reproducidas las dos caras de la cinta. Se detiene
cuando termina la reproducción en los dos sentidos.
: La platina continúa reproduciendo ambas caras de la
cinta 10 veces, y después, la reproducción se detiene
automáticamente.
: La platina se para automáticamente una vez
reproducida una cara de la cinta.
• NO apague la unidad mientras se está
reproduciendo o grabando una cinta. De hacerlo,
se podrían producir daños en la platina de
cassette o en las cintas.
No se recomienda usar cintas C-120 ni otras más
•
largas, dado que podría producirse un deterioro
en las características y porque tienden a enredarse
en los rodillos de presión y los cabrestantes.
• Esta unidad no es compatible con las cintas tipo
II y tipo IV.
Page 45

Escuchando radiodifusiones en FM y AM
FM/AM
PRESET
GROUP
PRESET
GROUP
UP
DOWN
MHz
SET
MHz
PRGM
FM MODE
FM/AM
DOWN
4 7 ¢
UP
VOLUME
Continúa
Cómo ajustar el intervalo entre frecuencias
del sintonizador
El intervalo entre frecuencias del sintonizador FM o AM sólo
se podrá ajustar mientras se encuentra sintonizada una
emisora FM o AM.
En el control remoto SOLAMENTE:
1
Pulse FM/AM para seleccionar “FM”
o bien “AM”.
2
Gire el control VOLUME + / –
mientras pulsa y mantiene
pulsado 7.
Conforme gira el control VOLUME + / –,
el intervalo entre frecuencias de la banda
seleccionada cambia de la siguiente
manera:
• Para FM: 50 kHz y 100 kHz*
• Para AM: 9 kHz y 10 kHz*
* Configuración inicial
+
Para detener la búsqueda, pulse ¢ o 4 (o UP ¢ o
DOWN 4 en la unidad).
Si pulsa repetidamente pulse ¢ o 4 (o UP ¢ o
DOWN 4 en la unidad)
La frecuencia cambia paso a paso.
Para cambiar el modo de recepción en FM
En el control remoto SOLAMENTE:
Cuando la difusión en FM estéreo sea difícil de
recibir o hayan ruidos, pulse FM MODE de
manera que aparezca “MONO” en la pantalla. El
indicador MONO también se enciende. Con esto
se conseguirá mejorar la recepción.
Para restablecer el efecto estereofónico, pulse de nuevo
FM MODE de manera que el indicador “STEREO” aparezca
en la pantalla y el indicador MONO se apague. En este modo
estéreo, se podrán escuchar sonidos estereofónicos cuando se
transmite un programa estereofónico.
El efecto estéreo también se restablece cuando:
• Se cambia la banda (FM o AM).
• Se cambia la frecuencia de la emisora.
• Se cambia la fuente de reproducción.
• Se apaga (o enciende) la unidad.
Español
Cuando usted cambia la configuración
Se borrarán las emisoras preajustadas para FM y AM. Por lo tanto,
vuelva a preajustar las emisoras. (Véase la columna de la derecha).
Cómo sintonizar una emisora
1
Pulse FM/AM para seleccionar ya
sea “FM” o “AM”.
La alimentación de la unidad se conecta
automáticamente y se sintoniza la emisora
sintonizada previamente—ya sea FM o AM.
• Cada vez que pulsa el botón, la banda cambia
alternativamente entre FM y AM.
• Si la emisora seleccionada previamente se encuentra
almacenada en un número de preajuste, aparecerá tal
número en lugar de “FM” o “AM”.
2
Pulse y mantenga pulsado ¢ o
4 (o UP ¢ o DOWN 4 en
la unidad) durante más de 1
segundo.
Cómo preajustar las emisoras
Usted podrá preajustar manualmente 25 emisoras FM y 15
emisoras AM.
En algunos casos, pueden haber frecuencias de prueba
memorizadas en el sintonizador debido a que la fábrica
examina la función de preajuste del sintonizador antes de
la entrega. Esto no es una anomalía. Usted podrá preajustar
en la memoria las emisoras deseadas siguiendo el método
de preajuste.
• Hay un límite de tiempo para realizar los siguientes pasos.
Si se cancelan los ajustes antes de haber terminado,
comience otra vez desde el paso 2.
En el control remoto SOLAMENTE:
1
Sintonice la emisora que desea preajustar.
• Véase “Cómo sintonizar una emisora” en la columna
izquierda.
2
Pulse SET.
“00” comienza a parpadear en la pantalla.
• ¢ (UP ¢): Aumenta las frecuencias.
• 4 (DOWN 4): Disminuye las frecuencias.
La unidad comienza a buscar emisoras y se detiene
cuando se sintoniza una emisora con una señal
suficientemente fuerte.
• Si un programa FM se emite en estéreo, el indicador
ST (estéreo) se enciende en la pantalla (sólo cuando hay
buena recepción).
16
Page 46

PRESET
GROUP
PRESET
GROUP
UP
DOWN
123
456
7809
OVER
MHz
PRGM
3
123
456
7809
OVER
FM/AM
PRESET
GROUP
PRESET
GROUP
UP
DOWN
AUX
Pulse PRESET GROUP o
PRESET GROUP para
seleccionar un número de
preajuste, y luego pulse SET.
La emisora preajustada se almacena en la memoria.
• Aunque no pulse SET, la emisora preajustada en
el número de preajuste se almacenará en la memoria
Español
5 segundos después.
También podrá usar el (los) botón(es)
numérico(s) para seleccionar un número
de preajuste.
• En este caso, no necesitará pulsar SET.
Ej.: Para seleccionar el número de
preajuste 5, pulse 5.
Para seleccionar el número de preajuste
15, pulse OVER, y luego 1, 5.
Para seleccionar el número de preajuste 20,
pulse OVER, y luego 2,0.
4
Para preajustar más emisoras, repita los
pasos 1 a 3 de arriba, asignando un número
de preajuste diferente para cada emisora.
• Si almacena una emisora nueva en un número ya
asignado se borrará la emisora almacenada previamente.
Si desenchufa el cable de alimentación de CA o se
Las emisoras preajustadas permanecen memorizadas.
produce una interrupción de la energía eléctrica
Cómo sintonizar una emisora preajustada
En el control remoto SOLAMENTE:
1
Pulse FM/AM para seleccionar ya
sea “FM” o “AM”.
La alimentación de la unidad se conecta
automáticamente y se sintoniza la emisora
sintonizada previamente—ya sea FM o AM.
• Cada vez que pulsa el botón, la banda cambia
alternativamente entre FM y AM.
2
Pulse repetidamente PRESET
GROUP o PRESET GROUP
para seleccionar un número de
preajuste.
Para sintonizar directamente una emisora preajustada
utilizando los botones numéricos
En el control remoto SOLAMENTE:
Pulsando el(los) botón(es) numérico(s)
podrá seleccionar el número de preajuste
deseado.
Ej.: Para seleccionar el número de preajuste
5, pulse 5.
Para seleccionar el número de preajuste
15, pulse OVER, y luego 1, 5.
Para seleccionar el número de preajuste
20, pulse OVER, y luego 2, 0.
Uso de un equipo externo
Cómo escuchar un equipo externo
Podrá escuchar un equipo externo tal como una grabadora de
MD, una platina de cassette, y otros equipos auxiliares.
•
En primer lugar, asegúrese de que el equipo externo esté
correctamente conectado a la unidad. (Consulte la página 7).
1
Ajuste el nivel de volumen al mínimo.
2
Pulse AUX.
Aparece “AUX” en la pantalla.
3
Comience a reproducir el equipo externo.
4
Ajuste el nivel de volumen al nivel de
audición deseado.
17
Para salir del modo AUX, seleccione otra fuente.
Para la operación del equipo externo
Consulte sus instrucciones.
Page 47

Grabación
REC
REC
PUSH OPEN
REV.MODE
MHz
REC
DOWN
4 7 ¢
UP
TAPE
BEAT CUT
Continúa
IMPORTANTE:
• La grabación o reproducción de material protegido por
la ley del copyright sin el consentimiento de sus
respectivos titulares podría resultar en una infracción
de las leyes de propiedad literaria.
• El nivel de grabación se ajusta automáticamente al nivel
correcto y por lo tanto, no será afectado por los demás
ajustes de sonido. De esta manera, durante la grabación,
podrá ajustar el sonido que está escuchando sin que el nivel
de grabación resulte afectado.
• Si las grabaciones realizadas por usted contienen
demasiado ruido o perturbaciones estáticas, podría ser que
la unidad se encuentra demasiado cerca de un televisor.
Aumente la distancia entre el televisor y la unidad.
• Podrá usar cintas tipo I para la grabación.
• NO apague la unidad mientras se está
reproduciendo o grabando una cinta. De hacerlo,
se podrían producir daños en la platina de
cassette o las cintas.
• NO utilice cintas del tipo II ni del tipo IV debido a
que la unidad no es compatible con tales cintas.
• No se recomienda usar cintas C-120 ni otras
más largas, dado que podría producirse un
deterioro en las características
a enredarse en los rodillos de presión y los
cabrestantes.
y porque
tienden
3
Comience a reproducir la fuente—FM,
AM o equipo auxiliar conectado al jack AUX.
• Cuando la fuente es FM o AM, sintonice la emisora que
desea grabar.
• Cuando se graban de los discos, véase “Grabación de
los discos—Grabación sincronizada de los discos” en
la página 19.
4
Pulse REC (grabación).
• El indicador REC aparece y el indicador 3 se
enciende en la pantalla.
5
Pulse TAPE ¤ ‹.
El indicador 3 empieza a parpadear y se inicia
la grabación.
• Si no hay un cassette insertado al pulsar REC
Aparece “NO TAPE” en la pantalla.
• Si hay una cinta protegida al pulsar REC
Aparece “PROTECT” en la pantalla.
Español
Se provee una cinta de guía en la cual no se puede grabar. Por
consiguiente, cuando se graban de los discos, de los programas de
FM/AM o de un equipo externo, primero haga avanzar la cinta de
guía para poder efectuar la grabación sin perder ninguna parte de la
música.
Para proteger sus grabaciones
Los cassettes tienen dos lengüetas pequeñas en la parte
posterior para protección contra el borrado accidental y la
regrabación.
Para proteger sus grabaciones, quite estas lengüetas.
Para volver a grabar una cinta protegida, tape los orificios con
cinta adhesiva.
Grabación en una cinta
En la unidad SOLAMENTE:
1
Ponga un cassette grabable, con el lado
expuesto de la cinta hacia abajo.
• Véase también la página 15.
2
Cierre suavemente el portacassette.
Al comienzo y al final de las cintas cassette
Cinta adhesiva
Para parar la grabación durante un momento,
pulse REC.
La grabación entra en pausa. Para reanudar la
grabación, pulse TAPE ¤ ‹.
Para parar la grabación, pulse 7.
La grabación se detiene.
Para sacar el cassette, presione PUSH OPEN
mientras la grabación está detenida.
Para grabar en ambos lados—Modo de inversión
En el control remoto SOLAMENTE:
Pulse repetidamente REV.MODE
(modo de inversión) hasta que se
encienda o .
• Cuando se utiliza el modo de inversión para la
grabación, se enciende y se inicia la grabación
primero en la dirección de avance ( 3 ).
Para cancelar el modo de inversión, pulse repetidamente
REV.MODE hasta que se encienda .
Para reducir el batido—Corte de batido
En el control remoto SOLAMENTE:
Si se escuchan silbidos mientras se graba un
programa en AM, pulse repetidamente BEAT
CUT hasta que se reduzcan los silbidos.
• Cada vez que pulsa el botón, la pantalla cambia
alternativamente entre “CUT-1” y “CUT-2”.
18
Page 48
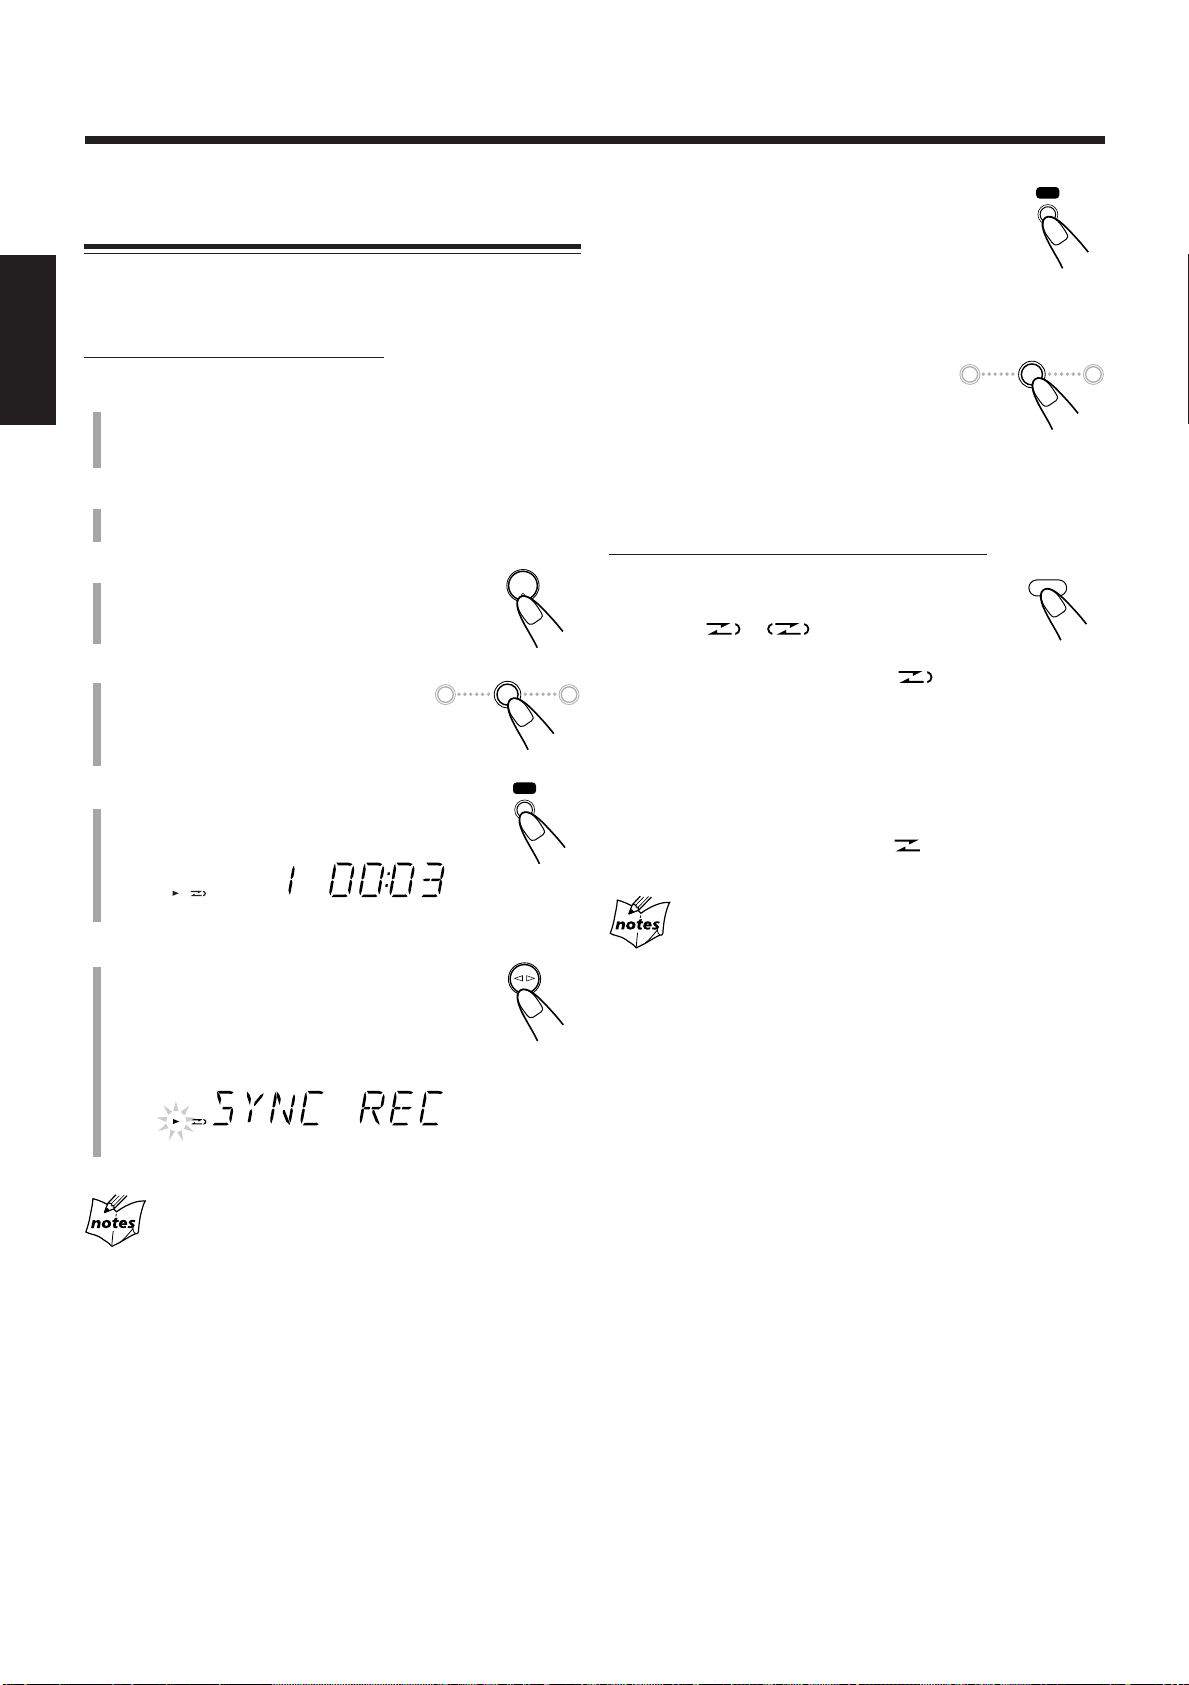
REC
REC
REV.MODE
REC
REC
CD
#/8
TAPE
DOWN
4 7 ¢
UP
DOWN
4 7 ¢
UP
Grabación de los discos
—Grabación sincronizada de los discos
Podrá iniciar simultáneamente la reproducción y la grabación
del disco.
Para parar la grabación durante un momento,
pulse REC.
Tanto la reproducción del CD como la grabación
de la cinta se ponen en pausa. Para reanudar la
grabación, pulse TAPE ¤ ‹.
En la unidad SOLAMENTE:
Español
1
Ponga un cassette grabable, con el lado
expuesto de la cinta hacia abajo.
• Véase también la página 15.
2
Cierre suavemente el portacassette.
3
Pulse CD ‹/8 para seleccionar el
reproductor de CD como fuente.
4
Pulse 7 para detener la
reproducción del disco.
• Si lo desea, podrá hacer una
programación (consulte la página 12).
5
Pulse REC (grabación).
El indicador 3 se enciende en la pantalla.
6
Pulse TAPE ¤ ‹.
Aparece “SYNC REC” y el indicador 3
comienza a parpadear lentamente en la pantalla.
La reproducción del CD y la grabación de la
cinta se inician automáticamente.
Para parar la grabación, pulse 7.
La grabación se para y la reproducción
del CD entra en pausa.
Para reproducir ambas caras—Modo de inversión
En el control remoto SOLAMENTE:
Pulse repetidamente REV.MODE
(modo de inversión) hasta que se
encienda o .
• Cuando se utiliza el modo de inversión para la
grabación sincronizada del disco, se enciende y la
grabación se inicia primero en la dirección de avance ( 3 ).
Cuando la cinta llega al final, la reproducción del CD entra
en pausa hasta que la grabación de la cinta cambie a la
dirección inversa, y luego la grabación continúa.
Para cancelar el modo de inversión, pulse repetidamente
REV.MODE hasta que se encienda .
Cuando se realiza la programación del temporizador
de apagado durante la grabación directa del disco
Programe un tiempo suficiente para que pueda finalizar la
reproducción del disco pues de lo contrario, la unidad se apagará
antes de que finalice la grabación.
• Si no hay un cassette insertado al pulsar REC
Aparece “NO TAPE” en la pantalla.
• Si hay una cinta protegida al pulsar REC
Aparece “PROTECT” en la pantalla.
19
Page 49

Uso de los temporizadores
CLOCK
/TIMER
SET
ON
DAILY 1
ON
DAILY 2
ON
DAILY 3
ON
REC
PRESET
GROUP
UP
DOWN
PRESET
GROUP
Continúa
Se disponen de cuatro temporizadores—Temporizador de
ajuste diario, temporizador de grabación, temporizador
Snooze y temporizador de apagado.
• Antes de usar estos temporizadores, deberá ajustar
correctamente el reloj incorporado a la unidad (consulte la
página 9).
Uso de los temporizadores de ajuste diario y
de grabación
Podrá programar el temporizador con la unidad encendida o
apagada.
Cómo funciona realmente el temporizador
Al llegar la hora de activación, la unidad se enciende
automáticamente (el indicador [temporizador] parpadea y
continúa parpadeando mientras se encuentra funcionando el
temporizador). Luego, al llegar la hora de término
programada, la unidad se apaga automáticamente (en espera).
La programación del temporizador se retiene en la memoria
hasta que la cambie.
• Cuando los indicadores (temporizador) y DAILY 1, 2 o 3
están encendidos en la pantalla, el temporizador actúa
como temporizador de ajuste diario. Una vez programado,
el temporizador se activará todos los días a la misma hora,
y se desactivará (en espera) automáticamente después de 60
minutos, hasta que usted lo desactive.
• Cuando los indicadores (temporizador) y REC se
encienden en la pantalla, el temporizador actúa como
temporizador de grabación. Una vez que finalice la
grabación por temporizador, los detalles del ajuste
permanecerán almacenados, pero el temporizador se
desactivará.
En el control remoto SOLAMENTE:
1
Pulse repetidamente CLOCK/TIMER
para seleccionar el temporizador que
desea ajustar y activar—Diario 1,
Diario 2, Diario 3 o grabación.
El ajuste del temporizador y la indicación de la hora
comienzan a parpadear en la pantalla.
Cada vez que pulsa el botón, la pantalla cambia de la
siguiente manera:
Temporizador de
ajuste diario 1
Temporizador de
ajuste diario 2
Temporizador de
ajuste diario 3
Temporizador de
grabación
Ajuste del reloj
Español
Antes de empezar...
Cuando utilice “TUNER” (sintonizador) como fuente de
reproducción, asegúrese de seleccionar la emisora deseada
antes de desconectar la alimentación.
• Hay un límite de tiempo para realizar los siguientes pasos.
Si se cancelan los ajustes antes de haber terminado,
comience otra vez desde el paso 1.
Indicación normal
2
Ajuste la hora a la que desea
activar la unidad.
(1) Pulse UP o DOWN para ajustar la
hora, y luego pulse SET.
(2) Pulse UP o DOWN para ajustar los
minutos, y luego pulse SET.
Si desea cambiar el ajuste de la hora,
pulse CANCEL.
• Si está programando el temporizador de
ajuste diario, el nombre de la fuente comienza
a parpadear en la pantalla.
\ Vaya al paso 4.
• Si está programando el temporizador de grabación, el
indicador OFF y la indicación de la hora comienzan a
parpadear en la pantalla.
20
Page 50

Español
OFF
REC
DAILY 1 DAILY 2 DAILY 3
REC
PRESET
GROUP
UP
DOWN
PRESET
GROUP
TUNER
TAPE
CD
SET
VOLUME
STANDBY/ON
DAILY 1
3
Para el temporizador de grabación
SOLAMENTE: Ajuste la hora de apagado a
la hora en que desea apagar la unidad.
(1) Pulse UP o DOWN para ajustar la hora, y luego pulse
SET.
(2) Pulse UP o DOWN para ajustar los minutos, y luego
pulse SET.
Si desea cambiar el ajuste de la hora, pulse CANCEL.
• El temporizador de grabación está activado. Los
indicadores (temporizador) y REC se encienden. La
pantalla vuelve a la indicación normal.
\ Vaya al paso 7.
4
Pulse UP o DOWN para
seleccionar la fuente de
reproducción.
Para desactivar el temporizador,
pulse y mantenga pulsado DAILY
TIMER/SNOOZE.
• Cada vez que pulsa y mantiene pulsado el botón,
el ajuste del temporizador cambia de la siguiente manera:
Cancelado
Para cambiar el temporizador, repita los pasos 1 a 6 de las
páginas 20 y esta misma página.
• Para volver a activar el temporizador de ajuste diario sin
cambiar el ajuste, pulse repetidas veces DAILY TIMER/
SNOOZE en la unidad para seleccionar el número de
temporizador que desea.
Cuando no hay fuente de reproducción (sea cinta
cassette o disco) dentro de la unidad al seleccionar
“TAPE” o “CD”
La fuente de reproducción cambia a “TUNER” al llegar la hora de
activación.
Si enciende la unidad al llegar a la hora de inicio
programada por el temporizador
El temporizador de ajuste no funciona.
Cada vez que pulsa el botón, la fuente cambia de la
siguiente manera:
• Cuando selecciona “TAPE” o “CD”, asegúrese de que la
fuente de reproducción (ya sea una cinta cassette o un
disco) se encuentre dentro de la unidad.
Si desea cambiar el ajuste de la hora, pulse repetidamente
CANCEL para volver al paso 2.
5
Pulse SET.
Las indicaciones de (temporizador) y del
número del temporizador de ajuste diario
activo se encienden. La pantalla vuelve a la
indicación normal.
6
Pulse VOLUME +/– para ajustar
el volumen para la hora de
activación.
7
Pulse STANDBY/ON para
apagar la unidad si ha
programado el temporizador con
la unidad encendida.
En la unidad SOLAMENTE:
Si desenchufa el cable de alimentación de CA o se
produce una interrupción de la energía eléctrica
El ajuste del temporizador permanece vigente. Ajuste el reloj
incorporado y vuelva a activar el temporizador.
Utilización del temporizador Snooze
El temporizador Snooze desactiva la unidad (en espera) sólo
durante 5 minutos mientras se encuentra activado el
temporizador de ajuste diario.
• El temporizador Snooze sólo se podrá ajustar mientras está
funcionando el temporizador de ajuste diario.
En la unidad SOLAMENTE:
Pulse DAILY TIMER/SNOOZE
mientras el temporizador de
ajuste diario está funcionando.
La unidad se apaga (en espera) y el indicador SNOOZE
aparece en la pantalla.
Después de 5 minutos, la unidad se enciende
automáticamente con la fuente seleccionada por usted en el
paso 4 de la columna izquierda.
Si la unidad se enciende cuando está funcionando el
temporizador Snooze
El temporizador Snooze y el temporizador de ajuste diario se cancelan.
Si ajusta el temporizador Snooze cuando faltan menos
de 5 minutos para la hora de desactivación por el
temporizador de ajuste diario
La unidad no se encenderá aunque transcurran 5 minutos.
Para activar el temporizador, pulse
y mantenga pulsado repetidas veces
DAILY TIMER/SNOOZE en la unidad para
seleccionar el número de temporizador que desea.
21
Si desenchufa el cable de alimentación o se produce
una interrupción de la energía eléctrica
El temporizador se cancelará. Primero deberá ajustar el reloj, y
luego otra vez el temporizador.
Page 51

Uso del temporizador de apagado (“Sleep”)
10 20
120
30 60
90
OFF
SLEEP
SLEEP
Con el temporizador “Sleep”, se puede quedar dormido
mientras escucha música o un programa de radio favorito.
• El temporizador de apagado (“Sleep”) se puede programar
estando la unidad encendida.
• También podrá apagar la unidad automáticamente usando
la espera automática. (Consulte la página 9).
Cómo funciona el temporizador de apagado (“Sleep”)
La alimentación de la unidad se desconecta automáticamente
tras un lapso de tiempo predeterminado.
En el control remoto SOLAMENTE:
1
Pulse SLEEP.
El indicador SLEEP comienza a parpadear
en la pantalla.
• Cada vez que pulsa el botón, el lapso de tiempo cambia
de la siguiente manera:
Si ajusta el temporizador de apagado (“Sleep”)
después que el temporizador de ajuste diario comience
a reproducir la fuente seleccionada
La unidad se apaga al llegar la hora de apagado del temporizador
programado con la hora de apagado más temprana.
Si ajusta el temporizador de apagado (“Sleep”)
mientras está reproduciendo o grabando una cinta
No apague la unidad con el temporizador de apagado (“Sleep”)
mientras se está pasando la cinta. Si la unidad se apaga durante la
reproducción o la grabación de una cinta, se podrían producir daños
en la platina de cassette o en las cintas.
Español
(Cancelado)
2
Espere unos 5 segundos después de
especificar el lapso de tiempo.
El indicador SLEEP permanece encendido en la pantalla.
Para verificar el tiempo que queda hasta la hora de
apagado, pulse SLEEP una vez para que se visualice el
tiempo que queda para el apagado durante unos 5 segundos.
Para cambiar la hora de apagado, pulse repetidamente
SLEEP hasta que aparezca el lapso de tiempo deseado.
Para cancelar el ajuste, pulse repetidamente SLEEP hasta
que el indicador SLEEP se apague y aparezca otra vez la
indicación normal en la pantalla.
• Al apagar la unidad también se cancela el temporizador de
apagado (“Sleep”).
22
Page 52

Mantenimiento
Para obtener el máximo rendimiento de la unidad, mantenga limpios los discos, las cintas y el mecanismo.
Notas generales
En general, podrá obtener un buen rendimiento manteniendo
los discos y el mecanismo limpios.
• Guarde los discos en sus estuches, y guárdelos en los
armarios o estantes.
Español
Limpieza de la unidad
• Manchas en la unidad
Deben limpiarse con un paño suave. Si la unidad está muy
sucia, límpiela con un paño mojado en una solución de
agua y detergente neutro diluido y bien exprimido, y luego
pásele un trapo seco.
• Para evitar que se deteriore la calidad de la unidad, se
dañe o se despegue la pintura, tenga en cuenta lo
siguiente:
– NO frote con un paño duro.
– NO frote con fuerza.
– NO utilice diluyente ni bencina para la limpieza.
– NO aplique ninguna sustancia volátil, tal como
insecticidas.
– NO permita que ninguna pieza de goma o de
plástico permanezca en contacto por un tiempo
prolongado.
Manejo de los discos
• Saque el disco de su estuche
sujetándolo por los bordes, mientras
presiona ligeramente el orificio
central.
• No toque la superficie brillante del
disco, ni doble el disco.
• Ponga el disco en su estuche después
del uso para que no se deforme.
• Tenga cuidado de no rayar la
superficie del disco cuando vuelva a
colocarlo en su estuche.
• Evite la exposición directa a la luz
del sol, a temperaturas extremas, y a
la humedad.
Manejo de las cintas cassette
• Si la cinta está floja en su cassette, elimine la
flojedad haciendo girar uno de los carretes
con un lápiz.
• Si la cinta está floja podrá quedar estirada,
cortada o enredada en el cassette.
• Tenga cuidado de no tocar la superficie de la
cinta.
• No almacene las cintas en:
– Lugares polvorientos
– Expuestos directamente a la luz del sol o de
otras fuentes de calor
– Lugares de mucha humedad
– Sobre un televisor o altavoz
– Cerca de un imán
Para mantener la mejor calidad de sonido de
grabación y de reproducción
Deberá limpiar las cabezas.
• Limpie las cabezas cada 10 horas de uso utilizando una
cinta limpiadora de cabezas del tipo húmero (disponible en
los establecimientos de productos electrónicos y de audio).
Si se ensucian las cabezas, aparecerán los siguientes
síntomas:
– Pérdida de calidad de sonido.
– Disminución del nivel de sonido.
– Desvanecimiento del sonido.
• No reproduzca cintas sucias o polvorientas.
• No toque las cabezas pulimentadas con herramientas
metálicas o magnéticas.
Cabrestante
Cabezal
23
Para limpiar el disco
Usando un lienzo suave, limpie el
disco con movimientos rectos desde el
centro hacia el borde.
NO utilice ningún tipo de solvente—como limpiador
de discos convencional, pulverizadores, diluyente,
o bencina—para limpiar el disco.
Rodillo presionador
Para desmagnetizar los cabezales
Apague la unidad, y utilice un desmagnetizador de cabezales
(disponible en las tiendas que venden productos electrónicos
y discos).
Page 53

Localización de averías
Si tiene algún problema con su unidad, verifique la siguiente lista para ver si consigue resolver el problema antes de acudir al
centro de servicio.
Si el problema persiste a pesar de las indicaciones contenidas en esta lista, o si la unidad está físicamente dañada, solicite el
servicio a personal cualificado, como por ejemplo, su proveedor.
Síntoma
No se efectúa la conexión.
No se escucha el sonido.
Difícil de escuchar las emisiones debido
a los ruidos.
El disco no se reproduce.
Grabación imposible.
Las operaciones están inhabilitadas.
No es posible operar la unidad desde el
control remoto.
Causa posible
El cable de alimentación no está
conectado a una toma de CA.
• Conexiones flojas o incorrectas.
• Hay un par de auriculares conectados.
• El disco MP3 está grabado con “packet
writing” (escritura por paquetes).
• Las antenas están desconectadas.
• La antena de cuadro de AM está muy
cerca de la unidad.
• La antena de FM no está debidamente
extendida y posicionada.
El disco está puesto boca abajo.
Se han removido las lengüetas pequeñas
del dorso del cassette.
El microprocesador incorporado podría
no funcionar correctamente debido a
interferencias eléctricas exteriores.
• Hay un obstáculo en la trayectoria
entre la unidad de control remoto y el
sensor remoto de la unidad.
• Las pilas están agotadas.
• Está utilizando el control remoto
demasiado lejos de la unidad.
Acción correctiva
Inserte la clavija en el tomacorriente.
• Verifique todas las conexiones y realice las
correcciones. (Consulte las páginas 6 y 7).
•
Desenchufe los auriculares del jack PHONES.
• No se puede reproducir. Reemplace el
disco.
• Vuelva a conectar las antenas correcta
y firmemente.
• Cambie la posición y la dirección de la
antena de cuadro de AM.
• Extienda la antena de FM para obtener
la mejor recepción.
Coloque el disco con el lado de la
etiqueta hacia arriba.
Tape los orificios con cinta adhesiva.
Desenchufe el cable de alimentación de
CA y luego vuélvalo a enchufar.
• Retire el obstáculo.
• Cambie las pilas. (Consulte la página 8).
• Las señales no pueden llegar al sensor
remoto. Acérquese a la unidad.
Español
Especificaciones
El diseño y las especificaciones se encuentran sujetos a cambios sin previo aviso.
Sección del amplificador
Potencia de salida:
15 W por canal, RMS mín., accionados en 4 Ω a 1 kHz, con
una distorsión armónica total no mayor que 10%. (IEC268-3)
Sensibilidad/Impedancia de entrada de audio (a 1 kHz)
AUX: 500 mV/50 kΩ
Altavoces/Impedancia: 4 Ω – 16 Ω
Sintonizador
Margen de sintonización de FM:
A intervalos de 100 kHz: 87,5 MHz—108,0 MHz
A intervalos de 50 kHz: 87,50 MHz—108,00 MHz
Margen de sintonización de AM:
A intervalos de 10 kHz: 530 kHz—1 710 kHz
A intervalos de 9 kHz: 531 kHz—1 710 kHz
Reproductor de CD
Margen dinámico: 85 dB
Relación señal a ruido: 85 dB
Lloro y fluctuación: No medible
Platina de cassette
Respuesta en frecuencia:
Normal (tipo I): 100 Hz – 10 000 Hz
Lloro y fluctuación: 0,35% (WRMS)
General
Requisito de potencia: CA 110 V–127 V / CA 220 V–
240 V (ajustable con el selector
de tensión), 50 Hz / 60 Hz
Consumo de energía: 40 W (en funcionamiento)
2 W (en espera)
Dimensiones (An/Al/Pr) (aprox.):
152 mm x 233 mm x 292 mm
Peso (aprox.): 3,9 kg
Accesorios suministrados
Véase página 6.
Sección de altavoces
Tipo: Tipo reflector de bajos de rango
completo
Altavoces: Cono de 10 cm x1
Capacidad de potencia: 15 W
Impedancia: 4 Ω
Margen de frecuencias: 100 Hz – 15 kHz
Dimensiones (An/Al/Pr) (aprox.):
147 mm x 233 mm x 189 mm
Peso (aprox.): 1,9 kg cada uno
24
Page 54

Introdução
Parabéns pela aquisição de um dos produtos JVC.
Antes de operar seu aparelho, leia esse manual completamente, com
atenção, a fim de obter o máximo desempenho do mesmo e guarde-o para
futura referência.
Sobre este manual
Este manual está organizado do seguinte modo:
• O manual explica principalmente as operações que
utilizam os botões do controle remoto.
Você pode utilizar tanto os botões do controle remoto
quanto os do aparelho principal para realizar as
mesmas operações se eles tiverem os nomes (ou marcas)
Português
iguais ou semelhantes, a menos que mencionado de
outra forma.
• As informações básicas e comuns a muitas funções são
agrupadas em um mesmo local e não são repetidas em cada
procedimento. Por exemplo, nós não repetimos as
informações sobre como ligar/desligar o aparelho, ajustar o
volume, alterar os efeitos de som e outras informações que
são explicadas na seção “Operações comuns”, nas páginas
9 e 10.
• As seguintes marcas são utilizadas neste manual:
Avisos e advertências utilizados para prevenir
danos ou riscos de incêndio/choque elétrico.
Também informam o que se pode ou não fazer
para obter o melhor desempenho possível do
aparelho.
Dá informações e dicas sobre o que você deve
saber.
Fontes de alimentação
• Ao desconectar o cabo de alimentação CA da tomada, puxe
sempre pelo plugue e não pelo cabo.
NÃO manuseie o cabo de alimentação CA com as
mãos molhadas.
Condensação de umidade
A umidade pode ser condensada na lente que fica dentro do
aparelho:
• Quando a sala começa a aquecer
• Em uma sala úmida
• Quando o aparelho é levado diretamente de um local frio
para um local quente
Se isso ocorrer, o aparelho poderá apresentar problemas de
funcionamento. Nesse caso, deixe-o ligado por algumas horas
até que a umidade se evapore, desconecte o cabo de
alimentação CA da tomada e conecte-o novamente.
Outros
• Se qualquer líquido ou objeto metálico cair dentro do
aparelho, desconecte o cabo de alimentação CA da tomada
e consulte o seu revendedor antes de realizar qualquer
operação.
• Se não for operar a unidade durante um longo período de
tempo, desligue o cabo de alimentação CA.
• A etiqueta de classificação está localizada na parte de baixo
do produto.
Precauções
Instalação
• Instale o aparelho em um local nivelado, seco e nem muito
quente nem muito frio—entre 5˚C e 35˚C.
• Instale o aparelho em um local com ventilação adequada
para evitar o aquecimento interno do mesmo.
• Deixe uma distância suficiente entre o aparelho e a TV.
• Mantenha os alto-falantes afastados da TV para evitar
interferências.
NÃO instale o aparelho próximo a fontes de calor
ou em um local sujeito à luz solar direta, poeira
excessiva ou vibrações.
1
NÃO desmonte a aparelho. No interior desta não
existem peças cuja manutenção possa ser
efectuada pelo utilizador.
Se ocorrer algum problema, desligue o cabo de alimentação
CA e entre em contacto com o seu concessionário.
Page 55

Índice
Localização dos botões ...................................................... 3
Aparelho principal ..................................................................... 3
Controle remoto ......................................................................... 5
Primeiros passos ................................................................ 6
Desembalagem .......................................................................... 6
Conexão das antenas AM e FM ................................................. 6
Conectando os alto-falantes....................................................... 6
Conectando outros equipamentos.............................................. 7
Ajustando o seletor de voltagem ............................................... 7
Colocando as pilhas no controle remoto ................................... 8
Operações comuns ............................................................. 9
Acertando o relógio ................................................................... 9
Ligando o aparelho .................................................................... 9
Desligamento automático do aparelho (Auto Standby) ............ 9
Seleção da fonte....................................................................... 10
Ajustando o volume................................................................. 10
Emudecimento gradativo (FADE MUTING) .......................... 10
Seleção dos modos de som ...................................................... 10
Reforço dos graves .................................................................. 10
Verificação da hora do relógio durante a reprodução .............. 10
Português
Reprodução de discos ...................................................... 11
Reproduzindo o disco inteiro—Reprodução normal ............... 11
Operações básicas com disco .................................................. 12
Programação da ordem de reprodução das faixas
—Reprodução programada ................................................ 12
Repetindo faixas—Reprodução repetição ............................... 13
Reproduzindo aleatoriamente—Reprodução aleatória ............ 14
Exibição do tempo restante durante a reprodução................... 14
Reprodução de fitas......................................................... 15
Reproduzindo uma fita ............................................................ 15
Sintonização de emissoras FM e AM ............................. 16
Ajuste do espaçamento do intervalo do sintonizador .............. 16
Sintonizando uma emissora ..................................................... 16
Programando emissoras ........................................................... 16
Sintonizando uma emissora pré-programada .......................... 17
Uso de um equipamento externo .................................... 17
Audição de um equipamento externo ...................................... 17
Gravação .......................................................................... 18
Gravando uma fita ................................................................... 18
Gravação de discos—Gravação sincronizada de disco ........... 19
Utilização dos timers ....................................................... 20
Usando o timer diário e timer de gravação.............................. 20
Utilizar o timer de adiamento (snooze) ..................................... 21
Utilizando o timer de desligamento automático ...................... 22
Manutenção ..................................................................... 23
Detecção de problemas.................................................... 24
Especificações .................................................................. 24
2
Page 56

Localização dos botões
OPEN
COMPACT
DIGITAL AUDIO
DAILY TIMER/SNOOZE
1
3
2
COMPACT
DIGITAL AUDIO
STANDBY
CD
PHONES DOWN
4
#/8
7¢
UP AUX
PUSH OPEN
TAPE FM/AM AUX
VOLUME
+—
MICRO COMPONENT SYSTEM
AUTO REVERSE
REC
4
5
6
7
8
p
9
q
w
e
r
t
Familiarize-se com os botões do aparelho.
Aparelho principal
Vista de cima
Português
Vista de frente
3
Page 57

Visor
SOUND
BASS
ON
DAILY 123
OFF
ALL GR. TOTAL REMAIN
MHz
k
Hz
SLEEP SNOOZEREC ST MP3MONO
SOUND BASS REC
A.STANDBYPRGM RANDOM
452316789pq
i
uy
t
a;o
r
w
e
Consulte as páginas entre parênteses para obter mais informações.
Continuação
Português
Aparelho principal
1 Bandeja do disco (11)
2 ) OPEN (bandeja do disco aberta) (11)
3 Botão DAILY TIMER/SNOOZE (21)
4 Sensor remotoção (5)
5 Luz STANDBY (9)
6 Botão (STANDBY/ON) (9)
7 Botães de seleçao
• CD #¥8, TAPE ¤‹, FM/AM, AUX
Pressionar um desses botões também liga o aparelho.
8 Tomada PHONES (10)
9 Botõe de controlo múltiplo
• DOWN 4, 7, UP ¢
p Suporte do toca-fitas (15, 18, 19)
q Visor
w Controle VOLUME + / – (10, 16)
e Tomada AUX (7, 17)
r Botão REC (18, 19)
t Botão PUSH OPEN (15, 18)
Visor
1 Indicadores DAILY 1/2/3 (número do timer)
2 Indicador (timer)
3 Indicadores ON/OFF (timer activado/desactivado)
4 Indicador REC (timer de gravação)
5 Indicador (pasta de grupo)
6 Indicador SLEEP
7 Indicador SNOOZE
8 Indicadores de modo de FM
• MONO, ST (estéreo)
9 Indicador MP3
p Indicador
q Indicador
w Indicador REC (gravação)
e Indicador 2 3 (direção da fita)
r Indicadores de repetição
• , ALL, GR. (grupo)
t Indicador (modo de reversão)
y Indicador PRGM (programa)
u Indicador RANDOM
i Visor principal
o Indicadores de tempo restante
• TOTAL, REMAIN
; Indicador A.STANDBY
a Indicadores freqüência
• MHz, kHz
4
Page 58

REC
STANDBY/ON
SLEEP
123
456
7809
CLOCK
/TIMER
PRESET
GROUP
UP
DOWN
PRESET
GROUP
SET
CANCEL
CD
RANDOM
TAPE
PROGRAM
FM/AM
REPEAT
AUX
OVER
REMAIN
SOUND/HBS BEAT CUT REV.MODE FADE MUTING
VOLUME
DISPLAY FM MODE A. STANDBY
3/8
w
e
y
u
i
;
1
2
3
4
5
7
9
p
t
8
q
a
r
6
o
Controle remoto
Consulte as páginas entre parênteses para obter mais informações.
Português
1 Botão STANDBY/ON (9, 21)
2 Botão SLEEP (22)
3 Botão CLOCK/TIMER (9, 20)
4 Botão SET (9, 16, 20, 21)
5 Botão CANCEL (20, 21)
6 Botões de seleção
• CD 3¥8, TAPE 2 3, FM/AM, AUX
Pressionar um desses botões também liga o aparelho.
7 Botão RANDOM (14)
8 Botão PROGRAM (12, 13)
9 Botões de controlo múltiplo
• PRESET GROUP /UP, PRESET GROUP /DOWN
• 4, 7, ¢
p Botão SOUND/HBS (10)
q Botão BEAT CUT (18)
w Botão DISPLAY (10)
e Botão A. (automático) STANDBY (9)
r Botão FM MODE (16)
t Botões numéricos (12, 17)
y Botão OVER (12, 17)
u Botão REMAIN (14)
i Botão REPEAT (13)
o Botãos VOLUME + / – (10, 21)
; Botão FADE MUTING (10)
a Botão REV. (reversão) MODE (15, 18, 19)
COMPACT
DIGITAL AUDIO
STANDBY
PHONES DOWN
CD
#/8
4
TAPE FM/AM AUX
UP AUX
7¢
VOLUME
+—
Ao utilizar o controle remoto, aponte-o para o
sensor remoto localizado no painel frontal.
5
Page 59

Primeiros passos
AM LOOP
FM ANTENNA
1
2,3
Ò
Â
Não ligue o cabo de alimentação de CA antes
que todas as outras conexões tenham sido feitas.
Continuação
Desembalagem
Antes de desembalar, certifique-se de que todos os seguintes
itens estejam incluídos.
O número entre parênteses indica a quantidade de peças
fornecida.
• Antena de quadro AM (1)
• Adaptador de plugue de CA (1)
• Controle remoto (1)
• Pilhas (2)
Se algum item estiver faltando, consulte o seu revendedor
imediatamente.
Conexão das antenas AM e FM
Antena de quadro AM
1
(fornecida)
Conectando os alto-falantes
Vo c ê pode conectar os alto-falantes usando os cabos de
alto-falante.
Vermelho
Preto
Vermelho
Cabo de
alto-falante
Preto
Cabo de
alto-falante
Português
2
Antenna FM
1
Conecte a antena AM de quadro fornecida ao
terminal AM LOOP.
Coloque a antena afastada do aparelho e ajuste sua
posição para a melhor recepção.
2
Ajuste a posição para a antena FM para a
melhor recepção.
Para uma melhor recepção de FM e AM
• Certifique-se de que os condutores de antena não toquem os
outros terminais e cabos de conexão.
• Mantenha as antenas afastadas das peças metálicas do aparelho,
cabos de conexão e cabo de alimentação CA.
Caixa acústica direita
1
Segure o grampo do terminal de alto-falante.
2
Insira a extremidade do cabo do alto-falante
Caixa acústica esquerda
no terminal.
Ligue os terminais do aparelho aos alto-falantes segundo
a polaridade correta: cabo vermelho a ª e cabo preto
a ·.
3
Solte o grampo.
IMPORTANTE:
• Utilize somente alto-falantes com a impedância
indicada nos terminais localizados na parte posterior
do aparelho.
• NÃO ligue mais de um altifalante a um terminal de
altifalante.
6
Page 60

L
R
AUX
AC 110-127V
VOLTAGE SELECTOR
AC 220-240V
Não ligue o cabo de alimentação de CA antes que todas as outras conexões tenham sido feitas.
Para retirar as tampas dos alto-falante
As tampas dos alto-falantes são removíveis como mostrado
na ilustração abaixo.
Furos
Projeções
Tampa do
alto-falante
Português
Para retirar a tampa do alto-falante, coloque os dedos ao
redor da projeção no topo da tampa e, em seguida, puxe-a
gentilmente para si enquanto segura o lado.
Faça o mesmo para o resto das projeções uma por vez.
Para instalar a tampa do alto-falante, coloque as projeções
da tampa nos furos na caixa acústica.
Se o equipamento de áudio tiver tomadas de pino pino para
saída de áudio:
Certifique-se de que os plugues de pino dos cabos de áudio
sejam coloridos—os plugues e jaques brancos são para os
sinais de áudio do canal esquerdo, e os vermelhos são para os
sinais de áudio do canal direito.
Ajustando o seletor de voltagem
Antes de ligar a energia, ajuste o seletor de voltagem
localizado na parte posterior do aparelho de acordo com a
voltagem da sua região.
Utilize uma chave de fenda para mover o seletor de voltagem
de modo que a voltagem seja a mesma da rede elétrica local.
(Veja a capa traseira).
Conectando outros equipamentos
Para conectar equipamentos de áudio
É possível ligar o equipamento de áudio—utilizado somente
como dispositivo de reprodução.
• NÃO conecte nenhum equipamento
enquanto a energia estiver ligada.
• NÃO ligue nenhum equipamento até que
todas as conexões estejam concluídas.
Para reproduzir o som de outros equipamentos através
deste aparelho, conecte as tomadas de saída de áudio do
outro equipamento à tomada AUX utilizando cabos de áudio
com plugues miniaturas (não fornecidos).
À saída de áudio
OU
Ao equipamento
de áudio
7
À saída de áudio
Page 61

Colocando as pilhas no controle remoto
Insira as pilhas—AAA/UM-4/R03—no controle remoto,
coincidindo a polaridade (+ e –) das pilhas com as marcas + e
– do compartimento de pilhas.
Quando o controle remoto não operar mais o aparelho, troque
as duas pilhas ao mesmo tempo.
1
• NÃO utilize uma pilha usada junto com uma
nova.
• NÃO utilize pilhas de tipos diferentes ao mesmo
tempo.
• NÃO exponha as pilhas ao calor ou fogo.
• NÃO deixe as pilhas no compartimento quando
não for utilizar o controle remoto por um período
prolongado. Caso contrário, ele poderá ser
danificado pelo vazamento das pilhas.
AGORA poderá ligar o aparelho e
qualquer outro equipamento ligado.
Português
IMPORTANTE:
Verifique todas as ligações antes de ligar o cabo de
alimentação.
2
AAA/UM-4/R03
3
8
Page 62

Operações comuns
CLOCK
/TIMER
PRESET
GROUP
UP
DOWN
PRESET
GROUP
SET
PRESET
GROUP
UP
DOWN
PRESET
GROUP
SET
CLOCK
/TIMER
STANDBY/ON
A. STANDBY
Acertando o relógio
Antes de continuar a operar o aparelho, ajuste primeiro o
relógio da mesma. Quando ligar o cabo de alimentação, os
números “0:00” começam a piscar no visor.
Vo c ê pode ajustar o relógio se o aparelho estiver ligado ou
desligado.
APENAS no controle remoto:
1
Pressione CLOCK/TIMER.
A indicação das horas começa a piscar.
Português
2
Pressione UP ou DOWN para
ajustar as horas e, em seguida,
pressione SET.
• Mantenha UP ou DOWN
pressionado para mudar a indicação
das horas continuamente.
A indicação dos minutos começa a piscar.
• O relógio funciona mesmo durante o ajuste.
3
Pressione UP ou DOWN para
ajustar os minutos e, em
seguida, pressione SET.
• Mantenha UP ou DOWN
pressionado para mudar a indicação
dos minutos continuamente.
O relógio incorporado começa a funcionar.
Para ajustar o relógio
APENAS no controle remoto:
1
Pressione CLOCK/TIMER
repetidamente para exibir a
indicação da hora atual.
A indicação das horas começa a piscar.
2
Repita os passos 2 e 3 na coluna esquerda.
Ligando o aparelho
Para ligar o aparelho, pressione
STANDBY/ON .
A luz STANDBY no aparelho apaga-se.
• Ao pressionar o botão de fonte—CD 3/8,
TAPE 2 3, FM/AM e AUX, o aparelho é ligado
automaticamente.
Para desligar o aparelho (modo standby), pressione
STANDBY/ON de novo.
A luz STANDBY se acende em vermelho no aparelho.
•“0:00” ficará piscando no visor até que você ajuste o
relógio incorporado. Depois de ajustar o relógio, a hora do
relógio aparecerá no visor enquanto o aparelho estiver no
modo standby.
• Mesmo quando o aparelho está no modo de standby, uma
pequena quantidade de energia é consumida.
Para desligar totalmente a alimentação, desconecte o cabo
de alimentação da tomada de CA.
Desligamento automático do aparelho
(Auto Standby)
• Se você desconectar o cabo de alimentação de CA ou se
houver uma falha de energia
O relógio é reposicionado a “0:00”. Se isso acontecer, ajuste o
relógio de novo.
• O relógio pode ganhar ou perder 1 ou 2 minutos por mês
Se isto acontecer, ajuste o relógio novamente.
9
Com a função Auto Standby, o aparelho é desligado
automaticamente (entra no modo standby) aproximadamente
3 minutos após a reprodução de um disco ou fita.
• Vo c ê também pode desligar o aparelho automaticamente
usando o temporizador de desligamento automático.
(Consulte a página 22).
APENAS no controle remoto:
Para ativar a função Auto Sandby, pressione
A.STANDBY.
O indicador A.STANDBY aparece no visor.
• Quando a reprodução é parada, o indicador
A.STANDBY começar a piscar no visor.
Para desativar a função Auto Sandby, pressione
A.STANDBY de novo.
O indicador A.STANDBY se apaga.
Page 63
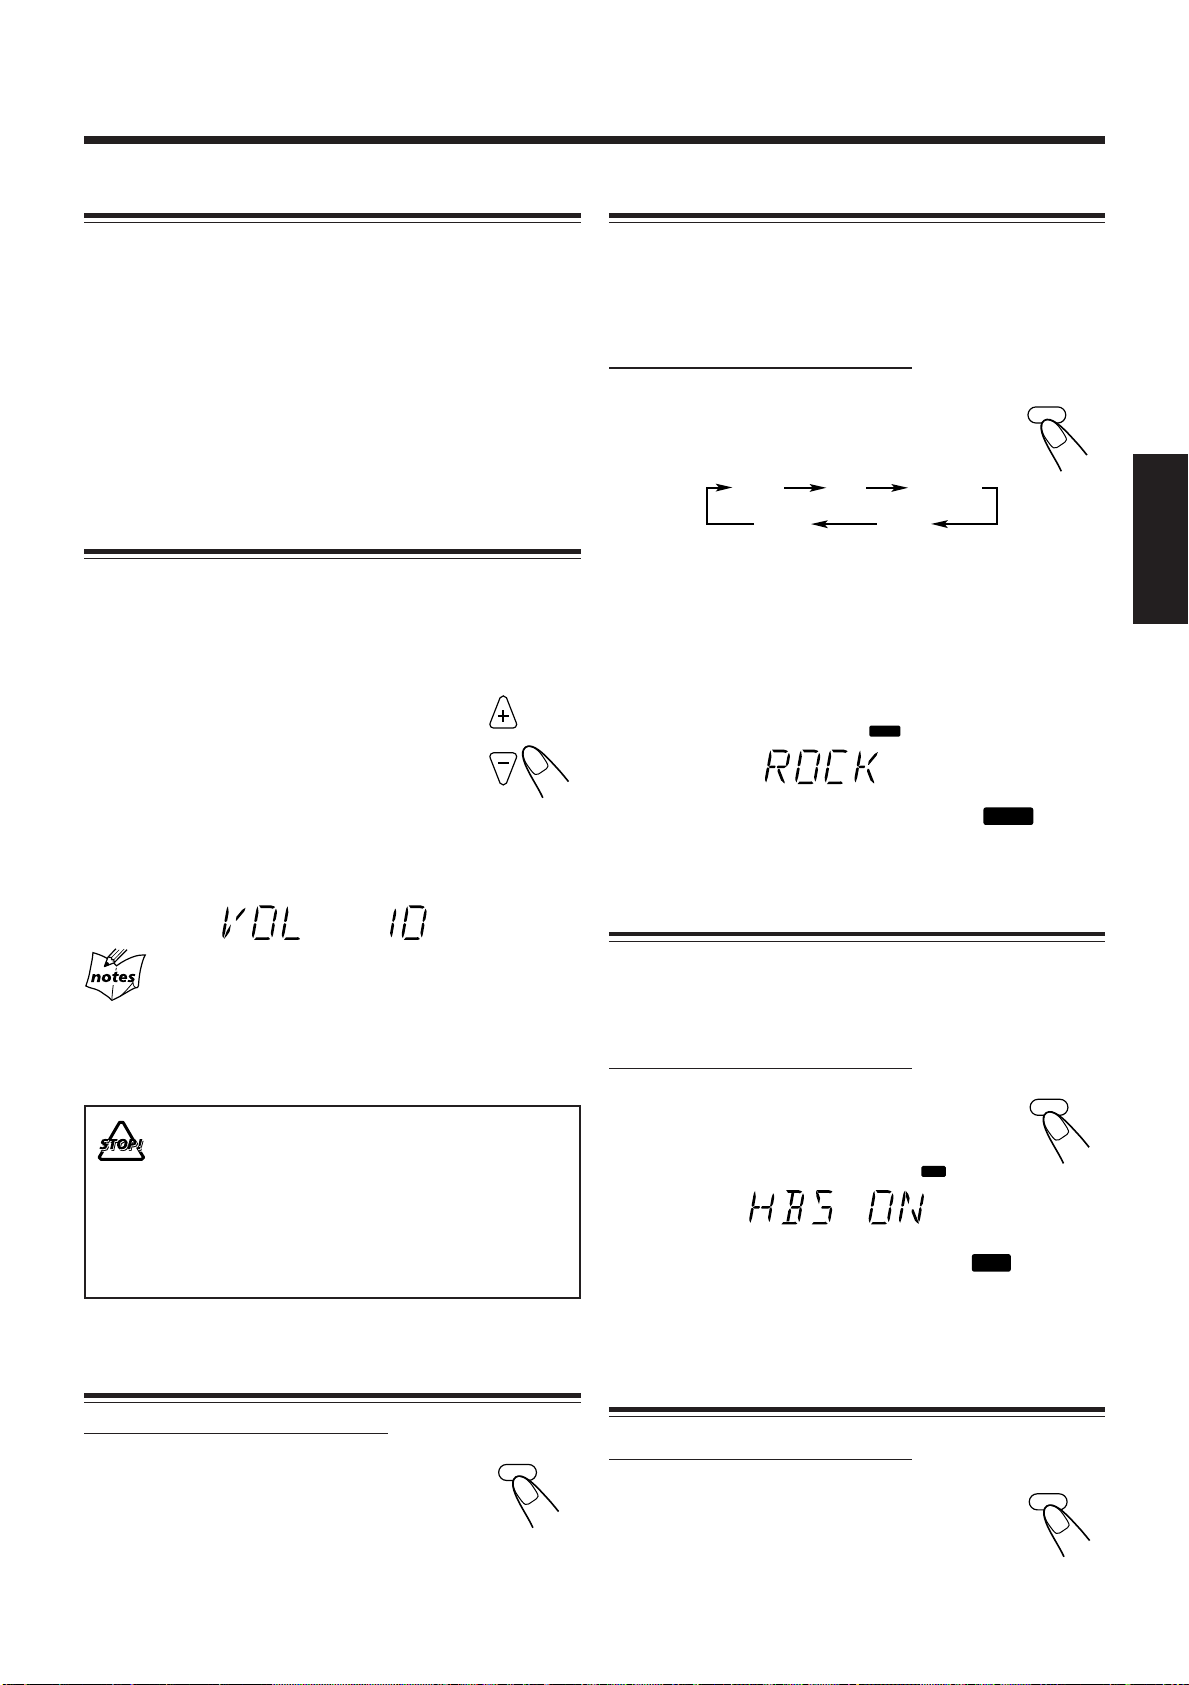
ROCK
JAZZ
FLAT
CLASSIC
POP
VOLUME
FADE MUTING
SOUND/HBS
SOUND
SOUND/HBS
BASS
DISPLAY
Seleção da fonte
SOUND
BASS
Seleção dos modos de som
Para selecionar a fonte, pressione CD 6, TAPE 2 3,
FM/AM ou AUX.
• Quando você selecionar CD como a fonte, a reprodução
começará automaticamente.
Para operar o CD player, consulte as páginas de 11 a 14.
Para operar o toca-fitas, consulte a página 15.
Para operar o sintonizador (FM ou AM), consulte as
páginas de 16 a 17.
Para gravar em uma fita, consulte as páginas 18 e 19.
Para utilizar um equipamento externo, consulte a página 17.
Ajustando o volume
O nível de volume pode ser ajustado somente com o aparelho
ligado. Você pode ajustar o nível de volume de “VOL MIN”,
“VOL 1” – “VOL 29” e “VOL MAX”.
• O nível do volume não afeta a gravação.
Para aumentar o volume, pressione VOLUME
+ (ou gire o controle VOLUME + / – para a
direita no aparelho).
Para baixar o volume, pressione VOLUME –
(ou gire o controle VOLUME + / – para a
esquerda no aparelho).
• Vo c ê pode mudar o nível do volume continuamente
mantendo um dos botões pressionado.
Vo c ê pode selecionar um dos 4 modos de som.
• Esta função também afeta o som dos fones de ouvido.
• Esta função só afeta o som de reprodução; ela não afeta a
gravação.
APENAS no controle remoto:
Para selecionar os modos de som, pressione
SOUND/HBS repetidamente.
• Cada vez que pressionar o botão, o modo de
som mudará como segue:
(Cancelado)
ROCK:
POP:
CLASSIC:
JAZZ:
FLAT:
Quando o modo de som é ativado, o indicador
acende no visor.
Som potente que enfatiza os agudos e graves.
Mais presença nos vocais e na gama média.
Som melhorado com agudos finos e graves
amplos.
Freqüências inferiores acentuadas para música
jazz.
O efeito do equalizador é cancelado.
se
Português
Para ouvir sozinho
Conecte um par de fones de ouvido à tomada PHONES. Nenhum
som sairá dos alto-falantes. Certifique-se de abaixar o volume antes
de conectar ou colocar os fones de ouvido.
NÃO desligue o aparelho (no modo standby) com
o volume ajustado em um nível extremamente alto;
caso contrário, o súbito impacto da energia sonora
poderá danificar sua audição, os alto-falantes e/ou
os fones de ouvido quando você ligar o aparelho
ou reproduzir uma fonte.
LEMBRE-SE, não é possível ajustar o nível de
volume com o aparelho no modo standby.
Emudecimento gradativo (FADE MUTING)
APENAS no controle remoto:
Pressione FADE MUTING.
O nível do volume diminui para “VOL MIN” e
“MUTING” aparece no visor.
Para cancelar o emudecimento, pressione FADE MUTING
de novo. O nível do volume é restaurado para o nível anterior.
Reforço dos graves
Vo c ê pode acentuar os graves.
• Esta função só afeta o som de reprodução; ela não afeta a
gravação.
APENAS no controle remoto:
Mantenha SOUND/HBS pressionado.
• Cada vez que você mantém SOUND/HBS
pressionado, a função HBS é ativada ou ativada.
Quando a função HBS é ativada, o indicador
no visor.
se acende
Verificação da hora do relógio durante a
reprodução
APENAS no controle remoto:
Pressione DISPLAY.
• Cada vez que você pressiona o botão, o visor
muda entre a indicação do relógio e a indicação
normal alternadamente. Depois de mudar o
visor para a indicação do relógio, operar qualquer botão ou
controle também muda o visor para a indicação normal.
10
Page 64

Reprodução de discos
MP3
MP3
CD
3/8
PRESET
GROUP
PRESET
GROUP
UP
DOWN
Este aparelho foi concebida para reproduzir os tipos de
discos—CD, CD-R e CD-RW.
Vo c ê pode reproduzir os discos que contêm faixas no
formato de CD de música ou arquivos MP3 no formato
ISO 9660.
• Neste manual, chamaremos um disco gravado com
arquivos MP3 de “disco MP3” e “arquivo” também será
referido como “faixa”.
Quando reproduzir CD-Rs ou CD-RWs
• Antes de reproduzir CD-Rs ou CD-RWs, leia atentamente
suas instruções ou precauções.
• CD-Rs (CD graváveis) e CD-RWs (CD reescrevíveis)
editados pelo usuário só podem ser reproduzidos se tiverem
sido “finalizados”.
• Este aparelho suporta discos de “sessões múltiplas” (até 5
Português
sessões).
• Este aparelho não pode reproduzir discos “escritos em
pacote”.
• Alguns CD-Rs ou CD-RWs podem não ser reproduzidos
neste aparelho por suas características, danos ou manchas
nos discos, ou se a lente do player estiver suja.
• Os discos CD-RW podem requerer um tempo de leitura
mais longo. Isso ocorre porque a refletância dos CD-RWs é
mais baixa que a dos discos regulares.
Notas para arquivos MP3
• O player só pode reconhecer arquivos com “MP3” ou
“mp3” como as extensões, que podem estar em qualquer
combinação de letras maiúsculas ou minúsculas. O nome
do arquivo precisa ter até 20 caracteres.
• Este aparelho reconhece arquivos e pastas em um disco nas
seguintes condições:
– até 640 arquivos MP3.
– até 256 pastas (incluindo a pasta raiz).
– até 8 níveis (incluindo a pasta raiz).
• Recomendamos que você grave o seu material em uma taxa
de amostragem de 44,1 kHz utilizando uma taxa de
transferência de dados de 128 kbps.
• Alguns arquivos MP3 ou discos podem não ser
reproduzidos em virtude de suas características ou
condições de gravação.
• Os discos MP3 requerem um tempo de leitura mais longo
do que os discos normais em virtude da complexidade da
configuração das pastas/arquivos.
• MP3i e MP3 Pro não se encontram disponíveis.
Notas gerais
Em geral, você terá a melhor performance mantendo os
discos e o mecanismo limpos.
• Guarde os discos em seus estojos, e mantenha-os em
armários ou em prateleiras.
• Mantenha a bandeja do disco fechada quando não a estiver
usando.
• O uso continuado de discos de forma irregular (forma de
coração, octogonal, etc.) pode danificar o aparelho.
11
Reproduzindo o disco inteiro—Reprodução normal
1
Pressione ) OPEN no topo do aparelho.
A bandeja do disco abre-se.
• Vo c ê pode inserir um disco ao mesmo tempo que escuta
uma outra fonte de reprodução.
2
Coloque um disco na bandeja, com o rótulo
voltado para cima.
Correto
3
Feche a bandeja do disco com cuidado.
4
Pressione CD 6.
O aparelho será ligado automaticamente e a
fonte mudará para o CD player.
Depois de carregar um disco, a primeira faixa do disco
começará a tocar.
Quando reproduzir
um CD de áudio:
Número da
faixa atual
Tempo decorrido
de reprodução
Quando reproduzir um
disco MP3:
Número da
faixa atual
• O disco pára automaticamente quando a última faixa
terminar de tocar.
Enquanto “READING” (lendo) estiver exibido no visor
Vo c ê não pode realizar nenhuma operação até que o aparelho
termine a leitura do disco.
Enquanto reproduz um disco MP3
A informação de etiqueta ID3 (o nome do título, artista e álbum até
30 caracteres) será exibida no visor. Quando o nome é muito longo
para ser exibido de uma vez, ele é rolado.
Para parar a reprodução, pressione 7.
O número total de faixas (ou grupos) e o
tempo total de reprodução aparecem no visor.
Quando parar a
reprodução de um
CD de áudio:
Número total
de faixas
Tempo total de
reprodução
Quando parar a reprodução
de um disco MP3:
Indicador da pasta de grupos
Número total
de grupos
• O tempo total de reprodução não aparece quando um disco
MP3 é carregado.
Incorreto
Indicador MP3
Tempo decorrido
de reprodução
Número total
de faixas
Page 65

CD
3/8
PRESET
GROUP
PRESET
GROUP
UP
DOWN
123
456
7809
OVER
PRESET
GROUP
PRESET
GROUP
UP
DOWN
PROGRAM
PRESET
GROUP
PRESET
GROUP
UP
DOWN
PROGRAM
123
456
7809
OVER
PRGM
PRGM
Continuação
Para remover o disco, pressione ) OPEN no aparelho e, em
seguida, retire o disco segurando pelas bordas enquanto
pressiona ligeiramente o pivô do aparelho.
• Se o disco não puder ser lido corretamente (por exemplo, se
estiver riscado) ou se for inserido um CD-R ou CD-RW
danificado
A reprodução não terá lugar.
• Se não houver nenhum disco
“NO DISC” aparecerá no visor.
NÃO tente abrir ou fechar a bandeja com as mãos,
pois poderá danificá-la.
Operações básicas com disco
Enquanto você estiver ouvindo um disco, é possível realizar
as seguintes operações.
Para interromper a reprodução por um momento
Durante a reprodução, pressione CD 3/8.
Durante uma pausa, o número da faixa atual e o
tempo decorrido de reprodução piscam no visor.
Para localizar um certo ponto em uma faixa
Durante a reprodução, mantenha ¢ ou 4
(ou UP ¢ ou DOWN 4 no aparelho)
pressionado.
• ¢ (UP ¢): Avança as faixas
rapidamente.
• 4 (DOWN 4): Reverte as faixas
rapidamente.
Enquanto reproduz um disco MP3
Esta função não se encontra disponível.
Programação da ordem de reprodução das
faixas—Reprodução programada
É possível definir a ordem de reprodução das faixas antes de
iniciar a reprodução. Você pode programar até 40 faixas.
APENAS no controle remoto:
1
Coloque um disco.
• Se a fonte atual não for o CD player, pressione CD 6
e, em seguida, 7 antes de proceder ao próximo passo.
Português
Para retomar a reprodução, pressione CD 3/8 novamente.
Para mudar de faixa
Antes ou durante a reprodução, pressione
¢ ou 4 (ou UP ¢ ou DOWN 4 no
aparelho) repetidamente.
• ¢ (UP ¢): Salta para o início da
• 4 (DOWN 4): Volta ao início da faixa atual ou faixas
Para seguir diretamente para outra faixa usando os
botões numéricos
APENAS no controle remoto:
Pressionar o(s) botão(ões) de número antes
ou durante a reprodução permite-lhe
reproduzir a faixa desejada.
Ex.: Para a faixa número 5, pressione 5.
Para a faixa número 15, pressione
OVER e, em seguida, pressione 1, 5.
Para a faixa número 20, pressione
OVER e, em seguida, pressione 2, 0.
(Apenas para disco MP3)
Para a faixa número 20, pressione OVER e,
em seguida, pressione 0, 2, 0.
Para a faixa número 156, pressione OVER e, em
seguida, pressione 1, 5, 6.
próxima faixa ou faixas
subseqüentes.
anteriores.
2
Pressione PROGRAM.
O indicador PRGM (programa) aparece no
visor.
3
Pressione ¢ ou 4 para
selecionar o número da faixa e,
em seguida, pressione
PROGRAM.
Número da faixa
Vo c ê também pode utilizar os botões
numéricos para selecionar um número
de faixa.
• Para a operação dos botões
numéricos, consulte “Para seguir
diretamente para outra faixa usando
os botões numéricos” na coluna
esquerda.
Quando programar desde um disco MP3
Pressionar PRESET GROUP
seleciona a primeira faixa de cada grupo.
Número do passo
do programa
ou PRESET GROUP
12
Page 66

PROGRAM
PRESET
GROUP
PRESET
GROUP
UP
DOWN
REPEAT
ALL
ALL
ALL GR.
PROGRAM
CD
3/8
PRESET
GROUP
PRESET
GROUP
UP
DOWN
PROGRAM
REPEAT
4
Repita a etapa 3 para programar outras
faixas de sua preferência.
5
Pressione CD 3/8.
As faixas são reproduzidas na ordem em que
você programou.
Se você tentar programar uma 41ª faixa
O termo “– – FULL – –” aparecerá no visor.
Para interromper a reprodução,
pressione 7.
Português
Repetindo faixas—Reprodução repetição
Sempre que desejar, você poderá repetir a reprodução de
todas as faixas, programas ou faixas individuais que estejam
sendo reproduzidos no momento.
APENAS no controle remoto:
Pressione REPEAT repetidamente
antes ou durante a reprodução.
• Cada vez que você pressiona o botão, a
reprodução repetida muda como segue, e os seguintes
indicadores de repetição se acendem no visor:
Indicadores de repetição
Para verificar o conteúdo programado
Vo c ê pode verificar o conteúdo do programa
pressionando PROGRAM repetidamente antes ou
depois da reprodução.
Para modificar o programa
Pressione PROGRAM repetidamente até que o
número do passo do programa que deseja
modificar apareça. Logo, siga o passo 3 do
procedimento de programação.
• Pressionar 0 apaga o passo selecionado.
Para adicionar faixas ao programa, pressione
PROGRAM repetidamente até que “0” apareça
como o número da faixa. Logo, siga o passo
3
do procedimento de programação.
Para apagar o programa
Pressione 7 antes ou após a reprodução.
O indicador PRGM desaparece do visor e
todo o conteúdo da memória é apagado (a
reprodução normal é restaurada).
• As faixas programadas também são apagadas
nos seguintes casos:
– Ao pressionar ) OPEN para abrir a bandeja do disco.
– Ao desligar o aparelho.
– Ao mudar a fonte.
Quando reproduzir um CD de áudio:
Cancelado
ALL: Durante a reprodução normal, repete todas as
faixas.
Durante a reprodução programada, repete
todas as faixas no programa.
: Repete uma faixa.
Quando reproduzir um disco MP3:
Cancelado
ALL: Durante a reprodução normal, repete todas as
faixas.
Durante a reprodução programada e
reprodução aleatória, repete todas as faixas no
programa.
GR.: Durante a reprodução normal, repete todas as
faixas em um grupo.
Durante a reprodução programada ou
reprodução aleatória, esta função não se
encontra disponível.
: Repete uma faixa.
Durante a reprodução aleatória, esta função
não se encontra disponível.
Durante a reprodução programada
A função Auto Standby não funciona.
13
Para cancelar a reprodução repetida,
pressione REPEAT repetidamente até que o
indicador de repetição se apague.
Page 67

REMAIN
RANDOM
RANDOM
REMAIN TOTAL REMAIN*
TOTAL REMAIN
Reproduzindo aleatoriamente
—Reprodução aleatória
Exibição do tempo restante durante a
reprodução
Vo c ê pode reproduzir as faixas aleatoriamente.
APENAS no controle remoto:
Pressione RANDOM.
O indicador RANDOM se acende no visor.
Para sair da reprodução aleatória, pressione 7 ou
RANDOM.
O indicador RANDOM se apaga.
• Não é possível ativar a função de reprodução aleatória
durante a reprodução programada.
Vo c ê pode exibir o tempo restante da faixa/disco atual e o
tempo decorrido da faixa/disco atual durante reprodução.
APENAS no controle remoto:
Pressione REMAIN repetidamente.
Quando reproduzir um CD de áudio:
• Cada vez que você pressiona o botão, o visor muda como
segue, e os seguintes indicadores de tempo restante se
acendem no visor:
Português
Indicadores de tempo restante
(Nenhum indicação)
REMAIN: Mostra o tempo restante da faixa atual.
TOTAL REMAIN: Mostra o tempo restante do disco.
Nenhuma indicação: Mostra o tempo decorrido da faixa atual.
* O tempo restante do disco (TOTAL REMAIN) não será
exibido nos seguintes casos:
– Durante a reprodução aleatória.
– Durante a reprodução programada.
Quando reproduzir um disco MP3:
• Cada vez que pressionar o botão, o visor mudará como
segue:
Informação de etiqueta ID3*
Indicação
normal
Nome da pasta**/
nome do arquivo
* A informação de etiqueta ID3 mostra o nome do título,
artista e álbum em seqüência.
Se um arquivo não tiver nenhum informação, “NO INFO”
aparece.
** Quando um arquivo não pertence a nenhuma pasta,
“ROOT” aparece.
14
Page 68

Reprodução de fitas
PUSH OPEN
DOWN
4 7 ¢
UP
DOWN
4 7 ¢
UP
PUSH OPEN
REV.MODE
TAPE
PRESET
GROUP
PRESET
GROUP
UP
DOWN
PRESET
GROUP
PRESET
GROUP
UP
DOWN
Reproduzindo uma fita
É possível reproduzir fitas tipo I.
1
Pressione PUSH OPEN.
O suporte do toca-fitas abre-se.
Português
2
Coloque uma fita cassete no toca-fitas com a
parte exposta voltada para baixo.
Se não houver qualquer cassete inserida quando
pressionar TAPE ¤ ‹
A mensagem “NO TAPE” a exibida no visor.
Para interromper a reprodução,
pressione 7.
Para bobinar rapidamente para a
esquerda ou para a direita, pressione
¢ ou 4 (ou UP ¢ ou DOWN
4 no aparelho).
O indicador de direção da fita ( 3 ou 2 )
começa a piscar rapidamente no visor.
3
Feche o suporte de fita gentilmente.
• Quando há uma fita dentro do suporte de fita, o
4
Pressione TAPE ¤ ‹.
A reprodução começa (se o aparelho estivesse
no modo standby, o mesmo seria ligado
automaticamente).
O indicador de direção da fita ( 3 ou 2 )
começa a piscar lentamente no visor.
• Sempre que pressionar o botão, a direção da fita muda:
Quando a fita chega ao final, o toca-fitas pára
automaticamente se o modo de reversão estiver definido
como ou . (Consulte “Para reproduzir os dois
lados—Modo de reversão”.)
15
indicador de direção da fita ( 3 ) se acende no visor.
3: reproduz o lado frontal.
2: reproduz o lado reversa.
Para retirar a fita, pressione PUSH OPEN no
aparelho enquanto a reprodução estiver parada.
Para reproduzir os dois lados—Modo de reversão
Vo c ê pode ajustar o toca-fitas para reproduzir um lado de uma
fita, os dois lados uma vez ou os dois lados continuamente.
APENAS no controle remoto:
Pressione REV.MODE (modo de
reversão).
• Sempre que pressionar o botão, o modo de
reversão se altera da seguinte forma:
: O toca-fitas pára automaticamente depois da
reprodução dos dois lados da fita. Pára quando a
reprodução na direção 2 é finalizada.
: O toca-fitas continua a reproduzir ambos lados da
fita 10 vezes, e então pára a reprodução
automaticamente.
: O toca-fitas pára automaticamente depois da
reprodução de um lado da fita.
• NÃO desligue o aparelho durante uma
reprodução ou gravação de uma fita. O toca-fitas
ou a fita pode sofrer danos.
• O uso de fitas C-120 ou mais longas não é
recomendado, pois pode ocorrer a deterioração
das características e, além disso, essas fitas se
emperram facilmente nos roletes e eixos giratórios.
• Este aparelho não é compatível com as fitas tipo
II e tipo IV.
Page 69
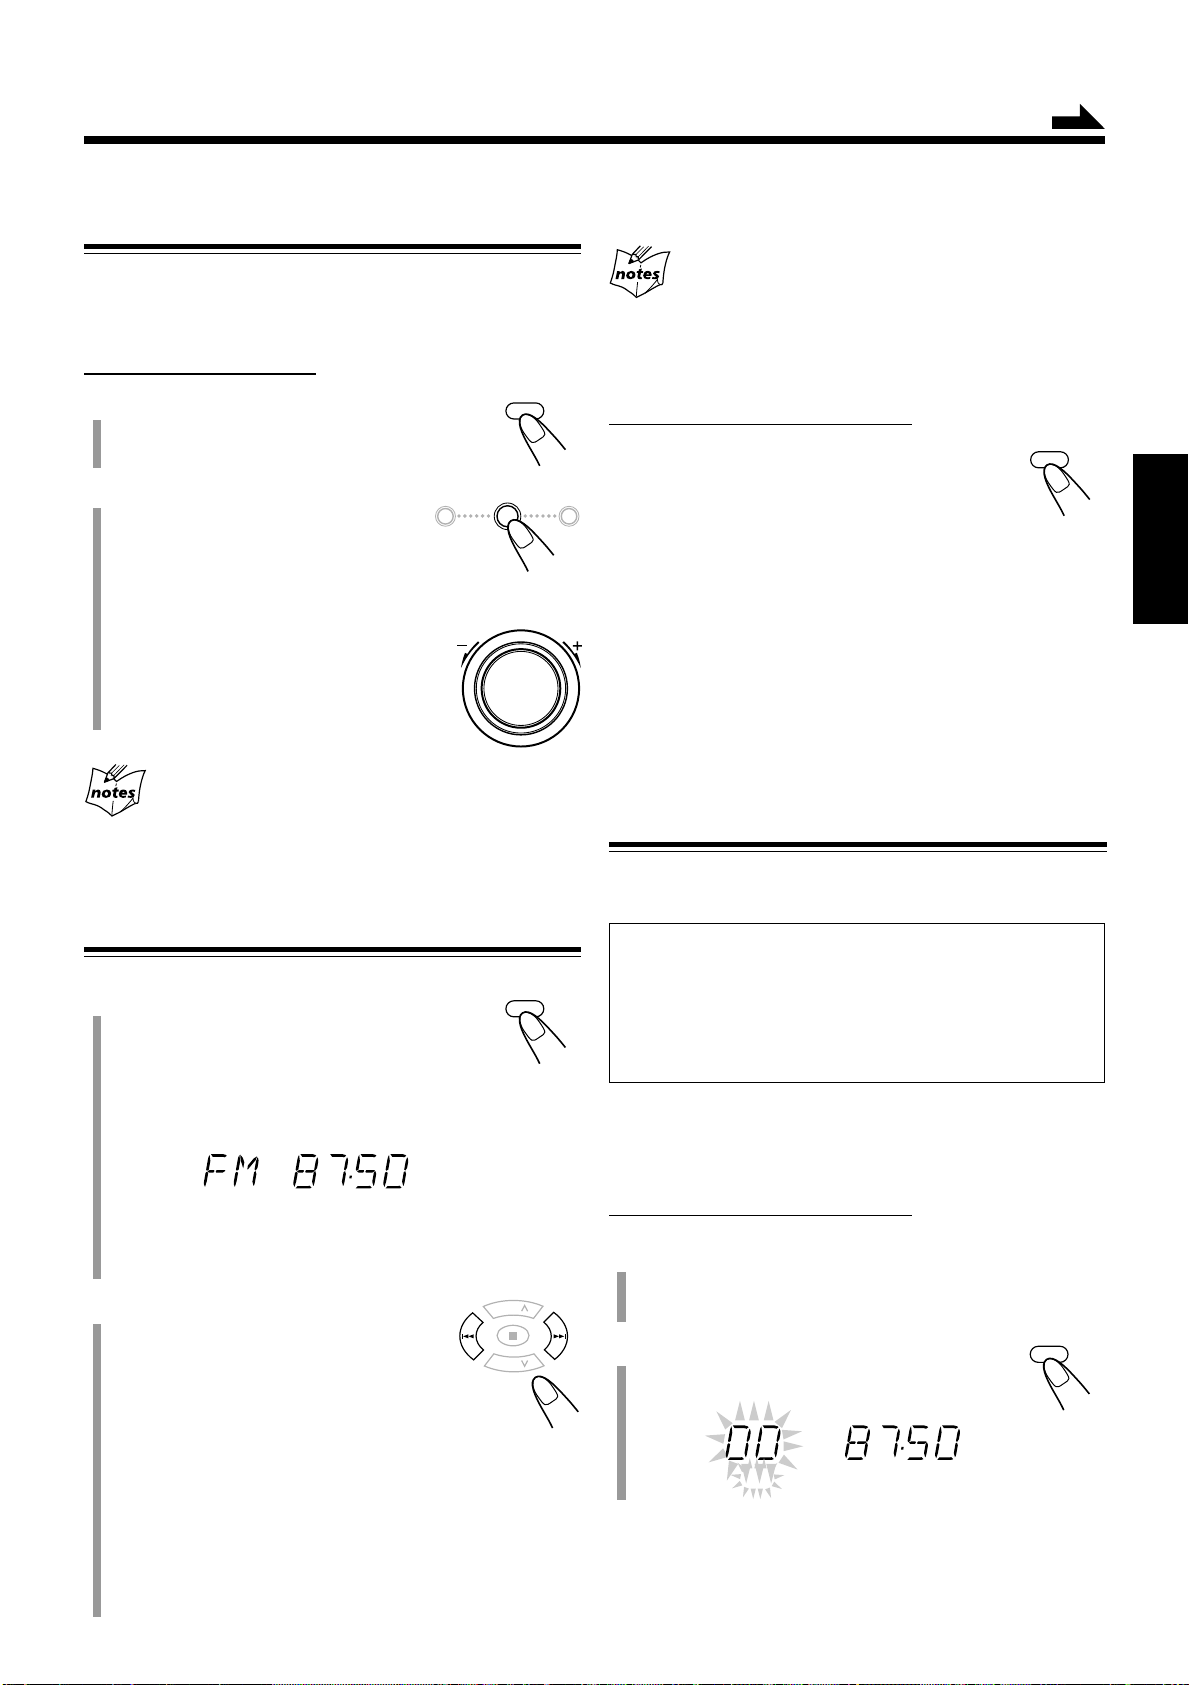
Sintonização de emissoras FM e AM
FM/AM
PRESET
GROUP
PRESET
GROUP
UP
DOWN
MHz
FM MODE
FM/AM
DOWN
4 7 ¢
UP
VOLUME
SET
MHz
PRGM
Continuação
Ajuste do espaçamento do intervalo do
sintonizador
Você só pode alterar o espaçamento do intervalo do
sintonizador FM ou AM enquanto estiver sintonizado em uma
emissora FM ou AM.
APENAS no aparelho:
1
Pressione FM/AM para selecionar
“FM” ou “AM”.
2
Gire o controle VOLUME
+ / – enquanto pressiona 7.
À medida que gira o controle
VOLUME + / –, o espaçamento do
intervalo para a banda selecionada
alterna-se como segue:
• Para FM: 50 kHz e 100 kHz*
• Para AM: 9 kHz e 10 kHz*
* Ajuste inicial
+
Para parar durante a busca, pressione ¢ ou 4 (ou
UP ¢ ou DOWN 4 no aparelho).
Quando pressionar ¢ ou 4 (ou UP ¢ ou
DOWN 4 no aparelho) repetidamente
A freqüência mudará passo a passo.
Para alterar o modo de recepção de FM
APENAS no controle remoto:
Quando uma transmissão FM estéreo estiver
difícil de receber ou com muito ruído,
pressione FM MODE de modo que “MONO”
apareça no visor. O indicador MONO também se
acende. A recepção melhorará.
Para restaurar o efeito estéreo, pressione FM MODE de
novo de modo que “STEREO” apareça no visor e o indicador
MONO se apague. No modo estéreo, você pode ouvir o som
estéreo quando um programa estéreo é transmitido.
O efeito estéreo também é restaurado quando:
• Mudar a banda (FM ou AM).
• Mudar a freqüência da emissora.
• Mudar a fonte de reprodução.
• Desligar (ou ligar) o aparelho.
Português
Ao mudar o ajuste
As emissoras pré-programadas tanto para FM como para AM são
apagadas. Você precisará programar as emissoras de novo. (Veja a
coluna direita.)
Sintonizando uma emissora
1
Pressione FM/AM para selecionar
“FM” ou “AM”.
O aparelho liga automaticamente, sintonizando a
última emissora previamente sintonizada FM ou AM.
• Sempre que pressionar o botão, a banda alterna entre
FM e AM.
• Se a emissora selecionada anteriormente estiver
armazenada em um número pré-programado, o número
pré-programado aparecerá em vez de “FM” ou “AM”.
2
Mantenha ¢ ou 4 (ou UP
¢ ou DOWN 4 no aparelho)
pressionado durante mais de 1
segundo.
Programando emissoras
Você pode pré-programar 25 emissoras FM e 15 AM
manualmente.
Em alguns casos, as freqüências de teste já foram
armazenadas, já que a função de programação do
sintonizador é examinada antes que o mesmo saia da
fábrica. Isso não é um mau funcionamento. Você pode
programar as emissoras desejadas na memória seguindo o
seguinte método de programação.
• Há um limite de tempo para realizar os seguintes passos. Se
o ajuste for cancelado antes que o finalize, comece de novo
a partir do passo 2.
APENAS no controle remoto:
1
Sintonize a emissora que deseja memorizar.
• Consulte “Sintonizando uma emissora” na coluna
esquerda.
2
Pressione SET.
“00” começa a piscar no visor.
• ¢ (UP ¢): Aumenta as freqüências.
• 4 (DOWN 4): Diminui as freqüências.
O aparelho começará a buscar as emissoras e parará
quando uma emissora com um sinal suficientemente forte
for sintonizada.
• Se um programa FM estiver sendo transmitido em
estéreo, o indicador ST (estéreo) se acenderá no visor
(somente quando a recepção estiver boa).
16
Page 70

123
456
7809
OVER
FM/AM
PRESET
GROUP
PRESET
GROUP
UP
DOWN
AUX
123
456
7809
OVER
PRESET
GROUP
PRESET
GROUP
UP
DOWN
MHz
PRGM
3
Pressione PRESET GROUP ou
PRESET GROUP
para
selecionar um número pré-
programado e, em seguida,
pressione SET.
A emissora pré-programada é armazenada na memória.
• Mesmo que você não pressione SET, a emissora será
armazenada automaticamente no número pré-
programado selecionado 5 segundos mais tarde.
Vo c ê também pode utilizar os botões
numéricos para selecionar um número
Português
pré-programado.
• Neste caso, você não precisa
pressionar SET.
Ex.: Para selecionar o número
pré-programado 5, pressione 5.
Para o número pré-programado 15,
pressione OVER e, em seguida, pressione 1, 5.
Para selecionar o número pré-programado 20,
pressione OVER e, em seguida, pressione 2, 0.
4
Para programar mais emissoras, repita os
passos de 1 a 3 acima, atribuindo um número
pré-programado diferente para cada emissora.
• Armazenar uma nova emissora em um número já usado
apaga a emissora armazenada anteriormente.
Se você desconectar o cabo de alimentação de CA ou se
houver uma falha de energia
As emissoras pré-programadas permanecerão armazenadas no
aparelho.
Sintonizando uma emissora pré-programada
APENAS no controle remoto:
1
Pressione FM/AM para selecionar
“FM” ou “AM”.
O aparelho liga automaticamente, sintonizando
a última emissora previamente sintonizada FM ou AM.
• Sempre que pressionar o botão, a banda alterna entre
FM e AM.
2
Pressione PRESET GROUP ou
PRESET GROUP
repetidamente para selecionar
um número pré-programado.
Para sintonizar diretamente uma emissora usando os
botões numéricos
APENAS no controle remoto:
Pressionar os botões numéricos permite-lhe
selecionar o número pré-programado
desejado.
Ex.: Para o número pré-programado 5,
pressione 5.
Para o número pré-programado 15,
pressione OVER e, em seguida,
pressione 1, 5.
Para o número pré-programado 20,
pressione OVER e, em seguida,
pressione 2, 0.
Uso de um equipamento externo
Audição de um equipamento externo
Vo c ê pode escutar o equipamento externo como um gravador
de MD, toca-fitas ou outro equipamento auxiliar.
• Primeiro, certifique-se de que o equipamento externo esteja
conectado corretamente ao aparelho. (Consulte a página 7.)
1
Ajuste o nível do volume para a posição
mínima.
2
Pressione AUX.
“AUX” aparece no visor.
17
3
Inicie a reprodução do equipamento externo.
4
Ajuste o nível do volume para o nível que
deseja escutar.
Para sair do modo AUX, selecione outra fonte.
Para a operação do equipamento externo
Consulte as suas instruções.
Page 71

Gravação
REC
REC
PUSH OPEN
REV.MODE
MHz
REC
DOWN
4 7 ¢
UP
TAPE
BEAT CUT
Continuação
IMPORTANTE:
• Pode ser contra a lei gravar ou reproduzir materiais
sem o consentimento do proprietário dos direitos
autorais.
• O nível de gravação é automaticamente ajustado para os
valores ideais, de modo a que a qualidade da gravação não
seja afectada pelos outros parâmetros de som. Dessa forma,
durante a gravação você pode ajustar o som que estiver
ouvindo sem afetar o nível de gravação.
• Se a gravação que você fez apresentar excesso de ruídos ou
estática, o aparelho pode estar próximo demais à TV.
Aumente a distância entre a TV e o aparelho.
• Vo c ê pode utilizar fitas tipo I para gravação.
• NÃO desligue o aparelho durante uma
reprodução ou gravação de uma fita. O toca-fitas
ou a fita pode sofrer danos.
• NÃO utilize fitas tipo II ou tipo IV, pois o aparelho
não é compatível com tais fitas.
• O uso de fitas C-120 ou mais longas não é
recomendado, pois pode ocorrer a deterioração
das características e, além disso, essas fitas se
emperram facilmente nos roletes e eixos giratórios.
No início ou no final das fitas
Há uma fita-guia que não pode ser gravada. Portanto, ao gravar de
discos, transmissões FM/AM ou equipamento externo, primeiro
bobine a fita-guia para garantir que a gravação seja feita sem a perda
de nenhuma parte da música.
3
Inicie a reprodução da fonte—FM, AM ou
equipamento auxiliar conectado à tomada
AUX.
• Quando a fonte for FM ou AM, sintonize a emissora que
deseja gravar.
• Quando gravar de discos, consulte “Gravação de
discos—Gravação sincronizada de disco” na página 19.
4
Pressione REC (gravação).
• O indicador REC aparece e o indicador 3 se
acende no visor.
5
Pressione TAPE ¤ ‹.
O indicador 3 começa a piscar e a gravação
começa.
• Se não houver qualquer cassete inserida quando pressionar REC
A mensagem “NO TAPE” é exibida no visor.
• Se uma cassete protegida estiver inserida quando pressionar REC
A mensagem “PROTECT” é exibida no visor.
Para fazer uma pausa na gravação, pressione REC.
A gravação é suspensa. Para retomar a gravação,
pressione TAPE ¤ ‹.
Português
Para proteger sua gravação
As fitas cassete costumam ter duas pequenas lingüetas na
parte de trás, utilizadas para proteger contra o apagamento ou
gravação acidentais.
Para proteger sua gravação, remova essas lingüetas.
Para regravar em uma fita protegida, cubra os orifícios com
fita adesiva.
Gravando uma fita
APENAS no aparelho:
1
Coloque uma fita cassete gravável, com a
parte exposta voltada para baixo.
• Consulte também a página 15.
2
Feche o suporte de fita gentilmente.
Para parar a gravação, pressione 7.
A gravação pára.
Para retirar a fita, pressione PUSH OPEN
enquanto a gravação estiver parada.
Para gravar nos dois lados—Modo de reversão
APENAS no controle remoto:
Fita adesiva
Pressione REV.MODE (modo de
reversão) várias vezes até o indicador
ou aparecer.
• Quando utilizar o modo de reversão para a
gravação, o indicador acende-se no visor e a gravação
é iniciada primeiro para a frente (3).
Para cancelar o modo de reversão, pressione REV.MODE
repetidamente até que se acenda.
Para reduzir o batimento—Corte de batimento
APENAS no controle remoto:
Se ouvir batimentos durante a gravação de uma
transmissão AM, pressione BEAT CUT
repetidamente até que os batimentos sejam reduzidos.
• Cada vez que você pressiona o botão, o visor
alterna-se entre “CUT-1” e “CUT-2”.
18
Page 72

Gravação de discos
REC
REC
REV.MODE
REC
REC
CD
#/8
TAPE
DOWN
4 7 ¢
UP
DOWN
4 7 ¢
UP
—Gravação sincronizada de disco
Vo c ê pode iniciar a reprodução de disco e gravação ao
mesmo tempo.
Para parar a gravação temporariamente,
pressione REC.
Tanto a reprodução do CD como a gravação da fita
entrarão no modo de pausa. Para continuar a
gravação, pressione TAPE ¤ ‹.
APENAS no aparelho:
1
Coloque uma fita cassete gravável, com a
parte exposta voltada para baixo.
• Consulte também a página 15.
2
Feche o suporte de fita gentilmente.
3
Pressione CD ‹/8 para selecionar o
Português
CD player como a fonte.
4
Pressione 7 para parar
reprodução do disco.
• Vo c ê pode criar um programa
(consulte a página 12) se quiser.
5
Pressione REC (gravação).
O indicador 3 se acende no visor.
6
Pressione TAPE ¤ ‹.
“SYNC REC” aparece e o indicador 3 começa
a piscar lentamente no visor.
A reprodução do CD e a gravação da fita
começam automaticamente.
Para parar a gravação, pressione 7.
A gravação parará e a reprodução do
CD será pausada.
Para gravar em ambos lados—Modo de reversão
APENAS no controle remoto:
Pressione REV.MODE (modo de
reversão) repetidamente até que ou
se acenda.
• Quando utilizar o modo de reversão para a
gravação sincronizada de disco, se acende e a
gravação começa na direção de avanço ( 3 ) primeiro.
Quando a fita chega ao fim, a reprodução do CD é pausada
até que a gravação da fita muda para a direção inversa e, em
seguida, a gravação continua.
Para cancelar o modo de reversão, pressione REV.MODE
repetidamente até que se acenda.
Ao fazer os ajustes do temporizador de
desligamento automático durante a gravando
diretamente de um disco
Deixe tempo suficiente para permitir que termine a reprodução do
disco, pois o aparelho será desligado antes de a gravação ser
concluída.
• Se não houver qualquer cassete inserida quando pressionar REC
A mensagem “NO TAPE” é exibida no visor.
• Se uma cassete protegida estiver inserida quando pressionar REC
A mensagem “PROTECT” é exibida no visor.
19
Page 73

Utilização dos timers
CLOCK
/TIMER
SET
PRESET
GROUP
UP
DOWN
PRESET
GROUP
ON
DAILY 1
ON
DAILY 2
ON
DAILY 3
ON
REC
Continuação
Existem quatro modos de temporização disponíveis—timer
diário, timer de gravação, timer de adiamento e timer de
desligamento automático.
• Antes de utilizar estes timers, certifique-se de que o relógio
incorporado esteja ajustado corretamente (consulte a página
9).
Usando o timer diário e timer de gravação
Vo c ê pode ajustar o timer tanto com o aparelho ligada quanto
desligada.
Modo de funcionamento do timer
Quando chega na hora de ativação, o aparelho é ligado
automaticamente (o indicador [timer] começa a piscar e
continua a piscar durante o funcionamento do timer). Logo,
ao chegar na hora de desativação, o aparelho será desligado
automaticamente (modo standby). A definição do timer
permanece na memória até que você a altere.
• Quando os indicadores (timer) e DAILY 1, 2 ou 3
estiverem acesos no visor, o timer funciona como um timer
diário. Uma vez que o timer tenha sido definido, ele será
ativado na mesma hora, sendo desligado automaticamente
(modo standby) após 60 minutos todos os dias até que seja
desativado.
• Quando os indicador (timer) e REC estiverem acesos no
visor, o timer agirá como timer de gravação. Depois de
ajustar o timer de gravação, os detalhes dos ajustes
permanecem armazenados, mas o timer é desligado.
APENAS no controle remoto:
1
Pressione CLOCK/TIMER
repetidamente para selecionar o timer
que deseja ajustar e ativar—diário 1,
diário 2, diário 3, ou gravação.
A definição do timer e a indicação das horas começam a
piscar no visor.
Cada vez que pressionar o botão, o visor mudará como
segue:
Timer diário 1
Timer diário 2
Timer diário 3
Timer de
gravação
Português
Antes de começar...
Quando você utilizar “TUNER” como a fonte a ser
reproduzida, selecione a emissora desejada antes de desligar
o aparelho.
• Há um limite de tempo para as etapas a seguir. Se o ajuste
for cancelado antes de você terminar a configuração,
reinicie a partir da etapa 1.
Ajuste do relógio
Indicação normal
2
Ajuste a hora de ativação na
qual deseja ligar o aparelho.
(1) Pressione UP ou DOWN para ajustar
as horas e, em seguida, pressione SET.
(2) Pressione UP ou DOWN para ajustar os
minutos e, em seguida, pressione SET.
Se você quiser mudar a definição das
horas, pressione CANCEL.
• Se você estiver definindo o timer diário, o
nome da fonte começará a piscar no visor.
\ Prossiga ao passo 4.
• Se você estiver definindo o timer de gravação, o
indicador OFF e a indicação das horas começarão a
piscar no visor.
20
Page 74

PRESET
GROUP
UP
DOWN
PRESET
GROUP
TUNER
TAPE
CD
SET
VOLUME
STANDBY/ON
DAILY 1
DAILY 1 DAILY 2 DAILY 3
REC
OFF
REC
3
APENAS para o timer de gravação:
Ajuste a hora de desativação na qual deseja
desligar o aparelho.
Para desativar o timer, mantenha
DAILY TIMER/SNOOZE pressionado.
• Cada vez que manter o botão pressionado, a
definição do timer mudará como segue:
Cancelado
Para mudar o timer, repita os passos de 1 a 6 nas páginas 20
(1) Pressione UP ou DOWN para ajustar as horas e, em
seguida, pressione SET.
(2) Pressione UP ou DOWN para ajustar os minutos e, em
seguida, pressione SET.
e nesta página.
• Para ativar o timer diário de novo sem mudar a definição,
pressione DAILY TIMER/SNOOZE repetidamente no
aparelho para selecionar o número do timer desejado.
Se você quiser mudar a definição das horas, pressione
CANCEL.
• O timer de gravação será ativado. Os indicadores
(timer) e REC se acenderão. O visor volta à indicação
Português
normal.
A fonte de reprodução mudará para “TUNER” quando chegar na
hora de ativação.
Quando não houver uma fonte de reprodução (uma fita
ou um disco) colocada ao selecionar “TAPE” ou “CD”
\ Prossiga ao passo 7.
Se o aparelho for ligada antes da hora de activação do
4
Pressione UP ou DOWN para
selecionar a fonte de reprodução.
O timer não funciona.
A definição do timer permanece. Ajuste o relógio incorporado e
ative o timer de novo.
timer
Se desligar o cabo de alimentação CA ou se ocorrer
uma falha de alimentação
Cada vez que pressionar o botão, a fonte mudará como
segue:
• Certifique-se de que a fonte de reprodução (uma fita ou um
disco) esteja colocada ao selecionar “TAPE” ou “CD”.
Se você quiser mudar a definição das horas, pressione
CANCEL repetidamente para voltar ao passo 2.
5
Pressione SET.
Os indicadores (timer) e as indicações do
número do timer diário ativo se acendem. O
visor volta à indicação normal.
6
Pressione VOLUME +/– para
ajustar o volume para a hora de
ativação.
7
Pressione STANDBY/ON para
desligar o aparelho se tiver ajustado
o timer com o aparelho ligado.
APENAS no aparelho:
Para ativar o timer,
pressione DAILY TIMER/SNOOZE
repetidamente no aparelho para
selecionar o número do timer desejado.
21
Utilizar o timer de adiamento (snooze)
O timer de adiamento (snooze) desliga o aparelho (standby)
durante apenas 5 minutos quando o timer diário está activado.
•É possível ajustar o timer de adiamento (snooze) apenas
quando o timer diário estiver activado.
APENAS no aparelho:
Pressione DAILY TIMER/
SNOOZE enquanto o timer
diário estiver funcionando.
O aparelho será desligado (modo standby) e o indicador
SNOOZE aparecerá no visor.
Após 5 minutos, o aparelho será ligado automaticamente com
a fonte selecionada no passo 4 na coluna esquerda.
Se o aparelho for ligada quando o timer de adiamento
(snooze) estiver activado
O timer de adiamento (snooze) e o timer diário são cancelados.
Se ajustar o timer de adiamento (snooze) quando
restarem menos de 5 minutos para a desactivação do
timer diário
O aparelho não se ligará mesmo quando tiverem passado 5 minutos.
Se desligar o cabo de alimentação CA ou se ocorrer
uma falha de alimentação
A activação do timer será cancelada. Primeiro é necessário ajustar o
relógio, e depois é necessário ajustar o timer outra vez.
Page 75

10 20
120
30 60
90
OFF
SLEEP
SLEEP
Utilizando o timer de desligamento
automático
Ao utilizar o timer de desligamento automático você pode
adormecer ouvindo música.
•É possível configurar o timer de desligamento automático
quando o aparelho estiver ligado.
• Vo c ê também pode desligar o aparelho automaticamente
usando a função Auto Standby. (Consulte a página 9).
Como funciona o timer de desligamento automático
O aparelho desliga automaticamente na hora programada.
APENAS no controle remoto:
1
Pressione SLEEP.
O indicador SLEEP começa a piscar no visor.
• Sempre que pressionar o botão, o período de tempo se
altera do seguinte modo:
Quando definir o timer de desligamento automático
depois que o timer diário iniciar a reprodução de uma
fonte selecionada
O aparelho será desligado com o timer que tiver a hora de
desligamento mais cedo.
Se você definir o timer de desligamento automático
durante a reprodução ou gravação de uma fita
Não desligue o aparelho com o timer de desligamento automático
enquanto uma fita estiver sendo reproduzida.
Se o aparelho for desligado durante a reprodução ou gravação de
uma fita, o toca-fitas ou a fita poderá sofrer danos.
Português
(cancelado)
2
Aguarde cerca de 5 segundos após especificar
o período de tempo.
O indicador SLEEP permanece aceso no visor.
Para verificar o tempo que resta até o desligamento
automático, pressione SLEEP uma vez para exibir no visor o
tempo restante por cerca de 5 segundos.
Para mudar a hora de desligamento, pressione SLEEP
repetidamente até que a duração do tempo desejada apareça.
Para cancelar a definição, pressione SLEEP repetidamente
até que o indicador SLEEP se apague e o visor volte à
indicação normal.
• Desligar o aparelho também cancela o timer de
desligamento automático.
22
Page 76

Manutenção
Para obter o melhor desempenho do seu aparelho, mantenha os discos, fitas e o mecanismo sempre limpos.
Notas gerais
Em geral, você terá a melhor performance mantendo os
discos, fitas e o mecanismo limpos.
• Guarde os discos e fitas em seus estojos, e mantenha-os em
armários ou em prateleiras.
Limpando o aparelho
• Manchas no aparelho
O aparelho deve ser limpo com um pano macio. Se o
aparelho estiver muito manchado, limpe-o com um pano
embebido com detergente neutro diluído em água e
esfregue bem, depois seque-o com um pano seco.
• Como o aparelho pode perder a qualidade, se danificar
ou desbotar, tome cuidado com o seguinte:
Português
– NÃO o limpe com um pano áspero.
– NÃO o limpe com força.
– NÃO o limpe com thinner nem benzina.
– NÃO aplique nenhuma substância volátil, como
inseticidas.
– NÃO o deixe em contato com borracha ou plástico por
muito tempo.
Manuseio de discos
• Remova o disco de sua caixa
segurando-o pela borda e
pressionando levemente o orifício
central.
• Não toque a face brilhante do disco
nem aperte as bordas para recurvá-
lo.
• Coloque o disco de volta na caixa
após o uso, para evitar deformações.
• Cuidado para não arranhar a
superfície do disco ao colocá-lo de
volta na caixa.
• Evite exposição à luz solar direta,
temperaturas extremas e umidade.
Manuseio de fitas cassete
• Se a fita estiver frouxa dentro do cassete,
elimine a folga inserindo um lápis em uma
das bobinas em movimentos giratórios.
• Se a fita ficar frouxa, ela poderá ser esticada,
arrebentar ou se enroscar no cassete.
• Tome cuidado para não tocar a superfície da
fita.
• Evite guardar a fita em um dos seguintes
locais:
– Lugares empoeirados
– Locais quentes ou sujeitos à luz solar direta
–Áreas úmidas
– Em cima de uma TV ou alto-falantes
– Perto de um ímã
Para manter a melhor qualidade sonora de gravação e
reprodução
Vo c ê precisa limpar os cabeçotes.
• Limpe os cabeçotes após cada 10 horas de uso com uma
fita de limpeza de cabeçotes do tipo úmida (disponível nas
lojas de artigos eletrônicos e de áudio).
A sujeira do cabeçote causa os seguintes sintomas:
– Deterioração da qualidade sonora.
– Redução do nível sonoro.
– Enfraquecimento do som.
• Não reproduza fitas sujas ou poeirentas.
• Não toque no cabeçote altamente polido com nenhuma
ferramenta metálica ou magnética.
Eixo
giratório
Cabeçote
23
Para limpar o disco
Limpe-o com um pano macio, fazendo
movimentos em linha reta do centro
para as bordas.
NÃO UTILIZE solventes—como, por exemplo,
limpador de discos convencionais, spray, thinner
ou benzina—para limpar o disco.
Rolete
Para desmagnetizar os cabeçotes
Desligue o aparelho e utilize um desmagnetizador (disponível
em lojas de artigos eletrônicos e discos).
Page 77

Detecção de problemas
Se você tiver problemas com seu aparelho, verifique essa lista a fim de encontrar uma possível solução antes de contatar a
assistência técnica.
Se o problema não for resolvido com as dicas fornecidas aqui ou se o aparelho sofreu danos físicos, chame uma pessoa
qualificada, como o seu revendedor, para executar o serviço.
Sintoma
O aparelho não é ligado.
Nenhum som é ouvido.
Má recepção do rádio.
O disco não é reproduzido.
É impossível gravar.
As operações estão desativadas.
Não é possível operar o aparelho com o
controle remoto.
Causa provável
O cabo de alimentação não está
conectado a uma tomada de CA.
• As conexões estão incorretas ou soltas.
• Os fones de ouvido estão conectados.
• O disco MP3 está gravado com
“escrita em pacotes”.
• As antenas estão desconectadas.
• A antena de quadro AM está muito
próxima do aparelho.
• A antena de fio FM não está adequada-
mente estendida e posicionada.
O disco está virado ao contrário.
As lingüetas da parte posterior do
cassete foram removidas.
O microprocessador interno não
funciona devido à interferência elétrica
externa.
• O caminho entre o controle remoto e o
sensor remoto está bloqueado.
• As pilhas estão gastas.
• O controle remoto está sendo usado
muito distante da unidade.
Ação
Insira o plugue na tomada.
• Verifique todas as conexões e efetue as
correções necessárias. (Consulte as
páginas 6 e 7.)
• Desconecte os fones de ouvido da
tomada PHONES.
• Este tipo de disco não pode ser
reproduzido. Troque o disco.
• Reconecte as antenas firmemente.
• Mude a posição e a direção da antena
de quadro AM.
• Estenda a antena de FM e oriente-a até
obter a melhor posição de recepção.
Coloque o disco com a etiqueta voltada
para cima.
Tampe os orifícios com fita adesiva.
Desconecte o cabo de alimentação de
CA e, depois, volte a conectá-lo.
• Remova a obstrução.
• Troque as pilhas. (Consulte a página 8.)
• Os sinais não conseguem comunicar
com o sensor remoto. Aproxime-se
mais do aparelho.
Português
Especificações
Seção do amplificador
Potência de saída:
15 W por canal, mín. RMS, aos 4 Ω a 1 kHz, com no
máximo 10% de distorção harmônica total. (IEC268-3)
Sensibilidade/impedância da entrada de áudio (a 1 kHz)
AUX: 500 mV/50 kΩ
Alto-falantes/impedância:4 Ω – 16 Ω
Sintonizador
Faixa de sintonia de FM:
A intervalos de 100 kHz: 87,5 MHz – 108,0 MHz
A intervalos de 50 kHz: 87,50 MHz – 108,00 MHz
Faixa de sintonia de AM:
A intervalos de 10 kHz: 530 kHz – 1 710 kHz
A intervalos de 9 kHz: 531 kHz – 1 710 kHz
CD player
Alcance dinâmico: 85 dB
Relação sinal/ruído: 85 dB
Distorção e tremulação: Incomensurável
Toca-fitas
Resposta em freqüência:
Normal (tipo I): 100 Hz – 10 000 Hz
Distorção e tremulação: 0,35% (WRMS)
O design e especificações estão sujeitos a alterações sem aviso prévio.
Geral
Requisitos de energia: CA 110 V – 127 V / CA 220 V –
240 V (ajustável com seletor de
voltagem), 50 Hz/60 Hz
Consumo de energia: 40 W (em operação)
2 W (no modo standby)
Dimensões (L x A x P) (aprox.):
152 mm x 233 mm x 292 mm
Massa (aprox.): 3,9 kg
Acessórios fornecidos
Consulte a página 6.
Seção dos alto-falantes
Tipo: Tipo reflexão de graves, de
amplitude máxima
Alto-falantes: 1 cone de 10 cm
Capacidade de uso de energia: 15 W
Impedância: 4 Ω
Gama de freqüências: 100 Hz—15 kHz
Dimensões (L x A x P) (aprox.):
147 mm x 233 mm x 189 mm
Massa (aprox.): 1,9 kg cada
24
Page 78

MEMO
Page 79

MEMO
Page 80

VICTOR COMPANY OF JAPAN, LIMITED
AC 110-127V
VOLTAGE SELECTOR
AC 220-240V
AC 110-127V
VOLTAGE SELECTOR
AC 220-240V
Mains (AC) Line Instruction (not applicable for Europe, U.S.A.,
Canada, Australia, and U.K.)
Instrucción sobre la línea de la red (CA) (no aplicable para Europa,
EE.UU., Canadá, Australia, ni el Grã-Bretanha)
Instrução sobre a tensão da rede eléctrica (CA) (não aplicável para
a Europa, os E.U.A., o Canadá, a Austrália e o Reino Unido)
IMPORTANT for mains (AC) line
BEFORE PLUGGING IN, do check that your mains (AC) line voltage corresponds with the
position of the voltage selector switch provided on the outside of this equipment and, if different,
reset the voltage selector switch, to prevent from a damage or risk of fire/electric shock.
IMPORTANTE para la línea de la red (CA)
ANTES DE ENCHUFAR EL EQUIPO, compruebe si la tensión de la línea de la red a(CA)
corresponde con la posición del selector de tensión situado en la parte exterior del equipo, y si es
diferente, reajuste el selector de tensión para evitar el riesgo de incendios/descargas eléctricas.
IMPORTANTE para a ligação à tensão da rede (CA)
ANTES DE LIGAR O APARELHO A UMA TOMADA DA REDE, verifique se a tensão da rede
CA corresponde à posição do seletor de voltagem localizado na parte externa deste equipamento.
Caso não corresponda, reajuste o seletor de voltagem a fim de evitar avarias ou riscos de incêndio
e choque elétrico.
EN, SP, PR
© 2004 VICTOR COMPANY OF JAPAN, LIMITED
0504AIMMDWORI
 Loading...