


CD PORTABLE SYSTEM
CD-PORTABLE-SYSTEM
CHAINE PORTABLE A CD DRAAGBAAR CD-SYSTEEM SISTEMA PORTATIL CON CD
SISTEMA PORTATILE CON LETTORE CD
RC-EX30B
1 2 3
4 5 6
7 8 9
0
+
–
TAPE
RANDOM CD
GROUP
TUNER
BAND
REMOTE SENSOR
PUSH
STOP
E
AUS
PLAY/P
DISPLAY
INSTRUCTIONS
BEDIENUNGSANLEITUNG
MANUEL D’INSTRUCTIONS
GEBRUIKSAANWIJZING
MANUAL DE INSTRUCCIONES
ISTRUZIONI
LVT1213-004B
[E]

Warnings, Cautions and Others Warnung, Achtung und sostige Hinweise
Mises en garde, précautions et indications diverses Waarschuwingen, voorzorgen en andere mededelingen Avisos, Precauciones y Varios
Simboli di avvertenza, attenzione e altri
Caution –– STANDBY/ON button!
Disconnect the mains plug to shut the power off completely. The STANDBY/ON button in any position does not disconnect the mains line.
Achtung — STANDBY/ON-Schalter!
Den Netzstecker aus der Steckdose ziehen, um die Stromversorgung vollkommen zu unterbrechen. Der Schalter STANDBY/ON unterbrichet in keiner Stellung die Stromversorgung vollkommen.
Attention — Commutateur STANDBY/ON!
Déconnecter la fiche de secteur pour couper complètement le courant. Le commutateur STANDBY/ON ne coupe jamais complètement la ligne de secteur, quelle que soit sa position.
Voorzichtig — STANDBY/ON schakelaar!
Om de stroomtoevoer geheel uit te schakelen, trekt u de stekker uit het stopkontakt. Anders zal er altijd een geringe hoeveelheid stroom naar het apparaat lopen, ongeacht de stand van de STANDBY/ON schakelaar.
Precaución –– Interruptor STANDBY/ON!
Desconectar el cable de alimentación para desactivar la alimentación totalmente. Cualquiera que sea la posición de ajuste del interruptor STANDBY/ON, la alimentación no es cortada completamente.
Attenzione –– L’interruttore STANDBY/ON!
Disinserire la spina del cavo di alimentazione dalla presa della rete elettrica per staccare completamente l’alimentazione. L’interruttore STANDBY/ON in nessuna posizione stacca la linea di alimentazione elettrica principale.
Per l’Italia:
“Si dichiara che il questo prodotto di marca JVC è conforme alle prescrizioni del Decreto Ministeriale n.548 del 28/08/95 pubblicato sulla Gazzetta Ufficiale della Repubblica Italiana n.301 del 28/12/95.”
CAUTION
To reduce the risk of electrical shocks, fire, etc.:
1.Do not remove screws, covers or cabinet.
2.Do not expose this appliance to rain or moisture.
ACHTUNG
Zur Verhinderung von elektrischen Schlägen,
Brandgefahr, usw:
1.Keine Schrauben lösen oder Abdeckungen enternen und nicht das Gehäuse öffnen.
2.Dieses Gerät weder Regen noch Feuchtigkeit aussetzen.
ATTENTION
Afin d’éviter tout risque d’électrocution, d’incendie, etc.:
1.Ne pas enlever les vis ni les panneaux et ne pas ouvrir le coffret de l’appareil.
2.Ne pas exposer l’appareil à la pluie ni à l’humidité.
VOORZICHTIG
Ter vermindering van gevaar voor brand, elektrische schokken, enz.:
1.Verwijder geen schroeven, panelen of de behuizing.
2.Stel dit toestel niet bloot aan regen of vocht.
PRECAUCIÓN
Para reducir riesgos de choques eléctricos, incendio, etc.:
1.No extraiga los tornillos, las cubiertas ni la caja.
2.No exponga este aparato a la lluvia o a la humedad.
ATTENZIONE
Per ridurre il rischio di shock elettrici, incendi, ecc...
1.Non togliete viti, coperchi o la scatola.
2.Non esponete l’apparecchio alla piogggia e all’umidità.
– G-1 –

CAUTION
•Do not block the ventilation openings or holes.
(If the ventilation openings or holes are blocked by a newspaper or cloth, etc., the heat may not be able to get out.)
•Do not place any naked flame sources, such as lighted candles, on the apparatus.
•When discarding batteries, environmental problems must be considered and local rules or laws governing the disposal of these batteries must be followed strictly.
•Do not expose this apparatus to rain, moisture, drippimg or splashing and that no objects filled with liquids, such as vases, shall be placed on the apparatus.
ACHTUNG
•Blockieren Sie keine Belüftungsschlitze oder - bohrungen.
(Wenn die Belüftungsöffnungen oder -löcher durch eine Zeitung oder ein Tuch etc. blockiert werden, kann die entstehende Hitze nicht abgeführt werden.)
•Stellen Sie keine offenen Flammen, beispielsweise angezündete Kerzen, auf das Gerät.
•Wenn Sie Batterien entsorgen, denken Sie an den
Umweltschutz. Batterien müssen entsprechend den geltenden örtlichen Vorschriften oder Gesetzen entsorgt werden.
•Setzen Sie dieses Gerät auf keinen Fall Regen,
Feuchtigkeit oder Flüssigkeitsspritzern aus. Es dürfen auch keine mit Flüssigkeit gefüllen Objekte, z. B. Vasen, auf das Gerät gestellt werden.
ATTENTION
•Ne bloquez pas les orifices ou les trous de ventilation.
(Si les orifices ou les trous de ventilation sont bloqués par un journal un tissu, etc., la chaleur peut ne pas être
évacuée correctement de l’appareil.)
•Ne placez aucune source de flamme nue, telle qu’une bougie, sur l’appareil.
•Lors de la mise au rebut des piles, veuillez prendre en considération les problèmes de l’environnement et suivre strictement les règles et les lois locales sur la mise au rebut des piles.
•N’exposez pas cet appareil à la pluie, à l’humidité, à un
égouttement ou à des éclaboussures et ne placez pas des objets remplis de liquide, tels qu’un vase, sur l’appareil.
VOORZICHTIG
•Zorg dat u de ventilatieopeningen en -gaten niet afsluit. (Als de ventilatieopeningen en -gaten worden afgesloten door bijvoorbeeld papier of een doek, kan er hitte in het apparaat worden opgebouwd.)
•Zet geen bronnen met open vuur, zoals brandende kaarsen, op het apparaat.
•Wees milieubewust en gooi lege batterijen niet bij het huishoudelijk afval. Lege batterijen dient u in te leveren met het KCA of bij een innamepunt voor batterijen.
•Stel dit apparaat niet bloot aan regen, vocht, drupwater of spatwater en plaats geen enkel voorwerp waarin zich een vlocistof bevindt, zoals een vaas, op het apparaat.
Gebruikte batterijen:
PRECAUCIÓN
•No obstruya las rendijas o los orificios de ventilación.
(Si las rendijas o los orificios de ventilación quedan tapados con un periódico, un trozo de tela, etc., no se podrá disipar el calor).
•No ponga sobre el aparato ninguna llama al descubierto, como velas encendidas.
•Cuando tenga que descartar las pilas, tenga en cuenta los problemas ambientales y observe estrictamente los reglamentos o las leyes locales sobre disposición de las pilas.
•No exponga este aparato a la lluvia, humedad, goteos o salpicaduras. Tampoco ponga recipientes conteniendo líquidos, como floreros, encima del aparato.
ATTENZIONE
•Evitare di ostruire le aperture o i fori di ventilazione con giornali, indumenti etc., in quanto s’impedirebbe al calore di fuoriuscire.
•Non collocare fiamme libere (es. candele accese) sull’apparecchio.
•Le batterie devono essere smaltite nel rispetto dell’ambiente, attenendosi ai regolamenti locali in materia.
•Non esporre l’apparecchio a pioggia, umidità, gocciolamenti e spruzzi d’acqua ed evitare di sovrapporvi oggetti contenenti liquidi (vasi etc.).
– G-2 –

IMPORTANT FOR LASER PRODUCTS
1.CLASS 1 LASER PRODUCT
2.CAUTION: Do not open the top cover. There are no user serviceable parts inside the unit; leave all servicing to qualified service personnel.
3.CAUTION: Visible and invisible laser radiation when open and interlock failed or defeated. Avoid direct exposure to beam.
4.REPRODUCTION OF LABEL: CAUTION LABEL,
PLACED INSIDE THE UNIT.
WICHTIG FÜR LASER-PRODUKTE
1.LASER-PRODUKT DER KLASSE 1
2.ACHTUNG: Die obere Abdeckung nicht öffnen. Das Gerät enthält keine Teile, die vom Benutzer gewartet werden können.Wartungen nur von qualifziertem Fachpersonal durchführen lassen.
3.ACHTUNG: Sichtbare und unsichtbare Laserstrahlung bei offenem Gerät und Defekt oder Umgehen der Verriegelung. Setzen Sie sich dem Strahl nicht direkt aus.
4.ANBRINGEN DES ETIKETTS: WARNHINWEIS-
ETIKETT, INNEN AM GERÄT ANGEBRACHT.
IMPORTANT POUR PRODUITS LASER
1.PRODUIT LASER CLASSE 1
2.ATTENTION: N’ouvrez pas le couvercle supérieur. Il n’y a aucune pièce réparable par l’utilisateur à l’intérieur de l’appareil; confiez toute réparation à un personnel qualifié.
3.ATTENTION: Risque de radiations laser visible and invisible quand l’appareil est ouvert et que le système de verrouillage ne fonctionne pas ou a été mis hors service. Évitez toute exposition directe au rayon.
4.REPRODUCTION DE L’ÉTIQUETTE: ÉTIQUETTE DE
PRÉCAUTION PLACÉE À L’INTÉRIEUR DE L’APPAREIL.
BELANGRIJK VOOR LASERPRODUKTEN
1.KLASSE 1 LASERPRODUKT
2.VOORZICHTIG: Open de bovenste afdekking niet. Er zijn geen door de gebruiker te repareren onderdelen in het toestel; laat onderhoud en reparatie over aan erkend onderhoudspersoneel.
3.VOORZICHTIG: Zichtbare en onzichtbare laserstraling indien open en interlock defect of buiten werking gesteld. Voorkom directe blootstelling aan de straal.
4.REPRODUCTIE VAN LABEL:
WAARSCHUWINGSLABEL IN TOESTEL
AANGEBRACHT.
IMPORTANTE PARA PRODUCTOS LÁSER
1.PRODUCTO LÁSER CLASE 1
2.PRECAUCIÓN: No abra la tapa superior. En el interior de la unidad no hay piezas que pueda reparar el usuario; encargue el servicio a personal técnico cualificado.
3.PRECAUCIÓN: Radiación láser visible e invisible en caso de apertura o con interbloqueo averiado o defectuoso. Evite la exposición directa a los haces.
4.REPRODUCCIÓN DE LA ETIQUETA: ETIQUETA DE
PRECAUCIÓN, COLOCADA EN EL INTERIOR DE LA
UNIDAD.
AVVERTENZE IMPORTANTI SUI PRODOTTI LASER
1.PRODOTTO LASER DI CLASSE 1
2.ATTENZIONE: Non aprire il coperchio superiore.
Nessuna parte interna dell’unità richiede manutenzione da parte dell’utente; per la manutenzione rivolgersi al personale qualificato.
3.ATTENZIONE: Quando l’unità è aperta e il dispositivo di sincronizzazione è guasto o non funzionante, si può verificare l’emissione di radiazioni laser visibili o non visibili. Evitare l’esposizione diretta ai raggi laser.
4.RIPRODUZIONE DELL’ETICHETTA: ETICHETTA DI
AVVERTENZA, POSIZIONATA SULLA SUPERFICIE
INTERNA DELL’UNITÀ.
CAUTION - INVISIBLE LASER RADIATION WHEN OPEN AND INTERLOCKS DEFEATED. AVOID EXPOSURE TO BEAM.
VORSICHT ! UNSICHTBARE LASERSTRAHLUNG TRITT AUS, WENN DECKEL GEÖFFNET UND WENN SICHERHEITSVERRIEGELUNG ÜBERBRÜCKT IST. NICHT DEM STRAHL AUSSETZEN!
VARNING - OSYNLIG LASERSTRÅLNING NÄR DENNA DEL ÄR ÖPPNAD OCH SPÄRR ÄR URKOPPLAD STRÅLEN ÄR FARLIG.
ADVARSEL - USYNLIG LASERSTRÅLING VED ÅBNING NÅR SIKKERHEDSAFBRYDERE ER UDE AF FUNKTION. UNDGÅ UDSÆTTELSE FOR STRÅLING.
– G-3 –

Caution: Proper Ventilation
To avoid risk of electric shock and fire, and to prevent damage, locate the apparatus as follows:
1Front: No obstructions and open spacing.
2Sides/ Top/ Back: No obstructions should be placed in the areas shown by the dimensions below.
3Bottom: Place on the level surface. Maintain an adequate air path for ventilation by placing on a stand with a height of 10 cm or more.
Achtung: Ausreichende Belüftung
Zur Vermeidung von elektrischen Schlägen, Feuer und sonstigen Schäden sollte das Gerät unter folgenden Bedingungen aufgestellt werden:
1Vorderseite: Hindernisfrei und gut zugänglich.
2Seitenund Rückwände: Hindernisfrei in allen gegebenen Abständen (s. Abbildung).
3Unterseite: Die Stellfläche muß absolut eben sein. Sorgen Sie für ausreichende Luftzufuhr durch Aufstellung auf einem Stand mit mindestens 10 cm Höhe.
Attention: Aération correcte
Pour prévenir tout risque de décharge électrique ou d’incendie et éviter toute détérioration, installez l’appareil de la manière suivante:
1Avant: Bien dégagé de tout objet.
2Côtés/dessus/dessous: Assurez-vous que rien ne bloque les espaces indiqués sur le schéma cidessous.
3Dessous: Posez l’appareil sur une surface plane et horizontale. Veillez à ce que sa ventilation correcte puisse se faire en le plaçant sur un support d’au moins dix centimètres de hauteur.
Front view Vorderansicht Face Vooraanzicht Vista frontal Vista frontale
15 cm
15 cm |
15 cm |
10 cm
Voorzichtig: Goede ventilatie vereist
Om brand, elektrische schokken en beschadiging te voorkomen, moet u het toestel als volgt opstellen:
1Voorkant: Geen belemmeringen en voldoende ruimte.
2Zijkanten/boven-/onderkant: Geen belemmeringen plaatsen in de hieronder aangegeven zones.
3Onderkant: Op vlakke ondergrond plaatsen. Voldoende ventilatieruimte voorzien door het toestel op een onderstel met een hoogte van 10 cm of meer te plaatsen.
Precaución: ventilación correcta
Para evitar el riesgo de descargas eléctricas e incendio y prevenir posibles daños, instale el equipo en un lugar que cumpla los siguientes requisitos:
1Parte frontal: Sin obstrucciones, espacio abierto.
2Lados/parte superior/parte posterior: No debe haber ninguna obstrucción en las áreas mostradas por las dimensiones de la siguiente figura.
3Parte inferior: Sitúe el equipo sobre una superficie nivelada. Mantenga un espacio adecuado para permitir el paso del aire y una correcta ventilación, situando el equipo sobre un soporte de 10 o más cm de allura.
Attenzione: Per una corretta ventilazione
Per prevenire il rischio di scosse elettriche e di incendio ed evitare possibili danni, collocare le apparecchiature nel modo seguente:
1Parte anteriore: Nessun ostacolo e spazio libero.
2Lati/Parte superiore/Retro: Lasciare libere le zone indicate dalle dimensioni di seguito.
3Base: Collocare su una superficie piana. Consentire un’adeguata ventilazione dell’impianto appoggiandolo su un tavolinetto alto almeno 10 cm.
Side view Seitenansicht Côté Zijaanzicht Vista lateral Vista laterale
15 cm
15 cm
15 cm
10 cm
– G-4 –

CONTENTS |
|
FEATURES ................................................................. |
1 |
SAFETY PRECAUTIONS ......................................... |
1 |
HANDLING PRECAUTIONS ................................... |
2 |
POWER SUPPLY ....................................................... |
3 |
NAMES OF PARTS AND CONTROLS .................... |
4 |
REMOTE CONTROL UNIT ...................................... |
5 |
TURNING THE UNIT ON/OFF ................................. |
6 |
SETTING THE CLOCK ............................................. |
7 |
ADJUSTING THE SOUND........................................ |
8 |
PLAYING COMPACT DISCS ................................... |
9 |
RADIO RECEPTION ............................................... |
15 |
CASSETTE PLAYBACK ......................................... |
17 |
RECORDING ............................................................ |
19 |
MAINTENANCE ...................................................... |
21 |
TROUBLESHOOTING ............................................ |
22 |
SPECIFICATIONS ................................................... |
23 |
FEATURES
1 |
Portable system incorporating CD player |
3 |
Synchronized recording with CD playback |
|
• CD functions can be operated with the remote |
4 |
MP3 playback capability |
|
control unit as well as on the main unit. |
5 |
Hyper-Bass Sound effect |
|
• 8-cm CD playback capability |
||
|
|
|
|
2 |
Digital LCD (Liquid Crystal Display) indicates |
|
|
|
general playback status. |
|
|
SAFETY PRECAUTIONS
Prevention of Electric Shocks, Fire Hazards
and Damages
•Even when the STANDBY/ON button is set to STANDBY, a very small current will flow. When the unit is turned on, the display window lights in blue. When the unit is in standby mode, the display window turns off. (Note, however, that the display window does not light even when the unit is turned on if the unit is operated on batteries.) To save power and for safety when not using the unit for an extended period of time, disconnect the power cord from the household AC outlet.
•Do not handle the power cord with wet hands.
•When unplugging from the wall outlet, always grasp and pull the plug, not the power cord.
•Consult your nearest dealer when damage, disconnection, or contact failure is found with the cord.
•Do not bend the cord sharply, or pull or twist it.
•Rating label is placed on the exterior of the bottom.
•Do not modify the power cord in any manner.
•Do not remove screws to disassemble the unit and do not touch anything inside the unit to avoid accidents.
•Do not insert any metallic objects into the unit.
•Unplug the power cord when there is a possibility of lightning.
•If water gets inside the unit, unplug the power cord from the outlet and consult your dealer.
•Do not block the ventilation holes of the unit so that heat can escape.
•Do not install the unit in a badly ventilated place.
English
1

English
HANDLING PRECAUTIONS
Do not use this unit in direct sunlight or leave the unit in a closed automobile (or yacht, etc.) where it would be exposed to high temperatures above 40°C.
1Avoid using the unit in the following places:
•Where the temperature may become excessively high or low; the recommended temperature range is 5°C and 35°C.
•Where it could be subject to vibrations.
•Where it is excessively humid, such as in a bathroom.
•Where it could be magnetized by a magnet or speaker.
2Pay attention to dust.
Be sure to close the disc door so that the lens is not contaminated by dust. Do not touch the lens.
3Condensation
Condensation may occur in the following cases, in which the unit may not operate correctly:
•The unit is in a room where a heater has just been switched on.
•The unit is in a place where there is smoke or high humidity.
•The unit has just moved from a cold place to a
warm room.
In these cases, set the STANDBY/ON button to ON and wait one or two hours before use.
4Volume control
Compact discs produce very little noise compared with analog records. If you adjust the volume by listening to the noise as you do with analog records, the speakers could be damaged by a sudden blast of sound when playback starts. Therefore, turn down the volume before starting and adjust it as required while playing a CD.
5Safety mechanism
The unit incorporates a safety interlock mechanism which switches off the laser beam when the disc door is opened.
6Do not place magnetic objects such as cassette tapes near the speakers.
Since the speakers contain magnets inside, do not place cassette tapes or magnetic cards nearby as recorded data could be erased.
7Keep the unit away from the TV.
When the unit is used near a TV, the TV picture could be distorted. If this happens, move the unit away from the TV. If this does not correct the situation, avoid using the unit when the TV is turned on.
8Cleaning the cabinet
If the cabinet gets dirty, wipe it with a soft, dry cloth. Never use benzine or thinner as these could damage the surface finish.
9When listening with headphones
•Do not listen at high volumes as it could damage your hearing.
•For safety, do not drive while listening with headphones.
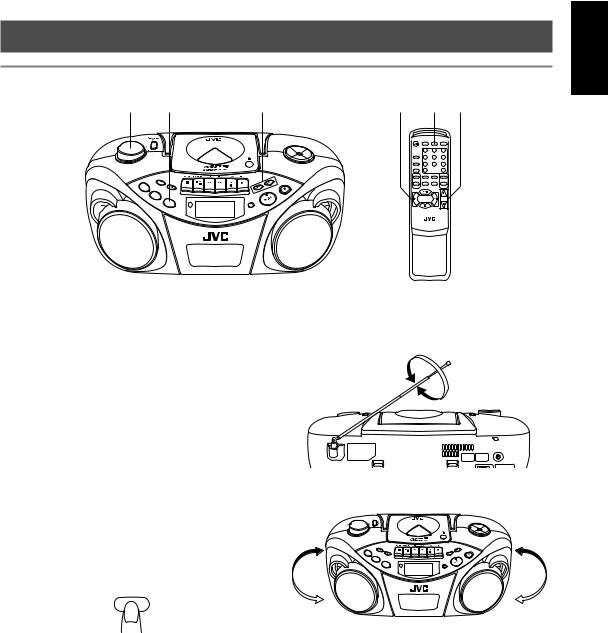
10Carrying handle
Do not raise or lower the carrying handle with the telescopic antenna extended, to avoid damaging the antenna. Position the carrying handle so that it does not interfere with operation.
2
POWER SUPPLY
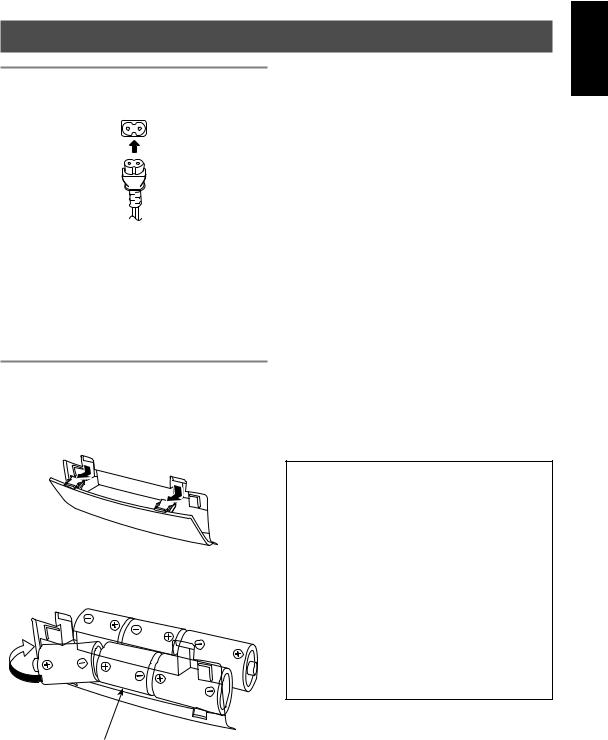
Operation on household AC
Connect the AC power cord.
AC IN
CAUTIONS:
•Use only with the JVC power cord provided with this unit to avoid malfunction or damage to the unit. Remove batteries when using the power cord.
•Be sure to unplug the power cord from the outlet when going out or when the unit is not in use for an extended period of time.
Operation on batteries
Loading batteries
1Open the battery cover.
Pull the battery cover toward you while pressing the sections marked by the arrows.
Checking batteries
When the tape speed or output sound level decreases, or CD playback becomes intermittent, replace all batteries with fresh ones.
When making an important recording, use new batteries (preferably alkaline batteries for a longer service life) to avoid any possible failure.
For better battery usage
•Continuous operation of the unit causes the battery power to be consumed more quickly than noncontinuous operation.
•Operation of the unit in a cold place causes the battery power to be consumed more quickly than in a warm place.
CAUTIONS:
•When not using the unit for a long time (more than two weeks) or when using the household AC, remove the batteries to avoid a malfunction or damage to the unit.
•When the JVC power cord provided with this unit is connected, the power is automatically switched from the batteries to the household AC even when the batteries are loaded.
However, remove the batteries when using the power cord.
2Insert six R20 (SUM-1)/D (13D)-size batteries.
Be sure to insert the batteries with the ª and · terminals positioned correctly.
|
1 |
|
3 |
|
2 |
6 |
5 |
|
|
|
4 |
CAUTIONS WHEN USING BATTERIES:
When batteries are used incorrectly, it may result in the leakage of chemicals from the batteries or they may explode. The following care should be taken:
•Check that the positive ª and negative · terminals of the batteries are positioned correctly and load them as shown in the figure on the left.
•Do not mix new and old batteries together, or mix different types of batteries.
•Do not try to recharge non-rechargeable batteries.
•Remove the batteries when the unit is not to be used for an extended period of time.
If chemicals from the batteries come in contact with your skin, wash them off immediately with water. If chemicals leak onto the unit, clean the unit completely.
R20 (SUM-1)/D (13D)-size batteries
3 Replace the cover.
English
3
English
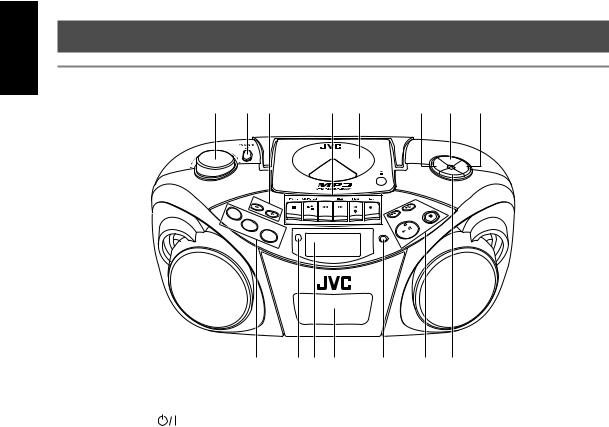
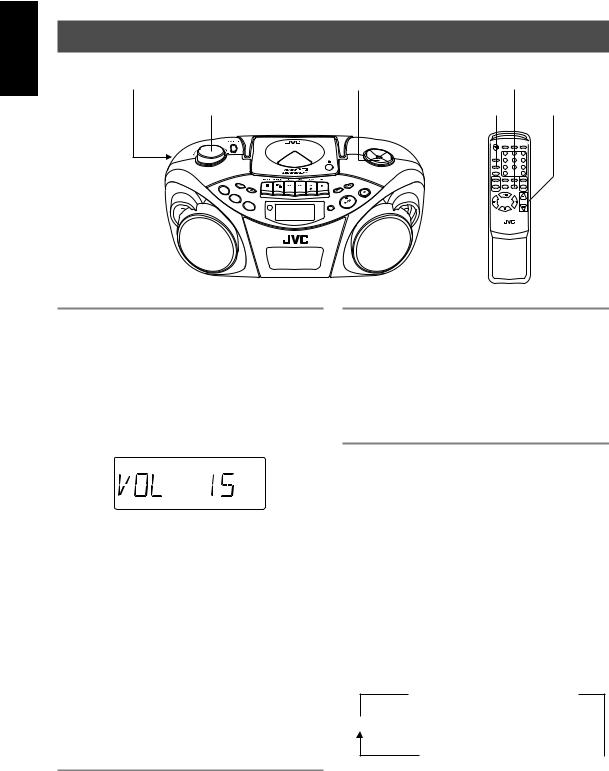
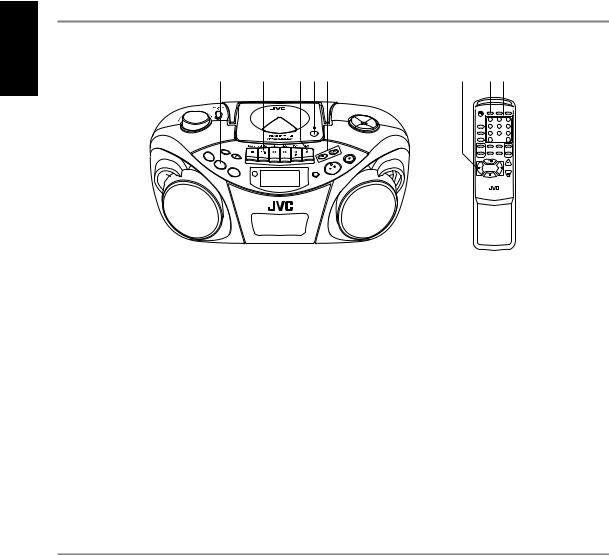
NAMES OF PARTS AND CONTROLS
Top and front sides
1 |
|
2 |
3 |
|
4 |
5 |
6 |
7 |
8 |
|
|
|
|
|
|
|
|
PROGRAM/ |
|
|
|
|
|
|
|
|
|
CLOCK SET |
|
|
|
|
|
|
|
|
PRESET |
|
|
|
|
|
|
|
|
|
DOWN |
PRESET |
|
|
|
|
|
|
|
|
|
UP |
|
|
|
|
|
|
|
|
|
HBS/ |
|
|
|
|
|
|
|
|
PUSH |
PRESET EQ |
|
|
|
|
|
|
|
|
|
|
|
|
|
|
GROUP |
|
|
|
STOP |
|
|
|
TAPE |
|
|
|
|
|
|
|
|
|
RANDOM |
|
|
|
|
PLAY/PAUSE |
|
|
|
|
|
|
|
|
|
|
|
||
|
|
CD |
|
|
|
|
|
|
|
|
|
TUNER |
|
|
|
|
|
|
|
|
|
|
REMOTE |
|
|
DISPLAY |
|
|
|
|
|
|
BAND |
SENSOR |
|
|
|
|
|
|
|
|
|
|
|
|
|
|
|
|
|
9 |
10 11 |
12 |
13 |
14 |
15 |
1 |
VOLUME knob |
|
|
8 |
PRESET UP button |
||
2 |
STANDBY/ON |
button |
|
9 |
TAPE button |
|
|
3 |
GROUP – button |
|
|
|
CD/RANDOM button |
||
|
GROUP + button |
|
|
|
BAND/TUNER button |
||
4 |
Tape operation buttons |
|
10 |
REMOTE SENSOR |
|||
|
PAUSE 8 button |
|
|
11 |
Display window |
||
|
STOP/EJECT § button |
|
12 |
Casette deck |
|
||
|
FF 1 button |
|
|
13 |
DISPLAY button |
||
|
REW ¡ button |
|
|
14 |
4 button |
|
|
|
PLAY 2 button |
|
|
|
¢ button |
|
|
|
REC ¶ button |
|
|
|
PLAY/PAUSE 3/8 button |
||
5 |
Disc door |
|
|
|
STOP 7 button |
|
|
6 |
PRESET DOWN button |
|
15 |
HBS/PRESET EQ button |
|||
7 |
PROGRAM/CLOCK SET button |
|
|
|
|
|
|
4
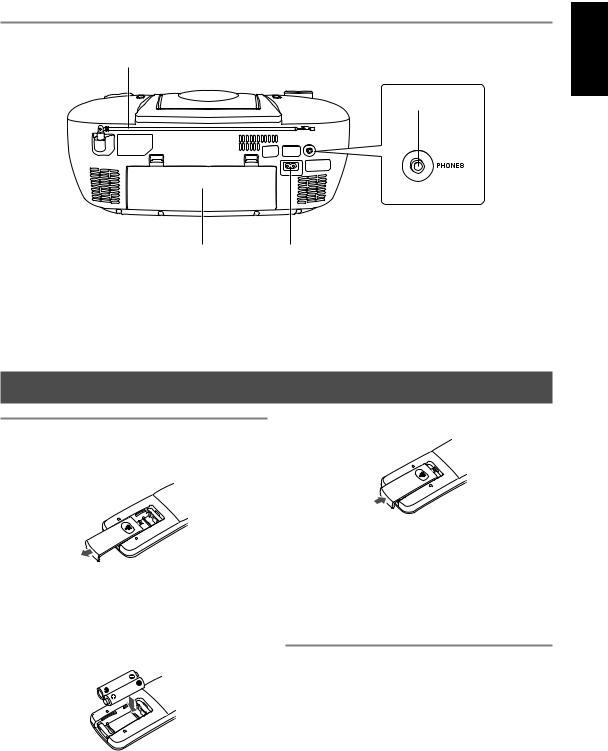
Rear side
16
17
|
18 |
19 |
|
16 |
Telescopic antenna |
18 |
Battery compartment cover |
17 |
PHONES jack |
19 |
ÓAC IN (AC input) jack |
|
Connect stereo mini headphones (3.5-mm diameters, |
|
|
|
impedance of 16 Ω to 32 Ω) to this jack. The speaker |
|
|
output is switched off with headphones connected.
REMOTE CONTROL UNIT
Installing batteries
1 Remove the battery cover from the back of the remote control unit.
2 Insert two AAA (UM-4)/R03-size batteries (supplied).
Insert the batteries with the ª and · terminals matching the indication inside the battery compartment. Insert the · ends first.
AAA (UM-4)/R03-size batteries
3 Replace the battery cover.
Battery replacement
The maximum operating distance between the remote control unit and the remote sensor section of the unit is approximately 7 meters. When the operating range decreases or remote control operation becomes unstable, replace the batteries with new ones.
Notes on using the remote control unit
•Point the top of the remote control unit toward the remote sensor section of the unit as directly as possible. The operable distance from the main unit decreases if you point the remote control unit at an angle.
•Press the buttons gently and firmly.
•Do not expose the remote sensor section of the unit to strong light (direct sunlight or artificial lighting) and make sure that there are no obstacles between the remote sensor section and the remote control unit.
English
5
English
Names of buttons
1 |
|
|
|
|
6 |
|
STANDBY/ON |
CD/ |
TUNER/ |
|
|
|
|
RANDOM |
BAND |
TAPE |
|
|
|
1 |
2 |
3 |
|
|
DISPLAY |
|
|
|
|
|
|
4 |
5 |
6 |
7 |
|
HBS/ |
|
|
|
|
2 |
PRESET EQ |
7 |
8 |
9 |
|
FM MODE |
|
||||
|
|
|
OVER |
|
|
|
/BEAT CUT |
|
|
|
|
|
|
0 |
|
|
|
|
UP |
PROGRAM/ |
INTRO |
+ |
|
|
CLOCK SET |
|
|||
3 |
PRESET |
REPEAT |
MUTING |
GROUP |
8 |
4 |
DOWN |
|
|
– |
|
|
|
|
|
|
|
5 |
|
|
|
VOLUME |
9 |
RM-SRCEX30J REMOTE CONTROL
1STANDBY/ON  button
2DISPLAY button HBS/PRESET EQ button FM MODE/BEAT CUT button
3PRESET UP/DOWN buttons
4PROGRAM/CLOCK SET button INTRO button
REPEAT button MUTING button
53/8 button
4 button
¢ button
7 button
6CD/RANDOM button TUNER/BAND button TAPE button
7Number buttons
8GROUP +/– buttons
9VOLUME +/– buttons
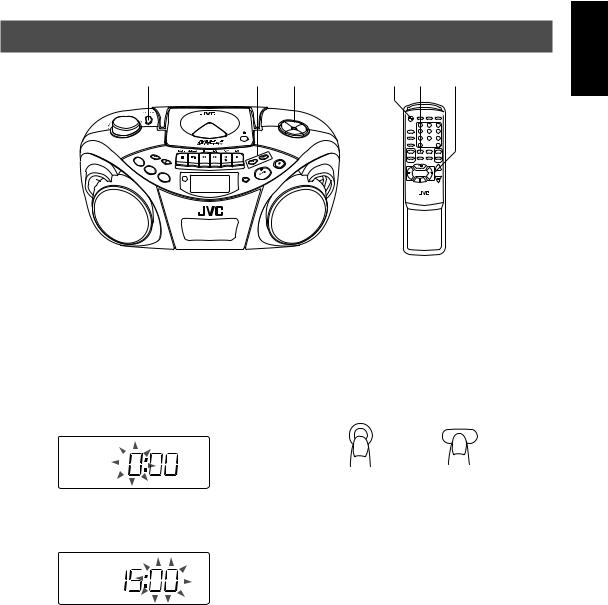
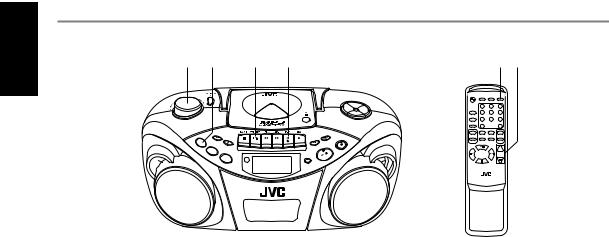
TURNING THE UNIT ON/OFF
STANDBY/ON 

PROGRAM/
CLOCK SET
PRESET
DOWN
|
|
|
|
PUSH |
|
|
GROUP |
|
STOP |
TAPE |
|
|
|
|
RANDOM |
|
|
A |
|
|
|
|
|
USE |
|
CD |
|
|
PLAY/P |
|
TUN |
|
|
|
|
|
REMOTE |
|
|
|
|
ER |
DISPLAY |
|
|
|
BAND |
SENSOR |
|
|
|
|
|
STANDBY/ON 

1 2 3
4 5 6
7 8 9
0
+
–
RM-SRCEX30J REMOTE CONTROL
STANDBY/ON
STANDBY/ON  button
Press the STANDBY/ON  button on the unit to turn on and off the unit.
You can also press the STANDBY/ON  button on the remote control unit.
The display window lights up when the unit is turned on. (Note, however, that the display window does not light even when the unit is turned on if the unit is operated on batteries.) The unit comes on ready to play the source selected when the unit was last turned off.
To switch off the power supply completely
Unplug the AC power cord from the AC outlet. If the batteries are inserted in the unit, take them out.
Notes:
•When you unplug the AC power cord or if a power failure occurs, the clock is reset to “0:00” right away, while the tuner preset stations (see page 16) will be erased in a few days. The clock indication will keep flashing until you set the clock again.
•Remove the batteries when carrying the unit by hand or in the trunk of a car. This prevents the power from being accidentally turned on, thus avoiding wasteful battery consumption.
6
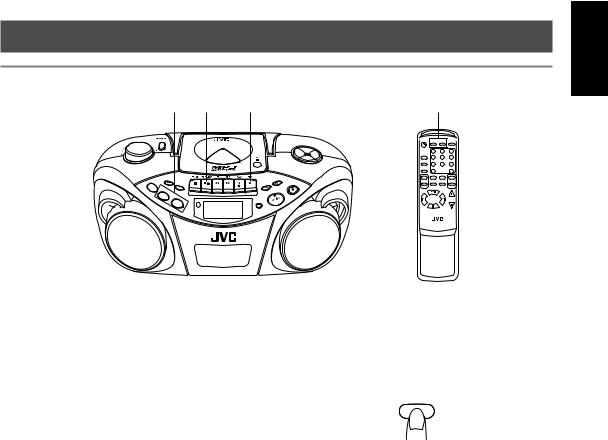
SETTING THE CLOCK
1
GROUP
TAPE |
RANDOM |
|
|
|
|
|
|
|
CD |
TUNER |
|
|
|
REMOTE |
|
|
|
BAND |
SENSOR |
|
|
|
3,4 2,3,4
PROGRAM/
CLOCK SET
PDROESET
WN
PUSH
STOP
PLAY/PAUSE
DISPLAY
1 2,3,4 3,4
1 2 3
4 5 6
7 8 9
0
+
–
RM-SRCEX30J REMOTE CONTROL
English
Before operating the unit any further, first set the clock built in this unit.
The clock uses 24-hour indication.
1Press STANDBY/ON  to turn off the unit, if it is turned on.
The clock flashes on the display window.
2Press and hold PROGRAM/CLOCK SET for more than 2 seconds.
The hour digits start flashing.
Note:
If there is a power failure, the clock loses the setting and is reset to “0:00.” The clock indication will keep flashing until you set the clock again.
To show the clock when the unit is on
Press DISPLAY.
Each time you press the button, the display changes the clock indication and the normal indication alternately.
DISPLAY
DISPLAY
3 Press 4 or ¢ to adjust the hour, then press
PROGRAM/CLOCK SET.
The minute digits start flashing.
4Press 4 or ¢ to adjust the minutes, then press
PROGRAM/CLOCK SET.
Main unit |
Remote |
Note:
Operating the unit while clock indication is displayed changes the display to the normal indication.
7
English
ADJUSTING THE SOUND
PHONES (on the rear) |
|
|
|
|
HBS/PRESET EQ |
MUTING |
|||
VOLUME |
|
|
|
|
HBS/PRESET EQ |
|
VOLUME +/– |
||
|
|
|
|
|
PROGRAM/ |
1 |
2 |
3 |
|
|
|
|
|
|
CLOCK |
SET |
|||
|
|
|
|
|
PRESET |
||||
|
|
|
|
|
DOWN |
|
|
|
|
|
|
|
|
|
|
|
4 |
5 |
6 |
|
|
|
|
|
PUSH |
|
|
|
|
|
|
|
|
|
|
|
7 |
8 |
9 |
|
|
|
|
|
|
|
0 |
|
|
|
|
|
|
|
|
|
|
|
+ |
|
|
|
GROUP |
|
P |
|
|
|
|
TAPE |
|
|
|
|
STO |
|
|
|
– |
|
R |
ANDOM |
|
|
AUSE |
|
|
|
|
|
|
|
|
Y/P |
|
|
|
|
|
|
CD |
|
|
PLA |
|
|
|
|
|
|
TUNER |
|
|
|
|
|
|
||
|
|
|
REMOTE |
DISPLAY |
|
|
|
|
|
|
|
|
BAND |
SENSOR |
|
|
|
|
|
|
|
|
|
|
|
|
|
|
|
RM-SRCEX30J REMOTE CONTROL
Adjusting the volume
Turn VOLUME clockwise to increase the volume or counterclockwise to decrease it.
You can press VOLUME + or VOLUME – on the remote control unit to increase or decrease the volume respectively.
The volume level can be adjusted in 31 steps (MIN, 1, 2,
... 29, MAX).
Caution:
DO NOT turn off the unit with the volume set to an extremely high level; otherwise a sudden blast of sound could damage your hearing and/or the speakers and headphones, when you turn on the unit or start playing another source next time.
REMEMBER you cannot adjust the volume unless the unit is turned on.
Turning off the sound temporarily
During playback, press MUTING on the remote control unit.
The sound is turned off and “MUTING” appears in the display window.
To restore the sound, press MUTING again.
Listening through headphones
Connect a pair of headphones to the PHONES jack.
No sound comes out of the speakers anymore. Be sure to turn down the volume before connecting headphones.
Reinforcing the bass sound
You can enjoy powerful bass sound with the Hyper-Bass Sound effect.
Press and hold HBS/PRESET EQ so that the HBS indicator lights up in the display window.
To turn off the effect, press and hold the button again so that the HBS indicator goes off.
Selecting the sound mode
You can select one of the 5 preset sound modes.
CLASSIC: Good for classical music.
ROCK |
: Boosts low and high frequency. Good for |
|
acoustic music. |
POP |
: Good for vocal music. |
JAZZ |
: Good for jazz music. |
FLAT |
: Normal sound. |
To select the sound mode
Press HBS/PRESET EQ repeatedly until the indicator for the sound mode you want appears in the display window.
Each time you press the button, the sound mode changes as follows:
 CLASSIC
  ROCK
ROCK
FLAT
JAZZ POP
POP
8
PLAYING COMPACT DISCS
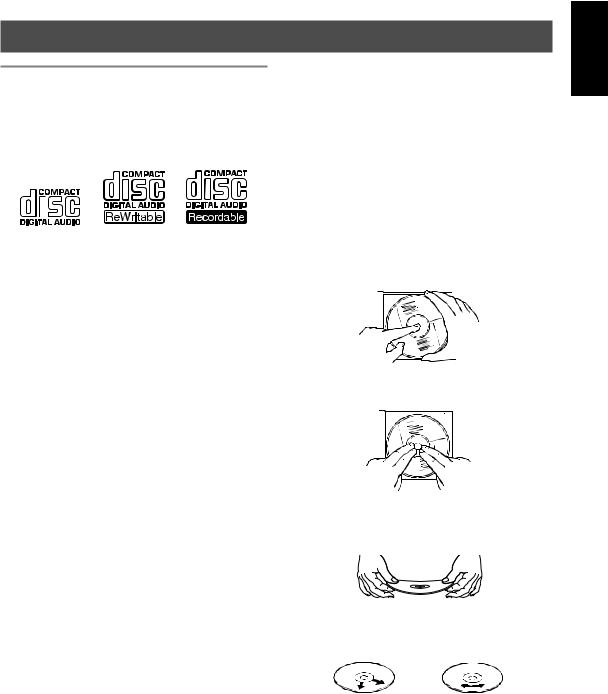
Notes on compact discs
This unit has been designed only to play back the following CDs.
•Digital audio CD
•Recordable digital audio CD (CD-R)
•Rewritable digital audio CD (CD-RW)
When playing a CD-R or CD-RW
You can play back finalized CD-R or CD-RW recorded in music CD format or in MP3 format. (If a CD-RW has been recorded in a different format, erase all the data on the CD-RW completely before recording on it.)
•You can play back CD-R or CD-RW in music CD format like an audio CD.
•Some CD-R or CD-RW may not be played back on this unit because of their disc characteristics, damage or stain on them, or if the player lens is dirty.
•The reflection factor of CD-RW is lower than that of other CDs, possibly causing CD-RW to take longer time to read.
Notes for MP3 files
•The unit can only recognize files with “MP3” or “mp3” as the extensions, which can be in any combination of upper and lower cases. The file name needs to be up to 20 characters.
•This unit recognizes files and folders on a disc in the following conditions:
–up to 640 MP3 files,
–up to 256 folders (including the root folder),
–up to 8th layers (including the root folder).
•It is recommended that you record your material at a 44.1-kHz sampling rate, using the 128-kbps data transfer rate.
•Some MP3 files or discs may not be played back because of their characteristics or recording conditions.
•MP3 discs require a longer readout time than normal discs because of the complexity of the folder/file configuration.
•MP3i and MP3 Pro are not available.
•The title, artist name and album name can be displayed as the ID3 TAG (ID3v1/1.1) information.
Handling discs
Since dirty, damaged or warped discs could damage the unit, care should be taken of the following:
•Do not touch the reflective recorded surface.
•Do not stick or write anything on the label side.
•Do not bend discs.
Storage
•After removing a disc from the unit, be sure to put it back in its case.
•Do not expose discs to direct sunlight, high temperatures from a heater, etc., high humidity or dust.
Cleaning discs
Before loading a disc, wipe off any dust, dirt or fingerprints with a soft, dry cloth. Discs should be cleaned by wiping radially, from the center to edge.
Never use thinner, benzine, record cleaner or antistatic spray.
•Removing the disc from its storage case and replacing it
Press the center and lift out.
Press to secure the disc.
• Handling
Incorrect
• Cleaning
Correct Incorrect
English
9
English
Basic operation
5 |
|
1 |
|
3 |
2 |
4 |
|
4 |
1 |
|
5 |
|
|
|
|
|
|
PROGRAM/ |
|
1 |
2 |
3 |
|
|
|
|
|
|
|
CLOCK |
SET |
|
|||
|
|
|
|
|
|
PRESET |
|
||||
|
|
|
|
|
|
DOWN |
|
|
|
|
|
|
|
|
|
|
|
|
|
|
4 |
5 |
6 |
|
|
|
|
|
PUSH |
|
|
|
|
|
|
|
|
|
|
|
|
|
|
|
7 |
8 |
9 |
|
|
|
|
|
|
|
|
|
0 |
|
|
|
|
|
|
|
|
|
|
|
|
|
+ |
|
|
|
GROUP |
|
|
STOP |
|
|
|
|
|
|
TAPE |
|
|
|
|
|
|
|
|
– |
|
|
|
RANDOM |
|
|
|
AUSE |
|
|
|
|
|
|
|
CD |
|
|
|
PLAY/P |
|
|
|
|
|
|
|
TUNER |
|
|
|
|
|
|
|
|
|
|
|
|
REMOTE |
DISPLAY |
|
|
|
|
|
|
|
|
|
|
BAND |
SENSOR |
|
|
|
|
|
|
|
|
|
|
|
|
|
|
|
|
|
|
|
RM-SRCEX30J REMOTE CONTROL
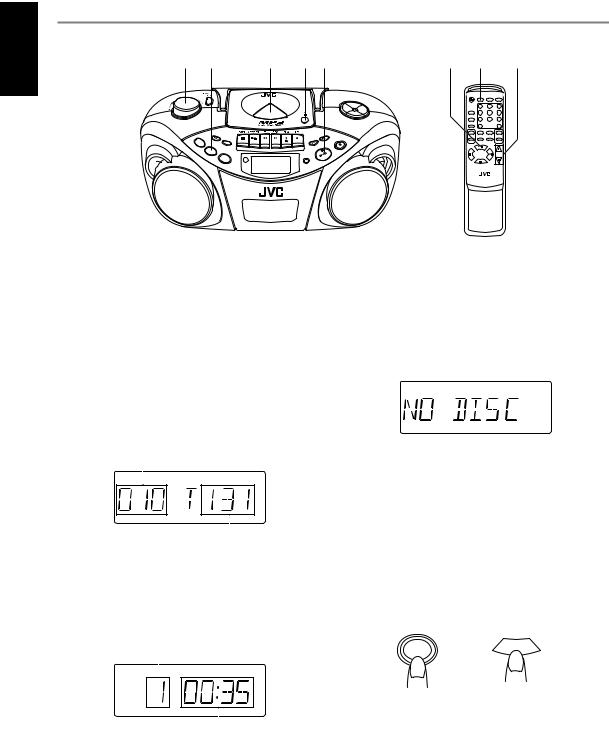
1Press CD/RANDOM to enter CD mode, if the unit is in TUNER or TAPE mode.
You can press CD/RANDOM on the remote control unit to enter CD mode.
2Press ) PUSH to open the disc door.
3Load a disc with the label side facing up and close the disc door.
•8-cm CD can be played on the unit without an adapter.
•When loading an MP3 disc, the MP3 indicator lights up, and the total number of groups (albums) and total number of tracks appear in the display window.
Total number of groups
Total number of tracks
4Press PLAY/PAUSE 3/8 to start playback.
You can start playback by pressing 3/8 on the remote control unit.
The current track number and elapsed playing time are displayed during playback.
Current track number
Elapsed playing time
When an MP3 disc is loaded, after the current track number and elapsed playing time have been displayed for 5 seconds, the ID3 TAG information (title, artist name and album name) scrolls through the display window once, if the MP3 disc has ID3 TAG information. For displaying the disc information, see page 11.
5 Adjust the volume.
Notes:
•When an MP3 disc is loaded, it may take more than 30 seconds to be read in, depending on the amount of information compiled in the disc.
•The following indication may be displayed when the disc is loaded upside down. Reload the disc correctly.
•If mistracking occurs during playback, lower the volume.
•Mistracking may occur if a strong shock is applied to the unit or if it is used in a place subject to vibrations (e.g. in a car travelling on a rough road).
•If you press CD/RANDOM while in CD mode, the unit enters the random playback mode.
To stop playback
Press STOP 7.
You can press 7 on the remote control unit to stop playback.
STOP
|
|
|
|
|
|
Main unit |
Remote |
||||
Caution:
Stop playback before opening the disc door. Check that the disc has completely stopped rotating before unloading the disc.
10

To pause playback
Press PLAY/PAUSE 3/8 during playback.
You can press 3/8 on the remote control unit to pause playback.
To resume playback, press the button again.
PLAY/PAUSE
|
|
|
|
Main unit |
Remote |
||
Skipping
•To skip back to the previous track
During playback, press 4 once to return to the beginning of the current track, press twice to skip back to the beginning of the previous track.
•To skip to the next track
During playback, press ¢ to skip to the beginning of the next track.
|
Main unit |
|
Remote |
Selecting a desired track directly
Use the number buttons on the remote control unit.
In case of an audio CD:
Example:
To select track 8, press 8.
To select track 21, press OVER, 2, then 1. Playback starts from the specified track.
In case of an MP3 disc:
Example:
To select track 8, press 8.
To select track 21, press OVER, 0, 2, then 1. To select track 115, press OVER, 1, 1, then 5.
Search – locating a desired position on the disc (audio CD only)
Press and hold 4 or ¢ during playback.
Monitor the sound and release the button when the desired position is located.
|
Main unit |
|
Remote |
Selecting a desired group (album) and track (MP3 disc only)
1 In stop mode, press GROUP + or GROUP – (on either the main unit or the remote control unit) repeatedly until the desired group (album) number is displayed.
2 Press 4 or ¢ (on either the main unit or the remote control unit) to select a desired track from the current group (album).
3Press PLAY/PAUSE 3/8 (or 3/8 on the remote control unit) to start playback.
Note:
During playback, if you press GROUP + or GROUP –, playback skips to the first track of the next or previous group (album), and the track number is shown in the display window.
Checking the remaining time (audio CD only)
Press and hold DISPLAY (on either the main unit or the remote control unit) for more than 1 second.
Each time you press and hold the button, the display changes in the following order:
 Track number being played and elapsed playing time
Track number being played and remaining time of the track
(“TRACK” and “REMAIN” light up.)
Track number being played and remaining time of the disc
(“TOTAL” and “REMAIN” light up.)
Displaying the disc information (MP3 disc only)
In stop mode:
When you press 4 or ¢ to select a track, the group (album) number and group name\file name scroll through the display window twice, and then the current group (album) number and track number are displayed again.
During playback:
When you press and hold DISPLAY for more than 1 second, the title, artist name and album name* scroll through the display window once, and then the track number being played and elapsed playing time are displayed again.
*If the track has no text information, “NO INFO” appears instead.
English
11

English |
Repeat/Random playback |
|
|
|
CD/RANDOM |
|
|
GROUP |
|
TAPE |
RANDOM |
|
|
|
|
|
|
|
CD |
TUNER |
|
|
|
REMOTE |
|
|
|
BAND |
SENSOR |
|
|
|
PROGRAM/
CLOCK SET
PDROESET
WN
PUSH
P
STO
AUSE
Y/P
PLA
DISPLAY
REPEAT CD/RANDOM
1 2 3
4 5 6
7 8 9
0
+
–
RM-SRCEX30J REMOTE CONTROL
Repeat playback
Press REPEAT on the remote control unit during playback.
Each time you press the button, the repeat mode changes in the following order:
In case of an audio CD:
 Repeat playback of all tracks on the disc (“REPEAT” and “ALL” light up.)
Repeat playback of a single track (“REPEAT” and “1” light up.)
Repeat playback is canceled.
In case of an MP3 disc:
 Repeat playback of all tracks on the disc (“REPEAT” and “ALL” light up.)
Repeat playback of a group (album) (“REPEAT” and “GROUP” light up.)
Repeat playback of a single track (“REPEAT” and “1” light up.)
Repeat playback is canceled.
Random playback
Press CD/RANDOM in CD mode so that the RANDOM indicator lights up in the display window.
You can press CD/RANDOM on the remote control unit to select random playback.
Tracks are played in random order.
To cancel random playback, press the button again so that the RANDOM indicator goes off.
12

Programmed playback
Up to 40 tracks can be programmed to play in any desired order.
|
1 |
|
|
3,5 |
2,4,5 |
6 |
6 |
2,4,5 |
1 |
3 |
3 |
|
|
|
|
|
PROGRAM/ |
|
|
|
1 |
2 |
3 |
||
|
|
|
|
CLOCK |
SET |
|
|
|
||||
|
|
|
|
PRESET |
|
|
|
|
||||
|
|
|
|
DOWN |
|
|
|
|
|
|
|
|
|
|
|
|
|
|
|
|
|
|
4 |
5 |
6 |
|
|
|
|
PUSH |
|
|
|
|
|
|
|
|
|
|
|
|
|
|
|
|
|
|
7 |
8 |
9 |
|
|
|
|
|
|
|
|
|
|
0 |
|
|
|
|
|
|
|
|
|
|
|
|
|
|
+ |
|
|
G |
|
|
|
|
|
|
|
|
|
|
|
|
ROUP |
|
STOP |
|
|
|
|
|
|
|
|
TAPE |
|
|
|
|
|
|
|
|
|
|
– |
|
|
RANDOM |
|
|
PLAY/PAUSE |
|
|
|
|
|
|
|
|
|
CD |
|
|
|
|
|
|
|
|
|
|
|
|
TUNER |
|
|
|
|
|
|
|
|
|
|
|
|
|
REMOTE |
DISPLAY |
|
|
|
|
|
|
|
|
|
|
|
BAND |
SENSOR |
|
|
|
|
|
|
|
|
|
|
|
|
|
|
|
|
|
|
|
|
|
|
RM-SRCEX30J REMOTE CONTROL
English
1Press CD/RANDOM to enter CD mode, if the unit is in TUNER or TAPE mode.
You can press CD/RANDOM on the remote control unit to enter CD mode.
2Press PROGRAM/CLOCK SET in stop mode.
The PROGRAM indicator appears in the display window.
PROGRAM
3 Press 4 or ¢ to select a desired track to be programmed.
You can use the number buttons on the remote control unit to select a desired track.
PROGRAM
Track to be programmed
4Press PROGRAM/CLOCK SET.
5Repeat steps 3 and 4 to program other tracks.
6Press PLAY/PAUSE 3/8.
The tracks are played in the order you have programmed.
You can press 3/8 on the remote control unit to start programmed playback.
Note:
If you press CD/RANDOM while in CD mode, the unit enters the random playback mode.
To check the program contents
Press PROGRAM/CLOCK SET repeatedly in stop mode when “PROGRAM” is displayed.
Each time you press the button, the program number and the corresponding track number are shown in the display window.
To add tracks in the program
1Press PROGRAM/CLOCK SET repeatedly in stop mode when “PROGRAM” is displayed so that the track number “0” is shown.
2Press 4 or ¢ (or use the number buttons on the remote control unit) to select the track number to be added, then press PROGRAM/CLOCK SET.
To edit the program
1 Press PROGRAM/CLOCK SET in stop mode when “PROGRAM” is displayed so that the program number you want to edit is shown.
2 Press 4 or ¢ (or use the number buttons on the remote control unit) to select a new track number, then press PROGRAM/CLOCK SET.
To repeat programmed playback
Press REPEAT on the remote control unit after starting programmed playback.
To erase the entire program in the memory
Press STOP 7 (or 7 on the remote control unit) in stop mode when “PROGRAM” is displayed.
The program is cleared, and the PROGRAM indicator goes off.
The program is also cleared when you open the disc door, turn off the unit or change to other audio sources.
Note:
You cannot program more than 40 tracks.
“– – FULL – –” is displayed when you try to program the 41st track.
13
English
Programmed playback of an MP3 disc
Up to 40 tracks can be programmed to play in any desired order.
1Press PROGRAM/CLOCK SET in stop mode.
The PROGRAM indicator appears in the display window.
2Press GROUP + or GROUP – to select a desired group (album).
The first track number in the selected group (album) is shown.
3Press 4 or ¢ to select a desired track in the group (album).
You can use the number buttons on the remote control unit to select a desired track.
4Press PROGRAM/CLOCK SET.
5Repeat steps 2 to 4 to program other tracks.
6Press PLAY/PAUSE 3/8.
The tracks are played in the order you have programmed.
You can press 3/8 on the remote control unit to start programmed playback.
To check the program contents
Press PROGRAM/CLOCK SET repeatedly in stop mode.
Each time you press the button, the program number and the corresponding track number are shown in the display window.
To change the program
You can add tracks in the program or edit the program in the same manner as for an audio CD. See the previous page.
To erase the entire program in the memory
Press STOP 7 (or 7 on the remote control unit) in stop mode.
The program is cleared, and the PROGRAM indicator goes off.
The program is also cleared when you open the disc door or turn off the unit.
Note:
You cannot program more than 40 tracks.
“– – FULL – –” is displayed when you try to program the 41st track.
Playing back introductions – Intro playback
Every track of a CD can be played for the beginning 10 seconds.
INTRO
1 2 3
4 5 6
7 8 9
0
+
–
RM-SRCEX30J REMOTE CONTROL
Press INTRO.
The INTRO indicator appears in the display window and intro playback starts.
To use intro playback for programmed and random playback, press the button after starting playback.
To stop during playback
Press STOP 7 (or 7 on the remote control unit).
The INTRO indicator goes off and the unit exits from the intro playback.
To cancel intro playback without stopping
Press INTRO during playback.
The INTRO indicator goes off and the unit continues playback.
14
RADIO RECEPTION
Tuning in a station
4 1,2
|
|
GROUP |
|
TAPE |
RANDOM |
|
|
|
|
|
|
|
CD |
TUNER |
|
|
|
REMOTE |
|
|
|
BAND |
SENSOR |
|
|
|
3
PROGRAM/
CLOCK SET
PRESET
DOWN
PUSH
STOP
E
PLAY/PAUS
DISPLAY
3 |
1,2 |
4 |
|
1 |
2 |
3 |
|
4 |
5 |
6 |
|
7 |
8 |
9 |
|
0
+
–
RM-SRCEX30J REMOTE CONTROL
English
1Press BAND/TUNER to enter the tuner mode.
2Press BAND/TUNER to select the band, FM or AM.
3Press and hold 4 or ¢ for more than 1 second.
The unit starts searching and stops when a station of sufficient signal strength is tuned in.
If you press 4 or ¢ briefly and repeatedly, the frequency changes step by step.
4Adjust the volume.
Changing the FM reception mode
When an FM stereo broadcast is hard to receive or noisy, reception improves in monaural reception.
Press FM MODE/BEAT CUT on the remote control unit so that the MONO indicator appears in the display window.
To restore the stereo effect, press the button again so that the MONO indicator goes off.
FM MODE /BEAT CUT
Using the antennas
FM
AM
|
|
GROUP |
TAPE |
RANDOM |
|
|
|
|
|
CD |
TUNER |
|
|
|
|
|
BAND |
PUSH
STOP
 E PLAY/PAUS
DISPLAY
Note:
The FM reception mode setting will be canceled when you tune in another station.
Note:
The built-in ferrite core antenna may pick up interference from television receivers in the neighborhood disturbing AM reception.
15
English
Presetting stations
You can preset 20 FM and 10 AM stations.
1 |
2,6 |
3,5,6 |
4,6 |
2,6 |
4,6 |
3,5,6 |
1 |
4,6 |
|||
|
|
|
|
|
|
|
|
|
|
|
|
|
|
|
|
|
|
|
|
|
|
|
|
TAPE
RANDOM CD
GROUP
TUNER
BAND
REMOTE SENSOR
PROGRAM/
CLOCK SET
PDREOSET
WN
PUSH
STOP
PLAY/PAUSE
DISPLAY
1 2 3
4 5 6
7 8 9
0
+
–
RM-SRCEX30J REMOTE CONTROL
There is a time limit in doing the following steps. If the setting is canceled before you finish, start from step 3 again.
Note:
In some cases, test frequencies have been already memorized for the tuner since the factory examined the tuner preset function before shipment. This is not a malfunction. You can preset the stations you want into memory by following the presetting method.
1 Press BAND/TUNER to select the band, FM or AM.
2Press 4 or ¢ to tune in the station you want to preset.
3Press PROGRAM/CLOCK SET.
The PROGRAM indicator and the preset number start blinking in the display window.
 PROGRAM
 MHz
MHz
4 Press PRESET UP or PRESET DOWN to select the preset number.
You can use the number buttons on the remote control unit to select the preset number directly.
Example:
To select preset number 5, press 5.
To select preset number 15, press OVER, 1, then 5. To select preset number 20, press OVER, 2, then 0.
 PROGRAM
 MHz
MHz
Preset number
5Press PROGRAM/CLOCK SET.
The tuned station in step 2 is stored in the preset number selected in step 4.
Storing a new station on a used number erases the previously stored one.
If you used the number buttons to select the preset number in step 4, pressing PROGRAM/CLOCK SET is not necessary in this step.
6Repeat steps 2 to 5 to preset other stations, using different preset numbers.
Tuning in a preset station
1 Press BAND/TUNER to select the band, FM or AM.
2Press PRESET UP or PRESET DOWN repeatedly until the desired preset number appears.
You can use the number buttons on the remote control unit to select the preset number directly.
Example:
To select preset number 5, press 5.
To select preset number 15, press OVER, 1, then 5. To select preset number 20, press OVER, 2, then 0.
Note:
If you unplug the AC power cord or if a power failure occurs, the preset stations will be erased in a few days. If this happens, preset the stations again.
16
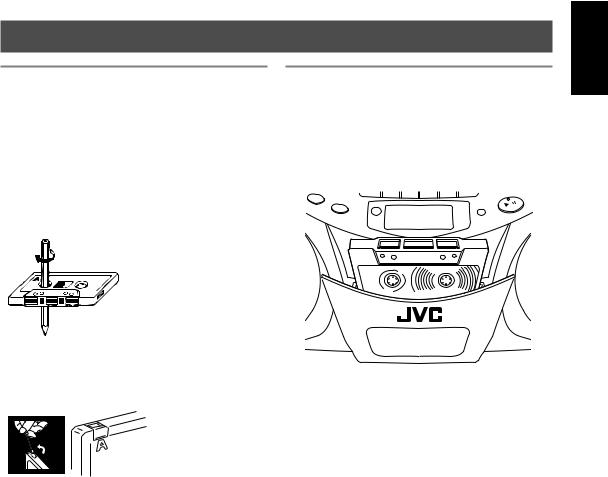
CASSETTE PLAYBACK
Notes on cassette tapes
•Use only type-I normal tapes. The recording/playback characteristics of this unit are those for normal tapes, which have different characteristics from CrO2 and metal tapes.
•The use of tapes longer than 120 minutes is not recommended, since characteristic deterioration may occur and these tapes easily jam in the pinch roller and the capstan.
•Loose tape may cause trouble. Gently tighten the tape with a pencil as shown in the figure below.
Turn the pencil to take up the slack.
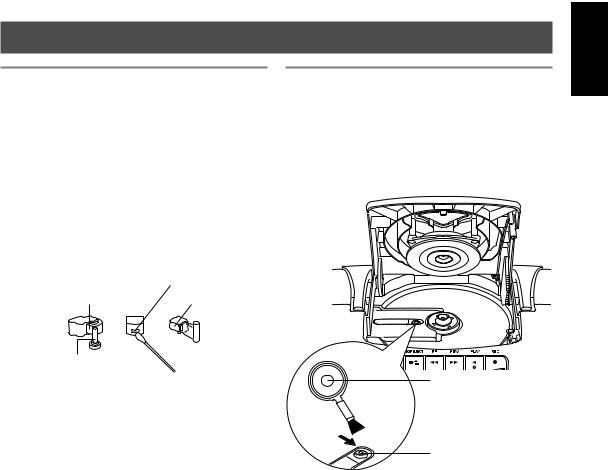
•To prevent recordings from being accidentally erased, remove the tab(s) with a screwdriver. After the tabs have been broken off, reseal the slots with adhesive tape to erase or re-record.
Loading a cassette
1 Press STOP/EJECT § to open the cassette holder.
2 Load a cassette with the open side up and the playback side facing out as shown in the figure below.
+ Forward direction
CD |
|
PLAY/PAUSE |
|
|
|
TUNER |
REMOTE |
DISPLAY |
BAND |
SENSOR |
|
|
|
3Close the cassette holder by pressing it gently and firmly.
The cassette holder clicks back into position.
English
17
English
Basic operation
4 |
|
1 |
|
2 |
3 |
|
|
|
|
|
PROGRAM/ |
|
|
|
|
|
CLOCK SET |
|
|
|
|
|
PRESET |
|
|
|
|
|
DOWN |
|
|
|
|
|
PUSH |
|
|
|
GROUP |
|
STOP |
|
TAPE |
|
|
|
|
|
RANDOM |
|
|
PLAY/PAUSE |
|
|
|
|
|
||
|
|
CD |
|
|
|
|
|
TUNER |
|
|
|
|
|
|
REMOTE |
DISPLAY |
|
|
|
|
BAND |
SENSOR |
|
|
|
|
|
|
1 4
1 2 3
4 5 6
7 8 9
0
+
–
RM-SRCEX30J REMOTE CONTROL
1Press TAPE to enter the tape mode.
2Load a cassette.
Use only a type-I normal tape.
3Press PLAY 2 to start playback.
4Adjust the volume.
To stop playback
Press STOP/EJECT §.
The tape also stops when it reaches the end.
Fast-winding a tape
Press REW ¡ or FF 1.
When the tape reaches the end, press STOP/EJECT § to release REW ¡ or FF 1.
18
RECORDING
Basic operation
|
|
1 |
2 |
3 |
|
|
|
|
PROGRAM/ |
|
|
|
|
CLOCK SET |
|
|
|
|
PRESET |
|
|
|
|
DOWN |
|
|
|
|
PUSH |
|
|
GROUP |
|
STOP |
TAPE |
|
|
|
|
RANDOM |
|
|
PLAY/PAUSE |
|
|
|
|
||
|
CD |
|
|
|
|
TU |
|
|
|
|
|
NER |
REMOTE |
DISPLAY |
|
|
BAND |
SENSOR |
|
|
|
|
|
1
1 2 3
4 5 6
7 8 9
0
+
–
RM-SRCEX30J REMOTE CONTROL
English
Standard recording
1Prepare the recording source.
•When recording from the radio:
Set to the tuner mode and tune in a desired station.
•When recording from a CD:
Set to the CD mode and load a CD.
2Load a blank or erasable cassette.
Use only a type-I normal tape.
3Press REC ¶.
PLAY 2 is also depressed, and recording starts.
To stop recording
Press STOP/EJECT §.
The tape also stops when it reaches the end.
Notes:
•It should be noted that it may be unlawful to rerecord pre-recorded tapes, records, or discs without the consent of the owner of copyright in the sound or video recording, broadcast or cable program and in any literary, dramatic, musical, or artistic work embodied therein.
•The recording level is automatically set correctly, so it is not affected by VOLUME. Thus, during recording you can adjust the sound you are actually listening to without affecting the recording level.
•If a recording you made has excessive noise or static, the unit may have been too close to a TV which was on during the recording. Either turn off the TV or increase the distance between the TV and the unit.
Using the beat-cut function
When recording an AM broadcast, beats may occur. If this happens while recording an AM broadcast, press FM MODE/BEAT CUT on the remote control unit to select the better beat-cut setting, “CUT-1” or “CUT-2.”
FM MODE /BEAT CUT
To start recording at the exact moment
1 Press PAUSE 8 first, then press REC ¶, thus entering the record-pause (standby) mode.
2 Press PAUSE 8 to release the tape at the exact moment you want to start recording.
Note:
Do not leave the unit in pause mode for more than a few minutes. Instead, press STOP/EJECT § to stop the tape.
19
English
Synchronized recording with CD playback
You can make the CD player to start playback when the tape deck enters the recording mode.
|
3 |
|
1 |
5 |
2 4 |
|
|
4 |
3 |
|
4 |
|
|
|
|
|
|
PROGRAM/ |
|
1 |
2 |
3 |
|
|
|
|
|
|
PRES |
CLOCK |
SET |
|
|||
|
|
|
|
|
DOWENT |
|
|
|
|
|
|
|
|
|
|
|
|
|
|
|
4 |
5 |
6 |
|
|
|
|
|
PUSH |
|
|
|
|
|
|
|
|
|
|
|
|
|
|
|
7 |
8 |
9 |
|
|
|
|
|
|
|
|
|
0 |
|
|
|
|
|
|
|
|
|
|
|
|
|
+ |
|
|
GROUP |
|
|
STOP |
|
|
|
|
|
|
TAPE |
|
|
|
|
|
|
|
|
|
– |
|
|
RANDOM |
|
|
|
PLAY/PAUSE |
|
|
|
|
|
|
|
CD |
|
|
|
|
|
|
|
|
|
|
|
TUN |
|
|
|
|
|
|
|
|
|
|
|
|
REMOTE |
|
|
|
|
|
|
|
|
|
|
|
ER |
|
DISPLAY |
|
|
|
|
|
|
|
|
|
BAND |
SENSOR |
|
|
|
|
|
|
|
|
|
|
|
|
|
|
|
|
|
|
|
|
RM-SRCEX30J REMOTE CONTROL
1Load a cassette.
Use only a type-I normal tape.
2Load a CD.
3Press CD/RANDOM to enter CD mode.
You can press CD/RANDOM on the remote control unit to enter CD mode.
4To start recording from the desired track, select the track by pressing 4 or ¢ in stop mode.
You can use the number buttons on the remote control unit to select the track.
5Press REC ¶.
PLAY 2 is also depressed, and synchronized recording starts.
•The CD SYNC indicator appears in the display window during synchronized recording.
When the tape reaches the end first, the CD player enters the pause mode. Press PLAY/PAUSE 3/8 (or 3/8 on the remote control unit) to continue playback, or press STOP 7 (or 7 on the remote control unit) to stop playback.
When the CD player stops first, the tape continues running. In this case, press STOP/EJECT § to stop the tape.
Erasing
When recording on a pre-recorded tape, the previous |
To erase a tape without making a new |
|
recording is erased and only the new recording is heard |
recording |
|
next time the tape is played back. |
1 |
Press TAPE on the unit to enter the tape mode. |
|
||
|
2 |
Press REC ¶. |
20
MAINTENANCE
Cleaning the heads, capstan and pinch roller
Cleaning is important!
When the tape is running, magnetic powder and dust naturally accumulate on the heads, capstan and pinch roller. When they become too dirty;
•Sound quality deteriorates.
•The sound output level drops.
•The previous recording is not completely erased.
•Recording is not performed satisfactorily.
To avoid these, clean the heads, capstan and pinch roller every 10 hours of use.
Head (recording/playback)
Pinch roller |
Erasure head |
Capstan
Open the cassette holder. Clean the heads, capstan and pinch roller.
For effective cleaning, use a cleaning kit available at an audio store.
After cleaning, make sure that the cleaning fluid has dried completely before loading a cassette.
Cautions:
•Keep magnets and metallic objects away from the head. If the head becomes magnetized, noise will increase and the sound will deteriorate.
•Demagnetize the recording/playback head every 20 to 30 hours of use with a head demagnetizer available at an audio store. When demagnetizing the head, the unit should be turned off.
As the erasure head of the unit is of magnetic type, do not demagnetize it.
•Do not use anything other than alcohol for cleaning. Thinner and benzine will damage the rubber pinch roller.
Cleaning the CD pickup lens
If the CD pickup lens is dirty, the sound may be degraded.
Open the disc door and clean the lens.
Use a blower (available at a camera store, etc.) to blow off dust on the lens.
Blower
Lens
English
21

English
TROUBLESHOOTING
• If you are having a problem with your unit, check this |
• If you cannot solve the problem from the hints given |
list for a possible solution before calling for service. |
here, or the unit has been physically damaged, call a |
|
qualified person, such as your dealer, for service. |
Symptom |
|
Possible cause |
Power cannot be turned on. |
The power cord is unplugged. |
|
|
|
|
When PLAY 2 is pressed, tape does not |
PAUSE 8 is pressed. |
|
move. |
|
|
|
|
|
Playback sound is at a very low level. |
• Batteries are run down. |
|
|
|
• The head is dirty. |
|
|
|
REC ¶ does not function. |
• The safety tabs of the cassette have |
|
|
|
been broken off. |
|
|
• No cassette is loaded. |
|
|
|
The disc is loaded but does not play. |
• The disc is upside down. |
|
|
|
• The disc is dirty. |
|
|
• The disc is damaged or warped. |
|
|
• The lens is dirty. |
|
|
• There is moisture condensation. |
Action
Connect the power cord.
Press PAUSE 8 again to release it.
•Replace the batteries with new ones.
•Clean the head.
•Reseal the slots with adhesive tape.
•Load a cassette.
•Load the disc with the label side facing up.
•Clean the disc.
•Replace the disc with a playable one.
•Clean the lens.
•Turn the unit on and wait one or two hours before use.
No sound from the speakers.
Since the tape speed is irregular, wow and flutter occur.
Radio reception is poor and there is much static.
Remote control is impossible.
Headphones are conneced.
•The pinch roller or capstan is dirty.
•Batteries are run down.
The antenna is not properly adjusted.
•Batteries in the remote control unit are run down.
•The remote sensor section is exposed to bright light (direct sunlight, etc.)
Disconnect the headphones.
•Clean the pinch roller and capstan.
•Replace the batteries with new ones.
Adjust the antenna correctly.
•Replace the batteries with new ones.
•Try not to operate the unit under direct sunlight, etc.
Note:
When the unit is moved from a cold place of around 0˚C to a warm place, it may not operate normally, because moisture has formed inside the unit. Normal operation will be restored after waiting one or two hours.
22

SPECIFICATIONS
CD player
CD capacity |
: 1 CD |
Signal-to-noise ratio |
: 75 dB |
Dynamic range |
: 60 dB |
Tuner
Frequency range |
: FM 87.5 – 108.0 MHz |
|
AM 522 – 1 629 kHz |
Antennas |
: Telescopic antenna for FM |
|
Ferrite core antenna for AM |
Cassette deck
Frequency response |
: 60 Hz – 10 000 Hz |
Wow & flutter |
: 0.15% (WRMS) |
Fast wind time |
: Approx. 150 sec. |
|
(C-60 cassette) |
General
Speakers |
: 9 cm cone × 2 |
Speaker impedance |
: 4 Ω |
Output power |
: 4 W (2 W + 2 W) at 4 Ω |
|
(10% THD) |
Output terminals |
: PHONES × 1 |
Power supply |
: AC 230 V Ó, 50 Hz |
|
DC 9 V (R20 (SUM-1)/D |
|
(13D)-size batteries × 6) |
Power consumption |
: 18 W (at operation) |
|
3 W (on standby) |
Dimensions |
: 420 mm × 178 mm × |
|
250 mm (W/H/D) |
Mass |
: Approx. 3.2 kg |
|
(without batteries) |
Accessories provided |
: AC power cord × 1 |
|
Remote control unit × 1 |
|
Batteries for the remote |
|
control unit (AAA/UM-4/ |
|
R03) × 2 |
Design and specifications are subject to change without notice.
English
23

INHALT |
|
BESONDERE VORZÜGE ......................................... |
1 |
HINWEISE ZUR SICHERHEIT ................................ |
1 |
HINWEISE ZUR HANDHABUNG ........................... |
2 |
STROMVERSORGUNG ............................................ |
3 |
NAMEN DER TEILE UND BEDIENELEMENTE ... |
4 |
FERNBEDIENUNG ................................................... |
5 |
EIN-/AUSSCHALTEN DES GERÄTS ...................... |
6 |
EINSTELLEN DER UHRZEIT .................................. |
7 |
TONREGULIERUNG ................................................ |
8 |
CDs ABSPIELEN ....................................................... |
9 |
RADIOEMPFANG ................................................... |
15 |
KASSETTEN ABSPIELEN ...................................... |
17 |
AUFNEHMEN .......................................................... |
19 |
WARTUNG ............................................................... |
21 |
FEHLERSUCHE ....................................................... |
22 |
TECHNISCHE DATEN ............................................ |
23 |
BESONDERE VORZÜGE
1Tragbares System mit integriertem CD-Player
•CD-Funktionen können mit der Fernbedienung oder direkt am Gerät gesteuert werden.
•Auch 8-cm-CDs können wiedergegeben werden.
2Digitale LCD-Display (Flüssigkristallanzeige) zeigt den allgemeinen Wiedergabestatus an.
3Mit CD-Wiedergabe synchronisierte Aufnahme
4Wiedergabe von MP3 möglich
5Hyper-Bass-Soundeffekte
HINWEISE ZUR SICHERHEIT
Zum Schutz gegen Elektroschock, Brand und Beschädigung
•Auch wenn die STANDBY/ON-Taste auf STANDBY steht, fließt etwas Strom durch das Kabel. Wenn das Gerät eingeschaltet wird, leuchtet das Anzeigefenster blau auf. Wenn sich das Gerät im Bereitschaftsmodus befindet, ist das Anzeigefenster ausgeschaltet. (Bedenken Sie allerdings, dass das Anzeigefenster auch dann nicht aufleuchtet, wenn das Gerät eingeschaltet ist, aber mit Batterien betrieben wird.) Zur Sicherheit und um Strom zu sparen, sollten Sie das Netzkabel aus der Wandsteckdose ziehen, falls das Gerät längere Zeit nicht benutzt werden wird.
•Berühren Sie das Netzkabel nicht mit nassen Händen.
•Das Netzkabel darf grundsätzlich nur durch direktes Erfassen des Steckers abgezogen werden; ziehen Sie nicht am Kabel.
•Wenn am Kabel ein Schaden, Riss oder Wackelkontakt zu erkennen ist, müssen Sie bei Ihrem Fachhändler sofort ein neues Kabel besorgen.
•Das Kabel darf nicht geknickt, gezogen oder verdreht werden.
•Das Typenschild befindet sich außen auf der Geräteunterseite.
•Das Netzkabel darf in keiner Weise modifiziert werden.
•Entfernen Sie keinerlei Schrauben, um das Gerät zu zerlegen, und berühren Sie keine Komponenten im Geräteinnern; es besteht sonst Unfallgefahr.
•Stecken Sie keinerlei Metallgegenstände in das Gerät.
•Ziehen Sie bei einem Gewitter den Netzstecker ab, falls die Gefahr eines Blitzeinschlags besteht.
•Falls Wasser ins Gerät eingedringen sollte, müssen Sie sofort den Netzstecker abziehen und sich dann an einen Fachhändler wenden.
•Blockieren Sie nicht die Lüftungsöffnungen des Geräts, damit die Wärme entweichen kann.
•Stellen Sie das Gerät nicht an mangelhaft belüfteten Orten auf.
Deutsch
1

Deutsch
HINWEISE ZUR HANDHABUNG
Verwenden Sie das Gerät nicht unter direkter Sonneneinstrahlung, und lassen Sie es nicht im geschlossenen Fahrzeug (oder Boot usw.) liegen, wo die Innentemperatur 40ºC überschreiten könnte.
1Benutzen Sie das Gerät nicht an Orten folgender Art:
•Wo die Temperatur übermäßig hoch oder niedrig sein kann. Der empfohlene Temperaturbereich ist zwischen 5ºC und 35ºC.
•Wo starke Vibrationen auftreten könnten
•Wo die Feuchtigkeit sehr hoch ist, z.B. im Badezimmer
•Wo das Gerät starken Magnetquellen ausgesetzt ist, wie z.B. Elektromagneten oder Lautsprechern.
2Schützen Sie das Gerät vor übermäßigem Staub.
Schließen Sie das CD-Fach, damit die CD-Linse nicht von Staub blockiert wird. Berühren Sie niemals die CD-Linse.
3Kondensation
Unter den folgenden Bedingungen kann Kondensation auftreten und das Gerät nicht mehr ordnungsgemäß funktionieren:
•Wenn das Gerät in einem Raum steht, wo gerade eine Heizung eingeschaltet wurde
•Wenn das Gerät in einem Raum mit starkem Rauch oder hoher Luftfeuchtigkeit steht
•Wenn das Gerät von einem kalten in einen warmen Raum gebracht wurde
Stellen Sie in solchen Fällen die STANDBY/ONTaste auf ON und warten Sie eine oder zwei Stunden, bevor Sie das Gerät benutzen.
4Lautstärkeregelung
Anders als bei Analogschallplatten entsteht bei CDs extrem wenig Rauschen. Falls Sie versuchen, die Lautstärke durch Horchen auf den anfänglichen Rauschpegel einzustellen, wie Sie das vielleicht von Analogschallplatten gewohnt sind, können die Lautsprecher durch einen heftigen Schallstoß bei Beginn der Wiedergabe beschädigt werden. Drehen Sie deshalb die Lautstärke anfangs herunter, und regulieren Sie sie erst während der CD-Wiedergabe.
5Sicherheitsvorrichtung
Das Gerät weist eine Sicherheitsvorrichtung auf, die den Laserstrahl abschaltet, sobald das CD-Fach geöffnet wird.
6Lassen Sie keine magnetischen Gegenstände in der Nähe der Lautsprecher.
Die Lautsprecher enthalten Elektromagneten; wenn Sie Tonbandkassetten oder Magnetkarten darauf ablegen, könnten deren Daten eventuell gelöscht werden.
7Halten Sie das Gerät fern von Fernsehgeräten.
Wenn das Gerät zu nahe am Fernseher aufgestellt wird, kann es zu einer Verzerrung des Fernsehbilds kommen. Stellen Sie das Gerät in solchen Fällen weiter weg vom Fernseher auf. Falls die Bildverzerrung dadurch nicht behoben wird, sollten Sie das Gerät nicht benutzen, solange der Fernseher eingeschaltet ist.
8Reinigen des Gehäuses
Falls das Gehäuse schmutzig ist, können Sie es mit einem weichen, trockenen Tuch abwischen. Verwenden Sie auf keinen Fall Benzin oder Farbverdünner, da sonst die Geräteoberfläche Schaden leiden könnte.
9Betrieb mit Kopfhörer
•Stellen Sie die Lautstärke nicht zu hoch ein; es besteht die Gefahr permanenter Gehörschäden.
•Aus Sicherheitsgründen sollten Sie niemals mit aufgesetztem Kopfhörer ein Fahrzeug fahren.
10Tragegriff
Klappen Sie den Tragegriff nicht hoch oder herunter, solange die Antenne ausgefahren ist, da die Antenne sonst beschädigt werden könnte. Stellen Sie den Tragegriff so, dass er den Antennenbetrieb nicht behindert.
2
 Loading...