

Page 1
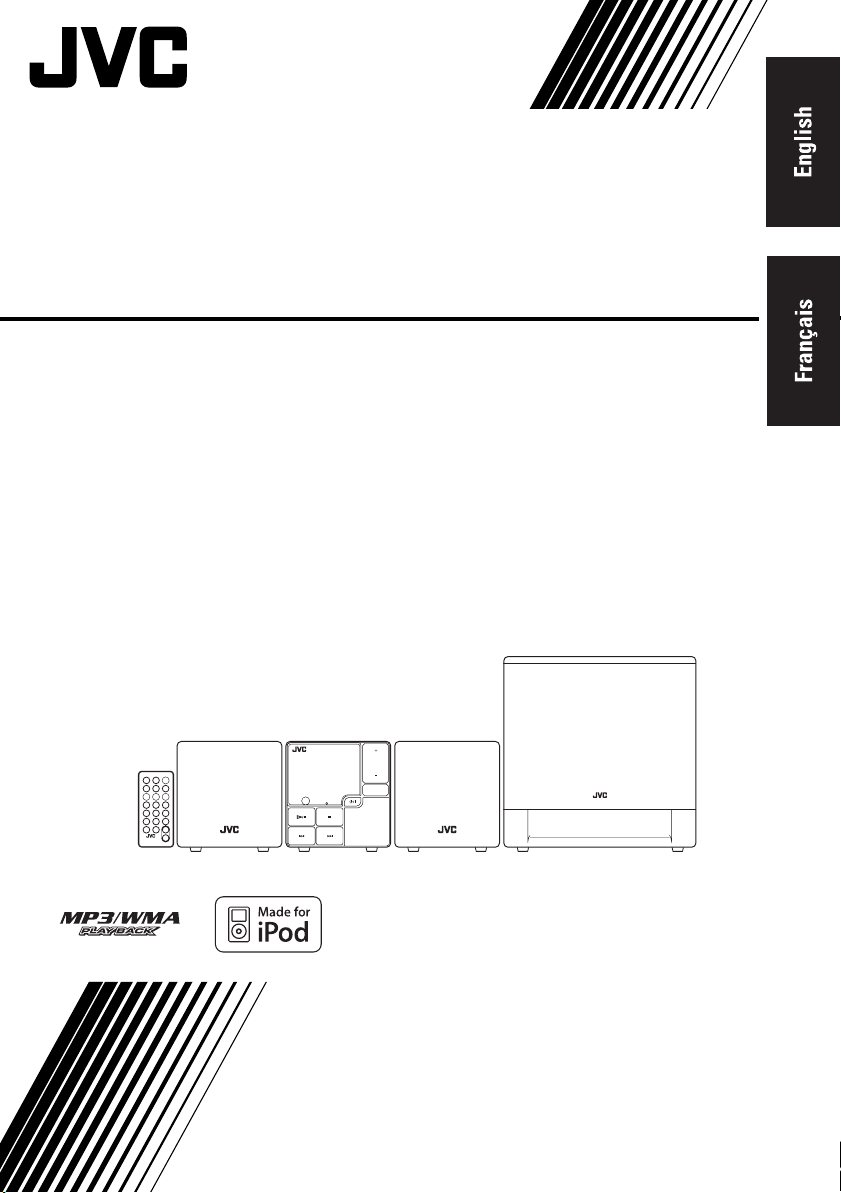
COMPACT COMPONENT SYSTEM
SYSTEME DE COMPOSANTS COMPACT
NX-PS1
—Consists of CA-NXPS1, SP-NXPS1F and SP-NXPS1W
—Composée du CA-NXPS1, SP-NXPS1F et du SP-NXPS1W
COMPACT COMPONENT SYSTEM
NX-PS1
VOLUME
FUNCTION
STANDBY
CA-NXPS1 SP-NXPS1F SP-NXPS1WSP-NXPS1F
INSTRUCTIONS
MANUEL D’INSTRUCTIONS
LVT1633-002A
[C]
Page 2
Warnings, Cautions and Others
Mises en garde, précautions et indications diverses
(For U.S.A.)
CAUTION
RISK OF ELECTRIC SHOCK
DO NOT OPEN
CAUTION: TO REDUCE THE RISK OF ELECTRIC SHOCK,
DO NOT REMOVE COVER (OR BACK).
NO USER SERVICEABLE PARTS INSIDE.
REFER SERVICING TO QUALIFIED SERVICE PERSONNEL.
The lightning flash with arrowhead symbol,
within an equilateral triangle is intended to
alert the user to the presence of uninsulated
"dangerous voltage" within the product's
enclosure that may be of sufficient
magnitude to constitute a risk of electric
shock to persons.
The exclamation point within an equilateral
triangle is intended to alert the user to the
presence of important operating and
maintenance (servicing) instructions in the
literature accompanying the appliance.
(For U.S.A.)
WARNING: TO REDUCE THE RISK OF FIRE
OR ELECTRIC SHOCK, DO NOT EXPOSE
THIS APPLIANCE TO RAIN OR MOISTURE.
G-1
Page 3

G-2
Page 4

(For U.S.A.)
This equipment has been tested and found to comply with the limits for a Class B digital
device, pursuant to part 15 of the FCC Rules. These limits are designed to provide
reasonable protection against harmful interference in a residential installation.
This equipment generates, uses and can radiate radio frequency energy and, if not installed
and used in accordance with the instructions, may cause harmful interference to radio
communications. However, there is no guarantee that interference will not occur in a
particular installation. If this equipment does cause harmful interference to radio or
television reception, which can be determined by turning the equipment off and on, the user
is encouraged to try to correct the interference by one or more of the following measures:
Reorient or relocate the receiving antenna.
Increase the separation between the equipment and receiver.
Connect the equipment into an outlet on a circuit different from that to which the receiver
is connected.
Consult the dealer or an experienced radio/TV technician for help.
(For U.S.A.)
CAUTION
Changes or modifications not approved by JVC could void the user’s authority to
operate the equipment.
(For U.S.A.)
For the main unit:
Declaration of Conformity
Model Number: NX-PS1
Trade Name: JVC
Responsible Party: JVC Americas Corp.
Address: 1700 Valley Road, Wayne New Jersey 07470
Telephone Number: 973-317-5000
This device complies with Part 15 of FCC Rules.
Operation is subject to the following two conditions:
(1) This device may not cause harmful interference, and (2) this device must accept any
interference received, including interference that may cause undesired operation.
For Canada/pour le Canada
THIS DIGITAL APPARATUS DOES NOT EXCEED THE CLASS B LIMITS FOR RADIO
NOISE EMISSIONS FROM DIGITAL APPARATUS AS SET OUT IN THE
INTERFERENCE-CAUSING EQUIPMENT STANDARD ENTITLED “DIGITAL
APPARATUS,” ICES-003 OF THE DEPARTMENT OF COMMUNICATIONS.
CET APPAREIL NUMERIQUE RESPECTE LES LIMITES DE BRUITS
RADIOELECTRIQUES APPLICABLES AUX APPAREILS NUMIRIQUES DE CLASSE
B PRESCRITES DANS LA NORME SUR LE MATERIEL BROUILLEUR; “APPAREILS
NUMERIQUES”, NMB-003 EDICTEE PAR LE MINISTRE DES COMMUNICATIONS.
G-3
Page 5
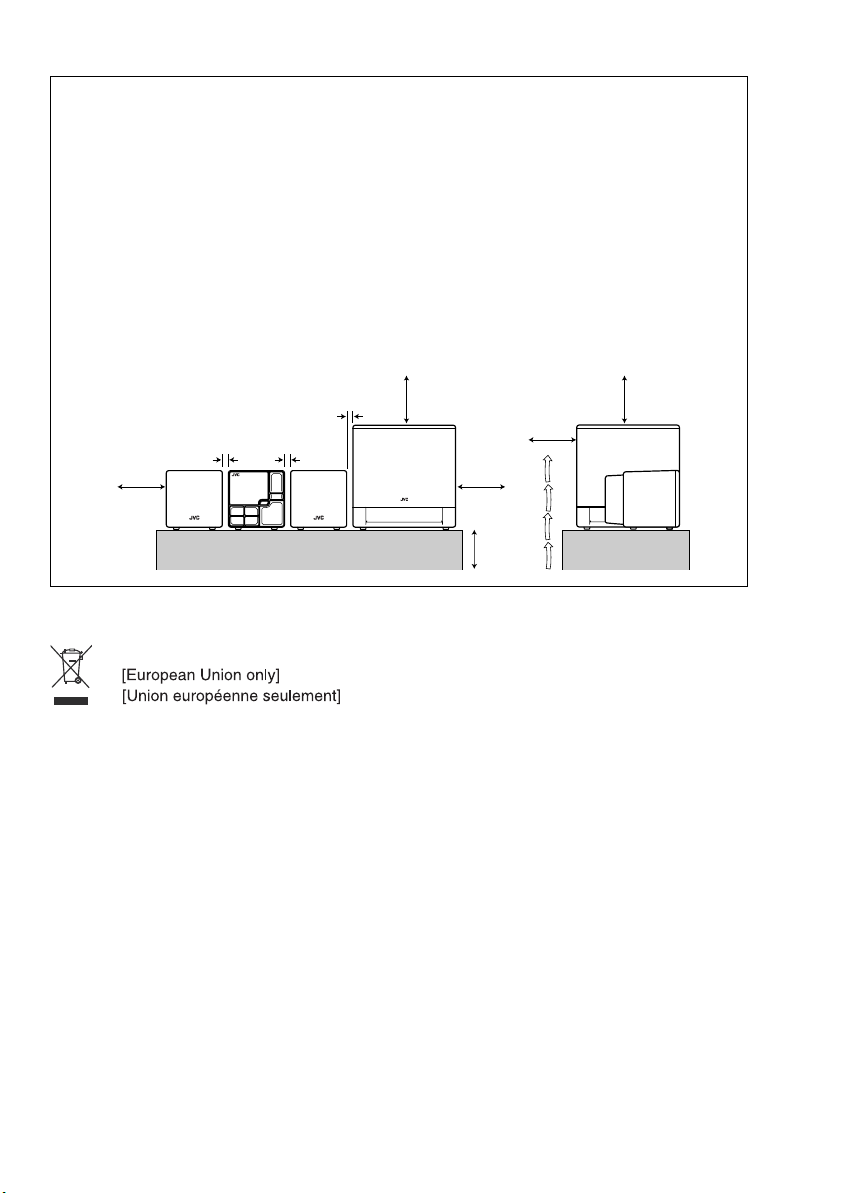
Caution: Proper Ventilation
To avoid risk of electric shock and fire, and to prevent damage, locate the apparatus as follows:
1. Front: No obstructions and open spacing.
2. Sides/ Top/ Back: No obstructions should be placed in the areas shown by the dimensions below.
3. Bottom: Place on the level surface. Maintain an adequate air path for ventilation by placing on a
stand with a height of 10 cm or more.
Attention: Aération correcte
Pour prévenir tout risque de décharge électrique ou d’incendie et éviter toute détérioration,
installez l’appareil de la manière suivante:
1. Avant: Bien dégagé de tout objet.
2. Côtés/dessus/dessous: Assurez-vous que rien ne bloque les espaces indiqués sur le schéma cidessous.
3. Dessous: Posez l’appareil sur une surface plane et horizontale. Veillez à ce que sa ventilation
correcte puisse se faire en le plaçant sur un support d’au moins dix centimètres de hauteur.
Front
Face
15 cm
2 cm 2 cm
2 cm
15 cm
15 cm
10 cm
Side
Côté
15 cm
15 cm
G-4
Page 6

Contents
Introduction ............................................. 2
Precautions ..............................................................2
Getting Started ........................................ 3
Connection ..............................................................5
Basic Operations ...................................... 7
Unit .........................................................................7
Remote Control .......................................................9
Setting the Clock and Daily Timer ...... 11
Setting the Clock ...................................................11
Setting the Daily Timer .........................................11
Playing Back from iPod ........................ 13
To Connect iPod ...................................................13
Basic Operations ...................................................14
Playing Back from USB mass storage class
device ................................................... 15
To connect the USB mass storage class device ....15
Basic Operations ...................................................15
Playing Back from the PC .................... 17
How to install the USB drivers .............................17
To playback sounds on the PC ..............................18
Playing Back from Other Equipment .. 19
To connect other equipment .................................19
Troubleshooting ..................................... 20
Specifications ......................................... 21
1
Page 7
Introduction
Thank you for purchasing a JVC product.
Please read all instructions carefully before operation, to ensure your complete understanding and
to obtain the best possible performance from the unit.
Precautions
Installation
• Install in a place which is level, dry and neither too hot nor too cold–between 5°C and 35°C.
• Install the System in a location with adequate ventilation to prevent internal heat buildup inside
the System.
DO NOT install the System in a location near heat sources, or in a place subject to
direct sunlight, excessive dust or vibration.
• Leave sufficient distance between the System and the TV.
• Keep the speakers away from the TV to avoid interference with TV.
Power sources
• When unplugging the System from the wall outlet, always pull on the plug, not the AC adaptor.
DO NOT handle the AC adaptor with wet hands.
Internal heat
For safety, observe the following carefully:
• Make sure there is good ventilation the main unit. Poor ventilation could overheat
and damage the System.
• DO NOT block the ventilation openings or holes. If they are blocked by a newspaper
or cloth, etc., the heat may not be able to get out.
Others
• Should any metallic object or liquid fall into the System, unplug the AC adaptor and consult your
dealer before operating any further.
DO NOT disassemble the System since there are no user serviceable parts inside.
• If you are not going to operate the System for an extended period of time, unplug the AC adaptor
from the wall outlet.
If anything goes wrong, unplug the AC adaptor and consult your dealer.
2
Page 8
Getting Started
Supplied Accessories
After unpacking, check to be sure that you have all the following items. The number in parentheses
indicates the quantity of each piece supplied.
• Remote control (1)
• Lithium coin battery CR2025 (1) (The battery has been installed when shipped from the factory.)
• Speaker cords 1.5m (2)
• Speaker cord 2.5m (1)
• AC power cord (1)
• AC adaptor (AA-R2401) (1)
• iPod connection cable (Audio) (1)
• iPod stand (1)
If anything is missing, consult your dealer immediately.
CAUTION:
To avoid risk of fire, and to prevent damage.
• Do not use AC adaptors except the supplied AC adaptor.
• Do not use the supplied AC adaptor for other equipment.
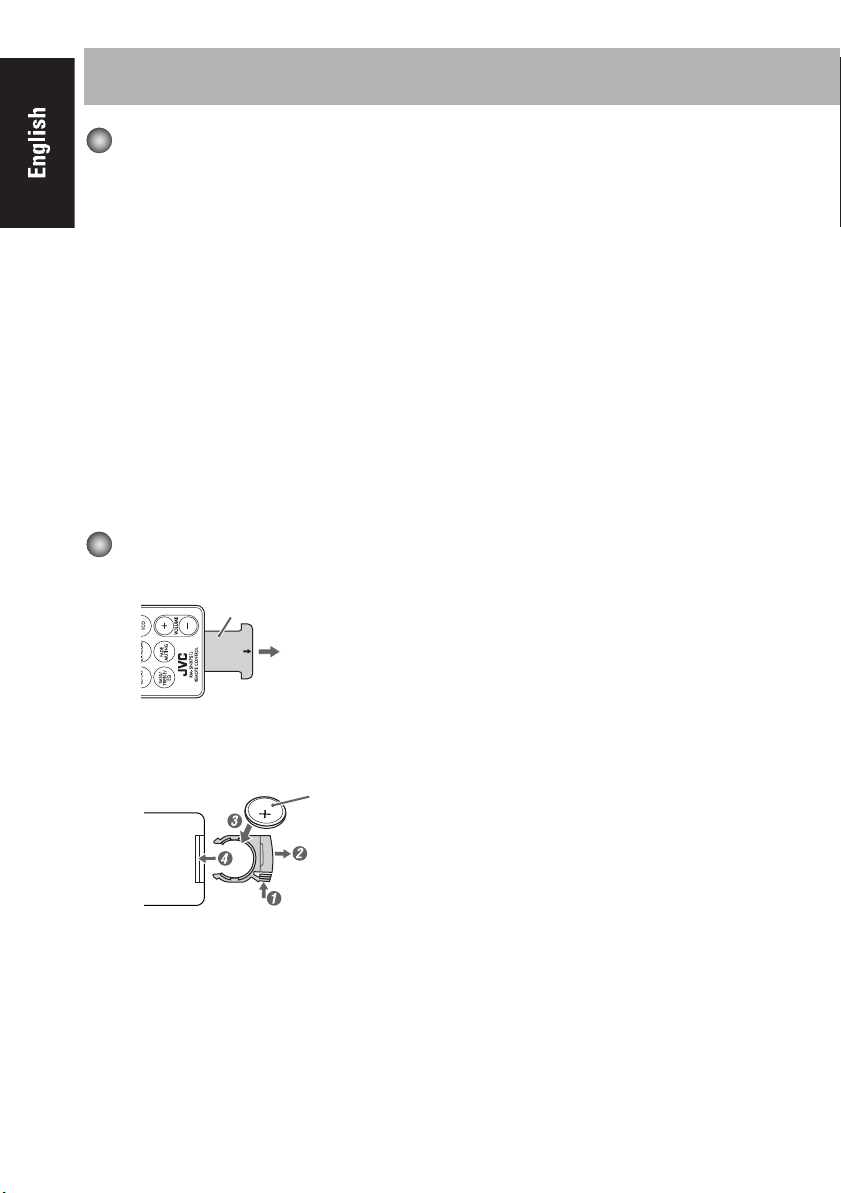
Prepare the Remote Control
When you use the remote control for the first time, pull out the insulation sheet.
Insulation sheet
(Front side)
Replacing the Battery in the Remote Control
Insert the battery into the remote control by matching the polarity (+ and -) correctly.
Lithium coin battery
(product number: CR2025)
(Rear side)
3
Page 9

Warning
• Store the battery in a place where children cannot reach. If a child accidentally
swallows the battery, consult a doctor immediately.
• Do not recharge, short, disassemble or heat the battery or dispose of it in a fire. Doing
any of these things may cause the battery to give off heat, crack, or start a fire.
• Do not leave the battery with other metallic materials. Doing this may cause the
battery to give off heat, crack, or start a fire.
• When throwing away or saving the battery, wrap it in tape and insulate; otherwise, the
battery may start to give off heat, crack, or start a fire.
• Do not poke the battery with tweezers or similar tools. Doing this may cause the
battery to give off heat, crack, or start a fire.
• Dispose of battery in the proper manner, according to federal, state, and local
regulations.
CAUTION:
Danger of explosion if battery is incorrectly replaced.
Replace only with the same or equivalent type.
4
Page 10
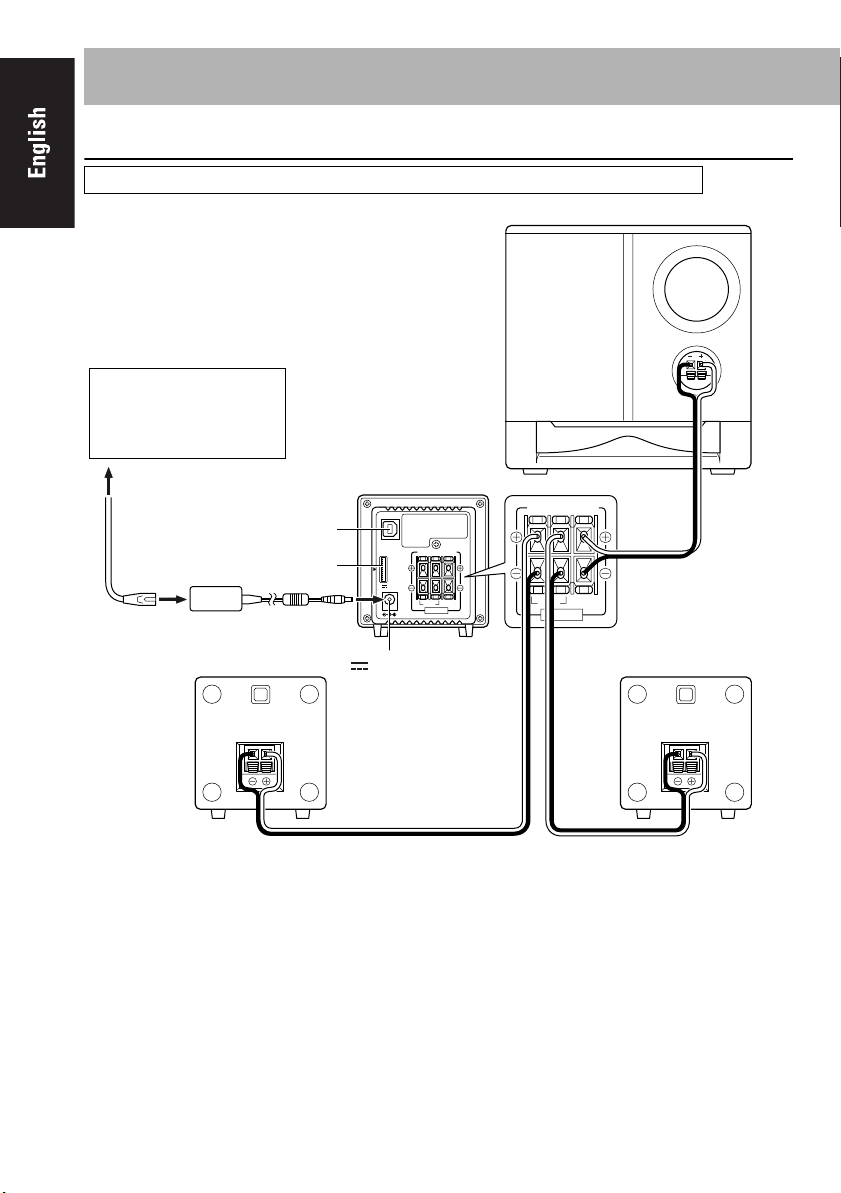
Connection
Do not connect the AC power cord until all other connections have been made.
Subwoofer
To a wall outlet
Plug the AC power cord
only after all connections
are complete.
USB AUDIO
AC power
cord
AC adaptor
AC adaptor
iPod terminal
Main speaker
Unit
RIGHT LEFT WOOFER
terminal
23V 2.5A
USB
AUDIO
RIGHT LEFT WOOFER
i Pod
DC IN
6-16Ω 8-16Ω
SPEAKERS
6-16Ω 8-16Ω
SPEAKERS
DC IN
23V 2.5A
Speaker cord (1.5m) Speaker cord (1.5m)
INPUT
Speaker cord (2.5m)
Main speaker
5
Page 11
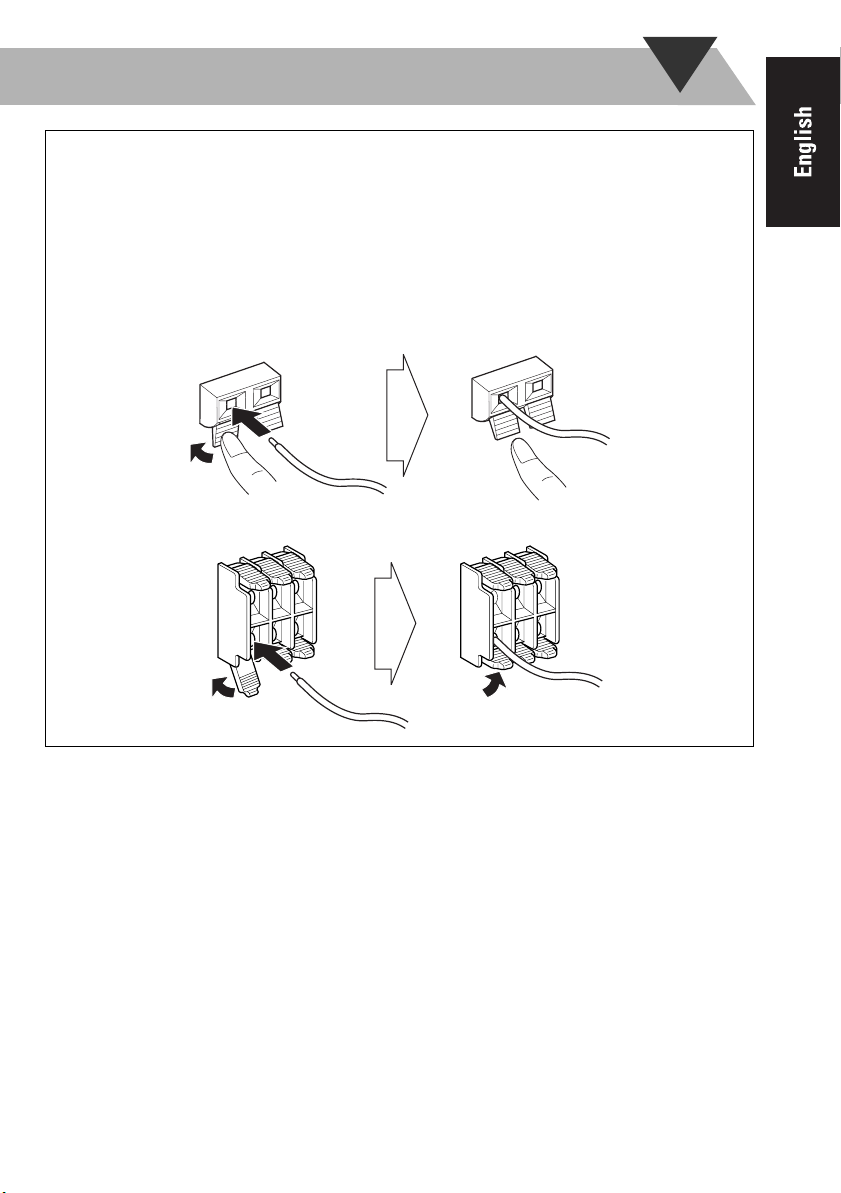
To connect the speaker cords
Make sure the unit, main speakers, and subwoofer are connected correctly and firmly.
When connecting the speaker cords, match the polarity of the speaker terminals: white cord to
(+) and white cord with black stripe to (-).
NOTES
• DO NOT connect more than one speaker to each terminal.
• DO NOT allow the conductor of the speaker cords to be in touch with the metallic parts of the
System.
e.g. Speaker
2 Insert
3 Release
1 Hold
e.g. Unit
2 Insert
1 Unlock
3 Lock
6
Page 12
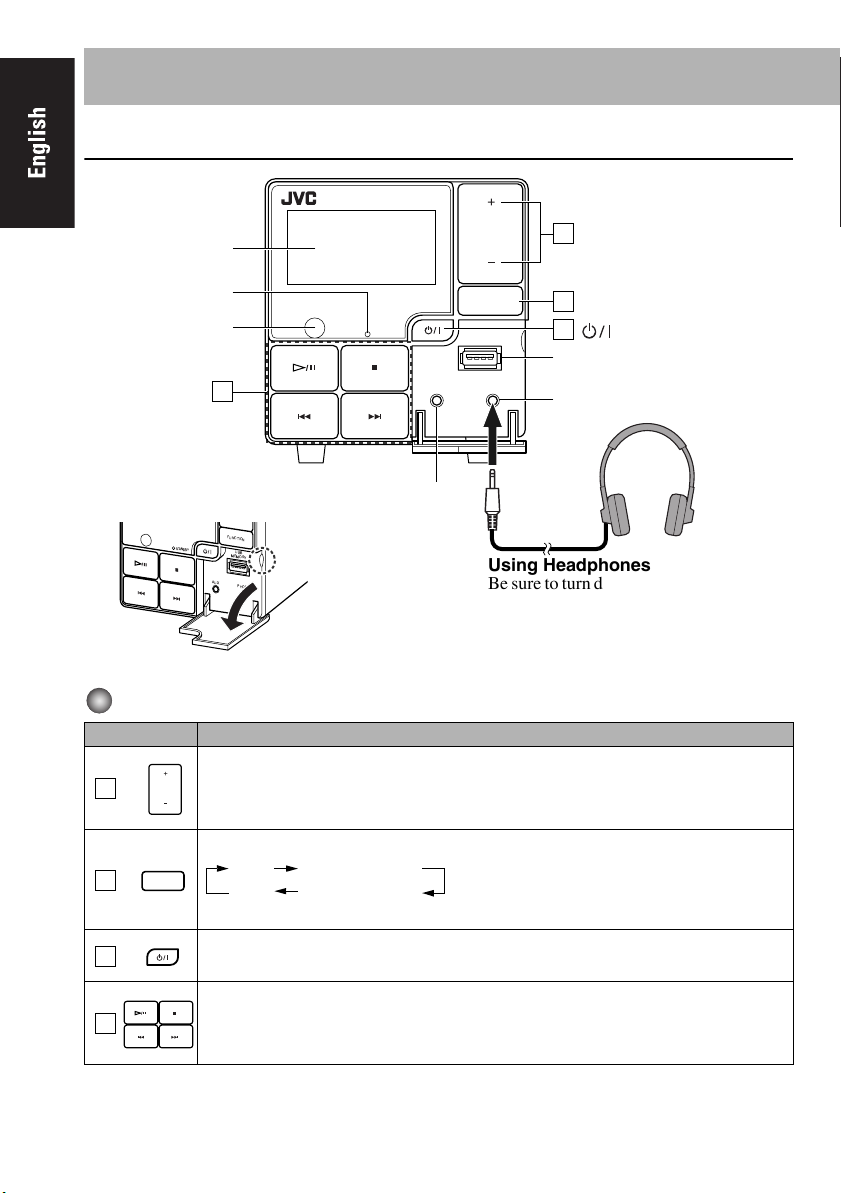
Unit
Basic Operations
COMPACT COMPONENT SYSTEM
NX-PS1
VOLUME
Display
STANDBY lamp
Remote control
sensor
Operation
buttons
4
Opening the front panel cover
FUNCTION
STANDBY
USB
MEMORY
AUX
PHONES
STANDBY
AUX jack
FUNCTION
USB
MEMORY
AUX PHONES
Operating on the Unit
Buttons Functions
Adjusts the volume level VOLUME MIN / 1 to 29 / VOLUME MAX.
VOLUME
1
Adjust the volume
1
Select a source
2
3
STANDBY/ON button
USB MEMORY terminal
PHONES jack
Using Headphones
Be sure to turn down the volume before
connecting or wearing the headphones.
• Connecting the headphones will
deactivate the speakers.
Selects a source. See “Playing Back from iPod” (P.13).
FUNCTION
2
3
iPod USB MEMORY
AUX USB AUDIO
Turns on or off (standby) the power.
See “Playing Back from USB mass storage class
device” (P.15).
See “Playing Back from the PC” (P.17).
See “Playing Back from Other Equipment” (
P.19
).
Operates music.
4
See “Playing Back from iPod” (P.13).
See “Playing Back from USB” (P.15).
7
Page 13
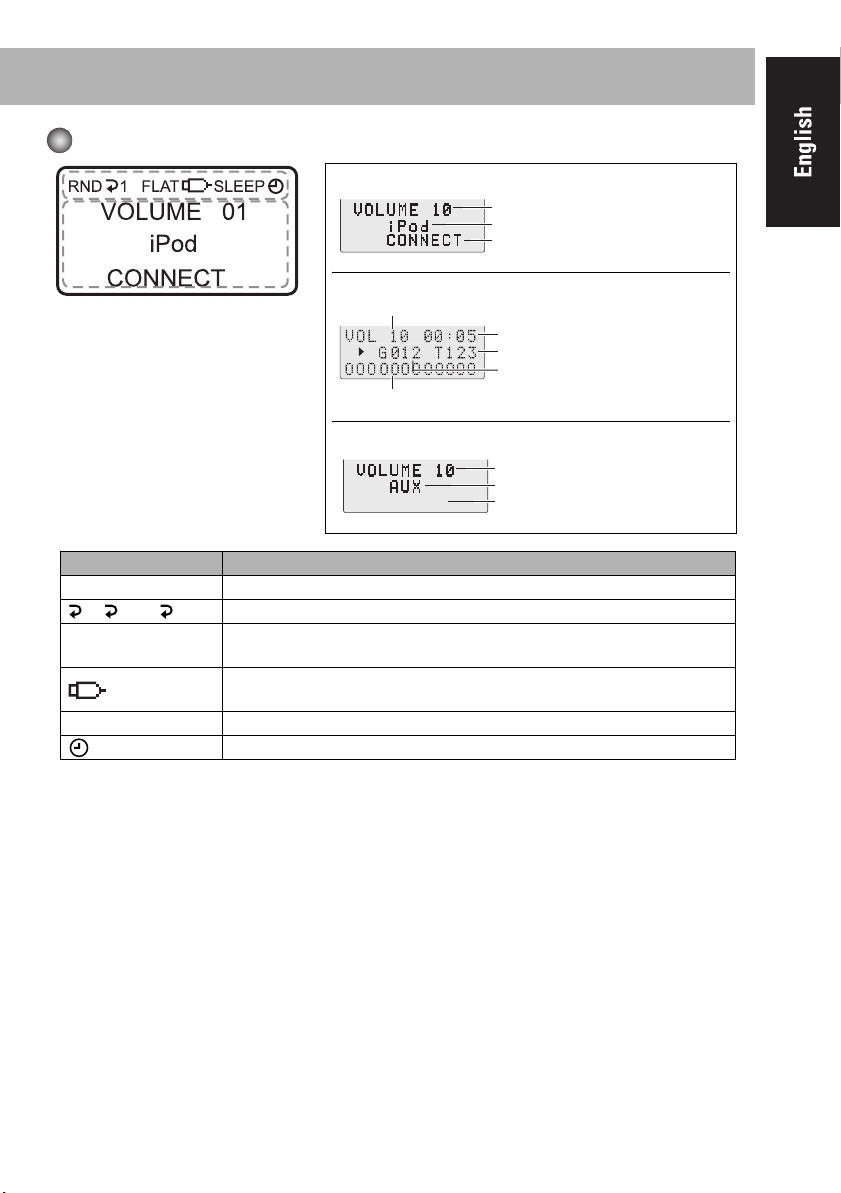
Display Information
While selecting iPod / USB AUDIO:
Volume level
Source name
Current status
While selecting USB MEMORY:
Volume level
Elapsed playing time
Current track number
Current group number
File information ⇔ Clock display
While selecting AUX:
Volume level
Source name
No display ⇔ Clock display
Symbols Description
RND Lights when Random Play mode is activated in USB Memory mode. (P.17)
1/ ALL/ GR Lights when Repeat mode is activated in USB Memory mode. (P.17)
FLAT/ROCK/POP/
JAZZ/CLAS(CLASSIC)
SLEEP Lights when the Sleep Timer is activated. (P.10)
Displays an selected EQ setting. (P.10)
Lights when the USB mass storage class device is connected and the USB
MEMORY mode is selected.
Lights when Daily Timer is set. (P.11)
⇔
Clock display
8
Page 14
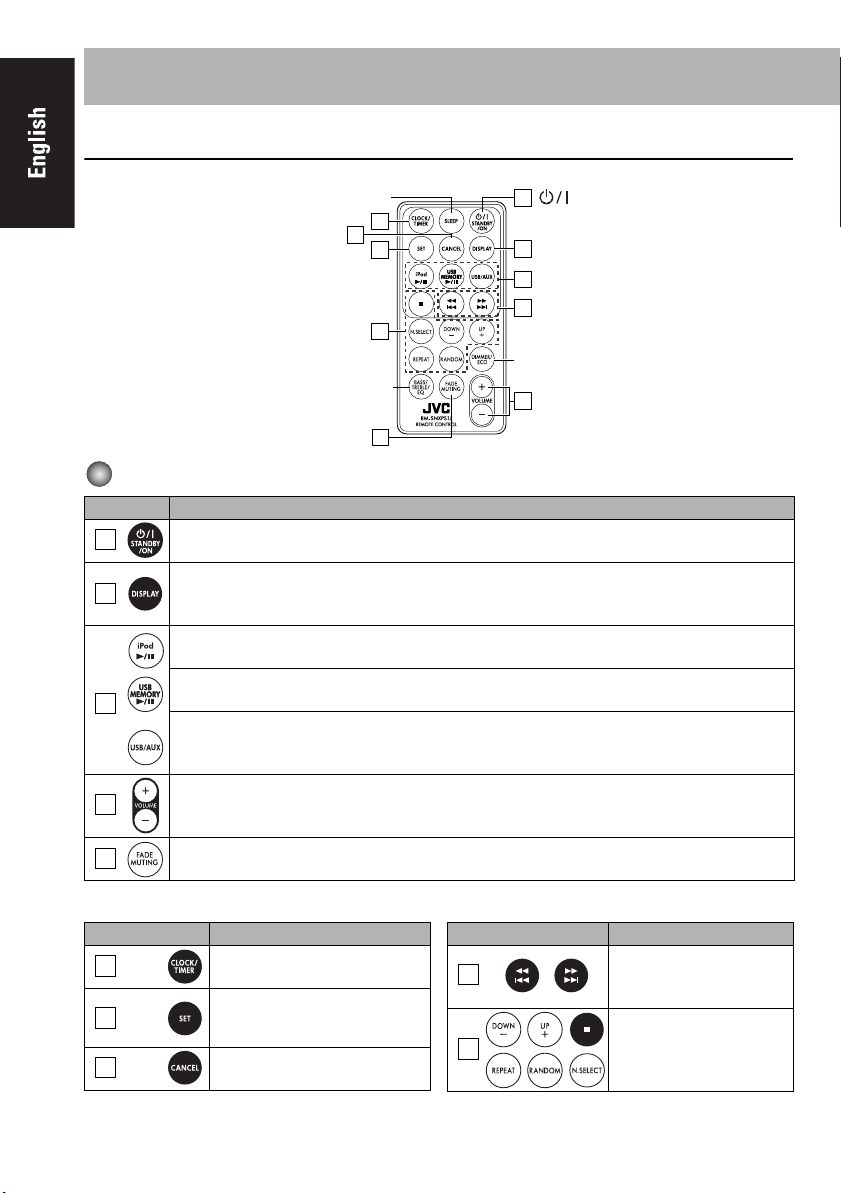
Remote Control
Sleep timer
6
8
7
10
Adjust the tone
FADE MUTING button
5
Operating on the Remote Control
Buttons Functions
1
2
3
Turns on or off (standby) the power
Changes the display information.
USB MEMORY mode : Clock display ⇔ File information
Other mode : Clock display ⇔ Source information
Changes source to iPod.
See “Playing Back from iPod” (P.13).
Changes source to USB MEMORY.
See “Playing Back from USB mass storage class device” (P.15).
Changes source to USB audio and AUX.
See “Playing Back from the PC” (P.17).
See “Playing Back from Other Equipment” (P.19).
STANDBY/ON button
1
Change the display information
2
Select a source
3
9
Dimmer/ECO mode
Adjust the volume
4
4
5
Adjusts the volume level VOLUME MIN / 1 to 29 / VOLUME MAX.
Drops the volume in a moment.
To restore the volume, press again, or adjust the volume level.
Others
Buttons Reference pages
6
7
8
CLOCK/TIMER set (P.11)
CLOCK/TIMER set (P.11)
USB MEMORY (P.15)
AUX (P.19)
CLOCK/TIMER set (P.11)
USB MEMORY (P.15)
9
Buttons Reference pages
9
10
CLOCK/TIMER set (P.11)
iPod (P.13)
USB MEMORY (P.15)
USB MEMORY (P.15)
Page 15

To dim the display—DIMMER
Press while the System is turned on. “DIMMER ON” appears.
• To cancel this function, press DIMMER/ECO again. “DIMMER OFF” appears.
To set the ECO mode.
In ECO mode, the dispaly goes off and the least power is consumed.
Press While the System is turned off. “ECO ON” appears and then nothing is displayed.
• To cancel this function, press DIMMER/ECO again.
“ECO OFF” appears and then the clock is displayed.
To turn off the System after a certain period of time—Sleep Timer
1
Press repeatedly to specify the time (in minutes) as follows:
10 20 30 60 90 120
OFF (Canceled)
2
• To check the time remaining before the shut-off time, press SLEEP once.
If you press the button repeatedly, you can change the shut-off time
Wait until the set time goes off.
To adjust the tone
1
2
ROCK Boosts low and high frequency. Good for acoustic music.
POP Good for vocal music.
JAZZ Good for jazz music.
CLAS
(CLASSIC)
FLAT Normal sound.
When the bass or treble level is adjusted, EQ is not effective and EQ symbol disappears.
BASS/TREBLE adjustment will not work at the same time as the EQ. The last setting made will become
effective.
Selects an item as follows :
EQ BASS TREBLE
• Adjust the bass and treble level with VOLUME +/- from -5 to +5.
• Select a EQ setting as follows with VOLUME +/-:
FLAT
Good for classical music.
ROCK
ROCK POP
CLAS JAZZ
10
Page 16

Setting the Clock and Daily Timer
Setting the Clock
1
2
• To go back to the previous step, press CANCEL.
• If there is a power failure, the clock loses the setting and is reset to “AM12:00”. You need to set
the clock again.
or
Activate the clock setting mode (“Clock Adjust” appears).
The hour digit of the time indication blinks on the display.
• If you have already adjusted the clock before, press the button repeatedly
until “Clock Adjust” appears.
Current timer settings
If the clock has not been adjusted, “Clock Adjust” appears first.
1 Adjust the hour. The minute digits of the time indication blink
2 Adjust the minute. The built-in clock starts working.
Timer setting Clock Adjust
Canceled
on the display.
Setting the Daily Timer
Without setting the built-in clock, you cannot use Daily Timer.
Using Daily Timer, you can wake up with music, etc.
Connect the iPod or USB mass storage device, or other equipment, to the Unit beforehand. (P.13,
P.15, P.19)
1
2
(Twice)
or
Select the timer setting mode.
Current timer settings
Canceled
1 Adjust the hour then the minute for Daily Timer on-time.
2 Adjust the hour then the minute for Daily Timer off-time.
• The on-time and off-time of the Daily Timer cannot be set to the same time.
3 Select the playback source—“iPod,” “USB MEMORY,” or “AUX.”
• If “USB MEMORY” is selected, select the GROUP number (“001” to
“500” and “---”) and then select the TRACK number (“001” to “999”
and “---”).
If you select “---,” TRACK1 in GROUP1 is set.
4 Select the volume level (“VOLUME MIN / 1 to 29 / VOLUME MAX”).
“SET OK” appears briefly followed by setting information, then the
icon appears on the display.
Timer setting
Clock Adjust
3
• To exit from the timer setting, press CLOCK/TIMER as required.
• To correct a misentry during the process, press CANCEL. You can return to the previous step.
Turn off the System (on standby).
11
Page 17
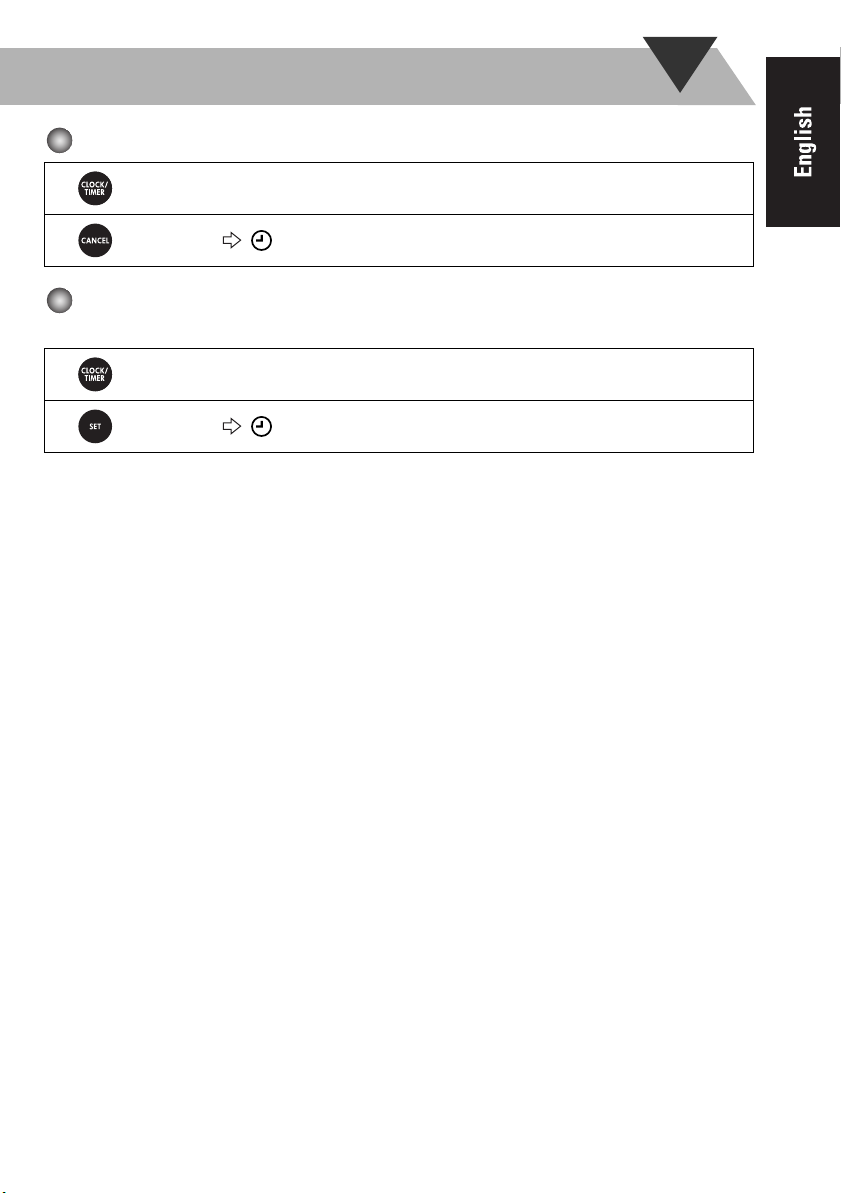
To cancel the Daily Timer
1
2
To turn on the Daily Timer again (Turn on a timer setting you have made
beforehand.)
1
2
Select the current timer settings mode.
icon disappears.
Select the current timer settings mode.
icon appears on the display.
12
Page 18
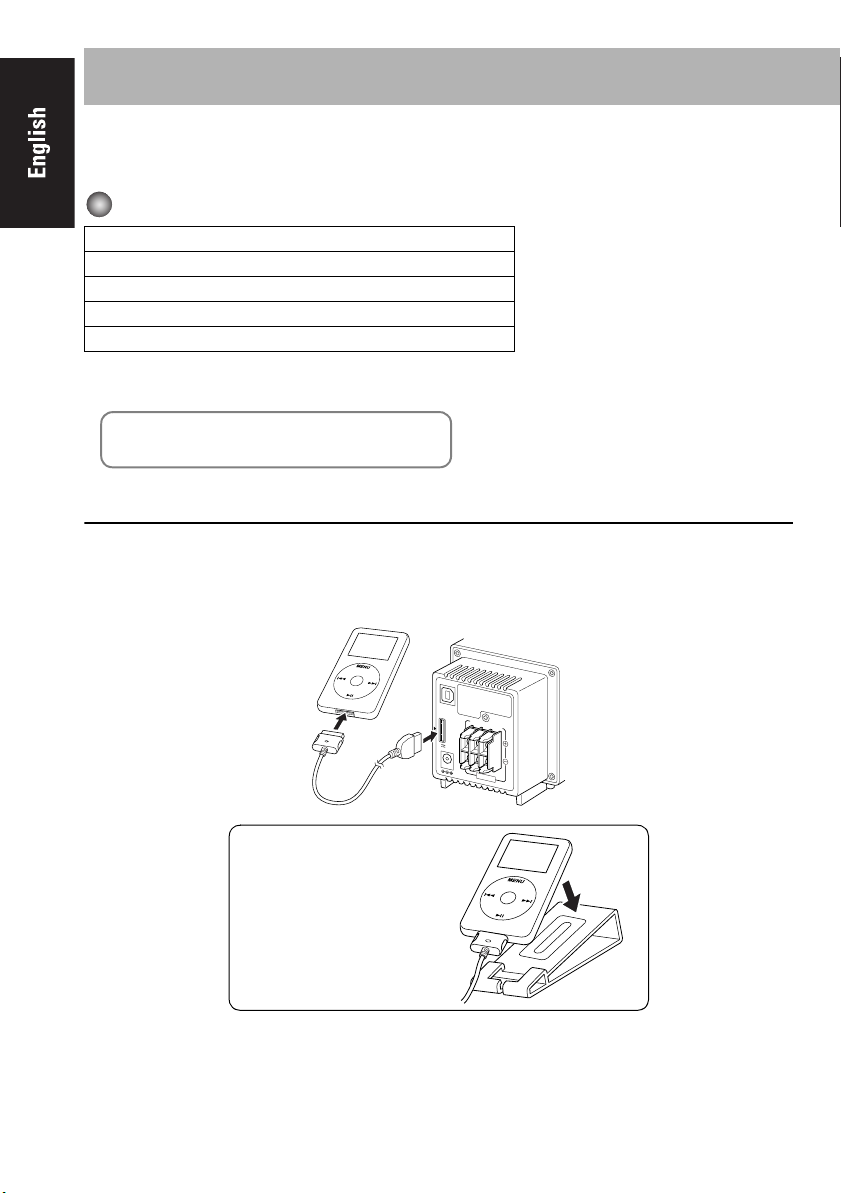
Playing Back from iPod
This system is equipped with an iPod terminal on the rear panel. You can connect your iPod to this
terminal and enjoy the sound from your iPod.
Compatible iPod types:
iPod nano 1G/2G/4G
iPod mini
iPod (4th Generation) 20G/40G
iPod photo (4th Generation) 20G/30G/40G/60G
iPod video (5th Generation) 30G/60G
If the iPod does not play correctly, please update your iPod software to the latest version.
• For details about updating your iPod, check on the Apple web site <http://www.apple.com>.
iPod is a trademark of Apple Computer, Inc.,
registered in the U.S. and other countries.
To Connect iPod
Connect the iPod to the System using the supplied cable.
Make sure the System is turned off when you connect it.
Connect the arrow of iPod terminal and the arrow of the connector facing each other.
13
2
You can place the iPod on
the supplied iPod stand.
USB
AUDIO
RIGHT
LEFT
1
WOOFER
i Pod
DC IN
23V
2.5A
8-16Ω
SPEAKERS
Page 19

When disconnecting the iPod, make sure that the System is turned off.
To remove the connector from
your iPod, squeeze the buttons
on the sides and pull.
Basic Operations
Button
On the Unit On the remote
Start playback / Pause
Press and hold : The iPod is in sleep mode
Increase the track numbers
Press and hold : Fast forward search
Decrease the track numbers
Press and hold : Fast reverse search
(Press this button during playback to jump back to the beginning of
the track.)
Function
NOTES
• The iPod battery is charged while the System is turned on or on standby (except in ECO mode).
See the iPod instruction manual about battery charging.
• If you connect an iPod to the iPod terminal and a USB mass storage class device to the USB
MEMORY terminal at the same time, the system might be overloaded.
• Sound distortion may occur when playing back audio sources with high recording levels. When
distortion occurs, it is recommended to turn off the equalizer of the iPod. For information on
operating the iPod, see the iPod instruction manual.
• JVC is not responsible for any loss of or damage to iPod that might result from the use of this
product.
• When you connect your iPod to the cable, make sure it connects all the way in.
• Do not carry the System with iPod connected. You might drop it down or it might cause damages
to the connector part.
• Do not touch or hit the iPod terminal pins or the connector pins directly. It might cause damages
to the connector part.
• Remove the iPod from the cable when you do not use.
• Always set volume to the minimum level when connecting or disconnecting the other equipment.
14
Page 20

Playing Back from USB mass storage class device
This System is equipped with a USB MEMORY terminal on the front panel. You can connect a
USB mass storage class device such as a USB flash memory device, Digital Audio Player (DAP),
etc. to this System.
This System cannot recognize a USB mass storage class device whose rating exceeds 5V/500mA.
To connect the USB mass storage class device
When connecting a USB mass storage class device, refer also to its manual.
FUNCTION
STANDBY
USB
MEMORY
AUX
PHONES
or
DAP
• When disconnecting the USB mass storage class device, make sure that the System is in the stop condition.
Basic Operations
Button
On the Unit On the remote
For MP3/WMA playback
1
2
Set Number select mode.
or
15
Function
Starts playback / Pauses
Stops playback
Increases the track numbers.
Press and hold : Fast forward search
Decreases the track numbers.
Press and hold : Fast reverse search
(Press this button during playback to jump back to the beginning of
the track.)
Input the Group n umber, then
input the Track number.
Track number
Group number
Page 21

3
• To exit from the Number select mode, press CANCEL.
NOTES
• You cannot send any data to your USB mass storage class device from this System.
• Always set volume to the minimum level when connecting or disconnecting the other equipment.
• Connect the USB mass storage class device directly to the system. Using a USB hub may result in
malfunction.
• Coded or encrypted tracks in a special method cannot be played on the unit.
• The USB mass storage device's battery is charged while the System is turned on or on standby (except
in ECO mode).
• An iPod does not play on the USB MEMORY terminal. “RESTRICT” appears on the display when an
iPod is connected to the USB MEMORY terminal while USB MEMORY is selected for the source.
• This System may not playback some USB mass storage devices and does not support DRM (Digital
Rights Management).
• Some MP3/WMA files cannot be played back and will be skipped.
This result from their recording processes and conditions.
• This System can play back MP3/WMA files with the extension code <.mp3> or <.wma> (regardless of
the letter case–upper/lower).
• Some characters or symbols will not be shown correctly on the display.
The maximum character number shown on the display is 32 (without the extension code) for files, and
30 for ID3 tag.
• It is recommended that you make each MP3 file at a sampling rate of 44.1 kHz and at a bit rate of 128
kbps. Similarly each WMA file at a sampling rate of 44.1 kHz and at a bit rate of 96 kbps.
• Playback order of MP3/WMA tracks may be different from the one you have intended while recording.
If a folder does not include MP3/WMA tracks, they are ignored.
Start playback.
16
Page 22

Repeat Play
1
Press repeatedly before you start playback to specify the repeat mode as follows:
1 Repeats the current track.
ALL Repeats all tracks.
GR Repeats all tracks in the current group.
Cancel
2
Start playback.
Random Play
1
2
RND appears on the display before you start playback.
• To cancel, press again.
Playback starts in random order.
Random Play ends when all tracks are played.
• To repeat random play, press REPEAT.
Playing Back from the PC
This System is equipped with a USB AUDIO terminal on the rear panel. You can connect your PC
to this terminal and enjoy the sound from your PC. When you connect your PC for the first time,
follow the procedure below.
How to install the USB drivers
1
2
Turn on your PC and start running Windows ® 98SE, Windows ® Me, Windows ® 2000, or
Windows
• If the PC has been turned on, close all the applications running.
Select USB AUDIO for the source.
• USB AUDIO can be selected also by the FUNCTION button on the unit.
®
XP.
USB AUDIO
AUX
17
Page 23

Connect the System to the PC using a USB cable (not supplied).
(rear panel)
3
• Use “USB series A plug to B plug” cable.
4
NOTE
• Always set volume to the minimum level when connecting or disconnecting the other equipment.
The USB drivers are installed automatically.
USB cable
(not supplied)
PC
To playback sounds on the PC
Refer to the manuals supplied with the media player application installed on the PC.
* Microsoft
registered trademarks of Microsoft corporation.
NOTES
• You cannot send any signal or data to your PC from this System.
• DO NOT turn off the unit or disconnect the USB cable while installing the drivers and for several
seconds while your PC is recognizing the receiver.
• Use a full speed USB cable (version 1.1).
Recommended cord length is shorter than approximately 2 m.
• If your PC does not recognize the unit, disconnect the USB cable and connect it again. If it does
not work yet, restart Windows.
• The installed drivers can be recognized only when the USB cable is connected between the unit
and your PC.
• The sound may not be played back correctly— interrupted or degraded—due to your PC settings
and PC specifications.
®
, Windows ® 98SE, Windows ® Me, Windows ® 2000 and Windows ® XP are
18
Page 24

Playing Back from Other Equipment
To connect other equipment
By using a stereo mini plug cord (not supplied), you can connect other equipment with analog audio
output jacks, such as Digital Audio Player, a TV, etc.
Stereo mini plug cord (not supplied)
AUX
(front panel)
• Refer to the manuals supplied with the other equipment.
NOTE
• Always set volume to the minimum level when connecting or disconnecting the other equipment.
Portable audio
device, Game
machine, etc.
To select other equipment for the source
Select AUX for the source.
USB AUDIO
AUX
• AUX can be selected also by the FUNCTION button on the unit.
To adjust the sound input level from other equipment
You can adjust the sound input level from the connected equipment, if the incoming signal is too
small or too large.
1
2
LEVEL 1:
Decreased input level. Suitable for equipment with high output level (such as a DVD player).
LEVEL 2:
Ordinary input level (factory setting). Suitable for equipment with low output level (such as a portable audio
device).
Select AUX for the source.
Press and hold until the indicator appears on the display. Then press and hold until setting is
changed.
LEVEL 1
LEVEL 2
19
Page 25

Troubleshooting
If you are having a problem with your System, check this list for a possible solution before calling
for service.
General:
Power does not come on.
Power plug is not inserted securely. Plug in securely.
Adjustments or settings are suddenly canceled before you finish.
There is a time limit. Repeat the procedure again.
Operations are disabled.
The built-in microprocessor may malfunction due to external electrical interference. Unplug
the AC power cord and then plug it back in.
Unable to operate the System from the remote control.
The path between the remote control and the remote sensor on the System is blocked.
Point it at the remote sensor on the font panel.
Signals cannot reach the remote sensor.
More closer to the System.
The batteries are exhausted.
No sound is heard from the speakers.
Speaker connections are incorrect or loose (P.5).
Headphones are connected (P.7).
Sound from PC connected with a USB cable has some noise (P.17).
PC is subjected to excessive load due to using other applications. Close the applications you do
not use.
PC is connected via USB Hub. Connect the PC directly to the main unit with a USB cable.
iPod/USB mass storage class device Operations:
The iPod doesn’t playback although the display indicates CONNECT.
The battery is empty. Let stand for more than approximately ten minutes on the connecting
condition.
Timer Operations:
Daily Timer does not work.
The System has been turned on when the ontime comes.
Timer starts working only when the System is turned off.
There might have been a power failure.
Set the clock first, then the timer again.
20
Page 26

Specifications
Amplifier
Output Power
Main Speaker 10 W per channel, min. RMS,
Subwoofer 30W, min. RMS, driven into
driven into 6Ω at 1kHz, with
no more than 10% total
harmonic distortion
8Ω at 100Hz, with no more
than 10% total harmonic
distortion
Terminals
Input Sensitivity/Impedance (1 kHz)
AUX IN LEVEL1 500 mV/47 kΩ
USB AUDIO Ver. 1.1
USB MEMORY Ver. 1.1
Compatible device Mass Storage Class
Compatible file system FAT16, FAT32
Bus power supply Max. 5V/500 mA
iPod
Compatible iPod types See page 13
Bus power supply Max. 5V/500 mA
Speaker terminals Main speaker 6Ω-16Ω
PHONES 32Ω - 1 kΩ
LEVEL2 125 mV/47 kΩ
Subwoofer 8Ω-16Ω
15 mW/ch output into 32Ω
Unit
Dimensions 90mm × 96mm × 137mm
(W/H/D)
Mass Approx. 0.5kg
Speaker Specifications
Main speaker SP-NXPS1F (each unit)
Type Full range bass-reflex type
Speaker Unit 7.5 cm cone × 1
Power handling Capacity
Impedance 6Ω
Frequency Range 150 Hz - 20 kHz
Sound pressure level 83 dB/W • m
10 W
Dimensions 90mm × 96mm × ×90mm
Mass Approx. 0.63kg
Subwoofer SP-NXPS1W
Type Bass Reflex Type
Speaker Unit 16 cm cone × 1
Power handling Capacity
Impedance 8Ω
Frequency Range 35 Hz - 150Hz
Sound pressure level 80 dB/W • m
Dimensions 221mm × 221mm × 222mm
Mass Approx. 3.5kg
(W/H/D)
30 W
(W/H/D)
Accessories
See page 3
Power Specifications
NX-PS1 (System)
Power Requirements
Power Consumption 19 W (power on mode)
AC Adaptor (AA-R2401)
INPUT AC 110V-240V
OUTPUT DC 23V 2.5A, 57.5VA
CA-NXPS1 (Main Unit)
Power Requirements DC IN 23V 2.5A
Design and specifications are subject to change without notice.
AC 110V-240V 50Hz/60Hz
12 W (in Standby mode)
1 W (in ECO mode)
50Hz/60Hz 1.5A
21
Page 27

Table des matières
Introduction ............................................. 2
Précautions ..............................................................2
Préparation .............................................. 3
Branchement ...........................................................5
Opérations de base .................................. 7
Appareil ..................................................................7
Télécommande ........................................................9
Réglage de l'horloge et de la minuterie de
réveil .................................................... 11
Réglage de l'horloge ..............................................11
Réglage de la minuterie de réveil .........................11
Lecture à partir d'un iPod .................... 13
Pour connecter un iPod .........................................13
Opérations de base ................................................14
Lecture à partir d'un appareil de stockage
de masse USB ...................................... 15
Pour connecter l'appareil de stockage de masse USB
Opérations de base ................................................15
Lecture à partir du PC .......................... 17
Installation des pilotes USB ..................................17
Pour écouter la musique stockée sur votre PC ......18
...15
Lecture à partir d'autre matériel ......... 19
Pour connecter d'autre matériel .............................19
Dépannage .............................................. 20
Spécifications ......................................... 21
1
Page 28

Introduction
Merci d'avoir fait l'acquisition d'un produit JVC.
Veuillez lire attentivement toutes les instructions avant d’utiliser cet appareil, afin d'être certain d'en
comprendre parfaitement le fonctionnement et de bénéficier ainsi de performances optimales.
Précautions
Installation
• Installez l’appareil dans un endroit plat, sec et tempéré, avec des température comprises entre 5°C et 35°C.
• Installez l’appareil dans un endroit permettant une ventilation correcte afin d’empêcher toute
surchauffe à l’intérieur de celui-ci.
NE PLACEZ PAS l’appareil à proximité d’une source de chaleur, dans un endroit
exposé aux rayons directs du soleil, à la poussière ou à des vibrations excessives.
• Éloignez suffisamment l’appareil du poste de télévision.
• Placez les enceintes à une distance suffisante du téléviseur pour éviter les interférences avec celui-ci.
Alimentation
• Lorsque vous débranchez l’appareil de la prise de courant, tirez toujours sur la prise et non sur
l'adaptateur CA.
NE MANIPULEZ PAS l'adaptateur CA avec les mains mouillées.
Chaleur interne
Pour garantir la sécurité, observez les recommandations suivantes :
• Vérifiez que la ventilation de l’appareil est suffisante. Une ventilation insuffisante
peut provoquer une surchauffe et endommager l’appareil.
• NE BLOQUEZ PAS le ventilateur ni les ouvertures ou orifices prévus pour la
ventilation. En cas de blocage ou d’obstruction par un journal, un vêtement, etc., l’air
chaud pourrait ne pas être évacué correctement.
Autres
• En cas de chute ou d’insertion d’objet métallique ou de liquide dans l’appareil, débranchez
l'adaptateur CA et consultez votre revendeur avant de remettre l’appareil en marche.
NE DÉMONTEZ PAS l’appareil : il ne comprend au niveau interne aucune zone
nécessitant l’intervention de l’utilisateur.
• Si vous ne prévoyez pas d’utiliser l’appareil pendant une longue période, débranchez l'adaptateur
CA de la prise secteur.
En cas de problème quelconque, débranchez l'adaptateur CA et consultez votre revendeur.
2
Page 29

Préparation
Accessoires fournis
Après avoir ouvert l’emballage, vérifiez que les éléments suivants sont présents. Le nombre entre
parenthèses indique la quantité fournie pour chaque élément.
• Télécommande (1)
• Pile bouton au lithium CR2025 (1) (La pile a été installée en usine.)
• Câbles d’enceintes 1,5 m (2)
• Câble d’enceinte 2,5 m (1)
• Cordon d'alimentation CA (1)
• Adaptateur CA (AA-R2401) (1)
• Câble de connexion iPod (Audio) (1)
• Support d’iPod (1)
Si un ou plusieurs éléments manquent, consultez immédiatement votre revendeur.
ATTENTION :
Pour éviter tout risque d'incendie et pour prévenir tout dommage.
• Utilisez uniquement l'adaptateur CA fourni avec l'appareil.
• N'utilisez pas l'adaptateur CA d'un autre appareil.
Préparation de la télécommande
Lorsque vous utilisez la télécommande pour la première fois, tirez sur la feuille isolante pour la
retirer.
Feuille isolante
(Avant)
Remplacement de la pile de la télécommande
Insérez la pile dans la télécommande en respectant les polarités (+ et –).
Pile bouton au lithium
(numéro de produit : CR2025)
(Arrière)
3
Page 30

Avertissement
• Rangez la pile dans un endroit hors de portée des enfants. Si un enfant avale
accidentellement la pile, consultez immédiatement un médecin.
• Ne rechargez pas la pile, ne la soumettez pas à un court circuit, ne la démontez pas,
ne la faites pas chauffer et ne la jetez pas au feu. En effet, la pile risquerait ainsi de
dégager de la chaleur, de se fissurer ou de provoquer un incendie.
• Ne laissez pas la pile en contact avec d'autres matériaux métalliques. En effet, la pile
risquerait ainsi de dégager de la chaleur, de se fissurer ou de provoquer un incendie.
• Si vous souhaitez jeter la pile ou la ranger, enveloppez-la dans du ruban adhésif afin
de l'isoler ; sinon la pile risquerait de dégager de la chaleur, de se fissurer ou de
provoquer un incendie.
• Ne percez pas la pile avec une pince ou des outils de ce type. En effet, la pile
risquerait ainsi de dégager de la chaleur, de se fissurer ou de provoquer un incendie.
• Recyclez correctement la pile, conformément aux réglementations fédérales, de
l'État ou locales.
ATTENTION :
Danger d'explosion en cas de remplacement
incorrect de la pile.
Remplacez-la uniquement par un type de pile
identique ou équivalent.
4
Page 31

Branchement
Ne branchez le cordon d'alimentation CA qu'après avoir fait toutes les autres
branchements.
Subwoofer
Vers une prise de
courant
Ne branchez le cordon
d'alimentation CA
qu'après avoir fait tous les
autres branchements.
Appareil
RIGHT LEFT WOOFER
6-16Ω 8-16Ω
SPEAKERS
Câble d’enceinte
(2,5 m)
Cordon
d'alimentation
CA
Adaptateur CA
Adaptateur
Borne USB
AUDIO
Borne iPod
23V 2.5A
USB
AUDIO
RIGHT LEFT WOOFER
i Pod
DC IN
6-16Ω 8-16Ω
SPEAKERS
INPUT
Enceinte
DC IN
Enceinte principale
23V 2.5A
Câble d’enceinte (1,5 m) Câble d’enceinte (1,5 m)
5
Page 32

Pour raccorder les câbles d'enceintes
Vérifiez que l'appareil, les enceintes principales et le subwoofer sont raccordés correctement.
Lors de la connexion des câbles d’enceintes, branchez les fils en respectant les polarités
indiquées sur les bornes d’enceintes : câble blanc sur (+) et câble blanc avec trait noir sur (–).
REMARQUES
• NE BRANCHEZ PAS plusieurs fils d’enceinte sur chaque borne.
• NE LAISSEZ PAS l’extrémité des fils d’enceintes toucher les parties métalliques de l’appareil.
Exemple enceinte
2 Insérer
3 Relâcher
1 Tenir
Exemple appareil
2 Insérer
1 Déverrouiller
3 Verrouiller
6
Page 33

Appareil
Opérations de base
COMPACT COMPONENT SYSTEM
NX-PS1
VOLUME
Affichage
Voyant STANDBY
Capteur de
commande à
STANDBY
FUNCTION
USB
MEMORY
distance
Touches des
fonctions
4
AUX PHONES
principales
Ouverture du panneau avant
FUNCTION
STANDBY
USB
MEMORY
AUX
PHONES
Prise jack AUX
Utilisation du casque
Veillez à toujours baisser le volume avant
de brancher ou d’utiliser un casque.
• Le fait de brancher un casque désactive
Fonctionnement sur l'appareil
Touches Fonctions
Règle le niveau de volume VOLUME MIN / 1 à 29 / VOLUME MAX.
VOLUME
1
1
2
3
Borne USB MEMORY
Prise jack PHONES
les enceintes.
Réglage du volume
Sélection d'une source
Touche STANDBY/ON
Sélectionne une source. Voir “Lecture à partir d'un iPod” (P.13).
FUNCTION
2
3
iPod USB MEMORY
AUX USB AUDIO
Met en marche/arrête (met en veille) l'appareil.
Voir “Lecture à partir d'un appareil de stockage de
masse USB” (P.15).
Voir “Lecture à partir du PC” (P.17).
Voir “Lecture à partir d'autre matériel” (
P.19
).
Commande la lecture de la musique.
4
Voir “Lecture à partir d'un iPod” (P.13).
Voir “Lecture à partir d'un appareil de stockage de masse USB” (P.15).
7
Page 34

Informations affichées à l'écran
Lorsque iPod / USB AUDIO est sélectionné :
Niveau du volume
Nom de la source
État actuel ⇔ Affichage de
l'horloge
Lorsque USB MEMORY est sélectionné :
Niveau du volume
Temps de lecture écoulé
Numéro de piste actuel
Numéro de groupe actuel
Informations sur le fichier ⇔ Affichage de l'horloge
Lorsque AUX est sélectionné :
Niveau du volume
Nom de la source
Aucun affichage ⇔ Affichage
de l'horloge
Symboles Description
RND S'allume lorsque le mode de lecture aléatoire est activé en mode USB Memory.
1/ ALL/ GR S'allume lorsque le mode de lecture répétée est activé en mode USB Memory.
FLAT/ROCK/POP/
JAZZ/CLAS
(CLASSIQUE)
SLEEP S'allume lorsque la minuterie d'arrêt est activée. (P.10)
(P.17)
(P.17)
Affiche le réglage EQ sélectionné. (P.10)
S'allume lorsque l'appareil de stockage de masse USB est connecté et que le
mode USB MEMORY est sélectionné.
S'allume lorsque la minuterie de réveil est réglée. (P.11)
8
Page 35

Télécommande
Minuterie d'arrêt
6
8
7
10
Réglage de la tonalité
Bouton FADE MUTING
5
Utilisation de la télécommande
Touches Fonctions
1
2
3
Met en marche ou arrête (met en veille) l'appareil
Change les informations de l'affichage.
Mode USB MEMORY : Affichage de l'horloge ⇔ Informations sur le fichier
Autre mode : Affichage de l'horloge ⇔ Informations sur la source
Fait passer la source sur iPod.
Voir “Lecture à partir d'un iPod” (P.13).
Fait passer la source sur USB MEMORY.
Voir “Lecture à partir d'un appareil de stockage de masse USB” (P.15).
Fait passer la source sur USB audio et AUX.
Voir “Lecture à partir du PC” (P.17).
Voir “Lecture à partir d'autre matériel” (P.19).
Touche STANDBY/ON
1
Changement des informations de
2
l'affichage
Sélection d'une source
3
9
Mode Dimmer/ECO
Réglage du volume
4
4
5
Règle le niveau de volume VOLUME MIN / 1 à 29 / VOLUME MAX.
Permet de baisser le volume instantanément.
Pour régler le volume sur son niveau précédent, appuyez à nouveau sur la touche ou réglez le
niveau de volume.
Autres
Touches Pages de référence
6
7
8
Régler CLOCK/TIMER (P.11)
Régler CLOCK/TIMER (P.11)
USB MEMORY (P.15)
AUX (P.19)
Régler CLOCK/TIMER (P.11)
USB MEMORY (P.15)
9
Touches Pages de référence
9
10
Régler CLOCK/TIMER
(P.11)
iPod (P.13)
USB MEMORY (P.15)
USB MEMORY (P.15)
Page 36

Pour réduire l'intensité lumineuse de l'affichage—DIMMER
Appuyez sur la touche lorsque l'appareil est en marche. “DIMMER ON” apparaît.
• Pour annuler cette fonction, appuyez à nouveau sur DIMMER/ECO. “DIMMER OFF” apparaît.
Pour régler le mode ECO.
En mode ECO, l'affichage s'éteint, consommant ainsi le minimum d'énergie.
Appuyez sur la touche lorsque l'appareil est arrêté. “ECO ON” apparaît et rien ne s'affiche à l'écran.
• Pour annuler cette fonction, appuyez à nouveau sur DIMMER/ECO.
“ECO OFF” apparaît et l'horloge s'affiche.
Pour que l'appareil s'éteigne au bout d'un certain temps—Minuterie d'arrêt
1
2
• Pour vérifier le temps qui reste avant que l'appareil s'éteigne automatiquement, appuyez une fois
sur SLEEP.
En appuyant plusieurs fois sur la touche, vous pouvez changer l'heure d'arrêt.
Appuyez plusieurs fois sur la touche pour spécifier la durée (en minutes) de la façon suivante :
10 20 30 60 90 120
OFF (Annulé)
Attendez jusqu'à ce que la durée réglée s'éteigne.
Pour régler la tonalité
1
2
ROCK Augmente les basses et hautes fréquences. Convient à la
POP Convient aux chants.
JAZZ Convient à la musique jazz.
CLAS
(CLASSIQUE)
FLAT Son normal.
Si vous réglez le niveau de graves et d'aigus, le réglage EQ n'intervient pas et le symbole EQ disparaît.
Le réglage de BASS/TREBLE ne fonctionnera pas en même temps que le réglage EQ. C'est le dernier réglage
effectué qui interviendra.
Sélectionnez un des éléments suivants :
EQ BASS TREBLE
• Réglez le niveau de graves et d'aigus avec VOLUME +/- de -5 à +5.
• Sélectionnez un des réglages EQ suivants avec VOLUME +/- :
FLAT
musique acoustique.
Convient à la musique classique.
ROCK
ROCK POP
CLAS JAZZ
10
Page 37

Réglage de l'horloge et de la minuterie de réveil
Réglage de l'horloge
1
2
• Pour repasser à l'étape précédente, appuyez sur CANCEL.
• En cas de panne de courant, les réglages de l'horloge sont perdus et elle est réglée sur “AM12:00”.
Vous devez régler à nouveau l'horloge.
ou
Activez le mode de réglage de l'horloge (“Clock Adjust” apparaît).
Les chiffres de l'heure clignotent à l'écran.
• Si vous avez déjà réglé l'horloge auparavant, appuyez plusieurs fois sur la
touche jusqu'à ce que “Clock Adjust” apparaisse.
Réglages actuels de la minuterie
Si l'horloge n'a encore jamais été réglée, “Clock Adjust” apparaît en
premier.
1 Régler les heures. Les chiffres des minutes clignotent à l'écran.
2 Régler les minutes. L'horloge intégrée commence à fonctionner.
Réglage de la minuterie
Annulé
Clock Adjust
Réglage de la minuterie de réveil
Si vous ne réglez pas l'horloge intégrée, vous ne pourrez pas utiliser la minuterie de réveil.
La minuterie de réveil vous permet de vous réveiller avec de la musique, etc.
Connectez auparavant l'iPod, l'appareil de stockage de masse USB ou un autre appareil à l'unité.
(P.13, P.15, P.19)
1
2
(Deux fois)
ou
Sélectionnez le mode de réglage de la minuterie.
Réglages actuels de la minuterie
Annulé
1 Réglez les heures, puis les minutes pour l'heure de mise en marche de
la minuterie de réveil.
2 Réglez les heures, puis les minutes pour l'heure d'arrêt de la minuterie
de réveil.
• L'heure de mise en marche et l'heure d'arrêt de la minuterie de réveil ne
peuvent pas être réglées sur la même heure.
3 Sélectionnez la source de lecture—“iPod,” “USB MEMORY” ou
“AUX.”
• Si “USB MEMORY” est sélectionné, sélectionnez le numéro de
GROUP (“001” à “500” et “---”), puis sélectionnez le numéro de
TRACK (“001” à “999” et “---”).
Si vous sélectionnez “---,” TRACK1 dans GROUP1 est réglé.
4 Sélectionnez le niveau de volume (“VOLUME MIN / 1 à 29 / VOLUME
MAX”).
“SET OK” apparaît brièvement suivi des informations sur les réglages,
puis l'icône apparaît à l'écran.
Réglage de la minuterie
Clock Adjust
3
• Pour quitter le réglage de la minuterie, appuyez sur CLOCK/TIMER de la façon requise.
• Pour corriger une erreur de saisie pendant le processus de réglage, appuyez sur CANCEL. Cette
touche permet de revenir à l'étape précédente.
Arrêter (mettre en veille) l'appareil.
11
Page 38

Pour annuler la minuterie de réveil
1
2
Pour activer à nouveau la minuterie de réveil (Activer un réglage de
minuterie précédemment effectué.)
1
2
Sélectionnez le mode de réglage actuel de la minuterie.
L'icône disparaît.
Sélectionnez le mode de réglage actuel de la minuterie.
L'icône apparaît à l'écran.
12
Page 39

Lecture à partir d'un iPod
Cet appareil est équipé d'une borne iPod située sur le panneau arrière. Vous pouvez connecter votre
iPod sur cette borne et écouter la musique stockée sur votre iPod.
Types d'iPod compatibles :
iPod nano 1 Go/2 Go/4 Go
iPod mini
iPod (4ème génération) 20 Go/40 Go
iPod photo (4ème génération) 20 Go/30 Go/40 Go/60 Go
iPod vidéo (5ème génération) 30 Go/60 Go
Si la lecture avec l'iPod ne fonctionne pas correctement, veuillez mettre à jour votre logiciel iPod
avec la dernière version.
• Pour plus de détails sur la mise à jour de votre iPod, rendez-vous sur le site Web d'Apple <http://
www.apple.com>.
iPod est une marque d'Apple Computer, Inc.,
déposée aux États-Unis et dans d'autres pays.
Pour connecter un iPod
Connectez l'iPod à l'appareil à l'aide du câble fourni.
Assurez-vous que l'appareil est hors tension lorsque vous le connectez.
Connectez la flèche de la borne iPod et la flèche du connecteur face à face.
13
2
1
Vous pouvez placer l'iPod
sur le support d'iPod fourni.
USB
AUDIO
RIGHT
LEFT
WOOFER
i Pod
DC IN
23V
2.5A
8-16Ω
SPEAKERS
Page 40

Lorsque vous déconnectez l'iPod, veillez à ce que l'appareil soit hors tension.
Pour retirer le connecteur de votre
iPod, appuyez sur les boutons
situés de chaque côté et tirez.
Opérations de base
Touche
Sur l'appareil Sur la
télécommande
Lancer la lecture / Pause
Maintenez la touche enfoncée : l'iPod passe en mode de veille
Passer aux numéros de piste suivants
Maintenez la touche enfoncée : recherche rapide en avant
Passer aux numéros de piste précédents
Maintenez la touche enfoncée : recherche rapide en arrière
(Appuyez sur ce bouton pendant la lecture pour repasser au début de
la plage.)
REMARQUES
• La batterie de l'iPod se recharge lorsque l'appareil est en marche ou en veille (sauf en mode ECO).
Pour plus d'informations sur la charge de la batterie, reportez-vous au manuel d'instructions de
l'iPod.
• Si vous connectez simultanément un iPod à la borne iPod et un appareil de stockage de masse USB
à la borne USB MEMORY, l'appareil risque de se trouver en surcharge.
• Une distorsion sonore risque de se produire lors de la lecture de sources audio comportant des
niveaux d'enregistrement élevés. En cas de distorsion, nous vous recommandons de désactiver
l'égalisateur de l'iPod. Pour plus d'informations sur le fonctionnement de l'iPod, reportez-vous au
manuel d'instructions de l'iPod.
• JVC n'est responsable d'aucune perte ni dommages infligés à votre iPod suite à l'utilisation de ce
produit.
• Lorsque vous connectez votre iPod au câble, veillez à ce qu'il soit enfoncé à fond.
• Ne déplacez pas le système lorsque l'iPod est connecté. Vous risqueriez de le faire tomber ou
d'endommager le connecteur.
• Ne touchez pas et ne heurtez pas les broches de la borne de l'iPod, ni celles du connecteur. Vous
risqueriez d'endommager le connecteur.
• Lorsque vous ne l'utilisez pas, retirez l'iPod du câble.
• Réglez toujours le volume au minimum lorsque vous connectez ou déconnectez l'autre matériel.
Fonction
14
Page 41

Lecture à partir d'un appareil de stockage de masse USB
Cet appareil est équipé d'une borne USB MEMORY sur le panneau avant. Vous pouvez connecter
sur ce système un appareil de stockage de masse USB de type mémoire flash USB, Digital Audio
Player (DAP), etc.
Ce système reconnaît les appareils de stockage de masse USB dont la puissance nominale dépasse
les 5 V/500 mA.
Pour connecter l'appareil de stockage de masse USB
Lors de la connexion d'un appareil de stockage de masse USB, reportez-vous aussi à son manuel.
FUNCTION
STANDBY
USB
MEMORY
AUX
PHONES
ou
DAP
• Lorsque vous déconnectez l'appareil de stockage de masse USB, assurez-vous que l'appareil est à l'arrêt.
Opérations de base
Touche
Sur l'appareil Sur la
télécommande
Fonction
Pour la lecture MP3/WMA
1
2
Réglez le mode de sélection de numéro.
ou
15
Lance la lecture / Pause
Arrête la lecture
Passe aux numéros de piste suivants
Maintenez la touche enfoncée : recherche rapide en avant
Passe aux numéros de piste précédents
Maintenez la touche enfoncée : recherche rapide en arrière
(Appuyez sur ce bouton pendant la lecture pour repasser au début de la plage.)
Saisissez le numéro de
groupe, puis le numéro de
piste.
Numéro de piste
Numéro de groupe
Page 42

3
• Pour quitter le mode de sélection de numéro, appuyez sur CANCEL.
REMARQUES
• Vous ne pouvez transférer aucune donnée du système à l'appareil de stockage de masse USB.
• Réglez toujours le volume au minimum lorsque vous connectez ou déconnectez l'autre matériel.
• Connectez l'appareil de stockage de masse USB directement au système. L'utilisation d'un hub USB
risque d'entraîner des dysfonctionnements.
• Les pistes codées ou cryptées à l'aide d'une méthode spéciale ne peuvent pas être lues sur l'appareil.
• La batterie de l'appareil de stockage de masse USB est rechargée lorsque l'appareil est en marche ou en
veille (sauf en mode ECO).
• Vous ne pouvez pas brancher un iPod sur la borne USB MEMORY. Si vous branchez un iPod sur la
borne USB MEMORY et que USB MEMORY est sélectionné comme source, “RESTRICT” apparaîtra
à l'écran.
• Il se peut que ce système ne puisse pas lire les données de certains appareils de stockage de masse USB
; en outre, il ne prend pas en charge le DRM (Digital Rights Management).
• Les fichiers MP3/WMA qui ne peuvent pas être lus seront omis.
Cela provient des processus et conditions utilisés lors de leur enregistrement.
• Cet appareil peut lire les fichiers MP3/WMA avec le code d'extension <.mp3> ou <.wma> (qu'il soit en
majuscules ou en minuscules).
• Certains caractères ou symboles ne s'afficheront pas correctement à l'écran.
Le nombre maximum de caractères pouvant s'afficher à l'écran est de 32 (sans le code d'extension) pour
les fichiers et de 30 pour les identifiants ID3.
• Nous vous recommandons de créer chaque fichier MP3 à une fréquence d'échantillonnage de 44,1 kHz
et à un débit binaire de 128 kbps. De même, créez chaque fichier WMA à une fréquence
d'échantillonnage de 44,1 kHz et à un débit binaire de 96 kbps.
• L'ordre de lecture des pistes MP3/WMA peut être différent de celui choisi lors de l'enregistrement. Si
un dossier ne contient aucune piste MP3/WMA, il sera ignoré.
Lancez la lecture.
16
Page 43
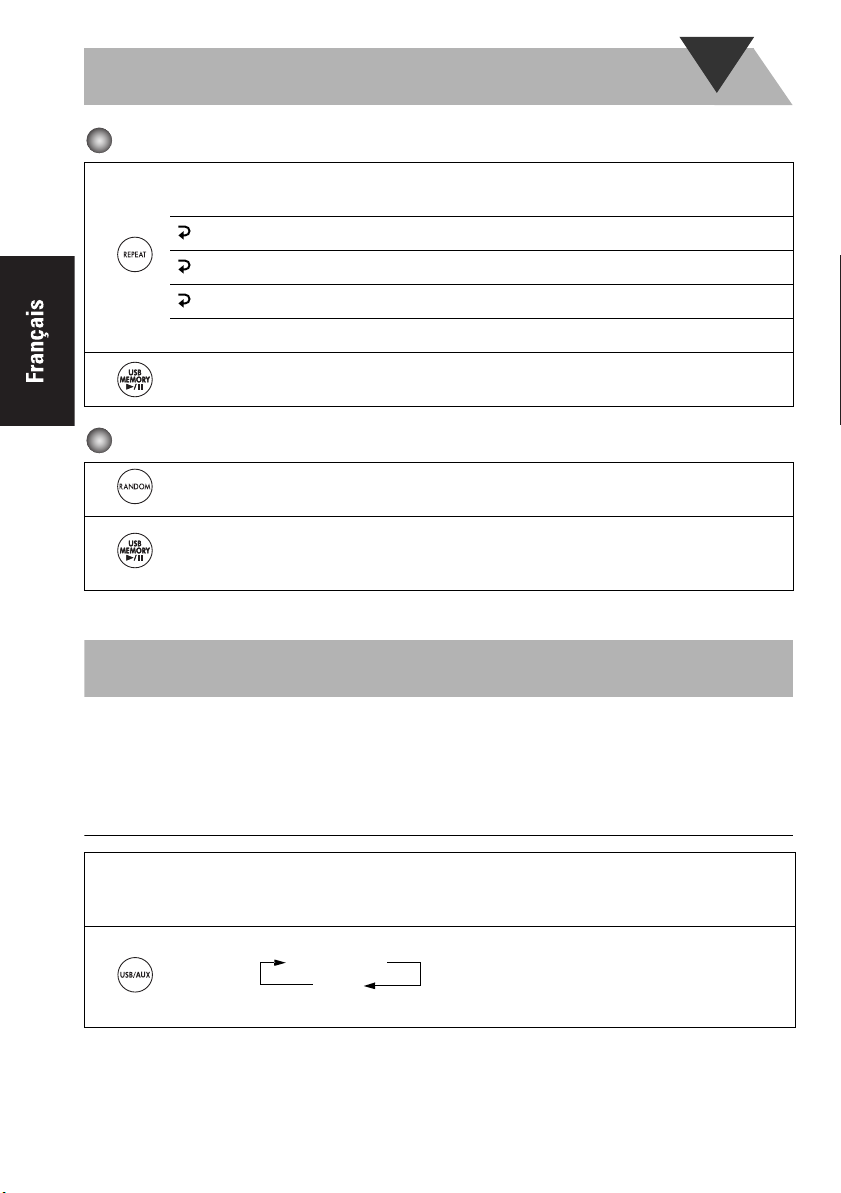
Lecture répétée
Appuyez plusieurs fois sur la touche avant de lancer la lecture pour spécifier le mode de
répétition de la façon suivante :
1 Répète la piste en cours.
1
ALL Répète toutes les pistes.
GR Répète toutes les pistes du groupe en cours.
Annuler
2
Lancez la lecture.
Lecture aléatoire
1
2
RND apparaît à l'écran avant le début de la lecture.
• Pour annuler, appuyez à nouveau sur la touche.
La lecture démarre en ordre aléatoire.
La lecture aléatoire se termine lorsque toutes les pistes ont été lues.
• Pour répéter la lecture aléatoire, appuyez sur REPEAT.
Lecture à partir du PC
Cet appareil est équipé d'une borne USB AUDIO sur le panneau arrière. Vous pouvez connecter
votre PC sur cette borne et écouter la musique stockée sur votre PC. Lorsque vous connectez votre
PC pour la première fois, suivez la procédure ci-dessous.
Installation des pilotes USB
1
2
Démarrez votre PC et exécutez Windows ® 98SE, Windows ® Me, Windows ® 2000 ou
Windows
• Si le PC était déjà démarré, fermez toutes les applications en cours d'exécution.
Sélectionnez USB AUDIO comme source.
• USB AUDIO peut aussi être sélectionné sur l'appareil à l'aide de la touche FUNCTION.
®
XP.
USB AUDIO
AUX
17
Page 44

Connectez l'appareil au PC à l'aide d'un câble USB (non fourni).
(panneau
arrière)
3
• Utilisez un câble “USB série prise A vers prise B”.
4
REMARQUE
• Réglez toujours le volume au minimum lorsque vous connectez ou déconnectez l'autre matériel.
Les pilotes USB sont installés automatiquement.
Câble USB
(non fourni)
PC
Pour écouter la musique stockée sur votre PC
Reportez-vous aux manuels fournis avec l'application de lecture de médias installée sur le PC.
* Microsoft
marques déposées de Microsoft corporation.
REMARQUES
• Vous ne pouvez envoyer aucun signal ou donnée de cet appareil à votre PC.
• N'éteignez PAS l'appareil et ne débranchez PAS le câble USB lors de l'installation des pilotes, ni
pendant les quelques secondes qui suivent la détection du récepteur par votre PC.
• Utilisez un câble USB pleine vitesse (version 1.1).
Nous recommandons une longueur de câble inférieure à 2 mètres (environ).
• Si votre PC ne reconnaît pas l'appareil, débranchez le câble USB et rebranchez-le. S'il ne
fonctionne toujours pas, redémarrez Windows.
• Les pilotes installés ne peuvent être reconnus que lorsque le câble USB est connecté entre
l'appareil et votre PC.
• Il se peut que les sons ne soient pas reproduits correctement (interruptions ou dégradation) en
raison des réglages et des spécifications de votre PC.
®
, Windows ® 98SE, Windows ® Me, Windows ® 2000 et Windows ® XP sont des
18
Page 45

Lecture à partir d'autre matériel
Pour connecter d'autre matériel
À l'aide d'un cordon stéréo avec mini-fiche (non fourni), vous pouvez connecter un autre type de
matériel (lecteur audio numérique, téléviseur, etc.) avec des prises jack audio analogiques.
Cordon stéréo avec mini-fiche (non fourni)
AUX
(panneau avant)
• Reportez-vous aux manuels fournis avec l'autre matériel.
REMARQUE
• Réglez toujours le volume au minimum lorsque vous connectez ou déconnectez l'autre matériel.
Appareil audio
portable, console
de jeux, etc.
Pour sélectionner un autre matériel comme source
Sélectionnez AUX comme source.
USB AUDIO
AUX
• AUX peut aussi être sélectionné sur l'appareil à l'aide de la touche FUNCTION.
Pour régler le niveau d'entrée du son à partir d'un autre matériel
Si le signal entrant est trop faible ou trop fort, vous pouvez régler le niveau d'entrée du son à partir
du matériel connecté.
1
2
LEVEL 1 :
Niveau d'entrée réduit. Convient au matériel disposant d'un niveau de sortie élevé (lecteur de DVD, etc.).
LEVEL 2 :
Niveau d'entrée normal (réglage d'usine). Convient au matériel disposant d'un niveau de sortie peu élevé
(appareil audio portable, etc.).
Sélectionnez AUX comme source.
Maintenez la touche enfoncée jusqu'à ce que l'indicateur apparaisse à l'écran. Maintenez ensuite
la touche enfoncée jusqu'à ce que le réglage change.
LEVEL 1
LEVEL 2
19
Page 46

Dépannage
En cas de problème avec votre appareil, consultez cette liste afin de trouver une éventuelle solution,
avant d'appeler le service après-vente.
Problèmes de type générique :
Impossible d'allumer l'appareil.
La prise de courant n'est pas enfoncée à fond. Enfoncez-la à fond.
Les réglages sont brusquement annulés avant que vous ayez terminé.
Vous disposez d'un délai limité pour terminer les réglages. Répétez la procédure.
Fonctionnement désactivé.
Il se peut que le microprocesseur intégré ne fonctionne pas correctement suite à des
interférences électriques externes. Débranchez le cordon d'alimentation CA et rebranchez-le.
Impossible d'utiliser l'appareil à partir de la télécommande.
Un obstacle se trouve entre la télécommande et le capteur de commande à distance du système.
Dirigez-la vers le capteur de commande à distance du panneau avant.
Les signaux n'arrivent pas jusqu'au capteur de commande à distance.
Approchez-vous de l'appareil.
Les piles sont déchargées.
Aucun son ne sort des enceintes.
Les branchements des enceintes sont incorrects ou détachés (P.5).
Un casque est connecté (P.7).
Le son provenant du PC connecté avec un câble USB est parasité (P.17).
Le PC est soumis à une charge excessive en raison de l'utilisation d'autres applications. Fermez
les applications que vous n'utilisez pas.
Le PC est connecté par l'intermédiaire d'un hub USB. Connectez le PC directement à l'appareil
à l'aide d'un câble USB.
Utilisation d'un iPod/appareil de stockage de masse USB :
L'iPod ne lit pas les données, alors que l'écran indique CONNECT.
La batterie est déchargée. Laissez l'iPod branché pendant plus de dix minutes environ.
Utilisation de la minuterie :
La minuterie de réveil ne fonctionne pas.
L'appareil a été mis en marche au moment de l'heure de déclenchement de la minuterie.
La minuterie ne se met en marche que lorsque l'appareil est arrêté.
Il se peut qu'il y ait eu une panne de courant.
Réglez tout d'abord l'horloge, puis la minuterie.
20
Page 47

Spécifications
Amplificateur
Puissance de sortie
Enceinte principale 10 W par voie, min. RMS,
Subwoofer 30 W, min. RMS, pour 8Ω
pour 6Ω d'impédance à 1 kHz,
avec une distorsion
harmonique totale ne
dépassant pas 10%
d'impédance à 100 Hz, avec
une distorsion harmonique
totale ne dépassant pas 10%
Bornes
Sensibilité d'entrée/Impédance (1 kHz)
AUX IN LEVEL1 500 mV/47 kΩ
LEVEL2 125 mV/47 kΩ
USB AUDIO Ver. 1.1
USB MEMORY Ver. 1.1
Appareil compatible Stockage de masse
Système fichier compatible
Alimentation bus Max. 5 V/500 mA
iPod
Types d'iPod compatibles
Alimentation bus Max. 5 V/500 mA
Bornes d'enceintes Enceinte principale 6Ω-16Ω
PHONES 32Ω - 1 kΩ sortie de
FAT16, FAT32
Voir page 13
Subwoofer 8Ω-16Ω
15 mW/voie pour 32Ω
Appareil
Dimensions 90 mm × 96 mm × 137 mm
Poids Environ 0,5 kg
(L/H/P)
Caractéristiques des enceintes
Enceinte principale SP-NXPS1F (chaque enceinte)
Type Bass-reflex à gamme de
fréquences étendue
Haut-parleur Cône de 7,5 cm × 1
Puissance
Impédance 6Ω
Plage de fréquences 150 Hz - 20 kHz
Niveau sonore 83 dB/W • m
10 W
Dimensions 90 mm × 96 mm × 90 mm
Poids Environ 0,63 kg
Subwoofer SP-NXPS1W
Type Bass Reflex
Haut-parleur Cône de 16 cm × 1
Puissance
Impédance 8Ω
Plage de fréquences 35 Hz - 150Hz
Niveau sonore 80 dB/W • m
Dimensions 221 mm × 221 mm × 222 mm
Poids Environ 3,5 kg
(L/H/P)
30 W
(L/H/P)
Accessoires
Voir page 3
Spécifications d'alimentation
NX-PS1 (système)
Alimentation requise
Consommation électrique
Adaptateur CA (AA-R2401)
ENTRÉE AC 110 V-240 V
SORTIE CC 23 V 2,5 A, 57,5 VA
CA-NXPS1 (unité principale)
Alimentation requise CC IN 23 V 2,5 A
La conception et les spécifications sont sujettes à
modifications sans avis préalable.
AC 110 V-240 V 50 Hz/60
Hz
19 W (en marche)
12 W (en mode veille)
1 W (en mode ECO)
50 Hz/60 Hz 1,5 A
21
Page 48

NX-PS1 COMPACT COMPONENT SYSTEM
EN, FR
© 2006 Victor Company of Japan, Limited
0906NSMCREBET
 Loading...