

Page 1
LT-32HA60U
Operating Instructions
Mode d'emploi
Handleiding
Instrucciones de Funcionamiento
Návod k použití
Návod na obsluhu
//
VOL
VOLCHCH
EnglishFrenchDutchSpanish
A-B
A-B
ANGLE
ANGLE
MENU
MENU
REC
REC
CZECH
SLOVAK
Page 2
EN
You get the smart card from y our cable sup plier (CAMs are custom ary). Insert the
smartcard into the C AM, and then insert the CA M into the CI slo t of your TV set.
modules
EN
Darty Plc © 22/24 Ely Pl ace, London EC1N 6TE, UK
2
Page 3
100-240V~50/60 Hz
EN
broken glass. You coul d be hurt or the un it could be come damage d.
it is damaged.
to allow for air circu lation.
3
EN
Page 4
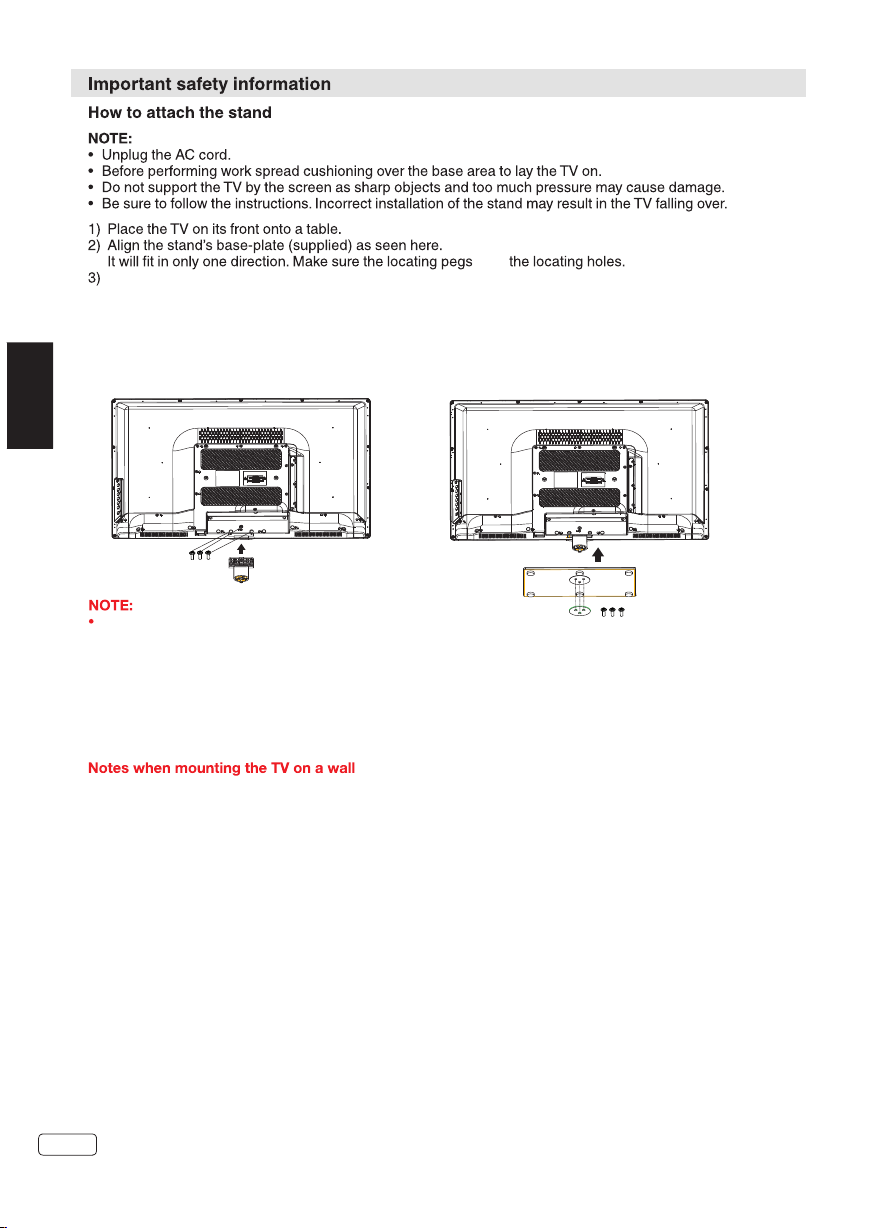
Carefully hold the b ase plate in po sition an d secure it wit h screws.
1. Place the TV with the display side down
on a flat surface. Use a cloth to protect the
display.Position the stand base pillar onto
fit in
2. Attach the stand base plate and washer to
the stand pole by firmly tightening the supplied
screws.
the bottom of the TV.
EN
3xM3x15m m
To detach the stand, per form these steps in reve rse order.
Dismantling the stand
For wall mounting , th e stand must be dismantl ed. To do this, remove scr ews ( above dra wing ) from t he
back . Fi t a VESA (200 x 100) w all mounting kit. Th e screw thread length mu st not exceed 5 mm (lower
screws) and 10mm (up per screws) i nto the TV.
Remove the stand as on e piece by reve rsing the f ixing proce dure described above .
You can refit the s crews to th e stand for saf e keeping , but tighten t hem only slightly.
VESA screw size 4xM4x 5mm
Protect the screen a nd lay the TV flat on its fa ce, on a stable table, wit h the stand foo t clear of th e
table edge.
To ensure a safe install ation, plea se observ e the followi ng when hanging the tele vision on a wal l:
Warning: This opera tion requir es two peop le.
Check that the wall ca n support the weight of th e televisio n set and a VES A-standar d wall mount
assembly (not supp lied).
Be sure to use only scre ws suitable for the mate rial of the wal l.
In case of any doubt ple ase contact a qualifie d installer.
Beware of electric al cables, ga s and water p ipes in the wal l.
Follow the instruc tions provi ded with th e wall mount.
The set must be instal led on a vertical wall.
Make sure that cable s are placed so that there i s no danger of tr ipping ov er them or dama ging
them.
3xM4x15m m
EN
4
Page 5
EN
it on the e dge.
scratching (such a s rings, wrist-watch , etc.).
the
While cleaning, do n ot wear jewel ry that cou ld cause surf ace
5
EN
Page 6
Safety Information
Safe use and care of you r televisio n
We ha ve designed a nd made this televisio n to meet
European Safety St andards, bu t as with any
electronic equip ment you must take care, t o stay
safe and get the best re sults. Here is some good
advice to help you do th is.
Read these instruc tions carefully befo re you try to
use the television .
Protect the mains le ad. You must ensu re the main s
lead cannot be walke d on, crushed , chafed, c ut or
trapped.
Switch off the mai ns power or pull out the mai ns plug
when you leave the tel evision una ttended , unless
EN
the function of the te levision requires a co ntinuous
power supply.
Do not continue to use y our televis ion if you ha ve
spilt liquids in it, i f it is damaged i n any way or if i t
does not work normal ly. Imme diately unp lug the
television and get e xpert advic e.
Avo id harsh cond itions such as wet or damp p laces,
high humidity, st rong vibration, extr emely high or
low temperatures , strong sunlight and pl aces that
are very dusty.
Never fit makeshif t stands or legs to the tele vision.
Never push objects i nto holes and v entilat ion slots.
To prevent electric sh ock do not remo ve any cove r.
Do not touch the LED dis play as it gets warm when
in use, this is normal a nd is not a fault.
If anything goes wro ng do not try to fix it yourse lf,
get a qualified serv ice agent to lo ok at it.
Pull out the mains plu g and disconn ect the aer ial
lead during thunde r storms.
Ventilation
Place the televisi on on a hard flat s urface aw ay from
direct sunlight or h eat sources . If it is in a cab inet
allow at least a 10cm ga p all around.
Do not obstruct the ve ntilation slots, inc luding thos e
underneath with so ft furnishi ngs.
Overheating will s horten the li fe of the tel evision
and increase the ris k of fire.
Cleaning
Disconnect the mai ns supply and u se only a lig htly
dampened soft clot h. Do not use chemical sol vents
or stro ng detergen ts as these may damage the
cabinet or screen.
Never allow water dr oplets to rem ain on the
screen as moisture c an cause perm anent
discolouration .
Greasy marks must on ly be removed with a
commercial clean er specific ally reco mmended for
LED screens.
Mains Supply
This te levision is d esigned to op erate fro m a 100240 Volts 50/60Hz AC mai ns supply. Other powe r
sources
may damage it. Check t hat the rating plate (on t he
back cover of the tele vision) states 100-2 40V AC
before you plug it in fo r the first time.
The manufacturer a ccepts NO liability fo r damage
or injury caused by us ing the produ ct with the
wrong mains voltag e.
Mains Plug
We ha ve fitted thi s television with a stan dard
mains plug.
If the ma ins lead is dam aged it must be
replaced with a main s lead of the sam e type and
rating to avoid a haza rd.
If fo r any reaso n you cut off t he mains pl ug,
please destroy the o ld plug as it wou ld be
dangerous if inser ted into a live p ower outl et.
Car efully fo llow the wiri ng instructions supp lied
with the new plug.
If a fu se is fitte d to the plug, re move the fu se
before throwing th e plug away.
Nev er use a fuse d mains plug wi thout the fuse
cover.
The m ains plug s hall be the mai n disconnect
device and should be a ccessible a t all times .
Dangerous voltage constituting a risk
of electric shock is present inside this
equipment.
This equipment is double insulated
and an earth connection is not
required.
This mark is applied to show the
equipment conforms to European
safety and electro-magnetic
compatibility standards.
EN
6
Page 7

Safety Information (cont)
Eye Fatigue
When using this product as a computer monitor, health and safety experts recommend short
frequent breaks rather than occasional longer breaks. For example a 5-10 minute break after
an hour of continuous screen work is considered to be better than a 15 min break every 2 hours.
Do not use the monitor against a bright background or where sunlight or other bright light
sources will shine directly onto the screen.
Headphones
CAUTION: Connect headphones with the volume set low and increase if required. Prolonged
listening through headphones at high volume settings can result in hearing damage.
Batteries
Remove batteries when the remote control is not to be used for a long time. Batteries left in
equipment may cause damage through deterioration and corrosive leakage, invalidating the
guarantee.
To protect the environment use local recycling facilities for battery disposal.
Dispose of used batteries according to the instructions.
CAUTION: Risk of explosion if batteries are replaced by an incorrect type.
DISPOSAL
You must dispose of this product according to local laws and regulations.
Because this product contains electronic components, the product must be
disposed of separately from household waste when the product reaches its end of life.
The product should be taken to your local collection point for recycling.
Some collection points accept products free of charge.
EN
WARNINGS:
This appliance is intended for domestic household use only and should not be used for any
other purpose or on any other application, such as for non-domestic use or use in a commercial
environment.
If the supply cord is damaged it must be replaced by the manufacturer, its service agent or
similarly qualified persons in order to avoid a hazard.
This apparatus shall not be exposed to dripping or splashing.
No objects filled with liquids, such as vases, shall be placed on the apparatus.
No naked flame sources, such as lighted candles should be placed on the apparatus.
The ventilation should not be impeded by covering the ventilation openings, with items such as
newspapers, tablecloths, curtains etc.
WARNING: To prevent injury, this apparatus must be securely attached to the floor/wall in
accordance with the installation instructions.
7
EN
Page 8

Features...... ................ ................ ....... ......... ....... ......... ....... ......... ....... ..2
Important Safety I nformation...... ................ ................ ................ .............3-7
Contents...... ................ ................ ................ ....... ......... ....... ......... ....... ..8
Installation.. ................ ................ ................ ................ ....... ......... ....... ...9-12
Remote Control.. ................ ................ ................ ................ ................ ...13-14
Operation..... ................ ................ ................ ....... ......... ....... ......... ....... .15-24
Troublesho oting tab le....... ....... ......... ....... ......... ....... ......... ....... ......... .....25 -29
Specification. ................ ................ ................ ................ ................ ....... .30
License Informat ion............. ................ ................ ................ ................ ..31
EN
EN
8
Page 9
Installation
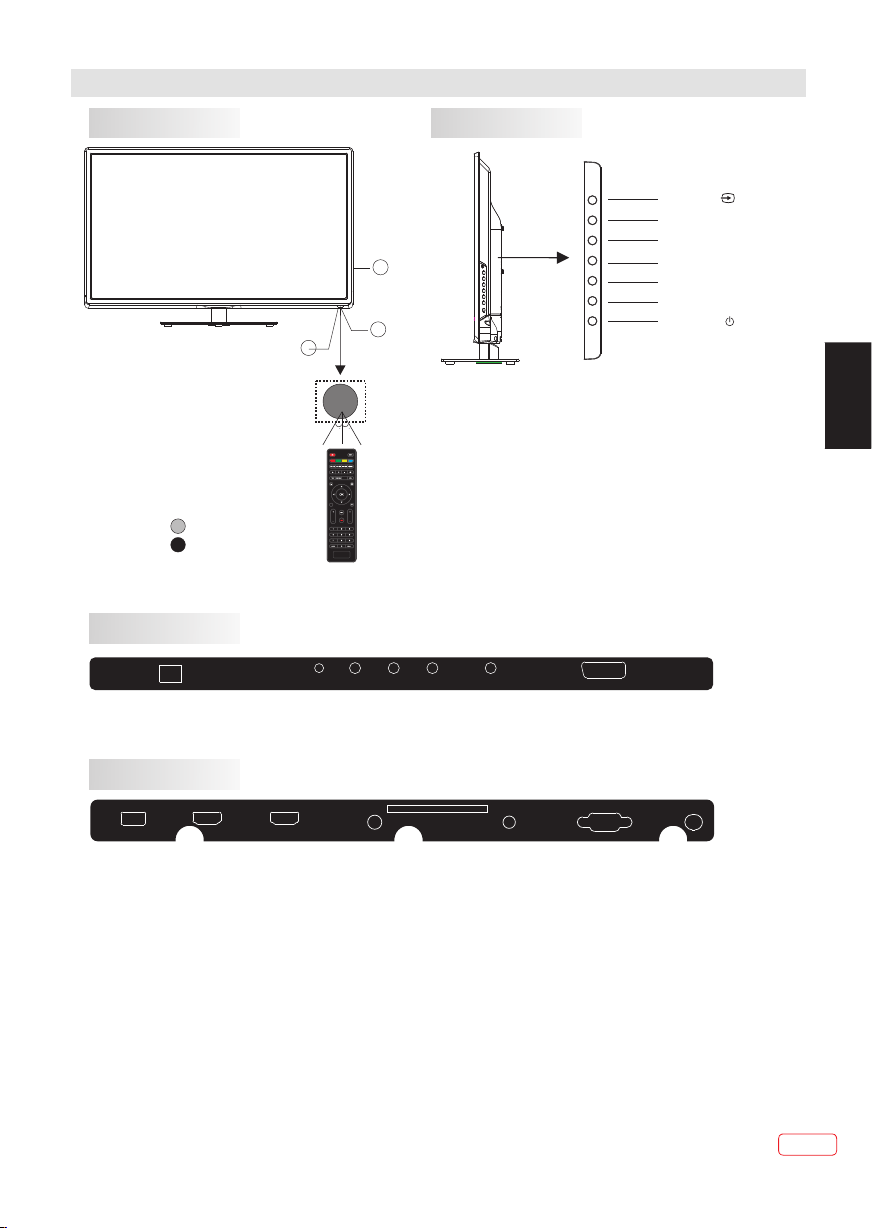
Front panel
KEYBOARD
3
1
2
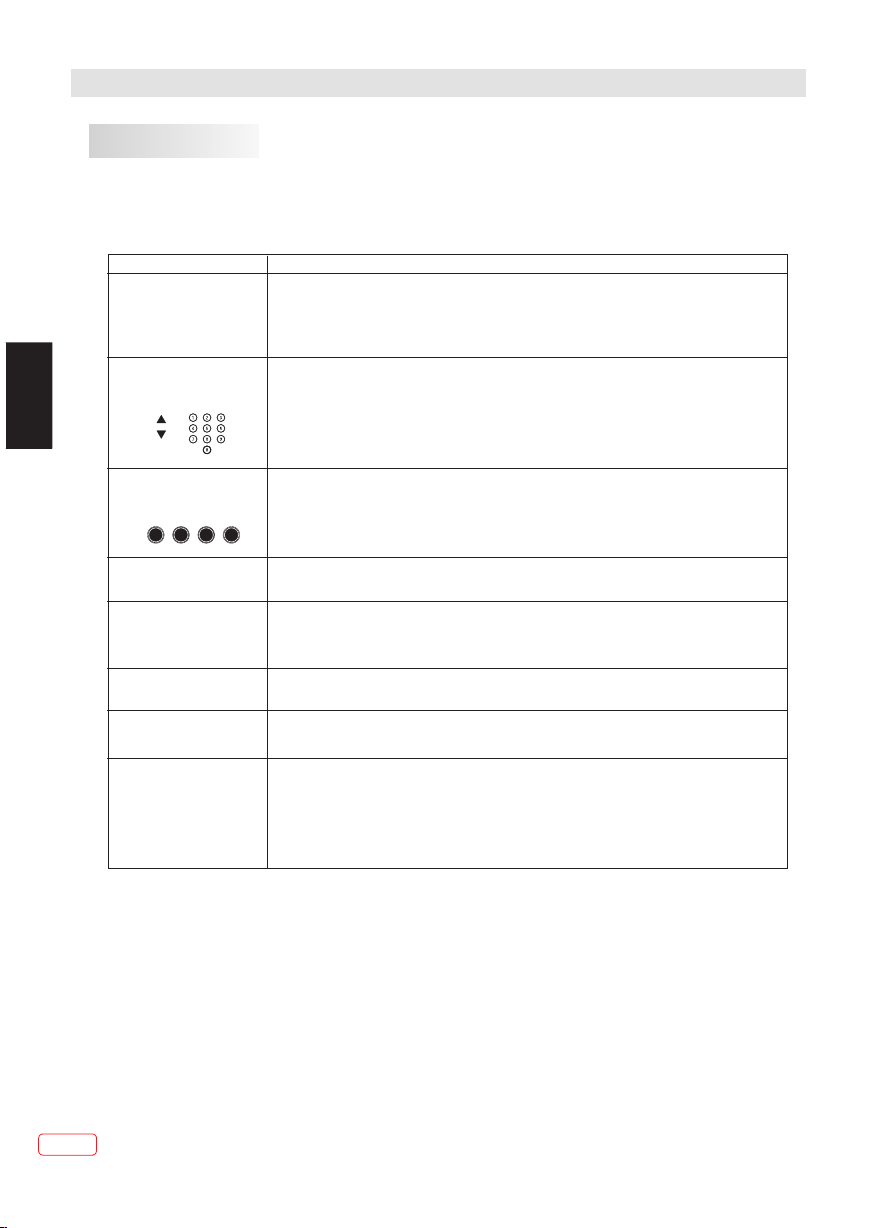
1. SOURCE: Displays the input source menu;
press repeatedly to move down the menu or press
"CH+" or "CH-" to select the required source.
2. MENU: Display main MENU.
3. CH+/CH-: In TV mode, press "CH+" or "CH-" to
change the channel up and down. In MENU mode,
press "CH+" or "CH-" to select items.In standby
mode, press "CH+" or "CH-" to turn on the TV.
4. VOL+/VOL-: Adjust sound level. In MENU mode,
press "VOL+ " or "VOL- " to adjust the item that
you selected.
5. STANDBY: Press this button to turn the unit ON
from STANDBY mode. Press it again to turn the set
back to STANDBY.
1: Remo te Control Se nsor.
2: Powe r Indicator L ED:
BLUE PO WER ON.
RED STANDBY.
3: Side b uttons
EPG
30 30
FREEZE
VOL CH
REAR AV Connections
AC-IN PUT
100-2 40V~ 50 /60Hz
YPbP r
VIDE O
L R
COAX IAL OUTP UT
SCAR T
All the terminals are(from left to right):AC-INPUT, YPbPr INPUT, VIDEO, AUDIO INPUT,
COAXIAL OUTPUT, SCART.
Note: VIDEO and YPbPr share one audio channel.
REAR AV Connections(SIDE)
USB HDMI 2(ARC ) HDMI1
HEAD PHONE
COMM ON INTE RFACE( CI)
PC AUDI O
VGA
SOU RCE
MEN U
CH+
CHVOL +
VOL STAN DBY
EN
R F
All the terminals are(from left to right):
USB, HDMI2(ARC), HDMI1, HEADPHONE, CI, PC AUDIO, VGA, RF.
Note: 1.When HDMI port gets DVI signal ,the audio signal is received from the PC Audio channel.
2.Insert the plug of the earphone into the headphone jack on the unit.
The speakers are then muted.
HDMI ARC ( Audio Return Channel)
The ARC function allo ws you to send au dio signa l from your ARC- compliant TV to ARC-c ompliant
audio devices (e.g . home theatr e) withou t the need to con nect any au dio cable (e. g. coaxial, optical
digital audio cabl e, or analog au dio cable ).
To enj oy the ARC function:
1. Make sure your ARC- co mpliant aud io device s are connect ed by an HDMI 1.4 cable to the H DMI 2 (ARC)
port of your ARC- compl iant TV. A nd open the ARC fu nction of ARC-complia nt audio devi ces.
2. Adjust TV setting : pr ess MENU button, choos e SETUP, then s et HDMI CEC C ontrol on.
3. Th en, just use yo ur TV rem ote control t o adjust th e volume outp ut (VOL + / - and MUTE) of the
connected audio de vice.
Note: if the ARC-comp liant audio d evices do n ot support so und that TV outputs, s uch as Dolb y
Digital , or Dolby Dig ital Plus, then ARC funct ion will not wo rk and ther e may be no sound f rom
ARC-compliant au dio devices .
9
EN
Page 10
Installation
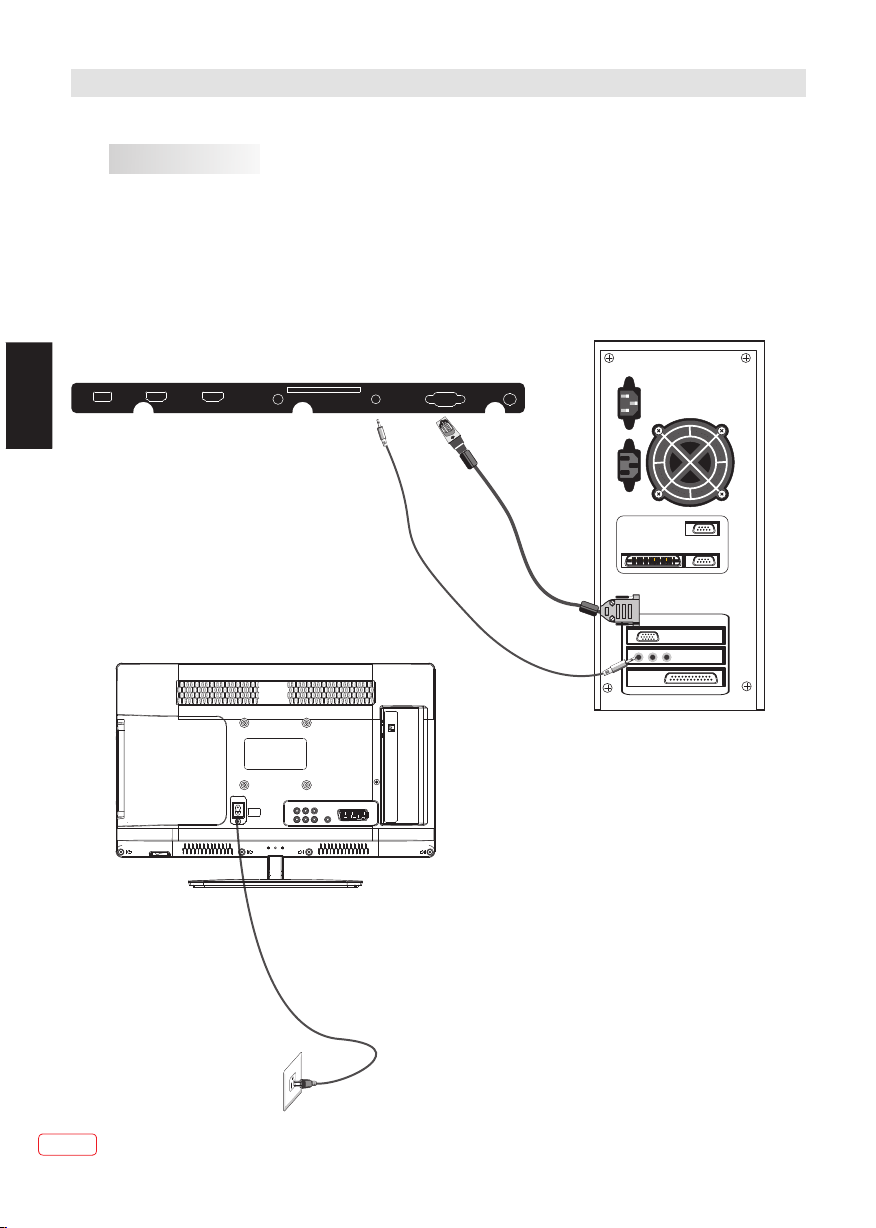
PC
STEPS:
Be sure both the TV an d computer are set to
Power off.
1.Connect VGA and aud io cable.
2.Connect the powe r cord.
3.Power on the TV, switc h to PC mode.
4.Power on the PC.
This sequence is ver y important.
USB HDMI2 (ARC) HDM I1
EN
HEADP HONE
COMMO N INTER FACE(C I)
PC AUDIO
VGA
R F
EN
10
Page 11

Installation
PC
PRESET MODE
RESOLUTION
V.Freq.(Hz) H.Freq.(kHz)
1
2
3
4
5
6
NOTE:
PC V.Freq.(Hz) not more than 60Hz
800*600
640*480
1024*768
1280*960 60 60
1280*720 60 45
1360*768 60 47.7
ANTENNA
60
60
60
37.88
31.47
48.36
EN
Note:
Aerial connectio ns: IEC(female).
Input impedance: 7 5 unbalance d.
11
EN
Page 12
Installation
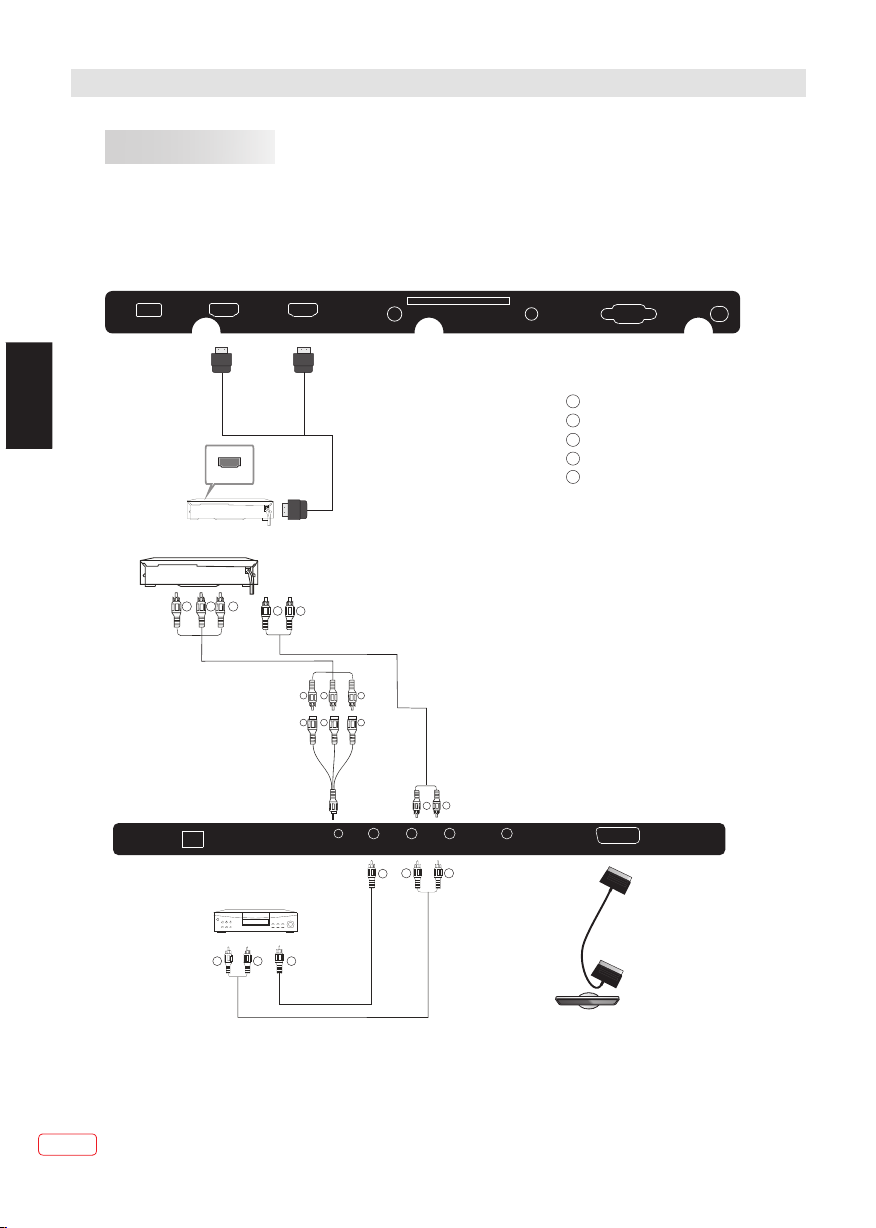
AV EQUIPMENT
This TV provides one group of AV, one group of YPbPr and one SCART for convenient
connection to VCR, DVD or other video equipment. Please refer to the owners manual
of the equipment to be connected.
REAR AND SIDE CONNECTIONS
EN
USB HD MI2(A RC) HDM I1
HDMI
VIDEO EQUIPMENT with YPbPr
GBR
100-2 40V~ 50 /60Hz
W
AC-IN PUT
HEAD PHONE
COMM ON INTE RFACE( CI)
R
RBG
RBG
R
W
YPbP r
VIDE O
Y
L R
W R
PC AUDI O
COAX IAL OUTP UT
VGA
Y
Yellow (video)
W
White(audio L)
R
Red(audio R or Pr)
B
Blue(Pb)
G
Green(Y)
SCAR T
R F
EN
VIDE O EQUIP MENT
W R
TO AUD IO OUTPU TS
It can be connected to the following appliances: VCR, multi disc player, DVD, camcorder,
video game or stereo system, etc.....
YPbPr can support these video formats: 480i,576i,480p,576p,720p,1080i,1080p.
NOTE:
Please use the attac hed SCART cable.
Y
TO VIDE O
OUTP UTS
12
(attached)
Page 13
REMOTE CONTROL
REMOTE CONTROL
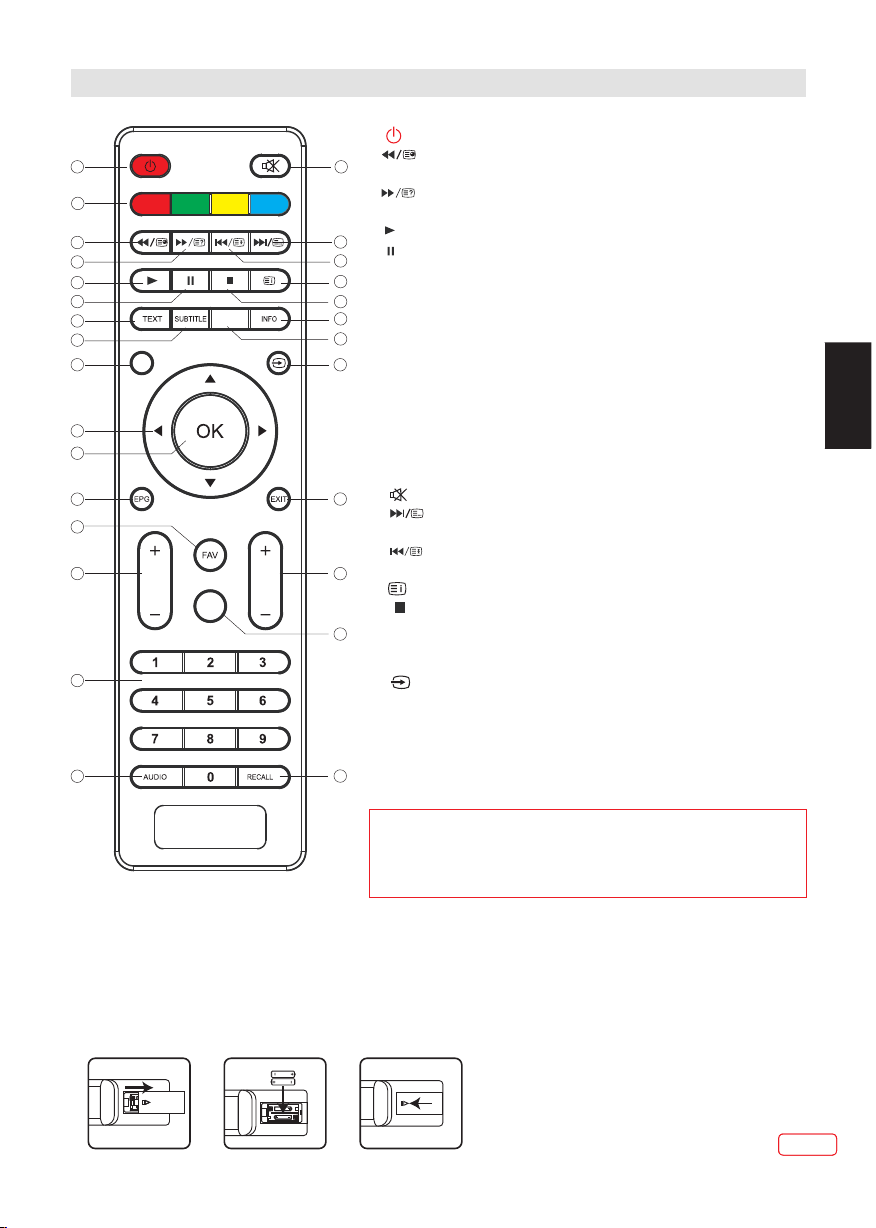
1: :To set the TV to standby or power on.
1
28
2
3
4
5
6
7
8
9
10
11
12
13
14
15
MENU
VOL
FREE ZE
CH
REC
Remote Control Bat tery Installation
The remote control r equires two AA A batterie s ( not sup plied). Bel ow are step s to
assist you with repl acing the bat teries.
1.Open the back cover o f the battery compartm ent.
2.Install the batte ries into the battery tr ay. Th ere are +/- pol arity
markings in the batt ery compartment. Ple ase ensure th e battery
polarity is correc t.
3.Close the battery c over.
2: :In USB mode, used as reverse key, in teletext
16
mode used as Sub-page key.
3: : In USB mode, used as forward key, in teletext
mode used as Reveal key.
4: : Press in USB Mode to begin or continue playback.
17
5: : Press in USB Mode to pause playback.
18
6:TEXT:To enter TELETEXT.
19
7: SUBTITLE: To turn on subtitles press the subtitle button
20
in DTV mode.
21
8 :MENU : Displays the main on-screen menu.
22
9 :CURSOR: To move within the menu.
23
10:OK: To confirm selection.
11:EPG: To display information about the programme being viewed
and what's on next in DTV mode.
12:FAV: To access your favourite channels list in ATV or DTV mode.
13:VOL+/- : To adjust sound level.
14:NUMERIC KEY: For direct access to channels.
15:AUDIO: To select the available audio language of TV programmes.
16: : To disable or enable the speaker sound output.
24
17: : In USB mode, used as next key, in teletext mode used as
list key. In DTV mode it lists TV and Radio channels.
18: : In USB mode, used as previous key, in teletext mode used
as hold key.
25
19: :In teletext mode used as index/shortcut button for PVR File System.
20: : Press to stop play in USB mode.
21:INFO: Press the info button to display the programme information of
26
the show you are watching.
22:FREEZE: Press to freeze the picture you are watching.
23: : Press to display and select the available video sources.
24:EXIT: To return to the previous menu or exit menu.
25:CH+/CH-: To access the next or previous channels.
26:REC:Press to record the TV programme you are watching in
DTV Mode.
27
27:RECALL: DTV Mode: Jumps to last channel viewed.
28. COLOURED BUTTONS (see footnote)
Footnote:
Red, green, yellow and blue buttons are multi-function;
please follow on-screen prompts and section
instructions.
EN
13
13
EN
EN
Page 14
REMOTE CONTROL
TELETEXT
Teletext is an informa tion system broadcas t by certain ch annels wh ich can be like a
newspaper. It also offers access to subti tles for viewers with he aring probl ems or who ar e not
familiar with the tr ansmission languag e (cable netw orks, sat ellite chan nels, etc.)
read
EN
Press :
T
EXT
(BUTTON 6)
SELECTING A PAGE
DIRECT ACCESS
TO THE ITEMS
INDEX
(BUTTON 19)
SUB PAGE
(BUTTON 2)
HOLD
(BUTTON 18)
REVEAL
(BUTTON 3)
LIST
(BUTTON 17)
You will obtain :
This is used to enter or e xit teletext mode. The summary appears wit h a
list of items that can b e accessed. Each item ha s a correspon ding 3 digi t
page number.
Enter the number of th e page required using th e numeric but tons and up
and down arrow butto ns. Example : page 120, e nter 120. The number i s
displayed top left , the counter turns and th en the page is di splayed .
Repeat this operat ion to view ano ther page . If the counte r continu es to
search, this means t hat the page is not transm itted. Sele ct anothe r
number.
Coloured areas are d isplayed at t he bottom o f the screen. The 4 colo ured
keys are used to acces s the items or correspon ding pages. The colo ured
areas flash when the i tem or the page i s not yet ava ilable.
This returns to the co ntents page (usually p age 100).
Certain pages cont ain sub-pag es which ar e automatic ally displayed
successively. This key i s used to stop or r esume sub -page
acquisition. The number appears top le ft.
To freeze the page.
To display or hide the concealed information (games solutions).
The user can set four fa vourite pages to be dire ctly linked t o the four
colour keys. The f avourite page number s should be sto red and res tored
to/fr om nonvolat ile memory for each chan nel by the syst em softwa re.
E
EN
14
Page 15
OPERATION
Installation Guide
The First Time Setup sc reen will app ear when th e
T V is fi rst switche d on or reset t o the factory
settings.
Fir st Time Se tup
OSD L angua ge Engl ish
Mod e Setti ng Home M ode
Cou ntry Ge rmany
Ant enna Typ e Air
Aut o Scan DT V+ATV
Sta rt
1).Press the ▼▲ buttons to navigate the menu and
◀▶buttons to change the settings. Select your
desired language to be displayed on the menu and
choose between Home Mode and Shop Mode.
Home or Shop modes
1. Home M ode is an energy-savin g Mode. Hom e
Mode is r ecommended for norma l viewing s etting
and is se t as default.
2. Shop M ode is an option for retai lers for ad vertisi ng
or prod uct presentation. Sh op Mode has a b righter
image t han Home Mode.
3. You may sw itch between Home or Sho p Mode
as you ch oose.
Note
If you select DVB-C, you will select Full or Quick
way to scan.Also you can select Auto Scan mode.
DTV+ATV or DTV only, or ATV only.
3). Channel tuning will commence. This operation
may take a few minutes. The display will show the
progress of the tuning and the number of
channels found.
4). If you want to skip the DTV tuning, press the
MENU button to interrupt the tuning half way.
You will then go straight to ATV tuning.
You may repeat the above step if you also want to
skip the ATV tuning. An installation reminder will
appear the next time you turn on the TV, if no
channel is found.
5). After tuning is complete, the channels are
arranged in a preset order. If you wish to skip
channels, modify the preset order or rename
channels, select Programme Edit under the
Channel menu.
EN
2). Press the ◀▶buttons to select AIR/Cable that is
to say DVB-T/DVB-C.
Fir st Time Se tup
OSD L angua ge Engl ish
Mod e Setti ng Home M ode
Cou ntry Ge rmany
Ant enna Typ e Cab le
Cab le Quic k
Aut o Scan DT V+ATV
Sta rt
Note
DTV Digital TV
ATV Analogue TV (not used in France and UK )
1. CHANNEL MENU
1. 1)Auto Tuning (DVB-T)
1). Press the MENU button and then press the▼▲
buttons to select the CHANNEL menu and then press
the OK button or right button.
2). Press the ▼▲ buttons to select Auto Scan and
then press the OK button or right button.
15
EN
Page 16

OPERATION
Pic ture
Aud io
Clo ck
Set up
Loc k
Aut o Scan
Man ual Sca n
Pro gram Ed it
Com mon Int erfac e
Sig nal Inf ormat ion
Sof tware U pdate (USB)
MENU
Ret urn Mo ve OK
OK
Cha nnel
3). Press the◀▶buttons to select Antenna Type to
Air that is to say DVB-T.
EN
Cha nnel
Ant enna Typ e A ir
Cou ntry Ge rmany
Mod e DTV+AT V
Pic ture
Sta rt
Aud io
Clo ck
Set up
Loc k
MENU
Ret urn Mo ve OK
OK
4). In Country item, press the ◀▶buttons to select
the country where you will operate the TV.
5). In the Mode item, press the ◀▶buttons to select
tune mode: ATV / DTV / DTV + ATV. Press the▼button
to select Start then press OK button or right button.
6). Channel tuning will commence. This operation may
take a few minutes. The display will show the progress
of the tuning and the number of channels found.
7). If you want to skip the DTV tuning, press the MENU
button to interrupt the tuning half way. You will then go
straight to ATV tuning. You may repeat the above step
if you also want to skip the ATV tuning. An installation
reminder will appear the next time you turn on the TV,
if no channel is found.
Aud io
Clo ck
Set up
Loc k
Sca nning C h12
Dig ital Ch annel s Found :
DTV: 3
Rad io: 0
Dat a: 0
Ana log Cha nnels F ound: 0
MENU
Ski p
EXIT
Exi t
Cha nnel
Pic ture
1.2 )Auto Tuning (DVB-C)
1). Press the MENU button and then press the▼▲
buttons to select the CHANNEL menu and then press
the OK button or right button.
2). Press the▼▲ buttons to select Auto Scan and
then press the OK button, or right button. Under
Antenna Type, select Cable, that is to say DVB-C.
Ant enna Typ e Cable
Cha nnel
Cou ntry Ge rmany
Mod e DTV+AT V
Pic ture
Sta rt
Aud io
Clo ck
Set up
Loc k
MENU
Ret urn Mo ve OK
3). Press the▼button and then press the◀▶buttons
to select the country where you will operate the TV.
4). In the Mode item, press the◀▶buttons to select
ATV / DTV / DTV + ATV.
5). Select start to enter the menu as below, to select
search mode, by pressing the OK button or right
button.
Qui ck
Cha nnel
Ful l
Adv anced
Pic ture
Aud io
Clo ck
Set up
OK
▶
8). After tuning is complete, the channels are arranged
in a preset order. If you wish to skip channels, modify
the preset order or rename channels, select
Programme Edit under the channel menu.
EN
16
Loc k
MENU
Ret urn Mo ve OK
6). Channel tuning will commence. This operation
may take a few minutes. The display will show the
progress of the tuning and the number of channels
found.
OK
Page 17

OPERATION
7). If you want to skip the DTV tuning, press the
MENU button to interrupt the tuning half way. You will
then go straight to ATV tuning. You may repeat the
above step if you also want to skip the ATV tuning. An
installation reminder will appear the next time you turn
on the TV,if no channel is found.
8). After tuning is complete, the channels are arranged
in a preset order. If you wish to skip channels, modify
the preset order or rename channels, select
Programme Edit under the channel menu.
Note
All the channels including ATV, DTV and Radio can
be tuned in one go, if the Tune Type is DTV+ATV .
All the old channels w ill disappe ar after au to tuning .
After auto tuning , the channel will skip to the first
DTV channel.
2. 1 )DTV Manual Tuning (DVB-T)
1). Press the MENU button and then press the▼▲
buttons to select the CHANNEL menu and then
press the OK button or right button..
2). Press the▼ ▲ buttons to select Manual
Scan and then press the OK button, or right button.
If you have selected Air in Auto Scan, you will enter
DVB-T manual scan menu.
Cha nnel
Dig ital Sc an Ch5
Sta rt
Str ength 5 4
Pic ture
Aud io
Clo ck
Set up
Loc k
MENU
Ret urn Mo ve OK
OK
3). The DTV Manual Scan screen will pop up.
Press the ◀▶ buttons to select the desired UHF
channel or press the OK button then input channel
number. Select Start to commence searching for this
channel. When the signal has been tuned, the picture
and signal strength will be displayed on the screen.
4). Press the MENU button to return back to the
main menu.
5). Press the EXIT button to exit the menu.
2. 2 )DTV Manual Tuning (DVB-C)
1). Press the MENU button and then press the
but tons to select the CHANNEL menu and th en
pre ss the OK button or the right button. If you have
sel ected Cable in Auto scan, you will enter DVBC
man ual scan menu.
▼▲
Fre quenc y 47400 0K
Cha nnel
Sym bol Rat e 6875K
Mod ulati on Auto
Pic ture
Sta rt
Aud io
Clo ck
Set up
Loc k
MENU
Ret urn Mo ve OK
OK
2). The DVB-C Manual Scan sc reen will pop up.
Pre ss the▼▲buttons to select(Frequency/Symbol/
QAM Type ),press OK to input Frequency and symbol,
pre ss ◀▶ to change QAM type, then select Start to
sta rt searching for this channel by pr essing the OK
but ton or right button. When the signa l has been tuned,
the picture and signal strength will be displayed on the
scr een.
3). Press the MENU button to return back to the
mai n menu.
4). Press the EXIT button to exit the menu.
3) ATV Manual tuning :
You can change the sound system, search for the analog
TV channels and fine tune the channels , then store the
channels you selected.
ATV Ma nual Tuning
Sav e to 1
Sys tem BG
Cur rent CH 1
Sea rch
Fin e tune
Fre quenc y 44.25 M Hz
Save
Note
1. Press red button to store the channels after
manual tuning .
2. If the number to be saved is the same as the
number of a current channel, when you press the Red
button, the new number will overwrite the current
channel number.
4). Programme edit:
Press the ▲or▼ Buttons to select Program Edit in the
Channel Menu. Then press the OK button or right button
to enter the sub-Menu. Then you will need to select the
program you wish to edit.
EN
17
EN
Page 18
OPERATION
Programm e Edit
001 T he HI TS
002 T MF
003 U KTV Br ’tl dea s
004 f t h
005 I deal Wo rld
006 C olour bars1 00
001 K iss
002 S mash Hi ts!
003 K erran g!
Del ete
Mov e
Delete: Press the Red Button to delete the channel
you highlighted.
SKIP: Press the Yellow Button to select the Skip
function and a SKIP icon will be displayed next to the
program and it will be skipped when changing the
EN
channel.
MOVE: Press the Green Button to highlight
the channel you want to move. An icon will display
Skip
Ren ame Fav orite
DTV
DTV
DTV
DTV
DTV
DTV
Rad io
Rad io
Rad io
FAV
ahead of the channel number. Then press the ▼ / ▲
Buttons to a new position and press the Green Button
to confirm.
Rename: (For ATV only) Press the Blue Button for
renaming the channel. Use the virtual keypad (as
shown below) to enter a new name and press the OK
Button to confirm.
1 2
abc3def
5
4
ghi
7
pqrs
6
jkl
mno
8
tuv9wxyz
FAV: Press the FAV Button to set the favourite channel.
(If you want to view the Favorite Channel List you need
to exit Program Edit Menu and then press the FAV
Button.)
5). Common Interface
This menu can display the CI card' s information.
6). Signal Information (Only for DTV)
Press the ▼/▲ Buttons to select the Signal
Information in the Channel Menu. Then press the OK
button or the right button to show the related information
of the current channel.
7). Software Update (USB)
Press the ▼ or ▲ Buttons to select Software Update
(USB) in the Channel Menu. Then press the OK
button or right button to update software by using a USB
device. Follow the software upgrade instructions provided
with the software.
Note: We recommend you perform a factory reset
(refer to Restore Factory Default in Setup menu) to
ensure the unit is successfully upgraded.
2. PICTURE MENU
The second item of the MENU is PICTURE MENU.
You can adjust picture effect here, such as
contrast, brightness, etc.
Press ▼▲ to move, press ◀▶ to adjust.
Pic ture Mo de Stan dard
Cha nnel
Bri ghtne ss 50
Con trast 4 5
Pic ture
Sha rpnes s 60
Aud io
Col or 45
Tint 0
Clo ck
Set up
Loc k
Med ium
DNR
Dyn amic Co ntras t Weak
Asp ect Rat io 16:9
Col or Temp
MENU
Ret urn Mo ve OK
Nor mal
OK
Note
1).You can choose between three colour temperature
modes: Normal, Cool, Warm.
2).PC Setting is available in PC mode only. It enables
you to adjust Horizontal position, vertical position,
size and phase.
3.AUDIO MENU
The third item of the MENU is the AUDIO MENU.
You can adjust the sound effect here such as
treble, bass, balance etc.
Press ▼▲ to move, press ◀▶ to adjust.
Sou nd Mode S tanda rd
Cha nnel
Treb le 0
Bas s 0
Pic ture
Bal ance 0
Aud io
Aut o Volume O n
Sur round S ound Of f
Clo ck
Set up
Loc k
Off
COA XIAL
Aud io Desc ripti on
MENU
Ret urn Mo ve OK
OK
Note
1.Auto volume: only available when the input
signal volume is too large or distorted.
Surround sound can be set on or off.
Coaxial is the digital output sound feature.
EN
18
Page 19
OPERATION
4.CLOCK MENU
The fourth item of the menu is the CLOCK MENU
You can adjust the clock, power on/off time,
sleep timer etc .Press ▼▲ to move, press OK
to adjust.
Sle ep Timer O ff
Cha nnel
Dat e 2010/ 04/3 0
Pic ture
On Tim e
Of Ti me
Aud io
Clo ck
Set up
Loc k
Auto Sleep
If after 15 minutes there is no signal input, the TV will
switch off to Auto Sleep, when the Auto Sleep function
is set to ON. The clock time is automatically set when
the TV is able to receive DTV.
f
Aut o Sleep O n
Time Z one
MENU
Ret urn Mo ve OK
OK
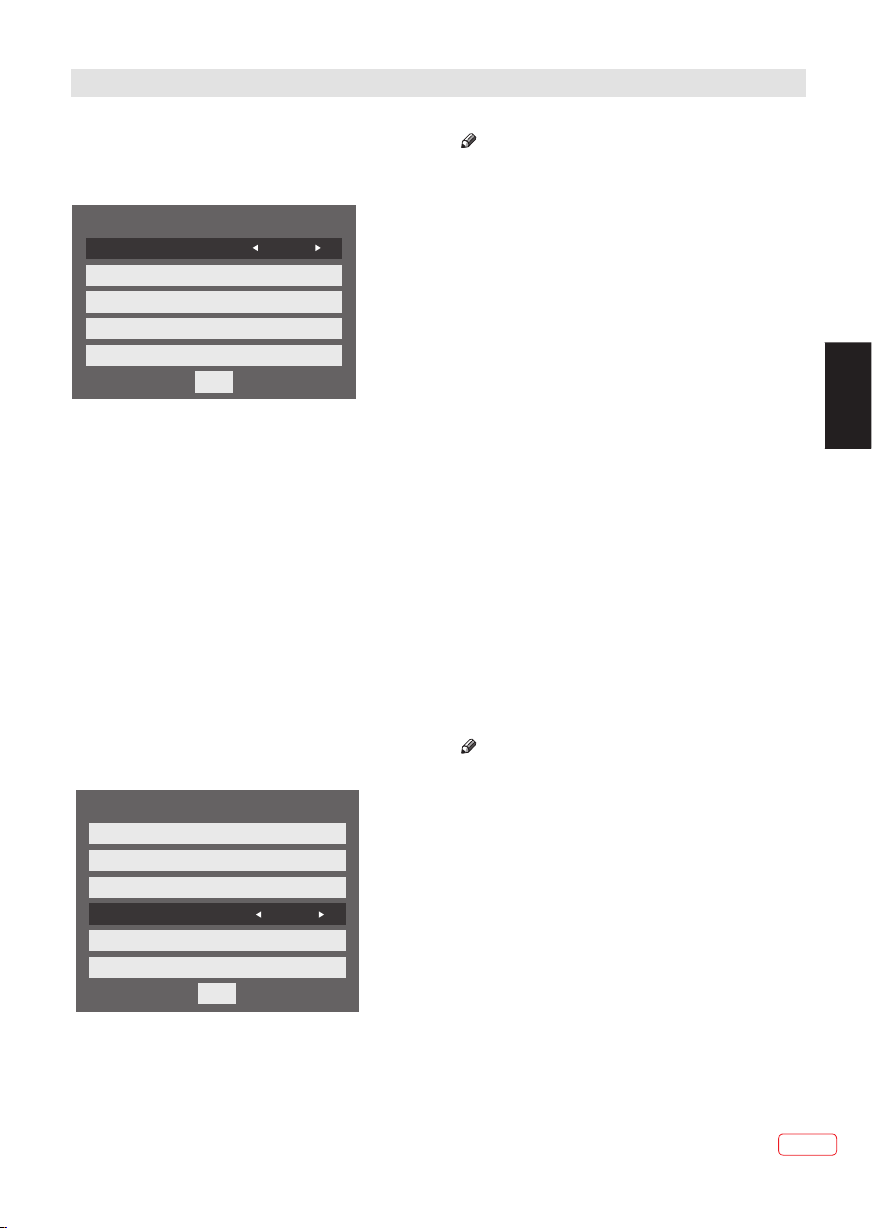
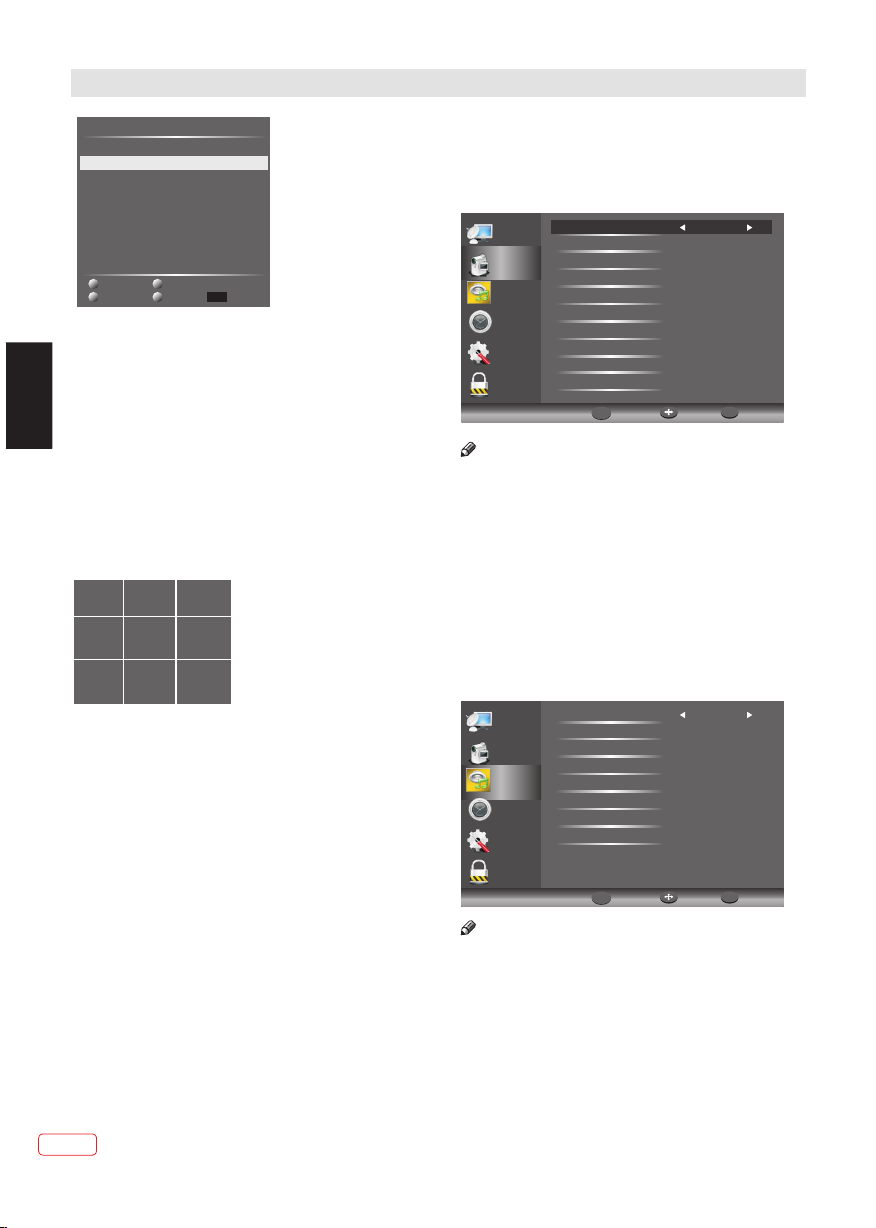
5.SETUP MENU
The fifth item of the MENU is the SETUP MENU. You
can adjust the OSD language, Audio language,Subtitle
language etc.
O E
Cha nnel
Pic ture
Aud io
Clo ck
Set up
Loc k
Auto St andby(4hr)
1. If aft er 4 hours fr om switch on, n o changes h ave
been ma de to the TV (channel or v olume cha nges,
for exa mple), the TV automa tic power -down pro cess
will st art. A pop-up window will ap pear on scr een.
After 1 50 seconds the TV will a utomati cally swi tch
to stan dby. To override the automatic s hutdown
press a ny button on the remote co ntrol.
2. To dis able the automatic pow er-down o f the TV,
go to Set up menu, select Auto Stan dby (4hr) a nd set
this op tion to Off by using the right arro w key.
To return to auto shutdown after 4 hours repeat the
above except use the left arrow key to select On(4
hours).
In PVR Fi le system men u you can set up USB
disk for PVR.
SD La nguag e ngl ish
A Lan guage s
udi o
Sub title
Cou ntry Ge rmany
PVR F ile Sys tem
Time shift R ecord T ime 1ho ur
Aut o Stand by(4h r) On(4 h ours )
Mod e Setti ng ome M ode
HDM I CEC Con trol On
OSD Ti me
10 se conds
Res tore Fa ctory D efaul t
MENU
Ret urn Mo ve OK
H
OK
PVR S ettin gs
Mov e Left
Mov e Right
OK
EXIT
Sel ect
Exi t
File Manager Device List
Scheduled Record
Timeshift Record Time: To set the max
Timeshift Record Time.
Auto Standby (4hr): To set the unit to
standby after 4 hours without any user
operation.
Mode Setting: To set Home mode or Shop
mode.
HDMI CEC Control: To set CEC function to
on or off.
OSD Time: Press ◄ or ► to select the menu
display time.
Restore Factory Default
Press the ▼ or ▲ Buttons to select Restore
Factory Default and press the OK Button to
enter the first setup. Once confirmed, all the
settings will be cleared. This should be used
if you experience any issues with your TV.
Note
Restore factory de fault will clear all the p rograms
and password.
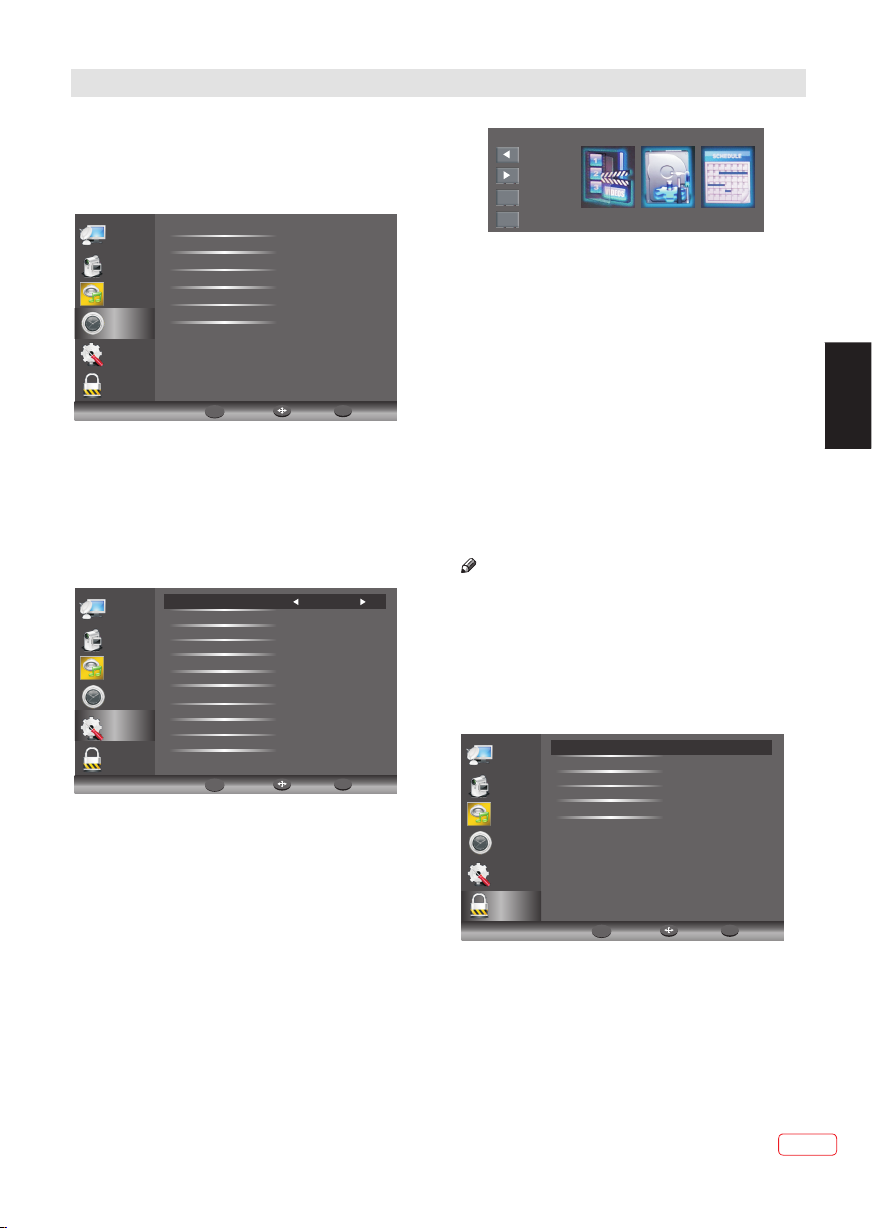
6.LOCK MENU
The sixth item of the menu is the LOCK MENU
You can lock system, set password, block program
and set parental guidance Once you set the lock
system on you can not search the channels or
change any programs.
Ent er Pass word -- --
Cha nnel
Ena ble Off
Cha nnel Lo cks
Pic ture
Par ental R ating N one
New P asswo rd ----
Aud io
Clo ck
Set up
Loc k
MENU
Ret urn Mo ve OK
The default password is 6666. If you change the
password, be sure to remember the new password!
If you forget the new password, enter the master
password "9527".
Channel Locks: Press ▼▲ to choose the
program, press OK button to block
the program. If you want unblock the program,
please enter the main menu, input the password,
choose the program, then press OK button again.
Parental Rating: Press ◀▶to choose rating.
OK
EN
19
EN
Page 20
OPERATION
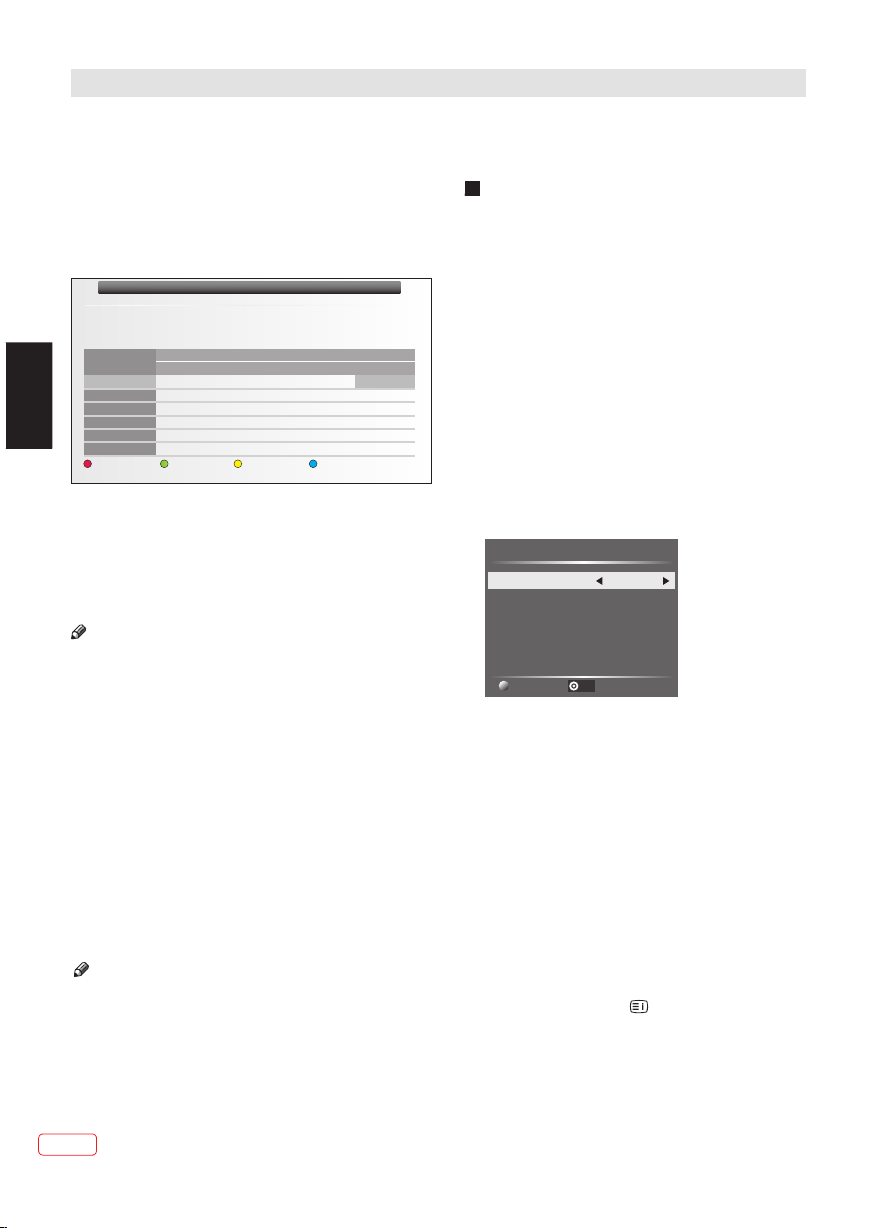
7.EPG Menu(Electronic Program Guide)
The EPG (Electronic Programme Guide) Menu provides
you with detailed broadcast program information. Press
the EPG Button and a pop-up Menu will be displayed
with program information about the channel you are
currently watching. You will be able to see up to seven
days of program information. To view the previous day
use the yellow button, and next day use the blue button.
800 H TV1
11:32 -12:1 7
FIKCIJA ( IGRANA I ANIMIRANA)Marichuy razmišlja kako će ubrzo saznati ho e li ponovno vidjeti ili
će zauvijek biti smetnja drugima, dok se Juan Miguel kune da će joj vratiti vid. Cecilia I Patric...
Mon. 25 Jan
800 HTV1
801 HTV2 Zg
802 RTL TV
EN
803 NOVA TV
804 CH-3 on T...
805 CH-5 on T...
Weekly
Move
10:00 11:00
First...Treća dob, emisija za umir... . .. Dne... .. TV k... . ..
Pod isti...
EPG D aily Mo de
11:32-12:17 Opreznoanđelom,telenovela
Evergreen(3.)
Dadilja
Malcolm u sredini Exkluziv
Naši najbolji dani
Reminder PrevDate NextDate
Zakon brojeva IN magazin
Real No Information
Real No Information
Rec:Record
25 Jan 2 010 10: 13
ć
Oprezno s anđe...
Zvjezdan, dok...
Info:Display
To see what is going to be broadcast after the current
program, press ► button. To view a different channel,
use the ▲ or ▼ buttons to highlight the channel and
then press the ◄ or ► buttons. To exit the EPG Menu,
press the EPG or EXIT button.
Note
Please refer to the bottom of the EPG screen for the
basic remote control key functions.
Weekly
In EPG mode, press the red button on the remote
control to switch between EPG Daily Mode and
EPG Weekly Mode.
The information will be displayed in different
ways, but the function is the same.
Schedule a recording
In EPG mode, press the REC Button on the remote
control to select a program to be recorded. You will
then enter Scheduled Record menu for record setting.
(Refer to the section of PVR file system.)
Note
Please ensure a compatible Hard Disc Drive or USB
device is inserted into the USB input to schedule
recordings. If your storage device is not compatible,
you will be asked to format it. In Setup menu, enter
the PVR File System Menu Device List to format
your device.
EXIT:Exit
WARNING
When formatting the USB device it will delete all the
files stored on the USB device.
Standby Record
If you have set a scheduled recording, your TV will
automatically turn on when the program is set to
Record and will automatically turn off after the
recording is complete.
During a scheduled recording the picture and volume
will be mute (there will be no display), however the
unit will be on. You can press the STANDBY Button
to turn the picture and volume back on.
Reminder (Green Button)
In the EPG Menu, press the Green Button to set a
program reminder. The below Reminder Menu will
then be displayed and you can use the ◄or ►buttons
to set the program reminder details. You will be able
to set reminder to occur once, Daily or Weekly.
Reminder
Fre quenc y
Cha nnel
Min ute
Hou r
Mon th
Dat e
Sche dule Li st
17:0 3 19/11/2 004
Off
The H ITS
0
17
Nov
19
OK
You may press Red button to view the scheduled
programs list. Also you may delete the programs you
have scheduled.
INFO
In the EPG Menu, press the INFO Button to view more
information about the current program.
8.PVR File System (only for DTV)
Press Menu Key, sel ect Setup s ubmenu. Pre ss the
▼ or ▲buttons to select P VR File System, then
press the OK button or r ight button to enter sub -menu
and then use the◄ or ►bu ttons to scroll throug h the
options.
Note: you may press th e button to open the PVR
File System direct ly.
EN
20
Page 21
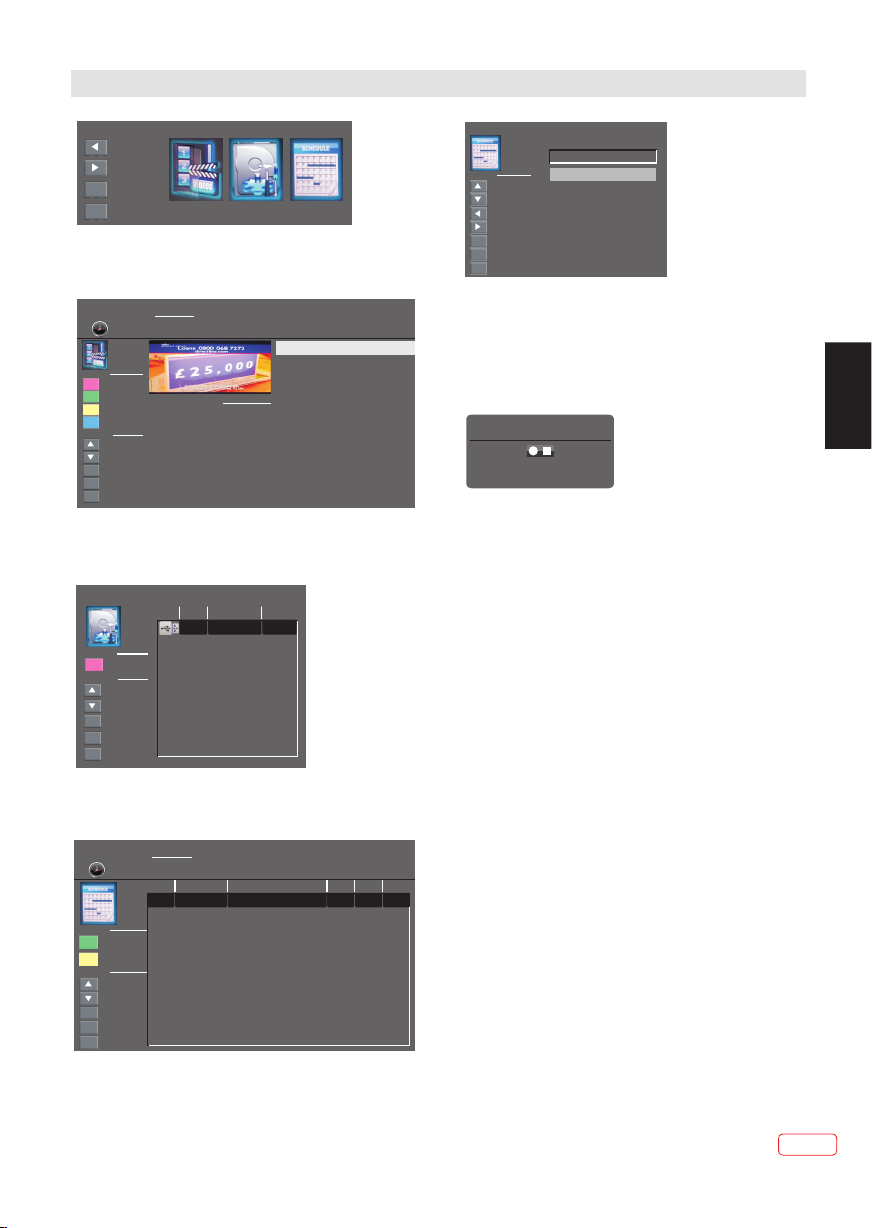
OPERATION
PVR S ettin gs
Mov e Left
Mov e Right
OK
EXIT
Sel ect
Exi t
File Manager Device List
Scheduled Record
File Manager: You may view all the recorded
programs here. Press blue key to play with
full screen.
Fil e Manag er
Sche duled R ecord
Function
EXIT
Hot Key
EXIT
OK
MENU
EXIT
Device List: Thi s sub menu will list the USB
devices connecte d to the TV set. You can selec t the
device and then pres s red button to format the U SB
device.
Dev ice Lis t
Function
Hot key
EXIT
OK
MENU
EXIT
Scheduled Record : You may set the scheduled
record List here. And y ou may also del ete the
scheduled record s you have set.
Sch edule d Recor d Setti ng List
Sche duled R ecord
Function
EXIT
Hot Key
EXIT
OK
MENU
EXIT
Enter the sub-menu . You may set the rec ording
frequency as Once, D aily, Weekly, Weekday, or off .
Play
Dele te One
Dele te All
Zoom
Move U p
Move D own
Sele ct
Retu rn
Exit
Form at
Move U p
Move D own
Sele ct
Retu rn
Exit
Dele te One
Dele te All
Move U p
Move D own
Sele ct
Retu rn
Exit
Stan dby
Current Playing File Into
Channel Name
Program Name
Recorded Time
Total Time
Description
Stan dby
Grou p
1
2
3
4
5
6
7
8
9
10
11
12
13
14
15
16
2012/08/09 11:44
Matt Baker and Clare Balding
present coverage of the eager...
Available Space
Device
192 MB
sda1
Freq uency
Once
Off
Off
Off
Off
Off
Off
Off
Off
Off
Off
Off
Off
Off
Off
Off
UKTV Br’tldeas_Good Food Bites_20041119_161021.ts
BBC ONE_Olympics 2012_20120808_114427.ts
UKTV Br’tldeas_Good Food Bites_20041119_162019.ts
BBC ONE
Olympics 2012
00:08:06
File System
FAT32
Chan nel
0 Colo urbar s100
Date
2004 .12.2 5
Start Time
18:1 7
Duration
00:3 0
Sch edule d Recor d - Group 1
Hot Key
EXIT
OK
MENU
EXIT
Move U p
Move D own
Adju st
Adju st
Sele ct
Retu rn
Exit
Setti ng Stat us
Setti ng Is Not I n Use
Frequ ency On ce
Chann el 6 Colo urbar s 100
Start T ime 200 4-12- 25
End Tim e 2004- 12-25
18:17
18:47
Record the program :
To record the program you are currently watching
press the REC Button and a red REC icon will appear
on the screen. The record time/ length and remaining
record time will be displayed in the menu below.
Recor ding
Rec orded Ti me : 00 : 00 : 40
Avai lable Ti me : 25 Min ute
To reveal the menu press the REC Button again.
To stop recording, press the Stop Button.
You may also enter the Media Player Menu to view
your recorded programs via Movie mode.
Play the recording :
The program record ed on the “USB” will be
saved in the folder “U SB record” on the
device.
You can play it in PV R File Syst em and in File
manager submenu.
1.The USB storage siz e can be betwee n
128MB and 500GB in siz e, but for practical use
2GB to 50 0GB is recomm ended.
2. Vi deo may becom e pixelated when Vid eo
bit rate is too low. Th is can be caused by connec ting
a USB extension cabl e instead of pl ugging th e USB
directly into the TV.
3. Not all USB devices a re compatible.
EN
21
EN
Page 22
OPERATION
Note
Ensur e the storage d evice used to record is
inserted into the US B Input on the back of the uni t
and is compatible fo r recording . If your sto rage
device is not compat ible, you wil l be asked to
format it. Enter the P VR File System menu and
select Device List t o format your device.
During recording , only the Stop function i s
available.
The re will be no rec ord function, when the
channel is CI+ chann el.
9.Time Shift
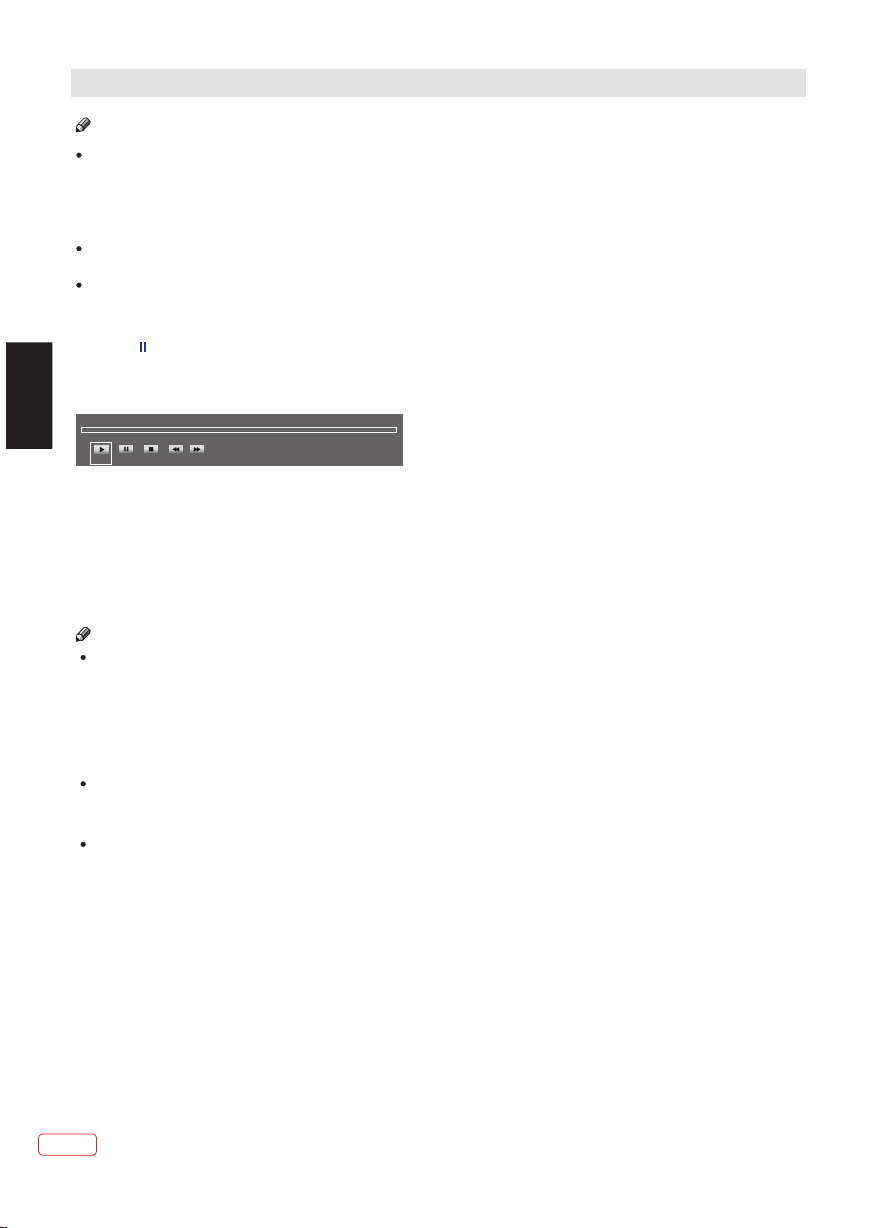
Press the button to pa use the program you are
watching to activa te Time Shift function. The below
menu will be display ed. This Menu will aut omaticall y
disappear after se veral secon ds.
EN
00:0 0:00
00:0 0:05
Play Pause FBStop FF
Choose the ▶ option an d press OK to resume
playing, and a white p lay icon will a ppear at th e
right of the screen, w hich shows that time shi ft is
being performed.
When the menu disapp eared, pres s the▶butto n,
the menu will appear a gain. To stop timeshif ting,
press the Stop butto n or OK button, or move the
cursor to select the S top option when the menu i s
on, and then follow th e pop-up guid e.
Note
Ensure t he storag e device used f or recording is
inserted into the US B Input on the back of the uni t
and is compatible fo r recording . If your sto rage
device is not compat ible, you wil l be asked to
format it. In Setup me nu,enter the PVR File Sy stem
submenu and select D evice List to format you r
device.
All the functions (P lay, Fas t Backward, F ast
Forward, Pause and S top) in the menu can only be
performed when the m enu is on.
The re will be no Time shift fun ction when th e
channel is CI+ chann el.
Avai lable Ti me
00:0 0:00/ 04:13 :20
Record file Playba ck
The TV records the p rogram on t he USB stick
in *.ts format "Time Shif t". If anothe r TV, PC, Lapto p,
DVD, or any other devi ce or periphe rals do not
support or recogni se the *.ts (time shift) f ile then it
will not play. "ts" i s the forma t used to broad cast
high-definitio n TV. You can play "ts" f iles on a
computer or laptop w ith the corre ct softwa re.
Refer to the Interne t or an IT su pplier to get m ore
information abou t the most appropriate s oftware.
Caution: JVC does no t take any resp onsibil ity for
any software downl oaded by any cu stomer or
retailer that may co ntain viruses or for any
malfunction resu lting of installing th e software.
The customer uses it a t their own risk.
EN
22
Page 23
OPERATION
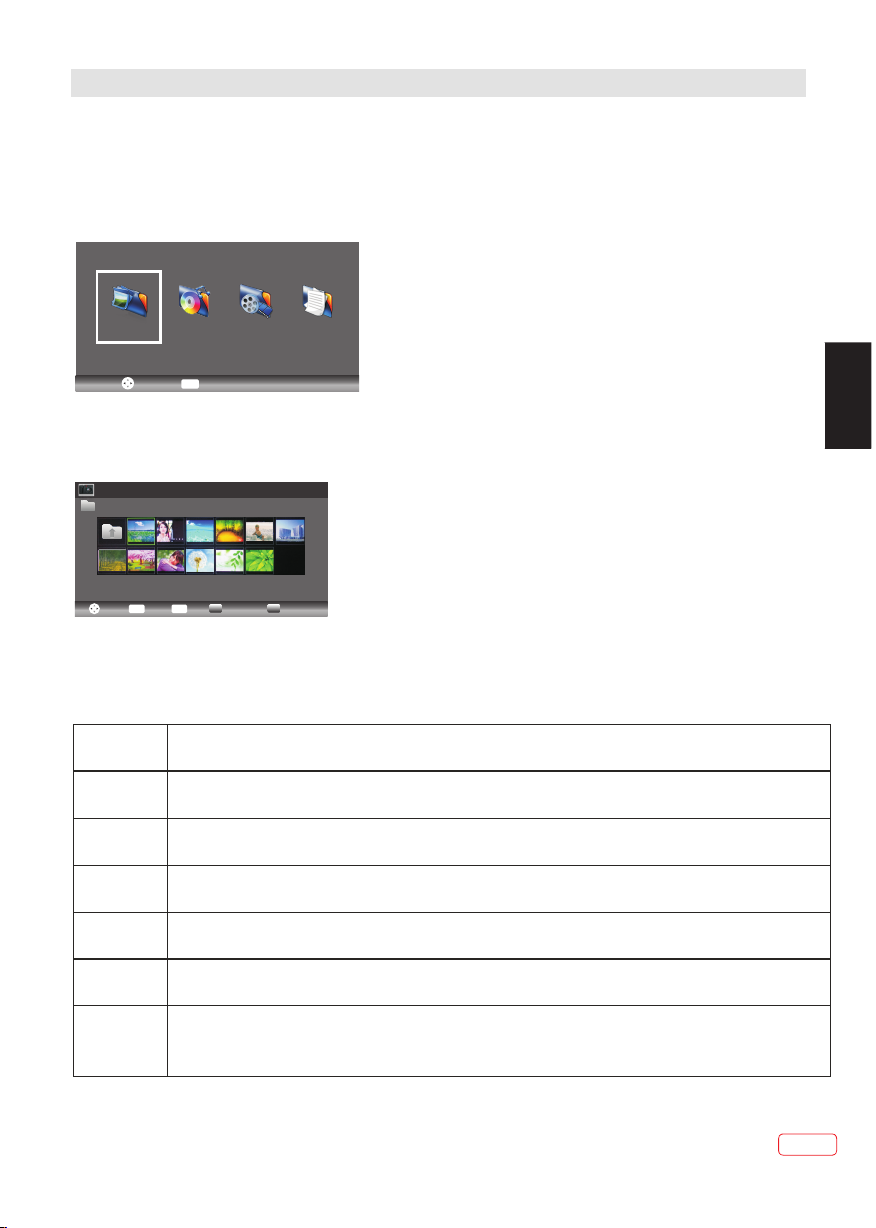
10.USB Player
Press source key, and select U SB in source li st, press OK button to ent er the USB menu .
Please make sure tha t the USB device has been co rrectly plu gged in the s lot. You can choo se between fo ur
media items: Photo , Music, Movie and Text. S elect the media type by pr essing◄►, p ress
button to enter the di sk selection menu.
OK
Pho to
Press the to selec t the right dis k and folde r,press OK to en ter the media files list . P ress Red button to go
back to the media type s election menu.
Select the media fil e by pressing or , then th e preview fra me will pop up. Press the button t o play
the media file in full s creen.When the movie f ile is playin g,press t he ▼ button display the contro l bar.
Pho to
USB 1/Pic
Sele ct
PHOTO
Basic functions
When photos are playing, press
Mus ic Mov ie Text
Sele ct
OK
Ente r
◄►
OK
Ente r ExitExit
Quic k Menu
◄► ▼ ▲ ►
to
Medi a Pad
“ ▼”key on the remote control, a help bar will display at the
bottom of the screen.
Play
Pause
Prev.
Next
Press“Play”key on the remote control to play.
Press Pause key on the remote control to pause.“ ”
Press“Left”key on the remote control to read the previous photo.
Press“Right”key on the remote control to read the next photo.
EN
Stop
Rotate
Quick Menu
Press“stop”key to stop playing and return to the previous menu.
Press“up/down”key to Rotate the photo.
Press Blue
key to enter Quick Menu to adjust Interval time,Repeat,
slideshow effect,and Background Music(in this case you have to play music first).
23
EN
Page 24

OPERATION
Mus ic
USB 1/Mus ic
.. 1/1
10547 672.m p3
14953 359.m p3
Title:
Album :
Artis t:
Track
Year: 201 0-09- 30
1 / 2
10547 672
PLAY
00:00 :53 00:00 :00
Sele ct
OK
Ente r Exi tExit
Quic k Menu
Medi a Pad
MUSIC
When music is playing, press “ ” key to select toolbar.►
Basic functions
FB “Left/Right”key on the remote control to select this function,press“ok”
:Press
key to fast backward. Press“PLAY”key to play normally.
FF “Left/Right”key on the remote control to select this function,press“ok”
EN
:Press
key to fast forward. Press“PLAY”key to play normally.
Background music “Left/Right”key on the remote control to select this
:Press
function,press“ok”key to turn on / off.
Other functions are similar to the PHOTO , Please refer to PHOTO options. ” ” ” ”
MOVIE
The operations are similar to the PHOTO .Please refer to PHOTO options.” ” ” ”
Basic functions
Press
Loop: “Left/Right”key on the remote control to select this function, press“ok”
key to set A and B times in the movie. The movie will repeatedly play between A and B
until you press "OK" again to deactivate this setting.
Zoom in “Left/Right”key on the remote control to select this function, press“ok”
:Press
key to enlarge picture.(if the size is larger than 1920x1080,this function is
not supported.)
Zoom out “Left/Right”key on the remote control to select this function,press“ok”
:Press
key to reduce picture. (if the size of a HD video is larger than 1920x1080, this function is
not supported).
Select Time Press“Left/Right”key on the remote control to select this function,press“ok”
:
key to select the time to play.
TEXT
Press ” to select previous / next page, Input the number key and OK to jump to the page
“▼ /▲
you want.
Below is a list of major f ile types that play from a U SB device
Photo .jpg files
Audio .mp3
Vid eo .avi ,.mp4
Text .txt
EN
24
Page 25
Troubleshooting table
TV Troubleshooter
A check through the gui de below coul d save you th e trouble of re turning your purchas e or waiting fo r a
service engineer. I f you require a ssistan ce with opera ting this p roduct you ca n phone our help line.
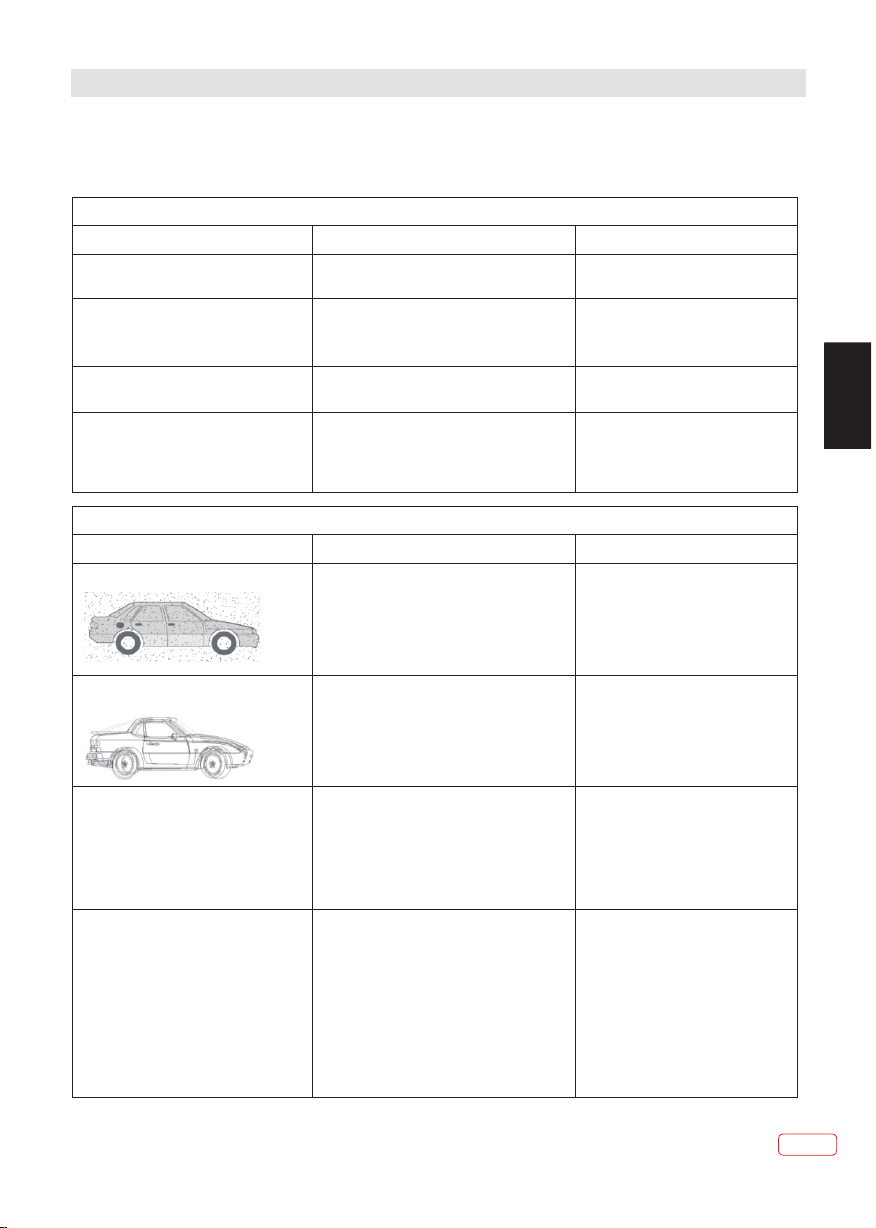
Analogue TV & gen eral
Sym ptoms
No sound
Cracklin g noises or di storted so und.
Ste reo swi tching to mo no. Awe ak signal or a m ono broadc ast. Che ck the signa l and your aer ial
No stereo so und from equ ipment
connecte d to the scart ( AV) so cket.
Analogue TV & gen eral Picture
Sym ptoms
Gra iny (sn owy) pictu re
Ext ra outl ines on obje cts in the pic ture
(ghosts) .
Sound
Possible c auses
The v olume i s set to minim um. The mute is
switched o n.
Int erfer ence from ca rs, fluore scent ligh ts,
video reco rder, a radio b roadcast , personal
computer o r other equi pment.
A mono scart le ad is being us ed to connec t
the t elevi sion. The signa l being view ed is
connecte d through th e aerial soc ket.
Possible c auses
Cl disconn ected.
Your vide o recorder c ould be faul ty.
Transm itter trou ble.
The o utsid e aerial has m oved, or is
damaged.
The a erial i s receivin g reflecte d signals
fro m hills o r building s. Faulty ae rial
sys tem.
Wha t to do
Turn the v olume up. Pr ess the mute
button to re lease 'mut e'.
Turn off one pi ece of equip ment at a
tim e to see if t he interfe rence clea rs.
See also wha t to do for pict ure
interfer ence.
sys tem.
Check that t he scart lea d is stereo.
Check the vi deo record er is
connecte d to the telev ision thro ugh
an AV (sc art) lead, t hen switch t he
tel evisi on to AV mode.
Wha t to do
If yo u have a vi deo record er try
plugging t he aerial di rectly int o the
tel evisi on. If the fau lt clears, t he
video reco rder is prob ably fault y.
Have your ae rial syste m checked.
Try to tun e in a better si gnal from
the s ame tel evision st ation.
Get y our aer ial system c hecked.
EN
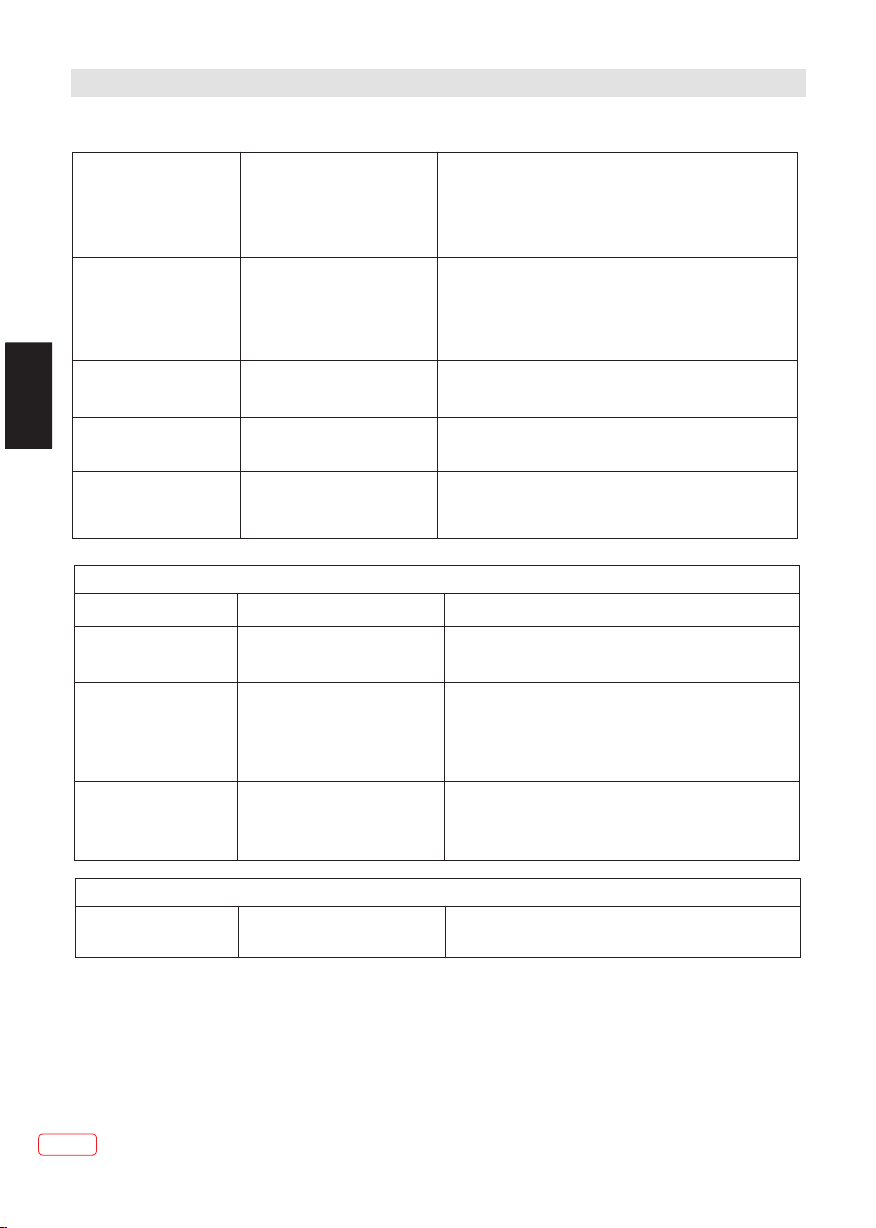
Picture in terferen ce like spot s or
str eaks.
Picture is t he wrong siz e or the sourc e
device (co mputer, DVD p layer, set to p
box and so on) w ill not let yo u set up the
pixel reso lution the d isplay can
reproduc e.
Wea k aerial sig nal. Inter ference fr om
electric al equipme nt such as pow er
too ls and mo tors.
Settings f or the digit al video equ ipment
output do no t match the mo nitors VGA
or DVI input s pecifica tions.
Source dev ice has not re ad the set-u p
data from th e display. Conne cting cabl e
does not hav e all the nece ssary
connecti ons.
Try to tun e in a better si gnal from
the s ame tel evision st ation. Get
your aeria l system che cked. Move
the i nterf ering equi pment furt her
away or if pos sible, tur n it off.
Change the r efresh rat e or
resoluti on setting s on the digit al
equipmen t, if possib le.
Avo id old cable s and adapte r
devices. U se only mode rn cables.
Re-start t he source de vice after
connecti ng and power ing up the
display. Chang e the graphi cs
adapter in y our comput er. Check
compatib le video res olutions g iven
in th ese ins truction s.
25
EN
Page 26
Troubleshooting table
Picture lo oks squash ed or
str etche d even thoug h the
aspect rat io control s are
set correc tly (for exa mple
4:3 o r 16:9) .
Picture in terferen ce like
wavy lines o r patterns .
Sound or col our
interfer ence may als o be
present.
No picture. Brig htness and contrast
Equipment feedin g the
display is set to the wr ong
aspect ratio.
Some other e quipment i s
using the sa me frequen cy.
Poor quali ty cable in th e path
between th e TV an d the TV
aerial.Your aeria l system is
receivin g an unwante d signal
on the same fr equency.
levels are set to mini mum.
EN
Jumbled teletext
characters
When RGB input is
used there is a
distorted pictur e or no
picture.
Analogue TV & gen eral Sound
Sym ptoms Possible c auses Wha t to do
Television s eems 'dead ' no lights co me on and
nothing wo rks.
The s tand- by light is on
but the butt ons don't se em
to wo rk.
Local func tion butto ns do
not work. St uck on stand by.
Poor quality signa l
Synchronisatio n signal is
missing.
Mains supp ly missing . Main
power swit ch is off.
Blown fuse o r circuit br eaker.
Try the fr ont panel
STAN DBY/ON but ton: if TV
comes on the n check "The
remote doe s not functi on".
Micro-co ntroller c onfused by
electric al disturb ance.
On the equipment fee ding the TV choose the c orrect
output aspect rati o such as 4:3 or 16:9 to match t he
TV. On digital eq uipment y ou might choo se 1280 x
960 pixels to match 4: 3 screens or
1280 x 768 pixels to mat ch 16:9 scree ns.
Put oth er equipmen t on stand-by to see if the
interference sto ps: change the output fr equency of
the equipment that i s causing interferen ce(see its
instructions). G et higher quality cabl e.
Get you r aerial syst em checked.
Increase the brigh tness and con trast set tings.
As for 'S nowy pictur e' and 'Ghosts'
Press the AV button to s elect the AV input which
receives the synch ronisatio n signal.
Make sure it i s not a genera l power cut.
Check the po wer switch es on the tele vision and a t the
power outl et. Check th e fuse or circ uit breake r at your main
fuse box. Lo ok for a possi ble cause of f ailure bef ore you
replace or r e-set it. Di sconnect p ower suppl y, wai t five
minutes an d try front pa nel STANDBY/ON . If still no go od,
disconne ct power sup ply and assu me the unit is f aulty.
Switch off main s power and wa it 10 minute s before try ing
again. (Le ave the TV unplug ged and call a s ervice
engineer i f this does no t work.)
Analogue TV & gen eral Remote
Wro ng functio ns or short
range.
EN
26
Batterie s run down.
Obs tacle i n the way.
Insert new b atteries
Remove any o bjects and a im from stra ight in fron t of the
remote sen sor with a cle ar line of sig ht.
Page 27

Troubleshooting table
Digital Terrestrial TV Troubleshooter
Sym ptoms Possible c auses Wha t to do
Picture bl ocking or
fre ezing . Sound brea king
up.
Some chann els are
missing.
Any or all of th e above
faults.
Wea k signal or wr ong type of
aerial.
Not receiv ing one or mor e
digital mu ltiplex fr equencie s.
Int erfer ence or othe r problem
caused by pa ssing aeri al signal
thr ough ot her equipm ent.
Try re-t uning.
Aerial may n ot be suitab le for digit al TV b roadcast s.
You may be in a p lace which d oes not get a go od digital TV
signal.
Get a n aeria l rigger to ch eck the aeri al system.
Try conn ecting the a erial dire ctly to the di gital TV receiv er
and then re- tuning.
If so me equi pment has a ra dio freque ncy modula tor, switch
it of f or change th e frequenc y of it and re-t une the anal ogue
TV. (Plea se see other e quipment s instruct ions for how t o
do th is.)
Multiplex
DVB-T (Digital Video Broadcasting - Terrestrial) is broadcast in groups of channels on one
common frequency. This arrangement is known as a Multiplex.
There are several multiplexes in the DVB-T system, each carrying a group of channels.
If the signal level on a particular multiplex frequency is poor you may lose the whole group
of channels on that multiplex.
EN
27
EN
Page 28
Troubleshooting table
Computer Monitor TV and HDMI Troubleshooter
Sound
Sym ptoms Possible c auses Possible s olutions
No sound
Sym ptoms
No picture .
EN
On- scree n message
indicate s video inpu t is not
compatib le.
Computer f eeding the TV
does not offer yo u suitable
settings t o match the TV
requirem ents.
Picture is n ot clear.
Picture is i n the wrong
position .
Picture lo oks squash ed
or stretch ed.
HDMI input i s being fed th rough
a conversi on connect or from
equipmen t with a DVI out put.
Possible c auses Possible s olutions
Settings f or the digit al video
equipmen t feeding th e TV do
not match th e TV in put
requirem ents.
Computer h as not excha nged
informat ion with the t elevisio n.
In ol der com puters, th e
graphics a daptor mig ht be
obsolete .
Television n eeds to be set u p for
the c omput er analogu e RGB
input (als o known as VGA - or sub).
Some input r esolutio ns produce
a clearer pi cture than o thers.
the wrong as pect ratio .
Equipmen t feeding th e TV is
set to
Connect so und output f rom the DVI eq uipment to a n
external a mplifier.
Picture
Change the r efresh rat e or resolut ion settin gs of the
computer g raphics ad aptor or oth er digital e quipment .
Re-start t he compute r while the te levision i s still conn ected
to th e power s upply, then try ag ain.
In excepti onal cases , you may need t o go into the
computer g raphics ad aptor sett ings and cle ar the check
box for Show o nly settin gs this moni tor can supp ort. For
Microsof t Windows th is can be foun d by right-c licking on
the Deskto p and follow ing Proper ties - Displ ay
Pro perti es - Setting s - advanced t ab Monitor t ab. The
availabi lity of this f unction an d the method o f adjustme nt
varies wit h computer o perating s ystem.
Upgrade yo ur graphic s adaptor.
For c omput er analogu e RGB input (a lso known as V GA-or
D-sub-, ac tivate the a utomatic s et-up func tion. The phase ,
fre quenc y, ver tical and ho rizontal p osition co ntrols mig ht
also need sl ight adjus tment.
Check info rmation in t he compute r monitor se ction of the se
instruct ions and try a d iff erent reso lution set ting.
For a T V with a compu ter monito r function f ed from the
computer a nalogue RG B connecto r (also know n as VGA or
D-sub, set u p the comput er graphic s adaptor re solution t o
have the sam e aspect rat io as the TV screen . (Aspect ra tio
means the ra tio of width t o height, wh ich in this ca se is
measured i n pixels.)
We have made every effort to ensure these instructions are as accurate as possibl e, h owever
we apologize for any inconvenience caused by minor inconsistencies which may occur as a
result of product improvement and development.
EN
28
Page 29

Troubleshooting table
23
EN
29
EN
Page 30
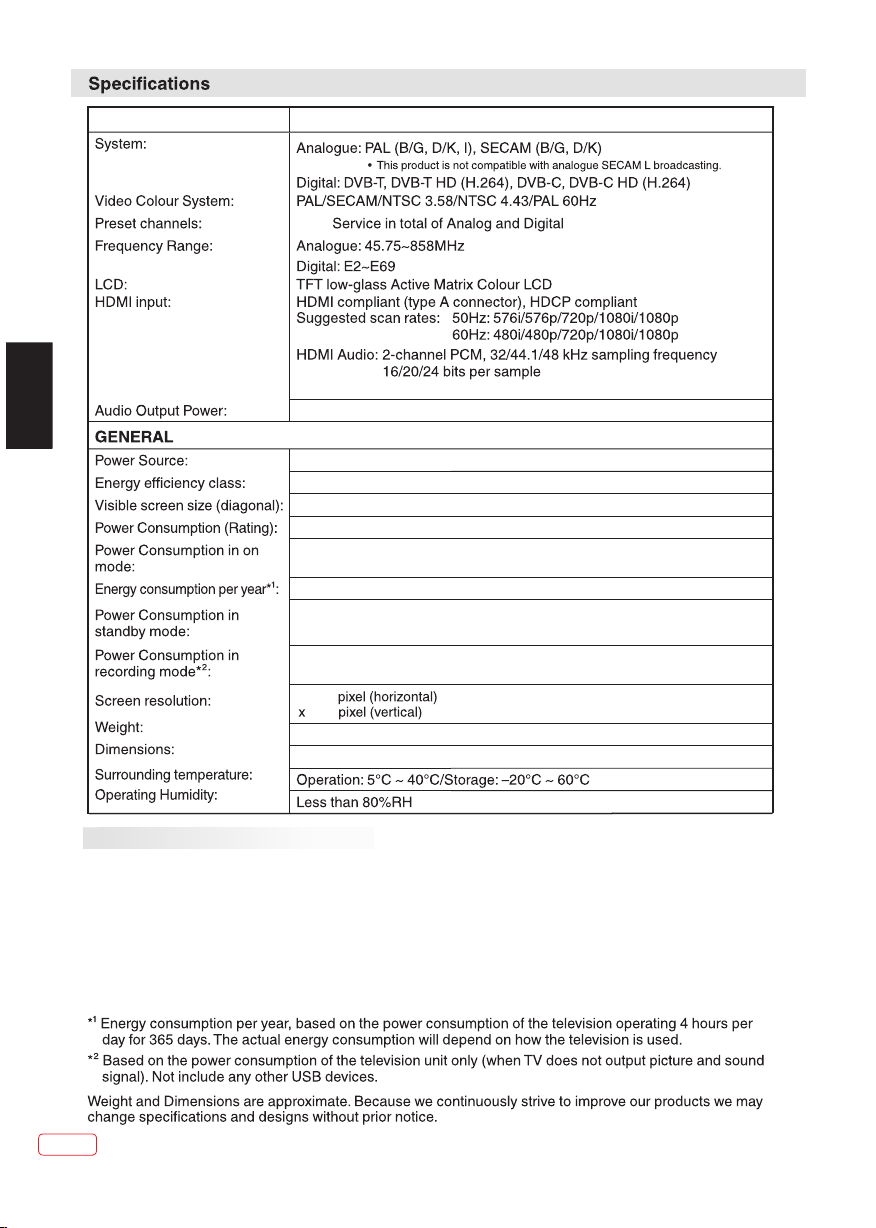
JVC / LT-32HA60U
1400
EN
Accessories
User’s Manu al..... ......... ....... ......... ....... .....1
Brown safety sheet ................ ................ ...1
Energy label.... ................ ................ ....... ..1
Remote control.. ................ ................ .......1
Screw .......... ....... ......... ....... ......... ....... .... 6
Stand Base Plate.. ................ ................ ....1
Stand Base Pillar.. ................ ................ ....1
Stand Washer. ....... ................ ................ ...1
SCART Cable. ....... ......... ....... ......... ....... ...1
sampling frequen cy , maximum bi trate is 64 0kHz.
approx. 8W(MAX) x 2
100-240V ~50/60Hz
A
80cm / 31.5in
50W
40W
58k Wh
≤0.30W
8W
1,366
768
6kg
74(W) x 49(H) x 20(D)cm
; 6-channel AC-3, 32/ 44/48KHz,
EN
30
Page 31

EN
31
EN
Page 32

Caractéristiques
Ècran LCD 16/9
•
• Technologie Rétro-éclairage LED
• Tuner HD TV / DVB-C
• Tuner - Câble - analogique
• Guide de programme Électronique (EPG) pour DVB
Instructions pou r les piles usées (valab le uniquement dans l’U E)
Protégez l’envir onnement - co ntactez l es autorité s locales p our obtenir d es conseils sur la façon
d'éliminer en tout e sécurité le s piles en fi n de vie. Le symb ole poube lle barrée in dique que les p iles
usagées ne doivent p as être jetée s avec les or dures ménag ères! Un sy stème de coll ecte séparée des
piles usagées est en p lace afin de pe rmettre u n traitemen t et recycl age correct c onformément à la
législation en vig ueur. Pour plu s d'infor mations sur l es systèmes de collect e et recyclage dans votr e
région, veuillez c ontacter vo tre mairi e.
Instructions DVB -C
• Les programmes cod és nécessit ent une car te à puce et un mod ule CA (CAM) p our le décoda ge.
Vous vous procurez la c arte à puce aup rès de votr e fournisse ur de câble ( les CAM sont d' usage). Insérez la
carte à puce dans le CAM e t insérez ens uite le CAM d ans la fente CI d e votre tél éviseur.
La carte à puce que vous i nsérer dans l e CAM.
• Actuellement envi ron 650 fourn isseurs d e câble off rent leur s ervice en Alle magne. Le syntoniseu r intégré ne
peut pas stocker aut omatiquem ent toute s les chaînes d isponib les de tous le ré seau câblé. Cette perf ormance
ne peut pas être atten due, avec autant de four nisseurs in dividue ls sur le march é. Veuillez utiliser le t ableau
des canaux de votre fo urnisseur p our la synt onisation m anuelle.
• Cette fente CI de la TV ne peut pas p rendre en cha rge tous les modules Cl+ d es 650 fourni sseurs. S i le
module de votre four nisseur d’a ccès n'es t pas pris en cha rge, veui llez demand er à votre revendeur un au tre
module CA ou utilisez l e décodeur de v otre four nisseur d’a ccès pour décrypter.
FR
Infor mation sur la f onction DVB-T
• Les fonctions rela tive à la télév ision num érique (ave c le logo DVB) ne sont dispo nibles que da ns le pays ou
la région où ces signa ux sont trans mis. Véri fiez avec le ve ndeur s’i l est possibl e de recevoir un signal DV B-T
dans la zone où vous hab itez.
• Retirez le CAM pour la r éception DV B-T.
• Une antenne DVB-T doit être raccordée po ur les caract éristiq ues DVB-T, les tr ansmiss ions numéri ques
futures DVB-T ou l a compati bilité ne son t pas garanties.
• Certaines foncti ons de la télév ision num érique peuv ent ne pas être disponib les dans cert ains pays .
• Le système DVB-T présent da ns cet appare il est un service de diffusion télévision nu mérique sur o ndes
hertziennes en cla ir.
• Lecteur Médias USB
• Mise hors tension au tomatique
• EVP (Enregistr eur vidéo personnel)
• Time Shift (Décalag e temporel)
• Nouveau cadre ultr afin*
L’appareil mis à la ter re de l'insta llation é lectrique d u bâtiment par le biais du r accordeme nt au secte ur ou
autres appareils a vec un branch ement mis à l a terre – et à un sys tème de dis tribution p ar câble utilisant un
câble coaxial, peu t, dans certa ines circ onstances , provoqu er un incendi e. Le branchement à un sys tème
de câblodistribu tion doit par c onséque nt être fourn i par un disp ositif four nissant une isolatio n électriqu e en
dessous d’une cert aine plage de f réquenc es.
Cher client,
Cet appareil est con forme aux dir ectives e uropéenne s en vigueur et normes en ma tière de compatibili té
électromagnéti que et de sécur ité élect rique.
Darty Plc © 22/24 Ely Pl ace, London EC1N 6TE, UK
* Le cadre extra mince p ermet plus qu 'une vue co mplète de l'é cran du tél éviseur. Mêm e le bord de l'éc ran
noir (env. 3 mm) est dé sormais v isible.
[Union européenn e]
FR 2
Page 33

Renseignements importants sur la sécurité
Cet app areil a é té prod uit sel on toutes les norm es de séc urité a ctuel les. Les conseil s de sécu rité su ivants doivent
proté ger les u tilis ateur s d’une utilisat ion imp ruden te et des dangers li és à cett e utili satio n.
• Bien qu e cet app areil a it été so igneusement, f abriq ué et con trôlé r igoureu semen t avant s a sorti e d'usine, comme
avec to us les ap parei ls élec triques il est pos sible q ue des pr oblèmes se dével oppen t. Si vou s remar quez une fumée,
une acc umula tion ex cessi ve de chaleur, ou tou t autre p hénom ène inattendu, v ous dev ez débr anche r la fiche de la
prise d e coura nt immé diate ment.
• Assure z-vou s que l'a ppare il est suffisa mment v entilé ! Ne le posez j amais à c ôté ou so us les ri deaux !
• Cet ens emble d oit êtr e uniqu ement branché à un e alime ntati on électrique de – n'ess ayez pa s
de le bra ncher à n 'impo rte que l autre type d'ali menta tion.
• La pris e de cour ant doi t être in stallée près de l' appar eil et fa cilement acces sible .
• Toute r épara tion doit être uni queme nt effectuée par un tec hnici en qual ifié.
• N'ouv rez pas c et appa reil. U n non-spéciali ste ess ayant d e réparer l'appa reil po urrai t être da ngereux et risqu erait d e
provo quer un i ncend ie.
• Éloig nez les r ongeu rs. Les r ongeurs (et auss i les cal opsit tes) ai ment mordre dans l es cord ons éle ctriques.
• L'ani mal peu t provo quer un c ourt-circuit ( risqu e d'inc endie!) et recevoir une d échar ge élec trique mortell e.
• Tenez t oujou rs la fiche lorsqu e vous re tirez l a fiche d u système d'alim entat ion sec teur. Ne t irez pas sur le cord on. Le
cordo n peut êt re surc hargé e t provoquer un cou rt-ci rcuit .
• Ne lave z pas. Ut ilise z uniqu ement un chiff on humi de, le même que lors d e l'ent retie n du meub le.
• Ne le plo ngez pa s dans ou s ous l'e au !
• Mette z l’app areil e n place d e telle sorte que pe rsonn e ne tréb uche sur le cordon .
• Il est re comma ndé d’i nstal ler cet appareil s ur des ba ncs à l’a bri des chocs afin d 'évit er tout d anger d e chute.
• Prene z note qu e les enf ants en b as âge peuvent fai re tomb er l’ap pareil de la table o u du meub le par l’ entre mise de
son cor don. Le s enfan ts peuv ent se blesser en le f aisan t.
• N'uti lisez p as l'ap parei l près des sources d e chale ur. La car casse et le cordon p ourra ient êt re endo mmagés par
l'imp act de la c haleu r.
• Méfie z-vou s les enf ants co pient ce que les adu ltes fo nt ! Ne col lez pas d ’objets dans les o rific es de ven tilation !
• Les ori fices d e venti latio n doivent rester o uvert s ! Ne pose z pas de jo urnaux ou couver tures s ur l'ap pareil !
• La télé comma nde n'e st pas un j ouet ! Les enfants e n bas âge p ourra ient av aler les pi les. Si u ne pile a é té aval ée,
appel ez immé diate ment un m édecin.
• L'écr an est en v erre et p eut se ca sser s’il est endo mmagé . Soyez p ruden t lors de la collect e des mor ceaux d e verre
tranc hants . Vous pou vez êtr e blessé ou l’appa reil pe ut être e ndommagé.
• Si l'ap parei l est fix é sur un mu r, contactez le mag asin où v ous ave z acheté l'appar eil pou r obten ir des co nseils et
confi ez les tr avaux d 'inst allation à des exp erts. D es trav aux d'i nstallation in compl ets ris quent de vous bles ser.
• Prene z des mes ures de p réven tion des chutes
- Si ces me sures n e sont pa s prise s, l'appareil pe ut tomb er et vou s pourr iez être blessé.
- Conta ctez le m agasi n où vous a vez acheté l'app areil p our obt enir tous les déta ils des m esure s.
• Lorsq u’un me uble de t élévi sion est utilisé ,
- Assure z-vou s que l'a ppare il repose entièr ement s ur le soc le et placé au centr e.
- Ne lais sez pas l es port es du meu ble ouvertes.
- Vous pou rriez ê tre ble ssé à la su ite de la chute ou de la c assur e de l'ap pareil, ou vos doi gts pou rraie nt se ret rouver
coinc és. Pre nez des p récau tions suppléme ntair es si vou s avez des enfants.
• Évite z de plac er l'ap parei l sur des surfaces q ui peuv ent êtr e soumi ses à des vibratio ns ou à des c hocs.
• Pour pr otége r l'app areil p endant un orage, d ébran chez le c ordon d'alimen tatio n et déco nnect ez l'antenne. Att entio n :
ne touc hez pas l e conne cteur d 'antenne.
• Lorsq ue vous q uitte z votre d omicile pour une l ongue p ériod e, débranchez le c ordon d 'alim entat ion pour des raiso ns
de sécu rité.
• L'app areil c hauffe quand i l fonct ionne . Ne reco uvrez pas l'appa reil de c ouver tures o u bâches afin d'év iter la
surch auffe. Les orifices d e venti latio n ne doiv ent pas être bloqu és. Ne le p lacez p as près d es radiateurs. N e le plac ez
pas en pl ein sol eil. Lo rsque v ous le plac ez sur un e étagè re, lai ssez 10 cm d'espac e libre a utour d e l’app areil entier afi n
de perm ettre u ne circ ulati on d'air.
• Le déve rseme nt de liq uides d ans l'appareil p eut ent raine r des dommages gra ves. Me ttez l' appar eil hors tension e t
débra nchez l 'alim entat ion électrique , puis fa ites ap pel à un technicie n quali fié ava nt d'ut iliser à nouveau l 'appa reil.
Respe ctez le s instr uctio ns suivantes pour évite r de rece voir un e décharge électrique m ettan t la vie en d anger :
• Proté gez-l e de l'hu midit é. Ne l’utilisez j amais d ans la sa lle de bain ou un saun a.
• Ne l’ut ilise z jamai s près d' une baign oire, d ouche o u pisci ne.
• N'uti lisez j amais l 'appa reil s’il a é té moui llé. Ce la peut a ussi signifier l 'humi dité de c onden sation qui se prod uit en
hiver q uand l’ appar eil fro id est amené dans un a ppart ement c hauff é. Atten dez ava nt de fai re fonctionner l 'appa reil,
surto ut en hiv er quan d il vien t juste d’être tra nspor té, jus qu'à ce q ue l’appa reil fr oid se so it adap té à la températur e de
la pièc e.
• Ne plac ez pas d' objet s lourd s sur le cordon. L’is olati on élec trique pourrai t être en domma gée.
• N’enr oulez j amais d e ruban isolant au tour de f lexio ns endo mmagées ou sur des f iches e ndomm agées . Ceux-ci
devra ient êt re répa rés ou re mplacés par un tec hnici en qual ifié.
• N’uti lisez j amais c et appa reil si le boitier e st défe ctueu x. Ne fai tes pas de réparat ions pr oviso ires si le boîtier e st
endom magé, i l doit êt re remp lacé par un boitie r neuf si n écess aire.
• Débra nchez l 'appa reil de la prise d'a limen tatio n élect rique avant le net toyag e de l'ap parei l.
• N'ess ayez ja mais de r épare r un cordon d'alim entat ion CA end ommagé avec un rub an isol ant - il do it être r éparé par
un spéc ialis te ou rem placé . Ne laissez pas vot re anim al de com pagnie lâché prè s du câbl e. Les an imaux e n mordant
dans le c âble po urrai ent rec evoir une déchar ge élec triqu e mortelle et pour raien t entra îner un d anger pour les aut res.
100 -24 0V CA ~ 50/6 0Hz
FR
3 FR
Page 34

Renseignements importants sur la sécurité
Comment fixer le support
REMARQUE :
• Débranchez le cord on d’alimen tation se cteur.
• Avan t d'effec tuer les tr avaux, étal ez un rembourrage sur la s urface de la ba se pour y pos er la TV.
• Ne soutenez pas la TV par l'écran car des obje ts pointus et trop de pres sion peuven t entrain er des
dommages.
• Respectez les inst ructions. Une instal lation inco rrecte du s upport peut e ntraîner une chute de la TV.
1) Placez le télévis eur sur sa face sur une tabl e.
2) Alignez la plaque de l a base du suppo rt (fourn ie) tel qu’il lustré ici.
EIle s' adaptera da ns un seul sens. Assurez- vous que les ch evilles d e positionn ement rentrent dans le s
trous de fixation.
3) Maintenez soign eusement la p laque de la b ase en positi on et fixez-la avec les vi s.
1. Placez le téléviseur sur une surface plane
avec l'écran face contre terre. Utilisez un
2. Vissez le plateau et la rondelle au pied du
support avec les vis fournies.
chiffon pour protéger l'écran. Fixez le pied
du support au bas de l'écran du téléviseur.
FR
3xM3x15m m
REMARQUE :
Pour retirer le supp ort, répétez ces étape s à l'envers.
Démonter le support
Si vous souhaitez in staller le té léviseu r sur le mur, le sup port doit ê tre démonté . Pour ce faire, retirez
les vis (voir schéma c i-dessus) fixées à l'a rrière de l'é cran. Ins tallez un sup port mural VESA (200 x 100) .
La longueur de filet age des vis dan s le télévi seur ne doit pa s être supérieure à 5mm (v is inférieu res) et
10mm (vis supérieu res)
Remarques sur l'installation du téléviseur sur un mur
Retirez l'ensemb le du support e n inversa nt la procédu re de fixation décrite c i-dessus.Vous
pouvez replacer le s vis sur le supp ort pour le s conserver m ais ne les vi ssez que légè rement.
Taille de vis VESA 4xM4x5 mm
Protégez l'écran e t placez le tél éviseur f ace contre te rre sur une t able stable a vec le support dans
le vide.
Pour une installat ion en toute sé curité, l isez attent ivement c e qui suit avan t d'accrocher le
téléviseur au mur :
Ave rtissemen t : Cette opé ration doit s 'effe ctuer à deux.
Vérifiez que le mur pe ut supporte r le poids du t éléviseur e t du suppor t mural stand ard VESA (non
fourni).
Assurez-vous de n' utiliser qu e des vis app ropriées à la m atière du m ur.
En cas de doute, faite s appel à un agen t spécial isé.
Prenez garde aux câb les électri ques et aux t uyaux de gaz et d 'eau dans l e mur.
Suivez les instruc tions fournies avec le s upport mura l.
Le téléviseur doit ê tre install é sur un mur ve rtical.
Assurez-vous de fi xer les câble s pour évit er tout risqu e de chute ou d e détériora tion.
3xM4x15m m
FR 4
Page 35

Renseignements importants sur la sécurité
At te nt ion p ou r préveni r le s incendi es, ne pl ac ez jamais d e bo ugies ou fl am mes ouver te s sur le
dessus ou à p ro ximité du t él éviseur.
Mis e en gard e pour l'uti lisation d 'écouteu rs
La musi que for te peut e ndomm ager votre audit ion de ma nière i rréversible, p ar cons équen t ne régl ez pas le volume
du son à un n iveau é levé lo rs de l'é coute au casque, n otamm ent en ca s de longues pério des d'é coute .
Dépla cemen t de l'ap parei l ou manutention manuel le
Lorsque l'ap parei l est dép lacé loin, débranchez l e cordo n d'ali menta tion et déconnectez ant enne, c âbles e t
tout disposi tif de pr évent ion des chutes.
• Un dépl aceme nt sans p rendr e ces précaution s pourr ait ent raîner des domma ges au co rdon d' alime ntation,
incen die, él ectro cutio n ou blessures pro venan t de la chu te de l'appareil .
Assur ez-vo us que le d éball age et le transfert de l'ap parei l sont ré alisés par deux ou plusie urs per sonne s et
que l'appare il rest e en posi tion verticale lors de ce tte opé ratio n.
Lorsque le meu ble a des r oulet tes, retirez les roulet tes du me uble et p ousse z-le tout en soute nant l' appar eil.
• Veille z à soute nir l'a ppareil lorsqu e le meub le est po ussé, c ar cela peut provo quer la c hute de l 'appa reil et vous
pourr iez êtr e bless é.
• L'app areil p ourra it lais ser des empreint es dans l es tabl es en bois avec des su rface s en bois t rès ten dres en raison
de son po ids.
• Encau stiqu er pour rait co rroder et dissou dre les p ieds en c aoutchouc. Des e mprei ntes no ires po urraient être
visib les sur l a table . Vous dev ez donc utiliser u nique ment de s bancs pour TV, qui ont é té cons truit s à cet effet.
Fixez les roul ettes l orsqu e l'appareil est instal lé sur un m euble à r oulet tes.
• Le meub le peut s e dépla cer et vo us pouvez être ble ssé si le s roule ttes ne s ont pas sécurisé es.
Enlev ez les ro ulett es lors que le meuble est pl acé sur u ne surf ace molle telle qu e tapis e t moque tte.
La distance en tre les y eux et l' écran doit être d'envir on 3 à 4 fois l a haute ur de l'é cran.
• Regar der d'u ne dist ance tr op proche peut ent raîne r une fat igue po ur vos yeux.
Lorsque vous i nstal lez le mo niteur sur une table, vei llez à ne p as le pla cer au bo rd.
• Cela pe ut prov oquer l a chute d u Moniteur, cause r des ble ssure s graves à un enfant o u à un adul te et de gr aves
domma ges au Mo niteu r.
Effet s indés irabl es poss ibles sur l'écran LCD: si u ne conf igura tion fixe (immob ile) de meure s ur l'éc ran LCD
penda nt de lon gues pé riodes de temps, l'imag e peut de venir d éfinitivemen t ancré e dans le p annea u TV LCD et
provo quer de s ubtil e mais pe rmanentes imag es fant ômes, c e type de d ommage N' EST PAS COUVERT PAR VOTR E
GARAN TIE. Ne l aisse z jamai s votre télévise ur allu mé pend ant de lo ngues pér iodes d e temps l orsqu 'il aff iche le s
forma ts suiv ants ou d es imag es :
• des ima ges fix es, tel les que l es cours de la Bours e, modè les de je ux vidéo, logos de c haîne s TV, et site s Web.
• des for mats sp éciau x qui n'u tilisent pas la to talit é de l'éc ran. Pa r exemple, regar der les m édias ( 16/9) de format
boîte a ux lett res sur u n affichage no rmal (4 /3) (ba ndes noires en hau t et en bas d e l'écr an) ; ou re garder un format d e
média s norma l (4/3) s ur un écr an large (16/9) (b andes n oires s ur les côtés gauch e et droi t de l'éc ran).
Atten tion !
Instr uctio ns de net toyag e pour votre télév iseur L CD.
Remar que de sé curit é :
Ava nt de com mencer à nettoye r, coupe z compl èteme nt l'alimentat ion éle ctriq ue de l'e nsemble et débra nchez l a fiche
de l'al iment ation p rinci pale.
Faite s atten tion de n e pas ray er la façade endui te en pla stiqu e – elle est très vulnérabl e aux ray ures ac cidentelles
(par ex . : rayur es d'on gles ou a utres objets cou pants ). Lors d u netto yage, ne portez pa s de bijo ux qui ri squent de
rayer l a surfa ce (tel s que bag ues, montre-br acele t, etc. .). Uti lisez un chiff on non pe lucheux et de l'ea u pure po ur
netto yer, mai s assur ez-vo us que le chiffo n est soi gneusement ess oré afi n qu'il s oit jus te humide et non dét rempé assur ez-vo us égal ement q ue le chiffon es t exemp t de toutes saleté s qui pou rrait p rovoq uer des rayures à la s urfac e.
Netto yez l'e nsemb le avec u ne pression mini male.
N'uti lisez p as de liq uide de n ettoyage de fenê tre cla ssiqu e. Son alcool/am monia c disso udra le r evêtement de la vi tre
avant .
N'uti lisez j amais d e solva nt ou diluant. N'u tilis ez jama is de nettoyants s pécia ux qui so nt conç us pour le nettoya ge
des écr ans de PC o u télév iseur s. Enfin séchez so igneu semen t en frot tant avec un chiffon pr opre et sec non
peluc heux.
N'uti lisez p as de ser viett es en papier ou tiss us pour n ettoy er l'en semble – le p apier p eut se dé sagré ger lorsqu'il es t
mouil lé ou peu t laiss er une tr ace de poussière . Certa ins pap iers peuvent éga lemen t être ab rasif e t rayer votre écra n.
FR
5 FR
Page 36

Renseignements importants sur la sécurité
Consignes de sécur ité
Pour une utilisati on en toute séc urité et un b on
entretien de votre t éléviseur,
Nous avons conçu et fa briqué ce tél éviseur p our
répondre aux norme s de sécurité e uropéen nes,
mais comme pour tout a ppareil éle ctroniq ue, vous
devez en prendre soi n, afin de rest er en sécur ité et
d'obtenir les meil leurs résul tats. Voic i quelques bo ns
conseils pour vous y a ider.
Lisez attentivem ent ces instructions a vant d’util iser
la télévision.
Protégez le cordon d 'alimenta tion. Vous d evez vous
assurer que le câble d 'alimenta tion ne peu t pas être
piétiné, écrasé, u sé, coupé ou co incé.
Coupez l'aliment ation élect rique ou dé branchez la
prise secteur lors que vous lais sez la télé vision, à
moins que la fonctio n de la télévis ion néces site une
alimentation con tinue.
Ne continuez pas à uti liser votre télévise ur si vous
avez renversé du liq uide dedans , s'il est
endommagé de quelq ue façon ou s’i l ne foncti onne
FR
pas normalement. D ébranchez i mmédiat ement le
téléviseur et obte nez les conse ils d'un sp écialiste .
Évitez les conditi ons difficiles tel les que lieux
mouillés ou humide s, une humidi té élevée , de fortes
vibrations, des te mpératures extrême ment élevés
ou faibles, un fort en soleillem ent et les en droits très
poussiéreux.
Ne le posez jamais sur d es supports i mprovis és ou
jambes. N'insére z jamais d'ob jets dans l es trous et
les fentes d'aérat ion. Afin d'év iter un cho c électriqu e
n’enlevez aucune p rotection . Ne touche z pas l'écran
LED car il devient cha ud lors
de l’utilisation , ceci est norm al et n'est p as un
défaut.
Si quelque chose ne va p as, n'essay ez pas de
réparer vous-mêm e, faites appel à un agent d e
service qualifié p our réparer.
Débranchez l'app areil et débr anchez l’ antenne
pendant les orages .
Ventilation
Placez le télévise ur sur une surface plate e t dure
loin des sources dir ectes de lumi ère du sole il ou de
chaleur. S’il est dan s un meuble, pe rmettre a u moins
un espace de 10 cm tout au tour.
N’obstruez pas les f entes de ventilation , y compris
celles du dessous av ec les tissus d 'ameubl ement.
La surchauffe ra ccourcit la durée de vie d e la
télévision et augm ente le risqu e d'incen die.
Nettoyage
Coupez l'aliment ation secte ur et utili sez uniquem ent
un chiffon doux lé gèrement humide. N'u tilisez pas d e
solvants chimiqu es ou déterge nts puiss ants qui
peuvent endommag er la carcass e ou l'écra n.
Ne laissez jamais de s gouttelet tes d'eau à l 'écran
car l'humidité peu t provoquer u ne décolo ration
permanente.
Les marques grasse s doivent seu lement êt re
enlevées avec un net toyant comm ercial
spécifiquement r ecommandé p our les écr ans
LED.
Alimentation sec teur
Ce téléviseur est co nçu pour fonc tionner à p artir
d'une alimentati on de 100 - 240 Volt s 50 / 60Hz
ca. D’autres sourc es d'énergi e
risqueraient de l' endommage r. Vérifie z que la
plaque signaléti que (au dos de la t élévisi on)
indique 100-240V AC a vant de la bran cher pour l a
première fois.
Le fabricant décli ne toute resp onsabil ité pour les
dommages ou blessu res causés pa r l'utili sation
du produit avec une ma uvaise tens ion
d'alimentation .
Fiche secteur
Nous avons équipé ce t éléviseur d 'une fich e
standard.
• Si le cordon d'alime ntation est e ndommag é, il
doit être remplacé p ar un cordon d’ aliment ation
de même type et classe ment pour éviter tout
risque.
• Si pour une raison que lconque, vo us coupez l a
fiche, veuillez dé truire la vie ille fich e car elle
serait dangereus e si elle venai t à être insé rée
dans une prise de cour ant.
• Suivez attentive ment les instruction s de câblage
fournies avec la nou velle fiche .
• Si la fiche est munie d' un fusible, e nlevez le
fusible avant de jet er la fiche.
• N’utilisez jamai s fiche secte ur à fusibl e sans le
couvercle de fusib le.
• La fiche secteur doi t être le disjo ncteur pr incipal
et doit être accessi ble à tout moment.
Une tension dangereuse constituant un risque
d'électrocution est présente à l'intérieur de cet
appareil.
Cet appareil est à double isolation et la mise
à la terre n’est pas nécessaire.
Cette marque est apposée pour indiquer
que l’appareil est conforme aux normes de
sécurité européennes et de compatibilité
électromagnétique.
FR 6
Page 37

Renseignements importants sur la sécurité
Consignes de sécurité (suite) Fatigue oculaire
Lorsque vous utilisez ce produit comme un écran d'ordinateur, les experts en matière de santé
et sécurité recommandent de faire de courtes pauses fréquentes plutôt que des pauses plus
longues.
Par exemple, une pause de 5 à 10 minutes après
une heure de travail continu à l’écran est réputée être plus bénéfique qu'une pause de 15
minutes toutes les 2 heures. N'utilisez pas le moniteur dans un contexte lumineux ou où la
lumière du soleil ou autres sources de lumière vive brille directement sur l’écran.
Casques
Attention : branchez les écouteurs avec le volume réglé à bas et augmentez le volume au
besoin. Une écoute prolongée au casque à volume élevé peut entraîner des pertes auditives.
Piles
Retirez les piles lorsque la télécommande ne doit pas être utilisée pendant une longue période.
Des piles laissées dans la télécommande peuvent provoquer des dommages par le biais d’une
détérioration et de fuites corrosives, invalidant la garantie.
Pour protéger l'environnement utilisez les installations de recyclage locales pour l'élimination
des piles usagées. Jetez les batteries usagées conformément aux instructions.
ATTENTION : Risque d'explosion si les piles sont remplacées par un type incorrect.
ÉLIMINATION
Vous devez éliminer ce produit selon les lois et réglementations locales.
Parce que ce produit contient des composants électroniques, le produit doit être
jeté séparément des ordures ménagères lorsqu’il est en fin de vie. Le produit doit être pris en
charge à votre point de collecte pour le recyclage.
Certains points de collecte acceptent les produits gratuitement.
FR
AVERTISSEMENTS
Cet appareil est destiné à un usage domestique et ne doit pas être utilisé à d'autres fins ou sur
n'importe quelles autres applications, telles qu'à usage non domestique ou dans un
environnement commercial.
Ne pas éclabousser ou mouiller l'appareil.
Aucun objet rempli de liquide, par exemple un vase, ne doit être placé sur l'appareil.
Cet appareil ne doit pas être exposé aux éclaboussures et à aucun objet rempli de liquide, tel
qu'un vase placé sur l'appareil.
Aucune source de flammes nues, comme des chandelles allumées ne doit être placée sur
l'appareil.
La ventilation ne doit pas être entravée par la couverture des orifices de ventilation, par des
articles tels que journaux, nappes, rideaux, etc.
AVERTISSEMENT : pour éviter tout accident, cet appareil doit être fixé solidement au sol/mur
selon les instructions d'installation.
7 FR
Page 38

Sommaire
Caractéristiques.....................................................................................2
Sommaire..............................................................................................3-7
Renseignements importants sur la sécurité...............................................8
Installation.............................................................................................9-12
Commande à distance... .........................................................................13-14
Fonctionnement.....................................................................................
Tableau de dépannage............................................................................
Instructions............................................................................................
Numéro de licence..................................................................................
FR
15-24
25-29
30
31
FR 8
Page 39

Installation
Panneau avant
3
CLAVIER
SOU RCE
MEN U
CH+
CHVOL +
VOL STAN DBY
1
2
1. SOURCE : affiche le menu de la source d'entrée ;
appuyez à plusieurs reprises pour faire descendre le
menu déroulant et appuyez sur « VOL-» ou « VOL + »
30 30
pour sélectionner la source souhaitée.
2. MENU : affiche le MENU principal.
3. CH + / CH- : en mode TV, appuyez sur « CH + » ou
« CH-» pour changer de chaîne vers le haut et vers le
bas. En mode MENU, appuyez sur « CH + » ou « CH-»
pour sélectionner des éléments. En mode veille,
appuyez sur « CH + » ou « CH-» pour allumer la TV.
4. VOL + / VOL-: réglez le niveau sonore. En mode
MENU, appuyez sur « VOL + » ou « VOL - » pour
régler l’élément que vous avez sélectionné.
1: Capteur de téléco mmande.
LED d'alimentati on:
2:
BLEU EN M ARCHE.
ROUGE V EILLE.
3: Bout ons latérau x
FREEZE
EPG
VOL CH
5. Veille : appuyez sur ce bouton pour allumer
l'appareil à partir du mode VEILLE. Appuyez à nouveau
Raccordements AV arrière
AC-IN PUT
100-2 40V~ 50 /60Hz
YPbP r
VIDE O
pour le remettre VEILLE.
L R
COAX IAL OUTP UT
SCAR T
Les prises périphériques sont les suivantes (de gauche à droite) : AC-INPUT (entrée CA), YPbPr INPUT
(entrée YPbPr), VIDEO, AUDIO INPUT (entrée audio), COAXIAL OUTPUT (sortie coaxiale), SCART (Péritel).
Remarque : VIDEO et YPbPr partagent le même canal audio.
FR
Raccordements AV ARRIÈRE (côté)
USB HDMI 2(ARC ) HDM I1
HEAD PHONE
COMM ON INTE RFACE( CI)
PC AUDI O
Les terminaux sont (de gauche à droite) :
USB, HDMI2(ARC), HDMI1, HEADPHONE (casque), CI (interface commune), PC AUDIO, VGA, RF
(fréquence radio)
Remarque :
1. Lorsque le port HDMI obtient le signal DVI, le signal audio est reçu à partir du canal Audio PC.
2. Insérez la fiche du casque dans la prise casque de l'appareil.Les enceintes sont ensuite mises en sourdine.
HDMI ARC (Canal de retour audio)
La fonction ARC vous pe rmet d'envo yer un sign al audio de vot re téléviseur compat ible ARC à des
appareils audio co mpatibles AR C (ex : home ci nema) sans de voir brancher de câble a udio (ex : câbl e
coaxial, câble aud io numériqu e optique o u câble audio a nalogique).
VGA
R F
Pour profiter de la fonction ARC :
1. Assurez-vous que v os appareil s audio com patibles ARC s ont connectés par un câb le HDMI 1.4
à l'entrée HDMI 2 (ARC ) do votre appa reil comp atible ARC. Act ivez ensuite l'optio n ARC de vos
appareils audio co mpatibles AR C.
2. Réglez les paramè tres du télév iseur : app uyez sur le bou ton du MENU , allez dans SE TUP pui s
activez HDMI CEC Con trol.
3. Utilisez ensuit e la télécomm ande de vot re télévise ur pour rég ler le volume ( VOL + / - et MUTE) de
l'appareil audio c onnecté.
9 FR
Page 40

Installation
PC
ETAP ES :
Veillez à ce que le télév iseur et l'or dinateu r soient hors t ension.
1. Branchez le câble V GA et audio.
2. Branchez le cordo n d'aliment ation.
3. Allumez le télévis eur, passez en m ode PC.
4. Allumez le PC.
Cette séquence est t rès importante.
USB HDMI2 (ARC) HDM I1
FR
HEADP HONE
COMMO N INTER FACE(C I)
PC AUDIO
VGA
R F
FR 10
Page 41

Installation
PC
MODE PRÉDEFINI
1
2
3
4
5
6
REMARQUE :
La fréquence verticale (Hz) du PC ne doit pas excéder 60Hz
RÉSOLUTION
800*600
640*480
1024*768
1280*960 60 60
1280*720 60 45
1360*768 60 47.7
V.Fréq.(Hz) H.Fréq.(kHz)
ANTENNE
60
60
60
37.88
31.47
48.36
FR
Remarque :
Branchements de l' antenne : Prise IEC (fem elle).
Impédance d'entr ée : 75 non équil ibré
11 FR
Page 42

Installation
ÈQUIPEMENTS AUDIO/VIDÉOS
Cette TV offre un groupe d’AV, un groupe YPbPr et une PERITEL pour un branchement facile au
magnétoscope, DVD ou autres équipements vidéo. Veuillez-vous référer au manuel du propriétaire de
l'appareil à raccorder.COLLEGAMENTI POSTERIORI E LATERALI
RACCORDEMENTS SUR LE CÔTÉ ET ARRIÈRE
USB HD MI2(A RC) HDM I1
HDMI
HEAD PHONE
COMM ON INTE RFACE( CI)
PC AUDI O
Y
W
R
B
G
VGA
Jaune (vidéo)
Blanc (audio L)
Rouge (audio R ou Pr)
Bleu (Pb)
Vert(Y)
FR
MATÉRIELvidéo avecYPbPr
R F
GBR
100-2 40V~ 50 /60Hz
QUIP EMENT VIDÉO
W R
POUR S ORTIE SAUDI O
AC-IN PUT
W
R
YPbP r
Y
POUR S ORTIE SVIDÉ OS
RBG
RBG
VIDE O
Y
W
L R
W R
R
COAX IAL OUTP UT
SCAR T
Il peut être relié aux appareils suivants : magnétoscope, lecteur multi-disque, DVD, caméscope, jeu vidéo ou
chaîne HI-FI, etc...
YPbPr peut prendre en charge les formats vidéo suivants : 480i, 576i, 480p, 576p, 720p, 1080i, 1080p.
FR 12
Page 43

TÉLÉCOMMANDE À DISTANCE
1
28
2
3
4
5
6
7
8
9
10
11
12
13
14
15
MENU
VOL
FREE ZE
CH
REC
16
17
18
19
20
21
22
23
24
25
26
27
1: :Pour allumer le téléviseur ou le mettre en veille.
2: :En mode USB, touche de retour en arrière. En mode télétexte,
touche de sous-page.
3: : En mode USB, touche d'avance rapide. En mode télétexte,
touche Révéler.
4: : Appuyez sur cette touche en mode USB pour démarrer ou
continuer la lecture.
5: : Appuyez sur cette touche en mode USB pour mettre la lecture en
pause.
6: TEXT : Pour aller dans Télétexte.
7: SUBTITLE (SOUS-TITRES): Pour activer les sous-titres, appuyez
sur la touche Subtitle en mode TNT.
8 :MENU : Affiche l'écran du menu principal.
9 :CURSEUR : Pour naviguer dans le menu.
10:OK : Pour confirmer la sélection.
11: EPG : Pour afficher des informations sur le programme regardé et
sur les programmes à suivre en mode TNT.
12:FAV : Pour accéder à la liste de vos chaînes préférées en mode TAT
ou TNT.
13:VOL+/- : Pour régler le volume.
14:PAVÉ NUMÉRIQUE : Pour accéder directement aux chaînes.
15:AUDIO : Pour sélectionner la langue audio disponible des
programmes télévisés.
16: : Pour désactiver ou activer le son des enceintes.
17: : En mode USB, touche Suivant. En mode télétexte, touche
Liste. En mode TNT, permet de répertorier les chaînes de télévision et
de radio.
18: : En mode USB, touche Précédent. En mode télétexte, touche
Conserver la page.
19: :En mode télétexte, touche sommaire/raccourci pour le
magnétoscope numérique.
20: : Pour arrêter la lecture en mode USB.
21:INFO : Appuyez sur la touche INFO pour afficher des informations
sur le programme que vous regardez.
22:FREEZE (FIGER) : Pour figer l'image que vous regardez.
23: : Pour afficher et sélectionner les sources vidéo disponibles.
24:EXIT (QUITTER) : Pour revenir au menu précédent ou quitter le
menu.
25:CH+/CH- : Pour naviguer entre les chaînes.
26:REC : Pour enregistrer le programme télévisé que vous regardez
en mode TNT.
27:RECALL : Mode TNT : Sélectionne la dernière chaîne regardée.
28. BOUTONS COLORÉS (voir note de bas de page)
FR
Note de bas de page :
Les touches rouge, verte, jaune et bleue sont
multifonctions ; suivez les instructions à l'écran.
Installation des p iles de la télécommand e
La télécommande né cessite deu x piles de ta ille AAA (non fou rnies). Voir ci-desso us les étapes à s uivre
pour remplacer les p iles.
1. Retirez le cache du c ompartime nt à piles.
2. Insé rez les piles d ans le compar timent. D es indicati ons de pola rité +/- figu rent dans le compartim ent
à piles. Assurez-vo us de suivre ce s indicat ions de polar ité.
3. Refermez le cache d u compartim ent à piles .
13 FR
Page 44

TÉLÉCOMMANDE À DISTANCE
TÉLÉTEXTE
Le télétexte est un sy stème d'informatio n diffusé par certai nes chaînes , qui peut êt re lu comme
unjournal. Il offre également un accès a ux sous-tit res pour le s téléspect ateurs ay ant des
problèmes d'audi tion ou qui nec onnaiss ent pas parfa itement la langue de tra nsmission ( réseaux
câblés, chaînes sa tellites, etc.).
FR
Appuyez sur :
T EXTE
(TOUCHE 6)
SÉLECTION
D'UNE PAGE
ACCÈS DIRECT
AUX RUBRIQUES
INDEX
(TOUCHE 19)
SOUS-PAGE
(TOUCHE 2)
SUSPENDRE
(TOUCHE 18)
RÉVÉLER
(TOUCHE 3)
LISTE
(TOUCHE 17)
Vous obtiendrez :
Ceci est utilisé pou r entrer ou sor tir du mode t élétexte. L e sommair e affiche
laliste des élémen ts accessib les. Chaq ue rubrique d ispose d'un numéro de
page corresponda ntà 3 chiffres.
Saisissez le numér o de la page souh aitée à l'a ide du pavé num érique et des
flèches pointant v ers le haut et vers le bas. Pa r exemple, po ur la page 12 0,
saisissez 120. Le nu méro s'affiche en ha ut à gauche. Pa tientez j usqu'à ce
que la page s'affi che.
Répétez cette opér ation pour affiche r une autre pag e. Si le temp s d'attente
est tro p long, cela si gnifie que la p age n'est p as disponib le. Compo sez un
autre numéro.
Les zones de couleur s sont affichées au ba s de l'écran. L es 4 touche s de
couleurservent à a ccéder aux ru briques o u aux pages cor respondantes.
Les zones colorées clignoten t lorsque l a rubrique ou l a page n'est pas
encore disponibl e.
Cela renvoie à la page d e contenu (gé néralem ent la page 100 ).
Certaines pages co ntiennent d es sous-p ages qui s'affiche nt
automatiquemen tsuccessi vement. C ette touche e st utilis ée pour arrêt er
ou reprendre l'acq uisitiond e la sous-p age. Le numér o apparaît en haut à
gauche.
Pour figer la page.
Pour afficher ou masquer les informations cachées (solutions de jeux).
L'utilisateur pe ut sélectio nner quat re pages à mett re dans ses f avoris qui
correspondront c hacune à un bou ton color é. Les numéro s de pages
préférées doiven t être sauveg ardées su r une mémoire n on volati le pour
chaque chaîne par le s ystème qui pe ut les rest aurer si beso in.
E
FR 14
Page 45

FONCTIONNEMENT
GUIDE D'INSTALLATION
L'écran de premièr e configura tion s'affiche à
lapremière mise so us tension du t élévise ur ou
réinitialisati on du réglage usine.
Fir st Time Se tup
OSD L angua ge Engl ish
Mod e Setti ng Home M ode
Cou ntry Ge rmany
Ant enna Typ e Air
Aut o Scan DT V+ATV
Sta rt
1). Appuyez sur les tou ches ▼▲ pou r naviguer
dans le menu et sur les bo utons ◀▶ po ur modifi er
les paramètres. Sé lectionne z la langue s ouhaitée,
le Mode maison/Bou tique à afficher sur l e menu.
Modes Maison ou Bout ique
1. Le Mode Maison est un m ode d'écono mie
d'énergie. Le Mode M aison est rec ommandé p our
le réglage de l'affichage normal et est dé fini par
défaut.
2. Le Mode Boutique es t une option po ur les
détaillants pour l a publicité o u la présen tation de
produit. Le Mode Bou tique a une ima ge plus
lumineuse que le Mod e Maison.
3. Vous pouvez passer d u Mode Maison a u Mode
Boutique à votre gré .
2). Appuyez sur les bou tons ◀▶ pou r sélectionner
AIR/Câble, c’est -à-dire DVB-T/DVB- C.
Remar que
Si vous sélectionn ez DVB-C, vou s sélecti onnerez
complet ou rapide po ur balayer. Vou s pouvez
également sélect ionner le mod e Auto Scan.
TVN + ATV ou TVN seule ment ou ATV seulement.
3). La syntonisati on de la chaîne c ommence . Cette
opération peut pre ndre quelqu es minute s.
L'affichage mo ntre l'avancement de l a
syntonisation et l e nombre de cha înes trou vées.
4). Si vous souhaite z ignorer le ré glage TVN,
appuyez sur le bouto n MENU pour int errompr e le
réglage à mi-chemi n.
Vous passez ensuite d irectemen t au réglag e ATV.
5). Une fois le réglag e terminé, le s chaînes s ont
classées dans un ord re prédéfin i. Si vous
souhaitez ignore r des chaînes , modifie r l'ordre
prédéfini ou renom mer des chaîn es, sélec tionnez
le programme Edite r sous le menu de l a chaîne.
Remar que
TVN TV numérique
ATV TV analogiq ue (non uti lisé au Royau me-Uni)
1. MENU DE LA CHAÎNE
1. 1) Réglage Automatiq ue (DVB-T)
1). Appuyez sur la touc he MENU, puis a ppuyez su r
les touches▼▲ pou r sélection ner le menu
CHAINE et appuyez en suite sur la to uche OK ou la
touche de droite.
2). Appuyez sur les tou ches ▼▲ pour sélection ner
Auto Scan et appuyez s ur la touche OK.
FR
Fir st Time Se tup
OSD L angua ge Engl ish
Mod e Setti ng Home M ode
Cou ntry Ge rmany
Ant enna Typ e Cab le
Cab le Quic k
Aut o Scan DT V+ATV
Sta rt
15 FR
Page 46

FONCTIONNEMENT
Aut o Scan
Cha nnel
Man ual Sca n
Pro gram Ed it
Pic ture
Com mon Int erfac e
Aud io
Sig nal Inf ormat ion
Sof tware U pdate (USB)
Clo ck
Set up
Loc k
MENU
Ret urn Mo ve OK
OK
3). Appuyez sur les touches ◀▶ pour sélectionner
le type d'antenneaérien c'est-à-dire DVB-T.
Ant enna Typ e A ir
Cha nnel
Cou ntry Ge rmany
Mod e DTV+AT V
Pic ture
Sta rt
Aud io
Clo ck
FR
Set up
Loc k
MENU
Ret urn Mo ve OK
OK
4). En mode pays, appu yez sur les touches ◀▶
pour sélectionne r le pays où vous a llez fair e
fonctionner la TV.
5). En mode éléments , appuyez sur les touche s
◀▶ pour s électio nner le mode de s yntonisation :
ATV / TVN / TVN + ATV. Appuyez sur la tou che▼
pour sélectionne r Démarrer.
6). La syntonisati on de la chaîne c ommence .
Cette opération pe utdurerqu elques mi nutes.
L'afficheur in dique laprogressio n de la
syntonisation et l e nombre de cha înestro uvées.
7). Si vous souhaite z ignorer le ré glage TVN,
appuyez sur la touch eMENU pour in terromp re la
syntonisation à mi -chemin. Vou s serez red irigé
ensuitedirecte ment vers la sy ntonisa tion
ATV.Vous pouvez répéte r l'étape ci- dessuss i
vous souhaitez éga lement igno rer la
syntonisation ATV.Un r appel
d’installation apparaîtr a au procha in allumage d u
téléviseur,si auc un canal n'es t trouvé.
8). A l a fin de la synto nisatio n, les chaîne s sont
classéesdans un or dre prédéfi ni. Si vous
souhaitez ignore r des chaînes , modifie rl'ordre
prédéfini ou renom mer des chaîn es,
sélectionnezle P rogramme Ed iter dans l e menu
de la chaîne.
Aud io
Clo ck
Set up
Loc k
Sca nning C h12
Dig ital Ch annel s Found :
DTV: 3
Rad io: 0
Dat a: 0
Ana log Cha nnels F ound: 0
MENU
Ski p
EXIT
Exi t
Cha nnel
Pic ture
1.2) Recherche aut omatique (DVB-C)
1). Appuyez sur la touc he MENU, puis a ppuyez su r
les touches▼▲pou r sélection ner le menu CHAINE
et appuyez ensuite s urla touche O K.
2). Appuyez sur les tou ches▼▲ pour sélectio nner
Auto Scan etappuye z sur la touche OK,
sélectionnez le Type d'antenne pourle c âble, c'est
à dire DVB-C.
Ant enna Typ e Cable
Cha nnel
Cou ntry Ge rmany
Mod e DTV+AT V
Pic ture
Sta rt
Aud io
Clo ck
Set up
Loc k
MENU
Ret urn Mo ve OK
OK
3). Appuyez sur la touc he▼, puis appuy ez sur les
touches ◀ ▶▼▲pour sé lectionne r le pays où vo us
allez faire foncti onnerla TV.
4). Dans le Mode menu, a ppuyez sur le s touches
◀▶ pour s électio nner ATV / TVN / TVN + ATV.
5). Sélectionnez D émarrer pou r accéder a u menu
ci-dessous, afin d e sélection nerle mod e recherche .
Qui ck
Cha nnel
Ful l
Adv anced
Pic ture
Aud io
Clo ck
Set up
Loc k
MENU
Ret urn Mo ve OK
6). La syntonisati on de la chaîne c ommence .
Cette opérationp eut prendre q uelques m inutes.
L'afficheur in dique la progression d e la
syntonisation et l e nombre dech aînes tro uvées.
▶
OK
FR 16
Page 47

FONCTIONNEMENT
7). Si vous souhaite z ignorer le ré glage TVN,
appuyez sur le bouto n MENU pour int errompr e
le réglage à mi-chem in. Vous serez directe ment
dirigé vers la synto nisation ATV.Vou s pouvez
répéterl’étape c i-dessus si v ous souha itez
également ignore r la syntonis ation
ATV.Unrappel d’inst allation ap paraîtr a au
prochain allumag e du télévise ur,si aucu ne
chaîne n'est trouv ée.
8). A l a fin de la synto nisatio n, les chaîne s sont
classéesdans un or dre prédéfi ni. Si vous
souhaitez ignore r des chaînes , modifie rl'ordre
prédéfini ou renom mer des chaîn es,
sélectionnezle P rogramme Ed iter dans l e menu
de la chaîne.
Remar que
Toutes les chaînes y com pris ATV, TVN et Radio
peuventêtre régl ées en une seul e fois, si le Type
de Tune est TVN +ATV.
2. 1) Syntonisatio n TVN manuelle (DVB- T)
1). Appuyez sur la touc he MENU, puis a ppuyez
sur les touches▼▲
pour sélectionne r le menu CHAIN E etappuy ez
sur la touche OK.
2). Appuyez sur les tou ches▼▲ pour
sélectionner le ba layage manu elet appu yez sur
le bouton OK, si vous sé lectionne z Aérien dan s
Auto Scan, vous entr ez dans le menu balayage
manuel DVB-T.
Cha nnel
3). L'écran de balay age manuel DV T appar ait.
Appuyez sur les touc hes ◀▶ pour s électio nner la
bande UHF désirée ou a ppuyez sur la t ouche OK pu is
entrez le numérode c haîne. Séle ctionne z Démarrer
pour commencer à rec hercherce tte chaîn e. Lorsque
le signal est réglé, l a puissance d e l'image et du signal
s’affiché à l'éc ran.
4). Appuyez sur la touc he MENU pour re venir aum enu
principal.
5). Appuyez sur la touc he SORTIE pour quitt er le
menu.
2. 2) Syntonisatio n TVN manuelle (DVB- C)
1). Appuyez sur la touc he MENU, puis a ppuyez su r les
touches▼▲pour sé lectionner le menu CHA INE
etappuyez sur la tou che OK. Si vous sélectio nnez le
câble en recherche a utomatiqu e,vous en trez dans le
menu de balayage man uel DVBC
Dig ital Sc an Ch5
Sta rt
Str ength 5 4
Pic ture
Aud io
Clo ck
Set up
Loc k
MENU
Ret urn Mo ve OK
OK
Fre quenc y 47400 0K
Cha nnel
Sym bol Rat e 6875K
Mod ulati on Auto
Pic ture
Sta rt
Aud io
Clo ck
Set up
Loc k
MENU
Ret urn Mo ve OK
2). L'écran de balay age manuel DV B-C appar ait.
Appuyez sur les touc hes▼▲pour s électio nner
(Fréquence /Symb ole/QAM Type ), appuy ez sur
OK pour entrer la fréq uence etsymbole, app uyez
sur ◀▶ po ur modifi er le type QAM, a ppuyez su r
Démarrerpour lan cer la recher che de cett e chaîne.
Lorsque le signale st réglé, la pu issance d u signal
et de l'image s’affiche à l'écran.
3). Appuyez sur la touc he MENU pour re venir
aumenu principal .
4). Appuyez sur la touc he SORTIE pour quitt er le
menu.
3) Syntonisation ATV m anuelle :
Vous pouvez changer l e système de so norisat ion,
recherchez des cha înesde TV analogiq ue et
syntoniser les cha înes, puis stocker les chaînes
que vous avez sélect ionnées.
ATV Ma nual Tuning
Sav e to 1
Sys tem BG
Cur rent CH 1
Sea rch
Fin e tune
Fre quenc y 44.25 M Hz
Save
Remarque
1. Appuyez sur le bouto n rouge de télé texte pou r
stocker les chaîne saprès la syntonisat ion
manuelle.
2. Si le nombre de chaîn es à enregist rer est
identique aunomb re de chaînes a ctuel, lo rsque
vous appuyez sur le bo uton Rouge, l e nouveau
numéro écrasera le numéro de cha îne actue l.
4). Mod ification d e programme
Appuyez sur les touc hes ▲ou▼ pour sél ectionn er
programme Editer d ans le menu de la c haîne. Pu is
appuyez sur la touch e OK pour entre r dans le
sous-menu. Ensui te, vous devez sélecti onner le
programme que vous s ouhaitez mo difier.
OK
17 FR
FR
Page 48

FONCTIONNEMENT
Programm e Edit
001 T he HI TS
002 T MF
003 U KTV Br ’tl dea s
004 f t h
005 I deal Wo rld
006 C olour bars1 00
001 K iss
002 S mash Hi ts!
003 K erran g!
Del ete
Mov e
Suppr imer : appuye z sur le bouton rouge pour
supprimer la chaîn eque vous ave z mise en
surbrillance.
IGNOR ER : appuyez su r le bouton jau ne pour
sélectionner la fo nction Igno reret l’i cône
IGNOR ER s’affi che à côté du p rogramme ; il s era
ignoré lors du chang ement de chaî ne.
DÉPLACER : appuyez s ur le bouton ve rt pour
mettre en surbrill ancela chaî ne que vous
souhaitez déplac er. L’icône s'a ffich eavant le
numéro de la chaîne. Ap puyez sur les t ouches
▼/▲ pour une nouvelle po sition et app uyez sur le
bouton vertpour co nfirmer.
Renommer : (pour ATV unique ment) appuyez sur
FR
le bouton bleu pourr enommer la ch aîne. Appu yez
sur la touche numéri que (commei llustré c idessous) pour entr er un nouveau n om et appuy ez
sur la touche OKpour c onfirmer.
Skip
Ren ame Fav orite
DTV
DTV
DTV
DTV
DTV
DTV
Rad io
Rad io
Rad io
FAV
1 2
abc3def
5
4
ghi
7
pqrs
tuv9wxyz
FAV : app uyez sur la tou che FAV pou r définir la
chaîne favorite. (Si vous souhaitez voi r la liste des
chaînes favorite s, vous devezquitter l e menu du
programme Éditer e t appuyez sur l a touche FAV).
5). Int erface comm une
Ce menu permet d'afficher les informat ions de la
carte CI.
6). Inf ormations s ur le signal (uniqueme nt pour
la TVN)
Appuyez sur les touc hes▼/▲pour séle ctionne r les
informations sur l e signaldan s le Menu de la
chaîne. Puis appuy ez sur la touch e OKpour
aff icher les inf ormations relative s à lachaîne en
cours.
7). Mis e à jour logici elle (USB)
Appuyez sur les touc hes ▼ ou ▲ pour sélectionn er
la mise à jour logicie lle(USB) da ns le Menu
Chaîne. Puis appuy ez sur la touch e OKpour me ttre
à jour le logiciel à l'a ide d'une clé U SB. Respe ctez
lesinstruction s de mise à nivea u de logici el
fournies avec lelo giciel.
Remarque : nous vous r ecommando ns d'effectuer
une réinitialisa tion d'usin e(consu ltez la rubri que «
restaurer les para mètres par défaut» dan s le menu
de configuration ) pourvous as surer que l 'appareil
est correctement m is à jour.
jkl
6
mno
8
FR 18
2. MENU IMAGE
Le deuxième élémen t du MENU est le ME NU
IMAGE .
Vous pouvez régler l’ effet d'image ici te ls
quecontraste, lu minosité, e tc..
Appuyez sur les touc hes▼▲ pour d éplacer,
appuyez sur les touc hes ◀▶ pour r égler.
Pic ture Mo de Stan dard
Cha nnel
Bri ghtne ss 50
Con trast 4 5
Pic ture
Sha rpnes s 60
Aud io
Col or 45
Tint 0
Clo ck
Set up
Loc k
Remar que
1).Vous pouvez choi sir entre tro is modes de
saturationde cou leurs : norma l, chaud, f roid.
2).Le réglage PC n’e st disponib le qu’en mo de PC.
Il vous permetde rég ler la positi on horizo ntale,
verticale,la dim ension et la pé riode.
3. MENU AUDIO
Le troisième éléme nt du MENU est le MENU
AUDIO.
Vous pouvez régler l' effet sonore ici tel s queaigu,
grave, balance, et c.
Appuyez sur les touc hes▼▲ pour d éplacer,
appuyez sur les touc hes ◀▶ pour r égler.
Cha nnel
Pic ture
Aud io
Clo ck
Set up
Loc k
Remar que
1. Volume auto : dispon ible unique ment lors que le
volume d’entrée
du signal est trop gra nd ou déformé .
Le son multicanal (S urround Sou nd) peut êt re
activé ou désactiv é.
COAXIAL se réfère à la sort ie de son numér ique.
Med ium
DNR
Dyn amic Co ntras t Weak
Asp ect Rat io 16:9
Col or Temp
MENU
Ret urn Mo ve OK
Sou nd Mode S tanda rd
Treb le 0
Bas s 0
Bal ance 0
Aut o Volume O n
Sur round S ound Of f
Off
COA XIAL
Aud io Desc ripti on
MENU
Ret urn Mo ve OK
Nor mal
OK
OK
Page 49

FONCTIONNEMENT
4.MENU HORLOGE
Le quatrième éléme nt du menu est le M ENU
HORLOGE.
Vous pouvez régler l' horloge, le t emps de
marche/arrêtmi nuterie de mi se en veill e, etc. Appuye z
sur les touches▼▲ p our vous dépl acer, appuyez sur
OKpour régler.
Sle ep Timer O ff
Cha nnel
Dat e 2010/ 04/3 0
Pic ture
On Tim e
f
Of Ti me
Aud io
Aut o Sleep O n
Time Z one
Clo ck
Set up
Loc k
MENU
Ret urn Mo ve OK
Veille automatiqu e
Si après 15 minutes il n 'y a aucun sign al d'entr ée,
la TV s era mise en mod e veille automatique ,
lorsque la fonctio n veille auto matique est activée .
L'heure de l’horlo ge est réglée a utomati quement
quandla TV est en me sure de recevoir la TV N.
5. MENU RÉGLAGE
Le cinquième éléme nt du MENU est le M ENU
RÉGLAGE. Vouspouv ez régler la la ngue de
l'OSD, la langue Audi o, la langue du s oustitrageetc.
SD La nguag e ngl ish
O E
Cha nnel
Pic ture
Aud io
Clo ck
Set up
Loc k
Mise en veille autom atique(4h)
1. Si après 4 heures d'a llumage, au cune
modification n'a é té effectuée à la télé vision (par
ex. : cha ngement du vo lume ou de chaî ne), le
processus automa tique de mise h ors tensi on de la
TVcommencera. Un e fenêtre pop -up s'affiche à
l'écran.
Après 150 secondes l e téléviseu r passe
automatiquemen t en modeveil le.Pour c ontourner
l'arrêt automati queappuye z sur n'imp orte quel
bouton de la télécom mande.
2. Pour désactiver l 'arrêt automatique d u
téléviseur,alle r au menu de conf igurati on,
sélectionnez Mis e en veille aut omatiqu e (4 h) et
désactivezcett e option à l'ai de de la touc he flèche
droite.
Pour revenir à l’arr êt automati que après 4 h eures
répéter les étapes c i-dessus ma is utilis ez la touche
flèche gauche pour s électionn er Marche
(4heures).
Dans le menu système d e fichiers EVP vous
pouvez configure rle lecteur U SB pour EPV.
udi o
A Lan guage s
Sub title
Cou ntry Ge rmany
PVR F ile Sys tem
Time shift R ecord T ime 1ho ur
Aut o Stand by(4h r) On(4 h ours )
Mod e Setti ng ome M ode
OSD Ti me
10 se conds
Res tore Fa ctory D efaul t
MENU
Ret urn Mo ve OK
OK
H
OK
PVR S ettin gs
Mov e Left
Mov e Right
OK
Sel ect
EXIT
Exi t
Heure d'enregist rement différé : pour dé finir
l’heured'enreg istrement d iffér é maximale.
Mise en veille autom atique (4h) :pour met tre
l’appareil en veil le après 4 heur es sans uti lisation pa r
n'importe quelut ilisateur.
Réglage du mode :pou r définir le mode maison o u
boutique.
HDMI CEC Control : Pou r activer ou désactive r la
fonction CEC.
Durée de l'afficha ge à l’écran (OSD) : appuy ez sur
les touches◄ ou ► pour s électionner le menu du rée
d’affichage.
Restaurer les para mètres usine par défau t
File Manager Device List
Scheduled Record
Appuyez sur les touc hes ▼ ou ▲ pour sélectionn er
Restaurerles par amètres usi ne par défa ut et appuyez
sur la touche OK pourr entrer la première
configuration. U ne fois confi rmé, tous l esréglage s
seront effacés .Cette fo nction doit ê tre
utiliséelorsqu evous renco ntrez des p roblèmes av ec
votre TV.
Remar que
La restauration de s paramètre s usine par d éfaut
eff ace tous les pr ogrammeset mots de pas se.
6. MENU VERROUILLA GE
Le sixième élément d u menu est le MEN U
VERROUILLAGE.
Vous pouvez verroui ller le systè me, défin ir un mot de
passe, bloquer un pr ogrammeet d éfinir le c ontrôle
parental. Après avo ir activé le sy stème de
verrouillagevo us ne pourrez p as recher cher des
chaînes oumodifi er des progra mmes.
Cha nnel
Le mot de passe par défa ut est 6666. Si vous
modifiez le mot de pas se, assurez -vous de ne p as
l'oublier !
Si vous oubliez le nou veau mot de pas se, compo sez
le mot de passe « Master » , 9527.
Channel Locks (Verr ouiller des c haînes) : Ap puyez
sur ▼▲ pou r choisir l e programme p uis appuyez sur
OK pour bloquer le pro gramme. Si vo us voulez
débloquer le progr amme, allez a u menu prin cipal,
saisissez le mot de pa sse, choisi ssez le pro gramme
puis appuyez à nouve au sur OK.
Contrôle parenta l : Appuyez sur ◀▶pour
sélectionner le co ntrôle pare ntal.
Ent er Pass word -- -Ena ble Off
Cha nnel Lo cks
Pic ture
Par ental R ating N one
New P asswo rd ----
Aud io
Clo ck
Set up
Loc k
MENU
Ret urn Mo ve OK
OK
19 FR
FR
Page 50

FONCTIONNEMENT
7. Menu EPG (Guide éle ctronique des
progr ammes)
Le Menu EPG (Guide éle ctronique d es progra mmes)
vous fournit des inf ormations détaillé es sur le
programme de diffusion. Appuyez surla t ouche EPG et
un Menu pop-up s’afficheavec des infor mations sur l e
programme de la chaî ne que vous ête sen train d e
regarder. Vous serez e n mesure de voi r la
programmation su r septjours . Pour conn aitre le
programme du lende main utilis ezle bout on jaune et
pour celui du jour pré cédent util isez le bou ton bleu
800 H TV1
11:32 -12:1 7
FIKCIJA ( IGRANA I ANIMIRANA)Marichuy razmišlja kako će ubrzo saznati ho e li ponovno vidjeti ili
će zauvijek biti smetnja drugima, dok se Juan Miguel kune da će joj vratiti vid. Cecilia I Patric...
Mon. 25 Jan
800 HTV1
801 HTV2 Zg
802 RTL TV
803 NOVA TV
804 CH-3 on T...
805 CH-5 on T...
Weekly
Move
Pour voir ce qui va être d iffusé après le prog ramme
FR
en cours, appuyez su r la touche ►. Pour affi cher une
10:00 11:00
First...Treća dob, emisija za umir... . .. Dne... .. TV k... . ..
Pod isti...
chaîne différe nte, utilisez les touc hes ▲ ou ▼ pour
sélectionner la ch aîne et appuy ez sur les to uches ◄
►. Pour q uitter le Men u EPG, appuyez sur la touc he
EPG ou SORTIE.
Remar que
Veuillez vous repor ter au bas de l'é cran EPG po ur
les fonctions de bas e des touches d e la
télécommande.
Hebdomadaire
Dans le menu EPG, vous p ouvez modifier le mode
aff ichage
entre le mode EPG quot idien et EPG hebdomada ire
par le bouton rouge.
Les deux modes sont un iquement affiché s de
différentes ma nières,
la fonction est la mêm e.
Enregistrement
En mode EPG, appuyez s ur la touche REC de la
télécommande pou r sélection ner un prog ramme à
enregistrer. Vous en trerez ensu ite dans le m enu
d'enregistreme nt à la demande p our le régl age de
l’enregistreme nt.
(Reportez-vous à l a section du sy stème de fi chiers
EVP).
Remar que
Veuillez vous assur er qu’un lect eur de disq ue dur
compatible ou un pér iphérique U SBest ins éré dans
l'entrée USB pour pl anifierle s enregis trements. S i
votre périphériq ue de stockag e n'est pas
compatible,on vo us demander a de le forma ter.Dans le
menu de configurat ion, entrez dansla li ste des
périphériques du m enu système d e fichier s EVP pour
formatervotre pé riphériqu e.
EPG D aily Mo de
11:32-12:17 Opreznoanđelom,telenovela
Evergreen(3.)
Dadilja
Malcolm u sredini Exkluziv
Naši najbolji dani
Reminder PrevDate NextDate
Zakon brojeva IN magazin
Real No Information
Real No Information
Rec:Record
25 Jan 2 010 10: 13
ć
Oprezno s anđe...
Zvjezdan, dok...
Info:Display
EXIT:Exit
MISE EN G ARDE !
Lors du formatage du p ériphériq ue USB, le
formatage suppri mera tous les fichier s stockés sur
le périphérique US B.
Attente d’enregistr ement
Si vous avez défini un e nregistre ment prog rammé,
votre TV s’allum era automatiquemen t lorsque le
programme est régl é pour enregi strer et s' arrêtera
automatiquemen t une fois l'en registr ement
terminé.
Au cours de l’enregi strement pr ogrammé , l’image
et et le volume seront t outefois muets (il y n'a ura
aucun affichag e), cependant, l'app areil sera en
marche. Vous pouvez a ppuyer sur la
touche VEILLE pour r allumer l’i mage et le vo lume
Rappel (bouton ver t)
Dans le Menu EPG, appu yez sur le bouton vert
pour régler un rappe l du programm e. Le Menu
Rappel ci-dessou s s’affiche et vous po uvez utilis er
les touches ◄ ou ►pour d éfinir les détails du
programme rappel . Vous serez en me sure
de définir le rappel p our qu’il se pr oduise un e fois,
quotidiennemen t ou hebdomad airemen t.
Reminder
Fre quenc y
Cha nnel
Min ute
Hou r
Mon th
Dat e
Sche dule Li st
Vous pouvez appuyer s ur le bouton ro uge pour
aff icherla lis te des programmes plan ifiés. Vous
pouvez aussi suppr imer les prog rammes qu e
vousavez planifi és.
INFO
Dans le Menu EPG, appu yez sur la touche INFO
pour obtenir plusd ’informat ions sur le p rogramme
en cours.
8.Système de fichi er EVP (u niquement p our la
TVN)
Appuyez sur la touch e Menu, sélec tionnez l e sousmenu de configurat ion. Appuyez s ur les
touches▼ ou ▲ pour séle ctionner le s ystème de
fichiers de EVP, pui s appuyez sur le bouton OK
pour entrer dans le so us-menu, pu is utilis ez les
touches◄ ou ► pour fai re défiler les options .
Remarque : vous pouv ez appuyer su r la touche
Pour ou vrir le systè me de fichiers EVP
directement.
17:0 3 19/11/2 004
Off
The H ITS
0
17
Nov
19
OK
FR 20
Page 51

FONCTIONNEMENT
PVR S ettin gs
Mov e Left
Mov e Right
OK
Sel ect
EXIT
Exi t
Gestionnaire de fi chiers : vous pouvez
visualiser tous le s programme s enregis trés ici.
Appuyez sur la touch e bleue pour pa sser en ple in
écran.
Fil e Manag er
Sche duled R ecord
Function
Play
Dele te One
EXIT
Dele te All
Zoom
Hot Key
Move U p
Move D own
EXIT
OK
Sele ct
MENU
Retu rn
EXIT
Exit
Liste des périphér iques : ce sous-menu
répertorie les pér iphérique s USB conne ctés au
téléviseur. Vous pou vez sélecti onner
lepériphérique , et appuyer en suite sur l e bouton
rouge pour formate r le périphér iqueUSB .
Dev ice Lis t
Function
Form at
Hot key
Move U p
Move D own
EXIT
OK
Sele ct
MENU
Retu rn
EXIT
Exit
Enregistrement p rogrammé : vous pouvez
définir la liste des e nregistre ments pro grammés
ici. Et vous pouvez ég alement sup primer
lesenregistrem ents progra mmés que vo us avez
définis
Sch edule d Recor d Setti ng List
Sche duled R ecord
Function
Dele te One
EXIT
Dele te All
Hot Key
Move U p
Move D own
EXIT
OK
Sele ct
MENU
Retu rn
EXIT
Exit
Ouvrir le sous-men u. Vous pouvez d éfinir la
fréquence d'enre gistremen t unique, q uotidienn e,
hebdomadaire, jo ur de la semain e, ou arrêt .
File Manager Device List
Stan dby
Current Playing File Into
Channel Name
Program Name
Recorded Time
Total Time
Description
Stan dby
Grou p
1
2
3
4
5
6
7
8
9
10
11
12
13
14
15
16
2012/08/09 11:44
Matt Baker and Clare Balding
present coverage of the eager...
Available Space
Device
192 MB
sda1
Freq uency
Once
Off
Off
Off
Off
Off
Off
Off
Off
Off
Off
Off
Off
Off
Off
Off
Scheduled Record
UKTV Br’tldeas_Good Food Bites_20041119_161021.ts
BBC ONE_Olympics 2012_20120808_114427.ts
UKTV Br’tldeas_Good Food Bites_20041119_162019.ts
BBC ONE
Olympics 2012
00:08:06
File System
FAT32
Chan nel
0 Colo urbar s100
Date
2004 .12.2 5
Start Time
18:1 7
Duration
00:3 0
Sch edule d Recor d - Group 1
Hot Key
EXIT
OK
MENU
EXIT
Enregistrer l'ém ission :
Pour enregistrer l e programme q ue vous reg ardez
actuellement app uyez sur la tou che REC et l’ icône
REC rouge apparaît ra à l'écran. L a durée
d'enregistreme nt / longueur e t le temps
d’enregistreme nt restant s'affic hera dans le menu
ci-dessous.
Move U p
Move D own
Adju st
Adju st
Sele ct
Retu rn
Exit
Setti ng Stat us
Setti ng Is Not I n Use
Frequ ency On ce
Chann el 6 Colo urbar s 100
Start T ime 200 4-12- 25
End Tim e 2004- 12-25
18:17
18:47
Recor ding
Rec orded Ti me : 00 : 00 : 40
Avai lable Ti me : 25 Min ute
Pour faire apparaî tre le menu app uyez sur la
touche REC à nouveau .
Pour arrêter l'enr egistreme nt, appuy ez sur le
bouton arrêter.
Vous pouvez égaleme nt entrer le Me nu du lecte ur
multimédia pour vi sualiser
vos programmes enr egistrés vi a le mode fil m.
Lire l' enregistr ement :
Le programme enreg istré sur l’ « USB » est
enregistré dans le d ossier « Enre gistrem ent USB
» sur le périphériqu e.
Vous pouvez le lire dan s le système de f ichiers
EVP et dans le sous- menu du gestionnaire d e
fichiers.
1. La taille de stocka ge USB peut être compris e
entre 128 Mo et 500 Go en ta ille, mais pour une
utilisation prat ique 2 Go à 500 Go es t
recommandé.
2. La vidéo peut être pi xelisée lor sque ledé bit
binaire de la vidéo es t trop faible . Cela peut ê tre
causé par une connex ionvia un câb le de rallo nge
USB au lieu de branche r l’USBdire ctement d ans le
téléviseur.
3. Les périphériqu es USB ne sont pa s tous
compatibles.
FR
21 FR
Page 52

FONCTIONNEMENT
Remar que
Assurez-vous que le p ériphériq ue de stock age
utilisé pour enreg istrer esti nséré dan s l'entrée
USB à l'arrière de l'a ppareilet q u’il est
compatible pour l' enregistr ement. Si v otre
périphérique de st ockagen'e st pas comp atible, il
vous sera demandé de le formater. E ntrez dan s
le menu du système de fi chiers EVP
etsélectionnez l a liste des pér iphériq ues pour
formater votre app areil.
Penda nt l'enregi strement, seule la fon ction
arrêt estdisponi ble.
Il n'ex iste aucune f onction d'enregist rement,
lorsque la chaîne es t la chaîne CI+ .
9.Time Shift
Appuyez sur pour met tre en pause le
programme que vous ê tesen train d e regarde r
afin d’activer la fo nction Time Sh ift. Le men u cidessouss'aff iche.Ce Menu dispara it
automatiquemen taprès quel ques seco ndes.
00:0 0:00
00:0 0:05
Play Pause FBStop FF
FR
Choisissez l'opt ion ▶ et appuye z sur OK pour
reprendrela lect ure et l’icôn e blanche d e lecture
apparaît à ladroit e de l'écran, q ui indiqu e que le
time shift esten cou rs.
Lorsque le menu a disp aru, appuye z sur la
Avai lable Ti me
00:0 0:00/ 04:13 :20
touche ▶, le menu s'affiche à nouveau. Pour
arrêter la fonctio n Time-Shift, appuyez s ur la
touche Arrêt ou dépla cez le curseu r pour
sélectionnerl' option arrê t lorsque l e menu est
activé, puissuiv re le guide pop u p.
Remar que
Assurez-vous que le p ériphériq ue de stock age
utilisé pour enreg istrer, esti nséré dan s l'entrée
USB à l'arrière de l'a ppareilet q u’il est
compatible pour l' enregistr ement. Si v otre
périphérique de st ockagen'e st pas comp atible, il
vous sera demandé de le formater. D ans le menu
de configuration , entrez dans l e sous-me nu du
système de fichier s EVPet sélectionnez L iste de
périphériques po ur formater v otre péri phérique.
Toute s les fonctio ns (lectu re, retour ra pide,
avance rapidepau se et arrêt) da ns le menu ne
peuvent êtreeffectuées que lorsque l e menu est
activé.
Il n'y au ra aucune fon ction Timeshift lorsq ue
lachaîne est la chaî ne CI+.
Lecture du fichier e nregistré
La TV e nregistre l e programme sur la clé USB
en *.ts format « Time Shi ft ». Si une autre TV, PC,
ordinateur porta ble,
DVD, ou tout autre dis positif ou périphéri ques
ne prennent pas en cha rge ou ne recon naissen t
pas le fichier *.ts (t ime shift), alors il
ne pourra pas être lu. « t s » est le format utilisé po ur
diffuser
la TV h aute défini tion. Vous pouvez lire le s fichiers
« ts » sur un
ordinateur ou ordi nateur port able avec l e logiciel
correct.
Consultez l'Inte rnet ou un four nisseur I T pour
obtenir plus
d’informations s ur le logicie l le plus app roprié.
Attention : JVC décl ine toute responsabi lité pour
tout logiciel télé chargé par un c lient ou
détaillant qui pou rrait conte nir des vir us ou pour
tout
dysfonctionnem ent résulta nt de l'ins tallation d u
logiciel.
FR 22
Page 53

FONCTIONNEMENT
10. Lecteur USB
Appuyez sur la touch e source et sél ectionn ez USB dans la li ste de sour ces, appuye z sur la touche OK pour
accéder au menu de l'U SB.
Assurez-vous que l e périphéri que USB est c orrecteme nt branch é dans la fente . Vous pouvez choisir ent re
quatre éléments mu ltimédias : p hoto, mus ique, film et t exte. Sél ectionnez l e type de média en appuyan t sur
◄►, app uyez sur OK pou r accéder au menu de sélec tion de disqu e.
Pho to
Mus ic Mov ie Text
Sele ct
OK
Ente r
Appuyez sur les touc hes ▼/▲ pour choi sir le bon di sque et le doss ier, appuyez sur OK pour ac céder à la liste
des fichiers média s. Appuyez sur l e bouton ro uge pourret ourner au menu de sélect ion du type de mé dia.
Sélectionnez le fi chier média e n appuyan t sur ◄► ou▼ ▲ , le cad re de visua lisation s’ affic he.
Appuyez sur ► pour lir e le fichier multimédi a en mode plein é cran. Lorsque le fichi er film est en cours de
lecture, appuyez s ur la touche ▼ pour affi cher la barre de contrôl e.
Pho to
USB 1/Pic
Sele ct
OK
Ente r ExitExit
Quic k Menu
Medi a Pad
PHOTO
Fonction de base
Lorsque les photos s ont en cours de l ecture, a ppuyer sur la t ouche « ▼ » sur l a télécomma nde, une barre
d'aide s'affic he en bas de l'écran.
Lectu re/Pa use
Précé dent
Suiva nt
Arrêt
Faire p ivote r
Appuyez sur la touche « Lecture/Pause » sur la télécommande pour lire ou mettre
en pause.
Appuyez sur la touche « Gauche » sur la télécommande pour regarder la photo
précédente.
Appuyez sur la touche « Droite » sur la télécommande pour lire la photo suivante.
Appuyez sur la touche « Arrêt » pour arrêter la lecture et revenir au menu
précédent.
Appuyez sur les touches « haut/bas » pour faire pivoter la photo.
FR
Menu ra pide
Appuyez sur la touche bleue, vous pouvez entrer dans le Menu rapide pour
régler l'intervalle de temps, répéter,effet diaporama, et fond Musical (vous
pouvez écouter la musique en premier).
23 FR
Page 54

FONCTIONNEMENT
Mus ic
USB 1/Mus ic
.. 1/1
10547 672.m p3
14953 359.m p3
1 / 2
10547 672
PLAY
00:00 :53 00:00 :00
Title:
Album :
Artis t:
Track
Year: 201 0-09- 30
Sele ct
OK
Ente r Exi tExit
Quic k Menu
Medi a Pad
MUSIQUE
Quand la musique jou e, appuyez su r la touche « ► » p our sélecti onner la barre d'outil s.
Fonctions de base
FB : appuyez sur la touche « Gauche/Droite » de la télécommande pour sélectionner
cette fonction, appuyez sur "ok"pour le retour rapide. Appuyez sur la touche « PLAY »
pour lire normalement.
FF : appuyez sur la touche « Gauche/Droite » de la télécommande pour sélectionner
cette fonction, appuyez sur «ok»pour l'avance rapide. Appuyez sur la touche
« PLAY » pour lire normalement.
Musique de fond : appuyez sur la touche « Gauche/Droite » de la télécommande,
sélectionnez cette fonction,appuyez sur la touche « ok » pour activer / désactiver.
FR
MUSIQUELes autre s fonctions sont sembl ables à « PHOTO », veuil lez-vous ré férer aux o ptions « PHOTO ».
FILM
Les opérations son t similaire s à « PHOTO » .Veuillez- vous réfé rer aux optio ns « PHOTO ».
Fonction de base
Boucle : appuyez sur la touche « Gauche/Droite » de la télécommande pour sélectionner
cette fonction, appuyez sur « ok »pour définir les temps A et B dans le film. Le film jouera
de façon répétée entre A et Bjusqu'à ce que vous appuyez sur « OK » à nouveau pour
désactiver ce paramètre.
Zoom avant : appuyez sur la touche « Gauche/Droite » de la télécommande pour
sélectionner cette fonction, appuyez sur « ok »pour agrandir la photo. (si le document
est supérieur à 1920 x 1080, cette fonction n'estpas supportée.)
Zoom arrière : appuyez sur la touche « Gauche/droite » de la télécommande pour sélectionner cette
fonction, appuyez sur « ok »pour réduire la photo. (Cette fonction ne supporte pas plus de 1920 x 1080
HD vidéo.)
Sélectionnez l'heure : appuyez sur la touche « Gauche/droite » de la télécommande pour sélectionner
cette fonction, appuyez sur « ok »pour sélectionner l'heure.
TEXTE
Appuyez sur « ▼ /▲ » pour sél ectionner l a page préc édente / suiv ante, sai sissez la tou che numérique et
OK pour accéder à la pag equevous so uhaitez .
Voici une liste des pri ncipaux typ es de fichi ers qui fonct ionnent depuis un péri phérique US B
Photo .jpg files
Audio .mp3
Vid eo .avi ,.mp4
Text .txt
FR 24
Page 55

Guide de dépannage
Dépannage du télév iseur
Lisez la section sui vante en prem ier lieu po ur éviter de re nvoyer votre achat ou d' attendre un responsa ble
après-vente inut ilement. Si v ous avez be soin d'aide p our l'utilisation de c e produit, vo us pouvez c ontactez
notre assistance t éléphoniq ue.
TV an alogi que & généra le
Sym ptôme s
Pas de son
Gré sille ment ou son dé formé
Le son passé d e Stereo à mon o. Signal tro p faible ou di ffu sion en mono . Vérifie z l'antenn e et le signal .
Aucun son st ereo depui s le
périphér ique conne cté à la prise scart
(AV) .
TV an alogi que et génér ale
Sym ptôme s
Ima ge gran uleuse (ne igeuse)
Les objets de l'imag e
apparaissent déc alés (image s
fantômes)
Son
Causes pos sibles
Le volume es t réglé au min imum. La tou che
« mue t » estac tivée.
Int erfér ence des voi tures, des l ampes
flu oresc entes,d' enregist reur vidéo , une
émi ssion d e radio, ord inateur pe rsonnels ou
autres app areils.
Une scart mono est uti lisée pour
connecter la TV. Le sign al en cours
de visualisation e st relié par la p rise
d'antenne.
Ima ge
Causes pos sibles
Cl déconne ctée.
Votre enreg istreur vi déo est peut -être
défectue ux.
Pro blème d e transmis sion.
L'antenn e a bougé, est e ndommagé e ou
est mal bran chée.
L'antenne reçoit d es signaux
réfléchis par les co llines ou les
bâtiments.
Antenne défectue use
Que f aire
Augmente z le volume. Ap puyez sur
la to uche « mu et »pour enl ever la
fon ction « m uet ».
Éte ignez l es apparei ls un par un
pour voir si l es interfé rences
s'e stomp ent. Consu ltez égale ment
la se ction c oncernan t les
interfér ences d'im age.
Vérifiez que le cordon de péritel
est stéréo.
Vérifiez que l'enregistreur vidéo
est connecté à la télévision par
un cordon (péritel) AV, puis
bascule letéléviseur en mode AV
Que f aire
Si vous avez un enregistreur
vidéo, essayez de brancher
l'antenne directement sur le
téléviseur. Si le défaut disparaît,
l'enregistreur vidéo est sans
doute à l'origine du problème.
Faites examiner l'antenne.
Essayez de syntoni ser un
signal de meilleur e qualité à
partir de la même stat ion de
télévision.
Faites examiner l' antenne
FR
Taches ou bandes sur l'i mage.
L'image n'est pas à la b onne taille
ou l'appareil sour ce (ordinat eur,
lecteur DVD, décod eur etc.) ne
permet pas de régler l a résolutio n
pixel pouvant être r eproduite p ar
l'écran.
Mauvaise récepti on de l'anten ne.
Interférences av ec d'autres
appareils électr iques (ex: mo teurs,
machine-outil) .
Les réglages des app areils vidé o
numériques ne sont p as adaptés
aux spécificatio ns d'entrée
VGA/H DMI du monite ur.
L'appareil sourc e n'a pas lu les
données de paramét rage de l'écr an.
Le câble utilisé n'a p as toutes les
connexions requi se
Essayez de syntoniser un signal
de meilleure qualité à partir de
la même station de télévision.
Faites examiner l'antenne.
Éloignez l'appareil à l'origine
des interférences ou éteignez-le
si possible.
Modifiez les paramètres du taux
d'actualisation ou de résolution
de l'appareil numérique, si
possible.
Évitez d'utilise r des vieux
câbles et des adapta teurs.
N'utilisez que des c âbles
modernes.
Redémarrez l'app areil sourc e
après avoir connec té et rallumé
l'écran.
Changez la carte gra phique de
votre ordinateur.
Vérifiez les résol utions vidé o
compatibles indi quées dans ce
mode d'emploi.
25 FR
Page 56

Guide de dépannage
L'image semble éti rée
ou aplatie, bien que l e
format d'image soi t
réglé correcteme nt (par
exemple 4:3 ou 16:9) .
Interférences vi suelles
(lignes ondulées o u
bandes sur
l'image).Prése nce
possible d'inter férences
sonores.
Pas d'image.
Caractères broui llés
dans le télétexte
Lorsque l'entrée R GB
est utilisée,
FR
l'image est distor due
ou inexistante.
TV an alogi que et génér ale
Sym ptôme s Causes pos sibles Que faire
La télévision semb le
"morte" : aucun témo in
ne s'allume et rien ne
fonctionne.
La lumière de veille
est activée mais les
touches ne semblen t
pas fonctionner.
Les touches de fonction
locales nefonctionnent
pas. Bloqué en veille.
L'appareil alime ntant
l'écran n'est pas ré glé sur le
bon format d'image
Un autre appareil ut ilise la
même fréquence.C âble de
mauvaise qualité e ntre le
téléviseur et l'an tenne.
L'antenne reçoit u n signal
parasite sur la même
fréquence.
La luminosité et le
contraste sont rég lés au
minimum.
Mauvaise récepti on
Signal de synchron isation
manquant.
Son
L'appareil n'est p as sous
tension.La prise d e courant
n'est pas sous
tension.Disjon cteur
déclenché ou fusib le grillé.
Le fusible ou le disjo ncteur a
sauté. Touche
STAN DBY/ON : si la TV
s’allume puis véri fiez que la
télécommande ne
fonctionne pas.
Dysfonctionnem ent du
microcontrôleu r lié à une
perturbation éle ctrique.
Sur l'appareil ali mentant le té léviseu r, choisisse z le
format de sortie qui c onvient, par exemple 4 :3
(format conventi onnel), 16:9, 1280 x 960 o u 1280 x
768 pixels pour les gr ands écrans .
Mette z les autres ap pareils en mo de veille p our voir
si les interférenc es disparai ssent; ch angez la
fréquence de sorti e de l'appare il à l'orig ine des
interférences (v oir mode d'em ploi de cet a ppareil).
Procurez-vous un c âble de meill eure qual ité.
Faites examiner l' antenne
Augmentez les régl ages de lumin osité et de
contraste.
Comme pour "image ne igeuse" et "i mages
fantômes".
Appuyez sur le bouto n AV pour sélectionner l 'entrée
AV qui r eçoit le sign al de synchronisatio n.
Vérifiez qu'il ne s' agit pas d'un e coupure d e
courant.
Vérifiez les inter rupteurs d' aliment ation sur la
télévision etla
Prise de courant. Vé rifiez le fusible ou le
disjoncteur prin cipal de votr e
boîte à fusibles. Re cherchez un e cause pos sible
de l'échec avant
deremplacer ou de re définir. Cou pez
l'alimentation , attendez ci nq
minutes et essayez S TANDBY / ON sur la face
avant. Si pas de chang ement, débr anchez
l'alimentation e t supposez qu e l'appar eil est
défectueux.
Coupez l'aliment ation secte ur et atten dez 10
minutes avant d'es sayer ànouv eau. (Lai ssez le
téléviseur débra nché et appel er le servi ce
de maintenance si ce la ne fonctio nne pas.)
TV an alogi que et génér ale
Dysfonct ionnemen ts ou
portée tro p courte
FR 26
Remote
Piles épui sées.
Pré sence d 'un obstac le
Mettez des p iles neuve s.
Enlevez to us les obsta cles sur le pa ssage et dir igez la
télécomm ande tout dr oit vers le ca pteur.
Page 57

Guide de dépannage
Télévision Numérique Terrestre
Sym ptôme s Causes pos sibles Que faire
Blocage im age ouimag e
fig ée. Rup ture de son
Certaine s chaînes so nt
manquant es.
Tout ou partie d es
défauts qu i
précéden t.
Signal fai ble ou mauva is type de
d'antenn e.
Ne reçoit pa s une ou plusi eurs
fré quenc es de multip lexes
numériqu es.
Bro uilla ge ou tout aut re problèm e
causé par le p assage du si gnal
d'antenn e à travers d' autres
équipeme nts.
Ess ayez de s yntonise r à nouveau.
L'antenn e peut ne pas co nvenir pou r les émissi ons de
TV nu mériq ues.
Vous pouvez ê tre dans un en droit qui ne r eçoit pas un b on
signal TV numér ique.
Demandez à u n installa teur d'ant enne de véri fier le
sys tème aé rien.
Ess ayez de c onnecter l 'antenne d irecteme nt au récept eur
de télévis ion numéri queet de res yntonise r.
Si un équipe ment a un modu lateur de fr équence ra dio,
l'éteind re ou en chang er la fréque nce et re-sy ntoniser l a
TVan alogique . (Voir les ins truction s des autres
équipeme nts pour sav oir commen tprocéde r.)
Multi plex
DVB-T (Télévis ion numérique terres tre) est diffusée en g roupes de cha înes sur un efréquenc e commune .
Cette dispositio n s'appelle u n Multipl ex.
Il existe plusieur s multiplex es dans le sy stème DVB-T, po rtant cha cun un groupe d e chaînes.
Si le niveau du signal s ur une fréque nce parti culière de mu ltiplex est mauvais vo us risquez de p erdre
l'ensemble du grou pede chaîne s sur ce mult iplex.
FR
27 FR
Page 58

Guide de dépannage
Dépannage Moniteur TV d'ordinateur et HDMI
Son
Sym ptôme s Causes pos sibles Solutio ns po ssibl es
Pas de son
Sym ptôme s
Pas d'imag e.
Message à l' écranind ique
que l'entr ée vidéo n'e st
pas compat ible.
L'ordinateur
alimentant la TV
ne vous offre pas le s
FR
paramètres adapt és
pour répondre aux
exigences
de la TV.
L'image n'est pas
nette.
L'image est dans une
mauvaise
position.
L'image semble
écrasée
ou étirée.
L'entrée H DMI est alim entée par
un connect eur de conve rsion de
l'appare il avec une so rtie DVI.
Causes pos sibles Sol ution s pos sible s
Les paramè tres de l'ap pareil de
vidéo numé riqueali mentant la TV
necorres pondent pa s aux
exigence s d'entrée d e votreTV.
L'ordinateur n'a p as
échangé
les informations a vec la
télévision.
Dans les ordinateu rs plus
anciens, l'adapt ateur
graphique peut
êtreobsolète.
La télévision doit être configurée
pour une entrée ordinateur RVB
analogique
(Également connu sous le nom
de VGA - ou -sub).Certaines
résolutions d'entrée
produisentune image plus claire
que les autres.
Mauvais rapport d' aspect.
L'appareil alime ntant la TV
est réglé pour
Connecte z la sortie au dio de l'équ ipement DV I à un
amplific ateur exte rne.
Ima ge
Modifier l es paramèt res de résol ution ou de ta ux de
rafraich issement d e
l'adapta teur graph iques d'or dinateur o u autre maté riel
numériqu e.
Redémarrez l'ord inateur, alo rs que la tél évision
est toujours conne ctéeà l'ali mentati on électriq ue,
puis essayez à nouve au.
Dans des cas excepti onnels, vou s devrez en trer
dans les paramètre s de l'adapta teur grap hique de
l'ordinateur et effacer la case àcoche r pour
aff icher uniqu ement les paramètres q ue ce
moniteur peut pren dre en charge . PourMic rosoft
Windows faites un cl ic droitsur Propriét és bureau
et suivantes - Affi chage
Propriétés - Param ètres - ongle t Avancé o nglet
moniteur. Ladispo nibilité de c ette fonc tion et la
méthode de réglage varient sel on le systè me
d'exploitation .
Mise à niveau de votre a daptateur g raphiqu e.
Pour l'entrée RV B analogique d'ordin ateur
(également connu e sous le nom de VG A- ouD - sub, activez la fonctio n de réglage au tomatiq ue. La
phase,la fréquen ce, les contr ôles de la po sition
verticale et horiz ontale pour raienté galement
nécessiter un lége r ajustemen t.
Consultez les info rmations da ns la secti on du
moniteur d'ordin ateur de cesi nstruct ions et essay ez
un paramètre de réso lution différent .
Pour une TV avec une f onction de moniteur
d'ordinateur ali menté à parti rd'un con necteur RVB
analogique pour or dinateur (é galemen t connu sous
le nom de VGA ouD-sub, co nfigurez la r ésoluti on
de l'adaptateur gr aphique de l' ordinat eur
pourobtenir le mêm e rapport d'a spect que l 'écran
du téléviseur. (Rap port d'aspe ctsigni fie le rappor t
largeur-hauteu r, qui dans ce cas e stmesur é en
pixels).
Nous mettons tout en œ uvre pour garantir que c es instruct ions sont a ussi précis es que possible, toute fois,
nous nous excusons p our tout inco nvénien t causé par des i ncohérences mineur es qui pourra ient se pro duire
en conséquence de l' améliorat ion et du dév eloppemen t des produits.
FR 28
Page 59

Guide de dépannage
Veuillez consulter la liste suivante avant de faire appel au SAV.
Symptôme So lutio ns po ssibl es
Aucune image, aucun son
Pas de récep tion
La TV s 'éteint av ec un signal
d’absenc e d'entrée
d'antenn e
L'option d e chaîne ne pe ut
pas être sél ectionné e.
Mauvaise s couleurs
Pendant qu e vous regar dez
une chaine D VB (numéri que),
vous avez du s on mais
pas d'imag e.
Les images p ixellisé es ou
l’image s' arrête par
intermit tence.
Certaine s chaînes
numériqu es ne peuven t pas
êtr e vues.
Un craquem ent se fait
entendre p arfois de
l'appare il.
Allumez l’ appareil .
Vérifiez q ue la prise d' alimenta tion secte ur est corre ctement
branchée .Sélecti onnez le mod e d'entrée a pproprié .
Débranch ez l'appar eil pendan t 1 minute, le r ebranche z-le.
Ave z-vous syn tonisé dan s les chaîne s de télévis ion ?
Appuyez su r 1 sur la téléc ommande.
Connecte z l'antenn e.
Ass urez- vous que l’a ppareil es t en marche et n on en mode vei lle.
Ceci est nor mal.
15 minutes a près la disp arition du s ignal d'an tenne, l’a ppareil
passe au mod e veille.
L'appare il est confi guré en mode AV. Appu yez sur 23 sur l a
télécomm ande.
Des erreur s de couleur e t de luminos ité peuven t se produir e
lorsque le s angles de vi sion / la temp érature am biante de l’ air
(vo ir spéc ificatio ns techniq ues) sont dé passés.
Certaine s chaînes vo us propose u niquemen t du contenu a udio.
Ceci est nor mal.
Vérifiez t ous les bran chements d e l'antenn e.
Bougez l'a ntenne loi n des zones d' interfér ence possi ble.
Ess ayez d' utiliser u n amplific ateur d'an tenne.
Contacte z le fournis seur de serv ices pour vo us abonner.
S’il n’y a pas d e problème a vec l'imag e ou le son, il s’ agit du brui t
de la carcas se subissa nt des contr actions tr ès légères e n réponse
aux change ments de tem pérature d e la pièce.
Cela n'a auc un effet néfast e sur les perf ormances o u autres
aspects.
FR
L'écran LCD est un produit de très haute technologie, vous offrant des détails fins de
l’image. Parfois, quelques pixels inactifs peuvent apparaître sur l'écran comme un
point fixe de bleu, de vert ou de rouge. Veuillez noter que ceci n'affecte pas les
performances de votre produit.
29 FR
Page 60

Caractéristiques
Système :
Système de couleur vidéo :
Chaînes préréglées :
Plage de fréquence :
LCD
Entrée HDMI :
Puissance de sortie
audio :
GÉNÉRALITÉS
Source d’alimentation
Classe d'efficacité énergétique :
Taille d'écran visible
FR
(diagonale) :
Consommation d'énergie
(nominale) :
Consommation électrique
en mode :
Consommation d'énergie par an *¹:
JVC / LT-32HA60U
Analogique : PAL (B/G, D/K, I), SECAM (B/G, D/K)
• Ce produit n'est pas compatible avec la diffusion analogique SECAM L.
Numérique : DVB-T, DVB-T HD (H. 264), DVB-C, DVB-C HD (H.264)
PAL/SECAM/NTSC 3.58/NTSC 4.43/PAL 60Hz
Service de au total de l'analogique et numérique 1400
Analogique : 45,75 ~ 858 MHz
Numérique : E2 ~ E69
LCD couleur TFT à matrice active basse-verre
Compatible HDMI (connecteur de type A), compatible HDCP
Taux proposés de balayage : 50Hz: 576i/576p/720p/1080i/1080p
60Hz : 480i/480p/720p/1080i/1080p
HDMI Audio : 2 canaux PCM, fréquence d'échantillonnage de 32/44.1/48 kHz
16/20/24 bits par échantillon
environ 8W (MAXI) x2
100-240V ~50/60Hz
A
80cm / 31.5 pouces
50W
40W
58k Wh
Consommation d'énergie en
mode veille * ² :
Consommation d’énergie en mode
d'enregistrement * ² :
Résolution de l'écran :
Poids :
Dimensions :
Température ambiante :
Humidité de fonctionnement :
≤0.30W
8W
1,366 pixel (horizontal) x
768 pixel (vertical)
6kg
74(L) x 49(H) x 20(P)cm
Fonctionnement : 5°~40°/ Stockage : -20°~60°
Inférieure à 80 % HR
Accessoires
Notice d'utilisa tion............ ................ ..............1
Fiche de sécurité ma rron............ ................ ....1
Étiquette-éner gie............. ................ ...............1
Télécommande.. ................ ................ ....... ......1
Vis ......... ....... ......... ....... ......... ....... ................ ..6
Plateau du support ................ ................ .........1
Pied du support... ................ ................ ....... ....1
Rondelle du suppor t............... ................ ........1
Câble Péritel... ................ ................ ................ 1
* 1 Consommation d'é nergie par an , basée sur l a consommat ion d'énergie de la télé vision 4 heur es par
jour pendant 365 jou rs de fonctio nnement .. La consomm ation d'é nergie réel le dépendra d e l'utili sation
de la télévision.
* 2 Basé sur la consomma tion électr ique de l'a ppareil de té lévision uniquemen t (lorsque la TV
n'exporte pas les im ages et signa l sonore) . N'inclut pa s tous les au tres périph ériques USB.
Le poids et les dimens ions sont app roximat ives. Parce q ue nous nou s efforço ns contin uellement
d'améliorer nos pr oduits, nou s pouvons m odifier les s pécific ations et mod èles sans préavis.
FR 30
Page 61

Informations sur la licence
* DVB e t les log os DVB so nt des ma rques d éposé es du pro jet DVB .
* Fab riqué s ous lic ence de D olby La borat ories . Dolby e t le symb ole dou ble-D s ont des m arque s dépos ées de Do lby
Lab orato ries.
* Ce pr oduit e st prot égé par c ertai ns droi ts de pro priét é intel lectu elle de M icros oft. L’u tilis ation o u la dist ribut ion d'u ne
tel le tech nolog ie en deh ors de ce p rodui t est int erdit e sans un e licen ce de Mic rosof t.
* CE PR ODUIT E ST AUTORI SE SO US LA LI CENCE M PEG-4 V ISUAL PATE NT PO RTFOLI O POU R L’UTIL ISATIO N
PER SONNE LLE ET NO N COM MERCIALE D ’UN C ONSOMMATEUR PO UR EN COD ER (i) DE L A V IDÉ O EN
CON FORMI TÉ AVEC L A NORME MPEG- 4 VIS UAL (« MPE G-4 V IDEO ») E T/OU (ii) LE D ECO DAGE MPEG- 4 VID ÉO QUI
A ÉTÉ CO DE PAR UN CO NSO MMATEUR E NGAGE D ANS UNE AC TIVIT É PERSO NNELL E ET NON CO MME RCIAL E
ET/ OU A É TÉ OB TENUE D ’UNE VI DÉO FOU RNISS ANT SOUS LICENC E MPE G LA, LLC A FOURNI R LA VID EO MPEG-
4. AUC UNE LIC ENCE N’ EST ACCO RDÉ E OU IMPL ICITE POUR TO UTE AUTR E UTILI SATION . DES I NFORMATIONS
SUP PLÉME NTAIRE S NOTA MME NT CE LLE S CONCE RNANT L ES UT ILISATI ONS PRO MOTIO NNELL ES, INT ERNES
ET CO MME RCIALES ET DISP ONI BLE S PEUVE NT ÊTRE O BTE NUES À PARTIR D E MPE G LA LLC . SEE
HTT P://W WW.MPE GLA.C OM.
* CE PR ODUIT E ST SO US LA LI CENCE DU PORTEF EUI LLE D E BREVE T AVC POU R L’UT ILI SATION P ERS ONNEL LE
D’U N CONSO MMATEU R OU AUT RES UTILIS ATIO NS DA NS LE SQUEL LES IL NE REÇO IT PAS DE RÉMUNÉ RATI ON (i )
POU R ENCOD ER DES VI DÉOS CO NFORM ÉMENT A LA NOR ME AVC (« V IDÉ O AVC ») ET /OU ( ii) DÉC ODER DE S
VID ÉOS AVC QUI O NT ÉT É COD ÉES PA R UN CO NSOMM ATEU R ENGAGE DAN S UNE AC TIVITÉ PER SON NEL LE
ET/ OU A É TÉ OB TENUE D ’UN FOU RNISS EUR DE VI DÉO SOU S LICENCE PO UR FO URNIR DES VI DÉO S AV.
AUC UNE LIC ENCE N’ EST ACCO RDÉ E OU IMPLICI TE PO UR TO UTE AU TRE U TILIS ATIO N. DES INFOR MATI ONS
COM PLÉME NTAIRE S PEU VENT ÊTR E OBTEN UES AUPR ÈS DE MPE G LA, L.L .C. SEE H TTP:/ /WWW.M PEGLA .COM.
* Les t ermes H DMI et le L ogo HDM I et HDMI H igh Def initi on Mult imedi a Inter face so nt des ma rques c ommer ciale s ou des
mar ques dé posée s de HDMI L icens ing, LL C aux Eta ts-Un is et aut res pay s.
* Toute s les a utres marq ues s ont la propr iét é de leur s propr iétai res res pecti fs.
FR
31 FR
Page 62

Kenmerken
• 16:9 LCD-scherm
• LED-schermverl ichting tec hnologi e
• DVB-C/T-HDTV-tun er
• Kabel/analoge tu ner
• Elektronische pr ogrammagi ds (EPG) vo or DVB
Opmerking betref fende batterijen (al leen voor de EU)
Draag zorg voor het mi lieu. Neem co ntact op me t uw plaatsel ijke over heid voor adv ies over het veilig
wegwerpen van lege b atterijen . De doorkr uiste vuiln isemmer geeft aan dat ge bruikte bat terijen n iet bij het
gewone huisvuil th uishoren! E r bestaat e en afzonder lijk inzamelsystee m voor lege bat terijen , zodat deze
correct en volgens d e huidige wet geving be handeld en ge recycled kunnen word en. Neem cont act op met uw
plaatselijke ove rheid voor de tails bet reffend e inzamel - en recycles ystemen in uw buurt.
Opmerking betref fende DVB-C
• Voor het decoderen va n gecodeerd e program ma’s is een s martcar d en een CA-mod ule (CAM) vereist. U
kunt de smartcard bi j uw kabellev erancie r verkrijge n (CAM’s zijn gebrui kelijk). Zet de smartc ard in de CAM
en stop dan de CAM in de CI- sleuf van uw tv-toeste l.
• Momenteel bieden i n Duitsland a lleen ong eveer 650 kab elleveranciers hun d iensten aan . De ingebo uwde
tuner is niet in staat a lle beschik bare kana len van alle be staande kabelnetwe rken automa tisch ops laan. Dit
is een performance d ie niet kan wor den verwa cht, omdat er z oveel ind ividuele pr oviders op de m arkt zijn .
Gelieve waar nodig d e zendertab el van uw pro vider te gebr uikenom handmatig af t e stemmen.
• De CI-sleuf van deze t v kan onmogel ijk alle CI + modules van a lle 650 pro viders onde rsteunen. Al s de
module van uw provid er niet wordt o nderste und, kunt u een a ndere CA-module in uw wi nkel vragen o f de
settop-box van uw pr ovider gebr uiken voo r het decoder en.
Infor matie betre ffende de functie DVB- T
• Functies die verba nd houden met d igitale t elevisie (v oorzien van het DVB-lo go) zijn alle en beschi kbaar
binnen het land of geb ied waar derg elijke si gnalen word en uitgezonden. Vraag in uw w inkelna of de
ontvangst van DVB- signaleni n uw streek m ogelijk is.
• Verwijder de eventu eel ingezet te CAM voor h et ontvange n van DVB-T.
• Een DVB-T-antenne i s vereist voo r het ontva ngen van DVB- T.
• Ondanks het feit dat d e televisie voldoet aa n de technisc he gegeve ns van DVB-T, kan d e verenigbaarheid
NL
met toekomstige di gitale DVB-T-uitzen dingen niet w orden gegarandeerd .
• Het is mogelijk dat be paalde func ties van di gitale tele visie in sommige lande n niet beschi kbaar zij n.
• Het DVB-T-systeem d at in dit apparaat is inge bouwd is FTA (Free-t o-air of gr atis ontvan gst).
• USB-mediaspele r
• Automatisch uitsc hakelen
• PVR (persoonlijk e videoreco rder)
• Time-shift
• Nieuw smal-frame design
Apparatuur die op de b eveiligen de aardin g van een bouwi nstallatie is aanges loten via een s topcont act
of via andere appara tuur met een aa nsluiti ng op de aardin g en die tegelijkertij d is aangeslo ten op een
kabeldistribut iesysteem m et behulp v an een coaxia le kabel, kan in sommige o mstandigh eden
brandgevaar inho uden. Daaro m dient de aa nsluiting o p een kabeldistribut iesysteem t e gebeure n via
een apparaat dat ond er een bepaal d frequen tiebereik e lektrisch geïsolee rd is.
Geachte klant,
Dit apparaat is conf orm de gelden de Europe se richtlij nen en normen betreffende elektromagne tische
congruentie en ele ktrische ve ilighei d.
* Het extrasmalle fr ame staat meer toe dan all een een grote r beeld op he t tv-scherm . Ook de rand
(van ongeveer 3mm) v an het gitzwa rte scher m is nu zichtba ar.
NL
2
Darty Plc © 22/24 Ely Pl ace, London EC1N 6TE, UK
[Europese Unie]
Page 63

Belangrijke veiligheidsvoorschriften
Dit app araat w erd in ov ereen stemming met all e gelde nde vei ligheidsvoor schri ftenv ervaa rdigd. De onders taand e tips
voor de v eilig heid ku nnen de consumen t besch ermen t egen on achtzaam gebru ik en de ge varen d ie daar aan zijn
verbo nden.
• Hoewe l dit app araat m et de gro otste zorg is verv aardi gd en gro ndig werd gecont rolee rd voor dat het d e fabriek
verli et, is he t zoals b ij alle e lektrische app arate n mogel ijk dat zich toch pr oblem en voor doen. Al s u rook, hittevor ming
of ande re onve rwach te feno menen opmerkt mo et u onmi ddell ijk de stekker uit h et stop conta ct hale n.
• Zorg er voor da t dit app araat v oldoende geven tilee rd word t! Zet he t nooit onder of naa st gord ijnen !
• Dit app araat m ag uits luite nd worden aanges loten o p wisse lstroom netvoe ding va n – probeer het
op geen e nkele a ndere s troom bron aan te sluite n.
• Het sto pcont act moe t zich di cht bij het appara at bevi nden en g emakk elijk bereikba ar zijn .
• Repar aties m ogen ui tslui tend door erkend e repar ateur s worden uitgevo erd.
• Maak di t appar aat nie t open. P ogingen tot repa ratie d oor nie t-pro fessionelen ku nnen ge vaarl ijk zijn en brandg evaar
inhou den.
• Houd kn aagdi eren ui t de buur t van het apparaat . Knaag diere n (en parkietsoo rten) b ijten g raag in e lektrische
snoer en.
• Diere n kunne n daard oor kor tsluiting (bra ndgev aar!) v eroorzaken en ze lf een fa tale el ektri sche schok krijg en.
• Houd al tijd de s tekke r vast om d eze uit het stopco ntact t e verwi jdere n en trek niet aan het s noer. He t snoer
zouhi erdoo r overb elast w orden en kortslu iting k unnen v eroorzaken.
• Reini g dit toe stel no oit met v loeistof. Gebr uik net z oals u me ubila ir reinigt uitsl uiten d een voc htige doek.
• Niet in w ater on derdo mpele n!
• Insta lleer d it appa raat zo d at niemand over he t snoer k an stru ikele n.
• Dit app araat k an best w orden g eïnstalleerd o p schok vrije p lanken om gevaar d oor het v allen e rvan te v oorkomen.
• Vergee t niet da t peute rs het ap paraat aan de kabe l van een t afel of u it een ka st kunnen trekke n. Kind eren ku nnen
zichz elf daa rbij ve rwond en.
• Gebru ik het ap paraa t niet vl akbij warmtebr onnen . De behu izing en het snoer k unnen d oor hit te besc hadigd worden.
• Wee s indac htig dat kindere n volwa ssene n na-ap en! Stop geen voor werpe n in de ope ninge n van het apparaat !
• De open ingen v an het ap paraatmoeten vrij bli jven! L eg geen k ranten of afdekk ingen b oveno p het app araat!
• De afst andsb edien ing is ge en speelg oed! Pe uters k unnen d e batterijen erv an insl ikken . Raadp leeg meteen een ar ts
als een b atter ij is ing eslik t.
• Het sch erm is ve rvaar digd ui t breekbaar glas . Wee s voorzichtig al s u gebro ken gla s met sch erpe randen aanr aakt. U
kunt zi ch erme e verwo nden of h et apparaat besc hadig en.
• Om het ap paraa t tegen e en wand t e bevestigen nee mt u cont act op me t de wink el waar u het appara at koch t voor
advie s en laat u h et inst allat iewerk over aan sp ecial isten . Onvolledig ins talla tiewe rk kan to t verwonding lei den.
• Tref maa trege len teg en het va llen van dit appar aat:
- Het app araat k an vall en en u kun t verwondingen o plope n indie n dergelijke maa trege len nie t worde n genomen.
- Neem co ntact o p met de wi nkel wa ar u het apparaat ko cht voo r de exac te afme tingen.
• Wanneer een tv-ka st of sok kel wor dt gebr uikt:
- Zorg er voor da t het app araat v olledig op en op het m idden v an de leg plank staat.
- Laat de d euren v an de kas t niet op en.
- U kunt ve rwond ingen o plope n als het app araat v alt of br eekt of a ls ving ers gekle md kome n te zitt en. Tref e xtra
veili gheid svoor zorge n als u kinde ren hee ft.
• Zet het a ppara at niet n eer op ee n ondergrond waa r het aan s chokk en of tri lling kan w orden b lootg estel d.
• Besch erm het a ppara at bij on weer door de stekk er uit he t stopc ontac t te hallen en de ante nne los t e koppe len. Let
op: raa k de ante nne-a anslu iting niet aan.
• Haal om wille v an de vei ligheid de stekk er uit he t stopc ontac t als u uw woning voor e en lang ere per iode ve rlaat.
• Het app araat w armt ti jdens d e werkingop. Leg g een dek ens of af dekking op het app araat o m overv erhit ting te
voork omen.
De vent ilati eopen ingen m oeten vrij blijv en. Zet h et appa raat niet vlakbi j radia toren o f onder r echtstreeks zo nlich t.
Zorg vo or mins tens 10 c m vrije r uimte rondom het a ppara at voor e en goed e luchtcircula tie.
• In het ap paraa t gemor ste vlo eistof kan ernst ige sch ade ver oorza ken. Schakel het a ppara at mete en UIT, haal de
stekk er uit he t stopc ontac t en neem dan contac t op met ee n erken de repa rateur voordat u h et appa raat op nieuw
probe ert te ge bruik en.
Let op de onders taand e zaken o m levensgevaarlijke e lektr ische s chokken te voorkomen:
• Besch erm het a ppara at tege n vocht. Gebruik h et nooi t in een ba dkame r of sauna.
• Gebru ik nooi t vlakb ij een ba d, douche of zwemb ad.
• Gebru ik het ap paraa t in geen g eval als het is nat ge worde n. Dit ho udt ook condensv ormin g in, die i n de wint er kan
voork omen al s een kou d appar aat naar een verwa rmde ru imte wo rdt verplaatst. Wacht ’s w inter s na verp laatsing om
het app araat t e gebru iken to t het apparaat op ka merte mpera tuur is g ekomen.
• Zet gee n zware v oorwe rpen op h et snoer neer. Dit ka n de elek trisc he isolatie erva n besch adige n.
• Wind no oitis olere nde pla kband rond besch adigd e snoer en of stekkers. De ze moet en door e en erke nde reparateur
worde n gerep areer d of verv angen.
• Gebru ik dit ap paraa t niet al s de behuizing bes chadi gd is. Im proviseer geen r epara ties aa n een bes chadigde
behui zing do ch laat d eze zo no dig verva ngen.
• Haal de s tekke r van het a ppara at uit het stopcon tact vo ordat u h et gaat r einigen.
• Probe er nooi t een bes chadi gd wissel stroo msnoe r te repa reren met isolat ietap e. Dit mo et word en gerepareerd o f
verva ngen do or een er kend re parateur. Laat uw h uisdi eren ni et bij de kabel kome n. Dier en die in d e kabel b ijten
kunne n een fat ale ele ktris che schok krijge n en een ge vaar vo or anderen betek enen.
100-2 40V~5 0/60H z
NL
3
NL
Page 64

Belangrijke veiligheidsvoorzorgen
De sokkel bevestigen
OPMERKINGEN:
• Haal de stekker uit he t stopcontact.
• Spreid voordat u beg int een zacht e deken ove r het oppervl ak waar u de tv gaat neerleg gen.
• Houd de tv niet bij het sc herm vast omdat scherp e voorwerpe n en overma tigekrach t het kunnen
beschadigen.
• Volg nauwgezet de ins tructies. B ij onjuis te installa tie kan de tv omvallen.
1) Leg de tv met het scher m naar onder gericht nee r op een tafel.
2) Stop de basisplaa t van de (meege leverde ) sokkel in het a pparaat als aangegev en.
Deze past slechts op é én manier in he t apparaa t. Let erop dat d e pinnen in de gaten passe n.
3) Houd de basisplaa t voorzicht ig op zijn pl aats en beves tig dezemet schroeve n.
1. Plaats de TV met de schermzijde naar
onder gericht op een vlak oppervlak.
Bescherm het scherm met behulp van een
doek. Maak de paal van het voetstuk aan de
onderkant van de TV vast.
3xM3x15m m
2. Maak het voetstuk en de sluitring aan de paal
vast door de meegeleverde schroeven stevig
vast te draaien.
NL
3xM4x15m m
OPMERKING:
Om het vo etstuk los te m aken, voer deze stappe n in omgekeer de volgor de uit.
Het voetstuk afhalen
Voor muurmontage di ent het voets tuk van de TV te worden afgehaald . Om dit te doen, d raai de sch roeven
(bovenstaande te kening) ach teraan de TV los. Inst alleer ee n VESA (200 x 100) m uurmont agekit. De
draadlengte van de s chroef mag 5m m (onders te schroeve n) en 10mm (b ovenste sch roeven) in de TV niet
overschrijden.
Opmerkingen voor het monteren van de TV aan een muur.
Haal het voetstuk in z ijn geheel af d oor boven staande mon tageprocedure in omg ekeerde
volgorde uit te voer en.
U kunt de schroeven op nieuw in het vo etstuk sc hroeven zod at u deze nie t verliest, s chroef ze
echter alleen losj es vast.
VESA schroefafmet ing 4xM4x5mm
Bescherm het scher m en leg de TV met het scher m omlaag op een stabiele t afel en het voe tstuk
over de rand van de tafe l.
Voor een veilige inst allatie, ho ud rekeni ng met het onde rstaande wanneer u de te levisie aan e en
muur hangt:
Waarschuwi ng: Deze ha ndeling moe t door twee personen wor den uitgevo erd.
Controleer of de muu r het gewicht v an de telev isie en de VESA -standa ard muurhou der (niet
meegeleverd) kan d ragen.
Gebruik alleen sch roeven die vo or het mate riaal van de mu ur geschikt zijn.
In geval van twijfel , neem contact op met een be kwame insta llateur.
Let op voor elektris che kabels, g as- en wate rleidinge n in de muur.
Volg de aanwijzinge n die met de muur houder zi jn meegelev erd.
De houder moet op een ve rticale muu r worden ge ïnstallee rd.
Leg de kabels op een der gelijke man ier zodat s truikelge vaar en schade aan de kabe ls wordt
vermeden.
NL
4
Page 65

Belangrijke veiligheidsvoorzorgen
WAARSCHUW ING: om bran dgevaar te v oorkomen m ag men geen ka arsen o f and ere naa kte v lamme n
bovenop of v lakbij het t v-toeste l zetten.
Waarsc huwing bet reffende h oofdtele foons
Luide muzi ek kan onomk eerbareg ehoorsch ade veroor zaken . Ste l daaro m noo it te hog e vol umes in w ann eer u via e en
hoofdtel efoon luis tert, in het b ijzonder a ls langdur ig word t gel uiste rd.
Het appara at verplaa tsen of met de h and dragen
Wannee r het appara at over een la nge afstan d wordt verp laatst, mo et de stekke r uit het stop contact wo rden gehaa ld en
de an tenne e n alle ander e aangeslo ten kabels w orden losg ekoppeld , zodat geen e nkel appar aat kan vall en.
• Het appara at verplaa tsen zonde r dit te doen ka n het netsno er beschad igen, b ran dgeva ar in houde n en el ektri sch e schok ken
of ve rwond ing veroor zaken als he t apparaat v alt.
Let e rop dat h et apparaa t door twee of m eer person en moet word en uitgepa kt en verpla atst en dat he t apparaat d an
steeds rec htop moet bl ijven.
Als de sokke l van de tv op wie len staat, d ienen de wie lstoppen t e worden ver wijderd en h et apparaa t onderste und
terwijl he t wor dt verp laatst.
• Zor g ervoo r dat u het appa raat onder steunt ter wijl de sokk el wordt ged uwd, om dat h et appa raa t kan val len e n u hierd oor
gewond kun t raken.
• Door zijn ge wicht kan he t apparaat d euken make n in tafels va n zeer zacht e houtsoor ten.
• Rubberen v oetjesku nnen door bo enwas op meu bilair gaa n corro der en en sme lte n, zoda t zwa rte vle kke n op het ho ut
achterbl ijven. Geb ruik daaro m alleen tv- tafels die s peciaal vo or dit do ele inde zi jn on tworp en.
Bevestig w ielstopp en wanneer d e tv wordt geï nstallee rd op een sokk el met wiele n.
• De sokkelv erplaats t gemakkel ijk en u kunt ge wond raken a ls de wie len n iet geb lok keerd zij n.
• Verwijder d e wielen wan neer de sokk elwordt ne ergezet op e en zach te on dergr ond z oals ee n mat o f vloer kle ed.
De afstand t ussen de oge n en het scher m moet 3 à 4 keer zo g root zijn al s de hoogte va n het scherm .
• Tv- kijken van o p een te klein e afstand ka n vermoeie nd zijn voor d e ogen.
Zet d e tv niet t e dicht bij de r and als u hem op e en tafel ins talleert .
• Hierdoor k an de monito r vallen, er nstige ver wonding bi j zowel v olw assen en al s kinde ren v eroor zak en en de mo nit or erns tig
beschadi gen.
Mog elijk e negatiev e effecten o p lcd-sche rmen: wann eer een vast ( niet-bew egend) pat roon la ngd urig op h et sc herm bl ijf t,
kan dat beel d zich in het lc d-paneel enten en sub tiele doch p erman ent e spook bee lden ve roo rzake n. Di t type va n sch ade wor dt
NIET DOOR DE GARA NTIE GEDEK T. Laat de tv niet l angdurig i ngeschak eld terwij l de volg end e patro nen o f beeld en op h et
sch erm bli jven:
• Niet veran derende be elden, zoa ls tellers met aandel en, pat ron en van vi deo games , log o’s v an tv-z end ers en we bsi tes.
• Speciale f ormats die h et volledi ge scherm ni et vullen. B ijvoorbe eld: la ngd urig ki jke n naar me dia v anhet b rie venbu sfo rmaat
(16:9) op ee n normale di splay (4:3 ) (met zwart e balken bov en- en onder aan het s che rm), of n aar m edia va n het n ormal e
formaat (4 :3) op een bre edbeeldd isplay (16 :9) (met zwa rte balken o p de link er- e n recht erz ijde va n het s cherm ).
Aandacht !
Instruct ies voor het r einigen va n uw LCD-tv.
Veilighei dsvoorzo rgen:
Sch akel de t v volledig u it voordat u b egint te rei nigen en haa l de stekker u it het stopc ontac t.
Wee s voorzich tig voor kra ssen maken i n de plastic d eklaag van h et voor pan eel – dit i s uit erst kr asg evoel ig (b ijv. door
vingerna gels of ande re scherpe v oorwerpe n). Draag da arom tijde ns het re ini gen gee n juw elen (z oal s ringe n, po lshor log es
e.d.) die kr assen kunn en maken. Ge bruik een pl uisvrije d oek en zuive r water v oor h et rein ige n, maar z org e rvoor d at de d oek
goed is uitg ewrongen z odat deze al leen nog wat v ochtig is en n iet dru ipe nd nat. Z org e r ook voo r dat d e doek ni et is b evuil d
met zaken di e krassen ku nnen maken .
Veeg het appa raat schoo n zonder onn odige krac ht uit te oefe nen.
Geb ruik no oit standa ard reinig ingsmidd elen voor he t poets en va n ramen . Alco hol of am mon iak in de ze pr oduct en ka n de
deklaag va n het scherm o plossen.
Geb ruik no oit oplosm iddelen of v erfverdu nner. Gebru ik geen r ein iging smi ddele n die s pecia al be doeld z ijn v oor het r ein igen
van pc-mon itors of CRT-tv’s. Dr oog tenslo tte het appa raat met een s chone , plu isvri je, d roge do ek.
Geb ruik no oit keuken papier of pa pieren zak doeken om he t toestel te r einig en – pa pier de sin tegre ert a ls het na t is en l aat een
sto ffig spoor a chter. Somm ige papier soorten he bben ook een s chure nde w erkin g en ma ken kra sse n in het sc her m.
NL
NL
5
Page 66

Belangrijke veiligheidsvoorzorgen
Veiligheidsvoorzorgen
Veilig gebruik en ond erhoud van uw t elevisi e
Hoewel wij deze tele visie confo rm de Europ ese
Veiligheidsnorm enhebben on tworpen e n
vervaardigd, die nt men zoals me t alle elek tronische
apparatuur voorz ichtig te zij nvoor de ve iligheid en
voor optimale resu ltaten. Hie r volgen en kele nuttig e
tips om u daarbij te hel pen.
Lees deze handleid ing aandach tig voord at u de tv in
gebruik neemt.
Bescherm het netsn oer. Let erop da t niemand e rop
kan trappen, erove r kan struikelen en dat he t niet
gekneld, geschaa fd of gesnede n kan worde n.
Schakel de voeding u it of haal de ste kker uit he t
stopcontact wann eer u de tv onbeh eerd acht erlaat,
tenzij bepaalde fu ncties van de t v ononder broken
voeding vergen.
Gebruik uw tv niet nad at er vloeistof op is gemo rst,
als hij beschadigd i s of niet norma al lijkt te w erken.
Haal in dergelijke g evallen de st ekker met een uit het
stopcontact en vra ag advies aan e en expert .
Voorkom nadelige om standighe den zoals n atte of
vochtige plaatse n, een hoge voc htighei dsgraad,
sterke trilling, e xtreem hoge of lage temp eraturen,
sterk zonlicht en ze er stoffige plaats en.
NL
Bevestig nooit geï mprovisee rde sokke ls of voeten
aan de televisie.
Duw geen voorwerpe n in de opening en en
ventilatiesleu ven van de behu izing.
Verwijder geen enke l deel van de beh uizing om
elektrische scho kken te voork omen. Raa k het LEDscherm niet aan omda t dit warm word t tijdens h et
gebruik: dit is norm aal en wijst ni et op een def ect.
Probeer in geval van p roblemen he t apparaa t niet
zelf te r epareren, d och laat het nazien door e en
erkende technicu s.
Haal bij onweer de ste kker uit het stopconta ct en
koppel de antenne lo s.
Ventilatie
Zet de te levisie nee r op een harde on dergron d waar
hij niet kan worden bl ootgestel d aan recht streeks
zonlicht of warmte bronnen. Als d it in een kas t is
moet u minstens 10 cm vr ije ruimte rondom het
apparaat voorzie n.
Blokkeer de ventil atieopeni ngen niet , met inbegri p
van deze op de onderzi jde van het app araat doo r
bijvoorbeeld zac hte stoffering.
Oververhitting z ou de levensd uur van de te levisie
aanzienlijk verk orten en een gr oter bran dgevaar
inhouden.
NL
6
Reinigen
Haal de stekker uit he t stopcontact en gebru ik
alleen een zachte, l icht bevoch tigde doe k.
Gebruik geen chemi sche of sterke
reinigingsmidd elen omdat de ze de behui zing en
het scherm kunnen be schadigen .
Laat in geen geval wat erdruppel s op het sche rm
achter omdat dit per manente ver kleurin g kan
veroorzaken.
Vetvlekken mogen ui tsluitend w orden ver wijderd
met een in de handel ver krijgbaar
reinigingsmidd el dat specia al is ontwo rpen voor
LED-schermen.
Voeding
Deze televisie is on tworpen om te w erken op
wisselstroomvo eding van 100 -240 Volt 50 /60 Hz.
Andere stroombro nnen kunnen h et appara at
beschadigen. Con troleer voo rdat u de tv vo or het
eerst op de netvoedi ng aansluit o f “100-24 0 V AC”
op het typeplaatje ( op de achterk ant) staa t.
De fabrikant kan NIE T aansprakelijk wo rden
gesteld voor schad e of verwondi ng door geb ruik
van het product met ee n ongeschik t voltage .
Stekker
Wij hebben deze tele visie uitge rust met ee n
standaard stekke r.
• Een beschadigd net snoer mag uit sluiten d
worden vervangen d oor een snoer v an hetzel fde
type en dezelfde spa nning om geva ar te
voorkomen.
• Als u om de een of andere red en de stekker m oet
afknippen, dient d e oude stekke r te worden
vernietigd omdat h et gevaarli jk zou zijn a ls
iemand deze in een sto pcontact on der spann ing
zou stoppen.
• Volg nauwlettend de i nstructie s voor beka beling
van de nieuwe stekke r.
• Wanneer de ste kker een ze kering beva t dient
deze te worden verwi jderd voord at u de stekk er
wegwerpt.
• Gebruik in geen geva l een stekker m et zekeri ng
zonder dat de zekeri ng veilig is af gedekt.
• De netstekker doet d ienst als hoo fdschak elaar
om het apparaat voll edig van de voe ding los te
koppelen en dient te a llen tijde be reikbaa r te zijn.
Gevaarlijk voltage aanwezig binnenin dit
apparaat, dat een gevaar van elektrische
schokken inhoudt.
Dit apparaat is dubbel geïsoleerd zodat
geen aardeaansluiting nodig is.
Deze markering is aangebracht om aan
te geven dat het apparaat conform is de
Europese normen voor de veiligheid en
elektromagnetische congruentie.
Page 67

Belangrijke veiligheidsvoorzorgen
Veiligheidsvoorzorgen (vervolg)
Oogvermoeidheid
Voor wie dit product als een computermonitor gebruikt, raden gezondheid- en
veiligheidsexperts frequente korte pauzes aanboven minder frequente lange pauzes. Een
pauze van 5-10 minuten na een uur ononderbroken schermwerk is bijvoorbeeld beter dan een
pauze van 15 minuten om de 2 uur. Gebruik de monitor niet tegen een helder verlichte
achtergrond of waar zonlicht of een andere heldere lichtbron rechtstreeks op het scherm
schijnt.
Hoofdtelefoon
OPGELET: zet het volume op een laag niveau voordat u de hoofdtelefoon opzet en verhoog zo
nodig daarna. Langdurig via een hoofdtelefoon naar hoge volumes luisteren kan
gehoorstoornissen veroorzaken.
Batterijen
Verwijder debatterijenwanneer de afstandsbediening lange tijd niet zal worden gebruikt.
Batterijen die in apparatuur achterblijven kunnen een corrosieve vloeistof gaan lekken, wat het
apparaat kan beschadigen en de garantie ongeldig maakt.
Maak gebruik van plaatselijke recycling-systemen voor batterijen om het milieu te beschermen.
Werp oude batterijen alleen in overeenstemming met de reglementering en instructies weg.
OPGELET: explosiegevaar als batterijen verkeerd zijn ingezet. Vervanguitsluitend door
batterijen van hetzelfde of gelijkaardige type.
OVER WEGWERPEN
U moet dit product in overeenstemming met de plaatselijke wetgeving en reglementering
afdanken.
Omdat dit product elektronische onderdelen bevat, hoort het aan het eind van de gebruiksduur
niet thuis bij het gewone huisvuil.
Dit product moet worden afgeleverd bij een plaatselijk inzamelpunt vanwaar het kan worden
gerecycled.
Sommige inzamelpunten aanvaarden producten gratis.
NL
WAARSCHUWINGEN:
Dit apparaat is uitsluitend bestemd voor huishoudelijk gebruik en mag niet worden gebruikt
voor andere doeleinden of in andere toepassingen, zoals voor niet-huishoudelijk gebruik of in
commerciële omgevingen.
Stel dit apparaat niet bloot aan druppels of spatten.
Plaats geen voorwerpen gevuld met een vloeistof, zoals een vaas, op het apparaat.
Dit apparaat mag niet worden blootgesteld aan druppelende of spattende vloeistof en
voorwerpen die met water zijn gevuld (zoals vazen) mogen niet bovenop het apparaat worden
gezet.
Zet geen naakte vlammen zoals van kaarsen bovenop het apparaat.
De ventilatie mag niet worden verhinderd door het afdekken van de ventilatieopeningen met
voorwerpen zoals kranten, tafelkleden, gordijnen enz.
WAARSCHUWING: om verwonding te voorkomen moet dit apparaat stevig en in
overeenstemming met de instructies voor de installatie zijn bevestigd op de ondergrond/tegen
de wand.
7
NL
Page 68

Inhoudsopgave
Kenmerken ……………………………………………………………….. 2
Inhoudsopgave ………………………………………………………….. 3-7
Belangrijke veiligheidsvoorschriften ………………………………….8
Installatie …………………………………………………………….......9-12
De afstandsbediening …………………………………………………..13-14
Bediening ……………………………………………………………......
Tabel voor het oplossen van problemen ………………………………
Technische gegevens ……………………………………………………
Informatie over licenties ………………………………………………..
NL
15-24
25-29
30
31
NL
8
Page 69

Installatie
Voorpaneel
3
TOETSENBORD
BRO N
MEN U
KAN +
KAN VOL +
VOL STAN D-B Y
1
2
1. BRON: geeft het menu met de ingangbronnen aan;
druk herhaaldelijk om neerwaarts in het menu te
verrollen en druk op VOL+ of VOL- om de gewenste
bron te selecteren.
2. MENU: geeft het HOOFDMENU op het scherm aan.
3. KAN+/KAN-: druk in de tv-modus op KAN+ of KAN-
om op of neer naar andere kanalen over te gaan. Druk
in de MENUMODUS op KAN+ of KAN- om items te
selecteren. Druk in de modus stand-byop KAN+ of
KAN- om de tv in te schakelen.
4. VOL+/VOL-: om het geluidsniveau in te stellen. Druk
in de MENUMODUS op VOL+ of VOL- om een
geselecteerd item in te stellen.
5. STAND-BY: druk in de modus STAND-BYop deze
1: Sens or van de afsta ndsbediening
LED-indicatorl ampje:
2:
BLAUW I NGESCHAKE LD.
ROOD STAND-BY.
3: Toet sen op de zijka nt
30 30
FREEZE
EPG
VOL CH
toets om het apparaat in te schakelen. Druk nogmaals
om het tv-toestel weer in STAND-BY te schakelen.
AV-aansluitingen op de ACHTERZIJDE
AC-IN PUT
100-2 40V~ 50 /60Hz
De aansluitingen zijn (van links naar rechts): AC-INGANG, YPbPr-INGANG, VIDEO, AUDIO-INGANG,
COAXIALE UITGANG, SCART.
Opmerking: VIDEO en YPbPr delen één audiokanaal.
YPbP r
VIDE O
L R
COAX IAL OUTP UT
SCAR T
NL
AV-aansluitingen op de ACHTERZIJDE (ZIJKANT)
USB HDMI 2(ARC ) HDM I1
De aansluitingen zijn (van links naar rechts):
USB, HDMI2(ARC), HDMI1, KOPTELEFOON, CI, PC AUDIO, VGA, RF
Opmerkingen:
1.Wanneer de HDMI1-poort een DVI-signaal ontvangt wordt het geluidssignaal ontvangen via het
pc-audiokanaal.
2.Stop de stekker van een hoofdtelefoon in het contact voor de hoofdtelefoon van het apparaat. De
luidsprekers zijn dan uitgeschakeld.
HEAD PHONE
COMM ON INTE RFACE( CI)
PC AUDI O
VGA
R F
HDMI ARC (Audio Return Channel)
De ARC-functie stel t u in staat om audiosigna len vanaf uw ARC -compatibele TV na ar uw ARC-compatibele
audioapparaten ( bijv. home theatre- systeem) te sturen zon der een audio kabel (bi jv. coaxia le, optis che
digitale audioka bel of analog e audioka bel) te moete n aansluiten.
Om van de ARC-functie te ge nieten:
1. Zorg dat uw ARC-comp atibele aud ioappar aten met de HDM I 2 (ARC)-poort van uw ARC- compatibe le TV
zijn verbonden doo r middel van ee n HDMI 1.4- kabel. Open v ervolgens de ARC-func tie van de
ARC-compatibel e audioappa raten.
2. Pas de TV-instel ling aan: Druk op de MENU kn op, kies SETU P (INST ELLEN), en stel vervol gens
HDMI CEC Control (HD MI CEC regeli ng) op ON (AA N) in.
3. Gebruik vervolg ens uw TV-afstandsb ediening om h et volume ( VOL + / - en MUTE) van het
verbonden audioa pparaat te re gelen.
9
NL
Page 70

Installatie
PC
STAP PEN:
Zorg ervoor dat zowe l de tv als de computer zijn
uitgeschakeld.
1. Sluit de VGA- en gelu idskabel aa n.
2. Sluit het netsnoe r aan.
3. Schakel de tv in en sch akel naar de pc -modus.
4. Schakel de pc in.
Deze volgorde is zee r belangrij k.
USB HDMI2 (ARC) HDM I1
HEADP HONE
COMMO N INTER FACE(C I)
PC AUDIO
VGA
R F
NL
NL
10
Page 71

Installatie
PC
PRESET-MODUS
RESOLUTIE
V.Freq. (Hz) H.Freq. (kHz)
1
2
3
4
5
6
OPMERKINGEN:
PC V.Freq.(Hz) niet meer dan 60Hz
800*600
640*480
1024*768
1280*960 60 60
1280*720 60 45
1360*768 60 47.7
ANTENNA
Stekker
60
60
60
37.88
31.47
48.36
NL
Eenbuitenanten ne
Opmerking:
Antenne-aanslu itingen: IE C (binnen ).
Ingangsimpedan tie: 75 oneve nwichti g.
11
NL
Page 72

Installatie
AV-UITRUSTING
Deze tv is uitgerust met een groep van AV, een groep van YPbPr en een SCART voor gemakkelijke
aansluiting op videorecorders, dvd-spelers of andere videoapparatuur. Raadpleeg de handleiding van
de aan te sluiten apparatuur.
AANSLUITINGEN OP DE ACHTER- EN ZIJKANT
USB HD MI2(A RC) HDM I1
HDMI
VIDEO-APPARAAT met YPbPr
G
R
NL
B
100-2 40V~ 50 /60Hz
W
AC-IN PUT
HEAD PHONE
COMM ON INTE RFACE( CI)
R
RBG
RBG
R
W
YPbP r
VIDE O
Y
L R
W R
PC AUDI O
Y
Geel (video)
W
Wit (audio L)
R
Rood (audio R of Pr)
B
Blauw (Pb)
G
Groen (Y)
COAX IAL OUTP UT
SCAR T
VGA
R F
NL
VIDE O-APPA RAAT
W R
NAA R VIDEO- UITGA NGEN
Y
NAA R AUDIOUITG ANGEN
Het tv-toestel kan op de volgende apparatenworden aangesloten: videorecorder, multidiskspeler,
dvd-speler, camcorder, videogame of stereosysteem, enz.
YPbPr ondersteunt de volgende videoformats: 480i, 576i, 480p, 576p, 720p, 1080i, 1080p.
12
Page 73

DE AFSTANDSBEDIENING
1
28
2
3
4
5
6
7
8
9
10
11
12
13
14
15
MENU
VOL
FREE ZE
CH
REC
1: : Om de TV in stand-by te zetten of in te schakelen.
2: :In de USB-modus, werkt als een Terugspoelen toets; in
16
teletekstmodus, werkt als een Subpagina toets.
3: : In de USB-modus, werkt als een Doorspoelen toets; in
teletekstmodus, werkt als een Onthullen toets.
4: : In de USB-modus, om het afspelen te starten of te hervatten.
5: : In de USB-modus, om het afspelen te onderbreken.
17
6: TEXT: Om TELETEKST te openen.
18
7: SUBTITLE: To turn on subtitles press the subtitle button
in DTV mode.
19
8 :SUBTITLE: In de DTV-modus, om de ondertiteling in te schakelen.
20
9 :CURSOR: Om binnen het menu te navigeren.
21
10: OK : Om uw keuze te bevestigen.
22
11:EPG: In de DTV-modus, om informatie over het huidig bekeken
programma en het volgend programma weer te geven.
23
12:FAV: In de ATV of DTV-modus, om toegang tot de lijst met favoriete
kanalen te krijgen.
13:VOL+/- : Om het volume te regelen.
14:CIJFERTOETS: Voor directe toegang tot de kanalen.
15:AUDIO: Om de beschikbare audiotalen van TV-programma's te
selecteren.
16: : Om het geluid van de luidsprekers in- of uit te schakelen.
17: : In de USB-modus, werkt als een Volgende toets; in
teletekstmodus, werkt als een Lijst toets. In de DTV-modus, geeft de
24
TV- en radiokanalen in een lijst weer.
18: : In de USB-modus, werkt als een Vorige toets; in
teletekstmodus, werkt als een Vasthouden toets.
19: :In de teletekstmodus, wordt gebruikt als Index/Snelkoppeling
25
knop voor het PVR-bestandssysteem.
20: : Om het afspelen in de USB-modus te stoppen.
21:INFO: Om informatie over het huidig bekeken programma weer te
geven.
26
22:FREEZE: Om het huidig beeld te blokkeren.
23: : Om beschikbare videobronnen weer te geven en te selecteren.
24:EXIT: Om naar het vorig menu terug te keren of het menu af te
sluiten.
25:CH+/CH-: Om toegang tot de volgende of vorige kanalen te krijgen.
26:REC: In de DTV-modus, om het huidig bekeken TV-programma op
te nemen.
27:RECALL: In de DTV-modus, om naar het laatst bekeken kanaal te
gaan.
27
28. GEKLEURDE KNOPPEN (Zie voetnoot)
NL
Voetnoot:
De rode, groene, gele en blauwe knop hebben
meerdere functies. Volg de aanwijzingen op het
scherm en in deze gebruiksaanwijzing.
De batterijen in de af standsbediening in stalleren
De afstandsbedie ning werkt op t wee AAA batte rijen (niet m eegeleverd).
Hieronder vindt u de p rocedure om d e batteri jen te vervan gen.
1. Open het deksel van h et batterijvak.
2. Installeer de bat terijen in he t batteri jvak. De juis te polari teit (+/-) is i n het batterijvak aang egeven.
Zorg da t de polarite it juist is.
3. Sluit het batteri jdeksel.
13
NL
Page 74

DE AFSTANDSBEDIENING
TELETEKST
Teletekst is een infor matiesysteem dat doo r bepaalde ze nders wor dt uitgezon den en als een krant
kan worden gelezen . Het biedt ook t oegang to t ondertite ling voor k ijkers met ge hoorproblemen of
die niet vertrouwd z ijn met de taal van uitzen dingen (kab elnetwerken, satel lietzenders enz.).
Druk op:
TEKST
(TOETS 6)
EEN PAGINA
SELECTEREN
RECHTSTREEKSE
TOEGANG TOT ITEMS
INDEX
(TOETS 19)
NL
SUBPAGINA
(TOETS 2)
VASTHOUDEN
(TOETS 18)
TONEN
(TOETS 3)
LIJST
(TOETS 17)
Deze toets wordt geb ruikt om de teletekst- modus binne n te gaan of te
verlaten. Op het sch erm verschijnt een sam envatting m et een lijs t van
items die u kunt binne ngaan, waar bij elk ite m een overeen komstig
paginanummer bes taande uit 3 ci jfers hee ft.
Voer het nummer van de ge wenste pagi na in met beh ulp van de
cijferknoppen en d e pijl omhoog e n omlaag kn oppen. Bijv oorbeeld: pagina
120, voer 120 in. Het nu mmer wordt li nksbove naan weerge geven, de teller
draait en de pagina wo rdt vervolg ens weerg egeven.
Herhaal deze bewer king om een and ere pagin a te bekijken . Als de teller
blijft zoeken, bet ekent dit dat de pagina ni et wordt uitg ezonden . Kies een
ander nummer.
Onderaan het scher m worden gekl eurde vel denaangeg even. De 4
gekleurde toetse n worden gebr uikt voor t oegang tot de ze items of
overeenkomstig e pagina’s. De gekle urde velden k nippere n wanneer het
item of de pagina nog ni et beschikb aar is.
Met deze toets keert u t erug naar de pagina van de i nhoudsopg ave
(gewoonlijk pagi na 100).
Sommige pagina’s omvatten ook subpag ina’s, die automat isch
achtereenvolge ns op het scher m verschi jnen. Deze to ets wordt g ebruikt
om het verschijnen v an subpagin a’s te st oppen of herv atten. He t
nummer wordt links boven aange geven.
Om de pagina te bevriezen.
Om verborgen informatie (oplossingen van spellen) op het scherm te zien of
te verbergen.
De gebruiker kan vie r favoriete npagina 's instelle n om direct aan de vier
gekleurde toetse n te koppelen . De nummer s van de favori etenpag ina's
moeten voor elk kana al door de syst eemsoft ware van/na ar het niet -vluchtig
geheugen worden op geslagen en t eruggez et.
U verkrijgt:
E
NL
14
Page 75

BEDIENING
Gids voor de installatie
Het venster van de ini tiële insta llatie ve rschijnt al s
u de tv voor het eerst ins chakelt en na het
terugstellen van d e fabrieksi nstelli ngen.
Fir st Time Se tup
OSD L angua ge Engl ish
Mod e Setti ng Home M ode
Cou ntry Ge rmany
Ant enna Typ e Air
Aut o Scan DT V+ATV
Sta rt
1).Druk op de toetsen ▼▲om doorheen het menu te
navigeren en op de toetsen◀▶om de instellingen
te wijzigen. Selecteer de gewenste taal, de modus
Thuis/Winkel die u op de display wilt zien.
De modi THUIS/WINKEL
1. De Thuismodus is een energ iebespa rende mod us
en is aan bevolen als instelli ng voor nor maal tv-k ijken.
Deze mo dus is ook als standaard modusin gesteld .
2. De Win kelmodus is een optie di e door verk opers
wordt g ebruikt voor het adver teren of de p resenta tie
van pro ducten. De Winkelmod us heeft ee n helderd er
beeld d an de Thuismodus.
3. U kunt n aar wens afwisselen tu ssen de mod i Thuis
en Wink el.
2). Druk op de toetsen ◀▶ om AIR/kabel te
selecteren, met andere woorden DVB-T/DVB-C.
Opmerking
Als u DVB-C selecteert kunt u kiezen uit de
volledige of snelle manier van scannen. DVT+ATV
of enkel DTV, of enkel ATV.
3). Het afstemmen op kanalen zal beginnen. Dit
kan enkele minuten in beslag nemen. De
vooruitgang van het scannen en het aantal
gevonden kanalen worden op de display
aangegeven.
4).Om DTV-afstemmen over te slaan drukt u op de
toets MENU om het afstemmen halverwege te
onderbreken. Het systeem gaat dan rechtstreeks
over naar ATV-afstemmen.
5). Nadat het afstemmen is voltooid worden de
kanalen in een vaste volgorde gerangschikt. Om
kanalen over te slaan wijzigt u de volgorde of geeft
u de kanalen een nieuwe naam. Selecteer
daarvoor “Programma’s bewerken” in het
Kanaalmenu.
Opmerking
DTV Digitale tv
ATV Analoge tv (niet gebruikt in het VK)
1. KANAALMENU
1. 1)Automatisch afstemmen (DVB-T):
NL
Fir st Time Se tup
OSD L angua ge Engl ish
Mod e Setti ng Home M ode
Cou ntry Ge rmany
Ant enna Typ e Cab le
Cab le Quic k
Aut o Scan DT V+ATV
Sta rt
1).Druk op de toets MENU en dan op de toetsen
om het KANAALMENU te selecteren en druk dan op
de toets OK of rechts.
2). Druk op de toetsen om “Automatisch scannen”
te selecteren en druk dan op de toets OK.
▼▲
▼▲
15
NL
Page 76

BEDIENING
Aut o Scan
Cha nnel
Man ual Sca n
Pro gram Ed it
Pic ture
Com mon Int erfac e
Aud io
Sig nal Inf ormat ion
Sof tware U pdate (USB)
Clo ck
Set up
Loc k
MENU
Ret urn Mo ve OK
3). Druk op de toetsen om “Air” als het type
◀▶
OK
antenne te kiezen, met andere woorden DVB-T.
Ant enna Typ e A ir
Cha nnel
Cou ntry Ge rmany
Mod e DTV+AT V
Pic ture
Sta rt
Aud io
Clo ck
Set up
Loc k
MENU
Ret urn Mo ve OK
4). Druk in de optie Land op de toetsen om het
NL
OK
◀▶
land in te stellen waar u de tv gaat gebruiken.
5). Druk in de optie Modus op de toetsen ◀▶omeen
afstemmodus te selecteren uit: ATV/DTV/DTV+ATV.
Druk op de toets om “Starten” te selecteren.▼
6). Het afstemmen op kanalen zal beginnen. Dit kan
enkele minuten in beslag nemen. De vooruitgang van
het scannen en het aantal gevonden kanalen worden
op de display aangegeven.
7). Om DTV-afstemmen over te slaan drukt u op de
toets MENU om het afstemmenhalverwege te
onderbreken. Het systeem gaat dan rechtstreeks
over naar ATV-afstemmen. U kunt deze stap ook
herhalen om ook ATV-afstemmen over te slaan.
Een herinnering voor de installatie verschijnt de
volgende keer dat u de tv inschakelt op het scherm
wanneer geen kanaal werd gevonden.
8). Nadat het afstemmen is voltooid worden de
kanalen in een vaste volgorde gerangschikt. Om
kanalen over te slaan wijzigt u de volgorde of
geeft u de kanalen een nieuwe naam. Selecteer
daarvoor “Programma’s bewerken” in het
Kanaalmenu.
Aud io
Clo ck
Set up
Loc k
Sca nning C h12
Dig ital Ch annel s Found :
DTV: 3
Rad io: 0
Dat a: 0
Ana log Cha nnels F ound: 0
MENU
Ski p
EXIT
Exi t
Cha nnel
Pic ture
1.2 )Automatisch afstemmen (DVB-C)
1). Druk op de toets MENU, dan op de toetsen
om het KANAALMENU te selecteren en druk dan op
de toets OK.
2). Druk op de toetsen om “Automatisch scannen”
te selecteren en druk dan op de toets OK, selecteer
“Kabel” als het type antenne, met andere woorden
DVB-C.
Cha nnel
Pic ture
Aud io
Clo ck
Set up
Loc k
▼▲
Ant enna Typ e Cable
Cou ntry Ge rmany
Mod e DTV+AT V
Sta rt
MENU
Ret urn Mo ve OK
3). Druk op de toets▼en dan op de toetsen ◀▶▼▲
om het land te selecteren waar u de tv gaat gebruiken.
4). Druk in de Modusmenu op de toetsen◀▶ om
ATV/DTV/DTV+ATV te selecteren.
5). Selecteer “Starten” om het onderstaande menu
binnen te gaan en een zoekmodus te selecteren.
Qui ck
Cha nnel
Ful l
Adv anced
Pic ture
Aud io
Clo ck
Set up
Loc k
MENU
Ret urn Mo ve OK
6). Het afstemmen op kanalen zal beginnen. Dit kan
enkele minuten in beslag nemen. De vooruitgang van
het scannen en het aantal gevonden kanalen worden
op de display aangegeven.
▼▲
OK
▶
OK
NL
16
Page 77

BEDIENING
7).Om DTV-afstemmen over te slaan drukt u op de
toets MENU om het afstemmen halverwege te
onderbreken. Het systeem gaat dan rechtstreeks
over naar ATV-afstemmen. U kunt deze stap ook
herhalen om ook ATV-afstemmen over te slaan. Een
herinnering voor de installatie verschijnt de volgende
keer dat u de tv inschakelt op het scherm wanneer
geen kanaal werd gevonden.
8).Nadat het afstemmen is voltooid worden de kanalen
in een vaste volgorde gerangschikt. Om kanalen over
te slaan wijzigt u de volgorde of geeft u de kanalen een
nieuwe naam. Selecteer daarvoor “Programma’s
bewerken” in het Kanaalmenu.
Opmerkingen
Alle kanalen met inbegrip van ATV, DTV en Radio
kunnen in één keer worden gevonden als het type
afstemmen “DTV+ATV” is.
Alle oude kanalen zi jn na het autom atische
afste mmen verdwe nen.
Na het automatische afstemmen gaat het systeem
over naar het eerste DTV-kanaal
2. 1 )DTV handmatig afstemmen (DVB-T)
1). Druk op de toets MENU, dan op de toetsen
om het KANAALMENU te selecteren en druk dan
op de toets OK.
2).Druk op de toetsen om “DTV handmatig
scannen”te selecteren en druk dan op de toets OK.
Als u in het Automatische scannen“Air”heeft
geselecteerd, gaat u het menu van DVT-T handmatig
scannen binnen.
Cha nnel
Pic ture
Aud io
Clo ck
Set up
Loc k
▼▲
Dig ital Sc an Ch5
Sta rt
Str ength 5 4
MENU
Ret urn Mo ve OK
3). Het venster van DTV handmatig scannen verschijnt
op het scherm. Druk op de toetsen ◀▶ om het
gewenste UHF-kanaal te selecteren of druk op de toets
OK en voer dan het kanaalnummer in. Selecteer
“Starten” om het zoeken naar dit kanaal te beginnen.
Nadat op dat signaal is afgestemd verschijnen het
beeld en de signaalsterkte op het scherm.
4). Druk op de toets MENU om terug te keren naar
het hoofdmenu.
5). Druk op de toets EXIT om het menu te verlaten.
2. 2 )DTV handmatig afstemmen (DVB-C)
1). Druk op de toets MENU, dan op de toetsen
om het KANAALMENU te selecteren en dru k dan op
de toets OK. Als u in het Automatische scannen
“Ka bel” heeft geselec teerd gaat het systeem het
men u van DVB-C handmatig scannen binnen.
▼▲
OK
▼▲
Fre quenc y 47400 0K
Cha nnel
Sym bol Rat e 6875K
Mod ulati on Auto
Pic ture
Sta rt
Aud io
Clo ck
Set up
Loc k
MENU
Ret urn Mo ve OK
2). Het venster van DVB-C handmatig sc annen
ver schijnt op het scherm. Druk op de toetsen ▼▲om
te selecteren (freque ntie / symbool /QAM-typ e)
en druk op OK om frequentieen symbool in te voeren .
Dru k op ◀▶ om QAM-type te wijzigen en druk op
“St arten” om het zoeken naar dit kanaa l te starten.
Nad at op dat signaal is afgestemd vers chijnen het
bee ld en de sig naalsterkte op het sche rm.
3). Druk op de toets MENU om ter ug te keren naar
het hoofdmenu.
4). Druk op de toets EXIT om het menu te verlaten.
3) ATV handmatig afstemmen:
U kunt het geluidssysteem instellen, zoeken naar
analoge tv-kanalen en er fijn op afstemmen en dan de
gevonden kanalen in het geheugen opslaan.
ATV Ma nual Tuning
Sav e to 1
Sys tem BG
Cur rent CH 1
Sea rch
Fin e tune
Fre quenc y 44.25 M Hz
Save
Opmerkingen
1. Druk na het handmatige afstemmen op de rode
teleteksttoets om de kanalen in het geheugen op te
slaan.
2. Als het op te slaan nummer gelijk is aan het nummer
van een bestaand kanaal zal bij het indrukken van de
rode toets het nieuwe nummer dat bestaande kanaal
vervangen.
4). Programma’s bewerken:
Druk op de toets ▲of▼ om “Programma’s bewerken”
in het Kanaalmenu te selecteren. Druk dan op de toets
OK om een submenu binnen te gaan. U moet dan het
te bewerken programma selecteren.
OK
17
NL
NL
Page 78

BEDIENING
Programm e Edit
001 T he HI TS
002 T MF
003 U KTV Br ’tl dea s
004 f t h
005 I deal Wo rld
006 C olour bars1 00
001 K iss
002 S mash Hi ts!
003 K erran g!
Del ete
Mov e
Wissen: druk op de rode toets om het gehighlighte
programma te wissen.
OVERSLAAN: druk op de gele toets om de optie
“overslaan” te kiezen, zodat het icoon OVERSLAAN
naast het programma verschijnt en dat programma
zal worden overgeslagen als u een ander kanaalkiest.
VERPLAATSEN: druk op de groene toets om het
kanaal dat u wilt verplaatsen te highlighten. Bij het
kanaalnummer verschijnt een icoon. Druk dan op de
Skip
Ren ame Fav orite
DTV
DTV
DTV
DTV
DTV
DTV
Rad io
Rad io
Rad io
FAV
toetsen▼ / ▲ om een nieuwe positie te kiezen en
druk op de groene toets om te bevestigen.
Nieuwe naam(alleen voor ATV): druk op de blauwe
toets om een kanaal een nieuwe naam te geven. Druk
op de cijfertoetsen (als hieronder aangegeven) om
een nieuwe naam in te voeren en druk op de toets OK
om te bevestigen.
1 2
4
ghi
7
pqrs
abc3def
5
6
jkl
mno
8
tuv9wxyz
NL
FAV:druk op de toets FAV om een favoriet kanaal in
te stellen. (Om de lijst van Favoriete kanalen te zien
moet u het menu van Programma’s
bewerkenverlaten en dan op de toets FAV drukken.
5). Common interface
Dit menu brengt informatie over de CI-kaart op het
scherm.
6). Signaalinformatie
Druk op de toetsen om “Signaalinformatie” te
kiezen in het Kanaalmenu. Druk dan op de toets OK
om informatie over het huidige kanaal te zien.
7). Software-update (USB)
Druk op de toets ▼ of ▲ om “Software-update (USB)”
te kiezen in het Kanaalmenu. Druk dan op de toets OK
om de software via een USB te updaten. Volg voor het
upgraden de instructies die bij de software zijn
meegeleverd.
Opmerking: het is raadzaam het apparaat terug te
stellen naar de fabrieksinstellingen (zie “Terugstellen
naar de fabrieksinstellingen”in het Instelmenu) om er
zeker van te zijn dat het correct wordt geüpgraded.
▼/▲
2. B EE LD ME NU
Het tweede item van het MENU is het BEELDMENU.
U kunt hier het beeldeffect instellen, zoals het
contrast, de helderheid enz.
Druk op ▼▲ om te verplaatsen, druk op om in
te stellen.
.
Pic ture Mo de Stan dard
Cha nnel
Bri ghtne ss 50
Con trast 4 5
Pic ture
Sha rpnes s 60
Aud io
Col or 45
Tint 0
Clo ck
Set up
Loc k
Med ium
DNR
Dyn amic Co ntras t Weak
Asp ect Rat io 16:9
Col or Temp
MENU
Ret urn Mo ve OK
◀▶
Nor mal
OK
Opmerkingen
1).U kunt kiezen uit drie kleurtemperaturen: normaal,
warm, koel.
2).De PC-instelling is alleen beschikbaar in de PCmodus. Hier kunt u de horizontale en verticale positie,
grootte en fase instellen.
3.GELUIDMENU
Het derde item van het MENU is het GELUIDMENU.
Hierin kunt u geluidseffecten instellen zoals hoge
tonen, bastonen, balans enz.
Druk op ▼▲ om te verplaatsen, druk op◀▶om in te
stellen.
Sou nd Mode S tanda rd
Cha nnel
Treb le 0
Bas s 0
Pic ture
Bal ance 0
Aud io
Aut o Volume O n
Sur round S ound Of f
Clo ck
Set up
Loc k
Off
COA XIAL
Aud io Desc ripti on
MENU
Ret urn Mo ve OK
OK
Opmerking
1.Het automatische volume is alleen beschikbaar
wanneer de signaalingang te luid of het geluid
vervormd is.
De surround sound kan worden in- of uitgeschakeld.
Coaxiaal is de digitale uitgangsfunctie voor het geluid.
NL
18
Page 79

BEDIENING
4.KLOKMENU
Het vierde item van het menu is het KLOKMENU.
U kunt hierin de klok, tijd voor het in/uitschakelen,
slaaptimer enz. instellen. Druk op▼ ▲ om te
verplaatsen, druk op OK om in te stellen.
Automatisch slapen
De tv schakelt automatisch over naar de slaapstand
wanneer 15 minuten lang geen enkel signaal wordt
ontvangen als de optie Automatisch slapen is
INGESCHAKELD. De tijd wordt automatisch
ingesteld wanneer de tv een DTV-signaal ontvangt.
Sle ep Timer O ff
Cha nnel
Dat e 2010/ 04/3 0
Pic ture
On Tim e
f
Of Ti me
Aud io
Aut o Sleep O n
Time Z one
Clo ck
Set up
Loc k
MENU
Ret urn Mo ve OK
OK
5. INSTELMENU
Het vijfde item van het MENU is het INSTELMENU.
U kunt hierin de OSD-taal, audiotaal, taal van de
ondertiteling enz. instellen.
SD La nguag e ngl ish
O E
Cha nnel
Pic ture
Aud io
Clo ck
Set up
Loc k
Auto St andby(4hr)
1. De tv sc hakelt de automatisc h uit wanne er 4 uur
na het in schakelen nog geen enk ele bewer king is
gedaa n (bijvoorbeeld vera nderen va n kanaal of
volum e). Een pop-upvenste r verschi jnt dan op he t
scher m.De Tv schakelt 150 s econden l ater
autom atisch in stand-by. Druk op eend er welke
toets v an de afstandsbedien ing om het
autom atische uitschakel en te annul eren.
2. Om het a utomatische uitsch akelen va n de tv te
annul eren kunt u naar het Inste lmenu gaa n,
“Auto matisch stand-by (4u )” select eren en dez e
optie U itschakelen met behu lp van de rec htse
pijlt oets.
Om het au tomatische uitscha kelen na 4 uu r
opnie uw te activeren volgt u de b ovensta ande
stapp en behalve dat u de linker toets geb ruikt om
“Insc hakelen (4u)” te selec teren.
U kunt in h et menu van het PVR-best andsyst eem
een USB -disk instellen voor P VR.
udi o
A Lan guage s
Sub title
Cou ntry Ge rmany
PVR F ile Sys tem
Time shift R ecord T ime 1ho ur
Aut o Stand by(4h r) On(4 h ours )
Mod e Setti ng ome M ode
OSD Ti me
10 se conds
Res tore Fa ctory D efaul t
MENU
Ret urn Mo ve OK
H
OK
PVR S ettin gs
Mov e Left
Mov e Right
OK
EXIT
Sel ect
Exi t
File Manager Device List
Scheduled Record
Time-shift opnametijd: om de maximale
opnametijd voor time-shift opnames in te stellen.
Automatisch stand-by (4u): om het apparaat
naar stand-by te schakelen wanneer 4 uur
lang geen enkele bewerking gebeurt.
Modusinstelling: om de Thuis- of
Winkelmodus in te stellen.
HDMI CEC Control (HDMI CEC-regeling):
Om de CEC-functie op aan of uit te zetten.
OSD-tijd: druk op◄ of ►om de displaytijd van
het menu in te stellen.
Terugstellen naar fabrieksinstellingen: druk
op de toetsen ▼ of ▲ om “Terugstellen naar
fabrieksinstellingen” te selecteren en druk op
de toets OK om de initiële instellingen binnen
te gaan. Eenmaal bevestigd zullen alle
instellingen worden gewist. Dit mag alleen
worden gebruikt als u problemen met uw tv heeft.
Opmerking
Het terugstellen n aar fabriek sinstel lingen wist a lle
programma’s en h et paswoord.
6.VERGRENDELMENU
Het zesde item in het menu is het VERGRENDELMENU.
U kunt hierin het systeem vergrendelen, een wachtwoord
instellen, programma’s blokkeren en de oudercontrole
instellen. Nadat het vergrendelsysteem is ingesteld kunt
u niet langer naar kanalen zoeken of programma’s
bewerken.
Cha nnel
Het standaard wachtwoord is 6666. Als u het
wachtwoord vergeet, zorg dat u het nieuw wachtwoord
onthoudt!
Als u het nieuw wachtwoord bent vergeten, voer het
hoofdwachtwoord "9527” in.
Channel Locks (Kanaalvergrendeling): Druk op ▼ ▲
om het programma te kiezen en druk op de OK knop om
het programma te blokkeren. Als u de blokkering van
het programma wilt opheffen, open het hoofdmenu,
voer het wachtwoord in, kies het programma en druk
vervolgens nogmaals op de OK knop.
Parental Rating (Ouderlijke classificatie): Druk op
◀▶ om de gewenste classificatie te kiezen.
Ent er Pass word -- -Ena ble Off
Cha nnel Lo cks
Pic ture
Par ental R ating N one
New P asswo rd ----
Aud io
Clo ck
Set up
Loc k
MENU
Ret urn Mo ve OK
OK
19
NL
NL
Page 80

BEDIENING
7.EPG-menu (elektronische programmagids)
Het EPG-menu (elektronische programmagids) biedt u
gedetailleerde informatie over uitzendingen. Druk op de
toets EPG om het EPG-menu te openen, met informatie
over het kanaal dat u momenteel bekijkt. U kunt
informatie over programma’s van zeven dagen zien.
Gebruik de gele toets om de volgende dag te zien en de
blauwe toets om de vorige dag te zien.
800 H TV1
11:32 -12:1 7
FIKCIJA ( IGRANA I ANIMIRANA)Marichuy razmišlja kako će ubrzo saznati ho e li ponovno vidjeti ili
će zauvijek biti smetnja drugima, dok se Juan Miguel kune da će joj vratiti vid. Cecilia I Patric...
Mon. 25 Jan
800 HTV1
801 HTV2 Zg
802 RTL TV
803 NOVA TV
804 CH-3 on T...
805 CH-5 on T...
Weekly
Move
10:00 11:00
First...Treća dob, emisija za umir... . .. Dne... .. TV k... . ..
Druk op de toets om te zien wat na het huidige
EPG D aily Mo de
11:32-12:17 Opreznoanđelom,telenovela
Evergreen(3.)
Dadilja
Pod isti...
Naši najbolji dani
Reminder PrevDate NextDate
Malcolm u sredini Exkluziv
Zakon brojeva IN magazin
Real No Information
Real No Information
Rec:Record
►
25 Jan 2 010 10: 13
ć
Oprezno s anđe...
Zvjezdan, dok...
Info:Display
programma zal worden uitgezonden.Gebruik de toets
▲ of ▼om een ander kanaal te highlighten, druk dan
op de toets◄ of ► om dat kanaal te bekijken. Druk op
de toets EPG of EXIT om het EPG-menu te verlaten.
NL
Opmerking
U ziet de basisfuncties van de toetsen van de
afstandsbediening onderaan het EPG-scherm.
Wekelijks
U kunt in het EPG-menu de displaymodus op
Dagelijkse EPG of Wekelijkse EPG instellen met
behulp van de Rode toets.
Deze twee modi hebben dezelfde functies maar
worden op een verschillende manier op de display
aangegeven.
Opnemen
Druk in de EPG-modus op de toets REC van de
afstandsbediening om een programma voor de
opname te selecteren. U gaat dan het menu van
de Geprogrammeerde opnames binnen om de
opname in te stellen. (Zie alinea “PVRbestandsysteem”).
Opmerking
Zorg ervoor dat een compatibele harde schijf of USBapparaat op de USB-ingang is aangesloten om
opnames te programmeren. Als uw opslagapparaat
niet verenigbaar is zal u worden gevraagd om dat te
formatteren. Ga in het Instelmenu het menu PVRbestandsysteem binnen om uw apparaat te
formatteren.
EXIT:Exit
WAARSCHUWING
Het formatteren van een USB-apparaat wist alle
bestanden die op het USB-apparaat zijn opgeslagen.
Stand-by opname
Nadateen opname is geprogrammeerd schakelt de tv
automatisch in als de ingestelde tijd is bereikt en
automatisch weer uit nadat de opname is voltooid.
hoewel het toestel tijdens de geprogrammeerde
opname is ingeschakeld, is het beeld en geluid
uitgeschakeld (er is geen display). U kunt op
de toets STAND-BY drukken om het beeld en
volume weer in te schakelen.
Herinnering (groene toets)
Druk in het EPG-menu op de groene toets om een
herinnering voor een programma in te stellen. Het
onderstaande Herinnermenu verschijnt dan op het
scherm, en u kunt de toets ◄of ►gebruiken om
details voor een herinnering aan een programma in
te stellen. U kunt herinneringen eenmalig, dagelijks
of wekelijks instellen.
Reminder
Fre quenc y
Cha nnel
Min ute
Hou r
Mon th
Dat e
Sche dule Li st
17:0 3 19/11/2 004
Off
The H ITS
0
17
Nov
19
OK
U kunt op de Rode toets drukken om de lijst van
geprogrammeerde programma’s te zien. U kunt
daarin ook geprogrammeerde programma’s wissen.
INFO
Druk in het EPG-menu op de toets INFO voor meer
informatie over het huidige programma.
8.PVR-bestandsysteem (alleen voor DTV)
Druk op de menutoets e n selecteer h et submen u
van de instellinge n. Druk op de toe ts ▼ of ▲ om
“PVR-bestandsy steem” te selecteren , druk dan op
de toets OK om het subme nu binnen te gaan en
gebruik de toets ◄ of ►o m doorheen de opties te
verrollen.
Opmerking: u kunt op d e toets drukken om
rechtstreeks naa r het PVR-bestandsys teem over
te gaan.
NL
20
Page 81

BEDIENING
PVR S ettin gs
Mov e Left
Mov e Right
OK
EXIT
Sel ect
Exi t
File Manager Device List
Scheduled Record
Bestandenbeheerder: u kunt hierin alle
opgenomen programma’s zien. Druk op de
blauwe toets om op het volledige scherm te
zien.
Fil e Manag er
Sche duled R ecord
Function
EXIT
Hot Key
EXIT
OK
MENU
EXIT
Apparatuurlijst: dit submenu geeft een lijst van de
USB-apparaten die op het tv-toestel zijn aangesloten.
U kunt een apparaat selecteren en dan op de Rode
toets drukken om het USB-apparaat te formatteren.
Dev ice Lis t
Function
Hot key
EXIT
OK
MENU
EXIT
Geprogrammeerde opname: u kunt hier de lijst van
geprogrammeerde opnames instellen. U kunt ook
reeds geprogrammeerde opnames uit de lijst wissen.
Sch edule d Recor d Setti ng List
Sche duled R ecord
Function
EXIT
Hot Key
EXIT
OK
MENU
EXIT
Ga het su bmenu binne n. U kunt de freq uentie va n
opnames instelle n als eenmali g, dageli jks,
wekelijks, weekd agen of uit.
Play
Dele te One
Dele te All
Zoom
Move U p
Move D own
Sele ct
Retu rn
Exit
Form at
Move U p
Move D own
Sele ct
Retu rn
Exit
Dele te One
Dele te All
Move U p
Move D own
Sele ct
Retu rn
Exit
Stan dby
Current Playing File Into
Channel Name
Program Name
Recorded Time
Total Time
Description
Stan dby
Grou p
1
2
3
4
5
6
7
8
9
10
11
12
13
14
15
16
2012/08/09 11:44
Matt Baker and Clare Balding
present coverage of the eager...
Available Space
Device
192 MB
sda1
Freq uency
Once
Off
Off
Off
Off
Off
Off
Off
Off
Off
Off
Off
Off
Off
Off
Off
UKTV Br’tldeas_Good Food Bites_20041119_161021.ts
BBC ONE_Olympics 2012_20120808_114427.ts
UKTV Br’tldeas_Good Food Bites_20041119_162019.ts
BBC ONE
Olympics 2012
00:08:06
File System
FAT32
Chan nel
0 Colo urbar s100
Date
2004 .12.2 5
Start Time
18:1 7
Duration
00:3 0
Sch edule d Recor d - Group 1
Hot Key
EXIT
OK
MENU
EXIT
Move U p
Move D own
Adju st
Adju st
Sele ct
Retu rn
Exit
Setti ng Stat us
Setti ng Is Not I n Use
Frequ ency On ce
Chann el 6 Colo urbar s 100
Start T ime 200 4-12- 25
End Tim e 2004- 12-25
18:17
18:47
Programma’s opnemen
Druk om het programma dat u momenteel bekijkt op
te nemen op de toets REC, zodat het REC-icoon op
het scherm verschijnt. De opnametijd/lengte en
resterende tijd wordt in het onderstaande menu
aangegeven.
Recor ding
Rec orded Ti me : 00 : 00 : 40
Avai lable Ti me : 25 Min ute
Druk opnieuw op de REC-toets om het menu te zien.
Druk op de Stoptoets om de opname te stoppen.
U kunt het menu van de Mediaspeler ook binnengaan
om uw opgenomen programma’s te zien via de
Filmmodus.
Opnam es weergeve n:
Programma’s di e op “USB” zijn opgenome n worden
opgeslagen in de map “ USB-opnam es” op het
apparaat.
U kunt deze bestande n weergeven i n het PVRbestandsysteem e n in het submen u van de
Bestandbeheerd er.
1. De grootte van de USB -opslag kan tussen
128MB en 500GB bedra gen, maar het g ebruik va n
2GB tot 500GB is aanbe volen.
2. Vi deo kan gepix eleerd worden wannee r de
bitsnelheid van vi deo te laag is. D it kan gebe uren
wanneer een USB-ve rlengkabe l is aanges loten in
plaats van de USB rech tstreeks op de tv aan te
sluiten.
3. Niet alle USB-app araten zijn c ompatib el.
NL
21
NL
Page 82

BEDIENING
Opmerkingen
Zorg er voor dat het op slagapparaat dat voo r de
opname wordt gebru ikt in de USB-i ngang op de
achterzijde van de t v is ingezet en compatib el is
voor het opnemen. Als u w opslagapp araat nie t
compatibel is, wor dt u gevraagd o m het te
formatteren. Ga he t menu PVR-bestandsy steem
binnen en selectee r “Apparatu urlijst ” om uw
apparaat te format eren.
Alleen de stopfunct ie is tijdens h et opneme n
beschikbaar.
Er is gee n opnamefun ctie voor het kanaal CI+ .
9.Time Shift
Druk op de toets om het pr ogramma dat u aan
het bekijken bent te o nderbreke n om de funct ie
Time-shift te activer en. Het onder staande m enu
verschijnt dan op he t scherm. Dit menu verdw ijnt
enkele seconden la ter automat isch.
00:0 0:00
00:0 0:05
Play Pause FBStop FF
Kies de optie ▶ en druk op O K om de weergave te
hervatten, zodat e en wit weerga ve-icoo n rechts op
het scherm wordt aan gegeven, wa t beteken t dat de
time-shift wordt u itgevoerd.
Druk wanneer het men u verdwijnt o p de toets▶om
het menu weer te laten v erschijne n. Druk om he t
NL
time-shiften te st oppen op de toets Stop of ve rplaats
in het geopende menu d e cursor naar d e Stop-op tie
en volg dan de gids die op h et scherm ver schijnt .
Opmerkingen
Zorg erv oor dat het o pslagappa raat dat u voor de
opname gaat gebrui ken in de USB-p oort op de
achterkant van het a pparaat is ingezet en co mpatibel
is voor opname. Als uw op slagappar aat niet
compatibel is, wor dt u gevraagd h et te forma tteren.
Ga in het Instelmenu h et submenu va n het PVRbestandsysteem b innen en sele cteer “Ap paratuurl ijst”
om uw apparaat te form atteren.
Alle functies (Weergave, Snel achter uit, Snel
vooruit, Pauze en St op) van het menu kunnen al leen
worden gebruikt al s het menu geop end is.
De func tie Time-shi ft is niet beschikbaar w anneer
het geselecteerd e kanaal het CI + kanaal is .
Avai lable Ti me
00:0 0:00/ 04:13 :20
Wee rgave van opg enomen be standen
De tv neemt programm a’s op een USB-stick o p in
de opmaak *.ts of “Time-s hift”. Als een a ndere tv,
pc, laptop, dvd-sp eler of randa pparaat d e
opmaak *.ts (Time-shi ft) niet herk ent of onde rsteunt,
kan dit niet worden we ergegeven . “ts” is de op maak
die wordt gebruikt v oor het uitzenden van hi ghdefinition-tv. U kunt“ts -bestande n” op een computer
of laptop met de corre cte software weergev en.
Raadpleeg het inte rnet of een IT-l everanc ier voor
informatie over de m eest geschi kte softw are.
Opgelet: JVC kan nie t aansprake lijk word en gesteld
voor door klanten of v erkopers ge downloa de
software die virus sen of andere d efecten a ls gevolg
van software-ins tallatie. De klant geb ruikt deze op
eigen risico.
NL
22
Page 83

BEDIENING
10.USB-speler
Druk op de brontoets , selecteer “USB” in de br onnenlijs t en druk op OK o m het USB-men u binnen te gaan.
Zorg ervoor dat het US B-apparaa t correct i n de sleuf is ges topt. U kun t kiezen uit vi er media-items: foto ,
muziek, film en teks t. Selecteer het type me dia door te dru kken op◄► en druk op de toe ts OK om het me nu
van de diskselecti e binnen te gaa n.
Pho to
Druk op om de gewenst e disk en map te selectere n en druk op OK om de l ijst van me diabestan den
binnen te gaan. Druk o p de Rode toets o m terug te ke ren naar het se lectiem enu van de medi atypes.
Selecteer het medi abestand do or te drukk en op◄►of ▼ ▲zod at een prev iew-venst er verschijnt. Druk op
de toets ►om het media bestand op het volledi ge scherm wee r te geven. D ruk tijdens d e weergave van
filmbestanden op d e toets ▼ om de con troleba lk op het scher m te zien.
Pho to
USB 1/Pic
Sele ct
Foto
Basisfuncties
Druk tijdens de weergave van foto’s op de toets van de afstandsbediening om een hulpbalk
Mus ic Mov ie Text
Sele ct
OK
Ente r
▼/▲
OK
Ente r ExitExit
Quic k Menu
Medi a Pad
▼
onderaan het scherm te zien.
Weergave/
pauze
Voorg.
Volgende
Stop
Draaien
Druk op de toets Weergave/pauze van de afstandsbediening om de weergave te
starten of onderbreken.
Druk op de toets Links van de afstandsbediening om de vorige foto te zien.
Druk op de toets Rechts van de afstandsbediening om de volgende foto te zien.
Druk op de toets Stop om de weergave te stoppen en terug te keren naar het
voorgaande menu.
Druk op de toets Op/neer om de foto te draaien.
NL
Snelmenu
Druk op de Blauwe toets om het Snelmenu binnen te gaan voor het instellen van
de intervaltijd, herhaling, het effect voor diavoorstellingen en de
achtergrondmuziek (u kunt de muziek eerste afspelen).
23
NL
Page 84

BEDIENING
Mus ic
USB 1/Mus ic
.. 1/1
10547 672.m p3
14953 359.m p3
Title:
Album :
Artis t:
Track
Year: 201 0-09- 30
1 / 2
10547 672
PLAY
00:00 :53 00:00 :00
Sele ct
OK
Ente r Exi tExit
Quic k Menu
Medi a Pad
MUZIEK
Druk tijdens de muziekweergave op de toets om de werkbalk te selecteren.►
Basisfuncties
FB: druk op de toets Links/rechts van de afstandsbediening om deze functie te
selecteren en druk op de toets OK om snel achteruit te gaan. Druk op de toets PLAY
voor de normale weergave.
FF: druk op de toets Links/rechts van de afstandsbediening om deze functie te
selecteren en druk op de toets OK om snel vooruit te gaan. Druk op de toets PLAY
voor de normale weergave.
Achtergrondmuziek: druk op de toets Links/rechts van de afstandsbediening om
deze functie te selecteren en druk op de toets OK om in/uit te schakelen.
De andere functies zijn dezelfde als bij “FOTO”. Verwijs naar de opties van “FOTO”.
FILM
De basisbediening is dezelfde als bij “FOTO”. Verwijs naar de opties van “FOTO”.
Basisfuncties
NL
Loop: druk op de toets Links/rechts van de afstandsbediening om deze functie te
selecteren en druk op de toets OK om een punt A en B van de film te stellen. De passage
tussen A en B wordt dan herhaald weergegeven tot u nogmaals op OK drukt om deze
instelling te annuleren.
Inzoomen: druk op de toets Links/rechts van de afstandsbediening om deze functie te
selecteren en druk op de toets OK om het beeld te vergroten. (Deze functie is niet
beschikbaar als het bestand groter is dan 1920x1080.)
Uitzoomen: druk op de toets Links/rechts van de afstandsbediening om deze functie te
selecteren en druk op de toets OK om het beeld te verkleinen. (Deze functie is niet
beschikbaar als de HD-video groter is dan 1920x1080.)
Tijd selecteren: druk op de toets Links/rechts van de afstandsbediening om deze
functie te selecteren en druk op de toets OK om een tijd voor de weergave te kiezen.
TEKST
“▼ /▲
Druk op ” om naar de voorgaande/volgende pagina over te gaan, voer een getal in met de
cijfertoetsen en druk op OK om naar de gewenste pagina te verspringen.
Hieronder volgt een lijst van de belangrijkste types bestanden die van een USB-apparaat kunnen
worden weergegeven.
Foto .j pg-bestan den
Geluid .mp3
Vid eo .avi en mp4
Tekst .tx t
NL
24
Page 85

TABEL VOOR HET OPLOSSEN VAN PROBLEMEN
Probl emen op de TV opl ossen
Het raadplegen van o nderstaan de tabell en kan het teru gsturen van uw aankoop o f het wachten o p een
reparateur overb odig maken. Al s u tijdens h et gebruik va n dit product hulp nodig h ebt, kunt u telefonisc h
contact opnemen me t onze hulpli jn.
Analoge tv & g eluid alge meen
Sym ptome n
Gee n gelui d
Kra akgel uiden of ver vormd gelu id.
Ste reo sch akelt over n aar mono. Zw ak sign aal o f een uit zen ding in m ono . Co ntrol eer h et sign aal e n uw
Gee n stere ogeluid ui t het appara at
dat op het sca rt-conta ct (AV) is
aangeslo ten.
Analoge tv & b eeld algem een
Sym ptome n
Korrelig ( sneeuw) be eld.
Mogelijk e oorzaken
Het volume i s op het minim um ingeste ld.
Het geluid i s uitgesch akeld.
Sto ring va n auto’s, een TL-lam pen,
videorec order, een ra dio-uitz ending,
persoonl ijke compu ter of ander e
apparatu ur.
U gebruikt e en mono-sc artkabel v oor de
aansluit ing naar de te levisie. H et bekeken
signaal is a angeslot en via het
antennec ontact.
Mogelijk e oorzaken
CI lo sgeko ppeld.
Uw vi deore corder is we llicht def ect.
Pro bleme n met de zende r.
De buitena ntenne is ve rplaatst o f
beschadi gd.
Wat u kunt d oen
Zet h et volu me harder. Dr uk op de
toe ts Mute o m het geluid i n te
sch akele n.
Sch akel de rgelijke a pparaten é én
voor één uit o m na te gaan of de
sto ring ve rdwijnt. K ijk ook naar
wat te doen bi j beeldsto ringen.
antennes ysteem.
Controle er of de scart kabel ster eo is.
Controle er of de video recorder m et
behulp van e en AV (sc art) kabel
op de tv is aang esloten en s chakel
dan de telev isie in de AV-modus.
Wat u kunt d oen
Als u een vide orecorde r heeft,
probeer da n de antenne
rechtstr eeks op de tel evisie aan t e
sluiten.
Als de fout hi ermee word t verholpe n
is de videor ecorder we llicht def ect.
Laat uw ante nnesyste em nakijke n.
NL
Ext ra cont ouren rond o bjecten in
het beeld (s pookbeel den).
Beeldsto ringen zoa ls vlekken o f
str epen.
Het beeld he eft de verke erde
afmeting en of het bron apparaat
(co mpute r, dvd-spel er, set top-b ox e.d.)
sta at u niet t oe een pixel resoluti e in te
ste llen di e het scherm k an
reproduc eren.
De antenne o ntvangt ee n dubbel sig naal
door weerk aatsing va n bergen of
gebouwen .
Defecte an tenne.
Zwa k anten nesignaa l. Storing v an
elektris che appara tuur zoals w erktuige n
of mo toren .
De instell ingen voor d e digitale u itgang van
de videoap paratuur s temmen nie t overeen
met de techn ische gege vens van de VG A
of DV I-ing ang van de mon itor.
Het bronap paraat hee ft geen reso luties die
zijn opgeg even in deze h andleidi ng.
De kabel van d e aansluit ing omvat ni et alle
benodigd e aansluit ingen.
Pro beer op e en beter sig naal van
dezelfde t v-zender a f te stemmen .
Laat uw ante nnesyste em nakijke n.
Pro beer op e en beter sig naal van
dezelfde t v-zender a f te stemmen .
Laat uw ante nnesyste em nakijke n.
Verplaats h et apparaa t dat storin gen
veroorza akt of schak el het indie n
mogelijk u it.Pas ind ien mogeli jk de
hernieuw ingssnel heid of de
resoluti e-instel lingen van h et
digitale a pparaat aa n.
Voorkom het g ebruik van o ude
kabels en ad apters. Ge bruik alle en
moderne ka bels. Hers tart het
bronappa raat na het aa nsluiten e n
opstarte n van de displ ay. Ge bruik
een andere g rafische a dapter in uw
computer.
Controle er de compat ibele vide oresoluti es die in deze h andleidi ng
zijn opgeg even.
25
NL
Page 86

TABEL VOOR HET OPLOSSEN VAN PROBLEMEN
Het beeld zi et er
samenged rukt of uitg erekt
uit, ook al zi jn de waarde n
van de beeld afmeting en
correct in gesteld
(bijvoor beeld 4:3 of 1 6:9).
Beeldsto ring zoals
golvende l ijnen of pat ronen.
Gel uid- of k leurstor ingen
kunnen ook a anwezig zi jn.
Geen beeld. Helderheid en
Verwarde letters op
teletekst.
Wanneer de RGB ingang wordt gebru ikt
is er een vervormd of
geen beeld.
Analoge tv & g eluid alge meen
Sym ptome n Moge lijke o orzaken Wat u kunt d oen
NL
De te levis ie lijkt “do od” geen licht en branden e n
niets werk t.
Het stand- by lampje
brandt maa r de toetsen
lijken nie t te werken.
Lokale fun ctietoet sen
werken nie t. Vas tgelopen
in stand-b y.
Het apparaat dat op de
display wordt weer gegeven
is ingesteld op de
verkeerde beelda fmetingen .
Een ander ap paraat geb ruikt
dezelfde f requenti e.
Kabel van sl echte kwal iteit in
het pad tuss en de tv en de tvantenne.
Uw antenne systeem on tvangt
een ongewe nst signaa l op
dezelfde f requenti e.
contrastniveau s zijn op het
minimum ingestel d.
Signaal van slecht e
kwaliteit.
Het synchronisat iesignaal
ontbreekt.
Gee n stroo mvoeding .
De hoofdsc hakelaar i s
uitgesch akeld.
Ges prong en zekerin g van de
circuito nderbrek ing.
Pro beer de t oets STAND-BY/
AAN o p het voo rpaneel: a ls de tv
inschake lt, contro leer dan
"De afstan dsbedien ing werkt
niet".
Micro-co ntroller i n de war
door elekt rische sto ring.
Kies de correcte bee ldverhoud ing voor de u itgang
van het bronappara at dat op de tv wor dt
weergegeven, zoa ls 4:3 of 16:9 di e bij de tv pas sen.
Kies op het digitale a pparaat 128 0 x 960 pixel s voor
4:3-schermen of 12 80 x 768 pixels v oor 16:9schermen.
Schakel andere app araten in sta nd-by om te z ien of
de storing dan stopt : stel een ande re
uitgangfrequen tie in dan die va n het appar aat dat
de storing veroorz aakt (zie de ha ndleidi ng ervan).
Koop een kabel van bet ere kwalite it.
Laat uw antennesys teem nakijk en.
Verhoog de instelli ng van de helde rheid en he t
contrast.
Zelfde als voor “Sne euw op het beel d” en
“Spookbeelden” .
Druk op de toets AV om de AV-ingang te s electeren
die het synchronis atiesigna al ontvan gt.
Controle er of het geen a lgemene st roomonde rbreking i s.
Controle er de stroom schakela ars van de tel evisie en he t
sto pcont act. Contr oleer de zek ering van de
circuito nderbrek ing in uw zeke ringkast . Zoek naar ee n
mogelijk e oorzaak va n het defect v oordat u het t oestel
vervangt o f terugste lt. Haal de st ekker uit he t stopcont act,
wacht vijf m inuten en pr obeer STAND-BY /AAN op het
voorpane el. Als dit nie t helpt laat u d e stekker ui t het
sto pcont act en kunt u er van uitgaa n dat het appa raat
defect is.
Sch akel de n etvoedin g uit en wacht 1 0 minuten vo ordat u
opnieuw pr obeert. (L aat de tv van de v oeding los gekoppel d
en bel een rep arateur in dien dit nie t helpt.)
Analoge tv & a fstandsb ediening a lgemeen
Verkeerde f uncties of
kort berei k.
NL
26
De batteri jen zijn lee g.
Er zi t een obs takel in de we g.
Zet n ieuwe b atterije n in.
Verwijder v oorwerpe n en obstake ls die in de weg z itten en
richt van re cht voor de af standsse nsor in een re chte lijn.
Page 87

TABEL VOOR HET OPLOSSEN VAN PROBLEMEN
Problemen met de digitenne-tv
Sym ptome n Moge lijke o orzaken Wat u kunt d oen
Het beeld bl okkeert of
bevriest .
Het geluid i s gebroken .
Sommige ka nalen
ontbreke n.
Eén van of all e
bovensta ande defec ten.
Zwa k signa al of verkee rd type
antenne.
De tv o ntvan gt één of meer dere
digitale m ultiplex -frequen ties
niet.
Sto ring of a nder probl eem
veroorza akt door een
voorbijk omend ante nnesigna al
van andere a pparatuu r.
Pro beer op nieuw af te st emmen.
De antenne i s wellicht n iet geschi kt voor digi tale tvuitzendi ngen.
Het is mogel ijk dat u zich o p een plaats b evindt waa r geen
goed digit aal tv-sig naal kan wor den ontvan gen.
Laat uw ante nnesyste em nakijke n door een ant enneinstalla teur.
Pro beer de a ntenne rec htstreek s op de ontvan ger van de
digitale t v aan te sluit en en dan opni euw af te stem men.
Als andere a pparatuu r is uitgeru st met een
radiofre quentiem odulator, s chakel die u it of stel er ee n
andere fre quentie op i n en stem de ana loge tv opni euw af.
(Verwijs na ar de handle iding van de a ndere appa ratuur om
te le ren hoe d it te doen.)
Digitenne
DVB-T (digitale video-uitzending - terrestriaal) betekenthet uitzenden in groepen van kanalen
op één gemeenschappelijke frequentie. Deze regeling staat bekend als een multiplex of
digitenne.
Er zijn verschillende digitennes in het DVB-T-systeem, waarbij elk een groep kanalen draagt.
Als het signaalniveau op een bepaalde multiplexfrequentie te zwak is, is het mogelijk dat u de
hele groep van kanalen op deze digitenne verliest.
NL
27
NL
Page 88

TABEL VOOR HET OPLOSSEN VAN PROBLEMEN
Problemen met de computermonitor-tv en HDMI
Gel uid
Sym ptome n Moge lijke o orzaken Mogelijk e oplossin gen
Gee n gelui d
Sym ptome n
Gee n beeld .Een beric ht op
het scherm g eeft aan dat
de video-i ngang niet
compatib el is.
De compute r die op de tv is
aangeslo ten biedt u ge en
geschikt e instelli ngen die
met de verei sten van de tv
overeens temmen.
Het beeld is n iet duidel ijk.
NL
Het beeld is i n de
verkeerd e positie.
Het beeld zi et er
samenged rukt of
uitgerek t uit.
HDMI-ing ang wordt ge voed via
een conver sie-aans luiting va n
apparatu ur met een DVI -uitgang .
Mogelijk e oorzaken Mogelijk e oplossin gen
De instell ingen voor h et digital e
apparaat d at op de tv is
aangeslo ten stemme n niet
overeen me t de vereist en van
de tv-inga ng.
De compute r heeft geen
informat ie met de tele visie
uitgewis seld.
Bij oudere c omputers i s het
mogelijk d at de grafis che adapte r
verouder d is.
De te levis ie moet word en
ingestel d voor de anal oge RGBingang van d e computer ( ook
bekend als V GA - of D-sub).
Sommige in gangreso luties
producer en een helde rder beeld
dan andere .
Verkeerde b eeldverh ouding.
Het appara at dat op de tv is
aangeslo ten is inges teld op
Sluit de gel uiduitga ng van het DVI -apparaa t aan op een
externe ve rsterker.
Beeld
Ste l een and ere hernie uwingssn elheid of re solutie va n de
grafisch e adapter va n de compute r of andere di gitale
apparatu ur in.
Herstart de computer terwijl de televisie nog op de
stroomvoeding is aangesloten en probeer dan opnieuw.
In uitzonderlijke gevallen kan het nodig zijn de instellingen
van de grafische adapter van de computer binnen te gaan en
het vakje “Toon alleen instellingen die deze monitor
ondersteunt” uit te vinken. Voor Microsoft Windows kan dit
worden gevonden door rechts te klikken op het Bureaublad
en dan “Eigenschappen – Display eigenschappen-Instellingen Geavanceerd tabblad - monitor tabblad” te volgen. De
beschikbaarheid van deze functie en de methode van
installeren kunnen variëren naargelang het besturingssysteem
van de computer.Upgrade uw grafische adapter.
Voor de analo ge RGB-ing ang van de com puter (ook b ekend
als VGA of D-su b) activee rt u de automa tische ins telfunct ie.
De fa se, fre quentie, v erticale e n horizont ale positi e moeten
misschie n ook een wein ig worden aa ngepast.
Controle er de inform atie in het ho ofdstuk va n de
computer monitor va n deze handl eiding en pr obeer een
andere ins telling va n de resolut ie .
Voor een tv met c omputerm onitorfu nctie die wo rdt gevoed
via de analo ge RGB-aan sluiting v an de comput er (ook
bekend als V GA of D-sub), s telt u de reso lutie van de
grafisch e adapter va n de compute r in op de zelfd e
beeldver houding al s die van het tv -scherm.
(Be eldve rhouding b etekent de v erhoudin g van de breed te
tot d e hoogt e, die in dit ge val in pixel s wordt uitg edrukt.)
Hoewel wij alle inspanningen hebben geleverd om deze handleiding zo nauwkeurig mogelijk op
te stellen, verontschuldigen wij ons voor eventueel ongemak als gevolg van kleine
onnauwkeurigheden, die in deze gebruiksaanwijzing kunnen voorkomen omdat wij onze
producten voortdurend ontwikkelen en verbeteren.
NL
28
Page 89

TABEL VOOR HET OPLOSSEN VAN PROBLEMEN
Gelieve de onderstaande lijst te controleren voordat u een reparatieservice inroept.
Symptoom Mog elijk e opl ossin g
Gee n beeld , geen gelui d
Gee n ontva ngst
De tv s chake lt uit als het
signaal va n de antenne ingang ont breekt
Gee n kanaa loptie
kan worden g eselecte erd.
Fou te kleu ren
Wel g eluid maar g een beeld
tij dens he t bekijken v an een
(digitaa l) DVB-kan aal
Beeld in blo kjes of
onderbro ken.
Sommige di gitale kan alen
zijn niet vi ndbaar.
U hoort soms e en
kra akgel uid van het
apparaat .
Sch akel he t apparaat i n.
Controle er of de stekk er goed in het s topconta ct zit.
Selectee r de juiste in gangmodu s.
Laat de stek ker 1 minuut u it het stopc ontact en st op dan weer in .
Is de t v op tv-z enders afg estemd?
Druk op 1 van de a fstandsb ediening .
Sluit de ant enne aan.C ontrolee r of het appar aat is
ING ESCHA KELD en niet i n de modus Sta nd-by staa t.
Dit is norma al.Het app araat scha kelt 15 minu ten nadat he t
antennes ignaal is ve rdwenen na ar de modus St and-by.
Het appara at is in de AV-modus ges chakeld. D ruk op 23 van
de afstand sbedieni ng.
Fou te kleu ren en helde rheid kunn en voorkom en wanneer d e
maximale k ijkhoek/ omgeving stempera tuur wordt o vertroffen
(zi e Technische g egevens) .
Sommige ka nalen zend en alleen ge luid uit. Di t is normaal .
Controle er alle ante nne-aans luitinge n.
Verplaats d e antenne ve rder weg van m ogelijke s toringen .
Pro beer ee n antennev ersterke r te gebruik en.
Neem conta ct op met uw ser viceprov ider voor ee n abonneme nt.
Als er niets a an de hand is me t het beeld of g eluid, is di t het
geluid van d e behuizin g die ietwat s amentrek t door veran deringen
in de omgevi ngstempe ratuur.
Dit heeft ge en enkele in vloed op de we rking of and ere aspect en
van uw tv.
NL
Het lcd-paneel is een zeer hoogtechnologisch product dat u fijne
beelddetails geeft.
Soms kunnen enkele niet-actieve pixels op het scherm verschijnen als
een vast punt
in blauw, groen of geel. Dit heeft geen enkele invloed op de werking van
uw product.
29
NL
Page 90

Technische gegevens
Systeem
Kleursysteem video
Preset-kanalen
Frequentiebereik
LCD
HDMI-ingang
Uitgangvermogen audio
JVC / LT-32HA60U
Analoog: PAL (B/G, D/K, I), SECAM (B/G, D/K)
* Dit product is niet verenigbaar met analoge SECAM-uitzendingen.
Digitaal: DVB-T, DVB-T HD (H.264), DVB-C, DVB-C HD (H.264)
PAL/SECAM/NTSC 3.58/NTSC 4.43/PAL 60 Hz
1400 met inbegrip van analoge en digitale kanalen
Analoog: 45.75-858MHz
Digitaal: E2-E69
TFT Low-glas amoled-LCD
HDMI-verenigbaar (type A aansluiting), HDCP-verenigbaar
Gesuggereerde scansnelheden:
50 Hz: 576i/576p/720p/1080i/1080p
60 Hz: 480i/480p/720p/1080i/1080p
HDMI-audio: 2 kanalen-PCM, 32/44. 1/48 bemonsteringsfrequentie
16/20/24 bits perbemonstering
ongeveer 8W (MAX.)x2
Stroombron
Energieklasse
Zichtbare schermgrootte
(diagonaal)
Stroomverbruik (nominaal)
Stroomverbruik in aanmodus
Jaarlijks energieverbruik *¹
Stroomverbruik in stand-
NL
bymodus
Stroomverbruik in
opnamemodus *²
Schermresolutie
Gewicht
Afmetingen
Omgevingstemperatuur
Omgevingsvochtigheid
100-240V ~50/60Hz
A
80cm / 31.5in
50W
40W
58k Wh
≤0.30W
8W
1,366pixel(hor izontaal) x768pix el(vertic aal)
6kg
74(B) x 49(H) x 20(D)cm
Wer king:5-40 ºC/Opslag:-20-60 ºC
Minderdan80%RV
Toebehoren
Gebruiksaanwij zing............ ................ ......1
Bruin veiligheid sblad.... ....... ................ ..... 1
Energielabel.. ................ ................ ..........1
Afsta ndsbedien ing............. ................ ......1
Schroef ........ ....... ......... ....... ......... ....... ... 6
Voetstuk…………….. ................ ................ 1
Paal voor voetstuk ……………........... .........1
Sluitring voor voe tstuk........... ................ ...1
SCART-kabel.. ....... ......... ....... ......... ....... ..1
1 Het jaarlijkse energieverbruik is gebaseerd op het stroomverbruik als de televisie
*
365 dagen per jaar 4 uur per dag wordt gebruikt.Het eigenlijke stroomverbruik is
afhankelijk van de manier waarop de tv wordt gebruikt.
*2 Is gebaseerd op het stroomverbruik van het televisietoestel (zonder dat de tv een
beeld- of geluidssignaal uitbrengt). Andere USB-apparaten zijn niet meegerekend.
Het gewicht en de afmetingen zijn approximatief. Omdat wij voortdurend streven
naar verbetering van onze producten, is het mogelijk dat de uiteindelijke technische
gegevens en ontwerpen zonder voorafgaande kennisgeving zijn gewijzigd.
NL
30
Page 91

Informatie over licenties
• DVB en de DVB- logo’s zijn han delsmerk en van het DVB -project .
• Vervaardi gd onder lic entie van Do lby Labora tories. Do lby en he t dub bele- D-s ymboo l zij n hande lsm erken v an
Dolby Labo ratories .
• Dit produc t is bescher md door bepa alde intel lectuele e igend oms recht en va n Micro sof t. Het zo nde r licen tie v an
Microsof t gebruike n of verdele n van deze tec hnologie b uiten dit pr oduct i s ver boden .
• DIT P RODUCT IS GELIC ENTIEERD O NDER DE MPEG -4 VISUELE PATENT PORTFOLIO LI CENTIE VOO R
PER SOONL IJK EN NIET-C OMMERCIE EL GEBRU IK DOOR DE CON SUMENT VOOR (i) H ET CO DEREN VAN
VID EO IN OVE REENSTEM MING MET DE VISUE LE STANDAARD MPE G-4 (“MPEG -4 VIDEO”) E N/OF (ii) HE T
DECODERE N VAN MP EG-4 VIDEO D IE DOOR DE CON SUMENT GECODE ERD WERD VOO R PERSOONL IJKE EN
NIE T-COMM ERCIELE ACT IVITEITE N EN/OF VERK REGEN WERD VAN EEN V IDEOPROV IDER MET EEN
LIC ENTIE VAN MPE G LA VOOR HET LEVERE N VAN MP EG-4 VIDEO . GEEN LICEN TIE WORDT VERLE END
VOO R OF IS VAN TOE PASS ING VOORAN DER GEBRUI K. BIJKOME NDE INFORM ATIE M ET IN BEGRIP VAN
INF ORMATIE MET BETR EKKING TOT PR OMOTIONE EL, INTERN E N COMMERCI EEL GEBR UIK EN
LIC ENTIE VERLENIN G KAN WORDEN V ERKREGEN B IJ MPEG LA, LL C. ZIE http: //WWW.MPE GLA.COM.
• DIT P RODUCT IS GELIC ENTIEERD O NDER DE AVC-PATEN T PORTFO LIO LICENT IE VOOR PERS OONLIJK
GEB RUIK OF AN DER GEBRUI K DOOR DE CONS UMENT WAARB IJ GEEN INKO MEN WORDT VERWORVEN UIT
(i) HET CODEREN VAN VID EO IN OVEREE NSTEMMIN G MET DE AVC-S TAND AARD (“AVC VIDEO ”) EN/OF (ii )
HET DECODEREN VAN AVC VIDEO DI E DOOR EEN CON SUMENT GECODE ERD IS VOOR PE RSOONLIJ KE
DOE LEIND EN EN/OF VER KREGEN WER D VAN EE N VIDEOPRO VIDER MET LICEN TIE VOOR HET LEVE REN
VAN AVC VIDEO . GEE N LICEN TIE WORDT VERLE END VOOR OF ZA L VAN TOEPASSING Z IJN OP ANDER
GEB RUIK. B IJKOMEND E INFORMATIE KAN W ORDEN VERK REGEN BIJ MP EG LA, L.L.C .. ZIE
htt p://W WW.MPEGLA .COM.
• De te rmen HD MI en HDMI Hig h-Defini tion Multi media Inte rface en het H DMI-logo z ijn han del smerk en of
geregist reerde han delsmerk en van HDMI Li censing LL C in de Vere nig de Stat en en a ndere l and en.
• Alle andere h andelsme rken zijn he t eigendom v an hun respe ctiev eli jke eig ena ars.
31
NL
NL
Page 92

Prestaciones
Pantalla LCD 16:9 Reproduct or multimed ia-USB
Tecnología de Retroi luminació n LED Desco nexión Autom ática
Sintonizador DVB -C/T-HDTV PVR (Grabad or Vídeo Pe rsonal)
Sintonizador-a nalógico- cable Time S hift
Guía Pr ogramació n Electrónica (EPG) pa ra DVB Nuevo di seño mold ura-fina*
Advertencia sobr e pilas (sólo válido en la U E)
Cuidemos del medio a mbiente – con sulte a las a utoridade s locales sobre el métod o para desech ar
las pilas agotadas d e modo seguro . ¡El símbo lo de la papele ra con ruedas tachada in dica que las
pilas usadas no se deb en tirar en la ba sura domé stica! Exis te vigent e un sistema se parado de
recogida de pilas us adas que perm ite el trat amiento cor recto y el re ciclaje en cu mplimient o de la
legislación actu al. Consult e a las autor idades loca les para obtener infor mación sobr e los progr amas
de recogida y recicl aje de residu os en su zona .
Notas DVB-C
Los programas codi ficados req uieren un a tarjeta Sma rtcard y un m ódulo CA (CAM) p ara proceder a
su descodificaci ón.
Puede adquirir la ta rjeta smart card en su pr oveedor de te levisió n por cable (CA Ms son productos
habituales). Int roduzca la ta rjeta sma rtcard en el CA M y después i ntroduzca e l CAM en la ranura CI
de su televisor. La tar jeta Smartcard se intr oduce en el CAM .
En la actualidad exi sten aproxi madamen te 650 provee dores de televisión po r cable en Alema nia. El
sintonizador inc orporado no p uede auto máticamen te memorizar todos los c anales disp onibles d e
todas las redes de tel evisión por c able. Est a prestació n no puede ex istir con tan e levada oferta de
televisión por cab le. Utilice l a tabla de ca nales de su pro veedor de televisión p or cable para
sintonizar manua lmente los ca nales.
La ranura CI de este tel evisor no es compatibl e con todos los m ódulos CI + de los 650 prov eedores
de televisión por ca ble. Si el módu lo de su prov eedor no es com patible, solicite a su d istribuid or otro
módulo CA o utilice el de codificad or del prov eedor para de scodificar la progra mación.
Infor mación sobr e la función DVB-T
Cualquier funció n relativa a la t elevisi ón digital (c on el logo DVB) está dispo nible en su paí s o zona
sólo si se transmite l a señal de tele visión di gital. Verif ique con el personal de la t ienda que es po sible
recibir la señal dig ital DVB-T en la zona do nde usted res ide.
Retire el CAM para pod er recibir la s eñal de tel evisión dig ital, en caso de que se hubi era introdu cido
previamente.
Debe existir una ant ena DVB-T conectad a para poder re cibir las s eñal DVB-T.
Incluso cuando el te levisor cum ple las esp ecificaci ones DVB- T, no se puede gara ntizar la
compatibilidad d e las transmi siones di gitales DVB -T futu ras.
Algunas funcione s de televisi ón digita l podrían no es tar disponibles en alg unos países .
ES
El sistema DVB-T incluido en este aparat o es FTA (tra nsmisión gr atuita).
ES 2
Los aparat os conecta dos a la toma de t ierra prot ectora de la i nstalaci ón del edifi cio a tra vés d e la cone xió n a la red
eléctric a o la conexió n a otros apar atos conec tados a la tom a de tierra – y a un s istema de di stribuci ón de cab le
uti lizan do un cable co axial, pue de en alguna s circunst ancias gen erar un i nce ndio. L a con exión a u n sis tema de
distribu ción de cabl e debe ser rea lizada a tra vés de un disp ositivo qu e propo rci one ais lam iento e léc trico p or
debajo de ci erto rango d e frecuenc ia.
Estimado Cliente ,
Este aparato cumpl e las directi vas y norma s europeas vi gentes re ferentes a co mpatibilidad
electromagnéti ca y segurida d eléctri ca.
Darty Plc © 22/24 Ely Pl ace, London EC1N 6TE, UK
El diseño de m oldura ext ra-fina pe rmite la vis ualizaci ón complet a de la pan tal la del te lev isor. In clu so el bor de
súper-ne gro de la pant alla (apro x. 3mm) es vis ible.
Page 93

Información importante sobre seguridad
Este ap arato h a sido fa brica do cumpliendo to das las n ormat ivas actuales de s eguri dad. Lo s sigui entes consejos
sobre s eguri dad per mitir án a los usuarios ut iliza r el prod ucto correctam ente y ev itar si tuaci ones de peligro du rante
su uso.
Aunqu e este ap arato h a segui do un cuidadoso pr oceso d e fabri cación y ha supera do un rig uroso c ontro l de
calid ad en la fá brica , al igua l que todos los apar atos el éctri cos podría produ cirse a lgún pr oblem a. Si observa
humo, u n exces ivo cal entam iento u otro fenóm eno ext raño, d esenc hufe inmediata mente e l cable d e
alime ntaci ón.
¡Comp ruebe q ue el apa rato es tá suficientem ente ve ntila do! ¡Nunca se debe c oloca r cerca o d ebajo d e una
corti na!
Este ap arato s olo se de be cone ctar a una toma de cor rient e – no inte nte con ectar lo a
ningú n otro ti po de fue nte de al imentación.
La toma d e corri ente ut iliza da debe estar inst alada c erca de l aparato y tener fácil acc eso.
Todas las r epara cione s deben ser efectuadas só lo por pe rsona l técnico cualif icado .
No abri r el apar ato. La a pertu ra del aparato por u na pers ona no pr ofesional podr ía ser pe ligro so y prov ocar un
incen dio.
Mante ner fue ra del al cance d e roedores. Los ro edore s (y tamb ién las cacatúas ) muerd en los ca bles el éctricos.
Los ani males p ueden p rovocar un cortocircu ito (¡p eligr o de incendio!) y re cibir u na desc arga el éctrica.
Para de sench ufar el c able de a limentación se d ebe tir ar de la cl avija. No tirar de l cable . El cabl e podrí a
sobre carga rse y pro vocar u n cortocircuit o.
No limp iar con a gua. Ut iliza r solo un paño húmed o, del mi smo mod o que se limpian los m ueble s.
¡No sum ergir e n agua!
El apar ato se de be inst alar de m odo que nadie pued a trope zar con s u cable de aliment ación .
Se reco miend a insta lar el ap arato en un soport e antig olpes p ara evitar su posi ble caí da.
Recue rde que l os niño s podrían tirar el aparat o desde u na mesa o u n mueble tirando d e su cabl e de alim entac ión.
Los niñ os podr ían suf rir dañ os al realizar est a acció n.
No util ice el ap arato c erca de f uentes de calor. La c arcas a y el cabl e de alimentació n podrí an resu ltar da ñados por
el calo r.
¡Recu erde qu e los niñ os imit an a los adul tos! ¡N o intro duzca n ingún objeto por l as ranu ras de ve ntila ción!
¡Los or ifici os de ven tilac ión deben perman ecer ab ierto s! ¡No colocar nin gún per iódic o ni cubi erta sobre el
apara to!
¡El man do a dist ancia n o es un jug uete! Los niños po drían i ngeri r las pilas. En caso d e inges tión de u na pila ,
acuda i nmedi atame nte al mé dico.
La pant alla es tá comp uesta d e cristal y podría r omper se si suf re algú n daño. Cuidado al r ecoge r los cri stales
rotos d e borde s afila dos. Po dría sufrir daño s perso nales o m ateri ales.
Si dese a insta lar el ap arato e n la pared, consul te cómo h acerl o en la tienda donde l o adqui rió y per mita qu e la
insta lació n sea rea lizad a por un técnico. La i nstal ación i ncompleta podr ía prov ocar le sione s.
Adopt e medid as adec uadas p ara evitar la caíd a del apa rato
-Si est as medi das no se i mplem entan, el aparat o podrí a caer y pr ovoca r lesiones.
-Cons ulte en l a tiend a donde a dquirió e l telev isor pa ra que le f aciliten sus dim ensio nes.
Cuand o se util iza un so porte p ara el televisor,
-Comp ruebe q ue el apa rato es tá totalmente ap oyado e n el sopo rte y en la parte central del m ismo.
-No dej a abier tas las p uerta s del soporte
-Podr ía sufr ir lesi ones pe rsonales si el apa rato su fre una c aída o ro tura, o podría pil larse l os dedo s. Extreme las
preca ucion es ante l a prese ncia de niñ os.
No colo que el ap arato e n una sup erficie someti da a vibr acion es o golpes.
Para pr otege r el apar ato dur ante una torment a con apa rato el éctri co, desenchufe e l cable d e alime ntación y
desco necte l a anten a. Prec aución: no tocar e l conec tor de la a ntena .
Cuand o vaya a es tar fue ra de cas a durante un largo p eriod o de tiem po, desenchufe e l cable d e alime ntaci ón AC
por su se gurid ad.
El apar ato se ca lient a duran te su funcionami ento. N o coloc ar ninguna cubie rta o man ta sobr e el apar ato para
evita r su sobr ecale ntami ento. No bloquea r los ori ficio s de ventilación . No inst alar ce rca de un r adiador. No
coloc ar bajo l a luz dir ecta de l sol. Al colo car el te levis or en un es tante deberá dej ar 10cm , de espa cio lib re
alred edor de l apara to para f acilitar la circ ulaci ón de air e.
Si se der rama un l íquid o dentr o del aparato se pue den pro ducir d años graves. APAGUE el ap arato y d esenchufe
el cabl e de alim entac ión, de spués consulte a l perso nal téc nico antes de volv er a ence nder el a parat o.
Prest e atenc ión a las s iguie ntes instrucciones pa ra evit ar una de scarga eléctrica que po dría se r morta l:
Prote ja el apa rato de l a humed ad. No utilizar en e l cuart o de baño n i en la sauna.
No util izar ce rca de un a bañer a, ducha o piscina .
No util izar el a parat o despu és de que se haya moja do. Est a condi ción también inc luye la h umeda d por
conde nsaci ón, que s e gener a en invierno cuan do el apa rato fr ío se introduce en u na vivi enda ca lient e. Espere
antes d e poner e n funci onami ento el aparato, e speci almen te después de que ha ya sido t ransp ortad o en invierno,
hasta q ue el apa rato fr ío se hay a adaptado a la temp eratu ra de la ha bitación.
No colo car nin gún obj eto pes ado sobre e l cable d e alime ntaci ón. Podría dañar e l aisla nte elé ctric o.
No enro llar ci nta ais lante a lrededo r del cab le eléc trico o u na clavija dañad a. Debe n ser rep arado s por personal
cuali ficad o.
No util izar es te apar ato si la c arcasa está defe ctuos a. No rea lizar n inguna reparac ión pro visio nal si la carcasa
está da ñada – de berá su stitu ir la carcasa por ot ra nuev a cuand o sea necesario.
Desen chufe e l apara to de la to ma de corriente an tes de pr ocede r a su limpieza.
No inte nte rep arar un c able de a limentación da ñado ut iliza ndo cinta aislan te – esta a vería d ebe ser r eparada o el
cable s ustit uido po r un espe cialista. No dej e a ningú n anima l doméstico suel to cerc a del cab le. Los a nimales
podrí an mord er el cab le y reci bir una descarga e léctr ica mor tal, provocand o situa cione s de ries go para otros.
AC 100- 240V~ 50/60 Hz
ES
3 ES
Page 94

Información importante sobre seguridad
Cómo instalar la base del televisor
NOTA:
Desenchufe el cabl e de alimenta ción.
Antes de realizar cu alquier tar ea coloqu e un cojín en la ba se para apoyar el televi sor.
No sujete el televis or por la panta lla porqu e los objetos a filados o una excesiva p resión podr ían dañar lo.
Asegúrese de segui r las instruc ciones. L a instalaci ón incorrecta de la base p uede provoc ar la caída d el
televisor.
1) Coloque el televi sor apoyado e ncima de un a mesa sobre la p arte frontal.
2) Alinee la placa infe rior de la base ( suminis trada) tal y co mo se indica en la ilustra ción.
Encajará en una sola d irección. As egúrese d e que las clavi jas de sujeción encaja n en los orific ios de
sujeción.
3) Mantenga la placa i nferior cor rectame nte colocad a y sujétel a con los torni llos.
1. Coloque el televisor sobre una superficie
plana con la pantalla mirando hacia abajo.
Utilice un paño para proteger la pantalla.
Coloque la base de apoyo en la parte
inferior del televisor.
2. Acople el pie de la base y la arandela a la
columna y fije ambas con los tornillos
suministrados.
3xM3x15m m
NOTA:
Para desmontar la ba se de apoyo lle ve a cabo los p asos anteri ores en orden inverso.
3xM4x15m m
Desmontaje de la base de apoyo
La base de apoyo debe se r retirada de l televis or para poder m ontarlo a la pared. Quit e los
ES
tornillos (dibuj o anterior) d e la parte tr asera del tel evisor. Atornille un sop orte de pared
VESA (200 x 100). La long itud de las ros cas de los to rnillos que s e inserta n en el televis or
no deben exceder 5 mm, e n el caso de los to rnillos i nferiores , y 10 mm en el cas o de los superi ores.
Indicaciones al montar el televisor a la pared
Retire la base de apoy o del televis or en una pie za deshacie ndo el paso de fijación de scrito
anteriormente.
Los tornillos pued en dejarse en roscado s a la base de apoy o para que no se pierdan, pe ro no deben
apretarse demasi ado.
Tamaño del tornillo VE SA 4 x M4 x 5 mm
Proteja la pantall a y deposite el t eleviso r por el lado de la p antalla sobre una mesa e stable, con l a base
de apoyo alejada del b orde la mesa.
Para garantizar un a instalaci ón fiable , tenga en cuen ta lo siguiente al monta r la televisión a la pared :
Advertencia: Se re quiere a dos pe rsonas pa ra realizar e sta tarea .
Asegúrese de que la pa red pueda sop ortar el pe so del televi sor y el soporte de pared VE SA (no
incluido).
Asegúrese de usar so lamente tor nillos ap ropiados pa ra el tipo de pared.
En caso de dudas, póng ase en contac to con un ins talador cua lificado.
Tenga cuidado con los ca bles eléctr icos, así c omo las tuber ías de gas y ag ua de la pared.
Siga las instrucci ones que se inc luyan con e l soporte de pa red.
El televisor debe in stalarse en u na pared ve rtical.
Asegúrese de coloc ar los cables d e tal forma q ue no haya peli gro de tropezar con ello s o dañarlos.
ES
4
Page 95

Información importante sobre seguridad
ADVERTENCIA Para e vitar un incendio, nun ca debe coloc ar ningún tipo de vela ni ob jeto con
llama de fuego encen dida encima o c erca del te levisor.
Advertencia sobr e Aur iculares
La música a volumen el evado puede p rovocar l esiones aud itivas irreversibl es, por lo tant o el volume n no
se debe ajustar a nive l alto cuando s e utilice n auricular es, especialmente du rante perio dos de tiem pos
largos de audición .
Mover el aparato o tra nsportarlo a mano
Cuando el aparato va a s er trasladado a gran dis tancia, desenchufe e l cable de alimentació n,
desconecte la ante na, los cables de conexi ón y cualquier aparato a nti-caídas.
Si se mue ve el aparato s in hacer lo anterior pod rían produc irse daño s en el cable de al imentació n, un
incendio, una desc arga eléctr ica o lesio nes provoca das por la caída del apara to.
Asegúrese de que el ap arato es desembalado y t rasladado por dos o más pe rsonas y que el aparato
permanece en posic ión vertical durante e ste proceso.
Cuando el soporte de l televisor tiene rued as, retire las ruedeci llas del soporte y empúj elo a la vez
que suj eta el televi sor.
Asegúrese de sujeta r el televiso r cuando em puje el sopor te, porqu e el aparato po dría caer y usted
sufrir lesiones.
El apar ato podría pr ovocar muescas en una me sa de madera co n una super ficie super ior
extremadamente b landa debid o a su elevad o peso.
El uso de s pray limpia muebles pod ría corro er y disolver l os pies de go ma. En la mesa po dría haber
marcas negras. Por e ste motivo, solo se debe n utilizar mu ebles esp ecíficame nte diseñados para el
televisor.
Las ruedas se deben fr enar cuando el aparato e sté instalado en un sopo rte de televisor con rue das.
Si las ru edas no están f renadas, el soporte se p odría mover y u sted podr ía sufrir les iones.
Retire las ruedas cu ando el sopor te se coloq ue en una super ficie blanda como una al fombra o moqu eta.
La dist ancia entre l os ojos y la pantalla debe s er al menos equivalent e a 3 o 4 veces la altura de la
panta lla.
La visu alización d e la televisi ón a poca dis tancia pued e fatigar los ojos.
Al inst alar la Panta lla en una mesa, nunca deb e colocarla en el borde.
La Pant alla podría c aer, provoca ndo lesio nes graves a un n iño o un adulto, y daños gra ves a la
Pantalla.
Posibles Efectos Adve rsos en la Pantalla LCD: S i una imagen fi ja (inmóvil) permane ce en la pantal la
LCD durante un largo p eriodo de tie mpo, la ima gen podría qu edar permanentemen te gravada en l a
pantalla LCD del tel evisor y prov ocar una li gera imagen f antasma en la pantalla . Este tipo de da ño NO
ESTÁ CU BIERTO POR LA GARAN TÍA. No deje el t eleviso r encendido d urante largos period os de tiempo
mientras está visu alizando lo s siguien tes formato s o imágene s:
Imáge nes fijas, co mo teletipos, dibujo s de videojue gos, logo s de canales de t elevisión y websites .
Forma tos especia les que no utilicen la pan talla compl eta. Por ej emplo, form ato buzón (16:9), form ato
normal (4:3) (Barr as negras en la p arte supe rior e inferi or de la pant alla); o form ato normal (4:3) en
pantalla amplia (1 6:9) (Barra s negras en e l lado izquie rdo y derecho de la pantal la).
¡Atención!
Instrucciones de l impieza del t eleviso r LCD.
Notas sobre Seguri dad:
Antes de comenzar a li mpiar, apagu e el aparat o por complet o y desconecte el cable de a limentaci ón de la
toma de corriente.
Extreme las precau ciones para n o dañar el pa nel frontal c on recubrimiento plá stico – es altamente
vulnerable a araña zos acciden tales (po r ejemplo, pr ovocadas por las uñas u ot ros objetos a filados ).
Durante la limpiez a del aparato , no utilic e bisutería q ue podría rayar la super ficie (por ej emplo, an illos,
reloj de pulsera, et c.). Utilice un paño sin p elusa y agua li mpia para limpiar el apa rato, pero as egúrese d e
escurrir bien el pañ o para que esté h úmedo per o no empapado – a segúrese también de qu e el paño no
está sucio porque la s uciedad pod ría rayar l a superfici e.
Limpie el aparato ej erciendo la m ínima pre sión.
No utilice líquido l impiador pa ra crista les. El alcoh ol/amoniaco disolv ería el recub rimient o frontal de la
pantalla. No utili ce disolven te ni solve nte. No utili ce sustan cias de limpi eza especia lmente di señadas
para limpiar Panta llas de orden ador ni tel evisores co nvencionales. Por úl timo, secar por comple to con un
paño seco, limpio y si n pelusa.
NO utilice papel de co cina ni pañue los de pape l para limpia r el aparato – el papel se pue de desinteg rar al
mojarse o puede deja r un rastro de po lvo. Algun os papeles pu eden ser abrasivos y ray ar la pantall a.
ES
5
ES
Page 96

Información importante sobre seguridad
Información sobre Seguridad
Uso correcto y mante nimiento de l televis or
Este te levisor ha si do diseñado y f abricad o conforme a
las Normas Europea s de Segurida d, pero al ig ual que
cualquier aparat o electróni co es impor tante adopt ar
unas precaucione s para evitar p roblema s y asegurar
el funcionamient o óptimo. Estas son algu nas
recomendacione s.
Antes de utilizar el t elevisor le a detenid amente esta s
instrucciones.
Proteja el cable de al imentació n. Debe gar antizar que
el cable eléctrico n o sea pisado, a plastad o, dañado,
cortado o pellizca do.
Apague el aparato y de senchufe el c able de
alimentación ant es de alejars e del telev isor, a menos
que el funcionamie nto del telev isor requ iera el
suministro eléct rico contin uo.
Interrumpa el uso de l televisor, c uando hay a
derramado líquid o encima, el ap arato est é dañado o
no funcione con norm alidad. Des enchufe e l televisor
inmediatamente y c onsulte a un té cnico.
Evite las condicio nes extrema s, por ejem plo los
lugares mojados, c on elevada hu medad, fu ertes
vibraciones, tem peraturas e xtremad amente elev adas
o bajas, la luz solar di recta y lugar es con much o polvo.
No instale al televi sor ninguna b ase o pie pro visional.
No introduzca ning ún objeto en lo s orifici os o ranuras
de ventilación. Pa ra evitar des cargas el éctricas, n o
abra ninguna cubie rta del apara to. No toqu e la
pantalla LED porqu e se calienta d urante su
funcionamiento , este fenóme no es norma l y no supone
ninguna avería.
ES
Si algo funciona inc orrectame nte, no int ente arregl arlo
usted mismo, acuda a u n servicio técnico ofi cial.
Desenchufe el cabl e de alimenta ción y el cab le de la
antena durante las t ormentas co n aparato e léctrico.
No permita que algun a gota de agua pe rmanezc a
en la pantalla porqu e la humedad pu ede provo car
la pérdida de color pe rmanente.
Los restos de grasa se d eben elimin ar solo con u n
producto de limpie za indicado p ara panta llas LED
y disponible a la vent a.
Alimentación
Este te levisor ha si do diseñado p ara funci onar
con un suministro el éctrico AC de 10 0-240 Volt ios
50/60Hz. El uso de cua lquier otra f uente de
alimentación pod ría dañar el ap arato. Ant es de
conectar el televi sor por prime ra vez, com pruebe
que la placa de caract erísticas (en la parte
posterior del tele visor) indi ca 100-24 0V AC.
El fabricante NO ser á responsab le de los dañ os o
lesiones provoca dos por el uso de l product o con
una fuente de alimen tación inco rrecta.
Clavija Eléctric a
El televisor está eq uipado con un a clavija
Eléctrica estánd ar.
-Si el cable de aliment ación está da ñado, deb e
ser sustituido por u n cable de alim entació n del
mismo tipo y caracte rísticas para evitar c ualquier
peligro.
-Si por cualquier mot ivo se corta la clavija
eléctrica incorp orada con el ap arato, se d ebe
destruir la clavij a antigua por que podrí a ser
peligrosa si se intr odujera en un a toma de
corriente operat iva.
-Siga atentamente l as instrucc iones de
instalación sumi nistradas c on la clavi ja nueva.
-Si la clavija incluy e un fusible, e xtraiga e l fusible
antes de tirar la clav ija.
-No utilice una clavi ja eléctric a con fusib le sin la
tapa del fusible.
-La clavija eléctri ca es el dispos itivo de
desconexión eléc trica y debe es tar acces ible en
todo momento.
Ventilación
Coloque el televis or en una super ficie pla na y sólida,
alejado de la luz dire cta del sol y otr as fuente s de
calor. Si se instala de ntro de un mueb le, debe ex istir
un hueco alrededor d el televiso r de 10cm com o
mínimo.
No cubra las ranuras d e ventilaci ón, y tampo co las de
la parte inferior, co n objetos tap izados.
El sobrecalentam iento del tel evisor re ducirá su vid a
útil y puede provoca r un incendio .
Limpi eza
Desconecte el apar ato de la toma de c orrient e y utilice
solo un paño suave lig eramente hu medecid o. No
utilice ninguna su stancia quí mica ni det ergentes
fuertes porque pod rían dañar la c arcasa o la p antalla
del televisor.
ES
6
En el interior de este aparato existe
tensión eléctrica peligrosa que puede
provocar una descarga eléctrica.
Este aparato está doblemente
aislado y no es necesario utilizar
una conexión a tierra.
Esta señal indica que el aparato
cumple las normas europeas de
seguridad y compatibilidad
electromagnética
Page 97

Información importante sobre seguridad
Información sobre Seguridad (continuación)
Fatiga visual
Cuando el producto se utilice como una pantalla de ordenador, los especialistas sanitarios y de seguridad
recomiendan realizar descansos breves y frecuentes en lugar de descansos más largos y ocasionales. Por
ejemplo es preferible descansar durante 5-10 minutos después de una hora de uso continuo que descansar 15
minutos después de 2 horas de uso.
No utilice la pantalla sobre un fondo luminoso y tampoco donde la luz directa del sol u otra fuente de luz se
refleje directamente sobre la pantalla.
Auriculares
PRECAUCIÓN: Conecte los auriculares con el volumen ajustado a nivel bajo e increméntelo cuando sea
necesario. La audición prolongada con auriculares a elevado volumen puede provocar lesiones auditivas.
Pilas
Extraiga las pilas del mando a distancia cuando éste no vaya a ser utilizado durante un largo periodo de
tiempo. Las pilas que permanecen dentro de un aparato pueden dañarlo debido al deterioro y la oxidación del
líquido de las pilas, invalidando la garantía.
Para contribuir al cuidado del medio ambiente, utilice los puntos locales de reciclaje para desechar las pilas.
Las pilas usadas se deben eliminar según las instrucciones.
PRECAUCIÓN: Si las pilas se sustituyen por otras de tipo incorrecto, podría producirse una explosión.
ELIMINACIÓN
Este producto se debe desechar cumpliendo la normativa y las disposiciones de la regulación local.
Debido a que el producto contiene componentes electrónicos, no se debe tirar en la basura doméstica cuando
el producto llega al final de su vida útil.
El producto se debe depositar en un punto limpio para proceder a su reciclaje.
Algunos puntos limpios aceptan productos gratuitamente.
ADVERTENCIAS
Este aparato ha sido concebido solo para uso doméstico y no se debe utilizar con ningún otro objetivo o
aplicación, por ejemplo el uso no doméstico o el uso comercial
Si el cable de alimentación está dañado, debe ser sustituido por el fabricante, el servicio técnico o persona con
formación similar para evitar cualquier peligro.
Este aparato no debe quedar expuesto a goteos o salpicones.
No coloque objetos que contengan líquidos encima de la unidad (p.ej. jarrones).
No colocar encima del aparato ningún objeto con una llama de fuego, por ejemplo una vela encendida.
No obstruir la ventilación, cubriendo los orificios de ventilación con objetos como periódicos, manteles,
cortinas, etc.
ADVERTENCIA: Para evitar lesiones, el aparato se debe instalar en el suelo/pared conforme a las
instrucciones de instalación.
ES
7
ES
Page 98

Índice
Prestaciones…… ……………………… ………………… ……………………… ……………2
Índice…………………… ……………………… ………………… ……………………… …….3-7
Información Impo rtante sobr e Segurid ad………………… ……………………………….8
Instalación……… ……………………… ………………… ……………………… ……………9-12
Mando a Distancia… ……………………… ………………… ……………………… ……….13-14
Funcionamiento ……………………… ………………… ……………………… …………….
Tabla de resolución de p roblemas… ………………… ……………………… ……………..
Especificacion es………………… ………………… ……………………… …………………
Información sobr e la Licencia ………………… ……………………… …………………….
15-24
25-29
30
31
ES
ES
8
Page 99

Instalación
Panel Frontal
3
1
TECLAS
FUE NTE
MEN Ú
CAN +
CAN -
VOL +
VOL -
ESP ERA
2
1. FUENTE: Permite ver el menú de fuente de
entrada; pulse varias veces para avanzar por el
menú y pulse “VOL-“ o “VOL+” para seleccionar la
fuente deseada.
2. MENÚ: Permite ver el menú principal.
3. CAN+/CAN-: En el modo TV, pulse “CAN+” o
“CAN-“ para incrementar o disminuir de canal. En
el modo MENÚ, pulse “CAN+” o “CAN-“ para
seleccionar las opciones. En el modo espera, pulse
“CAN+” o “CAN-“ para encender el televisor.
4. VOL+/VOL-: Permite ajustar el nivel de sonido.
En el modo MENÚ, pulse “VOL+” o “VOL-“ para
ajustar la variable seleccionada.
5. ESPERA: Pulse este botón para ENCENDER el
televisor desde el modo de ESPERA. Púlselo de
nuevo para activar el modo de ESPERA del
televisor.
1.Sensor del Contro l Remoto.
2.LED indicador de al imentació n:
AZUL EN CENDIDO
ROJO ES PERA.
3.Botones laterales
EPG
30 30
FREEZE
VOL CH
Conexiones POSTERIORES AV
AC-IN PUT
100-2 40V~ 50 /60Hz
YPbP r
VIDE O
L R
COAX IAL OUTP UT
SCAR T
Conexiones disponibles (de izquierda a derecha): TOMA DE ALIMENTACIÓN AC, ENTRADA YPbPr,
VÍDEO, ENTRADA DE AUDIO, SALIDA COAXIAL, EUROCONECTOR.
Nota: Las conexiones de VÍDEO y YPbPr comparten un canal de audio.
Conexiones POSTERIORES AV (LATERAL)
USB HDMI 2(ARC ) HDM I1
HEAD PHONE
COMM ON INTE RFACE( CI)
PC AUDI O
VGA
R F
ES
All the terminals are(from left to right):
USB, HDMI2(ARC), HDMI1, AURICULARES, DVB-CI (Interfaz Común), PC AUDIO, VGA, RF.
Note: 1.When HDMI port gets DVI signal ,the audio signal is received from the PC Audio channel.
2.Insert the plug of the earphone into the headphone jack on the unit.
The speakers are then muted.
HDMI ARC (Canal de Retorno de Audio)
La función ARC le permi te enviar señ ales de aud io desde su tel evisor a otros disposi tivos compa tibles
con esta tecnologí a (p.ej. cine e n casa) sin n ecesidad de c onectar n ingún cable d e audio
(p.ej. cable coaxi al, cable ópt ico de audi o digital, o ca ble de audio analógico ).
Cómo ha cer uso de la fun ción ARC:
1. Compruebe que los d ispositiv os con tecn ología ARC est án conectados median te un cable HDM I 1.4
al puerto HDMI 2 (ARC) d e su televiso r. A continu ación, ac tive la funci ón ARC de estos dispositi vos.
2. Ajuste la configur ación de su tel evisor: p ulse el botón M ENU, elij a CONFIGURA CIÓN, y active el
Control HDMI CEC.
3. A continuación, uti lice el mando a d istanci a de su televis or para ajustar el nivel d el volumen
(VOL+/-, MUTE) del d ispositivo de audio co nectado.
9
ES
Page 100

Instalación
ORDENADOR:
PASOS:
Compruebe que el tel evisor y el ord enador es tán
Apagados.
1. Conecte VGA y el cable a udio.
2. Conecte el cable de a limentaci ón.
3. Encienda el telev isor, selecc ione el mod o PC.
4. Encienda el orden ador.
Es muy importante se guir el orden d e estas ins truccione s.
USB HD MI2(A RC) HDM I1
ES
HEADP HONE
COMMO N INTER FACE(C I)
PC AUDIO
VGA
R F
ES
10
 Loading...