

Page 1
LED TV
LT-29DG43J
INSTRUCTIONS
Page 2
Features
16:9 LCD screen
•
LED-Backlight-Technology
•
DVB-C/T-HDTV-Tuner
•
Cable-analogue-Tuner
•
Electronic Progr. Guide (EPG) for DVB
•
USB-Media player
•
Auto Power Off
•
PVR (Personal Video Recorder)
•
Time Shift
•
New Thin-frame design*
•
Information for the DVB-T function
Any function relative to the digital television (with the DVB logo) is available only within the country or area
•
where such signals are transmitted. Verify with the salesman if it is possible to receive a DVB-T signal in
the zone where you live.
Remove the CAM for DVB-T reception, if it has been inserted.
•
A DVB-T antenna must be connected for DVB-T reception.
•
Even if the television conforms to the DVB-T specifications, the compatibility to future digital DVB-T
•
transmissions is not guaranteed.
Some digital television functions may not be available in some countries.
•
The DVB-T system present in this device is FTA (Free to air).
•
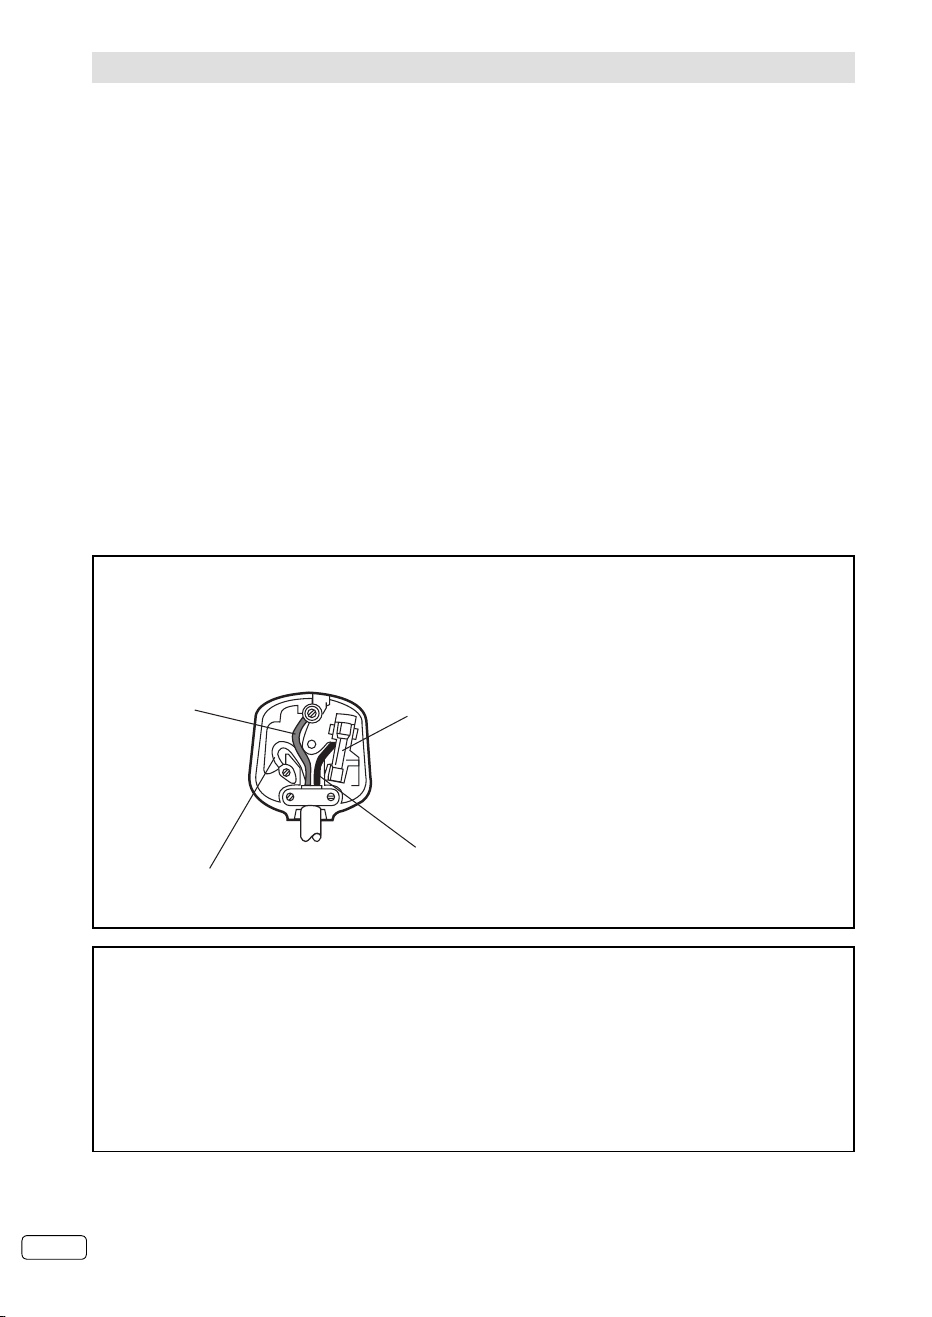
MAINS (AC) OPERATION
The wires in the mains lead are coloured in accordance with the following code :
IMPORTANT
As the colours of the wires in the mains lead of this
GREEN
&
YELLOW
(Earth)
(if there is earth cable)
BLUE
(Neutral)
FUSE
BROWN
(Live)
appliance may not correspond with the coloured markings
identifying the terminals in your plug, proceed as follows:
The wire which is coloured green and yellow must be
connected to the terminal which is marked with the letter E, or
by the earth symbol, or coloured green or green and yellow.
The wire which is coloured blue or black must be
connected to the terminal which is marked with the letter
N or coloured Black.
The wire which is coloured brown or red must be
connected to the terminal which is marked with the letter
L or coloured Red.
For continued protection against risk of fire, replace only
with same type and rating of fuse (ASTA approved 5A
250VAC fuse).
Dear Customer, [European Union]
This apparatus is in conformance with the valid European directives and standards regarding
electromagnetic compatibility and electrical safety.
European representative of the manufacturer is:
ORION ELECTRIC (POLAND) SP.ZO.O.
OSTASZEWO 57 87-148 LYSOMICE
POLAND
* The extra-slim frame allows more than a full view to the TV’s screen. Even the superblack screen’s rim
(3mm approx.) is now visible.
EN 2
Page 3

Contents
Features ........................................................................................................................................................2
Contents .......................................................................................................................................................3
Important safety information..........................................................................................................................4
Location of controls ....................................................................................................................................... 7
Remote Control ............................................................................................................................................. 8
Antenna connection ....................................................................................................................................10
Auto setup...................................................................................................................................................11
Selecting the input source ........................................................................................................................... 11
On-screen Language Selection ..................................................................................................................12
Station search .............................................................................................................................................12
Manual Channel Scan.................................................................................................................................12
Channel Setup ............................................................................................................................................ 13
Auto Synchronization ..................................................................................................................................13
Power On/Off Timer .................................................................................................................................... 13
Basic Operation ..........................................................................................................................................14
Teletext .......................................................................................................................................................14
Stereo reception in analogue cable TV channel mode ................................................................................15
Remarks on DVB-T system .........................................................................................................................16
Password Setup (Parental lock) .................................................................................................................. 17
EPG (Electronic Programme Guide) ...........................................................................................................17
Using the Digital Service .............................................................................................................................17
Other convenience functions ......................................................................................................................18
Picture size and resolution .......................................................................................................................... 20
Picture format..............................................................................................................................................21
Information for recording function ...............................................................................................................22
Recording the TV programme ..................................................................................................................... 22
Watch the recorded programme .................................................................................................................22
Preparing your USB device for playing Time Shift recordings .....................................................................22
Time Shift .................................................................................................................................................... 23
EPG Recording ...........................................................................................................................................23
Media Operation ......................................................................................................................................... 24
Media Browser ............................................................................................................................................24
Playable File Types .....................................................................................................................................24
Playback files ..............................................................................................................................................25
Connecting an HDMI or a DVI device to the HDMI input ............................................................................. 26
Connection to other equipment ...................................................................................................................26
Troubleshooting table ..................................................................................................................................28
Specifications .............................................................................................................................................29
Information on software license ..................................................................................................................30
*
The “HD ready” Logo is a trademark of DIGITALEUROPE.
* DVB and the DVB logos are trademarks of the DVB project.
* Manufactured under license from Dolby Laboratories. Dolby and the double-D symbol are trademarks of
Dolby Laboratories.
* This product is protected by certain intellectual property rights of Microsoft. Use or distribution of such
technology outside of this product is prohibited without a license from Microsoft.
THIS PRODUCT IS LICENSED UNDER THE MPEG-4 VISUAL PATENT PORTFOLIO LICENSE FOR
*
THE PERSONAL AND NON-COMMERCIAL USE OF A CONSUMER FOR (i) ENCODING VIDEO IN
COMPLIANCE WITH THE MPEG-4 VISUAL STANDARD (“MPEG-4 VIDEO”) AND/OR (ii) DECODING MPEG-
4 VIDEO THAT WAS ENCODED BY A CONSUMER ENGAGED IN A PERSONAL AND NON-COMMERCIAL
ACTIVITY AND/OR WAS OBTAINED FROM A VIDEO PROVIDER LICENSED BY MPEG LA TO PROVIDE
MPEG-4 VIDEO. NO LICENSE IS GRANTED OR SHALL BE IMPLIED FOR ANY OTHER USE. ADDITIONAL
INFORMATION INCLUDING THAT RELATING TO PROMOTIONAL, INTERNAL AND COMMERCIAL USES
AND LICENSING MAY BE OBTAINED FROM MPEG LA, LLC. SEE HTTP://WWW.MPEGLA.COM.
* THIS PRODUCT IS LICENSED UNDER THE AVC PATENT PORTFOLIO LICENSE FOR THE PERSONAL
USE OF A CONSUMER OR OTHER USES IN WHICH IT DOES NOT RECEIVE REMUNERATION TO (i)
ENCODE VIDEO IN COMPLIANCE WITH THE AVC STANDARD (“AVC VIDEO”) AND/OR (ii) DECODE AVC
VIDEO THAT WAS ENCODED BY A CONSUMER ENGAGED IN A PERSONAL ACTIVITY AND/OR WAS
OBTAINED FROM A VIDEO PROVIDER LICENSED TO PROVIDE AVC VIDEO. NO LICENSE IS GRANTED
OR SHALL BE IMPLIED FOR ANY OTHER USE. ADDITIONAL INFORMATION MAY BE OBTAINED FROM
MPEG LA, L.L.C. SEE HTTP://WWW.MPEGLA.COM.
* The terms HDMI and HDMI High-Definition Multimedia Interface, and the HDMI Logo are trademarks or
registered trademarks of HDMI Licensing LLC in the United States and other countries.
* All other trademarks are property of their respective owners.
3 EN
Page 4

Important safety information
WARNINGS
TO REDUCE THE RISK OF BURNS, ELECTRIC SHOCK, FIRE OR INJURY TO PERSONS, PLEASE
CAREFULLY READ ALL SAFETY INSTRUCTIONS. THE SEPARATE OPERATING MANUAL MAY CONTAIN
ADDITIONAL SAFETY INSTRUCTIONS.
THIS APPLIANCE IS INTENDED FOR DOMESTIC / HOUSEHOLD USE ONLY AND SHOULD NOT BE
USED FOR ANY OTHER PURPOSE OR IN ANY OTHER APLICATION, SUCH AS NON DOMESTIC USE
OR IN A COMMERCIAL ENVIRONMENT.
TO PREVENT ELECTRIC SHOCK, DO NOT REMOVE ANY COVER.
WARNING
To prevent fire, never place any type of candle or open
flame on the top or near the TV set.
No naked flame sources such as lighted candles should be placed on the apparatus.
Pull the mains plug out of the wall socket and disconnect the external aerial (if any) during thunderstorms.
If anything goes wrong, don’t try and fix it yourself, get a qualified service agent to carry out any repairs or
maintenance.
Save these instructions for future reference.
We have designed and made this product to meet European safety standards, but as with any electronic
equipment you must take care.
Here is some good advice to help you stay safe and get the best results...
Install or locate this product only in accordance with the installation instructions found in the instruction book
supplied separately.
Use this product only for its intended purpose as described in the operating instructions supplied separately.
Children and the infirm must be closely supervised by a competent person. If the product includes small parts, do
not let children play with it.
Examine the product thoroughly: if it is damaged in any way notify the retail store where you purchased it.
For products supplied with a mains adapter or a detachable mains cord, if the adapter or its leads get damaged, it
must be replaced with an adapter of the same type and rating.
To save power, disconnect from the mains when you are not using the product unless the function of the product
requires a continuous power supply.
If the power switch does not disconnect the product from the mains supply, the mains plug shall be the main
disconnect device and shall be operable at all times.
Avoid harsh conditions such as wet or damp places, rain, high humidity, strong vibration, extremely high or low
temperatures, strong sunlight and places that are very dusty.
DO NOT install or use this product if you have spilt liquids in it, if it is damaged in any way, if it has been dropped
or if it does not work normally. Disconnect from the mains and seek expert advice.
DO NOT leave the product unattended while it is operating unless it is designed to do so.
DO NOT store this product outdoors or expose to rain or moisture.
DO NOT use this product near water, for example near a kitchen sink, in a bathroom or near a swimming pool
unless specified in the operating instructions.
DO NOT remove outer panels or covers from the product. Repairs must only be undertaken by a qualified service
person.
DO NOT place the product or mains lead near a hot surface such as a gas or electric cooker or fire.
DO NOT operate the product when room humidity is excessive.
Power supply
Make sure the voltage marked on the rating plate on the rear of the product matches the supply in your area. An
incorrect supply voltage is dangerous and may result in a fire or damage to the product.
The manufacturer accepts no responsibility for any damage or injury resulting from connecting to any voltage
other than that specified on the rating plate located on the back of the product. See the instruction book for exact
voltage range.
Mains plug and mains lead
We have fitted this equipment with a standard mains plug. If you cut off the mains plug or fit a different type,
destroy the old plug, as it is dangerous to insert it into a live power outlet.
If a fuse is fitted to the plug, remove the fuse before throwing the plug away.
Carefully follow the wiring instructions supplied with a new plug.
Never use a fused mains plug without the fuse cover.
If the mains lead becomes damaged, it must be replaced by the manufacturer, its service agent or similarly
qualified person with an approved mains lead of the same type and rating to avoid a hazard.
Make sure the mains lead cannot be walked on crushed, chafed or cut and that it is routed in such a way as to
reduce the risk of a tripping hazard.
Do not let the mains lead hang over edge of a table or counter or come into contact with hot surfaces.
Do not immerse the mains lead or mains plug in water or any other liquid.
The socket-outlet must be installed near the equipment and easily accessible.
EN 4
Page 5

Important safety information
Mains plug wiring
In a rewirable plug the wires in the mains lead of this equipment must be connected as follows.
The wire coloured brown must be connected to the terminal that is marked with the letter L.
The wire coloured blue must be connected to the terminal that is marked with the letter N.
If there is a green and yellow wire it must be connected to the earth terminal that is marked E, or with the earth
symbol
Never connect brown or blue wires to the earth terminal
You must make sure the mains lead is firmly secured under the cord clamp.
Mains fuse
UK standard (BS1363) mains plugs must be fitted with a BS1362 standard fuse. Please see the operating
instructions for the correct fuse rating.
Ventilation
Ensure that the unit is sufficiently ventilated! Never place next to or underneath curtains!
The ventilation should not be impeded by covering the ventilation openings with items, such as newspapers,
tablecloths, curtains etc.
The unit becomes warm when in operation. Do not place any covers or blankets on the unit in order to prevent
overheating. The ventilation holes are not to be blocked. Do not set up near radiators. Do not place in direct
sunshine. When placing on a shelf leave 10 cm free space around the whole unit. Make some space around TV
(Correct shelf assembly).
The apparatus shall not be exposed to dripping or splashing and that no objects filled with liquids, such as vases,
shall be placed on the apparatus.
Cleaning
Disconnect the mains supply and use only a lightly dampened soft cloth. Do not use chemical solvents or strong
detergents as these may damage the cosmetic finish.
Never allow water droplets to remain on the screen as moisture can cause permanent discoloration. Greasy marks
must be removed using a commercially available cleaner for LCD screens.
Batteries
Remove batteries when the product is not to be used for a long time. Batteries left in the product may cause
damage through deterioration and corrosive leakage, invalidating the guarantee.
To protect the environment, use local recycling facilities for disposal.
Never throw batteries on a fire - danger of explosion!
Wall or stand mounting
Products that may be mounted on a stand or wall must be securely attached in accordance with the installation
instructions. Never fit non-approved stands or legs.
For wall mounting, always ensure the area to be drilled is free from electrical wires, water and gas pipes, by using
a suitable locator device.
Eye Fatigue
When you are using a computer monitor, health and safety experts recommend short frequent breaks rather than
occasional, longer breaks, for example a 5-10 minute break after an hour of continuous screen work is likely to be
better than a 15 minute break every 2 hours.
Do not use the monitor against a bright back ground and where sunlight or other light sources will shine directly on
the screen.
Headphone Volume Warning
Prolonged listening through some headphones at high volume settings can result in hearing damage.
Foot pads
Caution: foot pads (if supplied) may cause discolouration of certain furniture and shelf finishes.
Disposal
disposed of separately from household waste when the product reaches the end of its life.
Contact the store where you bought the product and your local authority to learn about disposal and recycling.
The batteries must be disposed of at your local recycling point. See the operating instructions to find out how to
remove the batteries for disposal.
We apologise for any inconvenience caused by minor inconsistencies in the operating instructions, which may
occur as a result of product improvement and development.
or coloured green and yellow.
As a responsible retailer we care about the environment. As such we urge you to follow the correct
disposal procedure for the product, packaging materials and if applicable, accessories and batteries.
This will help conserve natural resources and ensure that the materials are recycled in a manner that
protects health and the environment.
You must follow laws and regulations about disposal. Waste electrical products and batteries must be
5 EN
Page 6

Important safety information
How to attach the stand
NOTE:
• Unplug the AC cord.
• Before performing work spread cushioning over the base area to lay the TV on.
• Do not support the TV by the screen as sharp objects and too much pressure may cause damage.
• Be sure to follow the instructions. Incorrect installation of the stand may result in the TV falling over.
1) Place the TV on its front onto a table.
2) Align the stand’s base-plate (supplied) as seen here.
It will fit in only one direction. Make sure the locating pegs project through the locating holes.
3) Carefully hold the base plate in position and secure it with screws (4x16mm)x4 (included).
NOTE:
To detach the base plate, perform these steps in reverse order.•
Dismantling the base
For wall mounting, the base must be dismantled. To do this, remove screws (J, see page 10) from the back.
Take off the base entirely. Fit a VESA 100mm wall mounting kit.
31 cm
10 cm
10 cm
Bracket holes
Screws
66 cm
25 cm
5 cm
7 cm
Notes when mounting the TV on a wall
Before wall-mounting, please check carefully the location of the TV’s mounting-holes.•
EN 6
Page 7
Location of controls
4
5
6
7
1
3
2
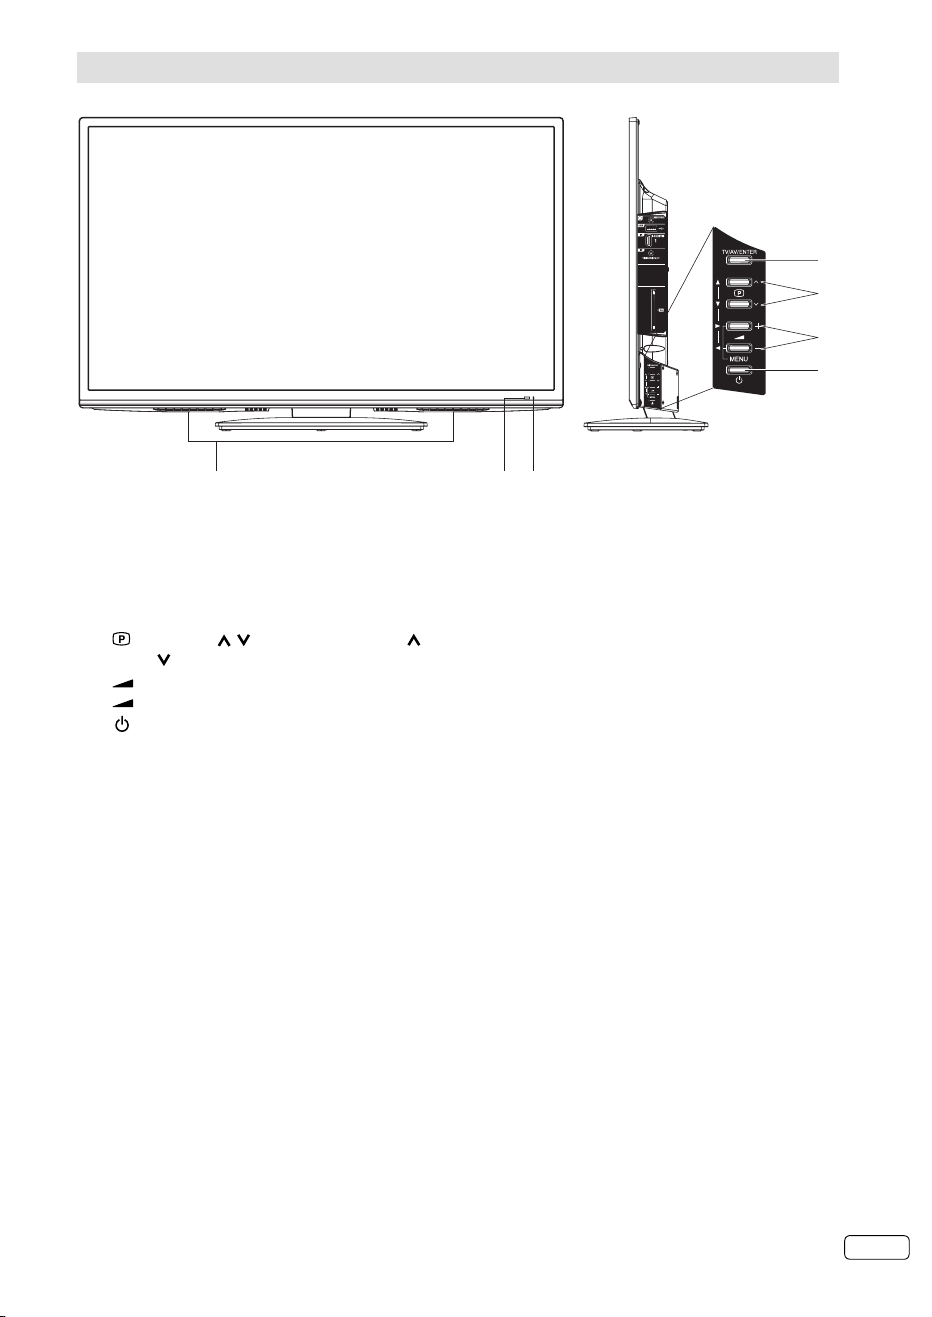
Description of Indicators and Controls
1. Loudspeakers
2. Power indicator: The power indicator lights up red in standby mode, and green in power - ON mode.
3. Remote sensor
4. TV/AV/ENTER button: Select input mode. In Menu : Using as ENTER button.
5.
(Channel) / /▲/▼ buttons: Press to change to a higher numbered channel set into memory.
Press
to change to a lower numbered channel set into memory. In Menu: Setting.
6.
(Volume) +/–/◀/▶/MENU buttons : Volume / In Menu :To display the menu screen. Press hold
(Volume) +/– the same time about 1 second the menu will be appear.
(Power)-button: Preparation: Connect power-cable to AC220~240V/50Hz.
7.
Press power-button to enter standby mode or turn on the power.
If you want to cut the mains power-supply, please power-off with your remote-unit first. Wait for the red
light, before you cut the line. Failure to do so, might hinder the TV to save (memorize) recent settings.
For complete disconnection from the mains power supply, remove the supplied power cable from the
socket.
7 EN
Page 8

Remote Control
Function Page
Enter standby mode or turn on the power 11
Display programme position number 14, 15
Select between the available broadcast audio 14, 15
Display the subtitle 14
Select channel
~
Select Teletext page
Enter password
Select an input source 11
Display the EPG (Electronic Progr. Guide) 17
Activate the menu / In menu, return 1 step
Exit menu
Cursor buttons
Memorize
CH LIST 14
Cursor buttons
Turn the sound on/off
Select picture format 14, 21
14
15
17
EN 8
Volume
Still picture
Hold the text page
Switches between the present channel and the last
selected channel
Sub page selection 15
Change the TV channel or Teletext page up or down 14,15
Select to operate TV
To enter Media Browser 24
Call Play Mode screen
Call recording list
Recording TV programme / EPG record 22, 23
Teletext ON / Text Mix / OFF 14
Reveal quiz page answers 15
Teletext enlargement 15
Fastext/TOPtext buttons
Control buttons for USB - playback
14
15
25
14
25
Page 9
Remote Control
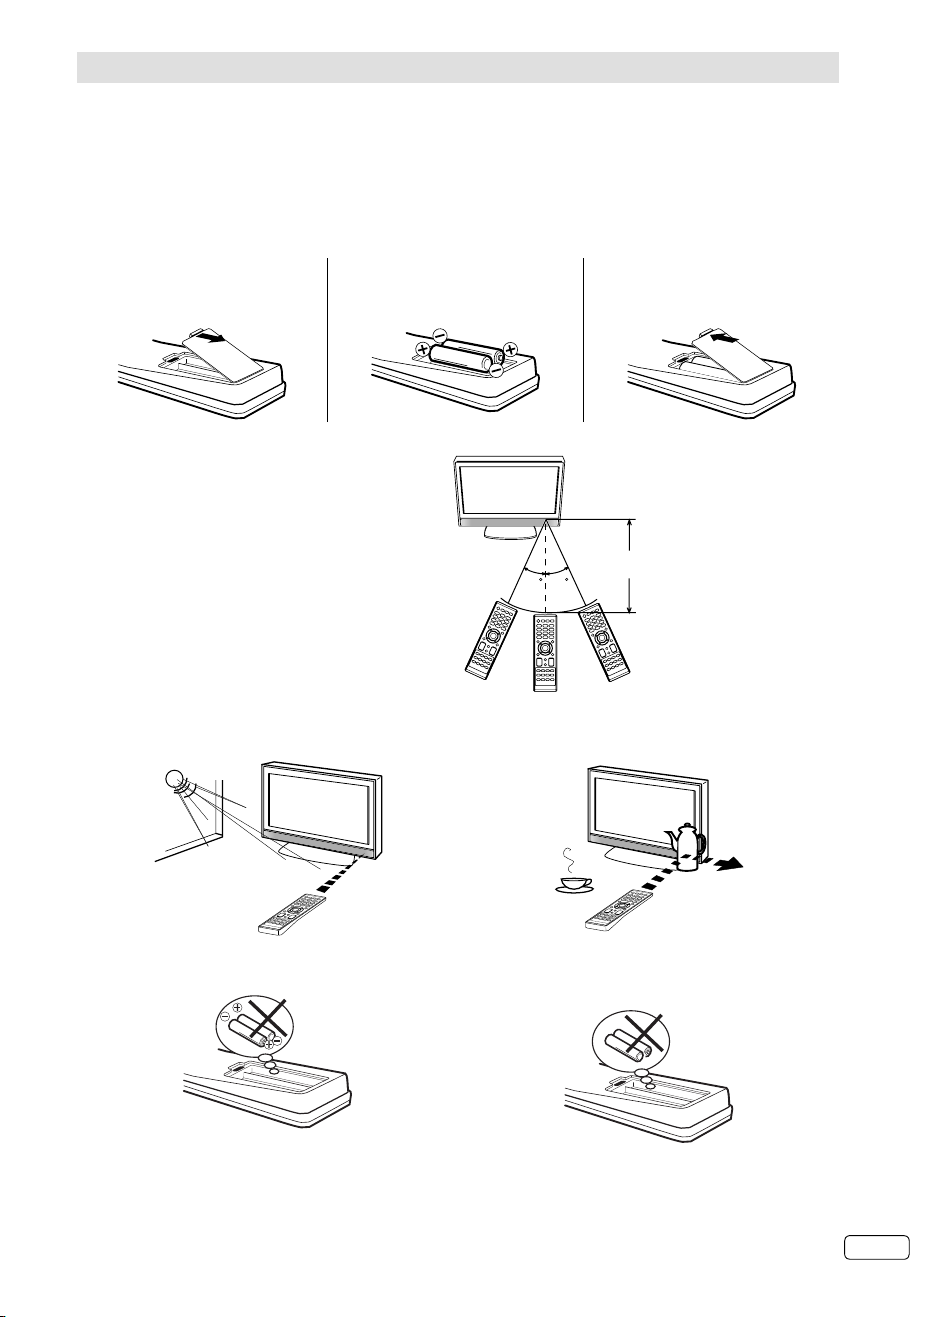
Install the batteries
Use batteries type UM-4 (AAA-Size).
Do not use old or weak batteries. The remote control may not work properly with a weak voltage from such
batteries. Replace exhausted batteries with new ones. Never try to recharge normal batteries - this could
cause an explosion.
Note:
Exhausted batteries can leak corrosive electrolyte, which may cause damage to the remote
•
control - therefore remove exhausted batteries immediately.
Batteries should not be exposed to excessive heat such as sunshine, fire or the like.
•
Open the battery
1
compartment.
Distance of Remote Control Operation
Install the batteries as shown
2
below, ensuring the correct
polarity.
Close the battery
3
compartment.
Remote sensor
Point the remote control
directly at the remote sensor.
The remote control handset will not work properly in the following cases:
a) If bright sunlight directly beams onto the unit front. b) If an obstacle is placed between the unit and the
30 30
handset.
Maximum distance approx. 5m
Transmitter window
Z
Z
Z
Z
Z
Z
c) If the batteries have not been installed
according to their polarities.
d) If the batteries are weak.
9 EN
Page 10
Antenna connection
Note: Before you connect other appliances:
To avoid potentially damaging your set, make sure all items are switched off and disconnected from the
•
mains power when you make the connections.
Arrange the desired connection.
•
When you have finished making the connections, reconnect the mains power to the unit and switch it
•
back on.
Connect your antenna as shown below (D). Connections to other equipment is explained further on
P.26-27. If you have problems with reception, consult a specialist of antenna.
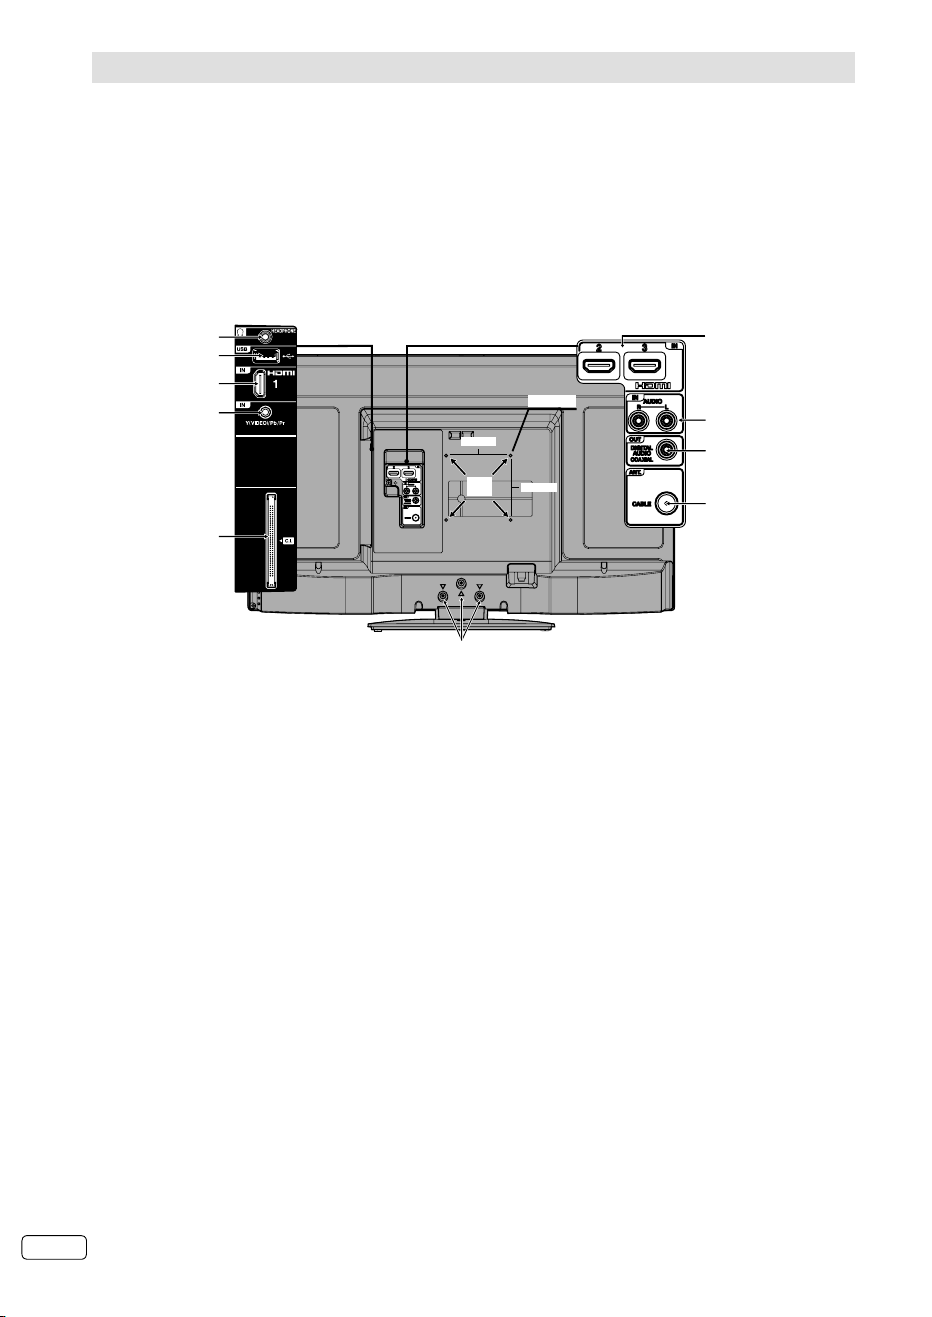
Back Side
(E)
(F)
(A)
(G)
(H)
(J)
100 mm
(I)
M4 x 10
100 mm
(A)
(B)
(C)
(D)
(A) HDMI1/2/3 input: See P.26.
(B) AUDIO IN: Input for Audio input for component/AV (Sharing). See P.26-27.
(C) DIGITAL AUDIO COAXIAL output: digital audio output. See P.26
(D)
ANT. CABLE: Connect an antenna.
.
The built-in tuner receives all analogue cable programmes and DVB-T/-C channels.
(E) HEADPHONE jack: Plug headphones with a mini plug (3.5 mm) into this jack.
(F) USB input: See P.22-25.
(G) Y(VIDEO)/Pb/Pr input: Input for analogue Component-Signal. See P.26-27.
Note: AV-CVBS input is sharing with component input.
(H) C.I. slot: for CA- module (CAM) (if PayTV-provider supports this).
Note: To prevent malfunctions and damages, be sure to turn off the TV before inserting or removing
the CAM card.
(I) Bracket holes: Fix a wall mounting bracket (not supplied) here.
(J) To hang the television on a wall, remove these screws and then remove the stand.
Before performing work spread cushioning over an area to lay the TV on.
EN 10
Page 11

Auto setup
At the first time you operate after the purchase,
“Initial Setup” menu will appear.
You can repeat this process via the menu
system (see page 19).
Preparation:
Turn on TV-unit (see P.7) and connect antenna.
Initial Setup menu will appear.
1
Press ▲ or ▼ to select desired language.
Then press ▶ or ENTER.
Initial Setup Language
Please select your language:
English
Česky
Dansk
Nederlands
Suomi
Press ▲ or ▼ to select your country.
2
Then press ▶ or ENTER.
Press ▲ or ▼ to select “Antenna” or “Cable”.
5
Then press ▶ or ENTER.
Initial Setup Tuner Mode
Please select your tuner mode:
Antenna
Cable
Connect your DVB-T antenna (or DVB-C
6
antenna if you selected “Cable” at step 5) now.
Press ▲ or ▼ to select “Scan”. Then press ▶ or
ENTER.
Some country has query to search mode. You
•
can change this setting. Then press ENTER.
The tuning’s progress will be displayed in
percent for confirmation.
Initial Setup Channel Scan
First, please connect antenna.
Start channel scan now?
If you skip this step, the channel scan could be performed in Menu.
Initial Setup Country
Please select your country:
Spain
Finland
France
United Kingdom
Italy
Press ▲ or ▼ to select “Home Mode”, then
3
press ▶ or ENTER.
Initial Setup TV Location
Please select where the TV will be placed. The picture will be optimized for that location.
Home Mode
Store Mode
If you cancel Auto Sleep (see page 19), press
4
▲ or ▼ to select Off then press ▶ or ENTER.
Initial Setup Auto Sleep
Your TV has been set to power off after 4 hours of continuous viewing. If you want to
change this setting, please choose Off. This setting can also be changed in the MENU.
Off
3 Hours
4 Hours
5 Hours
Scan
Skip Scan
Note:
Please be patient - the Auto Tuning
•
process can take several minutes to
complete.
When the display reads 100%, press ENTER to
7
exit the menu.
Note:
•
To cancel the Auto Setup, press RETURN,
then press ◀ to select “YES” during the process,
or press RETURN in the tuning progress.
THE AUTOMATIC TUNING PROCESS WILL
ONLY START BY ITSELF THE FIRST TIME YOU
SWITCH THE SET ON. HOWEVER YOU CAN
RESTART THIS PROCESS VIA THE MENU
SYSTEM (see page 19).
If you could not set up a correct language in this
•
auto setup process, you will be able to make your
preferred language selection as illustrated in
page 12 (On-screen Language Selection).
Selecting the input source
Press INPUT SELECT to view a signal from another
device connected to your TV, such as a VCR or DVD
player. You can select each input source depending
on which input jacks you used to connect your
devices.
To select the video input source, press ▲/▼, then
press ENTER.
11 EN
Page 12

On-screen Language Selection
Press MENU. Then press ◀ or ▶ to select
1
“Setup”, then press ENTER.
Setup Picture Audio TV Setup Lock
OSD Language
Aspect Ratio
Blue Screen
Time Setup
Subtitle
Press ▲ or ▼ to select “OSD Language”, then
2
press ◀ or ▶ to select the desired language.
Press RETURN to exit the menu.
3
English
Auto
Off
Note:
Quick: If TV find a channel of NIT1 (Network
•
Information Table), it will find all other
channels in NIT1. Don’t scan for the channels
of other NIT. (only for Germany, Finland and
Norway)
Full: TV will find all the channels of NIT1,
•
NIT2, NIT3...
Advance: Define a frequency. Only search
•
channel in this frequency.
Channel Scan Picture Audio TV Setup Lock
Scan All Channels.
0%
Station search
Warning! All previously saved DVB-T channels
are deleted in Step 3. A new channel search
then starts automatically.
Preparation:
Make sure your antenna is connected to the
antenna input (see P.10). Select an appropriate
input mode. (See page 11). Then press MENU.
Press ◀ or ▶ to select “TV”, then press
1
Press
▲ or ▼ to select “Tuner Mode”
Press ◀ or ▶ to select “Antenna” or “Cable” .
Press ▲ or ▼ select “Channels”, then press ▶
2
or ENTER.
Press ▲ or ▼ select “Channel Scan”, then
3
press
▶
or ENTER.
Press ◀ or ▶ to select desired country,
press ENTER.
Channels Picture Audio TV Setup Lock
Channel Scan
Analogue Manual Scan
Digital Manual Scan
Channel Skip
Channel Sort
The Channel Scan will search for available TV-
4
channels and store the channels in the correct
order.
Cable : Search for Digital and Analogue channel.
You can select this option “Scan Mode: Quick/
Advance/Full”, then press ▲ or ▼ to select
“Scan” and press
or ENTER.
▶
ENTER.
.
then
Scan Mode Advance
Select
Frequency (KHz)
Scan
306000
Antenna: Search for Digital and Analogue
channel.
Channel Scan Picture Audio TV Setup Lock
Status: Scanning...
Digital Channels: 7
Analogue Channels: 0
6%
When TV programme have been stored 100%,
5
return to normal TV screen automatically.
Manual Channel Scan
Preparation:
Select “Analogue Manual Scan” or “Digital Manual
Scan” in Step 3 of Station search.
Analogue Manual Scan
Press ▲ or ▼ to select “Scan Up” or “Scan Down” to
start searching. Then press ▶ or ENTER.
Digital Manual Scan
Select RF Channel that you want to setup, then
press ENTER to start searching.
You can verify the signal strength and quality of
the selected service here. If necessary, adjust
the direction of the DVB-T antenna to obtain the
maximum signal strength.
EN 12
Page 13

Channel Setup
The Automatic station presetting stores the
stations in a specific order. However, this order
can be changed if you wish.
Press MENU. Press ◀ or ▶ to select “TV”,
1
then press ENTER.
Press
2
or ENTER.
Select desired option, then press ▶ or ENTER.
3
Channels Picture Audio TV Setup Lock
Description about the each setting option:
Channel Skip: Press ▲ or ▼ to select the channel
that you want to skip, then press ENTER. The
mark will appear.
Channel Sort: Press ▲ or ▼ to select the channel
that you want to move, then press ENTER. The
mark will appear.
Press ▲ or ▼ to select the position that you want
to move the channel to, then press ENTER.
Channel Edit: Press ▲ or ▼ to select the channel
that you want to edit, then press ENTER.
Following options are displayed.
- Channel Number: Press 0-9 buttons to enter
the desired memory position number, then press
ENTER.
- Channel Name: Press ENTER to enter edit
mode, then press ▲/▼ to select desired letter,
press ▶ to move the position, or ◀ to erase the
letter, then press ENTER repeatly.
- Frequency (only for Analogue TV): Yo u
can also directly enter the frequency value with
Number buttons (0-9), then press ENTER.
- Color System (only for Analogue TV): Color
System has already been preset to Auto. Do not
change anything here. Any changes can cause
picture or sound disruption.
- Sound system (only for Analogue TV):
Correct sound system is already installed. Any
changes can cause sound disruption.
Analogue Channel Fine Tune (only for Analogue TV):
Already correctly and optimally installed. Do not
change anything here. Any changes can cause
picture or sound disruption. The video can also be
affected.
Clean Channel List : Press
press ◀ to select “OK” and ENTER to delete all
Channel.
to select “Channels”, then press ▶
▲ or ▼
Channel Scan
Analogue Manual Scan
Digital Manual Scan
Channel Skip
Channel Sort
▶
or ENTER, then
Auto Synchronization
This feature can display the time based on the
DVB signal information.
If you wish to set the time manually, select “Off”
as follows and then perform the “Date” and “Time”
options.
Press MENU. Press ◀ or ▶ to select “Setup”,
1
then press
“
Time Setup”, press ▶ or ENTER.
Press ▲ or ▼ to select “Time”, then
2
ENTER.
Press ▲ or ▼ to select “Auto Synchronization”,
then
Press
3
press ◀ or ▶, 0-9
Press RETURN to exit the menu.
4
ENTER and press
p
ress ◀ or ▶ to select “Off”.
Time Picture Audio TV Setup Lock
Auto Synchronization
Date
Time
Power On Timer
Timer
Power On Channel
Power Off Timer
Select
MENU
Back
▲ or ▼
Timer
to select
to enter the correct time.
▲ or ▼
On
2012/04/26
11:12:34
Off
00:00:00
Off
00:00:00
“Date” or “Time”, then
to select
press ▶ or
Power On/Off Timer
This feature allows you to programme the TV to
turn on or off automatically at a set time.
Press MENU. Press ◀ or ▶ to select “Setup”
1
press
ENTER
“
Time Setup”, then press ▶ or ENTER.
Press ▲ or ▼ to select “Time”, then
2
ENTER.
Press ▲ or ▼ to select “Power On Timer” or
“Power Off Timer”, then
“Off”, “On” or “Once”.
If you set the “Power On Timer”, you can
•
also set the “Power On Channel”.
Press RETURN to exit the menu.
3
, then press ▲ or ▼
p
ress ◀ or ▶ to select
to select
press ▶ or
13 EN
Page 14

Basic Operation
Channel selection
With the Numbered buttons (0-9).
Example:
No. 2: Press 2.
•
No. 29: Press 2 and within 2 seconds, press 9.
•
No. 929: Press 9, 2, 9 same as above.
•
Press P + or - to change up or down a channel. This
takes approx. 2 seconds. If the auto search only stored 5
stations, only these 5 will appear. Skipped channels will
not appear (see P.13).
Channel List
The Channel List shows a list of all receivable
programmes.
Press CH LIST to display the Channel List.
Press Yellow to select display details.
Press ▲ or ▼, then press ENTER to select the desired
channel.
Press CH LIST to display the selected channel.
Information display
Press . The programme information will appear.
•
If you press twice, and 3 times, more information will
appear.
The following figure is an example of DVB-channel
reception.
EL TOQUE ARIEL
10:45-11:30
11:30-13:00 LA RULETA DE LA SUERTE
6+
Ariel Rodriquez presenta este programa mezclade cocina y espectáculo
.
NOMBRE ORIGINAL-.
1
Channel Name
2
DVB Teletext available
3
DVB Subtitle available
4
Audio Language
5
Audio Format
6
Video Format
7
Channel Number
8
There are more than 2 pages.
9
Programme Detail
0
Next Programme Duration
!
Parental Rating
@
Programme Duration
#
Programme Title
$
Signal type
%
Visual Impaired Audio
TTX
STTL
Spanish Stereo MPEG
576i SD
Audio/Subtitle language for DVB-channel
If the current watching DVB-channel has more than one
audio language or subtitle language, you can change
them with AUDIO I/II or .
Press AUDIO I/II several times to select the Audio
language.
Press to select the Subtitle language.
•
Note:
Some DVB-broadcasts may not provide subtitle
•
language service.
ANTENA 3
Antenna
1
11:12
1/4
Still picture
Press FREEZE to make a still picture. To cancel the still
picture, press FREEZE again.
Note:
•
During still picture mode, Aspect Ratio feature is not
available. (If you press PICTURE SIZE, still picture
mode will be canceled.)
•
During the playback of a movie file in MEDIA mode, still
picture function is not available.
Note:
•
During TV or external input mode, if there is no signal
reception, the TV will change to standby after approx.
15 minutes.
•
Some functions are activated and de-activated with
the same button. Others require RETURN button for
de-activating.
Teletext
Teletext is sent page by page. This unit is able to
automatically store up to 899 pages, but they can
only be accessed once they have been stored. This
can take a few moments.
The Teletext language menu allows the installation of
the teletext language.
The languages displayed are only those supported
by the channel.
Fastext/TOPtext
The Fastext/TOPtext is teletext with a special directory.
On the lower part of the screen there are four different
coloured fields (red, green, yellow and blue). These fields
lead directly to the pages shown within. The coloured
buttons on the remote control correspond to the coloured
fields. Press the appropriate coloured button in order to
activate the desired colour field.
Switch on / off Teletext
Teletext is not transmitted by all channels.
Select a channel that shows teletext.
Press . You will now see a teletext page.
(If “100” is shown without any text information, it may mean
that the channel you have selected does not support
teletext.)
Press again. Teletext and TV picture are shown
simultaneously.
again in order to switch off teletext.
Press
Press
again in order to switch on teletext again. The
last page which was stored is now shown.
Note:
You cannot select any other channels as long as teletext
•
is switched on. Switch teletext off when you want to
switch over to another channel.
EN 14
Page 15

Select Page
Press P + or - until the page you desire appears. Or
... enter the requested page number by using the 10
Number Buttons.
And if you mistype something, just enter the complete
3-digit wrong page number then enter the desired number
again. Or ... press one of the coloured teletext buttons so
that a page from Fastext/TOPtext is shown.
Hold Pages
Some pages are divided up into subpages by the channel.
Subpages are automatically shown in turn, as they are
transmitted. In order to hold the page, press . Press
again in order to display the next subpage.
Directly Select Subpages
You can directly select the subpages if required. You may use
one of two operations.
1.
Press in order to select subpage (S )
is shown. Enter 0 0 0 2. It can take a minute
before subpage 0002 appears.
Or:
2. Wait a few seconds, and the right now available
subpages will be shown in the top left of screen.
Select your page with
or .
Enlargement
In order to enlarge the display, press .
Either the upper or lower half of the screen is enlarged.
Each time you press you switch between the display of
the upper or lower half of the screen or the full picture.
Answering Quiz Questions
Some pages contain quiz questions with concealed
answers.
in order to show the answers.
Press
Stereo reception in analogue cable
TV channel mode
You can see the each signal type of STEREO,
Nicam Mono, and DUAL I/II, etc. on the TV-screen
when you press
When 2-channel sound reception is available,
you can select your preferred audio with the
AUDIO I/II.
Each time you press AUDIO I/II, the sound channel
will switch to the alternative channel available.
Note:
In case of bad reception, the stereo sound also
•
can be disturbed.
The sound multiplex displayed when
•
is user selected sound. It may not the same one
which is from the programme being broadcasted.
.
pressed
15 EN
Page 16

Remarks on DVB-T system
DVB-T is at present still being developed. You can get information regarding the current stage of
development from your specialist retailer.
As a digital service DVB-T basically works differently to previous analogue TV reception.
Reception Possibilities:
In contrast to cable TV, DVB-T is received via room or roof antennas. A room antenna is sufficient for
reception within the reception area of a DVB-T transmitter. A roof antenna may perhaps be necessary for
reception in a fringe area. Existing roof antennas may have to be turned in a different direction.
Contact your specialist retailer to find out about the location of the reception areas or fringe areas. You
cannot get DVB-T reception outside the fringe area. Ask a certified antenna specialist for advice on
interference with reception. The tuner of this appliance cannot provide active room antennas with operating
voltage. Active room antennas have to be equipped with a separate power supply.
Reception Quality:
DVB-T reception principally either works really well or not at all. There is not a smooth transition with a
constant reduction in reception quality. Digital interference occurs at maximum reception range:
the image freezes, the picture becomes blocky, the sound breaks up or reception cuts out altogether
at times. If you notice interference with DVB-T reception then this is usually not due to a fault on the TV
appliance. Please contact an antenna specialist if you have interference with reception. Inspection of the
quality of DVB-T reception is not included in the free warranty to be provided by the manufacturer of the TV
appliance.
Image and Sound Quality:
An individual transmitter transmits up to 4 TV channels on one transmission frequency. This is possible
through compression in accordance with the MPEG standard, which is similar to digital data storage on a
DVD. The data rate of DVB-T is just a lot lower; at present the max. video bit rate is approx. 4Mbps and the
max. audio bit rate is at 256kbps. Visible interference (e.g. blocky picture) can result at extremely low data
rates despite there being excellent reception quality within vicinity of the transmitter. Blocky pictures are
no fault of the receiver. They are the result of the low data rate transmitted. The digital DVB-T sound can be
transmitted to the digital amplifier via the digital output of your TV set.
Image Format
Images are transmitted in 4:3 format, 4:3 letterbox format (with black bars above and below the picture) and
anamorphic 16:9 format (without black bars). The max. transmitted resolution at present is 704x576.
Child Lock
Like DVDs, DVB-T offers can also provide age-restricted access. At the moment, no channels are equipped
with this restriction. This appliance does, however, already offer the feature of setting up password protected
age restrictions, which only work when the respective programmes are broadcast.
DVB-T Update
The DVB-T norm earmarks the transfer of firmware updates. The transfer of firmware updates is called Over
Air Download or OAD for short.
If this product happens to require a firmware update in future, this update could be received via DVB-T. If
the available software for updating is detected, the confirmation message whether start the software to
download is displayed. The rest please proceed to download-operation according to the directions of a TV
screen.
EPG (Electronic Programme Guide)
EPG is part of the DVB-signal with 8-days-schedule. This TV can receive and display the EPG-information
included into DVB.
EN 16
Page 17

Password Setup (Parental lock)
Parental Guidance is a function of the channel
provider. If it is not supported by the channel,
parental lock is without function. Currently there
are no channels supporting parental lock.
Press MENU. Press ◀ or ▶ to select “Lock”,
1
then press
Press 0 0 0 0 using the Number buttons
2
(0-9). (This is the default password.)
Press ▲/▼ to select “System Lock” and press
3
◀/▶ to select “On”, then press ▲ or ▼ to select
ENTER.
the desired option. Then press ▶ or ENTER.
Channel Block: Press ▲ or ▼ to select desired
channel, then press ENTER to set Channel
Block active/disactive.
Parental Guidance : Press ◀ or ▶ to select
desired Age Rating level (None/4-18).
Change Password:
•
New Password
Enter your chosen new password (please
call service, if you have forgotten the new
number).
•
Confirm Password
After you have entered the new password,
you need to enter the same password again
for confirmation.
Clean All : Press ◀/▶ to select “OK”, then
press ENTER. All settings are return to normal
setting.
Press RETURN to return the normal screen.
4
While toggling between channels, if a service which
has a parental rating (higher than your setting) and
you have set the “System Lock” to “On”, the channel
will be locked. The password entering screen
will appear. Then enter the password to view that
channel.
EPG (Electronic Programme Guide)
The Guide menu shows the available
programme listings for the next 8 days only.
Press GUIDE (EPG) to display the Guide
1
menu.
Thursday, 26-April-2012 11:08:54
30/04/2012 0:00 1:00
1 ANTENA 3
1
2 ANTENA.NEOX
3 ANTENA.NOVA
4 FRATV1
5 MNO
6 PQR
2 ANTENA.NEOX
TV ON UPA DANCE
EN ANTENA
TV ON
0:00 - 1:00 Mon, 30-Apr
(TP) (ENTRETENIMIENTO) Programa que.............................................................................
...................................................
,
DIRECTOR-.
LOS LADRONES VAN A LA OFICINA (R)
2
SHOW
6+
1/3
Service list :
1
Lists all the services that are currently available.
As you scroll through the service list by
pressing P+/- .
Events list :
2
List the events in a grid of rows.
You can press ◀/▶ to navigate through the rest
of the events.
You can easily move to the previous day or
next day in the Events List by pressing Red
or Green button (the date of the programme
information you are currently viewing is shown
in the top left hand corner).
The “View detail” shows the extended event
2
description of an event.
Each time you press Ye ll o w , detail text will
scroll page down.
•
Detail text will not shown when “System Lock”
feature is “On” and selected programme is
locked. You should enter the password for
display it.
•
To add schedule to schedule list, press Blue.
(See more detail on page 23.)
To clear the menu screen, press GUIDE (EPG)
or RETURN.
Using the Digital Service
Some services bring you programmes with
the Digital Service, letting you experience DTV
interactively.
When provided, the Digital Service will start when
you press
Note:
During Recording or Time shift mode, Digital
•
Service is not available.
.
BASKETBALL GAME 2012
Exit Down Select Up
News
Latest headlines from
Germany
Angola 0-1 Portugal
Serb&M 0-1 N’lands
Mexico 3-1 Iran
England water plea
Ballack set to return
World Football Interactive
TEXT to quit Use UP/DOWN and SELECT
17 EN
Page 18

Other convenience functions
Selected Items Setup hint
Picture
Picture Mode
Standard / Vivid / Soft / User Select the most suitable picture mode according to your
Brightness / Contrast / Colour / Sharpness /
Tint
Back Light You can use the Back Light feature to adjust the screen
Color Temperature Standard (Neutral) / Warm (Reddish) / Cool (Bluish)
Advanced Video
DNR You can clear up analogue TV signal by reducing the dot
Medium / Strong / Auto /
Off / Low
MPEG NR Similar with the Noise Reduction, you can set to reduce
Low / Medium / Strong /
Off
Audio
Balance / Bass / Treble You can adjust the sound quality to your preference.
Surround The Surround feature processes the audio signal to
On / Off
Equalizer Select the most suitable sound mode according to your
Off / Rock / Pop / Live / Dance /
Techno / Classic / Soft
Stable Sound This will automatically adjust volume so each channel
On / Off
Sound Type You can select your preferred audio with the ◀/▶.
Type You can set audio output.
Normal /Visually Impaired Select type of audio for output .
Visually Impaired You can set the output audio of Visually Impaired audio.
Speaker On/Off
Volume
TV
Tuner Mode See page 12.
Country Region ID (Appears only if the selected
country is Spain or Portugal)
Channels See page 12-13.
Schedule List See page 17, 23.
lighting condition.
You can adjust the picture to your preference.
“Tint” is available in NTSC signal.•
brightness for improved picture clarity.
noise.
“Auto” is available only in analogue signal.•
the block noise.
expand the listening field wider and deeper to create a
‘pseudo surround-sound’ from the TV’s speakers.
The feature works with stereo signals from TV broadcast
or AV input.
watching contents.
and input has the same average volume level.
Visually Impaired audio is verbal narration inserted to
explain detailed scene in parallel with normal audio for
people with visual impairment.
This option is available, when the setting of “Type”
•
above is “Visually Impaired” only. Press ▶ to enter the
following options.
Select to turn On/Off the Visually Impaired audio.
You can adjust the audio volume of Visually Impaired audio.
Set the different time zone for Spain and Portugal.
EN 18
Page 19

Other convenience functions
Selected Items Setup hint
Setup
Lock See page 17.
OSD Language See page 12.
Aspect Ratio See page 21.
Blue Screen You can set the TV to automatically change to a blue
On / Off
Time Setup
Time Zone If the time displayed on the Channel Information differs
Time See page 13.
Sleep Timer Sleep timer switches the TV to standby after a defined
Off / 10 / 20 / 30 / 40
/ 50 / 60 / 90 / 120
Minutes
Auto Sleep When the Set and Remote button operation are not
Off / 3 / 4 / 5 Hours
OSD Timer The OSD is cleared automatically as per this setting.
None / 5 / 10 / 15 / 30 /
45 /60 S
Subtitle
Subtitle On /Off Select subtitle On or Off.
Digital Subtitle Lang. 1st Select preferred subtitle language, if the current
Digital Subtitle Lang. 2nd Select second preferred subtitle language.
Subtitle Type Select the subtitle type (Normal / Hearing Impaired).
Teletext
Digital Teletext Language First preferred Videotext language can be set here,
Decoding Page Language Set language for the decoding page.
Audio Language
Audio Language 1st Select preferred audio language, if the current watching
Audio Language 2nd Select second preferred audio language, if the current
Common Interface You can access the Common Interface module
Disk Setup See page 22.
Format Disk You can format the USB devices.
First Time Installation See page 11.
Reset Default Press ▶ or ENTER to enter the Reset Default screen.
screen and mute the sound if the signal is weak or
absent.
from the actual time, adjust the time offset until the
correct time zone is shown.
Normally, this would be done by selecting “As
•
Broadcaster”.
period of time.
To cancel the Sleep Timer, set to “Off”.
operated with specified period by this setting (3/4/5
Hours), the power status is changed to stand by mode
automatically
watching DVB channel has more than one subtitle
language.
which is used in case that the currently viewed DVB
channel has more than one Videotext Languages.
If the channel does not have the Videotext language set
in “Digital Teletext Language”, the Videotext language is
displayed with first receiving language.
DVB channel has more than one audio language.
watching DVB channel does not have the language
set in “Audio Language 1st” option above. If the “Audio
Language 2nd” set here is not transmitted in the
channel, the first language included in the channel is
selected.
information from this menu option.
This unit supports the C.I. card of “ Top Up TV” and
•
“Boxer”.
Press ◀ to select “OK”, then press ENTER. Reset the
TV function will now begin.
19 EN
Page 20

Picture size and resolution
Resolution and picture quality
Broadcast wide screen films in different resolutions. The following table shows the resolution options for
wide screen film broadcast media.
Broadcast media
Resolution of the wide
screen signal
432i x 768 (Letterbox) Yes Yes Yes Yes Yes Yes No
576i x 768 (anamorphic) No Yes Yes Yes Yes Yes No
720 x 1280 (HD) No Yes No No No Yes Yes
1080i x 1920 (HD) No Yes No No No Yes Yes
1080p x 1920 (HD) No No No No No No Yes
Best picture quality is achieved when the input signal has a resolution of 1920 x 1080i. If a signal with a lower
resolution is input (e.g. analogue cable TV), there is a visibly poorer picture quality.
This is understandable as, if the same picture quality were available at a lower resolution, the broadcasting
companies would not need to take the trouble to send the signal at the higher resolution.
Why are there different resolutions?
Analogue cable TV uses a standardised TV signal. Each analogue 4:3- tube TV, however old it is, can
process this signal. That is the advantage of standardisation. The disadvantage is that the resolution has not
changed since the end of the Second World War. The resolution has been max. 576 x 768 for over 60 years.
For comparision: today’s TVs feature a FullHD-resolution of 1080 x 1920.
The analog cable-network offers the 16:9-format at a low resolution of only 432 x 768. This input covers only
16% of a FullHD-screen’s area. 84% of the screen would stay black, if the TV would not make up the rest by
some special mathematics. 84% of what you see had been made up artificially by magnifying the tiny inputsignal to full-screen-size. That’s the reason for the analog cable-network’s low picture-quality seen on every
FullHD-TV.
Picture quality and black bars
Wide screen films come in different formats. The format is the relationship
between the width and height of the picture. For example, with a 16:9 film
the width to height ratio is 16:9 or 1.78:1. Only 16:9 films can fill a HDready screen without black bars. Therefore, black bars are always visible
when a format other than 16:9 is received. E.g. 4:3, A 4:3 displays vertical
black bars to the right and left.
Analogue
cable TV
Digital
cable TV
DVB-T Satellite
(DVB-S)
DVD HDTV
Satellite
(DVB-S2)
4:3 picture 1:1 on
16:9 screen
Blu-rayDisc
EN 20
If a 4:3 picture is increased to 16:9 format then it either appears distorted
(see illustration) or some parts of the picture are cropped off at the top and
the bottom. This is completely normal and is not a fault in the wide screen TV.
4:3 picture zoomed on
Super Cinemascope films are wider than 16:9 films. They are in the format
2.4:1 or 22:9, for example. This is clearly wider than16:9. Therefore, Super
Cinemascope films display black bars at the top and bottom on any HDTV set.
Picture format and resolution
There is no connection between the picture format and the resolution received. For example, the Super
Cinemascope format can be received in all resolutions, even in the HD resolution1080ix1920. For HDTV
reception too an HDTV set may display black bars at the top and bottom.
16:9 screen
Page 21

Picture format
Picture Size
The required picture format can be set by pressing
the PICTURE SIZE button. Press PICTURE SIZE
until the required format is displayed.
You move through the following formats when you
press the button: Auto, 16:9, 4:3, Zoom1, Zoom2, 1:1
(DTV/HDMI mode only).
Auto (ATV/DTV/AV only)
The picture is automatically only then shown in
a format-filling display when a WSS-TV signal is
received.
Example:
If the analogue tuner receives a letterbox image with WSS
signal then the resulting image looks like this:
illustration 1:
Letterbox image is increased
WSS:
Public broadcasters include 16:9 identification,
the WSS signal (WideScreenSignalling), during
transmission in order to ensure automatic
conversion to 16:9.
Some private broadcasters do not transmit a WSS
signal. Automatic does not recognise anything
without WSS signal and does not automatically alter
the picture size. Use the PICTURE SIZE button to
set the required picture size for private channels.
Other formats
Press PICTURE SIZE until the desired size is
reached.
16:9
The width of the picture will be zoomed evenly.
16:9 is particularly suitable for DVD players, DVB-T,
DVB-C and satellite receivers, which can transmit
and show 16:9 feature films without black bars. In
the set-up menu of the set, adjust it to show that a
16:9 TV set is connected.
4:3
The picture is displayed in 4:3
format with black bars to the
right and left.
Zoom1/
Zoom2
The picture is increased.
1:1 (DTV/HDMI mode only)
All images are displayed on the
TV screen of 16:9 ratio without
overscanning. This is only a signal
of 1920 x 1080 full frame. Other
formats (eg. 576p) are smaller,
with black border.
The picture’s size does not follow the WSS properly
or the size switches unexpectedly with a faulty input
from antenna or channel: this is not the TV’s fault.
Countermeasure: Select a fixed-size for those
channels manually with the PICTURE SIZE key.
Do not set the AUTO position.
21 EN
Page 22

EN 22
Information for recording function
Preparation:
Plug-in an external storage device into the USB port.
Note:
•
The Power indicator of the unit will blink green
and red while the recording is in progress.
•
Time shift will not work for ATV or external
inputs. If you change the signal while recording a
programme (Live View), the recording will stop.
•
During Playback mode, ATV channel select or
input select options will not work.
•
You cannot play the recorded programme back
on a PC or other device.
•
We cannot guarantee compatibility with all USB
memory types/brands.
•
We do not accept responsibility for loss of files on
your USB devices caused by connection to this unit.
•
This TV will only work with FAT16/32 formatted
USB devices. This unit is not compatible with
NTFS formatted devices for recording function.
•
Recorded video is saved in the following
location on your device: [root]/pvr/. You can
play back by entering the “Media” menu (See
page 24.)
•
Do not use a USB extension cable.
•
When using the PVR/Media functions the
subtitles are set to “Off”. (in order to activate
subtitles you will need to change the subtitles
setting to “On”.)
•
If you want to display the subtitle of recorded
programmes, press
•
Please be advised that if your TV fails to complete
your programmed recording due to loss of signal
or power there will not be any error message
displayed.
•
Only use USB Memory or HDD for PVR. A
correspondence format is FAT16/32.
•
Recommend the high speed USB device (more
than 2MB/s). Connected using a USB Hub is not
detected, devices should be connected directly to
the TV’s USB port.
•
For connect the USB device, please refer the
Owner’s Manual provided with your USB device.
Use of a USB device capable of operating below
500mA/5V is recommended. This unit is capable
of supplying power of up to approximately 0.8A/5V.
Should the electricity supply exceed the said
amount, power to the connected device may be
automatically cut off as a protective measure.
For USB devices with large power requirements,
use devices that have their own power supply
sources.
•
Do not connect this product to a non-specified
device. It may cause damage to the device and
TV.
•
When recording or setting up a timed recording,
please check to see if your USB memory or HDD
has sufficient available memory.
If the available memory is insufficient, your
recording or timed recording may not be executed
or may be cut off while recording.
Generally, 10 minutes of recording requires
approximately 100 to 400 MB of memory.
.
Recording the TV programme
You can record a digital programme (Freeview)
onto a compatible USB stick or external hard
drive.
Press REC to start recording. The information
1
screen will appear.
To stop recording, press ■ (STOP). Press ◀ or
2
▶ to select “YES” in the confirmation screen,
then press ENTER.
Watch the recorded programme
Press REC LIST. Recorded file list will appear.
Press ▲/▼/◀/▶ to select desired file, then start
playback with ENTER.
You can use special function for playback. See
•
page 25.
Preparing your USB device for
playing Time Shift recordings
Press MENU. Press ◀ or ▶ to select “Setup”,
1
then press ENTER. Press ▲ or ▼ to select
“Disk Setup”, press ▶ or ENTER.
Select “Auto” or “Manual”, then setup your
2
device following the on-screen guide.
Auto setup
Press ▲ or ▼ to select “Auto”, then press
ENTER.
Disk Setup
This wizard is used to setup the USB disk for timeshift. Please select
the setup mode.
Auto
Manual
The system will execute automatically
“Analyzing” ⇒ “Creating timeshift file” ⇒
“Speed testing” ⇒ Conclusion.
Manual setup
Press ▲ or ▼ to select “Manual”, then press
ENTER. Press ▲ or ▼ to select “Format” or
“Skip”, then press ENTER.
Disk Setup
To have better performance, we recommend to format the USB disk.
It will erase all the data.
Format
Skip
If you select “Format”, The confirmation screen
will appear. Select your desired option, then
press ▲/▼ and press ENTER.
After formatting, you will be prompted to select
the size of the recording.
Disk Setup
Please select the file size for timeshift.
Select desired file size and press ENTER
to enter the next prompt menu (“Creating
timeshift file” ⇒ “Speed testing” ⇒ Conclusion).
512 MB
1.0 GB
1.5 GB
2.0 GB
2.5 GB
Page 23

Time Shift
You can record a digital programme by using
the USB storage device. This function is for
your convenience, and allows you to pause/
record a live programme for a period of time
based on the size of the USB drive inserted.
Preparation:
Plug-in an external storage device into USB port.
To start recording, press ▶ (PLAY) button.
1
The recording will start and the picture will be
paused.
To view a recorded programme, press ▶ (PLAY)
2
button again. The paused picture goes back
to a recorded programme and recording
continues.
To stop recording, press ■ (STOP) during
3
viewing a recorded programme, the pop-up
will appear. Select “YES” then press ENTER to
confirm stop recording.
EPG Recording
Preparation:
Plug-in an external storage device into USB port.
Press GUIDE (EPG) to enter EPG Menu
1
Screen press ▲ or ▼ to select the programme
which you want to record, then press Blue
button to enter the Schedule List page.
Note:
You can also enter the Schedule List page
by press T-REC then press Blue.
Channel number: Press ◀ or ▶ to select channel
number, and it will show the channel information
below.
Start date: Set the start date of record / reminder.
Start time: Set the start time of record / reminder.
Stop time: Set the stop time of record.
Schedule type: Select the schedule type (Record /
Reminder).
Repeat type: Select the repeat type (Once / Daily /
Week).
Make sure the start time is later than the current
3
time, then select “Add” and enter the schedule
record list page.
In the schedule record list page, you can add
more schedule by press Blue button, or delete
the schedule you had selected by press Red
button.
When the time is up, you will see the reminder
4
dialog box. Select “YES” to record. Or, no
answer about 30 seconds, recording will start.
Note:
•
Schedule List page also can be displayed by
select “Schedule List” in “TV” menu.
•
When the TV is in standby mode, and the time to
start record, TV will record the programme with
no power-on. You can check TV status by power
indicator on the front of TV (while recording the
programme, the indicator will flash red and green
alternately).
Schedule List 18:11:25
Channel number
Antenna 4Music All New! Katy P
Start date
Start time
Stop time
Schedule type
Repeat type
Press
2
▲/▼/◀/▶
press number buttons (0-9) to set date and
time.
to select desired option, then
CH1
2011/11/12
18:00
19:00
Record
Once
Add Cancel
23 EN
Page 24

Media Operation
Connect the USB storage device into the Media
1
Input terminal.
Press MEDIA to display the Media menu.
2
Note:
•
Do not disconnect a USB storage device while
it is being accessed. Doing so can damage the
device or the files stored on the device. You can
safely connect or disconnect the USB storage
device when the TV is not in MEDIA mode.
Back up all the data in the USB storage device in
•
case if data was lost due to unexpected accident.
We do not assume any liability for the losses by
misuse or malfunction.
Not all USB storage devices are compatible with
•
this TV.
The character that exceeds the display area is not
•
displayed.
We cannot guarantee compatibility with all USB
•
memory types/brands.
Can use FAT16/32 and NTFS (for USB playback
•
only) formatted USB devices only.
Do not use USB extension cable.
•
“tshift” folder is only for Time Shift function.
•
Cannot use in the Media menu.
Media Browser
Media Selection
Press ◀/▶ to select the desired media type
1
Photo/Music/Video or Text at Media Selection
and press ENTER. File selection window will
appear.
Select folder or file with ▲/▼/◀/▶, and then
2
start the playback with ENTER.
Press MENU in File selection screen, you can call
various operational options. Select the option by
ENTER/▲/▼/
◀/▶
.
Sort : Select the desired sort type.
Media Type : Select the desired media type.
Thumbnail Size : Select the thumbnail icon size.
Copy / Paste / Delete : You can copy/paste/delete
the file. When you delete the file, you cannot
recover it!
Recursive Parser / Normal Parser : Only display
all of the files which are associated with the current
folder(the folder is photo, music, video or text), such
as; if the current folder is photo, only display all
pictures in this folder.
Photo Frame : Press ENTER. Then select “One
photo mode” to show only one photo continuously.
Or select a folder (eg. C:\) to show all the photos
in that folder one by one. Press ENTER to start
playback.
Press MENU. “Sleep time” is shown. Press ENTER,
then select length of time to turn off the unit. Off:
Playback runs infinitely.
Press RETURN to exit photo mode.
EN 24
Photo Video Te xtMusic
File Selection
Photo C:\ 01/01
text
Jpeg
m4a
acc
Playback screen
Music
00:00:30 00:03:55 3/13
AAA.wma
19
Sort
Media Type
Thumbnail Size
Copy
Paste
Delete
Title: AAA
Artist: DDD
Album: N/A
Genre: N/A
Year: 2xxx
Duration: 00:03:55
Next:
Playable File Types
Photo
Music
Container
wma
Video Video Codec
Audio Codec
Te x t
BBB
JPEG (.jpg/.jpeg), BMP(.bmp),
PNG (.png)
WMA (.wma), WAVE (.wav),
MPEG1 (.mp2), MPEG4
(.m4a)
AVI (.avi), MKV (.mkv), MP4
(.mp4/.m4v), PS (.mpg/.mpeg),
TS (.ts/.tp/.trp), VOB (.vob)
Xvid, MPEG1, MPEG2,
MPEG4 SP/ASP, H.264,
MJPEG
MPEG1, MPEG2, MPEG4,
ACC, AAC-LC, HE-AAC,
PCM/ADPCM, AC3
Text (.txt)
Page 25

Playback files
Press ◀/▶ to select Photo, Music, Video or
1
Text at Media Selection and press ENTER. File
selection window will appear.
Select folder or file with ▲/▼/◀/▶, and then
2
start the playback with ENTER.
Press RETURN to return to Media Selection.•
You can playback the files with the following remote
control buttons.
Button Action
▲/▼/◀/▶
Press to show the previous / next picture.
Page down / up for Text mode.
Press MENU in Playback screen. You can use
various playback operation with appropriate
Operation menu. Select the option by ENTER/▲/▼/
◀/▶.
Pause/Play (
Pause/Play the contents.
Repeat (
Select the repeat mode.
Shuffle On/Off (
Play orderly or disorderly.
Rotate (
Rotate the picture.
)
)
)
)
ENTER
Play / Pause / Select.
Playback.
▶
▌▌
Pause.
Stop.
■
Next file.
P+
Previous file.
P-
During the playback, press to search
forward.
Search backward.
PLAY
MODE
Press to toggle the repeat mode.
REC
LIST
Press to show / hide the information window.
Note:
The content will change in accordance with
•
each media setting screen.
Duration (
Display the time for slideshow.
Zoom (
If possible, enlarge small pictures.
Effect (
Select the desired effect option to slideshow.
Show Info (
Display the information about the current contents.
Background Music (
Toggle BGM on or off.
Hide/Show Spectrum (
Hide/Show the spectrum.
Lyric options (
Depending on the model: no function.
Audio Only (
Hide all content on screen, and press MENU or
ENTER to display again.
Picture Mode (
Select the picture mode.
Screen Mode (
Select the screen mode.
Font (
Set the size, style and color of the font. Some files
do not function.
Note:
For large image sizes, the display time will be
•
longer than the slide show interval set.
)
)
)
)
)
)
)
)
)
)
)
25 EN
Page 26

Connecting an HDMI or a DVI device to the HDMI input
The HDMI input receives digital audio and uncompressed video from a HDMI equipped device or
uncompressed digital video from a DVI equipped device.
When you connect to a DVI device with a HDMI-to-DVI adapter cable, it only transfers the video
signal, so it is necessary to connect the external speaker units to output the audio signals.
Select the HDMI input mode (see P.11).
External speaker units
To AUDIO input
Audio cable (not supplied)
HDMI - to - DVI adapter cable
(HDMI type A connector)
TV (Rear/Side view)
To HDMI input
Note:
Please notice the operating manual for the HDMI device to be set up.
•
This unit cannot support PC signal from HDMI input.
•
HDMI cable (type A connector)
(not supplied)
(not supplied)
To AUDIO output
DVI device
To DVI output
or
HDMI device
To HDMI output
Connection to other equipment
Attention: Preparation:
• Disconnect all equipment from the AC-supply, to prevent any possible damage.
• Make the necessary connections.
• Make sure all connections are safe & secure before reconnecting your equipment the AC-supply.
Note:
Select an appropriate external input mode. (See page 11).•
1. Connecting a Video camera or Games console to AV
• Connect Video (Yellow) cable from devices to supplied Mini-pin cable
(Green connector). Then connect to the unit.
TV (Side view)
Mini-pin cable (supplied)
Video camera
(example)
TV (Back view)
Red
Blue
Green
Ye l l o w
White
Red
(AV cable, not supplied)
AV output
EN 26
2. Connecting an digital audio system
Connect Digital-amplifier to the Digital-Audio-output of the TV-unit with a coaxial digital cable.
TV (Back view)
Audio digital cable
(not supplied)
Surround sound amplifier
system
Page 27

Connection to other equipment
3. Connecting to other equipment
Please make the following settings inside your receiver’s / DVD-player’s setup-menu:
Video signal: composite (CVBS)
TV-Format: 16:9
Volume: MAX
If you miss to make these settings properly, picture quality will be inferior and parts of the picture might be
missing. This is not a fault of this TV-set.
In case you need help to make this adjustment with your satellite-receiver / DVD-player, please consult the
related instructions or contact the supplier or maker of those apparatus for support.
Please use the satellite’s remote-control handset to select Teletext or desired TV-station. Generally it is not
possible to store satellite TV-stations into a standard TV.
Press INPUT SELECT, select AV. Press PICTURE SIZE several times, until appropriate size is displayed.
Mini-pin cable
TV (Side view)
TV (Back view)
Connecting a SCART player
4. Connecting to a DVD player or other AV device with Component Video outputs
If your DVD player (or other device) has Component Video output jacks, use a suitable set of leads (RCA/
Phono) to connect these to the Component Video inputs on this TV via supplied Mini-pin cable as shown
- it can greatly enhance the picture quality and performance. Please remember that you will also need to
connect separate leads (RCA/Phono) for the audio signals.
TV (Side view)
TV (Back view)
Mini-pin cable
(supplied)
Green
Blue
Red
(supplied)
Red
Blue
Green
Ye l l o w
White
Red
To COMPONENT IN
Green
Blue
Red
(not supplied)
Audio cable (not supplied)
AV-cable
(not supplied)
Component output
Video cable
SCART-RCA-
Adapter
(supplied)
To SCART player
Y
Pb
Pr
DVD player
To AUDIO (L/R) IN
Note:
The Component Video input of this unit are for use with equipment which outputs interlaced signals (PAL: 576i/1080i or
•
NTSC: 480i/1080i) and progressive signals (PAL: 576p/720p or NTSC: 480p/720p).
Audio output
27 EN
Page 28

Troubleshooting table
Please check the following list before requesting service.
Symptom Possible solution Page
No picture, no sound Switch on the set.
No reception Have you tuned in the TV stations?
The TV switches off with
missing antenna input
signal
The Channel option cannot
be selected.
Wrong Colours Colour and Brightness errors can occur when the viewing
While viewing a DVB
(digital) channel, there is
sound but no picture.
Blocky image or image
stops intermittently.
Some digital channels
cannot be viewed.
A cracking sound is
sometimes heard from the
unit.
•
The LCD panel is a very high technology product, giving you fine picture details. Occasionally, a few
nonactive pixels may appear on the screen as a fixed point of blue, green or red. Please note that this
does not affect the performance
Check that the mains power outlet is properly connected.
Select appropriate input mode.
Unplug unit for 1 minute, then plug it back in.
Press 1 on the remote control.
Connect the antenna.
Make sure the set is ON and not in Standby mode
This is normal.
15 minutes after the antenna signal has disappeared, the set
will change to standby mode. 14
The unit is set to AV mode. Press 1 on the remote control.
angle/ambient air temperature (see technical specifications)
are exceeded.
Some channel offers audio content only. It is normal.
Check all antenna connections.
Move the antenna away from areas of possible interference.
Try using an antenna booster.
Contact the service provider to subscribe.
If there is nothing wrong with the picture or sound, this is the
sound of the cabinet undergoing very slight contractions in
response to changes in the room temperature.
There are no adverse effects on the performance or other
aspects.
of your product.
7
11
10
11
10
EN 28
Page 29

Specifications
System: Analogue: PAL (B/G, D/K, I), SECAM (B/G, D/K)
•
This product is not compatible with analogue SECAM L broadcasting.
Digital: DVB-T, DVB-T HD (H.264), DVB-C, DVB-C HD (H.264)
Video Colour System: PAL/SECAM/NTSC 3.58/NTSC 4.43/PAL 60Hz
Preset channels: 4000 Service in total of Analog and Digital
Frequency Range: Analogue: 45.75~858MHz
Digital: E2~E69
LCD: TFT low-glass Active Matrix Colour LCD
HDMI input: HDMI compliant (type A connector), HDCP compliant
Suggested scan rates: 50Hz: 576i/576p/720p/1080i/1080p
60Hz: 480i/480p/720p/1080i/1080p
24Hz: 1080p
HDMI Audio: 2-channel PCM, 32/44.1/48 kHz sampling frequency
16/20/24 bits per sample
Audio Output Power: approx. 10.0W (MAX) x 2
GENERAL
Power Source: AC 220-240V, 50Hz
Energy efficiency class: B
Visible screen size (diagonal):
Power consumption (Rating):
Power consumption in on
72 cm / 29 inches
57 W
38 W
mode:
Energy consumption per
*1
:
year
Poer consumption in standby
mode:
Power consumption in
recording standby mode
Power consumption in
recording mode
*2
:
*2
:
56 kWh/year
0.29 W
7.9 W
8.9 W
Screen resolution: 1366 pixel (horizontal) x 768 pixel (vertical)
Weight: 4.7 kg
Dimensions: 67(W)x43(H)x17(D) cm
Surrounding temperature:
Operating Humidity:
Operation: 5°C ~ 40°C/Storage: –20°C ~ 60°C
Less than 80%RH
ACCESSORIES
2 batteries (AAA/R03/UM-4)/Remote control unit/Base plate/Screws for base plate (4x16mm)x4/Mini pin
cable (Y (CVBS)/Pb/Pr)/SCART-RCA Adapter
*1
Energy consumption per year, based on the power consumption of the television operating 4 hours per
day for 365 days. The actual energy consumption will depend on how the television is used.
*2
Based on the power consumption of the television unit only (when TV does not output picture and sound
signal). Not include any other USB devices.
Weight and Dimensions are approximate. Because we continuously strive to improve our products we may
change specifications and designs without prior notice.
29 EN
Page 30

Information on software license
The following open source software component is included in this product:
* Posix Compatibility Layer
Portions of this software is
CYGPKG_POSIX Copyright © 1990, 1999 The Regents of the University of California.
All rights reserved.
* MIPS HAL
Portions of this software is
CYGPKG_HAL_MIPS Copyright © 1992 The Regents of the University of California.
All rights reserved.
* Standard C Library
Portions of this software are
CYGPKG_LIBC_STDIO Copyright © 1990 The Regents of the University of California.
CYGPKG_LIBC_STDLIB Copyright © 1990, 1992, 1993 The Regents of the University of California.
CYGPKG_LIBC_STRING Copyright © 1988 Regents of the University of California.
CYGPKG_LIBC_TIME Copyright © 1999 Kungliga Tekniska Hogskolan (Royal Institute of
Technology, Stockholm, Sweden).
All rights reserved.
Page 31

J3MW0401A SH 12/11
P
1012STH-OR-OR
 Loading...