

Page 1

DVD RECEIVER WITH MONITOR KW-AVX706
ENGLISH
RECEPTOR DVD CON MONITOR KW-AVX706
RÉCEPTEUR DVD ET MONITEUR KW-AVX706
EXTRA MONITOR CONTROL
MODE MENU
ASPECT
DVD / RECEIVER CONTROL
ZOOM
ATT
+10
SOURCE
+100
–100
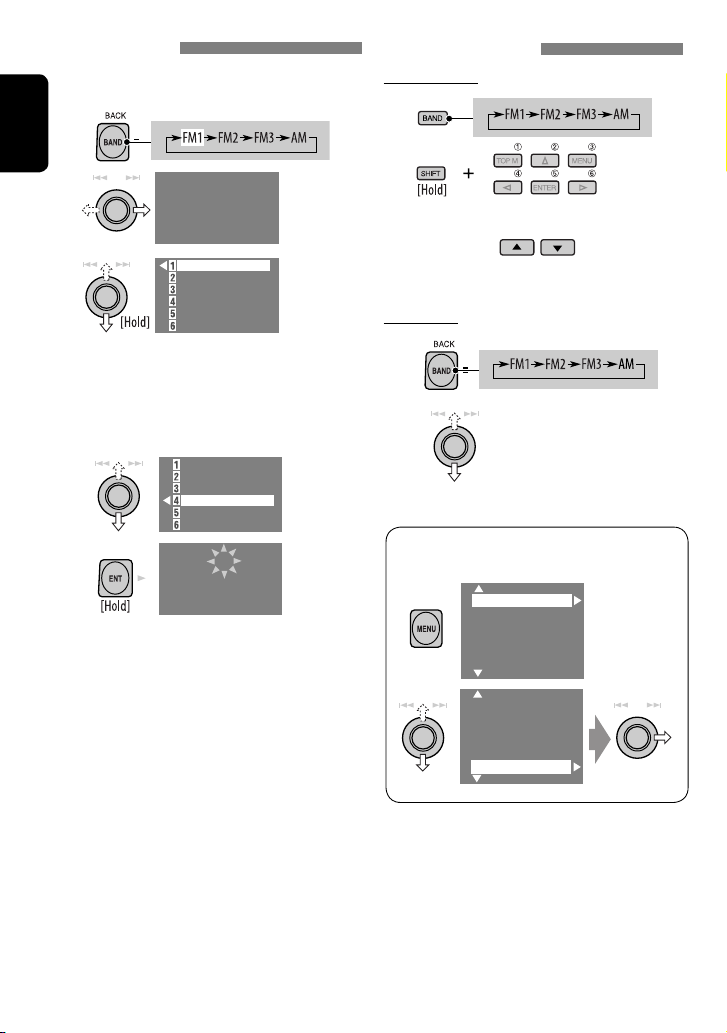
BAND
DIRECT
–10
ASPECT
DUAL
OSD
123
+
DISC
VOL
MENUTOP M
456
2nd VOL
ENTER
7809
–
DISC
RETURN
SETUP
SURROUND
SHIFT
RM-RK240
For canceling the display demonstration, see page 5.
Para cancelar la demostración en pantalla, consulte la página 5.
Pour annuler la démonstration des affichages, référez-vous à la page 5.
For installation and connections, refer to the separate manual.
Para la instalación y las conexiones, refiérase al manual separado.
Pour l’installation et les raccordements, se référer au manuel séparé.
INSTRUCTIONS
MANUAL DE INSTRUCCIONES
MANUEL D’INSTRUCTIONS
For customer Use:
Enter below the Model
No. and Serial No. which
are located on the top or
bottom of the cabinet.
Retain this information
for future reference.
Model No.
Serial No.
ESPAÑOL
FRANÇAIS
LVT1467-001B
[J]
Page 2
Please read all instructions carefully before operation, to ensure your complete understanding and
INFORMATION (For U.S.A.)
This equipment has been tested and found
ENGLISH
to comply with the limits for a Class B digital
device, pursuant to Part 15 of the FCC
Rules. These limits are designed to provide
reasonable protection against harmful
interference in a residential installation.
This equipment generates, uses, and can
radiate radio frequency energy and, if not
installed and used in accordance with the
instructions, may cause harmful interference
to radio communications. However, there
is no guarantee that interference will not
occur in a particular installation. If this
equipment does cause harmful interference
to radio or television reception, which can
be determined by turning the equipment
off and on, the user is encouraged to try to
correct the interference by one or more of
the following measures:
– Reorient or relocate the receiving antenna.
– Increase the separation between the
equipment and receiver.
– Connect the equipment into an outlet on
a circuit different from that to which the
receiver is connected.
– Consult the dealer or an experienced radio/
TV technician for help.
Thank you for purchasing a JVC product.
to obtain the best possible performance from the unit.
IMPORTANT FOR LASER PRODUCTS
1. CLASS 1 LASER PRODUCT
2. CAUTION: Do not open the top cover.
There are no user serviceable parts inside
the unit; leave all servicing to qualified
service personnel.
3. CAUTION: Visible and invisible laser
radiation when open and interlock failed or
defeated. Avoid direct exposure to beam.
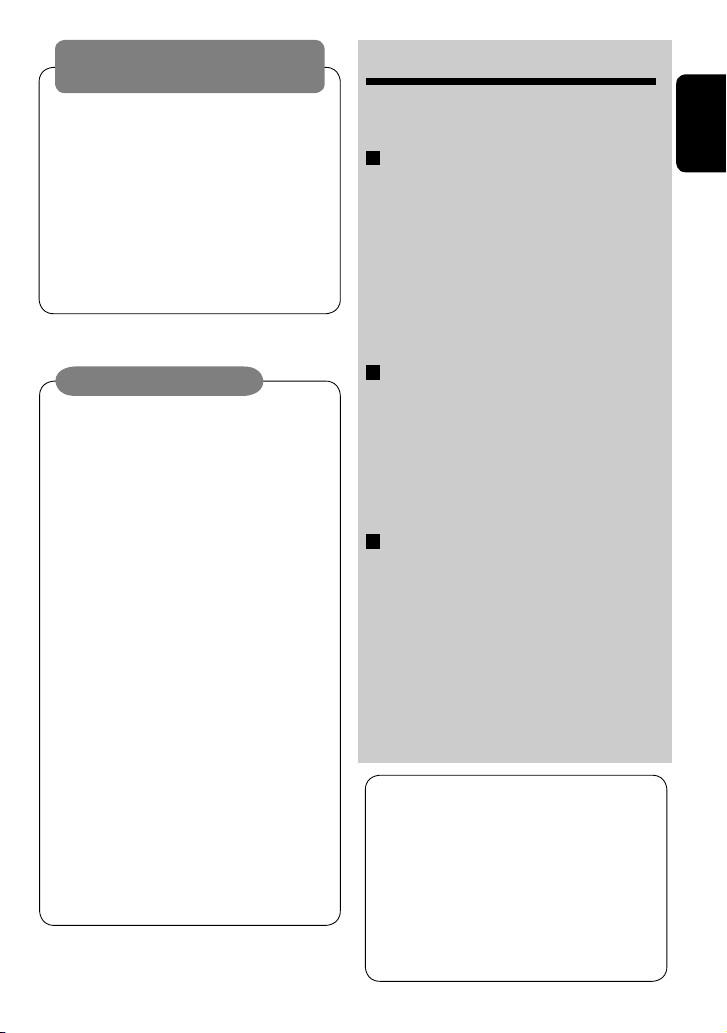
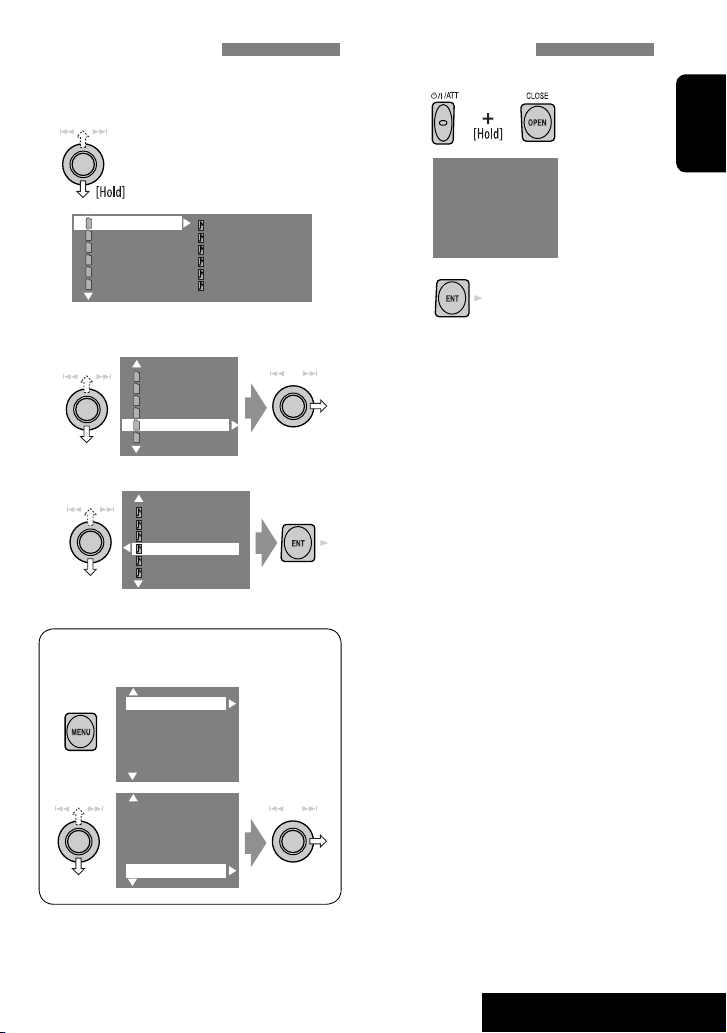
How to reset your unit
• Your preset adjustments
will also be erased.
How to forcibly eject a disc
NO EJECT?
EMERGENCY EJECT?
NO EJECT?
EMERGENCY EJECT?
Caution:
Changes or modifications not approved
by JVC could void the user’s authority to
operate the equipment.
• If this does not work, reset the unit.
For safety...
• Do not raise the volume level too much, as
this will block outside sounds, making driving
dangerous.
• Stop the car before performing any
complicated operations.
Temperature inside the car...
If you have parked the car for a long time in hot
or cold weather, wait until the temperature in
the car becomes normal before operating the
unit.
2
Page 3
WARNINGS:
To prevent accidents and damage
• DO NOT install any unit in locations where;
– it may obstruct the steering wheel and
gearshift lever operations.
– it may obstruct the operation of safety devices
such as air bags.
– it may obstruct visibility.
• DO NOT operate the unit while driving.
If you need to operate the unit while driving, be
sure to look ahead carefully.
• The driver must not watch the monitor while
driving.
CONTENTS
Introduction ............................................. 4
•
Before operating the unit ............................... 5
OPERATIONS
Basic operations
Control panel ............................................. 7
•
•
Remote controller (RM-RK240) ......................... 8
Listening to the radio ................................ 10
Disc operations ......................................... 13
Dual Zone operations ................................ 24
SD operations ........................................... 27
ENGLISH
Cautions on the monitor:
• This product has a fluorescent lamp that
contains a small amount of mercury. It
also contains lead in some components.
Disposal of these materials may be
regulated in your community due to
environmental considerations.
For disposal or recycling information
please contact your local authorities, or the
Electronic Industries Alliance:
http://www.eiae.org./
• The monitor built in this receiver has
been produced with high precision, but
it may have some ineffective dots. This is
inevitable and is not malfunction.
• Do not touch the surface of the liquid
crystal panel directly.
• Do not expose the monitor to direct
sunlight.
• When the temperature is very cold or very
hot...
– Chemical changes occur inside, causing
malfunction.
– Pictures may not appear clearly or
may move slowly. Pictures may not
be synchronized with the sound or
picture quality may decline in such
environments.
EXTERNAL DEVICES
Listening to the CD changer ....................... 29
Listening to the satellite radio ................... 31
Watching TV ............................................. 34
Listening to the iPod®/D. player ................. 36
Listening to other external components ..... 37
SETTINGS
Sound equalization ................................... 38
Assigning titles to the sources .................... 39
Menu operations ...................................... 40
Maintenance ............................................ 49
More about this unit ................................. 50
Troubleshooting ....................................... 54
Specifications ........................................... 58
This product incorporates copyright
protection technology that is protected
by U.S. patents and other intellectual
property rights. Use of this copyright
protection technology must be authorized
by Macrovision, and is intended for home
and other limited viewing uses only unless
otherwise authorized by Macrovision.
Reverse engineering or disassembly is
prohibited.
3
Page 4
Introduction
Disc type Recording format, file type, etc. Playable
DVD DVD Video
ENGLISH
DVD Recordable/Rewritable
(DVD-R*1/-RW, +R/+RW*2)
• Compliant to UDF bridge format
• DVD-RAM cannot be played.
Dual Disc DVD side
CD/VCD Audio CD/CD Text (CD-DA), DTS-CD
CD Recordable/Rewritable
(CD-R/-RW)
• Compliant to ISO 9660 level 1,
level 2, Romeo, Joliet
1
*
DVD-R recorded in multi-border format is also playable (except for dual layer discs).
2
*
It is possible to play back finalized +R/+RW (Video mode only) discs. However, the use of +R double layer disc is not recommended.
DVD Audio
DVD-ROM
DVD Video
MPEG1/MPEG2
JPEG
MP3/WMA/WAV
DivX/MPEG4
DVD-VR, +VR
Non-DVD side
VCD (Video CD)
SVCD (Super Video CD)
CD-ROM
CD-I (CD-I Ready)
CD-DA
MPEG1/MPEG2
JPEG
MP3/WMA/WAV
DivX/MPEG4
• “DVD Logo” is a trademark of DVD Format/Logo Licensing Corporation registered in the US, Japan and other countries.
Notice for DualDisc playback
The Non-DVD side of a “DualDisc” does
not comply with the “Compact Disc Digital
Audio” standard. Therefore, the use of NonDVD side of a DualDisc on this product is not
recommended.
Caution on volume setting:
Discs produce very little noise compared
with other sources. Lower the volume
before playing a disc to avoid damaging
the speakers by the sudden increase of the
output level.
4
Page 5
Note on Region Code:
DVD players and DVD Video discs have
their own Region Code numbers. This unit
can only play back DVD discs whose Region
If you insert a DVD Video disc of an
incorrect Region Code
“Region Error Please Eject” appears on the
monitor.
Code numbers include “1.”
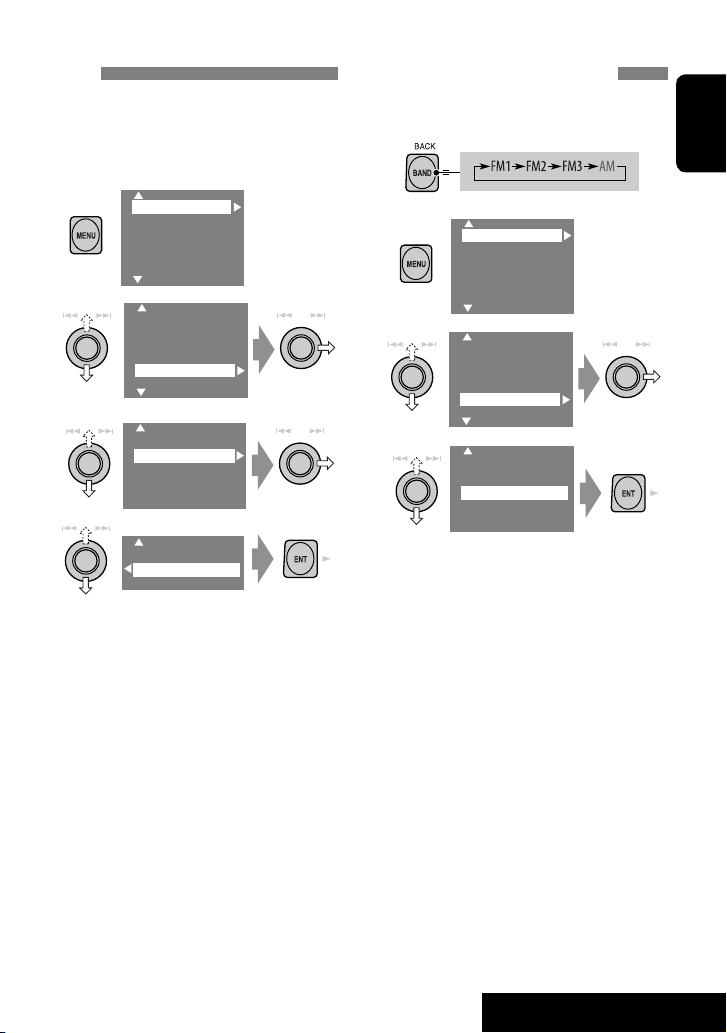
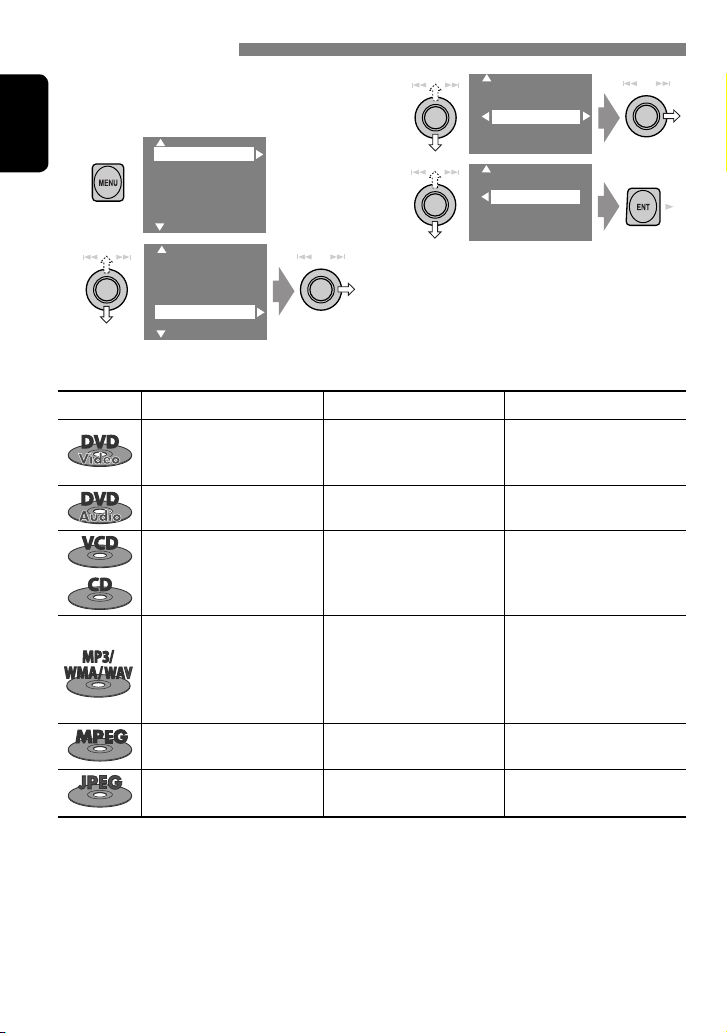
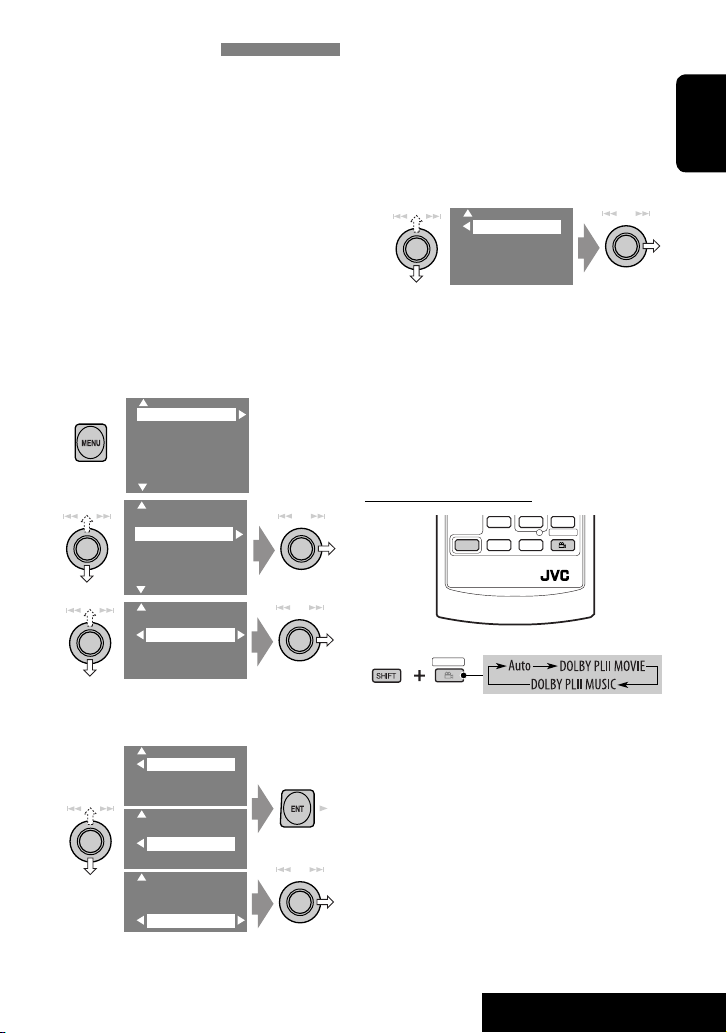
Before operating the unit—Cancel the display demonstration and set the clock
• See also page 40.
MENU
Setup
Surround
Equalizer
Sound
Mode
List
Display
Clock
Disc Setup 1
Disc Setup 2
Tuner
Input
~ Turn on the power.
Ÿ Display the <MENU>.
! Select <Setup> ] <Display> ] <Demonstration>, then activate the <Demonstration>
screen.
Setup
Surround
Equalizer
Sound
Mode
List
Display
Clock
Disc Setup 1
Disc Setup 2
Tuner
Input
Display
Clock
Disc Setup 1
Disc Setup 2
Tuner
Input
Demonstration
Wall Paper
Level Meter
Scroll
Tag Display
Dimmer
Demonstration
Wall Paper
Level Meter
Scroll
Tag Display
Dimmer
Off
On
ENGLISH
⁄ Cancel the display demonstrations.
Select “Off.”
Demonstration
Wall Paper
Level Meter
Scroll
Tag Display
Dimmer
Off
On
Continued on the next page
5
Page 6
ENGLISH
Time Set
12Hours/24Hours
1:00 AM
@ Return to the <Setup> menu.
¤ Select <Clock> ]<Time Set>.
# Activate the <Time Set> screen.
‹ Set the clock time.
Time Set
12Hours/24Hours
1:00 AM
Time Set
12Hours/24Hours
3:45 PM
$ Return to the <Clock> menu.
› Select <12Hours/24Hours>.
% Activate the <12Hours/24Hours> screen.
Time Set
12Hours/24Hours
12 Hours
24 Hours
fi Select either the 12-hour or 24-hour
system.
^ Finish the procedure.
• When either SIRIUS Satellite Radio or XM
Satellite Radio is connected, you can adjust
the internal clock automatically (☞ page
42).
6
Page 7
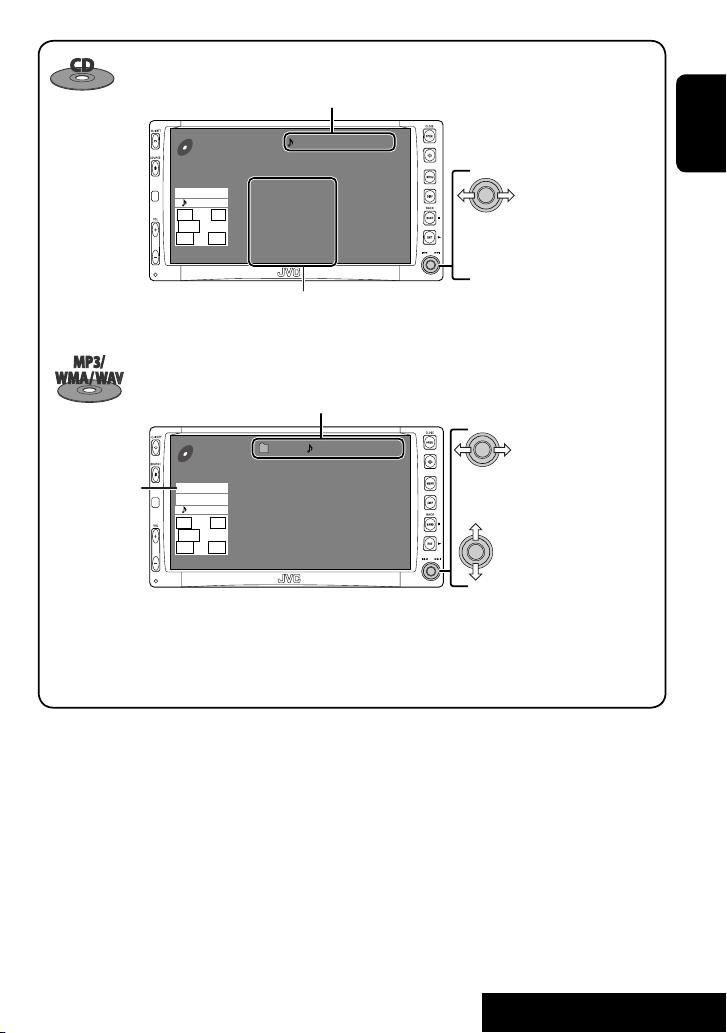
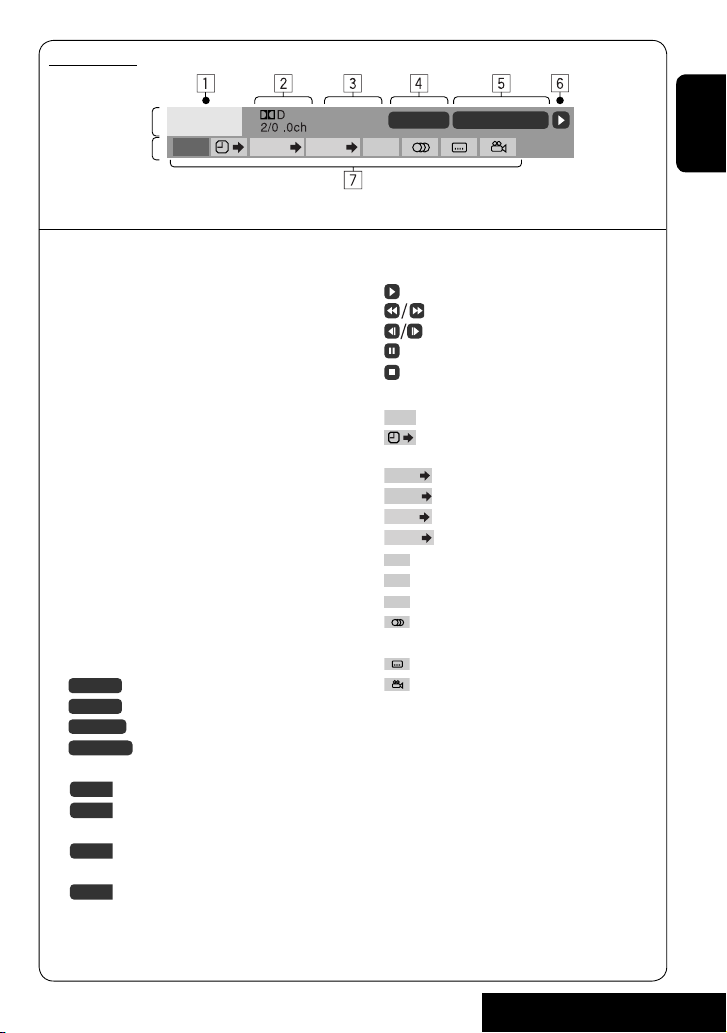
Basic operations — Control panel
Select the source.
TUNER = SAT (SIRIUS/XM) = DISC (DVD/VCD/CD) =
SD =CD-CH, iPod, D.PLAYER, or EXT-IN = TV = AV-IN
=(back to the beginning)
• You cannot select these sources if they are not
ready.
• Turn on the power.
• Turn off the power [Hold].
• Attenuate the sound (if the power is on).
Remote sensor
Adjust the volume.
Reset the unit.
• Use only when the internal
system malfunctions.
Display window
• DISC: Start playing.
• On menus: Enter.
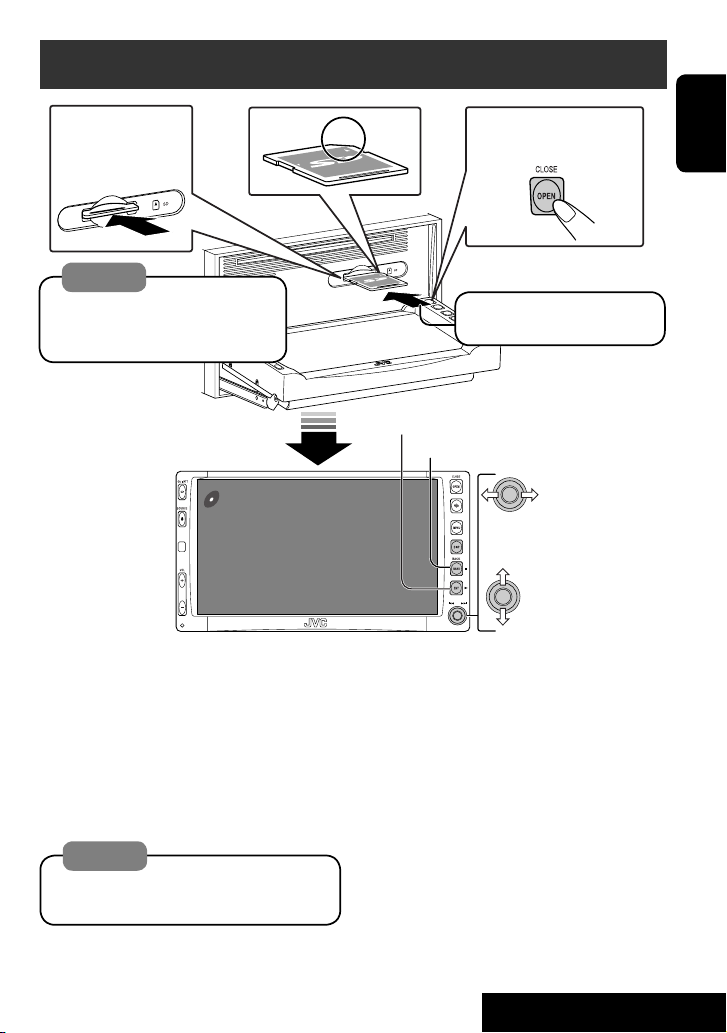
Open and close the monitor panel.
• When the monitor panel is open, you can
insert a disc and an SD card.
Display or erase <MENU>*1.
Change the monitor panel angle.
Change the display
information.
ENGLISH
*1 <MENU> screens
You can use the menus to set up various
settings.
The <MENU> screen consists of the
following sub-menus—Setup/Surround/
Equalizer/Sound/Mode/List/DualZone.
• For details, see pages 40 to 47.
• TUNER: Search for stations/Select
preset stations.
• SAT: Select categories/channels.
• DISC: Select chapters/tracks.
• On menus: Select items.
• iPod/D.PLAYER: Select tracks.
• TV: Select TV stations.
• TUNER/SAT: Select the bands.
• DISC: Stop playing.
• On menus: Back.
7
OPERATIONS
Page 8
Basic operations — Remote controller (RM-RK240)
Installing the lithium coin battery (CR2025)
ENGLISH
Before using the remote controller:
• Aim the remote controller directly at the
remote sensor on the unit.
• DO NOT expose the remote sensor to bright
light (direct sunlight or artificial lighting).
The receiver is equipped with the steering
wheel remote control function.
• See the Installation/Connection Manual
(separate volume) for connection.
Warning:
To prevent accidents and damage
• Do not install any battery other than
CR2025 or its equivalent.
• Store the battery in a place where children
cannot reach.
• Do not recharge, short, disassemble, or
heat the battery or dispose of it in a fire.
• Do not leave the battery with other
metallic materials.
• Do not poke the battery with tweezers or
similar tools.
• Wrap the battery with tape and insulate
when throwing away or saving it.
IMPORTANT:
If Dual Zone is activated (☞ page 24),
the remote controller functions only for
operating the DVD/CD player.
Main elements and features
EXTRA MONITOR CONTROL
MODE MENU
ASPECT
DVD / RECEIVER CONTROL
ATT
SOURCE
BAND
DUAL
VOL
2nd VOL
SHIFT
MONITOR CONTROL
1 Monitor control buttons
• Used for a JVC monitor—KV-MR9010,
or KV-MH6510.
DVD/RECEIVER CONTROL
2 • Turns on the power.
• Attenuates the sound if the power is on.
• Turns off the power if pressed and held
(while the power is on).
3 Selects the source.
4 Selects the FM/AM, and satellite radio
bands.
5 Changes the aspect ratio of the playback
pictures.
6 Activates or deactivates Dual Zone.
7 Adjusts the volume level.
• Also functions as 2nd VOL button when
pressed with SHIFT button (☞ page 24)
8*1 • DVD: Shows the disc menu.
• VCD: Resumes PBC playback
(☞page 19).
1
9*
Not used as SETUP button for this
receiver.
p SHIFT button
ZOOM
+10
–100
DIRECT
–10
ASPECT
123
+
DISC
MENUTOP M
456
ENTER
7809
–
DISC
SETUP
RETURN
SURROUND
+100
OSD
.
8
Page 9

q 7 (stop), 3 (play), 8 (pause)
• 3 (play) also function as ZOOM button
when pressed with SHIFT button (☞
page 20).
•
Not applicable for CD changer operations.
w*2 For advanced disc operations:
• 5 / ∞
DVD: Selects the titles.
Other discs except CD: Selects the
folders.
• 4 / ¢: reverse skip/forward skip
• 1 / ¡: reverse search/forward
search
For FM/AM/TV tuner operations:
• 5 / ∞:
Changes the preset stations.
• 4 / ¢:
– Functions to search for stations.
Press briefly: auto search
Press and hold: manual search
For satellite radio operations:
• 5 / ∞:
Changes the categories.
• 4 / ¢:
– Changes the channels if pressed briefly.
– Changes the channels rapidly if pressed
and held.
For Apple iPod
/JVC D. player
®
operations:
• ∞: Pauses/stops or resumes playback.
• 5: Enters the main menu (then
5/∞/4 / ¢ work as the menu
selecting buttons).*
3
• 4 / ¢ (in menu selecting mode)
– Selects an item if pressed briefly. (Then,
press ∞ to confirm the selection.)
– Skips 10 items at a time if pressed and
held.
e Shows the on-screen bar.
• Also functions as DIRECT button when
pressed with SHIFT button (☞ pages 18
to 20).
1
r*
• DVD: Shows the disc menu.
• VCD: Resumes PBC playback
(☞page 19).
1
t*
• Makes selection/settings.
• ~: Skips back or forward by 5 minutes
for MPEG.
• DISC +/– buttons: Changes discs for
“CD-CH.”
1
y*
RETURN button
u • DVD: Selects audio language
(
• VCD: Selects audio channel (
•
), subtitles ( ), angle ( ).
).
(angle) also functions as
SURROUND button when pressed with
SHIFT button (☞page 21).
1
*
Functions as number buttons when pressed
with SHIFT button.
–
TUNER: Selects preset station.
–
DISC: Selects chapter/title/group/folder/
track.
2
*
Functions as +10/–10/+100/–100 buttons
when pressed with SHIFT button.
3
*
5 : Returns to the previous menu.
∞ : Confirms the selection.
How to select a number
To select a number from 0 – 9:
To select a number greater than 9:
ENGLISH
• +100/–100 buttons used only for searching
for tracks whose number is greater than 99.
9
OPERATIONS
Page 10
Listening to the radio
ENGLISH
POWER]ON
Tuner indicators
☞ page 38.
Band
TUNER
FLAT
MO LO
3: 45 PM
Preset No.
FM1 P1
ABC Radio
87.5 MHz
87.5 MHz ABC Radio
88.3 MHz DEF FM
88.7 MHz GHI Radio
91.5 MHz JVC FM
93.1 MHz JKL Radio
95.3 MHz MNO FM
Assigned station name. If no name is assigned,
“NO NAME” appears.
Preset list—frequency/
assigned station names
~ Select “TUNER.”
Ÿ Select the bands.
! Search for a station—Auto Search.
• Manual Search: Hold either to left or right until “Manual Search” appears on the display, then
push it repeatedly.
• The ST indicator lights up when receiving an FM stereo broadcast with sufficient signal
strength.
When an FM stereo broadcast is hard to
receive
1
2
Setup
Surround
Equalizer
Sound
Mode
List
Setup
Surround
Equalizer
Sound
Mode
List
4
Off
On
Reception improves, but stereo effect will be
lost.
• The MO indicator lights up.
To restore stereo effect, select “Off” in step 4.
3
Mono
DX/Local
SSM
Title Entry
10
Page 11
Tuning in to stations with sufficient signal
strength
This function works only for FM bands.
Once you have activated this function (selected
“Local”), it always works when searching for FM
stations.
1
Setup
Surround
Equalizer
Sound
Mode
List
2
3
Setup
Surround
Equalizer
Sound
Mode
List
Mono
DX/Local
SSM
Title Entry
4
DX
Local
FM station automatic presetting —SSM
(Strong-station Sequential Memory)
This function works only for FM bands.
You can preset six stations for each band.
1
2
Setup
Surround
Equalizer
Sound
Mode
List
3
Setup
Surround
Equalizer
Sound
Mode
List
4
Mono
DX/Local
SSM
Title Entry
Local FM stations with the strongest signals
are searched and stored automatically in the
FM band.
ENGLISH
Only stations with sufficient signal strength
will be detected.
• The DX indicator goes off, then the LO
indicator lights up.
11
OPERATIONS
Page 12
Manual presetting
Ex.: Storing FM station of 92.5 MHz into preset
number 4 of the FM1 band.
1
ENGLISH
2
FM1
NO NAME
92.5 MHz
3
87.5 MHZ
88.3 MHz
88.7 MHz
91.5 MHz
93.1 MHz
95.3 MHz
• Each time you keep pushing up or down
the knob, you can change the FM bands.
• Preset List can also be accessed through
<MENU> = <List> (☞ right).
4
Select a preset number.
87.5 MHZ
88.3 MHz
88.7 MHz
91.5 MHz
93.1 MHz
95.3 MHz
5
FM1 P4
NO NAME
92.5 MHz
Selecting preset stations
On the remote:
1
2
or
On the unit:
1
2
• Preset List can also be accessed through
<MENU> = <List>.
Setup
Surround
Equalizer
Sound
Mode
List
12
Setup
Surround
Equalizer
Mode
List
Page 13
Disc operations
Now Reading...
DISC
3: 45 PM
The disc type is automatically detected, and playback starts automatically (for some discs: automatic
start depends on its internal program).
If a disc does not have any disc menu, all tracks in it will be played repeatedly until you change the
source or eject the disc.
If “
” appears on the monitor, the unit cannot accept the operation you have tried to do.
• In some cases, without showing “
,” operations will not be accepted.
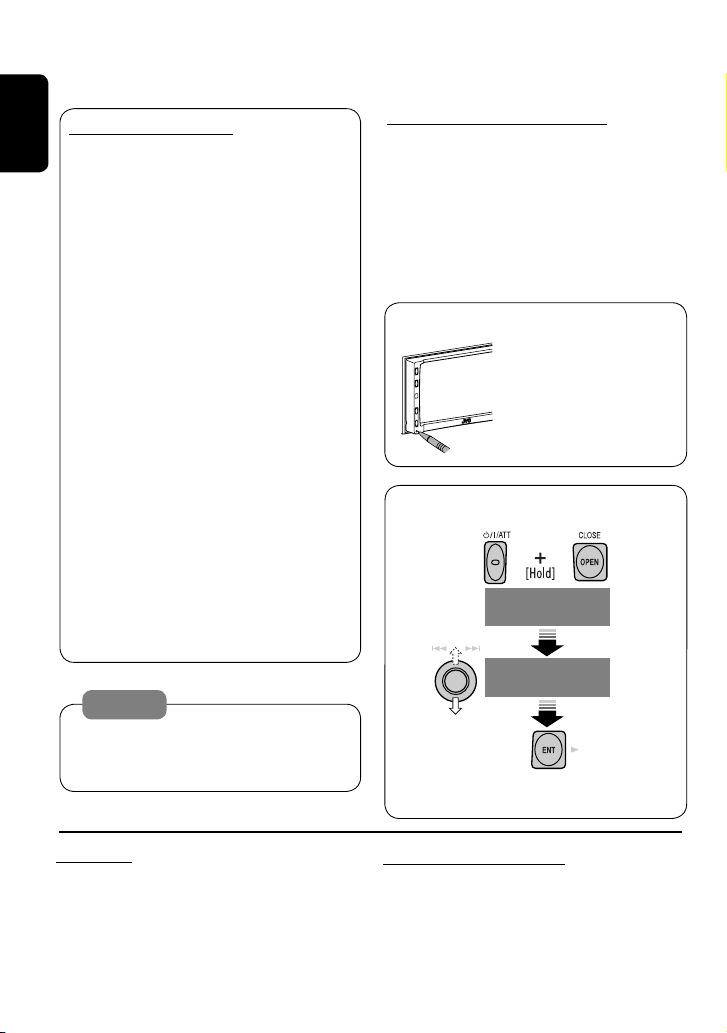
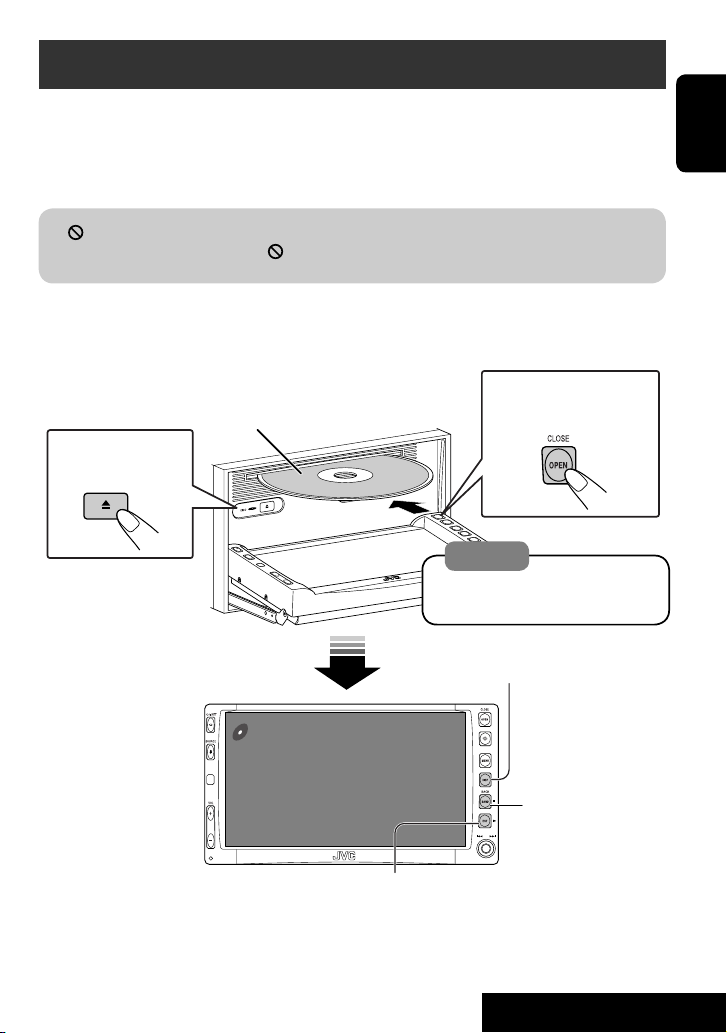
Open the monitor panel and insert the disc.
Playback starts automatically.
To open/close the
Label side
monitor panel
To eject the disc
Caution:
Do not place your finger behind the
monitor panel.
DISP: Press if no playback picture appears , but disc
information (☞ pages 14 and 15) screen is displayed.
ENGLISH
3: Start playback if necessary.
(For DVD: 10-second review if pressed during play.)
13
7: Stop.
OPERATIONS
Page 14
While playing the following discs, press .
01 01 0:00:12
Current folder Name
Current file name.mpg
Next file name.mpg
Next file name.mpg
Next file name.mpg
Next file name.mpg
Next file name.mpg
Next file name.mpg
CD
MPEG
3: 45 PM
FLAT
REPEAT
L R
SW
LS RS
Title no./Chapter no./Play time
Audio format
ENGLISH
Surround/
sound mode
Playback mode
Speaker/signal
indicators
(☞ page 50)
DVD
VIDEO
CHAP.RPT
L C R
SW LFE
LS RS
3: 45 PM
DIGITAL
MULTI
01 01 0:00:12
48kHz 24Bit 3/2.1
• Each time you press the button, playback
picture and disc information screens
(with/without level meter) appear in turn.
Sampling frequency/Bit rate/Recorded
signal channels
Press: Select chapter
Hold: Reverse/forward search*
Press: Select title
1
BONUS indicator
B.S.P. indicator
PBC indicator
lights up when
(☞ page 20)
(☞ page 20)
Disc type
PBC is in use.
DVD
AUDIO
PPCM
MULTI
REPEAT
L C R
SW LFE
LS RS
3: 45 PM
VCD
PBC
FLAT
L R
SW
LS RS
3: 45 PM
01 01 0:00:12
BONUS B.S.P
96kHz 24Bit 3/2.1
01 0:00:12
14
Group no./Track no./Play time
Press: Select track
Hold: Reverse/forward search*
Press: Select group
For MPEG: Folder no./Track no./Play time
For JPEG: Folder no./Track no.
Press: Select track
Hold: For MPEG: Reverse/forward
Track no./Play time
Press: Select track
Hold: Reverse/forward search*
2
search*
Press: Select folder
Hold: Display Folder List
1
1
Page 15
Track no./Play time
Audio format
(MP3/WMA/WAV)
CD
FLAT
REPEAT
L R
SW
LS RS
3: 45 PM
CD
MP3
FLAT
REPEAT
L R
SW
LS RS
3: 45 PM
01 0:00:12
Disc Title
Current track Title
Next track title
Next track title
Next track title
Next track title
Next track title
Next track title
Next track list (only for CD Text)
• “NO NAME” appears if no title is assigned
Folder no./Track no./Play time
01 01 0:00:12
Current folder Name
Current file name.mp3
Next file name.mp3
Next file name.mp3
Next file name.mp3
Next file name.mp3
Next file name.mp3
Next file name.mp3
Press: Select track
Hold: Reverse/forward search*
1
or recorded.
Press: Select track
Hold: Reverse/forward search*
1
Press: Select folder
Hold: Display Folder List
• Tag data will be shown instead of folder/
file names when they are recorded (with
“Tag Display” set to “On” ☞ page 41).
ENGLISH
1
*
Search speed: x2 ] x10.
2
*
Search speed: ¡1 ] ¡2.
• Microsoft and Windows Media are either registered
trademarks or trademarks of Microsoft Corporation in the
United States and/or other countries.
15
OPERATIONS
Page 16
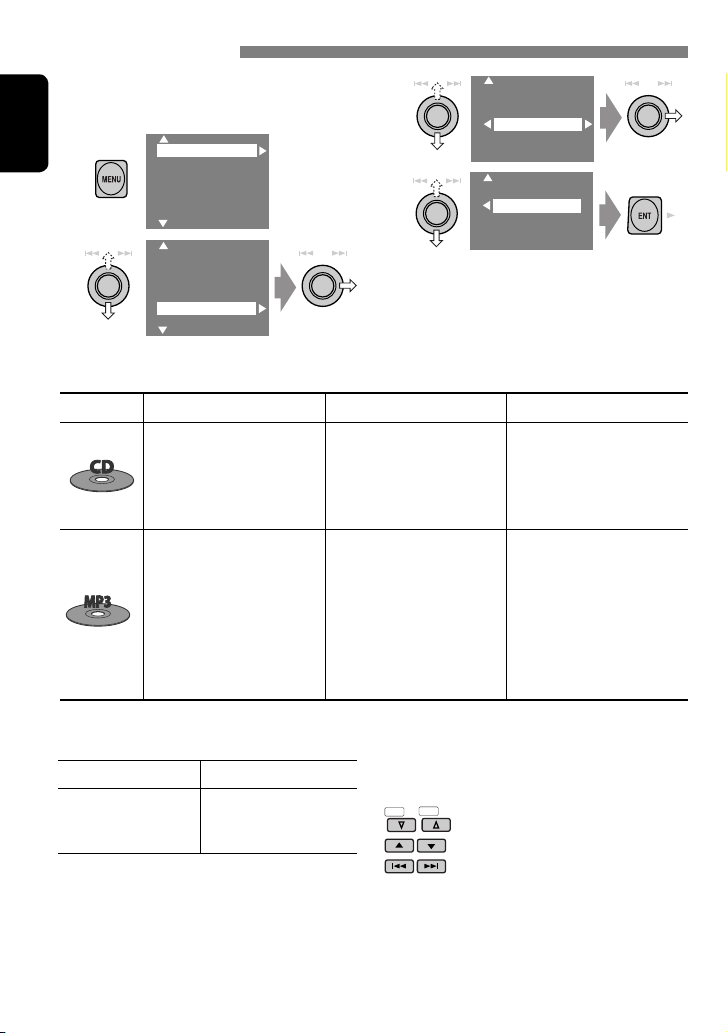
Selecting playback modes
You can use only one of the following playback
modes—Intro/Repeat/Random.
Ex. To select Track Repeat
1
ENGLISH
2
Setup
Surround
Equalizer
Sound
Mode
List
Setup
Surround
Equalizer
Sound
Mode
List
Disc type Intro Repeat Random
—
— Track: Repeats current track —
3
Off
Intro
Repeat
Random
4
Off
Track
Folder
When one of the playback modes is
selected, the corresponding indicator lights
up on the disc information screen.
To cancel, select “Off” in step 3 or 4.
Chapter: Repeats current
chapter
Title: Repeats current title
—
Track: Plays the first 15
seconds of each track (for
VCD: PBC not in use)
Track: Plays the first 15
seconds of each track
Folder: Plays the first 15
seconds of the first track of
each folder
—
—
Track: Repeats current track
(for VCD: PBC not in use)
Track: Repeats current track
Folder: Repeats all tracks of the
current folder
Track: Repeats current track
Folder: Repeats current folder
Folder: Repeats current folder
16
Disc: Randomly plays all tracks
(for VCD: PBC not in use)
Folder: Randomly plays all
tracks of current folder,
then tracks of next folders
Disc: Randomly plays all tracks
—
—
Page 17
Selecting tracks on the list
If a disc includes folders, you can display the
Folder/Track Lists, then start playback.
1
Folder List with the current
Track List on the right column
appears.
Prohibiting disc ejection
You can lock a disc in the loading slot.
1
NO EJECT?
EMERGENCY EJECT?
ENGLISH
My Best
Cinema
My Best 2
Pops
Favorite Songs
Easy Listenings
2
Select a folder, then activate the Track
Track001.mp3
Track002.mp3
Track003.mp3
Track004.mp3
Track005.mp3
Track006.mp3
List.
My Best
Cinema
My Best 2
Pops
Favorite Songs
Easy Listenings
3
Select a track, and start playing.
Song015.mp3
Song016.mp3
Song017.mp3
Song018.mp3
Song019.mp3
Song020.mp3
• Preset List can also be accessed through
<MENU> = <List>.
Setup
Surround
Equalizer
Sound
Mode
List
2
“No Eject” appears.
To cancel the prohibition, repeat the same
procedure to select “EJECT OK”.
Setup
Surround
Equalizer
Mode
List
17
OPERATIONS
Page 18

Operations using the remote controller—RM-RK240
EXTRA MONITOR CONTROL
MODE MENU
ASPECT
ENGLISH
DVD / RECEIVER CONTROL
ATT
SOURCE
BAND
DUAL
VOL
2nd VOL
SHIFT
RM-RK240
ZOOM
+10
–100
DIRECT
–10
ASPECT
123
+
DISC
456
ENTER
7809
–
DISC
SETUP
SURROUND
+100
OSD
MENUTOP M
RETURN
Reverse/forward search*
(Slow motion*2 during pause. No sound can be heard.)
Press: Select chapter (during play or pause).
Hold: Reverse/forward search*
Select chapter (during play or pause).
Select title (when not playing).
• To select a number, see also
“How to select a number” on
page 9.
Select title directly.
: Stop play.
: Pause (Frame by frame playback if pressed
while pausing moving pictures).
: Start play (10-second review if pressed while
playing moving pictures).
:
Reverse/forward search*1.
:
Press: Select track.
Hold: Reverse/forward search*3.
: Select group.
: Select aspect ratio.
: Select audio language.
*1 Search speed: x2 ] x5 ] x10 ] x20 ] x60
2
*
Slow motion speed: 1/32 ] 1/16 ] 1/8 ] 1/4 ] 1/2
3
*
Search speed: x2 ] x10
: Stop play.
: Pause (Frame by frame playback if pressed during pause).
: Start play (10-second review if pressed during play).
:
1
. (No sound can be heard.)
:
3
: Select title.
: Select aspect ratio.
: Select subtitle language.
: Select audio language.
: Select view angle.
+ :
DIRECT
OSD
+(
= ):
Using menu driven features...
1
2 Select an item you want to start
play.
3
+ :
Select track.
DIRECT
OSD
+(
= ):
Select group directly.
Using menu driven features...
1
2 Select an item you want to start play.
3
18
Page 19
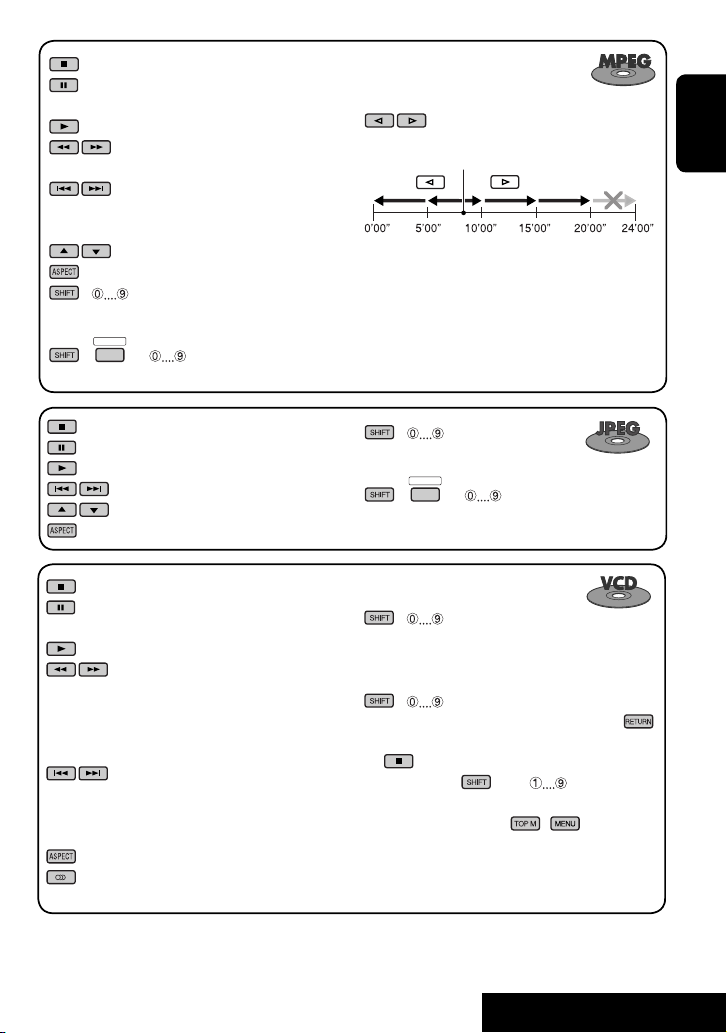
: Stop play.
: Pause (Frame by frame playback if pressed
during pause).
: Start play.
: Reverse/forward search*4. (No sound can
be heard.)
: Press: Select track.
Hold: Reverse/forward search*5. (No
sound can be heard.)
: Select folder.
: Select aspect ratio.
+ :
Select track (within the same folder).
DIRECT
OSD
+(
= ):
Select folder directly*6.
While playing...
: Return/advance the scenes by 5 minutes.
Current playback position
2nd press
1st press
1st press
2nd press
3rd press
ENGLISH
: Stop play.
: Pause.
: Start play.
: Select track.
: Select folder.
: Select aspect ratio.
: Stop play.
: Pause (Frame by frame playback if pressed
during pause).
: Start play.
:
Reverse/forward search*1 (Forward slow
motion*2 during pause. No sound can be
heard.)
• Reverse slow motion does not work.
:
Press: Select track.
Hold: Reverse/forward search*3. (No sound
can be heard.)
: Select aspect ratio.
: Select audio channel (ST: stereo, L: left,
R: Right).
4
*
Search speed: ¡1 ] ¡2 ] ¡3
5
*
Search speed: ¡1 ] ¡2
+ :
Select track (within the same folder).
DIRECT
OSD
+(
= ):
Select folder directly*6.
+ :
Select track.
During PBC playback...
+ : Select an item on the menu.
To return to the previous menus, press .
To cancel PBC playback
1
2 While holding , press to start the
desired track.
• To resume PBC, press / .
6
When 2-digit numbers are assigned at the beginning of their
*
folder names—01, 02, 03, and so on.
19
OPERATIONS
Page 20

: Stop play.
: Pause.
: Start play.
: Reverse/forward search*1.
ENGLISH
: Press: Select tracks.
: Select folder.
Hold: Reverse/forward search*
+ :
Select track (within the same folder).
DIRECT
OSD
+(
= ):
Select folder directly*6.
3
.
: Stop play.
: Pause.
: Start play.
: Reverse/forward search*1.
: Press: Select track.
Hold: Reverse/forward search*3.
+ : Select track.
*1 Search speed: x2 ] x5 ] x10 ] x20 ] x60
3
*
Search speed: x2 ] x10
6
*
When 2-digit numbers are assigned at the beginning of their
folder names—01, 02, 03, and so on.
Enlarging the view (Zoom in)
During moving picture playback...
ZOOM 1 ZOOM 2 ZOOM 3 ZOOM 4
ZOOM OFF
While pausing...
ZOOM 5ZOOM 6
Move the enlarged
portion.
ZOOM 1 ZOOM 2
ZOOM OFF
Playing back a bonus group
If a DVD Audio including a “bonus group” is
detected, the BONUS indicator lights up on the
disc information screen.
To play a bonus group...
1 Select the bonus group.
• The bonus group is usually recorded as
the last group.
2 Enter the key number.
• “key number” (a kind of password) for
the bonus group is not open to public.
The way of getting the key number
depends on the disc.
3 Follow the interactive instructions
shown on the monitor.
Selecting browsable still picture...
When a disc including browsable still pictures
is detected, the B.S.P. indicator lights up on the
disc information screen.
When disc shows the BSP selecting icons such
as @ or # on the screen...
1 Select an item you want to display.
2
To cancel zoom, select “ZOOM OFF.”
20
Page 21
Enjoying surround sounds
You can enjoy multi-channel surround
playback through the front, center, surround
speakers.
• Without connecting (and activating) center
speaker and surround speakers, you cannot
enjoy surround playback .
MULTI: For multi-channel encoded sources
such as Dolby Digital*
Audio. (When activated, “MULTI” is shown on
the disc information screen.)
Dolby Pro Logic II (Movie/Music): For 2
channel sources except for MPEG 2-channel
discs. (This can also be used for SD card
playback. ☞ page 27)
To turn on the surround...
1
2
3
• Surround Off: Deactivates surround.
• Surround On: Activates surround = go to
the following steps.
4
1
, DTS*2, and DVD
Setup
Surround
Equalizer
Sound
Mode
List
Setup
Surround
Equalizer
Mode
List
Surround Off
Surrond On
Auto
Dolby PLII Movie
Dolby PLII Music
Auto
Dolby PLII Movie
Dolby PLII Music
Auto
Dolby PLII Movie
Dolby PLII Music
• Auto: “MULTI” surround is activated when
multi-channel digital signals are detected.
• Dolby PLII Movie: Activates Dolby Pro
Logic II Movie.
• Dolby PLII Music: Activates Dolby Pro
Logic II Music = go to the following step.
5
Only when selecting “Dolby PLII
Music”
Panorama
CenterWidth
• Panorama: Select “Panorama On” to add
wraparound sound effect.
• CenterWidth: Adjust the center image
so it may be heard only from the center
speaker, only form the left/right front
speaker as a “phantom” center image, or
various combination of these speakers. As
the number increases, the “phantom” effect
becomes stronger (normally select “4”).
On the remote controller:
SHIFT
RM-RK240
SURROUND
1
SURROUND
• You cannot change the “Dolby PL II Music”
settings using the remote controller.
1
Manufactured under license from Dolby Laboratories. Dolby,
*
Pro Logic, MLP Lossless, and the double-D symbol are
trademarks of Dolby Laboratories.
2
*
“DTS” and “DTS Digital Surround” are registered trademarks
of Digital Theater Systems, Inc.
ENGLISH
21
OPERATIONS
Page 22

Operations using the on-screen bar (DVD/VCD/MPEG/JPEG)
These operations are possible on the monitor using the remote controller.
OSD
~ Display the on-screen bar (☞ page 23).
(twice)
Ÿ Select an item.
! Make a selection.
If pop-up menu appears...
• For entering time/numbers, see below.
ENGLISH
SHIFT
RM-RK240
123
456
ENTER
7809
How to select a number
To select a number from 0 – 9:
To select a number greater than 9:
• +100/–100 buttons used only to enter the
number greater than 99.
• To reduce numbers, use
or .
Entering time/numbers
Ex.:
DVD ] _:_ _:_ _
To enter 1 (hours): 02 (minutes): 00 (seconds),
press 1, 0, 2, 0, 0, then ENTER.
VCD (PBC not in use) ] _ _:_ _
To enter 64 (minutes): 00 (seconds),
press 6, 4, 0, 0, then ENTER.
• It is not required to enter tailing zeros (the
last two digits in the examples above).
• To correct a misentry, use
To remove the on-screen bar
.
22
Page 23
On-screen bar
Information
Operation
Above example is of DVD Video. Items shown on the bar vary due to the disc type.
1 Disc type
2 • DVD: Audio signal format
• VCD: PBC
3 Playback mode
DVD -V
TIME TITLE CHAP
DVD Video:
T. RPT: Title repeat
C. RPT: Chapter repeat
DVD Audio:
T. RPT: Track repeat
MPEG:
T. RPT: Track repeat
F. RPT: Folder repeat
JPEG:
F. RPT: Folder repeat
VCD:
T. RPT: Track repeat
D. RND: Disc random
T. INT: Track intro
Plays the beginning 15 seconds of
the current track
4 Playback information
5 Time indication
Current title/chapter
T02-C03
Current group/track
G02-T03
TRACK 01
Current track
F001-T001
TOTAL
T. REM
Current folder/track
Elapsed playing time of the disc
Remaining title time (for DVD)
T02-C03 TOTAL 1:25:58
C. RPT
RPT
6 Playback status
Play
Reverse/forward search
Reverse/forward slow-motion
Pause
Stop
7 Operation icons
Change time indication (see 5)
TIME
Time Search (Enter the elapsed playing
time of the current title or of the disc.)
TITLE
Title Search (by its number)
GROUP
Group Search (by its number)
CHAP
Chapter Search (by its number)
TRACK
Track Search (by its number)
RPT
Repeat play*
INT
Intro play*
RND
Random play*
1
1
1
Change the audio language or audio
channel
Change the subtitle language
Change the view angle
*1 ☞ page 16.
Remaining disc time (for others)
TIME
Elapsed playing time of the current
chapter/track
REM
Remaining time of the current
chapter/track
ENGLISH
23
OPERATIONS
Page 24
Dual Zone operations
You can enjoy a disc playback on the external
monitor connected to the VIDEO OUT and 2nd
AUDIO OUT plugs, while listening to any other
ENGLISH
source through the speakers.
• When Dual Zone is in use, you can only
operate the DVD/CD player using the remote
controller.
1
2
3
Setup
Surround
Equalizer
Sound
Mode
List
DualZone
Off
0n/Surround Off
0n/Surround On
• Off: Deactivates Dual Zone.
• On/Surround Off (DUAL): Activates
Dual Zone without applying Headphone
Surround*.
• On/Surround On (DUAL SURR): Activates
Dual Zone and applies Headphone
Surround.
To select a different source (main source) to
listen through the speakers:
Press SOURCE on the control panel.
• You cannot select “SD” for the main source.
• By using the buttons on the control panel, you
can operate the newly selected source without
affecting Dual Zone (DVD/CD) operations.
On the remote controller:
DUAL
VOL
2nd VOL
SHIFT
RM-RK240
1
2
Adjust the volume through the 2nd
AUDIO OUT plug.
3
Operate the DVD/CD player.
When Dual Zone is activated, the main source is
changed to “DISC.”
DUAL SURR
DVD
VIDEO
MULTI
DTS
01 01 0:00:12
48kHz 24Bit 3/2.1
Ex. When “On/Surround On” is selected.
* JVC original headphone virtual surround
system. This surround will also work for the
main source “DISC” though it is activated for
the sub-source. This surround does not work
for MPEG discs.
24
Page 25

Operations using the control screen (MP3/
WMA/WAV/MPEG/JPEG/CD)
While Dual Zone is on,
possible on the external monitor using the
remote controller.
The control screen automatically appears when
you insert a disc. (For MPEG/JPEG; while not
playing.)
Control screen
MP3/WMA/WAV/MPEG/JPEG
Folder : 2 / 3
01 Music
02 Music
03 Music
Track Information
Album
Weather
Artist
Robert M. Smith
Title
Rain
1 Current folder
2 Current folder number/total folder number
3 Folder list
4 Selected playback mode
5 Elapsed playing time of the current track
(not displayed for JPEG)
6 Operation status
7 Current track number/total number of
tracks in the current folder (total number of
tracks on the disc)
8 Track information (only for MP3/WMA/
WAV)
9 Track list
p Current track (highlighted bar)
To select a folder or track
1
Select “Folder” column or “Track” column
on the control screen.
2
Select a folder or track.
these operations are
TIME 00:00:14T. RPT
Track : 5 / 14 (Total 41)
Cloudy.mp3
Fair.mp3
Fog.mp3
Hail.wma
Indian summer.mp3
Rain.mp3
Shower.mp3
Snow.mp3
Thunder.wma
Typhoon.mp3
Wind.mp3
Winter sky.mp3
Ex.: MP3/WMA
• If necessary, press ENTER
to start playback.
Control screen
CD
TIME 00:14
Track : 5 / 14
Cloudy
Fair
Fog
Hail
Indian summer
Rain
Shower
Snow
Thunder
Typhoon
Wind
Winter sky
Track Information
Album
Four seasons
Artist
Robert M. Smith
Title
Rain
T. RPT
Ex.: CD Text
1 Selected playback mode
2 Elapsed playing time of the current track
3 Operation status
4 Current track number/total number of
tracks on the disc
5 Track information
6 Track list
7 Current track (highlighted bar)
To select a track
• If necessary, press ENTER
to start playback.
To change the playback modes
You can also change the playback modes.
• For CD/MP3/WMA/WAV: Intro/Repeat/
Random
• For others: Repeat
1
OSD
2
Only for CD/MP3/WMA/WAV: Select a
playback mode
3
Select your desired option.
4
25
OPERATIONS
ENGLISH
Page 26
Operations using the list screen (MP3/WMA/
WAV/MPEG/JPEG)
While Dual Zone is on,
possible on the external monitor using the
remote controller.
these operations are
ENGLISH
List screen
Folder list
While not playing...
1
Display the folder list.
Each time you press the button,
the list screen comes on and goes
off.
2
Select a folder on the list.
Folder : 144/240 Track 144/198 Page : 4/7
fol120
fol121
fol122
fol123
fol124
fol125
fol126
fol127
fol128
fol129
fol130
fol131
fol132
fol133
fol134
fol135
fol136
fol137
fol138
fol139
fol140
fol141
fol142
fol143
fol144
fol145
fol146
fol147
fol148
fol149
fol150
fol151
fol152
fol153
fol154
fol155
fol156
fol157
fol158
fol159
Track list
Folder : 144/240 Track 144/198 Page : 4/5
file0121.mp3
file0122.mp3
file0123.wma
file0124.mp3
file0125.mp3
file0126.wma
file0127.wma
file0128.mp3
file0129.mp3
file0130.wma
file0131.mp3
file0132.mp3
file0133.mp3
file0134.mp3
file0135.wma
file0136.mp3
file0137.wma
file0138.mp3
file0139.wma
file0140.wma
file0141.wma
file0142.mp3
file0143.wma
file0144.mp3
file0145.mp3
file0146.mp3
file0147.mp3
file0148.wma
file0149.wma
file0150.wma
file0151.wma
file0152.mp3
file0153.wma
file0154.mp3
file0155.wma
file0156.wma
file0157.wma
file0158.wma
file0159.mp3
file0160.wma
Ex.: Track list for MP3/WMA
1 Current folder number/total folder number
2 Current track number/total number of
tracks in the current folder
3 Current page/total number of the pages
included in the list
4 Current folder/track (highlighted bar)
The track list of the selected folder appears.
3
Select a track on the list.
To go back to the folder list, press
.
26
Page 27
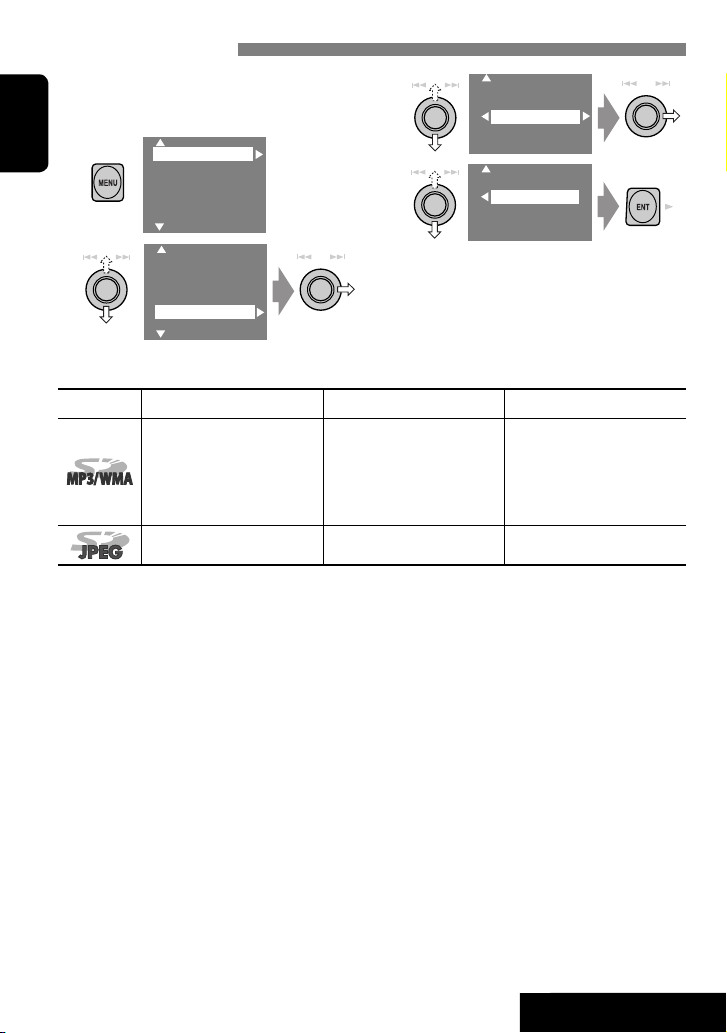
SD operations
To eject the disc
push in the SD card
lightly.
Caution:
Do not release your finger quickly;
otherwise, the SD card may pop out
from the unit.
SD
3: 45 PM
To open/close the
monitor panel
ENGLISH
Push in the SD card until you
hear a clicking sound.
3: Restart playback
7: Stop
Now Reading...
Press: Select track
Hold: Reverse/forward search
Press: Select folder
Hold: Display Folder List
(☞ page 17)
This unit can play MP3/WMA/JPEG tracks
stored in SD cards.
All tracks in the SD card will be played
repeatedly until you change the source.
• Removing the SD card will stop playback.
• You cannot select “SD” when Dual Zone is in
use.
Caution:
Make sure all important data has been
backed up.
You can operate the SD playback in the same
way you operate the MP3/WMA/JPEG discs
(except the OSD operation and those on the
external monitor).
• For general operational information, see
pages 13 to 21.
27
OPERATIONS
Page 28
Selecting playback modes
You can use only one of the following playback
modes—Intro/Repeat/Random.
Ex. To select Track Repeat
1
ENGLISH
2
Setup
Surround
Equalizer
Sound
Mode
List
Setup
Surround
Equalizer
Sound
Mode
List
File type Intro Repeat Random
Track: Plays the first 15
seconds of each track
Folder: Plays the first 15
seconds of the first track of
each folder
—
3
Off
Intro
Repeat
Random
4
Off
Track
Folder
When one of the playback modes is
selected, the corresponding indicator lights
up on the monitor.
To cancel, select “Off” in step 3 or 4.
Track: Repeats current track
Folder: Repeats all tracks of the
current folder
Folder: Repeats current folder
Folder: Randomly plays all
SD: Randomly plays all tracks
—
tracks of current folder,
then tracks of next folders
28
OPERATIONS
Page 29
Listening to the CD changer
Track no./Play time
POWER]ON
Not displayed for
conventional CD
CD-CH
Disc No.
FLAT
3: 45 PM
01 0:00:12
Disc Title
Current track Title
Next track title
Next track title
REPEAT
Next track title
Next track title
Next track title
Next track title
It is recommended to use a JVC
MP3-compatible CD changer with your unit.
• You can play only CDs (CD-DA) and MP3
discs.
Preparation:
Make sure “Changer” is selected for the external
input setting. (☞ page 45)
~ Select “CD-CH.”
Ÿ Display the Disc List.
MP3 DISC
JVC CAR AUDIO
BEST 10
BEST JAZZ
DISC 05
DISC 06
• Each time you keep pushing up or down
the knob, you can display the other list of
the remaining discs.
! Select a disc to start playing.
Press: Select track
Hold: Reverse/forward search
Press: Select folder (MP3 only)
Hold: Display Disc List
• While playing an MP3 disc, you can
select and start playing a track in the disc
using the Lists: Display List (select the
current disc) = Folder List =Track List,
then start playing a track you want.
MP3 DISC
JVC CAR AUDIO
BEST 10
BEST JAZZ
DISC 05
DISC 06
01FOLDER
02FOLDER
03FOLDER
04FOLDER
TRACK001
TRACK002
TRACK003
TRACK004
ENGLISH
MP3 DISC
JVC CAR AUDIO
BEST 10
BEST JAZZ
DISC 05
DISC 06
• When using the remote
controller, press...
DISC
DISC
+
–
29
EXTERNAL DEVICES
Page 30
Selecting playback modes
You can use only one of the following playback
modes—Intro/Repeat/Random.
Ex. To select Track Repeat
1
ENGLISH
2
Setup
Surround
Equalizer
Sound
Mode
List
Setup
Surround
Equalizer
Sound
Mode
List
Disc type Intro Repeat Random
Track: Plays the first 15
seconds of each track
Disc: Plays the first 15 seconds
of the first track of all
loaded discs
Track: Plays the first 15
seconds of each track
Folder: Plays the first 15
seconds of the first track of
each folder
Disc: Plays the first 15 seconds
of the first track of all
loaded discs
3
Off
Intro
Repeat
Random
4
Off
Track
Folder
Disc
When one of the playback modes is
selected, the corresponding indicator lights
up on the monitor.
To cancel, select “Off” in step 3 or 4.
Track: Repeats current track
Disc: Repeats all tracks of the
current disc
Track: Repeats current track
Folder: Repeats all tracks of the
current folder
Disc: Repeats all tracks of the
current disc
Disc: Randomly plays all tracks
of the current disc
All: Randomly plays all tracks of
all loaded discs
Folder: Randomly plays all
tracks of current folder,
then tracks of next folders
Disc: Randomly plays all tracks
All: Randomly plays all tracks of
all loaded discs
To use <Mode> menu
To use <List> menu
☞ above.
☞ pages 17 and 29.
Display List = Folder
List =Track List
You can use the following buttons on the
remote controller to operate the CD changer.
+
DISC
–
DISC
: Select disc.
: Select folder (MP3 only).
: Select track.
30
Page 31

Listening to the satellite radio
Before operating, connect either one of the following (separately purchased) to the CD changer jack
on the rear of this unit.
• JVC SIRIUS radio DLP—Down Link Processor, for listening to the SIRIUS Satellite radio.
• XMDirect
supplied), for listening to the XM Satellite radio.
TM
Universal Tuner Box—With a JVC Smart Digital Adapter (XMDJVC100: not
ENGLISH
For SIRIUS Radio
Activate your subscription after connection:
1 Turn on the power.
2 Select “SAT” for the source.
JVC DLP starts updating all the SIRIUS
channels. (See “GCI update”column below.)
• Once completed, JVC DLP tunes in to
the preset channel, CH184.
3
Check your SIRIUS ID, see page 45.
4 Contact SIRIUS on the internet at
<http://activate.siriusradio.com/> to
activate your subscription, or you can
call SIRIUS toll-free at 1-888-539SIRIUS (7474).
“Subscription Updated Press Any Key to
Continue” appears on the monitor once
subscription has been completed.
For XM Radio
Activate your subscription after connection:
1 Turn on the power.
2 Select “SAT” for the source.
XMDirectTM Universal Tuner Box starts
updating all the XM channels. “Channel
1” is tuned in automatically. (See “GCI
update”column below.)
3
Check your XM Satellite radio
ID labelled on the casing of the
XMDirect
tune in to “Channel 0” (see page 32).
4 Contact XM Satellite radio on
the internet at <http://xmradio.
com/activation/> to activate your
subscription, or you can call 1-800XM-RADIO (1-800-967-2346).
Once completed, the unit tunes in to one
of the available channels (Channel 4 or
higher).
TM
Universal Tuner Box, or
GCI (Global Control Information) update:
• If channels are updated after subscription, updating starts automatically, and no sound can be
heard.
For SIRIUS: “Channels Updating XX% completed” appears.
For XM: “UPDATING” appears.
• Update takes a few minutes to complete.
• Do not press any button or perform any operation until updating is completed.
31
EXTERNAL DEVICES
Page 32

ENGLISH
Signal strength level
POWER]ON
☞ page 38.
SIRIUS/XM Band
SAT
FLAT
LEVLEL
3: 45 PM
Preset No.
SR1 P1 01
Category Name
Channel Name
Channel Name
The City
40 at 40
Hank's Place
Audio Visions
Preview
Category name
Channel name
Channel no.
DISP: Switch to display
the preset list, program
information, and level meter.
* Composer name: only for
SIRIUS Satellite Radio
Preset list, program information—artist name/song name/
composer name*, or level meter
For SIRIUS Radio
~ Select “SAT.”
Ÿ Select the bands.
! Select a category.
• To select a channel from all categories,
select “ALL.”
⁄ Select a channel to listen.
• Hold either to left or right changes the
channels rapidly.
• While searching, invalid and
unsubscribed channels are skipped.
• “SIRIUS” and the SIRIUS dog logo are registered trademarks
of SIRIUS Satellite Radio Inc.
• XM and its corresponding logos are registered trademarks of
XM Satellite Radio Inc.
• “SAT Radio”, the SAT Radio logo and all related marks are
trademarks of SIRIUS Satellite Radio Inc., and XM Satellite
Radio, Inc.
For XM Radio
~ Select “SAT.”
Ÿ Select the bands.
! Select a category.
• To select a channel from all categories
(including non-categorised channels),
skip this step.
• If you do not select a channel within
15 seconds, the category selected is
canceled. You can select a channel from
all categories now.
⁄ Select a channel to listen.
• Hold either to left or right changes the
channels rapidly.
• While searching, invalid and
unsubscribed channels are skipped.
Checking the XM Satellite radio ID
Select channel “0.”
The 8-digit (alphanumeric)
ID number is displayed on the
monitor.
To cancel the ID number display, select
any channel other than channel “0.”
32
Page 33

Storing channels in memory
You can preset six channels for each band.
Ex.: Storing channels into preset number 5
1 Tune in to a channel you want.
XM1 38
Rock
XM Music Lab
2 Display the Preset list.
Channel Name
The City
40 at 40
Hank's Place
Audio Visions
Preview
• Preset List can also be accessed through
<MENU> = <List> (☞ right).
3 Select a preset number.
Channel Name
The City
40 at 40
Hank's Place
Audio Visions
Preview
4
XM1 P5 38
Rock
XM Music Lab
Selecting preset channels
On the remote only:
1
2
Selecting on the lists
You can select a channel using one of the
following lists—Preset list/Category list/
Channel list.
1
2
3
Select a desired list.
Setup
Surround
Equalizer
Sound
Mode
List
Setup
Surround
Equalizer
Mode
List
Preset List
Category List
Channel List
• Preset List: Display your preset channel
list = Select a preset channel.
• Category List: Displays the categories =
Select a category, then a channel within
the selected category.
• Channel List: Displays all channels
= Select a channel (directly from all
categories).
4 Select (a category, then) a channel.
The Beach
The Heart
20 on 20
MIXX XM
Special X
40 to 40
ENGLISH
• Category List can also be accessed by...
33
EXTERNAL DEVICES
Page 34

Watching TV
You can connect JVC’s KV-C1000 Tuner Unit to the AV BUS terminal on the rear.
Channel no.
ENGLISH
POWER]ON
☞ page 38.
3: 45 PM
TV
FLAT
4
BBC1
~ Select “TV.”
Ÿ Search for a station to listen—Auto Search.
• Manual Search: Hold either to left or right until “Manual Search” appears on the display, then
push it repeatedly.
• You can also use the remote controller supplied for the TV tuner unit, but some functions
may not work. (Aim it to the remote sensor of this receiver.)
Assigned name appears. If no
name is assigned, “NO NAME”
appears.
DISP: Press if no playback picture
appears, but source information
(this) screen is displayed.
Presetting TV stations
Automatic Memory presetting
You can preset 12 TV stations.
1
2
3
Local TV stations with the strongest signals
are searched and stored automatically.
Setup
Surround
Equalizer
Sound
Mode
List
Setup
Surround
Equalizer
Sound
Mode
List
OSD
Auto MEMORY
Title
Manual presetting
1 Select a station to preset.
2
JVCTV
2 Display the Preset list.
BBC1
BBC2
ABCTV
CBS
WHTV
HTV
• Each time you keep pushing up or down
the knob, you can change to the other
page of the Preset list.
• Preset List can also be accessed through
<MENU> = <List> (☞ page 35).
3 Select a preset number.
BBC1
BBC2
ABCTV
CBS
WHTV
HTV
34
Page 35

4
2 P5
JVCTV
Selecting preset stations
Selecting on the Preset List
1
BBC1
BBC2
ABCTV
CBS
JVCTV
HTV
2 Select a preset station.
BBC1
BBC2
ABCTV
CBS
JVCTV
HTV
• Preset List can also be accessed through
<MENU> = <List>.
Setup
Surround
Equalizer
Sound
Mode
List
Changing on-screen information
You can display channel number and assigned
name of the station while watching TV.
1
2
3
Setup
Surround
Equalizer
Sound
Mode
List
Setup
Surround
Equalizer
Sound
Mode
List
OSD
Auto MEMORY
Title Entry
4
Off
Channel
Channel+Station
• Off: No information will be displayed
while watching TV.
• Channel: Channel number will be
displayed while watching TV.
• Channel+Station: Channel number and
assigned name of the received station will
be displayed while watching TV.
ENGLISH
Setup
Surround
Equalizer
Mode
List
35
EXTERNAL DEVICES
Page 36

Listening to the iPod®/D. player
Track no./Play time
POWER]ON
ENGLISH
☞ page 38.
For Apple iPod and JVC D. player, it is required
to connect the interface adapter (KS-PD100 or
KS-PD500) to the CD changer jack on the rear.
Preparation:
Make sure “iPod” or “D. player” is selected for
the external input setting. (☞ page 45)
D.PLAYER
3: 45 PM
01 0:00:06
Album Name / Artist Name
Track Title
FLAT
REPEAT
~ Select “iPod” or “D. PLAYER.”
Playback starts automatically.
Ÿ Select a song.
Selecting a track from the player’s menu
1 Enter the player’s menu.
• This mode will be canceled if no
operations are done for about
5 seconds.
2 Select the desired menu.
Press: Select an item
Hold: Skip 10 items at a time if more
For iPod:
Playlists Ô Artists Ô Albums Ô Songs
Ô Genres Ô Composers Ô (back to the
beginning)
For D. player:
Playlist Ô Artist Ô Album Ô Genre Ô
Track Ô (back to the beginning)
than 10
3 Confirm the selection.
Enter player‘s menu
Pause/stop playback
• To resume, press again.
Press: Select track
Hold: Reverse/forward search
4 Repeat steps 2 and 3 to select a track.
• When a track is selected finally, playback
starts.
• To return to the previous menu...
Selecting playback modes
• When one of the playback modes is selected,
the corresponding indicator lights up on the
monitor.
1 Display <MENU>, then select <Mode>
] <Repeat> or <Random>.
2 Select an appropriate option.
Repeat One: Functions the same as “Repeat
One” or “Repeat Mode =
One.”
All: Functions the same as “Repeat
All” or “Repeat Mode = All.”
Random Album: Functions the same as
“Shuffle Albums” of the iPod.
Song/On: Functions the same as
“Shuffle Songs” or “Random
Play
= On.”
To cancel, select “Off.”
• iPod is a trademark of Apple Computer, Inc., registered in
the U.S. and other countries.
36
Page 37

Listening to other external components
AV-INPUT
You can connect an external component to the LINE IN/VIDEO IN plugs.
POWER]ON
AV-IN
AV-INPUT
Assigned title (☞ page 39)
ENGLISH
FLAT
3: 45 PM
DISP: Press if no playback picture
appears, but source information (this)
screen is displayed.
~ Select “AV-IN.”
Ÿ Turn on the connected component and start playing the source.
If you select “Camera Reverse” for “AV Input” (☞ page 45), some status messages such as
volume level change will not appear on the monitor while viewing the picture.
EXT-INPUT
You can connect an external component to the CD changer jack on the rear using the Line Input
Adapter—KS-U57 (not supplied) or AUX Input Adapter—KS-U58 (not supplied).
POWER]ON
Preparation:
Make sure “External Input” is selected for the external input setting. (☞ page 45)
EXT-IN
FLAT
3: 45 PM
EXT-INPUT
Assigned title (☞ page 39)
~ Select “EXT-IN.”
Ÿ Turn on the connected component and start playing the source.
37
EXTERNAL DEVICES
Page 38

Sound equalization
ENGLISH
POWER]ON
Selecting sound mode
~
Ÿ
!
Select a sound mode.
• For preset values of each sound mode,
☞ page 53.
• When surround (
sound equalization is temporarily
canceled.
Setup
Surround
Equalizer
Sound
Mode
List
Setup
Surround
Equalizer
Sound
Mode
List
Flat
Hard Rock
R&B
Pop
Jazz
Dance
Country
Reggae
Classic
User 1
User 2
User 3
☞ page 21) is activated,
Freq. 60Hz +03
Freq. 150Hz +02
Freq. 400Hz +02
Freq. 1kHz 00
Freq. 2.5kHz +01
Freq. 6.3kHz +01
Freq. 15kHz +03
Storing your own adjustment
You can store your adjustment into User 1,
User 2, and User 3.
1 Repeat steps ~ and Ÿ, then in step
!...
Flat
Hard Rock
R&B
Pop
Jazz
Dance
Freq. 60Hz +03
Freq. 150Hz +02
Freq. 400Hz +02
Freq. 1kHz 00
Freq. 2.5kHz +01
Freq. 6.3kHz +01
Freq. 15kHz +03
2 Adjust.
3 Store.
User 1
User 2
User 3
38
Page 39

Assigning titles to the sources
POWER]ON
MY BEST
ENGLISH
Press: Change character set
Hold: Erase title
You can assign titles to the following...
Sources
AV-INPUT
Maximum number of
characters
Up to 16 characters.
EXT-INPUT
FM/AM/TV stations Up to 16 characters—up
to 30 stations separately
for radio (FM/AM) and
for TV.
DISC/CD-CH*
Up to 32 characters—up
to 30 discs.
* You can assign titles only to conventional CDs.
~ Select the sources.
• For FM/AM: Select the band, then tune
in to a station.
• For AV-IN/EXT-IN: Select the source.
• For TV station: Select “TV,” then tune in
to a TV station.
• For a CD in this receiver: Insert a CD.
• For CDs in the CD changer: Select
“CD-CH,” then select a disc number.
Ÿ Display the title entry screen.
1
Setup
Surround
Equalizer
Sound
Mode
List
2
Setup
Surround
Equalizer
Sound
Mode
List
Ex.: When you select “DISC” as the source
3
Off
Intro
Repeat
Random
Title Entry
! Assign a title.
1 Select a character, then enter.
• To change the character set, press DISP.
(For available characters,
☞ page 53.)
2 Repeat step 1 until you finish entering
the title.
MY BEST
⁄ Finish the procedure.
39
SETTINGS
Page 40

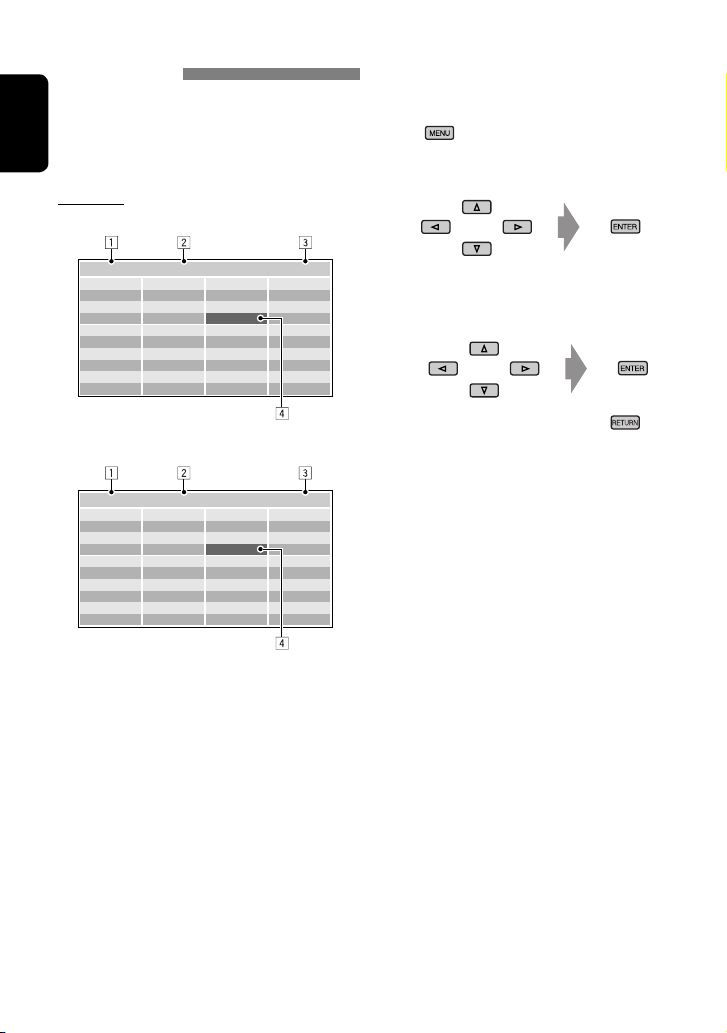
Menu operations
POWER]ON
ENGLISH
To return to the top menu
To return to the previous screen
Ex. Changing the “High Pass Filter” setting
~
Setup
Surround
Equalizer
Sound
Mode
List
• Non-available items will be displayed
being shaded.
Ÿ
Setup
Surround
Equalizer
Sound
Mode
List
Menu items
MENU
Setup
Surround
Equalizer
Sound
Mode
List
Display
Clock
Disc Setup1
Disc Setup2
Tuner
Input
!
Fader/Balance
Volume Adjust
Subwoofer
High Pass Filter
Crossover
Amplifier Gain
• Some items require you to repeat this
steps to set the sub-items.
⁄
Through
On
Setup
Surround
Equalizer
Sound
Mode
List
Dual Zone
Display
Clock
Disc Setup 1
Disc Setup 2
Tuner
Input
Others
40
Page 41

Menu items Selectable settings, [reference page]
Demonstration Off : Cancels.
Wall Paper
On: Activates the demonstration on the monitor.
You can select the background picture of the monitor.
Standard, Geometric Design, Sea, Simple Green, Simple
Orange, Simple Red, Simple Brown, Simple Grey
Initial: Underlined
ENGLISH
Level Meter
Scroll Off : Cancels.
Tag Display Off : Cancels.
Dimmer Off : Cancels.
Display
Dimmer Level
Bright
1
Screen Control
1
*
Not adjustable for audio sources.
*
You can select the level meter you want.
Meter 1, Meter 2, Meter 3
• Press DISP repeatedly to display the selected level meter on
the monitor.
Once: Scrolls the disc information once.
Auto:
• Holding DISP scrolls the information regardless of this
setting.
On: Shows the Tag data while playing MP3/WMA/WAV
On: Activates dimmer.
Auto: Dims the monitor when you turn on the headlights.
Time Set: Sets the Dimmer On/Off times.
You can preset the brightness for dimmer.
00 (brightest) to 10 (darkest); Initial 05
You can adjust color and brightness of the monitor.
–15 (darkest) to +15 (brightest); Initial 00
You can adjust the following to make the monitor clear and
legible for watching the playback picture. The settings are
stored separately for each source—“DISC,” “AV-IN,” and
“TV.”
–15 to +15; Initial 00
Bright: Adjust if the picture is too bright or too dark.
Contrast: Adjust the contrast.
Color: Adjust the color of the picture—lighter or darker.
Tint: Adjust the tint if the human skin color is
Repeats scrolling (5-second intervals).
tracks.
unnatural.
41
SETTINGS
Page 42

Menu items Selectable settings, [reference page]
1
*
Aspect
ENGLISH
Display
Time Set
12Hours/24Hours
Clock Adjust*
Clock
Time Zone*
DST (Daylight Savings
Time)*
1
*
Not adjustable for audio sources.
2
*
Displayed only when SIRIUS Satellite radio or XM Satellite radio is connected.
3
*
Displayed only when “Clock Adjust” is set to “Auto.”
2
3
3
You can change the aspect ratio of the picture.
Aspect ratio of incoming signal
4:3 16:9
Normal:
For 4:3 original
pictures
Full:
For 16:9 original
pictures
Just:
Zoom:
•
Auto:
For “DISC”:
selected to match to the incoming signals.
•
For the other video sources:
is xed to “NORMAL.”
☞ [6]
12 Hours, 24 Hours,
Auto: The built-in clock is automatically adjusted using
the clock time data provided via the satellite radio
channel.
Off : Cancels.
Select your residential area from one of the following time
zones for clock adjustment.
Eastern
,
Atlantic, Newfound, Alaska, Pacific, Mountain
Central
Off : Cancels.
On: Activates daylight savings time if your residential
area is subject to DST.
☞ [6]
Aspect ratio is automatically
Aspect ratio
,
42
Page 43

Menu items Selectable settings, [reference page]
Menu Language
Audio Language
Subtitle Select the initial subtitle language or erase the subtitle (OFF);
OSD Language
Monitor Type
4
*
16:9 4:3 LB
4:3 PS
Disc Setup 1
OSD Position
Position 1 Position 2
Select the initial disc menu language; Initial English (
page 48).
Select the initial audio language; Initial English (
☞ also page
48).
Initial OFF (☞ also page 48).
Select the on-screen language used for the external monitor
connected to the VIDEO OUT plug; Initial English.
Select the monitor type to watch a wide screen picture on the
external monitor.
• 16:9 : Select when the aspect ratio of the external monitor
is 16:9.
• 4:3LB [Letter Box]/4:3PS [Pan Scan]: Select when the
aspect ratio of the external monitor is 4:3. Refer to the
illustrations on the left to see how the pictures are shown
on the monitor.
Select the position of the on-screen bar,
☞ [23].
• 1 : Higher position
• 2 : Lower position
☞ also
ENGLISH
File Type
Select playback file type when a disc or an SD card contains
different types of files.
• Audio : Plays back audio files.
• Picture : Plays back JPEG files.
• Video : Plays back MPEG files (not available for SD cards).
5
D. (Dynamic) Range
*
Compres. (Compression)*
You can enjoy a powerful sound at a low volume level while
4
playing Dolby Digital software.
• Auto : Select to apply the effect to multi-channel encoded
software.
Disc Setup 2
4
*
Selectable only for “DISC” or “SD” (while not playing).
5
*
Selectable only for “DISC” or “SD.”
• On : Select this to always use this function.
43
SETTINGS
Page 44

Menu items Selectable settings, [reference page]
Speaker Size*
ENGLISH
4
Selects the speaker
Adjusts the speaker size
You can adjust the speaker size setting.
• Front: Small, Large
• Center: None, Small, Large
• Rear: None, Small, Large
• Sub Woofer: On, Off
• Speaker size: “Large” for 13-cm (5-1/4 inches) diameter or
more; “Small” for 13 cm (5-1/4 inches) or less.
Regardless of the setting above...
• No sound comes out of the subwoofer while playing Dolby
Pro Logic II Movie or Music if the front speaker is set to
“Large.”
• No sound comes out of the center speaker when surround is
deactivated.
Speaker Level
Selects the speaker
5
*
You can adjust the output level of the activated speakers (
see “Speaker Size” above), monitoring the test tone.
• Front Left/Center/Front Right/Rear Right/
Sub Woofer*
6
/Rear Left: adjust the output level of each
speaker in the range of –10dB to +10dB; Initial 00.
Adjusts the speaker level
Disc Setup 2
• Press and hold ENT to turn on and off the test tone—Test
Ton e: ON, OFF.
Speaker Distance
Selects the speaker
*
You can adjust the speaker output timing.
• Front Left/Center/Front Right/Rear Right/Rear Left:
adjust the speaker distance from the listening position in
7
the range of 15 cm/6 inches to 600 cm/240 inches in 15cm/6-inch step. [Initial: 120 cm (for center speaker), 150
cm (for the other speakers)]
Adjusts the speaker distance
• Press and hold DISP to change the measuring unit—cm and
inch.
4
*
Selectable only for “DISC” or “SD” (while not playing).
5
*
Selectable only for “DISC” or “SD.”
6
*
This subwoofer level setting takes effect only when surround is activated (
*7 Not selectable when only the front speakers are activated.
☞
☞ also page 47).
44
Page 45

Menu items Selectable settings, [reference page]
IF Band Width Auto: Increases the tuner selectivity to reduce interference
Area Setting US: When using in North/Central/South America. AM/
Tuner
8
SIRIUS ID
*
AV Input
Input
External Input
noises between adjacent stations. (Stereo effect may
be lost.)
Wide: Subject to the interference from adjacent stations,
but sound quality will not be degraded and the stereo
effect will remain.
FM intervals are set to 10 kHz/200 kHz.
South America: When using in South American countries
where FM interval is 100 kHz. AM interval is set to
10 kHz.
Europe: When using in any other areas. AM/FM intervals
are set to 9 kHz/50 kHz (100 kHz during auto
search).
Your SIRIUS identification number appears on the monitor
.
You can determine the use of LINE IN and VIDEO IN plugs.
Off : Select when no component is connected
(“AV-IN” is skipped while selecting the
source).
Audio&Video: Select when connecting an AV
component such as a VCR.
Audio: Select when connecting an audio
Camera
Camera Reverse
: Select when connecting the rear view
camera.
9
*
: The mirror image of the rear view is
component such as an MD player.
9
*
displayed on the monitor. (The monitor
on the receiver only; the normal rear view
appears on the external monitor.)
When connecting an external component to the CD changer
jack on the rear.
Changer/iPod/D. player
10
*
: CD changer, iPod, or D. player
☞ [29, 36]
External Input: Any other than the above.
8
*
Appears only when SIRIUS Satellite radio is connected.
*9 Reverse lamp wire connection is required. See Installation/Connection Manual (separate volume).
The rear view through the camera appears on the monitor in “Full” aspect ratio (regardless of the
aspect ratio setting) when you shift the gear to the reverse (R) position.
10
*
The name of the component detected through the CD changer jack is shown.
☞ [37]
ENGLISH
45
SETTINGS
Page 46

Menu items Selectable settings, [reference page]
Beep Off : Cancels.
Telephone Muting Off : Cancels.
ENGLISH
On: Activates the key-touch tone.
Muting1, Muting2: Select either one which mutes the
Others
Power LED Flash Off : Cancels.
On: When the ignition is turned off, the lamp on the
sounds while using the cellular phone.
button flashes.
Surround Off
11
*
Surround On
Surround
Flat/Hard Rock/R&B/Pop/
12
*
Jazz/Dance/Country/
Reggae/Classic/User
1/User 2/User 3
Equalizer
Fade r/Balance
Sound
Volume Adjust
11
*
Selectable only for “DISC” and “SD.”
12
*
Selectable only when surround is deactivated.
Select to deactivate the surround function.
Select to activate the surround function.
Auto, Dolby PLII Movie, Dolby PLII Music
• When you select “Dolby PLII Music,” you can adjust
☞ [38]
Adjust fader—speaker output balance between the front and
rear speakers.
• Upmost—front only
• Downmost—rear only
When using a two-speaker system, set the fader to the center
(00).
Adjust balance—speaker output balance between the left and
right speakers.
• Leftmost—left only
• Rightmost—right only
Adjust and store auto-adjustment volume level for each
source, comparing to the FM volume level. The volume level
will automatically increase or decrease when you change the
source.
• –12 to +12; Initial 00
“Panorama” and “CenterWidth.”
☞ [21]
46
Page 47

Menu items Selectable settings, [reference page]
Subwoofer
High Pass Filter Through: Select when the subwoofer is not connected.
Crossover
Sound
Amplifi er Gain You can change the maximum volume level of this receiver.
Rear Speaker*
Mono
DX / Local
SSM
15
Title Entry
Mode*
Off /Intro/Repeat/Random
14
Adjust the settings below in the submenu:
• Phase: Subwoofer phase. Select either “Normal” or
“Reverse,” which reproduces a better sound.
13
• Level*
On: Select when the subwoofer is connected.
Adjust the crossover frequency between the front/rear
speakers and the subwoofer.
80Hz, 120Hz, 150Hz
Off : Deactivates the built-in amplifier.
Low Power: VOL 00 to 30 (Select this if the maximum
High Power: VOL 00 to 50
You can activate/deactivate the rear speakers.
Off, On
Only for FM. (Off, On),
Only for FM. (DX, Local),
Only for FM.
Only for conventional CDs, FM/AM stations, TV stations, AVIN, and EXT-IN.
Only for disc playback, SD playback, and iPod/D. player.
: Subwoofer output level. Level: –6 to +8; Initial 0
power of the speakers is less than 50 W)
☞ [10]
☞ [11]
☞ [11]
☞ [39]
☞ [16, 30, 36]
OSD
Auto MEMORY
List
Only for TV. (Off, Channel, Channel+Station),
Only for TV.
The accessible lists differ depending on the sources.
☞ [34]
☞ [35]
ENGLISH
Dual Zone
13
This subwoofer level setting take effects only when surround is deactivated (
*
14
Functions only when Dual Zone is activated.
*
15
*
Items listed under <Mode> vary among the playback sources.
Off , On/Surround Off, On/Surround On,
47
☞ [24]
☞ also page 44)
SETTINGS
Page 48

Language codes (for DVD language selection)
Code Language Code Language Code Language Code Language Code Language
AA Afar FA Persian KL Greenlandic OC Occitan ST Sesotho
AB Abkhazian FI Finnish KM Cambodian OM (Afan) Oromo SU Sundanese
AF Afrikaans FJ Fiji KN Kannada OR Oriya SW Swahili
ENGLISH
AM Ameharic FO Faroese KO Korean (KOR) PA Panjabi TA Tamil
AR Arabic FY Frisian KS Kashmiri PL Polish TE Telugu
AS Assamese GA Irish KU Kurdish PS Pashto, Pushto TG Tajik
AY Aymara GD Scots Gaelic KY Kirghiz PT Portuguese TH Thai
AZ Azerbaijani GL Galician LA Latin QU Quechua TI Tigrinya
BA Bashkir GN Guarani LN Lingala RM
BE Byelorussian GU Gujarati LO Laothian RN Kirundi TL Tagalog
BG Bulgarian HA Hausa LT Lithuanian RO Rumanian TN Setswana
BH Bihari HI Hindi LV Latvian,Lettish RW Kinyarwanda TO Tonga
BI Bislama HR Croatian MG Malagasy SA Sanskrit TR Turkish
BN Bengali, Bangla HU Hungarian MI Maori SD Sindhi TS Tsonga
BO Tibetan HY Armenian MK Macedonian SG Sangho TT Tatar
BR Breton IA Interlingua ML Malayalam SH Serbo-Croatian TW Twi
CA Catalan IE Interlingue MN Mongolian SI Singhalese UK Ukrainian
CO Corsican IK Inupiak MO Moldavian SK Slovak UR Urdu
CS Czech IN Indonesian MR Marathi SL Slovenian UZ Uzbek
CY Welsh IS Icelandic MS Malay (MAY) SM Samoan VI Vietnamese
DZ Bhutani IW Hebrew MT Maltese SN Shona VO Volapuk
EL Greek JI Yiddish MY Burmese SO Somali WO Wolof
EO Esperanto JW Javanese NA Nauru SQ Albanian XH Xhosa
ET Estonian KA Georgian NE Nepali SR Serbian YO Yoruba
EU Basque KK Kazakh NO Norwegian SS Siswati ZU Zulu
Rhaeto-Romance
TK Turkmen
48
Page 49

Maintenance
Moisture condensation
Moisture may condense on the lens inside the
DVD/CD player in the following cases:
• After starting the heater in the car.
• If it becomes very humid inside the car.
Should this occur, the DVD/CD player may
malfunction. In this case, eject the disc and
leave the unit turned on for a few hours until
the moisture evaporates.
How to handle discs
When removing a disc from
its case, press down the center
holder of the case and lift the
disc out, holding it by the
edges.
• Always hold the disc by the edges. Do not
touch its recording surface.
When storing a disc into its case, gently insert
the disc around the center holder (with the
printed surface facing up).
• Make sure to store discs into the cases after
use.
Center holder
To keep discs clean
A dirty disc may not play correctly.
If a disc does become dirty, wipe it
with a soft cloth in a straight line
from center to edge.
• Do not use any solvent (for example,
conventional record cleaner, spray, thinner,
benzine, etc.) to clean discs.
To play new discs
New discs may have some rough
spots around the inner and outer
edges. If such a disc is used, this
unit may reject the disc.
To remove these rough spots, rub the edges with
a pencil or ball-point pen, etc.
Do not use the following discs:
Warped disc
Sticker
Sticker residue
Stick-on label
ENGLISH
49
Page 50

More about this unit
General
Turning on the power
• By pressing SOURCE on the unit, you can
ENGLISH
also turn on the power. If the source is ready,
playback starts.
Watching picture
• If you change the aspect ratio to “Just,” both
sides of the picture are extended horizontally
to fit the picture to the monitor size. It may
cause the center portion of the picture to look
distorted.
FM/AM
Storing stations in memory
• When SSM is over, received stations are
preset in No. 1 (lowest frequency) to No. 6
(highest frequency).
Disc
General
• In this manual, words “track” and “file” are
interchangeably used.
• This unit can also play back 8 cm discs.
• This unit can only play back audio CD
(CD-DA) files if different type of files are
recorded in the same disc.
• This unit can display only one-byte
characters. No other characters can be
correctly displayed.
Inserting a disc
• When a disc is inserted upside down, “Disc
Error Please Eject” appears on the monitor.
Eject the disc.
Ejecting a disc
• If the ejected disc is not removed within
15 seconds, the disc is automatically inserted
again into the loading slot to protect it from
dust. (Disc will not play this time.)
Speaker/signal indicators
Speaker indicators
• The speaker indicators—squares around “L,”
“R,” “LS,” and “RS” lights in light blue, when
the corresponding speakers are set to “Large”
or “Small” (☞ page 44).
• The center speaker indicator—square around
“C” lights in light blue, when the center
speaker is set to “Large” or “Small” and when
surround is activated.
• Sounds come out of the speakers whose
speaker indicators are lit on the monitor.
• The SW indicator lights up when “Sub
Woofer” is set to “On” (☞ page 44).
• The signal indicators indicate the incoming
signals—L (front left) / R (front right) / C
(center) / LFE (low frequency effect) / LS (left
surround) / RS (right surround) / S (monaural
surround).
• If the speaker is activated, but the signals
corresponding to the speaker are not coming
in, the signal indicators changes their color
from white to black to indicate no signals
coming in (therefore no sound comes through
the corresponding speakers).
Signal indicators
Changing the source
• If you change the source with Dual Zone
deactivated, playback also stops without
ejecting the disc.
Next time you select “DISC” for the playback
source, disc play starts from where it has been
stopped previously.
50
Page 51

Playing Recordable/Rewritable discs
• This unit can recognize a total of 3 500 files
and 250 folders (a maximum of 999 files per
folder).
• Use only “finalized” discs.
• This unit can play back multi-session discs;
however, unclosed sessions will be skipped
while playing.
• This unit can show the Tag data (Version 1.0,
1.1, 2.2, 2.3, or 2.4) for the files.
• This unit may be unable to play back some
discs or files due to their characteristics or
recording conditions.
Playing MPEG files
• This unit can play back MPEG files with the
extension code <.mpg> or <.mpeg>.
• The stream format should conform to MPEG
system/program stream.
• The file format should be MP@ML (Main
Profile at Main Level)/SP@ML (Simple Profile
at Main Level)/MP@LL (Main Profile at Low
Level).
• Audio streams should conform to MPEG1
Audio Layer-2.
Playing JPEG files
• It is recommended that you record a file at
640 x 480 resolution.
• This unit can play back baseline JPEG files.
Progressive JPEG files or lossless JPEG files
cannot be played.
Playing MP3/WMA/WAV files
• This unit can play back files with the
extension code <.mp3>, <.wma>, or <.wav>
(regardless of the letter case—upper/lower).
• This unit can play back the files meeting the
conditions below:
– Bit rate: MP3/WMA: 32 kbps — 320 kbps
– Sampling frequency:
48 kHz, 44.1 kHz, 32 kHz (for MPEG1)
24 kHz, 22.05 kHz, 16 kHz (for MPEG2)
48 kHz, 44.1 kHz, 32 kHz (for WMA)
44.1 kHz (for WAV)
• This unit can play back files recorded in VBR
(variable bit rate).
Files recorded in VBR have a discrepancy in
elapsed time indication.
• This unit cannot play back the following files:
– MP3 files encoded with MP3i and MP3 PRO
format.
– MP3 files encoded with Layer 1/2.
– WMA files encoded with lossless,
professional, and voice format.
– WMA files which are not based upon
Windows Media
– WMA files copy-protected with DRM.
– Files which have the data such as AIFF,
ATRAC3, etc.
Audio.
®
Enjoying surround sounds
• If “Surround On” is selected, “MULTI”
surround playback automatically starts for
multi-channel encoded discs regardless of the
“Surround On” setting.
• You cannot activate surround for MPEG
multi-channel DVD Video and MPEG 2channel sources. If “Surround On” is selected,
stereo sounds are emitted only through the
front speakers. “FRONT 2CH” appears on the
disc information screen.
• With “Auto” selected for “Surround On,”
stereo playback will start for DVD, DTSCD, and MPEG 2-channel sources without
surround signal encoded. In this case, no
sound comes out of the subwoofer.
• When “FIX” appears on the disc information
screen, no sound comes out of the subwoofer.
ENGLISH
51
Page 52

Playing SD cards
• The required recording format is FAT 16/32
and the recommended storage type is 8 MB to
512 MB.
Satellite radio operations
ENGLISH
• You can also connect the JVC SIRIUS radio
PnP (Plug and Play), using the JVC SIRIUS
radio adapter, KS-U100K (not supplied) to
the CD changer jack on the rear.
By turning on/off the power of the unit, you
can turn on/off the JVC PnP. However, you
cannot control it from this unit.
• To know more about SIRIUS Satellite radio or
to sign up, visit <http://www.sirius.com>.
• For the latest channel listings and
programming information, or to sign up
for XM Satellite radio, visit <http://www.
xmradio.com>.
iPod® or D. player operations
• When you turn on this unit, the iPod or
D. player is charged through this unit.
• The text information may not be displayed
correctly. This unit can display up to 40
characters.
Notice:
When operating an iPod or a D. player,
some operations may not be performed
correctly or as intended. In this case, visit the
following JVC web site:
For iPod users: <http://www.jvc.co.jp/
english/car/support/ks-pd100/index.html>
For D. player users: <http://www.jvc.co.jp/
english/car/support/ks-pd500/index.html>
Title assignment
• If you try to assign titles to more than 30 radio
stations, 30 TV stations, or 30 CDs, “NAME
FULL” flashes for a while. Delete unwanted
titles before assignment.
• Titles assigned to CDs in the CD changer can
also be shown if you play back the discs in the
built-in DVD/CD player and vice versa.
Menu settings
• If you change the “Amplifier Gain” setting
from “High Power” to “Low Power” while the
volume level is set higher than “30,” the unit
automatically changes the volume level to
“VOL 30.”
•
After you change any of “Menu Language/
Audio Language/Subtitle” settings, turn off then
on the power, and re-insert the disc (or insert
another disc) so that your setting takes effect.
• When you select “16:9” for a picture whose
aspect ratio is 4:3, the picture slightly changes
due to the process for converting the picture
width.
• Even if “4:3 PS” is selected, the screen size
may become “4:3 LB” for some discs.
• When selecting “None” for the center/rear
speakers and “Off” for subwoofer (Speaker
Size), surround setting is canceled and cannot
be adjusted.
• Center speaker size cannot be set to “Large”
if both the front and rear speakers are set to
“None” or “Small.”
About sounds reproduced through the rear
terminals
• Speaker out/analog discrete output (F-
OUT/R-OUT/CENTER/SUBWOOFER):
Multi-channel signals are emitted for a
multi-channel encoded disc. (When Dual
Zone is activated, the same signal emitted
through 2nd AUDIO OUT plugs are
emitted for the main source “DISC.”)
• 2nd AUDIO OUT: 2-channel signal is
emitted when Dual Zone is activated.
When playing a multi-channel encoded
disc, multi-channel signals are downmixed
(except for some DVD Audio).
52
Page 53

Sound modes (preset frequency level settings)
The list below shows the preset frequency level settings for each sound mode (see page 38).
Sound mode
Flat 00 00 00 00 00 00 00
Hard Rock +03 +03 +01 00 00 +02 +01
R&B +03 +02 +02 00 +01 +01 +03
Pop 00 +02 00 00 +01 +01 +02
Jazz +03 +02 +01 +01 +01 +03 +02
Dance +04 +02 00 –02 –01 +01 +01
Country +02 +01 00 00 00 +01 +02
Reggae +03 00 00 +01 +02 +02 +03
Classic +02 +03 +01 00 00 +02 00
User 1/2/3 00 00 00 00 00 00 00
60 Hz 150 Hz 400 Hz 1 kHz 2.5 kHz 6.3 kHz 15 kHz
Preset equalizing values
Characters shown on the monitor
In addition to the roman alphabet (A – Z, a – z), the following
characters will be used to show the various information on the
monitor.
• You can also use the following characters to assign titles (see
page 39).
• To assign the titles to the TV stations, you can only use the
roman alphabet (A – Z, a – z) and numbers (0 – 9).
Numbers and symbols
ENGLISH
53
Page 54

Troubleshooting
What appears to be trouble is not always serious. Check the following points before calling a service
center.
ENGLISH
• No sound comes out of the center speaker. Center speaker is used only for surround playback. No sound
• No sound comes out of the subwoofer while
playing in stereo.
• Remote controller does not work.
• The monitor is not clear and legible for
watching the playback picture.
General
• “Position Error Push Open Key” appears on the
monitor.
• “Mecha Error Push Reset” appears on the
monitor, and the panel does not move.
• “SD Loading Error” appears on the monitor. SD is not inserted fully. Fully insert it into the slot to close
• The unit does not work at all.
• SSM automatic presetting does not work. Store stations manually.
• Static noise while listening to the radio. Connect the antenna firmly.
FM/AM
• Disc can be neither recognized nor played .
• Disc cannot be ejected.
• Recordable/Rewritable discs cannot be played
back.
• Tracks on the Recordable/Rewritable discs
cannot be skipped.
• “Disc Error Please Eject” appears on the
monitor.
• “Eject Error” or “Loading Error” appears on the
monitor.
Disc playback
• Sound and pictures are sometimes interrupted
or distorted.
• No playback picture appears on the monitor.
• “Region Error Please Eject” appears on the
monitor when you insert a DVD Video.
Symptoms Remedies/Causes
comes out for stereo playback.
This happens while playing some discs with “Auto” selected
for “Surround On” (☞ pages 21 and 46). Cancel surround.
Deactivate Dual Zone (☞ page 24).
(While Dual Zone is activated, the remote controller only
functions for operating the DVD/CD player.)
Sunshine from the windshield may cause this symptom.
Adjust “Bright” and “Contrast” of “Screen Control.” (☞
page 41).
The monitor panel angle has been forcibly adjusted, or
interrupted while opening or closing. Press OPEN/CLOSE.
Reset the unit (☞ page 2).
the monitor panel.
Reset the unit (☞ page 2).
Eject the disc forcibly (☞ page 2).
Unlock the disc (☞ page 17).
• Insert a finalized disc.
• Finalize the discs with the component which you used for
recording.
Insert the disc correctly again.
Changing the source by pressing SOURCE will solve this
error.
• Stop playback while driving on rough roads.
• Change the disc.
Parking brake wire is not connected properly. (☞
Installation/Connection Manual.)
Region code is not correct (☞ page 5).
54
Page 55

Symptoms Remedies/Causes
• Disc cannot be played back. • Change the disc.
• Record the tracks using a compliant application in the
appropriate discs (☞ page 4).
• Add appropriate extension codes to the file names.
• Noise is generated. The track played back is not a playable file format. Skip to
another file.
• Tracks cannot playback as you have intended
them to play.
• Elapsed playing time is not correct. This sometimes occurs during playback. This is caused by
MP3/WMA/WAV playback
• “Disc No Files Please Eject” appears on the
monitor.
• Noise is generated. The track played back is not a playable file format. Skip to
• Tracks cannot playback as you have intended
them to play.
• “Now Reading” keeps flashing on the
monitor.
• “SD No Files Please Eject” appears on the
monitor, then returns to the previous source.
• “Not Support” appears on the monitor and
SD card playback
track is skipped.
• “SD Error Please Eject” appears on the
monitor, then returns to the previous source.
• “No Disc” appears on the monitor. Insert a disc into the magazine.
• “No Magazine” appears on the monitor. Insert the magazine.
• “No Files” appears on the monitor. Disc does not include playable files. Replace the disc with
• “Reset 08” appears on the monitor. Connect this unit and the CD changer correctly and press the
CD changer
• “Reset 01” – “Reset 07” appears on the
monitor.
• The CD changer does not work at all.
Playback order may differs from the one played back using
other players.
how the tracks are recorded.
Insert a disc that contains tracks of proper formats.
another file.
Playback order may differs from the one played back using
other players.
• Readout time varies depending on the SD card.
• Do not use too many hierarchy and folders.
• Turn off the power then on again.
Insert an SD card that contains tracks encoded in an
appropriate format.
Track is unplayable.
• SD card may be malfunctioning, or may not have been
formatted correctly.
• Do not pull out or attach the SD card while “Now
Reading” is shown.
playable files.
reset button of the CD changer.
Press the reset button of the CD changer.
Reset the unit (☞ page 2).
ENGLISH
55
Page 56

Symptom Remedy/Cause
• “CALL 1-888-539-SIRIUS TO SUBSCRIBE”
appears on the monitor.
• “No Signal” or “NO SIGNAL” appears on the
ENGLISH
monitor.
• “No Antenna” or “CHECK ANTENNA” appears
on the monitor.
• “Invalid Channel” appears on the monitor for
about 5 seconds, then returns to the previous
display when listening to the SIRIUS Satellite
radio.
• “CHANNEL–––” appears on the display for
about 2 seconds, then returns to the previous
channel while listening to the XM Satellite
radio.
• “NO NAME” appears on the monitor. No text information for the selected channel.
Satellite radio
• “Channels Updating XX% completed”(for
SIRIUS) or “UPDATING” (for XM) appear son
the monitor.
• “OFF AIR” appears on the display while
listening to the XM Satellite Radio.
• “LOADING” appears on the display while
listening to the XM Satellite Radio.
• “Reset 08” appears on the display. Reconnect this unit and the Satellite Radio correctly and
• Satellite Radio does not work at all. Reconnect the Satellite radio after a few seconds.
Starts subscribing to SIRIUS Satellite Radio (see page 31).
Move to an area where signals are stronger.
Connect the antenna firmly.
No broadcast on the selected channel.
Select another channel or continue listening to the previous
channel.
Selected channel is no longer available or is unauthorized.
Select another channel or continue listening to the previous
channel.
The unit is updating the channel information and it takes a
few minutes to complete. No sound can be heard
Selected channel is not broadcasting at this time.
Select another channel or continue listening to the previous
channel.
The unit is loading the channel information and audio. Text
information are temporarily unavailable.
reset this unit.
56
Page 57

Symptoms Remedies/Causes
• TV tuner unit does not work at all. Press the reset button of the TV tuner unit.
• “Reset 08” appears on the monitor. This unit is not connected to the TV tuner unit correctly.
TV tuner
• The iPod or D. player does not turn on or does
not work.
• The sound is distorted. Deactivate the equalizer either on this unit or the iPod/
• “Disconnect” appears on the monitor.
• For iPod: Playback stops. The headphones are disconnected during playback. Restart
• No sound can be heard when connecting an
iPod nano.
• No sound can be heard.
• “ERROR 01” appears on the monitor when
connecting a D. player.
iPod/D. player playback
• “NO FILES” or “NO TRACK” appears on the
monitor.
• “RESET 01” – “RESET 07” appears on the
monitor.
• “RESET 08” appears on the monitor. Check the connection between the adapter and this unit.
• The iPod’s or D. player’s controls do not work
after disconnecting from this unit.
• “No Signal” appears on the monitor. • Turn on the video component if it is not on.
AV-IN
Connect it correctly then press the reset button of the TV
tuner unit.
• Check the connecting cable and its connection.
•
Charge the battery.
• For D. player: Update the firmware version.
D. player.
Check the connecting cable and its connection.
playback.
Disconnect the headphones from the iPod nano.
Disconnect the adapter from the D. player. Then, connect it
again.
No tracks are stored. Import tracks to the iPod or D. player.
Disconnect the adapter from both this unit and iPod/D.
player. Then, connect it again.
Reset the iPod or D. player.
• This unit is not connected to the video component
correctly. Connect it correctly.
ENGLISH
57
Page 58

Specifications
Power Output:
ENGLISH
Signal to Noise Ratio
Load Impedance: 4 Ω (4 Ω to 8 Ω allowance)
Equalizer Control Range: Frequencies: 60 Hz, 150 Hz, 400 Hz, 1 kHz, 2.5 kHz,
Audio Output Level
AMPLIFIER
(F-OUT/R-OUT/CENTER/
SUBWOOFER):
Color System: NTSC
Video Output (composite): 1 Vp-p/75 Ω
Other Terminals: Input: LINE IN, VIDEO IN, Antenna input
Frequency Range: FM (with channel interval set to
FM Tuner Usable Sensitivity: 11.3 dBf (1.0 μV/75 Ω)
FM/AM TUNER
AM Tuner Sensitivity/Selectivity: 20 μV/35 dB
20 W RMS
and ≤ 1% THD+N
80 dBA (reference: 1 W into 4 Ω)
Level: ±10 dB
Line-Out Level/Impedance: 2.5 V/20 kΩ load (full scale)
Output Impedance: 1 kΩ
Output: 2nd AUDIO OUT
Others: CD changer, AV BUS
100 kHz or 200 kHz):
FM (with channel interval set to
50 kHz):
AM (with channel interval set to
10 kHz):
AM (with channel interval set to
9 kHz):
50 dB Quieting Sensitivity: 16.3 dBf (1.8 μV/75 Ω)
Alternate Channel Selectivity
(400 kHz):
Frequency Response: 40 Hz to 15 000 Hz
Stereo Separation: 35 dB
× 4 Channels at 4 Ω
6.3 kHz, 15 kHz
87.5 MHz to 107.9 MHz
87.5 MHz to 108.0 MHz
530 kHz to 1 710 kHz
531 kHz to 1 602 kHz
65 dB
58
Page 59

Signal Detection System: Non-contact optical pickup (semiconductor laser)
Frequency Response: DVD, fs=48 kHz: 16 Hz to 22 000 Hz
DVD, fs=96 kHz: 16 Hz to 44 000 Hz
VCD/CD: 16 Hz to 20 000 Hz
DVD/CD
Dynamic Range: 93 dB
Signal-to-Noise Ratio: 95 dB
Wow and Flutter: Less than measurable limit
Screen Size: 6.5 inch wide liquid crystal display
Number of Pixel: 280 800 pixels: 400 (horizontal) × 3 × 234 (vertical)
Drive Method: TFT (Thin Film Transistor) active matrix format
Color System: NTSC
MONITOR
Aspect Ratio: 16:9 (wide)
Allowable Storage Temperature: –10°C to +60°C (14°F to 140°F)
Allowable Operating Temperature: 0°C to +40°C (32°F to 104°F)
Power Requirement: Operating Voltage: DC 14.4 V (11 V to 16 V allowance)
Grounding System: Negative ground
Allowable Operating Temperature: 0°C to +40°C (32°F to 104°F)
Dimensions (W × H × D): Installation Size (approx.): 178 mm × 100 mm × 160 mm
GENERAL
(7-1/16" × 3-15/16" × 6-5/16")
Panel Size (approx.): 170 mm × 93 mm × 29 mm
(6-3/4" × 3-11/16" × 1-3/16")
Mass (approx.):
2.6 kg (5.8 lbs) (excluding accessories)
ENGLISH
Required space for the monitor ejection
160 (6-5/16) 88.5 (6-9/16)
Design and specifications are subject to change
without notice.
100 (3-15/16)
Unit: mm (inch)
CAUTION: When ejecting the monitor, keep an open
space for the monitor to come out. If not, the monitor
may obstruct the steering wheel and gearshift lever
operations, as this may result in a traffic accident.
If a kit is necessary for your car, consult your
telephone directory for the nearest car audio
speciality shop.
59
Page 60

Como primer paso, por favor lea detenidamente este manual para comprender a fondo todas las
Muchas gracias por la compra de un producto JVC.
instrucciones y obtener un máximo disfrute de esta unidad.
IMPORTANTE (EE.UU.)
Este equipo se ha sometido a todo tipo de
pruebas y cumple con las normas establecidas
para dispositivos de Clase B, de conformidad
con la Parte 15 de las reglas de la FCC (Comisión
Federal de Comunicaciones). Estas reglas
están diseñadas para asegurar una protección
razonable contra este tipo de interferencias
ESPAÑOL
en las instalaciones residenciales. Este equipo
genera y utiliza energía de radiofrecuencia. Si
no se instala y utiliza debidamente, es decir,
conforme a las instrucciones, podrían producirse
interferencias en radiocomunicaciones. Sin
embargo, no se garantiza que estas interferencias
no se produzcan en una instalación determinada.
Si este equipo ocasiona interferencias en
la recepción de radio o televisión, lo cual
puede comprobarse mediante la conexión o
desconexión del equipo, el problema podrá
corregirse mediante una o una combinación de
las siguientes medidas:
– Reoriente la antena receptora o cámbiela de
lugar.
– Aumente la separación entre el equipo y el
aparato receptor.
– Enchufe el equipo a una toma de corriente
situada en un circuito distinto del aparato
receptor.
– Consulte a su distribuidor o a un técnico
experto en radio/televisión.
Precauciones:
Los cambios o modificaciones no aprobados
por JVC pueden anular la autoridad del
usuario para operar el equipo.
IMPORTANTE PARA PRODUCTOS LÁSER
1. PRODUCTO LÁSER CLASE 1
2. PRECAUCIÓN: No abra la tapa superior. En
el interior de la unidad no hay piezas que
pueda reparar el usuario; encargue el servicio
a personal técnico cualificado.
3. PRECAUCIÓN: Radiación láser visible
e invisible en caso de apertura o con
interbloqueo averiado o defectuoso. Evite la
exposición directa a los haces.
Cómo reposicionar su unidad
• También se borrarán los
ajustes preestablecidos
por usted.
Cómo expulsar el disco por la fuerza
NO EJECT?
EMERGENCY EJECT?
NO EJECT?
EMERGENCY EJECT?
Para fines de seguridad...
• No aumente demasiado el nivel de volumen
pues es muy peligroso conducir si no se
escuchan los sonidos exteriores.
• Detenga el automóvil antes de efectuar
cualquier operación complicada.
• Si esto no funciona, reinicialice la unidad.
Temperatura dentro del automóvil...
Si ha dejado el automóvil estacionado durante
largo tiempo en un sitio cálido o frío, no opere
la unidad hasta que se normalice la temperatura
del habitáculo.
2
Page 61

ADVERTENCIAS:
Para evitar daños y accidentes
• NO instale la unidad en los siguientes sitios;
– puede obstaculizar las maniobras del volante
de dirección y de la palanca de cambios.
– puede obstaculizar la operación de los
dispositivos de seguridad, como por ejemplo,
bolsas de aire.
– Donde pueda obstruir la visibilidad.
• NO opere la unidad mientras maneja.
Si es necesario operar la unidad mientras maneja,
asegúrese de no apartar la vista de la carretera.
• El conductor no debe mirar el monitor mientras
conduce.
CONTENIDO
Introducción ............................................. 4
•
Antes de operar la unidad ............................... 5
OPERACIONES
Operaciones básicas
Panel de control .......................................... 7
•
•
Control remoto (RM-RK240) ............................ 8
Para escuchar la radio ............................... 10
Operaciones de los discos ........................... 13
Operaciones de Zona Dual ......................... 24
Operaciones de SD ..................................... 27
ESPAÑOL
Precauciones sobre el monitor:
• Este producto cuenta con una lámpara
fluorescente que contiene una pequeña
cantidad de mercurio. Algunos
componentes también contienen plomo.
Debido a consideraciones ambientales, la
disposición de tales materiales podría estar
reglamentada por las autoridades locales.
Para la información sobre la disposición
o el reciclaje, póngase en contacto con
las autoridades locales, o con Electronic
Industries Alliance: http://www.eiae.org./
• El monitor incorporado a este receptor
ha sido fabricado con tecnología de alta
precisión, pero puede contener algunos
puntos inefectivos. Estos es inevitable y no
es ningún signo de anomalía.
• Evite tocar directamente la superficie del
panel de cristal líquido.
• No exponga el monitor a la luz directa del
sol.
• Cuando la temperatura sea muy baja o
muy alta...
– Ocurren cambios químicos en el interior,
produciendo un mal funcionamiento.
– Puede suceder que las imágenes no
aparezcan claramente o que se muevan
con lentitud. En tales entornos, puede
suceder que las imágenes no estén
sincronizadas con el sonido, o que la
calidad del sonido se deteriore.
DISPOSITIVOS EXTERNOS
Escuchando el cambiador de CD ................. 29
Para escuchar la radio satelital .................. 31
Para ver televisión .................................... 34
Escuchando el iPod®/reproductor D. ........... 36
Escuchado otros componentes externos ...... 37
AJUSTES
Ecualización de sonido .............................. 38
Asignación de títulos a la fuente ................ 39
Operaciones de los menús .......................... 40
Mantenimiento ........................................ 49
Más sobre este receptor ............................. 50
Localización de averías .............................. 54
Especificaciones ........................................ 58
Este producto incorpora tecnología de
protección de los derechos de autor que
está protegida por patentes de EE.UU. y
otros derechos de propiedad intelectual. La
utilización de esta tecnología de protección
de los derechos de autor debe ser autorizada
por Macrovision y está destinada únicamente
para uso doméstico y otras formas limitadas
de visionado, a menos que Macrovision lo
autorice expresamente. Está prohibida la
ingeniería inversa o desmontaje del aparato.
3
Page 62

Introducción
Tipo de disco Formato de grabación, tipo de archivo, etc. Reproducible
DVD DVD Vídeo
DVD Audio
DVD-ROM
DVD Grabable/reescribible
(DVD-R*1/-RW, +R/+RW*2)
• Cumple con el formato puente
ESPAÑOL
UDF
• Los discos DVD-RAM no se
pueden reproducir.
Dual Disc Lado DVD
CD/VCD Audio CD/CD Text (CD-DA), DTS-CD
CD Grabable/reescribible
(CD-R/-RW)
• Compatible con ISO 9660 Nivel
1, Nivel 2, Romeo, Joliet
1
*
También es posible reproducir un DVD-R grabado en formato “multi-border” (excepto discos de doble capa).
2
*
Es posible reproducir discos finalizados +R/+RW (sólo modo vídeo). Sin embargo, no se recomienda usar discos +R de doble capa.
DVD Vídeo
MPEG1/MPEG2
JPEG
MP3/WMA/WAV
DivX/MPEG4
DVD-VR, +VR
Lado no-DVD
VCD (Vídeo CD)
SVCD (Súper Vídeo CD)
CD-ROM
CD-I (CD-I Ready)
CD-DA
MPEG1/MPEG2
JPEG
MP3/WMA/WAV
DivX/MPEG4
• “DVD Logo” es una marca comercial de DVD Format/Logo Licensing Corporation registrado en los EE.UU., Japón y otros países.
Precaución sobre la reproducción de DualDisc
El lado no DVD de un “DualDisc” no es
compatible con la norma “Compact Disc Digital
Audio”. Por consiguiente, no se recomienda
usar el lado no DVD de un DualDisc en este
producto.
Precaución sobre el ajuste de volumen:
Los discos producen muy poco ruido al
compararse con otras fuentes. Antes de
reproducir un disco, baje el volumen para
evitar daños a los altavoces debido a un
repentino aumento del nivel de salida.
4
Page 63

Nota sobre el código de región:
Los reproductores DVD y los discos DVD
Vídeo disponen de sus propios números
de códigos de región. Este receptor puede
Si inserta un disco DVD Vídeo con un código
de región incorrecto
Aparece “Region Error Please Eject” en el
monitor.
reproducir solamente discos DVD cuyos
números de código de región incluyan un “1”.
Antes de operar la unidad—Cancele la demostración en pantalla y ponga el reloj en hora
• Consulte también la página 40.
MENU
Setup
Surround
Equalizer
Sound
Mode
List
Display
Clock
Disc Setup 1
Disc Setup 2
Tuner
Input
~ Encienda la unidad.
Ÿ Visualice el <MENU>.
! Seleccione <Setup> ] <Display> ] <Demonstration> y, a continuación, active la pantalla
<Demonstration>.
Setup
Surround
Equalizer
Sound
Mode
List
Display
Clock
Disc Setup 1
Disc Setup 2
Tuner
Input
Display
Clock
Disc Setup 1
Disc Setup 2
Tuner
Input
Demonstration
Wall Paper
Level Meter
Scroll
Tag Display
Dimmer
Demonstration
Wall Paper
Level Meter
Scroll
Tag Display
Dimmer
Off
On
ESPAÑOL
⁄ Cancele las demostraciones en pantalla
Seleccione “Off”.
Demonstration
Wall Paper
Level Meter
Scroll
Tag Display
Dimmer
Off
On
Continúa en la página siguiente
5
Page 64

ESPAÑOL
Time Set
12Hours/24Hours
1:00 AM
@ Vuelva al menú <Setup>.
¤ Seleccione <Clock> ]<Time Set>.
# Active la pantalla <Time Set>.
‹ Ponga el reloj en hora.
Time Set
12Hours/24Hours
1:00 AM
Time Set
12Hours/24Hours
3:45 PM
$ Vuelva al menú <Clock>.
› Seleccione <12Hours/24Hours>.
% Active la pantalla <12Hours/24Hours>.
Time Set
12Hours/24Hours
12 Hours
24 Hours
fi Seleccione sistema de 12 horas o bien
sistema de 24 horas.
^ Finalice el procedimiento.
• El reloj interno se puede ajustar
automáticamente (☞ página 42) cuando está
conectada la radio por satélite SIRIUS o la
radio XM Satellite.
6
Page 65

Operaciones básicas — Panel de control
Selecciona la fuente.
TUNER = SAT (SIRIUS/XM) = DISC (DVD/VCD/CD) = SD
=CD-CH, iPod, D.PLAYER, o EXT-IN = TV = AV-IN =
(vuelta al comienzo)
• Podrá seleccionar algunas fuentes si no están
preparadas.
• Encienda el sistema.
• Apaga el sistema [Sostener].
• Atenúa el sonido (si el sistema está encendido).
Sensor remoto
Ajuste el volumen.
Reinicialice la unidad.
• Se utiliza sólo debido a un
malfuncionamiento interno
del sistema.
Ventanilla de
visualización
• DISC: Inicie la reproducción.
• En los menús: Para ingresar.
Abra y cierre el panel del monitor.
• Cuando se abre el panel del monitor, podrá
insertar un disco y una tarjeta SD.
Visualiza o borra <MENU>*1.
Cambie el ángulo del panel del
monitor.
Cambia la información en
pantalla.
ESPAÑOL
1
*
Pantallas <MENU>
Puede utilizar los menús para configurar los
diversos ajustes.
La pantalla <MENU> se compone de los
siguientes submenús—Setup/Surround/
Equalizer/Sound/Mode/List/DualZone.
• Para los detalles, consulte las páginas 40 a
47.
• TUNER: Efectúa búsqueda de emisoras/
selecciona emisoras preajustadas.
• SAT: Selecciona categorías/canales.
• DISC: Selecciona los capítulos/las pistas.
• En los menús: Selecciona las opciones.
• iPod/D.PLAYER: Selecciona las pistas.
• Televisor: Selecciona las emisoras de TV.
• TUNER/SAT: Selecciona las bandas.
• DISC: Pare la reproducción.
• En los menús: Atrás.
7
OPERACIONES
Page 66

Operaciones básicas — Control remoto (RM-RK240)
Instalación de la pila botón de litio (CR2025)
ESPAÑOL
Antes de utilizar el control remoto:
• Apunte el control remoto directamente hacia
el sensor remoto del receptor.
• NO exponga el sensor remoto a una luz
brillante (luz solar directa o iluminación
artificial).
El receptor está equipado con la función de
control remoto en el volante de dirección.
• Para la conexión, consulte el Manual de
instalación/conexión (volumen separado).
Advertencia:
Para evitar daños y accidentes
• No instale ninguna otra pila distinta de
CR2025 o su equivalente.
• Guarde la pila fuera del alcance de los
niños.
• Evite recargar, cortocircuitar, desarmar, o
calentar la pila, o arrojarla al fuego.
• No deje la pila con otros objetos metálicos.
• No toque la pila con pinzas u otras
herramientas similares.
• Enrolle la pila con una cinta y aíslela antes
de desecharla o guardarla.
IMPORTANTE:
Si se activa la Zona Dual (☞ página 24),
el control remoto funcionará sólo para
controlar el reproductor DVD/CD.
Elementos principales y funciones
EXTRA MONITOR CONTROL
MODE MENU
ASPECT
DVD / RECEIVER CONTROL
ATT
SOURCE
BAND
DUAL
VOL
2nd VOL
SHIFT
MONITOR CONTROL
1 Botones de control del monitor
• Se utilizan para el monitor JVC—
KV-MR9010 o KV-MH6510.
DVD/RECEIVER CONTROL
2 • Encienda la unidad.
• Atenúa el sonido si el sistema está
encendido.
• Desconecta la alimentación si lo pulsa
y mantiene pulsado (mientras la
alimentación está conectada).
3 Seleccione la fuente.
4 Selecciona las bandas FM/AM y de radio
por satélite.
5 Cambia la relación de aspecto de las
imágenes reproducidas.
6 Activa o desactiva la Zona Dual.
7 Ajusta el nivel de volumen.
• También funciona como botón 2nd
VOL cuando lo pulsa junto con el botón
SHIFT (☞ página 24)
8*1 • DVD: Muestra el número de disco.
• VCD: Reanuda la reproducción de PBC
(☞ página 19)
9*1 No se utiliza como botón SETUP en este
receptor.
p Botón SHIFT
8
ZOOM
+10
–100
–10
ASPECT
123
+
DISC
456
ENTER
7809
–
DISC
SETUP
SURROUND
.
.
+100
DIRECT
OSD
MENUTOP M
RETURN
Page 67

q 7 (parada), 3 (reproducción), 8 (pausa)
• El botón 3 (reproducción) también
funciona como botón ZOOM al pulsarlo
con el botón SHIFT (☞ página 20).
• No aplicable para las operaciones del
cambiador de CD.
2
Para operaciones avanzadas del disco:
w*
• 5 / ∞
DVD: Selecciona los títulos.
Otros discos excepto CD: Selecciona las
carpetas.
• 4 / ¢: salto hacia atrás/salto hacia
adelante
• 1 / ¡: búsqueda hacia atrás/
búsqueda hacia adelante
Para las operaciones del sintonizador
FM/AM/TV:
• 5 / ∞:
Cambia las emisoras preajustadas.
• 4 / ¢:
– Funciona para la búsqueda de
emisoras.
Pulse brevemente: búsqueda
automática
Pulse y mantenga pulsado: búsqueda
manual
Para las operaciones de la radio por
Satélite:
• 5 / ∞:
Cambia las categorías.
• 4 / ¢:
– Cambia los canales si lo pulsa
brevemente.
– Cambia rápidamente los canales si lo
pulsa y mantiene pulsado.
Para las operaciones de Apple iPod
reproductor D. de JVC:
®
• ∞: Pone en pausa/detiene o reanuda la
reproducción.
• 5: Entra al menú principal
(seguidamente, 5/∞/4 / ¢
funcionan como botones selectores
de menú).*
3
• 4 / ¢ (en el modo de selección de
menú)
– Selecciona una opción si lo pulsa
brevemente. (Seguidamente, pulse ∞
para confirmar la selección).
– Salta 10 opciones simultáneamente si
lo pulsa y mantiene pulsado.
e Muestra la barra en pantalla.
• Funciona también como el botón
DIRECT al pulsarlo junto con el botón
SHIFT (☞ páginas 18 a 20).
r*1 •
DVD: Muestra el número de disco.
• VCD: Reanuda la reproducción de PBC
(☞ página 19)
.
t*1 • Efectúa la selección/los ajustes.
• ~: Salta 5 minutos hacia atrás o
adelante para MPEG.
• Botones DISC +/–: Cambia los discos
para “CD-CH”.
1
y*
Botón RETURN
u •
DVD: Selecciona idioma de audio ( ),
subtítulos (
•
VCD: Selecciona el canal de audio ( ).
), ángulo ( ).
• (ángulo) también funciona como
botón SURROUND al pulsarlo junto
con el botón SHIFT (☞ página 21).
1
*
Funciona como botones numéricos cuando se
pulsa junto con el botón SHIFT.
–
TUNER: Selecciona la emisora preajustada.
–
DISC: Selecciona el capítulo/título/grupo/
carpeta/pista.
2
*
Funciona como botones +10/–10/+100/–100
cuando se pulsa junto con el botón SHIFT.
3
*
5 : Vuelve al menú anterior.
∞ : Confirma la selección.
Cómo seleccionar un número
Para seleccionar un número del 0 – 9:
/
Para seleccionar un número mayor que 9:
• Los botones +100/–100 se utilizan
solamente para buscar pistas que tengan un
número mayor que 99.
ESPAÑOL
9
OPERACIONES
Page 68

Para escuchar la radio
N° de preajuste
Nombre asignado a la emisora. Si no hay ningún
nombre asignado, aparecerá “NO NAME”.
Lista de preajustes—frecuencias/
nombres asignados a las emisoras
POWER]ON
☞ página 38.
ESPAÑOL
Indicadores del
sintonizador
Banda
TUNER
FLAT
MO LO
3: 45 PM
FM1 P1
ABC Radio
87.5 MHz
87.5 MHz ABC Radio
88.3 MHz DEF FM
88.7 MHz GHI Radio
91.5 MHz JVC FM
93.1 MHz JKL Radio
95.3 MHz MNO FM
~ Seleccione “TUNER”.
Ÿ Selecciona las bandas.
! Búsqueda de una emisora—Búsqueda automática.
• Búsqueda manual: Sosténgalo hacia la izquierda o la derecha hasta que en la pantalla aparezca
“Manual Search” y, a continuación, presiónelo repetidamente.
• El indicador ST lse enciende cuando se recibe una radiodifusión en FM estéreocon una señal
suficientemente fuerte.
Cuando una radiodifusión en FM estéreo
sea difícil de recibir
1
2
3
Setup
Surround
Equalizer
Sound
Mode
List
Setup
Surround
Equalizer
Sound
Mode
List
Mono
DX/Local
SSM
Title Entry
4
Off
On
Se consigue mejorar la recepción, pero se
pierde el efecto estereofónico.
• El indicador MO se enciende.
Para restablecer el efecto estéreo, seleccione
“Off” en el paso 4.
10
Page 69

Para sintonizar emisoras con un señal
suficientemente fuerte
Esta función funciona sólo para las bandas FM.
Una vez activada (habiendo seleccionado
“Local”), esta función siempre funcionará al
efectuar la búsqueda de emisoras FM.
1
2
Setup
Surround
Equalizer
Sound
Mode
List
Setup
Surround
Equalizer
Sound
Mode
List
3
Mono
DX/Local
SSM
Title Entry
4
DX
Local
Preajuste automático de emisoras FM —
SSM (Memoria secuencial de las emisoras
más fuertes)
Esta función funciona sólo para las bandas FM.
Se pueden preajustar seis emisoras para cada
banda.
1
2
3
4
Setup
Surround
Equalizer
Sound
Mode
List
Setup
Surround
Equalizer
Sound
Mode
List
Mono
DX/Local
SSM
Title Entry
ESPAÑOL
Se detectan solamente las emisoras con una
seńal suficientemente fuerte.
• El indicador DX se apaga y el indicador
LO se enciende.
Las emisoras FM locales con las señales
másintensas serán exploradas y almacenadas
automáticamente en la banda FM.
11
OPERACIONES
Page 70

Preajuste manual
Ej.: Almacenando una emisora FM de 92,5 MHz
en el número de preajuste 4 de la banda
FM1.
1
Selección de las emisoras preajustadas
En el control remoto:
1
2
2
FM1
NO NAME
92.5 MHz
ESPAÑOL
3
• Siempre que mantenga apretada la perilla
hacia arriba o abajo, se podrán cambiar las
bandas FM.
• También se podrá acceder a la lista de
preajustes a través de <MENU> = <List>
(☞ derecho).
87.5 MHZ
88.3 MHz
88.7 MHz
91.5 MHz
93.1 MHz
95.3 MHz
4 Seleccione un número de preajuste.
87.5 MHZ
88.3 MHz
88.7 MHz
91.5 MHz
93.1 MHz
95.3 MHz
5
FM1 P4
NO NAME
92.5 MHz
o
En la unidad:
1
2
• También se podrá acceder a la lista de
preajustes a través de <MENU> = <List>.
Setup
Surround
Equalizer
Sound
Mode
List
Setup
Surround
Equalizer
Mode
List
12
Page 71

Operaciones de los discos
Now Reading...
DISC
3: 45 PM
El tipo de disco se detecta automáticamente, y la reproducción se inicia automáticamente (para
algunos discos: el inicio automático depende de su programa interno).
Si el disco no dispone de ningún menú de disco, todas las pistas del mismo serán reproducidas
repetidamente hasta que usted cambie la fuente o expulse el disco.
Si aparece “
• En algunos casos, puede suceder que no se acepte la operación aunque no se visualice “
” en el monitor, significa que la unidad no puede aceptar la operación intentada.
Abra el panel del monitor e inserte el disco.
La reproducción se inicia automáticamente.
Para abrir/cerrar el panel
Lado de la etiqueta
del monitor
Para expulsar el
disco
Precaución:
No introduzca el dedo detrás del
panel del monitor.
DISP: Púlselo si la imagen reproducida no aparece,
pero sí se visualiza la pantalla de información
del disco (☞ páginas 14 y 15).
7: Parar.
”.
ESPAÑOL
3: Inicie la reproducción, si es necesario.
(Para DVD: 10 segundos de revisión instantánea durante la reproducción).
13
OPERACIONES
Page 72

Mientras se reproducen los siguientes discos, pulse .
Nº de título/Nº de capítulo/tiempo de reproducción
Formato de audio
DIGITAL
MULTI
01 01 0:00:12
48kHz 24Bit 3/2.1
Modo Surround/
Modo de
reproducción
ESPAÑOL
Indicadores de
altavoz/señal
(☞ página 50)
sonido
DVD
VIDEO
CHAP.RPT
L C R
SW LFE
LS RS
3: 45 PM
• Cada vez que presiona el botón, las
pantallas de la imagen reproducida
y de información del disco (con/
sin medidor de nivel) aparecen
alternativamente.
Frecuencia de muestreo/velocidad de
bits/canales de la señal grabada
Pulse: Selecciona el capítulo
Sostener: Búsqueda hacia atrás
adelante*
1
Pulse: Selecciona el título
Indicador BONUS
(☞ página 20)
Indicador B.S.P.
(☞ página 20)
Tipo de disco
El indicador PBC
se enciende
mientras se está
usando PBC.
L C R
SW LFE
LS RS
3: 45 PM
CD
MPEG
FLAT
REPEAT
L R
SW
LS RS
3: 45 PM
VCD
PBC
FLAT
L R
SW
LS RS
3: 45 PM
DVD
AUDIO
MULTI
01 01 0:00:12
BONUS B.S.P
PPCM
96kHz 24Bit 3/2.1
REPEAT
01 01 0:00:12
Current folder Name
Current file name.mpg
Next file name.mpg
Next file name.mpg
Next file name.mpg
Next file name.mpg
Next file name.mpg
Next file name.mpg
01 0:00:12
Nº de grupo/Nº de pista/tiempo de reproducción
Pulse: Seleccionar la pista
Sostener: Búsqueda hacia atrás/
adelante*
1
Pulse: Selecciona el grupo
Para MPEG: Nº de carpeta/Nº de pista/tiempo de
reproducción
Para JPEG: Nº de carpeta/Nº de pista
Pulse: Seleccionar la pista
Sostener: Para MPEG: Búsqueda hacia
atrás/adelante*
2
Pulse: Selecciona la carpeta
Sostener: Para visualizar la lista
de carpetas
Nº de pista/tiempo de reproducción
Pulse: Seleccionar la pista
Sostener: Búsqueda hacia atrás/
adelante*
1
14
Page 73

Nº de pista/tiempo de reproducción
Formato de audio
(MP3/WMA/WAV)
CD
FLAT
L R
SW
LS RS
3: 45 PM
01 0:00:12
Disc Title
Current track Title
Next track title
Next track title
REPEAT
Next track title
Next track title
Next track title
Next track title
Lista de pistas nuevas (sólo para CD Text)
Nº de carpeta/Nº de pista/tiempo de reproducción
CD
FLAT
L R
SW
LS RS
3: 45 PM
01 01 0:00:12
Current folder Name
Current file name.mp3
MP3
Next file name.mp3
Next file name.mp3
REPEAT
Next file name.mp3
Next file name.mp3
Next file name.mp3
Next file name.mp3
Pulse: Seleccionar la pista
Sostener: Búsqueda hacia atrás/
adelante*
1
• Aparece “NO NAME” cuando no hay
ningún título grabado o asignado.
Pulse: Seleccionar la pista
Sostener: Búsqueda hacia atrás/
adelante*
1
Pulse: Selecciona la carpeta
Sostener: Para visualizar la lista
de carpetas
• Si están grabados, aparecerán los datos
de etiqueta en lugar de los nombres de
carpetas/archivos (con “Tag Display”
ajustado a “On” ☞ página 41).
ESPAÑOL
1
*
Velocidad de búsqueda: x2 ] x10.
2
*
Velocidad de búsqueda: ¡1 ] ¡2.
• Microsoft y Windows Media son marcas registradas o bien
marcas comerciales de Microsoft Corporation en los Estados
Unidos y/u otros países.
15
OPERACIONES
Page 74

Selección de los modos de reproducción
Podrá utilizar solamente uno de los siguientes
modos de reproducción—Introducciones
musicales/repetida/aleatoria.
Ej.: Para seleccionar repetición de pista
1
2
ESPAÑOL
Setup
Surround
Equalizer
Sound
Mode
List
Setup
Surround
Equalizer
Sound
Mode
List
3
4
Al seleccionar uno de los modos de
reproducción, el indicador correspondiente
se enciende en la pantalla de información
del disco.
Para cancelar, seleccione “Off” en el paso 3 o 4.
Off
Intro
Repeat
Random
Off
Track
Folder
Tipo de
disco
Intro Repeat Random
Chapter: Repetir el capítulo
—
— Track: Repetir la pista actual —
Track: Se reproducen los
primeros 15 segundos
de cada pista (para VCD:
PBC no se utiliza)
Track: Se reproducen los
primeros 15 segundos
de cada pista
Folder: Se reproducen los
primeros 15 segundos
de la primera pista de
cada carpeta
—
—
actual
Title: Repetir el título
actual
Track: Repetir la pista actual
(para VCD: PBC no se
utiliza)
Track: Repetir la pista actual
Folder: Se repiten todas las
pistas de la carpeta
actual
Track: Repetir la pista actual
Folder: Repetir la carpeta
actual
Folder: Repetir la carpeta
actual
—
Disc: Se reproducen
Folder: Repetir aleatoriamente
Disc: Reproducir
—
—
aleatoriamente todas
las pistas (para VCD:
PBC no se utiliza)
todas las pistas de
la carpeta actual y
luego las pistas de las
siguientes carpetas
aleatoriamente todas
las pistas
16
Page 75

Selección de pistas en la lista
Si un disco incluye carpetas, podrá visualizar
las listas de carpetas/pistas y luego iniciar la
reproducción.
1
La lista de carpetas con la
actual lista de pistas aparece
en la columna derecha.
My Best
Cinema
My Best 2
Pops
Favorite Songs
Easy Listenings
2
Seleccione una carpeta y, a
continuación, active la lista de pistas.
3
Seleccione una pista y, a continuación,
inicie la reproducción.
My Best
Cinema
My Best 2
Pops
Favorite Songs
Easy Listenings
Song015.mp3
Song016.mp3
Song017.mp3
Song018.mp3
Song019.mp3
Song020.mp3
Track001.mp3
Track002.mp3
Track003.mp3
Track004.mp3
Track005.mp3
Track006.mp3
Prohibición de la expulsión del disco
Podrá bloquear un disco en la ranura de carga.
1
NO EJECT?
EMERGENCY EJECT?
2
Aparecerá “No Eject”.
Para cancelar la prohibición, repita el mismo
procedimiento que para seleccionar “EJECT
OK”.
ESPAÑOL
• También se podrá acceder a la lista de
preajustes a través de <MENU> =
<List>.
Setup
Surround
Equalizer
Sound
Mode
List
Setup
Surround
Equalizer
Mode
List
17
OPERACIONES
Page 76

Operaciones utilizando el control remoto—RM-RK240
EXTRA MONITOR CONTROL
MODE MENU
ASPECT
pulsa durante la pausa).
DVD / RECEIVER CONTROL
ATT
SOURCE
BAND
DUAL
VOL
ESPAÑOL
2nd VOL
SHIFT
RM-RK240
ZOOM
+10
–100
DIRECT
–10
ASPECT
123
+
DISC
456
ENTER
7809
–
DISC
SETUP
RETURN
SURROUND
+100
OSD
MENUTOP M
Búsqueda hacia atrás/adelante*1. (El sonido no se escucha).
(Cámara lenta*2 durante la pausa. El sonido no se escucha).
Pulse: Seleccionar un capítulo (durante la reproducción o la pausa).
Sostener: Búsqueda hacia atrás/adelante*
Seleccionar un capítulo (durante la
• Para seleccionar un número,
véase también “Cómo
seleccionar un número” en
reproducción o la pausa).
Seleccionar título (cuando no se está
reproduciendo).
la página 9.
Seleccionar directamente el título.
: Parar la reproducción.
: Pone en pausa (Reproducción cuadro por
cuadro si lo pulsa mientras están en pausa las
imágenes en movimiento).
: Inicia la reproducción (10 segundos de
revisión si lo pulsa durante la reproducción de
imágenes en movimiento).
:
Búsqueda hacia atrás/adelante*1.
:
Pulse: Seleccionar la pista
Sostener: Búsqueda hacia atrás/adelante*3.
: Selecciona un grupo.
: Selecciona una relación de aspecto.
: Seleccionar el idioma de audio.
: Parar la reproducción.
: Poner en pausa (Reproducción cuadro por cuadro si lo
: Iniciar la reproducción (10 segundos de revisión instantánea durante la
reproducción).
:
:
3
: Seleccionar título.
: Selecciona una relación de aspecto.
: Seleccionar el idioma de los subtítulos.
: Seleccionar el idioma de audio.
: Seleccionar el ángulo de visión.
+ :
Usando las funciones de
control por menú...
1
2 Seleccione el ítem que desea
reproducir.
3
DIRECT
OSD
+(
= ):
+ :
Seleccionar la pista.
DIRECT
OSD
+(
= ):
Selecciona directamente un grupo.
Usando las funciones de control por menú...
1
2 Seleccione el ítem que desea reproducir.
3
*1 Velocidad de búsqueda: x2 ] x5 ] x10 ] x20 ] x60
2
*
Velocidad a cámara lenta: 1/32 ] 1/16 ] 1/8 ] 1/4 ] 1/2
3
*
Velocidad de búsqueda: x2 ] x10
18
Page 77

: Parar la reproducción.
: Poner en pausa (Reproducción cuadro por
cuadro si lo pulsa durante la pausa).
: Inicia la reproducción.
: Búsqueda hacia atrás/adelante*4. (El
sonido no se escucha).
: Pulse: Seleccionar la pista.
Sostener: Búsqueda hacia atrás/
adelante*5. (El sonido no se escucha).
: Selecciona la carpeta.
: Selecciona una relación de aspecto.
+ :
Seleccionar la pista (dentro de la misma carpeta).
DIRECT
OSD
+(
= ):
Seleccionar directamente carpeta*6.
Mientras se está reproduciendo...
: Retrocede/avanza las escenas 5 minutos.
Posición de reproducción actual
2ª pulsación
1ª pulsación
1ª pulsación
2ª pulsación
3ª pulsación
ESPAÑOL
: Parar la reproducción.
: Pausa.
: Inicia la reproducción.
: Seleccionar la pista.
: Seleccionar la carpeta.
: Selecciona una relación de aspecto.
: Parar la reproducción.
: Poner en pausa (Reproducción cuadro por
cuadro si lo pulsa durante la pausa).
: Inicia la reproducción.
:
Búsqueda hacia atrás/adelante
lenta hacia adelante
*
1
*
2
(Cámara
durante la pausa. El
sonido no se escucha).
• La cámara lenta hacia atrás no funciona.
:
Pulse: Seleccionar la pista.
Sostener: Búsqueda hacia atrás/adelante
(El sonido no se escucha).
: Selecciona una relación de aspecto.
: Selecciona el canal de audio (ST: estéreo,
L: izquierdo, R: derecho).
*4 Velocidad de búsqueda: ¡1 ] ¡2 ] ¡3
5
*
Velocidad de búsqueda: ¡1 ] ¡2
+ :
Seleccionar la pista (dentro de la misma
carpeta).
DIRECT
OSD
+(
= ):
Seleccionar directamente carpeta
+ :
Seleccionar la pista.
Durante la reproducción PBC...
+ : Seleccione una opción en el menú.
Para volver a los menús anteriores, pulse
.
Para cancelar la reproducción PBC
1
3
*
.
2 Mientras mantiene pulsado , pulse
para iniciar la pista deseada.
• Para reanudar PBC, pulse / .
6
*
Cuando se asignan números de 2 dígitos que precedan a los
nombres de carpetas—01, 02, 03, y así sucesivamente.
19
6
*
.
OPERACIONES
Page 78

: Parar la reproducción.
: Pausa.
: Inicia la reproducción.
: Búsqueda hacia atrás/adelante*1.
: Pulse: Selecciona las pistas.
Sostener: Búsqueda hacia atrás/
adelante*3.
: Seleccionar la carpeta.
+ :
Seleccionar la pista (dentro de la misma
carpeta).
DIRECT
OSD
+(
= ):
Seleccionar directamente carpeta
6
*
.
: Parar la reproducción.
: Pausa.
ESPAÑOL
: Inicia la reproducción.
: Búsqueda hacia atrás/adelante*1.
: Pulse: Seleccionar la pista.
Sostener: Búsqueda hacia atrás/
adelante*3.
+ : Seleccionar la pista.
*1 Velocidad de búsqueda: x2 ] x5 ] x10 ] x20 ] x60
3
Velocidad de búsqueda: x2 ] x10
*
6
Cuando se asignan números de 2 dígitos que precedan a los
*
nombres de carpetas—01, 02, 03, y así sucesivamente.
Ampliación de la imagen (Zoom de
acercamiento)
Durante la reproducción de imágenes en
movimiento...
ZOOM 1 ZOOM 2 ZOOM 3 ZOOM 4
ZOOM OFF
Mientras está en pausa...
Para cancelar el zoom, seleccione “ZOOM OFF”.
ZOOM 5ZOOM 6
Mover la parte
ampliada.
ZOOM 1 ZOOM 2
ZOOM OFF
Reproducción de un grupo de
bonificación
Si se detecta un DVD Audio que incluya un
“grupo de bonificación”, el indicador BONUS
se enciende en la pantalla de información del
disco.
Para reproducir un grupo de bonificación...
1 Seleccione el grupo de bonificación.
• El grupo de bonificación se encuentra
grabado normalmente como último
grupo.
2 Introduzca el número clave.
•
El “número clave” (una especie de
contraseña) para el grupo de bonificación
no se da a conocer al público. La forma de
obtener el número clave depende del disco.
3 Siga las instrucciones interactivas que
aparecen en el monitor.
Selección de imágenes fijas buscables...
Cuando se detecta un disco que incluye imágenes
fijas buscables, se encenderá el indicador B.S.P.
en la pantalla de información del disco.
Cuando el disco muestra iconos de selección de
BSP como por ejemplo, @ o # en la pantalla...
1 Seleccione la opción que desea
visualizar.
2
20
Page 79

Cómo disfrutar de sonidos Surround
Puede disfrutar de una reproducción Surround
multicanal a través de los altavoces delanteros,
central, surround.
• No podrá disfrutar de una reproducción
Surround si no están conectados (y activados)
el altavoz central y los altavoces surround.
MULTI: Para fuentes codificadas multicanal,
como por ejemplo, Dolby Digital*
1
, DTS*2, y
DVD Audio. (Al activarse, aparece “MULTI” en
la pantalla de información del disco).
Dolby Pro Logic II (Movie/Music): Para
fuentes de 2 canales excepto para discos MPEG
de 2 canales. (Esto también se puede usar para
reproducción con tarjeta SD. ☞ página 27)
Para activar el efecto surround...
1
2
Setup
Surround
Equalizer
Sound
Mode
List
Setup
Surround
Equalizer
Mode
List
3
Surround Off
Surrond On
• Surround Off: Surround se desactiva.
• Surround On: Surround se activa = vaya a
los siguientes pasos.
4
Auto
Dolby PLII Movie
Dolby PLII Music
Auto
Dolby PLII Movie
Dolby PLII Music
Auto
Dolby PLII Movie
Dolby PLII Music
• Auto: “MULTI” surround se activa cuando
se detectan señales digitales multicanal.
• Dolby PLII Movie: Dolby Pro Logic II
Movie se activa.
• Dolby PLII Music: Dolby Pro Logic II
Music se activa = vaya al siguiente paso.
5
Sólo cuando se selecciona “Dolby PLII
Music”
Panorama
CenterWidth
• Panorama: Seleccione “Panorama On”
para añadir efecto de sonido envolvente.
• CenterWidth: Ajuste la imagen central
de manera que pueda escucharse sólo
del altavoz central, sólo por los altavoces
delanteros izquierdo/derecho como
una imagen “fantasma”, o de diversas
combinaciones de estos altavoces.
Conforme aumenta el número, el efecto
“fantasma” se intensifica (normalmente
seleccione “4”).
En el control remoto:
SHIFT
RM-RK240
SURROUND
1
SURROUND
• Los ajustes “Dolby PL II Music” no se pueden
cambiar usando el control remoto.
1
Fabricado bajo licencia de Dolby Laboratories. Dolby, Pro
*
Logic, MLP Lossless y el símbolo de la doble D son marcas
comerciales de Dolby Laboratories.
2
*
“DTS” y “DTS Digital Surround” son marcas comerciales de
Digital Theater Systems, Inc.
ESPAÑOL
21
OPERACIONES
Page 80

Operaciones usando la barra en pantalla (DVD/VCD/MPEG/JPEG)
Estas operaciones se pueden realizar en el monitor usando el control remoto.
OSD
~ Visualiza la barra en pantalla (☞ página 23).
(dos veces)
Ÿ Seleccione una opción.
! Efectúe una selección.
SHIFT
RM-RK240
123
456
ENTER
7809
ESPAÑOL
Si aparece el menú emergente...
• Para ingresar tiempos/números, véase lo siguiente.
Cómo seleccionar un número
Para seleccionar un número del 0 – 9:
Para seleccionar un número mayor que 9:
• Los botones +100/–100 se utilizan sólo para
ingresar números mayores que 99.
• Para disminuir los números, utilice
.
o
Para ingresar tiempos/números
Ej.:
DVD ] _:_ _:_ _
Para introducir 1 (horas): 02 (minutos):
00 (segundos),
pulse 1, 0, 2, 0, 0 y luego ENTER.
VCD (PBC no se utiliza) ] _ _:_ _
Para introducir 64 (minutos): 00 (segundos),
pulse 6, 4, 0, 0 y luego ENTER.
• No es necesario introducir los ceros
posteriores (los dos últimos dígitos en los
ejemplos de arriba).
• Para corregir una entrada incorrecta, utilice
.
Para borrar la barra en pantalla
22
Page 81

Barras en pantalla
Información
Funcionamiento
El ejemplo de arriba es de un DVD Vídeo. Las opciones mostradas en la barra varían según el
tipo de disco.
1 Tipo de disco
2 • DVD: Formato de señal de audio
• VCD: PBC
3 Modo de reproducción
DVD -V
TIME TITLE CHAP
DVD Vídeo:
T. RPT: Repetición de título
C. RPT: Repetición de capítulo
DVD Audio:
T. RPT: Repetición de pista
MPEG:
T. RPT: Repetición de pista
F. RPT: Repetición de carpeta
JPEG:
F. RPT: Repetición de carpeta
VCD:
T. RPT: Repetición de pista
D. RND: Aleatoria del disco
T. INT: Introducción de pista
Reproduce los primeros 15 segundos
de la pista actual
4 Información sobre reproducción
5 Indicación de la hora
Título/capítulo actual
T02-C03
Grupo/pista actual
G02-T03
TRACK 01
Pista actual
F001-T001
TOTAL
Carpeta/pista actual
Tiempo de reproducción
transcurrido del disco
Tiempo estante del título (para
T. REM
T02-C03 TOTAL 1:25:58
C. RPT
RPT
6 Estado de reproducción
Reproducción
Búsqueda hacia atrás/adelante
Cámara lenta hacia atrás/adelante
Pausa
Parada
7 Iconos de operación
Cambia la indicación del tiempo (véase
TIME
5)
Búsqueda de tiempo (Introduzca el
tiempo de reproducción del título o del
disco actual).
TITLE
Búsqueda de título (por su número)
GROUP
Búsqueda de grupo (por su número)
CHAP
Búsqueda de capítulo (por su número)
TRACK
Búsqueda de pista (por su número)
RPT
Reproducción repetida*
INT
Reproducción de introducciones
RND
Reproducción aleatoria*
musicales*
1
1
1
Cambia el idioma de audio o el canal de
audio
Cambia el idioma de los subtítulos
Cambia el ángulo de visión
*1 ☞ página 16.
DVD)
Tiempo restante del disco (para los
otros)
TIME
Tiempo de reproducción
transcurrido del capítulo/pista
actual
REM
Tiempo restante del capítulo/pista
actual
ESPAÑOL
23
OPERACIONES
Page 82

Operaciones de Zona Dual
Mientras escucha cualquier otra fuente a
través de los altavoces, podrá disfrutar de la
reproducción del disco en el monitor externo
conectado a las clavijas VIDEO OUT y 2nd
AUDIO OUT.
• Mientras se está usando la Zona Dual, sólo
podrá operar el reproductor DVD/CD
utilizando el control remoto.
1
ESPAÑOL
2
3
Setup
Surround
Equalizer
Sound
Mode
List
DualZone
Off
0n/Surround Off
0n/Surround On
• Off: Desactive la Zona Dual.
• On/Surround Off (DUAL): La Zona Dual
se activa sin aplicar Headphone Surround*.
• On/Surround On (DUAL SURR): La
Zona Dual se activa y se aplica Headphone
Surround.
Al activar la Zona Dual, la fuente principal
cambia a “DISC”.
DUAL SURR
DVD
VIDEO
MULTI
DTS
01 01 0:00:12
48kHz 24Bit 3/2.1
Ej.: Cuando se selecciona “On/Surround On”.
Para seleccionar una fuente distinta (fuente
principal) y escuchar a través de los altavoces:
Pulse SOURCE en el panel de control.
• No se puede seleccionar “SD” para la fuente
principal.
• Utilizando los botones del panel de control
podrá operar la fuente recién seleccionada
sin afectar las operaciones de la Zona Dual
(DVD/CD).
En el control remoto:
DUAL
VOL
2nd VOL
SHIFT
RM-RK240
1
2
Ajuste el volumen a través de la clavija
2nd AUDIO OUT.
3
Opere el reproductor DVD/CD.
* Sistema virtual Surround para auriculares
original de JVC Este efecto Surround también
será efectivo para la fuente principal “DISC”
aunque haya sido activado para la fuente
secundaria. Este efecto surround no se activa
para los discos MPEG.
24
Page 83

Operaciones usando la pantalla de control
(MP3/WMA/WAV/MPEG/JPEG/CD)
Mientras esté activada la Zona Dual,
operaciones se pueden realizar en el monitor
externo utilizando el control remoto.
La pantalla de control aparece automáticamente
al insertar un disco. (Para MPEG/JPEG;
mientras no se esté reproduciendo).
Pantalla de control
MP3/WMA/WAV/MPEG/JPEG
Folder : 2 / 3
01 Music
02 Music
03 Music
Track Information
Album
Weather
Artist
Robert M. Smith
Title
Rain
Track : 5 / 14 (Total 41)
Cloudy.mp3
Fair.mp3
Fog.mp3
Hail.wma
Indian summer.mp3
Rain.mp3
Shower.mp3
Snow.mp3
Thunder.wma
Typhoon.mp3
Wind.mp3
Winter sky.mp3
Ej.: MP3/WMA
1 Carpeta actual
2 Número de carpeta actual/número total de
carpetas
3 Lista de carpetas
4 Modo de reproducción seleccionado
5 Tiempo de reproducción transcurrido de la
pista actual (no se visualiza para JPEG)
6 Estado de operación
7 Número de la pista actual/número total de
pistas de la carpeta actual (número total de
pistas del disco)
8 Información de pista (sólo para MP3/
WMA/WAV)
9 Lista de pistas
p Pista actual (barra resaltada)
Para seleccionar una carpeta o una pista
1
Seleccione la columna “Folder” o la
columna “Track” en la pantalla de control.
estas
TIME 00:00:14T. RPT
Pantalla de control
CD
TIME 00:14
Track : 5 / 14
Cloudy
Fair
Fog
Hail
Indian summer
Rain
Shower
Snow
Thunder
Typhoon
Wind
Winter sky
Track Information
Album
Four seasons
Artist
Robert M. Smith
Title
Rain
T. RPT
Ej.: CD Text
1 Modo de reproducción seleccionado
2 Tiempo de reproducción transcurrido de la
pista actual
3 Estado de operación
4 Número de la pista actual/número total de
pistas del disco
5 Información de la pista
6 Lista de pistas
7 Pista actual (barra resaltada)
Para seleccionar una pista
•
Si es necesario, pulse ENTER
para iniciar la reproducción.
Para cambiar los modos de reproducción
También puede cambiar los modos de
reproducción.
•
Para CD/MP3/WMA/WAV: Introducciones
musicales/Repetida/Aleatoria
• Para otros: Repetida
OSD
1
2
Sólo para
Seleccione un modo de reproducción.
3
Seleccione la opción deseada.
CD/MP3/WMA/WAV
:
ESPAÑOL
2
Seleccione una carpeta o una pista.
•
Si es necesario, pulse ENTER
para iniciar la reproducción.
25
4
OPERACIONES
Page 84

Operaciones usando la pantalla de listas
(MP3/WMA/WAV/MPEG/JPEG)
Mientras esté activada la Zona Dual,
operaciones se pueden realizar en el monitor
externo utilizando el control remoto.
Pantalla de lista
Lista de carpetas
Folder : 144/240 Track 144/198 Page : 4/7
ESPAÑOL
fol120
fol121
fol122
fol123
fol124
fol125
fol126
fol127
fol128
fol129
fol130
fol131
fol132
fol133
fol134
fol135
fol136
fol137
fol138
fol139
fol140
fol141
fol142
fol143
fol144
fol145
fol146
fol147
fol148
fol149
fol150
fol151
fol152
fol153
fol154
fol155
fol156
fol157
fol158
fol159
estas
Mientras no se está reproduciendo...
1
Visualice la lista de carpetas.
Cada vez que pulsa el botón,
la pantalla de lista aparece y
desaparece.
2
Seleccione una carpeta de la lista.
Aparece la lista de pistas de la carpeta
seleccionada.
3
Seleccione una pista de la lista.
Lista de pistas
Folder : 144/240 Track 144/198 Page : 4/5
file0121.mp3
file0122.mp3
file0123.wma
file0124.mp3
file0125.mp3
file0126.wma
file0127.wma
file0128.mp3
file0129.mp3
file0130.wma
file0131.mp3
file0132.mp3
file0133.mp3
file0134.mp3
file0135.wma
file0136.mp3
file0137.wma
file0138.mp3
file0139.wma
file0140.wma
file0141.wma
file0142.mp3
file0143.wma
file0144.mp3
file0145.mp3
file0146.mp3
file0147.mp3
file0148.wma
file0149.wma
file0150.wma
file0151.wma
file0152.mp3
file0153.wma
file0154.mp3
file0155.wma
file0156.wma
file0157.wma
file0158.wma
file0159.mp3
file0160.wma
Ej.: Lista de pistas para MP3/WMA
1 Número de carpeta actual/número total de
carpetas
2 Número de la pista actual/número total de
pistas de la carpeta actual
3 Página actual/número total de páginas
incluidas en la lista
4 Carpeta/pista actual (barra resaltada)
Para volver a la lista de carpetas, pulse
.
26
Page 85

Operaciones de SD
Para expulsar el disco
presione ligeramente
sobre la tarjeta SD.
Precaución:
No suelte el dedo deprisa; de lo
contrario, la tarjeta SD podrá saltar
fuera de la unidad.
SD
3: 45 PM
Para abrir/cerrar el panel
del monitor
ESPAÑOL
Introduzca la tarjeta SD hasta
que oiga un chasquido.
3: Reinicie la reproducción
7: Parar
Now Reading...
Pulse: Seleccionar la pista
Sostener: Búsqueda hacia atrás/
adelante
Pulse: Seleccionar la
carpeta
Sostener: Aparecela lista de
carpetas
(☞ página 17)
Esta unidad puede reproducir pistas MP3/
WMA/JPEG guardadas en las tarjetas SD.
Todas las pistas de la tarjeta SD se reproducirán
repetidamente hasta que usted cambie la fuente.
• La reproducción cesa al sacar la tarjeta SD.
• No se puede seleccionar “SD” cuando se está
usando la Zona Dual.
Precaución:
Asegúrese de tener una copia de respaldo
de todos los datos importantes.
Puede efectuar la reproducción SD de la misma
manera que para los discos MP3/WMA/JPEG
(excepto la operación OSD y las que se realizan
en el monitor externo).
• Para una información general sobre las
operaciones, véase las páginas 13 a 21.
27
OPERACIONES
OPERACIONES
Page 86

Selección de los modos de reproducción
Podrá utilizar solamente uno de los siguientes
modos de reproducción—Introducciones
musicales/repetida/aleatoria.
Ej.: Para seleccionar repetición de pista
1
2
ESPAÑOL
Setup
Surround
Equalizer
Sound
Mode
List
Setup
Surround
Equalizer
Sound
Mode
List
3
4
Al seleccionar uno de los modos de
reproducción, el indicador correspondiente
se enciende en el monitor.
Para cancelar, seleccione “Off” en el paso 3 o 4.
Off
Intro
Repeat
Random
Off
Track
Folder
Tipo de
archivo
Intro Repeat Random
Track: Se reproducen los
primeros 15 segundos
de cada pista
Folder: Se reproducen los
primeros 15 segundos
de la primera pista de
cada carpeta
—
Track: Repetir la pista actual
Folder: Se repiten todas las
pistas de la carpeta
actual
Folder: Repetir la carpeta
actual
28
Folder: Repetir aleatoriamente
todas las pistas de
la carpeta actual y
luego las pistas de las
siguientes carpetas
SD: Reproducir
aleatoriamente todas
las pistas
—
OPERACIONES
Page 87

Escuchando el cambiador de CD
Nº de pista/tiempo de reproducción
POWER]ON
No se visualiza con
el CD convencional
CD-CH
Disc No.
FLAT
3: 45 PM
01 0:00:12
Disc Title
Current track Title
Next track title
Next track title
REPEAT
Next track title
Next track title
Next track title
Next track title
Se recomienda usar un cambiador de CD
compatible con MP3 JVC con este receptor.
• Puede reproducir sólo discos CD (CD-DA) y
MP3.
Preparativos:
Asegúrese de que se ha seleccionado “Changer”
para el ajuste de entrada externa. (☞ página 45)
~ Seleccione “CD-CH”.
Ÿ Visualice la lista de discos.
MP3 DISC
JVC CAR AUDIO
BEST 10
BEST JAZZ
DISC 05
DISC 06
• Siempre que mantenga apretada la perilla
hacia arriba o abajo, podrá visualizar la
otra lista de los discos restantes.
! Seleccione un disco para inicial la
reproducción.
Pulse: Seleccionar la pista
Sostener: Búsqueda hacia atrás/adelante
Pulse: Seleccionar la carpeta
(sólo MP3)
Sostener: Visualice la lista de
discos
• Mientras se reproduce un disco
MP3, podrá seleccionar e iniciar la
reproducción de una pista del disco
usando las Listas: Lista visualizada
(selección del disco actual) = Lista de
carpetas =Lista de pistas, y seguidamente
comience a reproducir la pista deseada.
MP3 DISC
JVC CAR AUDIO
BEST 10
BEST JAZZ
DISC 05
DISC 06
01FOLDER
02FOLDER
03FOLDER
04FOLDER
TRACK001
TRACK002
TRACK003
TRACK004
ESPAÑOL
MP3 DISC
JVC CAR AUDIO
BEST 10
BEST JAZZ
DISC 05
DISC 06
• Cuando utiliza el control
remoto, pulse...
DISC
DISC
+
–
29
DISPOSITIVOS EXTERNOS
Page 88

Selección de los modos de reproducción
Podrá utilizar solamente uno de los siguientes
modos de reproducción—Introducciones
musicales/repetida/aleatoria.
Ej.: Para seleccionar repetición de pista
1
2
ESPAÑOL
Setup
Surround
Equalizer
Sound
Mode
List
Setup
Surround
Equalizer
Sound
Mode
List
3
4
Al seleccionar uno de los modos de
reproducción, el indicador correspondiente
se enciende en el monitor.
Para cancelar, seleccione “Off” en el paso 3 o 4.
Off
Intro
Repeat
Random
Off
Track
Folder
Disc
Tipo de
disco
Track: Se reproducen los
Disc: Se reproducen los
Track: Se reproducen los
Folder: Se reproducen los
Disc: Se reproducen los
Para usar el menú
<Mode>
Para usar el menú
<List>
Intro Repeat Random
primeros 15 segundos
de cada pista
primeros 15 segundos
de la primera pista
de todos los discos
cargados
primeros 15 segundos
de cada pista
primeros 15 segundos
de la primera pista de
cada carpeta
primeros 15 segundos
de la primera pista
de todos los discos
cargados
☞ arriba.
☞ páginas 17 y 29.
Lista visualizada =
Lista de carpetas
=Lista de pistas
Track: Repetir la pista actual
Disc: Se repiten todas las
pistas del disco actual
Track: Repetir la pista actual
Folder: Se repiten todas las
pistas de la carpeta
actual
Disc: Se repiten todas las
pistas del disco actual
Los siguientes botones del control remoto se
pueden utilizar para operar el cambiador de CD.
+
DISC
–
DISC
: Seleccionar el disco.
: Seleccionar la carpeta (sólo MP3).
: Seleccionar la pista.
30
Disc: Reproduce
aleatoriamente todas
las pistas del disco
actual
All: Se reproducen
aleatoriamente todas
las pistas de todos los
discos cargados
Folder: Repetir aleatoriamente
todas las pistas de
la carpeta actual y
luego las pistas de las
siguientes carpetas
Disc: Reproducir
aleatoriamente todas
las pistas
All: Se reproducen
aleatoriamente todas
las pistas de todos los
discos cargados
Page 89

Para escuchar la radio satelital
Antes de la operación, conecte cualquiera de las dos unidades siguientes (adquiridas separadamente)
al jack del cambiador de CD de la parte trasera de esta unidad.
• SIRIUS radio DLP (Down Link Processor) de JVC, para escuchar la radio satelital SIRIUS.
• XMDirect
suministrado), para escuchar la radio XM Satellite.
TM
Universal Tuner Box—Usando un Smart Digital Adapter JVC (XMDJVC100: no
Para la radio SIRIUS
Active su suscripción después de la conexión:
1 Encienda la unidad.
2 Seleccione “SAT” para la fuente.
El DLP JVC comienza a actualizar todos los
canales SIRIUS. (Véase “Actualización de
GCI” en la columna de abajo).
• Una vez que termine, el DLP JVC
sintoniza el canal preajustado, CH184.
3
Verifique su SIRIUS ID, consulte la
página 45.
4 Póngase en contacto con SIRIUS
por Internet en <http://activate.
siriusradio.com/> para activar su
suscripción, o haga una llamada
gratuita a SIRIUS marcando 1-888539-SIRIUS (7474).
Una vez que haya finalizado su suscripción,
aparecerá “Subscription Updated Press Any
Key to Continue” en el monitor.
Para la radio XM
Active su suscripción después de la conexión:
1 Encienda la unidad.
2 Seleccione “SAT” para la fuente.
El Sintonizador universal XMDirectTM
comienza a actualizar todos los canales
XM. El “Channel 1” se sintoniza
automáticamente. (Véase “Actualización de
GCI” en la columna de abajo).
3
Consulte el número de identificación
de la radio satelital XM que aparece
en la etiqueta de la carcasa del
Sintonizador universal XMDirectTM o
sintonice el “Channel 0” (consulte la
página 32).
4 Para activar su suscripción, visite el
sitio web de la radio satelital XM en
<http://xmradio.com/activation/> o
llame al 1-800-XM-RADIO (1-800967-2346).
Una vez que termine, la unidad sintoniza
uno de los canales disponibles (Canal 4 o
superior).
ESPAÑOL
Actualización de GCI (“Global Control Information”):
• Si los canales han sido actualizados después de la suscripción, la actualización se inicia
automáticamente, y no se escucha ningún sonido.
Para SIRIUS: Aparece “Channels Updating XX% completed”.
Para XM: Aparece “UPDATING”.
• La actualización tarda algunos minutos en finalizar.
• No pulse ningún botón ni realice una operación hasta que finalice la actualización.
31
DISPOSITIVOS EXTERNOS
Page 90

POWER]ON
☞ página 38.
Nivel de intensidad de la
ESPAÑOL
señal
Banda SIRIUS/XM
SAT
FLAT
LEVLEL
3: 45 PM
N° de preajuste
SR1 P1 01
Category Name
Channel Name
Channel Name
The City
40 at 40
Hank's Place
Audio Visions
Preview
Nombre de la categoría
Nombre del canal
Nº de canal
DISP: Cambie a visualización
de la lista de preajustes,
información de programa,
y medidor de nivel.
* Nombre del compositor:
sólo para la radio por
satélite SIRIUS
Lista de preajustes, información de programa—nombre del
artista/nombre de la canción/nombre del compositor*, o
medidor de nivel
Para la radio SIRIUS
~ Seleccione “SAT”.
Ÿ Selecciona las bandas.
! Seleccione una categoría.
• Para seleccionar un canal de entre todas
las categorías, seleccione “ALL”.
⁄ Seleccione el canal de audición.
• Sosténgalo hacia la izquierda o la
derecha para que los canales cambien
rápidamente.
• Durante la búsqueda, se omiten los
canales no válidos y aquellos a los que no
está suscrito.
• “SIRIUS” y el logo del perro de SIRIUS son marcas
comerciales registradas de SIRIUS Satellite Radio Inc.
• XM y los logos correspondientes son marcas comerciales
registradas de XM Satellite Radio Inc.
• “SAT Radio”, el logo de SAT Radio y todos las demás marcas
relacionadas son marcas comerciales de SIRIUS Satellite
Radio Inc. y de XM Satellite Radio, Inc.
Para la radio XM
~ Seleccione “SAT.”
Ÿ Selecciona las bandas.
! Seleccione una categoría.
• Salte este paso para seleccionar un canal
entre todas las categorías (incluyendo
canales no categorizados).
• Si no selecciona un canal en el lapso de
15 segundos, se cancelará la categoría
seleccionada. Ahora puede seleccionar un
canal de entre todas las categorías.
⁄ Seleccione el canal de audición.
•
Sosténgalo hacia la izquierda o la derecha
para que los canales cambien rápidamente.
• Durante la búsqueda, se omiten los
canales no válidos y aquellos a los que no
está suscrito.
Comprobación de la identificación (ID) de
la radio XM Satellite
Seleccione el canal “0”.
En el monitor se visualiza el
número de identificación de 8
dígitos (alfanuméricos).
Para cancelar la visualización del número
de identificación, seleccione cualquier
canal que no sea “0”.
32
Page 91

Cómo almacenar canales en la memoria
Se pueden preajustar seis canales para cada
banda.
Ej.: Almacenando canales en el número de
preajuste 5.
1 Sintonice el canal que desee.
XM1 38
Rock
XM Music Lab
2 Visualice la lista de preajustes.
Channel Name
The City
40 at 40
Hank's Place
Audio Visions
Preview
• También se podrá acceder a la lista de
preajustes a través de <MENU> = <List>
(☞ derecha).
3 Seleccione un número de preajuste.
Channel Name
The City
40 at 40
Hank's Place
Audio Visions
Preview
4
XM1 P5 38
Rock
XM Music Lab
Selección de los canales de preajuste
Sólo en el control remoto:
1
Selección de las listas
Podrá seleccionar un canal mediante una de las
listas siguientes—Lista de preajustes/Lista de
categorías/Lista de canales.
1
2
3
Seleccione la lista deseada.
Setup
Surround
Equalizer
Sound
Mode
List
Setup
Surround
Equalizer
Mode
List
Preset List
Category List
Channel List
• Preset List: Visualice la lista de canales
preajustados por usted = Seleccione un
canal preajustado.
• Category List: Visualice las categorías =
Seleccione una categoría, y luego un canal
dentro de la categoría seleccionada.
• Channel List: Visualice todos los canales
= Seleccione un canal (directamente de
entre todas las categorías).
4 Seleccione (una categoría, luego) un
canal.
The Beach
The Heart
20 on 20
MIXX XM
Special X
40 to 40
ESPAÑOL
2
• También se puede acceder a la lista de
categorías mediante...
33
DISPOSITIVOS EXTERNOS
Page 92

Para ver televisión
Podrá conectar la unidad de sintonizador de KV-C1000 de JVC al terminal AV BUS de la parte
trasera.
Nº de canal
POWER]ON
☞ página 38.
TV
FLAT
4
BBC1
ESPAÑOL
3: 45 PM
~ Seleccione “TV”.
Ÿ Efectúa la búsqueda de una emisora—Búsqueda automática.
• Búsqueda manual: Sosténgalo hacia la izquierda o la derecha hasta que en la pantalla
aparezca “Manual Search” y, a continuación, presiónelo repetidamente.
• También podrá usar el control remoto suministrado para la unidad de sintonizador de TV,
pero puede suceder que algunas funciones no se activen. (Apúntelo hacia el sensor remoto de
este receptor).
Aparece el nombre asignado. Si
no hay ningún nombre asignado,
aparecerá “NO NAME”.
DISP: Púlselo si no aparece la
imagen de reproducción,
pero aparece la pantalla
(esta) de información de
fuente.
Preajuste de emisoras de TV
Memoria de preajuste automático
Puede preajustar 12 emisoras de TV.
1
2
3
Las emisoras de TV locales con las
señales más fuertes serán exploradas y
almacenadas automáticamente.
Setup
Surround
Equalizer
Sound
Mode
List
Setup
Surround
Equalizer
Sound
Mode
List
OSD
Auto MEMORY
Title
Preajuste manual
1 Seleccione la emisora que desea
preajustar.
2
JVCTV
2 Visualice la lista de preajustes.
BBC1
BBC2
ABCTV
CBS
WHTV
HTV
• Siempre que mantenga apretada la perilla
hacia arriba o abajo, podrá cambiar a otra
página de la lista de preajustes.
• También se podrá acceder a la lista de
preajustes a través de <MENU> = <List>
(☞ página 35).
3 Seleccione un número de preajuste.
BBC1
BBC2
ABCTV
CBS
WHTV
HTV
34
Page 93

4
2 P5
JVCTV
Selección de las emisoras preajustadas
Selección en la lista de preajustes
1
BBC1
BBC2
ABCTV
CBS
JVCTV
HTV
2 Seleccione la emisora presintonizada.
BBC1
BBC2
ABCTV
CBS
JVCTV
HTV
•
También se podrá acceder a la lista de
preajustes a través de <MENU> = <List>.
Setup
Surround
Equalizer
Sound
Mode
List
Cambio de la información en pantalla
Se podrá visualizar el número de canal y el
nombre asignado de la emisora mientras mira
televisión.
1
2
3
Setup
Surround
Equalizer
Sound
Mode
List
Setup
Surround
Equalizer
Sound
Mode
List
OSD
Auto MEMORY
Title Entry
4
Off
Channel
Channel+Station
• Off: No se visualizará ninguna
información mientras mira televisión.
• Channel: Se visualizará el número decanal
mientras mira televisión.
• Channel+Station: Se visualizarán el
número de canal y el nombre asignado
a la emisora recibida mientras mira
televisión.
ESPAÑOL
Setup
Surround
Equalizer
Mode
List
35
DISPOSITIVOS EXTERNOS
Page 94

Escuchando el iPod®/reproductor D.
Nº de pista/tiempo de reproducción
POWER]ON
☞ página 38.
ESPAÑOL
Para el Apple iPod y el reproductor D. de JVC,
es necesario conectar el adaptador de interfaz
(KS-PD100 o KS-PD500) al jack del cambiador
de CD de la parte trasera.
Preparativos:
Asegúrese de que se ha seleccionado “iPod” o
“D. player” para el ajuste de entrada externa.
(☞ página 45)
D.PLAYER
3: 45 PM
01 0:00:06
Album Name / Artist Name
Track Title
FLAT
REPEAT
~ Seleccione “iPod” o “D. PLAYER”.
La reproducción se inicia automáticamente.
Ÿ Seleccione una canción.
Selección de una pista en el menú del
reproductor
1 Acceda al menú del reproductor.
• Este modo se cancelará si no
se efectúa ninguna operación
durante unos 5 segundos.
2 Seleccione el menú deseado.
Pulse: Seleccione una opción.
Sostener: Salta 10 opciones a la vez si
hay más de 10
Para iPod:
Playlists Ô Artists Ô Albums Ô Songs Ô
Genres Ô Composers Ô (vuelta al comienzo)
Para el reproductor D.:
Playlist Ô Artist Ô Album Ô Genre Ô
Track Ô (vuelta al comienzo)
3 Confirme la selección.
Ingresa al menú del reproductor
Pone la reproducción en pausa/
parada
• Para reanudar, pulse otra vez.
Pulse: Seleccionar la pista
Sostener: Búsqueda hacia atrás/adelante
4 Repita los pasos 2 y 3 para seleccionar
una pista.
• Al seleccionar una pista, se iniciará la
reproducción.
• Para volver al menú anterior...
Selección de los modos de reproducción
• Al seleccionar uno de los modos de
reproducción, el indicador correspondiente se
enciende en el monitor.
1 Visualice <MENU> y, a continuación,
seleccione <Mode> ] <Repeat> o
<Random>.
2 Seleccione la opción apropiada.
Repeat One: Funciona igual que
Random Album: Funciona igual que
Para cancelar, seleccione “Off”.
• iPod es una marca comercial de Apple Computer, Inc.,
registrada en los EE.UU. y otros países.
“Repetir una” o “Modo
Repetición = Una”.
All: Funciona igual que
“Repetir Todas” o “Modo
Repetición= Todos”.
“Aleatorio Álbumes” del
iPod.
Song/On: Funciona igual que
“Aleatorio Canciones” o
“Reprod. Aleatoria
= Sí”.
36
Page 95

Escuchado otros componentes externos
AV-INPUT
Puede conectar un componente externo a las clavijas LINE IN/VIDEO IN.
POWER]ON
AV-IN
3: 45 PM
FLAT
AV-INPUT
Título asignado
DISP: Púlselo si no aparece la
(☞ página 39)
imagen de reproducción, pero
aparece la pantalla (esta) de
información de fuente.
~ Seleccione “AV-IN”.
Ÿ Encienda el componente conectado y comience a reproducir la fuente.
Si selecciona “Camera Reverse” para “AV input” (☞ página 45), algunos mensajes de estado
como por ejemplo, el cambio de nivel de volumen, no aparecerán en el monitor mientras mira la
imagen.
EXT-INPUT
Puede conectar un componente externo al jack del cambiador de CD de la parte trasera mediante el
adaptador de entrada de línea—KS-U57 (no suministrado) o el adaptador de entrada AUX—
KS-U58 (no suministrado).
POWER]ON
EXT-IN
FLAT
3: 45 PM
EXT-INPUT
Título asignado (☞ página 39)
ESPAÑOL
Preparativos:
Asegúrese de que se ha seleccionado “External Input” para el ajuste de entrada externa. (☞ página
45)
~ Seleccione “EXT-IN”.
Ÿ Encienda el componente conectado y comience a reproducir la fuente.
37
DISPOSITIVOS EXTERNOS
Page 96

Ecualización de sonido
POWER]ON
ESPAÑOL
Selección del modo de sonido
~
Ÿ
!
Seleccione un modo de sonido.
• Para los valores preajustados de cada
modo de sonido,
• Al activar Surround (
ecualización de sonido será cancelada
temporalmente.
Setup
Surround
Equalizer
Sound
Mode
List
Setup
Surround
Equalizer
Sound
Mode
List
Flat
Hard Rock
R&B
Pop
Jazz
Dance
Country
Reggae
Classic
User 1
User 2
User 3
☞ página 53.
☞ página 21), la
Freq. 60Hz +03
Freq. 150Hz +02
Freq. 400Hz +02
Freq. 1kHz 00
Freq. 2.5kHz +01
Freq. 6.3kHz +01
Freq. 15kHz +03
Cómo almacenar sus propios ajustes
Los ajustes realizados se pueden almacenar en
User 1, User 2, y User 3.
1 Repita los pasos ~ y Ÿ y, a
continuación, en el paso !...
Flat
Hard Rock
R&B
Pop
Jazz
Dance
Freq. 60Hz +03
Freq. 150Hz +02
Freq. 400Hz +02
Freq. 1kHz 00
Freq. 2.5kHz +01
Freq. 6.3kHz +01
Freq. 15kHz +03
2 Ajuste.
3 Almacene.
User 1
User 2
User 3
38
Page 97

Asignación de títulos a la fuente
POWER]ON
MY BEST
Puede asignar títulos a los siguientes...
Fuentes
AV-INPUT
EXT-INPUT
Emisoras FM/AM/
TV
DISC/CD-CH*
* Los títulos sólo se pueden asignar a los CDs
convencionales.
Número máximo de
caracteres
Hasta 16 caracteres.
Hasta 16 caracteres—
hasta 30 emisoras
separadamente para radio
(FM/AM) y para TV.
Hasta 32 caracteres
(hasta 30 discos)
~ Seleccione las fuentes.
•
Para
FM/AM: Seleccione la banda, y
seguidamente sintonice una emisora.
•
Para AV-IN/EXT-IN: Selecciona la fuente.
• Para emisora de TV: Seleccione “TV” y
seguidamente sintonice una emisora de
TV.
•
Para un CD de este receptor: Inserte un CD.
• Para los CDs del cambiador de CD:
Seleccione “CD-CH” y, seguidamente,
seleccione un número de disco.
Ÿ Visualice la pantalla de entrada de título.
1
Setup
Surround
Equalizer
Sound
Mode
List
Pulse: Para cambiar el
juego de caracteres
Sostener: Para borrar el título
2
Setup
Surround
Equalizer
Sound
Mode
List
Ej.: Al seleccionar “DISC” como fuente
3
Off
Intro
Repeat
Random
Title Entry
! Asigne un título.
1 Seleccione un carácter y, a continuación,
intro.
• Para cambiar el juego de caracteres,
presione DISP. (Para los caracteres
disponibles,
2 Repita el paso 1 hasta que termine de
introducir el título.
☞ página 53).
MY BEST
⁄ Finalice el procedimiento.
ESPAÑOL
39
AJUSTES
Page 98

Operaciones de los menús
POWER]ON
MENU
Para volver al menú superior
Para volver a las pantallas anteriores
ESPAÑOL
Ej.: Cambio del ajuste “High Pass Filter” (Filtro
pasaaltos)
~
• Las opciones no disponibles aparecen
sombreadas.
Ÿ
Opciones del menú
Setup
Surround
Equalizer
Sound
Mode
List
Setup
Surround
Equalizer
Sound
Mode
List
Setup
Surround
Equalizer
Sound
Mode
List
Display
Clock
Disc Setup1
Disc Setup2
Tuner
Input
!
Fader/Balance
Volume Adjust
Subwoofer
High Pass Filter
Crossover
Amplifier Gain
• Algunas opciones requieren que se
repitan estos pasos para ajustar las
opciones secundarias.
⁄
Through
On
Setup
Surround
Equalizer
Sound
Mode
List
Dual Zone
Display
Clock
Disc Setup 1
Disc Setup 2
Tuner
Input
Others
40
Page 99

Inicial: Subrayado
Opciones del menú Configuraciones seleccionables, [página de referencia]
Demonstration
(Demostración)
Off : Se cancela.
On: Activa la demostración en el monitor.
Wall Paper (Tapiz)
Level Meter (Medidor de
nivel)
Scroll (Desplazamiento) Off : Se cancela.
Tag Display (Visualización
de etiqueta)
Dimmer (Atenuador de
Display
luminosidad)
Dimmer Level
Bright
Screen Control*
1
No ajustable para fuentes de audio.
*
1
Podrá seleccionar la imagen de fondo del monitor.
Standard, Geometric Design, Sea, Simple Green, Simple
Orange, Simple Red, Simple Brown, Simple Grey
Puede seleccionar el medidor de nivel deseado.
Meter 1, Meter 2, Meter 3
• Pulse DISP repetidamente para visualizar el medidor de
nivel seleccionado en el monitor.
Once: La información del disco se desplaza una sola vez.
Auto: El desplazamiento se repite (a intervalos de 5
• Mantenga pulsado DISP para desplazar la información,
independientemente de este ajuste.
Off : Se cancela.
On: Muestra los datos de la etiqueta mientras se
Off : Se cancela.
On: El atenuador de luminosidad se activa.
Auto: El monitor se oscurece cuando se encienden los
Time Set:
Puede preajustar el brillo del atenuador de luminosidad.
00 (más brillante) a 10 (más oscura); Inicial 05
Puede ajustar el color y el brillo del monitor.
–15 (más oscura) a +15 (más brillante); Inicial 00
Puede realizar el siguiente ajuste para que el monitor
aparezca claro y legible para ver la imagen reproducida. Los
ajustes se almacenan separadametne para cada fuente—
“DISC”, “AV-IN”, y “TV”.
–15 a +15; Inicial 00
Bright: Ajústelo si la imagen es demasiado brillante u
Contrast: Ajuste el contraste.
Color: Ajusta el color de la imagen—más clara o más
Tint:
ESPAÑOL
segundos).
reproducen pistas MP3/WMA/WAV.
faros.
Ajusta los tiempos de activación/desactivación del
atenuador de luminosidad.
oscuro.
oscura.
Ajusta el matiz si la tez de las personas no es natural.
41
AJUSTES
Page 100

Opciones del menú Configuraciones seleccionables, [página de referencia]
Aspect*
1
Puede cambiar la relación de aspecto de la imagen.
Normal:
Para imágenes
ESPAÑOL
originales 4:3
Full:
Para imágenes
originales 16:9
Dispaly
Just:
Zoom:
Auto:
Time Set
12Hours/24Hours
Clock Adjust*
Clock
Time Zone*
2
3
DST (Hora de verano)*
1
*
No ajustable para fuentes de audio.
2
*
Sólo aparece cuando está conectada la radio satelital SIRIUS o XM.
3
*
Se visualiza sólo cuando “Clock Adjust” se ajusta a “Auto”.
☞ [6]
12 Hours, 24 Hours,
Auto: El reloj incorporado se ajustará automáticamente
Off : Se cancela.
Para el ajuste del reloj, seleccione su área residencial entre
una de las siguientes zonas horarias.
Eastern
Central
3
Off : Se cancela.
On: El horario de ahorro de luz diurna se activa si su
gracias a los datos de reloj suministrados mediante
el canal de radio satelital.
,
Atlantic, Newfound, Alaska, Pacific, Mountain
zona residencial está sujeta a DST.
Relación de aspecto de la señal
entrante
4:3 16:9
• Para “DISC”: La relación de aspecto se
selecciona automáticamente para que
corresponda con las señales entrantes.
• Para las otras fuentes de vídeo: La
relación de aspecto está fijada en
“NORMAL”.
☞ [6]
,
42
 Loading...