

Page 1
CD RECEIVER
РЕСИВЕР С ПРОИГРЫВАТЕЛЕМ КОМПАКТ-ДИСКОВ
KD-G507
В соответствии с Законом Российской Федерации “О защите прав
потребителей” срок службы (годности) данного товара “по истечении
которого он может представлять опасность для жизни, здоровья
потребителя, причинять вред его имуществу или окружающей среде”
составляет семь (7) лет со дня производства. Этот срок является
временем, в течение которого потребитель данного товара может
безопасно им пользоваться при условии соблюдения инструкции по
эксплуатации данного товара, проводя необходимое обслуживание,
включающее замену расходных материалов и/или соответствующее
ремонтное обеспечение в специализированном сервисном центре.
For installation and
connections, refer to the
separate manual.
Указания по установке и
выполнению
соединений приводятся
в отдельной
инструкции.
• This unit is equipped with the display demonstration. To cancel it, see page 6.
• Данное устройство имеет функцию демонстрации на экране дисплея. Порядок ее отмены
смотрите на странице 6.
Дополнительные косметические материалы к данному товару,
поставляемые вместе с ним, могут храниться в течение двух (2) лет со
дня его производства.
Срок службы (годности), кроме срока хранения дополнительных
косметических материалов, упомянутых в предыдущих двух пунктах, не
затрагивает никаких других прав потребителя, в частности, гарантийного
свидетельства JVC, которое он может получить в соответствии с законом
о правах потребителя или других законов, связанных с ним.
ENGLISH
РУCCKИЙ
INSTRUCTIONS
ИНСТРУКЦИИ ПО ЭКСПЛУАТАЦИИ
GET0194-001A
[EE]
Page 2
IMPORTANT FOR LASER PRODUCTS
1. CLASS 1 LASER PRODUCT
2. CAUTION: Do not open the top cover. There are no user serviceable parts inside the unit; leave all
servicing to qualified service personnel.
ENGLISH
3. CAUTION: Visible and invisible laser radiation when open and interlock failed or defeated. Avoid
direct exposure to beam.
4. REPRODUCTION OF LABEL: CAUTION LABEL, PLACED OUTSIDE THE UNIT.
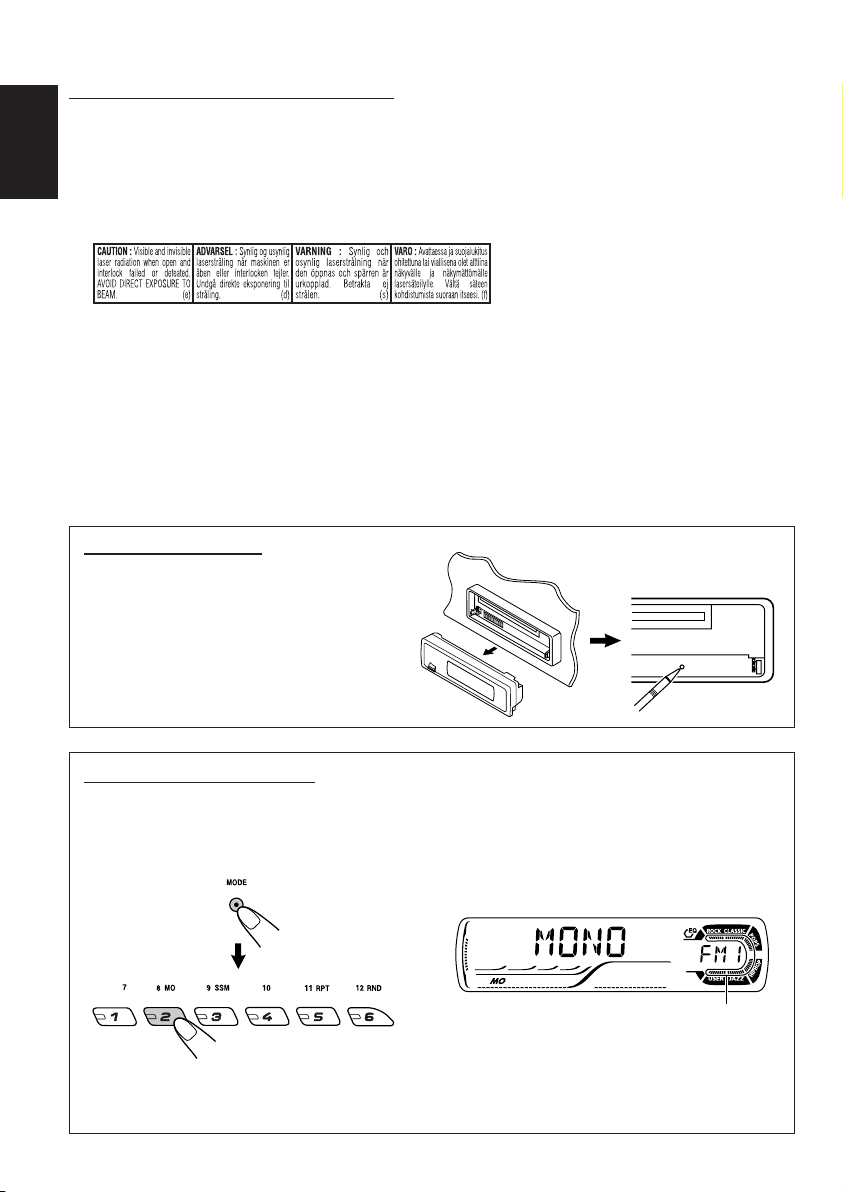
How to reset your unit
After detaching the control panel, press the
reset button on the panel holder using a ballpoint pen or a similar tool.
This will reset the built-in microcomputer.
Note:
Your preset adjustments—such as preset channels
or sound adjustments—will also be erased.
How to use the MODE button
If you press MODE, the unit goes into functions mode, then the number buttons and 5/∞ buttons
work as different function buttons.
Ex.: When number button 2 works as MO (monaural) button.
Time countdown indicator
To use these buttons for original functions again after pressing MODE, wait for 5 seconds
without pressing any of these buttons until the functions mode is cleared.
• Pressing MODE again also clears the functions mode.
2
Page 3

Thank you for purchasing a JVC product. Please read all instructions carefully before operation,
to ensure your complete understanding and to obtain the best possible performance from the unit.
CONTENTS
How to reset your unit ............................... 2
How to use the MODE button ................... 2
LOCATION OF THE BUTTONS ............ 4
Control panel ............................................. 4
BASIC OPERATIONS ....................... 5
Turning on the power ................................ 5
Canceling the display demonstration ........ 6
Setting the clock ........................................ 7
RADIO OPERATIONS ...................... 8
Listening to the radio ................................. 8
Storing stations in memory ....................... 9
Tuning in to a preset station ...................... 10
CD OPERATIONS ........................... 11
Playing a CD ............................................. 11
Locating a track or a particular portion
on a CD .................................................. 12
Selecting CD playback modes .................. 13
Playing a CD Text ...................................... 14
Prohibiting disc ejection ............................ 14
MP3 INTRODUCTION ...................... 15
What is MP3? ............................................ 15
How are MP3 files recorded and
played back? .......................................... 15
MP3 OPERATIONS ......................... 16
Playing an MP3 disc ................................. 16
Locating a file or a particular portion
on a disc ................................................. 17
Selecting MP3 playback modes ................ 19
ENGLISH
SOUND ADJUSTMENTS ................... 20
Selecting preset sound modes
(C-EQ: custom equalizer) ....................... 20
Adjusting the sound .................................. 21
OTHER MAIN FUNCTIONS ................ 22
Changing the general settings (PSM) ....... 22
Detaching the control panel ...................... 25
CD CHANGER OPERATIONS .............. 26
Playing discs ............................................. 26
Selecting the playback modes .................. 29
EXTERNAL COMPONENT OPERATIONS ... 30
Playing an external component ................. 30
USING THE REMOTE CONTROLLER ..... 31
Location of the buttons .............................. 32
TROUBLESHOOTING ...................... 33
MAINTENANCE ............................. 36
Handling discs ........................................... 36
SPECIFICATIONS........................... 37
BEFORE USE
*For safety....
• Do not raise the volume level too much, as this will
block outside sounds, making driving dangerous.
• Stop the car before performing any complicated
operations.
*Temperature inside the car....
If you have parked the car for a long time in hot
or cold weather, wait until the temperature in the
car becomes normal before operating the unit.
3
Page 4
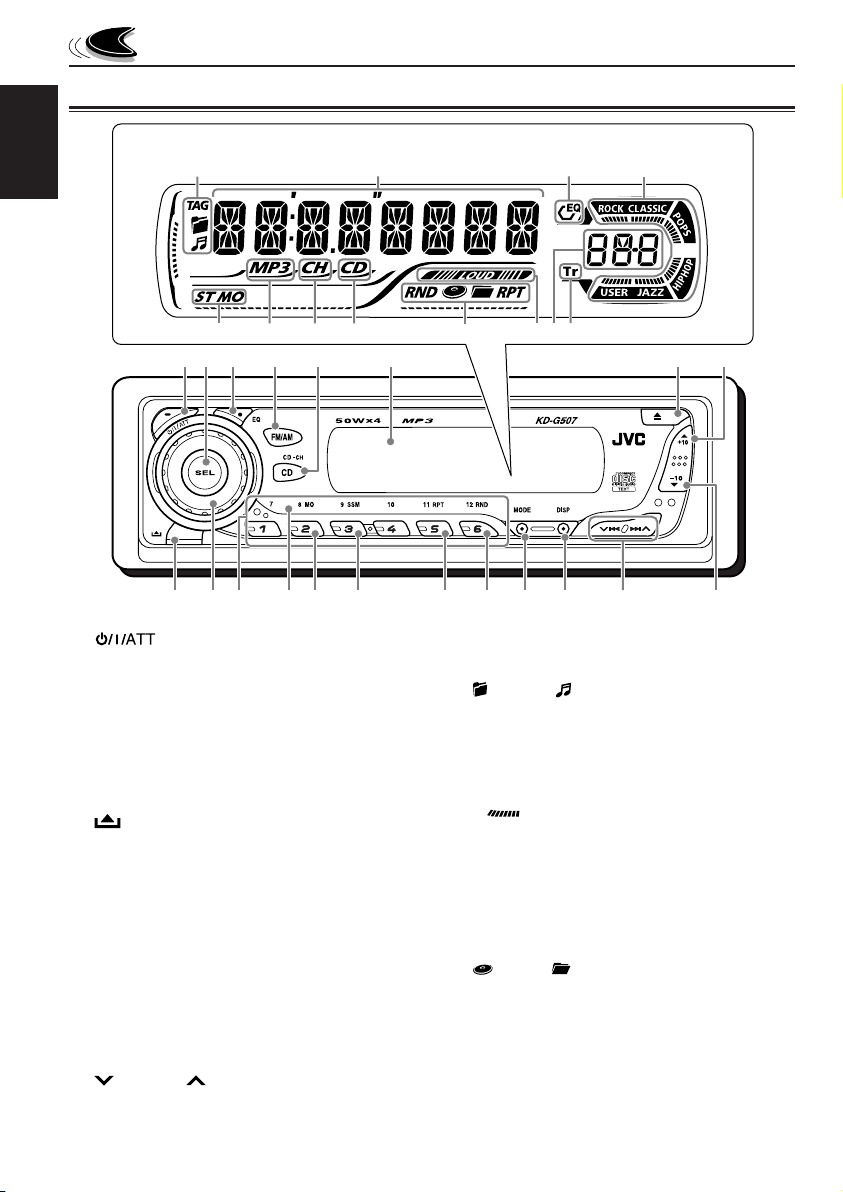
Control panel
Display window
ENGLISH
LOCATION OF THE BUTTONS
a s d
g zx/
1 3 4 62
h jk
5
l
f
7 8
9 u i o ;
p
q
1 (standby/on/attenuator) button
2 SEL (select) button
3 EQ (equalizer) button
4 FM/AM button
5 CD CD-CH (CD changer) button
6 Display window
7 0 (eject) button
8 5 (up) button
+10 button
9 (control panel release) button
p Control dial
q Number buttons
w Remote sensor
• You can control this unit with an optionally
purchased remote controller.
e MO (monaural) button
r SSM (Strong-station Sequential Memory)
button
t RPT (repeat) button
y RND (random) button
u MODE button
i DISP (display) button
o 4/¢ buttons
; ∞ (down) button
–10 button
e rw t y
4
Display window
a Disc information indicators—TAG (ID3 Tag),
(folder), (track/file)
s Main display
d EQ (equalizer) indicator
f Sound mode (C-EQ: custom equalizer)
indicators—ROCK, CLASSIC, POPS,
HIP HOP, JAZZ, USER
• also works as level meter during play if
the level meter is activated (see page 23).
g Tuner reception indicators—ST (stereo),
MO (monaural)
h MP3 indicator
j CH (CD changer) indicator
k CD indicator
l Playback mode/item indicators—RND (random),
(disc), (folder), RPT (repeat)
/ LOUD (loudness) indicator
z Source display
Volume level indicator
x Tr (track) indicator
Page 5
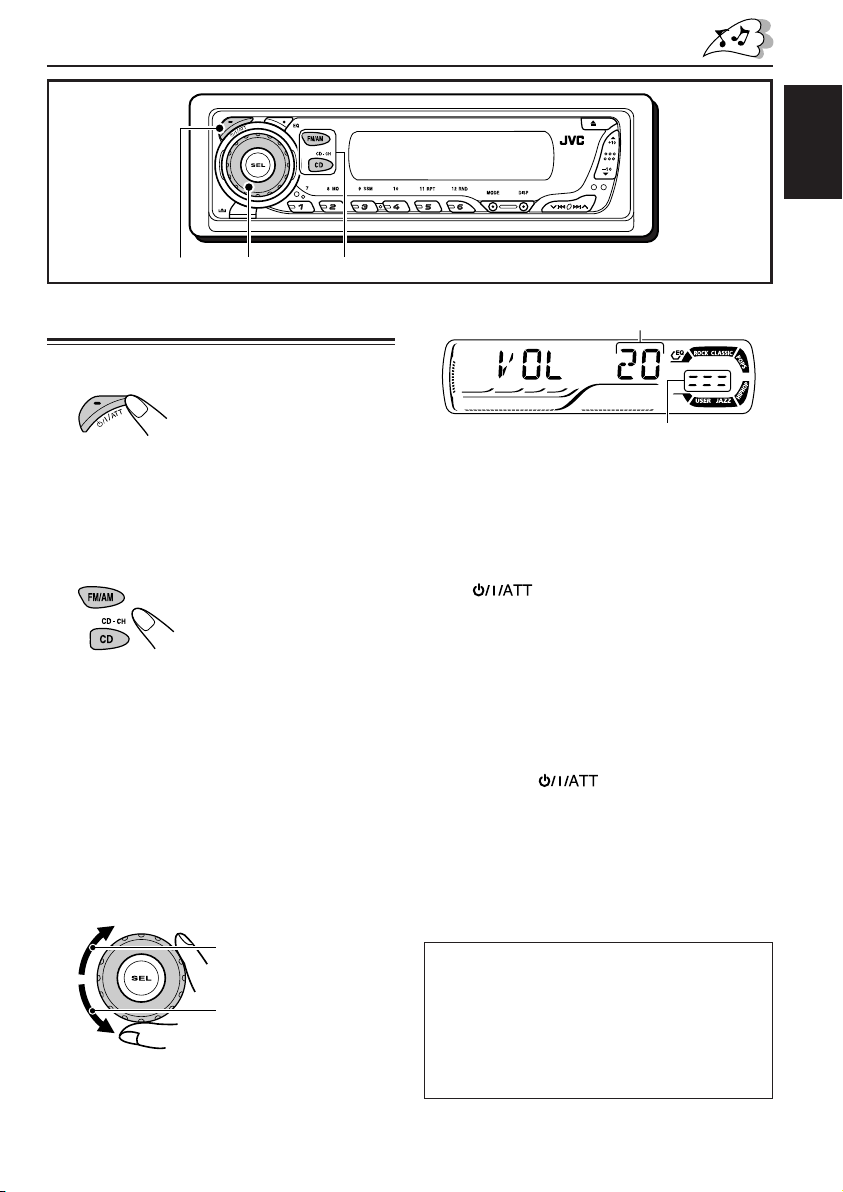
BASIC OPERATIONS
ENGLISH
1
3
Turning on the power
1
Turn on the power.
Note on One-Touch Operation:
When you select a source in step 2 below, the
power automatically comes on. You do not have
to press this button to turn on the power.
2
Select the source.
To operate the tuner (FM or AM),
see pages 8 – 10.
To play a CD,
see pages 11 – 14.
To play an MP3 disc,
see pages 16 – 19.
To operate the CD changer,
see pages 26 – 29.
To operate the external component
(LINE IN), see page 30.
3
Adjust the volume.
2
Volume level appears.
Volume level indicator
4
Adjust the sound as you want. (See
pages 20 and 21.)
To drop the volume in a moment
Press briefly while listening to any
source. “ATT” starts flashing on the display, and
the volume level will drop in a moment.
To resume the previous volume level, press the
button briefly again.
• If you turn the control dial, you can also restore
the sound.
To turn off the power
Press and hold for more than one
second.
“SEE YOU” appears, then the unit turns off.
• If you turn off the power while listening to a
disc, disc play will start from where playback
has been stopped previously, next time you
turn on the power.
To increase the volume
To decrease the volume
CAUTION on Volume Setting:
Discs produce very little noise compared with
other sources. If the volume level is adjusted for
the tuner, for example, the speakers may be
damaged by the sudden increase in the output
level. Therefore, lower the volume before playing a
disc and adjust it as required during playback.
5
Page 6
ENGLISH
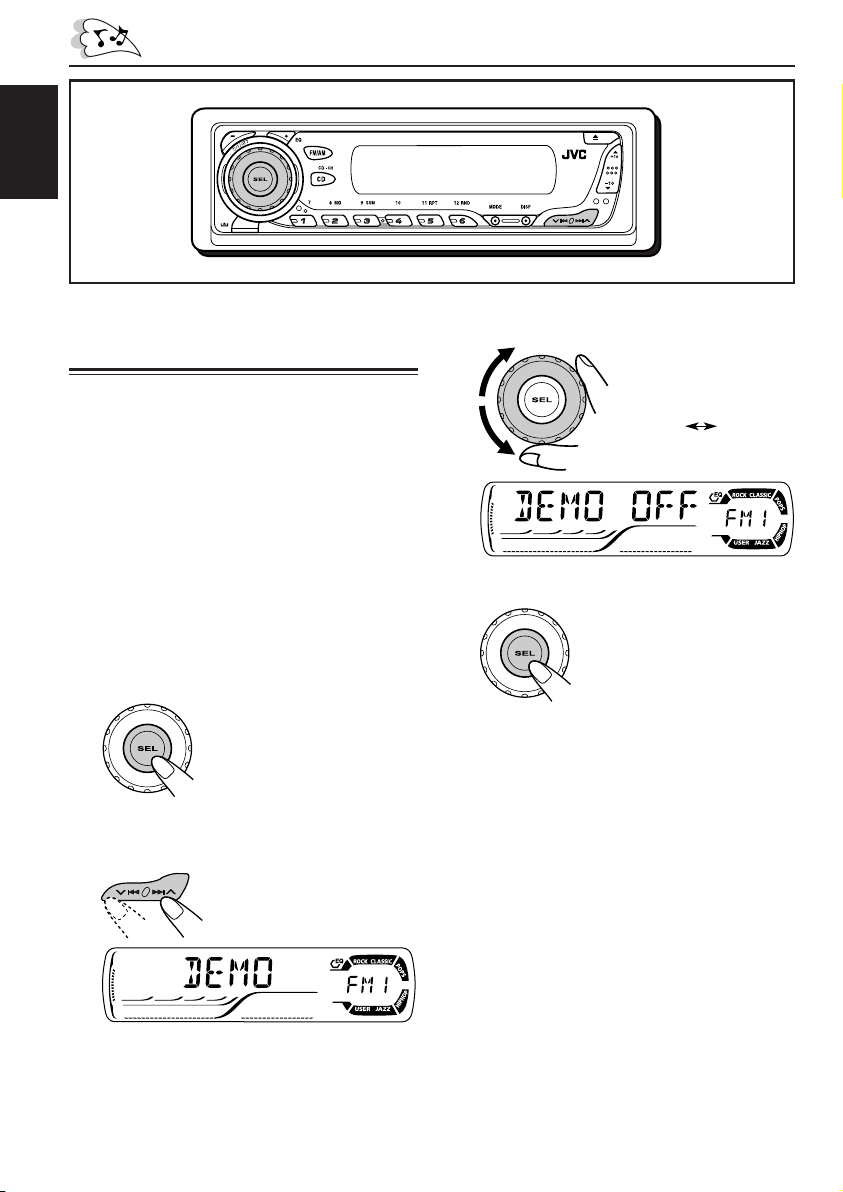
Canceling the display
demonstration
When shipped from the factory, display
demonstration has been activated, and starts
automatically when no operations are done for
about 20 seconds.
• It is recommended to cancel the display
demonstration before you use the unit for the
first time.
To cancel the display demonstration, follow
the procedure below:
1
Press and hold SEL (select) for more
than 2 seconds so that one of the
PSM items appears on the display.
(PSM: see pages 22 and 23.)
2
Select “DEMO” if not shown on the
display.
3
Select “DEMO OFF.”
DEMO OFF
4
Finish the setting.
To activate the display demonstration, repeat
the same procedure and select “DEMO ON” in
step 3.
DEMO ON
6
Page 7
ENGLISH
Frequency
Clock
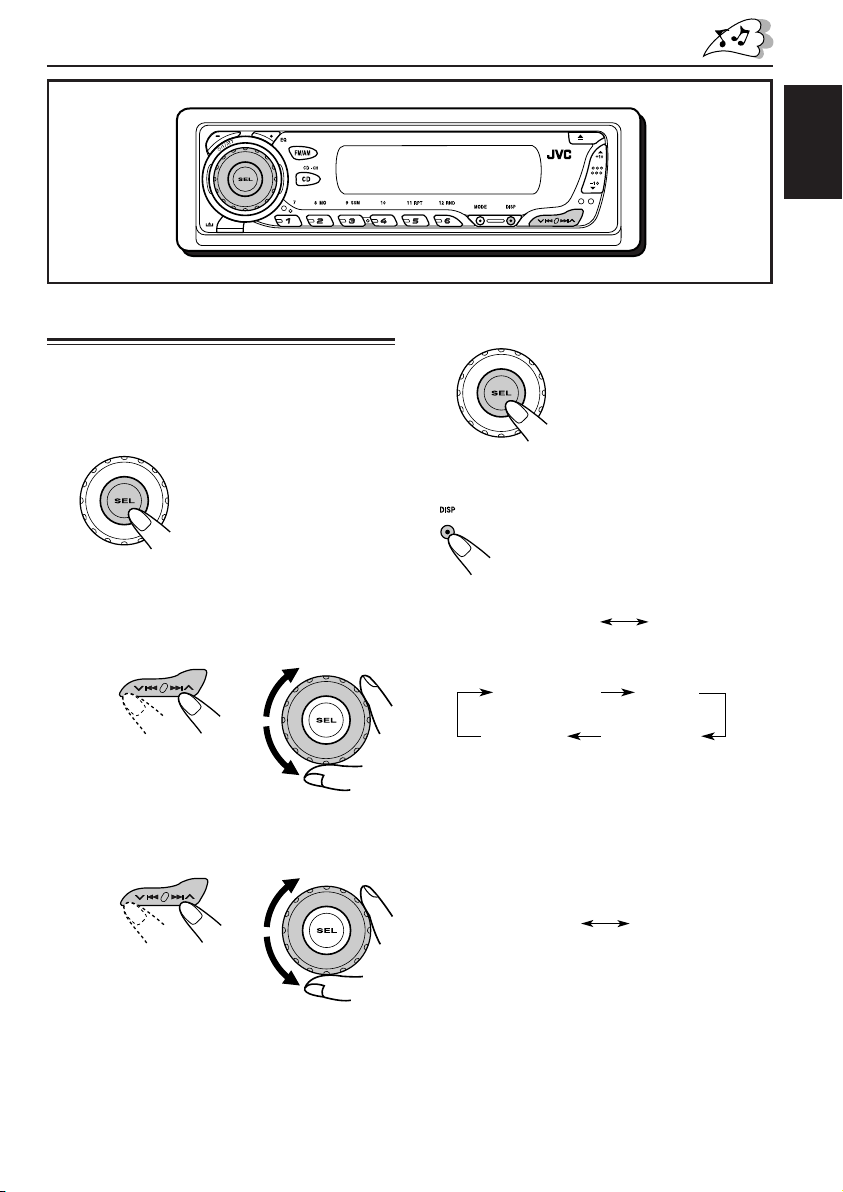
Setting the clock
1
Press and hold SEL (select) for more
than 2 seconds so that one of the
PSM items appears on the display.
(PSM: see pages 22 and 23.)
2
Set the hour.
1 Select “CLOCK H” (hour) if not shown on
the display.
2 Adjust the hour.
12
3
Set the minute.
1 Select “CLOCK M” (minute).
2 Adjust the minute.
12
4
Finish the setting.
To check the current clock time or change the
display mode
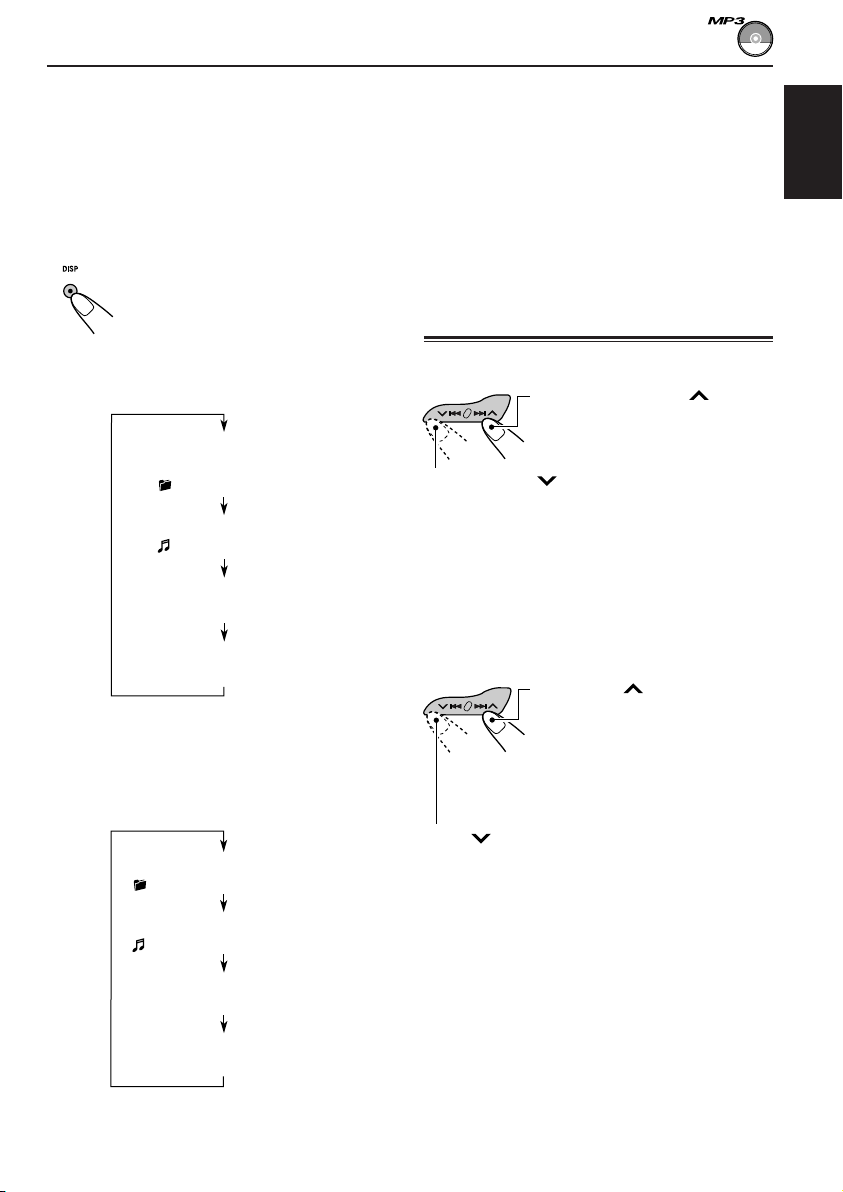
Press DISP (display) repeatedly.
Each time you press the button,
the display changes as follows:
• During tuner operation:
• During disc operation:
Elapsed
playing time
Track title
Notes:
• While playing a conventional CD, “NO NAME”
appears for the disc title/performer and the track title.
• For indication change while playing a CD Text or
an MP3 disc, see also pages 14 and 17.
• During external component operation:
LINE IN
• During power off:
The power turns on and the clock time is
shown for 5 seconds, then the power turns off.
Clock
Disc title /
performer
Clock
7
Page 8

ENGLISH
RADIO OPERATIONS
Listening to the radio
You can use either automatic searching or manual
searching to tune in to a particular station.
Searching for a station automatically:
Auto search
1
Select the band (FM1 – 3, AM).
Each time you press the
button, the band changes as
follows:
FM1 FM2 FM3 AM
Selected band appears.
Lights up when receiving an FM stereo
broadcast with sufficient signal strength.
Note:
This receiver has three FM bands (FM1, FM2,
FM3). You can use any one of them to listen to
an FM broadcast.
To stop searching before a station is
received, press the same button you have
pressed for searching.
Note:
FM1 and FM2: 87.5 MHz – 108.0 MHz
FM3: 65.00 MHz – 74.00 MHz
Searching for a station manually:
Manual search
1
Select the band (FM1 – 3, AM).
Each time you press the
button, the band changes as
follows:
FM1 FM2 FM3 AM
Note:
This receiver has three FM bands (FM1, FM2,
FM3). You can use any one of them to listen to
an FM broadcast.
2
Press and hold ¢ or 4
until “M” (manual) starts flashing on
the display.
2
Start searching for a station.
To search for stations of
higher frequencies
To search for stations of lower frequencies
When a station is received, searching stops.
8
Page 9

3
Tune in to a station you want while
“M” (manual) is still flashing.
To tune in to stations of
higher frequencies
To tune in to stations of lower frequencies
• If you release your finger from the button,
the manual mode will automatically turns
off after 5 seconds.
• If you hold down the button, the frequency
keeps changing—in 50 kHz intervals
(87.5 MHz – 108.0 MHz for FM 1 and
FM 2), in 30 kHz intervals (65.00 MHz –
74.00 MHz for FM 3) and 9 kHz for AM
—MW/LW until you release the button.
When an FM stereo broadcast is hard to
receive:
1 Press MODE to enter the
functions mode while listening
to an FM stereo broadcast.
2 Press MO (monaural), while
“MODE” is still flashing on the
display, so that “MONO”
appears on the display.
Each time you press the button,
monaural mode turns on and off
alternately.
Storing stations in memory
You can use one of the following two methods to
store broadcasting stations in memory.
• Automatic preset of FM stations: SSM (Strongstation Sequential Memory)
• Manual preset of both FM and AM stations
FM station automatic preset: SSM
You can preset 6 local FM stations in each FM
band (FM1, FM2, and FM3).
1
Select the FM band (FM1 – 3) you
want to store FM stations into.
Each time you press the
button, the band changes as
follows:
FM1 FM2 FM3 AM
2
Press MODE to enter the functions
mode.
3
Press and hold SSM for about
2 seconds.
ENGLISH
MO (monaural) indicator
When the MO indicator is lit on the display, the
sound you hear becomes monaural but the
reception will be improved.
“SSM” flashes, then disappears
when automatic preset is over.
Local FM stations with the strongest signals are
searched and stored automatically in the band
number you have selected (FM1, FM2, or FM3).
These stations are preset in the number buttons
—No.1 (lowest frequency) to No.6 (highest
frequency).
When automatic preset is over, the station stored
in number button 1 will be automatically tuned in.
9
Page 10
Manual preset
You can preset up to 6 stations in each band
(FM1, FM2, FM3, and AM) manually.
ENGLISH
Ex.: Storing FM station of 92.5 MHz into the
preset number 1 of the FM1 band.
1
Select the band (FM1 – 3, AM) you
want to store stations into (in this
example, FM1).
Each time you press the
button, the band changes as
follows:
FM1 FM2 FM3 AM
2
Tune in to a station (in this example,
of 92.5 MHz).
To tune in to stations of
higher frequencies
To tune in to stations of lower frequencies
4
Repeat the above procedure to store
other stations into other preset
numbers.
Notes:
• A previously preset station is erased when a new
station is stored in the same preset number.
• Preset stations are erased when the power supply to
the memory circuit is interrupted (for example,
during battery replacement). If this occurs, preset
the stations again.
Tuning in to a preset station
You can easily tune in to a preset station.
Remember that you must store stations first. If
you have not stored them yet, see “Storing
stations in memory” on pages 9 and 10.
1
Select the band (FM1 – 3, AM).
Each time you press the
button, the band changes as
follows:
FM1 FM2 FM3 AM
10
3
Press and hold the number button
(in this example, 1) for more than
2 seconds.
Preset number flashes for a while.
2
Select the number (1 – 6) for the
preset station you want.
Note:
You can also use the 5 (up) or ∞ (down) button on
the unit to select the next or previous preset stations.
Each time you press the 5 (up) or ∞ (down) button,
the next or previous preset station is tuned in.
Page 11
CD OPERATIONS
ENGLISH
Refer “MP3 OPERATIONS” on pages 16 to 19 for
operating MP3 discs.
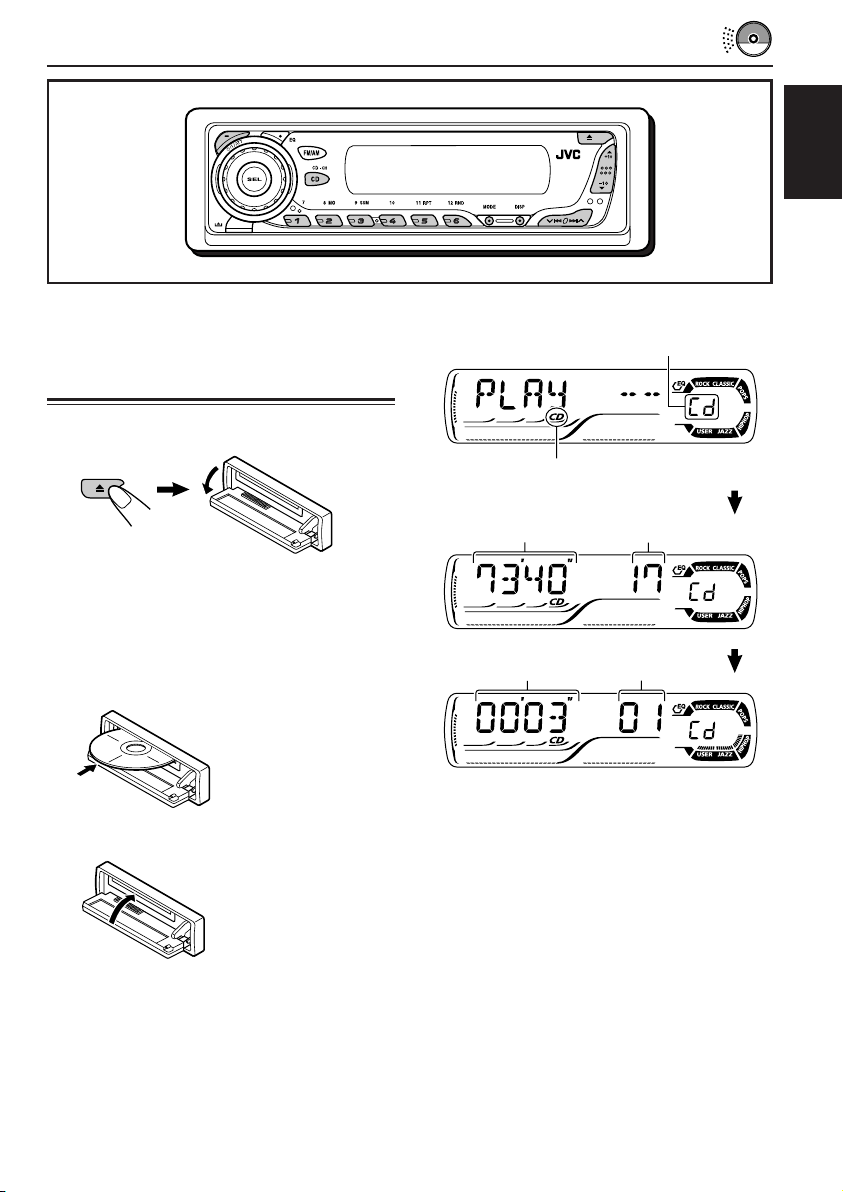
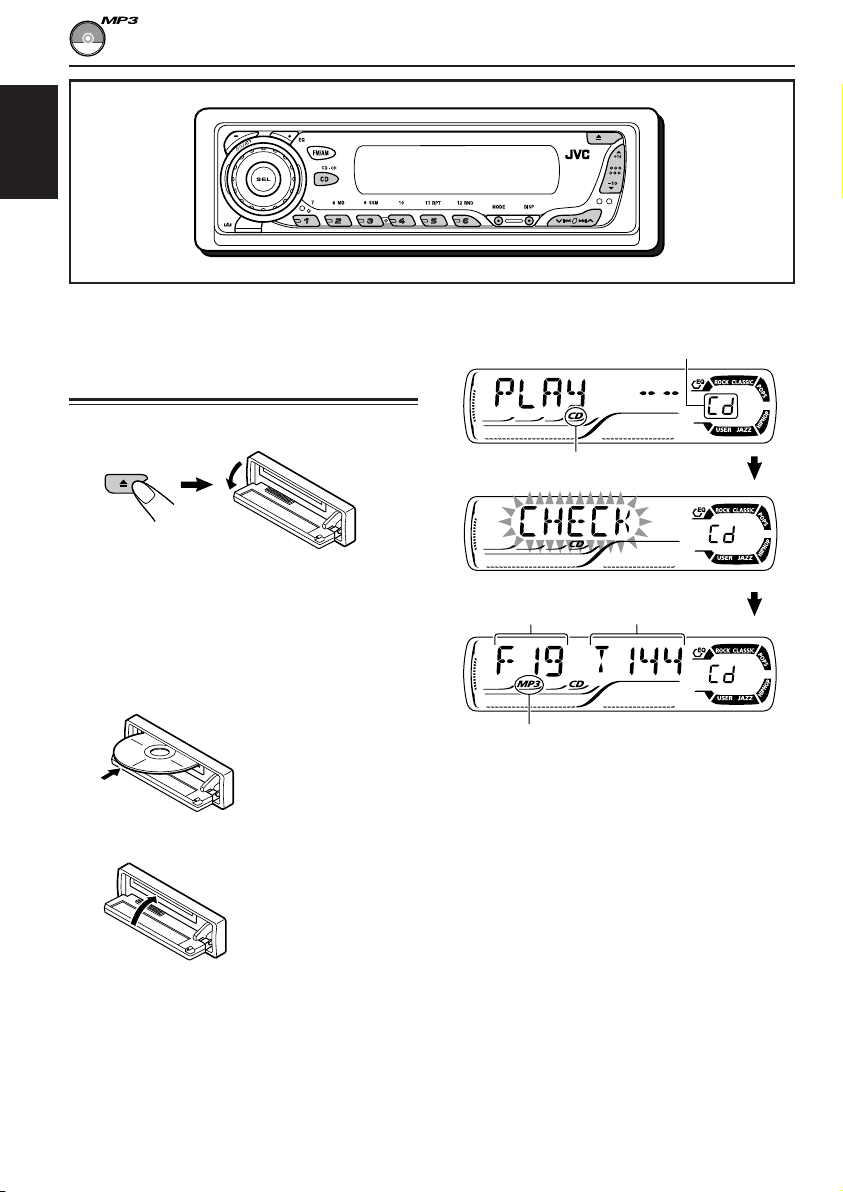
Playing a CD
1
Open the control panel.
Note on One-Touch Operation:
When a CD is already in the loading slot,
pressing CD CD-CH turns on the unit and starts
playback automatically.
2
Insert a CD into the loading slot.
The unit turns on,
draws the CD and
starts playback
automatically.
3
Close the control panel by hand.
All tracks will be played repeatedly until you
stop playback.
The display changes to show the following:
Current source indication
CD indicator
Total playing time
of the inserted disc
Elapsed playing time
Notes:
• When a CD is inserted upside down, the CD
automatically ejects (if the control panel is open).
If the control panel is closed, the source changes to
the previously selected source, “PLEASE” and
“EJECT” appear alternately on the display.
• If there is no CD in the loading slot, you cannot
select CD as the source. “NO DISC” appears on
the display.
• If the current disc is a CD Text, disc title/performer
and then track title will automatically appear.
Total track number
of the inserted disc
Current track
number
11
Page 12
To stop play and eject the CD
Press 0.
CD play stops and the control panel flips down.
The CD automatically ejects from the loading
slot. The source changes to the previously
ENGLISH
selected source.
• If you change the source, CD play also stops
(without ejecting the CD).
Next time you select “CD” as the source, CD
play starts from where playback has been
stopped previously.
Notes:
• If the ejected disc is not removed for about
15 seconds, the disc is automatically inserted again
into the loading slot to protect it from dust.
(Disc play will not start this time.)
• You can eject the disc even when the unit is turned
off.
Locating a track or a
particular portion on a CD
To fast-forward or reverse the track
Press and hold ¢ , while
playing a CD, to fast-forward
the track.
Press and hold 4, while playing a CD, to
reverse the track.
To go to the next or previous tracks
Press ¢ briefly, while
playing a CD, to go ahead to
the beginning of the next track.
Each time you press the button
consecutively, the beginning of
the next tracks is located and
played back.
Press 4 briefly, while playing a CD, to go
back to the beginning of the current track.
Each time you press the button consecutively,
the beginning of the previous tracks is located
and played back.
To go to a particular track directly
Press the number button corresponding to the
track number to start its playback.
• To select a track number from 1 – 6:
Press 1 (7) – 6 (12) briefly.
• To select a track number from 7 – 12:
Press and hold 1 (7) – 6 (12) for more than one
second.
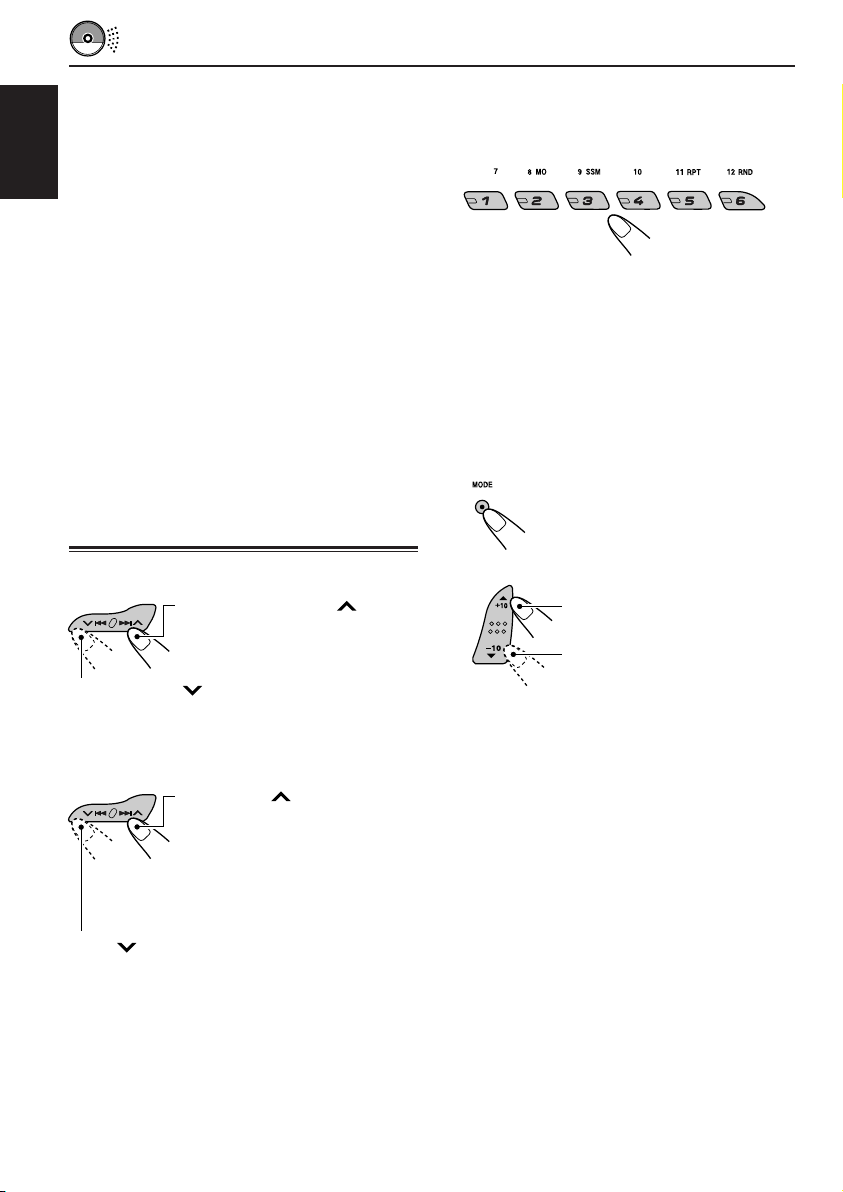
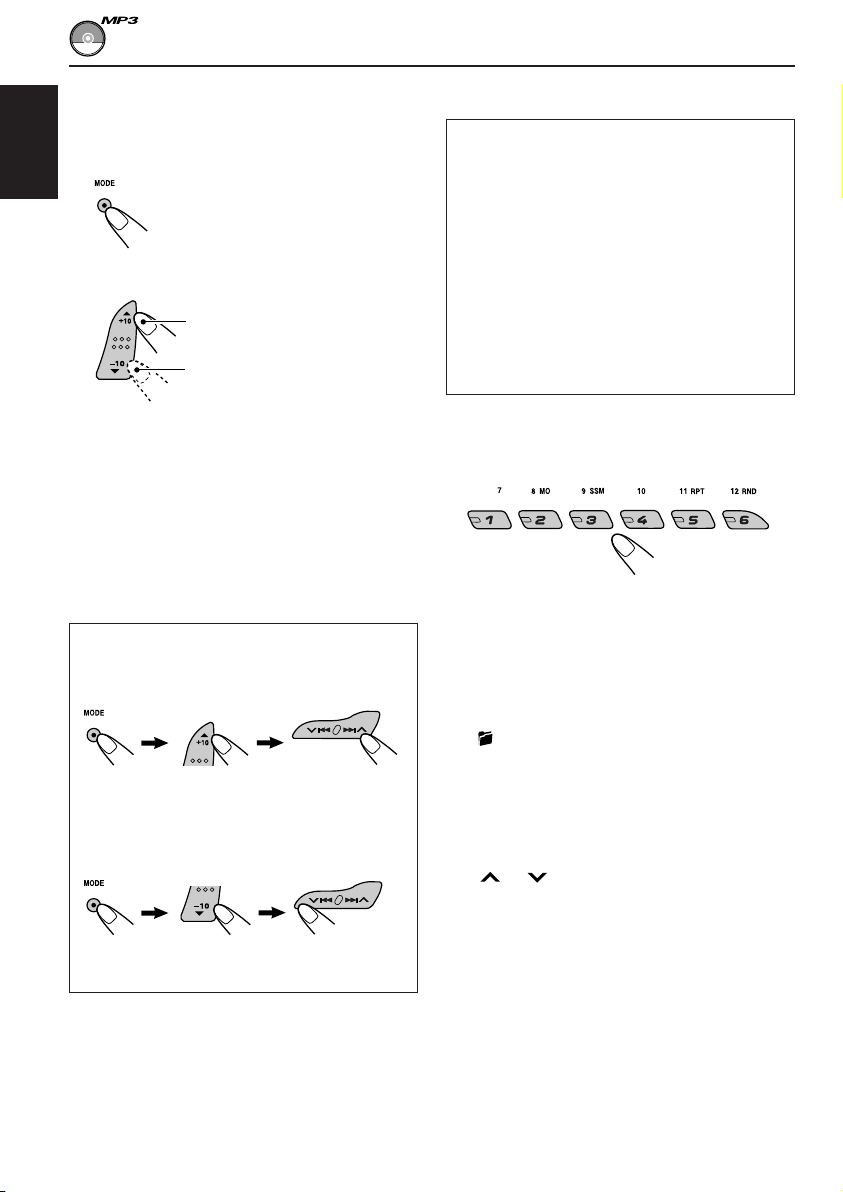
To go to a track quickly (+10 and –10 buttons)
1 Press MODE to enter the functions mode
while playing a CD.
2 Press +10 or –10.
To skip 10 tracks* forwards to
the last track
To skip 10 tracks* backwards to
the first track
* First time you press +10 or –10 button, the
track skips to the nearest higher or lower
track with a track number of multiple ten (ex.
10th, 20th, 30th).
Then each time you press the button, you can
skip 10 tracks (see “How to use the +10 and
–10 buttons” on page 13).
• After the last track, the first track will be
selected, and vice versa.
12
Page 13

How to use the +10 and –10 buttons
• Ex. 1: To select track number 32 while
playing track number 6
To play back tracks repeatedly
(Track Repeat Play)
You can play back the current track repeatedly.
1 Press MODE to enter the
functions mode while playing a
CD.
ENGLISH
(Three times) (Twice)
Track 6 \ 10 \ 20 \ 30 \ 31 \ 32
• Ex. 2 :To select track number 8 while
playing track number 36
(Three times) (Twice)
Track 36 \ 30 \ 20 \ 10 \ 9 \ 8
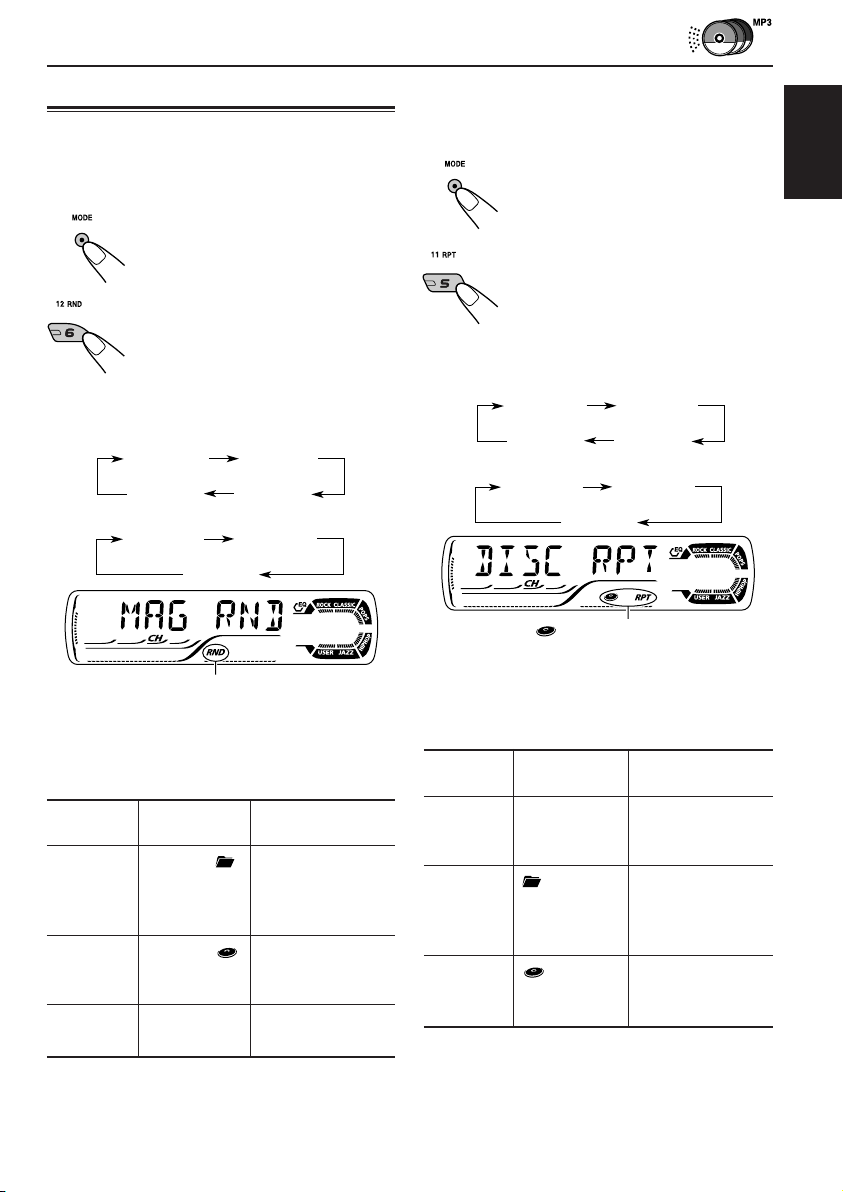
Selecting CD playback modes
To play back tracks at random
(Disc Random Play)
You can play back all tracks on the CD at random.
1 Press MODE to enter the
functions mode while playing a
CD.
2 Press RND (random), while
“MODE” is still flashing on the
display, so that “DISC RND”
appears on the display.
Each time you press the button,
disc random play mode turns on
and off alternately.
2 Press RPT (repeat), while
“MODE” is still flashing on the
display, so that “TRK RPT”
appears on the display.
Each time you press the button,
track repeat play mode turns on
and off alternately.
RPT indicator
When track repeat play is turned on, the RPT
indicator lights up on the display. The current
track starts playing repeatedly.
RND and (disc) indicators
When disc random play is turned on, the RND
and indicators light up on the display. A track
randomly selected starts playing.
13
Page 14
Playing a CD Text
Prohibiting disc ejection
In a CD Text, some information about the disc (its
disc title, performer, and track title) is recorded.
This CD Text information will be shown
ENGLISH
automatically when you play a CD Text.
To change the CD Text information
manually, select text display mode while
playing a CD Text.
Press DISP (display) repeatedly.
Each time you press the button,
the display changes as follows:
Disc title/performer
Track title
( lights up on the display)
Elapsed playing time and
Current track number
Clock and
Current track number
Notes:
• The display shows up to 8 characters at one time
and scrolls if there are more than 8 characters.
See also “To select the scroll mode—SCROLL” on
page 23.
Some characters or symbols will not be shown (and
be blanked) on the display.
(Ex. “ABCå!d#” ]“ABCA D ”)
• When you press DISP (display) while playing a
conventional CD, “NO NAME” appears for the
disc title/performer and the track title.
• When track title is shown, the Tr indicator and
current track number also appear on the right side
of the display.
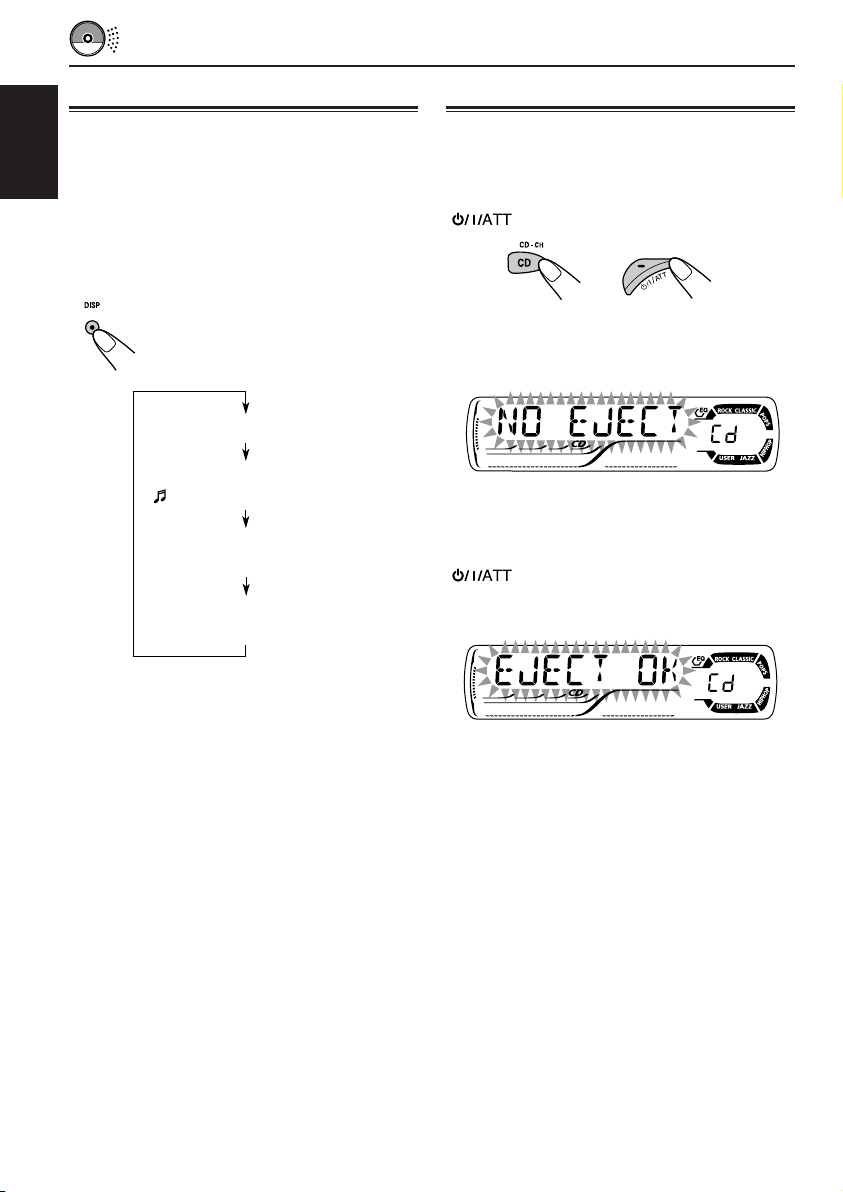
You can prohibit disc ejection and can lock a disc
in the loading slot.
While pressing CD CD-CH, press and hold
for more than 2 seconds.
“NO EJECT” flashes on the display for about
5 seconds, and the disc is locked and cannot be
ejected.
To cancel the prohibition and unlock the
disc
While pressing CD CD-CH, press and hold
again for more than 2 seconds.
“EJECT OK” flashes on the display for about
5 seconds, and the disc is unlocked.
14
Page 15
MP3 INTRODUCTION
What is MP3?
MP3 is an abbreviation of Motion Picture Experts
Group (or MPEG) Audio Layer 3. MP3 is simply a
file format with a data compression ratio of 1:10
(128 Kbps*).
* Bit rate is the average number of bits that one
second of audio data will consume. The unit used is
Kbps. To get a better audio quality, choose a higher
bit rate. The most popular bit rate for encoding is
128 Kbps.
• For details information about the MP3
discs, refer to “A Guide to MP3/WMA”
(separate volume).
Compatible with ID3 Tag
Extra information data such as album title,
performer name, song title, recording year, music
genre and a brief comment can be stored within
an MP3 file.
This unit can show both ID3v1 (Version 1) and
ID3v2 (Version 2) tags on the display. (See page
17.)
• Some characters cannot be shown correctly.
• If both ID3v1 and ID3v2 are recorded on a
disc, ID3v2 information will be shown.
How are MP3 files recorded
and played back?
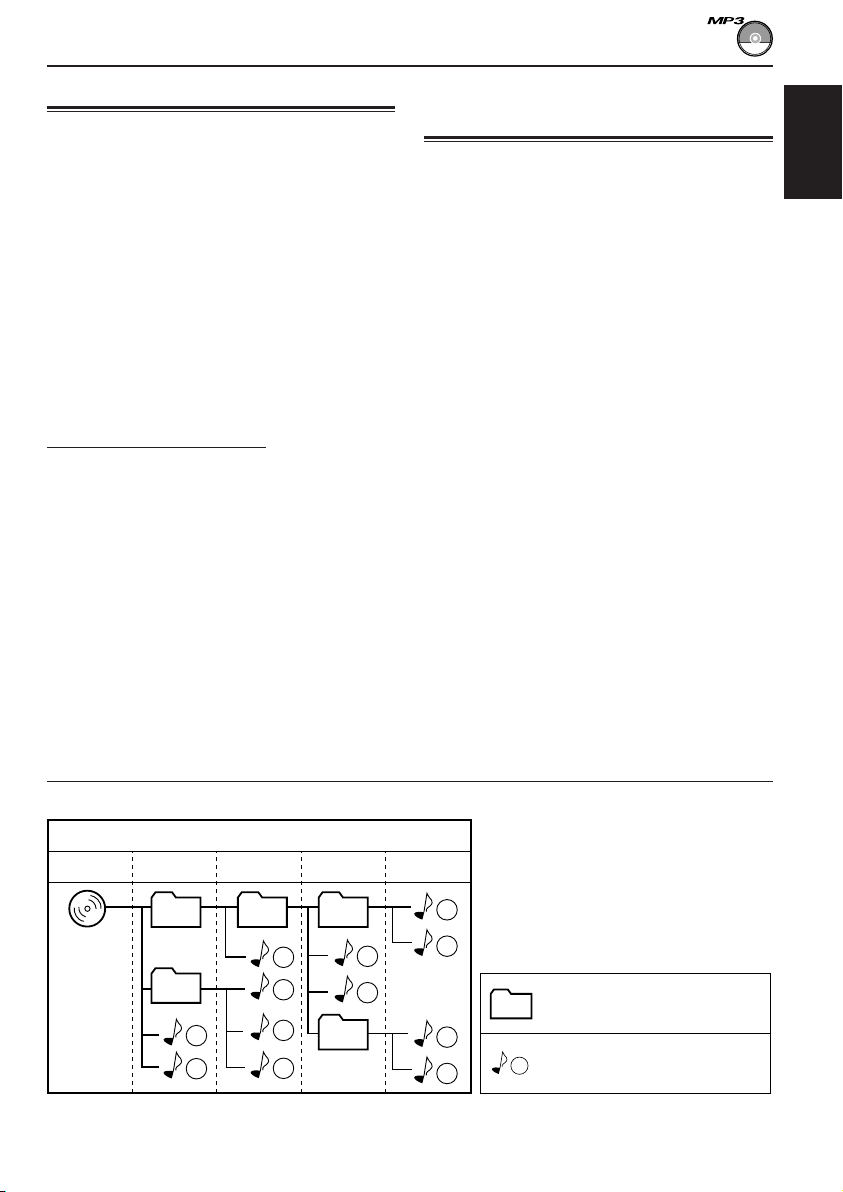
MP3 “files (tracks)” can be recorded in “folders”
—in PC terminology.
During recording, the files and folders can be
arranged in a way similar to arranging files and
folders of computer data.
“Root” is similar to the root of a tree. Every file
and folder can be linked to and be accessed from
the root.
The illustration below shows an example of how
MP3 files are recorded on a CD-R or CD-RW,
how they are played back, and how they are
searched for on this unit.
Notes:
• This unit can read a CD-ROM containing MP3
files. However, if non-MP3 files are recorded
together with MP3 files, this unit will take a longer
time to scan the disc. It may also cause the unit to
malfunction.
• This unit cannot read or play an MP3 file without
the extension code <.mp3>.
• This unit is not compatible with MP3 file encoded
with Layer 1 and Layer 2 formats.
• This unit is not compatible with Playlist**.
**A playlist is a simple text file, used on a PC, which
enables users to make their own playback order
without physically rearranging the files.
ENGLISH
Hierarchy
Level 1 Level 2 Level 3 Level 4 Level 5
6
7
8
9
ROOT
01
05
1
2
02 03
3
10
11
04
12
4
5
: Folder and their playback
01
order
: MP3 files and their playback
1
order
15
Page 16
ENGLISH
MP3 OPERATIONS
Refer also to “CD OPERATIONS” on pages
11 to 14.
Playing an MP3 disc
1
Open the control panel.
Note on One-Touch Operation:
When a disc is already in the loading slot,
pressing CD CD-CH turns on the unit and starts
playback automatically.
2
Insert an MP3 disc into the loading
slot.
The unit turns on,
draws the disc and
starts playback
automatically.
3
Close the control panel by hand.
All files will be played repeatedly until you
stop playback.
The display changes to show the following:
Current source indication
CD indicator
Total folder
number
MP3 indicator
Ex.: When the disc contains 19 folders
and 144 MP3 files
Notes:
• MP3 discs require a longer readout time.
(It differs due to the complexity of the folder/file
configuration.)
• When playback starts, folder and file names (or ID3
tags) will automatically appears. (See also page 17.)
• If you change the source or turn the power off, disc
playback stops (without ejecting the disc).
Next time you select the CD player as the source or
turn the power on, disc play starts from where
playback has been stopped previously.
Total file
number
16
Page 17
To stop play and eject the disc
Press 0.
Playback stops and the control panel flips down.
The disc automatically ejects from the loading slot.
To change the display information
While playing back an MP3 file, you can change
the MP3 disc information shown on the display.
Press DISP (display) repeatedly.
Each time you press the button,
the display changes to show the
following:
• When “TAG DISP” is set to “TAG ON”
(initial setting: see page 24)
Album name / performer
(folder name*)
(TAG lights up on the display)
Track title (file name*)
(TAG lights up on the display)
Elapsed playing time and
Current file number
Notes:
• The display shows up to 8 characters at a time and
scrolls if there are more than 8 characters.
See also “To select the scroll mode—SCROLL” on
page 23.
• When folder or file name is shown, current folder
number or the Tr indicator and current file number
also appear on the right side of the display.
Locating a file or a particular
portion on a disc
To fast-forward or reverse the file
Press and hold ¢ while
playing a disc, to fast-forward
the file.
Press and hold 4 while playing a disc, to
reverse the file.
Note:
During this operation, you can only hear intermittent
sounds. (The elapsed playing time also changes
intermittently on the display.)
ENGLISH
Clock and
Current file number
* If an MP3 file does not have ID3 tags, folder
name and file name appear. In this case, the
TAG indicator will not light up on the display.
• When “TAG DISP” is set to “TAG OFF”
Folder name
( lights up on the display)
File name
( lights up on the display)
Elapsed playing time and
Current file number
Clock and
Current file number
To skip to the next or previous files
Press ¢ briefly while
playing, to skip ahead to the
beginning of the next file.
Each time you press the button
consecutively, the beginning of
the next files is located and
played back.
Press 4 briefly, while playing, to skip back
to the beginning of the current file.
Each time you press the button consecutively,
the beginning of the previous files is located and
played back.
17
Page 18
To go to a particular file quickly within the
current folder (+10 and –10 buttons)
1 Press MODE to enter the functions mode
while playing a disc.
ENGLISH
2 Press +10 or –10.
To skip 10 files* forwards to
the last file
To skip 10 files* backwards to
the first file
* First time you press +10 or –10 button, the
file skips to the nearest higher or lower file
with a file number of multiple ten (ex. 10th,
20th, 30th).
Then each time you press the button, you can
skip 10 files (see “How to use the +10 and
–10 buttons” below).
• After the last file, the first file will be selected,
and vice versa.
How to use the +10 and –10 buttons
• Ex. 1: To select file number 32 while playing
file number 6
(Three times) (Twice)
File 6 \ 10 \ 20 \ 30 \ 31 \ 32
• Ex. 2 :To select file number 8 while playing
file number 36
To go to a particular folder directly
IMPORTANT:
To directly select the folders using the number
button(s), it is required that folders are
assigned 2 digit numbers at the beginning of
their folder names. (This can only be done
during the recording of CD-Rs or CD-RWs.)
Ex.: If folder name is “01 ABC”
= Press 1 to go to Folder 01 ABC.
If folder name is “1 ABC,” pressing 1
does not work.
If folder name is “12 ABC”
= Press and hold 6 (12) to go to Folder
12 ABC.
Press the number button corresponding to the
folder number to start playing the first file in the
selected folder.
• To select a folder number from 01 – 06:
Press 1 (7) – 6 (12) briefly.
• To select a folder number from 07 – 12:
Press and hold 1 (7) – 6 (12) for more than one
second.
Notes:
• If indicator flashes on the display after you have
selected a folder, it means that the folder does not
contain any MP3 files.
• You cannot directly select a folder with a number
greater than 12.
To select a particular file in a folder, press
¢ or 4 after selecting the folder.
(Three times) (Twice)
File 36 \ 30 \ 20 \ 10 \ 9 \ 8
18
Page 19
To skip to the next or previous folder
Press 5 (up) while playing an MP3
disc to skip to the next folder.
Each time you press the button
consecutively, the next folder is
located (and the first file in the
folder starts playing, if recorded).
Press ∞ (down) while playing an MP3 disc to
skip back to the previous folder.
Each time you press the button consecutively,
the previous folder is located (and the first file in
the folder starts playing, if recorded).
Note:
If the folder does not contain any MP3 files, it is
skipped.
Selecting MP3 playback modes
To play back files at random
(Folder Random/Disc Random Play)
You can play back all files of the current folder or
all files on the MP3 disc at random.
1 Press MODE to enter the
functions mode while playing an
MP3 disc.
2 Press RND (random), while
“MODE” is still flashing on the
display, so that “FLDR RND” or
“DISC RND” appears on the
display.
Each time you press the button,
the random play mode changes
as follows:
DISC RNDFLDR RND
Canceled
RND and (folder) indicators
Ex.: When you select “FLDR RND”
Mode
FLDR RND RND and All files of the
DISC RND RND and All files on the disc.
Active
indicator
indicators current folder, then
light up. files of the next
indicators
light up.
Plays at random
folder and so on.
To play back files repeatedly
(Track Repeat/Folder Repeat Play)
You can play back the current file or all the files
in the current folder repeatedly.
1 Press MODE to enter the
functions mode while playing an
MP3 disc.
2 Press RPT (repeat), while
“MODE” is still flashing on the
display, so that “TRK RPT” or
“FLDR RPT” appears on the
display.
Each time you press the button,
the repeat play mode changes
as follows:
TRK RPT FLDR RPT
Canceled
RPT indicator
Ex.: When you select “TRK RPT”
Mode
TRK RPT RPT indicator The current (or
FLDR RPT and RPT All files of the
Active
indicator
lights up. specified) file.
indicators current (or
light up. specified) folder.
Plays repeatedly
ENGLISH
19
Page 20
SOUND ADJUSTMENTS
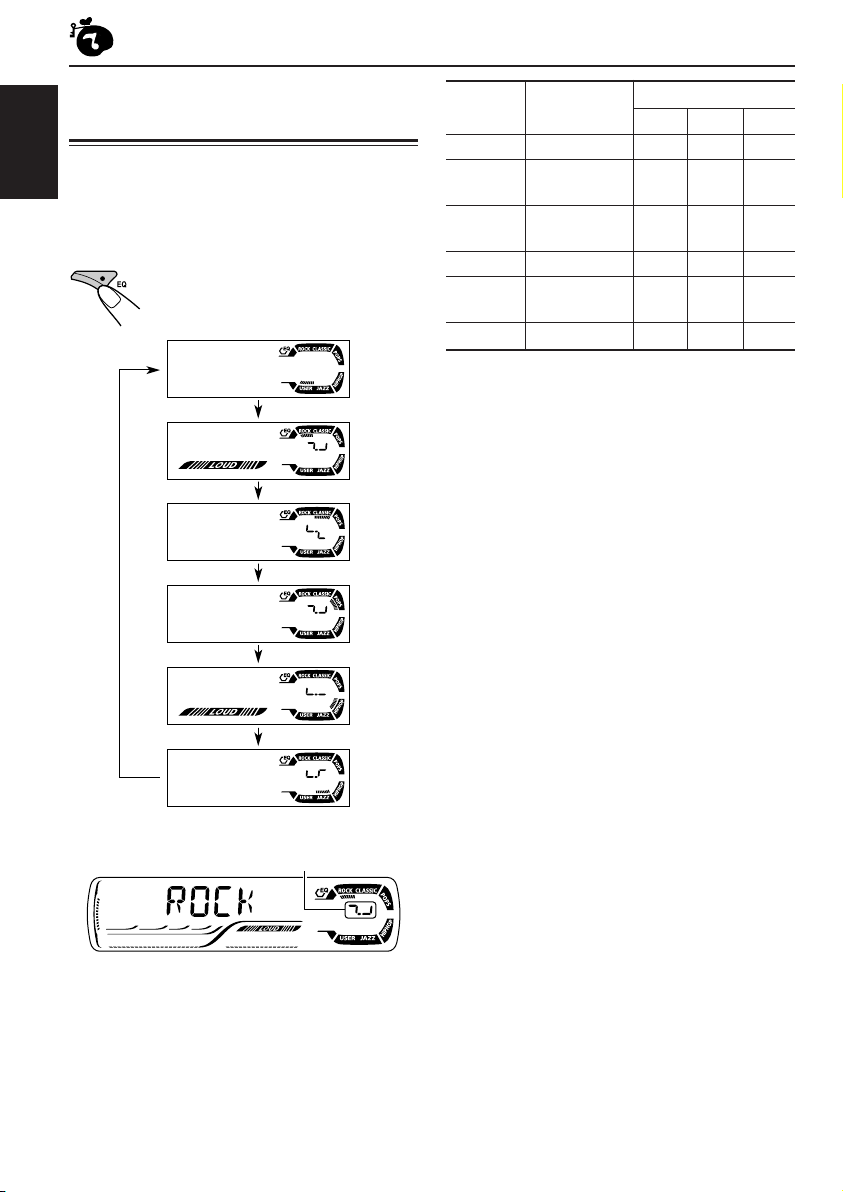
Selecting preset sound modes
(C-EQ: custom equalizer)
You can select a preset sound mode (C-EQ:
ENGLISH
custom equalizer) suitable to the music genre.
Select the sound mode you want.
Each time you press the
button, the sound modes
change as follows:
USER
ROCK
CLASSIC
POPS
Indication For: Preset values
BAS TRE LOUD
USER (Flat sound) 00 00 OFF
ROCK Rock or +03 +01 ON
disco music
CLASSIC Classical +01 –02 OFF
music
POPS Light music +04 +01 OFF
HIP HOP Funk or rap +02 00 ON
music
JAZZ Jazz music +02 +03 OFF
Note:
You can adjust each sound mode to your preference.
Once you make an adjustment, it is automatically
stored for the currently selected sound mode. See
“Adjusting the sound” on page 21.
20
HIP HOP
JAZZ
Indication pattern changes for each
sound mode except for “USER.”
Ex.: When you select “ROCK”
Page 21
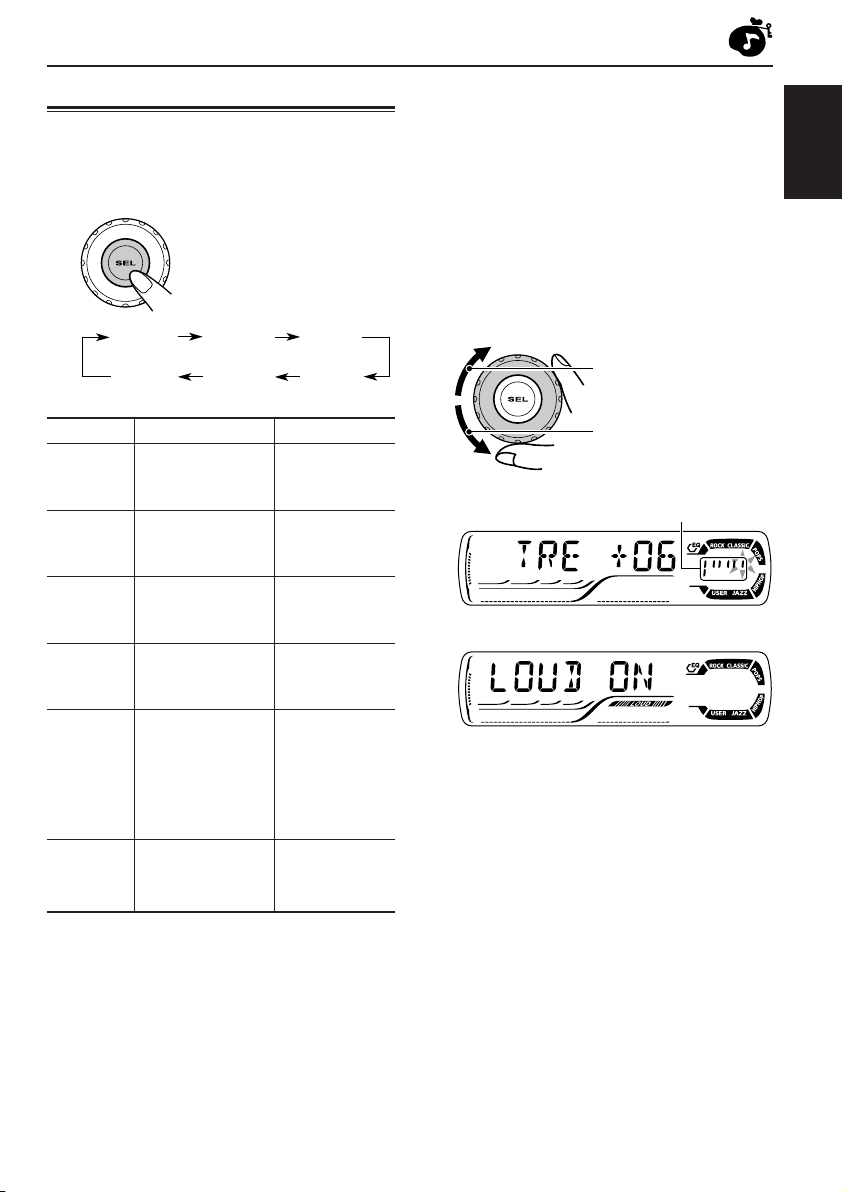
Adjusting the sound
You can adjust the sound characteristics to your
preference.
1
Select the item you want to adjust.
Each time you press the
button, the adjustable items
change as follows:
BAS
(bass)
VOL
(volume)
TRE
(treble)
LOUD
(loudness)
FAD
(fader)
BAL
(balance)
1
*
When you adjust the bass, treble, or loudness, the
adjustment you have made is stored for the
currently selected sound mode (C-EQ) including
“USER.”
2
*
If you are using a two-speaker system, set the fader
level to “00.”
3
*
Normally the control dial work as the volume
control. So you do not have to select “VOL” to
adjust the volume level.
4
*
Depending on the amplifier gain control setting.
(See page 24 for details.)
2
Adjust the setting.
To increase the level or
turn on the loudness
ENGLISH
Indication To do: Range
1
BAS*
TRE*
FAD *
BAL Adjust the left L06 (Left only)
LOUD*
VOL*
Adjust the bass. –06 (min.)
1
Adjust the treble. –06 (min.)
2
Adjust the front R06 (Rear only)
and rear speaker |
balance. F06 (Front only)
and right speaker |
balance. R06 (Right only)
1
Boost low and
high frequencies LOUD ON
to produce a well- |
balanced sound LOUD OFF
at low volume
level.
3
Adjust the volume. 00 (min.)
|
+06 (max.)
|
+06 (max.)
|
30 or 50 (max.)*
To decrease the level or
turn off the loudness
Indication pattern changes as
you adjust the bass or treble.
Ex. 1: When you adjust “TRE” (treble)
Ex. 2: When you turn on the loudness
3
Repeat steps 1 and 2 to adjust the
other items.
To reset each sound mode to the factory
4
settings, repeat the same procedure and
reassign the preset values listed in the table on
page 20.
21
Page 22
OTHER MAIN FUNCTIONS
Changing the general settings
3
Adjust the PSM item selected.
(PSM)
You can change the items listed in the table
ENGLISH
below and on page 23 by using the PSM
(Preferred Setting Mode) control.
Basic Procedure
1
Press and hold SEL (select) for more
than 2 seconds so that one of the
PSM items appears on the display.
(See below and page 23.)
2
Select the PSM item you want to
adjust.
Preferred Setting Mode (PSM) items
• For detailed operations of each PSM items, refer to the pages listed in the table.
4
Repeat steps 2 and 3 to adjust the
other PSM items if necessary.
5
Finish the setting.
Indications Selectable values/items
DEMO Display demonstration
CLOCK H Hour adjustment
CLOCK M Minute adjustment
LEVEL Level display
DIMMER Dimmer mode
TEL Telephone muting
22
Factory-preset See
settings page
DEMO ONDEMO OFF DEMO ON 6
0 — 23
00 — 59
OFF ON ON
AUTO OFF
ON
OFF MUTING 1
MUTING 2
00 (0:00)
0 (0:00)
AUTO
OFF
7
23
23
23
Page 23
Indications Selectable values/items
Factory-preset See
settings page
SCROLL Scroll mode
EXT IN* External component
TAG DISP Tag display
AMP GAIN Amplifier gain control
ONCE AUTO
OFF
CHANGER LINE IN CHANGER
TAG OFF TAG ON TAG ON 24
LOW PWR HIGH PWR HIGH PWR 24
* Displayed only when one of the following sources is selected—FM, AM, and CD.
To select the level meter—LEVEL
You can activate or deactivate the level meter
according to your preference.
When shipped from the factory, level meter is
activated.
• ON: Shows the audio level indicator.
• OFF: Cancels the audio level indicator;
sound mode indicator is shown.
To select the dimmer mode—DIMMER
When you turn on the car headlights, the display
automatically dims (Auto Dimmer).
When shipped from the factory, Auto Dimmer
mode is activated.
• AUTO: Activates Auto Dimmer.
• OFF: Cancels Auto Dimmer.
• ON: Always dims the display.
Note:
Auto Dimmer equipped for this unit may not work
correctly on some vehicles, particularly on those
having a control dial for dimming.
In this case, set the dimmer mode to “ON” or “OFF.”
To select the telephone muting—TEL
This mode is used when a cellular phone system
is connected. Depending on the phone system
used, select either “MUTING 1” or “MUTING 2”
whichever mutes the sounds from this unit.
When shipped from the factory, this mode is
deactivated.
• MUTING 1: Select if this setting can mute the
sounds.
• MUTING 2: Select if this setting can mute the
sounds.
• OFF: Cancels the telephone muting.
To select the scroll mode—SCROLL
You can select the scroll mode for the disc
information (when the entire text cannot be
shown at once).
When shipped from the factory, scroll mode is set
to “ONCE.”
• ONCE: Scrolls only once.
• AUTO: Repeats the scroll (5-second
intervals in between).
• OFF: Cancels scroll mode.
ONCE
23
ENGLISH
24
Note:
Even if the scroll mode is set to “OFF,” you can scroll
the display by pressing DISP (display) for more than
one second.
23
Page 24

To select the external component to use
—EXT IN
You can connect the external component to the
CD changer jack on the rear using the Line Input
ENGLISH
Adapter KS-U57 (not supplied).
To use the external component as the playback
source through this unit, you need to select
which component—CD changer or external
component—to use.
When shipped from the factory, CD changer is
selected as the external component.
• CHANGER: To use the CD changer.
• LINE IN: To use the external component
other than CD changer.
Note:
For connecting the Line Input Adapter KS-U57 and
the external component, refer to the Installation/
Connection Manual (separate volume).
To turn the tag display on or off
—TAG DISP
An MP3 file can contain file information called
“ID3 Tag” where its album name, performer, track
title, etc. are recorded.
There are two versions—ID3v1 (ID3 Tag version 1)
and ID3v2 (ID3 Tag version 2). If both ID3v1 and
ID3v2 are recorded on a disc, ID3v2 information
will be shown.
When shipped from the factory, “TAG ON” is
selected.
• TAG ON: Turns on the ID3 tag display while
• TAG OFF: Turns off the ID3 tag display while
playing MP3 files.
• If an MP3 file does not have ID3
tags, folder name and file name
appear.
playing MP3 files. (Only the folder
name and file name can be
shown.)
To select the amplifier gain control
—AMP GAIN
You can change the maximum volume level of
this unit. When the maximum power of the
speakers is less than 50 W, select “LOW PWR”
to prevent them from being damaged.
When shipped from the factory, “HIGH PWR” is
selected.
• LOW PWR: You can adjust the volume level
from “VOL 00” to “VOL 30.”
Note:
If you change the setting from
“HIGH PWR” to “LOW PWR” while
listening at a volume level more than
30, the unit automatically changes the
volume level to “VOL 30.”
• HIGH PWR:You can adjust the volume level
from “VOL 00” to “VOL 50.”
24
Page 25

Detaching the control panel
You can detach the control panel when leaving
the car.
When detaching or attaching the control panel,
be careful not to damage the connectors on the
back of the control panel and on the panel
holder.
Detaching the control panel
Before detaching the control panel, be sure to
turn off the power.
1
Unlock the control panel.
2
Pull the control panel out of the unit.
Attaching the control panel
1
Insert the right side of the control
panel into the groove on the panel
holder.
2
Press the left side of the control
panel to fix it to the panel holder.
ENGLISH
3
Put the detached control panel into
the provided case.
Note on cleaning the connectors:
If you frequently detach the control panel, the
connectors will deteriorate.
To minimize this possibility, periodically wipe the
connectors with a cotton swab or cloth moistened
with alcohol, being careful not to damage the
connectors.
Connectors
25
Page 26

ENGLISH
CD CHANGER OPERATIONS
We recommend that you use the JVC MP3compatible CD changer with your unit.
By using this CD changer, you can play back
your original CD-Rs (Recordable) and CD-RWs
(Rewritable) recorded either in audio CD format
or in MP3 format.
• You can also connect other CH-X series
CD changers (except CH-X99 and CH-X100).
However, they are not compatible with MP3
discs, so you cannot play back MP3 discs.
• You cannot use the KD-MK series CD
changers with this unit.
Before operating your CD changer:
• Refer also to the Instructions supplied for
your CD changer.
• If no discs are in the magazine of the CD
changer or the discs are inserted upside
down, “NO DISC” will appear on the display.
If this happens, remove the magazine and
set the discs correctly.
• If no magazine is loaded in the CD changer,
“NO MAG” appears on the display. If this
happens, insert the magazine in the CD
changer.
• If “RESET 1” – “RESET 8” appears on the
display, something is wrong with the
connection between this unit and the CD
changer. If this happens, check the
connection and make sure the cords are
connected firmly. Then, press the reset
button of the CD changer.
Playing discs
Select the CD changer (CD-CH).
CD CD-CH*
* If you have changed “EXT IN” setting to “LINE IN”
(see page 24), you cannot select the CD changer.
• When the current disc is an MP3 disc:
Playback starts from the first folder of the
current disc once file check is completed.
Selected disc number
(folder) indicator
MP3 indicator
Selected folder
number
26
Note:
Folder name appears on the display instead of
“ROOT,” if an MP3 disc contains a folder.
Page 27

• When the current disc is a CD:
Playback starts from the first track of the
current disc.
Selected disc number
Elapsed playing
time
Current track
number
To go to a particular disc directly
Press the number button corresponding to the
disc number to start its playback (while the CD
changer is playing).
ENGLISH
• To select a disc number from 1 – 6:
Press 1 (7) – 6 (12) briefly.
• To select a disc number from 7 – 12:
Press and hold 1 (7) – 6 (12) for more than
one second.
To fast-forward or reverse the track/file
Press and hold ¢ , during
play, to fast-forward the track/file.
Notes:
• When you press CD CD-CH, the power
automatically comes on. You do not have to press
to turn on the power.
• If you change the source, CD changer play also
stops. Next time you select the CD changer as the
source, CD changer play starts from where
playback has been stopped previously.
• When you start playing back a CD Text or MP3
disc, disc information will automatically appear on
the display. (See pages 14 and 17.)
Press and hold 4, during play, to reverse
the track/file.
Note:
During this operation, you can only hear intermittent
sounds. (The elapsed playing time also changes
intermittently on the display.)
To skip to the next or previous tracks/files
Press ¢ briefly during
play, to skip ahead to the
beginning of the next track/file.
Each time you press the button
consecutively, the beginning of
the next tracks/files is located
and played back.
Press 4 briefly during play, to skip back to
the beginning of the current track/file.
Each time you press the button consecutively,
the beginning of the previous tracks/files is
located and played back.
27
Page 28

This operation is only possible when
using JVC MP3-compatible CD changer
(CH-X1500).
To go to a track/file quickly (+10 and –10
ENGLISH
buttons)
1 Press MODE to enter the functions mode
while playing a disc.
2 Press +10 or –10.
To skip 10 tracks/files*
forwards to the last track/file
To skip 10 tracks/files*
backwards to the first track/file
* First time you press +10 or –10 button, the
track/file skips to the nearest higher or lower
track/file with a track/file number of multiple
ten (ex. 10th, 20th, 30th).
Then each time you press the button, you can
skip 10 tracks/files (see “How to use the +10
and –10 buttons” below).
• After the last track/file, the first track/file will
be selected, and vice versa.
Note:
If the current playing disc is an MP3 disc, files are
skipped within the same folder.
How to use the +10 and –10 buttons
• Ex. 1: To select track/file number 32 while
playing track/file number 6
To skip to the next or previous folder
(only for MP3 discs)
Press 5 (up) while playing an MP3
disc, to go to the next folder.
Each time you press the button
consecutively, the next folder is
located, and the first file in the
folder starts playback.
Press ∞ (down) while playing an MP3 disc, to go
to the previous folder.
Each time you press the button consecutively,
the previous folder is located, and the first file in
the folder starts playback.
To show the disc information for CD Text
and MP3 discs
This is possible only when connecting a JVC CD
changer equipped with CD Text and/or MP3 disc
information reading capability.
Select text display mode while playing a
CD Text or an MP3 disc.
• For details, see page 14 about CD Text disc
information and page 17 about MP3 disc
information.
(Three times) (Twice)
Track/File 6 \ 10 \ 20 \ 30 \ 31 \ 32
• Ex. 2 :To select track/file number 8 while
playing track/file number 36
(Three times) (Twice)
Track/File 36 \ 30 \ 20 \ 10 \ 9 \ 8
28
Page 29
Selecting the playback modes
To play back tracks/files at random
(Folder Random/Disc Random/Magazine
Random Play)
1 Press MODE to enter the
functions mode during play.
2 Press RND (random), while
“MODE” is still flashing on the
display.
Each time you press the button,
the random play mode changes
as follows:
For MP3 discs:
DISC RNDFLDR RND
For CDs:
Canceled
RND indicator
Ex.: When you select “MAG RND”
Note:
MP3 indicator also lights up if the current playing disc
is an MP3 disc.
Mode
FLDR RND* RND and All files of the
DISC RND RND and All tracks/files of
MAG RND RND indicator All tracks/files of
* “FLDR RND” is only applicable for MP3 discs.
Active
indicator
indicators current folder, then
light up. files of the next
indicators the current (or
light up. specified) disc.
lights up. the inserted discs.
MAG RND
MAG RNDDISC RND
Canceled
Plays at random
folder and so on.
To play back tracks/files repeatedly
(Track Repeat/Folder Repeat/Disc Repeat
Play)
1 Press MODE to enter the
functions mode during play.
2 Press RPT (repeat), while
“MODE” is still flashing on the
display.
Each time you press the button,
the repeat play mode changes
as follows:
For MP3 discs:
TRK RPT
Canceled
For CDs:
(disc) and RPT indicators
Ex.: When you select “DISC RPT”
Note:
MP3 indicator also lights up if the current playing disc
is an MP3 disc.
Mode
TRK RPT RPT indicator The current (or
FLDR RPT* and RPT All files of the
DISC RPT and RPT All tracks/files of
* “FLDR RPT” is only applicable for MP3 discs.
Active
indicator
lights up. specified) track/
indicators current (or
light up. specified) folder of
indicators light the current (or
up. specified) disc.
FLDR RPT
DISC RPT
DISC RPTTRK RPT
Canceled
Plays repeatedly
file.
the current disc.
ENGLISH
29
Page 30

ENGLISH
EXTERNAL COMPONENT OPERATIONS
Playing an external component
You can connect the external component to the
CD changer jack on the rear using the Line Input
Adapter KS-U57 (not supplied).
Preparations:
• For connecting the Line Input Adapter KS-U57 and
the external component, refer to the Installation/
Connection Manual (separate volume).
• Before operating the external component using the
following procedure, select the external input
correctly. See “To select the external component to
use—EXT IN” on page 24.
1
Select the external component
(LINE IN).
CD LINE IN*
• If “LINE IN”* does not appear on the display,
see page 24 and select the external input
(“LINE IN”).
* Displayed only when one of the following sources is
selected—FM, AM, and CD.
2
Turn on the connected component
and start playing the source.
3
Adjust the volume.
4
Adjust the sound as you want. (See
pages 20 and 21.)
Note on One-Touch Operation:
When you press CD CD-CH, the power automatically
comes on. You do not have to press to turn
on the power.
30
Page 31

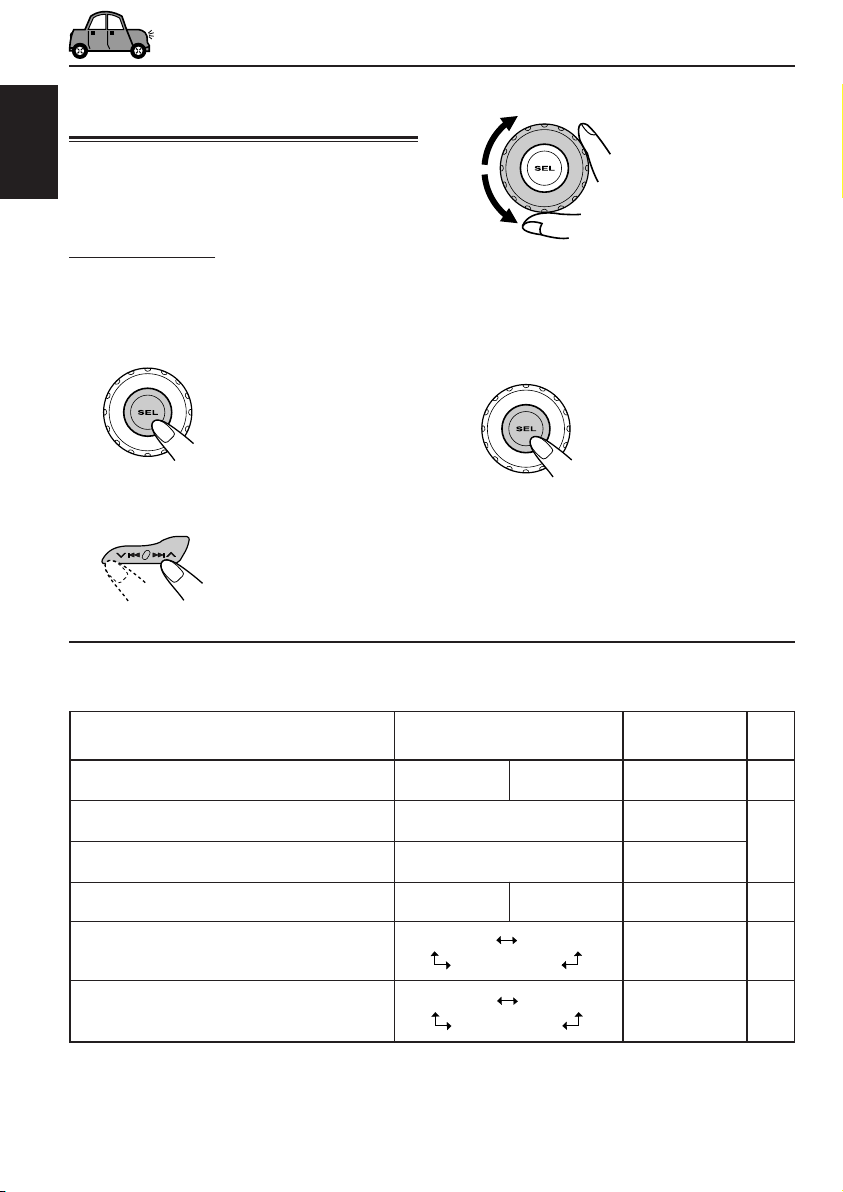
USING THE REMOTE CONTROLLER
This unit can be remotely controlled as instructed
here (with an optionally purchased remote
controller). We recommend that you use remote
controller RM-RK50 or RM-RK60 with your unit.
(Ex.: When you are using RM-RK60)
Before using the remote controller:
• Aim the remote controller directly at the remote
sensor on the main unit. Make sure there is no
obstacle in between.
Remote sensor
• Do not expose the remote sensor to strong
light (direct sunlight or artificial lighting).
Installing the battery
When the controllable range or effectiveness
of the remote controller decreases, replace
the battery.
1. Remove the battery holder.
1) Push out the battery holder in the
direction indicated by the arrow using a
ball point pen or a similar tool.
2) Remove the battery holder.
3. Return the battery holder.
Insert again the battery holder by pushing it
until you hear a clicking sound.
(back side)
WARNING:
• Store the battery in a place where children
cannot reach.
If a child accidentally swallows the battery,
consult a doctor immediately.
• Do not recharge, short, disassemble, or heat the
battery or dispose of it in a fire.
Doing any of these things may cause the battery
to give off heat, crack, or start a fire.
• Do not leave the battery with other metallic
materials.
Doing this may cause the battery to give off
heat, crack, or start a fire.
• When throwing away or saving the battery,
wrap it in tape and insulate; otherwise, the
battery may start to give off heat, crack, or start
a fire.
• Do not poke the battery with tweezers or similar
tools.
Doing this may cause the battery to give off
heat, crack, or start a fire.
ENGLISH
(back side)
2. Place the battery.
Slide the battery into the holder with the
+ side facing upwards so that the battery
is fixed in the holder.
Lithium coin
battery (product
number: CR2025)
CAUTION:
DO NOT leave the remote controller in a place
(such as dashboards) exposed to direct sunlight
for a long time. Otherwise, it may be damaged.
31
Page 32

Location of the buttons
RM-RK60
ENGLISH
S
1 • Turns on the unit if pressed when the unit is
turned off.
• Turns off the unit if pressed and held until
“SEE YOU” appears on the display.
• Drops the volume level in a moment if
pressed briefly.
Press again to resume the volume.
2 • Searches for stations while listening to the
radio.
• Fast-forwards or reverses the track/file if
pressed and held while listening to a disc.
• Skips to the beginning of the next track/file
or goes back to the beginning of the current
(or previous) tracks/files if pressed briefly
while listening to a disc.
3 • Selects the preset stations while listening to
the radio.
Each time you press the button, the preset
station number increases, and the selected
station is tuned in.
• Skips to the first file of the previous folder
while listening to an MP3 disc.
Each time you press the button, you can
move to the previous folder and start playing
the first file.
• While playing an MP3 disc on an MP3compatible CD changer;
– Skips to the previous disc if pressed
briefly.
– Skips to the previous folder if pressed and
held.
Note:
While playing a CD on a CD changer, this
always skips to the previous disc.
4 Selects the sound mode (C-EQ: custom
equalizer).
Each time you press the button, the sound
mode (C-EQ) changes.
5 • Selects the band while listening to the radio.
Each time you press the button, the band
changes.
• Skips to the first file of the next folder while
listening to an MP3 disc.
Each time you press the button, you can
move to the next folder and start playing the
first file.
• While playing an MP3 disc on an MP3-
compatible CD changer;
– Skips to the next disc if pressed briefly.
– Skips to the next folder if pressed and
held.
Note:
While playing a CD on a CD changer, this
always skips to the next disc.
6 Selects the source.
Each time you press the button, the source
changes.
32
7 Functions the same as the control dial on the
main unit.
Note:
These buttons do not function for the
preferred setting mode (PSM) adjustment.
Page 33

TROUBLESHOOTING
What appears to be trouble is not always serious. Check the following points before calling a service
center.
Symptoms
• Sound cannot be heard
from the speakers.
• This unit does not work
General
at all.
• SSM (Strong-station
Sequential Memory)
automatic preset does
not work.
FM/AM
• Static noise while
listening to the radio.
• Disc cannot be played
back.
• CD-R/CD-RW cannot
be played back.
• Tracks on the CD-R/
CD-RW cannot be
skipped.
Causes
The volume level is set to the
minimum level.
Connections are incorrect.
The built-in microcomputer may
have functioned incorrectly due
to noise, etc.
Signals are too weak.
The aerial is not connected
firmly.
Disc is inserted upside down.
CD-R/CD-RW is not finalized.
Remedies
Adjust it to the optimum level.
Check the cords and
connections.
Press the reset button on the
panel holder after detaching the
control panel. (The clock setting
and preset stations stored in
memory are erased.)
(See page 2.)
Store stations manually.
Connect the aerial firmly.
Insert the disc correctly.
• Insert a finalized CD-R/
CD-RW.
• Finalize the CD-R/CD-RW
with the component which
you used for recording.
ENGLISH
• Disc cannot be ejected.
• Disc sound is
sometimes interrupted.
Disc Playback
• “NO DISC” appears on
the display.
Disc is locked.
You are driving on rough roads.
Disc is scratched.
Connections are incorrect.
No disc in the loading slot.
Disc is inserted incorrectly.
Unlock the disc.
(See page 14.)
Stop playback while driving on
rough roads.
Change the disc.
Check the cords and
connections.
Insert a disc into the loading
slot.
Insert the disc correctly.
33
Page 34
Symptoms
Causes
Remedies
• Disc cannot be played back.
ENGLISH
• Noise is generated.
• A longer readout time is
• Files cannot be played back
MP3 Playback
• Elapsed playing time is not
required (“CHECK” keeps
flashing on the display).
as you have intended them
to play.
correct.
No MP3 files are recorded on
the disc.
MP3 files do not have the
extension code <.mp3> in
their file names.
MP3 files are not recorded in
the format compliant with ISO
9660 Level 1, Level 2, Romeo,
or Joliet.
The file played back is not an
MP3 file (although it has the
extension code <.mp3>).
Readout time varies due to
the complexity of the folder/file
configuration.
Playback order is determined
when the files are recorded.
This sometimes occurs during
play. This is caused by how
the files are recorded on the
disc.
Change the disc.
Add the extension code <.mp3>
to their file names.
Change the disc.
(Record MP3 files using a
compliant application.)
Skip to another file or change
the disc. (Do not add the
extension code <.mp3> to nonMP3 files.)
Do not use too many hierarchies
and folders. Also, do not record
any other types of audio tracks
together with MP3 files.
34
• indicator flashes on the
display.
• “NO FILES” appears on the
display.
• Correct characters are not
displayed (e.g. album
name).
The current folder does not
contain any MP3 file.
The current disc does not
contain any MP3 file.
This unit can only display
alphabets (capital: A–Z),
numbers, and a limited
number of symbols.
Select another folder.
Insert a disc that contains MP3
files.
Page 35

Symptoms
Causes
Remedies
• “NO DISC” appears on the
display.
• “NO MAG” appears on the
display.
• “RESET 8” appears on the
display.
• “RESET 1” – “RESET 7”
appears on the display.
• The CD changer does not
work at all.
No disc is in the magazine.
Discs are inserted upside down.
No magazine is loaded in the
CD changer.
This unit is not connected to the
CD changer correctly.
The built-in microcomputer may
function incorrectly due to
noise, etc.
Insert discs into the
magazine.
Insert discs correctly.
Insert the magazine.
Connect this unit and the
CD changer correctly and
press the reset button of the
CD changer.
Press the reset button of the
CD changer.
Press the reset button on the
panel holder after detaching
the control panel. (The clock
setting and preset stations
stored in memory are
erased.) (See page 2.)
About mistracking:
Mistracking may result from driving on extremely rough roads. This does not damage the unit and the disc,
but will be annoying.
We recommend that you stop disc play while driving on such rough roads.
ENGLISH
CD Changer
35
Page 36

MAINTENANCE
Handling discs
This unit has been designed to reproduce CDs,
CD-Rs (Recordable), CD-RWs (Rewritable), and
CD Texts.
ENGLISH
• This unit is also compatible with MP3 discs.
How to handle discs
When removing a disc
from its case, press down
the center holder of the case
and lift the disc out, holding
it by the edges.
• Always hold the disc by the edges. Do not
touch its recording surface.
When storing a disc into its case, gently insert
the disc around the center holder (with the
printed surface facing up).
• Make sure to store discs into the cases after
use.
To keep discs clean
A dirty disc may not be played
correctly. If a disc does become
dirty, wipe it with a soft cloth in a
straight line from center to edge.
To play new discs
New discs may have some rough
spots around the inner and outer
edges. If such a disc is used, this
unit may reject the disc.
To remove these rough spots, rub
the edges with a pencil or ball-point pen, etc.
Moisture condensation
Moisture may condense on the lens inside the
CD player in the following cases:
• After starting the heater in the car.
• If it becomes very humid inside the car.
Should this occur, the CD player may
malfunction. In this case, eject the disc and leave
the unit turned on for a few hours until the
moisture evaporates.
Center holder
When playing a CD-R or CD-RW
Before playing back CD-Rs or CD-RWs, read
their instructions or cautions carefully.
• Use only “finalized” CD-Rs or CD-RWs.
• Some CD-Rs or CD-RWs may not be played
back on this unit because of their disc
characteristics, and for the following reasons:
– Discs are dirty or scratched.
– Moisture condensation on the lens inside the
unit.
– The pickup lens inside the unit is dirty.
• CD-RWs may require a longer readout time
since the reflectance of CD-RWs is lower than
that of regular CDs.
• CD-Rs or CD-RWs are susceptible to high
temperatures or high humidity, so do not leave
them inside your car.
• Do not use following CD-Rs or CD-RWs:
– Discs with stickers, labels, or protective seal
stuck to the surface.
– Discs on which labels can be directly printed
by an ink jet printer.
Using these discs under high temperatures or
high humidity may cause malfunctions or
damage to discs. For example,
– Stickers or labels may shrink and warp a
disc.
– Stickers or labels may be peeled off so discs
cannot be ejected.
– Print on discs may get sticky.
Read instructions or cautions about labels and
printable discs carefully.
CAUTIONS:
• Do not insert 8 cm discs (single CDs) into the
loading slot. (Such discs cannot be ejected.)
• Do not insert any disc of unusual shape—like a
heart or flower; otherwise, it will cause a
malfunction.
• Do not expose discs to direct sunlight or any
heat source or place them in a place subject to
high temperature and humidity. Do not leave
them in a car.
• Do not use any solvent (for example,
conventional record cleaner, spray, thinner,
benzine, etc.) to clean discs.
36
Warped
disc
Sticker
Sticker
residue
Disc
Stick-on
label
Page 37

SPECIFICATIONS
AUDIO AMPLIFIER SECTION
Maximum Power Output:
Front: 50 W per channel
Rear: 50 W per channel
Continuous Power Output (RMS):
Front: 19 W per channel into 4 Ω, 40 Hz
to 20 000 Hz at no more than
0.8% total harmonic distortion.
Rear: 19 W per channel into 4 Ω, 40 Hz
to 20 000 Hz at no more than
0.8% total harmonic distortion.
Load Impedance: 4 Ω (4 Ω to 8 Ω allowance)
Tone Control Range:
Bass: ±10 dB at 100 Hz
Treble: ±10 dB at 10 kHz
Frequency Response: 40 Hz to 20 000 Hz
Signal-to-Noise Ratio: 70 dB
Line-Out Level/Impedance:
2.0 V/20 kΩ load (full scale)
Output Impedance: 1 kΩ
TUNER SECTION
Frequency Range:
FM1/FM2: 87.5 MHz to 108.0 MHz
FM3: 65.00 MHz to 74.00 MHz
AM: (MW) 522 kHz to 1 620 kHz
(LW) 144 kHz to 279 kHz
CD PLAYER SECTION
Type: Compact disc player
Signal Detection System: Non-contact optical
pickup (semiconductor laser)
Number of channels: 2 channels (stereo)
Frequency Response: 5 Hz to 20 000 Hz
Dynamic Range: 96 dB
Signal-to-Noise Ratio: 98 dB
Wow and Flutter: Less than measurable limit
MP3 decoding format:
MPEG 1/2 Audio Layer 3
Max. Bit Rate: 320 Kbps
GENERAL
Power Requirement:
Operating Voltage:
DC 14.4 V (11 V to 16 V allowance)
Grounding System: Negative ground
Allowable Operating Temperature: 0°C to +40°C
Dimensions (W × H × D):
Installation Size (approx.):
182 mm × 52 mm × 150 mm
Panel Size (approx.):
188 mm × 58 mm × 12 mm
Mass (approx.):
1.4 kg (excluding accessories)
ENGLISH
[FM Tuner]
Usable Sensitivity:
11.3 dBf (1.0 µV/75 Ω)
50 dB Quieting Sensitivity:
16.3 dBf (1.8 µV/75 Ω)
Alternate Channel Selectivity (400 kHz):
65 dB
Frequency Response: 40 Hz to 15 000 Hz
Stereo Separation: 30 dB
Capture Ratio: 1.5 dB
[MW Tuner]
Sensitivity: 20 µV
Selectivity: 35 dB
[LW Tuner]
Sensitivity: 50 µV
Design and specifications are subject to change
without notice.
37
Page 38

ВАЖНО ДЛЯ ЛАЗЕРНОЙ АППАРАТУРЫ
1. ЛАЗЕРНАЯ АППАРАТУРА КЛАССА 1
2. ПРЕДУПРЕЖДЕНИЕ: Не открывайте верхнюю крышку. Внутри устройства нет частей,
которые пользователь может отремонтировать. Ремонт должен осуществляться
квалифицированным обслуживающим персоналом.
3. ПРЕДУПРЕЖДЕНИЕ: Видимое и невидимое лазерное излучение при открытом устройстве,
отказе или нарушении блокировки. Избегайте прямого воздействия излучения.
4. ЭТИКЕТКА: ПРЕДУПРЕЖДАЮЩАЯ ЭТИКЕТКА, РАЗМЕЩЕННАЯ НА НАРУЖНОЙ СТОРОНЕ
УСТРОЙСТВА.
РУCCKИЙ
Как перенастроить Ваше устройство
После отсоединения панели управления
нажмите кнопку возврата в исходное положение
в контейнере панели, используя шариковую
ручку или аналогичный инструмент.
В результате этого встроенный
микрокомпьютер будет перенастроен.
Примечание:
Ваши запрограммированные настройки—такие как
запрограммированные каналы или настройки звука
—также сотрутся.
Как пользоваться кнопка MODE
Если Вы нажмете MODE, устройство переходит в режим функций, и нумерованные и кнопки
5/∞ действуют как кнопки различных функций.
Пример.: Hумерованная кнопка 2 работает как кнопка МО (монофонический).
Индикатор обратного отсчета времени
Чтобы снова вернуть первоначальные функции этих кнопок после нажатия кнопки
переключения режима MODE, подождите 5 секунд, не нажимая кнопок, пока режим
функций не будет сброшен.
• Если нажать на MODE еще раз, также выключается режим функций.
2
Page 39

Благодарим Вас за приобретение изделия JVC. Перед тем, как приступать к эксплуатации,
пожалуйста, внимательно прочитайте все инструкции с тем, чтобы полностью изучить и
обеспечить оптимальную работу этого устройства.
СОДЕРЖАНИЕ
Как перенастроить Ваше устройство ... 2
Как пользоваться Кнопка MODE .......... 2
РАСПОЛОЖЕНИЕ КНОПОК........ 4
Панель управления ................................. 4
ОСНОВНЫЕ ОПЕРАЦИИ ............. 5
Включение ............................................... 5
Отмена демонстрации функций
дисплея ................................................. 6
Установка часов ..................................... 7
ОПЕРАЦИИ С
РАДИОПРИЕМНИКОМ ............... 8
Прослушивание радио ............................ 8
Сохранение радиостанций в памяти ..... 9
Настройка на запрограммированную
радиостанцию ....................................... 10
ОПЕРАЦИИ С КОМПАКТ
-ДИСКАМИ .................................. 11
Воспроизведение компакт-диска .......... 11
Отыскание дорожки или конкретной
части на компакт-диске....................... 12
Выбор режимов воспроизведения
компакт-дисков .................................... 13
Воспроизведение текста на компакт
-диске .................................................... 14
Запрещение извлечения диска ............. 14
ПРЕДИСЛОВИЕ К МР3 ................ 15
Что такое МР3? ....................................... 15
Как записываются и воспроизводятся
файлы МР3? ......................................... 15
ОПЕРАЦИИ МР3............................ 16
Воспроизведение диска МР3................. 16
Отыскание файла или конкретной
части на диске ...................................... 17
Выбор режимов воспроизведения МР3 ...
19
НАСТРОЙКА ЗВУКА .................... 20
Выбор запрограммированных
режимов звучания (C-EQ:
специализированный эквалайзер) ..... 20
Настройка звука ..................................... 21
ДРУГИЕ ГЛАВНЫЕ ФУНКЦИИ ... 22
Изменение общих параметров
настройки (PSM) ................................... 22
Отсоединение панели управления........ 25
ОПЕРАЦИИ С ПРОИГРЫВАТЕЛЕМ
-АВТОМАТОМ КОМПАКТ
-ДИСКОВ .........................................
Воспроизведение компакт-дисков ........ 26
Выбор режимов воспроизведения ........ 29
26
ОПЕРАЦИИ С ВНЕШНИМ
КОМПОНЕНТОМ ......................... 30
Воспроизведение внешнего
компонента ........................................... 30
ИСПОЛЬЗОВАНИЕ ПУЛЬТА
ДИСТАНЦИОННОГО
УПРАВЛЕНИЯ .............................. 31
Расположение кнопок............................. 32
ВЫЯВЛЕНИЕ
НЕИСПРАВНОСТЕЙ ................... 33
ТЕХНИЧЕСКОЕ
ОБСЛУЖИВАНИЕ ...................... 36
Обращение с дисками ............................ 36
ТЕХНИЧЕСКИЕ
ХАРАКТЕРИСТИКИ .................... 37
РУCCKИЙ
ПЕРЕД ТЕМ, КАК ПРИСТУПАТЬ К ЭКСПЛУАТАЦИИ
*Для Вашей безопасности....
• Не повышайте слишком сильно громкость,
поскольку в результате этого заглушаются
внешние звуки, что делает опасным управление
автомобилем.
• Остановите автомобиль перед тем, как
выполнять любые сложные операции.
*Температура внутри автомобиля....
Если Вы припарковали Ваш автомобиль на
длительное время в жаркую или холодную погоду,
перед тем, как включать это устройство,
подождите до тех пор, пока температура в
автомобиле не придет в норму.
3
Page 40

РАСПОЛОЖЕНИЕ КНОПОК
Панель управления
Окно на экране дисплея
a s d
f
РУCCKИЙ
g zx/
h jk
1 3 4 62
9 u i o ;
p
q
1 Кнопка (резервный/включено/
аттенюатор)
2 Кнопка SEL (выбор)
3 Кнопка EQ (эквалайзер)
4 Кнопка FM/AM
5 Кнопка CD CD-CH (проигрыватель-
автомат компакт-дисков)
6 Окно на экране дисплея
7 Кнопка 0 (выталкивание)
8 Кнопка 5 (вверх)
Кнопка +10
9 Кнопка (освобождение панели
управления)
p Диск управления
q Нумерованные кнопки
w Дистанционный датчик
• Управлять этим устройством можно с
помощью дополнительно приобретенного
пульта дистанционного управления.
e Кнопка MO (монофонический)
r Кнопка SSM (последовательная память
для радиостанций с устойчивым сигналом)
t Кнопка RPT (повторное)
y Кнопка RND (произвольное)
u Кнопка MODE
i Кнопка DISP (дисплей)
o Кнопки 4/¢
; Кнопка ∞ (вниз)
Кнопка –10
4
5
e rw t y
l
7 8
Окно на экране дисплея
a Индикаторы информации диска
—TAG (метка ID3), (папка),
(дорожка/файл)
s Главный дисплей
d Индикатор EQ (эквалайзер)
f Индикаторы режимов звучания (C-EQ:
специализированный эквалайзер)—ROCK,
CLASSIC, POPS, HIP HOP, JAZZ, USER
• aтакже функционирует в качестве
индикатора уровня при воспроизведении, если
индикатор уровня активирован (см. стр. 23).
g Индикаторы приема тюнера—ST (стерео),
MO (монофонический)
h Индикатор MP3
j Индикатор CH (проигрыватель-автомат
компакт-дисков)
k Индикатор CD
l Индикаторы режимов и элементов
воспроизведения—RND (произвольное),
(диск), (папка), RPT (повторное)
/ Индикатор LOUD (компенсация)
z Дисплей источника звука
Индикатор уровня громкости
x Индикатор Tr (дорожка)
Page 41

ОСНОВНЫЕ ОПЕРАЦИИ
1
3
Включение
1
Включите устройство.
Примечание в отношении включения в
одно касание:
Когда Вы выбираете источник сигнала в
пункте 2 ниже, устройство автоматически
включается. Вам не нужно нажимать эту
кнопку для того, чтобы включить
устройство.
2
Выберите источник сигнала.
О том, как пользоваться тюнером (FM или
АМ), смотрите на страницах 8 – 10.
Порядок воспроизведения компакт-диска
смотрите на страницах 11 – 14.
О воспроизведении диска MP3
на страницах 16 – 19.
Порядок управления проигрывателем-
автоматом компакт-дисков
смотрите на страницах 26 – 29.
Порядок управления внешним
компонентом (LINE IN) смотрите на
странице 30.
3
Настройте громкость.
Чтобы повысить
громкость
Чтобы понизить
громкость
2
смотрите
Появляется уровня громкости.
Индикатор уровня громкости
4
Отрегулируйте звук так, как Вам
хочется. (Смотрите на страницах
20 и 21).
Чтобы моментально понизить
громкость
Кратко нажмите во время
прослушивания любого источника сигнала. На
экране дисплея начнет мигать надпись “АТТ”, и
уровень громкости моментально понизится.
Для того, чтобы восстановить предыдущий
уровень громкости, еще раз кратко нажмите
на эту кнопку.
•
При повороте диска управления Вы также
можете восстановить звук.
Чтобы выключить устройство
Нажмите и держите в течение более
1 секунды.
Появляется надпись “SEE YOU” (ДО ВСТРЕЧИ),
затем данное устройство выключается.
• Если Вы выключаете питание во время
прослушивания диска, Вы можете начать
воспроизводить диск с того места, на
котором остановились, в следующий раз,
когда включите питание.
ПРЕДОСТЕРЕЖЕНИЕ в отношении
установки громкости:
Д
иски издают очень мало шума по сравнению с
другими источниками звука. Если уровень
громкости установлен, например, для тюнера,
громкоговорители можно повредить резким
повышением уровня выходного сигнала.
Поэтому уменьшите громкость перед тем, как
приступать к воспроизведению диска, и
отрегулируйте его так, как требуется во время
воспроизведения.
РУCCKИЙ
5
Page 42
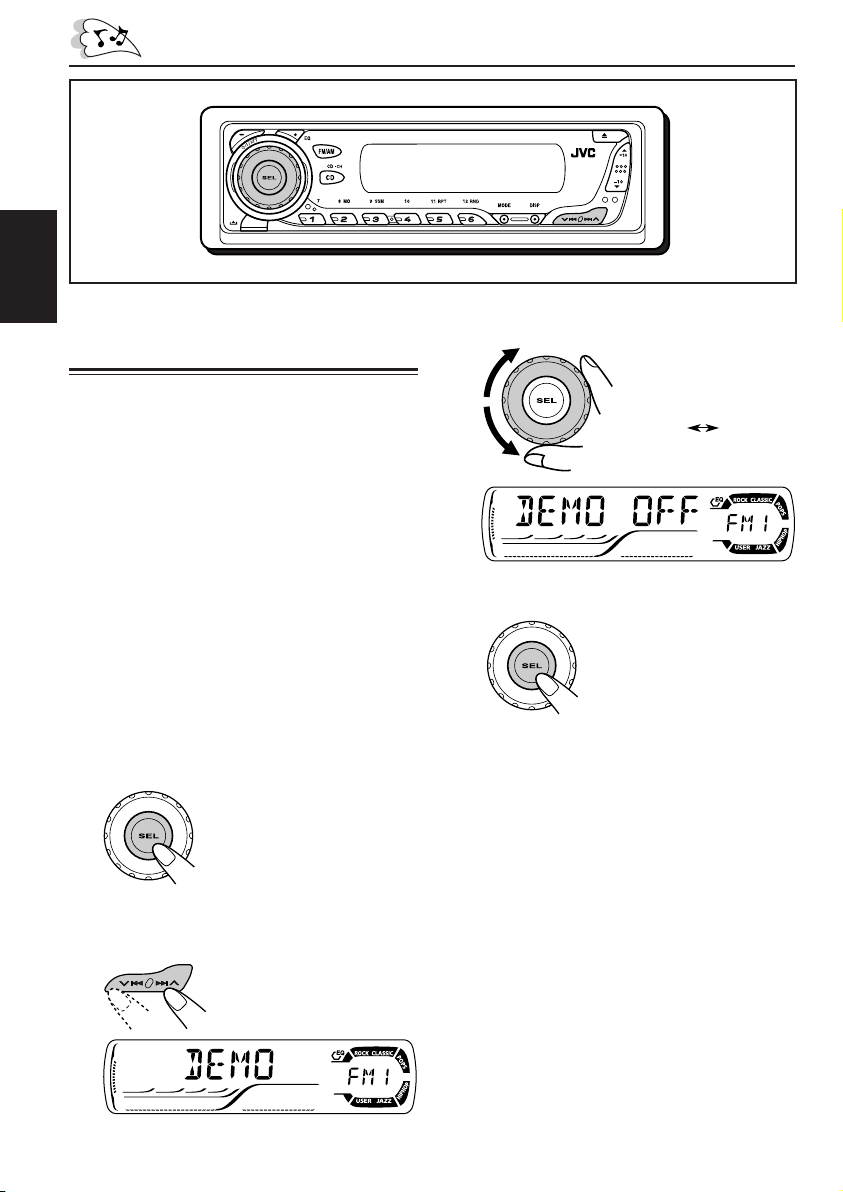
РУCCKИЙ
Отмена демонстрации
функций дисплея
На заводе-изготовителе устанавливается
демонстрация функций дисплея, которая
запускается автоматически при включении
нового устройства, если в течение 20 секунд
не будет выполнено никаких операций.
• Перед первым использованием устройства
рекомендуется отключить демонстрацию
функций дисплея.
3
Выберите “DEMO OFF”.
DEMO OFF
DEMO ON
Для отмены демонстрации функций
дисплея выполните указанную ниже
процедуру:
1
Нажмите и держите кнопку SEL
(выбор) в течение более 2 секунд
с тем, чтобы на экране дисплея
появился один из параметров
PSM. (PSM: Смотрите на страницах
22 и 23).
2
Выберите “DEMO”, если это не
показано на экране дисплея.
6
4
Закончите настройку.
Для запуска демонстрации функций
дисплея повторите эту же процедуру и
выберите “DEMO ON” в действии 3.
Page 43

Установка часов
1
Нажмите и держите кнопку SEL
(выбор) в течение более 2 секунд
с тем, чтобы на экране дисплея
появился один из параметров
PSM. (PSM: Смотрите на страницах
22 и 23).
2
Установите час.
1 Выберите “CLOCK H” (час на часах),
если это не показано на экране
дисплея.
2 Поставьте час.
12
3
Установите минуту.
1 Выберите “CLOCK M” (минута на
часах).
2 Поставьте минуту.
12
4
Закончите настройку.
Для проверки текущего времени на часах
или изменения режима работы дисплея
Повторно нажмите кнопку
DISP (дисплей).
При каждом нажатии этой
кнопки экран дисплея
меняется следующим образом:
• Во время работы тюнера:
Частота
• Во время операций с диском:
Истекшее время
воспроизведения
Название
дорожки
Примечания:
• При воспроизведении обычного компакт-диска,
появляется надпись “NO NAME” (названия нет)
в отношении названия диска/исполнителя и
названия дорожки.
• Информацию об изменении индикации при
воспроизведении CD-текста или диска MP3 см.
на страницах 14 и 17.
• Во время работы внешнего устройства:
LINE IN
• При выключенном питании:
Питание включается, и время на часах
появляется на дисплее на 5 секунд.
Затем питание выключается.
Часы
Часы
Название диска/
исполнитель
Часы
РУCCKИЙ
7
Page 44

ОПЕРАЦИИ С РАДИОПРИЕМНИКОМ
РУCCKИЙ
Прослушивание радио
Вы можете использовать автоматический или
ручной поиск при настройке на конкретную
радиостанцию.
Автоматический поиск
радиостанции:
Автоматический поиск
1
Выберите диапазон (FM1 – 3, AM).
При каждом нажатии этой
кнопки полоса частот
меняется следующим
образом:
FM1 FM2 FM3 AM
Появляется выбранный диапазон.
Данный индикатор отображается при
приеме стереосигнала FM-передачи
достаточной силы.
Примечание:
Этот приемник работает на трех
диапазонах FM (FM1, FM2, FM3). Вы можете
пользоваться любым из них для того, чтобы
слушать радиовещание на частотах FM.
2
Начинайте поиск радиостанции.
Для поиска радиостанций,
работающих на более
высоких частотах
Чтобы прекратить поиск до того, как
найдена радиостанция, нажмите на ту же
кнопку, на которую Вы нажимали для того,
чтобы начать поиск.
Примечание:
FM1 и FM2: От 87,5 МГц до 108,0 МГц
FM3: От 65,00 МГц до 74,00 МГц
Поиск радиостанции вручную:
Ручной поиск
1
Выберите диапазон (FM1 – 3, AM).
При каждом нажатии этой
кнопки полоса частот
меняется следующим
образом:
FM1 FM2 FM3 AM
Примечание:
Этот приемник работает на трех
диапазонах FM (FM1, FM2, FM3). Вы можете
пользоваться любым из них для того, чтобы
слушать радиовещание на частотах FM.
2
Нажмите и держите кнопку
или 4 до тех пор,
¢
пока на экране дисплея не начнет
мигать надпись “M” (ручной).
Для поиска радиостанций, работающих
на более низких частотах
После того, как радиостанция найдена,
поиск прекращается.
8
Page 45
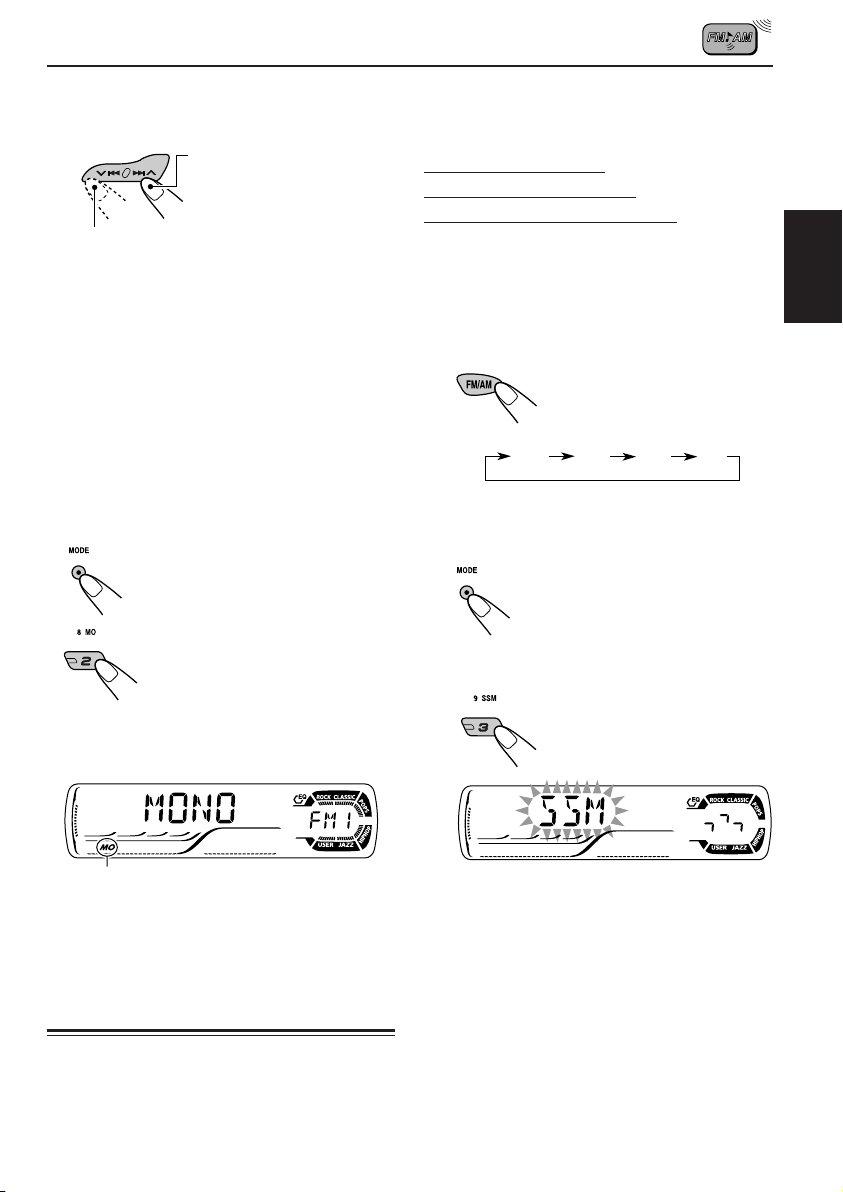
3
Настройтесь на радиостанцию,
которую Вы хотите слушать, пока
мигает буква “M” (ручной).
Чтобы настроиться на
радиостанции с более
высокими частотами
Чтобы настроиться на радиостанции с
более низкими частотами
• Если Вы снимите палец с кнопки,
ручной режим автоматически
выключится через 5 секунд.
•
Если Вы будете продолжать нажимать на
эту кнопку, частота будет продолжать
меняться: с интервалами в 50 кГц (87,5
МГц – 108,0 МГц на частотах FM 1 и FM
2), с интервалами в 30 кГц (65,00 МГц –
74,00 МГц на частотах FM 3) и с
интервалами в 9 кГц на частотах AM—
MW/LW, пока Вы не отпустите эту кнопку.
Когда затруднен прием
стереофонического
радиовещания на частотах FM:
1 Нажмите на MODE, чтобы
войти в режим функций во
время прослушивания
стереовещания FM.
2 Когда на дисплее мигает
надпись “MODE”, нажмите MO
(монофонический), чтобы на
дисплее появилась надпись
“MONO”.
При каждом нажатии кнопки
монофонический режим
попеременно включается и
выключается.
• Ручное программирование радиостанций,
работающих как на частотах FM, так и на
частотах АМ
Автоматическое
программирование
радиостанций FM: SSM
Вы можете запрограммировать 6 местных
радиостанций FM в каждом диапазоне FM
(FM1, FM2 и FM3).
1
Выберите тот диапазон FM (FM1 – 3),
в котором Вы хотите сохранить в
памяти радиостанции FM.
При каждом нажатии этой
кнопки полоса частот
меняется следующим
образом:
FM1 FM2 FM3 AM
2
Нажмите кнопку MODE для
перехода в режим настройки
функций.
3
Нажмите и удерживайте нажатой
кнопку SSM около 2 секунд.
РУCCKИЙ
Индикатор MO (монофонический)
Когда на экране дисплея загорается
индикатор MO, звук, который Вы слышите,
становится монофоническим, но качество
приема улучшается.
Сохранение
радиостанций в памяти
Вы можете воспользоваться одним из
следующих двух методов сохранения
радиовещательных станций в памяти:
• Автоматическое программирование
радиостанций FM: SSM (последовательная
память для радиостанций с устойчивым
сигналом)
На дисплее начнет мигать надпись
“SSM”, которая исчезает по завершении
автоматического программирования.
Местные радиостанции FM с самым сильным
сигналом находятся и запоминаются
автоматически в том диапазоне, который Вы
выберите (FM1, FM2 или FM3). Эти станции
программируются на нумерованных кнопках
—от № 1 (самая низкая частота) до № 6
(самая высокая частота).
По завершении автоматического
программирования радиоприемник
автоматически настраивается на
радиостанцию, сохраненную в памяти на
нумерованной кнопке 1.
9
Page 46
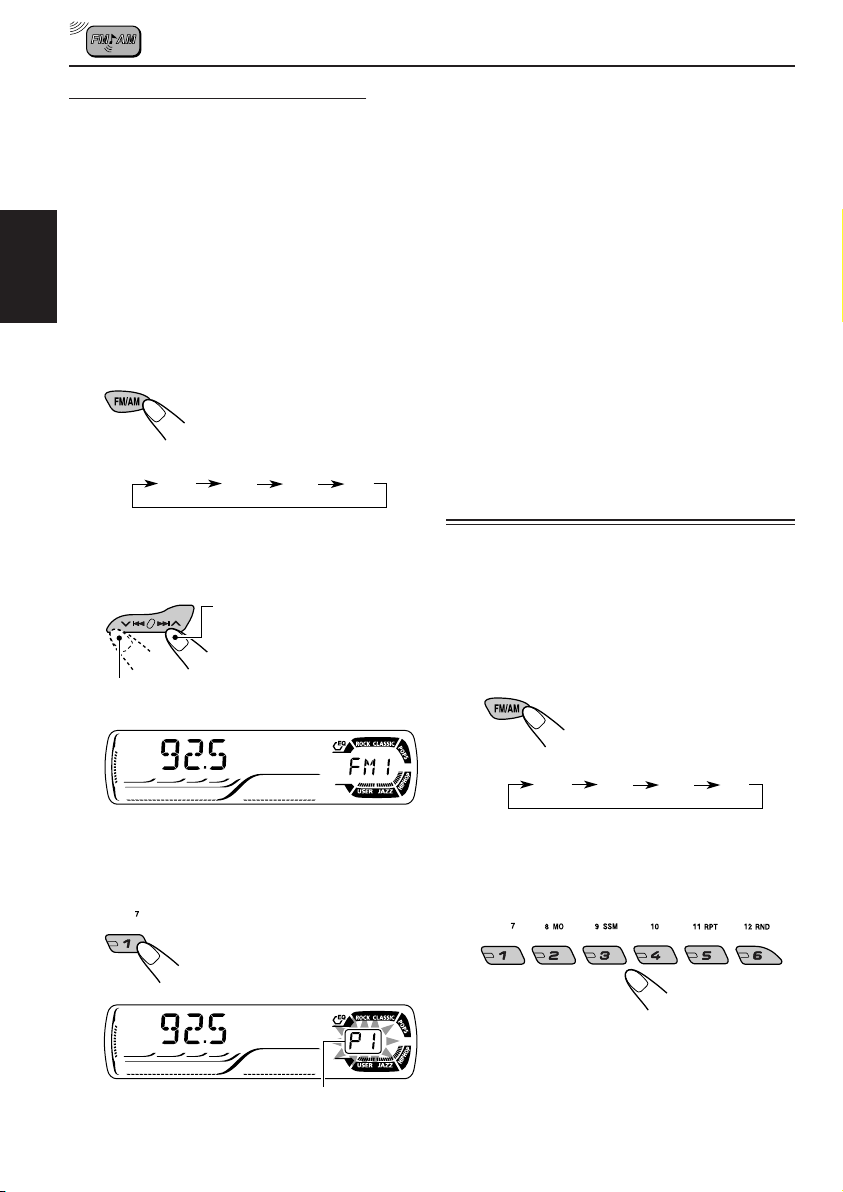
Ручное программирование
Вы можете запрограммировать до 6
радиостанций в каждом диапазоне (FM1,
FM2, FM3 и AM) вручную.
Пример.:
1
РУCCKИЙ
2
Для того, чтобы запомнить
радиостанцию FM с частотой 92,5 МГц
на кнопке программирования под
номером 1 диапазона FM1.
Выберите тот диапазон (FM1 – 3,
AM), в котором Вы хотите
сохранить в памяти радиостанции
(в данном примере—FM1).
При каждом нажатии этой
кнопки полоса частот
меняется следующим
образом:
FM1 FM2 FM3 AM
Настройтесь на радиостанцию
(в данном примере—на частоте
92,5 МГц).
Чтобы настроиться на
радиостанции с более
высокими частотами
Чтобы настроиться на радиостанции с
более низкими частотами
4
Повторите приведенную выше
процедуру для того, чтобы
сохранить в памяти другие
радиостанции под другими
запрограммированными
номерами.
Примечания:
• Ранее запрограммированная радиостанция
стирается, когда под тем же
запрограммированным номером запоминается
новая радиостанция.
• Запрограммированные радиостанции
стираются, когда прерывается питание
запоминающей схемы (например, во время
замены батарейки). Если это произойдет, снова
запрограммируйте эти станции.
Настройка на
запрограммированную
радиостанцию
Вы можете легко настроиться на
запрограммированную радиостанцию.
Помните, что Вы должны сначала сохранить
станции в памяти. Если Вы еще не сохранили
их в памяти, смотрите “Сохранение
радиостанций в памяти” на страницах 9 и 10.
1
Выберите диапазон (FM1 – 3, AM).
При каждом нажатии этой
кнопки полоса частот
меняется следующим
образом:
FM1 FM2 FM3 AM
10
3
Нажмите и держите нумерованную
кнопку (в данном примере—1) в
течение более 2 секунд.
Запрограммированный номер мигает
некоторое время.
2
Выберите номер (1 – 6) для той
запрограммированной
радиостанции, которую Вы хотите
запомнить.
Примечание:
Вы можете также воспользоваться кнопкой 5
(вверх) или ∞ (вниз) на устройстве для выбора
следующей или предыдущей радиостанции. При
каждом нажатии кнопки 5 (вверх) или ∞ (вниз)
выполняется настройка следующей или
предыдущей радиостанции.
Page 47
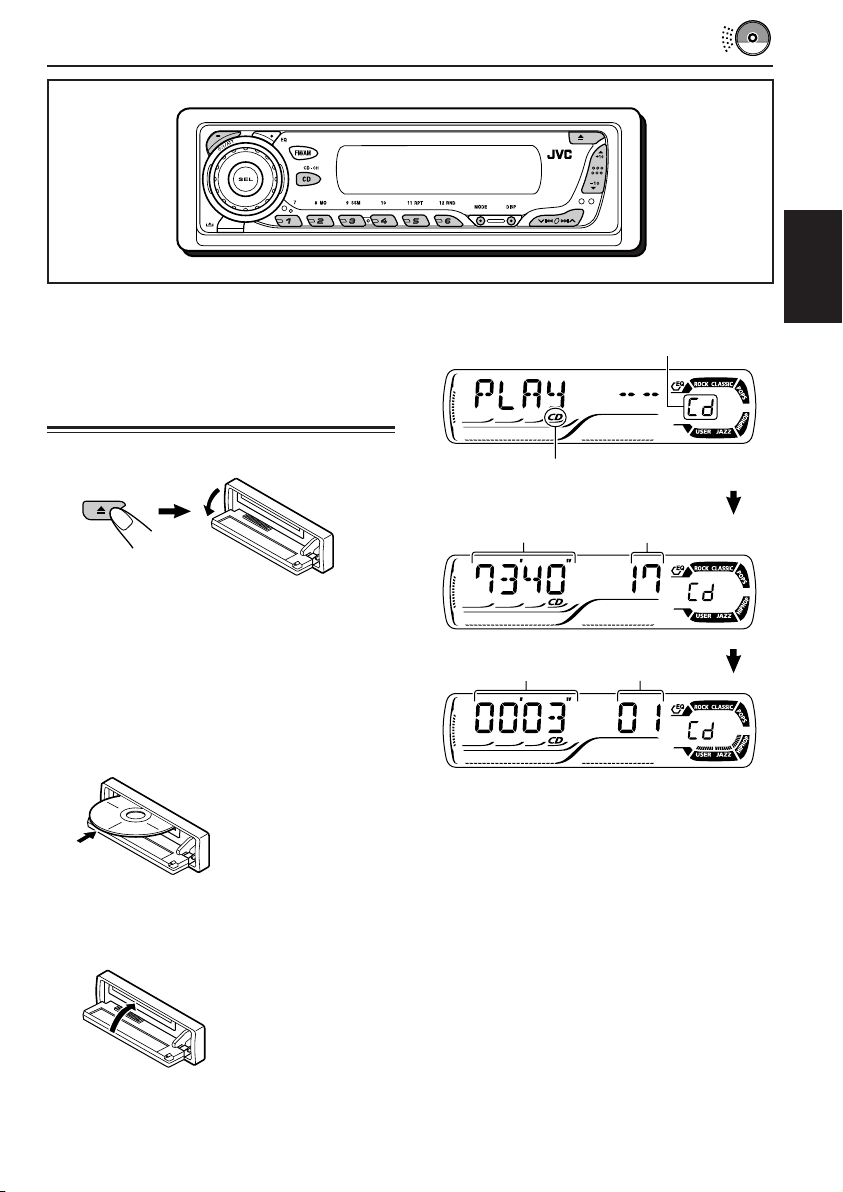
ОПЕРАЦИИ С КОМПАКТ-ДИСКАМИ
Сведения о работе с дисками MP3 см. в
разделе “ОПЕРАЦИИ MP3” на стр. 16 – 19.
Воспроизведение
компакт-диска
1
Откройте панель управления.
Примечание в отношении включения в
одно касание:
Когда компакт-диск уже вставлен в
отверстие для дисков, при нажатии
CD CD-CH устройство включается, и
автоматически начинает воспроизводиться
компакт-диск.
2
Вставьте диск в отверстие для
дисков.
Устройство
включается,
втягивает компактдиск и
автоматически
начинает
воспроизведение.
3
Закройте панель управления
вручную.
Все дорожки будут воспроизводиться
повторно до тех пор, пока Вы не
остановите воспроизведение.
На дисплее отображаются следующие элементы:
Индикация текущего источника звука
Индикатор CD
Общее время
воспроизведения
вставленного диска
Истекшее время
воспроизведения
Примечания:
• Когда компакт-диск вставляется неправильной
стороной, он автоматически выскакивает (если
панель управления открыта).
Если панель управления закрыта, в качестве
источника звука используется предыдущий
выбранный источник, а на дисплее поочередно
появляются надписи “PLEASE” и “EJECT”.
• Если в отверстии для дисков нет компактдиска, нельзя выбрать компакт-диск в качестве
источника звука. На дисплее появляется надпись
“NO DISC” (нет диска).
• Если текущий диск имеет формат CD-текст,
автоматически появится название диска или
исполнителя, а затем название дорожки.
Общее число
дорожки
вставленном диске
Номер текущей
дорожки
на
РУCCKИЙ
11
Page 48

Останов воспроизведения и
извлечение компакт-диск
Нажмите на 0.
Воспроизведение компакт-диска останавливается
и панель управления открывается. Kомпакт-диск
автоматически извлекается из отверстия для
дисков. Источник сигнала меняется на ранее
выбранный источник сигнала.
•
Eсли Вы меняете источник сигнала,
воспроизведение компакт-диска прекращается
(извлечения компакт-диска не происходит).
Когда Вы в следующий раз выбираете “CD”
РУCCKИЙ
(компакт-диск) в качестве источника звука,
воспроизведение компакт-диска начинается
с того места, где Вы остановились.
Примечания:
•
Если выскочивший диск не вытаскивать в течение
примерно 15 секунд, диск автоматически снова
вставляется в отверстие для дисков для того,
чтобы защитить его от пыли. (В этом случае
воспроизведение диска не начинается).
• Вы можете кнопкой выбросить диск даже при
выключенном устройстве.
Отыскание дорожки
или конкретной части
на компакт-диске
Для ускоренного перехода вперед
или перехода назад к дорожк
Нажмите и держите кнопку
¢
во время
воспроизведения компакт-диска
для того, чтобы ускоренно
перейти вперед к дорожку.
Нажмите и держите кнопку 4 во время
воспроизведения компакт-диска для того,
чтобы перейти назад к дорожку.
Для того, чтобы перейти на следующие
дорожки или предшествующие дорожки
Нажмите и тут же отпустите
кнопку ¢ во время
воспроизведения компакт-диска
для того, чтобы перейти вперед
к началу следующего
При каждом последовательном
нажатии этой кнопки находится
начало и воспроизводятся
следующие дорожки.
Нажмите и тут же отпустите кнопку 4 во
время воспроизведения компакт-диска для того,
чтобы вернуться к началу текущего
При каждом последовательном нажатии этой
кнопки находится начало и воспроизводятся
12
предшествующие дорожки.
у
дорожку
дорожку
Чтобы перейти непосредственно
на определенныйе дорожки
Нажмите на нумерованную кнопку,
соответствующую номеру такого дорожки,
чтобы начать его воспроизведение.
• Чтобы выбрать номер дорожки от 1 – 6:
Нажмите и тут же отпустите кнопки
1 (7) – 6 (12).
• Чтобы выбрать номер дорожки от 7 – 12:
Нажмите и держите в течение более 1
секунды кнопки 1 (7) – 6 (12).
Для быстрого перехода на дорожку
(кнопки +10 и –10)
1 Нажмите на MODE, чтобы войти в режим
функций во время воспроизведения
компакт-диска.
2 Нажмите +10 или –10.
Переход на 10 дорожек*
вперед к последней дорожке
Переход на 10 дорожек*
назад к первой дорожке
* При однократном нажатии кнопки +10
или –10 осуществляется переход с
текущей дорожки на ближайшую дорожку
с большим или меньшим номером,
кратным 10, (например, 10, 20 или 30).
Каждый раз при нажатии кнопки
осуществляется переход на 10 дорожек (см.
раздел “Использование кнопок +10 и –10”
на стр. 13).
• После последней дорожки будет выбрана
первая и наоборот.
.
.
Page 49
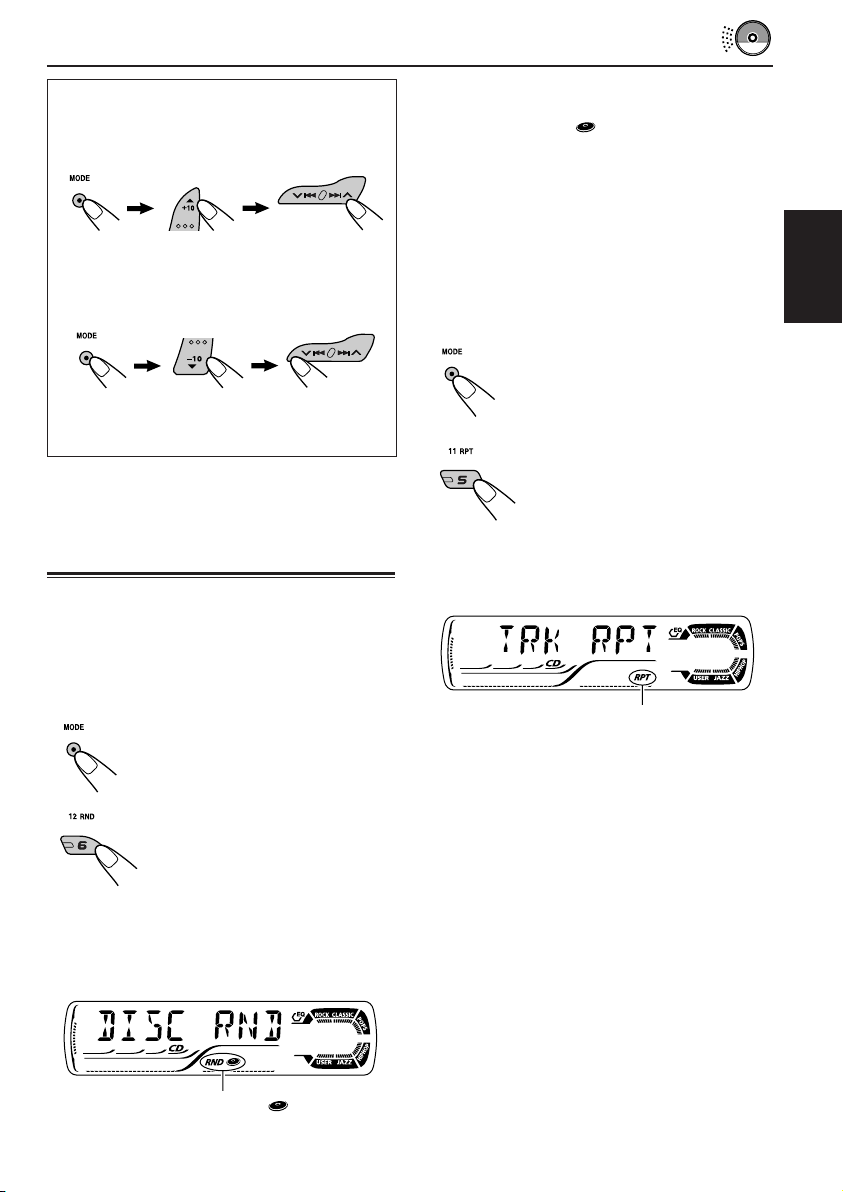
Использование кнопок +10 и –10
• Пример. 1: Выбор дорожки 32 при
воспроизведении дорожки 6
Когда режим произвольного воспроизведения
дисков включен, на дисплее загораются
индикаторы RND и . Воспроизведение
начинается с произвольно выбранной
дорожки.
(Три раза) (Дважды)
Дорожка 6 \ 10 \ 20 \ 30 \ 31 \ 32
• Пример. 2: Выбор дорожки 8 при
воспроизведении дорожки 36
(Три раза) (Дважды)
Дорожка 36 \ 30 \ 20 \ 10 \ 9 \ 8
Выбор режимов
воспроизведения
компакт-дисков
Произвольное воспроизведение
дорожки (Произвольное
воспроизведение дисков)
Вы можете воспроизводить все дорожки на
диске в произвольном порядке.
1 Нажмите на MODE, чтобы
войти в режим функций во
время воспроизведения
компакт-диска.
2 Когда на дисплее мигает
надпись “MODE” нажмите
RND (произвольное), чтобы
появилась надпись “DISC
RND”.
Каждый раз при нажатии
кнопки режим произвольного
воспроизведения поочередно
включается и выключается.
Повторное воспроизведение
дорожки (Повторное
воспроизведение дорожек)
Вы можете несколько раз повторять
воспроизведение текущегый дорожки.
1 Нажмите на MODE, чтобы
войти в режим функций во
время воспроизведения
компакт-диска.
2 Когда на дисплее мигает
надпись “MODE” нажмите
RPT (повторное), чтобы
появилась надпись “TRK RPT”.
Каждый раз при нажатии
кнопки режим повторного
воспроизведения поочередно
включается и выключается.
Индикатор RPT
Когда режим повторного воспроизведения
включен, на дисплее загорается индикатор
RPT (повторное). Воспроизведение
начинается с текущей дорожки.
РУCCKИЙ
Индикаторы RND и (диск)
13
Page 50

Воспроизведение текста
на компакт-диске
Запрещение извлечения
диска
В тексте на компакт-диске записана
некоторая информация о диске (название
диска, исполнитель и название дорожки).
Эта информация CD-текста будет
отображаться автоматически при
воспроизведении CD-текста.
Чтобы изменить информацию CD-
РУCCKИЙ
текста вручную, выберите режим
отображения текста во время
воспроизведения CD-текста.
Повторно нажмите кнопку DISP
(дисплей).
При каждом нажатии этой
кнопки экран дисплея меняется
следующим образом:
Название диска / исполнитель
Название дорожки
(на экране дисплея
загорается индикатор )
Истекшее время
воспроизведения и
номер текущей дорожкиr
Часы и номер
текущей дорожки
Для запрещения извлечения диска можно его
заблокировать в отверстие для дисков.
Нажимая кнопку CD CD-CH, нажмите
и удерживайте нажатой
клавишу
На экране дисплея в течение 5 секунд будет
мигать индикатор “NO EJECT” (извлечение
запрещено), диск блокируется и не может
быть извлечен.
более 2 секунд.
Чтобы отменить предотвращение
выскакивания и разблокировать
диск
Нажимая кнопку CD CD-CH, нажмите снова
кнопку и уди ерживайте в течение
более 2 секунд.
На экране дисплея в течение примерно 5
секунд мигает надпись “EJECT OK” (выброс
включен), и диск разблокирован.
Примечания:
• На дисплее может быть отображено
одновременно не более 8 символов, поэтому для
отображения большего количества символов
используется режим прокрутки.
См. также “Чтобы выбрать режим прокрутки
экрана—SCROLL” на стр. 23.
Некоторые символы не будут отображаться
(пустое место) на дисплее.
(Пример. “ABCå!d#” ]“ABCA D ”)
• Когда Вы нажимаете на кнопку DISP (дисплей)
во время воспроизведения обычного компактдиска, появляется надпись “NO NAME”
(названия нет) в отношении названия диска/
исполнителя и названия дорожки.
• Когда отображается название дорожки,
индикатор Tr и номер текущей дорожки также
появляются в правой части дисплея.
14
Page 51

ПРЕДИСЛОВИЕ К МР3
Что такое МР3?
МР3 – это сокращение от Звукового слоя 3
экспертной группы по кинематографии (или
MPEG). МР3 – это просто формат файла со
степенью сжатия данных 1:10 (128 Кбит/с*).
*
Скорость передачи данных в битах – это среднее
количество битов, которое может захватить
одна секунда звуковых данных. Используемой
единицей измерения является Кбит/с. Чтобы
получить лучшее качество звучания, выберите
более высокую скорость передачи данных в битах.
Наиболее популярной скоростью передачи данных
в битах для кодирования является 128 Кбит/с.
• Подробную информацию о дисках MP3
см. в руководстве “Cправочник к MP3/
WMA” (в отдельном издании).
Совместимость с тегом ID3
Дополнительные информационные данные,
такие как название альбома, имя
исполнителя, название песни, год записи,
музыкальный жанр и краткий комментарий,
можно хранить в файле МР3.
Это устройство может отображать на
дисплее и тег ID3v1 (версии 1), и тег ID3v2
(версии 2). (См. стр. 17).
• Некоторые знаки не могут быть показаны
правильно.
• Когда на диск записаны и тег ID3v1, и тег
ID3v2, будет отображаться информация
ID3v2.
Как записываются и
воспроизводятся
файлы МР3?
“Файлы (дорожки)” МР3 можно записывать
в “каталогах”—по терминологии
персональных компьютеров.
Во время записи файлы и каталоги можно
расположить путем, аналогичным тому, с
помощью которого располагаются файлы и
каталоги/папки компьютерных данных.
“Корень” похож на корень дерева. Каждый
файл и каталог можно связать с и иметь к
ним доступ от корня.
На приведенном ниже рисунке показано, как
осуществляется запись файлов MP3 на компактдиски однократной или многократной записи,
каким образом они воспроизводятся и как
осуществляется их поиск на данном устройстве.
Примечания:
• Данное устройство может считывать компакт-диск
постоянной памяти, содержащий файлы МР3. Однако,
если файлы не МР3 записаны вместе с файлами МР3,
данному устройству потребуется больше времени для
просмотра такого диска. Это также может привести
к неисправности данного устройства.
• Данное устройство не может считывать или
воспроизводить файл МР3 без дополнительного кода
<.mp3>.
• Данное устройство не поддерживает файлы MP3,
записанные в форматах Layer 1 и Layer 2.
• Данное устройство не поддерживает список
воспроизведения**.
**
Список воспроизведения – это простой
текстовой файл, используемый в персональном
компьютере, который дает возможность
пользователям составлять свой собственный
порядок воспроизведения без необходимости
физически изменять порядок размещения файлов.
РУCCKИЙ
Иеpаpхия
Уpовень 1Уpовень 2Уpовень 3Уpовень 4Уpовень
01
ROOT
05
1
2
02 03
3
10
11
04
12
4
5
5
6
7
8
9
: Папки и порядок их
01
воспроизведения
:
Файлы MP3 и порядок их
1
воспроизведения
15
Page 52

ОПЕРАЦИИ МР3
РУCCKИЙ
См. также “ОПЕРАЦИИ С КОМПАКТДИСКАМИ” на стр. 11 – 14.
Воспроизведение диска
МР3
1
Откройте панель управления.
На дисплее отображаются следующие
элементы:
Индикация текущего источника звука
Индикатор CD
16
Примечание в отношении включения в
одно касание:
Когда диск уже вставлен в отверстие для
дисков, при нажатии CD CD-CH устройство
включается, и автоматически начинает
воспроизводиться диск.
2
Вставьте диск МР3 в отверстие
для дисков.
Устройство
включается,
втягивает диск и
автоматически
начинает
воспроизведение.
3
Закройте панель управления
вручную.
Воспроизведение файлов будет
повторяться до тех пор, пока не будет
остановлено.
Общее
количество папок
Индикатор MP3
Пример.:
Примечания:
• Для считывания диска МР3 требуется больше
времени.(Оно определяется степенью сложности
конфигурации папки или файла).
• При запуске воспроизведения имена папок и
файлов (или метки ID3) появятся
автоматически. (См. также стр. 17).
• При смене источника воспроизведения или
отключении питания происходит останов
воспроизведения (диск не извлекается).
Когда Вы снова выбираете проигрыватель
компакт-дисков в качестве источника звука или
включаете питание, воспроизведение диска
начинается с того места, где ранее было
остановлено.
Вид экрана дисплея, если диск
содержит 19 папок и 144 файлов MP3
Общее количество
файлов
Page 53

Останов воспроизведения и
извлечение диска
Нажмите на 0.
Воспроизведение останавливается и панель
управления открывается. Диск автоматически
извлекается из отверстия для дисков.
Изменение отображаемой информации
При воспроизведении файле MP3 Вы можете
изменить информацию о диске MP3,
показанную на дисплее.
Повторно нажмите кнопку DISP
(дисплей).
При каждом нажатии кнопки
информация на дисплее
меняется следующим образом:
• Если для параметра “TAG DISP”
установлено значение “TAG ON”
(начальное значение: см. стр. 24)
Название альбома /
исполнитель (имя папки*)
(на экране дисплея загорается
индикатор TAG )
Название дорожки (имя файла*)
(на экране дисплея загорается
индикатор TAG )
Примечания:
• На дисплее может быть отображено
одновременно не более 8 символов, поэтому для
отображения большего количества символов
используется режим прокрутки.
См. также “Чтобы выбрать режим прокрутки
экрана—SCROLL” на стр. 23.
• Когда отображается имя папки или файла,
номер текущей папки или индикатор Tr и номер
текущего файла также появляются в правой
части дисплея.
РУCCKИЙ
Отыскание файла или
конкретной части на
диске
Быстрая перемотка файла вперед
или назад
Для быстрой перемотки
файла вперед нажмите и
удерживайте нажатой кнопку
¢ во время
воспроизведения диска.
Для перемотки файла назад нажмите и
удерживайте нажатой кнопку 4 во
время воспроизведения диска.
Истекшее время воспроизведения
и номер текущего файла
Часы и
номер
текущего файла
*
Если в файле MP3 нет тегов ID3, появляется имя
папки и имя файла.
TAG не будет отображаться на экране
дисплея.
В этом случае индикатор
• Если для параметра “TAG DISP”
установлено значение “TAG OFF”
Имя папки
(на экране дисплея
загорается индикатор
Имя файла
(на экране дисплея
загорается индикатор )
)
Истекшее время воспроизведения
и номер текущего файла
Часы и
номер
текущего файла
Примечание:
Во время этой операции Вы можете слышать
только прерывистые звуки. (Истекшее время
воспроизведения также прерывисто меняется на
экране дисплея).
Переход к следующим или
предыдущим файлам
Для перехода к началу
следующего файла
кратковременно нажмите
кнопку ¢ во время
воспроизведения.
При каждом последующем
нажатии этой кнопки
выполняется переход к началу
следующего файла, и
начинается его
воспроизведение.
Для перехода к началу текущего файла
кратковременно нажмите кнопку 4
во время воспроизведения.
При каждом последующем нажатии этой
кнопки выполняется переход к началу
предыдущего файла, и начинается его
воспроизведение.
17
Page 54

Быстрый переход к
определенному файлу в текущей
папке (кнопки +10 и –10)
1
Нажмите на MODE, чтобы войти в режим
функций во время воспроизведения диска.
2 Нажмите +10 или –10.
РУCCKИЙ
Переход на 10 файлов*
вперед к последней файлу
Переход на 10 файлов*
назад к первой файлу
* При однократном нажатии кнопки +10
или –10 осуществляется переход с
текущего файла на ближайший файл с
большим или меньшим номером, кратным
10 (например, 10, 20 или 30).
Каждый раз при нажатии кнопки
осуществляется переход на
раздел “Использование кнопок +10 и –10”
ниже).
• После последнего файла будет выбран
первый и наоборот.
10 файлов (см.
Переход к определенной папке
ВАЖНО:
Чтобы осуществлять непосредственный
выбор папок с помощью нумерованных
кнопок, в начале имени каждой папки
необходимо указать две цифры. (Это
можно сделать только во время записи
дисков однократной и многократной
записи).
Пример.:Если папка имеет имя “01 АВС”
= Нажмите кнопку 1 для
перехода к папке “01 ABC”.
Если папка имеет имя “1 ABC”,
нажатие кнопки не даст
результата.
Если папка имеет имя “12 АВС”
= Нажмите и удерживайте
нажатой кнопку 6 (12) для
перехода к папке “12 ABC”.
Нажмите нумерованную кнопку,
соответствующую номеру папки, чтобы
начать воспроизведение первого файла в
выбранной папке.
Использование кнопок +10 и –10
• Пример. 1: Выбор файла 32 при
воспроизведении файла 6
(Три раза)
файла 6 \ 10 \ 20 \ 30 \ 31 \ 32
• Пример. 2: Выбор файла 8 при
воспроизведении файла 36
(Три раза)
файла 36 \ 30 \ 20 \ 10 \ 9 \ 8
18
(Дважды)
(Дважды)
• Для выбора папки с номером 01 – 06:
Нажмите и тут же отпустите кнопки
1 (7) – 6 (12).
• Для выбора папки с номером 07 – 12:
Нажмите и держите в течение более 1
секунды кнопки 1 (7) – 6 (12).
Примечания:
• Если после выбора папки на экране дисплея
мигает индикатор , это означает, что в
папке нет файлов MP3.
• Нельзя непосредственно выбрать папку с
номером больше 12.
Чтобы выбрать определенный файл в
папке, нажмите кнопку ¢ или 4
после выбора папки.
Page 55

Переход к следующей или
предыдущей папке
Нажмите кнопку 5 (вверх) при
воспроизведении диска MP3,
чтобы перейти к следующей папке.
При каждом последующем
нажатии кнопки выполняется
поиск следующей папки (и
начинается воспроизведение
первого файла этой папки).
Нажмите кнопку ∞ (вниз) при воспроизведении
диска MP3, чтобы перейти к предыдущей папке.
При каждом последующем нажатии кнопки
выполняется поиск предыдущей папки (и
начинается воспроизведение первого файла
этой папки).
Примечание:
Если в папке нет файлов MP3, она пропускается.
Выбор режимов
воспроизведения МР3
Произвольное воспроизведение
файлов (Произвольное
воспроизведение папок/дисков)
Все файлы в текущей папке или все файлы
на диске МР3 можно воспроизводить в
произвольном порядке.
1 Нажмите кнопку MODE во
время воспроизведения
диска МР3, чтобы войти в
режим настройки функций.
2 Когда на дисплее мигает
надпись “MODE” нажмите
RND (произвольное), чтобы
появилась надпись “FLDR
RND” или “DISC RND”.
При каждом нажатии кнопки
режим произвольного
воспроизведения меняется
следующим образом:
DISC RNDFLDR RND
Otmeheho
Индикаторы RND и (папка)
Пример.: Экран дисплея при выборе
“FLDR RND”
Режим
FLDR RND Индикаторы Все файлы
DISC RND Индикаторы Все файлы
Активный
индикатор
RND и текущей папки,
загораются. затем файлы
RND и на диске.
загораются.
Воспроизводятся
в произвольном
режиме
следующей папки
и т.д.
Повторное воспроизведение
файлов (Повторное
воспроизведение дорожек/папок)
Файл или все файлы в текущей папке можно
воспроизводить несколько раз.
1 Нажмите кнопку MODE во
время воспроизведения
диска МР3, чтобы войти в
режим настройки функций.
2 Когда на дисплее мигает
надпись “MODE” нажмите
RPT (повторное), чтобы
появилась надпись “TRK
RPT” или “FLDR RPT”.
При каждом нажатии кнопки
режим повторного
воспроизведения меняется
следующим образом:
TRK RPT FLDR RPT
Otmeheho
Индикатор RPT
Пример.: Экран дисплея при выборе
Режим
TRK RPT
FLDR RPT Индикаторы Все файлы
“TRK RPT”
Активный Повторное
индикатор воспроизведение
Загорается
индикатор RPT
и RPT текущей (или
загораются.
Текущий (или
. выбранный)
файл.
выбранной) папки.
РУCCKИЙ
19
Page 56

НАСТРОЙКА ЗВУКА
Выбор
запрограммированных
режимов звучания (C-EQ:
специализированный
эквалайзер)
Вы можете выбрать запрограммированный
режим звучания (C-EQ: специализированный
эквалайзер), подходящий для конкретного
РУCCKИЙ
музыкального жанра.
Выберите тот режим звучания,
который Вы хотите.
При каждом нажатии кнопки
режим звучания меняется
следующим образом:
USER
ROCK
CLASSIC
Шаблон индикации изменяется для
каждого режима звучания, за
исключением режима “USER”.
Пример.: Экран дисплея при выборе
Индикация
USER (Бемольный 00 00 OFF
ROCK Рок- или +03 +01 ON
CLASSIC
POPS Легкая +04 +01 OFF
HIP HOP Фанк- или +02 00 ON
JAZZ Джазовая +02 +03 OFF
“ROCK” (рок)
Для: Запрограммиро-
звук) (выкл)
диско (вклю
-музыка -чено)
Классическая
музыка (выкл)
музыка (выкл)
рэп-музыка (вклю
музыка (выкл)
ванные значения
BAS TRE LOUD
+01 –02 OFF
-чено)
20
POPS
HIP HOP
JAZZ
Примечание:
Каждый режим звучания можно настроить по
своему желанию. Как только настройка выполнена,
она автоматически сохраняется для текущего
выбранного режима звучания. См. раздел
“Настройка звука” на стр. 21.
Page 57

Настройка звука
Вы можете настроить характеристики звука
по Вашему вкусу.
1
Выберите тот параметр, который
Вы хотите настроить.
При каждом нажатии
кнопки регулируемые
параметры меняются
следующим образом:
BAS
(
низкие
частоты
VOL
(
громкость
Индикация
BAS*
(низкие низкие частоты. |
частоты) +06 (макс.)
TRE*
(высокие высокие |
частоты) частоты. +06 (макс.)
FAD *
(регулятор
уровня
сигнала) F06 (Только
BAL
(баланс) левых и правых левые)
LOUD*
(компенсация)
VOL*
(громкость) громкость. |
Для того, чтобы:
1
Настроить –06 (мин.)
1
Настроить –06 (мин.)
2
Настроить баланс
передних и задних
громкоговорителей.
Настроить баланс
громкоговорителей.
1
Усильте низкие и
высокиечастоты,
чтобы обеспечить
хорошо
сбалансированное
звучание при
низком уровне
громкости.
3
Настроить 00 (мин.)
TRE
(
высокие
)
частоты
LOUD
)
(
компенсация
FAD
(
регулятор
)
уровня сигнала
BAL
(
баланс
)
Диапазон
R06(Только
|
L06 (Только
|
R06(Только
LOUD ON
|
LOUD OFF
30 или 50 (макс.)
)
задние)
передние)
правые)
1
*
При настройке верхних и нижних частот или
громкости выполненная настройка сохраняется
для текущего выбранного режима звучания
(C-EQ), включая режим “USER”
(пользовательский).
2
*
Если Вы используете систему с двумя
громкоговорителями, установите уровень
регулятора уровня сигнала на “00”.
3
*
Обычно диск управления выполняет функции
регулятора громкости. Поэтому нет
необходимости выбирать “VOL” (громкость)
для настройки уровня громкости.
4
*
В зависимости от настроек регулятора
усиления. (Подробнее см. на стр. 24).
2
)
Настройте уровень.
Повышение уровня
или включение звука
Понижение уровня
или выключение звука
Во время настройки низких или
высоких частот происходит
смена шаблона индикации.
Пример. 1: Когда Вы настраиваете
“TRE” (высокие частоты)
Пример. 2: Включение звука
3
Повторите пункты 1 и 2 чтобы
настроить другие параметры.
Чтобы вернуться к заводской установке,
повторите ту же самую процедуру и
переназначьте запрограммированные
4
*
значения, перечисленные в таблице на
странице 20.
РУCCKИЙ
21
Page 58

ДРУГИЕ ГЛАВНЫЕ ФУНКЦИИ
Изменение общих
параметров настройки
2
Выберите тот параметр PSM,
который Вы хотите настроить.
(PSM)
Вы можете изменить элементы,
перечисленные в приведенной ниже таблице и
на стр. 23, с помощью параметров управления
PSM (предпочитаемый режим настройки).
Основная процедура
РУCCKИЙ
1
Нажмите и держите кнопку SEL
(выбор) в течение более 2 секунд
с тем, чтобы на экране дисплея
появился один из параметров
PSM. (См. ниже и на стр. 23).
Параметры предпочтительного режима установки (PSM)
• Для получения подробной информации по каждому из элементов PSM см. страницы,
перечисленные в таблице.
Индикация
DEMO Демонстрация функций
дисплея
3
Настройте выбранный параметр
PSM.
4
Если требуется, повторите
2
пункты
другие параметры PSM.
5
Закончите настройку.
Выбираемые значения/
элементы
и 3, чтобы настроить
DEMO ONDEMO OFF
Запрограммированная
DEMO ON
заводская
настройка
См.
страницу
6
CLOCK H Настройка часа
CLOCK M Настройка минуты
LEVEL Показ уровня на экране
дисплея
DIMMER Режим регулятора
подсветки
TEL Приглушение звука
телефон
22
0 — 23
00 — 59
OFF ON ON
AUTO OFF
ON
OFF
MUTING 2
MUTING 1
0 (0:00)
00 (0:00)
AUTO
OFF
7
23
23
23
Page 59

Индикация
SCROLL Режим прокрутки экрана
Выбираемые значения/
элементы
ONCE AUTO
OFF
Запрограммированная
заводская
настройка
ONCE
См.
страницу
23
EXT IN* Внешний компонент
TAG DISP Изображение тега на
экране дисплея
AMP GAIN Регулятор усиления
CHANGER LINE IN CHANGER
TAG OFF TAG ON TAG ON 24
LOW PWR HIGH PWR HIGH PWR 24
* Появляется на экране дисплея, только когда выбран один из следующих источников звука—FM, AM и
компакт-диск.
Выбор индикатора уровня
—LEVEL
Вы можете активировать или деактивировать
индикатор уровня по желанию.
В исходных настройках, выполненных на
заводе-изготовителе, индикатор уровня
активирован.
• ON: Отображение индикатора
уровня звука.
• OFF: Отмена индикатора уровня
звука; отображается индикатор
режима звучания.
Чтобы выбрать режим регулятора
подсветки—DIMMER
Когда Вы включаете передние фары
автомобиля, экран дисплея автоматически
тускнеет (Автоматический регулятор подсветки).
При отправке с завода режим Автоматический
регулятор подсветки включен.
• AUTO (автоматический):
Включает Автоматический
регулятор подсветки.
• OFF (выключено):
Отменяет Автоматический
регулятор подсветки.
• ON (включено):
Всегда затемняет экран дисплея.
Примечание:
Автоматический регулятор подсветки,
установленный на этом устройстве, может не
работать правильно на некоторых автомобилях,
особенно на тех, на которых установлен диск
управления для уменьшения силы света.
В таком случае установите режим регулятора
подсветки на “ON” (включено) или “OFF”
(выключено).
Для выбора приглушения звука
при телефонном звонке—TEL
Этот режим используется, когда
подсоединена система сотового телефона. В
зависимости от используемой телефонной
системы выберите “MUTING 1” или
“MUTING 2” в зависимости от того, какой из
них подавляет звук этого устройства.
При отгрузке с завода этот режим отключен.
• MUTING 1: Выберите его, если при такой
установке приглушаются звуки.
• MUTING 2: Выберите его, если при такой
установке приглушаются звуки.
• OFF (выключено):
Отменяет приглушение звука
при телефонном звонке.
Чтобы выбрать режим прокрутки
экрана—SCROLL
Вы можете выбрать режим прокрутки для
информации диска (когда весь текст не
помещается на экране сразу).
При отправке с завода режим прокрутки
экрана установлен на “ONCE”.
• ONCE (один раз):
Прокручивает экран только
один раз.
• AUTO (автоматический):
Повторяет прокрутку экрана
(с интервалом в 5 секунд).
• OFF (выключено):
Отменяет автоматическую
прокрутку экрана.
Примечание:
Даже если режим прокрутки экрана установлен на
“OFF” (выключено), Вы можете прокрутить экран
дисплея, нажимая кнопку DISP (дисплей) в течение
более 1 секунды.
24
РУCCKИЙ
23
Page 60

Чтобы выбрать внешний компонент
для использования—EXT IN
Вы можете подключить внешний компонент к
контактному гнезду проигрывателя-автомата
компакт-дисков на задней панели с помощью
Адаптера входной линии KS-U57 (не
поставляется).
Для того, чтобы использовать внешний компонент
в качестве источника воспроизведения через
Ваше устройство, Вам нужно выбрать, какой
компонент—проигрыватель-автомат компактдисков или внешний компонент—использовать.
РУCCKИЙ
При отгрузке с завода проигрыватель-автомат
компакт-дисков выбирается в качестве внешнего
компонента.
• CHANGER (проигрыватель-автомат):
• LINE IN (входная линия):
Примечание:
Порядок соединения Адаптера входной линии KS-U57
и внешнего компонента смотрите в Руководство по
установке/подключению (в отдельном издании).
Чтобы использовать
проигрыватель-автомат
компакт-дисков.
Чтобы использовать внешний
компонент помимо
проигрывателя-автомата
компакт-дисков.
Чтобы включить или выключить
изображение тега на экране
дисплея—TAG DISP
Файл MP3 может содержать информацию,
отмеченную “ID3 Tag”, в которой указывается
название альбома, имя исполнителя,
название дорожки, и т.д.
Существует две версии—ID3v1 (тег ID3
версии 1) и ID3v2 (тег ID3 версии 2). Когда на
диск записаны и тег ID3v1, и тег ID3v2, будет
отображаться информация ID3v2.
При отгрузке с завода выбирается “TAG ON”.
Выбор регулятора усиления
—AMP GAIN
Максимальный уровень громкости данного
устройства можно изменить. Если
максимальная мощность динамиков менее
50 Вт, перейдите в режим “LOW PWR”, чтобы
предотвратить их повреждение.
При поставке изготовителем установлена
настройка “HIGH PWR”.
• LOW PWR: Вы можете настроить уровень
громкости с “VOL 00” на
“VOL 30”.
Примечание:
Настройку уровня громкости
можно изменить с “HIGH PWR” на
“LOW PWR” во время
прослушивания с уровнем
громкости больше 30, устройство
автоматически изменит уровень
громкости на “VOL 30”.
• HIGH PWR:Вы можете настроить уровень
громкости с “VOL 00” на
“VOL 50”.
• TAG ON: Включает изображение тега ID3
• TAG OFF: Выключает изображение тега
на экране дисплея во время
воспроизведения файлов МР3.
• Если файл МР3 не содержит
никаких тегов ID3,
появляются название
каталога и название файла.
ID3 на экране дисплея во время
воспроизведения файлов МР3.
(Могут быть показаны только
название каталога и название
файла).
24
Page 61

Отсоединение панели
управления
Вы можете отсоединить панель управления,
когда выходите из машины.
При отсоединении или установке панели
управления соблюдайте осторожность, чтобы
не повредить разъемы на задней стороне
панели управления и на держателе панели.
Как отсоединить панель
управления
Перед отсоединением панели управления не
забудьте выключить питание.
1
Освободите панель управления.
2
Bытащите панель управления из
устройства.
Как присоединить панель
управления
1
Вставьте правую сторону панели
управления в паз на контейнере
панели.
2
Нажмите на левую сторону
панели управления, чтобы
зафиксировать ее в контейнере
панели.
РУCCKИЙ
3
Положите отсоединенную панель
управления в предусмотренный
для нее футляр.
Примечание в отношении чистки
разъемов:
При частом снятии панели управления разъемы
могут испортиться.
Для того, чтобы свести до минимума такую
возможность, периодически протирайте
разъемы ватным тампоном или тканью,
смоченными в спирте, стараясь не повредить
разъемы.
Разъемы
25
Page 62

ОПЕРАЦИИ С ПРОИГРЫВАТЕЛЕМ
-АВТОМАТОМ КОМПАКТ-ДИСКОВ
РУCCKИЙ
Рекомендуется использовать с Вашим устройством
cовместимое с MP3 устройство автоматической
смены компакт-дисков компании JVC.
Проигрыватель компакт-дисков позволяет
воспроизводить компакт-диски однократной и
многократной записи, записанные в
аудиоформате или MP3-формате.
• Кроме того, можно подключать одно из
устройств автоматической смены компактдисков серии CH-X (кроме CH-X99 и CHX100). Однако эти устройства
несовместимы с дисками MP3, поэтому
невозможно воспроизводить диски MP3.
• С данным устройством нельзя
использовать устройства автоматической
смены компакт-дисков серии KD-MK.
Перед тем, как приступать к эксплуатации
Вашего проигрывателя-автомата компактдисков:
• Прочитайте также Инструкции, которые
прилагаются к Вашему проигрывателюавтомату компакт-дисков.
• Если в накопителе проигрывателяавтомата компакт-дисков нет дисков
или диски вставлены не той стороной,
на экране дисплея появляется надпись
“NO DISC” (нет диска). Если такое
произойдет, вытащите накопитель и
вставьте диски правильно.
• Если в проигрыватель-автомат компактдисков не вставлен накопитель, на
экране дисплея появляется надпись
“NO MAG” (нет накопителя). Если это
произойдет, вставьте накопитель в
проигрыватель-автомат компакт-дисков.
•
Если на экране дисплея появляется
надпись “RESET 1” – “RESET 8” (“возврат
в исходное положение 1” – “возврат в
исходное положение 8”), это означает, что
что-то не так в соединении между этим
устройством и проигрывателемавтоматом компакт-дисков. Если такое
случается, проверьте соединение и
убедитесь, что провода плотно
подсоединены. Затем нажмите на кнопку
возврата в исходное положение
проигрывателя-автомата компакт-дисков.
26
Воспроизведение
компакт-дисков
Выберите проигрыватель-автомат
компакт-дисков (CD-CH).
CD CD-CH*
* Если Вы изменили настройку “EXT IN” на
“LINE IN” (см. стр. 24), Вы не можете выбрать
устройство автоматической смены компактдисков.
• Если текущий диск имеет формат MP3:
воспроизведение начнется с первой папки
на текущем диске после завершения
проверки файлов.
Номер выбранного диска
Индикатор (папка)
Индикатор MP3
Примечание:
Если диск MP3 содержит папку, на дисплее вместо
“ROOT” появляется имя папки.
Выбранный
номер папки
Page 63

• Если текущий диск является компактдиском:
воспроизведение начнется с первой
дорожки текущего диска.
Номер выбранного диска
Истекшее время
воспроизведения
Примечания:
• Когда Вы нажимаете на кнопку CD CD-CH,
питание автоматически включается. Вам не
нужно нажимать
включить питание.
• Если Вы меняете источник звука или
выключаете данное устройство, воспроизведение
компакт-диска также прекращается. Когда Вы
снова выберете устройство автоматической
смены компакт дисков в качестве источника
звука, воспроизведение начнется с того места,
где оно было остановлено.
• Когда Вы начинаете воспроизведение CD-текста
или диска MP3, информация о диске
автоматически появляется на дисплее. (См. стр.
14 и 17).
Номер текущей
дорожки
кнопку, чтобы
Чтобы перейти непосредственно
на определенный диске
Нажмите на нумерованную кнопку,
соответствующую номеру такого диска,
чтобы начать его воспроизведение (во время
работы проигрывателя-автомата компактдисков).
• Чтобы выбрать номер диска от 1 – 6:
Нажмите и тут же отпустите кнопки
1 (7) – 6 (12).
• Чтобы выбрать номер диска от 7 – 12:
Нажмите и держите в течение более 1
секунды кнопки 1 (7) – 6 (12).
Для ускоренного перехода вперед
или перехода назад к дорожкy/
файлов
Нажмите и удерживайте
кнопку ¢ в режиме
воспроизведения для
перемотки вперед дорожек
или файлов.
Нажмите и удерживайте кнопку 4 в
режиме воспроизведения для перемотки
назад дорожек или файлов.
Примечание:
Во время этой операции Вы можете слышать
только прерывистые звуки. (Истекшее время
воспроизведения также прерывисто меняется на
экране дисплея).
Для того, чтобы перейти на
следующие или предшествующие
дорожки
Краткое нажатие кнопки 4 во время
воспроизведения осуществляет переход
назад к началу текущей дорожки или файла.
При каждом последовательном нажатии
кнопки выполняется поиск начала
предыдущих дорожек или файлов и их
воспроизведение.
/файлов
Краткое нажатие кнопки
¢ в режиме
воспроизведения
осуществляет переход вперед
к началу следующей дорожки
или файла.
При каждом
последовательном нажатии
кнопки выполняется поиск
начала следующих дорожек
или файлов и их
воспроизведение.
РУCCKИЙ
27
Page 64
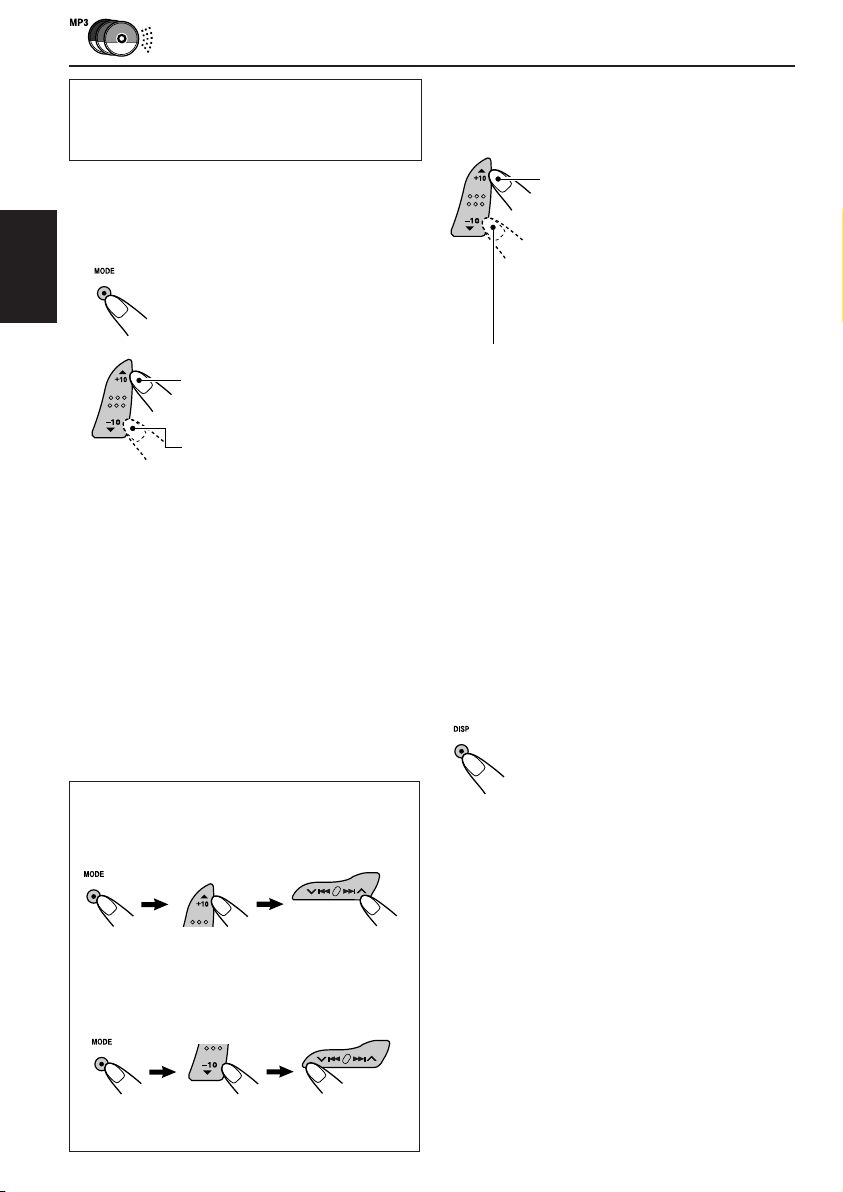
Данная операция возможна только при
использовании проигрывателяавтомата компакт-дисков компании JVC,
совместимого с MP3 (CH-X1500).
Переход к следующей или
предыдущей папке (только для
дисков MP3)
Для быстрого перехода к дорожке
или файлу (кнопки +10 и –10)
1 Нажмите на MODE, чтобы войти в режим
функций во время воспроизведения диска.
РУCCKИЙ
2 Нажмите +10 или –10.
Переход на 10 дорожек или
файлов* вперед к последней
дорожке/файлу
Переход на 10 дорожек или
файлов* назад к первой
дорожке/файлу
*
При однократном нажатии кнопки +10 или
–10 осуществляется переход с текущей
дорожки или файла на ближайшую дорожку
или файл с большим или меньшим номером,
кратным 10, (например, 10, 20 или 30).
Каждый раз при нажатии кнопки
осуществляется переход на 10 дорожек или
файлов (см. раздел “Использование кнопок
+10 и –10” ниже).
•
После последней дорожки или файла будет
выбрана первая дорожка или файл и наоборот.
Примечание:
Если текущим проигрываемым диском является
диск в формате MP3, пропускаются файлы,
находящиеся в одной папке.
При воспроизведении диска
MP3 нажмите кнопку
5 (вверх) чтобы перейти к
следующей папке.
При каждом последующем
нажатии кнопки выполняется
поиск следующей папки, и
начинается воспроизведение
первого файла этой папки.
При воспроизведении диска MP3 нажмите
кнопку ∞ (вниэ) чтобы перейти к
предыдущей папке.
При каждом последующем нажатии кнопки
выполняется поиск предыдущей папки, и
начинается воспроизведение первого файла
этой папки.
Отображение информации о
диске для CD-текста и дисков MP3
Это возможно только при подключении
устройства автоматической смены компактдисков JVC, поддерживающего функцию чтения
CD-текста и/или дисков в формате MP3.
Выберите режим отображения текста
при воспроизведении CD-текста или
дисков MP3.
Использование кнопок +10 и –10
• Пример. 1: Выбор дорожки 32 или файла
Дорожка/
файла 6 \ 10 \ 20 \ 30 \ 31 \ 32
• Пример. 2: Выбор дорожки 8 или файла
Дорожка/
файла 36 \ 30 \ 20 \ 10 \ 9 \ 8
28
32 при воспроизведении
дорожки 6 или файла 6
(Три раза) (Дважды)
8 при воспроизведении
дорожки 36 или файла 36
(Три раза) (Дважды)
•
Подробные сведения о CD-тексте см. на стр.
14, а о текстовой информации диска MP3 – на
стр. 17.
Page 65

Выбор режимов
воспроизведения
Воспроизведение дорожек или
файлов в произвольном режиме
(произвольное воспроизведение
папок/дисков/нескольких дисков)
1 Нажмите кнопку MODE в
режиме воспроизведения для
перехода в режим настройки
функций.
2 Когда на дисплее мигает
надпись “MODE” нажмите
RND (произвольное).
При каждом нажатии кнопки
режим произвольного
воспроизведения меняется
следующим образом:
Для дисков MP3:
DISC RNDFLDR RND
Otmeheho
Для компакт-дисков:
Индикатор RND
Пример.: Экран дисплея при выборе “MAG RND”
Примечание:
Индикатор MP3 также загорается, если текущий
воспроизводимый диск имеет формат MP3.
Режим
FLDR RND*
DISC RND
MAG RND Загорается
*
“FLDR RND” используется только для дисков MP3.
Активный
индикатор
Индикаторы
RND и
загораются. затем файлы
Индикаторы
RND и файлы текущего
загораются. (или выбранного)
индикатор
RND.
MAG RND
MAG RNDDISC RND
Otmeheho
Воспроизводятся
в произвольном
режиме
Все
файлы
текущей папки,
следующей
папки и т.д.
Все дорожки или
диска.
Все дорожки или
файлы вставленных
дисков.
Повторное воспроизведение
дорожек или файлов
(повторное воспроизведение
дорожек/папок/дисков)
1 Нажмите кнопку MODE в
режиме воспроизведения для
перехода в режим настройки
функций.
2 Когда на дисплее мигает
надпись “MODE” нажмите
RPT (повторное).
При каждом нажатии кнопки
режим повторного
воспроизведения меняется
следующим образом:
Для дисков MP3:
TRK RPT
Otmeheho
Для компакт-дисков:
Индикаторы (диск) и RPT
Пример.: Экран дисплея при выборе “DISC RPT”
Примечание:
Индикатор MP3 также загорается, если текущий
воспроизводимый диск имеет формат MP3.
Режим
TRK RPT Загорается Текущая
FLDR RPT* Индикаторы Все файлы
DISC RPT Индикаторы Все дорожки
*
“FLDR RPT” используется только для дисков MP3.
Активный
индикатор
индикатор (или выбранная)
RPT. дорожка/файл.
и RPT текущей
загораются. (или выбранной)
и RPT или файлы
загораются. текущего (или
FLDR RPT
DISC RPT
DISC RPTTRK RPT
Otmeheho
Повторное
воспроизведение
папки текущего
диска.
выбранного) диска.
РУCCKИЙ
29
Page 66
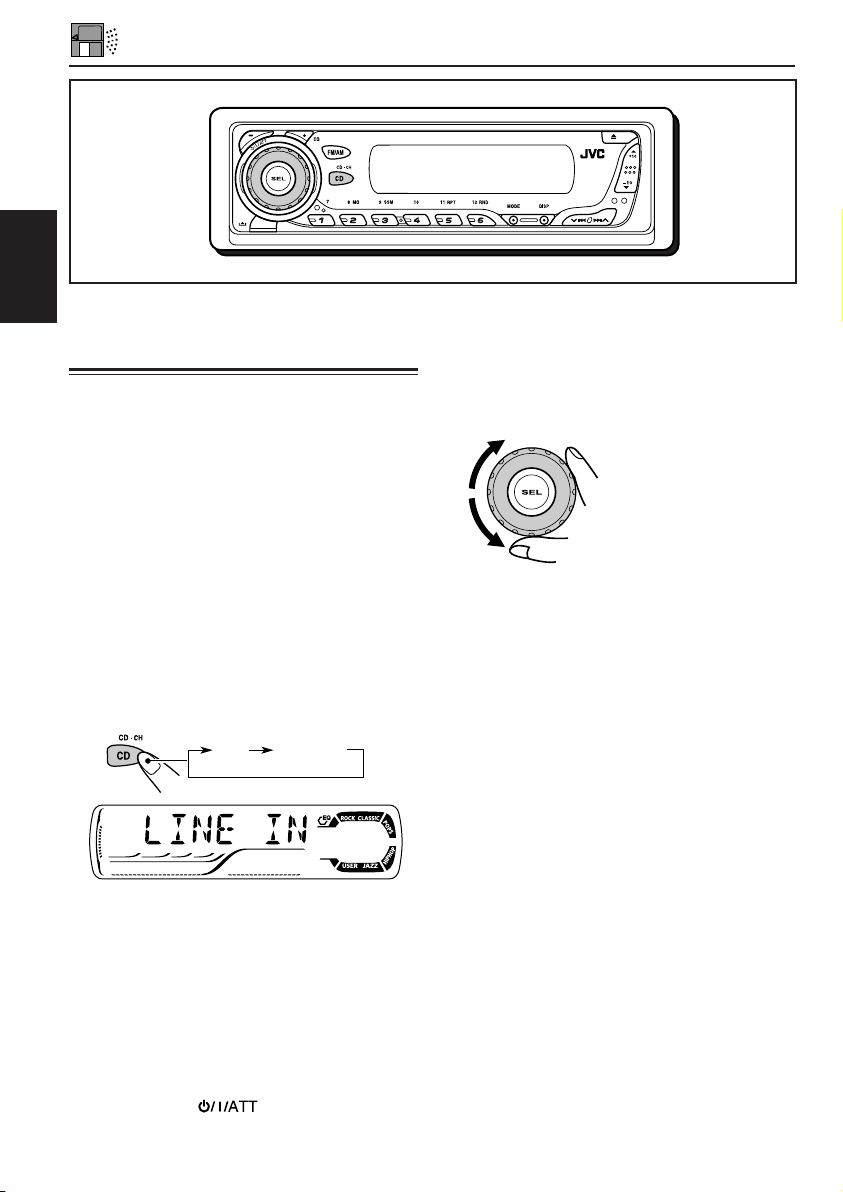
ОПЕРАЦИИ С ВНЕШНИМ КОМПОНЕНТОМ
РУCCKИЙ
Воспроизведение
внешнего компонента
Вы можете подключить внешний компонент к
контактному гнезду проигрывателя-автомата
компакт-дисков на задней панели с помощью
Адаптера входной линии KS-U57 (не
поставляется).
Подготовка:
• Порядок соединения Адаптера входной линии
KS-U57 и внешнего компонента смотрите в
Руководство по установке/подключению (в
отдельном издании).
• Перед тем, как приступать к эксплуатации
внешнего компонента с помощью нижеследующей
процедуры, выберите правильный внешний вход.
См. раздел “Чтобы выбрать внешний компонент
для использования—EXT IN” на стр. 24.
2
Включите подсоединенный
компонент и начинайте
воспроизводить источник звука.
3
Настройте громкость.
4
Отрегулируйте звук так, как Вам
хочется. (Смотрите на страницах
20 и 21).
1
Выберите внешний компонент
(LINE IN).
CD LINE IN*
• Если на экране дисплея не появляется
надпись “LINE IN”*, просмотрите страницу
24 и выберите внешний вход (“LINE IN”).
* Появляется на экране дисплея, только когда
выбран один из следующих источников звука
—FM, AM и компакт-диск.
Примечание в отношении включения в
одно касание:
Когда Вы нажимаете на кнопку CD CD-CH,
питание автоматически включается. Вам не
нужно нажимать кнопку, чтобы
включить питание.
30
Page 67

ИСПОЛЬЗОВАНИЕ ПУЛЬТА ДИСТАНЦИОННОГО УПРАВЛЕНИЯ
Настоящим устройством можно дистанционно
управлять, как указано здесь (при покупке по
Вашему выбору устройства дистанционного
управления). Мы рекомендуем Вам использовать
с Вашим устройством устройство дистанционного
управления RM-RK50 или RM-RK60.
(Пример.:Kогда Вы пользуетесь устройством
Перед тем, как пользоваться устройством
дистанционного управления:
• Направьте устройство дистанционного
управления прямо на дистанционный
датчик, расположенный на главном
устройстве. Убедитесь, что между ними нет
никакого препятствия.
•
Не подвергайте дистанционный датчик
воздействию сильного света (прямого солнечного
света или искусственного освещения).
RM-RK60)
Дистанционный датчик
Установка батарейки
Когда расстояние, с которого можно управлять,
уменьшается или снижается эффективность
работы устройства дистанционного
управления, замените батарейку.
1. Снимите держатель батарейки.
1) Выталкивайте держатель батарейки в
направлении, указанном стрелкой, с
помощью шариковой авторучки или
аналогичного инструмента.
2) Снимите держатель батарейки.
(задняя
сторона)
3.
Поставьте держатель батарейки на место.
Всовывайте обратно держатель батарейки
до тех пор, пока не услышите щелчок.
(задняя
сторона)
ПРЕДОСТЕРЕЖЕНИЕ:
• Храните батарейку в месте, не доступном
для детей.
Если ребенок случайно проглотит батарейку,
немедленно обратитесь за консультацией к
врачу.
• Не перезаряжайте, не укорачивайте, не
разбирайте, не нагревайте батарейку и не
бросайте ее в огонь.
Все это может привести к тому, что
батарейка начнет выделять тепло, треснет
или начнется пожар.
• Не оставляйте батарейку вместе с другими
металлическими материалами.
Это может привести к тому, что
батарейка начнет выделять тепло, треснет
или начнется пожар.
• При выбрасывании или сохранении батарейки
заверните ее в пленку и изолируйте; иначе
батарейка может начать выделять тепло,
треснет, или начнется пожар.
• Не протыкайте батарейку пинцетом или
аналогичными инструментами.
Это может привести к тому, что
батарейка начнет выделять тепло, треснет
или начнется пожар.
ПРЕДУПРЕЖДЕНИЕ:
Не оставляйте устройство дистанционного
управления в месте (таком как приборные
доски), подвергающемся воздействию прямого
солнечного света в течение длительного
времени. Иначе его можно повредить.
РУCCKИЙ
2. Поставьте батарейку.
Всуньте батарейку в держатель со стороной
+, направленной вверх, таким образом,
чтобы батарейка закрепилась в держателе.
Литиевая
батарейка в
форме монеты
(номер изделия:
CR2025)
31
Page 68

Расположение кнопок
RM-RK60
РУCCKИЙ
S
1 • Включает данное устройство, если
нажать, когда данное устройство
выключено.
• Выключает данное устройство, если
нажать и держать до тех пор, пока на
экране дисплея не появится надпись
“SEE YOU” (ДО ВСТРЕЧИ).
• Моментально понижает уровень
громкости, если ее нажать и тут же
отпустить.
Нажмите еще раз, чтобы восстановить
громкость.
2 • Ведет поиск станций во время
прослушивания радио.
• Быстро переходит вперед или
возвращается назад к дорожкy/файла,
если нажать и держать, пока
прослушивается диск.
• Переходит к началу следущенней
дорожки/файла или возвращается назад
к началу текущего (или предыдущего)
дорожкa/файла, если нажать и тут же
отпустить во время прослушивания
диска.
3 • Осуществляет выбор
запрограммированных радиостанций во
время прослушивания радио.
При каждом нажатии этой кнопки номер
запрограммированной радиостанции
возрастает, и приемник настраивается на
запрограммированную радиостанцию.
• Переходит к первому файлу предыдущей
папки при прослушивании диска MP3.
При каждом нажатии кнопки можно
перейти к предыдущей папке и начать
воспроизведение первого файла.
• При воспроизведении диска MP3 на
проигрывателе компакт-дисков,
поддерживающем формат MP3;
– Переход к предыдущему диску при
кратковременном нажатии.
– Переход к предыдущей папке при
нажатии и удерживании нажатой.
Примечание: При воспроизведении
компакт-диска на
проигрывателе компактдисков используется для
перехода к предыдущему диску.
4 Выбирает режим звучания (C-EQ:
специализированный эквалайзер).
При каждом нажатии этой кнопки режим
звучания (C-EQ) меняется.
5 • Выбирает полосу частот во время
прослушивания радио.
При каждом нажатии этой кнопки
полоса частот меняется.
• Переходит к первому файлу следующей
папки при прослушивании диска MP3.
При каждом нажатии кнопки можно
перейти к следующей папке и начать
воспроизведение первого файла.
• При воспроизведении диска MP3 на
проигрывателе компакт-дисков,
поддерживающем формат MP3;
– Переход к следующему диску при
кратковременном нажатии.
– Переход к следующей папке при
нажатии и удерживании нажатой.
Примечание: При воспроизведении
компакт-диска на
проигрывателе компактдисков используется для
перехода к следующему диску.
6 Выбирает источник звука.
При каждом нажатии этой кнопки
источник звука меняется.
7 Функционирует так же, как диск
управления на главном устройстве.
Примечание:Эти кнопки не работают для
установки предпочитаемого
режима настройки (PSM).
32
Page 69

ВЫЯВЛЕНИЕ НЕИСПРАВНОСТЕЙ
То, что может вначале показаться неисправностью, не всегда представляет собой серьезную проблему.
Перед тем, как обращаться в центр технического обслуживания, проверьте следующие пункты.
Симптомы
•
Громкоговорители не
издают звуков.
•
Это устройство совсем не
работает.
Общее
•
Автоматическое
программирование SSM
(последовательная
память для радиостанций
с устойчивым сигналом)
не работает.
FM/AM
•
Статические помехи при
прослушивании радио.
•
Диск не воспроизводится.
•
Компакт-диск
однократной записи/
перезаписываемый
компакт-диск не может
воспроизводиться.
•Дорожки
на компактдиске однократной
записи/
перезаписываемом
компакт-диске нельзя
пропускать.
Причины
Громкость поставлена на
минимальный уровень.
Соединения неправильные.
Возможно, произошел сбой
встроенного микрокомпьютера,
вызванный шумами, помехами и
иными подобными причинами.
Сигналы слишком слабые.
Ненадежно подсоединена
антенна.
Диск вставлен неправильной
стороной.
Компакт-диск однократной
записи/перезаписываемый
компакт-диск не закончен.
Способ устранения
Отрегулируйте ее до
оптимального уровня.
Проверьте провода и соединения.
Нажмите кнопку возврата в
исходное положение в контейнере
панели после отсоединения
панели управления. (Установка
часов и запрограммированные
радиостанции, сохраненные в
памяти, стираются). (Смотрите
страницу 2).
Сохраните радиостанции в
памяти вручную.
Надежно подсоедините антенну.
Вставьте компакт-диск
правильно.
•
Вставьте законченный
компакт-диск однократной
записи/перезаписываемый
компакт-диск.
•
Закончите компакт-диск
однократной записи/
перезаписываемый компактдиск с помощью компонента,
который Вы используете для
записи.
РУCCKИЙ
•
Невозможно извлечь
диск.
•
Звук диска иногда
прерывается.
Воспроизведение дисков
•
На экране дисплея
появляется надпись
“NO DISC” (нет диска).
Диск заперт.
Вы едете по неровным дорогам.
Диск поцарапан.
Соединения неправильные.
В отверстие для дисков не
вставлен диск.
Диск вставлен неправильно.
Освободите диск.
(Смотрите страницу 14).
Прекратите воспроизведение,
когда едите по неровным дорогам.
Поменяйте диск.
Проверьте провода и соединения.
Вставьте диск в отверстие для
дисков.
Вставьте диск правильно.
33
Page 70

Симптомы
Причины
Способ устранения
• Диск невозможно
воспроизвести.
РУCCKИЙ
• Диск невозможно
воспроизвести.
• Требуется более
длительное время на
считывание (на экране
дисплея продолжает
мигать надпись “CHECK”).
• Файлы невозможно
воспроизвести так, как
Вы намеревались их
Воспроизведение МР3
воспроизводить.
На данном диске нет
файлов МР3.
Файлы МР3 не имеют
дополнительного кода
<.mp3> в названиях их
файлов.
Файлы МР3 не записаны в
формате, совместимом с
ISO 9660, уровнем 1,
уровнем 2, Romeo или Joliet.
Воспроизводимый файл не
является файлом МР3
(хоты он и имеет
дополнительный код
<.mp3>).
Время считывания
отличается благодаря
сложности конфигурации
каталога/файла.
Порядок воспроизведения
устанавливается при записи
файлов.
Поменяйте диск.
Прибавьте дополнительный
код <.mp3> к названиям их
файлов.
Поменяйте диск.
(Запишите файлы МР3 с
помощью совместимой
прикладной программы).
Перейдите на другой файл
или поменяйте диск.
(Не добавляйте
дополнительный код <.mp3>
к файлам, не являющимся
файлами МР3).
Не используйте слишком
много иерархий и каталогов.
Также не записывайте какиелибо другие типы звуковых
треков вместе с файлами
МР3.
34
• Истекшее время
воспроизведения
неправильное.
• На дисплее мигает
индикатор .
• На экране дисплея
появляется надпись
“NO FILES” (нет файлов).
• На дисплее не показаны
правильные знаки
(например, название
альбома).
Какое иногда случается во
время воспроизведения.
Причиной этого является
то, каким образом файлы
записываются на данный
диск.
В текущем каталоге нет
файлов МР3.
На данном диске нет
файлов МР3.
Данное устройство может
показывать на экране
дисплея только алфавит
(заглавные буквы: A–Z),
цифры и ограниченное
количество символов.
Выберите другой каталог.
Вставьте диск, на котором
есть файлы МР3.
Page 71

Симптомы
Причины
Способ устранения
• На экране дисплея
появляется надпись
“NO DISC” (нет диска).
• На экране дисплея
появляется надпись
“NO MAG”.
• На экране дисплея
появляется
надпись“RESET 8”
(возврат в исходное
положение 8).
• На экране дисплея
появляется надпись
“RESET 1” – “RESET 7”
(возврат в исходное
положение 1 – возврат в
исходное положение 7).
• Это устройство совсем не
работает.
В накопителе нет диска.
Диски вставлен неправильно.
В проигрыватель-автомат
компакт-дисков не вставлен
накопитель.
Это устройство неправильно
подсоединено к
проигрывателю-автомату
компакт-дисков.
Возможно, произошел сбой
встроенного
микрокомпьютера,
вызванный шумами,
помехами и иными
подобными причинами.
Диски вставлены
неправильной стороной.
Вставьте диски правильно.
Вставьте накопитель.
Соедините это устройство
и проигрыватель-автомат
компакт-дисков правильно
и нажмите кнопку возврата
в исходное положение
проигрывателя-автомата
компакт-дисков.
Нажмите кнопку возврата
в исходное положение
проигрывателя-автомата
компакт-дисков.
Нажмите кнопку возврата
в исходное положение в
контейнере панели после
отсоединения панели
управления. (Установка
часов и
запрограммированные
радиостанции,
сохраненные в памяти,
стираются). (Смотрите
страницу 2).
РУCCKИЙ
Проигрывателя-автомата компакт-дисков
Относительно схождения с дорожки:
Схождение с дорожки может произойти в результате движения автомобиля по чрезвычайно неровной
дороге. Это не повредит устройство и диск, однако, это раздражает.
Мы рекомендуем Вам прекратить воспроизведение диска во время движения по таким неровным
дорогам.
35
Page 72

ТЕХНИЧЕСКОЕ ОБСЛУЖИВАНИЕ
Обращение с дисками
Данное устройство предназначено для
воспроизведения компакт-дисков
(перезаписываемых и однократной записи), а
также CD-текста.
• Устройство также поддерживает
воспроизведение дисков MP3.
Как обращаться с дисками
При вытаскивании диска
из его коробки нажмите на
РУCCKИЙ
центральный фиксатор коробки и
вытащите диск, держа его за
края.
•
Держите диск только за края.
Не касайтесь его поверхности с записью.
При закладке диска в его коробку
осторожно наденьте диск на центральный
фиксатор (поверхность с текстом должна
смотреть вверх).
•
После использования обязательно храните
диски в коробках.
Чтобы держать диски чистыми
Грязный диск может
воспроизводиться неправильно.
Если диск загрязнился, протрите его
мягкой тряпкой, двигаясь по прямой
линии от центра к краю.
Для воспроизведения новых дисков
Новые диски могут иметь некоторые
неровные места вокруг внутреннего и
внешнего края. Если используется
такой диск, данное устройство может
вытолкнуть этот диск.
Чтобы удалить такие неровные места, потрите
края с помощью карандаша или шариковой
авторучки и т.п.
Конденсация влаги
Влага может конденсироваться на линзе внутри
проигрывателя дисков в следующих случаях:
•
После включения обогревателя в автомобиле.
•
Если в салоне автомобиля становится очень
влажно.
Если такое случится, проигрыватель дисков
может начать плохо работать. В этом случае
вытащите диск и оставьте устройство
включенным на несколько часов до тех пор,
пока не испарится влага.
Центральный
фиксатор
Воспроизведение компакт-дисков
однократной или многократной записи
Перед воспроизведением компакт-дисков
однократной или многократной записи внимательно
прочитайте данные инструкции и предостережения.
•
Используйте только “завершенные” компактдиски однократной или многократной записи.
•
Некоторые компакт-диски однократной или
многократной записи не воспроизводятся на
данном устройстве в связи с их особенностями, а
также по следующим причинам:
– диски загрязнены или поцарапаны;
– на линзе внутри устройства присутствует
конденсат влаги;
– линза звукоснимателя загрязнена.
•
Для считывания дисков многократной записи
может потребоваться больше времени, так как
они имеют меньшую отражательную способность
по сравнению с обычными компакт-дисками.
•
Компакт-диски однократной или многократной
записи чувствительны к высоким температурам и
влажности, поэтому не оставляйте их в машине.
•
Не используйте следующие компакт-диски
однократной или многократной записи:
– диски с наклейками, этикетками или
защитными пленками на поверхности;
– диски, на которых можно печатать этикетки с
помощью струйного принтера.
Использование этих дисков при высоких
температурах или высокой влажности может
привести к их неисправностям или повреждению.
Пример.:
– наклейки и этикетки могут сжать и
деформировать диск;
– наклейки и этикетки могут отслоиться от
диска, и его нельзя будет извлечь;
– печать на дисках может сделать их клейкими.
Внимательно прочитайте инструкции и
предостережения об использовании этикеток и
дисков, на которых можно выполнять печать.
ПРЕДУПРЕЖДЕНИЯ:
• Не вставляйте 8-сантиметровые диски
(одиночные диски) в отверстие для дисков.
(Такие диски не выходят при выбросе).
•
Не вставляйте диски необычной формы,
такие как в форме сердечка или цветка; иначе
это приведет к появлению неисправности.
•
Не подвергайте диски воздействию прямого
солнечного света или любого источника тепла, а
также не кладите их в место, которое
подвергается воздействию высокой температуры
и влажности. Не оставляйте их в автомобиле.
• Не пользуйтесь никакими растворителями
(например, обычное чистящее средство для
пластинок, аэрозоль, разбавитель, бензин и
т.п.) для чистки дисков.
Деформированный
диск
36
Наклейка
Остаток
клея
Диск
Наклеиваемая
этикетка
Page 73

ТЕХНИЧЕСКИЕ ХАРАКТЕРИСТИКИ
СЕКЦИЯ УСИЛИТЕЛЯ
ЗВУКОВОЙ ЧАСТОТЫ
Максимальная выходная мощность:
Передние:50 Вт на канал
Задние: 50 Вт на канал
Непрерывная выходная мощность (RMS):
Передние:19 Вт на канал в 4 Ω, от 40 Гц
до 20 000 Гц при не более
0,8% суммарного.
Задние: 19 Вт на канал в 4 Ω, от 40 Гц
до 20 000 Гц при не более
0,8% суммарного.
Полное сопротивление нагрузки:
4 Ω (допуск: от 4 Ω до 8 Ω)
Диапазон регулирования тональности:
Низкие частоты: ±10 дБ при 100 Гц
Высокие частоты: ±10 дБ при 10 kГц
Частотная характеристика:
от 40 Гц до 20 000 Гц
Отношение сигнал-шум: 70 дБ
Уровень выхода/полное сопротивление:
Нагрузка 2,0 B/20 kΩ (полная шкала)
Выходное сопротивление: 1 kΩ
СЕКЦИЯ ТЮНЕРА
Частотный диапазон:
FM1/FM2: От 87,5 МГц до 108,0 МГц
FM3: От 65,00 МГц до 74,00 МГц
AM: (MW) От 522 кГц до 1 620 кГц
(LW) От 144 кГц до 279 кГц
[Тюнер FM]
Используемая чувствительность:
11,3 дБф (1,0 µB/75 Ω)
50 дБ пороговая чувствительность:
16,3 дБф (1,8 µB/75 Ω)
Избирательность обходного канала (400 kГц):
65 дБ
Частотная характеристика:
От 40 Гц до 15 000 Гц
Стерео разделение: 30 дБ
Коэффициент захвата: 1,5 дБ
СЕКЦИЯ ПРОИГРЫВАТЕЛЯ
КОМПАКТ-ДИСКОВ
Тип: Проигрыватель компакт-дисков
Система обнаружения сигнала:
Бесконтактный оптический звукосниматель
(полупроводниковый лазер)
Количество каналов: 2 канала (стерео)
Частотная характеристика:
Динамический диапазон: 96 дБ
Отношение сигнал-шум: 98 дБ
Коэффициент детонации:
Ниже измеряемого предела
Формат декодирования MP3:
MPEG 1/2 Audio Layer 3
Макс. скорость передачи битов:
320 Кбит/с
От 5 Гц до 20 000 Гц
ОБЩИЕ ХАРАКТЕРИСТИКИ
Потребность в электроэнергии:
Рабочее напряжение: 14,4 В пост. напр.
(допуск: от 11 В до 16 В)
Система заземления: Минус на массе
Допустимая рабочая температура:
От 0°C до +40°C
Размеры (Ш × В × Г):
Размеры установки (приблизит.):
182 мм × 52 мм × 150 мм
Размер панели (приблизит.):
188 мм × 58 мм × 12 мм
Масса (приблизит.):
1,4 кг (исключая принадлежности)
Дизайн и технические характеристики могут
меняться без уведомления.
РУCCKИЙ
[Тюнер MW]
Чувствительность: 20 µB
Избирательность: 35 дБ
[Тюнер LW]
Чувствительность: 50 µB
37
Page 74

Having TROUBLE with operation?
Please reset your unit
Refer to page of How to reset your unit
Затруднения при эксплуатации?
Пожалуйста, перезагрузите Ваше
устройство
Для получения информации о перезагрузке Вашего
устройства обратитесь на соответствующую страницу
EN, RU 1203KKSMDTJEIN
© 2003 VICTOR COMPANY OF JAPAN, LIMITED
 Loading...