

Page 1

DVD/CD RECEIVER
KD-ADV6160/KD-DV5100
ENGLISHESPAÑOL
RECEPTOR CON DVD/CD
RECEPTEUR DVD/CD
For canceling the display demonstration, see page 11.
Para cancelar la demostración en pantalla, consulte la página 11.
Pour annuler la démonstration des affichages, référez-vous à la page 11.
For installation and connections, refer to the separate manual.
Para la instalación y las conexiones, refiérase al manual separado.
Pour l’installation et les raccordements, se référer au manuel séparé.
KD-ADV6160/KD-DV5100
KD-ADV6160/KD-DV5100
INSTRUCTIONS
MANUAL DE INSTRUCCIONES
MANUEL D’INSTRUCTIONS
FRANÇAIS
For customer Use:
Enter below the Model
No. and Serial No. which
are located on the top or
bottom of the cabinet.
Retain this information for
future reference.
Model No.
Serial No.
GET0277-001B
[J]
Page 2
Thank you for purchasing a JVC product.
Please read all instructions carefully before operation, to ensure your complete understanding and to
obtain the best possible performance from the unit.
ENGLISH
INFORMATION (For U.S.A.)
This equipment has been tested and found to comply with the limits for a Class B digital device,
pursuant to Part 15 of the FCC Rules. These limits are designed to provide reasonable protection
against harmful interference in a residential installation. This equipment generates, uses, and can
radiate radio frequency energy and, if not installed and used in accordance with the instructions,
may cause harmful interference to radio communications. However, there is no guarantee that
interference will not occur in a particular installation. If this equipment does cause harmful
interference to radio or television reception, which can be determined by turning the equipment
off and on, the user is encouraged to try to correct the interference by one or more of the
following measures:
– Reorient or relocate the receiving antenna.
– Increase the separation between the equipment and receiver.
– Connect the equipment into an outlet on a circuit different from that to which the receiver is
connected.
– Consult the dealer or an experienced radio/TV technician for help.
IMPORTANT FOR LASER PRODUCTS
1. CLASS 1 LASER PRODUCT
2. CAUTION: Do not open the top cover.
There are no user serviceable parts inside
the unit; leave all servicing to qualified
service personnel.
3. CAUTION: Visible and invisible laser
radiation when open and interlock failed or
defeated. Avoid direct exposure to beam.
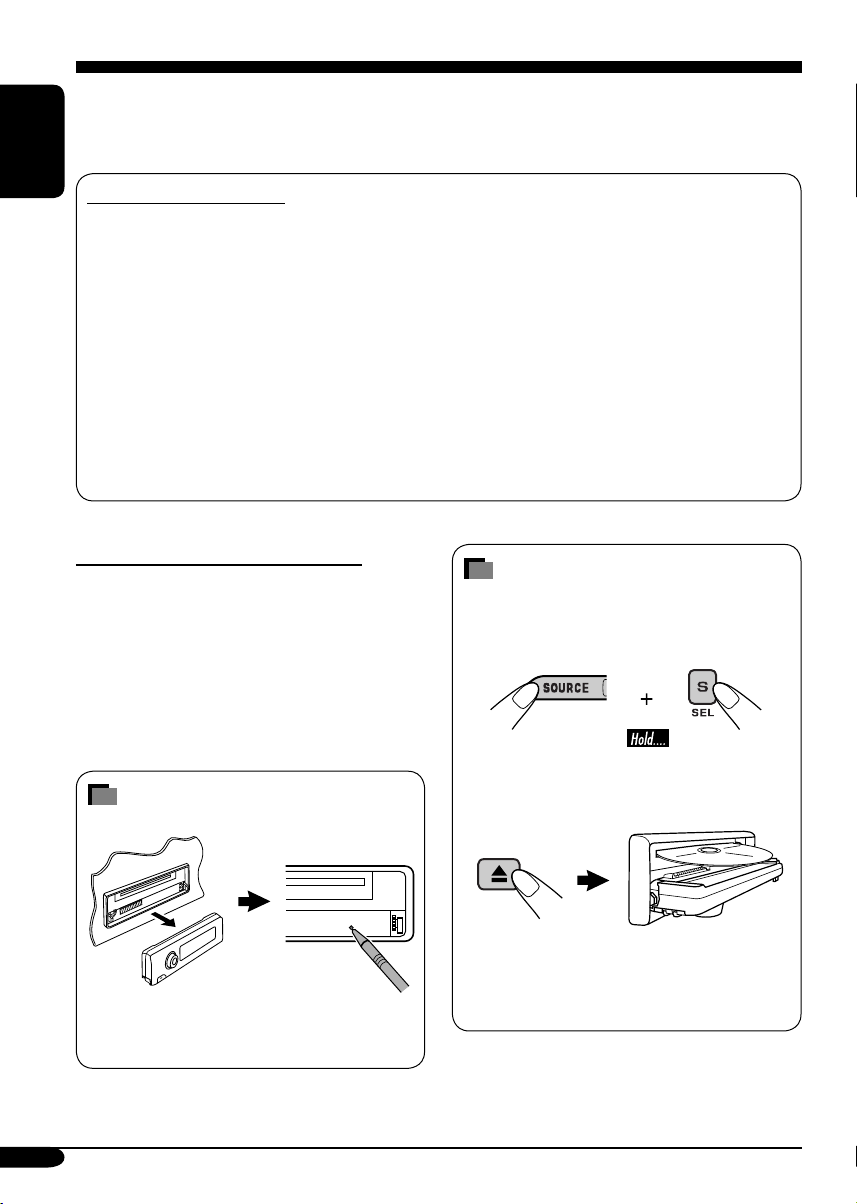
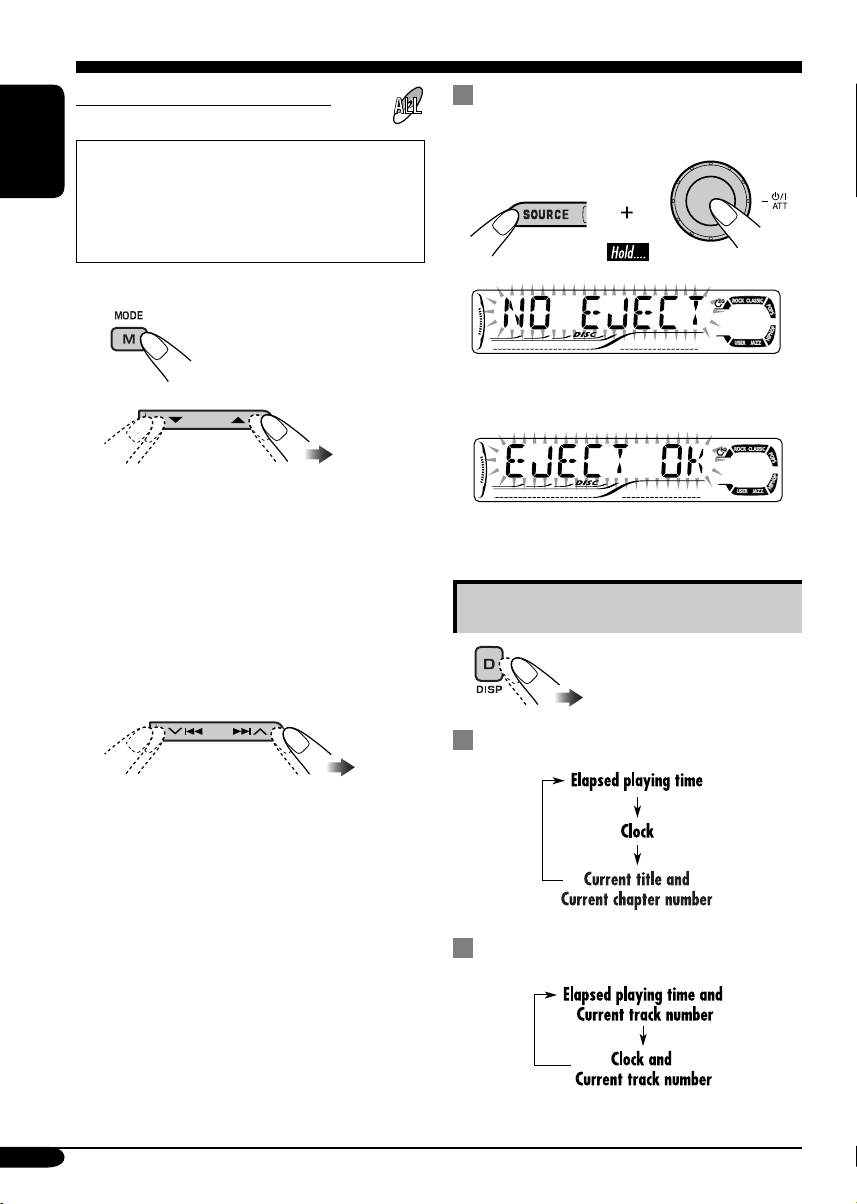
How to reset your unit
This will reset the microcomputer. Your
preset adjustments will also be erased.
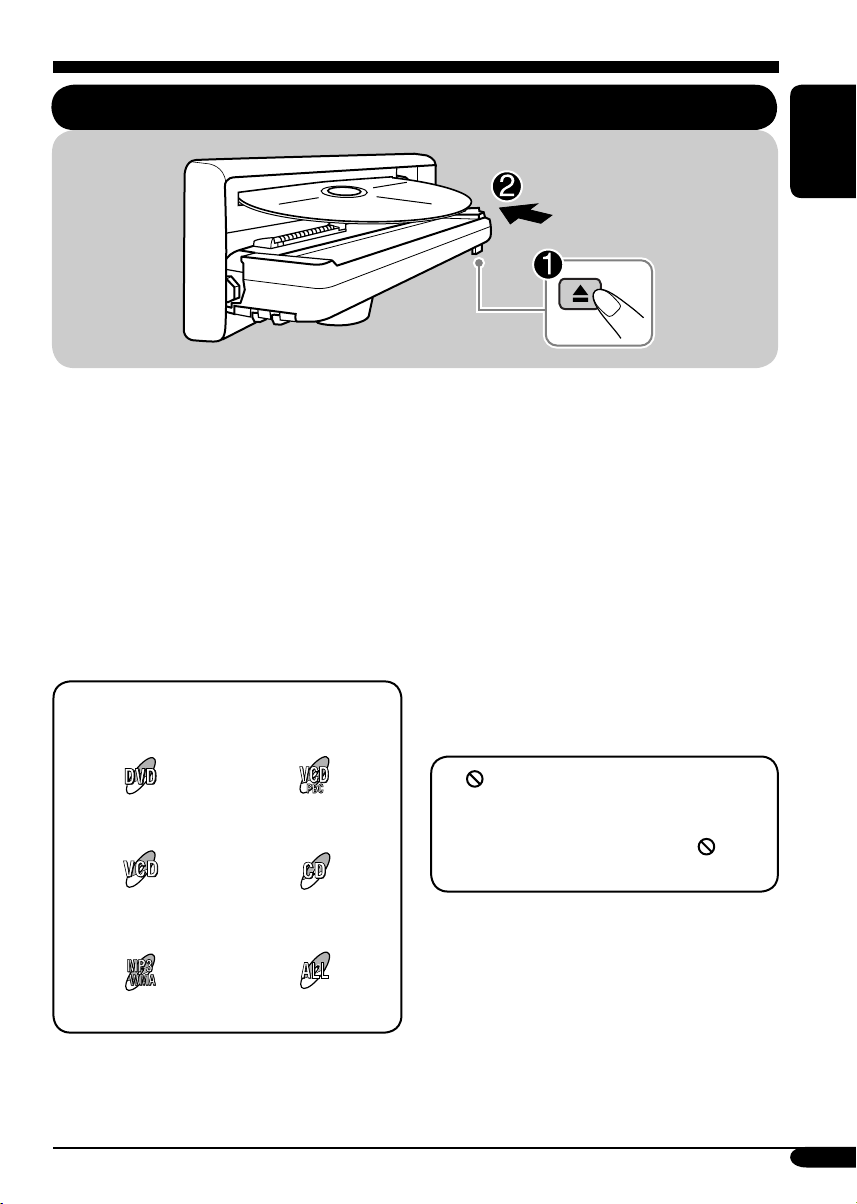
How to forcibly eject a disc
If a disc cannot be recognized by the receiver
or cannot be ejected, ejects the disc as
follows.
“PLEASE” and “EJECT” appear alternately
on the display.
• If this does not work, reset your receiver.
• Be careful not to drop the disc when it
ejects.
2
Page 3

WARNINGS:
• DO NOT install any receiver in
locations where;
– it may obstruct the steering wheel and
gearshift lever operations, as this may
result in a traffic accident.
– it may obstruct the operation of safety
devices such as air bags, as this may
result in a fatal accident.
– it may obstruct visibility.
• DO NOT operate any receiver while
manipulating the steering wheel, as this
may result in a traffic accident.
• The driver must not watch the monitor
while driving.
If the driver watches the monitor while
driving, it may lead to carelessness and
cause an accident.
• The driver must not put on the
headphones while driving. It is
dangerous to shut off the outside sounds
while driving.
• If you need to operate the receiver while
driving, be sure to look ahead carefully
or you may be involved in a traffic
accident.
• If the parking brake is not engaged,
“DRIVER MUST NOT WATCH THE
MONITOR WHILE DRIVING.”
appears on the monitor, and no
playback picture will be shown.
– This warning appears only when
the parking brake wire is connected
to the parking brake system built
in the car (refer to the Installation/
Connection Manual).
This product incorporates copyright
protection technology that is protected
by U.S. patents and other intellectual
property rights. Use of this copyright
protection technology must be authorized
by Macrovision, and is intended for home
and other limited viewing uses only unless
otherwise authorized by Macrovision.
Reverse engineering or disassembly is
prohibited.
Caution on volume setting:
Discs produce very little noise compared
with other sources. Lower the volume
before playing a disc to avoid damaging
the speakers by the sudden increase of the
output level.
ENGLISH
*For safety....
• Do not raise the volume level too much, as
this will block outside sounds, making driving
dangerous.
• Stop the car before performing any
complicated operations.
*Temperature inside the car....
If you have parked the car for a long time in
hot or cold weather, wait until the temperature
in the car becomes normal before operating the
unit.
3
Page 4
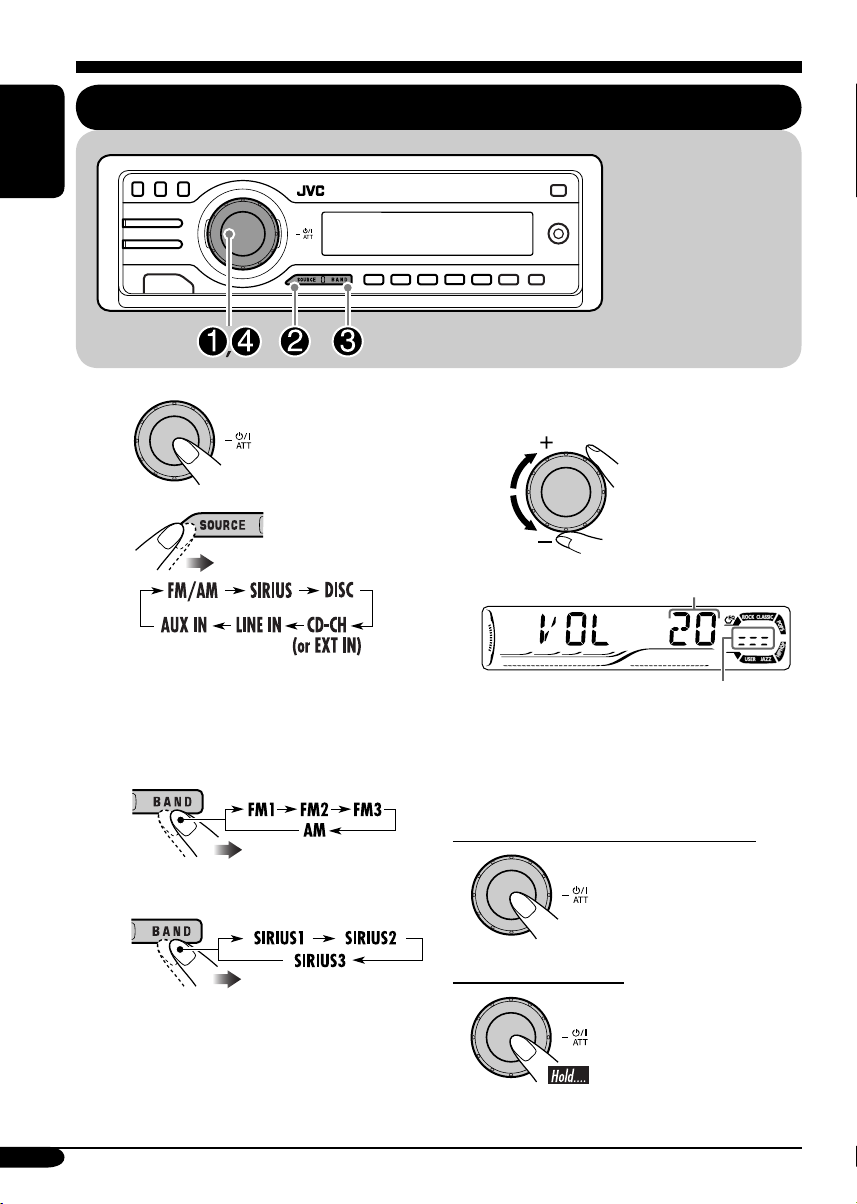
How to read this manual
The following methods are used to made the
explanations simple and easy-to-understand:
• Some related tips and notes are explained in
ENGLISH
“More about this receiver” (see pages
50 – 54).
• Button operations are mainly explained with
the illustrations as follows:
Press briefly.
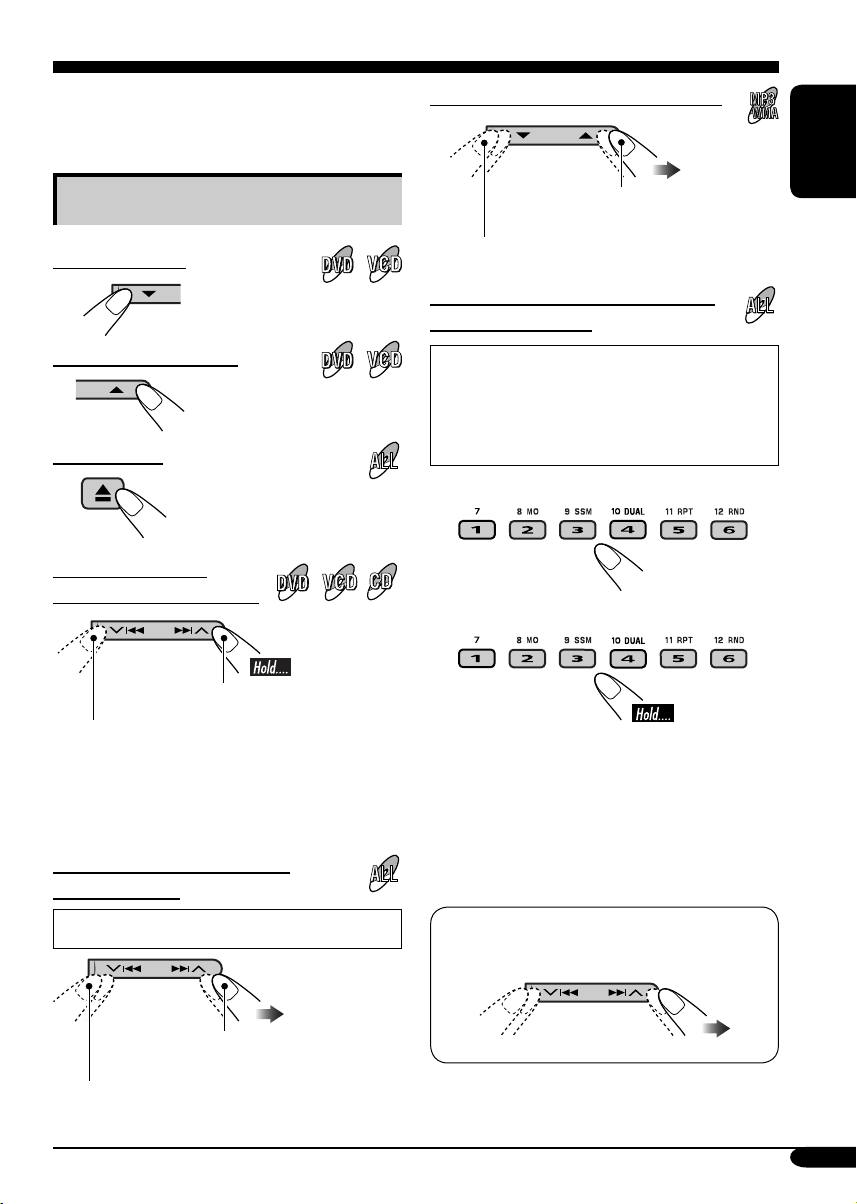
Press repeatedly.
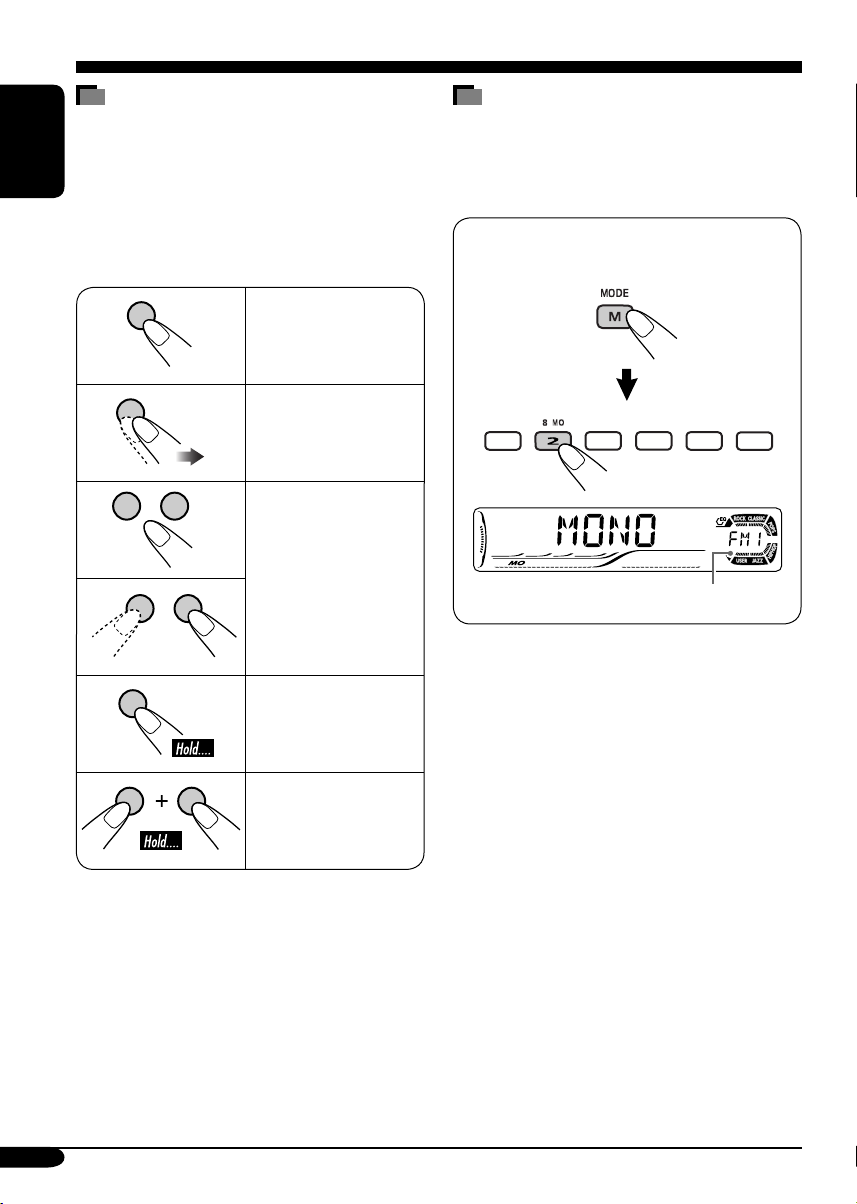
How to use the M MODE button
If you press M MODE, the receiver goes into
functions mode, then the number buttons and
5/∞ buttons work as different function buttons.
Ex.: When number button 2 works as
MO (monaural) button.
Press either one.
Press and hold until
your desired response
begins.
Press and hold both
buttons at the same
time.
4
Time countdown indicator
To use these buttons for original functions
again after pressing M MODE, wait for
5 seconds without pressing any of these buttons
until the functions mode is cleared.
• Pressing M MODE again also clears the
functions mode.
Page 5

Contents
How to reset your unit ........................... 2
How to forcibly eject a disc ................... 2
How to read this manual ........................ 4
How to use the M MODE button ........... 4
Introduction — Playable discs ............ 6
Control panel ................................ 7
Parts identification ................................. 7
Remote controller — RM-RK230
Main elements and features ................... 8
....... 8
Getting started .............................. 10
Basic operations ............................. 10
Canceling the display demonstrations ... 11
Setting the clock .................................... 11
Radio operations ............................ 12
Listening to the radio .................... 12
Storing stations in memory .................... 13
Listening to a preset station ................... 14
Disc operations .............................. 15
Playing a disc in the receiver ....... 15
Basic operations .................................... 17
DVD/VCD special functions ............ 19
Selecting subtitles .................................. 19
Selecting audio languages ..................... 19
Selecting multi-angle views ................... 19
Disc menu operations ............................ 20
Zoom in .................................................. 20
On-Screen disc operations ............... 21
Basic on-screen bar operations .............. 22
Basic control screen operations ............. 24
List screen operations ............................ 25
Other disc operations ..................... 29
Basic operations ..................................... 29
Changing the display information ......... 30
Selecting the playback modes ................ 31
Dual Zone operations ..................... 32
Listening with headphones .................... 32
Sound adjustments ......................... 33
Selecting preset sound modes ....... 33
Storing your own sound adjustments ..... 33
Adjusting the sound ............................... 34
General settings — PSM ................ 35
Basic procedure ..................................... 35
Other main functions ...................... 38
Assigning titles to the sources ............... 38
Detaching the control panel ................... 39
CD changer operations .................... 40
Playing discs in the CD changer
Changing the display information ......... 42
Selecting the playback modes ................ 43
External component operations
Playing an external component .... 44
.... 40
............ 44
SIRIUS® radio operations ................ 45
Listening to the SIRIUS® radio
Storing channels in memory .................. 47
Listening to a preset channel ................. 47
..... 46
Maintenance .................................. 48
Language codes .............................. 49
More about this receiver ................. 50
ENGLISH
DVD setup menu ............................ 26
Basic setting procedure .......................... 26
Troubleshooting ............................. 55
Specifications ................................. 59
5
Page 6

Introduction — Playable discs
Discs you can play
You can play back the following discs—12 cm
(4-3/4") and 8 cm (3-3/16")—on this receiver:
• DVD Video: Recorded in NTSC color
ENGLISH
system with Region Code “1” (see below).
– DVD-R/DVD-RW recorded in the DVD-
Video format can also be played (see page
50).
• Video CD (VCD)/audio CD
• MP3/WMA: Recorded either in CD-R/
CD-RW or DVD-R/DVD-RW/DVD-ROM.
– CD-R/CD-RW: Compliant with ISO 9660
Level 1, ISO 9660 Level 2, Romeo, and
Joliet.
– DVD-R/DVD-RW/DVD-ROM: Compliant
with UDF-Bridge Format*
1
.
On some discs, the actual operations may be
different from what is explained in this manual.
Discs cannot be played back
DVD-Audio, DVD-ROM (data), DVD-RAM,
DVD-R/DVD-RW recorded in the DVD-VR
format, CD-ROM, CD-I (CD-I Ready), Photo
CD, etc.
• Playing back these discs will generate noise
and damage the speakers.
Note on Region Code:
DVD players and DVD Video discs have
their own Region Code numbers. This
receiver can only play back DVD discs
whose Region Code numbers include “1.”
Examples:
If you insert a DVD Video disc of an
incorrect Region Code
“REGION CODE ERROR!” appears on the
monitor.
6
Caution for DualDisc playback
• The Non-DVD side of a “DualDisc” does
not comply with the “Compact Disc Digital
Audio” standard. Therefore, the use of NonDVD side of a DualDisc on this product may
not be recommended.
Digital audio formats
The System can play back the following digital
audio formats.
Linear PCM: Uncompressed digital audio,
the same format used for CDs and most studio
masters.
Dolby Digital *
developed by Dolby Laboratories, which
enables multi-channel encode to create the
realistic surround sound.
3
DTS *
(Digital Theater Systems):
Compressed digital audio, developed by Digital
Theater Systems, Inc., which enables multichannel like Dolby Digital. As the compression
ratio is lower than for Dolby Digital, it provides
wider dynamic range and better separation.
MPEG Audio: Another compressed digital
audio which also enables multi-channel encode
to create the realistic surround sound. However,
this System downmix the multi-channel signals
into 2 channels (decoded PCM) and play it
back.
1
*
A hybrid file system used to provide
compatibility with ISO 9660 for accessing
any type of files on the disc. (UDF stands for
Universal Disk Format.)
2
*
Manufactured under license from Dolby
Laboratories. “Dolby,” “Pro Logic,” and
the double-D symbol are trademarks of
Dolby Laboratories.
3
*
“DTS” and “DTS 2.0 + Digital Out” are
registered trademarks of Digital Theater
Systems, Inc.
“DVD Logo” is a trademark of DVD Format/
Logo Licensing Corporation registered in the
US, Japan and other countries.
2
: Compressed digital audio,
Page 7

Control panel
Parts identification
Display window
1 5 (up) / ∞ (down) buttons
• Function as Play / Stop buttons for DVD
and VCDs.
2 E EQ (equalizer) button
3 D DISP (display) button
4 S SEL (select) button
5 • Control dial
•
6 Display window
7 Remote sensor
8 0 (eject) button
9
p
q SOURCE button
w BAND button
e Number buttons
r MO (monaural) button
t SSM (Strong-station Sequential Memory)
button
y DUAL (dual zone) button*
* Only for KD-ADV6160.
u RPT (repeat) button
i RND (random) button
o M MODE button
AUX (auxiliary) input jack
;
(standby/on attenuator) button
4/¢ buttons
(control panel release) button
Display window
a Disc information indicators—
TAG (ID3 Tag),
s Main display
d Source display / Volume level indicator
f EQ (equalizer) indicator
g Sound mode indicators—ROCK,
CLASSIC, POPS, HIP HOP, JAZZ, USER
•
h Disc type indicators—WMA, MP3
j Tuner reception indicators—
k Playback source indicators—
l Playback mode / item indicators—
/ LOUD (loudness) indicator
z Tr (track) indicator
also works as the time countdown
indicator and level meter during play
(see page 36).
ST (stereo), MO (monaural)
CH: Lights up for the CD changer.
DISC: Lights up for the built-in DVD/CD
player.
RND (random),
RPT (repeat)
(folder), (track/file)
(disc), (folder),
ENGLISH
7
Page 8
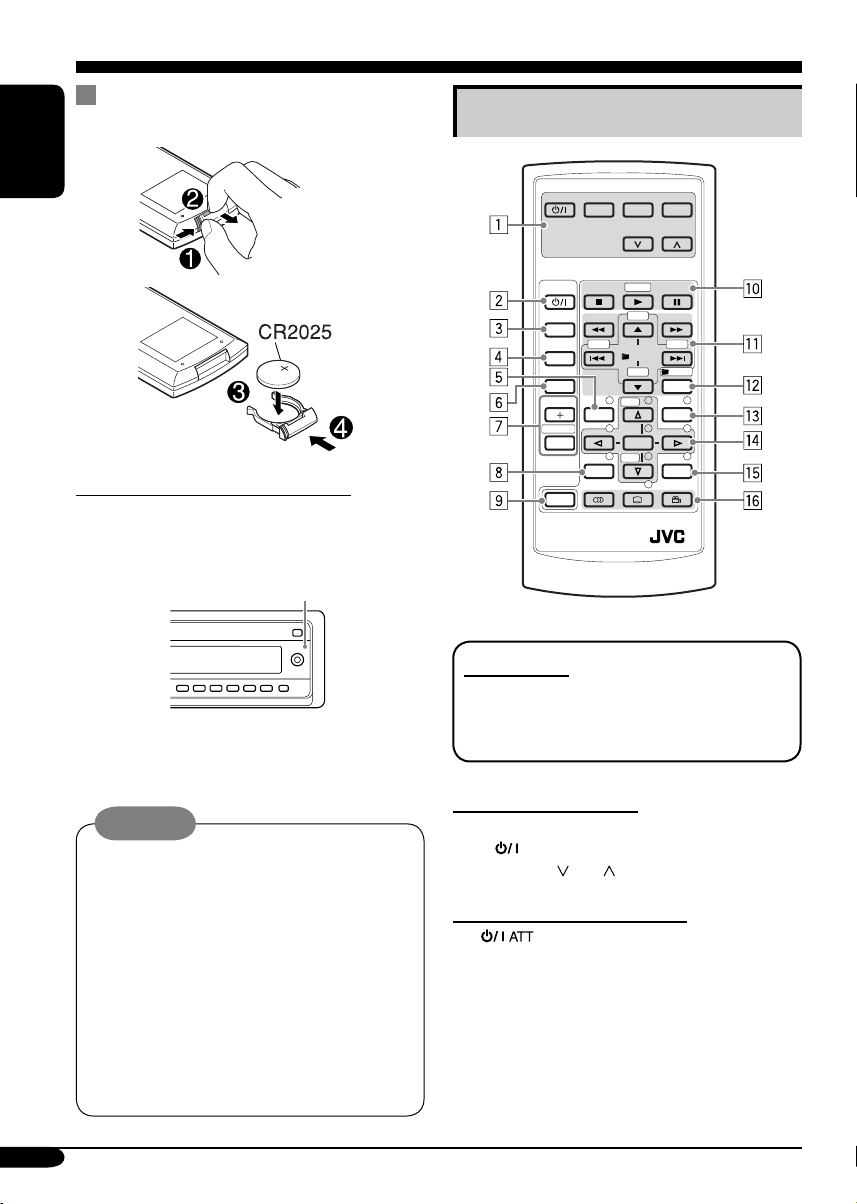
Remote controller — RM-RK230
Installing the lithium coin battery
(CR2025)
ENGLISH
Before using the remote controller:
• Aim the remote controller directly at the
remote sensor on the receiver. Make sure
there is no obstacle in between.
Remote sensor
• Do not expose the remote sensor to strong
light (direct sunlight or artificial lighting).
Main elements and features
MONITOR CONTROL
MODE MENU
ASPECT
DVD / RECEIVER CONTROL
ATT
SOURCE
BAND
DUAL
VOL
2nd VOL
SHIFT
RM-RK230
IMPORTANT:
For KD-ADV6160: If Dual Zone is activated
(see page 32), the remote controller only
functions for operating the DVD/CD player.
ZOOM
+10
–100
PRESET
/ TITLE
–10
123
+
DISC
MENUTOP M
456
ENTER
7809
–
DISC
SETUP
RETURN
+100
/ TITLE
OSD
Warning:
• Store the battery in a place where children
cannot reach to avoid risk of accident.
• To prevent the battery from over-heating,
cracking, or starting a fire:
– Do not recharge, short, disassemble, or
heat the battery or dispose of it in a fire.
– Do not leave the battery with other
metallic materials.
– Do not poke the battery with tweezers or
similar tools.
– Wrap the battery with tape and insulate
when throwing away or saving it.
8
MONITOR CONTROL
1 Monitor control buttons*
1
• (standby/on), MODE, ASPECT,
MENU,
and .
DVD/RECEIVER CONTROL
2
(standby/on attenuator) button
• Turns on and off the power and also
attenuates the sound.
3 SOURCE button
• Selects the source.
Page 9
4 BAND button
• Selects the FM/AM/SIRIUS
5 TOP M (menu) button*
®
bands.
2
• Display the DVD and VCD*3 disc menu.
6 DUAL button*
4
• Activate and deactivate Dual Zone.
7 VOL + / – buttons
• Adjusts the volume level.
• Also function as 2nd VOL +/– buttons
when pressed with SHIFT button*
8 SETUP button*
2
4
.
9 SHIFT button
p Basic disc operation buttons*
5
:
7 (stop), 3 (play), 8 (pause)
• 3 (play) also function as ZOOM button
when pressed with SHIFT button.
q Advanced disc operation/tuner operation
buttons*
6
For advanced disc operations:
•
/TITLE 5 / ∞
– Select the titles (for DVD) or folders
(for MP3/WMA).
• 4 / ¢ (reverse skip/forward skip)
• 1 / ¡ (reverse search/forward
search)*
5
For FM/AM tuner operations:
• PRESET 5 / ∞
– Changes the preset stations.
• 4 / ¢
– Functions to search for stations.
For SIRIUS
®
radio operations:
• PRESET 5 / ∞
– Changes the categories.
• 4 / ¢
– Changes the channels if pressed briefly.
– Changes the channels rapidly if pressed
and held.
w OSD button
• Display the on-screen bar.
• Also function as the
/TITLE button
when pressed with SHIFT button.
– You can directly select titles (for DVD)
or folders (for MP3/WMA) using the
number buttons (see page 18).
e MENU button*
2
• Display the DVD and VCD*3 disc menu.
r Menu operation buttons*
2
• Cursor (% , fi , @ , #), and ENTER
• % / fi : Also function as DISC + / –
buttons when the source is “CD-CH.”
t RETURN button*
2
y Special function buttons
• DVD/VCD:
• DVD:
1
*
Controllable only if your monitor is one of
(audio)
(subtitle), (angle)
the JVC monitors — KV-MR9010 or
KV-MH6510.
2
*
These buttons function as the number
buttons when pressed with SHIFT button.
3
*
Only when PBC is not in use.
4
*
Applicable only for KD-ADV6160.
5
*
Not used for CD changer operations.
6
*
These buttons function as the +10/–10
and +100/–100 buttons when pressed with
SHIFT button.
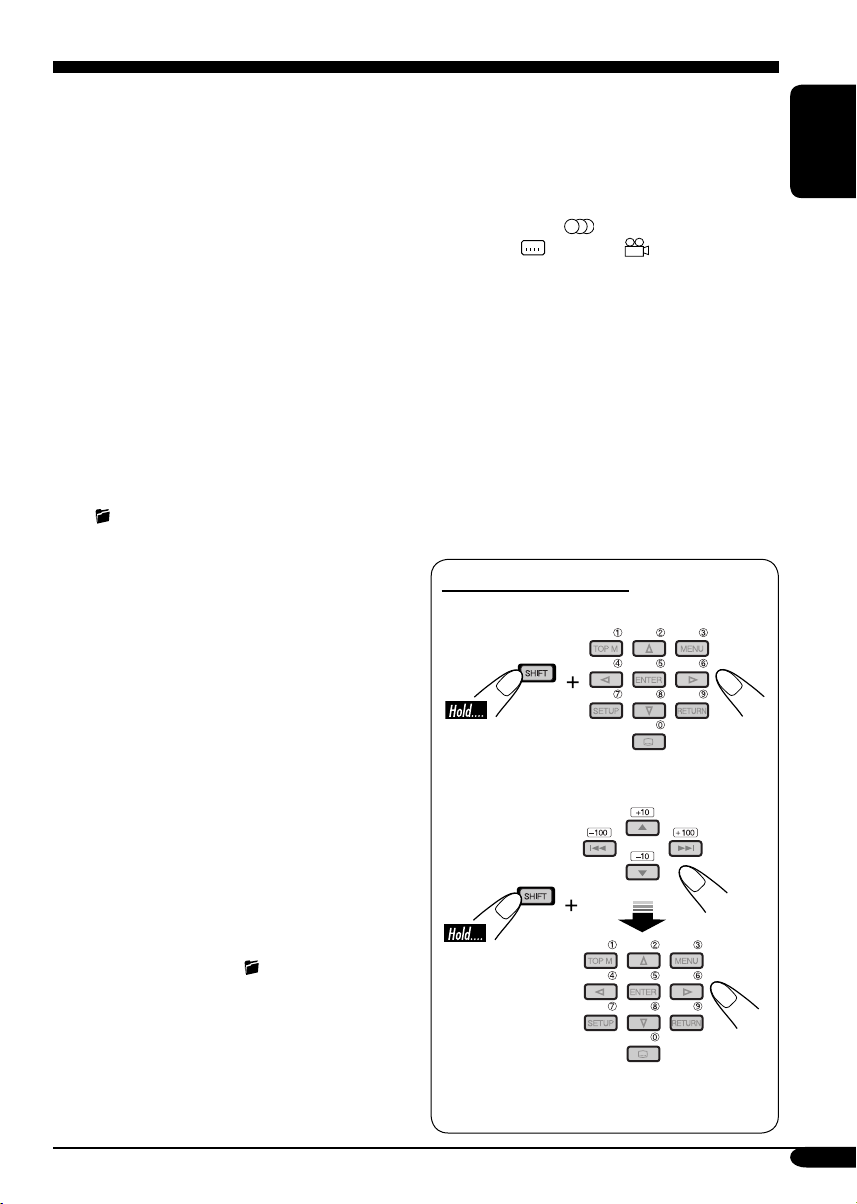
How to select a number
To select a number from 0 – 9:
To select a number greater than 9:
• +100/–100 buttons used only for searching
MP3/WMA tracks number greater than 99.
ENGLISH
9
Page 10
Getting started
Basic operations
ENGLISH
~
Ÿ
You cannot select some sources if they
are not ready.
! For FM/AM tuner only
* The control panel
illustrations used in
this manual is of
KD-ADV6160.
⁄ Adjust the volume.
Volume level appears.
Volume level indicator
@ Adjust the sound as you want.
(See pages 33 and 34.)
For SIRIUS® radio only
10
To drop the volume in a moment (ATT)
To restore the sound,
press it again.
To turn off the power
Page 11
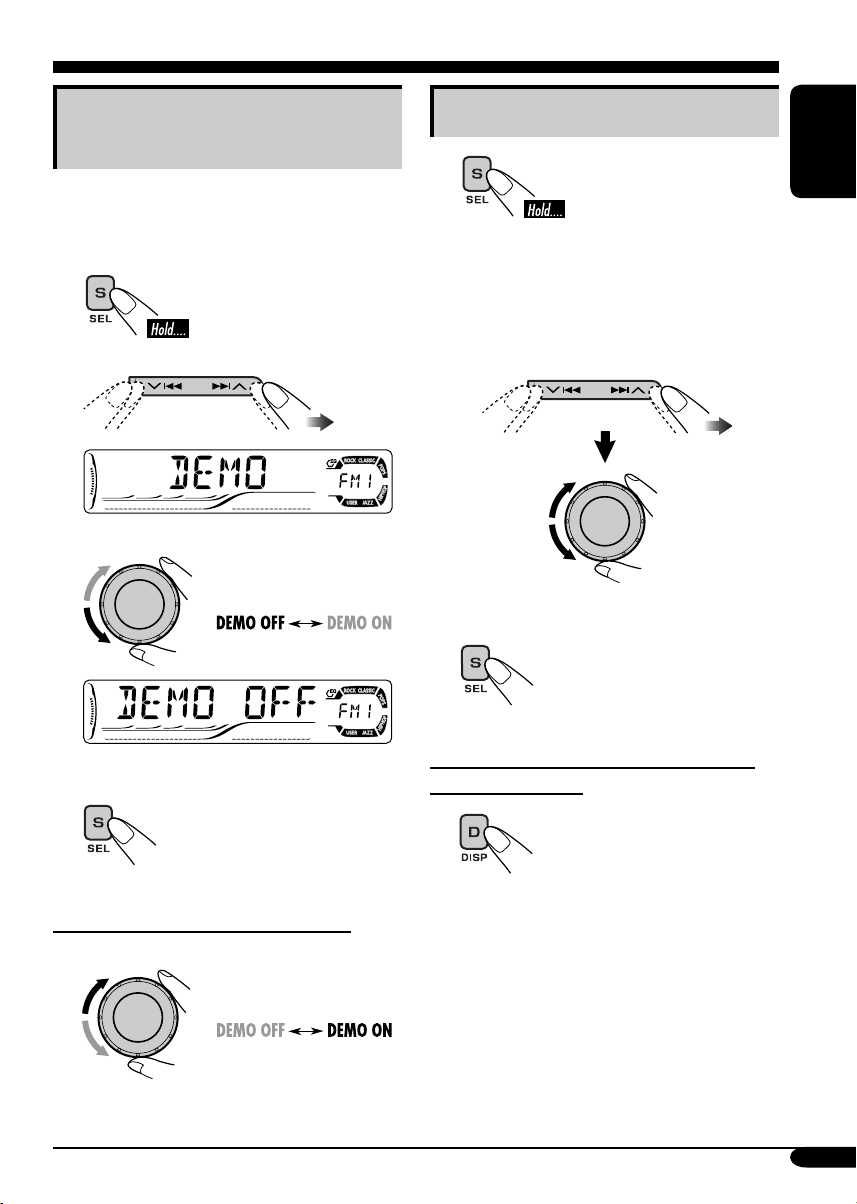
Canceling the display
demonstrations
If no operations are done for about 20 seconds,
display demonstration starts.
[Initial: DEMO ON]—see page 35.
1
2
3
Setting the clock
1
2
Set the hour and minute.
1 Select “CLOCK H” (hour), then
adjust the hour.
2 Select “CLOCK M” (minute),
then adjust the minute.
3 Finish the procedure.
ENGLISH
Finish the procedure.
4
To activate the display demonstration
In step 3 above...
To check the current clock time when the
power is turned off
11
Page 12

Radio operations
ENGLISH
Listening to the radio
~
Ÿ
Selected band appears.
Lights up when receiving an FM stereo
broadcast with sufficient signal strength.
! Start searching for a station.
When a station is received, searching
stops.
To stop searching, press the same
button again.
To tune in to a station manually
In step ! on the left column...
1
2 Select the desired station frequencies.
12
Page 13
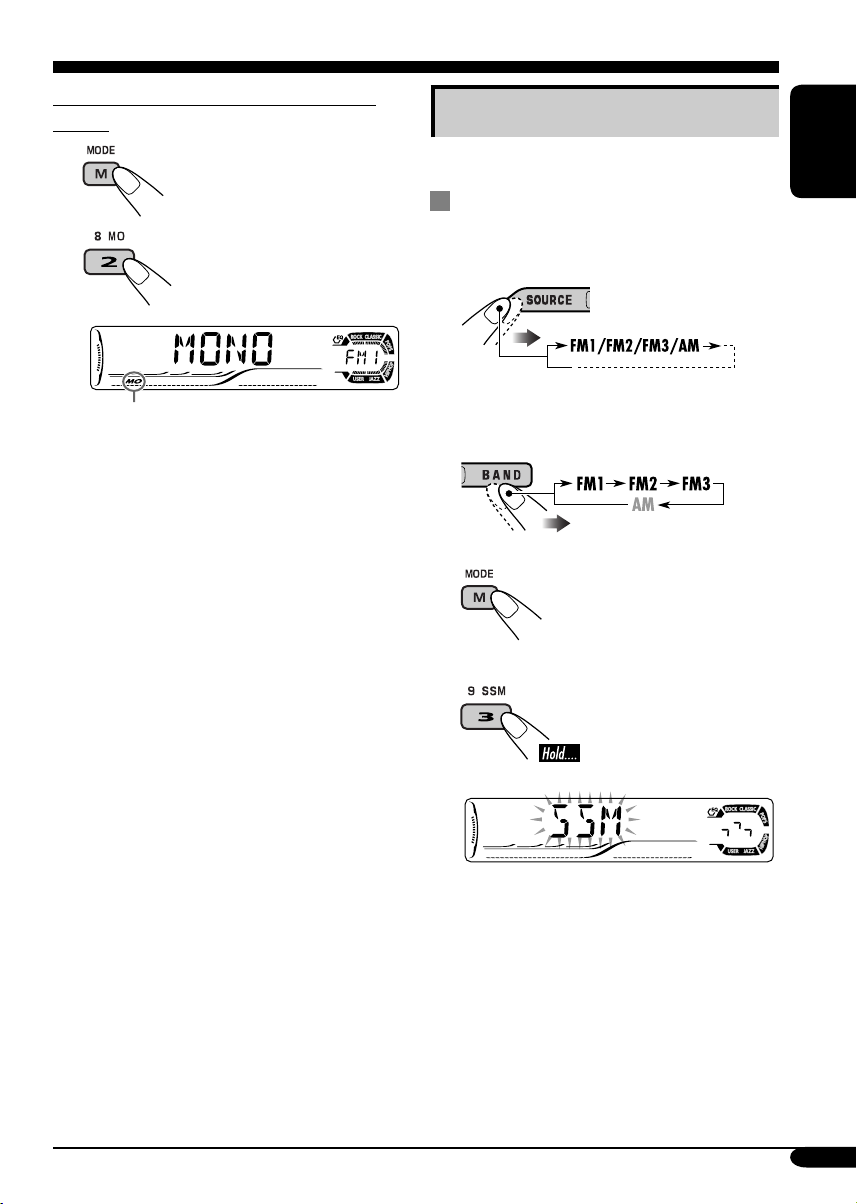
When an FM stereo broadcast is hard to
receive
1
2
Storing stations in memory
You can preset six stations for each band.
FM station automatic presetting —
SSM (Strong-station Sequential
Memory)
1
ENGLISH
Lights up when monaural mode is activated.
Reception improves, but stereo effect will
be lost.
To restore the stereo effect, repeat the same
procedure. “MONO OFF” appears and the MO
indicator goes off.
2 Select the FM band (FM1 – FM3)
you want to store into.
3
4
“SSM” flashes, then disappears when
automatic presetting is over.
Local FM stations with the strongest signals are
searched and stored automatically in the FM
band.
To be continued....
13
Page 14
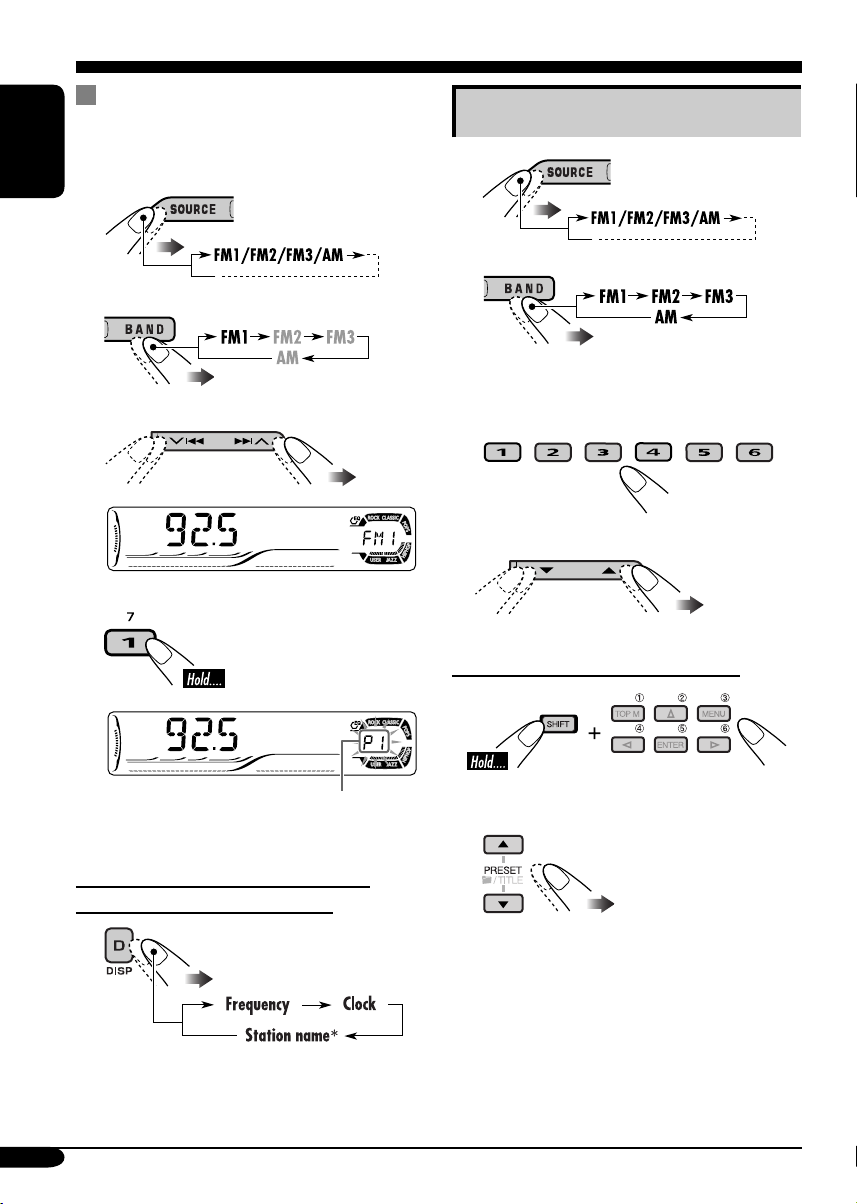
Manual presetting
Ex.: Storing FM station of 92.5 MHz into the
preset number 1 of the FM1 band.
ENGLISH
1
2
3
4
Listening to a preset station
1
2
3 Select the preset station (1 – 6) you
want.
or
When using the remote controller....
Preset number flashes for a while.
To check the current clock time while
listening to an FM or AM station
* If no title is assigned to a station, “NO
NAME” appears. To assign a title to a
station, see page 38.
14
or
Page 15
Disc operations
Playing a disc in the receiver
ENGLISH
The disc type is automatically detected, and
playback starts automatically (for DVD:
automatic start depends on its internal program).
If the current disc is an audio CD, CD Text,
MP3/WMA, or VCD without PBC, all tracks
will be played repeatedly until you change the
source or eject the disc.
• If a title list or disc menu appears while
playing a DVD or VCD with PBC, see “Disc
menu operations” on page 20.
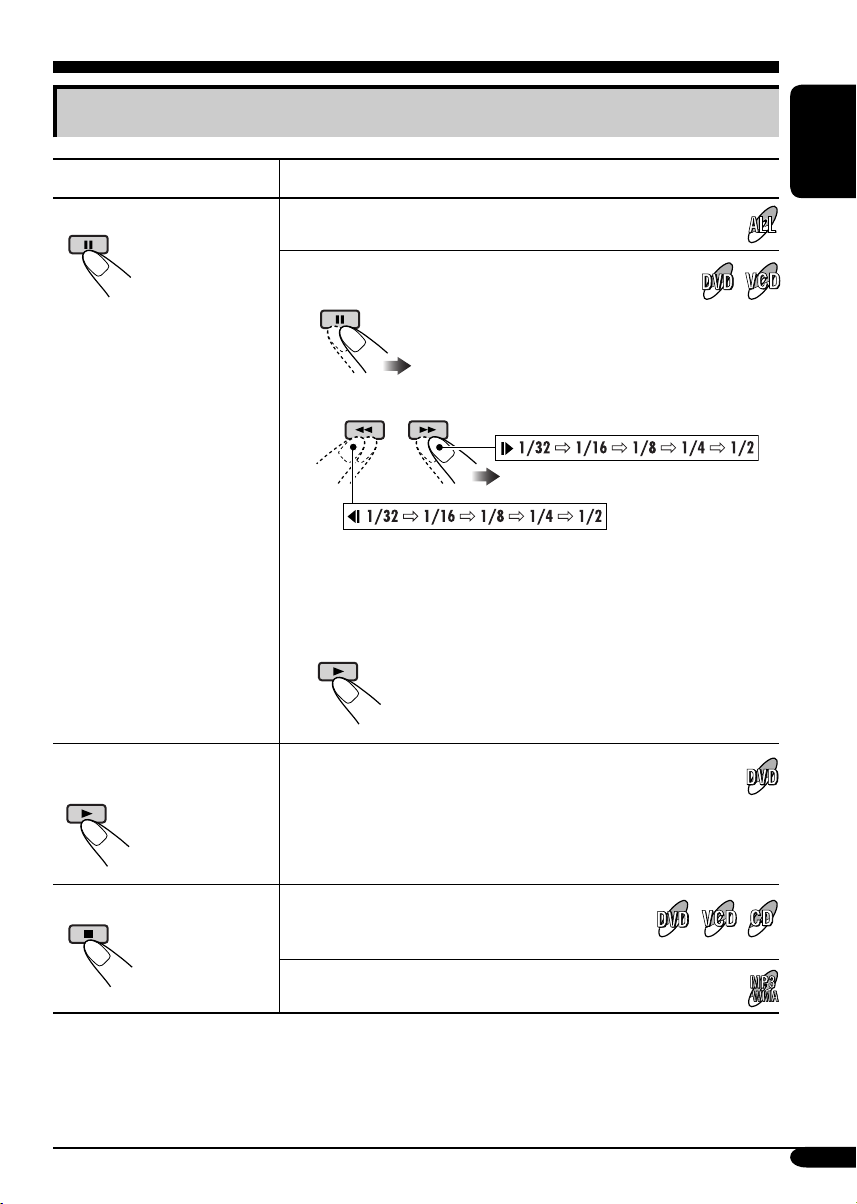
The following marks are used to indicate
the playable discs....
DVD Video Video CD with PBC
only
Video CD with/without
PBC
MP3/WMA disc All discs listed here
Audio CD/
CD Text
Before performing any operations, make
sure the following....
• Turn on the monitor for playing a DVD or
VCD. If you turn on the monitor, you can also
control the audio CD, CD Text, and MP3/
WMA playback by referring to the monitor
screen. (See pages 24 and 25.)
• For DVD playback, you can change the Setup
Menu setting to your preference. (See pages
26 – 28.)
• The operations explained on pages 17 – 28 are
using the remote controller.
• When you want to operate the DVD/CD
player using the buttons on the control panel,
see “Other disc operations” on pages 29 – 31.
If “
” appears on the monitor when
pressing a button, the receiver cannot accept
an operation you have tried to do.
• In some cases, without showing “
operations will not be accepted.
• Microsoft and Windows Media are either
registered trademarks or trademarks of
Microsoft Corporation in the United States
and/or other countries.
,”
To be continued....
15
Page 16

• When inserting a DVD disc:
Total title number
ENGLISH
Elapsed playing time
Current chapter number
• When inserting an MP3/WMA disc:
Total folder number
Total track number
Ex.: When an MP3 file is detected
• When inserting a VCD:
Total playing time
of the inserted disc
Elapsed playing
time
Total track number
of the inserted disc
• When inserting a CD Text/audio CD:
Total playing time
of the inserted disc
Total track number
of the inserted disc
CD Text: Disc title/performer =
Track title appears automatically
(see page 30).
Disc information appears
automatically (see page 30).
Elapsed playing
time
1
*
Either the MP3 or WMA indicator lights up
Current track
number
Current folder number
depending on the detected file.
2
*
Does not light up for DVD-R/DVD-RW.
16
Elapsed playing
time
To eject the disc
Current track
number
Page 17
Basic operations
Operations Display indication and/or next operation
To stop play temporarily
To replay the previous
scenes—One Touch Replay
“PAUSE” illuminates on the display.
A still picture appears.
A Frame by frame playback
B Slow motion playback
• No sound comes out during Slow Motion Playback.
• When playing a VCD, Reverse Slow Motion Playback is
prohibited.
To resume normal play:
The playback position moves back about 10 seconds before
the current position.
ENGLISH
• This function works only within the same title.
• For some DVDs, this function does not work.
To stop playback
* During play, on-screen guide icons appear on the monitor for a while (see page 53).
When you start playback again, playback
starts from where it has been stopped
(Resume play).
When you start playback again, playback starts from
the beginning of the last track.
To be continued....
17
Page 18
To go to the next or previous
chapters/tracks
To locate a particular title/chapter/
track directly
• For DVD: During play or pause
ENGLISH
To the following
chapters/tracks.
To go back to the beginning of the current
chapter/track, then the previous chapters/tracks.
To fast-forward or reverse
the chapter/track
Fast-forwards.
Reverses.
* The search speed changes to x2 ] x10 for all
discs (DVD, VCD, CD), but the information
shown on the monitor is only for DVD/VCD.
To forward or reverse
search the chapter/track
• For DVD: During play or pause—select a
chapter.
During stop—select a title.
• For VCD: While PBC (see page 20) is not
in use.
• For MP3/WMA: Select a track within the
same folder.
Select the number corresponding to the item
you want (see page 9).
To locate a title/folder
To the next title/folder.
To the previous title/folder.
To locate a particular title/folder
The information shown is only for DVD/VCD:
• To resume normal speed
18
Within 10 seconds,
press the number
buttons (see page 9).
Page 19
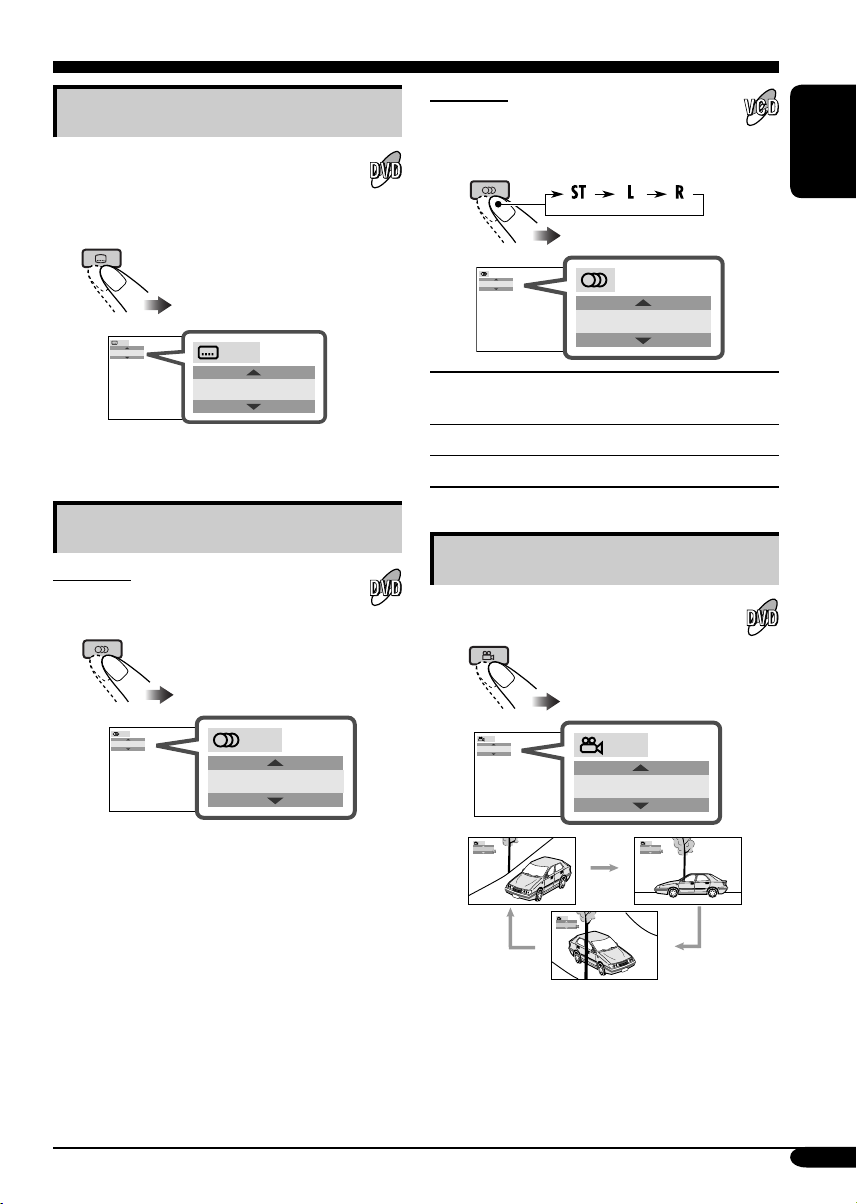
DVD/VCD special functions
For VCD:
Selecting subtitles
You can select the language of the subtitle
to be shown on the monitor.
• You can set the initial subtitle language
using the setup menu (see page 27).
You can select the audio channel to
play. (This is convenient when playing a
Karaoke VCD.)
ENGLISH
ST
1/3
ENGLISH
1/3
ENGLISH
Ex.: When the disc has 3 options
Selecting audio languages
For DVD:
You can select the language to listen to if
the disc has multiple audio languages.
1/3
ENGLISH
Ex.: When the disc has 3 options
1/3
ENGLISH
ST
To listen to normal stereo (left/right)
ST:
playback.
To listen to the L (left) audio channel.
L:
To listen to the R (right) audio channel.
R:
Selecting multi-angle views
You can view the same scene at different
angles if the disc has multi-angle views.
1/3
1
1/3
1
1/3
1
1/3
2
1/3
3
Ex.: When the disc has 3 multi-angle views
• For some DVDs and VCDs, changing the
subtitle language, audio language (or audio
channel) without using the disc menu is
prohibited.
19
Page 20
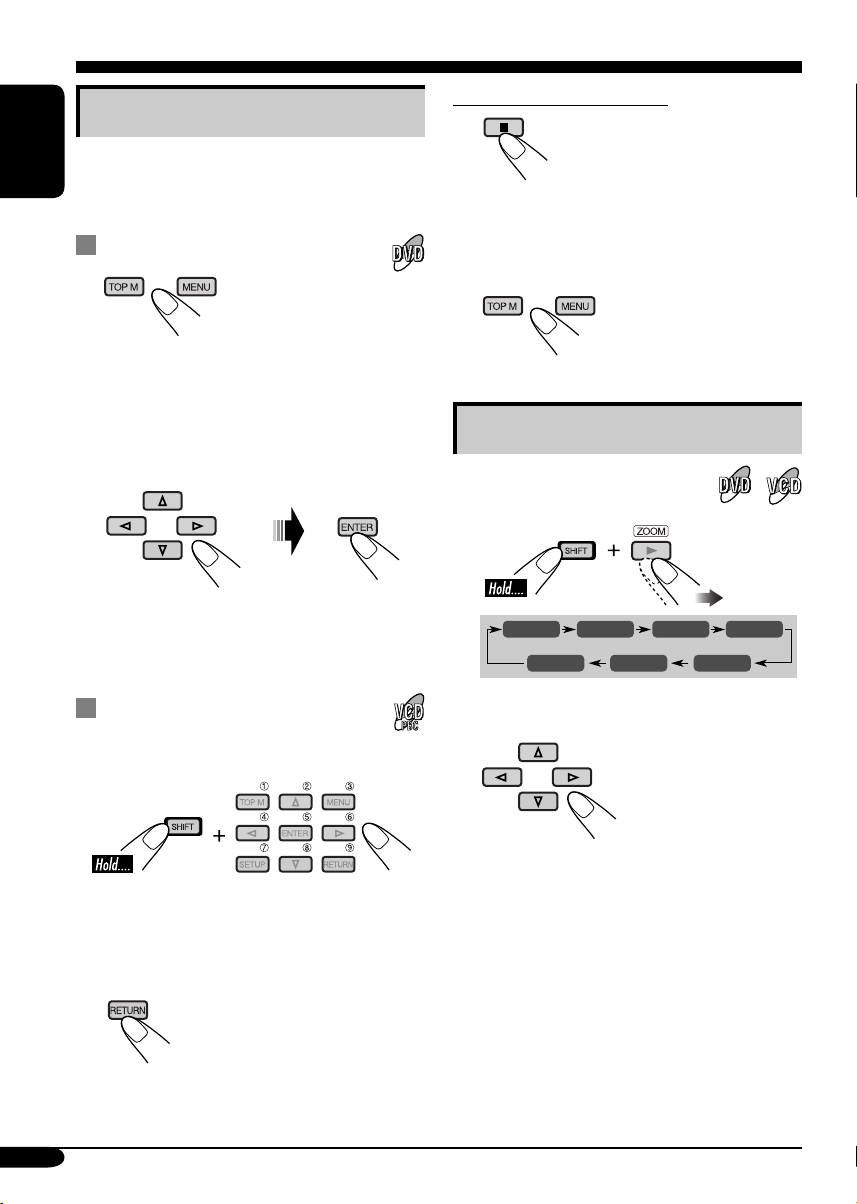
Disc menu operations
Menu-driven playback is possible while playing
back a DVD with menu-driven features or a
ENGLISH
VCD with the PBC (PlayBack Control).
While playing a DVD
1
A title list or disc menu will appear on the
monitor.
Canceling the PBC playback
1
2 Select a track to start normal playback using
the number buttons (see page 9).
To resume the PBC function
2 Select the item you want on the
menu.
Selected item starts playback.
• On some discs, you can also select items
using the corresponding number buttons.
While playing a VCD
• When a list of items is displayed on the
monitor.
• To select a number greater than 9, see “How
to select a number” on page 9.
To return to the previous menus
Zoom in
1
ZOOM 1 ZOOM 2 ZOOM 3 ZOOM 4
ZOOM OFF
2
Move the zoomed-in portion.
To cancel zoom, select “ZOOM OFF” in
step 1.
ZOOM 5ZOOM 6
20
Page 21

On-Screen disc operations
About the On-Screen Bar
You can check the disc information and use
some functions through the on-screen bar.
• For audio CD, CD Text, and MP3/WMA
disc you can also use the control screen
and list screen (see pages 24 and 25).
On-Screen bars
DVD
DVD -V
TIME TITLE CHAP
VCD
PBC
VCD
TIME
TRACK REPEAT
MP3/WMA
FILE
REPEAT
RANDOMINTRO
CD Text/audio CD
*
CD
5. 1ch
REPEAT
2ch
RANDOMINTRO
T02-C03 TOTAL 1:25:58
OFF
TRACK 01 TIME 00:36
RANDOMINTRO
TIME 00:00:36
TIME 00:36
1 Disc type
2 • Audio signal format type (for DVD and
DTS audio CD)
• PBC (only for VCD)
3 Playback information
Current track/chapter
T02-C03
TRACK 01
TOTAL
T. REM
Current track
Elapsed playing time of the disc
Remaining disc time (for VCD)/
remaining title time (for DVD-V)
TIME
Elapsed playing time of the
current chapter/track
REM
Remaining time of the current
chapter/track
4 Playback condition
Playback
Forward/reverse search
Forward/reverse slow-motion
Pause
Stop
5 Operation icons
Time indication
TIME
Time Search—Enter the elapsed
playing time of the current title
or of the disc.
TITLE
Title Search
CHAP
Chapter Search
TRACK
Track Search
Change the audio language or
audio channel.
Change the subtitle language.
Change the view angle.
Repeat play (for DVD)
OFF
REPEAT
Repeat play (for other discs)
INTRO
Intro play
RANDOM
Random play
ENGLISH
* Only for DTS audio CD
To be continued....
21
Page 22
Basic on-screen bar operations
1 Display the on-screen bar.
ENGLISH
• For DVD/VCD:
(twice)
• For other discs:
To erase the on-screen bar
• The selectable options for Repeat/Intro/
Randam plays:
OFF
Repeat play
DVD:
OFF CHAP TITLE
DVD -V
TIME TITLE CHAP
2ch
2 Select an item.
3 Make a selection.
• If pop-up menu appears....
1
DVD -V
TIME TITLE CHAP
or
2ch
_ _
T02-C03 TOTAL 1:25:58
OFF
T02-C03 TOTAL 1:25:58
OFF
REPEAT
Repeat play
VCD (while PBC is not in use):
REPEAT
MP3/WMA:
REPEAT TRACK
(Canceled)
CD Text/audio CD:
REPEAT TRACK
(Canceled)
REPEAT FOLDER
(Canceled)
22
2
Page 23
INTRO
Intro play
VCD (while PBC is not in use):
INTRO
MP3/WMA:
INTRO TRACK
(Canceled)
CD Text/audio CD:
INTRO TRACK
RANDOM
Random play
VCD (while PBC is not in use):
RANDOM
MP3/WMA:
RANDOM FOLDER
(Canceled)
CD Text/audio CD:
RANDOM DISC
(Canceled)
INTRO FOLDER
(Canceled)
(Canceled)
RANDOM DISC
(Canceled)
To search for a particular point by playing
time
1 Select .
2 Enter the elapsed playing time of the current
title or of the disc.
Ex.: • To enter 1 (hours): 02 (minutes): 00
(seconds), press 1, 0, 2, 0, then 0.
• To enter 54 (minutes): 00 (seconds),
press 0, 5, 4, 0, then 0.
• It is always required to enter the hour
digit (even “0” hour), but it is not
required to enter trailing zeros (the last
two digits in the examples above).
• To correct a misentry, press...
3 Finish the procedure.
ENGLISH
Refer also page 22 for the following operations.
To change the time information
1 Select
2 Change the time information.
TIME
.
TIME 0:00:58
REM 0:11:23
TOTAL 1:01:58T. REM 0:35:24
To search for a particular title/chapter/track
1 Select
TITLE
2 Enter the number.
• To correct a misentry, press the number
button until the correct number is entered.
3 Finish the procedure.
,
CHAP
, or
TRACK
.
23
Page 24
Basic control screen operations
You can search for and play the desired items
through the control screen.
ENGLISH
• The control screen automatically appears on
the monitor when you insert a disc.
MP3/WMA control screen
TIME 00:00:14REPEAT TRACK
FOLDER : 2 / 3
01 Music
02 Music
03 Music
Track Information
Album
Weather
Artist
Robert M. Smith
Title
Rain
1 Current folder
2 Current folder number/total folder number
3 Folder list
4 Selected playback mode
5 Elapsed playing time of the current track
6 Operation mode icon
‰ (play), 7 (stop), 8 (pause)
7 Current track number/total number of tracks
in the current folder (total number of tracks
on the disc)
8 Track information
9 Track list
p Current track (highlighted bar)
Track : 5 / 14 (Total 41)
Cloudy.mp3
Fair.mp3
Fog.mp3
Hail.wma
Indian summer.mp3
Rain.mp3
Shower.mp3
Snow.mp3
Thunder.wma
Typhoon.mp3
Wind.mp3
Winter sky.mp3
To select a folder or track
1 Select “Folder” column or “Track” column
on the control screen.
2 Select a folder or track.
CD Text/audio CD control
screen
TIME 00:14
Tra c k : 5 / 14
Cloudy
Fair
Fog
Hail
Track Information
Album
Four seasons
Artist
Robert M. Smith
Title
Rain
1 Elapsed playing time of the current track
2 Operation mode icon
‰ (play), 7 (stop), 8 (pause), ¡ (fast-
forward), 1 (reverse)
3 Current track number/total number of tracks
on the disc
4 Track information
5 Track list
6 Current track (highlighted bar)
Indian summer
Rain
Shower
Snow
Thunder
Typhoon
Wind
Winter sky
24
To select a track
Page 25
List screen operations
You can display the folder list/track list before
starting play. On this list, you can confirm the
contents and start playing a disc.
Folder/track list screens
Folder list (MP3/WMA)
For MP3/WMA:
While stop...
1 Display the folder list.
Each time you press the button,
the list screen comes on and
goes off.
2 Select a folder on the list.
ENGLISH
Folder : 153/240 Track 154/198 Page : 4/6
fol130
fol131
fol132
fol133
fol134
fol135
fol136
fol137
fol138
fol139
fol140
fol141
fol142
fol143
fol144
fol145
fol146
fol147
fol148
fol149
fol150
fol151
fol152
fol153
fol154
fol155
fol156
fol157
fol158
fol159
fol160
fol161
fol162
fol163
fol164
fol165
fol166
fol167
fol168
fol169
Track list (MP3/WMA/CD Text/audio CD)
Folder : 153/240 Track 154/198 Page : 4/6
file0131.mp3
file0132.mp3
file0133.wma
file0134.mp3
file0135.mp3
file0136.wma
file0137.wma
file0138.mp3
file0139.mp3
file0140.wma
file0141.mp3
file0142.mp3
file0143.mp3
file0144.mp3
file0145.wma
file0146.mp3
file0147.wma
file0148.mp3
file0149.wma
file0150.wma
file0151.wma
file0152.mp3
file0153.wma
file0154.mp3
file0155.mp3
file0156.mp3
file0157.mp3
file0158.wma
file0159.wma
file0160.wma
Ex.: Track list for MP3/WMA
file0161.wma
file0162.mp3
file0163.wma
file0164.mp3
file0165.wma
file0166.wma
file0167.wma
file0168.wma
file0169.mp3
file0170.wma
1 Current folder number/total folder number
(only for MP3/WMA)
2 Current track number/total number of tracks
in the current folder
3 Current page/total number of the pages
included in the list
4 Current folder/track (highlighted bar)
The track list of the selected folder appears.
To go back to the folder list
3 Select a track on the list.
For CD Text/audio CD:
While stop...
1 Display the track list.
Each time you press the button,
the list screen comes on and
goes off.
2 Select a track on the list.
25
Page 26
DVD setup menu
You can store the initial disc playback status.
• While playing, no change can be made on the
setup menu.
ENGLISH
Basic setting procedure
While stop...
1
LANGUAGE
MENU LANGUAGE
AUDIO LANGUAGE
SUBTITLE
ON SCREEN LANGUAGE
2
AUDIO
DIGITAL AUDIO OUTPUT
DOWN MIX
D. RANGE COMPRESSION
ENGLISH
ENGLISH
ENGLISH
ENGLISH
STREAM/PCM
STEREO
ON
4
AUDIO
DIGITAL AUDIO OUTPUT
DOWN MIX
D. RANGE COMPRESSION
5 Select an option.
AUDIO
DIGITAL AUDIO OUTPUT
DOWN MIX
D. RANGE COMPRESSION
6
AUDIO
DIGITAL AUDIO OUTPUT
DOWN MIX
D. RANGE COMPRESSION
STREAM/PCM
STEREO
DOLBY SURROUND
STEREO
ON
STREAM/PCM
STEREO
DOLBY SURROUND
STEREO
ON
STREAM/PCM
DOLBY SURROUND
ON
Ex.: When selecting the “AUDIO” menu
3 Select an item you want to set up.
AUDIO
DIGITAL AUDIO OUTPUT
DOWN MIX
D. RANGE COMPRESSION
Ex.: When selecting “DOWN MIX”
26
STREAM/PCM
STEREO
ON
To set other items on the same menu
Repeat steps 3 to 6.
To set other items on other menus
Repeat steps 2 to 6.
To return to the normal screen
Page 27
LANGUAGE menu
Item Contents
MENU LANGUAGE
AUDIO LANGUAGE
SUBTITLE
ON SCREEN LANGUAGE
• For the LANGUAGE settings, see also the language codes list on page 49.
Select the initial disc menu language.
Select the initial audio language.
Select the initial subtitle language or erase the subtitle (OFF).
Select the language for the Setup menu and some indications shown on
the monitor.
PICTURE menu
Item Contents
MONITOR TYPE
16:9 4:3 LETTER BOX
4:3 PAN SCAN
OSD POSITION
Position 1 Position 2
Select the monitor type to watch a wide screen picture on your
monitor.
• 16:9 [MULTI]* : Select this when the aspect ratio of your
monitor is 16:9.
• 4:3 [MULTI]* LETTER BOX : Select this when the aspect
ratio of your monitor is 4:3. While viewing a wide screen
picture, the black bars appear on the top and the bottom of the
screen.
• 4:3 [MULTI]* PAN SCAN : Select this when the aspect
ratio of your monitor is 4:3.
While viewing a wide screen picture, the black bars do not
appear; however, the left and right edges of the pictures will
not be shown on the screen.
* Select [MULTI] options for the multi-color system TVs.
Select the on-screen bar position on the monitor.
• 1 : Higher position
• 2 : Lower position
ENGLISH
To be continued....
27
Page 28
AUDIO menu
Item Contents
ENGLISH
DIGITAL AUDIO OUTPUT
DOWN MIX
D.RANGE COMPRESSION
Select the signal format to be emitted through the DIGITAL OUT
(Optical) terminal on the rear. For details, see page 54.
• PCM ONLY : Select this when connecting an amplifier or a
decoder incompatible with Dolby Digital, DTS, MPEG Audio, or
connecting to a recording device.
• DOLBY DIGITAL/PCM : Select this when connecting an
amplifier or a decoder compatible with Dolby Digital.
• STREAM/PCM : Select this when connecting an amplifier or a
decoder compatible with Dolby Digital, DTS, and MPEG Audio.
When playing back a multi-channel DVD disc, this setting affects
the signals reproduced through the LINE OUT jacks (and through
the DIGITAL OUT terminal when “PCM ONLY” is selected for
“DIGITAL AUDIO OUTPUT”).
• DOLBY SURROUND : Select this when you want to enjoy multi-
channel surround audio by connecting an amplifier compatible with
Dolby Surround to this receiver.
• STEREO : Normally select this.
You can enjoy a powerful sound at low or middle volume levels while
playing a Dolby Digital software.
• AUTO : Select this to apply the effect to multi-channel encoded
software (excluding 1-channel and 2-channel software).
• ON : Select this to always use this function.
28
Page 29
Other disc operations
In this section, you can learn how to use the
buttons on the control panel in order to operate
the DVD/CD player.
Basic operations
To stop playback
To start playback again
To eject a disc
To fast-forward or
reverse the chapter/track
To go to the next or previous folders
ENGLISH
To next folders.
To previous folders.
To locate a particular title/chapter/
folder/track directly
• For DVD: During play or pause—select a
chapter.
During stop—select a title.
• For VCD: While PBC (see page 20) is
not in use.
To select a number from 1 – 6:
To select a number from 7 – 12:
Fast-forwards.
Reverses.
* The search speed changes to x2 ] x10 for all
discs (DVD, VCD, CD), but the information
shown on the monitor is only for DVD/VCD.
To go to the next or previous
chapters/tracks
For DVD: During play or pause
To the following tracks.
To the beginning of the current track, then the
previous tracks.
• The number buttons can also use to select
item on the PBC menu.
• To use folder search on MP3/WMA discs, it
is required that folders are assigned with
2-digit number at the beginning of their folder
names—01, 02, 03, and so on.
• To select a particular track in a folder (for
MP3/WMA disc) after selecting a folder:
To be continued....
29
Page 30
To go to a chapter/track quickly
• For DVD: During play or pause.
• For VCD: While PBC (see page 20) is not
ENGLISH
• For MP3/WMA: Select a track within the
in use.
same folder.
1
2
First time you press 5 or ∞ button, the
chapter/track skips to the nearest higher
or lower chapter/track with a number of
multiple ten (ex. 10th, 20th, 30th).
Then each time you press the button, you
can skip 10 chapters/tracks.
• After the last chapter/track, the first
chapter/track will be selected and vice
versa.
3
Prohibiting disc ejection
You can lock a disc in the loading slot.
To cancel the prohibition, repeat the same
procedure.
Changing the display information
• For MP3/WMA, CD Text,
and audio CD, see page
42.
While playing a DVD
30
Each time you press the button
consecutively, the next or previous chapters/
tracks is located and played back.
While playing a VCD
Page 31

Selecting the playback modes
You can use only one of the following playback modes at a time.
1
2 Select your desired playback mode.
ENGLISH
Repeat play
• For DVD: During play or pause.
• For VCD: While PBC (see page 20) is
not in use.
Ex.: When “TRK RPT” is selected while
playing an MP3 disc
Random play
• For VCD: While PBC (see page 20) is
not in use.
Mode Plays repeatedly
CHP RPT*1: The current chapter.
• RPT lights up.
TIT RPT*
•
TRK RPT*
1
: The current title.
and RPT light up.
2
: The current track.
• RPT lights up.
FLDR RPT*
•
3
: All tracks of the current folder.
and RPT light up.
RPT OFF: For DVD: Cancels Repeat play.
For other discs: All tracks of the
disc.
Mode Plays at random
FLDR RND*3: All tracks of the current folder,
then tracks of the next folder and
so on.
• RND and
DISC RND: All tracks of the disc.
• RND and
RND OFF: Cancels.
light up.
light up.
Ex.: When “DISC RND” is selected while
playing an MP3 disc
1
Only while playing a DVD disc.
*
2
*
Except for DVD discs.
3
*
Only while playing an MP3 or a WMA disc.
31
Page 32

Dual Zone operations
Only for KD-ADV6160
Listening with headphones
ENGLISH
By connecting headphones to the 2nd
AUDIO OUT plug on the rear, you can
listen to the playback sound through the
DVD/CD player while listening to another
source through the speakers.
You can activate Dual Zone while listening to
any source.
• When Dual Zone is in use, you can only
operate the DVD/CD player using the remote
controller.
On the remote controller:
1 Activate Dual Zone.
The source automatically changes to
“DISC.”
To select a different source to listen through
the speakers, press SOURCE on the control
panel.
• By using the buttons on the control panel,
you can operate the newly selected source
without affecting Dual Zone operations.
2 Adjust the headphone volume
through the 2nd AUDIO OUT plug.
3 Operate the DVD/CD player using
the remote controller by referring to
the monitor screen.
To cancel Dual Zone operations, repeat step 1.
(“DUAL OFF” appears on the display.)
On the control panel:
You can also activate and deactivate Dual Zone.
1
2
The source automatically changes to
“DISC” when Dual Zone is activated.
Cautions:
• DO NOT put on the headphones while
driving a car. It is dangerous to shut off the
outside sounds while driving.
• DO NOT put on the headphones before
adjusting the 2nd VOL level properly;
otherwise, it may damage your hearing.
32
Page 33

Sound adjustments
Selecting preset sound modes
You can select a preset sound mode suitable to
the music genre.
Ex.: When “ROCK” is selected
Storing your own sound
adjustments
You can adjust the sound modes and store your
own adjustments in memory.
1
Indication pattern for each sound mode:
ROCKUSER
CLASSICJAZZ
HIP HOP POPS
4 Adjust the level (–05 to +05).
5 Repeat steps 3 and 4 to adjust the
other frequency bands.
ENGLISH
2 Enter the sound adjustment mode.
3 Select a frequency to adjust.
6 Store the adjustments in the
respective mode.
• For the preset frequency level settings, see
page 54.
33
Page 34
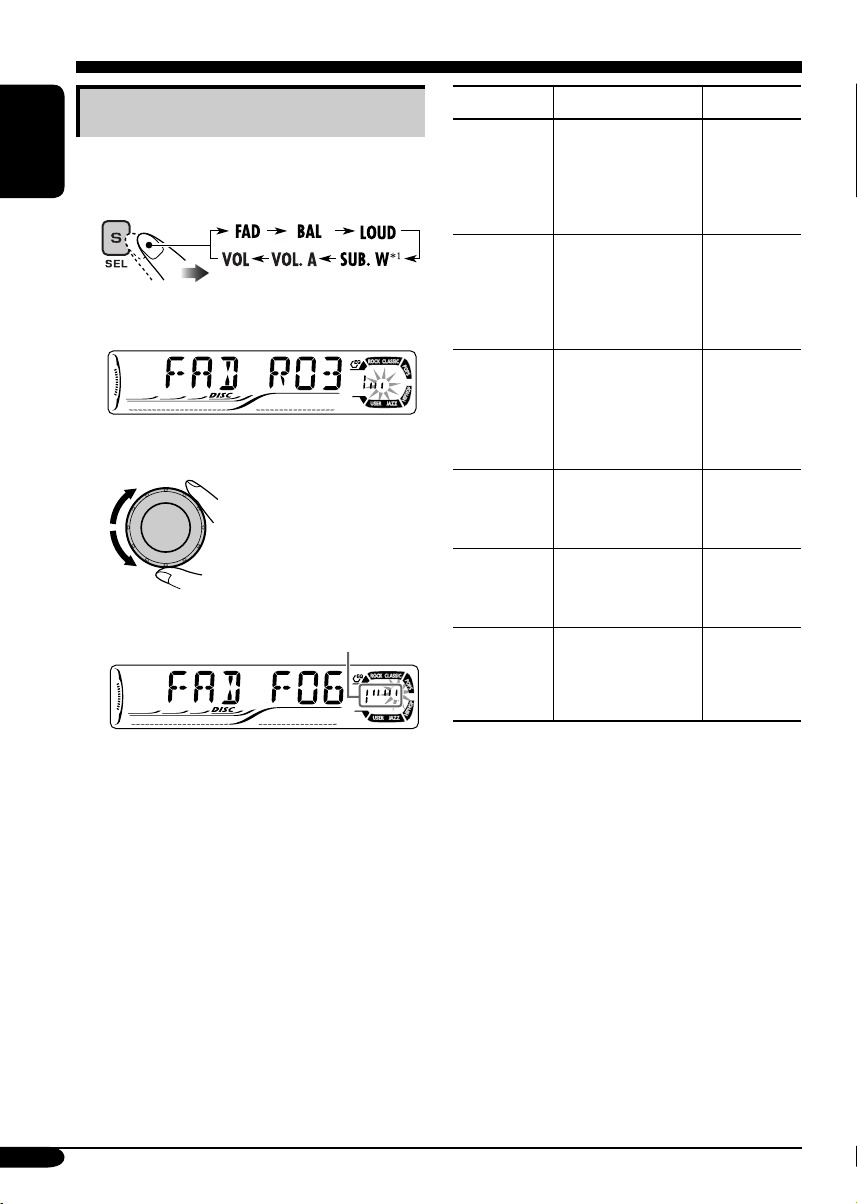
Adjusting the sound
You can adjust the sound characteristics to your
preference.
ENGLISH
1
*1 Only for KD-ADV6160
Ex.: When “FAD” is selected
2
Indication pattern changes
as you adjust the level.
Indication To do: Range
FAD*2
(fader)
Adjust the front
and rear speaker
balance.
BAL
(balance)
Adjust the left
and right speaker
balance.
LOUD
(loudness)
Boost low and
high frequencies
to produce a wellbalanced sound at
low volume level.
SUB. W*
(subwoofer)
3
Adjust the
subwoofer output
level.
VOL. A*
(volume
adjust)
VOL*
(volume)
4
Adjust and store
the volume level
of each source.
5
Adjust the
volume.
*2 If you are using a two-speaker system, set
the fader level to “00.”
3
*
Only for KD-ADV6160: This takes effect
only when a subwoofer is connected.
4
*
You cannot make an adjustment if the source
is FM. “FIX” will appear.
5
*
Normally the control dial works as the
volume control. So you do not have to select
“VOL” to adjust the volume level.
6
*
Depending on the amplifier gain control
setting. (See page 37 for details.)
R06
(Rear only)
to
F06
(Front only)
L06
(Left only)
to
R06
(Right only)
LOUD ON
J
LOUD OFF
00 (min.)
to
08 (max.)
–05 (min.)
to
+05 (max.)
00 (min.)
to
30 or 50
(max.)*
6
34
Page 35
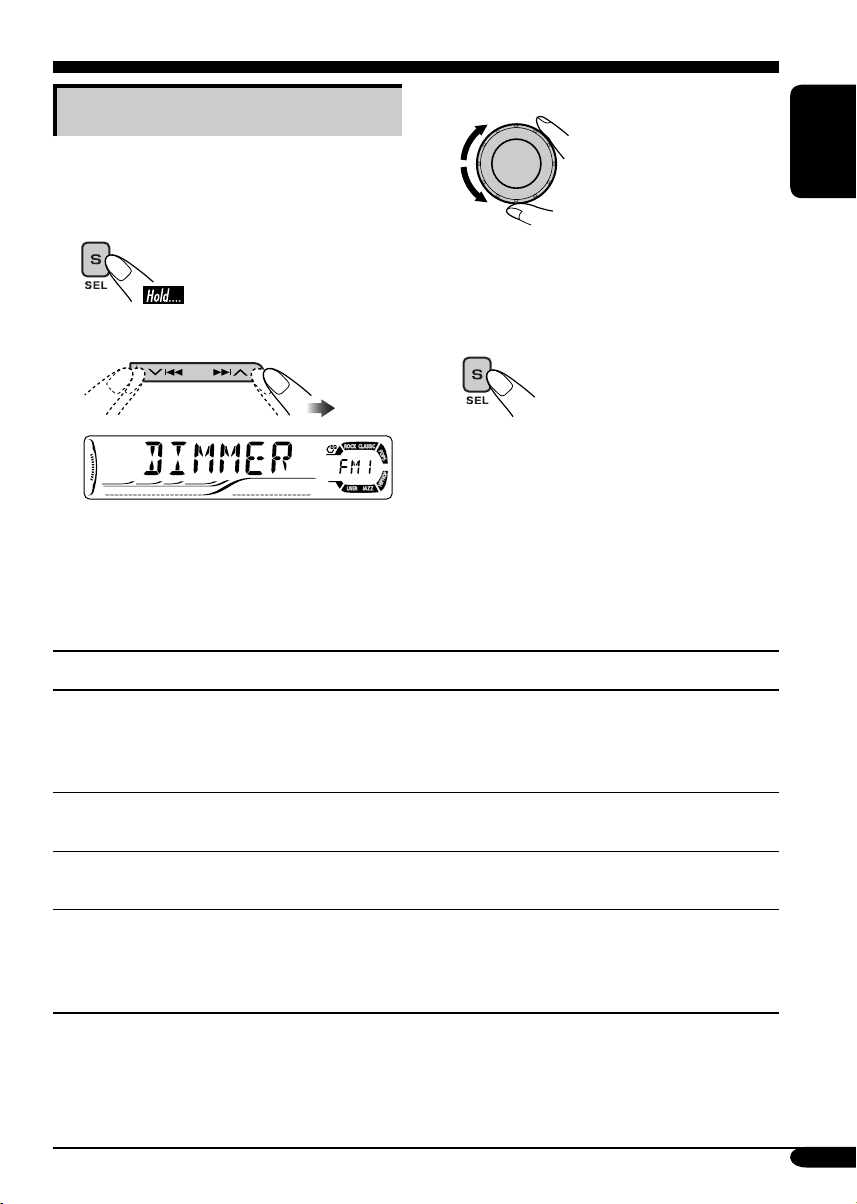
General settings — PSM
Basic procedure
3 Adjust the PSM item selected.
You can change PSM (Preferred Setting Mode)
items (except for SID) listed in the table that
follows.
1
2 Select a PSM item.
Ex.: When you select “DIMMER”
Indications Selectable settings, [reference page]
4 Repeat steps 2 and 3 to adjust the
other PSM items if necessary.
5 Finish the procedure.
ENGLISH
DEMO
Display demonstration
CLOCK H
Hour adjustment
CLOCK M
Minute adjustment
CLK ADJ*
Automatic clock
adjustments
* Displayed only when SIRIUS radio is connected.
DEMO ON: [Initial]; Display demonstration will be activated
automatically if no operation is done for about
20 seconds, [11].
DEMO OFF: Cancels.
1 – 12, [11]
[Initial: 1 (1:00)]
00 – 59, [11]
[Initial: 00 (1:00)]
AUTO: [Initial]; The built-in clock is automatically adjusted
using the clock time data provided via the SIRIUS
channel.
OFF: Cancels.
®
radio
To be continued...
35
Page 36

Indications Selectable settings, [reference page]
T-ZONE*
Time zone
ENGLISH
1, *2
Select your residential area from one of the following time zone for
clock adjustment.
EASTERN [Initial] “ ATLAN TIC “ NEWFOUND
(Newfoundland) “ ALASKA “ PACIFIC “ MOUNTAIN “
CENTRAL “ (back to the beginning).
1, *2
DST*
Daylight saving time
Activates this if your residential area is subject to DST.
ON: [Initial]; Activates daylight savings time.
OFF: Cancels.
1
SID*
SIRIUS® ID
The 12-digits SIRIUS identification number scrolls on the display
after 5 seconds, [45].
• Press S SEL to resume the previous display.
LEVEL
Audio level meter
DIMMER
Dimmer
ON: [Initial]; Activates the audio level indicator.
OFF: Cancels; sound mode indicator is shown, [33].
AUTO: [Initial]; Dims the display when you turn on the headlights.
ON: Activates dimmer.
OFF: Cancels.
3
TEL*
Telephone muting
MUTING 1/MUTING 2: Select either one which mutes the sounds
while using the cellular phone.
OFF: [Initial]; Cancels.
SCROLL*
Scroll
4
ONCE: [Initial]; Scrolls the disc information once.
AUTO:
Repeats scrolling (5-second intervals in between).
OFF: Cancels.
• Even if “SCROLL” is set to “OFF,” you can scroll the display by
pressing D DISP for more than one second.
1
*
Displayed only when SIRIUS radio is connected.
2
*
Displayed only when “CLK ADJ” is set to “AUTO.”
3
*
Only for KD-ADV6160.
4
*
Some characters or symbols will not be shown (and will be blanked) on the display
(Ex. “ABCå!d#” ]“ABCA D ”).
36
Page 37

Indications Selectable settings, [reference page]
WOOFER*
3
Subwoofer cutoff
frequency
3
HPF*
High pass filter
EXT IN*
6
External input
TAG DISP
Tag display
REAR SPK*
3, *5
Rear speaker output
AMP GAIN
Amplifier gain control
LOW: Frequencies lower than 80 Hz are sent to the subwoofer.
MID: [Initial]; Frequencies lower than 120 Hz are sent to the
subwoofer.
HIGH: Frequencies lower than 160 Hz are sent to the subwoofer.
HPF ON: The cut-off frequency is chosen automatically
according to the WOOFER setting (LOW/MID/
HIGH) so that you can enjoy the low frequency effect
(LFE) purely from the subwoofer if it is connected.
HPF OFF:
[Initial];
Cancels.
CHANGER: [Initial]; To use a JVC CD changer, [40].
EXT IN: To use any external component (other than SIRIUS
DLP), [44].
TAG ON: [Initial]; Shows the ID3 tag while playing MP3/WMA
tracks, [42].
TAG OFF: Cancels.
ON: [Initial]; Select this to turn on the rear speaker output.
OFF: Cancels.
You can change the maximum volume level of this receiver.
LOW PWR: VOL 00 – VOL 30 (Select this if the maximum power
of the speaker is less than 50 W to prevent them from
damaging the speaker.)
HIGH PWR: [Initial]; VOL 00 – VOL 50
3
OFF*
: Deactivates the built-in amplifier.
ENGLISH
AREA
Tuner channel interval
AREA EU: Select this when using the receiver in an area other
than North and South America. (FM: 50 kHz—manual
tuning, 100 kHz—auto search; AM: 9 kHz)
AREA US: [Initial]; Select this when using the receiver in North
or South America. (FM: 200 kHz; AM: 10 kHz)
5
*
Displayed only when Dual Zone is activated (see page 32).
6
*
Cannot be selected if the source is “CD-CH” or “EXT IN.”
37
Page 38

Other main functions
Assigning titles to the sources
You can assign titles to station frequencies
and CDs (both in this receiver and in the CD
ENGLISH
changer).
Sources
FM/AM tuner Up to 8 characters (up to
DISC/CD-CH Up to 32 characters (up
• You cannot assign a title to a DVD, VCD,
CD Text, or an MP3/WMA disc.
1 Select the source.
• For FM/AM tuner: Tune into a station.
• For a CD in this receiver: Insert a CD.
• For CDs in the CD changer: Select
“CD-CH,” then select a disc number.
2 Enter the title assignment mode.
Maximum number of
characters
30 station frequencies)
to 30 discs)
3 Assign a title.
1 Select a character.
2 Move to the next (or previous)
character position.
3 Repeat steps 1 and 2 until you
finish entering the title.
4 Finish the procedure.
Ex.: When you select “DISC” as the source
38
To erase the entire title
In step 2 on the left column....
Page 39

Detaching the control panel
When detaching or attaching the control panel,
be careful not to damage the connectors on
the back of the control panel and on the panel
holder.
Detaching the control panel
Before detaching the control panel, be sure to
turn off the power.
Attaching the control panel
ENGLISH
39
Page 40

CD changer operations
Playing discs in the CD changer
ENGLISH
About the CD changer
It is recommended to use the JVC MP3compatible CD changer with your receiver.
• You can also connect other CH-X series
CD changers (except CH-X99 and
CH-X100). However, they are not
compatible with MP3 discs, so you cannot
play back MP3 discs.
• You cannot use the KD-MK series CD
changers with this receiver.
• Disc text information recorded in the CD
Text can be displayed when a JVC CD
Text compatible CD changer is connected.
Before operating your CD changer:
• Refer also to the Instructions supplied
with your CD changer.
• You cannot control and play any DVD,
VCD, and WMA disc in the CD changer.
All tracks of the inserted discs in the magazine
will be played repeatedly until you change
the source or eject the magazine from the CD
changer.
~
If you have changed “EXT IN” setting
*
to “EXT IN” (see page 37), you
cannot select the CD changer.
Selected disc number
Ÿ Select a disc.
For disc number from 01 – 06:
40
For disc number from 07 – 12:
Page 41

• When the current disc is an MP3 disc:
Current disc number
To fast-forward or reverse the track
Folder name*
Current folder number
Disc information appears
automatically (see page 42).
Elapsed playing
time
Current track
number
* “ROOT” appears if no folder is included in
the disc.
• When the current disc is an audio CD or a
CD Text disc:
CD Text: Disc title/performer =
Track title appear automatically
(see page 42).
Fast-forwards.
Reverses.
To go to the next or previous tracks
To the following tracks.
To the beginning of the current track, then the
previous tracks.
To go to the next or previous folders (only
for MP3 discs)
To next folders.
To previous folders.
To skip to a track quickly during play
• For MP3 disc, you can skip a track within the
same folder.
Ex.: To select track 32 while playing track 6
ENGLISH
Elapsed playing
time
Current track
number
Current disc number
1
To be continued...
41
Page 42

2
ENGLISH
First time you press 5 or ∞ button, the
track skips to the nearest higher or lower
track with a track number of multiple ten
(ex. 10th, 20th, 30th).
Then each time you press the button, you
can skip 10 tracks.
• After the last track, the first track will be
selected and vice versa.
3
Changing the display information
While playing an MP3 disc
• When “TAG DISP” is set to “TAG
ON” (see page 37)
2
If an MP3 file does not have ID3
*
tags, folder name and file name
appear. In this case, the TAG
indicator will not light up.
• When “TAG DISP” is set to “TAG
OFF”
42
While playing an audio CD or a CD
Text
*1 If no title is assigned to an audio CD,
“NO NAME” appears. To assign a title
to an audio CD, see page 38.
Page 43

Selecting the playback modes
You can use only one of the following playback modes at a time.
1
2 Select your desired playback mode.
ENGLISH
Repeat play
Ex.: When “TRK RPT” is selected while
playing an MP3 disc
Random play
Ex.: When “DISC RND” is selected while
playing an MP3 disc
* Only while playing an MP3 disc.
Mode Plays repeatedly
TRK RPT: The current track.
• RPT lights up.
FLDR RPT*: All tracks of the current folder.
•
DISC RPT: All tracks of the inserted discs.
•
RPT OFF: Cancels.
and RPT light up.
and RPT light up.
Mode Plays at random
FLDR RND*: All tracks of the current folder,
then tracks of the next folder and
so on.
• RND and
DISC RND: All tracks of the current disc.
• RND and
MAG RND: All tracks of the inserted discs.
• RND lights up.
RND OFF: Cancels.
light up.
light up.
43
Page 44
External component operations
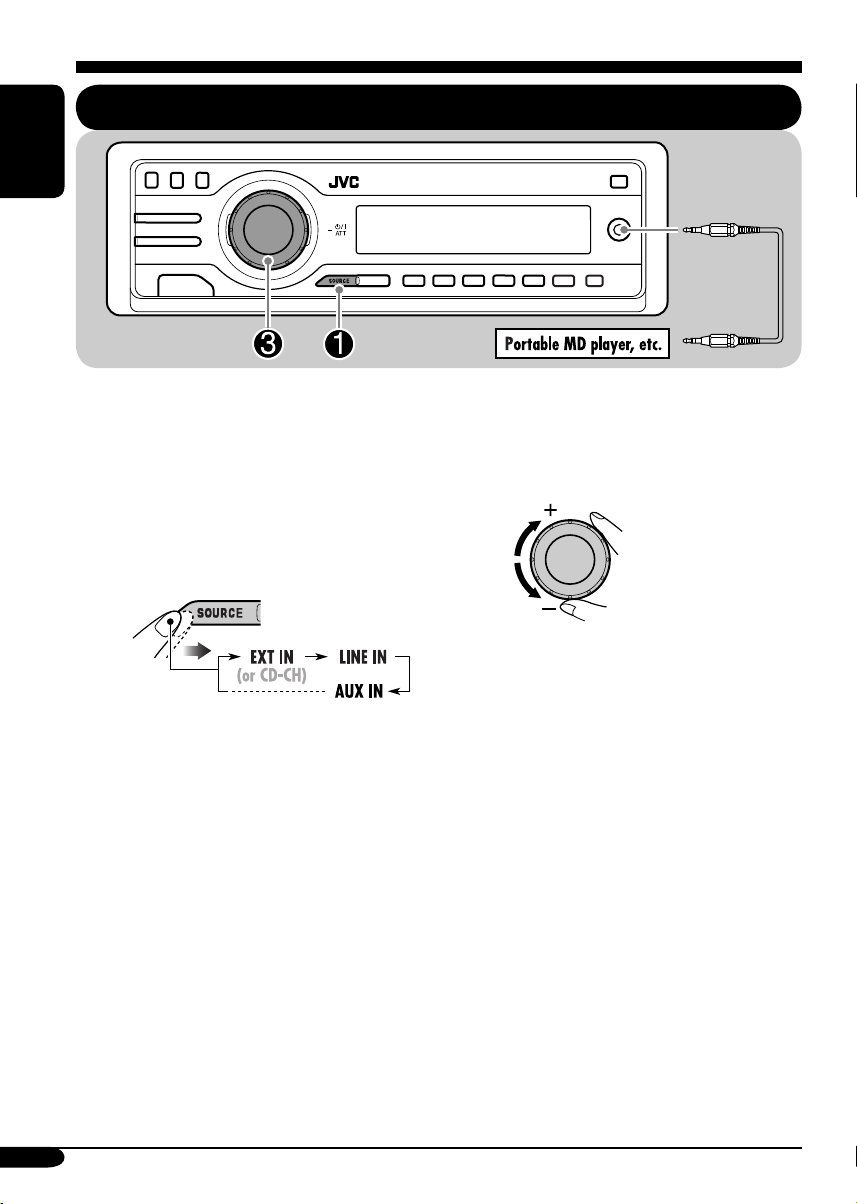
Playing an external component
ENGLISH
You can connect an external component to the
CD changer jack on the rear using the Line
Input Adapter—KS-U57 (not supplied), LINE
IN plug on the rear, or AUX (auxiliary) input
jack on the control panel.
• For connection, see Installation/Connection
Manual (separate volume).
Ÿ Turn on the connected component
! Adjust the volume.
~
and start playing the source.
LINE IN: For selecting the external
component connected to the
LINE IN plug.
AUX IN: For selecting the external
component connected to the
AUX input jack.
(NOT compatible with digital signals.)
EXT IN: For selecting the external
component connected to the
CD changer jack on the rear.
• If “EXT IN” does not appear, see page
37 and select the external input (EXT
IN).
44
⁄ Adjust the sound as you want.
(See pages 33 and 34.)
Page 45

SIRIUS® radio operations
About SIRIUS radio
SIRIUS is a satellite radio that can deliver
digital-quality sound.
SIRIUS has 65 music channels which are all
commercial-free and 50 channels of sports,
news, and entertainment programs.
You can enjoy and control the SIRIUS
radio digital entertainment channels
from the receiver by connecting the JVC
SIRIUS radio DLP—Down Link Processor
(optionally purchased) to the CD changer
jack on the rear.
• You can also connect the JVC SIRIUS
radio PnP (Plug and Play), KT-SR1000 or
KT-SR2000, using the JVC SIRIUS radio
adapter, KS-U100K (not supplied). By
turning on the power of the receiver, you
can turn on/off the JVC PnP. However,
you cannot control it from this receiver.
GCI (Global Control Information) update:
• If channels are updated after subscription,
updating starts automatically.
“UPDATING” flashes and no sound can
be heard.
• Update takes a few minutes to complete.
• Do not press any button or perform
any operation until updating has been
completed.
Before operating your SIRIUS radio:
• For connection, see Installation/
Connection Manual (separate volume).
• Refer also to the Instructions supplied
with your SIRIUS radio.
Before you can listen to JVC DLP, activate
your SIRIUS subscription after connection:
1
ENGLISH
2
JVC DLP starts updating all the SIRIUS
channels.
“UPDATING” flashes on the display for a
few minutes. No sound can be heard during
update.
Once completed, JVC DLP tunes in to the
preset channel, CH184.
3 Check your SIRIUS ID, see page 36.
4 Contact SIRIUS on the internet at
<http://activate.siriusradio.com/> to activate
your subscription, or you can call SIRIUS
toll-free at 1-888-539-SIRIUS (7474).
“SUB UPDT PRESS ANY KEY” scrolls
on the display once subscription has been
completed.
45
Page 46

ENGLISH
Listening to the SIRIUS® radio
~
Ÿ
! Select a category.
You can tune in to all the channels of
every category by selecting “ALL.”
Selecting a particular category
(SPORTS, ENTERTAINMENT, etc.)
allows you to enjoy only the channels
from the selected category.
⁄ Select a channel for listening.
Press and hold these buttons change the
channels rapidly.
• When changing the category or channel,
invalid and unsubscribed channels are skipped
automatically.
46
Page 47

Storing channels in memory
You can preset six channels for each band.
Ex.: Storing a channel into preset number 4.
1 Perform steps ~ to ⁄ on page 46, to
tune in to a channel you want.
2
Preset number flashes
for a while.
Listening to a preset channel
1
To change the display information while
listening to a channel
ENGLISH
2
3 Select the preset channel (1 – 6) you
want.
When using the remote controller....
47
Page 48

Maintenance
How to clean the connectors
Frequent detachment will deteriorate the
connectors.
To minimize this possibility, periodically wipe
ENGLISH
the connectors with a cotton swab or cloth
moistened with alcohol, being careful not to
damage the connectors.
Connector
Moisture condensation
Moisture may condense on the lens inside the
DVD/CD player in the following cases:
• After starting the heater in the car.
• If it becomes very humid inside the car.
Should this occur, the DVD/CD player may
malfunction. In this case, eject the disc and
leave the receiver turned on for a few hours
until the moisture evaporates.
To keep discs clean
A dirty disc may not play correctly.
If a disc does become dirty, wipe
it with a soft cloth in a straight line
from center to edge.
• Do not use any solvent (for example,
conventional record cleaner, spray, thinner,
benzine, etc.) to clean discs.
To play new discs
New discs may have some rough
spots around the inner and outer
edges. If such a disc is used, this
receiver may reject the disc.
To remove these rough spots, rub the edges
with a pencil or ball-point pen, etc.
Do not use the following discs:
Warped
disc
How to handle discs
When removing a disc from
its case, press down the center
holder of the case and lift the
disc out, holding it by the
edges.
• Always hold the disc by the edges. Do not
touch its recording surface.
When storing a disc into its case, gently insert
the disc around the center holder (with the
printed surface facing up).
• Make sure to store discs into the cases after
use.
48
Center holder
Sticker
Disc
Sticker
residue
Stick-on
label
Page 49

Language codes
Code Language Code Language Code Language
AA
AB
AF
AM
AR
AS
AY
AZ
BA
BE
BG
BH
BI
BN
BO
BR
CA
CO
CS
CY
DZ
EL
EO
ET
EU
FA
FI
FJ
FO
FY
GA
GD
GL
GN
GU
HA
HI
HR
HU
HY
IA
IE
Afar
Abkhazian
Afrikaans
Ameharic
Arabic
Assamese
Aymara
Azerbaijani
Bashkir
Byelorussian
Bulgarian
Bihari
Bislama
Bengali, Bangla
Tibetan
Breton
Catalan
Corsican
Czech
Welsh
Bhutani
Greek
Esperanto
Estonian
Basque
Persian
Finnish
Fiji
Faroese
Frisian
Irish
Scots Gaelic
Galician
Guarani
Gujarati
Hausa
Hindi
Croatian
Hungarian
Armenian
Interlingua
Interlingue
IK
IN
IS
IW
JI
JW
KA
KK
KL
KM
KN
KO
KS
KU
KY
LA
LN
LO
LT
LV
MG
MI
MK
ML
MN
MO
MR
MS
MT
MY
NA
NE
NO
OC
OM
OR
PA
PL
PS
PT
QU
RM
Inupiak
Indonesian
Icelandic
Hebrew
Yiddish
Javanese
Georgian
Kazakh
Greenlandic
Cambodian
Kannada
Korean (KOR)
Kashmiri
Kurdish
Kirghiz
Latin
Lingala
Laothian
Lithuanian
Latvian, Lettish
Malagasy
Maori
Macedonian
Malayalam
Mongolian
Moldavian
Marathi
Malay (MAY)
Maltese
Burmese
Nauru
Nepali
Norwegian
Occitan
(Afan) Oromo
Oriya
Panjabi
Polish
Pashto, Pushto
Portuguese
Quechua
Rhaeto-Romance
RN
RO
RW
SA
SD
SG
SH
SI
SK
SL
SM
SN
SO
SQ
SR
SS
ST
SU
SW
TA
TE
TG
TH
TI
TK
TL
TN
TO
TR
TS
TT
TW
UK
UR
UZ
VI
VO
WO
XH
YO
ZU
Kirundi
Rumanian
Kinyarwanda
Sanskrit
Sindhi
Sangho
Serbo-Croatian
Singhalese
Slovak
Slovenian
Samoan
Shona
Somali
Albanian
Serbian
Siswati
Sesotho
Sundanese
Swahili
Tamil
Telugu
Tajik
Thai
Tigrinya
Turkmen
Tagalog
Setswana
Tonga
Turkish
Tsonga
Tatar
Twi
Ukrainian
Urdu
Uzbek
Vietnamese
Volapuk
Wolof
Xhosa
Yoruba
Zulu
ENGLISH
49
Page 50

More about this receiver
Basic operations
Turning on the power
• By pressing SOURCE on the receiver, you
can also turn on the power.
ENGLISH
Selecting the sources
• When no disc is loaded in the receiver,
“DISC” cannot be selected.
• Without connecting to the CD changer or the
SIRIUS radio, “CD-CH” or “SIRIUS” cannot
be selected.
Turning off the power
• If you turn off the power while listening to a
disc, disc play will start automatically, next
time you turn on the power.
Tuner operations
Storing stations in memory
• During SSM search...
– All previously stored stations are erased and
stations are stored newly.
– Received stations are preset in No. 1
(lowest frequency) to No. 6 (highest
frequency).
– When SSM is over, the station stored in
No. 1 will be automatically tuned in.
• When storing a station manually, a previously
preset station is erased when a new station is
stored in the same preset number.
Disc operations
General
• In this manual, words “track” and “file” are
interchangeably used when referring to MP3/
WMA files and their file names.
• This receiver can also playback 8 cm
(3-3/16") discs.
• This receiver can only playback audio CD
(CD-DA) files if different type of files are
recorded in the same disc.
– The first track will be skipped if a different
type of file is detected first.
• When a disc has been loaded, selecting
“DISC” for the playback source starts disc
play.
Inserting a disc
• When a disc is inserted upside down,
“PLEASE” and “EJECT” appear alternately
on the display. Press 0 to eject the disc.
Playing a DVD-R/DVD-RW or CD-R/
CD-RW
• Use only “finalized” discs.
• This receiver can play back only the files of
the same type which is first detected if a disc
includes both audio CD (CD-DA) files and
MP3/WMA files.
• Only for CD-R/CD-RW: This receiver can
play back multi-session discs; however,
unclosed sessions will be skipped while
playing.
50
Page 51

• Some DVD-R/DVD-RW or CD-R/CD-RW
may not play back on this receiver because
of their disc characteristics, and for the
following causes:
– Discs are dirty or scratched.
– Moisture condensation occurs on the lens
inside the receiver.
– The pickup lens inside the receiver is dirty.
– CD-R/CD-RW on which the files are
written with “Packet Write” method.
– DVD-R/DVD-RW which are not written
in UDF-Bridge Format (eg. UDF format or
ISO format).
– There are improper recording conditions
(missing data, etc.) or media conditions
(stain, scratch, warp, etc.).
• DVD-RW/CD-RW may require a longer
readout time since the reflectance of DVDRW/CD-RW is lower than that of regular
discs.
• Do not use the following DVD-R/DVD-RW
or CD-R/CD-RW:
– Discs with stickers, labels, or protective seal
stuck to the surface.
– Discs on which labels can be directly
printed by an ink jet printer.
Using these discs under high temperatures or
high humidities may cause malfunctions or
damages to discs.
Playing an MP3/WMA disc
• This receiver can play back MP3/WMA files
with the extension code <.mp3> or <.wma>
(regardless of the letter case—upper/lower)
recorded in either CD-R/CD-RW or in
DVD-R/DVD-RW.
• This receiver can show the names of albums,
artists (performer), and ID3 Tag (Version 1.0,
1.1, 2.2, 2.3, or 2.4) for MP3 files and WMA
files.
• This receiver can display only one-byte
characters. No other characters can be
correctly displayed.
• This receiver can play back MP3/WMA files
meeting the conditions below:
– Bit rate: MP3: 32 kbps — 320 kbps
WMA: 32 kbps — 192 kbps
– Sampling frequency:
48 kHz, 44.1 kHz, 32 kHz (for MPEG-1)
24 kHz, 22.05 kHz, 16 kHz (for MPEG-2)
48 kHz, 44.1 kHz, 32 kHz (for WMA)
– Disc format: ISO 9660 Level 1/ Level 2,
Romeo, Joliet, Windows long file name
• The maximum number of characters for file/
folder names vary among the disc format used
(includes 4 extension characters—<.mp3> or
<.wma>).
– ISO 9660 Level 1: up to 12 characters
– ISO 9660 Level 2: up to 31 characters
– Romeo: up to 128 characters
– Joliet: up to 64 characters
– Windows long file name: up to 128
characters
• This receiver can recognize the total of
1100 files, 250 folders (maximum of 999 files
per folder).
• This receiver can play back the files recorded
in VBR (variable bit rate).
The files recorded in VBR have a discrepancy
in elapsed time display, and do not show
the actual elapsed time. Especially, after
performing the search function, this difference
becomes noticeable.
ENGLISH
To be continued....
51
Page 52

• This receiver cannot play back the following
files:
–
MP3 files encoded with MP3i and MP3 PRO
format.
– MP3 files encoded in an unappropriated
ENGLISH
format.
– MP3 files encoded with Layer 1/2.
– WMA files encoded with lossless,
professional, and voice format.
– WMA files which are not based upon
Windows Media
– WMA files copy-protected with DRM.
– WMA files recorded with MBR (Multiple
Bit Rate) format.
– Files which have the data such as WAVE,
ATRAC3, etc.
®
Audio.
Changing the source
• If you change the source, playback also stops
(without ejecting the disc).
Next time you select “DISC” for the playback
source (without activating Dual Zone), disc
play starts from where it has been stopped
previously.
Ejecting a disc
• If the ejected disc is not removed within
15 seconds, the disc is automatically inserted
again into the loading slot to prevent it from
dust. (Disc will not play this time.)
DVD setup menu
• When the language you have selected is not
recorded on a disc, the original language is
automatically used as the initial language. In
addition, for some discs, the initial languages
settings will not work as you set due to their
internal disc programming.
• While playing (or pausing), you cannot
change these languages.
After you change any of these language
settings, eject the disc and insert it (or another
disc) again so that your setting takes effect.
• When you select “16:9 [MULTI]” for a
picture whose aspect ratio is 4:3, the picture
slightly changes due to the process for
converting the picture width.
• Even if “4:3 [MULTI] PAN SCAN” is
selected, the screen size may become
“4:3 [MULTI] LETTER BOX” with some
DVDs. This depends on how they are
recorded.
General settings—PSM
• If you change the “AMP GAIN” setting from
“HIGH PWR” to “LOW PWR” while the
volume level is set higher than “VOL 30,” the
receiver automatically changes the volume
level to “VOL 30.”
52
Other main functions
• If you try to assign a title to a 31st station
or 31st disc, “NAMEFULL” flashes on
the display. Delete unwanted titles before
assignment.
• Titles assigned to discs in the CD changer can
also be shown if you playback the disc on the
receiver.
Page 53

About sounds reproduced through the rear terminals
• Through the analog terminals (Speaker out/LINE OUT/2nd AUDIO OUT): 2-channel signal is
emitted.
When playing a multi-channel encoded disc, multi-channel signals are downmixed.
(AUDIO—DOWN MIX: see page 28.)
• Through DIGITAL OUT (optical):
Digital signals (Linear PCM, Dolby Digital, DTS, MPEG Audio) are emitted through this
terminal. (For more details, see page 54.)
To reproduce multi-channel sounds such as Dolby Digital and DTS, connect an amplifier or
a decoder compatible with these multi-channel sources to this terminal, and set “DIGITAL
AUDIO OUTPUT” correctly. (See page 28.)
• About Dual Zone
While you are listening to the radio, CD changer, or external component through the speakers
built into your car compartment, you can listen to the playback sound of this DVD/CD player
using the headphones connected to the 2nd AUDIO OUT plug at the same time. (For details,
see page 32.)
On-screen guide icons
During play, the following guide icons may appear for a while on the monitor.
: Appears at the beginning of a scene containing multi-subtitle languages (for DVD only).
: Appears at the beginning of a scene containing multi-audio languages (for DVD only).
: Appears at the beginning of a scene containing multi-angle views (for DVD only).
: Playback
: Pause
: Forward Slow Motion Playback (for DVD and VCD only)
: Reverse Slow Motion Playback (for DVD only)
: Forward search
: Reverse search
ENGLISH
53
Page 54

Output signals through the DIGITAL OUT terminal
Output signals are different depending on the “DIGITAL AUDIO OUTPUT” setting on the setup
menu (see page 28).
ENGLISH
Playback Disc
DVD
48 kHz, 16/20/24 bits Linear PCM
96 kHz, Linear PCM
with DTS DTS bitstream 48 kHz, 16 bits stereo Linear PCM
with Dolby Digital Dolby Digital bitstream
with MPEG Audio MPEG bitstream 48 kHz, 16 bits Linear PCM
Audio CD, Video CD 44.1 kHz, 16 bits stereo Linear PCM /
Audio CD with DTS DTS bitstream 44.1 kHz, 16 bits stereo Linear PCM
MP3/WMA
DIGITAL AUDIO OUTPUT
Output Signals
STREAM/PCM DOLBY DIGITAL/PCM PCM ONLY
48 kHz, 16 bits stereo Linear PCM
48 kHz, 16 bits
stereo Linear PCM
48 kHz, 16 bits stereo Linear PCM
32/44.1/48 kHz, 16 bits Linear PCM
Sound modes (preset frequency level settings)
The list below shows the preset frequency level settings for each sound mode (see page 33).
Sound mode
USER 00 00 00 00 00 00 00
ROCK +03 +02 00 00 +01 +02 +01
CLASSIC +01 +03 +01 00 00 +02 00
POPS 00 +02 00 00 00 +01 +02
HIP HOP +04 +01 –01 –02 00 +01 00
JAZZ +03 +02 +01 +01 +01 +03 +01
60 Hz 150 Hz 400 Hz 1 kHz 2.4 kHz 6 kHz 15 kHz
Preset equalizing values
54
Page 55

Troubleshooting
What appears to be trouble is not always serious. Check the following points before calling a service
center.
Symptoms Causes Remedies
• Sound cannot be heard
from the speakers.
• The receiver does not
work at all.
General
• Remote controller does not
work.
• SSM automatic presetting
does not work.
• Static noise while listening
FM/AM
to the radio.
• Disc cannot be played
back.
• CD-R/CD-RW or DVD-R/
DVD-RW cannot be played
back.
• Tracks on the CD-R/
CD-RW or DVD-R/
DVD-RW cannot be
Disc playback
skipped.
• Disc cannot be recognized. The DVD/CD player may
• “NO DISC” appears on the
display.
The volume level is set to
the minimum level.
Connections are incorrect. Check the cords and
The built-in microcomputer
may have functioned
incorrectly due to noise, etc.
Dual Zone is activated
(see page 32).
Signals are too weak. Store stations manually.
The antenna is not connected
firmly.
Disc is inserted upside
down.
CD-R/CD-RW or DVD-R/
DVD-RW is not finalized.
have functioned incorrectly.
Disc is inserted incorrectly. Insert the disc correctly.
Adjust it to the optimum
level.
connections.
Reset the receiver
(see page 2).
While Dual Zone is
activated, remote controller
only functions for operating
the DVD/CD player.
Connect the antenna firmly.
Insert the disc correctly.
• Insert a finalized CD-R/
CD-RW or DVD-R/
DVD-RW.
•
Finalize the
or DVD-R/DVD-RW
the component which you
used for recording.
Eject the disc forcibly
(see page 2).
CD-R/CD-RW
with
ENGLISH
To be continued....
55
Page 56

• Sound and picture are
ENGLISH
• No playback picture
• No picture appears on the
Disc playback
• The left and right edges of
• Disc cannot be played
MP3/WMA playback
• Noise is generated. The track played back is not
Symptoms Causes Remedies
sometimes interrupted or
distorted.
(DVD, VCD) appears on
the monitor.
monitor at all.
the picture are missing on
the screen.
back.
You are driving on rough
roads.
Disc is scratched. Change the disc.
Connections are incorrect. Check the cords and
Parking brake wire is not
connected properly.
The video cord is not
connected correctly.
An incorrect input has
been selected on the TV or
monitor.
“4:3 [MULTI] PAN SCAN”
is selected when viewing on
a conventional TV
(aspect ratio 4:3).
No MP3/WMA tracks are
recorded on the disc.
MP3/WMA tracks do not
have the extension code
<.mp3> or <.wma> in their
file names.
MP3/WMA tracks are not
recorded in a compliant
format.
MP3/WMA tracks are
recorded in DVD+R/
DVD+RW media.
an MP3/WMA file (although
it has the extension code
<.mp3> or <.wma>).
Stop playback while driving
on rough roads.
connections.
See Installation/Connection
Manual.
Connect the video cord
correctly.
Select a correct input on the
TV or monitor.
Select “4:3 [MULTI]
LETTER BOX.”
(See page 27.)
Change the disc.
Add the extension code
<.mp3> or <.wma> to their
file names.
Change the disc.
Record MP3/WMA tracks
using a compliant application
(see page 6).
Change the disc.
Record MP3/WMA tracks
using DVD-R/DVD-RW
media.
Skip to another track or
change the disc. (Do not add
the extension code <.mp3>
or <.wma> to non-MP3 or
WMA tracks.)
56
Page 57

Symptoms Causes Remedies
• A longer readout time is
required.
• Tracks cannot be played
back as you have intended
them to play.
• Elapsed playing time is not
correct.
• “PLEASE” and “EJECT”
MP3/WMA playback
appear alternately on the
display.
• Correct characters are not
displayed (e.g. album name).
• “NO DISC” appears on the
display.
• “NO MAG” appears on
the display.
• “RESET 8” appears on the
display.
CD changer
• “RESET 1” – “RESET 7”
appears on the display.
• The CD changer does not
work at all.
Readout time varies due to
the complexity of the folder/
file configuration.
Playback order is determined
when the files are recorded.
This sometimes occurs
during play. This is caused
by how the tracks are
recorded on the disc.
The current disc does not
contain any MP3/WMA
tracks.
This receiver can only
display alphabets (capital:
A – Z), numbers, and a
limited number of symbols.
No disc is in the magazine.
Disc is inserted upside down.
No magazine is loaded in the
CD changer.
This receiver is not
connected to the CD changer
correctly.
The built-in microcomputer
may function incorrectly due
to noise, etc.
Do not use too many
hierarchies and folders.
ENGLISH
Insert a disc that contains
MP3/WMA tracks.
Insert disc into the magazine.
Insert disc correctly.
Insert the magazine.
Connect this receiver and the
CD changer correctly and
press the reset button of the
CD changer.
Press the reset button of the
CD changer.
Reset the receiver
(see page 2).
To be continued....
57
Page 58

• “CALL 1-888-539-
ENGLISH
• “NO SIGNAL” scrolls on
• “NO ANTENNA” scrolls
• “NO CH” appears on the
SIRIUS
• “NO (information)*”
• No sound can be heard. “UPDATING” flashes on
Symptoms Causes Remedies
SIRIUS TO SUBSCRIBE”
scrolls on the display.
the display.
on the display.
display for about
5 seconds, then returns to
the previous display.
appears or scrolls on the
display.
Subscription has not been
done.
Signals are too weak. Move to an area with
The antenna is not connected
firmly.
No broadcast on the selected
channel.
No text information for the
selected channel.
the display.
Starts subscribing
(see page 45).
stronger signals.
Connect the antenna firmly.
Select another channel or
continue listening to the
previous channel.
The receiver is updating the
channel information and
it takes a few minutes to
complete.
• SIRIUS radio does not
work at all.
* NO CATEGORY, NO CHANNEL, NO ARTIST, NO COMPOSER, or NO SONG/PROGRAM.
58
The built-in microcomputer
may have functioned
incorrectly due to noise, etc.
Reconnect the SIRIUS radio
after a few seconds.
Page 59

Specifications
AUDIO AMPLIFIER SECTION
Power Output:
20 W RMS × 4 Channels at 4 Ω
and ≤ 1% THD+N
Signal to Noise Ratio:
80 dBA (reference: 1 W into 4 Ω)
Load Impedance: 4 Ω (4 Ω to 8 Ω allowance)
Equalizer Control Range:
Frequencies: 60 Hz, 150 Hz, 400 Hz, 1 kHz,
2.4 kHz, 6 kHz, 15 kHz
Level: ±10 dB
Audio Output Level:
KD-ADV6160:
Analog (2nd AUDIO OUT):
6 mW (at 16 Ω)
Digital (DIGITAL OUT: Optical):
Signal wave length: 660 nm
Output level: –21 dBm to –15 dBm
Line-Out Level/Impedance:
KD-ADV6160:
5.0 V/20 kΩ load (full scale)
KD-DV5100:
2.5 V/20 kΩ load (full scale)
Output Impedance: 1 kΩ
Subwoofer-Out Level/Impedance:
KD-ADV6160: 2.0 V/20 kΩ load (full scale)
Color System: NTSC
Video Output (composite): 1 Vp-p/75 Ω
Other Terminals: LINE IN, CD changer
TUNER SECTION
Frequency Range:
FM: 87.5 MHz to 107.9 MHz
(with channel interval set to 200 kHz)
87.5 MHz to 108.0 MHz
(with channel interval set to 50 kHz)
AM: 530 kHz to 1 710 kHz
(with channel interval set to 10 kHz)
531 kHz to 1 602 kHz
(with channel interval set to 9 kHz)
[FM Tuner]
Usable Sensitivity: 11.3 dBf (1.0 µV/75 Ω)
50 dB Quieting Sensitivity:
16.3 dBf (1.8 µV/75 Ω)
Alternate Channel Selectivity (400 kHz): 65 dB
Frequency Response: 40 Hz to 15 000 Hz
Stereo Separation: 35 dB
Capture Ratio: 1.5 dB
[AM Tuner]
Sensitivity: 20 µV
Selectivity: 35 dB
DVD/CD PLAYER SECTION
Signal Detection System: Non-contact optical
pickup (semiconductor laser)
Number of Channels: 2 channels (stereo)
Frequency Response:
DVD, fs=48 kHz/96 kHz: 16 Hz to 22 000 Hz
VCD, CD, MP3, WMA: 16 Hz to 20 000 Hz
Dynamic Range: 96 dB
Signal-to-Noise Ratio: 98 dB
Wow and Flutter: Less than measurable limit
MP3 (MPEG Audio Layer 3):
Max. Bit Rate: 320 kbps
WMA (Windows Media
Max. Bit Rate: 192 kbps
®
Audio):
GENERAL
Power Requirement:
Operating Voltage:
DC 14.4 V (11 V to 16 V allowance)
Grounding System: Negative ground
Allowable Operating Temperature:
0°C to +40°C (32°F to 104°F)
Dimensions (W × H × D):
Installation Size (approx.):
182 mm × 52 mm × 158 mm
(7-3/16
Panel Size (approx.):
188 mm × 58 mm × 11 mm
(7-7/16
Mass (approx.):
1.7 kg (3.7 lbs) (excluding accessories)
Design and specifications are subject to change
without notice.
If a kit is necessary for your car, consult
your telephone directory for the nearest car
audio speciality shop.
" × 2-1/16" × 6-1/4")
" × 2-5/16" × 7/16")
ENGLISH
59
Page 60

Muchas gracias por la compra de un producto JVC.
Como primer paso, por favor lea detenidamente este manual para comprender a fondo todas las
instrucciones y obtener un máximo disfrute de esta unidad.
IMPORTANTE (EE.UU.)
Este equipo se ha sometido a todo tipo de pruebas y cumple con las normas establecidas para
dispositivos de Clase B, de conformidad con la Parte 15 de las reglas de la FCC (Comisión
Federal de Comunicaciones). Estas reglas están diseñadas para asegurar una protección razonable
contra este tipo de interferencias en las instalaciones residenciales. Este equipo genera y utiliza
energía de radiofrecuencia. Si no se instala y utiliza debidamente, es decir, conforme a las
ESPAÑOL
instrucciones, podrían producirse interferencias en radiocomunicaciones. Sin embargo, no
se garantiza que estas interferencias no se produzcan en una instalación determinada. Si este
equipo ocasiona interferencias en la recepción de radio o televisión, lo cual puede comprobarse
mediante la conexión o desconexión del equipo, el problema podrá corregirse mediante una o
una combinación de las siguientes medidas:
– Reoriente la antena receptora o cámbiela de lugar.
– Aumente la separación entre el equipo y el aparato receptor.
– Enchufe el equipo a una toma de corriente situada en un circuito distinto del aparato receptor.
– Consulte a su distribuidor o a un técnico experto en radio/televisión.
IMPORTANTE PARA PRODUCTOS LÁSER
1. PRODUCTO LÁSER CLASE 1
2. PRECAUCIÓN: No abra la tapa superior.
En el interior de la unidad no hay piezas
que pueda reparar el usuario; encargue el
servicio a personal técnico cualificado.
3. PRECAUCIÓN: Radiación láser visible
e invisible en caso de apertura o con
interbloqueo averiado o defectuoso. Evite la
exposición directa a los haces.
Cómo reposicionar su unidad
Esto hará que se reposicione el
microcomputador. También se borrarán los
ajustes preestablecidos por usted.
Cómo expulsar el disco por la
fuerza
Si el disco no puede ser reconocido por el
receptor o no puede ser expulsado, expúlselo
de la siguiente manera.
“PLEASE” y “EJECT” aparecen
alternativamente en la pantalla.
• Si esto no funciona, intente reposicionar su
receptor.
• Tenga cuidado de no dejar caer el disco al
ser expulsado.
2
Page 61

ADVERTENCIAS:
• NO instale la unidad en los siguientes
sitios:
– Donde pueda obstruir la maniobra del
volante de dirección y del cambio de
engranajes, con el consiguiente riesgo
de accidentes de tráfico.
– Donde pueda obstruir el
funcionamiento de dispositivos de
seguridad tales como bolsas de aire,
pues podría resultar en un accidente
fatal.
– Donde pueda obstruir la visibilidad.
• NO OPERE la unidad mientras está
maniobrando el volante de dirección,
pues podría producirse un accidente de
tráfico.
• El conductor no debe mirar el monitor
mientras conduce.
Si el conductor mira el monitor mientras
conduce puede descuidarse y causar un
accidente.
• El conductor no deberá ponerse los
auriculares mientras conduce. Es
muy peligroso no escuchar los ruidos
exteriores durante la conducción.
• Si necesita operar el receptor mientras
conduce, asegúrese de mirar
atentamente hacia adelante para no
provocar un accidente de tráfico.
• Si no está aplicado el freno de
estacionamiento, aparecerá en el
monitor “EL CONDUCTOR NO DEBE
MIRAR EL MONITOR MIENTRAS
CONDUCE.”, y no se mostrará la
imagen de reproducción.
– Esta advertencia aparece únicamente
cuando el cable del freno de
estacionamiento se encuentra
conectado al sistema del freno de
estacionamiento incorporado al
automóvil (refiérase al Manual de
instalación/conexión).
Este producto incorpora tecnología de
protección de los derechos de autor que
está protegida por patentes de EE.UU. y
otros derechos de propiedad intelectual. La
utilización de esta tecnología de protección
de los derechos de autor debe ser autorizada
por Macrovision y está destinada únicamente
para uso doméstico y otras formas limitadas
de visionado, a menos que Macrovision lo
autorice expresamente. Está prohibida la
ingeniería inversa o desmontaje del aparato.
Precaución sobre el ajuste de volumen:
Los discos producen muy poco ruido al
compararse con otras fuentes. Antes de
reproducir un disco, baje el volumen para
evitar daños a los altavoces debido a un
repentino aumento del nivel de salida.
ESPAÑOL
*Para fines de seguridad....
• No aumente demasiado el nivel de volumen
pues es muy peligroso conducir si no se
escuchan los sonidos exteriores.
• Detenga el automóvil antes de efectuar
cualquier operación complicada.
*Temperatura dentro del automóvil....
Si ha dejado el automóvil estacionado durante
largo tiempo en un sitio cálido o frío, no opere
la unidad hasta que se normalice la temperatura
del habitáculo.
3
Page 62

Cómo leer este manual
Para que las explicaciones sean más simples
y fáciles de entender, hemos adoptado los
siguientes métodos:
• Algunas notas y consejos relacionados se
explican posteriormente en “Más sobre este
receptor” (consulte las páginas 50 – 54).
• Las operaciones de los botones se explican
principalmente mediante ilustraciones, de la
siguiente manera:
ESPAÑOL
Pulse brevemente.
Pulse repetidamente.
Cómo usar el botón M MODE
Si usted pulsa M MODE, el receptor entra
al modo de funciones y, a continuación,
los botones numéricos y los botones 5/∞
funcionan como botones de diferentes
funciones.
Ej.: Cuando el botón numérico 2 funciona
como botón MO (monaural).
Pulse uno u otro
botón.
Pulse y mantenga
pulsado hasta obtener
la acción deseada.
Pulse y mantenga
pulsados
ambos botones
simultáneamente.
4
Indicador de cuenta atrás del tiempo
Si después de pulsar M MODE desea
volver usar estos botones para las funciones
originales espere 5 segundos sin pulsar ninguno
de estos botones hasta que se cancele el modo
de funciones.
• Si pulsa M MODE otra vez también se
cancela el modo de funciones.
Page 63

Contenido
Cómo reposicionar su unidad ................ 2
Cómo expulsar el disco por la fuerza .... 2
Cómo leer este manual .......................... 4
Cómo usar el botón M MODE .............. 4
Introducción — Discos reproducibles .... 6
Panel de control ............................ 7
Identificación de las partes .................... 7
Control remoto
Elementos principales y funciones ........ 8
— RM-RK230
........... 8
Procedimientos iniciales .................. 10
Operaciones básicas ...................... 10
Cancelación de las demostraciones en
pantalla ............................................... 11
Puesta en hora del reloj .......................... 11
Operaciones de la radio .................. 12
Para escuchar la radio .................. 12
Cómo almacenar emisoras en la
memoria ............................................. 13
Cómo escuchar una emisora
preajustada ......................................... 14
Operaciones de los discos ............... 15
Reproduciendo un disco en el
receptor ...................................... 15
Operaciones básicas .............................. 17
Funciones especiales del DVD/VCD ... 19
Selección de subtítulos .......................... 19
Selección de los idiomas de audio ......... 19
Selección de vistas multiángulo ............ 19
Operaciones del menú del disco ............ 20
Zoom de acercamiento ........................... 20
Operaciones del disco en pantalla .... 21
Operaciones básicas de la barra en
pantalla ............................................... 22
Operaciones básicas de la pantalla de
control ................................................ 24
Operaciones de la pantalla de lista ........ 25
Otras operaciones de los discos ....... 29
Operaciones básicas ............................... 29
Cambio de la información en pantalla ... 30
Selección de los modos de reproducción ... 31
Operaciones de Zona Dual .............. 32
Audición con los auriculares ................. 32
Ajustes del sonido .......................... 33
Selección de los modos de sonido
preajustados ............................... 33
Cómo almacenar sus propios ajustes de
sonido ................................................. 33
Cómo ajustar el sonido .......................... 34
Configuraciones generales — PSM
Procedimiento básico ............................. 35
... 35
Otras funciones principales ............. 38
Asignación de títulos a las fuentes ........ 38
Desmontaje del panel de control ........... 39
Operaciones del cambiador de CD .... 40
Para reproducir discos en el
cambiador de CD ....................... 40
Cambio de la información en pantalla ... 42
Cómo seleccionar los modos de
reproducción ...................................... 43
Operaciones del componente externo
Reproducción de un componente
externo ......................................... 44
... 44
Operaciones de la radio SIRIUS® ..... 45
Para escuchar la radio SIRIUS® .... 46
Cómo almacenar canales en la memoria ...
Cómo escuchar un canal preajustado ..... 47
47
Mantenimiento ............................... 48
Codigos de idiomas ......................... 49
Más sobre este receptor ................. 50
ESPAÑOL
Menú de configuración del DVD ....... 26
Procedimiento de ajustes básicos .......... 26
Localización de averías ................... 55
Especificaciones .............................. 59
5
Page 64

Introducción — Discos reproducibles
Discos que se pueden reproducir
En este receptor podrá reproducir los siguientes
discos—de 12 cm (4-3/4 pulgada) y de 8 cm
(3-3/16 pulgada):
• DVD Vídeo: Grabado en sistema de color
NTSC con el código de región “1” (véase
abajo).
– También se pueden reproducir discos DVD-
R/DVD-RW grabados en formato DVDVídeo (consulte la página 50).
• Vídeo CD (VCD)/CD de audio
ESPAÑOL
• MP3/WMA: Grabados en CD-R/CD-RW o
en DVD-R/DVD-RW/DVD-ROM.
– CD-R/CD-RW: Compatible con ISO 9660
Level 1, ISO 9660 Level 2, Romeo y Joliet.
– DVD-R/DVD-RW/DVD-ROM: Compatible
con el formato puente UDF*
Con algunos discos, las operaciones realizadas
pueden ser distintas de las explicadas en este
manual.
1
.
Discos que no se pueden reproducir
DVD-Audio, DVD-ROM (datos), DVD-RAM,
DVD-R/DVD-RW grabado en formato
DVD-VR, CD-ROM, CD-I (CD-I Ready),
Photo CD, etc.
• La reproducción de estos discos generará
ruidos y dañará los altavoces.
Nota sobre el código de región:
Los reproductores DVD y los discos DVD
Vídeo disponen de sus propios números
de códigos de región. Este receptor puede
reproducir solamente discos DVD cuyos
números de código de región incluyan un “1”.
Ejemplos:
Si inserta un disco DVD Vídeo con un
código de región incorrecto
aparecerá “¡ERROR CÓDIGO
REGIONAL!” en el monitor.
Precaución sobre la reproducción de
DualDisc
• El lado no DVD de un “DualDisc” no es
compatible con la norma “Compact Disc
Digital Audio”. Por consiguiente, no se
recomienda usar el lado no DVD de un
DualDisc en este producto.
Formatos de audio digital
El Sistema puede reproducir los siguientes
formatos de audio digital.
PCM Lineal: Audio digital sin comprimir, el
mismo formato que el usado para los CDs y la
mayoría de los masters de estudio.
Dolby Digital *
desarrollado por Dolby Laboratories, que
permite la codificación multicanal para crear un
sonido envolvente real.
3
DTS *
(Digital Theater Systems): Audio
digital comprimido, desarrollado por Digital
Theater Systems, Inc., que ofrece sonido
multicanal, como Dolby Digital. Como la
relación de compresión es menor que para
Dolby Digital, proporciona un rango dinámico
más amplio y una mejor separación.
MPEG Audio: Otro audio digital comprimido
que también permite la codificación multicanal
para crear un sonido surround realístico. No
obstante, este sistema mezcla las señales
multicanal para convertirlas en 2 canales (PCM
decodificado) y las reproduce.
1
*
Un sistema de archivo híbrido utilizado
para ofrecer compatibilidad con ISO 9660
y permitir el acceso a cualquier tipo de
archivo del disco. (UDF son las siglas de
Universal Disk Format).
2
*
Fabricado bajo licencia de Dolby
Laboratories. “Dolby”, “Pro Logic”y
el símbolo con una doble D son marcas
registradas de Dolby Laboratories.
3
*
“DTS” y “DTS 2.0 + Digital Out” son
marcas comerciales de Digital Theater
Systems, Inc.
2
: Audio digital comprimido,
“DVD Logo” es una marca comercial de DVD
Format/Logo Licensing Corporation registrado
en los EE.UU., Japón y otros países.
6
Page 65

Panel de control
Identificación de las partes
Ventanilla de visualización
ESPAÑOL
1 Botones 5 (arriba) / ∞ (abajo)
• Funciona como botones de reproducción /
parada para discos DVD y VCD.
2 Botón E EQ (ecualizador)
3 Botón D DISP (visualizar)
4 Botón S SEL (seleccionar)
5 • Disco de control
• Botón
encendido)
6 Ventanilla de visualización
7 Sensor remoto
8 Botón 0 (expulsión)
9 Botones
p Botón
q Botón SOURCE
w Botón BAND
e Botones numéricos
r Botón MO (monaural)
t Botón SSM (Memoria secuencial de las
emisoras más fuertes)
y Botón DUAL* (zona dual )
* Sólo para KD-ADV6160.
u Botón RPT (repetición)
i Botón RND (aleatorio)
o Botón M MODE
; Toma de entrada AUX (auxiliar)
(atenuador en espera/
4/¢
(liberación del panel de control)
Ventanilla de visualización
a
Indicadores de información del disco—TAG
(etiqueta ID3)
archivo
s Pantalla principal
d Visualización de fuente / Indicador de nivel
de volumen
f Indicador EQ (ecualizador)
g Indicadores del modo de sonido—ROCK,
CLASSIC, POPS, HIP HOP, JAZZ, USER
• Durante la reproducción,
funciona como indicador de cuenta atrás
del tiempo y medidor de nivel (consulte la
página 36).
h
Indicadores de tipos de discos
j Indicadores de recepción del sintonizador
—ST (estéreo), MO (monaural)
k Indicador de la fuente de reproducción—
CH: Se enciende para el cambiador de CD.
DISC: Se enciende para el reproductor de
l Indicadores del modo de reproducción/
/ Indicador LOUD (sonoridad)
z Indicador Tr (pista)
DVD/CD incorporado.
ítem—RND (aleatoria),
(carpeta), RPT (repetición)
, (
carpeta
), (
pista/
)
también
—WMA, MP3
(disco),
7
Page 66

Control remoto — RM-RK230
Instalación de la pila botón de litio
(CR2025)
ESPAÑOL
Antes de utilizar el control remoto:
• Apunte el control remoto directamente hacia
el sensor remoto del receptor. Asegúrese de
que no haya ningún obstáculo en medio.
Sensor remoto
• NO exponga el sensor remoto a una luz
potente (luz solar directa o iluminación
artificial).
Elementos principales y funciones
MONITOR CONTROL
MODE MENU
ASPECT
DVD / RECEIVER CONTROL
ATT
SOURCE
BAND
DUAL
VOL
2nd VOL
SHIFT
RM-RK230
IMPORTANTE:
Para KD-ADV6160: Si se activa la Zona
Dual (consulte la página 32), el control
remoto funciona solamente para controlar el
reproductor DVD/CD.
ZOOM
+10
–100
PRESET
/ TITLE
–10
123
+
DISC
MENUTOP M
456
ENTER
7809
–
DISC
SETUP
RETURN
+100
/ TITLE
OSD
Advertencia:
• Para evitar riesgos de accidentes, guarde la
pila en un lugar seguro, fuera del alcance
de los niños.
• Para proteger la pila contra el
recalentamiento, las grietas, o para evitar
que produzca incendio:
– Evite recargar, cortocircuitar, desarmar
o calentar la pila, o arrojarla al fuego.
– No deje la pila con otros materiales
metálicos.
– No toque la pila con pinzas u otras
herramientas similares.
– Enrolle la pila con una cinta y aíslela
antes de desecharla o guardarla.
8
CONTROL DEL MONITOR
1 Botones de control del monitor*
1
• (atenuador/en espera), MODE,
ASPECT, MENU,
y .
CONTROL DEL DVD/RECEPTOR
2 Botón
(atenuador/en espera
encendido)
• Conecta y desconecta la alimentación y
también atenúa el sonido.
3 Botón SOURCE
• Selecciona la fuente.
Page 67

4 Botón BAND
• Selecciona las bandas FM/AM/SIRIUS
5 Botón TOP M (menú)*
2
®
.
• Visualiza el menú de los discos DVD y
3
VCD*
.
6 Botón DUAL*
4
• Activa y desactiva la Zona Dual.
7 Botones VOL + / –
• Ajusta el nivel de volumen.
• Funciona también como botones 2nd
VOL +/– al pulsarlos junto con el botón
4
SHIFT*
8 Botón SETUP*
9 Botón SHIFT
p Botones de operaciones básicas del disco*
.
2
5
7 (parada), 3 (reproducción), 8 (pausa)
• El botón 3 (reproducción) también
funciona como botón ZOOM al pulsarlo
con el botón SHIFT.
q Botones de operaciones avanzadas del
disco/sintonizador*
6
Para operaciones avanzadas del disco:
•
/TITLE 5 / ∞
– Selecciona los títulos (para DVD) o las
carpetas (para MP3/WMA).
• 4 / ¢ (salto hacia atrás/salto hacia
adelante)
• 1 / ¡ (búsqueda hacia atrás/búsqueda
hacia adelante)*
5
Para las operaciones del sintonizador de FM/AM:
• PRESET 5 / ∞
– Cambia las emisoras preajustadas.
• 4 / ¢
– Funciona para la búsqueda de emisoras.
Para las operaciones de la radio SIRIUS
®
:
• PRESET 5 / ∞
– Cambia las categorías.
• 4 / ¢
–
Cambia los canales si lo pulsa brevemente.
– Cambia rápidamente los canales si lo
pulsa y mantiene pulsado.
w Botón OSD
• Visualiza la barra en pantalla.
• Funciona también como el botón
/TITLE al pulsarlo con el botón SHIFT.
– Utilizando los botones numéricos, podrá
seleccionar directamente los títulos (para
DVD) o las carpetas (para MP3/WMA)
(consulte la página 18).
e Botón MENU*
• Visualiza el menú de los discos DVD y
VCD
*3.
2
r Botones de operación del menú*
• Cursor (% , fi , @ , #) y ENTER
• % / fi : Funciona también como los
botones DISC + / – cuando la fuente es
“CD-CH”.
t Botón RETURN*
2
y Botones de funciones especiales
• DVD/VCD:
• DVD:
1
*
Se puede controlar solamente si su monitor
(audio)
(subtítulo), (ángulo)
es un monitor JVC — KV-MR9010 o
KV-MH6510.
2
*
Estos botones funcionan como botones
:
numéricos al pulsarlos junto con el botón
SHIFT.
3
*
Sólo cuando no se utiliza el PBC.
4
*
Aplicable solamente para KD-ADV6160.
5
*
No se utiliza para las operaciones del
cambiador de CD.
6
*
Estos botones funcionan como los botones
+10/–10 y +100/–100 al pulsarlos junto con
el botón SHIFT.
Cómo seleccionar un número
Para seleccionar un número entre 0 – 9:
Para seleccionar un número mayor que 9:
• Los botones +100/–100 se utilizan
solamente para buscar pistas MP3/WMA
con un número mayor que 99.
2
ESPAÑOL
9
Page 68

Procedimientos iniciales
Operaciones básicas
ESPAÑOL
* Las ilustraciones
del panel de control
utilizadas en este
manual son del
KD-ADV6160.
~
Ÿ
Podrá seleccionar algunas fuentes si no
están preparadas.
! Para el sintonizador FM/AM
solamente
Para la radio SIRIUS® solamente
⁄ Ajuste el volumen.
Aparece el nivel de volumen.
Indicador de nivel de volumen
@ Ajuste el sonido según se desee.
(Consulte las páginas 33 y 34).
Para disminuir el volumen en un instante
(ATT)
Para restablecer el
sonido, púlselo otra vez.
Para apagar la unidad
10
Page 69

Cancelación de las
demostraciones en pantalla
Si no se efectúa ninguna operación durante unos
20 segundos, se iniciará la demostración en
pantalla.
[Inicial: DEMO ON]—consulte la página 35.
1
2
3
Puesta en hora del reloj
1
2
Ajuste la hora y los minutos.
1 Seleccione “CLOCK H” (hora) y,
seguidamente ajuste la hora.
2
Seleccione “CLOCK M” (minutos)
y, seguidamente ajuste los minutos.
3 Finalice el procedimiento.
ESPAÑOL
Finalice el procedimiento.
4
Para activar la demostración en pantalla
En el paso 3 de arriba...
Para verificar la hora actual cuando la
unidad está apagada
11
Page 70

Operaciones de la radio
Para escuchar la radio
ESPAÑOL
~
Ÿ
Aparece la banda seleccionada.
Se enciende cuando se recibe una
radiodifusión FM estéreo con una
intensidad de señal suficiente.
! Comience la búsqueda de la
emisora.
La búsqueda se interrumpe cuando se
recibe una emisora.
Para detener la búsqueda, presione
nuevamente el mismo botón.
Para sintonizar manualmente una emisora
En el paso ! de la izquierda...
1
2 Seleccione las frecuencias de las emisoras
deseadas.
12
Page 71

Cuando una radiodifusión en FM estéreo sea
difícil de recibir
1
2
Se enciende cuando se activa el modo
monaural.
Se consigue mejorar la recepción, pero se
pierde el efecto estereofónico.
Para restablecer el efecto estereofónico, repita
el procedimiento. Aparece “MONO OFF” y el
indicador MO se apaga.
Cómo almacenar emisoras en la
memoria
Se pueden preajustar seis emisoras para cada
banda.
Preajuste automático de emisoras
FM —SSM (Memoria secuencial de
las emisoras más fuertes)
1
2
Seleccione la banda FM (FM1 – FM3)
en la que desea almacenar.
3
ESPAÑOL
4
“SSM” parpadea, y luego desaparece al
finalizar el preajuste automático.
Las emisoras FM locales con las señales más
intensas serán exploradas y almacenadas
automáticamente en la banda FM.
Continúa....
13
Page 72

Preajuste manual
Ej.: Almacenando una emisora FM de 92.5
MHz en el número de preajuste 1 de la
banda FM1.
1
Cómo escuchar una emisora
preajustada
1
ESPAÑOL
2
3
4
El número de preajuste parpadea durante
unos momentos.
Para verificar la hora actual mientras
escucha una emisora FM o AM
2
3 Seleccione la emisora preajustada
(1 – 6) deseada.
o
Cuando se utiliza el control remoto....
o
* Si no se le ha asignado título a la emisora,
aparecerá “NO NAME”. Para asignar un
título a una emisora, consulte la página 38.
14
Page 73

Operaciones de los discos
Reproduciendo un disco en el receptor
ESPAÑOL
El tipo de disco se detecta automáticamente,
y la reproducción se inicia también
automáticamente (para DVD: el inicio
automático depende de su programa interno).
Si el disco actual es un CD de audio, CD Text,
MP3/WMA, o VCD sin PBC, todas las pistas
se reproducirán repetidamente hasta que usted
cambie la fuente o expulse el disco.
• Si aparece una lista de títulos o un menú de
disco mientras se reproduce un DVD o VCD
con PBC, consulte “Operaciones del menú del
disco” en la página 20.
Las siguiente marcas se utilizan para
indicar los discos reproducibles....
DVD Vídeo Vídeo CD con PBC
solamente
Vídeo CD con/sin PBC CD de audio/CD Text
Antes de realizar cualquier operación,
compruebe lo siguiente....
• Encienda el monitor para reproducir un DVD
o VCD. Si enciende el monitor, también
podrá controlar la reproducción del CD de
audio, CD Text, y MP3/WMA refiriéndose a
la pantalla del monitor. (Consulte las páginas
24 y 25).
• Para la reproducción del DVD, podrá cambiar
el ajuste del menú de configuración según sus
preferencias. (Consulte las páginas 26 – 28.)
• Las operaciones descritas en las páginas 17
– 28 utilizan el control remoto.
• Si desea operar el reproductor DVD/CD
utilizando los botones del panel de control,
consulte “Otras operaciones de los discos” en
las páginas 29 – 31.
Si aparece “
botón, significa que el receptor no acepta la
operación que ha intentado realizar.
• En algunos casos, puede suceder que no se
acepte la operación aunque no se visualice
“
”.
” en el monitor al pulsar un
Disco MP3/WMA Todos los discos
listados aquí
• Microsoft y Windows Media son marcas
registradas o bien marcas comerciales de
Microsoft Corporation en los Estados Unidos
y/u otros países.
Continúa....
15
Page 74

• Cuando se inserta un disco DVD:
Número total de títulos
Tiempo de reproducción transcurrido
ESPAÑOL
Número del capítulo actual
• Cuando se inserta un disco MP3/WMA:
Número total de carpetas
Número total de pistas
Ej.: Cuando se detecta un archivo
MP3
La información del disco aparece
automáticamente (consulte la
página 30).
Tiempo de
reproducción
transcurrido
Número de la
pista actual
• Cuando se inserta un VCD:
Tiempo de
reproducción total
del disco insertado
Tiempo de
reproducción
transcurrido
Número total de
pistas del disco
insertado
• Cuando se inserta un CD Text/CD de
audio:
Tiempo de
reproducción total
del disco insertado
Número total de
pistas del disco
insertado
CD Text: Título del disco/ejecutante
=
El título de la pista aparece
automáticamente (consulte la página 30).
Tiempo de
reproducción
transcurrido
Número de la
pista actual
Número de la carpeta actual
1
*
Se enciende el indicador MP3 o WMA,
dependiendo del archivo detectado.
2
*
No se enciende para el DVD-R/DVD-RW.
16
Para expulsar el disco
Page 75

Operaciones básicas
Operaciones Indicación en pantalla y/o siguiente operación
Para detener la
reproducción
temporalmente
Se ilumina “PAUSE” en la pantalla.
Aparece una imagen fija.
A Reproducción cuadro por cuadro
B Reproducción a cámara lenta
• No se escucha sonido durante la reproducción a cámara lenta.
• No es posible realizar la reproducción a cámara lenta hacia
atrás cuando se reproduce un VCD.
Para reanudar la reproducción normal:
ESPAÑOL
Para reproducir las escenas
anteriores—Reproducción
de un solo toque
Para detener la
reproducción
* Durante la reproducción, en el monitor aparecen iconos de guía en pantalla durante unos
instantes (consulte la página 53).
La posición de reproducción retrocede aproximadamente 10
segundos antes de la posición actual.
• Esta función sólo se puede utilizar dentro del mismo título.
• Esta función no se puede utilizar con algunos DVDs.
Al volver a iniciar la reproducción, ésta se
inicia desde el punto de interrupción
(Reanudación de la reproducción).
Al volver a iniciar la reproducción, ésta se inicia desde
el comienzo de la última pista.
Continúa....
17
Page 76

Para desplazarse a los capítulos/
pistas siguientes o anteriores
Para localizar directamente un título/
capítulo/pista específico
• Para DVD: Durante la reproducción o la
pausa
A los siguientes
capítulos/pistas.
ESPAÑOL
Para retroceder al comienzo del capítulo/pista
actual, y luego a los capítulos/pistas anteriores.
Para avanzar rápidamente o
retroceder el capítulo/pista
Avanza
rápidamente.
Retrocede.
* La velocidad de búsqueda cambia a x2 ]
x10 para todos los discos (DVD, VCD, CD),
pero la información mostrada en el monitor
es sólo para el DVD/VCD.
Para la búsqueda
progresiva/regresiva del
capítulo/pista
• Para DVD: Durante la reproducción o la
pausa—selecciona un capítulo.
Durante la parada—selecciona
un título.
• Para VCD: Mientras no se utiliza el PBC
(consulte la página 20).
• Para MP3/WMA: Para seleccionar una
pista dentro de la misma
carpeta.
Seleccione el número correspondiente a la
opción que desea (consulte la página 9).
Para localizar un título/carpeta
Al siguiente título/
carpeta.
Al título/carpeta anterior.
Para localizar un título/carpeta
específico
La información mostrada es sólo para el DVD/
VCD:
• Para reanudar la velocidad normal
18
Pulse los botones
numéricos (consulte
la página 9) antes de
que transcurran 10
segundos.
Page 77

Funciones especiales del DVD/VCD
Para VCD:
Selección de subtítulos
Podrá seleccionar el idioma del subtítulo
que desea visualizar en el monitor.
• Podrá definir el idioma inicial para los
subtítulos utilizando el menú de configuración
(consulte la página 27).
Podrá seleccionar el canal de audio que
desea reproducir. (Esto es conveniente
cuando se reproduce un Karaoke VCD).
ST
1/3
ENGLISH
1/3
ENGLISH
Ej.: Cuando el disco dispone de 3 opciones
Selección de los idiomas de audio
Para DVD:
Podrá seleccionar el idioma que desea
escuchar si el disco dispone de múltiples
idiomas de audio.
1/3
ENGLISH
Ej.: Cuando el disco dispone de 3 opciones
1/3
ENGLISH
ST
Para escuchar reproducción estereofónica
ST:
normal (izquierdo/derecho).
Para escuchar el canal de audio L
L:
(izquierdo).
Para escuchar el canal de audio R
R:
(derecho).
Selección de vistas multiángulo
Si el disco contiene vistas multiángulo,
podrá ver la misma escena desde
diferentes ángulos.
1/3
1
1/3
1
1/3
1
1/3
2
ESPAÑOL
1/3
3
Ej.: Cuando el disco dispone de 3 vistas
multiángulo
• Con algunos DVDs y VCDs, no podrá
cambiar el idioma de los subtítulos o el
idioma de audio (o canal de audio) sin
utilizar el menú del disco.
19
Page 78

Operaciones del menú del disco
La reproducción controlada por menú podrá
realizarse mientras se reproduce un DVD con
características de control por menú o un VCD
con PBC (control de reproducción).
Mientras se está reproduciendo
un DVD
ESPAÑOL
1
La lista de títulos o el menú del disco
aparece en el monitor.
Para cancelar la reproducción PBC
1
2 Utilice los botones numéricos para
seleccionar una pista e iniciar la
reproducción normal (consulte la página 9).
Para reanudar la función PBC
2 Seleccionar la opción deseada en el
menú.
Se empieza a reproducir la opción
seleccionada.
• En algunos discos, también podrá
seleccionar las opciones deseadas
pulsando los botones numéricos
correspondientes.
Mientras se está reproduciendo
un VCD
• Cuando se visualiza la lista de opciones en el
monitor.
• Para seleccionar un número mayor que 9,
consulte “Cómo seleccionar un número” en la
página 9.
Zoom de acercamiento
1
ZOOM 1 ZOOM 2 ZOOM 3 ZOOM 4
ZOOM OFF
2
Mover la parte ampliada.
Para cancelar el zoom, seleccione “ZOOM
OFF” en el paso 1.
ZOOM 5ZOOM 6
Para volver a los menús anteriores
20
Page 79

Operaciones del disco en pantalla
Acerca de la barra en pantalla
Podrá verificar la información del disco y
utilizar algunas funciones a través de la barra
en pantalla.
• Para los discos CD de audio, CD Text, y
MP3/WMA, podrá utilizar la pantalla de
control y la pantalla de lista (consulte las
páginas 24 y 25).
Barras en pantalla
DVD
DVD -V
TIME TITLE CHAP
2ch
VCD
VCD
TIME
PBC
TRACK REPEAT
MP3/WMA
FILE
REPEAT
RANDOMINTRO
CD Text/CD de audio
*
REPEAT
5. 1ch
RANDOMINTRO
CD
* Sólo para CD de audio DTS
T02-C03 TOTAL 1:25:58
OFF
TRACK 01 TIME 00:36
RANDOMINTRO
TIME 00:00:36
TIME 00:36
1 Tipo de disco
2 • Tipo de formato de señal de audio (para
DVD y CD de audio DTS)
• PBC (sólo para VCD)
3 Información sobre reproducción
Pista/capítulo actual
T02-C03
TRACK 01
TOTAL
Pista actual
Tiempo de reproducción
transcurrido del disco
T. REM
Tiempo restante del disco (para
VCD)/tiempo restante del título
(para DVD-V)
TIME
Tiempo de reproducción
transcurrido del capítulo/pista
actual
REM
Tiempo restante del capítulo/
pista actual
4 Condición de reproducción
Reproducción
Búsqueda progresiva/regresiva
Cámara lenta hacia adelante/
atrás
Pausa
Parada
5 Iconos de operación
Indicación de la hora
TIME
Búsqueda de tiempo—
Introduzca el tiempo de
reproducción del título o del
disco actual.
TITLE
Búsqueda de título
CHAP
Búsqueda de capítulo
TRACK
Búsqueda de pista
Cambia el idioma de audio o el
canal de audio.
Cambia el idioma de los
subtítulos.
Cambia el ángulo de visión.
Reproducción repetida (para
OFF
DVD)
REPEAT
Reproducción repetida (para
otros discos)
INTRO
Reproducción de introducciones
musicales
RANDOM
Reproducción aleatoria
ESPAÑOL
Continúa....
21
Page 80

Operaciones básicas de la barra
en pantalla
1 Visualice la barra en pantalla.
• Para DVD/VCD:
ESPAÑOL
• Para otros discos:
(dos veces)
Para borrar la barra en pantalla
• Las opciones que se pueden seleccionar
para la reproducción repetida/de
introducciones musicales/aleatoria son:
OFF
Reproducción repetida
DVD:
OFF CHAP TITLE
DVD -V
TIME TITLE CHAP
2ch
T02-C03 TOTAL 1:25:58
OFF
2 Seleccione una opción.
3 Efectúe una selección.
• Si aparece el menú emergente....
1
DVD -V
TIME TITLE CHAP
o
2ch
T02-C03 TOTAL 1:25:58
OFF
_ _
REPEAT
Reproducción repetida
VCD (mientras no se utiliza el PBC):
REPEAT
MP3/WMA:
REPEAT TRACK
REPEAT FOLDER
CD Text/CD de audio:
REPEAT TRACK
22
2
Page 81

INTRO
Reproducción de introducciones
musicales
VCD (mientras no se utiliza el PBC):
INTRO
MP3/WMA:
INTRO TRACK
INTRO FOLDER
Para efectuar la búsqueda de un punto
específico según el tiempo de reproducción
1 Seleccione .
2 Introduzca el tiempo de reproducción
transcurrido del titulo o del disco actual.
ESPAÑOL
CD Text/CD de Audio:
INTRO TRACK
RANDOM
Reproducción aleatoria
VCD (mientras no se utiliza el PBC):
RANDOM
MP3/WMA:
RANDOM FOLDER
RANDOM DISC
CD Text/CD de Audio:
RANDOM DISC
Para las siguientes operaciones, consulte
también la página 22.
Para cambiar la información del tiempo
1 Seleccione
2 Cambie la información del tiempo.
TIME
.
TIME 0:00:58
REM 0:11:23
TOTAL 1:01:58T. REM 0:35:24
Ej.: • Para introducir 1 (horas): 02 (minutos):
00 (segundos), pulse 1, 0, 2, 0 y luego 0.
• Para introducir 54 (minutos): 00
(segundos), pulse 0, 5, 4, 0 y luego 0.
• Siempre se deberá introducir el dígito
de la hora (aunque sea la hora “0”),
pero no necesitará introducir los ceros
a la derecha (los dos últimos dígitos del
ejemplo anterior).
• Para corregir una entrada incorrecta,
pulse...
3 Finalice el procedimiento.
Para efectuar la búsqueda de un título/
capítulo/pista específico
1 Seleccione
TITLE
2 Introduzca el número.
• Para corregir una entrada incorrecta, pulse
el botón numérico hasta que se introduzca
el número correcto.
3 Finalice el procedimiento.
,
CHAP
o
TRACK
.
23
Page 82

Operaciones básicas de la
pantalla de control
Podrá efectuar la búsqueda y la reproducción de
las opciones deseadas a través de la pantalla de
control.
• La pantalla de control aparece
automáticamente en el monitor al insertar un
disco.
ESPAÑOL
Pantalla de control de
MP3/WMA
TIME 00:00:14REPEAT TRACK
FOLDER : 2 / 3
01 Music
02 Music
03 Music
Track Information
Album
Weather
Artist
Robert M. Smith
Title
Rain
Track : 5 / 14 (Total 41)
Cloudy.mp3
Fair.mp3
Fog.mp3
Hail.wma
Indian summer.mp3
Rain.mp3
Shower.mp3
Snow.mp3
Thunder.wma
Typhoon.mp3
Wind.mp3
Winter sky.mp3
Para seleccionar una carpeta o una pista
1 Seleccione la columna “Folder” o la
columna “Track” en la pantalla de control.
2 Seleccione una carpeta o una pista.
Pantalla de control de CD Text/
CD de audio
TIME 00:14
Tra c k : 5 / 14
Cloudy
Fair
Fog
Hail
Track Information
Album
Four seasons
Artist
Robert M. Smith
Title
Rain
Indian summer
Rain
Shower
Snow
Thunder
Typhoon
Wind
Winter sky
1 Carpeta actual
2 Número de carpeta actual/número total de
carpetas
3 Lista de carpetas
4 Modo de reproducción seleccionado
5 Tiempo de reproducción transcurrido de la
pista actual
6 Icono del modo de operación
‰ (reproducción), 7 (parada), 8 (pausa)
7 Número de la pista actual/número total de
pistas de la carpeta actual (número total de
pistas del disco)
8 Información de la pista
9 Lista de pistas
p Pista actual (barra resaltada)
24
1 Tiempo de reproducción transcurrido de la
pista actual
2 Icono del modo de operación
‰ (reproducción), 7 (parada), 8 (pausa),
¡ (avance rápido), 1 (retroceso)
3 Número de la pista actual/número total de
pistas del disco
4 Información de la pista
5 Lista de pistas
6 Pista actual (barra resaltada)
Para seleccionar una pista
Page 83

Operaciones de la pantalla
de lista
Podrá visualizar la lista de carpetas/lista de
pistas antes de iniciar la reproducción. En
esta lista, podrá confirmar los contenidos y
comenzar a reproducir el disco.
Pantallas de la lista de
carpetas/pistas
Lista de carpetas (MP3/WMA)
Para MP3/WMA:
Mientras está detenido...
1 Visualice la lista de carpetas.
Cada vez que pulsa el botón,
la pantalla de lista aparece y
desaparece.
2 Seleccione una carpeta de la lista.
ESPAÑOL
Folder : 153/240 Track 154/198 Page : 4/6
fol130
fol131
fol132
fol133
fol134
fol135
fol136
fol137
fol138
fol139
fol140
fol141
fol142
fol143
fol144
fol145
fol146
fol147
fol148
fol149
fol150
fol151
fol152
fol153
fol154
fol155
fol156
fol157
fol158
fol159
fol160
fol161
fol162
fol163
fol164
fol165
fol166
fol167
fol168
fol169
Lista de pistas (MP3/WMA/CD Text/CD de
audio)
Folder : 153/240 Track 154/198 Page : 4/6
file0131.mp3
file0132.mp3
file0133.wma
file0134.mp3
file0135.mp3
file0136.wma
file0137.wma
file0138.mp3
file0139.mp3
file0140.wma
file0141.mp3
file0142.mp3
file0143.mp3
file0144.mp3
file0145.wma
file0146.mp3
file0147.wma
file0148.mp3
file0149.wma
file0150.wma
file0151.wma
file0152.mp3
file0153.wma
file0154.mp3
file0155.mp3
file0156.mp3
file0157.mp3
file0158.wma
file0159.wma
file0160.wma
Ej.: Lista de pistas para MP3/WMA
file0161.wma
file0162.mp3
file0163.wma
file0164.mp3
file0165.wma
file0166.wma
file0167.wma
file0168.wma
file0169.mp3
file0170.wma
1 Número de la carpeta actual/número total de
carpetas (sólo para MP3/WMA)
2 Número de la pista actual/número total de
pistas de la carpeta actual
3 Página actual/número total de páginas
incluidas en la lista
4 Carpeta/pista actual (barra resaltada)
Aparece la lista de pistas de la carpeta
seleccionada.
Para volver a la lista de carpetas
3 Seleccione una pista de la lista.
Para CD Text/CD de audio :
Mientras está detenido...
1 Visualice la lista de pistas.
Cada vez que pulsa el botón,
la pantalla de lista aparece y
desaparece.
2 Seleccione una pista de la lista.
25
Page 84

Menú de configuración del DVD
Podrá almacenar el estado de reproducción
inicial del disco.
• Mientras se está reproduciendo, no podrá
realizar ningún cambio en el menú de
configuración.
Procedimiento de ajustes básicos
Mientras está detenido...
ESPAÑOL
1
IDIOMA
IDIOMA DE MENU
IDIOMA DE AUDIO
SUBTÍTULO
IDIOMA EN PANTALLA
2
AUDIO
SALIDA DE AUDIO
MEZCLA
COMPR. GAMA DINÁMICA
Ej.: Cuando se selecciona el menú “AUDIO”
3 Seleccione la opción que desea
configurar.
AUDIO
SALIDA DE AUDIO
MEZCLA
COMPR. GAMA DINÁMICA
ESPAÑOL
ESPAÑOL
ESPAÑOL
ESPAÑOL
STREAM/PCM
ESTÉREO
CONECTAR
STREAM/PCM
ESTÉREO
CONECTAR
4
AUDIO
SALIDA DE AUDIO
MEZCLA
COMPR. GAMA DINÁMICA
STREAM/PCM
ESTÉREO
DOLBY SURROUND
ESTÉREO
CONECTAR
5 Seleccione una opción.
AUDIO
SALIDA DE AUDIO
MEZCLA
COMPR. GAMA DINÁMICA
STREAM/PCM
ESTÉREO
DOLBY SURROUND
ESTÉREO
CONECTAR
6
AUDIO
SALIDA DE AUDIO
MEZCLA
COMPR. GAMA DINÁMICA
Para configurar otras opciones en el mismo
menú
Repita los pasos 3 a 6.
Para configurar otras opciones en otros
menús
Repita los pasos 2 a 6.
Para volver a la pantalla normal
STREAM/PCM
DOLBY SURROUND
CONECTAR
Ej.: Cuando se selecciona “MEZCLA”
AVISO: El idioma en pantalla de arriba se puede cambiar utilizando el ajuste “Menú IDIOMA”
(consulte también la página 27). La unidad se expide de fabrica ajustada a “ENGLISH” (inglés).
26
Page 85

Menú IDIOMA
Opción Contenidos
IDIOMA DE MENU
IDIOMA DE AUDIO
SUBTÍTULO
IDIOMA EN PANTALLA
• Para los ajustes de LANGUAGE, consulte también la lista de códigos de idioma en la página 49.
Selecciona el idioma inicial del menú de disco.
Selecciona el idioma de audio inicial.
Selecciona el idioma inicial del subtítulo o borrar el subtítulo
(DESCONECTAR).
Selecciona el idioma para el menú de configuración y algunas
indicaciones mostradas en el monitor.
Menú IMAGEN
Opción Contenidos
TIPO DE MONITOR
POSICIÓN DEL OSD
Seleccione el tipo de monitor para ver una imagen en pantalla
ancha en su monitor.
• 16:9 [MULTI]* : Selecciónelo cuando la relación de aspecto
de su monitor sea de 16:9.
• 4:3 [MULTI]* BUZÓN : Selecciónelo cuando la relación de
aspecto de su televisor sea de 4:3. Mientras mira una imagen
de pantalla ancha, aparecerán franjas negras en las partes
superior e inferior de la pantalla.
• 4:3 [MULTI]* PANORAM. Y ESCANEO: Selecciónelo
cuando la relación de aspecto de su televisor sea de 4:3.
Mientras mira una imagen de pantalla ancha, las franjas
negras no aparecen, pero los bordes izquierdo y derecho de
las imágenes aparecerán recortados en la pantalla.
* Seleccione las opciones [MULTI] para los televisores con
sistema multicolor.
Seleccione la posición de la barra en pantalla en el monitor.
• 1 : Posición más alta
• 2 : Posición más baja
ESPAÑOL
Continúa....
27
Page 86

Menú AUDIO
Opción Contenidos
SALIDA DE AUDIO
ESPAÑOL
MEZCLA
COMPR. GAMA DINÁMICA
Seleccione el formato de señal a emitirse a través del terminal
DIGITAL OUT (óptica) de la parte trasera. Para los detalles, consulte
la página 54.
• PCM SÓLO : Selecciónelo al conectar un amplificador o
decodificador que no sea compatible con Dolby Digital, DTS,
MPEG Audio o al conectar un dispositivo de grabación.
• DOLBY DIGITAL/PCM : Selecciónelo al conectar un
amplificador o decodificador compatible con Dolby Digital.
• STREAM/PCM : Selecciónelo al conectar un amplificador o
decodificador compatible con Dolby Digital, DTS y MPEG Audio.
Cuando reproduce un disco DVD multicanal, este ajuste afecta las
señales reproducidas a través de los jacks LINE OUT (y a través del
terminal DIGITAL OUT cuando se selecciona “PCM SÓLO” para
“SALIDA DE AUDIO”).
• DOLBY SURROUND : Selecciónelo cuando desee escuchar
sonido envolvente multicanal conectando un amplificador
compatible con Dolby Surround a este receptor.
• ESTÉREO : Normalmente seleccione este ajuste.
Podrá escuchar un sonido potente a niveles de volumen bajo a
mediano mientras se reproduce un software Dolby Digital.
• AUTO : Selecciónelo para aplicar el efecto a un software codificado
multicanal (excluyendo software de 1-canal y de 2-canales).
• CONECTAR : Selecciónelo para utilizar siempre esta función.
28
Page 87

Otras operaciones de los discos
En esta sección, podrá aprender cómo usar
los botones del panel de control para operar el
reproductor DVD/CD.
Operaciones básicas
Para detener la reproducción
Para volver a iniciar la
reproducción
Para expulsar un disco
Para el avance rápido o el
retroceso de un capítulo/
pista
Para desplazarse a las carpetas
siguientes o anteriores
A las carpetas siguientes.
A las carpetas anteriores.
Para localizar directamente un título
/capítulo/carpeta/pista específico
• Para DVD: Durante la reproducción o la
pausa—seleccione un capítulo.
Durante la parada—seleccione
un título.
• Para VCD: Mientras no se utiliza el PBC
(consulte la página 20).
Para seleccionar un número entre 1 – 6:
Para seleccionar un número entre 7 – 12:
ESPAÑOL
Avanza rápidamente.
Retrocede.
* La velocidad de búsqueda cambia a x2 ]
x10 para todos los discos (DVD, VCD, CD),
pero la información mostrada en el monitor
es sólo para el DVD/VCD.
Para desplazarse a los capítulos/
pistas siguientes o anteriores
Para DVD: Durante la reproducción o la pausa
A las pistas siguientes.
Al comienzo de la pista actual y, seguidamente,
a las pistas anteriores.
• Los botones numéricos también se pueden
utilizar para seleccionar una opción en el
menú PBC.
• Para poder utilizar la búsqueda de carpetas
en los discos MP3/WMA, tiene que haber
asignado a las carpetas un número de 2 dígito
que preceda a sus respectivos nombres—01,
02, 03, y así sucesivamente.
• Para seleccionar una pista específica de
una carpeta (para disco MP3/WMA)
después de seleccionar la carpeta:
Continúa....
29
Page 88

Para desplazarse rápidamente a un
capítulo/pista
• Para DVD: Durante la reproducción o la
pausa.
• Para VCD: Mientras no se utiliza el PBC
(consulte la página 20).
• Para MP3/WMA: Para seleccionar una
pista dentro de la misma
ESPAÑOL
carpeta.
Prohibición de la expulsión del disco
Podrá bloquear un disco en la ranura de carga.
1
2
La primera vez que pulsa el botón 5 o ∞,
el capítulo/pista salta al siguiente capítulo/
pista más alto o bajo que sea múltiplo de
diez (ej.: 10
Luego, cada vez que pulsa el botón, podrá
saltar 10 capítulos/pistas.
• Después del último capítulo/pista, se
seleccionará el primer capítulo/pista y
viceversa.
a
, 20a, 30a).
3
Cada vez que pulsa el botón sucesivamente,
se localizarán y reproducirán los capítulos/
pistas siguientes o anteriores.
Para cancelar la prohibición, repita el mismo
procedimiento.
Cambio de la información en
pantalla
• Para MP3/WMA, CD
Text, y CD de audio,
consulte la página 42.
Mientras reproduce un DVD
30
Mientras reproduce un VCD
Page 89

Selección de los modos de reproducción
Podrá utilizar solamente uno de los siguientes modos de reproducción a la vez.
1
2 Seleccione el modo de reproducción deseado.
Reproducción repetida
• Para DVD: Durante la reproducción o
la pausa.
• Para VCD: Mientras no se utiliza el
PBC (consulte la página 20).
Ej.: Cuando se selecciona “TRK RPT”
mientras se reproduce un disco MP3
Modo Reproduce repetidamente
CHP RPT*1: El capítulo actual.
• RPT se enciende.
TIT RPT*
•
TRK RPT*
• RPT se enciende.
FLDR RPT*
•
RPT OFF: Para DVD: La reproducción
Para otros discos: Todas las
1
: El título actual.
y RPT se encienden.
2
: La pista actual.
3
: Todas las pistas de la carpeta
actual.
y RPT se encienden.
repetida se cancela.
pistas del disco.
ESPAÑOL
Reproducción
aleatoria
Modo Reproduce aleatoriamente
FLDR RND*3: Todas las pistas de la carpeta
• Para VCD: Mientras no se utiliza el
PBC (consulte la página 20).
• RND y
DISC RND: Todas las pistas del disco.
• RND y
RND OFF: Se cancela.
Ej.: Cuando se selecciona “DISC RND”
mientras se reproduce un disco MP3
1
*
Sólo mientras se reproduce un disco DVD.
2
*
Excepto para discos DVD.
3
*
Sólo mientras se reproduce un disco MP3 o WMA.
actual y, seguidamente, todas las
pistas de la siguiente carpeta, y
así sucesivamente.
se encienden.
se encienden.
31
Page 90

Operaciones de Zona Dual
Sólo para KD-ADV6160
Audición con los auriculares
Conectando los auriculares a la clavija
2nd AUDIO OUT de la parte trasera, es
posible escuchar el sonido de reproducción
a través del reproductor DVD/CD mientras
escucha otra fuente a través de los altavoces.
Podrá activar la Zona Dual mientras está
ESPAÑOL
escuchando cualquier fuente (excepto AM).
• Mientras se está usando la Zona Dual,
sólo podrá operar el reproductor DVD/CD
utilizando el control remoto.
En el control remoto:
1 Active la Zona Dual.
La fuente cambia automáticamente a
“DISC”.
Si desea seleccionar una fuente diferente
para escuchar a través de los altavoces,
pulse SOURCE en el panel de control.
• Utilizando los botones del panel de
control podrá operar la fuente recién
seleccionada sin afectar las operaciones
de la Zona Dual.
2 Ajuste el volumen de los auriculares
a través de la clavija 2nd AUDIO
OUT.
3 Opere el reproductor DVD/CD
utilizando el control remoto,
refiriéndose a la pantalla del
monitor.
Para cancelar las operaciones de la Zona
Dual, repita el paso 1. (Aparece “DUAL OFF”
en la pantalla).
En el panel de control:
También podrá activar y desactivar la Zona
Dual.
1
2
La fuente cambia automáticamente a
“DISC” cuando se activa la Zona Dual.
Precauciones:
• NO se ponga los auriculares mientras
conduce. Es muy peligroso no escuchar los
ruidos exteriores durante la conducción.
• NO se ponga los auriculares antes de
ajustar correctamente el nivel de 2nd
VOL, pues se podrá dañar su capacidad de
audición.
32
Page 91

Ajustes del sonido
Selección de los modos de sonido preajustados
Podrá seleccionar un modo de sonido
preajustado adecuado al género musical.
Ej.: Cuando se selecciona “ROCK”
Cómo almacenar sus propios
ajustes de sonido
Podrá ajustar los modos de sonido a su gusto y
almacenar sus propios ajustes en la memoria.
1
Patrón de indicación para cada modo de sonido:
ROCKUSER
CLASSICJAZZ
ESPAÑOL
HIP HOP POPS
4 Ajuste el nivel (–05 a +05).
5 Repita los pasos 3 y 4 para ajustar
otras bandas de frecuencias.
2 Acceda al modo de ajuste de sonido.
3 Seleccione la frecuencia que desea
ajustar.
6 Almacene los ajustes en el modo
respectivo.
• Para los ajustes del nivel de frecuencia
preajustado, consulte la página 54.
33
Page 92

Cómo ajustar el sonido
Usted puede ajustar las características de sonido
según sus preferencias.
1
ESPAÑOL
*1 Sólo para KD-ADV6160
Ej.: Cuando se selecciona “FAD”
2
El patrón de indicación
cambia conforme ajusta el
nivel.
34
Indicación Para: Margen
FAD*2
(fader)
BAL
(balance)
LOUD
(sonoridad)
SUB. W*
(subwoofer)
VOL. A*
(ajuste de
volumen)
VOL*
(volumen)
*2 Si está utilizando un sistema de dos
altavoces, ajuste el nivel de fader a “00”.
3
Sólo para KD-ADV6160: Esto sólo tendrá
*
efecto al conectar un subwoofer.
4
No podrá realizar el ajuste si la fuente es
*
FM. Aparecerá “FIX”.
5
Normalmente el disco de control funciona
*
como control de volumen. Por lo tanto, no
necesitará seleccionar “VOL” para ajustar
el nivel de volumen.
6
Dependiendo del ajuste de control de
*
ganancia del amplificador. (Para los
detalles, consulte la página 37).
3
4
5
Ajusta el balance
de los altavoces
delanteros y
traseros.
Ajusta el balance
de los altavoces
izquierdo y
derecho.
Refuerza las
frecuencias
altas y bajas
para producir
un sonido bien
balanceado a
bajos niveles de
volumen.
Ajusta el nivel
de salida del
subwoofer.
Ajustar y
almacenar el
nivel de volumen
de cada fuente.
Ajustar el
volumen.
R06
(Trasero
solamente)
a
F06
(Delantero
solamente)
L06
(Izquierdo
solamente)
a
R06
(Derecho
solamente)
LOUD ON
LOUD OFF
00 (mín.)
a
08 (máx.)
–05 (mín.)
a
+05 (máx.)
00 (mín.)
a
30 o 50
(máx.)*
J
6
Page 93

Configuraciones generales — PSM
Procedimiento básico
Podrá cambiar las opciones (excepto para SID)
de PSM (Modo de ajustes preferidos) listadas
en la siguiente tabla.
seleccionada.
1
4 Repita los pasos 2 y 3 para ajustar
3 Ajuste la opción de PSM
las otras opciones de PSM, si fuera
2
Seleccione una opción de PSM.
necesario.
5 Finalice el procedimiento.
Ej.: Cuando se selecciona “DIMMER”
Indicaciones Configuraciones seleccionables, [página de referencia]
ESPAÑOL
DEMO
Demostración en pantalla
CLOCK H
Ajuste de la hora
CLOCK M
Ajuste de los minutos
CLK ADJ*
Ajuste del reloj
* Se visualiza sólo cuando está conectada la radio SIRIUS.
DEMO ON: [Inicial]; La demostración en pantalla se activará
automáticamente si no se efectúa ninguna
operación durante unos 20 segundos, [11].
DEMO OFF: Se cancela.
1 – 12, [11]
[Inicial: 1 (1:00)]
00 – 59, [11]
[Inicial: 00 (1:00)]
AUTO: [Inicial]; El reloj incorporado se ajustará
automáticamente utilizando los datos de reloj
suministrados mediante el canal de radio SIRIUS
OFF: Se cancela.
®
.
Continúa...
35
Page 94

Indicaciones Configuraciones seleccionables, [página de referencia]
T-ZONE*
1, *2
Zona horaria
Para el ajuste del reloj, seleccione su área residencial entre una de las
siguientes zonas horarias.
EASTERN [Inicial] “ ATLAN TIC “ NEWFOUND
(Newfoundland (Terranova)) “ ALASKA “ PACIFIC “
MOUNTAIN “ CENTRAL “ (vuelta al comienzo).
1, *2
DST*
Hora de verano
ESPAÑOL
1
SID*
SIRIUS® ID
Actívelo si su área residencial está sujeta a DST (hora de verano).
ON: [Inicial]; Activa la hora de verano.
OFF: Se cancela.
El número de identificación SIRIUS de 12 dígitos se desplaza en la
pantalla después de 5 segundos, [45].
• Pulse S SEL para restablecer la visualización anterior.
LEVEL
Medidor de nivel de
ON: [Inicial]; Activa el indicador de nivel de audio.
OFF: Se cancela; aparece el indicador de modo de sonido, [33].
audio
DIMMER
Atenuador de
luminosidad
3
TEL*
Silenciamiento del
teléfono
SCROLL*
4
Desplazamiento
AUTO: [Inicial]; Al encender los faros, la pantalla se oscurece.
ON: El atenuador de luminosidad se activa.
OFF: Se cancela.
MUTING 1/MUTING 2: Seleccione el que sea apropiado para
silenciar el sonido mientras se utiliza el teléfono celular.
OFF: [Inicial]; Se cancela.
ONCE: [Inicial]; La información del disco se desplaza una sola vez.
AUTO: El desplazamiento se repite (a intervalos de 5 segundos).
OFF: Se cancela.
• Aunque “SCROLL” esté ajustado a “OFF”, podrá desplazar la
pantalla pulsando D DISP durante más de un segundo.
*1 Se visualiza sólo cuando está conectada la radio SIRIUS.
2
*
Se visualiza sólo cuando “CLK ADJ” se ajusta a “AUTO”.
3
*
Sólo para KD-ADV6160.
4
*
Algunos caracteres o símbolos no serán mostrados (y serán borrados) en la pantalla.
(Ej.: “ABCå!d#” ]“ABCA D ”).
36
Page 95

Indicaciones Configuraciones seleccionables, [página de referencia]
WOOFER*
3
Frecuencia de corte del
subwoofer
3
HPF*
Filtro pasaaltos
EXT IN*
6
Entrada externa
TAG DISP
Visualización de
etiqueta
REAR SPK*
3, *5
Salida del altavoz
trasero
AMP GAIN
Control de ganancia del
amplificador
LOW: Las frecuencias inferiores a 80 Hz se envían al subwoofer.
MID: [Inicial]; Las frecuencias inferiores a 120 Hz se envían al
subwoofer.
HIGH: Las frecuencias inferiores a 160 Hz se envían al subwoofer.
HPF ON: La frecuencia de corte se selecciona automáticamente
de acuerdo con el ajuste WOOFER (LOW/MID/
HIGH) de manera que pueda disfrutar del efecto
de baja frecuencia (LFE) solamente a través del
subwoofer, si está conectado.
HPF OFF:
[
Inicial
];
Se cancela.
CHANGER: [Inicial]; Para usar un cambiador de CD JVC, [40].
EXT IN: Para usar otro componente externo (que no sea
SIRIUS DLP), [44].
TAG ON: [Inicial]; Muestra la etiqueta ID3 mientras se
reproducen las pistas MP3/WMA, [42].
TAG OFF: Se cancela.
ON: [Inicial]; Selecciónelo para activar la salida del altavoz
trasero.
OFF: Se cancela.
Podrá cambiar el nivel máximo de volumen de este receptor.
LOW PWR: VOL 00 – VOL 30 (Selecciónelo si la potencia
máxima del altavoz es de menos de 50 W para
protegerlo contra los daños).
HIGH PWR: [Inicial]; VOL 00 – VOL 50
3
OFF*
: Desactiva el amplificador incorporado.
ESPAÑOL
AREA
Intervalo entre canales
del sintonizador
AREA EU: Selecciónelo cuando utilice este receptor en un área
que no sea América del Norte y del Sur. (FM: 50 kHz
—sintonización manual, 100 kHz—búsqueda
automática; AM: 9 kHz)
AREA US: [Inicial]; Selecciónelo cuando utilice el receptor en
América del Norte o del Sur. (FM: 200 kHz; AM:
10 kHz)
5
*
Se visualiza sólo cuando se activa la Zona Dual (consulte la página 32).
6
*
No se puede seleccionar si la fuente es “CD-CH” o “EXT IN”.
37
Page 96

Otras funciones principales
Asignación de títulos a las fuentes
Podrá asignar títulos a las frecuencias de las
emisoras, y a los CDs (tanto en este receptor
como en el cambiador de CD).
Fuentes
ESPAÑOL
Sintonizador
FM/AM
DISC/CD-CH Hasta 32 caracteres (hasta
• No es posible asignar título a un disco DVD,
VCD, CD Text o MP3/WMA.
1 Seleccione las fuentes.
• Para el sintonizador FM/AM: Sintonice
una emisora.
• Para un CD de este receptor. Inserte un
CD.
• Para los CDs del cambiador de CD:
Seleccione “CD-CH” y, seguidamente,
seleccione un número de disco.
Número máximo de
caracteres
Hasta 8 caracteres (hasta 30
frecuencias de emisoras)
30 discos)
3 Asigne un título.
1 Seleccione un carácter.
2 Muévase a la posición del carácter
siguiente (o anterior).
3 Repita los pasos 1 y 2 hasta que
termine de introducir el título.
4 Finalice el procedimiento.
2 Acceda al modo de asignación de
títulos.
Ej.: Al seleccionar “DISC” como fuente
38
Para borrar el título entero
En el paso 2 de la izquierda....
Page 97

Desmontaje del panel de control
Al desmontar o instalar el panel de control,
preste atención para no dañar los conectores
provistos al dorso del mismo y en el portapanel.
Desmontaje del panel de control
Antes de desmontar el panel de control,
asegúrese de desconectar la alimentación.
Fijación del panel de control
ESPAÑOL
39
Page 98

Operaciones del cambiador de CD
Para reproducir discos en el cambiador de CD
ESPAÑOL
Acerca del cambiador de CD
Se recomienda usar un cambiador de CD
compatible con MP3 JVC con este receptor.
• También podrá conectar cambiadores de
CD de la serie CH-X (excepto CH-X99
y CH-X100). Sin embargo, no podrá
reproducir discos MP3 debido a que no
son compatibles con discos MP3.
• No podrá utilizar los cambiadores de CD
de la serie KD-MK con este receptor.
• La información de texto del disco grabada
en el CD Text se puede visualizar cuando
se ha conectado un cambiador de CD
compatible con CD Text JVC.
Antes de hacer funcionar su cambiador de
CD:
• Consulte también el manual de
instrucciones entregado con su cambiador
de CD.
• No podrá controlar ni reproducir ningún
disco DVD, VCD y WMA en el cambiador
de CD.
Todas las pistas de los discos insertados en
el cargador se reproducirán repetidamente
hasta que usted cambie la fuente o extraiga el
cargador del cambiador de CD.
~
* Si ha cambiado el ajuste “EXT IN”
a “EXT IN” (consulte la página 37),
no podrá seleccionar el cambiador de
CD.
Número de disco seleccionado
Ÿ Seleccione un disco.
Para un número de disco del 01 – 06:
Para un número de disco del 07 – 12:
40
Page 99

• Cuando el disco actual es un disco MP3:
Número de disco actual
Para el avance rápido o el retroceso de la
pista
Avanza rápidamente.
Nombre de la carpeta*
Número de la carpeta actual
La información del disco aparece
automáticamente (consulte la
página 42).
Tiempo de
reproducción
transcurrido
Número de la
pista actual
* Aparecerá “ROOT” si no hay ninguna
carpeta incluida en el disco.
• Cuando el disco actual es un CD de audio o
un CD Text:
CD Text: Título del disco/ejecutante
=
El título de la pista aparece
automáticamente (consulte la página 42).
Tiempo de
reproducción
transcurrido
Número de la
pista actual
Retrocede.
Para ir a las pistas siguientes o anteriores
A las pistas siguientes.
Al comienzo de la pista actual, luego a las pistas
anteriores.
Para ir a las carpetas siguientes o
anteriores (sólo para disco MP3)
A las carpetas siguientes.
A las carpetas anteriores.
Para saltar rápidamente una pista durante
la reproducción
• Si es un disco MP3 o WMA, podrá saltar una
pista dentro de la misma carpeta.
Ej.: Para seleccionar la pista 32 mientras
reproduce la pista 6
1
ESPAÑOL
Número de disco actual
Continúa...
41
Page 100

2
Al pulsar el botón 5 o ∞ por primera vez,
se saltará a la pista superior o inferior más
próxima con un número de pista que sea
múltiplo de diez (ej.: 10
Luego, cada vez que pulsa el botón, podrá
ESPAÑOL
saltar 10 pistas.
• Después de la última pista, se seleccionará
la primera pista, y viceversa.
a
, 20a, 30a).
3
Cambio de la información en
pantalla
Mientras se reproduce un disco MP3
• Cuando se ajusta “TAG DISP” a “TAG
ON” (consulte la página 37)
*2 Si el archivo MP3 no dispone de
etiquetas ID3, aparecerán el nombre
de la carpeta y el nombre del
archivo. En este caso, el indicador
TAG no se encenderá.
• Cuando se ajusta “TAG DISP” a “TAG
OFF”
42
Mientras se reproduce un CD de
audio o un CD Text
*1 Si no se le ha asignado título a un CD
de audio, aparecerá “NO NAME”.
Para asignar un título a un CD de
audio, consulte la página 38.
 Loading...