

Page 1
ENGLISH
VIDEO CASSETTE PLAYER
WITH LINE RECORDING
HR-P55A
HR-P56A
INSTRUCTIONS
LPT0711-001B Printed in Indonesia
COPYRIGHT © 2002 VICTOR COMPANY OF JAPAN, LTD. 0402 MNVfIDfOT
SAFETY FIRST............................................................................... 1
Buttons, Connectors and Indicators ................................................ 3
Front Panel ............................................................................. 3
Rear Panel .............................................................................. 3
Remote control....................................................................... 4
On-screen display .................................................................. 4
Main Menu ............................................................................ 5
Basic Connections.......................................................................... 6
Initial Settings.............................................................................. 7
Video Channel Set.................................................................. 7
Language Set .......................................................................... 7
Playback ...................................................................................... 8
Recording..................................................................................... 9
Editing ....................................................................................... 10
Tape dubbing ....................................................................... 10
Subsidiary Settings ..................................................................... 11
Player’s information (Self-Diagnosis) ..................................... 11
Colour System Set ................................................................ 11
Specifications.............................................................................. 12
● Only cassettes marked “VHS” can be used with this video
cassette player.
SAFETY FIRST
Safety Precautions
The rating plate and the safety caution are on the rear of the unit.
WARNING:DANGEROUS VOLTAGE INSIDE
WARNING:TO PREVENT FIRE OR SHOCK HAZARD, DO NOT
The STANDBY/ON 1 button does not completely shut off
mains power from the unit, but switches operating current on
and off.
This unit is produced to comply with Standard IEC 60065.
When the equipment is installed in a cabinet or a shelf, make sure
that it has sufficient space on all sides to allow for ventilation
(10 cm or more on both sides, on top and at the rear).
When discarding batteries, environmental problems must be
considered and the local rules or laws governing the disposal of
these batteries must be followed strictly.
Failure to heed the following precautions may result in damage to
the player, remote control or video cassette.
1. DO NOT
… in an environment prone to extreme temperatures or
… in direct sunlight.
… in a dusty environment.
… in an environment where strong magnetic fields are
… on a surface that is unstable or subject to vibration.
2. DO NOT
(If the ventilation openings or holes are blocked by a
newspaper or cloth, etc., the heat may not be able to get out.)
3. DO NOT
4. DO NOT
or remote control.
(If water or liquid is allowed to enter this equipment, fire or
electric shock may be caused.)
5. DO NOT
6. DO NOT
water. Also DO NOT place any containers filled with water or
liquids (such as cosmetics or medicines, flower vases, potted
plants, cups, etc.) on top of this unit.
7. DO NOT
candles, on the apparatus.
8. AVOID
EXPOSE THIS UNIT TO RAIN OR MOISTURE.
place the player …
humidity.
generated.
block the player’s ventilation openings or holes.
place heavy objects on the player or remote control.
place anything which might spill on top of the player
expose the apparatus to dripping or splashing.
use this equipment in a bathroom or places with
place any naked flame sources, such as lighted
violent shocks to the player during transport.
—1—
Page 2

Beware of moisture condensation
A
Moisture in the air will condense on the player when you move it
from a cold place to a warm place, or under extremely humid
conditions—just as water droplets form on the surface of a glass
filled with cold liquid. Moisture condensation on the head drum
will cause damage to the tape
may occur, keep the player’s power turned on for a few hours to let
the moisture dry.
. In conditions where condensation
When transporting
䡲 Be sure to remove cassette from player before packing.
䡲 Avoid violent shocks to the player during packing and transport.
How to use the remote control
Before use, insert the batteries in the correct directions as
indicated under the battery cover.
● Point the remote control toward the receiving window on the
player.
● The maximum operating distance of the remote control is about
7.5 m.
NOTE:
If the remote control does not work properly, remove its batteries,
wait for a few seconds, replace the batteries and then try again.
Video heads cleaning
Accumulation of dirt and other particles on the video heads may
cause the playback picture to become blurred or interrupted.
Clean the video heads using a dry cleaning cassette or be sure to
contact your nearest JVC dealer if such troubles occur.
● You can check the video head status by using the player’s
information function. (
墌
5, 11)
Usable cassettes
● Compact VHS camcorder recordings can
be played on this player. Simply place the
recorded cassette into a VHS Cassette
Adapter and it can be used just like any
full-sized VHS cassette.
● This player can record on regular VHS and Super VHS cassettes.
However, it will record and play back regular VHS signals only.
It is not possible to play back a recorded Super VHS cassette.
TTENTION:
To mobile phone users:
Using a mobile phone in the vicinity of the player may cause
picture vibration on the screen or change the screen to a blue
back display.
On placing the player:
Some TVs or other appliances generates strong magnetic fields.
Do not place such appliance on top of the player as it may
cause picture disturbance.
—2—
Page 3
Buttons, Connectors and Indicators
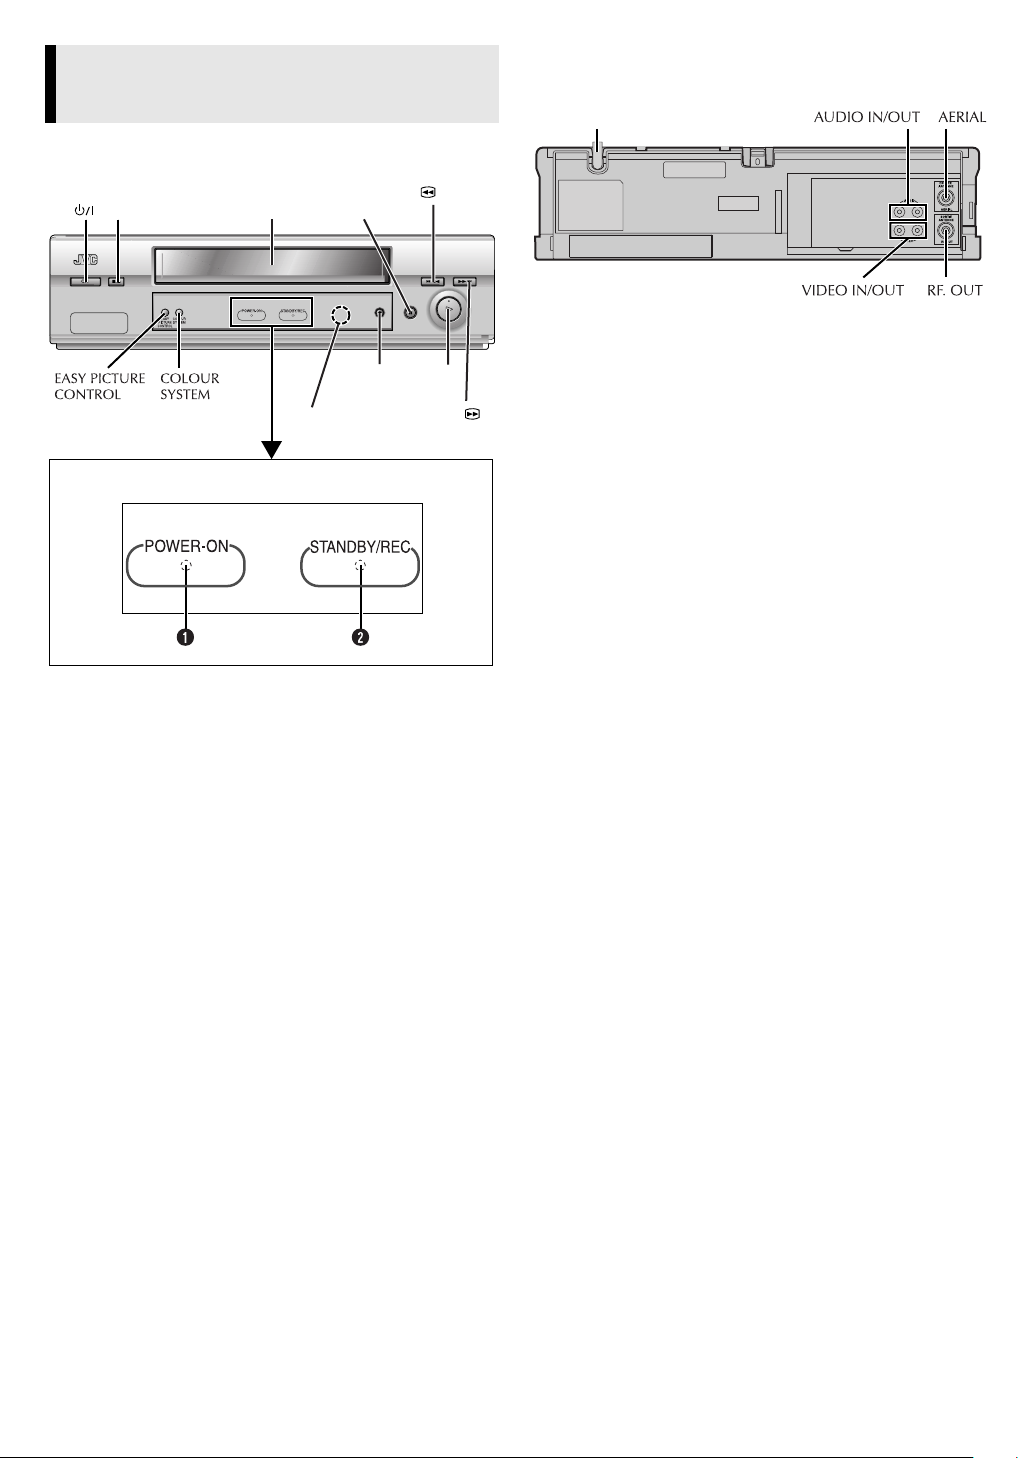
Front Panel
Cassette
Stop/Eject
0
loading slot
Pa us e
Rewind
9
Rear Panel
Mains power cord
3
7
Fast
Forward
Play
Record
Infrared beam
receiving window
Display panel
A Power Indicator
B Standby/Record Indicator*
* Standby/Record Indicator lights when the player is in standby mode
or during recording.
4
5
—3—
Page 4
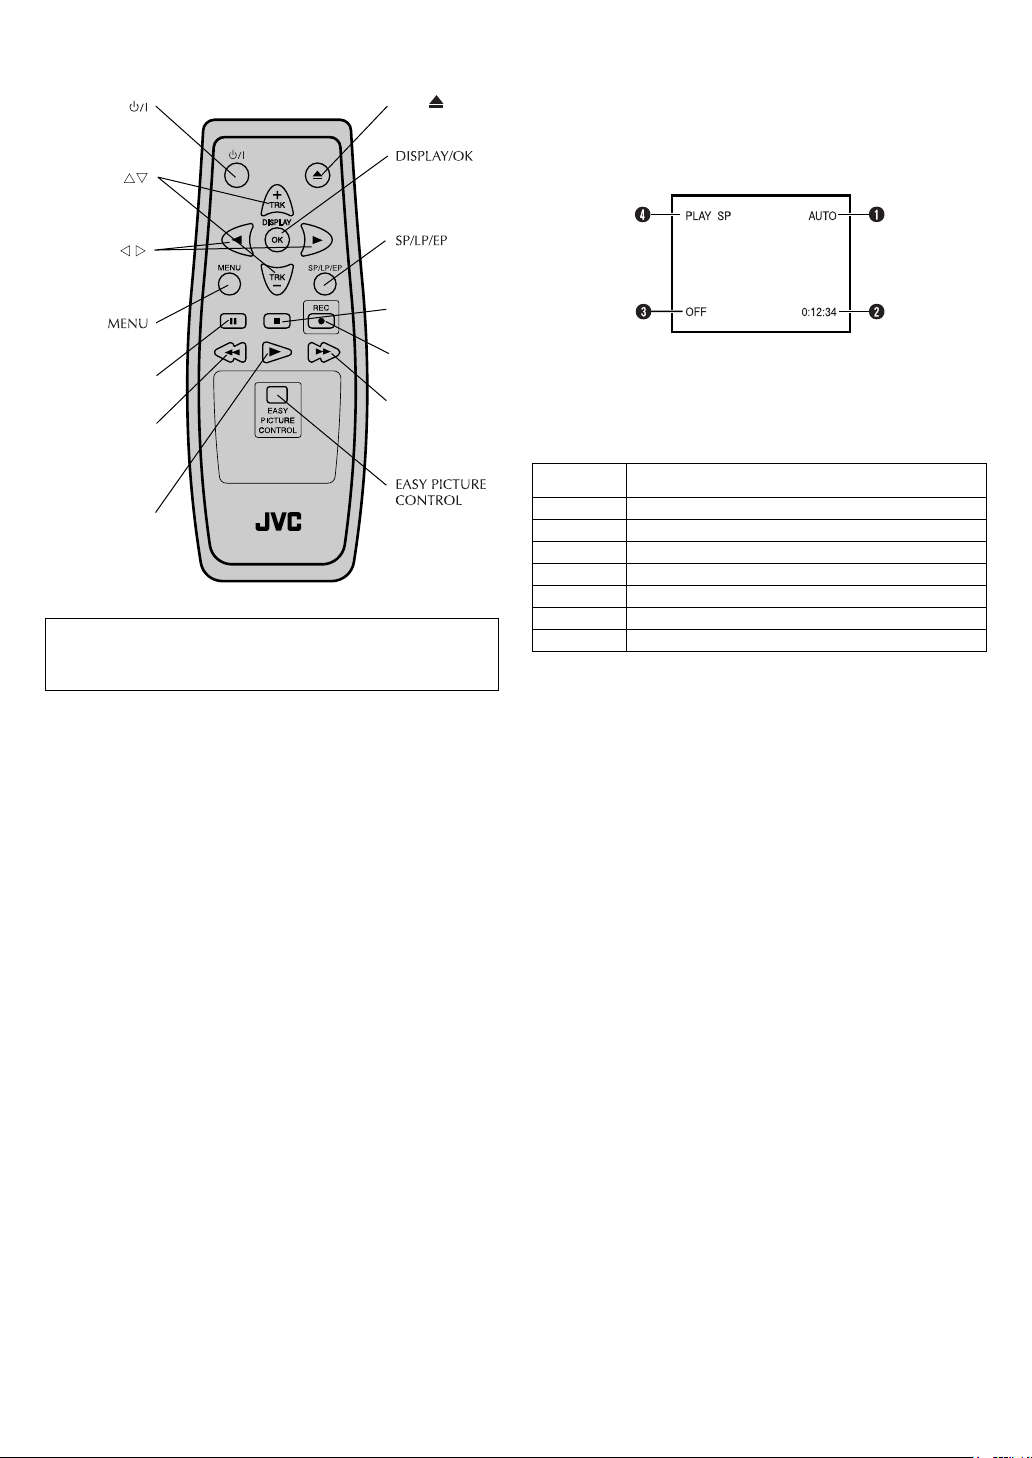
Remote control On-screen display
A
If you press DISPLAY (OK) on the remote control when “OSD” is
Eject
Stop8
Record7
Pau se 9
Fast Forward
Rewind3
Play4
5
TTENTION:
The remote control is used exclusively for this player. You
cannot operate another JVC player or recorder.
set to “ON” (
screen. The indications disappears in about 3 seconds. To clear
the on-screen display completely, press DISPLAY (OK) again.
A Colour system
B Time counter
C EPC mode
D Player operation mode/Tape speed
On-screen
display
PLAY appears during playback.
REW appears during rewinding.
FF appears during fast-forwarding.
EJECT appears when you eject the cassette.
STOP appears when you stop playback or recording.
REC appears during recording.
PAUSE appears in the record pause mode.
墌 5), you can see the current player status on the
Description
—4—
Page 5

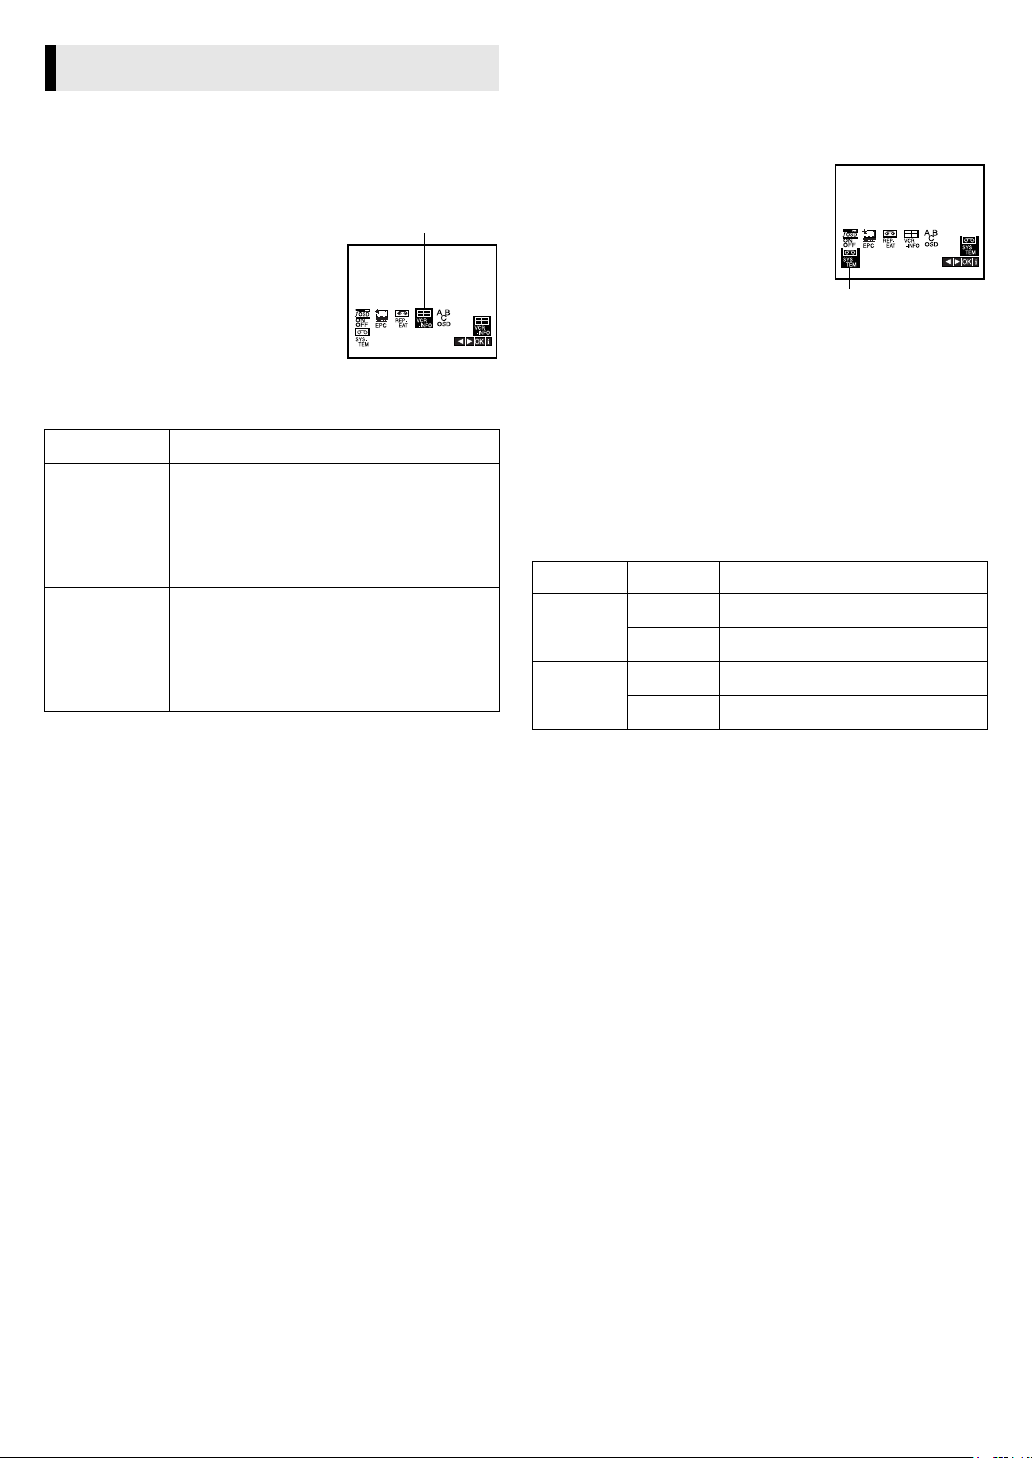
Main Menu
You can perform various operations or change various mode
settings on the Main Menu Screen.
● Turn on the player and the TV, and set your TV to its AV mode or
video channel.
● The procedure shows how to set “OSD” to “ON”.
A
Access Main Menu screen
Press MENU. Press w e to select the icon
“OSD”, then press OK.
B
Change setting
Press w e to set to “ON”, then press OK.
C
Return to normal screen
Press MENU.
OSD
*The default setting is
Icon Description
A
OSD ON / OFF
B
EPC OFF / SOFT / SHARP
When this function is set to “ON”, various
player status information (on-screen display)
appears on the screen.
This function helps you to adjust the playback
picture quality according to your preference.
: Picture quality is not adjusted.
OFF
: Reduces image coarseness when viewing
SOFT
overplayed tapes containing much noise.
: Clearer, sharper-edged picture when
SHARP
viewing images with much flat, same-coloured
surfaces such as cartoons.
NOTES:
● You can perform EPC setting only during
playback.
● You can also perform EPC setting by pressing
EASY PICTURE CONTROL
on the remote control.
C
REPEAT ON / OFF
D
VCR
INFO
If you want to play back a tape repeatedly, set
“REPEAT” to “ON”. For details, refer to “Repeat
playback” (
This function allows you to check the status of
the player and tape inserted into the player. For
details, refer to “Player’s information (Self-
Diagnosis)” (
墌
墌
8).
11).
in the following table.
bold
on the player or
E
ABC OSD
F
SYSTEM AUTO / PAL / MESECAM / NTSC-PB /
Select this icon to set the language. You can
select among 2 languages. For details, refer to
“Language Set” (
NTSC3.58 / NTSC4.43
Select the appropriate colour system when you
play back or recording a tape. For details, refer
to “Colour System Set” (
墌
7).
11).
墌
— 5 —
Page 6

Basic Connections
A
Check contents
Make sure the package contains all of the accessories listed in
“Specifications” (
B
Situate player
Place the player on a stable, horizontal surface.
C
Connect player to TV
Aerial connector
12).
墌
Back of TV
Audio/video input
connectors
Audio/video cable
(not provided)
RF cable
(provided)
TV aerial
cable
RF Connection
Disconnect the TV aerial cable from the TV.
A
Connect the TV aerial cable to the AERIAL connector on the
B
rear of the player.
Connect the provided RF cable between the RF. OUT
C
connector on the rear of the player and the TV’s aerial connector.
● Before using the player, refer to “Video Channel Set” (
墌
7).
AV Connection
If your TV is equipped with audio/video input connectors, perform
AV connection to improve picture quality during tape playback.
Connect an optional audio/video cable between AUDIO/
A
VIDEO OUT connectors on the rear of the player and the TV’s
audio/video input connectors.
Mains power cord
Back of player
Mains outlet
AUDIO/VIDEO
OUT
AERIAL
RF. OUT
— 6 —
Page 7

Initial Settings
A
Language Set
You can change the language setting manually as required.
Video Channel Set
Video channel (RF output channel) is the channel on which your
TV receives picture and sound signals from the player through the
RF cable.
Perform the following steps only if you have connected the player
to your TV via the RF connection.
Turn on the player and the TV.
A
Confirm the video channel
Select the vacant position 36 on your TV.
Insert a pre-recorded cassette into the player and press 4. You can
see the picture on the screen.
NOTE:
If channel 36 is already occupied, or if the picture is distorted, or if
you want to change the video channel, consult your nearest JVC
dealer.
B
Store channel on TV
Store the channel 36 on your TV.
● For details, refer to the instruction manual of your TV.
With AV connection
To view picture signals from the player, set your TV to its AV
mode.
With RF connection
To view picture signals from the player, set your TV to the video
channel.
TTENTION:
If you connect the player to TV with RF connection (墌6), press
1 to engage the player in the standby mode when you watch a
TV programme. TV broadcast can not be received through
AERIAL connector when the player is turned on.
Turn on the player and the TV, and set your TV to its AV mode or
video channel.
A
Access Main Menu screen
Press MENU. Press w e to select the icon
“ABC OSD”, then press OK.
B
Select language
Press w e to select the desired language,
then press OK.
ENGLISH : English
РУССКИЙ : Russian
C
Return to normal screen
Press MENU.
ABC OSD
— 7 —
Page 8

Playback
A
Basic Playback
● Turn on the TV and select the AV mode or video channel.
● Set “SYSTEM” to the appropriate mode. (
A
Load a cassette
Make sure the window side is
up, the rear label side is facing
you and the arrow on the front of
the cassette is pointing towards
the player.
● Do not apply too much pressure when inserting.
● The player turns on automatically.
● If the cassette’s record safety tab has been removed, playback
begins automatically.
B
Start playback
Press 4.
● If the tape reaches its end during playback, the player stops
playback, rewinds the tape and ejects the cassette, then enters
the standby mode automatically.
During playback
Stop playback
Press 8 on the remote
control.
Pause playback and view still picture
Press 9.
● The player enters Pause mode after moving 2 or 3 frames.
● If there is vertical jitter, use the TRK+/– to correct the picture.
● Press 4 to resume normal playback.
● Still picture playback stops automatically after about 5 minutes
to protect the heads.
High-Speed Search
Press 3 or 5.
● Press 4 to resume normal playback.
● High-speed search stops automatically after about 3 minutes to
protect the heads, then normal playback resumes.
TTENTION:
In the search or still mode,
● the picture will be distorted.
● the noise bars will appear.
● there will be a loss of colour.
● the picture may not appear.
● However, this is not malfunction.
OR Press 0 on the player.
墌
5)
When the tape is not running
Rewind/fast-forward at high speed
Press 3 or 5.
Eject the cassette
Press . OR Press 0 on the player.
● You can also eject the cassette when the player is standby
mode.
● When the tape is ejected, the counter is reset automatically.
Engage the player in the standby mode
Press 1 on the remote
control.
OR Press 1 on the player.
Playback Features
Adjusting tracking condition
Automatic tracking adjustment
When a new cassette is loaded, the player enters the automatic
tracking mode. “AUTO TRACKING” appears on the screen during
the automatic tracking mode.
Manual tracking adjustment
If automatic tracking cannot eliminate noises well during
playback, adjust the tracking manually.
Press and hold TRK + or – to eliminate the noises.
Logic Search
If you press and hold 3 or 5 during rewinding or fastforwarding, you can see the picture on the screen. Releasing it
cancels the picture search and resume rewinding and fastforwarding.
Repeat playback
If you want to play back a tape repeatedly, set “REPEAT” to “ON”.
A
Press MENU to access Main Menu screen.
B
Press w e to select the icon “REPEAT”,
then press OK.
C
Press w e to set to “ON”, then press
OK.
D
Press MENU to return to normal screen.
● When the end of the tape is reached, the
player automatically rewinds tape to the
beginning and repeats playback
continuously.
NOTE:
Set “REPEAT” to “OFF” when you want to stop repeat playback.
Ejecting a tape also stops repeat playback.
REPEAT
—8—
Page 9

A
A
Recording
Accidental erasure prevention
To prevent accidental recording on a
recorded cassette, remove its record
safety tab. To record on it later, cover
the hole with adhesive tape.
Basic Recording
TTENTION:
It is possible to record programme if you connect your player to a
TV equipped with AUDIO and VIDEO output connector.
It is only possible to record programme selected on you TV. Do
not change the channel during recording.
Turn on the TV and select the AV mode or video channel.
A
Connect player to TV
Connect the audio/video cable between the AUDIO/VIDEO IN
connectors of your player and the audio/video output connectors
on your TV.
Record safety tab
B
Load a cassette
Make sure the record safety tab is intact. If not, cover the hole with
adhesive tape before inserting the cassette.
● The player turns on automatically.
C
Select recording channel on TV
Turn on your TV and select the channel you want to record with
the TV’s channel selector.
D
Set tape speed
Press SP/LP/EP. The current setting for the tape speed appears on
the screen for about 3 seconds. Press SP/LP/EP again to change
the setting while tape speed is displayed.
● You can select SP or EP when you record NTSC signals, SP or LP
when you record PAL signals.
E
Start recording
Press 7.
● Do not change the channel during recording.
● If the tape reaches its end during recording, the player stops
recording, rewinds the tape and ejects the cassette, then enters
the standby mode automatically.
TTENTION:
Once 7 is pressed, the player starts recording. Be careful not to
record on an important tape.
Aerial connector
Back of TV
Audio/video cable
(not provided)
Audio/video output
connectors
TV aerial cable
During recording
Pause recordin g
Press 9.
● Press 9 to resume recording.
● The player stops automatically after about 5 minutes to protect
the heads.
Stop recording
Press 8 on the remote
control.
OR Press 0 on the player.
Back of player
AUDIO/VIDEO IN
— 9 —
Page 10

Editing
Tape dubbing
AV mode
RF cable
(provided)
RecorderTV receiver
Player
Your player
Audio/video cable
(not provided)
Another player
A
Make connections
Connect the player’s AUDIO/VIDEO IN connectors to another
player’s audio/video output connectors.
B
Load cassettes
Insert the playback cassette into the source player and the cassette
to be recorded on into your player.
C
Start playback
Engage the Play mode of the source player.
D
Start recording
Engage the Record mode of the recording deck.
— 10 —
Page 11
Subsidiary Settings
Player’s information (Self-Diagnosis)
This function allows you to check the status of the player and tape
inserted into the player.
A Press MENU to access Main Menu screen.
B Press w e to select the icon “VCR
INFO”, then press OK.
C Press w e to select item to check the
status, then the status message appears on
the screen. Refer to the following table
below.
D Press MENU to return to normal screen.
Item Description/message
HEAD STATUS You can check the status of the player’s video
head.
OK: No problem
PLEASE CLEAN: Clean the video heads using a
dry cleaning cassette or be sure to contact
your nearest JVC dealer.
TAPE STATUS You can check the status of the tape inserted
into the player.
RECORDABLE: The cassette can be recorded.
NOT RECORDABLE: Insert a cassette with the
record safety tab intact, or cover the hole
using adhesive tape.
VCR INFO
Colour System Set
You can play back PAL, MESECAM and NTSC (3.58 or 4.43) tapes,
or record PAL and MESECAM and NTSC (3.58 or 4.43) signals on
this player. Select the appropriate colour system.
A Press MENU to access Main Menu screen.
B Press w e to select the icon “SYSTEM”,
then press OK.
C Press w e to select the appropriate
mode, then press OK.
D Press MENU to return to normal screen.
AUTO: Normally select this. The
appropriate colour system is selected
automatically depending on the playback
or recording signals.
If “AUTO” does not work correctly, set the following mode
manually.
PAL: To record PAL signals, or playback a PAL tape.
MESECAM: To record SECAM signals, or play back a MESECAM
tape.
NTSC-PB: To play back a NTSC tape on PAL TV
NTSC3.58: To record NTSC3.58 signals, or play back a NTSC3.58
tape
NTSC4.43To record NTSC4.43 signals, or play back a NTSC4.43
tape
You can change the system setting as follows:
Source Mode System change
PAL/
MESECAM
NTSC
Playback AUTO{PAL{MESECAM
Recording AUTO{PAL{MESECAM
Playback NTSC-PB{NTSC3.58{NTSC4.43
Recording NTSC3.58{NTSC4.43
SYSTEM
NOTES:
● You can also perform SYSTEM setting by pressing COLOUR
SYSTEM on the player.
About NTSC Playback
● Some TVs shrink the picture vertically and place black bars at
the top and bottom of the screen, or cut off the top and bottom
portions of superimposed displays. This is not a malfunction.
● The picture may roll up and down. This can be corrected if your
TV has the V-HOLD control function.
● The counter and tape remaining time readings will be incorrect.
● During search or still, the picture will be distorted, and there
may be a loss of colour.
—11—
Page 12

Specifications
GENERAL
Power : 110 V – 240 Vd, 50 Hz/60 Hz
Power consumption
Power on : Approx. 12 W
Standby mode : 3.0 W
Video Head system : Rotary two-head helical scan system
Tape format : Tape width 1/2"
(12.7 mm high density VHS tape)
Rewind time : Approx. 180 sec. with E-180 cassette
Dimensions (W x H x D) : 360 mm x 94.5 mm x 230 mm
Weight : 3.2 kg
Operating temperature : 5°C to 35°C
Operating humidity : Less than 80 %
VIDEO
Signal system : PAL/SECAM-type colour signal and
CCIR monochrome signal, 625 lines
50 fields
Recording Format : PAL/MESECAM/NTSC3.58/NTSC4.43
RF OUT : PAL/SECAM (G or K)
Input level : 1.0 Vp-p, 75 Ω, unbalanced
Output level : 1.0 Vp-p, 75 Ω, unbalanced
RF modulator : UHF channels 32 – 40 (Adjustable)
AUDIO
Input level : –6.0 dBm, more than 47 kΩ
Output level : –6.0 dBm, less than 1.5 kΩ
Audio track : Mono track
Audio frequency response
: 100 Hz to 10,000 Hz
(–6/+3 dBm)
ACCESSORIES
Provided accessories : RF cable,
Infrared remote control unit,
“R3” battery x 2
Specifications shown are for SP mode unless specified otherwise.
E. & O.E. Design and specifications subject to change without
notice.
— 12 —
 Loading...