

Page 1
Basic User Guide
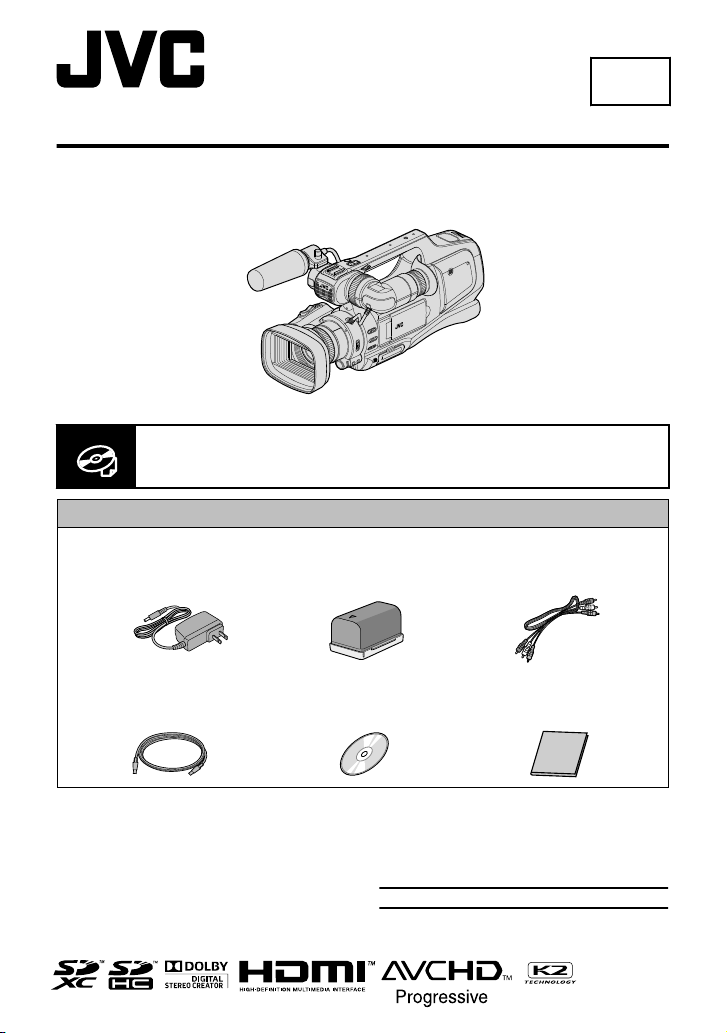
Verifying the Accessories
CD-ROM Basic User Guide
(this manual)
Battery Pack
BN-VF823U
(x1)
AV Cable
(1 m)
USB Cable
(Type A - Mini Type B)
(1 m)
(1.9 m)
AC Adapter
AP-V20U
* This illustration shows the GY-HM70U with an optional microphone.
HD MEMORY CARD CAMERA RECORDER
GY-HM70U
For detailed operating instructions, refer to the “Detailed User Guide” in
.
the CD-ROM. (p. 4)
LYT2647-001A-M
EN
Dear Customers
Thank you for purchasing this JVC product.
Before use, please read the Safety Precautions
and Cautions on p. 2 and p. 24 to ensure
safe use of this product.
For Future Reference:
Enter the Model No. (located on the bottom of
the camera) and Serial No.
(located on the bottom of the camera) below.
Model No.
Serial No.
Page 2
Safety Precautions
CAUTION
RISK OF ELECTRIC SHOCK
DO NOT OPEN
CAUTION: TO REDUCE THE RISK OF ELECTRIC SHOCK,
DO NOT REMOVE COVER (OR BACK).
NO USER-SERVICEABLE PARTS INSIDE.
REFER SERVICING TO QUALIFIED SERVICE PERSONNEL.
The lightning flash with arrowhead symbol, within an
equilateral triangle, is intended to alert the user to the
presence of uninsulated "dangerous voltage" within the
product's enclosure that may be of sufficient magnitude
to constitute a risk of electric shock to persons.
The exclamation point within an equilateral triangle is
intended to alert the user to the presence of important
operating and maintenance (servicing) instructions in
the literature accompanying the appliance.
WARNING: TO PREVENT FIRE OR SHOCK
HAZARD, DO NOT EXPOSE THIS UNIT TO
RAIN OR MOISTURE.
NOTES:
•
The rating plate and safety caution are on the
bottom and/or the back of the main unit.
•
The serial number plate is on the bottom of the
unit.
•
•
•
•
The rating information and safety caution of the
AC adapter are on its upper and lower sides.
For USA-California Only
This product contains a CR Coin Cell Lithium
Battery which contains Perchlorate Material
– special handling may apply.
See www.dtsc.ca.gov/hazardouswaste/perchlorate
When the equipment is installed in a cabinet or on
a shelf, make sure that it has sufficient space on all
sides to allow for ventilation (10 cm (3-15/16") or
more on both sides, on top and at the rear).
Do not block the ventilation holes.
(If the ventilation holes are blocked by a newspaper,
or cloth etc. the heat may not be able to get out.)
No naked flame sources, such as lighted candles,
should be placed on the apparatus.
When discarding batteries, environmental problems
must be considered and the local rules or laws
governing the disposal of these batteries must be
followed strictly.
The apparatus shall not be exposed to dripping or
splashing.
Do not use this equipment in a bathroom or places
with water.
Also do not place any containers filled with water
or liquids (such as cosmetics or medicines, flower
vases, potted plants, cups etc.) on top of this unit.
(If water or liquid is allowed to enter this equipment,
fire or electric shock may be caused.)
Do not point the lens or the viewfinder directly into
the sun. This can cause eye injuries, as well as
lead to the malfunctioning of internal circuitry.
There is also a risk of fire or electric shock.
CAUTION!
The following notes concern possible physical
damage to this unit and to the user.
Carrying or holding this unit by the LCD monitor
and/or the viewfinder can result in dropping the
unit, or in a malfunction.
Do not use a tripod on unsteady or unlevel surfaces.
It could tip over, causing serious damage to the unit.
CAUTION!
Connecting cables (Audio/Video, etc.) to this unit
and leaving it on top of the TV is not recommended,
as tripping on the cables will cause this unit to fall,
resulting in damage.
CAUTION:
The mains plug shall remain readily operable.
•
Remove the mains plug immediately if the
camcorder functions abnormally.
WARNING:
The battery pack, the camcorder with battery
installed, and the remote control with battery
installed should not be exposed to excessive heat
such as direct sunlight, fire or the like.
Make a backup of important recorded data
JVC will not be responsible for any lost data.
It is recommended to copy your important recorded
data to a disc or other recording media for storage
once every 3 months.
AVERTISSEMENT : POUR ÉVITER
LES RISQUES D’INCENDIE OU
D’ÉLECTROCUTION, NE PAS EXPOSER
L’APPAREIL À LA PLUIE NI À L’HUMIDITÉ.
ATTENTION
RISQUE D'ÉLECTROCUTION
NE PAS OUVRIR
ATTENTION:
POUR ÉVITER TOUT RISQUE D'ÉLECTROCUTION,
NE PAS OUVRIR LE BOÎTIER.
AUCUNE PIÉCE INTÉRIEURE N'EST À RÉGLER PAR L'UTILISATEUR.
SE RÉFÉRER À UN AGENT QUALIFIÉ EN CAS DE PROBLÉME.
Le symbole de I'éclair à I'intérieur d'un triangle
équilatéral est destiné à alerter I'utilisateur sur la
présence d'une "tension dangereuse" non isolée dans
le boîtier du produit. Cette tension est suffisante pour
provoquer I'électrocution de personnes.
Le point d'exclamation à I'intérieur d'un triangle
équilatéral est destiné à alerter I'utilisateur sur la
présence d'opérations d'entretien importantes au
sujet desquelles des renseignements se trouvent
dans le manuel d'instructions.
REMARQUES :
La plaque d’identification et l’avertissement de
sécurité se trouvent sous l’appareil et/ou au dos.
La plaque du numéro de série est située sur la
partie inférieure de l’appareil.
Les informations d’identification et l’avertissement
de sécurité de l’adaptateur secteur sont situés sur
ses côtés supérieur et inférieur.
.
2
Page 3
Remember that this unit is intended for
private consumer use only.
Any commercial use without proper permission
is prohibited. (Even if you record an event such
as a show, performance or exhibition for personal
enjoyment, it is strongly recommended that you
obtain permission beforehand.)
Trademarks
•
AVCHD Progressive/AVCHD and the AVCHD
Progressive/AVCHD logo are trademarks of
Panasonic Corporation and Sony Corporation.
•
x.v.Color™ is a trademark of
Sony Corporation.
•
HDMI (High-Definition Multimedia Interface) and
HDMI logo are either registered trademarks or
trademarks of HDMI Licensing, LLC in the
United States and/or other
countries.
•
Manufactured under license from Dolby
Laboratories. Dolby and the double-D symbol
are trademarks of Dolby Laboratories.
•
SDXC and SDHC logos are trademarks of
SD-3C, LLC.
•
Windows® is either registered trademark or
trademark of Microsoft Corporation in the
United States and/or other countries.
•
Macintosh is a registered trademark of Apple Inc.
•
iMovie and iPhoto are trademarks of Apple Inc.,
registered in the U.S. and other countries.
•
Intel, Intel Core, and Pentium are trademarks or
registered trademarks of Intel Corporation or its
subsidiaries in the United States and other countries.
•
Other product and company names included in
this instruction manual are trademarks and/or
registered trademarks of their respective holders.
•
Marks such as ™ and ® have been omitted in this
manual.
IMPORTANT SAFETY INSTRUCTIONS
1. Read these instructions.
2. Keep these instructions.
3. Heed all warnings.
4. Follow all instructions.
5. Do not use this apparatus near water.
6. Clean only with dry cloth.
7. Do not block any ventilation openings. Install in
accordance with the manufacturer’s instructions.
8. Do not install near any heat sources such
as radiators, heat registers, stoves, or other
apparatus (including amplifi ers) that produce heat.
9. Protect the power cord from being walked on or
pinched particularly at plugs, convenience
receptacles, and the point where they exit from
the apparatus.
10. Only use attachments/accessories specifi ed by
the manufacturer.
11. Use only with the cart,
stand, tripod, bracket,
or table specifi ed by
the manufacturer, or
sold with the apparatus.
When a cart is used,
use caution when
moving the cart/
apparatus combination
to avoid injury from tip-over.
12. Unplug this apparatus during lightning storms or
when unused for long periods of time.
13. Refer all servicing to qualifi ed service personnel.
Servicing is required when the apparatus has
been damaged in any way, such as power-supply
cord or plug is damaged, liquid has been spilled
or objects have fallen into the apparatus, the
apparatus has been exposed to rain or moisture,
does not operate normally, or has been dropped.
If this symbol is shown, it is only valid
in the European Union.
When using the AC adapter in areas other
than the USA
The provided AC adapter features automatic
voltage selection in the AC range from 110 V to 240 V.
USING HOUSEHOLD AC PLUG ADAPTER
In case of connecting the unit’s power cord to
an AC wall outlet other than American National
Standard C73 series type use an AC plug
adapter, called a “Siemens Plug”, as shown.
For this AC plug adapter, consult your nearest
JVC dealer.
Plug Adapter
Remove the AC adapter from the AC wall outlet
when not in use.
Do not leave dust or metal objects adhered to
the AC wall outlet or AC adapter (power/DC plug).
•
•
Be sure to use the supplied AC adapter.
Do not use the supplied AC adapter with other
devices.
•
•
This product is licensed under the AVC Patent
Portfolio License for the personal use of a
consumer or other uses in which it does not receive
remuneration to
(i) encode video in compliance with the AVC
standard (“AVC Video”) and/or
(ii) decode AVC Video that was encoded by a
consumer engaged in a personal activity and/or
was obtained from a video provider licensed to
provide AVC Video. No license is granted or shall
be implied for any other use. Additional information
may be obtained from MPEG LA, L.L.C.
See http://www.mpegla.com
.
3
Page 4
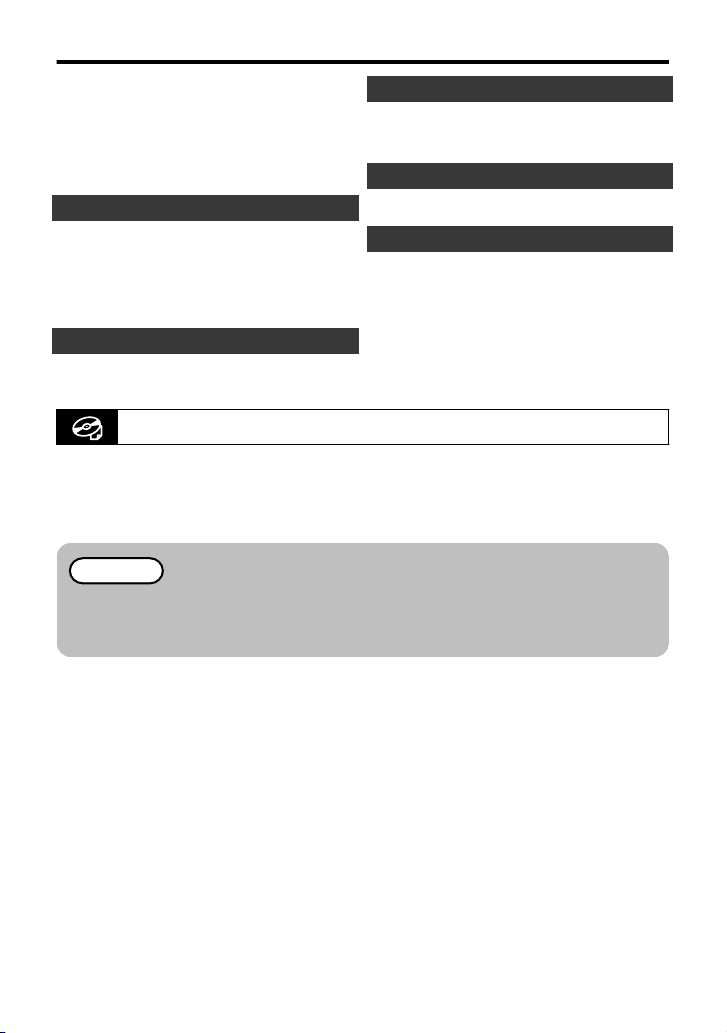
Table of Contents
Safety Precautions ................................. 2
Names of Parts and Functions ............... 5
Names of Buttons and Functions on the
LCD Monitor ........................................... 6
Using the Icon Buttons/Thumbnails ........ 7
Getting Started
Charging the Battery Pack
Grip Belt Adjustment ..............................
Inserting an SD Card ............................ 10
Clock Setting ........................................ 12
..................... 8
Recording
Video Recording .................................. 13
Still Image Recording ........................... 15
Viewing the Detailed User Guide
.
A
Insert the supplied CD-ROM into your PC.
B
Double-click the CD-ROM icon in “Computer” or “My Computer”.
C
Click the “GY-HM70U_manual” folder.
0
Detailed User Guides in PDF files are displayed.
Playback
Playing Back/Deleting Files on this Unit
Playing Back on TV .............................. 18
Copying
Copying to Computer ........................... 19
Other Problems
9
Changing Menu Settings ...................... 21
Troubleshooting ................................... 22
Cautions ............................................... 24
Recordable Time/Number of Images
Specifications ....................................... 27
Memo
Adobe Acrobat Reader version 5 or higher or Adobe Reader is required to view the
PDF file.
http://www.adobe.com/
.. 16
... 26
4
Page 5
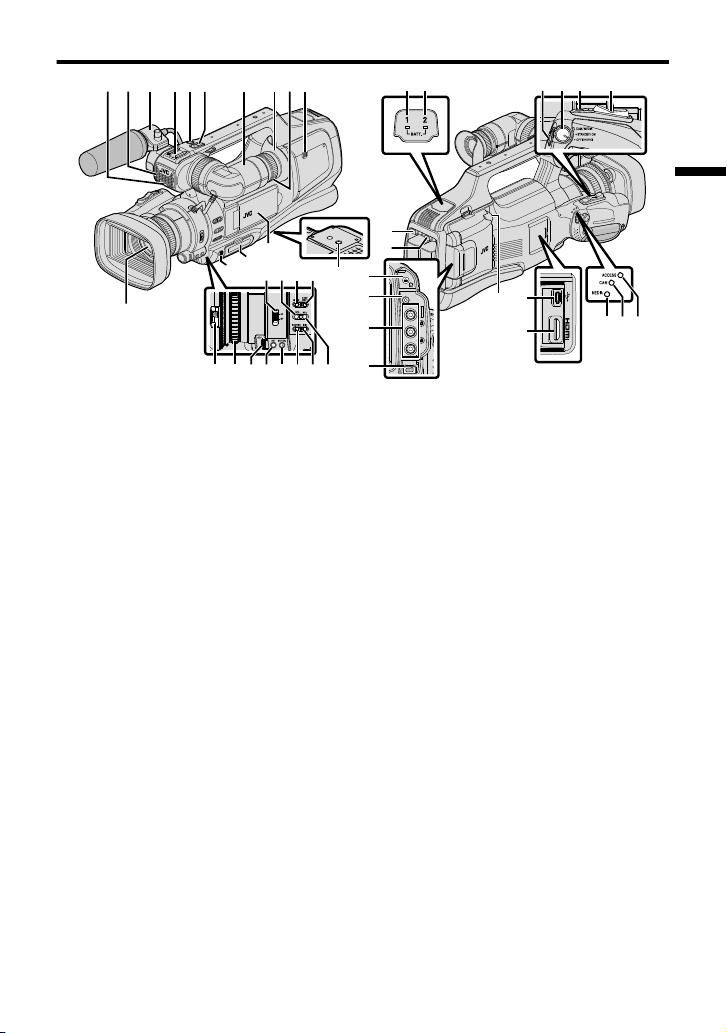
Names of Parts and Functions
REMOTE
AV
DC
345 08
b
a
jk
e
C
B
F
E
A
z
x
y
lmn
gfhopi
q
GHI
D
c
d
t
12 9
7
6
uwvsr
.
* Microphone is optional.
A
Tally lamp
B
Built-in microphone
C
Microphone holder
D
Shoe
E
“REC” (Record) button
F
Zoom lever
G
Viewfinder
H
Eyepiece
I
Eyepiece focus lever
J
Built-in speaker
K
Lens/Lens cover
L
“DOOR LOCK” lever
M
SD card slot A, B
N
LCD monitor
O
Tripod mounting holes
P
“AF/MF” Focus switch
Q
i.AUTO (Intelligent Auto) button
R
MODE (Video/Still image) button
S
“CAM”/“MEDIA” button
T
Lens cover switch
U
Focus ring
V
“ADJ.” dial
W
“SET” button
X
“WHT BAL” White balance selection
button
Y
“SHUTTER” Shutter speed button
Z
“IRIS” Iris button
a
“AE±” Exposure button
b
“BATT. 1” charge indicating lamp
c
“BATT. 2” charge indicating lamp
d
“REC” (Record) button
e
“STANDBY/ON OFF”/“CAM/MEDIA”
Power/Operation
f
“SNAPSHOT” (Still image recording)
button
g
Zoom lever
h
“BATT. 1” lock release button
i
“BATT. 2” lock release button
j
Headphone jack
k
“REMOTE” Remote jack
l
“AV” connector
m
“DC” connector
n
“MIC” jack
o
USB connector
p
HDMI connector
q
“MEDIA” Media mode indicating lamp
r
“CAM” Camera mode indicating lamp
s
“ACCESS” Access indicating lamp
mode selection switch
5
Page 6
Names of Buttons and Functions on the
MENU
≪MEDIA
REC
1
2
6
5
4
3
0:01:23 0:12:34
MENU
≪CAM
6
2 3 4 5
1
B
≪CAM
MENU
3 4 56
1
2
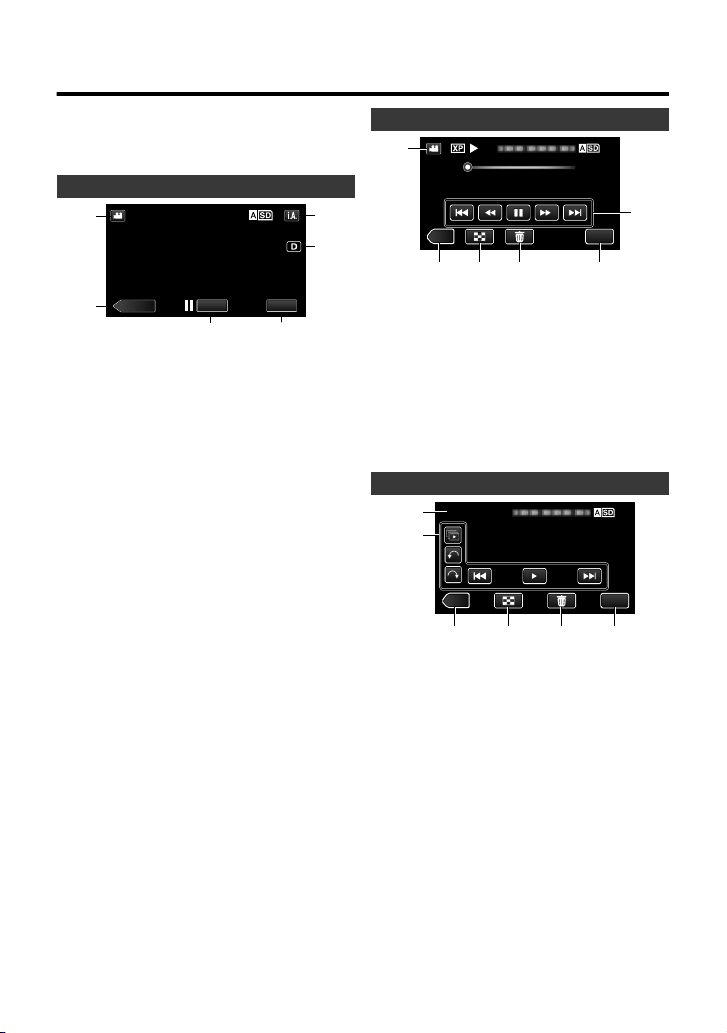
LCD Monitor
The following screens are displayed during
the video and still image modes, and
operate as the touch screens.
Recording Screen (Video/Still Image)
.
A
A/B (Video (60i/60p)/Still Image)
Mode
Button
B
Media Mode Button
Switches to the media (playback) mode.
C
Recording Start/Stop Button
6
: Video Recording Start Button
7
: Video Recording Stop Button
: Still Image Recording Button
Q
D
Menu Button
E
Display Button
Simple display: Some displays
disappear after approximately 3
seconds.
Full display: Displays everything.
Switches the display between full and
simple with every tap of the button.
F
C/H (Intelligent Auto/Manual) Button
Playback Screen (Video)
.
A
A/B (Video (60i/60p)/Still Image)
Button
B
Camera Mode Button
Switches the camera (recording) mode.
C
Index Screen (Thumbnail Display)
Button
D
Delete Button
E
Menu Button
F
Operation Buttons
Playback Screen (Still Image)
.
A
A/B (Video (60i/60p)/Still Image)
Button
B
Operation Buttons
C
Camera Mode Button
Switches the camera (recording) mode.
D
Index Screen (Thumbnail Display)
Button
E
Delete Button
F
Menu Button
Mode
Mode
6
Page 7
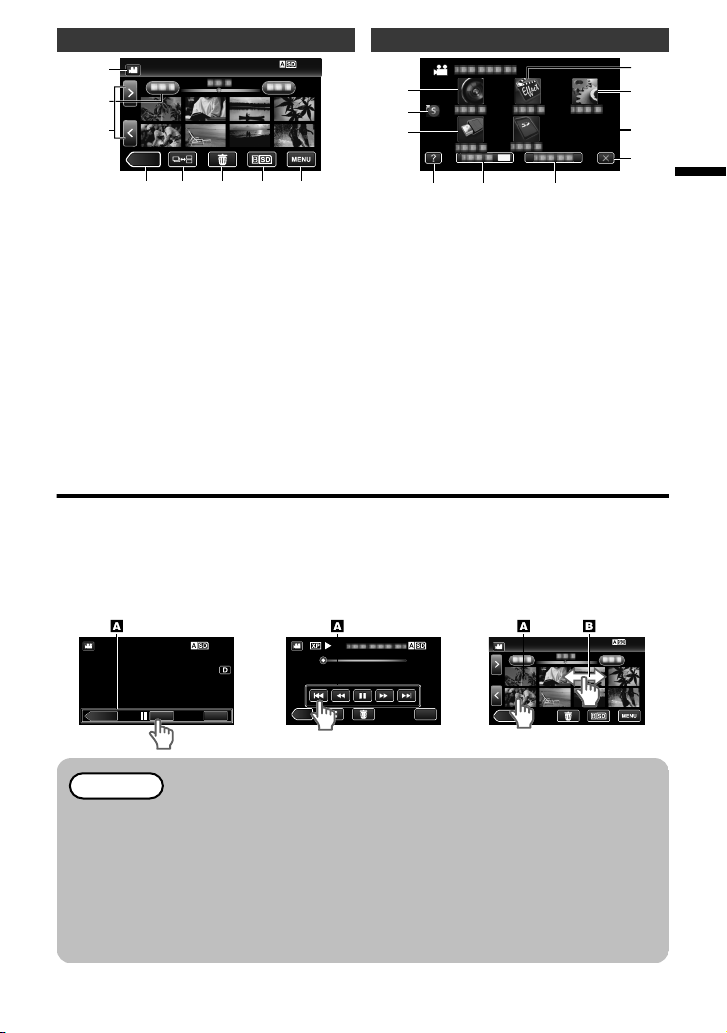
Index Screen (Thumbnail Display)
≪CAM
2
3 4 5 6 7
1
8
OFF
3
1
2
5
4
6
7
8
9
0
≪CAM
0:01:23 0:12:34
Recording Screen Playback Screen Index Screen
MENU
≪MEDIA
REC
0:01:23 0:12:34
MENU
≪CAM
Menu screen (recording mode)
.
A
A/B (Video (60i/60p)/Still Image)
Button
B
Date Button
C
Camera Mode Button
Switches the camera (recording) mode.
D
Still Image Mode Button (Still image
only)
E
Delete Button
F
Playback Media Button
Switches between the SD card slots.
G
Menu Button
H
Page Forward/Back Button
Mode
.
A
RECORD SETTING Menu
B
Shortcut Menu
C
CONNECTION SETTINGS Menu
D
Help Button
E
SILENT Button
F
INFO. Button
G
Close Button
H
MEDIA SETTINGS Menu
I
SETUP Menu
J
SPECIAL RECORDING Menu
Using the Icon Buttons/Thumbnails
There are two ways to operate the touch screen, namely “tap” and “drag”. The following
are some examples.
A
Tap the displayed button (icon) or thumbnail (file) on the touch screen to make selection.
B Drag the thumbnails on the touch screen to search for the desired file.
.
Memo
0
The touch screen of
not respond smoothly, apply slightly more force to your fingertip.
0
Do not press or rub with excessive force.
0
Do not operate the touch screen using an object with a sharp tip.
0
Pressing two or more places at a time may cause a malfunction.
0
Tap the buttons (icons) on the touch screen accurately. The buttons may not
respond if they are not tapped on the right area.
0
Perform “TOUCH SCREEN ADJUST” if the reactive area of the screen is
misaligned with the touched area.
this unit is pressure-sensitive. When the touch screen does
7
Page 8
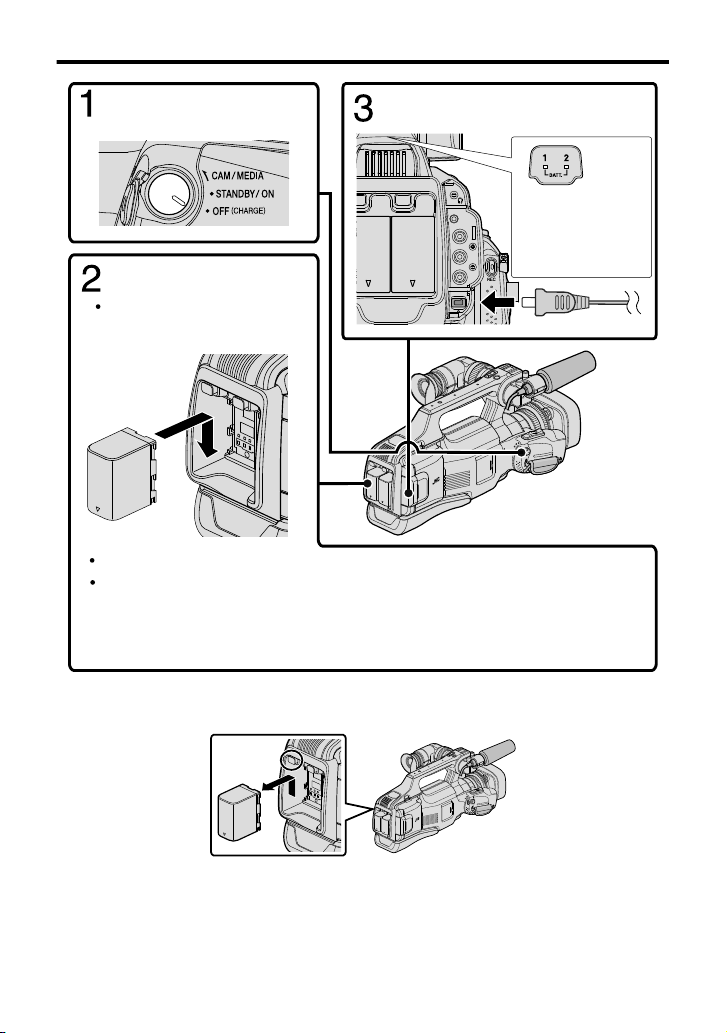
Charging the Battery Pack
TT.1 BATT.2
REMOTE
AV
DC
Charging finished:
Goes out
Set the “STANDBY/ON
OFF” switch to “OFF”.
Attach the battery pack.
Align the terminal of the
battery pack with this unit.
Either BATT.1 or BATT.2 can be charged.
If two battery packs are attached, BATT.1 is charged first. After the charging of
BATT.1 is completed, BATT.2 is charged. However, if BATT.1 is attached while
BATT.2 is being charged, BATT.1 will be charged after the charging of BATT.2 is
completed. Both battery packs cannot be charged at the same time.
Connect the DC connector and
plug in the power.
Charging Lamp1, 2
Charging in progress:
Blinks
.
0
The battery pack is not charged at the time of purchase.
0
To detach the battery
pack, press the battery lock release button, and slide the battery
pack out of this unit.
.
8
Page 9
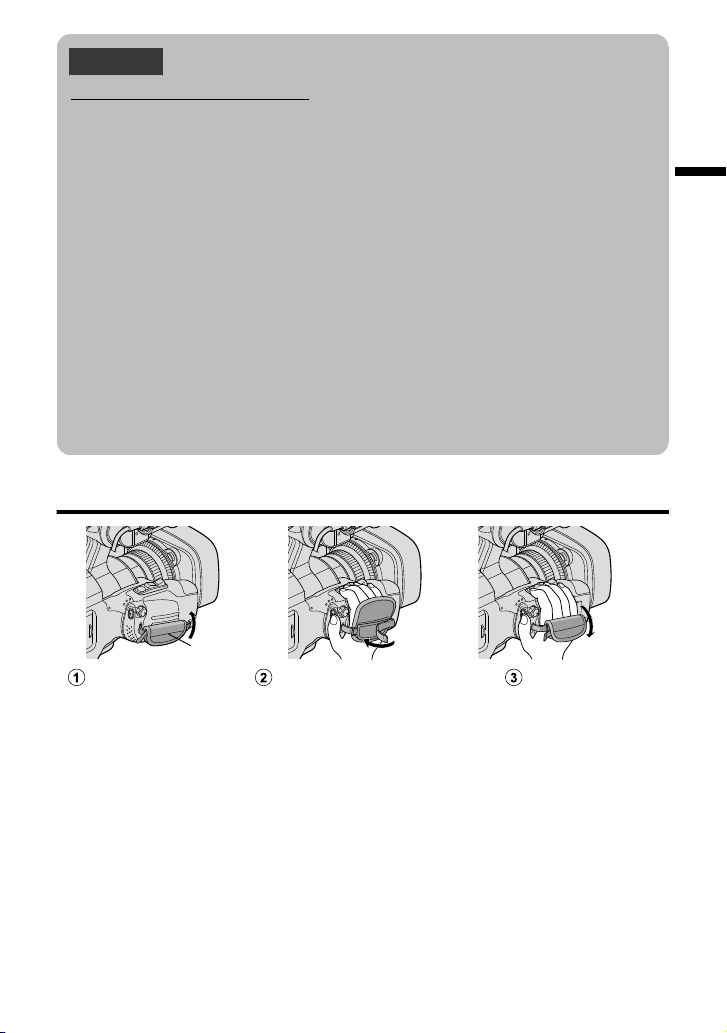
Caution
Pull back the Pad
Adjust the length of the belt
Attach the Pad
Pad
Be sure to use JVC battery packs.
0
If you use any other battery packs besides JVC battery packs, safety and
performance cannot be guaranteed.
0
If malfunctions (overcurrent, overvoltage, transmission error, etc) occur, or if any
battery manufactured other than JVC is attempted for battery charge, charging
stops. In these cases, the CHARGE lamp blinks quickly for notification.
0
You can record or play back videos while the AC adapter is connected. (Battery
charging cannot be performed during recording or playback.)
Remove the battery when the unit is to be used for a long time. Performance
of the battery may drop if it is left attached to the unit.
0
Charging time: Approx. 3 h 30 m (using supplied battery pack)
0
The charging time is when the unit is used at 25°C (77°F). If the battery pack is
charged outside the room temperature range of 10°C to 35°C (50°F to 95°F),
charging may take a longer time or it may not start. CHARGE lamp blinks 2 times
in a slow cycle for notification if the battery charge does not start. Also, please
note that the recordable and playable time may be shortened under some usage
conditions, such as at low temperature.
0
You can use this unit even if only one battery pack is attached.
Grip Belt Adjustment
.
9
Page 10

Inserting an SD Card
※
Set the “STANDBY/ON
OFF” switch to “OFF”.
Open the door.
Slide the “DOOR LOCK” lever to
the left, and pull the door
towards you.
Insert an SD card into slot A.
Label
Close the door.
After closing the door, slide the
“DOOR LOCK” lever to the right
to lock the door.
Turn off the power of this unit before
inserting or removing a SD card.
Insert a commercially available SD card before recording.
This unit comes with two SD card slots. When two SD cards are inserted and “SEAMLESS
RECORDING” in the “RECORD SETTING” menu is set to “ON”, recordings can be
continued on the other card even if one card is full or error occurs on one card.
.
o
To remove the card
Push the card inward once, then pull it out straight.
Memo
Operations are confirmed on the following SD cards.
Manufacturer Panasonic, TOSHIBA, SanDisk
Video A Class 4 or higher compatible SD card (2 GB)/
Still Image B SD card (256 MB to 2 GB) / SDHC card (4 GB to 32 GB) /
0
Using SD cards (including SDHC/SDXC cards) other than those specified
above may result in recording failure or data loss.
0
This unit is not guaranteed to operate with all SD cards, even when using the ones
specified above. Some SD cards may not work due to specification changes, etc.
0
To protect the data, do not touch the terminals of the SD card.
0
When using an SDXC card, check its compatibility with the OS of your computer
by referring to the Detailed User Guide.
10
Class 4 or higher compatible SDHC card (4 GB to 32 GB)/
Class 4 or higher compatible SDXC card (48 GB to 128 GB)
0
When recording with video quality “UXP”, Class 6 or
higher is recommended.
0
When recording in progressive
higher is required.
SDXC card (48 GB to 128 GB)
format (60p), Class 6 or
Page 11

o
REC STILLS TO SLOTS
REC VIDEO TO SLOTS
MEDIA SETTINGS
SLOT B
REC VIDEO TO SLOTS
MEDIA SETTINGS
FORMAT SD CARD
FILE
FORMATTING SLOT A
To use an SD card in SLOT B
Recording can be performed on a card
when “REC VIDEO TO SLOTS” or “REC
STILLS TO SLOTS” of “MEDIA
SETTINGS” menu is set to “SLOT B”.
A
Open the LCD monitor.
B
Tap “MENU”.
C
Tap “MEDIA SETTINGS”.
D
Tap “REC VIDEO TO SLOTS” or
“REC STILLS TO SLOTS”.
o
To use SD cards that have been
used on other devices
Format (initialize) the card using
“FORMAT SD CARD” from “MEDIA
SETTINGS”.
All data on the card will be deleted
when it is formatted. Copy all files on
the card to a PC before formatting.
A
Perform steps A - C from “To use
an SD card”.
B
Tap “FORMAT SD CARD”.
E
Tap “SLOT B”.
.
.
.
C
Tap the slot with the card to format.
D
Tap “FILE”.
.
E
Tap “YES”.
F
After formatting, tap “OK”.
11
Page 12

Clock Setting
NO
YES
SET DATE/TIME!
AM
201324 10 00
TIMEDATE
CLOCK SETTING
DEC
SET
SETUP
LANGUAGE
Set the “STANDBY/ON OFF”
1
switch to “ON”.
Open the LCD monitor.
2
.
Tap “YES” when “SET DATE/
3
TIME!” is displayed.
.
Set the date and time.
4
.
0
When the year, month, day, hour, or
minute item is tapped, “∧” and “∨” will
be displayed.
Tap “∧” or “∨” to adjust the value.
0
Repeat this step to input the year,
month, day, hour, and minute.
After setting the date and time, tap
5
SET.
Select the region where you live
6
and tap “SAVE”.
0
Time difference between the selected
city and the GMT (Greenwich Mean
Time) is displayed.
0
Tap “<” or “>” to select the city name.
To change the display language
The language on the display can be
changed.
A
Open the LCD monitor.
B
Tap “MENU”.
C
Tap “SETUP”.
D
Tap “LANGUAGE”.
.
E
Tap the desired language.
Memo
0
If “SET DATE/TIME!” appears
after the clock has been set, the
internal clock battery is drained.
For details on replacing the
battery, contact your nearest
JVC dealer or JVC service
center.
12
Page 13

Video Recording
4
H
P
A
C
A
321
Open the
lens cover.
Check if the
recording mode is
A video.
If the mode is B still
image, tap B on the
touch screen, then tap
A to switch.
Check if the recording
mode is C Intelligent
Auto.
If the mode is H Manual,
tap H on the touch
screen, then tap P to
switch.
Start
recording.
Press again
to stop.
Zooming
(Wide angle) (Telephoto)
:
( :
)60p (progressive) mode
60i (interlace) mode
You can record without worrying about the setting details by using the Intelligent Auto
mode. Settings such as exposure and focus will be adjusted automatically to suit the
shooting conditions.
Before recording an important scene, it is recommended to conduct a trial
recording.
.
0
The mode can also
button on this unit.
0
The mode can also be switched between Intelligent Auto and Manual by pressing the
“i.AUTO” button on this unit.
0
You can also tap 6 on the touch screen to record. To stop recording, tap 7.
0
The “REC” button and zoom lever on the handle can also be used.
0
To use the viewfinder during recording, close the LCD monitor.
0
To view images on the viewfinder, adjust the focus by turning the eyepiece focus lever
at the bottom of the viewfinder.
be switched between video and still image by pressing the “MODE”
13
Page 14

o
MENU
≪MEDIA
0:00:00 [0:54]
REC
Image Stabilizer
Video Quality
Recording-Standby
Recording in Progress
Seamless recording *1 /
Auto recovery recording *2
Battery 2 Indicator
Battery 1 Indicator
Recording Media
Remaining Recording Time
Scene Counter
Indications during video recording
.
*1 Seamless recording:
Automatically switches to a different media and continues recording when two SD
cards are inserted to
runs out.
*2 Auto recovery recording:
Automatically switches to a different media and continues recording when two SD
cards are inserted to this unit and there is an error in the recording media.
0
When only one SD card is being inserted, seamless recording and auto recovery
recording cannot be performed. q will appear.
The icon does not appear when “SEAMLESS RECORDING” in the “RECORD
SETTING” menu is set to “OFF”.
this unit and the remaining space on the current recording media
Memo
0
After using, slide the lens cover switch to close the lens cover.
0
The estimated recording time of the supplied battery pack is approximately 1
hour 5 minutes.
0
When recording is in progress with one battery attached, another battery can
be attached without stopping recording.
0
When 2 batteries are
be turned off if there is remaining battery power on either one or both.
0
Do not remove the AC adapter, or SD card when the access lamp is lighted.
The recorded data may become unreadable.
0
Do not turn off the camera when the access lamp is lighted. The recorded data
may become unreadable.
0
The angle of view may change when the image stabilizer is turned on or off.
0
Videos recorded in 60p mode (select “60p” in “SYSTEM SELECT”) can be
played back only by the AVCHD Progressive compatible devices.
0
While this unit may be used with the LCD monitor reversed and closed, the
temperature rises more easily. Leave the LCD monitor open when using this
unit.
0
The power may turn off to protect the circuit if the temperature of this unit rises
too much.
attached, removing one battery won’t cause the power to
14
Page 15

Still Image Recording
Check if the
recording mode is
B still image.
If the mode is A
video, tap A on the
touch screen, then
tap B to switch.
Set the focus on the subject.
Press halfway
Lights up in green
when focused
Take a still image.
Press fully
Lights up during still
image recording
.
0
Image stabilization only starts when the button is pressed halfway.
0
You can also tap Q on the touch screen to record. However, focus cannot be set by
pressing halfway.
15
Page 16

Playing Back/Deleting Files on this Unit
≪CAM
QUIT
SET
REL ALL
SEL ALL
DELETE
Ta p A or B to select the video
or still image mode.
Tap “<<MEDIA” on the touch
screen to select the playback
mode.
Tap “<<CAM” to return to the
recording mode.
Tap on the file to play back.
Ta p u to return to the index
screen.
Ta p e to pause playback.
Ta p s / t at the bottom to
select the media for playback.
Volume adjustment during
playback
+ side: Turn up
the volume
- side: turn
down the
volume
To delete unwanted files
Ta p A.
Tap on the files to delete.
A delete mark appears on the selected file.
To remove the delete mark, tap again.
Tap “SET”.
Tap “EXECUTE” when the confirmation
message appears.
Tap “OK”.
:
( :
)
60p (progressive) mode
60i (interlace) mode
Select and play back the recorded videos or still images from an index screen (thumbnail
display).
.
0
The W button on the
images that are recorded continuously within 2 seconds or with the continuous shooting
mode will be grouped together and displayed with a green frame on a separate index
screen.
The index screen changes between the normal index screen and group index screen
with every tap of the W button.
o
To capture a still image during playback
Pause the playback and press the SNAPSHOT button.
16
index screen is only displayed during still image playback. Still
Page 17

o
Usable operation buttons during playback
d / e Playback/pause Start/pause slideshow
u
Stop (returns to index screen) Stop (returns to index screen)
g
h
i
j
0
The buttons disappear after
buttons again.
Advances to the next video Advances to the next still image
Returns to the beginning of the scene Returns to the previous still
Forward search Reverse search -
k
During pause forward slow-motion / During
pause
l
During pause reverse slow-motion / During
pause press and hold to start reverse slow
playback
R
S
T
During Video Playback During Still Image Playback
image
press and hold
to start slow playback
- Rotates 90 degrees
counterclockwise
- Rotates 90 degrees clockwise
- Continuous playback of
images taken by continuous
shooting
approximately 5 seconds. Tap on the screen to display the
-
-
17
Page 18

Playing Back on TV
To HDMI
Connector
HDMI Cable
(Sold Separately)
HDMI Connector
Input
TV
AV
TV
To AV Connector
AV Cable
(Provided)
Video Input
Video Input
Audio Input (L)
Audio Input (R)
Ye l l o w
Red
White
Ye l l o w
Red
White
Preparation:
0
Turn off both camera and TV.
To connect using the HDMI connector
.
Memo
0
Use a High Speed HDMI cable.
To connect using the AV connector
Change the settings of “VIDEO OUTPUT” in “CONNECTION SETTINGS” according to
the connection.
.
Playback Operation
After the connection with TV is completed
A
Connect the AC adapter. (p. 8)
B
Turn on the camera and the TV.
C
Select the TV input switch.
D
Start playback on the camera.
18
Page 19

Copying to Computer
To USB Connector
USB Cable
(Provided)
AC Adapter To AC
Outlet (110 V to
240 V)
To USB Connector
To DC
Connector
CONNECT TO PC
TYPE TO CONNECT
SELECT DEVICE
SELECT DEVICE
You can read and copy the files on the SD
card by connecting this unit to a computer
using a USB cable.
Connect the USB cable and the AC
1
adapter.
.
A
Connect using the provided USB
cable.
B
Connect the AC adapter to this
unit.
C
Turn on the camera.
0
Be sure to use the supplied JVC AC
adapter.
0
The “SELECT DEVICE” menu
appears.
Tap “CONNECT TO PC”.
2
.
Windows
Select “Computer” (Windows
Vista) / “My Computer” (Windows
XP) / “Computer” (Windows
the “Start” menu, then click on the
3
“JVCCAM_SD” icon.
Mac Computer
Double-click on the “No Name”
icon, then click on the
“JVCCAM_SD” icon.
0
Open the folder with the desired files.
(p. 20)
Copy the files to any folder in the
4
computer (desktop, etc).
7) from
19
Page 20

Disconnecting this Unit from Computer
Click
No Name
Tra s h
[JVCCAM_SD] [DCIM]
[AVCHD] [BDMV]
[STREAM]
[BACKUP]
[CLIPINF]
[PLAYLIST]
[INDEX.BDM]
[MOVIEOBJ.BDM]
[EXTMOV]
[PRIVATE]
MOV_0001.MTS
MOV_0002.MTS
MOV_0003.MTS
…
…
**XXX.MTS
[JVC]
PIC_0001.JPG
PIC_0002.JPG
PIC_0003.JPG
[100JVCSO]
[101JVCSO]
[102JVCSO]
(SD Card)
(Still Image Folder)
(Management Information)
(Still Image File)
(Video File)
(Video files with defective management information)
**: Unique Number
(Last 2 Digits of Unit Serial
Number)
(Windows)
Click “Safely Remove Hardware
1
and Eject Media”.
Disconnecting this Unit from Computer
(Mac Computer)
Throw the “No Name” icon into the trash
can.
.
.
Click “Safely Remove USB Mass
2
Storage Device”.
(For Windows Vista) Click “OK”.
3
Disconnect the USB cable from the
4
computer.
List of Files and Folders
Folders and files are created in the SD card as shown below.
They are created only when necessary.
.
Caution
0
When the camera and PC are connected by an USB cable, recorded media
are read-only.
20
Page 21

Changing Menu Settings
REC
≪MEDIA
MENU
OFF
To change camera settings, tap [MENU]
and select the item which you want to
change.
Tap “MENU”.
1
.
Tap the desired menu.
2
.
0
“SILENT”: sets the camera to “silent
mode”.
“INFO.”: displays “remaining recording
time”.
0
Tap F
to display “shortcut menu”.
Tap the desired item to change the
3
settings.
0
Tap 0 or 1 to scroll the screen.
0
Tap “∧” or “∨” to scroll the screen.
o
To exit the screen
Tap “L”.
o
To return to the previous screen
Tap “J”.
(Icon type screen)
.
(List type screen)
.
21
Page 22

Troubleshooting
If you encounter problems with this unit, check the following before requesting service.
1 Refer to “Trouble” below.
2 Refer to the “Troubleshooting” section in the “Detailed User Guide”.
If you have difficulties operating the unit, refer to the detailed descriptions in the
“Detailed User Guide”.
3 This unit is a microcomputer-controlled device. Electrostatic discharge, external
noise and interference (from a TV, a radio, etc.) might prevent it from functioning
properly.
In such a case, reset the unit.
A
Turn off the power.
B
Remove
on the power.
4 If the above do not solve the problem, consult your nearest JVC dealer or JVC
service center.
the AC adapter
Trouble
Trouble Action Page
POWER/CHARGE
lamp starts blinking
when the power is
turned off.
Power supply
Recording cannot be
performed.
and battery pack from this unit, reattach them, turn
0
The battery pack is being charged. 8
0
Check the A/B button. 13
0
Set to the recording
the “<<CAM” button.
mode by tapping
16
Recording stops
automatically.
Recording
Unable to record
properly in the
Intelligent Auto mode.
Sound or video is
interrupted.
Playback
22
0
Turn off this unit,
turn it on again. (This unit stops
automatically to protect the circuit
when the temperature rises.)
0
Recording stops automatically after
12 hours of continuous recording.
0
When there are multiple
and depending on the shooting
conditions, exposure and focus may
not be adjusted correctly in the
Intelligent Auto mode. In this case,
adjust the settings manually.
0
Sometimes playback is interrupted
the connecting section between two
scenes. This is not a malfunction.
wait for a while, and
light sources
-
-
-
at
-
Page 23

0
Check the remaining battery power.
(When the battery pack is fully
charged, the lamp does not flash.)
The lamp does not flash
during battery pack
charging.
Other Problems
This unit heats up.
0
When charging in either
environment, ensure that battery is
being charged within the permitted
temperature range. (Otherwise,
charging may stop to protect the
battery pack.)
0
This is not a malfunction. (This unit
may become warm when used for a
long time.)
a hot or cold
Warning Indications
Warning Indications Action Page
0
Turn off and on this unit again. -
0
If the above does not solve the
RECORDING FAILURE
DATA RECORDED FILE IS
TOO SMALL TO BE
Warning Indications
MEMORY CARD ERROR!
SAVED
problem, back up your files and
execute “FORMAT SD CARD” in the
“MEDIA SETTINGS” menu. (All data
will be deleted.)
0
When “TIME-LAPSE RECORDING”
is stopped with the recorded time
less than “0:00:00:17”, the video will
not be saved.
0
Turn off and on this unit again. -
0
Remove the AC adapter and battery
pack, then remove and re-insert the
SD card.
0
Remove any dirt from the SD card
terminals.
0
If the above does not solve the
problem, back up your files and
execute “FORMAT SD CARD” in the
“MEDIA SETTINGS” menu. (All data
will be deleted.)
8
-
8
-
-
-
-
-
-
23
Page 24

Cautions
Troubleshooting Recording Medium
•
•
Be sure to follow the guidelines below
to prevent corruption or damage to your
recorded data.
•
Do not bend or drop the recording medium,
When formatting or erasing data using
the camcorder, only the file administration
information is changed. The data is not
completely erased from the recording medium.
If you want to completely erase all of the data,
we recommend either using commercially
available software that is specially designed for
that purpose, or by physically destroying the
camcorder with a hammer etc.
or subject it to strong pressure, jolts or
vibrations.
•
Do not splash the recording medium with water.
•
Do not use, replace, or store the recording
medium in locations that are exposed to
strong static electricity or electrical noise.
•
Do not turn off the camcorder power or
remove the battery or AC adapter during
shooting, playback, or when otherwise
accessing the recording medium.
•
Do not bring the recording medium near
objects that have a strong magnetic fi eld or
that emit strong electromagnetic waves.
•
Do not store the recording medium in locations
with high temperature or high humidity.
•
Do not touch the metal parts.
LCD Monitor
•
To prevent damage to the LCD monitor, DO
NOT
... push it strongly or apply any shocks.
... place the camcorder with LCD monitor on the
bottom.
•
To prolong service life
... avoid rubbing it with coarse cloth.
Battery Pack
The supplied battery pack is a
lithium-ion battery. Before using
the supplied battery pack or an
optional battery pack, be sure
to read the following cautions:
•
To avoid hazards
... do not burn.
... do not short-circuit the terminals. Keep it away
from metallic objects when not in use. When
transporting, make sure the provided battery cap
is attached to the battery. If the battery cap is
misplaced, carry the battery in a plastic bag.
... do not modify or disassemble.
... do not expose the battery to temperatures
exceeding 60°C
(140°F)
, as this may cause the
battery to overheat, explode or catch fi re.
... use only specifi ed chargers.
•
To prevent damage and prolong service life
... do not subject to unnecessary shock.
... charge within the temperature range of 10°C
to 35°C
(50°F to 95°F)
. Cooler temperatures
require longer charging time, or in some cases
stop charging at all. Warmer temperatures prevent
complete charging, or in some cases stop charging
at all.
... store in a cool, dry place. Extended exposure
to high temperatures will increase natural
discharge and shorten service life.
keep a 30% battery level ( ) if the battery pack is
not to be used for a long period of time. In addition,
fully charge and then fully discharge the battery
pack every 6 months, then continue to store it at
a 30% battery level ( ).
...
... remove from charger or powered unit when not
in use, as some machines use current even
when switched off.
... do not drop or subject to strong impact.
While the LCD monitor screen and viewfinder
have more than 99.99% effective pixels, 0.01%
of the pixels may be bright spots (red, blue,
green) or dark spots. This is not a malfunction.
The spots will not be recorded.
Terminals
ATTENTION:
The product you have purchased
is powered by a rechargeable
battery that is recyclable.
Please call 1-800-8-BATTERY for
information on how to recycle this
battery.
(USA and Canada only)
.
24
Page 25

Main Unit
•
For safety, DO NOT
... open the camcorder’s chassis.
... disassemble or modify the unit.
... allow infl ammables, water or metallic objects to
enter the unit.
... remove the battery pack or disconnect the
power supply while the power is on.
... leave the battery pack attached when the
camcorder is not in use.
... place naked fl ame sources, such as lighted
candles, on the apparatus.
... expose the apparatus to dripping or splashing.
... leave dust or metal objects adhered to the
power plug or an AC wall outlet.
... insert any objects in the camcorder.
•
Avoid using the unit
... in places subject to excessive humidity or dust.
... in places subject to soot or steam such as near
a cooking stove.
... in places subject to excessive shock or vibration.
... near a television set.
... near appliances generating strong magnetic
or electric fi elds (speakers, broadcasting
antennas, etc.).
... in places subject to extremely high (over 40°C
or
104°F
) or extremely low (under 0°C
or 32°F
)
temperatures.
•
DO NOT leave the unit
... in places of over 50°C
(122°F).
... in places where humidity is extremely low
(below 35%) or extremely high (above 80%).
... in direct sunlight.
... in a closed car in summer.
... near a heater.
... in high places such as on a TV. Leaving the unit
in high places while a cable is connected may
result in a malfunction if the cable is caught and
the unit falls onto the floor.
•
To protect the unit, DO NOT
... allow it to become wet.
... drop the unit or strike it against hard objects.
... subject it to shock or excessive vibration during
transportation.
... keep the lens directed at extremely bright
objects for long periods.
... expose the lens to direct sunlight.
... swing it excessively when using the hand strap.
... swing the soft camcorder case excessively
when the camcorder is inside it.
... store the camcorder in a dusty or sandy area.
•
To prevent the unit from dropping,
•
Fasten the grip belt securely.
•
When using the camcorder with a tripod,
attach the camcorder to the tripod securely.
If the camcorder drops, you may be injured and
the camcorder may be damaged.
When a child uses the unit, there must be
parental guidance.
... cover camcorder with a towel, cloth and so on.
Changes or modifications not approved by JVC
could void the user’s authority to operate the
equipment. This equipment has been tested
and found to comply with the limits for a Class A
digital device, pursuant to Part 15 of the FCC
Rules.
These limits are designed to provide reasonable
protection against harmful interference when
the equipment is operated in a commercial
environment.
This equipment generates, uses, and can
radiate radio frequency energy and, if not
installed and used in accordance with the
instructions, may cause harmful interference to
radio communications. Operation of this
equipment in a residential area is likely to cause
harmful interference in which case the user will
be required to correct the interference at his
own expense.
CAN ICES-3 A/NMB-3 A
This device complies with Part 15 of FCC Rules.
Operation is subject to the following two conditions:
(1) This device may not cause harmful interference,
and (2) this device must accept any interference
received, including interference that may cause
undesired operation.
.
25
Page 26

Recordable Time/Number of Images
Approximate Video Recording Time
Quality
60p 15 m 35 m 1 h 10 m 2 h 30 m 3 h 50 m 5 h 10 h 10 m
UXP 20 m 40 m 1 h 20 m 2 h 50 m 4 h 10 m 5 h 40 m 11 h 30 m
XP 30 m 1 h 2 h 4 h 6 h 8 h 10 m 16 h 20 m
SP 40 m 1 h 20 m 2 h 50 m 5 h 50 m 8 h 30 m 11 h 30 m 23 h 10 m
EP 1 h 40 m 3 h 30 m 7 h 10 m 14 h 40 m 21 h 30 m 28 h 50 m 57 h 50 m
SSW 1 h 20 m 2 h 40 m 5 h 30 m 11 h 20 m 16 h 40 m 22 h 20 m 44 h 50 m
SEW 2 h 50 m 5 h 40 m 11 h 30 m 23 h 30 m 34 h 30 m 46 h 10 m 92 h 40 m
0
The approximate recording time
depending on the shooting environment.
Approximate Number of Still Images (Unit: Number of Shots)
4000x3000 (12M) (4:3) 500 1100 2200 4500
2816x2112 (5.9M) (4:3) 1100 2200 4500 9200
2048x1536 (3.1M) (4:3) 2100 4200 8500 9999
1920x1080 (2.1M) (16:9) 3100 6500 9999 9999
Approximate Recording Time (Using Battery)
BN-VF815U 1 h 15 m 2 h 25 m
BN-VF823U (supplied) 1 h 50 m 3 h 30 m
0
The battery pack is not charged at the time of purchase.
0
The actual recording time is an estimated length of time when operations such as to
start/stop recording, turning on/off the power, zooming are performed. It may be
shortened in the actual
times the expected recording time.)
0
The above are values when “MONITOR BRIGHTNESS” is set to “3” (standard), and
“SYSTEM SELECT” is set to 60i.
4 GB 8 GB 16 GB 32 GB 48 GB 64 GB 128 GB
Image Size
640x480 (0.3M) (4:3) 9999 9999 9999 9999
Battery Pack Actual Recording Time Continuous Recording Time
use. (It is recommended to prepare battery packs ready for three
SDHC/SDXC card
is only a guide. The actual recording time may shorten
SDHC Card
4 GB 8 GB 16 GB 32 GB
26
Page 27

Specifications
Informação sobre eliminação de baterias
■ Para Brasil
Este produto não deverá ser eliminado como lixo doméstico em geral.
Devolva a bateria velha ao comerciante ou para a rede autorizada, para que seja devolvida
ao fabricante ou importador.
A reciclagem e eliminação de lixo em uma maneira adequada, ajudarão para preservar
recursos, prevenindo, ao mesmo tempo, contra efeitos prejudiciais sobre a nossa saúde e
o meio ambiente.
Para Retirar a Bateria Recarregável
Pressione botão e puxe a bateria para fora.
Camera
Power supply Using AC adapter: DC 11 V, Using battery pack: DC 7.2 V
Power consumption 3.6 W (when “MONITOR BRIGHTNESS” is set to “3” (standard))
Dimensions (mm) 227 mm x 232 mm x 472 mm (8-15/16" x 9-3/16" x 18-5/8") (W x H
Mass Approx. 2.9 kg (6.4 lbs) (camera only),
The specifications and appearance of this product are subject to changes for further
improvement without prior notice.
For more information, please refer to the Detailed User Guide.
Rated Current Consumption : 1A
x D: excluding grip belt)
Approx. 3.1 kg (6.9
attached)
lbs) (when 2pcs of the battery BN-VF823U are
.
27
Page 28

.
©2013 JVC KENWOOD Corporation
*LYT2647-001A-M*
0513HOH-SW-VM
U
 Loading...