

Page 1
DVD RECEIVER WITH MONITOR KW-AVX708/KW-AVX700
ENGLISH
中
配備屏幕的
DVD
接收機
EXTRA MONITOR CONTROL
DVD / RECEIVER CONTROL
SOURCE
BAND
DUAL
2nd VOL
SHIFT
RM-RK240
MODE MENU
ATT
–100
ASPECT
VOL
SETUP
ASPECT
ZOOM
+10
+100
DIRECT
–10
OSD
123
+
DISC
MENUTOP M
456
ENTER
7809
–
DISC
RETURN
SURROUND
KW-AVX708/KW-AVX700
For installation and connections, refer to the separate manual.
有關安裝和連接方法,分別參閱操作手冊。
文
INSTRUCTIONS
使用說明書
LVT1469-010B
[UF]
Page 2

Thank you for purchasing a JVC product.
Please read all instructions carefully before operation, to ensure your complete understanding and
to obtain the best possible performance from the unit.
IMPORTANT FOR LASER PRODUCTS
ENGLISH
1. CLASS 1 LASER PRODUCT
2. CAUTION: Do not open the top cover. There are no user serviceable parts inside the unit; leave
all servicing to qualified service personnel.
3. CAUTION: Visible and invisible laser radiation when open and interlock failed or defeated.
Avoid direct exposure to beam.
4. REPRODUCTION OF LABEL: CAUTION LABEL, PLACED OUTSIDE THE UNIT.
How to reset your unit
• Your preset adjustments will also be erased.
For safety...
• Do not raise the volume level too much, as
this will block outside sounds, making driving
dangerous.
• Stop the car before performing any
complicated operations.
How to forcibly eject a disc
NO EJECT?
EMERGENCY EJECT?
NO EJECT?
EMERGENCY EJECT?
• If this does not work, reset the unit.
Temperature inside the car...
If you have parked the car for a long time in hot
or cold weather, wait until the temperature in
the car becomes normal before operating the
unit.
2
Page 3
WARNINGS:
To prevent accidents and damage
• DO NOT install any unit in locations where;
– it may obstruct the steering wheel and
gearshift lever operations.
– it may obstruct the operation of safety devices
such as air bags.
– it may obstruct visibility.
• DO NOT operate the unit while driving.
If you need to operate the unit while driving, be
sure to look ahead carefully.
• The driver must not watch the monitor while
driving.
CONTENTS
Introduction ............................................. 4
•
Before operating the unit ............................... 5
OPERATIONS
Basic operations
• Control panel ............................................. 7
•
Remote controller (RM-RK240) ......................... 8
Listening to the radio ................................ 10
Disc operations ......................................... 13
Dual Zone operations ................................ 24
SD operations ........................................... 27
ENGLISH
Cautions on the monitor:
• The monitor built in this receiver has
been produced with high precision, but
it may have some ineffective dots. This is
inevitable and is not malfunction.
• Do not expose the monitor to direct
sunlight.
• Do not touch the surface of the liquid
crystal panel directly.
• When the temperature is very cold or very
hot...
– Chemical changes occur inside, causing
malfunction.
– Pictures may not appear clearly or
may move slowly. Pictures may not
be synchronized with the sound or
picture quality may decline in such
environments.
This product incorporates copyright
protection technology that is protected
by U.S. patents and other intellectual
property rights. Use of this copyright
protection technology must be authorized
by Macrovision, and is intended for home
and other limited viewing uses only unless
otherwise authorized by Macrovision.
Reverse engineering or disassembly is
prohibited.
EXTERNAL DEVICES
Listening to the CD changer ....................... 29
Listening to the iPod®/D. player ................. 31
Listening to other external components ..... 32
SETTINGS
Sound equalization ................................... 33
Assigning titles to the sources .................... 34
Menu operations ...................................... 35
Maintenance ............................................ 43
More about this unit ................................. 44
Troubleshooting ....................................... 47
Specifications ........................................... 50
<MENU> language
In this manual, English is used as the
<MENU> language for explanation
purposes. You can change the <MENU>
language to Chinese using the “Language”
setting (☞ page 37).
• Once you have selected Simplified Chinese
or Traditional Chinese, Chinese folder/file
names and tag data can be displayed on the
built-in monitor.
3
Page 4
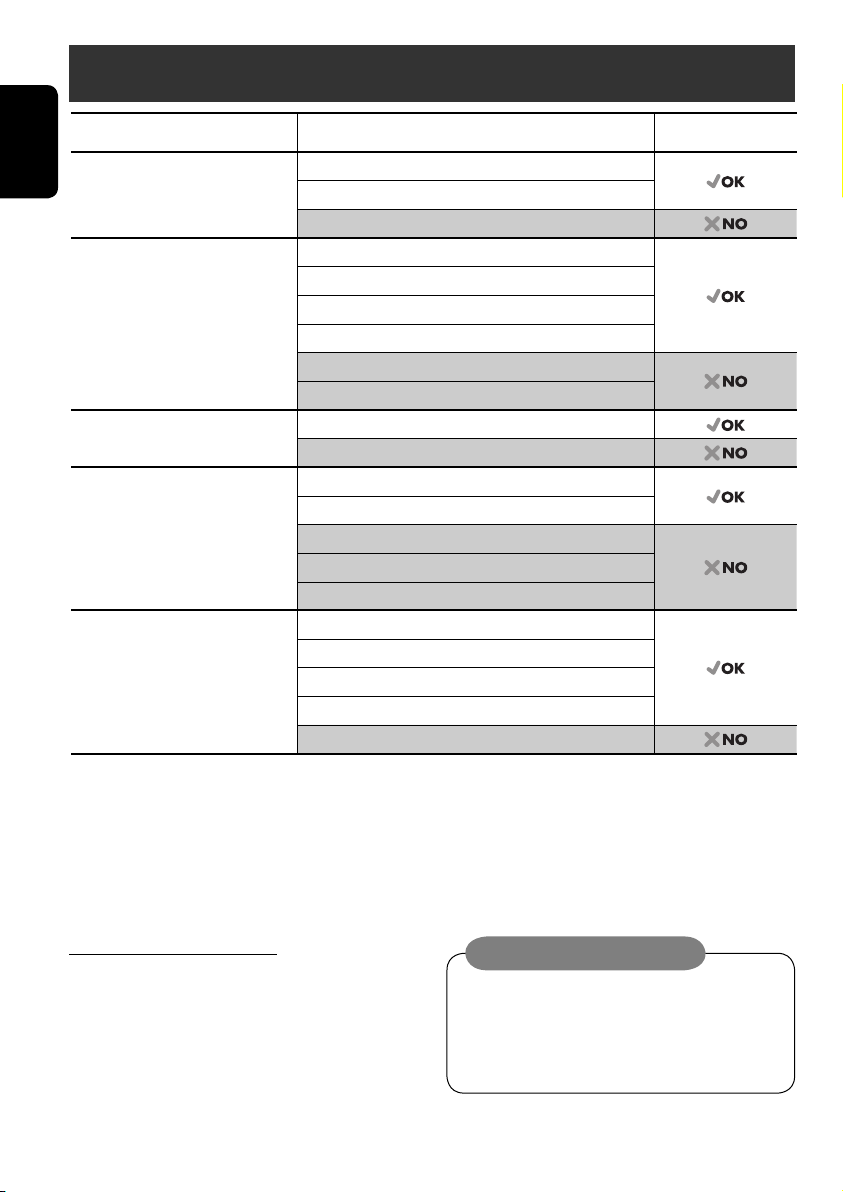
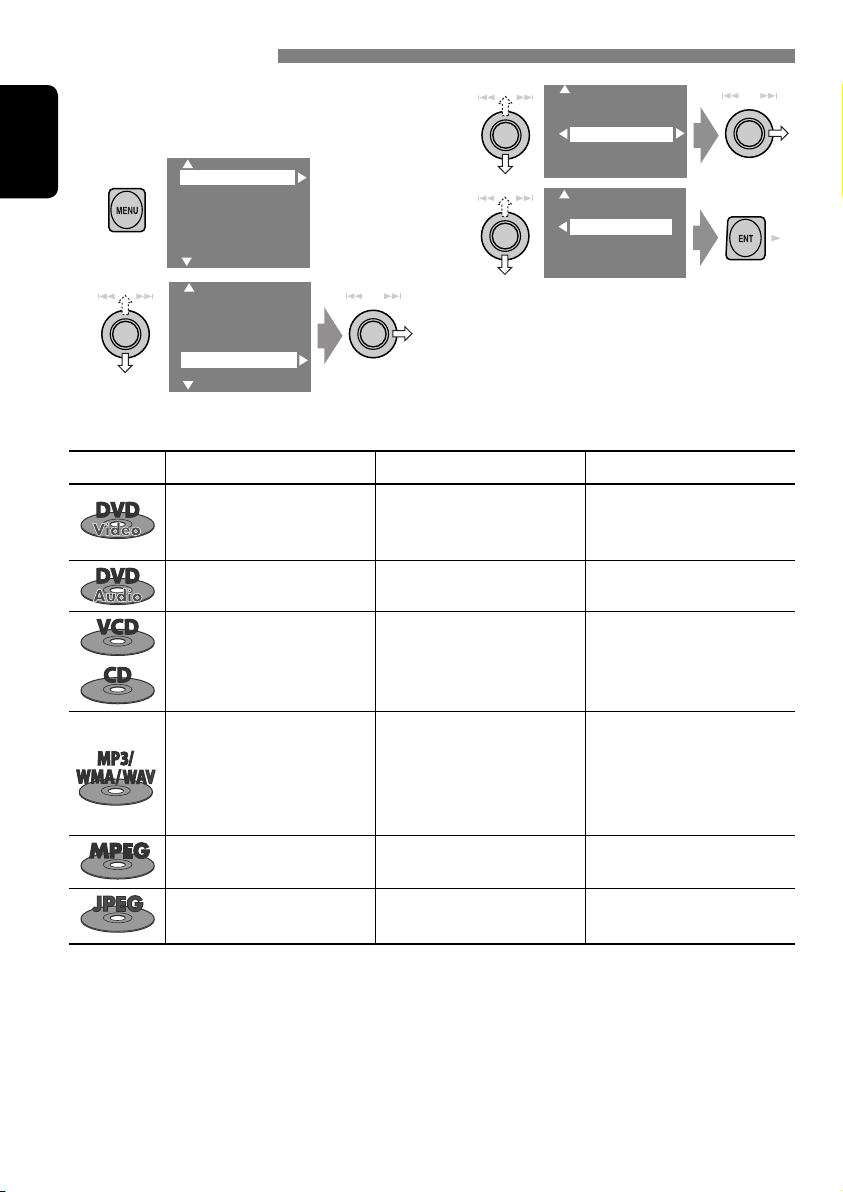
Introduction
Disc type Recording format, file type, etc. Playable
DVD DVD Video
ENGLISH
DVD Recordable/Rewritable
(DVD-R*1/-RW, +R/+RW*2)
• Compliant to UDF bridge format
• DVD-RAM cannot be played.
Dual Disc DVD side
CD/VCD Audio CD/CD Text (CD-DA), DTS-CD
CD Recordable/Rewritable
(CD-R/-RW)
• Compliant to ISO 9660 level 1,
level 2, Romeo, Joliet
1
*
DVD-R recorded in multi-border format is also playable (except for dual layer discs).
2
*
It is possible to play back finalized +R/+RW (Video mode only) discs. However, the use of +R double layer disc is not recommended.
DVD Audio
DVD-ROM
DVD Video
MPEG1/MPEG2
JPEG
MP3/WMA/WAV
DivX/MPEG4
DVD-VR, +VR
Non-DVD side
VCD (Video CD)
SVCD (Super Video CD)
CD-ROM
CD-I (CD-I Ready)
CD-DA
MPEG1/MPEG2
JPEG
MP3/WMA/WAV
DivX/MPEG4
• “DVD Logo” is a trademark of DVD Format/Logo Licensing Corporation registered in the US, Japan and other countries.
Notice for DualDisc playback
The Non-DVD side of a “DualDisc” does
not comply with the “Compact Disc Digital
Audio” standard. Therefore, the use of NonDVD side of a DualDisc on this product is not
recommended.
Caution on volume setting:
Discs produce very little noise compared
with other sources. Lower the volume
before playing a disc to avoid damaging
the speakers by the sudden increase of the
output level.
4
Page 5
Note on Region Code:
DVD players and DVD Video discs have
their own Region Code numbers. This unit
can only play back DVD discs whose Region
Code numbers include “6.”
If you insert a DVD Video disc of an
incorrect Region Code
“Region Error Please Eject” appears on the
monitor.
ENGLISH
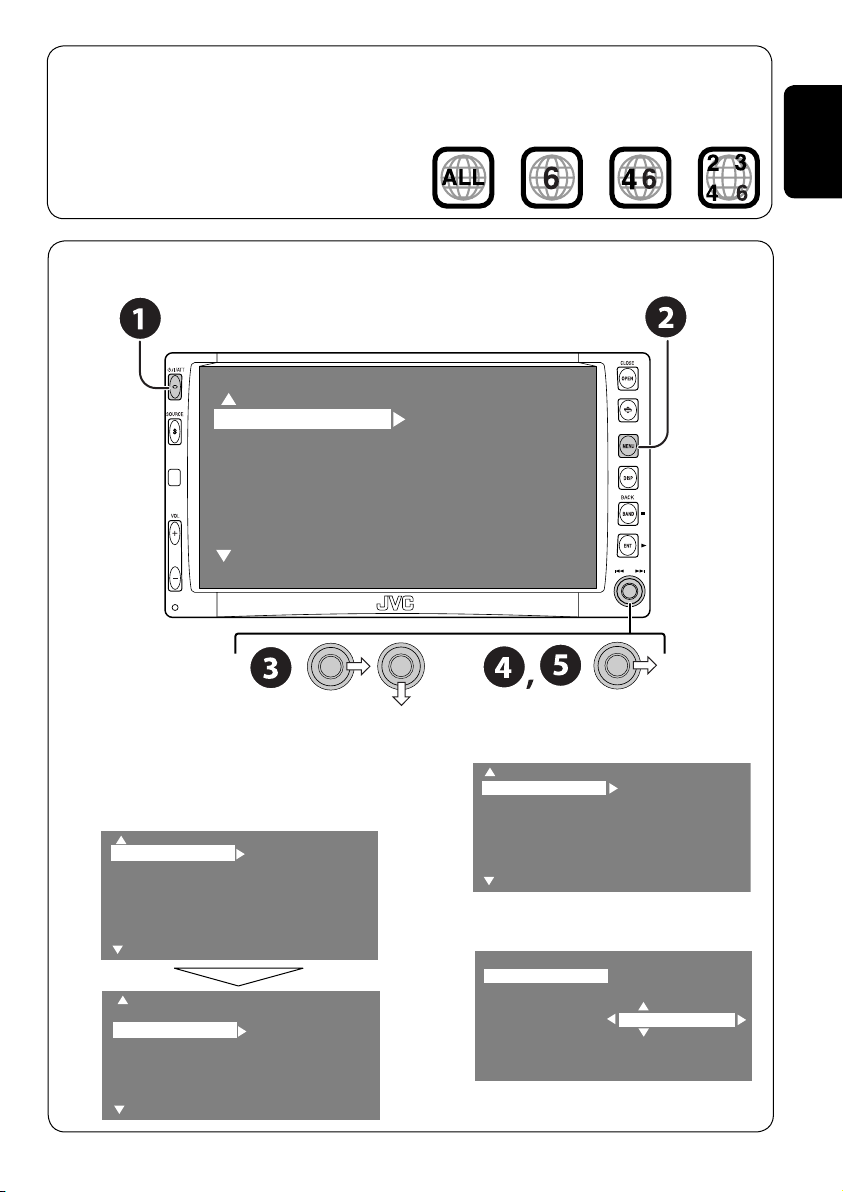
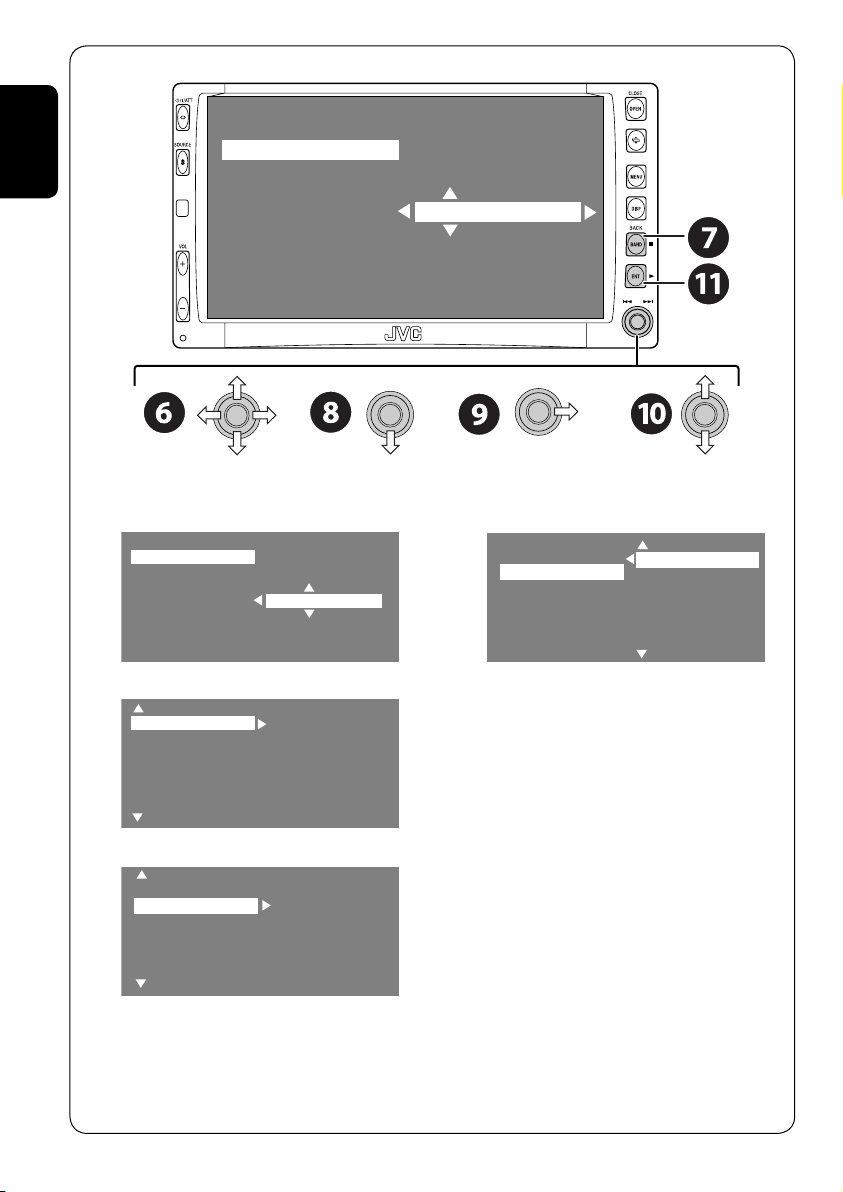
Before operating the unit—Set the clock
MENU
Setup
Disc Surround
Equalizer
Sound
Mode
List
~ Turn on the power.
Ÿ Display the <MENU>.
! Select <Setup> ]<Clock>.
Setup
Disc Surround
Equalizer
Sound
Mode
List
Display
Clock
Disc Setup 1
Disc Setup 2
Tuner
Input
Display
Clock
Disc Setup 1
Disc Setup 2
Tuner
Input
Time Set
12Hours/24Hours
• See also page 35.
Display
Clock
Disc Setup 1
Disc Setup 2
Tuner
Input
⁄ Display the <Clock> menu.
Time Set
12Hours/24Hours
1:00 AM
@ Select <Time Set>, then activate the
<Time Set> screen.
Time Set
12Hours/24Hours
1:00 AM
Continued on the next page
5
Page 6
ENGLISH
Time Set
12Hours/24Hours
1:00 AM
¤ Set the clock time.
Time Set
12Hours/24Hours
3:45 PM
# Return to the <Clock> menu.
Time Set
12Hours/24Hours
3:45 PM
‹ Select <12Hours/24Hours>.
Time Set
12Hours/24Hours
12 Hours
24 Hours
$ Activate the <12Hours/24Hours> screen.
Time Set
12Hours/24Hours
12 Hours
24 Hours
› Select either the 12-hour or 24-hour
system.
% Finish the procedure.
6
Page 7
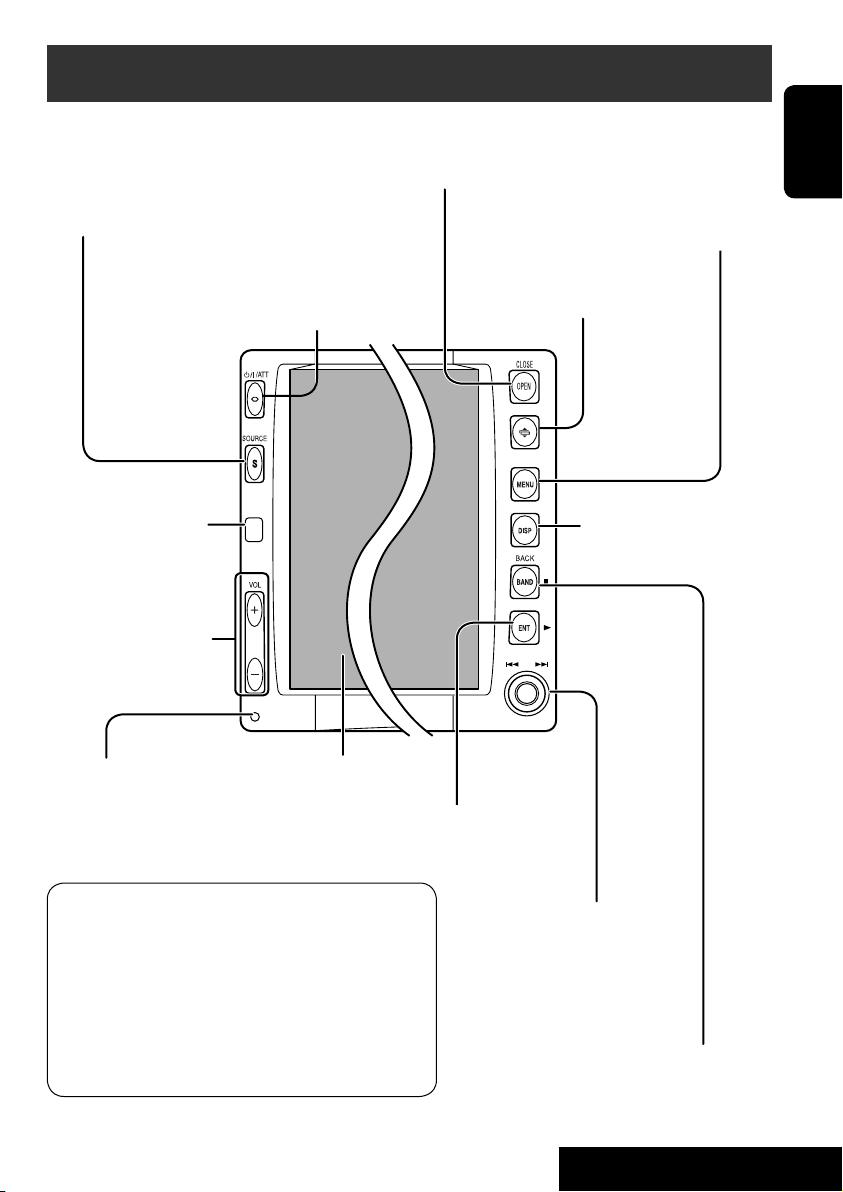
Basic operations — Control panel
Select the source.
TUNER = DISC (DVD/VCD/CD) = SD =CD-CH, iPod,
D.PLAYER, or EXT-IN = AV-IN =(back to the beginning)
• You cannot select these sources if they are not
ready.
• Turn on the power.
• Turn off the power [Hold].
• Attenuate the sound (if the power is on).
Remote sensor
Adjust the volume.
Open and close the monitor panel.
• When the monitor panel is open, you can
insert a disc and an SD card.
Display or erase <MENU>*1.
Change the monitor panel angle.
Change the display
information.
ENGLISH
Reset the unit.
• Use only when the internal
system malfunctions.
Display window
• DISC: Start playing.
• On menus: Enter.
*1 <MENU> screens
You can use the menus to set up various settings.
The <MENU> screen consists of the following
sub-menus—Setup/Disc Surround/Equalizer/Sound/
Mode/List/DualZone.
• For details, see pages 35 to 42.
• You can also change the <MENU> language
to either Simplified Chinese or Traditional
Chinese. See “Language” on pages 37.
• TUNER: Search for stations.
• DISC: Select chapters/tracks.
• On menus: Select items.
• iPod/D.PLAYER: Select tracks.
7
• TUNER: Select the bands.
• DISC: Stop playing.
• On menus: Back.
OPERATIONS
Page 8
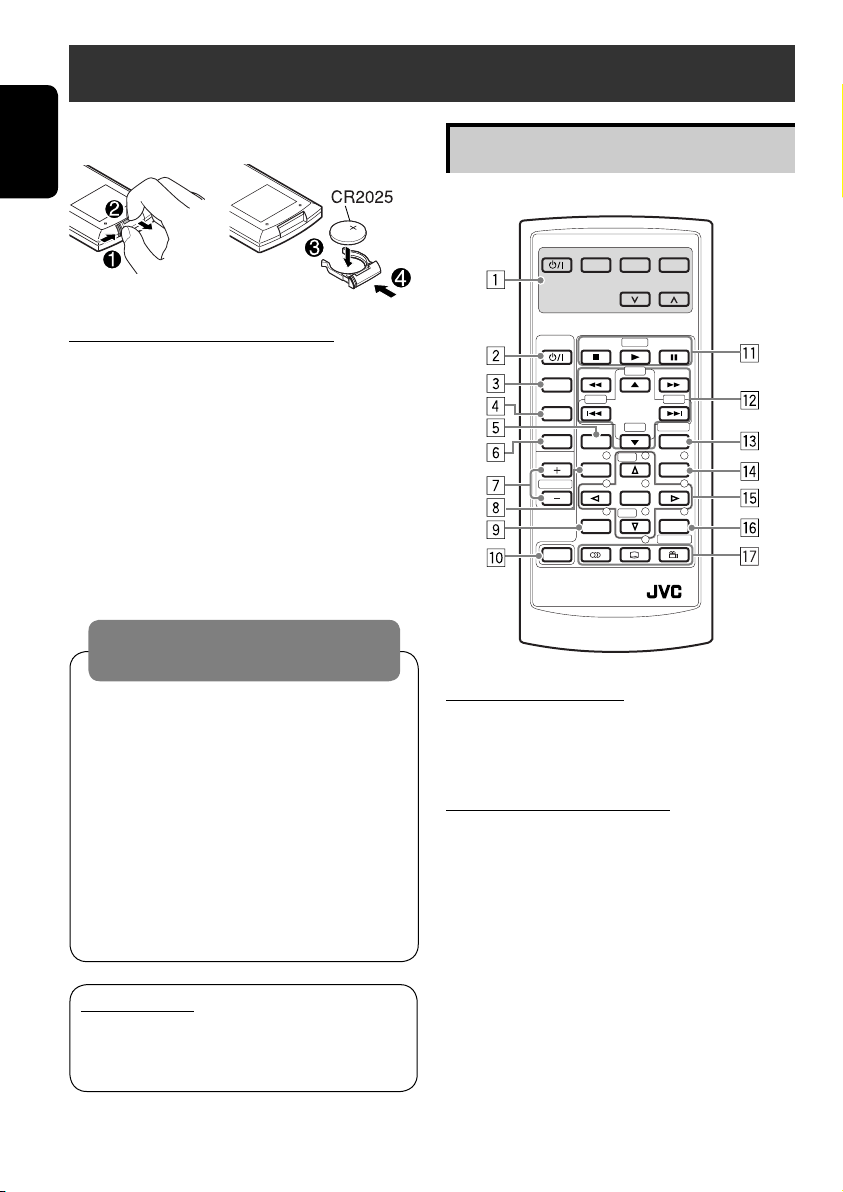
Basic operations — Remote controller (RM-RK240)
Installing the lithium coin battery (CR2025)
ENGLISH
Main elements and features
EXTRA MONITOR CONTROL
MODE MENU
ASPECT
Before using the remote controller:
• Aim the remote controller directly at the
remote sensor on the unit.
• DO NOT expose the remote sensor to bright
light (direct sunlight or artificial lighting).
Warning:
To prevent accidents and damage
• Do not install any battery other than
CR2025 or its equivalent.
• Store the battery in a place where children
cannot reach.
• Do not recharge, short, disassemble, or
heat the battery or dispose of it in a fire.
• Do not leave the battery with other
metallic materials.
• Do not poke the battery with tweezers or
similar tools.
• Wrap the battery with tape and insulate
when throwing away or saving it.
IMPORTANT:
If Dual Zone is activated (☞ page 24),
the remote controller functions only for
operating the DVD/CD player.
DVD / RECEIVER CONTROL
ATT
SOURCE
BAND
DUAL
VOL
2nd VOL
SHIFT
RM-RK240
ZOOM
+10
–100
DIRECT
–10
ASPECT
123
+
DISC
MENUTOP M
456
ENTER
7809
–
DISC
SETUP
RETURN
SURROUND
+100
OSD
MONITOR CONTROL
1 Monitor control buttons
• Used for a JVC monitor—KV-MR9010,
or KV-MH6510.
DVD/RECEIVER CONTROL
2 • Turns on the power.
• Attenuates the sound if the power is on.
• Turns off the power if pressed and held
(while the power is on).
3 Selects the source.
4 Selects the FM/AM bands.
5 Changes the aspect ratio of the playback
pictures.
6 Activates or deactivates Dual Zone.
7 Adjusts the volume level.
• Also functions as 2nd VOL button when
pressed with SHIFT button (☞ page 24)
8*1 • DVD: Shows the disc menu.
• VCD: Resumes PBC playback
(☞page 19).
8
.
Page 9

9*1 Not used as SETUP button for this
receiver.
p SHIFT button
q 7 (stop), 3 (play), 8 (pause)
• 3 (play) also function as ZOOM button
when pressed with SHIFT button (☞
page 20).
•
Not applicable for CD changer operations.
w*2 For advanced disc operations:
• 5 / ∞
DVD: Selects the titles.
Other discs except CD: Selects the
folders.
• 4 / ¢: reverse skip/forward skip
• 1 / ¡: reverse search/forward
search
For FM/AM tuner operations:
• 5 / ∞:
Changes the preset stations.
• 4 / ¢:
– Functions to search for stations.
Press briefly: auto search
Press and hold: manual search
For Apple iPod
/JVC D. player
®
operations:
• ∞: Pauses/stops or resumes playback.
• 5: Enters the main menu (then
5/∞/4 / ¢ work as the menu
selecting buttons).*
3
• 4 / ¢ (in menu selecting mode)
– Selects an item if pressed briefly. (Then,
press ∞ to confirm the selection.)
– Skips 10 items at a time if pressed and
held.
e Shows the on-screen bar.
• Also functions as DIRECT button when
pressed with SHIFT button (☞ pages 18
to 20).
1
r*
• DVD: Shows the disc menu.
• VCD: Resumes PBC playback
(☞page 19).
1
t*
• Makes selection/settings.
• ~: Skips back or forward by 5 minutes
for MPEG.
• DISC +/– buttons: Changes discs for
“CD-CH.”
y*1 RETURN button
u • DVD: Selects audio language
(
), subtitles ( )*1, angle ( ).
• VCD: Selects audio channel (
•
(angle) also functions as
).
SURROUND button when pressed with
SHIFT button (☞page 21).
1
*
Functions as number buttons when pressed
with SHIFT button.
–
TUNER: Selects preset station.
–
DISC: Selects chapter/title/group/folder/
track.
2
*
Functions as +10/–10/+100/–100 buttons
when pressed with SHIFT button.
3
*
5 : Returns to the previous menu.
∞ : Confirms the selection.
How to select a number
To select a number from 0 – 9:
To select a number greater than 9:
• +100/–100 buttons used only for searching
for tracks whose number is greater than 99.
ENGLISH
9
OPERATIONS
Page 10
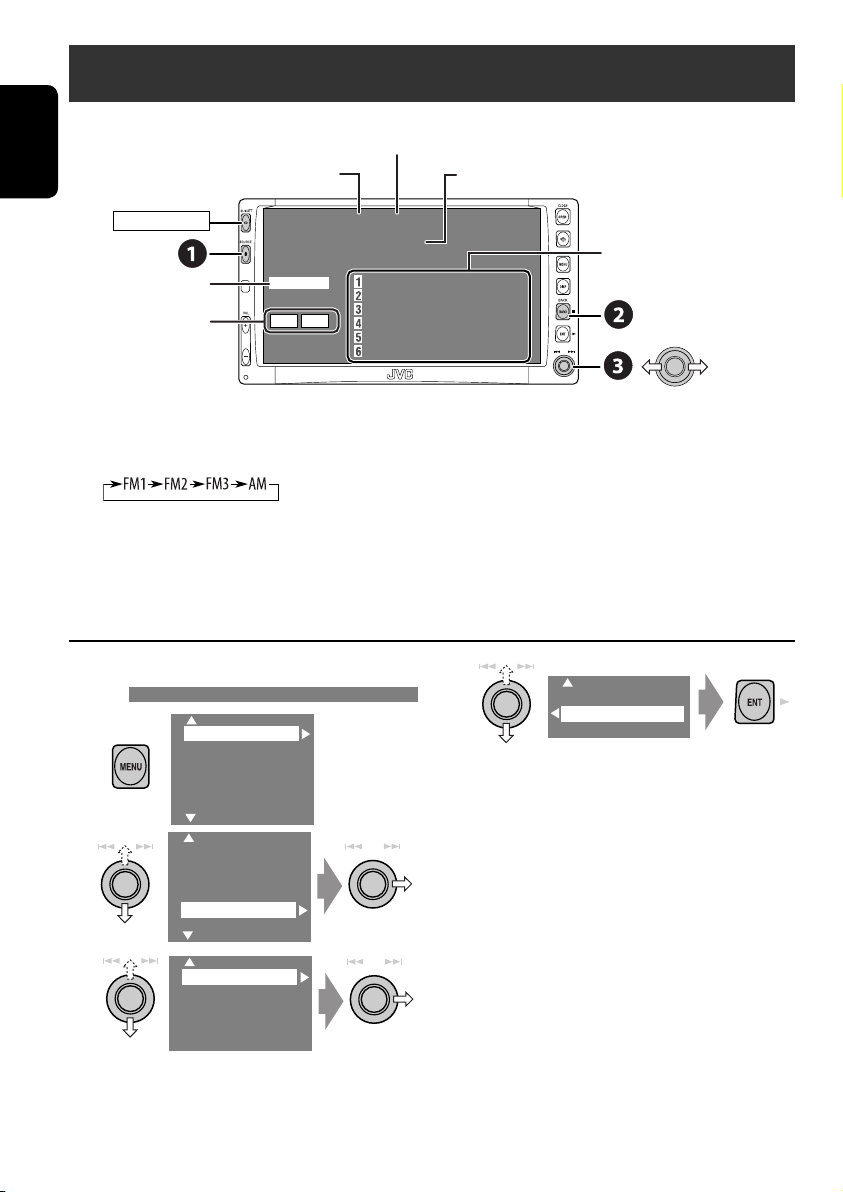
Listening to the radio
Preset No.
Assigned station name. If no name is assigned,
“NO NAME” appears.
Preset list—frequency/
assigned station names
ENGLISH
POWER]ON
Tuner indicators
☞ page 33.
Band
TUNER
FLAT
MO LO
3: 45 PM
FM1 P1
ABC Radio
87.5 MHz
87.5 MHz ABC Radio
88.3 MHz DEF FM
88.7 MHz GHI Radio
91.5 MHz JVC FM
93.1 MHz JKL Radio
95.3 MHz MNO FM
~ Select “TUNER.”
Ÿ Select the bands.
! Search for a station—Auto Search.
• Manual Search: Hold either to left or right until “Manual Search” appears on the display, then
push it repeatedly.
• The ST indicator lights up when receiving an FM stereo broadcast with sufficient signal
strength.
When an FM stereo broadcast is hard to
receive
1
Setup
Disc Surround
Equalizer
Sound
Mode
List
4
Off
On
Reception improves, but stereo effect will be
lost.
• The MO indicator lights up.
2
3
Setup
Disc Surround
Equalizer
Sound
Mode
List
Mono
DX/Local
SSM
Title Entry
To restore stereo effect, select “Off” in step 4.
10
Page 11

Tuning in to stations with sufficient signal
strength
This function works only for FM bands.
Once you have activated this function (selected
“Local”), it always works when searching for FM
stations.
1
Setup
Disc Surround
Equalizer
Sound
Mode
List
2
Setup
Disc Surround
Equalizer
Sound
Mode
List
3
Mono
DX/Local
SSM
Title Entry
4
DX
Local
FM station automatic presetting —SSM
(Strong-station Sequential Memory)
This function works only for FM bands.
You can preset six stations for each band.
1
2
Setup
Disc Surround
Equalizer
Sound
Mode
List
3
Setup
Disc Surround
Equalizer
Sound
Mode
List
4
Mono
DX/Local
SSM
Title Entry
Local FM stations with the strongest signals
are searched and stored automatically in the
FM band.
ENGLISH
Only stations with sufficient signal strength
will be detected.
• The DX indicator goes off, then the LO
indicator lights up.
11
OPERATIONS
Page 12
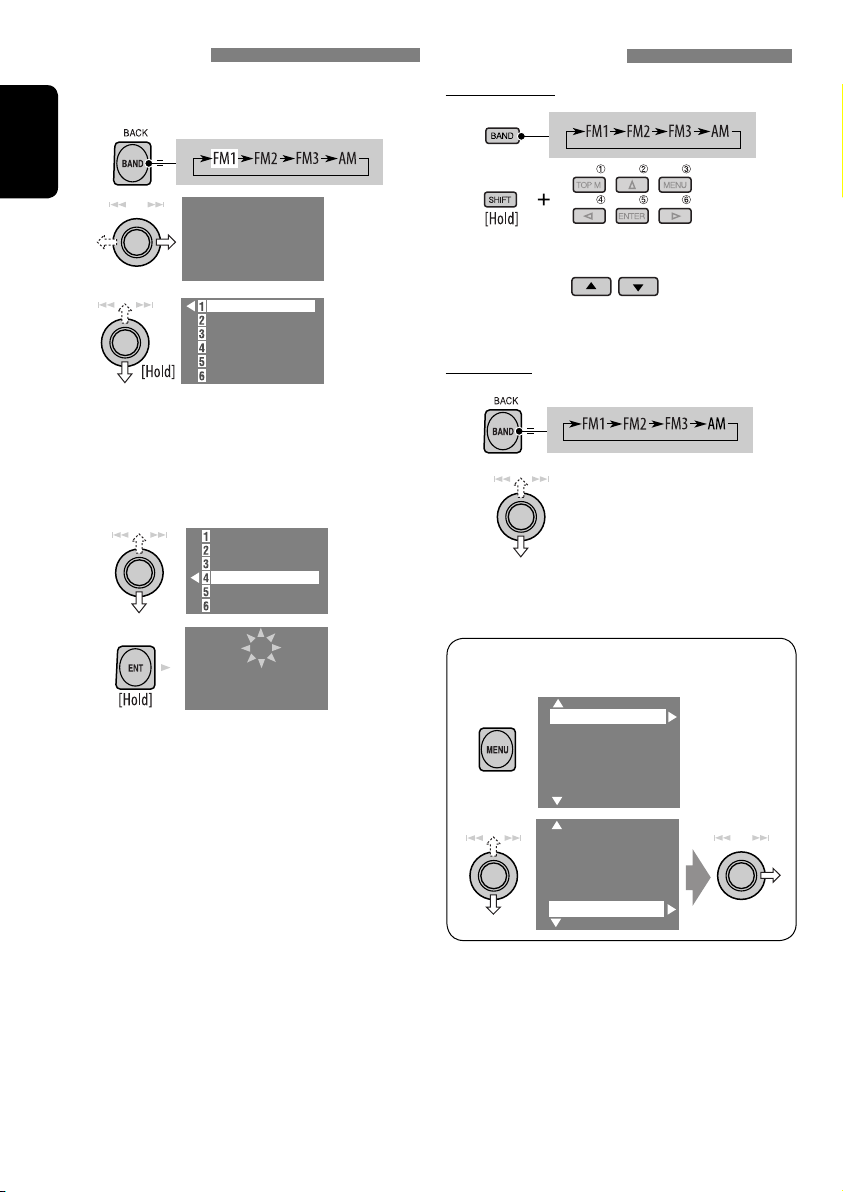
Manual presetting
Ex.: Storing FM station of 92.5 MHz into preset
number 4 of the FM1 band.
1
ENGLISH
2
FM1
NO NAME
92.5 MHz
3
87.5 MHZ
88.3 MHz
88.7 MHz
91.5 MHz
93.1 MHz
95.3 MHz
• Each time you keep pushing up or down
the knob, you can change the FM bands.
• Preset List can also be accessed through
<MENU> = <List> (☞ right).
4
Select a preset number.
87.5 MHZ
88.3 MHz
88.7 MHz
91.5 MHz
93.1 MHz
95.3 MHz
5
FM1 P4
NO NAME
92.5 MHz
Selecting preset stations
On the remote:
1
2
or
On the unit:
1
2
• Preset List can also be accessed through
<MENU> = <List>.
Setup
Disc Surround
Equalizer
Sound
Mode
List
12
Setup
Disc Surround
Equalizer
Mode
List
Page 13
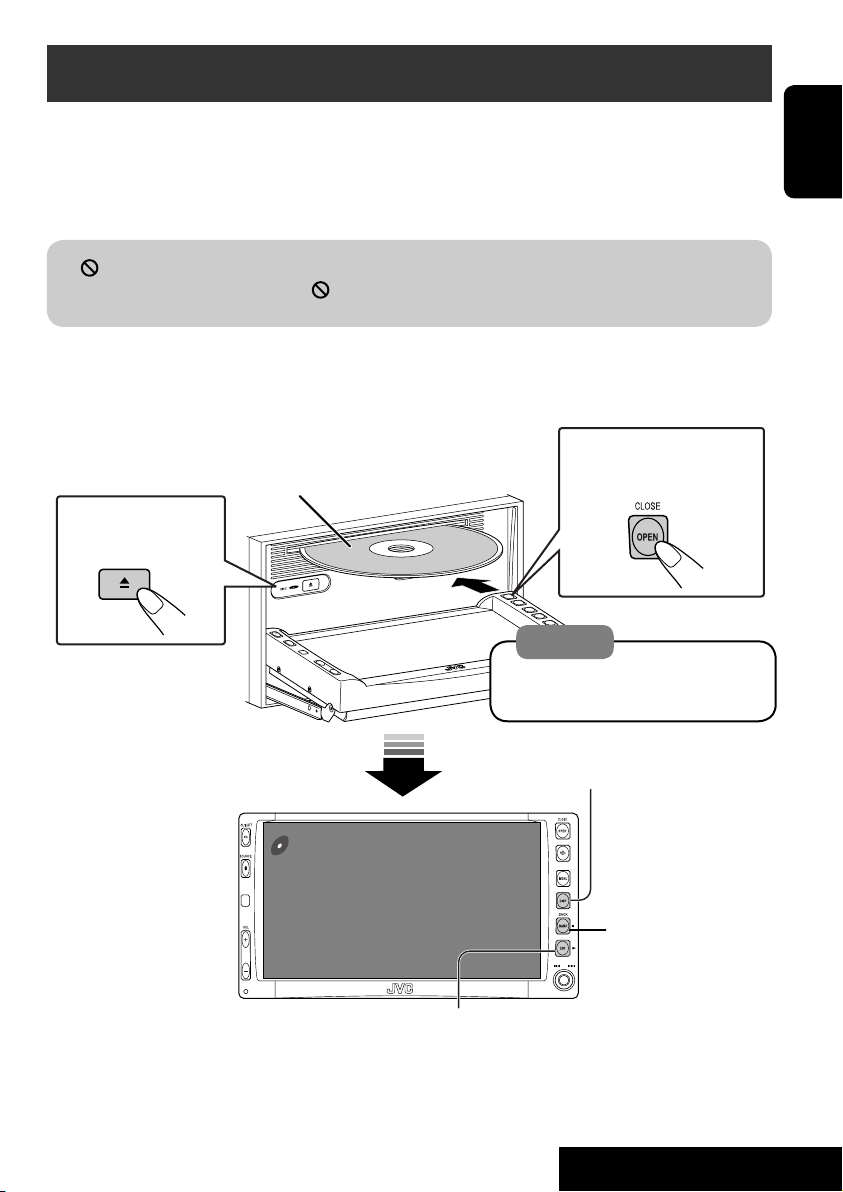
Disc operations
Now Reading...
DISC
3: 45 PM
The disc type is automatically detected, and playback starts automatically (for some discs: automatic
start depends on its internal program).
If a disc does not have any disc menu, all tracks in it will be played repeatedly until you change the
source or eject the disc.
” appears on the monitor, the unit cannot accept the operation you have tried to do.
If “
• In some cases, without showing “
,” operations will not be accepted.
Open the monitor panel and insert the disc.
Playback starts automatically.
To open/close the
Label side
monitor panel
To eject the disc
Caution:
Do not place your finger behind the
monitor panel.
DISP: Press if no playback picture appears , but disc
information (☞ pages 14 and 15) screen is displayed.
ENGLISH
3: Start playback if necessary.
(For DVD: 10-second review if pressed during play.)
13
7: Stop.
OPERATIONS
Page 14
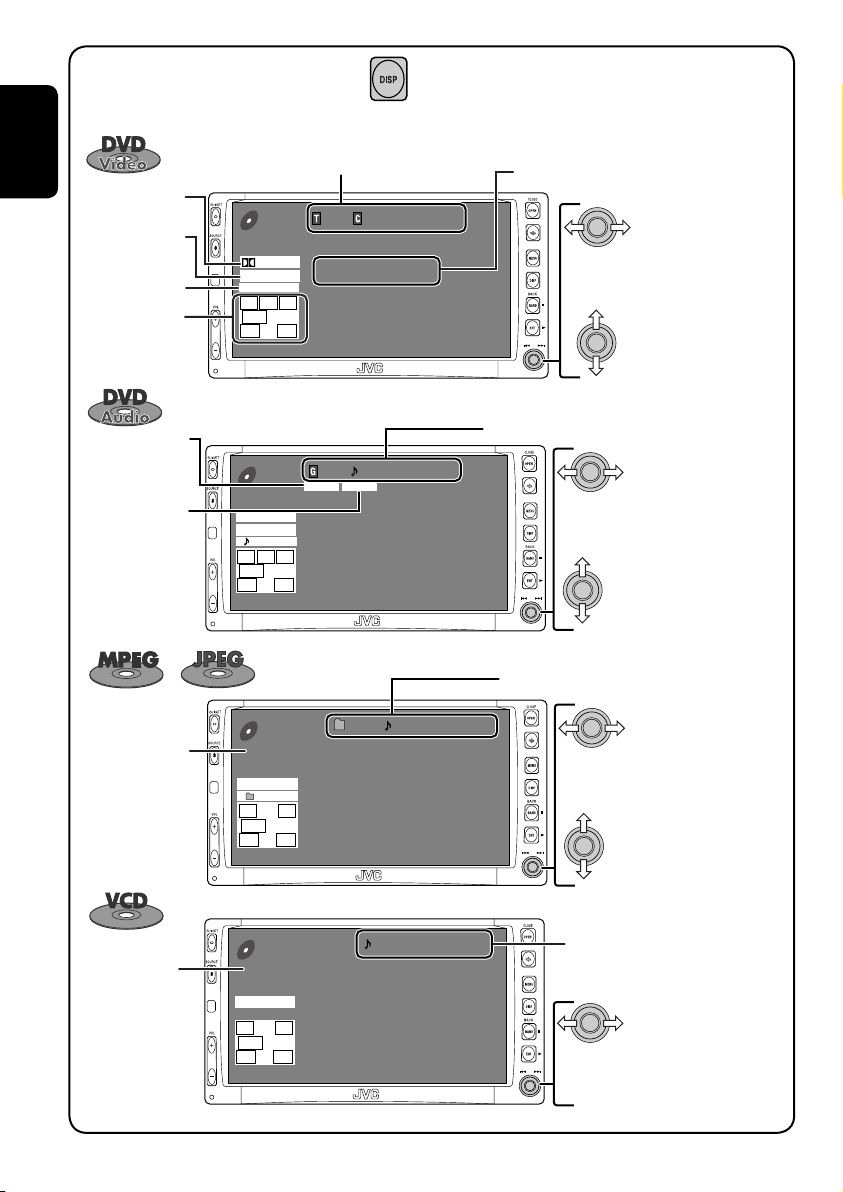
While playing the following discs, press .
01 01 0:00:12
Current folder Name
Current file name.mpg
Next file name.mpg
Next file name.mpg
Next file name.mpg
Next file name.mpg
Next file name.mpg
Next file name.mpg
CD
MPEG
3: 45 PM
FLAT
REPEAT
L R
SW
LS RS
• Each time you press the button, playback
picture and disc information screens
(with/without level meter) appear in turn.
ENGLISH
Audio format
Surround/
sound mode
Playback mode
Speaker/signal
indicators
(☞ page 44)
BONUS indicator
(☞ page 20)
B.S.P. indicator
(☞ page 20)
Title no./Chapter no./Play time
DVD
VIDEO
DIGITAL
MULTI
CHAP.RPT
L C R
SW LFE
LS RS
3: 45 PM
DVD
AUDIO
PPCM
MULTI
REPEAT
L C R
SW LFE
LS RS
3: 45 PM
01 01 0:00:12
48kHz 24Bit 3/2.1
01 01 0:00:12
BONUS B.S.P
96kHz 24Bit 3/2.1
Sampling frequency/Bit rate/Recorded
signal channels
Press: Select chapter
Hold: Reverse/forward search*
Press: Select title
Group no./Track no./Play time
Press: Select track
Hold: Reverse/forward search*
Press: Select group
For MPEG: Folder no./Track no./Play time
For JPEG: Folder no./Track no.
1
1
lights up when
Disc type
PBC indicator
PBC is in use.
VCD
PBC
FLAT
L R
SW
LS RS
3: 45 PM
01 0:00:12
14
Press: Select track
Hold: For MPEG: Reverse/forward
2
search*
Press: Select folder
Hold: Display Folder List
Track no./Play time
Press: Select track
Hold: Reverse/forward search*
1
Page 15
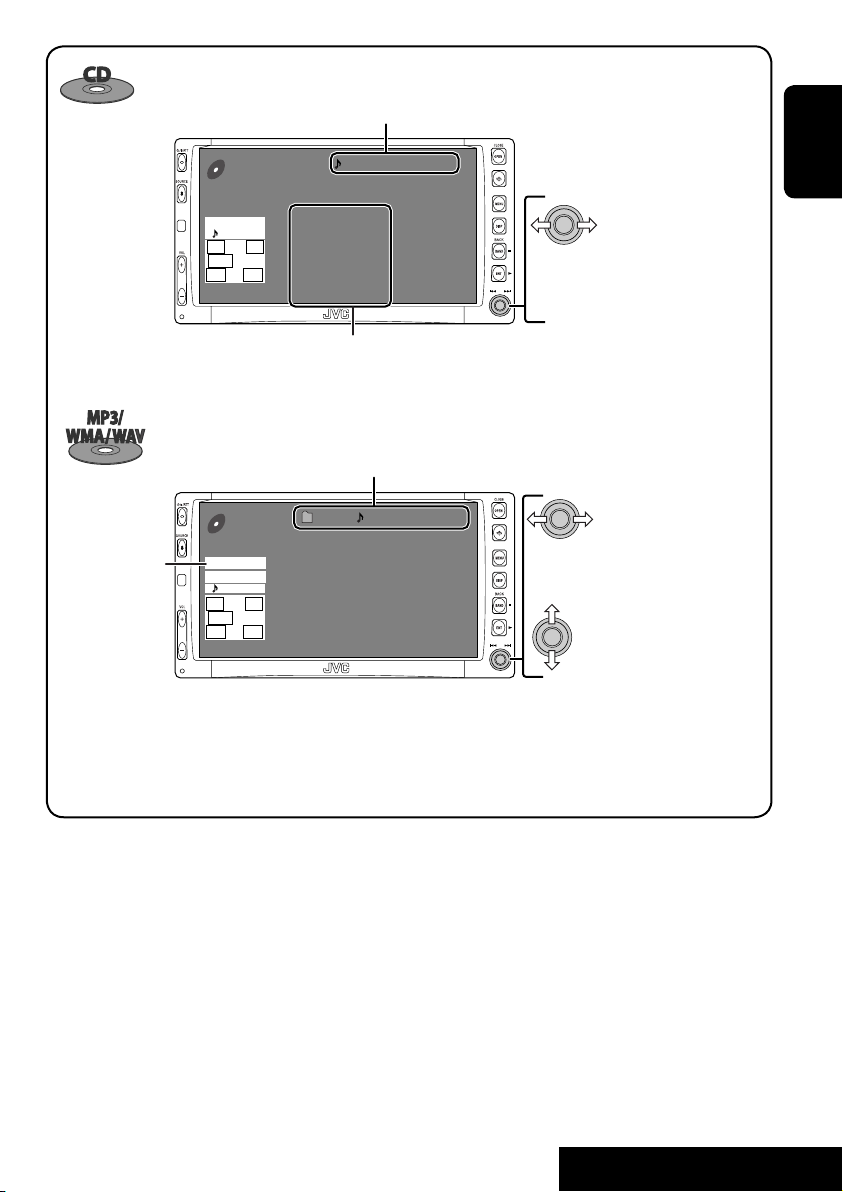
Track no./Play time
Audio format
(MP3/WMA/WAV)
CD
FLAT
REPEAT
L R
SW
LS RS
3: 45 PM
CD
MP3
FLAT
REPEAT
L R
SW
LS RS
3: 45 PM
01 0:00:12
Disc Title
Current track Title
Next track title
Next track title
Next track title
Next track title
Next track title
Next track title
Next track list (only for CD Text)
• “NO NAME” appears if no title is assigned
Folder no./Track no./Play time
01 01 0:00:12
Current folder Name
Current file name.mp3
Next file name.mp3
Next file name.mp3
Next file name.mp3
Next file name.mp3
Next file name.mp3
Next file name.mp3
Press: Select track
Hold: Reverse/forward search*
1
or recorded.
Press: Select track
Hold: Reverse/forward search*
1
Press: Select folder
Hold: Display Folder List
• Tag data will be shown instead of folder/
file names when they are recorded (with
“Tag Display” set to “On” ☞ page 36).
ENGLISH
1
*
Search speed: x2 ] x10.
2
*
Search speed: ¡1 ] ¡2.
• Microsoft and Windows Media are either registered
trademarks or trademarks of Microsoft Corporation in the
United States and/or other countries.
15
OPERATIONS
Page 16
Selecting playback modes
You can use only one of the following playback
modes—Intro/Repeat/Random.
Ex. To select Track Repeat
1
ENGLISH
2
Setup
Disc Surround
Equalizer
Sound
Mode
List
Setup
Disc Surround
Equalizer
Sound
Mode
List
Disc type Intro Repeat Random
Chapter: Repeats current
—
Title: Repeats current title
— Track: Repeats current track —
3
Off
Intro
Repeat
Random
4
Off
Track
Folder
When one of the playback modes is
selected, the corresponding indicator lights
up on the disc information screen.
To cancel, select “Off” in step 3 or 4.
chapter
—
Track: Plays the first 15
seconds of each track (for
VCD: PBC not in use)
Track: Plays the first 15
seconds of each track
Folder: Plays the first 15
seconds of the first track of
each folder
—
—
Track: Repeats current track
(for VCD: PBC not in use)
Track: Repeats current track
Folder: Repeats all tracks of the
current folder
Track: Repeats current track
Folder: Repeats current folder
Folder: Repeats current folder
16
Disc: Randomly plays all tracks
(for VCD: PBC not in use)
Folder: Randomly plays all
tracks of current folder,
then tracks of next folders
Disc: Randomly plays all tracks
—
—
Page 17
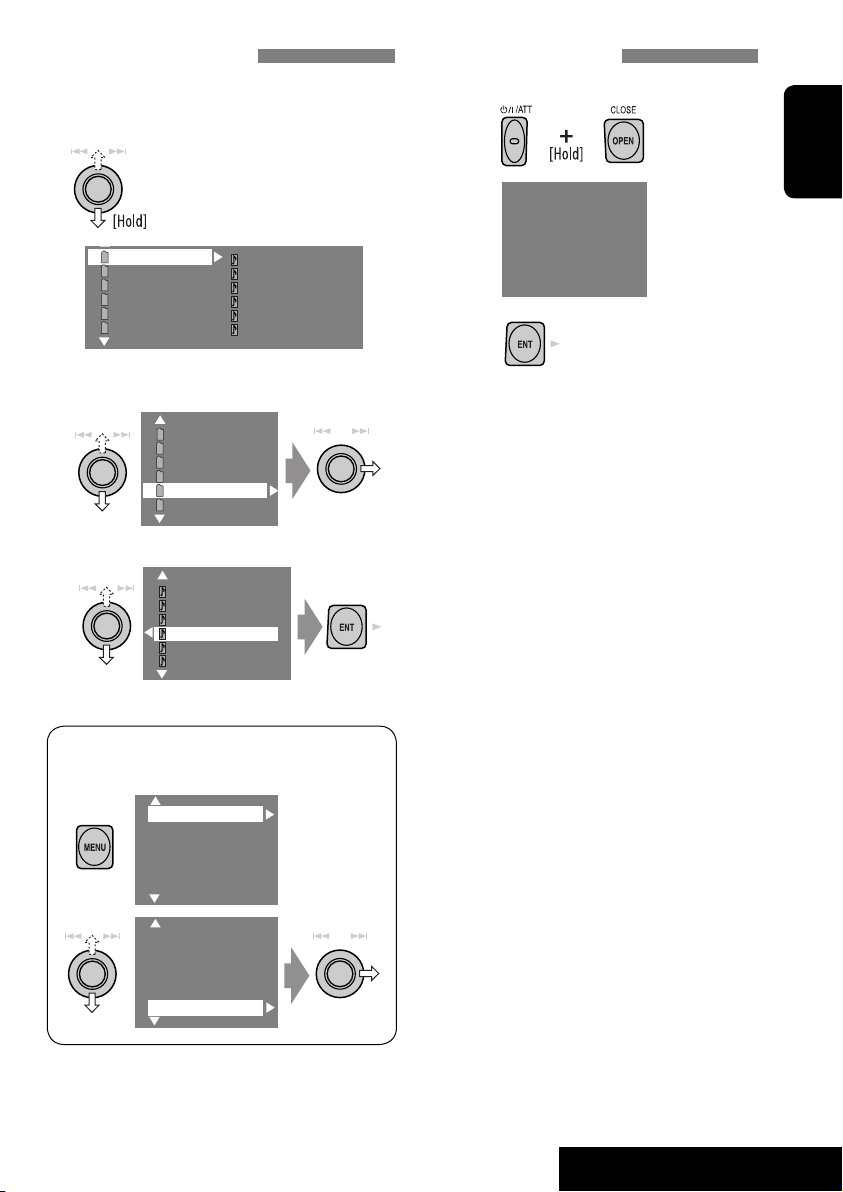
Selecting tracks on the list
If a disc includes folders, you can display the
Folder/Track Lists, then start playback.
1
Folder List with the current
Track List on the right column
appears.
Prohibiting disc ejection
You can lock a disc in the loading slot.
1
NO EJECT?
EMERGENCY EJECT?
ENGLISH
My Best
Cinema
My Best 2
Pops
Favorite Songs
Easy Listenings
2
Select a folder, then activate the Track
Track001.mp3
Track002.mp3
Track003.mp3
Track004.mp3
Track005.mp3
Track006.mp3
List.
My Best
Cinema
My Best 2
Pops
Favorite Songs
Easy Listenings
3
Select a track, and start playing.
Song015.mp3
Song016.mp3
Song017.mp3
Song018.mp3
Song019.mp3
Song020.mp3
• Preset List can also be accessed through
<MENU> = <List>.
Setup
Disc Surround
Equalizer
Sound
Mode
List
2
“No Eject” appears.
To cancel the prohibition, repeat the same
procedure to select “EJECT OK”.
Setup
Disc Surround
Equalizer
Mode
List
17
OPERATIONS
Page 18

Operations using the remote controller—RM-RK240
EXTRA MONITOR CONTROL
MODE MENU
ASPECT
ENGLISH
DVD / RECEIVER CONTROL
ATT
SOURCE
BAND
DUAL
VOL
2nd VOL
SHIFT
RM-RK240
ZOOM
+10
–100
DIRECT
–10
ASPECT
123
+
DISC
MENUTOP M
456
ENTER
7809
–
DISC
SETUP
RETURN
SURROUND
+100
OSD
• To select a number, see also
“How to select a number” on
page 9.
: Stop play.
: Pause (Frame by frame playback if pressed
while pausing moving pictures).
: Start play (10-second review if pressed while
playing moving pictures).
:
Reverse/forward search*1.
:
Press: Select track.
Hold: Reverse/forward search*3.
: Select group.
: Select aspect ratio.
: Select audio language.
: Stop play.
: Pause (Frame by frame playback if pressed during pause).
: Start play (10-second review if pressed during play).
:
Reverse/forward search*
1
(No sound can be heard.)
(Slow motion*2 during pause. No sound can be heard.)
:
Press: Select chapter (during play or pause).
Hold: Reverse/forward search*
3
: Select title.
: Select aspect ratio.
: Select subtitle language.
: Select audio language.
: Select view angle.
+ :
Select chapter (during play or pause).
Select title (when not playing).
DIRECT
OSD
+(
= ):
Using menu driven features...
1
2 Select an item you want to start
play.
3
Select title directly.
+ :
Select track.
DIRECT
OSD
+(
= ):
Select group directly.
Using menu driven features...
1
2 Select an item you want to start play.
3
*1 Search speed: x2 ] x5 ] x10 ] x20 ] x60
2
*
Slow motion speed: 1/32 ] 1/16 ] 1/8 ] 1/4 ] 1/2
3
*
Search speed: x2 ] x10
18
Page 19

: Stop play.
: Pause (Frame by frame playback if pressed
during pause).
: Start play.
: Reverse/forward search*4. (No sound can
be heard.)
: Press: Select track.
Hold: Reverse/forward search*5. (No
sound can be heard.)
: Select folder.
: Select aspect ratio.
+ :
Select track (within the same folder).
DIRECT
OSD
+(
= ):
Select folder directly*6.
While playing...
: Return/advance the scenes by 5 minutes.
Current playback position
2nd press
1st press
1st press
3rd press
2nd press
ENGLISH
: Stop play.
: Pause.
: Start play.
: Select track.
: Select folder.
: Select aspect ratio.
: Stop play.
: Pause (Frame by frame playback if pressed
during pause).
: Start play.
:
Reverse/forward search*1 (Forward slow
motion*2 during pause. No sound can be
heard.)
• Reverse slow motion does not work.
:
Press: Select track.
Hold: Reverse/forward search*3 (No sound
can be heard.)
: Select aspect ratio.
: Select audio channel (ST: stereo, L: left,
R: Right).
+ :
Select track (within the same folder).
DIRECT
OSD
+(
= ):
Select folder directly*6.
+ :
Select track.
During PBC playback...
+ : Select an item on the menu.
To return to the previous menus, press .
To cancel PBC playback
1
2 While holding , press to start the
desired track.
• To resume PBC, press / .
4
Search speed: ¡1 ] ¡2 ] ¡3
*
5
*
Search speed: ¡1 ] ¡2
6
When 2-digit numbers are assigned at the beginning of their
*
folder names—01, 02, 03, and so on.
19
OPERATIONS
Page 20

: Stop play.
: Pause.
: Start play.
: Reverse/forward search*1.
ENGLISH
: Press: Select tracks.
: Select folder.
Hold: Reverse/forward search*
+ :
Select track (within the same folder).
DIRECT
OSD
+(
= ):
Select folder directly*6.
3
.
: Stop play.
: Pause.
: Start play.
: Reverse/forward search*1.
: Press: Select track.
Hold: Reverse/forward search*3.
+ : Select track.
*1 Search speed: x2 ] x5 ] x10 ] x20 ] x60
3
*
Search speed: x2 ] x10
6
*
When 2-digit numbers are assigned at the beginning of their
folder names—01, 02, 03, and so on.
Enlarging the view (Zoom in)
During moving picture playback...
ZOOM 1 ZOOM 2 ZOOM 3 ZOOM 4
ZOOM OFF
While pausing...
ZOOM 5ZOOM 6
Move the enlarged
portion.
Playing back a bonus group
If a DVD Audio including a “bonus group” is
detected, the BONUS indicator lights up on the
disc information screen.
To play a bonus group...
1 Select the bonus group.
• The bonus group is usually recorded as
the last group.
2 Enter the key number.
• “key number” (a kind of password) for
the bonus group is not open to public.
The way of getting the key number
depends on the disc.
3 Follow the interactive instructions
shown on the monitor.
Selecting browsable still picture...
When a disc including browsable still pictures
is detected, the B.S.P. indicator lights up on the
disc information screen.
When disc shows the BSP selecting icons such
as @ or # on the screen...
ZOOM 1 ZOOM 2
ZOOM OFF
To cancel zoom, select “ZOOM OFF.”
1 Select an item you want to display.
2
20
Page 21

Enjoying surround sounds
You can enjoy multi-channel surround
playback through the front, center, surround
speakers.
• Without connecting (and activating) center
speaker and surround speakers, you cannot
enjoy surround playback .
MULTI: For multi-channel encoded sources
such as Dolby Digital*
Audio. (When activated, “MULTI” is shown on
the disc information screen.)
Dolby Pro Logic II (Movie/Music): For 2
channel sources except for MPEG 2-channel
discs. (This can also be used for SD card
playback. ☞ page 27)
To turn on the surround...
1
2
1
, DTS*2, and DVD
Setup
Disc Surround
Equalizer
Sound
Mode
List
Setup
Disc Surround
Equalizer
Mode
List
• Auto: “MULTI” surround is activated when
multi-channel digital signals are detected.
• Dolby PLII Movie: Activates Dolby Pro
Logic II Movie.
• Dolby PLII Music: Activates Dolby Pro
Logic II Music = go to the following step.
5
Only when selecting “Dolby PLII
Music”
Panorama
Center Width
• Panorama: Select “Panorama On” to add
wraparound sound effect.
• Center Width: Adjust the center image
so it may be heard only from the center
speaker, only form the left/right front
speaker as a “phantom” center image, or
various combination of these speakers. As
the number increases, the “phantom” effect
becomes stronger (normally select “4”).
On the remote controller:
SHIFT
RM-RK240
SURROUND
ENGLISH
3
Surround Off
Surrond On
• Surround Off: Deactivates surround.
• Surround On: Activates surround = go to
the following steps.
4
Auto
Dolby PLII Movie
Dolby PLII Music
Auto
Dolby PLII Movie
Dolby PLII Music
Auto
Dolby PLII Movie
Dolby PLII Music
1
SURROUND
• You cannot change the “Dolby PL II Music”
settings using the remote controller.
1
Manufactured under license from Dolby Laboratories. Dolby,
*
Pro Logic, MLP Lossless, and the double-D symbol are
trademarks of Dolby Laboratories.
2
*
“DTS” and “DTS Digital Surround” are registered trademarks
of Digital Theater Systems, Inc.
21
OPERATIONS
Page 22

Operations using the on-screen bar (DVD/VCD/MPEG/JPEG)
These operations are possible on the monitor using the remote controller.
OSD
~ Display the on-screen bar (☞ page 23).
(twice)
Ÿ Select an item.
! Make a selection.
If pop-up menu appears...
• For entering time/numbers, see below.
ENGLISH
SHIFT
RM-RK240
123
456
ENTER
7809
How to select a number
To select a number from 0 – 9:
To select a number greater than 9:
• +100/–100 buttons used only to enter the
number greater than 99.
• To reduce numbers, use
or .
Entering time/numbers
Ex.:
DVD ] _:_ _:_ _
To enter 1 (hours): 02 (minutes): 00 (seconds),
press 1, 0, 2, 0, 0, then ENTER.
VCD (PBC not in use) ] _ _:_ _
To enter 64 (minutes): 00 (seconds),
press 6, 4, 0, 0, then ENTER.
• It is not required to enter tailing zeros (the
last two digits in the examples above).
• To correct a misentry, use
To remove the on-screen bar
.
22
Page 23

On-screen bar
Information
Operation
Above example is of DVD Video. Items shown on the bar vary due to the disc type.
1 Disc type
2 • DVD: Audio signal format
• VCD: PBC
3 Playback mode
DVD -V
TIME TITLE CHAP
C. RPT
DVD Video:
T. RPT: Title repeat
C. RPT: Chapter repeat
DVD Audio:
T. RPT: Track repeat
MPEG:
T. RPT: Track repeat
F. RPT: Folder repeat
JPEG:
F. RPT: Folder repeat
VCD:
T. RPT: Track repeat
D. RND: Disc random
T. INT: Track intro
Plays the beginning 15 seconds of
the current track
4 Playback information
5 Time indication
Current title/chapter
T02-C03
Current group/track
G02-T03
TRACK 01
F001-T001
TOTAL
T. REM
Current track
Current folder/track
Elapsed playing time of the disc
Remaining title time (for DVD)
T02-C03 TOTAL 1:25:58
RPT
6 Playback status
Play
Reverse/forward search
Reverse/forward slow-motion
Pause
Stop
7 Operation icons
Change time indication (see 5)
TIME
Time Search (Enter the elapsed playing
time of the current title or of the disc.)
TITLE
Title Search (by its number)
GROUP
Group Search (by its number)
CHAP
Chapter Search (by its number)
TRACK
Track Search (by its number)
RPT
Repeat play*
INT
Intro play*
RND
Random play*
1
1
1
Change the audio language or audio
channel
Change the subtitle language
Change the view angle
*1 ☞ page 16.
Remaining disc time (for others)
TIME
Elapsed playing time of the current
chapter/track
REM
Remaining time of the current
chapter/track
ENGLISH
23
OPERATIONS
Page 24

Dual Zone operations
You can enjoy a disc playback on the external
monitor connected to the VIDEO OUT and 2nd
AUDIO OUT plugs, while listening to any other
ENGLISH
source through the speakers.
• When Dual Zone is in use, you can only
operate the DVD/CD player using the remote
controller.
1
2
3
Setup
Disc Surround
Equalizer
Sound
Mode
List
DualZone
Off
0n/Surround Off
0n/Surround On
• Off: Deactivates Dual Zone.
• On/Surround Off (DUAL): Activates
Dual Zone without applying Headphone
Surround*.
• On/Surround On (DUAL SURR): Activates
Dual Zone and applies Headphone
Surround.
To select a different source (main source) to
listen through the speakers:
Press SOURCE on the control panel.
• You cannot select “SD” for the main source.
• By using the buttons on the control panel, you
can operate the newly selected source without
affecting Dual Zone (DVD/CD) operations.
On the remote controller:
DUAL
VOL
2nd VOL
SHIFT
RM-RK240
1
2
Adjust the volume through the 2nd
AUDIO OUT plug.
3
Operate the DVD/CD player.
When Dual Zone is activated, the main source is
changed to “DISC.”
DUAL SURR
DVD
VIDEO
DTS
MULTI
01 01 0:00:12
48kHz 24Bit 3/2.1
Ex. When “On/Surround On” is selected.
* JVC original headphone virtual surround
system. This surround will also work for the
main source “DISC” though it is activated for
the sub-source. This surround does not work
for MPEG discs.
24
Page 25

Operations using the control screen (MP3/
WMA/WAV/MPEG/JPEG/CD)
While Dual Zone is on,
possible on the external monitor using the
remote controller.
The control screen automatically appears when
you insert a disc. (For MPEG/JPEG; while not
playing.)
Control screen
MP3/WMA/WAV/MPEG/JPEG
Folder : 2 / 3
01 Music
02 Music
03 Music
Track Information
Album
Weather
Artist
Robert M. Smith
Title
Rain
these operations are
TIME 00:00:14T. RPT
Track : 5 / 14 (Total 41)
Cloudy.mp3
Fair.mp3
Fog.mp3
Hail.wma
Indian summer.mp3
Rain.mp3
Shower.mp3
Snow.mp3
Thunder.wma
Typhoon.mp3
Wind.mp3
Winter sky.mp3
Control screen
CD
T. RPT
Track Information
Album
Four seasons
Artist
Robert M. Smith
Title
Rain
Ex.: CD Text
1 Selected playback mode
2 Elapsed playing time of the current track
3 Operation status
4 Current track number/total number of
tracks on the disc
5 Track information
6 Track list
7 Current track (highlighted bar)
TIME 00:14
Track : 5 / 14
Cloudy
Fair
Fog
Hail
Indian summer
Rain
Shower
Snow
Thunder
Typhoon
Wind
Winter sky
ENGLISH
Ex.: MP3/WMA
1 Current folder
2 Current folder number/total folder number
3 Folder list
4 Selected playback mode
5 Elapsed playing time of the current track
(not displayed for JPEG)
6 Operation status
7 Current track number/total number of
tracks in the current folder (total number of
tracks on the disc)
8 Track information (only for MP3/WMA/
WAV)
9 Track list
p Current track (highlighted bar)
To select a folder or track
1
Select “Folder” column or “Track” column
on the control screen.
2
Select a folder or track.
• If necessary, press ENTER
to start playback.
To select a track
• If necessary, press ENTER
to start playback.
To change the playback modes
You can also change the playback modes.
• For CD/MP3/WMA/WAV: Intro/Repeat/
Random
• For others: Repeat
1
OSD
2
Only for CD/MP3/WMA/WAV: Select a
playback mode
3
Select your desired option.
4
25
OPERATIONS
Page 26

Operations using the list screen (MP3/WMA/
WAV/MPEG/JPEG)
While Dual Zone is on,
possible on the external monitor using the
remote controller.
these operations are
ENGLISH
List screen
Folder list
While not playing...
1
Display the folder list.
Each time you press the button,
the list screen comes on and goes
off.
2
Select a folder on the list.
Folder : 144/240 Track 144/198 Page : 4/7
fol120
fol121
fol122
fol123
fol124
fol125
fol126
fol127
fol128
fol129
fol130
fol131
fol132
fol133
fol134
fol135
fol136
fol137
fol138
fol139
fol140
fol141
fol142
fol143
fol144
fol145
fol146
fol147
fol148
fol149
fol150
fol151
fol152
fol153
fol154
fol155
fol156
fol157
fol158
fol159
Track list
Folder : 144/240 Track 144/198 Page : 4/5
file0121.mp3
file0122.mp3
file0123.wma
file0124.mp3
file0125.mp3
file0126.wma
file0127.wma
file0128.mp3
file0129.mp3
file0130.wma
file0131.mp3
file0132.mp3
file0133.mp3
file0134.mp3
file0135.wma
file0136.mp3
file0137.wma
file0138.mp3
file0139.wma
file0140.wma
file0141.wma
file0142.mp3
file0143.wma
file0144.mp3
file0145.mp3
file0146.mp3
file0147.mp3
file0148.wma
file0149.wma
file0150.wma
file0151.wma
file0152.mp3
file0153.wma
file0154.mp3
file0155.wma
file0156.wma
file0157.wma
file0158.wma
file0159.mp3
file0160.wma
Ex.: Track list for MP3/WMA
1 Current folder number/total folder number
2 Current track number/total number of
tracks in the current folder
3 Current page/total number of the pages
included in the list
4 Current folder/track (highlighted bar)
The track list of the selected folder appears.
3
Select a track on the list.
To go back to the folder list, press
The language on the external monitor
You cannot display the Chinese characters
correctly even though you have selected
Simplified Chinese or Traditional Chinese
for “Language” (☞ page 37).
.
26
Page 27

SD operations
To eject the disc
push in the SD card
lightly.
Caution:
Do not release your finger quickly;
otherwise, the SD card may pop out
from the unit.
SD
3: 45 PM
To open/close the
monitor panel
ENGLISH
Push in the SD card until you
hear a clicking sound.
3: Restart playback
7: Stop
Now Reading...
Press: Select track
Hold: Reverse/forward search
Press: Select folder
Hold: Display Folder List
(☞ page 17)
This unit can play MP3/WMA/JPEG tracks
stored in SD cards.
All tracks in the SD card will be played
repeatedly until you change the source.
• Removing the SD card will stop playback.
• You cannot select “SD” when Dual Zone is in
use.
Caution:
Make sure all important data has been
backed up.
You can operate the SD playback in the same
way you operate the MP3/WMA/JPEG discs
(except the OSD operation and those on the
external monitor).
• For general operational information, see
pages 13 to 21.
27
OPERATIONS
Page 28

Selecting playback modes
You can use only one of the following playback
modes—Intro/Repeat/Random.
Ex. To select Track Repeat
1
ENGLISH
2
Setup
Disc Surround
Equalizer
Sound
Mode
List
Setup
Disc Surround
Equalizer
Sound
Mode
List
File type Intro Repeat Random
Track: Plays the first 15
seconds of each track
Folder: Plays the first 15
seconds of the first track of
each folder
—
Track: Repeats current track
Folder: Repeats all tracks of the
Folder: Repeats current folder
3
Off
Intro
Repeat
Random
4
Off
Track
Folder
When one of the playback modes is
selected, the corresponding indicator lights
up on the monitor.
To cancel, select “Off” in step 3 or 4.
Folder: Randomly plays all
tracks of current folder,
current folder
then tracks of next folders
SD: Randomly plays all tracks
—
28
OPERATIONS
Page 29

Listening to the CD changer
Track no./Play time
POWER]ON
Not displayed for
conventional CD
CD-CH
Disc No.
FLAT
REPEAT
3: 45 PM
01 0:00:12
Disc Title
Current track Title
Next track title
Next track title
Next track title
Next track title
Next track title
Next track title
It is recommended to use a JVC
MP3-compatible CD changer with your unit.
• You can play only CDs (CD-DA) and MP3
discs.
Preparation:
Make sure “Changer” is selected for the external
input setting. (☞ page 40)
~ Select “CD-CH.”
Ÿ Display the Disc List.
MP3 DISC
JVC CAR AUDIO
BEST 10
BEST JAZZ
DISC 05
DISC 06
• Each time you keep pushing up or down
the knob, you can display the other list of
the remaining discs.
! Select a disc to start playing.
ENGLISH
Press: Select track
Hold: Reverse/forward search
Press: Select folder (MP3 only)
Hold: Display Disc List
• While playing an MP3 disc, you can
select and start playing a track in the disc
using the Lists: Display List (select the
current disc) = Folder List =Track List,
then start playing a track you want.
MP3 DISC
JVC CAR AUDIO
BEST 10
BEST JAZZ
DISC 05
DISC 06
01FOLDER
02FOLDER
03FOLDER
04FOLDER
TRACK001
TRACK002
TRACK003
TRACK004
MP3 DISC
JVC CAR AUDIO
BEST 10
BEST JAZZ
DISC 05
DISC 06
• When using the remote
controller, press...
DISC
DISC
The language on the disc information
screen
You cannot display the Chinese characters
correctly even though you have selected
Simplified Chinese or Traditional Chinese
+
–
for “Language” (☞ page 37).
29
EXTERNAL DEVICES
Page 30

Selecting playback modes
You can use only one of the following playback
modes—Intro/Repeat/Random.
Ex. To select Track Repeat
1
ENGLISH
2
Setup
Disc Surround
Equalizer
Sound
Mode
List
Setup
Disc Surround
Equalizer
Sound
Mode
List
Disc type Intro Repeat Random
Track: Plays the first 15
seconds of each track
Disc: Plays the first 15 seconds
of the first track of all
loaded discs
Track: Plays the first 15
seconds of each track
Folder: Plays the first 15
seconds of the first track of
each folder
Disc: Plays the first 15 seconds
of the first track of all
loaded discs
Track: Repeats current track
Disc: Repeats all tracks of the
Track: Repeats current track
Folder: Repeats all tracks of the
Disc: Repeats all tracks of the
3
Off
Intro
Repeat
Random
4
Off
Track
Folder
Disc
When one of the playback modes is
selected, the corresponding indicator lights
up on the monitor.
To cancel, select “Off” in step 3 or 4.
Disc: Randomly plays all tracks
of the current disc
current disc
current folder
current disc
All: Randomly plays all tracks of
all loaded discs
Folder: Randomly plays all
tracks of current folder,
then tracks of next folders
Disc: Randomly plays all tracks
All: Randomly plays all tracks of
all loaded discs
To use <Mode> menu
To use <List> menu
☞ above.
☞ pages 17 and 29.
Display List = Folder
List =Track List
You can use the following buttons on the
remote controller to operate the CD changer.
+
DISC
–
DISC
: Select disc.
: Select folder (MP3 only).
: Select track.
30
Page 31

Listening to the iPod®/D. player
Track no./Play time
POWER]ON
☞ page 33.
For Apple iPod and JVC D. player, it is required
to connect the interface adapter (KS-PD100 or
KS-PD500) to the CD changer jack on the rear.
Preparation:
Make sure “iPod” or “D. player” is selected for
the external input setting. (☞ page 40)
D.PLAYER
FLAT
REPEAT
3: 45 PM
01 0:00:06
Album Name / Artist Name
Track Title
~ Select “iPod” or “D. PLAYER.”
Playback starts automatically.
Ÿ Select a song.
Selecting a track from the player’s menu
1 Enter the player’s menu.
• This mode will be canceled if no
operations are done for about
5 seconds.
2 Select the desired menu.
Press: Select an item
Hold: Skip 10 items at a time if more
than 10
For iPod:
Playlists Ô Artists Ô Albums Ô Songs
Ô Genres Ô Composers Ô (back to the
beginning)
For D. player:
Playlist Ô Artist Ô Album Ô Genre Ô
Track Ô (back to the beginning)
3 Confirm the selection.
Enter player‘s menu
Pause/stop playback
• To resume, press again.
Press: Select track
Hold: Reverse/forward search
4 Repeat steps 2 and 3 to select a track.
• When a track is selected finally, playback
starts.
• To return to the previous menu...
Selecting playback modes
• When one of the playback modes is selected,
the corresponding indicator lights up on the
monitor.
1 Display <MENU>, then select <Mode>
] <Repeat> or <Random>.
2 Select an appropriate option.
Repeat One: Functions the same as “Repeat
One” or “Repeat Mode =
One.”
All: Functions the same as “Repeat
All” or “Repeat Mode = All.”
Random Album: Functions the same as
“Shuffle Albums” of the iPod.
Song/On: Functions the same as
“Shuffle Songs” or “Random
Play = On.”
To cancel, select “Off.”
• iPod is a trademark of Apple Computer, Inc., registered in
the U.S. and other countries.
ENGLISH
31
EXTERNAL DEVICES
Page 32

Listening to other external components
AV-INPUT
You can connect an external component to the LINE IN/VIDEO IN plugs.
ENGLISH
POWER]ON
AV-IN
AV-INPUT
Assigned title (☞ page 34)
FLAT
3: 45 PM
DISP: Press if no playback picture
appears, but source information (this)
screen is displayed.
~ Select “AV-IN.”
Ÿ Turn on the connected component and start playing the source.
If you select “Camera Reverse” for “AV Input” (☞ page 40), some status messages such as volume
level change will not appear on the monitor while viewing the picture.
EXT-INPUT
You can connect an external component to the CD changer jack on the rear using the Line Input
Adapter—KS-U57 (not supplied) or AUX Input Adapter—KS-U58 (not supplied).
POWER]ON
EXT-IN
FLAT
3: 45 PM
EXT-INPUT
Assigned title (☞ page 34)
Preparation:
Make sure “External Input” is selected for the external input setting. (☞ page 40)
~ Select “EXT-IN.”
Ÿ Turn on the connected component and start playing the source.
32
Page 33

Sound equalization
POWER]ON
Freq. 60Hz +03
Freq. 150Hz +02
Freq. 400Hz +02
Freq. 1kHz 00
Freq. 2.5kHz +01
Freq. 6.3kHz +01
Freq. 15kHz +03
ENGLISH
Selecting sound mode
~
Ÿ
!
Select a sound mode.
• For preset values of each sound mode,
☞ page 49.
• When surround (
sound equalization is temporarily
canceled.
Setup
Disc Surround
Equalizer
Sound
Mode
List
Setup
Disc Surround
Equalizer
Sound
Mode
List
Flat
Hard Rock
R&B
Pop
Jazz
Dance
Country
Reggae
Classic
User 1
User 2
User 3
☞ page 21) is activated,
Storing your own adjustment
You can store your adjustment into User 1,
User 2, and User 3.
1 Repeat steps ~ and Ÿ, then in step
!...
Flat
Hard Rock
R&B
Pop
Jazz
Dance
Freq. 60Hz +03
Freq. 150Hz +02
Freq. 400Hz +02
Freq. 1kHz 00
Freq. 2.5kHz +01
Freq. 6.3kHz +01
Freq. 15kHz +03
2 Adjust.
3 Store.
User 1
User 2
User 3
33
SETTINGS
Page 34

Assigning titles to the sources
POWER]ON
ENGLISH
MY BEST
Press: Change character set
Hold: Erase title
You can assign titles to the following...
Sources
AV-INPUT
Maximum number of
characters
Up to 16 characters.
EXT-INPUT
FM/AM stations Up to 16 characters—up
to 30 stations.
DISC/CD-CH*
Up to 32 characters—up
to 30 discs.
* You can assign titles only to conventional CDs.
~ Select the sources.
• For FM/AM: Select the band, then tune
in to a station.
• For AV-IN/EXT-IN: Select the source.
• For a CD in this receiver: Insert a CD.
• For CDs in the CD changer: Select
“CD-CH,” then select a disc number.
Ÿ Display the title entry screen.
1
Setup
Disc Surround
Equalizer
Sound
Mode
List
2
Setup
Disc Surround
Equalizer
Sound
Mode
List
Ex.: When you select “DISC” as the source
3
Off
Intro
Repeat
Random
Title Entry
! Assign a title.
1 Select a character, then enter.
• To change the character set, press DISP.
(For available characters,
2 Repeat step 1 until you finish entering
the title.
MY BEST
☞ page 43.)
⁄ Finish the procedure.
34
Page 35

Menu operations
POWER]ON
MENU
To return to (or erase) the top menu
To return to the previous screen
Ex. Changing the “High Pass Filter” setting
~
Setup
Disc Surround
Equalizer
Sound
Mode
List
• Non-available items will be displayed
being shaded.
Ÿ
Setup
Disc Surround
Equalizer
Sound
Mode
List
Setup
Disc Surround
Equalizer
Sound
Mode
List
Display
Clock
Disc Setup1
Disc Setup2
Tuner
Input
!
Fader/Balance
Volume Adjust
Subwoofer
High Pass Filter
Crossover
Amplifier Gain
• Some items require you to repeat this
steps to set the sub-items.
⁄
Through
On
ENGLISH
Menu items
Setup
Disc Surround
Equalizer
Sound
Mode
List
Dual Zone
35
Display
Clock
Disc Setup 1
Disc Setup 2
Tuner
Input
Others
SETTINGS
Page 36

Menu items Selectable settings, [reference page]
Initial: Underlined
Wall Paper
ENGLISH
Level Meter
Scroll Off : Cancels.
Tag Display Off : Cancels.
Dimmer Off : Cancels.
Display
Dimmer Level
Bright
Screen Control
You can select the background picture of the monitor.
Standard, Geometric Design, Sea, Simple Green, Simple
Orange, Simple Red, Simple Brown, Simple Grey
You can select the level meter you want.
Meter 1, Meter 2, Meter 3
• Press DISP repeatedly to display the selected level meter on
the monitor.
Once: Scrolls the disc information once.
Auto:
• Holding DISP scrolls the information regardless of this
setting.
On: Shows the Tag data while playing MP3/WMA/WAV
On: Activates dimmer.
Auto: Dims the monitor when you turn on the headlights.
Time Set: Sets the Dimmer On/Off times.
You can preset the brightness for dimmer.
00 (brightest) to 10 (darkest); Initial 05
You can adjust color and brightness of the monitor.
–15 (darkest) to +15 (brightest); Initial 00
1
*
You can adjust the following to make the monitor clear and
legible for watching the playback picture. The settings are
stored separately for each source—“DISC” and “AV-IN.”
–15 to +15; Initial 00
Bright: Adjust if the picture is too bright or too dark.
Contrast: Adjust the contrast.
Color: Adjust the color of the picture—lighter or darker.
Tint: For NTSC playback: Adjust the tint if the human
Repeats scrolling (5-second intervals).
tracks.
skin color is unnatural.
For PAL playback: “FIX” appears. This cannot be
adjusted.
36
Page 37

Menu items Selectable settings, [reference page]
1
Aspect
*
You can change the aspect ratio of the picture.
Aspect ratio of incoming signal
Display
NTSC/PAL
Language
4:3 16:9
ENGLISH
Normal:
For 4:3 original
pictures
Full:
For 16:9 original
pictures
Just:
Zoom:
Auto:
For “DISC”:
Aspect ratio is
•
automatically selected to match to the
incoming signals.
•
For the other video sources:
Aspect
ratio is xed to “NORMAL.”
2
*
This setting is valid only to the external monitor connected.
Select the color system of the external monitor—NTSC, PAL.
2, *3
*
You can select the <MENU> language shown on the
monitor—English, Chinese Simple, Chinese Trad.,
☞ [3]
Time Set
Clock
12Hours/24Hours
4
Menu Language
*
Audio Language
☞ [6]
12 Hours, 24 Hours,
Select the initial disc menu language (
Select the initial audio language (
☞ [6]
☞ also page 42).
☞ also page 42).
Subtitle Select the initial subtitle language or erase the subtitle (OFF)
Disc Setup 1
1
Not adjustable for audio sources.
*
2
*
Turn off the power and turn on it again to make the new setting effective.
3
*
Once you have selected Simplified Chinese or Traditional Chinese, Chinese folder/file names and
(☞ also page 42).
tag data can be displayed on the built-in monitor.
4
*
Selectable only for “DISC” or “SD” (while not playing).
37
SETTINGS
Page 38

Menu items Selectable settings, [reference page]
OSD Language
Monitor Type
ENGLISH
4
*
OSD Position
Disc Setup 1
File Type
D. (Dynamic) Range
Compres. (Compression)*
16:9 4:3 LB
4:3 PS
Position 1 Position 2
Select the on-screen language used for the external monitor
connected to the VIDEO OUT plug.
Select the monitor type to watch a wide screen picture on the
external monitor.
• 16:9 : Select when the aspect ratio of the external monitor
is 16:9.
• 4:3LB [Letter Box]/4:3PS [Pan Scan]: Select when the
aspect ratio of the external monitor is 4:3. Refer to the
illustrations on the left to see how the pictures are shown
on the monitor.
Select the position of the on-screen bar,
☞ [23].
• 1 : Higher position
• 2 : Lower position
Select playback file type when a disc or an SD card contains
different types of files.
• Audio : Plays back audio files.
• Picture : Plays back JPEG files.
• Video : Plays back MPEG files (not available for SD cards).
You can enjoy a powerful sound at a low volume level while
4
playing Dolby Digital software.
• Auto : Select to apply the effect to multi-channel encoded
software.
• On : Select this to always use this function.
Speaker Size*
5
Selects the speaker
*
4
You can adjust the speaker size setting.
• Front: Small, Large
• Center: None, Small, Large
• Rear: None, Small, Large
• Sub Woofer: On, Off
• Speaker size: “Large” for 13-cm diameter or more; “Small”
Disc Setup 2
Adjusts the speaker size
for 13 cm or less.
Regardless of the setting above...
• No sound comes out of the subwoofer while playing Dolby
Pro Logic II Movie or Music if the front speaker is set to
“Large.”
• No sound comes out of the center speaker when surround
is deactivated.
4
*
Selectable only for “DISC” or “SD” (while not playing).
5
*
Selectable only for “DISC” or “SD.”
38
Page 39

Menu items Selectable settings, [reference page]
Speaker Level
Selects the speaker
You can adjust the output level of the activated speakers (
see “Speaker Size” on page 38), monitoring the test tone.
• Front Left/Center/Front Right/Rear Right/
Sub Woofer*
speaker in the range of –10dB to +10dB; Initial 00.
6
/Rear Left: adjust the output level of each
Adjusts the speaker level
5
*
Speaker Distance*
Disc Setup 2
Selects the speaker
7
• Press and hold ENT to turn on and off the test tone—Test
Ton e: ON, OFF.
You can adjust the speaker output timing.
• Front Left/Center/Front Right/Rear Right/Rear Left:
adjust the speaker distance from the listening position in
the range of 15 cm/6 inches to 600 cm/240 inches in 15cm/6-inch step. [Initial: 120 cm (for center speaker), 150
cm (for the other speakers)]
Adjusts the speaker distance
• Press and hold DISP to change the measuring unit—cm and
inch.
IF Band Width Auto: Increases the tuner selectivity to reduce interference
noises between adjacent stations. (Stereo effect may
be lost.)
Tuner
Wide: Subject to the interference from adjacent stations,
but sound quality will not be degraded and the stereo
effect will remain.
☞
ENGLISH
6
*
This subwoofer level setting takes effect only when surround is activated (
*7 Not selectable when only the front speakers are activated.
39
☞ also page 41).
SETTINGS
Page 40

Menu items Selectable settings, [reference page]
AV Input
ENGLISH
Input
External Input
Beep Off : Cancels.
Telephone Muting Off : Cancels.
Others
Power LED Flash Off : Cancels.
Surround Off
10
*
Surround On
Disc Surround
Flat/Hard Rock/R&B/Pop/
11
*
Jazz/Dance/Country/
Reggae/Classic/User
1/User 2/User 3
Equalizer
You can determine the use of LINE IN and VIDEO IN plugs.
Off : Select when no component is connected
(“AV-IN” is skipped while selecting the
source).
Audio&Video: Select when connecting an AV
component such as a VCR.
Audio: Select when connecting an audio
8
Camera
*
: Select when connecting the rear view
Camera Reverse
component such as an MD player.
camera.
8
*
: The mirror image of the rear view is
displayed on the monitor (The monitor
on the receiver only; the normal rear view
appears on the external monitor.).
When connecting an external component to the CD changer
jack on the rear.
Changer/iPod/D. player
9
*
: CD changer, iPod, or D. player
☞ [29, 31]
External Input: Any other than the above.
On: Activates the key-touch tone.
Muting1, Muting2: Select either one which mutes the
sounds while using the cellular phone.
On: When the ignition is turned off, the lamp on the
button flashes.
Select to deactivate the surround function.
Select to activate the surround function.
Auto, Dolby PLII Movie, Dolby PLII Music
• When you select “Dolby PLII Music,” you can adjust
“Panorama” and “Center Width.”
☞ [21]
☞ [32]
☞ [33]
8
Reverse lamp wire connection is required. See Installation/Connection Manual (separate volume).
*
The rear view through the camera appears on the monitor in “Full” aspect ratio (regardless of the
aspect ratio setting) when you shift the gear to the reverse (R) position.
9
*
The name of the component detected through the CD changer jack is shown.
10
*
Selectable only for “DISC” and “SD.”
11
*
Selectable only when surround is deactivated.
40
Page 41

Menu items Selectable settings, [reference page]
Fader/Balance
Adjusts fader
Adjust balance
Volume Adjust
Subwoofer
Sound
High Pass Filter Through: Select when the subwoofer is not connected.
Crossover
Adjust fader—speaker output balance between the front and
rear speakers.
• Upmost—front only
• Downmost—rear only
When using a two-speaker system, set the fader to the center
(00).
Adjust balance—speaker output balance between the left and
right speakers.
• Leftmost—left only
• Rightmost—right only
Adjust and store auto-adjustment volume level for each
source, comparing to the FM volume level. The volume level
will automatically increase or decrease when you change the
source.
• –12 to +12; Initial 00
Adjust the settings below in the submenu:
• Phase: Subwoofer phase. Select either “Normal” or
“Reverse,” which reproduces a better sound.
• Level*
On: Select when the subwoofer is connected.
Adjust the crossover frequency between the front/rear
speakers and the subwoofer.
80Hz, 120Hz, 150Hz
12
: Subwoofer output level. Level: –6 to +8; Initial 0
ENGLISH
Amplifi er Gain You can change the maximum volume level of this receiver.
Off : Deactivates the built-in amplifier.
Low Power: VOL 00 to 30 (Select this if the maximum
power of the speakers is less than 50 W)
High Power: VOL 00 to 50
Rear Speaker*
Mono
14
DX / Local
Mode*
SSM
12
*
This subwoofer level setting take effects only when surround is deactivated (
13
Functions only when Dual Zone is activated.
*
14
*
Items listed under <Mode> vary among the playback sources.
13
You can activate/deactivate the rear speakers.
Off, On
Only for FM. (Off, On),
Only for FM. (DX, Local),
Only for FM.
☞ [11]
☞ [10]
☞ [11]
☞ also page 39).
41
SETTINGS
Page 42

Menu items Selectable settings, [reference page]
Title Entry
14
Off /Intro/Repeat/Random
Mode*
ENGLISH
List
Dual Zone
14
Items listed under <Mode> vary among the playback sources.
*
Code Language Code Language Code Language Code Language Code Language
Only for conventional CDs, FM/AM stations, AV-IN, and
EXT-IN.
Only for disc playback, SD playback, and iPod/D. player.
☞ [34]
☞ [16, 30, 31]
The accessible lists differ depending on the sources.
Off , On/Surround Off, On/Surround On,
☞ [24]
AA Afar FA Persian KL Greenlandic OC Occitan ST Sesotho
AB Abkhazian FI Finnish KM Cambodian OM (Afan) Oromo SU Sundanese
AF Afrikaans FJ Fiji KN Kannada OR Oriya SW Swahili
AM Ameharic FO Faroese KO Korean (KOR) PA Panjabi TA Tamil
AR Arabic FY Frisian KS Kashmiri PL Polish TE Telugu
AS Assamese GA Irish KU Kurdish PS Pashto, Pushto TG Tajik
AY Aymara GD Scots Gaelic KY Kirghiz PT Portuguese TH Thai
AZ Azerbaijani GL Galician LA Latin QU Quechua TI Tigrinya
BA Bashkir GN Guarani LN Lingala RM
Rhaeto-Romance
TK Turkmen
BE Byelorussian GU Gujarati LO Laothian RN Kirundi TL Tagalog
BG Bulgarian HA Hausa LT Lithuanian RO Rumanian TN Setswana
BH Bihari HI Hindi LV Latvian,Lettish RW Kinyarwanda TO Tonga
BI Bislama HR Croatian MG Malagasy SA Sanskrit TR Turkish
BN Bengali, Bangla HU Hungarian MI Maori SD Sindhi TS Tsonga
BO Tibetan HY Armenian MK Macedonian SG Sangho TT Tatar
BR Breton IA Interlingua ML Malayalam SH Serbo-Croatian TW Twi
CA Catalan IE Interlingue MN Mongolian SI Singhalese UK Ukrainian
CO Corsican IK Inupiak MO Moldavian SK Slovak UR Urdu
CS Czech IN Indonesian MR Marathi SL Slovenian UZ Uzbek
CY Welsh IS Icelandic MS Malay (MAY) SM Samoan VI Vietnamese
DZ Bhutani IW Hebrew MT Maltese SN Shona VO Volapuk
EL Greek JI Yiddish MY Burmese SO Somali WO Wolof
EO Esperanto JW Javanese NA Nauru SQ Albanian XH Xhosa
ET Estonian KA Georgian NE Nepali SR Serbian YO Yoruba
EU Basque KK Kazakh NO Norwegian SS Siswati ZU Zulu
42
SETTINGS
Page 43

Maintenance
Moisture condensation
Moisture may condense on the lens inside the
DVD/CD player in the following cases:
• After starting the heater in the car.
• If it becomes very humid inside the car.
Should this occur, the DVD/CD player may
malfunction. In this case, eject the disc and
leave the unit turned on for a few hours until
the moisture evaporates.
How to handle discs
When removing a disc from
its case, press down the center
holder of the case and lift the
disc out, holding it by the
edges.
• Always hold the disc by the edges. Do not
touch its recording surface.
When storing a disc into its case, gently insert
the disc around the center holder (with the
printed surface facing up).
• Make sure to store discs into the cases after
use.
Center holder
To keep discs clean
A dirty disc may not play correctly.
If a disc does become dirty, wipe it
with a soft cloth in a straight line
from center to edge.
• Do not use any solvent (for example,
conventional record cleaner, spray, thinner,
benzine, etc.) to clean discs.
To play new discs
New discs may have some rough
spots around the inner and outer
edges. If such a disc is used, this
unit may reject the disc.
To remove these rough spots, rub the edges with
a pencil or ball-point pen, etc.
Do not use the following discs:
Warped disc
Sticker
Sticker residue
ENGLISH
Characters available for text input
In addition to the roman alphabet (A – Z, a – z), the characters in
the table can be used. You cannot use Chinese characters.
43
Stick-on label
Numbers and symbols
Page 44

More about this unit
General
Turning on the power
• By pressing SOURCE on the unit, you can
ENGLISH
also turn on the power. If the source is ready,
playback starts.
Watching picture
• If you change the aspect ratio to “Just,” both
sides of the picture are extended horizontally
to fit the picture to the monitor size. It may
cause the center portion of the picture to look
distorted.
FM/AM
Storing stations in memory
• When SSM is over, received stations are
preset in No. 1 (lowest frequency) to No. 6
(highest frequency).
Disc
General
• In this manual, words “track” and “file” are
interchangeably used.
• This unit can also play back 8 cm discs.
• This unit can only play back audio CD
(CD-DA) files if different type of files are
recorded in the same disc.
Inserting a disc
• When a disc is inserted upside down, “Disc
Error Please Eject” appears on the monitor.
Eject the disc.
Ejecting a disc
• If the ejected disc is not removed within
15 seconds, the disc is automatically inserted
again into the loading slot to protect it from
dust. (Disc will not play this time.)
Speaker/signal indicators
Speaker indicators
• The speaker indicators—squares around “L,”
“R,” “LS,” and “RS” lights in light blue, when
the corresponding speakers are set to “Large”
or “Small” (☞ page 38).
• The center speaker indicator—square around
“C” lights in light blue, when the center
speaker is set to “Large” or “Small” and when
surround is activated.
• Sounds come out of the speakers whose
speaker indicators are lit on the monitor.
• The SW indicator lights up when “Sub
Woofer” is set to “On” (☞ page 38).
• The signal indicators indicate the incoming
signals—L (front left) / R (front right) / C
(center) / LFE (low frequency effect) / LS (left
surround) / RS (right surround) / S (monaural
surround).
• If the speaker is activated, but the signals
corresponding to the speaker are not coming
in, the signal indicators changes their color
from white to black to indicate no signals
coming in (therefore no sound comes through
the corresponding speakers).
Signal indicators
Changing the source
• If you change the source with Dual Zone
deactivated, playback also stops without
ejecting the disc.
Next time you select “DISC” for the playback
source, disc play starts from where it has been
stopped previously.
44
Page 45

Playing Recordable/Rewritable discs
• This unit can recognize a total of 3 500 files
and 250 folders (a maximum of 999 files per
folder).
• Use only “finalized” discs.
• This unit can play back multi-session discs;
however, unclosed sessions will be skipped
while playing.
• This unit can show the Tag data (Version 1.0,
1.1, 2.2, 2.3, or 2.4) for the files.
• This unit may be unable to play back some
discs or files due to their characteristics or
recording conditions.
• The maximum number of Chinese characters
for file/folder names shown on the built-in
monitor is 12 – 25 characters (including the
extension code). The maximum number
differs depending on the character set.
Playing MPEG files
• This unit can play back MPEG files with the
extension code <.mpg> or <.mpeg>.
• The stream format should conform to MPEG
system/program stream.
• The file format should be MP@ML (Main
Profile at Main Level)/SP@ML (Simple Profile
at Main Level)/MP@LL (Main Profile at Low
Level).
• Audio streams should conform to MPEG1
Audio Layer-2.
Playing JPEG files
• It is recommended that you record a file at
640 x 480 resolution.
• This unit can play back baseline JPEG files.
Progressive JPEG files or lossless JPEG files
cannot be played.
Playing MP3/WMA/WAV files
• This unit can play back files with the
extension code <.mp3>, <.wma>, or <.wav>
(regardless of the letter case—upper/lower).
• This unit can play back the files meeting the
conditions below:
– Bit rate: MP3/WMA: 32 kbps — 320 kbps
– Sampling frequency:
48 kHz, 44.1 kHz, 32 kHz (for MPEG1)
24 kHz, 22.05 kHz, 16 kHz (for MPEG2)
48 kHz, 44.1 kHz, 32 kHz (for WMA)
44.1 kHz (for WAV)
• This unit can play back files recorded in VBR
(variable bit rate).
Files recorded in VBR have a discrepancy in
elapsed time indication.
• This unit cannot play back the following files:
– MP3 files encoded with MP3i and MP3 PRO
format.
– MP3 files encoded with Layer 1/2.
– WMA files encoded with lossless,
professional, and voice format.
– WMA files which are not based upon
Windows Media
– WMA files copy-protected with DRM.
– Files which have the data such as AIFF,
ATRAC3, etc.
Audio.
®
Enjoying surround sounds
• If “Surround On” is selected, “MULTI”
surround playback automatically starts for
multi-channel encoded discs regardless of the
“Surround On” setting.
• You cannot activate surround for MPEG
multi-channel DVD Video and MPEG 2channel sources. If “Surround On” is selected,
stereo sounds are emitted only through the
front speakers. “FRONT 2CH” appears on the
disc information screen.
• With “Auto” selected for “Surround On,”
stereo playback will start for DVD, DTSCD, and MPEG 2-channel sources without
surround signal encoded. In this case, no
sound comes out of the subwoofer.
• When “FIX” appears on the disc information
screen, no sound comes out of the subwoofer.
ENGLISH
45
Page 46

Playing SD cards
• The required recording format is FAT 16/32
and the recommended storage type is 8 MB to
512 MB.
iPod® or D. player operations
ENGLISH
• When you turn on this unit, the iPod or
D. player is charged through this unit.
• The text information may not be displayed
correctly.
– due to incompatibility of the recorded
characters, such as accented letters.
– due to communication condition between
the iPod or D. player and the unit.
• This unit can display up to 40 characters.
• You cannot display the Chinese characters for
the text information correctly even though
you have selected Simplified Chinese or
Traditional Chinese for “Language.”
Notice:
When operating an iPod or a D. player,
some operations may not be performed
correctly or as intended. In this case, visit the
following JVC web site:
For iPod users: <http://www.jvc.co.jp/
english/car/support/ks-pd100/index.html>
For D. player users: <http://www.jvc.co.jp/
english/car/support/ks-pd500/index.html>
Menu settings
• GB13000 character set is used for displaying
tags and other text information when you
select “Chinese Simple” for “Language.” When
you select “Chinese Trad.” (☞ page 37), Big5
character set is used.
– Some characters may not be displayed
correctly if different character sets are used
for the album name and the artist name.
• If you change the “Amplifier Gain” setting
from “High Power” to “Low Power” while the
volume level is set higher than “30,” the unit
automatically changes the volume level to
“VOL 30.”
•
After you change any of “Menu Language/
Audio Language/Subtitle” settings, turn off then
on the power, and re-insert the disc (or insert
another disc) so that your setting takes effect.
• When you select “16:9” for a picture whose
aspect ratio is 4:3, the picture slightly changes
due to the process for converting the picture
width.
• Even if “4:3 PS” is selected, the screen size
may become “4:3 LB” for some discs.
• When selecting “None” for the center/rear
speakers and “Off” for subwoofer (Speaker
Size), surround setting is canceled and cannot
be adjusted.
• Center speaker size cannot be set to “Large”
if both the front and rear speakers are set to
“None” or “Small.”
Title assignment
• If you try to assign titles to more than 30 radio
stations, or 30 CDs, “NAME FULL” flashes
for a while. Delete unwanted titles before
assignment.
• Titles assigned to CDs in the CD changer can
also be shown if you play back the discs in the
built-in DVD/CD player and vice versa.
About sounds reproduced through the rear
terminals
• Speaker out/analog discrete output (FOUT/R-OUT/CENTER/SUBWOOFER):
Multi-channel signals are emitted for a
multi-channel encoded disc. (When Dual
Zone is activated, the same signal emitted
through 2nd AUDIO OUT plugs are
emitted for the main source “DISC.”)
• 2nd AUDIO OUT: 2-channel signal is
emitted when Dual Zone is activated.
When playing a multi-channel encoded
disc, multi-channel signals are downmixed
(except for some DVD Audio).
46
Page 47

Troubleshooting
What appears to be trouble is not always serious. Check the following points before calling a service
center.
Symptoms Remedies/Causes
• No sound comes out of the center speaker. Center speaker is used only for surround playback. No sound
comes out for stereo playback.
• No sound comes out of the subwoofer while
playing in stereo.
• The monitor is not clear and legible for
watching the playback picture.
• Remote controller does not work.
General
• “Position Error Push Open Key” appears on the
monitor.
• “Mecha Error Push Reset” appears on the
monitor, and the panel does not move.
• “SD Loading Error” appears on the monitor. SD is not inserted fully. Fully insert it into the slot to close
• The unit does not work at all.
• SSM automatic presetting does not work. Store stations manually.
• Static noise while listening to the radio. Connect the antenna firmly.
FM/AM
• Disc can be neither recognized nor played .
• Disc cannot be ejected.
• Recordable/Rewritable discs cannot be played
back.
• Tracks on the Recordable/Rewritable discs
cannot be skipped.
• “Disc Error Please Eject” appears on the
monitor.
• “Eject Error” or “Loading Error” appears on the
monitor.
• Sound and pictures are sometimes interrupted
Disc playback
or distorted.
• No playback picture appears on the monitor.
• The external monitor shows black and white
wavy pictures.
• “Region Error Please Eject” appears on the
monitor when you insert a DVD Video.
This happens while playing some discs with “Auto” selected
for “Surround On” (☞ pages 21 and 40). Cancel surround.
Sunshine from the windshield may cause this symptom.
Adjust “Bright” and “Contrast” of “Screen Control.” (☞
page 36).
Deactivate Dual Zone (☞ page 24).
(While Dual Zone is activated, the remote controller only
functions for operating the DVD/CD player.)
The monitor panel angle has been forcibly adjusted, or
interrupted while opening or closing. Press OPEN/CLOSE.
Reset the unit (☞ page 2).
the monitor panel.
Reset the unit (☞ page 2).
Eject the disc forcibly (☞ page 2).
Unlock the disc (☞ page 17).
• Insert a finalized disc.
• Finalize the discs with the component which you used for
recording.
Insert the disc correctly again.
Changing the source by pressing SOURCE will solve this
error.
• Stop playback while driving on rough roads.
• Change the disc.
Parking brake wire is not connected properly. (☞
Installation/Connection Manual.)
“NTSC/PAL” setting is not correct. Select an appropriate
setting (☞ page 37).
Region code is not correct (☞ page 5).
ENGLISH
47
Page 48

• Disc cannot be played back. • Change the disc.
ENGLISH
• Noise is generated. The track played back is not a playable file format. Skip to
• Tracks cannot playback as you have intended
them to play.
• Elapsed playing time is not correct. This sometimes occurs during playback. This is caused by
MP3/WMA/WAV playback
• “Disc No Files Please Eject” appears on the
monitor.
• Noise is generated. The track played back is not a playable file format. Skip to
• Tracks cannot playback as you have intended
them to play.
• “Now Reading” keeps flashing on the
monitor.
• “SD No Files Please Eject” appears on the
monitor, then returns to the previous source.
• “Not Support” appears on the monitor and
SD card playback
track is skipped.
• “SD Error Please Eject” appears on the
monitor, then returns to the previous source.
• “No Disc” appears on the monitor. Insert a disc into the magazine.
• “No Magazine” appears on the monitor. Insert the magazine.
• “No Files” appears on the monitor. Disc does not include playable files. Replace the disc with
• “Reset 08” appears on the monitor. Connect this unit and the CD changer correctly and press the
CD changer
• “Reset 01” – “Reset 07” appears on the
monitor.
• The CD changer does not work at all.
Symptoms Remedies/Causes
• Record the tracks using a compliant application in the
appropriate discs (☞ page 4).
• Add appropriate extension codes to the file names.
another file.
Playback order may differs from the one played back using
other players.
how the tracks are recorded.
Insert a disc that contains tracks of proper formats.
another file.
Playback order may differs from the one played back using
other players.
• Readout time varies depending on the SD card.
• Do not use too many hierarchy and folders.
• Turn off the power then on again.
Insert an SD card that contains tracks encoded in an
appropriate format.
Track is unplayable.
• SD card may be malfunctioning, or may not have been
formatted correctly.
• Do not pull out or attach the SD card while “Now
Reading” is shown.
playable files.
reset button of the CD changer.
Press the reset button of the CD changer.
Reset the unit (☞ page 2).
48
Page 49

Symptoms Remedies/Causes
• The iPod or D. player does not turn on or does
not work.
• Check the connecting cable and its connection.
•
Charge the battery.
• For D. player: Update the firmware version.
• The sound is distorted. Deactivate the equalizer either on this unit or the iPod/
D. player.
• “Disconnect” appears on the monitor.
Check the connecting cable and its connection.
• For iPod: Playback stops. The headphones are disconnected during playback. Restart
playback.
• No sound can be heard when connecting an
Disconnect the headphones from the iPod nano.
iPod nano.
• No sound can be heard.
• “ERROR 01” appears on the monitor when
Disconnect the adapter from the D. player. Then, connect it
again.
connecting a D. player.
iPod/D. player playback
• “NO FILES” or “NO TRACK” appears on the
No tracks are stored. Import tracks to the iPod or D. player.
monitor.
• “RESET 01” – “RESET 07” appears on the
monitor.
Disconnect the adapter from both this unit and iPod/D.
player. Then, connect it again.
• “RESET 08” appears on the monitor. Check the connection between the adapter and this unit.
• The iPod’s or D. player’s controls do not work
Reset the iPod or D. player.
after disconnecting from this unit.
• “No Signal” appears on the monitor. • Turn on the video component if it is not on.
AV-IN
• This unit is not connected to the video component
correctly. Connect it correctly.
ENGLISH
Sound mode
Flat 00 00 00 00 00 00 00
Hard Rock +03 +03 +01 00 00 +02 +01
R&B +03 +02 +02 00 +01 +01 +03
Pop 00 +02 00 00 +01 +01 +02
Jazz +03 +02 +01 +01 +01 +03 +02
Dance +04 +02 00 –02 –01 +01 +01
Country +02 +01 00 00 00 +01 +02
Reggae +03 00 00 +01 +02 +02 +03
Classic +02 +03 +01 00 00 +02 00
User 1/2/3 00 00 00 00 00 00 00
60 Hz 150 Hz 400 Hz 1 kHz 2.5 kHz 6.3 kHz 15 kHz
Preset equalizing values
49
Page 50

Specifications
Maximum Power Output: Front/Rear: 50 W per channel
ENGLISH
Continuous Power Output
(RMS):
Load Impedance: 4 Ω (4 Ω to 8 Ω allowance)
Equalizer Control Range: Frequencies: 60 Hz, 150 Hz, 400 Hz, 1 kHz, 2.5 kHz,
Signal-to-Noise Ratio: 70 dB
Audio Output Level
AMPLIFIER
(F-OUT/R-OUT/CENTER/
SUBWOOFER):
Color System: PAL/NTSC
Video Output (composite): 1 Vp-p/75 Ω
Other Terminals: Input: LINE IN, VIDEO IN, Antenna input
Frequency Range: FM: 87.5 MHz to 108.0 MHz
FM Tuner Usable Sensitivity: 11.3 dBf (1.0 μV/75 Ω)
FM/AM TUNER
AM Tuner Sensitivity/Selectivity: 20 μV/35 dB
Front/Rear: 20 W per channel into 4 Ω, 40 Hz to
20 000 Hz at no more than 0.8% total
harmonic distortion
6.3 kHz, 15 kHz
Level: ±10 dB
Line-Out Level/Impedance: 2.5 V/20 kΩ load (full scale)
Output Impedance: 1 kΩ
Output: 2nd AUDIO OUT
Others: CD changer, AV BUS
AM: 531 kHz to 1 602 kHz
50 dB Quieting Sensitivity: 16.3 dBf (1.8 μV/75 Ω)
Alternate Channel Selectivity
(400 kHz):
Frequency Response: 40 Hz to 15 000 Hz
Stereo Separation: 35 dB
65 dB
50
Page 51

Signal Detection System: Non-contact optical pickup (semiconductor laser)
Frequency Response: DVD, fs=48 kHz: 16 Hz to 22 000 Hz
DVD, fs=96 kHz: 16 Hz to 44 000 Hz
VCD/CD: 16 Hz to 20 000 Hz
DVD/CD
Dynamic Range: 93 dB
Signal-to-Noise Ratio: 95 dB
Wow and Flutter: Less than measurable limit
Screen Size: 6.5 inch wide liquid crystal display
Number of Pixel: 280 800 pixels: 400 (horizontal) × 3 × 234 (vertical)
Drive Method: TFT (Thin Film Transistor) active matrix format
Color System: PAL/NTSC
MONITOR
Aspect Ratio: 16:9 (wide)
Allowable Storage Temperature: –10°C to +60°C
Allowable Operating Temperature: 0°C to +40°C
Power Requirement: Operating Voltage: DC 14.4 V (11 V to 16 V allowance)
Grounding System: Negative ground
Allowable Operating Temperature: 0°C to +40°C
Dimensions (W × H × D): Installation Size (approx.): 178 mm × 100 mm × 160 mm
GENERAL
Panel Size (approx.): 170 mm × 93 mm × 29 mm
Mass (approx.):
2.6 kg (excluding accessories)
ENGLISH
Design and specifications are subject to change without notice.
Required space for the monitor ejection
CAUTION: When ejecting the monitor, keep an open
space for the monitor to come out. If not, the monitor
may obstruct the steering wheel and gearshift lever
operations, as this may result in a traffic accident.
160
88.5
100
Unit: mm
51
Page 52

Having TROUBLE with operation?
Please reset your unit
Refer to page of How to reset your unit
在操作時遇到麻煩了?
請重設本機
參閱如何重設本機之頁
EN, CS
© 2006 Victor Company of Japan, Limited
0506MNMMDWJEIN
Page 53

LVT1469-011A
[UF]
KW-AVX708/KW-AVX700
Installation/Connection Manual
安裝∕連接手冊
0506MNMMDWJEIN
EN, CS
© 2006 Victor Company of Japan, Limited
ENGLISH
This unit is designed to operate only on 12 V DC, NEGATIVE ground electrical systems. If
your vehicle does not have this system, a voltage inverter is required, which can be purchased at
JVC car audio dealers.
WARNINGS
• DO NOT install any unit in locations where;
– it may obstruct the steering wheel and gearshift lever operations, as this may result in a
traffic accident.
– it may obstruct the operation of safety devices such as air bags, as this may result in a fatal
accident.
– it may obstruct visibility.
• DO NOT operate any unit while manipulating the steering wheel, as this may result in a traffic
accident.
• The driver must not watch the monitor while driving.
If the driver watches the monitor while driving, it may lead to carelessness and cause an
accident.
• If you need to operate the unit while driving, be sure to look ahead carefully or you may be
involved in a traffic accident.
• If the parking brake is not engaged, “Parking Brake” appears on the monitor for a while, and no
playback picture will be shown.
– This warning appears only when the parking brake wire is connected to the parking brake
system built in the car.
Notes on electrical connections
• Replace the fuse with one of the specified rating. If the fuse blows frequently, consult your JVC
car audio dealer.
• Maximum input of the speakers should be more than 50 W at the rear and 50 W at the front,
with an impedance of 4 Ω to 8 Ω.
• Be sure to ground each unit to the car’s chassis.
• To prevent short-circuit, cover the terminals of the UNUSED leads with insulating tape.
• The unit become very hot after use. Be careful not to get burned when removing them.
中文
本機僅可使用直流 12 V 、負極接地的電源系統。如果您的車輛沒有這一電源系統,則需要一個電
壓變換器,可以在 JVC 汽車音響分銷商處買到。
警告
• 切勿將本機安裝在下述位置;
– 可能會妨礙操作方向盤和變速排檔桿的位置,否則可能引發交通事故。
– 可能會妨礙操作安全裝置,如安全氣袋等的位置,否則可能引發致命的交通事故。
– 可能會妨礙視野的位置。
• 切勿在操作方向盤的過程中操作本機,否則可能引發交通事故。
• 駕駛員在駕駛過程中切勿觀看顯示器。
若駕駛員在駕駛過程中觀看顯示器,可能因為注意力不集中而導致意外事故的發生。
• 若您需要在駕駛時操作本機,請務必小心注意前方,否則您可能會導致意外。
• 若手剎車未嚙合,“Parking Brake”字樣在顯示器上出現,且無法播放圖像。
– 僅當手剎車導線與汽車內置的手剎車系統相連接時此警告信息才會出現。
進行電路連接時注意
• 把保險絲更換為額定負荷值的保險絲。如果保險絲經常燒壞,請向 JVC 汽車音響分銷商詢問。
• 揚聲器的最大輸入應該是后置揚聲器超過 50 W,以及前置揚聲器為 50 W,其阻抗為 4 Ω 至
8 Ω。
• 務必將每一機件的地線接至車身。
• 為防止電源短路,請用絕緣帶包住未使用電線的端子。
• 本機在使用過后會變得很熱。拆卸時小心別被燙傷。
Heat sink
散熱片
Parts list for installation and connection
The following parts are provided for this unit.
If anything is missing, contact your dealer immediately.
Main unit
主機
Plate for use with a Nissan car
用于日產汽車的框
Power cord
電路連接用的配線束
Flat head screws (M5 x 8 mm)
平頭螺絲(M5 x 8 mm)
用于安裝和連接的零件裹
本機配備以下零件。
若發現缺少任何一件零件,請即刻聯絡您的分銷商。
AV I/O cord
音頻視頻輸入輸出電纜
Round head screws (M5 x 8 mm)
圓頭螺絲(M5 x 8 mm)
Reverse gear signal extension cord
倒車擋信號延長電纜
Remote controller
遙控器
Battery
電池
CR2025
RM-RK240
Crimps
捲曲連接器
TROUBLESHOOTING
• The fuse blows.
* Are the red and black leads connected correctly?
• Power cannot be turned on.
* Is the yellow lead connected?
• No sound from the speakers.
* Is the speaker output lead short-circuited?
• Sound is distorted.
* Is the speaker output lead grounded?
* Are the “–” terminals of L and R speakers grounded in common?
• Noise interfere with sounds.
* Is the rear ground terminal connected to the car’s chassis using shorter and thicker cords?
• Unit becomes hot.
* Is the speaker output lead grounded?
* Are the “–” terminals of L and R speakers grounded in common?
故障排除
• 保險絲燒斷。
* 檢查紅色導線接頭和黑色導線接頭是否連接正確﹖
• 電源不能接通。
* 檢查黃色導線接頭是否接上﹖
• 揚聲器沒有聲音。
* 檢查揚聲器輸出導線接頭是否短路﹖
• 聲音失真。
* 檢查揚聲器輸出端子是否接地﹖
* 檢查揚聲器的左 (L)、右 (R) 端子的負極 (–) 是否共同接地﹖
• 噪音干擾音響。
* 后接地端子與車身是否使用較短和較粗的電線連接﹖
• 本機發熱。
* 檢查揚聲器輸出端子是否接地﹖
* 檢查揚聲器的左 (L)、右 (R) 端子的負極 (–) 是否共同接地﹖
1
Page 54

INSTALLATION (IN-DASH MOUNTING)
安裝(裝設、固定在儀表板內)
The following illustration shows a typical installation. However, you should make adjustments
corresponding to your specific car. If you have any questions or require information regarding
installation kits, consult JVC car audio dealer or a company supplying kits.
• If you are not sure how to install this unit correctly, have it installed by a qualified technician.
Before installing the unit
• When mounting the unit, be sure to use the screws provided, as instructed. If other screws are
used, there is a possibility that parts could become loose or damaged.
• When tightening screws or bolts be careful not to pinch any connection cord.
• Make sure not to block the fan on the rear panel to maintain proper ventilation when installed.
1
Remove the audio system originally installed in the car, together with its mounting brackets.
Note: Be sure to keep all the screws and parts removed from your car for future use.
2
Attach the mounting brackets (removed from the car), to this unit (see below).
3
Connect the power cord and AV I/O cord
• See page 3 for the power cord connection.
• See page 4 for the AV I/O connection.
4
Install this unit using the screws removed in step 1.
The following example is for installation in a Toyota car. For more details, consult your JVC car
audio dealer.
下面的圖解表示了典型的安裝程序。但是在實際安裝時,您應該根據您的汽車作適當的調整。如
果您有問題,或需要有關配套元件的資料,請向 JVC 汽車音響分銷商或配套元件供應公司詢問。
• 如果您不能確定如何正確地安裝本機,應請合格的技術人員來安裝。
安裝本機之前
• 當裝上本機時,必須按照指示使用配備的螺絲釘。如果使用其他螺絲釘,相關零件可能會鎖不
緊或損壞。
• 當鎖緊螺絲釘或螺栓時,切記不要壓擠到任何連接電線。
• 當安裝上后,切記不要阻擋到后面板的風扇以維持適當的通風。
1
拆卸原本安裝在汽車內的音響系統,以及其裝配架。
備注:請務必保留所有從您汽車拆卸的螺絲和零件作日后使用。
2
將(從汽車拆卸的)裝配架安上本機(請看下圖)。
3
連接電源線和音頻視頻輸入輸出電纜。
• 請參閱第 3 頁有關電源線連接。
• 請參閱第 4 頁有關音頻視頻輸入輸出連接。
4
使用在步驟 1 拆卸的螺絲安裝本機。
以下以豐田(Toyota)汽車安裝為例。請聯絡您的 JVC 汽車音響分銷商有關更多細節。
Mounting bracket removed from the car
從汽車拆卸的裝配架
Mounting bracket removed from the car
從汽車拆卸的裝配架
Supplied screws
配備螺絲
Select the appropriate type fitting
to your audio system space.
選擇適合您的音響系統安裝空間的
型號。
Note : When installing the unit on the mounting bracket, make sure to use the
supplied screws (M5 x 8 mm). If longer screws are used, they could damage
the unit.
備注 : 安裝本機進裝配架時,請務必使用配備的螺絲(M5 x 8 mm)。若使用比較長的
螺絲,有關螺絲可能會損壞本機。
Screws removed from the car in step
在步驟 1 從汽車拆卸的螺絲
Supplied screws
配備螺絲
If necessary, restore the protruding tabs.
若有必要,請重新裝上凸緣。
1
When installating the unit in a Nissan car
當安裝本機于日產汽車時
Plate for use with a Nissan car
用于日產汽車的框
Required space for the monitor ejection
拆卸屏幕所需之空間
100
Unit: mm
160
88.5
單位:mm(毫米)
ELECTRICAL CONNECTIONS
PRECAUTIONS on power supply and speaker connections:
• DO NOT connect the speaker leads of the power cord to the car battery; otherwise, the
units will be seriously damaged.
• BEFORE connecting the speaker leads of the power cord to the speakers, check the speaker
wiring in your car.
Install the unit at an angle of less than 30˚, taking it into account that the monitor would eject
when in use (see below).
將本機安裝在少于 30˚ 的角度,您必須考慮到屏幕可以在使用時彈出(請看下圖)。
30˚
電路連接
電源和揚聲器接線注意事項:
• 切勿把揚聲器導線接頭接至電池;否則本機將會嚴重損壞。
• 在把揚聲器導線接頭接至揚聲器之前,檢查您汽車上的揚聲器線路。
+
L
-
+
R
-
+
-
+
-
+
L
-
+
R
-
2
+
-
+
-
+
L
-
+
R
-
+
-
+
-
Page 55

ENGLISH
中文
Before connecting...
Check the wiring in the car carefully. Incorrect connection may cause serious damage to the
units. The leads of the power cord and those of the connector from the car body may be
different in color.
1
Connect the colored leads of the power cord in the order specified in the illustration below.
2
Connect the antenna cord.
3
Connect the wiring harness to the main unit.
Rear ground terminal
本機后背接地端子
Not used
未啟用
Fan
風扇
15 A fuse
15 A 保險絲
3
A
B
C
2
See page 4.
請看第 4 頁。
To antenna
連接至天線
1
*2Before checking the operation of this unit prior
to installation, this lead must be connected,
otherwise power cannot be turned on.
2
本機未安裝時,進行工作狀況檢查之前,
*
必須把這導線接上,否則不能開啟電源。
Black
黑色
2
Yellow*
2
黃色*
Red
紅色
Blue
藍色
Blue with white stripe
藍色帶有白色條紋
Orange with white stripe
橙色帶有白色條紋
To metallic body or chassis of the car
1
接至金屬車體或汽車底盤
To a live terminal in the fuse block connecting to the car battery
(by passing the ignition switch)
2
接至保險絲單元內的附屬端子,保險絲單元與車裝電池相連接
(用于旁路點火開關)
3
接線前...
仔細檢查汽車內的線路。不正確的接線會導致本機嚴重損壞。電力線的引線和車身的連接器引線在
顏色上可能有所不同。
1
依照下圖所示之次序連接電源線的顏色導線。
2
將天線的電線連接起來。
3
將線束連接至主機。
1
Not included with this unit
*
1
本機沒有配備
*
To an accessory terminal in the fuse block
接至保險絲單元內的附屬端子
To automatic antenna if any (250 mA max.)
4
接至自動天線(若有裝設)(最大 250 mA)
To the remote lead of other equipment (200 mA max.)
5
連接至另一架儀器的遙控導線(最大 200 mA)
To car light control switch
6
(ILLUMINATION)
連接至汽車車燈控制開關
1
*
1
*
Ignition switch
點火開關
Fuse block
保險絲單元
White with black stripe
白色帶有黑色條紋
Left speaker (front)
左揚聲器(前置)
White
白色
Brown
褐色
Light green
淺綠色
9
Gray with black stripe
灰色帶有黑色條紋
Right speaker (front)
右揚聲器(前置)
Gray
灰色
(PARKING BRAKE)
Green with black
stripe
綠色帶有黑色條紋
Left speaker (rear)
左揚聲器(后置)
To cellular phone system
7
連接至移動電話系統
8
Green
綠色
Crimp
捲曲連接器
Purple with black
stripe
紫色帶有黑色條紋
To parking brake of the car (see below)
連接至汽車的停車制動器(請看下圖)
Purple
紫色
Right speaker (rear)
右揚聲器(后置)
Connecting the parking brake wire∕連接至手剎車導線
Crimp
捲曲連接器
Parking brake
手剎車
Parking brake switch (inside the car)
手剎車開關(位于車內)
PARKING
BRAKE
Parking brake wire (light green)
手剎車導線(淺綠色)
To metallic body or chassis of the car
接至金屬車體或汽車底盤
3
Page 56

Connecting the external amplifiers∕連接至外接功率放大器
A
You can connect amplifiers to upgrade surround system in the car compartment.
• Connect the amplifiers to 5.1-ch analog discrete output jacks to enjoy multi-channel source
(DVD Video/DVD Audio).
• To activate the center speaker, see page 38 of the INSTRUCTIONS.
• Disconnect the speakers from the main unit, and connect them to the amplifier. Leave
the speaker leads of the unit unused.
Front speakers
前置揚聲器
Rear speakers
后置揚聲器
Amplifier
功率放大器
3
*
Amplifier
功率放大器
3
*
INPUT
L
R
INPUT
L
R
L
R
L
R
R
R
L
L
您可以連接功率放大器以提升車廂內的環繞音響系統。
• 將功率放大器連接至 5.1 頻道模擬離散輸出插座以享受多頻道音源(DVD 視頻∕DVD 音
頻)。
• 若要激活中置揚聲器,請參閱第 38 頁的指示。
• 將揚聲器和本機斷開,再接上功率放大器。將本機的揚聲器接線放置不用。
3
Firmly attach the ground wire to the metallic
INPUT
Amplifier
功率放大器
Center speaker
3
中置揚聲器
*
*
body or to the chassis of the car—to the
place uncoated with paint (if coated with
paint, remove the paint before attaching the
wire). Failure to do so may cause damage
to the unit.
3
將地線與金屬車體或者汽車底盤緊密連接,
*
INPUT
Amplifier
功率放大器
Subwoofer
3
*
重低音揚聲器
連接處應該沒有被油漆覆蓋(如果已塗上油
漆,在連接電線前,將油漆刮去)。如果不
這樣做,可能會損壞本機。
Connecting the AV I/O cord∕連接至音頻視頻輸入輸出電纜
B
2nd AUDIO OUT
VIDEO OUT
LINE IN
VIDEO IN
REVERSE
GEAR
SIGNAL
L
R
L
R
Audio/video cords (not supplied)
音頻∕視頻電纜(沒有配備)
Reverse gear signal extension cord*
倒車檔信號延長電纜*
To car battery
*4Required only when connecting a rear view
連接至汽車電池
camera to VIDEO IN plug.
4
只有在連接后視攝影機至 VIDEO IN(視頻輸
*
入)插座時需要。
L
R
L
R
4
REVERSE
GEAR
SIGNAL
Reverse lamp lead
倒車信號燈導線
4
Crimp
捲曲連接器
2nd monitor (KV-MR9010, etc.)
第 2 台屏幕(KV-MR9010 或其他型號)
Cordless headphones (KS-HP2)
無線耳機(KS-HP2)
Playback source (Video camera, etc.)
播放源(攝影機或其他)
Reverse lamp
倒車信號燈
To reverse lamp
連接至倒車信號燈
Connecting the external components∕連接其他外接組件
C
CAUTION:
Before connecting the external components, make sure that the unit is turned off.
CD changer, Apple iPod®, or JVC D. player∕CD 換碟器、Apple iPod® 或 JVC D. player
Set the external input setting correctly––either to “Changer,” “iPod,” or “D. player”
(See page 40 of the INSTRUCTIONS.)
正確地設置外接輸入設置—“Changer”(換碟器)、“iPod”或“D. player”(請參
閱第 40 頁的指示。)
5
*
JVC CD changer
JVC CD 換碟器
6
*
Apple
iPod
6
5
Connecting cord supplied for your CD changer
*
5
您的 CD 換碟器配備的連接電纜
*
*
6
KS-PD100/KS-PD500 (separately
*
purchased)
6
KS-PD100/KS-PD500(另外購置)
*
JVC
D. player
小心:
連接外接組件之前,先確定本機已經關閉。
Other external component∕其他外接組件
Select “External Input” for the external input setting (See page 40 of the INSTRUCTIONS.)
選擇“External Input”(外接輸入)作為外接輸入設置(請參閱第 40 頁的指示。)
Line Input Adapter KS-U57
(separately purchased)
電路輸入適配器 KS-U57
(另外購置)
Audio cord
(not supplied)
音頻電纜(沒有配
備)
AUX Input Adapter KS-U58 (separately purchased)
AUX 輸入適配器 KS-U58(另外購置)
3.5 mm stereo mini plug
3.5 mm 立體聲迷你插頭
• iPod is a trademark of Apple Computer, Inc., registered in the U.S. and other countries.
• iPod 是 Apple Computer, Inc.(蘋果電腦公司)在美國及其他國家注冊的商標。
To disconnect the connector
Hold the connector top tightly (1), then pull it out (2).
若要拆除連接器
握緊連接器頂部(1),然后將之拉出(2)。
External component
外接組件
External component
外接組件
4
 Loading...