

JVC KD-NX5000, EXAD KD-NX5000 Instructions Manual

,....,~
~
ail
@I~
ULT~t=4
?,O'q
~dh
I)[]IDOLBVI
2VE
(illD~i
2.0+0igital
Out
DIGITAL
ODD
AUDIO/VIDEO
IOIGITAL
VIOEol
QuO
~
NAVTEQ
-.
RADIO
READY
TRAFFIC
-.M
Microsoftill>
Windowsill>
Powered
HDD
NAVIGATION/DVD
RECEIVER
NAVEGACION
HDD/RECEPTOR
DVD
SYSTEME
DE
NAVIGATION A
DISQUE
DUR/RECEPTEUR
DVD
KD-NX5000
JVC
For installation
and
connections,_ refer to the separate manual.
Para la instalacion
ylas conexiones, refierase
al
manual separado.
Pour l'installation et les raccordements,
se
referer au manuel separe.
INSTRUCTIONS
MANUAL
DE
INSTRUCCIONES
MANUEL
D'INSTRUCTIONS
For customer Use:
Enter belowthe Model
No. and Serial No. which
are located
on
the top
or
bottomofthe cabinet.
Retain this information
for future reference.
Model No.
Serial No.
LVT1627-001A
[J]
,....,~
~
ail
@I~
ULT~t=4
?,O'q
~dh
I)[]IDOLBVI
2VE
(illD~i
2.0+0igital
Out
DIGITAL
ODD
AUDIO/VIDEO
IOIGITAL
VIOEol
QuO
~
NAVTEQ
-.
RADIO
READY
TRAFFIC
-.M
Microsoftill>
Windowsill>
Powered
HDD
NAVIGATION/DVD
RECEIVER
NAVEGACION
HDD/RECEPTOR
DVD
SYSTEME
DE
NAVIGATION A
DISQUE
DUR/RECEPTEUR
DVD
KD-NX5000
JVC
For installation
and
connections,_ refer to the separate manual.
Para la instalacion
ylas conexiones, refierase
al
manual separado.
Pour l'installation etles raccordements,
se
referer au manuel separe.
INSTRUCTIONS
MANUAL
DE
INSTRUCCIONES
MANUEL
D'INSTRUCTIONS
For customer Use:
Enter below the Model
No. and Serial No. which
are located
on
the top
or
bottomofthe cabinet.
Retain this information
for future reference.
Model No.
Serial No.
LVT1627-001A
[J]
I
Thank you for purchasing a
Jve
product.
Please read
all
instructions carefully before operation, to ensure your complete understanding and to
obtain the best possible performance from the unit.
IMPORTANT
FOR
LASER
PRODUCTS
1.
CLASS1LASER
PRODUCT
2.
CAUIION:
Do not open the top cover. There are no user serviceable parts inside the unit; leave
all
servicing to qualified service personnel.
3.
CAUTION:
(For U.S.A.) Visible and/or invisible class
II
laser radiation when open. Do not stare into beam.
(For Canada) Visible and/or invisible class
1M
laser radiation when open. Do not view directly
with optical instruments.
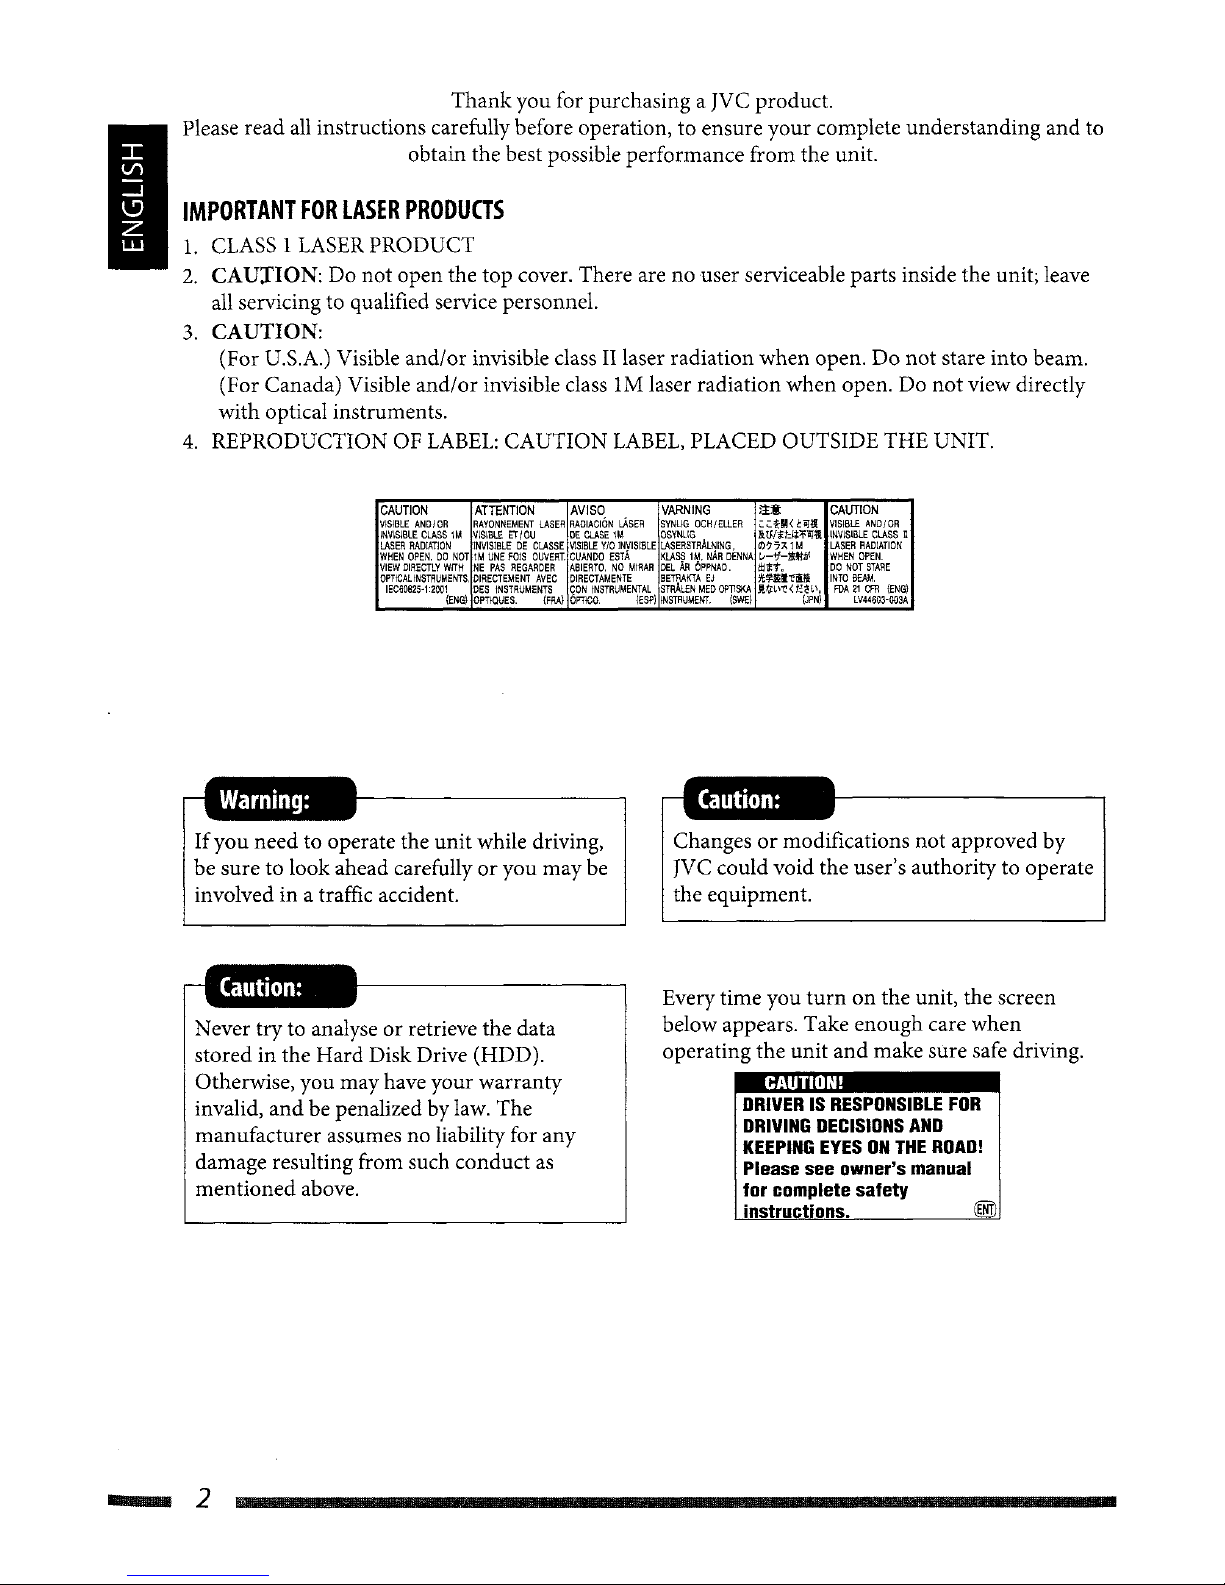
4. REPRODUCTION
OF
LABEL:
CAUTION
LABEL,
PLACED OUTSIDE THE UNIT.
CAUTION
ATTENTION
AVISO
VARNING
i.!M:
CAUTION
VISIBLE
AND/OR
RAYONNEMENT
LASER
RADiACION
LASE~
SYNlIG
OCHIELLER
~~HIl<1:OJll!
VISIBLE
AND/OR
INVISIBLE
CLASS1MVISIBLE
ETlOU
DE
CLASE
1M
OSYNLlG
llVlit:lt:fOJll!
INVISIBLE
CLASS
U
LASER
RADIATION
INVISIBLEDECLASSE
'I1SlBLE
Y/OINVISIBLE
~J~~SlT~~~~%ENNA
M7A.1M
LASER
RADIATION
WHEN
OPEN.DONOT1MUNE
FOIS
OUVERT.
CUANDO
EST.!.
1,,-<;I-IUlbl
WHEN
OPEN
VIEW
DIRECTLY
WITH
NE
PAS
REGARDER
ABIERTO.NOMtRAR
DELAROPPNAD.
!Uf.
DO
NOT
STARE
OPT!CALINSTRUMENTS
DIRECTEMENT
AVEC
DIRECTAMENTE
BETRAKTA
EJ
l'/;!i!lIl.'iti
INTO
BEAM,
IECS0825·1:1001
DES
INSTRUMENTS
CON
INSTRUMENTAL
STMLEN
MED
OPT1SKA
j!,1.i'\l.'<t~H\.
FDA11CFR
(ENG)
(ENG!
OPTIQUES.
!FRA)
61'11CO
IESP)
INSTRUMENT.
(SWE)
(JPNI
lV44S03-00SA
If
you need to operate the unit while driving,
be sure to look ahead carefully oryou may be
involved in a traffic accident.
Never tryto analyse or retrieve the data
stored in the Hard Disk Drive (HDD).
Otherwise, you may have your warranty
invalid, and be penalized by law. The
manufacturer assumes no liabilityfor any
damage resulting from such conduct
as
mentioned above.
Changes
or
modifications not approved by
JVC
could void the user's authority to operate
the equipment.
Every time you
turnonthe unit, the screen
below appears. Take enough care when
operating the unit and make sure safe driving.
CAUTION!
DRIVERISRESPONSIBLE
FOR
DRIVING
DECISIONS
AND
KEEPING
EYESONTHE
ROAD!
Please see owner's manual
for complete safety
instructions.
@ill
_2
I
Thank you for purchasing a
Jve
product.
Please read
all
instructions carefully before operation, to ensure your complete understanding and to
obtain the best possible performance from the unit.
IMPORTANT
FOR
LASER
PRODUCTS
1.
CLASS1LASER
PRODUCT
2.
CAUIION:
Do not open the top cover. There are no user serviceable parts inside the unit; leave
all
servicing to qualified service personnel.
3.
CAUTION:
(For U.S.A.) Visible and/or invisible class
II
laser radiation when open. Do not stare into beam.
(For Canada) Visible and/or invisible class
1M
laser radiation when open. Do not view directly
with optical instruments.
4. REPRODUCTION
OF
LABEL:
CAUTION
LABEL,
PLACED OUTSIDE THE UNIT.
CAUTION
ATTENTION
AVISO
VARNING
i.!M:
CAUTION
VISIBLE
AND/OR
RAYONNEMENT
LASER
RADiACION
LASE~
SYNlIG
OCHIELLER
~~HIl<1:OJll!
VISIBLE
AND/OR
INVISIBLE
CLASS1MVISIBLE
ETlOU
DE
CLASE
1M
OSYNLlG
llVlit:lt:fOJll!
INVISIBLE
CLASS
U
LASER
RADIATION
INVISIBLEDECLASSE
'I1SlBLE
Y/OINVISIBLE
~J~~SlT~~~~%ENNA
M7A.1M
LASER
RADIATION
WHEN
OPEN.DONOT1MUNE
FOIS
OUVERT.
CUANDO
EST.!.
1,,-<;I-IUlbl
WHEN
OPEN
VIEW
DIRECTLY
WITH
NE
PAS
REGARDER
ABIERTO.NOMtRAR
DELAROPPNAD.
!Uf.
DO
NOT
STARE
OPT!CALINSTRUMENTS
DIRECTEMENT
AVEC
DIRECTAMENTE
BETRAKTA
EJ
l'/;!i!lIl.'iti
INTO
BEAM,
IECS0825·1:1001
DES
INSTRUMENTS
CON
INSTRUMENTAL
STMLEN
MED
OPT1SKA
j!,1.i'\l.'<t~H\.
FDA11CFR
(ENG)
(ENG!
OPTIQUES.
!FRA)
61'11CO
IESP)
INSTRUMENT.
(SWE)
(JPNI
lV44S03-00SA
If
you need to operate the unit while driving,
be sure to look ahead carefully oryou may be
involved in a traffic accident.
Never tryto analyse or retrieve the data
stored in the Hard Disk Drive (HDD).
Otherwise, you may have your warranty
invalid, and be penalized by law. The
manufacturer assumes no liabilityfor any
damage resulting from such conduct
as
mentioned above.
Changes
or
modifications not approved by
JVC
could void the user's authority to operate
the equipment.
Every time you
turnonthe unit, the screen
below appears. Take enough care when
operating the unit and make sure safe driving.
CAUTION!
DRIVERISRESPONSIBLE
FOR
DRIVING
DECISIONS
AND
KEEPING
EYESONTHE
ROAD!
Please see owner's manual
for complete safety
instructions.
@ill
_2
•
DO
NOT
install any unit in locations
where:
- it
may
obstruct the steering wheel
and
gearshift lever operations.
- it
may
obstruct the operationofsafety
devices such
as
air bags.
- it
may
obstruct visibility.
•
DO
NOT
operate the
unit
while driving.
If
you
needtooperate the unit while driving,
be sure to
look
ahead carefully.
• The driver
must
not
watch the
monitor
while driving.
•
If
the
parking
brakeisnot
engaged,
"Parking Brake" flashes on the monitor,
and
no playback picture will be shown.
- This
warning
appears only when the
parking brake wire
is
connected to the
parking brake system built in the car
(refer to the Installation/Connection
Manual).
Hard
Disk
Drive
(HDD)
Installation
This unit has a built-in
HDD,
whichisa device
to read
minute
magnetic changes. The inside
of
the deviceisprecision components, requiring
you to notice the following
when
installing the
unit:
Install the
unit
at a place where the following
conditions are satisfied:
• Dry
and
neither too
hot
nor
too
cold-
between
SOC
(41°F) and
35°C
(95°F).
If
the temperature is
too
low, the
HDD
will
not
work. Wait until the temperaturein the
car becomes normal before operating the
unit.
• At an altitude between
-300
m
(~980
ft)
below
sea level
and
+3000 m (9800
ft)
above sea
level.
•
With
adequate ventilation to prevent internal
heat buildup in the unit.
Before
using
HOD
While the
unitisturned
on, the
hard
disk
is
constantly rotating at a high speed. This
requires you to notice the following:
• DO
NOT
impart
vibrationorshock.
•
DO
NOT
allow anything having strong
magnetism
or
emitting
strong
electromagnetic
waves (cellular phones, etc.) nearthe unit.
•
DO
NOT
disconnect the power cords from
the car battery
when
the
unitisturned
on.
Failure in following the above cautions
may
damage the
HDD
(the
stored
data will be lost
and be never restored).
When
the
temperatureislow, the
HDD
may
take some time to start up,
or
may
reboot
automatically.
It
should be
noted
thatitmay
be unlawful to
re-record pre-recorded tapes, records,
or
discs
without the consent
of
the ownerofcopyright
in the
soundorvideo recording, broadcast
or
cable
programme
andinany
literary, dramatic,
musical,
or
artistic
work
embodied
therein.
!
3
~
•
DO
NOT
install any unit in locations
where:
- it
may
obstruct the steering wheel
and
gearshift lever operations.
- it
may
obstruct the operationofsafety
devices such
as
air bags.
- it
may
obstruct visibility.
•
DO
NOT
operate the
unit
while driving.
If
you
needtooperate the unit while driving,
be sure to
look
ahead carefully.
• The driver
must
not
watch the
monitor
while driving.
•
If
the
parking
brakeisnot
engaged,
"Parking Brake" flashes on the monitor,
and
no playback picture will be shown.
- This
warning
appears only when the
parking brake wire
is
connected to the
parking brake system built in the car
(refer to the Installation/Connection
Manual).
Hard
Disk
Drive
(HDD)
Installation
This unit has a built-in
HDD,
whichisa device
to read
minute
magnetic changes. The inside
of
the deviceisprecision components, requiring
you to notice the following
when
installing the
unit:
Install the
unit
at a place where the following
conditions are satisfied:
• Dry
and
neither too
hot
nor
too
cold-
between
SOC
(41°F) and
35°C
(95°F).
If
the temperature is
too
low, the
HDD
will
not
work. Wait until the temperaturein the
car becomes normal before operating the
unit.
• At an altitude between
-300
m
(~980
ft)
below
sea level
and
+3000 m (9800
ft)
above sea
level.
•
With
adequate ventilation to prevent internal
heat buildup in the unit.
Before
using
HOD
While the
unitisturned
on, the
hard
disk
is
constantly rotating at a high speed. This
requires you to notice the following:
• DO
NOT
impart
vibrationorshock.
•
DO
NOT
allow anything having strong
magnetism
or
emitting
strong
electromagnetic
waves (cellular phones, etc.) nearthe unit.
•
DO
NOT
disconnect the power cords from
the car battery
when
the
unitisturned
on.
Failure in following the above cautions
may
damage the
HDD
(the
stored
data will be lost
and be never restored).
When
the
temperatureislow, the
HDD
may
take some time to start up,
or
may
reboot
automatically.
It
should be
noted
thatitmay
be unlawful to
re-record pre-recorded tapes, records,
or
discs
without the consent
of
the ownerofcopyright
in the
soundorvideo recording, broadcast
or
cable
programme
andinany
literary, dramatic,
musical,
or
artistic
work
embodied
therein.
!
3
~

Howtoreset
your
unit
• Your preset adjustments
will also be erased.
Howtodetach/attach
the
control
panel
Howtoforcibly
ejectadisc
If
a disc cannotbe recognized by the unit
or
cannot be ejected, eject the discasfollows.
+
~{i
[Hold]
Emergency Eject
and
No
Eject (or Eject
OK)
appear on the monitor.
Press
..
/ T repeatedly to select Emergency
Eject,
then
press ENT.
•
If
this does
not
work, reset your unit.
•
Be
careful
not
to drop the disc when it ejects.
Detaching
Attaching
~4
• The
monitor
built in this unit has been
produced with high precision,
but
it may
have some ineffective dots. This
is
inevitable
andisnot
malfunction.
•
Do
not
expose the
monitor
to direct
sunlight.
For
safety
...
• Do
not
raise the volume level too much, as
this will block outside sounds, making driving
dangerous.
• Stop the car before performing any
complicated operations.
Temperature
inside
the
car
...
If
you have parked the car for a long timeinhot
or
cold weather, wait until the temperature in
the car becomes normal before operating the
unit.
Cautiononvolume
setting:
Discs produce very little noise compared with
other
sources. Lower the volume before playing
a disc to avoid damaging the speakers by the
sudden
increaseofthe
output
level.
This
product
incorporates copyright
protection technology that
is
protected
by
U.S. patents
and
other intellectual
property rights. Use
of
this copyright
protection technology must be authorized
by
Macrovision,
andisintended for
home
and
other limited viewing uses only unless
otherwise authorized
by
Macrovision.
Reverse engineering
or
disassembly
is
prohibited.
INFORMATION
(For
U.S.A.)
This equipment has been tested
and
found
to comply with the limits for a Class Bdigital
device,
pursuant
to Part15of
the FCC Rules.
These limits are designed to provide reasonable
protection against harmful interference in
a residential installation. This equipment
generates, uses,
and
can radiate radio frequency
energy and,
if
not
installed
and
used in
accordance with the instructions, may cause
harmful interference to radio communications.
However, there
is
no guarantee
that
interference
will
not
occur in a particular installation.Ifthis
equipment does cause harmful interference
to radio
or
television reception, which can be
determined by turning the equipment
off
and
on, the userisencouraged to try to correct the
interference
by
oneormoreofthe following
measures:
- Reorient
or
relocate the receiving antenna.
- Increase the separation between the
equipment
and
receiver.
- Connect the equipment into an outlet
on
a circuit different from that to which the
receiver
is
connected.
- Consult the dealer
oranexperienced radio I
TV technician for help.
[European
Union
only
J
!
-
-
--
5_

6
Contents
_m
------
8
Introduction
Initial settings
Basic
operations
Parts
index
Remote controller-RM-RK250
18
Navigation
system A
Basic
operations
Registering your home
Starting guidance
Searching for a place
Howyou are guided
Arranging your route
Registering favorite points
Traffic information on map
Navigation menu items
!
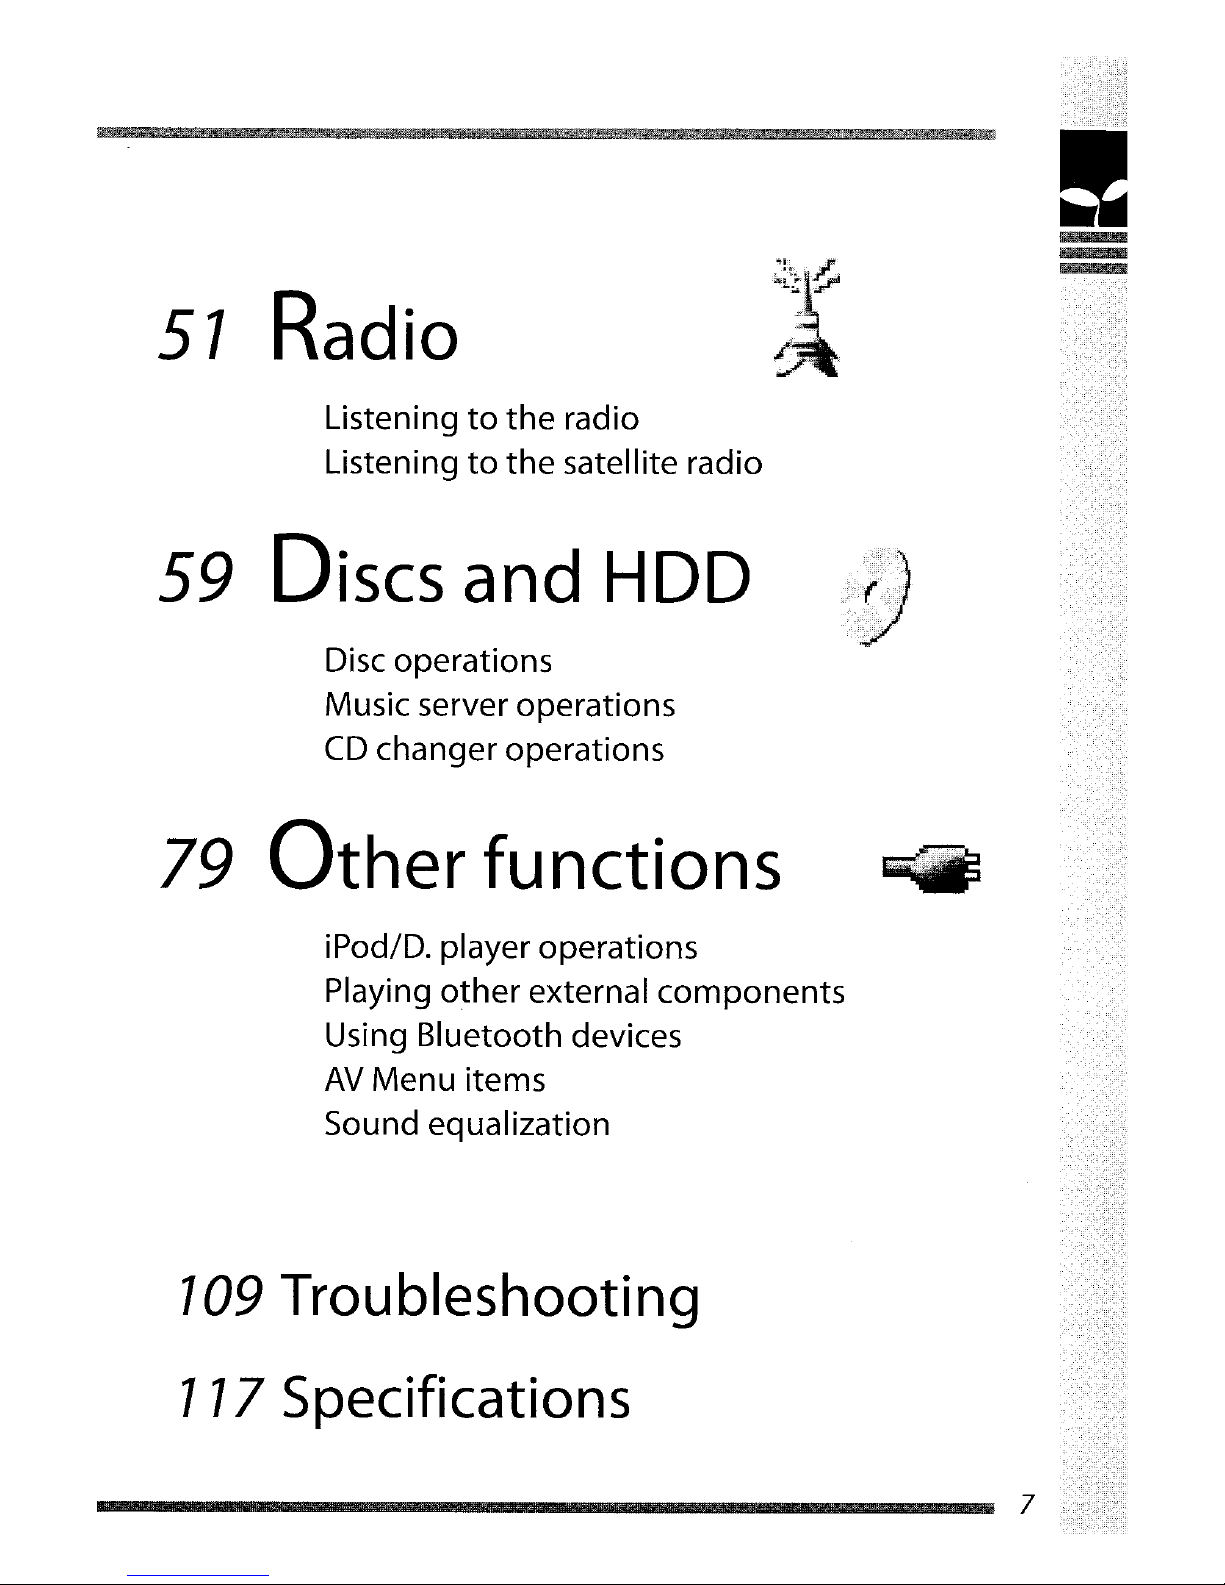
iPod/D. player operations
Playing other external components
Using Bluetooth devices
AV
Menu items
Sound equalization
7
Disc operations
Music server operations
CD
changer operations
Listening
to
the
rad
io
Listening
to
the
satellite radio
109
Troubleshooting
117 Specifications
79
Other
functions
59 Discs and HDD
51
Radio
!
iPod/D. player operations
Playing other external components
Using Bluetooth devices
AV
Menu items
Sound equalization
7
Disc operations
Music server operations
CD
changer operations
Listening
to
the
rad
io
Listening
to
the
satellite radio
109
Troubleshooting
117 Specifications
79
Other
functions
59 Discs and HDD
51
Radio
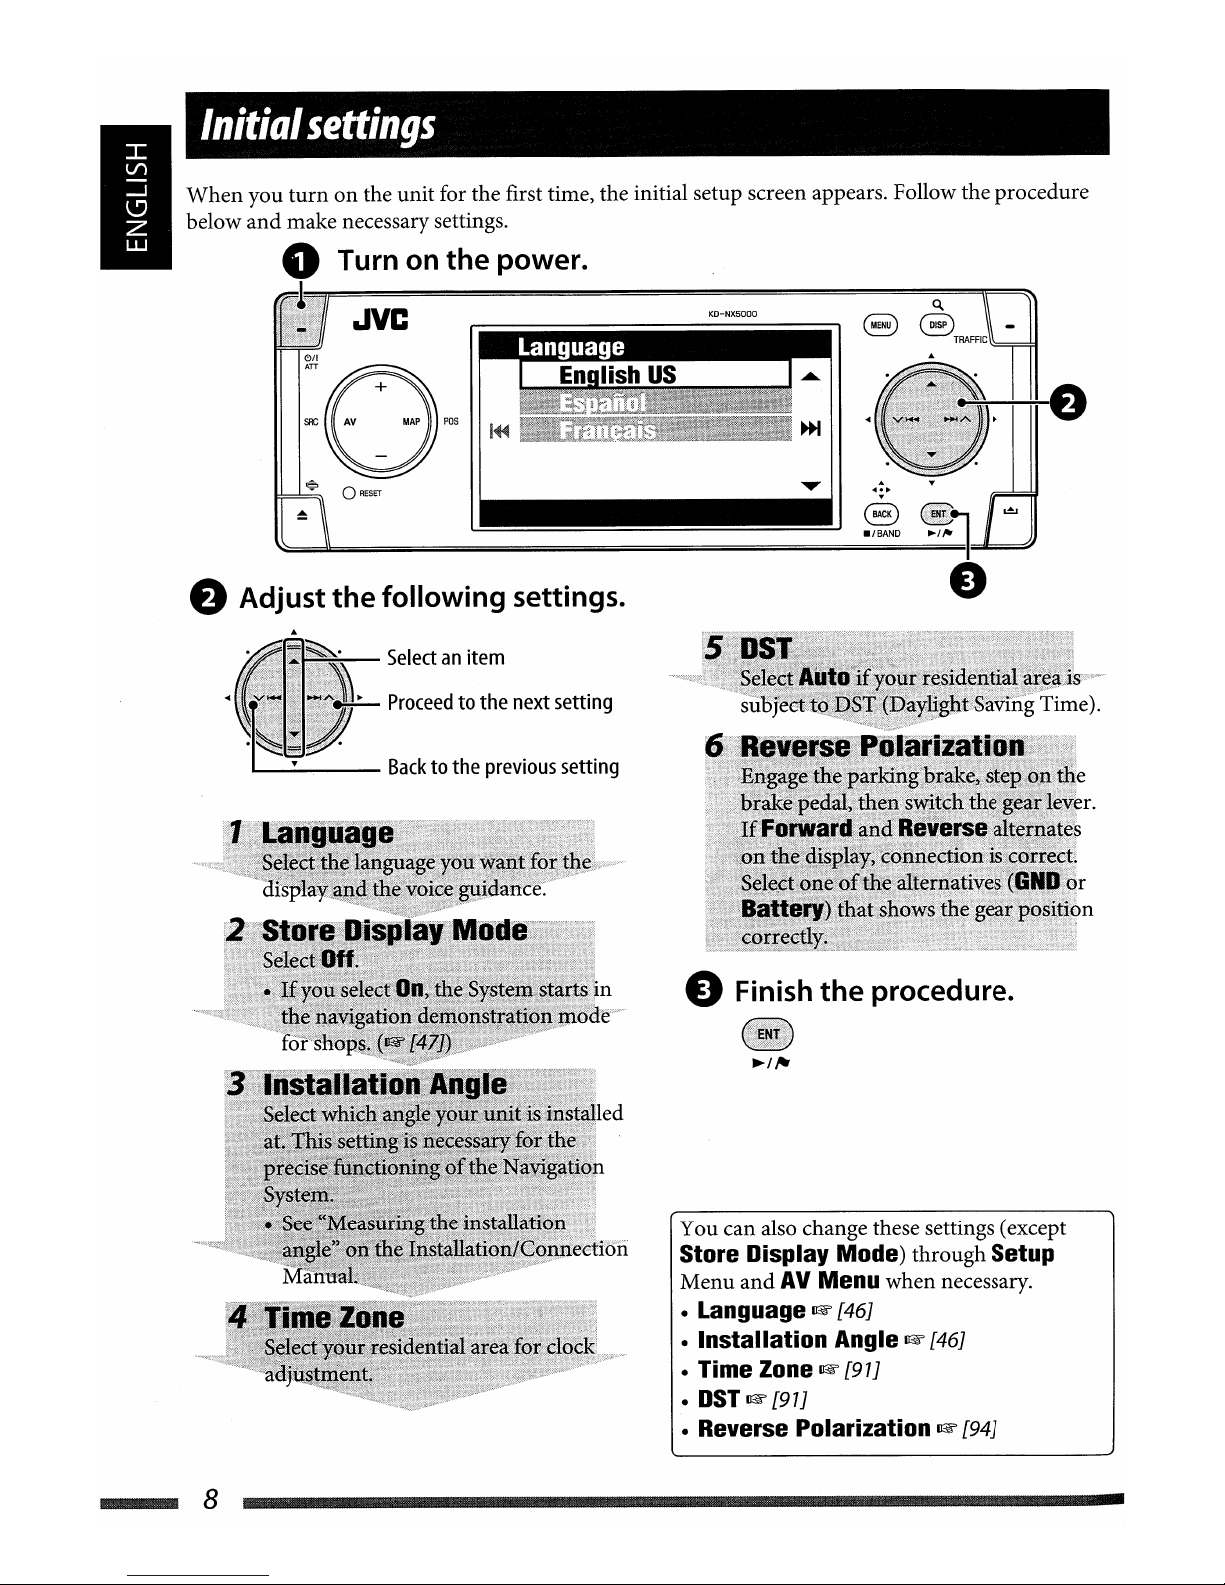
Initial
settings
When
you
turnonthe
unit
for
the
first time,
the
initial setup
screen
appears. Follow
the
procedure
below
and
make
necessary settings.
o Turn on the power.
'~~~~~~~~~~~~~~~~~~~~o.~!!!!t=~
JVC
S
BTRAFFIC
-
:O~5
~
o
RESET
~I
~/'-=I
e Adjust the following settings.
e Finish
the
procedure.
You
can
also change these settings (except
Store Display Mode)
through
Setup
Menu
and
AV
Menu
when
necessary.
• Language
~
[46J
• Installation Angle
~
[46J
• Time Zone mF [97J
•
DST
mF
[97J
• Reverse Polarization
~
[94J
Selectanitem
~
Proceedtothe
next
setting
a....-
Backtothe
previous
setting
8

Calibration
Before using the Navigation System first time, itisrequired to calibrate the Navigation System .
• After deleting the calibration data
(1&
[46J
Reset Calibration)
or
changing the installation
angle
(1&
[46J
Installation
Angle), calibration
is
also required.
1 Display
the
map
screen.
POS
2 Display
the
detail screen
and
check the
connections.
[Hold]
GPSAntenna
•
OK
~
ConnectionisOK. ([5]:
numberofthe GPS
satellites whose signalisdetected.)
•
NG
~
Antennaisdisconnectedorshort-circuited.
Speed
Signal
Drive the car for a while.
•
If
the
number
increasesasyou speed up the car,
connectionisOK.
Sensor Status
Learning
Lv.
:0
GPS
Antenna
:OK
[5]
~
Speed
Signal :12.0
~~!
Parking
Brake
:On
Direction :Forward
Calibrating •.•
~
:
Calibration
not
in
progress
.
.
r=;
..
:
Calibrationinprogress.
Parking
Brake
Steponthe brake pedal, then disengage
and
engage the
parking brake repeatedly.
•
If
Off appears when disengaged
andOnappears when engaged, connectionisOK.
If
the
resultisnot
good, check
the
connection
.
• You can see detailed information
on
the items
of
Sensor Statusin
Information
~
Connection.
(1&
[43J)
3 After confirmingall the above connections, drive the car to
start
calibration.
• This process can take
five
minutesormore dependingonthe average speed driven.
• A certain speed (greater than
25
mi/h
(40 km/h))
is
required for calibration.
• Calibration time differs amongthe cars.
•
During
calibrating, you can use the AV functionsofthe unit (you can listen to the music,
etc.)
•
If
you
turn
offthe ignition switch, calibrationistemporarily stopped.
Whenitis
turned
on, calibration will restart.
Once calibration
is
finished, the arrowhead icon turns red
and
the current position information
appears instead
of
Calibrating •••. Learning Lv. (maximum level
is4)reaches 1 after
calibration finished.
Navigation (functions suchas guidance
or
route
simulation)
cannotbeused
until
calibration
is complete.
Initialsettings 9
....
Calibration
Before using the Navigation System first time, itisrequired to calibrate the Navigation System .
• After deleting the calibration data
(1&
[46J
Reset Calibration)
or
changing the installation
angle
(1&
[46J
Installation
Angle), calibration
is
also required.
1 Display
the
map
screen.
POS
2 Display
the
detail screen
and
check the
connections.
[Hold]
GPSAntenna
•
OK
~
ConnectionisOK. ([5]:
numberofthe GPS
satellites whose signalisdetected.)
•
NG
~
Antennaisdisconnectedorshort-circuited.
Speed
Signal
Drive the car for a while.
•
If
the
number
increasesasyou speed up the car,
connectionisOK.
Sensor Status
Learning
Lv.
:0
GPS
Antenna
:OK
[5]
~
Speed
Signal :12.0
~~!
Parking
Brake
:On
Direction :Forward
Calibrating •.•
~
:
Calibration
not
in
progress
.
.
r=;
..
:
Calibrationinprogress.
Parking
Brake
Steponthe brake pedal, then disengage
and
engage the
parking brake repeatedly.
•
If
Off appears when disengaged
andOnappears when engaged, connectionisOK.
If
the
resultisnot
good, check
the
connection
.
• You can see detailed information
on
the items
of
Sensor Statusin
Information
~
Connection.
(1&
[43J)
3 After confirmingall the above connections, drive the car to
start
calibration.
• This process can take
five
minutesormore dependingonthe average speed driven.
• A certain speed (greater than
25
mi/h
(40 km/h))
is
required for calibration.
• Calibration time differs amongthe cars.
•
During
calibrating, you can use the AV functionsofthe unit (you can listen to the music,
etc.)
•
If
you
turn
offthe ignition switch, calibrationistemporarily stopped.
Whenitis
turned
on, calibration will restart.
Once calibration
is
finished, the arrowhead icon turns red
and
the current position information
appears instead
of
Calibrating •••. Learning Lv. (maximum level
is4)reaches 1 after
calibration finished.
Navigation (functions suchas guidance
or
route
simulation)
cannotbeused
until
calibration
is complete.
Initialsettings 9
....

Basic
operations
..lye
To
turnonthe
power
Reset
the unit.
• Use
only
when
the
internal
malfunctions.
To
change
the
source
SAC
~
8 -
TRAFFIC
® ®
~
./BAND
~/".
SAC
To
turn
off
the
power
[Hold]
c!>/1
An
To
drop
the
volumeina
moment
(ATT)
ATTindicator
flashes.
To
restore
the
sound, press
the
same
button
again.
To
adjust
the
volume
....
70
TUNER""
SAT*""
DISC*"" HOD'''''
CD-CHI
EXT-IN/iPod/D.
PLAYER*""
Bluetooth
Audio*
....
(Backtothe beginning)
*
You
cannot
selert
these
sourcesifthey
are
not
ready.
To
turn
off
theAVfunction
[Hold]
The
display switchestothe
map
screen.
•
To
activate
the
AV function, press
the
button
briefly.
For
navigation
operations,
~
[7
8J.
For
radio
operations,~[57
J.
For
disc/HDD
operations,
~
[59J.
For
Bluetooth
operations,
~
[83J.
For
other
sources,
~
[79J
.
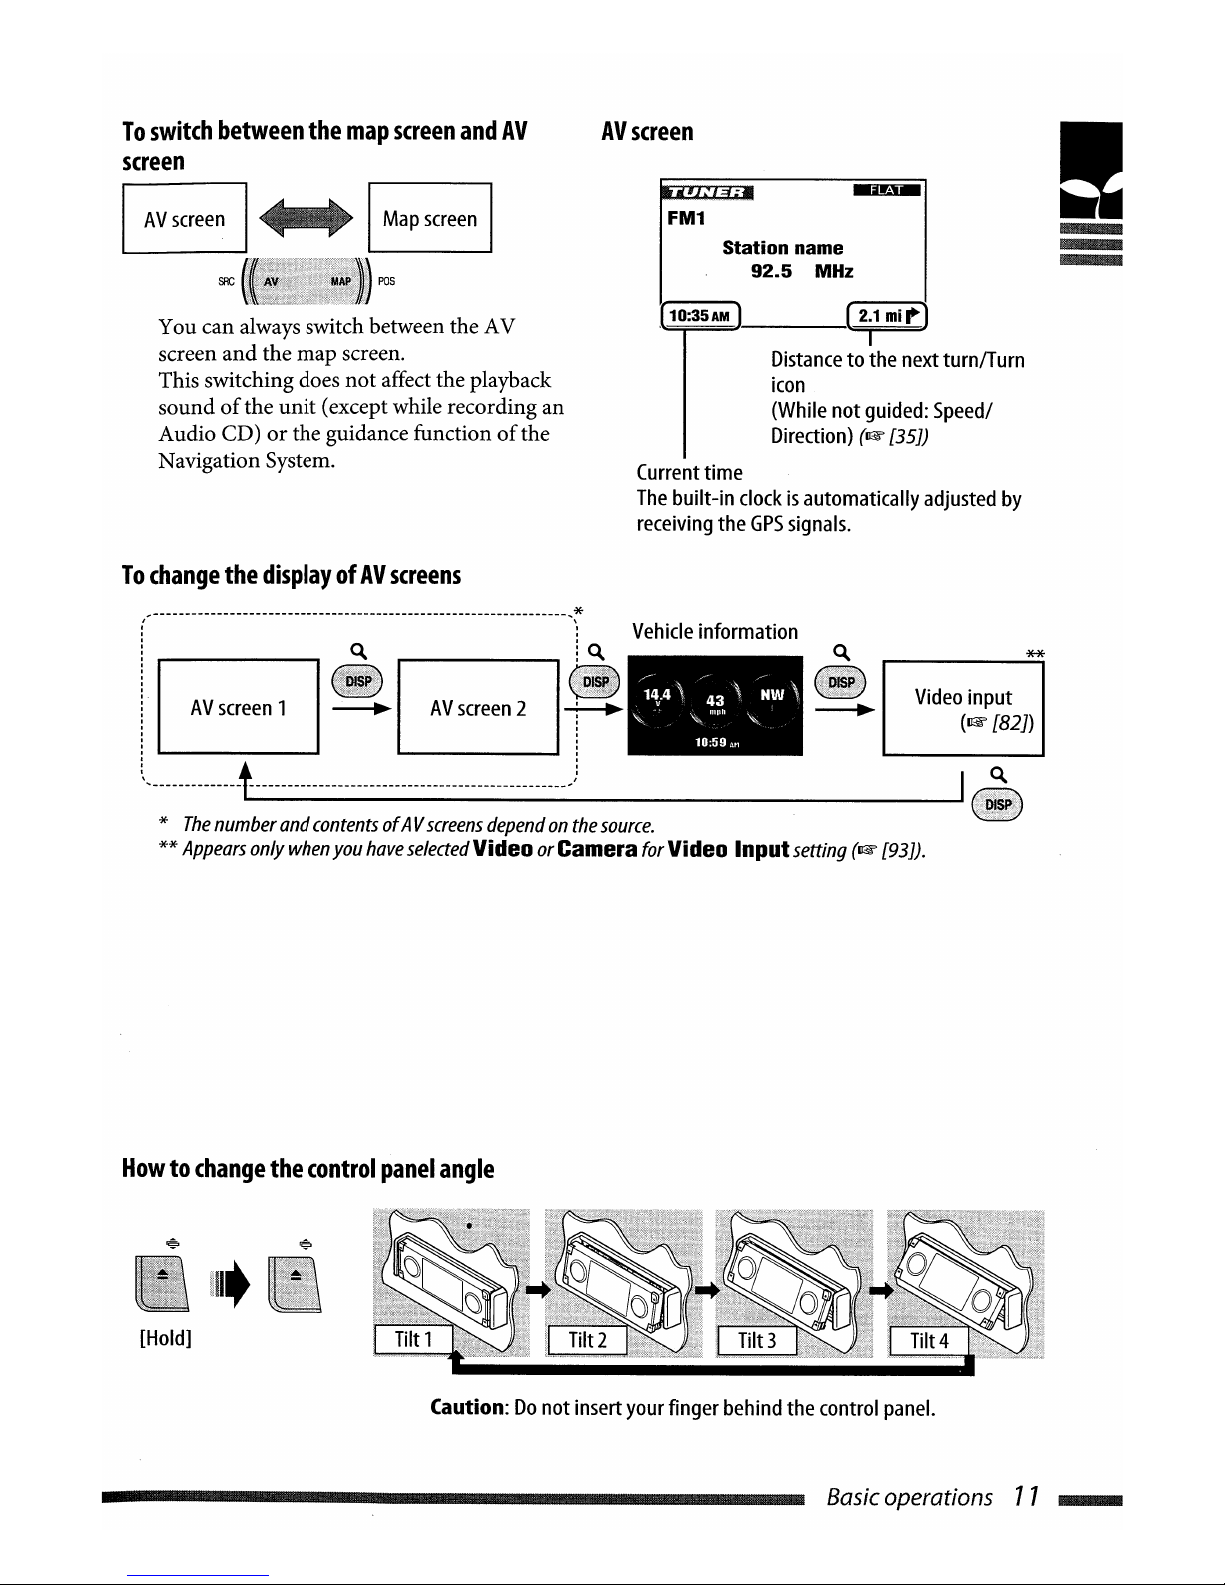
To
switch
between
the
map
screen
and
AV
screen
I
AV
screen
I
SRC
You can always switch between the AV
screen
and
the map screen.
This switching does
not
affect the playback
sound
of
the
unit
(except while recording an
Audio CD)
or
the guidance functionofthe
Navigation System.
AV
screen
FM1
Station name
92.5
MHz
10:35AM 1 (2
j
1
mi~)
Distancetothe
next
turn/Turn
icon
(While
not
guided:
Speed/
Direction)
(1kW
[35])
Current
time
The
built-in
clockisautomatically
adjusted
by
receiving
the
GPS
signals.
To
change
the
displayofAV
screens
(-----------------------------------------------------------------'~
Vehicle
information
i
~
!~
~
**
.
AV
screen
1
~
AV
screen
2 r
l.
-------nnntnn--------n-mm--nun----------mn----j
~~.4'
/43
\
"~w"
'"
,1111\1\"
lO:59
At1
Video
input
(~
[82])
*
The
number
and
contents
ofAV
screens
dependonthe
source.
**
Appears
only
when
you
have
seleded
VideoorCamera for Video Inputsetting
(1kW
[93]).
Howtochange
the
control
panel
angle
lit
[Hold]
Caution:
Do
not insert
your
finger
behind
the
control
panel.
Basic operations 77
....
To
switch
between
the
map
screen
and
AV
screen
I
AV
screen
I
SRC
You can always switch between the AV
screen
and
the map screen.
This switching does
not
affect the playback
sound
of
the
unit
(except while recording an
Audio CD)
or
the guidance functionofthe
Navigation System.
AV
screen
FM1
Station name
92.5
MHz
10:35AM 1 (2
j
1
mi~)
Distancetothe
next
turn/Turn
icon
(While
not
guided:
Speed/
Direction)
(1kW
[35])
Current
time
The
built-in
clockisautomatically
adjusted
by
receiving
the
GPS
signals.
To
change
the
displayofAV
screens
(-----------------------------------------------------------------'~
Vehicle
information
i
~
!~
~
**
.
AV
screen
1
~
AV
screen
2 r
l.
-------nnntnn--------n-mm--nun----------mn----j
~~.4'
/43
\
"~w"
'"
,11I1\1\"
lO:59
At1
Video
input
(~
[82])
*
The
number
and
contents
ofAV
screens
dependonthe
source.
**
Appears
only
when
you
have
seleded
VideoorCamera for Video Inputsetting
(1kW
[93]).
Howtochange
the
control
panel
angle
lit
[Hold]
Caution:
Do
not insert
your
finger
behind
the
control
panel.
Basic operations 77
....

To
callupa
menu
Navu!:atI.on
Menus
Map
screen
Destination
Menu
~
[42J
Destination 1/2
AVMenu
Av
screen
FM1
Station
name
92.5
MHz
10:35AM
AV
Menu
~
[90J
1 Setup
2.1
mi~
I
......
Information
Menu
~
[42J
- I
to:
I
To
navigate
through
menus
I Current Position I
......
Press:
Selectamenu
item
Hold:
Skip
to the first
menu
itemonthe
next
page
Proceed
to the next
menu
1...-
Back
to the
previous
menu
Setup
Menu
~
[43J
~'I;"'I
I Guidance Voice I
......
Togobacktothe
previous screen
and
adjust
other
items:
•
-'BAND
....
12
To
cancel
menu
operations
and
~
returntothe
map
screenorthe
AV •
screen:
To
callupa
menu
Navu!:atI.on
Menus
Map
screen
Destination
Menu
~
[42J
Destination 1/2
AVMenu
Av
screen
FM1
Station
name
92.5
MHz
10:35AM
AV
Menu
~
[90J
1 Setup
2.1
mi~
I
......
Information
Menu
~
[42J
- I
to:
I
To
navigate
through
menus
I Current Position I
......
Press:
Selectamenu
item
Hold:
Skip
to the first
menu
itemonthe
next
page
Proceed
to the next
menu
1...-
Back
to the
previous
menu
Setup
Menu
~
[43J
~'I;"'I
I Guidance Voice I
......
Togobacktothe
previous screen
and
adjust
other
items:
•
-'BAND
....
12
To
cancel
menu
operations
and
~
returntothe
map
screenorthe
AV •
screen:

Menu
screen
'
~llIlli!I!IIIII~~
Current
page
number/
Remaining
time until the
----e
_
Total
page
number
menu
screen
goes
off.
(Appears
onlyonAV
Menu.)
•
If
items
are
displayedingray,
you
cannot
use
them
now.
In this manual, operationofselecting a
menu
itemisinstructedasin the example below.
Ex.:
AV
Menu
¢EQ
¢Pop
!
CD
Call up AV Menu.
(g)
Select
EQ
in AV Menu.
Exit
® Change the setting
as
you like.
~
I
POP
ENT
Now the settingischanged. Press DISP to exit
from the menu,
or
BACK togoback to the
previous menu.
Basic operations 73
....
Menu
screen
'
~llIlli!I!IIIII~~
Current
page
number/
Remaining
time until the
----e
_
Total
page
number
menu
screen
goes
off.
(Appears
onlyonAV
Menu.)
•
If
items
are
displayedingray,
you
cannot
use
them
now.
In this manual, operationofselecting a
menu
itemisinstructedasin the example below.
Ex.:
AV
Menu
¢EQ
¢Pop
!
CD
Call up AV Menu.
(g)
Select
EQ
in AV Menu.
Exit
® Change the setting
as
you like.
~
I
POP
ENT
Now the settingischanged. Press DISP to exit
from the menu,
or
BACK togoback to the
previous menu.
Basic operations 73
....
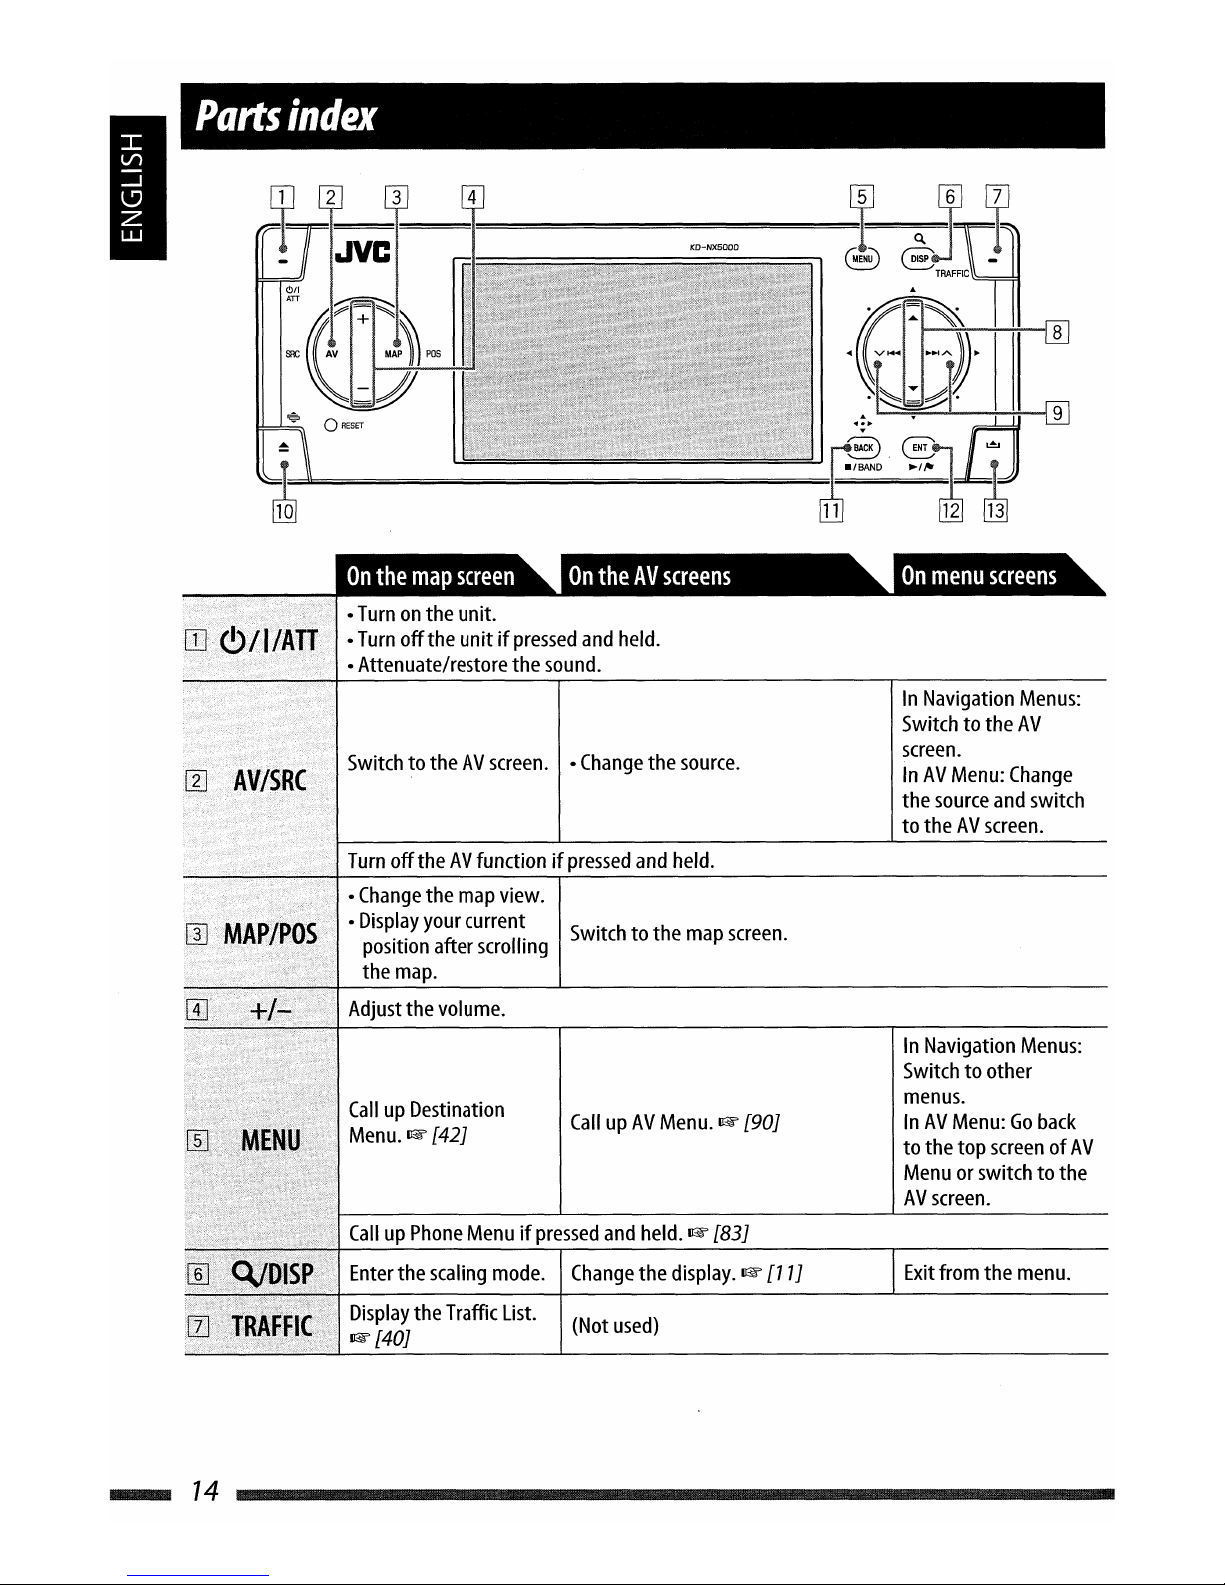
Parts
index
•
Turnonthe
unit.
,--;-.;
.1,
•.
·.11·
I......
I
L!j··
~)tlllAII··.
I•
Turn
off
the
unitifpressed
and
held.
•Attenuate/restore the
sound.
~i
ii
....•••.
~IVJ7r8RI(/i
iii
SwitchtotheAVscreen.•Change
the
source.
Turn
offtheAVfunctionifpressed
and
held
.
••••..••••.•.••••••.•.••••<••••••
/ •
Change
the
map
view
.
•.9B••••
/.MI8e~lgt~8i
<I ·
Display
your
current
Switchtothe
map
screen
.
.•
t¢
position
after
scrolling
the
map.
Adjust
the
volume.
CallupAV
Menu.
~
[901
CallupPhone
Menuifpressed
and
held.~[831
Enter
the
scaling
mode.
Change
the
display.
~
[11]
(Not
used)
....
74
In
Navigation
Menus:
Switchtothe
AV
screen.
InAVMenu:
Change
the
source
and
switch
to theAVscreen.
In
Navigation
Menus:
Switch
to other
menus.
InAVMenu:Goback
to
the top
screen
ofAV
Menuorswitchtothe
AV
screen.
Exit
from
the
menu.
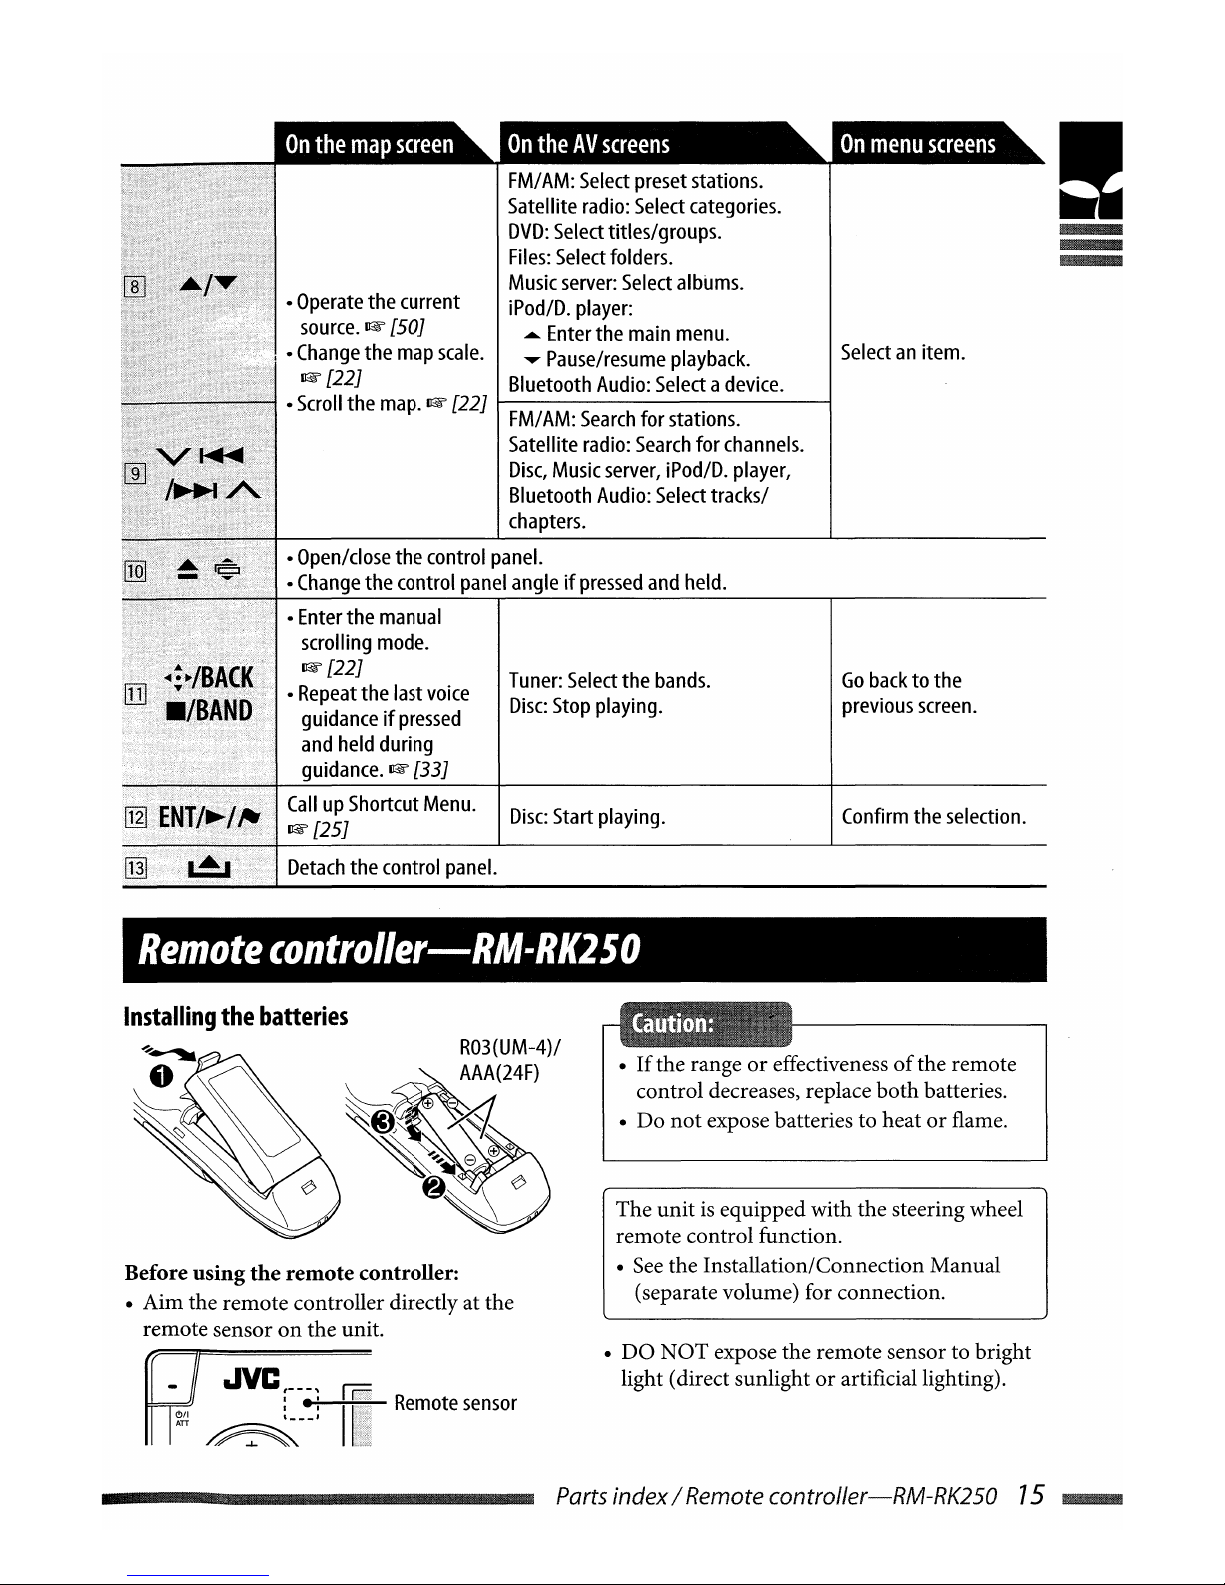
!
Confirm
the
selection.
Go
backtothe
previous
screen.
Selectanitem.
Tuner:
Select
the
bands.
Disc:
Stop
playing.
~
[25J
Disc:
Start
playing.
Detach
the
control
panel.
•
Enter
the
manual
scrolling
mode.
~[22J
•
Repeat
the
last
voice
guidanceifpressed
and
held
during
guidance.
~
[33J
CallupShortcut
Menu.
•
Open/close
the
control
panel.
•
Change
the
control
panel
angleifpressed
and
held.
FM/
AM:
Select
preset
stations.
Satellite
radio:
Select
categories.
DVO:
Select
titles/groups.
Files:
Select
folders.
Music
server:
Select
albums.
•
Operate
the
current
iPod/D.
player:
source.
~
[50J
Enter
the
main
menu.
I •
Change
the
map
scale.
Pause/resume
playback.
~
[22J
Bluetooth
Audio:
Selectadevice.
•
Scroll
the
map.
~
[22J
t----------------1
FM/
AM:
Search
for
stations.
Satellite
radio:
Search
for
channels.
Disc,
Music
server,
iPod/D.
player,
Bluetooth
Audio:
Select
tracks/
chapters.
Remote
controller-RM-RK250
Installing
the
batteries
Before
using
the
remote
controller:
• Aim the remote controller directly at the
remote sensor
on
the unit.
•
If
the rangeoreffectivenessofthe remote
control decreases, replace bothbatteries.
• Do
not
expose batteries to heatorflame.
The
unitisequipped with the steering wheel
remote control function .
•
See
the Installation/Connection Manual
(separate volume) for connection.
•
DO
NOT
expose the remote sensor to bright
light (direct sunlight
or
artificial lighting).
.JVC
r
-.~
~~:
~rii~r;;:;;s,;";;,;,,i_
Remote
sensor
~--'II
Parts index / Remote controller-RM-RK250 75
~

Operations
from
the
remote
controller
I
•
Change
the
source.
Turn
offtheAVfunctionifpressed
and
held.
•
Change
the
map
view.
•
Display
your
current
Switch
to the
map
screen.
position after
scrolling
the
map.
CallupDestination
Menu.
CallupAV
Menu.
~
[90J
~[42J
In
Navigation
Menus:
Switch
to theAVscreen.
InAVMenu:
Change
the
source
and
switch
to the
AV
screen.
In
Navigation
Menus:
Switch
to other
menus.
InAVMenu:Goback
to the
top
screenofAV
Menu
or
switch
to theAVscreen.
chapters.
CallupDial
Menu
when
aBluetooth
phoneisconnected.
~
[86J
Attenuate/restore the
sound.
Go
back
to the
previous
screen.
Exit
from
the
menu
.
Start
gUidance
to a
home.
~[24J
Selectanitem.
Confirm
the
selection.
(Not
used)
(Not
used)
Disc:
Start playing/pause.
FM/
AM:
Select
preset
stations.
Satellite
radio:
Select
categories.
DVD:
Select
titles/groups.
Files:
Select
folders.
Music
server:
Select
albums.
iPod/D.
player:
...
Enter
the
main
menu.
.....
Pause/resume
playback.
Bluetooth
Audio:
Selectadevice.
FM/
AM:
Search
for stations.
Satellite
radio:
Search
for
channels.
Disc,
Music
server,
iPod/D.
player,
Bluetooth
Audio:
Select
tracks/
Adjust
the
volume.
Enter
the
scaling
mode.
Change
the
display.~[11
J
Scale
the
map.
Start
guidance
to a
home.
(Not
used)
~[24J
Repeat
the
last
voice
Tuner:
Select
the
bands.
guidanceifpressed
and
held
during
guidance.
Disc:
Stop
playing.
Display
the
Traffic
List.
~[40J
i·····.·
·i·
«
«.
<·<1
CallupShortcut
Menu.
~[25J
<r
(
">
J
Scroll
the
map
(in
eight
~*~~~~
directions).
....
76
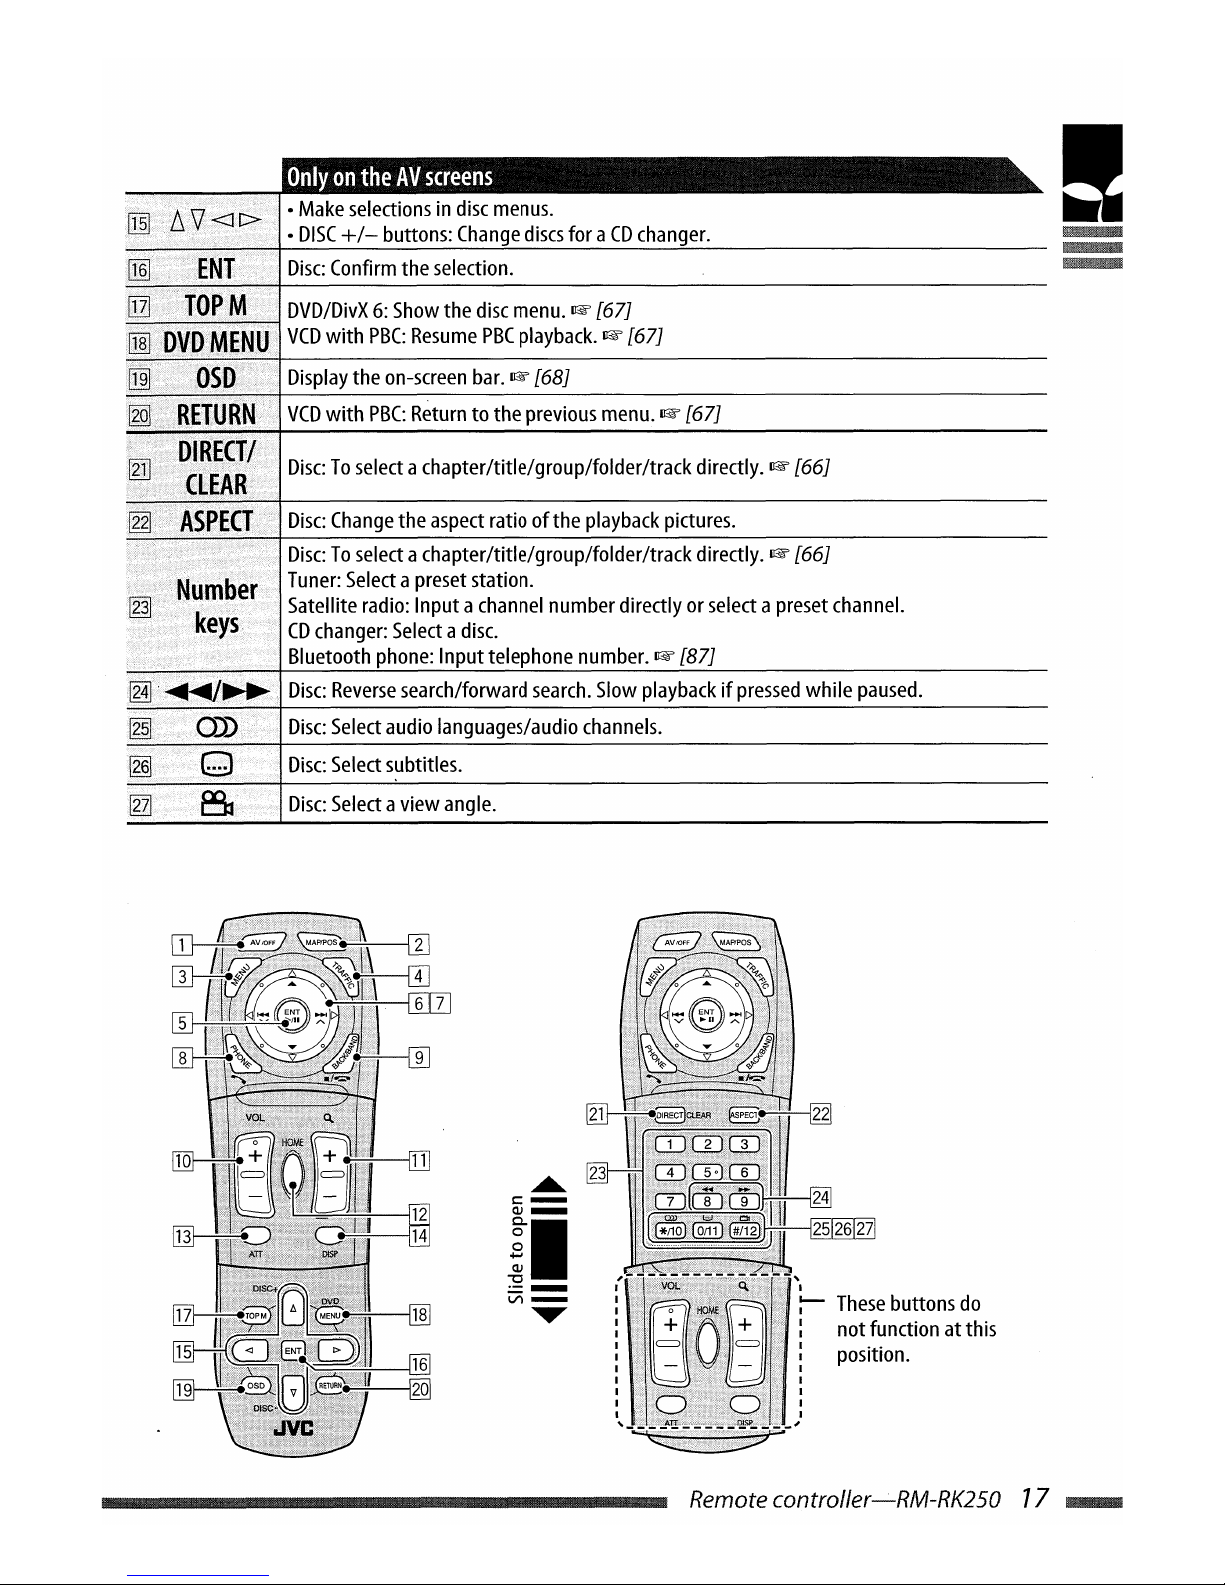
•
Make
selectionsindisc
menus.
•
DISC
+/-
buttons:
Change
discs
for aCDchanger.
Disc:
Confirm
the
selection.
DVD/DivX6:Show
the
disc
menu.
~
[67J
~~~~~
VCD
with
PBC:
Resume
PBC
playback.
~
[67J
Display
the
on-screen
bar.
~
[68J
VCD
with
PBC:
Return
to the
previous
menu.
~
[67J
if···.····}.;
••••
·}::
•••·;••
Iiil
Disc:Toselect
achapter/title/group/folder/track directly.
~
[66J
Disc:
Change
the
aspect
ratio of the
playback
pictures.
Disc:Toselect
achapter/title/group/folder/track directly.
~
[66J
Tuner:
Selectapreset
station.
Satellite
radio:
Input a
channel
number
directlyorselectapreset
channel.
CD
changer:
Selectadisc.
Bluetooth
phone:
Inputtelephone
number.
~
[87J
Disc:
Reverse
search/forward
search.
Slow
playbackifpressed
while
paused.
Disc:
Select
audio
languages/audio
channels.
Disc:
Select
subtitles.
Disc:
Select
aview
angle
.
!
.....
s::-
OJ_
II
~=
.....
These
buttons
do
notfunction at this
position.
Remote controller-RM-RK250 77
~
•
Make
selectionsindisc
menus.
•
DISC
+/-
buttons:
Change
discs
for aCDchanger.
Disc:
Confirm
the
selection.
DVD/DivX6:Show
the
disc
menu.
~
[67J
~~~~~
VCD
with
PBC:
Resume
PBC
playback.
~
[67J
Display
the
on-screen
bar.
~
[68J
VCD
with
PBC:
Return
to the
previous
menu.
~
[67J
if···.····}.;
••••
·}::
•••·;••
Iiil
Disc:Toselect
achapter/title/group/folder/track directly.
~
[66J
Disc:
Change
the
aspect
ratio of the
playback
pictures.
Disc:Toselect
achapter/title/group/folder/track directly.
~
[66J
Tuner:
Selectapreset
station.
Satellite
radio:
Input a
channel
number
directlyorselectapreset
channel.
CD
changer:
Selectadisc.
Bluetooth
phone:
Inputtelephone
number.
~
[87J
Disc:
Reverse
search/forward
search.
Slow
playbackifpressed
while
paused.
Disc:
Select
audio
languages/audio
channels.
Disc:
Select
subtitles.
Disc:
Select
aview
angle
.
!
.....
s::-
OJ_
II
~=
.....
These
buttons
do
notfunction at this
position.
Remote controller-RM-RK250 77
~
I
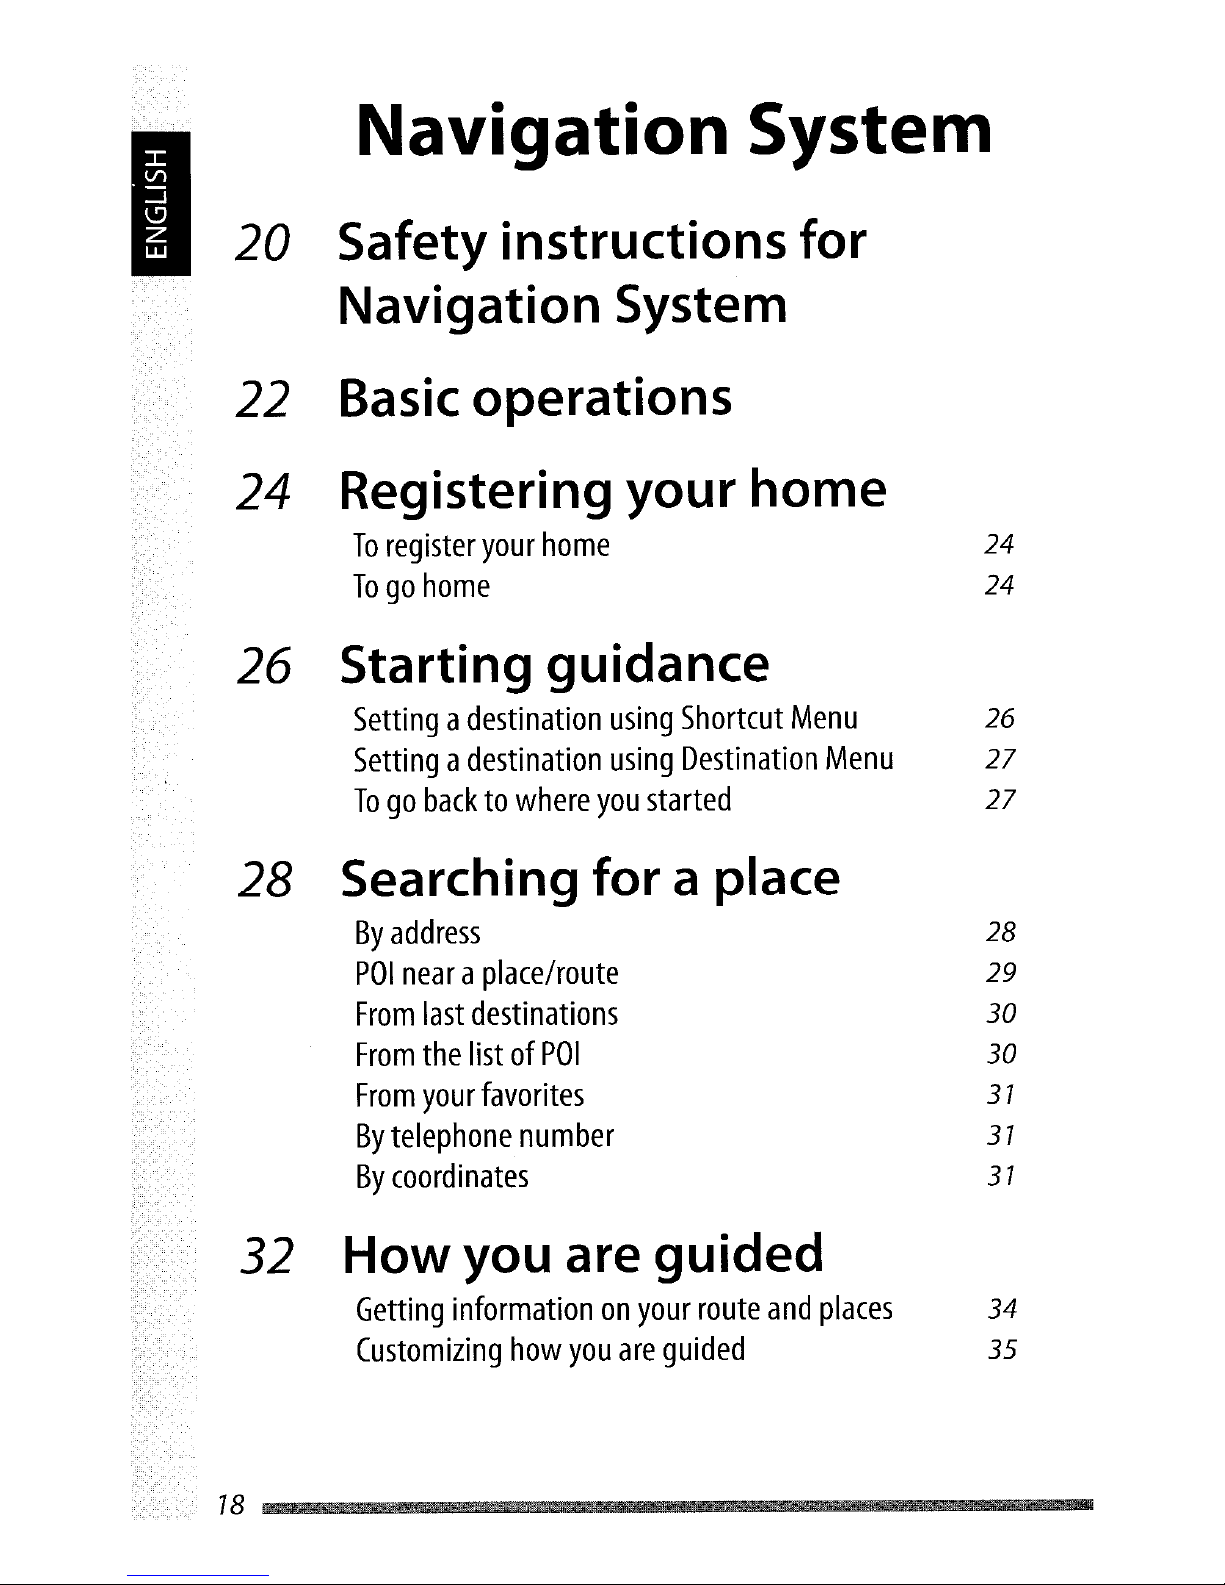
Navigation System
20
Safety
instructions
for
Navigation System
22
Basic
operations
24
Registering your
home
To
register
your
home
24
Togohome
24
26 Starting guidance
Settingadestination
using
Shortcut
Menu
26
Settingadestination
using
Destination
Menu
27
Togobacktowhere
you
started
27
28 Searching for a place
By
address
28
POI
nearaplace/route
29
From
last
destinations
30
From
the
listofPOI
30
From
your
favorites
31
By
telephone
number
31
By
coordinates
31
32
How
you are
guided
Getting
information
on
your
route
and
places
34
Customizing
how
you
are
guided
35
I
Navigation System
20
Safety
instructions
for
Navigation System
22
Basic
operations
24
Registering your
home
To
register
your
home
24
Togohome
24
26 Starting guidance
Settingadestination
using
Shortcut
Menu
26
Settingadestination
using
Destination
Menu
27
Togobacktowhere
you
started
27
28 Searching for a place
By
address
28
POI
nearaplace/route
29
From
last
destinations
30
From
the
listofPOI
30
From
your
favorites
31
By
telephone
number
31
By
coordinates
31
32
How
you are
guided
Getting
information
on
your
route
and
places
34
Customizing
how
you
are
guided
35

36 Arranging your route
Setting
placestostop
by
Saving
and
loading
routes
Avoidingacongestion
ahead
36
37
37
-
I
38 Registering favorite points
Marking
your
favorite
points
38
Editing
your
favorite
points
38
40 Traffic information on map
WhatisTMC?
40
Checking
the
traffic
information
40
How
traffic
informationisreflectedinnavigation
47
Subscribingtotraffic
service
47
42 Navigation menu items
Destination
Menu
42
Information
Menu
42
Setup
Menu
43
46 Remote operations
47 Additional information
79

Saf~tx
;n$tlu(f;ODS
(01
Navigation
System
..
I
SAFETY
INSTRUCTIONS
Useofthe Navigation Systemisonly permitted
ifthe traffic conditions are suitable
and
you
are absolutelysure that no risk, obstruction
or
inconvenience will be incurred to you,
your passengers
or
other road users. The
requirements
of
the Road Traffic Regulations
must always be followed.
The destinationmust
notbeenteredwhile driving the car.
The Navigation System serves solelyasan aid
to navigation.
It
never releases the drivers from
their duties to drive carefully and to make
own judgementin road traffic. Inaccurate
or incorrect instructions may
happen
to be
given due to changing traffic conditions. The
actual road signs
and
traffic regulations must
therefore always be observed. In particular, the
Navigation System cannot be used
as
an aid to
orientation when visibility
is
poor.
This Navigation System must onlybe used for
its intendedpurpose. The volume
of
the car
radio/Navigation System mustbe adjusted so
that external noise
is
still audible.
Navigation guidance
is
performed, based
on
the database, therefore, it may
not
be applicable
to the
current
situation becauseofchanges in
traffic conditions (e.g. changes in tollroads,
principal roads, one-way traffic,
or
other traffic
regulations). In this case, observe the current
traffic signs
or
regulations.
• Traffic signs should be observed carefully
while driving using the Navigation System.
Navigation System
is
only an aid. Driver
must
always decide whether or
not
to heed the
information provided.
Jve
does
not
accept
liability for erroneous data provided bythe
Navigation System.
• Traffic guidance is restricted to
passenger vehicles only. Special driving
recommendations and regulations for other
vehicles (e.g. commercialvehicles) are
not
included.
•
Do
not
operate the
unit
while driving.
Termsoflicence
You are granted a
non
-exclusive licence to use
the database for
your
personal purposes. The
present licence does
not
authorise the granting
of
sublicenses.
Use
of
the dataisonly permitted in this
specific
Jve
system.Itis
forbidden to extract
or
make further useofsignificant parts
of
the database content,orto duplicate, modity,
adapt, translate, analyse, decompile
or
reverse-
engineer any
part
thereof.
_20

WARNING:
Road traffic regulations always take priority
when a vehicle
is
being driven in traffic.
Navigation System
is
only an aid. Errors may
occur in individual data items/entries. At all
times, the driver must decide whether
or
not
to
heed the information provided.
Jve
does
not
accept liability for erroneous data
provided by
the
Navigation System.
© 2006 NAVTEQ All rights reserved.
When
replacing/rotating
the
tires:
It
is
required to clear all the accumulated
learning data which is
important
for accurate
navigation. To clear the data, perform
Reset
Calibration
on
page 46.
On
map
updating
If
"Your map dataismore
than
one year old
and updates maybe available." appears on the
monitor, visit <http://www.jvc-exad.com>.
For details aboutupdating your unit, visit
<http://www.jvc-exad.com>.
~
I
Safetyinstructions forNavigation System 27
~

Basic
operations
Current
position
mode
-
The
map
scrolls automaticallyso
that
your
position
is alwaysatthe
centerofthe
map.
Scale
Show
traffic information.
(1lW
[40])
Switch
to theAVscreen.
Scale
the
map.
Callupa
menu
screen.
i
Your
position
Current
time
Current
street
name
POS
Adjust
the
volume.
,==~=:;11;;;;;;;;;;
iiiiiiil_iiiiiiiiiiiiOiiiiiiiiiiiiiiOiiiiiiiiiiiiiiOiiiiil;;;;;;;iiiiiiiiiiiiOii
iiiiiiiiiiiiOiiiiiiiiiii
iiiiiiii;;;;;;;;;;;;;;;jij;ji;iiiiijiijij;ji;iiiiijii;;;;;;;;;;;;;;;jij;ji;iiiiijii;;;;;;;;;;;;;;;jij;ji;iiiiijiiiiiiiiiiiiiiiiiP!!
Scroll
the
map.
CallupShortcut
Menu.
Operate
the
currentAVsource.
(1lW
[50])
Change
the
map
view.
(1lW
next page)/Display
your
current
position.
To
scroll
the
map
To
change
the
map
scale
To
display
your
current
position
Zoom
in
Zoominrapidly
==---
Zoom
out
------
Zoom
out rapidly
1
2
v~
<>
.=>
UTL)
V
The map scrolls in eight directions.
• Press
and
hold the
button
to keep
scrolling the map.
1
2
Direction
and
distance
from
your
current
position
~
POS
___
22
Basic
operations
Current
position
mode
-
The
map
scrolls automaticallyso
that
your
position
is alwaysatthe
centerofthe
map.
Scale
Show
traffic information.
(1lW
[40])
Switch
to theAVscreen.
Scale
the
map.
Callupa
menu
screen.
i
Your
position
Current
time
Current
street
name
POS
Adjust
the
volume.
,==~=:;11;;;;;;;;;;
iiiiiiil_iiiiiiiiiiiiOiiiiiiiiiiiiiiOiiiiiiiiiiiiiiOiiiiil;;;;;;;iiiiiiiiiiiiOii
iiiiiiiiiiiiOiiiiiiiiiii
iiiiiiii;;;;;;;;;;;;;;;jij;ji;iiiiijiijij;ji;iiiiijii;;;;;;;;;;;;;;;jij;ji;iiiiijii;;;;;;;;;;;;;;;jij;ji;iiiiijiiiiiiiiiiiiiiiiiP!!
Scroll
the
map.
CallupShortcut
Menu.
Operate
the
currentAVsource.
(1lW
[50])
Change
the
map
view.
(1lW
next page)/Display
your
current
position.
To
scroll
the
map
To
change
the
map
scale
To
display
your
current
position
Zoom
in
Zoominrapidly
==---
Zoom
out
------
Zoom
out rapidly
1
2
v~
<>
.=>
UTL)
V
The map scrolls in eight directions.
• Press
and
hold the
button
to keep
scrolling the map.
1
2
Direction
and
distance
from
your
current
position
~
POS
___
22

To
change
the
map
view
POS
The
map
view changes as follows:
Heading
Up-+3D
Map-+North
Up
t I
Heading
Up
The
map
rotates so
that
you
are always
displayed
heading
"upwards."
The
direction
is displayed
with
a compass icon e.
3DMap
The
map
is displayedin"heading
up"
and
in
a
three-dimensional
view.
The
direction is
displayed
with
a compass icon
e.
North
Up
The
map
view is orientedwith
north
"upwards," like usual
paper
maps.
The
direction
you
are heading to is displayed
at
the
upper
right
cornerofthe
screen
with
an
icon
such
as
D.
You
can
also change
the
map
view
through
Setup
Menu
~
Map Options~Map
View
(~
[45]).
To
callupmenus
Navigation
Menus
Each
time
you
press
the
button,
the
menu
switches as follows:
(Map
screen)
-+
Destination
Menu
-+
Information
Menu
-+
Setup
Menu
-+
(Back
to the
map
sc.reen)
Menu
operations~[73]
Menu
items~[42 - 46]
Shortcut
Menu
~/'"
Shortcut
Menu
appears.
~
[25]
Iconsonthe
map
•
Favorite
points
(~
[38 - 39])
~
POI
(PointOfInterest)
(~
[30,49])
•
Traffic
(~
[40, 50])
• Favorite icons are displayedonthe
map
when
a
group
is selectedinthe
Favorite Icon
setting(~[45])
and
the
map
scale is between
100
ft (30
m)
and
1.2 mile (2.0 km).
•
POI
icons are displayedonthe
map
when
a
group
is selectedinthe
POI
Icon
setting
(~
[45])
and
the
map
scale is 100 ft (30m)or
160 ft (50 m).
• Traffic icons are displayedonthe
map
when
the
Traffic Display setting is activated
(~[45])
and
the
map
scale is between 100 ft
(30
m)
and
1.2 mile (2.0 km).
~
I
Basic operations 23
BIIIIB
To
change
the
map
view
POS
The
map
view changes as follows:
Heading
Up-+3D
Map-+North
Up
t I
Heading
Up
The
map
rotates so
that
you
are always
displayed
heading
"upwards."
The
direction
is displayed
with
a compass icon e.
3DMap
The
map
is displayedin"heading
up"
and
in
a
three-dimensional
view.
The
direction is
displayed
with
a compass icon
e.
North
Up
The
map
view is orientedwith
north
"upwards," like usual
paper
maps.
The
direction
you
are heading to is displayed
at
the
upper
right
cornerofthe
screen
with
an
icon
such
as
D.
You
can
also change
the
map
view
through
Setup
Menu
~
Map Options~Map
View
(~
[45]).
To
callupmenus
Navigation
Menus
Each
time
you
press
the
button,
the
menu
switches as follows:
(Map
screen)
-+
Destination
Menu
-+
Information
Menu
-+
Setup
Menu
-+
(Back
to the
map
sc.reen)
Menu
operations~[73]
Menu
items~[42 - 46]
Shortcut
Menu
~/'"
Shortcut
Menu
appears.
~
[25]
Iconsonthe
map
•
Favorite
points
(~
[38 - 39])
~
POI
(PointOfInterest)
(~
[30,49])
•
Traffic
(~
[40, 50])
• Favorite icons are displayedonthe
map
when
a
group
is selectedinthe
Favorite Icon
setting(~[45])
and
the
map
scale is between
100
ft (30
m)
and
1.2 mile (2.0 km).
•
POI
icons are displayedonthe
map
when
a
group
is selectedinthe
POI
Icon
setting
(~
[45])
and
the
map
scale is 100 ft (30m)or
160 ft (50 m).
• Traffic icons are displayedonthe
map
when
the
Traffic Display setting is activated
(~[45])
and
the
map
scale is between 100 ft
(30
m)
and
1.2 mile (2.0 km).
~
I
Basic operations 23
BIIIIB

Registering
your
home
To
register
your home
Register your homeoryour office, wherever
you go often, as Home, so thatyou can easily set
that place
as
destination.
• You can register homes only after calibration
is
finished.
(1&
[9J)
1
If
you
are at
home
now, check
that your
home
is displayed at
the center
of
the map.
• Adjust the position byscrolling the
map
if
necessary.
2 Call up ShortcutMenu.
3 Select [Add to Favorite]
The
homeismarked
with.
icon.
4 Select [Set Home]
•.
The
homeismarked
with.
icon.
• The icon may not appear depending
on
the
map
scale andyour Favorite Icon
setting.
(1&
[45])
• You can register several places as
Home
by
registering the placesasfavorite points
and
setting their group to Home.
(1&
[38,39])
Togohome
(Home)
When
you have registered your home, you can
easily'get guided to home.
While
not
guided
...
1 Call up Shortcut Menu.
2 Select [Go Home] •
to
start
guidance.
•Ifyou have registered several homes,
select the one you want to go to from a
list.
On the remote:
HOME
You can also be guided to
home
through
Destination
Menu
~
Home.
To
cancel
guidance
1 Call up Shortcut Menu.
2 Select [Cancel Guidance]
•.
You can also cancel guidance through
Destination
Menu
~
Cancel Guide.
...
24

WhatisShortcut
Menu?
On
the
map
screen, you can call up Shortcut Menu by pressing ENT. ShortcutMenuisa gateway
to various operations.
Map
screen
..
Shortcut
Menu
While
not
gUided
....
I
To selectanicon, press ENToroneofthe four
keys
on
the right circle button corresponding
to the icon.
While
guided
Register this placeashome.
~
[24J
(Appears
when no home
is
registered
and
a favorite
icon
is
selected.)
Show information
on
this place.
~
[35J
Start guidance to a home.
~
[24J
(Not
selectable
if
no homeisregistered.)
Set
Home
Go
Home
•
•
•
Cancel
Guidance
AddtoFavorite
Edit
Favorite
Vicinity
Go
Here
AddtoVia
Point
Cancel the guidance.
~
[24J
Add this place tb your favorite points.
~
[38J
Edit this favorite point.
~
[39J
(Appears
only when a favorite icon
is
selected.
Not
selectable while driving.)
Search for POI aroundthis place.
~
[29J
Start guidance to this place.
~
[26J
Recalculate the route to stop by this place.
~
[36J
(Appears only while guided.)
Registering
your
home
25
II!IRI

Starting
guidance
• You can set destinations only after calibrationisfinished.
(~
[9J)
Settingadestination
using
Shortcut
Menu
oScroll
the
map to display
the
destination at
the
center
of
the
map.
eCall up Shortcut Menu.
e Select [Go Here]
~.
•
to
start guidance.
The System starts calculating the route to the selected destination)
and
guidance starts.
To
cancel
guidance
1 Call up Shortcut Menu.
2 Select [Cancel Guidance]
•.
..
...
26
You can also cancel guidance through
Destination
Menu
~
Cancel Guide.
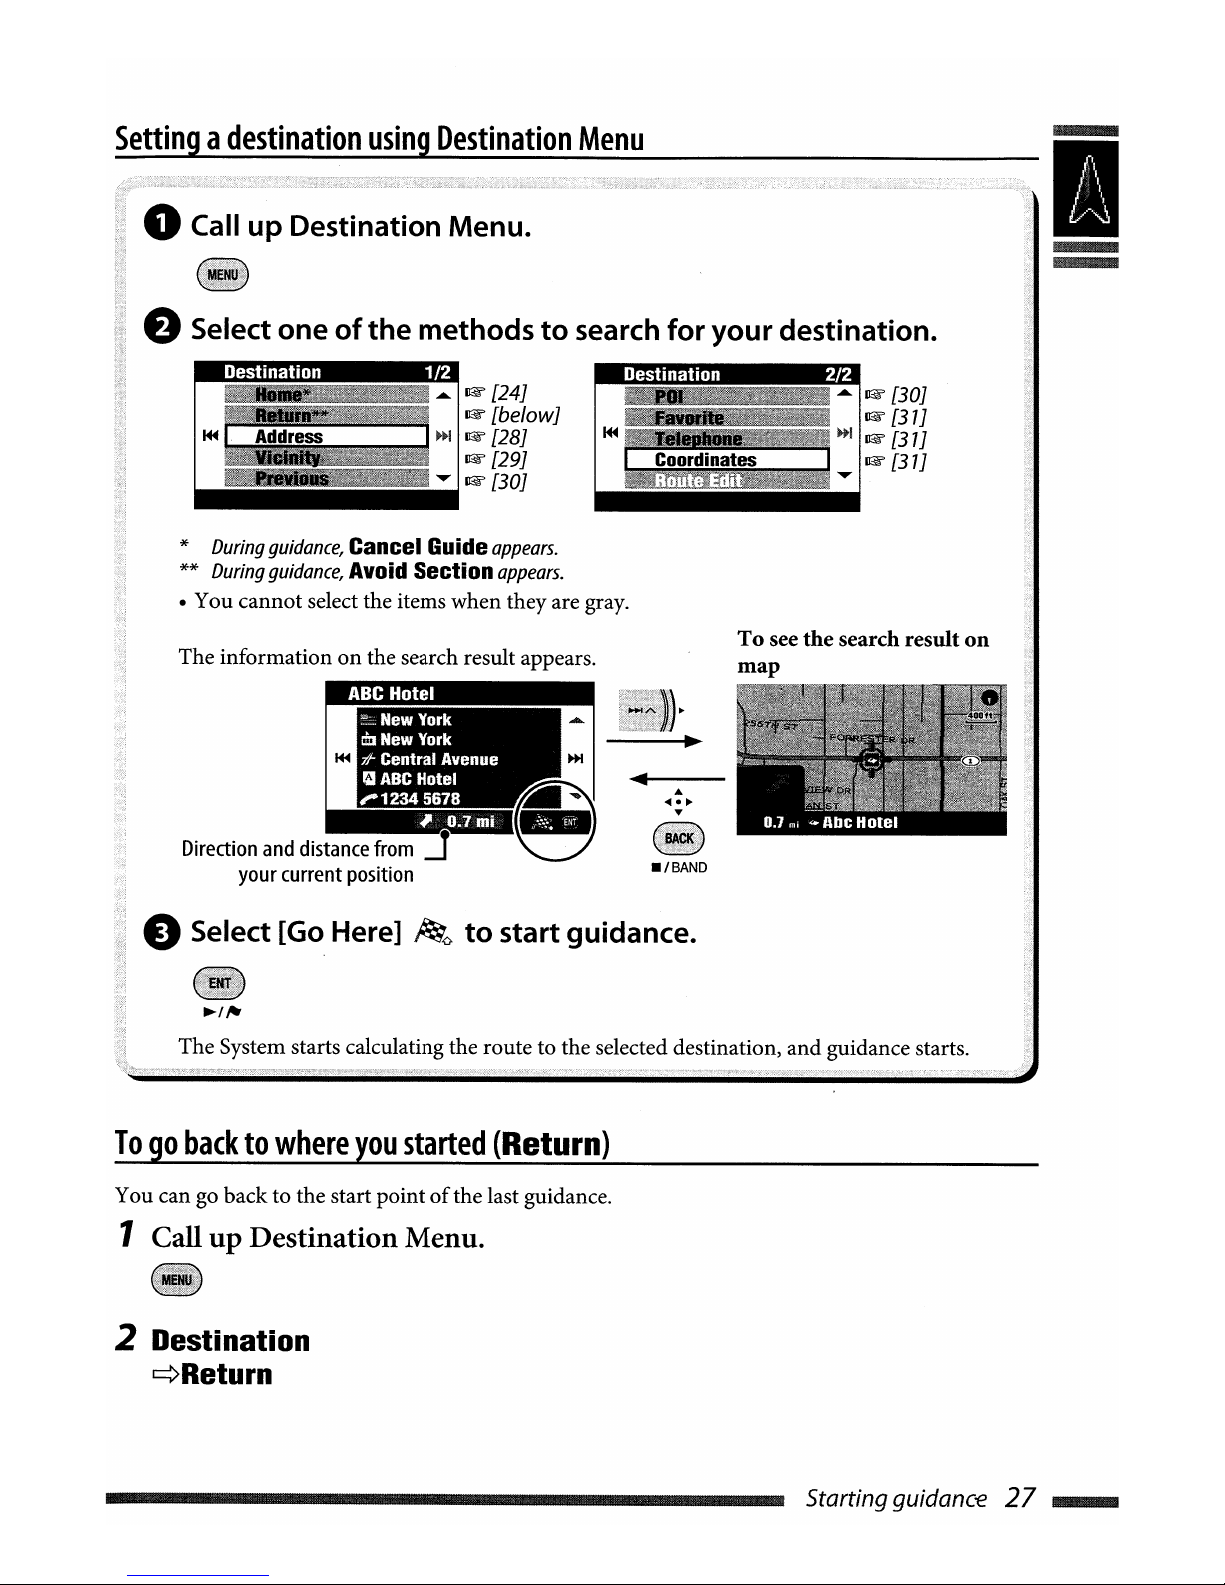
Settingadestination
using
Destination
Menu
oCall
up
Destination Menu.
f.) Select one
of
the
methods
to
search
for
your
destination.
~
I
Destination
1/2
I@f'
[24J
I@f'
[be/owJ
~~
I@f'
[28J
I
J!!!;;!~
I@f'
[29J
..
1&
[30]
Destination
2/2
....
I@f'
[30J
I@f' [31J
»1
I@f' [3 1J
~=~cioolrldi~nait~esl==~
1@f'[31J
*
During
guidance,
Cancel Guide
appears.
**
During
guidance,
Avoid Section
appears
.
• You cannot select the items when theyare gray.
The information
on
the search result appears.
I:
~NewYork
tm
New York
71-
Central Avenue
"ABC
Hotel
'-1234
5678
~ O.!lmi
Direction
and
distance
from
=r
your
current
position
_'BAND
To
see
the
search
result
on
map
e Select [Go Here]
~o
to
start guidance.
~,,.
The System starts calculating the route to the selected destination,
and
guidance starts.
Togobacktowhere
you
started
(Return)
You can go back to the start pointofthe last guidance.
1 Call
up
Destination Menu.
2
Destination
~Return
Startingguidance
27
~

Ex.
Input
screen
foracity
name
1 Call
up
Destination Menu.
1 New York I...
3 Select
the
item
you
want
from the
list.
By
address
(Address)
2 Destination
¢Address
••••••••••
I1DBmllll.ma.
DO
.mm.mIlD
liD
••••••
mil
:
~.-':~;
--'
Enteraspace
Display
other
keyboards*
Delete
the
last
character
Display
the
list
of
matches
*
You
can
also
change
the
keyboardbypressing
DISP.
For
available
charactears,
I@f'
[10SJ.
**
Buttons
vary
dependingonthe
input
item.
Searching
fora
place
To
input
names,
addresses,ornumbers
1
Enter
characters.
3
Input
the state
name
.
•
Input
the city nameifa stateisalready
selected.
Enter
the selected character
Move
the
cursoronthe
~
keyboard
~/'"
• Available characters are automatically
narrowed downasthe System searches its
database for matches.
2 Display
the
listofmatches.
~
• This
buttonisavailable when the matches
are narrowed down to 100orless.
• You can also display the list
of
matches by
pressing
and
holding ENT.
•
When
the matches are narrowed down to
5
or
less, the list appears automatically.
ElDBBDDDmDD
ElDmmmOmll11lD
mamalllJ
aDl!I-p-_
Displays
the
listofall
the states.
4
Input
the cityname.
DfJEJlIlJDIIBDB
DDBBDDmmDD
ElDmmmOmll1IJD
mamalllJlIlIlI13
1......-.(0_:
1
I_Mt,_ha_,_~mm-----:··
,
Select
thistosearchbystreet
name
.
• Inputting characters
~
[leftcolumn]
.....
28

5 Input the street name.
• You
can
also select
the
centerofthe
city.
(The
listofcity centers
may
appear.) You
do
not
havetoinput
the
house
number
in
this case.
• Select
the
areatosearch
from
the
list
if
Select Area is displayed.
6 Input the house number.
• You
can
also select
the
entire
streetoran
intersectiononthe
street.
•
Ifnodataofhouse
number
for
the
selected street is availableinthe
database,
this step is skipped.
POI
nearaplace/route
(Vicinity)
You
can
search for a
POI
around
the
place
where
you
are now.
While
guided,
you
can
also
search for a
POI
near
the
destinationoralong
the
route.
1 Call up Destination Menu.
2 Destination
~Vicinity
Select Category 1/3
Gas
station
~
...
~
Area:
Local
Change_
While
guided, select
the
areatosearch
if
necessary.
~/"
[Hold]
Local Area:
within
1.2mi(2 kIn)
of
your
current
position.Ifno
POI
is
foundinthis
area,
the
System
expands
the
areatosearch.
Near Destination:
within
1.2mi(2 kIn)
of
the
destination.Ifno
POIisfound
in
this area,
the
System
expands
the
area
to
search.
Along Route: 30
mi
(50 kIn)
along
the
route
you
are taking.
3 Select a category (then a sub
category
if
any)
of
the POI.
The
result is listedinthe
orderofdistance
from
the
place
where
you
are.
4 Select a POI from the list.
You
can
search
foraPOI
around
a place
on
the
map
through
Shortcut
Menu
q
[Vicinity]
•.
Follow steps 3
and
4
above after selecting [Vicinity].
~
I
Searching for aplace 29
~
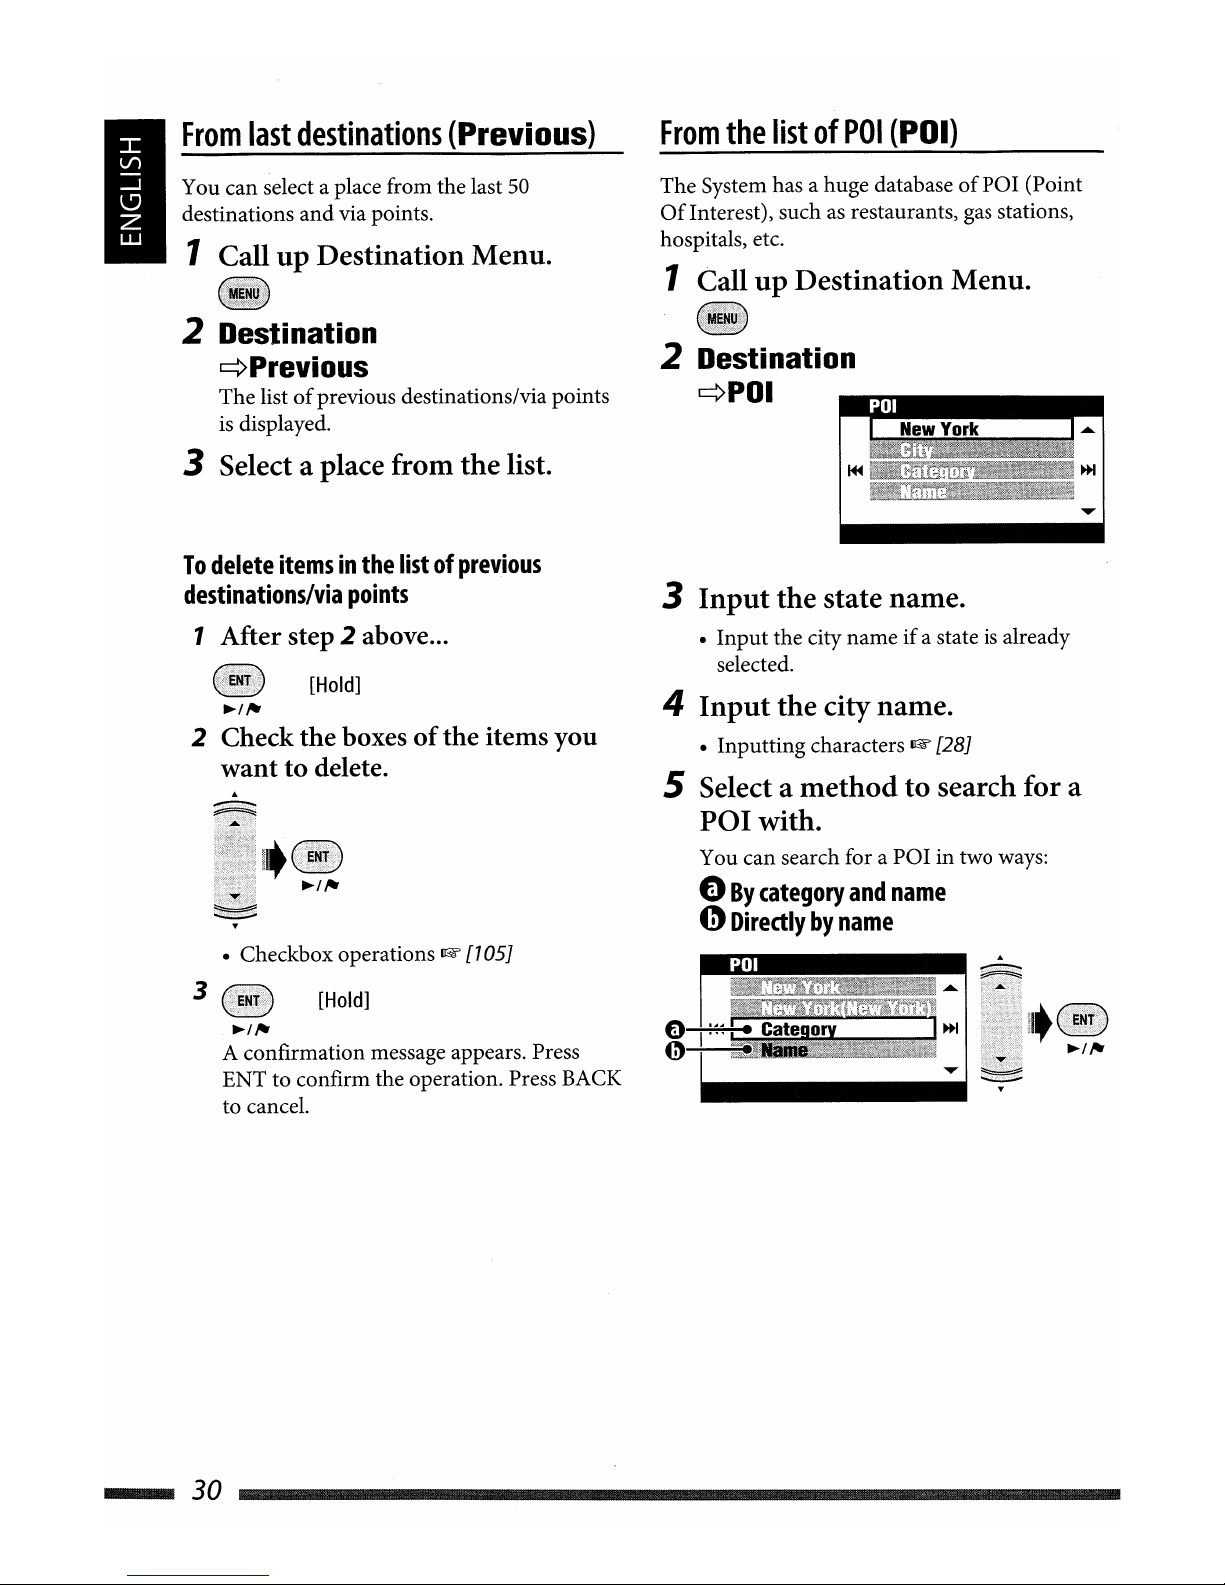
From
last
destinations
(Previous)
You can select a place from the last
50
destinations
and
via points.
1 Call
up
Destination Menu.
From
the
listofPOI
(POI)
The System has a huge databaseofPOI (Point
Of
Interest), suchasrestaurants, gas stations,
hospitals, etc.
1 Call
up
Destination Menu.
2 Destination
¢Previous
The listofprevious destinations/via points
is displayed.
3 Select a place from thelist.
2 Destination
¢POI
1 New York I
.....
~!1!!I!~
~/'"
2 Check
the
boxesofthe
items you
wanttodelete.
~
--
You can search for a POI in two ways:
o
By
category
and
name
4)
Directlybyname
4
Input
the cityname.
• Inputting characters~[281
5 Select a
methodtosearch for a
POI
with.
3
Input
the state name.
•
Input
the city nameifa stateisalready
selected.
~I
,.,
A confirmation message appears. Press
ENT to confirm the operation. Press BACK
to cancel.
• Checkbox operations
~
[7051
[Hold]
3
To
delete
itemsinthe
listofprevious
destinations/via
points
1 After step 2 above ...
[Hold]
....
30
From
last
destinations
(Previous)
You can select a place from the last
50
destinations
and
via points.
1 Call
up
Destination Menu.
From
the
listofPOI
(POI)
The System has a huge databaseofPOI (Point
Of
Interest), suchasrestaurants, gas stations,
hospitals, etc.
1 Call
up
Destination Menu.
2 Destination
¢Previous
The listofprevious destinations/via points
is displayed.
3 Select a place from thelist.
2 Destination
¢POI
1 New York I
.....
~!1!!I!~
~/'"
2 Check
the
boxesofthe
items you
wanttodelete.
~
--
You can search for a POI in two ways:
o
By
category
and
name
4)
Directlybyname
4
Input
the cityname.
• Inputting characters~[281
5 Select a
methodtosearch for a
POI
with.
3
Input
the state name.
•
Input
the city nameifa stateisalready
selected.
~I
,.,
A confirmation message appears. Press
ENT to confirm the operation. Press BACK
to cancel.
• Checkbox operations
~
[7051
[Hold]
3
To
delete
itemsinthe
listofprevious
destinations/via
points
1 After step 2 above ...
[Hold]
....
30
 Loading...