

DVD/CD RECEIVER
KD-AVX20
For canceling the display demonstration, see page 7.
For installation and connections, refer to the separate manual.
INSTRUCTIONS
LVT1940-006A
[A]
Thank you for purchasing a JVC product.
Please read all instructions carefully before operation, to ensure your complete understanding and to obtain the best
possible performance from the unit.
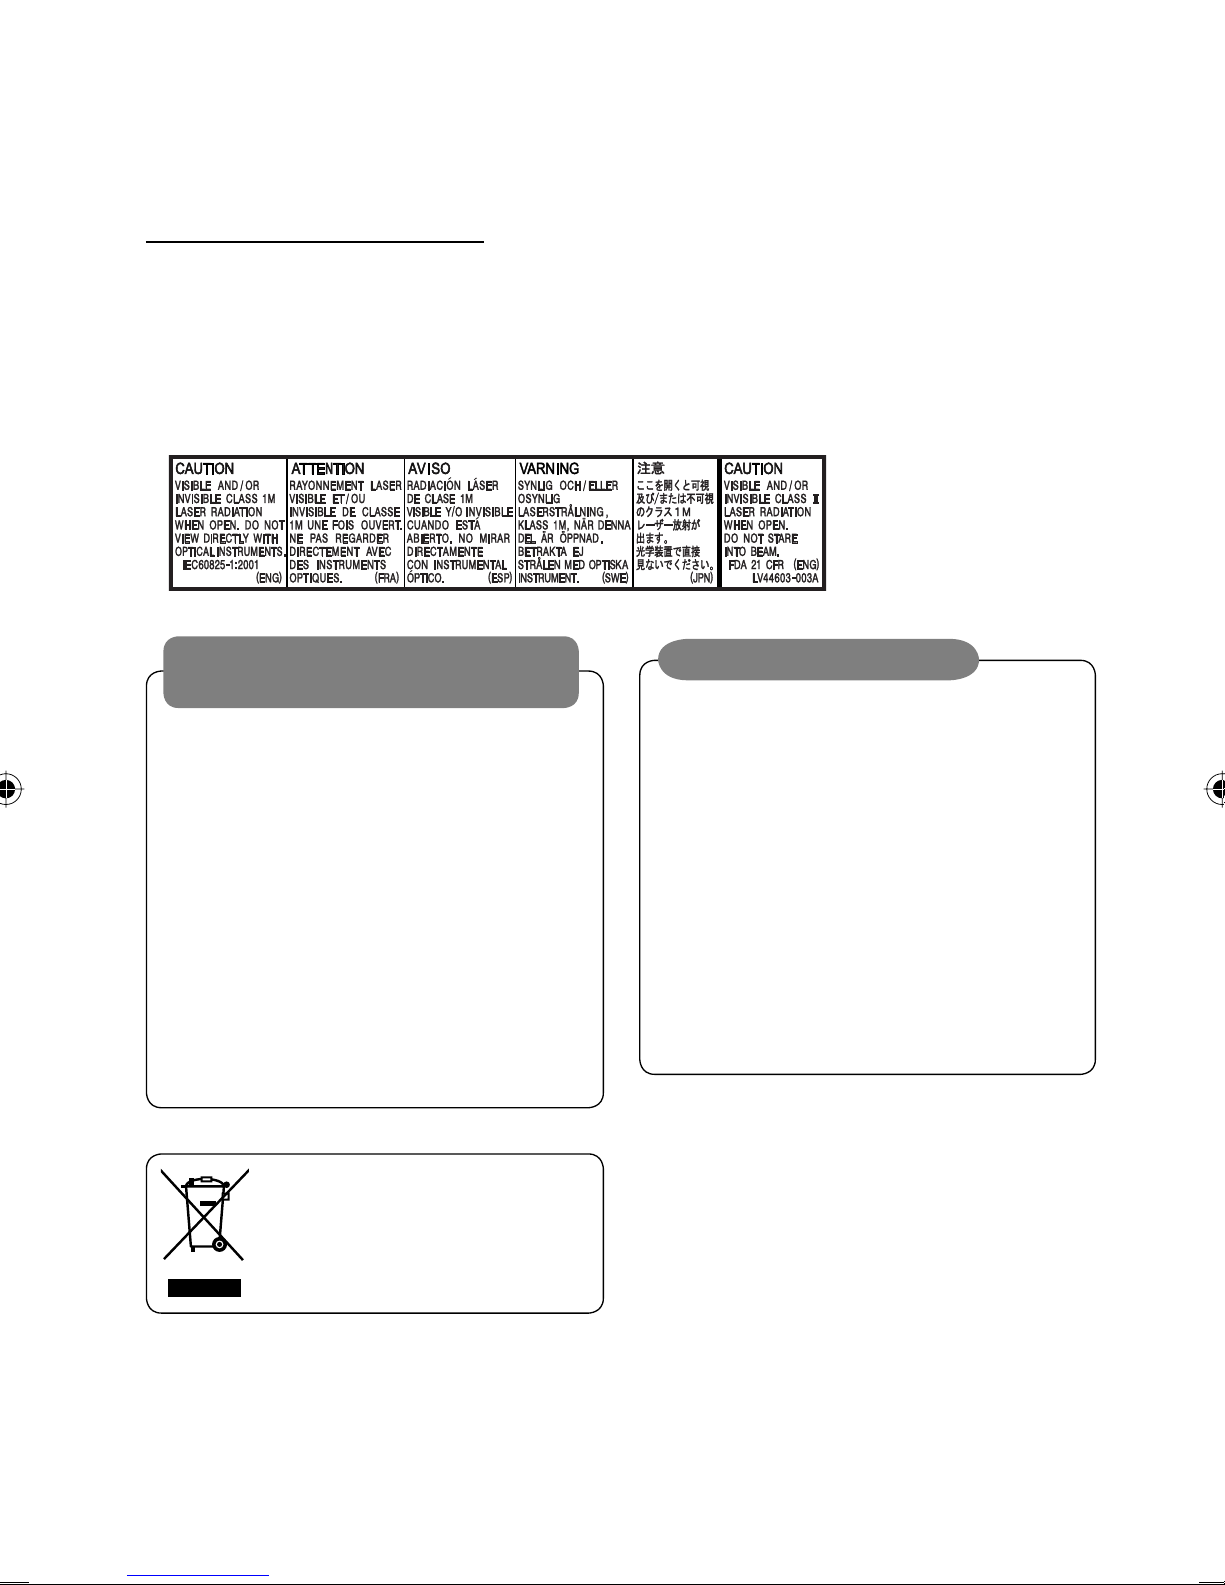
IMPORTANT FOR LASER PRODUCTS
1. CLASS 1 LASER PRODUCT
2. CAUTION: Do not open the top cover. There are no user serviceable parts inside the unit; leave all servicing to
qualified service personnel.
3. CAUTION: Visible and/or invisible class 1M laser radiation when open. Do not view directly with optical
instruments.
4. REPRODUCTION OF LABEL: CAUTION LABEL, PLACED OUTSIDE THE UNIT.
WARNINGS:
To prevent accidents and damage
• DO NOT install any unit or wire any cable in a
location where;
– it may obstruct the steering wheel and
gearshift lever operations.
– it may obstruct the operation of safety devices
such as air bags.
– it may obstruct visibility.
• DO NOT operate the unit while driving.
If you need to operate the unit while driving, be
sure to look around carefully.
• The driver must not watch the monitor while
driving.
[European Union only]
Cautions on the monitor:
• The monitor built in this unit has been produced
with high precision, but it may have some
ineffective dots. This is inevitable and is not
malfunction.
• Do not expose the monitor to direct sunlight.
• When the temperature is very cold or very hot...
– Chemical changes occur inside, causing
malfunction.
– Pictures may not appear clearly or may move
slowly. Pictures may not be synchronized
with the sound or picture quality may decline
in such environments.
2
How to reset your unit
• Your preset adjustments will also be erased.
Contents
How to reset your unit .......................... 3
How to forcibly eject a disc .................... 3
INTRODUCTION
Playable disc type ................................. 4
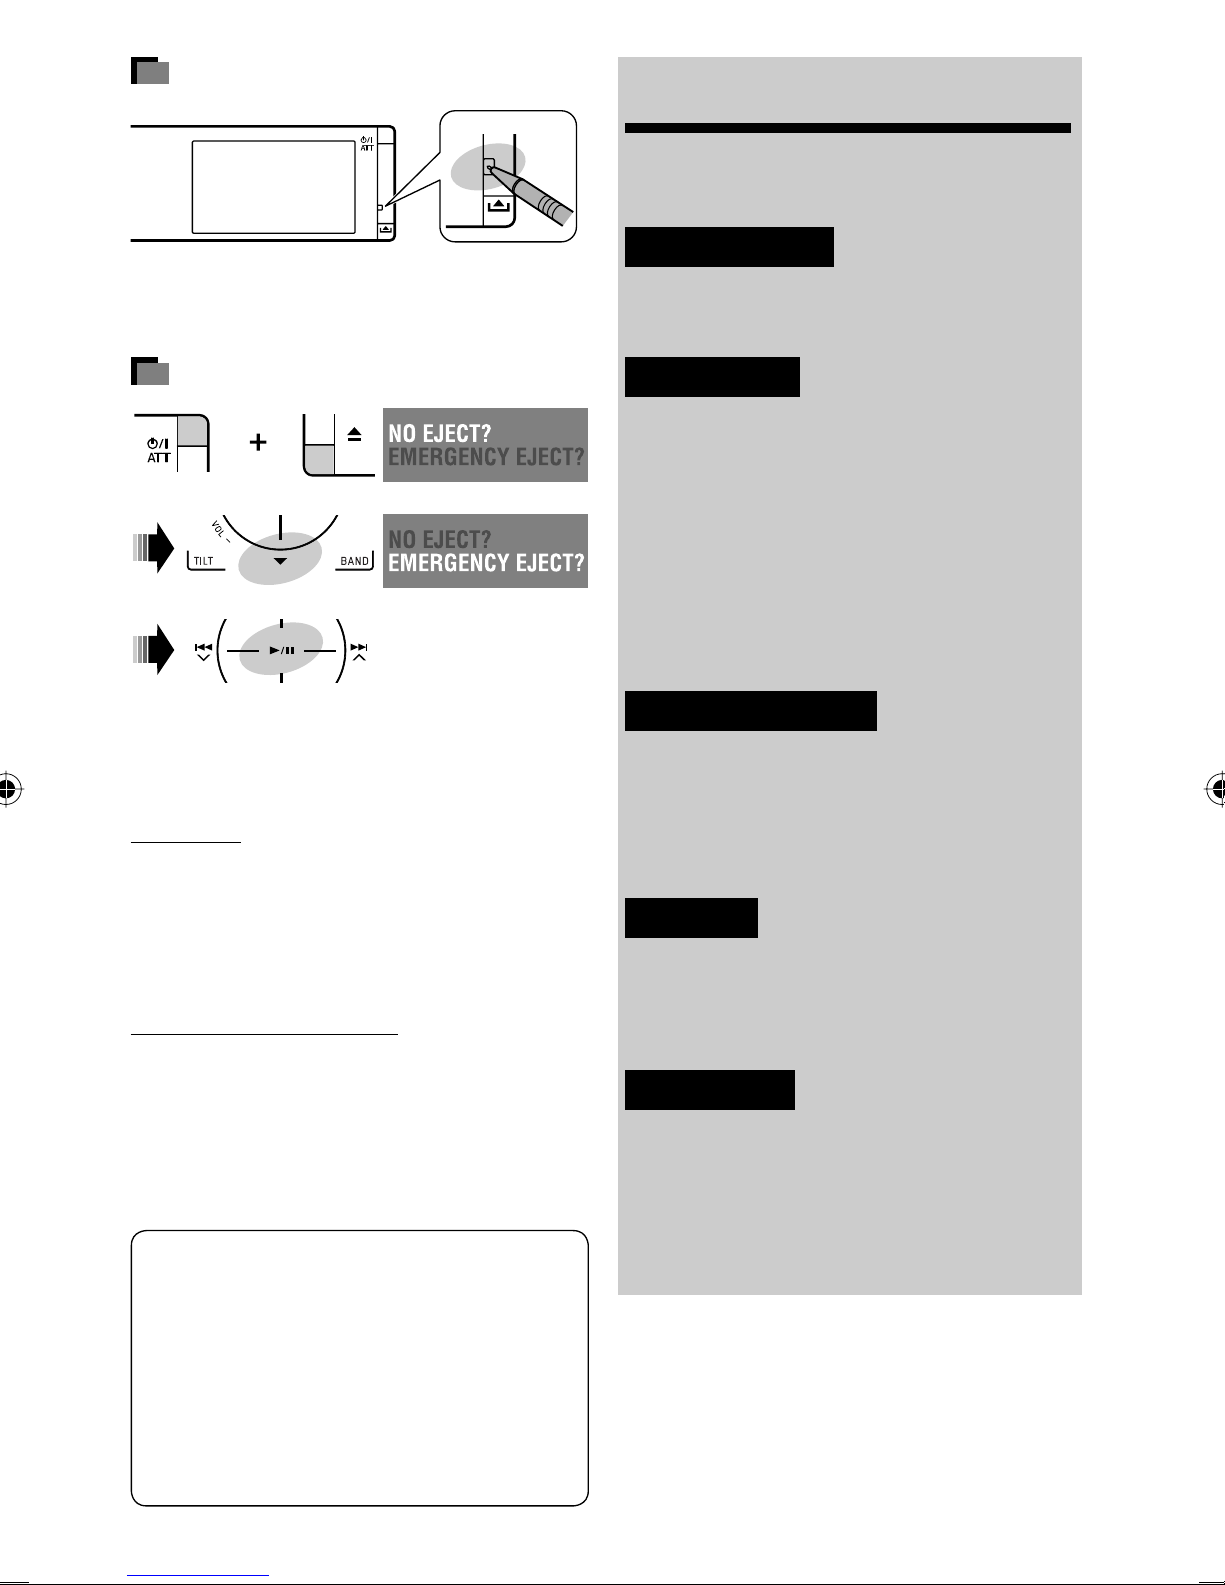
How to forcibly eject a disc
[Hold]
• Be careful not to drop the disc when it ejects.
• If this does not work, reset the unit.
For safety...
• Do not raise the volume level too much, as this will
block outside sounds, making driving dangerous.
• Stop the car before performing any complicated
operations.
Before operations
................................. 5
OPERATIONS
Basic operations—AV menu .................. 6
Basic operations—Control panel
........... 8
Basic operations—
Remote controller (RM-RK252) ........... 10
Listening to the radio ........................... 12
Disc operations ..................................... 15
USB operations ..................................... 28
EXTERNAL DEVICES
Listening to the iPod/iPhone ................. 30
Listening to the CD changer
................... 33
Listening to other external
components ...................................... 35
SETTINGS
Sound equalization ............................... 37
Temperature inside the car...
If you have parked the car for a long time in hot or cold
weather, wait until the temperature in the car becomes
normal before operating the unit.
This product incorporates copyright protection
technology that is protected by U.S. patents
and other intellectual property rights. Use of
this copyright protection technology must be
authorized by Macrovision, and is intended for
home and other limited viewing uses only unless
otherwise authorized by Macrovision. Reverse
engineering or disassembly is prohibited.
Assigning titles to the sources
............... 38
Menu items .......................................... 39
REFERENCES
Maintenance ........................................ 46
More about this unit
............................. 47
Troubleshooting ................................... 54
Specifications ....................................... 58
3
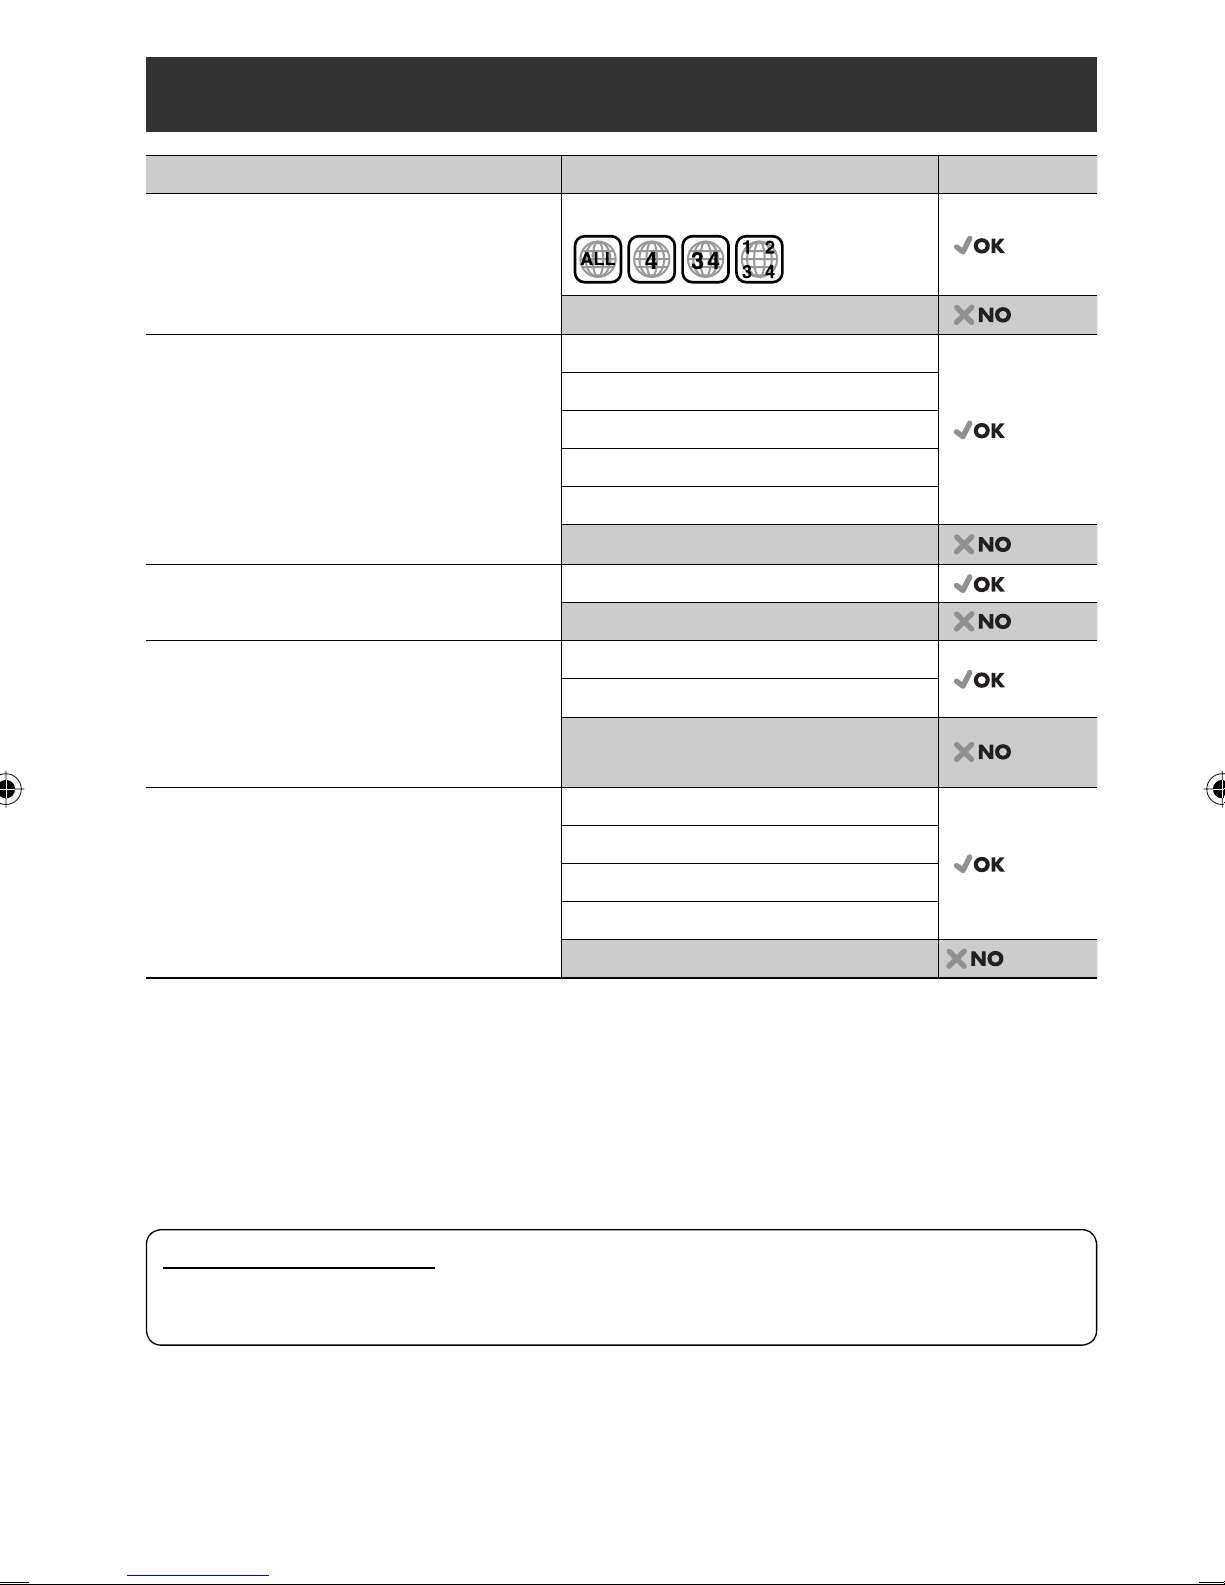
Playable disc type
Disc type Recording format, file type, etc. Playable
DVD
• DTS sound cannot be reproduced.
DVD Video (Region Code: 4)*
DVD Audio/DVD-ROM
1
DVD Recordable/Rewritable
(DVD-R/-RW*2, +R/+RW*3)
• DVD Video: UDF bridge
• DVD-VR
• DivX/MPEG1/MPEG2/JPEG/MP3/WMA/WAV:
Compliant to ISO 9660 level 1, level 2, Romeo,
Joliet
DualDisc DVD side
CD/VCD Audio CD/CD Text (CD-DA)
CD Recordable/Rewritable
(CD-R/-RW)
• Compliant to ISO 9660 level 1, level 2, Romeo,
Joliet
DVD Video
DVD-VR
DivX/MPEG1/MPEG2
JPEG
MP3/WMA/WAV
AAC/MPEG4/DVD+VR/DVD-RAM
Non-DVD side
VCD (Video CD)
DTS-CD/SVCD (Super Video CD)/CD-ROM/
CD-I (CD-I Ready)
CD-DA
MP3/WMA/WAV
JPEG
DivX/MPEG1/MPEG2
*1 If you insert a DVD Video disc of an incorrect Region Code, “Region code error” appears on the monitor.
*2 DVD-R recorded in multi-border format is also playable (except for dual layer discs). DVD-RW dual layer discs are not
playable.
*3 It is possible to play back finalized +R/+RW (Video format only) discs. “DVD” is selected as its disc type when a
+R/+RW disc is loaded. +RW double layer discs are not playable.
Caution for DualDisc playback
The Non-DVD side of a “DualDisc” does not comply with the “Compact Disc Digital Audio” standard. Therefore,
the use of Non-DVD side of a DualDisc on this product may not be recommended.
AAC/MPEG4
4
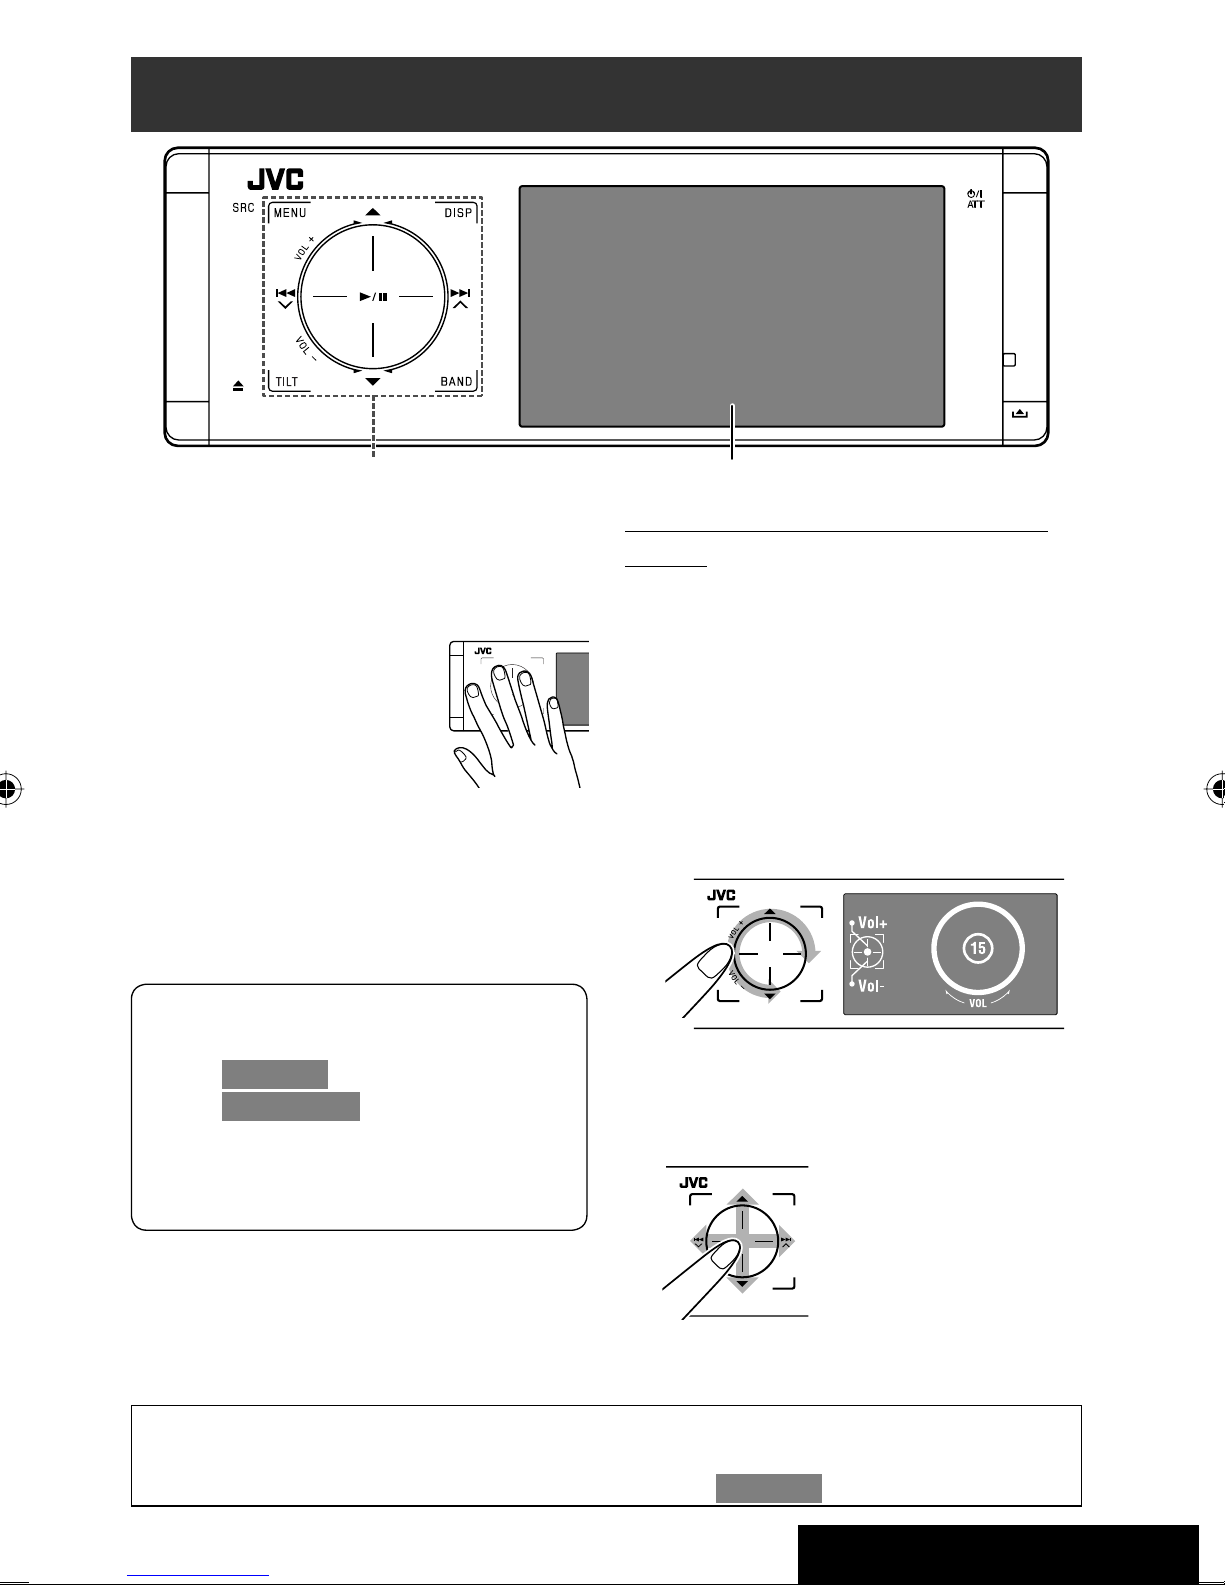
Before operations
Touch pad controls
The lights of the touch pad controls and monitor are
turned off when no operation is done for about 10
seconds.
The lights are turned on in the following cases:
– When you move your hand close
to the touch pad controls.*
– When your finger touches the
touch pad controls.*
– When you use the remote
controller.
– When the signal from the rear view camera comes in.
* Depending on the setting. To change the setting, ☞
page 43.
The lights are always turned on in the following
cases:
– While <AV Menu> is displayed.
– While <Source Menu> is displayed.
– While the control panel is open.
– When <Illumination> is set to <Normal>.
(☞ page 43)
Monitor
How to operate the unit by the touch pad
controls
You can operate the unit by touching the appropriate
part of the touch pad controls.
• To adjust the volume, move your finger on the
touch pad knob as illustrated below to display the
animation on the monitor, then touch 5 or ∞
repeatedly.
– You can also adjust the volume by just continuing
to move your finger on the touch pad knobs as
illustrated below.
• When you slide your finger on the touch pad knob
as illustrated below, it functions in the same way as
touching 5 / ∞ / 4 / ¢.
• Operations are explained mainly using the touch pad controls and buttons of the unit; however, the buttons
on the remote controller can work in the same way if they have the same names or marks.
• In the explanation, the screen names are highlighted. For example, <AV Menu>.
5
INTRODUCTION
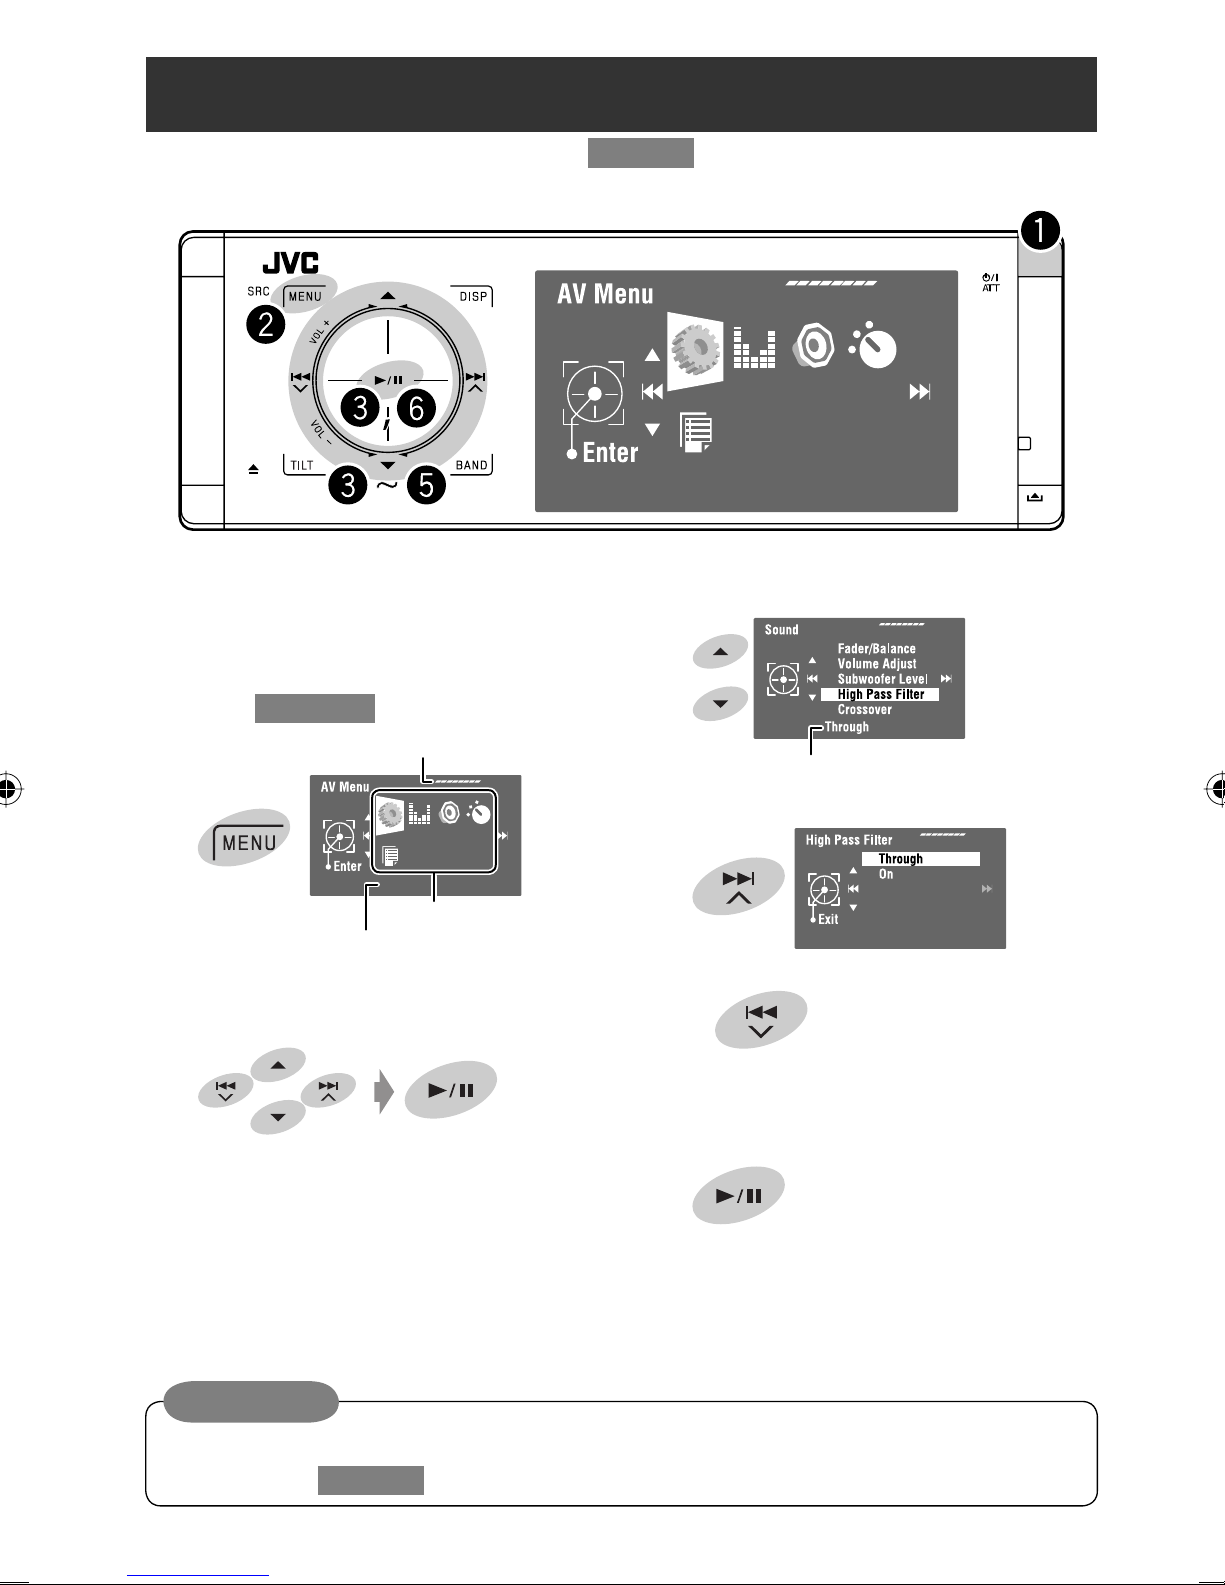
Basic operations— AV menu
You can use the menus to set up various settings from <AV Menu>. For details of each menu and setting, see “Menu
items.” (☞ pages 39 to 45)
AV Setup
~ Turn on the power.
The lights of the touch pad controls and monitor
are turned on.
Ÿ Enter <AV Menu>.
Time countdown indicator
AV Setup
Setup icons
Current selected icon name
• Non-available items will be shaded.
! Select an icon to enter the setup screen.
⁄ Select an item.
Current setting of the selected item
@ Enter the next screen.
• To return to the previous screen:
• Repeat steps ⁄ and @ to set the sub-item if
needed.
¤ Finish the procedure.
Important
Indication language: English indications are used for the purpose of explanation. You can select the indication
language from the <AV Menu>. (☞ page 40)
6
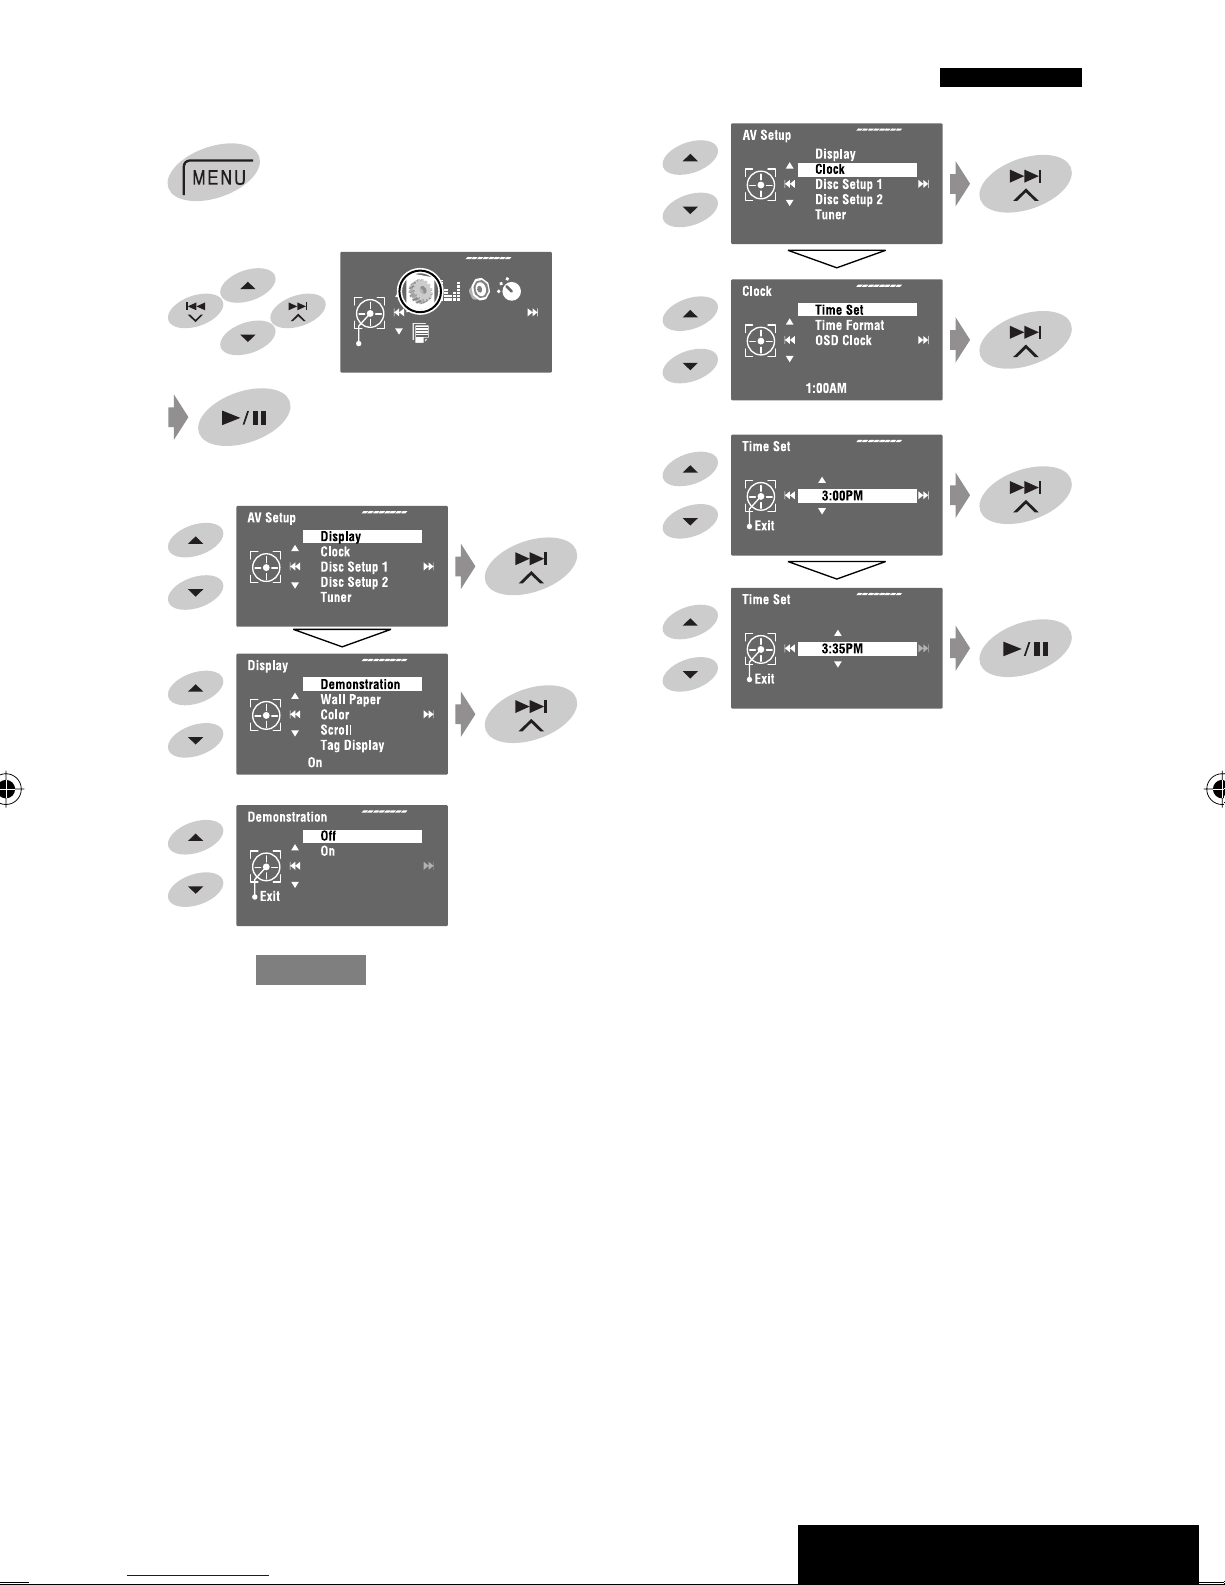
Canceling the display demonstration and setting the clock
1
2
3
6
AV Menu
Enter
AV Setup
7
4
5
Return to <AV Setup> by touching 4
repeatedly.
7
OPERATIONS
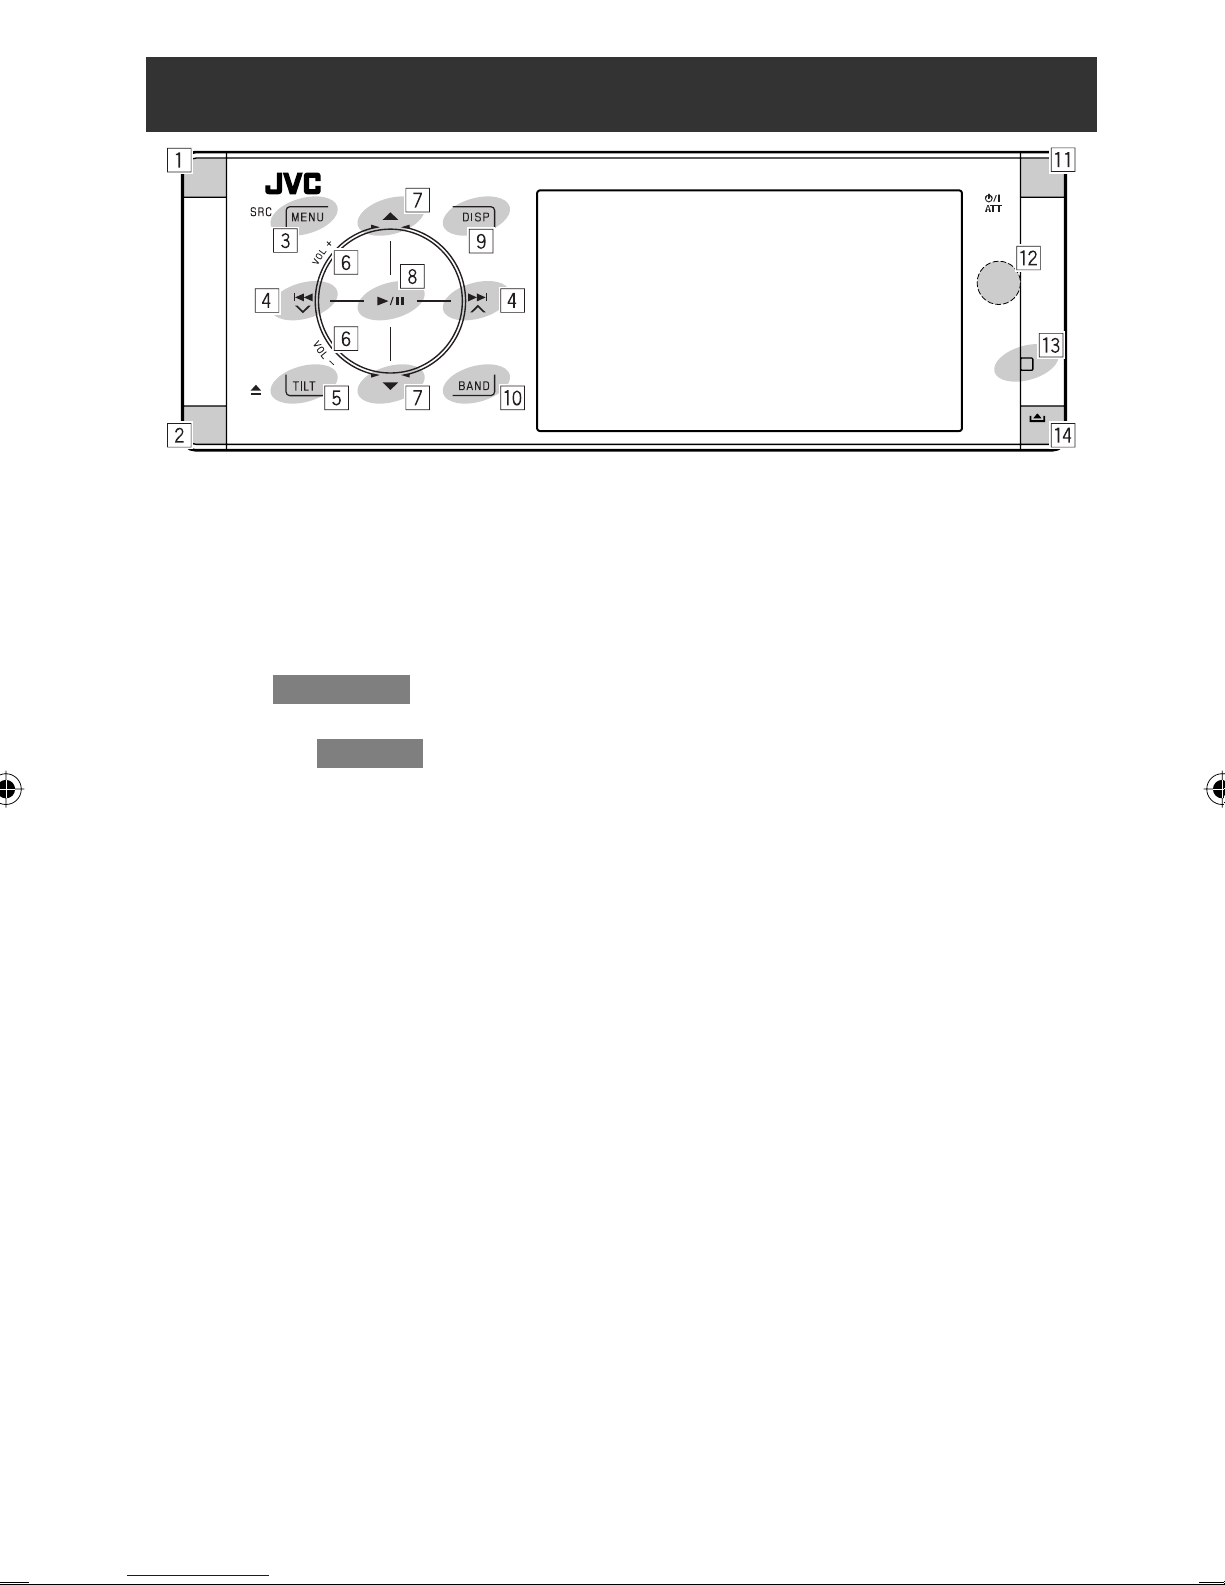
Basic operations — Control panel
1 Selects sources.*
“Tuner” = “Disc” = “USB” or “USB iPod”
= “Changer,” “iPod,” or “External Input” =
“AV Input”
• You can also select sources by touching
5 / ∞ / 4 / ¢ after holding SRC for
entering <Source Menu>.
2 • Ejects the disc.
3 • Enters or exits <AV Menu>.
4 • “Tuner”: Searches for stations.
• “Disc,” “USB,” “USB iPod,” “Changer,” and “iPod”:
Reverse skip/forward skip
• On menus:
– Enters the previous/next screen.
– Selects items.
5 Tilts the control panel. (☞ page 9)
6 Adjusts the volume level. (☞ page 5)
1
7*2 • “Tuner”: Selects preset stations.
• “Disc,” “USB,” and “Changer”: Selects titles/
folders.
• “USB iPod”: Selects the next/previous items.
• “iPod”: Enters the player’s menu and pauses
playback.
• On menus: Selects items.
8 • “Disc,” “USB,” “USB iPod,” and “Changer”: Starts
and pauses playback.
• On menus: Enters the next screen or exits the
displayed screen.
9 Changes the display information. (☞ page 9)
p • “Tuner”: Selects the bands.
• “Disc” and “USB”: Stops playback.
q • Turns on the power.
• Turns off the power [Hold].
• Attenuates the sound (when the power is on).
w Remote sensor
e Resets the unit.
• Use only when the internal system malfunctions.
r Detaches the control panel (To attach, ☞ page 9).
*1 You cannot select these sources if they are not ready.
*2 By holding 5 / ∞, you can display the list accessible
for the selected source.
8
To tilt the control panel
Touch TILT repeatedly.
To attach the control panel
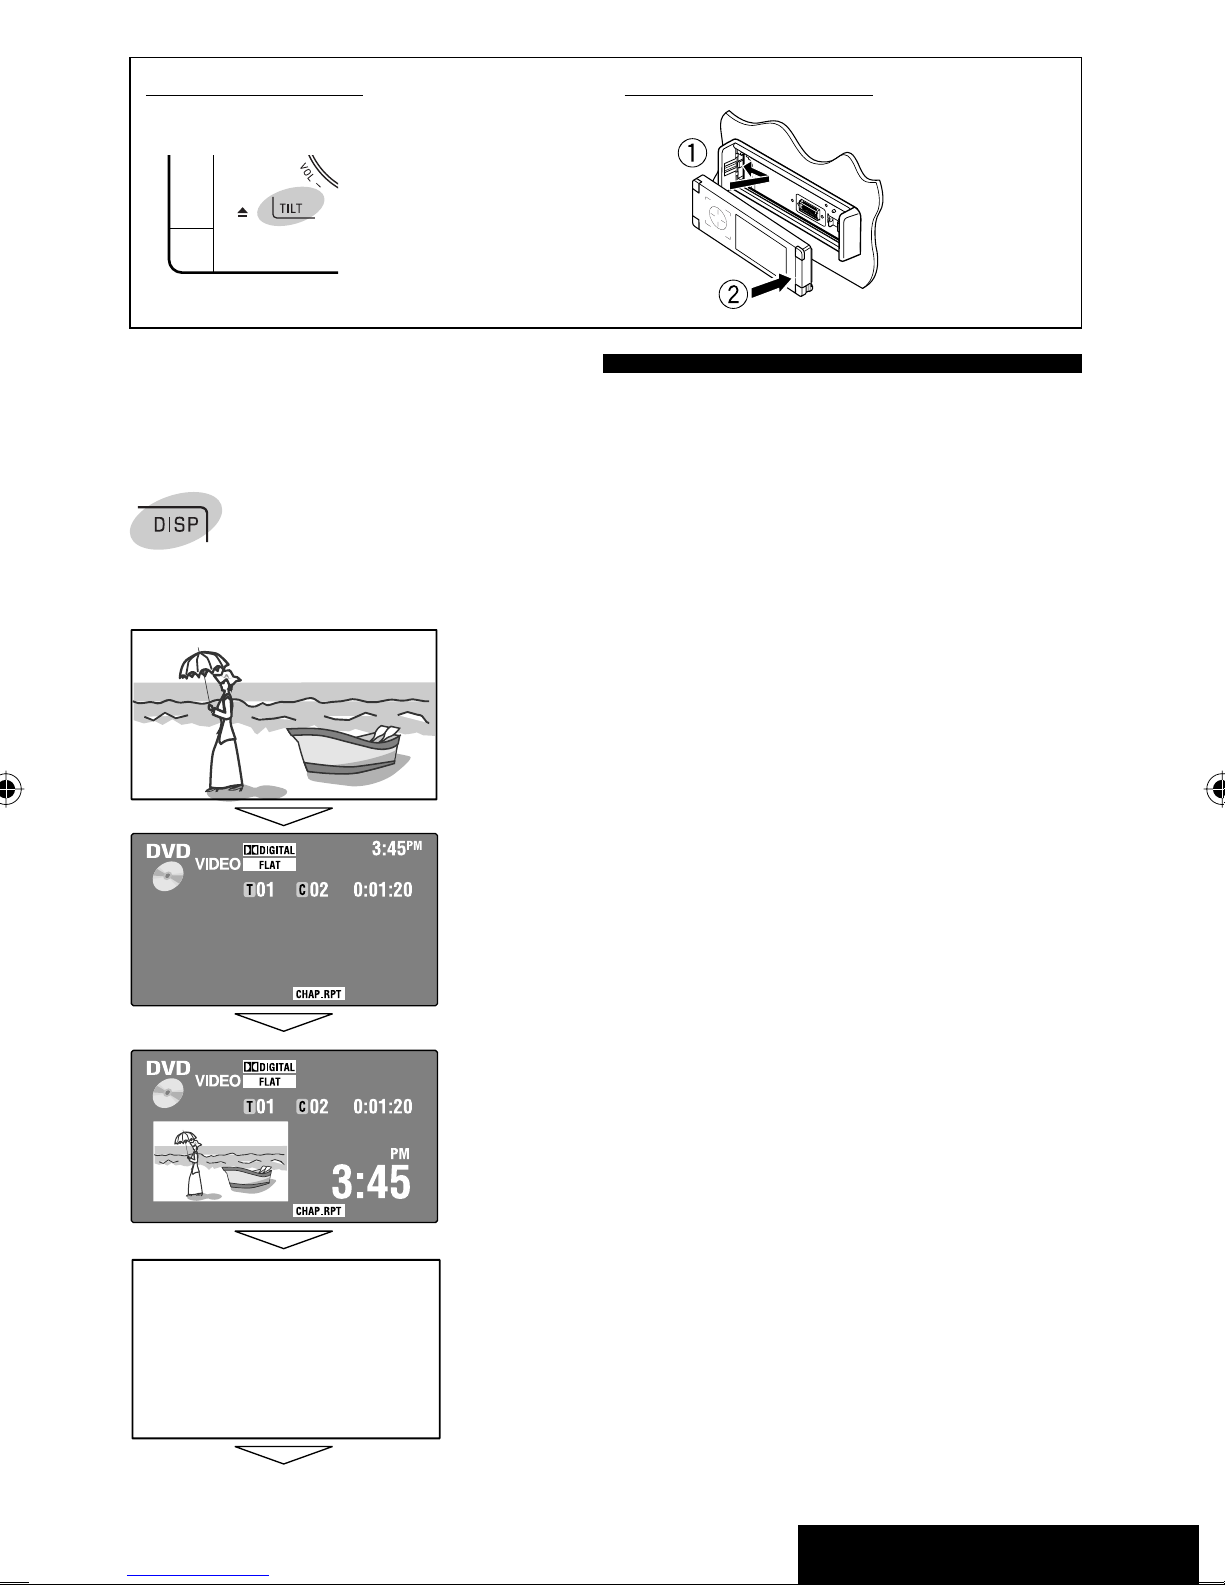
Changing the display information
Available display information varies among the playback sources.
Each time you touch DISP, the display changes to show the various information.
Ex.: When the playback source is a DVD video disc.
Playback picture screen (only for video sources)
Source information screen
Playback picture and the source information screen
• When the source is “USB iPod,” the Artwork of the song is shown if the
song has an Artwork data. (☞ page 41)
• While MP3/WMA file is played, “Jacket picture” is shown if the file has the
tag data including “Jacket picture.”
Navigation screen
• This screen is displayed when <Navigation> is selected for <AV Input>.
(☞ pages 35 and 42)
Back to the beginning
9
OPERATIONS
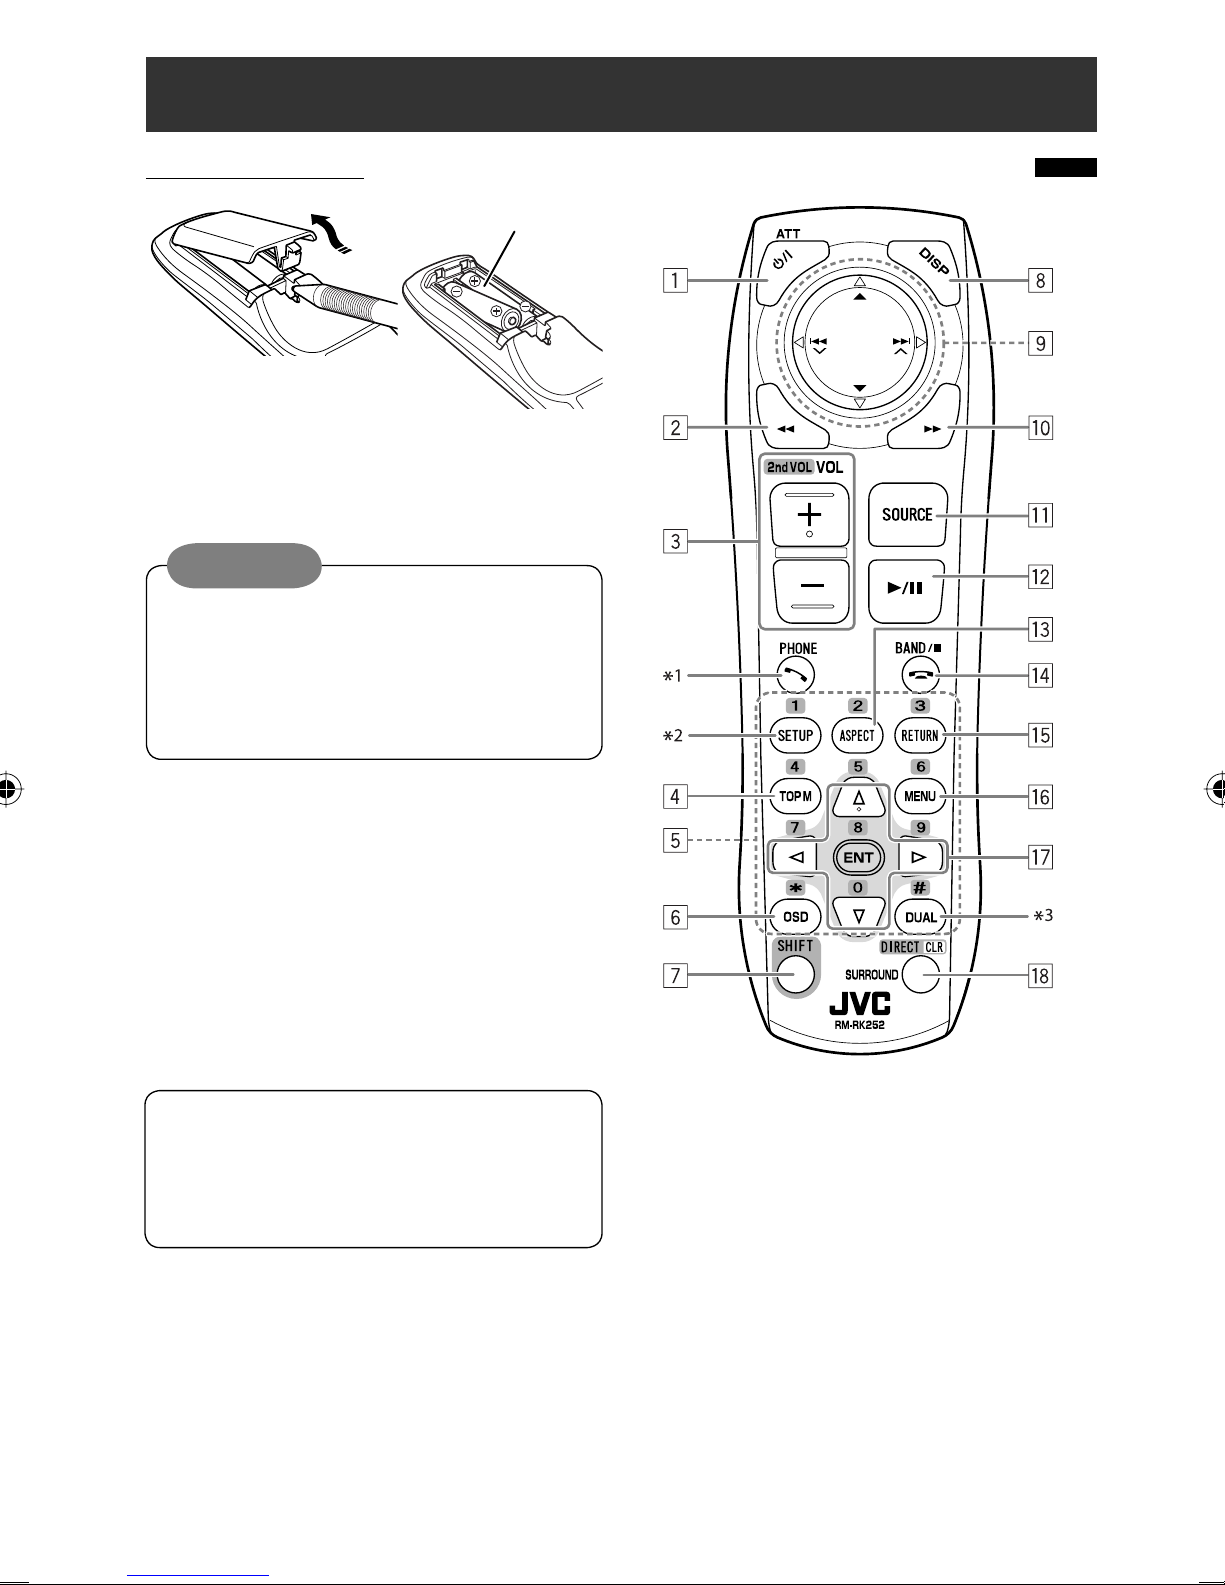
Basic operations — Remote controller (RM-RK252)
Installing the battery
R03/LR03/AAA
Insert the batteries into the remote controller by
matching the polarity (+ and –) correctly.
Caution:
• Danger of explosion if battery is incorrectly
replaced. Replace only with the same or
equivalent type.
• Battery shall not be exposed to excessive heat
such as sunshine, fire or the like.
Main elements and features
If the range or effectiveness of the remote
controller decreases, replace both batteries.
Before using the remote controller:
• Aim the remote controller directly at the remote
sensor on the unit.
• DO NOT expose the remote sensor to bright light
(direct sunlight or artificial lighting).
The unit is equipped with the steering wheel
remote control function.
• See the Installation/Connection Manual (separate
volume) for connection.
1 • Turns on the power.
• Turns off the power [Hold].
• Attenuates the sound (when the power is on).
2 “Disc,” “USB,” and “USB iPod”: Reverse search
3 • Adjusts the volume level.
• Does not function as “2nd VOL.”
4 • DVD: Displays the disc menu.
• VCD: Resumes PBC playback (☞ page 23).
• DVD-VR: Displays the Original Program screen.
10

5 • Enters numbers (while holding SHIFT). (☞ pages
14, 20 to 23)
• “Tuner”: Selects the preset stations (while
holding SHIFT).
6 Displays the on-screen bar.
7 Functions with other buttons (see 5 and i).
8 Displays the display information.
9 “Tuner”:
• 5 / ∞: Selects preset stations.
•
/ : Searches for stations.
– Auto Search
– Manual Search [Hold]
“Disc” and “Changer”:
• 5 / ∞:
– DVD: Selects the title.
– DVD-VR: Selects the program/play list.
– Other discs (except VCD/CD): Selects the
folders.
• 4 / ¢:
– Reverse skip/forward skip
– Reverse search/forward search [Hold]
“USB”:
• 5 / ∞: Selects the folders.
• 4 / ¢:
– Reverse skip/forward skip
– Reverse search/forward search [Hold]
“USB iPod”:
• 5 / ∞: Selects previous/next item.
• 4 / ¢:
– Reverse skip/forward skip
– Reverse search/forward search [Hold]
“iPod”:
• ∞: Pauses or resumes playback.
• 5: Enters the main menu (then 5 / ∞ / 4 /
¢ work as the menu selecting buttons).*
4
• 4 / ¢:
– Reverse skip/forward skip
– Reverse search/forward search [Hold]
In menu selecting mode:
– Selects an item. (Then, press ∞ to confirm the
selection.)
– Skips 10 items at a time [Hold].
p “Disc,” “USB,” and “USB iPod”: Forward search
q Selects the source.
w • “Disc,” “USB,” and “USB iPod”: Starts and pauses
playback.
e Changes the aspect ratio of the playback pictures.
r • “Tuner”: Selects the bands.
• “Disc” and “USB”: Stops playback.
• Does not function as “
.”
t VCD: Returns to the PBC menu.
y • DVD Video: Displays the disc menu.
• VCD: Resumes PBC playback. (☞ page 23)
• DVD-VR: Displays the Play List screen.
u • Makes selection/settings.
• @ / #: Skips back or forward by 5 minutes for
DivX/MPEG1/MPEG2.
• % / fi: Changes discs for “Changer.”
i • “Disc” and “USB”: Switches the number entry
mode (while holding SHIFT).
• Erases the misentry after entering a wrong
number (while holding SHIFT).
• Does not function as “SURROUND.”
*1 Not used for this unit.
*2 Does not function as “SETUP.”
*3 Does not function as “DUAL.”
*4 5 : Returns to the previous menu.
∞ : Confirms the selection.
11
OPERATIONS
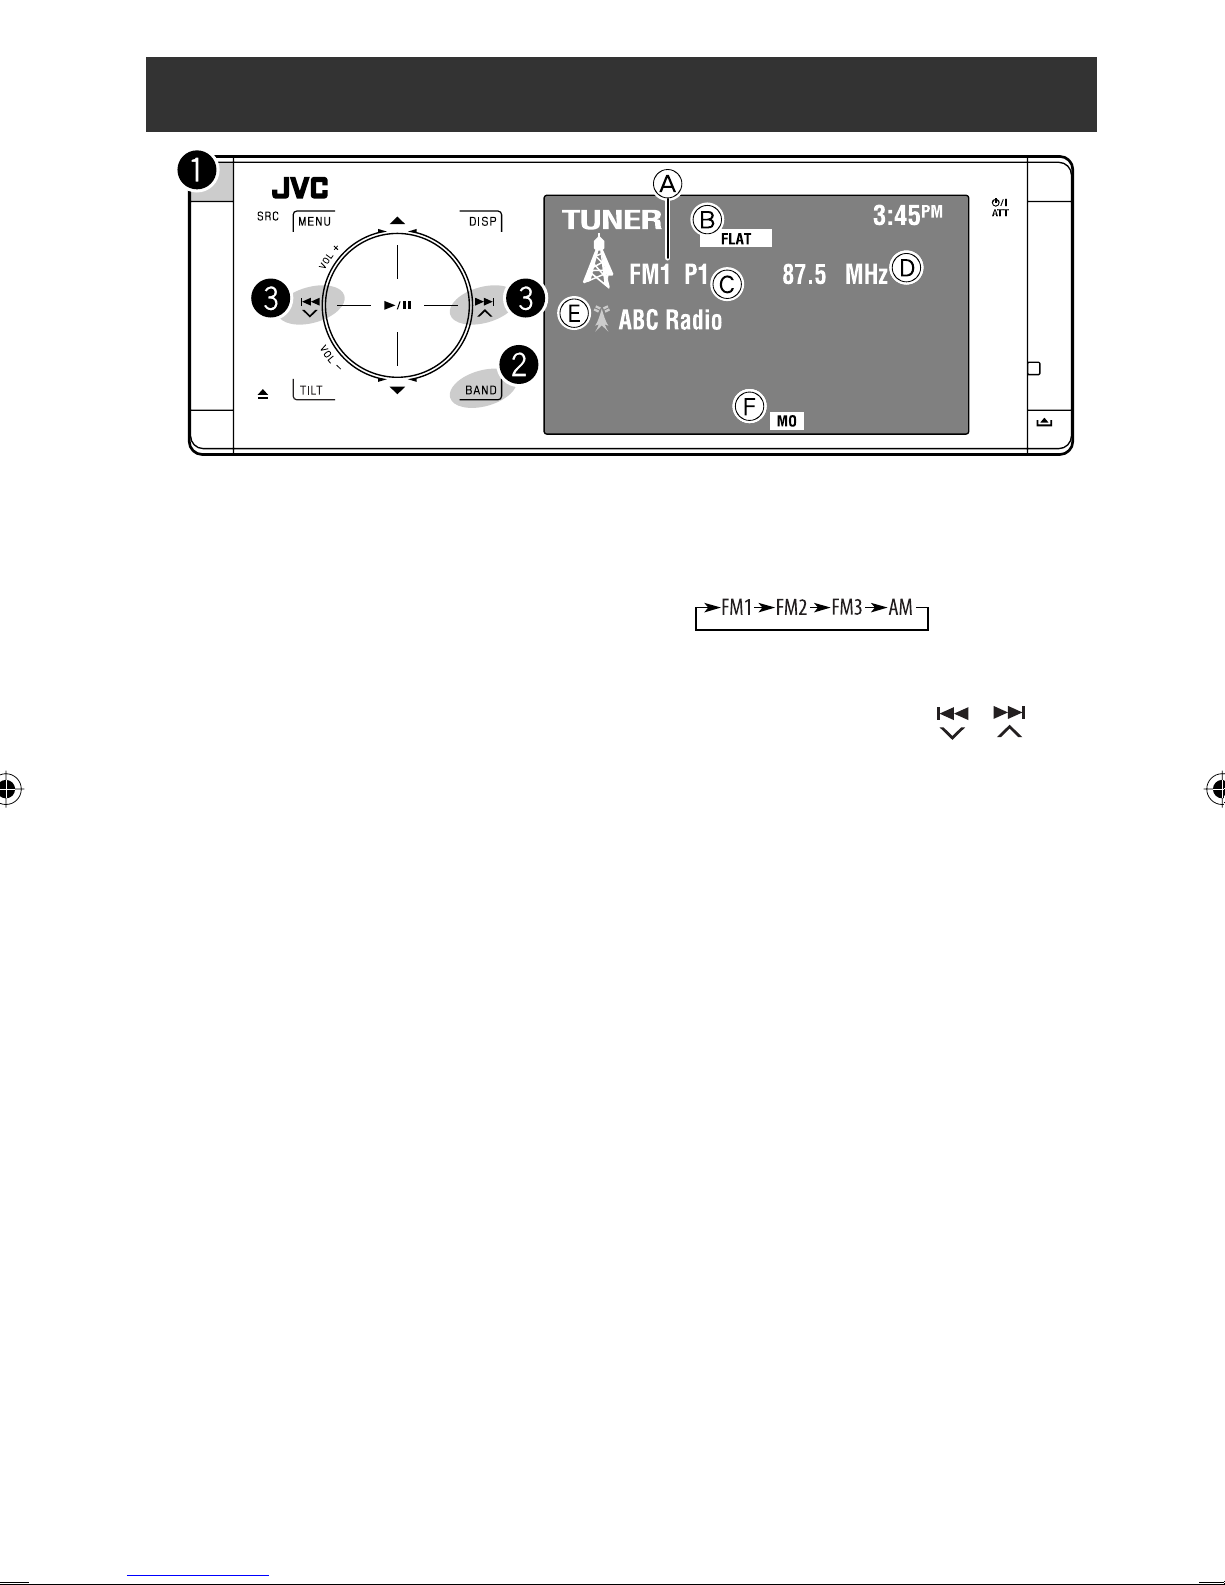
Listening to the radio
A Band
B Sound mode (
C Preset no.
D Frequency
E Assigned station name (
F FM reception indicator
☞ page 37)
~ Select “Tuner.”
Ÿ Select the band.
☞ page 38)
! Search for a station—Auto Search.
• Manual Search: Hold either or until
“Manual Search” appears on the monitor, then
touch it repeatedly.
• The ST indicator lights up when receiving an
FM stereo broadcast with sufficient signal
strength.
12
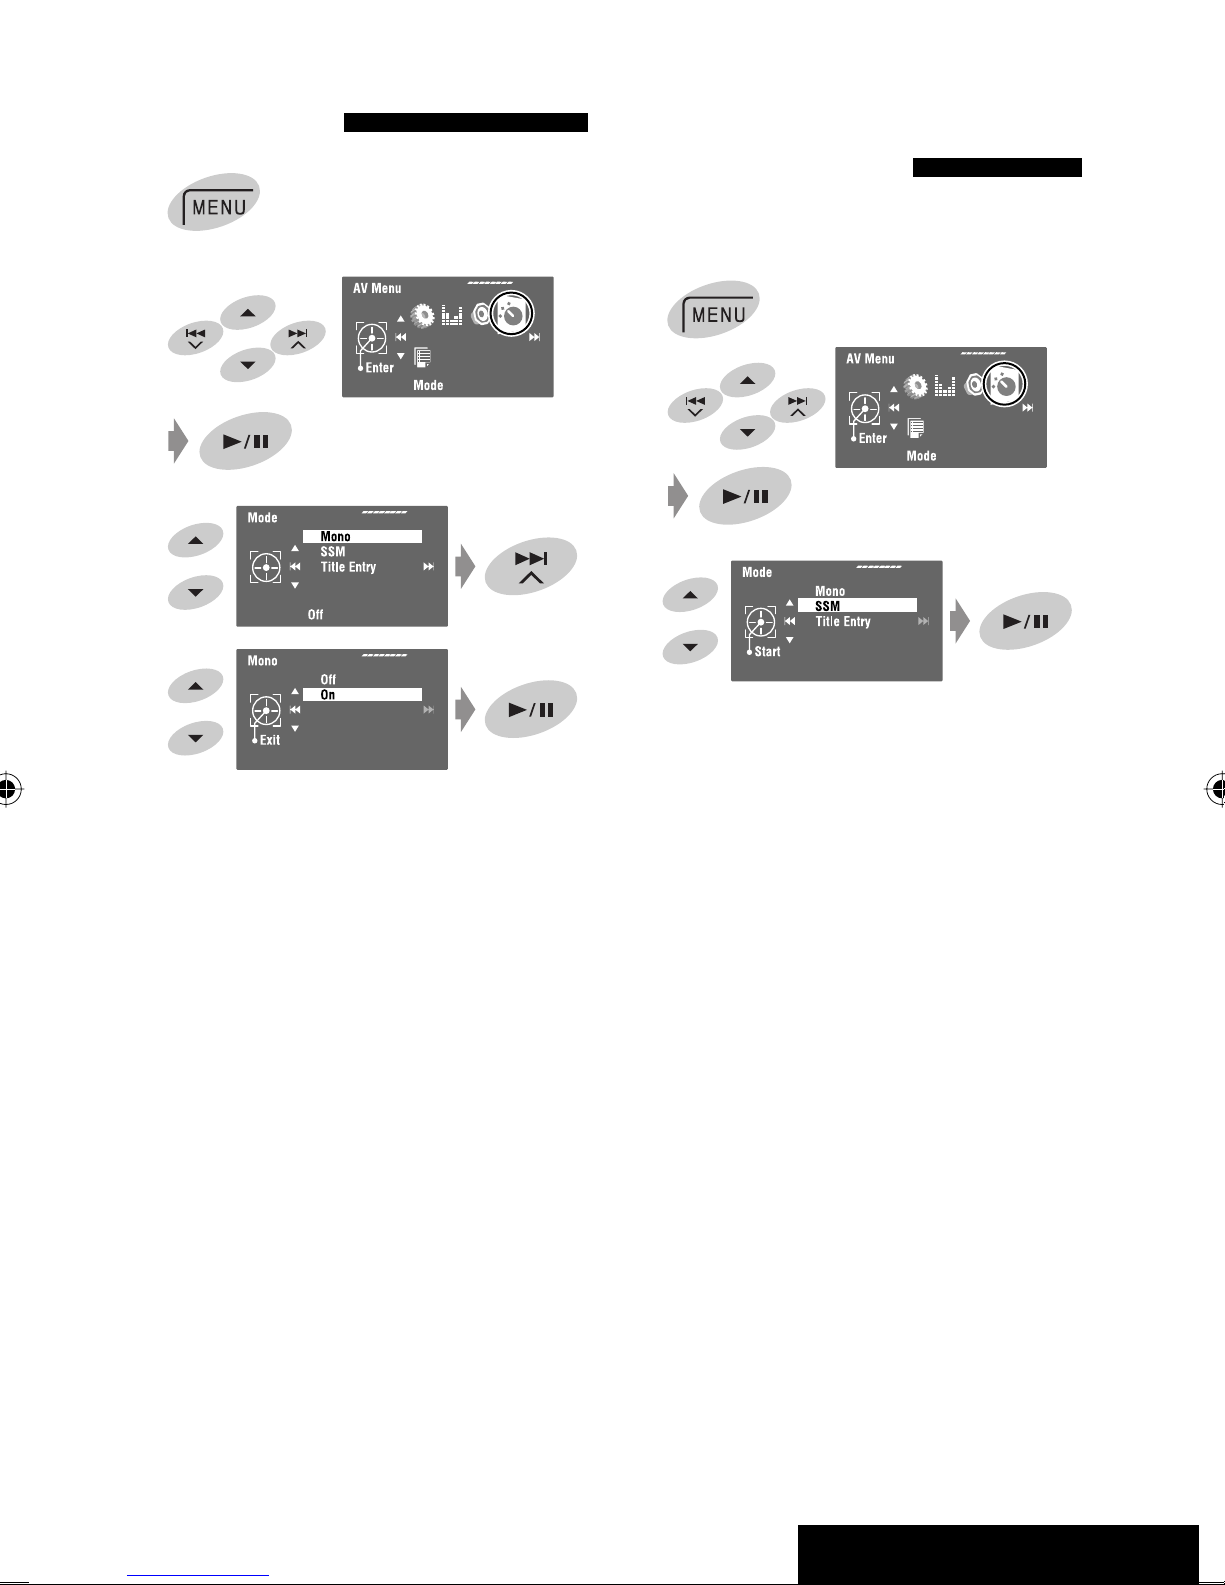
When an FM stereo broadcast is
FM station automatic presetting
hard to receive
1
2
3
4
—SSM (Strong-station
Sequential Memory)
This function works only for FM bands.
You can preset six stations for each band.
1
2
3
Reception improves, but the stereo effect will be
lost.
• The MO indicator lights up.
To restore the stereo effect, select <Off> in step 4.
Local FM stations with the strongest signals are
searched and stored automatically in the FM band.
13
OPERATIONS
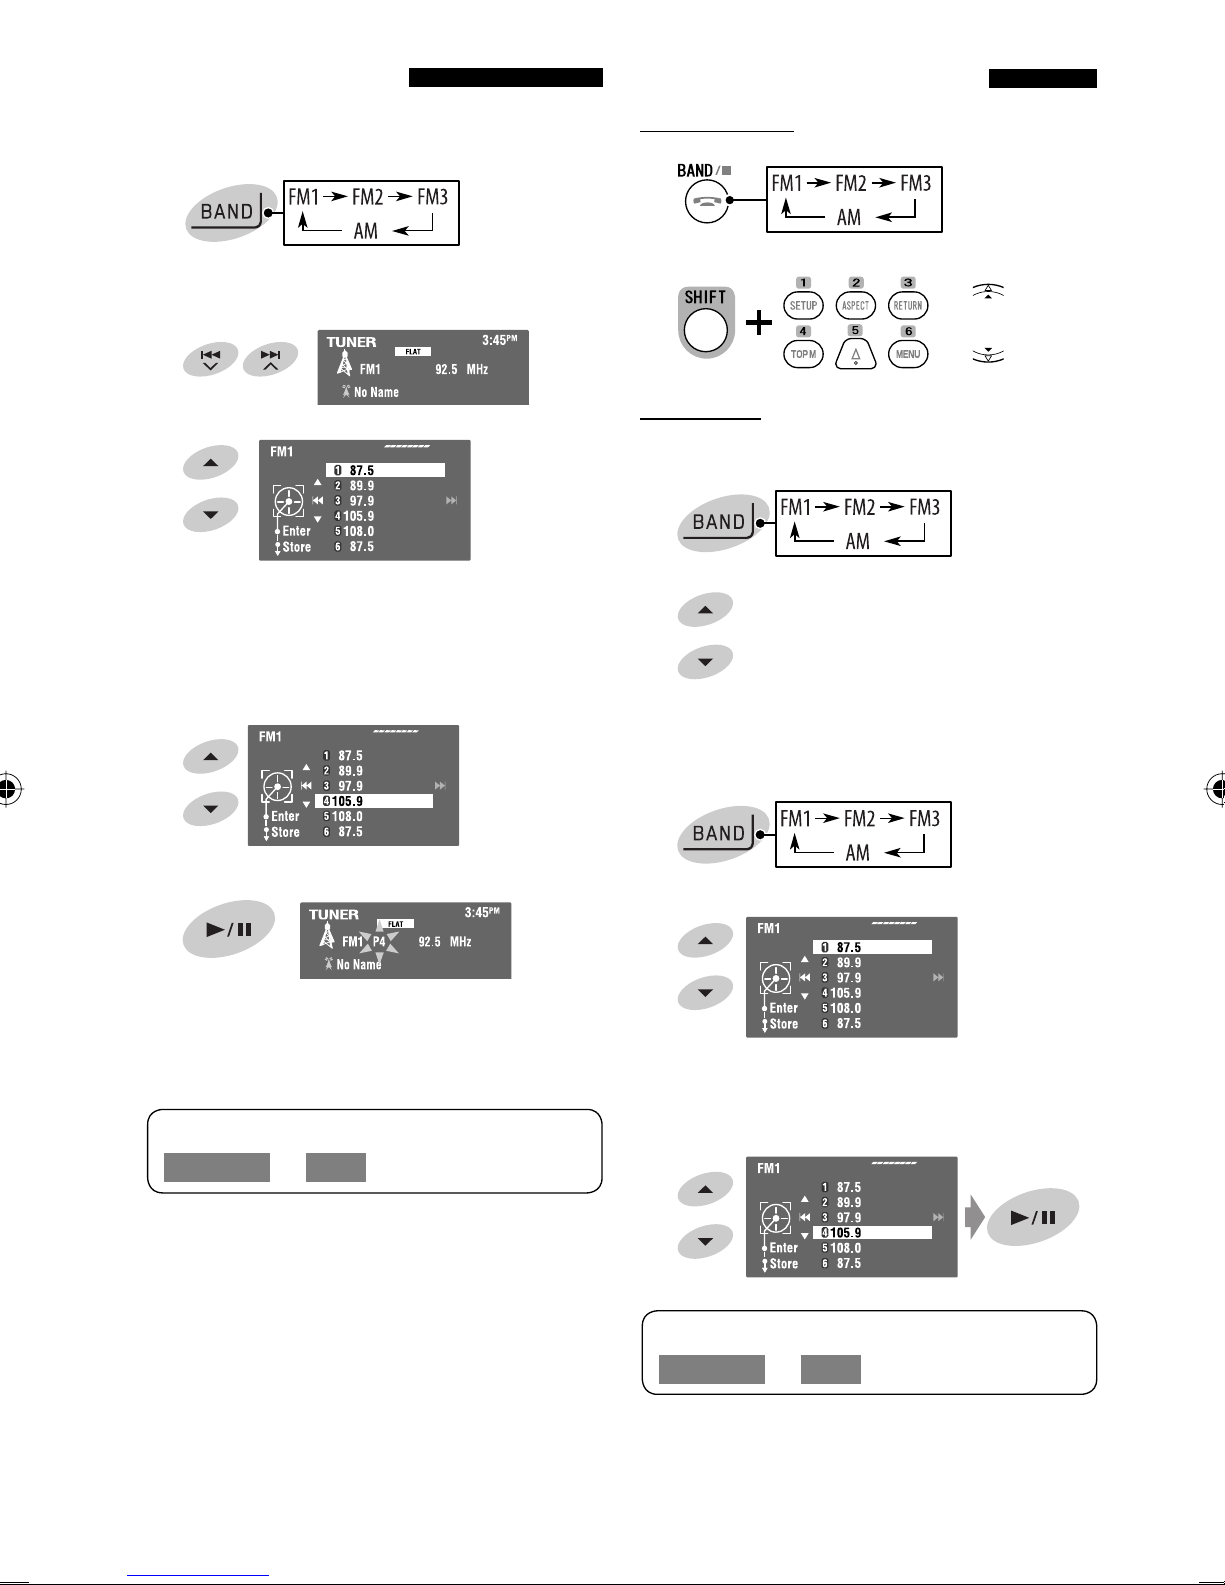
Manual presetting
Selecting preset stations
Ex.: Storing the FM station of 92.5 MHz into preset
number 4 of the FM1 band.
1
2
Tune in to a station you want to preset.
3
[Hold]
The Preset List appears.
• For FM: Each time you hold 5 / ∞ , you can
change the bands.
On the remote:
1
2
or
On the unit:
To select directly
1
2
4 Select a preset number.
5 Store the station.
[Hold]
The station selected in step 2 is now stored in
preset number 4.
The Preset List can also be accessed through
<AV Menu> = <List>.
To select from the Preset List
1
2
[Hold]
• For FM: Each time you hold 5 / ∞ , you can
change the bands.
3 Select the preset number.
The Preset List can also be accessed through
<AV Menu> = <List>.
14
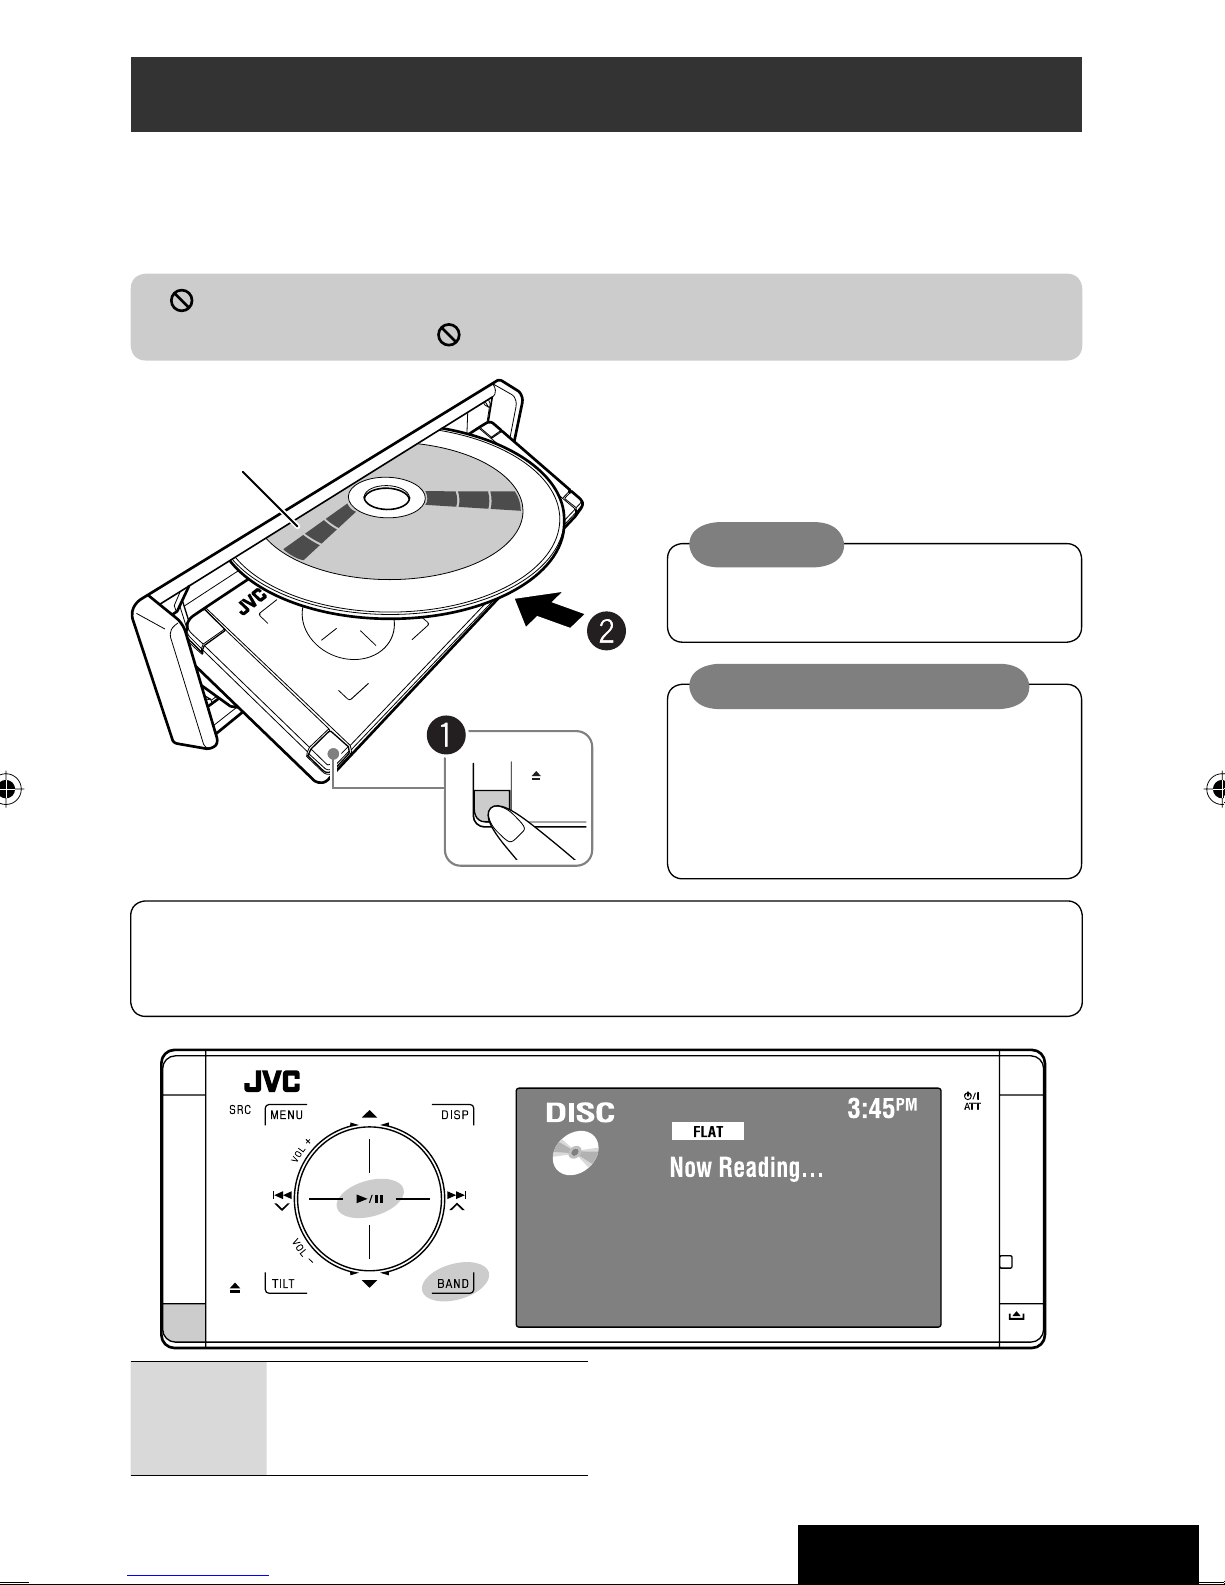
Disc operations
The disc type is automatically detected, and playback starts automatically (for some discs: automatic start depends
on its internal program).
If a disc does not have any disc menu, all tracks in it will be played repeatedly until you change the source or eject the
disc.
If “ ” appears on the monitor, the unit cannot accept the operation you have tried to do.
• In some cases, without showing “ ,” operations will not be accepted.
~ Open the front panel.
Label side
Ÿ Insert the disc.
Playback starts automatically.
Caution:
Do not place your finger behind the control
panel.
Caution on volume setting:
Discs and connected USB devices produce
very little noise compared with other sources.
Lower the volume before playing a disc to
avoid damaging the speakers by the sudden
increase of the output level.
When playing back a multi-channel encoded disc, the multi-channel signals are downmixed.
• You can fully enjoy multi-channel sound by connecting an amplifier or a decoder compatible with these
multi-channel sources. (☞ also page 52)
0: Ejects the disc.
3/8: Starts and pauses playback.
BAND: Stops playback.
15
OPERATIONS
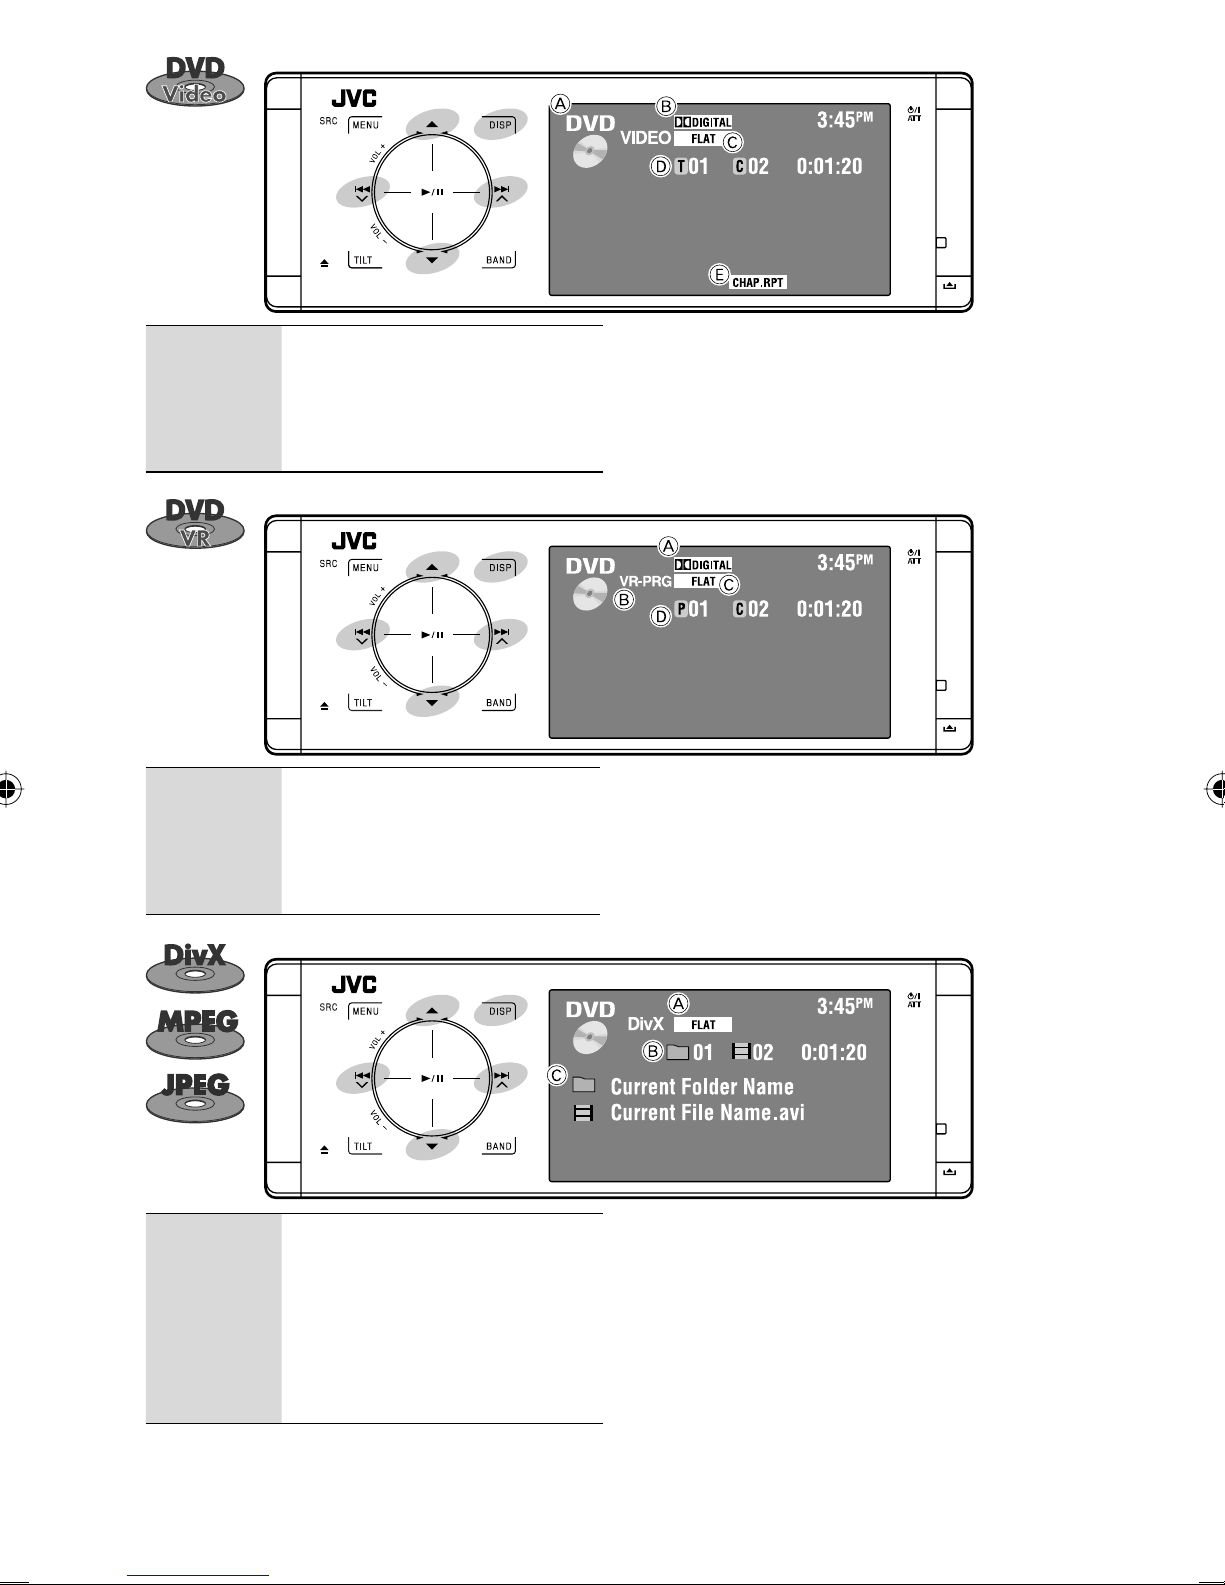
4 ¢: Touch: Selects chapter.
Hold: Reverse/forward search*
5 ∞: Selects title.
DISP:
Touch if necessary (☞ page 9).
A Disc type
1
B Audio format
C Sound mode (
D Title no./Chapter no./Playing time
E Playback mode (
☞ page 37)
☞ page 18)
4 ¢: Touch: Selects chapter.
Hold: Reverse/forward search*
1
5 ∞: Selects program no./Play List no.
DISP:
Touch if necessary (☞ page 9).
4 ¢: Touch: Selects track.
Hold: Reverse/forward search for
DivX/MPEG*
2
5 ∞: Touch: Selects folder.
Hold: Displays Folder List.
A Audio format
B VR-PRG: Original program
VR-PL: Play List
C Sound mode (
D Program no. (or Play List no.)/Chapter no./Playing time
A Sound mode (☞ page 37)
B For DivX/MPEG: Folder no./Track no./Playing time
For JPEG: Folder no./File no.
C Current folder name/current file name
☞ page 37)
DISP:
Touch if necessary (☞ page 9).
*1 Search speed: x2 ] x10
*2 Search speed: ¡1 ] ¡2
16
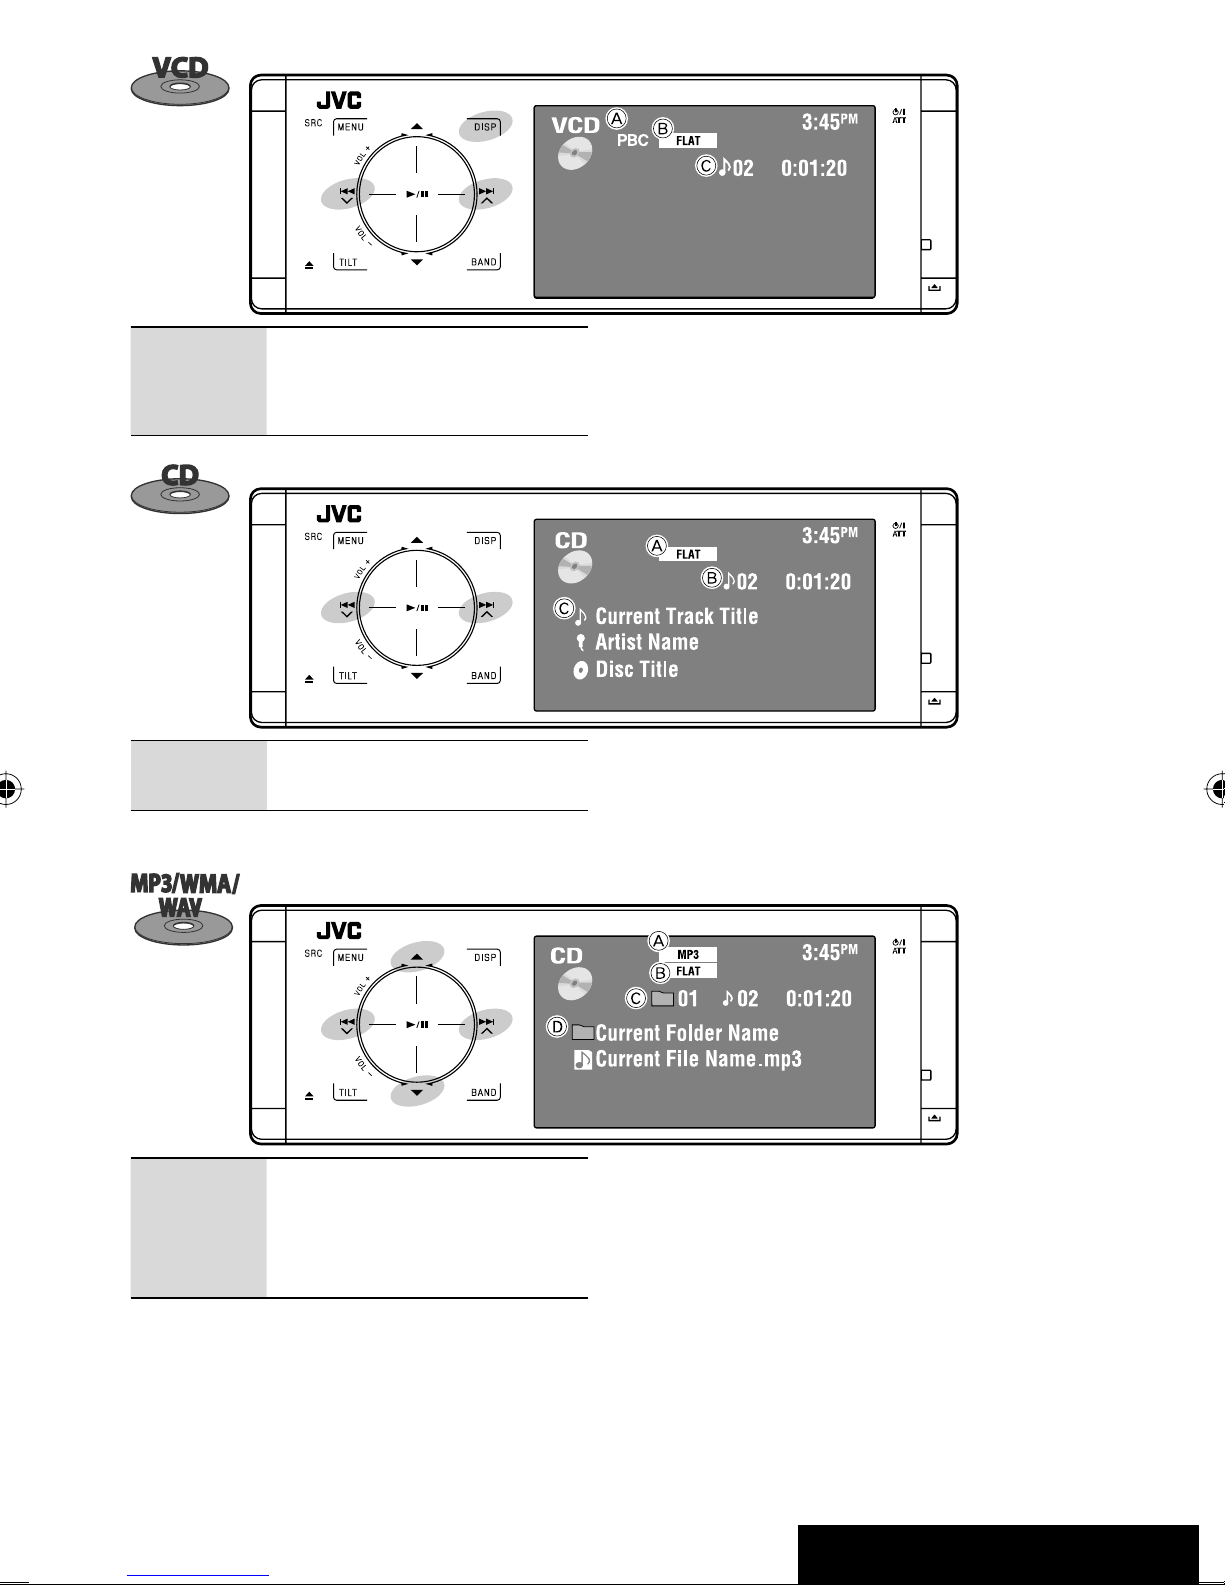
4 ¢: Touch: Selects track.
Hold: Reverse/forward search*
DISP:
Touch if necessary (☞ page 9).
A PBC indicator lights up when PBC is in use.
1
B Sound mode (
C Track no./Playing time
☞ page 37)
4 ¢: Touch: Selects track.
Hold: Reverse/forward search*
4 ¢: Touch: Selects track.
Hold: Reverse/forward search*
5 ∞: Touch: Selects folder.
Hold: Displays Folder List.
A Sound mode (☞ page 37)
1
1
B Track no./Playing time
C Track title/Artist Name/Disc title
A Audio format (MP3/WMA/WAV)
B Sound mode (
C Folder no./Track no./Playing time
D Current folder name/current file name
☞ page 37)
2
*
3
*
1
Search speed: x2 ] x10
*
*2 “No Name” appears for conventional CDs.
*3 Tag data will be shown instead of folder/file names
when they are recorded and <Tag Display> is set to
<On>. (☞ page 39)
17
OPERATIONS
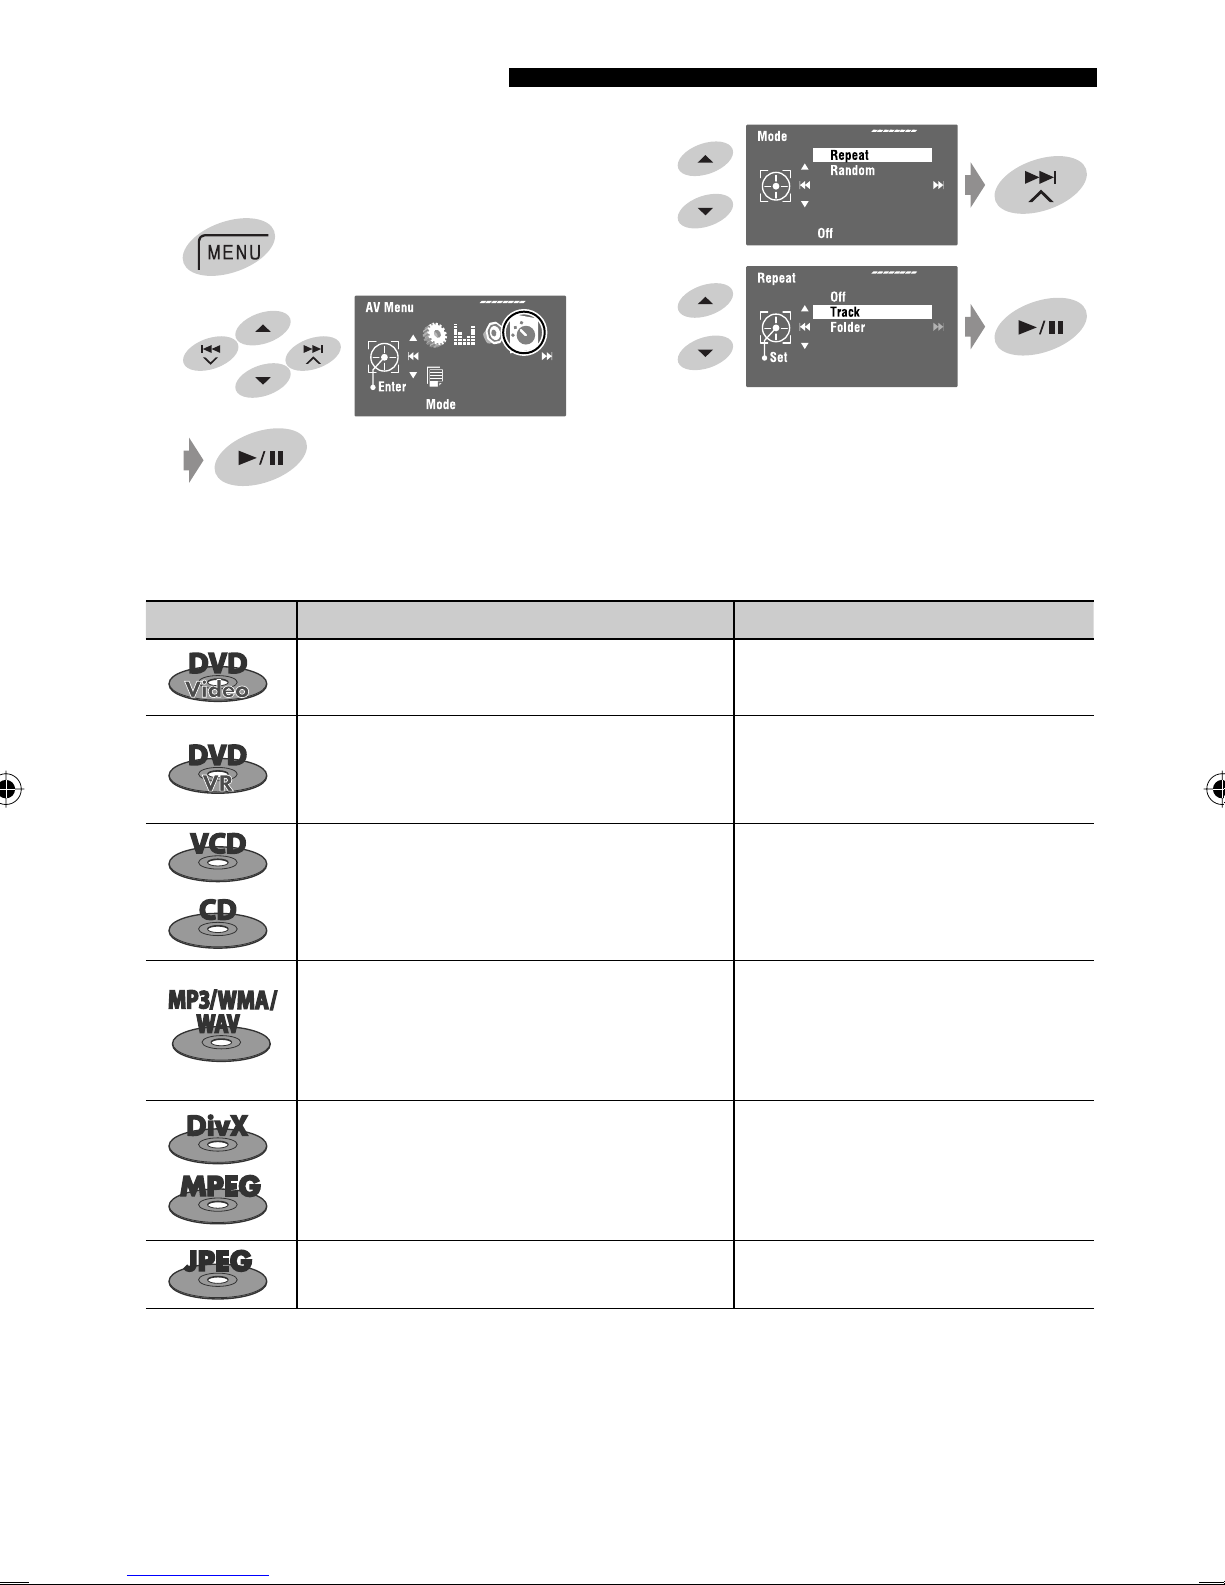
Selecting playback modes
You can use Repeat or Random playback mode.
Ex.: To select Track Repeat
3
1
4
2
When one of the playback modes is selected, the
corresponding indicator lights up on the source
information screen.
To cancel, select <Off> in step 4.
Disc type Repeat Random
Chapter: Repeats current chapter.
Title: Repeats current title.
—
Chapter: Repeats current chapter.
Program: Repeats current program (not available
for Playlist playback).
Track: Repeats current track (for VCD: PBC not
in use).
Track: Repeats current track. Folder: Randomly plays all tracks of
Folder: Repeats all tracks of the current folder. Disc (All): Randomly plays all tracks.
Track: Repeats current track. Folder: Randomly plays all tracks of
Folder: Repeats all tracks of the current folder. Disc (All): Randomly plays all tracks.
Folder: Repeats all tracks of the current folder.
Disc (All): Randomly plays all tracks (for
VCD: PBC not in use).
current folder, then tracks of
next folders.
current folder, then tracks of
next folders.
—
—
18
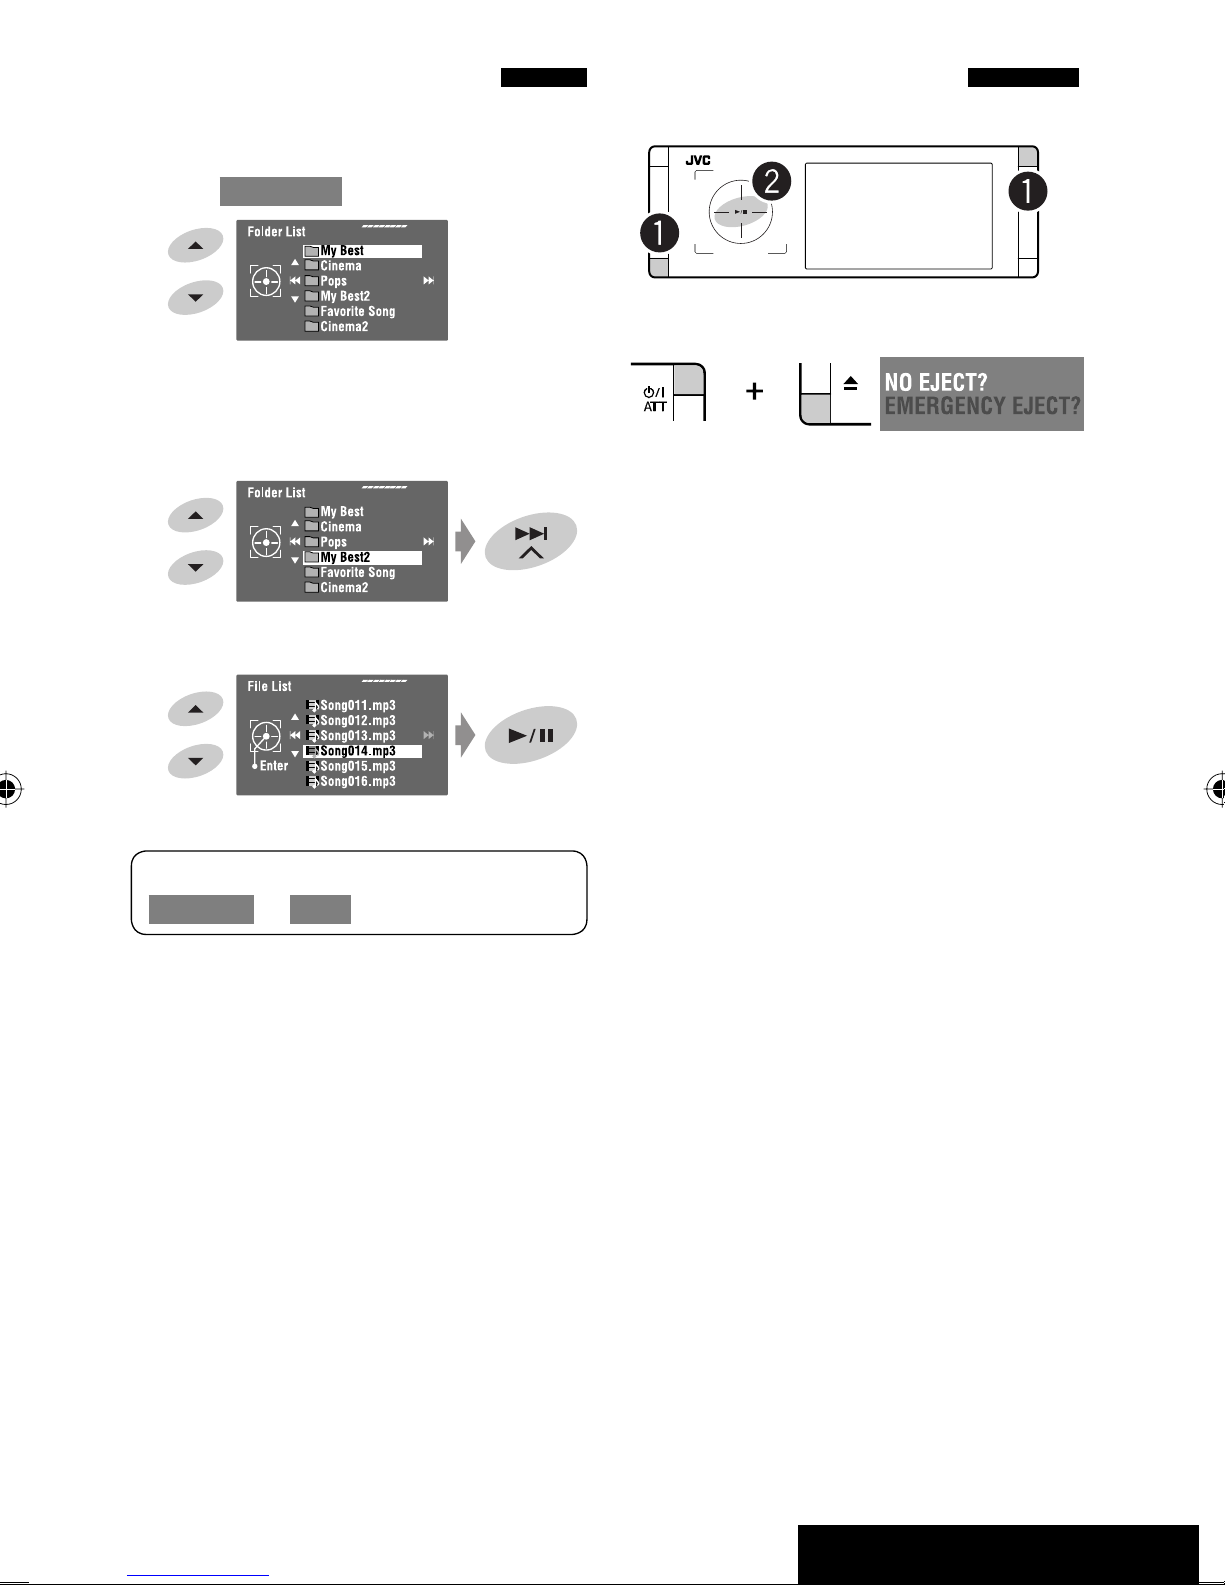
Selecting tracks on the list
Prohibiting disc ejection
If a disc includes folders, you can display the Folder/
Track (File) Lists, then start playback.
1 Enter <Folder List>.
[Hold]
• Hold the button to display the next/previous
folders.
2 Select a folder.
3 Select a file.
You can lock a disc in the loading slot.
~ Hold the buttons at the same time.
[Hold]
Ÿ Activate the prohibition.
“No Eject” appears.
To cancel the prohibition, repeat the same procedure
to select <EJECT OK?>.
The Folder List can also be accessed through
<AV Menu> = <List>.
19
OPERATIONS
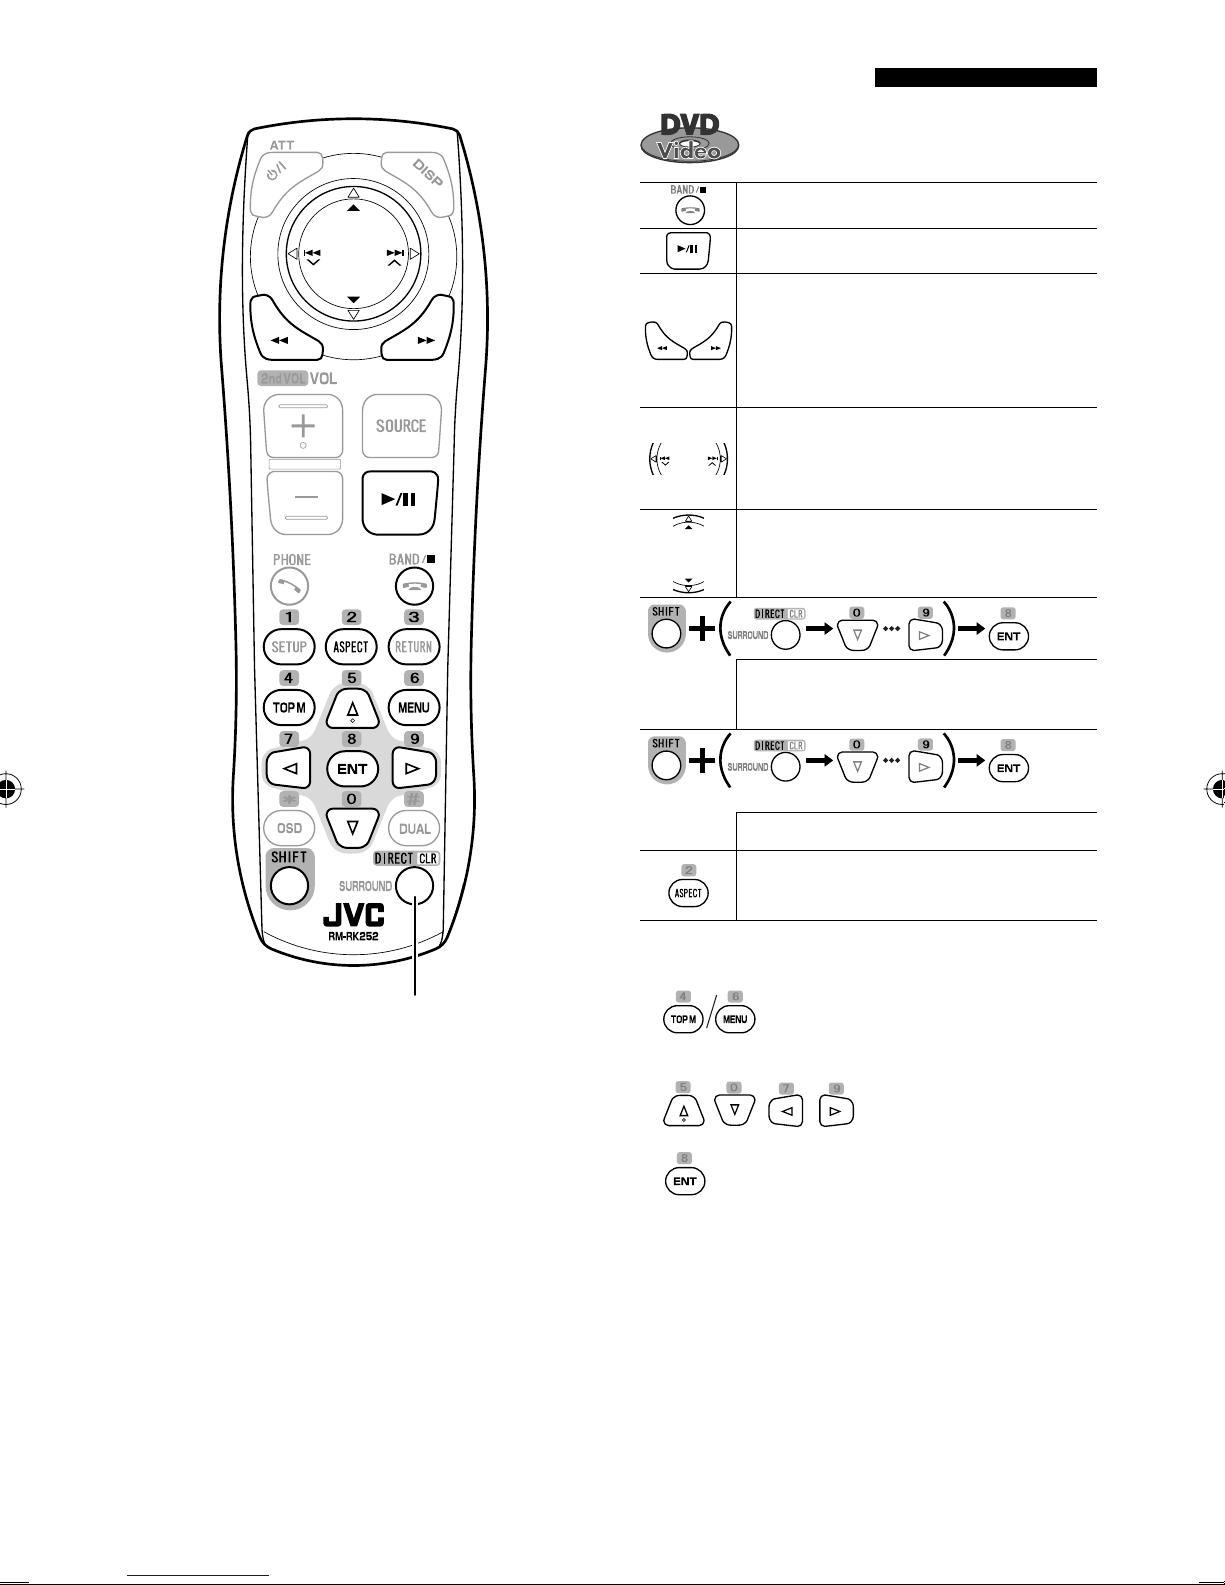
Operations using the remote controller—RM-RK252
Stops playback.
Starts or pauses playback.
• Reverse/forward search*1 (No sound
can be heard.)
• Slow motion*2 during pause. (No sound
can be heard.)
• Selects chapter (during playback or
pause).
• Reverse/forward search*
Selects title (during playback or pause).
3
[Hold]
Also functions as CLR (clear):
Erases a misentry if pressed while
holding SHIFT.
• Selects chapter.
• Selects title (when not playing).
[Twice]
Selects title (during playback or pause).
Changes the aspect ratio of the playback
pictures.
Using menu driven features
1.
2. Select an item you want to start playback.
3.
20
 Loading...