

Page 1
COMPACT COMPONENT SYSTEM
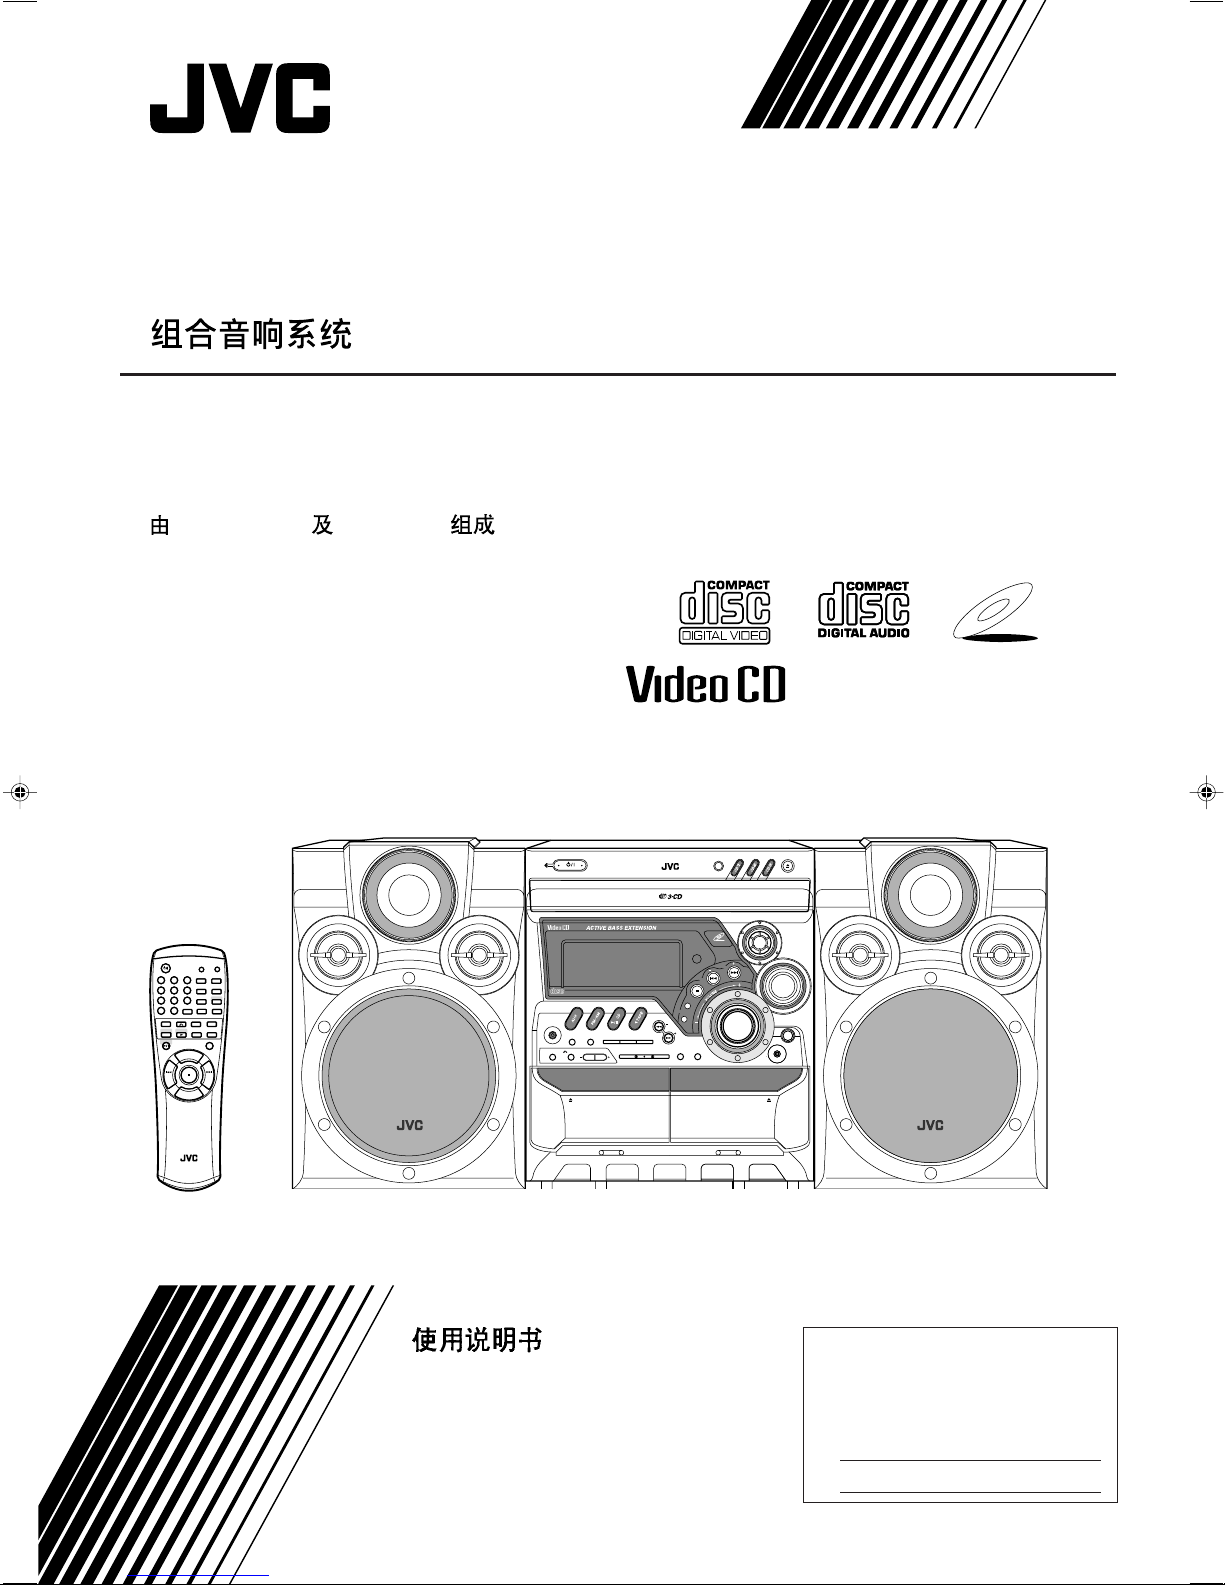
MX-K55V
Consists of CA-MXK55V and SP-MXK55
CA-MXK55V
SP-MXK55
STANDBY/ON
12
456
78
+10
10
RETURNSLEEP
TAPE
FM/AM
CD
/
SELECT
PREV.
RM–SMXK55V REMOTE CONTROL
FM MODE/
STILL
VOLUME
VOLUME
ACTIVE BASS
EX. LEVEL
3
9
KARAOKE ECHO
TAPE A/B
+
–
MPX
KEY CONTROL
I
DISC SKIP
PlayBack
VIDEO CD
Control
SP-MXK55
SOUND
MODE
V. INTROON SCREEN
SLOWHIGHLIGHT
AUX
i
FADE
MUTING
NEXT
STANDBY
STANDBY/ON
NTSC/PAL COMPATIBILITY
COMPACT
COMPACT COMPONENT SYSTEM
DIGITAL AUDIO
PHONES
CLOCK
/
TIMER
PBC
RETURN
A
DISPLAY
VCD NUMBER
EJECT
PLAY
CA-MXK55V
DISC CHANGE
PLAY & EXCHANGE
VIDEO CD
PREV
MX -K55V
SET
CANCEL
/DEMO
TUNING
SELECT
REPEAT PROGRAM
RANDOM
REC START
TAPE A
TAPE B
DUBBING
/STOPCDREC START
FULL - LOGIC CONTROL
CD SYNCHRO RECORDING
CD-R/RW PLAYBACK
SOUND
MODE
ACTIVE BASS
PRESET
EX. LEVEL
NEXT
MIC LEVEL
MIN MAX
EJECT
REC/PLAY
B
SP-MXK55
MIC
INSTRUCTIONS
For Customer Use:
Enter below the Model No. and Serial
No. which are located either on the rear,
bottom or side of the cabinet. Retain this
information for future reference.
Model No.
Serial No.
LVT0699 -001A
[US]
Page 2
Warnings, Cautions and Others
Caution –– switch!
Disconnect the mains plug to shut the power off completely. The switch in any position does not disconnect the mains line. The power can be remote controlled.
– G-1 –
Page 3
CAUTION
To reduce the risk of electrical shocks, fire, etc.:
1. Do not remove screws, covers or cabinet.
2. Do not expose this appliance to rain or moisture.
CAUTION
• Do not block the ventilation openings or holes.
(If the ventilation openings or holes are blocked by a
newspaper or cloth, etc., the heat may not be able to
get out.)
• Do not place any naked flame sources, such as
lighted candles, on the apparatus.
• When discarding batteries, environmental problems
must be considered and local rules or laws governing
the disposal of these batteries must be followed
strictly.
• Do not use this apparatus in a bathroom or places
with water. Also do not place any containers filled with
water or liquids (such as cosmetics or medicines,
flower vases, potted plants, cups, etc.) on top of this
apparatus.
– G-2 –
Page 4
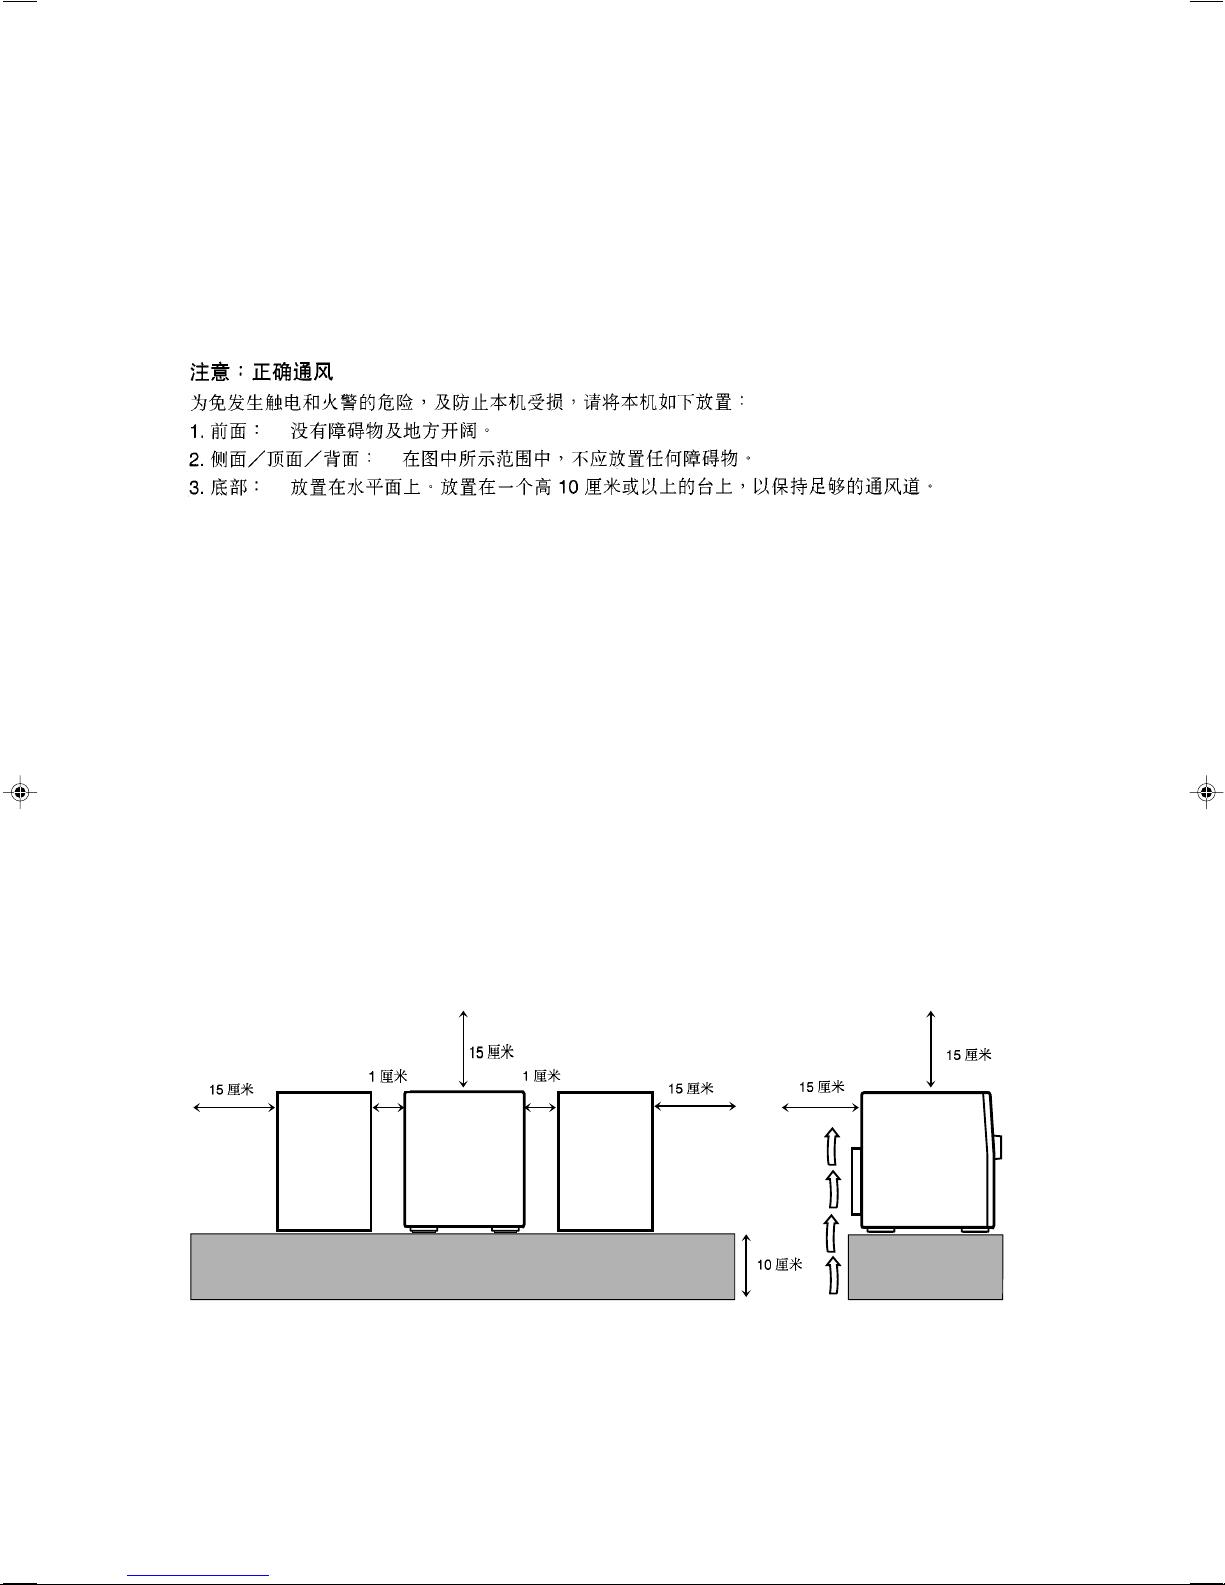
Caution: Proper Ventilation
To avoid risk of electric shock and fire, and to prevent damage, locate the apparatus as follows:
1 Front: No obstructions and open spacing.
2 Sides/ Top/ Back: No obstructions should be placed in the areas shown by the dimensions below.
3 Bottom: Place on the level surface. Maintain an adequate air path for ventilation by placing on a stand
with a height of 10 cm or more.
15 cm
1 cm
SP-MXK55 SP-MXK55
15 cm
1 cm
– G-3 –
15 cm
15 cm
15 cm
CA-MXK55V CA-MXK55V
10 cm
Page 5
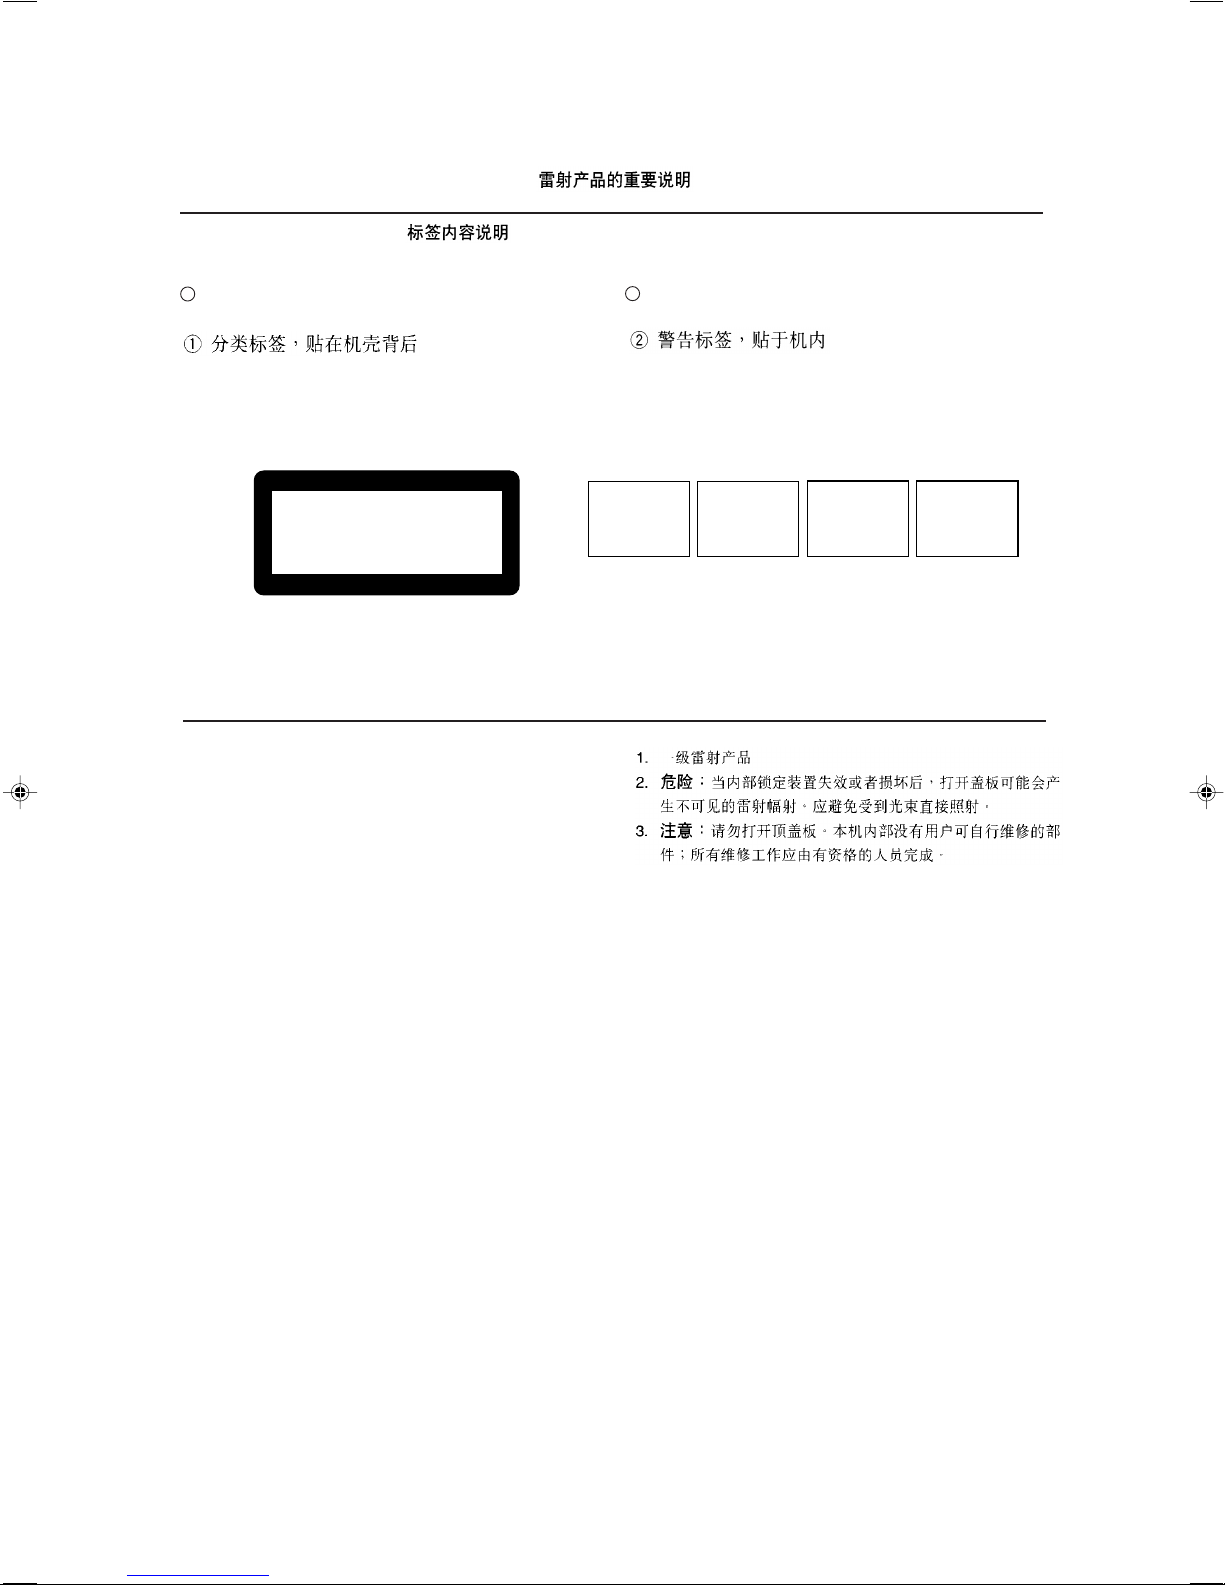
IMPORTANT FOR LASER PRODUCTS / /
REPRODUCTION OF LABELS /
1 CLASSIFICATION LABEL, PLACED ON REAR
ENCLOSURE
CLASS 1
LASER PRODUCT
1. CLASS 1 LASER PRODUCT
2. DANGER: Invisible laser radiation when open and interlock
failed or defeated. Avoid direct exposure to beam.
3. CAUTION: Do not open the top cover. There are no user
serviceable parts inside the Unit; leave all servicing to qualified service personnel.
2 WARNING LABEL, PLACED INSIDE THE UNIT
DANGER: Invisible laser
radiation when open and
interlock failed or defeated.
AVOID DIRECT EXPOSURE
TO BEAM. (e)
VARNING: Osynlig laserstrålning när denna del är
öppnad och spärren är
urkopplad. Betrakta ej
strålen. (s)
ADVARSEL: Usynlig laserstråling ved åbning, når
sikkerhedsafbrydere er ude
af funktion. Undgå udsættelse for stråling (d)
VARO: Avattaessa ja suojalukitus ohitettaessa olet
alttiina näkymättömälle
lasersäteilylle. Älä katso
säteeseen. (f)
– G-4 –
Page 6
Introduction
English
We would like to thank you for purchasing one of our JVC products.
Before operating this unit, read this manual carefully and thoroughly to
obtain the best possible performance from your unit, and retain this manual
for future reference.
About This Manual
This manual is organized as follows:
• The manual mainly explains operations using the
buttons and controls on the unit. You can also use the
buttons on the remote control if they have the same or
similar names (or marks) as those on the unit.
If operation using the remote control is different from
that using the unit, it is then explained.
• Basic and common information that is the same for many
functions is grouped in one place, and is not repeated in
each procedure. For instance, we do not repeat the
information about turning on/off the unit, setting the
volume, changing the sound effects, and others, which are
explained in the section “Common Operations” on pages 9
to 11.
• The following marks are used in this manual:
Gives you warnings and cautions to prevent
damage or risk of fire/electric shock.
Also gives you information which is not good
for obtaining the best possible performance
from the unit.
Gives you information and hints you had better
know.
Power sources
• When unplugging from the wall outlet, always pull the
plug, not the AC power cord.
DO NOT handle the AC power cord with wet
hands.
Moisture condensation
Moisture may condense on the lens inside the unit in the
following cases:
• After starting heating in the room
• In a damp room
• If the unit is brought directly from a cold to a warm place
Should this occur, the unit may malfunction. In this case,
leave the unit turned on for a few hours until the moisture
evaporates, unplug the AC power cord, and then plug it in
again.
Others
• Should any metallic object or liquid fall into the unit,
unplug the unit and consult your dealer before operating
any further.
• If you are not going to operate the unit for an extended
period of time, unplug the AC power cord from the wall
outlet.
Precautions
Installation
• Install in a place which is level, dry and neither too hot nor
too cold — between 5˚C (41˚F) and 35˚C (95˚F).
• Install the unit in a location with adequate ventilation to
prevent internal heat built-up in the unit.
• Leave sufficient distance between the unit and the TV.
• Keep the speakers away from the TV to avoid interference
with TV.
DO NOT install the unit in a location near heat
sources, or in a place subject to direct sunlight,
excessive dust or vibration.
DO NOT disassemble the unit since there are no
user serviceable parts inside.
If anything goes wrong, unplug the AC power cord and
consult your dealer.
– 1 –
Page 7

Contents
English
Location of the Buttons and Controls....................... 3
Front Panel ................................................................. 3
Remote Control .......................................................... 5
Getting Started............................................................ 6
Unpacking .................................................................. 6
Putting the Batteries into the Remote Control ........... 6
Connecting Antennas ................................................. 6
Connecting Speakers .................................................. 7
Connecting Other Equipment..................................... 8
Adjusting the Voltage Selector ................................... 8
Cancelling the Display Demonstration ...................... 8
Common Operations .................................................. 9
Turning On or Of f the Power ....................................... 9
Setting the Clock ........................................................ 9
Selecting the Sources................................................. 10
Setting the AM Tuner Interval Spacing.................... 10
Adjusting the Volume ............................................... 10
Reinforcing the Bass Sound ..................................... 11
Selecting the Sound Modes ...................................... 11
Listening to FM and AM Broadcasts...................... 12
Tuning in a Station ................................................... 12
Presetting Stations .................................................... 12
Tuning in a Preset Station ........................................ 12
Playing Back Tapes ................................................... 20
Playing Back a Tape ................................................. 20
Recording .................................................................. 21
Recording a Tape on Deck B.................................... 21
Dubbing Tapes.......................................................... 22
CD Synchronized Recording ..................................... 22
Using the Microphones............................................. 23
Singing Along (Karaoke) ......................................... 23
Microphone Mixing ................................................. 23
Using Multiplex Discs
— Multiplex Sound (MPX)................................ 24
Adjusting Key Control ............................................. 24
Using the Timers....................................................... 25
Using Daily Timer.................................................... 25
Using Recording Timer............................................ 26
Using Sleep Timer.................................................... 27
Timer Priority........................................................... 27
Maintenance .............................................................. 28
Troubleshooting ........................................................ 29
Specifications............................................................. 30
Playing Back Discs.................................................... 13
Loading Discs........................................................... 13
Playing Back the Entire Discs
— Continuous Play............................................. 13
Basic Disc Operations .............................................. 14
Programming the Playing Order of the Tracks
— Program Play ................................................. 14
Playing at Random — Random Play ....................... 15
Repeating Tracks or Discs — Repeat Play .............. 15
Prohibiting Disc Ejection — Tray Lock................... 15
Playing Video CDs ................................................... 16
Special Plays for Video CDs .................................... 16
Playing Video CDs with PBC Function ................... 18
– 2 –
Page 8
Location of the Buttons and Controls
English
Become familiar with the buttons and controls on your unit.
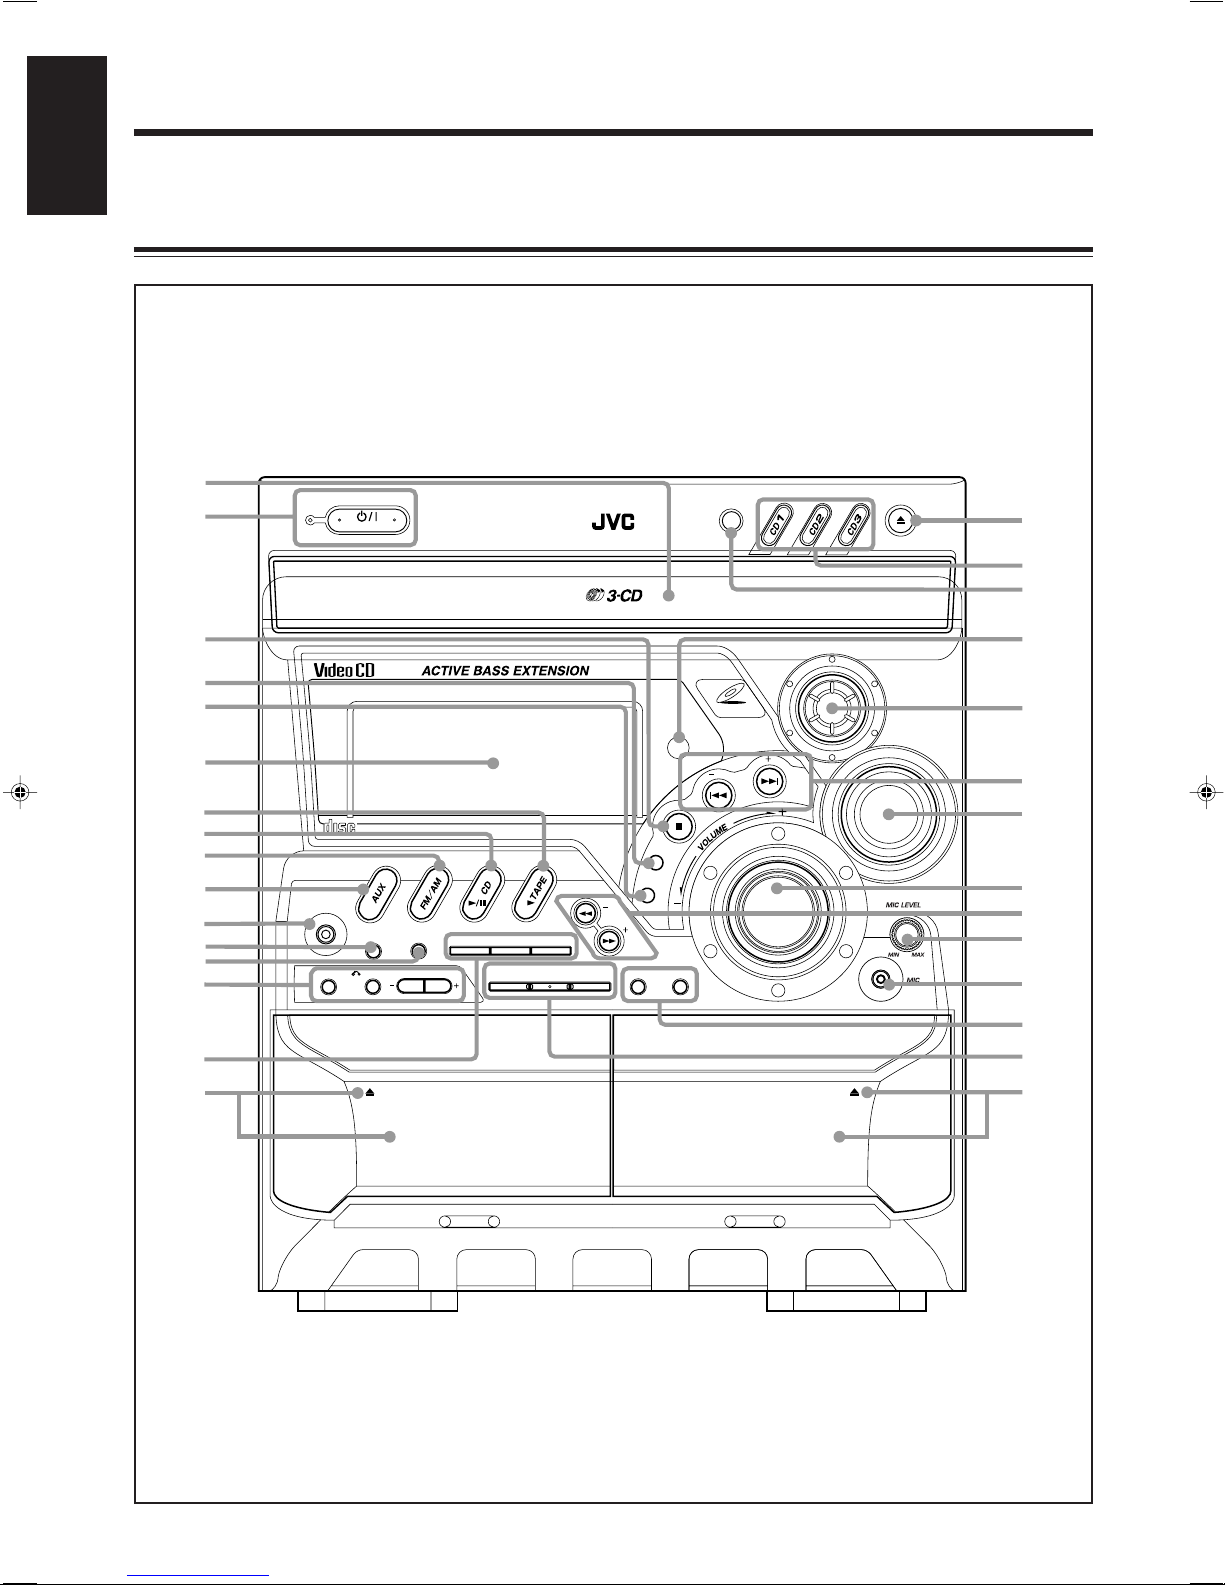
Front Panel
1
2
3
4
5
6
7
8
9
p
q
w
e
r
t
y
STANDBY
STANDBY/ON
NTSC/PAL COMPATIBILITY
COMPACT
COMPACT COMPONENT SYSTEM
DIGITAL AUDIO
PHONES
CLOCK
/
TIMER
PBC
RETURN
EJECT
DISPLAY
VCD NUMBER
SELECT
REPEAT PROGRAM
REC START
/STOPCDREC START
MX-K55V
RANDOM
PLAY & EXCHANGE
TUNING
DUBBING
CANCEL
TAPE A
/DEMO
DISC CHANGE
u
i
CD-R/RW PLAYBACK
o
;
SOUND
MODE
PREV.
VIDEO CD
PRESET
NEXT
ACTIVE BASS
EX. LEVEL
a
s
d
SET
f
g
h
TAPE B
j
k
l
EJECT
/
PLAY
A
FULL - LOGIC CONTROL
CD SYNCHRO RECORDING
– 3 –
REC/PLAY
B
Page 9
Continued
English
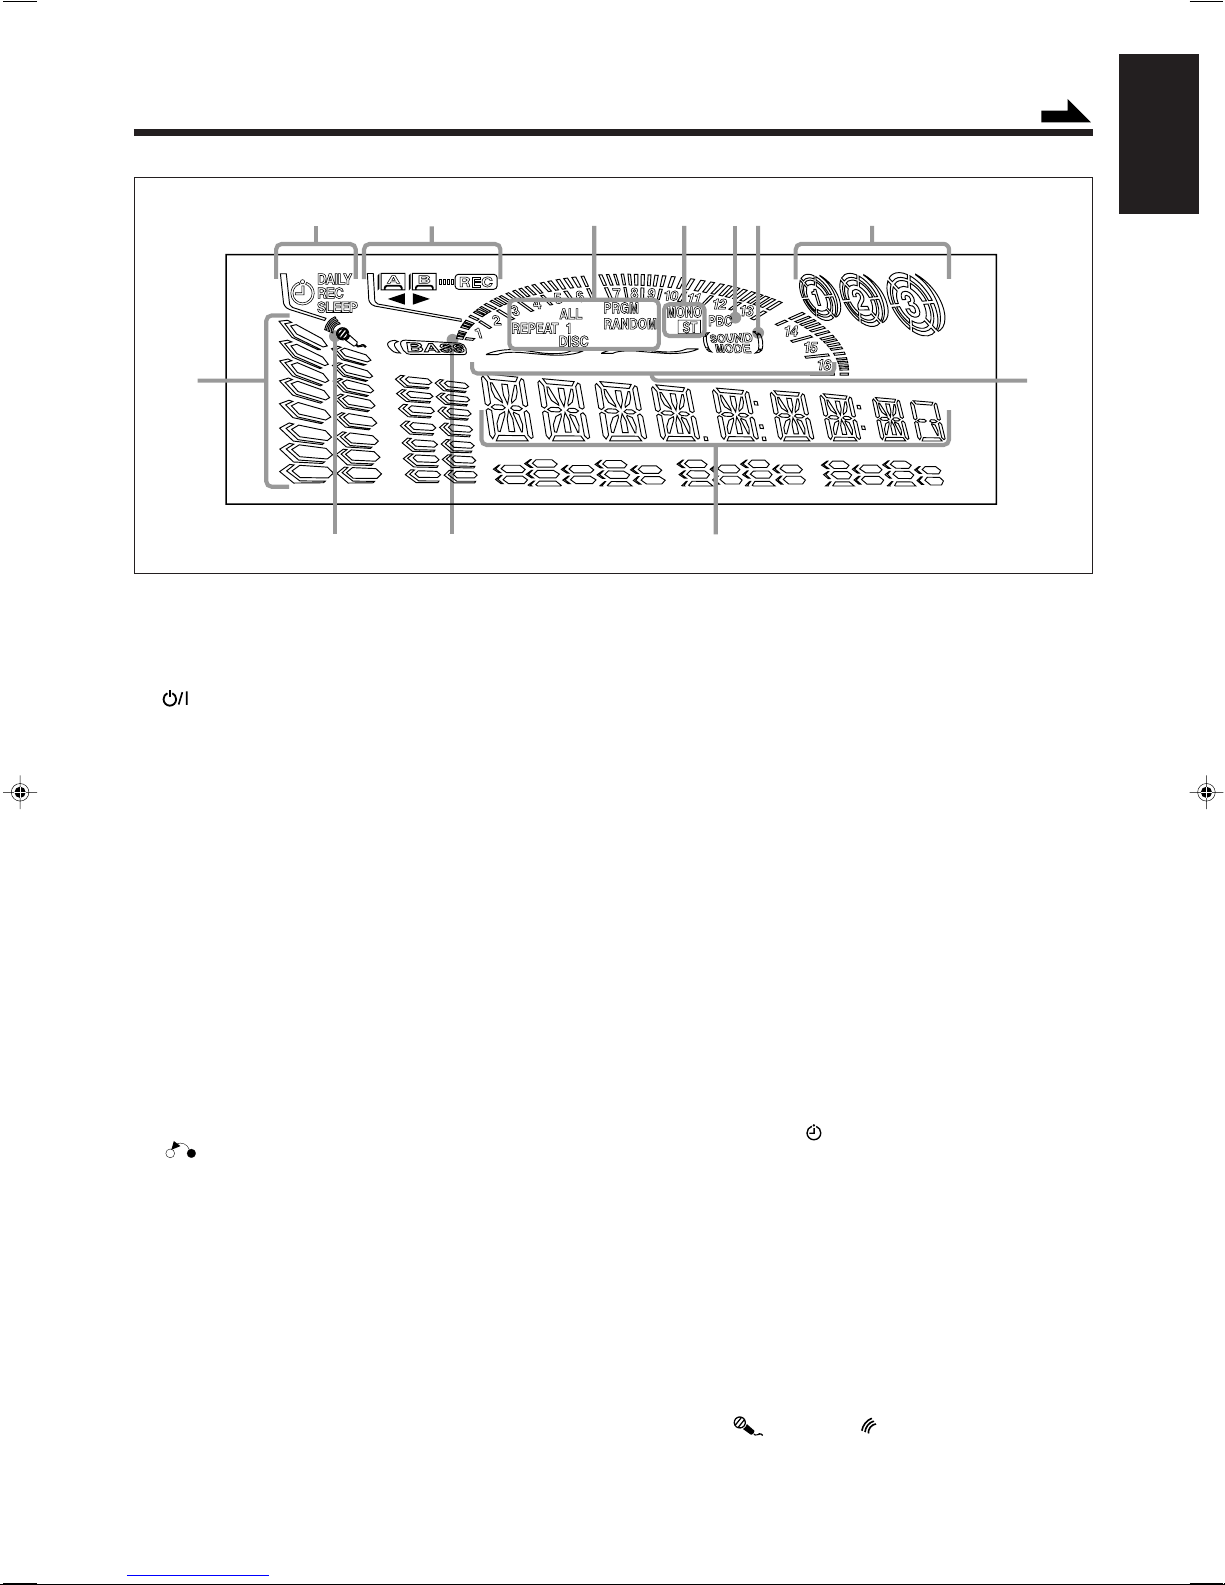
Display Window
1
8
9
See pages in the parentheses for details.
Front Panel
1 Carrousel
2 STANDBY/ON button and STANDBY lamp
(9, 26, 27)
3 7 (stop) button (13 – 23)
4 SET button (9, 12, 14, 25 – 27)
5 CANCEL button (9, 15, 25, 26)
DEMO button (8)
6 Display window
7 TAPE 3 button and lamp (10, 20, 22)
Pressing this button also turns on the unit.
8 CD 6 (play/pause) button and lamp (10, 13 – 15)
Pressing this button also turns on the unit.
SELECT button (18, 19)
9 FM/AM button and lamp (10, 12)
Pressing this button also turns on the unit.
p AUX button and lamp (10)
Pressing this button also turns on the unit.
q PHONES jack (10)
w CLOCK/TIMER button (9, 25 – 27)
e DISPLAY button (9)
r PBC button (18, 19)
RETURN button (18, 19)
VCD NUMBER + / – buttons (18, 19)
t REPEAT button (15)
PROGRAM button (14)
RANDOM button (15)
y Deck A cassette holder (20, 22)
• Pressing the 0 EJECT portion opens the holder.
u 0 (Carrousel open/close) button (13 – 16)
Pressing this button also turns on the unit.
i Disc number buttons and lamps (CD1, CD2, and CD3)
(13, 14, 17 – 19, 22)
Pressing one of these buttons also turns on the unit.
o DISC CHANGE button (13, 14)
; Remote sensor
a SOUND MODE control (11)
2
p
3
4
5
6
7
q
s PRESET + / – buttons (12)
4 / ¢ (reverse search/forward search) buttons
(9, 14, 16, 25 – 27)
PREV. (previous) / NEXT buttons (18, 19)
d ACTIVE BASS EX. LEVEL control (11)
f VOLUME control (10)
g TUNING + / – buttons (12)
1 / ¡ (fast rewind/fast forward) buttons
(10, 14, 16, 20)
h MIC LEVEL control (23)
j MIC jack (23)
k TAPE A button (16, 20)
• This button also functions as NTSC/PAL button.
TAPE B button (20)
l REC START/STOP button (21)
CD REC START button (22)
DUBBING button (22)
/ Deck B cassette holder (20 – 22)
• Pressing the EJECT 0 portion opens the holder.
Display window
1 Timer indicators
• DAILY (daily timer), REC (recording timer), SLEEP
(sleep timer), and (timer) indicators
2 Tape operation indicators
• A/B (operating deck), REC (recording), and 2 3 (tape
running) indicators
3 Disc play mode indicators
• REPEAT (1, 1 DISC, ALL DISC), PRGM (program),
and RANDOM indicators
4 Tuner operation indicators
• MONO and ST (stereo) indicators
5 PBC indicator
6 SOUND MODE indicator
7 Disc indicators
8 Volume level, Bass level, and Sound Mode pattern indicators
9 Karaoke ( ) and echo ( ) indicators
p BASS and its level indicators
q Main display
• Shows the source name, frequency, etc.
w Disc track number indicators
– 4 –
w
Page 10
English
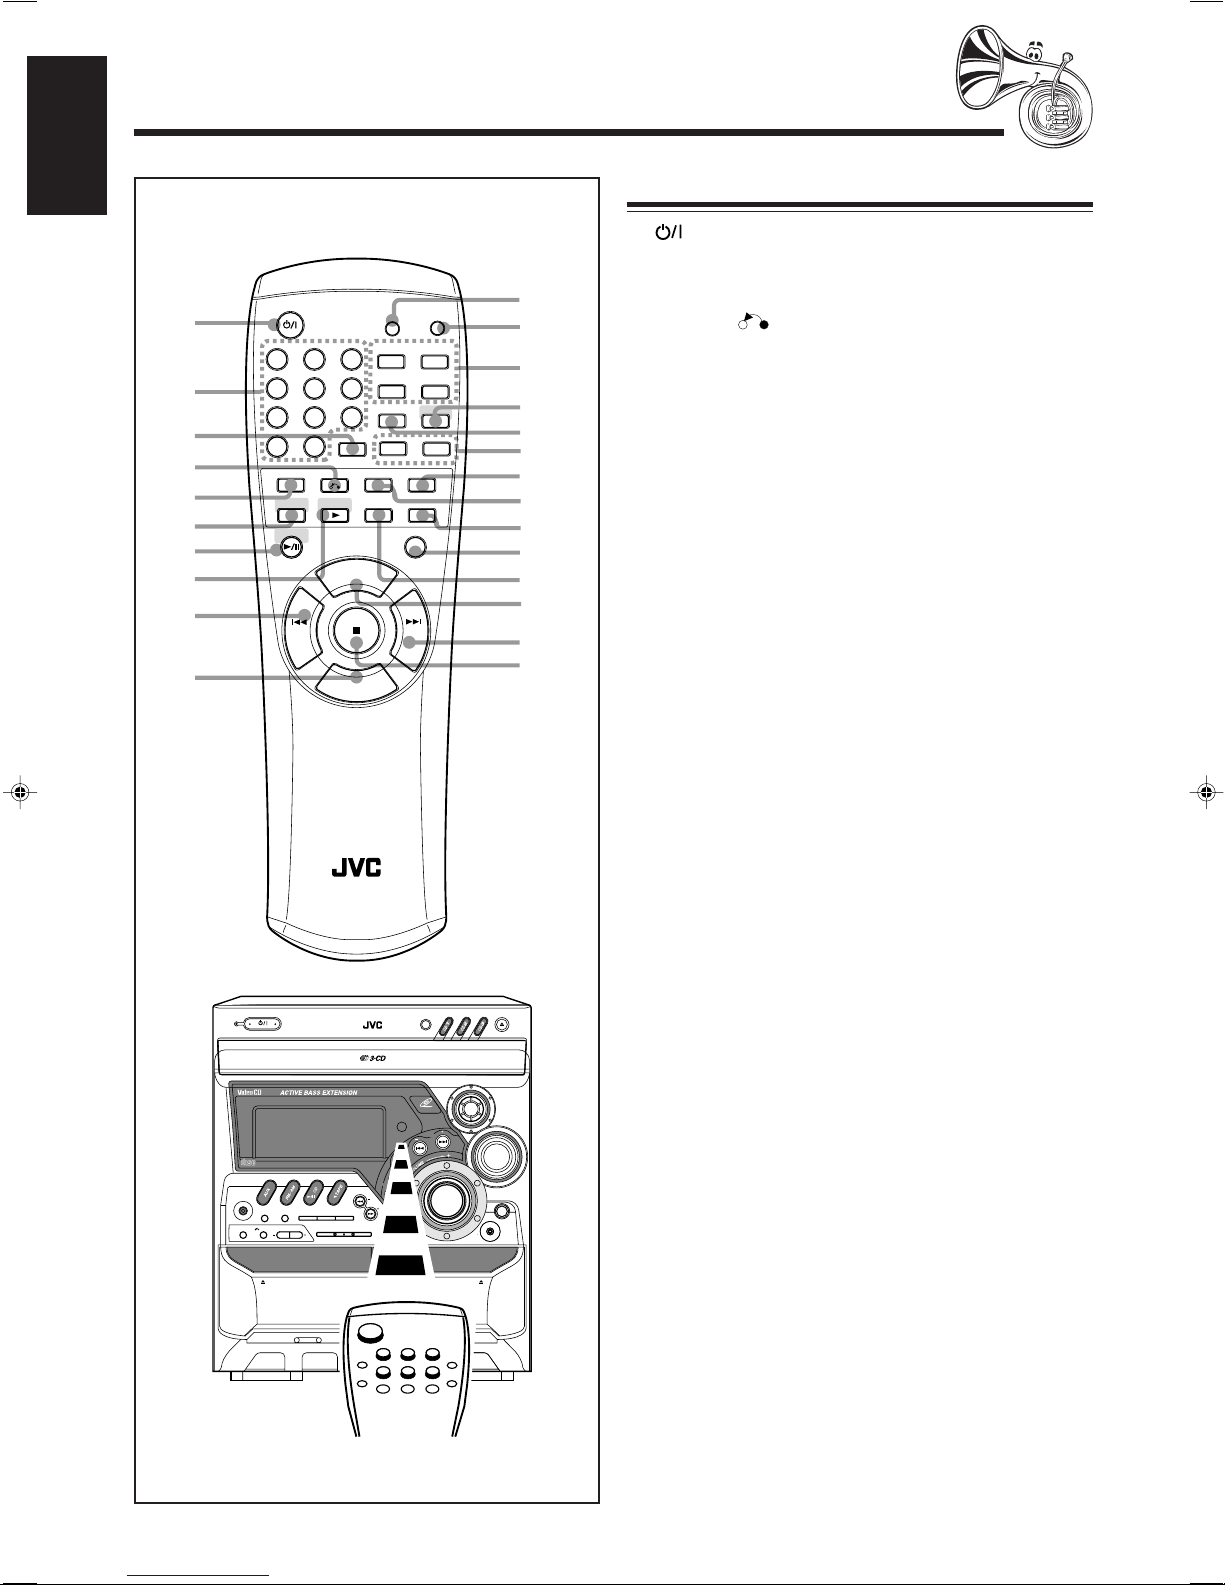
Remote Control
1
2
3
4
5
6
7
8
9
p
STANDBY/ON
12
456
78
10
FM/AM
CD
SELECT
PREV.
STANDBY
STANDBY/ON
ACTIVE BASS
EX. LEVEL
3
MPX
9
FM MODE/
KEY CONTROL
STILL
+10
RETURNSLEEP
TAPE
/
RM–SMXK55V REMOTE CONTROL
KARAOKE ECHO
TAPE A/B
+
VOLUME
VOLUME
–
I
MUTING
DISC SKIP
NEXT
V. INTROON SCREEN
FADE
DISC CHANGE
SOUND
MODE
SLOWHIGHLIGHT
AUX
i
q
w
e
r
t
y
u
i
o
;
a
s
d
f
Remote Control
1 STANDBY/ON button (9)
2 Number buttons (12, 14, 17)
3 FM MODE button (12)
STILL button (17)
4 RETURN button (18, 19)
5 SLEEP button (27)
6 FM/AM button (10, 12)
Pressing this button also turns on the unit.
7 CD 6 button (10, 13 – 15)
Pressing this button also turns on the unit.
SELECT button (18, 19)
8 TAPE 3 button (10, 20, 22)
Pressing this button also turns on the unit.
9 4 (fast rewind/reverse search) button (12, 14, 16, 20)
PREV. (previous) button (18, 19)
p VOLUME – button (10)
q ACTIVE BASS EX. LEVEL button (11)
w SOUND MODE button (11)
e VCD operating buttons
ON SCREEN button (17)
V. INTRO button (17)
HIGHLIGHT button (17)
SLOW button (16)
r AUX button (10)
Pressing this button also turns on the unit.
t MPX button (24)
y KEY CONTROL I / i buttons (24)
u ECHO button (23)
i KARAOKE button (23)
o FADE MUTING button (10)
; DISC SKIP button (13, 14)
a TAPE A/B button (20)
s VOLUME + button (10)
d ¢ (fast forward/forward search) button (12, 14, 16, 20)
NEXT button (18, 19)
f 7 (stop) button (13 – 23)
PLAY & EXCHANGE
NTSC/PAL COMPATIBILITY
COMPACT
COMPACT COMPONENT SYSTEM
DIGITAL AUDIO
PHONES
CLOCK
DISPLAY
/
TIMER
PBC
RETURN
EJECT
PLAY
A
VCD NUMBER
SELECT
REPEAT PROGRAM
REC START
/STOPCDREC START
FULL - LOGIC CONTROL
RANDOM
MX -K55V
DUBBING
SET
CANCEL
/DEMO
TUNING
TAPE A
TAPE B
CD SYNCHRO RECORDING
PLAY
PREV.
When using the remote control, point it at
the remote sensor on the front panel.
CD-R/RW PLAYBACK
SOUND
VIDEO CD
PRESET
MODE
ACTIVE BASS
EX. LEVEL
NEXT
MIC LEVEL
MIN MAX
MIC
EJECT
REC/PLAY
B
– 5 –
Page 11
Getting Started
Unpacking
Continued
English
Connecting Antennas
After unpacking, check to be sure that you have all the
following items.
The number in the parentheses indicates the quantity of the
pieces supplied.
• AM loop antenna (1)
• FM antenna (1)
• Remote control (1)
• Batteries (2)
• Video cord (1)
• AC plug adaptor (1)
If any is missing, consult your dealer immediately.
Putting the Batteries into the Remote Control
Insert the batteries — UM-4/AAA/IEC R03 — into the
remote control, by matching the polarity (+ and –) on the
batteries with the + and – markings on the battery
compartment.
When the remote control can no longer operate the unit,
replace both batteries at the same time.
1
FM antenna
FM antenna (supplied)
ANTENNA
FM [75 ]
AM
1 Attach the FM antenna to the FM [75 Ω ]
coaxial terminal.
2 Extend the FM antenna.
3 Fasten it up in the position which gives you
the best reception, then fix it on the wall, etc.
About the supplied FM antenna
The FM antenna supplied with this unit can be used as temporary
measure. If reception is poor, you can connect an outdoor FM
antenna.
2
UM-4/AAA/IEC R03
3
• DO NOT use an old battery together with a new one.
• DO NOT use different types of batteries together.
• DO NOT expose batteries to heat or flame.
• DO NOT leave the batteries in the battery
compartment when you are not going to use the
remote control for an extended period of time.
Otherwise, it will be damaged from battery leakage.
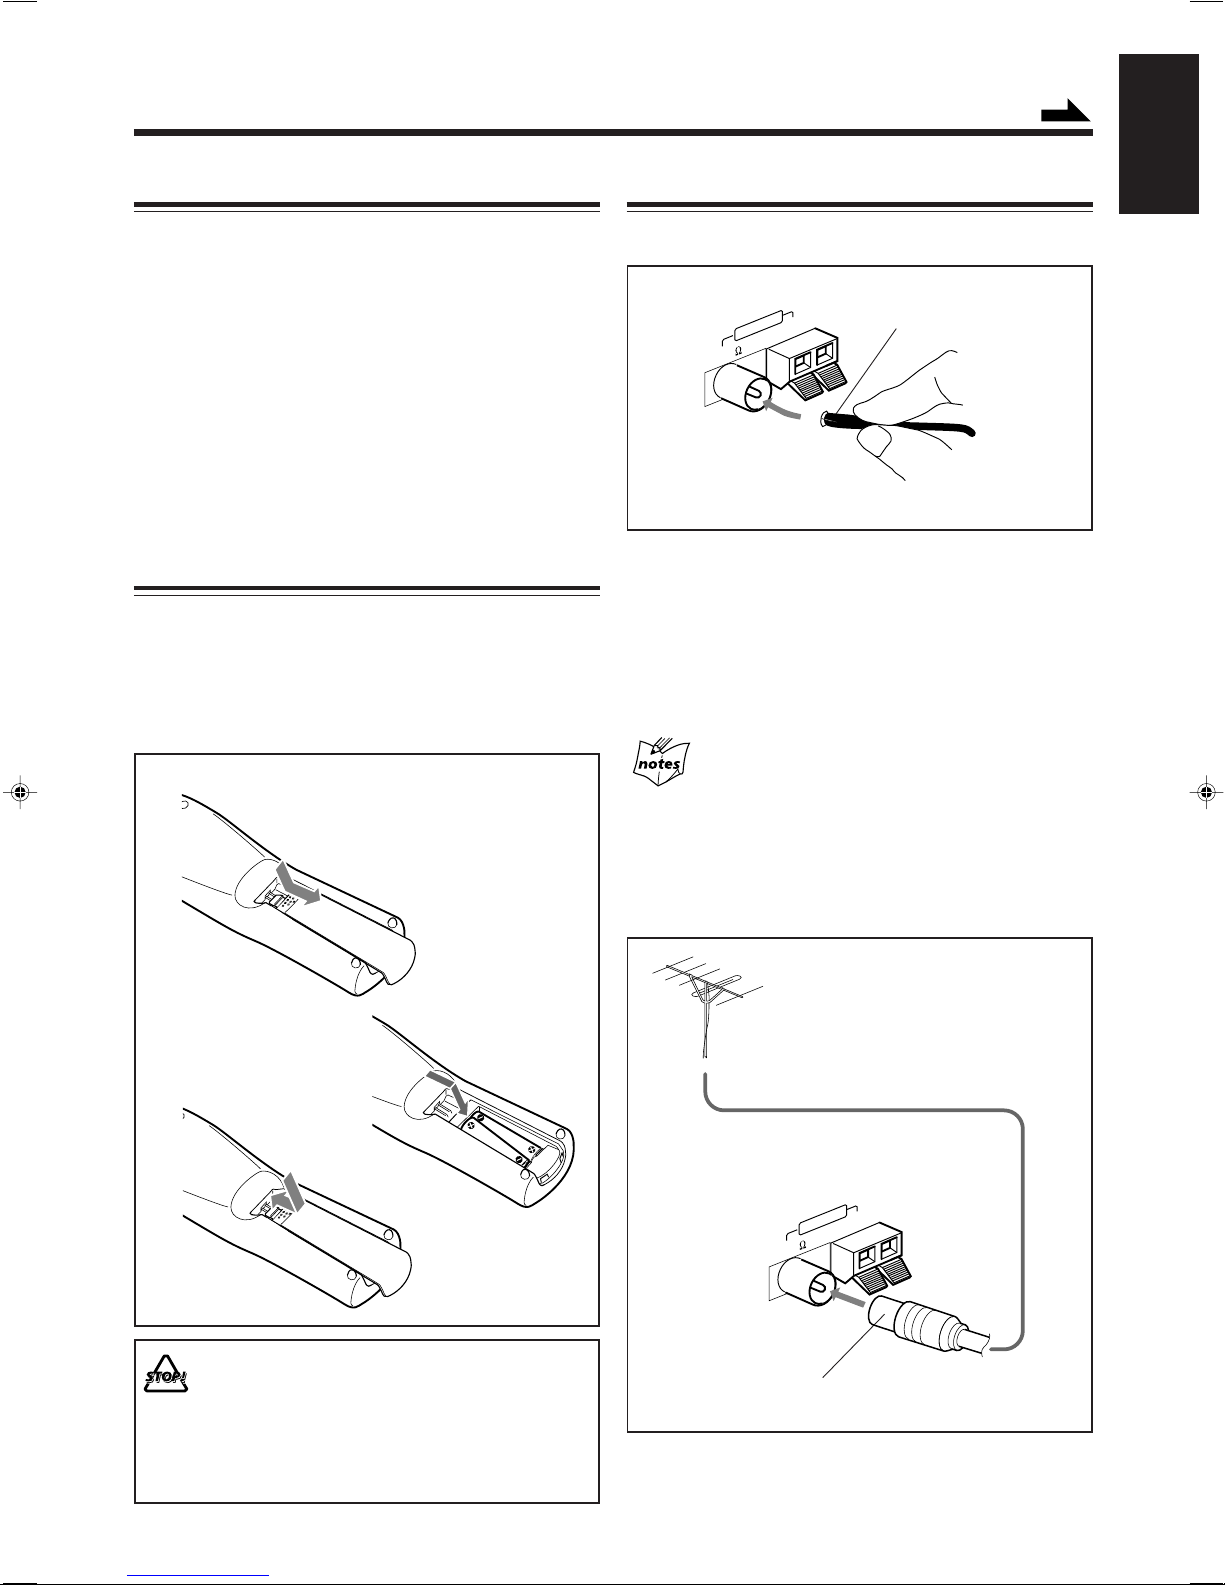
To connect an outdoor FM antenna
Before connecting it, disconnect the supplied FM antenna.
Outdoor FM antenna
(not supplied)
-
AM
ANTENNA
FM [75 ]
A 75 Ω antenna with coaxial type connector should be
used.
– 6 –
Page 12

English
AM antenna
Connecting Speakers
1
ANTENNA
[ ]
FM 75
2
AM
AM loop antenna
(supplied)
Vinyl-covered wire
(not supplied)
1
Speaker
cord
(red/black)
Red
SPEAKER
[ ]
6-16
R
Black
2
L
Speaker
cord
(red/black)
1 Press and hold the clamp of the AM terminal
on the rear of the unit.
2 Insert the end of the AM loop antenna cord
into the terminal.
3 Release the finger from the clamp.
4 Turn the AM loop antenna until you have the
best reception.
To connect an outdoor AM antenna
When reception is poor, connect a single vinyl-covered wire
to the AM terminal and extend it horizontally. (The AM loop
antenna must remain connected.)
For better reception of both FM and AM
• Make sure the antenna conductors do not touch any other
terminals and connecting cords.
• Keep the antennas away from metallic parts of the unit,
connecting cords, and the AC power cord.
from right
speaker’s
terminals
from left
speaker’s
terminals
1 Press and hold the clamp of the speaker
terminal on the rear of the unit.
2 Insert the end of the speaker cord into the
terminal.
Match the polarity (colors); Red (+) to red (+) and black
(–) to black (–).
3 Release the finger from the clamp.
IMPORTANT: Use only speakers with the same speaker
impedance as indicated by the speaker terminals on the
rear of the unit.
– 7 –
Page 13

Connecting Other Equipment
English
Adjusting the Voltage Selector
You can connect conventional audio equipment and TV.
• DO NOT connect any equipment while the
power is on.
• DO NOT plug in any equipment until all
connections are complete.
To connect an analog component
Be sure that the plugs of the audio cords are color coded:
White plugs and jacks are for left audio signals, and red ones
for right audio signals.
AUX IN
Audio equipment
To audio output
Connect the audio output jacks on the other equipment and
the AUX IN jacks by using audio cords (not supplied).
Before plugging in the unit, set the correct voltage for your
area with the voltage selector on the rear of the unit.
• DO NOT plug in before setting the voltage
selector on the rear of the unit and all connection
procedures are complete.
110
240
127
230-
VIDEO
220
127
OUT
110
240
230-
220
VOLTAGE
SETTING
VOLTAGE
SETTING
Using a screw driver, set the voltage selector so that the arrow
on printed on the rear points the correct voltage where you
use this unit. (See the back cover page.)
To connect the TV
VIDEO
OUT
To video input
TV
Connect the video input jacks and the VIDEO OUT jack on
the rear using a video cord (supplied.)
NOW, you can plug in the unit and other
connected equipment FINALLY!
Cancelling the Display Demonstration
When connecting the AC power cord into a wall outlet, the
unit automatically starts display demonstration.
On the unit ONLY:
To cancel the display demonstration, press
DEMO.
When you press other buttons
The display demonstration stops temporarily. It will start
automatically again (if no operation is done for 2 minutes) until you
cancel it by pressing DEMO.
To start the display demonstration manually
Press and hold DEMO again for more than 2 seconds.
CANCEL
/DEMO
– 8 –
Page 14

Common Operations
English
Turning On or Off the Power
To turn on the unit, press
STANDBY/ON so that the STANDBY
lamp goes off.
STANDBY
STANDBY/ON
3
Press 4 or ¢ to adjust
the minute, then press SET.
PRESET
NEXT
PREV
SET
To turn off the unit (on standby), press
STANDBY/ON again so that the
STANDBY
STANDBY/ON
STANDBY lamp lights up.
A little power is always consumed even while the unit is on
standby.
To switch off the power supply completely, unplug the AC
power cord from the AC outlet.
When you unplug the AC power cord or if a power
failure occurs
The clock is reset to “– –:– –” soon, while the tuner preset stations
(see page 12) will be erased in a few days.
Setting the Clock
Before operating the unit any further, first set the clock built
in this unit. You can set the clock whether the unit is on or
off.
On the unit ONLY:
CLOCK
/
1
Press CLOCK/TIMER.
TIMER
To check the clock time
Press DISPLAY while playing any source.
DISPLAY
• Each time you press the button, the source
indication and the clock time alternate on the
display.
To adjust the clock again
If you have adjusted the clock before, you need to press
CLOCK/TIMER repeatedly until “CLOCK” is selected.
• Each time you press the button, the clock/timer setting
modes change as follows:
DAILY
Canceled
If there is a power failure
The clock loses the setting and is reset to “– –:– –.” You need to set
the clock again.
ON TIME
CLOCK
REC
ON TIME
The hour digits start flashing
on the display.
2
Press 4 or ¢ to adjust
the hour, then press SET.
• If you want to correct the hour after pressing
SET, press CANCEL. The hour digits start
flashing again.
PRESET
NEXT
PREV
SET
– 9 –
Page 15

Selecting the Sources
Continued
English
Adjusting the Volume
To listen to the FM/AM broadcasts, press FM/AM. (See
page 12.)
To play back discs, press CD 6. (See pages 13 – 19.)
To play back tapes, press TAPE 3. (See page 20.)
To select the external equipment as the source, press AUX.
SELECT
When you press the play button for a particular source (AUX,
FM/AM, CD 6, and TAPE 3), the unit turns on (and the
unit starts playing the source if it is ready — COMPU PLAY
CONTROL).
Setting the AM Tuner Interval Spacing
Some countries space AM stations 9 kHz apart, and some
countries use 10 kHz spacing.
On the unit ONLY:
When shipped, the unit is set to 9 kHz spacing.
To select 10 kHz interval, press STANDBY/ON while
holding down ¡ when the unit is in standby mode. “AM -10” appears on the display.
TUNING
+
STANDBY
STANDBY/ON
You can adjust the volume level only while the unit is turned
on.
Turn the VOLUME control clockwise
to increase the volume or
counterclockwise to decrease it.
• The volume level can be adjusted in 32
steps (VOL MIN, VOL 1 — VOL 30,
and VOL MAX).
When using the remote control, press VOLUME + to increase
the volume or press VOLUME – to decrease it.
For private listening
Connect a pair of headphones to the PHONES jack. No sound
comes out of the speakers. Be sure to turn down the volume before
connecting or putting on headphones.
DO NOT turn off (on standby) the unit with the volume
set to an extremely high level; otherwise, a sudden
blast of sound can damage your hearing, speakers
and/or headphones when you turn on the unit or start
playing any source next time.
REMEMBER you cannot adjust the volume level while
the unit is on standby.
To turn down the volume level temporarily
Press FADE MUTING on the remote control.
The volume level gradually decreases to “VOL
MIN.”
To restore the sound, press the button again.
FADE
MUTING
To change back to 9 kHz interval, press STANDBY/ON
while holding down 1 when the unit is in standby mode.
“AM -- 9” appears on the display.
STANDBY
TUNING
+
STANDBY/ON
– 10 –
Page 16

English
Reinforcing the Bass Sound
This function only affects the playback sound, but does not
affect your recording.
The ACTIVE BASS EX. (e xtension) LEVEL control pro vided
for this unit can maintain the richness and fullness of the bass
sound while listening to any source at low volume.
Turn the ACTIVE BASS EX. LEVEL
control clockwise to increase the bass
sound or counterclockwise to decrease it.
• The
bass sound level
can be adjusted in 3
steps (LOW, MID, HIGH).
BASS indicator lights up when the
Active Bass Extension is turned on.
When using the remote control, press ACTIVE BASS EX.
LEVEL to adjust the bass sound level. The Active Bass
Extension level changes as LOW = MID = HIGH =
OFF = (back to the beginning).
To cancel the Active Bass Extension, turn the control
counterclockwise until “OFF” appears.
Selecting the Sound Modes
This function only affects the playback sound, but does not
affect your recording.
ACTIVE BASS
EX. LEVEL
• As you turn the control, the sound modes change as
follows:
D.CLUB
(Dance CLUB)
OFF
(Canceled)
HALL STADIUM ROCK
CLASSIC
POP
Surround modes*:
D.CLUB: Increases resonance and bass.
HALL: Adds depth and brilliance to the sound.
STADIUM: Adds clarity and spreads the sound, like in an
outdoor stadium.
SEA (Sound Effect Amplifier) modes:
ROCK: Boosts low and high frequency. Good for
acoustic music.
POP: Good for vocal music.
CLASSIC: Good for classical music.
OFF: Cancels the sound mode.
* Surround elements are added to the SEA elements to create a
being-there feeling in your room.
When one of these modes is selected, the SOUND MODE
indicator lights up as —
While one of the SEA modes (SEA elements without surround
elements) is selected, the SOUND MODE indicator lights up as
—
When using the remote control, press SOUND MODE to
adjust the sound mode.
• Each time you press the button, the sound modes change as
follows:
D.CLUB
(Dance CLUB)
HALL STADIUM ROCK
You can select one of the 6 preset sound modes (3 surround
modes and 3 SEA — Sound Effect Amplifier — modes).
To select the sound modes, turn the
SOUND MODE control until the sound
mode you want appears on the display.
SOUND MODE indicator
also lights up on the display.
SOUND
MODE
– 11 –
OFF
(Canceled)
CLASSIC
POP
Page 17

Listening to FM and AM Broadcasts
Before operating the tuner, make sure you have selected the
correct AM spacing intervals (see page 10).
Tuning in a Station
1
Press FM/AM.
The unit automatically turns on and tunes
in the previously tuned station (either FM
or AM).
• Each time you press the button, the
band alternates between FM and AM.
2
Start searching for stations.
On the unit:
Press and hold TUNING + or
TUNING – for more than 1
second.
On the remote control:
Press and hold 4 or
¢ for more than 1 second.
The unit starts searching for stations
and stops when a station of sufficient
signal strength is tuned in. If a
program is broadcasted in stereo, the ST (stereo) indicator
lights up.
To stop during searching, press TUNING + or TUNING –
(or 4 or ¢ on the remote control).
When you press TUNING + or TUNING –
(or 4 or ¢ on the remote control) briefly and
repeatedly
The frequency changes step by step.
PREV.
TUNING
NEXT
On the unit ONLY:
1
Tune in the station you want to preset.
• See “Tuning in a Station” on the left column.
2
Press SET.
3
Press PRESET + or PRESET –
to select a preset number.
4
Press SET again.
The tuned station in step 1 is stored in the preset number
selected in step 3.
• Storing a new station on a used number erases the
previously stored one.
When you unplug the AC power cord or if a power
failure occurs
The preset stations will be erased in a few days. If this happens,
preset the stations again.
English
SET
PRESET
NEXT
PREV
SET
To change the FM reception mode
When an FM stereo broadcast is hard to receive or
noisy, press FM MODE on the remote control so
that “MONO” appears and the MONO indicator
also lights up on the display. Reception improves.
To restore the stereo effect, press FM MODE again so that
“STEREO” appears on the display and the MONO indicator
goes off from the display.
In this stereo mode, you can hear stereo sounds when a
program is broadcasted in stereo.
Presetting Stations
You can preset 30 FM and 15 AM stations.
In some cases, test frequencies have been already memorized
for the tuner since the factory examined the tuner preset
function before shipment. This is not a malfunction. You can
preset the stations you want into memory by following the
presetting method.
• There is a time limit in doing the following steps. If the
setting is canceled before you finish, start from step 1
again.
FM MODE/
STILL
Tuning in a Preset Station
1
Press FM/AM.
The unit automatically turns on and tunes
in the previously tuned station (either FM
or AM).
• Each time you press the button, the
band alternates between FM and AM.
2
Select a preset number.
On the unit:
Press PRESET + or
PRESET –.
On the remote control:
Press the number buttons.
Ex.: For preset number 5, press 5.
For preset number 15, press +10,
then 5.
For preset number 20, press +10,
then 10.
For preset number 25, press +10,
+10, then 5.
For preset number 30, press +10, +10, then 10.
– 12 –
PRESET
PREV
12
456
78
10
NEXT
3
9
+10
Page 18

Playing Back Discs
English
This unit has been designed to playback the following CDs:
Audio CD, Video CD, CD-R, and CD-RW.
Continued use of irregular shape discs (heart-shape,
octagonal, etc.) can damage the unit.
When playing a CD-R or CD-RW
User-edited CD-Rs (Recordable) and CD-RWs
(Rewritable) can be played back only if they are already
“finalized.”
• You can play back your original CD-Rs or CD-RWs
recorded in music CD format. (However, they may not
be played back depending on their characteristics or
recording conditions.)
• Before playing back CD-Rs or CD-RWs, read their
instructions or cautions carefully.
• Some CD-Rs or CD-RWs may not be played back on
this unit because of their disc characteristics, damage or
stain on them, or if the player’s lens is dirty.
• CD-RWs may require a longer readout time. (This is
caused by the fact that the reflectance of CD-RWs is
lower than for regular CDs.)
About the disc indicators
Each disc indicator corresponds to the disc tray of the same number.
Disc number
Disc indicator
• The disc marker lights up for the disc number you have selected.
• The disc indicator rotates while the corresponding disc is being
played.
• The disc indicator goes off when the unit has detected that there is
no disc on the corresponding disc tray.
Disc marker
Playing Back the Entire Discs — Continuous
Play
You can play discs continuously.
1
Load discs.
Loading Discs
Whenever you press 0, the source automatically
changes to CD.
1
Press 0.
The unit automatically turns on and the
carrousel comes out.
2
Place one or two discs correctly on the front
slots of the carrousel, with its label side up.
CORRECT INCORRECT
• When using a CD single (8 cm), place it on the inner
circle of the disc tray.
3
If you wish to load a third disc,
press DISC CHANGE on the unit
or DISC SKIP on the remote
control.
The carrousel rotates by 120˚.
4
Press 0 again.
The carrousel closes.
DISC CHANGE
DISC SKIP
2
Press one of the disc number
buttons (CD1, CD2 or CD3)
for the disc you want to play.
The playback starts from the first
track of the selected disc.
Track number of the currently playing
disc is flashing. (Track numbers
exceeding 16 are not displayed.)
Track number
• Pressing CD 6 instead of the disc number buttons
starts playing back if a disc is on the tray.
When you turn on the unit, ALL DISC indicator lights up on
the display automatically. If you do not want all the discs to
play back, select 1 DISC by pressing REPEAT.
ALL DISC
REPEAT ALL DISC REPEAT 1 DISC
ALL DISC: Plays all loaded discs.
1 DISC: Plays back one disc.
To stop during play, press 7.
To remove the disc, press 0.
1 DISC
Elapsed playing time
REPEAT 1
– 13 –
Page 19

Disc playback sequence (when ALL DISC is selected)
MT
When 3 discs are loaded on the disc trays, they are played in one of
the following sequences.
• When CD1 is pressed : CD1 ] CD2 ] CD3 (then stops)
• When CD2 is pressed : CD2 ] CD3 ] CD1 (then stops)
• When CD3 is pressed : CD3 ] CD1 ] CD2 (then stops)
* When only 2 discs are loaded, they are played in the same order,
but the disc tray without a disc is skipped.
Continued
English
Programming the Playing Order of the Tracks
— Program Play
You can arrange the order in which the tracks play before you
start playing. You can program up to 32 tracks.
• To use Repeat play (see page 15) for Program play, press
REPEAT after starting Program play.
On the unit ONLY:
Basic Disc Operations
While playing a disc, you can do the following operations.
To exchange discs during playback of another
Press DISC CHANGE to change the disc, and
the carrousel comes out.
If you change discs during play, the current play
will not stop until all discs you have changed are
played.
To close the carrousel, press DISC CHANGE or 0.
To skip to the another disc in the carrousel
Press DISC SKIP on the remote control.
To stop play for a moment
Press CD 6.
While pausing, “PAUSE” appears on the
display.
To resume play, press CD 6 again.
To locate a particular point in a track
During play, press and hold 1 or ¡.
• 1: Fast reverses the track.
• ¡: Fast forwards the track.
When using the remote control, press and
hold 4 or ¢ .
To go to another track
Press 4 or ¢ repeatedly before or
during playback.
• 4:Goes back to the beginning of
the current or previous tracks.
• ¢:Skips to the beginning of the
next or succeeding tracks.
PREV
DISC CHANGE
DISC SKIP
SELECT
TUNING
PRESET
NEXT
1
Load discs.
• If the current playing source is not the CD player, press
CD 6, then 7 before going to the next step.
2
Press PROGRAM.
The PRGM (program) indicator lights up on
the display.
Track number
Disc number
3
Press one of the disc number
Program step number
buttons (CD1, CD2 or CD3)
to select the disc number you
want to play.
4
Press 4 or ¢ to select the track number,
then press SET.
Each time you select a track and press SET, the selected
track number is added to the disc track number indicator.
PRESET
NEXT
PREV
SET
PROGRAM RANDO
If you press and hold 4 or ¢ on the unit before or
during play
You can change the tracks continuously.
To go to another track directly using the number
buttons
Pressing the number button(s) before or
during play allows you to start playing the
track number you want.
Ex.: For track number 5, press 5.
For track number 15, press +10, then 5.
For track number 20, press +10, then 10.
For track number 32, press +10, +10, +10, then 2.
12
456
78
10
3
9
+10
– 14 –
Page 20

English
M
5
Program other tracks you want.
• To program tracks from the same disc, repeat step 4.
• To program tracks from a different disc, repeat steps 3
and 4.
6
Press CD 6.
The tracks are played in the order you
have programed.
To stop during play, press 7.
To exit from Program play mode, press PROGRAM again
before or after play so that the unit enters Continuous play
mode.
SELECT
To stop during play, press 7.
• Random play also stops when 0 is pressed.
To exit from Random play mode, press RANDOM again
during play so that the unit enters Continuous play mode.
To use Random play mode, you have to exit from the
Program play mode.
If you press 4 or ¢
Skips to the next track selected randomly.
Repeating Tracks or Discs — Repeat Play
To modify the program
Before playing, you can erase the programed
tracks shown on the display by pressing CANCEL.
• Each time you press the button, the last
programmed track is erased from the program.
To check the program during play, press ¢ (or 4) so that the
playing track will change according to the program (or reverse)
order.
To add tracks in the program before play, simply select the disc
numbers and/or track numbers you want to add by following steps
3 and 4 of the programming procedure on page 14.
To erase the entire program before or during play, press 7 twice.
• Ejecting a carrousel, exiting from Program play mode, and
turning off the unit will also erase the stored memory.
If you try to program a 33rd track
“FULL” will appear on the display.
If your entry is ignored
You have tried to program a track from an empty tray, or a track
number that does not exist on the disc. Such entries are ignored.
CANCEL
/DEMO
Playing at Random — Random Play
The tracks of the selected disc will play at random.
You can have all the discs, the program or the individual track
currently playing repeat as many times as you like.
PROGRA
To repeat play, press REPEAT during or before
playing.
• Each time you press the button, Repeat play
mode changes as follows, and the following
indicator lights up on the display:
ALL DISC
REPEAT ALL DISC REPEAT 1 DISC
REPEAT 1: Repeats one track on one disc.
REPEAT 1 DISC*: Repeats all the tracks on one disc.
REPEA T ALL DISC: Repeats all the tracks on all the discs.
* REPEAT 1 DISC is not used for Program play.
To cancel Repeat play, press REPEAT repeatedly until the
REPEAT indicator (REPEAT 1, REPEAT 1 DISC or
REPEAT ALL DISC) goes off from the display.
• Repeat play and Random play cannot be used at the same
time.
1 DISC
REPEAT 1
REPEAT
Prohibiting Disc Ejection — Tray Lock
You can prohibit disc ejection from the unit and lock discs.
• This operation is possible only while the unit is on and the
CD player selected as the source.
1
Load a disc.
• If the current playing source is not the CD player, press
CD 6, then 7 before going to the next step.
2
Press RANDOM so that “RANDOM”
appears on the display .
The RANDOM indicator also lights up on the
display.
• The tracks are played automatically at random. Random
play ends when all tracks are played once.
RANDOM
On the unit ONLY:
To prohibit disc ejection, press 0 for the carrousel while
holding 7.
“LOCKED” appears for a while, and the carrousel is locked.
To cancel the prohibition and unlock the discs, press 0 for
the carrousel while holding 7.
“UNLOCKED” appears for a while, and the carrousel is
unlocked.
If you try to eject discs
“LOCKED” appears to inform you that the Tray Lock is in use.
– 15 –
Page 21

Playing Video CDs
You can play Video CDs either with or without the PBC
(PlayBack Control) function.
Before playing, set video output correctly according to your TV
system. Refer to “Connecting Other Equipment” on page 8.
1
Turn on the TV and select the video input so
that you can view the pictures from the unit.
• Refer also to the manual supplied with your TV.
To locate a particular point in a track
During play, press and hold 1 or ¡.
• 1: Fast reverses the track.
• ¡: Fast forwards the track.
Each time you press the button, “SCAN”
appears upper left on the TV screen. When
using the remote control, press and hold
4 or ¢.
Continued
TUNING
PREV.
English
NEXT
2
Prepare the discs.
• Refer to “Loading Discs” on page 13.
3
Start playback of the discs.
You can play Video CDs by using same buttons for
playing audio CD both on the unit and on the Remote
Control.
• Refer to “Basic Disc Operations” on page 14.
To stop during play, press 7.
To stop play and remove the disc, press 0 for the disc being
played.
Please make sure that the Video CDs to be played
is not flawed optically, as this may cause a
distorted sound or the unit to malfunction.
To adjust the color system — NTSC/PAL
According to a Video CD or the color system used
on your TV, press TAPE A on the unit while the
unit is turned off (on standby.) When you press this
button for the first time, the present color system
appears in the display.
Each time you press the button, the following appears in the
display window.
NTSC PAL
• Be sure to select either NTSC or PAL position when the picture
on the TV screen appears correctly.
TAPE A
To go to another track
PREV.
PREV.
PRESET
NEXT
Press 4 or ¢ repeatedly before or
during playback.
• 4: Goes back to the beginning of the
current or previous tracks.
• ¢: Skips to the beginning of the next
or succeeding tracks.
If you press and hold 4 or ¢ on the unit before or
during play
You can change the tracks continuously.
Special Plays for Video CDs
You can use the following special plays for Video CDs both
with and without PBC function.
To enjoy slow motion playback
Press SLOW on the remote control during
playback.
A still picture appears on the screen.
Each time you press the button, slow motion speed
changes as follows:
Normal play
SLOW 1/8
SLOW 1/2
SLOW 1/4
• To resume normal playback, press CD 6.
SLOW
NEXT
About the color system
When wrong position selected, picture on TV screen will lose the
color and change into monochrome view.
During slow motion playback
No sound comes out.
– 16 –
Page 22

English
To play Still picture playback
Press STILL on the remote control during
playback.
When you press the button, playback pauses and a
still picture is shown on the TV screen.
• To resume normal playback, press CD 6.
To view Operation Status
You can view operation status about the track being played on
the TV screen.
Press ON SCREEN on the remote control.
The information about the disc being played are
shown on TV: disc number, track number and
playing time.
DISC 1 01 00:00:00
To erase operation status, press ON SCREEN
again. All the information about the track being
played disappear.
To view the Video Intro of a Video CD
You can view contents of a video CD, the first 5 seconds of
each track on the disc.
• For a video CD with PBC function, cancel the PBC
function. Refer to “Playing Video CDs without Using
Menu Screen” on page 19.
1
Press one of the disc number
buttons (CD1, CD2 or CD3)
on the unit to select the disc
you want to view the video
intro.
Playback starts.
2
Press V.INTRO after a picture
appears on the TV screen.
The video intro starts and shows in sequence
(the first 5 seconds of nine tracks) on the TV
screen. If the disc consists more than 9 tracks,
remaining tracks are shown after the first 9
tracks finish showing.
VIDEO INTRO
1
2
3
5
4
7
6
8
9
FM MODE/
STILL
ON SCREEN
ON SCREEN
V. INTRO
3
Press the number button of the
video intro you want to
playback.
Playback starts from the selected track.
12
456
78
10
3
9
+10
To stop and cancel the video intro, press 7.
To view the Highlights of a Video CD
You can view 9 highlights scenes of the selected track on a
video CD. These highlight scenes are created by dividing the
track equally into 9 portions and the beginning (5 seconds
each) of those 9 scenes are shown on the TV screen.
• For a video CD with PBC function, cancel the PBC
function. Refer to “Playing Video CDs without Using
Menu Screen” on page 19.
1
Press one of the disc number
buttons (CD1, CD2 or CD3)
on the unit and the number
button of the track you want
to view the highlights.
Playback starts.
2
Press HIGHLIGHT after a picture
HIGHLIGHT
appears on the TV screen.
The highlight starts and shows in sequence (the
first 5 seconds of nine divided highlight
scenes) on the TV screen.
HIGHLIGHT
1
2
3
5
4
7
3
Press the number button of the
highlight scene you want to
playback.
Playback starts from the beginning of
the selected scene.
To stop and cancel the highlight, press 7.
During video intro or highlight play
The picture shown on the TV screen may be partially distorted,
resulting from noises or incorrect manufacturing of the disc.
6
8
9
12
456
78
10
3
9
+10
– 17 –
Page 23

Playing Video CDs with PBC Function
The PBC (Playback Control) function allows you to enjoy
menu-driven operation and high resolution still pictures.
This unit is designed for playback of video CDs,
version 1.1 and 2.0. Only with version 2.0, you can
call up “on screen menu” function. This unit will not
play back any other video CDs other than 1.1 and
2.0 versions.
Menu-driven operation
You can interact with the TV screen using menu screens to
select and play items of the disc.
High-resolution still pictures
You can view high-resolution still pictures having quality
four times higher than playback pictures.
Playing Video CDs with Using Menu Screens
When you start playing a video CD with the PBC function, a
selection menu appears on the TV screen. This menu shows a
list of items to select and play.
• The playback operation procedure may differ depending on
the disc you use.
Continued
1
Turn on the TV and select the video input so
that you can view the pictures from the unit.
Refer also to the manual supplied for your TV.
2
Prepare V ideo CDs.
Refer to “Loading Discs” on page 13.
“VCD/CD” appears and then “PBC” indicator lights on
the display.
3
Start playback of the Video CD.
Press CD 6 SELECT to start playback
of the currently selected disc or press CD1,
CD2 or CD3 to select the disc and start
SELECT
playback.
4
Select the item you want to playback when a
selection menu appears on the TV.
Press VCD NUMBER + or – to select the
item number. Then press CD 6 SELECT
to start the playback.
English
VCD NUMBER
Button controls:
VCD NUMBER + or –
Select a specific menu item from the TV
screen or the monitor.
44
PREV.
4 or NEXT
44
Move through menu screens.
66
CD
6 SELECT
66
When “SELECT XX” appears on the TV
screen, pressing this button jumps to the
selected picture or program.
RETURN
Press the button once, return to the previous
menu or screen.
77
7 (stop)
77
Press and hold the button for a few seconds, quit the
operation of the video CDs.
PBC
Each time you press the button, PlayBack
Control function is set to on/off. When you
change the function, video CDs program
automatically starts again from the beginning of
selected function.
• You cannot call up menu screen by pressing this button.
¢¢
¢
¢¢
PRESET
PREV.
SELECT
VCD NUMBER
SELECT
NEXT
RETURN
PBC
– 18 –
Page 24

English
Basic Flow of Menu Play Operation
Some discs may show moving pictures or divided screens.
• When a list of items appears, you can select the
item you want to play back by pressing VCD
NUMBER + or – repeatedly.
For example, “SELECT 01” appears on the
screen and “SEL-01 ” on the display.
• When moving picture appears, you
can select a moving picture by either
pressing PREV. 4 or NEXT ¢ or
pressing CD 6 SELECT after
selecting the item number by VCD
NUMBER + or – while the moving picture you
want to view is being played back. “SELECT
XX” appears on the screen.
• When a menu appears after the item you
selected has finished playing, you can select another
number of the item you want to view next.
• If the video CD has more than 2 pages
of menu, you can view the remaining
items by pressing NEXT ¢. If you
want to go back to the previous menu,
press PREV. 4.
• After playback, press RETURN to go back
to the previous screen. Each time you press the
button, you can go back to the previous screen up
to the beginning of the program one by one.
• If you want to stop Menu Play, press 7 for more than 2
seconds. Some discs may return you to the menu screen
shown before playback.
PREV.
PREV.
PRESET
SELECT
PRESET
VCD NUMBER
RETURN
Playing Video CDs without Using Menu Screen
You can cancel the PBC function and play the disc without
using menu screen.
1
Turn on the TV and select the video input so
that you can view the pictures from the Unit.
Refer also to the manual supplied for your TV.
NEXT
2
Prepare a Video CD.
Refer to “Loading Discs” on page 13.
3
Start playback of the Video CD.
Press the CD 6 SELECT to start
playback of the currently selected
disc or press the CD1, CD2 or CD3
to select the disc and start playback.
NEXT
4
Press PBC on the unit.
To stop during playback, press 7.
The PBC function restores automatically.
When the PBC function is canceled,
some pictures, such as still pictures, may not be played back.
SELECT
PBC
VCD NUMBER +/–
VCD NUMBER +/–
1. Sub-sub menu
1. ......
2. ......
3. ......
1. Sub menu
1. ......4. ......
2. ......
3. ......
2. Still Picture
Playback
If “NEXT” or “PREVIOUS” is shown on the TV
screen (for some Video CDs it may be hidden or
illustrated),
you can move to the next or previous screen by pressing NEXT ¢
or PREV. 4. By pressing
RETURN, you can also go back
to the previous screen, the opening menu screen, or some other
screen (this depends on how the Video CD has been programmed.)
TV Screen
Main menu
1. ......
2. ......
3. ......
2. Still Picture
Playback
3. Moving
Pictures
3. Sub menu
1. ......
2. ......
3. ......
4. Moving
Pictures
NEXT
PREV.
3. Sub menu
4. ......
5. ......
6. ......
RETURN
RETURN
– 19 –
Page 25

Playing Back Tapes
Playing Back a Tape
1
Press EJECT (0) for the deck you want to
use.
EJECT
EJECT
For Deck B
For Deck A
2
Put a cassette in with the exposed part of the
tape down.
• You can play back only type I.
English
To stop during play, press 7.
To operate the other deck, press TAPE A or TAPE B (or
TAPE A/B on the remote control), then TAPE 3.
To fast-forward the tape, press ¡ (or ¢ on the remote
control). The tape direction indicator (3) starts flashing
quickly.
To rewind the tape, press 1 (or 4 on the remote
control). The tape direction indicator (2) starts flashing
quickly.
To remove the cassette, press 0 EJECT for deck A or
EJECT 0 for deck B.
EJECT
EJECT
3
Close the cassette holder gently.
If you put cassettes in both decks A and B, the last deck
which you have put a cassette into is selected.
To operate the other deck, press TAPE A or TAPE B (or
TAPE A/B on the remote control).
4
Press TAPE 3.
The tape play starts and the tape running
indicator (3) starts flashing slowly.
When the tape plays to the end, the deck
automatically stops.
The use of the C-120 or thinner tape is not
recommended, since characteristic deterioration
may occur and this tape easily jams in the pinch
rollers and the capstans.
TAPE
– 20 –
Page 26

Recording
C
English
IMPORTANT:
• It may be unlawful to record or play back copyrighted
material without the consent of the copyright owner.
• The recording level is automatically set correctly, so it is
not affected by the VOLUME control, the SOUND MODE
control, and the ACTIVE BASS EX. LEVEL control. Thus,
during recording you can adjust the sound you are actually
listening to without affecting the recording level.
• While recording, you can hear sound modes through the
speakers or headphones. However, the sound is recorded
without these effects (see page 11).
• If recordings you have made have excessive noise or static,
the unit may be too close to a TV. Place the unit away from
the TV.
• You can use type I tape for recording.
To protect your recording
Cassettes have two small tabs
on the back to protect
unexpected erasure or rerecording.
To protect your recording,
remove these tabs.
To re-record on a protected tape, cover the holes with
adhesive tape.
Recording a Tape on Deck B
On the unit ONLY:
1
Press EJECT 0 for the deck B.
EJECT
EJECT
2
Put a recordable cassette in with the exposed
part of the tape down.
To keep the best recording and playback sound quality
If the heads, capstans, and pinch rollers of the cassette decks
become dirty, the following will occur:
• Impaired sound quality
• Discontinuous sound
• Fading
• Incomplete erasure
• Difficulty in recording
To clean the head, capstan, and pinch roller
Use a cotton swab moistened with alcohol.
Capstan
Erase head
Pinch roller
Head
To demagnetize the head
Turn off the unit, and use a head demagnetizer (available at
electronics and record shops).
3
Close the cassette holder gently.
4
Start playing the source — FM, AM, CD
player or auxiliary equipment connected to
AUX IN jacks.
• When you want to use the dubbing method, see
“Dubbing Tapes” on page 22.
• When the source is CD, you can also use CD
Synchronized Recording (see “CD Synchronized
Recording” on page 22.)
REC START
5
Press REC START/STOP.
The REC (recording) indicator lights up on
the display and recording starts.
To stop during recording, press REC START/STOP again
or 7.
To remove the cassette, press EJECT 0 for deck B.
/STOPCDRE
– 21 –
Page 27

Dubbing Tapes
N
English
CD Synchronized Recording
On the unit ONLY:
1
Press TAPE 3, then 7.
2
Put the source cassette into deck A, and a
recordable cassette into deck B.
3
Press DUBBING.
Dubbing starts.
“DUBBING” appears, and the REC
(recording) indicator lights up on the
display.
You can easily record a CD onto a tape.
• You can also record the tracks in order you have made the
program.
On the unit ONLY:
1
Put a recordable cassette into deck B.
2
Place a disc correctly on the circle of the disc
tray, with its label side up.
3
Press one of the disc number buttons (CD1,
CD2 or CD3) to select the disc, then 7.
DUBBING
RT
RT
CD
DUBBI
4
Press CD REC START.
“CD REC” appears, and the REC
(recording) indicator lights up on the display.
REC START
To stop during dubbing, press 7.
To remove the cassette, press 0 EJECT for deck A and
EJECT 0 for deck B.
Deck B starts recording and the CD player starts playing.
When the recording is done, the CD player and deck B
stop.
To stop during CD Synchronized Recording, press 7.
To remove the cassette, press EJECT 0 for deck B.
– 22 –
Page 28

Using the Microphones
English
You can enjoy singing along (Karaoke) and microphone
mixing.
IMPORTANT:
• Always set the MIC LEVEL to MIN when connecting
or disconnecting the microphone.
• When you do not use the microphone, keep the
microphones unconnected.
If howling or squealing (feedback) occurs while using the
microphone, take the following actions to prevent these
noises.
• Adjust the MIC LEVEL and VOLUME controls.
• Avoid pointing the microphone towards the speakers.
If you use the following sources as the playing source
for Vocal Masking, you cannot get the satisfactory
results
• Radio programs — a radio signal is not as reliable as the signals
coming from a tape, CD or VCD.
• Monaural sources.
• Poorly dubbed tapes.
• Sources recorded with duets, strong echo, a chorus, or only a few
instruments.
To apply an echo to your voice
Press ECHO on the remote control so that the
echo ( ) indicator lights up on the display.
Each time you press the button, the echo level
changes as follows:
ECHO
Singing Along (Karaoke)
You can enjoy singing along (Karaoke) using Vocal Masking.
Vocal Masking reduce the lead vocal of the playing source
while playing back a source.
• This function cannot be used for multiplex discs or tapes.
1
Rotate MIC LEVEL to MIN.
2
Connect the microphone (not supplied) by
plugging it into the MIC jack.
The karaoke indicator ( ) lights up on the display.
3
Start playing the source — CD, tape or other
connected component.
4
Press KARAOKE on the remote
control.
“V.MASK” appears on the display for a few
seconds.
5
Rotate MIC LEVEL and
VOLUME controls as you sing
into the microphone.
When you finish singing, cancel the
Karaoke function by pressing
KARAOKE.
• By pressing REC START/STOP, you
can record your singing along if you
want. (For more details, see page 21.)
• To stop during recording, press 7.
KARAOKE
ECHO 1 ( )
ECHO OFF ( )
As the number increases, a stronger echo effect applies to
your voice.
ECHO 2 ( )
Microphone Mixing
When you use microphone with any playback source, follow
the procedure below.
1
Rotate MIC LEVEL to MIN.
2
Connect the microphone (not supplied) by
plugging it into the MIC jack.
3
Start playing the source — CD, tape or other
connected component.
4
Rotate MIC LEVEL and
VOLUME controls as you sing
into the microphone.
• By pressing REC START/STOP, you
can record your singing along if you
want. (For more details, see page 21.)
• To stop during recording, press 7.
– 23 –
Page 29

Using Multiplex Discs — Multiplex Sound
(MPX)
In a multiplex karaoke disc, the instrumental part is recorded
on the left channel and the vocal part is recorded on the right
channel. By using Multiplex Sound (MPX) function, you can
select the channel to play back.
• This function cannot be used for multiplex karaoke tapes.
On the remote control ONLY:
1
Press MPX during play.
• Each time you press the button, output sound
changes as follows:
Lch MONO: Only the left channel (instrumental parts) is
played back through both the right and left
speakers.
Rch MONO: Only the right channel (vocal parts) is
played back through both the right and left
speakers.
STEREO: Cancels the Multiplex Sound (MPX)
(normal stereo playback resumes).
When you finish enjoying Karaoke
Cancel the Multiplex Sound (MPX) function; otherwise, normal
playback will not be possible.
MPX
Adjusting Key Control
You can adjust the key of the source if it’s not suite on you.
• This function is available only when you use CDs or Video
CDs for karaoke source.
On the remote control ONLY:
1
Start the source disc.
2
Press KEY CONTROL.
To lower the key, press KEY CONTROL I
from “KEY 0” to “KEY –7.”
To raise the key, press KEY CONTROL i
from “KEY 0” to “KEY +7.”
To cancel the key control, press KEY CONTROL I or i
until “KEY 0” appears on the display.
If you use the key control function
• When you change the key, the key position remains unless you
change it again. To restore the original key of the source, refer to
“To cancel the key control” above.
• You cannot adjust the key while recording.
• When you change the source, key control function is canceled and
the key returns to “KEY 0.”
KEY CONTROL
I
i
English
– 24 –
Page 30

Using the Timers
English
There are three timers available — Daily Timer, Recording
Timer, and Sleep Timer.
Before using the timers, you need to set the clock built in the
unit. (See “Setting the Clock” on page 9.)
Using Daily Timer
With Daily Timer, you can wake to your favorite music or
radio program. You can set the timer whether the unit is on or
off.
How Daily Timer actually works
The unit automatically turns on, set the volume level to the
preset level, and starts playing the specified source when the
on-time comes (the indicator flashes while the timer is
operating). Then, when the off-time comes, the unit
automatically turns off (stands by).
The timer setting remains in memory until you change it.
• There is a time limit in doing the following steps. If the
setting is canceled before you finish, start from step 1
again.
• If you have made a mistake while setting timer, press
CANCEL. (However, this does not always work. If
CANCEL does not work, press CLOCK/TIMER repeatedly
and start from step 1 again.)
Before you start...
• When using a CD as the source to play —
– Make sure there is a CD on the currently selected disc
number tray.
• When using a tape as the source to play —
– Make sure that a tape is in the deck whose deck
indicator (A or B) is lit on the display.
• When using the external component as the source to
play —
– Set the timer equipped with the external component at
the same time.
On the unit ONLY:
1
Press CLOCK/TIMER repeatedly
until “DAILY” appears on the
display.
indicator lights up and the DAILY (daily
timer) indicator also starts flashing on the display.
• Each time you press the button, the timer setting modes
change as follows:
DAILY
ON TIME
REC
CLOCK
/
TIMER
2
Press CLOCK/TIMER again.
“ON TIME” appears for 2 seconds, then the
unit enters on-time setting mode.
3
Set the on-time you want the
unit to turn on.
1) Press 4 or ¢ to set the hour,
PRESET
PREV
then press SET.
2) Press 4 or ¢ to set the
minute, then press SET.
“OFF TIME” appears for 2 seconds, then
the unit enters off-time setting mode.
4
Set the off-time you want the
unit to turn off (on standby).
PRESET
PREV
1) Press 4 or ¢ to set the hour,
then press SET.
2) Press 4 or ¢ to set the minute, then press
SET .
The unit enters source selecting mode.
5
Press 4 or ¢ to select the
source to play, then press
SET.
PRESET
PREV
• Each time you press 4 or ¢,
the source changes as follows:
TAPE
TUNER AM
CD
SET
TUNER FM
AUX
TUNER FM: tunes into a specified preset FM station.
= go to step 6.
TUNER AM: tunes into a specified preset AM station.
= go to step 6.
CD: plays a disc from the first track.
= go to step 7.
TAPE: plays a tape in deck A or B. = go to step 7.
AUX: plays an external source. = go to step 7.
CLOCK
/
TIMER
SET
SET
NEXT
NEXT
NEXT
Canceled
CLOCK
(See page 9.)
ON TIME
– 25 –
Page 31

6
When you have selected
“TUNER FM” or “TUNER
AM” in step 5. Select the
preset station number.
Press 4 or ¢ to select the preset station
number, then press SET.
The unit enters volume setting mode.
7
Press 4 or ¢ to set the
volume level.
• You can select the volume level
from VOL MIN, VOL 1 — VOL 30,
and VOL MAX.
PREV
PREV
PRESET
PRESET
Continued
English
Using Recording Timer
NEXT
With Recording Timer, you can make a tape of a radio
broadcast automatically. You can set the timer whether the
unit is on or off.
SET
How Recording Timer actually works
The unit automatically turns on, tunes into the specified
station, sets the volume level to “VOL MIN,” and starts
recording when the on-time comes (the indicator flashes
while the timer is operating). Then, when the off-time comes,
the unit automatically turns off (stands by).
The timer setting remains in memory until you change it.
NEXT
• There is a time limit in doing the following steps. If the
setting is canceled before you finish, start from step 1
again.
• If you have made a mistake while setting the timer, press
CANCEL. (However, this does not always work. If
CANCEL does not work, press CLOCK/TIMER repeatedly
and start from step 2 again.)
On the unit ONLY:
8
Press SET to complete the Daily
SET
Timer setting.
The DAILY (daily timer) indicator stops
flashing and remains lit. The settings you have
done are shown on the display in sequence for your
confirmation.
9
Press STANDBY/ON to
STANDBY
STANDBY/ON
turn off the unit (on standby)
if you have set the Daily
Timer with the unit turned
on.
If the unit is turned on when the timer-on time comes
Daily Timer does not work.
To turn on or off Daily Timer after its setting is done
1 Press CLOCK/TIMER repeatedly until
“DAILY” appears on the display.
2 To turn off the Daily Timer, press
CANCEL.
The DAILY (daily timer) indicator goes off
from the display (“OFF” appears for a while).
The Daily Timer is canceled, but the setting
for the Daily Timer remains in memory.
To turn on the Daily Timer, press SET.
The DAILY (daily timer) indicator lights up on
the display. The settings you have done are
shown on the display in sequence for your
confirmation.
CLOCK
/
TIMER
CANCEL
/DEMO
SET
1
Put a recordable cassette into deck B.
2
Press CLOCK/TIMER repeatedly
/
until “REC” appears on the
display.
indicator lights up and the REC
(recording timer) indicator also starts flashing on the
display.
• Each time you press the button, the timer setting modes
change as follows:
DAILY
Canceled
3
Press CLOCK/TIMER again.
ON TIME
CLOCK
(See page 9.)
“ON TIME” appears for 2 seconds, then the
unit enters on-time setting mode.
REC
ON TIME
CLOCK
TIMER
CLOCK
/
TIMER
– 26 –
Page 32

English
4
5
6
7
Set the on-time you want the
unit to turn on.
1) Press 4 or ¢ to set the hour,
then press SET.
2) Press 4 or ¢ to set the
minute, then press SET.
“OFF TIME” appears for 2 seconds, then
the unit enters off-time setting mode.
Set the off-time you want the
unit to turn off (on standby).
1) Press 4 or ¢ to set the hour,
then press SET.
2) Press 4 or ¢ to set the
minute, then press SET.
The unit enters preset station selecting
mode.
Select the preset station.
1) Press 4 or ¢ to select the
band (“TUNER FM” or “TUNER
AM”), then press SET.
2) Press 4 or ¢ to select a
preset channel number, then press SET.
The REC (recording timer) indicator stops
flashing and remains lit. The settings you
have done are shown on the display in
sequence for your confirmation.
Press STANDBY/ON to
turn off the unit (on standby) if
necessary.
PREV
PREV
PREV
STANDBY
PRESET
PRESET
PRESET
SET
SET
SET
STANDBY/ON
Using Sleep Timer
NEXT
With Sleep Timer, you can fall asleep to music.
You can set Sleep Timer when the unit is turned on.
How Sleep Timer actually works
The unit automatically turns off after the specified time
length passes.
On the remote control ONLY:
1
NEXT
NEXT
Press SLEEP.
The time length until the shut-off time appears
and the SLEEP indicator starts flashing on the
display.
• Each time you press the button, the time length changes
as follows:
SLEEP10
OFF
(Canceled)
2
Wait for about 5 seconds after specifying the
SLEEP20 SLEEP30 SLEEP60
SLEEP90SLEEP120
time length.
The SLEEP indicator stops flashing and remains lit.
To check the remaining time until the shut-off time, press
SLEEP once so that the remaining time until the shut-off time
appears for about 5 seconds.
To change the shut-off time, press SLEEP repeatedly until
the desired time length appears on the display.
To cancel the setting, press SLEEP repeatedly until “OFF”
appears on the display so that the SLEEP indicator goes off
from the display.
• Sleep Timer is also canceled when you turn off the unit.
SLEEP
If you want to listen to another source while recording
Press REC START/STOP or 7 to stop recording. Without stopping
it, you cannot change the source.
To turn on or off Recording Timer after its setting is
done
1 Press CLOCK/TIMER repeatedly until
“REC” appears on the display.
2 To turn off the Recording Timer, press
CANCEL.
The REC (recording timer) indicator goes off
from the display (“OFF” appears for a while).
The Recording Timer is canceled, but the
setting for the Recording Timer remains in memory.
To turn on the Recording Timer, press SET.
The REC (recording timer) indicator lights up
on the display. The settings you have done are
shown on the display in sequence for your
confirmation.
CLOCK
/
TIMER
CANCEL
/DEMO
SET
Timer Priority
Since each timer can be set separately, you may wonder what
happens if the setting for these timers overlaps.
Here are examples.
• Recording Timer has priority over Daily Timer.
If Daily Timer is set to come on while Recording Timer is
operating, Daily Timer will not come on at all.
6:00 7:307:006:30
Recording Timer
Daily Timer
does not work.
• If Sleep Timer overlaps with another timer (either Daily
Timer or Recording Timer), a timer with the earlier shut-off
time has priority.
Sleep Timer
Recording Timer
6:00
7:30
7:006:30
canceled.
When using the Recording Timer and Sleep Timer at the
same time, pay special attention to the shut-off time.
– 27 –
Page 33

Maintenance
To get the best performance of the unit, keep your discs, tapes, and mechanism clean.
English
Handling discs
DO NOT use any solvent — such as conventional
record cleaner, spray, thinner, or benzine — to
clean the disc.
• Remove the disc from its case by
holding it at the edge while pressing the
center hole lightly.
• Do not touch the shiny surface of the
disc, or bend the disc.
• Put the disc back in its case after use to
prevent warping.
• Be careful not to scratch the surface of
the disc when placing it back in its case.
• Avoid exposure to direct sunlight,
temperature extremes, and moisture.
To clean the disc
Wipe the disc with a soft cloth in a straight
line from center to edge.
Handling cassette tapes
• If the tape is loose in its cassette, take
up the slack by inserting a pencil in
one of the reels and rotating.
• If the tape is loose, it may get
stretched, cut, or caught in the
cassette.
• Be careful not to touch the tape
surface.
• Avoid the following places to store the
tape:
— In dusty places
— In direct sunlight or heat
— In moist areas
— Near a magnet
– 28 –
Page 34

Troubleshooting
English
If you are having a problem with your unit, check this list for a possible solution before calling for service.
If you cannot solve the problem from the hints given here, or the unit has been physically damaged, call a qualified person,
such as your dealer, for service.
Symptom
Unable to cancel the display demonstration.
No sound is heard.
Hard to listen to broadcasts because of
noise.
The disc sound is discontinuous.
The carrousel does not open or close.
The disc does not play.
The cassette holders cannot be opened.
Impossible to record.
Stereo effect is lost.
Operations are disabled.
Unable to operate the unit from the remote
control.
The pictures of the video CD is distorted.
Cause
Other buttons are pressed to cancel the
display demonstration.
Connections are incorrect or loose.
• Antennas are disconnected.
• The AM loop antenna is too close to the
unit.
• The FM antenna is not properly extended
and positioned.
The disc is scratched or dirty.
• The AC power cord is not plugged in.
• The carrousel is locked.
The disc is placed upside down.
Power supply from the AC power cord has
been cut off while the tape was running.
Small tabs on the back of the cassette are
removed.
Vocal Masking is activated.
The built-in microprocessor may
malfunction due to external electrical
interference.
• The path between the remote control and
the remote sensor on the unit is blocked.
• The batteries are exhausted.
When you pause or advance the pictures
manually, the pictures are distorted. This is
not a malfunction.
Action
Press DEMO on the unit. (See page 8.)
Check all connections and make
corrections. (See pages 6 to 8.)
• Reconnect the antennas correctly and
securely.
• Change the position and direction of the
AM loop antenna.
• Extend the FM antenna at the best
position.
Clean or replace the disc. (See page 28.)
• Plug the AC power cord.
• Unlock the carrousel. (See page 15.)
Place the disc with the label side up.
Turn on the unit.
Cover the holes with adhesive tape.
Cancel the Vocal Masking. (See page 23.)
Unplug the AC power cord and then plug it
back in.
• Remove the obstruction.
• Replace the batteries.
– 29 –
Page 35

Specifications
Amplifier section — CA-MXK55V
Output Power:
80 W per channel, min. RMS, driven into 6 Ω at 1 kHz with no more
than 10% total harmonic distortion.
Audio input sensitivity/Impedance (at 1 kHz)
Speakers/Impedance: 6 Ω — 16 Ω
Tuner
FM tuning range: 87.50 MHz — 108.00 MHz
AM tuning range:
CD player
CD Capacity: 3 CDs
Dynamic range: 85 dB
Signal-to-noise ratio: 85 dB
Cassette deck
Frequency response
Wow and flutter
General
Power requirement: AC 110 V / AC 127 V / AC 220 V /
Power consumption: 120 W (at operation)
Dimensions (approx.): 270 mm x 317 mm x 447 mm (W/H/D)
Mass (approx.): 8.6 kg (19.0 lbs)
AUX: 530 mV/50 kΩ
ΜΙC: 2.5 mV/5 kΩ
At 9 kHz intervals : 531 kHz — 1 602 kHz
At 10 kHz intervals : 530 kHz — 1 710 kHz
Normal (type I): 50 Hz — 14 000 Hz
0.15% (WRMS)
AC 230 V — AC 240 V
voltage selector), 50 Hz / 60 Hz
17 W (on standby)
11
/16 in. x 12 1/2 in. x 17 5/8 in.)
(10
English
(adjustable with the
Supplied accessories
See page 6.
Speaker section — SP-MXK55
Type: 3-way bass-reflex type
Speaker units: Woofer: 13.5 cm (5
Midrange: 5 cm (2 in.) cone x1
Tweeter: 2 cm (
Power handling capacity:
90 W
Impedance: 6 Ω
Frequency range: 45 Hz — 20 000 Hz
Sound pressure level: 82 dB/W•m
Dimensions (approx.): 215 mm x 323 mm x 242 mm (W/H/D)
Mass (approx.): 3.3 kg (7.3 lbs) each
Design and specifications are subject to change without notice.
1
/2 in. x 12 3/4 in. x 9 9/16 in.)
(8
3
/8 in.) cone x1
13
/16 in.) dome x1
– 30 –
Page 36

Mains (AC) Line Instruction (not applicable for Europe, U.S.A., Canada, Australia, and
U.K.)
ANTENNA
AM
[ ]
FM 75
AUX IN
SPEAKER
[ ]
6-16
L
R
110
127
240
230-
220
VOLTAGE
SETTING
VIDEO
OUT
IMPORTANT for mains (AC) line
BEFORE PLUGGING IN, do check that your mains (AC)
line voltage corresponds with the position of the voltage
selector switch provided on the outside of this equipment
and, if different, reset the voltage selector switch, to
prevent from a damage or risk of fire/electric shock.
110
127
220
VOLTAGE
SETTING
240
230-
EN, CH
VICTOR COMPANY OF JAPAN, LIMITED
JVC
0601KSMMDWSAM
 Loading...