

Page 1

FPC Installation Instructions
Part No. 530-005362-01
Revision 2
1 October 2002
Contents FPC Description....................................................................................................................2
This document describes how to remove and replace a Flexible PIC Concentrator (FPC) on a
Juniper Networks M20, M40, M40e, or M160 Internet router.
For additional installation and configuration information, refer to the following
documentation:
! M20 Internet Router Hardware Guide
! M40 Internet Router Hardware Guide
! M40e Internet Router Hardware Guid e
! M160 Internet Router Hardware Guide
! JUNOS Internet Software Operational Mode Command Reference
! JUNOS Internet so ftware configuration guides
M20 FPC Description.....................................................................................................3
M40 FPC Description.....................................................................................................4
M40e FPCs Description................................................................. ...... ...... ..... ...... ..........5
M160 FPCs Description..................................................................................................7
Tools and Parts Required......................................................................................................8
Replace an FPC in an M20 Router.........................................................................................9
Remove an FPC from an M20 Router.............................................................................9
Install an FPC in an M20 Router...................................................................................10
Replace an FPC in an M40 Router.......................................................................................12
Remove an FPC from an M40 Router...........................................................................12
Install an FPC in an M40 Router...................................................................................14
Replace an FPC in an M40e or M160 Router.......................................................................16
Remove an FPC from an M40e or M160 Router...........................................................16
Install an FPC in an M40e or M160 Router...................................................................18
Replace a PIC in an M40e-FPC............................................................................................20
Remove a PIC from an M40e-FPC................................................................................21
Install a PIC in an M40e-FPC........................................................................................21
PIC Software Configuration.................................................................................................22
Contact Juniper Networks....................................................................................................22
•
•
•
•
•
•
•
•
•
•
•
•
•
•
•
•
•
•
•
•
•
•
•
•
•
•
•
•
•
•
•
•
•
•
•
•
•
•
•
•
•
•
•
•
•
•
•
•
FPC Installation Instructions
1
Page 2

FPC Description
•
FPC Description
•
•
•
•
•
•
•
•
•
•
•
•
•
•
•
•
•
•
•
•
•
•
•
•
•
•
•
•
•
•
•
•
•
•
•
•
•
•
•
•
•
•
•
•
•
•
•
•
•
•
•
•
•
•
•
•
•
The FPCs on a router house the Physical Interface Cards (PICs), which connect the router to
network media. The I/O Manager ASIC or ASICs on the FPC acc epts incoming data packets
from the PICs on the FPC and divides each packet into 64-byte cells. The cells cross the
midplane to the SFM, where another ASIC de cides how to distribute them among the
memory buffers located on and shared by all installed FPCs. After the SFM decides how to
forward a pa cket, the I/O Manager ASIC or ASICs on the FPC reassembles the corresponding
data cells back into network-packet form and passes the packet to the appropriate PIC for
transmission to the network.
FPCs are hot-insertable and hot-removable. When you remove or install an FPC, packet
forwarding halts for about 200ms while the Packet Forw arding Engin e ad j us ts to the change
in the amount of memory available in the pool located on and shared by all FPCs. When you
install an FPC into a functioning router, the Routing Engine downloads the FPC software, the
FPC runs its diagnostics, and the PICs housed on the FPC are enabled. Forwarding continues
uninterrupted during this process.
An FPC can be installed into any FPC slot, regardless of the PICs it contains, and any
combination of slots can be used. If a slot is empty, you must install a blank FPC panel to
shield it, so th at cooling air can circulate properly throughout the card cage.
For a description of the FPCs supported on each router, see the following sections:
! M20 FPC Description on page 3
! M40 FPC Description on page 4
! M40e FPCs De scription on page 5
! M160 FPCs Description on page 7
FPC Installation Instructions
2
Page 3
FPC Description
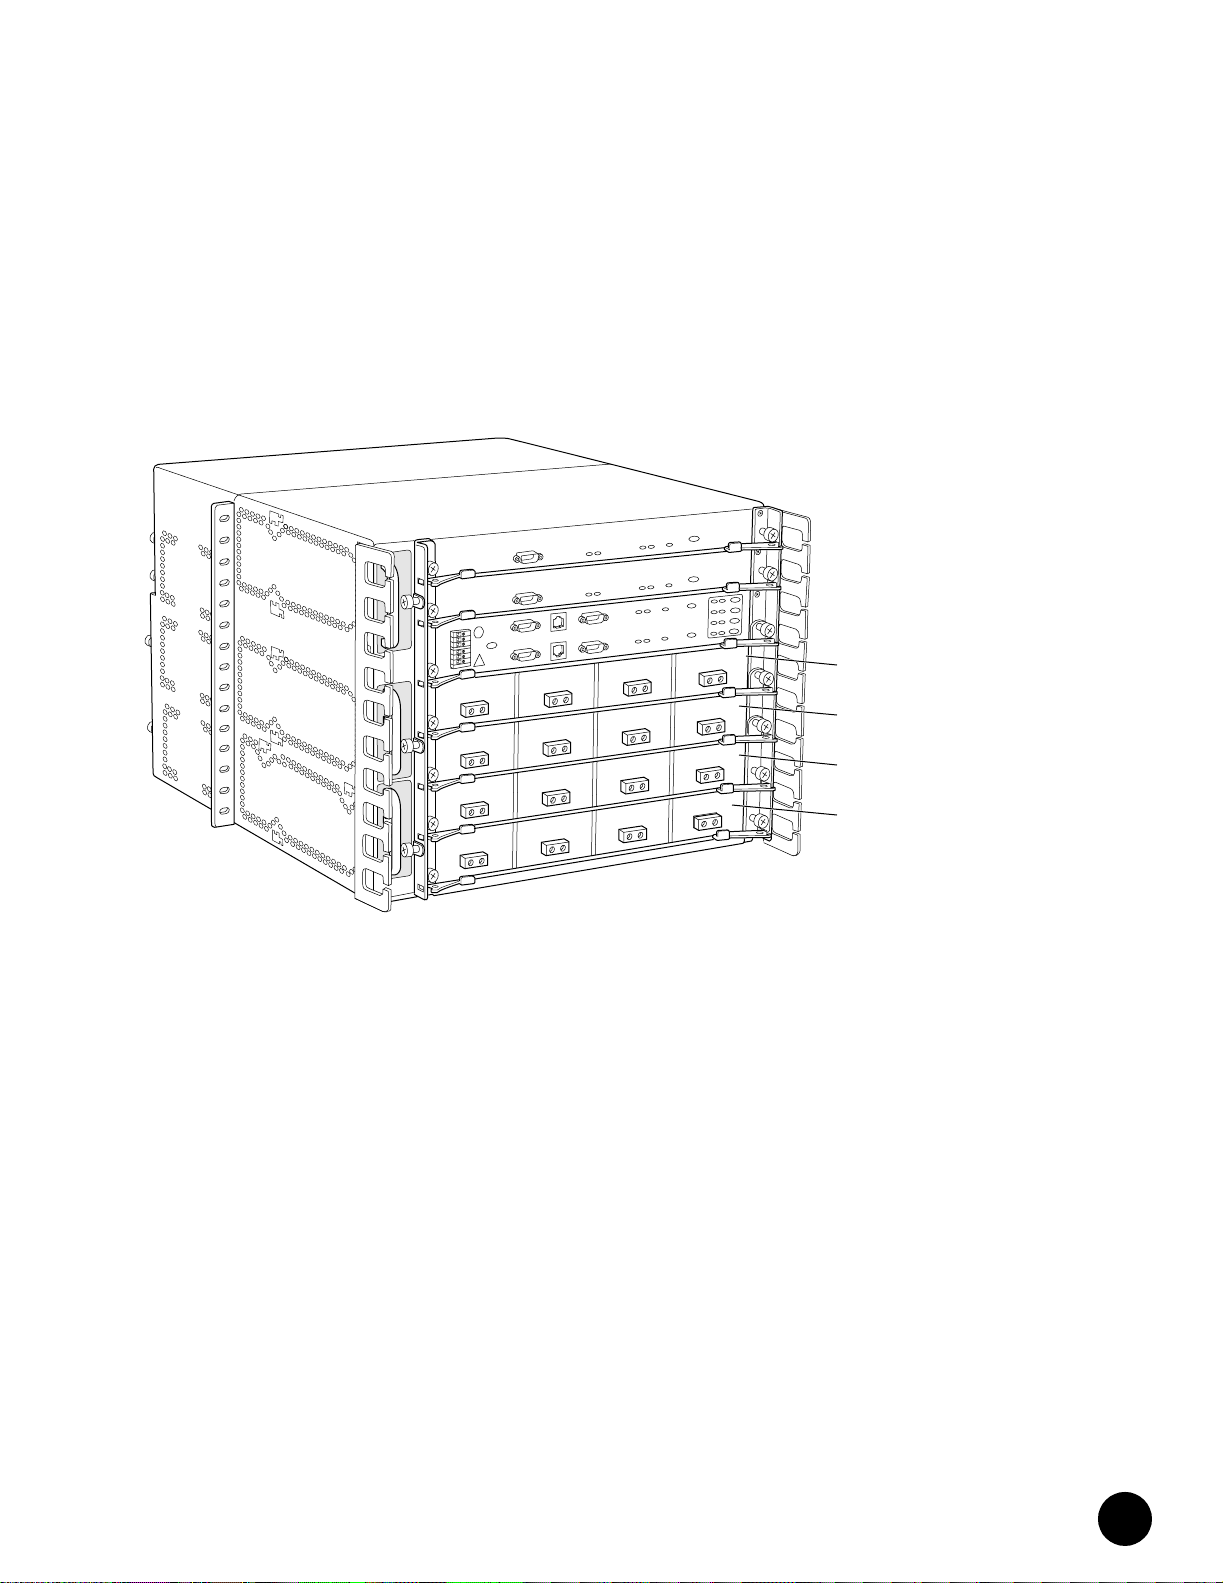
M20 FPC Description
In an M20 router, up to four FPCs install horizontally into the midplane from the front of the
chassis, below th e System and Sw itch Boar d (SSB). Each FPC is referenc ed by the number of
the slot in which it is installed. The slot numbers range from FPC0 through FPC3, from top to
bottom in the chassis. Each FPC accommodates up to four PICs. Figure 1 shows a chassis
with FPCs—each housing four PICs—installed in all four slots.
Figure 1: M20 Router with Four FPCs Installed
FPC0
FPC1
FPC2
FPC3
1111-B
•
•
•
•
•
•
•
•
•
•
•
•
•
•
•
•
•
•
•
•
•
•
•
•
•
•
•
•
•
•
•
•
•
•
•
•
•
•
•
•
•
•
•
•
•
•
•
•
•
•
•
•
•
•
•
•
•
•
FPC Installation Instructions
3
Page 4
FPC Description
•
M40 FPC Description
•
•
•
•
•
•
•
•
Figure 2: M40 Router with FPC Installed in Slot FPC7
•
•
•
•
•
•
•
•
•
•
•
•
•
•
•
•
•
•
•
•
•
•
•
•
•
•
•
•
•
•
•
•
•
•
•
•
•
•
•
•
•
•
•
•
•
•
•
•
•
In an M40 router, up to eight FPCs install vertically into the backplane from the front of the
chassis, four on either side o f t h e System Control Board ( S CB ) . Each FPC is referen ced by the
number of the slot in which it is installed. The slot numbers range from FPC0 through FPC7,
from left to right in the chassis. Each FPC can accommodate up to four PICs. Figure2 shows
an FPC housing four PICs installed in slot FPC7.
FPC
PICs
(installed in FPC)
FPC LEDs
1060
FPC Installation Instructions
4
Page 5
FPC Description
M40e FPCs Description
In an M40e router, up to eight FPCs install vertically into the midplane from the front of the
chassis. Each FPC is referenced by the number of the slot in which it is installed. The slot
numbers range from FPC0 through FPC7, from left to right in the chassis.
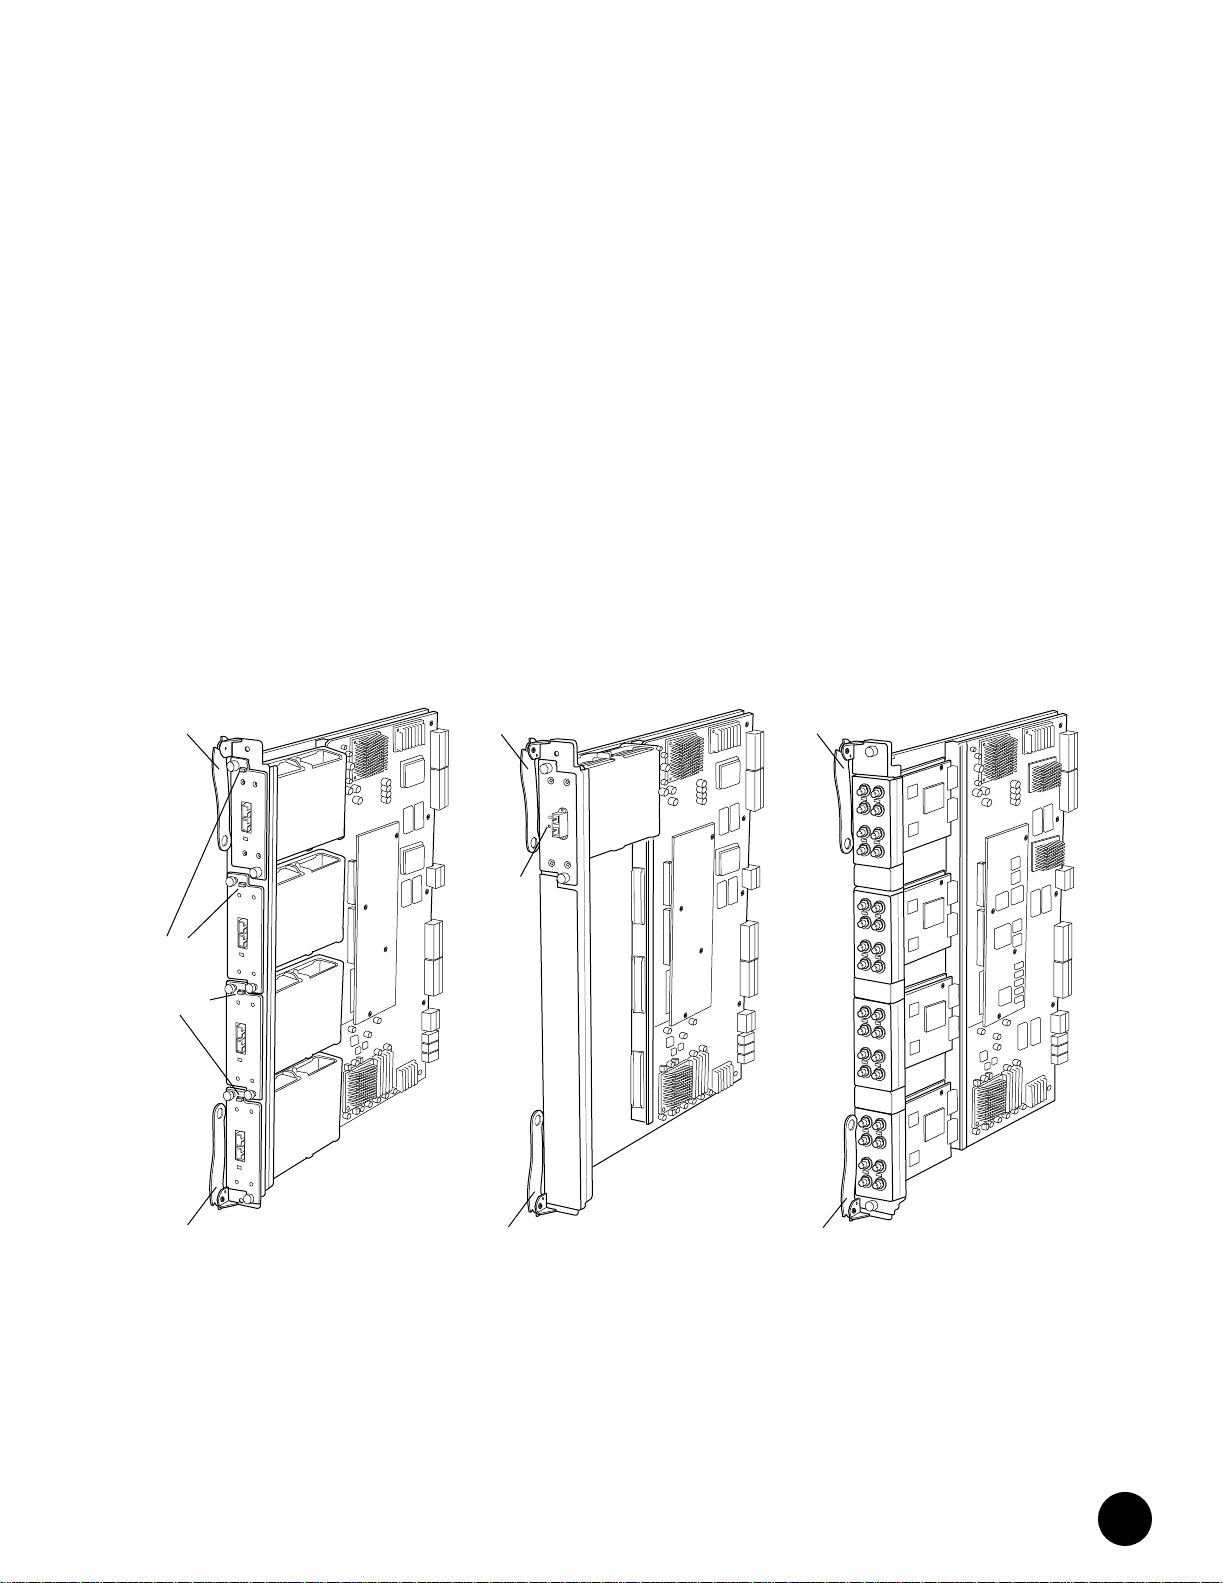
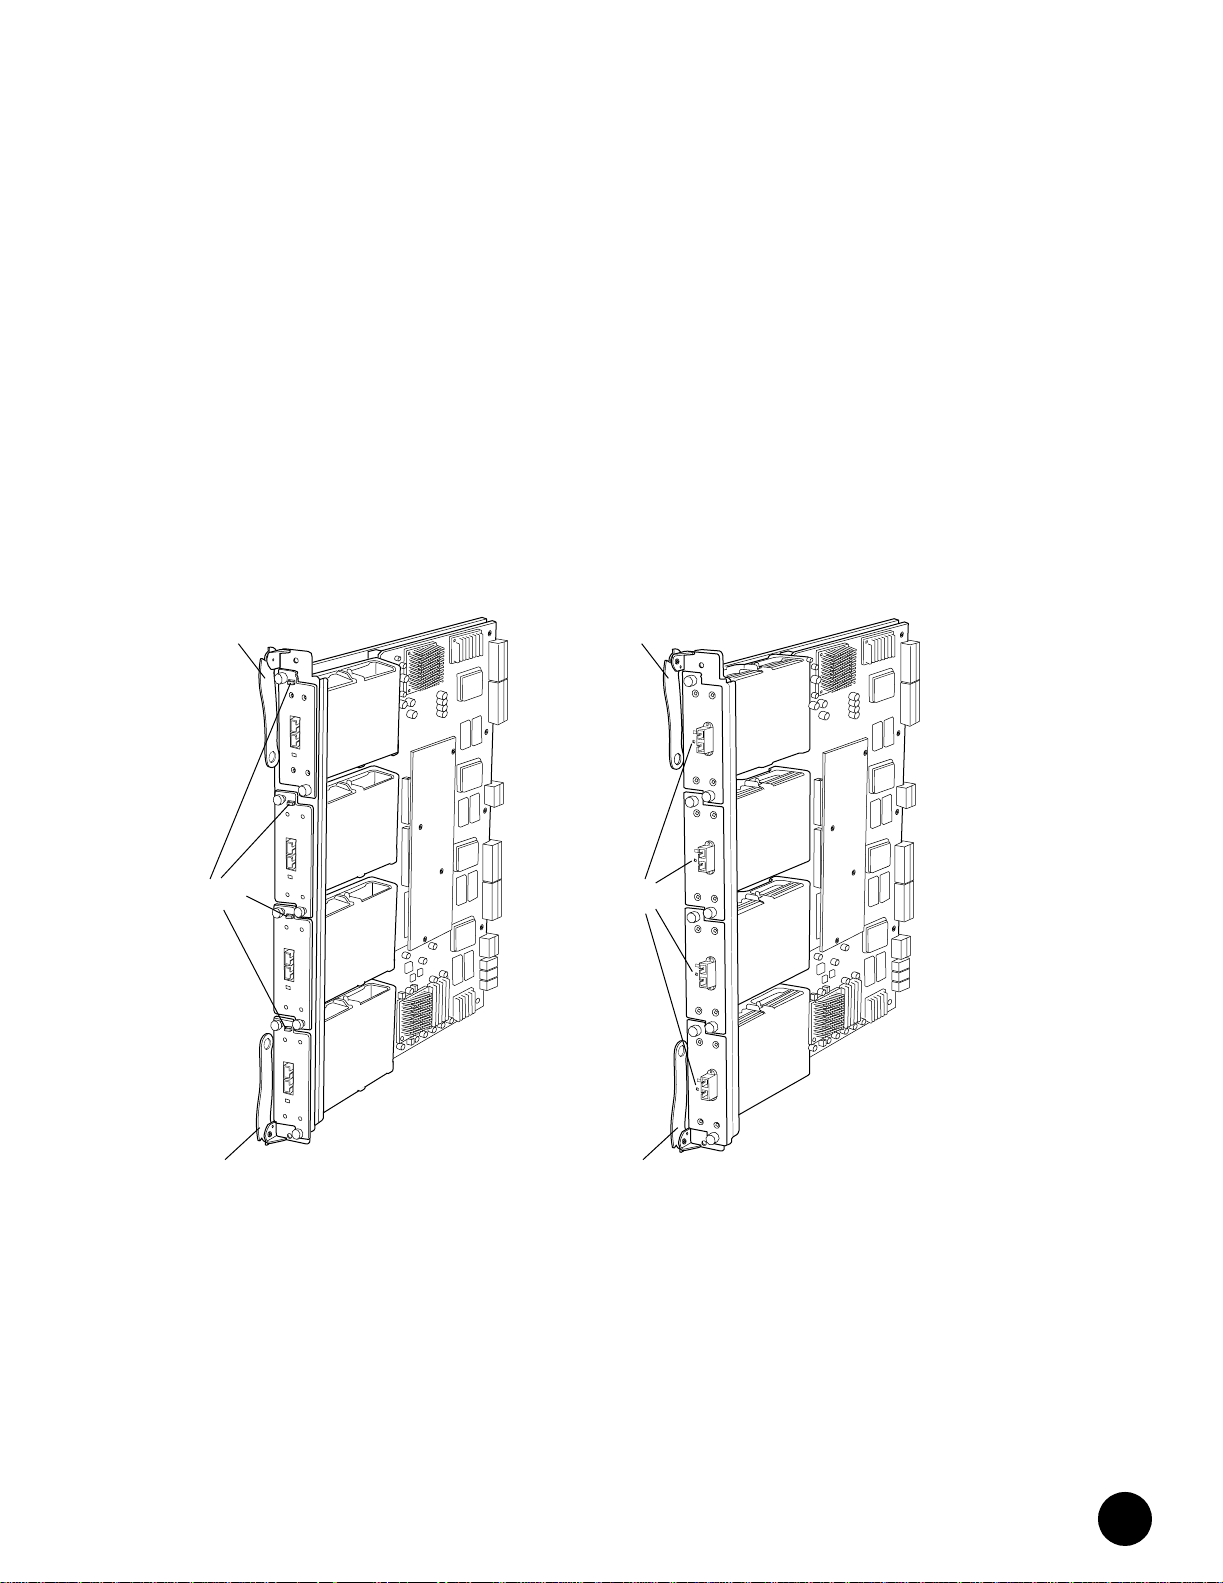
The M40e router supports the three types of FPC shown in Figure 3:
! M40e-FPC—Accommodates up to four PICs of the type also supported on
M20 and M40 routers.
! M40e-FPC1—Accommodates up to four lower-speed PICs such as single-port OC-12 and
Gigabit Ethernet interfaces. The offline button for each PIC is on the FPC card carrier.
! M40e-FPC2—Accommodates one higher-speed PIC, such as an OC-48/STM-16 interface.
The lower three slots in the M40e-FPC2 are covered by a blank panel. The offline button
for the PIC is on the PIC faceplate.
Figure 3: M40e-FPC, M40e-FPC1, and M40e-FPC2
M40e - FPC1
Ejector lever
Offline
buttons
(on FPC)
Ejector lever
Ejector lever
Offline
button
Ejector lever
M40e - FPC2
Ejector lever
Ejector lever
M40e-FPC
1944
•
•
•
•
•
•
•
•
•
•
•
•
•
•
•
•
•
•
•
•
•
•
•
•
•
•
•
•
•
•
•
•
•
•
•
•
•
•
•
•
•
•
•
•
•
•
•
•
•
•
•
•
•
•
•
•
•
•
FPC Installation Instructions
5
Page 6
FPC Description
•
•
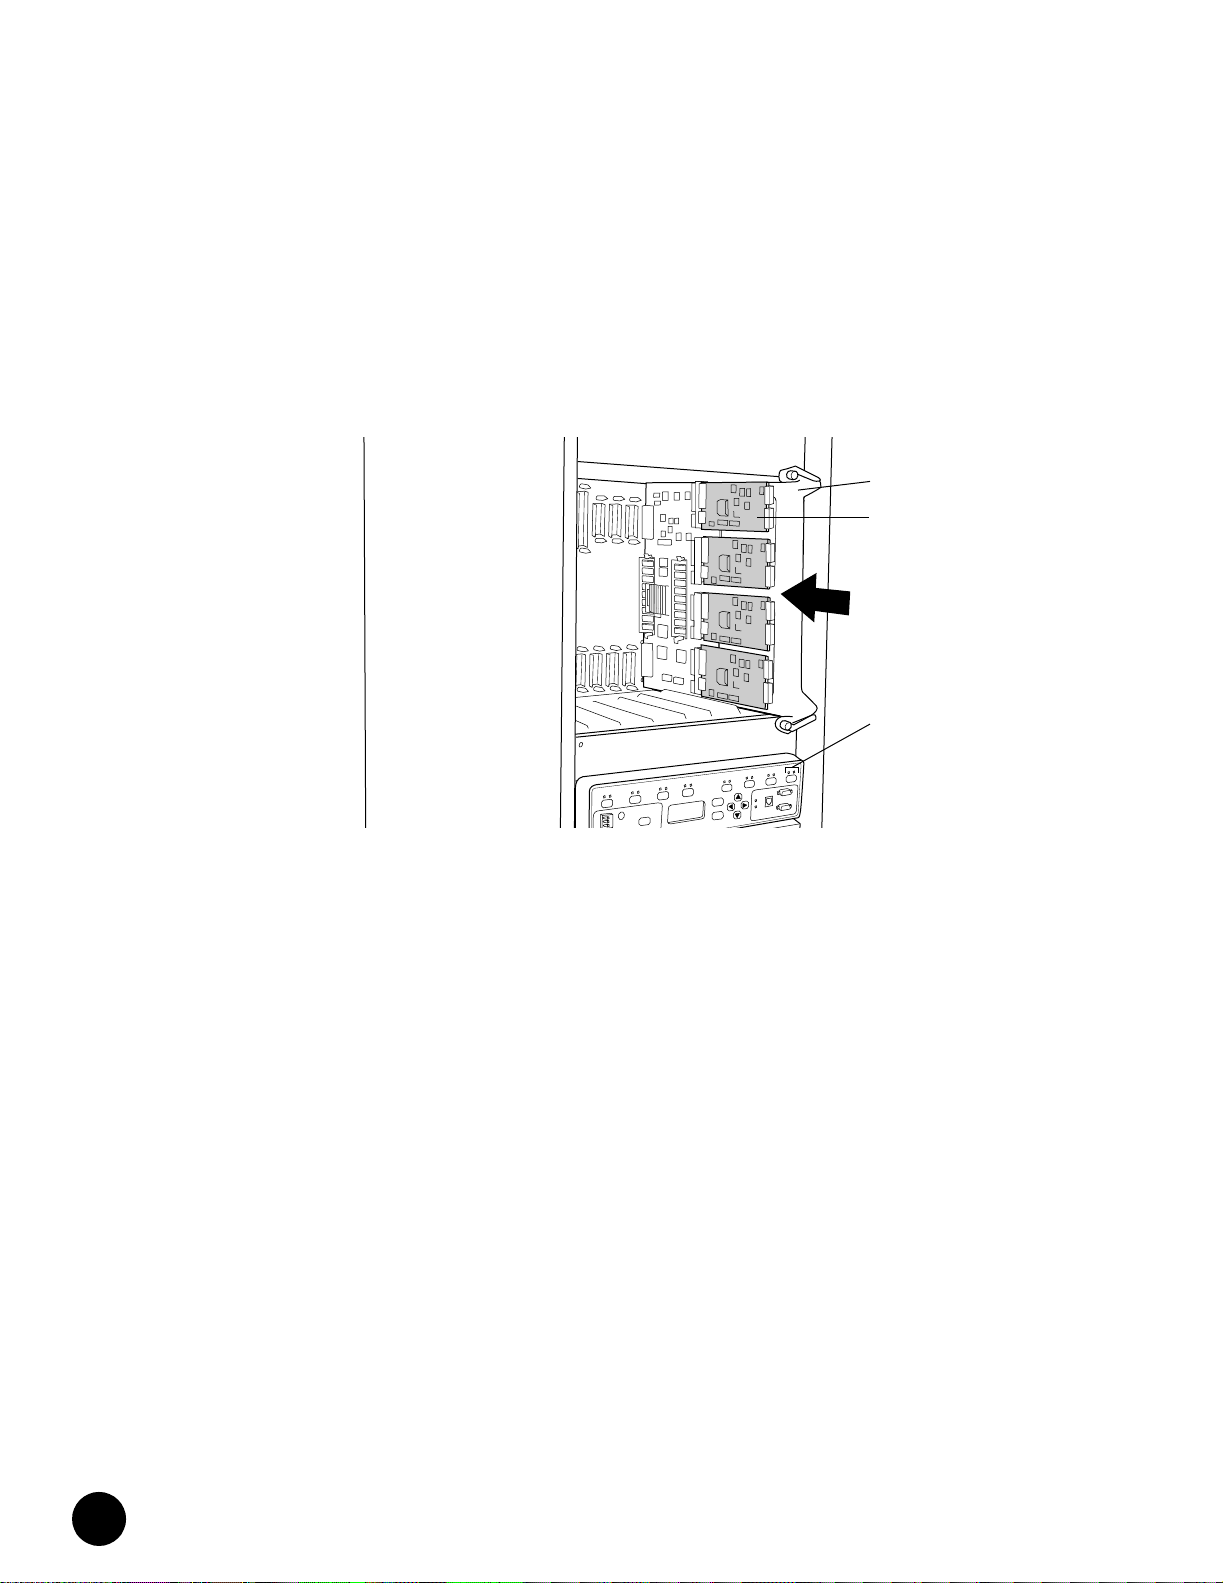
Any combination of the three types of FPC can be installed in the M40e router. Figure 4
shows an M40e router with an M40e-FPC1 (housing four PICs) installed in slot FPC0.
•
•
•
Figure 4: M40e Router with an M40e-FPC1 Installed in Slot FPC0
•
•
•
•
•
•
•
R
•
•
•
•
•
•
•
•
•
•
•
•
•
•
•
•
•
•
•
•
•
•
•
•
•
•
•
•
•
•
•
•
•
•
•
•
•
•
•
•
•
•
•
•
•
•
1909
FPC Installation Instructions
6
Page 7
FPC Description
M160 FPCs Description
In an M160 router, up to eight FPCs install vertically into the midplane from the front of the
chassis. Each FPC is referenced by the number of the slot in which it is installed. The slot
numbers range from FPC0 through FPC7, from left to right in the chassis.
The M160 router supports the two types of FPC shown in Figure 5:
! FPC1—Accommodates up to four lower-speed PICs such as single-port OC-12 and
Gigabit Ethernet interfaces. The offline button for each PIC is on the FPC card carrier.
! FPC2—Accommodates up to four higher-speed PICs, such as OC-48, and Tunnel
interfaces. The offline button for each PIC is on the PIC faceplate.
Figure 5: FPC1 and FPC2 for the M160 Router
FPC 1
Ejector lever
Offline buttons
(on FPC)
Ejector lever
Any combination of the two FPC t ypes can be installed in the M160 router. The installation
and removal of the two FPC types is identical, so the instructions in this document refer to
both types simply as “FP C”.
Ejector lever
Offline buttons
(on PICs)
Ejector lever
FPC 2
1187
•
•
•
•
•
•
•
•
•
•
•
•
•
•
•
•
•
•
•
•
•
•
•
•
•
•
•
•
•
•
•
•
•
•
•
•
•
•
•
•
•
•
•
•
•
•
•
•
•
•
•
•
•
•
•
•
•
•
FPC Installation Instructions
7
Page 8

Tools and Parts Required
•
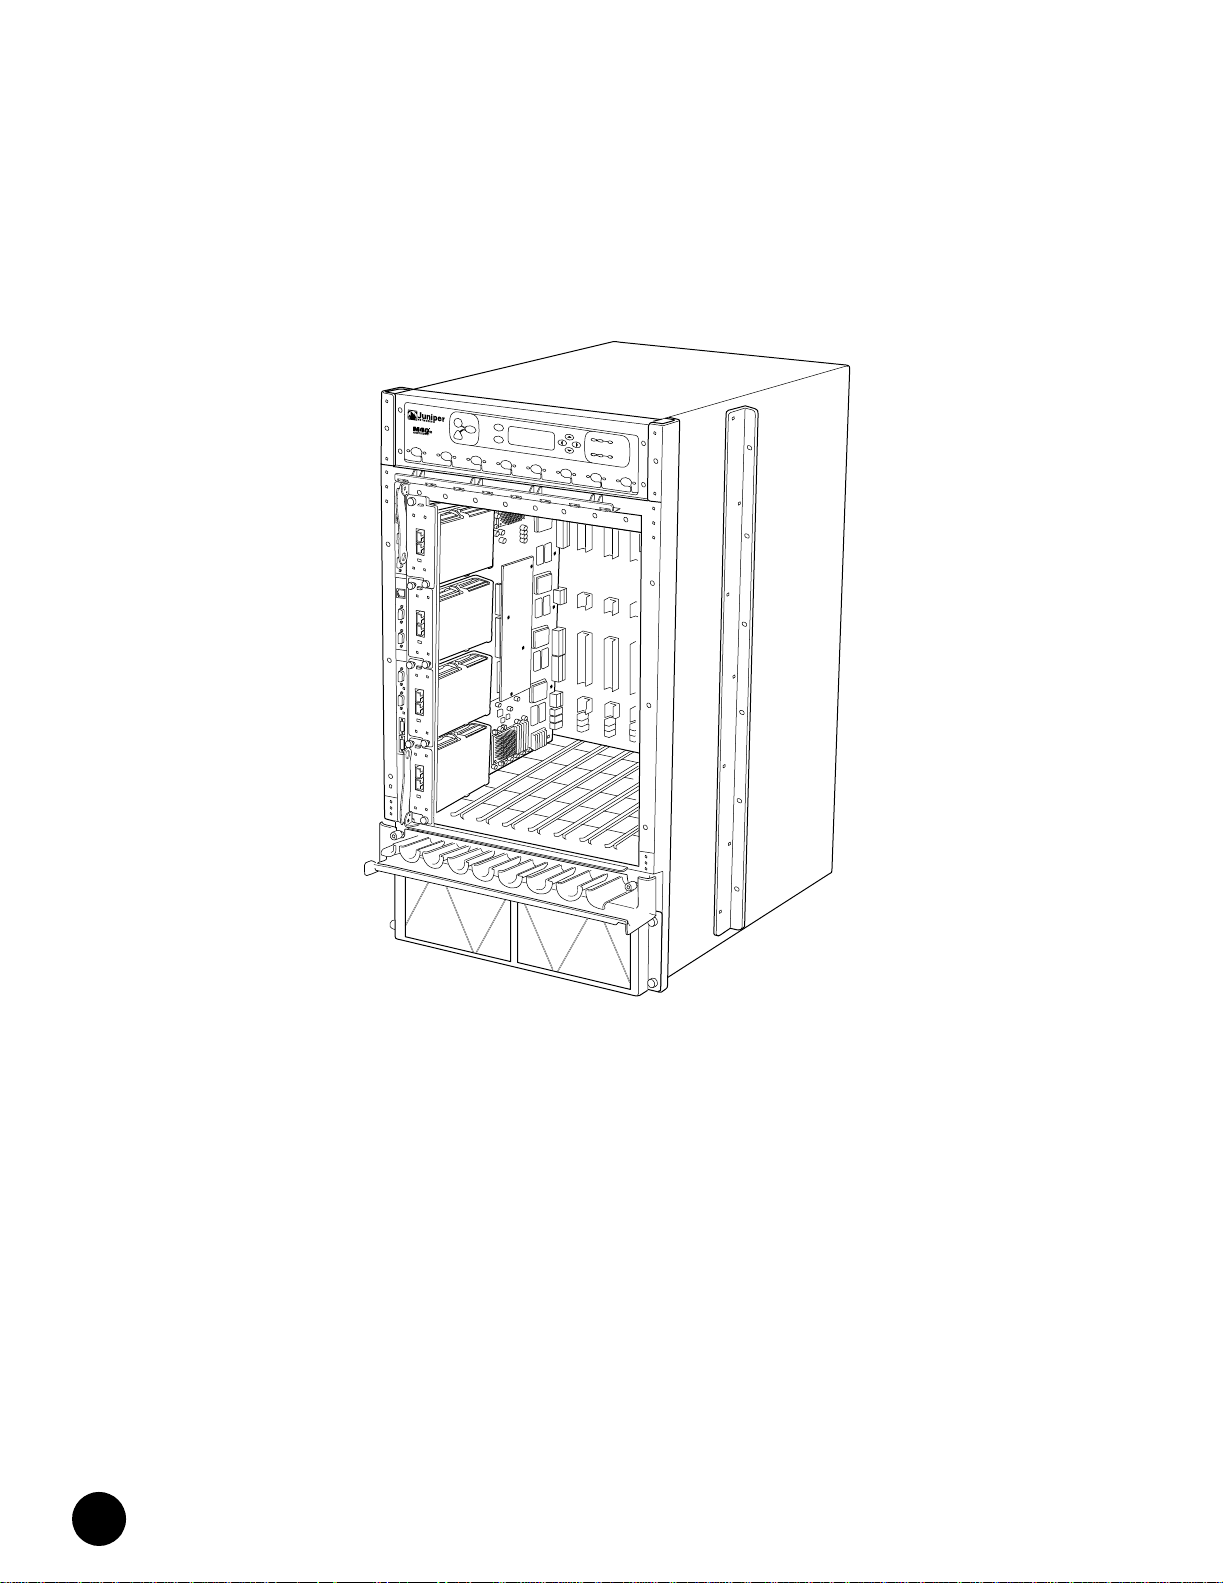
Figure 6 shows an M160 router with an FPC1 (housing four PICs) installed in slot FPC0.
•
•
Figure 6: M160 Router with an FPC1 Installed in Slot FPC0
•
•
•
•
•
R
•
•
•
•
•
•
•
•
•
•
•
•
•
•
•
•
•
•
•
•
•
•
•
•
•
•
•
•
•
•
Tools and Parts Required
•
•
•
•
•
•
•
•
•
•
To replace an FPC or a PIC, you need the following tools and parts:
! Phillips (+) screwdrivers, numbers 1 and 2
! Electrostatic bag or antistatic mat, one for each FPC removed from the chas sis and PIC
removed from an FPC
! ESD grounding wrist strap
•
•
•
•
•
•
•
•
•
•
1189
FPC Installation Instructions
8
Page 9

Replace an FPC in an M20 Router
Replace an FPC in an M20 Router
On an M20 router, the FPCs are hot-insertable and hot-removable, so you can remove and
replace them without powering down the router. When you remove an FPC, the router
continues to function, but the PICs installed on the FPC do not receive or transmit data.
For instructions, see the following sections:
! Remove an FPC from an M20 Router on page 9
! Install an FPC in an M20 Router on page 10
Remove an FPC from an M20 Router
The FPCs on an M20 router are located on the front of the chassis below the craft interface.
Each FPC, fully configured with four PICs, weighs about 3lbs (1.5 kg).
To remove an FPC from an M20 router, follow this procedure:
1. Place a antistatic foa m mat on a flat, stabl e surface to receive the FPC. If a foam mat is
not ava ilable , s u bst it u te a standard f lat antistati c ma t but use extra care whe n laying the
FPC on it to avoid damaging the electrical components. If any of the PICs on the FPC use
fiber-optic cable, also have ready a rubber safety cap for each transceiver and cable.
2. Att ach an ESD str ap to your ba re wrist and connect the str ap t o one of the ESD points o n
the chassis.
3. Label the cables connected to each PIC on the FPC so that you can reconnect the cables
to the correct PICs.
4. Take the FPC of fline by pressing and ho lding its offline button for 5 seconds or until the
green OK LED next to the button goes out. The FPC offline buttons are l o cated in a
column at the right side of the craft interface.
5. Disconnect the cables from the PICs on the FPC. If a PIC uses fiber-optic cable,
immediately cover each transceiver and the end of each cable with a rubber safety cap.
Carefully drape each disconnected cable over the covered metal hooks in the cable
management system at the top of the chassis front, to prevent the cables from
developing stress points.
Do not look directly into the ends of fiber-optic cables or
into the transceivers on the PIC faceplate. Single-mode
fiber-optic cable and the PICs that use it (such as ATM and
SONET/SDH i nterfaces) emit laser light that can damage
your eyes.
Do not leave a transceiv er unc over ed. The s afety cap k eeps
the port clean and prevents accidental exposure to laser
light.
6. Unscrew the thumbscrews at the left and right ends of the FPC.
7. Pull the ends of the extractor clips, which are adjacent to the thumbscrews, away from
the face of the FPC.
•
•
•
•
•
•
•
•
•
•
•
•
•
•
•
•
•
•
•
•
•
•
•
•
•
•
•
•
•
•
•
•
•
•
•
•
•
•
•
•
•
•
•
•
•
•
•
•
•
•
•
•
•
•
•
•
•
•
FPC Installation Instructions
9
Page 10

Replace an FPC in an M20 Router
•
•
•
•
•
•
•
•
•
•
•
•
•
•
•
•
•
•
•
Figure 7: Remove an FPC from an M20 Router
•
•
•
•
•
•
•
•
•
•
•
•
•
•
•
•
•
•
•
•
•
•
•
•
•
•
Install an FPC in an M20 Router
•
•
•
•
•
•
•
•
•
•
•
•
•
8. Grasp the FPC with both hands and slide it about halfway out o f the chassis.
SeeFigure7.
9. Place one hand underneath the FPC to support it, and slide it completely out of the
chassis. Set the FPC on the antistatic foam mat prepared in Step 1, component-side
down and with the PIC faceplates facing you.
10. If you are removing or replacing PICs on the FPC, see the instructions in the M20 Internet
Router Hardware Guide.
To install an FPC in an M20 router, follow this procedure:
1. Attach an ESD wrist strap to your bare wrist and connect the wrist strap to one of the
two ESD points on the chassis.
2. Install or remove PICs as desired by following the instructions in the M20 Internet Router
Hardware Gui de. You must install or remove PICs before installing the FPC into the
chassis . If a ny PI Cs us e f iber- opti c cab le, make sure th at e ach t r ansc ei v er i s co v er ed wi th
a rubber safety cap.
To avoid damaging any components, use extra care when
laying the FPC on the antistatic mat, particularly if the mat
is not made of foam.
Do not stack the FPC on top of or under any other
component.
PICs
FPC
1114
FPC Installation Instructions
10
Page 11

Replace an FPC in an M20 Router
3. Grasp the f ron t of th e FPC with bo th hand s and a lign th e r ear wit h the guides at th e sides
of the FPC slot in the chassis.
4. Slide the FPC straight into the card cage u ntil it contacts the midplane.
When about 1 in. (2.5 cm) of the FPC remains outside the
slot, adjust the insertion speed so that it takes between 1
and 15 seconds for the FPC to contact the midplane.
Completing the insertion too quickly or too slowly can
cause the router to reset.
5. Push the ends of the extractor clips, located at the left and right ends of the FPC, inward
toward the face of the FPC. See Figure 8.
6. Tighten the thumbscrews at the left and right ends of the FPC.
7. If any of the PICs on the FPC use fiber-optic cable, remove the rubber safety cap from
each transceiver and the end of each cable.
Do not look directly into the ends of fiber-optic cables or
into the transceivers on the PIC faceplate. Single-mode
fiber-optic cable and the PICs that use it (such as ATM and
SONET/SDH i nterfaces) emit laser light that can damage
your eyes.
8. Insert the appropriate cables into the cable connector ports on each PIC on the FPC.
Secure the cables so that they are not supporting their own weight. Place excess cable
out of the way in a neatly coiled loop, using the cable management system. Placing
fasteners on a loop helps to maintain its shape.
Do not let cab le hang free from the co nnector. Do not
allow fastened loops of cable to dangle from the ladder
rack, because this stresses the cable at the fastening point.
A v oid bend ing f iber- optic c ab le beyond its minimum bend
radius. An arc smaller than a few inches in diameter can
damage the cable and cause problems that are difficult to
diagnose.
9. If installing multiple FPCs, repeat Steps 2 through 8 for each one. Wait 30 seconds after
installing each FPC to allow the FPC and PICs to come online.
•
•
•
•
•
•
•
•
•
•
•
•
•
•
•
•
•
•
•
•
•
•
•
•
•
•
•
•
•
•
•
•
•
•
•
•
•
•
•
•
•
•
•
•
•
•
•
•
•
•
•
•
•
•
•
•
•
•
FPC Installation Instructions
11
Page 12

Replace an FPC in an M40 Router
•
Figure 8: Install an FPC in an M20 Router
•
•
•
•
•
•
•
•
•
•
•
•
•
•
•
•
•
•
•
•
•
•
•
•
•
Replace an FPC in an M40 Router
•
•
•
•
•
•
•
•
•
•
•
•
•
•
Remove an FPC from an M40 Router
•
•
•
•
•
•
•
•
•
•
•
•
•
•
•
•
•
•
On an M40 router, the FPCs are hot-insertable and hot-removable, so you can remove and
replace them without powering down the router. When you remove an FPC, the router
continues to function, but the PICs installed on the FPC do not receive or transmit data.
For instructions, see the following sections:
! Remove an FPC from an M40 Router on page 12
! Install an FPC in an M40 Router on page 14
The FPCs on an M40 router are located on the front of the chassis below the craft interface.
Each FPC, fully configured with four PICs, weighs about 3lbs (1.5 kg).
To remove an FPC from an M40 router, follow this procedure:
1. Place an antistatic foam mat on a flat, stable surface to receive the FPC. If a foam mat is
not ava ilable , s u bst it u te a standard f lat antistati c ma t but use extra care whe n laying the
FPC on it to avoid damaging the electrical components. If any of the PICs on the FPC use
fiber-optic cable, also have ready a rubber safety cap for each transceiver and cable.
2. Attach an ESD wrist strap to your bare wrist an d connect the s trap to one of the ESD
points on the chassis.
3. Label the cables connected to each PIC on the FPC so that you can r econnect each cable
to the correct PIC.
Craft
interface
PICs
FPC
1113
FPC Installation Instructions
12
Page 13

Replace an FPC in an M40 Router
4. Take the FPC of fline by pressing and holding its offline button for 5 seconds or until the
green OK LED next to the button goes out. The offline button for each FPC is located on
the craft interface just below the FPC slot.
5. Disconnect the cables from the PICs on the FPC. If a PIC uses fiber-optic cable,
immediately cover each transceiver and the end of each cable with a rubber safety cap.
Arrange the disconnected cables in the cable management system at the top of the
chassis front, to prevent the cables from developing stress points.
Do not look directly into the ends of fiber-optic cables or
into the transceivers on the PIC faceplate. Single-mode
fiber-optic cable and the PICs that use it (such as ATM and
SONET/SDH i nterfaces) emit laser light that can damage
your eyes.
Do not leave a transceiv er unc over ed. The s afety cap k eeps
the port clean and prevents accidental exposure to laser
light.
A v oid bend ing f iber- optic c ab le beyond its minimum bend
radius. An arc smaller than a few inches in diameter can
damage the cable and cause problems that are difficult to
diagnose.
6. Unscrew the thumbscrews at the top and bottom of the FPC.
7. Pull the ends of the extractor clips, which are adjacent to the thumbscrews, away from
the face of the FPC. See Figure 9.
8. Grasp the FPC with both hands and slide it about halfway out o f the chassis.
9. Place one hand underneath the FPC to support it, and slide it completely out of the
chassis. Set the FPC on the antistatic foam mat prepared in Step 1, component-side
down and with the PIC faceplates facing you.
To avoid damaging any components, use extra care when
laying the FPC component-side down on the antistatic
mat, particularly if the mat is not made of foam.
Do not stack the FPC on top of or under any other
component.
10. If you are removing or replacing PICs on the FPC, see the instructions in the
M40 Internet Router Hardware Guide.
•
•
•
•
•
•
•
•
•
•
•
•
•
•
•
•
•
•
•
•
•
•
•
•
•
•
•
•
•
•
•
•
•
•
•
•
•
•
•
•
•
•
•
•
•
•
•
•
•
•
•
•
•
•
•
•
•
•
FPC Installation Instructions
13
Page 14

Replace an FPC in an M40 Router
•
Figure 9: Remove an FPC from an M40 Router
•
•
•
•
•
•
•
•
•
•
•
•
•
•
•
•
•
•
•
•
•
•
Install an FPC in an M40 Router
•
•
•
•
•
•
•
•
•
•
•
•
•
•
•
•
•
•
•
•
•
•
•
•
•
•
•
•
•
•
•
•
•
•
•
To install an FPC in an M40 router, follow this procedure:
1. Att ach an ESD str ap to your ba re wrist and connect the str ap t o one of the ESD points o n
the chassis.
2. Install or remove PICs as desired by following the instructions in the M40 Internet Router
Hardware Gui de. You must install or remove PICs before installing the FPC into the
chassis . If a ny PI Cs us e f iber- opti c cab le, make sure th at e ach t r ansc ei v er i s co v er ed wi th
a rubber safety cap.
3. Align the rear bottom co rners of the FPC with the guides at the bottom of the FPC slot.
Slide the FPC all the way into the card cage until it contacts the backplane.
4. Push the ends of the e xt ract or c lips , located at th e to p and bott om of the FPC , t ow ar d the
face of the FPC. See Figure 10.
5. Tighten the thumbscrews at the top and bottom of the FPC.
7
1059
When about 1 in. (2.5 cm) of the FPC remains outside the
slot, adjust the insertion speed so that it takes between 1
and 15 seconds for the FPC to contact the backplane.
Completing the insertion too quickly or too slowly can
cause the router to reset.
FPC Installation Instructions
14
Page 15

Replace an FPC in an M40 Router
6. If any of the PICs on the FPC connect to fiber-optic cable, remove the rubber safety cap
from each transceiver and each cable.
7. Insert the appropriate cable into the cable connector ports on each PIC on the FPC.
Secure the cables so that they are not supporting their own weight. Place excess cable
out of the way in a neatly coiled loop, using the cable management system. Placing
fasteners on a loop helps to maintain its shape.
8. If installing multiple FPCs, repeat Steps 2 through 7 for each one. Wait 30 seconds after
installing each FPC to allow the FPC and PICs to come online.
Figure 10: Install an FPC in an M40 Router
Do not look directly into the ends of fiber-optic cables or
into the transceivers on the PIC faceplate. Single-mode
fiber-optic cable and the PICs that use it (such as ATM and
SONET/SDH i nterfaces) emit laser light that can damage
your eyes.
Do not let cab le hang free from the co nnector. Do not
allow fastened loops of cable to dangle from the ladder
rack, because this stresses the cable at the fastening point.
A v oid bend ing f iber- optic c ab le beyond its minimum bend
radius. An arc smaller than a few inches in diameter can
damage the cable and cause problems that are difficult to
diagnose.
FPC
PICs
(installed in FPC)
FPC LEDs
1060
•
•
•
•
•
•
•
•
•
•
•
•
•
•
•
•
•
•
•
•
•
•
•
•
•
•
•
•
•
•
•
•
•
•
•
•
•
•
•
•
•
•
•
•
•
•
•
•
•
•
•
•
•
•
•
•
•
•
FPC Installation Instructions
15
Page 16

Replace an FPC in an M40e or M160 Router
•
Replace an FPC in an M40e or M160 Router
•
•
•
•
•
•
•
•
•
•
•
•
•
•
Remove an FPC from an M40e or M160 Router
•
•
•
•
•
•
•
•
•
•
•
•
•
•
•
•
•
•
•
•
•
•
•
•
•
•
•
•
•
•
•
•
•
•
•
•
•
•
•
•
•
•
•
On an M40e or M160 router, the FPCs are hot-insertable and hot-removable, so you can
remove and replace them without powering down the router. When you remove an FPC, the
router continues to function, but the PICs installed on the FPC do not receive or transmit
data.
For instructions, see the following sections:
! Remove an FPC from an M40e or M160 Router on page 16
! Install an FPC in an M40e or M160 Router on page 18
The FPCs on an M40e or M160 router are located on the front of the chassis below the craft
interface. Each FPC weighs up to 15 lb (6.8kg).
To remove an FPC, follow this procedure:
1. Place an antistatic mat on a flat, stable surface to receive the FPC. If removing an
M40e-FPC from an M40e router, use a foam mat; if one is not available, substitute a
standard flat antistatic mat but use extra care when laying the M40e-FPC on it to avoid
damaging the electrical components. If any of the PICs on the FPC use fiber-optic cable,
also have ready a rubber saf e ty cap for each transceiver and cable.
2. Att ach an ESD str ap to your ba re wrist and connect the str ap t o one of the ESD points o n
the chassis.
3. Label the cables connected to each PIC on the FPC so that you can later reconnect the
cables to the correct PICs.
4. Take the FPC offline by pressing and holding down its offline button for about 5 seconds
or until the red FAIL LED next to the button lights. The offline button for each FPC is
located on the craft interface directly above the FPC slot.
5. Disconnect the cables from the PICs on the FPC. If a PIC uses fiber-optic cable,
immediately cover each transceiver and the end of each cable with a rubber safety cap.
Arrange the disconnected cables in the cable management system directly below the
FPC card cage, to prevent the cables from developing stress points.
Do not look directly into the ends of fiber-optic cables or
into the transceivers on the PIC faceplate. Single-mode
fiber-optic cable and the PICs that use it (such as ATM and
SONET/SDH i nterfaces) emit laser light that can damage
your eyes.
FPC Installation Instructions
16
Page 17

Replace an FPC in an M40e or M160 Router
Do not leave a transceiv er unc over ed. The s afety cap k eeps
the port clean and prevents accidental exposure to laser
light.
A v oid bend ing f iber- optic c ab le beyond its minimum bend
radius. An arc smaller than a few inches in diameter can
damage the cable and cause problems that are difficult to
diagnose.
6. If you need to remove or replace PICs in an M40e-FPC1 or M40e-FPC2 or on an
M160 router, perform the removal or replacemen t now, before removing the FPC
from the chassis. For instructions, see the M40e Internet Router Har d ware Guide or
M160 Internet Router Hardware Guide . If removing or replacing PICs in an M40e-FPC,
wait until Step 11.
7. Unscrew the thumbscrews at the top and bottom of the FPC.
8. Pull the ends of the ejector levers, which are adjacent to the thumbscrews, away from
the face of the FPC until they are nearly perpendicular to it (see Figure 11, which s hows
an M160 router).
9. Grasp the FPC with both hands and slide it about halfway out o f the chassis.
10. Place one hand under the FPC to support it and slide it completely out of the chassis.
Set the FPC on the antistatic foam mat prepared in Step 1.
The weight of the FPC is concentrated in the back end. Be
prepared to accept the full weight—up to 15 lb (6.8 kg)—as
you slide the FPC out of the chassis.
Do not hold the FPC b y the e jecto r lev er s , bus bar s , or e dge
connectors. They cannot support its weight.
To avoid damaging any components, use extra care when
laying an M40e-FPC component-side down on the
antistatic mat, particularly if the mat is not made of foam.
Do not stack the FPC on top of or under any other
component.
11. If removing or replacing PICs on an M40e-FPC, see the instructions in “Replace a PIC in
an M40e-FPC ” on page 20.
•
•
•
•
•
•
•
•
•
•
•
•
•
•
•
•
•
•
•
•
•
•
•
•
•
•
•
•
•
•
•
•
•
•
•
•
•
•
•
•
•
•
•
•
•
•
•
•
•
•
•
•
•
•
•
•
•
•
FPC Installation Instructions
17
Page 18

Replace an FPC in an M40e or M160 Router
•
Figure 11: Remove an FPC from an M40e or M160 Router
•
•
•
•
•
Offline button
•
•
•
•
•
•
•
•
•
•
•
•
•
•
Ejector levers
•
•
•
•
•
•
•
•
•
•
•
•
•
•
•
•
Install an FPC in an M40e or M160 Router
•
•
To install an FPC in an M40e or M160 router, follow this procedure (see Figure 12):
•
•
•
1. Att ach an ESD str ap to your ba re wrist and connect the str ap t o one of the ESD points o n
the chassis.
•
•
•
•
2. If installing an M40e-FPC, you must install PICs into it now, before installing the
M40e-FPC in th e chassis. See the instructions in “Replace a PIC in an M40e-FPC” on
page 20.
•
•
•
If installing an M40e-FPC1 or M40e-FPC2 in an M40e router or any FPC in an M160
router, wait to remove or replace PICs until Step 7.
•
•
•
If any PICs already ins talled in the FPC use fiber-optic cable, make sure that each
transceiver is covered with a rubber safety cap.
•
•
•
3. Verify that the ends of the ejector levers, which are locat ed at the top and bottom of the
FPC, are pushed outward, nearly perpendicular to the face of the FPC.
•
•
•
•
R
1191
FPC Installation Instructions
18
Page 19

Replace an FPC in an M40e or M160 Router
4. Grasp the front of the FPC with one hand and place the other hand under the FPC to
support it.
Do not hold the FPC b y the e jecto r lev er s , bus bar s , or e dge
connectors. They cannot support its weight.
5. Align the rear bottom c o rners of the FPC wit h the guides at th e bottom of the desired
FPC slot. Slide the FPC all the way into the card cage until it contacts the midplane.
When an M40e-FPC is ins t alle d in th e chass is, the lettering
on the faceplates of the PICs is upside down .
6. Push the end s o f t he ej e ctor lev ers inward until they are nearly flush with the face of the
FPC (see Figure 12, which shows an M160 router).
7. If installing an M40e-FPC1 or M40e-FPC2 in an M40e router or any FPC in an
M160 router, you can remove or replace PICs at this point. For instructions, see the
M40e Internet Router Hardware Guide or M160 Internet Router Hardware Guide.
8. If any of the PICs on the FPC connect to fiber-optic cable, remove the rubber safety cap
from each tr an sc ei ver and cable.
Do not look directly into the ends of fiber-optic cables or
into the transceivers on the PIC faceplate. Single-mode
fiber-optic cable and the PICs that use it (such as ATM and
SONET/SDH i nterfaces) emit laser light that can damage
your eyes.
9. Insert the appropriate cable into the cable connector ports on each PIC on the FPC.
Secure the cables so that they are not supporting their own weight. Place excess cable
out of the way in a neatly coiled loop, using the cable management system. Placing
fasteners on a loop helps to maintain its shape.
Do not let cab le hang free from the co nnector. Do not
allow fastened loops of cable to dangle from the ladder
rack, because this stresses the cable at the fastening point.
A v oid bend ing f iber- optic c ab le beyond its minimum bend
radius. An arc smaller than a few inches in diameter can
damage the cable and cause problems that are difficult to
diagnose.
10. Press and hold the FPC offline button on the craft interface above the slot that houses
the FPC to bring the FPC and PICs online. When the FPC is online, the FPC LED labeled
OK on the craft inter face l ights steadily and you can release the offline button.
•
•
•
•
•
•
•
•
•
•
•
•
•
•
•
•
•
•
•
•
•
•
•
•
•
•
•
•
•
•
•
•
•
•
•
•
•
•
•
•
•
•
•
•
•
•
•
•
•
•
•
•
•
•
•
•
•
•
FPC Installation Instructions
19
Page 20

Replace a PIC in an M40e-FPC
•
Figure 12: Install an FPC in an M40e or M160 Router
•
•
•
•
•
•
•
•
•
•
•
•
•
•
•
•
•
•
•
Ejector
levers
•
•
•
•
•
•
•
•
•
•
•
•
•
•
•
•
You can also use the following CLI command to confirm correct FPC and PIC functioning:
user@host> show chassis fpc
•
•
For mo re inform at io n, se e th e JUNOS Internet Software Operational Mode Command Reference.
•
•
•
Replace a PIC in an M40e-FPC
•
•
•
•
•
•
•
To remove or replace a PIC in an M40e-FPC, see the instructions in the following sections:
! Remove a PIC from an M40e-FPC on page 21
! Install a PIC in an M40e-FPC on page 21
•
•
•
•
•
•
•
•
•
•
R
1193
FPC Installation Instructions
20
Page 21

Replace a PIC in an M40e-FPC
Remove a PIC from an M40e-FPC
To remove a PIC from an M40e-FPC, follow this procedure:
1. Place an electrostatic bag or antistatic mat on a flat, stable surface to receive the PIC.
2. Att ach an ESD str ap to your ba re wrist and connect the str ap t o one of the ESD points o n
the chassis.
3. With the M40e-FPC lying component-side down and with the PIC faceplates facing you,
use a screwdriver to loosen the two screws that secure the PIC to the FPC.
4. Carefully turn over the M4 0e-FPC and lay it on the ma t component-side up with the PIC
faceplat es f a ci n g y o u .
5. Arrows on the M40e-FPC indicate the position of metal bars that are attached to the PIC
circuit board near the front end. To remove the PIC from the slot, place a finger behind
each bar and pull the PIC toward you gently but firmly.
6. Place the PIC in the electrostatic bag or on the antistatic mat prepared in Step 1.
Install a PIC in an M40e-FPC
To install a PIC in an M40e-FPC, follow this procedure:
1. Attach an ESD wrist strap to your bare wrist, and connect the wrist strap to one of the
ESD points on the chassis.
2. Place the M40e-FPC on an antistatic foam mat, component-side up and with its
faceplate facing you. If a foam mat is not available, substitute a standard flat antistatic
mat but use extra care when laying the M40e-FPC on it to avoid damaging the electrical
components.
Do not grasp the PIC anywhere other than at the metal
bars described in the instruction. Do not touch or apply
force to the PIC’s heat s i nks, circuit boards (even at the
edges), or other electronic components.
You might need to rock the PIC back and forth to loosen it
from the connector in the M40e-FPC slot. T o a void bending
the pins on the connector, use the smallest and gentlest
motion possible.
•
•
•
•
•
•
•
•
•
•
•
•
•
•
•
•
•
•
•
•
•
•
•
•
•
•
•
•
•
•
•
•
•
•
•
•
•
•
•
•
•
•
•
•
•
•
•
•
•
•
•
•
•
•
•
•
•
•
FPC Installation Instructions
21
Page 22

PIC Software Configuration
•
•
•
3. Push the PIC part way into the M40e-FPC slot. Carefully align the tabs on the
PIC connector with the notches in the connector at the rear of the M40e-FPC slot,
and push the PIC in until the connectors join.
•
•
•
•
•
•
If the pins on the FPC connector are not aligned properly
with the holes in the PIC connector, the pins might be bent
or the holes damaged. Either kind of damage can prevent
the PIC and M40e-FPC from functioning correctly.
•
•
•
•
4. Carefully turn over the M40e-FPC and lay it component-side down on the mat with the
PIC faceplates facing you.
•
•
5. Using a Phi ll ip s screwd ri ver, tighten the two scr e ws that secure the PIC in the M40e -F PC.
•
•
•
PIC Software Configuration
•
•
•
•
•
•
•
•
If you have installed an FPC that houses one or more PICs, the PICs function only after you
add the necessary statements for them to the router configuration. For instructions, see the
JUNOS Internet Software Configuration Guide: Interfaces and Class of Service. If you have
installed a blank FPC panel or a blank PIC, you do not need to modify the router’s
configuration. T he router automatically discovers that the interfaces in an FPC slot or PIC
location are nonoperational and does not attempt to initialize them.
•
•
Contact Juniper Networks
•
•
•
•
•
•
•
•
•
•
•
•
•
•
For technical support, contact the Juniper Networks Technical Assistance Center (JTAC) at
support@juniper.net. If you are reporting a software problem, please issue the following
command from the CLI before contacting support:
user@host> request support information | save filename
For documentation issues, contact Juniper Networks at tech-doc@juniper.net.
When instructed by a JTAC representative to provide a core file for analysis, gzip the file,
rename the file to include your company name, copy it to ftp.juniper.net:pub/incoming, and
then send the filename, along with software version information (the output of the show
version command) and the configuration, to support@juniper.net.
•
•
•
•
•
•
•
•
•
Juniper Networks is registered in the U.S. Patent and Trademark Office and in other countries as a trademark of Juniper Networks, Inc. Broadband Cable
•
Processor, ERX, ESP, G1, G10, Internet Processor, JUNOS, JUNOScript, M5, M10, M20, M40, M40e, M160, MRX, M-series, NMC-RX, SDX, ServiceGuard,
•
T320, T640, T-series are trademarks of Juniper Networks, Inc. All other trademarks, service marks, registered trademarks, or registered service marks are
the property of their respective owners. All specifications are subject to change without notice.
•
•
Copyright © 2002, Juniper Networks, Inc.
•
All rights reserved. Printed in USA.
•
•
FPC Installation Instructions
22
 Loading...