

Page 1

Junos®Space
JA1500 Appliance User Guide
Published: 2012-12-10
Revision 1
Copyright © 2012, Juniper Networks, Inc.
Page 2

Juniper Networks, Inc.
1194 North Mathilda Avenue
Sunnyvale, California 94089
USA
408-745-2000
www.juniper.net
This product includes the Envoy SNMP Engine,developed by Epilogue Technology, an Integrated Systems Company. Copyright © 1986-1997,
Epilogue Technology Corporation. All rights reserved. This program and its documentation were developed at private expense, and no part
of them is in the public domain.
This product includes memory allocation software developed by Mark Moraes, copyright © 1988, 1989, 1993, University of Toronto.
This product includes FreeBSD software developed by the University of California, Berkeley, and its contributors. All of the documentation
and software included in the 4.4BSD and 4.4BSD-Lite Releases is copyrighted by the Regents of the University of California. Copyright ©
1979, 1980, 1983, 1986, 1988, 1989, 1991, 1992, 1993, 1994. The Regents of the University of California. All rights reserved.
GateD software copyright © 1995, the Regents of the University. All rights reserved. Gate Daemon was originated and developed through
release 3.0 by Cornell University and its collaborators. Gated is based on Kirton’s EGP, UC Berkeley’s routing daemon (routed), and DCN’s
HELLO routing protocol. Development of Gated has been supported in part by the National Science Foundation. Portions of the GateD
software copyright © 1988, Regents of the University of California. All rights reserved. Portions of the GateD software copyright © 1991, D.
L. S. Associates.
This product includes software developed by Maker Communications, Inc., copyright © 1996, 1997, Maker Communications, Inc.
Juniper Networks, Junos, Steel-Belted Radius, NetScreen, and ScreenOS are registered trademarks of Juniper Networks, Inc. in the United
States and other countries. The Juniper Networks Logo, the Junos logo, and JunosE are trademarks of Juniper Networks, Inc. All other
trademarks, service marks, registered trademarks, or registered service marks are the property of their respective owners.
Juniper Networks assumes no responsibility for any inaccuracies in this document. Juniper Networks reserves the right to change, modify,
transfer, or otherwise revise this publication without notice.
Products made or sold by Juniper Networks or components thereof might be covered by one or more of the following patents that are
owned by or licensed to Juniper Networks: U.S. Patent Nos. 5,473,599, 5,905,725, 5,909,440, 6,192,051, 6,333,650, 6,359,479, 6,406,312,
6,429,706, 6,459,579, 6,493,347, 6,538,518, 6,538,899, 6,552,918, 6,567,902, 6,578,186, and 6,590,785.
Junos Space Junos Space JA1500 Appliance
Copyright © 2012, Juniper Networks, Inc.
All rights reserved.
Revision History
December 2012— Juniper Networks Junos Space JA1500 Appliance, Release 12.3
The information in this document is current as of the date on the title page.
YEAR 2000 NOTICE
Juniper Networks hardware and software products are Year 2000 compliant. The Junos OS has no known time-related limitations through
the year 2038. However, the NTP application is known to have some difficulty in the year 2036.
END USER LICENSE AGREEMENT
The Juniper Networks product that is the subject of this technical documentation consists of (or is intended for use with) Juniper Networks
software. Use of such software is subject to the terms and conditions of the End User License Agreement (“EULA”) posted at
http://www.juniper.net/support/eula.html. By downloading, installing or using such software, you agree to the terms and conditions
of that EULA.
Copyright © 2012, Juniper Networks, Inc.ii
Page 3

Table of Contents
About the Documentation . . . . . . . . . . . . . . . . . . . . . . . . . . . . . . . . . . . . . . . . . . . . xi
Junos Space Documentation and Release Notes . . . . . . . . . . . . . . . . . . . . . . . xi
Documentation Conventions . . . . . . . . . . . . . . . . . . . . . . . . . . . . . . . . . . . . . . . xi
Documentation Feedback . . . . . . . . . . . . . . . . . . . . . . . . . . . . . . . . . . . . . . . . . xii
Requesting Technical Support . . . . . . . . . . . . . . . . . . . . . . . . . . . . . . . . . . . . . xii
Self-Help Online Tools and Resources . . . . . . . . . . . . . . . . . . . . . . . . . . . . . . . xiii
Opening a Case with JTAC . . . . . . . . . . . . . . . . . . . . . . . . . . . . . . . . . . . . . . . . xiii
Part 1 Overview
Chapter 1 Overview of the Junos Space JA1500 Appliance . . . . . . . . . . . . . . . . . . . . . . . . 3
Junos Space JA1500 Appliance Overview . . . . . . . . . . . . . . . . . . . . . . . . . . . . . . . . . 3
Junos Space Application Overview . . . . . . . . . . . . . . . . . . . . . . . . . . . . . . . . . . 4
Parts of the Junos Space JA1500 Appliance . . . . . . . . . . . . . . . . . . . . . . . . . . . . . . . 4
JA1500 Appliance Front Panel . . . . . . . . . . . . . . . . . . . . . . . . . . . . . . . . . . . . . . 4
Mounting Brackets . . . . . . . . . . . . . . . . . . . . . . . . . . . . . . . . . . . . . . . . . . . . 5
Chassis . . . . . . . . . . . . . . . . . . . . . . . . . . . . . . . . . . . . . . . . . . . . . . . . . . . . . 5
Hard Disks . . . . . . . . . . . . . . . . . . . . . . . . . . . . . . . . . . . . . . . . . . . . . . . . . . 5
Ports . . . . . . . . . . . . . . . . . . . . . . . . . . . . . . . . . . . . . . . . . . . . . . . . . . . . . . . 6
RAID Controller . . . . . . . . . . . . . . . . . . . . . . . . . . . . . . . . . . . . . . . . . . . . . . 6
Status LEDs . . . . . . . . . . . . . . . . . . . . . . . . . . . . . . . . . . . . . . . . . . . . . . . . . 6
JA1500 Rear Panel . . . . . . . . . . . . . . . . . . . . . . . . . . . . . . . . . . . . . . . . . . . . . . . . 7
Cooling System . . . . . . . . . . . . . . . . . . . . . . . . . . . . . . . . . . . . . . . . . . . . . . 7
AC Power Switch . . . . . . . . . . . . . . . . . . . . . . . . . . . . . . . . . . . . . . . . . . . . . 7
Power Supply . . . . . . . . . . . . . . . . . . . . . . . . . . . . . . . . . . . . . . . . . . . . . . . . 7
Understanding How Nodes Are Connected in a Fabric . . . . . . . . . . . . . . . . . . . . . . 8
NTP Time Source For Each JA1500 Appliance . . . . . . . . . . . . . . . . . . . . . . . . . . . . . 9
Fabric Management Overview . . . . . . . . . . . . . . . . . . . . . . . . . . . . . . . . . . . . . . . . . . 9
Single Node Functionality . . . . . . . . . . . . . . . . . . . . . . . . . . . . . . . . . . . . . . . . . 10
Multinode Functionality . . . . . . . . . . . . . . . . . . . . . . . . . . . . . . . . . . . . . . . . . . . 11
Node Function Availability . . . . . . . . . . . . . . . . . . . . . . . . . . . . . . . . . . . . . . . . . 13
Part 2 Planning
Chapter 2 Planning for the Junos Space JA1500 Appliance . . . . . . . . . . . . . . . . . . . . . . . 17
Rack Requirements and Specifications for a Junos Space JA1500 Appliance . . . . 17
Environmental Requirements for the Junos Space JA1500 Appliance . . . . . . . . . . 18
Power Requirements for a Junos Space JA1500 Appliance . . . . . . . . . . . . . . . . . . 19
iiiCopyright © 2012, Juniper Networks, Inc.
Page 4

JA1500 Appliance User Guide
Part 3 Safety
Chapter 3 Safety and Compliance for the Junos Space JA1500 Appliance . . . . . . . . . 23
Part 4 Installation
Chapter 4 Installing the Junos Space JA1500 Appliance . . . . . . . . . . . . . . . . . . . . . . . . . 29
General Safety Guidelines and Warnings for the Junos Space JA1500
Appliance . . . . . . . . . . . . . . . . . . . . . . . . . . . . . . . . . . . . . . . . . . . . . . . . . . . . . 23
Fire Safety Requirements for the Junos Space JA1500 Appliance . . . . . . . . . . . . . 24
Fire Suppression . . . . . . . . . . . . . . . . . . . . . . . . . . . . . . . . . . . . . . . . . . . . . . . . 24
Fire Suppression Equipment . . . . . . . . . . . . . . . . . . . . . . . . . . . . . . . . . . . . . . 24
Unpacking the Junos Space JA1500 Appliance . . . . . . . . . . . . . . . . . . . . . . . . . . . 29
Attaching Mounting Brackets to a Junos Space JA1500 Appliance . . . . . . . . . . . . 30
Installing the Junos Space JA1500 Appliance in a Rack and Connecting the
Cables . . . . . . . . . . . . . . . . . . . . . . . . . . . . . . . . . . . . . . . . . . . . . . . . . . . . . . . . . 31
Connecting a Console to a Junos Space JA1500 Appliance . . . . . . . . . . . . . . . . . . 33
Booting and Configuring the Junos Space JA1500 Appliance . . . . . . . . . . . . . . . . 33
Booting and Configuring the Junos Space JA1500 Appliance from a USB
Drive . . . . . . . . . . . . . . . . . . . . . . . . . . . . . . . . . . . . . . . . . . . . . . . . . . . . . . . . . . 34
Part 5 Configuration
Chapter 5 Configuring the Junos Space JA1500 Appliance . . . . . . . . . . . . . . . . . . . . . . . 41
Configuring Basic Settings for a Junos Space JA1500 Appliance . . . . . . . . . . . . . . 41
Understanding How Junos Space Uses Ethernet Interfaces eth0 and eth3 . . . . . 44
Changing Network and System Settings for a Junos Space Appliance . . . . . . . . . 45
Changing the Password . . . . . . . . . . . . . . . . . . . . . . . . . . . . . . . . . . . . . . . . . . 45
Setting Routing Option . . . . . . . . . . . . . . . . . . . . . . . . . . . . . . . . . . . . . . . . . . . 46
Adding DNS Servers . . . . . . . . . . . . . . . . . . . . . . . . . . . . . . . . . . . . . . . . . . . . . 46
Setting the System Time . . . . . . . . . . . . . . . . . . . . . . . . . . . . . . . . . . . . . . . . . 46
Retrieving Logs . . . . . . . . . . . . . . . . . . . . . . . . . . . . . . . . . . . . . . . . . . . . . . . . . 47
Configuring Security . . . . . . . . . . . . . . . . . . . . . . . . . . . . . . . . . . . . . . . . . . . . . 48
Running the Shell . . . . . . . . . . . . . . . . . . . . . . . . . . . . . . . . . . . . . . . . . . . . . . . 49
Viewing Nodes in the Fabric . . . . . . . . . . . . . . . . . . . . . . . . . . . . . . . . . . . . . . . . . . 49
Changing Views . . . . . . . . . . . . . . . . . . . . . . . . . . . . . . . . . . . . . . . . . . . . . . . . 49
Viewing Fabric Node Details . . . . . . . . . . . . . . . . . . . . . . . . . . . . . . . . . . . . . . 50
Adding a Node in the Fabric . . . . . . . . . . . . . . . . . . . . . . . . . . . . . . . . . . . . . . . . . . . 52
Adding a Node . . . . . . . . . . . . . . . . . . . . . . . . . . . . . . . . . . . . . . . . . . . . . . . . . . 53
Part 6 Upgrading
Chapter 6 Upgrading the Junos Space JA1500 Appliance Software . . . . . . . . . . . . . . . 57
Junos Space Software Upgrade Overview . . . . . . . . . . . . . . . . . . . . . . . . . . . . . . . 57
Upgrading the Junos Space Software . . . . . . . . . . . . . . . . . . . . . . . . . . . . . . . . . . . 58
Junos Space 11.3 Release Highlights . . . . . . . . . . . . . . . . . . . . . . . . . . . . . . . . . 58
Before You Begin . . . . . . . . . . . . . . . . . . . . . . . . . . . . . . . . . . . . . . . . . . . . . . . . 59
Upgrading Junos Space Release 11.1 or 11.2 to Release 11.3 . . . . . . . . . . . . . . . 59
Upgrading the Network Application Platform . . . . . . . . . . . . . . . . . . . . . . . . . . . . 59
Copyright © 2012, Juniper Networks, Inc.iv
Page 5

Table of Contents
Part 7 Troubleshooting
Chapter 7 Troubleshooting the Junos Space JA1500 Appliance Hardware . . . . . . . . . 65
Removing and Installing a Hard Disk . . . . . . . . . . . . . . . . . . . . . . . . . . . . . . . . . . . . 65
Removing and Installing a Fan . . . . . . . . . . . . . . . . . . . . . . . . . . . . . . . . . . . . . . . . . 67
Removing and Installing a Power Supply . . . . . . . . . . . . . . . . . . . . . . . . . . . . . . . . 68
Part 8 Index
Index . . . . . . . . . . . . . . . . . . . . . . . . . . . . . . . . . . . . . . . . . . . . . . . . . . . . . . . . . 73
vCopyright © 2012, Juniper Networks, Inc.
Page 6

JA1500 Appliance User Guide
Copyright © 2012, Juniper Networks, Inc.vi
Page 7

List of Figures
Part 1 Overview
Chapter 1 Overview of the Junos Space JA1500 Appliance . . . . . . . . . . . . . . . . . . . . . . . . 3
Figure 1: Junos Space JA1500 Appliance . . . . . . . . . . . . . . . . . . . . . . . . . . . . . . . . . . 3
Figure 2: JA1500 Appliance Front Panel . . . . . . . . . . . . . . . . . . . . . . . . . . . . . . . . . . 5
Figure 3: JA1500 Appliance LEDs . . . . . . . . . . . . . . . . . . . . . . . . . . . . . . . . . . . . . . . 6
Figure 4: Parts of the JA1500 Rear Panel . . . . . . . . . . . . . . . . . . . . . . . . . . . . . . . . . . 7
Figure 5: Administrator Connects to a Single Virtual IP Address to Manage Fabric
Nodes . . . . . . . . . . . . . . . . . . . . . . . . . . . . . . . . . . . . . . . . . . . . . . . . . . . . . . . . . 10
Figure 6: Functions Enabled on Fabric Containing One Node . . . . . . . . . . . . . . . . . 11
Figure 7: Functions Enabled on Fabric Containing Two Nodes . . . . . . . . . . . . . . . . 12
Figure 8: Functions Enabled on Fabric Containing Three Nodes . . . . . . . . . . . . . . . 12
Part 4 Installation
Chapter 4 Installing the Junos Space JA1500 Appliance . . . . . . . . . . . . . . . . . . . . . . . . . 29
Figure 9: JA1500 Appliance Front Panel . . . . . . . . . . . . . . . . . . . . . . . . . . . . . . . . . 32
Part 7 Troubleshooting
Chapter 7 Troubleshooting the Junos Space JA1500 Appliance Hardware . . . . . . . . . 65
Figure 10: JA1500 Appliance Hard Disk Alarm LEDs . . . . . . . . . . . . . . . . . . . . . . . . 65
Figure 11: JA1500 Appliance Hard Disk Removal . . . . . . . . . . . . . . . . . . . . . . . . . . . 66
Figure 12: JA1500 Appliance Hard Disk Installation . . . . . . . . . . . . . . . . . . . . . . . . 66
Figure 13: JA1500 Appliance Front Panel Status LEDs . . . . . . . . . . . . . . . . . . . . . . 67
Figure 14: JA1500 Appliance Fan Removal . . . . . . . . . . . . . . . . . . . . . . . . . . . . . . . 68
Figure 15: JA1500 Appliance Fan Installation . . . . . . . . . . . . . . . . . . . . . . . . . . . . . 68
Figure 16: JA1500 Appliance Front Panel Status LEDs . . . . . . . . . . . . . . . . . . . . . . 69
Figure 17: JA1500 Power Supply Removal . . . . . . . . . . . . . . . . . . . . . . . . . . . . . . . . 69
Figure 18: JA1500 Appliance Power Supply Installation . . . . . . . . . . . . . . . . . . . . . 70
viiCopyright © 2012, Juniper Networks, Inc.
Page 8

JA1500 Appliance User Guide
Copyright © 2012, Juniper Networks, Inc.viii
Page 9

List of Tables
About the Documentation . . . . . . . . . . . . . . . . . . . . . . . . . . . . . . . . . . . . . . . . . . xi
Table 1: Notice Icons . . . . . . . . . . . . . . . . . . . . . . . . . . . . . . . . . . . . . . . . . . . . . . . . . xii
Part 1 Overview
Chapter 1 Overview of the Junos Space JA1500 Appliance . . . . . . . . . . . . . . . . . . . . . . . . 3
Table 2: JA1500 Appliance Front Panel LEDs . . . . . . . . . . . . . . . . . . . . . . . . . . . . . . 6
Part 2 Planning
Chapter 2 Planning for the Junos Space JA1500 Appliance . . . . . . . . . . . . . . . . . . . . . . . 17
Table 3: JA1500 Appliance Rack Requirements . . . . . . . . . . . . . . . . . . . . . . . . . . . . 17
Table 4: JA1500 Appliance Operation Environmental Requirements . . . . . . . . . . . 18
Table 5: Environmental Requirements for Appliance Storage . . . . . . . . . . . . . . . . 19
Table 6: Network Environmental Requirements for the Appliance . . . . . . . . . . . . . 19
Table 7: JA1500 Appliance AC Power Requirements . . . . . . . . . . . . . . . . . . . . . . . . 19
Table 8: JA1500 Appliance DC Power Requirements . . . . . . . . . . . . . . . . . . . . . . . 20
Part 4 Installation
Chapter 4 Installing the Junos Space JA1500 Appliance . . . . . . . . . . . . . . . . . . . . . . . . . 29
Table 9: Items in the JA1500 Appliance Shipping Container . . . . . . . . . . . . . . . . . 29
Part 5 Configuration
Chapter 5 Configuring the Junos Space JA1500 Appliance . . . . . . . . . . . . . . . . . . . . . . . 41
Table 10: How Junos Space IP Addresses Function . . . . . . . . . . . . . . . . . . . . . . . . 44
Table 11: Fields for the Fabric Monitoring Inventory Panel . . . . . . . . . . . . . . . . . . . 50
ixCopyright © 2012, Juniper Networks, Inc.
Page 10

JA1500 Appliance User Guide
Copyright © 2012, Juniper Networks, Inc.x
Page 11

About the Documentation
•
Junos Space Documentation and Release Notes on page xi
•
Documentation Conventions on page xi
•
Documentation Feedback on page xii
•
Requesting Technical Support on page xii
Junos Space Documentation and Release Notes
For a list of related Junos Space documentation, see http://www.juniper.net/techpubs/.
If the information in the latest release notes differs from the information in the
documentation, follow the Junos Space Release Notes.
To obtain the most current version of all Juniper Networks®technical documentation,
see the product documentation page on the Juniper Networks website at
http://www.juniper.net/techpubs/.
Juniper Networks supports a technical book program to publish books by Juniper Networks
engineers and subject matter experts with book publishers around the world. These
books go beyond the technical documentation to explore the nuances of network
architecture, deployment, and administration using the Junos operating system (Junos
OS) and Juniper Networks devices. In addition, the Juniper Networks Technical Library,
published in conjunction with O'Reilly Media, explores improving network security,
reliability, and availability using Junos OS configuration techniques. All the books are for
sale at technical bookstores and book outlets around the world. The current list can be
viewed at http://www.juniper.net/books .
Documentation Conventions
Table 1 on page xii defines the notice icons used in this guide.
xiCopyright © 2012, Juniper Networks, Inc.
Page 12
JA1500 Appliance User Guide
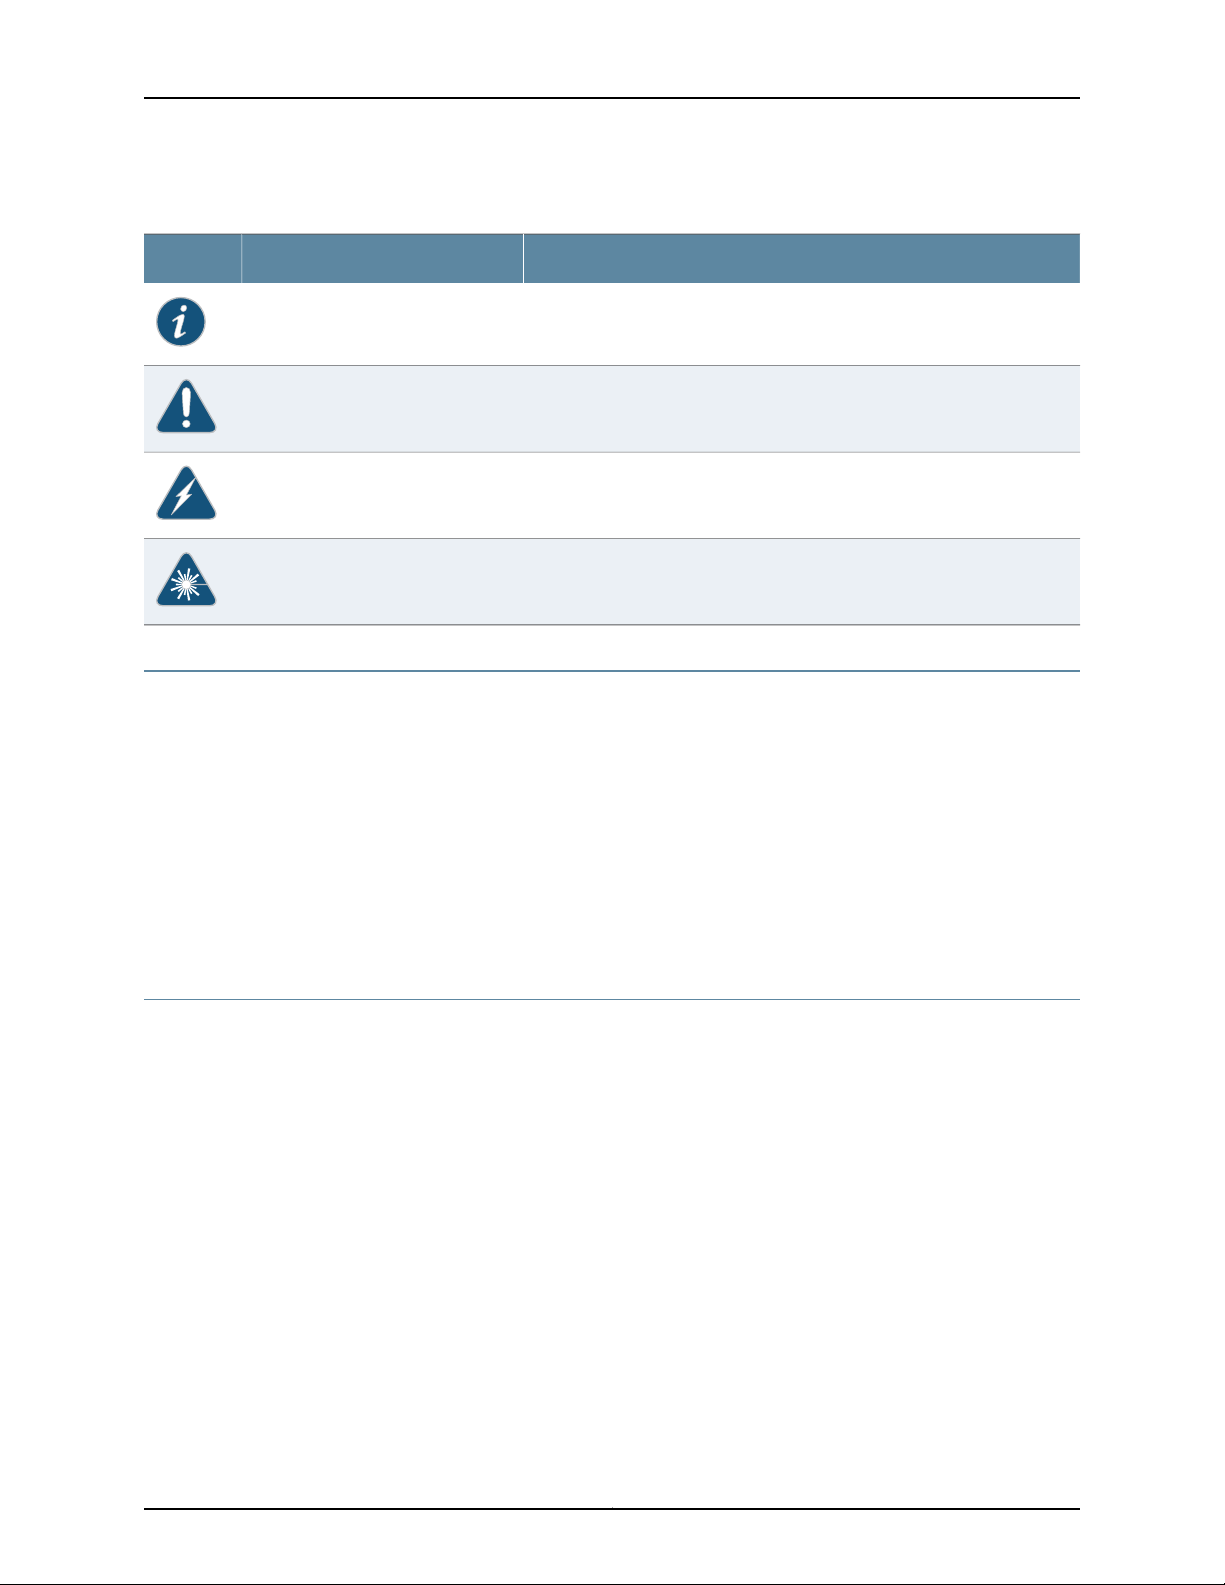
Table 1: Notice Icons
Documentation Feedback
DescriptionMeaningIcon
Indicates important features or instructions.Informational note
Indicates a situation that might result in loss of data or hardware damage.Caution
Alerts you to the risk of personal injury or death.Warning
Alerts you to the risk of personal injury from a laser.Laser warning
We encourage you to provide feedback, comments, and suggestions so that we can
improve the documentation. You can send your comments to
techpubs-comments@juniper.net, or fill out the documentation feedback form at
https://www.juniper.net/cgi-bin/docbugreport/ . If you are using e-mail, be sure to include
the following information with your comments:
•
Document or topic name
•
URL or page number
•
Software release version (if applicable)
Requesting Technical Support
Technical product support is availablethrough the Juniper Networks TechnicalAssistance
Center (JTAC). If you are a customer with an active J-Care or JNASC support contract,
or are covered under warranty, and need post-sales technical support, you can access
our tools and resources online or open a case with JTAC.
•
JTAC policies—For a complete understanding of our JTAC procedures and policies,
review the JTAC User Guide located at
http://www.juniper.net/us/en/local/pdf/resource-guides/7100059-en.pdf.
•
Product warranties—For product warranty information, visit
http://www.juniper.net/support/warranty/.
•
JTAC hours of operation—The JTAC centers have resources available 24 hours a day,
7 days a week, 365 days a year.
Copyright © 2012, Juniper Networks, Inc.xii
Page 13

Self-Help Online Tools and Resources
For quick and easy problem resolution, Juniper Networks has designed an online
self-service portal called the Customer Support Center (CSC) that provides you with the
following features:
•
Find CSC offerings: http://www.juniper.net/customers/support/
•
Search for known bugs: http://www2.juniper.net/kb/
•
Find product documentation: http://www.juniper.net/techpubs/
•
Find solutions and answer questions using our Knowledge Base: http://kb.juniper.net/
•
Download the latest versions of software and review release notes:
http://www.juniper.net/customers/csc/software/
•
Search technical bulletins for relevant hardware and software notifications:
https://www.juniper.net/alerts/
•
Join and participate in the Juniper Networks Community Forum:
http://www.juniper.net/company/communities/
About the Documentation
•
Open a case online in the CSC Case Management tool: http://www.juniper.net/cm/
To verify service entitlement by product serial number, use our Serial Number Entitlement
(SNE) Tool: https://tools.juniper.net/SerialNumberEntitlementSearch/
Opening a Case with JTAC
You can open a case with JTAC on the Web or by telephone.
•
Use the Case Management tool in the CSC at http://www.juniper.net/cm/.
•
Call 1-888-314-JTAC (1-888-314-5822 toll-free in the USA, Canada, and Mexico).
For international or direct-dial options in countries without toll-free numbers, see
http://www.juniper.net/support/requesting-support.html.
xiiiCopyright © 2012, Juniper Networks, Inc.
Page 14

JA1500 Appliance User Guide
Copyright © 2012, Juniper Networks, Inc.xiv
Page 15

PART 1
Overview
•
Overview of the Junos Space JA1500 Appliance on page 3
1Copyright © 2012, Juniper Networks, Inc.
Page 16

JA1500 Appliance User Guide
Copyright © 2012, Juniper Networks, Inc.2
Page 17

CHAPTER 1
Overview of the Junos Space JA1500
Appliance
•
Junos Space JA1500 Appliance Overview on page 3
•
Parts of the Junos Space JA1500 Appliance on page 4
•
Understanding How Nodes Are Connected in a Fabric on page 8
•
NTP Time Source For Each JA1500 Appliance on page 9
•
Fabric Management Overview on page 9
Junos Space JA1500 Appliance Overview
The Junos Space JA1500 appliance is a Juniper Networks, dedicated, physical, hardware
device that is engineered to provide the computing power and specific requirements
needed to install and run the Junos Space application. The JA1500 appliance all-in-one
design makes the Junos Space application deployment simpler by giving administrators
a turnkey solution. You can power up a the JA1500 appliance, make required configuration
changes, then start using the Junos Space application without concerning yourself with
hardware and OS and application installation. (See Figure 1 on page 3).
Figure 1: Junos Space JA1500 Appliance
The JA1500 appliance allows administrators to migrate from a strategy of one large
server in the corner, to distribute multiple servers based on load and geography. You can
combine Junos Space appliances in clusters for high availability or increased throughput.
The JA1500 appliance ensures that consistent infrastructure is deployed across an
organization, reducing complexity. The JA1500 appliance means that only one
vendor—Juniper Networks—supports integrated components reducing complexity.
The administrator can also deploy and run the Junos Space application as a virtual
appliance. The administrator can combine Junos Space appliances in clusters for high
availabilityor increased throughput. The administratorcan create a fabric of Junos Space
appliances, Junos Space virtual appliances, or a combination of both appliances and
virtual appliances.
3Copyright © 2012, Juniper Networks, Inc.
Page 18

JA1500 Appliance User Guide
Junos Space Application Overview
The Junos Space application, running on a JA1500 appliance, is a comprehensive platform
for building and deploying applications for collaboration, productivity, and network
infrastructure and operations management. The Junos Space application provides a
runtime environment implemented as a fabric of virtual and physical appliances.
The Junos Space Network Application Platform (Platform) provides effective tools for
automating network operations, including device discovery and management, topology
visualization, device image deployment, job management, audit logging, user
administration,and systemadministration.Systemadministration tasks include managing
the Junos Space fabric which comprises one or more IP-connected nodes, database,
licenses, applications, troubleshooting, and tagging.
Junos Space applications:
•
Allowservice providers deliver secure connectivity services (SCS) over an MPLS network
to their customers.
•
Automatically detect problems on Juniper Networks devices running Junos and scripts
and proactively collects the troubleshooting information needed to diagnose and fix
the issue. Service Now allows operational personnel to open technical support cases
with JTAC. JTAC resolves cases and provides the customer proactive information to
minimize future problems.
•
Allow network engineers to provide enterprise services like break, fix, and truck roll of
networking gear and to quickly deploy networking gear in large number of branch
offices accurately and easily.
•
Allow security designers to design and provision the security aspect of the network
and enable large enterprise customers to rapidly deploy firewalls and VPNs.
Other proprietary, OEM, and third-party application will be developed in subsequent
Junos Space releases.
The Junos Space Platform > Administration > Manage Application workspace allows
the administrator add, upgrade, and delete applications.
Related
Parts of the Junos Space JA1500 Appliance on page 4•
Documentation
Parts of the Junos Space JA1500 Appliance
The dimensions of the Junos Space JA1500 appliance are 17.72inx 17.26in x 3.5in (450mm
x 438.4mm x 88mm). Its front panel, rear panel, and LEDs are described in the sections
that follow.
JA1500 Appliance Front Panel
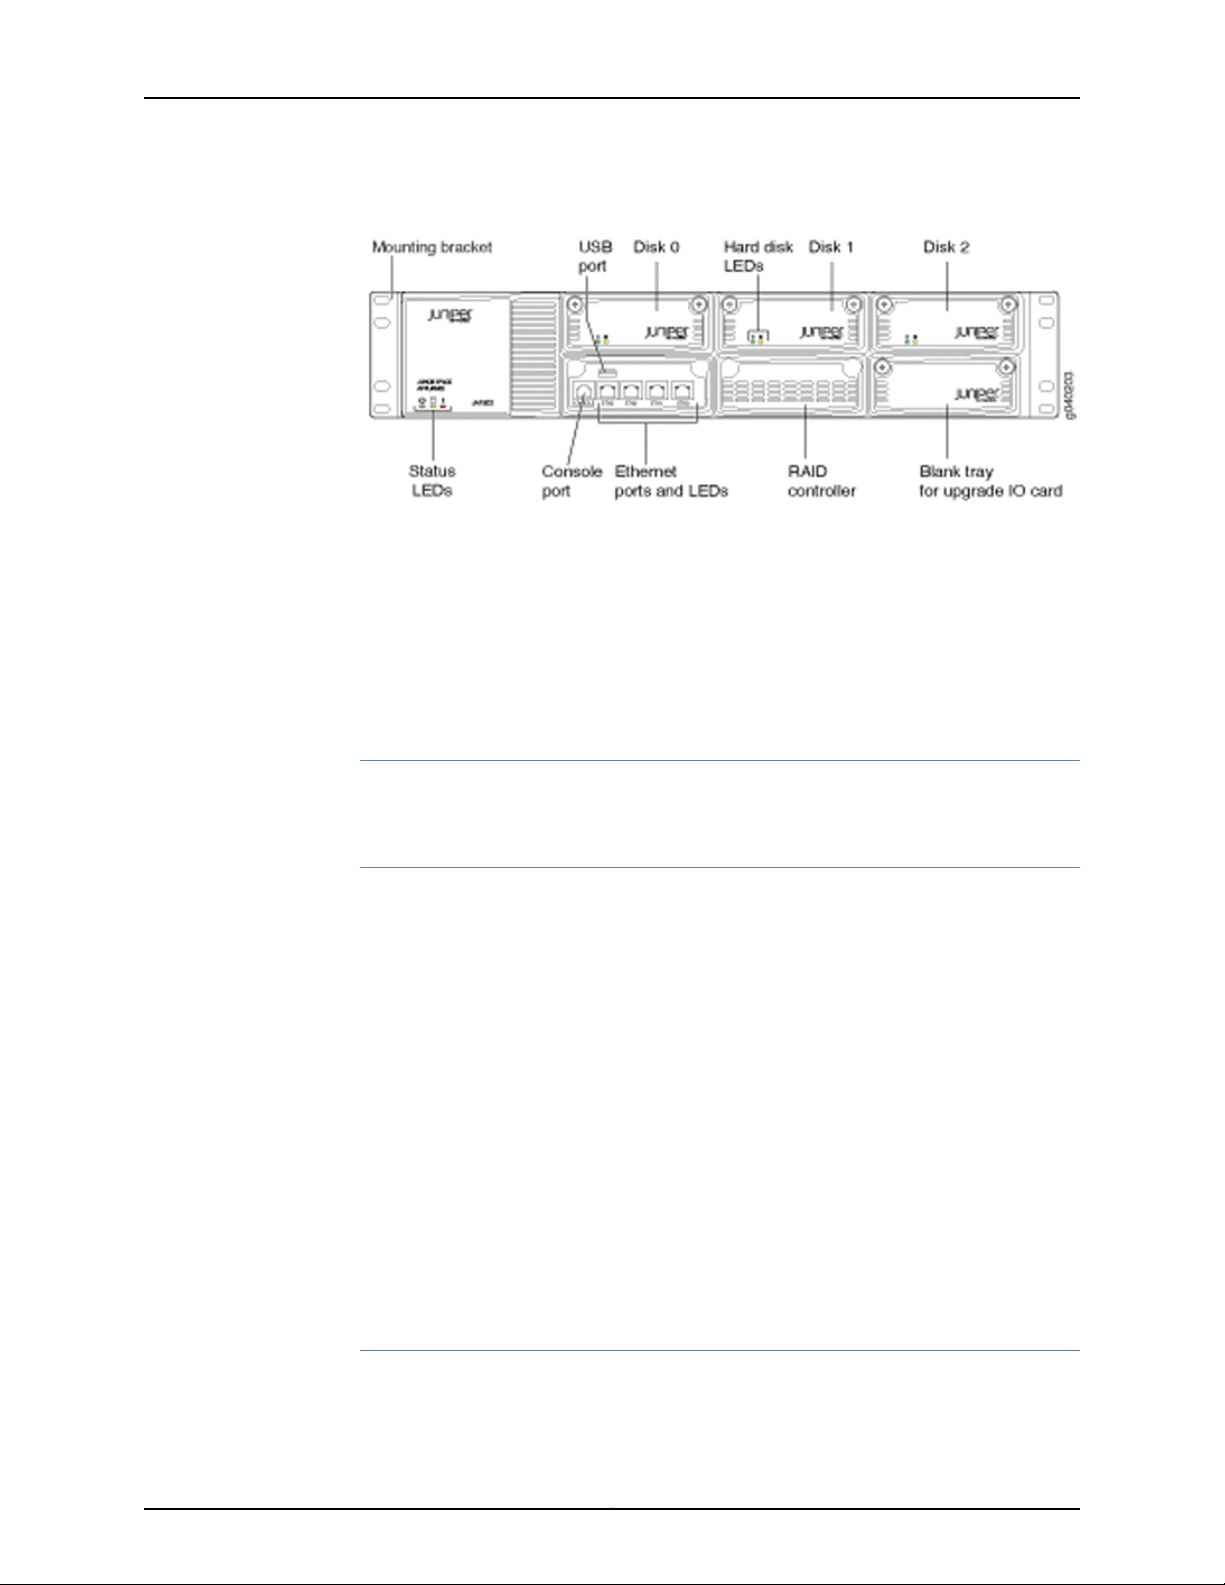
Figure 2 on page 5 shows the front panel of the JA1500 appliance.
Copyright © 2012, Juniper Networks, Inc.4
Page 19
Chapter 1: Overview of the Junos Space JA1500 Appliance
Figure 2: JA1500 Appliance Front Panel
•
Mounting Brackets on page 5
•
Chassis on page 5
•
Hard Disks on page 5
•
Ports on page 6
•
RAID Controller on page 6
•
Status LEDs on page 6
Mounting Brackets
The JA1500 appliance includes front ears, rear mounting rails for mounting in a 4-post
standard rack, and midpoint brackets for mounting in a 2-post, 19-inch equipment rack.
Chassis
The JA1500 appliance has a 2U rack-mountable chassis. The chassis includes the
following:
•
Three 1TB hard disks in hot-swappable RAID 5 array
•
One RAID controller
•
Four RJ-45 10/100/1000 Gigabit Ethernet ports
•
One RJ-45 serial console port
•
One USB interface
•
Optional single IOC slot available for I/O card expansion
•
One 250-watt cold-swappable power supply with an AC power receptacle; 1 optional
dual-redundant, hot-swappable power supply
•
One AC power switch
•
Two cooling fans
Hard Disks
The JA1500 appliance includes three hard disk drives in RAID 5 array. The serial attached
SCSI (SAS), hot-swappable drives are externally accessible in field-replaceable trays,
5Copyright © 2012, Juniper Networks, Inc.
Page 20
JA1500 Appliance User Guide
providing component high availablilty. If one drive fails, the system recovers by
hot-swapping the failed drive, which is automatically rebuilt. The disks are labeled from
left to right Disk 0 , Disk 1, Disk 2. Front panel LEDs indicate drive activity and failure.
Ports
The JA1500 Appliance includes the following ports:
•
Four RJ-45 10/100/1000 Mbps network ports using an Intel Gigabit Ethernet controller.
The ports are numbered from left to right: ETH3, ETH2, ETH1, ETH0.
•
One RJ-45 serial console port labeled CONSOLE.
•
One USB interface
•
One optional single input/output card (IOC) slot available for expansion I/O ports. The
JA1500 ships with a dummy tray that can be replaced with an upgrade I/O card.
RAID Controller
The JA1500 appliance RAID controller manages the physical disk drives and presents
them to the computer as logical units.
Status LEDs
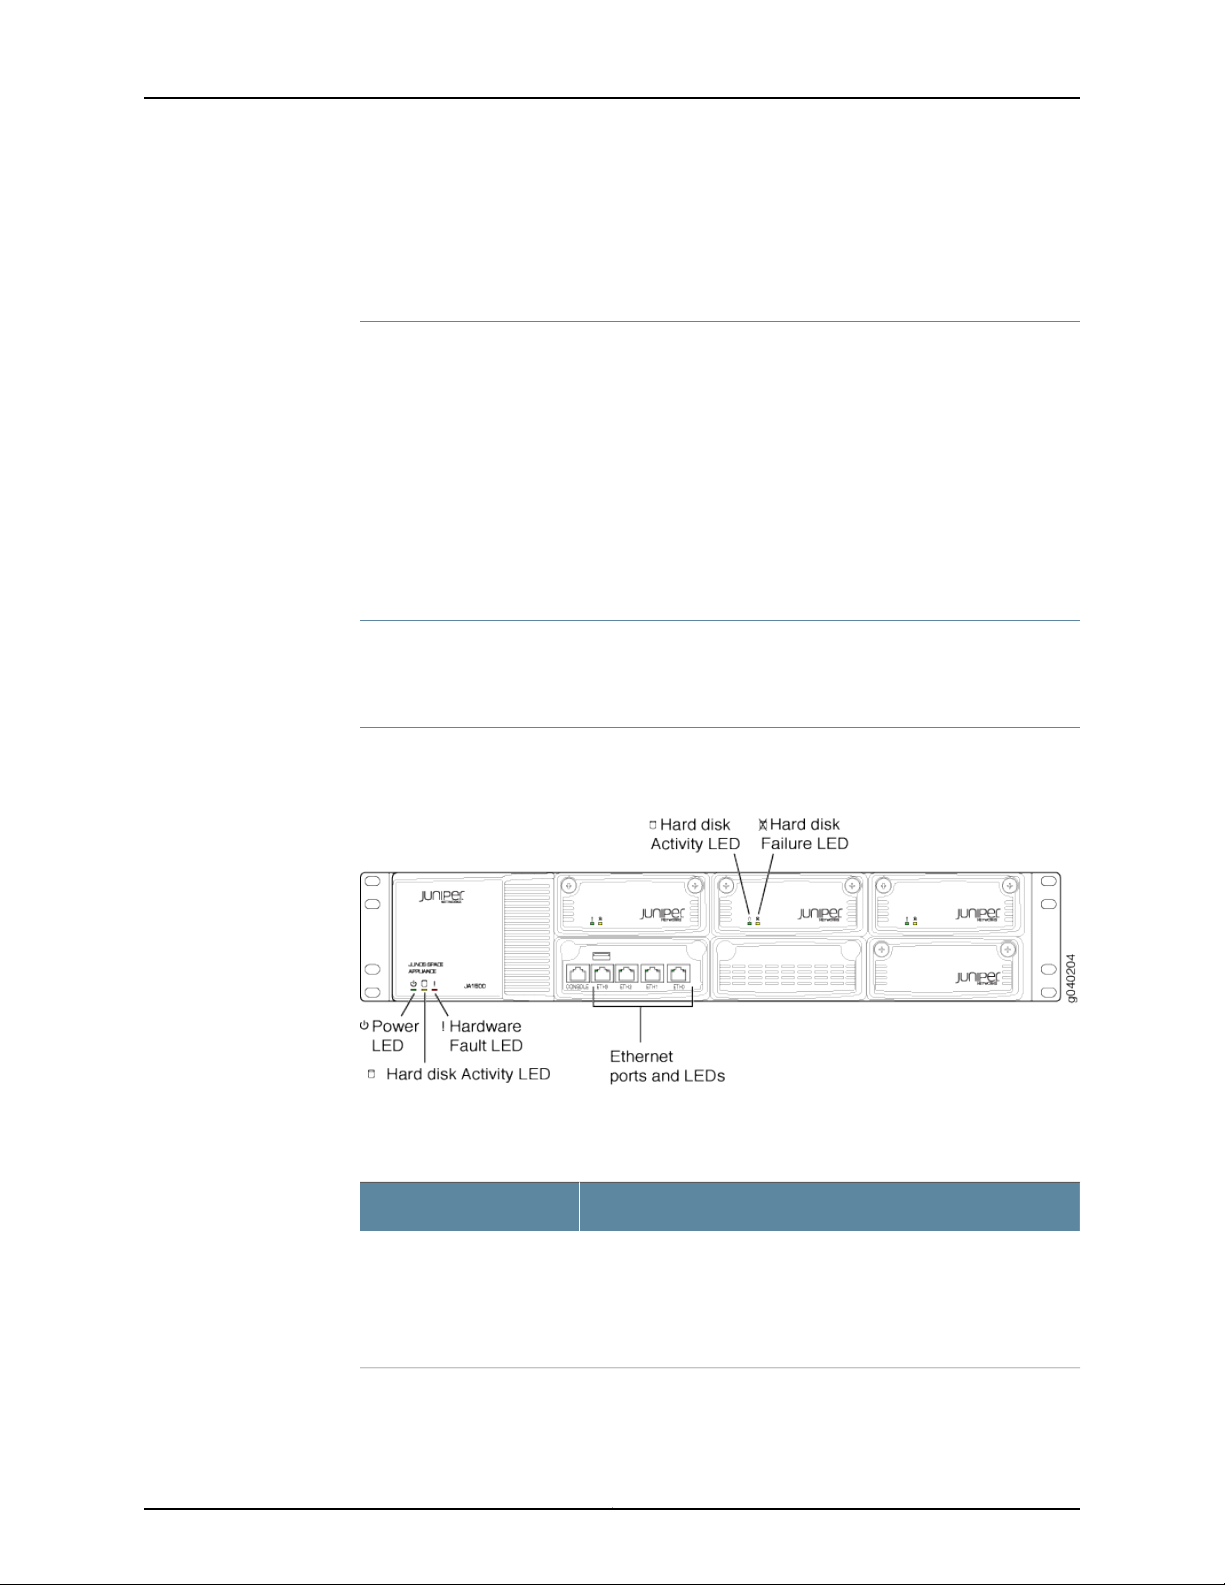
The JA1500 Appliance LEDs are shown in Figure 3 on page 6.
Figure 3: JA1500 Appliance LEDs
The JA1500 chassis LEDs are described in Table 2 on page 6.
Table 2: JA1500 Appliance Front Panel LEDs
DescriptionLEDs
•
Chassis Status LEDs
Power LED (green)—Indicates that the appliance is powered on
•
Hard Disk Activity LED (yellow)—Indicates the hard disk is in use
(writing or reading data)
•
Hardware Fault (red)—Indicates that a fan, power supply, or
temperature alarm has occurred
Copyright © 2012, Juniper Networks, Inc.6
Page 21
JA1500 Rear Panel
Chapter 1: Overview of the Junos Space JA1500 Appliance
Table 2: JA1500 Appliance Front Panel LEDs (continued)
DescriptionLEDs
•
Ethernet Ports and LEDs
Hard Disk Activity/Failure
LEDs
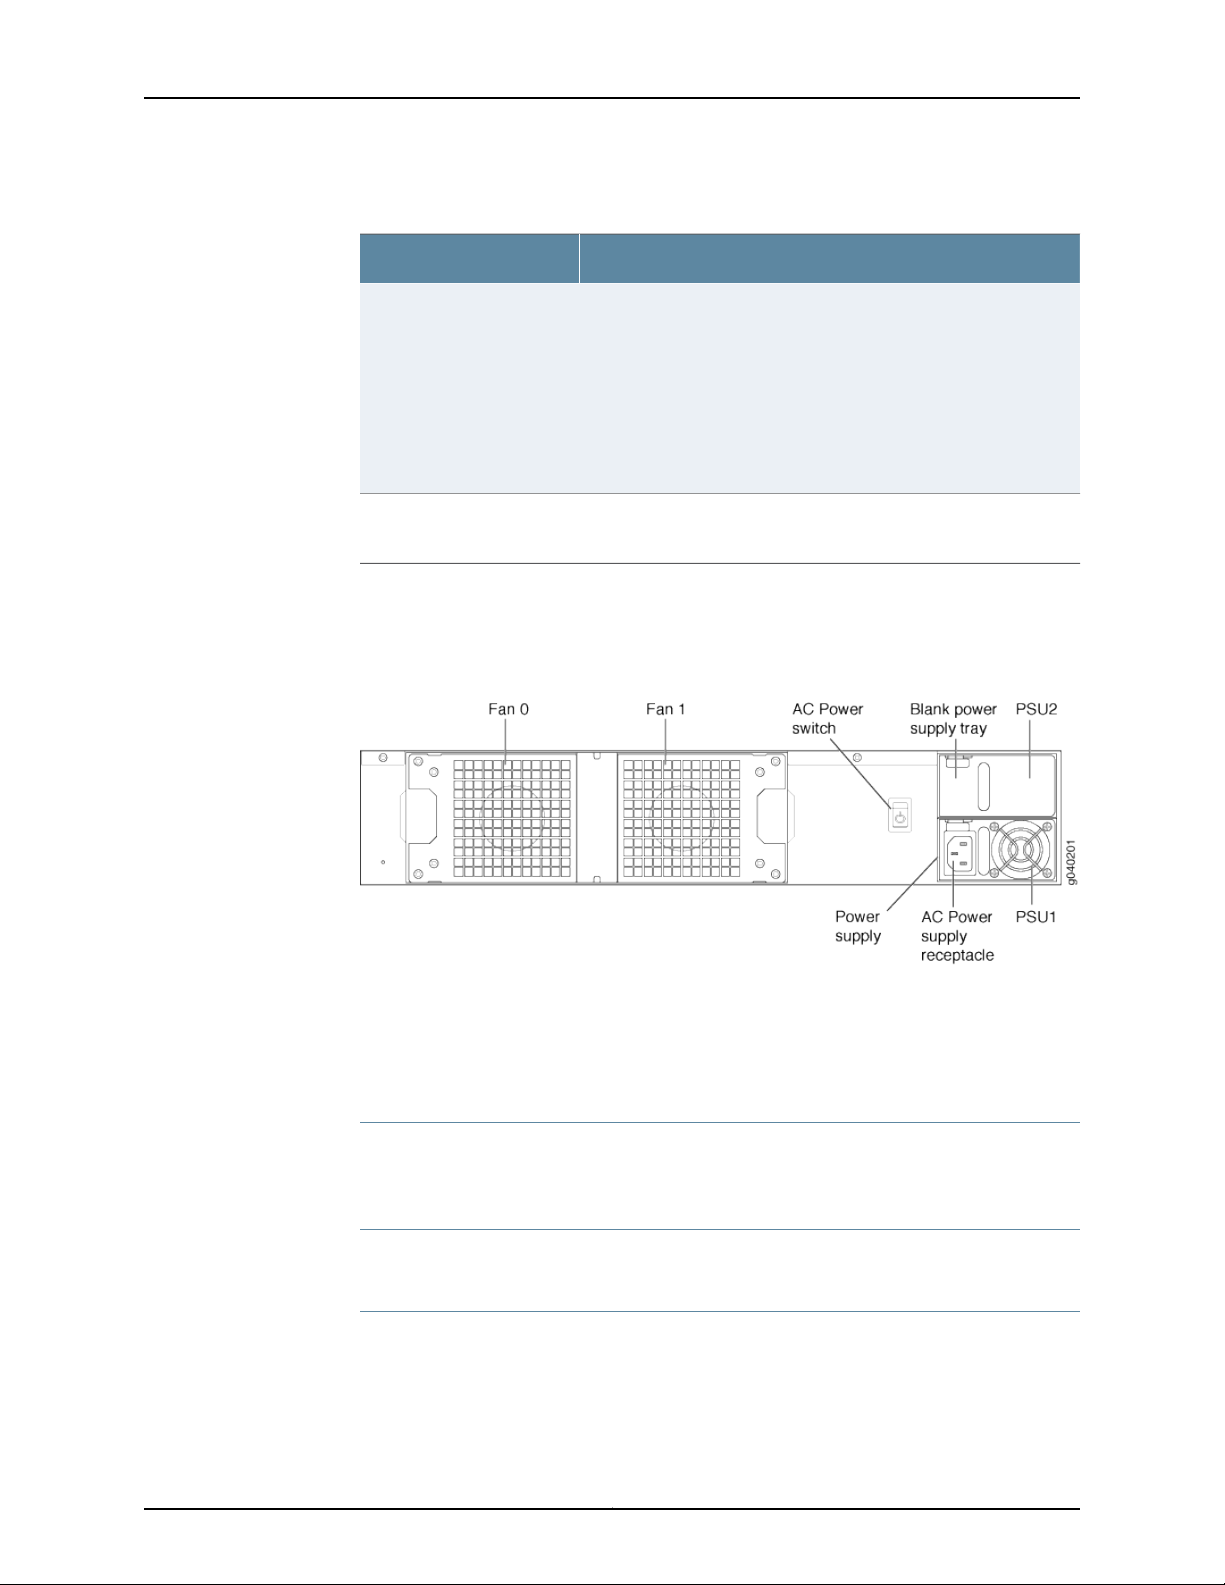
Figure 4 on page 7 shows the rear panel of the JA1500 appliance.
Left Ethernet Port LED (green)—Indicates link and activity
•
On—indicates the link
•
Blinking—indicates activity
•
Right Ethernet Port LED—Indicates the link speed
•
Off—10 Mbps
•
Green—100 Mbps
•
Yellow–1000 Mbps or 1 Gbps
•
LED 1 on left (green)—When lit, indicates disk activity
•
LED 2 on right (red)—When lit, indicates disk failure
Figure 4: Parts of the JA1500 Rear Panel
•
Cooling System on page 7
•
AC Power Switch on page 7
•
Power Supply on page 7
Cooling System
The JA1500 appliance includes two rear-accessible, hot-swappable fans to cool the
other components.
AC Power Switch
The AC power switch is between the fans on the left and the power supplies on the right.
Power Supply
The JA1500 appliance includes a cold-swappable, 250 W (90 to 264 V) autoranging
power supply for all countries. The power supply is high efficiency and is 80 PLUS certified.
The power supply includes an AC receptacle for a power cord. The JA1500 appliance is
7Copyright © 2012, Juniper Networks, Inc.
Page 22

JA1500 Appliance User Guide
upgradable to a redundant hot-swappable dual power supply. The power supplies are
numbered from bottom to top: PSU1, PSU2.
If the JA1500 appliance includes two power supplies, plug each power cord into a separate
power circuit to ensure that the device continues to receive power if one of the power
circuits fails.
Related
Junos Space JA1500 Appliance Overview on page 3•
Documentation
Understanding How Nodes Are Connected in a Fabric
Each Junos Space appliance (physical or virtual) that you install and configure is
represented as a single node in the fabric. You can add nodes without disrupting the
services that are running on the fabric. When you install and configure the first appliance,
Junos Space automatically creates a fabric with one node. For each additional appliance
you install and configure, you must add a node to logically represent the appliance in the
fabric. Youadd nodes to the fabric from the Administration workspace in the Junos Space
user interface. Each node that you add to the fabric increases the resource pool for the
node functions to meet the scalability and availability requirements of your network. By
default, Junos Space automatically enables node functionality across the nodes in the
fabric to distribute workload.The nodes in the fabric work together to provide a virtualized
resource pool for each of the node functions: load balancer, database, and application
logic.
In a fabric comprising two or more nodes, Junos Space provides failover when a node
functioning as the active server (load balancer server or database server) goes down. By
default, Junos Space marks a particular node down and routes failover requests to the
node that Junos Space designates as standby server. Junos Space uses a heartbeat
mechanism to check whether the nodes in the fabric are running. When a node functioning
as the active server fails (the appliance crashes or stops sending heartbeats), the node
functioning as the standby server takes over all resources that were managed by the
node functioning as active server. Nodes in a Junos Space fabric rely on IP multicast
messagesto discover each other, thereforeensure that IP multicast packets are reachable
among all nodes in the Junos Space fabric.
Related
Documentation
To add, manage, and monitor the nodes in the fabric, a Junos Space user connects to a
single Web IP address. The IP address of first (active) node and second (standby) node,
and the Web (virtual) IP address must all be in the same subnet. The Web IP address
must work on both the first and second node in the fabric. When both nodes are in same
subnet, and the first (active) node goes down, the second (standby) node becomes the
active node and packets continue to be directed from the router to the Junos Space Web
IP address, and then to the second node. However, if the second (standby) node is
configuredin a different subnet from the first (active) node, and the first node goes down,
the second node becomes the active node, but because the Web IP address now points
to a different subnet address, packets originally destined for first node will not be received
by the second node.
Fabric Management Overview on page 9•
• Viewing Nodes in the Fabric on page 49
Copyright © 2012, Juniper Networks, Inc.8
Page 23

• Adding a Node in the Fabric on page 52
NTP Time Source For Each JA1500 Appliance
To ensure consistent behavior among all nodes in a multinode fabric, each node’s time
must be synchronized with every other node in the fabric. When you configure each Junos
Space JA1500 appliance with an NTP server, you ensure that, if the first node (which is
used to synchronize time for all nodes in the fabric) goes down, all other nodes in the
fabric remain synchronized. To ensure this behavior, all nodes in a fabric must use the
same external NTP source that you configure for the first appliance.
NOTE: By default, Junos Space translates time so that the time displayed in
the user interface corresponds to Junos Space server time, but is mapped to
the local time zone of your client computer.
The default system clock for a JA1500 appliance may not be precise enough for some
networks. To ensure time synchronization across all nodes in the fabric, Juniper strongly
recommends that you use the following guidelines:
Chapter 1: Overview of the Junos Space JA1500 Appliance
•
Add an NTP server to the first virtual appliance during initial setup.
•
For each additional appliance, add the same NTP server that you specified for the first
appliance.
Related
Documentation
Fabric Management Overview on page 9•
• Understanding How Nodes Are Connected in a Fabric on page 8
• Managing Nodes in the Fabric
Fabric Management Overview
You can deploy Junos Space appliances to create a fabric that provides the scalability
and availability that your managed network requires as you add more devices, services,
and users.
A Junos Space fabric comprises one or more IP-connected nodes. A node is a logical
object that represents a single Junos Space JA1500 appliance or Junos Space virtual
appliance, its operating system, and the Junos Space software that runs on the operating
system. Each Junos Space appliance or virtual appliance that you install and configure
is represented as a single node in the fabric. You can add nodes without disrupting the
services that are running on the fabric. When you add nodes to the fabric, you can manage
and monitor the nodes from the Administrationworkspace. To add, manage, and monitor
NOTE: You must add the NTP server before you add the first node to the
fabric from the user interface.
9Copyright © 2012, Juniper Networks, Inc.
Page 24
JA1500 Appliance User Guide
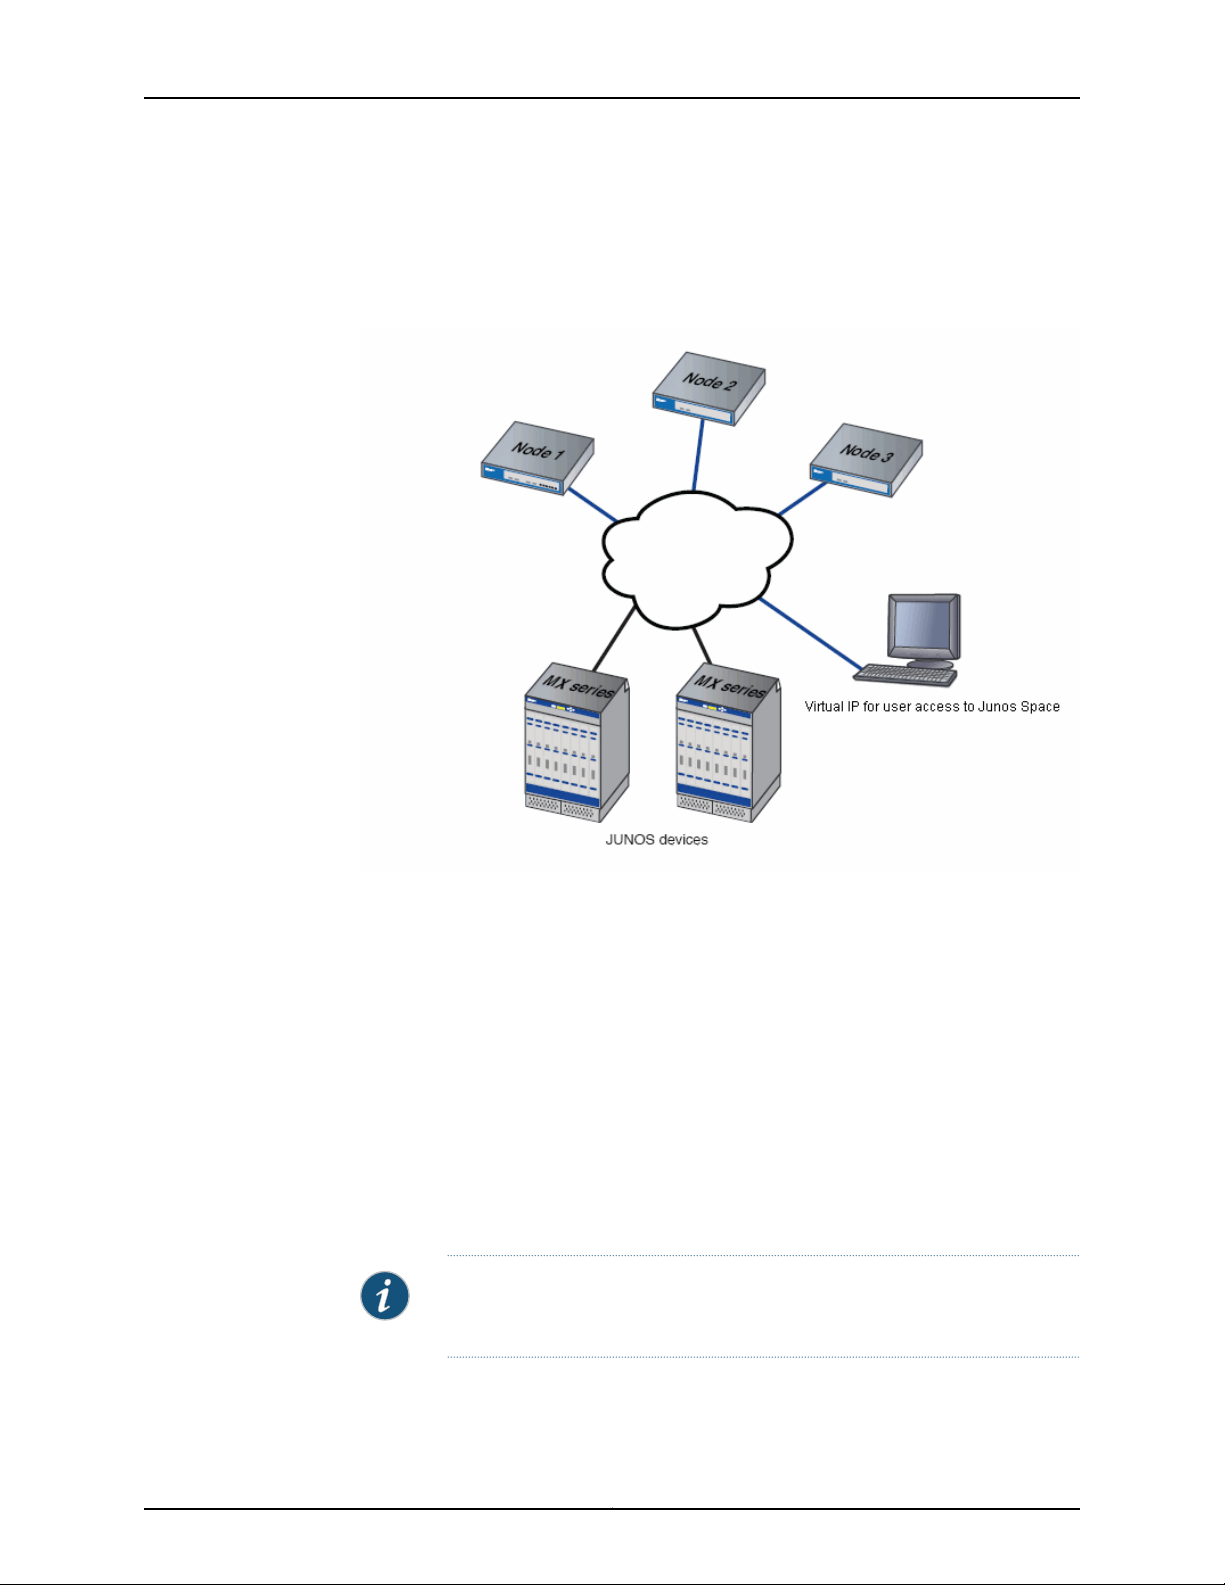
nodes in the fabric, a fabric administrator connects to a single virtual IP address. See
Figure 5 on page 10
Figure 5: AdministratorConnects to a Single Virtual IP Address to Manage
Fabric Nodes
Single Node Functionality
When the fabric comprises a single appliance, all devices in the managed network connect
to the appliance. When you install and configure the first appliance, Junos Space
automatically creates a fabric with one node. By default, a fabric that consists of a single
node provides complete Junos Space management functionality. The following node
functions are enabled for the node:
•
Load Balancer— for processing HTTP requests from remote browsers and NBI clients
•
Database— for processing database requests (create, read, update, and delete
operations)
•
Application Logic— for processing Junos Space service requests and Data Manipulation
Language (DML) workload (device connectivity, device events, and logging)
NOTE: A fabric that comprises a single node provides no workload balancing
and no backup if the appliance goes down.
Copyright © 2012, Juniper Networks, Inc.10
Page 25
Multinode Functionality
As your network expands with new devices, services, and users, you can add Junos Space
appliances to handle the increased workload. When you install and configure the first
appliance, Junos Space automatically creates a fabric with one node. For each additional
appliance you install and configure, you must add a node to logically represent the
appliance in the fabric. Each node that you add to the fabric increases the resource pool
for the node functions to meet the scalability and availability requirements of your network.
By default, Junos Space automatically enables node functionality across the nodes in
the fabric to distribute workload. The nodes in the fabric work together to provide a
virtualized resource pool for each of the node functions: load balancer, database, and
application logic.
The Junos Space node functions distribute workload across operating nodes according
to the following load-distribution rules:
•
Chapter 1: Overview of the Junos Space JA1500 Appliance
LoadBalancer—When a node that functions as the active load balancer server is down,
all HTTP requests are automatically routed to the standby load balancer server that
is running on a separate node.
•
Database— When a node that functions as the active database server is down, all
database requests (create, read, update, and delete) are routed to the node that
functions as the standby database server.
•
Application Logic— Device connections and user requests are distributed among the
nodes, and device-related operations are routed to the node to which the device is
connected.
Junos Space uses the following algorithm to ensure that the number of devices
connected to a node does not exceed the threshold limit for each node:
Threshold Limit = [ (number of devices in database) / (number of nodes running) ] + 2
The following workflow describes how the node functions are enabled across the fabric
as nodes are added:
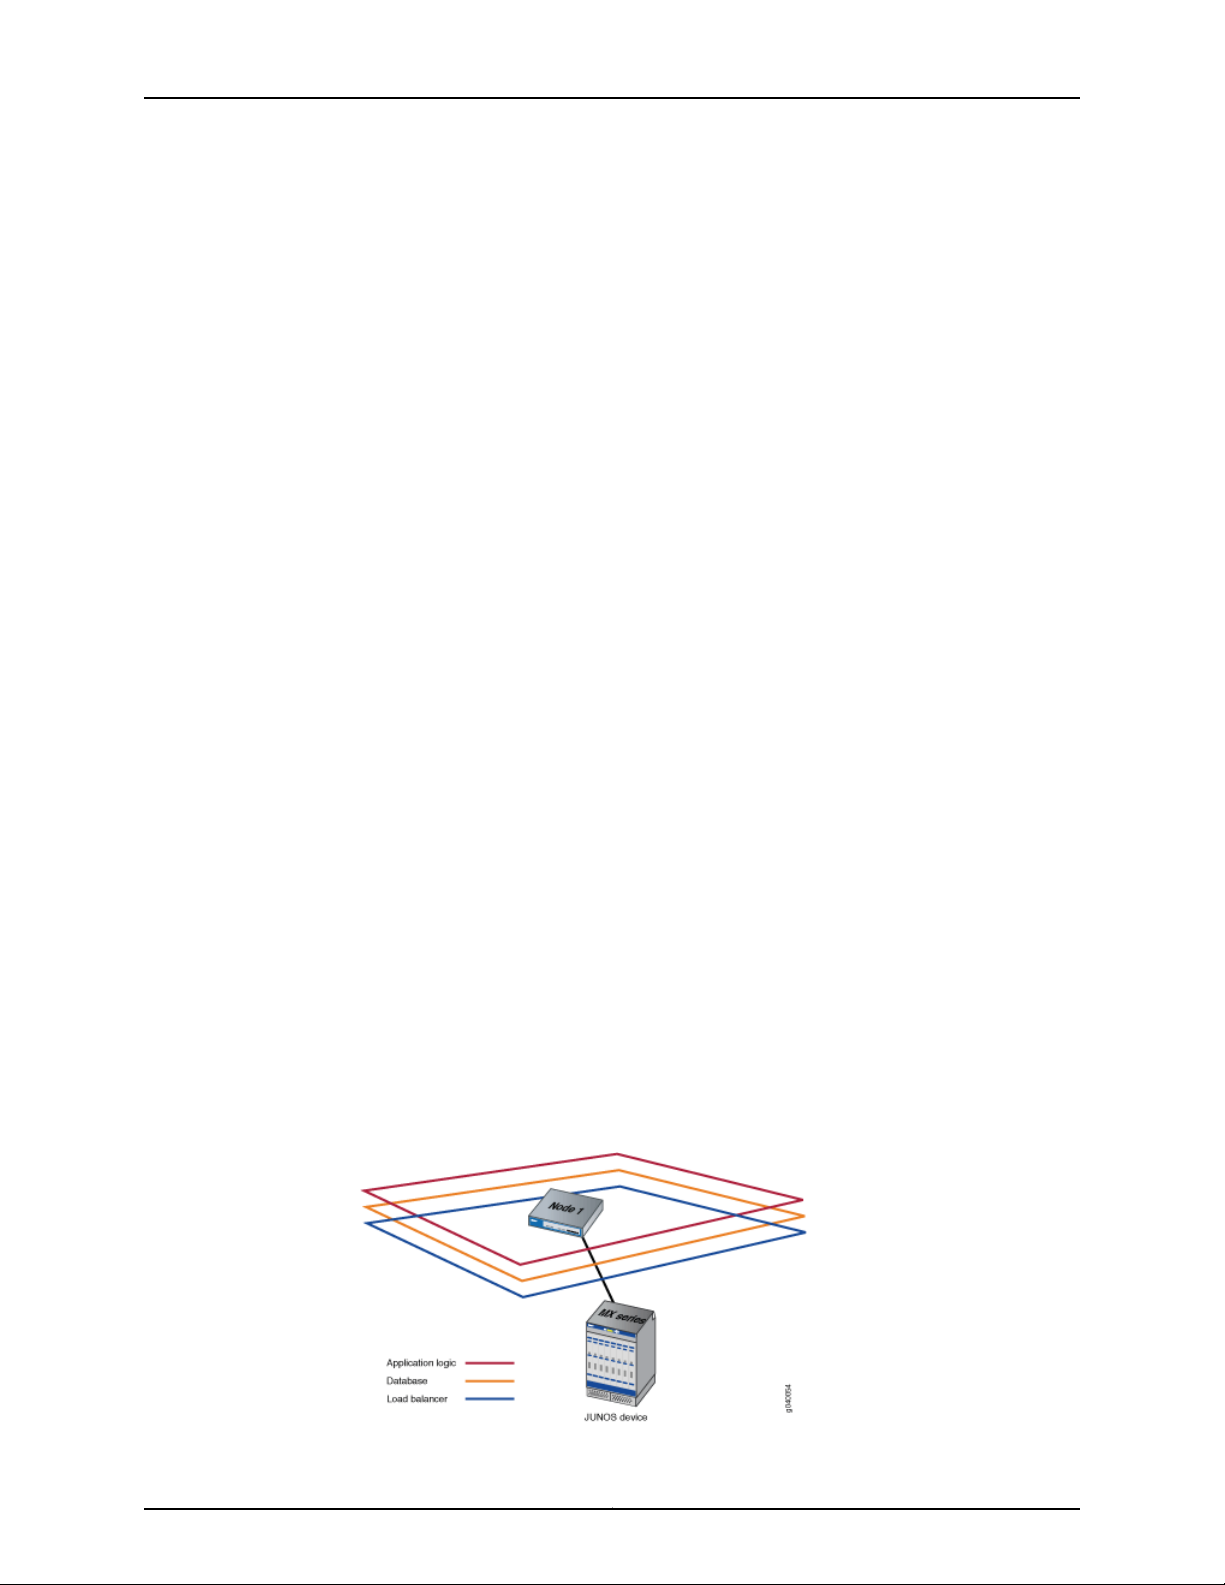
•
First node: The load balancer, database, and application logic functions are enabled
on the node. Each node function provides both scalability and high availability. Figure
6 on page 11 shows all functions enabled on a fabric comprising one node.
Figure 6: Functions Enabled on Fabric Containing One Node
11Copyright © 2012, Juniper Networks, Inc.
Page 26
JA1500 Appliance User Guide
•
Second node: When a second node is added to the fabric, the first node functions as
the active load balancer server and active database server, and the second node
functions as the standby load balancer server and standby database server. The load
balancer and application logic node functions provide scalability and high availability.
The database node function on the second node provides high availability only. Figure
7 on page 12 shows the functions enabled on a fabric comprising two nodes.
Figure 7: Functions Enabled on Fabric Containing Two Nodes
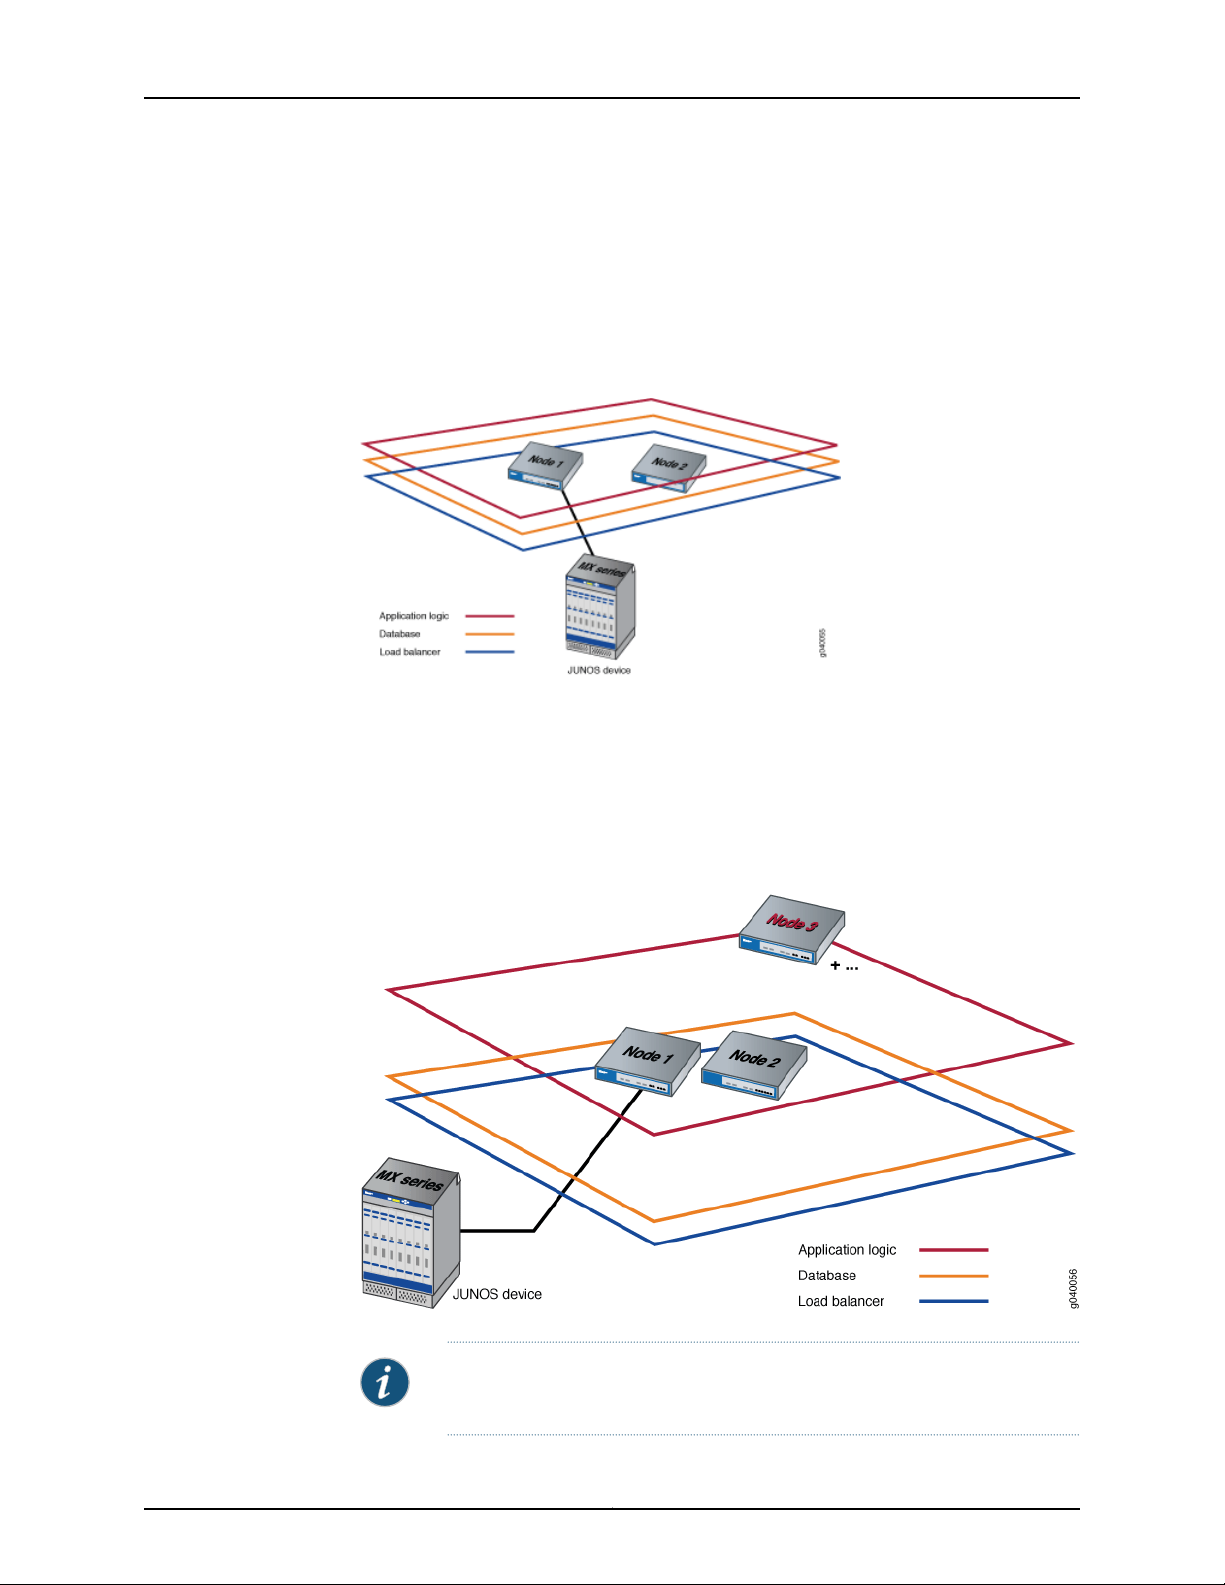
•
Third and subsequent nodes: Only the application logic functionality is enabled on the
third node to provide equal distribution of device connections and user requests across
all nodes, and to route device-related operations to the node to which the device is
connected. The application logic functionality provides both scalability and high
availability. Figure 8 on page 12 shows the functions enabled on a fabric comprising
three nodes.
Figure 8: Functions Enabled on Fabric Containing Three Nodes
NOTE: For the third node and each subsequent node added to the fabric,
only the application logic functionality is enabled.
Copyright © 2012, Juniper Networks, Inc.12
Page 27

Node Function Availability
In a fabric comprising two or more nodes, Junos Space provides failover when a node
functioning as the active server (load balancer server or database server) goes down. By
default, Junos Space marks a particular node down and routes failover requests to the
node that Junos Space designates as standby server. Junos Space uses a heartbeat
mechanism to check whether the nodes in the fabric are running. When a node functioning
as the active server fails (the appliance physically crashes or stops sending heartbeats),
the node functioning as the standby server takes over all resources that were managed
by the node functioning as the active server.
Chapter 1: Overview of the Junos Space JA1500 Appliance
Related
Documentation
• Adding a Node in the Fabric on page 52
• Viewing Nodes in the Fabric on page 49
13Copyright © 2012, Juniper Networks, Inc.
Page 28

JA1500 Appliance User Guide
Copyright © 2012, Juniper Networks, Inc.14
Page 29

PART 2
Planning
•
Planning for the Junos Space JA1500 Appliance on page 17
15Copyright © 2012, Juniper Networks, Inc.
Page 30

JA1500 Appliance User Guide
Copyright © 2012, Juniper Networks, Inc.16
Page 31

CHAPTER 2
Planning for the Junos Space JA1500
Appliance
•
Rack Requirements and Specifications for a Junos Space JA1500 Appliance on page 17
•
Environmental Requirements for the Junos Space JA1500 Appliance on page 18
•
Power Requirements for a Junos Space JA1500 Appliance on page 19
Rack Requirements and Specifications for a Junos Space JA1500 Appliance
The Junos Space JA1500 appliance has a 2U rack-mountable chassis. It ships with 2-post
and 4-post mounting hardware. The appliance can be installed in many types of racks,
including four-post (telco) racks and open-frame racks. The dimensions of the Junos
Space JA1500 appliance are 17.72in x 17.26in x 3.5in (450mm x 438.4mm x 88mm).
Table 3 on page 17 lists the rack requirements.
Table 3: JA1500 Appliance Rack Requirements
Rack
Requirement
Rack size and
strength
Guidelines
Use a front-mount rack, four-post rack (telco), or a center-mount rack.Rack type
•
Ensure that the rack complies with one of these standards:
•
A 19-in. rack as defined in Cabinets, Racks, Panels, and Associated
Equipment (document number EIA-310–D) published by the Electronics
Industry Association (http://www.eia.org).
•
A 600-mm rack as defined in the four-part Equipment Engineering
(EE); European telecommunications standard for equipment practice
(document numbers ETS 300 119-1 through 119-4) published by the
European Telecommunications Standards Institute
(http://www.etsi.org).
The horizontal spacing between the rails in a rack that complies with
this standard is wider than the appliance’s mounting brackets, which
measure 19 in. (48.2 cm) from outer edge to outer edge. Use approved
wing devices to narrow the opening between the rails as required.
•
Ensure that the spacing of rails and adjacent racks allow for the proper
clearance around the appliance and rack.
17Copyright © 2012, Juniper Networks, Inc.
Page 32

JA1500 Appliance User Guide
Table 3: JA1500 Appliance Rack Requirements (continued)
Rack
Requirement
Rack connection
to building
structure
One pair of mounting brackets is supplied with the appliance. The holes in the mounting
brackets are spaced at 1 U (1.75 in. or 4.445 cm), so the appliance can be mounted in any
rack that provides holes spaced at that distance.
The outer edges of the mounting brackets extend the width of the chassis to 19 in. (48.2
cm), and the front of the chassis extends approximately 0.5 in. (1.27 cm) beyond the
mounting brackets. The spacing of rails and adjacent racks must also allow for the
clearances around the appliance and rack.
Guidelines
•
Secure the rack to the building structure.
•
If earthquakes are a possibility in your geographical area, secure the rack
to the floor.
•
Secure the rack to the ceiling brackets as well as wall or floor brackets if
maximum stability is required.
Related
Documentation
Environmental Requirements for the Junos Space JA1500 Appliance on page 18•
• Power Requirements for a Junos Space JA1500 Appliance on page 19
Environmental Requirements for the Junos Space JA1500 Appliance
The appliance must be installed in a rack or cabinet housed in a dry, clean, well-ventilated,
and temperature-controlled environment.
Ensure that these environmental guidelines are followed:
•
The site must be as dust-free as possible, because dust can clog air intake vents and
filters, reducing the efficiency of the appliance cooling system.
•
Maintain ambient airflow for normal appliance operation. If the airflow is blocked or
restricted, or if the intake air is too warm, the appliance might overheat.Table 4 on
page 18 provides the required environmental conditions for normal appliance operation.
Table 4: JA1500 Appliance Operation Environmental Requirements
ToleranceDescription
No performance degradation to 10,000 feet (3048 meters)Altitude
Relative humidity
Normal operation ensured in relative humidity range of 8% to
90%, noncondensing
Temperature
Normal operation ensured in temperature range of 41° F to 104°
F (5° C to 40° C)
Table 5 on page 19 lists the environmental requirements for storing the appliance while
nonoperational.
Copyright © 2012, Juniper Networks, Inc.18
Page 33

Chapter 2: Planning for the Junos Space JA1500 Appliance
Table 5: Environmental Requirements for Appliance Storage
ToleranceDescription
Related
Documentation
Altitude
Relative Humidity
Temperature
The appliance can be stored safely up to 40,000 feet (12,192
meters)
The appliance can be stored safely in relative humidity range of
5% to 95%, noncondensing
The appliance can be stored safely in temperature range of –40°
F to 158° F (-40° C to 70° C)
Table 6 on page 19 lists the network environmental requirements for the appliance.
Table 6: Network Environmental Requirements for the Appliance
RequirementsDescription
IP addresses
Cables
General Safety Guidelines and Warnings for the Junos Space JA1500 Appliance on
•
page 23
One IP address per appliance and one additional IP address for the
common Web GUI.
The network needs standard power cables with localized plugs for the
US, UK, and Europe. The network requires copper cables not fiber cables.
None needed. The switches are connected through the eth0 interface.HA link
• Rack Requirements and Specifications for a Junos Space JA1500 Appliance on page 17
• Power Requirements for a Junos Space JA1500 Appliance on page 19
Power Requirements for a Junos Space JA1500 Appliance
A JA1500 appliance can be powered by an AC and DC electrical supply. Table 7 on page 19
shows the electrical power requirements for a JA1500 appliance with AC power
supply.Table 8 on page 20 shows the electrical power requirements for a JA1500 appliance
with DC power supply.
Table 7: JA1500 Appliance AC Power Requirements
RequirementItem
90 to 264 VACAC input voltage
50 to 60 HzAC input line frequency
60 AAC current rating
19Copyright © 2012, Juniper Networks, Inc.
Page 34

JA1500 Appliance User Guide
Table 7: JA1500 Appliance AC Power Requirements (continued)
RequirementItem
Related
Documentation
Maximum output power
250 W (One AC power supply)
2x 250W (Two AC power supplies)
Table 8: JA1500 Appliance DC Power Requirements
RequirementItem
560 wattDC power Supply info
-38V to -72VDC Power module
<60ADC power supply Peak inrush
80Plus 560w AC, 80Plus 560w DCPower Module Max Efficiency
• Rack Requirements and Specifications for a Junos Space JA1500 Appliance on page 17
• Environmental Requirements for the Junos Space JA1500 Appliance on page 18
• General Safety Guidelines and Warnings for the Junos Space JA1500 Appliance on
page 23
Copyright © 2012, Juniper Networks, Inc.20
Page 35

PART 3
Safety
•
Safety and Compliance for the Junos Space JA1500 Appliance on page 23
21Copyright © 2012, Juniper Networks, Inc.
Page 36

JA1500 Appliance User Guide
Copyright © 2012, Juniper Networks, Inc.22
Page 37

CHAPTER 3
Safety and Compliance for the Junos
Space JA1500 Appliance
•
General Safety Guidelines and Warnings for the Junos Space JA1500
Appliance on page 23
•
Fire Safety Requirements for the Junos Space JA1500 Appliance on page 24
General Safety Guidelines and Warnings for the Junos Space JA1500 Appliance
The following guidelines help ensure your safety and protect the appliance from damage.
The list of guidelines might not address all potentially hazardous situations in your working
environment, so be alert and exercise good judgment at all times.
•
Perform only the procedures explicitly described in the hardware documentation for
this product. Make sure that only authorized service personnel perform other system
services.
•
Keep the area around the chassis clear and free from dust before, during, and after
installation.
•
Keep tools away from areas where people could trip over them while walking.
•
Do not wear loose clothing or jewelry, such as rings, bracelets, or chains, which could
become caught in the chassis.
•
Wear safety glasses if you are working under any conditions that could be hazardous
to your eyes.
•
Do not perform any actions that create a potential hazard to people or make the
equipment unsafe.
•
Never attempt to lift an object that is too heavy for one person to handle.
•
Never install or manipulate wiring during electrical storms.
•
Never install electrical jacks in wet locations unless the jacks are specifically designed
for wet environments.
•
Operate the appliance only when it is properly grounded.
•
Ensure that the separate protective earthing terminal provided on this product is
permanently connected to earth.
23Copyright © 2012, Juniper Networks, Inc.
Page 38

JA1500 Appliance User Guide
•
Replace fuses only with fuses of the same type and rating.
•
Do not open or remove chassis covers or sheet-metal parts unless instructions are
provided in the hardware documentation for this product. Such an action could cause
severe electrical shock.
•
Do not push or force any objects through any opening in the chassis frame. Such an
action could result in electrical shock or fire.
•
Avoid spilling liquid onto the appliance. Such an action could cause electrical shock
or damage the appliance.
•
Avoid touching uninsulated electrical wires or terminals that have not been
disconnected from their power source. Such an action could cause electrical shock.
•
Always ensure that all modules, power supplies, and blanks are fully inserted and that
the installation screws are fully tightened.
Related
Documentation
Fire Safety Requirements for the Junos Space JA1500 Appliance on page 24•
• Environmental Requirements for the Junos Space JA1500 Appliance on page 18
Fire Safety Requirements for the Junos Space JA1500 Appliance
In the event of a fire emergency involving switches and other network equipment, the
safety of people is the primary concern. You should establish procedures for protecting
people in the event of a fire emergency, provide safety training, and properly provision
fire-control equipment and fire extinguishers.
In addition, you should establish procedures to protect your equipment in the event of a
fire emergency.Juniper Networks products should be installed in an environment suitable
for electronic equipment. We recommend that fire suppression equipment be available
in the event of a fire in the vicinity of the equipment, and that all local fire, safety, and
electrical codes and ordinances be observed when installing and operating your
equipment.
Fire Suppression
In the event of an electrical hazard or an electrical fire, you should first turn power off to
the equipment at the source. Then use a Type C fire extinguisher, which uses noncorrosive
fire retardants, to extinguish the fire.
Fire Suppression Equipment
Type C fire extinguishers, which use noncorrosive fire retardants such as carbon dioxide
and Halotron™, are most effective for suppressing electrical fires. Type C fire extinguishers
displace oxygen from the point of combustion to eliminate the fire. For extinguishing fire
on or around equipment that draws air from the environment for cooling, you should use
this type of inert oxygen displacement extinguisher instead of an extinguisher that leaves
residues on equipment.
Do not use multipurpose Type ABC chemical fire extinguishers (dry chemical fire
extinguishers). The primary ingredient in these fire extinguishers is monoammonium
Copyright © 2012, Juniper Networks, Inc.24
Page 39

Chapter 3: Safety and Compliance for the Junos Space JA1500 Appliance
phosphate,which is very sticky and difficult to clean. In addition, in the presence of minute
amounts of moisture, monoammonium phosphate can become highly corrosive and
corrodes most metals.
Any equipment in a room in which a chemical fire extinguisher has been discharged is
subject to premature failure and unreliable operation. The equipment is considered to
be irreparably damaged.
NOTE: To keep warranties effective, do not use a dry chemical fire extinguisher
to control a fire at or near a Juniper Networks appliance. If a dry chemical fire
extinguisher is used, the unit is no longer eligible for coverage under a service
agreement.
We recommend that you dispose of any irreparably damaged equipment in an
environmentally responsible manner.
Related
Documentation
• General Safety Guidelines and Warnings for the Junos Space JA1500 Appliance on
page 23
• Environmental Requirements for the Junos Space JA1500 Appliance on page 18
25Copyright © 2012, Juniper Networks, Inc.
Page 40

JA1500 Appliance User Guide
Copyright © 2012, Juniper Networks, Inc.26
Page 41

PART 4
Installation
•
Installing the Junos Space JA1500 Appliance on page 29
27Copyright © 2012, Juniper Networks, Inc.
Page 42

JA1500 Appliance User Guide
Copyright © 2012, Juniper Networks, Inc.28
Page 43

CHAPTER 4
Installing the Junos Space JA1500
Appliance
•
Unpacking the Junos Space JA1500 Appliance on page 29
•
Attaching Mounting Brackets to a Junos Space JA1500 Appliance on page 30
•
Installing the Junos Space JA1500 Appliance in a Rack and Connecting the
Cables on page 31
•
Connecting a Console to a Junos Space JA1500 Appliance on page 33
•
Booting and Configuring the Junos Space JA1500 Appliance on page 33
•
Booting and Configuring the Junos Space JA1500 Appliance from a USB Drive on page 34
Unpacking the Junos Space JA1500 Appliance
The Junos Space JA1500 appliance is shipped in a cardboard shipping container and is
secured with foam packing material. The container also includes an accessory box. The
items, listed in Table 9 on page 29 are included in the JA1500 appliance box:
Table 9: Items in the JA1500 Appliance Shipping Container
Appliance” on page 4)
QuantityComponent
1Junos Space JA1500 appliance chassis (See “Parts of the Junos Space JA1500
1Power cable
2Mounting kits
1RJ–45 to DB–9F cable with adapter, 7 ft. Console cable
27-foot, blue, Category 5e cable
1Null modem serial cable
1USB restore media Flash drive
1Security Products Safety Guide
29Copyright © 2012, Juniper Networks, Inc.
Page 44

JA1500 Appliance User Guide
CAUTION: The JA1500 appliance is maximally protected inside the shipping
container. Do not unpack it until you are ready to begin installation.
WARNING: The dimensions of a JA1500 appliance are 17.72in x 17.26in x 3.5in
(450mm x 438.4mm x 88mm) and it weighs over 27 lbs. (approximately 12.2
Kg). Use correct lifting technique when moving the appliance.
To unpack the appliance, follow these steps:
1. Move the shipping container to a staging area as close to the installation site as
possible, but where you have enough room to remove the system components.
2. Position the container so that the arrows are pointing up.
3. Open the top flaps on the shipping container.
4. Remove the accessory box and verify the contents against the parts inventory on the
label attached to the container.
5. Pull out the packing material holding the appliance in place.
6. Read the “General SafetyGuidelines and Warnings” document with particular attention
to “Chassis Lifting Guidelines.”
7. Remove the appliance from the shipping container.
8. Verify the appliance chassis components received against the packing list. Table 9
on page 29 provides an inventory of parts provided with a appliance.
9. Save the shipping container and packing materials in case you need to move or ship
the appliance later.
Related
Documentation
Attaching Mounting Brackets to a Junos Space JA1500 Appliance on page 30•
• Installing the Junos Space JA1500 Appliance in a Rack and Connecting the Cables on
page 31
• Connecting a Console to a Junos Space JA1500 Appliance on page 33
• Booting and Configuring the Junos Space JA1500 Appliance on page 33
Attaching Mounting Brackets to a Junos Space JA1500 Appliance
To install your physical appliance in a rack, you must attach mounting brackets to the
appliance.
Your JA1500 appliance is shipped with front ears, midpoint brackets, rear mounting rails,
and mounting screws.
Copyright © 2012, Juniper Networks, Inc.30
Page 45

Chapter 4: Installing the Junos Space JA1500 Appliance
The outer edges of the mounting brackets extend the width of the chassis to 19 in. (48.2
cm). The spacing of rails and adjacent racks must also allow for the clearances around
the appliance and rack.
The chassis and bracketsare designed to allow front, middle, or rear mounting in a 19–inch
rack.
You need a Phillips (+) screwdriver, number 2 to mount the brackets.
To attach the mounting bracket to a physical appliance, follow these steps:
1. Place the physical appliance on a flat, stable surface.
2. Align the mounting brackets along the front, rear, or center of a side panel of the
physical appliance chassis, depending on how you want to mount the appliance in a
rack. For example, if you want to center-mount the appliance, align the mounting
brackets along the center of the side panel.
3. Align the bottom hole in the mounting bracket with a hole on the side panel on the
appliance chassis.
4. Insert one mounting screw (provided in the accessorybox shipped with the appliance)
into each of the two aligned holes. Using the Phillips screwdriver, tighten the screw
to the chassis. Ensure that the other holes in the mounting bracket are aligned with
the other holes in the side panel.
5. Insert screws into the other holes in the mounting bracket aligned with the holes in
the side panel and tighten the screws to the chassis using the Phillips screwdriver.
Related
Documentation
Unpacking the Junos Space JA1500 Appliance on page 29•
• Installing the Junos Space JA1500 Appliance in a Rack and Connecting the Cables on
page 31
Installing the Junos Space JA1500 Appliance in a Rack and Connecting the Cables
Before installing the physical appliance in a rack:
•
Unpack the appliance, as described in “Unpacking the Junos Space JA1500 Appliance”
on page 29.
•
Removethe JA1500 appliance from the shipping container and place it on a flat surface.
•
Attach the mounting brackets to the chassis, as described in “Attaching Mounting
Brackets to a Junos Space JA1500 Appliance” on page 30.
To install the physical appliance in a rack:
You need a Phillips (+) screwdriver, number 2
31Copyright © 2012, Juniper Networks, Inc.
Page 46

JA1500 Appliance User Guide
1. Position the chassis in the rack. We recommend that two people perform this step:
One person holds the chassis in place while the other inserts the screws.
WARNING: Use the recommended lifting technique when moving the
physical appliance.
2. Align the holes in the mounting bracket with the holes in the rack rails.
3. Insert the screws in each of the holes and tighten them with the Phillips screwdriver.
4. Plug the Ethernet cable into the network port marked ETH0 on the front panel. See
Figure 9 on page 32.
Figure 9: JA1500 Appliance Front Panel
Related
Documentation
5. Plug the null modem serial cable into the CONSOLE port.
This cable was shipped with your appliance. If you do not have this cable, use any
other null modem serial cable.
The basic hardware installation is now complete. The next step is to connect the physical
appliance to a console.
Connecting a Console to a Junos Space JA1500 Appliance on page 33•
• Attaching Mounting Brackets to a Junos Space JA1500 Appliance on page 30
• Connecting a Console to a Junos Space JA1500 Appliance on page 33
• Booting and Configuring the Junos Space JA1500 Appliance on page 33
• Booting and Configuring the Junos Space JA1500 Appliance from a USB Drive on
page 34
Copyright © 2012, Juniper Networks, Inc.32
Page 47

Chapter 4: Installing the Junos Space JA1500 Appliance
Connecting a Console to a Junos Space JA1500 Appliance
To connect to a physical appliance for the first time, you must attach your appliance to
a console terminal running an emulation utility such as HyperTerminal.
To connect to console, follow these steps:
1. Configure a console terminal or terminal emulation utility to use the following serial
connection parameters:
•
9600 bits per second
•
8-bit no parity (8N1)
•
1 stop bit
•
No flow control
2. Connect the terminal or laptop to the null modem serial or cable plugged into the
JA1500 appliance console port.
The procedure allows you to install the Junos Space application and operating system
on the JA1500 appliance.
Related
Documentation
Booting and Configuring the Junos Space JA1500 Appliance on page 33•
• Installing the Junos Space JA1500 Appliance in a Rack and Connecting the Cables on
page 31
• Upgrading the Junos Space Software on page 58
Booting and Configuring the Junos Space JA1500 Appliance
Follow these steps to start up the Junos Space JA1500 Appliance and install the Junos
Space application and operating system.
The JA1500 Appliance must be installed in a rack, turned on, and connected to a console
terminal running an emulation utility such as HyperTerminal.
To start a JA1500 appliance and install the Junos Space software, follow these steps:
1. Configure a console terminal or terminal emulation utility to use the following serial
connection parameters:
•
9600 bits per second
•
8-bit no parity (8N1) 8
•
1 stop bit
•
No flow control
2. Connect the terminal to the CONSOLE port using the console cable.
33Copyright © 2012, Juniper Networks, Inc.
Page 48

JA1500 Appliance User Guide
3. Plug the power cord into the AC receptacle on the rear panel. If the appliance has two
power supplies, plug a power cord into each AC receptacle.
4. Plug the other end of the power cord into a wall socket. If the appliance has two power
supplies, plug each power cord into a separate wall sockets.
The appliance is shipped with a version of the Junos Space software. When the
appliance is powered on, the serial console displays diagnostic information before
booting. When booting is complete, the serial console displays the login prompt. You
are now ready to configure basic settings on the appliance. See “Configuring Basic
Settings for a Junos Space JA1500 Appliance” on page 41
Related
Documentation
Configuring Basic Settings for a Junos Space JA1500 Appliance on page 41•
• Connecting a Console to a Junos Space JA1500 Appliance on page 33
• Upgrading the Junos Space Software on page 58
• Booting and Configuring the Junos Space JA1500 Appliance from a USB Drive on
page 34
Booting and Configuring the Junos Space JA1500 Appliance from a USB Drive
This procedure shows you how to reset a Junos Space appliance to its factory settings
by using a standard USB 2.0 drive.
This process has three main steps:
1. Copying an ISO image onto the key
2. Ensuring that the appliance’s basic input/output system (BIOS) boots from the key
instead of the disk
3. Running the reinstallation procedure
To reset an appliance to the factory settings from a USB drive:
1. Plug the USB drive into the USB port of a device, such as a laptop or PC, that is
connected to the Internet.
NOTE: For images up to Release 11.2, you can use a USB drive with 2 GB
of free space. However, for Releases 11.4 and later, you must use a USB
drive with at least 4 GB of free space.
2. Using a Web browser, navigate to the Juniper Networks Junos Space software
download site (http://www.juniper.net/support/products/space/), and click Image for
hardware Appliance to download the Junos Space USB bootable image.
The name of the downloaded image will be space-< version >.< spinnumber >.img.
For example, space-11.1R1.1.img
3. Convert and copy the ISO image to the USB drive.
Copyright © 2012, Juniper Networks, Inc.34
Page 49

Chapter 4: Installing the Junos Space JA1500 Appliance
You can copy the ISO image to the USB drive in two ways:
•
Using Win32 Disk Imager software (for Windows users)
To create a bootable USB drive using the Win32 Disk Imager software, follow these
steps:
a. Open the Win32. Disk Imager software to copy the Junos Space ISO image file
to your USB drive. The Win32 Disk Imager dialog box appears.
(You can download the Win32 Disk Imager software for free from
https://launchpad.net/win32-image-writer .)
b. Click the browse icon and select the image file that you want to copy to the USB
drive.
c. Verify that the device drive letter matches the chosen USB drive, and click Write.
After creating the USB drive, you need to set up the device (laptop or PC) and
Junos Space appliance to accept the USB drive as the reinstall media. For this,
the BIOS menu of the appliance needs to be modified. You can modify the BIOS
menu by creating a serial connection between the device (laptop or PC) and the
Junos Space appliance. Togain access to the BIOS menu, you must use a terminal
application (such as Putty, Hyperterm, or SecureCRT) to send a DEL character
to the Junos Space appliance as soon as it powers on.
The terminal application maps every keyboard key to a code that it sends through
the serial cable. Typically, pressing the Delete key on a PC keyboard does not
send a DEL character.
To ensure that the terminal application maps a key to the DEL character, go to
the settings dialog box of the application and select the Backspace Key sends
DEL option. After you make this modification, you must ensure that the connection
is opened with the typical serial parameters of 9600, 8, none, 1, and none.
•
Using the dd program in Linux
You can also use Linux distributions to create a bootable USB drive. You do not
need a PC for this procedure.
To create a bootable USB drive using Linux distributions:
a. While you can use any of the available conversion tools, we recommend using
the dd program in Linux to convert the ISO image.
In a CLI window, enter the following command at the CLI prompt to convert and
copy the ISO image:
dd if= space-< version >.< spinnumber >.img of=/dev/sdb
where
space-< version >.< spinnumber >.img is the name of the downloaded image.
/dev/sdb is the name of the device drive into which your USB drive is plugged..
b. Press the Enter key to copy the ISO image to the USB drive.
35Copyright © 2012, Juniper Networks, Inc.
Page 50

JA1500 Appliance User Guide
4. After you copy the ISO image to the USB drive, remove the USB drive from the device
and plug it into the USB port of the Junos Space JA1500 appliance.
5. Power on the appliance. The boot menu appears.
6. After about one minute, the BIOS menu appears.
NOTE: If the hard disk LEDs begin to flash at this point for more than a
few seconds, the appliance is booting from disk instead of the USB drive
and is not loading the BIOS menu.
7. Ensure that the USB boot is at the top of the appliance boot priority order.
By default, the boot order in the BIOS of the appliance prevents it from booting from
a USB drive. However,you can access the menu and change the boot order by sending
the DEL character three times as soon as you power on the appliance.
Press the DEL key three times as soon as the appliance powers on. The BIOS setup
appears and displays the appliance boot priority order:
Boot priority order:
1: USB KEY: CBM USB 2.0-(USB 2.0)
2: PCI SCSI: ASR-5405 PCI-E RAID
3: PCI BEV: IBA GE Slot 0B00 v1240
4: USB CDROM
5: ALL USB KEY
6: All USB CDROM
7: CF Card:
8: SATA Port 1:
If USB KEY:CBM USB 2.0- (USB 2.0) is not at the top of the list, use the down arrow
to select it and the <+> key to move it to the top of the list. Press the F10 key to save
your changes and exit the BIOS setup.
8. After you have confirmed the BIOS setting, power off the appliance.
9. Power on the appliance again. The boot prompt displays the following menu:
To enter rescue mode, type rescue-serial < ENTER >
or rescue-kvm < ENTER >
To boot from local type:
local < ENTER >
To reinstall type:
reinstall < ENTER >
boot:
Type reinstall and press the Enter key at the boot prompt to install the ISO image
from the USB drive.
If no input is provided, the appliance boots from the local disk by default.
After completing the installation, the appliance powers down. The reinstallation
process should take 30 to 60 minutes
Copyright © 2012, Juniper Networks, Inc.36
Page 51

Chapter 4: Installing the Junos Space JA1500 Appliance
WARNING: This procedure overwrites your hard disk drive with a new
factory default Junos Space installation. No trace of the previous
installation or configuration shall remain. If you do not want to erase your
system, power off the device immediately.
10. The next time you power on the appliance, it boots with the Junos Space version you
have selected, and eventually prompts you for the default username (super) and
password (juniper123).
NOTE: Do not remove the USB drive until the reinstallation procedure is
complete and the appliance is powered off.
Follow the instructions at Configuring Basic Settings for a Junos Space JA1500 Appliance
to configure basic Junos Space settings the next time you power on the appliance.
Related
Documentation
• Configuring Basic Settings for a Junos Space JA1500 Appliance on page 41
• Booting and Configuring the Junos Space JA1500 Appliance on page 33
37Copyright © 2012, Juniper Networks, Inc.
Page 52

JA1500 Appliance User Guide
Copyright © 2012, Juniper Networks, Inc.38
Page 53

PART 5
Configuration
•
Configuring the Junos Space JA1500 Appliance on page 41
39Copyright © 2012, Juniper Networks, Inc.
Page 54

JA1500 Appliance User Guide
Copyright © 2012, Juniper Networks, Inc.40
Page 55

CHAPTER 5
Configuring the Junos Space JA1500
Appliance
•
Configuring Basic Settings for a Junos Space JA1500 Appliance on page 41
•
Understanding How Junos Space Uses Ethernet Interfaces eth0 and eth3 on page 44
•
Changing Network and System Settings for a Junos Space Appliance on page 45
•
Viewing Nodes in the Fabric on page 49
•
Adding a Node in the Fabric on page 52
Configuring Basic Settings for a Junos Space JA1500 Appliance
You must configure basic network and machine information to make your appliance
accessible to the network.
To configure the startup settings of the JA1500 Appliance, follow these steps:
1. At the serial console login prompt, type the default user name and press Enter. The
default user name for console access is admin.
2. At the login prompt, type the default password and press Enter. The default password
for console access is abc123. Junos Space prompts you to change your default
password.
3. Enter the default password, then enter your new password. All passwords are case
sensitive. You see passwd: all authentication tokens updated successfully.
4. Enter a new IP address for interface ETH0 and press Enter. See also “Understanding
How Junos Space Uses Ethernet Interfaces eth0 and eth3” on page 44.
NOTE: The first and second appliance or virtual appliance that you
configure in a cluster (fabric) must be in the same subnet.
5. Enter a new subnet mask for interface ETHO and press Enter.
6. Enter the default gateway as a dotted decimal IP address and press Enter.
7. Enter the nameserver address in dotted decimal notation for interface ETH0 and press
Enter.
41Copyright © 2012, Juniper Networks, Inc.
Page 56

JA1500 Appliance User Guide
8. Specify whether the Junos Space system will be added to an existing cluster.
•
If the appliance will be not be added to an existing node cluster or is the first node
in the cluster:
•
Enter n when prompted “Will this Junos Space system be added to an existing
cluster?”
•
Enter the IP address for Web access.
The IP address for Web access must be in the same subnet as the IP address for
interface ETH0 but must be a different IP address.
•
Enter the display name for this node.
This is the logical node name that Junos Space displays for the first node in a
cluster.
•
If the JA1500 Appliance will be added to an existing node cluster, enter y when
prompted “Will this Junos Space system be added to an existing cluster?”
9. Enter the IP address for the Web GUI and press Enter.
10. Enter the display name for the node and press Enter.
11. Enter the password for the cluster maintenance mode.
This is the password a maintenance mode administrator must specify to access
maintenance mode and shutdown all nodes.
12. Reenter the password to confirm it. You see the settings summary:
1> IP Change: eth0 is 1.1.1.1 / 1.1.1.1
2> Default Gateway = 1.1.1.1 on eth0
3> DNS add: 1.1.1.1
4> Create as first node or standalone
5> Web IP address is 1.1.1.1
6> Node display name is "space1"
7> Password for Junos Space maintenance mode is set.
A> Apply settings
C> Change settings
Q> Quit and set up later
R> Redraw menu
Choice [ACQR]:
13. If the settings are correct, type A to apply the setting by typing option and press Enter.
You see the following:
Applying Changes...
Re-loading database
5280 semi-random bytes loaded
Generating RSA private key, 1024 bit long modulus
........................++++++
.....++++++
e is 65537 (0x10001)
grep: /etc/ha.d/haresources: No such file or directory
Stopping High-Availability services:
Copyright © 2012, Juniper Networks, Inc.42
Page 57

Chapter 5: Configuring the Junos Space JA1500 Appliance
[ OK ]
logd is already stopped
heartbeat is stopped. No process
Starting High-Availability services:
2009/11/04_11:34:50 INFO: Resource is stopped
[ OK ]
Done!
Adding password for user maintenance
httpd is stopped
Starting httpd: httpd: Could not reliably determine the server's fully qualified domain
name, using 10.155.65.191 for ServerName
[ OK ]
Starting MySQL.. SUCCESS!
Welcome to the Junos Space Network Settings Utility.
Initializing, please wait
Junos Space Appliance Settings Menu
1> Change Password
2> Set Routing
3> Set DNS Servers
4> Change Time Options
5> Retrieve Logs
6> Security
7> (Debug) run shell
Q> Quit
R> Redraw Menu
Choice [1-7,QR]:
14. Type 7 to run the shell. You see the following:
Password:
[root@junos-space-0256122008000008 ~]# ls
anaconda-ks.cfg install.log install.log.syslog
[root@junos-space-0256122008000008 ~]# df -h
Filesystem Size Used Avail Use% Mounted on
/dev/sda1 3.8G 1.3G 2.4G 34% /
/dev/mapper/jmpvgnocf-lvvar
1.8T 316M 1.7T 1% /var
tmpfs 4.0G 0 4.0G 0% /dev/shm
[root@junos-space-0256122008000008 ~]# jmp_setup
Welcome to the Junos Space Network Settings Utility.
Initializing, please wait
Junos Space Appliance Settings Menu
1> Change Password
2> Set Routing
43Copyright © 2012, Juniper Networks, Inc.
Page 58

JA1500 Appliance User Guide
3> Set DNS Servers
4> Change Time Options
5> Retrieve Logs
6> Security
7> (Debug) run shell
Q> Quit
R> Redraw menu
Choice [1-7,QR]:
15. Type Q to quit.
The configuration of the JA1500 Appliance is now complete.
NOTE: To log in to the Junos Space user interface from a Web browser, See
the Junos Space Network Application User Guide.
Related
Understanding How Junos Space Uses Ethernet Interfaces eth0 and eth3 on page 44•
Documentation
Understanding How Junos Space Uses Ethernet Interfaces eth0 and eth3
Junos Space is designed to perform best using only eth0 if the managed devices are
routable, using in-bound management. Use eth3 for a device management subnet if the
managed devices are non-routable or on an out-of-band management subnet.
Table 10 on page 44 describes how Junos Space interfaces intentionally function:
Table 10: How Junos Space IP Addresses Function
Function/Interface
SSH and device management if eth3 is not configured (node IP)eth0
GUI interface with an instance of JBOSS running (GUI)eth0:0
Not supportedeth1
Not supportedeth2
eth3
Device management when managed devices are on a subnet and not reachable
by way of eth0.
Junos Space uses eth0 and eth3 interfaces as follows:
•
Secure Shell Daemon (sshd) is listening on all IP addresses.
•
The web interface is only on the VIP, the same subnet as eth0.
•
Device management, outbound (discover) and inbound (post-discovery), including
syslog and DMI, should be eth3, or eth0 if eth3 is not configured.
Copyright © 2012, Juniper Networks, Inc.44
Page 59

Chapter 5: Configuring the Junos Space JA1500 Appliance
Related
Documentation
Configuring Basic Settings for a Junos Space JA1500 Appliance on page 41•
• Changing Network and System Settings for a Junos Space Appliance on page 45
Changing Network and System Settings for a Junos Space Appliance
You can change some of the basic settings that you configured when you first installed
and set up your Junos Space appliance. You can also change system time defaults and
retrieve system log files for your appliance.
Each time you log in from the Junos Space system console, the Junos Space Appliance
Settings menu appears. Follow the system prompts from the menu to set or modify any
menu options. Password changes take effect immediately. Any configuration changes
you make do not take effect until you apply the changes.
You can perform the following tasks from the Junos Space Appliance Settings menu:
Junos Space Appliance Settings Menu
1> Change Password
2> Set Routing
3> Set DNS Servers
4> Change Time Options
5> Retrieve Logs
6> Security
7> (Debug) run shell
•
•
•
•
•
•
•
Changing the Password
To change your password:
1. From the Junos Space Appliance Settings menu, enter 1 at the prompt.
2. Enter y when prompted to change the password for an admin user.
3. Type the new password and press Enter.
4. Retype the new password and press Enter.
Q> Quit
R> Redraw Menu
Choice [1-7,QR]:
Changing the Password on page 45
Setting Routing Option on page 46
Adding DNS Servers on page 46
Setting the System Time on page 46
Retrieving Logs on page 47
Configuring Security on page 48
Running the Shell on page 49
45Copyright © 2012, Juniper Networks, Inc.
Page 60

JA1500 Appliance User Guide
Setting Routing Option
Your password is updated and the setup program returns you to the main menu.
The Set Routing option changes only the default gateway. You cannot add a new static
route using Set Routing. When you have only a management ETH0 interface configured,
the Set Routing option allows you to change the default gateway for the Management
interface. However, if you have both ETH0 and ETH3 interfaces configured, the Set
Routing option provides two options: one to change the default gateway for the
management interface ETH0; the other to change the gateway for the device
management interface ETH3. See also “Understanding How Junos Space Uses Ethernet
Interfaces eth0 and eth3” on page 44.
To modify options for the default gateway or static routing:
1. From the Junos Space Appliance Settings menu, enter 2 at the prompt.
2. Enter one of the following options:
Adding DNS Servers
NOTE: Enter only option 1 if you have configured only ETH0. Enter both
option 1 and/or 2 if you have configured both ETH0 and ETH3 interfaces.
•
Enter 1 to change default gateway options.
Follow the prompts to change the IP address of the default gateway and return to
the main menu.
•
Enter 2 to change the static routing options.
Follow the prompts to add a new static route and return to the main menu.
You can add up to three DNS servers. Enter each one using dotted decimal notation (for
example, 10.157.191.252. Each addition returns you to the main menu.
To add a DNS server:
1. From the Junos Space Appliance Settings menu, enter 3 at the prompt.
2. Enter 1 to add a nameserver.
3. Enter the new nameserver in dotted decimal notation.
Repeat Step 1 through Step 3 to add another DNS server.
Setting the System Time
When you configure each Junos Space appliance or virtual appliance with an NTP server,
you ensure that, if the first node (which is used to synchronize time for all nodes in the
fabric) goes down, all other nodes in the fabric remain synchronized. To ensure this
behavior, all nodes in a fabric must use the same external NTP source that you configure
for the first appliance.
Copyright © 2012, Juniper Networks, Inc.46
Page 61

Chapter 5: Configuring the Junos Space JA1500 Appliance
NOTE: When an NTP server is enabled on the first node in the cluster, all
other nodes are synchronized with the NTP server time. However to ensure
time synchronization across all nodes in a fabric in the event of failover, all
nodes in a fabric should be configured using the same NTP server.
To change time options for an appliance:
1. From the Junos Space Appliance Settings menu, enter 4 at the prompt.
2. Enter 2 to set NTP servers.
NTP servers automatically set the system clock based on external time sources.
3. Enter one of the following values at the prompt:
•
1 to enable or disable NTP.
•
2 to add an NTP server.
The remaining numbered options let you remove an NTP server from the list.
Retrieving Logs
4. Follow the prompts to enable, set, or delete the NTP servers and return to the main
menu.
To retrieve system log files, you can use SecureCopy (SCP) if the network is functional,
or a USB device if the network is down.
NOTE: To save the system log file to a USB device, the device must be
connected to the Junos Space appliance.
To retrieve system logs:
1. From the Junos Space Appliance Settings menu, enter 5 at the prompt.
2. Choose a method for retrieving log files from the Retrieve Logs submenu:
a. To save the log files to USB , enter 1 and follow the prompts.
Junos Space retrieves the log files on all cluster members and combines them into
a tar file. After the file is created, you can copy the file onto a USB device.
b. To save the log files using SCP enter 2 and follow the prompts.
Junos Space retrieves the log files on all cluster members and combine them into
a tar file. After the file is created, you can transfer the file to a remote SCP server.
47Copyright © 2012, Juniper Networks, Inc.
Page 62

JA1500 Appliance User Guide
Configuring Security
The Security CLI menu command allows you to enable and disable the firewall and SSH
connection to an appliance. Enabling or disabling the firewall and SSH take place
immediately.
You can enable the firewall to examine all traffic routed between the network and the
appliance to prevent intrusion. The Enable Firewall option is enabled on the appliance
by default. The Enable Firewall option toggles to Disable Firewall when the option is
enabled.
NOTE: The only recommended time to disable the firewall is when using
Service Now e-mail or SNMP notifications, or when using Service Now through
a proxy.
Additionally, you can enable an SSH connection to the appliance. SSH is enabled by
default.If SSH is disabled,you can still connect to an appliance through the serial console.
To enable a firewall:
NOTE: The firewall is enabled on the appliance by default.
1. From the Junos Space Appliance Settings menu, enter 6. The submenu appears.
2. If the firewall option is disabled, enter option 1 Enable Firewall.
3. Type the password. You see the following at the prompt:
Starting jmp-firewall: [ OK ]
To disable a firewall:
1. From the Junos Space Appliance Settings menu, enter 6. The submenu appears.
2. If the firewall is enabled, enter option 1 Disable Firewall.
3. Type the password. You see the following at the prompt:
Flushing firewall rules: [ OK ]
Setting chains to policy ACCEPT: filter [ OK ]
Unloading iptables modules: [ OK ]
Stopping jmp-firewall:
To enable SSH:
NOTE: SSH is enabled on the appliance by default.
1. From the Junos Space Appliance Settings menu, enter 6. The submenu appears.
2. If SSH is disabled, enter option 2 Disable SSH.
Copyright © 2012, Juniper Networks, Inc.48
Page 63

Running the Shell
Chapter 5: Configuring the Junos Space JA1500 Appliance
3. Type the password. You see the following at the prompt:
Starting sshd: [ OK ]
This action starts the SSH daemon process.
To disable SSH:
1. From the Junos Space Appliance Settings menu, enter 6.The submenu appears.
2. If SSH is enabled, enter option 2 Enable SSH.
3. Type the password. You see the following at the prompt:
Stopping sshd: [ OK ]
This action stops the SSH daemon process.
To run shell commands to debug Junos Space:
1. From the Junos Space Appliance Settings menu, enter 7 and follow the prompts.
Related
Configuring Basic Settings for a Junos Space JA1500 Appliance on page 41•
Documentation
Viewing Nodes in the Fabric
The Fabric Monitoring inventory page allows the administrator to view configuration and
runtime information for each node in the Junos Space fabric. You can also monitor the
status of the database, load balancer, and application logic functions running on each
node, and identify nodes that are overloaded or down. The Fabric Monitoring inventory
page refreshes every 10 seconds, by default.
•
Changing Views on page 49
•
Viewing Fabric Node Details on page 50
Changing Views
You can display fabric monitoring in two views: thumbnail and tabular. By default, fabric
monitoring objects appear in thumbnail view.
In thumbnail view, fabric monitoring appears as icons listed in descending order
alphabetically by node name. Each fabric has a node name.
Each node in the fabric is represented by a thumbnail, which indicates whether the node
is a JA1500 Junos Space Appliance (JA1500) or a Junos Space Virtual Appliance (Junos
Space VA), and the node functions (database, load balancer, or application logic) that
run (whether up or down) on the appliance. For example, icons for the JA1500 Junos
Space appliance and virtual appliance are shown.
49Copyright © 2012, Juniper Networks, Inc.
Page 64

JA1500 Appliance User Guide
In tabular view, fabric nodes appear in a table sorted by node name. Each fabric is a row
in the Fabric Monitoring table.
To change views:
1. Navigate to Platform > Administrator > Manage Fabric. The Manage Fabric page
appears.
2. Click a view indicator at the right of the Manage Fabric page title bar.
Viewing Fabric Node Details
To view detailed runtime and status information for a node:
•
Double-click a node in either thumbnail or tabular views.The View Node Details page
appears.
•
In Fabric Monitoring thumbnail view, move the zoom slider to the far right.
Table 11 on page 50 describes the node information displayed in each column in the table
and from the detailed view.
Table 11: Fields for the Fabric Monitoring Inventory Panel
DescriptionField
Node Name
Status
The logical name assigned to the node.
NOTE: For the first node, Junos Space uses the node name that the user specifies during the initial
configuration of the Junos Space appliance (physical or virtual). For each subsequent node, the user
must specify a node name when adding the node to the fabric.
The IP address for the node.Management IP
Connection status for the node.
•
UP—Node is connected to the fabric.
•
DOWN—Node is disconnected from the fabric.
% CPU
The percentage of CPU resource utilized by the node.
•
Unknown—The percentage of CPU utilized is unknown, for example, because the node is not
connected.
Copyright © 2012, Juniper Networks, Inc.50
Page 65

Chapter 5: Configuring the Junos Space JA1500 Appliance
Table 11: Fields for the Fabric Monitoring Inventory Panel (continued)
DescriptionField
% RAM
% Disk
App Logic
Database
The percentage of memory resource utilized by the node.
•
Unknown—The percentage of memory utilized is unknown, for example, because the node is not
connected.
The percentage of the /var directory utilized by the node.
•
Unknown—The percentageof the /vardirectory utilized by the node is unknown, for example, because
the node is not connected.
Application Logic function status for the node.
•
UP— Application Logic function is running on node.
•
DOWN—Application Logic function enabled on the node but is not running.
•
Unknown—Status for the application logic function is unknown, for example, because the node is
not connected.
•
N/A— Application Logic function is not configured to run on the node.
Database function status for the node.
•
UP—Database function is running on node.
•
DOWN—Database function that is enabled on the node but is not running.
•
Unknown—Status for the Database function is unknown, for example, because the node is not
connected.
•
N/A—Database function is not configured to run on the node.
NOTE: By default, the Database function is enabled on no more than two nodes in the fabric.
Hardware Model
Load Balancer
Serial Number
Model of Junos Space Appliance.
NOTE: Hardware model appears when you double-click a thumbnail or table row for a detailed view
of the node.
NOTE: Hardware model only applies for a Junos Space physical appliance.
Load Balancer function for the node.
•
UP – Load Balancer function is running on the node.
•
DOWN – Load Balancer function that is enabled on the node is not running.
•
Unknown – Status for the Load Balancer function is unknown, for example, because the node might
not be connected.
•
N/A – Load Balancer function is not running because it is not configured to run on the node.
NOTE: By default, the Load Balancer function is enabled on no more than two nodes in the fabric.
Serial Number for the Junos Space appliance.
NOTE: Serial number appears when you double-click a thumbnail or table row for a detailed view of
the node.
51Copyright © 2012, Juniper Networks, Inc.
Page 66

JA1500 Appliance User Guide
Table 11: Fields for the Fabric Monitoring Inventory Panel (continued)
DescriptionField
Software Version
Junos Space Release Version.
NOTE: Software version appears when you double-click a thumbnail or table row for a detailed view
of the node.
For more information about manipulating data on the Fabric Monitoring inventory page,
see the Junos Space Network Application Platform User Guide.
Related
Documentation
Fabric Management Overview on page 9•
• Understanding How Nodes Are Connected in a Fabric on page 8
• Adding a Node in the Fabric on page 52
•
Adding a Node in the Fabric
You can deploy one or more Junos Space appliances or virtual appliances to create a
scalable fabric. As the number of devices on your network expands, you can add nodes
to the fabric to manage the increased workload. Each Junos Space appliance and virtual
appliance that runs the complete Junos Space software is represented as a single node
in the fabric. By default, the Junos Space fabric contains a single node that provides
complete Junos Space management functionality. Junos Space automatically adds the
first node to the fabric and uses the logical node name that you assign to the appliance
or virtual appliance when you configure the first appliance (node) in a cluster (fabric).
For each additional appliance or virtual appliance you deploy, you must add the node in
Junos Space to represent the appliance or virtual appliance in the fabric.
Before you add a node to the fabric, you must ensure the following:
•
The new node must be configured to be added to an existing cluster. See Configuring
an Appliance to Add to an Existing Cluster for more details.
•
The ETH0 IP address on the first and second nodes and the virtual IP (VIP) address
for the fabric must be in the same subnet.
•
You must be able to route multicast packets through all nodes in the fabric.
•
You must configure the same Network Time Protocol (NTP) servers on all nodes in
the fabric.
•
You must ensure that all nodes are running the same software release version.
•
If the new node is a virtual appliance, you must ensure that the first and second nodes
are hosted on two separate VMware ESX servers to ensure failover support.
Copyright © 2012, Juniper Networks, Inc.52
Page 67

Adding a Node
Chapter 5: Configuring the Junos Space JA1500 Appliance
NOTE: Wherethe Junos Space Virtual Appliance documentationreferences
“ESX server”, you can use either the ESX server, version 3.5 or later, or the
ESXi server, version 4.0 or later.
•
Adding a Node on page 53
You can add one or more nodes to the existing Junos Space fabric, but you can add only
one node at a time.
To add a node to the Junos Space fabric:
1. From the taskbar, select the Administration workspace.
2. From the taskbar, select the Manage Fabric icon.
3. From the taskbar, select the Add Fabric Node task.
The Add Fabric Node screen appears.
4. In the Name field, enter a name for the node.
5. In the IP address field, enter the IP address of the Junos Space appliance or virtual
appliance.
6. Schedule the Add Fabric Node operation:
•
Clear the Schedule at a later time check box (the default) to initiate the add node
operation when you complete step 7 of this procedure.
•
Select the Schedule at a later time check box to specify a later start date and time
for the add node operation.
NOTE: The selected time in the scheduler corresponds to Junos Space
server time but is mapped to the local time zone of the client computer.
7. Click Add to add the node to the fabric.
53Copyright © 2012, Juniper Networks, Inc.
Page 68

JA1500 Appliance User Guide
The node is added to the fabric and appears in the Junos Space user interface and
database. When you add a node, the node functions are automatically assigned by
Junos Space. By default, the first and second nodes added to a fabric perform all the
following functions:
•
Database— for processing database requests (create, read, update, and delete
operations)
•
Load Balancer— for processing HTTP requests from remote browsers and NBI
clients
•
Application Logic— for processing back-end business logic (Junos Space service
requests) and data manipulation language (DML) workload (device connectivity,
device events, and logging)
By default, the third node, and all subsequent nodes, added to a fabric perform only
the Application Logic function.
Copyright © 2012, Juniper Networks, Inc.54
Page 69

PART 6
Upgrading
•
Upgrading the Junos Space JA1500 Appliance Software on page 57
55Copyright © 2012, Juniper Networks, Inc.
Page 70

JA1500 Appliance User Guide
Copyright © 2012, Juniper Networks, Inc.56
Page 71

CHAPTER 6
Upgrading the Junos Space JA1500
Appliance Software
•
Junos Space Software Upgrade Overview on page 57
•
Upgrading the Junos Space Software on page 58
•
Upgrading the Network Application Platform on page 59
Junos Space Software Upgrade Overview
To upgrade Junos Space software for Juniper Networks physical and virtual appliances,
you upload the Junos Space image file to your existing fabric and perform the software
upgrade from the Junos Space user interface. When you perform an upgrade, all
appliances (nodes) in the fabric are upgraded with the new software.
To ensure a successful upgrade of your Junos Space appliances, complete the following
tasks.
•
Back up all your Junos Space data before you begin the upgrade process.
•
When upgrading a Junos Space virtual appliance, perform a snapshot to save a copy
of the current Junos Space software configuration of the appliance.
•
Ensure that the current Junos Space virtual appliance meets the memory requirement
of the software to which you want to upgrade.
•
Download the Junos Space software image from the Juniper Networks software
download Web site.
•
Complete the steps to upgrade your current Junos Space software to the latest software
version. See “Upgrading the Junos Space Software” on page 58.
NOTE: To perform the Junos Space upgrade , you must log in as the default
super administrator or system administrator.
•
Validate that the software is successfully installed by logging in to Junos Space,
selecting the Help icon to the right in the banner, then clicking About in the side panel.
57Copyright © 2012, Juniper Networks, Inc.
Page 72

JA1500 Appliance User Guide
To view the version of the installed Junos Space software, select the Help icon in the
user interface banner, and click on the About panel.
•
Upload the License Key that was sent to you when you purchased the Junos Space
software upgrade.
Related
Documentation
Upgrading the Junos Space Software on page 58•
• Upgrading the Network Application Platform on page 59
Upgrading the Junos Space Software
Junos Space administrator can upgrade software for the JA1500 Junos Space appliance
by downloading the Junos Space Upgrade image file from the Juniper Networks software
download site onto the local client file system. Once downloaded, upload the Junos
Space software to Junos Space using Platform > Administration > Manage Applications
Upgrade Platformaction. Thereafter, Junos Space upgrades the selectedsoftware. When
you perform an upgrade, all appliances (nodes) in the fabric are upgraded with the new
software.
CAUTION: The Junos Space Upgrade supports only two consecutive releases.
CAUTION: You cannot upgrade directly from Junos Space release 1.0, 1.1, 1.2,
1.3, or 1.4 to release 11.3. Instead, you must upgrade indirectly to Junos Space
release 11.1 or 11.2 before upgrading to release 11.3.
•
Junos Space 11.3 Release Highlights on page 58
•
Before You Begin on page 59
•
Upgrading Junos Space Release 11.1 or 11.2 to Release 11.3 on page 59
Junos Space 11.3 Release Highlights
The Junos Space Upgrade Release 11.3 includes:
Junos Space Release 11.3 Contents
•
Network Application Platform Release 11.3 (The platform provides the operating
environment for Junos Space, therefore upgrade using the Platform > Administration
> Manage Application Upgrade Platform action.)
•
Service Now Release 11.3
•
Service Insight Release 11.3
Available Hot-Pluggable Applications
The following applications are hot-pluggablein Junos Space.Hot-pluggableapplications
mean that adding removing, and upgrading occurs while Junos Space is still running, and
Copyright © 2012, Juniper Networks, Inc.58
Page 73

Before You Begin
Chapter 6: Upgrading the Junos Space JA1500 Appliance Software
without service interruption. A hot-pluggableapplication is packagedseparately and has
an separate image file for installing and upgrading.
•
Ethernet Design
•
Network Activate
•
QoS Design
•
Security Design Release
•
Virtual Control Release
Beforeyou upgrade the Junos Space Software, ensure that you are aware of the following:
•
Upgrading to Junos Space release 11.3 clears existing user preferences set using the
User Preference global action icon at the right in the title bar of Application Chooser.
•
We recommend that you:
•
Back up the Junos Space database before you begin the upgrade process. See also
“Junos Space Software Upgrade Overview” on page 57.
•
Clear the Web browser cache before logging in to the upgraded Junos Space software.
•
You must log in as the default super administrator or system administrator to upgrade
Junos Space.
Upgrading Junos Space Release 11.1 or 11.2 to Release 11.3
The Platform provides the running environment for all Junos Space applications, so
upgrading it causes operation interruption.
NOTE: When upgrading Junos Space from release 11.1 or 11.2 to release 11.3,
the Network Application Platform and Service Now application are upgraded
only. Junos Space release 11.1 or 11.2 applications are disabled. You must
upgrade release 11.1 or 11.2 disabled applications to release 11.3. Do not add
disabled Junos Space Release 11.1 or 11.2 applications using Platform >
Administration > Manage Applications > Add Application.
To upgrade Junos Space from release 11.1 or 11.2 to release 11.3, see “Upgrading the Network
Application Platform” on page 59.
Upgrading the Network Application Platform
The Network Application Platform (Platform) provides the running environment for all
Junos Space applications, so upgrading causes operation interruption. The Upgrade
Network Application Platform action allows the administrator to upgrade the Network
Application Platform independently from one version to another without installing other
Junos Space applications.
59Copyright © 2012, Juniper Networks, Inc.
Page 74

JA1500 Appliance User Guide
NOTE: During an upgrade of Junos Space release 11.1 or 11.2 to release 11.3 on
a multi-node fabric, the install status is shown in the installation process.
To upgrade the Junos Space Platform:
1. Ensure that the Junos Space Upgrade image to which you want to upgrade is
downloaded to the local client file system using
https://www.juniper.net/support/products/space/#sw.
2. Select Platform > Administration > Manage Applications.
The Manage Applications inventory page appears.
3. Right-click the Network Application Platform application to select it.
4. Select Upgrade Platform in the pop-up menu.
You can also select the platformand select UpgradePlatformfrom the Actions drawer.
The Upgrade Application page appears displaying all previously uploaded versions
of the Platform.
5. Do one of the following:
•
If the platform to which you want to upgrade is listed in the Upgrade Application
dialog box, select the file, and click Upgrade.
The application upgrade process begins. (Go to the next step.)
•
If the application to which you want to upgrade is not listed in the Upgrade
Application dialog box, click Upload.
The Software File page appears.
Upload the new application by performing one of the following:
a. Click Upload via HTTP.
The Software File dialog box appears.
i. Type the name of the application file or click Browse to navigate to where the
new Junos Space application file is located on the local file system.
ii. Click Upload
b. Click Upload via SCP.
The Upload Software via SCP dialog box appears. You must add the following
Secure Copy remote machine credentials.
i. Add your username.
ii. Add your password.
iii. Conform by adding your password again.
iv. Add the host IP address.
Copyright © 2012, Juniper Networks, Inc.60
Page 75

Chapter 6: Upgrading the Junos Space JA1500 Appliance Software
v. Add the local path name of the Junos Software application file.
vi. Click Upload.
The new application is uploaded from the local file system into Junos Space and
displayed by application name, filename, version, release level, and required Junos
Space Platform version
When the process is completed the Upgrade Platform Job Information dialog box
appears.
a. In the Upgrade Application Job Information dialog box, if you click the Job ID link,
you see the Upgrade Application job on the Platform > Job Management > Manage
Jobs inventory page.
i. Ensure that the job is successful.
ii. SelectAdministration> ManageApplications to continue with the add application
process.
The Manage Applications inventory page appears.
b. Right-click the Network Application Platform application and select Upgrade
Platform.
c. Click OK.
The Upgrade Platform dialog box appears. You see the application file that was
uploaded.
d. Select the application file to which you want to upgrade, and click Upgrade. The
application upgrade process begins.
6. You enter Maintenance mode. Junos Space prompts you to enter a user name and
password to enter maintenance mode. The user name is maintenance; the password
is one that the administrator created during the initial installation process.
7. Enter the maintenance mode user name and password in the text field.
8. Click OK.
Junos Space displays a status window during the platform upgrade process.
9. When the platform upgrade completes, click the Return to Maintenance Menu link.
The Maintenance Mode Actions window appears.
10. Click the Log Out and Exit from Maintenance Mode link.
The installation progress window appears.
NOTE: The platform upgrade process takes approximately between 2
and 30 minutes to complete depending on the size of the Junos Space
database.
61Copyright © 2012, Juniper Networks, Inc.
Page 76

JA1500 Appliance User Guide
When the installation is complete, the Junos Space login prompt appears.
NOTE: If a blank page appears instead of the login prompt, click Refresh.
The login prompt is then displayed.
NOTE: Juniper Networks recommends that you clear the Web browser
cache before logging in to the upgraded software.
NOTE: Juniper recommends that you perform a functional audit on all
deployed services after upgrading.
You can now log in to begin using the upgraded Junos Space software.
Related
Documentation
• Upgrading the Junos Space Software on page 58
Copyright © 2012, Juniper Networks, Inc.62
Page 77

PART 7
Troubleshooting
•
Troubleshooting the Junos Space JA1500 Appliance Hardware on page 65
63Copyright © 2012, Juniper Networks, Inc.
Page 78

JA1500 Appliance User Guide
Copyright © 2012, Juniper Networks, Inc.64
Page 79

CHAPTER 7
Troubleshooting the Junos Space JA1500
Appliance Hardware
•
Removing and Installing a Hard Disk on page 65
•
Removing and Installing a Fan on page 67
•
Removing and Installing a Power Supply on page 68
Removing and Installing a Hard Disk
Problem The JA1500 appliance ships with three hard disk drives in RAID 5 array.The hot-swappable
and hot-insertable drives are externally accessible in field-replaceable trays. You can
removeand replacea hard disk without powering off the appliance or disrupting functions
If one drive fails, the appliance recovers by automaticallyrebuilding the failed drive. During
failure,the LED 2 on the right on the front of the hard disk tray turns solid red and an alarm
sounds . See Figure 10 on page 65.
Figure 10: JA1500 Appliance Hard Disk Alarm LEDs
CAUTION: RAID system performance is impacted during the hard disk recovery
process.The rebuild processcan take betweenone hour and a day depending
on the system load.
Solution Before you begin removing a hard drive from a JA1500 appliance, ensure that you have
taken the necessary precautions to prevent ESD damage.
65Copyright © 2012, Juniper Networks, Inc.
Page 80

JA1500 Appliance User Guide
To remove a failed hard disk and install a new one:
1. Place an antistatic bag on a flat surface.
2. Attach the electrostatic discharge (ESD) grounding strap to your bare wrist, and
connect the strap to the ESD point on the JA1500 appliance
3. Loosen the hard disk captive screws. See Figure 11 on page 66.
Figure 11: JA1500 Appliance Hard Disk Removal
4. Slide the hard disk tray out of the appliance.
5. Put the failed hard disk in the antistatic bag for return material authorization (RMA).
6. Remove the new hard disk from the antistatic bag.
7. Insert the new hard disk into the JA1500 appliance and secure the two captive screws.
See Figure 12 on page 66.
Figure 12: JA1500 Appliance Hard Disk Installation
The alarm silences and LED 2 starts blinking indicating the new hard drive is recovering
RAID volume. LED 2 stops blinking when the drive rebuilding is complete and normal
operation is established.
Related
Documentation
Removing and Installing a Fan on page 67•
• Removing and Installing a Power Supply on page 68
Copyright © 2012, Juniper Networks, Inc.66
Page 81

Removing and Installing a Fan
Problem The JA1500 appliance ships with two field-replaceable fans that are hot-removable and
hot-insertable. You can remove and replace a fan without powering off the appliance or
disrupting functions.
When a fan fails, the full cooling load switches to the remaining fan and the red Failure
LED blinks on the JA1500 front panel and an alarm sounds. See Figure 13 on page 67.
Figure 13: JA1500 Appliance Front Panel Status LEDs
Chapter 7: Troubleshooting the Junos Space JA1500 Appliance Hardware
CAUTION: The JA1500 appliance should not run on one fan for an extended
period of time. Failed fans should be replaced as soon as possible.
Solution Before you begin removing a fan tray from a JA1500 appliance, ensure that you have
taken the necessary precautions to prevent ESD damage.
To remove a failed fan and install a new one:
1. Place the antistatic bag or the antistatic mat on a flat, stable surface.
2. Attach the electrostatic discharge (ESD) grounding strap to your bare wrist, and
connect the strap to the ESD point on the chassis.
3. Press the latch to release the fan. See Figure 14 on page 68.
67Copyright © 2012, Juniper Networks, Inc.
Page 82

JA1500 Appliance User Guide
Figure 14: JA1500 Appliance Fan Removal
4. Pull the fan out of the chassis.
Related
Documentation
5. Place the fan in the antistatic bag or on the antistatic mat placed on a flat, stable
surface.
6. Remove the new fan from the antistatic bag.
7. Insert the new fan until the latch locks. See Figure 15 on page 68.
Figure 15: JA1500 Appliance Fan Installation
When you replace the failed fan, the cooling load is distributed back evenly across
both fans, the failure LED goes out, and an the alarm silences.
Removing and Installing a Hard Disk on page 65•
• Removing and Installing a Power Supply on page 68
Removing and Installing a Power Supply
Problem The JA1500 appliance ships with one AC power supply that is cold-swappable. You must
remove a failed power supply and insert a new one while the main power is off.
The JA1500 appliance is upgradable to a redundant hot-swappable dual power supply.
If the JA1500 appliance includes two power supplies, plug each power cord into a separate
power circuit to ensure that the device continues to receive power if one of the power
Copyright © 2012, Juniper Networks, Inc.68
Page 83

Chapter 7: Troubleshooting the Junos Space JA1500 Appliance Hardware
circuits fails. If a power supply fails, you can remove it while the other functioning power
supply carries the full power load.
When a power supply fails, the red Failure status LED lights on the front panel of the
JA1500 appliance. See Figure 16 on page 69.
Figure 16: JA1500 Appliance Front Panel Status LEDs
Solution Before you begin removing a power supply from a JA1500 appliance, ensure that you
have taken the necessary precautions to prevent ESD damage.
To remove a failed power supply and install a new one:
1. Place the antistatic bag or the antistatic mat on a flat, stable surface.
2. Attach the electrostatic discharge (ESD) grounding strap to your bare wrist, and
connect the strap to the ESD point on the chassis.
3. Remove the power source cable from the power supply faceplate. Pull out the female
end of the power cord connected to the power supply faceplate.
4. Push on the locking ejector lever to the right until it is in its furthest position. See Figure
17 on page 69.
Figure 17: JA1500 Power Supply Removal
69Copyright © 2012, Juniper Networks, Inc.
Page 84

JA1500 Appliance User Guide
5. Grasp the power supply handle and pull firmly to slide it halfway out of the appliance.
6. Place one hand under the power supply to support it and slide it completely out of
the appliance.
7. Place the power supply in the antistatic bag or on the antistatic mat placed on a flat,
stable surface.
8. Remove the new power supply from the antistatic bag.
9. Insert the new power supply until the ejector lever locks. See Figure 18 on page 70.
Figure 18: JA1500 Appliance Power Supply Installation
Related
Documentation
The red failure alarm on the JA1500 front panel goes out when the new power supply
is powered on and the alarm silences.
• Removing and Installing a Hard Disk on page 65
• Removing and Installing a Fan on page 67
Copyright © 2012, Juniper Networks, Inc.70
Page 85

PART 8
Index
•
Index on page 73
71Copyright © 2012, Juniper Networks, Inc.
Page 86

JA1500 Appliance User Guide
Copyright © 2012, Juniper Networks, Inc.72
Page 87

H
hard disk
alarm..................................................................................65
failure..................................................................................65
Index
A
application
Platform, adding............................................................59
C
Configuring Junos Space
USB drive...........................................................................34
conventions
notice icons........................................................................xi
text.........................................................................................xi
customer support....................................................................xii
contacting JTAC...............................................................xii
D
documentation
comments on...................................................................xii
F
fabric
connection status..........................................................50
CPU resource...................................................................50
disk space..........................................................................51
high availability................................................................13
management IP address............................................50
management overview..................................................9
memory resource............................................................51
monitoring node status
application logic....................................................49
database..................................................................49
load balancer..........................................................49
multinode functionality.................................................11
node name.......................................................................50
node serial number........................................................51
overview...............................................................................8
single node functionality.............................................10
fan
alarm...................................................................................67
failure..................................................................................67
J
Junos Space software
base application.............................................................58
hot-pluggable applications.......................................58
network application platform, upgrading.............59
upgrade highlights.........................................................58
upgrade scenarios.........................................................58
upgrading..........................................................................58
upgrading , before you begin.....................................59
M
Manage Applications
upgrading Junos Space Software...........................58
Manage Applications workspace
Platform, upgrading......................................................59
manuals
comments on...................................................................xii
N
node
overview...............................................................................9
redundancy........................................................................13
nodes
how connected in Junos Space fabric......................8
notice icons.................................................................................xi
NTP server
overview...............................................................................9
P
power requirements...............................................................19
power supply
alarm..................................................................................68
failure.................................................................................68
R
removing
fan........................................................................................67
hard disk............................................................................65
power supply...................................................................68
requirements
power...................................................................................19
73Copyright © 2012, Juniper Networks, Inc.
Page 88

JA1500 Appliance User Guide
S
safety guidelines and warnings
general................................................................................23
support, technical See technical support
T
technical support
contacting JTAC...............................................................xii
text conventions defined.......................................................xi
troubleshooting
fan failure...........................................................................67
hard disk failure..............................................................65
power supply failure.....................................................68
U
upgrading Junos Space Platform.....................................59
W
warnings
general................................................................................23
Copyright © 2012, Juniper Networks, Inc.74
 Loading...