

Page 1
“NOTES DE SECURITE IMPORTANTES”
“Lorsque vous utilisez un appareil électrique, des précautions élémentaires doivent toujours être suivies,
comme celles-ci.” “Lisez attentivement ces instructions avant d’utiliser cette machine à coudre.”
“DANGER-
1. "Un appareil ne doit jamais être laissé sans surveillance lorsqu’il est branché. Toujours débrancher cet
appareil du secteur immédiatement après utilisation et avant de le nettoyer."
“ATTENTION
1. “Ne pas utiliser cet appareil comme un jouet. Porter une attention particulière lorsque cet appareil est
utilisé par des enfants.”
2. “N’utiliser cet appareil que dans le cadre de ses fonctions, mentionnées dans le présent manuel.
N’utiliser que les piéces fournies ou recommandées par le fabricant dans ce manuel.”
3. “Ne pas utiliser cet appareil si une de ses prises ou cordons est endommagé, ou s’il ne fonctionne pas
correctement. S’il est tombé, a été endommagé, tombé dans l’eau, retourner l’appareil auprès de votre
revendeur le plus proche pour une réparation, ou une vérication technique ou électrique.”
4. “Ne jamais utiliser cet appareil dans un lieu dépourvu d’aération. Maintenez une ventilation sufsante
autour de la machine et du rhéostat et éviter la poussière et les chutes de tissus aux alentours des
sources d’aération de la machine.”
5. “Eloignez vos doigts des pièces mobiles de la machine. Faites particulièrement attention aux
mouvements de l’aiguille.”
6. “Toujours utiliser la plaque aiguille appropriée. Une plaque non appropriée peut faire casser l’aiguille.”
7. “Ne pas utiliser d’aiguilles courbes.”
8. “Ne pas tirer ou pousser le tissu lorsque vous cousez, cela pourrait abîmer, voire casser l’aiguille.”
9. “Mettre l’interrupteur de la machine en position <OFF> losrque vous manipulez l’aiguille, ou l’enlez.
De même lorsque vous changez le pied presseur.”
10. “Débranchez toujours votre machine lorsque vous ôtez le capot, lorsque vous la nettoyez, ou pour tout
autre manipulation mentionnée dans le manuel d’instruction.”
11. “Ne jamais laisser d’objet entrer dans les ouvertures de la machine.”
12. “Ne pas utiliser à l’extérieur.”
13. “Ne pas utiliser lorsqu’un aérosol a été pulvérisé, ou lorsque de l’oxygène a été administré.”
14. “Avant de débrancher la machine, mettre l’interrupteur en position éteint <OFF>.”
15. “Ne pas débrancher en tirant sur le cordon. Pour débrancher, tenir la prise, pas le cordon.”
Pour réduire le risque d’électrocution.”
Pour les risques de brûlure, électrocutions et de blessures.”
-
“RETENEZ CES INSTRUCTIONS”
“Cette machine à coudre est destinée à une utilisation domestique uniquement.”
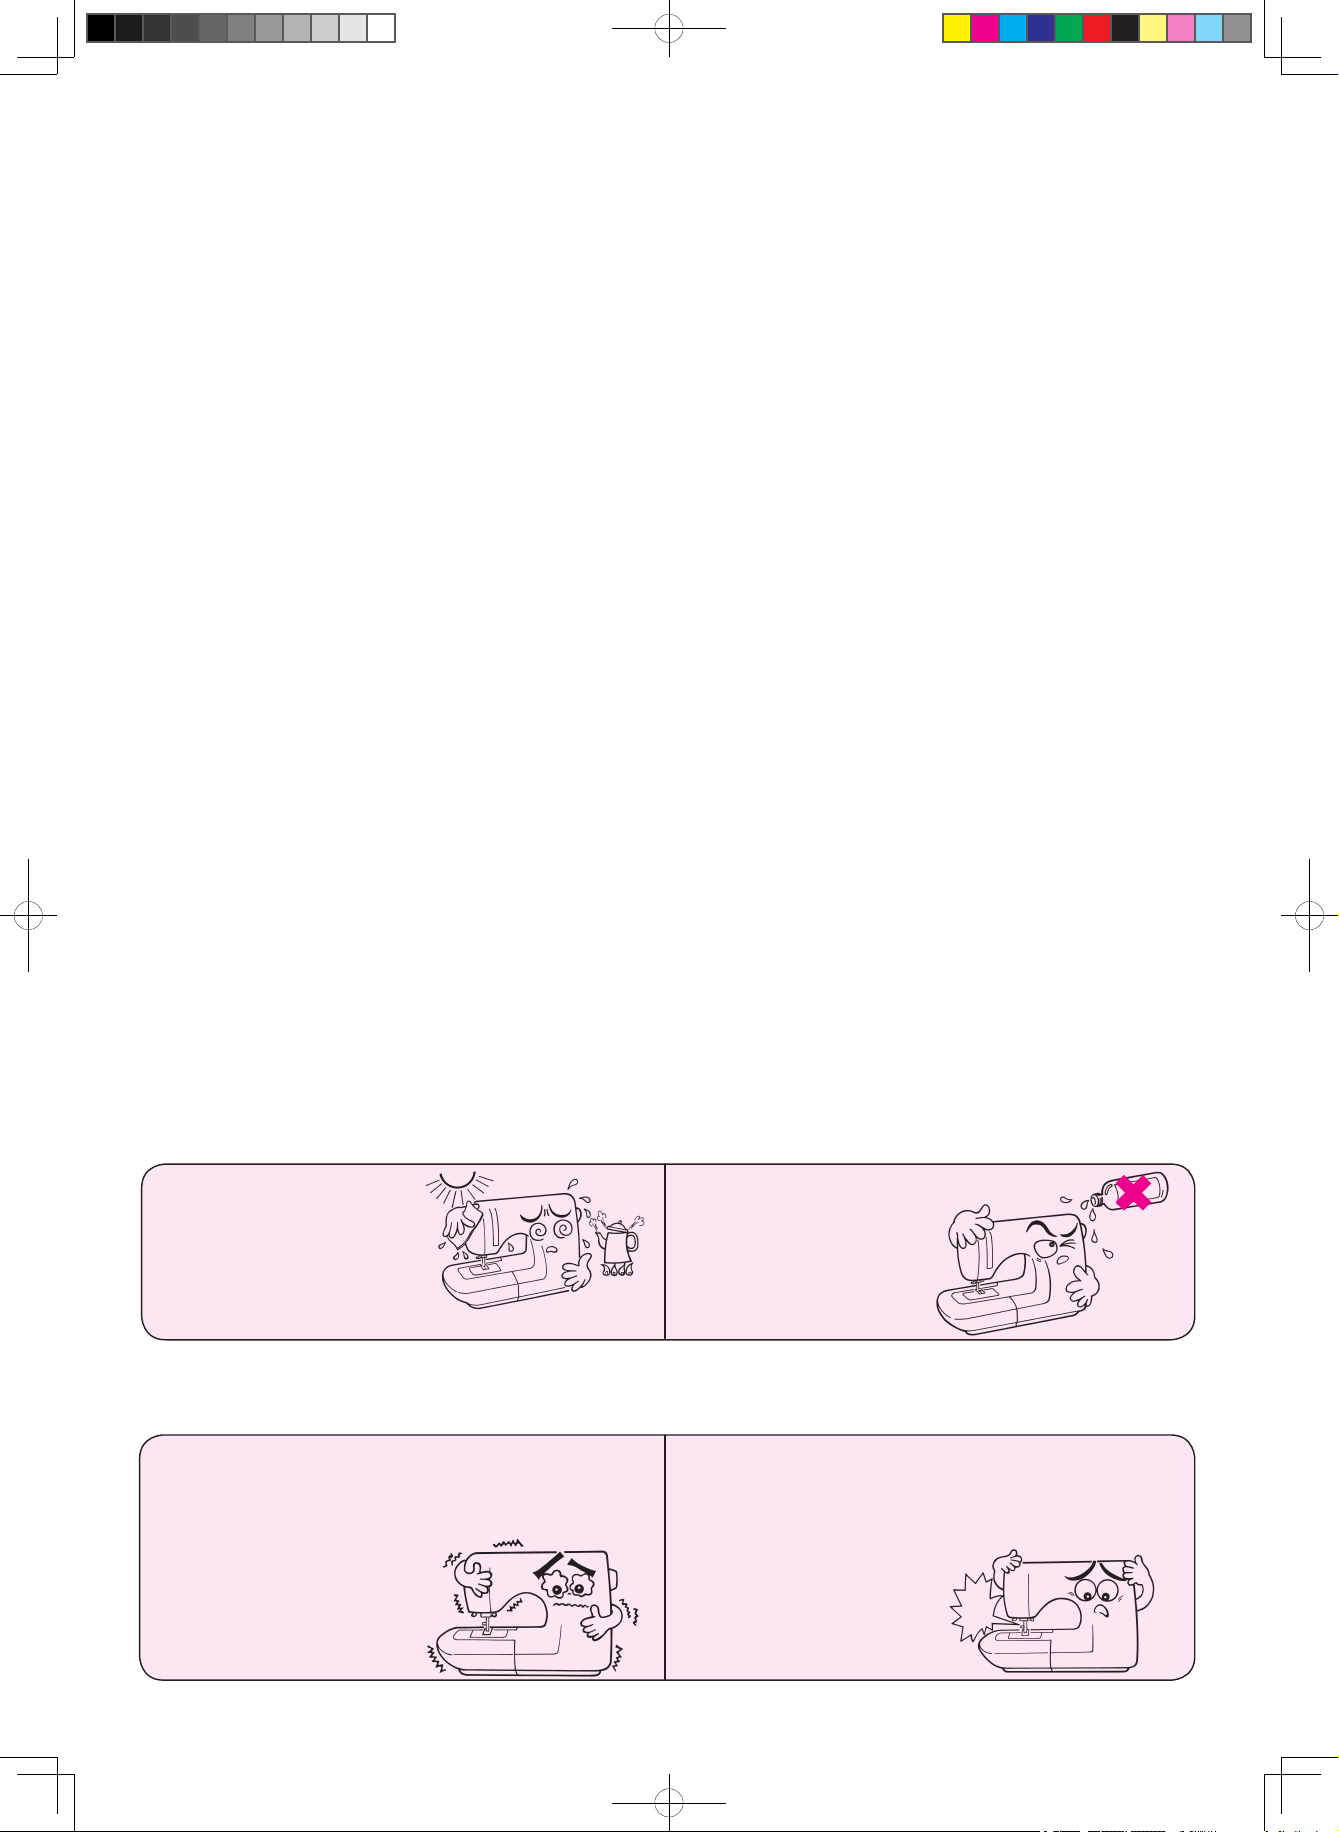
● Ne pas exposer la
machine directement
au soleil ou dans une
atmosphère humide.
Parce qu'il y a des composants électroniques et électriques dans la machine, il convient donc de bien
suivre ces recommandations an d'éviter toute détérioration de votre machine.
● Utilisez ce produit dans une température
comprise entre 5 et 40° degrés Celsius.
Si la température est extrêmement basse,
la machine peut
ne pas fonctionner
correctement.
● Ne pas utiliser
de détergents
ou alcool pour
nettoyer la
machine.
● La machine peut s’arrêter et se mettre en
sécurité en cas de surchauffe lorsque
la machine coud lentement et depuis
longtemps.
Au bout de 10 minutes
la machine sera de
nouveau opérationnelle.
Stop!
2
Page 2
INSTRUCCIONES DE SEGURIDAD IMPORTANTES
Cuando utilice un aparato eléctrico, deben seguirse las precauciones de seguridad básicas, incluidas la
siguiente: Lea todas las instrucciones antes de utilizar esta máquina de coser.
Para reducir el riesgo de descarga eléctrica:
PELIGRO
1. Nunca debe deje desatendida la máquina cuando esté enchufada. Desenchufe siempre esta máquina
de la toma de corriente inmediatamente después de utilizarla y antes de limpiarla.
ADVERTENCIA
1. No permita que se utilice esta máquina como un juguete. Tenga mucho cuidado cuando la utilicen niños o
cuando haya niños cerca.
2. Use esta máquina para los fines correctos descritos en esta guía. Utilice sólo los accesorios
recomendados por el fabricante y contenidos en este manual.
3. Nunca utilice esta máquina si el cable o el enchufe están dañados, si no funciona correctamente, si
se ha caído, está dañada o si se ha mojado. Devuelva la máquina al distribuidor o servicio técnico
autorizado más cercano para su inspección, reparación y ajuste eléctrico o mecánico.
4. Nunca utilice la máquina con las aberturas de ventilación bloqueadas. Mantenga las aberturas de
ventilación de la máquina de coser y el pedal libre de acumulaciones de bra, polvo y retales.
5. No acerque los dedos a las partes móviles. Preste especial atención a la aguja de la máquina de coser.
6. Utilice siempre la placa aguja adecuada. Una placa aguja no adecuada puede romper la aguja.
7. No utilice agujas torcidas.
8. No tire de la ropa ni la empuje cuando esté cosiendo. Puede deformar la aguja y acabar por romperla.
9. Apague la máquina (“O”) cuando realice ajustes en el área de la aguja, como al enhebrar y cambiar la
aguja, al enhebrar la canilla, al cambiar el prensatelas, etc.
10. Desenchufe siempre la máquina de coser de la toma de corriente cuando retire cubiertas, la lubrique o
realice cualquier otro ajuste de servicio mencionado en el manual de instrucciones.
11. No introduzca ningún objeto en ninguna abertura.
12. No utilice la máquina en exteriores.
13. No utilice la máquina si se utilizan productos en aerosol (spray) o si se administra oxígeno.
14. Para desconectar la máquina, establezca todos los controles en posición apagada (“O”), y
desenchúfela de la toma de corriente.
15. No desenchufe la máquina tirando del cable. Para desenchufarla, sujete el enchufe, no el cable.
-
Para reducir el riesgo de quemaduras, incendio, descarga
-
eléctrica o cualquier otro daño a personas:
CONSERVE ESTAS INSTRUCCIONES
Esta máquina de coser esta diseñada para su uso doméstico.
Utilice sólo el pedal JC-001 con los modelos HZL-F300, HZL-F400 o HZL-F600.
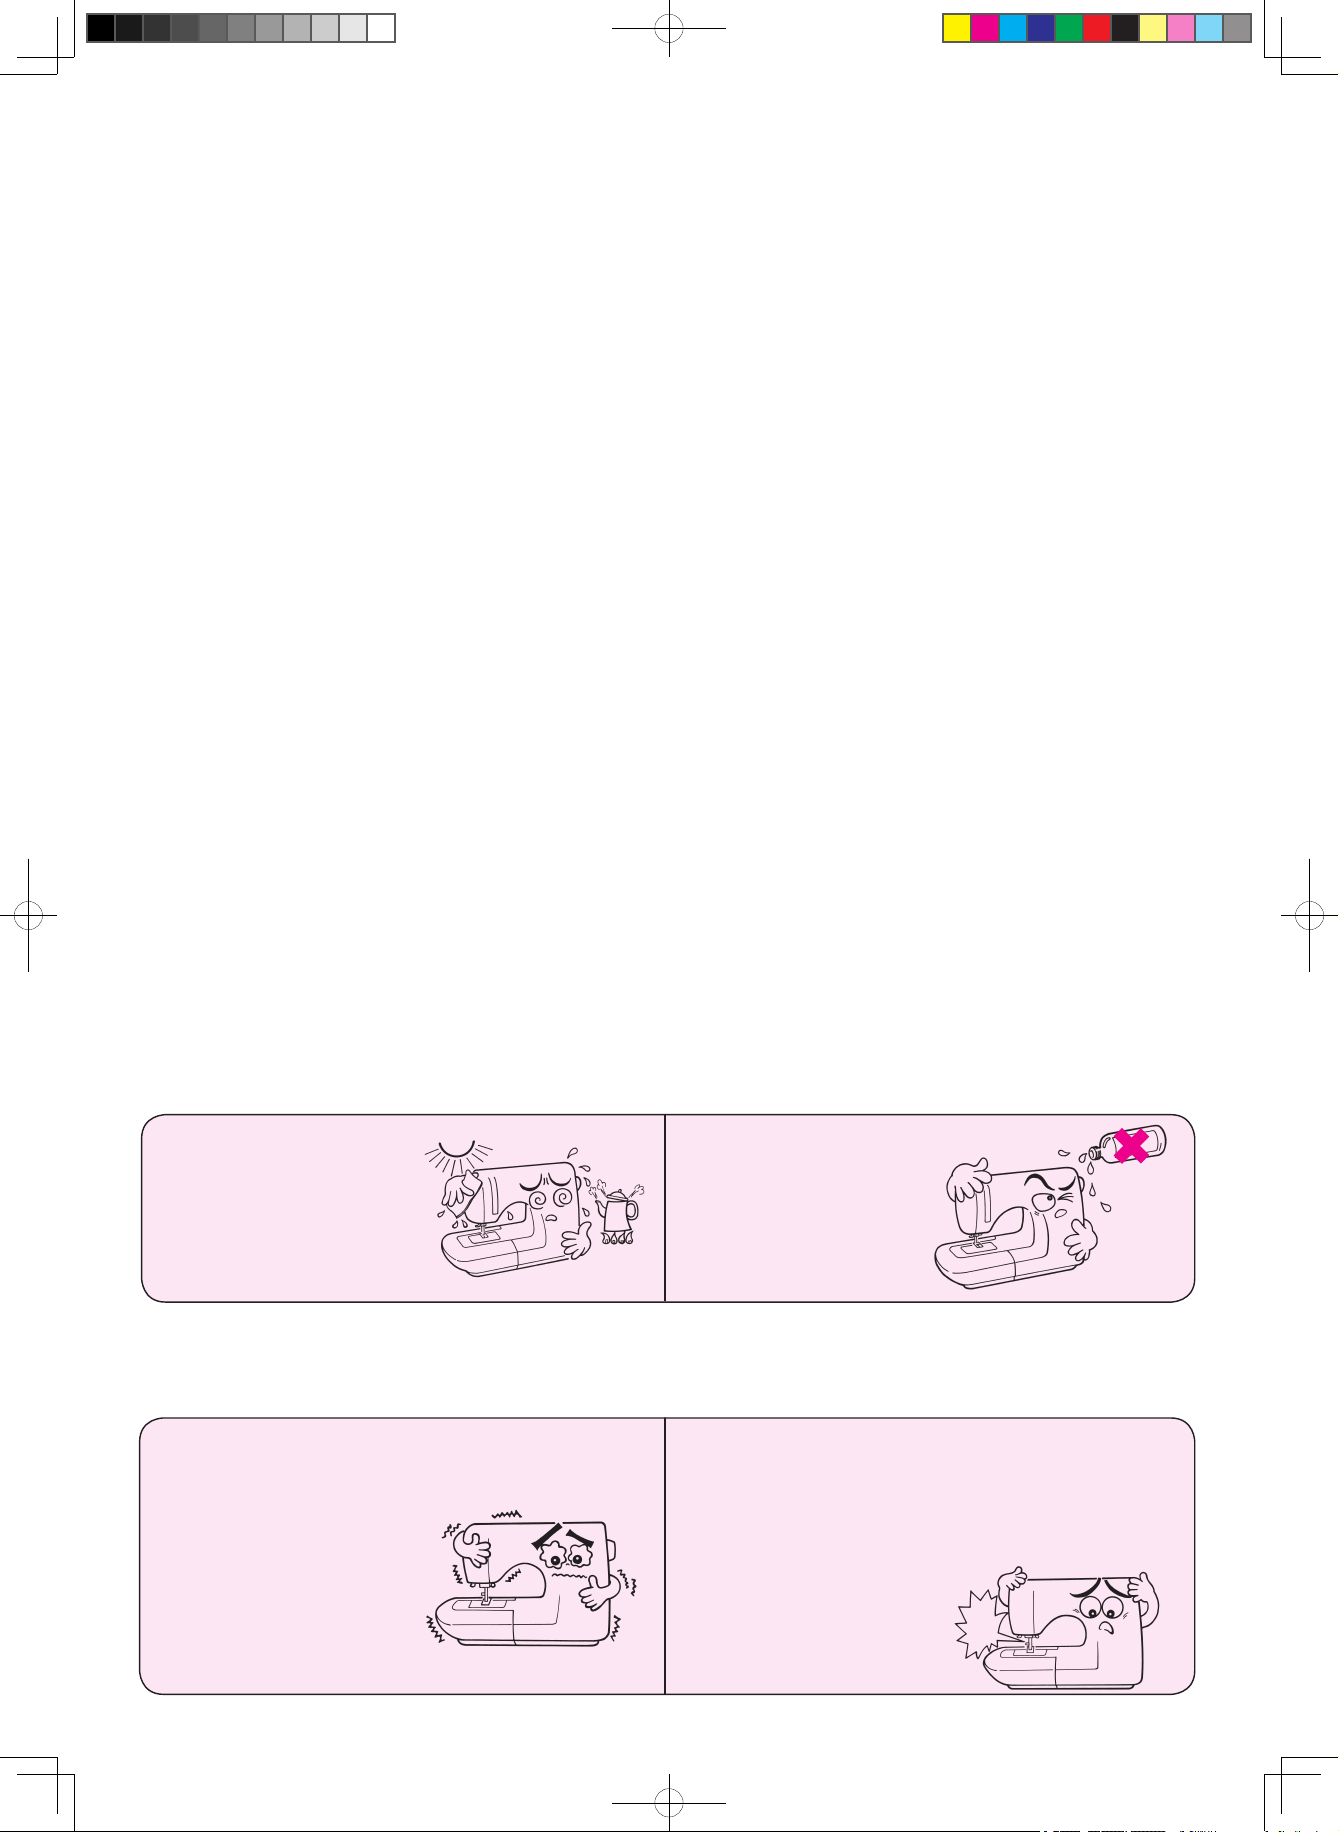
● No exponga la
máquina a la luz
del sol directa ni a
ambientes húmedos.
Puesto que esta máquina de coser incorpora microordenadores, semiconductores y placas de circuito
precisas, preste atención a las situaciones siguientes.
● No exponga la máquina a la luz del sol
directa ni a ambientes húmedos.
● No utilice
disolventes para
limpiar la máquina.
● El mecanismo de seguridad detendrá esta
de coser para que evitar que se recaliente
cuando cosa lentamente durante mucho
tiempo. En este caso, el botón de
arranque y parada no estará iluminado.
La máquina de coser
volverá a condiciones
operativas tras unos
10 minutos.
Stop!
3
Page 3
«ВАЖНЫЕ ИНСТРУКЦИИ ПО ТЕХНИКЕ БЕЗОПАСНОСТИ»
«При использовании электрического прибора следует соблюдать основные меры предосторожности,
включая следующие меры предосторожности».
«Перед использованием швейной машины прочтите все инструкции по эксплуатации».
«ВНИМАНИЕ!-
1. «Никогда не оставляйте швейную машину без присмотра, когда она включена в сеть. Всегда
отключайте швейную машину от сети сразу же после использования и перед тем, как
производить чистку».
«ПРЕДУПРЕЖДЕНИЕ-
1. «Никогда не позволяйте обращаться с машиной как с игрушкой. Особое внимание требуется,
когда машина используется детьми, или во время работы машины рядом находятся дети».
2. «Используйте данную машину только по назначению, указанному в настоящем руководстве.
Используйте только те дополнительные устройства, которые рекомендованы изготовителем и
содержатся в настоящем руководстве».
3. «Никогда не используйте машину, если у нее поврежден сетевой шнур или штепсельная вилка,
если она не функционирует должным образом, и если она упала, была повреждена или намокла.
Отправьте машину ближайшему официальному дилеру или в центр обслуживания для проверки,
ремонта, электрической или механической наладки».
4. «Никогда не используйте данную машину при закрытых вентиляционных отверстиях. Следите за
тем, чтобы в вентиляционных отверстиях и на ножной педали не скапливались хлопковый пух,
пыль и остатки ткани».
5. «Не дотрагивайтесь пальцами до движущихся частей швейной машины. Особая осторожность
требуется на участке вокруг иглы швейной машины».
6. «Всегда используйте соответствующую игольную пластинку. Неправильная игольная пластинка
может привести к поломке иглы».
7. «Не используйте изогнутые иглы».
8. «Не тяните или не проталкивайте ткань в процессе шитья. Это может искривить иглу и привести
к ее поломке».
9. «Выключайте ("O") швейную машину, чтобы выполнить какие-либо действия в области
иглы, например, чтобы продеть нить в иглу, заменить иглу, заправить шпульку или заменить
прижимную лапку и т. д».
10. «Всегда вынимайте вилку швейной машины из розетки, прежде чем снимать крышки, смазывать
машину или выполнять другие указанные в руководстве настройки в процессе эксплуатации
машины пользователем».
11. «Никогда не бросайте или не вставляйте предметы в отверстия».
12. «Не используйте машину вне помещения (на открытом воздухе)».
13. «Не работайте на машине, если используются аэрозольные (распыляющие) средства или
происходит снабжение кислородом».
14. «Чтобы отключить машину, поверните все органы управления в положение «выключено» («O»),
затем выньте вилку из розетки».
15. «Чтобы вынуть вилку из розетки, не тяните ее за шнур. Чтобы вынуть вилку из розетки, беритесь
за вилку, а не за шнур».
Для уменьшения риска поражения электрическим током»:
Для уменьшения риска возгорания, поражения
электрическим током, получения ожогов или
травм»:
«СОХРАНИТЕ ЭТО РУКОВОДСТВО»
«Данная швейная машина предназначена только для бытового применения».
Используйте только ножную педаль JF-1000 для машин HZL-K85 и HZL-K65.
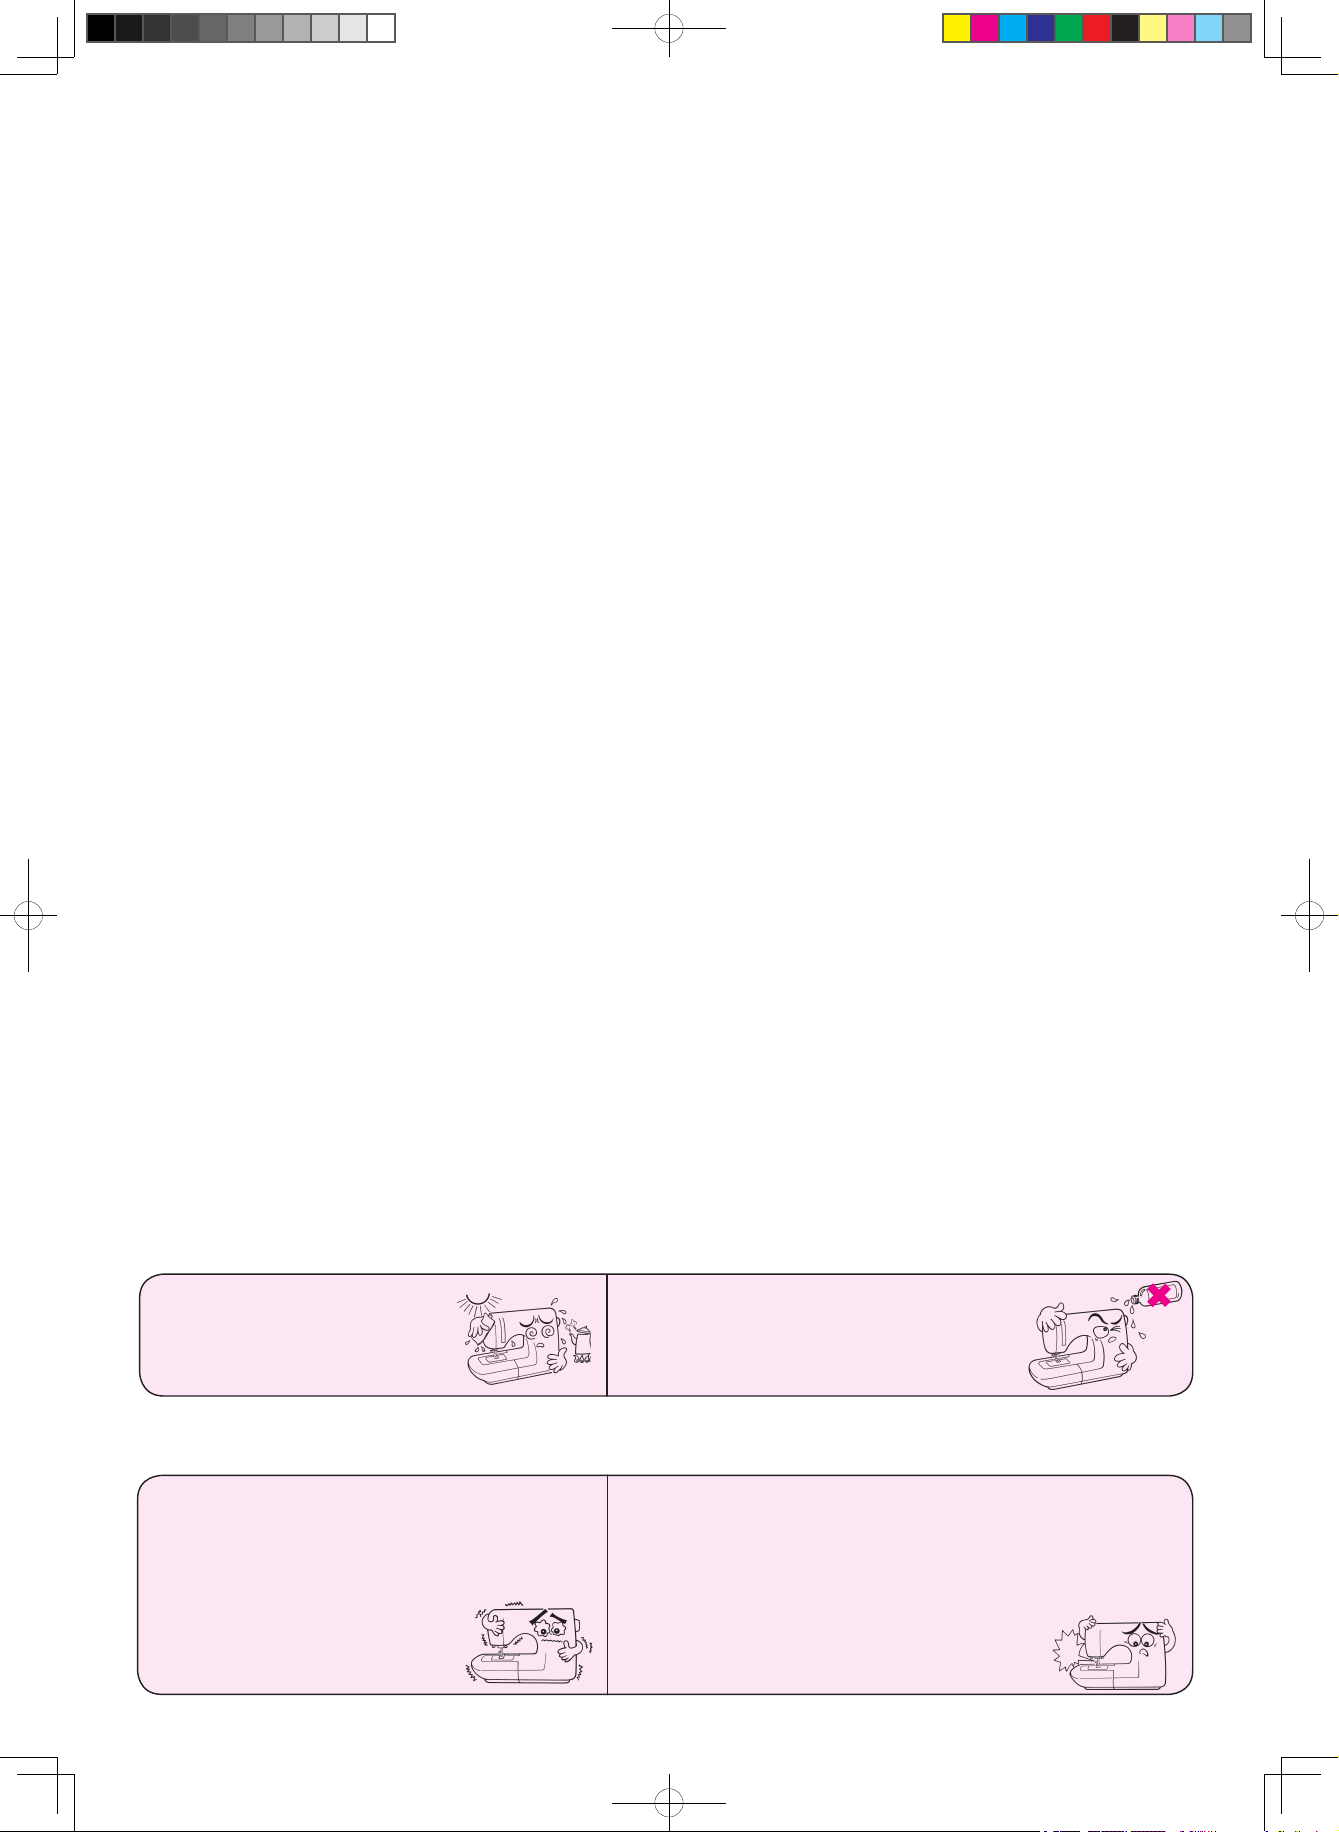
●
●
Не храните машину под
прямыми солнечными
лучами или в условиях
высокой влажности.
Поскольку микропроцессор(ы), полупроводник(и) и точная(ые) монтажная(ые) плата(ы)
встраиваются в данную швейную машину, пожалуйста, обратите внимание, что могут возникнуть
следующие условия.
● Используйте данную машину при
температуре от 5 до 40 град. Цельсия.
Если температура будет
слишком низкой, то
швейная машина будет
работать неправильно.
Не используйте растворители
или другие аналогичные
моющие средства для чистки
машины.
● Данная швейная машина будет останавливаться
благодаря предохранительному устройству для
защиты машины от перегрева, когда она будет
работать медленно и в течение длительного
времени.
В этом случае кнопка старт/стоп будет
подавать звуковой сигнал и мигать
красным цветом.
Stop!
4
Page 4
CONTENTS / TABLE DES MATIERES / ÍNDICE / INDICE
CONTENTS
Important safe guards ·········································································· 1
Principal parts···················································································· 6,7
Accessories ·························································································· 7
Major functions ················································································ 8-13
Winding the bobbin ·······································································14-16
Placing bobbin in the case
Threading the machine ································································· 17-19
Automatic needle threader / Pulling up the bobbin thread
Changing the presser foot ································································· 20
Attaching the needle ·········································································· 21
Types of feet and their applications ············································ 22,23
How to adjust stitch shape ································································ 23
How to adjust thread tension ···························································· 24
Fabric, thread and needle table···················································· 25,26
How to adjust stitch length(manually) ········································· 27,28
Straight stitch ················································································ 29,30
Straight stitch on strechy fabric
Automatic lock stitch ···································································· 31-34
Manual lock stitch and sewing start on heavy fabric
Zigzag stitch ························································································ 35
How to adjust stitch width (manually) ·············································· 36
Overcasting ························································································· 37
Reinforced stretch stitch ··································································· 38
Automatic buttonholes ·································································39-41
Bartacking ······················································································ 42,43
Darning stitch ····················································································· 44
Quilting stitch ····················································································· 45
Patchwork ··························································································· 46
Inserting zippers ············································································ 47-50
Lapped insertion / Centered insertion
Blindstitch ······················································································ 51,52
Quilting attachment,Quilt guide ························································ 53
Optional parts ················································································ 54-61
Invisible zipper foot /Manual buttonhole foot
Rolled hemming foot / Even feed foot / Smooth foot
Maintenance(Cleaning) ······································································ 62
Performance check list ································································· 63-66
TABLE DES MATIERES
Mise en garde························································································ 2
Principaux éléments·········································································· 6,7
Accessoires ·························································································· 7
Fonctions principales ·····································································8-13
Bobinage de la canette ·································································14-16
Placer la canette dans le boîtier
Enlage de la machine ·································································· 17-19
Enlage automatique de l’aiguille / Faire remonter le l de canette
Changement du pied presseur ·························································· 20
Pose de l’aiguille ················································································ 21
Types de pieds et leurs applications ··········································· 22,23
Comment ajuster la forme du point ·················································· 23
Comment régler la tension du l ······················································· 24
Matière, l et aiguille ····································································· 25,26
Comment régler manuellement la longueur du point ················ 27,28
Point droit ······················································································· 29,30
Point droit sur tissu extensible
Points d’arrêt programmables ·····················································31-34
Point d’arrêt manuel et départ de la couture sur les tissu épais
Point zig zag ························································································ 35
Comment régler la largeur des points (manuellement) ·················· 36
Surlarge ····························································································· 37
Point triple élastique ·········································································· 38
Boutonnières automatiques en 1 temps ····································· 39-41
Couture d’arrêt ··············································································· 42,43
Point de reprise ·················································································· 44
Point de courtepointe ········································································· 45
Patchwork ··························································································· 46
Fermetures à glissière ··································································47-50
Fermetures recouvertes / Fermetures centrées
Point invisible ················································································ 50,51
Ensemble pour quilting,Guide ouateur ············································ 53
Accessoires optionnels ································································ 54-61
Pied fermeture invisible / Pied boutonnière manuelle
Pied ourlet roulé / Pied double entraînement / Pied à semelle lisse
Nettoyage de la machine ··································································· 62
Problèmes éventuels et remèdes simples ·································· 63-66
CONTENIDO
Instrucciones de seguridad importantes ··········································· 3
Componentes ····················································································· 6,7
Accesorios ···························································································· 7
Funciones principales····································································· 8-13
Bobinado de la canilla··································································· 14-16
Colocación de la canilla en el estuche
Enhebrado de la máquina ····························································· 17-19
Enhebrador automático de la aguja / Tirar del hilo de la canilla
Sustitución del prensatelas ······························································· 20
Instalación de la aguja ······································································· 21
Tipos de prensatelas y sus aplicaciones ···································· 22,23
Cómo ajustar la forma de la puntada ··············································· 23
Cómo ajustar la tensión del hilo ······················································· 24
Tabla de tejidos, hilo y aguja ························································ 25,26
Cómo ajustar la longitud de la puntada (manualmente) ············ 27,28
Puntada recta ················································································· 29,30
Pespunte recto en tejido tipo punto
Puntada de remate automática ····················································31-34
Puntada de seguridad manual e inicio de costura en tejidos gruesos
Puntada en zigzag ·············································································· 35
Cómo ajustar la anchura de la puntada (manualmente) ················· 36
Sobrehilado ························································································· 37
Puntada de refuerzo para tejidos elásticos ····································· 38
Ojales automáticos········································································ 39-41
Presillado ······················································································· 42,43
Puntada de zurcido ············································································ 44
Puntada de acolchar ·········································································· 45
Patchwork ··························································································· 46
Colocación de cremalleras ···························································47-50
Colocación recubierta / Colocación centrada
Puntada invisible ··········································································· 51,52
Accesorio para acolchar,Guía de acolchar ······································ 53
Componentes opcionales ····························································· 54-61
Prensatelas para cremalleras invisibles /Prensatelas para ojales manuales
Prensatelas para dobladillos enrollados / Prensatelas de paso uniforme
Prensatelas suave
Mantenimiento (limpieza) ··································································· 62
Lista de comprobación de funcionamiento ································ 63-66
СОДЕРЖАНИЕ
Важные инструкции по технике безопасности······························1
Основные части ··············································································· 6,7
Принадлежности ················································································· 7
Основные функции ······································································· 8-13
Намотка нити на шпульку ···························································14-16
Установка шпульки в колпачок
Заправка нити в машине ····························································17-19
Автоматический нитевдеватель / Вытягивание шпульной нити
Замена прижимной лапки ······························································· 20
Установка иглы ················································································· 21
Типы прижимных лапок и их применение ······························ 22,23
Регулирование формы стежка ·······················································23
Регулирование натяжения нити ····················································· 24
Таблица соответствия тканей, нитей и игл ····························· 25,26
Регулирование длины стежка (вручную) ································ 27,28
Прямая строчка ············································································ 29,30
Прямая строчка для эластичной ткани
Автоматическое шитье челночным стежком ·························· 31-34
Челночный стежок и начало шитья на тяжелой ткани
Строчка зигзаг ··················································································· 35
Регулирование ширины стежка (вручную) ·································· 36
Краеобметочная строчка ································································· 37
Усиленный стежок эластичной строчки ······································· 38
Автоматическое выметывание петель ···································· 39-41
Изготовление закрепок ······························································· 42,43
Штопальная строчка ········································································ 44
Стегальная строчка ·········································································· 45
Пэчворк (лоскутное шитье) ····························································· 46
Вшивание молнии ········································································47-50
Вшивание под планку / Вшивание по центру
Потайная строчка ········································································· 51,52
Приспособление для стегальной строчки ··································· 53
Дополнительные приспособления ·········································· 54-61
Лапка для потайной молнии
Лапка для выметывания петель в ручном режиме
Лапка для подрубки руликом / Лапка для равномерной подачи материала
Прижимная лапка с гладкой поверхностью
Техническое обслуживание (Чистка) ············································ 62
Перечень возможных неисправностей и их устранение ······ 63-66
5
Page 5
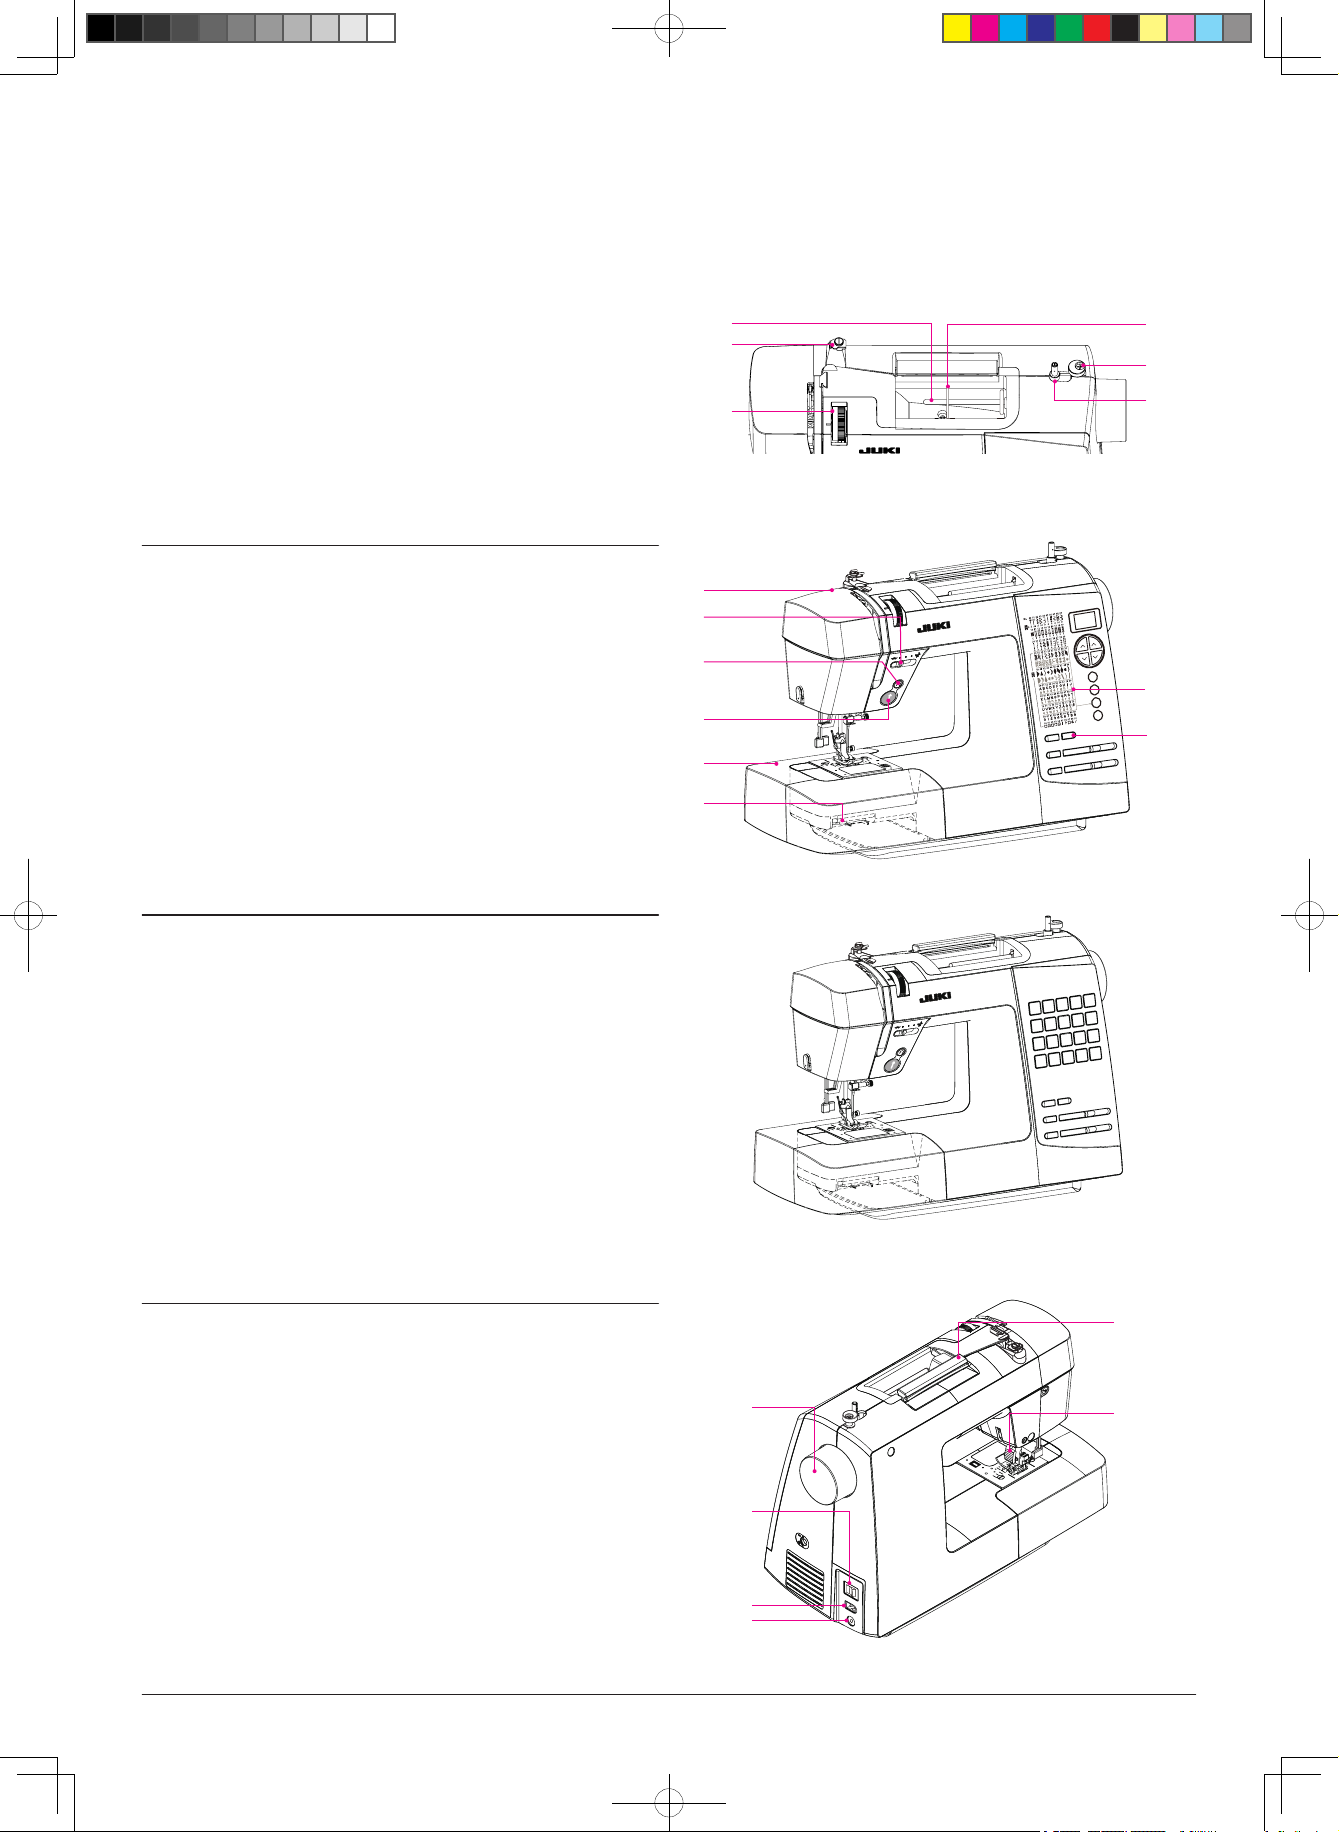
Principal Parts / Principaux éléments
Componentes / Основные части
1. Spool pin
2. Bobbin thread guide
3. Thread tension dial
4. Thread spool cap
5. Bobbin winding regulator
6. Bobbin winder
7. Face cover
8. Speed controller
9. Reverse stitch button
10. Start/Stop button
11. Auxiliary bed
1. Porte-bobine
2. Guide-l de canette
3. Bouton de tension du l
4. Chapeau de bobine
5. Arrêt du dévidoir de canette
6. Dévidoir de canette
7. Capot frontal
8. Curseur de vitesse
9. Bouton de marche arrière
10. Bouton start/stop
11. Rallonge de bras
12. Drop feed lever
13.Automatic lock stitch button
14. Stitch selection panel
15. Handwheel
16. Light / Power switch
17. Power cord receptacle
18. Foot controller receptacle
19. Handle
20. Presser foot lever
12. Levier pour abaisser la griffe
13. Bouton de point d’arrêt auto
14. Panneau de sélection du point
15. Interrupteur de courant
16. Volant manuel
17. Prise du cordon d’alimentation
18. Prise du rhéostat
19. Poignée
20. Levier du pied presseur
10
11
12
1
2
3
7
8
9
4
5
6
14
13
HZL-K85
1. Pivote de la bobina
2. Guía de enhebrado de la
canilla
3. Regulador de tensión del
hilo
4. Tapa de la bobina
5. Regulador de bobinado de
la canilla
6. Bobinador de canilla
7. Cubierta frontal
8. Control de velocidad
9. Botón de puntada inversa
10. Botón de arranque/parada
11. Mesa auxiliar
1. Стержень катушки
2. Направитель шпульной
нити
3. Регулятор натяжения нити
4. Колпачок катушки
5. Регулятор намотки
шпульки
6. Устройство намотки
шпульки
7. Передняя крышка
8. Регулятор скорости
9. Кнопка обратной строчки
10. Кнопка «старт/стоп»
11. Вспомогательный стол
12. Palanca de descenso de los
dientes
13. Botón de puntada de remate
automática
14. Panel de selección de puntada
15. Volante
16. Luz/interruptor de alimentación
17. Conector del cable de alimentación
18. Conector del pedal
19. Asa
20. Palanca del prensatelas
12. Рычаг двигателя ткани
13. Кнопка автоматического
челночного стежка
14. Панель выбора строчки
15. Маховик
16. Подсветка / Выключатель
питания
17. Гнездо электрического
соединения
18. Гнездо подключения ножной
педали
19. Ручка
20. Рычаг подъема прижимной
лапки
15
16
17
18
HZL-K65
19
20
6
Page 6
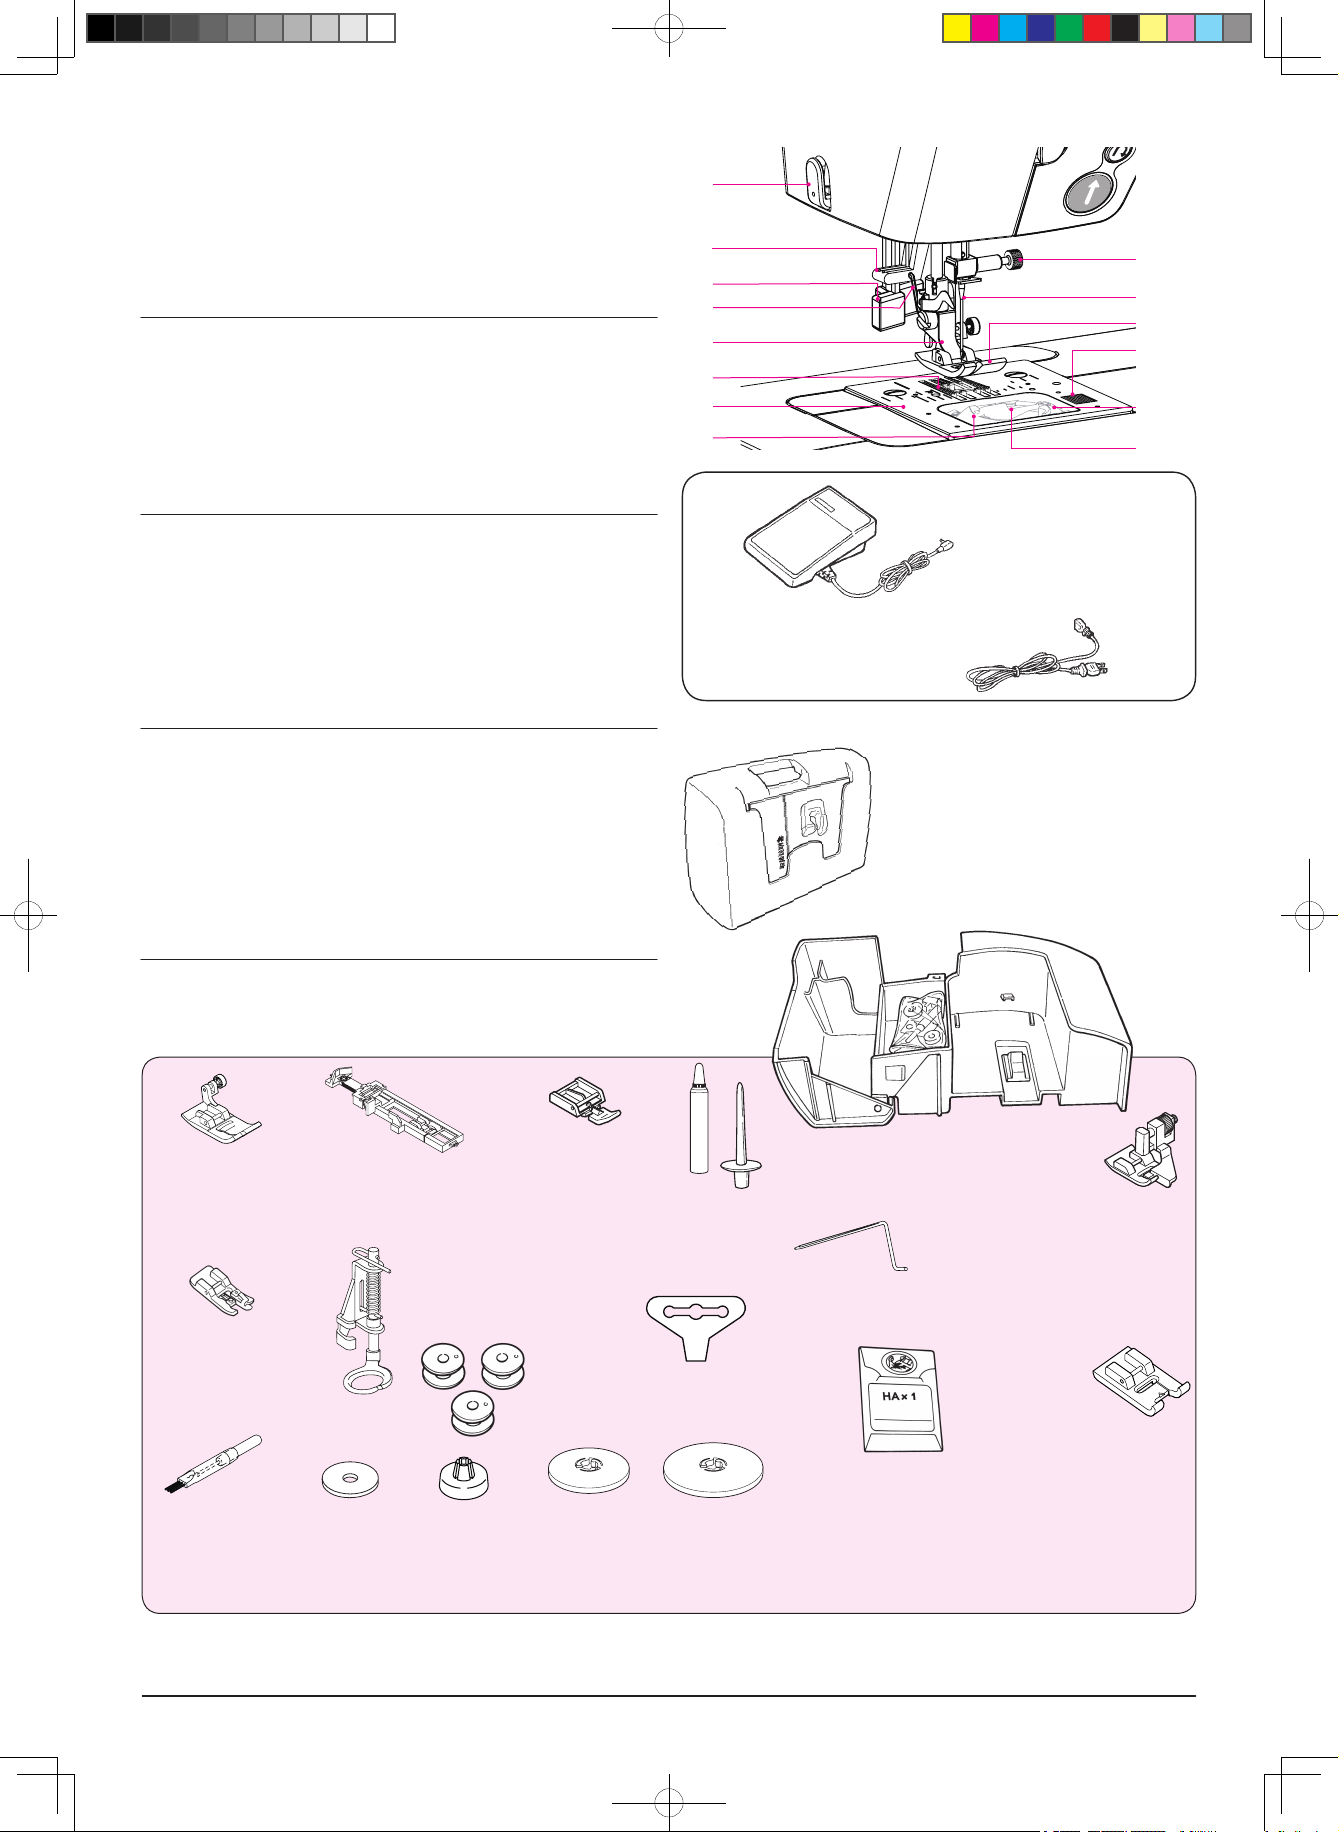
1. Thread Cutter
2. Needle threader
3. Buttonholing lever
4. Presser foot release lever
5. Presser foot shank
6. Feed dog
7. Needle plate
1. Coupe-l
2. Enle-aiguille
3. Levier de boutonnière
4. Releveur de pied presseur
5. Montage du pied presseur
6. Griffes d’entraînement
7. Plaque aiguille
1. Cortahilos
2. Enhebrador
3. Palanca para ojales
4. Palanca de liberación del
prensatelas
5. Vástago del prensatelas
6. Dientes
7. Placa aguja
1. Приспособление для
обрезки нити
2. Нитевдеватель
3. Рычаг выметывания петель
4. Рычаг опускания
прижимной лапки
5. Стержень прижимной лапки
6. Зубчатая рейка
7. Игольная пластина
8. Bobbin case
9. Needle clamp
10. Needle
11. Presser foot
12. Hook cover release button
13. Hook cover
14. Bobbin
8. Boîtier à canette
9. Montage du pied
10.Aiguille
11. Pied presseur
12. Bouton d’ouverture du capot
13. Capot de la canette
14. Canette
8. Estuche de la canilla
9. Sujeción de la aguja
10. Aguja
11. Prensatelas
12. Botón de liberación de la tapa del
garo
13. Tapa del garo
14. Canilla
8. Шпульный колпачок
9. Фиксатор иглы
10. Игла
11. Прижимная лапка
12. Кнопка открывания крышки
челнока
13. Крышка челнока
14. Шпулька
1
2
3
4
5
6
7
8
Foot controller
Rhéostat
Control de velocidad del pedal
Педаль регулирования
скорости шитья
· You can keep instruction manual at hard
case.
· Vous pouvez ranger votre manuel
d’instructions dans le capot rigide.
· Puede conservar el manual de
instrucciones en la funda rígida.
· Вы можете хранить данное руководство
9
10
11
12
13
14
Electric power cord
Cordon électrique
Cable de alimentación
Сетевой шнур
по эксплуатации в специальном жестком
ящике.
Accessories / Accessoires
Accesorios / Принадлежности
*
Standard presser foot (A)
Pied presseur standard (A)
Prensatelas estándar (A)
Стандартная прижимная
лапка(А)
Overcasting foot (C)
Pied ourlet invisible (C)
Prensatelas de sobrehilado(C)
Лапка для краеобметочной
строчки(C)
Buttonhole foot (E)
Pied boutonnière (E)
Para ojales (E)
Лапка для выметывания
петель(E)
Quilting attachment
Ensemble pour quilting
Accesorio para acolchar
Приспособление для
стегальной строчки
Zipper foot (B)
Pied fermeture à glissière (B)
Para cremalleras (B)
Лапка для молнии(B)
Bobbins (3)
Canettes (3)
Canillas (3)
Шпульки(3)
*
Seam ripper
Découvit
Descosedor
Вспарыватель швов
* These items are equipped with machine.
* La machine est pourvue de ces éléments.
* Elementos incluidos con la máquina.
* Машина оснащена данными принадлежностями.
7
Spool pin felt disc
Disque en feutre de
la broche porte-bobine
Disco de eltro del
pivote de bobina
Войлочная шайба
для стержня катушки
Spool cap(small)
Coiffe (petite)
Tapa de bobina
(pequeño)
Колпачок катушки
(маленький)
T-shape screw-driver
Tournevis en T
Destornillador en T
Т-образная отвертка
Spool cap(medium)
Coiffe (moyenne)
Tapa de bobina
(medio)
Колпачок катушки
(средний)
Oiler
Graisseur
Lubricante
Масленка
*
Spool cap(large)
Coiffe (grande)
Tapa de bobina
(grande)
Колпачок катушки
(большой)
Auxiliary Bed
Spool pin
Broche porte-bobine
Pivote de la bobina
Стержень катушки
Quilt guide
Guide ouateur
Guía para colchas
Направитель для стегальной строчки
Needle pack
Paquet d’aiguilles (130-705H)
Paquete de agujas
Набор игл
Plateau de travail
Mesa auxiliar
Вспомогательный стол
Manual buttonhole foot(I)
Pied boutonnière manuelle (I)
Prensatelas para ojales manuales (I)
Лапка для выметывания петель в
ручном режиме(I)
Blindstitch presser foot (D)
Pied pour surlage (D)
Prensatelas de puntada invisible (D)
Лапка для потайной строчки(D)
For K85 only
Pour la K85 uniquement
Sólo para K85
только для машины K85
HA×1 No.11 2P
( )
No.14 1P
HA×1 No 11×2
o
(
N
14×1
)
Page 7
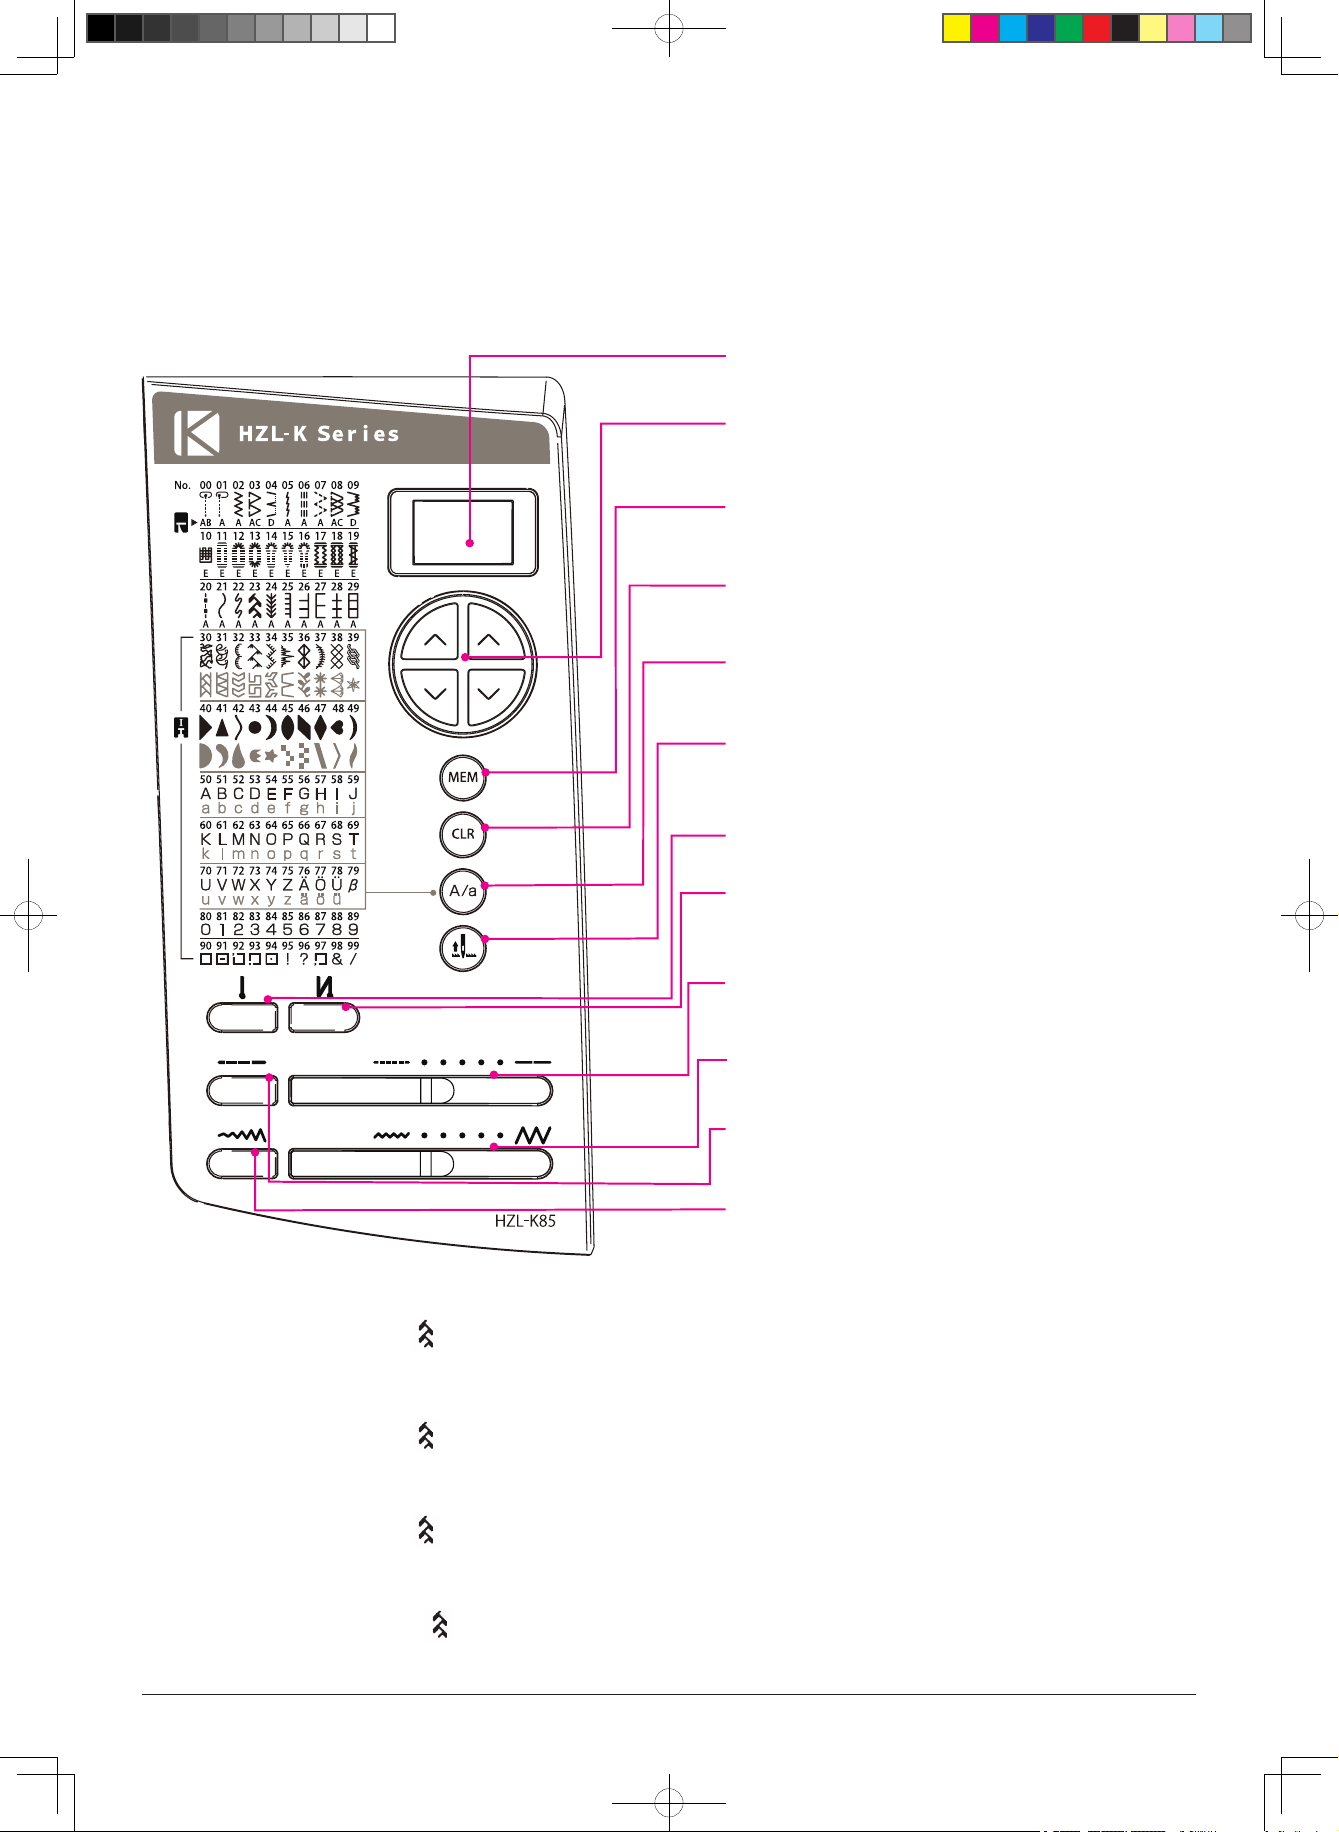
Major functions / Fonctions principales
2. Press three times of upper right side (number of units).
2. Appuyez à trois reprises dans le coin supérieur droit (unités).
2. Pulse tres veces en el lado superior derecho (unidades).
Funciones principales / Основные функции
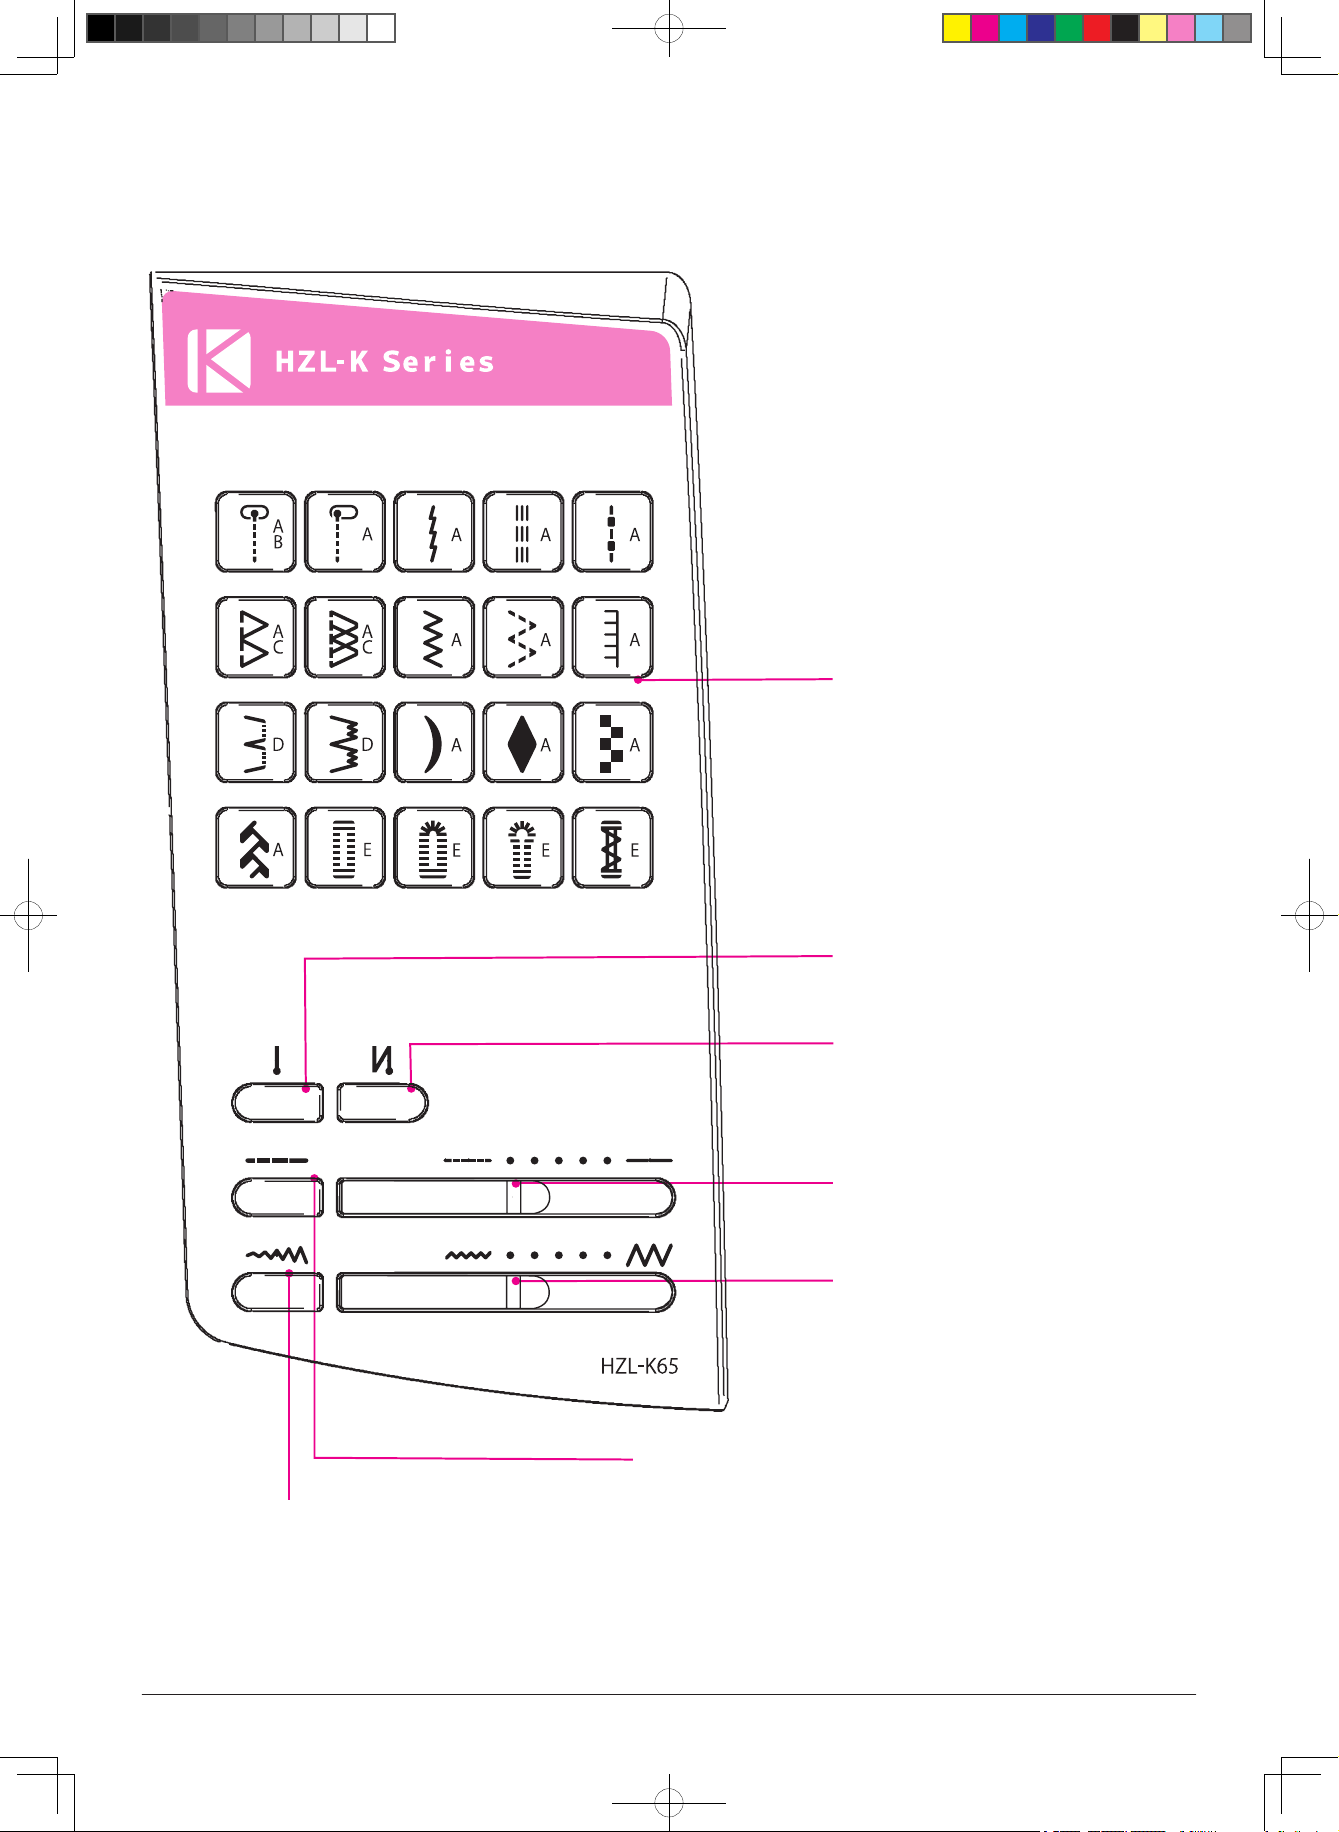
Type of Stitch patterns and operation (Operation/indication panel)
Types de point et sélection (touches de sélection)
Tipos de patrones de puntada y operación (panel de operación/indicación)
Виды шаблонов строчки и управление (панель управления/индикации)
Pattern No. / stitch length / Zigzag width indicator
HZL-K85
Numéro de programme / Longueur du point/Indicateur de la largeur du zigzag
Nº patrón / longitud de puntada / indicador de ancho de zigzag
Номер шаблона / длина стежка / указатель ширины стежка зигзаг
Pattern number selection button
Bouton de sélection du numéro de programme
Botón de selección de número de patrón
Кнопка выбора номера шаблона
Memory key
Touche Mémoire
Tecla Memoria
Клавиша памяти
Clear key
Touche Effacer
Tecla Borrar
Клавиша сброса
Shift key
Touche Décaler
Tecla Mayús
Клавиша смены регистра
Needle up/down button
Aiguille haute/basse
Botón de subir/bajar aguja
Кнопка иглы в верхнем/нижнем положении
Automatic lock stitch button (reinforcement stitch)
Touche d'exécution automatique de points arrière
Botón de puntada de remate automática
Кнопка автоматического шитья челночным стежком
Automatic lock stitch button (reverse stitch)
Touche d'exécution automatique de points arrière
Botón de puntada de remate automática
Кнопка автоматического шитья обратной строчки
Stitch length adjusting lever
Curseur de réglage de la longueur du point
Palanca de ajuste de longitud de puntada
Рычаг регулирования длины стежка
Zigzag width adjusting lever
Levier de réglage de largeur
Palanca de ajuste de ancho de zigzag
Рычаг регулирования ширины стежка зигзаг
Stitch length manual adjustment button
Touche de réglage manuel de la longueur du point
Botón de ajuste manual de longitud de puntada
Кнопка регулирования длины стежка вручную
Zigzag width manual adjustment button
Touche de réglage manuel de largeur
Botón de ajuste manual de ancho de zigzag
Кнопка регулирования ширины стежка зигзаг вручную
* When turning on the machine, straight stitch "00" (center needle position) will be automatically chosen.
* Choose the pattern No. you want to sew by pushing the pattern No. selection button.
Example) When you want to choose (No.23) _ 1. Press twice of upper left side (number of tens).
2. Press three times of upper right side (number of units).
* Lorsque vous allumez la machine, le point droit « 0 » (position centrale de l’aiguille) est automatiquement sélectionné.
* Choisissez le numéro de programme avec lequel vous souhaitez coudre en appuyant sur le bouton de sélection du numéro de programme.
Exemple) Si vous souhaitez choisir (N° 23) _ 1. Appuyez à deux reprises dans le coin supérieur gauche (dizaines).
2. Appuyez à trois reprises dans le coin supérieur droit (unités).
* Cuando encienda la máquina, se elegirá automáticamente la puntada recta "00" (posición central de la aguja).
* Elija el núm. de patrón que desea coser pulsando el botón de selección de núm. de patrón.
Ejemplo: Cuando desee seleccionar (Nº.23) _ 1. Pulse dos veces en el lado superior izquierdo (decenas).
2. Pulse tres veces en el lado superior derecho (unidades).
* При включении машины автоматически устанавливается режим выбора прямой строчки «00» (с расположением иглы по центру).
* Выберите необходимый номер шаблона для шитья, нажав кнопку выбора номера шаблона.
Например) Если вы хотите выбрать (№23), то: _ 1. Дважды нажмите верхнюю левую часть кнопки (количество десятков).
2. Трижды нажмите верхнюю правую часть кнопки (количество единиц).
8
Page 8
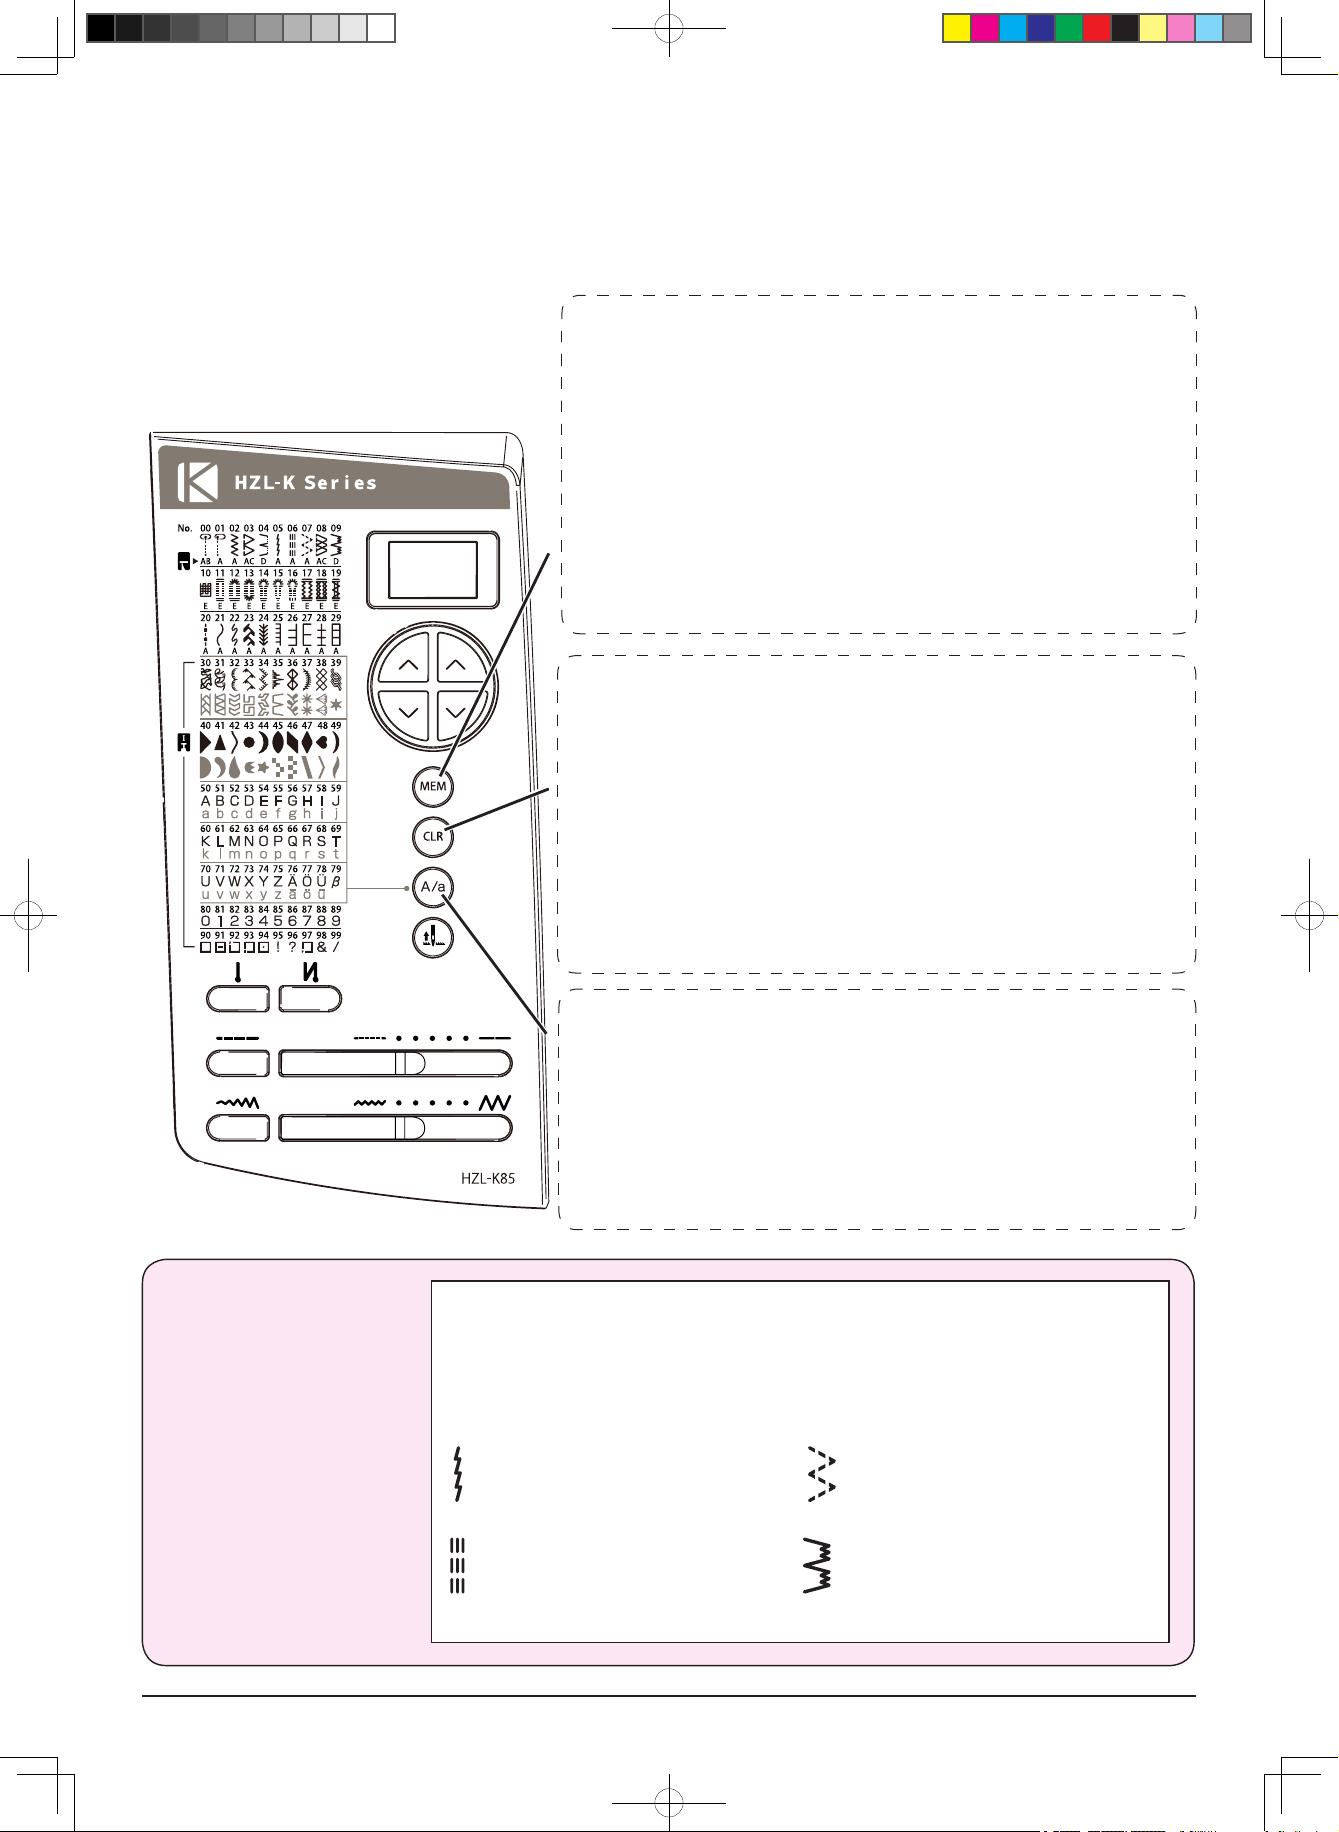
How to use Memory key / Clear key / Shift key
Comment utiliser la touche Mémoire / Effacer / Décaler
Cómo utilizar la tecla Memoria / tecla Borrar / tecla Mayús
Использование клавиши памяти / клавиши сброса / клавиши смены регистра
HZL-K85
Memory key :
Touche
Mémoire :
Tecla
Memoria:
Клавиша
памяти:
Clear key :
Touche
Effacer :
Tecla Borrar:
Клавиша
сброса:
Press this key when storing the selected letters or patterns (30 to 99)
into memory . Letters and patterns can be stored into memory up to 40.
Press it every time after you choose the letter or pattern.
Appuyez sur cette touche pour mémoriser les lettres ou programmes
sélectionnés (30 à 99). Il est possible de mémoriser jusqu'à 40 lettres
et programmes.Appuyez sur cette touche chaque fois que vous
choisissez une lettre ou un programme.
Pulse esta tecla cuando almacene las letras o patrones seleccionados
(de 30 a 99) en la memoria. Las letras y los patrones pueden
almacenarse en la memoria (hasta 40). Púlsela cada vez que elija la
letra o patrón.
Нажмите эту клавишу, чтобы сохранить в памяти машины
выбранные буквы или шаблоны (от 30 до 99). В памяти машины
может храниться до 40 букв и шаблонов. Нажимайте эту клавишу
каждый раз после того, как выбираете букву или шаблон.
Letters and patterns stored in memory can be deleted from the rear
part of them. When keeping the button pressed, all stored memory can
be deleted.
Il est possible d’effacer les lettres et programmes mémorisés depuis les
derniers éléments mémorisés. Si vous maintenez enfoncée la touche,
tous les programmes et lettres mémorisés sont effacés.
Las letras y patrones almacenados en memoria pueden suprimirse
desde atrás. Cuando mantenga el botón pulsado, puede suprimirse
toda la memoria almacenada.
Буквы и шаблоны, хранящиеся в памяти машины, можно удалять
из числа тех, которые были сохранены последними. Удерживая
клавишу нажатой, можно удалить всю информацию, которая
хранится в запоминающем устройстве машины.
This sewing machine has stitch
patterns for stretchy fabric such
as knitted fabric, jersey and so
on.
Cette machine possède des
programmes spéciaux pour les
matières extensibles comme les
mailles, tricots, jerseys, etc.
Esta máquina de coser tiene
patrones de puntada para tejido
elástico como malla de tricot,
punto, etc.
В данной швейной машине
имеются шаблоны строчек для
эластичных тканей, например,
трикотажа, джерси и т.д.
Shift key :
Touche
Décaler :
Tecla Mayús:
Клавиша
смены
регистра:
Press this key when you want to choose the lower patterns from pattern
No.30 to 78. (The lamp will be lit)
Appuyez sur cette touche pour choisir les programmes inférieurs de 30
à 78. (Le témoin s’allume)
Pulse esta tecla cuando desee elegir los patrones inferiores del patrón.
Nº 30 a 78. (Se enciende la luz)
Нажимайте эту клавишу, если вы хотите выбрать нижние шаблоны
из шаблонов от No. 30 до 78. (Загорится лампочка)
Stitch patterns for stretchy fabrics
Programmes pour matières extensibles
Patrones de puntada para tejido elástico
Шаблоны строчек для эластичных тканей
Straight stitch for elastic
Point droit pour mailles nes
Puntada recta para tejido elástico
Прямая строчка для эластичной ткани
Stretch reinforcing stitch
Point droit triple extensible
Puntada de refuerzo para tejido elástico
Усиленный стежок эластичной строчки
3-step zigzag stitch
Zig-zag piqué à 3 points
Puntada en zigzag en 3 pasos
Трехшаговый зигзаг
Blind stitch for elastic
Ourlet invisible extensible
Puntada invisible para tejido elástico
Потайная строчка для эластичной ткани
9
Page 9
HZL-K65
Pattern
Clavier de sélection de points
Patrón
Шаблон
Zigzag width manual adjustment button
Touche de réglage manuel de largeur
Botón de ajuste manual de ancho de zigzag
Кнопка регулирования ширины стежка зигзаг вручную
Automatic lock stitch button (reinforcement stitch)
Touche de point de programmation du point d’arrêt
Botón de puntada de remate automática
Кнопка автоматического шитья челночным
стежком
Automatic lock stitch button (reverse stitch)
Bouton d’exécution automatique de points arrière
Botón de puntada inversa automática
Кнопка автоматического шитья обратной
строчки
Stitch length adjusting lever
Curseur de réglage de la longueur du point
Palanca de ajuste de longitud de puntada
Рычаг регулирования длины стежка
Zigzag width adjusting lever
Levier de réglage de largeur
Palanca de ajuste de ancho de zigzag
Рычаг регулирования ширины стежка зигзаг
Stitch length manual adjustment button
Touche de réglage manuel de la longueur du point
Botón de ajuste manual de longitud de puntada
Кнопка регулирования длины стежка вручную
10
Page 10
Major Functions / Fonctions principales
Funciones principales / Основные функции
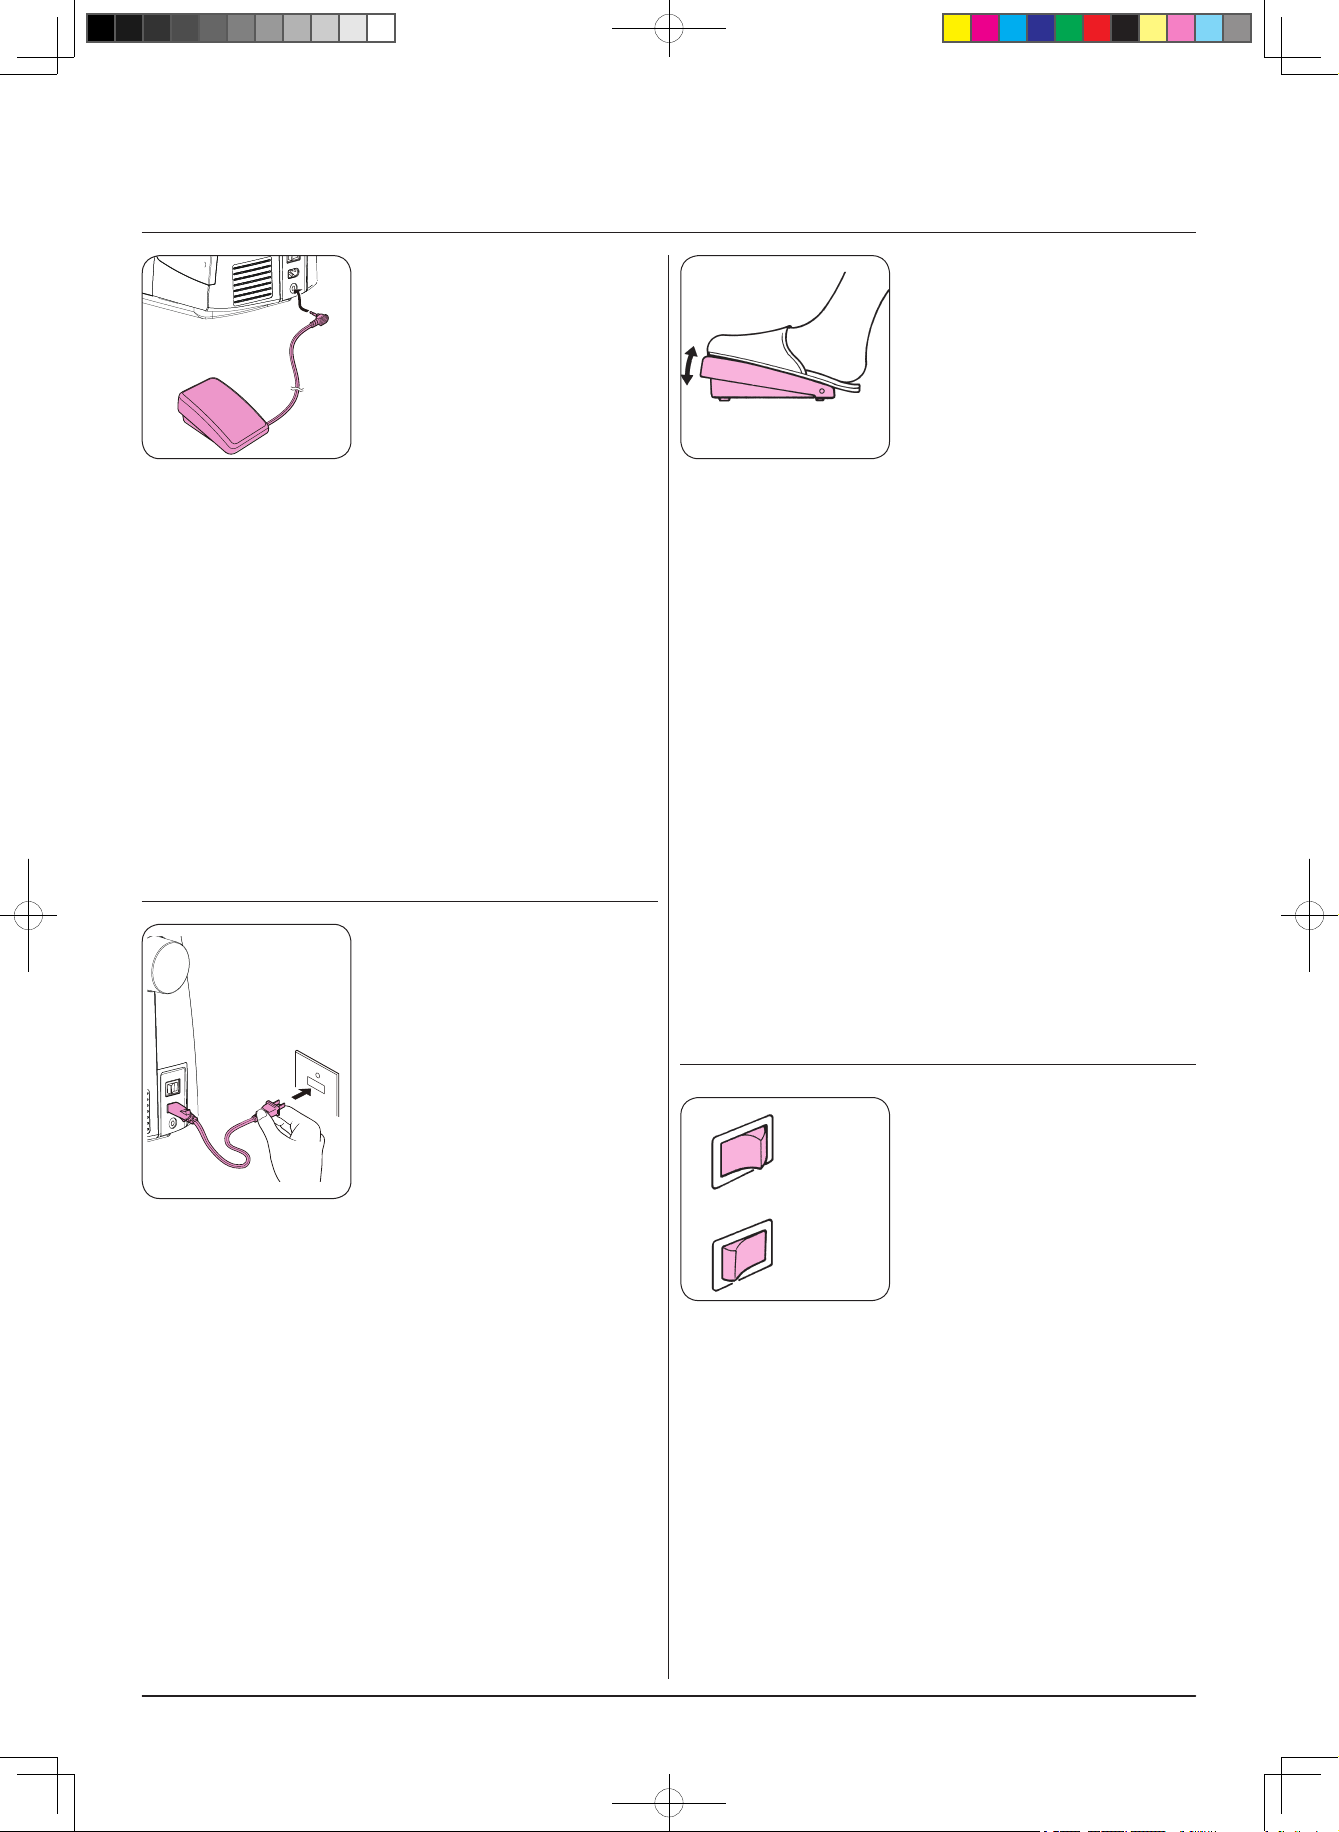
■ Foot controller
Push Foot controller plug into
lower receptacle at right end of
machine.
During use of foot controller,
Start and Stop Button is
nonusable.
■ Rhéostat
Insérez la fiche du rhéostat dans la prise inférieure sur la
droite de la machine. Pendant l’utilisation du rhéostat, le
bouton marche/arrêt n’est pas utilisable.
■ Pedal
Inserte el enchufe del pedal en el conector inferior en el
extremo derecho de la máquina.
Durante el uso del pedal, el botón de arranque o parada
no puede utilizarse.
■ Ножная педаль
Вставьте штекер ножной педали в нижнее гнездо,
расположенное с правой стороны машины.Во время
использования ножной педали кнопка старт/ стоп не
используется.
■ Power cord
Push power cord plug [1] into
upper receptacle at right end of
machine.
Plug [2] into electric outlet.
● To run the machine press foot
controller. The harder you
press, the faster machine will
sew. To stop machine, remove
foot from controller.
● Pour actionner la machine,
appuyez sur le rhéostat. Plus
on appuie, plus la vitesse est
élevée (en rapport avec la
position du curseur de vitesse).
On arrête la machine en retirant
le pied.
● Para poner en marcha la
máquina, presione el pedal.
Cuando mayor sea la presión,
más rápidamente coserá la
máquina. Para detener la
máquina, levante el pie del
pedal.
● Для запуска машины нажмите
на ножную педаль. Чем
сильнее Вы нажимаете, тем
быстрее машина строчит. Для
остановки машины уберите
ногу с педали.
[1]
[2]
■ Cordon électrique
Insérez la prise du cordon (1)
dans son logement à l’arrière
de la machine.
Branchez (2) dans la prise de
courant.
■ Cable de alimentación
Inserte el enchufe del cable de
alimentación [1] en el conector
superior en el extremo derecho
de la máquina.
Enchufe [2] en la toma de
corriente.
■ Сетевой шнур
Вставьте штекер [1] сетевого
шнура питания в верхнее
гнездо, расположенное с
правой стороны машины.
Вставьте вилку [2] шнура в
розетку электросети.
ON
Marche
Encendido
Вкл.
OFF
Arrêt
Apagado
Выкл.
■ Mains power and light switch
■ Interrupteurs de courant et
de lumière
■ Interruptor y luz de
alimentación
■ Выключатель подсветки и
питания
11
Page 11
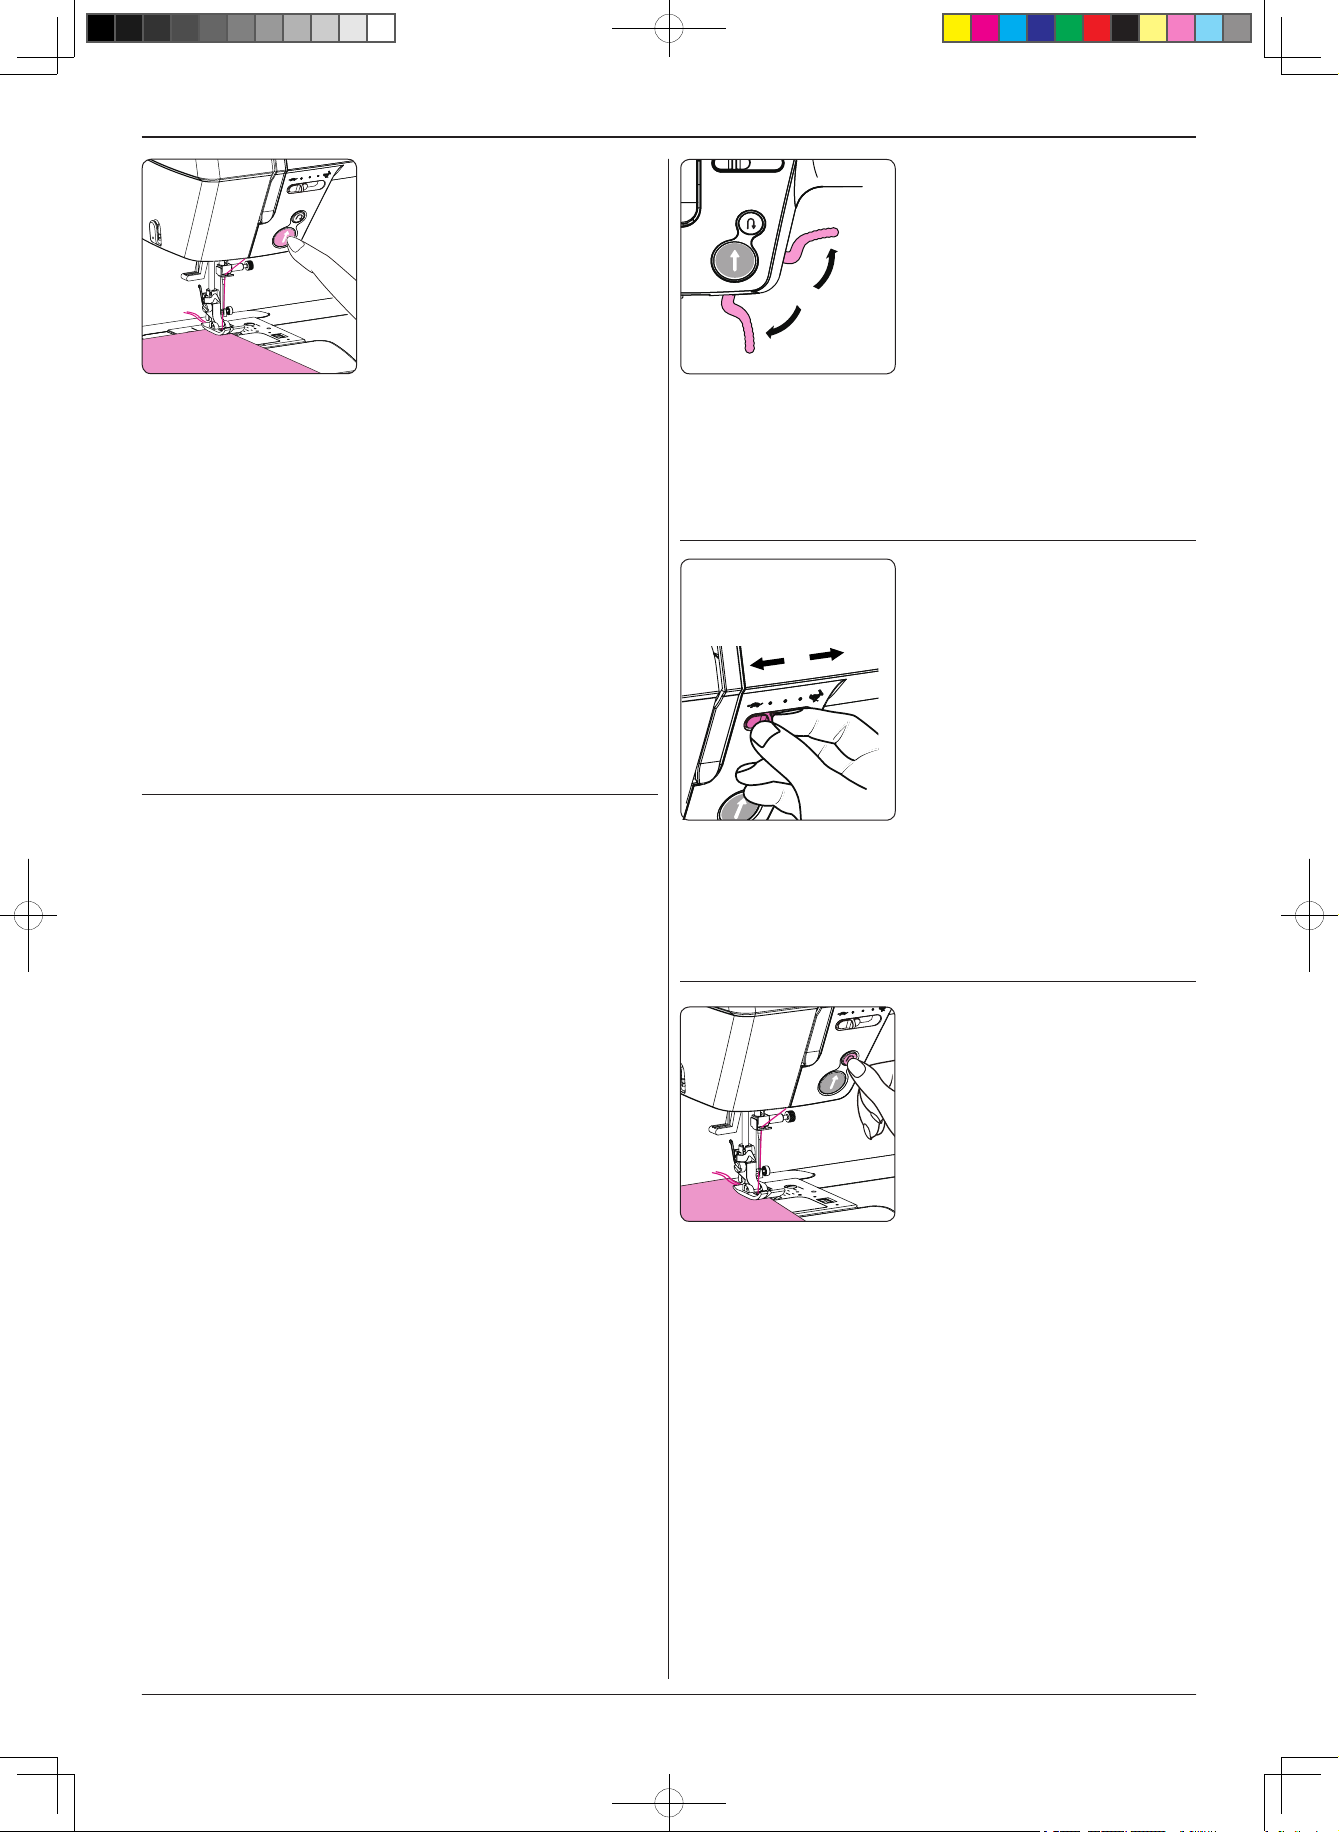
■ Start/stop button
Press the button for start. Push
it again to stop sewing. Needle
will stop at its lowest position.
■ Touche marche/arrêt
Pressez cette touche pour
démarrer ou pour arrêter la
machine. L’aiguille s’arrête en
position basse. Cette touche
n’est active que le rhéostat
débranché.
■ Botón de arranque/parada
Pulse el botón para arrancar.
Vuelva a pulsarlo para parar de
coser. La aguja se detendrá en
la posición más baja.
■ Кнопка старт/стоп
Нажмите кнопу для начала
шитья. Для окончания шитья
нажмите кнопку еще раз.
Игла остановится в самом
нижнем положении.
Slower
Lent
Más lento
Медленнее
(a)
(b)
Faster
Rapide
Más rápido
Быстрее
■ Presser foot lever
(a) Presser foot goes up.
(b) Presser foot comes down.
■ Levier du pied presseur
(a) Le pied remonte.
(b) Le pied descend.
■ Palanca del prensatelas
(a) El prensatelas sube.
(b) El prensatelas baja.
■ Рычаг подъема прижимной
лапки
(a) Лапка поднимается.
(b) Лапка опускается.
■ Speed controller
You can adjust Maximum
sewing speed.
■ Curseur de vitesse
Vous pouvez régler la vitesse
maximale de couture avec ce
curseur électronique.
■ Pedal
Puede ajus tar la velocidad
máxima de costura.
■ Регулятор скорости шитья
Вы можете отрегулировать
максимальную скорость
шитья.
■ Reverse stitch button
Push it manually to secure the
stitches at sewing-start and end
of seam. If you push this button
at sewing-end, needle will stop
at its highest position.
■ Touche de couture arrière
Utilisez cette touche pour arrêter vos coutures au départ
et à la fin. Si vous l’actionnez la machine arrêtée, l’aiguille
remontera en position haute.
■ Botón de puntada inversa
Púlselo manualmente para fijar las puntadas al inicio y
al final de la costura. Si pulsa este botón al final de la
costura, la aguja se detendrá en su posición más alta.
■ Кнопка обратной строчки
Нажмите кнопку рукой для усиления строчки в начале
шитья и в конце шва. При нажатии этой кнопки в конце
шитья игла остановится в самом верхнем положении.
12
Page 12
(a)
(b)
■ Thread tension dial
(a) To increase the needle
thread tension.
(b) To decrease the needle
thread tension.
■ Bouton de tension du l
(a) Pour augmenter la tension
du l d’aiguille.
(b) Pour diminuer la tension.
■ Rueda de tensión del hilo
(a) Para aumenta r la tensión
del hilo de la aguja.
(b) Par a reducir la tensión del
hilo de la aguja.
■ Регулятор натяжения нити
(a) Для увеличения натяжения
игольной нити.
(b) Для уменьшения
натяжение игольной нити.
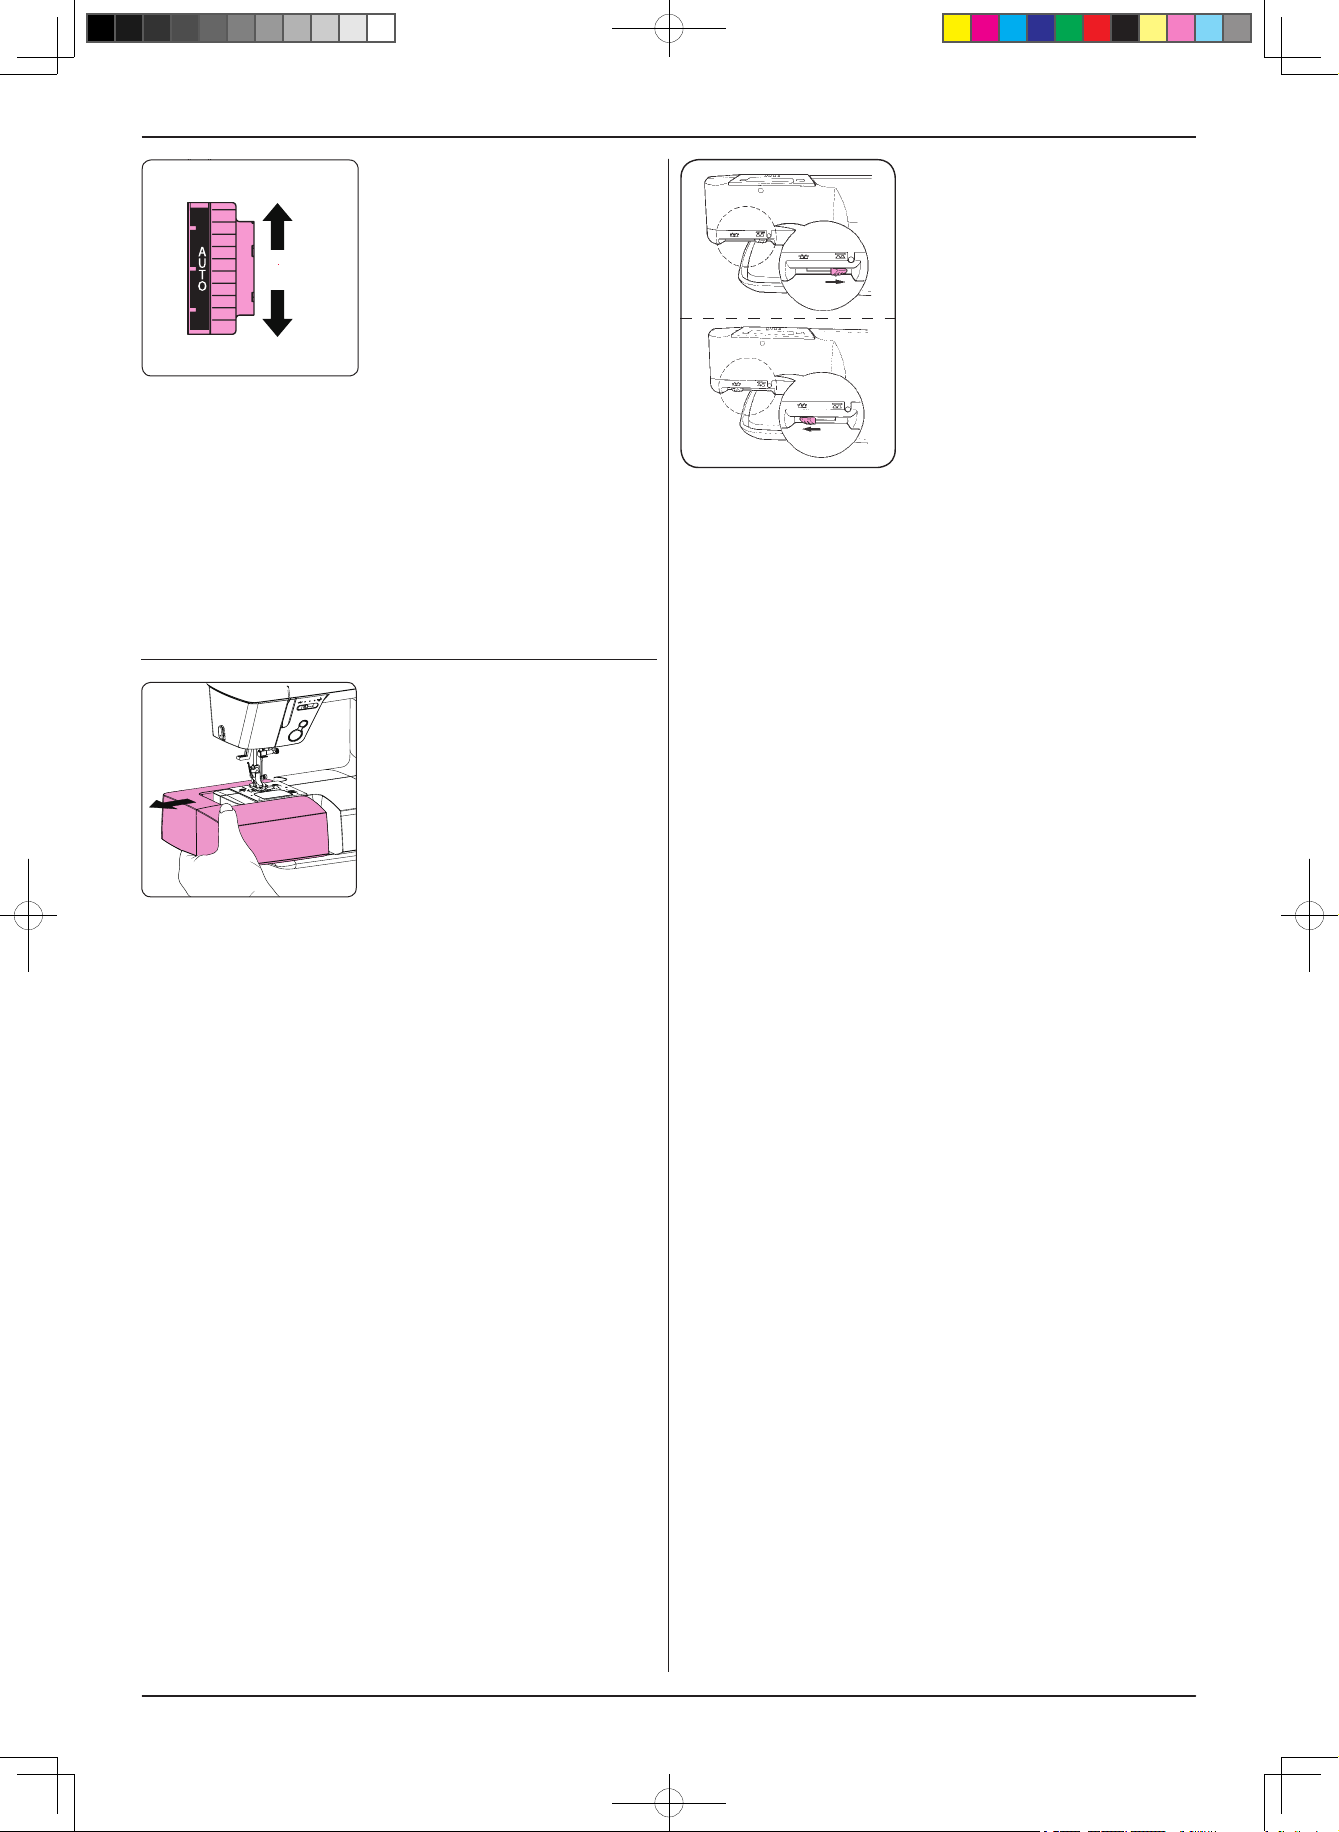
■ Free arm
Draw the auxiliary bed to the
left side.
■ Bras-libre
Retirez la tablette-rallonge vers
la gauche.
■ Brazo libre
Arras tre la mesa au xil iar
hacia la izquierda.
■ Свободный рукав
Снимите вспомогательный
стол, сдвигая его влево.
■ Drop feed dog
The feed dog should be
lowered for special sewing
techniques, such as free
[1]
motion embroidery.
The feed dog must be always
up for normal sewing. The
drop feed lever is on the front
of the free arm. Slide the lever
either to the right (down) [1] or
[2]
the left (up) [2]. To bring up the
feed dog, turn the handwheel
after sliding lever to the left.
■ Entraînement par griffe
La griffe d’entraînement doit être placée en position basse
pour certaines techniques de couture spéciales telles que
la broderie libre. La griffe d’entraînement doit toujours
être en position haute pour la couture normale. Localiser
le levier de griffe d’entraînement à l’avant du bras libre.
Déplacer le levier vers la droite (position basse) [1] ou
la gauche [2] (position haute). Pour ramener la griffe
d’entraînement, en position haute, tourner le volant après
avoir déplacé le levier vers la gauche.
■ Descenso de los dientes
Los dientes deben bajarse para técnicas de costura espec
iales, como el bordado libre. Los dientes siempre deben
estar elevados para la costura normal. La palanca de los
clientes está en la parte frontal del brazo libre. Deslice
la palanca hacia la derecha (bajar) [1] o a la izquierda
(subir) [2]. Para elevar los dientes, gire el volante después
deslizar la palanca a la izquierda.
■ Двигатель ткани
Зубчатая рейка двигателя ткани опускается для
выполнения специальных видов работ, например, для
вышивки в свободно-ходовой технике. Для обычного
шитья зубчатая рейка должна быть всегда поднята.
Рычаг двигателя ткани расположен спереди на
свободном рукаве. Переведите рычаг вправо (вниз) [1]
или влево (вверх) [12]. Чтобы поднять зубчатую рейку,
поверните маховик после того, как сдвинете рычаг
влево.
13
Page 13

Winding the Bobbin / Bobinage de la canette
Bobinado de la canilla / Намотка нити на шпульку
● Winding the bobbin
● Enlage pour le remplissage de canette
● Bobinado de la canilla
● Намотка нити на шпульку
Bobbin thread guide
Guide-l de canette
Guía de enhebrado de la canilla
Намотка нити на шпульку
1
* When you turn on the power to the machine under the bobbin winding
condition, the machine will beep.
* Lorsque vous allumez la machine en mode de remplissage de canette,
eile émet un bip sonore.
* Cuando encienda la alimentación en la máquina en situación de
bobinado de la calidad, la máquina emitirá un pitido.
* Если Вы включите машину в сеть во время намотки нити на
шпульку, то прозвучит соответствующий сигнал
Bobbin winder
Dévidoir
Bobinador de canilla
Устройство намотки шпульки
Bobbin winding regulator
Arrêt de canette
Regulador de bobinado
de la canilla
Регулятор намотки шпульки
3
Thread spool cap (Small)
Petite bobine
Tapa de la bobina de hilo
(pequeña)
Колпачок катушки с
нитью(маленький)
Small spool
Petite coiffe
Bobina pequeña
Маленькая
катушка
■ Open the hook cover.
Caution:
Turn off the machine before opening the hook cover.
■ Ouvrez le capot.
Attention:
Débranchez la machine auparavant.
■ Abra la tapa del garo.
Precaución:
Apague la máquina antes de abrir la tapa del garo.
■ Откройте крышку челнока
Предостережение:
Перед тем, как открывать крышку челнока, отключите
машину от сети.
■ Take out the bobbin.
2
■ Retirez la canette vide.
■ Extraiga la canilla.
■ Выньте шпульку
Thread spool cap (large / medium)
Coiffe pour canette de ls (grande/moyenne)
Tapa de la bobina de hilo (grande/media)
Колпачок катушки с нитью
(большой/средний)
Large spool
Grande coiffe
Bobina grande
Большая катушка
■ Place the thread spool and cap onto the spool pin.
Select the spool cap that matches the circumference of
the thread spool to be used.
■ Placez la bobine de l et la coiffe sur le porte-bobine.
Sélectionnez le type de coiffe de taille appropriée à la
bobine.
■ Coloque la bobina de hilo y la tapa en el pivote de la
bobina.
Seleccione la tapa de la bobina que coincida con la
circunferencia de la bobina de hilo que se utilizará.
■ Установите катушку с нитью и колпачок на
стержень катушки
Выберите колпачок катушки, соответствующий
конфигурации используемой катушки с нитью.
14
Page 14
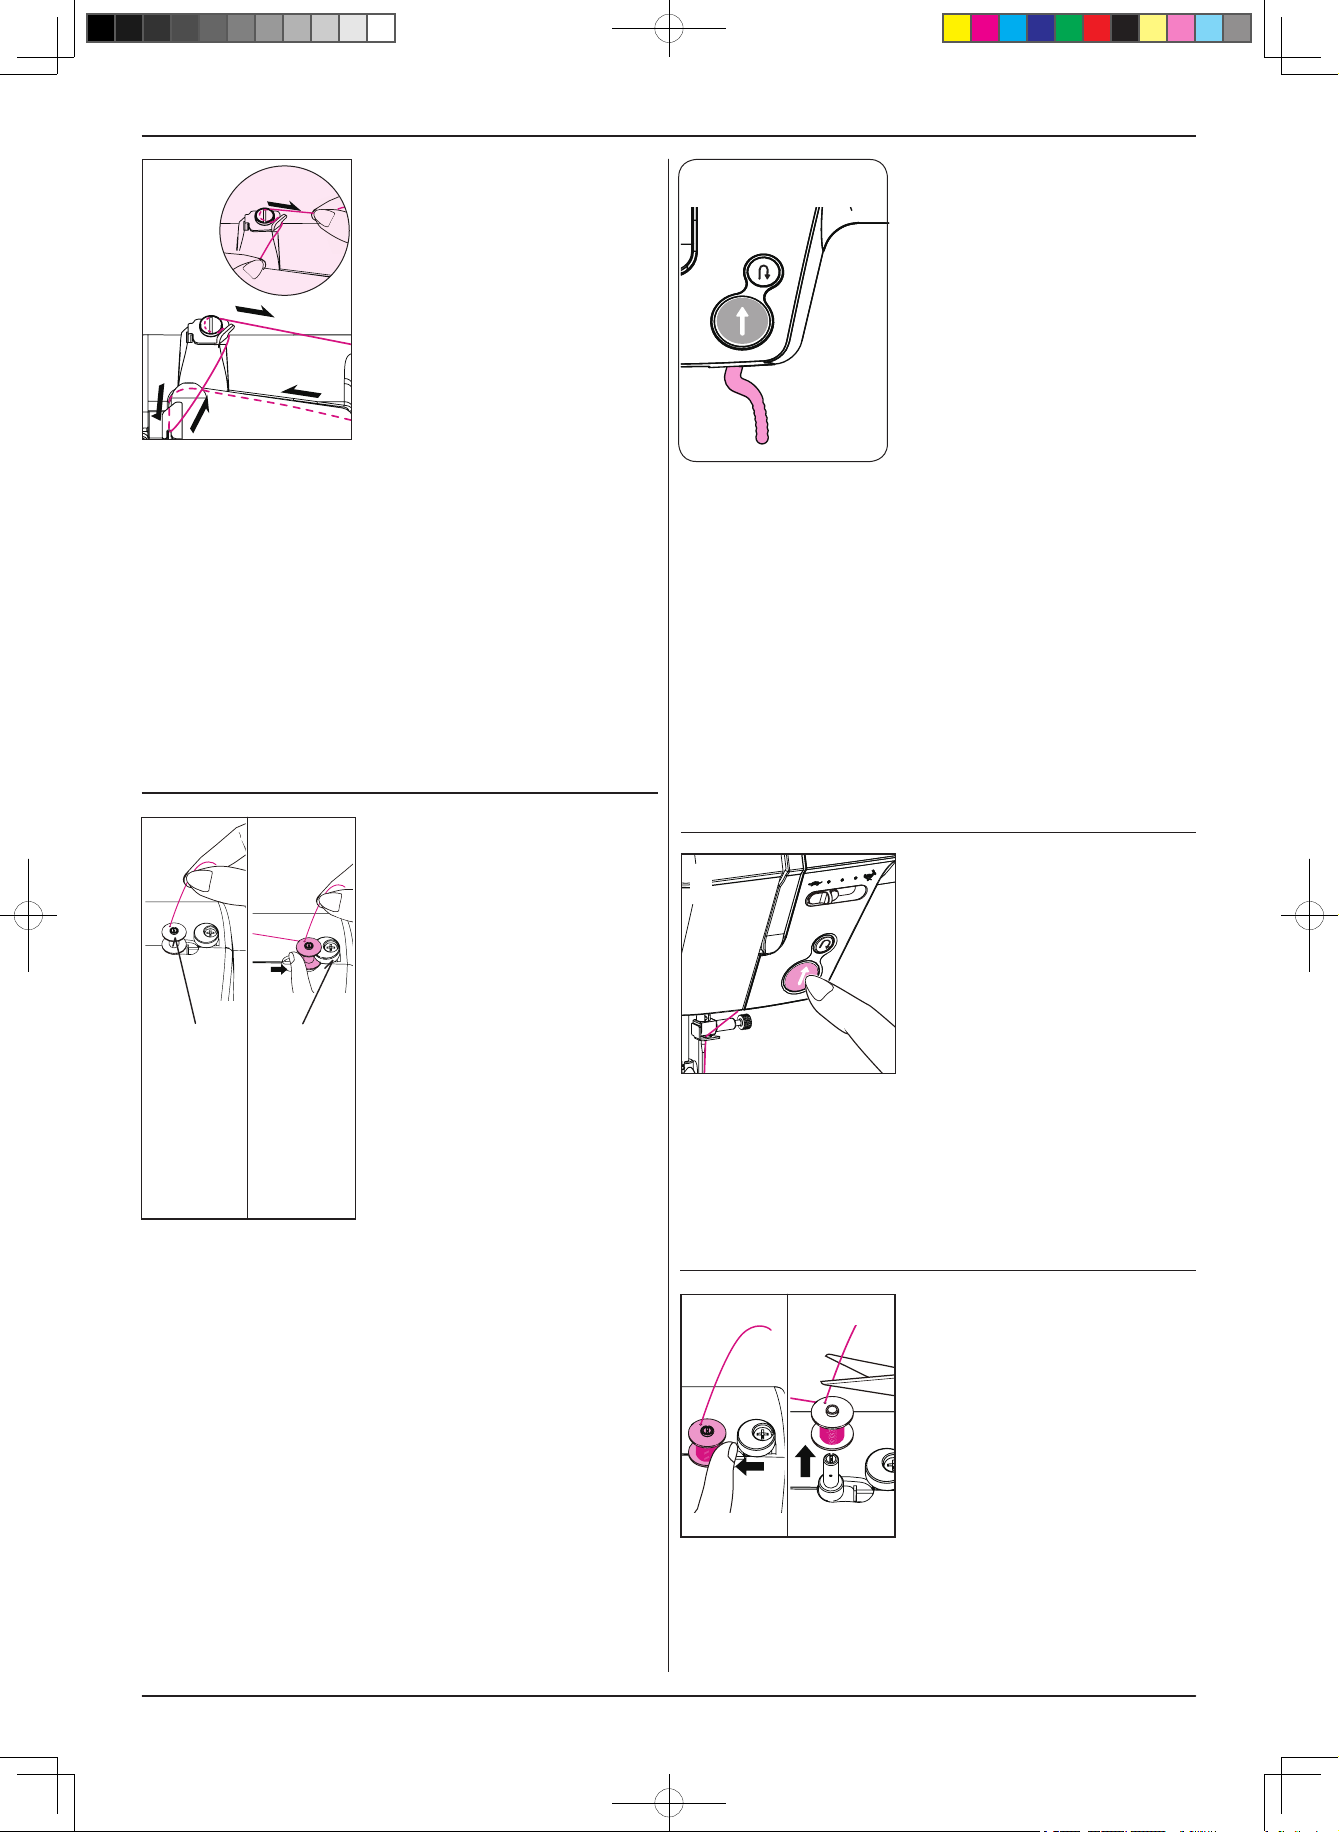
■ Thread the bobbin thread
4
■ Enhebre la guía de hilo de la canilla.
Coloque el hilo con ambas manos alrededor de la gu ía
de hilo de modo que se enrolle en el sentido de las agujas
del reloj.
■ Заправьте нить в направитель шпульной нити
Обеими руками обмотайте нить вокруг
нитенаправителя так, чтобы она наматывалась по
часовой стрелке.
guide.
Put the thread with both hands
around the thread guide so
that it winds clockwise.
■ Enlez le l dans le guide.
Insérez le fil avec les deux
mains sous le ressort du guide
pour qu’il se déroule dans le
sens d’une montre.
■ Bobbin winding mode
6
■ Modo de bobinado de la canilla
Cuand o el bo binador de la canilla est é en posic ión de
funcionamiento, el botón de arranque/parada cambiará a
naranja. En situación de bobinado de la canilla, la aguja
no se moverá.
■ Режим намотки нити на шпульку
Когда устройство намотки шпульки находится
в рабочем положении, цвет кнопки старт/стоп
изменяется на оранжевый. Во время намотки нити на
шпульку игла не двигается.
When bobbin winder is in its
working position, start stop
button will change to orange.
When bobbin winding condition,
needle will not move.
■ Mode de bobinage de canette
Lorsque le dévidoir est en
position de marche, la touche
marche/arrêt devient orange.
En condition de bobinage de la
canette, l’aiguille ne bouge pas.
5
Bobbin winder
Dévidoir
Bobinador de
la canilla
Устройство
намотки
шпульки
Bobbin winding
regulator
Arrêt de canette
Regulador de
bobinado de la
canilla
Регулятор
намотки
шпульки
■ Set the bobbin on the
bobbin winder.
Press the bobbin toward the
bobbin winding regulator.
■ Placez la canette sur l’axe
du dévidoir.
Poussez la canette contre
l’arrêt de canette.
■ Coloque la canilla en el
bobinador de la canilla.
Presio ne l a canil la haci a el
regulador de bobinado de la
canilla.
■ Установите шпульку
на устройство намотки
шпульки
Прижмите шпульку к
регулятору намотки шпульки.
■ Start winding the bobbin.
7
■ Empiece a bobinar la canilla.
Después de bobinar la canilla, vuelva a pulsar el botón de
arranque/parada.
■ Начните намотку нити на шпульку
Завершив намотку нити на шпульку, снова нажмите
кнопку старт/стоп.
8
Upon completion of winding
the bobbin, press the start /
stop button again.
■ Embobinez la canette.
Une fois la canette remplie,
arrêtez la machine.
■ Push the bobbin back to the
left.
Cut an excess thread and take
out the bobbin.
15
■ Poussez la canette vers la
gauche.
Coupez l’excédent de fil et
retirez la canette.
■ Vuelva a empujar la canilla a la izquierda.
Corte el exceso de hilo y retire la canilla.
■ Переведите шпульку снова влево
Обрежьте лишнюю нить и снимите шпульку.
Page 15
9
■ Put the bobbin in the
bobbin case.
Place the bobbin so that thread
winds counterclockwise.
10
■ Thread the bobbin case.
Put the thread [1] and place
thread on groove [2] and draw
the thread to rear of machine.
■ Placez la canette dans son
boîtier.
Elle doit tourner dans le sens
inverse des aiguilles d’une
montre.
■ Coloque la canilla en el estuche de la canilla.
Coloque la canilla de modo que el hilo se enrolle en
sentido contrario a las agujas del reloj.
■ Вставьте шпульку в колпачок
Установите шпульку так, чтобы нить шла против
часовой стрелки.
■ Enlez le boîtier à canette.
Passez le l dans la fente (1),
[2]
[1]
■ Enhebre el estuche de la canilla.
Coloque el hilo [1], coloque el hilo en la hendidura [2] y
dirija el hilo a la parte posterior de la máquina.
■ Заправьте нить в шпульный колпачок
Вставьте нить [1], проденьте ее через бороздку [2] и
направьте к задней стороне машины.
11
puis ressortez-le par la fente
(2) et placez le vers l’arrière
de la machine.
■ Close the hook cover.
■ Refermez le capot.
■ Cierre la tapa del garo.
● Adjusting the bobbin thread guide
● Réglage du guide-l de canette
● Ajuste de la guía de hilo de la canilla
● Регулировка направителя шпульной нити
In the case where the bobbin is unevenly
wound with thread according to the type of
thread, the bobbin thread guide has to be adjusted.
Dans le cas où la canette serait mal remplie,
selon le type de l, il convient de régler le guide.
En caso de que la canilla se bobine de forma
irregular de acuerdo con el tipo de hilo, debe
ajustarse la guía de hilo de la canilla.
В случае неравномерной намотки нити на шпульку
вследствие несоответствия типу нити необходимо
отрегулировать направитель шпульной нити.
■ Закройте крышку челнока
●
Move the bobbin thread guide up or down
to adjust so that the bobbin is evenly wound
with thread.
Déplacez le guide-fil en hauteur pour le
régler afin que le fil soit régulièrement
enroulé sur la canette.
Suba o baje la guía de hilo de la canilla
para ajustarla de modo que el hilo se enrolle
niformemente en la canilla.
Перемещайте направитель шпульной
нити вверх или вниз, чтобы нить
равномерно наматывалась на шпульку.
● ●
16
Page 16
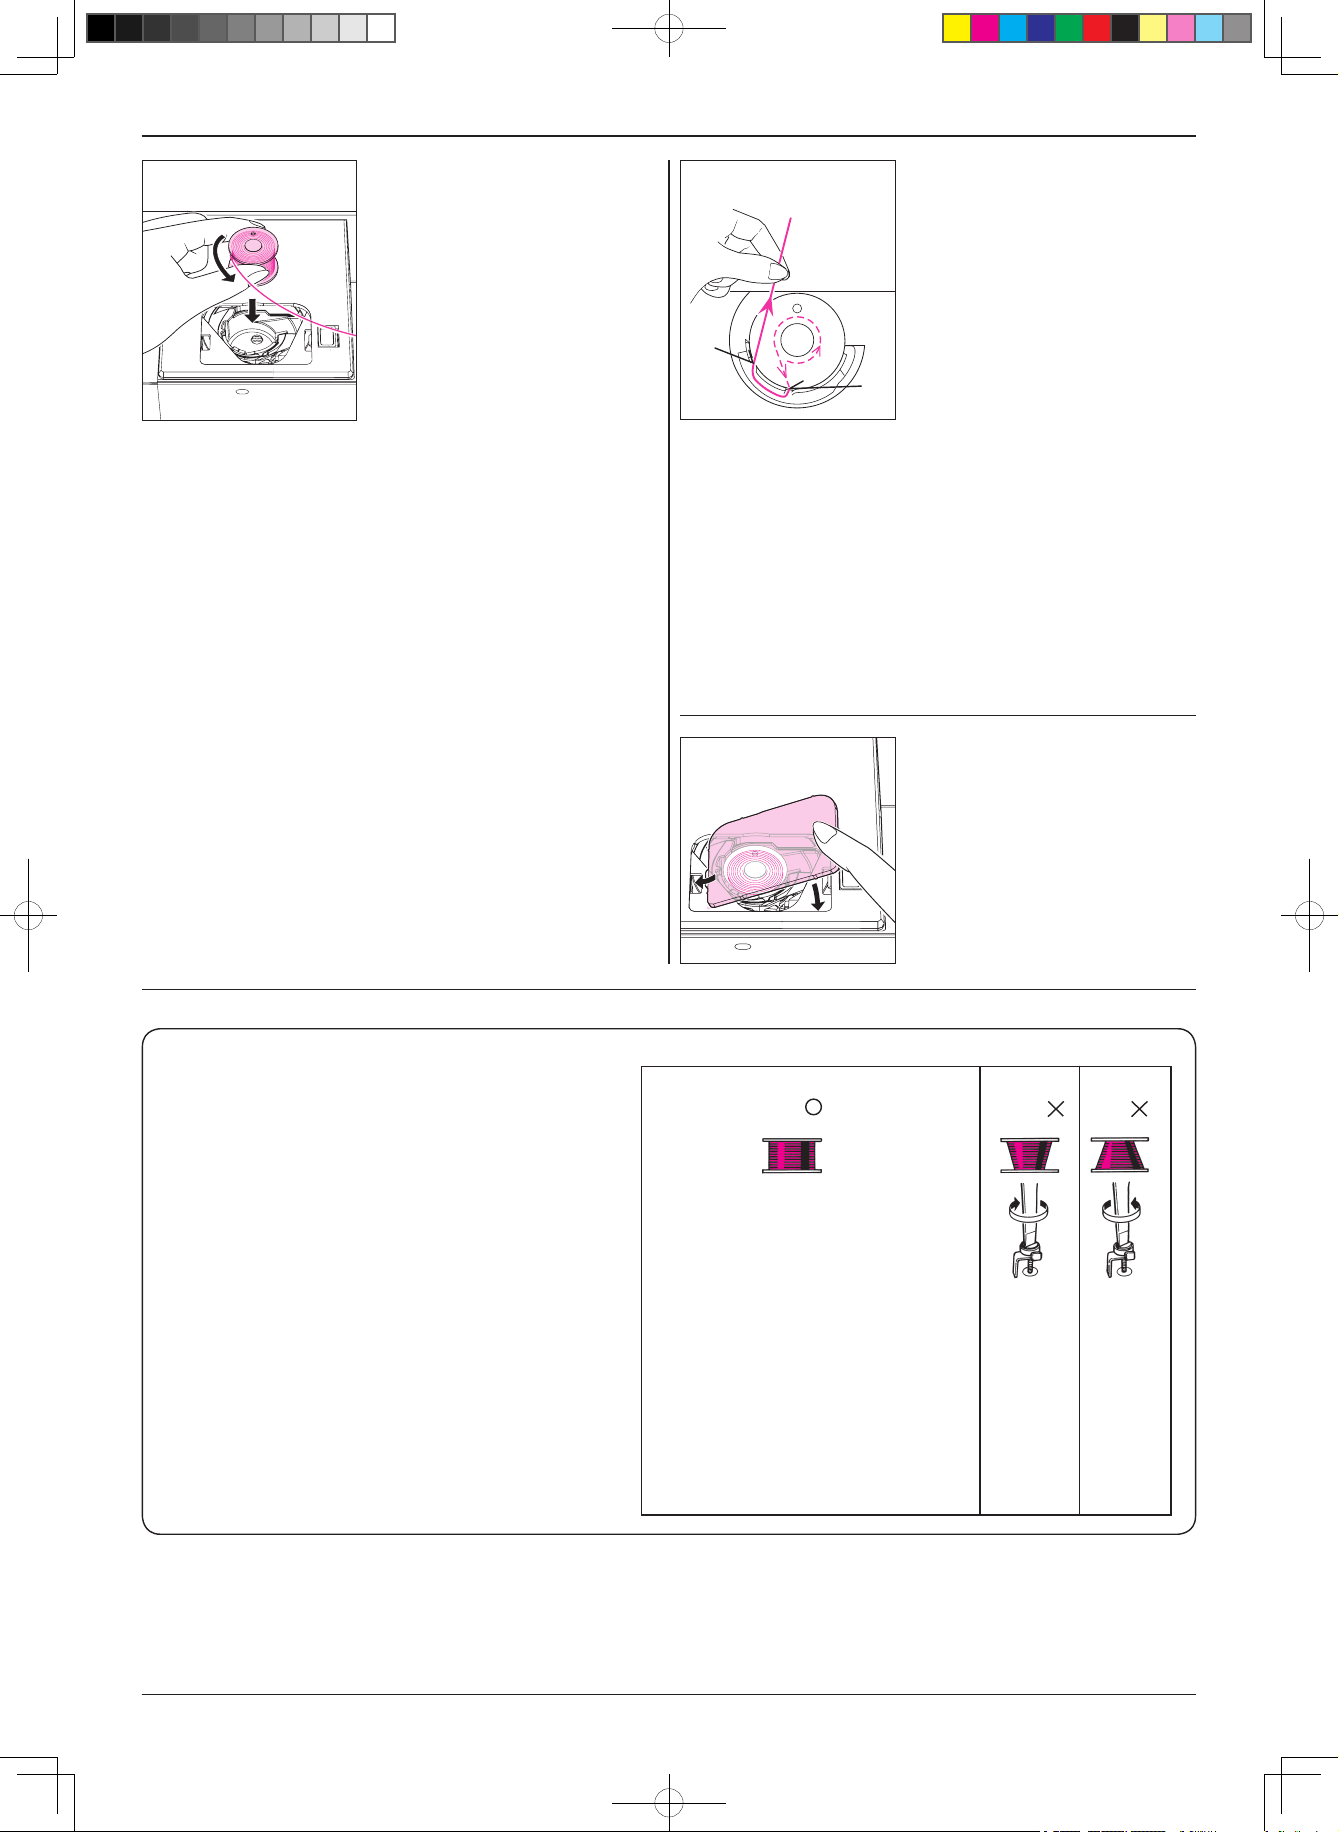
Threading The Machine / Enlage de la machine
Enhebrado de la máquina / Заправка нити в машине
CAUTION:
ATTENTION:
PRECAUCIÓN:
ПРЕДОСТЕРЕЖЕНИЕ:
Take-up
Levier tendeur
Estirador
Нитепритягиватель
Be sure to turn off the machine before threading.
* Be sure to raise the presser foot before threading.
Assurez-vous d’avoir éteint la machine avant l’enlage.
* Veiller à soulever le pied presseur avant d’enler le l.
Asegúrese de apagar la máquina antes de enhebrarla.
* Asegúrese de elevar el prensatelas antes del enhebrado.
Не забудьте отключить машину от сети перед заправкой нити в машине.
* Не забудьте поднять прижимную лапку перед заправкой нити в машине.
[2]
[4]
[3]
[5]
1
2
[2]
[1]
[6]
■ Raise the presser foot lever.
■ Relevez le pied presseur.
■ Suba la palanca del
prensatelas.
■ Поднимите рычаг
прижимной лапки
■ Thread the thread guide.
■ Enlez le guide-l.
■ Enhebre la guía de hilo.
■ Заправьте нить в
нитенаправитель
3
4
[2]
[3]
■ Draw the thread through
the groove and pull it
downward.
■ Passez le l dans la fente et
tirez-le vers le bas.
■ Pase el hilo a través la
hendidura y tírelo hacia atrás.
■ Проденьте нить через
бороздку и потяните ее
вниз
■ Pass the thread around [3],
then pull it upward.
■ Passez le l autour [3] puis
tirez-le vers le haut.
■ Pase el hilo alrededor de [3],
y tire de él hacia arriba.
■ Обведите нить вокруг [3],
затем потяните ее вверх
17
Page 17

5
[4]
Take-up
Levier tendeur
Estirador
Нитепритягиватель
6
[5]
■ Thread the thread to take-up
[4], then pull it downward.
■ Enfilez le levier tendeur de
l [4], puis redescendez.
■ Enhebre el hilo en el
estirador [4], y tire de él
hacia atrás.
■ Заправьте нить в
нитепритягиватель [4],
затем потяните ее вниз
■ Draw the thread behind [5]
from the right.
■ Glissez le fil dessous [5]
depuis la droite.
■ Lleve el hilo por detrás [5]
desde la derecha.
■ Проведите нить за [5]
справа
■ Thread the hook.
2
Hook
Crochet
Garo
Челнок
■ Enhebre el garo.
Pulse la palanca de enhebrado totalmente y un garfio
pasará por el ojo de la aguja.
Pase el hilo por delante de la aguja y debajo del garo.
■ Заправьте нить в челнок
Нажмите и полностью опустите рычаг заправки нити;
крючок пройдет сквозь игольное ушко. Пропустите
нить перед иглой и под крючком.
Push threading lever all the
way down and a hook will go
through eye of needle.
Pass thread in front of needle
and below hook.
■ Enlez le crochet.
Abaisser le levier de l'enfile-
aiguille, afin que le crochet
passe à travers le chas.
Présentez le fil devant
l’enleur; relâchez le levier.
Automatic Needle Threader
Enlage automatique de l’aiguille
Enhebrador automático de la aguja
Автоматический нитевдеватель
* Check to be sure that the needle is in its highest position.
* Contrôlez que l’aiguille est bien en position la plus haute.
* Asegúrese de que la aguja esté en su posición más alta.
* Убедитесь в том, что игла находится в самом высоком положении.
■ Lower the presser foot.
1
[A]
■ Baje el prensatelas.
Eleve la aguja.
A continuación, baje el enhebrador de la aguja y el hilo (A).
■ Опустите нитевдеватель Поднимите иглу
Затем опустите нитевдеватель и нить (A). aangegeven.
(A).
Raise the needle.
Then, lower the needle
threader and thread (A).
■ Abaissez le pied presseur.
Relevez l’aiguille.
Ensuite, abaissez l’enfile-
aiguille et le l (A).
■ Raise the needle threader.
3
■ Eleve el enhebrador de la aguja.
Levante la palanca y la aguja se enhebrará.
Si el hilo se enhebra en el ojo de la aguja, retire un dedo
del extremo del hilo.
■ Поднимите нитевдеватель
Отпустите рычаг, и нить будет заправлена в иглу. Если
нить заправляется в игольное ушко, то уберите палец
от кончика нити.
4
Release the lever, and the
needle will be threaded.
If thread is threaded to the
needle eye , release a finger
off a thread tip.
■ Relevez le levier de l’enleur.
Relâchez le levier et le fil est
enlé dans l’aiguille. Si le l est
enlé dans le chas de l’aiguille,
relâchez un doigt du bout du l.
■ Draw out thread.
Draw out thread through
needle eye by approximately
10 cm.
■ Tirez le l.
Tirez la boucle du l depuis le
chas d’aiguille sur 10 cm.
■ Saque hilo.
Tire del hilo a través de la aguja, aproximadamente unos
10 cm.
■ Проденьте нить
Проденьте нить через игольное ушко, оставив
свободный конец нити длиной около 10 см.
18
Page 18
Pulling Up The Bobbin Thread
Faire remonter le l de canette
Tirar del hilo de la canilla
Вытягивание шпульной нити
■ Lightly hold the needle
1
■ Слегка придерживайте игольную нить пальцами
2
thread with ngers.
■ Tenez légèrement le l avec
les doigts.
■ Sujete con suavidad el hilo
de la aguja con los dedos.
■ Turn the handwheel toward
you.
The needle moves up and
down to draw up the bobbin
thread from the bobbin.
■ Tournez le volant vers vous.
L’aiguille remontera avec le l
inférieur.
■ Gire el volante hacia usted.
La aguja sube y baja para
tomar el hilo procedente de la
canilla.
■ Поверните маховик на себя
Игла будет перемещаться вверх и вниз, чтобы
вытянуть шпульную нить из шпульки.
■ Pull both the needle and
3
■ Tire de los hilos de la aguja y la canilla y saque unos
10 cm.
Páselos bajo el prensatelas hacia la parte de atrás de la
máquina.
■ Потяните обе нитки, игольную и шпульную,
вытянув их на длину около 10 см
Проведите их под прижимной лапкой в направлении
задней части машины.
bobbin threads out by 10 cm.
Pass them under presser foot
toward back of machine.
■ Tirez les deux ls sur 10 cm.
Passez-les sous le pied et vers
l’arrière de la machine.
19
Page 19
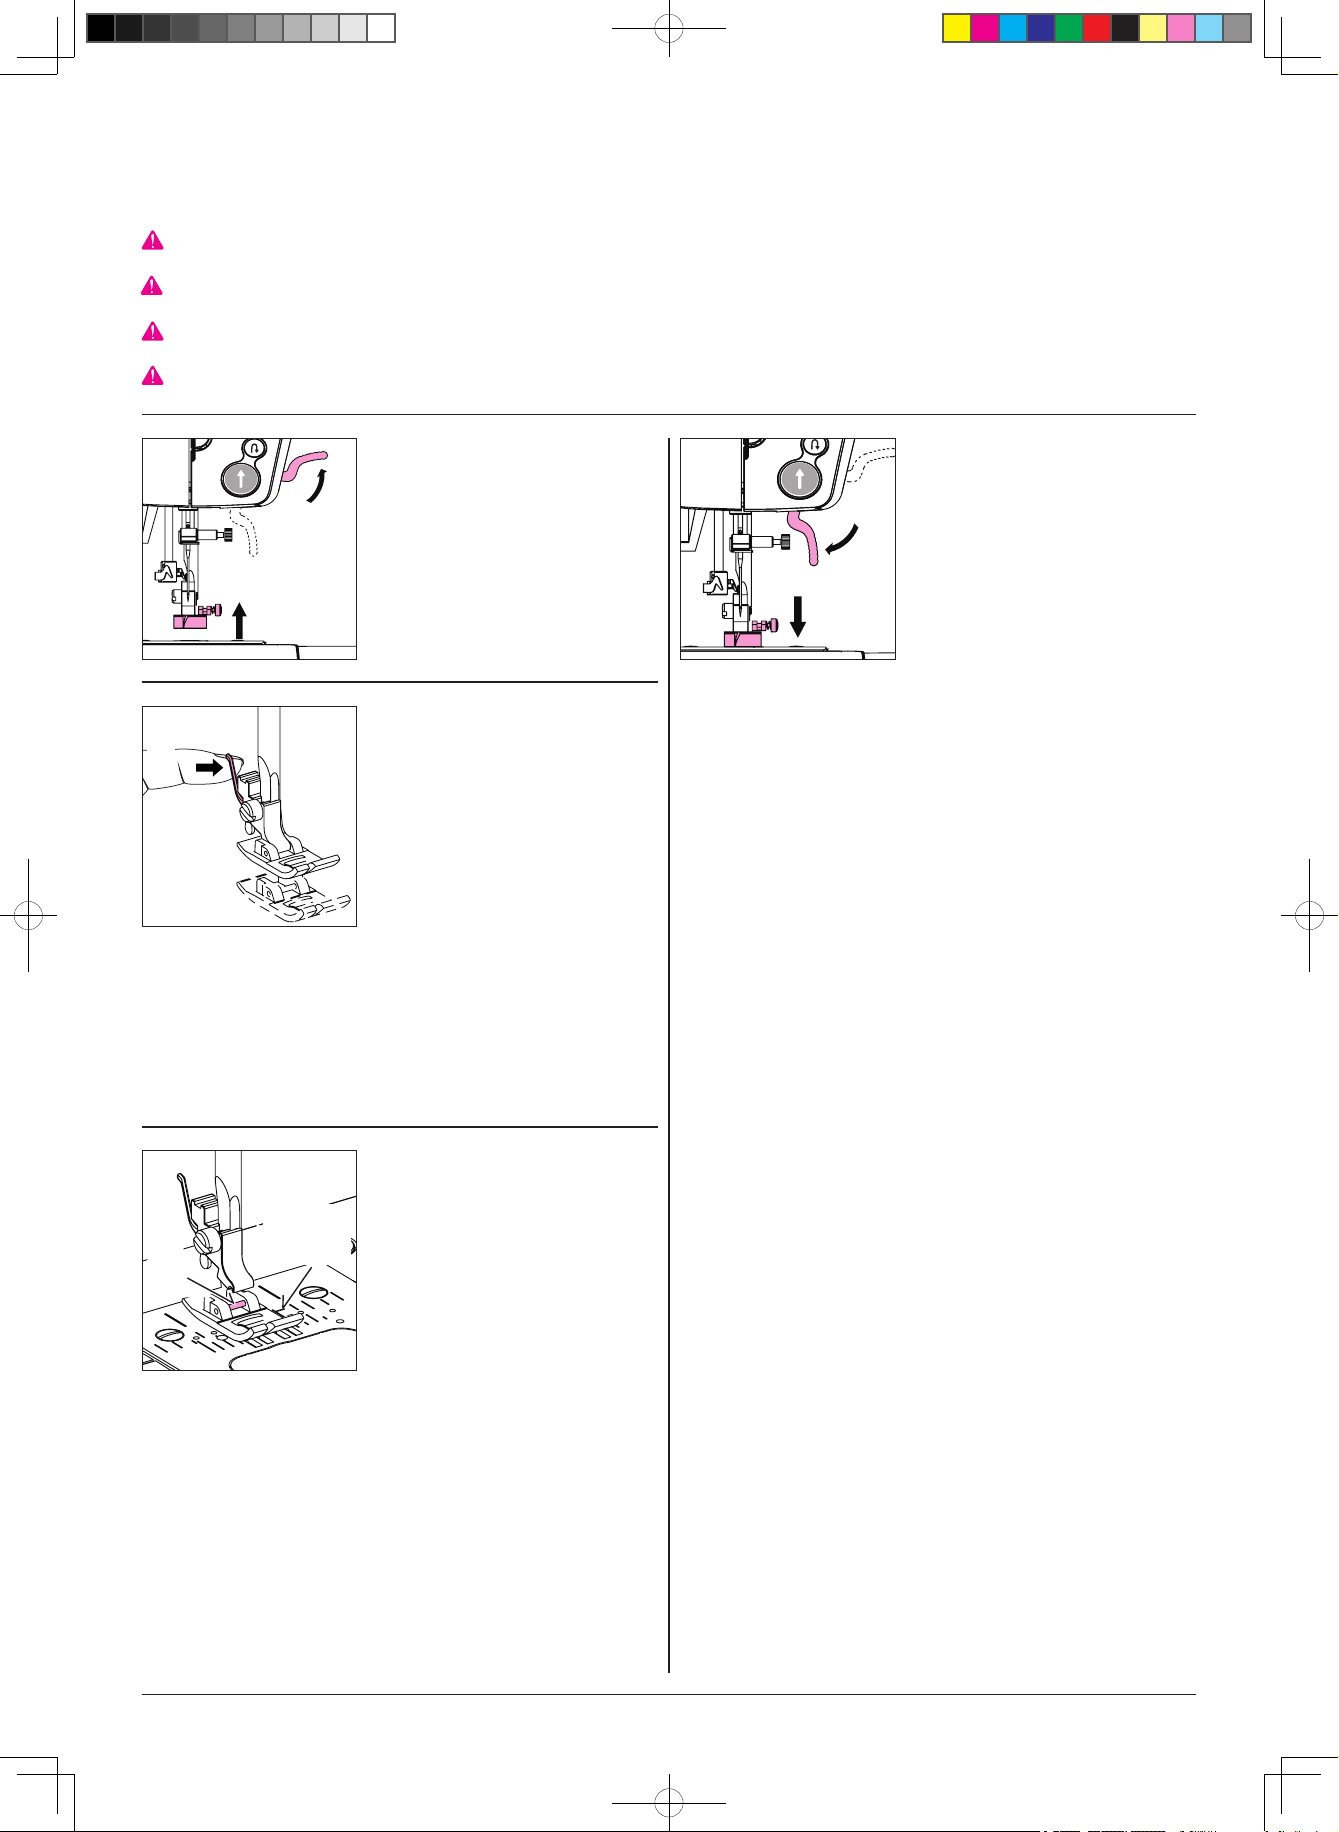
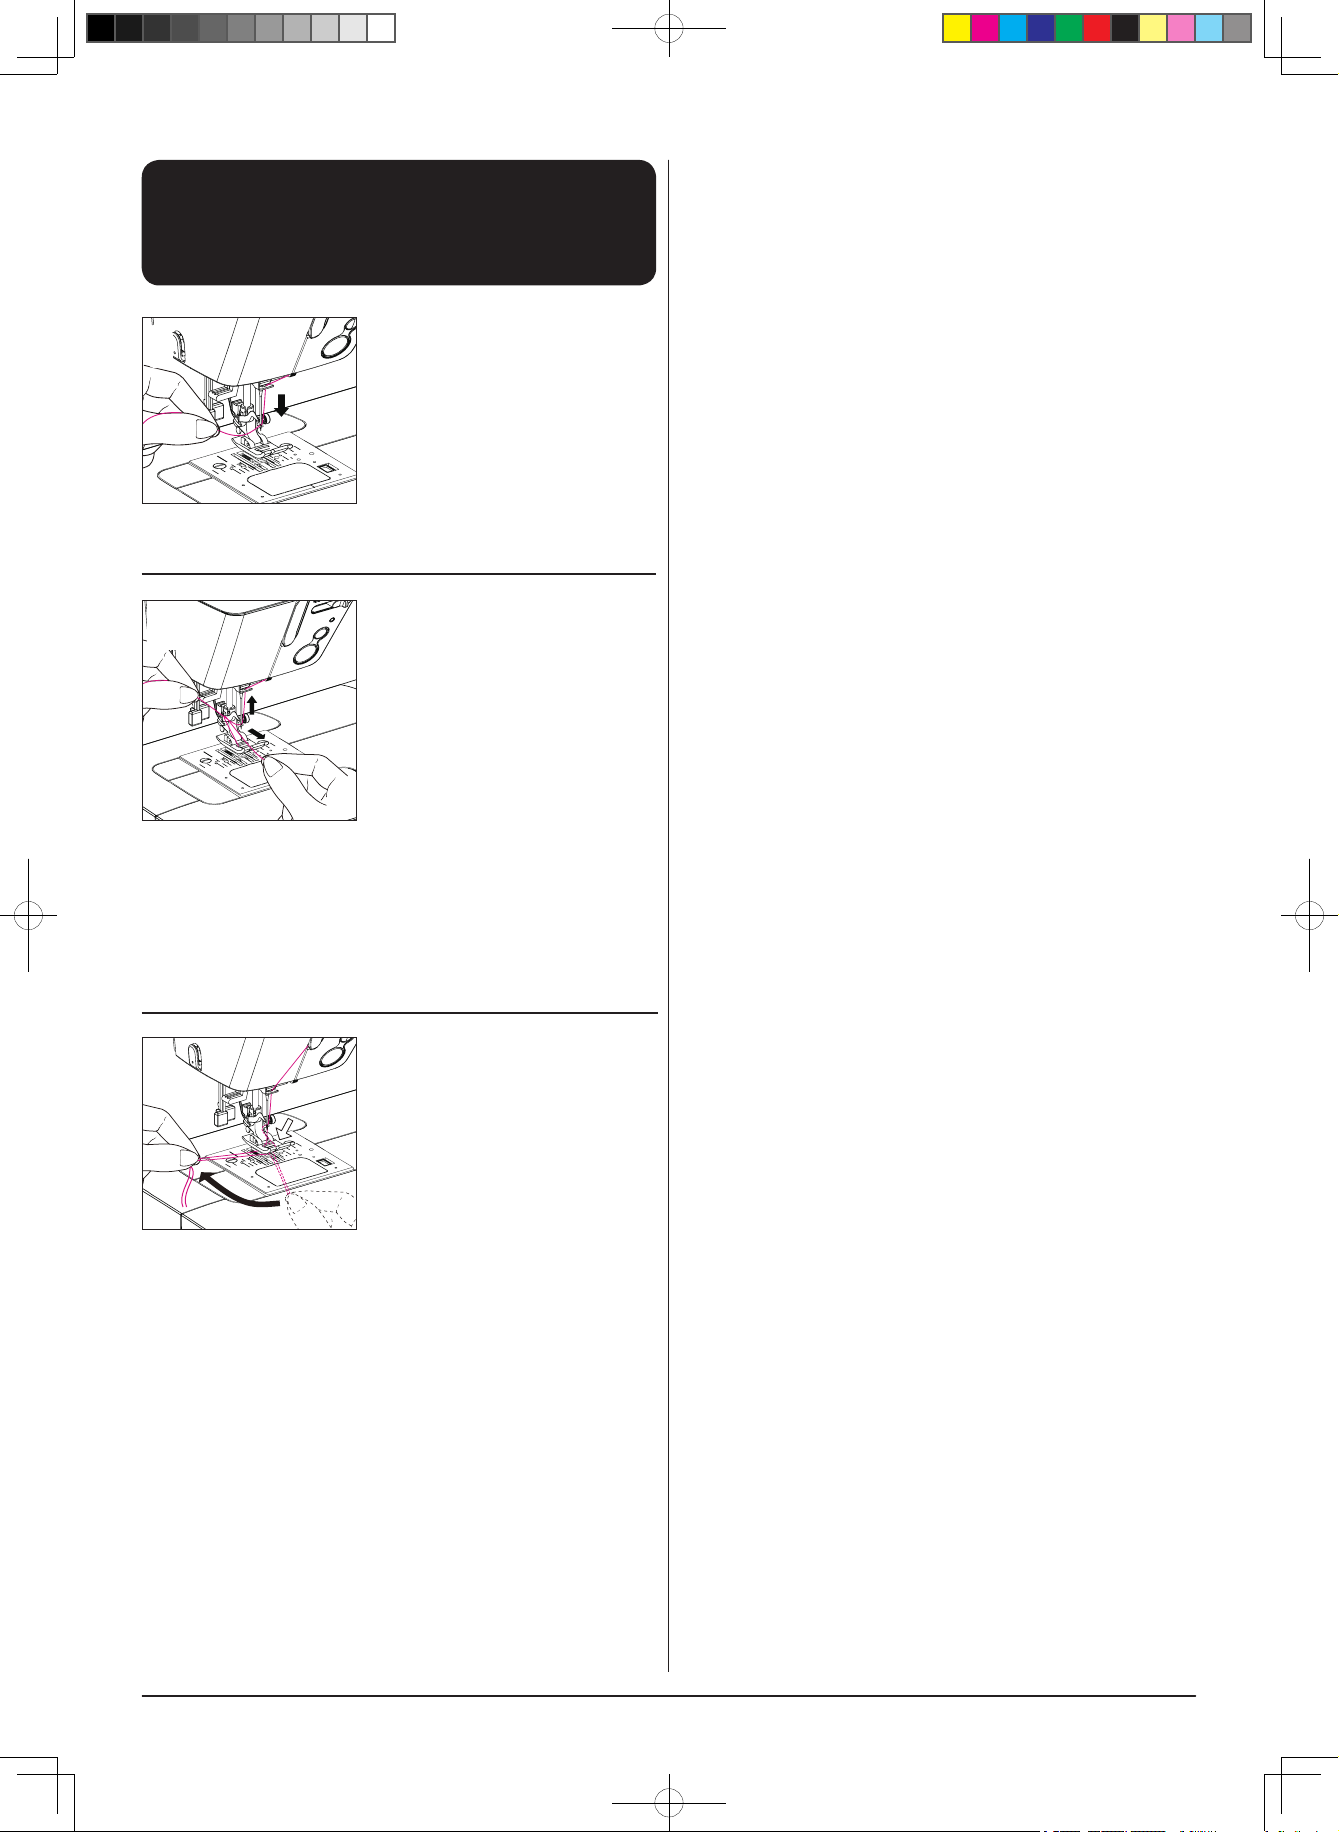
Changing The Presser Foot / Changement du pied presseur
Sustitución del prensatelas / Замена прижимной лапки
CAUTION:
ATTENTION:
PRECAUCIÓN:
ПРЕДОСТЕРЕЖЕНИЕ:
1
2
Push
Appuyer
Empujar
Нажмите
Make sure to disconnect the plug from the wall outlet before changing the presser foot.
Assurez-vous d’avoir débranché la machine avant de changer le pied.
Asegúrese de desconectar el enchufe de la toma de corriente antes de cambiar el prensatelas.
Перед тем, как заменить прижимную лапку, убедитесь в том, что вилка сетевого шнура вынута
из стенной розетки.
■ Raise the presser foot.
■ Relevez le pied presseur.
■ Suba el prensatelas.
■ Поднимите прижимную
лапку
■ Remove the presser foot.
Press the presser foot release
lever in the direction of the
arrow.
■ Retirez le pied.
Appuyez sur le levier
d’enclenchement de pied pour
le relâcher.
4
■ Baje el prensatelas.
Baje la palanca del prensatelas y el prensatelas se jará en
posición emitiendo un chasquido.
■ Опустите прижимную лапку
Опустите рычаг прижимной лапки, и лапка будет
зафиксирована на месте.
■ Lower the presser foot.
Lower the presser foot lever,
and the presser foot will be
snapped in place.
■ Abaissez le pied presseur.
A ce moment, le pied sera
enclenché dans son logement.
■ Retire el prensatelas.
Presione la palanca de liberación del prensatelas en la
dirección de la echa.
■ Снимите прижимную лапку
Нажмите на рычаг опускания прижимной лапки в
направлении, указанном стрелкой.
■ Align the presser foot pin
3
Marker line
Ligne repère
Pin
Tige
Pivote
Стержень
■ Поставьте прижимную лапку так, чтобы ее стержень
был на одной линии с отметкой на игольной
пластине.
Marca
Линия отметки
with the marker line on the
needle plate.
■ Alignez l’attache du pied
avec la ligne repère de la
plaque aiguille.
■ Alinee el pivote del
prensatelas con la marca en
la placa aguja.
20
Page 20
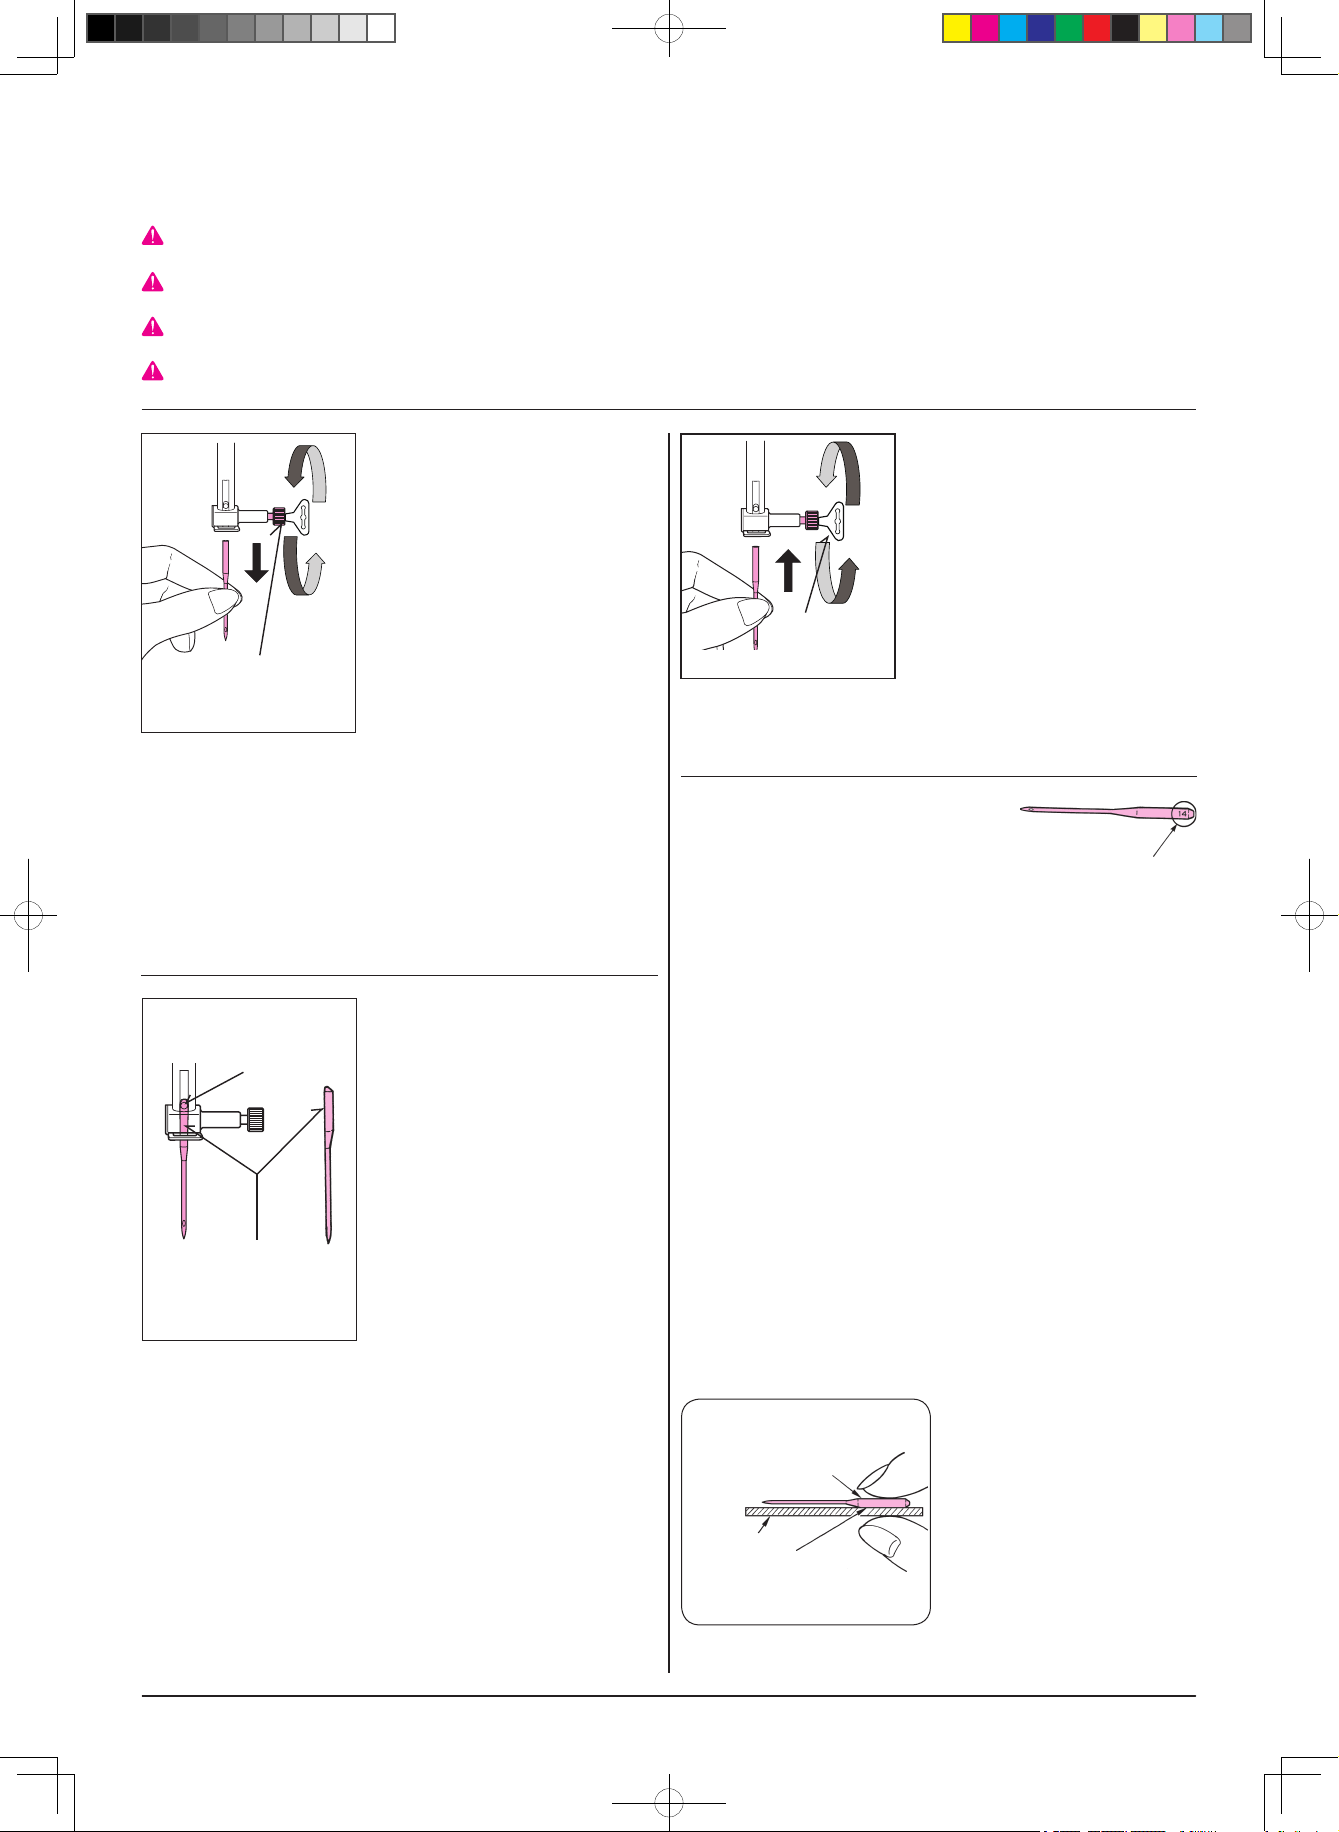
Attaching The Needle / Pose de l’aiguille
Instalación de la aguja / Установка иглы
CAUTION:
ATTENTION:
PRECAUCIÓN:
ПРЕДОСТЕРЕЖЕНИЕ:
Make sure to disconnect plug from wall outlet before inserting needle.
Assurez-vous d’avoir débranchée la machine.
Asegúrese de desconectar el enchufe de la toma de corriente antes de insertar la aguja.
Перед тем, как вставить иглу, убедитесь в том, что вилка сетевого шнура вынута из стенной
розетки.
■ Removing the needle.
1 3
(1) Turn the handwheel toward
you until the needle bar
reaches its highest position.
(2) Loosen the needle clamp
screw.
■ Retirez l’aiguille.
(1) Tournez le volant vers vous
Needle clamp screw
Vis serre-aiguille
Tornillo de sujeción de la aguja
Зажимный винт иглы
jusqu’à ce que l’aiguille soit en
haut.
(2) Dévissez la vis du serre-
aiguille.
■ Плотно затяните зажимный винт иглы с помощью
■ Extracción de la aguja.
(1) Gire el volante hacia usted hasta que la barra de la aguja
alcance la posición más alta.
(2) Aoje el tornillo de sujeción de la aguja.
■ Снятие иглы
(1) Поворачивайте маховик на себя, пока иглодержатель
не окажется в самом высоком положении.
(2) Ослабьте зажимный винт иглы.
■ Attaching the needle.
(The needle cannot be
inserted unless it is correctly
2
Stopper pin
Arrêt d’aiguille
Pivote de tope
Штифт стопора
positioned.)
Hold the needle with its flat
part facing away from you, and
insert it fully until it touches the
stopper pin.
■ Placez l’aiguille.
The at part should face away from you.
Côté plat vers l’arrière
La parte plana debe quedar detrás.
Плоская сторона должна быть
обращена назад.
(L’aiguille ne peut pas être
insérée à l’envers).
Soutenez l’aiguille avec le côté
plat vers l’arrière et insérez-la à
fond jusqu’à l’arrêt d’aiguille.
■ Colocación de la aguja.
● Needle to be purchased
● Aiguilles à utiliser
● Aguja que debe comprarse
● Иглы, которые следует
приобретать
When purchasing spare needles, specify
HAx1 (130/705H) for household sewing
machine or HAx1SP (needle for knits).
Lorsque vous rachetez des aiguilles,
spécifiez le type 130/705H (standard)
pour machine à coudre ou HAx1SP (pour
jerseys).
Cuando compre agujas de recambio,
especifique HAx1 (130/705H) para
máquinas de coser domésticas o HAx1SP
(aguja para punto).
Приобретая запасные иглы, указывайте
следующие спецификации: НАх1
(130/705Н) – для бытовых швейных
машин или НАх1SP (игла для трикотажа).
● Checking the needle
● Vérication de l’aiguille
● Comprobación de la aguja
● Проверка иглы
(La aguja no puede insertarse a menos que se coloque
correctamente.)
Sostenga la aguja con la parte plana atrás e insértela por
completo hasta que toque el pivote de tope.
■ Установка иглы(Игла не может быть вставлена без
предварительного надлежащего позиционирования)
Держите иглу плоской стороной от себя и вставляйте ее,
пока она не коснется штифта стопора.
■ Securely tighten the needle
clamp screw, using the
screwdriver furnished with the
machine.
■ Revissez fermement la vis du
serre-aiguille avec le tournevis
fourni.
Screwdriver
Tournevis
Destornillador
Отвертка
■ Apriete fuertemente el tornillo
de sujeción de la aguja
utilizando el destornillador
suministrado con la máquina.
отвертки, поставляемой в комплекте с машиной.
Needle size
Taille de l’aiguille
Tamaño de la aguja
Размер иглы
The larger the number,
the thicker the needle.
Plus le tissu est épais,
plus la taille d’aiguille
est grosse.
Cuanto mayor sea el
número, más gruesa
será la aguja.
Чем больше номер
иглы, тем толще игла.
* Check the needle for its
straightness occasionally. Any
bent needle would cause stitch
skipping, thread breakage or
damage to fabrics.
* Vérifiez la bonne qualité de
l’aiguille régulièrement. Toute
aiguille épointée ou tordue peut
endommager votre tissu et
causer des défauts de couture
importants.
* De vez en cuando, compruebe
que la aguja esté recta. Una
aguja doblada causaría saltos
en la costura, roturas de hilo o
daño en los tejidos.
* Периодически проверяйте
иглу на кривизну. Любая
гнутая игла может привести к
пропускустежков, обрыву нити
или повреждению тканей.
Flat plate
Pièce plate
Supercie
plana
Плоская
пластина
Parallel
Parallèle
Paralelo
Параллельно
Flat part of needle
Côté plat de l’aiguille
Parte plana de la aguja
Плоская часть иглы
21
Page 21
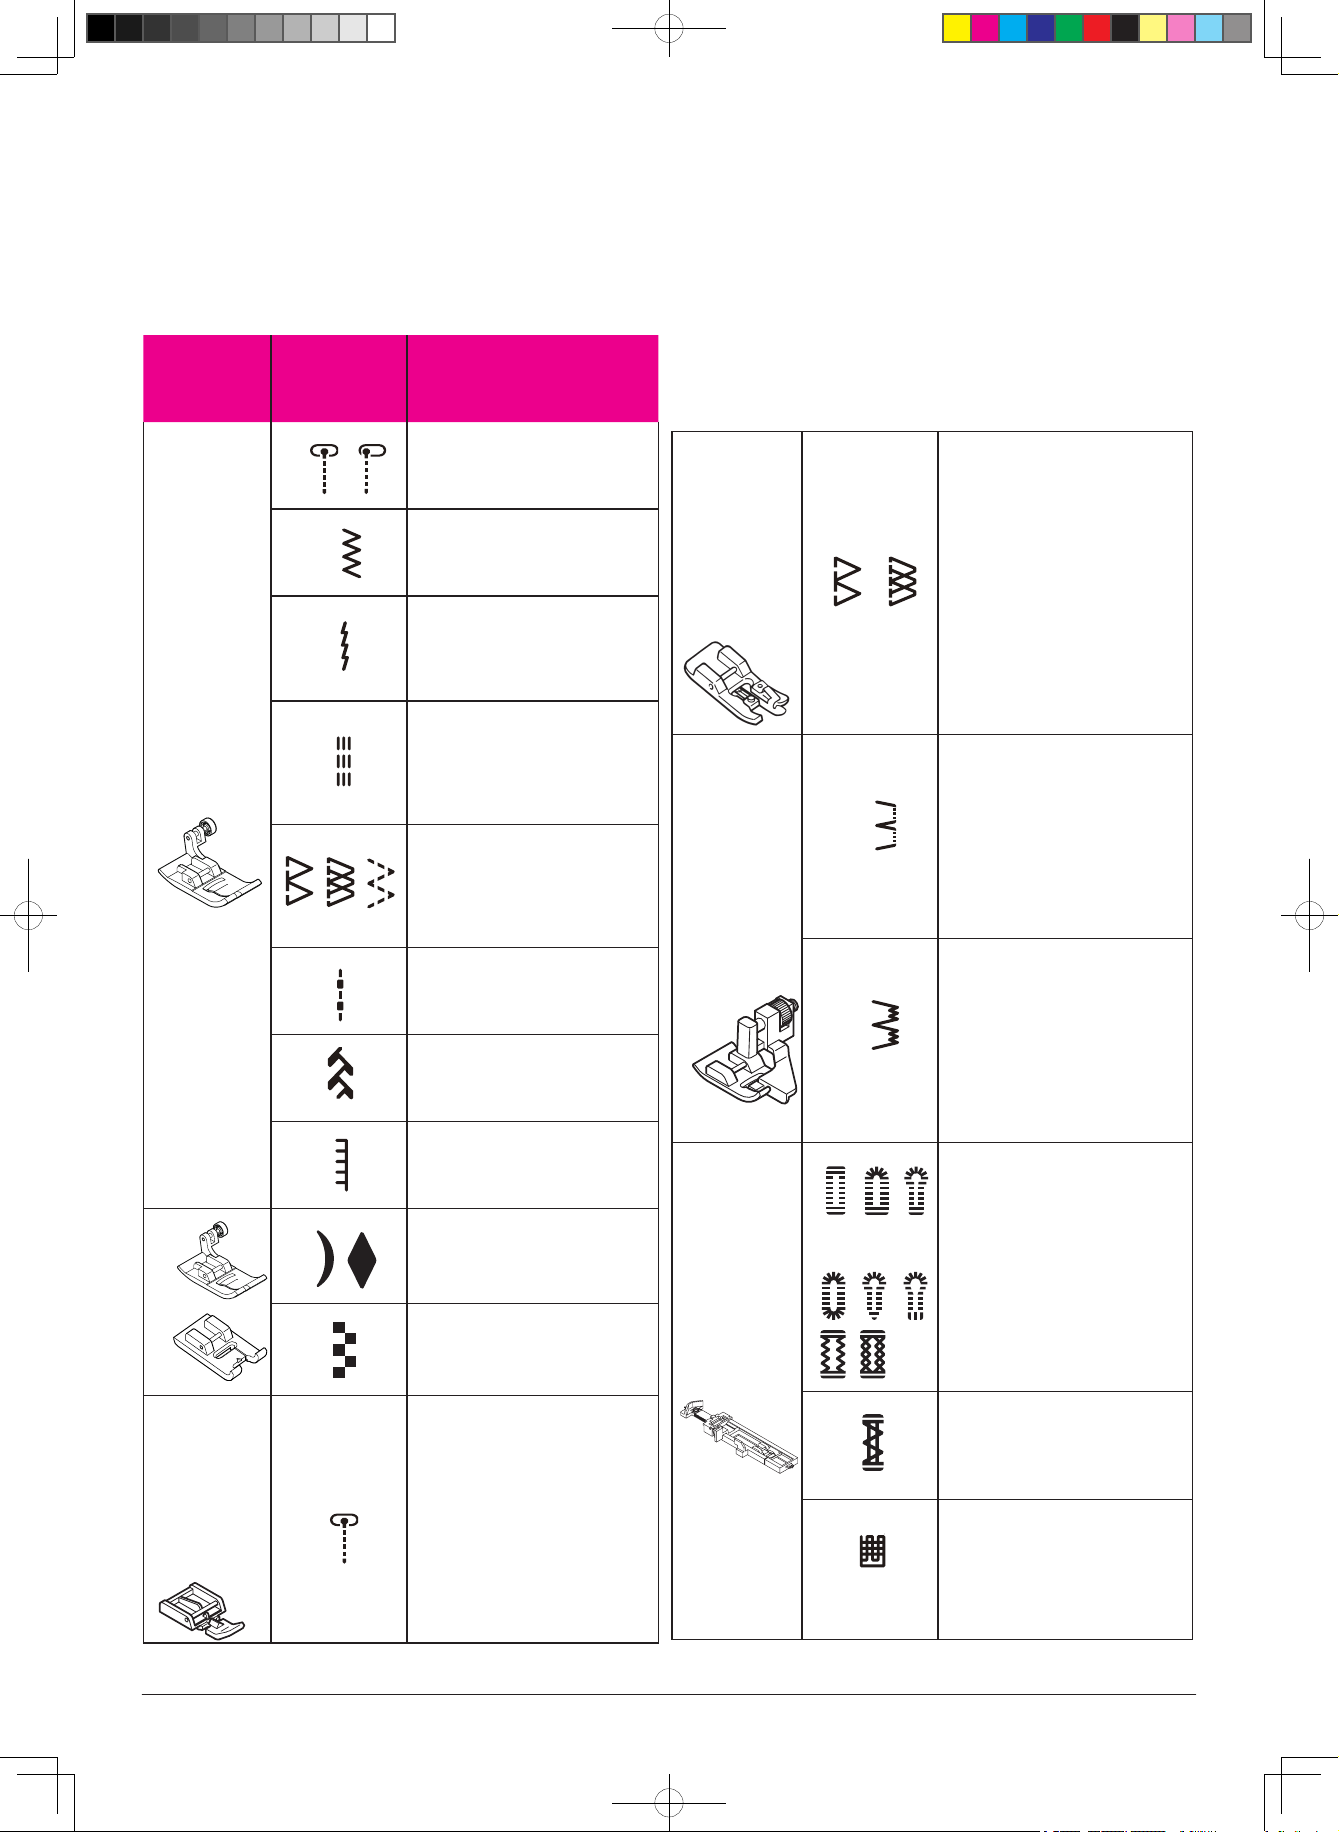
Types of Feet and Their Applications
Types de pieds et leurs applications
Tipos de prensatelas y sus aplicaciones
Типы прижимных лапок и их применение
HZL-K85 model / HZL-K65 model
Standard
presser foot (A)
Pied presseur
standard (A)
Prensatelas
estándar (A)
Standaard
naaivoet (A)
HZL-K65
*1
HZL-K85
*2
Zipper foot (B)
Pied fermeture
glissière (B)
Prensatelas
para cremalleras
(B)
Лапка для
молнии (B)
Stitch pattern
Programme
Patrón de puntada
Шаблон строчки
Typical applications
Applications types
Aplicaciones típicas
Типичное применение
Straight stitch
Point droit
Puntada recta
Прямая строчка
Zigzag stitch
Point zigzag
Puntada en zigzag
Строчка зигзаг
Straight stitch for elastic
Point droit pour jerseys
Puntada recta para tejido elástico
Прямая строчка для
эластичной ткани
Stretch reinforcing stitch
Point triple
Puntada de refuerzo para tejido
elástico
Усиленный стежок эластичной
строчки
Overcasting 3-step zigzag stitch
Zig-zag piqué 3 points
Puntada en zigzag de
sobrehilado en 3 pasos
Краеобметочная строчка
трехшаговым стежком зигзаг
Quilt stitch
Quilting
Puntada de acolchar
Стегальная строчка
Patchwork, etc.
Patchwork, etc.
Patchwork, etc.
Пэчворк и т.д.
Applique
Applications
Aplique
Стежок для аппликации
Scallop stitch
Feston
Puntada con festones
Фестонный стежок
Pattern stitch
Assemblage
Puntada de patrón
Монтажный стежок
Setting zipper
Insertion glissières
Colocación de la cremallera
Вшивание молнии
Overcasting
foot (C)
Pied surlage(C)
Prensatelas de
sobrehilado (C)
Лапка для
обметки края (C)
Blindstitch
presser foot (D)
Pied ourlet
invisible (D)
Prensatelas de
puntada
invisible (D)
Лапка для
потайной
строчки (D)
Buttonhole foot
(E)
Pied
boutonnière (E)
Prensatelas
para ojales (E)
Лапка для
ыметывания
петель (E)
( HZL-K85 only )
Overcasting (Overlocking)
Surlage (overlock)
Sobrehilado (sobreorillado)
Обметка края (оверлок)
Blindstitch
Point invisible
Puntada invisible
Потайная строчка
Blindstitch for elastic fabric
Point invisible (pour tissu stretch)
Puntada invisible para tejido elástico
Потайная строчка для
эластичной ткани
Buttonholing
Boutonnière
Ojales
Выметывание петель
Bartack
Points d'extrémités renforcés
Presillado
Закрепочная строчка
Darning stitch (HZL-K85)
Point de reprise (HZL-K85)
Puntada de para zurcidos
(HZLK85)
Стежок для штопки
* 1 Standard
* 2 Manual
presser foot (A) / Pied presseur standard (A) / Prensatelas estándar (A) / Стандартная прижимная лапка (A)
buttonhole foot(I) / Pied boutonnière manuelle (I) / Prensatelas para ojales manuales (I) / Лапка для выметывания петель в ручном режиме (l)
22
Page 22

HZL-K85
Pattern stitch / Points de programme
Puntada de patrón / Монтажный стежок
Scallop stitch / Points de feston
Puntada con festones /
Фестонный стежок
Alphabet / Alphabet
Alfabeto / Алфавит
How to adjust stitch shape (HZL-K85 model only)
Comment ajuster la forme du point (modèle HZL-K85 seulement)
Cómo ajustar la forma de la puntada (sólo modelo HZL-K85)
Регулирование формы стежка (только для модели HZL-K85)
● When you sew pattern stitch, be sure to do test sewing.
The stitch result may be deformed depends on the type or thickness of fabric.
● Cuando cosa una puntada de patrón, asegúrese de coser
una prueba.
El resultado de la puntada puede resultar deformado en función del tipo o el
grosor del tejido.
Manual buttonhole foot(I)
1
Pied boutonnière manuel (I)
Prensatelas para ojales
manuales (I)
Лапка для выметывания
петель в ручном режиме(I)
■ Make sure that the presser
foot is correct.
■ Vériez d’utiliser le bon pied
presseur.
■ Asegúrese de que el
prensatelas sea correcto.
■ Убедитесь в том, что
установлена правильная
прижимная лапка.
■ Select the pattern.
2
■ Sélectionnez le programme.
■ Seleccione el patrón.
■ Выберите шаблон
■ Start/stop button
3
Press the button for start.
Push it again to stop sewing.
Needle will stop at its lowest
position.
● Lorsque vous cousez les points d’un programme, veillez à
faire un essai de couture.
Le résultat du point peut être déformé selon le type ou l’épaisseur du tissu.
● При шитье монтажным стежком не забудьте выполнить
проверочное шитье.
Получаемый стежок может деформироваться в зависимости от типа или
толщины ткани.
■ Lift the presser foot and take
4
out the fabric.
Wait until the needle totally
stops. Push the reverse stitch
button to raise the needle and
then raise the presser foot lever.
■ Relevez le pied et retirez le tissu.
Attendez que l’aiguille soit bien
arrêtée.Appuyez sur la touche
couture arrière pour remonter l’aiguille puis relevez le pied.
■ Eleve el prensatelas y retire el tejido.
Espere a que la aguja s e detenga por completo.
Presione el botón de puntada inversa para elevar la aguja y,
a continuación, levante la palanca del prensatelas.
■ Кнопка старт/стоп
Нажмите кнопку, чтобы начать работу. Нажмите кнопку
еще раз, чтобы остановить шитье. Игла остановится в
самом нижнем положении.
too far / trop loin /
demasiado lejos /
Слишком широкий
■ Touche marche/arrêt
Pressez cette touche pour
démarrer ou pour arrêter la
machine. L’aiguille s’arrête en
position basse. Cette touche
n’est active que le rhéostat
débranché.
■ Botón de arranque/parada
Pulse el botón para arrancar. Vuelva a pulsarlo para parar
de coser. La aguja se detendrá en la posición más baja.
■ Поднимите прижимную лапку и вытащите ткань
Дождитесь полной остановки иглы. Нажмите кнопку
обратной строчки, чтобы поднять иглу, и затем поднимите
рычаг прижимной лапки.
23
Adjust with adjusting
screw to form the
stitch.
Ajustez avec la vis de
réglage pour former
le point.
Ajustar con el tornillo
de ajuste para formar
la puntada.
Отрегулируйте форму
стежка с помощью
регулировочного
установочного винта.
Turn the screw toward (-).
Tournez la vis vers (-).
Gire el tornillo hacia (-).
Поверните винт в направлении(-).
too close / trop près /
demasiado cerca /
Слишком плотный
Turn the screw toward (+).
Tournez la vis vers (+).
Gire el tornillo hacia (+).
Поверните винт в направлении(+).
Page 23

How To Adjust Thread Tension
Comment régler la tension du l
Cómo ajustar la tensión del hilo
Регулирование натяжения нити
* Adjust the thread tension as described below when special type of fabric is used or the thread tension has
changed from the adequate setting.
* Les réglages de tension ci-dessous sont utiles lorsque l’on coud une matière spéciale ou que les réglages
initiaux ont été changés.
* Ajuste la tensión del hilo según se describe a continuación cuando se utilice el tipo de tejido especial o cuando
la tensión del hilo no sea el valor adecuado.
* При использовании специальной ткани или при изменении натяжения нити по сравнению с натяжением,
установленным по умолчанию, отрегулируйте натяжение нити, как описано ниже.
Normally, well-tensed seam is
obtained when the needle thread
and bobbin thread interlace with
each other at the middle of the fabric
thickness.
Normalement, une bonne tension
est obtenue quand les deux
fils s’entrecroisent au centre
de l’épaisseur du tissu (d’où la
nécessité de toujours faire vos
essais sur deux épaisseurs de
tissu).
Normalmente, una costura con una
tensión correcta se obtiene cuando
el hilo de la aguja y el hilo de la
canilla se entrelazan en la mitad del
grosor del tejido.
Обычно, хорошо натянутый
шов получается тогда, когда
игольная нить и шпульная нить
переплетаются друг с другом в
середине толщины ткани.
Middle of fabric thickness
Milieu des tissus
Grosor del tejido
Середина толщины ткани
Upper thread (Needle thread)
Fil supérieur (l d’aiguille)
Hilo superior (hilo de aguja)
Верхняя нить(Игольная нить)
Fabric (right side)
Tissu (dessus)
Tejido (del derecho)
Ткань(лицевая сторона)
Fabric (wrong side)
Tissu (dessous)
Tejido (del revés)
Ткань(изнаночная сторона)
Bobbin thread
Fil de canette
Hilo de canilla
Шпульная нить
The upper thread tension is too low.
La tension supérieure est trop faible.
La tensión del hilo superior es demasiado baja.
Натяжение верхней нити слишком слабое.
Upper thread (Needle thread)
Fil supérieur (l d’aiguille)
Hilo superior (hilo de aguja)
Верхняя нить (Игольная нить)
Bobbin thread
Fil de canette
Hilo de canilla
Шпульная нить
To increase upper thread tension.
Pour augmenter la tension supérieure.
Para aumentar la tensión del hilo superior.
Усилить натяжение верхней нити.
The upper thread tension is too high.
La tension supérieure est trop forte.
La tensión del hilo superior es demasiado alta.
Натяжение верхней нити слишком сильное.
Upper thread (Needle thread)
Fil supérieur (l d’aiguille)
Hilo superior (hilo de aguja)
Верхняя нить (Игольная нить)
Bobbin thread
Fil de canette
Hilo de canilla
Шпульная нить
To decrease upper thread tension.
Pour diminuer la tension supérieure.
Para reducir la tensión del hilo superior.
Ослабить натяжение верхней нити.
24
Page 24

Fabric, thread and needle table
Fabric Thread Needle
Light-weight materials
Medium-weight materials
Lawn
Georgette
Tricot Spun thread ……………………………………….….No.60-90
Wool and synthetic fabrics
Cotton and synthetic fabrics Spun thread …………………………………… …….No.50, 60 No.11-14
Silk thread …………………………………………….No.80,90
Spun thread …………………………………………..No.80,90
Silk thread …………………………………………….No.80
Spun thread …………………………………………..No.60-90
HA×1
No.11
Knit needle
No.11
No.11-14
Light jersey
Ordinary wool and
synthetic fabrics
Heavy-weight materials
* In general, the same thread is used for both needle and bobbin threads.
* Thin thread and needle will be used for light-weight fabrics and thick thread and needle will be used for heavy-weight materials.
* Check that the combination of needle and thread is OK by trial sewing on the material which will be sewn.
* Knit needle is good for stretchy fabrics (such as knits) and synthetic fabrics.
* Use thread No. 30 - 90.
* When it is difcult to go over an overlapped section, guide the fabric by hand.
* When sewing decorative stitches or letters (Page 50), use knit needle for better nish.
Denim Spun thread …………………………………………..No.30-50 No.14-16
Jersey
Coat Silk thread …………………………………………… No.50 No.11-14
Silk thread …………………………………………… No.50
Spun thread …………………………………………..No.50, 60
Silk thread …………………………………………….No.50
Spun thread …………………………………………..No.50, 60
Silk thread …………………………………………….No.50
Spun thread …………………………………………..No.50, 60
Matière, l et aiguille
Tissu Fil Aiguille
Tissus ns
Tissus moyens
Lin
Crêpe
Tricot Fil synthétique …………………………………….….No.60-90
Laine et matières
synthétiques
Coton et matières
synthétiques
Fil de soie …………………………………………….No.80,90
Fil synthétique ………………………………………..No.80,90
Fil de soie …………………………………………….No.80
Fil synthétique ………………………………………..No.60-90
Fil synthétique ………………………………… …….No.50, 60 No.11-14
Knit needle
No.11
No.11-14
Knit needle
No.11-14
HA×1
No.11
Knit needle
No.11
No.11-14
Jersey léger
Laine ordinaire et
matières synthétiques
Tissus épais
* En général le même l est utilisé pour l'aiguille et la canette.
* Un l et une aiguille ne sont utilisés pour coudre des matières légères un l et une aiguille épaisses sont utilisés pour des matières épaisses.
* Vériez que la combinaison l/aiguille est OK en faisant des essais sur la matière qui sera cousue.
* L'aiguille pour jersey est bonne pour les matière extensibles (comme du jersey) et pour les matières synthétiques.
* Utilisez un l No. 30 à 90.
* Quand il est difcile de coudre une surépaisseur, guidez la matière avec les mains .
* Lors de la couture de points décoratifs ou de lettres (Page 50), utilisez une aiguille pour jersey pour un meilleur résultat.
Denim Fil synthétique ………………………………………..No.30-50 No.14-16
Jersey
Côtes Fil de soie …………………………………………… No.50 No.11-14
Fil de soie …………………………………………… No.50
Fil synthétique ………………………………………..No.50, 60
Fil de soie …………………………………………….No.50
Fil synthétique ………………………………………..No.50, 60
Fil de soie …………………………………………….No.50
Fil synthétique ………………………………………..No.50, 60
Knit needle
No.11
No.11-14
Knit needle
No.11-14
25
Page 25

Tabla de tejidos, hilo y aguja
Tejido Hilo Aguja
Materiales nos
Materiales medios
Lino
Crespón
Tricot Hilo normal …..…………………………………...…Nº.60-90
Lana y tejidos sintéticos
Algodón y tejidos sintéticos Hilo normal …..…………………………………...…Nº.50,60 Nº.11-14
Hilo de seda …..…………………………………...…Nº.80,90
Hilo normal …..…………………………………...…Nº.80,90
Hilo de seda …..…………………………………...…Nº.80
Hilo normal …..…………………………………...…Nº.60-90
HA×1
Nº.11
Aguja para
punto
Nº.11-14
Punto no
Lana y tejidos sintéticos
convencionales
Materiales gruesos
* En general, el mismo hilo se utiliza tanto para la aguja como para la canilla..
* Se utilizará un hilo y una aguja nos para tejidos nos y un hilo y una aguja gruesos para materiales gruesos.
* Compruebe que la combinación de hilo y aguja sea correcta. Para ello, realice pruebas en el material que coserá.
* La aguja de punto es adecuada para tejidos elásticos (como el punto) y tejidos sintéticos.
* Utilice el hilo Nº. 30 - 90.
* Cuando sea difícil pasar por una sección superpuesta, guíe el tejido con la mano.
* Cuando cosa puntadas decorativas o letras (página 50), utilice la aguja de punto para un acabado óptimo.
Tejano Hilo normal …..…………………………………...…Nº.30-50 Nº.14-16
Punto
Paño Hilo de seda …..…………………………………...…Nº.50 Nº.11-14
Hilo de seda …..…………………………………...…Nº.50
Hilo normal …..…………………………………...…Nº.50,60
Hilo de seda …..…………………………………...…Nº.50
Hilo normal …..…………………………………...…Nº.50,60
Hilo de seda …..…………………………………...…Nº.50
Hilo normal …..…………………………………...…Nº.50,60
Таблица соответствия тканей, нитей и игл
Ткань Нить Игла
Легкие ткани
Средние ткани
Батист
Жоржет
трикотаж Нить из волокна ……………………………….…No.60-90
шерстяные и
синтетические ткани
Хлопок и синтетические
ткани
Шелковая нить…………………………………….No.80,90
Нить из волокна ………………………………….No.80,90
Шелковая нить…………………………………….No.80
Нить из волокна ………………………………….No.60-90
Нить из волокна ………………………………….No.50, 60 No.11-14
Aguja para
punto
Nº.11
Nº.11-14
Aguja para
punto
Nº.11-14
HA×1
No.11
Игла для трикотажа
No.11
No.11-14
Легкая джерси
Шерсть для суконного
прядения и синтетические
ткани
Тяжелые ткани
* Обычно, в качестве, как игольной нити, так и шпульной нити, используют одну и ту же нить.
* Для легких тканей необходимо использовать тонкую нить и тонкую иглу, а для тяжелых тканей – толстую нить и толстую иглу.
* Проверьте, правильно ли подобрана комбинация иглы и нити, с помощью пробного шитья на материале, который будет обрабатываться.
* Иглы для трикотажа хорошо подходят для эластичных тканей (например, трикотажные изделия) и синтетических тканей.
* Используйте нить #30-90.
* Когда возникают трудности при обработке участка, прошиваемого внахлестку, направляйте ткань руками.
* Для обеспечения лучшей отделки при прокладывании декоративных стежков или шитье букв (стр. 50) используйте иглу для трикотажа.
Джинсовая ткань Нить из волокна …………………………………..No.30-50 No.14-16
Джерси
Обивочные ткани Шелковая нить…………………………………… No.50 No.11-14
Шелковая нить ……………………………………No.50
Нить из волокна ………………………………….No.50, 60
Шелковая нить…………………………………….No.50
Нить из волокна ………………………………….No.50, 60
Шелковая нить ……………………………………No.50
Нить из волокна ………………………………… No.50, 60
Игла для трикотажа
No.11
No.11-14
Игла для трикотажа
No.11-14
26
Page 26

How To Adjust Stitch Length (manually)
Comment régler manuellement la longueur du point
Cómo ajustar la longitud de la puntada (manualmente)
Регулирование длины стежка (вручную)
stitch length manual adjustment button
Touche de réglage manuel de la longueur du point
Botón de ajuste manual de longitud de puntada
кнопка регулирования длины стежка вручную
For HZL-K85 only
The actual stitch length will be shown on LED
display when manual button is pressed
Pour la HZL-K85 uniquement
La longueur de point actuelle est indiquée sur
l’affichage LED lorsque la touche manuelle est
enfoncée
Sólo para HZL-K85
La longitud real de la puntada se mostrará en la
pantalla LED cuando se pulse el botón manual
Только для HZL-K85
При нажатии кнопки регулирования длины
стежка вручную на светодиодном дисплее будет
отображаться фактическая длина стежка.
* When machine is turned on again or a pattern is re-selected, the stitch length will be
automatically set to a preset one.
* To adjust the stitch length to a desired one, press the stitch length manual adjustment button
(the button will light up). To cancel the manual adjustment mode, select a pattern or press the
stitch length manual adjustment button again.
* Lorsque la machine est rallumée ou qu’un autre point a été sélectionné, la longueur de
point a automatiquement été préréglée.
* Pour régler la longueur des points, appuyer sur la touche manuelle (le témoin s’allume).
(Pour annuler le réglage manuel, sélectionnez un point ou rappuyez sur la touche).
* Cuando se vuelve a encender o la máquina o se vuelve a seleccionar la máquina, la
longitud de puntada establecida puede establecerse en un valor predenido.
* Para ajustar la longitud de puntada deseada, presione el botón de ajuste manual de
longitud de puntada (el botón se encenderá). Para cancelar el modo de ajuste manual,
seleccione un patrón o vuelva a presionar el botón de ajuste manual de la longitud de
puntada.
* При включении машины или повторном выборе шаблона длина стежка автоматически
устанавливается в ранее заданном значении.
* Чтобы отрегулировать необходимую длину стежка, нажмите кнопку регулирования
длины стежка вручную (кнопка загорится). Чтобы отменить режим регулирования
вручную, выберите шаблон или снова нажмите кнопку регулирования длины стежка
вручную.
HZL-K85 Only
Stitch pattern
Programme
Patrón de puntada
Шаблон строчки
Automatic (mm)
Automatique (mm)
Automático (mm)
Автоматический
режим (мм)
Manual (mm)
Manuel (mm)
Manual (mm)
Регулирование
вручную (мм)
HZL-K85 Only
Stitch pattern
Programme
Patrón de puntada
Шаблон строчки
Automatic (mm)
Automatique (mm)
Automático (mm)
Автоматический
режим (мм)
Manual (mm)
Manuel (mm)
Manual (mm)
Регулирование
вручную (мм)
※ ※ ※ ※
2.4 2.0 2.4 2.0 3.0 2.6 1.2 1.8 1.0 0.4 0.5 0.6 1.4
1.2
0.4
1.8
0 ~ 4.0
※ ※ ※ ※ ※ ※ ※ ※
2.0 0.6 2.6 0.8 - - 2.6 0.5
1.6
0.2
~2.0
~1.0
1.2
~2.6
~2.6
0.4
~4.0
~4.0
- - 1.2~2.6 0.0~1.0
~3.8
1.6
~2.6
0~4.0
0.4
~4.0
0.2
~2.0
0.2~1.0
1.0
~1.8
27
Page 27

Examples of automatically/manually determined straight stitch lengths.
Exemples de longueur de point automatique/manuelle
Ejemplos de determinación automática/manual de las longitudes de puntada recta.
Примеры автоматического/ручного регулирования длины стежка прямой строчки
Automatic / Automatique / Automático/ Автоматическое регулирование
For automatically-determined stitch length:
The best-suited stitch length for selected pattern is automatically established regardless of the
position of the adjusting lever.
Pour une longueur de point automatiquement sélectionnée:
La longueur de point idéale est automatiquement établie quelque soit la position du curseur.
Para la determinación automática de la longitud de la puntada:
La longitud ideal de puntada para el diseño seleccionado está establecida según la posición de la
palanca de ajuste.
Для длины стежка, определяемой в автоматическом режиме
Наиболее подходящая длина стежка для выбранного вида строчки это длина,
устанавливаемая автоматически независимо от положения регулировочного рычага.
Manual / Manuelle / Manual / Регулирование вручную
* The machine will beep when the adjusting lever is moved. Set the adjusting lever at a desired position.
* Even in the case where the stitch length is manually adjusted, the stitch length manual adjustment button will ash on and off when the
automatically-determined stitch length position is reached.
* La machine émet un bip sonore quand le curseur est bougé. Réglez- le sur la position requise.
* Le bouton manuel clignote lorsque la longueur des points déterminée automatiquement est atteinte même si l’on a réglé la longueur des
points manuellement.
* La máquina pitará cuando se mueva la palanca de ajuste. Establezca la palanca de ajuste en la posición deseada.
* Incluso en caso de que se ajuste manualmente la longitud de puntada, el botón de ajuste manual parpadeará cuando se alcance la
posición de longitud de puntada determinada automáticamente.
* При перемещении регулировочного рычага в машине срабатывает звуковой сигнал. Установите регулировочный рычаг в
необходимое положение.
* Даже в случае регулирования длины стежка вручную кнопка регулирования длины стежка вручную будет подсвечиваться; она
погаснет в тот момент, когда будет достигнута позиция автоматически определенной длины стежка.
When the stitch length manual adjustment
button is pressed and adjusting lever is moved
to the right beyond the point at which the
manual button ashes on and off.
Si l'on appuie sur le bouton manuel et déplace
le levier de réglage vers la droite au-delà du
point auquel le bouton manuel clignote:
When the adjusting lever is moved to the left
beyond the point at which the manual button
ashes on and off.
Si l’on déplace le levier de réglage vers la
gauche au-delà du point auquel le bouton
manuel clignote.
Cuando se presiona el botón de ajuste manual
de la longitud de puntada y la palanca de
ajuste se mueve a la derecha, más allá del
punto en el que el botón manual parpadea.
При нажатии кнопки регулирования
HZL-K85 Only HZL-K85 Only
длины стежка вручную и перемещении
регулировочного рычага вправо за пределы
позиции, в которой кнопка регулирования
вручную подсвечивается и гаснет.
Cuando la palanca de ajuste se mueve a
la izquierda, más allá del punto en el que
parpadea el botón manual.
При перемещении регулировочного рычага
влево за пределы позиции, в которой кнопка
регулирования вручную подсвечивается и
гаснет.
28
Page 28

Straight Stitch / Point droit
Puntada recta / Прямая строчка
The straight stitch is the basic stitch.
Le point droit est le point de base.
La puntada recta es la puntada básica.
Прямая строчка – это основная строчка.
1
Standard presser foot (A)
Pied standard (A)
Prensatelas estándar (A)
Стандартная прижимная
лапка(А)
■ Make sure that the presser
foot is correct.
■ Vériez d’utiliser le bon pied
presseur.
■ Asegúrese de que el
prensatelas sea el correcto.
■ Убедитесь в том, что
прижимная лапка выбрана
правильно
CAUTION:
ATTENTION:
PRECAUCIÓN:
ПРЕДОСТЕРЕЖЕНИЕ:
3
■ Placez le tissu et abaissez le pied.
Mettez le tissu sous le pied an que l’aiguille pénètre au point
de départ voulu.Tirez les deux ls vers l’arrière et abaissez le
pied presseur.
Turn off the machine before
changing the presser foot.
Eteignez la machine avant de
changer le pied presseur.
Apagu e la máq uina ant es de
cambiar el prensatelas.
Отключите машину от сети
перед тем, как менять
прижимную лапку.
■ Set the fabric and lower the
presser foot.
Place the fabric under the
presser foot so the needle will
enter the sewing start point of
the fabric. Pull both the needle
and bobbin threads to the rear
of the machine and lower the
presser foot.
2
Center needle
position
Aiguille au
centre
Posición
central de la
aguja
Положение
иглы по центру
Left needle
position
Aiguille à
gauche
Posición
izquierda
de la aguja
Положение
иглы слева
■ Select a stitch pattern.
■ Sélectionnez le programme.
■ Seleccione un patrón de
puntada.
■ Выберите шаблон строчки
■ Coloque el tejido y baje el prensatelas.
Coloque el tejido bajo el prensatelas de modo que la aguja
se introduzca en el punto de inicio de costura del tejido. Tire
de los hilos de la aguja y la canilla hacia la parte posterior de
la máquina y baje el prensatelas.
■ Расположите ткань и опустите прижимную лапку.
Расположите ткань под прижимной лапкой так, чтобы
игла вошла в ткань в точке начала шитья. Отведите обе
нити, игольную и шпульную, к задней стороне машины и
опустите прижимную лапку.
■ Begin sewing.
4
■ Commencez à coudre.
■ Empiece a coser.
■ Начинайте шить.
29
Page 29

■ Lightly hold the fabric with
返しぬい
スタート
ストップ
5
■ Sostenga el tejido suavemente con las manos.
Procure no ejercer una fuerza excesiva al tirar del tejido
mientras esté cosiendo.
■ Слегка поддерживайте ткань руками.
Будьте осторожны, не тяните ткань слишком сильно во
время шитья.
6
7
8
■ Eleve el prensatelas y retire el tejido.
Espere a que la aguja s e detenga por completo.
Presione el botón de puntada inversa para elevar la aguja y,
a continuación, levante la palanca del prensatelas.
■ Поднимите прижимную лапку и уберите ткань
Подождите, пока игла не остановится полностью.
Нажмите кнопку обратной строчки, чтобы поднять иглу,
затем поднимите рычаг прижимной лапки.
your hands.
Be careful not to apply
excessive pulling force to the
fabric while sewing.
■ Guidez légèrement le tissu
avec vos mains.
Faites attention de ne pas tirer
ou retenir le tissu pendant la
couture.
■ Adjust the sewing speed.
■ Ajustez la vitesse.
■ Ajuste la velocidad de
costura.
■ Регулируйте скорость
шитья.
■ Stop sewing.
■ Arrêtez de coudre.
■ Pare de coser.
■ Остановите машину
■ Lift the presser foot and take
out the fabric.
Wait until the needle totally
stops. Push the reverse stitch
button to raise the needle and
then raise the presser foot
lever.
■ Relevez le pied et retirez le
tissu.
Attendez que l’aiguille soit bien
arrêtée. Appuyez sur la touche
couture arrière pour remonter
l’aiguille puis relevez le pied.
■ Trim the threads.
9
[A]
■ Corte los hilos.
Saque una cantidad de hilo de la aguja y la canilla de unos
10cm y córtela con el “cortahilos” instalado en la cubierta
frontal. [A] =Cortahilos
■ Обрежьте нити.
Вытяните игольную и челночную нити на длину примерно
10 см и отрежьте их с помощью «приспособления для
обрезки нити», установленного на фронтальной крышке.
[A] = Приспособление для обрезки нити.
10
■ Anude los hilos en el lado del revés del tejido.
Tire de los hilos restantes en el revés del tejido, anuda los
hilos y córtelos a ras del nudo.
■ Завяжите нити узелком на изнаночной стороне ткани
Вытяните оставшиеся нити на изнаночную сторону
ткани, завяжите их узелком и обрежьте у края узелка.
● Straight stitch for elastic fabric.
Finished seams are elastic. This stitch system
can be used for producing straight stitches on
elastic fabrics such as knits and jersey.
● Point droit pour tissus élastiques.
Les coutures sont extensibles. Ce point
produit des points droits très souples sur les
jerseys fins et les mailles.
● Puntada recta para tejido elástico.
Las costuras acabadas son elásticas. Este
sistema de puntada puede utilizarse para
crear puntadas rectas en tejido elástico como
tricot y punto.
● Прямая строчка для эластичной ткани.
Обработанные швы эластичны. Данную
систему шитья можно использовать
для прокладывания прямых строчек на
эластичных тканях, например, трикотажных
тканях и джерси.
Pull out the needle and bobbin
threads by approximately 10cm
and cut them with the “thread
cutter” mounted on the face
cover. [A] =Thread cutter
■ Coupez les ls.
Tirez les deux ls sur env. 10cm
et coupez-les avec le coupefil situé sur l’avant du capot
frontal. [A] = coupe-ls
■ Knot the threads on the
wrong side of the fabric.
Pull out the remaining threads
on the wrong side of the fabric,
knot the threads and cut them
at the edge of the knot.
■ Nouez les fils à l’envers du
tissu.
Retirez les ls restant à l’envers
du tissu, nouez-les et coupezles au bord du noeud.
30
Page 30

● Automatic lock stitch
● Points d’arrêt programmables
● Puntada de remate automática
● Автоматическое шитье челночным стежком
HZL-K65
To prevent stitches from coming apart:
Select a pattern to be sewn, then press or button.
The pressed button will light up and the machine will
perform lock stitch at the beginning.
Press reverse button to perform lock stitch at the end of sewing.
Pour empêcher les points de se défaire :
Sélectionnez un programme à coudre, puis appuyez sur la touche
ou . La touche enfoncée s’allume et la machine exécute le point
d’arrêt au début. Appuyez sur la touche couture arrière pour exécuter le
point d’arrêt à la n de la couture.
Para evitar que se abran las puntadas:
Seleccione un patrón para coser y pulse el botón o .
El botón pulsado se encenderá y la máquina realizará la puntada de
remate al inicio.
Presione el botón de puntada inversa para realizar la puntada de
remate al nal de la costura.
Чтобы предотвратить распускание строчек:
Выберите шаблон для шитья, затем нажмите кнопку или .
Нажатая кнопка загорится, и машина начнет выполнять шитье
челночным стежком в начале шитья.
Нажмите кнопку обратной строчки для выполнения шитья
челночным стежком по окончании шитья.
To cancel the automatic lock stitch, follow one of the three different
procedures described below:
Pour annuler cette fonction, suivez une des trois procédures proposées
ci-dessous:
Para cancelar la puntada de r emate automática, siga uno de los tres
procedimientos diferentes que se describen a continuación:
Чтобы отменить автоматическое шитье челночным стежком,
выполните одну из трех операций, описанных ниже:
(1) Press or button again.
(2) Select another pattern.
(3) Turn off power to the machine.
(1) Pressez à nouveau la touche
(2) Sélectionnez un autre programme.
(3) Rallumez de nouveau la machine.
(1) Vuelva pulsar el botón o
(2) Seleccione otro patrón.
(3) Apague la alimentación de la máquina.
(1) Нажмите снова кнопку или .
(2) Выберите другой шаблон.
(3) Отключите электропитание машины.
Example:
Straight stitch
Exemple:
Point droit
Ejemplo:
Puntada recta
Пример:
Прямая строчка
31
[1]
Fabric
Tissu
Tejido
Ткань
[2]
[1]
Fabric
Tissu
Tejido
Ткань
[2]
Page 31

1
■ Select rst stitch pattern to be sewn.
Press button.
The machine produces lock stitches and automatically starts
sewing from the starting position.
2
■ Press the reverse stitch
button.
When the predetermined
seam end is reached, press
the reverse stitch button.
Then, the machine will
perform lock stitches, stop at
the predetermined position.
* The machine will not perform
lock stitch when you stop by
stop button or foot controller.
* The machine will perform
lock stitches by pressing the
reverse stitch button after
pressing the stop button
■ Sélectionnez d’abord le programme à coudre.
Pressez la touche .
La machine effectue les points d’arrêt puis démarre la
couture à l’endroit initial.
■ Seleccione el primer patrón de puntada que desee coser.
Pulse el botón o .
La máquina realiza puntadas de remate y automáticamente
empieza a coser desde la posición inicial.
■ Прежде всего, выберите шаблон строчки для шитья
Нажмите кнопку .
Машина выполняет шитье челночным стежком и
автоматически начинает шитье со стартовой позиции.
■ Appuyez sur la touche couture arrière.
Lorsque la fin prédéterminée de la couture est atteinte,
appuyez sur la touche couture arrière. Puis, la machine
exécutera le point d’arrêt et s’arrêtera à la position
prédéterminée.
* La machine n’exécutera pas le point d’arrêt si vous arrêtez
la couture avec la touche d’arrêt ou le rhéostat.
* La machine exécutera le point d’arrêt si vous appuyez sur
la touche couture arrière après avoir appuyé sur la touche
d’arrêt.
■ Pulse el b otón de puntada inversa.
Cuando llegue al nal de co stura predetermi nado, pulse
el botón de puntada inversa.
A continuación, la máquina realizará puntadas de remate
y se detendrá en la posición predeterminada.
* La máquina no realizará la puntada de remate cuando se
detenga con el botón de parada o el pedal.
* La máquina realizará puntadas de remate cuando pulse el
botón de puntada inversa después de pulsar el botón de
parada.
■ Нажмите кнопку обратной строчки
Нажмите кнопку обратной строчки, когда будет
достигнута заранее определенная позиция в конце
шва. Машина будет выполнять шитье челночным
стежком и остановится в заранее определенной
позиции.
* Машина не будет выполнять шитье челночным
стежком, если вы остановите работу машины, нажав
кнопку «стоп» или ножную педаль.
* Машина будет выполнять шитье челночным стежком
при нажатии кнопки обратной строчки после того, как
будет нажата кнопка «стоп».
32
Page 32

● Lock stitch (Reverse stitch)
● Couture arrière
● Puntada de remate (puntada inversa).
● Челночный стежок (обратная строчка)
Use this function to produce lock stitches of more than three stitches.
Utilisez cette fonction pour faire plus de trois points en couture arrière.
Utilice esta función para producir puntadas de remate de más de tres puntadas.
Используйте эту функцию, чтобы выполнить более трех челночных стежков.
* The machine will perform reverse stitching as long as the reverse stitch button is being pressed.
* The machine performs reverse stitching at low speed.
[1]
* La machine coud en arrière tant que la touche est pressée.
[2]
Fabric
Tissu
Tejido
Ткань
* La machine ne coud en arrière qu’à vitesse électroniquement réduite.
* La máquina realizará puntadas inversas mientras esté pulsado el botón de puntada inversa.
* La máquina realiza las puntadas inversas a baja velocidad.
[3]
* Машина будет выполнять прокладывание обратной строчки, пока будет нажата кнопка
обратной строчки.
* Машина выполняет прокладывание обратной строчки на низкой скорости.
■ Press the reverse stitch
1
■ Pulse el botón de puntada inversa.
La máquina realiza puntadas inversas mientras esté
pulsado el botón de puntada inversa.
■ Нажмите кнопку обратной строчки
Машина выполняет прокладывание обратной строчки,
пока нажата кнопка обратной строчки.
button.
The machine performs
reverse stitching as long as
the reverse stitch button is
being pressed.
■ Pressez la touche “arrière”.
La machine effectue la
couture en arrière tant que la
touche est pressée.
3
■ Press the reverse stitch
button.
(The machine will stop with its
needle up.)
■ Pressez la touche “arrière”.
(La machine s’arrête avec
l’aiguille en haut).
■ Pulse el b otón de puntada
inversa.
(La máquina se detendrá con
la aguja subida.)
■ Нажмите кнопку обратной
строчки
(Машина остановится с
поднятой иглой.)
2
33
■ Sew the seam.
■ Effectuez votre couture.
■ Cosa la costura.
■ Прошивайте шов
Page 33

● Beginning of sewing heavy-weight fabric
● Démarrer la couture sur des matières épaisses
● Empezar a coser tejido grueso
● Начало шитья на тяжелой ткани.
To start sewing from the multi-layer material edge, use the button mounted on the presser foot to
make the presser foot parallel to the fabric, thereby ensuring smooth sewing.
Pour démarrer votre couture sur les bords des épaisseurs, vous pouvez utiliser le bouton situé sur
le pied presseur pour l’aligner en parallèle avec le tissu, assurant ainsi une couture facilitée.
Para empezar a coser desde un borde de material con varias capas, utilice el botón montado en
Standard presser foot (A)
Pied standard (A)
Prensatelas estándar (A)
Стандартная прижимная
лапка (А)
el prensatelas para que el prensatelas discurra en paralelo al tejido, de modo que se garantice
una costura suave
Чтобы начать шитье от края многослойного материала, используйте кнопку, которая
находится на прижимной лапке, и установите прижимную лапку параллельно ткани,
обеспечивая тем самым ровное шитье.
■ Pressing the button (spring) that is mounted on the
presser foot into the groove in the presser foot holder
and lower the presser foot.
■ Appuyez sur le bouton (ressort) qui est monté sur le
pied dans la fente du support de pied, abaissez le pied
presseur.
■ Pulse el botón (resorte) montado en el prensatelas
para insertarlo en la abertura del soporte del
prensatelas y baje el prensatelas.
■ Нажмите кнопку (пружину), которая находится
на прижимной лапке в бороздке держателя
прижимной лапки, опустите прижимную лапку.
34
Page 34

Zigzag Stitch / Point zig zag
Puntada en zigzag / Строчка зигзаг
CAUTION:
ATTENTION:
PRECAUCIÓN:
ПРЕДОСТЕРЕЖЕНИЕ:
1
Standard presser foot (A)
Pied standard (A)
Prensatelas estándar (A)
Стандартная
прижимная лапка(А)
Make sure to turn off the machine before changing the presser foot.
Assurez-vous d’éteindre la machine avant de changer le pied presseur.
Asegúrese de apagar la máquina antes de cambiar el prensatelas.
Убедитесь в том, что машина отключена от сети, прежде чем менять прижимную лапку.
■ Make sure that the presser
foot is correct.
■ Vérifiez d’avoir le bon pied
presseur.
■ Asegúrese de que el
prensatelas será el correcto.
■ Убедитесь в том, что
прижимная лапка выбрана
правильно.
■ Select the zigzag stitch
2
Stitch width
Rapport de largeur
Ancho de puntada
Ширина стежка
3.5
2.0
Stitch length
Longueur du point
Longitud de la puntada
Длина стежка
■ Выберите шаблон строчки зигзаг.
(Автомат.)
Ширина зигзага: 3,5
ммДлина стежка: 2,0 мм
pattern.
(Automatic)
Zigzag width: 3.5 mm
Stitch length: 2.0 mm
■ Sélectionnez le point zig-
zag.
(Automatique)
Largeur du point: 3.5 mm
Réglage de longueur:2.0mm
■ Seleccione el patrón de
puntada en zigzag.
(Automático)
Anchura del zigzag: 3,5 mm
Longitud de la puntada: 2,0 mm
35
Page 35

How To Adjust Stitch Width (manually)
Comment régler la largeur des points (manuellement)
Cómo ajustar la anchura de la puntada (manualmente)
Регулирование ширины стежка (вручную)
Zigzag width manual adjustment button
Touche de réglage manuel de la largeur du zigzag
Botón de ajuste manual de la anchura de zigzag
Кнопка регулирования ширины зигзага вручную
Adjusting lever
Curseur de réglage
Palanca de ajuste
Регулировочный рычаг
Stitch width vs. stitch length
Rapport de largeur/Longueur du point
Anchura de puntada y longitud de la puntada
Ширина стежка в сравнении с длиной стежка
LED display (HZL-K85)
Af chage LED (HZL-K85)
Pantalla LED (HZL-K85)
Показание на светодиодном дисплее (HZL-K85)
Stitch width (mm)
Rapport de Largeur (mm)
Anchura de puntada (mm)
Ширина стежка (мм)
Automatic
Automatique
Stitch length (mm)
longueur du point (mm)
Longitud de puntada (mm)
Длина стежка (мм)
Automático
Автоматически
Manual
Manuel
Manual
Вручную
* To adjust the stitch width, press the zigzag width manual adjustment button (the
button will light up) and move the adjusting lever to left or right.
* To cancel the manual adjustment mode, select a pattern or press the zigzag width
manual adjustment button again.
* Pour régler la largeur des points, appuyer sur la touche manuelle
(le touche manuelle s’allume) et déplacer le bouton de réglage à gauche ou à
droite.
* Pour désactiver le mode de réglage manuel, sélectionner une configuration ou
appuyer à nouveau sur la touche manuelle.
* Para ajustar la anchura de puntada, pulse el botón de ajuste manual de la anchura
de zigzag (se encenderá el botón) y mueva la palanca de ajuste a la izquierda o a
la derecha.
* Para cancelar el modo de ajuste manual, seleccione un patrón o vuelva a pulsar el
botón de ajuste manual de la anchura de zigzag.
* Чтобы отрегулировать ширину стежка, нажмите кнопку регулирования ширины
зигзага вручную (кнопка загорится) и переместите регулировочный рычаг
влево или вправо.
* Чтобы отменить режим регулировки вручную, выберите шаблон или снова
нажмите кнопку регулирования ширины зигзага вручную.
2.02.0
2.0 2.0
~ ~ ~ ~
0.5 ~ 4
0.5 ~ 4 0.5 ~ 4 0.5 ~ 4
Stitch patterns which are possible to adjust stitch width
Con gurations de points dont la largeur des points peut être réglée
Patrones de puntada en los que es posible ajustar el ancho de puntada
Шаблоны, для которых можно регулировать ширину стежка
HZL-K85 Only
Stitch pattern
Programme
Patrón de puntada
Шаблон строчки
Automatic (mm)
Automatique (mm)
Automático (mm)
Автоматически (мм)
Manual (mm)
Manuel (mm)
Manual (mm)
Вручную (мм)
HZL-K85 Only
Stitch pattern
Programme
Patrón de puntada
Шаблон строчки
Automatic (mm)
Automatique (mm)
Automático (mm)
Автоматически (мм)
Manual (mm)
Manuel (mm)
Manual (mm)
Вручную (мм)
6.3 3.
3.3
~
6.3
7.0 4.7 7.0 5.0 7.0 5.0
7
2.
5
2.5
~
4.5
3.5
7.0
~
~
※ ※
7.0 3.5 7.0
2.5 ~ 7.0 4.0 ~ 7.0 2.5 ~ 7.0
※ ※ ※ ※ ※
5.0
5.5
3.0
7.0
~
7.0
~
3.0 ~ 5.0 5.0 ~ 7.0 3.0 ~ 5.0
※
for HZL-K85 only
※
pour la HZL-K85 uniquement
※
Sólo para ZL-K85
※
только для HZL-K85
※
7.0
36
Page 36

Overcasting
Surlarge
Sobrehilado
Краеобметочная строчка
This stitch style is used to prevent the edge of fabric from
fraying.
Ce point est utilisé pour éviter que les bords ne s’eflochent
par frottement.
Este estilo de puntada se utiliza para evitar que el borde
del tejido se deshilache.
Данный тип строчки используется для предотвращения
разлохмачивания кромки ткани.
CAUTION:
ATTENTION:
PRECAUCIÓN:
Make sure to turn off the machine before
changing the presser foot.
Assurez-vous d’éteindre la machine
avant de changer le pied presseur.
Asegúrese de apagar la máquina antes
de cambiar el prensatelas.
ПРЕДОСТЕРЕЖЕНИЕ:
Убедитесь в том, что машина
отключена от сети, прежде чем менять
прижимную лапку.
Standard presser foot (A)
Pied standard (A)
Prensatelas estándar (A)
Стандартная прижимная лапка(А)
■ Change the presser foot with the one that matches the
pattern to be sewn.
For or patterns, be sure to use the standard presser
foot (A).
■ Vériez que le pied soit adapté à ce programme.
Pour les programmes ou vériez d’utiliser le pied
standard (A).
■ Cambie el prensatelas por uno que coincida con el
patrón que debe coserse.
Overcasting foot (C)
Pied surlage (C)
Prensatelas de sobrehilado (C)
Лапка для обметки края(C)
Guide
Guide
Guía
Направитель
■ When the overcasting foot is used.
Perform sewing with the fabric edge pressed towards the
guide.
■ Lorsque vous utilisez le pied surlage.
Positionnez le bord du tissu contre le guide du pied.
■ Cuando se utilice el prensatelas de sobrehilado.
Cosa con el borde del tejido presionado hacia la guía.
Para patrones o , asegúrese de utilizar el
prensatelas estándar (A).
■ Замените прижимную лапку на ту, которая
соответствует выбранному шаблону для шитья.
Для шаблонов и применяйте стандартную
прижимную лапку (A).
37
■ Когда используется лапка для обметки края
Обметывайте край ткани, прижав его к направителю.
Page 37

Reinforcing stretch (elastic) stitch
Point triple élastique
Puntada de refuerzo para tejidos elásticos
Усиленный стежок эластичной строчки
The reinforcing stretch stitch helps reinforce seams when
used for sewing of elastic fabric or the force-exerted part
of fabric that is likely to fray.
Le point triple élastique aide à renforcer les coutures pour
les matières extensibles ou demandant un renfort dans le
sens d’élongation.
La puntada de refuerzo para tejido elástico ayuda a
reforzar las costuras cuando se utiliza para coser tejido
elástico o la parte del tejido que recibe mayor tensión y
que tiene más probabilidad de deshilacharse.
Усиленный стежок эластичной строчки помогает
укрепить швы при работе с эластичными
тканями или укрепить части ткани, которые могут
разлохмачиваться.
CAUTION:
ATTENTION:
PRECAUCIÓN:
Make sure to turn off the machine before
changing the presser foot.
Assurez-vous d’éteindre la machine
avant de changer le pied presseur.
Asegúrese de apagar la máquina antes
de cambiar el prensatelas.
ПРЕДОСТЕРЕЖЕНИЕ:
Убедитесь в том, что машина
отключена от сети, прежде чем менять
прижимную лапку.
1
Standard presser foot (A)
Pied standard (A)
Prensatelas estándar (A)
Стандартная прижимная
лапка(А)
2
■ Change the presser foot
with the appropriate one.
■ Vérifiez que le pied soit
adapté à ce programme.
■ Cambie el prensate las por
uno adecuado.
■ Замените прижимную лапку
на соответствующую
■ Select the pattern.
■ Sélectionnez le programme.
■ Seleccione el patrón.
■ Выберите шаблон
* Example of use
* Exemple d’utilisation
* Ejemplo de uso
* Пример применения
Pocket sewing is frequently sewn with reinforcing stretch stitches.
Couture de poche renforcée avec ces points.
Los bolsillos suelen coserse con puntadas de refuerzo.
Карман часто пришивается эластичными укрепляющими
стежками.
Patch pocket
Application de la poche
Pieza de bolsillo
Накладной карман
Attaching handles to bags
Montage des poignées de sac
Costura de asas de bolsas
Пришивание ручек к сумкам
Sleeve attaching
Montage des manches
Costura de mangas
Пришивание рукава
Side
Côté
Lateral
Боковая
сторона
Back body
Dos
Parte de la espalda
Спинка
Reinforcing stitch
Points renforcés
Puntada de refuerzo
Укрепляющий стежок
38
Page 38

Automatic buttonholes
Boutonnières automatiques en 1 temps
Ojales automáticos
Автоматическое выметывание петель
Select a pattern according to type of fabric and size of
button to be used.
Sélectionner une configuration en fonction du type de
tissu et de la taille des boutons à utiliser.
Seleccione un pat rón de acuerdo con el tipo de tejido y el
tamaño de botón que se utilizará.
Выберите шаблон в соответствии с типом ткани и
размером используемых пуговиц.
■ Lower the buttonhole foot after placing a button on it.
1
Buttonhole foot (E)
Pied boutonnière (E)
Prensatelas para ojales (E)
Лапка для выметывания
петель(E)
A
B
The buttonhole length is automatically determined only by placing a button on sliding part. (If
a button cannot t in the buttonhole foot, the buttonhole length will be “buttonhole diameter +
button thickness.”)
■ Abaissez le pied boutonnière après avoir placé un bouton dessus.
La longueur de la boutonnière est automatiquement déterminée simplement en plaçant un
bouton sur la section coulissante. (Si un bouton n’entre pas dans le pied boutonnière, la
longueur de la boutonnière est de « diamètre de la boutonnière + épaisseur du bouton ».)
■ Baje el prensatelas para ojales después de colocar en él un botón.
La longitud del ojal se determina automáticamente con sólo colocar un botón en la parte
deslizante. (Si el botón no cabe en el prensatelas para ojales, la longitud del ojal será el
diámetro del ojal más el grosor del botón.)
CAUTION:
Make sure to turn off the machine before
changing the presser foot.
ATTENTION:
Assurez-vous d’éteindre la machine
avant de changer le pied presseur.
PRECAUCIÓN:
Asegúrese de apagar la máquina antes
de cambiar el prensatelas.
ПРЕДОСТЕРЕЖЕНИЕ:
Убедитесь в том, что машина
отключена от сети, прежде чем менять
прижимную лапку.
■ Опустите лапку для выметывания петель после того, как положите на нее пуговицу
Длина петли определяется автоматически только после того, как на скользящую
часть лапки будет положена пуговица. (Если пуговица не умещается на лапке для
выметывания петель, то длина петли определяется как «диаметр петли + толщина
пуговицы».)
■ Select a buttonhole that matches your purpose.
■ Sélectionnez le programme voulu.
2
■ Seleccione un ojal que se ajuste a sus necesidades.
■ Выберите петлю, которая соответствует вашей цели
Pattern
Programme
Patrón
Шаблон
For sewing small buttonholes in shirts, blouses, children’s clothing,
to medium weight fabric.
Petites boutonnières pour chemises, vêtements d’enfants, etc.
Para coser ojales pequeños en camisas, blusas, ropa para niños,
hasta tejidos medios.
Для шитья маленьких петель на рубашках, блузках, детской одежде,
на средних тканях.
For sewing large buttonholes on medium to heavy weight fabric.
Pour coudre de grosses boutonnières sur des tissus moyens à lourds.
Para coser ojales largos en tejidos medios y gruesos.
Для шитья больших петель на средних и тяжелых тканях.
Typical application
Application type
Aplicación típica
Типичное применение
*
Pattern
Programme
Patrón
Шаблон
*
*
*
※
for HZL-K85 only
※
pour la HZL-K85 uniquement
※
Sólo HZL-K85
※
только для HZL-K85
Typical application
Application type
Aplicación típica
Типичное применение
For sewing large buttonholes on medium to heavy weight fabric.
Pour coudre de grosses boutonnières sur des tissus moyens à lourds.
Para coser ojales largos en tejidos medios y gruesos.
Для шитья больших петель на средних и тяжелых тканях.
For knit fabrics such as double knit.
Pour des tissus tricotés comme le tricot à maille double.
Para tejidos tricotados, como doble tricotado.
Для трикотажных тканей, например, двухстороннего основовязаного
трикотажа.
For stretch fabrics such as cotton jersey.
Pour les tissus extensibles comme le jersey de coton.
Para tejidos elásticos, como de punto de algodón.
Для эластичных тканей, например, джерси-хлопок.
39
Page 39

■ Install buttonhole foot (E).
3
■ Instale el prensatelas (E).
Pase el hilo d e la aguja por debajo del prensatelas y, a
continuación, lleve el hilo a un lado del prensatelas.
■ Установите лапку для выметывания петель (Е)
Выведите игольную нить из-под прижимной лапки, и
затем отведите нить в сторону от прижимной лапки.
Mark
4
■ Marque las posiciones de los ojales.
Dibuje líneas de marca en las posiciones de los ojales en
el tejido con un marcador.
■ Отметьте расположение петель
С помощью маркера нанесите линии отметок на ткань в
местах расположения петель.
Marque
Marca
Метка
Pass the needle thread
through under the presser
foot, and then draw the thread
to the side of the presser foot.
■ Placez le pied boutonnière (E).
Placez le fil d’aiguille sous
le pied à travers celui-ci, et
dégagez le fil vers le côté du
pied.
■ Mark the buttonhole
positions.
Draw marker lines on the
fabric at the buttonhole
positions with an assistant
marker.
■ Marquez les positions de la
boutonnière.
Marquez les lignes de repère
sur le tissu avec un marqueur
textile.
■ Lower the buttonholing
6
Buttonholing lever
Levier de boutonnière
Palanca para ojales
Рычаг выметывания петель
(C)
(B)
(A)
Marked position
Position marquée
Posición marcada
Намеченная позиция
(C)
■ Baje la palanca para ojales.
Baje la palanca (C) hasta llegar al tope entre el tope (A) y (B).
* Si arranca la máquina de coser sin bajar la palanca,
emitirá un pitido.
* Si la palanca (C) no desciende a la posición correcta,
ajuste la palanca y luego coloque el tejido.
■ Опустите рычаг выметывания петель
Опускайте рычаг (C) до предела движения между
ограничителями (А) и (В).
* Если вы запустите швейную машину, не опустив рычаг,
прозвучит сигнал.
* Если рычаг (С) не займет нужную позицию, то
установите рычаг надлежащим образом, а затем
разложите ткань.
(C) (C)
lever.
Lower the lever (C) until it will
go no further between the
stopper (A) and (B).
* If you start the sewing
machine without lowering the
lever, the machine will beep.
* If the lever (C) doesn't come
to right position,set the lever
and then place the fabric.
■ Abaissez le levier de
boutonnière.
Abaissez le levier (C) jusqu’à
ce qu’il n’aille pas plus loin
entre la butée (A) et (B).
* Si vous démarrez la machine
à coudre sans abaisser le
levier, la machine sera déviée.
* Si le levier (C) ne se place pas
dans la bonne position, réglez le
levier, puis positionnez le tissu.
■ Lower the buttonhole foot at
5
Marked position
Position marquée
Posición marcada
Намеченная позиция
■ Baje el prensatelas para ojales en la posición marcada.
Baje el prensatelas para ojales de modo que la posición
marcada se encuentre en el centro del oricio de entrada
de la aguja en el prensatelas.
■ Опустите лапку для выметывания петель на
намеченную позицию
Опустите лапку так, чтобы намеченная позиция
располагалась в центре отверстия для иглы на лапке.
the marked position.
L o w e r t h e b u t t o n h o l e f o o t ,
so that the marked position is
at the center of needle entry
hole in the foot.
■ Abaissez le pied
boutonnière à la position
marquée.
Abaissez le pied boutonnière
afin que la position marquée
soit un centre du point de
pénétration de l’aiguille dans
le pied boutonnière.
7
■ Begin sewing.
■ Commencez à coudre.
■ Empiece a coser.
■ Начинайте шить
40
Page 40

Sewing sequence
Cycle de couture
8
Secuencia de costura
Последовательность операций при выметывании петель
1 2 3 4
5 6 7
After the completion of sewing, trim the threads.
* From the second buttonhole and beyond, lower the buttonhole foot at the next marker line on the fabric for sewing buttonholes.
Après avoir ni le cycle, coupez les ls.
* Depuis la seconde boutonnière et plus, abaissez le pied sur la marque suivante sur le tissu.
Después de acabar de coser, corte los hilos.
* A partir del segundo ojal, baje el prensatelas para ojales a la siguiente línea de marca en el tejido para coser los ojales.
После окончания выметывания петель обрежьте нити
*Начиная со второй петли и далее, опускайте лапку для выметывания петель на следующие намеченные позиции на ткани и
выметывайте петли.
The machine will automatically stop sewing after producing back tack stitches.
The machine will stop with its needle up.
La machine s’arrête automatiquement après avoir effectuée les points d’arrêt.
Elle stoppe l’aiguille en haut.
La máquina parará de coser automáticamente después de producir unas
puntadas de presillado. La máquina se detendrá con la aguja subida.
Машина автоматически остановится, выполнив закрепочные стежки.
Машина остановится с поднятой иглой.
■ Open the buttonhole using a seam ripper.
9
Stopper pin
Epingle d’arrêt
Aller de tope
Булавка
It is recommended to use a straight pin to prevent from
excessive cutting of buttonhole.
■ Ouvrez la boutonnière avec le découvit.
Il est recommandé d’utiliser une épingle droite pour éviter
de couper les extrémités de la boutonnière en l’ouvrant.
■ Abra el ojal utilizando un descosedor.
Se recomienda util izar un aller recto para evitar cortar el
ojal en exceso.
■ Прорезайте петли с помощью вспарывателя швов
Рекомендуется использовать булавку, чтобы
предотвратить излишнее прорезывание петли.
Adjusting the stitch length / Réglez la longueur du point
Ajuste de la longitud de la puntada / Регулирование длины стежка
* To sew buttonholes on heavy-weight
materials such as denim with thick thread,
set the stitch length larger than the
automatically-determined one.
* Pour coudre les boutonnières sur les tissus
épais comme le jeans ou avec un gros l,
réglez la longueur du point plus longue que
celle d’origine.
* Para coser ojales en materiales gruesos,
como tela tejana, con un hilo grueso, ajuste
la longitud de la puntada en un valor mayor
que el que se determina automáticamente.
* Для того чтобы выметывать петли
толстой нитью на тяжелых тканях,
таких как джинсовая ткань, установите
большее значение длины стежка,
чем то, которое было установлено
автоматически.
To decrease stitch length:
Pour diminuer la longueur du point:
Para reducir la longitud de la puntada:
Для уменьшения длины стежка:
To increase stitch length:
Pour augmenter la longueur du point:
Para aumentar la longitud de la puntada.
Для увеличения длины стежка:
41
Page 41

Bartacking / Couture d’arrêt
Presillado / Изготовление закрепок
Bartacking is used to reinforce part of seam that is likely to
ravel.
La couture d’arrêt permet de renforcer une partie de la
couture susceptible de s’eflocher.
El presillado se utiliza la parte de una costura que tiene
probabilidades de descoserse.
Закрепки используют для укрепления той части шва, в
которой он может разойтись.
CAUTION:
ATTENTION:
PRECAUCIÓN:
Make sure to turn off the machine before
changing the presser foot.
Assurez-vous d’éteindre la machine
avant de changer le pied presseur.
Asegúrese de apagar la máquina antes
de cambiar el prensatelas.
ПРЕДОСТЕРЕЖЕНИЕ:
Убедитесь в том, что машина
отключена от сети, прежде чем менять
прижимную лапку.
■ Set the darning stitch
1
■ Установите длину штопального стежка. Сместите
лапку в сторону, чтобы установить длину
stitch length
longueur des
points
Longitud de
la puntada
Длина стежка
2
3
Buttonhole foot (E)
Pied boutonnière (E)
Prensatelas para ojales (E)
Лапка для выметывания
петель(E)
length. Push the slide to set
the length.
■ Réglez la longueur du point
de reprise. Appuyez sur le
côté pour régler la longueur.
■ Ajuste la longitud d e la
puntada de zurcido.
Presione el lateral para
ajustar la longitud.
■ Select the pattern.
■ Sélectionnez le programme.
■ Seleccione el patrón.
■ Выберите шаблон
■ Install buttonhole foot (E).
Pass the needle thread
through under the presser
foot, and then draw the thread
to the side of the presser foot.
■ Placez le pied boutonnière (E).
Placez le fil d’aiguille sous
le pied à travers celui-ci, et
dégagez le fil vers le côté du
pied.
■ Lower the buttonholing lever.
4
■ Abaissez le levier de
boutonnière.
■ Baje la palanca para ojales.
Buttonholing lever
Levier de boutonnière
Palanca para ojales
Рычаг выметывания
петель
5
The bottom line of bar tacking stitch.
Position marquée
Parte inferior de la puntada para
Нижняя линия закрепочной
строчки
■ Coloque el tejido bajo el prensatelas para ojales para
alinear la línea inferior y la marca roja en el prensatelas.
La puntada nal iza en la lí nea roja del ojal.
■ Расположите ткань под лапку для выметывания
петель таким образом, чтобы нижняя линия и
красная метка на прижимной лапке совместились
Строчка заканчивается на линии красной метки на
прижимной лапке.
■ Опустите рычаг
выметывания петель
■ Place fabric under the button
hole foot to set the bottom
line and red mark on foot.
The stitch ends at the line of
the button hole red mark.
■ Placez le tissu sous le pied
boutonnière pour régler la
ligne inférieure et le repère
rouge sur le pied.
Le point s’arrête sur la
ligne du repère rouge de la
boutonnière.
■ Start machine
6
■ Démarrez la machine
■ Arranque la máquina
■ Instale el prensatelas (E).
Pase el hilo de l a aguja por debajo del prensatelas y, a
continuación, lleve el hilo a un lado del prensatelas.
■ Установите лапку для выметывания петель (Е)
Выведите игольную нить из-под прижимной лапки, и затем
отведите нить в сторону от прижимной лапки.
Buttonholing lever
Levier de boutonnière
Palanca para ojales
Рычаг выметывания
петель
■ Запустите машину
42
Page 42

7
■ It will perform straight
stitch to point [A] and bartacking. It will go up to top
by straight stitch.
■ La machine exécute le point
droit sur le point [A] et la
couture d'arrêt.
La machine avance jusqu’en
haut au point droit
* Application examples
* Exemples d’applications
* Ejemplos de aplicación
* Примеры применения
Bags
Sacs
Bolsas
Сумки
■ Se realizará una puntada
[A]
Automatically U-turn
Retours automatiques en U
Giro automático
Автоматический поворот
на 180 град.
recta desde el p unto [A]
y el presillado. Volverá al
principio con una puntada
recta.
■ Прокладывается прямая строчка до точки [А] и
производится закрепка строчки. При подъеме вверх
также выполняется прямая строчка
■ After bar-tacking at top, it
8
automatically start zigzag
stitch and stop at [A].
■ Après la couture d’arrêt en
haut, le point zigzag démarre
automatiquement et s’arrête
en [A].
Trousers and skirts
Pantalons et jupes
Pantalones y faldas
Брюки и юбки
Pockets
Poches
Bolsillos
Карманы
Top
Haut
Principio
Верхняя часть
[A]
■ Despué s del presil lad o al
iniciará automáticamente
la pu ntada e n zigzag y se
detendrá en [A].
■ После закрепки в
верхней части машина
автоматически начинает
шитье стежков зигзаг и
останавливается в позиции
[А]
43
Page 43

HZL-K85 Only
Darning stitch / Point de reprise
Puntada de zurcido / Штопальная строчка
■ Set the darning stitch length.
1
■ Установите длину штопального стежка
Сместите лапку в сторону, чтобы установить длину.
stitch length
longueur des
points
Longitud de
la puntada
Длина стежка
2
Push the slide to set the
length.
■ Réglez la longueur du point
de reprise.
Appuyez sur le côté pour
régler la longueur.
■ Ajuste la longitud de la
puntada de zurcido.
Presione el lateral para ajustar
la longitud.
■ Select the pattern.
■ Sélectionnez le programme.
■ Seleccione el patrón.
CAUTION:
ATTENTION:
PRECAUCIÓN:
ПРЕДОСТЕРЕЖЕНИЕ:
Make sure to turn off the machine before
changing the presser foot.
4
5
Assurez-vous d’éteindre la machine
avant de changer le pied presseur.
Asegúrese de apagar la máquina antes
de cambiar el prensatelas.
Убедитесь в том, что машина
отключена от сети, прежде чем менять
прижимную лапку.
■ Lower the buttonholing
lever.
■ Abaissez le levier de
boutonnière.
■ Baje la palanca para ojales.
■ Опустите рычаг
выметывания петель
■ Place fabric.
■ Placez le tissu.
■ Coloque el tejido.
■ Расположите ткань
■ Выберите шаблон
■ Install buttonhole foot (E).
3
Buttonhole foot (E)
Pied boutonnière (E)
Prensatelas para ojales (E)
Лапка для выметывания
петель(E)
■ Instale el prensatelas (E).
Pase el hi l o de l a aguja por debajo del prensatelas y, a
continuación, lleve el hilo a un lado del prensatelas.
■ Установите лапку для выметывания петель (Е)
Выведите игольную нить из-под прижимной лапки, и
затем отведите нить в сторону от прижимной лапки.
Pass the needle thread
through under the presser
foot, and then draw the thread
to the side of the presser foot.
■ Placez le pied boutonnière (E).
Placez le fil d’aiguille sous
le pied à travers celui-ci, et
dégagez le fil vers le côté du
pied.
■ Begin sewing.
6
■ Empiece a coser.
La máquina se detendrá automáticamente cuando acabe
de coser un patrón.
■ Начинайте шить
Машина остановится автоматически, когда завершится
шитье одного шаблона.
The machine will stop
automatically when the sewing
of one pettarn is completed.
■ Commencez la couture.
La machine s’arrête
automatiquement lorsque la
couture d’un programme est
terminée.
44
Page 44

Quilting stitch / Point de courtepointe
返しぬい
スタート
ストップ
Puntada de acolchar / Стегальная строчка
The works of quilting and patch work can be nished as
though they were hand-sewn by using inconspicuous
bobbin thread.
Les travaux de courtepointe et de patchwork peuvent
avoir une nition “cousu main” en utilisant un l de canette
discret.
Los trabajos de acolchado y patchwork pueden acabarse
como si se h ubier an cosido a mano ut ilizando un hilo de
canilla discreto.
На этой машине можно выполнять работы в технике
квилтинг (простегивание) и пэчворк (лоскутное шитье),
готовые изделия будут такими, как будто они делаются
вручную, благодаря использованию незаметной
шпульной нити.
CAUTION:
ATTENTION:
PRECAUCIÓN:
Make sure to turn off the machine before
changing the presser foot.
Assurez-vous d’éteindre la machine
avant de changer le pied presseur.
Asegúrese de apagar la máquina antes
de cambiar el prensatelas.
ПРЕДОСТЕРЕЖЕНИЕ:
Убедитесь в том, что машина
отключена от сети, прежде чем менять
прижимную лапку.
1
Standard presser foot (A)
Pied standard (A)
Prensatelas estándar (A)
Стандартная прижимная
лапка(А)
2
■ Change the presser foot with
the appropriate one.
■ Vérifiez que le pied soit
adapté à ce programme.
■ Cambie el prensatelas por
uno que sea apropiado.
■ Замените прижимную
лапку на соответствующую
■ Select the pattern.
■ Sélectionnez le programme.
■ Seleccione el patrón.
■ Выберите шаблон
3
■ Lower the presser foot lifting
lever and start sewing.
■ Abaissez le levier relève
pied et commencer la
couture.
■ Baje la palanca de elevación
del prensatelas y empiece a
coser.
■ Опустите рычагподъема
прижимной лапки и
начинайте шить
45
Page 45

Patch Work / Patchwork
Patchwork / Пэчворк (лоскутное шитье)
Runstitch
1 3
Fabric (wrong side)
Tissu (dessous)
Tejido (del revés)
Ткань(изнаночная сторона)
Surpiqûre
Pespunte
Стачивающая строчка
Seam allowance
Tolérance de couture
Margen de costura
Припуск на шов
1 cm
■ Runstitch the fabric.
Runstitch two pieces of fabric.
■ Surpiquez le tissu.
Surpiquez les deux morceaux de tissu.
■ Cosa el tejido.
Cosa dos piezas de tejido.
■ Стачайте ткань
Стачайте два полотна ткани.
Overlapping patch
Patch recouvert
Parche superpuesto
Сшивание лоскутков внахлестку
Fabric (right side)
Tissu (dessus)
Tejido (del derecho)
Ткань
(лицевая сторона)
■ Select stitch pattern.
■ Sélectionnez le programme.
■ Seleccione un patrón de
puntada.
■ Выберите шаблон строчки
Open patch
Patch ouvert
Parche abierto
Сшивание лоскутков
открытым швом
Fabric (right side)
Tissu (dessus)
Tejido (del derecho)
Ткань
(лицевая сторона)
2
Standard presser foot (A)
Pied standard (A)
Prensatelas estándar (A)
Стандартная прижимная
лапка(А)
■ Make sure that the presser
foot is correct.
■ Vériez que le pied presseur
est le bon.
■ Asegúrese de que el
prensatelas sea el correcto.
■ Убедитесь в том, что
выбрана правильная
прижимная лапка
* Sew patterns so that they extend over both pieces of fabric.
* Cousez les points an qu’ils s’étendent au-delà des deux morceaux de
tissu.
* Cosa patrones de modo que abarquen las dos piezas de tejido.
Шейте так, чтобы строчка захватывала оба полотна ткани.
*
46
Page 46

Inserting Zippers / Fermetures à glissière
Colocación de cremalleras / Вшивание молнии
Zippers are set in two different ways such as by inserting
in side seam of the garment and by centering in opening.
Les fermetures à glissière sont placées de deux façons
différentes : recouverte sur le côté du vêtement ou centrée
à l’ouverture.
Las cremalleras se colocan de dos maneras diferentes:
CAUTION:
ATTENTION:
en la costura lateral de una prenda y centradas en una
abertura.
Молнии вшиваются двумя разными способами,
PRECAUCIÓN:
ПРЕДОСТЕРЕЖЕНИЕ:
например: вшивание молнии в боковой шов изделия и
вшивание по центру.
■ Select stitch pattern.
1
■ Sélectionnez le programme.
Make sure to turn off the machine before
changing the presser foot.
Assurez-vous d’éteindre la machine
avant de changer le pied presseur.
Asegúrese de apagar la máquina antes
de cambiar el prensatelas.
Убедитесь в том, что машина
отключена от сети, прежде чем менять
прижимную лапку.
Center needle position
Aiguille au centre
Posición central de la aguja
Центральное положение иглы
2
Seam...Stitch length [Auto]
Couture…Longueur de point [Auto]
Costura - Longitud de puntada [auto.]
Шов…длина стежка[Авто]
Fabric (wrong side)
Tissu (dessous)
Tejido (del revés)
Ткань
(изнаночная сторона)
Machine-baste...Stitch length [4]
Bâti…Longueur de point [4]
Hilván - Longitud de puntada [4]
Сметывание на машине
…длина стежка[4]
■ Seleccione un patrón de puntada.
■ Выберите шаблон строчки
■ Insert zippers using the standard presser foot (A).
Place the fabrics face-to-face. Check the runstitching length
and the length of zipper to be inserted. Baste the zipper on
the fabrics.
* Machine-baste...Zipper opening length + 1 cm
■ Une fermeture est recouverte lorsque un bord tissu la
recouvre et la cache, ne laissant apparaitre que le point
droit.
* Bàti à la machine…Longueur de la fermeture +1cm
■ Inserte las cremalleras utilizando el prensatelas
estándar (A).
Coloque un tejido delante de otro. Compruebe la longitud
del pespunte y la longitud de la cremallera que se insertará.
Hilvane la cremallera en el tejido.
* Longitud de puntada de hilván-cremallera + 1 cm
47
Reverse stitches (1 cm)
Points d’arrêt (1 cm)
Puntadas inversas (1 cm)
Стежки обратной строчки(1см)
■ Вшивайте молнию, используя стандартную
прижимную лапку (А)
Сложите оба полотна лицевой стороной друг к другу.
Проверьте длину стачивающей строки и длину
вшиваемой молнии. Приметайте молнию к ткани.
* Сметывание на машине…Длина разъема молнии + 1 см
Page 47

3
Zipper foot (B)
Pied fermeture éclair (B)
Prensatelas para cremalleras (B)
Лапка для молнии(B)
(Left)
(Gauche)
(Izquierda)
(Слева)
lapped insertion / Fermetures recouvertes
Colocación recubierta / Вшивание под планку
(Right)
(Dessus)
(Derecha)
(Справа)
■ Attach the zipper foot (B) to the machine.
To sew the left part of the zipper, place the zipper under the
right portion of the zipper foot. To sew the right part of the
zipper, place the zipper under the left portion of the foot.
■ Si la fermeture est à gauche de l’aiguille, la partie gauche
du pied ira sur le zip. Si la fermeture est à droite de l’aiguille,
la partie droite du pied ira sur le zip.
■ Instale el prensatelas para cremalleras (B) en la
máquina.
Para coser la parte izquierda de la cremallera, coloque la
cremallera bajo la porción derecha del prensatelas de la
cremallera. Para coser la parte derecha de la cremallera,
coloque la cremallera bajo la parte izquierda del prensatelas.
■ Прикрепите к машине лапку для молнии (В)
Чтобы пришить левую сторону молнии, положите ее
под правую часть лапки для молнии. Чтобы пришить
правую сторону молнии, положите ее под левую часть
лапки.
1
3mm Teeth
Fabric(wrong
side)
Tissu(dessous)
Tejido (del revés)
Ткань
(изнаночная
сторона)
Dents
Dientes
Замок
Slider
Glisseur
Carro
Замок
Zipper opening size
Mesure d’ouverture de
la fermeture
Lado de abertura de la
cremallera
Длина разъема молнии
■ Open the seam allowance.
Neatly open the seam allowance. Adjust the back seam
allowance so that it projects 3 mm from the seam. Press
with an iron to make a crease. Fit the crease at the edge of
teeth.
■ Recouvertes: Les fermetures sont insérées dans la
couture du vètement.
Le bord des dents suit la couture.
Coudre la fermeture du bas vers le haut au bord de la partie
à rabattre.
■ Abra el margen de costura.
Abra bien el margen de costura. Ajuste el margen de
costura posterior de modo que sobresalga 3 mm de la
costura. Pase la plancha para formar un doblez. Ajuste el
doblez a lo largo del borde de los dientes.
■ Раскройте припуск на шов
Аккуратно раскройте припуск на шов. Отрегулируйте
задний припуск так, чтобы он выступал на 3 мм от шва.
Загладьте утюгом, чтобы получилась складка. Складку
приложите к краю зубчиков молнии.
48
Page 48

Attach the right side
2
Attachez le côté gauche
Instale el lado derecho
Притачивание правой стороны
■ Sew the zipper tape on the seam allowance from
bottom to top.
Fitting the edge of the zipper foot at the edge of the zipper
teeth, sew the zipper tape on the seam allowance. At the
slider part of the zipper, stop the machine at a position
about 5 cm before the slider, move the slide to the far side
Slider
Glisseur
Carro
Замок
Fabric
(wrong side)
Tissu (dessous)
Tejido (del revés)
Ткань(изнаночная)
Stitch length [Auto]
Longueur de point [Auto]
Longitud de puntada [automático]
ДЛина стежка[Авто]
of the presser foot, then sew the zipper until its top end is
reached.
■ Plaquez le tissu à rabattre au bout de la fermeture.
Coudre la fermeture du bas vers le haut comme indiqué
en suivant le bord.
■ Cosa la cinta d e la cremallera e n el margen de
costura de abajo arriba.
Ajustando el borde del prensatelas para cremalleras a lo
largo de los dientes de la cremallera, cosa la cinta de la
cremallera en el margen de costura. En la parte del carro
de la cremallera, pare la máquina en una posición de unos
5 cm delante del carro, mueva el carro al extremo alejado
del prensatelas y cosa la cremallera hasta que alcance el
tope superior.
■ Прострачивайте ленту молнии по припуску на шов снизу вверх
Прикладывая край лапки для молнии к краю зубчиков молнии, прострочите ленту молнии по припуску на шов.
Что касается области замка молнии, остановите машину примерно в 5 см от замка, отодвиньте его к задней части
лапки и прострочите молнию до верхнего конца.
3
Attach the left side
Attachez le côté gauche
Colocación del lado derecho
Притачивание левой стороны
Opening end (reverse stitch)
Extrémité d’ouverture (point arrière)
Extremo de la abertura (puntada de remate)
Конец разъема(обратная строчка)
Stitch length [Auto]
Longueur de point [Auto]
Longitud de puntada [auto.]
ДЛина стежка[Авто]
Machine-baste
Bâti machine
Hilván
Сметывание на
машине
■ Put the top cloth over the zipper. Baste the zipper and
set it on the fabric.
Move the slider to the top of zipper. Put the top cloth
over the zipper and perform basting. Stitch the zipper, as
illustrated, with reverse stitches produced at the opening
end. At the slider section, undo the basting stitch seam,
lower the slider and sew the remaining part.
■ Epinglez ou bâtissez la fermeture au vêtement depuis
le dessous à travers la bande de la fermeture, la
bande à rabattre et le dessus du vêtement.
Dégagez le dessus du vêtement. Cousez à travers le bout
le plus bas de la fermeture jusqu’à la taille. Utilisez les
points de bâti comme guide. Décousez le bâti.
■ Coloque la tela superior sobre la cremallera. Hilvane
la cremallera y colóquela en el tejido.
Mueva el carro a la parte superior de la cremallera.
Coloque la pieza superior sobre le tejido e hilvánela.
Cosa la cremallera como se muestra, con puntadas de
remate en el extremo de la abertura. En la parte del carro,
deshaga la costura hilvanada, baje el carro y cosa la parte
restante.
49
■ Положите верхнюю ткань поверх молнии.
Приметав молнию, уложите ее на ткани
Передвиньте замок в верхнюю часть молнии.
Положите верхнюю ткань поверх молнии и сметайте.
Прострочите молнию, как показано, прошив стежками
обратной строчки конец разъема. В области замка
молнии распустите шов стежков наметочной строчки и
прошейте оставшуюся часть.
Page 49

Centered Insertion / Fermetures centrées
Colocación centrada / Вшивание по центру
1
Fabric (wrong side)
Tissu (dessous)
Tejido (del revés)
Ткань(изнаночная сторона)
2
Seamline
Couture
Línea de costura
Линия шва
Baste
Bâti
Hilván
Наметка
Teeth
Dents
Dientes
Зубчики
Attach the right side
Attachez le côté gauche
Instale el lado derecho
Притачивание правой стороны
Slider
Glisseur
Carro
Замок
Zipper (wrong side)
Fermeture (dessous)
Cremallera (del revés)
Молния(изнаночная сторона)
Fabric (wrong side)
Tissu (dessous)
Tejido (del revés)
Ткань(изнаночная сторона)
Baste
Bâti machine
Hilván
Наметка
■ Baste zipper and garment body.
Open the seam allowance. Fitting the teeth of zipper at
the end of the seam line, perform basting.
■ Centrées: La fermeture est centrée dans l’ouverture et
convient pour presque tous les tissus.
Bâtissez à la machine l’ouverture de la fermeture à l’endroit
à la ligne de couture et maintenez ouvert la partie à
coudre.
■ Hilvane la cremallera y la prenda.
Abra e l margen de costura. Ajuste los dientes de la
cremallera al nal de la línea de costura e hilvane.
■ Сметайте молнию и ткань
Раскройте припуск на шов. Прикладывая зубчики
молнии к концу линии шва, приметайте ее.
■ Sew the left part of the zipper on the seam allowance
from bottom of opening to top.
■ Bâtissez à travers la bande de la fermeture. Cousez le
tissu de l’extérieur.
Tournez la partie gauche du vêtement vers le haut et
cousez à travers la fermeture en cousant toules les
épaisseurs.
Opening end (reverse stitch)
Extrémité d’ouverture (point arrière)
Extremo de la abertura (puntada de remate)
Конец разъема(обратная строчка)
Stitch length [Auto]
Longueur de point [Auto]
Longitud de puntada [automático]
ДЛина стежка[Авто]
3
Stitch length [Auto]
Longueur de point [Auto]
Longitud de puntada [automático]
ДЛина стежка[Авто]
Attach the left side
Attachez le côté gauche
Instale el lado izquierdo
Притачивание правой стороны
Fabric (right side)
Tissu (dessus)
Tejido (del revés)
Ткань(лицевая сторона)
Fabric (right side)
Tissu (dessus)
Tejido (del revés)
Ткань
(лицевая сторона)
■ Cosa la parte izquierda de la cremallera, del margen
de costura de la parte inferior de la abertura hasta
arriba.
■ Прошейте левую часть молнии по припуску на шов
с конца разъема молнии до ее верха
■ Sew the right part of zipper.
After the completion of sewing, undo the basting stitch
seam.
■ Cousez dessus à travers toutes les épaisseurs.
Décousez les coutures de bâti.
■ Cosa la parte derecha de la cremallera.
Despué s de acabar de coser, deshaga la costura del
hilván.
■ Прошейте правую сторону молнии
Окончив шитье, распустите шов стежков наметочной
строчки.
50
Page 50

Blindstitch / Point invisible
Puntada invisible / Потайная строчка
Blindstitching provides a durable way to finish a hem
and is presented as an instantly selectable pattern as
a convenience. It needs practice, so a test sewing is
suggested.
L’ourlet invisible procure une finition durable pour les
ourlets et est facilité par son programme instantanément
sélectionné. Il nécessite un peu de pratique, aussi faites
quelques essais auparavant.
Con la puntada invisible se puede obtener un acabado
duradero de los dobladillos. Es un tipo de costura que se
puede seleccionar.
Para obtener unos resultados óptimos, se necesita
práctica, es por ello, que se recomienda hacer pruebas
hasta conseguir lo que se desea.
Потайная строчка даёт возможность надёжно
подрубить кромку материала.
Эта строчка выбирается одним нажатием кнопки, что
удобно, но для её выполнения нужна практика.
Предлагаем сначала сделать пробную строчку.
CAUTION:
ATTENTION:
PRECAUCIÓN:
Make sure to turn off the machine before
changing the presser foot.
Assurez-vous d’éteindre la machine
avant de changer le pied presseur.
Asegúrese de apagar la máquina antes
de cambiar el prensatelas.
ПРЕДОСТЕРЕЖЕНИЕ:
Убедитесь в том, что машина
отключена от сети, прежде чем менять
прижимную лапку.
1. Fold the fabric and then baste it.
1. Pliez le tissu et bâtissez-le.
1 2
1. Doble el tejido e hilvánelo.
1. Подверните ткань и сметайте эту часть.
0.5~0.6 cm
Fabric (wrong side)
Tissu (dessous)
Tejido (del revés)
Ткань
(изнаночная сторона)
2. Fold the fabric at the basting stitch seam.
2. Repliez le tissu et bâtissez-le.
2. Doble el tejido por la costura del hilván.
2. Сложите ткань по наметочному шву.
Fabric (wrong side)
Tissu (dessous)
Tejido (del revés)
Ткань
(изнаночная сторона)
3.
Fabric (wrong side)
Tissu (dessous)
Tejido (del revés)
Ткань
(изнаночная сторона)
Finished hem
Ourlet ni
Dobladillo acabado.
Готовый подгиб
Basting
Bâti
Hilván
Наметка
■ Overcast the fabric, and fold the edge.
Refer to page 37 for overcasting.
Blindstitch presser foot (D)
Pied ourlet invisible (D)
Prensatelas de puntada
invisible (D)
Лапка для потайной строчки(D)
3
For elastic fabric
Pour tissu extensible
Para tejido elástico
Для эластичной ткани
■ Change the presser foot.
■ Changez le pied presseur.
■ Retire el prensatelas.
■ Замените прижимную
лапку
■ Select the blindhem stitch
pattern.
■ Sélectionnez le programme
approprié.
■ Selecci one el patrón de
puntada invisible para
dobladillos.
■ Выберите шаблон строчки
потайного шва
■ Surlez le tissu et pliez le bord.
Référez vous à la page 37 pour le surlage.
■ Sobrehile el tejido y doble el borde.
Consulte la página 37 para más información sobre
sobrehilado.
■ Обметайте ткань и подверните край
См. стр. 32, Краеобметочная строчка.
51
Page 51

4 5
Fabric
(wrong side)
Tissu
(dessous)
Tejido
(del revés)
Ткань
(изнаночная сторона)
■ Position the folded edge against the guide.
Guide
Guide
Guía
Направитель
Fabric (wrong side)
Tissu (dessous)
Tejido (del revés)
Ткань
(изнаночная сторона)
Finished hem
Ourlet ni
Dobladillo acabado.
Готовый подгиб
Place the folded edge against the presser foot guide, and
sew the fabric.
■ Positionnez le bord plié le long du guide.
Placez le bord contre le guide et cousez.
■ Coloque el borde doblado a lo largo de la guía.
Coloque el borde doblado a lo largo de la guía del
prensatelas y cosa el tejido.
■ Расположите подвернутый край вдоль направителя
Расположите подвернутый край вдоль направителя
прижимной лапки и прошейте ткань.
■ Turn the fabric over.
After sewing the seam, turn the fabric over.
■ Retournez le tissu.
Après la couture, retournez le tissu.
■ Dé la vuelta al tejido.
Después de coser la costura, dé la vuelta al tejido.
■ Выверните ткань.
После прошивания шва выверните ткань.
How to adjust the guide of the blind stitch presser foot
Comment ajuster le guide du pied pour couture invisible
Cómo ajustar la guía del prensatelas para puntadas invisibles
Регулирование направителя прижимной лапки для потайной строчки
* Adjust the width adjusting lever on condition that needle is not stinging fabric.
* Régler le levier de réglage de largeur alors que l’aiguille ne pique pas le tissu.
* Ajuste la palanca de ajuste de anchura de modo que la aguja no pinche el tejido.
* Отрегулируйте рычаг регулировки ширины, при этом следите за тем, чтобы игла не прокалывала ткань.
Fabric (right side)
Tissu (dessus)
Tejido (del derecho)
Ткань
(лицевая сторона)
If the stitches fail to reach the folded edge:
Si les points n’atteignent pas le bord du pli:
Si las puntadas no consiguen llegar al borde doblado:
Если стежки не достигают подвернутого края:
Guide
Guide
Guía
Направитель
Turn the screw toward you, and the guide will shift to the right. Turn the screw away from you, and the guide will shift to the left.
Tournez la vis vers vous et le guide se déplacera vers la droite. Tournez la vis loin de vous et le guide se déplacera vers la gauche.
Gire el tornillo hacia usted y la guía se desplazará a la derecha. Gire el tornillo en sentido inverso y la guía se desplazará a la
Поверните винт на себя, и направитель сместится вправо. Поверните винт от себя, и направитель сместится влево.
If the stitches reach too far beyond the folded edge:
Si les points sont trop à l’intérieur du bord plié:
Si las puntadas quedan mucho más allá del borde doblado:
Если стежки выходят слишком далеко за подвернутый край:
Guide
Guide
Guía
Направитель
izquierda.
52
Page 52

Quilting attachment / Ensemble pour quilting
Accesorio para acolchar / Приспособление для стегальной строчки
Pattern to be used
Programme
Patrón que se utilizará
Используемый шаблон
строчки
CAUTION:
ATTENTION:
PRECAUCIÓN:
Make sure to turn off the machine before
changing the presser foot.
Assurez-vous d’éteindre la machine
avant de changer le pied presseur.
Asegúrese de apagar la máquina antes
de cambiar el prensatelas.
ПРЕДОСТЕРЕЖЕНИЕ:
Убедитесь в том, что машина
отключена от сети, прежде чем менять
прижимную лапку.
Two piles of fabric are stitched together with batting placed between them to produce quilt with your original design.
Deux pièces de tissu sont cousues ensemble avec un bâti placé entre elles pour produire un quilt avec votre dessin
original.
Cosa dos piezas de tejido con guata entre ellas para producir colchas con su diseño original.
Сшивайте два полотна ткани, прокладывая между ними ватин, и в результате вы получите стеганое изделие
вашей собственной оригинальной конструкции.
Presser foot shank screw
1
Vis de support
Tonillo del vástago del
prensatelas
Винт стержня
прижимной лапки
Presser bar
Barre du pied
Barra del prensatelas
Стержень прижимной лапки
■ Remove presser foot holder.
Lift presser bar, remove
presser foot shank screw and
presser foot holder.
■ Retirez la vis du support.
Releves la barre du pied,
retirez le puis la vis du support
et celui-ci.
■ Retire el soporte del
prensatelas.
Levante la bar ra del
prensatelas, extraiga el tornillo
del vástago y el soporte del
prensatelas.
2
■ Установите регулятор двигателя ткани в положение
«NOT FEED» (НЕТ ПОДАЧИ)
3
■ Set the drop-feed knob to
“NOT FEED”.
■ Placer le bouton
d’entraînement par griffe sur
“NOT FEED”.
■ Ajuste el regulador de los
dientes de modo que queden
ocultos.
■ Install the quilting foot.
■ Installez le pied quilting.
■ Снимите держатель прижимной лапки
Поднимите стержень прижимной лапки, отвинтите
винт стержня прижимной лапки и снимите держатель
прижимной лапки.
Quilt guide / Guide ouateur
Guía de acolchar / Направитель стегальной строчки
■ You can sew straight along with the quilt gude.
■ Vous pouvez coudre droit le long du guide ouateur.
■ Puede coser recto al o largo de la guía de acolchar.
■ Вы можете шить по прямой с направителем стегальной строчки.
53
■ Instale el prensatelas de
acolchar.
■ Установите стегальную
лапку
Page 53

Optional parts / Accessoires optionnels
Componentes opcionales / Дополнительные приспособления
Invisible zipper foot
Pied fermeture invisible
Prensatelas para cremalleras invisibles
Лапка для потайной молнии
Since a seam does not appear on the right side of fabric, opening can be
nished with fabric edges neatly butted.
An qu’aucune couture n'apparaisse sur le devant du tissu, l’ouverture
doit être nie avec les bords du tissu rentrés à l’intérieur.
Puesto que no aparece costura en la cara derecha del tejido, la abertura
puede presentar un acabado limpio en el borde del tejido.
Поскольку шов не появляется на лицевой стороне ткани, молнию
можно соединить встык с краями ткани.
Pattern to be used
Programme
Patrón que se utilizará
Используемый
шаблон строчки
CAUTION:
ATTENTION:
PRECAUCIÓN:
ПРЕДОСТЕРЕЖЕНИЕ:
Make sure to turn off the machine before
changing the presser foot.
Assurez-vous d’éteindre la machine
avant de changer le pied presseur.
Asegúrese de apagar la máquina antes
de cambiar el prensatelas.
Убедитесь в том, что машина
отключена от сети, прежде чем менять
прижимную лапку.
1
Basting
Bâti
Hilván
Наметка
Fabric (wrong side)
Tissu (envers)
Tejido (del revés)
Ткань
(изнаночная сторона)
Runstitch
Surpiqûre
Pespunte
Стачивающая
строчка
a: Opening end
b: Opening size
c: Zipper size
a: Extremo de la abertura
b: Tamaño de la abertura
c: Tamaño de la cremallera
b c
a
2.5 cm
Reverse stitch (1 cm)
Couture arrière (1 cm)
Puntada de remate (1 cm)
Обратная строчка(1см)
a: Apertura nal
b: Tamaño apertura
c: Tamaño cremallera
а: Конец разъема молнии
b: Длина разъема молнии
c: Длина молнии
■ Check the zipper opening size. Install the standard
presser foot (A).
Place two pieces of fabric face to face. Baste the fabric
from the edge of fabric to the opening end. At the opening
end, change the stitch length to [2.0] and sew reverse
stitches by 1 cm and sew until the predetermined position is
reached. Neatly open the seam allowance.
■ Vériez la taille de l’ouverture du zip. Installez le pied
standard (A).
Placez les deux morceaux de tissu face à face. Bâtissez
depuis le bord du tissu jusqu’à l’extrémité de l’ouverture.
Arrivé à celle-ci, réglez la longueur du point à (2) et
cousez en arrière sur 1 cm et cousez jusqu’à la position
prédéterminée. Ouvrez sur la tolérance de couture.
■ Compruebe el tamaño de abertura de la cremallera.
Instale el prensatelas estándar (A).
Coloque dos piezas de tela cara con cara. Hilvane el tejido
del borde del tejido al extremo de la abertura. En el extremo
de la abertura, cambie la longitud de puntada a [2.0],
cosa puntadas de remate a 1 cm y cosa hasta alcanzar la
posición predeterminada. Abra bien el margen de costura.
■ Проверьте длину разъема молнии. Установите
стандартную прижимную лапку (A)
Положите два полотна ткани лицевой стороной друг к
другу. Приметайте ткань от края ткани до конца разъема
молнии. В конце разъема молнии измените значение
длины стежка на [2,0], прострочите 1 см обратной
строчкой и продолжайте шить, пока не достигнете
заранее определенной позиции. Аккуратно раскройте
припуск на шов.
54
Page 54

2
Basting
Bâti
Hilván
Наметка
Cardboard
Carton renfort
Cartón
Картон
a: Basting (only zipper tape and seam allowance)
a: Bâti (bande du zip et tolérance seulement)
a: Hilvanado (sólo la cinta de la cremallera y el margen de costura)
a: Наметка(только для тесьмы для молнии и припуска на шов)
a
Fabric (wrong side)
Tissu (envers)
Tejido (del revés)
Ткань
(изнаночная сторона)
Invisible zipper
(wrong side)
Fermeture invisible
(envers)
Cremallera invisible
(del revés)
Потайная молния
(изнаночная сторона)
■ Put the invisible zipper on the fabric so that its center
meets the seam line. Place a cardboard between the seam
allowance and front fabric.
Manually baste both sides of seam allowances and zipper
tapes. Upon completion of basting, remove the cardboard.
■ Mettez la fermeture invisible sur le tissu an que son centre
rencontre la ligne de couture. Placez du carton de renfort
entre la bande de tolérance et le dessus du tissu.
Bâtissez manuellement chacun des côtés de la bande de
tolérance et celle du zip.
Une fois terminé, retirez le renfort.
■ Coloque la cremallera invisible en el tejido de modo que el
centro coincida con la línea de costura. Coloque una pieza
de cartón entre el margen de costura y el tejido frontal.
Hilvane manualmente ambos lados de los márgenes de
costura y las cintas de la cremallera. Cuando acabe de
realizar el hilvanado, retire el cartón.
■ Положите потайную молнию на ткань так, чтобы ее
центр совпал с линией шва. Положите картон между
припуском на шов и передним краем ткани. Вручную
сметайте обе стороны припуска на шов и тесьмы для
молнии. После окончания сметывания уберите картон.
3
4
Invisible zipper foot
Pied fermeture invisible
Prensatelas para cremalleras invisibles.
Лапка для потайной молнии
Tape
Bande
Cinta
Тесьма
Seam
Couture
Costura
Шов
Teeth
Dents
Dientes
Зубчики
Fabric
Tissu
Tejido
Ткань
■ Undo the basting stitch seam to the bottom of opening as
shown in the sketch given in step 1. Then, open the zipper.
■ Depuis le point de bâti du fond de l’ouverture, suivez les
étapes. 1. puis, ouvrez la fermeture.
■ Deshaga la costura del hilván en la parte inferior de la
abertura como se muestra en la ilustración del paso 1. A
continuación, abra la cremallera.
■ Распустите шов стежков наметочной строчки до конца
разъема молнии, как показано на схеме в действии 1.
Затем раскройте молнию.
■ Aligning the teeth of either zipper tape with the groove
on the zipper foot, sew the zipper at the very edge of the
teeth from the end of opening while raising the teeth with
ngers.
■ Alignez les dents avec la bande de la fermeture avec la
fente contre le pied, cousez au plus près des dents.
■ Alineando los dientes de cada cinta de la cremallera con
la acanaladura del prensatelas para cremalleras, cosa
la cremallera en el mismo borde de los dientes desde
el extremo de la abertura abriendo los dientes con los
dedos.
55
■ Выравнивая зубчики тесьмы для молнии в одну линию
с бороздкой на лапке для молнии, прошивайте молнию
по самой кромке зубчиков, начиная от конца разъема
молнии и поднимая зубчики пальцами.
Page 55

5
Invisible zipper foot
Pied fermeture invisible
Prensatelas para
cremalleras invisibles
Лапка для потайной
молнии
Tape
Bande
Cinta
Тесьма
■ Sew the remaining zipper tape on the other side of seam
allowance in the same procedure.
(The lower portion of zipper tape located below the bottom
of the opening will remain loose without sewn on the seam
allowance.)
6
Teeth
Dents
Dientes
Зубчики
Slider
Glissière
Carro
Замок
Seam
Couture
Costura
Шов
Fabric
Tissu
Tejido
Ткань
■ Cousez en maintenant la bande de la fermeture de l’autre
côté de la tolérance de couture, de la même manière que
le fond de l’ouverture restera lâche sans couture sur la
tolérance de couture).
■ Cosa la cinta de cremallera restante en el otro lado del
margen de costura siguiendo el mismo procedimiento.
(La porción inferior de la cinta de cremallera situada
debajo de la parte inferior de la abertura quedará suelta,
sin quedar cosida en el margen de costura.)
■ Прошейте оставшуюся часть тесьмы для молнии на
другой стороне припуска на шов таким же образом.
(Нижняя часть тесьмы для молнии, расположенная
ниже конца разъема молнии, останется не пришитой к
стороне припуска на шов.)
■ Take out the slider and pull it out to appear on the right
side of the fabric.
■ Sortez la glissière et tirez-la sur l’endroit du tissu.
■ Saque el car ro y ti re de él para que aparezca en el
anverso del tejido.
■ Выньте замок молнии и вытяните его на лицевую
сторону ткани.
56
Page 56

Manual buttonhole foot
Pied boutonnière manuel
Prensatelas para ojales manuales
Лапка для выметывания петель в ручном режиме
Pattern to be used
Programme
Patrón que se utilizará
Используемый
шаблон строчки
Use this foot for buttonholing heavy-weight placket or collar band.
Utilisez ce pied pour des boutonnières sur des tissus épais et spongieux.
Utilice este prensatelas para realizar ojales en aberturas resistentes o
cuellos.
Используйте данную прижимную лапку для выметывания петель на
карманах из тяжелых тканей или на стойке воротника.
CAUTION:
ATTENTION:
PRECAUCIÓN:
Make sure to turn off the machine before
changing the presser foot.
Assurez-vous d’éteindre la machine
avant de changer le pied presseur.
Asegúrese de apagar la máquina antes
de cambiar el prensatelas.
ПРЕДОСТЕРЕЖЕНИЕ:
Убедитесь в том, что машина
отключена от сети, прежде чем менять
прижимную лапку.
■ Mark fabric to indicate
1
buttonhole placement. Lower
buttonhole foot so that mark is
at center of needle entry hole
in foot.
■ Marquez le tissu à
l’emplacement requis.
Abaissez le pied afin que la
marque soit alignée avec le
Mark
Marque
Marca
Метка
centre du trou d’entrée de
l’aiguille dans le pied.
■ Marque el tejido para indicar la ubicación del ojal.
Baje el prensatelas de modo que la marca quede centrada
en el oricio de entrada de la aguja en el prensatelas.
■ С помощью метки на ткани обозначьте положение
петли. Опустите лапку для выметывания петель так,
чтобы метка находилась в центре отверстия для иглы
на лапке.
Buttonholing lever
Levier boutonnière
2
Palanca de ojales
Рычаг выметывания
петель
3
Top
Haut
Principio
Верх
bottom
bas
Final
Низ
End of mark
Marque de n
Fin de la marca
Конец метки
■ Lower buttonholing lever.
■ Abaissez le levier boutonnière.
■ Baje la palanca para ojales.
■ Опустите рычаг
выметывания петель.
■ When needle reaches bottom
of marker line, slightly press
lever toward front of machine.
■ Lorsque l’aiguille atteint le bas
du trait de repère, appuyez
légèrement sur le levier vers
l’avant de la machine.
■ Cuando la aguja llegue al
final de la marca, presione
suavemente la palanca hacia
la parte frontal de la máquina.
■ Когда игла дойдет до
нижней части линии
отметки, слегка нажмите
на рычаг в направлении
передней стороны машины.
57
Page 57

4
Mark
Marque
Marca
Метка
* La máquina empieza a coser un pespunte recto en la
sección izquierda paralela del ojal, de abajo arriba.
■ Cuando la aguja llegue al final de la marca, presione
suavemente la palanca hacia la parte frontal.
* Машина начинает шитье прямой строчкой по левой
параллельной части петли снизу вверх.
■ Когда игла дойдет до верха метки, слегка нажмите на
рычаг в направлении передней стороны машины.
* Machine starts straight
stitching on left-hand parallel
section of buttonhole from
bottom to top.
■ When needle reaches top
of mark, slightly press lever
toward front .
* La machine commence la
couture droite sur la section
parallèle gauche de la
boutonnière de bas en haut.
■ Lorsque l’aiguille atteint le haut
du repère, appuyez légèrement
sur le levier vers l’avant.
■ It perform straight stitch from
6
■ Se realizará un pespunte recto de abajo arriba en la
sección paralela derecha del ojal.
Cuando la ag uja llegue al nal de la marca, tire suavemente
de la palanca hacia la parte frontal de la máquina.
■ Машина выполняет шитье прямой строчкой снизу
вверх по правой параллельной части петли.Когда игла
дойдет до верха метки, слегка нажмите на рычаг в
направлении передней сторон ы машины.
bottom to top on right-hand
parallel section of button hole.
When needle reaches top
of mark, slightly pull lever
towards front of machine.
■ La machine exécute le point
droit de bas en haut sur la
section parallèle droite de la
boutonnière. Lorsque l’aiguille
atteint le haut du repère, tirez
légèrement sur le levier vers
l’avant de la machine.
* Machine starts zigzag stitching
5
End of mark
Marque de n
Fin de la marca
Конец метки
* La máquina empieza a coser en zigzag en la sección paralela
izquierda del ojal, después de realizar el presillado al principio.
■ Cuando la aguja llegue al final de la marca, presione la
palanca hacia la parte frontal.
* Машина начинает шитье строчкой зигзаг по левой
параллельной части петли после выполнения закрепки
вверху.
■ Когда игла дойдет до низа метки, слегка нажмите на
рычаг в направлении передней стороны машины.
Caution
1. Take care not to allow
fabric to come in contact
with buttonholing lever.
If buttonholing lever is
pressed by mistake,
operation mode will be
changed to bartacking.
2. If sewing machine does
not operate as described
above, stop machine
and re-press stitch
selection button. It will
start buttonholing from
the beginning.
on left-hand parallel section of
buttonhole after bartacking on
top.
■ When needle reaches bottom
of mark, press lever toward
front.
* La machine commence le point
zigzag sur la section parallèle
gauche de la boutonnière après
la couture d'arrêt en haut.
■ Lorsque l’aiguille atteint le bas
du repère, appuyez légèrement
sur le levier vers l’avant.
ATTENTION:
1. Faîtes attention que le tissu
na gêne pas la course
du levier boutonnière. Si
celui-ci est appuyé par
erreur, le cycle des points
sera modié.
2. Si la machine n’effectue
pas le travail comme
décrit ci-avant, arrêtez la
machine et re-sélectionnez
le programme. La fonction
boutonnière automatique
sera reprise depuis le
début.
■ Machine starts zigzag stitching
7
Stop the machine
Arrêt de la machine
Detenga la máquina
Остановка машины
le point d’arrêt, exécute la couture d’arrêt et s’arrête.
■ La máquina empieza a coser en zigzag en la sección paralela
derecha del ojal. Cuando la aguja llegue a la parte inferior
de la marca, tire de la palanca hacia delante de modo que
empiece el presillado, realice la costura de cierre y pare.
■ Машина начинает шитье строчкой зигзаг по правой
параллельной части петли. Когда игла дойдет до низа
метки, нажмите на рычаг в направлении передней
стороны машины, чтобы машина выполнила закрепку
строчки и остановилась.
Precaución
1. Procure que el tejido no
entre en contacto con la
pa lanca para ojales. Si
la pantalla para ojales
se presiona por error, el
modo de operación pasará
a presillado.
2. Si la máquina de coser
no funciona como se ha
descrito, detenga la máquina
y vuelva a pulsar el botón
de selección de puntada.
Empezará a realizar ojales
desde el principio.
on right-hand parallel section
of buttonhole. When needle
reaches bottom of mark, pull
lever toward front so it starts
bartacking, perform fastening
stitching and stop.
■ La machine commence le point
zigzag sur la section parallèle
droite de la boutonnière.
Lorsque l’aiguille atteint le bas
du repère, tirez sur le levier vers
l’avant et la machine commence
Предостережение
1. Следите за тем, чтобы ткань
не соприкасалась с рычагом
выметывания петель. Если
случайно нажать рычаг
выметывания петель, то
машина начнет выполнять
закрепку строчки.
2. Если машина не работает
так, как описано выше,
остановите ее и снова
нажмите кнопку выбора
строчки. Машина начнет
выметывание петли с
самого начала.
58
Page 58

Rolled hemming foot
Pied ourlet roulotté
Prensatelas para dobladillos enrollados
Лапка для подрубки руликом
Pattern to be used
Programme
Patrón que se utilizará
Используемый
шаблон строчки
CAUTION:
ATTENTION:
PRECAUCIÓN:
ПРЕДОСТЕРЕЖЕНИЕ:
Fabric edge is hemmed while rolling it under.
Used for nishing bottom of shirts and blouses and edges of frills and handkerchiefs.
Le bord du tissu est ainsi roulotté en dessous.
Permet de nir les bas de robes chemisiers et les bord des mouchoirs légers.
Se cose un dobladillo en el borde del tejido mientras se enrolla por debajo.
Se utiliza para acabar el nal de camisas y blusas y los bordes de volantes y pañuelos.
Край подгибается путем подвертки ткани.
Используется для подшивки низа рубашек и блузок, а также отделки оборок и кромок платков.
Make sure to turn off the machine before
changing the presser foot.
Assurez-vous d’éteindre la machine
avant de changer le pied presseur.
Asegúrese de apagar la máquina antes
de cambiar el prensatelas.
Убедитесь в том, что машина
отключена от сети, прежде чем менять
прижимную лапку.
1
2
Groove
Fente
Hendidura
Бороздка
Fabric
Tissu
Tejido
Ткань
0.5cm
0.8cm
■ Cut away a corner of fabric in order to make work easier.
Insert fabric into spiral groove in hemmer foot until needle position is
reached.
■ Coupez un coin du tissu an de pouvoir travailler facilement.
Insérez le tissu dans la spirale formée par le pied jusqu’à l’aiguille.
■ Corte una esquina de tejido para facilitar el trabajo.
Inserte tejido en el canal en espiral del prensatelas para dobladillos hasta
alcanzar la posición de la aguja.
■ Отрежьте уголок ткани, чтобы облегчить работу.
Вставляйте ткань в спиральную бороздку лапки для подрубки, пока
она не достигнет положения иглы.
■ Drawing ends of needle and bobbin threads, turn handwheel 3 or 4 turns
by hand to guide fabric to hemmer foot.
■ Enmaintenant les bouts des fils d’aiguille et de canette, tournez
manuellement le volant de 3 ou 4 tours pour guider le tissu dans le pied.
Cousez.
■ Retire los extremos de los hilos de la aguja y la canilla, dé 3 o 4 vueltas
al volante con la mano para guiar el tejido por el prensatelas para
dobladillos.
■ Оттянув концы игольной и шпульной нитей, поверните маховик рукой
3 – 4 раза, чтобы направить ткань в лапку для подрубки.
59
Page 59

Even feed foot
Pied double entraînement
Prensatelas de paso uniforme
Лапка для равномерной подачи материала
Pattern to be used
Programme
Patrón que se utilizará
Используемый
шаблон строчки
CAUTION:
ATTENTION:
PRECAUCIÓN:
ПРЕДОСТЕРЕЖЕНИЕ:
Make sure to turn off the machine before
changing the presser foot.
Assurez-vous d’éteindre la machine
avant de changer le pied presseur.
Asegúrese de apagar la máquina antes
de cambiar el prensatelas.
Убедитесь в том, что машина
отключена от сети, прежде чем менять
прижимную лапку.
This even feed foot is generally used for fabrics (such as knits, jersey, vinyl cloth, articial leather and leather) that are difcult to be fed by sewing
machine. It ensures smooth feed of fabric while preventing fabric from slippage to achieve neatly nished seams.
Ce pied est généralement employé pour les matières (comme les tricots, jersey, vinyl, cuir articiel et cuir) qui sont difciles à entraîner sous le pied
normal. Il assure un entraînement progressif et souple qui évite les fronces ou les défauts de point.
Este prensatelas suele utilizarse para tejidos (como malla de tricot, punto, tela vinílica, piel sintética y cuero) que resulta difícil introducir en la
máquina de coser. Garantiza una introducción suave del tejido a la vez que evita deslizamientos para obtener costuras con un acabado óptimo.
Лапка для равномерной подачи материала используется в основном для материалов (таких, как трикотаж, джерси, виниловые материалы,
искусственная кожа и кожа), подача которых в швейной машине затруднена. Данная лапка обеспечивает плавную подачу материала,
предотвращая проскальзывание и смещение ткани, и аккуратную отделку швов.
1
Presser foot clamp screw
Vis de support
Tornillo de sujeción de prensatelas
Зажимный винт прижимной лапки
2
Presser foot clamp screw
Vis du support
Tornillo de sujeción
del prensatelas
Зажимный винт
прижимной лапки
Presser bar
Barre du pied
Barra del prensatelas
Стержень прижимной
лапки
Needle clamp screw
Vis serre-aiguille
Tornillo de sujeción
de la aguja
Винт иглодержателя
■ Remove presser foot holder.
Lift presser bar, remove presser foot shank screw and presser foot holder.
■ Retirez le support du pied.
Relevez la barre du pied, retirez le pied et sa vis de support pour retirer
celuici.
■ Quite el soporte del prensatelas.
Suba la barra del prensatelas, quite el tornillo y saque el soporte.
■ Снимите держатель прижимной лапки
Поднимите стержень прижимной лапки, отвинтите винт стержня
прижимной лапки и снимите держатель прижимной лапки.
■ Attach even feed foot to machine.
Put arm of actuating lever on needle clamp, attach to presser bar and
securely tighten presser foot shank screw.
■ Fixez le pied double entraînement à la machine.
Placez le bras du levier en action sur le serre-aiguille, xez la barre de
presseur et serrez fermement la vis de tige du pied presseur.
■ Instale el prensatelas de paso uniforme en la máquina.
Coloque el brazo de la palanca de accionamiento en la sujeción de la
aguja, conecte la barra del prensatelas y apriete rmemente el tornillo del
vástago del prensatelas.
■ Установите на машину лапку для равномерной подачи
материала
Прикрепите пусковой рычаг к иглодержателю, прикрепите лапку
к стержню прижимной лапки и надежно затяните винт стержня
прижимной лапки.
* Sewing speed should be set at low to medium.
* La vitesse de couture doit être comprise entre lent et moyen.
* La velocidad de costura debe establecerse de baja a media.
* Скорость шитья следует устанавливать в диапазоне от низкой скорости до
средней скорости.
60
Page 60

Smooth foot
Pied à semelle lisse
Prensatelas suave
Прижимная лапка с гладкой поверхностью
CAUTION:
ATTENTION:
PRECAUCIÓN:
Make sure to turn off the machine before
changing the presser foot.
Assurez-vous d’éteindre la machine
avant de changer le pied presseur.
Asegúrese de apagar la máquina antes
de cambiar el prensatelas.
ПРЕДОСТЕРЕЖЕНИЕ:
Убедитесь в том, что машина
отключена от сети, прежде чем менять
прижимную лапку.
■ This foot provides smooth surface.
Smooth foot is suitable for hard-to-feed fabrics (jersey, vinyl cloth or
leather).
■ Ce pied a une semelle lisse.
Il est particulièrement
recommandé pour les tissus difciles à entrainer (jersey, vinyl, tissu ou
cuir).
■ Este prensatelas proporciona una supercie suave.
El prensatelas suave es adecuado para tejido difícil de acompañar (punto,
tela vinílica o cuero)
■ Данная прижимная лапка имеет гладкую поверхность.Прижимная
лапка с гладкой поверхностью подходит для материалов (джерси,
виниловые материалы или кожа), подача которых в швейной
машине затруднена.
61
Page 61

Maintenance (cleaning) / Nettoyage de la machine
Mantenimiento (limpieza) / Техническое обслуживание (Чистка)
CAUTION:
ATTENTION:
PRECAUCIÓN:
ПРЕДОСТЕРЕЖЕНИЕ:
1
■ Extraiga la placa aguja.
Extraiga primero la aguja y el prensatelas. A continuación,
extraiga la placa aguja.
■ Снимите игольную пластину
Прежде всего, снимите иглу и прижимную лапку. Затем
снимите игольную пластину.
2
Be sure to disconnect the plug from wall outlet before cleaning and lubricating machine.
Assurez vous de débrancher la prise du secteur avant de nettoyer la machine.
Desconecte la alimentación y desenchufe el cable de la toma eléctrica antes de limpiar y lubricar la máquina.
Перед тем, как чистить и смазывать машину, убедитесь в том, что вилка сетевого шнура вынута из
стенной розетки.
■ Remove needle plate.
Remove first needle and
presser foot. Then, detach
needle plate.
■ Retirez les peluches et la
poussière.
■ Remove the bobbin case
holder.
■ Retirez la capsule.
■ Extraiga el soporte del
estuche de la canilla.
■ Уберите держатель
шпульного колпачка.
■ Clean to remove lint and
3
■ Nettoyez la partie entre les griffes et le crochet.
REMARQUE : Injectez une goutte d’huile de machine à
coudre sur la coursière de la navette dans le sens des
èches.
■ Límpielo para eliminar bras y polvo.
Limpie el área entre los dientes y las rendijas de la placa
aguja utilizando un cepillo o similar.
NOTA: Aplique una gota de aceite para máquinas de
coser en la guía como se indica en las echas.
■ Выполните чистку, чтобы удалить хлопковый пух
и пыль
Почистите участки между зубьями рейки двигателя
ткани и прорезями в игольной пластине с помощью
щеточки или аналогичного приспособления.
ПРИМЕЧАНИЕ: Влейте по капле масла для швейных
машин в пазы челнока, как указано стрелками на
рисунке.
dust.
Clean the area between feed
dog teeth and slots in needle
plate, using brush or the like.
NOTE : Put a drop of sewing
machine oil on the shuttle race
as indicated by the arrows.
■ Re-install bobbin case
4
[A]
correspondre sa saillie avec la partie marquée par la èche.
■ Vuelva a instalar el soporte del estuche de canilla.
[A]: Oriente el soporte del estuche de la canilla con la parte
marcada con la echa e inserte el soporte en su lugar.
■ Верните на место держатель шпульного колпачка
[A]: Установите держатель на место, сравняв выступ
держателя шпульного колпачка с частью, обозначенной
стрелкой.
holder.
[A]: Fitting projection of bobbin
case holder with part marked with
arrow, place the holder in place.
■ Après avoir nettoyé la
machine, remettre la capsule
et la plaque aiguille.
[A]: Mettre le support de boîte
à canette en place en faisant
62
Page 62

Performance Check list
If sewing difculties occur, make sure the instructions are correctly followed.
If a problem still exists, the reminders below may help to solve it.
Problem Cause (Reason) Action to be taken Page
Machine fails to
feed fabric.
Needle breaks.
Thread breaks.
Bobbin thread
breaks.
Skipped stitches.
Puckering occurs.
Thread tangles on
wrong side of fabric.
Loud noise, heavy to
turn the hand wheel.
Sewing machine will
not sew when start
button is pressed.
Needle cannot be
threaded.
* Machine runs idle.
* Stitch length is set at left position of manual mode.
* Drop feed is engaged.
* Needle is bent. Needle is not correctly installed.
* Presser foot does not match pattern selected.
* Relation among needle, thread and fabric is not appropriate.
* Machine head is incorrectly threaded.
* Thread is caught in a part that is not to be threaded.
* Needle thread tension is too high.
* Needle is bent.
* Needle is not installed correctly.
* Needle is bent.
* Machine head is not correctly threaded.
* Thread tension is too high.
* Needle and thread do not match fabric.
* Machine head is not correctly threaded. * Re-thread machine head correctly. 17-19
* Lint or dust has accumulated in hook. * Clean up hook. 62
* Bobbin winder is set in bobbin winding position.
* Foot controller is connected to machine.
* Needle is not raised to its highest position.
* Needle is not installed by fully inserting into needle clamp.
* Sewing machine is rotated by mistake with needle threading
lever lowered (during needle threading).
* Return bobbin winder to the left.
* Set stitch length at auto mode or right position of manual mode.
* Disengage drop feed.
* Change needle with a new one and install it correctly.
* Use presser foot that matches the pattern selected.
* Use needle and thread that match fabric.
* Re-thread machine head correctly.
* Check spool pin and thread guide for thread tangling.
* Adjust thread tension adequately.
* Replace needle with a new one.
* Correctly attach needle.
* Replace needle with a new one.
* Re-thread machine head correctly.
* Adjust thread tension adequately.
* Use needle and thread that correctly match fabric.
* Return bobbin winder to the left.
* Start machine with foot controller or remove connector from
machine.
* Turn handwheel to raise needle to its highest position.
* Correctly install needle.
* Turn handwheel slightly away from you (in direction opposite to
normal direction of rotation in which handwheel turns to perform
sewing).
14-16
27,28
13
21
23
25,26
17-19
24
21
21
21
17-19
24
25,26
14-16
11
18
21
-
Specication table
Item Specication
Dimensions 415 (W) x 300 (H) x 190 (D) mm
Dimensions with case 440 (W) x 305 (H) x 215 (D) mm
Weight 7.1kg (with case: 8.2kg)
Rated voltage/ Power consumption 120V / 0.62A 60Hz (USA and Canada only)
Acoustic noise level
220-230V / 65W 50 / 60Hz
less than 70 db(A)
63
Page 63

Problèmes éventuels et remèdes simples
Si vous recontrez des difcultés,vériez d’abord que vous avez bien suivi les instructions.
L’expérience démontre que la plupart des problèmes sont dus à des détails d’utilisation.
Sinon, essayez de résoudre vorte problème à l’aide du tableau ci-dessous.
En cas de persistance, ramenez la machine auprès de votre vendeur spécialisé.
Probléme Cause A faire Page
La machine
n’entraîne pas le
tissu.
Casse d’aiguilles.
Casse de ls.
Le l de canette
casse.
Points manqués.
Fronçes
Boucles au-dessous du
tissu.
Machine dure et
bruyante.
Lamachine ne coud
pas quand on
actionne la touche
Start.
L’aiguille ne peut
être enlée.
* La machine tourne dans le vide.
* La longueur du point est réglée en position gauche du mode
manuel.
* Placer l’entraînement par griffe en position basse.
* L’aiguille est tordue. Elle n’est pas correctement mise.
* Le pied presseur n’est pas adapté au programme
sélectionné.
* La relation aiguille/l/tissu est inappropriée.
* La machine est mal enlée.
* Le l est entré dans un endroit non prévu.
* La tension supérieure est trop forte.
* L’aiguille est épointée.
* L’aiguille est mal mise.
* L’aiguille est épointée.
* La machine est mal enlée.
* La tension du l est trop forte.
* L’aiguille ou le l ne correspond pas au tissu.
* La machine est mal enlée. * Refaire l’enlage.
* Poussière et débris accumulés dans le crochet. * Nettoyer le crochet.
* Le dévidoir de canette est en position remplissage.
* Le rhéostat est branché.
* L’aiguille n’est pas relevée à fond.
* L’aiguille est pas bien insérée dans le serre-aiguille.
* La machine est actionnée par erreur avec l’enleur abaissé.
* Remettre le dévidoir de canette à gauche.
* Sélectionnez la longueur du point en mode auto ou en position
droite du mode manuel.
* Placer l’entraînement par griffe en position haute.
* Changer l’aiguille avec une nouvelle et l’installer correctement.
* Mettre un pied presseur adapté.
* Utiliser une aiguille et un l appropriés.
* Renler la machine correctement.
* Vérier depuis le porte-bobine et les guides-ls.
* Régler correctement la tension.
* Remplacer l’aiguille.
* Remettre correctement l’aiguille.
* Remplacer l’aiguille.
* Refaire l’enlage.
* Réduire la tension.
* Utiliser une aiguille ou un l adéquat.
* Remettre le dévidoir à gauche.
* Démarrer la machine avec le rhéostat ou le débrancher.
* Tourner manuellement le volant pour la remonter.
* Installer correctement l’aiguille.
* Tourner le volant à l’envers (vers l’arrière).
14-16
27,28
13
21
23
25,26
17-19
24
21
21
21
17-19
24
25,26
17-19
62
14-16
11
18
21
-
Tableau de caractéristiques
Sujet Caractéristique
Dimensions 415 (L) x 300 (H) x 190 (P)
Dimensions avec la mallette 440 (L) x 283 (H) x 213 (P)
Poids 7.1kg (avec mallette : 8.2kg)
Courant absorbé/
consommation
Niveau sonore moins de 70 dB
120V / 1.0A 60Hz (USA et Canada)
220-230V / 65W 50 / 60Hz
64
Page 64

Lista de comprobación de funcionamiento
Si se producen dicultades al coser, asegúrese de seguir correctamente las instrucciones.
Si el problema persiste, los recordatorios siguientes pueden ayudarle a resolverlo.
Problema Causa (razón) Acción que debe emprenderse Página
La máquina no
puede aceptar
tejido.
La aguja se rompe.
El hilo se rompe.
El hilo de la canilla se
rompe.
Se saltan puntadas.
Se producen
fruncidos.
Se producen
acumulaciones de
hilo en el revés del
tejido.
Ruido fuerte al gi rar
el volante.
La máquina de
coser no cose al
pulsar el botón de
arranque.
No puede
enhebrarse la
aguja.
* La máquina está desocupada.
* La longitud de la puntada está ajustada en la posición
izquierda del modo manual.
* Los dientes están armados.
* La aguja está doblada. La aguja no está correctamente
instalada.
* El prensatelas no coincide con el patrón seleccionado.
* La relación entre aguja, hilo y tejido no es correcta.
* Se ha enhebrado mal la máquina.
* El hilo queda atrapado en una parte que no debe enhebrarse.
* La tensión del hilo de la aguja es demasiado alta.
* La aguja está doblada.
* La aguja no está instalada correctamente.
* La aguja está doblada.
* La máquina no se ha enhebrado correctamente.
* La tensión del hilo de la aguja es demasiado alta.
* La aguja y el hilo no coinciden con el tejido.
* La máquina no se ha enhebrado correctamente. * Vuelva a enhebrar la máquina correctamente.
* Se han acumulado bras o polvo en el garo * Limpie el área del garo.
* El bobinador de canilla está ajustado en posición de hacer
canilla.
* El pedal está conectado a la máquina.
* La aguja no está subida a su posición más alta.
* La aguja no se ha insertado completamente en la sujeción de
la aguja.
* Se ha girado por error la máquina de coser con la palanca
de enhebrado de la aguja bajada (durante el enhebrado de
la aguja).
* Vuelva a colocar el bobinador de canilla a la izquierda.
* Establezca la longitud de puntada en modo automático o en la
posición derecha del modo manual.
* Desarme los dientes.
* Cambie la aguja por una nueva e instálela correctamente.
* Utilice un prensatelas que coincida con el patrón seleccionado.
* Utilice una aguja e hilo que se ajusten al tejido.
* Vuelva a enhebrar la máquina correctamente.
* Compruebe el pivote de la bobina y la guía de hilo por si se ha
enredado.
* Ajuste la tensión del hilo según convenga.
* Sustituya la aguja por una nueva.
* Instale la aguja correctamente.
* Sustituya la aguja por una nueva.
* Vuelva a enhebrar la máquina correctamente.
* Ajuste la tensión del hilo según convenga.
* Utilice una aguja e hilo que se ajusten al tejido.
* Vuelva a colocar el bobinador de canilla a la izquierda.
* Arranque la máquina con el pedal o desconecte el pedal de la
máquina.
* Gire el volante para subir la aguja a su posición más alta.
* Instale correctamente la aguja.
* Gire el volante hacia delante (en dirección inversa a la
dirección de rotación normal en la que se gira el volante para coser).
14-16
26,27
13
21
22
24
17-19
23
21
21
21
17-19
23
24
17-19
62
14-16
11
18
21
-
Tabla de especicaciones
Elemento
Dimensiones 415 (An) x 300 (Al) x 190 (F) mm
Dimensiones con caja 440 (An) x 305 (Al) x 215 (F) mm
Peso 7,1kg (con caja: 8,2 kg)
Voltaje nominal / Consumo de
alimentación
120 V / 0,62 A 60 Hz (sólo EE.UU. y Canadá)
220-230 V / 65 W 50/60 Hz
Nivel acústico de ruido inferior a 70db
Especicación
65
Page 65

Перечень возможных неисправностей и их устранение
F-3
В случае возникновения трудностей во время работы, проверьте, правильно ли вы соблюдали инструкции.
Если проблема все еще осталась, справочная таблица, указанная ниже, может вам помочь.
Проблема Причина Способ решения Стр.
Машина не подает
материал.
Игла ломается.
Нить рвется.
Шпульная нить
рвется.
Пропуск стежков.
Ткань собирается.
Нить путается на
изнаночной стороне
ткани.
Сильный шум,
маховик
поворачивается с
трудом.
Машина не шьет
при нажатой кнопке
«старт».
Невозможно вдеть
нить в иглу.
*Машина работает вхолостую.
*Длина стежка установлена в левом положении режима
ручного управления.
*Зубчатая рейка двигателя ткани зацепилась.
*Игла согнулась. Игла вставлена неправильно.
*Прижимная лапка не соответствует выбранному шаблону
строчки.
*Нарушено соответствие иглы, нити и ткани.
*Нить неправильно заправлена в головку швейной машины.
*Нить попала в ту часть, которая не должна заправляться
нитью.
*Слишком сильное натяжение игольной нити.
*Игла согнулась.
*Игла вставлена неправильно.
*Игла согнулась.
*Нить неправильно заправлена в головку швейной машины.
*Слишком сильное натяжение нити.
*Игла и нить не соответствуют ткани.
*Нить неправильно заправлена в головку швейной машины. *Заправьте нитью головку машины повторно и правильно.
*В челноке скопился хлопковый пух или пыль. *Почистите челнок.
*Устройство намотки шпульки установлено в положении
намотки нити на шпульку.
*К машине подключена ножная педаль.
*Игла не поднята в самое высокое положение.
*Игла вставлена в иглодержатель не полностью.
*Машина приведена в действие случайно, когда рычаг заправки
нити в иглу был опущен (во время продевания нити в иглу).
*Возвратите устройство намотки шпульки в левую сторону.
*Установите длину стежка в режим автоматического управления
или в правое положение режима ручного управления.
*Освободите зубчатую рейку.
*Замените иглу новой иглой и вставьте ее правильно.
*Используйте прижимную лапку, которая соответствует выбранному
шаблону строчки.
*Используйте иглу и нить, которые соответствуют ткани.
*Заправьте нитью головку машины повторно и правильно.
*Проверьте стержень катушки и нитенаправитель на запутывание
нити.
*Отрегулируйте натяжение нити соответствующим образом.
*Замените иглу новой иглой.
*Правильно вставьте иглу.
*Замените иглу новой иглой.
* Заправьте нитью головку машины повторно и правильно.
*Отрегулируйте натяжение нити соответствующим образом.
*Используйте иглу и нить, которые точно соответствуют ткани.
*Возвратите устройство намотки шпульки в левую сторону.
*Запустите машину с помощью ножной педали или уберите
соединительный шнур.
*Поверните маховик, чтобы поднять иглу в самое высокое
положение.
*Правильно вставьте иглу.
*Поверните маховик немного от себя (в направлении,
противоположном обычному направлению вращения, в котором
маховик вращается при выполнении шитья).
14-16
27,28
13
21
23
25,26
17-19
-
24
21
21
21
17-19
24
25,26
17-19
62
14-16
11
18
21
-
Таблица основных технических характеристик
Позиция Характеристики
Размеры 415 (Ш) × 300 (В) × 190 (Г) мм
Размеры с ящиком 440 (Ш) × 305 (В) × 215 (Г) мм
Вес
Номинальное напряжение/
Потребляемая мощность
Translation УРОВЕНЬ ШУМА : МЕНЕЕ 70 Дцб
7,1 кг (с ящиком: 8,2)
120 В / 0,62 А, 60 Гц (только для США и
Канады)220 –230 В / 65 Вт, 50 / 60 Гц
66
Page 66

F-4
2-11-1,TSURUMAKI,TAMA-SHI,
TOKYO,206-8551,JAPAN
PHONE : (81)42-357-2341
FAX : (81)42-357-2379
Copyright © 2011 JUKI CORPORATION
All rights reserved throughout the world.
40116221
Part No. 82971
©
11
/11
Page 67

COMPUTER SEWING MACHINE
MACHINEA COUDRE ELECTRONIQUE
MÁQUINA DE COSER ELECTRÓNICA
КОМПЬЮТЕРНАЯ ШВЕЙНАЯ МАШИНА
HZL-K85/K65
INSTRUCTION MANUAL
MANUEL D’INSTRUCTIONS
MANUAL DE INSTRUCCIONES
ИНСТРУКЦИЯ ПО ЭКСПЛУАТАЦИИ
HZL-K85
HZL-K65
F-1
Page 68

“IMPORTANT SAFETY INSTRUCTIONS”
“When using an electrical appliance, basic safety precautions should always be followed, including the
following.”“Read all instructions before using this sewing machine.”
“DANGER-
1. “ This sewing machine should never be left unattended when plugged in. Always unplug this sewing
machine from the electric outlet immediately after using and before cleaning.”
“WARNING
1. “Do not allow to be used as a toy. Close attention is necessary when this appliance is used by or near
children.”
2. “Use this appliance only for its intended use as described in this manual. Use only attachments
recommended by the manufacturer as contained in this manual.”
3. “Never operate this appliance if it has a damaged cord or plug, if it is not working properly, if it has been
dropped or damaged, or dropped into water. Return the appliance to the nearest authorized dealer or
service center for examination, repair, electrical or mechanical adjustment.”
4. “Never operate the appliance with any air openings blocked. Keep ventilation openings of the sewing
machine and foot controller free from the accumulation of lint, dust and loose cloth.”
5. “Keep ngers away from all moving parts. Special care is required around the sewing machine needle.”
6. “Always use the proper needle plate. The wrong plate can cause the needle to break.”
7. “Do not use bent needles.”
8. “Do not pull or push fabric while stitching. It may deect the needle causing it to break.”
9. “Switch the sewing machine off ("O") when making any adjustments in the needle area, such as
threading needle, changing needle, threading bobbin, or changing presser foot and the like.”
10. “Always unplug sewing machine from the electrical outlet when removing covers, lubricating, or when
making any other user servicing adjustments mentioned in the instruction manual.”
11. “Never drop or insert any object into any opening.”
12. “Do not use outdoors.”
13. “Do not operate where aerosol (spray) products are being used or where oxygen is being
administered.”
14. “To disconnect, turn all controls to the off (“O”) position, then remove plug from outlet.”
15. “Do not unplug by pulling on cord. To unplug, grasp the plug, not the cord.”
To reduce the risk of electric shock:”
To reduce the risk of burns, re, electric shock, or injury to persons: ”
-
“SAVE THESE INSTRUCTIONS”
“This sewing machine is intended for household use only.”
Use only foot controller JF-1000 with your HZL-K85 and HZL-K65.
● Do not expose
machine to direct
sunlight or humid
atmosphere.
As the microcomputer(s), semi-conductor(s) and precise wiring board(s) is built in this sewing
machine,please pay attention that the following condition(s) may occur.
● Use this product in a temperature between
5 and 40 degree Celsius. If temperature is
extremely low, this sewing machine may
not work properly.
● Do not use thinner
or other similar
solvents to clean
machine.
● This sewing machine will stop due to safety
mechanism to prevent the machine from
overheating, when it sews slowly and for
a long time. In this event, Start and Stop
button will beep and blink in red.
The sewing machine will
return to working
condition after about 10
minutes.
Stop!
F-2
1
 Loading...