

Page 1

Attention
Please read this instruction manual before using
the machine as it contains important operational
and safety information.
Keep this manual accessible so that you may
refer to it at anytime while operating the machine.
INSTRUCTION MANUAL
COMPUTER SEWING MACHINE
HZL-DX series
Page 2

Page 3

1
“IMPORTANT SAFETY INSTRUCTIONS”
When using an electrical appliance, basic safety precautions should always be followed, including the following: Read all instructions before using this sewing machine.
“DANGER
____ To reduce the risk of electric shock:”
1. The appliance should never be left unattended when plugged in.
2. Always unplug this appliance from the electric outlet immediately after using and before
cleaning.
“WARNING
____
To reduce the risk of burns, re, electric shock, or injury to persons:”
1.
Do not allow this appliance to be used as a toy. Close attention is necessary when this appliance is used by or near children. This appliance can be used by children aged from 8 years and
above
and persons with reduced physical, sensory or mental capabilities or lack of experience
and knowledge if they have been given supervision or instruction concerning use of the appli
-
ance in a safe way and understand the hazards involved. Children shall not play with the appliance. Cleaning and user maintenance shall not be made by children without supervision.
2. Use this appliance only for its intended use as described in this manual. Use only attachments recommended by the manufacturer as contained in this manual.
3.
Never operate this appliance if it has a damaged cord or plug, if it is not working properly, if it
has been dropped or damaged, or dropped into water. Return the appliance to the nearest authorized dealer or service center for examination, repair, electrical or mechanical adjustment.
4. Never operate the appliance with any air openings blocked. Keep ventilation openings of the
sewing machine and foot control free from the accumulation of lint, dust, and loose cloth.
5.
Keep ngers away from all moving parts. Special care is required around the sewing machine needle.
6. Always use the proper stitch plate. The wrong plate can cause the needle to break.
7. Do not use bent needles.
8. Do not pull or push fabric while stitching. It may deect the needle causing it to break.
9. Switch the sewing machine off “O” when making any adjustments in the needle area, such as
threading needle, changing needle, threading bobbin, or changing presser foot.
10. Always unplug the machine from the electrical outlet when removing covers, when lubricating
or when making any other user servicing adjustments mentioned in the instruction manual.
11. Never drop or insert any object into any opening.
12. Do not use outdoors.
13.
Do not operate where aerosol (spray) products are being used or where oxygen is being administered.
14. To disconnect, turn all controls to the off “O” position, then remove plug from outlet.
15. Do not unplug by pulling on cord. To unplug, grasp the plug, not the cord.
16. Basically, the machine should be disconnected from the electricity supply when not in use.
17. If the power cord of this appliance is damaged, it must be replaced with a special cord by
your nearest authorized dealer or service center.
18. (Except USA/Canada) This machine is provided with double insulation.
Use only identical replacement parts. See instructions for servicing Double-Insulated machine.
“SERVICING DOUBLE-INSULATED PRODUCTS”
In a double-insulated product, two systems of insulation are provided instead of grounding. No
grounding means is provided on a double-insulated product nor should a means for grounding be
added to the product. Servicing a double-insulated product requires extreme care and knowledge
of the system and should only be done by qualied service personnel. Replacement parts for a
double-insulated product must be identical to those parts in the product. A double-insulated product is marked with the words DOUBLE INSULATION or DOUBLE INSULATED.
The symbol
may also be marked on the product.
“SAVE THESE INSTRUCTIONS”
“This sewing machine is intended for household use only.”
Page 4
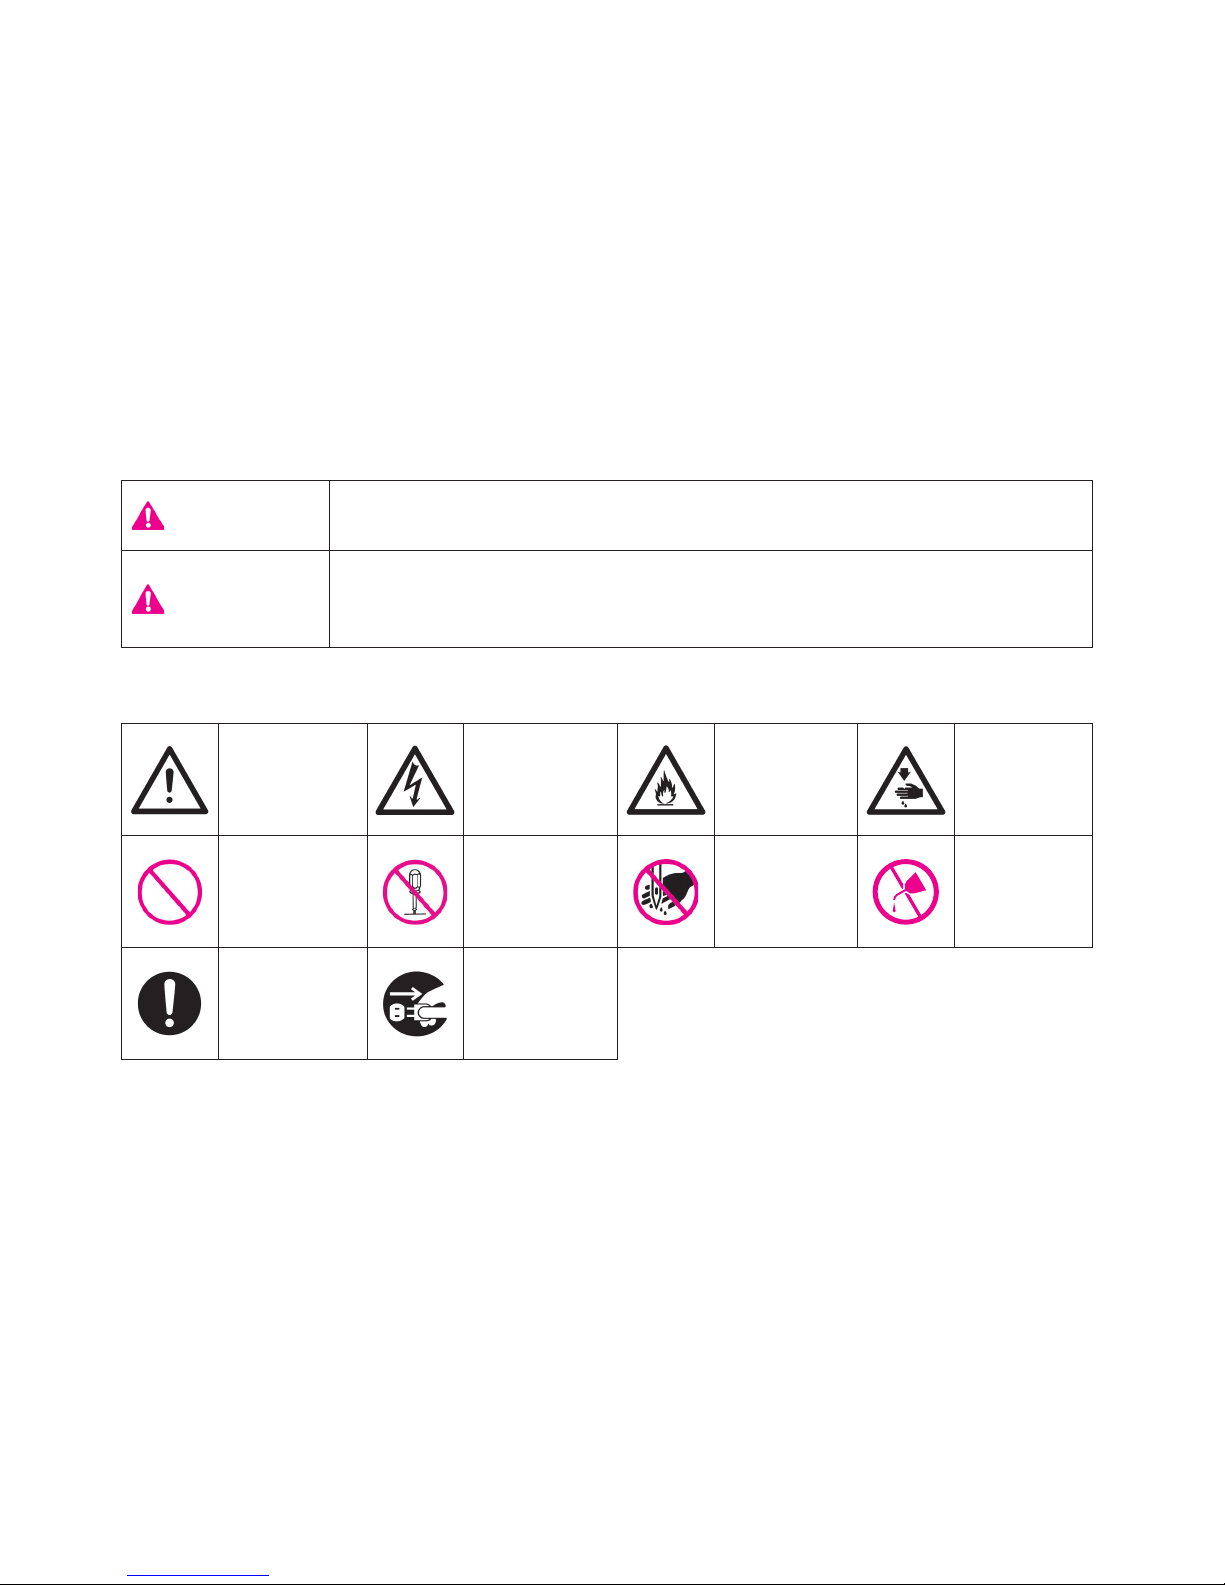
2
Danger
warning
which is not
specied
There is a
risk of electrical shock
There is a
risk of re
There is
a risk of
injury to
hands, etc.
Prohibited matter
which is not
specied
Disassembly/
alteration is
prohibited
Do not
place ngers under
the needle
Do not
pour oil,
etc.
Generally
required
behavior
Disconnect
the power
plug
Congratulations on your purchase of a JUKI sewing machine.
Please be sure to read safety precautions in “To use the sewing machine safely” in the Instruction
Manual before use to fully understand the functions and operating procedures of the sewing machine so as to use the sewing machine for a long time.
After you have read the Instruction Manual, please be sure to keep it together with the warranty
so that you can read it whenever necessary.
To use the sewing machine safely
Marks and pictographs included in the Instruction Manual and shown on the sewing machine are
used so as to ensure safe operation of the sewing machine and to prevent possible risk of injury
to the user and other people.
Warning marks are used for different purposes as described below.
WARNING
Indicates that there is a possible risk of death or serious injury if this
mark is ignored and the sewing machine is used in a wrong manner.
ATTENTION
Indicates the operation, etc. which can cause a possible risk of person-
al injury and/or physical damage if this mark is ignored and the sewing
machine is used in a wrong manner
.
Pictographs mean the following:
Page 5

3
● Do not wipe the sewing machine with solvent such
as thinner.
When the sewing machine
is soiled, put a small quantity of neutral detergent on
a piece of soft cloth and
carefully wipe off the sewing machine with it.
● Be sure to use the sewing machine
in the temperature range from 5ºC
to 40ºC.
If the temperature is excessively
low, the machine can fail to operate
normally.
WARNING
For the combination of the material and the thread and needle, in particular, refer to the explanation table in “Replacement of the needle”.
If the needle or thread does not match the material used such as in the case that an extra heavyweight material (e.g., denim) is sewn with a thin needle (#11 or higher), the needle can break resulting in an unexpected personal injury.
Other precautions
● Do not put the sewing machine
under the direct sunlight or in a
humid place.
Be aware that the following state can take place since the sewing machine incorporates
semi-conductor electronic parts and precise electronic circuits.
* The operating temperature of the sewing machine is between 5ºC and 40ºC. Do not use the
sewing machine under the direct sunlight, near the burning things such as a stove and candle,
or in a humid place. By so doing, the temperature in the interior portion of the sewing machine
can rise or the coating of the power cord can melt, causing re or electrical shock.
● The safety device of the sewing machine will work
to stop the sewing machine in order to prevent the
generation of abnormal heat in the case the sewing machine is continuously engaged in sewing at
a low sewing speed for a long time or it is continuously engaged in sewing for a long time under the
high temperature environment. In this event, Start
and Stop button will not light.
The sewing machine will
return to working condition
after about 10 minutes.
Stop!
Page 6
4
“IMPORTANT SAFETY INSTRUCTIONS” .....1
Contents .........................................................4
Principal parts .................................................6
Accessories ....................................................7
Connecting to the power supply ....................8
Function of operational buttons ......................9
Name and function of other operational buttons...
10
Speed control ...............................................12
Adjustable starting stitch speed ........ 13
Low-speed inching sewing ............................. 13
Adjustable reverse stitch speed
........ 13
Lifting/lowering of the presser foot................14
Automatic presser foot lifting .......................... 14
Presser foot auto lift button ............................ 14
Presser foot lifting lever .................................. 14
Installation of knee lifting lever ....................... 15
Foot switch function
.......................... 15
Changing the presser foot ............................16
Bobbin thread preparation ............................18
Needle thread preparation ............................22
Threading the needle thread .......................... 22
Automatic needle threader ............................. 24
Pulling up the bobbin thread ........................... 25
Attaching the needle .....................................26
Fabric, thread and needle table ....................27
How to adjust thread tension ........................28
How to adjust the presser foot pressure .......29
How to lower the feed dog ............................29
Changeover of needle holes (straight stitch
slide plate) ....................................................30
DX7
How to select a stitch pattern ............31
DX5
How to select a stitch pattern ............34
Contents
Basic operations
Practical sewing
Patchwork quilt
Straight stitch ................................................37
Seam guide line on the throat plate ................ 38
Automatic lock stitch and thread trimming ...... 40
How to change needle positions .................... 41
How to change the stitch length ..................... 41
Other straight stitch patterns .......................... 42
Zigzag stitch .................................................43
Overcasting stitch .........................................44
Blind stitch ....................................................46
Buttonhole stitches .......................................49
Buttonhole with gimp ...................................... 53
When changing the width of the buttonhole ... 54
When changing the density of the seam ........ 54
Manual 2-step buttonhole .............................55
Sewing buttons .............................................57
Bartacking.....................................................58
Inserting zippers ...........................................60
Lapped insertion ............................................. 61
How to use the quilt guide ............................62
Scallop stitches.............................................63
Decorative stitches .......................................64
Patchwork piecing ........................................66
Appliqué (1) ..................................................67
Appliqué (2) ..................................................68
Crazy quilt.....................................................69
Stitch in ditch quilting ....................................70
Quilting (straight stitch) .................................71
Quilting (free motion) ....................................72
Page 7

5
Basic operations
Practical sewing
Patchwork quilt
Decorative stitches
Decorative stitches
One-point stitch/sewing letters .....................74
Preparation before sewing ............................. 74
Test sewing ..................................................... 74
Operational buttons and screen ..................... 75
How to select pattern (letters) ........................ 76
How to edit patterns (letters) .......................... 78
How to stitch a pattern (letters) ...................... 79
Disposing thread ends of jump stitches .......... 79
Save/call of patterns (letters) .......................... 80
To sew patterns continuously ......................... 81
Character selecting methods ........................82
Type and usage of options ...............83
1
Change of seam width of buttonhole ......... 84
2
Change of needle position ......................... 85
3
Selecting the stop position of needle ......... 86
4
Twin needle sewing ................................... 87
5
Foot switch function ................................... 89
6
Presser foot pivot function ......................... 90
7
Setting the pivot height .............................. 91
8
Setting the oat-function height ................. 92
9
Setting of the presser foot lifting after thread
trimming..................................................... 93
!0
Adjusting the darning ................................. 94
!1
Adjustable starting stitch speed ................. 95
!2
Adjustable reverse stitch speed ................. 96
!3
Guide ......................................................... 97
!4
Adjusting the touch panel sensitivity .......... 98
!5
Contrast of Liquid Crystal Display (LCD) ... 99
!6
Button reception buzzer volume settings . 100
!7
Language setting ..................................... 101
!8
Elongation ................................................ 102
!9
Deleting the settings ................................ 104
Message catalog ........................................105
Introduction of optional accessory parts .....107
● Rolled hemming presser foot .................... 107
● Button attaching presser foot .................... 107
●
Quilt presser foot (Transparent zigzag type)
. 107
● Cording and Embroidery presser foot ....... 107
● Pearl attaching presser foot ...................... 107
● Presser foot with guide .............................. 107
● Binder presser foot .................................... 107
● Hemming presser foot for zigzag .............. 107
● Quilt presser foot (open type) .................... 107
● Appliqué presser foot ................................ 107
● Cording presser foot ................................. 107
● Invisible zipper foot .................................... 107
● Smooth presser foot .................................. 108
● Eyelet punch ..............................................108
● Wide Table ................................................. 108
● Open toe presser foot ................................ 108
● Edge sewing presser foot .......................... 108
● Magnier ....................................................109
● Spool holder .............................................. 109
How to install Wide Table ........................... 110
Machine Maintenance ................................ 111
Performance check list ............................... 112
DX7
List of stitch patterns .......................114
DX5
List of stitch patterns .......................116
Specication list .............................. back cover
Page 8

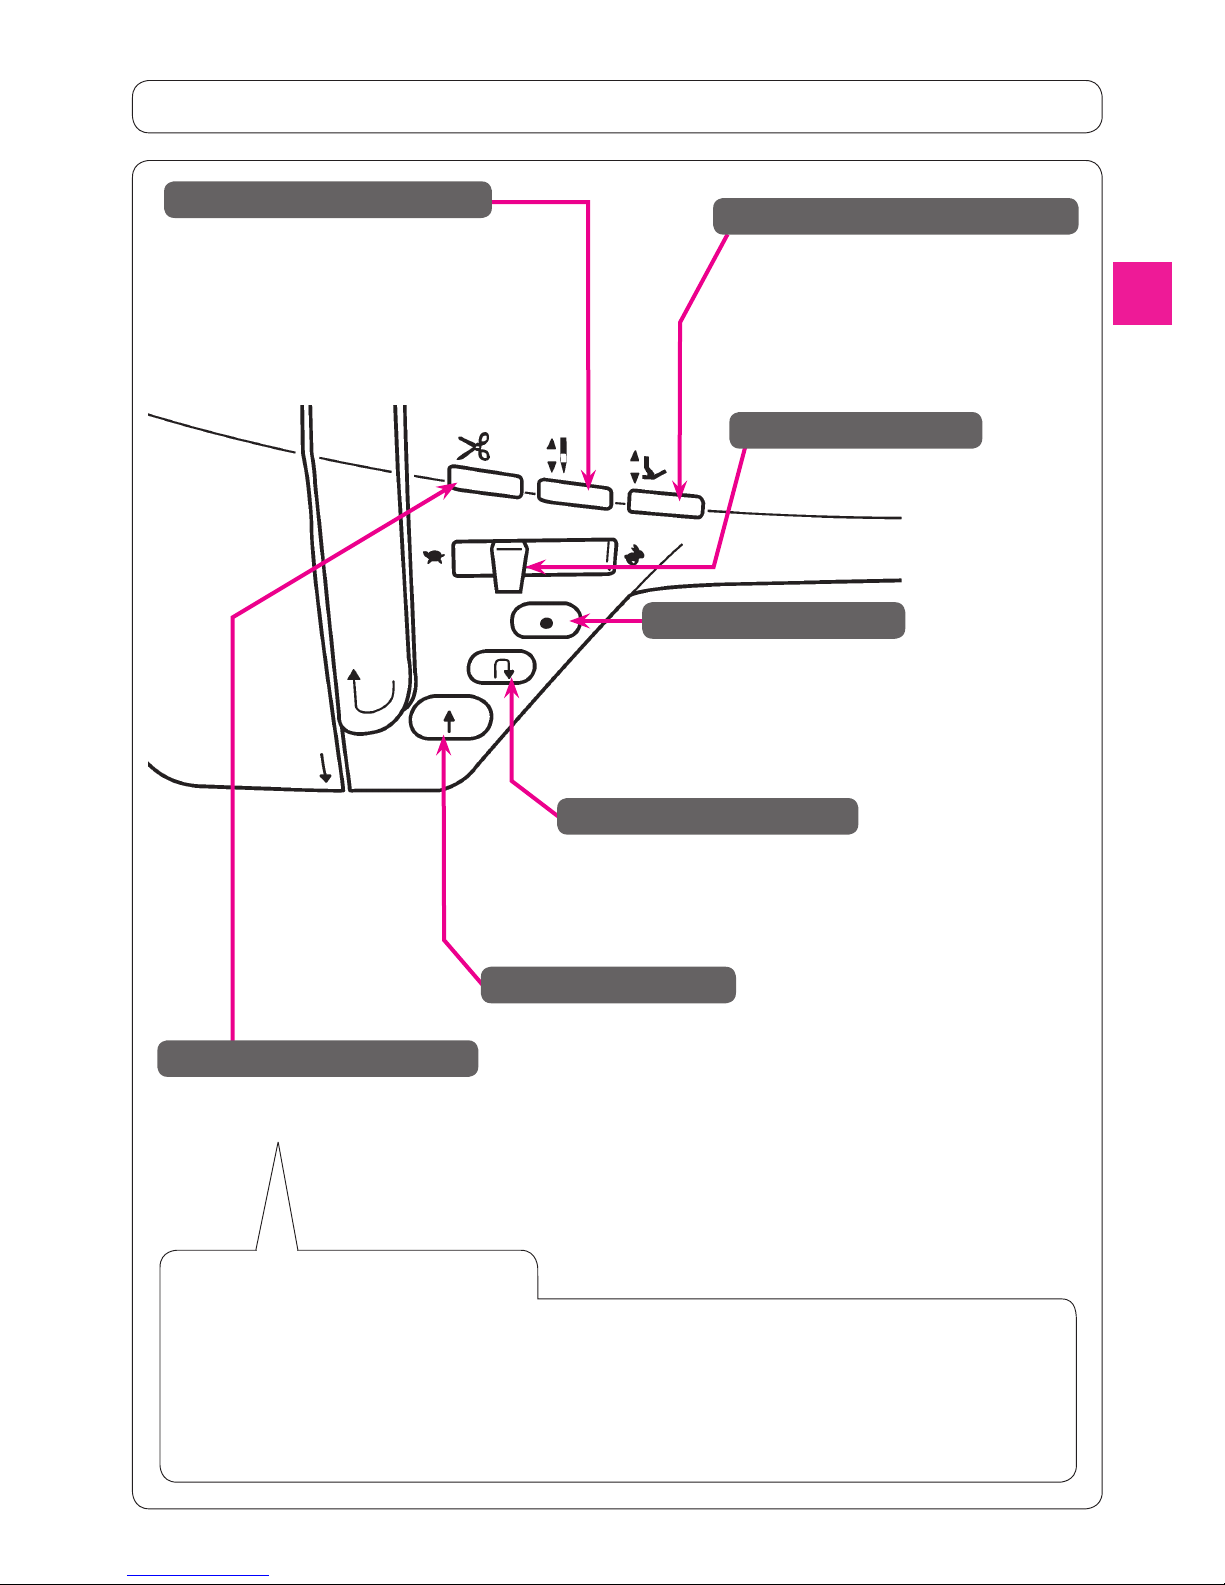
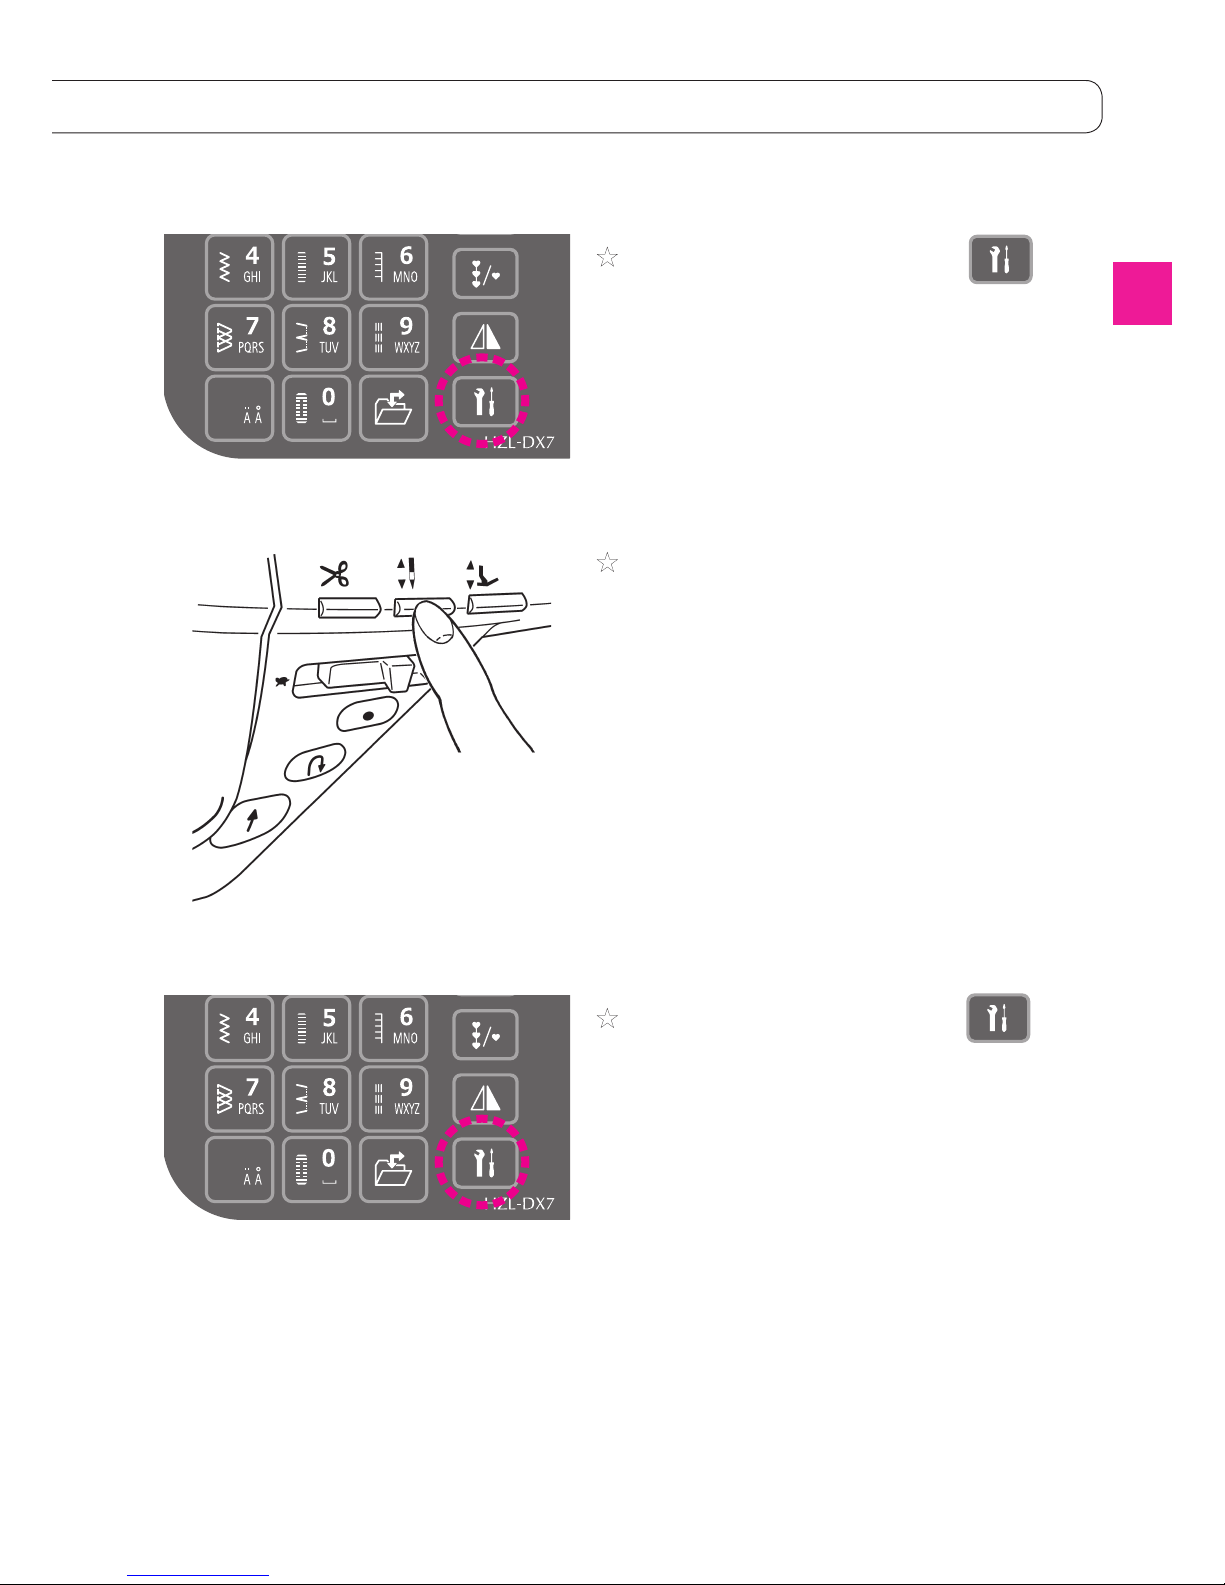
6
Lock stitch button
Principal parts
Hand wheel (pulley)
Power switch
Machine-socket-inlet
Foot-controller-jack
Spool cap (large)
Spool pin
LCD Screen
Operational
buttons
Face plate cover
Threading lever
Start/stop button
Auxiliary bed
(accessory case)
Presser foot lifting lever
Drop feed knob
Needle setscrew
Needle
Presser foot
Sensor pinhole for buttonholing
Presser foot releasing button
Feed dog
Throat plate
Hook cover
Bobbin winding
shaft
Hook cover release
button
Presser foot holder setscrew
Presser foot holder
Thread trimming button
Hard case
Wide table
* Do not put heavy ob-
jects onto hard case
and wide table.
* Do not remove the
styrene foam tted
inside the hard case.
If it is removed, the
sewing machine can
be damaged when it
is placed in the hard
case or other problems can occur.
Thread cutter
Reverse stitch
button
Speed controller
Needle up/down button
Presser foot pressure adjustment dial
Thread tension
adjustment dial
Knee lifting lever
hole
Light under arm
DX7 Only
DX7 Only
Presser foot auto lift button
Straight stitch slide plate
Straight stitch slide plate
lever
Page 9

7
Draw the auxiliary bed out to the left.
Accessories
● Inside the auxiliary bed.
Quilt guide
T-shape
screwdriver
Blind stitch presser
foot (D)
Ripper
Zipper presser
foot (B)
Overcasting
presser foot (C)
Cleaning brush
Eyelet punch
Standard presser foot (A)
Buttonhole presser
foot (E)
Bobbin (3)
Needle set
HA X 1 # 11 (1)
# 14 (1)
# 16 (1)
for knit # 11 (1)
Smooth
presser foot (T)
● Inside the accessories bag.
● Supplied with the machine
● Inside hard case
Walking
foot (N)
Foot Controller
model name; JC-001
Bobbin (1) Spool cap (large)
Spool cap (Small)
Spool cap (Middle)
Manual buttonhole
presser foot (I)
Patchwork
presser foot (P)
Open toe presser
foot (O)
Twin needle
Quilt presser
foot (Q)
Edge Sewing
presser foot (R)
Auxiliary
spool pin
Instruction manual
(This manual)
Knee-lifting lever
Power cord
DX7 Only
DX7 Only
DX7 Only
DX7 Only
DVD
(One set)
Page 10

8
Connecting to the power supply
Not-using foot-controller that using start/stop-
button:
1. Turn OFF the power switch (turn to “O”)
2. Insert cord-connector into machine-socket-inlet.
3. Insert plug into socket-outlet.
4. Turn ON the power switch. (Turn to “I”)
Using the foot-controller:
1. Turn OFF the power switch (turn to “O”)
2. Insert the foot-controller-plug into the foot-controller-jack.
3. Insert cord-connector into machine-socket-inlet.
4. Insert plug into socket-outlet.
5. Turn ON the power switch. (Turn to “I”)
* When the foot controller is plugged in, the start/stop but-
ton cannot be used to start sewing.
Start button: Can not operate to start sewing.
Stop button: Can operate to stop sewing.
• Disconnect the plug and turn off the power switch (turn
to “O”) that always sewing machine is not to use.
WARNING
Power switch
Power switch
Plug
Plug
Foot controller
Foot-controller-plug
Foot-controllerjack
Machine receptacle
Operating power switch:
Turn OFF the machine, set the power switch to "0"
Turn ON the machine, set the power switch to "I"
ON
OFF
WARNING (For U.S.A.,Canada only)
This appliance has a polarized plug (one blade wider than
the other). To reduce the risk of electric shock, this plug is
intended to t in a polarized outlet only one way. If the plug
does not t fully in the outlet, reverse the plug. If it still does
not t, contact a qualied electrician to install the proper
outlet. Do not modify the plug in any way.
* Be aware that the presser foot comes down automatical-
ly if you turn the power ON with the presser foot lifted.
Page 11
9
While sewing, speed can be adjusted.
For straight stitch/zigzag stitch: The sewing machine performs
reverse stitch as long as this button is
held pressed.
For other stitch types: The sewing machine performs lock
stitch.
When machine stops, press this button to change
the needle position. (When the needle is up, the
needle moves down and vise versa.)
The sewing machine performs sewing at a low
speed by keeping this button held pressed for a
long time.
* The needle will not move when the presser foot
is in its upper position or no pattern is selected.
After sewing, press this button to trim
both threads automatically.
Function of operational buttons
Notes for thread trimming:
1. Do not use thread thicker than No.30.
2. After trimming, the stitch can be done without pulling up bobbin thread.
3. When sewing again after thread trimming, if you pull up the bobbin thread again and place it under-
neath the presser foot together with needle thread, you can avoid birds nest on the wrong side of the
fabric.
4. Regularly clean the machine (refer to page 111), as dust in the area of the thread trimming unit may
cause malfunction.
When this button is pressed, the sewing machine
performs lock stitch.
When this button is pressed while the sewing machine is engaged in pattern sewing, the sewing machine stops after it has completed the sewing of the
one-cycle/one-point of the pattern.
When pressing this button, machine starts to sew slowly and then
up to the speed set by speed controller. Another press of this button
stops the sewing machine.
Color of button indicates machine status.
Green: Ready to start and/or while sewing
Red: Not ready to start
Orange: When the lock stitch button is pressed while the sewing
machine is engaged in pattern sewing (The sewing machine performs lock stitch after it has completed the sewing of the pattern by one cycle. Then, the sewing machine
stops.)
When this button is pressed while the
sewing machine is at rest, the presser
foot position is changed.
When the presser foot is in its upper position, it comes down to its lower position
and vice versa.
Presser foot auto lift button
Speed controller
Reverse stitch button
Start/stop button
Thread trimming button
Needle up/down button
Lock stitch button
Page 12

10
Presser foot to
be used (marking)
Stitch pattern
Zigzag width
Stitch length
2
Stitch length ad-
justing dial
3
Conrmation
button
6
Automatic lock
stitch and thread
trimming button
7
Float function
button
8
Continuous
stitch button
9
Mirror image but
-
ton
!0
Option button
4
Selection button
1
Zigzag width adjust-
ing dial
5
Clear button
!3
Pattern selection mode
switching button
!2
Pattern selection button
Needle stop position
Pattern number
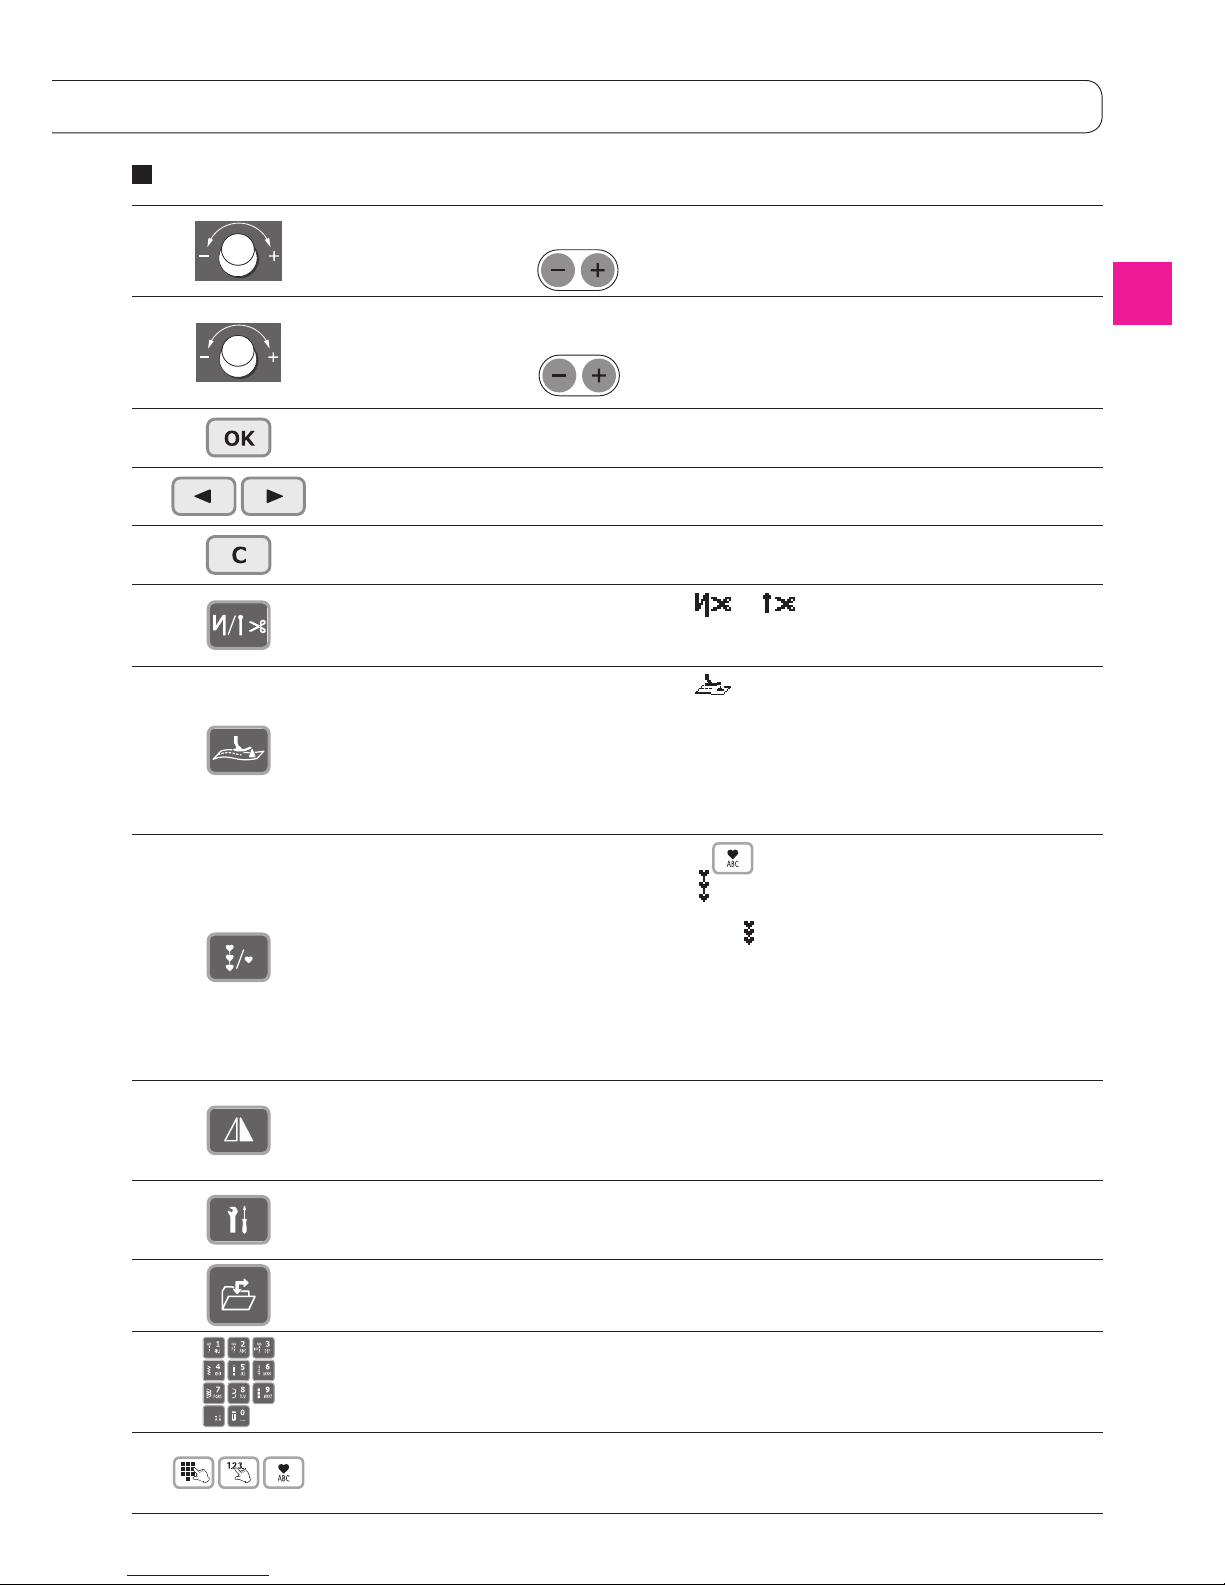
Name and function of other operational buttons
* Patterns on the
screen will be sewn.
Operational buttons and screen
!1
Save/Call button
Description of screen
Name of operational button
Needle stops
at its highest
position
No
indication
Needle stops
at its lowest
position
Needle position
(Center needle position in
this pattern.)
Direct patterns
Practical patterns
Buttonhole patterns
Quilt patterns
Decorative patterns
1
Decorative patterns
2
Letters
10 most often used
patterns can be selected.
A pattern can be selected
by inputting the pattern
number. (Refer to pages
114 and 117 for the
pattern numbers.)
Patterns such as letters
which can be combined,
can be selected.
Setting of automatic lock
stitch and thread trimming
Reverse stitch and
thread trimming
Lock stitch and
thread trimming
No
indication
No setting
Float function setting
Float function
No
indication
No setting
* Adjusting
buttons on DX5.
Direct pattern
Letters
Number
selection (Input
by number)
* Adjusting
buttons on DX5.
Page 13
11
1
Zigzag width
adjustment dial
This is used to change the zigzag width and the needle position.
2
Stitch length
adjustment dial
This is used to change the stitch length.
In the case of the free motion, this dial is used for adjusting the presser foot height.
3
Conrmation
button
This is used to conrm the selected stitch pattern and/or settings.
4
Selection button
This is used to move the cursor.
5
Clear button
This is used to delete the selected stitch pattern and to cancel each setting.
When pressing the button continuously, all the saved stitch patterns will be deleted.
6
Automatic lock
stitch and thread
trimming button
When this button is pressed, or is displayed on the screen.
The machine will automatically lock stitches at sewing-start and sewing-end and
then trim both threads.
7
Float function
button
When this button is pressed, is displayed on the screen.
When using the oat function, the sewing machine performs sewing with its presser
foot slightly lifted.
This function is used in the case of sewing materials such as velvet or sewing quilting that is likely to cause cloth slippage between two layers.
Another press on this button cancels this function.
(Refer to page 92 for more details.)
8
Continuous
stitch button
This button is valid only when “ “ mode.
When this button is pressed,
(Continuous stitch with large intervals) is displayed
on the screen.
When this button is pressed again,
(Continuous stitch with small intervals) is dis-
played on the screen.
(The interval between letters and gures cannot be changed.)
The machine will sew the selected stitch patterns continuously.
When it is pressed again, the machine will cancel this function.
* When it is pressed while sewing, the machine will stop after the selected patterns
are sewn completely.
9
Mirror Image
button
After selecting a stitch pattern, press this button to make a mirror image of the selected pattern.
* There are some patterns that can not make a mirror image.
*
For the symmetric pattern, the sewing start position is changed and ▼ is displayed.
!0
Option button
Optional functions (19 functions) can be set.
* Optional functions vary from stitch pattern to stitch pattern.
(Refer page 83 for more details.)
!1
Save/call button
This is used to save and/or call a pattern. The machine can save maximum 10 patterns. (Refer to page 80 for more details.)
!2
Pattern selection
button
A stitch pattern can be selected.
* Usage of the buttons varies by pattern selecting mode.
(Refer to page 31 and 34 for more details.)
!3
Pattern selection
mode switching
button
When the pattern selection mode needs to be changed, press the desired button.
The selected button will be illuminated.
Name and function of operational buttons
* Adjusting buttons on DX5.
* Adjusting buttons on DX5.
Page 14

12
Foot controller
To run the machine, press the foot controller.
The harder you press, the faster the machine sews.
Speed controller will set the maximum sewing speed.
Pressing harder → faster speed
Pressing weaker → slower speed
* Always clean the foot controller.
It is important that you do not place any objects on the foot
controller as it may cause injury to the user and may cause
malfunctions.
Speed control
How to adjust the speed:
Speed controller
Maximum sewing speed can be freely set by the speed
controller.
Faster speed
Faster speed
Slower speed
Foot switch function
The sewing machine can be set to carry out one of the
following operations when the front section of the foot controller is depressed:
1
Reverse stitch
5
Presser foot lift
2
Lock stitch
6
Thread trimming
3
Half stitch sewing
7
No function
4
One stitch sewing
This function has been
factory-set to "1 Reverse
stitch" at the time of ship-
ment.
Slower speed
(Refer to page 89)
Page 15
13
The sewing speed at the start of sewing can be increased by
using the option button.
When the needle up/down switch is held pressed, the sewing machine performs sewing at a low speed.
★
Adjustable starting stitch speed
★
Low-speed inching sewing
(Refer to page 95)
The reverse stitch speed can be increased by using the option button.
Adjustable reverse stitch speed
★
(Refer to page 96)
Page 16

14
Presser foot lifting lever
Lifting/lowering of the presser foot
The presser foot is lifted/lowered with the presser foot lifting
lever.
The presser foot can be lifted higher than the ordinary lift
position. This feature is useful when placing a heavy-weight
material on the sewing machine.
Even after the presser foot has been lifted with the presser
foot lifting lever, the presser foot can be lowered with the
presser foot auto lift button.
1
Lowered position …… Presser foot should be lowered
when sewing.
2
Ordinary lift position …… This position is used for fabric
removal and/or changing the
presser foot.
3
Extra lift position …… This position is used to put heavy
materials underneath the presser
foot.
* Be careful that the presser foot and the needle should
not interfere when the needle is in down position and the
presser foot is raised to the extra lift position.
1
2
3
1
2
3
The presser foot of the sewing machine automatically goes up slightly when the sewing
machine stops. (Presser foot pivot function)
When the sewing machine is re-started, the presser foot comes down automatically to
allow the user to start sewing with no additional operation.
When the thread trimming button is pressed, the presser foot automatically goes up after the completion of thread trimming.
This function can be set to OFF using the option button.
In addition, when the needle stop position is set to "Stop with its needle up", the presser
foot pivot function is automatically set to OFF.
Automatic
presser foot
lifting
Presser foot
auto lift button
The presser foot can be lifted/lowered by pressing the presser foot auto lift
button.
(Refer to page 9)
Presser foot lifting lever
Presser foot
The presser foot auto lift button and the presser foot lifting lever are interoperable.
When the presser foot lifting lever is once lifted to position 3 after the presser foot
has been lifted with the presser foot auto lift button, the presser foot lifting lever can
be used for lifting/lowering the presser foot.
Page 17
15
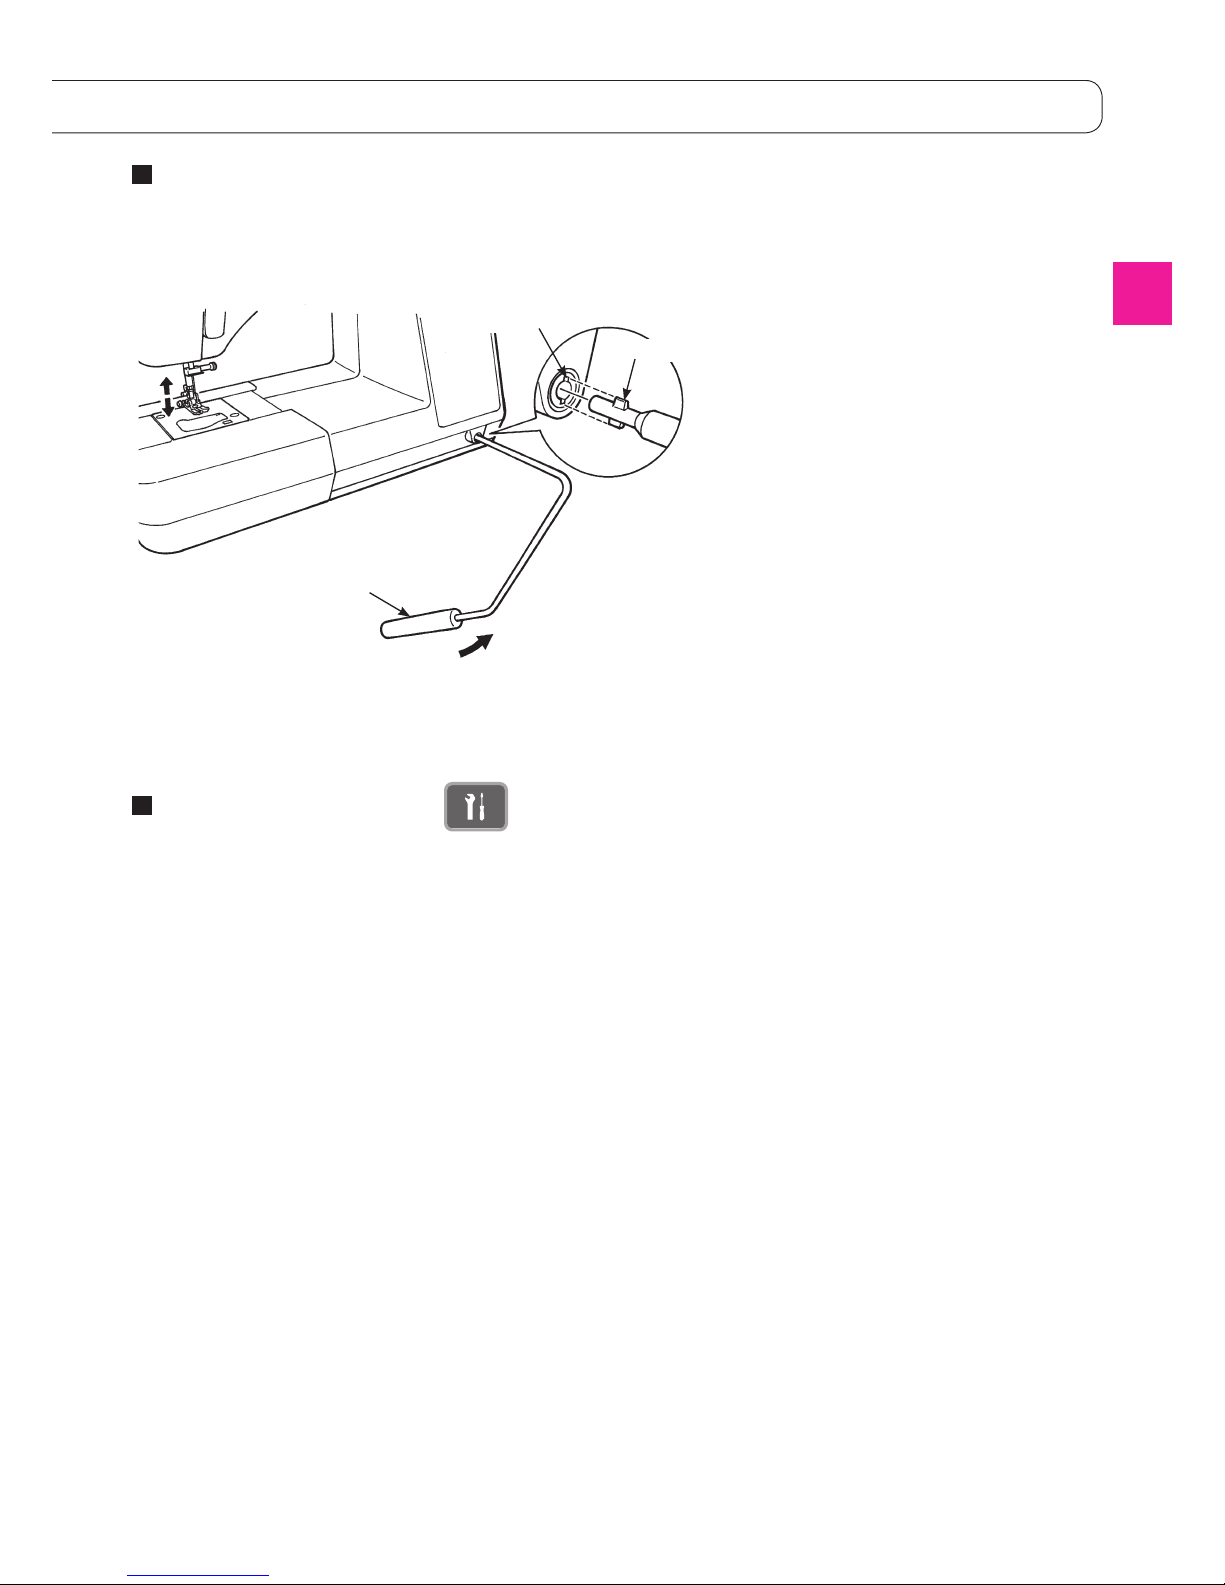
The knee lifting lever is useful when a guilt is being sewn
and for other projects that require the use of both hands.
With the knee lifting lever, you are able to control the position
of the presser foot without using your hands.
Insert the knee lifting lever so that concave and
convex meet.
Push the lever to right-hand side to lift the presser foot.
The presser foot is lowered when the lever goes back to the
original position.
* Do not touch the knee lifting lever while sewing.
It may cause a deformation of a stitch pattern.
Knee lifting lever
convex portion
concave portion
Lifting
Optional function can be set so that the presser foot can be lifted/lowered by depressing the front part of the foot
controller.
Foot switch function
Installation of knee lifting lever
(Refer to page 89)
Page 18
16
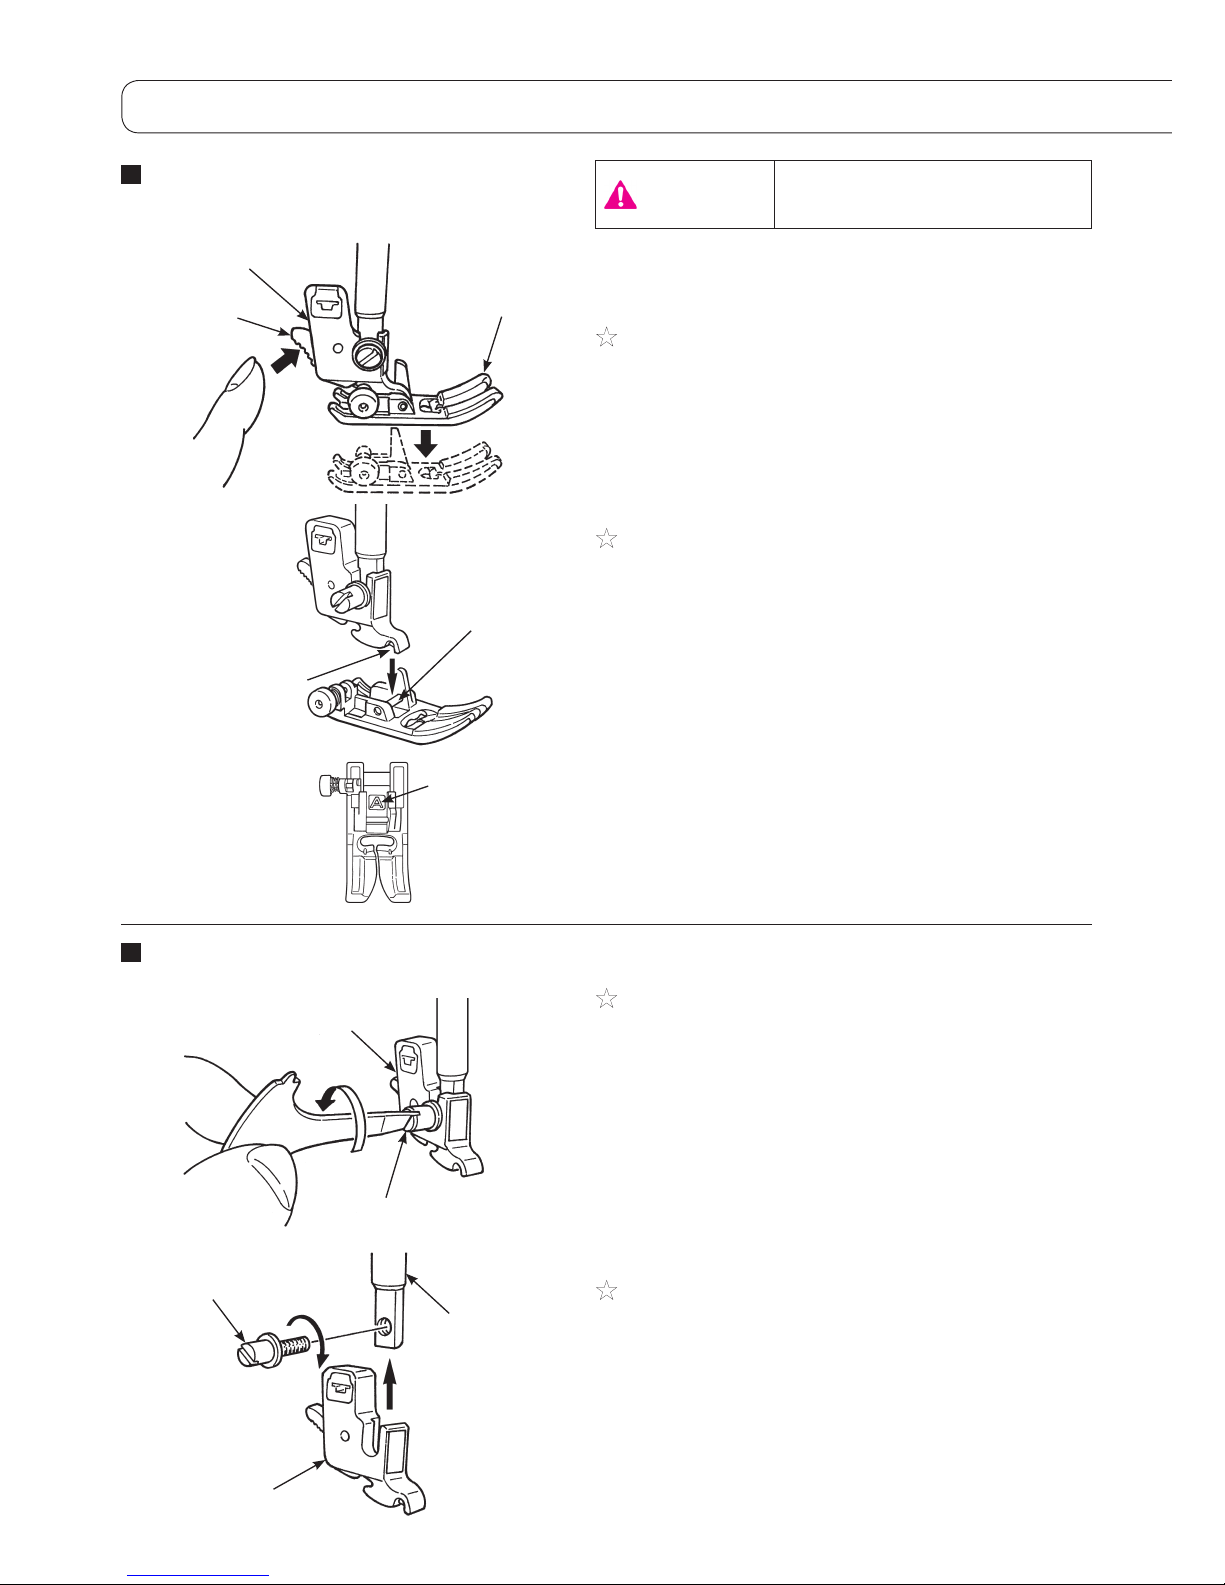
Removing and installing the
presser foot
Removing and installing presser foot holder
★
Removing presser foot
1. Raise the needle and presser foot.
2. Press the presser foot releasing button to remove the
presser foot.
★
Installing presser foot
Align the pin of the presser foot and the groove in the
presser foot holder. Then lower the presser foot holder
with the presser foot lifting lever.
* Each presser foot has a marking. Use the appropriate
presser foot for the stitch pattern to be sewn.
★
Removing presser foot holder
1. Lift the needle and presser foot lifting lever.
2. Loosen the setscrew of the presser foot holder to the
left and remove the presser foot holder.
★
Installing presser foot holder
Align the screw hole at the presser bar with the hole of
presser foot holder (long groove). Tighten the setscrew
rmly by turning it to the right side.
Changing the presser foot
Turn OFF the power before
replacing presser foot.
Attention
Presser foot
releasing button
Presser foot holder
Presser foot
Groove in presser
foot holder
Pin
Presser foot
marking
Setscrew of presser
foot holder
Presser foot holder
Setscrew of presser
foot holder
Presser foot holder
Presser bar
* Do not lift the presser foot with the presser foot auto
lift button before turning the power OFF.
Page 19
17
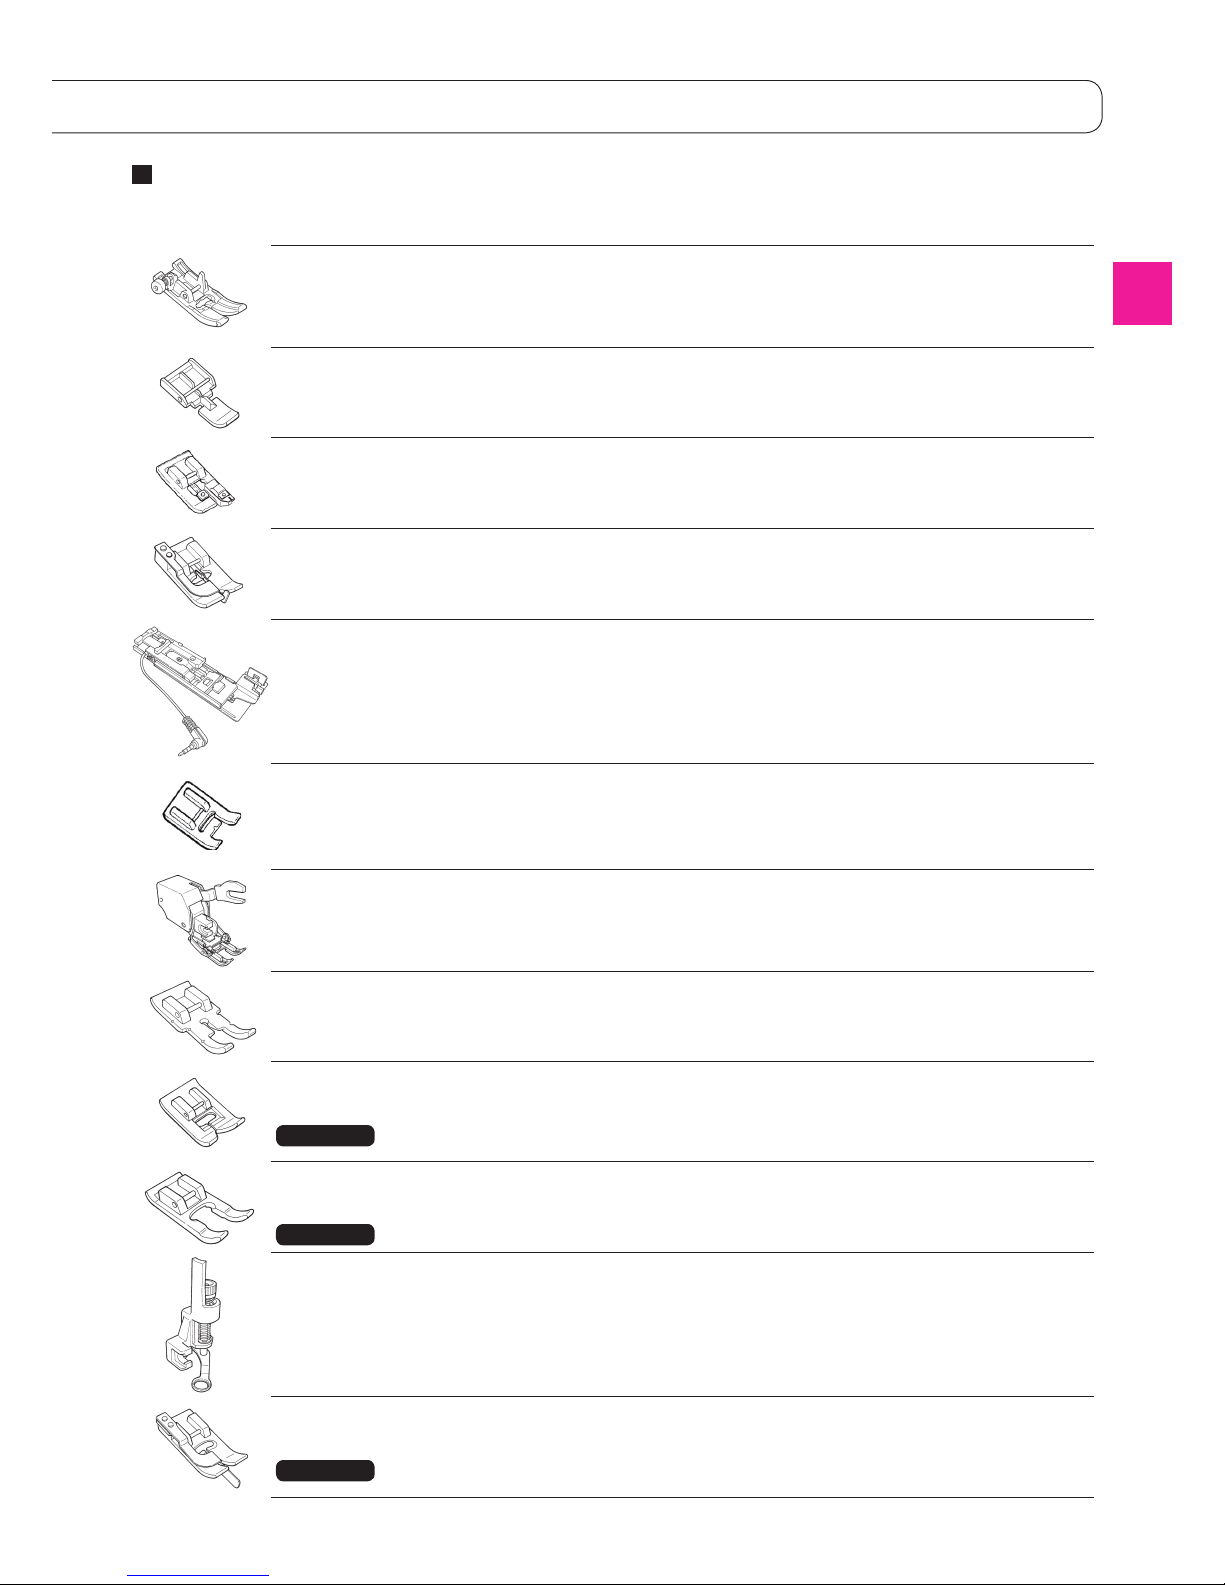
The type and application of the presser foot
Standard presser
foot
A
This is used mainly for straight stitch and zigzag stitches.
Use this presser foot especially when sewing heavy-weight
materials.
Zipper presser foot B
This is used to attach zippers.
Overcasting presser
foot
C
This presser foot is used exclusively for overcasting to prevent
the cut edge of fabrics from fraying.
Blind stitch presser
foot
D
This presser foot is used for blind stitch on hems of trousers
and skirts, or sleeves.
Buttonhole presser
foot
E
This presser foot is used for automatic buttonholing.
Manual buttonhole
presser foot
I
This is used for sewing decorative stitches, letters and bartacks.
Also for manual buttonhole (pattern No. 03).
Walking foot N
In general, this presser foot is used for difcult-to-feed” materials such as knits, jersies, vinyl, articial leather and leather or
quilting.
Patchwork presser
foot
P
This presser foot is used for patchwork stitches. There are two
seam lines, 1/4-inch and 1/8-inch from center needle position.
Smooth presser
foot
T
This presser foot is used for non-slippery materials like vinyl
and satin stitches.
Open toe presser
foot
O
This is used for the applique and decorative stitches.
(Front part of the presser foot is open for better visibility.)
Quilt presser foot Q
This is used for the quilt stitch.
(Machine setting: Straight Stitch and Center needle position)
Refer to page 72 for more details.
Edge Sewing
presser foot
R
This is used for patchwork, sewing center line of joined
materials by using the center guide of the presser foot.
* Fine tune the needle position by zigzag width adjustment dial.
Marking of presser foot
↓
DX7 Only
DX7 Only
DX7 Only
Page 20

18
Bobbin thread preparation
Open the hook cover.
Take out the bobbin.
* If the bobbin has too little thread, do not use it as the
thread will get tangled.
* Use only the designated bobbin. Other bobbins may
cause malfunction.
1
2
Taking out the bobbin
1
Small spool
Large spool
Spool Cap
Place a thread spool to spool pin and a
spool cap onto the spool pin.
* Be aware that a spool with a small remaining
amount of thread can cause tangling or slip-off of
thread.
There are three types of the spool caps, large, medium and small. Choose the size of spool cap according
to the thread spool to be used.
Setting thread spool
Hook cover
Spool Cap
<Exclusive bobbin>
Made of transparent plastic
11.5 mm
20.5 mm
When the bobbin is taken
out and/or put into the bobbin case, turn off the power
(turn to “O”).
Attention
Page 21
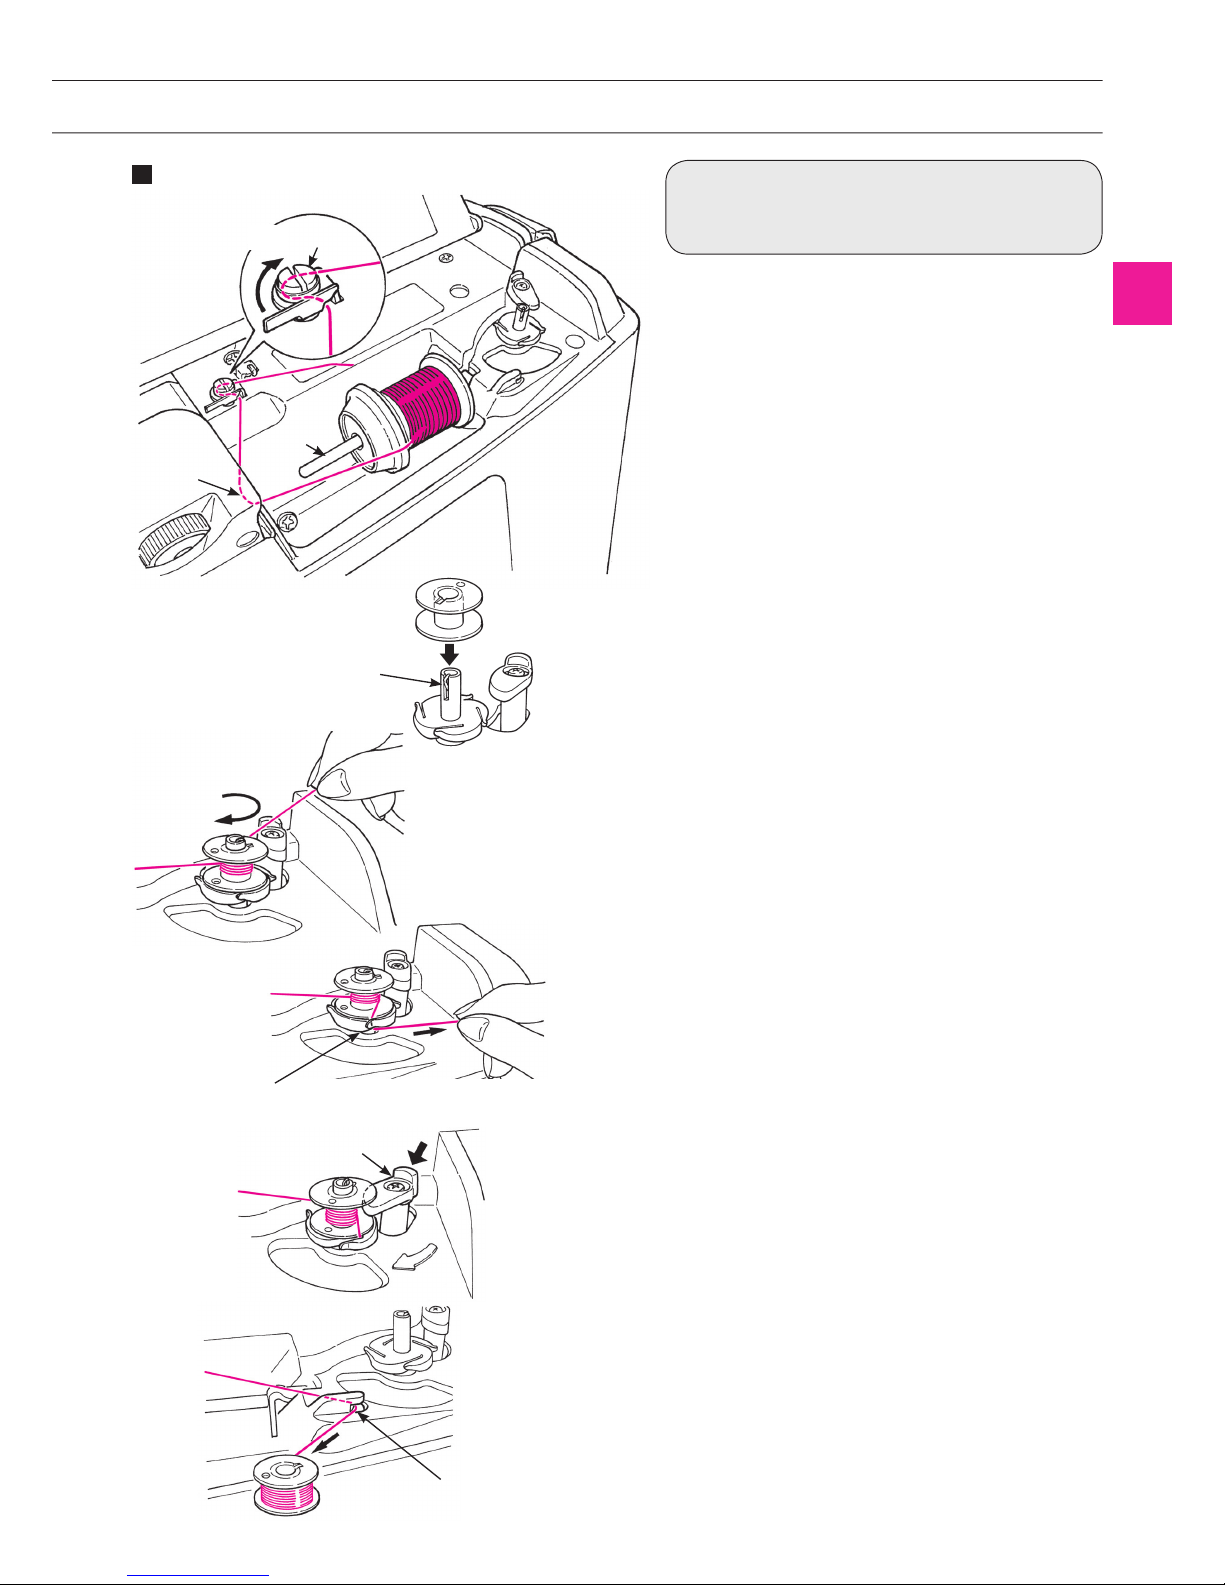
19
Thread the guide A and then
thread the thread guide (guide in
the circle) for bobbin winding
1
Place the thread spool to the spool
pin.
2
Winding the bobbin thread
* An exclusive motor is built-in for winding
bobbin so that you can wind bobbin at any
time.
Set the bobbin on the bobbin winding
shaft.
3
4
Wind the thread to the bobbin 4-5 times in
clockwise direction.
Put the thread end into the guide at the
bobbin winding shaft and pull it to the
right side to cut it.
5
7
Push the bobbin winding regulator
towards the bobbin to start winding the
bobbin.
* Be careful that the bobbin winding regulator
works as a switch.
6
When winding is nished, the shaft
stops automatically, the bobbin winding
regulator moves to right and return to the
original position.
Remove the bobbin from the bobbin
winding shaft and cut the thread by cutter.
* Bobbin winding will automatically stop even
while winding, when the winding speed is reduced due to a load to the bobbin winding motor
caused by thread tangling.
Bobbin winding regulator
Guide (with cutter)
Spool
pin
Cutter
Thread guide
Bobbin
winding shaft
A
Page 22
20
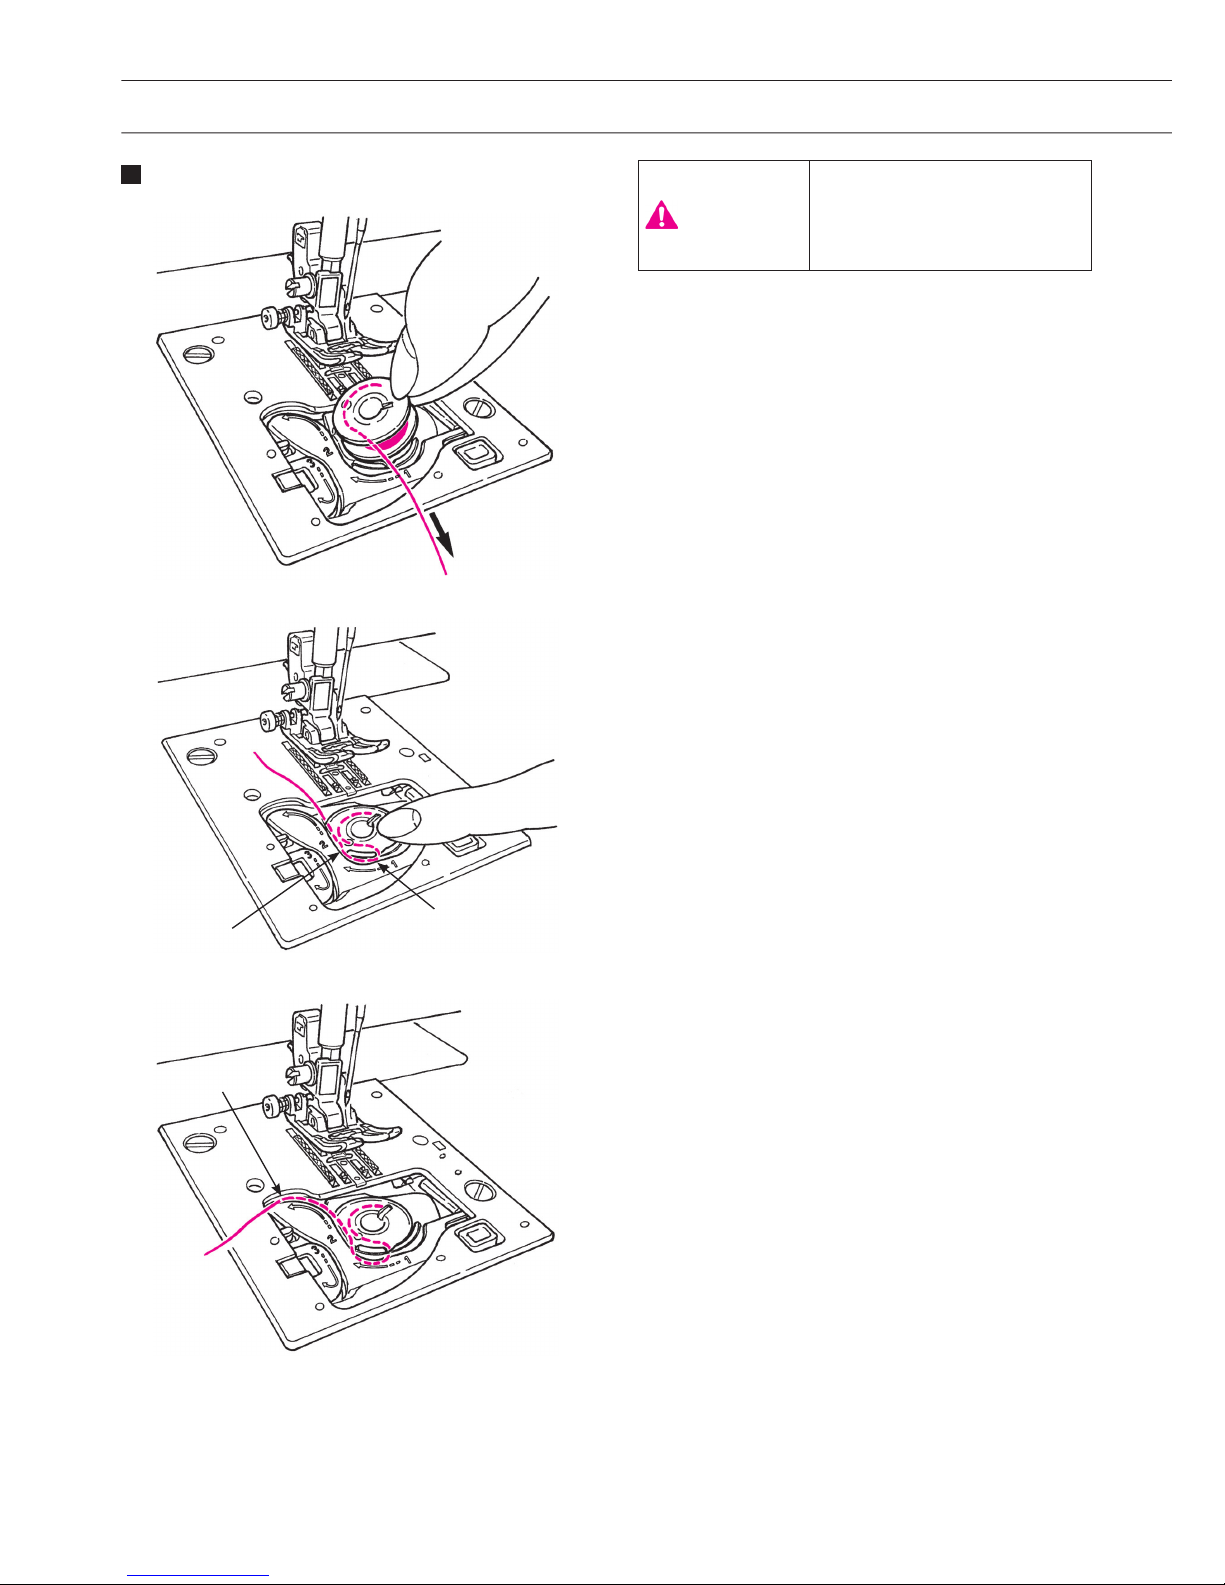
Put the bobbin in the bobbin case.
* Place the bobbin so that thread winds counter-
clockwise.
Thread groove A and B by pulling the
thread end.
* It will be easier to thread grooves when you
press the bobbin lightly with your nger.
Thread guide C by pulling the thread to
left side.
1
3
2
B
A
Setting the bobbin
C
When the bobbin is taken
out and/or put into the bobbin case, turn off the power
(turn to “O”).
Attention
Page 23

21
Thread to guide D and E leave the thread
underneath. (Thread guide E first and it
will thread to guide D as well.)
* When pulling bobbin thread, bobbin rotates
counterclockwise. If bobbin rotates clockwise,
put the bobbin upside down.
4
D
E
Cut the thread with the built-in cutter
F
.
5
Close the hook cover.
6
F
You can start to sew in this condition (without
pulling up the bobbin thread), however, if you want
to sew with the bobbin thread pulled out, refer to
“Pulling up the bobbin thread” in the page 25.
C
Page 24
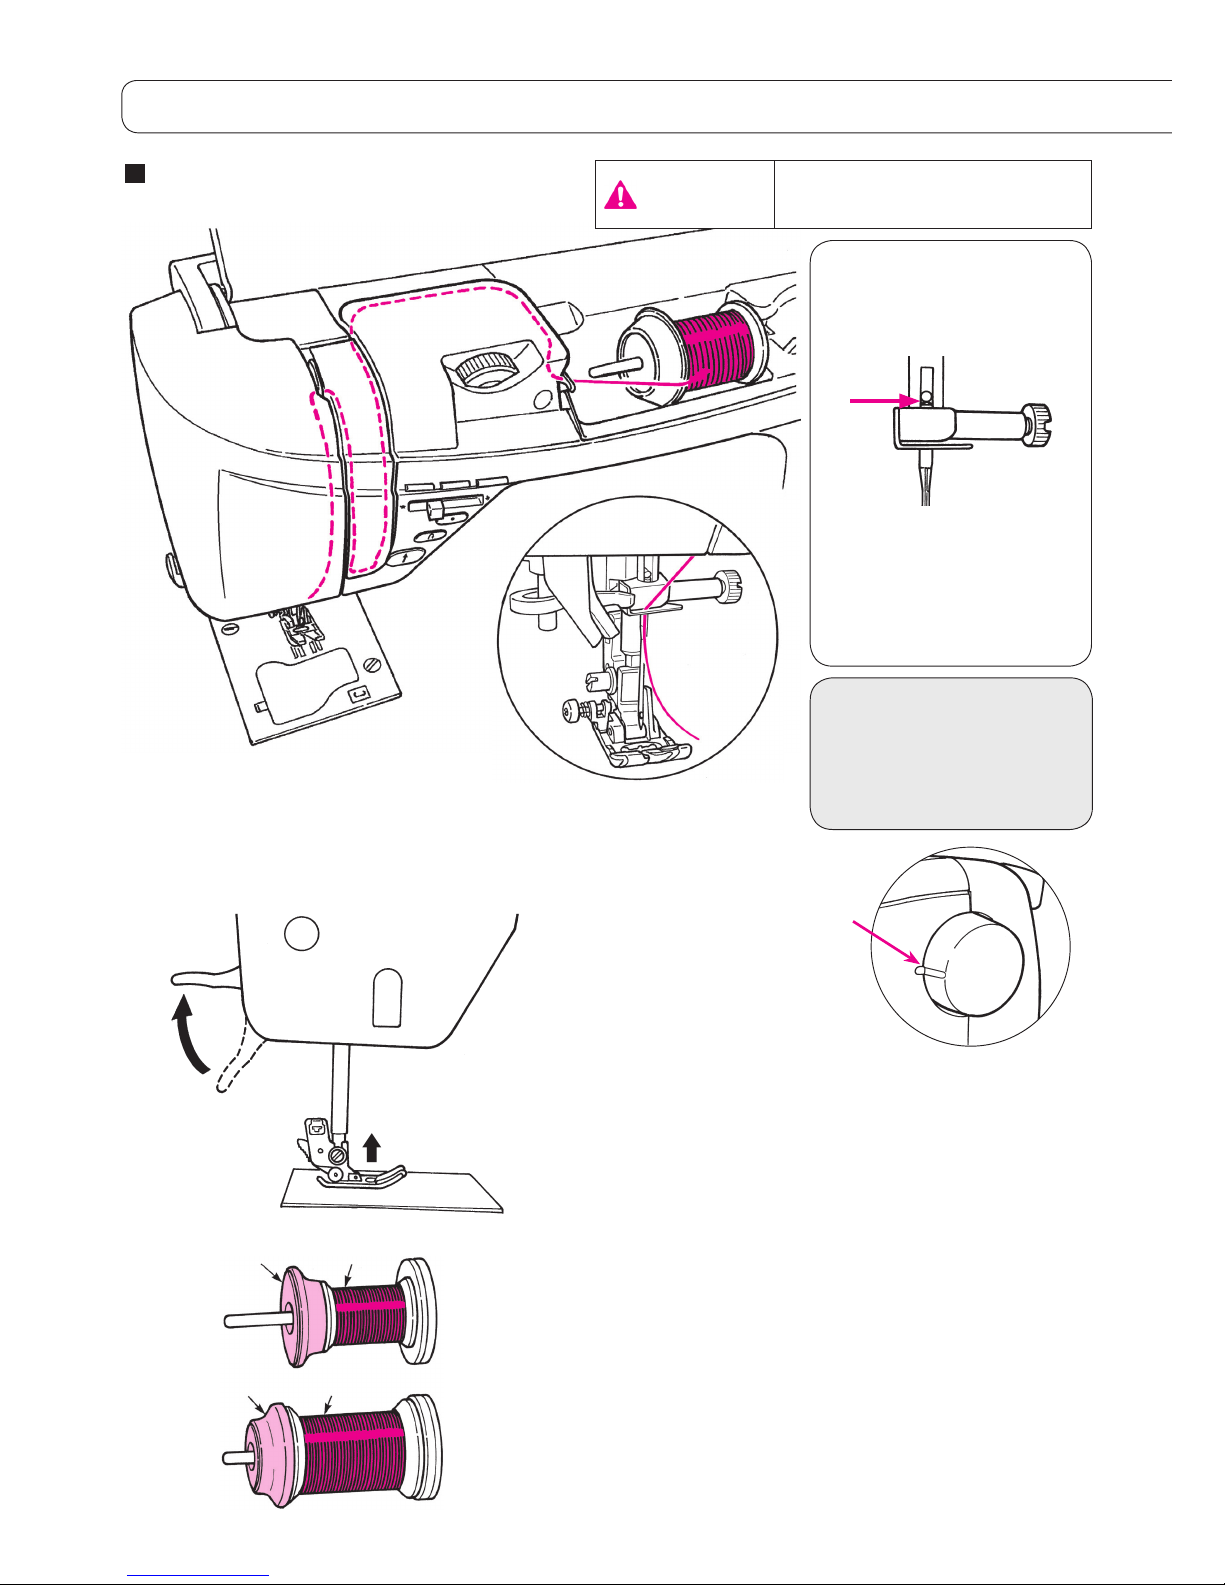
22
1
Lift the presser foot lifting lever.
1
2
3
4
5
Make sure to push the
needle to the top.
It is impossible to perform
stitching if the needle is not
correctly installed or a bent
needle is used. Pay close attention as this will cause machine malfunction.
Note:
2
Small spool
Large spool
Place a thread spool to the spool pin and
a spool cap onto the spool pin.
There are three types of the spool caps, large, medium and small. Choose the size of spool cap according
to thread spool to be used.
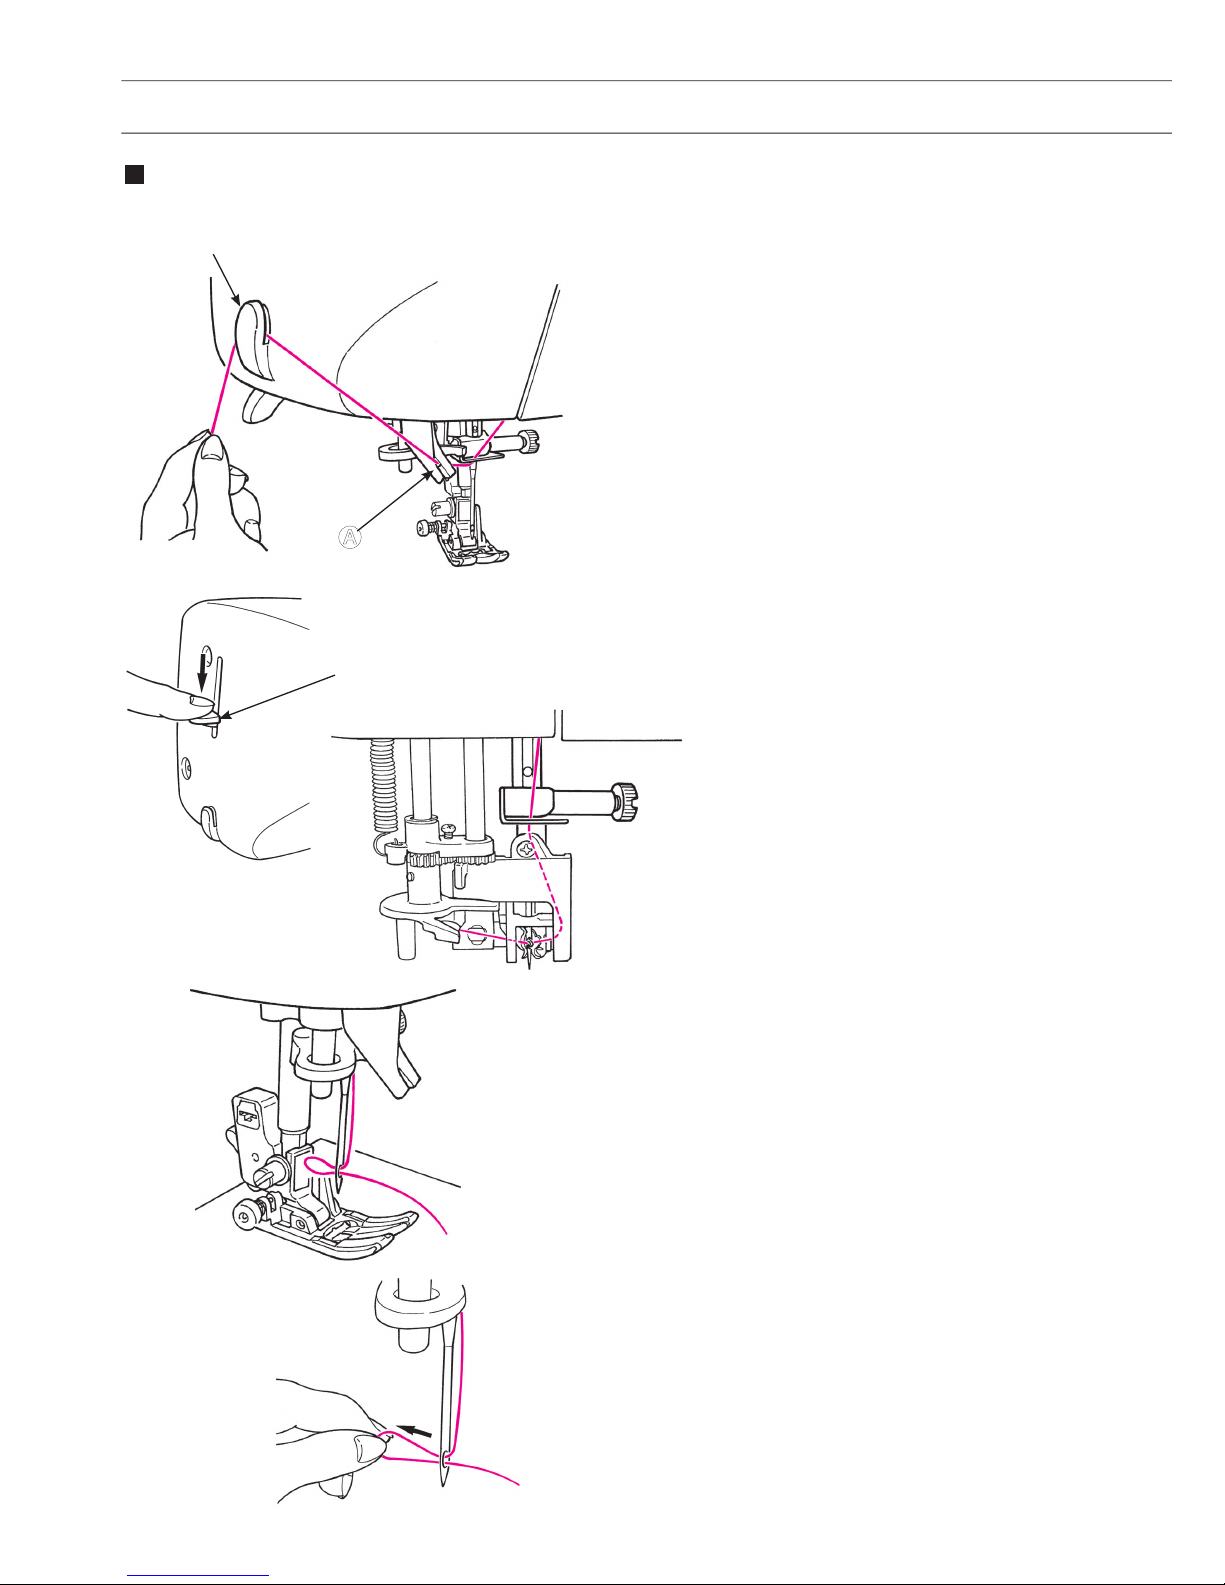
Threading the needle thread
* Use the needle: No.11-16
and the thread: No.30-90.
*
When twin needle is used,
the automatic needle
threader can not be used.
* Align the marking at the
hand wheel with the one
on the machine body.
Spool cap
Spool cap
Needle thread preparation
Turn OFF the power switch before threading the machine head.
Attention
Page 25
23
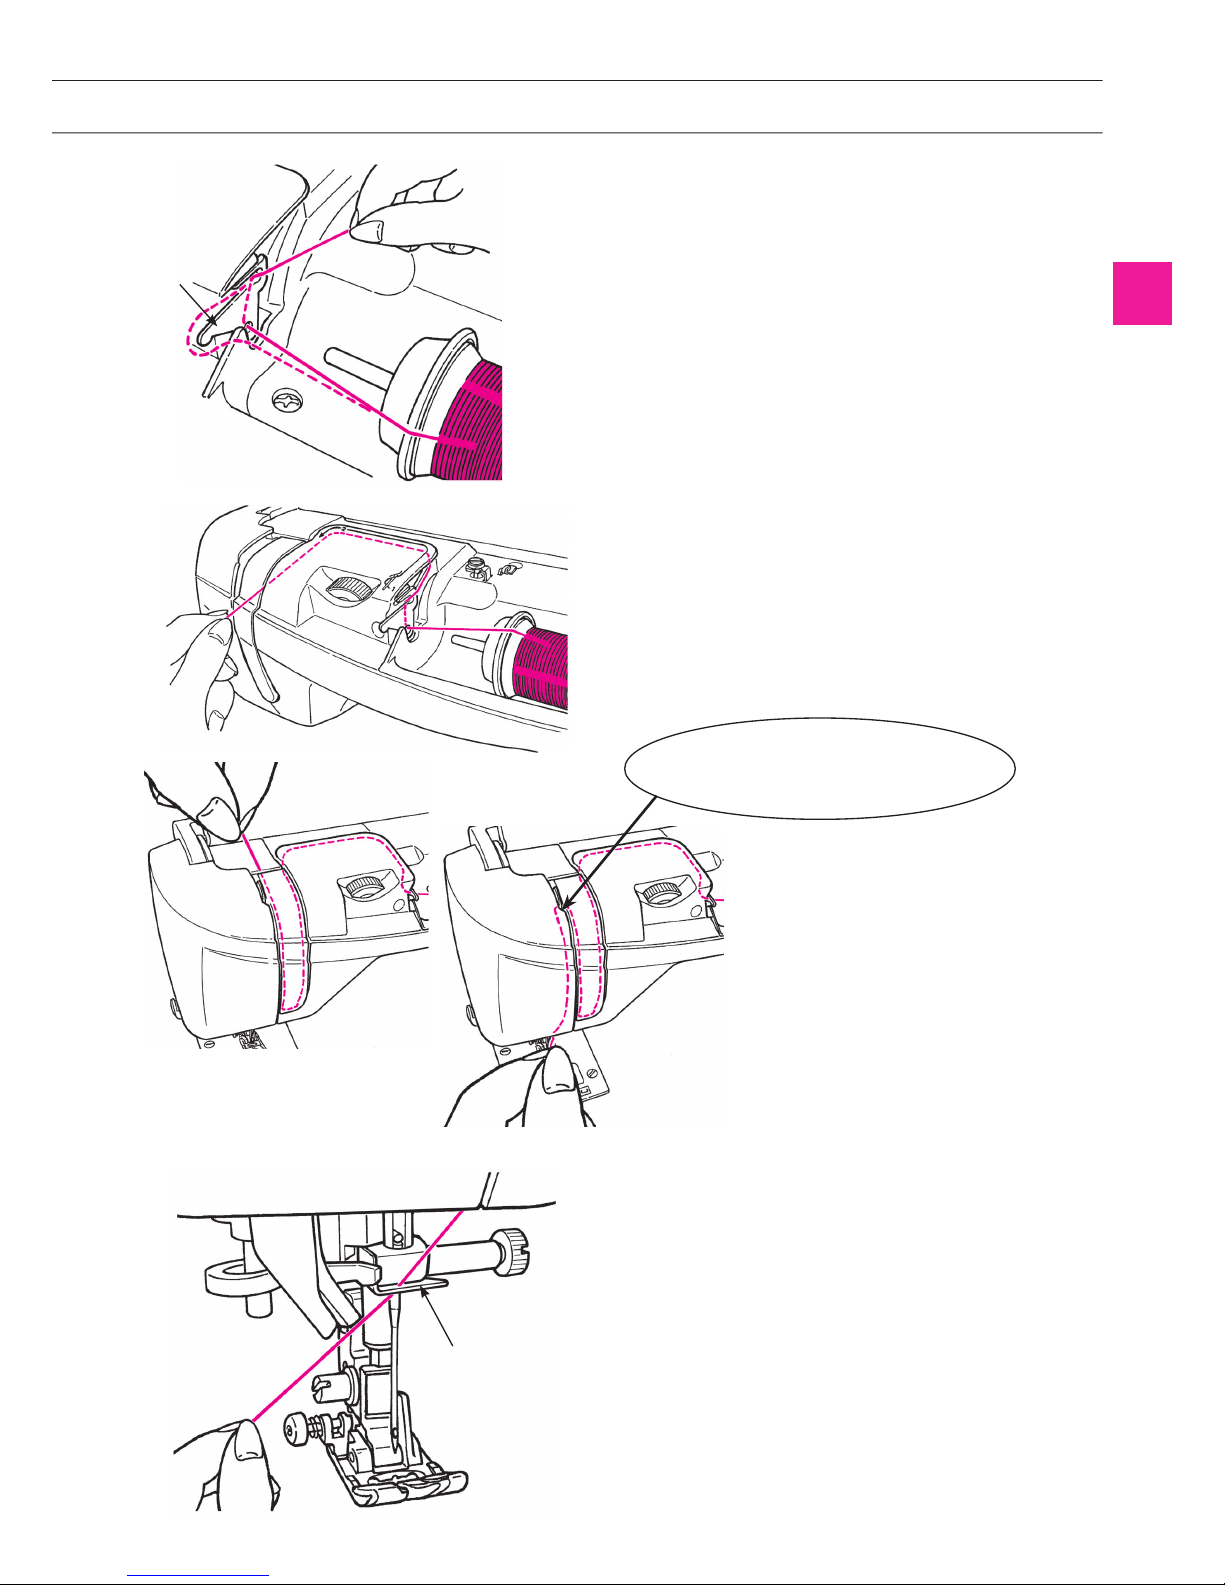
Thread to guide A.
Hold the thread end and thread according
to the arrow marking.
* Make sure that the presser foot is raised.
Otherwise the machine is not correctly thread-
ed.
3
4
Thread the guide B from the right-hand
side.
Draw the needle thread out from the guide by approximately 10 cm.
5
B
A
* Check that the thread take-up
is correctly threaded.
Page 26
24
Release the threading lever and the
needle thread is threaded to the needle
eye.
1
Lower the presser foot.
* The automatic needle threader sometimes fails
to thread the needle when the presser foot is
raised.
2
Thread to A and cut the thread with the
thread cutter.
4
3
Lower the threading lever until it comes to
a complete stop.
*
Lower the threading lever slowly.
Threading lever
A
Thread cutter
Lift the presser foot. Then, draw the
needle thread backward.
Pull out the thread from the needle eye by approx.
10 cm or 4 inches long.
5
* Be careful that the cutter is inside.
Automatic needle threader
Page 27
25
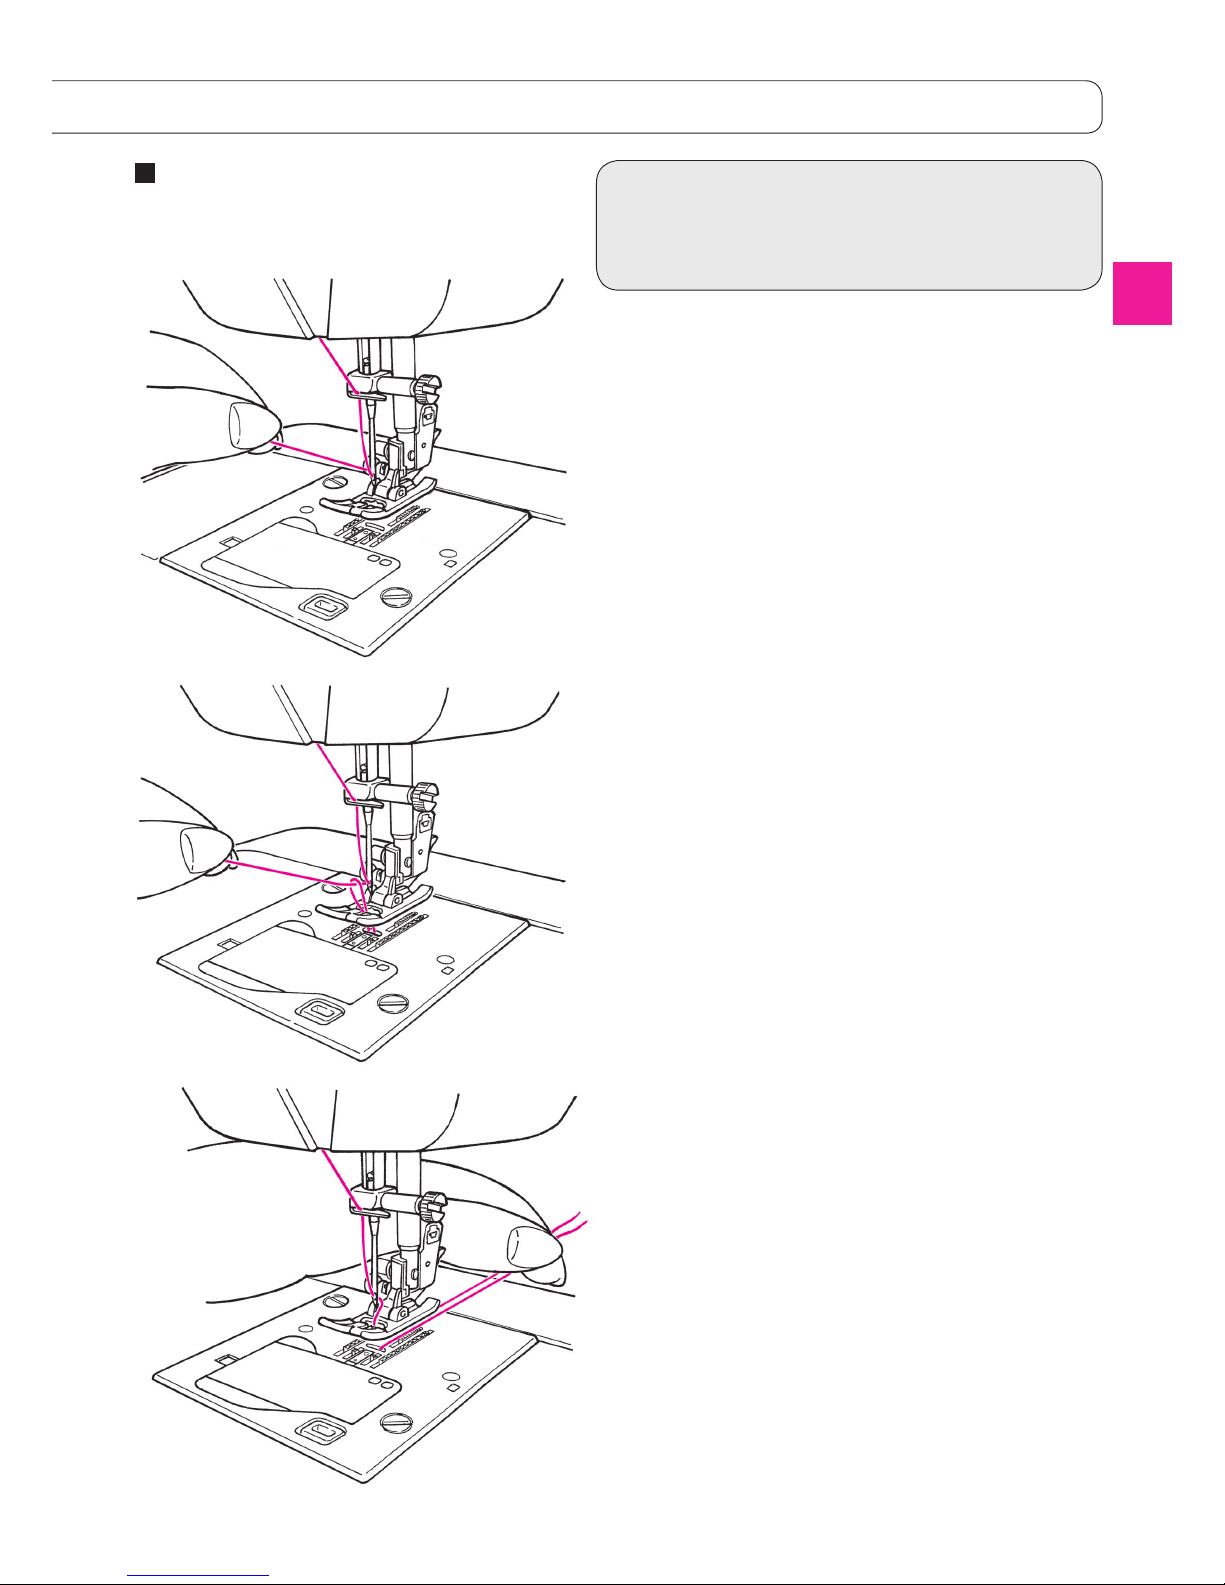
Basic operation:
You can start to sew without pulling up the bobbin
thread, however, if you want to sew with the bobbin thread pulled out, follow the directions below.
Pull out both needle and bobbin threads
by approx. 10 cm (4 inches) long and pass
them under the presser foot towards the
back of the machine.
1
Lift the presser foot and lightly hold the
end of the needle thread.
2
Turn the hand wheel towards you to move
the needle up and down. Loop of bobbin
thread will be pulled out when you will
pull the needle thread lightly.
3
Pulling up the bobbin thread
Page 28
26
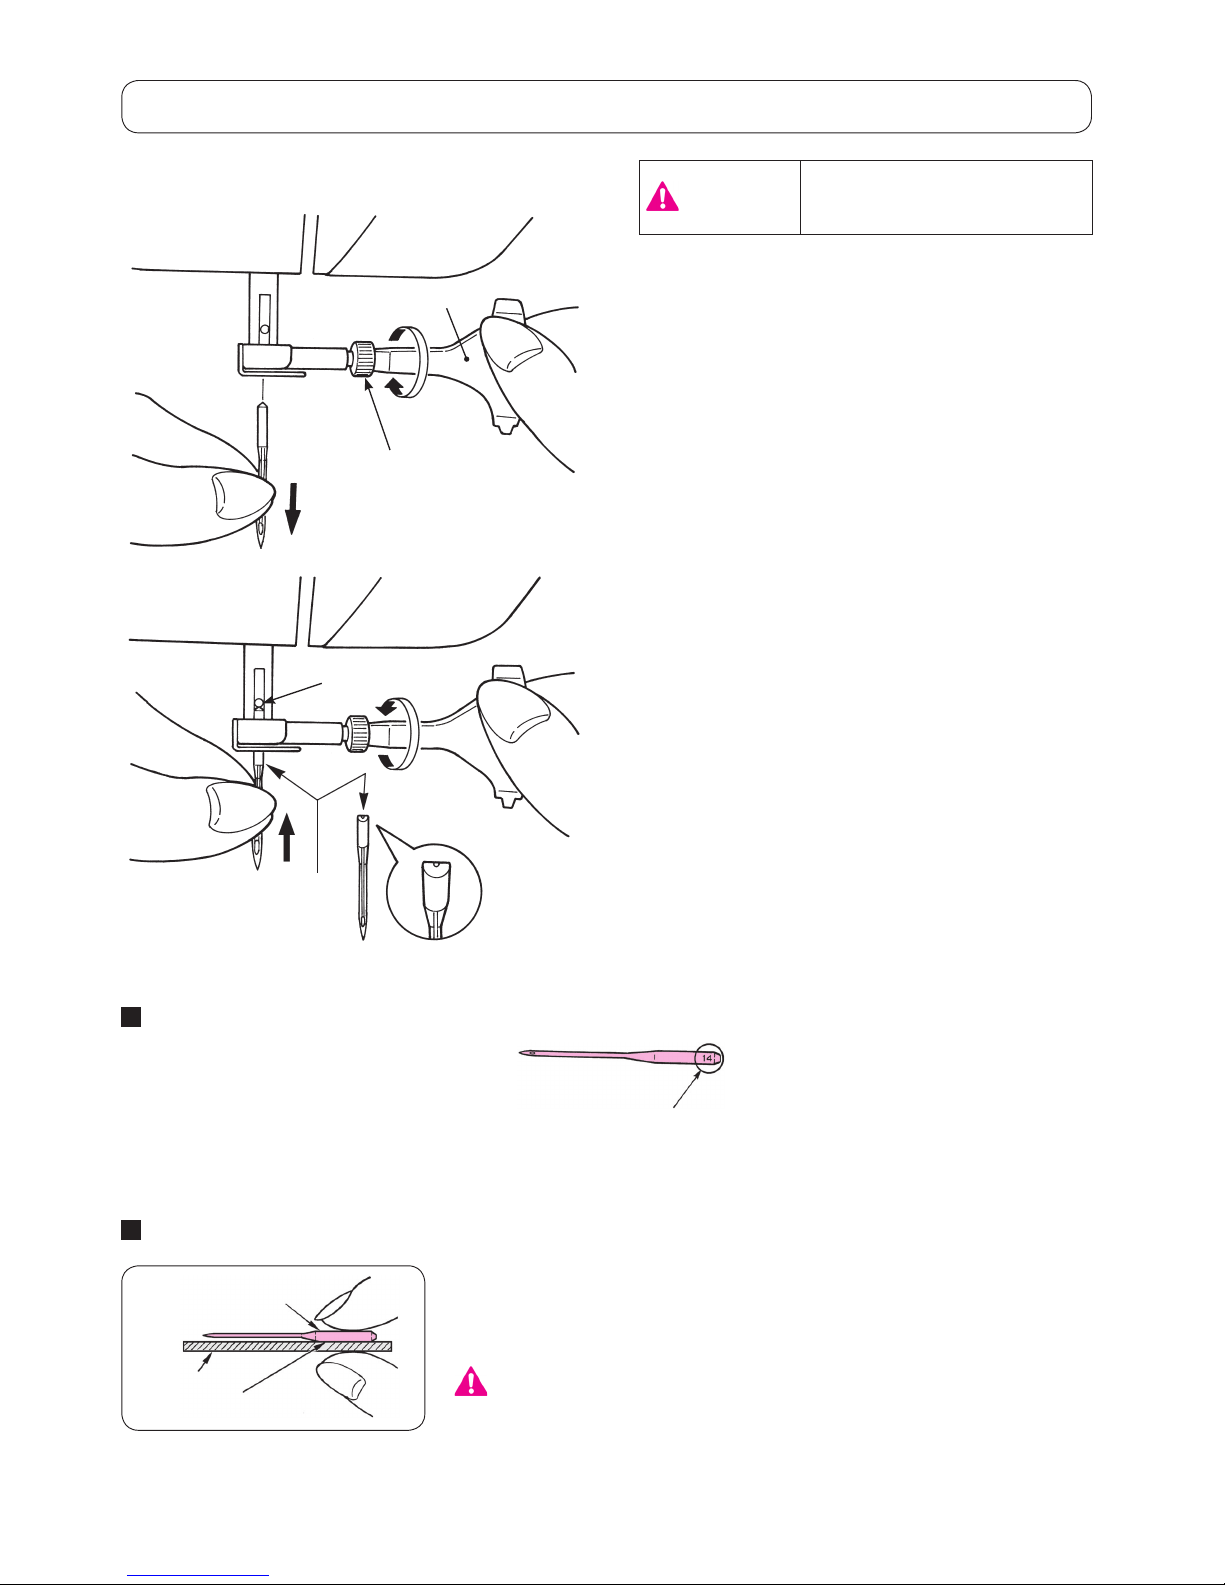
Attaching the needle
Needles to be purchased
When purchasing spare needles,
specify HA X 1 (130/705H) or HA X 1
SP (needle for knits) .
Checking the needle
Check the needle for its straightness occasionally.
Any bent needle would cause skipped stitches, thread
breakage or damage to materials.
Flat object
The at part of the needle
Shank
Needle size:
The larger the number, the thicker the needle.
Needle setscrew
Stopper pin
Hold the needle
with its at part
facing away
from you
If the needle is not properly installed or a bent
needle is used, needle breakage can be caused.
It will cause damage to the machine.
1
Removing needle
1. Turn the hand wheel towards you until the needle
comes to the highest position and lower the presser
foot.
2. Turn the needle setscrew towards you 1-2 times
and remove the needle.
2
Attaching the needle
(The needle cannot be inserted unless it
is correctly positioned.)
Hold the needle with its at part facing away from you,
and insert it fully until it touches the stopper pin.
Securely tighten the needle setscrew.
Attention:
Screwdriver
When changing the needle,
turn off the power.
Warning
Page 29

27
Fabric, thread and needle table
Fabric Thread Needle
HA×1
Light-weight
materials
Lawn
Silk thread
…………………………………………
No.80,90
Spun thread
………………………………………
No.80,90
No.11
Georgette
Tricot Spun thread
………………………………………
No.60-90
Knit needle
No.11
Wool and synthetic
fabrics
Silk thread
………………………………………………
No.80
Spun thread
……………………………………
No.60-90
No.11-14
Medium-weight
materials
Cotton and synthetic
fabrics
Spun thread
……………………………………
No.50, 60 No.11-14
Light jersey
Silk thread
………………………………………………
No.50
Spun thread
……………………………………
No.50, 60
Knit needle
No.11
Ordinary wool and
synthetic fabrics
Silk thread
………………………………………………
No.50
Spun thread
……………………………………
No.50, 60
No.11-14
Heavy-weight
materials
Denim Spun thread
………………………………………
No.30-50 No.14-16
Jersey
Silk thread
………………………………………………
No.50
Spun thread
……………………………………
No.50, 60
Knit needle
No.11-14
Coat Silk thread
………………………………………………
No.50 No.11-14
* In general, the same thread is used for both needle and bobbin threads.
* Thin thread and needle will be used for light-weight fabrics and thick thread and needle will be used for heavy-
weight materials.
* Check that the combination of needle and thread is OK by trial sewing on the material which will be sewn.
* Knit needle is good for stretchy fabrics (such as knits) and synthetic fabrics.
* Use thread No. 30 - 90.
* When it is difcult to go over an overlapped section, guide the fabric by hand.
* When sewing “quilt patterns”, “decorative patterns” or “letters” (refer to pages 31 to 36), better nish will be
ensured by using a knit needle.
Page 30

28
How to adjust thread tension
When the needle thread is too
strong:
The bobbin thread will be pulled to the front side of the
fabric. Turn the thread tension adjustment dial towards
"-1" to "-3".
When the needle thread is too
low:
The needle thread will be pulled to the wrong side of
fabric. Turn the thread tension adjustment dial towards
"+1" to "+3".
In case a correct tension setting is not obtained, check
thread paths for both needle and bobbin threads.
Needle thread
Bobbin thread
A
Fabric (right side)
Fabric (right side)
Needle thread
Bobbin thread
Bobbin thread
Needle thread
Fabric (right side)
Well-balanced thread tension
Straight stitch: Needle and bobbin threads interlace
with each other at the middle of the
fabric thickness. (
A
)
Zigzag stitch: Needle thread is pulled a little bit to the
wrong side of the fabric.
If the machine is set to “Auto”, it is suitable for most
fabrics. However, adjustment may be necessary according to fabrics and sewing applications.
If the tension is not correctly set, it will cause imbalanced stitch formation, puckering, and/or thread
breakage.
Weaker tension
Stronger tension
Thread tension
adjustment dial
Fabric (wrong side)
Fabric (wrong side)
Fabric (wrong side)
Page 31

29
How to adjust presser foot pressure
Turn the presser foot pressure adjustment dial to set the
proper pressure.
When sewing in general, set the presser foot pressure
adjustment dial to “5”.
When sewing on light synthetic fabrics, stretchy fabrics,
appliqué which seam allowance is overlapped, etc., lower the number on the presser foot pressure adjustment
dial. (reducing the presser foot pressure)
How to lower the feed dog
Move the drop feed knob to the right-hand side, in case
the feed dog is in the down position for free motion quilting, button sewing, etc.
* Move the drop feed knob to the left-hand side after
sewing. The feed dog will be engaged automatically
when the machine starts to sew.
When lowering the feed dog
When lifting the feed dog
Drop feed knob
Presser foot
pressure adjustment
dial
How to adjust the presser foot pressure
How to lower the feed dog
Stronger
Weaker
Page 32

30
Changeover of needle holes (straight stitch slide plate)
Patterns which can be used
with the straight stitch
selection
After you have changed the needle hole to the needle hole for
straight stitches, press to display the patterns that can
be used.
Select a pattern with or and press to
conrm the pattern.
How to use the straight
stitch slide plate
Do not turn the handwheel by hand when using the
needle hole for straight stitches. Be aware that the
needle can come in contact with the straight stitch
slide plate if you turn the handwheel by hand.
Attention
2
Normal needle hole
1
Needle hole for straight stitches
2
1
Lever
Straight stitch
slide plate
It is possible to change the needle hole between the needle
hole for straight stitches and the normal needle hole without
changing the throat plate.
In the case of starting sewing from the edge of material, the
material can be smoothly sewn without being pulled into the
needle hole by using the needle hole for straight stitches.
It is possible to change the needle hole to be used only by
changing over the lever position.
Lift the needle and the presser foot.
1
By moving the lever to the left: The
needle hole for straight stitches is
selected.
2
By moving the lever to the right while
slightly pushing it away from you: The
normal needle hole is selected.
1
2
* Change the needle hole from the needle for straight
stitches to the normal needle hole before turning the
power OFF.
DX7
DX5
* When a pattern other than those which can be sewn with
the straight stitch selection is selected, the needle hole
for straight stitches cannot be used.
If a pattern other than the straight stitch selection is se-
lected when the needle hole for straight stitches is select-
ed,
will be displayed on the screen.
1. The screen will be restored to the normal one by re-
turning the lever to the right.
2. The screen will be changed over to the Direct 1 when
is pressed.
Page 33

31
Push and check the stitch pattern in this
portion and select.
Push and select a pattern type from with select button
(
or ). Then, select a pattern with its pattern number.
Select stitch pattern by number.
Pattern can also be selected using .
DX7
How to select a stitch pattern
☆
There are 287 types of stitch patterns.
☆
When turning on the machine, the straight stitch of the center needle position is chosen automatically.
☆
There are 4 methods to select stitch pattern.
Pattern
No.
1 2 3 4 5 6 7 8 9 0
Pattern Application
Center
needle
position
Piecing
7mm
Piecing
1/4”
Zigzag stitch
Applique
Over casting
stitch
Blind stitch
Straight
reinforced stitch
Buttonhole
Straight
stitch
Refer
to
page
37 66 66 43 67 68 44 46 42 49
Pattern
No.
01 02 03 04 05 06 07 08 09 10 11 12 13 14 15 16 17 18 19 20 21 22
Pattern Application
Left
needle
position
Center
needle
position
Left
needle
position
Right
needle
position
Three point zig zag
Two point zig zag
Overcasting stitch
Overcasting stitch
Used for lightweight material
Overcasting stitch
Used for exible material
Ornamental pattern
Blind stitch
Used for lightweight material
Blind stitch
Used for exible material
Shell tuck
Back straightline stitch
Back zigzag stitch
Bar tack
Eyelet
Button sewing
Fly stitch
Straight stitch
Straight stitch for
elastic
Zigzag stitch
Refer
to
page
37 42 43 43 45 - 44 45 - - - 64 46 46 - 42 - 58 - - 57 -
On the LCD screen you will see
the selected stitch pattern and
the marking of the presser foot
to be used.
・
Practical patterns
❶
Direct patterns
❷
Other patterns
Page 34

32
Pattern
Refer
to
page
68 ~ 70, 72
Pattern
No.
01 02 03 04 05 06 07 08 09 10 11 12 13 14 15
Pattern
Application
Standard
buttonholes
2-step
buttonhole
Rounded
end
Keyhole
buttonholes
For knit
Decorative
Refer
to
page
49 ~ 56
Pattern
Refer
to
page
64
Pattern
Refer
to
page
64
・
Buttonhole patterns
・
Quilt patterns
・
Decorative patterns 1
Patterns for crazy quilt
・
Decorative patterns 2
Combination patterns
Patterns for elongation
Page 35

33
Push and select a pattern type from with select button
(
or ). Then, select a pattern with its pattern number.
The pattern types are same with those of "Quilt patterns", "Decorative patterns 1" and "Decorative patterns 2".
“Quilt patterns” numbers 01 and 02 are not available for one-point sewing.
Some patterns can overlap when combined. In such cases, combine them while inserting a space (decorative
patterns 2: No. 52) between the patterns.
Pattern
Refer
to
page
74 ~ 82
Pattern
Refer
to
page
74 ~ 82
❸
One point pattern
❹
Letters
Select stitch pattern
by number.
Quilt patterns Decorative patterns 1 Decorative patterns 2
Push
and select a letter type from with the select
button (
or ). Check this portion.
(Refer to page 75 for how to select letters.)
Page 36

34
Push and check the stitch pattern in this
portion and select.
DX5
How to select a stitch pattern
☆
There are 185 types of stitch patterns.
☆
When turning on the machine, the straight stitch of the center needle position is chosen automatically.
☆
There are 4 methods to select stitch pattern.
Pattern
No.
1 2 3 4 5 6 7 8 9 0
Pattern Application
Center
needle
position
Piecing
7mm
Piecing
1/4”
Zigzag stitch
Applique
Over casting
stitch
Blind stitch
Straight
reinforced stitch
Buttonhole
Straight
stitch
Refer
to
page
37 66 66 43 67 68 44 46 42 49
Pattern
No.
01 02 03 04 05 06 07 08 09 10 11 12 13 14 15 16 17 18 19 20
Pattern Application
Left
needle
position
Center
needle
position
Left
needle
position
Right
needle
position
Three point zig zag
Two point zig zag
Overcasting stitch
Overcasting stitch
Used for lightweight material
Overcasting stitch
Used for exible material
Ornamental pattern
Blind stitch
Used for lightweight material
Blind stitch
Used for exible material
Shell tuck
Fly stitch
Bar tack
Eyelet
Button sewing
Straight stitch
Straight stitch for
elastic
Zigzag stitch
Refer
to
page
37 42 43 43 45 - 44 45 - - - 64 46 46 - - 58 - - 57
On the LCD screen you will see
the selected stitch pattern and
the marking of the presser foot
to be used.
・
Practical patterns
❶
Direct patterns
❷
Other patterns
Push and select a pattern type from with select button
(
or ). Then, select a pattern with its pattern number.
Select stitch pattern by number.
Pattern can also be selected using .
Page 37

35
Pattern
No.
01 02 03 04 05 06 07 08 09 10 11 12 13 14 15
Pattern
Application
Standard
buttonholes
2-step
buttonhole
Rounded
end
Keyhole
buttonholes
For knit
Decorative
Refer
to
page
49 ~ 56
・
Buttonhole patterns
Pattern
Refer
to
page
64
Pattern
Refer
to
page
68 ~ 70, 72
・
Quilt patterns
・
Decorative patterns
Combination patterns
Patterns for elongation
Page 38

36
Push and select a pattern type from with select button
(
or ). Then, select a pattern with its pattern number.
The pattern types are same with those of "Quilt patterns" and "Decorative patterns".
“Quilt patterns” numbers 01 and 02 are not available for one-point sewing.
Some patterns can overlap when combined. In such cases, combine them while inserting a space (decorative
patterns: No. 71) between the patterns.
Pattern
Refer
to
page
74 ~ 82
❸
One point pattern
❹
Letters
Pattern
Refer
to
page
74 ~ 82
Select stitch pattern
by number.
Quilt patterns Decorative patterns
Push
and select a letter type from with the select button
(
or ). Check this portion.
(Refer to page 75 for how to select letters.)
Page 39

37
Straight stitch
Sewing start
Pull the needle and bobbin threads under the presser
foot to the rear of the machine and lower the presser
foot to start sewing.
Sewing end
Stop sewing and push the thread trimming button to trim
the threads.
<by thread trimming button>
When you push the thread trimming button, the thread is
trimmed and the presser foot automatically goes up.
You can also set the function to lift the presser foot after
thread trimming to OFF.
(Refer to page 93 )
<by foot controller>
* You can also cut the threads by the thread cutter at
the face plate cover.
Pattern No. Direct 1
Presser foot
Standard presser
foot (A)
Thread tension Auto
Attention
Turn OFF the power switch
before replacing the presser
foot.
This means presser foot is up.
Lower the presser foot to start
sewing.
Foot switch function
It is possible to set so that the thread is trimmed by
depressing the front section of the foot controller.
(Refer to page 89 )
Page 40

38
When sewing the edge of thick
fabrics
Turn the hand wheel and let the needle enter at the position of sewing start. Push the black button A by nger and
lower the presser foot. Release the finger from the black
button and start sewing. When the presser foot will be on
the fabric completely, the black button will be disengaged
automatically.
When changing the sewing direction
When you stop the sewing machine, the sewing machine
stops with its needle down and the presser foot automatically goes up.
Then, change the sewing direction and re-start the sewing
machine.
★
Seam guide line on the throat plate
Align the fabric edge with a seam guide line and sew.
* Numbers on the guide line show the distance in mm and
inches between the center needle position and the guide
line.
Numbers, 7, 10 and 20 are millimeter.
Numbers, 1/ 4, 5/ 8 and 1 are inches.
5 mm
On center needle position basis
(Refer to page 90 )
Presser foot pivot function
The presser foot pivot function can also be turned
OFF.
A
Page 41

39
Lock stitch after sewing-end
<When start/stop button is used>
After the sewing is nished, push the reverse stitch button.
While it is pressed, the machine will sew reverse and when
it is released, the machine will stop sewing reverse.
<When foot controller is used>
While the reverse stitch button is pressed, the machine will
sew reverse. When the reverse stitch button is released,
the machine sews straight.
In the case of sewing one-point stitches or letters, the sewing machine stops after the completion of lock stitches.
Lock stitch
It is used for sewing lock stitches which are inconspicuous.
<When start/stop button is used>
Push the lock stitch button at the end of sewing.
The sewing machine sews lock stitches and stops.
<When foot controller is used>
Push the lock stitch button at the end of sewing.
The sewing machine sews lock stitches and stops.
* When you push the button while sewing one-point stitch-
es or letters, the sewing machine sews until one cycle of
the selected pattern is completed, sews lock stitches and
stops. The start/stop button lights up in orange during
the one cycle.
★
★
Foot switch function
It is possible to set so that the sewing machine performs sewing of reverse stitches or lock stitches by
depressing the front section of the foot controller.
(Refer to page 89)
Adjustable reverse stitch speed
Reverse stitch speed and lock stitch speed can be
set.
(Refer to page 96)
Page 42

40
Example: straight stitch
B
Fabric
A
The sewing machine operates differently
according to the button you press.
B
: Press the reverse stitch button.
The machine sews reverse stitches, stop sewing and trim both needle and bobbin threads
automatically.
: Press the lock stitch button.
The sewing machine sews lock stitches, auto-
matically stops and trims both the needle and
bobbin threads.
1
After selecting a pattern, you can press
.
is displayed on the screen.
When you press the button again,
is displayed to
show that the lock stitch is set.
2
Place the fabric in the sewing start
position and begin sewing.
A
:
The machine sews a few back stitches and continue.
: The sewing machine sews a few lock stitches
and continues sewing.
3
Automatic lock stitch and t
hread trimming
★
B
Fabric
A
The sewing machine automatically sews reverse stitches and lock
stitches at the start of sewing. Then, it starts normal sewing.
When you push the reverse stitch button at the end of sewing, the sewing machine sews reverse stitches, trims threads and stops.
Press
to change the settings.
Straight stitch/zigzag stitch Pattern
Press once
Screen display:
(Reverse stitch)
Screen display:
(Lock stitch)
Press twice
Screen display:
(Lock stitch)
Screen display: None
(No setting)
Press three times
Screen display: None
(No setting)
Example) In the case of straight stitches
Page 43

41
When changing the needle position
of straight stitch
It is possible to change the needle position with the zigzag
width adjusting dial/button.
Turning to the left (- side), the needle moves to the left.
Turning to the right (+ side), the needle moves to the right.
Pushing “-”, the needle moves to the left.
Pushing “+”, the needle moves to the right.
When changing the stitch length
It is possible to change the stitch length with the stitch
length adjusting dial/button.
Turning to the left (- side), the displayed value becomes
smaller and the stitch length becomes smaller accordingly.
Turning to the right (+ side), the displayed value becomes
larger and the stitch length becomes larger.
Pushing “-”, the displayed value becomes smaller and the
stitch length becomes smaller accordingly.
Pushing “+”, the displayed value becomes larger and the
stitch length becomes larger.
★
How to change needle positions How to change the stitch length
DX7
DX5
DX7
DX5
DX7
DX5
DX7
DX5
Page 44

42
Reinforced stretch stitch
The reinforcing stretch stitch helps reinforce seams
when used for sewing of elastic fabric or the force-exerted part of fabric that is likely to fray.
Straight stitch for elastic fabric
Finished seams are elastic. This stitch system can be
used for producing straight stitches on elastic fabrics
such as knits and jersey.
Other straight stitch patterns
★
Reverse straight stitch
Machine starts to sew reverse and when reverse stitch
button is pushed, it sews forward.
DX7 Only
Page 45

43
Zigzag stitch
When changing the zigzag width
The zigzag width can be adjusted while sewing.
Turning to the left (- side), displayed value becomes smaller
and the zigzag width becomes smaller accordingly.
Turning to the right (+ side), displayed value becomes larger and the zigzag width becomes larger accordingly.
Pushing “-”, displayed value becomes smaller and the zigzag width becomes smaller accordingly.
Pushing “+”, displayed value becomes larger and the zigzag width becomes larger accordingly.
When changing the stitch length
The stitch length can be adjusted while sewing.
Turning to the left (- side), the displayed value becomes
smaller and the stitch length becomes smaller accordingly.
Turning to the right (+ side), the displayed value becomes
larger and the stitch length becomes larger accordingly.
Pushing “-”, the displayed value becomes smaller and the
stitch length becomes smaller accordingly.
Pushing “+”, the displayed value becomes larger and the
stitch length becomes larger accordingly.
Width
Length
Pattern No. Direct 4
Presser foot
Standard presser
foot (A)
Attention
Turn OFF the power switch
before replacing the presser
foot.
DX7
DX5
DX7
DX5
DX7
DX5
DX7
DX5
Page 46

44
Pattern No. Practical 07
Presser foot
Overcasting presser
foot (C)
Push the fabric towards the guide and sew.
If the fabric and guide are apart, it will not make a
nice stitch formation. Make sure to guide the fabric
along the guide and sew slowly.
* Before sewing, make sure to check that the needle
will not hit the presser foot.
Overcasting stitch
Overcasting stitch 1
Pattern No. Direct 7
Presser foot
Overcasting presser
foot (C)
This stitch is used for overcasting medium- to heavyweight materials.
Guide the fabric along the guide and sew.
* Before sewing, make sure to check that the needle
will not hit the presser foot.
Overcasting stitch 2
・
This stitch is used to prevent the edge of fabric from fraying.
Attention
Turn OFF the power switch
before replacing the presser
foot.
Attention
Turn OFF the power switch
before replacing the presser
foot.
Page 47

45
This stitch is used to prevent the cut edge of fabric
from fraying.
Keep some seam allowance and cut the sewn fabric
carefully so that stitches are not cut by the scissors.
Overcasting by 3-point zigzag
Pattern No. Practical 05
Presser foot
Standard presser
foot (A)
This overcasting stitch is used for overcasting lightweight materials.
Guide the fabric along the guide and sew.
* Before sewing, make sure to check that the needle
will not hit the presser foot.
Overcasting stitch 3
Pattern No. Practical 08
Presser foot
Overcasting presser
foot (C)
* Do not use overcasting presser foot (C).
Attention
Turn OFF the power switch
before replacing the presser
foot.
Attention
Turn OFF the power switch
before replacing the presser
foot.
Page 48

46
Blind stitch
Fabric
(wrong side)
Fabric
(wrong side)
Basting line
Fabric
(wrong
side)
0.5 to 0.6 cm
Fabric
(wrong side)
Finish line
Finish line
0.5 to 0.6 cm
Finish line
1
Sewing overcasting stitches on the edge
of fabric.
● Refer to page 44 for overcasting stitches.
2
Carry out basting by hand.
3
Fold from basting line.
Leave 0.5 to 0.6 cm.
Folding fabrics
Pattern No.
Direct 8
Practical 13 (Lightweight material)
Practical 14
(Stretchy fabrics)
Presser foot
Blind stitch presser
foot (D)
Pattern
number
Attention
Turn OFF the power switch
before replacing the presser
foot.
Page 49

47
Finish line
Fabric
(right side)
Fabric
(wrong
side)
Fabric
(wrong side)
Guide
Fabric
(wrong
side)
Folded edge
Guide
Needle
Folded
edge
Guide
4
Align the guide of the presser foot with
the folded edge.
Turn the hand wheel and adjust with
the zigzag width adjusting dial so that
stitches reach the folded edge.
* Pay attention so that needle will not hit the
presser foot.
5
Position the folded edge against the guide
and sew.
6
Turn over the fabric after sewing.
Page 50

48
Turn the zigzag width
adjusting dial to the
right side.
2. If the stitches fail to reach the folded edge
1. If the stitches reach too far beyond the folded edge
When changing the needle entry point
Turn the handwheel
to check the needle
entry point. When
adjusting, make sure
the needle is in the
up position.
Turn the handwheel
to check the needle
entry point. When
adjusting, make sure
the needle is in the
up position.
DX7
DX5
Push the zigzag width
adjusting button "+".
Turn the zigzag width
adjusting dial to the
left side.
Push the zigzag width
adjusting button "-".
DX7
DX5
Page 51

49
Buttonhole stitches
Buttonhole type
* The buttonhole length is automatically determined only by placing a button on the buttonhole press-
er foot.
*
The machine can sew buttonholes for buttons with diameters of 0.7 - 3.2 cm.
*
In case of stretchy fabrics, use non-elastic interlining on the wrong side of the fabric.
*
Make sure to perform test sewing to see that the machine sews buttonholes correctly.
*
Buttonhole Nos. 09 - 12 are for knit fabrics and should be used with a knit needle.
Pattern No.
Direct 0
Buttonhole 01, 02,
04~15
Presser foot
Buttonhole presser
foot (E)
0
Standard buttonhole
Buttonhole for medium to heavy
weight materials
Standard buttonhole
01
Stitch length is larger.
Buttonhole for heavy weight materials
02
Sews buttonhole double
03
Manual 2-step buttonhole
Use this buttonhole, when there
is an overlapped section in the
fabric or when you want to sew
larger buttonhole than 3.2 cm
diameter. (Refer to page 55)
04
Rounded end
Buttonholes for women’s blouses
and children’s clothes.
Also for light weight materials
05
06
Keyhole
Keyhole buttonhole for heavy
weight materials such as suits,
jackets, coats, etc.
07
Round keyhole
08
Large and thick keyholes for
heavy weight materials
09
For knit
Buttonhole for light weight knit
(also used as decorative buttonhole)
10
Buttonhole for medium weight
knit (also used as decorative
buttonhole)
11
Buttonhole for light weight knit
Sews buttonhole double
12
Buttonhole for medium weight
knit
Sews double buttonhole
13
Decorative
Decorative buttonholes
Decorative buttonhole which look
like hand-sewn
14
15
* Refer to page 55 for button-
hole 03.
Pattern
number
Attention
Turn OFF the power switch
before replacing the presser
foot.
Page 52

50
Groove
Button holder
1
Set the presser foot.
Lift the needle and lift the presser foot.
Align the groove of the presser foot holder with the pin
of the presser foot and lower the presser foot holder to
set.
2
Set the button.
Pull the button holder toward A, place the button on
the button holder, and then push the holder toward B
to set the buttonhole length.
* It is impossible to set a button thicker than
4mm.
Pin
A
B
3
Set the buttonhole sensor pin.
Insert the sensor pin into the sensor pin hole at the
face plate cover.
* Insert the pin into the hole completely.
* If the machine starts to sew without inserting
the pin into the hole, the following message will
be shown on the display.
Set the sensor pin
and restart.
Sensor pin
* Check the following
points after setting the
presser foot and then
start to sew buttonholes.
Check that there
is a clearance.
If there is not a
clearance, the
machine will
not sew neat
stitches.
Page 53

51
4
Place the fabric under the presser foot.
Raise the presser foot, pass the needle thread through
the hole on the presser foot and pull it out sideways.
Place the fabric under the presser foot, align the marking with the sewing-start point. Penetrate the needle
into the fabric by turning the hand wheel and lower the
presser foot.
5
Start sewing.
The machine will stop automatically after sewing the
buttonhole.
* If a buttonhole of the same size will be sewn
again, push the thread trimming button to trim
the threads and raise the presser foot.
Under this condition move to another point,
lower the presser foot and then start sewing.
*
Do not change stitch length and/or zigzag width
during buttonholing. Otherwise this will cause
imbalanced stitches.
*
If thread trimming button is pushed while sew
ing buttonhole, the machine will stop and will
not complete the buttonhole.
* Depending on material to be sewn and weaving di-
rection of the material, there might be a slight difference in zigzag widths between right and left lines of
buttonholes. Test sewing is recommended.
Hole on the
presser foot
Sewingstart point
Needle
thread
Marking
Start from here
Page 54

52
Eyelet
punch
It will be easier to sew buttonholes on the thin fabrics
and/or near the overlapped sections, if the clamping
plate is used.
Clamping plate
1. Attach the buttonhole presser foot
to the presser foot holder, with the
clamping plate together.
2. Place the fabric between the presser
foot and the clamping plate.
* You can remove the clamping plate by holding A.
● Buttonhole clamping plate
Stopper
pin
6
Unplug the sensor pin after sewing.
7
Opening the buttonhole using a ripper.
[double bartack]
Pierce a stopper pin at the bartack and open the buttonhole with a ripper. Be careful not to cut the stitches.
[Keyhole buttonhole]
Place a cardboard under the buttonhole and make a
hole with the eyelet punch. Then pierce a stopper pin
at the bartack and open the buttonhole with a ripper.
Ripper
A
Turn off the power when
setting the clamping plate.
Caution
Page 55

53
Hook
Buttonholes with gimp thread prevent the buttonholes from stretching and can make them more secure.
* A buttonhole with gimp thread should be sewn using the double bartack pattern (Pattern No. Direct 0).
1
Pass the needle thread through under the
presser foot and then draw the thread to
the side of the presser foot.
2
Put one end of gimp thread into the
notch at the front right side of buttonhole
presser foot, pull the gimp thread under
the presser foot and thread it at the hook
of the presser foot.
3
After threading at the hook, pull the gimp
thread back under the presser foot and
put it into the notch at the front left side of
the presser foot rmly.
4
Bring down the needle to the sewing start
point and lower the presser foot.
5
Sew the buttonhole.
6
Pull the left gimp thread to take off slack
and cut excess gimp thread.
Pattern No. Direct 0
Presser foot
Buttonhole presser
foot (E)
Notch
Buttonhole with gimp
Attention
Turn OFF the power switch
before replacing the presser
foot.
Page 56

54
Turn the zigzag width
adjusting dial/button.
Turn the stitch length
adjusting dial/button.
* The setting of the buttonhole width
and stitch length will be cancelled
when the power is shut down or another pattern is selected.
Turn to the left
Pushing “-”
The width becomes
narrow
Turn to the right
Pushing “+”
The width becomes
wide
narrow wide
Turn to the left
Pushing “-”
The stitch length
becomes narrow
Turn to the right
Pushing “+”
The stitch length
becomes larger
Narrow stitches Large stitches
narrow
larger
* The width of buttonhole can be changed by ( ) option. (Refer to page 84)
When changing the density of the seam
When changing the width of the buttonhole
DX7
DX5
DX7
DX5
Page 57

55
Manual 2-step buttonhole
1
Set the manual buttonhole presser foot (I).
2
Pass the needle thread through the
hole of the presser foot and pull it out
sideways together.
Hole on the
presser foot
sewing
start point
Needle
thread
3
Bring down the needle on the sewing start
point and lower the presser foot.
* Turn the “zigzag width” and “stitch length” ad-
justing dials before sewing when you want to
change the buttonhole width and density of the
seam.
4
Push start/stop button to sew.
* At this time, if the start/stop button is pushed, the
machine will stop sewing. And if the start/stop button
is pushed again, then the machine will continue to sew
the left side of the buttonhole.
Push the reverse stitch button when it
reaches the necessary length of the left
side of the buttonhole.
Sew bartack and the right side of the
buttonhole, then the machine sews
bartack and right side of the buttonhole.
Necessary length
Pattern No. Buttonhole 03
Presser foot
Manual buttonhole
presser foot (I)
Attention
Turn OFF the power switch
before replacing the presser
foot.
Reverse stitch
button
Page 58

56
5
Push reverse stitch button when it comes
to the sewing start point.
Sewing start
point
Stopper
pin
6
Sew bartack and lock stitches until the
machine stops automatically.
7
Pierce a stopper pin at the bartack and
open the buttonhole with a ripper.
Be careful not to cut the stitches.
As the numbers of stitches of both right and left lines
of buttonhole is memorized in the sewing machine, the
buttonhole of the same size can be sewn.
* If you want to change the memory, select the stitch
pattern once again.
* In the case of a 2-step buttonhole, sewing direc-
tion of the left and that of the right side is different. Due to this and according to fabrics to be
sewn, it may be possible that the density of each
side looks different.
Ripper
Reverse stitch
button
Page 59

57
Sewing buttons
Pattern No.
Practical 21
DX7
Practical 20
DX5
Presser foot
Manual buttonhole
presser foot (I)
* Do not use the automatic thread trimming function when sewing buttons.
1
Move the drop feed knob to the right hand
side.
Feed dog is now down.
2
Place a button under the presser foot and
adjust the zigzag width according to the
distance between holes in button.
3
Make sure that needle enters holes in
button, by turning hand wheel manually.
4
Carry out sewing while turning the
handwheel by hand.
If you pull the material, the button could be moved
from the correct position causing needle breakage.
Buttons can be sewn without fail by using the sepa-
rately-available button sewing presser foot (refer to
page 107).
5
Trim needle and bobbin threads by about
10cm (4 inches) long after sewing.
Make a knot to secure the stitches.
3.5 mm
Example)
Attention
Turn OFF the power switch
before replacing the presser
foot.
Page 60

58
Bartacking
Bartacking is used to reinforce the part of the seam that is likely to ravel.
* The length of the bartack is determined by pushing the reverse stitch button, but it will automatically make a
u-turn when it reaches the maximum of 20 stitches.
* If the presser foot cannot be parallel to throat plate, use ller fabric or cardboard.
Fabric
example of use
Trousers
and skirt
Bag
Pocket
2
Place the fabric under the presser foot.
10 cm
1
Pass the needle thread through the
presser foot.
Pattern No.
Practical 18
DX7
Practical 17
DX5
Presser foot
Manual buttonhole
presser foot (I)
Attention
Turn OFF the power switch
before replacing the presser
foot.
Page 61

59
To sew a bartack of the same length again…
when the length of the rst bartack has been memorized,
● When the start/stop
button is pushed, the
machine starts to sew
and makes a u-turn
automatically at the
same point as the rst
bartack.
● When it comes to the
sewing end point, push
the reverse stitch button.
* The sewing machine
continues sewing unless
you push the reverse
stitch button.
* If you want to change the memorized length of the bar tack,
please select stitch pattern again.
3
Start sewing.
Push the start/stop button and the machine starts to
sew straight stitches.
4
When it comes to the turning point push
the reverse stitch button.
The machine goes back to the starting point by sewing
straight stitches and then it sews zigzag stitches to the
point where the reverse stitch button is pushed.
5
When the machine comes to the sewing
end point, push the reverse stitch button.
The machine sews lock stitches and stops.
Reverse stitch
button
Start/stop button
Starting
point
Lock
stitches
T
urning
point
Page 62

60
Inserting zippers
* Make sure to use center needle position
(Stitch pattern No. Direct 1).
(right) (left)
2
Attach the zipper presser foot (B) to the
machine.
When sewing the left side of the zipper, place the zipper under the right portion of the zipper presser foot.
When sewing the right side of the zipper, place the
zipper under the left portion of the foot.
1
Use the standard presser foot (A) to sew.
Place the fabrics face-to-face. Check the runstitching
length and the length of the zipper to be inserted. Machine baste the zipper onto the fabrics.
Machine basting = zipper opening length + 1 cm
Machine basting ...
Stitch length “4”
Crotch end
Reverse stitch (1cm)
Runstitching ... Stitch length “Automatic”
Preparation before attaching zipper
Pattern No. Direct 1
Presser foot
Zipper presser foot
(B)
Zippers are set in two different ways: by inserting into
the side seam of the garment and by centering in position.
Attention
Turn OFF the power switch
before replacing the presser
foot.
Fabric
(wrong side)
Page 63

61
5 cm
0.7 to 1 cm
Basting
Reverse
stitches
Basting
stitches
Zipper
Fabric
(wrong side)
Fabric (right side)
Fabric
(right side)
5 cm
0.3 cm
Slider
Move up the
slider
1
Open the seam allowance.
Neatly open the seam allowance. Adjust the back
seam allowance so that it projects 3 mm from the
seam. Press with an iron to make a crease. Fit the
crease along the edge of the teeth.
2
Sew the zipper tape on the seam
allowance from bottom to top.
Fitting the edge of the zipper presser foot along the
edge of the zipper teeth, sew the zipper tape on the
seam allowance. At the slider part of the zipper, stop
the machine at 5 cm (2 inches) before the slider. Move
the slider to the far side of the presser foot and sew
the zipper until its top end is reached.
3
Put the fabric over the zipper.
Baste the zipper and set it on the fabric.
* Baste the zipper tape with the fabric with hand bast-
ing stitches.
Move the slider to the top of the zipper.
Put the fabric over the zipper and perform basting.
Zipper
Fabric
(wrong side)
Zipper opening size
1 cm
Teeth
Slider
0.3 cm
Crotch end
4
Sew reverse stitches and sew the righthand side.
After sewing reverse stitches, set the left hand side of
the zipper presser foot to the zipper teeth. Sew until
5 cm (2 inches) of the zipper end. Undo the basting stitches and move the slider to the far end of the
presser foot. Then sew the rest of the way.
Set on right
Set on left
Lapped insertion
Page 64

62
Presser foot
holder
Narrower sewing
lines
Quilt Guide
Wider sewing
lines
How to use the quilt guide
2
Sew while tracing the stitches with the tip
of the quilt guide.
Distance between sewing lines can be adjusted freely.
1
Insert the quilt guide into the groove of
the presser foot holder.
Pattern No. Direct 1, 4
Presser foot
Standard presser
foot (A)
Attention
Turn OFF the power switch
before replacing the presser
foot.
Page 65

63
Scallop stitches
This stitch is used for decorating edging on items such as
table cloths, collars on blouse, etc.
1
To keep the pattern intact, leave some
margin and sew on the edge of the cloth.
2
Cut the sewn fabric carefully so that
stitches are not cut by the scissors.
Pattern
No.
Decorative 2: 53, 54
DX7
Decorative: 72, 73
DX5
Presser
foot
Manual buttonhole
presser foot (I)
* Adjust stitch length of the decorative stitches
according to the fabric to be sewn.
Sewing on fabric too thick may cause jamming.
Pattern
number
Attention
Turn OFF the power switch
before replacing the presser
foot.
Page 66

64
Example)
Decorative stitches
Pattern
No.
Decorative 1: 01~80
DX7
Decorative 2: 01~80
DX7
Decorative: 01~90
DX5
Presser
foot
Manual buttonhole
presser foot (I)
Display of the length of one cycle
Although the length of one cycle of the decorative pattern is displayed, treat it only as
a reference, as this will be changeable based on fabric and thread.
The length of one
cycle is displayed.
7.7 mm
Pattern
number
Attention
Turn OFF the power switch
before replacing the presser
foot.
Pass down the needle thread through the
presser foot hole and draw it sideways.
Place the fabric under the presser foot
and start.
Page 67

65
Combination of patterns
Patterns which can be combined
(How to sew a combination of patterns)
2
Select the pattern No. 71.
Sew the pattern No. 71
while aligning the inner
edge of the presser foot
with the edge of the pattern (
A
).
1
Sew the pat-
tern No. 70.
A
★
For sewing pattern
Nos. 70 and 71 in
combination
★
For sewing pattern
Nos. 79 and 80 in
combination
B
2
Select the pattern No. 80.
Sew the pattern No. 80
while aligning the outer
edge of the presser foot
with the center line of the
pattern (
B
).
1
Sew the pat-
tern No. 79.
Example of combinations of patterns
Lace-like patterns can be sewn by combining patterns.
Patterns which can be combined
Example of combinations of patterns
DX7
DX5
Page 68

66
Attention
Turn OFF the power switch
before replacing the presser
foot.
Patchwork piecing
To sew pieces of cloth together is called piecing in patchwork.
When piecing, the seam allowance is usually 1/4" (6.4 mm).
1
Cut the fabric with seam allowance.
2
Align the right end of the presser foot and
the edge of the fabric and sew.
The needle will enter 1/4" (6.4 mm) from the edge of
the fabric, so the seam allowance of 1/4" (6.4 mm) can
be sewn.
Pattern No.
Direct 2, 3
Presser foot
Standard presser
foot (A)
* You can change the needle position as you like.
Needle position change: Refer to pages 41 and 85.
The needle position can be
adjusted between 0.0~7.0.
When the needle position is
at ‘5.6’, the needle is 1/4" (6.4
mm) from the right edge of
standard presser foot (A).
1/4” (6.4 mm)
5.6
0.0 7.0
1/4” (6.4 mm)
Page 69

67
Appliqué (1)
The edge of the appliqué fabric is sewn with a compact zigzag, so it is suitable for the appliqué of cut fabric.
2
Turn the hand wheel towards you and
start sewing along with the outer side of
the appliqué fabric.
1
Cut the appliqué fabric at the nish
line, put it on the base fabric and x it
temporarily.
It is recommended to use both-sided adhesive interlining or the similar to x the appliqué fabric on the base
fabric. Use the interlining to the edge of the appliqué
fabric.
*
When sewing steep angles, keep the needle inside
the fabric, raise the presser foot, change sewing
direction and sew slowly.
Pattern
No.
Direct 5
DX7 Only
Decorative 2: 68, 69
Presser
foot
Manual buttonhole presser
foot (I)
Open toe presser foot (O)
DX7 Only
Keep the needle inside the fabric
at the point of arrow and raise the
presser foot.
3
At the end of sewing, press the lock stitch
button to sew lock stitches.
* Usually center needle position is used for appliqué
stitches but right or left needle position can be used.
Changing needle position: Refer to page 85.
*
You can also sew appliqués using the pattern Nos. 68
and 69 for elongation of the decorative patterns 2.
Refer to page 103.
Attention
Turn OFF the power
switch before replacing the presser foot.
Page 70

68
Appliqué (2)
To make the stitch unconspicuous, an appliqué can be sewn.
Seam allowance
2
Put the pattern paper onto the wrong side
of the fabric and fold the seam allowance
at the nish line.
1
Cut the appliqué fabric with seam
allowance of 3~5mm.
Pattern
No.
Direct 6
Quilting 44~50
DX7
Quilting 40~45
DX5
Presser
foot
Manual buttonhole presser foot (I)
Open toe presser foot (O)
DX7 Only
3
Put the appliqué fabric on the base fabric.
Temporarily x it with basting stitches or
glue.
4
Turn the hand wheel towards you and
start sewing along with the outer side of
the appliqué fabric.
* When sewing steep angles, keep the needle inside
the fabric, raise the presser foot, change sewing
direction and sew slowly.
5
Lock stitch at the end of sewing.
It is better to lock stitch at the outer side of the appliqué fabric.
* You can change the stitch base as you desire.
Changing needle position: Refer to page 85.
Basting
Pattern paper
Pattern
number
Attention
Turn OFF the
power switch
before replacing
the presser foot.
Page 71

69
Pattern
No.
Quilting 03~80
DX7
Quilting 03~50
DX5
Presser
foot
Manual buttonhole presser foot (I)
Open toe presser foot (O)
DX7 Only
Crazy quilt
Example 1) Quilting 54
Sew patterns so that they extend over both pieces of fabric.
Using a decorative stitch, this gives a decorative look to the
joining of patchworks.
It is recommended to use decorative thread such as embroidery thread.
Example 2) Quilting 56
Sew patterns so that the presser foot holds one side of fabric.
Random pattern
Random stitch patterns (Quilting 64~80) are transformations
of Quilting 47~63.
The width can be changed automatically by section, so that
you can enjoy those patterns.
Pattern
number
Attention
Turn OFF the
power switch
before replacing
the presser foot.
DX7 Only
Page 72

70
Stitch in ditch quilting
Pattern No.
Direct 1
DX7
Quilting 40
DX5
Quilting 36
Presser foot
Edge sewing presser
foot (R)
This is separately available
for
DX5
This is for quilting the edge of patchworks and appliqués.
The machine will sew the lower (thinner) side of the fabric
layers. As a result, the stitches will not be noticeable and
have an effect to make the design look three dimensional or
emphasized.
2
Put the guide of the presser foot along
with the crease and sew.
The needle enters behind the guide, so that the edge
of the crease can be sewn.
1
Put the top layer of fabric with patchwork
and/or appliqués, quilting cotton and
bottom layer of fabric together by pin or
basting stitches.
Curved concealed quilting
Use manual buttonhole presser foot (I) or the open toe
presser foot (O). Sew curves by lifting the presser foot and
changing the direction very often.
Also this can be done by free motion with the quilt presser
foot. (Refer to page 72.)
* If the desired points can not be sewn, adjust the nee-
dle position.
Needle position change: refer to pages 41 and 85.
Attention
Turn OFF the power switch
before replacing the presser foot.
★
Hand look quilt stitches
Handsewn look seams can be sewn by using a transparent
thread as the needle thread.
DX7
Quilting 40
DX5
Quilting 36
Bobbin thread Needle thread
Page 73

71
* To further avoid fabric shifts, set the presser foot
pressure lower.
Adjustment of presser foot pressure: Refer to page
29.
Setscrew for presser
foot holder
Actuating lever
Needle
clamp
1
Put top layer of fabric with patchwork and/
or appliqué, quilting cotton and bottom
fabric together by using pin or basting
stitches.
3
Place your hands to both sides of the
presser foot and sew by pulling the
fabrics apart.
* Sew with slow to medium sewing speed.
Quilting (straight stitch)
Quilting is the process of sewing the top layer of fabric, with
quilting cotton in between and a bottom layer of fabric underneath.
By using the walking foot, the machine feeds both top and
bottom fabrics together at the same time, so fabric shifting is
eliminated.
Pattern No.
Direct 1, 4
Presser foot Walking foot (N)
Setscrew for presser
foot holder
Presser bar
Presser foot
holder
2
Assemble the walking foot.
Raise the presser bar. Loosen the setscrew for presser foot holder and remove the presser foot holder.
(Refer to page 16)
Fit the actuating lever on the needle clamp. Then, t
the assembling point of the walking foot in the presser bar. Securely tighten the setscrew for presser foot
holder.
Assembling point
Attention
Turn OFF the power switch
before replacing the presser
foot.
Page 74

72
1
Put top layer of fabric with patchwork and/
or appliqué, quilting cotton and bottom
fabric together by using pin or basting
stitches.
2
Assemble the quilt presser foot.
Raise the presser bar. Loosen the setscrew for presser foot holder and remove the presser foot holder.
(Refer to page 16)
Set the quilting foot and tighten the setscrew for presser foot.
Quilting (free motion)
Pattern No.
Quilting
1
Presser foot Quilt presser foot (Q)
3
Move the drop feed knob to the right hand
side.
Feed dog is now down.
Setscrew for
presser foot holder
Setscrew for presser
foot holder
Presser bar
Presser foot
holder
Attention
Turn OFF the power switch
before replacing the presser
foot.
It is called free motion quilting when moving the fabrics freely towards any
directions without using the feed dog of sewing machine.
When the feed dog is lowered (drop feed condition), it is possible to sew
various curves and/or any directions by moving the fabrics by hands.
* Be sure to sew straight stitch
pattern (center stitch base).
When doing the free motion
with zigzag stitch, use the
quilt presser foot (Transparent
zigzag type) which is optionally available from your dealer.
Page 75

73
4
Place the fabric underneath the presser
foot and lower the presser foot.
5
Adjust the presser foot height according
to the material thickness.
The height can be adjusted in two different ways.
①
I
n the case of free motion (Pattern No. Quilting 1),
the presser foot height for the oat function can
be adjusted with the stitch length adjusting dial.
②
Adjusting with the presser foot screw
.
The material can be moved smoothly with no resistance
by adjusting the presser foot height to about 1 mm
above the material.
Screw
1 mm
6
Use both hands to hold the fabrics and
move it without letting it loose.
The target stitch length is about 1.5 ~ 2.0
mm.
7
When free motion sewing is nished,
move the drop feed knob back to the left
side.
The feed dog will be up and engaged at the same time
as the machine starts to sew.
● How to lock stitches
1. At sewing start, pull up the bobbin thread on the top layer of the fabric, hold both needle and bobbin
threads together and sew 3 stitches on the same point. After that move fabrics as you wish.
In this way, stitches on the wrong side of the fabrics look neat.
2. At sewing-end sew 3 stitches on the same point and stop.
● How to sew stitches with the same stitch length
1. When the foot controller is used, the fabrics can be guided by both hands and you can move the fabrics
freely.
2. Set the speed controller to medium or medium low rst, press the foot controller completely and move the
fabrics.
-- if stitches become too large, set the speed controller to “faster”
-- if stitches become too small, set the speed controller to “slower”.
Tips
Height
increases
Height
decreases
Page 76

74
Pattern
No.
-
Presser
foot
Manual buttonhole
presser foot (I)
One-point stitch/sewing letters
(in order to sew a pattern neatly, apply
interlining and conduct a test sewing rst.)
Use an iron to attach a fusible interlining to the wrong side of
fabric.
* When stitch length becomes too small, the bobbin thread
will come out to the front side of fabric and/or stitches
might get stuck. Therefore make sure to conduct a test
sewing beforehand.
Fabric
Since the pattern might be deformed according to the type and thickness of fabric and
fusible interlining to be used, make sure to
conduct test sewing on the same fabric and
interlining.
Carry out adjustment using the
optional functions.
(Refer to page 94 for details.)
Correct shape When right side is higher than
left side,
When right side is lower than
left side,
Carry out the adjustment while conducting
test sewing by pressing
Carry out the adjustment while conducting
test sewing by pressing
Pattern
No.
DX7
Quilting:
03~80
Decorative 1:
01~80
Decorative 2:
01~80
DX5
Quilting:
03~50
Decorative:
01~90
Letters
Presser
foot
Manual buttonhole presser
foot (I)
Preparation before sewing
Test sewing
Adjustable range
~
Adjustable range
~
Attention
Turn OFF the power
switch before replacing the presser foot.
DX7
DX5
* In the case a quilting
pattern is sewn as the
one-point stitch, some
pattern shapes can be
different from those displayed on the screen.
Page 77

75
Presser foot to be
used (symbol)
Sewing pattern
Zigzag width
Length of stitch
Stitch length adjusting
dial
Conrmation button
Continuous stitch button
Mirror image button
Option button
Selection button
Zigzag width
adjusting dial
Clear button
Pattern selec
-
tion button
Needle-stop position
Stitch Pattern No.
Needle stops at its
highest position
No
indication
Needle stops at its
lowest position
Number of patterns
selected
Elongation
(Refer to page 102)
Operational buttons and screen
Float function button
Float function setting
Float function
No
indication
No setting
Setting of automatic lock
stitch and thread trimming
Lock stitch and
thread trimming
No
indication
No setting
Continuous sewing setting
Continuous sewing
with intervals
Continuous sewing
without intervals
No
indication
No setting
Automatic lock stitch
and thread trimming
button
One-point/letter
selection button
* Adjusting
buttons on DX5.
* Adjusting
buttons on DX5.
Pattern inversion
setting
Save/call button
Page 78

76
Press .
Press
.
Press
.
Press
or
to select
.
Press or
to select
.
How to select pattern (letters)
Press .
Example:
JUKI
For
DX5
, different selection screen
and pattern number are used.
Press
and .
(Pattern No. 31)
Press
twice.
Press
Press
twice.
Press
three
times.
Page 79

77
Press .
Press
or
to select
.
Press .
Press
.
Press
and .
(Pattern No. 31)
When you want to change the size of
pattern (letters) …..
Move the cursor to the desired pattern (letter).
You can change the height and width by:
Height: Zigzag width adjusting dial
Width: Stitch length adjusting dial
When you want to insert a space
between a pattern (letter) and pattern
(letter)….
Combine a pattern (letter) and a pattern (letter)
while inserti
ng:
DX7
Decorative patterns 2, No. 52 ( )
DX5
Decorative pattern, No. 71 (
).
Page 80

78
Change to .
Press , and
move the ‘_’(cursor) to the position
where you wish to
delete.
By pressing
,
the pattern on the
cursor “
" will be
deleted.
Press .
How to edit patterns (letters)
JUKI JUKI
Press .
Example)
Press
and .
(Pattern No. 16)
Page 81

79
Pass down the needle thread through the
presser foot hole and draw it sideways.
Place the fabric underneath the presser foot
and start.
The machine will stop automatically when sewing is nished.
Notes:
1.
Note that the sewing speed varies according to
stitch patterns (letters) to be sewn.
2.
If the automatic thread trimmer is used while sew-
ing, the machine starts to sew from the beginning.
3.
In case of condensed sewing, if the stitch length is
too small, the stitches may get stuck.
Get rid of unnecessary thread on the front side
of fabric by scissors.
Disposing thread ends of jump stitches
How to stitch a pattern (letters)
Page 82

80
The letters and one point patterns can be combined and saved for later use.
There are 10 folders in total for saving.
Press .
Use
to select
folder to save and
press
.
Notes: means
there exists already
a pattern.
means empty
and available for
saving pattern.
(Save) (Call)
Press .
Press to
select the folder
where you wish
to call the desired
combination.
Press
.
Press .
Press
.
Press
.
Save/call of patterns (letters)
Page 83

81
To delete the content stored inside a
folder.
Use to
select the target
folder where content to be deleted
is stored.
Press
.
Use
to select “delete” and press
.
Press .
Press
.
To sew patterns continuously
A combination of letters and one-point stitches or single patterns can be sewn continuously.
Select a pattern and press . Then, the selected pat-
tern can be sewn in repetition.
Two kinds of continuous sewing can be selected.
Press
once:
is displayed on the screen. In this case, patterns
can be sewn continuously with large intervals inserted
between patterns.
1
Press twice:
is displayed on the screen. In this case, patterns
can be sewn continuously with small intervals inserted
between them.
2
Another press on cancels the continuous sewing.
* If you cancel the continuous sewing during sewing, the
sewing machine stops after the completion of the pattern it
has been sewing.
Example)
Example)
Page 84

82
Character selecting methods
No. of pressing a button
1 2 3 4 5 6 7 8 9 10 11 12 13 14
@ ! &
’
( ) , . ? - ・ / : ;
A B C a b c
D E F d e f
G H I g h i
J K L j k l
M N O m n o
P Q R S p q r s
T U V t u v
W X Y Z w x y z
_
No. of pressing a
button
1 2 3 4 5
Immediately after
selecting A
Ä Å Æ
A
Immediately after
selecting a
à ä å
a
Immediately after
selecting C
Ç
C
Immediately after
selecting c
ç
c
Immediately after
selecting e
è é ê ë
e
Immediately after
selecting i
ì
i
Immediately after
selecting N
Ñ
N
Immediately after
selecting n
ñ
n
Immediately after
selecting O
Ö Ø
O
Immediately after
selecting o
ò ö ø œ
o
Immediately after
selecting U
Ü
U
Immediately after
selecting u
ù ü
u
Other than the
above letters
Ineffective
No. of press-
ing a button
1
1
2
3
4
5
6
7
8
9
0
Page 85

83
Type and usage of options
Type of options
Default
setting
If a pattern
is selected
again
If the pow-
er is turned
OFF and
re-turned
ON
1
Changing the seam
width of buttonhole
The seam width of buttonhole is changeable.
Standard
The current
setting will
remain.
The setting
will return
to the
default.
2
Change of needle
position
You can change the stitch base line.
(Depend-
ing on the
pattern)
The setting
will return
to the
default.
The setting
will return
to the
default.
3
Selecting the stop
position of needle
You can select the needle position (needle-up or
needle-down) when the sewing machine stops.
Stop with
the needle
down
The current
setting will
remain.
The current
setting will
remain.
4
Twin needle sewing Select this option when using twin needle.
Single
needle
The current
setting will
remain.
The current
setting will
remain.
5
Foot switch function
You can select the operation to be carried out when
depressing the front section of the foot controller.
You can select the operation from among "reverse
stitch", "lock stitch", "half stitch sewing", "one stitch
sewing", "presser foot lifting/lowering", "thread
trimming" and "no function".
reverse
stitch
The current
setting will
remain.
The current
setting will
remain.
6
Presser foot pivot
function
You can select the setting where the presser foot
goes up with the needle held in the needle-down stop
position when you stop the sewing machine.
ON
The current
setting will
remain.
The current
setting will
remain.
7
Setting the pivot height
You can set the presser foot height in the case of
using the pivot function.
Setting range: 2.0 - 6.0 mm (in increments of 1 mm)
2.0
The current
setting will
remain.
The current
setting will
remain.
8
Setting the oatfunction height
You can set the presser foot height when pressing the
oat function button.
Setting range: 0.0 - 2.5 mm (in increments of 0.1 mm)
0.5
The current
setting will
remain.
The current
setting will
remain.
9
Setting of the presser
foot lifting after thread
trimming
You can select the setting were the presser foot
goes up automatically after the completion of thread
trimming.
ON
The current
setting will
remain.
The current
setting will
remain.
!0
Adjusting the darning
This function is used for adjusting the pattern shape.
Adjustable range: -30 - 30
0
The current
setting will
remain.
The current
setting will
remain.
!1
Adjustable starting
stitch speed
You can select the sewing speed to be employed at
the start of sewing.
Slow
The current
setting will
remain.
The current
setting will
remain.
!2
Adjustable reverse
stitch speed
You can select the reverse stitch speed and lock stitch
speed.
Slow
The current
setting will
remain.
The current
setting will
remain.
!3
Guide
The guide for winding bobbin thread, setting of
bobbin, threading of needle thread, changing presser
foot and needle can be seen on the LCD display.
- - -
!4
Adjusting the touch
panel sensitivity
You can adjust the touch panel sensitivity in ve
steps.
3.0
The current
setting will
remain.
The current
setting will
remain.
!5
Contrast of Liquid
Crystal Display (LCD)
The LCD contrast can be chosen from 11 levels.
6
The current
setting will
remain.
The current
setting will
remain.
!6
Button reception
buzzer volume setting
You can change the volume of buzzer that is produced
when pressing the button on the touch panel.
Loud
The current
setting will
remain.
The current
setting will
remain.
!7
Language setting
You can select language from 8 languages or
pictographs.
(Depend-
ing on
destina-
tion)
The current
setting will
remain.
The current
setting will
remain.
!8
Elongation
The length of the patterns (
DX7
Decorative 2:
No.53 ~ 69,
DX5
Decorative: No.72 ~ 84) can be
adjusted. Adjusting range is from size 1 to size 5.
(Depend-
ing on the
pattern)
The current
setting will
remain.
The setting
will return
to the
default.
!9
Deleting the settings You can reset all settings to their default settings.
- - -
Page 86

84
1
Change of seam width of buttonhole
The seam width of buttonhole is changeable.
* It is changeable when sewing a buttonhole.
Small
Standard Large
* Default setting is “standard”.
Example) narrowing (reducing) the seam width
The width is now changed.
* When opening buttonhole with a ripper, make sure
not to cut the stitches.
* The setting goes back to the default setting after the
sewing machine is turned off and on.
Seam width
Press
.
Press
.
Press
.
Several seconds
later.
Press
.
Page 87

85
2
Change of needle position
You can change the stitch base line.
* Default setting differs with pattern.
It is now changed to left needle position.
* In case of a combined stitch pattern, if the needle po-
sition is changed, the needle position of the selected
patterns is all changed to the same needle position at
the same time.
However, if letter is included in the combined stitch
pattern, needle position will not be changed.
* After a change of needle position and in the event
that other stitch pattern is selected, the sewing machine goes back to the default setting.
Press
.
Press
.
Press
.
Several seconds
later.
Press
.
Example) change the needle position of zigzag stitch to left needle position.
Left needle
position
Center needle
position
Right needle
position
Page 88

86
Press
.
3
Selecting the stop position of needle
You can select the needle position (needle-up or needle-down) when the
sewing machine stops.
* Default setting is the needle-down stop.
Example) To set the needle position when the sewing
machine stops to the needle-up stop:
The needle stop position is set to the
needle-up stop.
* The setting is memorized even when the machine is
turned off and on.
Press
.
Press
.
Press
.
Several seconds
later.
* In the case the needle stop
position is set to the “needle-up stop”, the presser
foot pivot function is automatically set to OFF.
Twin needle
Needle stops
at its highest
position
Needle stops
at its lowest
position
Single needle
Needle stops
at its highest
position
No
indication
Needle stops
at its lowest
position
<Display on the screen>
Page 89

87
4
Twin needle sewing
By using two needles beautiful decorative stitches can
be sewn.
* When using twin needles, make sure to set twin nee-
dle sewing in Option
and perform test sewing.
*
When twin needle sewing, make sure to use thread
size smaller than No. 60.
* Make sure to use a twin needle with size of 2.0 mm
(included needle: 2.0 mm).
* When twin needle sewing, the sewing speed will be-
come slower.
A
B
C
2.0 mm
1
2
How to thread the needles
Place the supplementary spool pin.
Thread to the thread guide A rst. After that,
thread paths are same up from B to F.
Do not thread G for right-hand needle.
Thread to right-hand and left-hand needles
separately.
*
Automatic needle threader can not be used.
Thread each needle manually.
* Automatic thread trimmer can not be used in
case of twin needle sewing.
1
2
3
4
D
E
F
3
4
* Bobbin winding is also
possible with supplementary
spool pin.
G
Attention
Turn OFF the power before
replacing needles.
Needle bar
thread guide
Pattern
No.
Direct: 1, 4, 5, 9
DX7
Practical:
01~06, 16, 17
Quilting: 03
Decorative 2: 53~60
DX5
Practical:
01~06
Quilting: 03
Decorative: 72~78
Presser
foot
Standard presser foot (A)
Manual buttonhole presser foot (I)
Page 90

88
Press
.
* Twin needle setting can not be done while a stitch
pattern other than those for twin needle sewing is
selected.
mark will be shown.
The twin needle setting can only be carried out
when suitable pattern is selected and center needle position is selected at the same time.
Setting of twin needle sewing
Symbol of twin needle sewing will be
shown on the display.
* When in twin needle sewing, the stitch patterns will be
limited. In addition, the stitch length and zigzag width
will be also adjusted to suit the twin needle sewing.
* The setting is memorized even when the machine is
turned off and on.
* Select a stitch
pattern suitable
for twin needle
sewing.
The sewing
image
Maximum 7.0 mm
* Maximum zigzag
width is 7.0 mm,
however, display
shows
.
5.0
7.0
Press
.
Press
.
Press
or
three
times.
Press
.
Several seconds
later.
Page 91

89
The foot switch function has now been
set.
* The setting is memorized even when the machine
is turned off and on.
5
Foot switch function
Press
.
Press
or
to select
. Then,
press
.
Select the
function using
and
press
.
Reverse stitch foot switch setting
In the case you select this function, the sewing machine sews reverse stitches when you
depress the front section of the foot controller.
1
Lock stitch foot switch setting
In the case you select this function, the sewing machine sews lock stitches when you
depress the front section of the foot controller.
2
Half-stitch sewing foot switch setting
In the case you select this function, the sewing machine sews a half stitch when you
depress the front section of the foot controller.
3
One-stitch sewing foot switch setting
In the case you select this function, the sewing machine sews one stitch when you depress the front section of the foot controller.
4
Presser-foot lifting/lowering foot
switch setting
In the case you select this function, the presser foot goes up/comes down when you depress the front section of the foot controller.
5
Thread trimming foot switch setting
In the case you select this function, the thread
trimmer trims the thread when you depress
the front section of the foot controller.
6
No-function setting
The foot switch function is set to OFF.
7
Several seconds
later.
You can select the operation to be carried out when depressing the front section of the foot controller.
You can select the operation from among "reverse stitch", "lock stitch", "half stitch sewing", "one stitch sewing",
"presser foot lifting/lowering", "thread trimming" and "no function".
* Default setting is the "reverse stitch".
Page 92

90
6
Presser foot pivot function
You can select the setting where the presser foot goes up with the needle
held in the needle-down stop position when you stop the sewing machine.
Example) To set the presser foot pivot function to OFF
* Default setting is ON.
The presser foot pivot function has now
been set to OFF.
* The setting is memorized even when the machine is
turned off and on.
Press
.
Press
.
Several seconds
later.
Press
.
* In the case the needle stop
position is set to the “needle-up stop”, the presser
foot pivot function is automatically set to OFF.
Press
or
to select
.
Then, press
.
Page 93

91
7
Setting the pivot height
You can set the presser foot height in the case of using the pivot function.
Setting range: 2.0 - 6.0 mm (in increments of 1 mm)
* Default setting is 2.0 (mm).
Example) To set the pivot height to 3.0 (mm)
The pivot height has now been set to 3.0
(mm).
* The setting is memorized even when the machine is
turned off and on.
Press
.
Press
.
Several seconds
later.
Press
.
Press or
to select
.
Then, press
.
Page 94

92
8
Setting the oat-function height
You can set the presser foot height when pressing the oat function
button.
Under this mode, the straight stitch (Pattern No. 1) is automatically
selected.
Setting range: 0.0 - 2.5 mm (in increments of 0.1 mm)
* Default setting is 0.5 (mm).
●
Adjusting the oat-function height
The oat-function height has now been
changed.
* The setting is memorized even when the machine is
turned off and on.
Press
.
Several seconds
later.
Float function
This is the function to slightly lift the
presser foot during sewing.
This function is used when sewing
quilting or materials such as velvet
that is likely to cause cloth slippage
between two layers.
Press
to adjust the presser foot to
such a height that it holds the fabric appropriately.
Place the fabric (for test sewing) which is same with
the fabric to be actually sewn. Adjust the presser foot
height on the setting screen and carry out test sewing.
If the presser foot height is excessively high, the fabric cannot be fed causing thread entanglement. It is
therefore necessary to adjust the presser foot height
carefully.
Press after the
completion of adjustment.
Press
or
to select
.
Then, press
.
Page 95

93
9
Setting of the presser foot lifting after thread trimming
You can select the setting were the presser foot goes up automatically after the completion of thread trimming.
Example) To set the function to lift the presser foot after thread trimming to OFF
* Default setting is ON.
The function to lift the presser foot after
thread trimming has now been set to OFF.
* The setting is memorized even when the machine is
turned off and on.
Press
.
Press
.
Several seconds
later.
Press
.
Press or
to select
.
Then, press
.
Page 96

94
!0
Adjusting the darning
This function is used for adjusting the pattern shape.
Adjustable range: -30 - 30
Press
.
Example)
Press . Adjust the
pattern while carrying out test sewing.
Pattern adjustment has now been
completed.
* The setting is memorized even when the machine is
turned off and on.
Press after the
completion of adjustment.
Several seconds
later.
Correct shape When right side is higher than left
side,
When right side is lower than left
side,
Carry out the adjustment while conducting
test sewing by pressing.
Carry out the adjustment while conducting
test sewing by pressing.
Adjustable range
~
Adjustable range
~
Press or
to select
.
Then, press
.
Page 97

95
!1
Adjustable starting stitch speed
You can select the sewing speed to be employed at the start of sewing.
Slow
Standard
Fast
* Default setting is “Slow”.
Example) To increase the sewing speed at the start of sewing
The sewing speed at the start of sewing
has now been set to "Fast".
* The setting is memorized even when the machine is
turned off and on.
Press
.
Press
.
Several seconds
later.
Press
twice.
Press or
to select
.
Then, press
.
Page 98

96
!2
Adjustable reverse stitch speed
You can select the reverse stitch speed and lock stitch speed.
Slow
Standard
Fast
* Default setting is “Slow”.
Example) To increase the reverse stitch (lock stitch) speed
The reverse stitch (lock stitch) speed has
now been set to "Fast".
* The setting is memorized even when the machine is
turned off and on.
Press
.
Press
.
Several seconds
later.
Press
twice.
Press
to select
.
Then, press
.
Page 99

97
!3
Guide
The guide for winding bobbin thread, setting of bobbin, threading of needle thread, changing presser foot and
needle can be seen on the LCD display.
<Winding bobbin
thread>
<Changing presser
foot>
<Setting of bobbin>
<Threading of needle
thread>
<Changing needle>
Press or to end the guide.
Press
.
The page will proceed when pressing
.
Press
to select
.
Then, press
.
Page 100

98
!4
Adjusting the touch panel sensitivity
You can adjust the touch panel sensitivity in ve steps.
Setting range: 1.0 - 5.0
* Default setting is 3.0
Example) To increase the touch panel sensitivity (to 4.0)
The touch panel sensitivity has now been
adjusted to "4.0".
* The setting is memorized even when the machine is
turned off and on.
Press
.
Press
.
Several seconds
later.
Press
.
Press
to select
.
Then, press
.
 Loading...