

Page 1

COMPUTER SEWING MACHINE
HZL-F series
Attention
Please read this instruction manual before using
the machine as it contains important operational
and safety information.
Keep this manual accessible so that you may refer
to it at anytime while operating the machine.
INSTRUCTION MANUAL
Page 2

Page 3

1
IMPORTANT SAFETY INSTRUCTIONS
When using an electrical appliance, basic safety precautions should always be followed, including the following:
Read all instructions before using this sewing machine.
DANGER
-To reduce the risk of electric shock:
1. An appliance should never be left unattended when plugged in.
2. Always unplug this appliance from the electric outlet immediately after using and before cleaning.
WARNING
-To reduce the risk of burns, fire, electric shock, or inquiry to persons:
1. Do not allow this appliance to be used as a toy. Close attention is necessary when this appliance is used by or
near children.
2. Use this appliance only for its intended use as described in this manual. Use only attachments recommended
by the manufacturer as contained in this manual.
3. Never operate this appliance if it has a damaged cord or plug, if it is not working properly, if it has been dropped
or damaged, or dropped into water. Return the appliance to the nearest authorized dealer or service center for
examination, repair, electrical or mechanical adjustment.
4. Never operate the appliance with any air openings blocked. Keep ventilation openings of the sewing machine
and foot controller free from the accumulation of lint, dust and loose cloth.
5. Keep fingers away from all moving parts. Special care is required around the sewing machine needle.
6. Always use the proper throat plate. The wrong plate can cause the needle to break.
7. Do not use bent needles.
8. Do not pull or push fabric while stitching. It may deflect the needle causing it to break.
9. Switch the sewing machine off (“O”) when making any adjustments in the needle area, such as threading
needle, changing needle, threading bobbin, or changing presser foot and the like.
10. Always unplug sewing machine from the electrical outlet when removing covers, lubricating, or when making
any other user servicing adjustments mentioned in the instruction manual.
11. Never drop or insert any object into any opening.
12. Do not use outdoors.
13. Do not operate where aerosol (spray) products are being used or when oxygen is being administered.
14. To disconnect, turn all controls to the off (“O”) position, then remove plug from outlet.
15. Do not unplug by pulling on cord. To unplug, grasp the plug, not the cord.
SAVE THESE INSTRUCTIONS
This sewing machine is intended for household use only.
Foot controller: Model JC-001 Foot controller can be used on sewing machine model HZL-F300, HZL-F400, or HZL-600.
The working temperature of sewing machine is from 5 to 40 degree Celsius. Do not use sewing machine under
direct sunlight, near a heat source such as stove, iron, candle or any hot objects and in the place where temperature
is high. Otherwise temperature inside sewing machine becomes high and/or vinyl of the power cord may be
damaged, resulting in fire or an electric shock.
Always check a combination of material, thread and needle size. (Refer to page 24.) If the combination is not right,
for example, sewing thick material such as denim with thin needle like size 11 and smaller, needle may break and it
will cause injury to your body.
Page 4

● Do not use thinner or other similar solvents
to clean machine.
● Do not expose machine to direct sunlight or
humid atmosphere.
As the microcomputer(s), semi-conductor(s) and precise wiring board(s) is built in this sewing machine,
please pay attention that the following condition(s) may occur.
● Use this product in a temperature between
5 and 40 degree Celsius.
If temperature is extremely low, this sewing
machine may not work properly.
● This sewing machine will stop due to safety
mechanism to prevent the machine from overheating,
when it sews slowly and for a long time. In this event,
Start and Stop button will not light.
The sewing machine will
return to working condition
after about 10 minutes.
Thank you for purchasing our products.
To safely and properly use this product, please read the instruction manual carefully and understand
the properties of this computer sewing machine. This machine is composed of well-chosen brand-name parts
and is well quality controlled. Please try a variety of different sewing methods and have fun.
FOR USA AND CANADA ONLY
This appliance has a polarized plug (one blade wider than the other). To reduce the risk of
electric shock, this plug is intended to fit in a polarized outlet only one way. If the plug does
not fit fully in the outlet, reverse the plug. If it still does not fit, contact a qualified electrician to
install the proper outlet. Do not modify the plug in any way.
Stop!
2
Page 5

3
Practical sewing
Straight stitch
………………………………………………
34~38
How to use seam guide line on the throat plate
Automatic lock stitch and programmed thread
trimming
How to change needle positions
How to change the stitch length
Other straight stitch patterns
Zigzag stitch
………………………………………………………
39
Overcasting stitch
………………………………………
40, 41
Blind stitch
……………………………………………………
42~44
Buttonhole stitches
………………………………………
45~50
Standard buttonholing
Keyhole buttonholing
Buttonhole with gimp
When changing the width of the buttonhole
When changing the density of the seam
Manual 2-step buttonhole
……………………………
51, 52
Bartacking
……………………………………………………
53, 54
Inserting zippers
…………………………………………
55~57
Side zipper attachment
Butted zipper attachment
Shirring and gathering
………………………………………
58
Pintucking
……………………………………………………………
59
Welt seam
……………………………………………………………
60
How to use quilt guide
F600 / F400
…………………
61
Scallop stitches
…………………………………………………
62
Decorative stitches
……………………………………………
63
Important safety instructions
…………………………
1, 2
Principal parts
………………………………………………………
5
Accessories
……………………………………………………………
6
Basic operations
Function of operational buttons
……………………………
7
Connecting to the power supply
……………………
8, 9
Name and function of other operational
buttons
……………………………………………………………
10, 11
Speed control
………………………………………………………
12
Presser foot lifting lever and installation of
knee lifting lever
…………………………………………………
13
Changing the presser foot
…………………………
14, 15
Bobbin thread preparation
…………………………
16~19
Needle thread preparation
…………………………
20~21
Threading the needle thread
Automatic needle threader
Pulling up the bobbin thread
Attaching the needle
…………………………………………
24
Fabric, thread and needle table
………………………
25
How to adjust thread tension
……………………………
26
How to adjust presser foot pressure
………………
27
How to lower feed dog
………………………………………
27
How to select a stitch pattern
F600
…………
28, 29
How to select a stitch pattern
F400
…………
30, 31
How to select a stitch pattern
F300
…………
32, 33
Contents
Basic operations
Practical sewing
Patchwork quilt
Decorative
stitches
Page 6

4
Type and usage of Options
……………
81~90
1. Change of seam width of buttonhole
…………
81
2. Change of needle position
…………………………
82
3. Setting the thread trimming foot switch
to OFF
……………………………………………………………
83
4. Twin needle sewing
………………………………
84, 85
5. Guide
………………………………………………………………
86
6. Contrast of liquid crystal display (LCD)
……
87
7. Button reception buzzer volume settings
…
88
8. Language setting
…………………………………………
89
9. Elongation
………………………………………………………
90
Message catalog
…………………………………………………
91
Introduction of optional accessory parts
……
92, 93
How to install wide table
……………………………………
94
Machine maintenance
………………………………………
95
Performance check list
………………………………
96, 97
List of stitch patterns
F600
………………………
98, 99
List of stitch patterns
F400
…………………
100, 101
List of stitch patterns
F300
…………………
102, 103
Specifications
……………………………………………………
104
Decorative stitches
One-point stitch/sewing letters
…………………
72~79
Preparation before stitching
…………………………
72
Test sewing
………………………………………………………
72
Operational buttons and screen
……………………
73
How to select patterns (letters)
………………
74, 75
How to edit patterns (letters)
…………………………
76
How to stitch a pattern (letters)
……………………
77
Disposing thread ends of jump stitches
………
77
Save / call of pattern (letters)
…………………
78, 79
Character selecting methods
……………………………
80
Patchwork quilt
Patchwork piecing (joining)
………………………………
64
Applique (1)
…………………………………………………………
65
Applique (2)
…………………………………………………………
66
Crazy quilt
……………………………………………………………
67
Stitch in ditch quilting
F600 Only
…………………
68
Quilting (straight stitch)
F600 / F400
………………
69
Quilting (free motion)
F600 / F400
……………
70, 71
Page 7
5
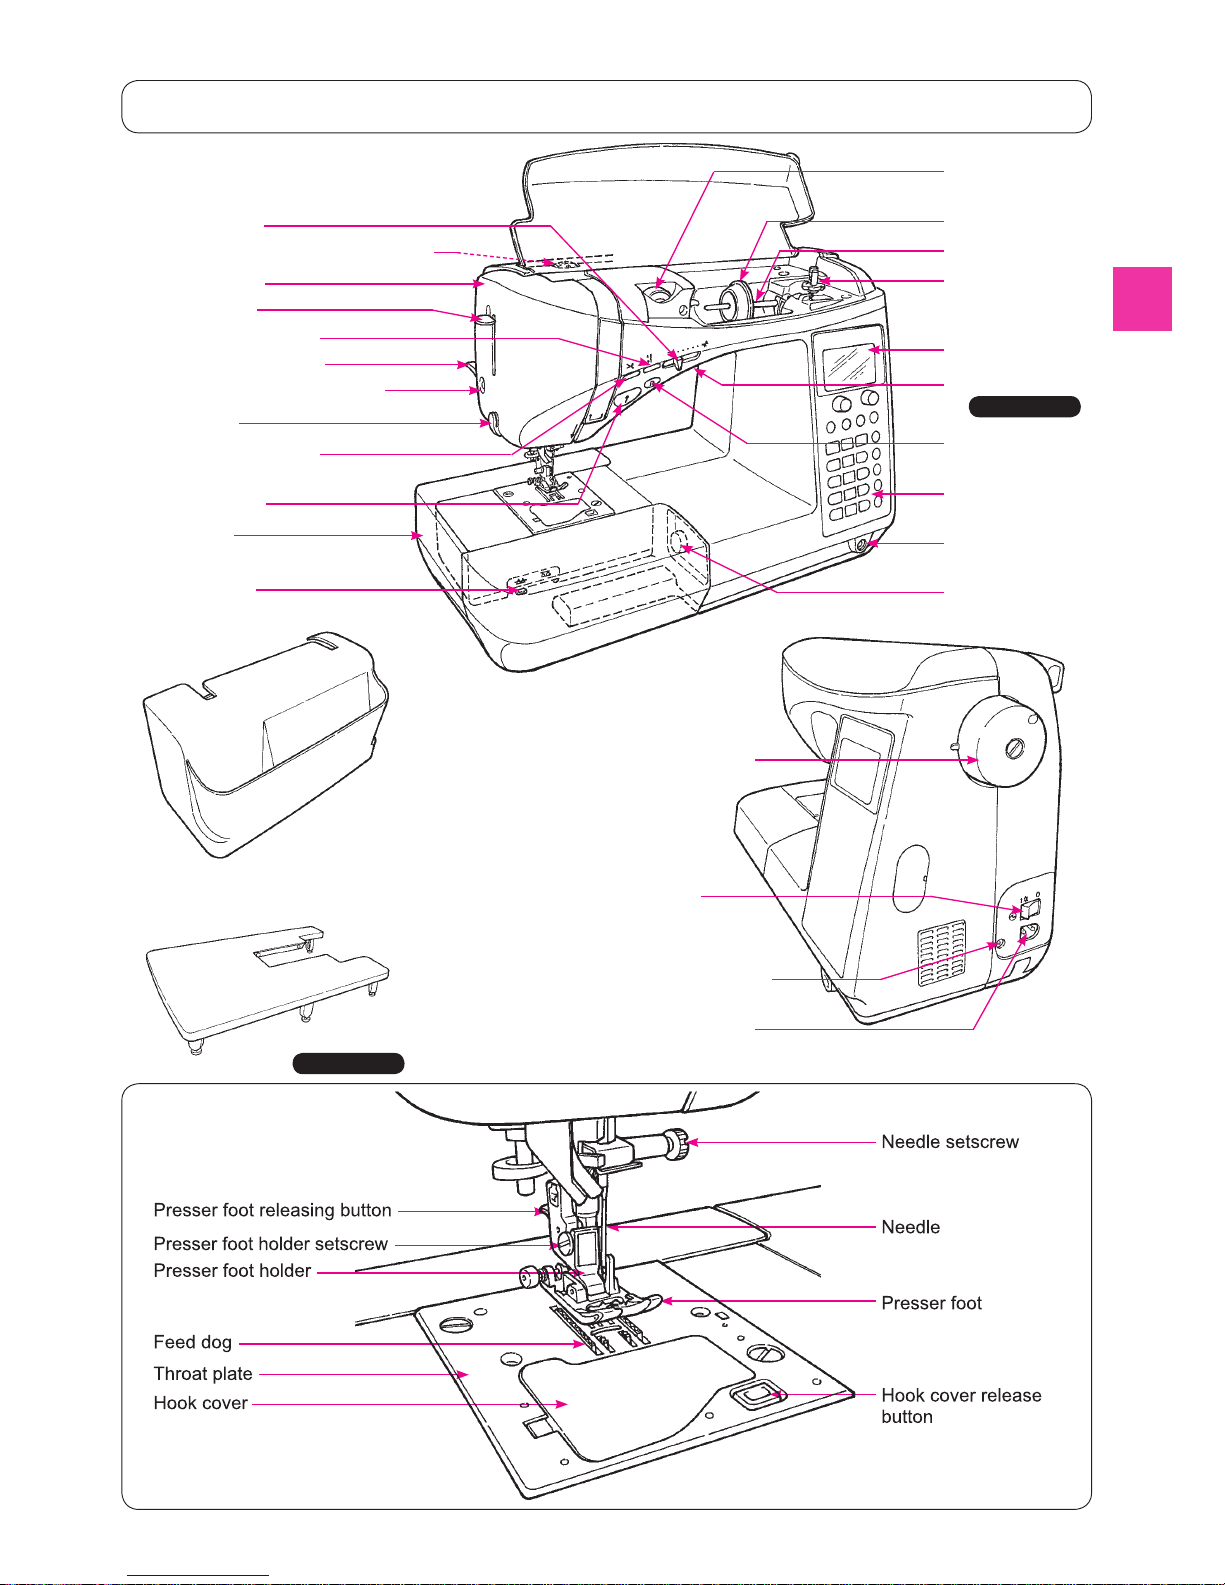
Hand wheel (pulley)
Power switch
Machine-socket-inlet
Foot-controller-jack
Spool cap (large)
Spool pin
LCD Screen
Operational
buttons
Face plate cover
Threading lever
Start/stop button
Auxiliary bed
(accessory case)
Presser foot lifting lever
Drop feed knob
Needle setscrew
Needle
Presser foot
Sensor pinhole for buttonholing
Presser foot releasing button
Feed dog
Throat plate
Hook cover
Bobbin winding
shaft
Hook cover release
button
Presser foot holder setscrew
Presser foot holder
Thread trimming button
Hard case
Wide table
* Do not put heavy objects onto
hard case and wide table.
Thread cutter
Reverse stitch
button
Speed controller
Needle up/down button
Presser foot pressure adjustment dial
Thread tension
adjustment dial
Pattern
adjustment dial
Knee lifting lever
hole
Light under arm
F600 Only
F600 Only
Principal parts
Page 8
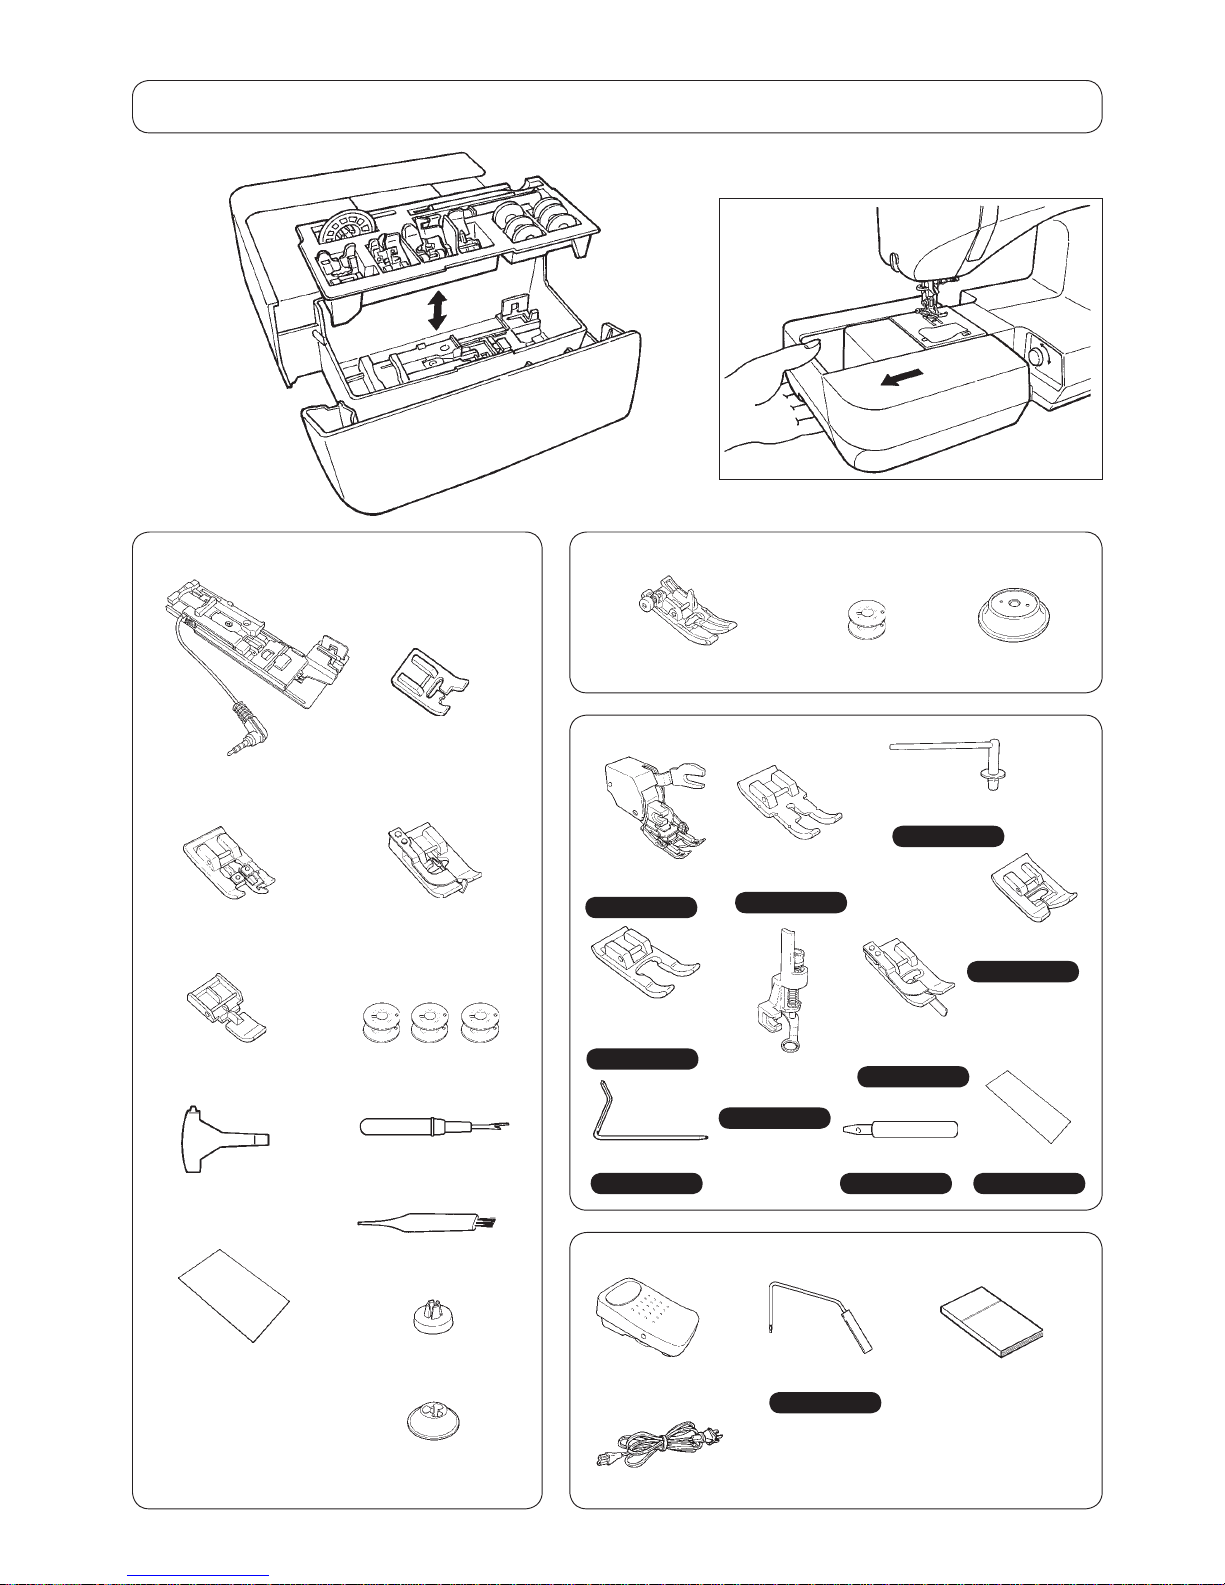
Draw the auxiliary bed out to the left.
● Inside the auxiliary bed.
Quilt guide
T-shape
screwdriver
Blind stitch presser
foot (D)
Ripper
Zipper presser
foot (B)
Overcasting
presser foot (C)
Cleaning brush
Eyelet punch
Standard presser foot (A)
Buttonhole presser
foot (E)
Bobbin (3)
Needle set
HA X 1 # 11 (1)
# 14 (1)
# 16 (1)
for knit # 11 (1)
Smooth
presser foot (T)
Accessories
● Inside the accessories bag.
● Supplied with the machine
● Inside hard case
Walking
foot (N)
Foot Controller
model name; JC-001
Bobbin (1) Spool cap (large)
Spool cap (Small)
Spool cap (Middle)
Manual buttonhole
presser foot (I)
Patchwork
presser foot (P)
Open toe presser
foot (O)
Twin needle
Quilt presser
foot (Q)
Edge Sewing
presser foot (R)
Auxiliary
spool pin
Instruction manual
(This manual)
Knee-lifting lever
Power cord
F600 Only
F600 Only
F600 / F400
F600 / F400
F600 / F400
F600 / F400
F600 / F400
F600 / F400
F600 / F400
F600 Only
F600 Only
6
Page 9
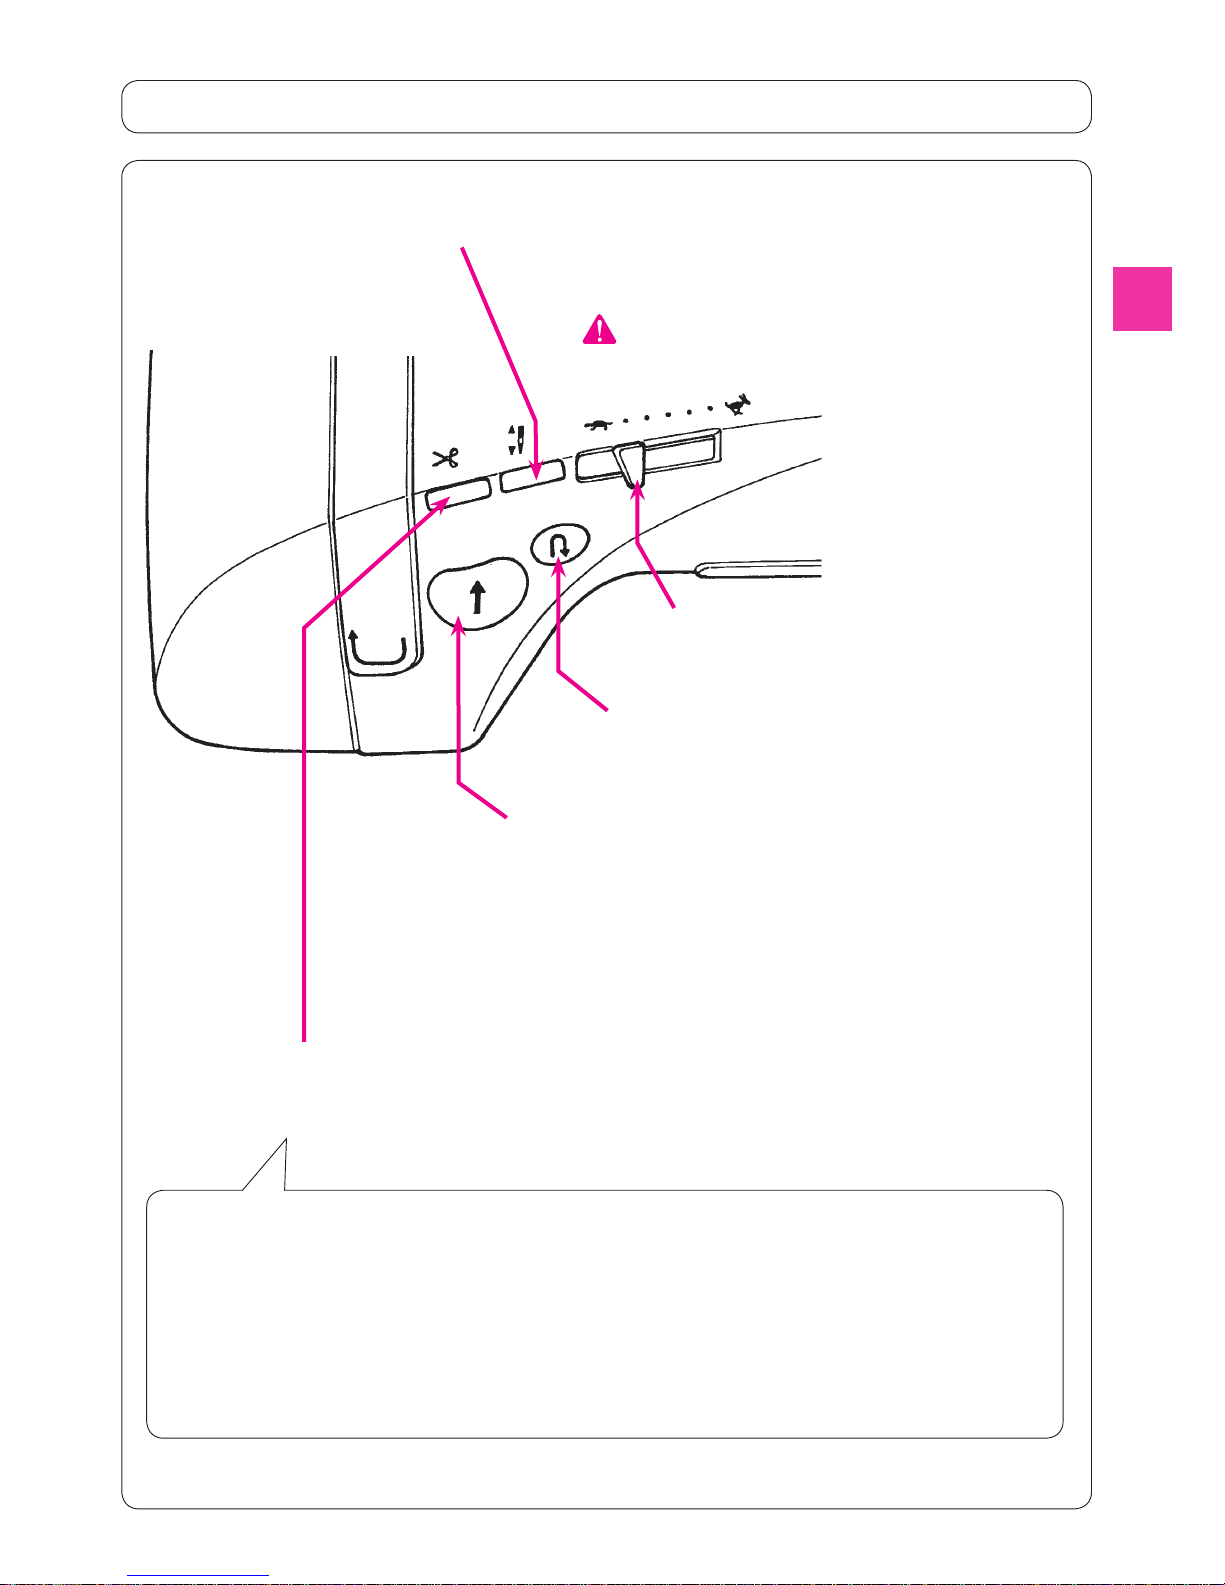
Speed controller
While sewing, speed can be adjusted.
Start/stop button
When pressing this button, machine starts to sew slowly and then
up to the speed set by speed controller.
When pressing this button again, machine stops with needle at
its down position.
Color of button indicates machine status.
Green: Ready to start and/or while sewing
Red: Not ready to start (When it is pushed in red condition,
needle moves by one stitch.)
Reverse stitch button
While pressing this button, machine sews reverse
(lock stitch).
When machine stops, press this button to change the needle
position. (When the needle is up, the needle moves down
and vise versa.)
* when a stitch pattern is not selected, needle does not
move downward but you can move the needle up.
Even when the presser foot is raised, be aware
that the needle moves up or downward.
Thread trimming button
After sewing, press this button to trim both
threads automatically.
Function of operational buttons
Notes for thread trimming:
1. Do not use thread thicker than No.30.
2. After trimming, the stitch can be done without pulling up bobbin thread.
3. When sewing again after thread trimming, if you pull up the bobbin thread again and place it underneath
the presser foot together with needle thread, you can avoid birds nest on the wrong side of the fabric.
4. Regularly clean the machine (refer to page 94), as dust in the area of the thread trimming unit may
cause malfunction.
Needle up/down button
7
Page 10
8
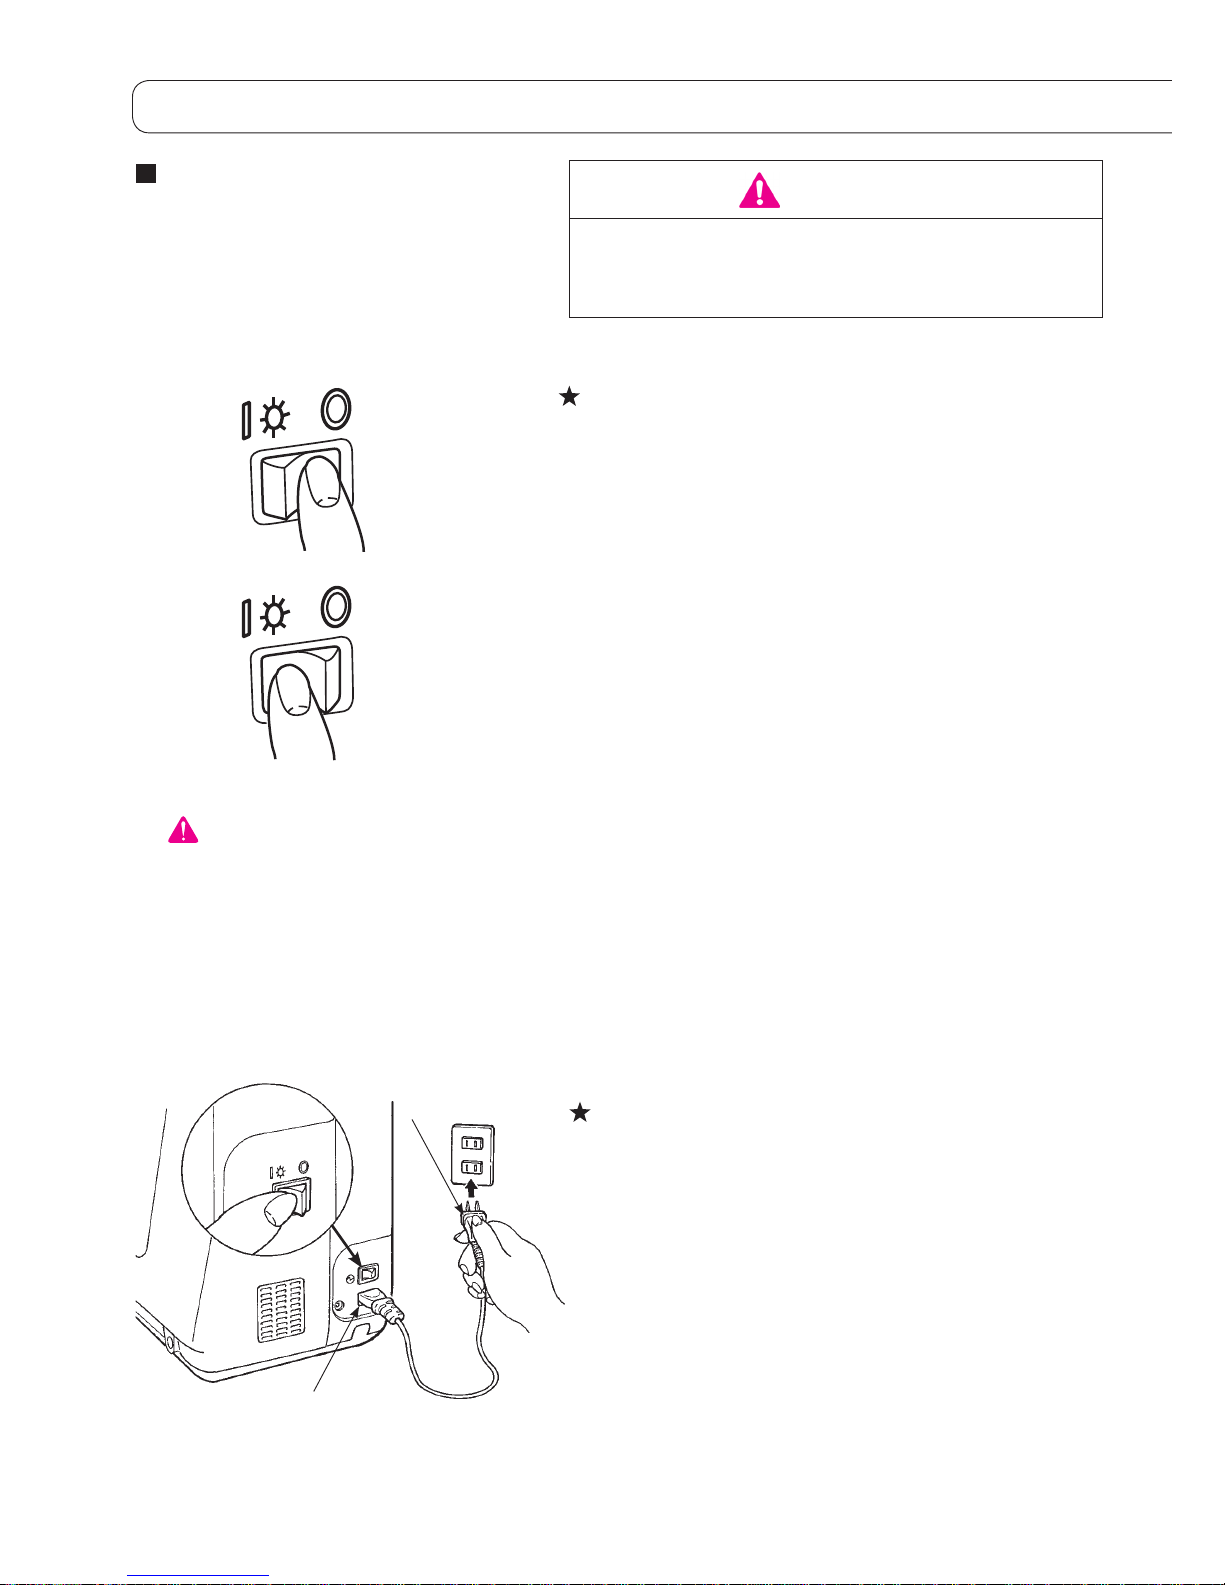
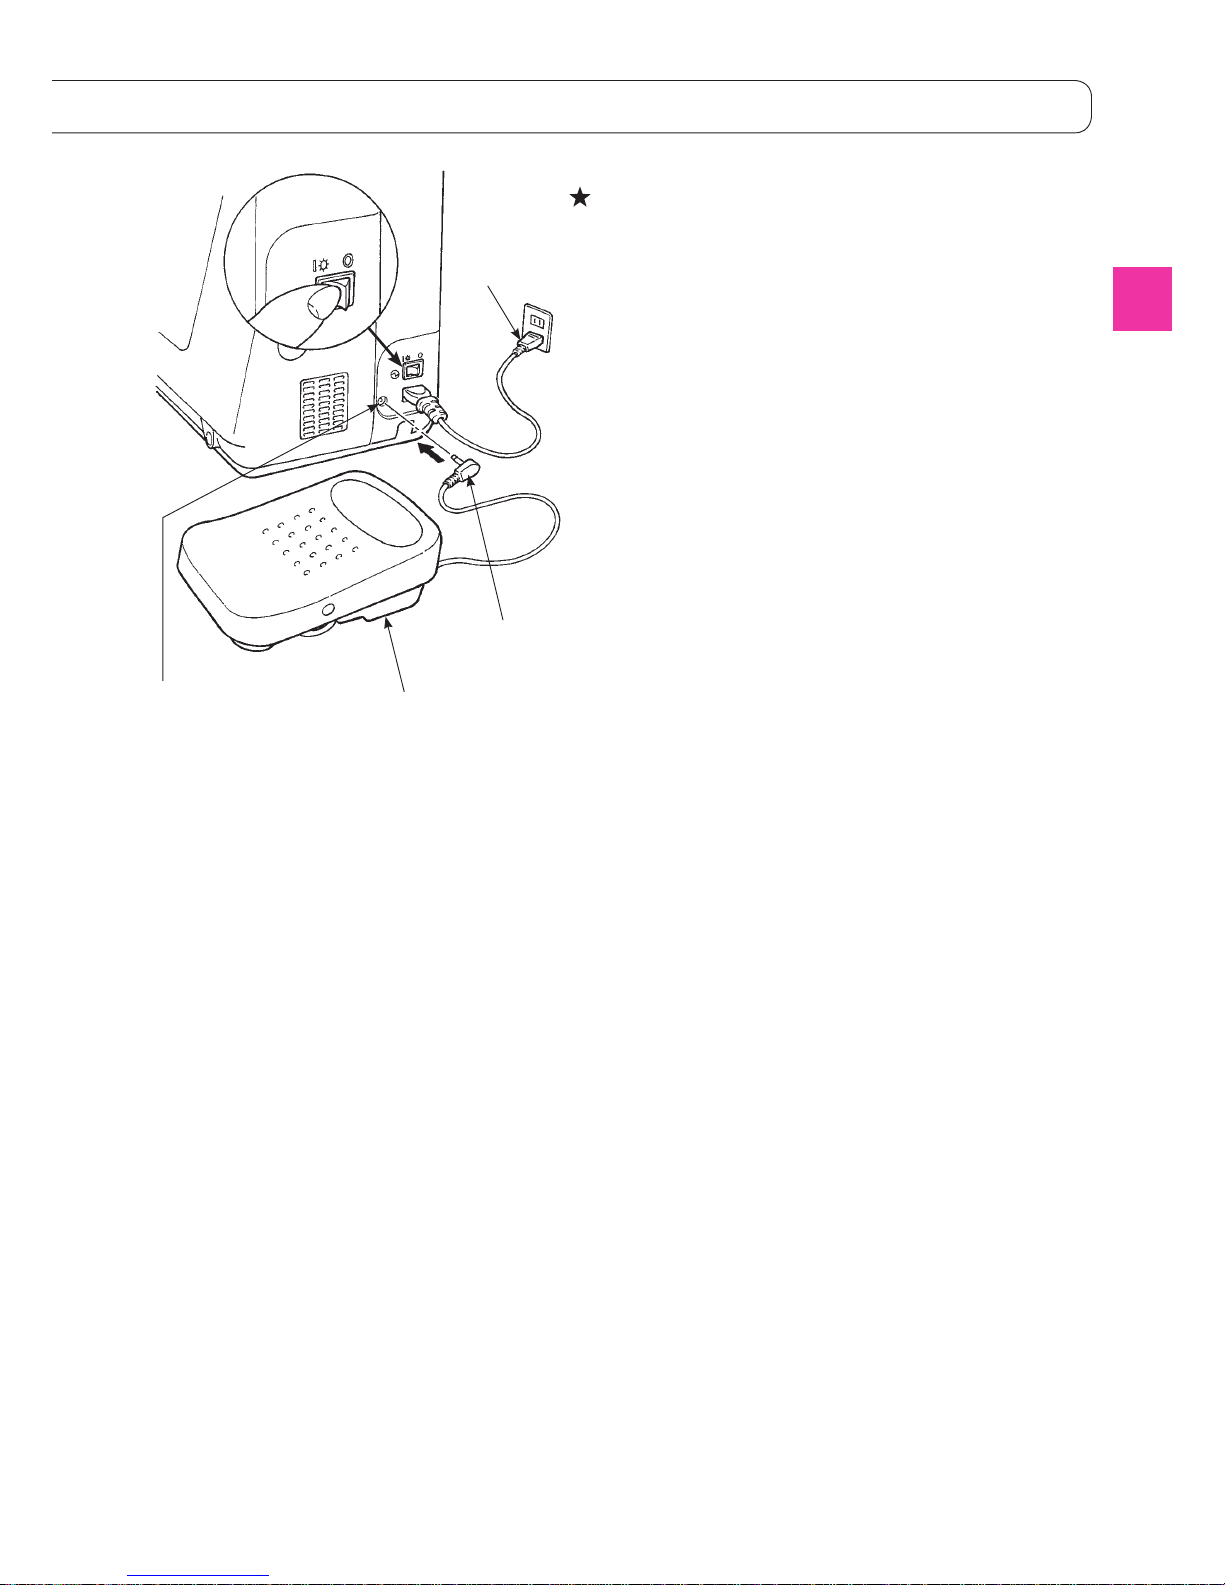
Connecting to the power supply
Connecting to the
power supply
Warning
• Disconnect the plug and turn off the power
switch (turn to “O”) that always sewing machine
is not to use.
In case Start/stop button is used:
Power switch
Plug
Machine-socket-inlet
Operating power switch:
Turn OFF the machine, set the power switch to "0"
Turn ON the machine, set the power switch to "I"
OFF
ON
WARNING (For U.S.A.,Canada only)
This appliance has a polarized plug (one blade wider than the
other). To reduce the risk of electric shock, this plug is intended
to fit in a polarized outlet only one way. If the plug does not fit fully
in the outlet, reverse the plug. If it still does not fit, contact a
qualified electrician to install the proper outlet. Do not modify the
plug in any way.
1. Turn OFF the power switch (turn to “O”)
2. Insert cord-connector into machine-socket-inlet.
3. Insert plug into socket-outlet.
4. Turn ON the power switch. (Turn to “I”)
Page 11
9
Using the foot-controller:
Power switch
Plug
Foot controller
Foot-controller-plug
Foot-controller-jack
1. Turn OFF the power switch (turn to “O”)
2. Insert the foot-controller-plug into the foot-controller-jack.
3. Insert cord-connector into machine-socket-inlet.
4. Insert plug into socket-outlet.
5. Turn ON the power switch. (Turn to “I”)
* When the foot controller is plugged in, the start/stop button
cannot be used to start sewing.
Start button: Can not operate to start sewing.
Stop button: Can operate to stop sewing.
Page 12
10
Page 13
1
Zigzag width
adjustment dial
This is used to change the zigzag width and the needle position.
2
Stitch length
adjustment dial
This is used to change the stitch length.
3
Confirmation
button
This is used to confirm the selected stitch pattern and/or settings.
4
Selection button
This is used to move the cursor.
5
Clear button
This is used to delete the selected stitch pattern and to cancel each setting.
When pressing the button continuously, all the saved stitch patterns will be
deleted.
6
Automatic lock
stitch and thread
trimming button
When it is pressed, symbol “ “ will be shown on the screen.
The machine will automatically lock stitches at sewing-start and sewing-end
and then trim both threads.
7
Needle stop
position
switching button
When it is pressed, either symbol “ ” or “ ” will be shown on the screen.
When sewing with symbol “
”, the needle stops at its highest position.
When sewing with the symbol “
”, the needle stops at its lowest position.
8
Continuous
stitch button
This button is valid only when “ “ mode.
When it is pressed, symbol “
“ will be shown on the screen.
The machine will sew the selected stitch patterns continuously.
When it is pressed again, the machine will cancel this function.
* When it is pressed while sewing, the machine will stop after the selected
patterns are sewn completely.
9
Mirror Image
button
After selecting a stitch pattern, press this button to make a mirror image of the
selected pattern.
* There are some patterns that can not make a mirror image.
!0
Option button
It is possible to change the following function and settings.
・
Seam width of buttonhole
・
Needle position
・Thread trimming by foot controller ・Twin needle
・Guide
・
LCD display contrast
・Buzzer volume
・
Language
・Elongation
* Optional functions vary from stitch pattern to stitch pattern.
(Refer page 80~89 for more details.)
!1
Save/call button
This is used to save and/or call a pattern. The machine can save maximum 10
patterns. (Refer to page 77 and 78 for more details.)
!2
Pattern selection
button
A stitch pattern can be selected.
* Usage of the buttons varies by pattern selecting mode.
(Refer to page 27~32 for more details.)
!3
Pattern selection
mode switching
button
When the pattern selection mode needs to be changed, press the desired
button. The selected button will be illuminated.
Name and function of operational buttons
* buttons on F400/F300.
* buttons on F400/F300.
11
Page 14
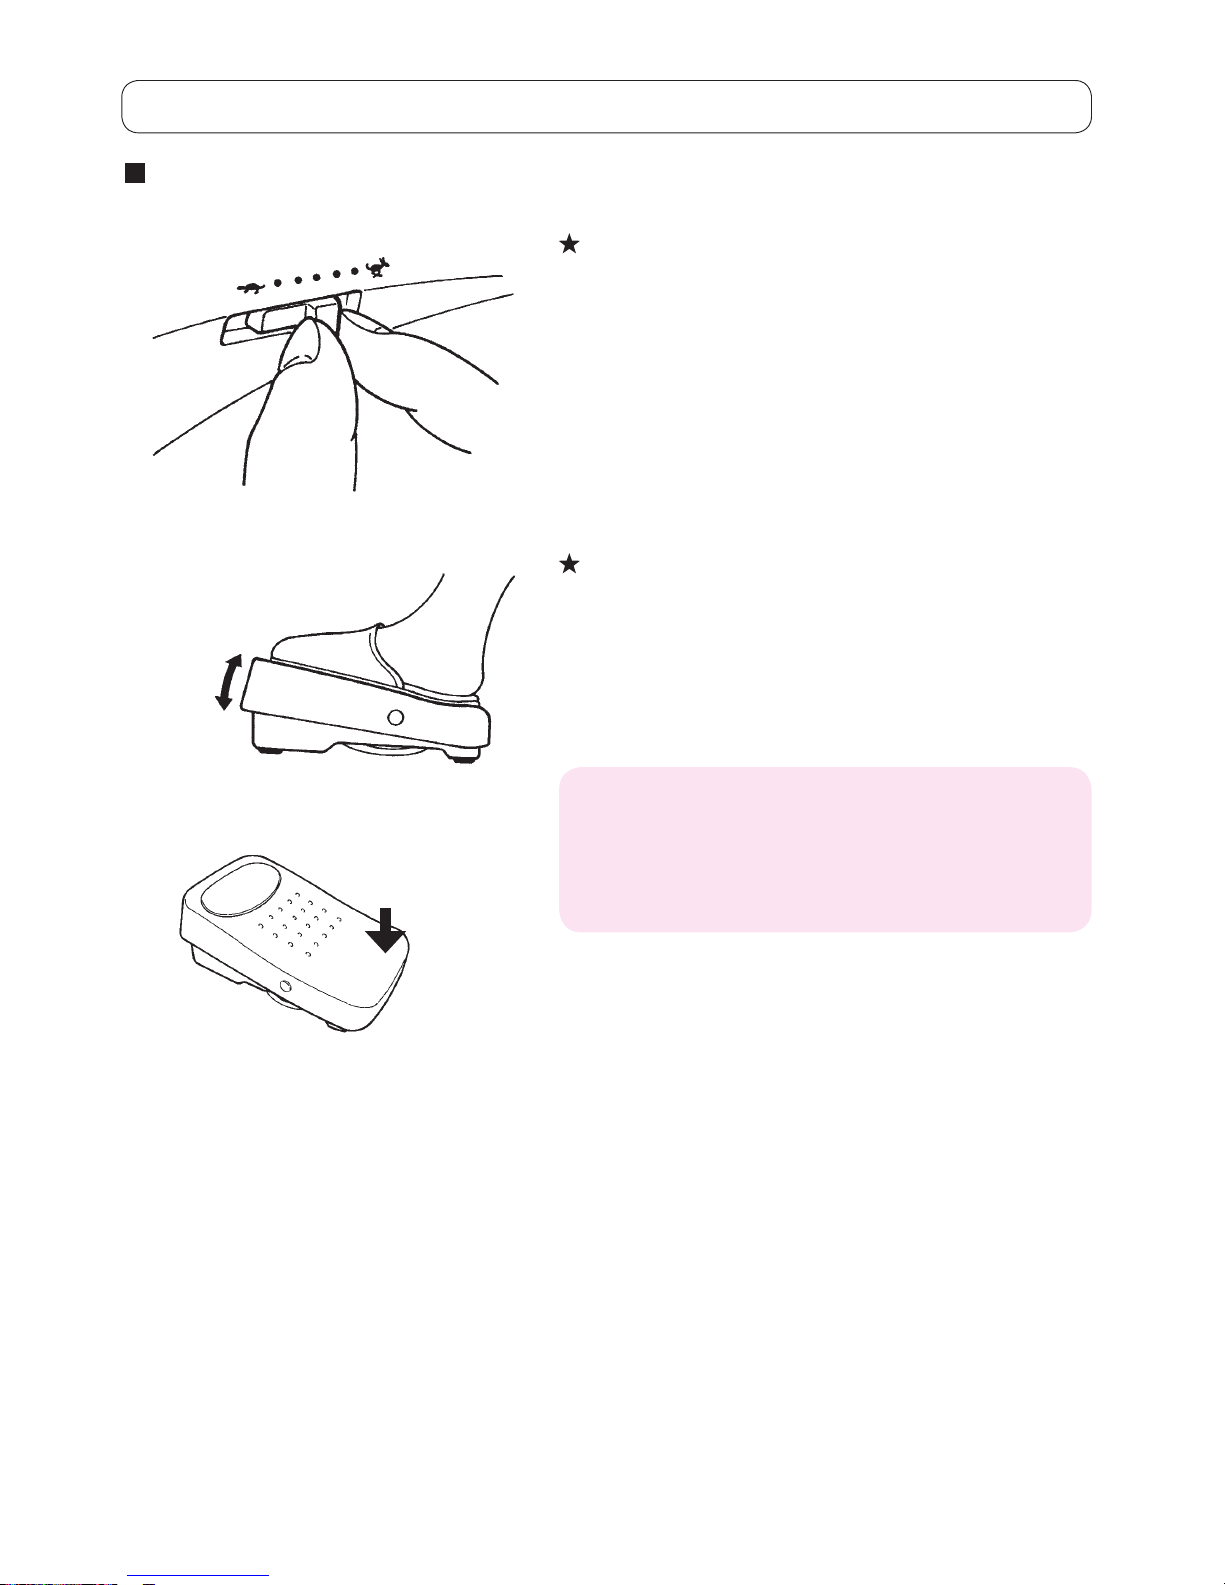
Speed control
Speed control
Speed controller
Maximum sewing speed can be freely set by the speed
controller.
Faster speed
Slower speed
Faster speed
Slower speed
Thread trimming
foot switch
Foot controller
To run the machine, press the foot controller.
The harder you press, the faster the machine sews.
Speed controller will set the maximum sewing speed.
Pressing harder → faster speed
Pressing weaker → slower speed
“Thread trimming foot switch”
When the heel side of the foot controller is pressed,
the threads are trimmed.
→ It is also possible to cancel this function.
(Refer to page 82.)
* Always clean the foot controller.
It is important that you do not place any objects on the foot
controller as it may cause injury to the user and may cause
malfunctions.
12
Page 15
The knee lifting lever is useful when a guilt is being sewn and
for other projects that require the use of both hands. With the
knee lifting lever, you are able to control the position of the
presser foot without using your hands.
Insert the knee lifting lever so that concave and convex meet.
Push the lever to right-hand side to lift the presser foot.
The presser foot is lowered when the lever goes back to the
original position.
* Do not touch the knee lifting lever while sewing.
It may cause a deformation of a stitch pattern.
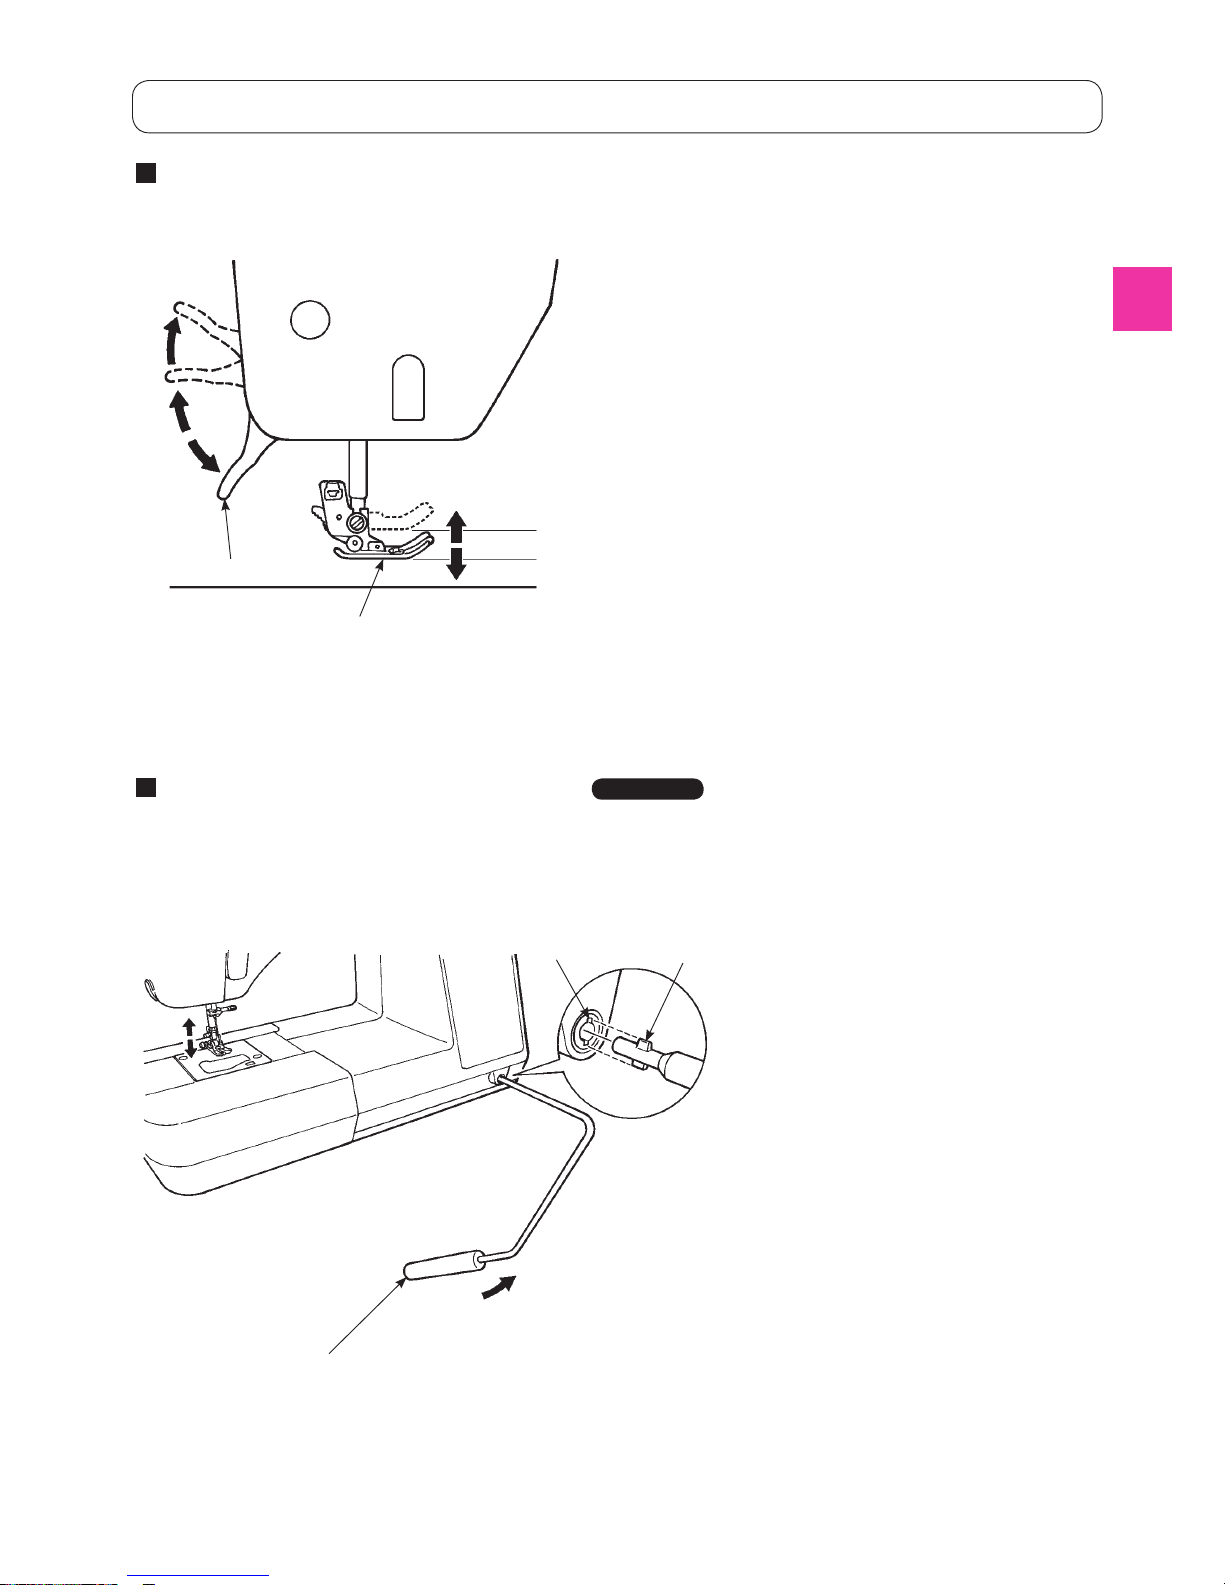
Presser foot lifting lever and installation of knee lifting lever
Presser foot lifting lever
Installation of knee lifting lever
The presser foot can be up or down position by using
the presser foot lifting lever.
1
Lowered position …… Presser foot should be lowered
when sewing.
2
Ordinary lift position …… This position is used for fabric
removal and/or changing the
presser foot.
3
Extra lift position …… This position is used to put heavy
materials underneath the presser
foot.
* Be careful that the presser foot and the needle should not
interfere when the needle is in down position and the
presser foot is raised to the extra lift position.
Presser foot lifting lever
Presser foot
Knee lifting lever
convex portion
concave portion
1
2
3
1
2
3
Lifting
F600 / F400
13
Page 16

14
Changing the presser foot
Removing and installing the
presser foot
Removing and installing presser foot holder
Removing presser foot
1. Raise the needle and presser foot.
2. Press the presser foot releasing button to remove the
presser foot.
Installing presser foot
Align the pin of the presser foot and the groove in the
presser foot holder. Then lower the presser foot holder
with the presser foot lifting lever.
* Each presser foot has a marking. Use the appropriate
presser foot for the stitch pattern to be sewn.
Presser foot
releasing button
Presser foot holder
Presser foot
Groove in presser
foot holder
Pin
Presser foot
marking
Removing presser foot holder
1. Lift the needle and presser foot lifting lever.
2. Loosen the setscrew of the presser foot holder to the
left and remove the presser foot holder.
Setscrew of presser
foot holder
Presser foot holder
Installing presser foot holder
Align the screw hole at the presser bar with the hole
of presser foot holder (long groove). Tighten the setscrew
firmly by turning it to the right side.
Setscrew of presser
foot holder
Presser foot holder
Presser bar
Attention
Turn OFF the power switch
before replacing presser foot.
Page 17
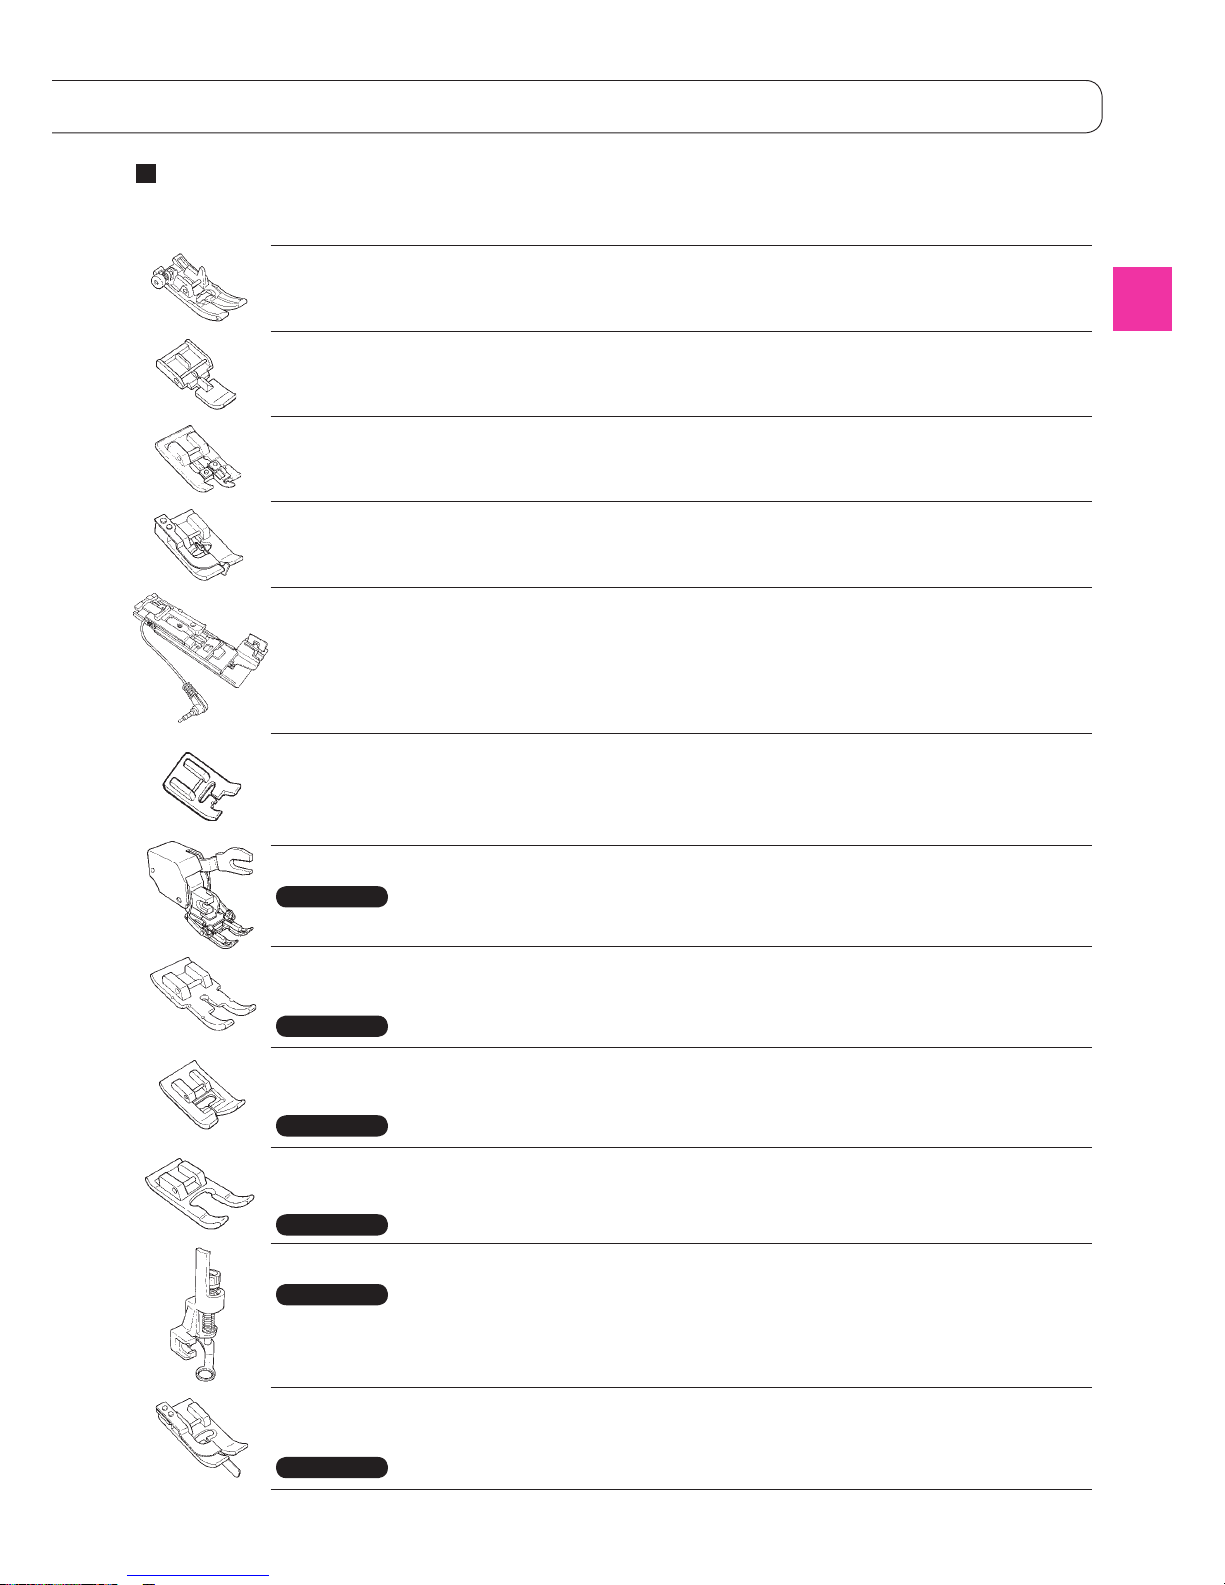
The type and application of the presser foot
Standard presser
foot
A
This is used mainly for straight stitch and zigzag stitches.
Use this presser foot especially when sewing heavy-weight
materials.
Zipper presser foot B
This is used to attach zippers.
Overcasting presser
foot
C
This presser foot is used exclusively for overcasting to prevent
the cut edge of fabrics from fraying.
Blind stitch presser
foot
D
This presser foot is used for blind stitch on hems of trousers
and skirts, or sleeves.
Buttonhole presser
foot
E
This presser foot is used for automatic buttonholing.
Manual buttonhole
presser foot
I
This is used for sewing decorative stitches, letters and bartacks.
Also for manual buttonhole (pattern No. 03).
Walking foot N
In general, this presser foot is used for difficult-to-feed” materials
such as knits, jersies, vinyl, artificial leather and leather or
quilting.
Patchwork
presser foot
P
This presser foot is used for patchwork stitches. There are two
seam lines, 1/4-inch and 1/8-inch from center needle position.
Smooth presser
foot
T
This presser foot is used for non-slippery materials like vinyl
and satin stitches.
Open toe presser
foot
O
This is used for the applique and decorative stitches.
(Front part of the presser foot is open for better visibility.)
Quilt presser foot Q
This is used for the quilt stitch.
(Machine setting: Straight Stitch and Center needle position)
Edge Sewing
presser foot
R
This is used for patchwork, sewing center line of joined
materials by using the center guide of the presser foot.
* Fine tune the needle position by zigzag width adjustment dial.
Marking of presser foot
↓
F600 Only
F600 Only
F600 Only
F600 / F400
F600 / F400
F600 / F400
15
Page 18

16
Bobbin thread preparation
Open the hook cover.
Take out the bobbin.
* If the bobbin has too little thread, do not use it as
the thread will get tangled.
* Use only the designated bobbin. Other bobbins may
cause malfunction.
1
2
Taking out the bobbin
1
Small spool
Large spool
Spool Cap
Spool Cap
Place a thread spool to spool pin and a
spool cap onto the spool pin.
* Do not use the thread cone with a small amount
of thread. This may cause thread tangling
and/or the thread coming out of the eye of the
needle when starting to sew.
There are three types of the spool caps, large, medium
and small. Choose the size of spool cap according to
the thread spool to be used.
Setting thread spool
Hook cover
Attention
Turn OFF the power switch
before the bobbin is taking
out and/or put into the
bobbin case.
Spool Cap Small spool
Spool Cap
Large spool
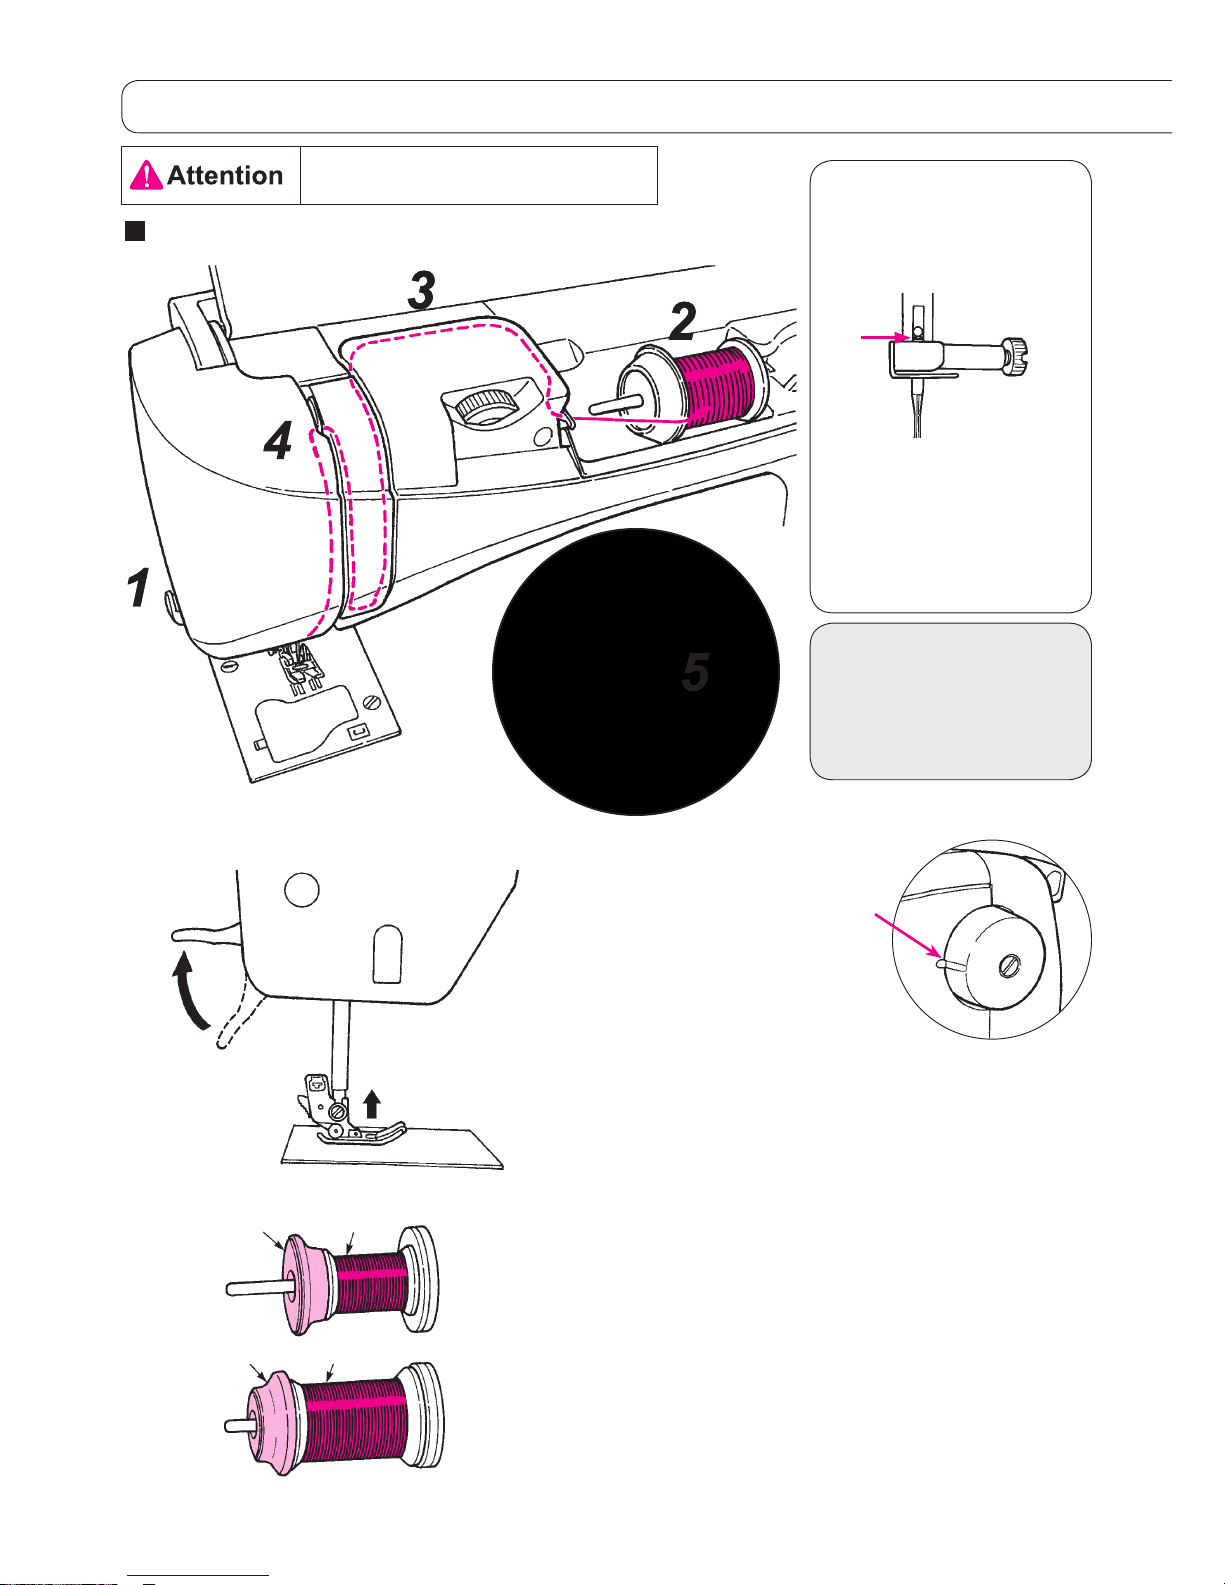
Page 19
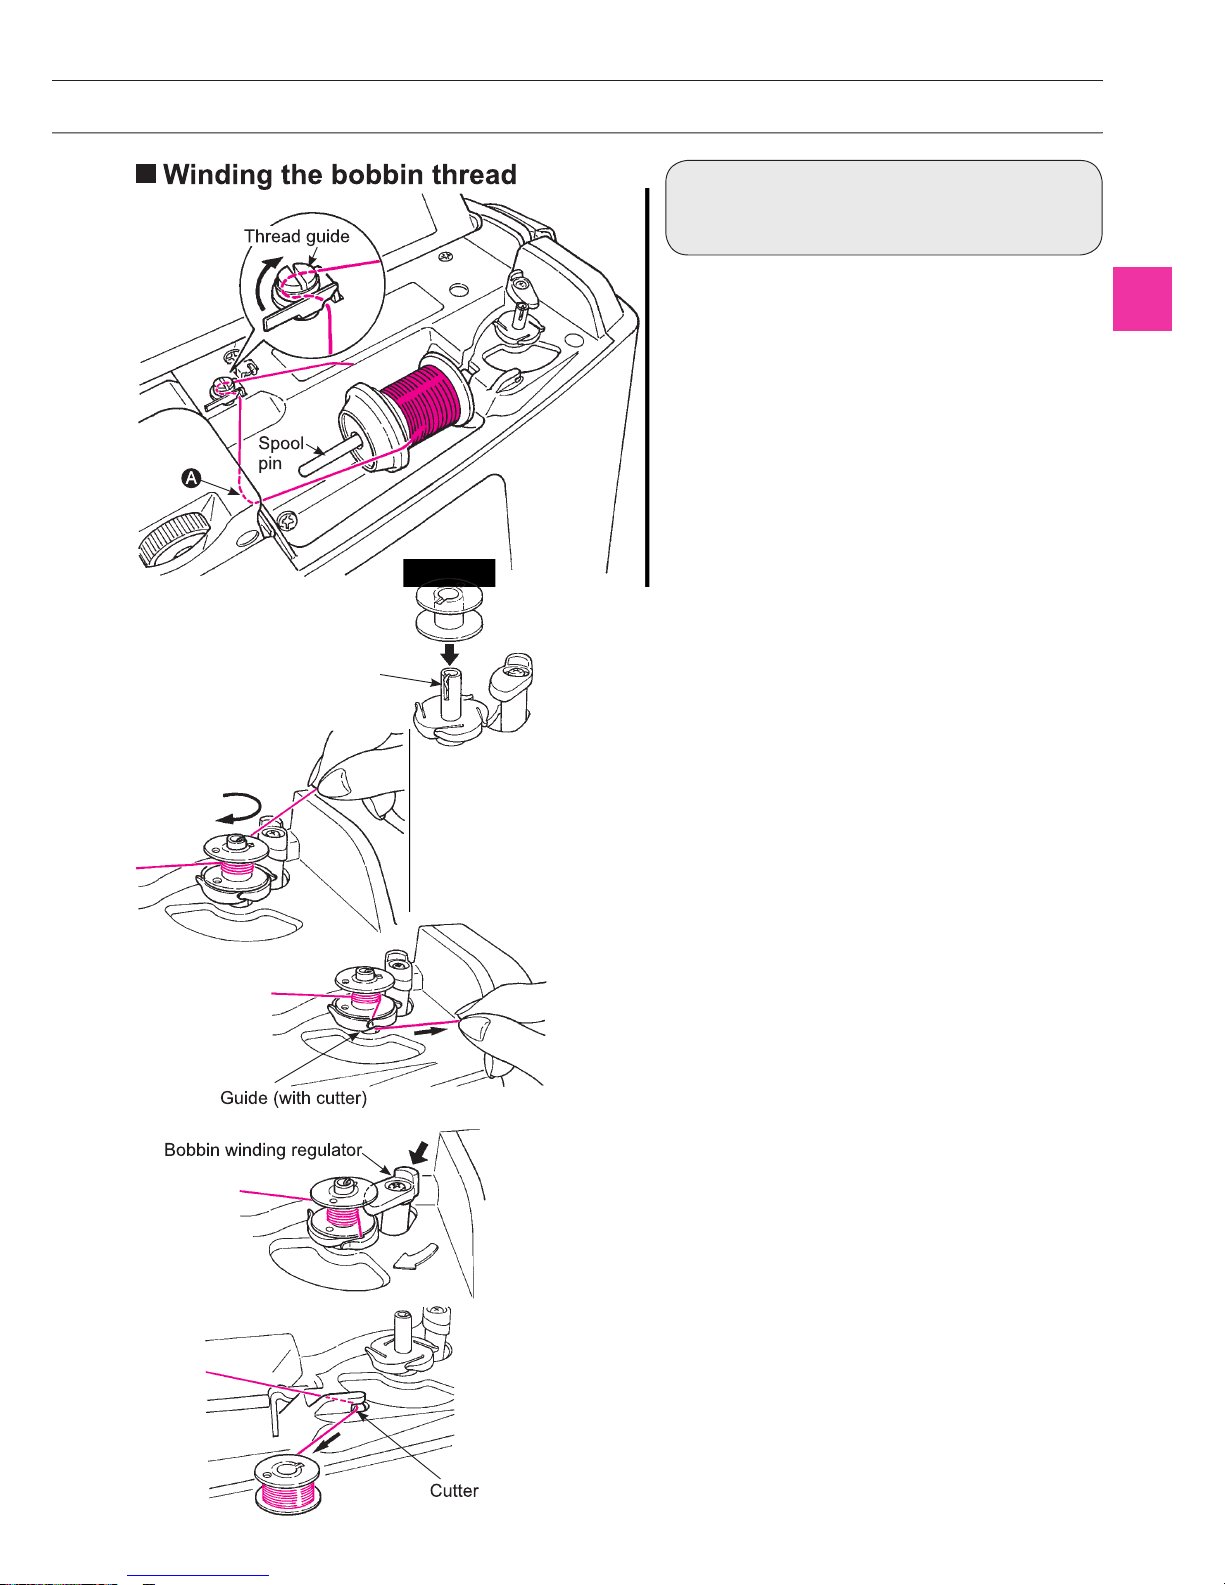
1
Place the thread spool to the spool
pin.
2
Winding the bobbin thread
* An exclusive motor is built-in for winding
bobbin so that you can wind bobbin at
any time.
Set the bobbin on the bobbin winding
shaft.
3
4
Wind the thread to the bobbin 4-5 times in
clockwise direction.
Put the thread end into the guide at the
bobbin winding shaft and pull it to the
right side to cut it.
5
7
Push the bobbin winding regulator
towards the bobbin to start winding the
bobbin.
* Be careful that the bobbin winding regulator
works as a switch.
6
When winding is finished, the shaft
stops automatically, the bobbin winding
regulator moves to right and return to the
original position.
Remove the bobbin from the bobbin
winding shaft and cut the thread by cutter.
* Bobbin winding will automatically stop even
while winding, when the winding speed is
reduced due to a load to the bobbin winding
motor caused by thread tangling.
Bobbin winding regulator
Guide (with cutter)
Cutter
Thread the guide A and then
thread the thread guide (guide in
the circle) for bobbin winding
Spool
pin
Thread guide
A
Bobbin
winding shaft
17
Page 20
Put the bobbin in the bobbin case.
* Place the bobbin so that thread winds
counterclockwise.
Thread groove A and B by pulling
the thread end.
* It will be easier to thread grooves when you
press the bobbin lightly with your finger.
Thread guide C by pulling the thread
to left side.
1
3
2
B
A
Setting the bobbin
C
18
Page 21
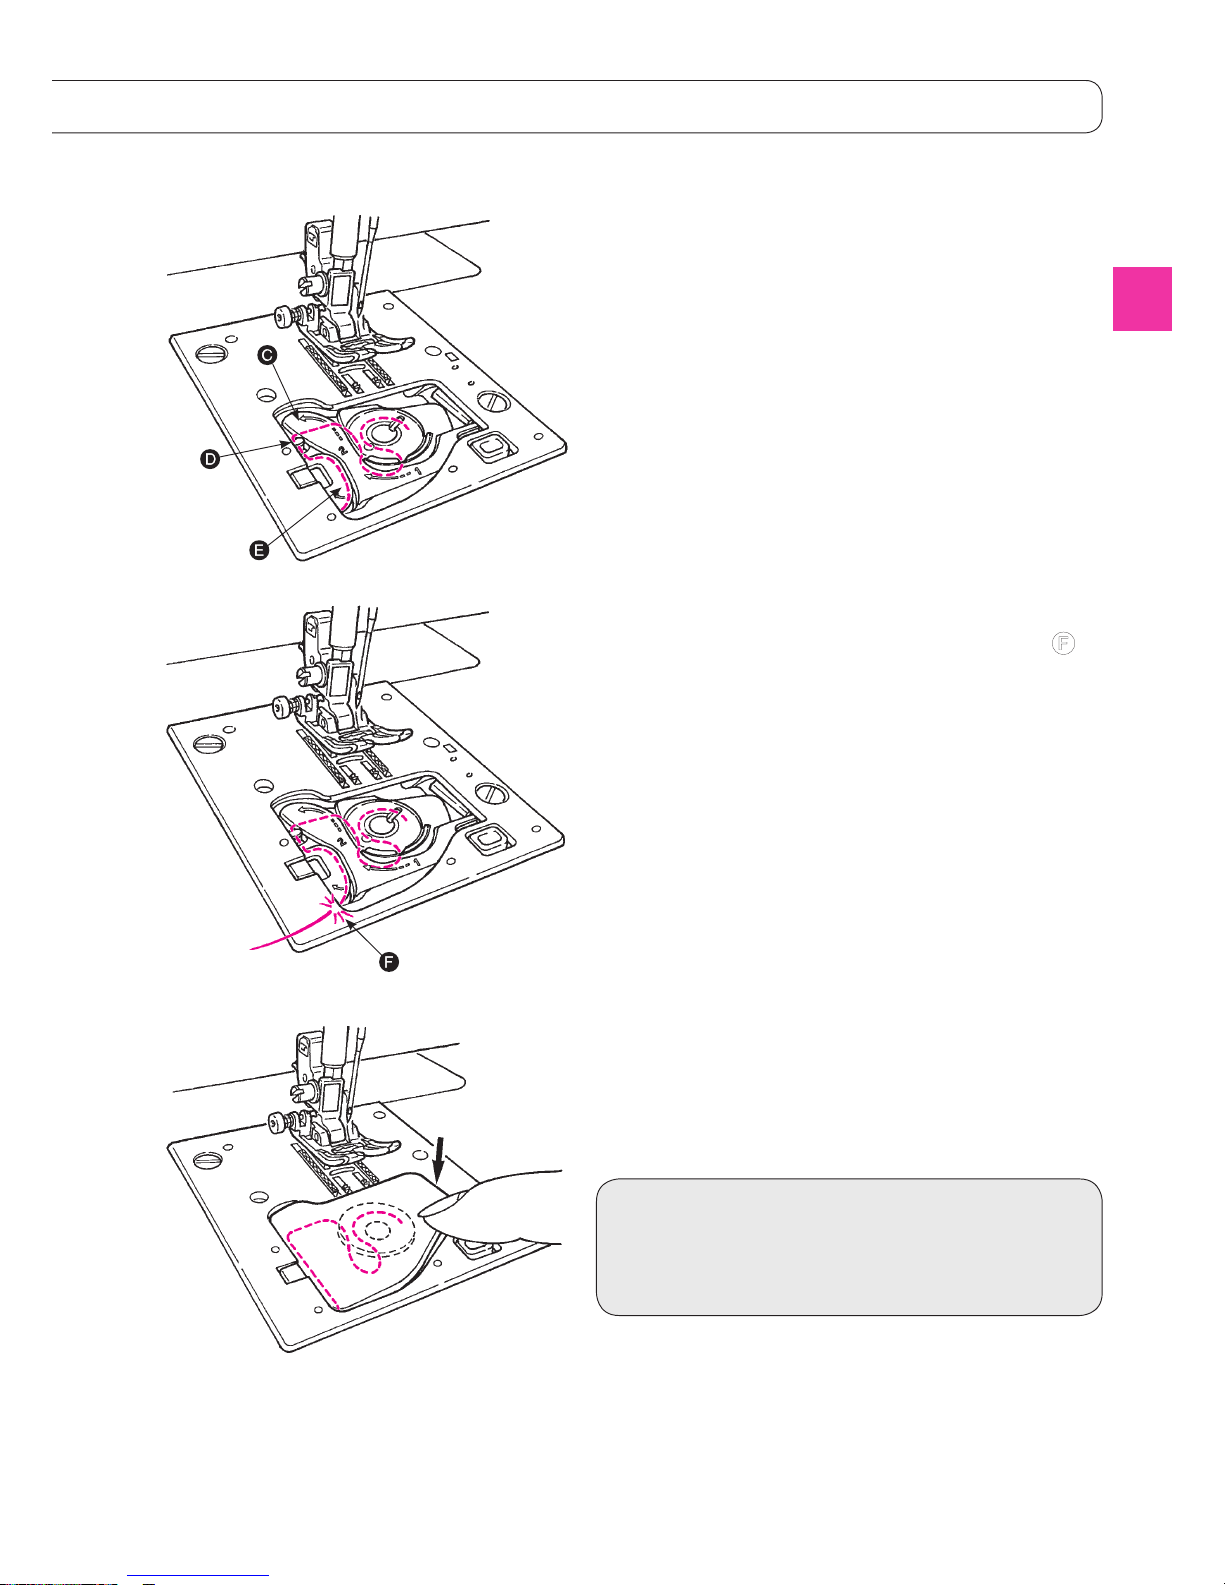
Cut the thread with the built-in cutter
F
.
5
Close the hook cover.
6
F
You can start to sew in this condition (without
pulling up the bobbin thread), however, if you want
to sew with the bobbin thread pulled out, refer to
“Pulling up the bobbin thread” in the page 22.
Thread to guide D and E leave the thread
underneath. (Thread guide E first and it
will thread to guide D as well.)
* When pulling bobbin thread, bobbin rotates
counterclockwise. If bobbin rotates clockwise,
put the bobbin upside down.
4
D
E
C
19
Page 22
20
1
Lift the presser foot lifting lever.
1
2
3
4
5
Make sure to push the
needle to the top.
It is impossible to perform
stitching if the needle is not
correctly installed or a bent
needle is used. Pay close
attention as this will cause
machine malfunction.
Note:
2
Place a thread spool to the spool pin and
a spool cap onto the spool pin.
There are three types of the spool caps, large, medium
and small. Choose the size of spool cap according to
thread spool to be used.
Threading the needle thread
* Use the needle: No.11-16
and the thread: No.30-90.
* When twin needle is used,
the automatic needle
threader can not be used.
* Align the marking at the
hand wheel with the one
on the machine body.
Small spool
Large spool
Spool cap
Spool cap
Needle thread preparation
Attention Turn OFF the power switch
before winding the bobbin thread.
Spool cap Small spool
Spool cap
Large spool
Turn OFF the power switch
before winding the bobbin thread.
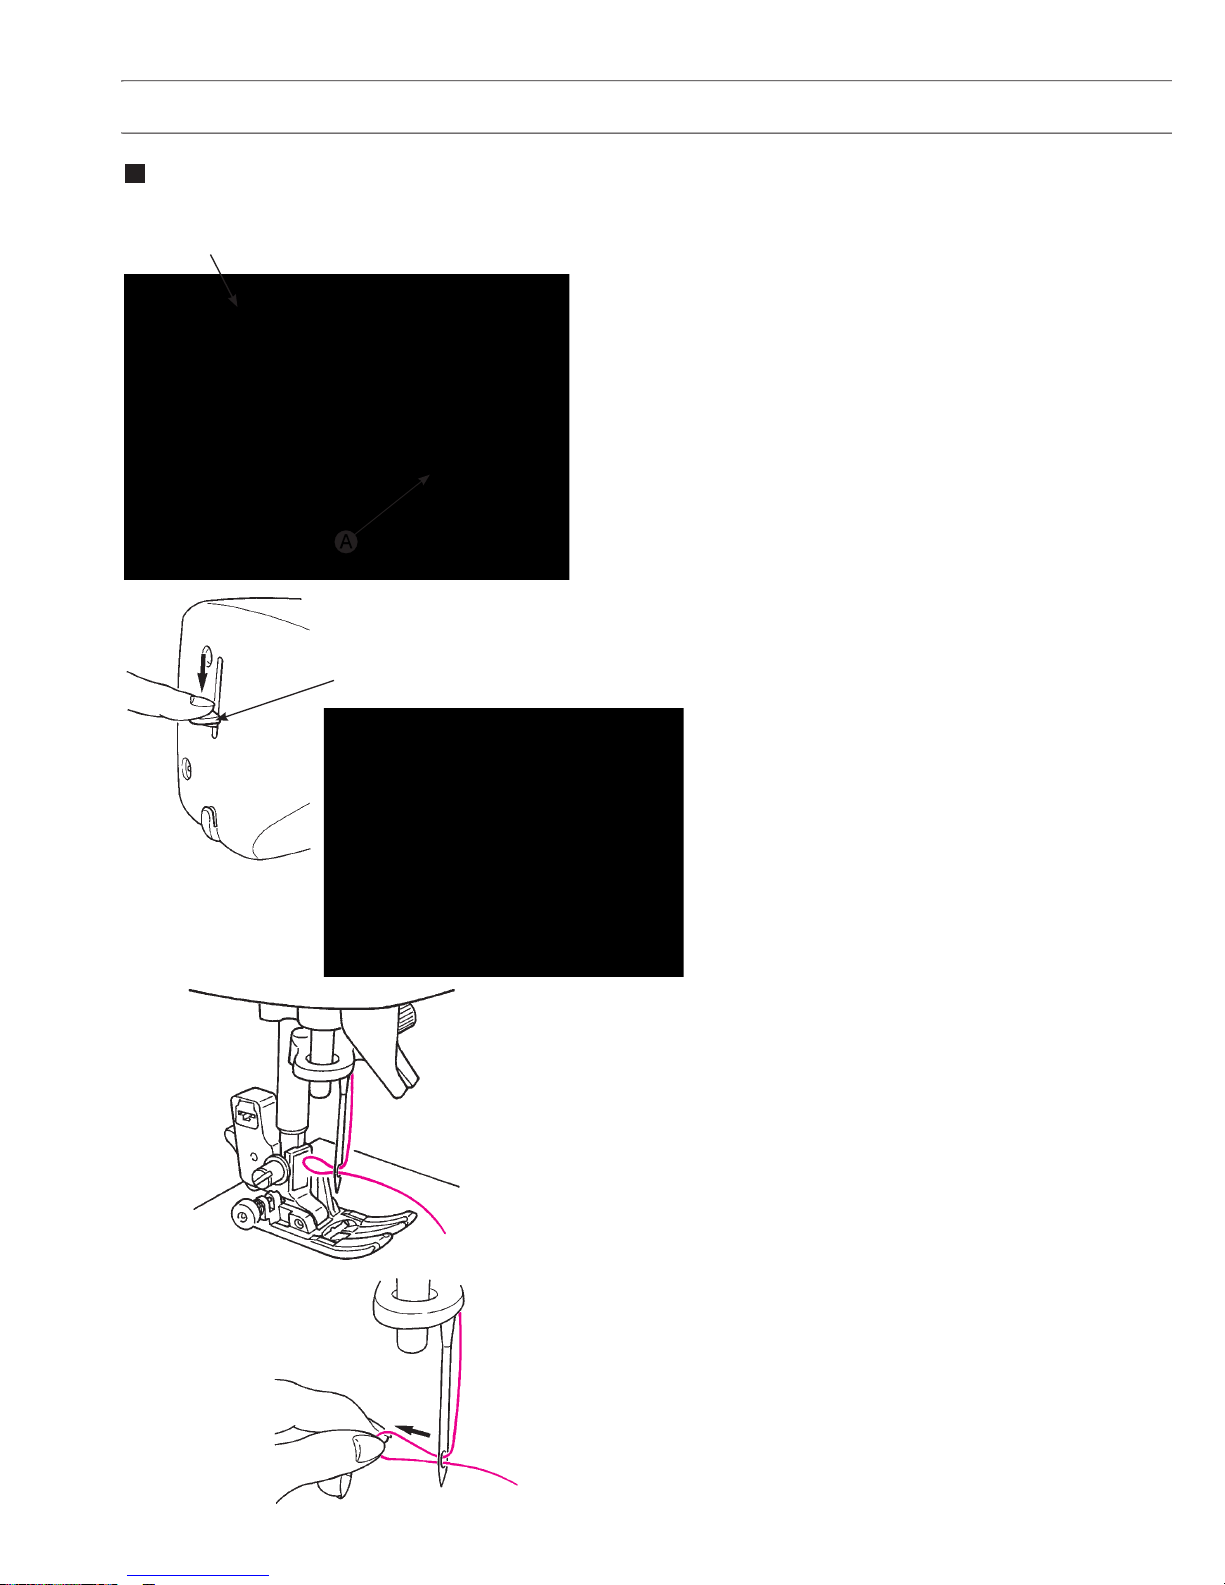
Page 23
Thread to guide A.
Hold the thread end and thread according
to the arrow marking.
* Make sure that the presser foot is raised.
Otherwise the machine is not correctly threaded.
3
4
Thread the guide B from the right-hand
side.
* It is easier to thread by pulling thread towards
left back side.
5
A
* Check that the thread take-up
is correctly threaded.
B
21
Page 24
Release the threading lever and the
needle thread is threaded to the needle
eye.
Automatic needle threader
1
Lower the presser foot.
* The automatic needle threader sometimes
fails to thread the needle when the presser
foot is raised.
2
Thread to A and cut the thread with the
thread cutter.
4
3
Lower the threading lever until it comes
to a complete stop.
* Lower the threading lever slowly.
Threading lever
A
Thread cutter
Pull the thread backward.
Pull out the thread from the needle eye by approx.
10 cm or 4 inches long.
5
* Be careful that the cutter is inside.
22
Page 25

Pulling up the bobbin thread
Basic operation:
You can start to sew without pulling up the bobbin
thread, however, if you want to sew with the
bobbin thread pulled out, follow the directions
below.
Pull out both needle and bobbin threads
by approx. 10 cm (4 inches) long and
pass them under the presser foot towards
the back of the machine.
1
Lift the presser foot and lightly hold the
end of the needle thread.
2
Turn the hand wheel towards you to move
the needle up and down. Loop of bobbin
thread will be pulled out when you will
pull the needle thread lightly.
3
23
Page 26
24
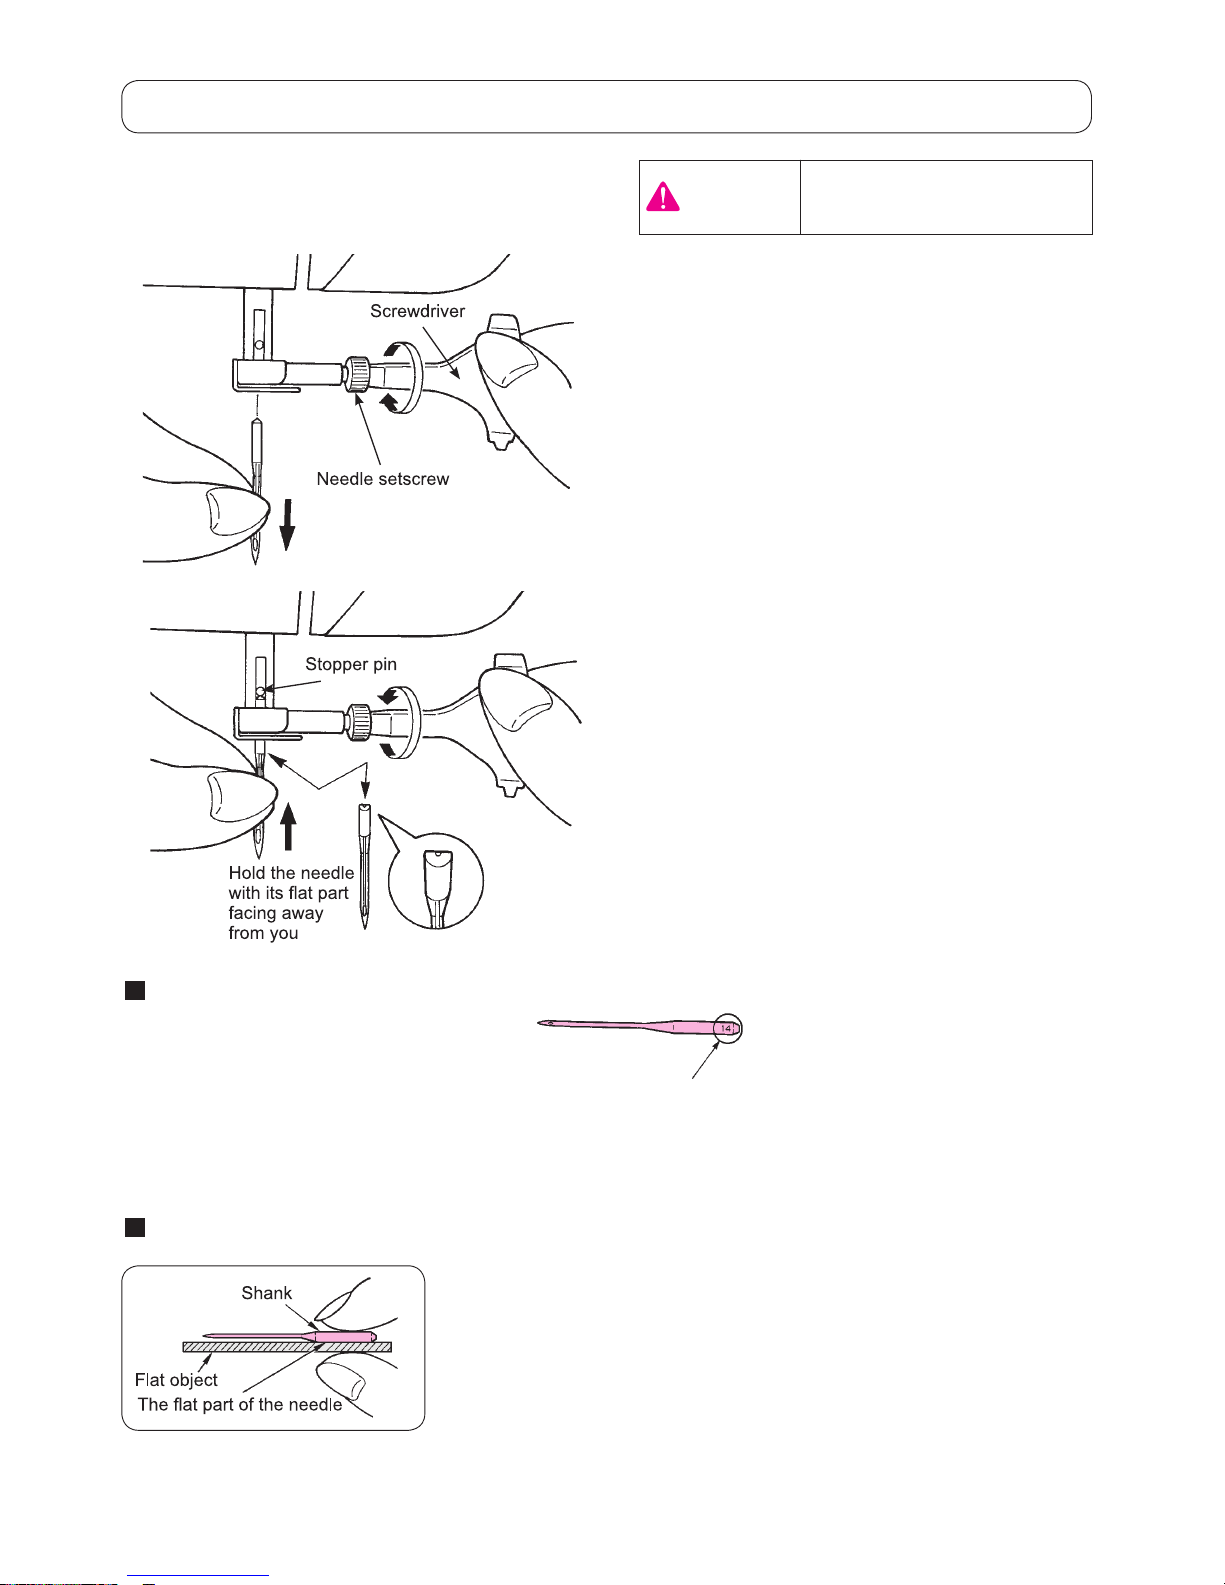
Needle size:
The larger the number, the thicker the needle.
Attaching the needle
Needles to be purchased
When purchasing spare needles,
specify HA X 1 (130/705H) or
HA X 1 SP (needle for knits) .
Checking the needle
Check the needle for its straightness occasionally.
Any bent needle would cause skipped stitches,
thread breakage or damage to materials.
Flat object
The flat part of the needle
Shank
Needle setscrew
Stopper pin
Hold the needle
with its flat part
facing away
from you
The machine will not sew if the needle is not inserted
correctly and/or a bent needle is used. It will cause
damage to the machine.
1
Removing needle
1. Turn the hand wheel towards you until the needle
comes to the highest position and lower the presser
foot.
2. Turn the needle setscrew towards you 1-2 times and
remove the needle.
2
Attaching the needle
(The needle cannot be inserted unless it
is correctly positioned.)
Hold the needle with its flat part facing away from you,
and insert it fully until it touches the stopper pin.
Securely tighten the needle setscrew.
Attention:
Screwdriver
Warning
Turn OFF the power switch
before changing the needle.
Page 27
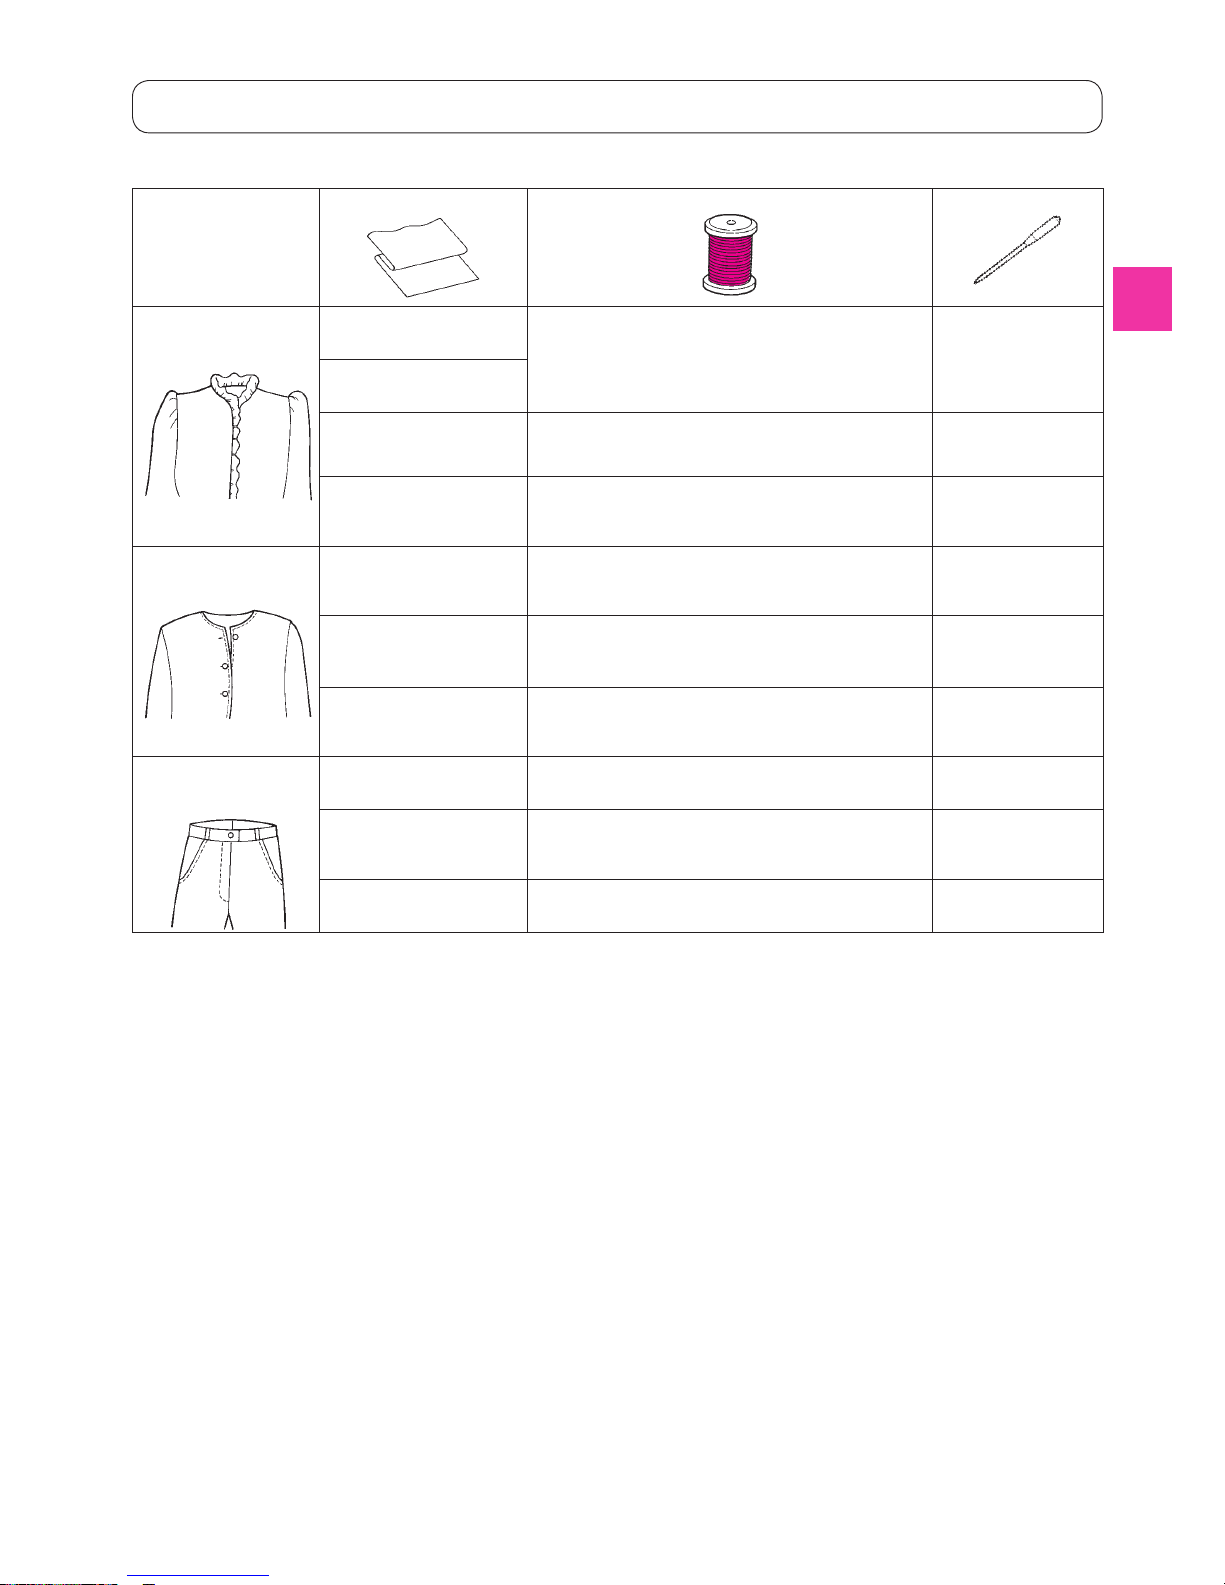
Fabric, thread and needle table
Fabric Thread Needle
HA×1
Light-weight
materials
Lawn
Silk thread
…………………………………………
No.80,90
Spun thread
………………………………………
No.80,90
No.11
Georgette
Tricot Spun thread
………………………………………
No.60-90
Knit needle
No.11
Wool and synthetic
fabrics
Silk thread
………………………………………………
No.80
Spun thread
……………………………………
No.60-90
No.11-14
Medium-weight
materials
Cotton and synthetic
fabrics
Spun thread
……………………………………
No.50, 60 No.11-14
Light jersey
Silk thread
………………………………………………
No.50
Spun thread
……………………………………
No.50, 60
Knit needle
No.11
Ordinary wool and
synthetic fabrics
Silk thread
………………………………………………
No.50
Spun thread
……………………………………
No.50, 60
No.11-14
Heavy-weight
materials
Denim Spun thread
………………………………………
No.30-50 No.14-16
Jersey
Silk thread
………………………………………………
No.50
Spun thread
……………………………………
No.50, 60
Knit needle
No.11-14
Coat Silk thread
………………………………………………
No.50 No.11-14
* In general, the same thread is used for both needle and bobbin threads.
* Thin thread and needle will be used for light-weight fabrics and thick thread and needle will be used for
heavy-weight materials.
* Check that the combination of needle and thread is OK by trial sewing on the material which will be sewn.
* Knit needle is good for stretchy fabrics (such as knits) and synthetic fabrics.
* Use thread No. 30 - 90.
* When it is difficult to go over an overlapped section, guide the fabric by hand.
* When sewing decorative stitches or letters (Page 28, 30 and 32), use knit needle for better finish.
25
Page 28

How to adjust thread tension
When the needle thread is too
strong:
The bobbin thread will be pulled to the front side of the
fabric. Turn the thread tension adjustment dial towards
"-1" to "-3".
When the needle thread is too
low:
The needle thread will be pulled to the wrong side of
fabric. Turn the thread tension adjustment dial towards
"+1" to "+3".
In case a correct tension setting is not obtained, check
thread paths for both needle and bobbin threads.
Needle thread
Bobbin thread
A
Fabric (right side)
Fabric (right side)
Needle thread
Bobbin thread
Bobbin thread
Needle thread
Fabric (right side)
Well-balanced thread tension
Straight stitch: Needle and bobbin threads interlace
with each other at the middle of the
fabric thickness. (
A
)
Zigzag stitch: Needle thread is pulled a little bit to the
wrong side of the fabric.
If the machine is set to “Auto”, it is suitable for most
fabrics. However, adjustment may be necessary
according to fabrics and sewing applications.
If the tension is not correctly set, it will cause
imbalanced stitch formation, puckering, and/or thread
breakage.
Weaker tension
Stronger tension
Thread tension
adjustment dial
Fabric (wrong side)
Fabric (wrong side)
Fabric (wrong side)
26
Page 29
How to adjust presser foot pressure
Turn the presser foot pressure adjustment dial to set the
proper pressure.
When sewing in general, set the presser foot pressure
adjustment dial to “5”.
When sewing on light synthetic fabrics, stretchy fabrics,
appliqué which seam allowance is overlapped, etc., lower
the number on the presser foot pressure adjustment dial.
(reducing the presser foot pressure)
How to lower the feed dog
Move the drop feed knob to the right-hand side, in case
the feed dog is in the down position for free motion
quilting, button sewing, etc.
* Move the drop feed knob to the left-hand side after
sewing. The feed dog will be engaged automatically
when the machine starts to sew.
When lowering the feed dog
When lifting the feed dog
Drop feed knob
Stronger
Weaker
Presser foot
pressure adjustment
dial
How to adjust the presser foot pressure /
How to lower the feed dog
27
Page 30
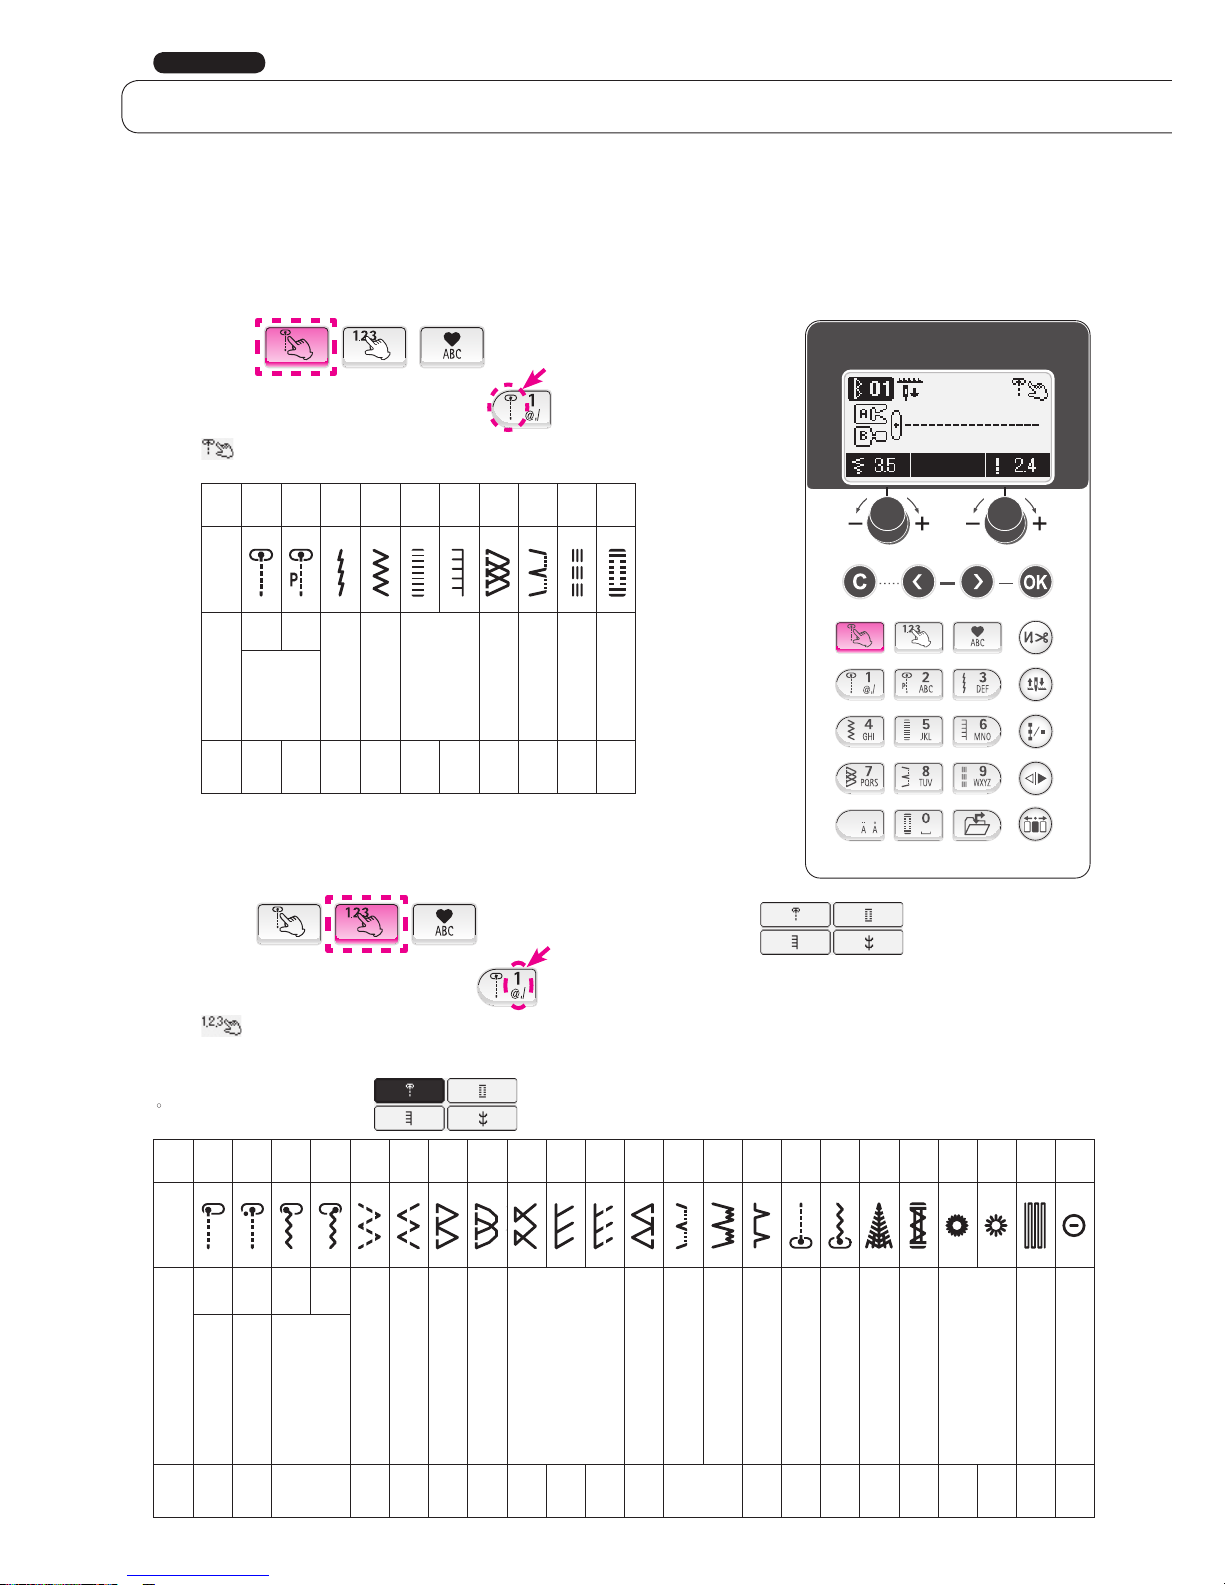
How to select a stitch pattern
F600
Push and choose stitch pattern type.
Select stitch pattern by number.
will be indicated on top right side of the screen.
Direct patterns
☆
There are 225 types of stitch patterns.
☆
When turning on the machine, the straight stitch of the center needle position is chosen automatically.
☆
There are 4 methods to select stitch pattern.
Pattern
No.
1 2 3 4 5 6 7 8 9 0
Pattern Application
Center
needle
position
Piecing
Straight stitch
for elastic
Zigzag stitch
Applique
Over casting
stitch
Blind stitch
Straight
reinforced stitch
Buttonhole
Straight
stitch
Refer
to
page
33 63 37 38 64 65 39 41 37 44
Pattern
No.
01 02 03 04 05 06 07 08 09 10 11 12 13 14 15 16 17 18 19 20 21 22 23
Pattern Application
Left
needle
position
Center
needle
position
Left
needle
position
Right
needle
position
Three point zig zag
Two point zig zag
Overcasting stitch
Overcasting stitch
Used for lightweight material
Overcasting stitch
Used for flexible material
Ornamental pattern
Blind stitch
Used for lightweight material
Blind stitch
Used for flexible material
Shell tuck
Back straightline stitch
Back zigzag stitch
Fly stitch
Bar tack
Eyelet
Darning
Button sewing
Straight stitch
Lock stitch (stay
stitches)
Zigzag stitch
Refer
to
page
33 37 38 40 - 39 40 - - - - 41 - 37 - - 52 - - 71 -
1
Push and check the stitch
pattern in this portion and select.
will be indicated on top right side of the screen.
Other patterns
2
On the LCD screen you will see
the selected stitch pattern and the
marking of the presser foot to be
used.
・
Practical patterns
28
Page 31

Push and choose
. Check the number in this portion
and select.
will be indicated on top right side of the screen.
Pattern
No.
01 02 03 04 05 06 07 08 09 10 11 12 13 14 15
Pattern
Application
Standard
buttonholes
2-step
buttonhole
Rounded
end
Keyhole
buttonholes
For knit
Decorative
Refer
to
page
44
Pattern
Refer
to
page
65
Pattern
Refer
to
page
62
Pattern
Refer
to
page
71~78, 89
Pattern
Refer
to
page
71~78
・
Buttonhole patterns
・
Quilt patterns
・
Decorative patterns
One point pattern
3
Push and choose
. Check this portion.
Input letters by cell phone input. (Refer to page 73)
will be indicated on top right side of the screen.
Letters
4
Patterns for elongation
Patterns for crazy quilt
29
Page 32

Push and choose stitch pattern type.
Select stitch pattern by number.
will be indicated on top right side of the screen.
Push and check the stitch
pattern in this portion and select.
will be indicated on top right side of the screen.
Pattern
No.
01 02 03 04 05 06 07 08 09 10 11 12 13 14 15 16 17 18 19 20 21
Pattern Application
Left
needle
position
Center
needle
position
Left
needle
position
Right
needle
position
Three point zig zag
Two point zig zag
Overcasting stitch
Overcasting stitch
Used for lightweight material
Overcasting stitch
Used for flexible material
Ornamental pattern
Blind stitch
Used for lightweight material
Blind stitch
Used for flexible material
Shell tuck
Fly stitch
Bar tack
Eyelet
Darning
Button sewing
Straight stitch
Lock stitch (stay
stitches)
Zigzag stitch
Refer
to
page
33 37 38 40 - 39 40 - - - - 41 - - 52 - 71 -
How to select a stitch pattern
F400
Direct patterns
☆
There are 157 types of stitch patterns.
☆
When turning on the machine, the straight stitch of the center needle position is chosen automatically.
☆
There are 4 methods to select stitch pattern.
Pattern
No.
1 2 3 4 5 6 7 8 9 0
Pattern Application
Center
needle
position
Piecing
Straight stitch
for elastic
Zigzag stitch
Applique
Over casting
stitch
Blind stitch
Straight
reinforced stitch
Buttonhole
Straight
stitch
Refer
to
page
33 63 37 38 64 65 39 41 37 44
1
Other patterns
2
On the LCD screen you will see
the selected stitch pattern and the
marking of the presser foot to be
used.
・
Practical patterns
30
Page 33

Pattern
Refer
to
page
71~78
Pattern
Refer
to
page
71~78, 89
Pattern
Refer
to
page
65
Pattern
No.
01 02 03 04 05 06 07 08 09 10 11 12 13 14 15
Pattern
Application
Standard
buttonholes
2-step
buttonhole
Rounded
end
Keyhole
buttonholes
For knit
Decorative
Refer
to
page
44
Pattern
Refer
to
page
62
・
Buttonhole patterns
・
Quilt patterns
・
Decorative patterns
Patterns for elongation
Push and choose
. Check the number in this portion
and select.
will be indicated on top right side of the screen.
One point pattern
3
Push and choose
. Check this portion.
Input letters by cell phone input. (Refer to page 73)
will be indicated on top right side of the screen.
Letters
4
31
Page 34

Push and choose stitch pattern type.
Select stitch pattern by number.
will be indicated on top right side of the screen.
Push and check the stitch
pattern in this portion and select.
will be indicated on top right side of the screen.
How to select a stitch pattern
F300
Direct patterns
☆
There are 105 types of stitch patterns.
☆
When turning on the machine, the straight stitch of the center needle position is chosen automatically.
☆
There are 4 methods to select stitch pattern.
Pattern
No.
1 2 3 4 5 6 7 8 9 0
Pattern Application
Center
needle
position
Piecing
Straight stitch
for elastic
Zigzag stitch
Applique
Over casting
stitch
Blind stitch
Straight
reinforced stitch
Buttonhole
Straight
stitch
Refer
to
page
33 63 37 38 64 65 39 41 37 44
1
Other patterns
2
On the LCD screen you will see
the selected stitch pattern and the
marking of the presser foot to be
used.
・
Practical patterns
Pattern
No.
01 02 03 04 05 06 07 08 09 10 11 12 13 14 15 16 17 18 19 20 21
Pattern Application
Left
needle
position
Center
needle
position
Left
needle
position
Right
needle
position
Three point zig zag
Two point zig zag
Overcasting stitch
Overcasting stitch
Used for lightweight material
Overcasting stitch
Used for flexible material
Ornamental pattern
Blind stitch
Used for lightweight material
Blind stitch
Used for flexible material
Shell tuck
Fly stitch
Bar tack
Eyelet
Darning
Button sewing
Straight stitch
Lock stitch (stay
stitches)
Zigzag stitch
Refer
to
page
33 37 38 40 - 39 40 - - - - 41 - - 52 - 71 -
32
Page 35

Pattern
Refer
to
page
65
Pattern
Refer
to
page
62
Pattern
Refer
to
page
71~78, 89
Pattern
Refer
to
page
71~78
Pattern
No.
01 02 03 04 05 06 07 08 09 10 11 12 13 14 15
Pattern
Application
Standard
buttonholes
2-step
buttonhole
Rounded
end
Keyhole
buttonholes
For knit
Decorative
Refer
to
page
44
・
Buttonhole patterns
・
Quilt patterns
・
Decorative patterns
Patterns for elongation
Push and choose
. Check the number in this portion
and select.
will be indicated on top right side of the screen.
One point pattern
3
Push and choose
. Check this portion.
Input letters by cell phone input. (Refer to page 73)
will be indicated on top right side of the screen.
Letters
4
33
Page 36

34
Straight stitch
Attention
Pattern No. Direct 1
Presser foot
Standard presser
foot (A)
Thread tension Auto
Sewing start
Pull the needle and bobbin threads under the presser
foot to the rear of the machine and lower the presser foot
to start sewing.
Sewing end
Stop sewing and push the thread trimming button to trim
the threads.
<by thread trimming button>
Push the thread trimming button to trim the threads.
<by foot controller>
Push heel side of the foot controller to trim the threads.
* This function can be cancelled.
(Refer to page 82.)
* You can also cut the threads by the thread cutter at
the face plate cover.
Thread trimming
foot switch
This means presser foot is up.
Lower the presser foot to start
sewing.
Turn OFF the power switch
before replacing the presser
foot.
Page 37

34
When sewing the edge of thick
fabrics
Turn the hand wheel and let the needle enter at the position
of sewing start. Push the black button by finger and lower
the presser foot. Release the finger from the black button
and start sewing. When the presser foot will be on the
fabric completely, the black button will be disengaged
automatically.
When changing the sewing direction
Stop sewing in front of the predetermined position and then
continue to sew, stitch by stitch, by using needle up/down
button until the target point. Leave the needle inside the
fabrics and raise the presser foot. With the needle inside the
fabrics change the sewing direction, lower the presser foot
and then start sewing.
Lock stitch after sewing-end
<When start/stop button is used>
After the sewing is finished, push the reverse stitch button.
While it is pressed, the machine will sew reverse and when
it is released, the machine will stop sewing reverse.
*When reverse stitching, the sewing speed is slow.
<When foot controller is used>
The machine will sew reverse at almost the same speed
as the normal sewing. When the reverse stitch button is
released, the machine sews straight.
Seam guide line on the throat plate
Align the fabric edge with a seam guide line and sew.
* Numbers on the guide line show the distance in mm and
inches between the center needle position and the guide
line.
Numbers, 7, 10 and 20 are millimeter.
Numbers, 1/ 4, 5/ 8 and 1 are inches.
5
8
4
/
/
1
1
10
20
10
7
5
8
4
/
/
1
1
5 mm
On center needle position basis
35
Page 38

After selecting a stitch pattern, push one time.
The machine will sew a few reverse stitches (lock stitches),
trim both needle and bobbin threads and stop.
Symbol on screen:
When is pushed once again,
this function will be cancelled.
Example: straight stitch
3
Fabric
2
Press the reverse stitch button.
The machine sews reverse stitches, stop sewing and
trim both needle and bobbin threads automatically.
1
After selecting a pattern, you can press
to display on the screen.
2
Place the fabric in the sewing start
position and begin sewing.
The machine sews a few back stitches and continue.
3
Automatic lock stitch and t
hread trimming
36
Page 39

When changing the needle position
of straight stitch
It is possible to change the needle position with the
zigzag width adjusting dial/button.
Turning to the left (- side), the needle moves to the left.
Turning to the right (+ side), the needle moves to the right.
Pushing "-", the needle moves to the left.
Pushing "+", the needle moves to the right.
When changing the stitch length
It is possible to change the stitch length with the
stitch length adjusting dial/button.
Turning to the left (- side), the displayed value becomes
smaller and the stitch length becomes smaller accordingly.
Turning to the right (+ side), the displayed value becomes
larger and the stitch length becomes larger.
Pushing "-", the displayed value becomes smaller and
the stitch length becomes smaller accordingly.
Pushing "+", the displayed value becomes larger and
the stitch length becomes larger.
How to change needle positions / How to change the stitch length
F600 Only
F400 / F300
F600 Only
F400 / F300
37
Page 40

Lock stitch (stay stitches)
At the sewing-end, push the reverse stitch button.
The machine will sew several stay stitches and stop.
Reinforced stretch stitch
The reinforcing stretch stitch helps reinforce seams when
used for sewing of elastic fabric or the force-exerted part
of fabric that is likely to fray.
Straight stitch for elastic fabric
Finished seams are elastic. This stitch system can be
used fo r producing straight stitches on elastic fabrics
such as knits and jersey.
Other straight stitch patterns
Reverse straight stitch
Machine starts to sew reverse and when reverse stitch
button is pushed, it sews forward.
F600 Only
38
Page 41

39
Zigzag stitch
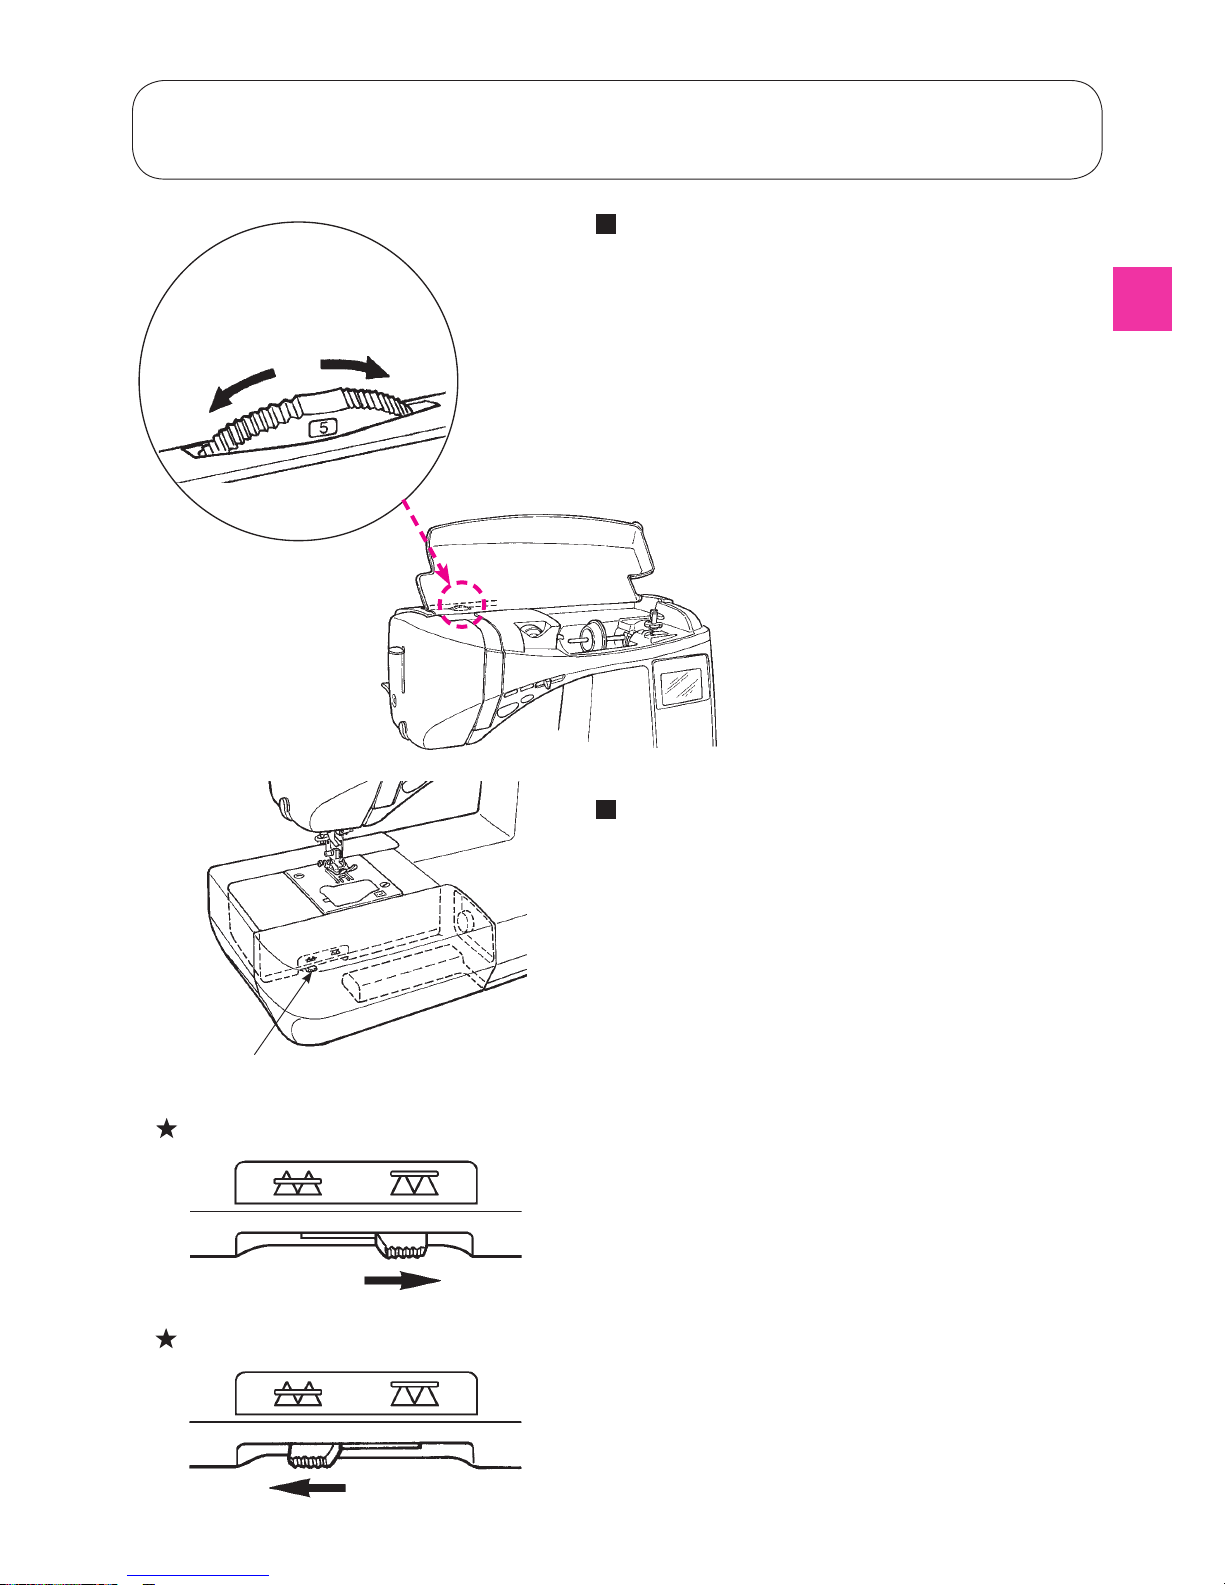
When changing the zigzag width
The zigzag width can be adjusted while sewing.
Turning to the left (- side), displayed value becomes smaller
and the zigzag width becomes smaller accordingly.
Turning to the right (+ side), displayed value becomes larger
and the zigzag width becomes larger accordingly.
Pushing "-", displayed value becomes smaller and the
zigzag width becomes smaller accordingly.
Pushing "+", displayed value becomes larger and the
zigzag width becomes larger accordingly.
When changing the stitch length
The stitch length can be adjusted while sewing.
Turning to the left (- side), the displyed value becomes
smaller and the stitch length becomes smaller accordingly.
Turning to the right (+ side), the displayed value becomes
larger and the stitch length becomes larger accordingly.
Pushing "-", the displyed value becomes smaller and
the stitch length becomes smaller accordingly.
Pushing "+", the displayed value becomes larger and
the stitch length becomes larger accordingly.
Width
Length
Pattern No. Direct 4
Presser foot
Standard presser
foot (A)
F600 Only
F400 / F300
F600 Only
F400 / F300
Attention
Turn OFF the power switch
before replacing the presser
foot.
Page 42

40
Overcasting stitch
Push the fabric towards the guide and sew.
If the fabric and guide are apart, it will not make a
nice stitch formation. Make sure to guide the fabric
along the guide and sew slowly.
* Before sewing, make sure to check that the needle
will not hit the presser foot.
Overcasting stitch 1
Pattern No. Direct 7
Presser foot
Overcasting
presser foot (C)
This stitch is used for overcasting medium- to heavyweight materials.
Guide the fabric along the guide and sew.
* Before sewing, make sure to check that the needle
will not hit the presser foot.
Overcasting stitch 2
Pattern No. Practical 07
Presser foot
Overcasting
presser foot (C)
・
This stitch is used to prevent the edge of fabric from fraying.
Attention
Attention
Turn OFF the power switch
before replacing the presser
foot.
Turn OFF the power switch
before replacing the presser
foot.
Page 43

41
This stitch is used to prevent the cut edge of fabric
from fraying.
Keep some seam allowance and cut the sewn fabric
carefully so that stitches are not cut by the scissors.
Overcasting by 3-point zigzag
Pattern No. Practical 05
Presser foot
Standard presser
foot (A)
This overcasting stitch is used for overcasting lightweight materials.
Guide the fabric along the guide and sew.
* Before sewing, make sure to check that the needle
will not hit the presser foot.
Overcasting stitch 3
Pattern No.
Practical 08 (Light weight material)
Presser foot
Overcasting
presser foot (C)
* Do not use overcasting presser foot (C).
Attention
Attention
Turn OFF the power switch
before replacing the presser
foot.
Turn OFF the power switch
before replacing the presser
foot.
Page 44

42
Blind stitch
Fabric
(wrong side)
Fabric
(wrong side)
Basting line
Fabric
(wrong
side)
0.5 to 0.6 cm
Fabric
(wrong side)
Finish line
Finish line
0.5 to 0.6 cm
Finish line
1
Sewing overcasting stitches on the edge
of fabric.
● Refer to pages 39 and 40 for overcasting stitches.
2
Basting.
3
Fold from basting line.
Leave 0.5 to 0.6 cm.
Folding fabrics
Pattern No.
Direct 8
Practical 13 (Light weight material)
Practical 14
(Stretchy fabrics)
Presser foot
Blind stitch presser
foot (D)
Pattern
number
Attention
Turn OFF the power switch
before replacing the presser
foot.
Page 45

Finish line
Fabric
(right side)
Fabric
(wrong side)
Fabric
(wrong side)
Guide
Fabric
(wrong side)
Folded edge
Guide
Needle
Folded
edge
Guide
4
Align the guide of the presser foot with
the folded edge.
Turn the hand wheel and adjust with
the zigzag width adjusting dial so that
stitches reach the folded edge.
* Pay attention so that needle will not hit the
presser foot.
5
Position the folded edge against the guide
and sew.
6
Turn over the fabric after sewing.
43
Page 46

2. If the stitches fail to reach the folded edge
1. If the stitches reach too far beyond the folded edge
Turn the zigzag width adjusting
dial to the left side.
When changing the needle entry point
Turn the zigzag width adjusting
dial to the right side.
Push the zigzag width
adjusting button "-".
F600 Only
F400 / F300
F600 Only
F400 / F300
Push the zigzag width
adjusting button "+".
Turn the handwheel
to check the needle
entry point. When
adjusting, make sure
the needle is in the
up position.
Turn the handwheel
to check the needle
entry point. When
adjusting, make sure
the needle is in the
up position.
44
Page 47

45
* The buttonhole length is automatically determined only by placing a button on the buttonhole
presser foot.
* The machine can sew buttonholes for buttons with diameters of 0.7 - 3.2 cm.
* In case of stretchy fabrics, use non-elastic interlining on the wrong side of the fabric.
* Make sure to perform test sewing to see that the machine sews buttonholes correctly.
* Buttonhole Nos. 09 - 12 are for knit fabrics and should be used with a knit needle.
Pattern No.
Direct 0
Buttonhole 01, 02,
04~15
Presser foot
Buttonhole presser
foot (E)
Pattern
number
Buttonhole type
0
Standard buttonhole
Buttonhole for medium to
heavy weight materials
Standard buttonhole
01
Stitch length is larger.
Buttonhole for heavy weight
materials
02
Sews buttonhole double
03
Manual 2-step buttonhole
Use this buttonhole, when there is
an overlapped section in the fabric
or when you want to sew larger
buttonhole than 3.2cm diameter.
(Refer to page 50)
04
Rounded end
Buttonholes for women’s
blouses and children’s
clothes.
Also for light weight
materials
05
06
Keyhole
Keyhole buttonhole for
heavy weight materials such
as suits, jackets, coats, etc.
07
Round keyhole
08
Large and thick keyholes for
heavy weight materials
09
For knit
Buttonhole for light weight knit
(also used as decorative
buttonhole)
10
Buttonhole for medium weight
knit (also used as decorative
buttonhole)
11
Buttonhole for light weight knit
Sews buttonhole double
12
Buttonhole for medium weight
knit
Sews double buttonhole
13
Decorative
Decorative buttonholes
Decorative buttonhole which
look like hand-sewn
14
15
Buttonhole stitches
Attention
Turn OFF the power switch
before replacing the presser
foot.
Page 48

Groove
Button holder
1
Set the presser foot.
Push the needle up/down button to raise the needle
and lift the presser foot.
Align the groove of the presser foot holder with the pin
of the presser foot and lower the presser foot holder to
set.
2
Set the button.
Pull the button holder toward A, place the button on
the button holder, and then push the holder toward B
to set the buttonhole length.
* It is impossible to set a button thicker than
4mm.
Pin
A
B
3
Set the buttonhole sensor pin.
Insert the sensor pin into the sensor pin hole at the
face plate cover.
* Insert the pin into the hole completely.
* If the machine starts to sew without inserting
the pin into the hole, the following message will
be shown on the display.
Set the sensor pin
and restart.
Sensor pin
* Check the following
points after setting the
presser foot and then
start to sew buttonholes.
Check that there
is a clearance.
If there is not a
clearance, the
machine will
not sew neat
stitches.
46
Page 49

4
Place the fabric under the presser foot.
Raise the presser foot, pass the needle thread through
the hole on the presser foot and pull it out sideways.
Place the fabric under the presser foot, align the
marking with the sewing-start point. Penetrate the
needle into the fabric by turning the hand wheel and
lower the presser foot.
5
Start sewing.
The machine will stop automatically after sewing the
buttonhole.
* If a buttonhole of the same size will be sewn
again, push the thread trimming button to trim
the threads and raise the presser foot.
Under this condition move to another point,
lower the presser foot and then start sewing.
* Do not change stitch length and/or zigzag width
during buttonholing. Otherwise this will cause
imbalanced stitches.
* If thread trimming button is pushed while
sewing buttonhole, the machine will stop and
will not complete the buttonhole.
* Depending on material to be sewn and weaving
direction of the material, there might be a slight
difference in zigzag widths between right and left
lines of buttonholes. Test sewing is recommended.
Hole on the
presser foot
Sewing-
start point
Needle
thread
Start from here
Marking
47
Page 50

48
Eyelet
punch
Stopper pin
6
Unplug the sensor pin after sewing.
7
Opening the buttonhole using a ripper.
[double bartack]
Pierce a stopper pin at the bartack and open the
buttonhole with a ripper. Be careful not to cut the
stitches.
[Keyhole buttonhole]
Place a cardboard under the buttonhole and make a
hole with the eyelet punch. Then pierce a stopper pin
at the bartack and open the buttonhole with a ripper.
Ripper
It will be easier to sew buttonholes on the thin fabrics
and/or near the overlapped sections, if the clamping
plate is used.
Clamping plate
1. Attach the buttonhole presser foot to
the presser foot holder, with the
clamping plate together.
2. Place the fabric between the presser
foot and the clamping plate.
* You can remove the clamping plate by holding .
● Buttonhole clamping plate
Caution
Turn off the power switch before
setting the clamping plate.
Page 51

49
Buttonholes with gimp thread
prevent the buttonholes from
stretching and can make them
more secure. Use thread such as
hand-sewn buttonholes and similar
for gimp thread.
Buttonhole with gimp
Pattern No. Direct 0
Presser foot
Buttonhole presser
foot (E)
Attention
Hook
1
Pass the needle thread through under the
presser foot and then draw the thread to
the side of the presser foot.
2
Put one end of gimp thread into the
notch at the front right side of buttonhole
presser foot, pull the gimp thread under
the presser foot and thread it at the hook
of the presser foot.
3
After threading at the hook, pull the gimp
thread back under the presser foot and
put it into the notch at the front left side
of the presser foot firmly.
4
Bring down the needle to the sewing start
point and lower the presser foot.
5
Sew the buttonhole.
6
Pull the left gimp thread to take off slack
and cut excess gimp thread.
Notch
Turn OFF the power switch
before replacing the presser
foot.
Page 52

When changing the width of the buttonhole
When changing the density of the seam
Turn the zigzag width
adjusting dial/button.
Turn the stitch length
adjusting dial/button.
* The setting of the buttonhole width
and stitch length will be cancelled
when the power is shut down or
another pattern is selected.
wide
Turn to the left
Pushing "-"
The stitch length
becomes narrow
Narrow stitches Large stitch
narrow
larger
Turn to the right
Pushing "+"
The stitch length
becomes larger
Turn to the left
Pushing "-"
The width becomes
narrow
Turn to the right
Pushing "+"
The width becomes
wide
F600 Only
F400 / F300
F600 Only
F400 / F300
narrow
* The width of buttonhole can be changed by (
) option. (Refer to page 80)
50
Page 53

51
Manual 2-step buttonhole
1
Set the manual buttonhole presser foot (I).
2
Pass the needle thread through the
hole of the presser foot and pull it out
sideways together.
Hole on the
presser foot
sewing
start point
Needle
thread
3
Bring down the needle on the sewing
start point and lower the presser foot.
* Turn the “zigzag width” and “stitch length”
adjusting dials before sewing when you want to
change the buttonhole width and density of the
seam.
4
Push start/stop button to sew.
* At this time, if the start/stop button is pushed, the
machine will stop sewing. And if the start/stop button
is pushed again, then the machine will continue to sew
the left side of the buttonhole.
Push the reverse stitch button when it
reaches the necessary length of the left
side of the buttonhole.
Sew bartack and the right side of the
buttonhole, then the machine sews
bartack and right side of the buttonhole.
Necessary length
Pattern No. Buttonhole 03
Presser foot
Manual buttonhole
presser foot (I)
Reverse stitch button
Attention
Turn OFF the power switch
before replacing the presser
foot.
Page 54

5
Push reverse stitch button when it comes
to the sewing start point.
Sewing start
point
Stopper pin
Ripper
6
Sew bartack and lock stitches until the
machine stops automatically.
7
Pierce a stopper pin at the bartack and
open the buttonhole with a ripper.
Be careful not to cut the stitches.
As the numbers of stitches of both right and left lines
of buttonhole is memorized in the sewing machine, the
buttonhole of the same size can be sewn.
* If you want to change the memory, select the stitch
pattern once again.
Reverse stitch button
* In the case of a 2-step buttonhole, sewing
direction of the left and that of the right side is
different. Due to this and according to fabrics to
be sewn, it may be possible that the density of
each side looks different.
52
Page 55

53
Bartacking
Bartacking is used to reinforce the part of the seam that is likely to ravel.
* The length of the bartack is determined by pushing the reverse stitch button, but it will automatically make
a u-turn when it reaches the maximum of 20 stitches.
* If the presser foot cannot be parallel to throat plate, use filler fabric or cardboard.
Fabric
example of use
Trousers
and skirt
Bag
Pocket
2
Place the fabric under the presser foot.
10 cm
1
Pass the needle thread through the
presser foot.
Pattern No.
Practical 19
Practical 17
Presser foot
Manual buttonhole
presser foot (I)
Attention
F400 / F300
F600
Turn OFF the power switch
before replacing the presser
foot.
Page 56

Starting
point
Lock
stitches
To sew a bartack of the same length again…
when the length of the first bartack has been memorized,
● When the start/stop
button is pushed, the
machine starts to sew
and makes a u-turn
automatically at the same
point as the first bartack.
● When it comes to the
sewing end point,
push the reverse
stitch button.
* If you want to change the memorized length of the bar tack,
please select stitch pattern again.
Turning
point
3
Start sewing.
Push the start/stop button and the machine starts to
sew straight stitches.
4
When it comes to the turning point
push the reverse stitch button.
The machine goes back to the starting point by sewing
straight stitches and then it sews zigzag stitches to the
point where the reverse stitch button is pushed.
5
When the machine comes to the sewing
end point, push the reverse stitch button.
The machine sews lock stitches and stops.
Reverse stitch button
Start/stop button
54
Page 57

55
Inserting zippers
* Make sure to use center needle position
(Stitch pattern No. Direct 1).
(right) (left)
2
Attach the zipper presser foot (B) to the
machine.
When sewing the left side of the zipper, place the
zipper under the right portion of the zipper presser
foot. When sewing the right side of the zipper, place
the zipper under the left portion of the foot.
1
Use the standard presser foot (A) to sew.
Place the fabrics face-to-face. Check the runstitching
length and the length of the zipper to be inserted.
Machine baste the zipper onto the fabrics.
Machine basting = zipper opening length + 1 cm
Machine basting ...
Stitch length “4”
Fabric
(wrong side)
Crotch end
Reverse stitch (1cm)
Runstitching ... Stitch length “Automatic”
Preparation before attaching zipper
Pattern No. Direct 1
Presser foot
Zipper presser foot
(B)
Zippers are set in two different ways: by inserting into
the side seam of the garment and by centering in
position.
Attention
Turn OFF the power switch
before replacing the presser
foot.
Page 58

5cm
0.7 to 1 cm
Basting
Reverse
stitches
Basting stitches
Zipper
Fabric
(wrong side)
Fabric (right side)
Fabric
(right side)
5 cm
0.3 cm
Slider
Move up the
slider
1
Open the seam allowance.
Neatly open the seam allowance. Adjust the back
seam allowance so that it projects 3 mm from the
seam. Press with an iron to make a crease. Fit the
crease along the edge of the teeth.
2
Sew the zipper tape on the seam
allowance from bottom to top.
Fitting the edge of the zipper presser foot along the
edge of the zipper teeth, sew the zipper tape on the
seam allowance. At the slider part of the zipper, stop
the machine at 5 cm (2 inches) before the slider. Move
the slider to the far side of the presser foot and sew
the zipper until its top end is reached.
3
Put the fabric over the zipper.
Baste the zipper and set it on the fabric.
* Baste the zipper tape with the fabric with hand
basting stitches.
Move the slider to the top of the zipper.
Put the fabric over the zipper and perform basting.
Zipper
Fabric
(wrong side)
Zipper opening size
1 cm
Teeth
Slider
0.3 cm
Crotch end
4
Sew reverse stitches and sew the
right-hand side.
After sewing reverse stitches, set the left hand side of
the zipper presser foot to the zipper teeth. Sew until
5 cm (2 inches) of the zipper end. Undo the basting
stitches and move the slider to the far end of the
presser foot. Then sew the rest of the way.
Lapped insertion
Set on right
Set on left
56
Page 59

Fabric
(wrong side)
Teeth
Seam line
Basting
Zipper
(back)
Slider
Fabric
(wrong side)
1
Baste zipper and garment body.
Open the seam allowance. Fit the teeth of the zipper at
the end of the seam line and perform basting by hand.
Pull the slider tab to the up side.
0.7 to 1 cm
0.7 to 1 cm
Fabric
(right side)
Zipper tape
Reverse
stitches
2
Sew the left part of the zipper on the seam
allowance from the bottom of the opening
to the top.
Sew 0.7 to 1 cm from the seam line.
3
Sew the right part of the zipper.
Sew reverse stitches a few times.
Sew the other side 0.7 to 1 cm from the seam line.
4
Undo only the basting stitches.
Centered insertion
Set on right
Set on left
57
Page 60

58
Shirring
Gathering
Shirring and gathering
Shirring: such as the shoulder line and waist of the skirt, on which shirring is not seen.
Gathering: such as shoulder joining and the frills of a skirt.
2
Loosen the needle thread tension.
1
Change the stitch length.
Set 3.0 - 4.0 for gathering and
1.5 - 2.0 for shirring.
3
Start sewing.
Leave about 5 cm of needle and bobbin
threads both at the sewing start and at
the sewing end and sew a parallel line.
4
Pull the lower thread by hand to shrink
the fabrics
Gathering Shirring
Pattern No. Direct 1
Presser foot
Standard presser
foot (A)
Loose
F600 Only
F400 / F300
F600 Only
F400 / F300
Attention
Turn OFF the power switch
before replacing the presser
foot.
Page 61

59
Pintucking
This stitch is used to sew decorations on the front of blouses
and/or aprons, etc.
Example of use
● Blouse ● Apron
2
Sew the creases one by one and avoid
it stretching.
1
Iron the creases of the pintuck.
3
After sewing, turn over pintucks and
iron them.
Pattern No. Direct 1
Presser foot
Standard presser
foot (A)
Width of finished
pintuck
Crease
Crease
Attention
Turn OFF the power switch
before replacing the presser
foot.
Page 62

60
Welt seam
This stitch is used for securing an edge.
0.7 cm
Fabric
(wrong side)
Fabric
(wrong side)
Fabric
(wrong side)
Fabric
(wrong side)
1.5 cm
Finish line
1
Put the fabrics together and sew.
2
Cut half of the seam allowance.
3
Open the fabrics from the finish line and
fold the seam allowance together and
iron.
4
Wrap up the shorter seam allowance with
the longer one and sew the edge of the
crease.
Fabric
(wrong side)
Pattern No. Direct 1
Presser foot
Standard presser
foot (A)
Attention
Turn OFF the power switch
before replacing the presser
foot.
Page 63

61
Presser foot
holder
Narrower
sewing lines
Quilt Guide
Wider sewing
lines
How to use the quilt guide
2
Sew while tracing the stitches with the tip
of the quilt guide.
Distance between sewing lines can be adjusted freely.
1
Insert the quilt guide into the groove of
the presser foot holder.
Pattern No. Direct 1, 4
Presser foot
Standard presser
foot (A)
F600 / F400
Attention
Turn OFF the power switch
before replacing the presser
foot.
Page 64

62
Scallop stitches
This stitch is used for decorating edging on items such as
table cloths, collars on blouse, etc.
1
To keep the pattern intact, leave some
margin and sew on the edge of the cloth.
2
Cut the sewn fabric carefully so that
stitches are not cut by the scissors.
Pattern
No.
One point 24, 25
One point 24
One point 13
Presser
foot
Manual buttonhole
presser foot (I)
* Adjust stitch length of the decorative stitches
according to the fabric to be sewn.
Sewing on fabric too thick may cause jamming.
F600
F400
F300
Attention
Turn OFF the power switch
before replacing the presser
foot.
Page 65

63
Decorative stitches
Pattern
No.
Decorative 01~72
Decorative 01~49
Decorative 01~20
Presser
foot
Manual buttonhole
presser foot (I)
Display of the length of one cycle
Although the length of one cycle of the decorative pattern is displayed,
treat it only as a reference, as this will be changeable based on fabric and thread.
Example) ’s
The length of one
cycle is displayed.
Place the fabric under
the presser foot and start.
5.8 mm
F600
F400
F300
Attention
Turn OFF the power switch
before replacing the presser
foot.
Page 66

64
Patchwork piecing
To sew pieces of cloth together is called piecing in patchwork.
When piecing, the seam allowance is usually 1/4" (6.4 mm).
1
Cut the fabric with seam allowance.
2
Align the right end of the presser foot and
the edge of the fabric and sew.
The needle will enter 1/4" (6.4 mm) from the edge of
the fabric, so the seam allowance of 1/4" (6.4 mm) can
be sewn.
Pattern No. Direct 2
Presser foot
Standard presser
foot (A)
* You can change the needle position as you like.
Needle position change: Refer to page 81
The needle position can be
adjusted between 0.0~7.0.
When the needle position is at ‘5.6’,
the needle is 1/4" (6.4 mm) from
the right edge of standard presser
foot (A).
1/4" (6.4 mm)
5.6
0.0 7.0
Attention
1/4" (6.4 mm)
Turn OFF the power switch
before replacing the presser
foot.
Page 67

65
Applique (1)
The edge of the applique fabric is sewn with a compact
zigzag, so it is suitable for the applique of cut fabric.
2
Turn the hand wheel towards you and
start sewing along with the outer side of
the applique fabric.
When you start sewing, the machine will automatically
sew 3 lock stitches.
1
Cut the applique fabric at the finish
line, put it on the base fabric and fix it
temporarily.
It is recommended to us e both-sided adhesive
interlining or the similar to fix the appliqué fabric on
the base fabric. Use the interlining to the edge of the
appliqué fabric.
* When sewing steep angles, keep the needle inside
the fabric, raise the presser foot, change sewing
direction and sew slowly.
Pattern No. Direct 5
Presser
foot
Manual buttonhole
presser foot (I)
Open toe presser foot
(O)
Keep the needle inside the fabric
at the point of arrow and raise the
presser foot.
3
At the end of sewing, push the reverse
stitch button to sew lock stitches for 3~5
stitches.
* Usually center needle position is used for appliqué
stitches but right or left needle position can be used.
Changing needle position: Refer to page 81
F600 Only
Attention
Turn OFF the power switch
before replacing the presser
foot.
Page 68

66
Applique (2)
Attention
To make the stitch unconspicuous, an applique can be sewn.
Seam allowance
2
Put the pattern paper onto the wrong side
of the fabric and fold the seam allowance
at the finish line.
1
Cut the applique fabric with seam
allowance of 3~5mm.
Pattern
No.
Direct 6
Quilting 01~04, 35~37
Quilting 01~04, 07, 08
Presser
foot
Manual buttonhole presser foot (I)
Open toe presser foot (O)
3
Put the applique fabric on the base fabric.
Temporarily fix it with basting stitches or
glue.
4
Turn the hand wheel towards you and
start sewing along with the outer side of
the applique fabric.
When you start sewing, the machine will automatically
sew 3 lock stitches.
* When sewing steep angles, keep the needle inside
the fabric, raise the presser foot, change sewing
direction and sew slowly.
5
Lock stitch at the end of sewing.
Push the reverse stitch button and the machine will
automatically sew 3 lock stitches.
It is better to lock stitch at the outer side of the applique
fabric.
* Usually center needle position is used for appliqué
stitches but right or left needle position can be used.
Changing needle position: Refer to page 81
Basting
F600 Only
F600
F400/F300
Pattern paper
Turn OFF the power
switch before replacing
the presser foot.
Page 69

67
Pattern
No.
Quilting 01~67
Quilting 01~29
Quilting 01~22
Presser
foot
Manual buttonhole
presser foot (I)
Crazy quilt
Example 1) Quilting 08
Sew patterns so that they extend over both pieces of fabric.
Using a decorative stitch, this gives a decorative look to the
joining of patchworks.
It is recommended to use decorative thread such as
embroidery thread.
Example 2) Quilting 10
Sew patterns so that the presser foot holds one side of fabric.
Random pattern
Random stitch patterns (Quilting 18~34) are transformations
of Quilting 01~17.
The width can be changed automatically by section, so that
you can enjoy those patterns.
F600 Only
F600
F400
F300
Pattern
number
Attention
Turn OFF the power switch
before replacing the presser
foot.
Page 70

68
Stitch in ditch quilting
Pattern No. Direct 1
Presser
foot
Edge sewing
presser foot (R)
This is for quilting the edge of patchworks and appliqués.
The machine will sew the lower (thinner) side of the fabric
layers. As a result, the stitches will not be noticeable and
have an effect to make the design look three dimensional or
emphasized.
2
Put the guide of the presser foot along
with the crease and sew.
The needle enters behind the guide, so that the edge
of the crease can be sewn.
1
Put the top layer of fabric with patchwork
and/or appliqués, quilting cotton and
bottom layer of fabric together by pin or
basting stitches.
Curved concealed quilting
Use manual buttonhole presser foot (I) or the open toe
presser foot (O). Sew curves by lifting the presser foot and
changing the direction very often.
Also this can be done by free motion with the quilt presser
foot. (Refer to page 69.)
* If the desired points can not be sewn, adjust the
needle position.
Needle position change: refer to page 81
F600 Only
Attention
Turn OFF the power switch
before replacing the presser
foot.
Page 71

69
Setscrew for presser foot
Actuating lever
Needle
clamp
1
Put top layer of fabric with patchwork and/or
appliqué, quilting cotton and bottom fabric
together by using pin or basting stitches.
3
Place your hands to both sides of the
presser foot and sew by pulling the
fabrics apart.
* Sew with slow to medium sewing speed.
Quilting (straight stitch)
Quilting is the process of sewing the top layer of fabric,
with quilting cotton in between and a bottom layer of fabric
underneath.
By using the walking foot, the machine feeds both top and
bottom fabrics together at the same time, so fabric shifting is
eliminated.
Pattern No. Direct 1, 4
Presser foot Walking foot (N)
Setscrew for
presser foot holder
Presser bar
Presser foot holder
2
Assemble the walking foot.
Raise the presser bar. Loosen the setscrew for presser
foot holder and remove the presser foot holder. (Refer
to page 13)
Set the actuating lever on the needle clamp and insert
the assembling point to the presser bar and tighten the
setscrew for presser foot.
* To further avoid fabric shifts, set the presser foot
pressure lower.
Adjustment of presser foot pressure: Refer to page 26
* If it is necessary to sew with the same distance, use
quilt guide.
Quilt guide: Refer to page 60
Assembling point
F600 / F400
Attention
Turn OFF the power switch
before replacing the presser
foot.
Page 72

70
1
Put top layer of fabric with patchwork
and/or appliqué, quilting cotton and
bottom fabric together by using pin or
basting stitches.
2
Assemble the quilt presser foot.
Raise the presser bar. Loosen the setscrew for presser
foot holder and remove the presser foot holder. (Refer
to page 13)
Set the quilting foot and tighten the setscrew for
presser foot.
Quilting (free motion)
It is called free motion quilting when moving the fabrics freely
towards any directions without using the feed dog of sewing
machine.
When the feed dog is lowered (drop feed condition), it is
possible to sew various curves and/or any directions by
moving the fabrics by hands.
Pattern No. Direct 1
Presser
foot
Quilt presser foot (Q)
3
Move the drop feed knob to the right hand
side.
Feed dog is now down.
Setscrew for presser foot
Setscrew for
presser foot holder
Presser
bar
Presser foot
holder
4
Place the fabric underneath the presser
foot and lower the presser foot.
5
Adjust the height of presser foot
according to the thickness of the fabrics
by screw. When the height is 1mm from
the surface of the fabrics, it will be easier
to move the fabrics without interference.
Screw
1 mm
F600 / F400
Attention
Turn OFF the power switch
before replacing the presser
foot.
Page 73

6
Use both hands to hold the fabrics
and move it without letting it loose.
The target stitch length is about
1.5~2.0mm.
7
When free motion sewing is finished,
move the drop feed knob back to the left
side.
The feed dog will be up and engaged at the same time
as the machine starts to sew.
● How to lock stitches
1. At sewing start, pull up the bobbin thread on the top layer of the fabric, hold both needle and bobbin
threads together and sew 3 stitches on the same point. After that move fabrics as you wish.
In this way, stitches on the wrong side of the fabrics look neat.
2. At sewing-end sew 3 stitches on the same point and stop.
● How to sew stitches with the same stitch length
1. When the foot controller is used, the fabrics can be guided by both hands and you can move the fabrics
freely.
2. Set the speed controller to medium or medium low first, press the foot controller completely and move
the fabrics.
-- if stitches become too large, set the speed controller to “faster”
-- if stitches become too small, set the speed controller to “slower”.
Tips
When doing the free motion with zigzag stitch, use the quilt presser foot (transparent type)
which is optionally available from your dealer.
71
Page 74

72
Pattern adjustment dial
One-point stitch/sewing letters
(in order to sew a pattern neatly, apply interlining
and conduct a test sewing first.)
Use an iron to attach a fusible interlining to the wrong side of
fabric.
* When stitch length becomes too small, the bobbin thread will
come out to the front side of fabric and/or st itches might get
stuck. Therefore make sure to conduct a test sewing beforehand.
Fabric
Since the pattern might be deformed
according to the type and thickness of
fabric and fusible interlining to be used,
make sure to conduct test sewing on the
same fabric and interlining.
Select stitch pattern No. 22
F600
(No.
20
F400 / F300
) for test sewing; If the
stitch pattern deforms, adjust it by the
pattern adjustment dial.
Preparation before sewing
Correct shape
Test sewing
When right side is higher than
left side,
When right side is lower than
left side,
Turn the pattern
adjustment dial to
the left side.
Turn the pattern
adjustment dial to
the right side.
Pattern
No.
One point 01~38
One point 01~33
One point 01~18
Letters
Presser
foot
Manual buttonhole
presser foot (I)
Pattern
No.
Practical22
Practical20
Presser
foot
Manual buttonhole
presser foot (I)
F600
F400
F300
Attention
F600
F400
F300
F400 / F300
F600
Turn OFF the power switch
before replacing the presser
foot.
Page 75

73
Page 76

have 3 fonts
F400 F300
Press
three times.
Press twice.
Press
one time.
Press
Select
How to select pattern (letters)
Example:
Press
Press
Press
and .
(Pattern No. 16)
JUKI
Press
Press
Press twice.
74
Page 77

Press
Select
Press
Press
Press
and .
(Pattern No. 13)
When you want to change the size of
pattern (letters) …..
Move the cursor to the desired pattern (letter).
You can change the height and width by:
Height: Zigzag width adjusting dial
Width: Stitch length adjusting dial
75
Page 78

How to edit patterns (letters)
JUKI
Example)
JUKI
Change to
.
Press , and
move the ‘_’(cursor)
to the position where
you wish to delete.
By pressing ,
the pattern on the
cursor "
" will be
deleted.
Press
Press
Press
and .
(Pattern No. 13)
have 3 fonts
F400 F300
76
Page 79

Place the fabric underneath the presser foot
and start.
The machine will stop automatically when sewing is finished.
Notes:
1. Note that the sewing speed varies according to
stitch patterns (letters) to be sewn.
2. If the automatic thread trimmer is used while sewing,
the machine starts to sew from the beginning.
3. In case of condensed sewing, if the stitch length is
too small, the stitches may get stuck.
Get rid of unnecessary thread
on the front side of fabric by scissors.
How to stitch a pattern (letters)
Disposing thread ends of jump stitches
77
Page 80

Save/call of patterns (letters)
The letters and one point patterns can be combined and saved for later use.
There are 10 folders in total for saving.
Use to select
folder to save and
press
Notes: means
there exists already
a pattern.
means empty
and available for
saving pattern.
(Save) (Call)
Press to
select the folder
where you wish
to call the desired
combination.
Press
Press
Press
Press
Press
Press
78
Page 81

To delete the content stored inside a folder.
Use to select
the target folder
where content to be
deleted is stored.
Press
Use to
select “delete” and
press
Press
Press
79
Page 82

Character selecting methods
No. of pressing a button
1 2 3 4 5 6 7 8 9 10 11 12 13 14
@ ! &
’
( ) , . ? - ・ / : ;
A B C a b c
D E F d e f
G H I g h i
J K L j k l
M N O m n o
P Q R S p q r s
T U V t u v
W X Y Z w x y z
_
No. of pressing a
button
1 2 3 4 5
Immediately after
selecting A
Ä Å Æ
A
Immediately after
selecting a
à ä å
a
Immediately after
selecting C
Ç
C
Immediately after
selecting c
ç
c
Immediately after
selecting e
è é ê ë
e
Immediately after
selecting i
ì
i
Immediately after
selecting N
Ñ
N
Immediately after
selecting n
ñ
n
Immediately after
selecting O
Ö Ø
O
Immediately after
selecting o
ò ö ø œ
o
Immediately after
selecting U
Ü
U
Immediately after
selecting u
ù ü
u
Other than the
above letters
Ineffective
No. of pressing
a button
1
1
2
3
4
5
6
7
8
9
0
80
Page 83

Type and usage of options
The width is now changed.
* When opening buttonhole with a ripper, make
sure not to cut the stitches.
* The setting goes back to the default setting after
the sewing machine is turned off and on.
Changing the seam
width of buttonhole
Change of needle
position
Setting thread
trimming foot switch
Twin needle sewing
Guide
Contrast of Liquid
Crystal Display (LCD)
Button reception
buzzer volume setting
Language setting
Elongation
< Type of options >
The seam width of buttonhole is changeable.
* It is changeable when sewing a buttonhole.
Small
Standard
L
arge
* Default setting is “standard”.
Example) narrowing (reducing) the seam width
Seam width
1
Change of seam width of
buttonhole
Press
Press
Press
Press
81
Page 84

Change of needle position
Example) change the needle position of zigzag stitch to left needle position.
* Default setting is center needle position.
2
Press
Press
Press
Press
It is now changed to left needle position.
* In case of a combined stitch pattern, if the
needle position is changed, the needle position
of the selected patterns is all changed to the
same needle position at the same time.
However, if letter is included in the combined
stitch pattern, needle position will not be
changed.
* After a change of needle position and in the
event that other stitch pattern is selected, the
sewing machine goes back to the default setting.
82
Page 85

Setting the
thre
ad trimming foot switch to OFF
In order to avoid trimming the thread by mistake while sewing,
you can set the thread trimming foot switch to “off” beforehand.
The thread trimming foot switch is now
turned off.
* There is not a change in the display, however,
even if the foot switch is pressed, threads will
not be trimmed.
* The setting is memorized even when the machine
is turned off and on.
3
Press
Press
Press
Press
83
Page 86

84
Twin needle sewing
* When using twin needles, make sure to set twin needle
sewing in Option and perform test sewing.
* When twin needle sewing, make sure to use thread size
smaller than No. 60.
* Make sure to use a twin needle with size of 2.0 mm (included
needle: 2.0 mm).
* When twin needle sewing, the sewing speed will become
slower.
Pattern
No.
Direct 1, 4
One-point 17, 19, 20, 21,
24~31, 34~38
One-point 17, 19, 20, 21,
24~29, 31~33
One-point 9, 10, 13~17
Presser
foot
Standard presser foot (A)
Manual buttonhole presser foot (I)
By using two needles beautiful decorative stitches
can be sewn.
2.0 mm
1
How to thread the needles
Place the supplementary spool pin.
Thread to the thread guide first. After that,
thread paths are same up from to .
Do not thread for right-hand needle.
Thread to right-hand and left-hand needles
separately.
* Automatic needle threader can not be
used. Thread each needle manually.
* Automatic thread trimmer can not be
used in case of twin needle sewing.
1
2
3
4
F600
F400
F300
Turn OFF the power switch before
replacing the presser foot.
Attention
Page 87

* Twin needle setting can not be done while a stitch
pattern other than those for twin needle sewing is
selected.
mark will be shown.
The twin needle setting can only be carried out
when suitable pattern is selected and center
needle position is selected at the same time.
Setting of twin needle sewing
Symbol of twin needle sewing will be
shown on the display.
* When in twin needle sewing, the stitch patterns will be
limited. In addition, the stitch length and zigzag width
will be also adjusted to suit the twin needle sewing.
* The setting is memorized even when the machine is
turned off and on.
* Select a stitch
pattern suitable for
twin needle sewing.
The sewing
image
Maximum 7.0 mm
* Maximum zigzag
width is 7.0 mm,
however, display
shows
.
5.0
7.0
Press
Press
Press
Press
Press
three times.
85
Page 88

Guide
The guide for winding bobbin thread, setting of bobbin, threading of needle thread, changing presser
foot and needle can be seen on the LCD display.
<Winding bobbin
thread>
<Changing presser
foot>
<Setting of bobbin>
<Threading of needle
thread>
<changing needle>
The page will proceed when pressing
Press or to end the guide.
5
Press
Press
Press twice.
86
Page 89

Contrast of Liquid Crystal Display (LCD)
The LCD contrast can be chosen from 11 levels.
The contrast is now changed.
* The setting is memorized even when the machine
is turned off and on.
6
Press
Press
Press
three times.
Press
Press
Example) Reduce the contrast of display.
87
Page 90

Button reception buzzer volume settings
The volume of buzzer can be adjusted.
Mute low loud
Now the volume setting is changed and
it will not produce a sound even when a
button is pressed.
* The setting is memorized even when the machine
is turned off and on.
Example) Setting the volume to “mute”
7
Press
Press
Press
four times
Press
Press
88
Page 91

Dutch German Russian Japanese Pictograph
English Spanish Italian French
Language setting
You can select language from 8 languages or pictographs.
(Default setting is English.)
The language is now changed to Italian
and all messages will be displayed in
Italian from now on.
* The setting is memorized even when the machine
is turned off and on.
Example) Change the language to Italian.
8
Press
Press
Press
Press
five times.
Press twice.
89
Page 92

Elongation
Pattern No.
One-point 24~38
One-point 24~33
One-point 13~18
↑ Adjusting range is from size 1 to size 5. (Default setting is size 3.)
↑ The size is now changed.
The length of the patterns (stitch pattern
F600
No.24 ~ 38,
F400
No.24 ~ 33,
F300
No.13 ~ 18)
can be adjusted.
* Select a pattern
which size can be
elongated.
9
Example) changing to size 5
Press
Press
Press
Press
* The setting is memorized even when the machine
is turned off and on.
F600
F400
F300
90
Page 93

Message catalog
Message Cause (Reason to display such messages)
1
A. When “start/stop”, “reverse stitch” or “thread-trimming” button
is pressed while the presser foot is raised.
B. When presser foot is raised while sewing.
2
A. When one of the buttonhole stitches is selected and the
buttonhole sensor pin is not connected, the machine starts to
sew.
3
A. When a stitch pattern other than buttonholes is selected but
the buttonhole sensor pin is connected, the machine starts to
sew.
4
A. When in the mode, user attempts to select stitch
patterns more than the maximum number of memory (70).
5
A. When in the mode and more than one stitch pattern is
selected, user attempts to move to mode
and/or
.
B. When in the
mode and more than one stitch pattern is
selected, user presses the
button for more than two
seconds (deleting all).
C. When in the
mode and more than one stitch pattern is
selected, user presses the
button (calling a memory).
6
A. When the process of saving a pattern into folder is completed.
7
A. When in the option setting, settings which will be kept after
turning off the machines are changed. (Thread trimming by
foot controller, LCD contrast, buzzer volume and language
setting)
8
A. When the setting of the machine is changed to twin needle
sewing (option setting).
9
A. When in twin needle sewing, a stitch pattern other than twin
needle sewing is selected.
10
A. When the motor is locked, the machine stops temporarily for
safety.
91
Page 94

With this presser foot it is possible to attach
pearls, beads and thick cord.
● Rolled hemming presser foot
Make your home sewing more pleasant!
Please purchase the following items in the shop where you buy our products.
Fabric edge is hemmed while rolling it under.
Used for bottom of shirts, blouses, frills and the
edge of handkerchiefs.
● Button attaching presser foot
● Quilt presser foot
(transparent type)
This presser foot is used to attach buttons on
garments.
● Cording and Embroidery
presser foot
● Pearl attaching presser foot
● Presser foot with guide
●
Binder presser foot
● Hemming presser foot for
zigzag
● Quilt presser foot (open type)
It is used for free-motion quilting. Zigzag stitch is
also possible with this presser foot.
It is used in free motion quilting and a cord can
be sewn together with this presser foot.
As the presser foot has markings, which show
2 mm distance, these marking will serve as
a guide.
It is possible to attach tapes such as bias tape
into four folds.
It is used in free motion sewing. As the front
portion is open, it is easy to see the needle
entry point.
Fabric edge is hemmed by zigzag while rolling
it under. Used for bottom of shirts, blouses, frills
and the edge of handkerchiefs.
● Cording presser foot
(for 3 cords)
It is possible to attach 1 - 3 cords by three-point
zigzag or decorative stitch.
● Appliqué presser foot
● Invisible zipper foot
As a seam does not appear on the right side
of the fabric, an opening can be finished
with fabric edges neatly butted.
Since the front and back of the presser foot is
short, it is easy to move the materials at curve
points. Also fabrics can be seen easily because
it is transparent.
Introduction of optional accessory parts
● Throat plate for straight stitch
Use with patchwork presser foot for better
stitch quality.
F600 F400 F300
F600 F400 F300
F600 F400 F300
F600 F400 F300
F600 F400 F300
F600 F400 F300
F600 F400 F300
F600 F400 F300
F600 F400 F300
F600 F400 F300
F600 F400 F300
F600 F400 F300
F600 F400 F300
92
Page 95

This is to open hole at round area of keyhole
buttonhole.
● Walking foot
This presser foot is used for "difficult-to-feed"
materials such knit, jersies, vinyl, artificial leather
and leather or quilting.
● Auxiliary spool pin
● Quilt presser foot
This spool pin is used for twin needle sewing or
for bobbin thread winding.
● Smooth presser foot
● Eyelet punch
● Wide Table
●
Patchwork presser foot
● Open toe presser foot
● Edge sewing presser foot
This presser foot is used for quilt stitches (free
motion quilting).
This presser foot is used for non-slippery
materials like vinyl and satin stitches.
For sewing large projects such as quilts, etc.
This presser foot is used for patchwork stitches.
This presser foot is used for patchwork, sewing
center line of joined materials by using the center
guide of the presser foot.
This presser foot is used for appliqué and
decorative stitches. (Front part of the presser
foot is open for better visibility.)
● Knee lifting lever
You can raise or lower presser foot by knee,
without using your hand.
● Quilt guide
This is a guide is to sew lines in the same
distance.
F300
F300
F300
F300
F400 F300
F400 F300
F400 F300
F400 F300
F400 F300
F300
F300
93
Page 96

Adjust the height of legs so that the top
surface of Wide Table is the same height
of sewing machine body.
How to install Wide Table
1
Remove auxiliary bed.
2
Open legs of Wide Table until they stop
securely at the stopping position.
3
Assemble Wide Table to sewing machine
body.
Attach it to free arm of sewing machine.
4
* Don't put any heavy materials on the Wide Table.
* Don't move sewing machine with Wide Table attached.
Attention
94
Page 97

95
Install the bobbin case holder.
Install the bobbin case holder so that points and
touch each other.
Install the throat plate.
When attaching the throat
plate, align the positioning
pins with holes of throat plate.
Machine Maintenance
When lint and/or dirt has built up, it may cause machine
failures. Therefore, clean the machine frequently.
Bobbin case
holder
Throat plate
1
Remove the throat plate
Remove needle and presser foot and remove
the needle plate by using T-shape screwdriver.
2
Remove the bobbin case holder.
3
Remove lint and dirt.
Remove lint and dirt around the feed dog and bobbin
case holder with the cleaning brush.
4
Attention
Always must be disconnected plug from
socket-outlet before remove throat-plate
and remove bobbin-case-holder.
Page 98

If sewing difficulties occur, make sure the instructions are correctly followed.
If a problem still exists, the reminders below may help solve it.
Case Cause (Reason) Solution
Refer-
ence
page
● The machine stops
sewing suddenly.
(This is in case you can
turn hand wheel by hand.)
● The machine sews at slow speed
continuously.
(The machine has a mechanism
to automatically cut off the power to
prevent the motor from overheating.)
● Turn off the power and wait for a
while (about 10 minutes). The
safety mechanism will be reset
and the machine will return to
normal.
2
● The machine will not
work even when started.
● Presser foot is in up position. ● Lower the presser foot and start
to sew.
12
● The machine will not work
even when start/stop
button is pressed.
(This is in case sewing
light is still on.)
● The needle hits presser foot due to an
installation of incorrect presser foot.
● The needle fell into the hook area
and tried to start.
● Use the appropriate presser foot
to the selected stitch pattern.
● Remove the needle from the
hook area.
-
-
● Needle breaks. ● Thick material is sewn with a thin
needle.
● The needle is not inserted fully.
● The needle setscrew is not securely
tightened.
● The wrong presser foot is used for a
certain pattern.
● Check the combination of fabric,
thread and needle.
● Check the installation of needle.
● Securely tighten the needle
setscrew.
● Check the combination of stitch
pattern and presser foot to be
used.
24
23
23
-
● Loud noise and/or keen
noise while sewing
● Lint or dust has accumulated in the
feed dog.
● Lint or dust has accumulated in the
hook.
● Clean the feed dog area.
● Clean the hook area.
94
94
● Machine fails to feed
fabrics.
● The stitch length is set at “0”.
● Soft fabrics such as towels are being
sewn.
● The machine is set in drop feed
condition. (the drop feed knob is on
the right side)
● When the stitch pattern is
reselected, the machine goes
back to the default setting.
● Set the stitch length to 3 – 5.
● Set the drop feed knob to left
side.
36
-
26
● Needle can not be
threaded. (This is in case
needle threader will not
turn.)
● The hook of needle
threader does not go
through the needle eye.
● The needle is not in the up position.
(When needle is not in the up
position, needle threader will not turn.
This is to avoid damages to the hook.)
● The needle is not inserted fully.
● Rotate the hand wheel and lift the
needle upwards.
● Check the installation of the
needle.
21
23
Performance check list
96
Page 99

Case Cause (Reason) Solution
Refer-
ence
page
● The needle threading lever
will not return to the original
position and the machine
can not turn properly.
(This is in case the hook of
needle threader remains in
the needles eye.)
● Hand wheel is turned by mistake
while the needle threading lever
is in down position. (in the process
of threading to the needle.)
● Turn hand wheel slightly away
from you. (to the opposite side
when sewing).
-
● The machine will not start
even when start/stop button
is pressed.
● The foot controller is plugged in. ● Start/stop button can function
when foot controller is removed.
8
● Thread breaks.
● Stitch is skipped.
● The machine is incorrectly threaded.
● There is knot or knurl on the
thread.
● The setting of manual thread
tension is incorrect.
● The needle is bent or the tip of
needle is broken.
● The needle is installed incorrectly.
● Threading of bobbin thread is not
correct.
● The bobbin can not turn smoothly
inside the hook holder.
● The needle size does not match
the thread.
● Thread take-up is not threaded.
● Rethread the machine correctly.
● Remove knot or knurl from
thread.
● Adjust thread tension manually
according to fabrics and thread
to be used.
● Change needle.
● Install needle correctly.
● Check the correct way of setting
bobbin thread.
● Check the correct way of
winding bobbin thread.
● Check the combination of thread
and needle.
● Rethread the machine correctly.
19
-
25
23
23
17
-
24
19
● Thread tension is not good. ● The needle thread is threaded in
correctly.
● The bobbin thread is threaded
incorrectly.
● The direction of spool cap doesn’t
match the spool.
● Rethread the machine correctly.
● Check the correct way of setting
bobbin thread.
● Attach the spool cap in a correct
direction.
19
17
19
● Puckering occurs. ● The stitch length is too large on
light-weight fabrics.
● The needle tip is broken.
● Make the stitch length smaller
(shorter).
● Change needle.
36
23
●
sign is shown on the
LCD display.
● Safety mechanism works when
machine stops due to motor lock.
● The safety mechanism will be
reset in a short while (about 10
minute) and the machine will
return to normal. (At this time, the
start/stop button will not light up.)
-
97
Page 100

List of stitch patterns
F600
Patterns for crazy quilt
98
 Loading...