

Page 1

IMPORTANTES INSTRUCCIONES DE SEGURIDAD
Cuando se usa un aparato eléctrico, debe seguirse unas precauciones básicas y que vienen
incluidas a continuación.
"Leer las instrucciones antes de usar la máquina de coser."
PELIGRO
1. La máquina no debe dejarse nunca desatendida mientras esté conectada. Desconectar la máquina de la red
eléctrica inmediatamente después de su uso y antes de limpiarla.
2. Desconectar la máquina de la red antes de cambiar la bombilla.
Colocar una bombilla del mismo tipo con una potencia de 15 Watios.
CUIDADO
1. No usar la máquina como un juguete.
Prestar atención si fuese necesario cuando la máquina está siendo usada por niños o cerca de ellos.
2. Usar la máquina de coser solamente como se describe en este manual.
Usar únicamente los accesorios recomendados por el fabricante y que vienen especificados en este manual.
3. No trabajar nunca con la máquina en caso de que tenga el cable o el enchufe en malas condiciones, si no cose
correctamente, en caso de que se haya caído, haya sido dañada o se haya mojado.
4. No usar la máquina con los orificios de ventilación bloqueados. Mantener los orificios de ventilación de la
máquina de coser y el pedal sin acumulación de polvo, suciedad y restos de tejido.
5. No introducir no insertar objetos en los orificios de ventilación.
6. No usar al aire libre.
7. No usar mientras se estén utilizando productos aerosoles (spray) o en lugares donde se esté administrando
oxigeno.
8. Para desconectar, girar el interruptor hasta la posición Off ( "0" ), luego desconectar el enchufe de la red.
9. No desconectar el enchufe tirando del cable. Para desconectar, tirar de la clavija, no del cable.
10. Mantener los dedos alejados de todas las partes movibles de la máquina. Tener un cuidado especial con la
aguja.
11. Usar siempre la placa de agujas apropiada. Una placa de agujas impropia puede producir la rotura de la aguja.
12. No usar agujas despuntadas.
13. No presionar ni tirar del tejido mientras se está cosiendo. Esto podría doblar la aguja y romperla.
14. Situar el interruptor principal de la máquina en posición Off ( "0" ) cuando se realice algún ajuste en el área de la
aguja como enhebrar la aguja, cambiar la aguja, cambiar la canilla, cambiar el pie prensatelas y similares.
15. Desconectar siempre la máquina de la red eléctrica cuando se retiren las tapas, para lubricar, o cuando se
realice algún otro tipo de ajuste mecánico mencionado en el manual de instrucciones.
Para reducir el riesgo de una descarga eléctrica.
-
Para reducir el riesgo de quemaduras, fuego, descargas
-
eléctricas o causar daños a personas.
CONSERVE ESTE MANUAL DE
INSTRUCCIONES
Esta máquina de coser es para uso doméstico
Este instrumento se conforma con directivo de CEE 89/336/EEC
cubriendo supresión contra interferencia de radio.
Este equipo está etiquetado con el símbolo de reciclado que puede verse arriba. Esto quiere
decir que al final de la vida del equipo, éste debe ser llevado a un punto de recogida específico
para equipos electrónicos, y no a los contenedores normales de residuos domésticos. Esto
beneficiará al medio ambiente para todos. (Sólo Unión Europea)
1
Page 2
2
Page 3

TABLE OF CONTENTS
1. KNOWING YOUR SEWING MACHINE
Machine identification ............................................. 6 - 9
Accessories ......................................................... 10 - 11
Setting up your machine ..................................... 12 - 13
Spool pins, Presser foot lever ............................. 14 - 15
Pressure regulator ............................................... 14 - 15
Drop feed lever .................................................... 16 - 17
Converting to free-arm sewing ............................ 16 - 17
Reverse stitch lever ............................................. 16 - 17
Stitch pattern dial and indicator .......................... 18 - 19
Stitch length/super (stretch) stitch control .......... 18 - 19
Zig zag width adjusting lever .............................. 18 - 19
Winding the bobbin ............................................. 20 - 21
Threading the bobbin thread ............................... 22 - 23
Needle, thread and fabric chart .......................... 24 - 25
Threading the top thread ..................................... 26 - 27
Using automatic needle threader ........................ 28 - 29
Picking up bobbin thread .................................... 30 - 31
2. STARTING TO SEW
Machine setting chart .......................................... 32 - 35
Straight stitch ....................................................... 36 - 45
Turning a square corner, Darning,
Inserting zips and piping, Sewing on heavy fabric,
Adjusting top thread tension
Changing presser feet ......................................... 44 - 45
Zigzag stitch ........................................................ 46 - 47
Satin stitch
Blind stitch ........................................................... 48 - 49
Three-step zigzag ................................................ 50 - 51
Double-action stitch ............................................. 50 - 51
Shell hem ............................................................. 52 - 53
Faggoting ............................................................. 52 - 53
Stretch stitches .................................................... 54 - 59
Triple straight stitch, Ric-rac stitch, Overlock stitch,
Smocking stitch, Elastic overlock stitch, Fishbone stitch,
Stretch overlock stitch, Stretch patching stitch
Decorative embroidery designs .......................... 60 - 61
Tips on design stitching
Buttonhole making .............................................. 62 - 67
Corded buttonholes, Adjusting stitch balance
3. CARING FOR YOUR MACHINE
Cleaning the feed dogs and shuttle area ........... 68 - 69
Changing light bulb ............................................. 70 - 71
4. CHECK CHART FOR PERFORMANCE
PROBLEMS
Check chart ce .............................................. 72 - 73
For European version
Dimensions: 410 mm × 170 mm × 300 mm
Mass of the equipment: 7.3 kg
Rated Voltage: 230V ~
Rated Frequency: 50Hz
Rated input: 65W
Rated ambient temperature: 15 - 35°C
Acoustic noise level: less than 70db(A)
3
Page 4

CONTENIDO
1. PRINCIPALES PARTES DE LA MAQUINA
Identificación de la máquina ................................... 6 - 9
Accesorios ........................................................... 10 - 11
Preparación de la máquina ................................. 12 - 13
Porta carretes, Palanca pie prensatelas ............ 14 - 15
Regulador de presión .......................................... 14 - 15
Control de dientes ............................................... 16 - 17
Conversión para la costura con brazo ................ 16 - 17
Palanca de la puntada de retroceso ................... 16 - 17
Selector e indicador de puntadas ....................... 18 - 19
Control largo de puntada y puntada super (elástica) .. 18 - 19
Selector ancho puntada ...................................... 18 - 19
Devanado de la canilla ........................................ 20 - 21
Enhebrado del hilo de la canilla .......................... 22 - 23
Tabla de hilo, aguja y material ............................ 24 - 25
Enhebrado del hilo superior ................................ 26 - 27
Empleo del enhebrador aguja ............................. 28 - 29
Recogida del hilo de la canilla ............................ 30 - 31
2. EMPEZER A COSER
Esquema de ajuste de la máquina ..................... 32 - 35
Puntada recta ...................................................... 36 - 45
Giro en esquinas en ángulo recto, Zurcido,
Inserción de cremalleras y vivo,
Cosiendo materiales pesados,
Ajuste de la tensión del hilo superior
Cambio del pie prensatelas ................................ 44 - 45
Puntada zig-zag .................................................. 46 - 47
Puntada de relleno
Puntada invisible ................................................. 48 - 49
Zig-zag de tres puntadas .................................... 50 - 51
Puntada de acción doble .................................... 50 - 51
Dobladillo de concha ........................................... 52 - 53
Fagoting (Diente de rata) .................................... 52 - 53
Puntadas elásticas .............................................. 54 - 59
Puntada recta triple, Puntada zig-zag a dos agujas,
Puntada overlock, Puntada nido de abeja,
Puntada overlock elástica, Puntada raspa,
Puntada overlock elástica,
Puntadas elástica de parches
Diseños de bordados decorativos ...................... 60 - 61
Tipos de puntadas decorativas
Confección de ojales ........................................... 62 - 67
Ojales con cordón,
Ajuste de la compensación puntadas ojal
3. CUIDE SU MAQUINA
Limpiar el area del transportador y la lanzadera ........ 68 - 69
Cambio de la bombilla ........................................ 70 - 71
4. CUADRO DE EXAMEN PARA
LOS PROBLEMAS DE EJECUCION
Check chart ce c ........................................... 72 - 73
4
Para versión europea
Dimensiones: 410 mm × 170 mm × 300 mm
Peso del equipo: 7,3 kg
Voltaje nominal: 230V ~
Frecuencia nominal: 50Hz
Consumo nominal: 65W
Temperatura ambiente nominal: 15 - 35°C
Nivel de ruido acústico: menos de 70db(A)
Page 5

6 - 9
10 - 11
12 - 13
14 - 15
14 - 15
16 - 17
................................. 16 - 17
16 - 17
...................... 18 - 19
18 - 19
18 - 19
............................................... 20 - 21
..................................... 22 - 23
24 - 25
..................................... 26 - 27
28 - 29
30 - 31
................................... 44 - 45
.................................................... 46 - 47
48 - 49
50 - 51
......................................... 50 - 51
52 - 53
............................................... 52 - 53
.......................................... 54 - 59
60 - 61
............................. 62 - 67
32 - 35
.................................................. 36 - 45
For European version
Dimensions: 410 mm × 170 mm × 300 mm
Mass of the equipment: 7.3 kg
Rated Voltage: 230V ~
Rated Frequency: 50Hz
Rated input: 65W
Rated ambient temperature: 15 - 35°C
Acoustic noise level: less than 70db(A)
68 - 69
............................................... 70 - 71
Check chart ce c ........................................... 72 - 73
55
Page 6
1. KNOWING YOUR SEWING MACHINE
MACHINE IDENTIFICATION
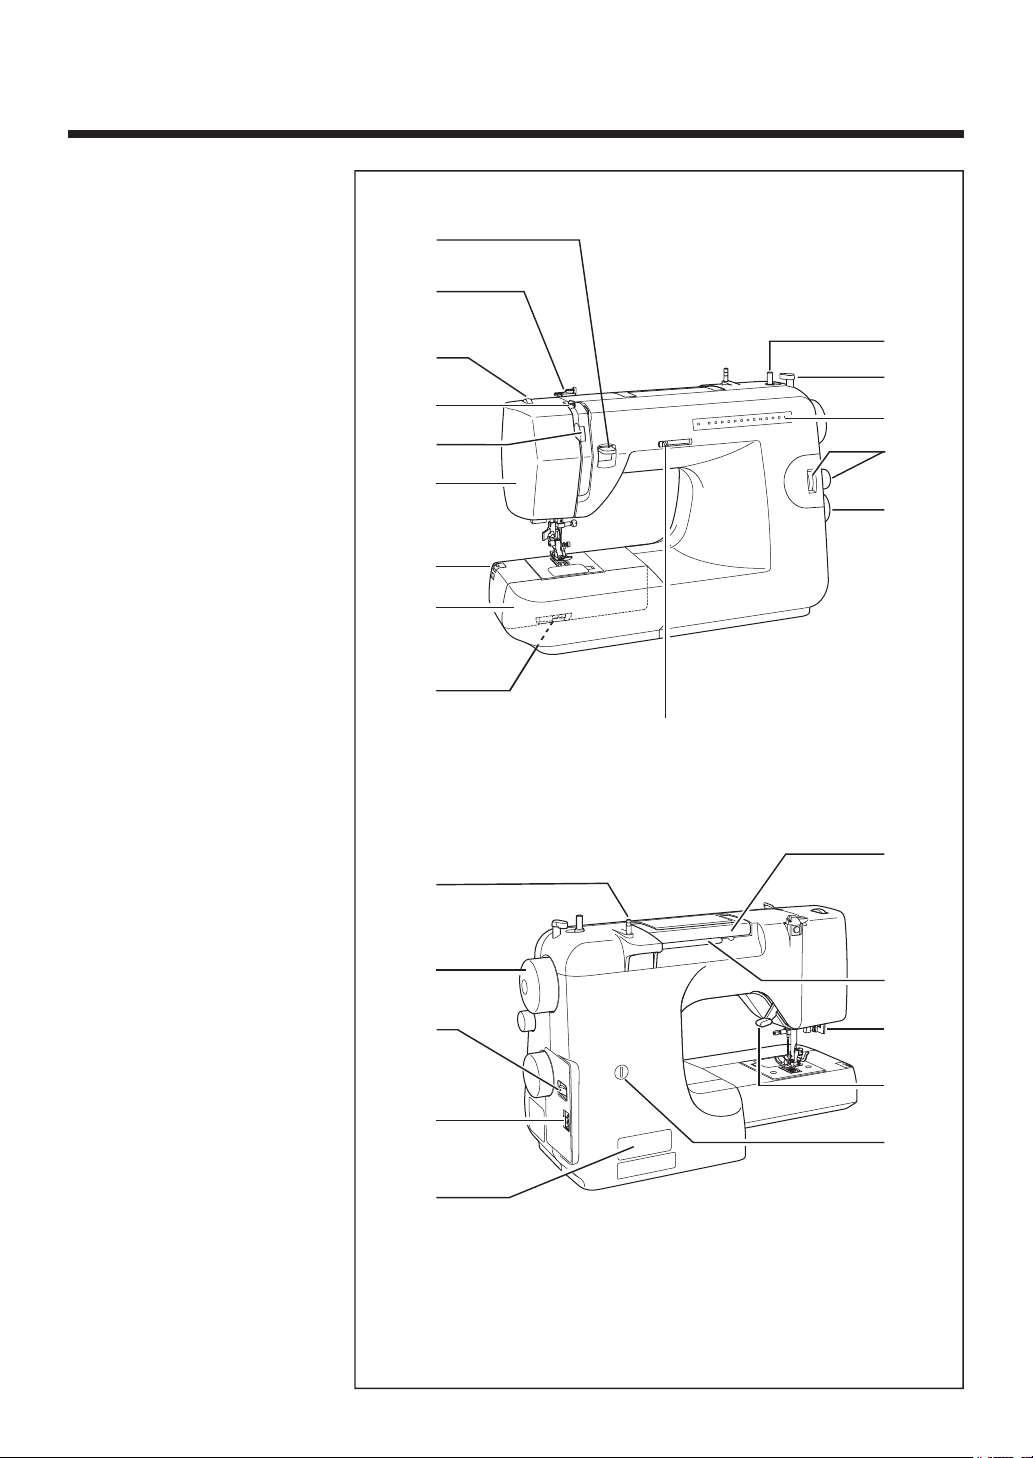
1. Reverse stitch lever
2. Thread guide
3. Pressure regulator
4. Thread take-up
5. Thread tension dial
6. Face cover
7. Thread cutter
8. Auxiliary bed
(Accessory box)
9. Drop feed lever
10. Bobbin winder
11. Bobbin winding regulator
12. Stitch indicator
13. Stitch length adjusting dial
14. Stitch pattern dial
15. Zig zag width adjusting lever
16. Retractable spool pin
17. Hand wheel
18. Light switch
19. Speed controller receptacle
20. Identification plate
21. Handle
22. Spool pin
23. Buttonhole lever
24. Presser foot lever
25. Buttonhole stitch adjuster
1
2
3
4
5
6
7
8
9
10
11
12
13
14
15
6
16
17
18
19
20
21
22
23
24
25
Page 7
1. PRINCIPALES PARTES DE
LA MAQUINA
IDENTIFICATION DE LA MAQUINA
1. Palanca puntada de retroceso
2. Guía hilo
3. Regulador de presión
4. Tria-hilos
5. Control tensión hilo
6. Cubierta frontal
7. Cortador de hilo
8. Base de extensión
(caja de accesorios)
9. Control de dientes
10. Eje devanador canilla
11. Tope devanador canilla
12. Indicador de puntadas
13. Control longitud puntada
14. Selector de puntadas
15. Selector ancho puntada
16. Pasador carrete
17. Volante
18. Interruptor corriente / luz
19. Enchufe del control por pedal
20. Placa de identificación
21. Asa para llevar
22. Pasador carrete
23. Palanca para ojales
24. Palanca pie prensatelas
25. Dispositivo de ajuste puntada ojal
7
Page 8

26. Automatic needle threader
27. Presser foot screw
28. Needle
29. Hook cover
30. Needle bar
31. Needle clamp screw
32. Presser foot release lever
33. Presser foot
34. Feed dogs
35. Needle plate
36. Hook cover release button
37. Foot controller
38. Instruction manual
30
31
32
26
33
27
34
28
29
35
36
37 38
8
Page 9

26. Enhebrador automatico aguja
27. Tornillo pie prensatelas
28. Aguja
29. Tapa de canilla
30. Barra de aguja
31. Tornillo de sujeción aguja
32. Palanca de desprendimiento
prensatelas
33. Pie prensatelas
34. Transporte de dientes
35. Plancha aguja
36. Botón de apertura tapacanilla
37. Control por pedal (Reostato)
38. Manual de instrucciones
9
Page 10
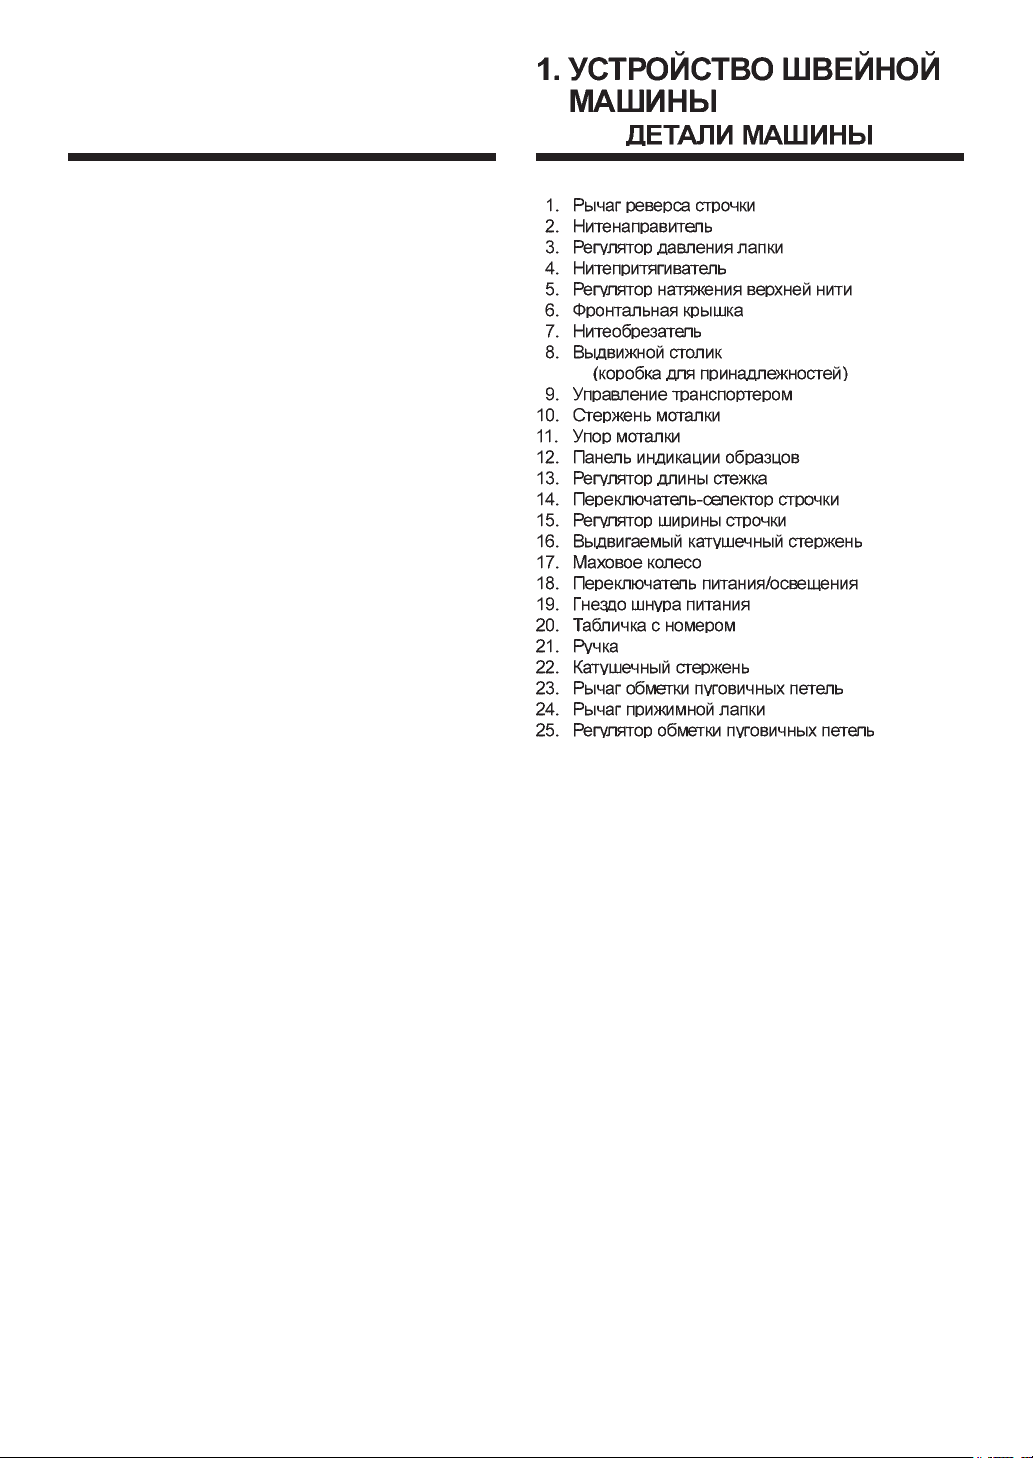
1. Needles
2. Bobbins
3. Spool pin cap (large)
4. Spool pin cap (small)
5. Seam ripper/Brush
6. Screwdriver (large)
7. Screwdriver (small)
8. Oiler
9. Blind stitch presser foot
10. Zipper foot
11. Overcasting foot
12. Buttonhole foot
13. Hard case
ACCESSORIES
12 34
13
5678
9101112
Seam ripper/Brush
Abridor de ojales/Cepillo
Finger guard *Except USA version
Gard del dedo *Excepto la version de los E.E.U.U.
10
Page 11

ACCESORIOS12SETTING UP YOUR MACHINE
1. Agujas
2. Canillas
3. Tapa del pasador carrete
4. Tapa del pasador carrete
5. Abridor de ojales/Cepillo
6. Destornillador (grande)
7. Destornillador (pequeño)
8. Lubrificador (Aceitera)
9. Prensatelas de puntada invisible
10. Pata para cremalleras
11. Pata para overlocado
12. Pata para ojales
13. Caso duro
11
Page 12

Be sure to wipe off any surplus oil from needle
plate area before using your machine the first
time.
FOOT CONTROLLER
Connect the plug of the foot controller into the
machine socket (1) and your wall outlet (2) as
illustrated.
LIGHT SWITCH
Your machine will not operate until the light
switch is turned on. The same switch controls
both the power and the light.
When servicing the machine, or changing
needles, etc., machine must be disconnected
from the power supply.
Set light switch at “OFF”
Poner el Interruptor de corriente/
luz de velocidad en “OFF”
CAUTION
Foot controller
Control por pedal
Always disconnect the machine from power supply by
removing the plug from the socket-outlet.
Page 13
PREPARACION DE LA MAQUINA
Asegurarse de limpiar cualquier aceite sobrante del área
de la plancha de aguja, antes de usar, por primera vez,
la máquina.
CONTROL POR PEDAL
Conecte el pedal a la máquina (1) y el enchufe a la
alimentación de corriente (2) tal como se ve en el dibujo.
INTERRUPTOR CORRIENTE/LUZ
La máquina no funcionará hasta que se conecte el
interruptor de corriente / luz. El mismo interruptor controla
la corriente y la luz. Cuando se está utilizando la máquina,
o se están cambiando agujas o bobillas, etc., la máquina
se debe desconectar de los suministros principales.
PRECAUCION
Siempre desconectar desenchufando el
cordón de la corriente eléctrica.
13
Page 14
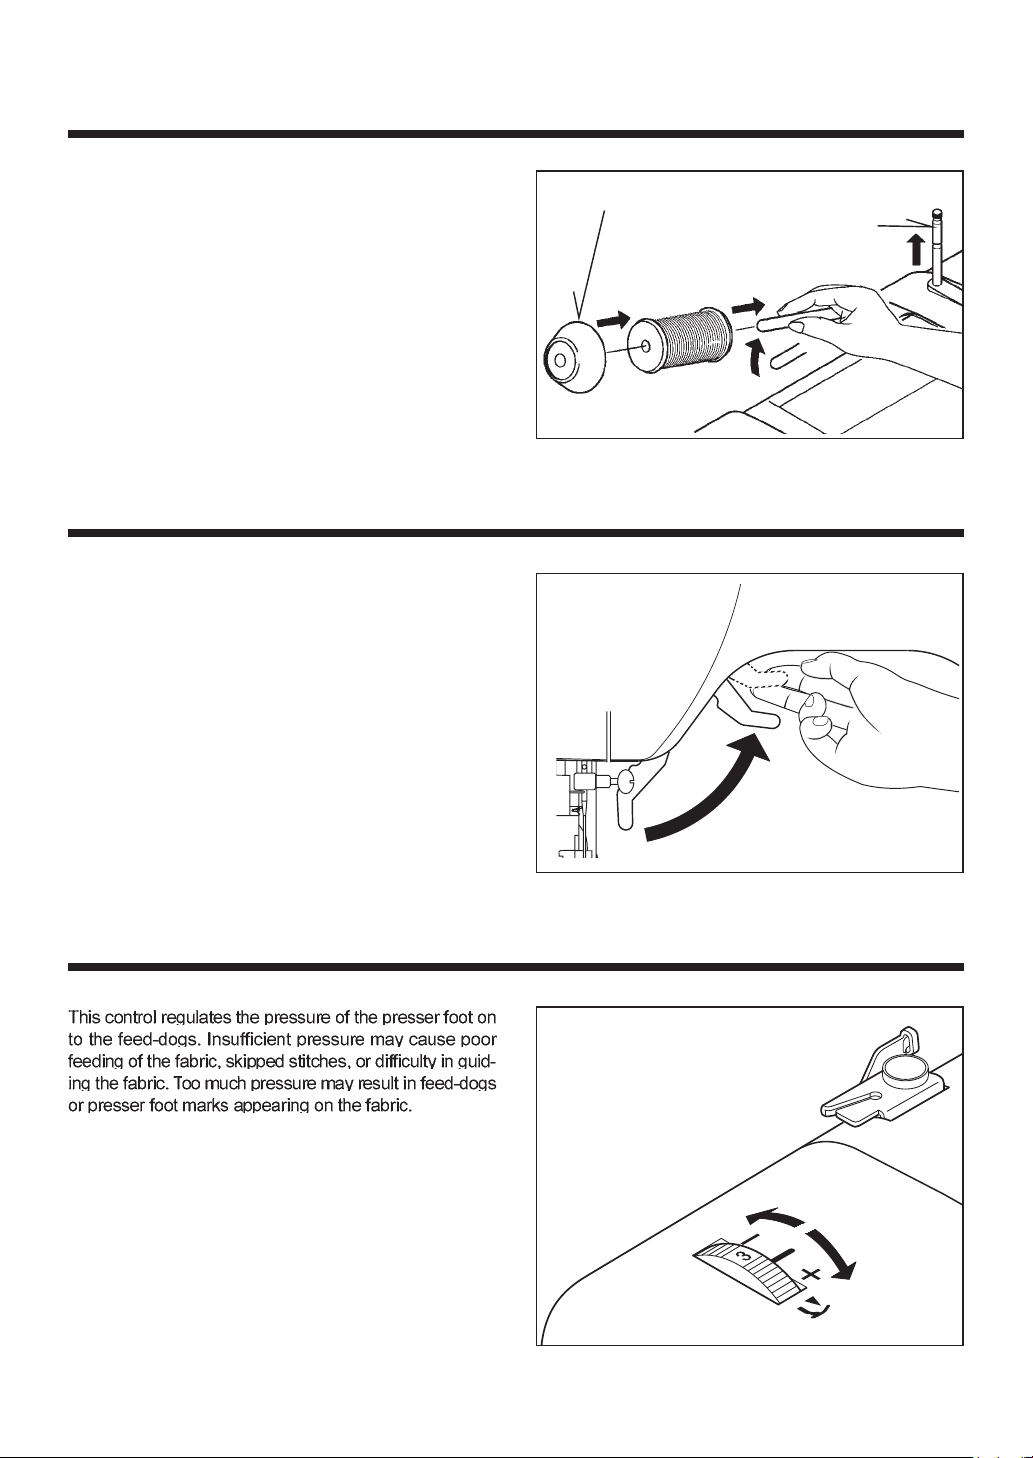
SPOOL PINS
Place a spool of thread on the spool pin. Secure it with
the spool cap (A) leaving a gap between the spool cap
and the reel of thread to allow the reel to rotate freely.
Pull up the spool pin (B) . This is used for bobbin winding
when the machine is already threaded.
PRESSER FOOT LEVER
There are three positions for your presser foot.
1. Lower the presser foot to sew.
2. Raise the lifter to the middle position to insert or
remove fabric.
3. Lift it to its highest position to change the presser foot
or to remove thick fabric.
A
B
PRESSURE REGULATOR
For most fabrics set the control at 3. For thicker ones
increase it to 4 and for finer ones decrease to a lower
number.
14
Page 15
PORTA CARRETES
Coloque un carrete de hilo en el porta-carretes. Fijelo
con la tapa (A) asegurándose una salida fluida del hilo.
Tire de la barrita (B). Esta se utiliza para el llenado de
canilla cuando la máquina ya está enhebrada.
PALANCA PIE PRENSATELAS
Su prensatelas tiene tres posiciones.
1. Bajar el prensatelas para coser.
2. Levantar la palanca a la posición media para insertar
o mover la tela.
3. Levantar a la posición más alta para cambiar el
prensatelas o para mover el material grueso.
REGULADOR DE PRESION
Este control regula la presión de la pata prensatelas sobre
el transporte de dientes. Una presión insuficiente puede
causar un pobre transporte del material, saltos de puntada
ó dificultades en guiar el tejido. Demasiada presión puede
producir marcas en el tejido, por causa de los dientes del
transporte o la pata prensatelas.
Para la mayoría de tejidos, poner el control al
tejidos gruesos poner al
número.
y para finos reducir un
. 3. Para
15
Page 16
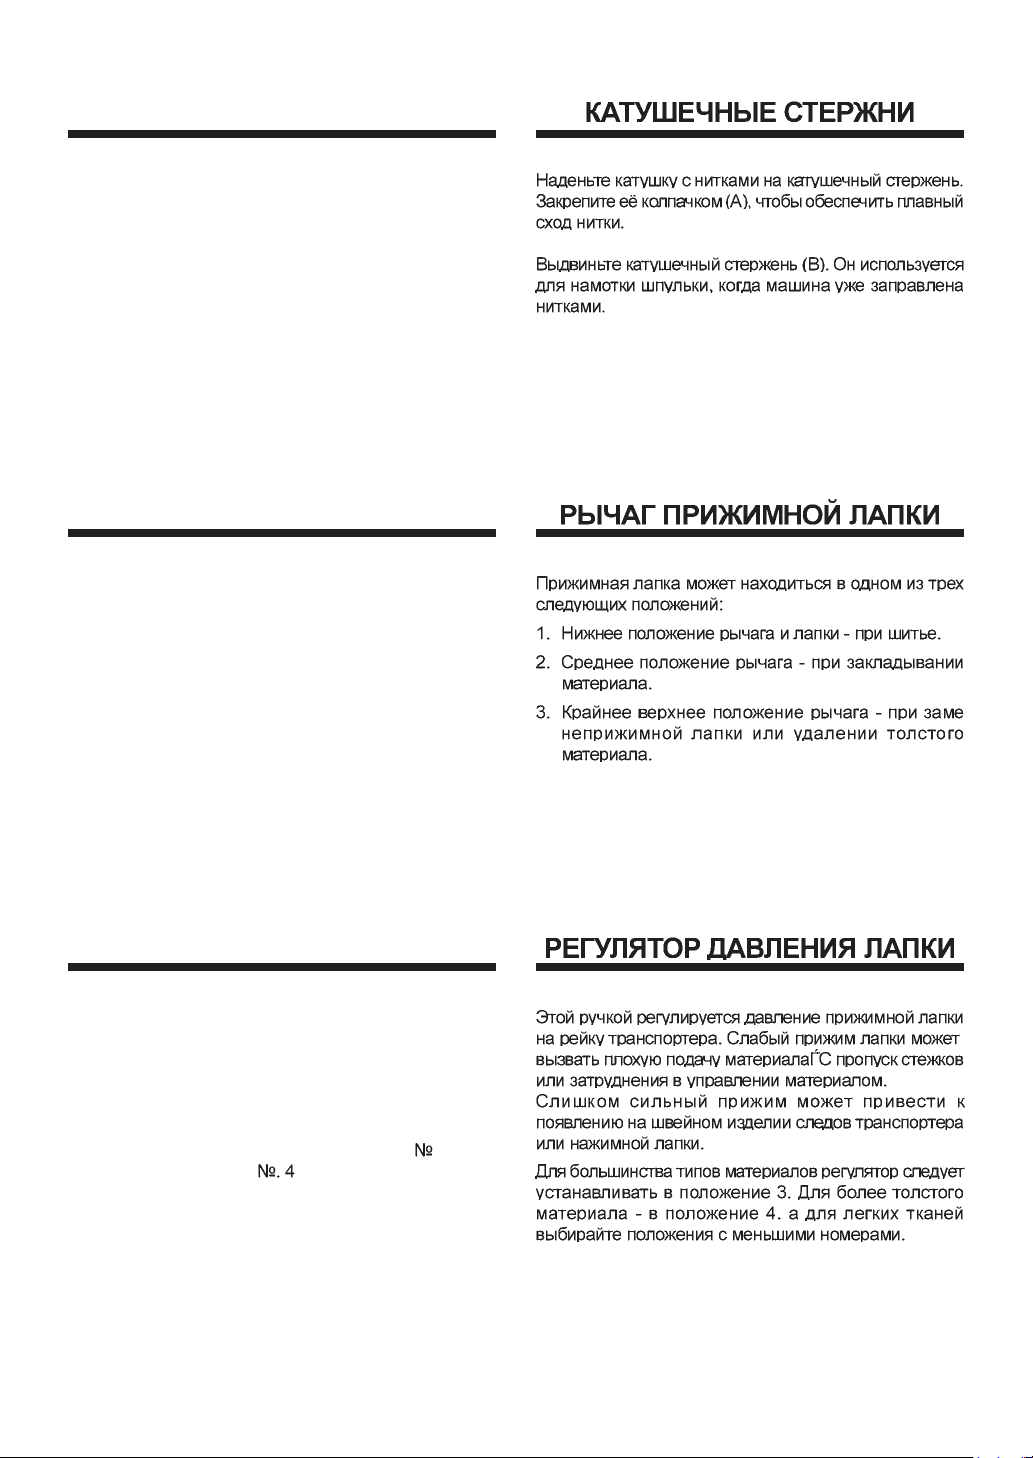
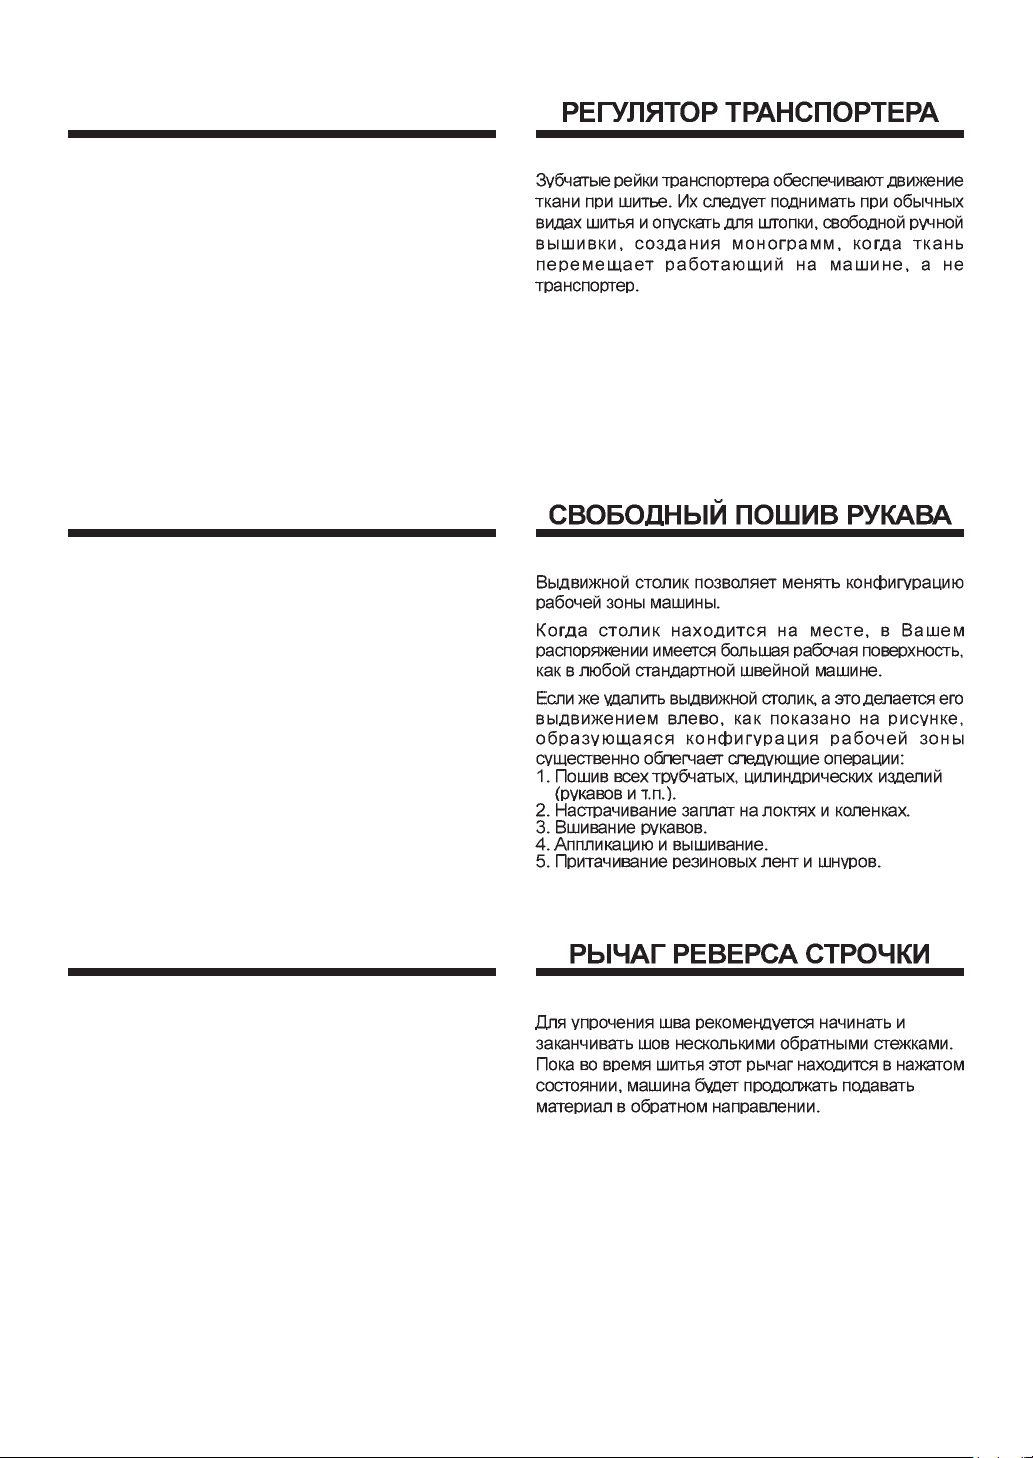
DROP FEED LEVER
The drop feed lever the movement of the fabric that is
being sewn. They should be raised for all general sewing
purposes and lowered for darning, freehand embroidery
and monogramming so that you, and not the feed dogs,
are moving the fabric.
CONVERTING TO FREE-ARM SEWING
Your machine can be used either as a flat-bed, or as a
free-arm model.
With the auxiliary bed in position, it provides a large
working surface as a standard flat-bed model.
By removing the auxiliary bed (just pull it off to the left as
shown), the machine converts into a free-arm model.
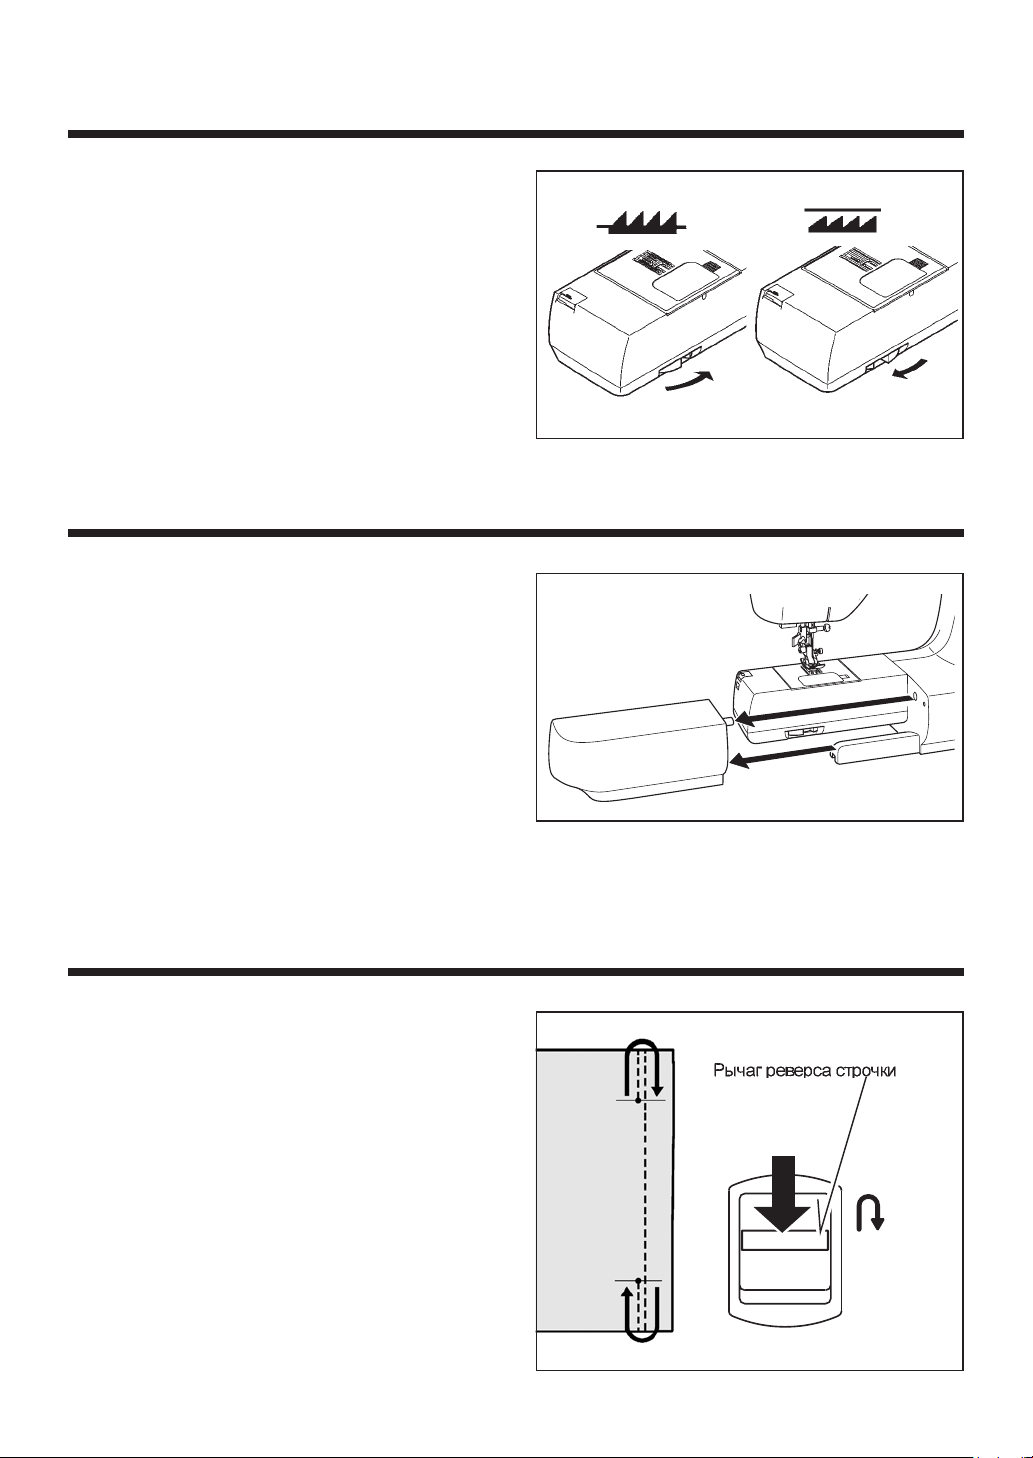
REVERSE STITCH LEVER
It is recommended to begin, or end seams with several
stitches in reverse for reinforcement. As long as you are
pressing down this lever while sewing, the machine will
continue to feed the fabric backwards.
16
Reverse stitch lever
Palanca puntada de retroceso
Page 17
CONTROL DE DIENTES
Los dientes controlan el movimiento del género que se
esta cosiendo. deben estar elevados durante las
operaciones de costura y bajados durante el remendado,
bordado con bastidor y colocación de anagramas de
modo que sea Vd. y no los dientes quien mueva el género.
CONVERSION PARA LA
COSTURA CON BRAZO
La máquina tanto se puede utilizar como base plana o
una máquina de brazo libre.
Con la base de extensión en posición se consigue una
superficie de trabajo grande como la de un modelo normal
de base plana.
Sacando la base de extensión (estirándola hacia fuera
hacia la izquierda, tal como está mostrado), la máquina
se convierte en un modelo de brazo libre.
PALANCA DE LA PUNTADA DE
RETROCESO
Al empezar o finalizar las costuras se recomienda realizar
diversas puntadas con el retroceso para el refuerzo de la
costura. Mientras se está presionando hacia abajo esta
palanca durante la costura, la máquina seguirá
transportando hacia atrás el tejido.
17
Page 18
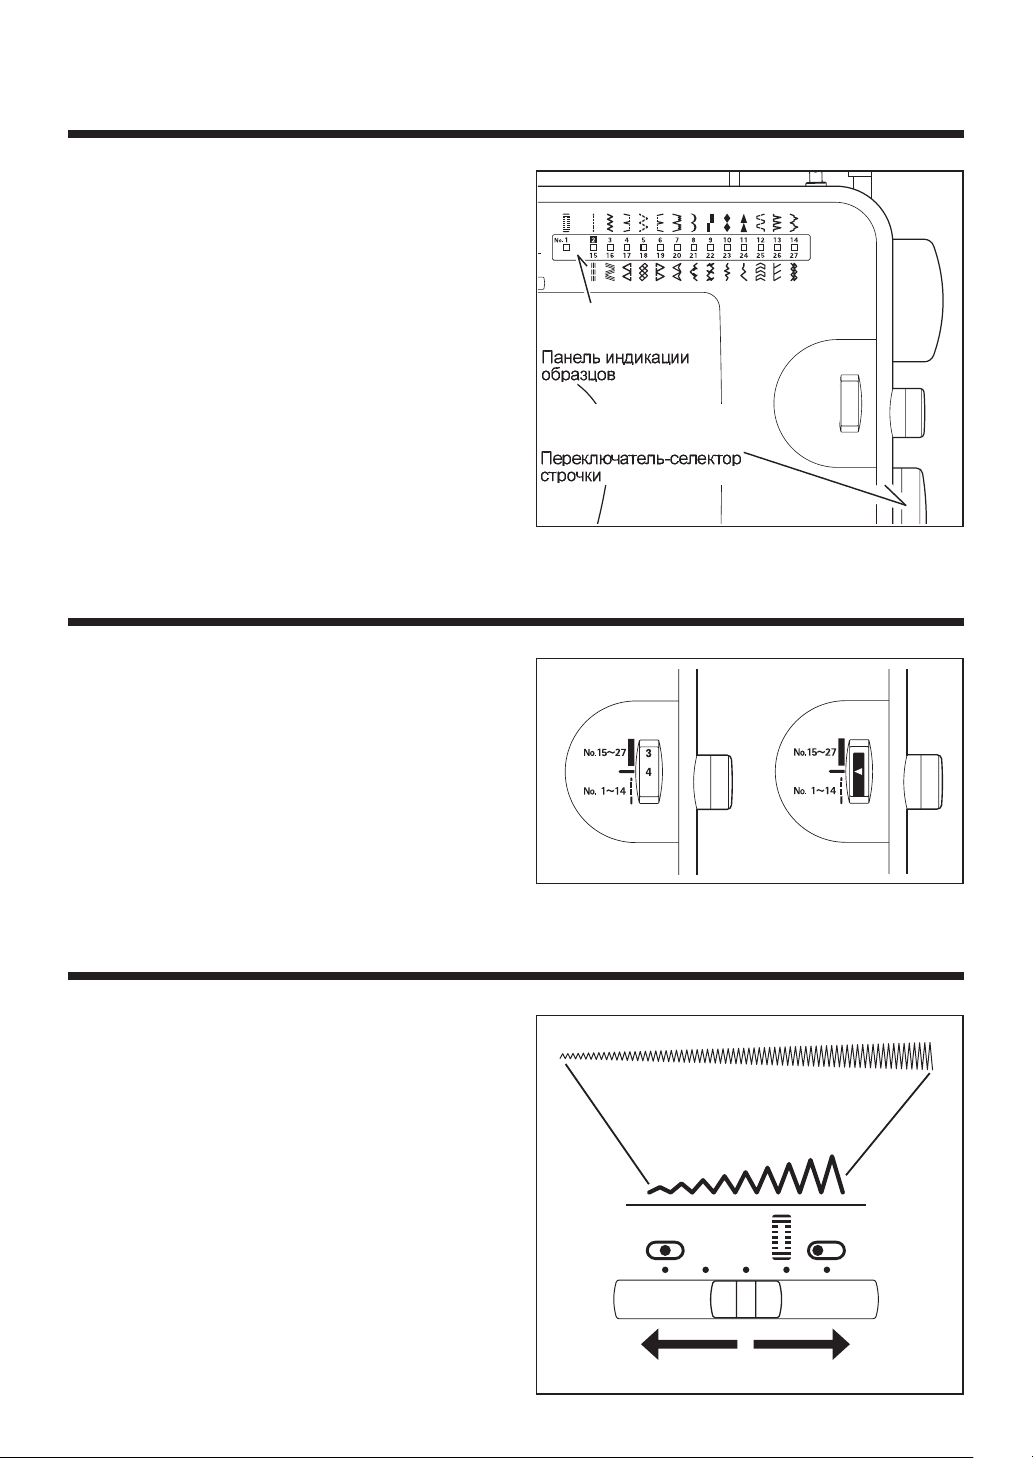
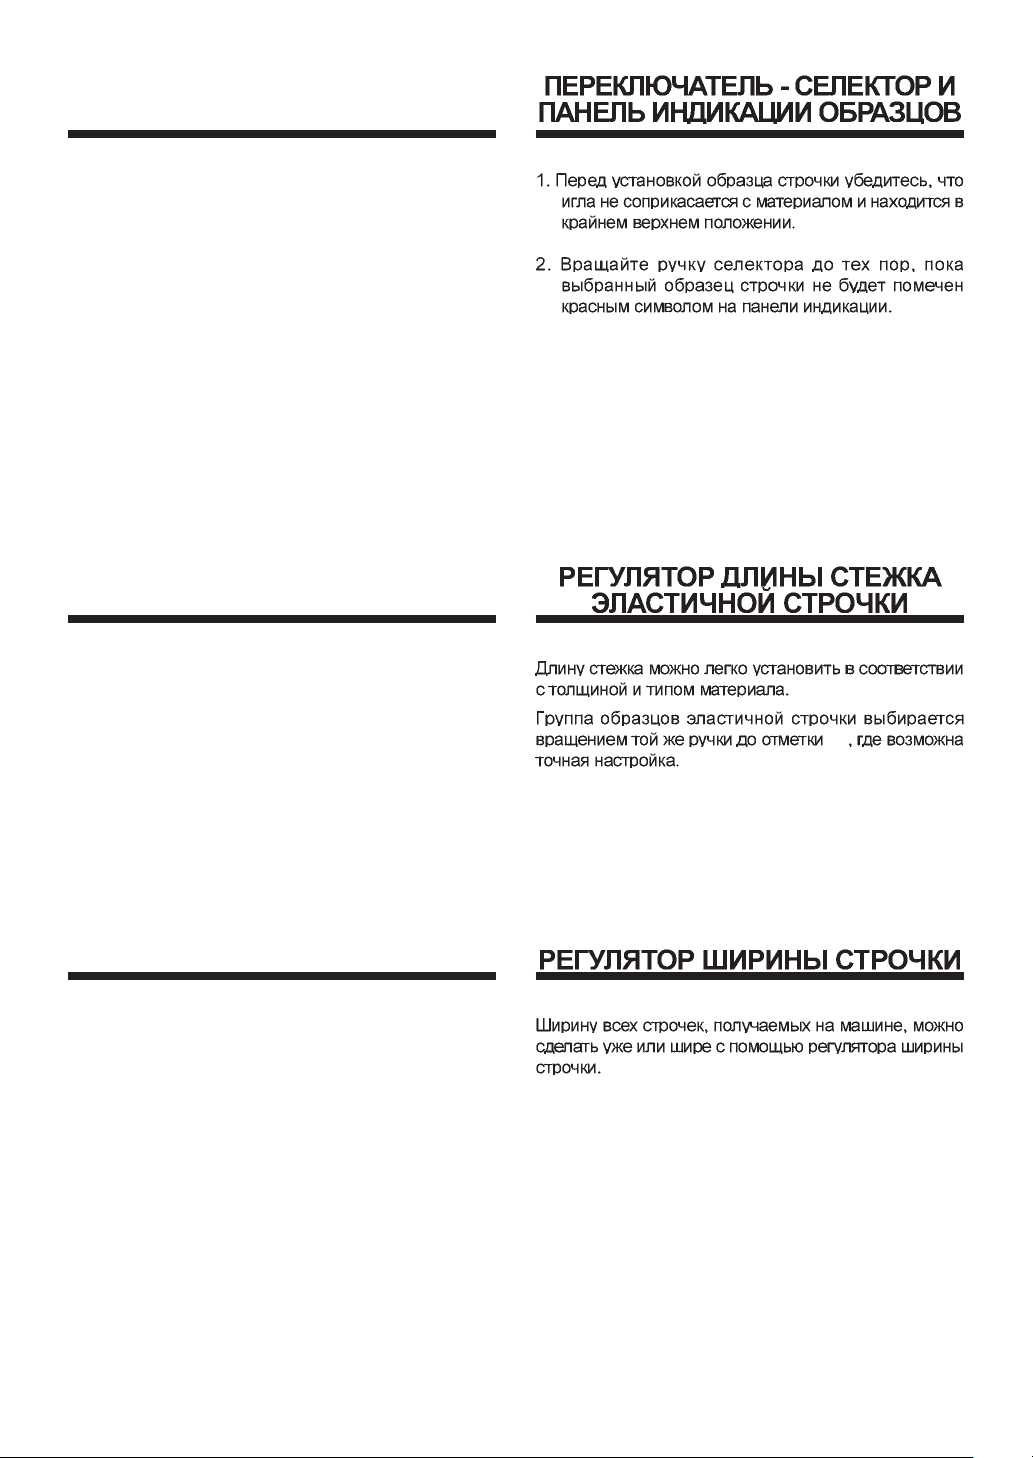
STITCH PATTERN DIAL AND INDICATOR
1. To select a stitch, be sure needle is out of fabric at its
highest position.
2. Then turn the dial until the required stitch is indicated
by the red symbol on the indicator panel.
STITCH LENGTH/SUPER (STRETCH) STITCH CONTROL
Stitch length can be selected easily according to thickness
and type of fabric.
Super (stretch) stitch patterns can be selected by turning
the same dial to
made.
mark where fine adjustment can be
W
Stitch indicator
Indicador de puntadas
Stitch pattern dial
Selector de puntadas
ZIG ZAG WIDTH ADJUSTING LEVER
The width of all the stitches produced on this machine
can be made narrower or wider by adjusting the zig zag
width adjusting lever.
18
Page 19
SELECTOR E INDICADOR DE
PUNTADAS
1. Para seleccionar una puntada asegurarse que la aguja
está fuera del tejido y en su posición más alta.
2. Entonces girar el selector hasta que el indicador rojo
aparezca en la puntada requerida.
CONTROL LARGO DE PUNTADA
Y PUNTADA SUPER (ELASTICA)
El largo de puntada puede ser seleccionado fácilmente
de acuerdo con el tipo de material y su grosor.
El grupo de puntadas super (elásticas) pueden ser
seleccionadas girando el mismo dial hasta la marca
en donde se podrá hacer un ajuste más fino.
W
W
SELECTOR ANCHO PUNTADA
En esta máquina puede regularse el ancho de puntada
ajustando el "selector ancho puntada".
19
Page 20
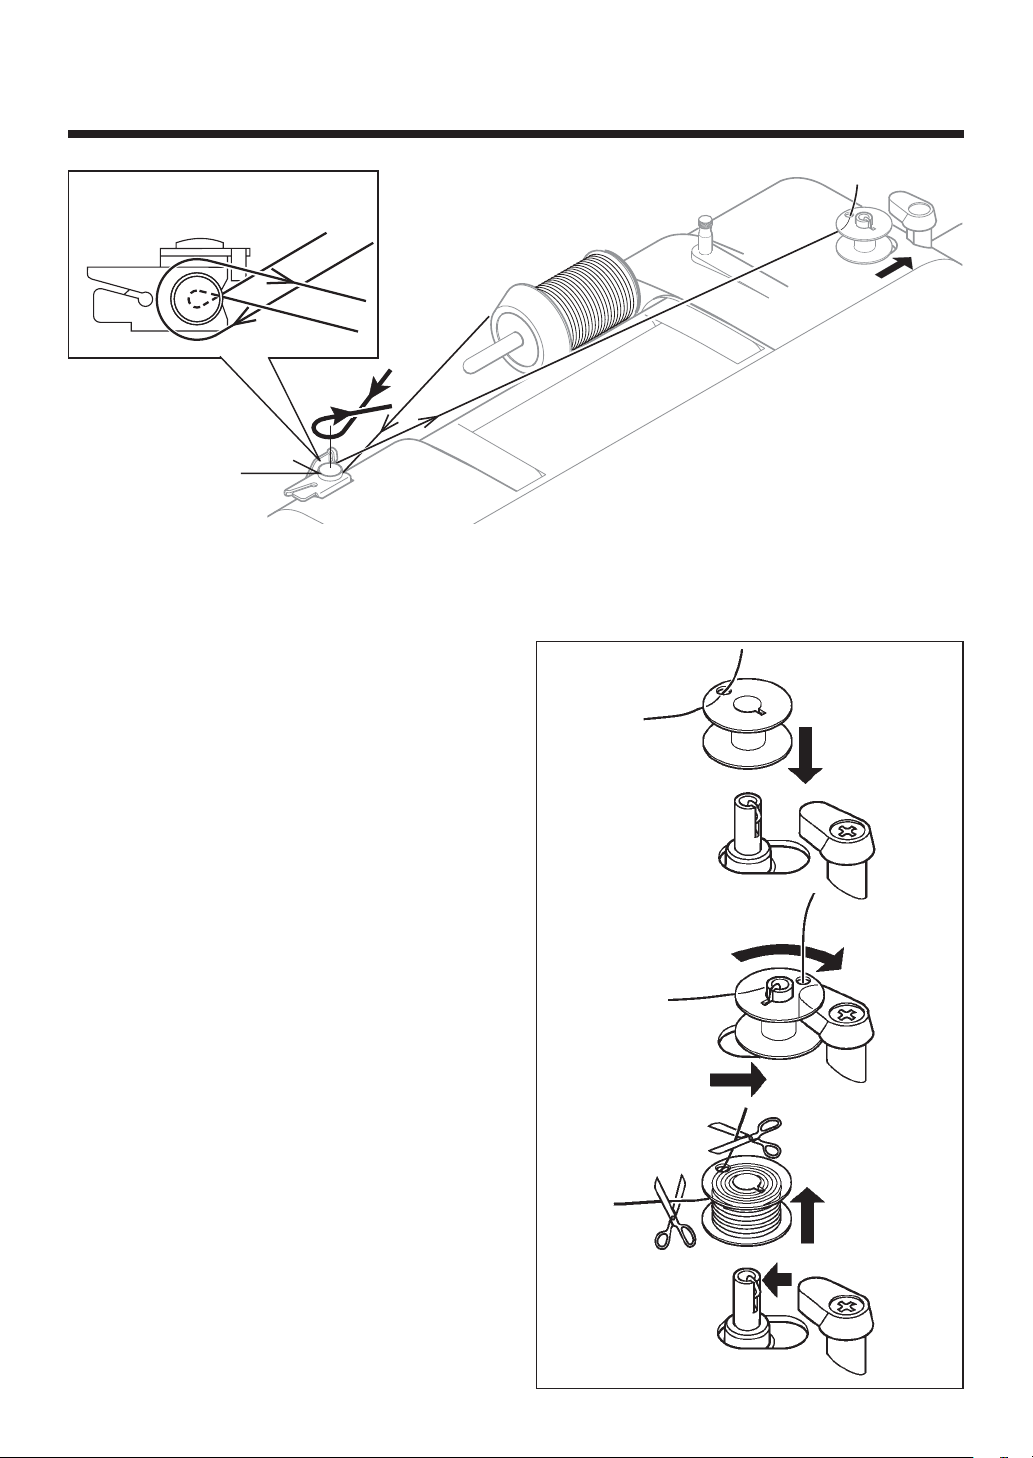
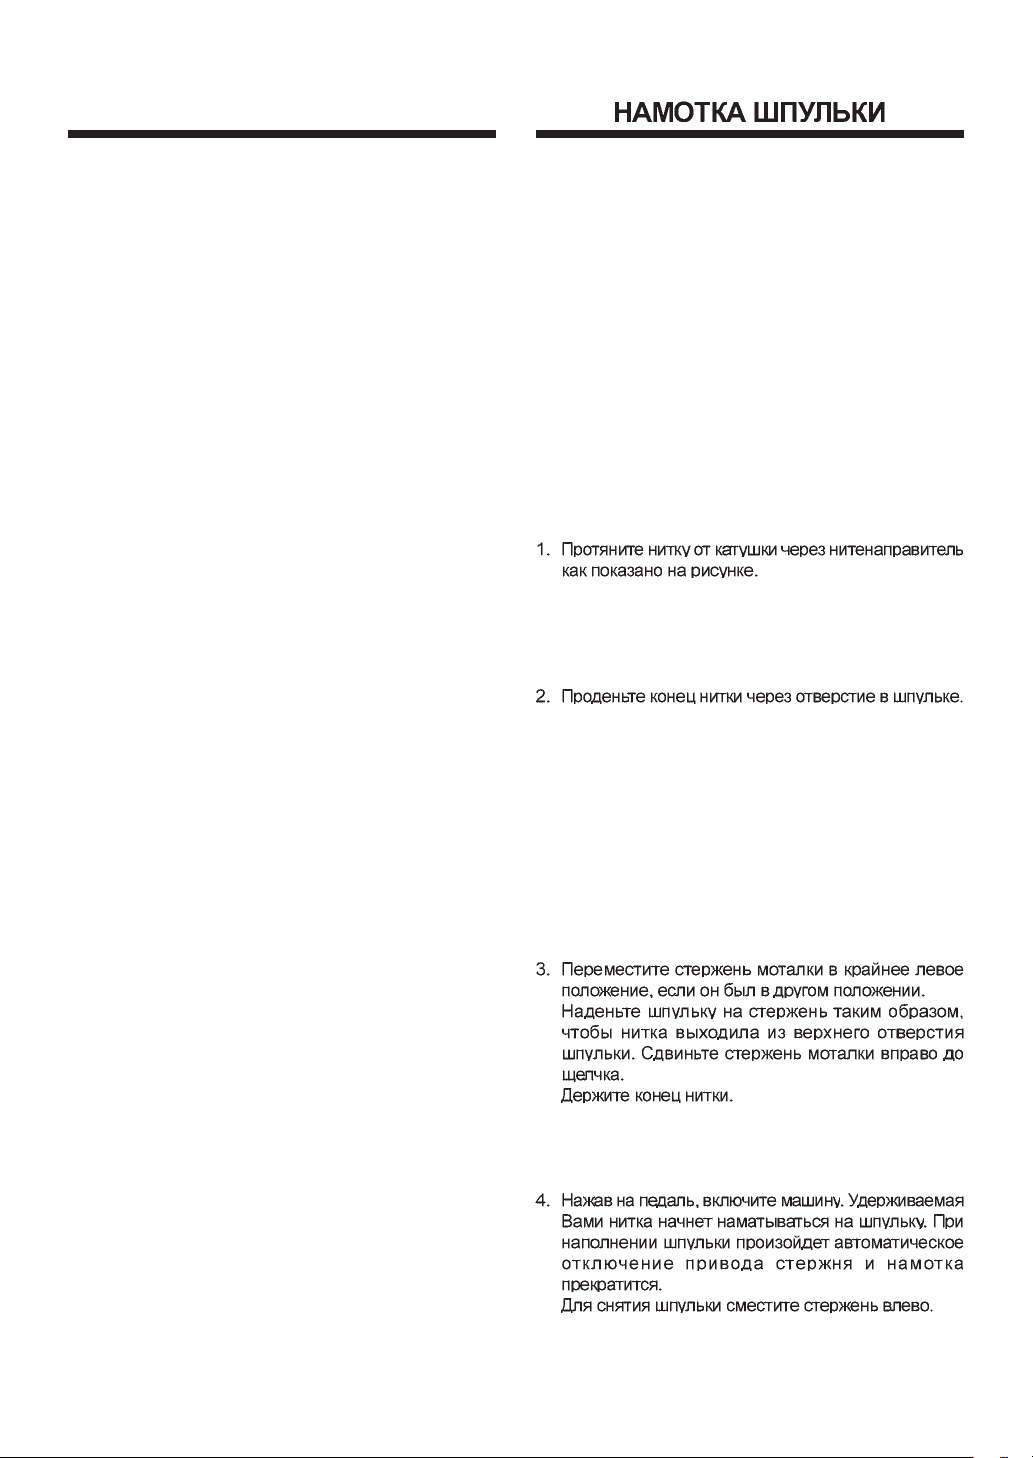
WINDING THE BOBBIN
1
1. Pass thread from spool through thread guides as
shown.
2. Pull end of thread through hole in bobbin as shown.
3. Push bobbin winder to far left position, if it is not already
there. Place bobbin onto shaft with end of thread
coming from top of bobbin. Push bobbin winder to right
until it clicks. Hold onto end of thread.
4. Start machine. The thread that is held will snap. Bobbin
will cease turning when completely filled. Push shaft
to left to remove bobbin.
2
3
4
20
Page 21
DEVANADO DE LA CANILLA
1. Pasar el hilo desde el carrete, a través del guía hilo,
tal como está mostrado.
2. Estirar el extremo del hilo, a través del agujero en la
canilla, tal como está mostrado.
3. Empujar el eje del devanador canilla hacia la posición
maxima izquierda, si no está ya ahi. Colocar la canilla
en el eje, con el extremo del hilo saliendo por la parte
superior de la canilla. Empujar hacia la derecha el eje
del devanador, hasta que se sienta un golpe seco.
Retener el extremo del hilo.
4. Poner en marcha la máquina. El hilo que está retenido
se soltará. La canilla cesará de girar cuando se haya
llenado por completo. Empujar hacia la izquierda el
eje para sacar la canilla.
21
Page 22
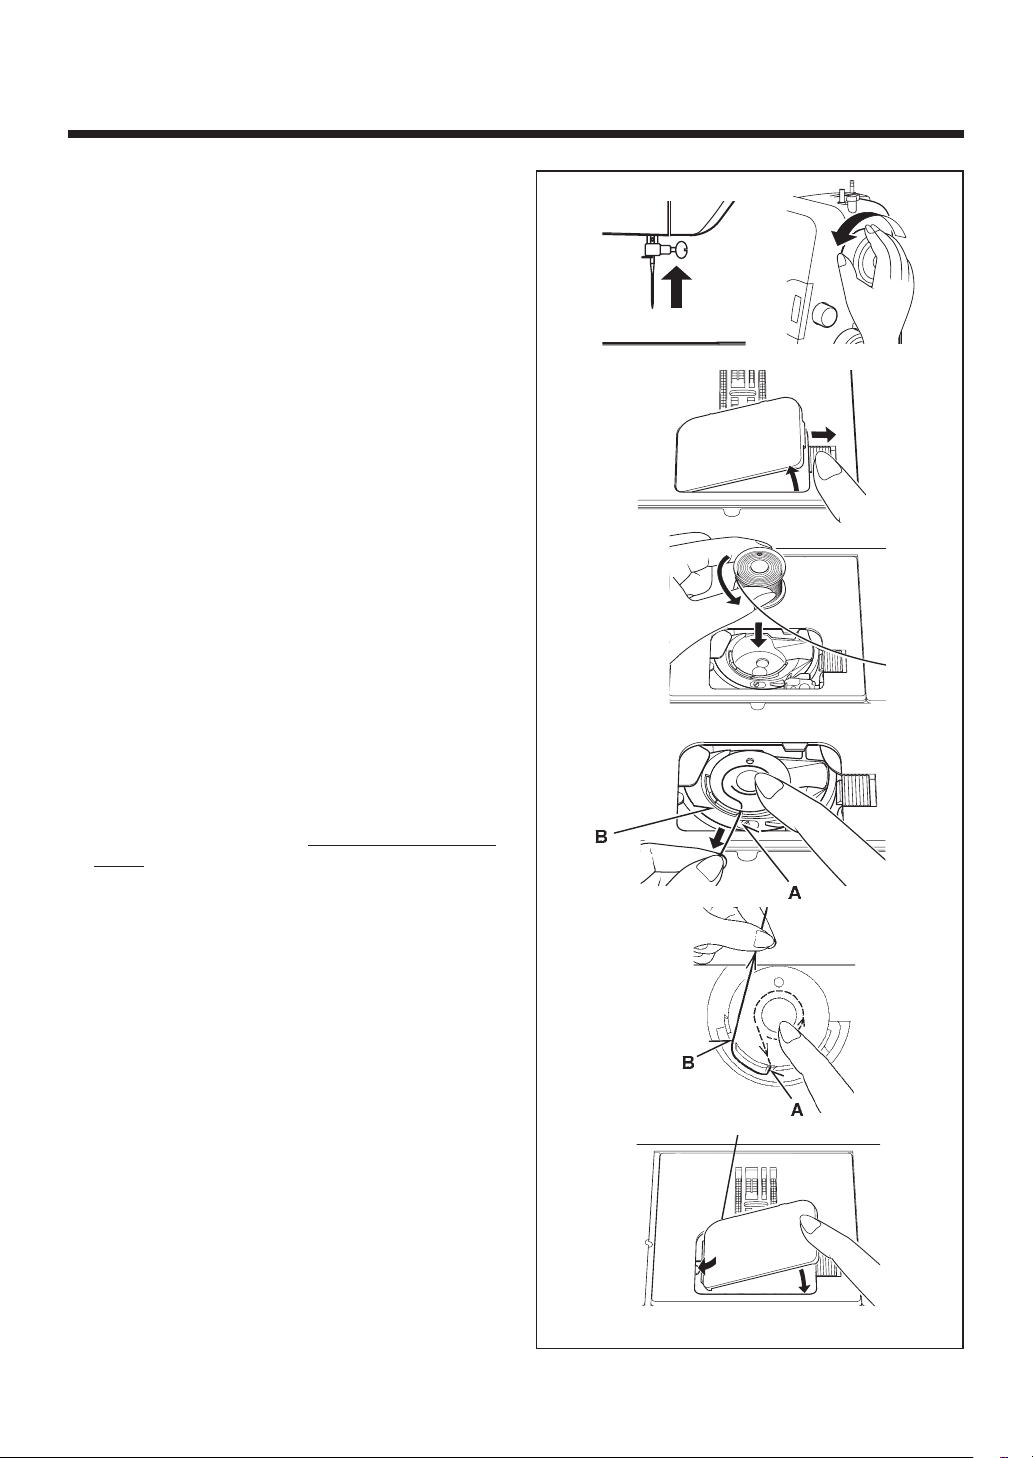
THREADING THE BOBBIN THREAD
1. Raise the needle to its highest position by rotating the
hand wheel towards you.
1
2. Remove the hook cover by pushing the release button
to the right while pushing the left corner of plate.
3. Insert the bobbin making sure the bobbin rotates anticlockwise.
4. Pull thread through the slot (A) and then to the left.
With a finger held gently on top of the bobbin, pull
thread through the slot (B)
sound, and then leave about 15 cm of thread.
until you hear a clicking
2
3
4
5. Replace the hook cover onto the needle plate.
22
5
Page 23
ENHEBRADO DEL HILO DE LA
CANILLA
1. Eleve la aguja hasta su posición más alta girando el
volante hacia Vd.
2. Desmontar la tapa de canilla empujando el botón de
liberación hacia la derecha mientras se empuja la
esquina izquierda de la placa.
3. Coloque la bobina, asegurándose que gire en sentido
contrario a las agujas del reloj.
4. Lleve el hilo por la abertura (A) y después hacia la
izquierda.
Mientras presiona la bobina pase el hilo por la abertura
hasta oir un chasquido y deje entonces unos 15
(B)
cm. de hilo.
5. Vuelva a cerrar la tapa.
23
Page 24

NEEDLE, THREAD AND FABRIC CHART
Checking needle
With a good needle, a uniform clearance will be provided
between needle shank and flat plane of board over length.
Do not use a needle that has a bent or blunt point.
Use the standard needles. The size of your needle should
match the size of the thread and both should match the fabric.
For normal sewing, the same size and type of thread
should be used in the bobbin as on the upper part of the
machine.
Never use a bent or dull needle.
For successful sewing of stretch fabrics use stretch stitch
needles.
Thread Size Needle Size Fabric
Cotton 60 - 100
Synthetic
Machine embroidery
Cotton
Synthetic
Silk A
Machine embroidery
Cotton 60 - 80
Mercerized 50 - 60
Synthetic
Cotton 30 - 60
Mercerized heavy
duty
Stretch
stitch
needle
70
or
80
80
or
90
100
All stretch fabrics.
Sheer cottons, silk
synthetics, fine laces,
batiste, dimity.
Medium weight cottons,
medium weight synthetics,
poplin, seersucker,
gingham, velvet, light
weight woolens, linen.
Heavy weight cottons,
medium to heavy
weight woollens, denim.
Shank
Espiga
Changing the needle
1. Raise the needle bar to its highest position by turning
the hand wheel toward you.
2. Loosen the needle clamp screw by turning it toward
you.
3. Remove the needle by pulling it downward.
4. Insert the new needle into the needle clamp with the
flat side away from you.
5. Push the needle up as far as it can go.
6. Tighten the needle clamp screw firmly with the screw
driver.
Flat board
Tablero plano
CAUTION
Pin
Pasador
Flat part of needle
Parte plana de la aguja
Always disconnect the machine from power
supply by removing the plug from the
socket-outlet.
Flat side
Lado plano
Needle
Aguja
Clamp screw
Tornillo
Flat
side
away
from
you.
Lado
plano
hacia
fuera
de Vd.
24
Page 25

TABLA DE HILO, AGUJA Y
MATERIAL
Usar las agujas normales. El tamaño de su aguja y el del
hilo deben armonizar con el material. Ver la tabla
siguiente.
Para coser normalmente, usar el mismo tamaño y el
mismo tipo de hilo tanto en la aguja como en la bobina.
Nunca usar una aguja torcida o obtusa.
Para coser materiales con buen éxito, usar agujas para
punto elástico.
Tipo de hilo Aguja Material
Algodón del
60 - 100
Algodón
Sintético
Sada
Algodón 60 - 80
Mercerizado 50 - 60
Sintético
Algodón 30 - 60
Mercerizado pesado
Aguja para
punto elástico
70
o
80
80
o
90
100
Todos los materiales
elásticos
Algodón puro, seda, material
sintético, batista, muselina,
nilón
Algodón de peso mediano,
material sintético de peso
mediano, popelin, linón,
terciopelo
Algodón pesado, lana mediano
a pesado, vaqueros
Verificación de la aguja
Con una buena aguja, se logrará una separación uniforme
entre la espiga de la aguja y el plano del tablero a lo
largo.
No usar una aguja que esté torcida u obtusa.
Siempre desconectar desenchufando el
PRECAUCION
cordón de la corriente eléctrica.
Cambio de la aguja
1. Levantar la barra de la aguja a la posición más alta
girando el volante hacia Ud.
2. Aflojar el tornillo que sujeta la aguja girándolo hacia
Ud.
3. Quitar la aguja sacándola hacia abajo.
4. Insertar la aguja nueva en la brida porta-aguja con el
lado plano hacia la parte posterior.
5. Empujar la aguja lo más arriba posible.
6. Apretar el tornillo fimemente con el destornillador.
100
25
Page 26

THREADING THE TOP THREAD
1. Raise the presser foot lever.
2. Raise the needle to its highest position by
rotating the hand wheel towards you.
3. Thread the machine in the following order
as illustrated.
26
Page 27

ENHEBRADO DEL HILO SUPERIOR
1. Levantar la palanca prensatelas.
2. Levantar la aguja a la posición más
elevada girando el volante de la máquina
hacia usted.
3. Enhebrar la máquina siguiendo el orden
de la ilustración.
27
Page 28

USING AUTOMATIC NEEDLE THREADER
Raise the needle to its highest position by rotating the
hand wheel towards you.
1. Hook thread to thread guide as illustrated.
2. Pull down lever holding the end of thread.
3. Turn the lever as far as it will go.
4. Guide thread into hooked end and pull it upward.
5. Return the lever and needle will be threaded
automatically.
6. Release the lever and pull thread away from you.
NOTE:
For smooth threading it is recommended to set the
machine at straight stitching (center position) when using
needle threader.
5
2
3
1
4
6
28
Page 29

EMPLEO DEL ENHEBRADOR
AGUJA
Levantar la aguja a la posición más elevada girando el
volante de la máquina hacia uated.
1. Enhebrar el hilo en el guía hilo como indica la
ilustración.
2. Bajar la palanca sujetando el extremo del hilo.
3. Girar la palanca hasta el final.
4. Colocar el hilo en la horquilla de enganche y estirarlo
hacia arriba.
5. Retornar la palanca a su posición y la aguja será
enhebrada automáticamente.
6. Soltar la palanca y tirar del hilo hacia usated.
Nota:
Para conseguir un enhebrado correcto con el enhebrador,
se recomienda poner el selector de la máquina en puntada
recta (posición central).
29
Page 30

1. Raise the presser foot lever.
PICKING UP BOBBIN THREAD
1
2. Holding needle thread loosely with your left hand, turn
hand wheel towards you one revolution with your right
hand until the needle comes to its highest position.
3. Lightly pull up the top thread, and pick up bobbin
thread, which will appear through the needle plate slot.
2
3
4. Pull both top and bobbin threads together towards
back of machine under the presser foot, leaving about
15 cm clear.
30
4
Page 31

RECOGIDA DEL HILO DE LA
CANILLA
1. Alzar la palanca del pie prensatelas.
2. Manteniendo flojo el hilo de la aguja con la mano
izquierda, girar hacia Vd. el volante con la mano
derecha, hasta que la aguja alcance su posición más
alta.
3. Tirar ligeramente del hilo superior y recoger el hilo de
la canilla, que aparecerá a través de la abertura de la
plancha de aguja.
4. Tirar de ambos hilos juntos, hacia atrás de la máquina,
por debajo del pie prensatelas, dejando alrededor de
15 cm. de hilo.
31
Page 32

2. STARTING TO
SEW
2. EMPEZER A
COSER
MACHINE
SETTING CHART
1. STITCH INDICATOR
INDICADOR
ESQUEMA DE
AJUSTE DE LA
MAQUINA
2. STITCH LENGTH/SUPER STITCH CONTROL
CONTROL LONGITUD PUNTADA
3. ZIG ZAG WIDTH ADJUSTING LEVER
CONTROL ANCHO PUNTADA
5. DROP FEED LEVER
CONTROL DIENTES
32
4. PRESSER FOOT
PRENSATELAS
B. Blind stitch presser foot
Pata para puntada invisible
D. Zipper foot
Pata para cremalleras
A. Zig-zag foot
Pata para zig-zag
C. Overcasting foot
Pata para overlocado
E. Buttonhole foot
Pata para ojales
Page 33

1.
STITCH
BUTTONHOLE .1. E
(Cente r positio n)
STRAIGHT
(Left position)
ZIGZA G 3 0.5 - 4 MIN. - MAX. A
BLIND 4 1 - 4 MID. - MAX. B
THREE-STEP ZIGZAG 5
FOUR-POINT LINGERIE 6
STRETCH BLIND 7 1 - 4 MID. - MAX. A
DECORATIVE
DOUBLE ACTION 12.
STITCH
INDI CATOR
2 1 - 4 A
89
10. 11.
2.
STITCH LENGTH/
SUPER STITCH
CONTROL
1 - 4 MID. - MAX. A
0.5 MID. - MAX. A
1 - 4 MID. - MAX. A LINGERIE 13.
3.
ZIG ZAG WI DT H
ADJUST ING
LEVER
PRESSER
FOOT
4.
5.
DROP FEED
LEVER
FAGGOTING 14.
TRIP LE
STRAIGHT
RIC-RAC 16. MIN. - MAX.
SMOCKING 18. MID. - MAX.
LEFT OVERLOCK 19. MID. - MAX. A,C
ELASTIC OVERLOCK 20
SUPER
DECORATIVE
FISHBONE 25
STRETCH OVERLOCK 26
STRETCH PATCHING 27
INSERTING ZIPS
(Cente r positio n)
15. A
(Left position)
A RIGHT OVERLOCK 17. MID. - MAX.
21 22
23 24
MID. - MAX. A
1 - 4 C
DARNING
(Cente r positio n)
(Left position)
2
33
Page 34

2.
CONTROL
LONGI TUD
PUNTADA
1.
INDI CADOR
PUNTADA
OJALES .1. E
(al centro)
RECTA
(a la izquierda)
ZIG-ZAG 3 0.5 - 4 MIN. - MAX. A
INVISIBLE 4 1 - 4 MED. - MAX. B
ZIG ZA G TRE S PUNTADAS 5
LENCERIA CUATRO PUNTOS 6
INVISIBLE SUPER ELASTICO 7 1 - 4 MED. - MAX. A
DECORATIVAS
DOBLE ACCION 12.
2 1 - 4 A
1 - 4 MED. - MAX. A
89
0.5 MED. - MAX. A
10. 11.
1 - 4 MED. - MAX. A LENCERIA 13.
3.
CONTROL
ANCHO
PUNTADA
PRENSATELAS
4. 5.
CONTROL
DIE NTE S
FAGOTING 14.
PUNTADA
TRIP LE
ZIG-ZAG 16. MIN. - MAX.
NIDO DE ABEJA 18. MED. - MAX.
OVERLOCK IZQUIERDA 19. MED. - MAX. A,C
OVERLOCK ELASTICO 20
SUPER
DECORATIVAS
RASPA 25
OVERLOCK ELASTICO 26
ELASTICA DE PARCHES 27
INSERCION DE CREMALLERAS
(al centro)
15. A
(a la izquierda)
A OVERLOCK DERECHA 17. MED. - MAX.
21 22
23 24
MED. - MAX. A
1 - 4 C
ZURCIDO
34
(al centro)
(a la izquierda)
2
Page 35

1. 2. 3. 4. 5.
.1. E
2 1 - 4 A
3 0.5 - 4 A
4 1 - 4 B
5
1 - 4 A
6
7 1 - 4 A
89
0.5 A
10. 11.
12.
1 - 4 A13.
14.
15. A
16.
A17.
18.
19. A,C
20
21 22
23 24
A
25
26
27
1 - 4 C
2
35
Page 36

STRAIGHT STITCH
Straight stitch at center needle position with following
settings ;
Stitch pattern dial
-
2
Zig zag width adjusting lever
Straight stitch at left needle position with following
settings ;
Stitch pattern dial
Zig zag width adjusting lever
-
-
-
STARTING TO SEW
Before placing the material on the ma chine, see that the
ends of the threads have been drawn about 15 cm to the
rear of the machine. Hold on the threads during the sewing
of the first 3 or 4 stitches of the seam.
Fasten each seam by back tacking at the beginning and
end of the seam.
REMOVING FABRIC
First turn the handwheel towards you until the needle is
at its highest position, then raise the presser foot, draw
materials to the rear and cut off excess thread with the
thread cutter located on the left end of working surface or
on the presser bar.
36
Page 37

PUNTADA RECTA
Puntada recta posición aguja en el centro realizar
los siguientes ajustes :
Selector puntada
-
2 2
Selector ancho puntada
Puntada recta en posición aguja en la izquierda
realizar los ajustes siguientes :
Selector puntada
Selector ancho puntada
-
-
-
INICIO DE LA COSTURA
Antes de colocar el tejido en la máquina, asegurarse de
que los extremos de los hilos se hayan estirado unos 15
cm. por detrás de la máquina. Sostener los hilos durante
la costura de las 3 ó 4 primeras puntadas.
Asegurar cada costura realizando el atacado al principio
y al final de la costura.
SACANDO EL TEJIDO
Gire el volante hacia Vd. hasta que la aguja se encuentre
en su posición más alta, suba la pata prensatelas lleve el
matarial hacia atras y corte el hilo sobrante con el cortador
situado en el extremo izquierdo del area de trabajo o en
la barra del prensatelas.
37
Page 38

TURNING A SQUARE CORNER
To turn a square corner 5/8" (16 mm) from the fabric edge,
stop stitching with the needle tip piercing the fabric, when
reaching the cornering guide as shown. Raise the presser
foot, turn fabric.
New stitching line will align with 5/8" (16 mm) seam guide
on side of needle plate. Lower the presser foot and begin
stitching in new direction.
Cornering guide
Guía de esquinas
DARNING
Drop feed lever ( )
Lower feed dogs and remove presser foot.
Stretch fabric with embroidery hoops with the hole at
center. Holding the needle thread, take one stitch and
pick up bobbin thread through the fabric. Lower presser
bar and start sewing at a slow to medium speed, moving
the fabric back and forth with a steady rhythm. Turn fabric
and sew another layer of stitching across over the first
layer of stitching.
38
Page 39

GIRO EN ESQUINAS EN
ANGULO RECTO
Para girar en una esquina en ángulo recto a 16 mm. del
borde del tejido, parar la costura con la punta de la aguja
atravesando el tejido, cuando se está alcanzando la guía
de esquinas, tal como está mostrado. Alzar el pie
prensatelas y girar el tejido.
La nueva línea de pespuntes se alineará con la guía de
costura de 16 mm. en el lateral de la plancha de aguja.
Bajar el pie prensatelas y empezar la costura en la
dirección nueva.
ZURCIDO
Control dientes ( )
Baje los dientes y saque la pata prensatelas. Con el
bastidor de bordar tense el material con el agujero en el
centro. Sujete el hilo aguja y coja el hilo de la bobina a
través del género. Baje la barra prensatelas y comience
a coser a velocidad de lenta a media, moviendo el género
de adelante hacia atrás con un ritmo constante. Gire el
material y de otra capa de puntadas cruzada encima de
la primera.
39
Page 40

INSERTING ZIPS AND PIPING
SETTING
Use zipper foot which allows you to sew to the right or left
of the zipper or close to the cord.
Needle to left of foot Needle to right of foot
INSERTING ZIPS
To sew down the right side, attach left side of zipper foot
to presser foot holder so that the needle passes through
the opening on the left side of the foot.
To sew down the left side, attach right side of foot to foot
holder.
PIPING
To pipe soft furnishings, cover cord with a bias strip of
fabric and pin or tack it to the main piece of fabric.
Attach right side of zipper foot to foot holder so that needle
passes through the opening on the right side of the foot.
Aguja a la izquierda del
prensatelas
Aguja a la derecha del
prensatelas
40
Page 41

INSERCION DE
CREMALLERAS Y VIVO
Utilizar el prensatelas de cremalleras que permite coser
a la derecha o la izquierda de la cremallera o cerca del
cordón vivo.
INSERCION DE CREMALLERAS
Para coser el lado derecho, aplicar el lado izquierdo del
prensatelas de cremalleras al sujetador pie prensatelas,
de manera que la aguja pase a través de la abertura en
el lado izquierdo del prensatelas.
Para coser el lado izquierdo, aplicar el lado derecho del
prensatelas al sujetador prensatelas.
VIVEADO
Para vivear articulos blandos, cubrir el cordón con una
cinta de tejido al bies y sujetarla con un alfiler o atacarla
a la pieza principal de tejido.
Aplicar el lado derecho del prensatelas de cremalleras al
sujetador prensatelas, de manera que la aguja pase a
través de la abertura en el lado derecho del prensatelas.
41
Page 42

SEWING ON HEAVY FABRIC
When sewing on heavy fabric, toe of presser foot tend to
lift up and fabric feeding may not be done smoothly.
1. Raise presser foot.
2. Pushing the button on the right side of presser foot,
lower presser foot.
1
2
3. Presser foot is locked in a horizontal position and fabric
will be fed smoothly. The button will be released
automatically after sewing few stitches.
42
3
Page 43

COSIENDO MATERIALES
PESADOS
Al coser materiales pesados, la punta del pie prensatelas
se tiende a levantar y el material puede no alimentarse
suavemente.
1. Levantar el pie prensatelas.
2. Presionando el botón del lado derecho del pie
prensatelas, se baja el pie prensatelas.
3. El pie prensatelas se bloquea en posición horizontal
y el material se alimentará suavemente. El botón será
liberado automáticamente después de coser algunas
puntadas.
43
Page 44

ADJUSTING TOP THREAD TENSION
STRAIGHT STITCHING
The good looking appearance of your stitching is largely
determined by the balanced tension of both top and
bobbin threads. The tension is well balanced when these
two threads 'lock' in the middle of layers of fabric you are
sewing.
Set the thread tension dial at "5" for ordinary sewing.
If, when you start to sew, you find that the stitching is
irregular, you will need to adjust the thread tension dial.
Make any adjustments with presser foot 'down'.
BOBBIN TENSION
The bobbin tension has been correctly set at the factory,
so you do not need to adjust it.
Under side
Reverso
Well balanced
Bien equilibrada
Top stitch too tight
Puntada superior
demasiado apretada
Top side
Cara
Top stitch too loose
Puntada superior
demasiado floja
CHANGING PRESSER FEET
Be sure needle is in the up position. Raise presser foot
lever.
1. Raise presser foot release lever to remove the foot.
2. Place the desired foot on the needle plate aligning
needle holes.
3. Lower the presser foot lever so that the foot holder
snaps on the foot.
Always disconnect the machine from power
supply by removing the plug from the
CAUTION
socket-outlet.
44
Presser foot lever
Palanca pie prensatelas
3
1
Presser foot release lever
Palanca de
desprendimiento prensatelas
2
Page 45

AJUSTE DE LA TENSION DEL
HILO SUPERIOR
COSTURA RECTA
El buen aspecto de la costura generalmente está
determinado por la tensión equilibrada de ambos hilos
superior e inferior.
Ponga el control de tensión en la posición "5" para costura
normal.
Si se encuentra que la costura es irregular, se necesitará
ajustar el control de la tensión.
Cualquier ajuste se ha de realizar con el pie prensatelas
abajo.
TENSIÓN BOBINA
Esta ha sido ajustada correctamente en fábrica por lo
que no es necesario realizar ningún ajuste.
CAMBIO DEL PIE PRENSATELAS
Asegurarse de que la aguja está en la posición superior.
Alzar la palanca del pie prensatelas.
1. Alzar la palanca de desprendimiento prensatelas para
sacar el prensatelas.
2. Colocar el prensaetelas deseado sobre la plancha de
agujas, alineando los agujeros aguja.
3. Bajar la palanca pie prensatelas, de manera que el
sujetador prensatelas se cierre de golpe en el
prensatelas.
Siempre desconectar desenchufando el
PRECAUCION
cordón de la corriente eléctrica.
45
Page 46

ZIGZAG STITCH
3
ZIGZAG STITCHING
The top thread may appear on the bottom depending on
the thread, fabric, type of stitch and sewing speed, but
the bobbin thread must never appear on the top of the
fabric.
SATIN STITCH
This is a closely spaced attractive stitches use for
appliqué, bar-tacking, etc. Slightly loosen top thread
tension for satin stitching.
Use a backing of tissue paper or interfacing for the sheer
materials to avoid puckering.
Under side
Reverso
Top side
Cara
46
Page 47

PUNTADA ZIG-ZAG
COSTURA ZIG-ZAG
El hilo superior puede aparecer en la parte inferior, según
el hilo, tejido, tipo de puntada y velocidad de costura,
pero el hilo de la canilla nunca deberá aparecer en la
parte superior del tejido.
PUNTADA DE RELLENO
Esta es una puntada atractiva compactamente espaciada,
usada para aplicaciones, atacados, etc.. Para la puntada
de relleno aflojar ligeramente la tensión del hilo superior.
Para evitar el arrugado en materiales finos, utilizar en el
revés un papel tejido o entretela.
3 3
47
Page 48

BLIND STITCH
4
7
4
-
Regular blind stitch for normal fabrics
7
1. First neaten the edge. For lightweights turn up and
baste about 10 mm. For heavyweights overcast.
2. Fold garment away from hem leaving about 6 mm of
hem edge extending.
3. Place garment under blind stitch foot with the fold of
the garment against guide and adjust it by turning
screw so that the zigzag just catches the fold.
Elastic blind stitch for soft, stretchable
fabrics
12
Medium to heavyweight fabric
Tissus moyens et lourds
Under side
Reverso
1
Fine fabric
Tissus fins
Under side
Reverso
3
2
Screw
Tornillo
7 - 8mm
4. Press both sides of the finished hem. The right side of
the garment will show only the blind stitches.
48
4
Top side
Cara
Right side of finished hem
Derecho del dobladillo acabado
Page 49

PUNTADA INVISIBLE
7
4
7
4
4
7
1. Primero pulir el borde. Los tejidos ligeros se doblan e
hilvanan alrededor de 10 mm. Los tejidos gruesos se
sobrehilan.
2. Doblar la prenda hacia fuera del dobladillo, dejando
que se extienda el borde del dobladillo alrededor de
6 mm.
3. Colocar la prenda debajo del prensatelas de puntada
invisible, con el doble de la prenda contra la guía y
desplazarla girando el tornillo, de manera que el zigzag coja el doble.
Puntada invisible regular para las telas
normales.
Puntada invisible super elástico para las
telas suves, elástico.
4
-
7
-
4 Planchar ambos lados del dobladillo acabado. El lado
derecho de la prenda mostrará sólo las puntadas
invisibles.
49
Page 50

THREE-STEP ZIGZAG
This is a strong stitch bec ause as its name implies, it
makes three short stitches where the normal zig-zag
makes only one.
For this reason it is highly recommended for overcasting
all types of fabrics.
It is also ideal for mending tears, patching, sewing
towelling, patch-work and attaching flat elastic.
5
DOUBLE-ACTION STITCH
Double-action stitch is ideal for producing flat overlapped
seams on almost any type of fabric and a bolder effect
will result from sewing with contrasting thread.
12
Å
5 mm
5 mm
Å
50
Page 51

ZIG-ZAG DE TRES
PUNTADAS
Esta es una puntada fuerte, ya que como su nombre
implica, realiza tres puntadas cortas donde el zig-zag
normal sólo realiza una.
Por esta razón es muy recomendada para el sobrehilado
de todo tipo de tejidos.
También es ideal para zurcir desgarrones, parches, coser
toallas, remiendos y aplicación de elástico plano.
5
5
PUNTADA DE
12
ACCION DOBLE
Puntada de acción doble es ideal para producir costura
plana doblada sobre casí todos tipos de tejidos y efecto
de borde resultará de cosido con hilos contrastes.
12
51
Page 52

SHELL HEM
6 13
6
13
Turn under the raw edge and press. Place the fabric right
side up so that the zig-zag part of the stitch sews just
over the folded edge, pulling the fabric in to form a shell
hem.
Trim away excess fabric close to the stitching line.
Four-point shell stitch
-
If bigger size of shell pattern is desired,
use four-point shell stitch.
Regular shell stitch
-
Regular shell stitch produces a tiny shell
hem on lingerie and other fine garments.
6
13
FAGGOTING
This is a popular decorative stitch (used in sleeves or
fronts of blouses and dresses). To attach two separate
pieces of fabric together, leave a little space inbetween.
To prepare the fabric:
Fold under the seam allowances on the cut edges, and
press. Baste folded edges to tissue paper with about 1/8"
space between. Stitch over the 1/8" allowance, just
catching the fabric fold on both sides with needle. Remove
bastings and paper; press.
14
52
Page 53

DOBLADILLO DE
CONCHA
6 13
6 13
6
13
Girar hacia abajo el borde del tejido y planchar. Colocar
el derecho del tejido arriba, de manera que la parte del
zig-zag de la puntada cosa sobre el borde doblado,
estirando el tejido y formando un dobladillo de concha.
Recortar el tejido sobrante cerca de la línea de puntadas.
Puntada de concha de cuatro puntos
-
Si quiere tamaño más grande, usar la
puntada de concha de cuatro puntos.
Puntada de concha normal
La puntada de concha normal produce
un dobladillo de concha diminuta en
lencería y otras prendas finas.
13
6
-
-
FAGOTING
(Diente de rata)
Esta es una puntada muy popular (usada en mangas o
delanteros de blusas y vestidos). Para sujetar dos piezas
separadas de tejido dejar un pequeño espacio entre ellas.
Para preparar el tejido:
Doblar el tejido hacia abajo y presionarlo. Hilvanar los
bordes doblados al papel de seda, dejando un espacio
de 1/8". Coser por encima del espacio de 1/ 8", cogiendo
con la aguja el género doblado por ambos lados. Sacar
los hilvanes y el papel; planchar.
14
14
53
Page 54

STRETCH STITCHES
Stretch stitches are mainly for use on knit, or stretchable
fabrics, but can also be used on ordinary materials.
ADJUSTING STRETCH STITCH BALANCE
Stitch length/super (stretch) stitch control should be at
mark for most materials. Depending upon the type of
W
fabric used, you may need to adjust this Control to match
forward stitches of stretch sewing with reverse motion
stitches.
Ric-rac Stitch
Puntada zig-zag a do agujas
Smocking Stitch
Puntada nido de abeja
TRIPLE STRAIGHT STITCH
Triple straight stitch is farstronger than ordinary straight
stitch because it locks three times-forwards, backwards
and forwards.
It is particularly suitable for reinforcing the seams of
sportswear in stretch and non-stretch fabrics, and for
curved seams which take a lot of strain.
Use this stitch also to top-stitch round lapels, collars and
cuffs to give a professional finish to your garments.
RIC-RAC STITCH
Ric-rac is a quick method of finishing a raw edge and
providing a decorative top-stitch in one operation.
It is ideal for edging neck-bands, armholes, sleeves and
hems.
15
16
54
Page 55

PUNTADAS
ELASTICAS
Las puntadas elásticas se utilizan principalmente en
géneros de punto o materiales elásticos, pero también
se puede usar en materiales corrientes.
Utilizar la aguja de puntada elástica con tronco azul,
cuando se cosan tejidos elásticos. Utilizar las agujas
normales para los tejidos no elásticos.
AJUSTE FINO PUNTADA ELASTICA
El control del largo de puntada/ super (elástica), debe de
estar en la marca
Dependiendo del tipo de material a coser, usted deberá
ajustar este control para conseguir igualar las puntadas
hacia adelante con las puntadas de atrás.
para la mayoría de materiales.
W
15
PUNTADA RECTA TRIPLE
La puntada recta triple es mucho más fuerte que la
puntada recta corriente, ya que entrelaza tres veces–
hacia adelante, hacia atrás y hacia adelante.
Es particularmente adecuada para reforzar las costuras
de prendas deportivas de tejidos elásticos y no elásticos
y para costuras curvas que requieren una gran
resistencia.
Utilizar también esta puntada para sobrecoser solapas
redondeadas, cuellos y puños, ya que proporciona un
acabado profesional a las prendas.
W
15
PUNTADA ZIG-ZAG A
DOS AGUJAS
El zig-zag es un método rápido de acabado de un borde
y proporciona una sobrecostura decorativa en una
operación.
Es ideal para escotes, sisas, mangas y dobladillos.
16
16
55
Page 56

OVERLOCK STITCH
This is the same type stitch used by the garment industry
in making sportswear - it forms and finishes the seam in
one operation.
It's very effective for use in repairing raw or worn edges
of older garments.
17 19
17
19
SMOCKING STITCH
1. Make a straight line of gathers across the fabric that
you wish to smock.
2. With a narrow strip of fabric directly under the line of
gathering, stitch over the gathers. The design will be
a series of small diamonds.
ELASTIC OVERLOCK STITCH
Use this stitch in preference to regular overlock stitch for
overcasting stretch or knit fabrics where strength and
flexibility are required.
18
20
56
Page 57

PUNTADA OVERLOCK
17 19
Este es el mismo tipo de puntada usada por la industria
de la confección en la fabricación de prendas. Se forma
y acaba la costura en una operación.
Es muy efectiva para el uso en la reparación de bordes
gastados de prendas usadas.
17 19
PUNTADA NIDO DE ABEJA
1. Realiza una línea recta de fruncidos a través del tejido
que se desea adornar con nido de abeja.
2. Con una tira estrecha de tejido, directamente debajo
de la línea de fruncido, coser sobre los fruncidos. El
diseño será una serie de diamantes pequeños.
PUNTADA
OVERLOCK ELASTICA
Utlice preferentemente esta puntada antes que el overlock
normal para operaciones en géneros elásticos o de punto,
donde se require fuerza y flexibiidad.
18
20
18
20
57
Page 58

FISHBONE STITCH
Use to create decorative borders and for embroidery.
25
STRETCH OVERLOCK STITCH
Stretch overlock seams and overcasts in one to produce
a narrow, supple seam, particularly suited to swimwear,
sportswear, T-shirts, babywear in stretch nylon, stretch
towelling, jersey and cotton jersey.
STRETCH PATCHING STITCH
Stretch patching stitch, as well as being a decorative stitch,
is ideal for patching stretch fabrics such as jersey and
knitwear.
26
27
58
Page 59

PUNTADA RASPA
25
Utilicela para crear dobladillos decorativos y para
bordados.
25
PUNTADA OVERLOCK
ELASTICA
Las costuras overlock elásticas producen una costura
estrecha y elástica particularmente adecuada para
prendas de baño, prendas de sport, camisetas T, prendas
de niños de nilón elástico, toalla elástica, jersey y algodón.
PUNTADA ELASTICA DE
26
27
PARCHES
La puntada elástica de parches, además de ser una
puntada decorativa es ideal para poner parches en
géneros elásticos, tales como jersey y género de punto.
26
27
59
Page 60

DECORATIVE EMBROIDERY DESIGNS
Your Machine will produce a wide range of beautiful
decorative embroidery patterns as illustrated on the Stitch
indicator panel.
Simply select the design of your choice and proceed to
sew, the pattern will be produced automatically. The final
effect of each design will depend on stitch length setting.
TIPS ON DESIGN STITCHING
1. Always make a practice design on a scrap of the fabric
you plan to use.
2. Start with a full bobbin and plenty of thread on the
spool to avoid running out of thread in the middle of
your design.
3. Reduce the top thread tension slightly.
4. On a very soft fabric you may want to use a tissue
paper backing or organdy that can be cut away
afterwards.
Scallop pattern on collar
8
9
10
11
21
22
23
24
8
60
Domino on bias tape
Diamond on narrow hem
Scallop pattern on collar
Arrowhead on lapel
9
10
11
Page 61

DISEÑOS DE
BORDADOS
DECORATIVOS
Su máquina producirá una amplia gama de hermosas
puntadas decorativas, tal como se ilustran en el panel de
puntadas.
Simplemente selecione el diseño a su gusto y proceda a
coser, el dibujo se reproducirá automáticamente.
TIPOS DE PUNTADAS DECORATIVAS
1. Practique el dibujo siempre en su trozo de tela que
vaya a usar.
2. Empezar con el carrete y la canilla llenos para evitar
coser sin hilo a mitad de su diseño.
3. Reducir ligeramente la tensión del hilo superior.
4. En materiales muy suaves, puede ser necesario usar
papel ó organdi, que puede ser quitado
posteriormente.
Dibujo de ondas de cuello
Dominó en cintas al bies
Diamantes en dobladillo estrecho
Dibujo de ondas de cuello
Punta de flecha en solapa
61
Page 62

BUTTONHOLE MAKING
1. Slide the button carrier and insert the button.
1
Tab A
Lengüeta A
1
Tab B
Lengüeta B
2. Set the zig zag width adjusting lever at buttonhole
position.
3. Attach the buttonhole foot.
4. Place the garment under the foot so that the needle
pierces the fabric at the beginning of buttonhole.
2
Zig zag width adjusting lever
Selector ancho puntada
3, 4
62
Page 63

CONFECCION DE OJALES
1. Deslice el porta botones e inserte el botón.
2. Ajustar el selector ancho puntada a la posición de ojal.
1
1
3. Ponga la pata para ojales.
4. Coloque la prenda debajo de la pata de forma que la
aguja traspase el género al inicio del ojal.
63
Page 64

5. Lower the buttonhole lever and the presser foot lever.
5
6. Push the buttonhole lever away from you.
7. Start machine to complete entire buttonhole.
6
7
8. Remove the garment and cut open the buttonhole,
using the cutter in the accessories.
Be careful not to cut any of the seam thread.
64
8
Page 65

5. Baje la palanca para ojales y la de la pata prensatelas.
6. Suba la palanca para ojales.
7. Arranque la máquina para completar el ojal.
8. Cuando se termina la costura, use un abridor de ojales
para abrir el material en el centro del ojal.
Tenga cuidado de no cortar el hilo de la costura.
65
Page 66

CORDED BUTTONHOLES
Hook filler cord (crochet thread or buttonhole twist) to the
spur and pull both ends of the cord forward under the
guide.
Sew buttonhole in the way that zig-zag stitches cover the
cord.
When completed, release the cord from foot, pull ends of
cord forward and snip off extra length.
ADJUSTING STITCH BALANCE
Stitch length differences in forward and reverse stitches
of the buttonhole are equalized with the buttonhole stitch
adjuster.
If the reverse stitches are too close together, turn the
adjuster slightly clockwise using a coin as illustrated; if
they are too far apart, turn anti-clockwise.
66
Page 67

OJALES CON CORDON
Enganchar el cordón de relleno al saliente de la guía y
estirar ambos extremos del cordón hacia adelante, por
debajo de la guía.
Coser el ojal de forma que las puntadas de zig-zag cubran
el cordón.
Cuando se haya terminado, soltar el cordón, tirar hacia
adelante de los extremos y cortar el sobrante.
AJUSTE DE LA COMPENSACION
PUNTADAS OJAL
Las diferencias de longitud puntada en las puntadas hacia
adelante y hacia atrás del ojal, se igualan con el
dispositivo de ajuste puntada ojal.
Si las puntadas hacia atrás son demasiado compactas,
girar ligeramente el dispositivo de ajuste, usando una
moneda como está ilustrado. Si están demasiado
separadas, girar en el sentido contrario.
67
Page 68

3. CARING FOR YOUR MACHINE
CLEANING THE FEED DOGS AND SHUTTLE AREA
CAUTION
To ensure the best possible operation of your machine, it
is necessary to keep the essential parts clean at all times.
1. Raise the needle to its highest position.
2. Remove the needle plate.
3. Remove the bobbin case.
Always disconnect the machine from power supply by removing the plug from the socket-outlet.
1
2
3
Needle plate
Placa aguja
Bobbin case
Cápsula
4. Clean the feed dogs and shuttle area with the lint
brush.
NOTE : Put a drop of sewing machine oil on the
shuttle race as indicated by the arrows.
5. Replace the bobbin case with the projection positioned
against the spring. Replace the needle plate.
Bobbin case
Cápsula
4
5
Projection
Resalte
Spring
Muell
68
Page 69

3. CUIDE SU MAQUINA
LIMPIAR EL AREA DEL TRANSPORTADOR Y LA LANZADERA
PRECAUCION
Es necesario que mantenga las piezas esenciales limpias
siempre, para obtener un funcionamiento eficáz de su
máquina.
1. Levanter la aguja a la posición más alta.
2. Quite la placa aguja.
3. Quite la cápsula.
Siempre desconectar desenchufando el
cordón de la corriente eléctrica.
4. Limpiar el área del transportador y de la lanzadera
con el cepillo de hilachas.
ATENCION: Echar una gota de aceite para máquina
de coser por el eje central de lanzadera
y el carril de lanzadera como está
indicado con las fiechas.
5. Vuelva a colocar la cápsula con el resalte contra el
muelle. Coloque de nuevo la placa aguja.
69
Page 70

CHANGING LIGHT BULB
In USA
1. Remove the face cover. Push up the bulb slightly and
turn clockwise.
2. Insert new bulb, push up and turn counterclockwise.
Replace the face cover.
Face cover
In USA
Cubierta frontal
En los E. E. U. U.
Screw
Guia
In Europe
1. Remove the face cover and unscre the bulb.
2. Firmly screw in a new bulb. Replace the face cover.
Always disconnect the machine from power
supply by removing the plug from the
CAUTION
Do not use a bulb of more than 15 watts.
socket-outlet.
In Europe
En Europa
Light bulb
Bombilla
Face cover
Cubierta frontal
Screw
Guia
Light bulb
Bombilla
70
Page 71

CAMBIO DE LA BOMBILLA
En los E. E. U. U.
1. Quite la cubierta frontal. Empuje hacia arriba la
bombilla levemente y de vuelta a la derecha.
2. Inserte la bombilla nuevo, empuje hacia arriba y de
vuelta a la izquierda. Substituya la cubierta frontal.
En Europa
1. Quitar la tapa frontal, desenroscar la bombilla.
2. Roscar firmemente una nueva. Volver a colocar la tapa
frontal.
Desenchufar la corriente antes de cambiar
PRECAUCION
No usar una bombilla de más de 15 watios.
la bombilla.
71
Page 72

4. CHECK CHART FOR PERFORMANCE PROBLEMS
GENERAL PROBLEMS
Machine does not sew.
* Foot controller is not connected.
* Power switch is turned off.
Machine jams/knocks.
* Thread is caught in shuttle.
(see page 68 - 69).
* Needle is damaged.
(see page 24 - 25).
Fabric does not move.
* Presser foot is not lowered.
* Stitch length is set at 0.
STITCHING PROBLEMS
Machine skips stitches.
* Needle is not all the way up into needle clamp.
page 24 - 25.
* Needle is bent or blunt.
(see page 24 - 25).
* Machine is not threaded correctly.
26 - 27.
* Thread is caught in shuttle.
(see page 68 - 69).
* Fabric is a certain knit or synthetic.
stitch needle (see page 24 - 25).
Stitches are irregular.
* Needle size is not correct for thread and fabric.
-
See page 24 - 25.
* Machine is not threaded correctly.
26 - 27.
* Top thread tension is too loose.
44 - 45.
* Fabric is being pulled or pushed against machine
feeding action. - Guide it gently.
* Bobbin has not been wound evenly.
Needle breaks.
* Fabric is being pulled or pushed against machine
feeding action.
* Needle size is not correct for thread and fabric.
-
See page 24 - 25.
* Needle is not all the way up into the needle clamp
(See page 24 - 25).
-
Guide it gently.
-
Turn on the switch.
-
Clean shuttle
-
Replace needle
-
Lower presser foot.
-
Set it at 1 to 4.
-
Replace needle
-
Clean shuttle
-
-
See page 12 - 13.
-
-
See page
-
Use stretch
-
See page
See page
-
Rewind bobbin.
See
72
THREAD PROBLEMS
Thread bunches.
* Top and bobbin threads are not drawn back under
presser foot before starting seam.
-
Draw both threads back under presser foot about 4
inches (10 cm) and hold until a few stitches are
formed.
Needle thread breaks.
* Machine is not threaded correctly.
* Top thread tension is too tight.
* Needle is bent. - Replace needle (see page 24 - 25).
* Needle size is not correct for thread and fabric.
-
See page 24 - 25.
Bobbin thread breaks.
* Bobbin case is not threaded correctly.
22 - 23.
* Lint accumulates in bobbin case or shuttle.
-
Remove lint (see page 68 - 69)
Fabric puckers.
* Top thread tension is too tight.
(see page 44 - 45).
* Stitch length is too long for sheer or soft fabric.
-
Shorten stitch length.
-
See page 26 - 27.
-
See page 44 - 45.
-
See page
-
Adjust thread tension
Page 73

4. CUADRO DE EXAMEN
PARA LOS PROBLEMAS
DE EJECUCION
PROBLEMAS GENERALES
Máquina no cose.
* El cordón eléctrico no está conectado (vea página 12 - 13).
* El interruptor de potencia está desconectado.
– Conectelo.
Máquina se atasca/rechina.
* El hilo está enredado en la lanzadera. – Limpiar la
lanzadera (vea página 68 - 69).
* La aguja se rompe. – Reponer la aguja
(vea página 24 - 25).
La tela no se mueve.
* El prensatelas no está bajado perfectamente.
– Bajar el prensatelas.
* Longitud del punto es demasiado corto. – Prolonger
la longitud del punto.
PROBLEMAS DE PUNTO
La máquina salta puntos.
* La aguja no está fijada en la brida portaagujas (vea
página 24 - 25).
* La aguja está torcida o obtusa. – Reponer la aguja
(vea página 24 - 25).
* La máquina no enhebra correctamente
(vea página 26 - 27).
* El material es de punto o sintético. – Use la aguja de
talón azul (vea página 24 - 25).
Puntos son irregulares.
* El número de la aguja no es correcto para el hilo ni el
material (vea página 24 - 25).
* La máquina no enhebra correctamente
(vea página 26 - 27).
* La tensión del hilo superior es demasiado floja
(vea página 44 - 45).
* El material está tirado o empujado contra la acción de
alimentación. – Guiario suavemente.
* La bobina no se ha devanado de un modo igual.
– Redevanar la bobina.
La aguja se rompe.
* El material está tirado o empujado contra el acción de
alimentación.
* El número de la aguja no es correcto para el hilo ni el
material (vea página 24 - 25).
* La aguja no está fijada en la brida portaagujas
(vea página 24 - 25).
PROBLEMAS DE HILO
Los hilos se juntan.
* Los hilos superior e inferior no están sacados debajo
del prensatelas antes de empezar a coser, – Sacar
ambos hilo debajo del prensatelas unos 10 cm y
mantener hasta que se formen unos pocos puntos.
La aguja se rompe.
* La máquina no enhebra correctamente
(vea página 26 - 27).
* La tensión del hilo superior es demasiado apretada
(vea página 44 - 45).
* La aguja está torcida. – Cambiar la agja
(vea página 24 - 25).
* El número de la aguja no es correcto para el hilo ni el
material (vea página 24 - 25).
El hilo inferior se rompe.
* La cápsula de portacanilla no enhebra correctamente
(vea página 22 - 23).
* Las hilas se acumulan en la cápsula o en la
lanzadera. – Quitarias (vea página 68 - 69).
La tela no queda plana.
* Las tensiones del hilo superior e inferior están
demasiado apretadas. – Ajustar las tensiones del hilo
(vea página 44 - 45).
* La longitud del punto es demasiado largo para
material fino o suave. – Acortar la longitud del punto.
73
Page 74

8-2-1, KOKURYO-CHO,
CHOFU-SHI, TOKYO 182-8655, JAPAN
PHONE: 03(3480)5034
FAX: 03(3480)5037
http: //www.juki.co.jp
E-mail: hsm@juki.co.jp
Copyright © 2006 JUKI CORPORATlON
All right reserved throughout the world.
Printed in China
40053206 10/06
©
Page 75

INSTRUCTION MANUAL
MANUAL DE INSTRUCCION
Page 76

“IMPORTANT SAFETY INSTRUCTIONS”
“ When using an electrical appliance, basic safety precautions should always be followed, including the following.”
“ Read all instructions before using this sewing machine.”
“DANGER
1. “This sewing machine should never be left unattended when plugged in. Always unplug this sewing machine from
the electric outlet immediately after using and before cleaning.”
2. “Always unplug before replacing light bulb. Replace bulb with same type rated 15 watts.”
“WARNING
1. “Do not allow to be used as a toy. Close attention is necessary when this sewing machine is used by or near
children.”
2. “Use this sewing machine only for its intended use as described in this manual. Use only attachments recommended
by the manufacturer as contained in this manual.”
3. “Never operate this sewing machine if it has a damaged cord or plug, if it is not working properly, if it has been
dropped or damaged, or dropped into water. Return the sewing machine to the nearest authorized dealer or service
center for examination, repair, electrical or mechanical adjustment.”
4. “Never operate the sewing machine with any air openings blocked. Keep ventilation openings of the sewing machine
and Foot controller free from the accumulation of lint, dust, and loose cloth.”
5. “Never drop or insert any object into any opening.”
6. “Do not use outdoors.”
7. “Do not operate where aerosol (spray) products are being used or where oxygen is being administered.”
8. “To disconnect, turn switch to the off (“0”) position, then remove plug from outlet.”
9. “Do not unplug by pulling on cord. To unplug, grasp the plug, not the cord.”
10. “Keep fingers away from all moving parts. Special care is required around the sewing machine needle.”
11. “Never sew with a damaged needle plate as this can cause needle to break.”
12. “Do not use bent needles.”
13. “Do not pull or push fabric while stitching. It may deflect the needle causing it to break.”
14. “Switch the sewing machine off (“0”) when making any adjustments in the needle area, such as threading needle,
changing needle, threading bobbin, or changing presser foot, etc.”
15. “Always unplug sewing machine from the electrical outlet when removing covers, lubricating, or when making any
other user servicing adjustments mentioned in the instruction manual.”
To reduce the risk of electric shock:”
-
To reduce the risk of burns, fire, electric shock, or or injury to persons: ”
-
“CAUTION
Moving parts-To reduce risk of injury, switch off before servicing. Close cover before
-
operating machine.”
“SAVE THESE INSTRUCTIONS”
“This product is for household use, or equivalent.”
FOOT CONTROLLER (USA only)
Use Matsushita Electric, Model 4C-316B with this sewing machine.
POLARIZED PLUGS CAUTION (USA only)
This appliance has a polarized plug (one blade wider than the other). To reduce the risk of electric shock, this
plug is intended to fit in a polarized outlet only one way. If the plug does not fit fully in the outlet, reverse the
plug. If it still does not fit, contact a qualified electrician to install the proper outlet. Do not modify the plug in any
way.
This appliance complies with EEC Directive 89/336/EEC covering the electromagnetic
compatibility.
This equipment is marked with the recycling symbol. It means that at the end of the life ofthe
equipment you must dispose of it separately at an appropriate collection point and not place itin
the normal domestic unsorted waste stream. This will benefit the environment for all.
(European Union only)
 Loading...