

Page 1

ASSEMBLYMANUAL
Specifications
Length 1,332mm Mainrotorblades 710mm Tailoutputshaftdia. ∅ 6 Gearratio 10.18:1:4.72
Height 356mm Mainshaftdia. ∅ 12 Tailrotordia. 288mm Li-pobattery 6cell× 2
Width 210mm Mainrotordia. 1,599mm Controlsystem 120°CCPM
Grossweight 3,500g 〜※ notincludingbattery
CONTENTS
1.
Introduction
2.
Additionalitemsrequired
3.
Toolsrequiredforassembly,Usefultools,Universallinks,Indicationoftemporaryfixation
4.
Nutandbolttypes,Preventionofloosenedbolts,Tighteningbolts,Grease,Instantadhesiveagent,Sanding,Assemblyhints
5.
Assemblyprocedure1
6.
Assemblyprocedure2
7.
Assemblyprocedure3
8.
Assemblyprocedure4
9.
Assemblyprocedure5
10.
Assemblyprocedure6
11.
Installationexamplesforbattery,ESC
……………………………………………………………………………………………………………P.2-P.5
…………………………………………………………………………………………………P.5
……………………………………………………………………………………………P.8-P.10
……………………………………………………………………………………………P.11-P.16
……………………………………………………………………………………………P.17-P.18
……………………………………………………………………………………………P.19-P.24
……………………………………………………………………………………………P.25-P.29
……………………………………………………………………………………………P.30-P.31
………………………………………………………………………………P.32
Taildrivesystem
:Shaftdrive
………………P.6
P.7
12.
Gearratioandrotorrpmsetup
13.
Whenrepairisnecessary
14.
Servohornneutraladjustment
15.
Settingandadjustmentofthetransmitter
16.
Finalcheckspriortoflight
17.
Fineadjustmentfollowingtestflight
18.
Readpriortoflight
19.
Partslist
20.
Productwarrantyandindemnificationofliability
Repairandtransferofproduct
21.
……………………………………………………………………………………………………………P.44-P.57
………………………………………………………………………………………P.34-P.37
………………………………………………………………………………………P.41-P.41
………………………………………………………………………………………………P.42-P.43
………………………………………………………………………………………P.33
…………………………………………………………………………………………P.38
…………………………………………………………………………………P.41
…………………………………………………………………………………………P.59
…………………………………………………………………P.39-P.40
…………………………………………………………………P.58
Page 2
Introduction
ThankyouforpurchasingthisJRproduct.
TheFORZA700isanelectrichelicopterperfectforadvancedand3Dflyers.
Pleasebesuretounderstandtheinstructionsinthismanualbeforecommencingassembly.
Besuretoobservethesesafetyprecautions
Donotassembleorflythishelicopterwithoutseekingexpertassistance.Besuretoreceiveguidancefromourdealer
oranadvancedpilot.Aninstructorhelpingyouisrequestedtofullyobservenotonlytheinstructionsandprecautionsin
thismanualbutalsotherulesandguidelinesforflight.
Inordertopreventfireorinjury,alwaysobservethestatedsafetyprecautionseachtimeyougoflying.
Themanualdescribeswarnings,dangersandcautionsforsafeassemblyandflying.Theyareveryimportant.
Thefollowingsymbolsareusedtoindicatetheprecautionsforpreventingaccidentsduetoerroneoushandlingofthis
product.Pleasebesuretofollowtheseinstructions.
Neglectofthisprecautionarynoticeisverylikelytoresultindeathorseriousinjurytothe
DANGER
user.
Neglectofthisprecautionarynoticeislikelytoresultindeath,seriousinjuryordamage
WARNING
NOTE
toproperty.
Neglectofthisprecautionarynoticeisnotlikelytoresultindeathorseriousinjurybutmay
resultininjuryordamagetoproperty.
Takeguidancefromourdealeroradvancedpilot
Thishelicopterisnotatoy.
IfyouareabeginnerwithR/Chelicopters,orifyouareunfamiliarwithelectricpoweredmodels,donottrytoassemble
orflythismodelbyyourself.
Becausemanypartsarealreadyassembled,itmaylooksimpleandeasytooperate.However,itactuallyrequires
extremelydelicateassembly,adjustmentandoperation.
Takeappropriateguidancefromourdealeroranadvancedpilotsothatyoucanenjoyflyingthismodelandexperience
itsfullperformance.
Ifyoucannotcompletetheassemblybyyourself,itisrecommendedyoutakeguidancefromourdealeroran
advancedpilot.Whenyoufirstflythemodel,besuretoaskforassistance.Flyingthehelicopteralonemayinvolvegreat
dangertoyourselforothers,aswellasdamagingthehelicopter.Gettingproperguidancehelpspreventaccidentsanddamage.
Also,pleasepaycloseattentiontotheuseandcareofperipheralequipmentincludingthebattery,charger,etc.
Buyaradiocontrolinsurancepolicy
Pleasebesuretopurchasea"radiocontrolinsurancepolicy".
Fordetails,pleaseinquirewithourdistributorsoraninsuranceagent.
Becarefulwhenhandlingpartssuchasthebatteryorcharger
Improperhandlingmayresultinelectricshock,burn,explosion,orfire.
Donotusethechargerorbatteriesnearanopenflame.Ifapowergeneratorisused,donotuseanopenflamenearit,
thefuel,oranyrelateddevices.
Cigarettesmayalsocausefire-donotoperatethisproductorrelateddeviceswhilesmoking.
PleasefollowtheguidancefromrelatedInstructionmanualswhileusingthisproduct.
Whenlinkingtheconnectors,pleasewearfire-resistantglovestopreventelectricshockandburns.
Whennotflying,pleaseunplugthebatteryconnectors.
Whilestoringormovingthebattery,pleaseusespecialbatterycases.
Donotstorebatteriesinahightemperatureenvironmentsuchasacartrunk.
P.2
Page 3

Precautionsforhandling
●Immediatelyafterflight,themotor,speedcontrolandbatteryareveryhot.Becarefultoavoidafireorburn.
●Accessoriessuchasthebatteryandelectricalpartsshouldbehandledwithcare.Iftheinsulationistornorthe
connectorisshorted,youcouldbeburntorinjured.Readtheinstructionsforuseofsuchaccessoriesbeforehandling.
●Donotchargeordischargethebatterynearanopenflameorinahotenvironment.
●Unnecessarydisassemblyormodificationofanycomponentsarestrictlyprohibited.
Neglectofthiscouldresultinafaultand/oraccident.
●Stopandunplugthemotorbeforedoingthefollowingactions:
①Whenyoumakeadjustmentstothehelicopterorthecontrolsysytem.
②Whenyoureplaceanyaccessoriesorparts.
③Whenthehelicopterhassomethingwrongorwhenyounoteunusualnoise,smellorvibration.
④Whendangerisexpected.
●Usepartsonlywithintheirservicelimits,ifindicated.
●Inordertorealizeapleasantflight,trytokeepappropriategearbacklash,movablepartsmovingsmoothly,bolts
tightened,andpartslubricatedorreplacedasrequired.
Precautionsforsafeflight
Themodelcouldcrashduetoslightassemblyfailure,operationalmistake,servicefailure(loosebolts,etc.),interferenceandsoon.
Alwayskeepinmindthattheradiocontrolhelicopterwhichiscontrolledbyradiofrequency,maygooutofcontrolforsome
reason,andtheoperatorshouldpayattentiontohimself/herselfandthesurroundingenvironmentatalltimesforsafeflying.
◎Toflythehelicopter,itisnecessarytofullymasteroperationalskillsforflightaswellasbasicflightmethods.
Receiveguidancefromourdistributororanexperiencedpilotandoperateundertheirinstructions.
◎Ifyounoticeanabnormalitybeforeflight,besuretoeliminatethecausebeforeflying.
◎Iftwoormoreradiodevicesareusedsimultaneouslyonthesamefrequency,youcannotoperatethehelicopter
becauseofinterference.Ifsomeoneelseisusingthesamefrequency,operationmaystop.Ifthereisinterferencedespite
nooneusingthesamefrequency,asourceofinterferenceexists.Neverflyuntilthisinterferencehasbeencleared.
Flyingsiteandrange
①Theflyingrangeofthehelicoptercanbedefinedasthedistancewhereitcanreceivetheradiofrequencysignalfromthe
transmitter.Howeveritstruerangeislimitedtowhereyoucanconfirmthebehaviorofthehelicopterwithyourowneyes.
②Neveroperatethehelicopterinaplacewhereyoumaylosesightofit,ortheradiosignalfromyourtransmitterfailstoreachit-asacrashisverylikely.
③Trytounderstandthesurroundingsatalltimesandneverflyinbadweather,suchasstrongwindorrain,atnightorinlowvisibility.
④Neverflyinaplacewheretherearepeople,cars,schools,hospitals,otherbuildingsorobstacles,orbyariveroron
theseashore;flyatanexclusiveairfieldwhereradiosignalsarecontrolled.
⑤Donotflynearroads,tracks,electriclines,high-tensionlinesorotherobjectsdetermineddangerous.
⑥Pleasedonotletthenoisesofmainrotorbladesorotherpartsdisturbthesurroundings.
ObservetheserulesandmannerstohelpenjoythisR/Chelicopter.
Precautionsfortheoperator
ThefollowingitemsareprecautionsfortheoperatorflyingthisR/Chelicopter.
Besuretoobservethem.
①Thefollowingpersonsorthoseinthefollowingstatesshouldneveroperatethishelicopter:
●Infants,children,orotherpersonswhohavenoknowledgeorexperienceofR/Chelicopters.
●Pregnantwoman.
●Whenyouaretired,ill,underinfluenceofmedicineoralcoholandcannotmakeproperjudgmentsinsafeoperation.
●
Whenyouareabeginnerorborrowsomeone'sradiocontrolhelicopterandhavenottakensufficientsafetyguidanceontheoperatingmethods.
●Thosewhoarebelievedtobeincapableofflyingaradiocontrolhelicopter.
②Weareasy-to-moveclothes.
●
Choosetowearclotheswhoseedgesorhemscannotcomeintocontactwiththerotatingpartsofthehelicopter,theantennaorcontrolsonthetransmitter,endangeringyou.
●Itisverydangerousifaccessoriessuchasrings,bracelets,etc.arecaughtbythehelicopterorthetransmitter.
Removethemandbundlelonghairsothattheywillnotbecaught.
P.3
Page 4

●Inordertoprotectyourfeet,wearsolid,easy-to-moveshoes,avoidingsandalsorhigh-heelshoes.
●Wearacap,gloves,sunglassesorgogglesasrequired.
③DonotflytheHelicopterinanunnaturalposture.
●Avoidstandinginanunstableorslipperyposition.
●Donotflywhilelookingbackward,sittingorlying.
●Donotbringthehelicoptertooclosetotheoperatororsurroundingpeople(iftherearebystanders,makesurethat
theyarebehindtheoperator).
④Takesufficientflightbreaks.
●Anexcessivelylongflightmakestheoperatorlosehis/herconcentrationduetofatigue,leadingtoaccidents.
Takeadequateflightbreaks.Avoidanunreasonablylongflight,whichcouldresultinunexpectedaccidentsor
injuries.
Precautionsforstarting
①
Makesuretheboltsfortheblades(mainrotor,tailrotor)areproperlytightened-thereshouldbesomemovementpossible.
Checkallotherscrewstoconfirmtheyareproperlytightened.Retightenanyloosescrews.
②Makesurethatnotoolusedforassemblyoradjustmenthasbeenleftinthehelicopterbody,andthatallparts
affectingflightperformancearefreefromfault.
③
Keeptheairfieldasneatandtidyaspossibleandplacethehelicopterinastableplace(objectssuchascables,wires,strings,
debrisofbrokenparts,screws,etc.,maybescatteredbythewindpressurefromtherotoranddamagethehelicopter).
④Makesurethatthebatteriesinthetransmitterandthereceiverarefullycharged.
⑤Alwaysturnonthetransmitterfirst.
⑥Conductadistance(range)testofthetransmitter.Followthedirectionsofyourtransmittermanufacture.
Movethecontrolsandconfirmmovementofthehelicopterservos.Iftheydonotmoveproperly,checkthecauseand
haveitrepaired,ifnecessary.
⑦
a.Extendthetransmitter'santennatoitsfulllength.Putthereceiver'santennathroughanantennatubeandmakesurethat
itcaneasilyreceivetheradiosignal,ensuringitcannotbecaughtbymovingparts(donotbendorbundletheantenna).
b.Whenusinga2.4GHztransmitter,pleaseadjusttheantennaasdirectedinthemanualsuppliedwiththetransmitter.
◎Starting
①Whenmovingtoatake-offsite,notethatifyourclothescontactthetransmittersticks,therotormaysuddenlystart
running.Pleaseproceedwithcaution.
②
Whenstartingthemotor,makesurethatthereisnoperson,animalorobstaclearoundthehelicopter,whichmaybecaughtbytherotors.
③
Afterstartingthemotor,pleaseunderstandsettingthethrottlestick/trimtoslowestpositionstopsthemotor.Rising
therotationspeedsuddenlyisverydangerous.StarttherotationgraduallyusingtheslowstartfunctionoftheESC.
Afterthemainrotorisrotating,abruptstickoperationwillcausethehelicoptertorisequickly.Pleasesetthestickto
medium-slowpositionandwait.Makesuretheriseoftherotorspeedfollowsyourstickoperation.
④Whenliftingthehelicopterintotheair,besuretoremainatleast10mormoreawayfromit.
⑤Landbeforeadjustingthetransmitterorhelicopter.Donotallowpartofyourbodyorclothestocontactthe
transmittersticksbymistake,anddonotputthetransmitterdowninastandingpositionbecausewind,etc.maytip
thetransmitterover,bumpingthethrottlestick,andcausingthehelicoptertosuddenlyleapintotheair,endangering
yourselforothers.
⑥Donotputyourhandoranyobjectsintothemovablepartswhiletheyarerunning.
⑦Whencheckingthetrackingadjustmentstayatleast5mormorefromthehelicopter.
◎Stopping
Movethethrottlestickdownandallowthemotorandmainrotorbladestostopcompletely.Holdtherotorheadbyhand,
removethepower-supplybatteries,andswitchoffthereceiver.Turnthetransmitterofflast.
P.4
Page 5
PRECAUTIONSDURINGFLIGHT
①Ifyounoteanabnormalitysuchasunusualnoise,vibration,etc.duringflight,swiftlylandthehelicopterinasafe
placeandeliminatethecausepriortoflyingagain.
②
Ifthemainrotorcomesintocontactwiththegroundduringflightitsappearancemaylookfaultless,butfinecracksor
distortionsmayhaveoccurredindifferentparts.Ifyoucontinuetoflyitinthatcondition,thecracksmayextend,allowing
theinnerleadweighttoflyoutorcausethemainrotortocomeoffthemainbladeholder,thusleadingtoaseriousaccident.
Ifthemainrotorisdamagedevenslightlyorifthereisapossibilityofdamage,replaceitwithanewoneimmediately.
③
Neverlookawayfromthehelicopterduringflight.Ifyoudosoevenforashortperiodoftime,itmaychangeitspostureoryou
maylosesightofit,andloosecontrol.Alwaysassumetheworst-casescenarioandallcareshouldbetakentopreventacrash.
④
Donotfly(orhover)thehelicopterkeepingthemainrotorateyelevelbecauseitisdangerous.Alwaysensurethatthemainrotorishigherthaneyelevel.
⑤
Neverallowthepowerofthetransmitterorthehelicoptertorunlow(setthetransmittertimer,etcasaprecautionarymeasure).
⑥Donottouchthemainrotorortailrotorwhiletheyarerunning.
Inspectionafterflight
①Aftereachflightinspectthefollowing:
Checkscrewsfortightnessandpartsforwear,deteriorationanddamage.
Wipedirtandwaterdropsfromthehelicopter(ifdirtonthemovablepartsisleftuncleanedforalongtime,theymay
movelesssmoothly,havingabadeffectonflightperformance).
②Makesurethemotor,ESC,andbatteryarenotabnormallyhot.
③Whenstoringthehelicopterforalongperiodoftime,cleanitbeforestorage.
●Storeitinadry,safeplacebeyondthereachofinfantsorchildren.
●Ifthereisdamageorotherproblems,repairorreplacecomponentsasnecessarybeforestorage.
Tolubricateorreplaceparts,followtherelevantpartsassemblyprocessesinthemanualandtheinstructionsinthepartslists.
④
⑤Checkwhetherornotthereceiverandgyroarefirmlysecured,andfreefromproblems.
⑥Checkthereceiverantennawirefromtimetotimebecauseitscoremaybecomebroken.Thismaynotbeimmediately
apparent,sohaveitcheckedperiodicallybythemanufacturer.
⑦Onceyourflyingsessionisover,besuretoremovethebatteryfromthehelicopter.
Replacementparts
Whenreplacingparts,useourspecifiedoriginalorourauthorizedoptionalparts.Donotmodifytheseparts.
Ourproductwarrantydoesnotcoveranytroublesresultingfromuseofnon-originalparts.Donotuseout-of-standard
parts,becausetheymaycauseanaccidentoraproblemexposingyoutogreatdanger.
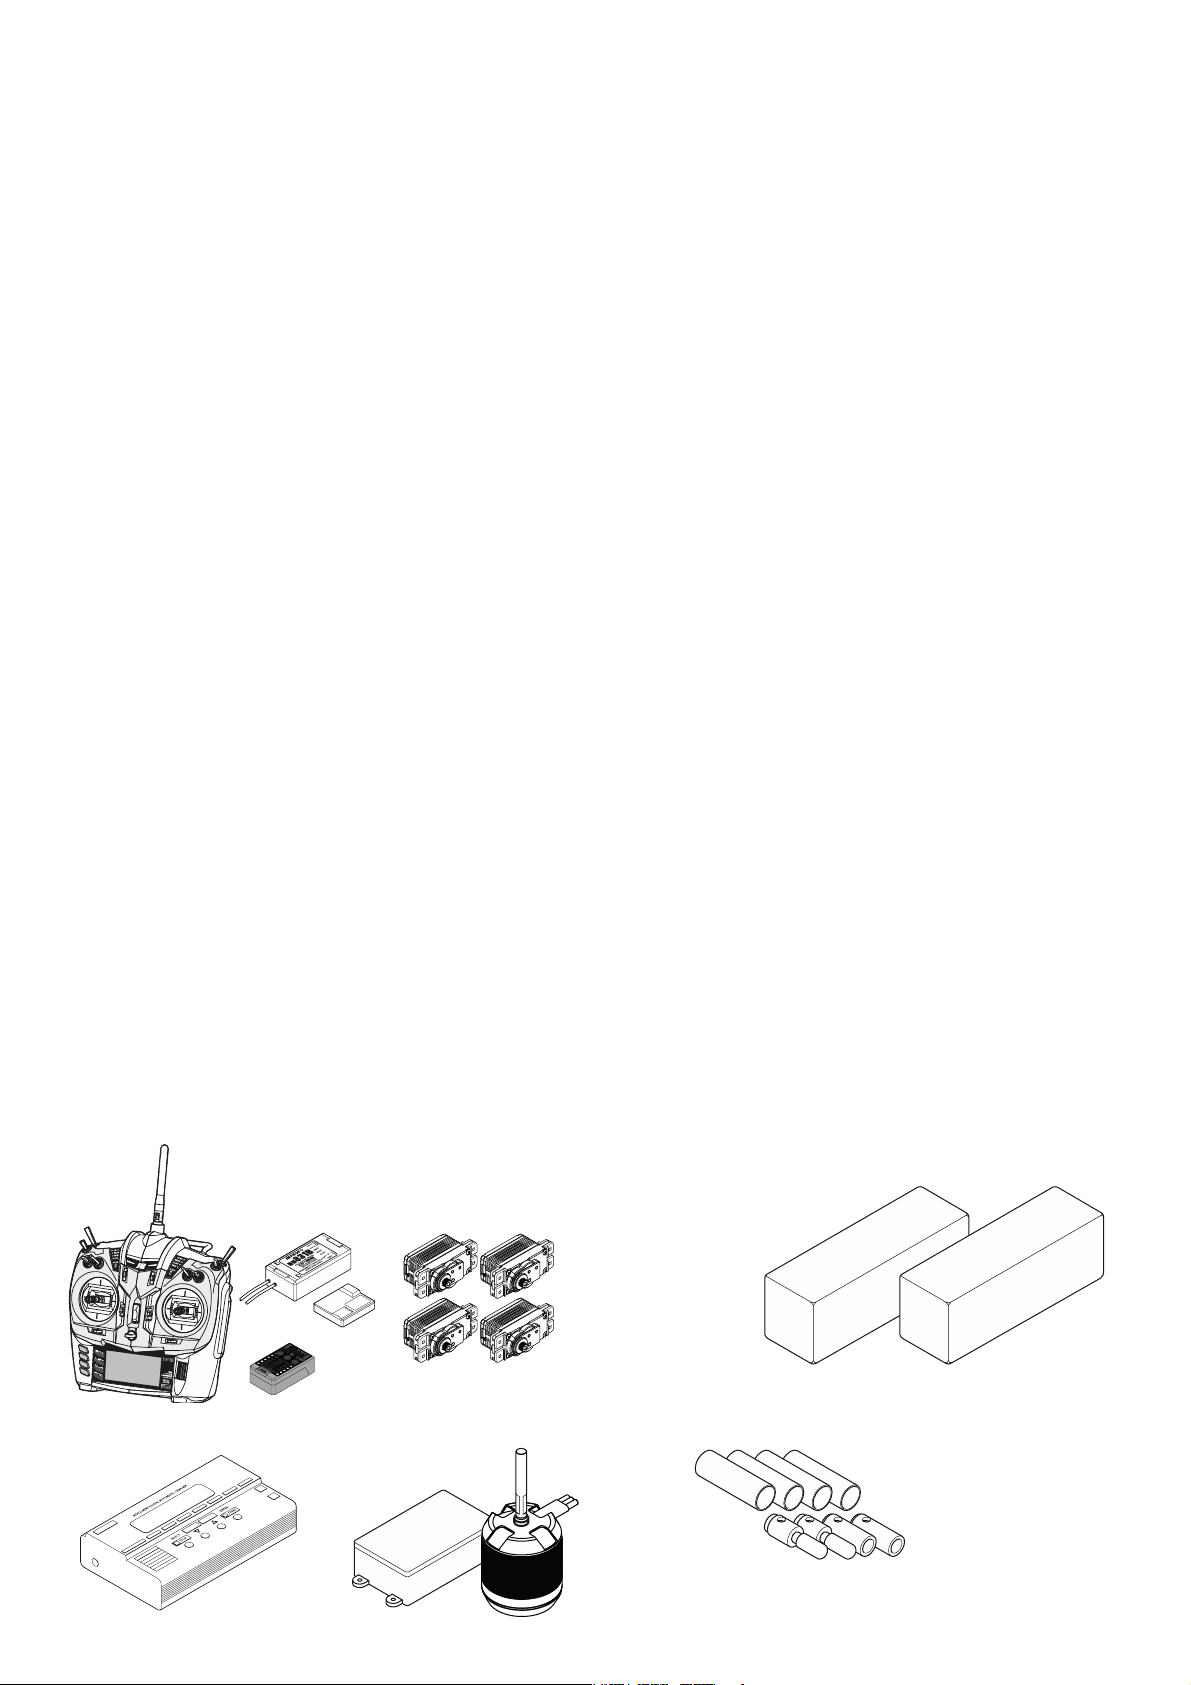
Additionalitemsrequired
Transmitter(120CCPMcapable)
Batterycharger
Brushlessmotor&ESC
ESC/120A 〜
Lithium-polymerbattery(Li-Po)6cell
21
22.2V4,500mAh 〜× 2
Batteryconnectorset
543
KV:500-520
※Pleaseseep.33fordetails.
P.5
Page 6
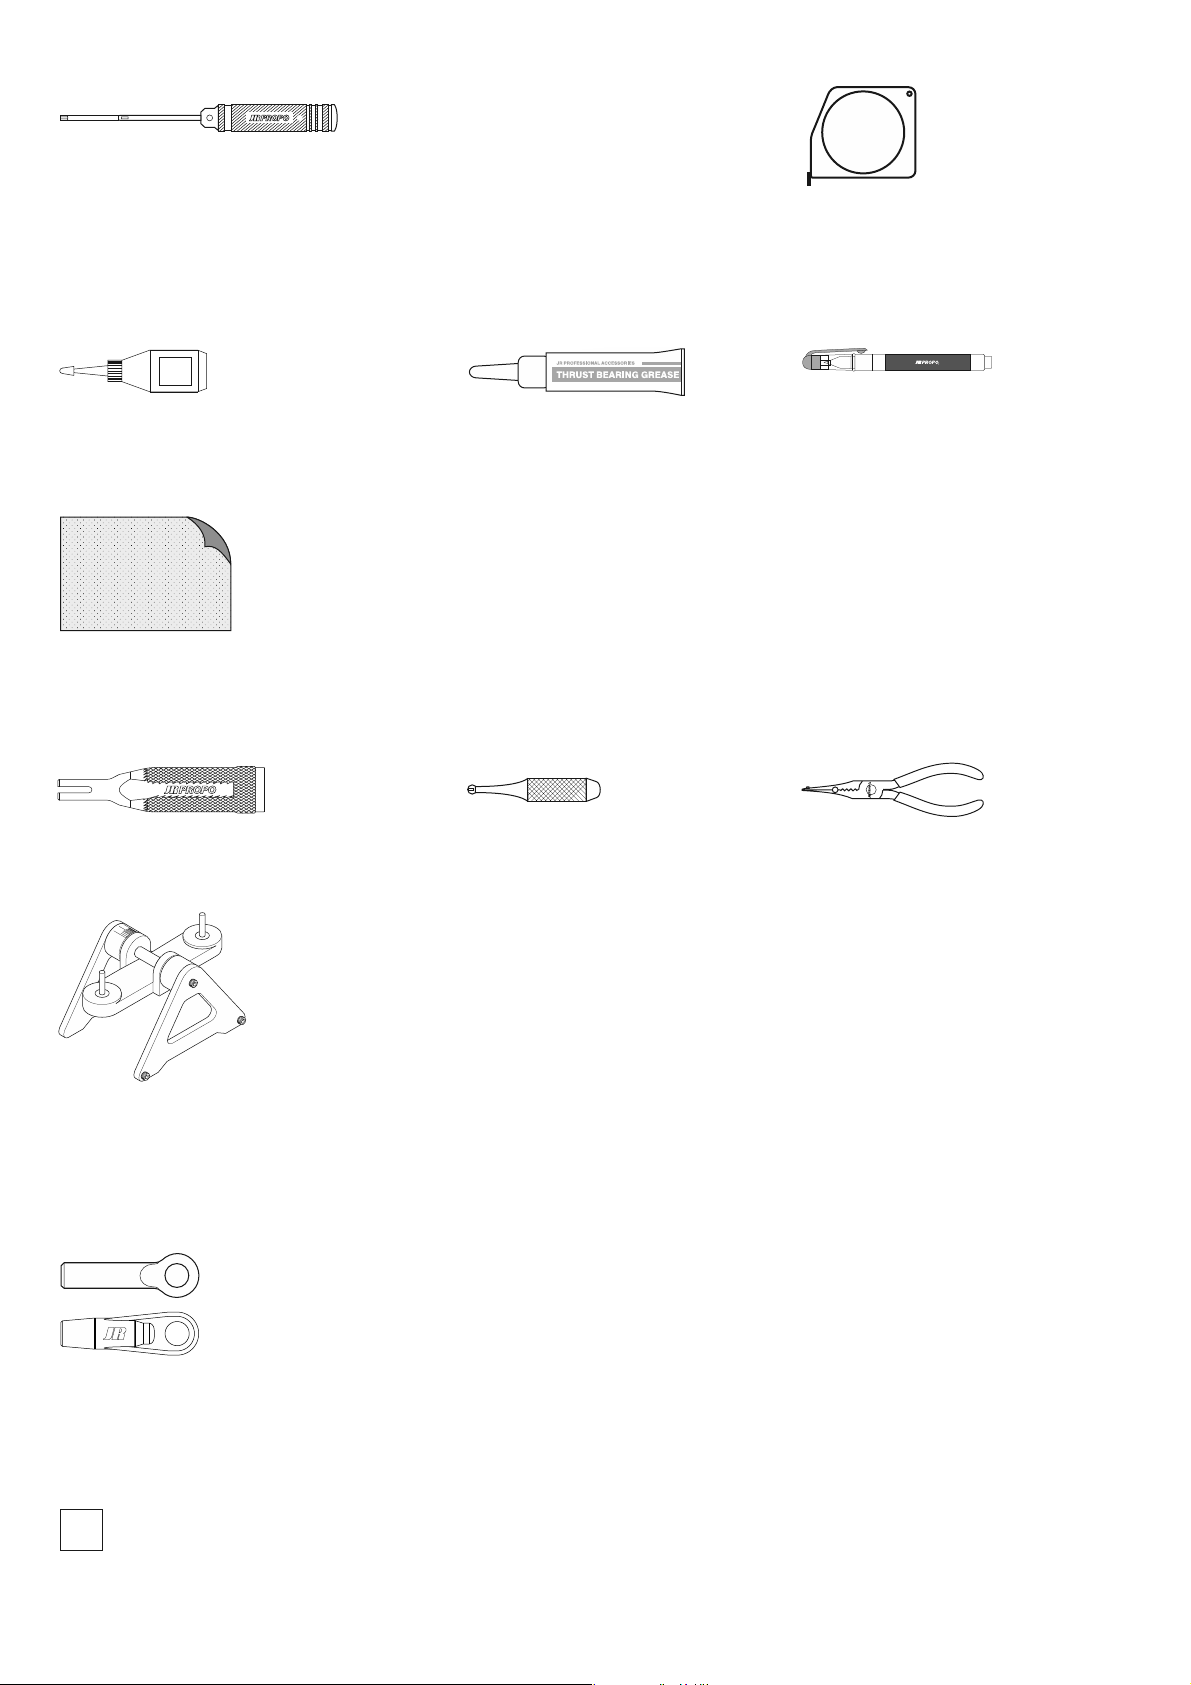
Toolsrequiredforassembly
コ
ン
r
e
l
ベ
u
ッ
R
ク
e
p
ス
a
T
Hexdriver :1,5mm
2mm
2.5mm
3mm
4mm
瞬間
CAG
CAGlue
Sandpaper#300〜400
Usefultools
digitalpitchgauge
Thrustbearinggrease
Taperule
Oiltouchpen
Othergeneraltoolsrequired for
makingamodel
Universallinkdriver UniversallinkplierUniversallinktrimmer
Bladebalancer
Universallinks
TheUniversallinkshaveafrontandbackandaremountedinthespecifieddirectionatthetimeofattachingthelinkage.
Thefollowingdescribeshowtotellthefrontandback.
Atthetimeofattachingthelinkage,payattentiontothedirectionofeachuniversallinkduringassembly.
JRPROPO
Thesidemarked"JR"isthefront.Atthetimeoffittingthelinkage,attachtheuniversallinktojoint
ballbypressingthebacksideontotheball.
Indicationoftemporaryfixation
Theareasmarkedwiththefollowingsymbolshouldbetemporarilyfixeduntilassemblyandrelevantprocessesare
completed.Anumber"(×2)"nexttothesymboldenotesthenumberofpartsrequiredtobetemporarilyfixed.
☆
P.6
Page 7
Boltandnuttypes
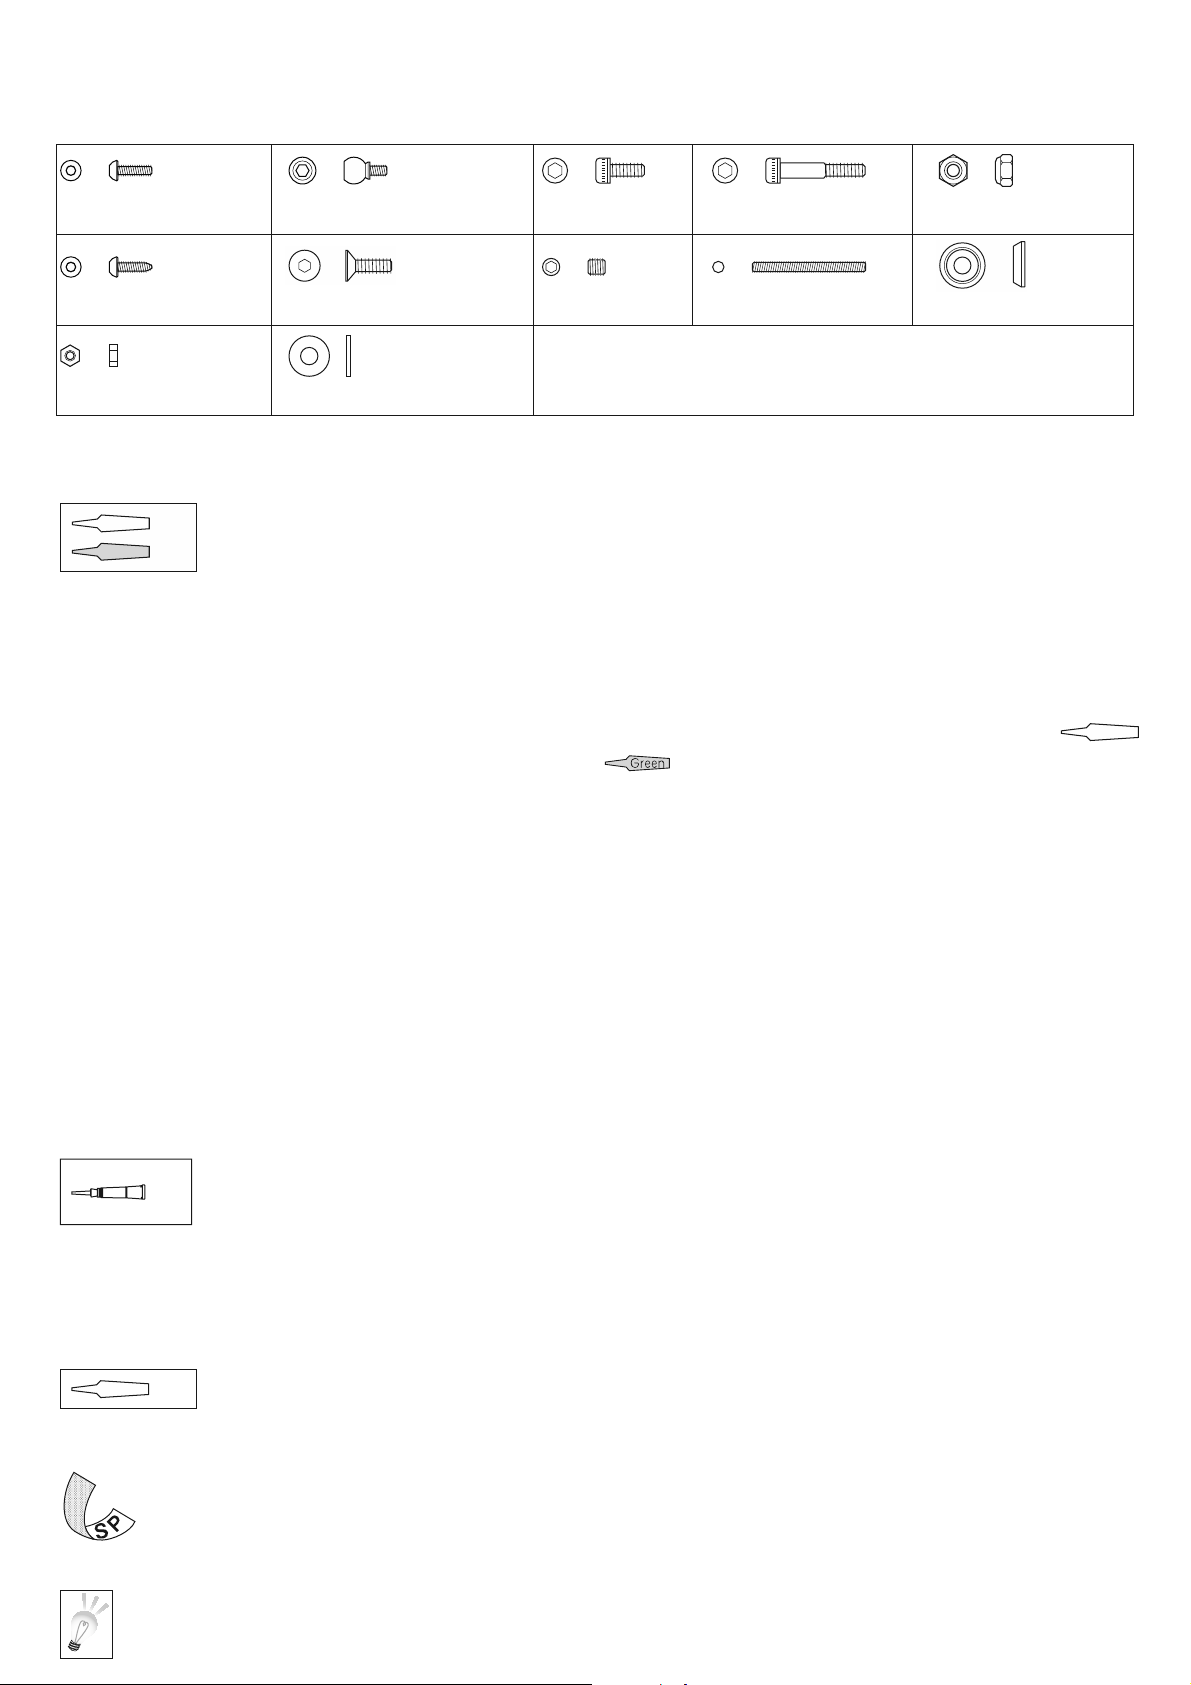
ThefollowingillustratestheboltsusedforFORZA700.
※Thesearejustexamplesforeachtype-severaldifferentsizesareused.
Buttonheadbolt Jointballscrew
Hextappingscrew
Nut
Flatwasher
Socketheadbolt
SetscrewFlatheadbolt
Specialsocketheadbolt
Threadedrod
Nylonlocknut
Specialwasher
Preventionofloosenedbolts
Red (×2)
Green (×2)
alcoholandadheredwithascrewlockingagentsuchasJRThreadlock(green:hard,red:soft).
Thesameappliesforthepartsmarkedwiththesamesymbols.Aparenthesizednumberaddedtothesymbolindicates
thenumberofboltstobeappliedwiththescrewlockingagent.Ifmultiplepiecesofthesamepartareused,thesymbols
includingthosefortheirboltsmaybeomitted.Therearetwokindsofscrewlockingagents.Greendenotesahardagent
andredasoftone;usethemproperly,accordingtotheinstructions.Whenred(soft)agentisrequired,themark
isused,andwhenthegreen(hard)oneisrequired,themark isused.
Afterassembly,ifyouwanttoremovethebolts,etc.securedwiththescrewlockingagent,weakenthethreadlockagent
byadequatelyheatingtheboltwithatorchorasolderingiron(ifyoutrytoremovethembyforce,youmaydamagethe
boltorwrenchandfailtoremovethepart).Whenheatingtoloosenthescrewlockingagent,careshouldbetakennotto
deformthesurroundingresinparts.
Boltsmaybeloosenediftheyareexposedtovibrationforalongperiodoftime.Forthisreason,itis
necessarytotakepropercountermeasurestopreventthemfrombeingloosened.Ineachprocess,the
boltsandmatchingtappedholesmarkedwiththesymbolsshownaboveshouldbedegreasedwith
Red
Tighteningbolts
TheboltsusedforR/CHelicopterarerathersmall.Iftheyareovertightened,thethreadmaybedamaged.
Pleasebeespeciallycarefulwhentighteningthetappingscrewsintoplasticparts.
Grease
グリスアップ
GreaseUp
(×2)
Applythrustbearinggreasetotherelevantpartsmarkedwiththissymbol.
Instantadhesiveagent
Bondtherelevantpartsmarkedwiththefollowingsymbol,usinganinstantadhesiveagent.(CAglue)
Aswiththescrewlockingagent,anumber"(x2)"nexttothesymboldenotesthenumberofpartsrequiredtobeadhered.
(×2)
CAG
Sanding
Sandthepartswhereindicatedwiththissymbol.
Assemblyhint
Thereisahintforassemblymarkedwiththissymbol.
P.7
Page 8
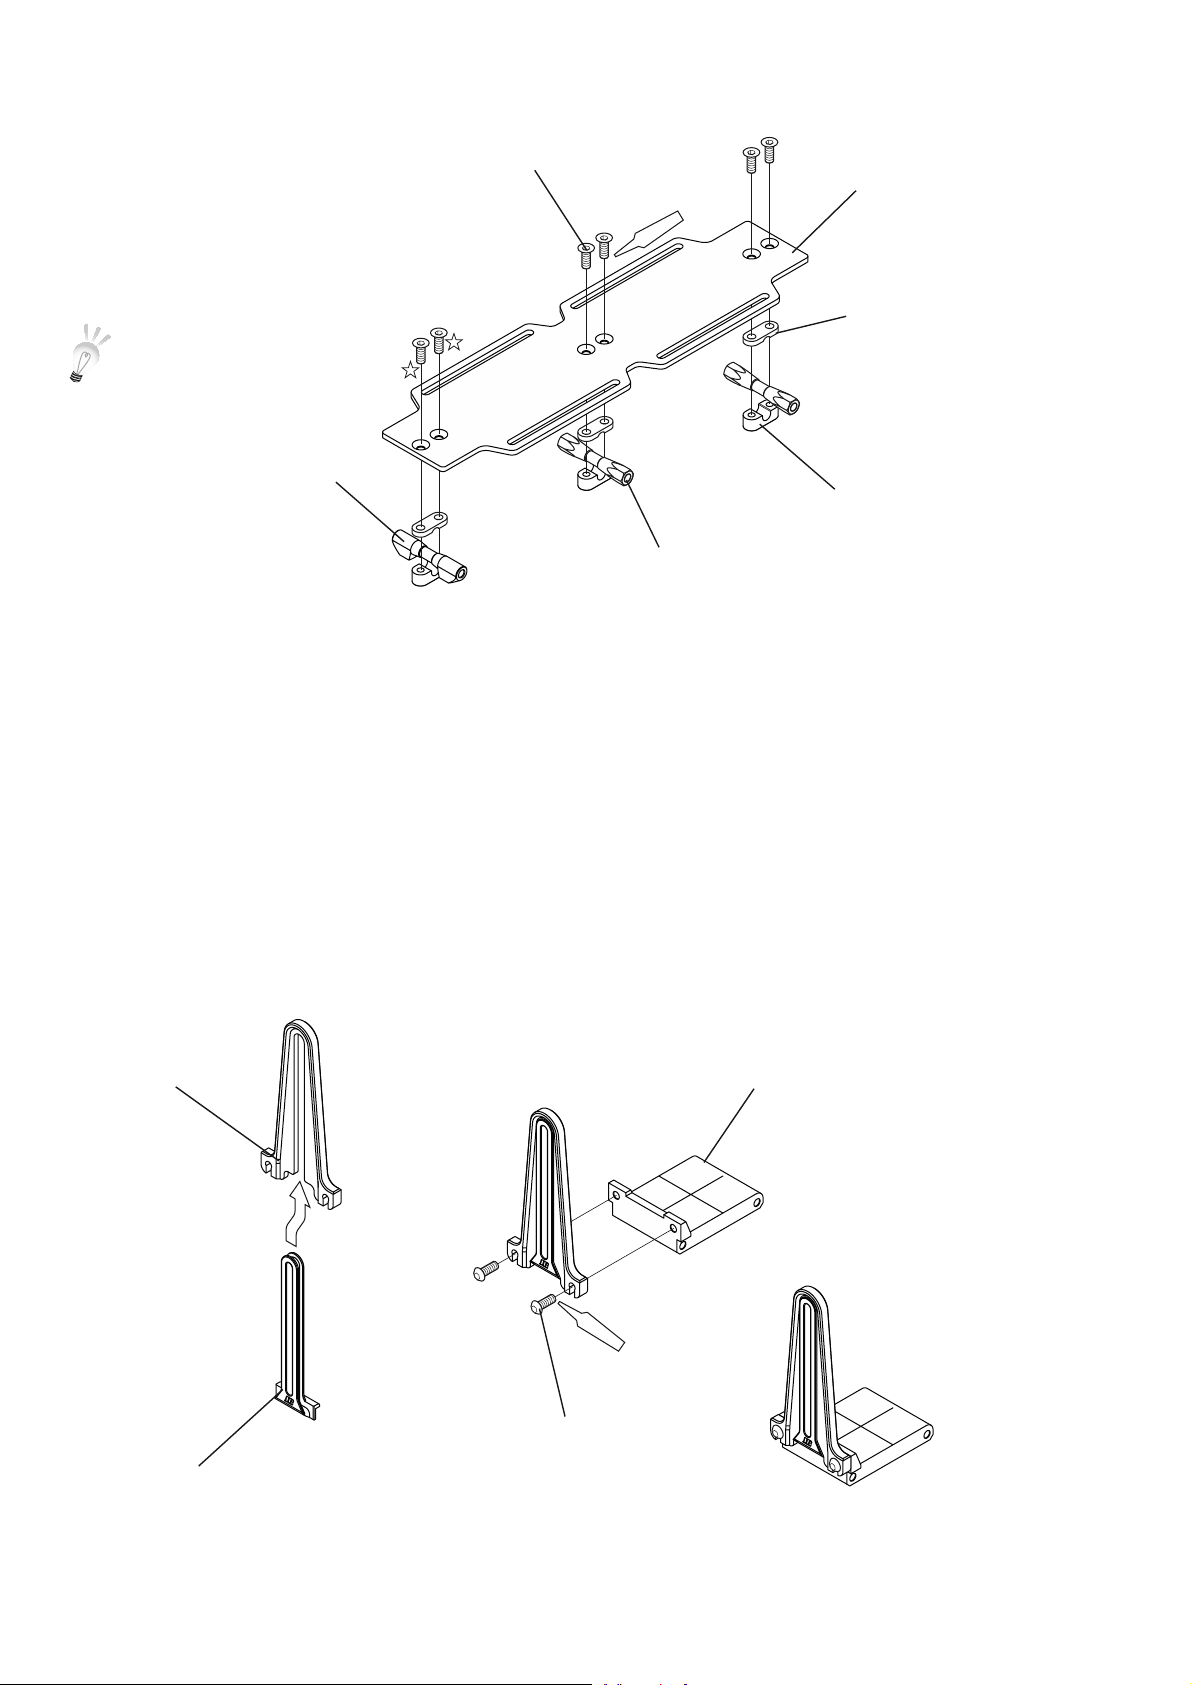
1-1 CARBONTRAYLASSEMBLY
FlatheadboltM3 × 8( × 6)
※ Temporarilytightenthese
FlatheadboltsM3 × 8-they
aretightenfirmlywhenthe
upperframeisinstalled.
Platecrossmember
CarbontrayL
Red (×4)
TraybracketB( × 3)
TraybracketA( × 3)
CrossmemberL32( × 2)
1-2 RADIUSSUPPORTASSEMBLY
Radiussupport Radiussupportbracket
Red (×2)
ButtonheadboltM3 × 8( × 2)
CompleteAssembly
Radiussupportrail
P.8
Page 9
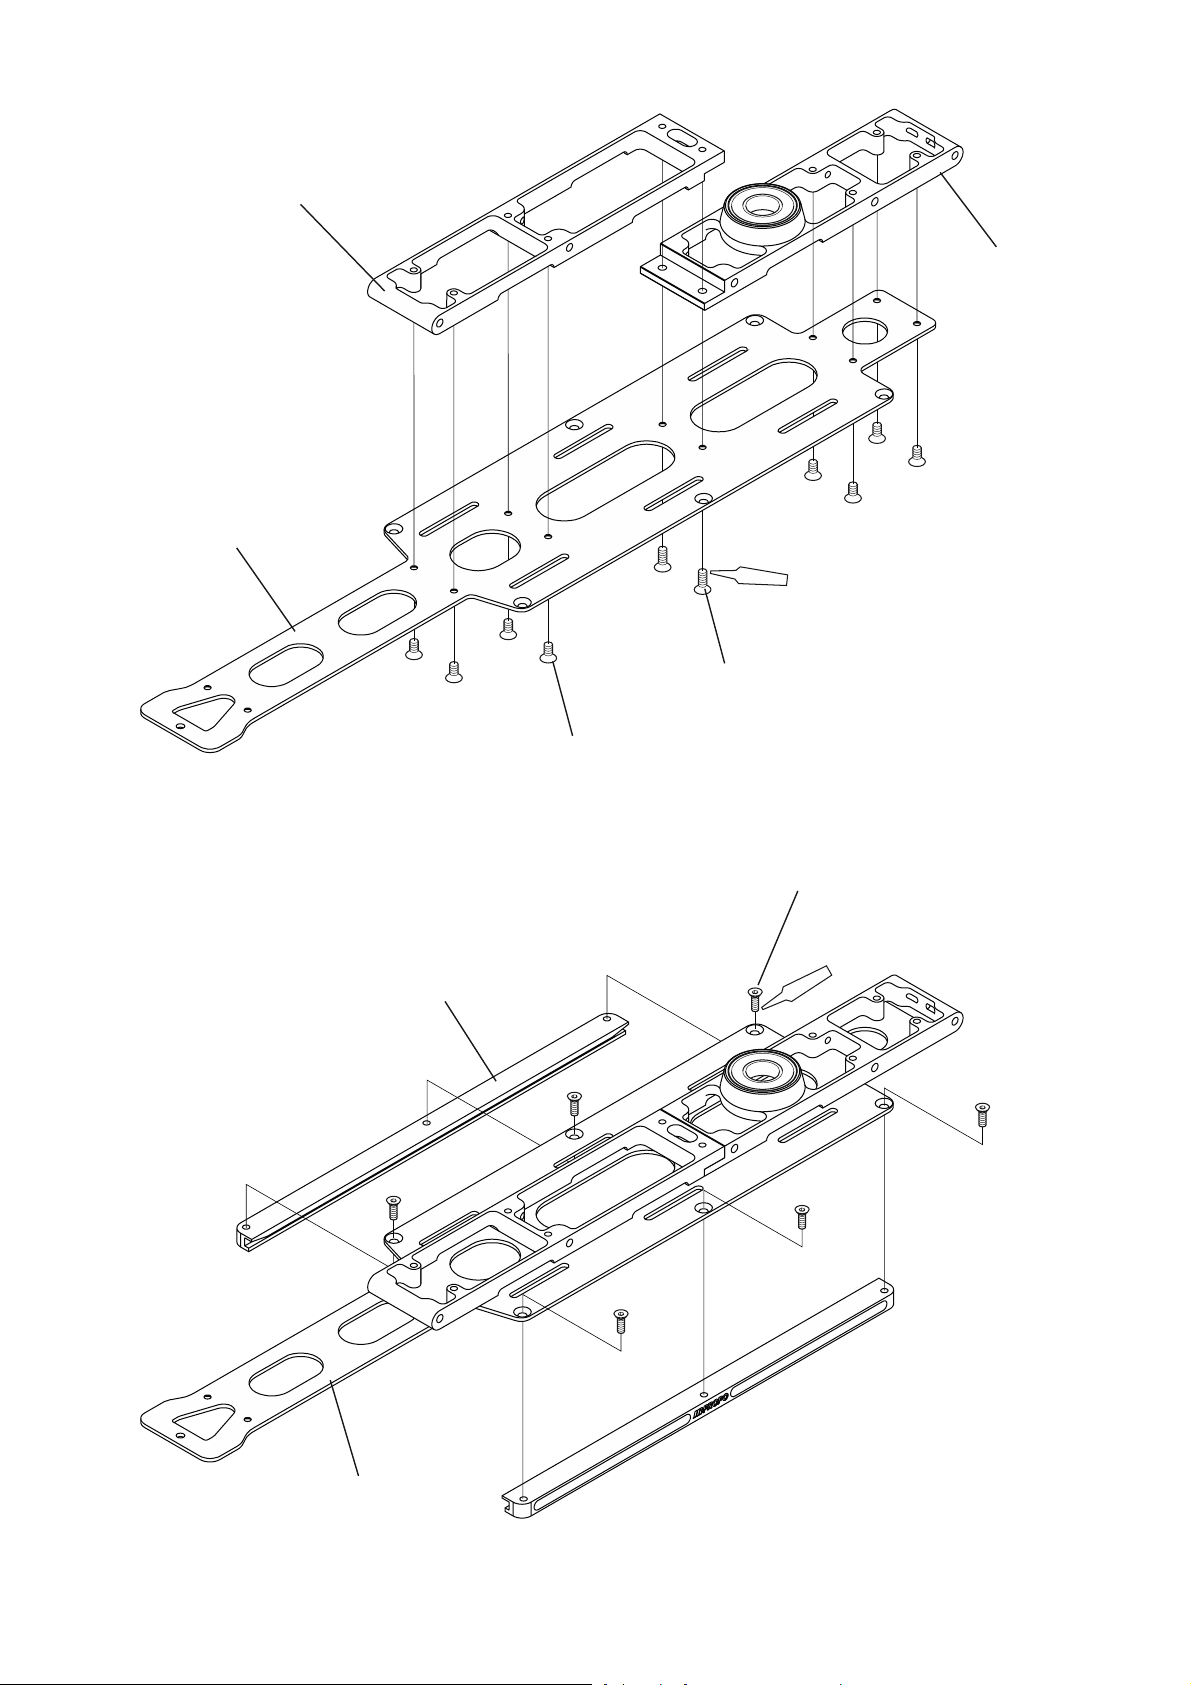
1-3 MIDDLECROSSMEMBERASSEMBLY
MiddlecrossmemberB
Carbonmiddleplate
MiddlecrossmemberA
Red (×10)
FlatheadboltM3 × 8( × 2)
FlatheadboltM3 × 6( × 8)
1-4 BATTERYMOUNTPLATERAILINSTALLATION
Batterymountplaterail( × 2)
FlatheadboltM2.5 × 6( × 6)
Red (6)
Previouslyassembled
P.9
Page 10
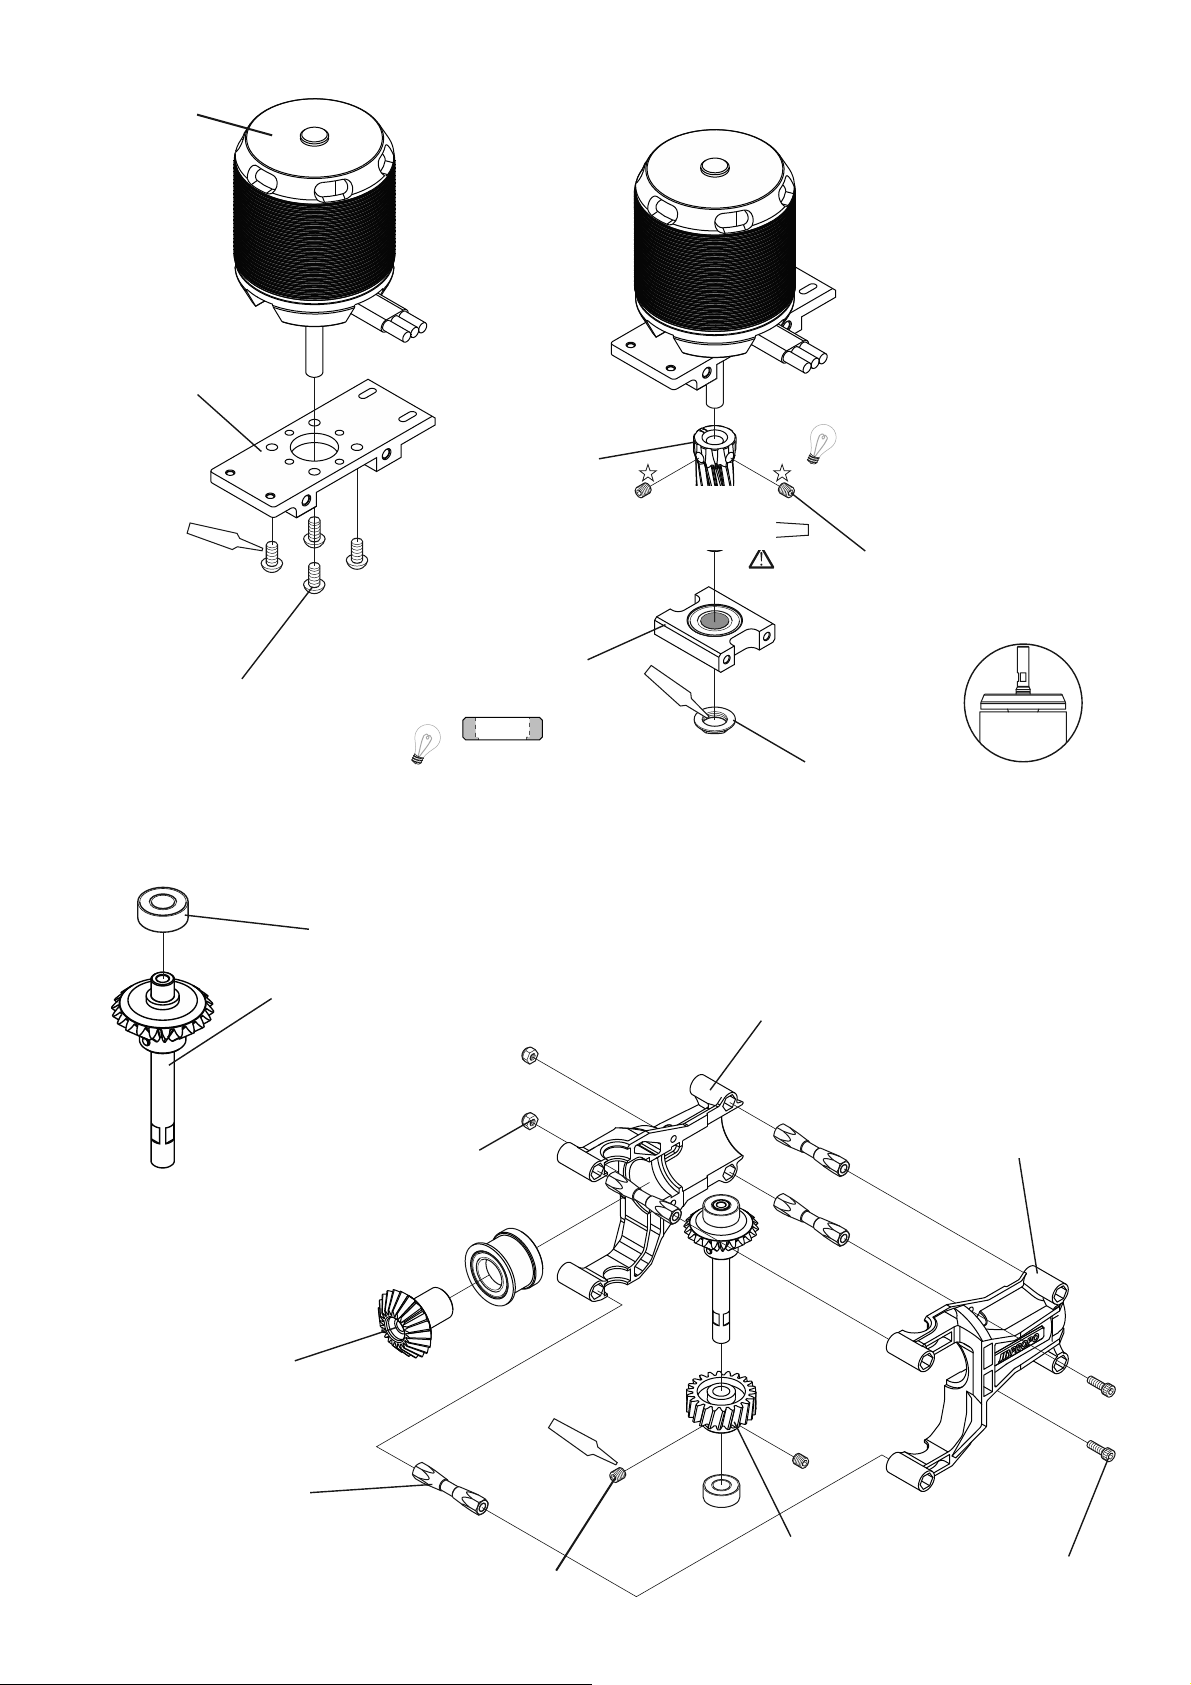
1-5 MOTOR MOUNT ASSEMBLY
Brushlessmotor
(soldseparately)
Motormount
Red(×4)
PiniongearT11
(standard)
※ PiniongearT12
(Optionalpart-soldseparately)
Red
DANGER
※ Temporarilytightenone
setscrewM4×4ontothe
D-cutonthemotorshaft.If
thereisnoD-cut,pleasefile
oneinanappropriateposition.
Nexttemporarilytightenthe
secondSetscrewM4×4.
Thesearebothtightenfirmly
whentheupperframeis
installed.
SetscrewM4×4(×2)
ButtonheadboltM4×8(×4)
Pinionbearingblockassembly
1-6 TAIL PINION UNIT ASSEMBLY
Shieldedbearing6×13×5(×2)
FrontbevelgearT22assembly
#62062
NylonlocknutM2.6
Top
※ Notetheproperorientation
(×2)
Red
PinionnutM9
TailpinionunitR
TailpinionunitL
BevelgearAT22
CrossmemberL32(×4)
P.10
SetscrewM
4×4(×2)
Red(×2)
TailpiniongearT22
SocketheadboltM2.6 × 8(×2)
Page 11
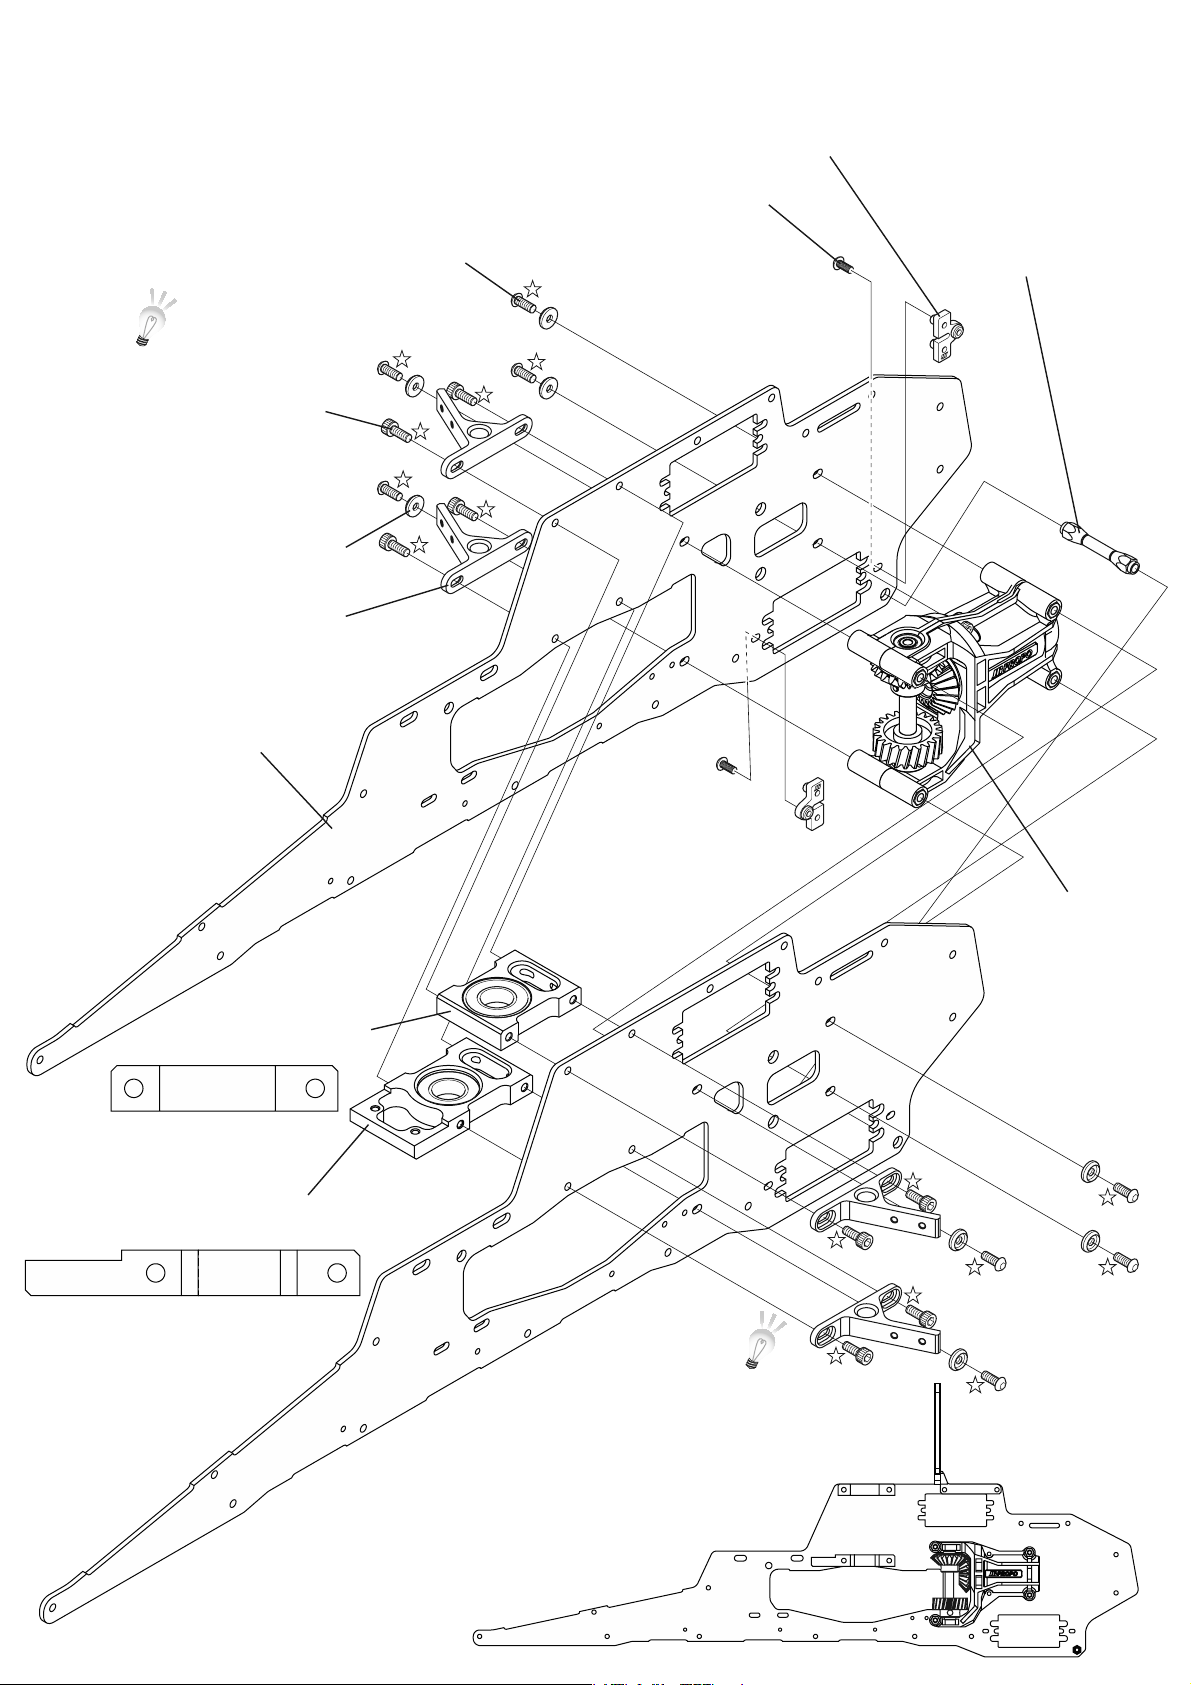
2-1 CARBONUPPERFRAMEASSEMBLY
ButtonheadboltM2.5 × 6( × 2)
Servomountplate( × 2)
ButtonheadboltM3 × 8( × 8)
※ TemporarytightentheseM3 × 8bolts
-tightenfirmlywhenthedrivegearis
installed.
SocketheadboltM3×8(×8)
SpecialwasherM3( × 8)
Servomount( × 4)
Carbonupperframe( × 2)
Crossmemberw/StepL32
TOP
TOP
Assembledinstep
1-6
Topbearingblock
assembly
Middlebearingblockassembly
※ Temporarytightenthese
M3 × 8bolts-tighten
firmlywhenthedrivegearis
installed.
P.11
Page 12
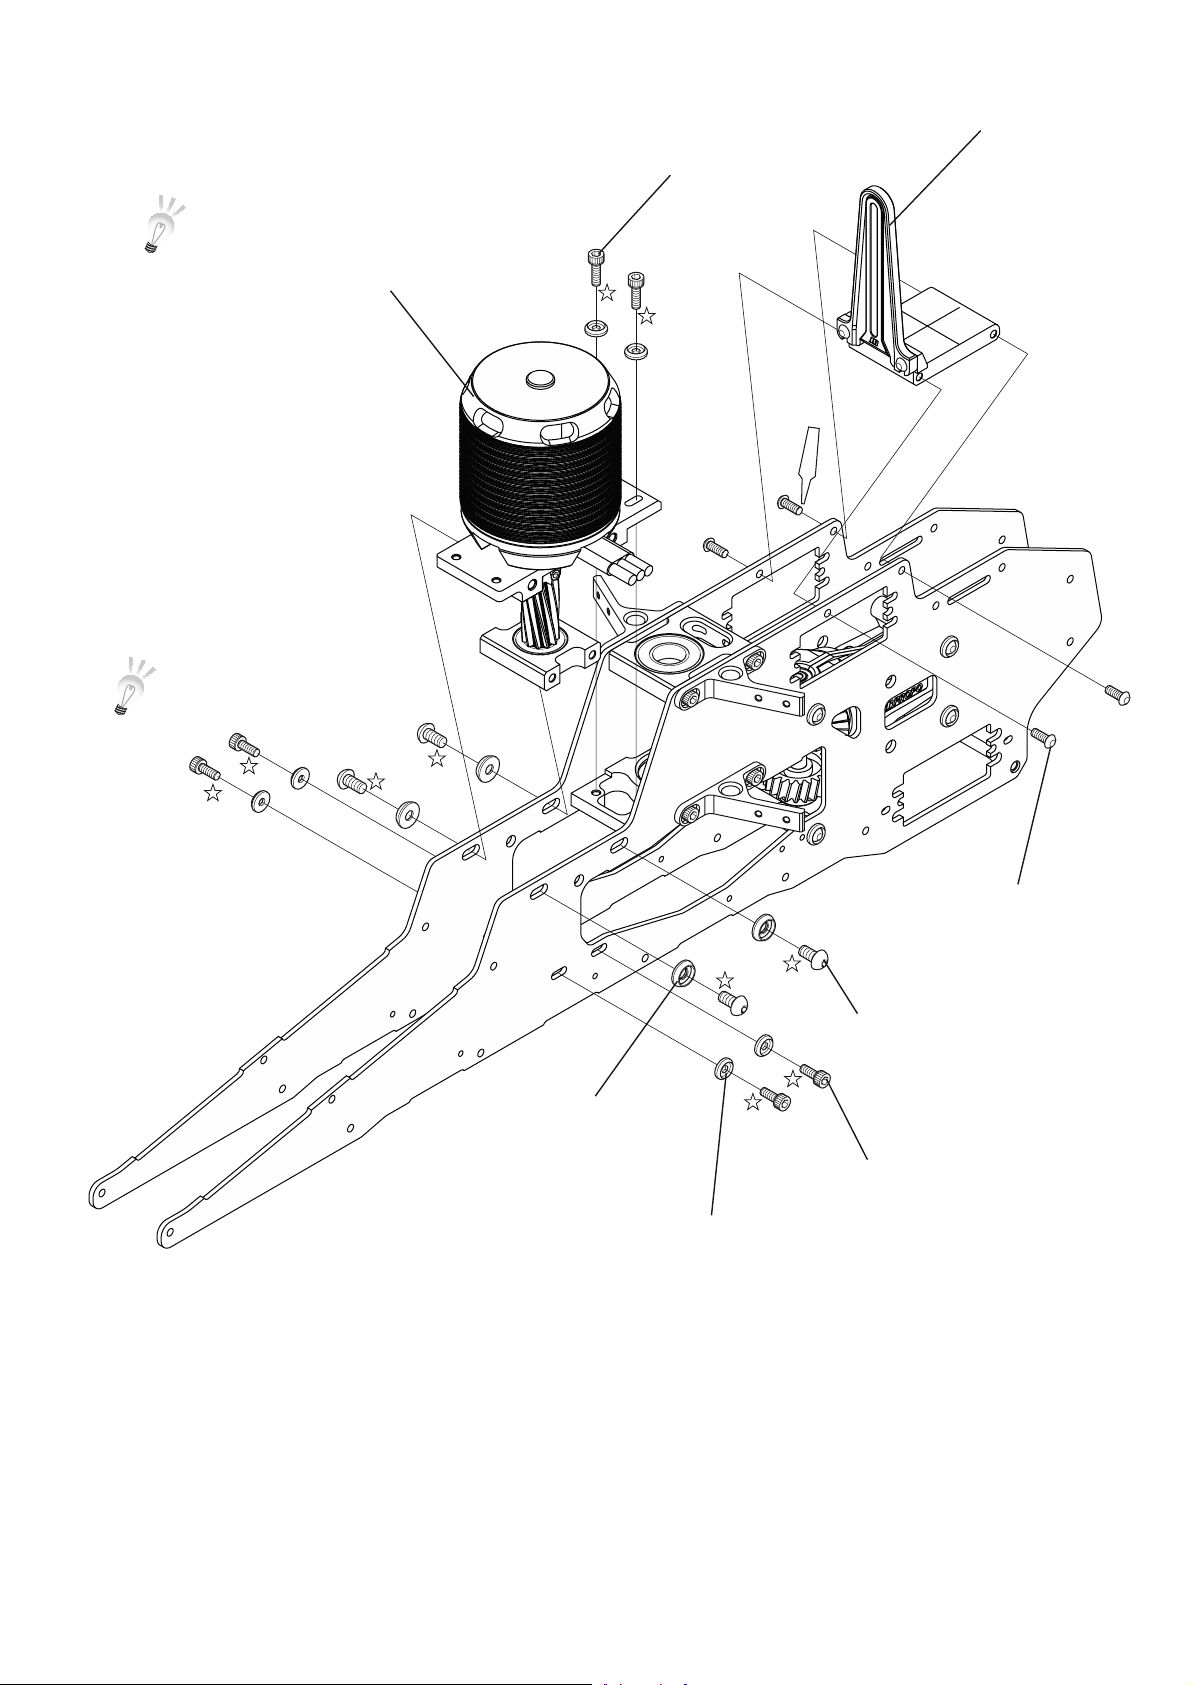
2-2 MOTORMOUNTINSTALLATION
Tightenthesetscrewswhichwere
previouslytemporarilytightened.
Assembledinstep1-5
Assembledinstep1-2
SocketheadboltM3 × 10( × 2)
Red (×4)
※ Temporarytightenthese
bolts-tightenfirmlywhen
thedrivegearisinstalled.
ButtonheadboltM3 × 8( × 4)
ButtonheadboltM4 × 8( × 4)
SpecialwasherM4( × 4)
SocketheadboltM3 × 8( × 4)
P.12
SpecialwasherM3( × 6)
Page 13
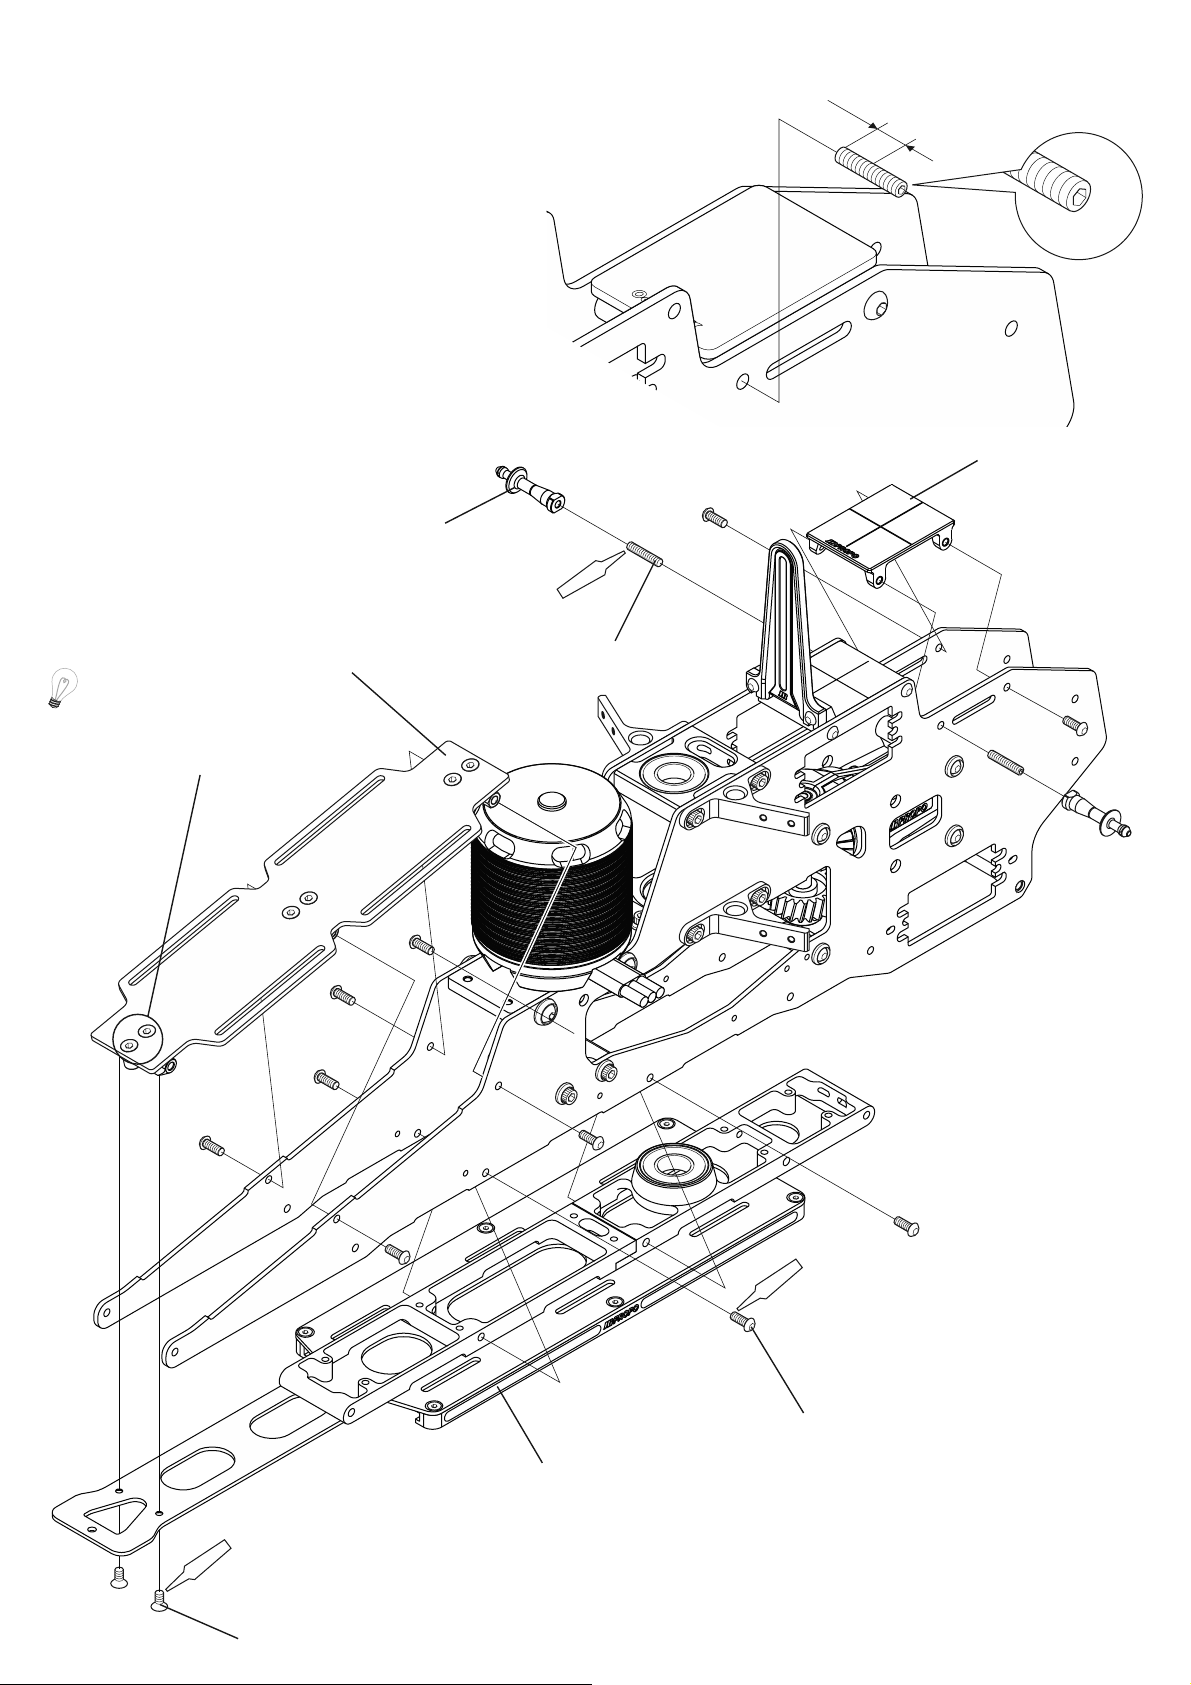
8mm
2-3 CARBON TRAY L AND MIDDLE CROSS MEMBER INSTALLATION
BodycatchL21(×2)
Red(×2)
Metalgyromount
#61802
Assembledinstep1-1
※ Tightentheflatheadboltswhich
werepreviouslytemporarilytightened.
SetscrewM3×15(×2)
Red (×2)
FlatheadboltM3×6(×2)
Red (×10)
ButtonheadboltM3×8(×10)
Assembledinstep1-4
P.13
Page 14
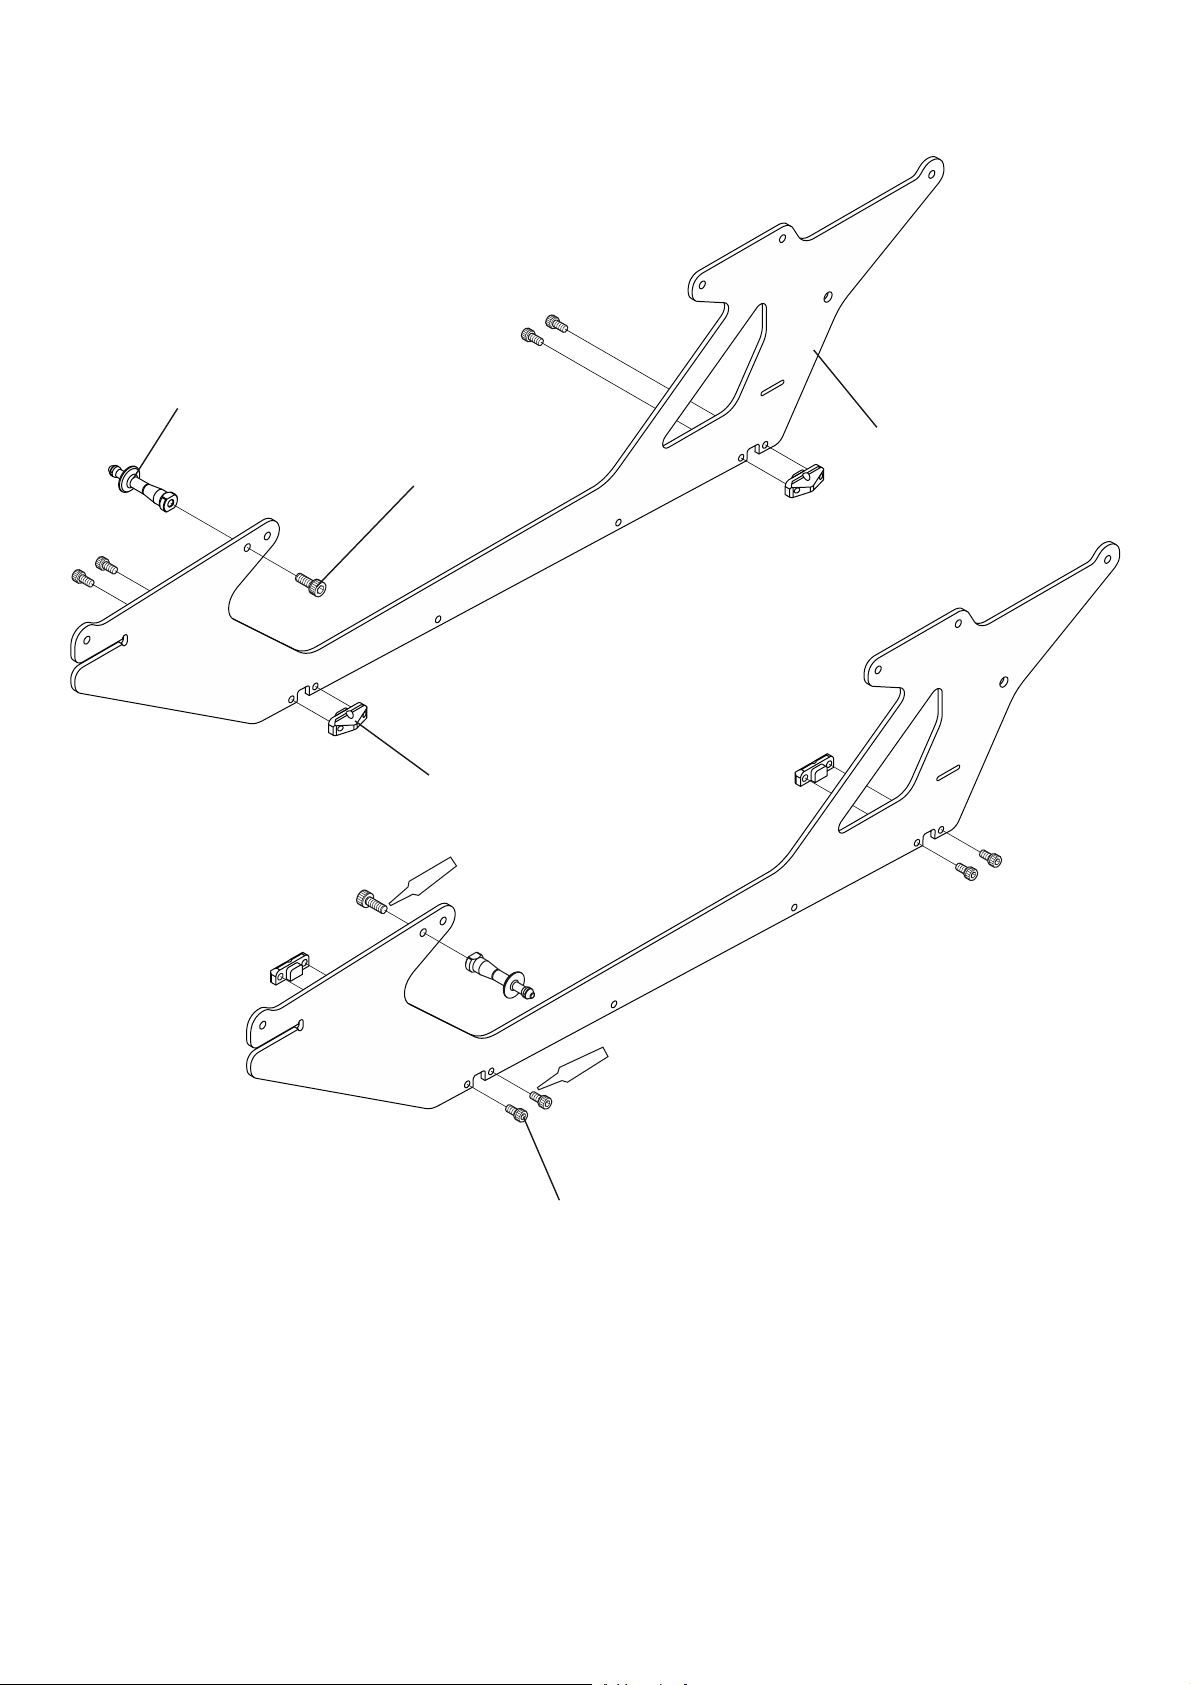
2-4 CARBONLOWERFRAMEASSEMBLY
BodycatchL21( × 2)
SocketheadboltM3 × 8( × 2)
Carbonlowerframe( × 2)
Landingstrutadapter( × 4)
Red (×2)
Red (×8)
SocketheadboltM2.6×5(×8)
P.14
Page 15
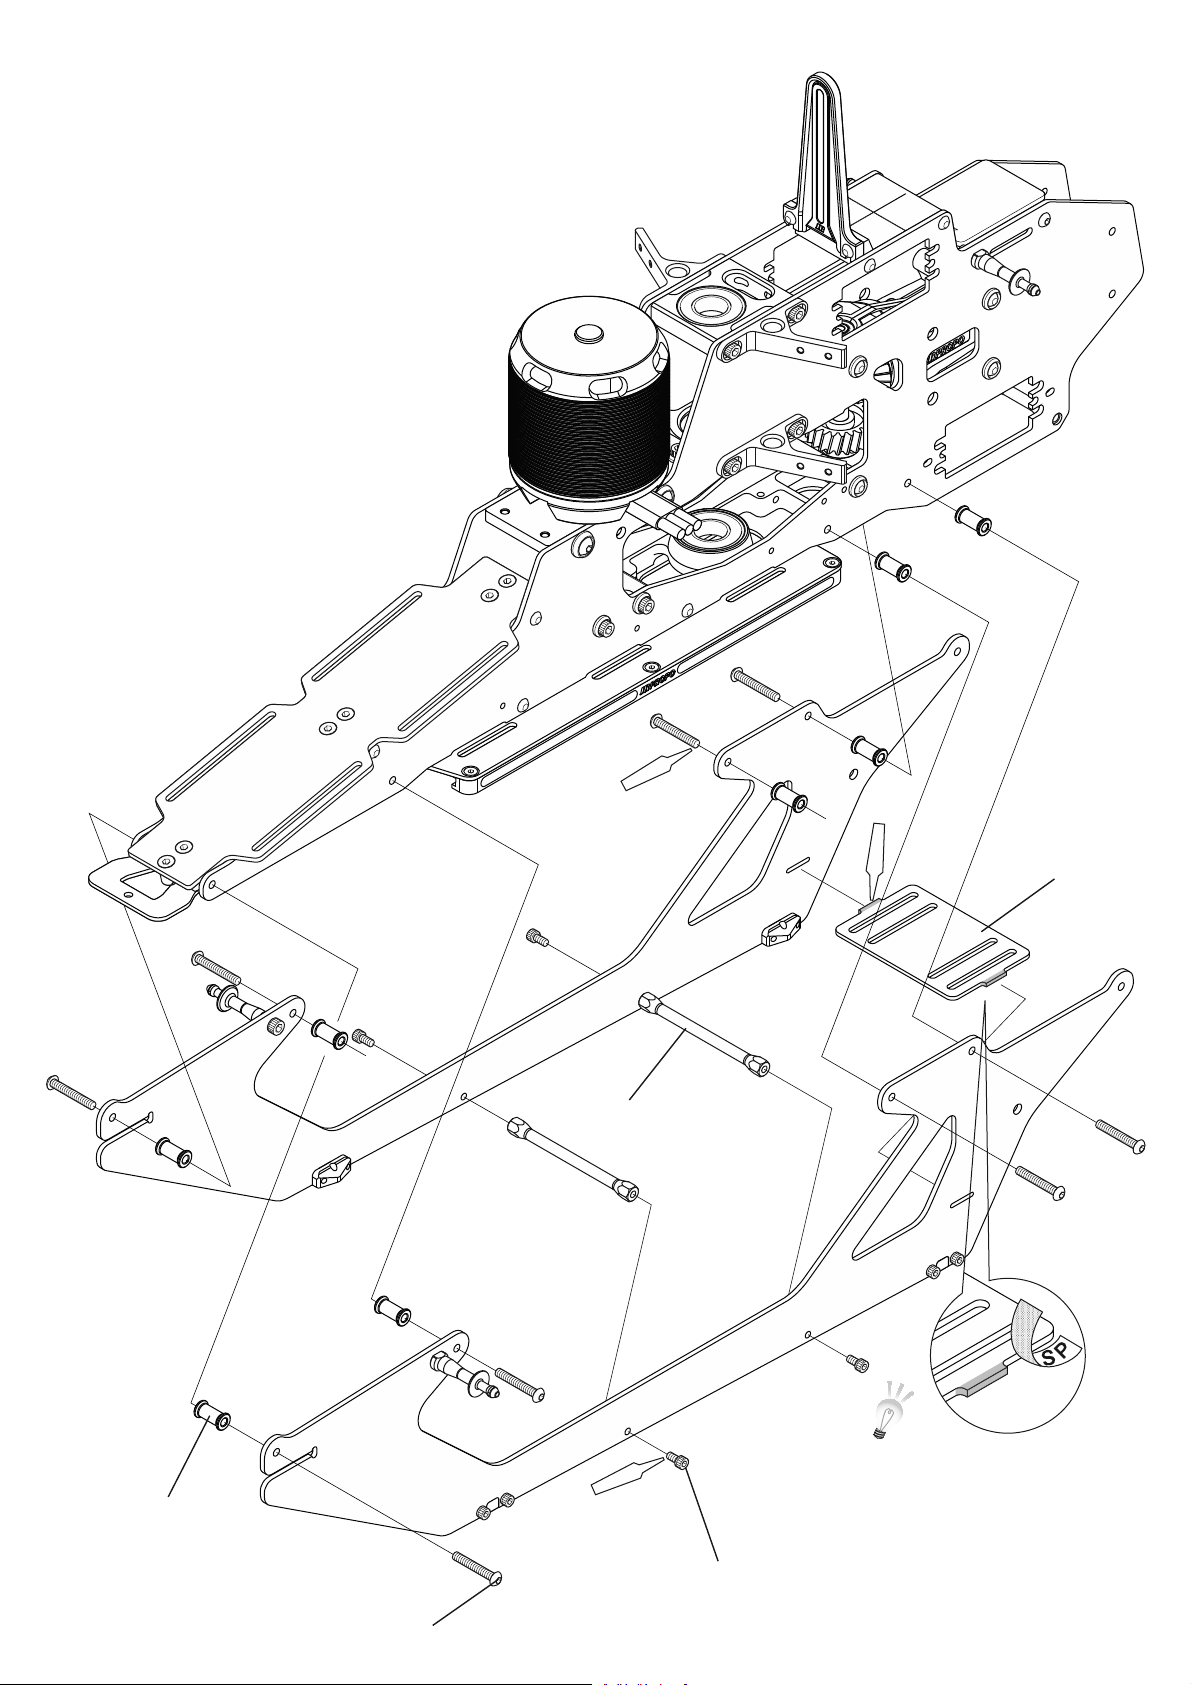
2-5 UPPERANDLOWERFRAMECO-ASSEMBLY
Red(×8)
CrossmemberL60M2.6( × 2)
CAG (×2)
CarbontrayS
SpacerL12( × 8)
ButtonheadboltM3 × 20( × 8)
※ Sandthesurfaceofthecarbontraywhere
Red(×4)
itisinsertedintotheslotofthelower
frameandusesomeCAgluetosecureit.
SocketheadboltM2.6 × 5( × 4)
P.15
Page 16
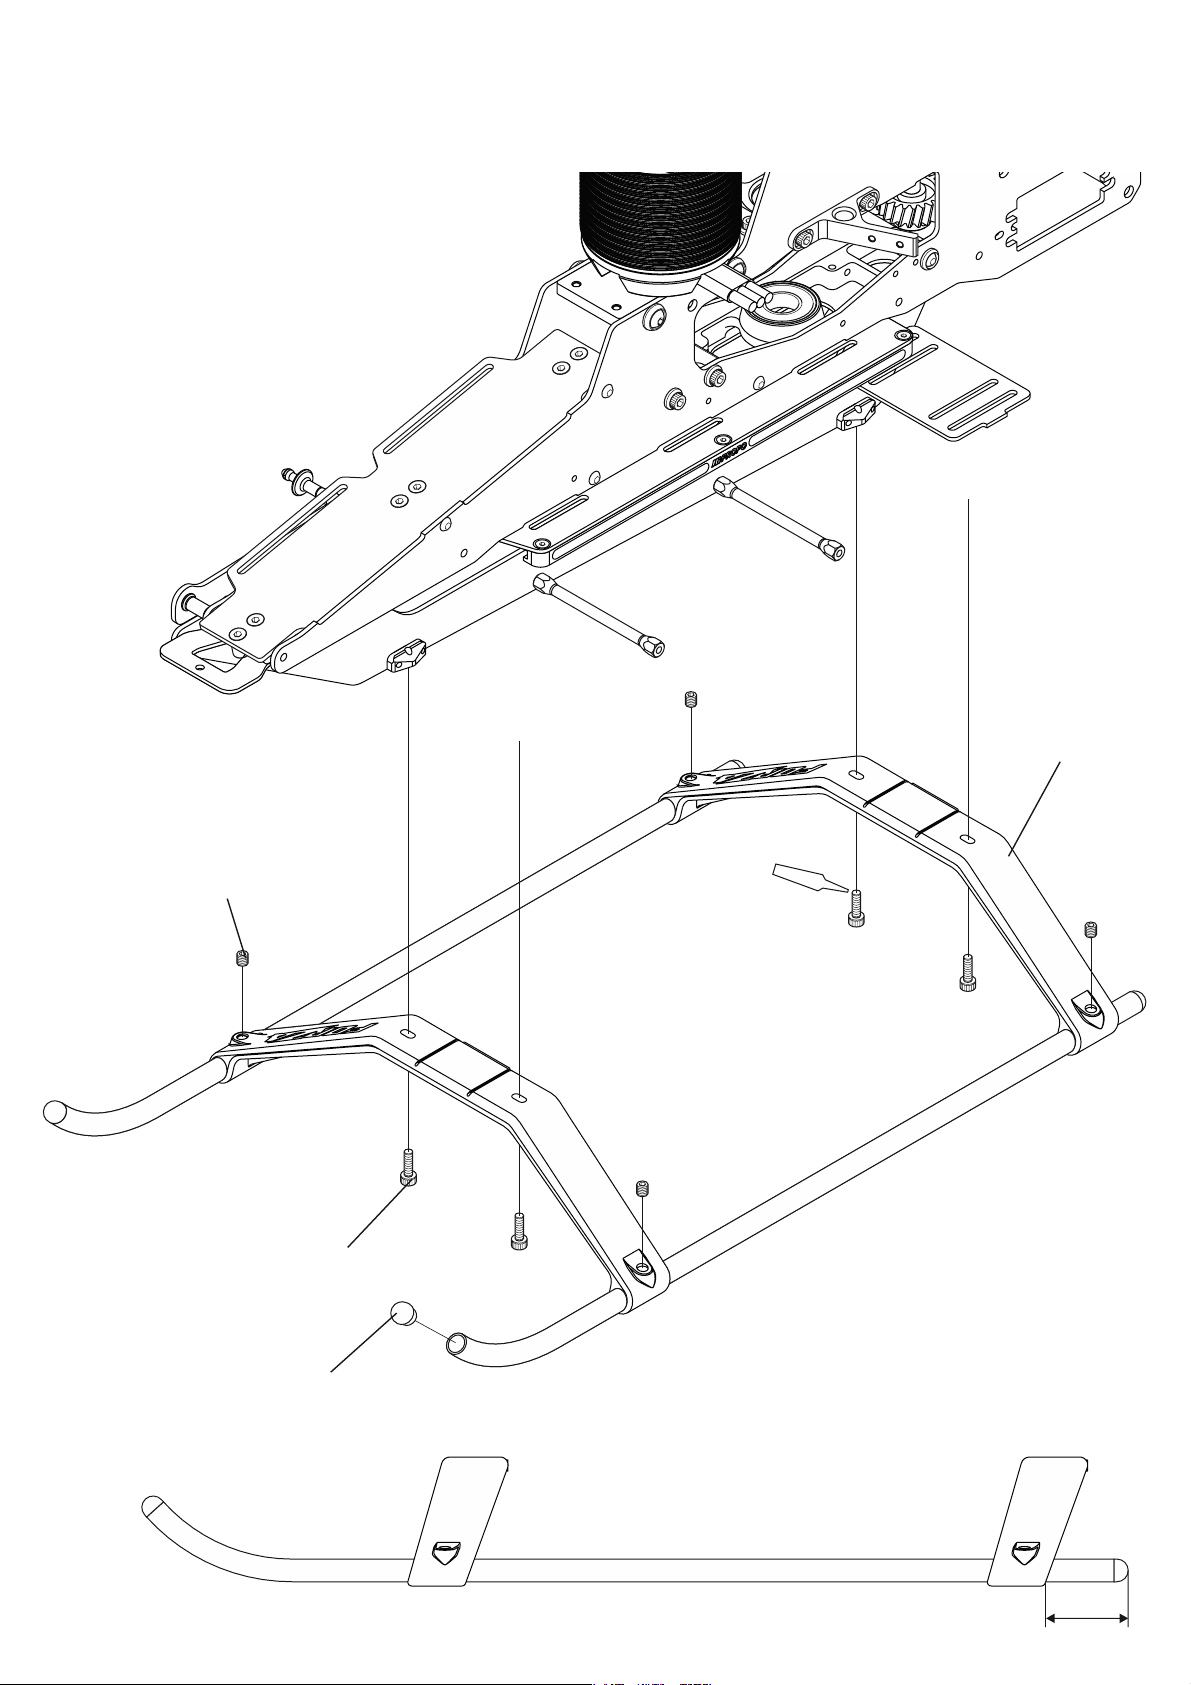
2-6 LANDINGGEARINSTALLATION
SetscrewM4×4(×4)
SocketheadboltM3×10(×2)
Landingstrut(×2)
Red(×4)
Landingskidcap(×4)
P.16
25mm
Page 17
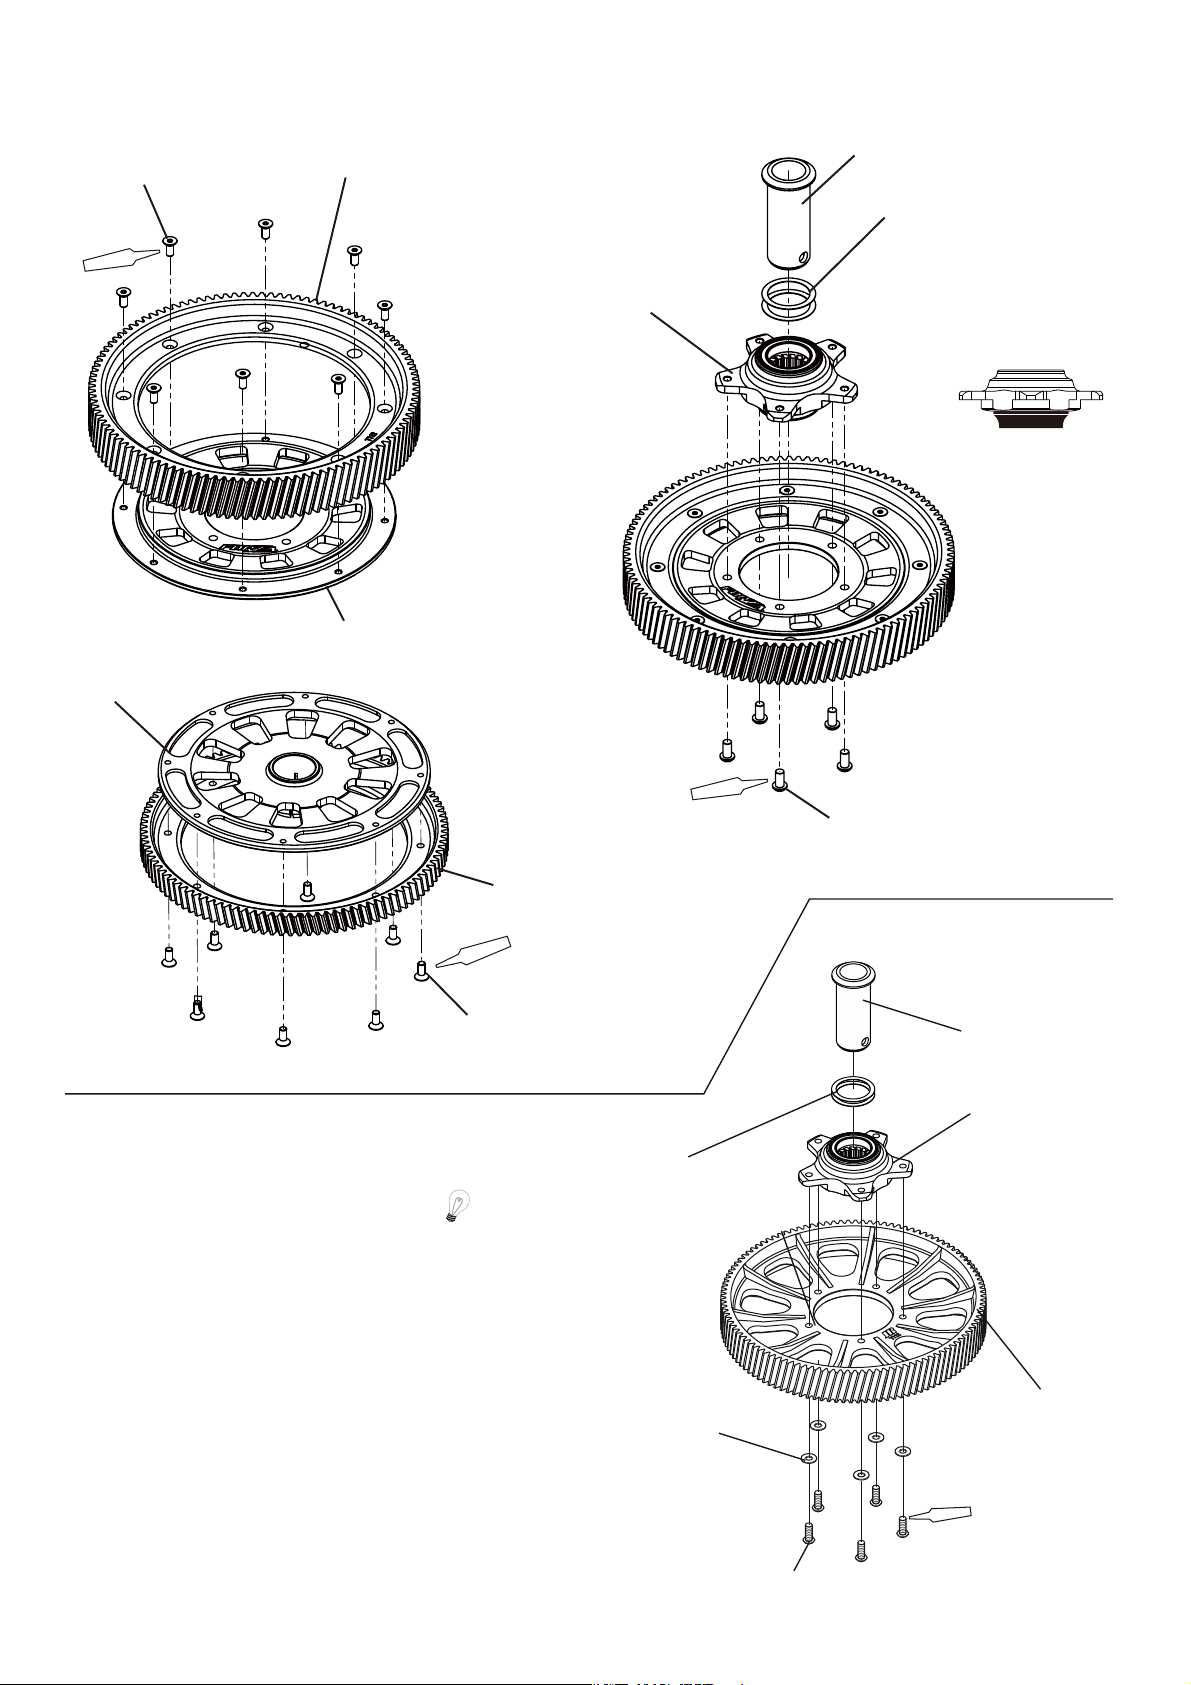
3-1 MAINDRIVEGEARASSEMBLY
Red
Red
Red
Red
Red
Red
(X4)
(X5)
Brg グリス
GreaseUp
Red
Red
Red
Red
Red
Red
Red
Red
Red
Red
Red
(X1)
(X2)
(X3)
(X4)
(X5)
(X6)
(X7)
(X8)
(X9)
Brg グリス
GreaseUp
Red
Red
Red
Red
Red
Red
Red
Red
Red
Red
Referringtothefigure,assembletheHGmaindrivegearandthe
HGtaildrivegear.
Flatheadbolt
M2.5x6(x8)
(X8)
HGtailgearhub
#62074
HGmaindrivegearT112
#62070
HGmaingearhub
#62071
Autorotationunit
eveelsnoitatorotuA
Shimwasher
15x19x0.2(x2)
*Usetheseshimwashers
toeliminateanyplay
betweentheupperand
lowerdrivegearsafterthe
mainshaftisinstalled.
*Notetheproperorientation
Assemblymethodformaingear#61985
HGtaildrivegearT104
#62073
FlatheadboltM2.5x6(x8)
Shimwasher15 × 19 × 0.2( × 2)
※ Use1or2oftheseshim
washerstoeliminateanyplay
betweentheupperandlower
drivegears(afterthemain
shaftisinstalled).
FlatwasherM3(×5)
ButtonheadboltM3x6(x5)
Autrotationsleeve
Autrotationunit
MaindrivegearT112
Red (×5)
ButtonheadboltM3×8(×5)
P.17
Page 18
Red
Red
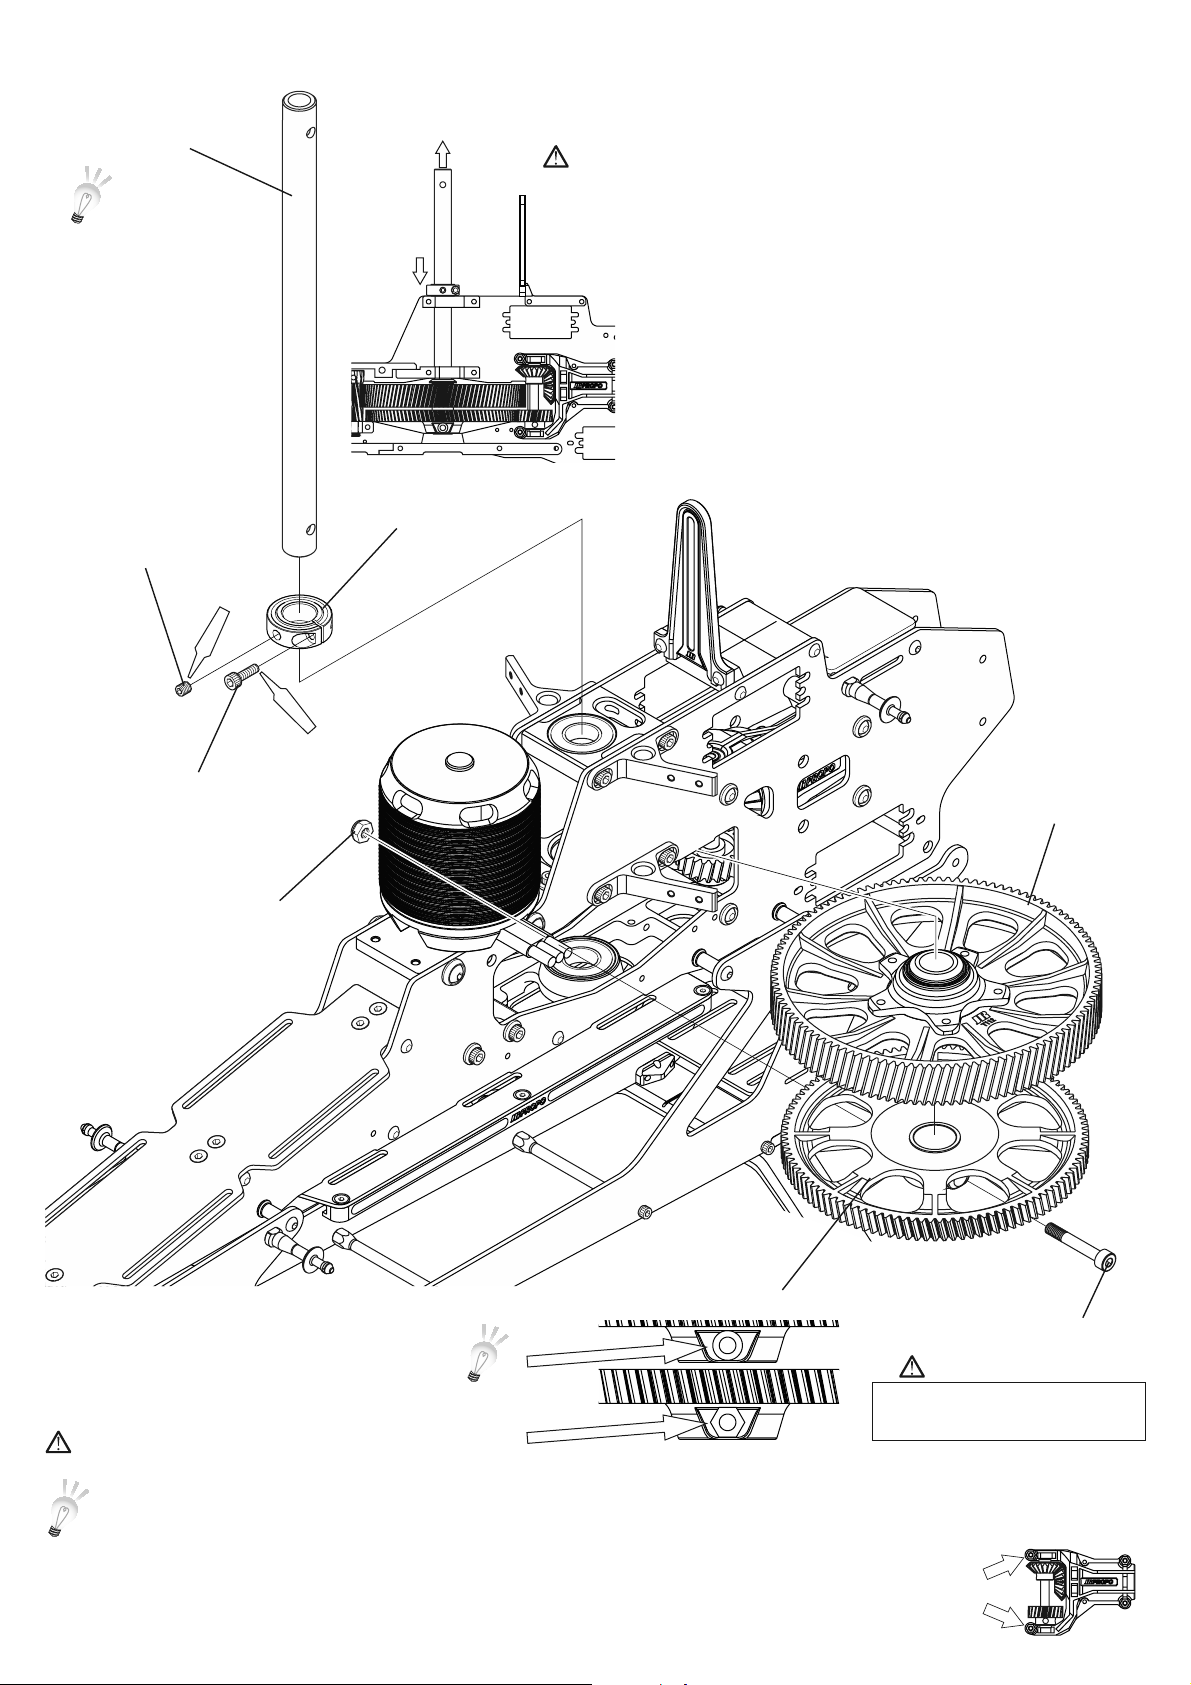
3-2 MAINDRIVEGEAR,TAILDRIVEGEAR,MAINSHAFTCOLLARINSTALLATION
Mainshaft
※ Themainshaftcan
beinsertedaround
eitherway.
SetscrewM4 × 4
WARNING
※ Pullthemainshaftupandpushdownonthemainshaftcollar.
Makesurethemainshaftissecuredwithnoup-downmovement.
Mainshaftcollar
SocketheadboltM3 × 10
NylonlocknutM4(t3.8)
TaildrivegearT104
SpecialsocketheadboltM4 × 26
Previously
assembledparts
DANGER
※ Noteinstallationdirection
NOTE
※ Oncethemaingearisinstalled,adjustthemaingearbacklash.Use2layersofplasticpartsbagasanadjustmentguide.
Afterthebacklashadjustmentiscomplete,tightenfirmlythefront4boltsofthetailpinionunitwhichweretemporarily
tightenedinstep2-1,andthemotormountwhichwastemporarilytightenedinstep2-2.
※Replacethisboltfrequently
duringmaintenance.
P.18
※ Tightenfirmlyonlythefrontbolts.
Page 19
Red (×8)
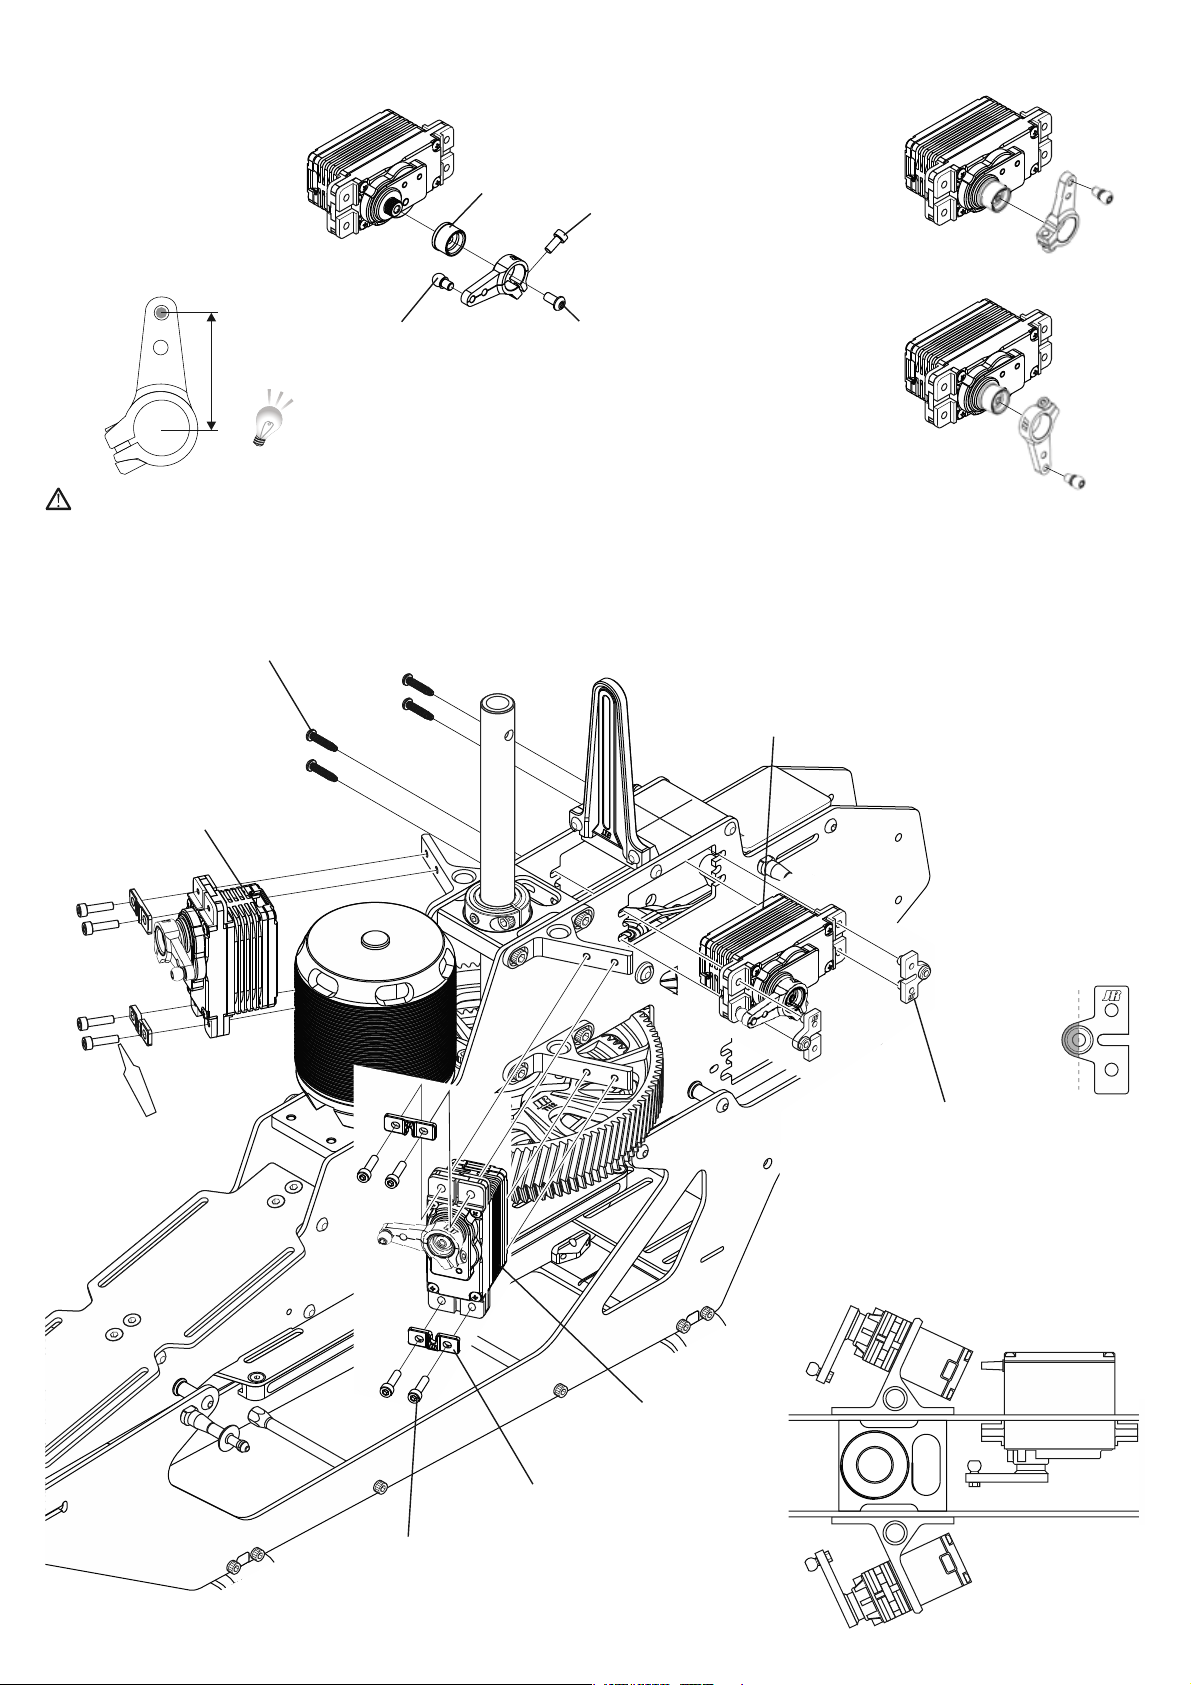
4-1 SWASHSERVOINSTALLATION
<SwashservoA>
AdjustablemetalhornD
(InnerLess)#61991B
Adjustablehorn
innerV2#70721
(x3)
Socketheadbolt
M2.6x6(x3)
<SwashservoB>
<SwashservoC>
WARNING
HEXTappingscrewM2.6 × 12( × 4)
SwashservoB
ControlballL2.5
(x3)
Buttonheadbolt
M3x06
20mm
※ NotetheproperdirectionoftheJointball
screwforAservo.
※ Usetherubberisolatorssuppliedwiththeservo.
Whentighteningthebolts,therubbergrommetsshouldbeslightlycompressed.
Donotusethemetalgrommetinserts.
SwashservoA
Servomountplate( × 2)
※ Iftheseservomountplatesare
difficulttoinstallbecausetheytouch
theframe,trimasshowninthefigure
above.
Servolayout
SwashservoC
Servoholdingplate( × 4)
SocketheadboltM2.6× 10( × 8)
P.19
Page 20
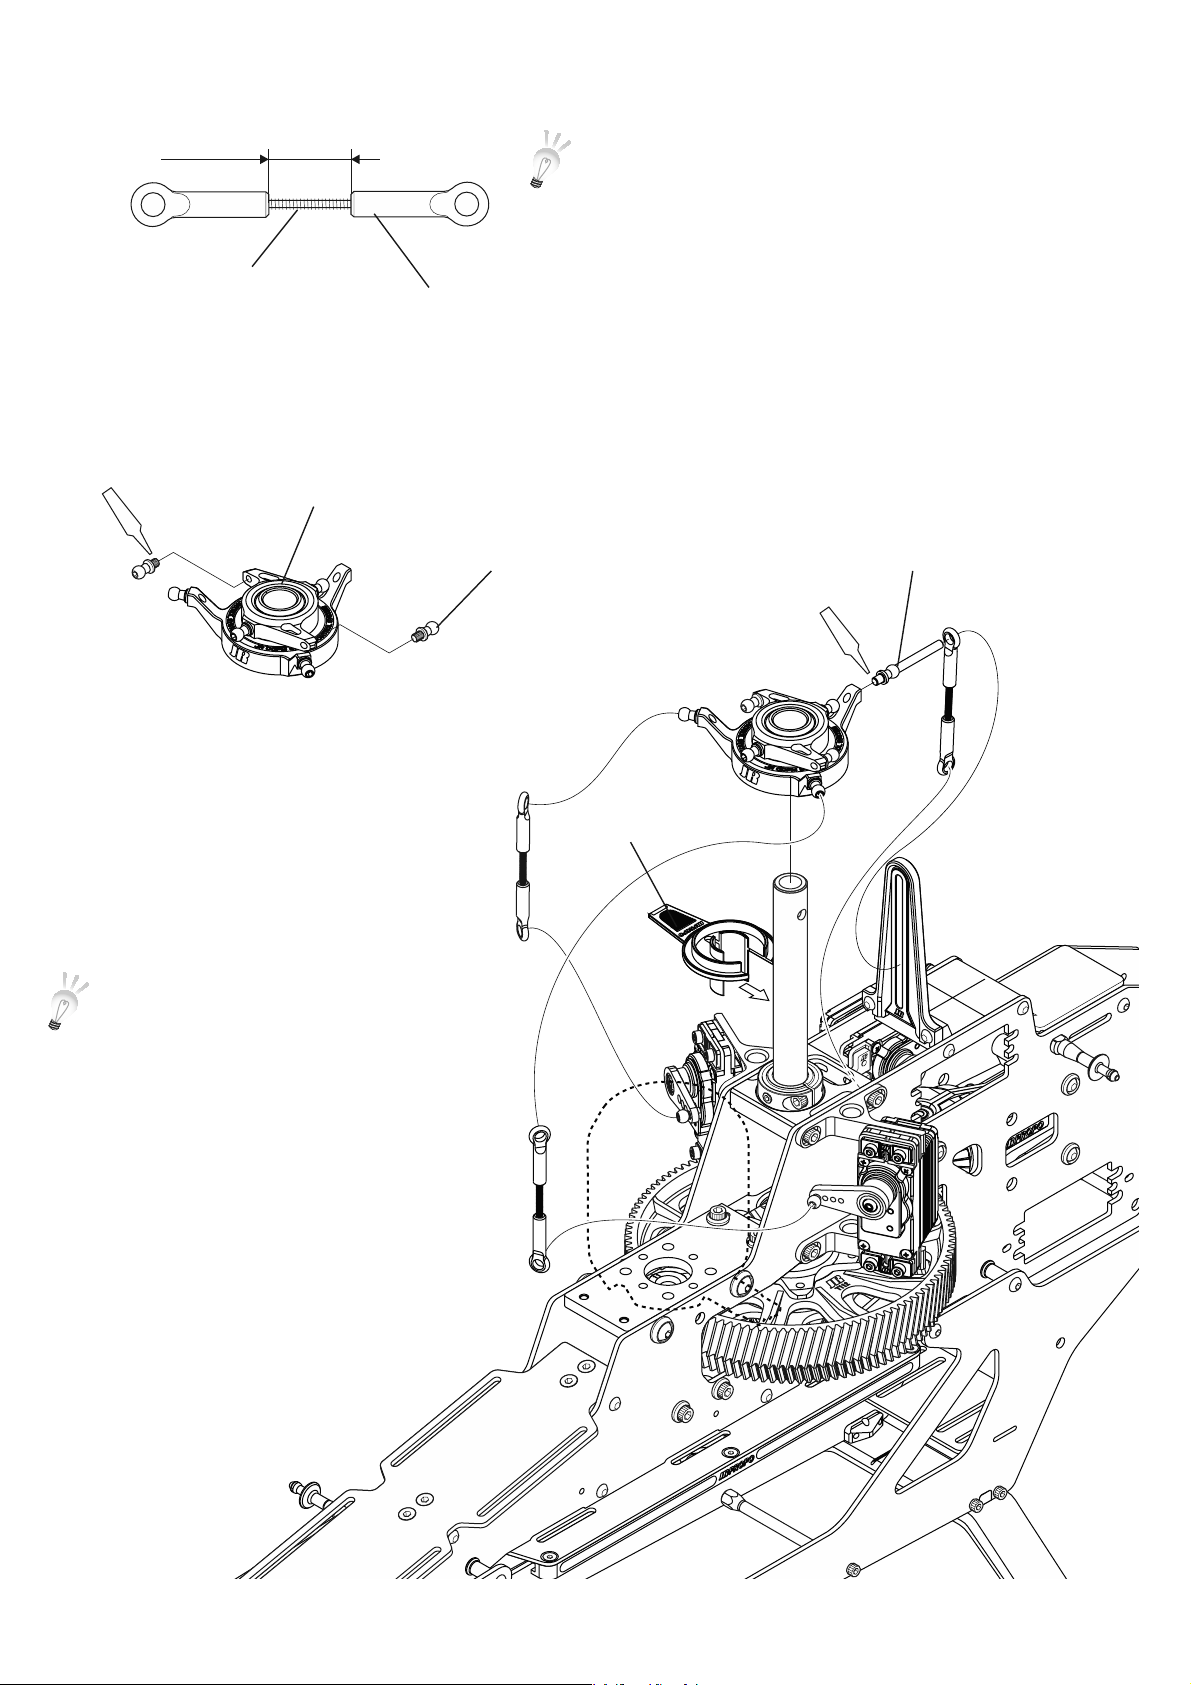
4-2 SWASHPLATEINSTALLATION
14〜15mm
ThreadedrodM2.3 × 30( × 3)
Red(×6)
Swashplateassembly
JRPROPO
Universallink( × 6)
ControlballL5.5( × 6)
※ Inserttheswashlevelerandadjustthe3linkagessothe
servohornbecomehorizontal.
Jointballshaft
Red
※ Oncethelinkagerodsareinstalled,adjust
theservospositionandtightentheservo
mountswhichwerepreviouslytemporarily
tightenedinstep2-1
Swashgauge
P.20
Page 21
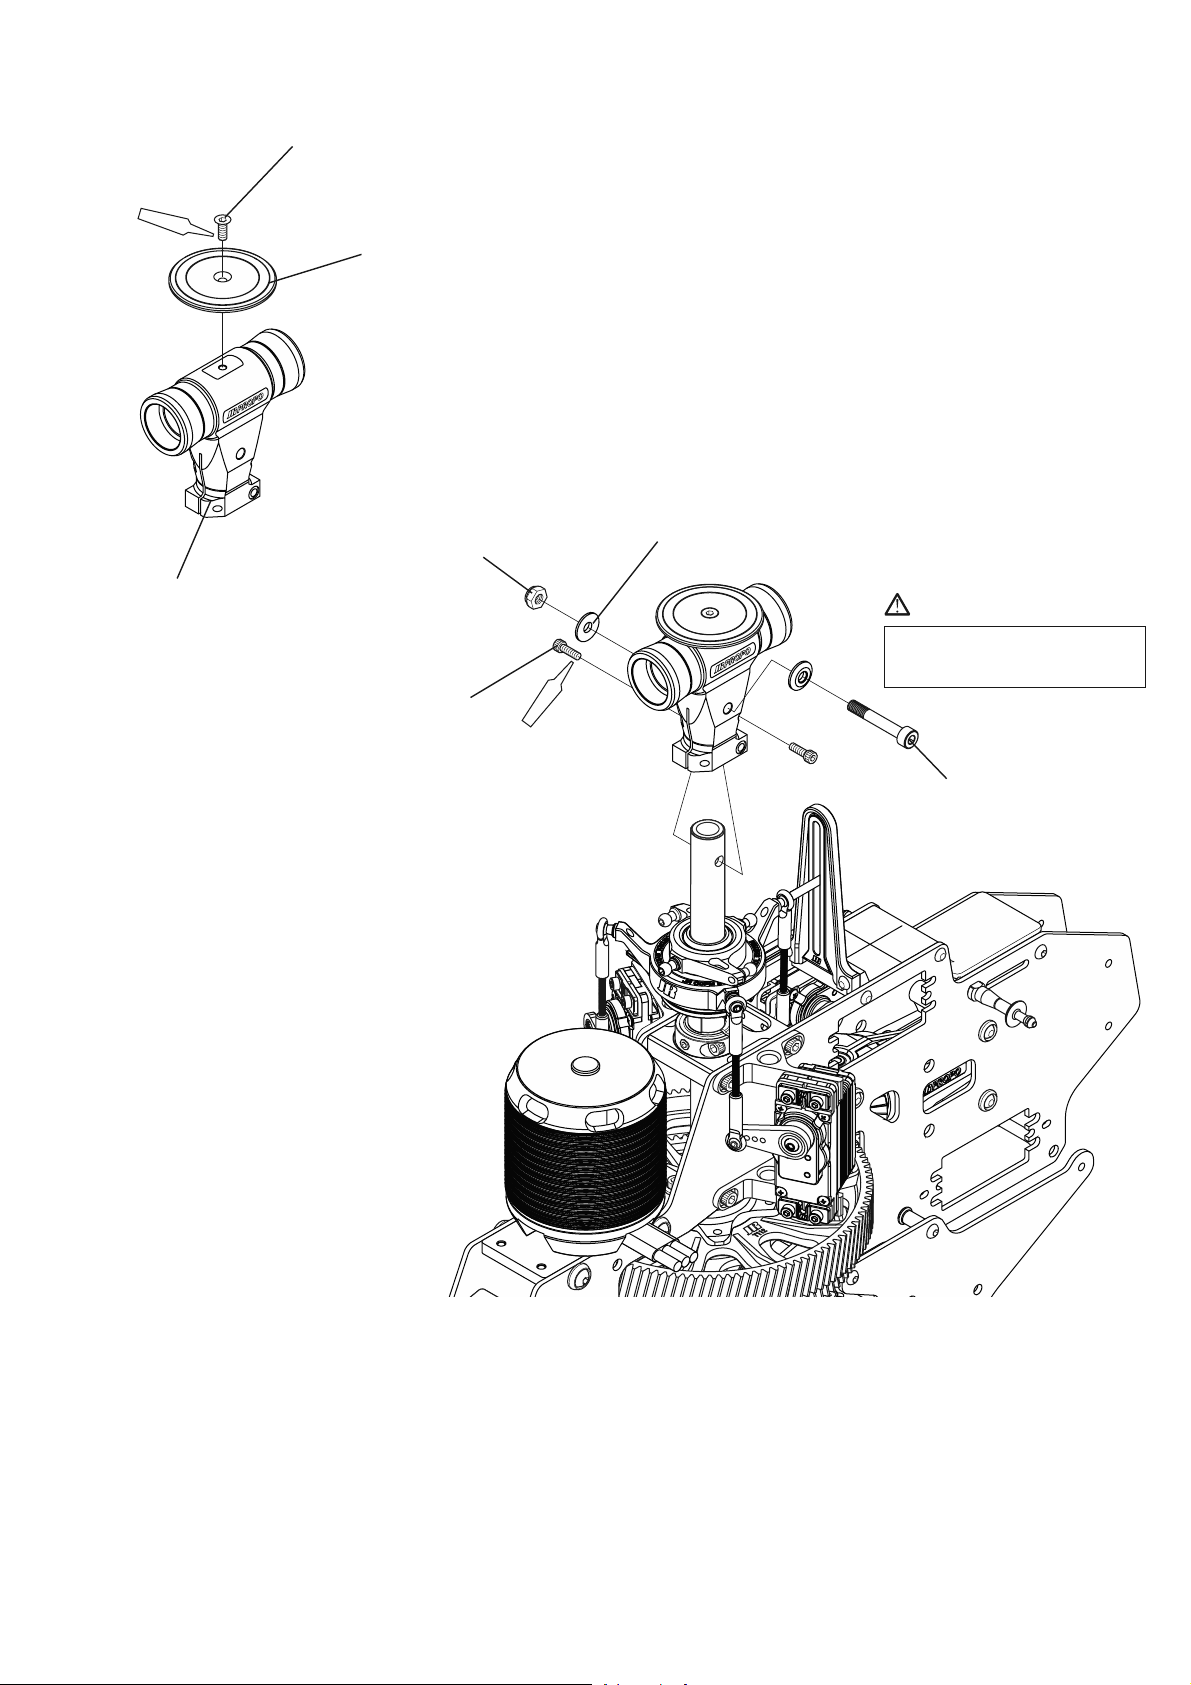
4-3 CENTERHUBINSTALLATION
FlatheadboltM3 × 8
Red
Headbutton
NylonlocknutM4(t3.8)
Centerhub
SocketheadboltM2.6 × 8( × 2)
Washer4 × 11 × 1.7( × 2)
DANGER
※ Replacetheboltswhen
performingmaintenance.
Red(×2)
SpecialsocketheadboltM4 × 26
P.21
Page 22
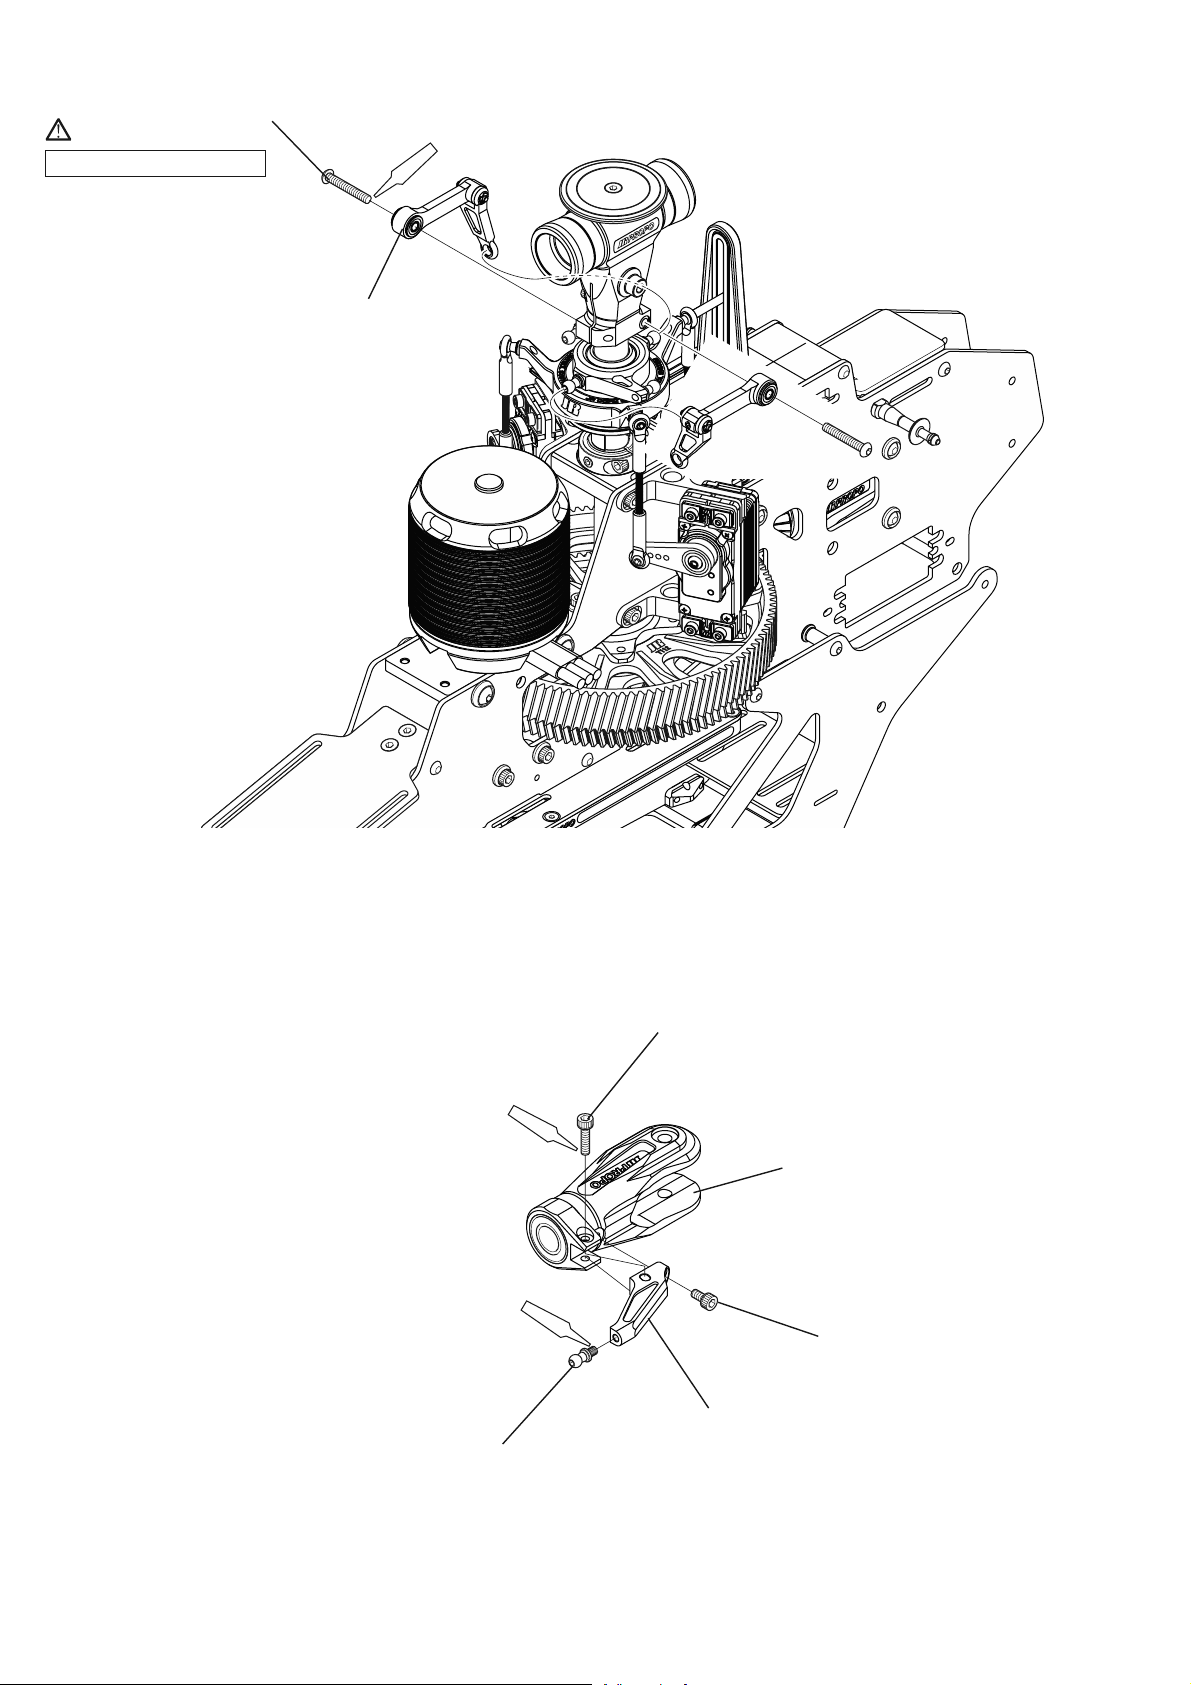
4-4 FBLWASHOUTARMASSEMBLYINSTALLATION
ButtonheadboltM3 × 20( × 2)
DANGER
※ Donotovertighten.
FBLWashoutarmassembly( × 2)
Red (×2)
4-5 MAINBLADEHOLDERASSEMBLY
※ Maketwosets.
SocketheadboltM3×12(×2)
Red(×4)
Mainbladeholderassembly( × 2)
Red(×2)
SocketheadboltM3 × 6( × 2)
Pitcharm( × 2)
P.22
ControlballL5.5( × 2)
Page 23
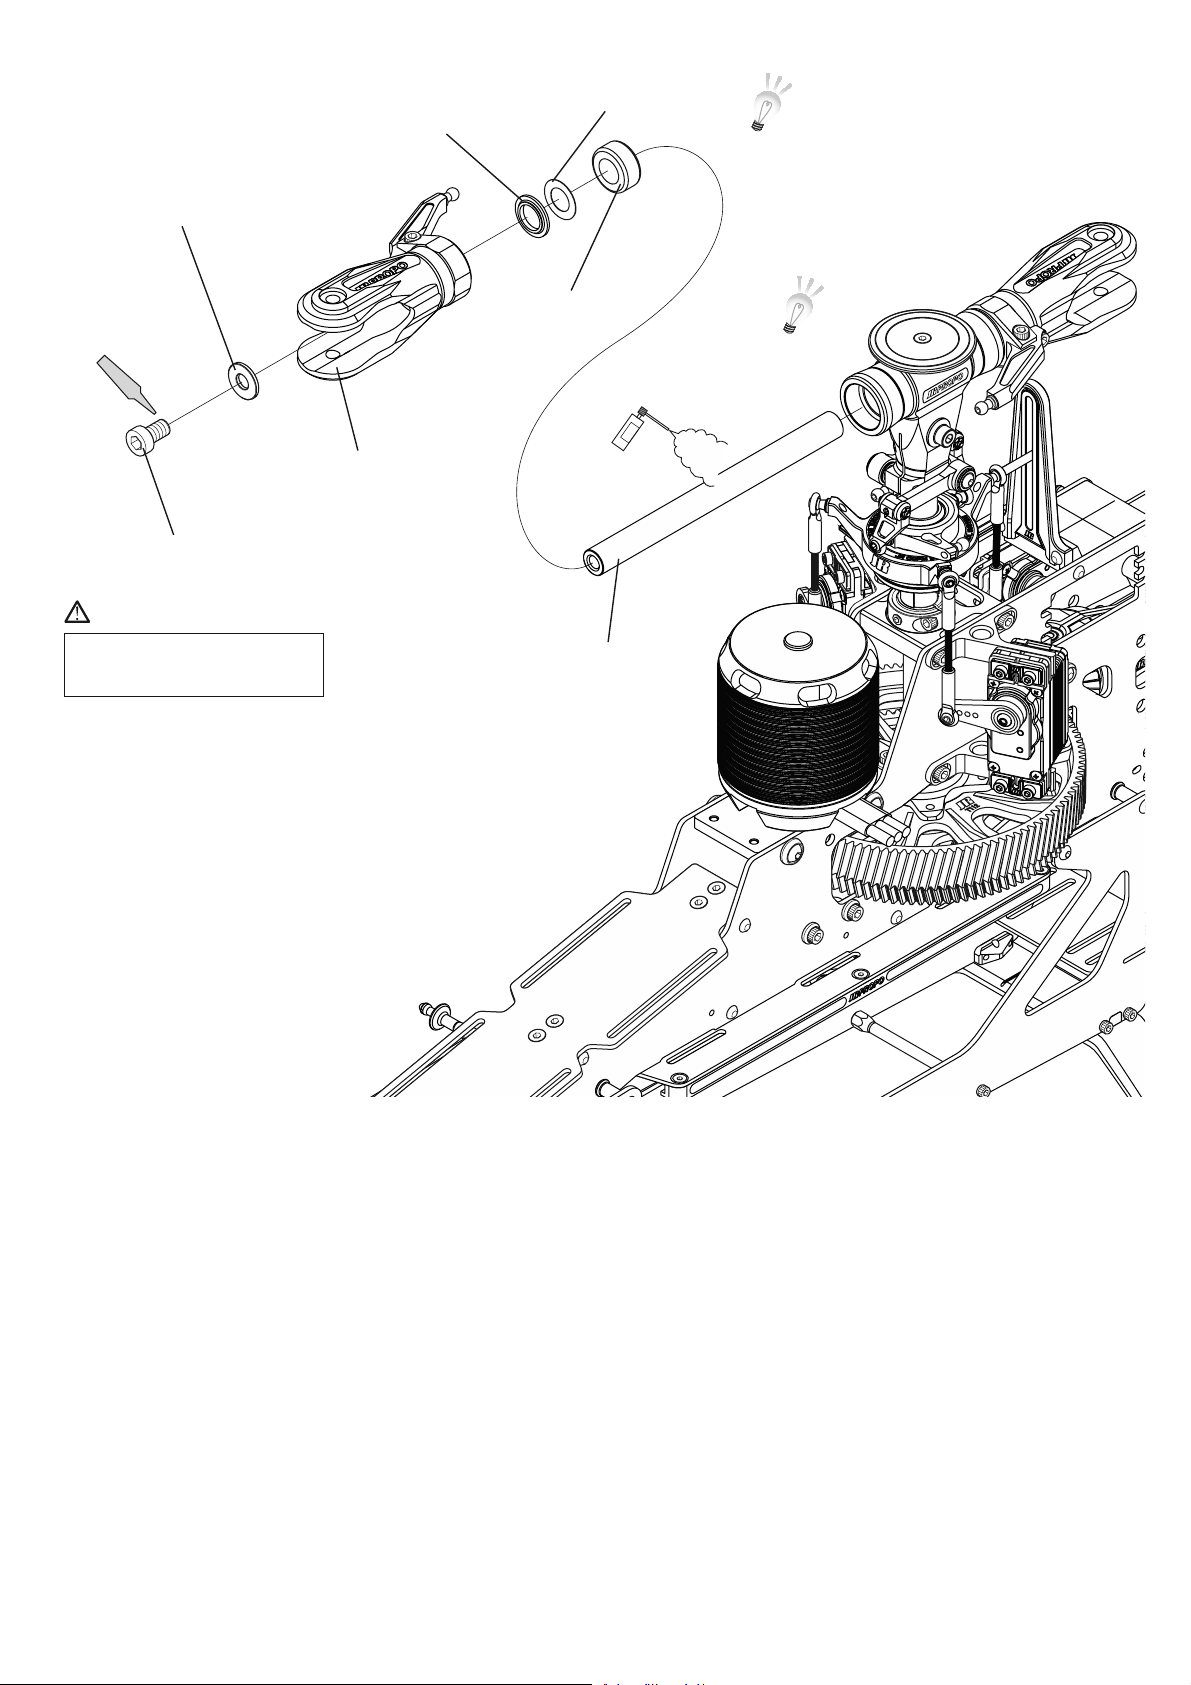
4-6 MAINBLADEHOLDERINSTALLATION
Gripspacer( × 2)
SpindlewasherM6( × 2)
Damperrubber90 ゜
( × 2)
Green(×2)
Previouslyassembled
SocketheadboltM6 × 10
(Lowprofile)( × 2)
DANGER
Shimwasher( × 2)
Applyasmall
amountofoil.
オイル
OIL
※ Theshimwashersareusedto
adjustabacklashwhenthemail
bladeholderisinstalled.
※ Replacetheboltswhen
performingmaintenance.
Spindleshaft
P.23
Page 24
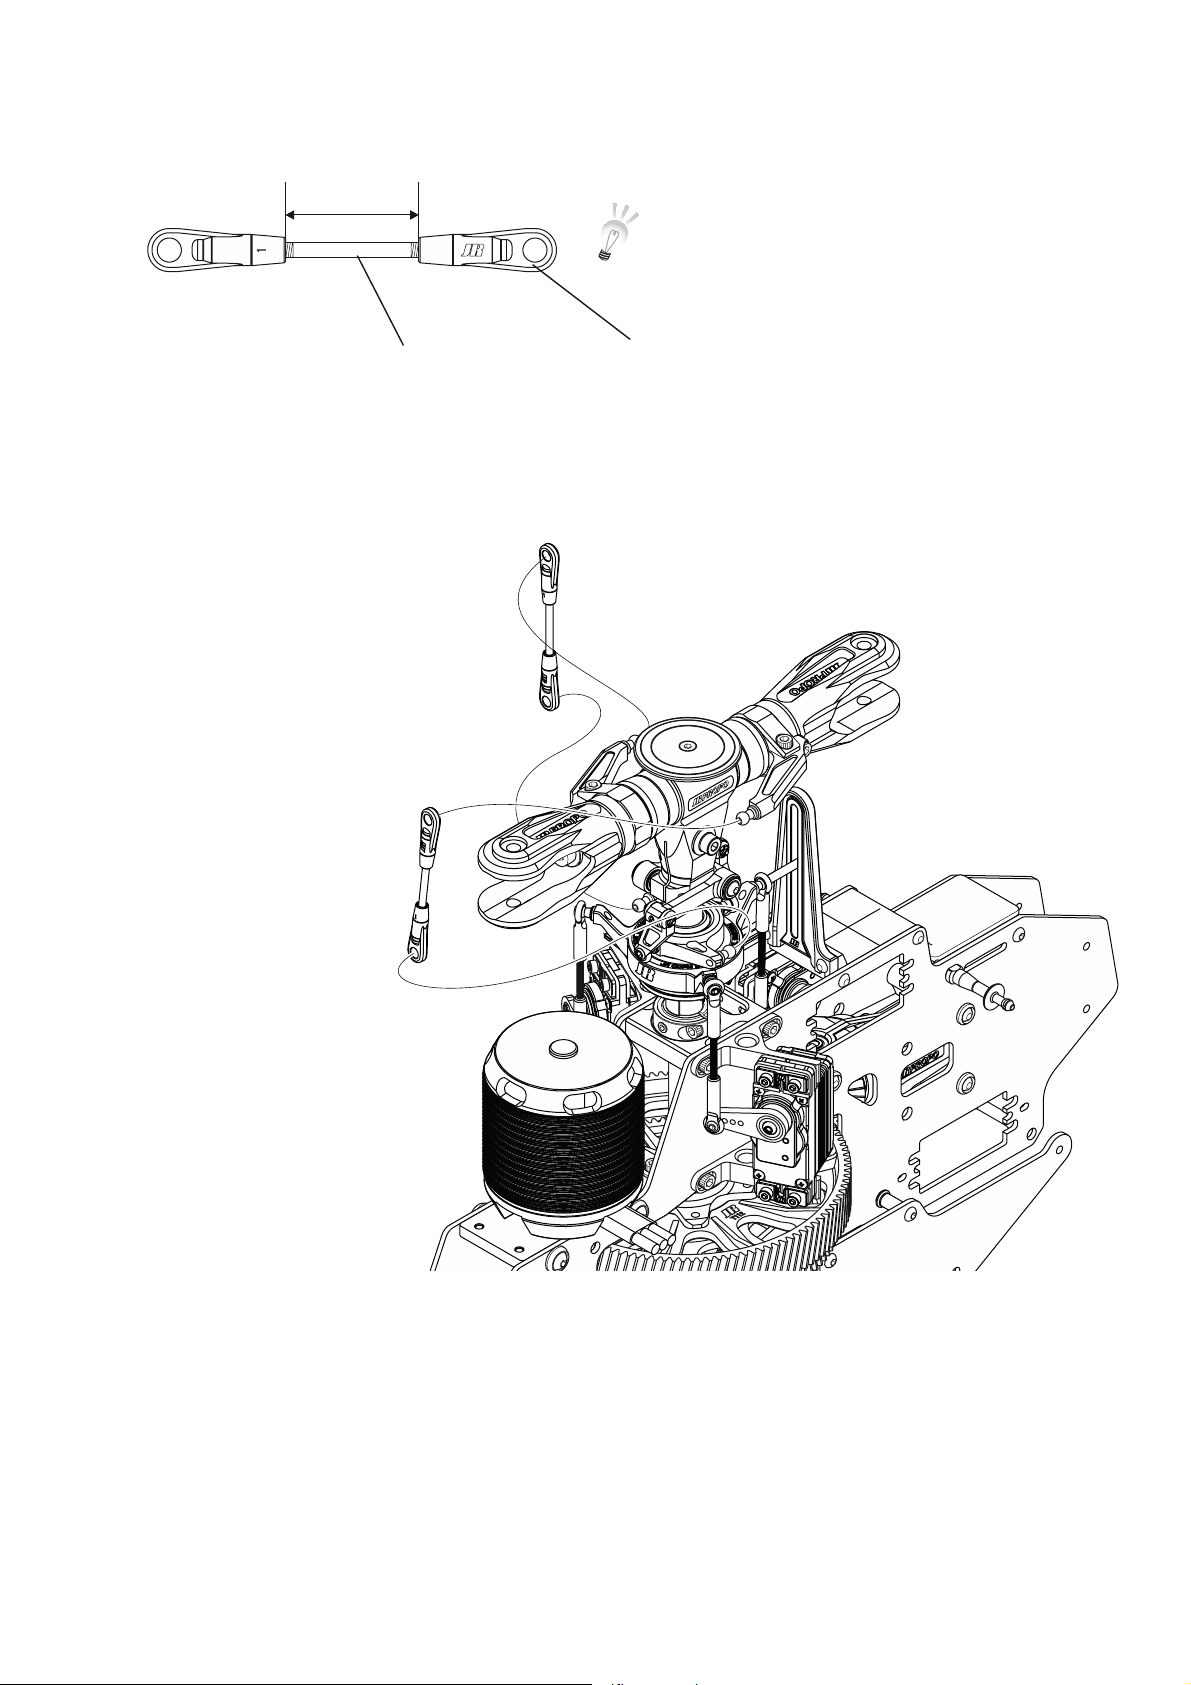
4-7 ROTORHEADLINKAGES
23.5mm
FBLthreadedrodL45( × 2)
※ Withtheswashlevelerinstalled,adjustthetwo
linkagessothemainrotorpitchangleis0 ゜.
FBLuniversallink( × 4)
P.24
Page 25
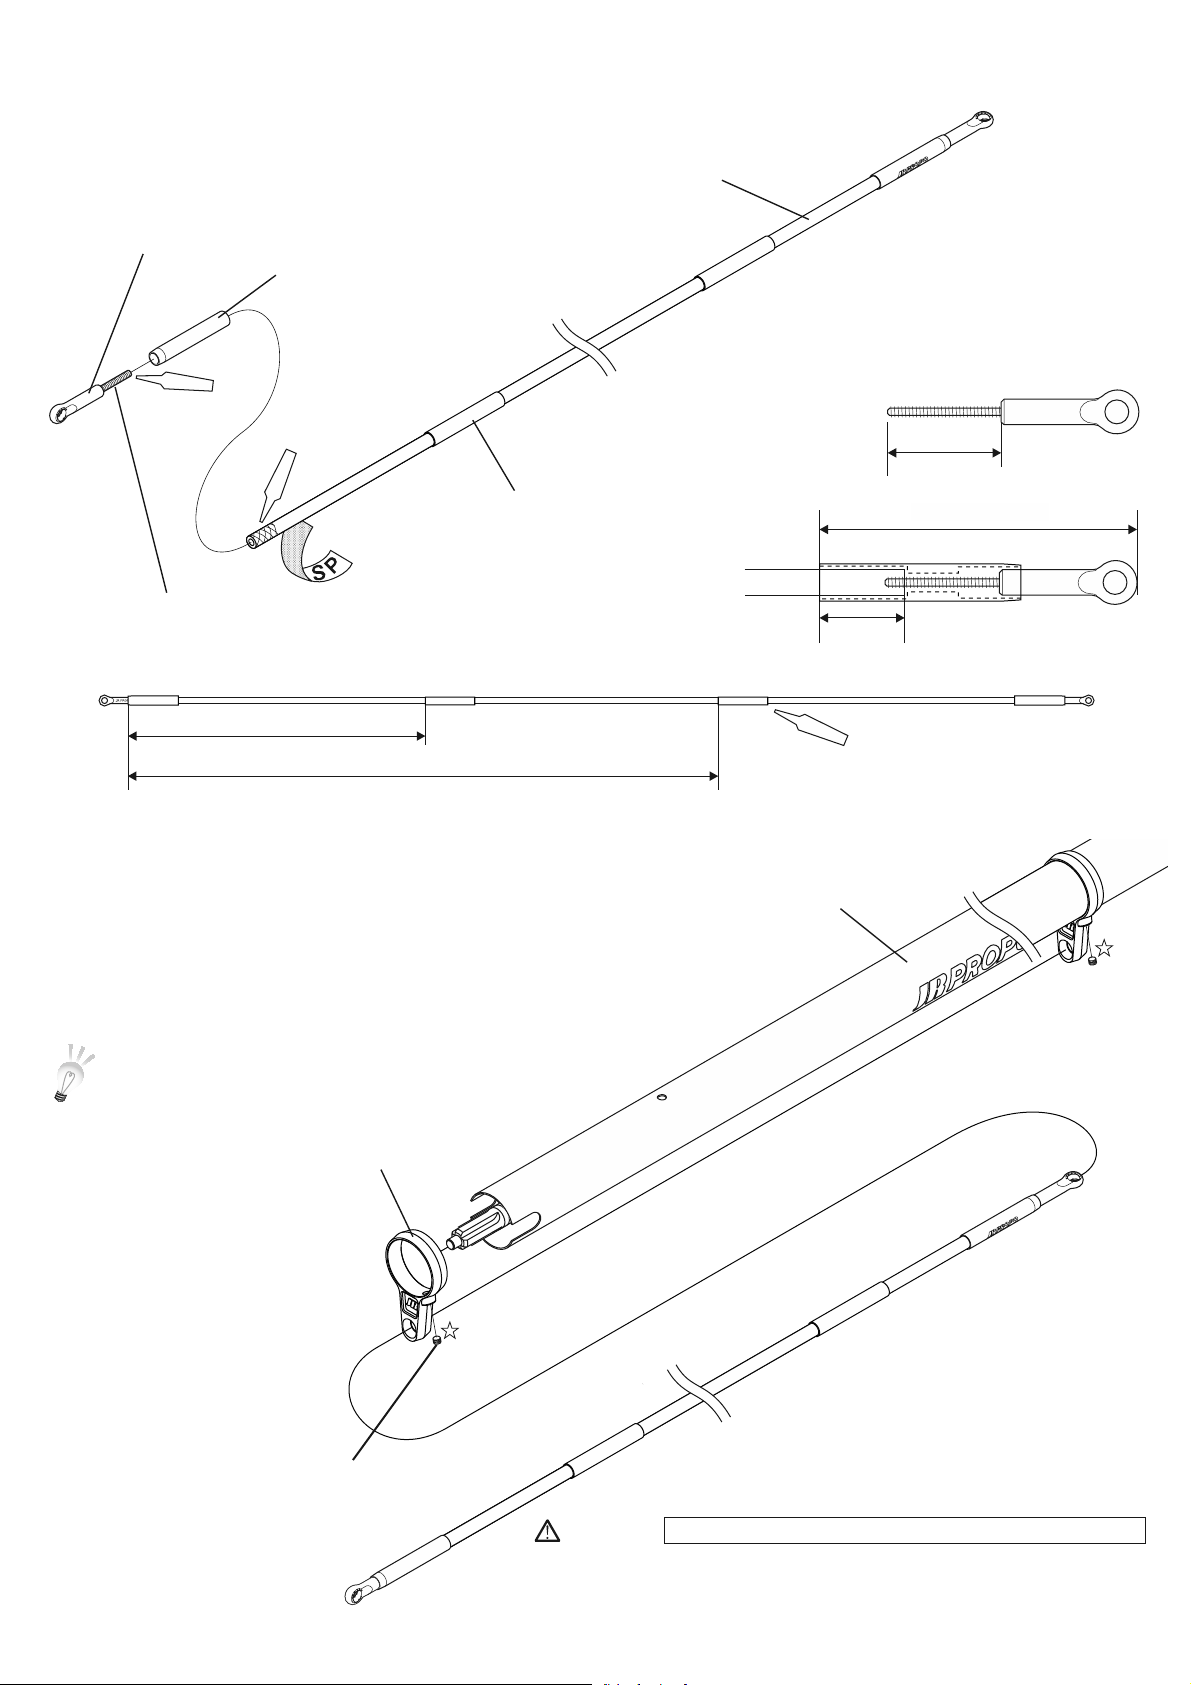
5-1 TAILCONTROLRODASSEMBLY
Universallink( × 2)
Tailcontrolrodend( × 2)
Red (×2)
A+B (×2)
Tailcontrolrodsleeve( × 2)
ThreadedrodM2.3 × 30( × 2)
TailcontrolrodL740
15mm
JRPROPO
20mm
約 56mm
Approx.:56mm
Towardfront
220mm
505mm
5-2 TAILCONTROLRODINSTALLATION
※ Temporarilytightenthetailcontrolrodguides.
Tightenfirmlywhentherudderservoisinstalledso
thepositionmatchesthelineofthetailcontrolrod.
Tailcontrolrodguide( × 2)
Towardrear
CAG (×2)
Tailboomassembly
Towardrear
SetscrewM3 × 4( × 2)
Towardfront
DANGER
※ Notetheproperorientationofthetailcontrolrod.
P.25
Page 26
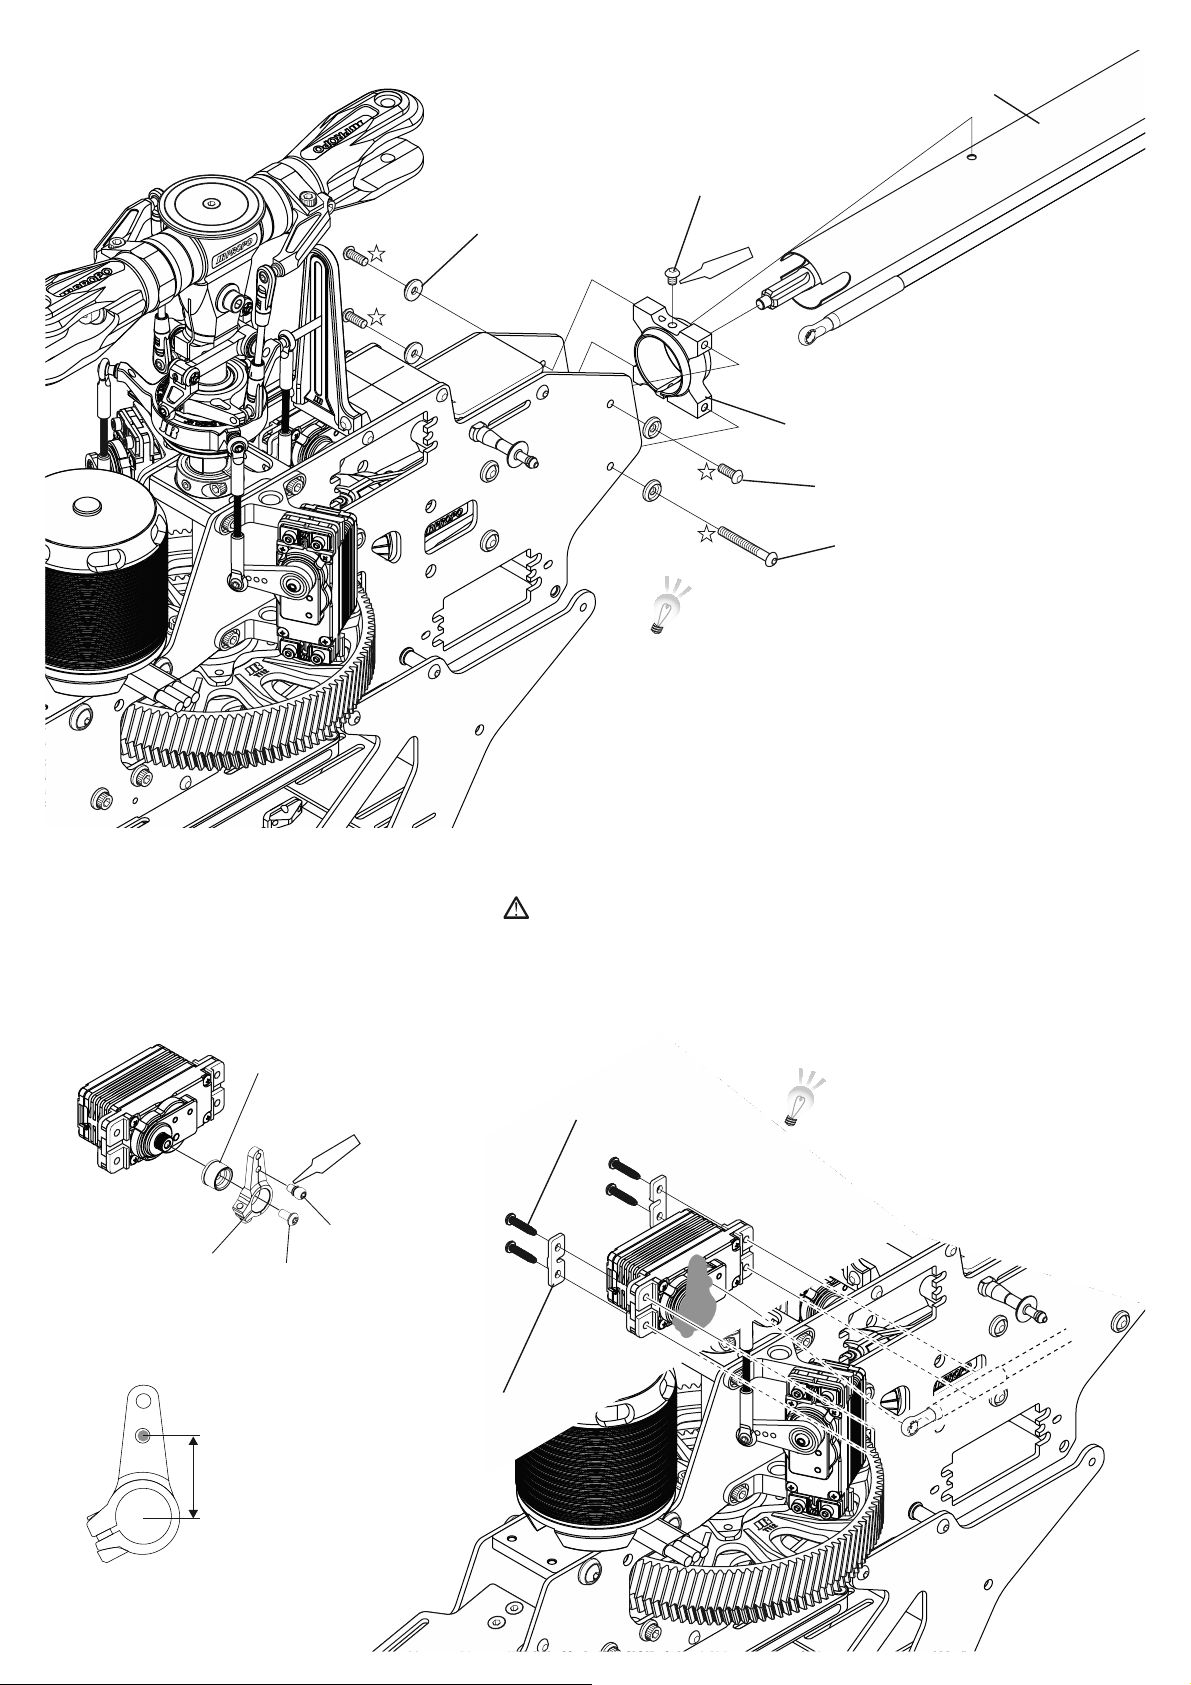
Red
5-3 TAIL BOOM INSTALLATION
Previoulyassembled
ButtonheadboltM3×4
SpecialwasherM3(×4)
Red
Metaltailboomholder
ButtonheadboltM3×8(×3)
ButtonheadboltM3×25
※ Temporarilytightenatthispointandtighten
firmlywhentherearbodyisinstalled.
5-4 RUDDER SERVO INSTALLATION
Rudderservo
Adjustablehorn
innerV2#70721
ControlballL2.5
Socketheadbolt
M2.6x6
AdjustablemetalhornD
(InnerLess)#61991B
Buttonheadbolt
M3x06
Servoholdingplate(×2)
NOTE
HEXTappingscrew
M2.6×12(×4)
※ Usetherubberisolatorssuppliedwiththeservo.
Whentighteningthebolts,therubbergrommetsshouldbe
slightlycompressed.
Donotusethemetalgrommetinserts.
※ Attachthetailcontrolrodtotherudder
servoandtightenthesetscrewswhich
weretemporarilytightenedinstep5-2.
P.26
14mm
Page 27
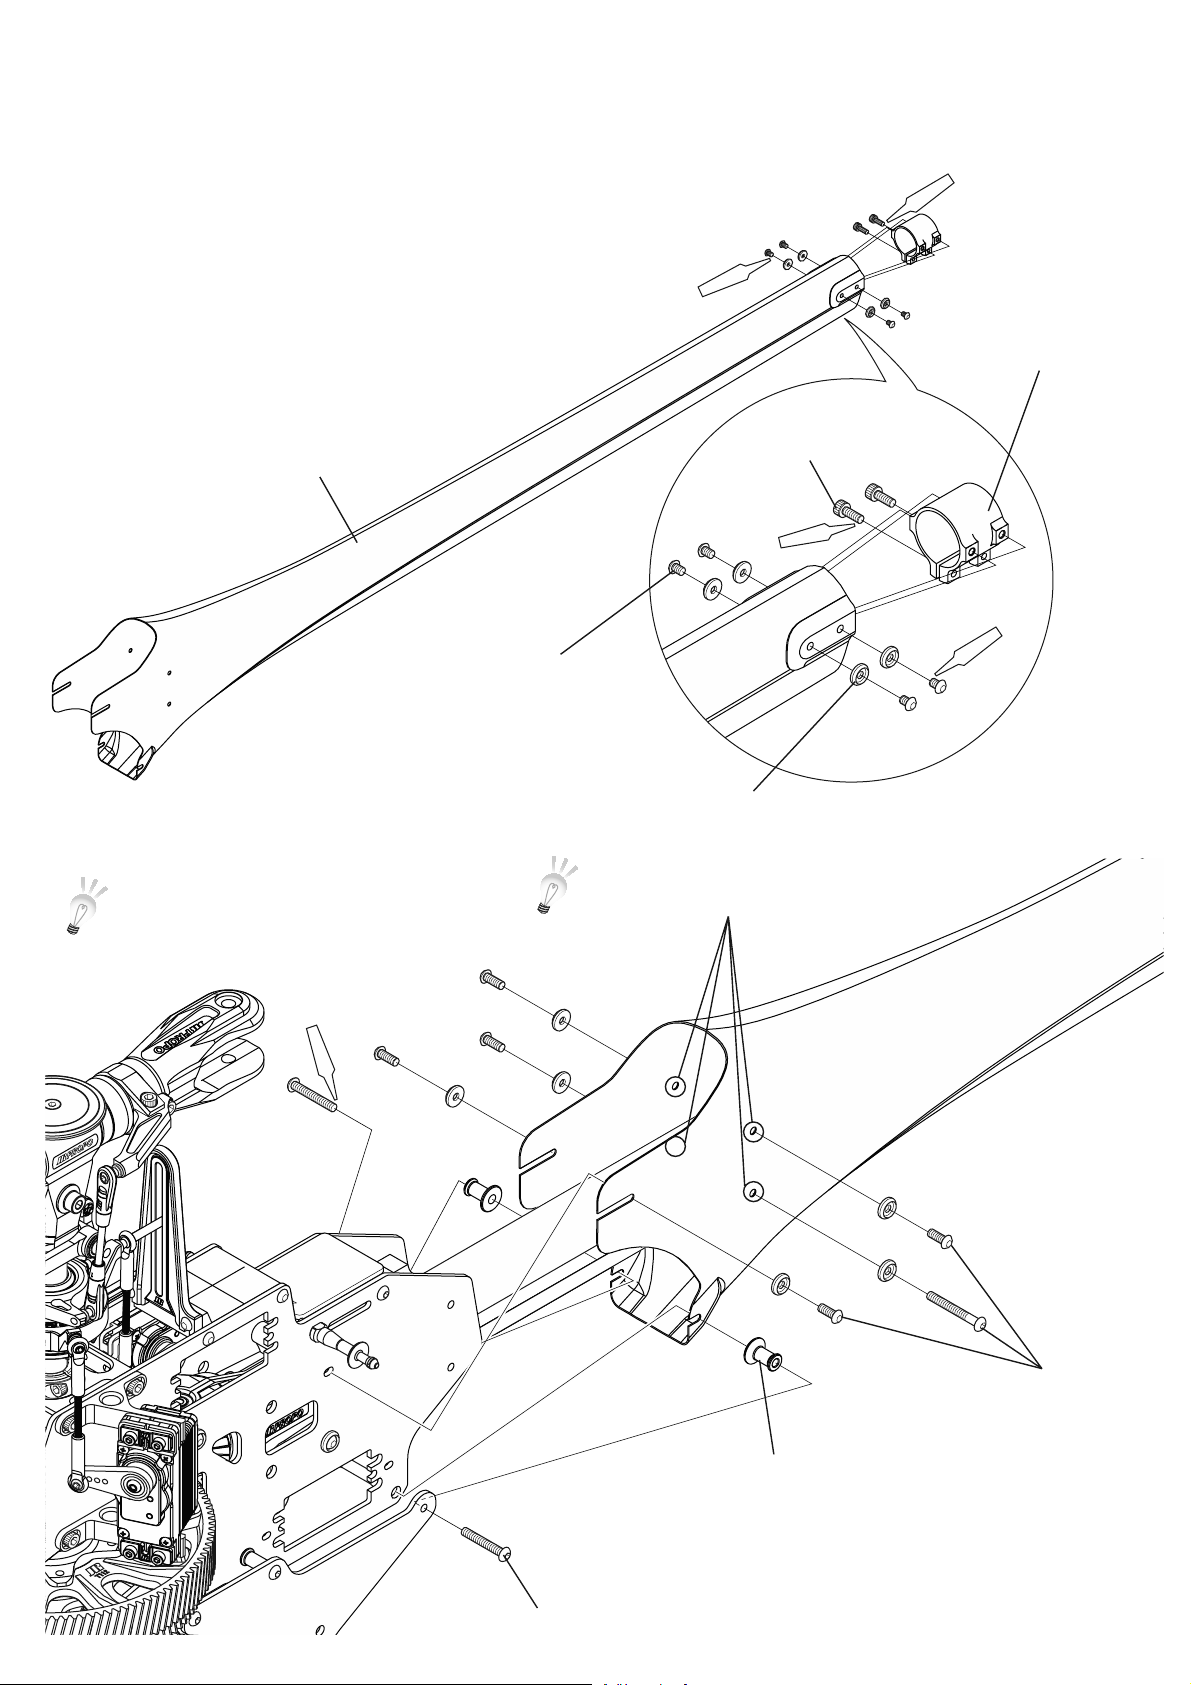
Red (×4)
Red(×2)
5-5 FRPREARBODYINSTALLATION
Red (×2)
Red(×2)
Rearbodyclamp
FRPrearbody
ButtonheadboltM3 × 4( × 4)
※ Tightenthebuttonhead
bolts(6)whichwerepreviously
temporarilytightened.
SocketheadboltM3×8(×2)
SpecialwasherM3( × 4)
※ Filethemountingholessothattherear
bodycanmountsmoothly.
Red(×8)
Boltswhichwerepreviously
temporarilytightened.
SpacerL11( × 2)
ButtonheadboltM3 × 20( × 2)
P.27
Page 28
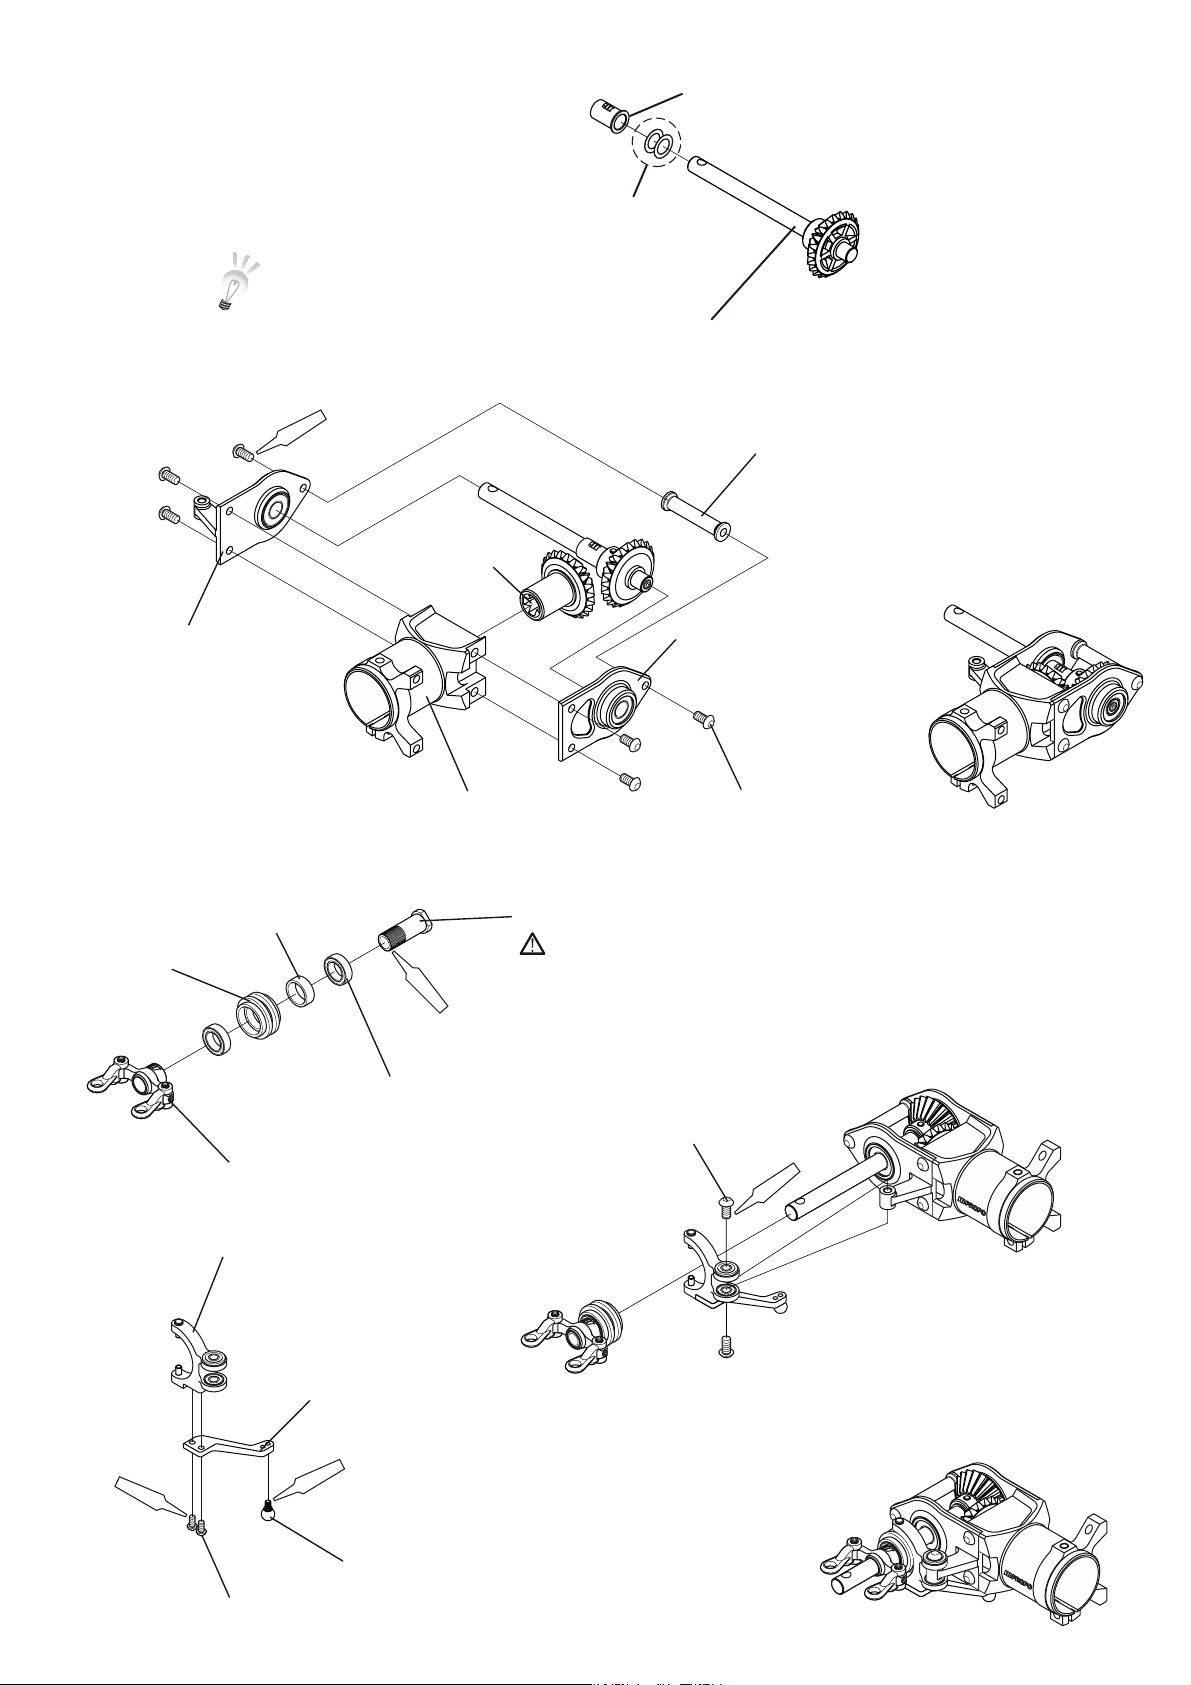
5-6 TAILGEARCASEASSEMBLY
※Theshimsareusedtoeliminateanyleftto
rightplayinthetailoutputshaft.
Tailoutputshaftcollar
Polyslider
06X9.5X0.13(X2)
ReartailbevelgearT22Assʼy#62063
Red (×6)
BevelgearAT22
TailgearcaseplateR
Tailgearcaseassembly
5-7 TAILPITCHCONTROLLEVERASSEMBLY
Tailslideringbearingcollar
Tailslidering
Red
Tailslideringsleeve
WARNING
※ Becauseitisreversethread,
bewarethetighteningdirection.
Tailgearcasecrossmember
CompleteAssembly
TailgearcaseplateL
ButtonheadboltM3×6(×6)
Shieldedbearing7 × 11 × 3( × 2)
HGmetaltailPCplate
TailpitchcontrolleverA
TailpitchcontrolleverB
Red(×2)
ButtonheadboltM2×5(×2)
P.28
ButtonheadboltM3×6(×2)
Red (×2)
CompleteAssembly
Red
JoinballscrewL3
Page 29
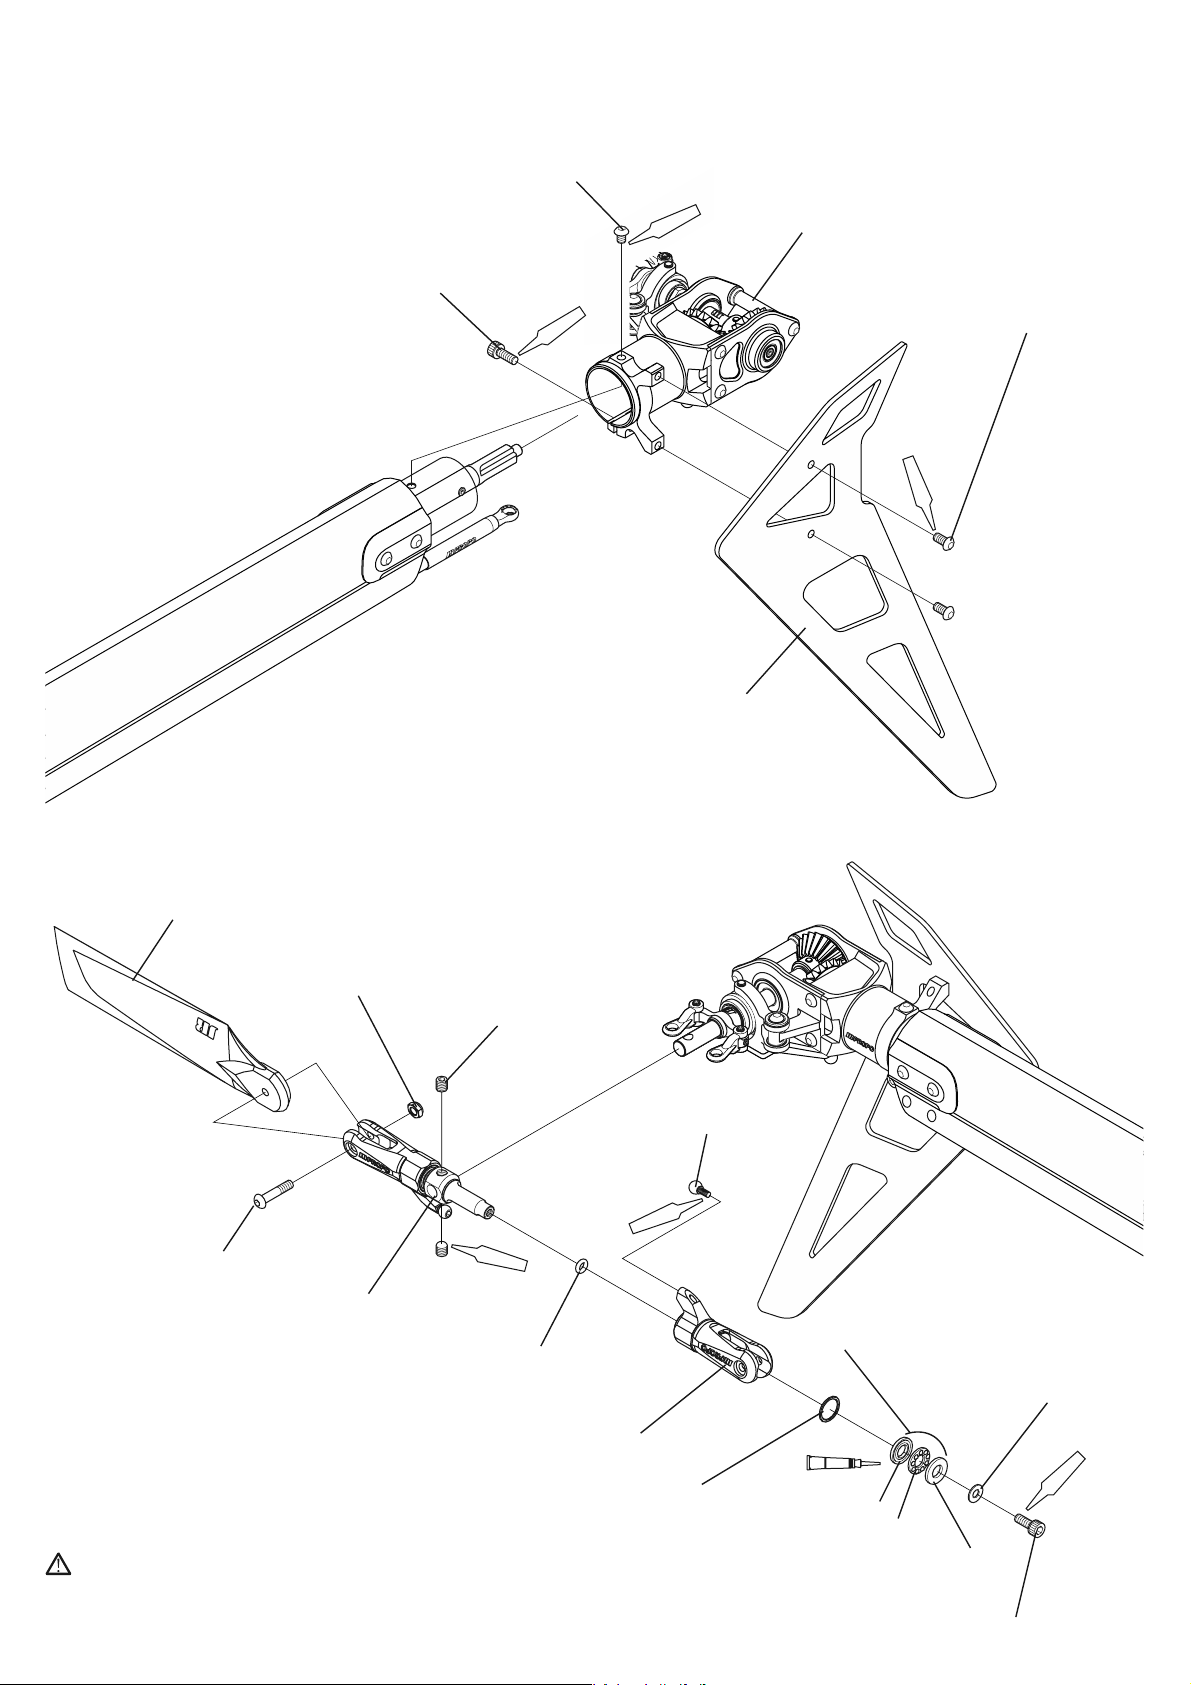
5-8 TAILGEARCASE,CARBONVERTICALFININSTALLATION
ButtonheadboltM3 × 4
SocketheadboltM3 × 8
Red
Red
Carbonverticalfin
Previouslyassembled
ButtonheadboltM3 × 6( × 2)
Red(×2)
5-9 METALTAILBLADEHOLDERASSEMBLY
Carbontailrotorblade( × 2)
NylonlocknutM3(t2.8)( × 2)
SetscrewM4 × 4( × 2)
JoinballscrewL4( × 2)
Red(×2)
BladeboltM3× 15( × 2)
Tailcenterhub∅ 6
O-ring3.5 × 5.5 × 1( × 2)
Metaltailbladeholderassembly( × 2)
NOTE
※ ApplyasmallamountofNo.61597JRThrustbearinggreaseontothethrust
bearings.
Red (×2)
Washer8 × 10 × 0.5( × 2)
InnerDia.:Large
Nodistinctionoffrontandback
Thrustbearing5 × 10 × 4( × 2)
FlatwasherM3( × 2)
グリスアップ
(×2)
GreaseUp
InnerDia.:Small
SocketheadboltM3 × 8( × 2)
Red (×2)
P.29
Page 30
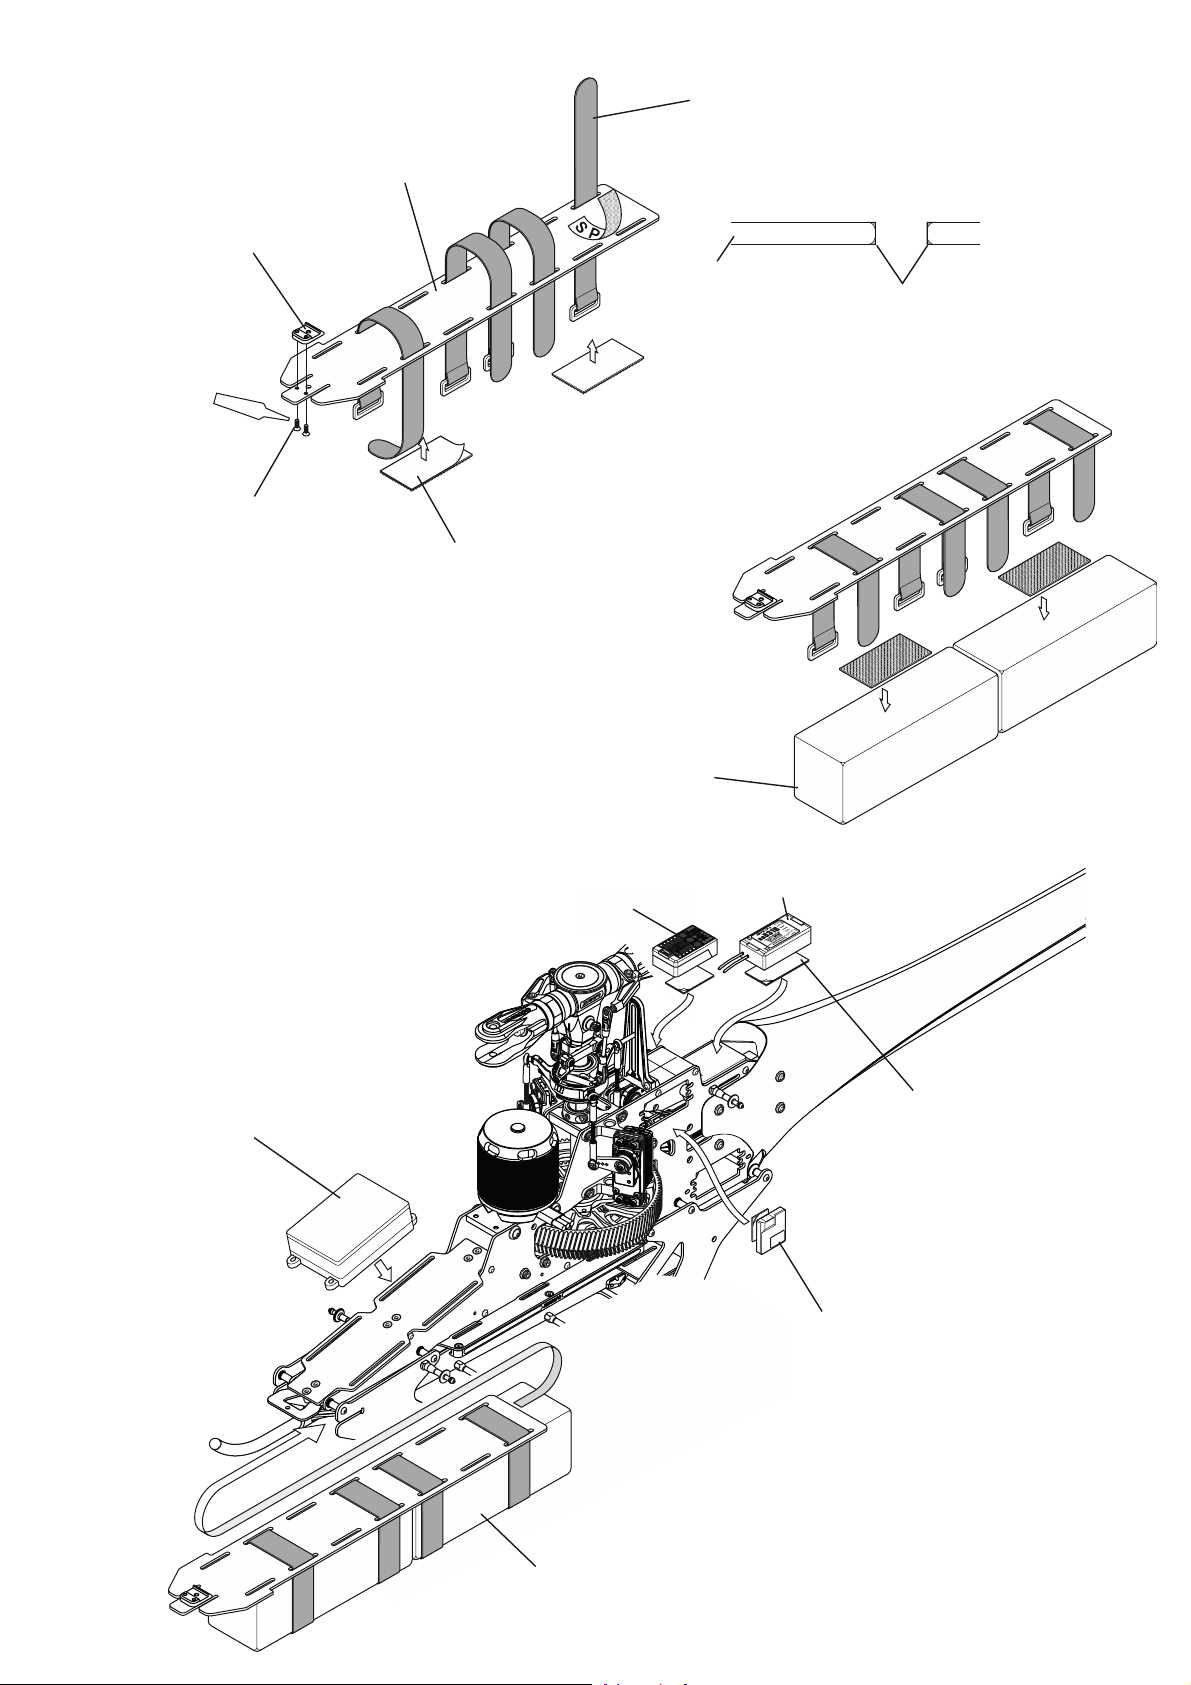
6-1 BATTERYMOUNTPLATEASSEMBLY
Batterymountplate
Batteryplatehook
Red(×2)
FlatheadboltM2.5 × 6( × 2)
HookandloopfastenerL60( × 2)
Hookandloopstrap( × 4)
Topreventthestrapsbeingdamagedbysharp
edges,werecommendsandingtheslotsonthe
batterymountplate.
Batterymountplate
Sandingtheedges
Battery(soldseparately)
6-2 BATTERY/GYRO/RECEIVER/ESCINSTALLATION
※ Pleaserefertop.32.
ESC(soldseparately)
Gyro(soldseparately)
Receiver(soldseparately)
Doublesideformtape
(soldseparately)
Remoteantenna
P.30
Previouslyassembled
Page 31
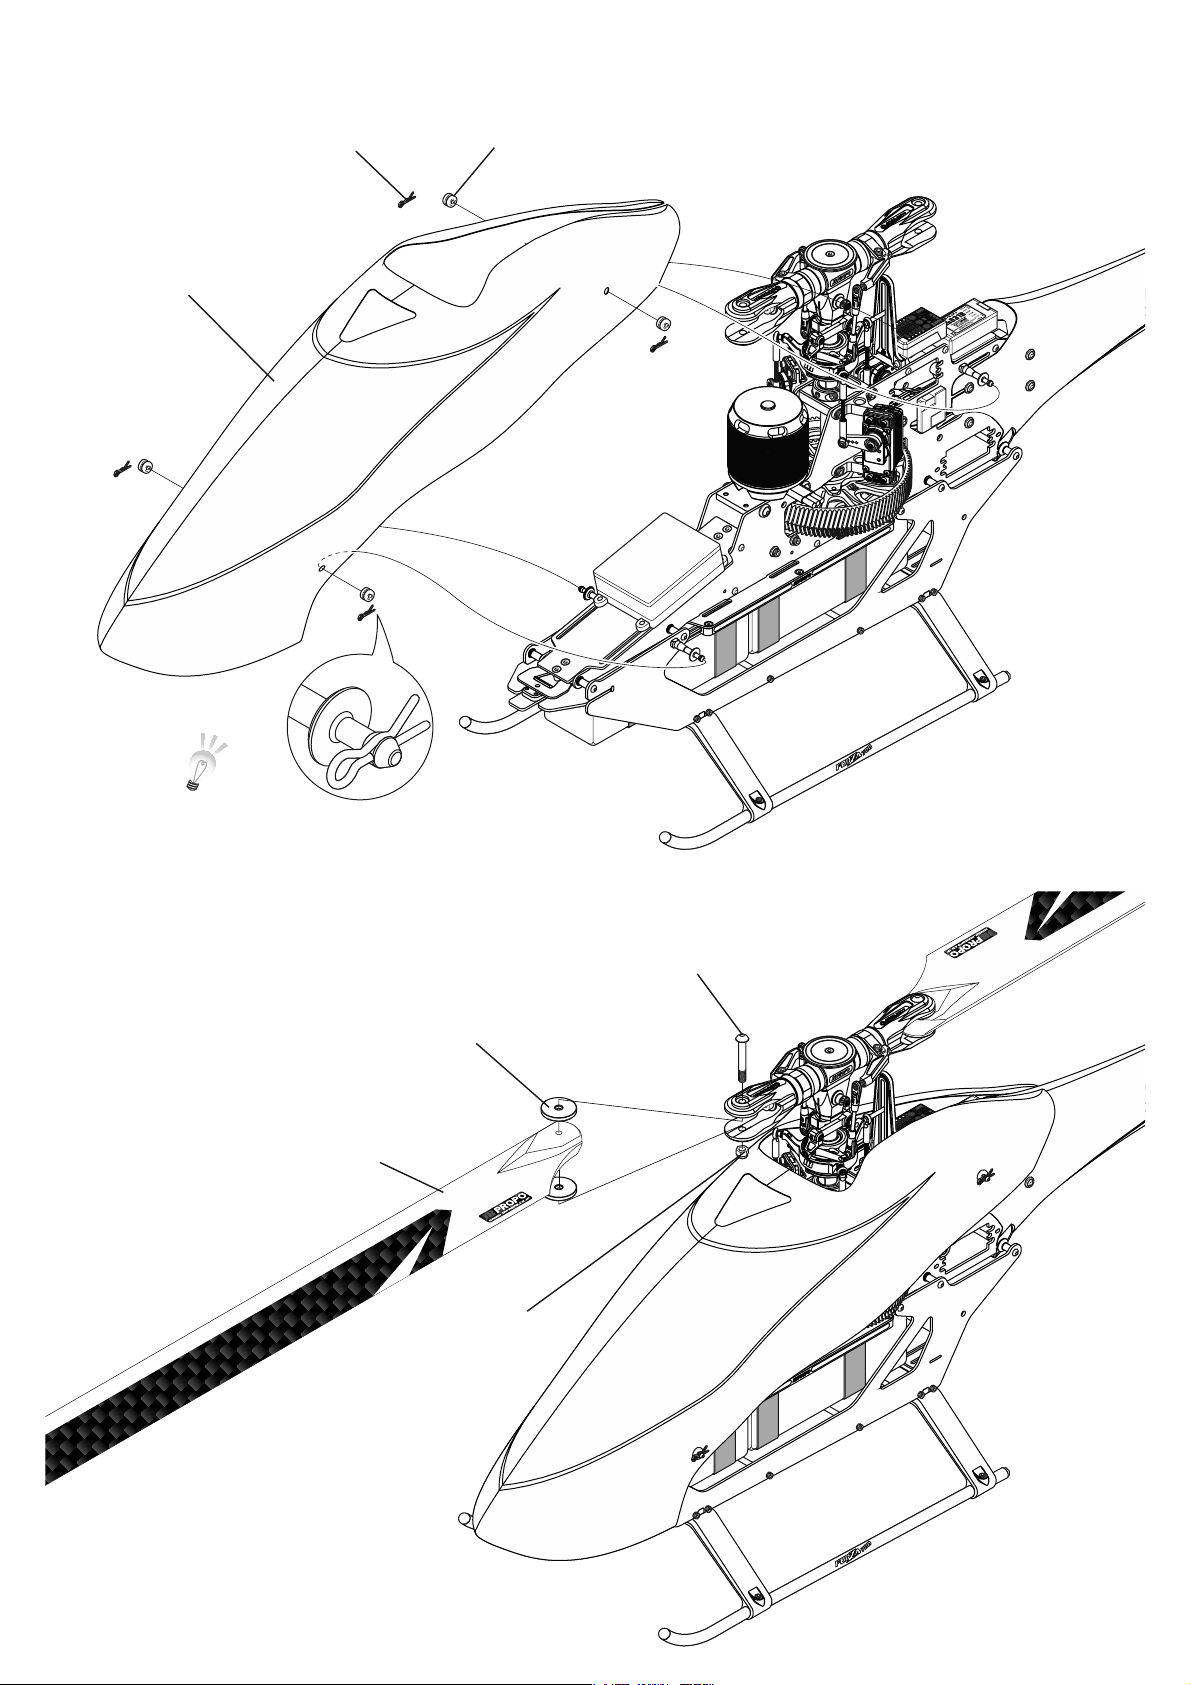
6-3 FRPFRONTBODYINSTALLATION
FRPfrontbody
Snappin4mm( × 4)
Rubbergrommet( × 4)
Passthesnappinthroughtheholeinthebodycatch.
6-4 MAINROTORBLADEINSTALLATION
RotorspacerALt3( × 4)
Mainrotorblade(×2)
(soldseparately)
NylonlocknutM5( × 2)
MainbladeboltM5( × 2)
P.31
Page 32

INSTALLATIONEXAMPLESFORBATTERYANDESC
P.32
Page 33
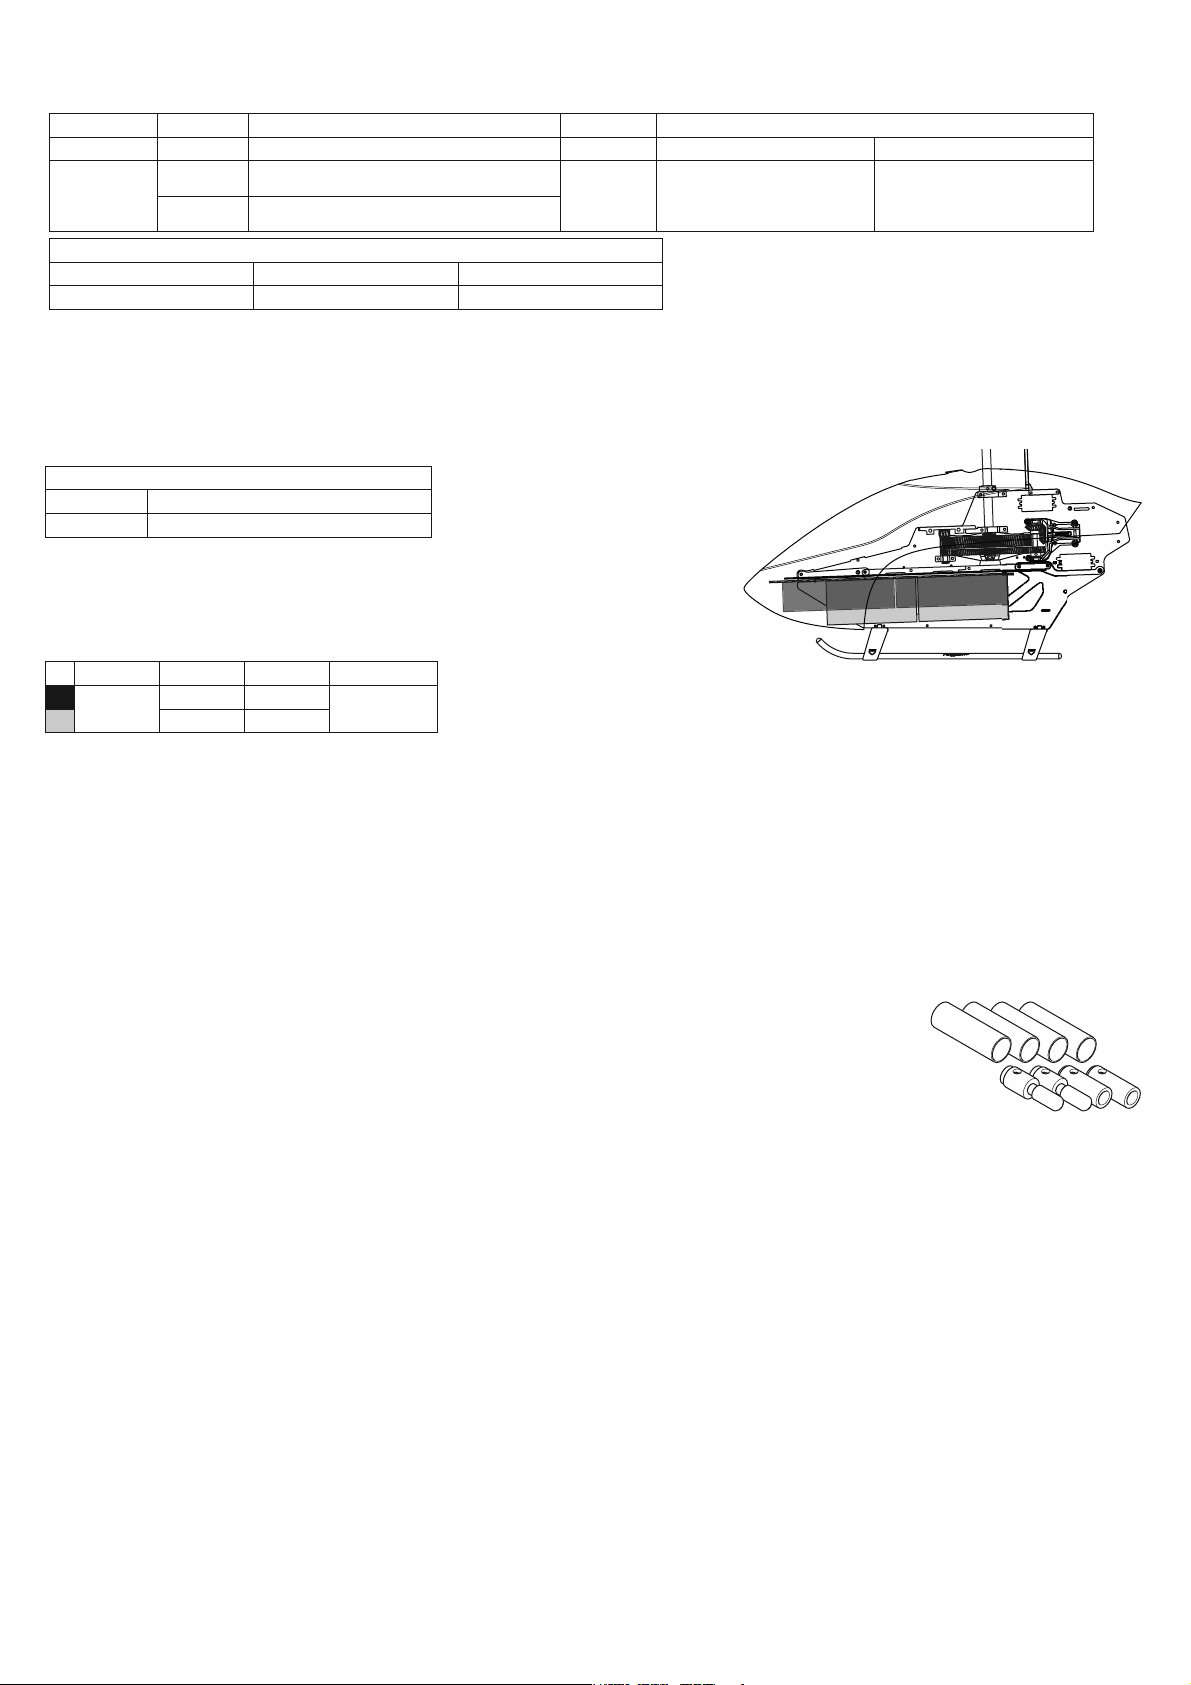
GEARRATIOANDROTORRPMSETUP
Battery Pinion GearRatio Motor Approximateflighttime(whenusing5,000mAh)
Pinion:Main KVvalue 1,500〜1,600rpm 2,000〜2,300rpm
12cell
Hovering Flying 3D
1,500rpm 〜 1,600rpm 2,000rpm 〜 2,200rpm 2,100rpm 〜 2,300rpm
※ Inordertoextendbatterylife,itisrecommendedtoleaveatleast15%batterycapacityremainingaftereachflight.
● BatteryGuide
Cell Voltage/Capacity
6Cell×2 22.2V4,500mAh 〜 × 2
T11 10.18:1
T12 9.33:1 ※ T12-soldseparately
RotorRPM
Li-PoBattery
520 approx.8-10mins approx.3-4mins
● Batterysize ※ Refertoafigureontheright,choosewheretomount
thebatteryAorB.
W L H
A
55mm
B 280mm 62mm
● Pleasedonotflyconsecutively.
Aftereachflight,pleasedonotstartthenextflightuntilthemotor,ESCandotherpartshavecooleddown.
Ifyouflyconsecutively,themotor,ESCandotherpartsmaygetdamagedfromoverheating.
● Connectors
Connectorsratedfor120Aorabovearerecommended.
Mistakesinconfusingplus(+)andminus(-)areverydangerousandmayleadtocatastrophicaccidents.
Topreventconnectionmistakes,pleaseconfirmtheconnectingmethodandthecolorofthewires
arecorrect.
330mm 50mm
(maximum)
A
B
P.33
Page 34
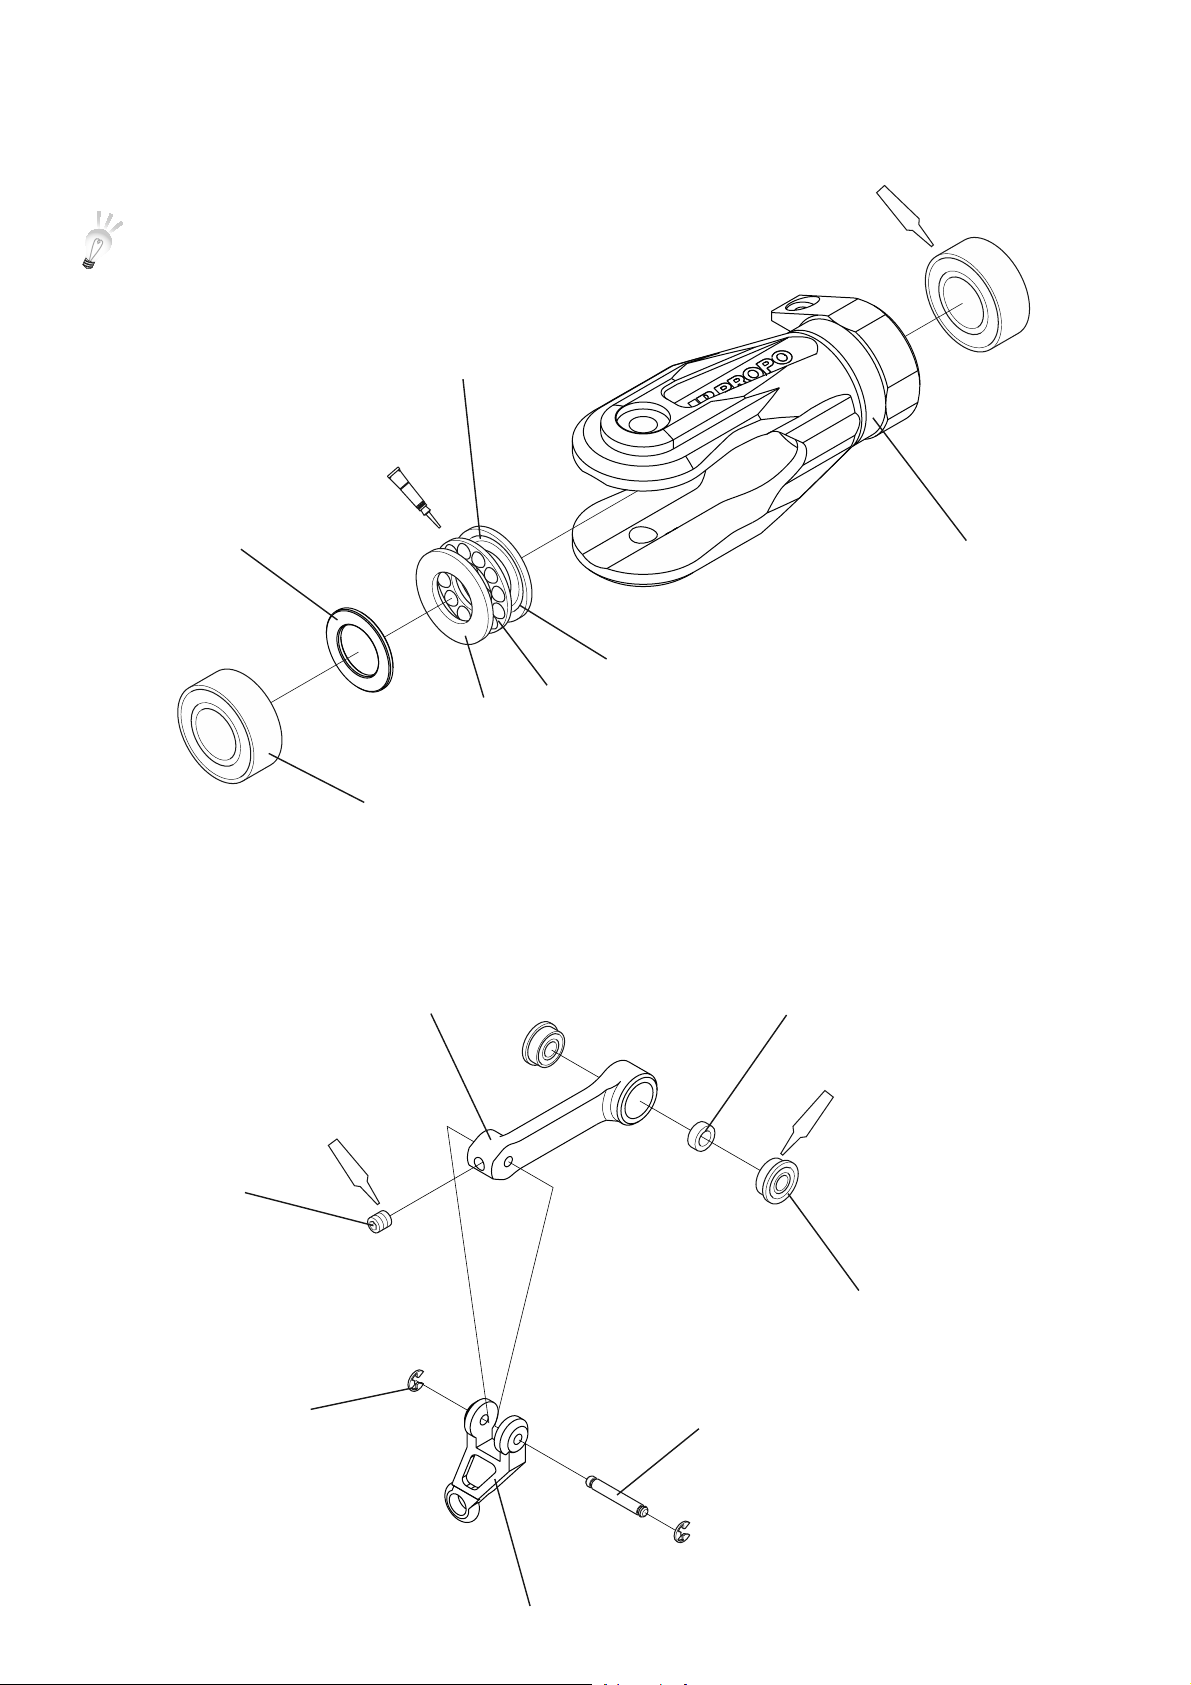
Whenrepairisnecessary-MAINBLADEHOLDER
※ ApplyasmallamountofNo.61597JRThrustbearinggreaseontothethrust
bearings.
Thrustbearing10 × 18 × 5.5
(×2)
グリスアップ
GreaseUp
Thrustwasher
Red(×2)
Mainbladeholder
InnerDia.:Large
Nodistinctionoffrontandback
InnerDia.:Small
Shieldedbearing10 × 19 × 7( × 2)
Whenrepairisnecessary-FBLWASHOUTARMASSEMBLY
FBLWashoutarm
Red
SetscrewM3 × 3
Spacer3 × 5 × 1.8
Red (×2)
EStopperringM1.5( × 2)
P.34
FlangedbearingF3 × 7 × 3( × 2)
Washoutlinkpin
Washoutlink
Page 35
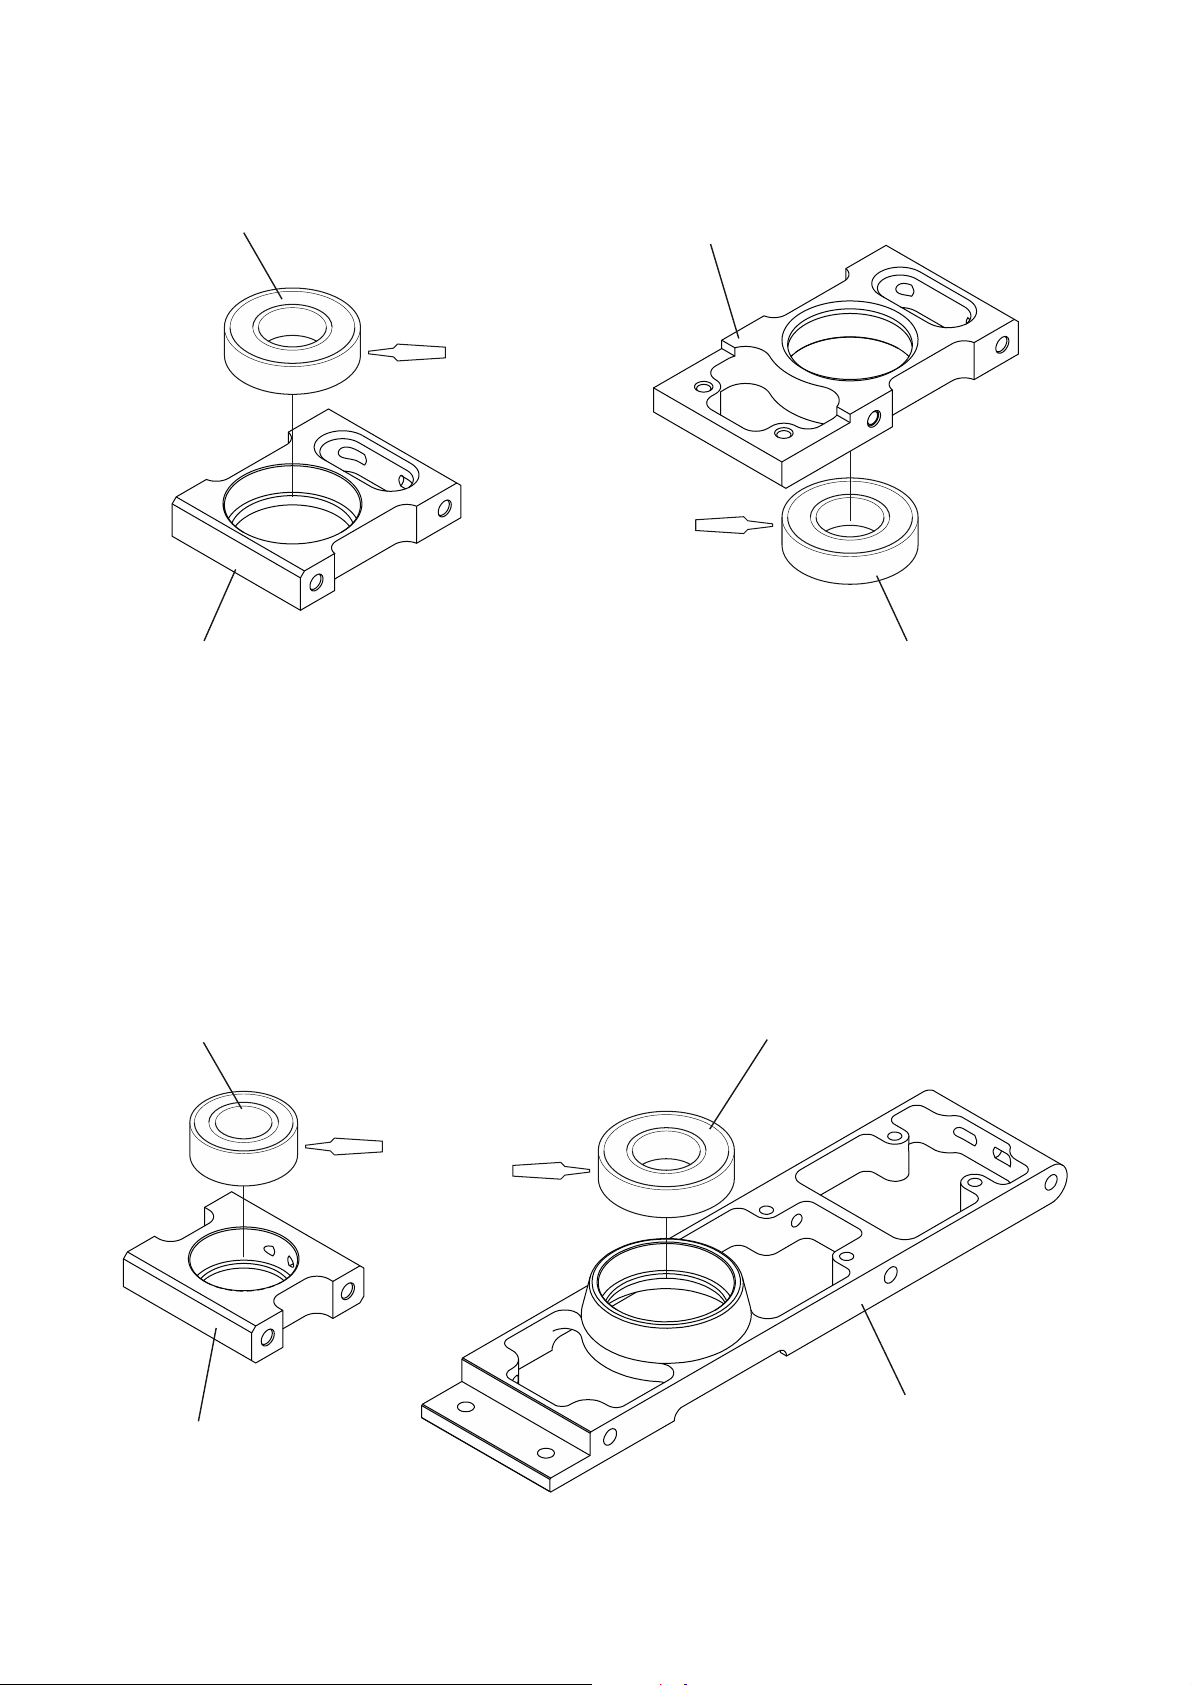
Whenrepairisnecessary-TOPBEARINGBLOCKASSEMBLY/MIDDLEBEARINGBLOCKASSEMBLY
Shieldedbearing12 × 24 × 6
Topbearingblockassembly
Middlebearingblockassembly
Red
Red
Shieldedbearing12 × 24 × 6
Whenrepairisnecessary-PINIONBEARINGBLOCKASSEMBLY/MIDDLECROSSMEMBERA
Shieldedbearing10 × 19 × 7
Red
Red
Pinionbearingblockassembly
Shieldedbearing12 × 24 × 6
MiddlecrossmemberA
P.35
Page 36
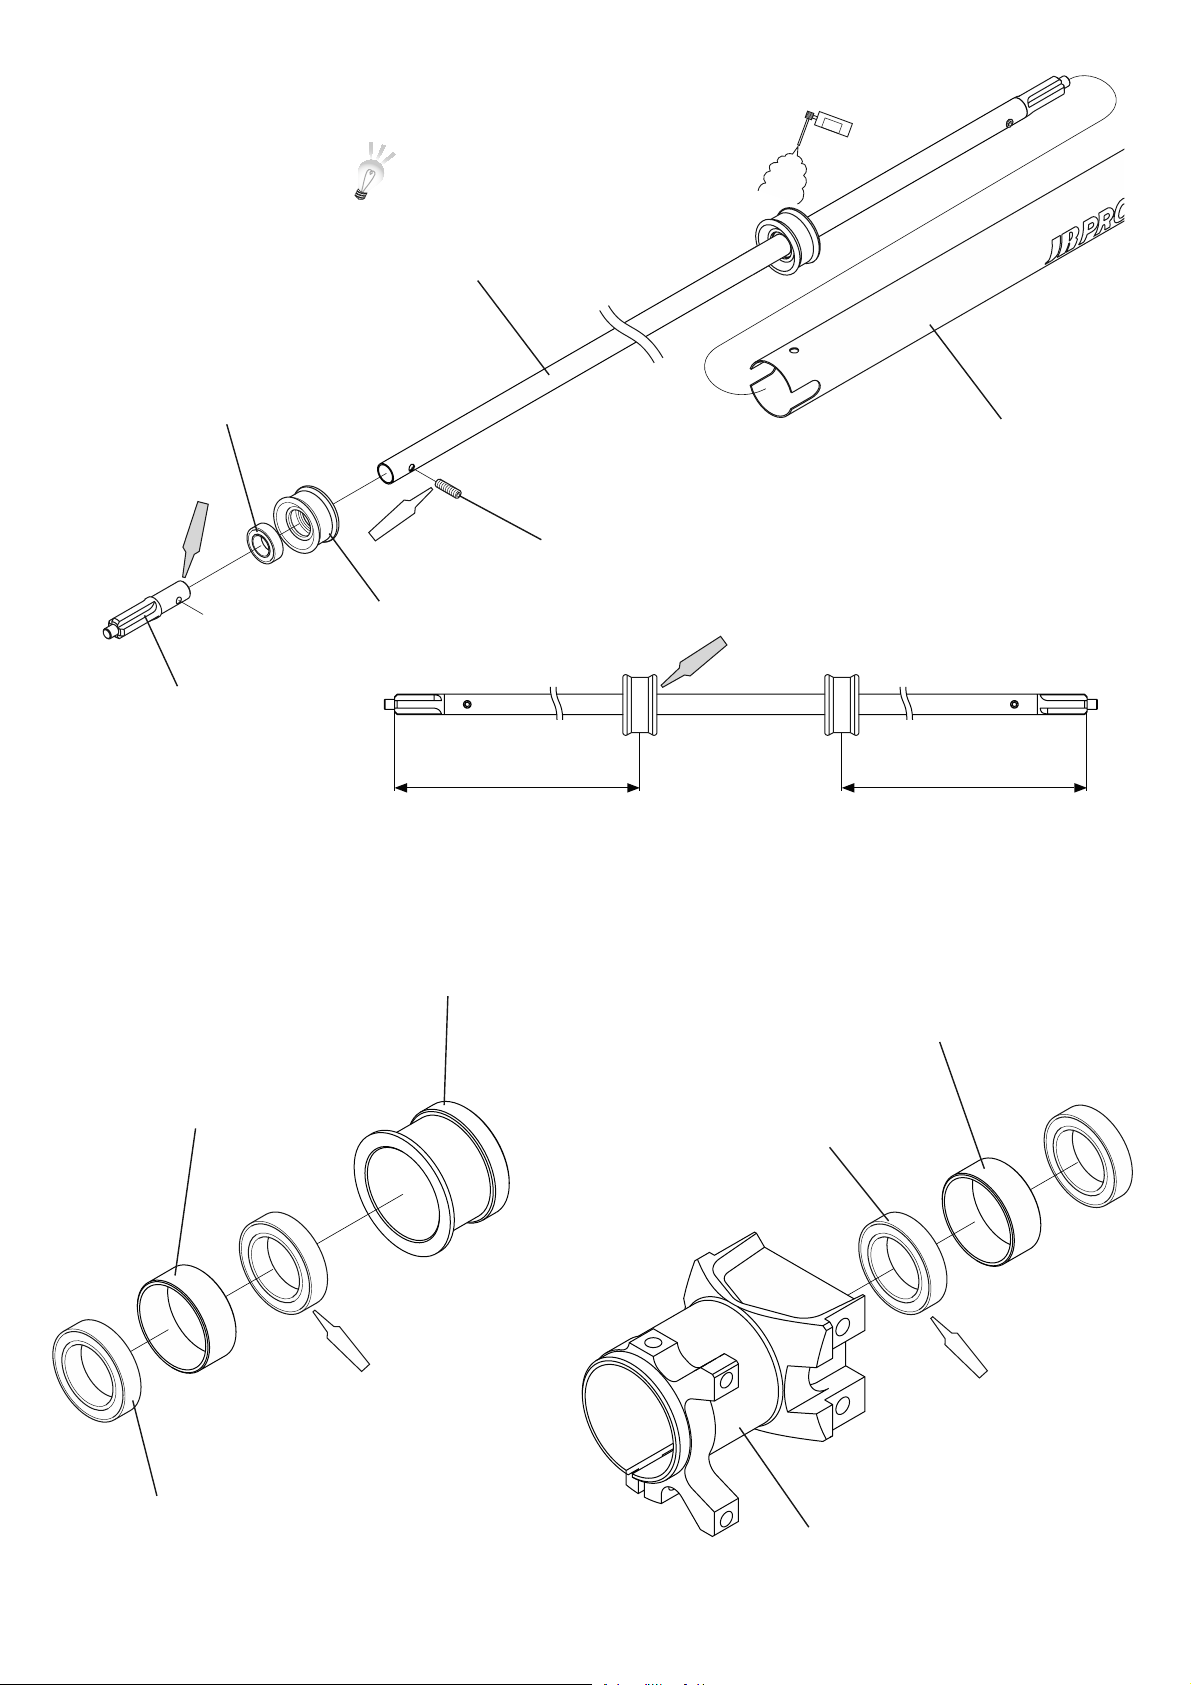
Whenrepairisnecessary-TAILBOOMASSEMBLY
Applyasmallamountofoilonthe
shaftiftheshaftguideisdifficultto
install.
Driveshaft
Shieldedbearing8 × 14 × 4( × 2)
オイル
OIL
TailboomL813
Green (×2)
Red
SetscrewM3 × 10( × 2)
Shaftdriveguide( × 2)
Green (×2)
Driveshaftjoint( × 2)
275mm
295mm
Whenrepairisnecessary-TAILPINIONUNITBEARINGBLOCKASSEMBLY/TAILGEARCASEASSEMBLY
Tailpinionunitbearingblock
Tailgearcasebearingcollar7mm
Tailgearcasebearingcollar7mm
Shieldedbearing12 × 18 × 4( × 2)
P.36
Red (×2)
Shieldedbearing12 × 18 × 4( × 2)
Red (×2)
Tailgearcase
Page 37
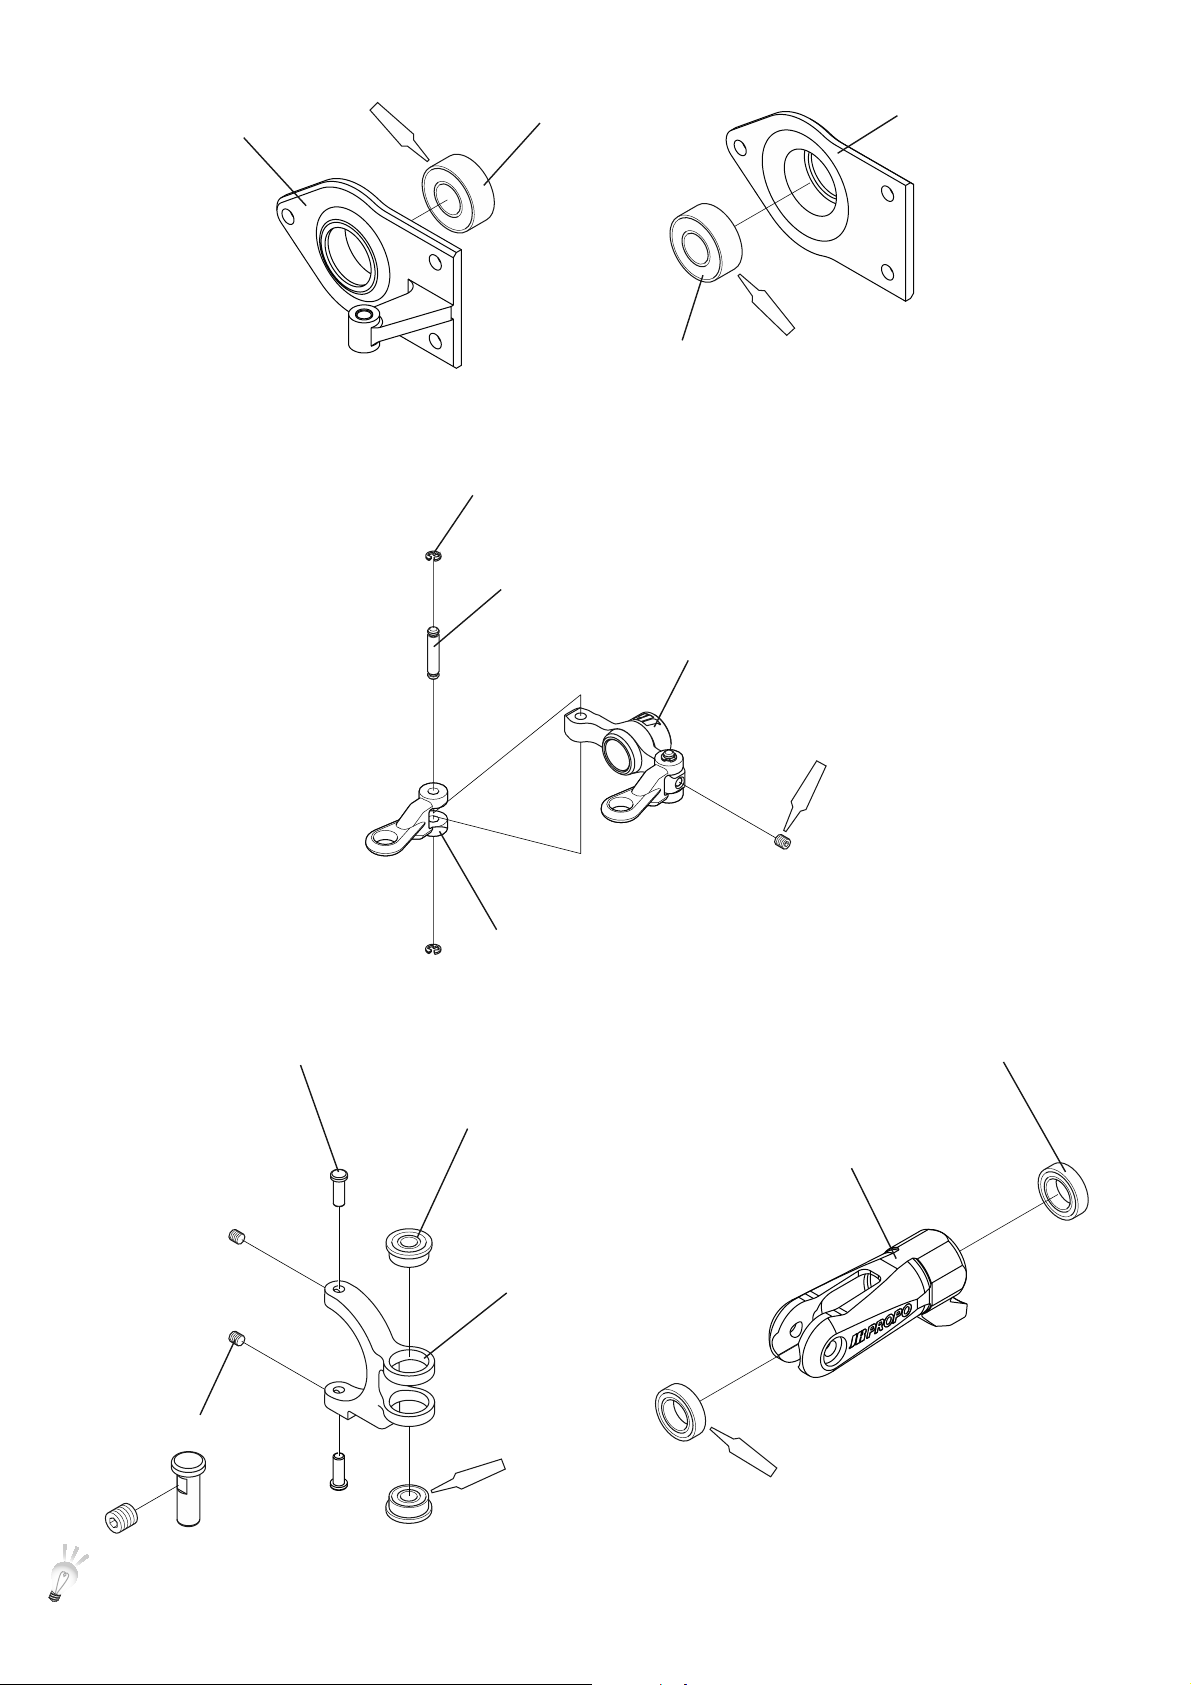
Whenrepairisnecessary-TAILGEARCASEPLATEL/TAILGEARCASEPLATER
TailgearcaseplateR
Red
Red
TailgearcaseplateL
Shieldedbearing6 × 13 × 5
Shieldedbearing6 × 13 × 5
Whenrepairisnecessary-HGMETALTAILPCPLATE
EStopperringM1.5( × 4)
HGTailPClinkpin( × 2)
HGmetaltailPCplate
Red (×2)
TailPClinkB( × 2)
Whenrepairisnecessary-TAILPITCHCONTROLLEVERA/TAILBLADEHOLDER
TailPCleverpin( × 2)
FlangedbearingF3 × 7 × 3( × 2)
Metaltailbladeholder
TailpitchcontrolleverA
Shieldedbearing6 × 10 × 3( × 2)
SetscrewM2 × 2( × 2)
Red (×2)
TightenthesetscrewontherecessofthetailPCleverpin.
Red (×2)
P.37
Page 38
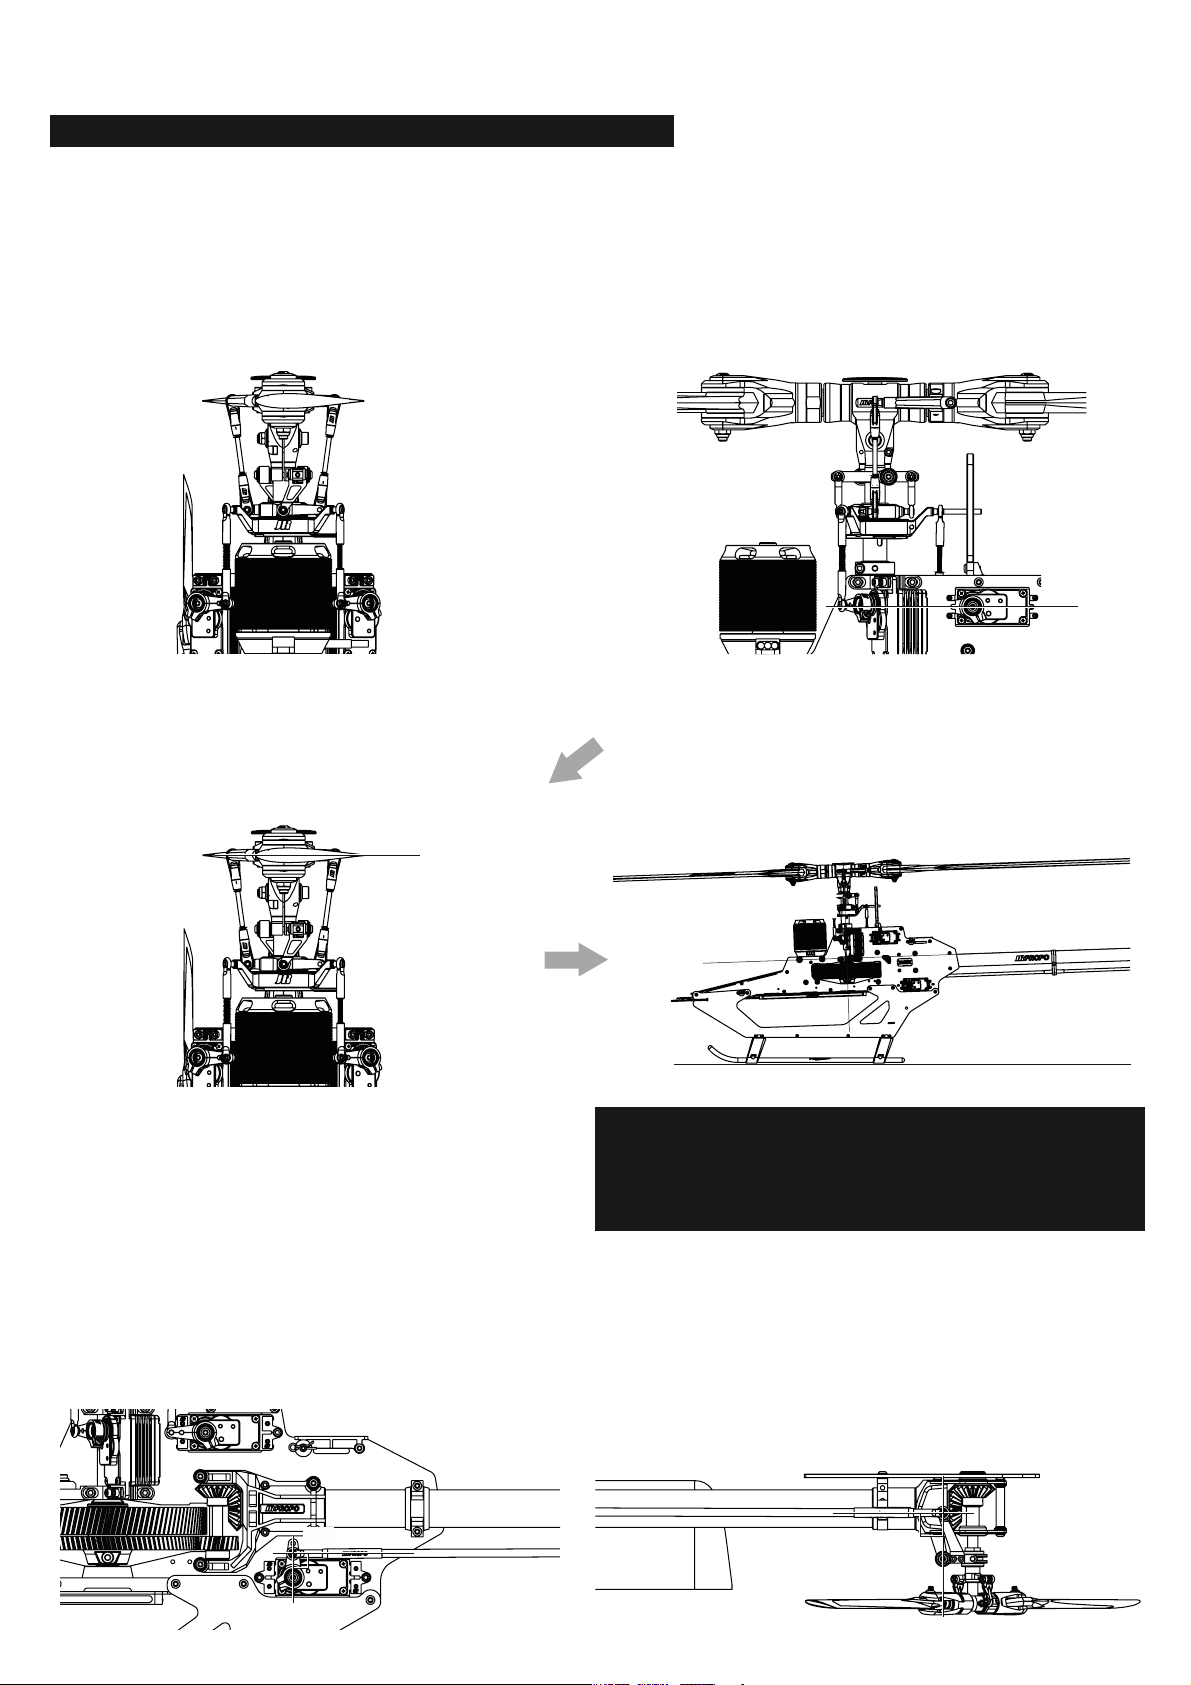
SERVONEUTRALADJUSTMENT
Theservohornsshouldsofaronlybetemporarilytightened.
① Disconnectthemotorwiresbeforemakinganyadjustments.Turnonthetransmitterfirstthenturnonthereceiver
(helicopter).
② Confirmthetransmittersticksandtrimsareintheneutralposition.Ifyourtransmitterhaspitchtrimlevers,settheseto
neutralaswell.
Horizontal
③ Pushdownontheswashplatesoittouchesthe
swashleveler.
0°
⑤ AdjusttheFBLthreadrodL45sothemainrotorpitch
angleis0 ゜.
⑥ Rudderadjustment
Confirmthetailcontrolrod ispositionedat90degrees. Ifitisnot,adjust thelengthofthetail controlrodandtheservo
hornangle.
④Withtheswashlevelerinstalled,adjustthethreadrodM2.3
x30sotheservohornsbecomehorizontal.
※ Noteforzeroingyourpitchgauge:Becausethishelicopter
hasafrontslopingmainshaft,zerothepitchgaugeas
showninthisfigure(ontheheadbutton,motor,carbon
middleplateetc.)
P.38
90°
ViewfrombelowViewfromside
90°
Page 39
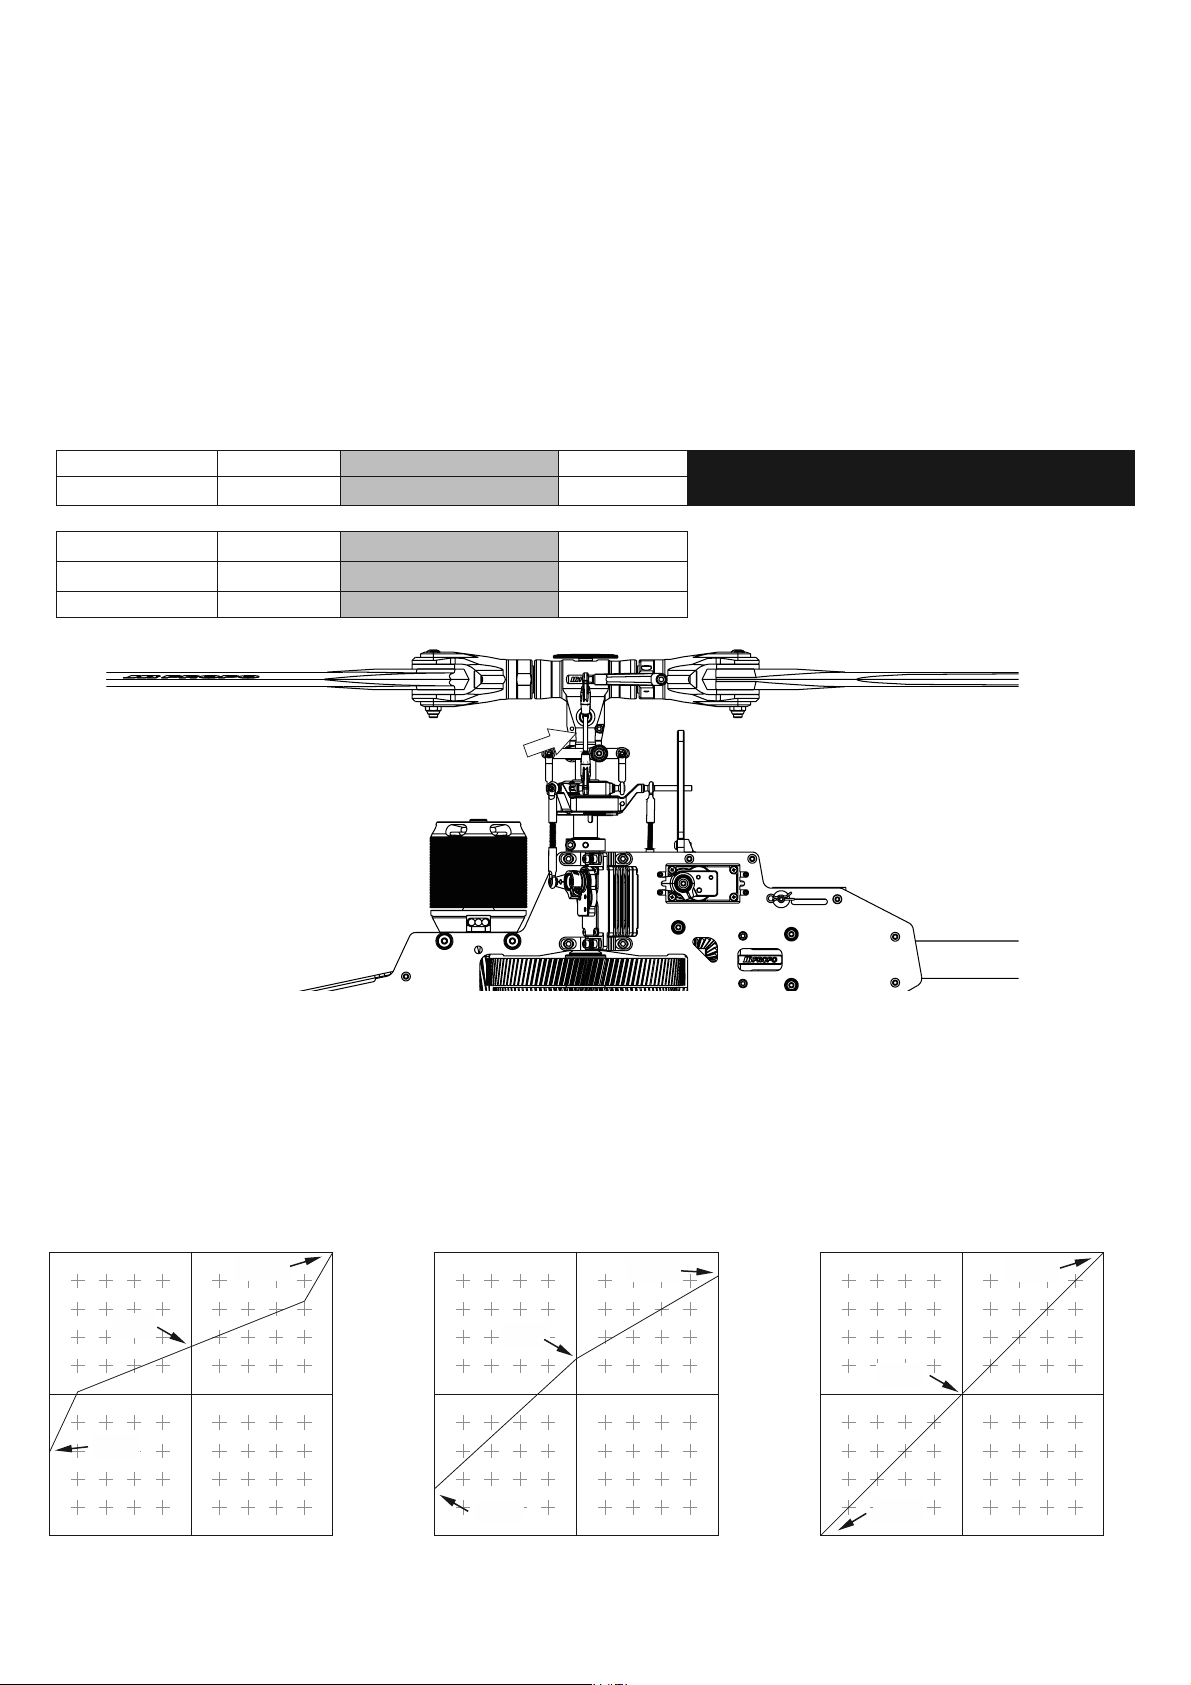
SETTINGANDADJUSTMENTOFTHETRANSMITTER
1.【Rotorpitchsetting】 ※ PleaserefertotheinstructionssuppliedwithyourFBLcontrolunit.
MeasurethepitchoftheMainRotorBladesusingtheJRdigitalpitchgauge(No.61796,soldseparately).
Theintermediate(middle)valueshouldbesetto0°-withthepitchstickinitsmiddlepositionthepitchreadingshould
be0°.Ifitisnot,adjustthelengthoftherodsshowninthefollowingfiguretoaccuratelysetthepitchto0°.
Oncetheintermediatepitchhasbeenadjustedto0°byrodadjustment,measurethehighandlowpitchvalues.Itis
presumedthattheyarealmostasdescribedinthetable.Iftheyareslightlyhigherorlower,usethe"swashtype(mix)"
functiontoadjustthepitchstroke(swashpitchmix%).Increaseordecreasethepitchpercentvalueasrequired.In
thiscase,thehighandlowpitchescannotbeseparatelyadjusted.Iftheabove-mentionedintermediatepitchhasbeen
correctlyadjusted,adjustingeitherthehighorlowpitchshouldautomaticallyresultinthefiguresseeninthetable.Ifthis
isnotthecase,changetherodlengthandthepitchpercentvalueintheswashmix,ignoringtheintermediatevalue,so
thatthehighandlowpitchesareproperlyadjusted.
Lowpitch Intermediatepitch Highpitch
Referencepitch -12° 0° +12°
Hovering -5° +4° +12°
Stunt -8° +3° +10°
3D -12° 0° +12°
Rodtoadjustthepitch
※ Whenconfirmingoradjustingthereferencepitch
range,thepitchcurveshouldbeatdefaultvalues.
2.【PitchCurve(Transmitterpitchcurveadjustment)】
ThisfunctionallowsyoutomakeadjustmentfreelybetweenspecificpointsastohowmuchMainRotorBladepitch
shouldbesetataparticularpitch(throttle)stickposition.Thisisoneofthebasicimportantadjustmentsofthe
helicopter.ThisadjustmentdependsontheMainRotorBladesusedandinteractionwiththethrottlecurve.Tobegin
withmakeadjustmentasshowninthefollowingfigure,referringalsotothetableintheprevioussection.Makefine
adjustmentsaftertestflying.
+12°
+4°
-5°
0% 100% 0% 100% 0% 100%
Stickposition StickpositionStickposition
【Hovering】 【Stunt】 【3D】
Rotorpitch
+3°
-8°
Pitchcurve
+10°
+12°
±0°
Rotorpitch
-12°
Rotorpitch
P.39
Page 40
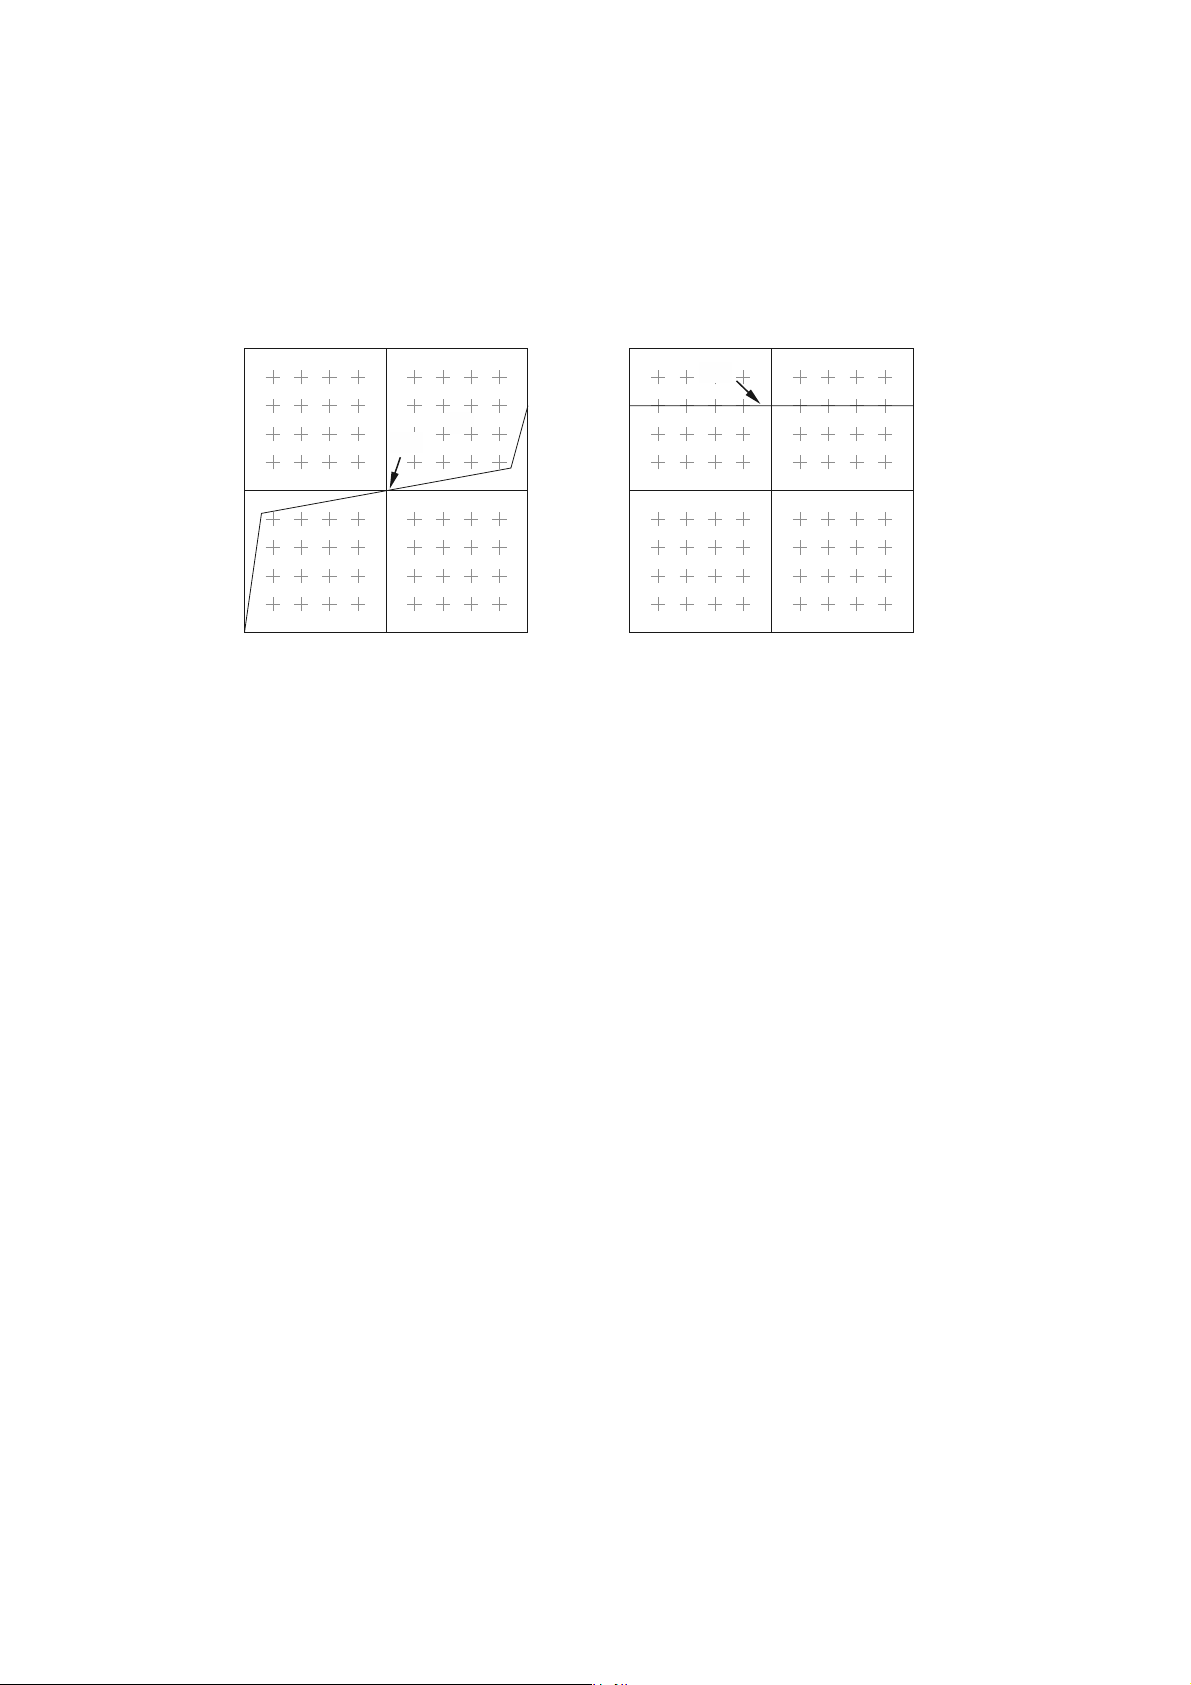
3.【Throttlecurve(TransmitterThrottleCurveFunction)】
Adjustthethrottlecurvesotherotorrpmisasperthetableonpage33
Fordetails,pleaserefertoyourtransmitterInstructionManualandadjustthevaluesaccordingly.
Pleasebeextracarefulnottoturnonthemotor.
Thethrottlevaluesherearejustexamples.Inordertopreventover-speedofthemainrotor,pleaseadjustcarefullyafter
testflyingthehelicopter.
※IfyourradiohasaThrottledelayfunction,werecommendyoutousethisto prevent sudden changesinrotorspeed
whenchangingflightmodes.
50%
Throttlecurve
80%
Poweroutput
0% 100%
Low LowStickposition Stickposition
【Hovering】 【Stunt/3D】
High High
Poweroutput
0% 100%
FINALCHEKSPRIORTOFLIGHT
Althoughsomeitemscanonlybeadjustedaftertestflights,itispossibletodosomefinalcheckpriortoflight.Please
recheckthefollowing:
① LookthroughallthestepsintheInstructionManualagainandmakesurethatallboltsarefirmlytightened.Checkin
particulartheboltsusedformountingtheballstothelevers,andeachboltwhichwastightenedafterbacklashadjustment
ofthegearmeshwascompleted.
② Confirmallservosfunctionsmoothlyandtheirdirectionofoperationiscorrect.
Alsocheckthattheservohornscrewsarefirmlytightened.
③ Makesurethegyrocontroldirectioniscorrect.
④ Makesurethatthebatteryinthetransmitterandthatpoweringthereceiver(inthehelicopter)isfullycharged.
⑤ Checkthatthereceiver,gyro,ESCandbatteryarefirmlysecured.
⑥ MakesurethattheMainRotorBladesandtheTailRotorBladesareattachedinthecorrectorientation.
Ifnoissueshavebeenfoundaftercheckingalloftheabove,testflythehelicopterandmakeadjustmentsasnecessary.
Ifpossible,thehelicoptershouldbetestflownundertheguidanceofanexperiencedoperator.
P.40
Page 41
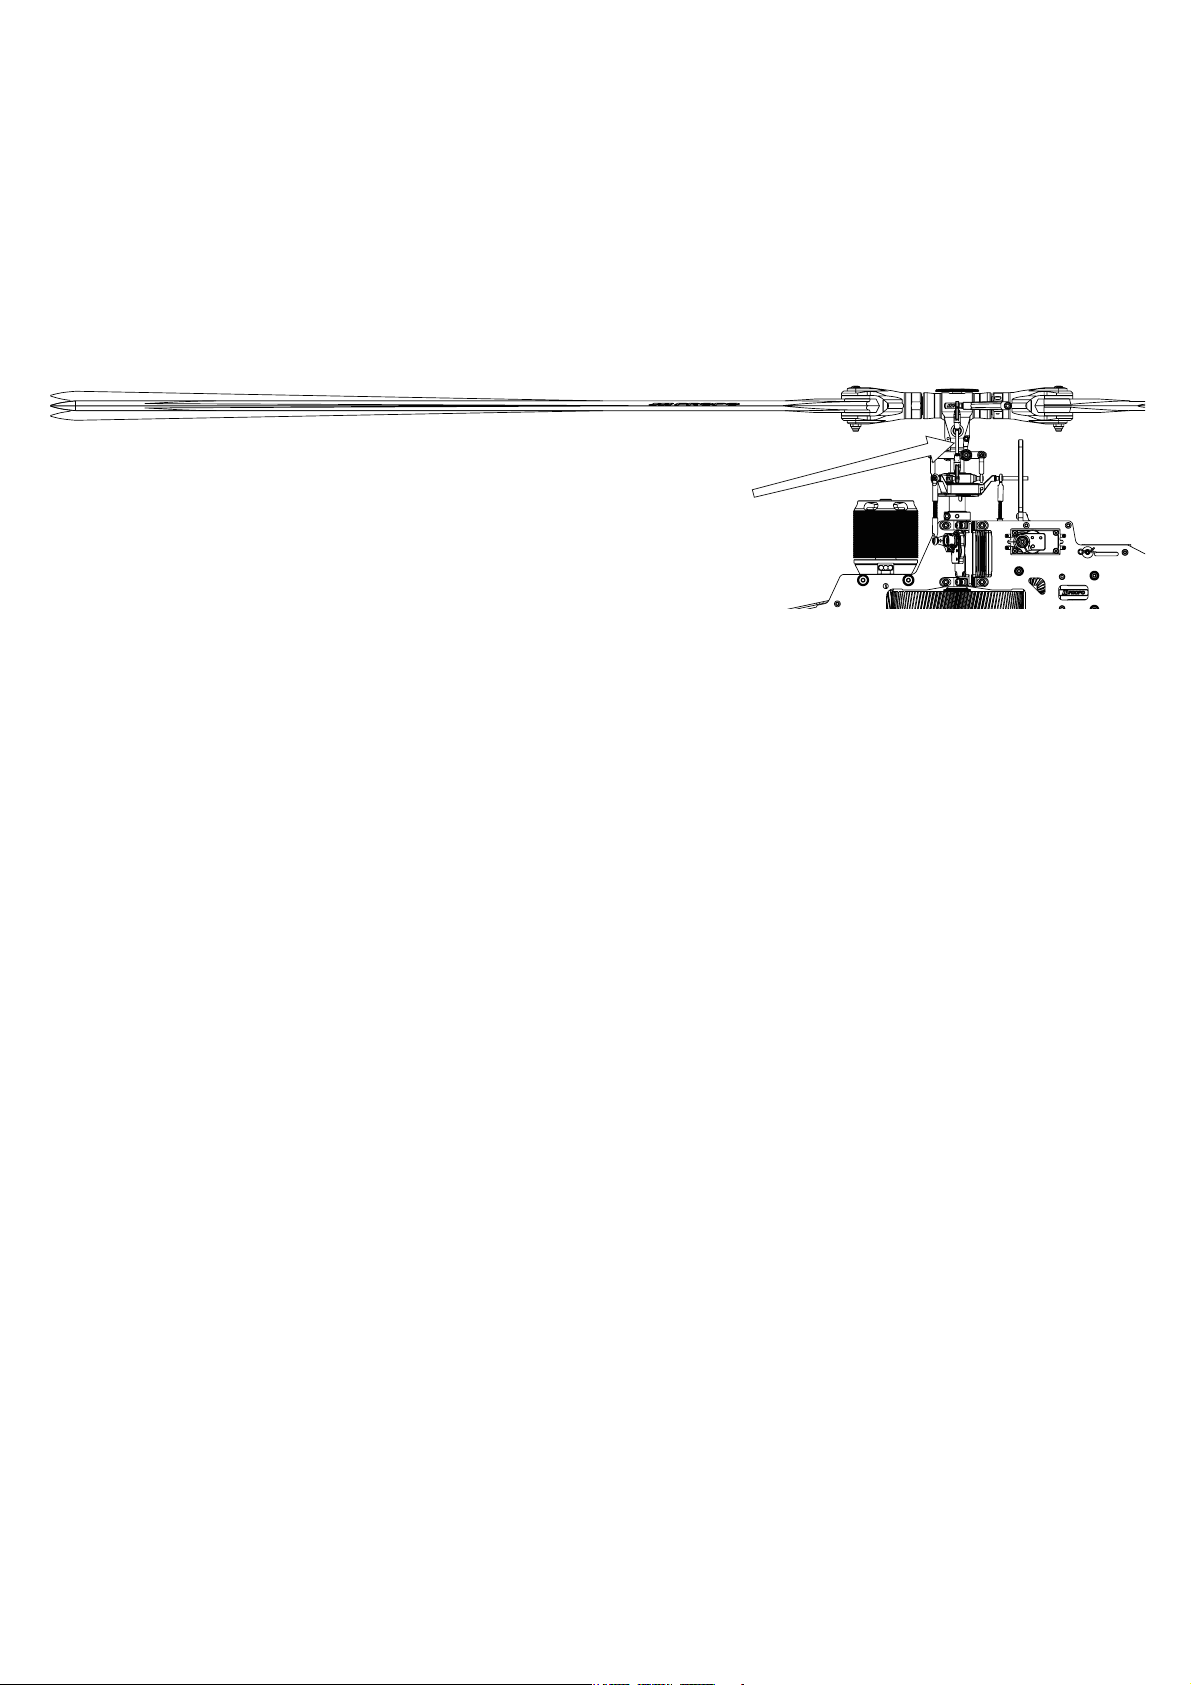
FINEADJUSTMENTFOLLOWINGTESTFLIGHT
【Itemswhichneedtobereadjustedafterthetestflight】
TrackingAdjustment
ThisistoadjustbothMainRotorBladestothesamepitch,soeachproducesthesameamountoflift.Iftheyarenot
uniform,theirtrajectoryisnotseenasanidenticallineasshowninthefigurebelow.Thisleadstovibrationsanda
helicopterwhichdoesnotflywell.Whenthehelicopterisabouttoleavetheground,lookattheplaneofrotationof
theMainRotorBladesfromtheside.NoadjustmentisrequiredifthetrajectoryoftheMainRotorBladesisseenasan
identicalline.Ifverticallymisaligned,pitchadjustmentononebladeisrequired.Oneitherthe'high'or'low'bladeadjustthe
UniversalLinkoftherodshowninthefollowingfigureinsuchamannerthatthebladepitchisincreasedordecreasedas
required.
Rodtoadjustthepitch
Trackingadjustmentisdangerous.Remainatleast5mormorefromthehelicopteratalltimes.
P.41
Page 42

BESURETOREADPRIORTOFLIGHT
Thishelicopterisnotatoy.Itisintendedforthosehavinghadpriorexperienceflyingaradiocontrolhelicopter,with
appropriateknowledgeandskills.
Evenanadvancedoperatorwell-versedinradiocontrolhelicoptersmayforgetsomesafetyprecautions.Refreshyour
memorybyreadingthefollowing.
Flythehelicopterinamannersuitablefortheoperator'sskills,avoidinganyunnecessaryriskduringflight.Formaneuvers
demonstratedinacompetition,emulatethemafterfullyunderstandingandmasteringtheoperatingmethodsandskillsrequired.
Whenflyingthehelicopter,notonlyabeginnerorintermediateoperator,butanadvancedoperatorshouldneverflyalone.
Listentoexplanationsfromanassistantoraninstructorhavingexpertise,andflyundertheirinstruction.
1.【PrecautionsafterAssembly】
ⓐ Checkallboltsarefullytightened.Tightenanylooseones.
ⓑ Besuretousescrewlockingagentwhentightenallbolts,ifsoinstructedintheInstructionManual.Whendoingthis,
degreasetheboltsandnutscompletely.
ⓒ Checktherotatingparts(MainRotorBlades,TailRotor)andthattheirboltsarefullytightened.
Howeveritisnecessarythatthebladescanbemovedslightlybackandforth.
ⓓ Setthethrottlesticktotheslowestposition,thenturnonthetransmitter(ensureitisfullycharged).
Next,turnonthehelicopterbyplugginginthemainbattery.Alwaysturnoninthisorder.
Operatethesticks(throttle/pitch,aileron,elevatorandrudder)toconfirmcorrectfunction.
Alwayshavethemotorunpluggedsothatthemotorwillnotturnon.
ⓔ Nevercutorbundletheantennawire.Putitintheantennatubesothatitwillnotbecaughtbytherotororthemain
gear.
Ifa2.4Ghztransmittersetisused,pleaseadjusttheantennatothecorrectorientationasrecommendedintheradio
manual.
ⓕ Securelyholdthehelicopterwithbothhandswhenmovingit.Thehelicopterhassharpparts(suchasmachined
metal)payattentiontoavoidinjury.
2.【PrecautionsPriortoFlight】
ⓐ MakesurethattheMainRotorBladesandTailRotorarefreefromanycracksordamage.Iftheyaredamagedeven
justalittle,donotusethem.
ⓑ Withthestickattheslowestposition,turnonthetransmitterthenreceiverandcheckforcorrectcontrolmovements.
ⓒ Careshouldbetakennottocatchyourclothsonthetransmitterstickswhenmovingthehelicopter.Movethehelicopter
tothetakeoffpositionusingtwoormorepersons-oneholdingthehelicopterwithbothhandsandtheothercarryingitems
requiredforflight,suchasthetransmitter.
ⓓ Besuretochecktheremainingcapacityofallbatteriespriortoflight.
ⓔ Conductadistance(range)testofthetransmitter.Withthetransmitterantennacollapsed,move15mormorefromthe
helicopter.Moveallthesticksandconfirmthemovementofthehelicopterservosfollowthesticks.Iftheydonotmove
properlydeterminethecauseandcorrectbeforeflight.Askforrepairifitisneeded.
ⓕ IftwoormoreRadiosareusedsimultaneouslyonthesamefrequencyyoucannotflytheradiocontrolhelicopter
becauseofinterference.Ifsomeoneelseisusingthesamefrequency,waituntilheorshehasfinishedoperation.Ifthere
isinterferencedespitenooneusingthesamefrequency.itisconceivablyanexternalinterferencesourceexists.Neverfly
untilthatinterferencesourcehasbeencleared.
ⓖ Whileconnectingthebatteriespoweringthehelicopter,makesurethethrottlestickisattheslowestpositionandthe
throttleholdswitchison.
3.【Precautionsduringflight】
ⓐ NeverflytheHelicopternearhouses,high-tensionlinesoraheavy-trafficroad.
ⓑ Neverflyitabovepeople,houses,behindyouortofaraway.Ifthehelicoptercrashesorcomesintocontactwiththe
humanbody,itcouldcauseseriousinjuryordeath.
P.42
Page 43

ⓒ Keepyoureyesonthehelicopterduringflight.Ifyoulookawayevenforashortperiodoftime,itmaychangeits
positionoryoumaylosesightofitandloosecontrol.
ⓓ Donotfly(orhover)withtheMainRotorBladesateyelevelbecauseitisdangerous.AlwaysensurethattheMain
RotorBladesarehigherthaneyelevel.
ⓔ Becarefulnottoexhaustthebatterypower.Usethetimerfunctiononthetransmitter,keeptheremainingbattery
powerundercheck.
ⓕ WhenstoppingtheMainRotorBladesnevertouchthem.Waitforthemtostopnaturally.
ⓖ Ifyounoticeanabnormalityduringflight,landthehelicopterimmediatelyandcheckforanyloosebolts,etc.Donotfly
itagainuntilthecausehasbeencompletelyeliminated.
ⓗ InacrashpartsliketheLi-PobatteryortheESCinthehelicoptercouldcatchfire.Keepafireextinguishernearduring
flightforsafetyandfireprevention.
4.【Precautionsafterflight】
ⓐ Checkforanylooseboltsorshakyparts.Ifthereisanyabnormality,repairthembeforethenextflight.
ⓑ IftheMainRotorBladesoranyotherpartcomeintocontactwiththegroundduringflight,donotusethoseparts
eveniftheirappearancelooksfaultless.Replacethemwithnewones.
ⓒ Checkwhetherornotthebattery,receiver,gyro,etc.arefirmedsecured.
ⓓ Checktheantennawirefromtimetotimebecauseitscoremayhavebeenbroken.Ifbrokenwithinthecoating,itmay
notbeimmediatelyapparent.Refertothemanufacturerperiodicallyforservicing.
P.43
Page 44
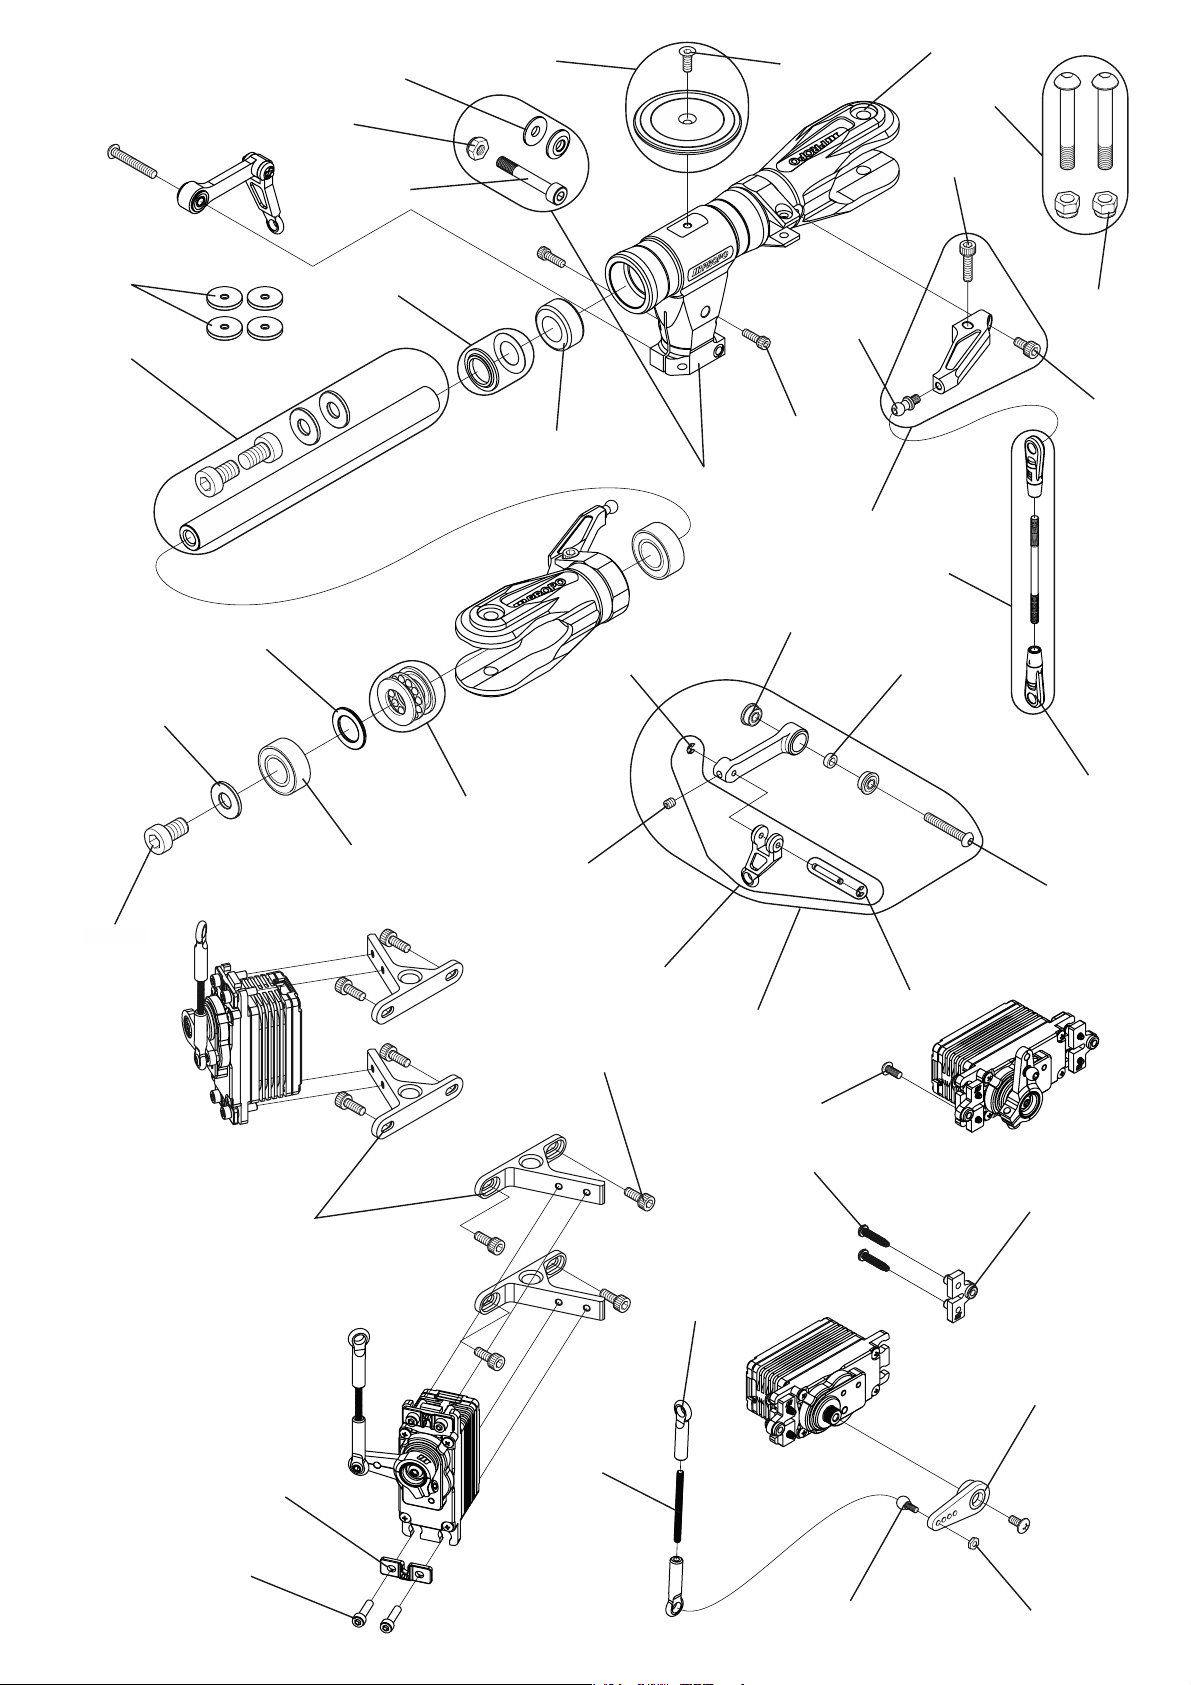
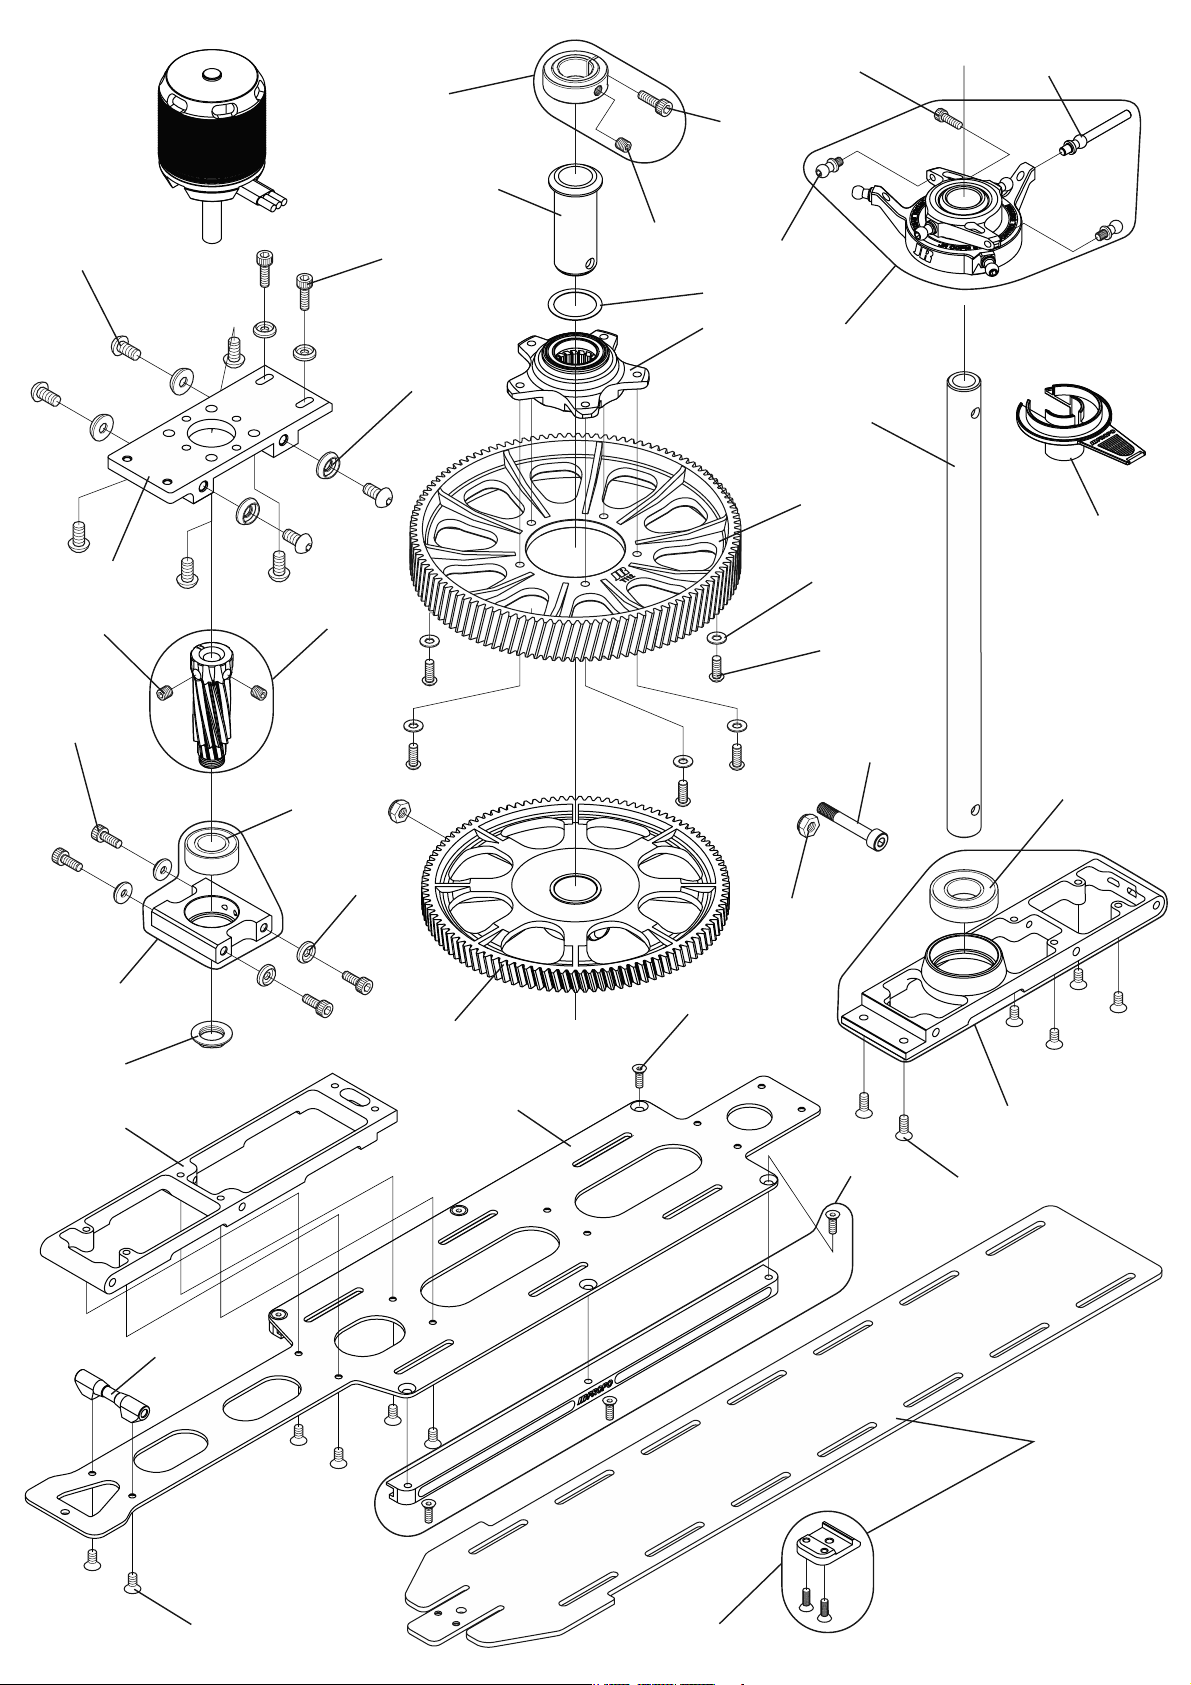
80164
70664
80181
61933
80095
61935
70719
80015
70776
61937
70620
70759
70758
81005
81017
96344
80067
81016
61934
80115
61936
81041
80075
96452
80012
80259
70119
70760
80260
80264
70010
70657
61938
80013
80193
80257
96459
61939
70004
05015
80258
96459
P.44
P.44
80089
70661
80037
Page 45

Item# Description Quantity NoteDescription
05015 Superhorn 5
61933 Headbutton 1 w/FlatheadboltM3 × 8
61934 Centerhub 1
61935 Mainbladeholderassembly 1 L-1910ZZ,SST-1810DSGalreadyinstalled
61936 Pitcharm 1 w/ControlballL5.5,Socketheadbolt
61937 Spindleshaft 1 w/Bolt,Washer
61938 FBLWashoutarmassembly 1 LF-730ZZalreadyinstalled
61939 Servomount 2
70004 Universallink 10
70010 Washoutlink 2 w/Washoutlinkpin
70119 Spacer3 × 5 × 1.8 2
70620 SpindlewasherM6 2
70657
70661 JoinballscrewL4 5
70664 Washer4 × 11 × 1.7 2
70719 HGMainbladeboltsetM5 2 Silver,w/Nylonlocknut
70758 Gripspacer 2 w/Shimwasher
70759 Thrustwasher 2
70760 FBLuniversallink 4
70776 RotorspacerALt3 4 Color:Silver
Washoutlinkpin
w/Specialsocketheadbolt,Socketheadbolt,Washer,Nylonlocknut
2 w/Ering,For1kit
80012 SocketheadboltM3 × 6 10
80013 SocketheadboltM3 × 8 10
80015
80037 NutM2 10
80067 SetscrewM3 × 3 10
80075 NylonlocknutM5 10
80089 SocketheadboltM2.6 × 10 10
80095 FlatheadboltM3 × 8 10
80115 SocketheadboltM2.6 × 8 10
80164 NylonlocknutM4(t3.8) 10
80181 SpecialsocketheadboltM4 × 26 2
80193 ButtonheadboltM2.5 × 6 2
80257 HEXTappingscrewM2.6 × 12 10
80258 ThreadedrodM2.3 × 30 2
80259 FBLthreadedrodL45 2 w/FBLuniversallink
80260 ButtonheadboltM3 × 20 10
80264 SocketheadboltM6 × 10(Lowprofile) 5
81005 Shieldedbearing10 × 19 × 7 2 L-1910ZZ
81016 EStopperringM1.5 10
81017 Thrustbearing10 × 18 × 5.5 1 SST-1810DSG
81041 FlangedbearingF3×7×3 2 LF-730ZZ
SocketheadboltM3 × 12
10
96344 Damperrubber90(10 ∅ ) 2
96452 ControlballL5.5 1
96459 Servomountplateset 1 Servoholdingplate,ServomountplateFor1kit
P.45
Page 46
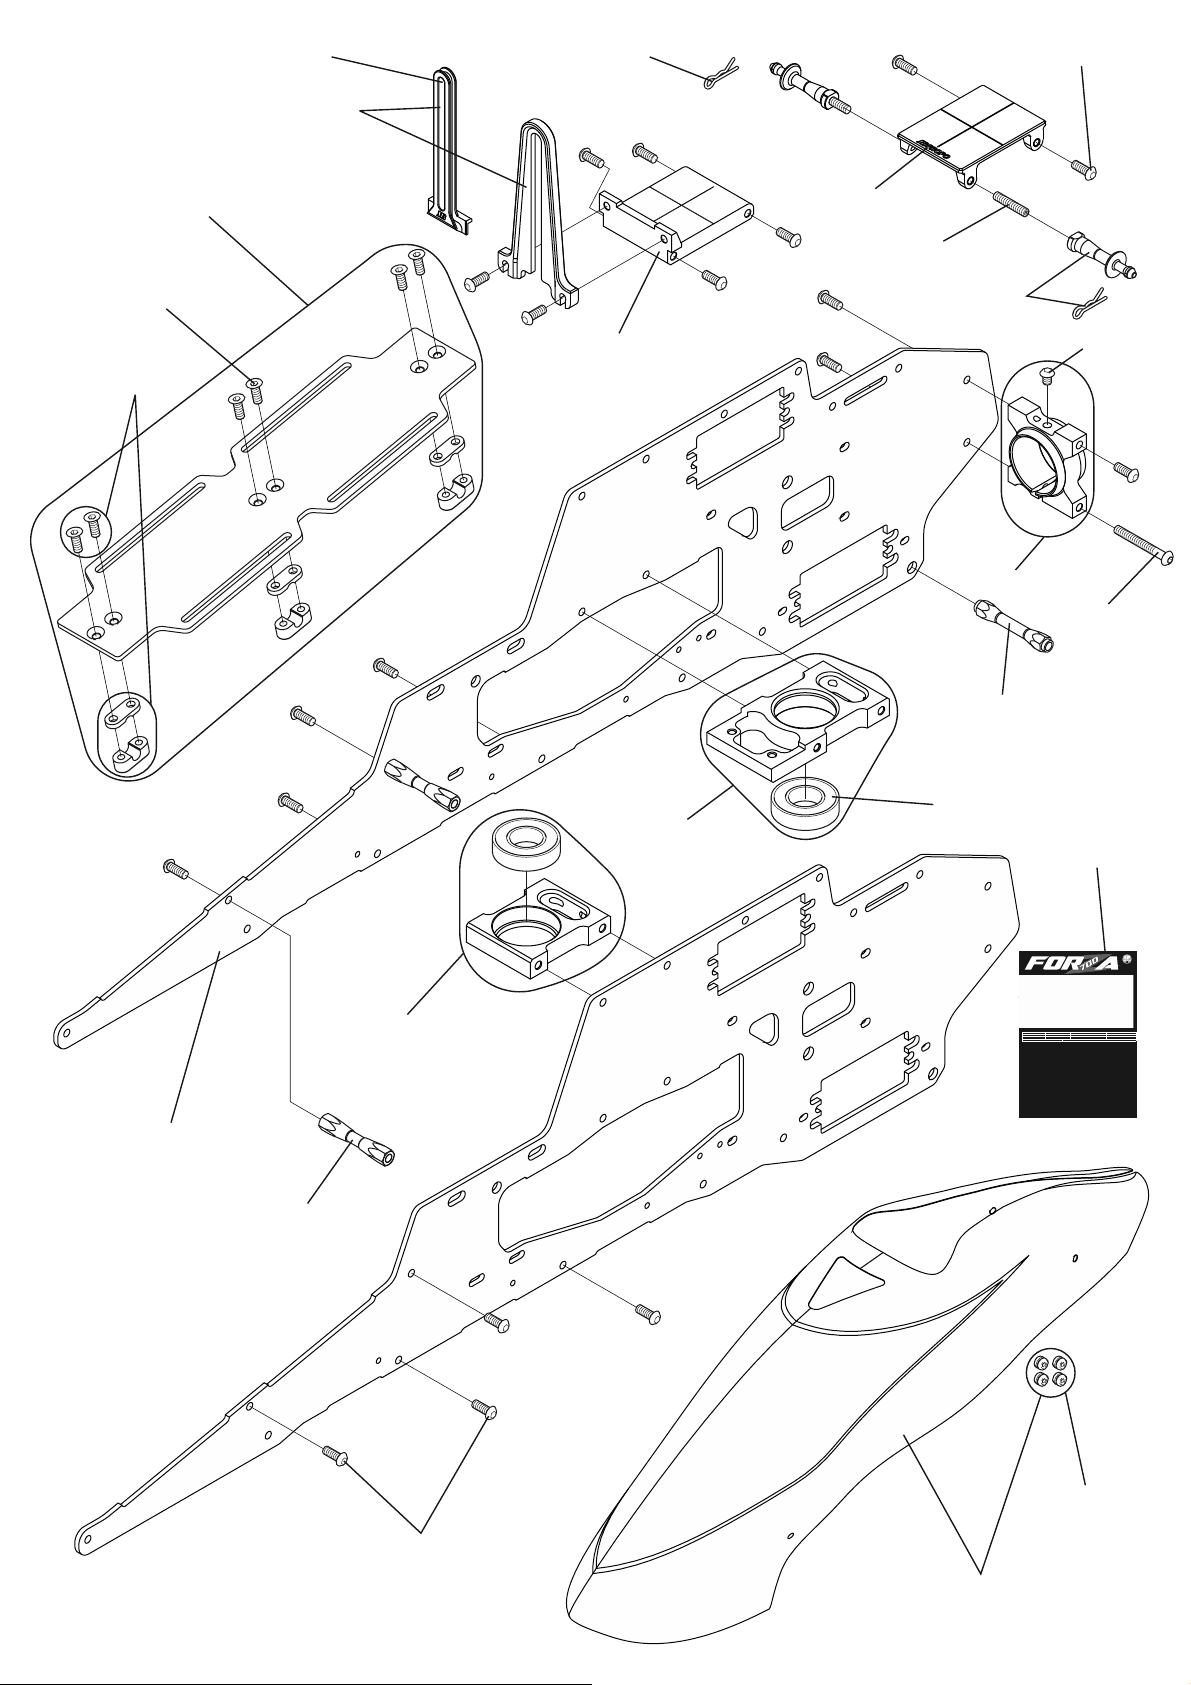
61943
61942
80262
80119
80095
70764
61941
61944
61802
80068
70763
80204
61947
80261
70762
61940
70761
61945
61946
81055
96544
主要諸元
もくじ
はじめに
1.
…………………………………………………………………………………………………………………P.2-P.5
キット以外に必要なもの
2.
………………………………………………………………………………………………………P.5
組み立てに必要なもの・あると便利なもの・ユニバーサルリンクについて・仮止めの指示
3.
4.
工程1
5.
…………………………………………………………………………………………………………………P.8-P.10
工程2
6.
………………………………………………………………………………………………………………P.11-P.16
工程3
7.
…………………………………………………………………………………………………………………P.17-P.18
工程4
8.
…………………………………………………………………………………………………………………P.19-P.24
工程5
9.
…………………………………………………………………………………………………………………P.25-P.29
工程6
10.
…………………………………………………………………………………………………………………P.30-P.31
バッテリー、アンプの搭載例
11.
………………………………………………………………………………………………P.32
バッテリー選択の目安
12.
………………………………………………………………………………………………………P.33
組立済み部品の補修
…………………………………………………………………………………………………P.34-P.37
13.
組み立て後の総合調整
14.
………………………………………………………………………………………………………P.38
プロポの操作性に関する設定と調整
15.
………………………………………………………………………………P.39-P.40
フライト前の最終チェック
…………………………………………………………………………………………P.40-P.41
16.
…………………………………………………………………………………………………P.41
テストフライト後の微調整
17.
…………………………………………………………………………………P.42-P.43
フライト前に必ずお読みください
18.
パーツリスト
…………………………………………………………………………………………………………P.44-P.57
19.
製品の保証と賠償責任・修理とアフターサービス、製品の譲渡について
20.
…………………………P.6
……………………………………P.58-P.59
組立説明書
P.7
P.46
P.46
60072
80119
82406
Page 47

ytitnauQnoitpircseD#metI etoNnoitpircseD
4temmorgrebbuR27006
61802
6194
80241
Metalgyromount
6 Middlebearingblockassembly 1 6901ZZalreadyinstalled
HEXTappingscrew(black)M3 × 8
1
1emarfreppunobraC04916
1liartroppussuidaR34916
1tekcarbtroppussuidaR44916
1redlohmoobliatlateM74916
223LrebmemssorC16707
223LpetS/wrebmemssorC26707
0151×3MwercsteS86008
018×3MtlobdaehtalF59008
018×3MtlobdaehnottuB91108
014×3MtlobdaehnottuB40208
10
0152×3MtlobdaehnottuB16208
01mm4nippanS26208
ZZ109616×42×21gniraebdedleihS55018
8×3MtlobdaehtalF,B/AtekcarbyarT/w1LyartnobraC14916
liartroppussuidaR/w1troppussuidaR24916
dellatsniydaerlaZZ10961ylbmessakcolbgniraebpoT54916
mm4nippanS/w212LhctacydoB36707
8×3MtlobdaehtalF/wB/A2testekcarbyarT46707
temmorgrebbuR/w1ydobtnorfPRF60428
1launamylbmessA44569
P.47
Page 48
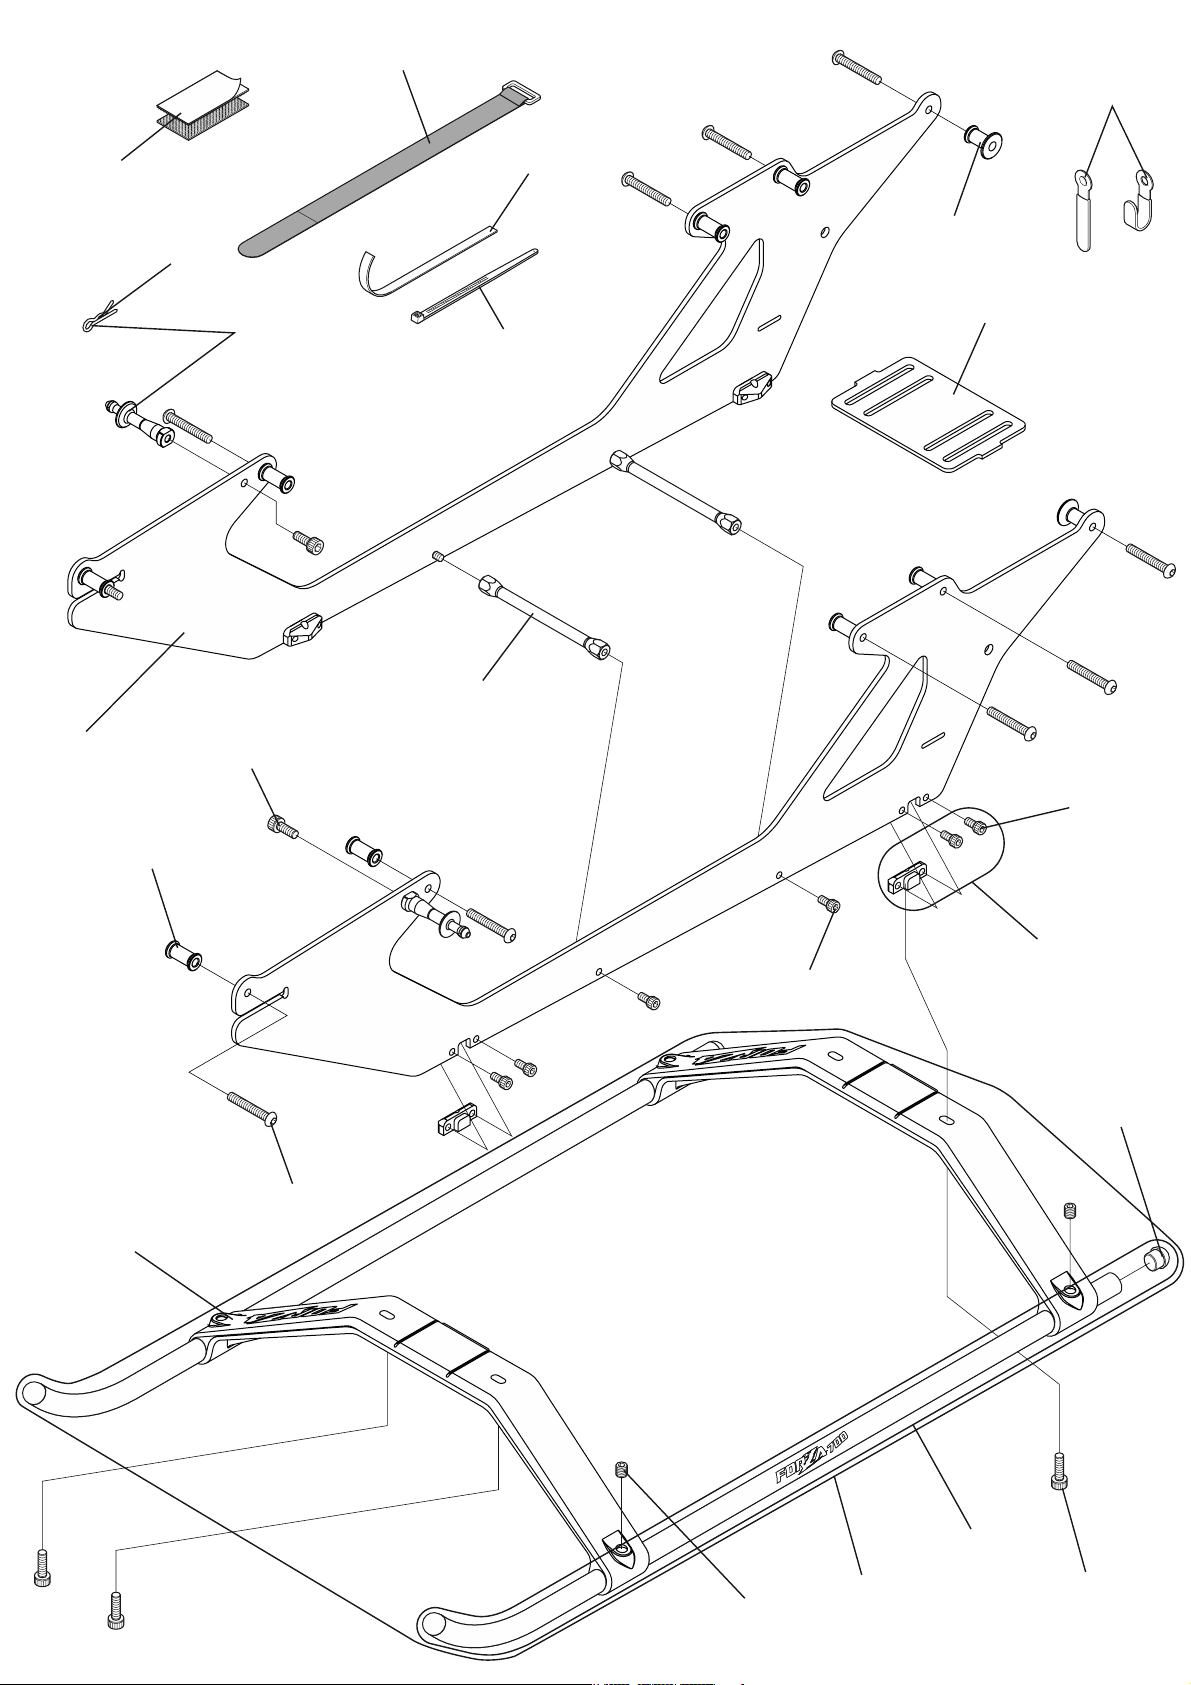
61675
70189
61629
80262
70763
61303
70766
61949
75059
70767
61948
61951
80013
80227
70765
70768
80227
70023
80260
P.48
P.48
80004
61950
61952
80014
Page 49

Item# Description Quantity NoteDescription
61303 HookandloopstrapS 2 L:200
61629 HookandloopFastenerL60 2
61675 Hookandloopstrap 2 BlackL:260
61948 Carbonlowerframe 1
61949 CarbontrayS 1
61950 Landingstrutset 1 Oneset
61951 Landingstrut 2 w/SetscrewM4 × 4
61952 Landingskid 2 w/Landingskidcap
70023 Landingskidcap 4
70189 Cordholder 10 w/FlatwasherM3
75059 NylonstrapS 10
70763 BodycatchL21 2 w/Snappin4mm
70765 SpacerL12 2
70766 SpacerL11 2
70767 CrossmemberL60M2.6 2
70768 Landingstrutadapter 2 w/SocketheadboltM2.6 × 5
80004 SetscrewM4 × 4 10
80013 SocketheadboltM3 × 8 10
80014 SocketheadboltM3 × 10 10
80227 SocketheadboltM2.6 × 5 10
80260 ButtonheadboltM3 × 20 10
80262 Snappin4mm 10
P.49
Page 50
96292
61956
80014
80115
70769
80201
61953
80004
80013
61954
81005
80014
70631
80004
96452
70775
61957
61960
61962
61958
61961
80036
80119
80181
81055
61955
70572
61967
70770
70583
61959
61963
80164
80263
61966
61965
80095
61964
P.50
P.50
80065
70771
Page 51

Item# Description Quantity NoteDescription
61953 Motormount 1
61954 PiniongearT11 1 w/SetscrewM4 × 4
61955 Pinionbearingblockassembly 1 L-1910ZZalreadyinstalled
61956 Autrotationsleeve 1
61957 Autrotationunit 1 Bearingalreadyinstalled
61958 MaindrivegearT112 1
61959 TaildrivegearT104 1
61960 Swashplateassembly 1 w/ControlballL5.5,Jointballshaft
61961 Swashgauge 1
61962 Mainshaft 1
61963 Carbonmiddleplate 1
61964 Batterymountplate 1 w/hook
61965 Batterymountplaterail 2 w/FlatheadboltM2.5 × 6
61966 MiddlecrossmemberA 1 6901ZZalreadyinstalled
61967 MiddlecrossmemberB 1
70572 PinionnutM9 1
70583 SpecialwasherM3 10
70631 SpecialwasherM4 10
70769 Jointballshaft 1
70770 Platecrossmember 1 L32P20
70771 Batteryplatehook 1
70775 Shimwasher15 × 19 × 0.2 2
80004 SetscrewM4 × 4 10
80013 SocketheadboltM3 × 8 10
80014 SocketheadboltM3 × 10 10
80036 FlatwasherM3 10
80065 FlatheadboltM3 × 6 10
80095 FlatheadboltM3 × 8 10
80115 SocketheadboltM2.6 × 8 10
80119 ButtonheadboltM3 × 8 10
80164 NylonlocknutM4(t3.8) 10
80181 SpecialsocketheadboltM4 × 26 2
80201 ButtonheadboltM4 × 8 10
80263 FlatheadboltM2.5 × 6 10
81005 Shieldedbearing10 × 19 × 7 2 L-1910ZZ
81055 Shieldedbearing12 × 24 × 6 1 6901ZZ
96292 Mainshaftcollar 1 w/Socketheadbolt,Setscrew
96452 ControlballL5.5 1
P.51
Page 52
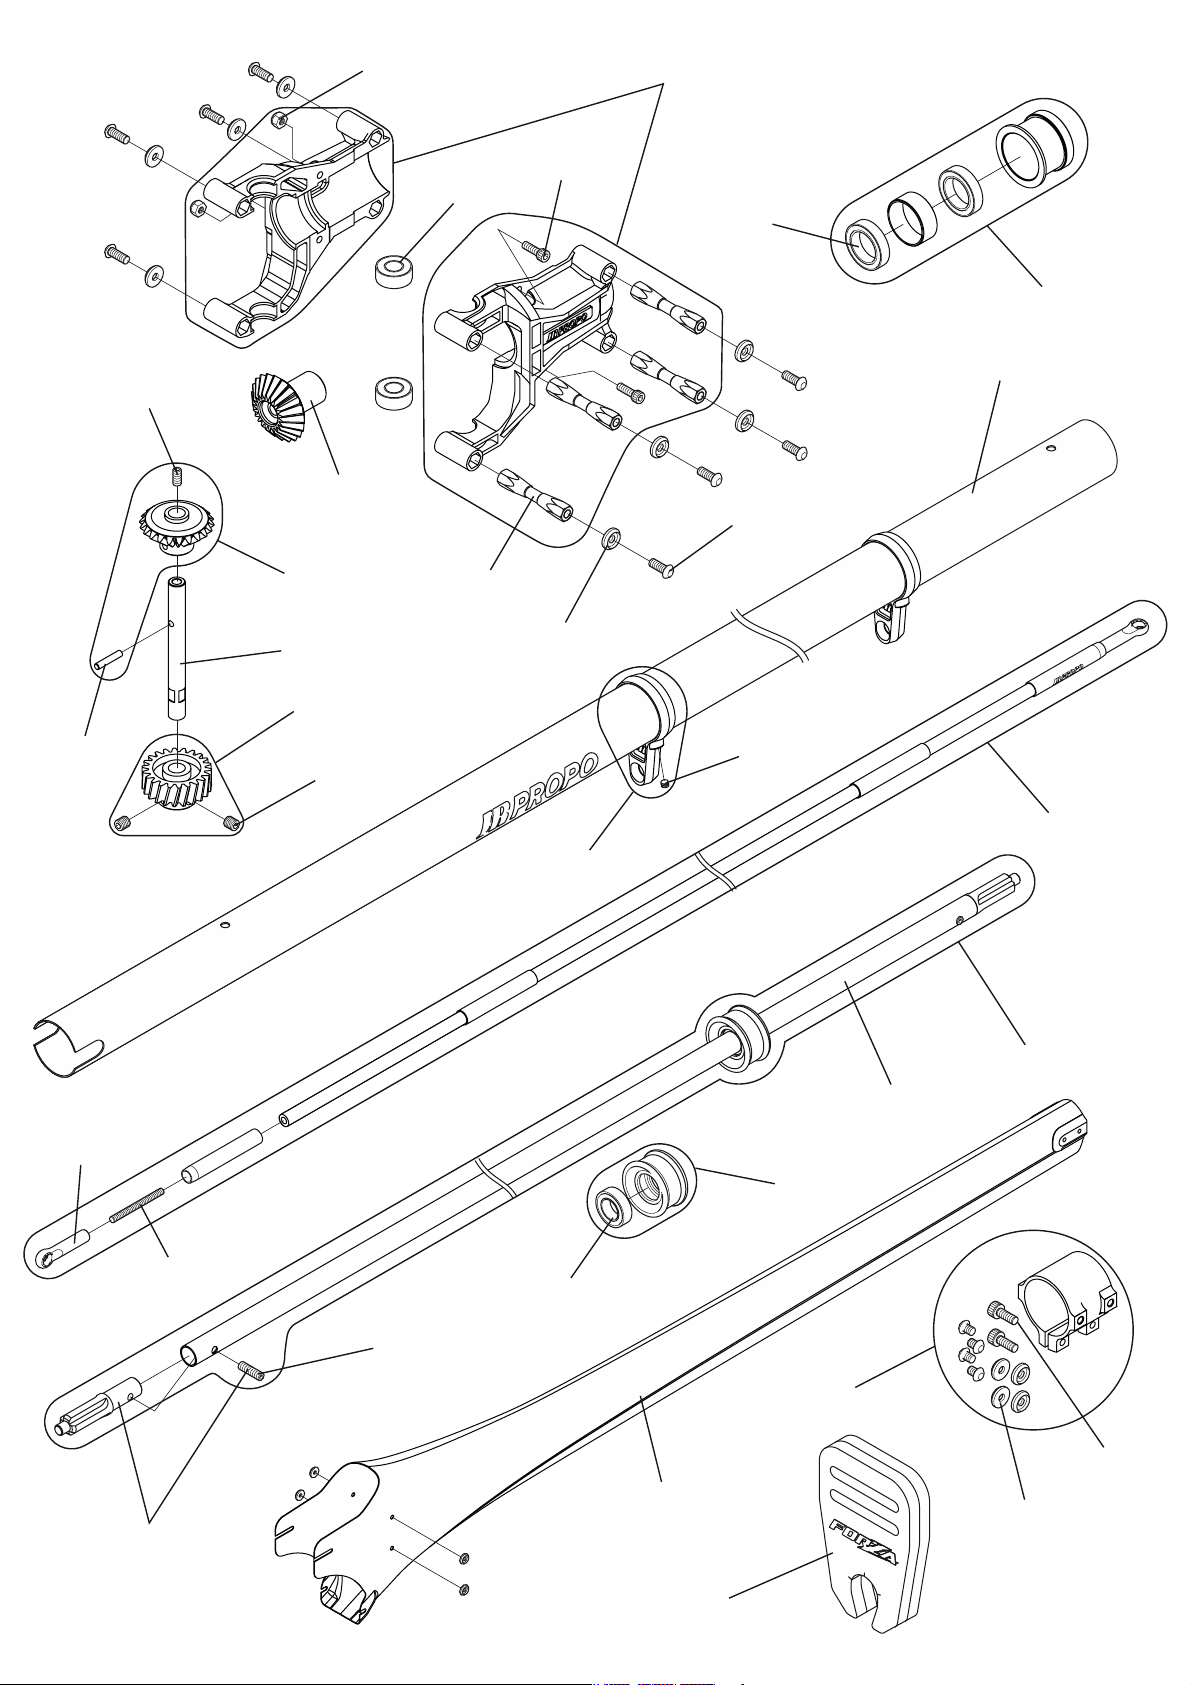
80168
61970
80129
61969
80115
81073
81068
61974
83170
80119
70772
70004
61971
61972
61973
80004
70761
70583
80001
83173
61968
83172
83171
96198
P.52
P.52
80258
81067
80192
61975
80013
82407
80204
96197
61976
Page 53

Item# Description Quantity NoteDescription
61968 Tailcontrolrodguideset 2 w/SetscrewM3 × 4
61969 Tailpinionunitset 1 Oneset
61970 BevelgearAT22 2
61971 BevelgearBT22 2 w/Bevelgearpin,SetscrewM3 × 6
61972 Tailpinionshaft 1
61973 TailpiniongearT22 1 w/SetscrewM4 × 4
61974
61975
61976 Bladeholder 1 forrearbody
70004 Universallink 10
70583 SpecialwasherM3 10
70761 CrossmemberL32 2
70772 Bevelgearpin∅ 2.3 2
80001 SetscrewM3 × 4 10
80004 SetscrewM4 × 4 10
80013 SocketheadboltM3 × 8 10
80115 SocketheadboltM2.6 × 8 10
80119 ButtonheadboltM3 × 8 10
80129 NylonlocknutM2.6 10
80168 SetscrewM3 × 6 10
80192 SetscrewM3 × 10 10
80204 ButtonheadboltM3 × 4 10
80258 ThreadedrodM2.3 × 30 2
81067 Shieldedbearing8 × 14 × 4 2 L-1480ZZ
81068 Shieldedbearing12 × 18 × 4 1 6701ZZ
81073 Shieldedbearing6 × 13 × 5 2 L-1360ZZ
82407 FRPrearbody 1
83170 TailboomL813 1
83171 Driveshaft 1
83172 Driveshaftset 1 w/Shaftdriveguide,Driveshaftjoint
83173 TailcontrolrodL740 1 Oneset
Tailpinionunitbearingblockassembly
Rearbodyclamp
1 Bearingalreadyinstalled
1
w/Socketheadbolt,Buttonheadbolt,Specialwasher
96197 Driveshaftjoint 2 w/SetscrewM3 × 10
96198 Shaftdriveguide 1 w/L-1480ZZ
P.53
Page 54
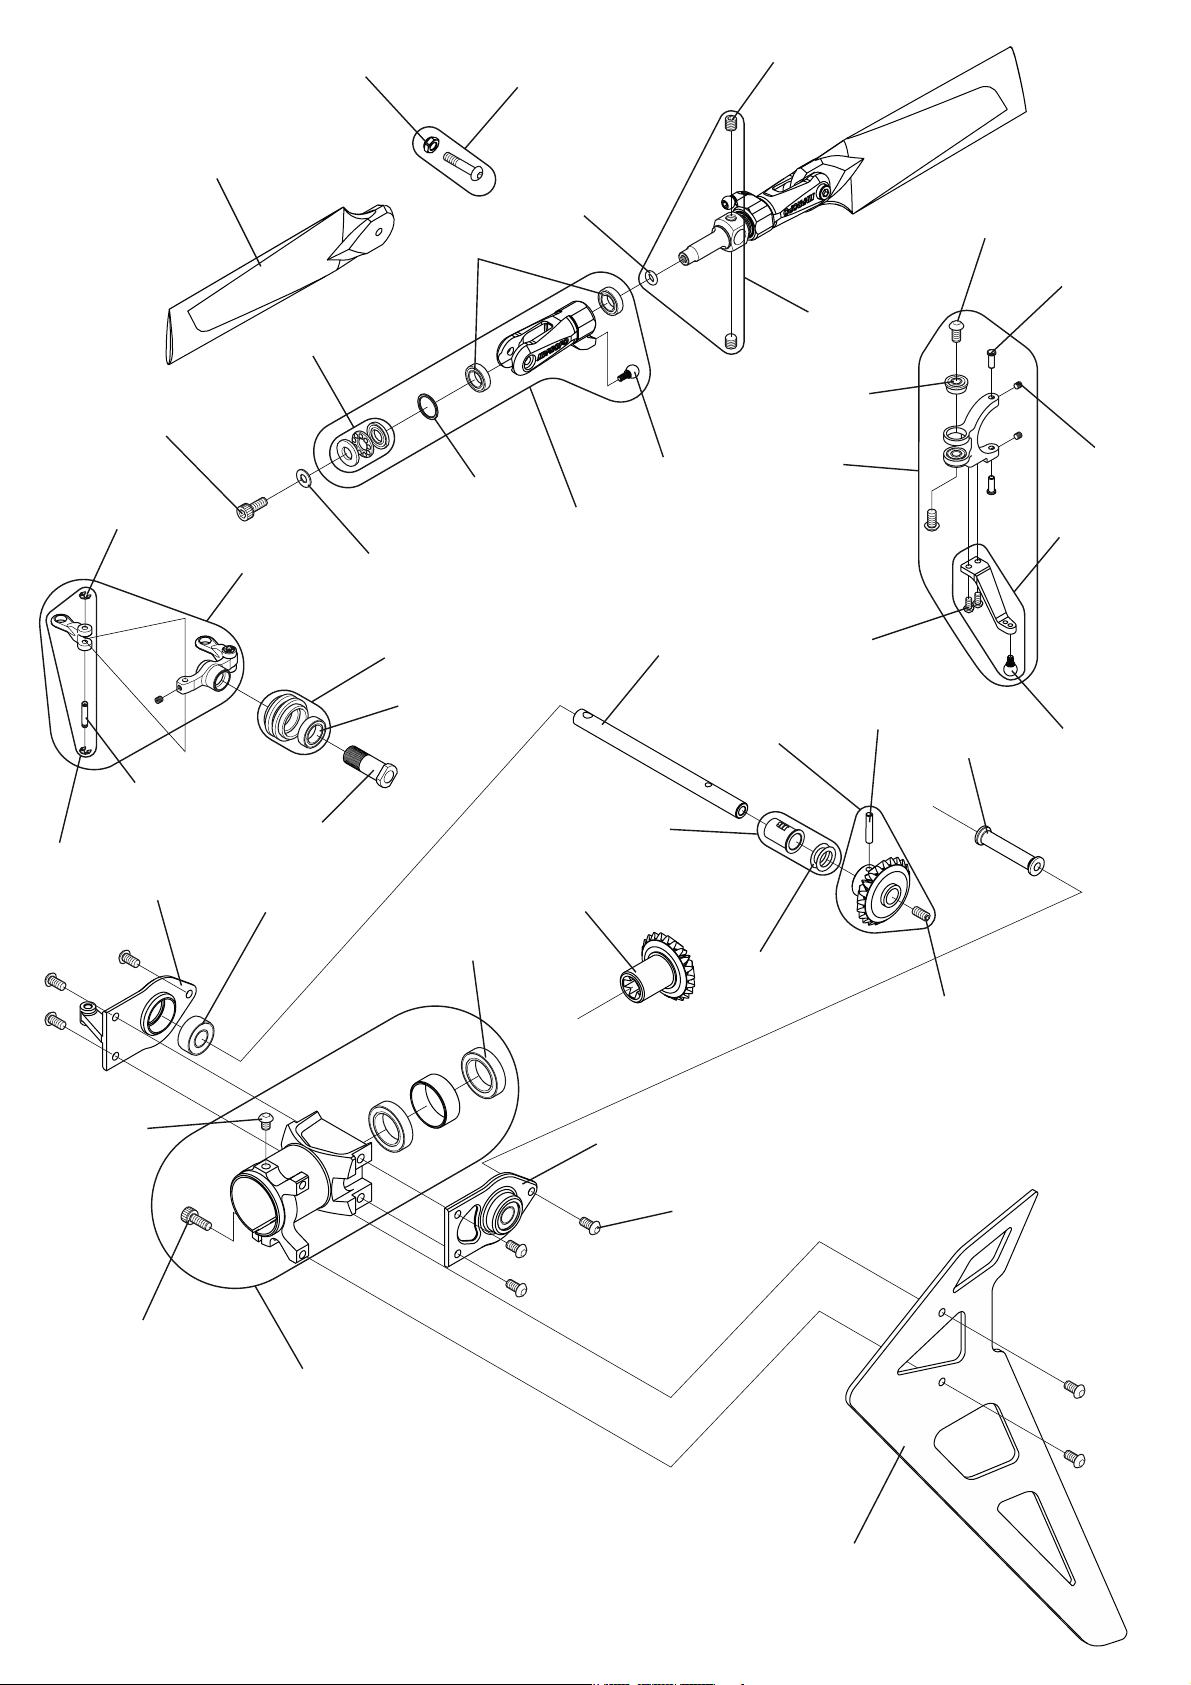
80013
81016
61978
61780
81029
80039
80036
81071
70545
80266
70163
61977
70661
80004
61779
81041
61979
80091
70773
80245
61980
60556
70293
61986
80204
81073
96330
61201
81065
81068
61970
61981
61982
61985
61971
80091
80205
80249
70772
61984
80168
70660
P.54
P.54
80013
61983
61987
Page 55

Item# Description Quantity NoteDescription
60556 TailPClinkB 2 w/Linkpin,EstopperringM1.5
61201 Tailslidering 1 w/L-1170ZZ
61779 Tailcenterhub∅ 6 1 w/SetscrewM4 × 4,O-ring
61780 HGmetaltailPCplate 1 w/SetscrewM2 × 2,Link,Pin
61970 BevelgearAT22 2
61971 BevelgearBT22 2 w/Bevelgearpin,SetscrewM3 × 6
61977 Metaltailbladeholderassembly 1 Bearingalreadyinstalled
61978 Carbontailrotorblade 2
61979 Tailpitchcontrolleverset 1 A/B,Bearingalreadyinstalled
61980 Tailpitchcontrollever 1 w/JointballscrewL3
61981 Tailoutputshaft 1
61982 Tailoutputshaftcollar 1 w/Polyslider
61983 Tailgearcaseassembly 1 Bearingalreadyinstalled
61984 Tailgearcasecrossmember 1 Color:Silver
61985 TailgearcaseplateL 1 L-1360ZZalreadyinstalled
61986 TailgearcaseplateR 1 L-1360ZZalreadyinstalled
61987 Carbonverticalfin 1
70163 O-ring3.5 × 5.5 × 1 2
70293 HGTailPClinkpin 2
70545 Washer8 × 10 × 0.5 2
70660 JoinballscrewL3 5
70661 JoinballscrewL4 5
70772
70773 TailPCleverpin 2
80004 SetscrewM4 × 4 10
80013 SocketheadboltM3 × 8 10
80036 FlatwasherM3 10
80039 NylonlocknutM3(t2.8) 10
80091 ButtonheadboltM3 × 6 10
80168 SetscrewM3 × 6 10
80204 ButtonheadboltM3 × 4 10
80205 Polyslider6 × 9.5 × 0.13 10
80245 SetscrewM2 × 2 5 w/HEXwrench0.89
80249 ButtonheadboltM2 × 5 10
80266 BladeboltsetM3 × 15(Silver) 1 Bolt × 2,Nylonlocknut × 2
81016 EStopperringM1.5 10
81029 Thrustbearing5 × 10 × 4 2 T5-10
81041 FlangedbearingF3×7×3 2 LF-730ZZ
81065 Shieldedbearing7 × 11 × 3 2 L-1170ZZ
81068 Shieldedbearing12 × 18 × 4 1 6701ZZ
81071 Shieldedbearing6 × 10 × 3 2 L-1060ZZ
81073 Shieldedbearing6 × 13 × 5 2 L-1360ZZ
Bevelgearpin∅ 2.3 2
96330 Tailslideringsleeve 1
P.55
Page 56
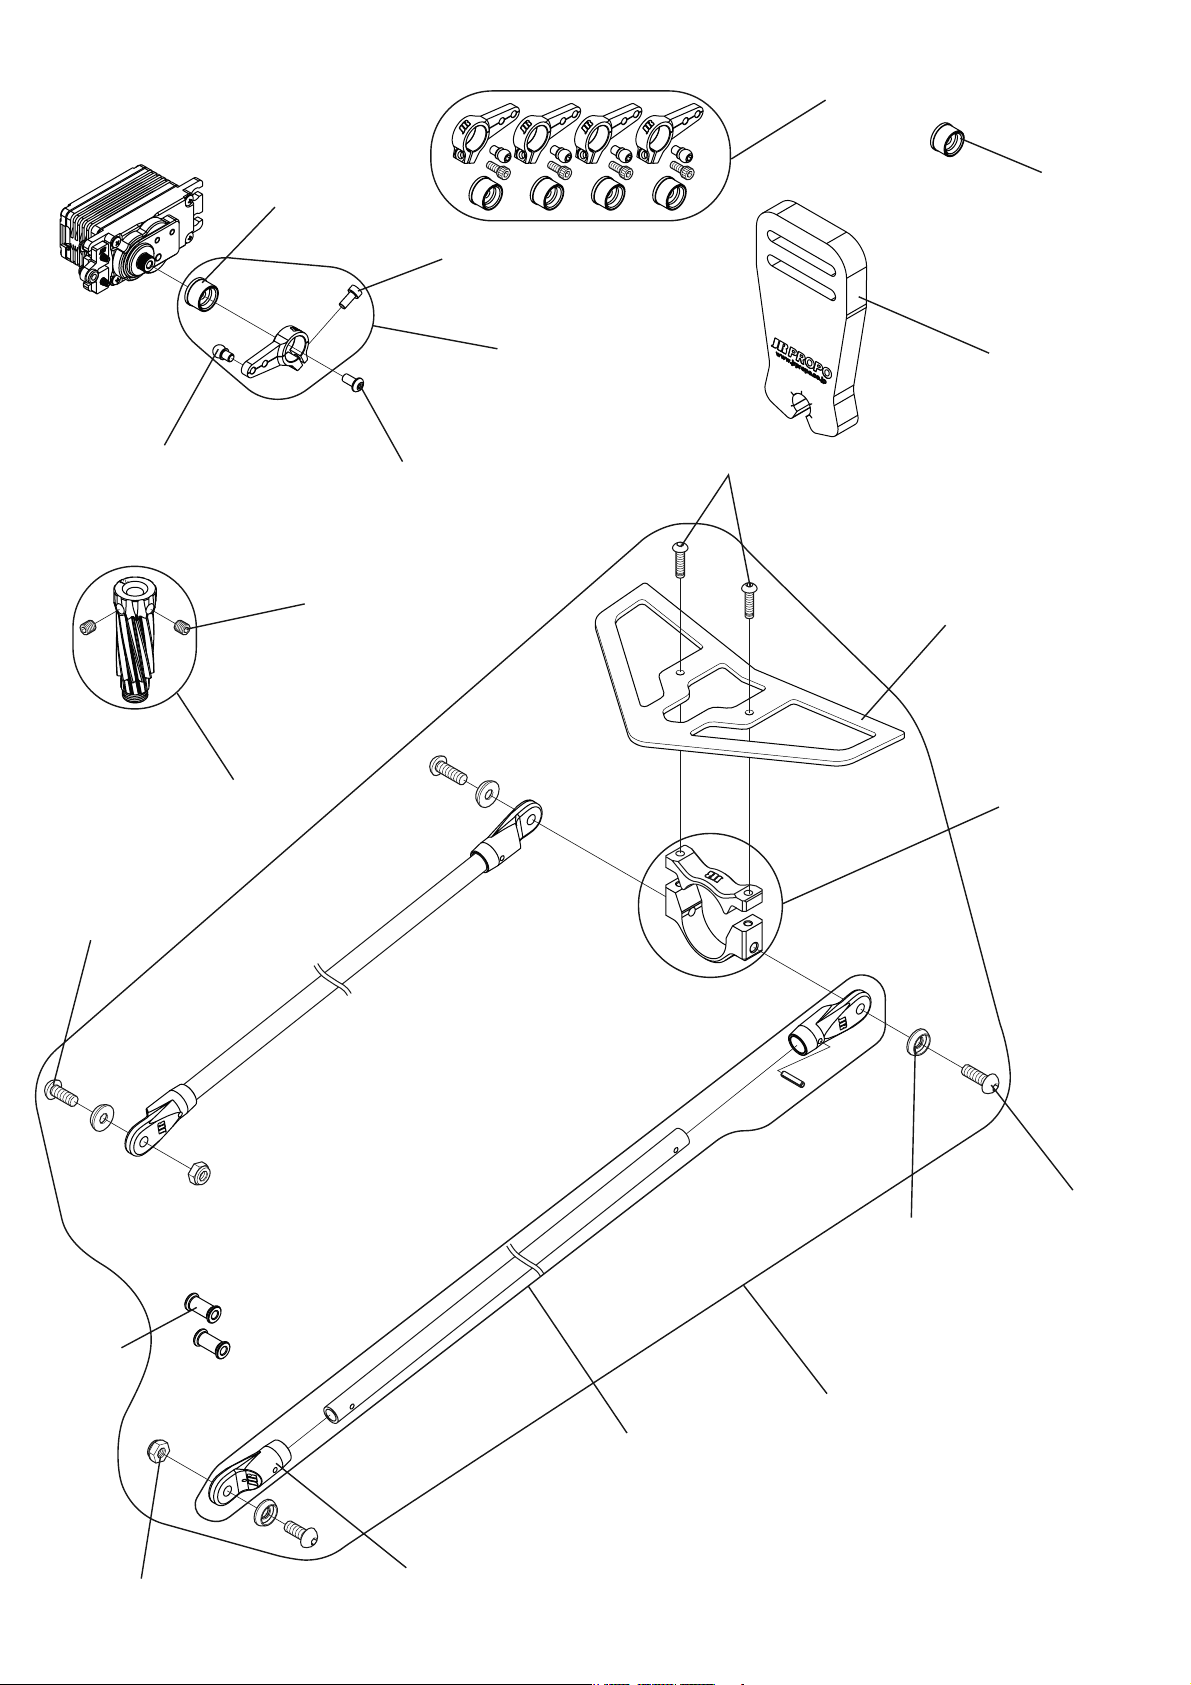
Optionalparts-Notincludedinthekit
61992
70701
70721
80004
80091
80117
61991
70712
61300
80214
61549
80265
70765
61989
61990
80171
70631
P.56
P.56
61988
83174
70774
80164
Page 57

Item# Description Quantity NoteDescription
61300 Bladeholder 1
61549 CarbonhorizontalfinB 1
61988 Standardboombraceset 1 Oneset
61989 PiniongearT12 1 w/SetscrewM4 × 4
61990 Tailboombraceclamp 1
61991
61992
70631 SpecialwasherM4 10
70701
70712
70721
70765 SpacerL12 2
70774 Tailboombraceend 4 SpringpinM2 × 9
80004 SetscrewM4 × 4 10
80091 ButtonheadboltM3 × 6 10
80117 SocketheadboltM2.6 × 6 10
80164 NylonlocknutM4(t3.8) 10
80171 ButtonheadboltM4 × 10 10
80214 ButtonheadboltM3 × 12 10
80265 ButtonheadboltM4 × 12 10
83174 Carbontailboombrace 2 w/Tailboombraceend
AdjustablemetalhornD
AdjustablemetalhornD× 4
ControlballL2.5 1
Adjustablemetalhorninner(Futabatype)
AdjustablemetalhorninnerV2 1
1 w/Servohorninner,Controlball
1
w/Servohorninner,Controlball4pcseach
1
P.57
Page 58

PRODUCTWARRANTYANDLIABILITYINDEMNITY
PRODUCTWARRANTY
Thefollowingdescribestheprovisionsonproductwarrantyandliabilityindemnity.Readthemthoroughlybeforeusing
theproduct.
1.Theproducthasbeendeliveredtoyouafterstrictinspection.Afterunpackingthekit,besuretocheck
itscontents.Ifthereareanyfaultyparts,contactourDistributorpriortoassemblingthehelicopter.
2.Foranypre-assembleditem(rotorhead,etc.),besuretocheckassemblyofpartsandtightnessofboltsand
nuts.Ifanabnormalityisnoted,contactourDistributor.
3.Forproductfaultsandfailuresnoticedbeforecompletionofassembly,wewillreplacetherelevant
partswithnewonesonlywhenwehavedeterminedthemasaclearincipientfailure.Evenifaspecific
faultyparthasaneffectonotherfaultlessones,ourproductwarrantyonlycoversthefaultyitem.
Ifyouhaveeventheslightestsuspiciononsomepartsduringassembly,contactourDistributor.
4.Notethatourproductwarrantydoesnotcoveranyfailuresofpartswhichhaveresultedfromyour
handlingduringassembly.
5.Thecomponentpartsoftheproducthavebeenfullyexaminedandcheckedintheirdesignphaseand
manufacturedunderafullmanagementsystem.Wehavealsoconfirmedthroughlong-termteststhat
theyhavenoqualityproblem.Howeverwear,deterioration,servicelifeofparts,andthe
performanceofthehelicopterdependgreatlyontheworkingenvironmentatyoursite(assembly,
adjustment,flightcondition,storage),andthecharacteristicsofthehelicopterdifferconsiderably
dependingontheseunidentifiablefactors.Asitisvirtuallyimpossibleforustohavedirectinvolvement
withtheproductunderyourmanagement,wewilltakenoresponsibilityforanyproductfailureswhich
haveoccurredduringuseaftercompletionofassembly,andanyaccidentsorlossesattributabletothem.
Notealsothatwewilltakenoresponsibilitywhenyouhaveusedpartsotherthanouroriginalonesor
thoseproducedbyourauthorizedoptionalpartsmanufacturer,orforanyotherproblemsoraccidents
resultingfrommodifications.
LIABILITYINDEMNITY
1.TheProduct,byitsnature,includesdangerouselementsdependingonhowitishandled.Whenflyingit,
operateitatyourownrisk,payingfullheedtothesurroundingpersonsandobjectsaswellasyourself.
Notethatwewilltakenoresponsibilityforanyaccidentsofwhatevercauseduringuseofthisproduct.
Itisrecommendedtobuyaradiocontrolorrecreationinsurancepolicyjustincaseofunexpected
accidents.Fordetailsoftheradiocontrolinsurancepolicy,inquirewithourdistributororanearbyradio
controlmodelshoporinsuranceagent.
P.58P.58
Page 59

REPAIRANDTRANSFEROFPRODUCT
REPAIR
ForRepairandAfterSalesServicesofaJRHelicopter,pleaseconsultwithyourJRHelicopterdistributor.
TRANSFEROFPRODUCT
Themanualmaybeaccompaniedbyasupplementalmanual,additionalmanualorerratabecauseof
improvementstotheproductortypographicalerrorsofthemanual.Theymayincludeveryimportant
informationforflight.
[ForTransferor]
Whentransferringtheproducthandoverallaccompanyingdocumentstogether.
[ForTransferee]
Checktheaccessoriesatthetimeofhandingoverthehelicopter.Ifyouarenotsurewhathasaccompaniedthe
manual,checkwithyourJRHelicopterdistributor.
*Thesedaysanincreasingnumberofgoodshavebeentransferred(soldandpurchased)throughInternet
auction.Therelevantpartiesarekindlyrequestedtochecktheconditionofthehelicopterandthe
existenceoftheaccessoriesanditistheirresponsibilitytotradeopenly.
P.59
Page 60

manF700DFAen250311
Forza700DFAAssemblyManual
Theproductandthecontentsoftheseinstructionsaresubjecttochange
withoutnoticeduetoimprovement.
 Loading...