

Page 1

J.P.Instruments Fuel Flow Installation Manual Report # 400
FS-450 Page 1 of 16
Rev A : Date 02/1/2002
Table of Contents
1 Installation Instructions 2
2 Placards and Markings 2
3 Installing the Fuel Flow Transducer: 3
4 Mounting Procedure 700921 4
5 Mounting Procedure: 700922 5
6 Mounting Procedure 700923 6
7 Mounting Procedure:700924 7
8 Specifications and Limitations 8
9 TSO Conditions 8
10 Specifications and Limitations 9
11 TSO Label 10
12 Operating Instructions 11
13 Initial Check Out 12
14 List of Major components: 14
15 Instructions for Continued Airworthiness (ICA) 14
16 Wiring Drawing 15
17 Template Drawing 16
J.P.INSTRUMENTS
PO BOX 7033
HUNTINGTON BEACH CA 92646
Last printed in USA
02/19/13
Page 2

J.P.Instruments Fuel Flow Installation Manual Report # 400
FS-450 Page 2 of 16
Rev A : Date 02/1/2002
1 Installation Instructions
General: A complete thorough familiarization and understanding of the system and this manual is necessary before
commencing the installation. All work must conform with A.C. 43.13.1Ach. 11 sec. 2, 3, 7. The accuracy of this
instrument depends entirelyupon the accuracy of the data entered. A periodical checking of the actual fuel onboard
will eliminate the accumulation of errors due to evaporation leaks, etc.
Route the (Optional) External Warning Control Line: The wire from pin 4 on the J-1 (D-SUB 9) can be
connected to an external warning light or buzzer. This pin goes to ground when the display flashes a warning. The
current in this line must be limited to 0.25amps (maximum). Exceeding this limit willdamage the unit. Tie off this wire
if not in use as not too obstruct the freedom of the controls. The FS-450 can be connected in parallel to any existing
digital fuel flow system. When connected to an existing flow sensor pin 3 red is not connected. See drawing 450508.
Install the Instrument in the Panel: Locate a 2.25 diameter hole or 3.125 diameter in the instrument panel,
where you would like to mount the indicator per drawing 450124. The instrument configures itself automatically for
14/28 volt aircraft. The instrument is 1.5” deep less connectors and is 2.6 or 3.5 square behind the panel.
Route the Fuel Flow Transducer Wires: Route thefuel flow wires from the probes through the firewall
using fireproof rubber grommets and flame retarding silicone. Use an existing hole if possible. Following the existing
wiring harness. All wires must be routed away from high temperature areas (exhaust stacks, turbochargers, etc.).
Secure Probe leads to a convenient locationon the engine, being sure there is sufficient slack to absorb engine
torque. It is essential in routing thefuel flow transducer wires not be allowed to touch metal parts of the air-frame or
engine since abrasionwill destroy this wire. Connect wires in accordance with DWG 450508.
2 Placards and Markings
Do not use the PN 700900-1 Flow Transducer on aircraft with a gravity feed system.
Transducer Identification Markings
PN 700900-1 stamped on TSO label and Marked "20l " on the top of the unit,
PN 700900-2 stamped on TSO label and Marked "231" on the top of the unit.
PN FT4-8AEXS-LEA-2029 stamped on transducer side
The placard PN 700905
"Do Not Rely on Fuel Flow Instrument to Determine Fuel Levels in Tanks.”
Must be mounted on the aircraft instrument panel near the P/N 450000( ).
If the aircraft is equipped with a primary fuel flow gage, the following placard must be mounted on the
aircraft instrument panel near the P/N 450000().
"Refer to Original Fuel Flow Instrumentation for Primary Information.”
Page 3
J.P.Instruments Fuel Flow Installation Manual Report # 400
fuel pump.
END VIEW UP
transducer and the
FS-450 Page 3 of 16
Rev A : Date 02/1/2002
Aircraft Configuration
1. PN 450000-G All gravity Flow installations without
Must use transducer PN 700900-2
2. PN 450000-P All Fuel injected engines with vapor return lines
to fuel tank , all Continental and certain Lycoming engines.
3. PN 450000-P,-H All pump fed carbureted and Fuel injected
engines without vapor return lines. PN 450000-P range up to
Drawing Location
700923
700922
700921
Between Fuel tank and
Carburetor.
Between throttle body and
fuel flow divider.
Between engine driven pump
and servo/throttle body or
carburetor
60 GPH and PN 450000-H range up to 120 GPH
4. PN 450000-D Pressure Carbureted engines with vapor return
lines. Requires Dual transducers
5. PN 450000-M- If “M” is after the PN it signifies that the displayis
3” Fuel flow for twin engine aircraft single indicator.
700924
450508
700922
One transducer in Carb inlet
line and one transducer in
outlet line
Between throttle body and
fuel flow divider.
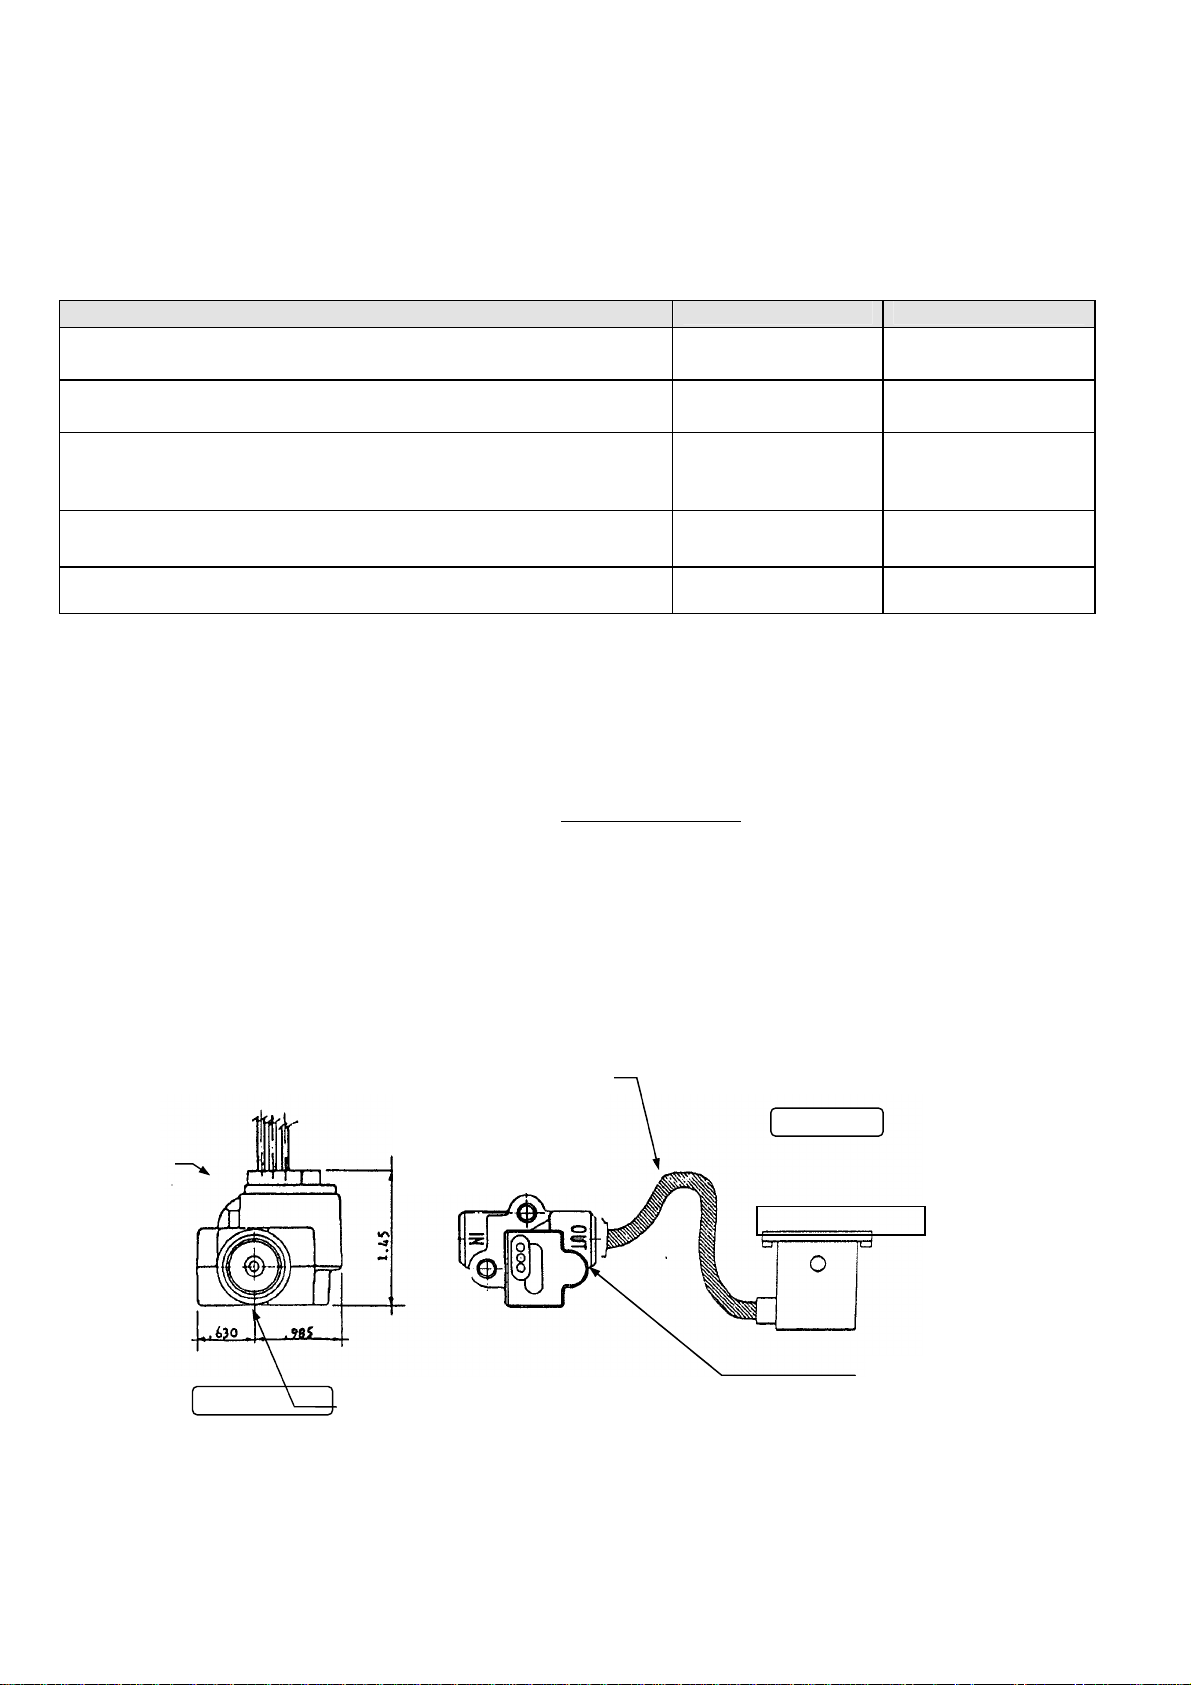
3 Installing the Fuel Flow Transducer:
Mount the Fuel Flow Transducer using the appropriate drawing in this manual.
The instructions listed below must be followed when installing a Fuel Flow Transducer.
Note: If your engine is equipped witha fuel return line from the carburetor back to the fuel tank two transducers are
required.
The transducer output port should be mounted lower or even with the carburetor inlet port(or fuel servo on a fuel
injected engine). If this is not possible, a loop should be put in the fuel line between the Fuel Flow Transducer and
the carburetor or fuel servo(see diagram below). It is recommended not to hard mount the transducer to the
carburetor or fuel servo.
Do not remove the caps on the flow transducer until the fuel hoses are ready to be installed.
The flow of fuel through the transducer must follow the direction marked on the transducer.
If the transducer is
higher than the
Mount the
transducer
with the
wires up.
carburetor or fuel
servo, put a loop in the
fuel line between the
¼ NPT
SIDE VIEW
Carburetor or Servo
The direction of the fuel
flow through the transducer
is marked on top
The flow transducer must be mounted so the wires exiting the transducer are pointing up.
Before connecting any hoses, thoroughly clean them and insure they are free of any loose material. High air
pressure my be used, However, do not allow high air pressure to pass through the flow transducer.
Page 4
J.P.Instruments Fuel Flow Installation Manual Report # 400
Existing Fitting
support
MS21919 Clamp
as required
FS-450 Page 4 of 16
Rev A : Date 02/1/2002
Fuel injector
Aeroquip
900591B Clamp
AE102/624-24
TRANSDUCER
2-AN816- Pipe to
Flare fitting. Do not
use aluminum fittings
To Engine Driven Fuel
Pump Existing
8" max from
New 303Aeroquip hoseAeroquip Fire Sleeve
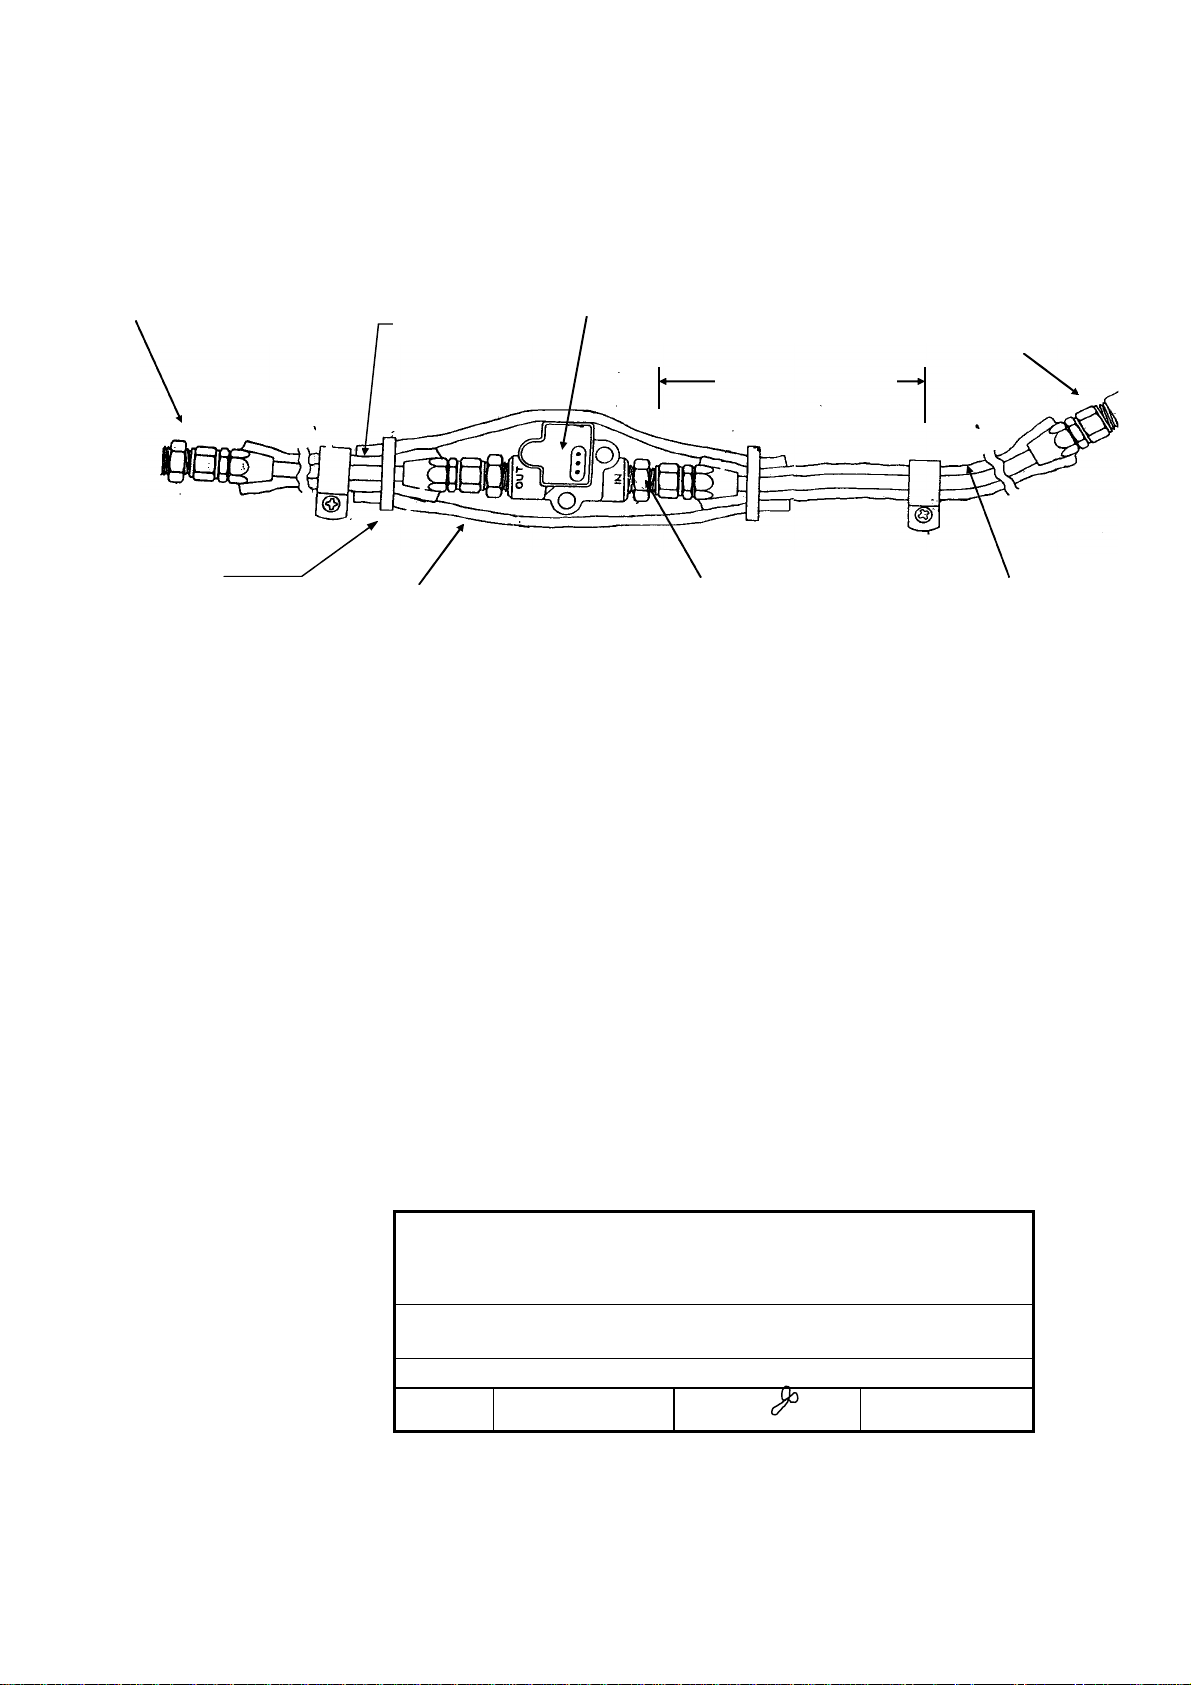
4 Mounting Procedure 700921
1. Find a convenient location within 8" of a hose support or fitting and away from anyhot exhaust pipes to suspend
the Fuel Flow Transducer. The hose support or fitting may be on the input or output line of the Flow Transducer.
2. Remove the fuel hose which goes from the Fuel Pump to theCarburetor (or Fuel Servo).
3. Purchase two new hoses, one from the fuel pump (or the Fuel Filter) to the Fuel Flow Transducer and the other
from the Fuel FlowTransducer to thecarburetor (or fuel servo). There must be flexible hose in and out of the
Transducer. The hoses must meet TSO-C53a Type C or D FAA specification. The new hoses must be the
same size as the current hose in the aircraft.
4. Before connecting fuel hose to the carburetor, verifythat the boost pump delivers at least 125% of takeoff fuel
consumption at minimum fuel pressure as marked on fuel pressure gage.
5. Mount the FuelFlow Transducer in the fuelline. The Flow Transducer must be wrapped with Fire Sleeving
available at JPI. Place a small hole in the fire sleeve and pass the transducer wires through it. Seal with High
temperature Silicone RTV sealant
6. For best results it is advisable to have two inches of straight tube just before the inlet to the transducer
J.P.INSTRUMENTS
PO Box 7033
Huntington Beach CA 92646
Title : Installation of a Fuel Flow Transducer in the fuel line fromthe
fuel pump to the carburetor or fuel servo.
Drawing No. 700921
Date
02/14/97
Drawn Approved
Rev NC
Page 5
J.P.Instruments Fuel Flow Installation Manual Report # 400
IN
303 hose
FS-450 Page 5 of 16
Rev A : Date 02/1/2002
To the Flow Divider
OUT
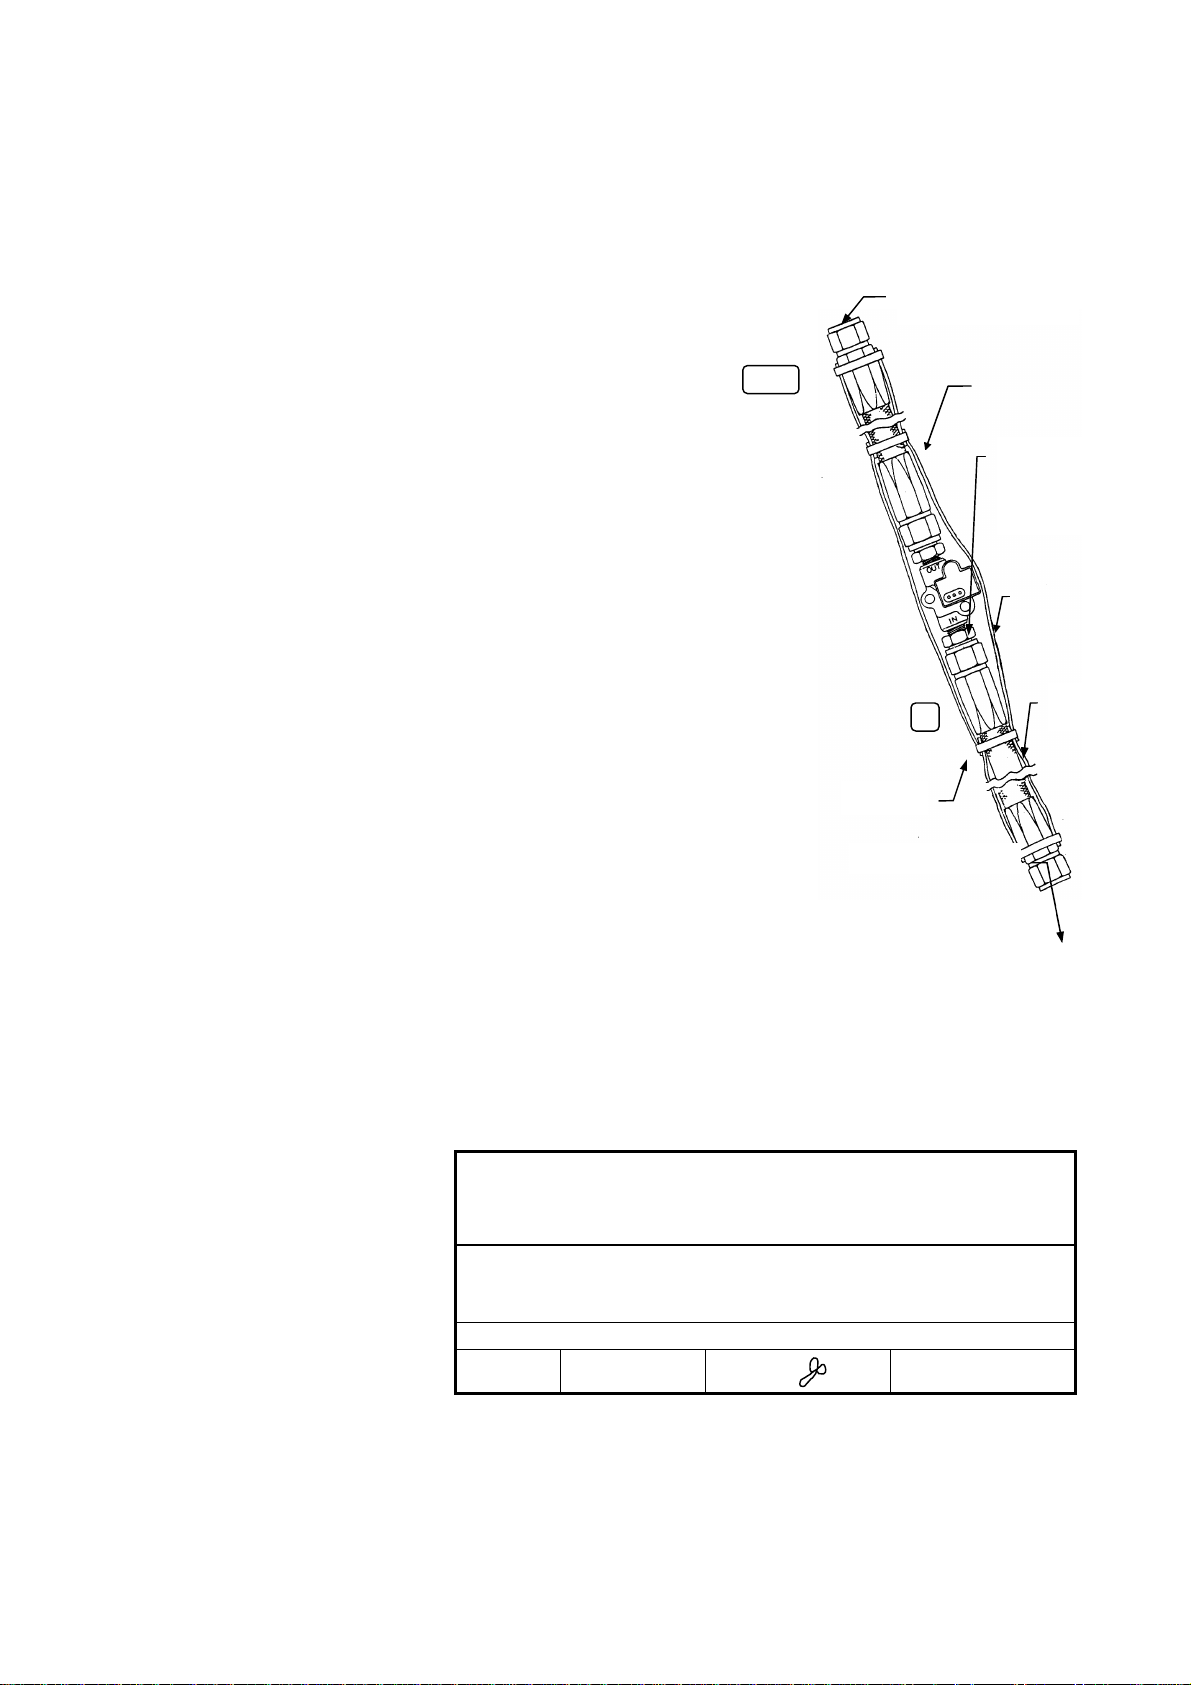
5 Mounting Procedure: 700922
1. Find a convenient location between the Throttle Body and the Flow
Divider and away from any hot exhaust pipes to suspend the Fuel Flow
Transducer.
2. Remove the fuel hose which goes from the Throttle Body to the Flow
Divider.
3. Purchase two new hoses, one from the Fuel Servo to the Fuel Flow
Transducer and the other from the Fuel Flow Transducer to the Flow
Divider. There must be flexible hose in and out of the Fuel
Transducer. The hoses must meet TSO-C53a Type C or D FAA
specification. The new hoses must be the same size as the current
hose in the aircraft.
4. Mount the Fuel Flow Transducer in the fuel line. The Flow Transducer
must be wrapped with Fire Sleeve available at JPI. Place a small
hole in the fire sleeve and pass the transducer wires through it. Seal
with High temperature Silicone RTV sealant.
Aeroquip
900591B Clamp
Fittings ¼ NPT to
Fuel Hose (do not
use aluminum
fittings
Aeroquip Fire
Sleeve
AE102/62-24
Aeroquip
See note 5
From theFuel Servo
5. Secure at either end of the transducer to any convenient point on the engine with MS21919 clamps or
equivalent.
6. For Continental fuel injected engines adjust the fuel pressure to account for the pressure drop across the
transducer per Continental Service Bulletin M89-10, available at JPI.
J.P.INSTRUMENTS
PO Box 7033
Huntington Beach CA 92646
Title Installation of the Fuel Flow Transducer in the fuel line
between the Throttle Body and the Flow Divider. Only applicable
for Continental Fuel Injected Engines
Drawing No. 700922
Date
02/14/97
Drawn/ Approved
Rev NC
Page 6

J.P.Instruments Fuel Flow Installation Manual Report # 400
Aeroquip Fire
aluminum fittings
Engine
FS-450 Page 6 of 16
Rev A : Date 02/1/2002
Fuel line to the
Carburetor
MS 21919 Clamp
as required
Aeroquip Fire sleeve
AE102/62-24
8 inches
Maximum from
support
OUT
TRANSDUCER
Sleeve
AE102/62-24
Fuel IN
Fittings ¼ NPT to Fuel
Hose (do not use
From theFuel Tank
Aeroquip
900591B Clamp
Mount to
Firewall or
6 Mounting Procedure 700923
1. Find a convenient location within 8" of a hose support or fitting and away from any hot exhaust pipes to suspend the
Fuel Flow Transducer. The hose support or fitting may be onthe input or output line of the Flow Transducer.
2. Remove the fuel hose which goes from the Carburetor to the Fuel Tank.
3. Mount the Fuel Flow Transducer in the fuel line. You must use the 700900-2 Fuel Flow Transducer on a gravity
feed system. The PN 700900-2 Transducer is marked "Model 231" on the top of the transducer. The Flow
Transducer must be wrapped with Fire Sleeving available at JPI. Place a small hole in the fire sleeve andpass
the transducer wires through it. Seal with High temperature Silicone RTV sealant.
4. Purchase two new hoses, one from the Fueltank to the Fuel FlowTransducer and the other from the Fuel Flow Trans-
ducer to the Carburetor. There must be flexible hose in and out of the Fuel Transducer. The hoses must meet
TSO-C53a Type C or D FAA specification. The newhoses must be the same size as the current hose in the
aircraft.
5. For best results it is advisable to have two inches of straight tube just before the inlet to the transducer.
J.P.INSTRUMENTS
PO Box 7033
Huntington Beach CA 92646
Title : Gravity Installation of a Fuel Flow Transducer in
the fuel supply line from the fuel tank to the carburetor
without a fuel pump.
Drawing No. 700923
Date
02/14/97
Drawn/
02/14/97
Approved
Rev NC
Page 7

J.P.Instruments Fuel Flow Installation Manual Report # 400
Aeroquip Fire
aluminum fittings
Engine
Carburetor
Main Fuel Transducer
FS-450 Page 7 of 16
Rev A : Date 02/1/2002
Fuel line to the
8 inches
Maximum from
support
Sleeve
AE102/62-24
Aeroquip
900591B Clamp
From themechanical
pump
Fuel IN
Fittings ¼ NPT to Fuel
Hose (do not use
Mount to
Firewall or
MS 21919 Clamp
as required
OUT
Aeroquip Fire sleeve
AE102/62-24
7 Mounting Procedure:700924
1. Find a convenient location within 8" of a hose support or fitting and away from any hot exhaust pipes to suspend the
Fuel Flow Transducer. The hose support or fitting may be on the input or output line of the Flow Transducer.
2. Remove the fuel hose which goes from the mechanical pump to the Carburetor.
3. Remove the fuel hose which goes from the Carburetor return line to the Fuel Tank.
4. Mount the Fuel Flow Transducer in the fuel line from the mechanical pump to the Carburetor per the above drawing;
note the flowdirection on the transducer. Mount the return Fuel flow transducer in the return line from the Carburetor
to the fuel tank, note the transducer willbe reversed. This kit is supplied with two PN 700900-1 transducers. Check
the K factors to be within 0.1. Either transducer may be used as thesupply transducer. Both Flow Transducers
must be wrapped with Fire Sleeving available at JPI. Place asmall hole in the fire sleeve and pass the transducer
wires through it. Seal with Hightemperature Silicone RTV sealant.
5. There must be flexible hose in and out of the Fuel Transducer. The hoses must meet TSO-C53a Type C or D FAA
specification. The new hoses must be the same size as the current hose in the aircraft.
6. Before connecting fuel hose to the carburetor, verifythat the boost pump delivers at least 125% of takeoff fuel
consumption at minimum fuel pressure as marked on fuel pressure gage.
J.P.INSTRUMENTS
PO Box 7033
Huntington Beach CA 92646
Title : Differential Installation, of a Fuel Flow Transducer
in the fuel supply or return line from the carburetor to the
fuel tank
Drawing No. 700924
Date
02/14/97
Drawn/
02/14/97
Approved
Rev NC
Page 8

J.P.Instruments Fuel Flow Installation Manual Report # 400
FS-450 Page 8 of 16
Rev A : Date 02/1/2002
8 Specifications and Limitations
Model:
FS-450, PN 450000()
Case Dimensions:
2.6" x 2.6" x 1.5" depth, 2 1/4" round Bezel.
3.26” x 3.26” x 1.56” depth, 3.12 round Bezel
Weight:
Unit Only 0.08 lbs
Indicator & Harness: 0.25 Lbs.
Flow Transducer: PN 700900-1,-2 0.19 Lbs.
Hi flow PN FT4-8AEXS-LEA-2029 0.5 Lbs.
Power Requirements:
10 to 35 Volts, 0.2 Amp. 1 amp CB
Low Fuel Warning Display
The display message will blink anytime the programmed, Low Fuel Warning or the Time to Empty Limit are violated.
External Warning Control Line:
Takes wire on pin 4 to ground when blinking. Current should be limited to 0.25 amp.
Accuracy:
Flow: 2% or better in accordance with TSO C44b.
Resolution
Fuel Flow: 0.1 Gal. or 1 Lb. or 1 Lt.
Fuel Remaining: 0.1 Gal. or 1 Lb. or 1 Lt.
Fuel Used: 0.1 Gal. or 1 Lb. or 1 Lt.
Time to Empty: 10 minute default
Max Displayed Range (Unit Only):
Fuel Flow: 199.9 Gals. or 162.0 or Gal/Hr or 1199 Lbs./Hr or 749 Ltr./Hr.
Fuel Remaining: 999 Gals. or 811 or Gals. or 1999 Lbs. or 1999 Ltrs.
Fuel Used: 999 Gals. or 811 or Gals. or 1999 Lbs. or 1999 Ltrs.
Time to Empty: 19 hours 59 minutes
9 TSO Conditions
“The conditions and test required for TSO approval of this article are minimum performance standards. It is the
responsibility of those desiring to install this article either on or within a specific type or class of aircraft to determine that
the aircraft installation conditions are within the TSO standards. The article may be installed only if installation of the article
is approved bythe Administrator.”
Page 9

J.P.Instruments Fuel Flow Installation Manual Report # 400
FS-450 Page 9 of 16
Rev A : Date 02/1/2002
10 Specifications and Limitations
Instrument P/N 450000-P, -D
Transducer P/N, 700900-1
Range: 0.6 to 60 GPH Range: 3 to 90 GPH
Linearity: %1 (8 to 60 GPH) Linearity: %1 (8 to 60 GPH)
K Factor Approx. 29,000 K Factor: Approx. 19500
Pressure Drop: 1.2 PSI at 30 GPH
4.8 PSI at 60 GPH
Working Press: 200 PSI Working Press: 200 PSI
Min. Burst Press: 2000 PSI Min. Burst Press: 2000 PSI
Operating Temp. Range -55oC to 70oC Operating Temp. Range -55oC to 70oC
Non Operating Temp. Range: -65oC to 100oC Non Operating Temp. Range: -65oC to 100oC
Fuel Ports: 1/4" Female NPT Fuel Ports: 1/4" Female NPT
Instrument P/N 450000-G
Transducer P/N 700900-2
Pressure Drop: .31 PSI at 30 GPH
2.8 PSI at 90 GPH
Instrument P/N 450000-H .
Transducer P/N (FT 4-8AEXS-LEA-2029)
Range: 3 to 120 GPH
Linearity: %1 (9 to 120 GPH)
K Factor Approx. 48,000
Pressure Drop: 0.23 PSI at 30 GPH
0.8 PSI at 60 GPH
Working Press: 1500 PSI
Min. Burst Press: 2000 PSI
Operating Temp. Range -55oC to 70oC
Non Operating Temp. Range: -65oC to 100oC
Fuel Ports: AN816-8-8
RS232/422 Input Ports FS-450 .
Single Line Receive Method: RS-232C, RS-423, or 5 Volt Serial.
Protocol: 1 Start bit, 8 Data bits, 1 Stop bit.
Baud Rate: Automatic: 9600,4800,1200
Format: Automatic: Aviation Date, Northstar Binary, NMEA-183
RS232 Output Port
Transmit Method: RS-232 Single Line.
Protocol: 1 Start bit, 8 Data bits, 1 Stop bit.
Baud Rate: 9600
Transmit Format: Garmin, Allied Signal, Arnav, UPS
Page 10

J.P.Instruments Fuel Flow Installation Manual Report # 400
FS-450 Page 10 of 16
Rev A : Date 02/1/2002
11 TSO Label
Page 11

J.P.Instruments Fuel Flow Installation Manual Report # 400
FS-450 Page 11 of 16
Rev A : Date 02/1/2002
12 Operating Instructions
The FS-450 Fuel Scan uses a small turbine transducer that measures the fuel flowing into the engine. Higher fuel flow
causes the transducer turbineto rotate faster which generates a faster pulse rate. Prior to engine start youinform the
FS-450 Fuel Scan of the known quantityof fuel aboard, and itwill keep track of all fuel used. There are two standard
operating modes of the FS-450: Automatic Scanning, and Manual Scanning. The FS-450 has programmable alarms.
When the remaining amount of fuel falls below the alarm limit the bottom displaywill show the amount of fuel REMaining
and the specific cue light will flash. When the remaining time falls below the alarm limit the bottom display will showthe
MINutes of fuel remaining and the specific cue light will flash. When an alarm is displayed, tapping the STEP button will
temporarily disable the alarm indication for the next ten minutes. When an alarm is displayed, holding the STEP button
until the word appears will disable that alarm indication for the remainder of the flight. After initial self-test, youwill
be asked to inform the FS-450 of start up fuel. The FS-450 willdisplay (or liters or
pounds) for one second, and then flash until anybutton is pressed. The displaywill pause at each
parameter for a few seconds in the Automatic scanning mode. In the Manual scanning mode, tap the STEP button to
advance to next parameter. Holding the STEP button willdisplay the previous parameters in the sequence (rapidly
backwards).
Procedure—Changing the Set Up by entering the program mode.
Hold both
buttons for 5
seconds until
the words
Tap STEP
button until
the words
Hold both
buttons for 5
seconds until
the words
Tap STEP
to next item
AUTO sequencesthrough
these values
Hold or tapAUTO to
select main capacity
Hold or tapAUTO to
select AUX capacity
Hold or tapAUTO to
select low time limit
Hold or tapAUTO to
select low quantity limit
Description
Selects fuel units
Main tank capacity, in units selected
Y—Yes—aircraft has auxiliary tanks (next step)
Auxiliary tank capacity (skipped if AUX? is no)
Alarm limit in minutes for low time in tanks
Alarm limit for low fuel quantity in tanks, in units selected
Y—Yes—carbureted engine
Y—Yes toexit; N—No to review list again
Page 12

J.P.Instruments Fuel Flow Installation Manual Report # 400
FS-450 Page 12 of 16
Rev A : Date 02/1/2002
Digital displayfor numeric readouts and messages: top displayis fuel flow and the lower displayfor all other
parameters.
Indicator lights to show what information is beingdisplayed on thedigital display
FlowScan® 450M
Flow Scan® -450M
Flow per Hr.
Left Engine Right Engine
LEFT ENGINE RIGHTENGINE
15.3 15.6
Function
Function
TUSD LUSD RUSD REM H.M. REQ RES
TUSD LUSD RUSD REM H.M. REQ RES
Parameter Description
USD—Total Fuel Used
REM—Fuel Remaining
H.M.—Time to Empty
REQ—Fuel required to nextGPS WPT or
Destination
RES—Fuel Reserve at next GPS WPT or
Destination
50.7
50.7
STEP AUTO
STEP AUTO
J
P
I
TSO
J
TSO
P
I
Always shows fuel
Always shows fuel flow
flow of each engine
of each engine
shows all other
shows all other fuel
Flow
fuel parameters
parameters
Per Hr
AUTO enters the
AUTO enters the automatic
automatic scan mode
scan mode
38.2
37.2
02.45
25.8
I I.3
Function
USD REM H.M. REQ--RES
Example Comments
Since last refueling or trip total.
In gallons, liters or pounds
Hours. Minutes Remaining at current fuel burn
Present with GPS interface Valid signal and way point
Present with GPS interface Valid signal and way point
J
FS 450
P
I
Fuel Flow GPH
STEP AUTO
Gallons
Per Hr.
-MPG
Always shows fuel flow
shows fuel parameter
corresponding to indicator light
indicator lights index through
each parameter
AUTO enters the automatic
scan mode
STEP enters manual scan mode,
steps through each paramerter
13 Initial Check Out
Electronics Warranty: The aircraft owner must read the Warranty before starting the installation. There is
information in the Warranty that may alter your decision to install this instrument. If you do not accept
the terms of the Warranty, JPI offers a 30 day money back guarantee.
Transducer Warranty: All transducers suspected of malfunctioning must be sent back to JPI to be bench
flow tested. JPI sends the transducer back to the original manufacturer for testing, who in tern charges
JPI, $70 for the testing. If the transducer is found defective a new transducer will be issued.
If you are not an FAA Certified Aircraft Mechanic familiar with the issues of installing aircraft fuel
flow, Do Not attempt to install this instrument. The installer should use current aircraft standards and
practices to install this instrument (refer to AC 43.13).
Read the entire Installation Instructions and resolve any issues you may have before starting the installa-
tion.
THIS INSTALLATION WILL REQUIRE SOME PARTS UNIQUE TO YOUR AIRCRAFT THAT ARE NOT
SUPPLIED IN THE KIT (including, but not limited to hoses and fittings). Acquire all the parts
necessary to install this instrument before starting the installation. Do not use aluminum fittings with the
PN 700900-1 or PN 700900-2 transducer.
Page 13

J.P.Instruments Fuel Flow Installation Manual Report # 400
FS-450 Page 13 of 16
Rev A : Date 02/1/2002
Check that the instrument make and model are correct before starting the installation (check the markings
on the side of the instrument). A gravity feed system requires an PN 700900-2 flow transducer (marked
"231" on top). A carbureted engine with a fuel return line requires two transducers at additional cost
If this instrument is to replace an existing unit in the aircraft, it is the installer's responsibility to move or
replace any existing instruments or components in accordance with FAA approved methods and procedures. The following Installation Instructions do not cover moving or the removal of any existing
instruments or components.
Before connecting any hoses to the transducer, thoroughly clean them and insure they are free of any
loose material. Never pass high pressure air through or blow through the transducer, damage will
occur.
Remove the transducer cap plugs when ready to install hoses. Do not use aluminum fittings with the fuel
flow transducer or Gauling may occur.
The inlet and outlet ports of the transducer have ¼ NPT threads. When assembling fittings into the inlet
and outlet Do Not Exceed a torque of 15 ft. lbs. Or screw the fittings in more than 2 full turns past hand
tight.
A screen or filter should be installed upstream of the transducer. As turbulence upstream of the
transducer affects it’s performance, there should be a reasonable length of straight line between the
transducer inlet.
Install the transducer with the wires leads UP to vent bubbles and insure that the rotor is totally immersed
in fluid.
Note the direction of fuel flow marked on the transducer. Fuel must flow in this direction.
Note and record the K-factor engraved in the side of the transducer and also on the white tag attached to
the transducer. Most transducers have a K- factor of 29.90.
10. System Checkout: Check instrument operation as follows:
Turn the aircraft master switch on (engine off). Tap the step switch until 0 GPH is displayed. Turn the
boost pump on for a few seconds. The display should indicate 3 to 8 GPH.. A problem at this step could
be caused by poor connections on the red or black power and ground leads.
A reading of “ --- “ dashes indicate no fuel flow transducer signals. A problem at this step could be caused
by a poor connection or crossed flow transducer wires.
With the engine running, check the "FLOW" Display to read properly.
After running the engine, check the fuel hoses, transducers and fittings for leaks.
Page 14

J.P.Instruments Fuel Flow Installation Manual Report # 400
FS-450 Page 14 of 16
Rev A : Date 02/1/2002
14 List of Major components:
PN 450000-( ) -P -G -D -H -M
Indicator PN 450000 1 1 1 1
Indicator PN 450000-M 1
Harness PN 450507 1 1 1
Harness PN 450510 1
Harness PN 450506 1
Transducer PN 700900-1 1 2 2
Transducer PN 700900-2 1
Transducer High Flow PN FT4-8AEXS-LEA-2029 1
Part Number Description
PN 450000-P All pump fed Carburetor and injected engines with
maximum take-off flow range to 60 GPH
PN 450000-G All Gravity feed systems without mechanical pump
PN 450000-D All pressure carburetor systems with return line to tank
PN 450000-H All mechanical pump fed systems with a high flow
range, on take-off, to 120 GPH.
PN 450000-M Fuel flow for twin engine aircraft single indicator
15 Instructions for Continued Airworthiness (ICA)
There are no field adjustments and or calibration requirements for the P/N 450000 series instrument after initial
installation. ICA is not required. Maintenance of nonfunctioning or malfunctioning components is limited to
removal and replacement of JPI factorysupplied new or repaired components as described in the
troubleshooting section of the installation instructions
Page 15

J.P.Instruments Fuel Flow Installation Manual Report # 400
FS-450 Page 15 of 16
Rev A : Date 02/1/2002
16 Wiring Drawing
Page 16

J.P.Instruments Fuel Flow Installation Manual Report # 400
FS-450 Page 16 of 16
Rev A : Date 02/1/2002
17 Template Drawing
 Loading...