

Page 1

kixx
™
stroller
birth to 15kg/birth - 36 months
Instruction Manual
Manual de Instruções
Manual de instrucciones
Mode d’emploi
Bedienungsanleitung
Handleiding
Manuale di istruzioni
Kullanma kalvuzu
GB
PT
ES
FR
DE
NL
IT
TR
Page 2

7
FIGURE 1 ~ 3
11
2
3
2
1
4
11
9
1
1
2
2
FIGURE 7 - 12
FIGURE 1 - 6
5
6
8
12
1
2
1
2
10
1
2
Page 3

FIGURE 18 ~ 23
FIGURE 13 ~ 17
13
14
15
1
2
18
17
3
1
A
2
B
1
2
3
16
4
3
19
20
1
3
2
23
22
21
1
2
Page 4
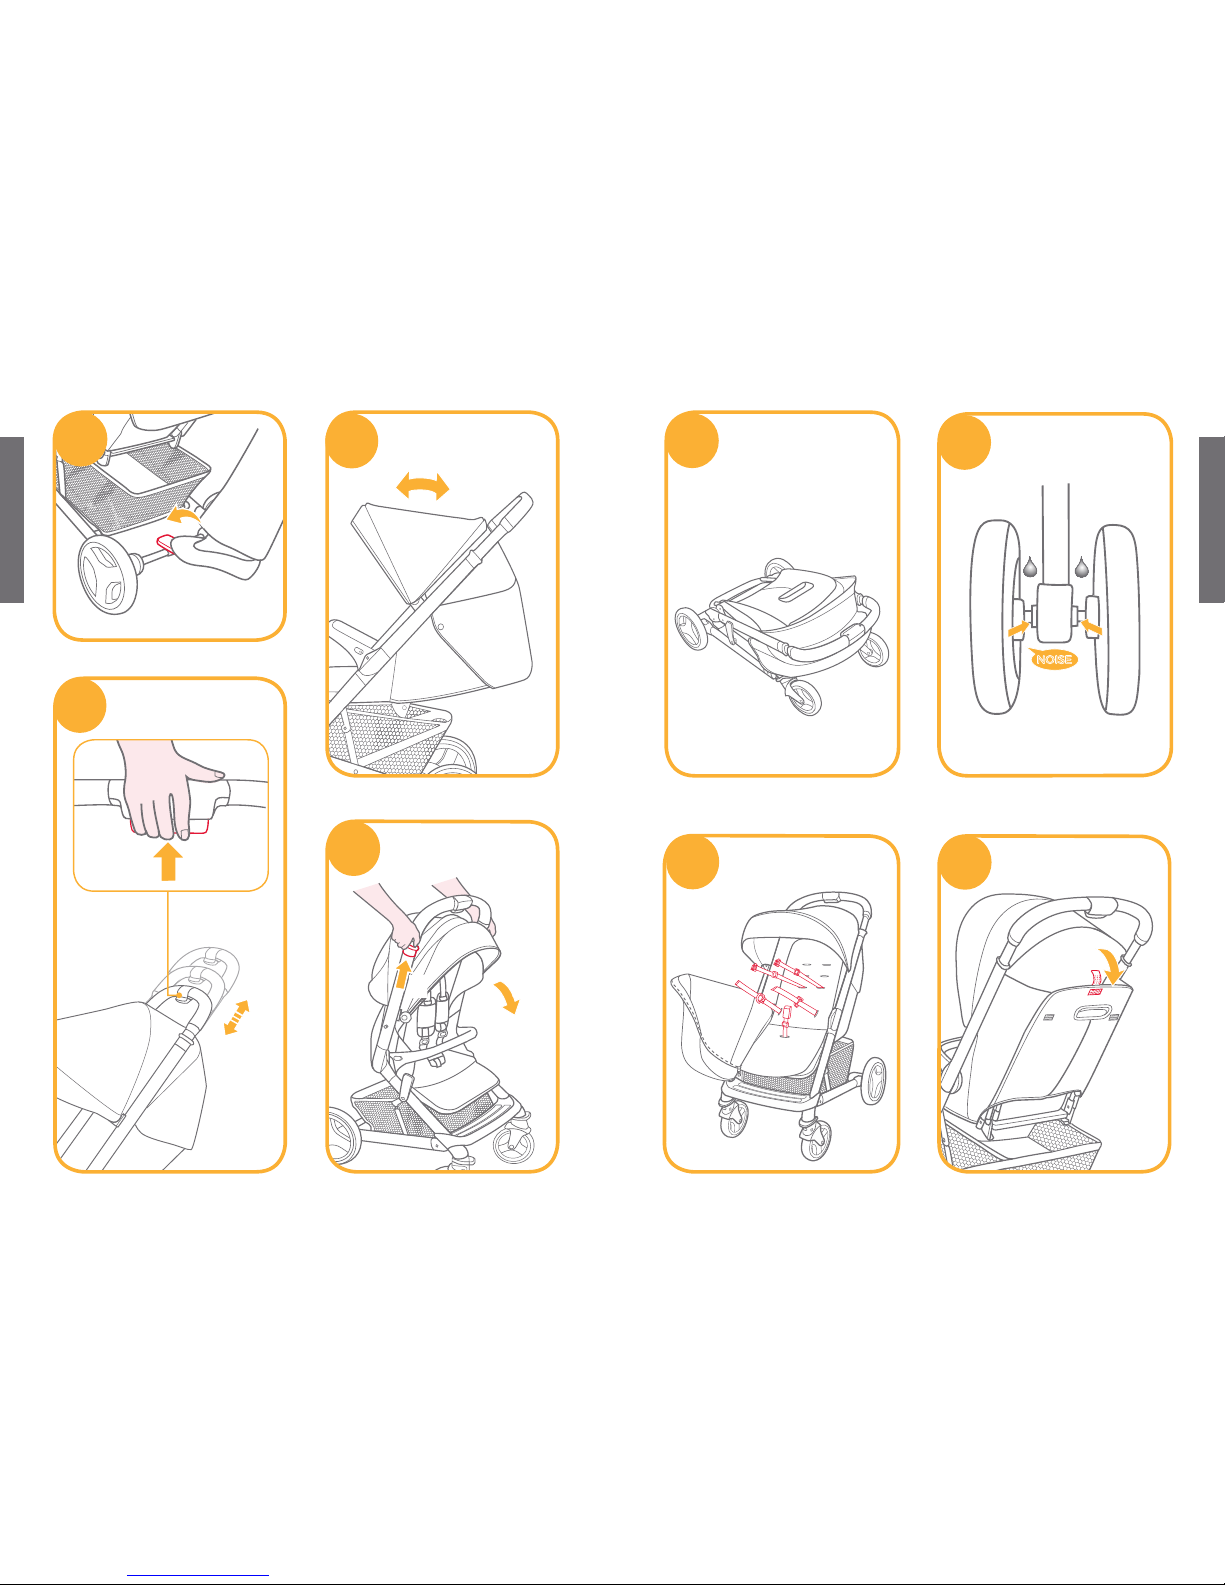
FIGURE 24 - 27
FIGURE 28 - 31
5
6
24
26
27
1
2
2
1
25
28
31
30
29
NOISE
Accessories (
May not be included in purchase
)
Accessories may be sold separately or may not be available depending on region.
Page 5

FIGURE 32 - 35
8
7
33
32
34
35
Page 6

9
GB
Welcome to Joie
™
Congratulations on becoming part of the Joie family! We are so excited to be part of your journey
with your little one. While traveling with the Joie Kixx™, you are using a high quality, fully certified
stroller, approved to European safety standards EN 1888-2012. This product is suitable for use with
children weighing under 15kg. Please carefully read this manual and follow each step to ensure a
comfortable ride and best protection for your child.
IMPORTANT - Keep these instructions for future reference.
Visit us at joiebaby.com to download manuals and see more exciting Joie products!
Contents
Figures 1-8
WARNINGS 11
Stroller Assembly 12
Open Stroller 12
Assemble Front Wheels 12
Assemble Rear Wheels 13
Assemble Hood 13
Assemble Armbar 13
Stroller Operation 13
Adjust Recline 13
Use Buckle 13
Use Shoulder & Waist Harnesses 13
Adjust Calf Support 14
Use Front Swivel Lock 14
Use Brake 14
Use Hood 14
Adjust Handle 14
Fold Stroller 15
Accessories 15
Care and Maintenance 15
Emergency
In case of emergency or accident, it is most important to have your child taken care of with first aid and
medical treatment immediately.
10
Product Information
Read all the instructions in this manual before using this product. If you have any further questions, please
consult the retailer. Some features may vary depending on model.
Product Kixx Stroller
Suitable for Child weighing under 15kg (birth - 36 months)
Materials Plastics, metal, fabrics
Patent No. Patents pending
Made in China
Brand Name Joie
Website www.joiebaby.com
Manufacturer Joie Children's Products (UK) Limited
1 Stroller Frame
2 Front Wheel ( X2)
3 Rear Wheel ( X2)
4 Brake Assembly
5 Hood
6 Arm Bar
7 Hood
8 Seat Pad
9 Calf Support
10 Swivel Lock
11 Front Wheel
12 Rear Wheel
13 Buckle
14 Shoulder Harness
15 Folding Button
16 Handle Adjustment
Button
17 Storage Basket
18 Brake Lever
19 Storage Latch
20 Storage Latch
Mount
21 Handle
Parts List
Make sure all parts are available before assembly. If any part is missing, please contact local
retailer. No tools are required for assembly.
19
20
18
17
21
1
2
3
5
x2
x2
6
8
7
9
11
10
14
15
12
13
16
4
Accessories
(May not be included)
1 Rain Cover (on certain models)
2 Footmuff (on certain models)
3 Seat Pad (on certain models)
1
2
3
Accessories may be sold separately or
may not be available depending on region.
Page 7

11
12
WARNING
! WARNING Always use the crotch combination with the waist belt. It is
suggested that the shoulder harnesses be used as well.
! WARNING Ensure that all the locking devices are engaged before use.
! WARNING Do not let your child play with this product.
! WARNING Check that the pram body or seat unit attachment devices
are correctly engaged before use.
! Adult assembly required.
! Use the stroller with a child weighing less than 15kg. It will cause dam-
age to the stroller with an unfitted child.
! To prevent a hazardous, unstable condition, do not place more than
4.5kg in the storage basket.
! Never leave child unattended. Always keep child in view while in stroller.
! Use the stroller with only one child at a time. Never place purses, shop-
ping bags, parcels or accessory items on the handle or hood.
! Overloading, folding incorrectly, or using component parents from other
manufacturers may cause the stroller to be damaged, broken or unsafe.
Please read the instruction manual carefully.
! Never use it along with component parts from other manufacturers.
! Please read all the instructions in the manual before using the product.
Please save instruction manual for future use. Failure to follow these
warnings and instructions may result in serious injury or death.
! Safety belts and restraint systems must be used correctly.
! To avoid serious injury from falling or sliding out, always use seat belt.
! Make sure your child’s body is clear from the moving parts when adjust-
ing the stroller.
!
Child may slip into leg openings and be strangled if the harness is not used.
! Never use stroller on stairs or escalators.
! Keep away from high temperature objects, liquids, and electronics.
! Never allow your child to stand on the stroller or sit in the stroller with
head toward front of stroller.
! Never place the stroller on roads, slopes or dangerous areas.
! Do make sure all mechanisms are fixed before using the stroller.
! To avoid strangulation, DO NOT place items with a string around your
child’s neck, suspend strings from this product, or attach strings to toys.
! To prevent tipping DO NOT put anything on the handle.
! DO NOT lift stroller while child is in stroller.
! DO NOT use storage basket as a child carrier.
! To prevent tipping, never let child climb the stroller. Always lift the child
in and out of the stroller.
! To avoid finger entrapment, use care when folding and unfolding the
stroller.
! Be sure the stroller is fully open or folded before allowing child near the
stroller.
! To ensure your child’s safety, please make sure all parts are assembled
and fastened properly before using the stroller.
! To avoid strangulation, do make sure your child is clear from the hood.
! Always engage the brakes when parking the stroller.
! Discontinue using stroller if it is damaged or broken.
! Stroller to be used only at walking speed. This product is not intended
for use while jogging.
! To avoid suffocation, remove plastic bag and packaging materials be-
fore using this product. The plastic bag and packaging materials should
then be kept away from babies and children.
! This product is not suitable for running or skating.
! Pushchair designed to be used from birth shall recommend the use of
the most reclined position for new born babies.
!
The parking device shall be engaged when placing and removing children.
! Carry cot is only suitable for a child who cannot sit up unaided, roll over
and cannot push itself up on its hands and knees. Maximun weight of
the child: 9kg.
! Carry cot is NOT to be used for long term sleeping.
! DO NOT use or add any mattress other than the one supplied with the
carry cot.
! For car seats used in conjunction with a chassis, this vehicle does not
replace a cot or a bed. Should your child need to sleep, then it should
be placed in a suitable pram boby, cot or bed.
Stroller Assembly
Please read all the instructions in this manual before assembling and using this product.
Open Stroller
Separate storage latch from storage mount
1
, and then lift the handle upwards
2
, a click sound means the
stroller is open completely.
! Check that the stroller is completely open before continuing.
Assemble Front Wheels
Assemble front wheels to front legs. Check that wheels are securely attached by pulling on wheel assemblies.
3
To disassemble front wheel, detach front wheel from front leg
4
- 2 while pressing the release button.
4
- 1
Page 8

13
14
Assemble Rear Wheels
Assemble brake assembly to rear legs 5, assemble rear wheels to brake assembly 6. Wrap the connecting
tube of rear legs with the flap of the storage basket, and then snap the three snap buttons
7
.
! Check that wheels are securely attached by pulling on wheel assemblies.
To disassemble rear wheel, detach rear wheel from rear wheel mount
8
- 2 while pressing the release button.
8
- 1
Assemble Hood
Align the Clips of the hood with the mounts on the tubes, and then slide to assemble the hood.
9
Please snap the 3 hook and loop fasteners on canopy rear retention and the snaps both sides.
10
Assemble Armbar
Align the armbar slots with the armbar mounts, and then insert to lock. 11
To disassemble armbar, press armbar release button
12
- 1, and then pull up the armbar. 12 - 2
The completely assembled stroller is shown as
13
Stroller Operation
Adjust Recline
There are 4 angles for the backrest.
To recline the backrest, squeeze the recline handle on the back of the seat
14
- 1, pull down on the backrest.
14
- 2
To raise the backrest, push up.
! Make sure the recline is set properly for use.
Use Buckle
Release Buckle
Press the center button to release the buckle.
15
Lock Buckle
Match the waist belt buckle with the shoulder buckle
16
- 1, and click into the center buckle.
16
- 2
A “click” sound means the buckle is locked completely.
16
- 3
! To avoid serious injury from falling or sliding out, always secure your child with harness.
! Make sure your child is snugly secured. The space between the child and the shoulder harness is about the
thickness of one hand.
! Do not cross the shoulder belts. This will cause pressure on child’s neck.
Use Shoulder & Waist Harnesses
! In order to protect your child from falling out, after your child is placed into the seat, check whether the
shoulder and waist harnesses are at proper height and length.
17
- 1 Shoulder harness anchor A
17
- 2 Shoulder harness anchor B
17
- 3 Slide adjuster
For larger child, use shoulder harness anchor A and the highest shoulder slots. For smaller child, use shoulder harness
anchor B and the lowest shoulder slots.
To adjust the position of the shoulder harness anchor, open the zipper of seat back, turn the anchor to be level
with the side facing forward. Thread it through the shoulder harness slot from back to front.
18
Rethread it
through the slot that is closest to child's shoulder height.
19
Use slide adjuster to change the harness length.
20
- 1
Press the button
20
- 2, while pulling the waist harness to proper length.
20
- 3
Adjust Calf Support
The calf support has 2 positions.
Raise Calf Support
To raise the calf support, just push it upwards.
Lower Calf Support
Press the adjustment buttons on both sides of the calf support
21
- 1, and rotate the calf support downwards.
21
- 2
Use Front Swivel Lock
Push up the front swivel locks to maintain the moving direction.
22
Tip
It is recommended to use swivel locks on uneven surfaces.
Use Brake
To lock wheels, step the brake lever downwards.
23
To release wheels, step the brake lever forwards.
24
Tip
Always apply brake when stroller is in stopped position.
Use Hood
To open the canopy, pull canopy toward front.
25
To fold the canopy, pull canopy toward back.
25
Adjust Handle
The handle has 3 positions.
To adjust the height of the handle, pull the handle upward or downward
26
- 2 while pressing the handle
adjustment button.
26
- 1
Page 9

16
Fold Stroller
! Please fold the hood before folding the stroller.
Push the stroller forward to fold
27
- 2 while lifting both of the folding buttons.
27
- 1
The completely fold stroller is shown as 28.
Accessories
Accessories may be sold separately or may not be available depending on region.
Use Footmuff
The soft footmuff can provide your child with a warm and comfortable environment.
Assemble the footmuff by following these steps.
1. Place the footmuff over the seat after unziping it, thread the shoulder harnesses, waist harnesses and crotch
harness through respective slots.
30
2. Thread loop fastener on the top of the footmuff through the backrest, and then stick it to the hook fastener.
31
3. Place baby into the footmuff, lock the safety buckle, and then rezip the footmuff.
The assembled footmuff is shown as
32
Use Rain Cover
To assemble the rain cover, place it over the stroller, and then attach the 7 pairs of hook and loop fasteners
onto the stroller frame shown in the above pictures.
33
! Before using the rain cover, please make sure the backrest has been adjusted to the lowest position and the
infant car seat has been fastened.
! Please always check the ventilation, when the rain cover is on the stroller.
! When not in use, please check that the rain cover has been cleaned and dried before it is folded.
! Do not fold the stroller before the rain cover is removed.
! Do not place your child into the stroller assembled with rain cover during hot weather.
Use Seat Pad
see images
34
-
35
Care and Maintenance
! Removable seat pad may be washed in cold water and drip-dried. No bleach.
! To clean stroller frame, use only household soap and warm water. No bleach or detergent.
! From time to time, check your stroller for loose screws, worn parts,torn material or stitching. Replace or
repair the parts as needed.
! Excessive exposure to sun or heat could cause fading or warping of parts.
! If stroller becomes wet, open hood and allow to dry thoroughly before storing.
! If wheels squeak, use a light oil (e.g., Silicon Spray, antirust oil, or sewing machine oil). It is important to get
the oil into the axle and wheel assembly.
29
! When using your stroller at the beach, completely clean your stroller after use to remove sand and salt from
mechanisms and wheel assemblies.
15
Page 10

17
18
PT
Bem-vindo a Joie
™
Parabéns para tornar-se parte da família Joie! Estamos muito felizes de participar com você na
viagem de sua criança. Enquanto viajar com Joie Kixx TM você use um carrinho de crianças de
alta qualidade, inteiramente certificado, aprovado pela normas de segurança europeias EN 1888-
2012. Este produto é adequado para crianças com peso abaixo de 15 kg. Leia atentamente este
manual e siga todos os passos para garantir uma viagem confortável e a melhor proteção para a
sua criança.
! IMPORTANTE-Guardar este manual de instruções para referências futuras
Visite-nos a joiebaby.com para baixar manuais de instruções e para ver mais produtos maravilho-
sos Joie!
Conteúdo
Figuras 1-8
AVISOS 19
Montagem do carrinho 20
Abertura do carrinho 20
Montagem das dianteiras 21
Montagem das traseiras 21
Montagem da capota 21
Montagem alça 21
Funcionamento do carrinho 21
Ajuste inclinação 21
Utilização fivela 21
Utilizaçãde arnês para ombro e cintura 22
Ajuste suporte para pernas 22
Utilização dispositivo de bloqueio eixo frontal 22
Utilização do freio 22
Utilização capota 22
Ajuste da alça 23
Dobramento do carrinho 23
Acessórios 23
Cuidado e manutenção 24
Emergências
Em caso de emergência ou acidente, o mais importante é cuidar da sua criança dando os primeiros socorros
imediatos e tratamento médico.
18
Informações sobre o produto
Leia todas as instruções deste manual antes de usar o produto. Se tiver outras perguntas, contacte o seu comerciante.
Alguns componentes podem variar segundo o modelo.
Produto
Adequado para
Materiais
Patente no
Produzido em
Nome marca
Site web
Fabricante
Carrinho para crianças Kixx
Criança com peso máximo até 15 kg (desde o nascimento – 36 meses)
Materiais plásticos, metal, tecidos
Pendente
China
Joie
www.joiebaby.com
JoieChildren’s Product (UK) Limited
1 Quadro carrinho
2 Roda dianteira (X2)
3 Roda traseira (X2)
4 Conjuto freio
5 Capota
6 Alça
7 Capota
8 Almofada
9 Apoio para pernas
10 Dispozitivo de
bloqueio eixo
11 Roda dianteira
12 Roda traseira
13 Fivela
14 Arnês para ombro
15
Botão de dobramento
16 Botão de ajuste alça
17 Cesto de
armazenamento
18 Pedal freio
19 Fecho
armazenamento
20 Dispozitivo
montagem fecho
21 Alça
Lista peças componentes
Antes da montagem certifique-se que todas as peças estão disponíveis. Em caso de falta de peças, entre
em contato com seu distribuidor local. Não são necessárias ferramentas para a montagem.
19
20
18
17
21
1
2
3
5
x2
x2
6
8
7
9
11
10
14
15
12
13
16
4
Acessorios
(Podem não estar
inclusos na compra)
1
Capa de chuva
2 Cobre pés
3 forro do assento
1
2
3
Page 11

19
20
AVISOS
! AVISO Use sempre o divisor entrepernas com a cintura. Sugerimos que
você use também os arnês para ombro.
! AVISO Antes de usar o produto, certifique-se que são ativados todos os
dispositivos de bloqueio.
! AVISO Não deixe a criança a jogar com o produto.
! AVISO Antes de utilização, verifique que os dispositivos de fixacão da
cadeira e do corpo do carrinho sejam fixados corretamente.
! É necessário o montagem por um adulto.
! O carrinho é para uma criança com peso inferior a 15 kg. Uma criança
com um peso inadequado pode danificar o assento.
! Para evitar situações de risco, instáveis, não coloque mais de 4,5 kg na
caixa de armazenamento.
! Não deixe a criança sem supervisão. Sempre que seu filho está no car-
rinho não deixe-o sem supervisão.
! Utilize o carrinho para só uma criança. Nunca coloque malotes, sacos
de compras, pacotes ou acessórios sobre a alça ou capota.
! Em caso de sobrecarga , o dobramento incorreto ou o uso de elemen-
tos constituintes de outros fabricantes, isso pode causar danos, , ou
prejudicar o carrinho. Leia atentamente o manual de instruções
! Nunca use o carrinho com peças de outros fabricantes.
! Leia todas as intruções do manual antes de usar o produto. Guarde o
manual de instruções para referência futura. A falta de respeito destes
avisos e instruções pode levar a lesões graves ou morte.
! Os cintos de segurança e os sistemas de fixação devem ser correta-
mente usados.
! Para evitar ferimentos graves causados por quedas ou deslizamento,
use sempre cintos de segurança.
! Certifique-se que, ao ajustar o carrinho, a criança não esteja ao lado
das parte móveis.
! A criança pode deslizar através das aberturas para as pernas e pode
ser estrangulado, se os cintos de segurança não são usados.
! Nunca use o carrinho nas escadas ou nas escadas rolantes.
! Mantenha longe de objetos de alta temperatura, líquidos e aparelhos
eletrônicos.
! Nunca permita que uma criança levanta-se de pé ou seja sentada com
a cabeça orientada para a frente do carrinho.
! Nunca deixe o carrinho na rua, em declive ou em áreas de risco.
! Certifique-se que todos os mecanismos são fixados antes de usar o
carrinho.
! Para evitar estrangulamento, NÃO coloque objetos com a cordas ao
redor do pescoço da criança, elementos pendentes do produto e não
anexe cordas aos brinquedos.
! Para evitar capotamento, NÃO coloque nada sobre o cabo.
! Não levante o carrinho, quando a criança estiver nele.
! NÃO utilize o cesto para carregar a criança.
! Para evitar a derrubada, nunca deixe sua acriança a subir no carrinho.
Leve sua criança de e no cesto.
! Para garantir a segurança da criança, certifique-se de todas as peças
estiverem montadas e fixadas bem antes de usar o carrinho.
! Para evitar estrangulamento, certifique-se que a criança não estiver
perto da capota.
! Quando você parar o carro, sempre ativar os freios.
! Pare de usar o carrinho se ele estiver danificado ou quebrado.
! O Carrinho pode ser utilizado apenas para velocidade da marcha nor-
mal. O produto não é destinado para uso durante a corrida.
! Para evitar sufocamento, remova todos os sacos e embalagens de
plástico antes de usar o produto. Os sacos e as embalagens em plástico devem ser mantidos longe de bebês e crianças.
! Este produto não é destinado para uso durante a corrida ou patinação.
! O carrinho é projetado para ser usado desde o nascimento, e para os
recém-nascidos é recomendada a posição de inclinação máxima.
! O dispositivo de estacionamento deve ser activado quando colocar ou
retirar a criança do carrinho.
! O mosés é adequado só para uma criança que não pode levar-se sem
ajuda, rolar-se ou levar-se com a ajuda das mãos ou dos joelhos. O
peso máximo da criança: 9 kg
! O mosés NÃO deve ser usado para os períodos de sono prolongados.
! NÃO acrescente ou utilize outro colchão que aquilo fornecido junto com
o mosés.
! Para as cadeiras de carro utilizadas junto com o chassis, este veículo
não substitui uma cama portátil para crianças ou uma cama. Se seu
filho precisa dormir, coloque-o em um carrinho, cama portátil para crianças ou cama adequado.
Montagem do carrinho
Leia todas as instruções contidas neste manual antes de montar e usar este produto.
Abertura do carrinho
Separe o fecho de armazenamento do suporte de armazenamento
1
, e leve o cabo acima
2
, um clique
significa que o carrinho está completamente aberto.
! Antes de continuar, verifique se o carrinho está completamente aberto.
Page 12

21
2222
Montagem das rodas dianteiras
Monte as rodas dianteiras nos suportes dianteiros. Verifique se as rodas são afixadas adequadamente puxando
dos conjuntos da roda
3
Para desmontar a roda dianteira, separe a roda dianteira do suporte de frente
4
- 2
pressionando o botão de liberação
4
- 1
Montagem das rodas traseiras
Monte o conjunto do freio ás rodas traseiras 5, alinhe as rodas traseiras ao conjunto do freio 6. Enrole o tubo
de conexão sobre o suporte do cesto de armazenamento e após pressione os três botões
7
.
! Verifique se as rodas são afixadas adequadamente puxando dos conjuntos da roda.
Para desmontar a roda traseira, separe a roda traseira do suporte traseiro
8
- 2 pressionando o botão de
liberação.
8
- 1
Montagem da capota
Alinhe os ganchos da capota com os suportes dos tubos e após deslize para montar a capota. 9
Afixe os três ganchos e os laços de fixação da parte de fixação posterior da capota e os grampos dos ambos os
lados.
10
Montagem da alça
Alinhe as extremidades da alça com os suportes da alça e após insira-os para bloqueá-las 11.
Para desmontar a alça pressione o botão de liberação
12
- 1 e após puxe a alça para as mãos 12 - 2
Á figura 13 está apresentado o carrinho completamente montado.
Manobra do carrinho
Ajuste inclinação
O encosto tem 4 ângulos.
Para inclinar o encosto aperte a alça de ajuste da parte posterior do assento
14
- 1após puxe do encosto.
14
- 2
Para levar o encosto, empurre-o acima.
! Certifique-se de que a inclinação está ajustada adequadamente.
Uso da fivela
Liberação fivela
Pressione o botão central para liberar a fivela.
15
Bloqueio fivela
Ajuste a fivela para a cintura com aquila para ombro
16
- 1 e insira-os na fivela central
16
- 2 Um clique
significa o bloqueio completo da fivela.
16
- 3
! Sempre fixe a criança com os cintos de segurança, para evitar lesões graves que podem ocorrer em caso
de cair ou escorregar.
! Ofereça segurança á sua criança adequadamente. O espaço entre a criança e os cintos de ombro é da
espessura de uma mão.
! Não cruze os cintos de ombros. Isso produzirá pressão sobre o pescoço da criança..
Utilização dos cintos para ombro e cintura
! Para proteger a criança de cair, depois de colocá-lo no assento,verifique se os cintos de ombro e cintura
são á altura e comprimento adequados..
17
- 1 Dispozitivo de fixação arnês para ombro A
17
- 2 Dispozitivo de fixação arnês para ombro B
17
- 3 Dispozitivo de ajuste por deslizamento
Para crianças mais grandes, use o dispositivo de fixação do cinto de segurança para ombros A e os orifícios
mais acima. Para as crianças mais pequenos, use o dispositivo de fixação do cinto de segurança e os orifícios
do baixo.
Para ajustar a posição use o dispositivo de fixação do cinto de segurança para ombros, gire o dispositivo ao
nível da parte dianteira. Tire o dispositivo através o orifício para os cintos de trás para a frente.
18
Passe-o de
novo através o espaço mais próximo da altura do ombro da criança.
19
Use o dispositivo de ajuste para mudar o comprimento do arnês .
20
- 1
Pressione o botão
20
- 2 enquanto afixe o arnês para cintura ao comprimento adequado.
20
- 3
Reglarea suportului pentru gambă
Ajuste do suporte para pernas
O suporte tem 2 posições.
Levar o suporte para pernas
Para levar o suporte para pernas, puxe-o acima.
Baixar o suporte para pernas
Pressione os botões de ajuste nas duas partes do suporte para pernas
21
- 1 e gire o suporte para pernas
para baixo.
21
- 2
Utilização dispositivo de bloqueio eixo dianteiro
Puxe os dispositivos de bloqueio do eixo frontal para manter a direção de movimento..
22
Dica
ecomenda-se a utilização do dispositivo de bloqueio do eixo em superfícies irregulares.
Utilização do freio
Para bloquear as rodas, pressione o pedal de freio para baixo.
23
Para liberar as rodas, puxe o pedal de freio.
24
Dica
Use o freio sempre que o carrinho está parado.
Utilização capota
Para abrir a capota puxe-a em frente.
25
Para dobrar a capota puxe-a para trás.
25
Page 13

23
24
Ajuste alça
A alça tem 3 posições.
Para reglar a altura da alça puxe a alça acima ou para baixo
26
- 2 pressionando o botão de ajuste da alça..
26
- 1
Dobramento do carrinho
! Antes de dobrar o carrinho, dobre a capota..
Pressione o carrinho para a frente para dobrá-lo
27
- 2 , enquaanto pressione os ambos botões de
dobrament.
27
- 1
O carrinho completamente dobrado é como em.
28
Acessórios
Os acessórios podem ser comercializadas separadamente ou podem não estar disponíveis dependendo da
região.
Utilisação de cobre pés
Cobre pés macio assegura um ambiente quente e confortável para sua criança.
Monte o cobre pés como segue.
1. Coloque o cobre pés no assento após abrir o zíper, passe o arnês de ombro, a cintura e o arnês de fixação
entrepernas através os suportes respectivos.
30
2. Passe o laço de fixação do lado superior do cobre pés através o encosto e após encaixe-o ao gancho de
fixação.
31
3. Coloque a criança no cobre-pés, bloqueie a fivela de segurança e feche o zíper para os pés.
A imagem
32
apresenta o cobre pés completamente montado.
Utilização de capa de chuva
Para motar a capa de chuva, coloque-a sobre o carrinho e fixe os 7 pares de ganchos, laços ede ilhós na capa
de chuva.
33
! Antes de usar a capa de chuva, por favor certifique-se de que o encosto foi ajustado na posição e que a
cadeira de carro para crianças foi fixada.
! Verifique cada vez a ventilação quando a capa de chuva estiver sobre o carrinho.
! Quando não for utilizada, verifique se a capa de chuva for limpa e seca antes de dobrar.
! Não dobre o carrinho antes de remover a capa de chuva.
! Não coloque a criança no carrinho que tem montada a capa de chuva durante a temporada quente.
Revestimento do assento
ver imagens 34 -
35
Cuidado e Manutenção
! O acolchoado para o assento removível pode ser lavado com água fria e pode ser secado naturalmente. Sem
branqueamento
! Para limpar o quadro do carrinho, use somente sabão para uso doméstico e água quente. Sem lixívia ou
detergentes.
! Verifique periodicamente o carrinho para o desgaste de peças, parafusos soltos, materiais quebrados ou
costura. Se necessário, substituir ou reparar as peças.
! A exposição excessiva ao sol ou calor pode produzir descoloração ou a deformidade das peças..
! Se o carro estiver molhado, retire a capota e deixe-o secar completamente antes do armazenamento.
! Se as rodas rangam, utilize óleo mais leve (por exemplo spray de silicone, óleo anti-ferrugem ou óleo de
máquina de costura). É importante introduzir óleo no eixo e no sistema de rodas.
29
! Ao usar o carrinho na praia, limpe-o inteiramente depois da utilização para remover toda a areia e sal dos
mecanismos e das assambléias das rodas.
Page 14

25
26
ES
Bienvenido a Joie
™
Felicidades por hacer parte de la familia Joie! Somos muy contentos por hacer parte de su viaje
con el niño. Cuando viaja con Joie Kixx™, está usando una carriola de alta calidad, completamente
certificada, aprobada según el estándar europeo de seguridad EN 1888-2012. El producto es adecuado para niños con un peso máximo de 15 kg. Lea con atención este manual y siga cada paso
para asegurar un paseo confortable y la mayor protección para su niño.
IMPORTANTE – Guarde estas instrucciones para referencias futuras.
Visítenos en joiebaby.com para descargar manuales de instrucciones y para ver más productos
extraordinarios Joie!
Contenido
Figuras 1-8
ADVERTENCIAS 27
Ensamble de la carriola 29
Abrir la carriola 29
Ensamble de las ruedas delanteras 29
Ensamble de las ruedas traseras 29
Ensamble de la cubierta 29
Ensamble de la barra para brazos 29
Uso de la carriola 29
Ajuste de la inclinación 29
Uso de la hebilla 30
Uso de arneses para el hombro y la cintura 30
Ajuste del soporte para las piernas 30
Uso del mecanismo de bloqueo anti-giro delantero 30
Uso del freno 30
Uso de la cubierta 31
Ajuste del mango 31
Pliegue de la carriola
Accesorios 31
Cuidado y mantenimiento 32
Emergencia
En caso de emergencia o accidentes es muy importante cuidar en primer lugar de su niño y darle
inmediatamente los primeros auxilios y tratamiento médico.
26
Informaciones sobre el producto
Lea todas las instrucciones de este manual antes de usar el producto. Para preguntas, por favor contacte el
distribuidor. Algunas características pueden variar según el modelo.
Producto
Adecuado para
Materiales
N° de patente
Fabricado en
Marca
Pagina web
Productor
Carriola Kixx
Niños con un peso máximo de 15 kg (del nacimiento – 36 meses)
plástico, metal, telas
en espera
China
Joie
www.joiebaby.com
JoieChildren’s Product (UK) Limited
19
20
18
17
21
1
2
3
5
x2
x2
6
8
7
9
11
10
14
15
12
13
16
4
1 Cuadro de la carriola
2 Rueda delantera (X2)
3 Rueda trasera (X2)
4 Ensamblaje del freno
5 Cubierta
6 Barra para brazos
7 Cubierta
8 Cojinete para el
asiento
9 Suporte para las
piernas
10 Bloqueo anti-giro
11 Rueda delantera
12 Rueda trasera
13 Hebilla
14 Arnés para hombro
15 Botón de pliegue
16 Botón de ajuste
mango
17 Cesta de
almacenamiento
18 Palanca de freno
19 Pestillo de
almacenamiento
20 Soporte del pestillo
de almacenamiento
21 Mango
Lista de piezas
Asegúrese que todas las piezas para el ensamble están disponibles. Si faltan piezas, contacte el comerciante
local. No se necesitan utensilios para el ensamblaje.
Accessorios
(es posible que no
se incluyan con
la compra)
1
Cubre lluvia
2 Cubierta para los pies
3 forro del asiento
1
2
3
Page 15

27
28
ADVERTENCIAS
! ATENCIÓN Use siempre el dispositivo de entrepiernas en combinación
con el cinturón para la cintura. También se deben usar los arneses para
el hombro.
! ATENCIÓN Antes del uso, asegúrese que todos los dispositivos de blo-
queo están activados.
! ATENCIÓN No deje al niño jugar con el producto.
! ATENCIÓN Antes del uso, verifique si los dispositivos de adjunto del
asiento y del cuerpo del capazo están sujetados correctamente.
! El ensamblaje tiene que ser realizado por un adulto.
! La carriola es adecuada para niños con un peso máximo de 15 kg. Un
peso inadecuado puede deteriorar la carriola.
! Para prevenir condiciones peligrosas y la falta de estabilidad, no ponga
más de 4,5 kg en la cesta de almacenamiento.
! Nunca deje el niño desatendido. Supervise el niño siempre que esté en
la carriola.
! Use la carriola para un solo niño a la vez. Nunca ponga sacos, bolsas
de compras, paquetes o accesorios en el mango o en la cubierta.
! En caso de carga excesiva, pliegue incorrecto o uso de componentes
básicos de otros productores la carriola se puede deteriorar, averiar
o se puede volver insegura. Por favor lea con atención el manual de
instrucciones.
! Nunca use la carriola con partes componentes fabricadas por otros
productores.
! Por favor lea todas las instrucciones del manual antes de usar el pro-
ducto. Por favor guarde el manual de instrucciones para referencias
futuras. Si no se respetan estas advertencias e instrucciones pueden
ocurrir heridas graves o la muerte.
! Los cinturones de protección y los sistemas de sujeción tienen que ser
usadas correctamente.
! Para evitar heridas graves causadas por caídas o resbales use siempre
los cinturones de seguridad.
! Asegúrese que cuando está ajustando la carriola el niño no está cerca
de las partes móviles.
! El niño puede resbalar por los espacios para las piernas y se puede
asfixiar si no se usan los cinturones.
! Nunca use la carriola en escaleras o escaleras mecánicas.
! Mantenga a distancia objetos con temperaturas altas, líquidos o apara-
dos electrónicos.
! Nunca deje al niño estar de pie en la carriola o con la cabeza hacia la
frente de la carriola.
! No deje la carriola en la calle, en pendiente o en zonas peligrosas.
! Antes de usar la carriola asegúrese que todos los mecanismos están
sujetados.
! Para evitar la estrangulación, NO ponga objetos con cordones alred-
edor del cuello del niño, elementos suspendidos de este producto y no
ponga cordones en los juguetes.
! Para evitar el vuelco, NO ponga nada en el mango.
! NO levante la carriola mientras el niño está adentro.
! NO use la cesta para cargar al niño.
! Para evitar el vuelco, nunca deje al niño subir en la carriola. Levante
siempre el niño de la y en la carriola. anexe cordas aos brinquedos.
! Para evitar el prendimiento de los dedos, pliegue y despliegue la car-
riola con atención.
! Asegúrese que está completamente desplegada o plegada antes de
dejar los niños cerca.
! Para asegurar la seguridad del niño, asegúrese que ha ensamblado y
sujetado bien todas las partes antes de usar la carriola.
! Para evitar la estrangulación, asegúrese que el bebe no está cerca de la
cubierta.
! Accione siempre los frenos cuando estacione la carriola.
! Deje de usar la carriola si está deteriorada o averiada.
! La carriola se va a usar solo a la velocidad de camino normal. El pro-
ducto no está destinado a ser usado mientras está corriendo.
! Para evitar la asfixia, quite todas las bolsas y los embalajes de plástico
antes de usar el producto. Las bolsas y los embalajes de plástico tienen
que ser guardados lejos de bebes y niños.
! El producto no se debe usar mientras está corriendo o patinando.
! La silla de paseo desde el nacimiento, y para recién nacidos se reco-
mienda el uso en posición máxima de inclinación.
! El dispositivo de estacionamiento se tiene que activar cuando sienta y
cuando saca el niño de la carriola.
! El capuzo es adecuado solamente para un niño que no puede levan-
tarse de pies sin ayuda, no se puede voltear y no se puede levantar en
sus manos o en las rodillas. El peso máximo del niño: 9 kg
! NO use la carriola durante el sueño prolongado.
! NO use o añade otro tipo de colchón que aquello suministrado con la
carriola.
! Para los asientos de coche en conjunto con un bastidor, este vehículo
no sustituye una cuna o una cama. En el caso que su niño necesita
dormir, entonces debe poner una carriola, una cuna o una cama adecuada para el bebe.
Page 16

29
30
Ensamble de la carriola
Por favor lea con atención las instrucciones de este manual antes de ensamblar y usar el producto.
Abrir la carriola
Separe el pestillo de almacenamiento del soporte del pestillo de almacenamiento 1 y después tire el mango
hacia arriba
2
, si oye un clic significa que el producto está completamente abierto.
! Verifique si el producto está completamente abierto antes de seguir.
Ensamble de las ruedas delanteras
Monte las ruedas delanteras en los soportes delanteros. Verifique si las ruedas están sujetadas tirando del
ensamble de las ruedas.
3
Para desmontar las ruedas delanteras, quite las ruedas de los soportes delanteros
4
- 2 presionando el botón de suelto.
4
- 1
Ensamble de las ruedas traseras
Monte las ruedas delanteras en los soportes delanteros. 5 , monte las ruedas traseras al ensamble de freno 6.
Envuelve el tubo de conexión sobre el soporte de la cesta de almacenamiento y después presione los tres
botones.
7
! Verifique si las ruedas son agregadas de forma segura empujando sobre los ensambles de la rueda.
Para desensamblar la rueda trasera, desagregue la rueda trasera del soporte de la rueda trasera
8
- 2 mientras
presionando el botón de suelto.
8
- 1
Ensamble de la cubierta
Inserte los clips de la cubierta en el soporte sobre los tubos y después deslice para ensamblar la cubierta. 9
Por favor cierre de golpe los 3 ganchos y los sujetadores de bucle sobre la parte de retención trasera de la
cubierta y los clips sobre los ambos lados.
10
Ensamble de la barra para brazos
Alinee los bordes de la barra para brazos, y después insértelos para bloquear 11.
Para desensamblar la barra para brazos, presione el botón de suelto de la barra para brazos
12
- 1 y después
tire la barra para brazos.
12
- 2
La figura 13 se presenta la carriola completamente ensamblada.
Uso de la carriola
Ajuste de la inclinación
Existen 3 ángulos para el respaldo.
Para inclinar el respaldo tire el mango de ajuste del lado trasero del asiento
14
- 1 y tire el respaldo.
14
- 2
Para levantar el respaldo, tire hacia arriba.
! Asegúrese que la inclinación es ajustada correctamente para el uso.
30
Uso de la hebilla
Suelto de la hebilla
Presione el botón central para soltar la hebilla.
15
Bloqueo de la hebilla
Combinen la hebilla del cinturón para la cintura con la hebilla para los hombros
16
- 1 e introdúzcala en la
hebilla central.
16
- 2 Si se oye un clic significa que la hebilla es completamente bloqueada.
16
- 3
! Para evitar heridas graves causadas por las caídas o los resbales, protege siempre el niño con los arneses.
! Asegúrese que el niño está bien protegido. El espacio entre el niño y el arnés para los hombros es aproxi-
madamente de una mano.
! No crucen los cinturones para los hombros. Esto puede causar una presión sobre el cuello del niño.
Uso de los arneses para los hombros y para la cintura
! Para proteger el niño contra la caída, después de que el niño esté dentro del asiento, verifique si los arneses
para los hombros y para la cintura tienen una altura y una longitud correcta.
17
- 1 Dispositivo de arreglo para los hombros A
17
- 2 Dispositivo de arreglo para los hombros B
17
- 3 Dispositivo de ajuste por deslizo
Para un niño más grande, use el dispositivo de arreglo para los hombros A y los espacios más altos para los
hombros. Para niños más pequeños, use el dispositivo de arreglo para los hombros B y los espacios más
bajos para los hombros.
Para ajustar la posición del dispositivo de arreglo para los hombros, abre la cremallera del lado trasero del
asiento, trae el dispositivo de arreglo al nivel con el lado delantero. Páselo por el espacio del arnés para los
hombros desde atrás hacia adelante.
18
Repáselo por el espacio más cercano de la altura de los hombros del
niño.
19
Use el dispositivo de ajuste por deslizo para cambiar la longitud del arnés.
20
- 1
Presione el botón
20
- 2 mientras que tire el arnés para la cintura hasta una longitud adecuada.
20
- 3
Ajuste del soporte para las piernas
El soporte para las piernas tiene 2 posiciones.
Levante el soporte para las piernas
Para levantar el soporte para las piernas, solamente tírelo hacia arriba.
Baje el soporte para las piernas
Presione los botones de ajuste en los dos lados del soporte para las piernas
21
- 1 y gire el soporte para las
piernas hacia abajo.
21
- 2
Uso del bloqueo anti-giro delantero
Presione los bloqueos anti-giro delanteros para mantener la dirección de movimiento.
22
Consejo
Se recomienda el uso de los bloqueos anti-giro sobre las superficies desniveladas.
Uso del freno
Para bloquear las ruedas, pise sobre la palanca del freno hacia abajo.
23
Page 17

31
32
Para soltar las ruedas, solamente levante la palanca del freno hacia arriba.
24
Consejo
Use siempre el freno cuando la carriola está en una posición de parada.
Uso de la cubierta
Para abrir la cubierta, tiren la cubierta hacia adelante. 25
Para plegar la cubierta tiren la cubierta hacia atrás.
25
Ajuste del mango
El mango tiene 3 posiciones.
Para ajustar la altura del mango, tire el mango hacia arriba o hacia abajo.
26
- 2 mientras que presione el
botón de ajuste del mango.
26
- 1
Pliegue de la carriola
! Por favor pliegue la cubierta antes de plegar la carriola.
Tire la carriola hacia adelante para pliegue
27
- 2, mientras qui levante los dos botones de pliegue.
27
- 1
La carriola completamente plegada aparece como en
28
.
Accesorios
Los accesorios pueden ser vendidos por separado o puede no estar disponible dependiendo de la región.
Uso de la cubierta para las piernas
La cubierta para las piernas suave puede ofrecer al niño un ambiente caliente y confortable.
Ensamble la cubierta para las piernas siguiendo estos pasos.
1. Ponga la cubierta para las piernas sobre el asiento después de bajar el cierre, pase los arneses para los
hombros, los arneses para la cintura y los arneses de entrepiernas por los espacios respectivos.
30
2. Pase el sujetador de bucle sobre el lado superior de la cubierta para las piernas a través del respaldo, y después
cuélguelo al sujetador del gancho. 31
3. Ponga el bebé dentro de la cubierta para las piernas, bloquea la hebilla de seguridad, y después re-cierre la
cubierta para las piernas.
La cubierta ensamblada para las piernas aparece como en. 32
Uso de la cubierta contra la lluvia
Para armar el cobertor de lluvia, colóquelo sobre el coche, y luego ajuste los 7 pares de ganchos y ajuste el
protector.
33
! Antes de usar la cubierta para la lluvia, por favor, asegúrese de que el respaldo ha sido ajustado a la
posición más baja y el asiento de seguridad infantil ha sido fijada.
! Por favor verifique siempre la ventilación, cuando la cubierta contra la lluvia esté sobre la carriola.
! Cuando no se usa, por favor verifique si la cubierta contra la lluvia ha sido limpiada y secada antes del pliegue.
! No pliegue la carriola antes de retirar la cubierta contra la lluvia.
! No ponga el niño dentro de la carriola con la cubierta contra la lluvia en condiciones de clima caliente.
forro del asiento
consulte las imagenes
34
-
35
Cuidado y mantenimiento
! El cojinete para el asiento se puede lavar con agua fría y secado rápidamente. Sin blanqueador.
! Para limpiar el cuadro de la carriola, use solamente jabón de casa y agua caliente. Sin blanqueador o
detergente.
! De vez en cuando, verifique su carriola si hay tornillos sueltos, piezas usadas, materiales rotos o puntadas.
Remplace o repare las piezas si es necesario.
! Una exposición excesiva al sol o al calor puede causar la degradación o la deformación de las piezas.
! Si la carriola se moja, abre la cubierta y déjela secarse muy bien antes de almacenamiento.
Si las ruedas chirrían, use un aceite ligero (por ejemplo, espray con silicio, aceite antioxidante, o aceite por
máquina de coser). Es importante poner el aceite dentro del eje y el ensamble de la rueda.
29
! Cuando se usa la carriola en la playa, limpie completamente su carriola después del uso y quite la arena y la
sal de los mecanismos y de los ensambles de la rueda.
Page 18

33
34
FR
Bienvenu à Joie
™
Félicitations pour avoir entrée dans la famille Joie! Nous sommes si enthousiastes à faire partie
de votre voyage avec votre petit. Pendant le voyage avec Joie Kixx™, vous utilisez une poussette
d’haute qualité, complètement attestée, approuvée par les standards européens de la sécurité
EN 1888-2012. Ce produit est approprié pour les enfants pesant moins de 15 kg. S’il vous plaît lire
soigneusement ce manuel et suivez chaque étape pour assurer une promenade confortable et la
meilleure protection pour votre enfant.
IMPORTANT – Gardez ce manuel d’instruction pour une référence future.
Visitez-nous à joiebaby.com pour télécharger des manuels et pour voir plus des produits extraor-
dinaires Joie!
Contenu
Figures 1-8
AVERTISSEMENTS 35
Assemblage de la poussette 36
Ouverture de la poussette 36
Assemblage des roues frontales 37
Assemblage des roues arrières 37
Assemblage de la capuche 37
Assemblage de la barre de bras 37
Utilisation de la poussette 37
Réglage d’inclinaison 37
Utilisation de la boucle 38
Utilisation d’harnais d’épaule et pour la taille 38
Réglage du support-jambe 38
Utilisation du verrou anti-pivotant frontal 38
Utilisation de la freine 38
Utilisation de la capuche 39
Réglage de la manche 39
Pliage de la poussette 39
Accessories 39
Entretien et maintenance 40
Émergence
En cas d’une émergence ou d’un accident, le plus important est de prendre soin d’enfant avec les premiers
secours et le traitement médicale immédiate.
34
Informations sur le produit
Lisez toutes les instructions dans ce manuel avant d’utiliser ce produit. Si vous avez quelques autres
questions, s’il vous plaît consulter le distributeur. Certaines caractéristiques peuvent varier selon le modèle.
Produit
Approprié pour
Matériels
N° Brevet
Fabriqué en
Nom de la marque
Site web
Fabricant
Poussette Kixx
Enfant pesant moins de 15 kg (à partir de la naissance – à 36 moins)
Matériels plastiques, métal, tissus
Brevets en attente
Chine
Joie
www.joiebaby.com
JoieChildren’s Product (UK) Limited
19
20
18
17
21
1
2
3
5
x2
x2
6
8
7
9
11
10
14
15
12
13
16
4
1 Cadre de la poussette
2 Roue frontale (X2)
3 Roue arrière (X2)
4 Assemblage freine
5 Capuche
6 Barre de bras
7 Capuche
8 Coussin d’assise
9 Support-jambe
10 Verrou anti-pivotant
11 Roue frontale
12 Roue arrière
13 Boucle
14 Harnais d’épaule
15 Bouton de pliage
16 Bouton de réglage de
la manche
17 Panier de rangement
18 Levier de freine
19 Loquet de
rangement
20
Support du loquet
de rangement
21 Manche
Liste des pièces composantes
Assurez-vous que toutes les pièces composantes sont disponibles avant de l’assemblage. Si n’importe quelle
pièce composante manque, s’il vous plaît contacter le distributeur local. Pas des outils requis pour l’assemblage.
Accessoires
(Peuvent ne pas
etre inclus lors de
l’achat)
1
Housse pour la pluie
2 Housse pour les pieds
3 Doublure intérieure
1
2
3
Page 19

35
36
MISES EN GARDE
! MISE EN GARDE Utilisez toujours la combinaison d’entrejambes avec la
ceinture. Le harnais pour les épaules doit être aussi utilisé.
! MISE EN GARDE Assurez-vous que tous les dispositifs de blocage sont
enclenchés avant d’utiliser le produit.
! MISE EN GARDE Ne permettez pas à l’enfant de jouer avec ce produit.
! MISE EN GARDE Vérifiez si l’armature de la poussette ou l’unité du
siège sont correctement enclenchés avant d’utiliser le produit. .
! L’assemblage doit être réalisé par un adulte.
! Utilisez la poussette avec un enfant qui pèse moins de 15 kg.
L’utilisation avec un enfant plus grand peut endommager la poussette.
! Pour prévenir une condition dangereuse, instable, ne rangez plus de 4,5
kg dans le porte-bagages.
! Ne laissez pas l’enfant sans surveillance. Surveillez toujours l’enfant
lorsqu’il se trouve dans la poussette.
! Utilisez la poussette seulement avec un enfant à la fois. Ne rangez pas
des sacs à main, des bourses d’achats, des colis ou d’autres accessoires sur la poignée ou le baldaquin.
! Le surcharge, le pliage incorrecte, ou l’utilisation des composants
d’autres fabricants peut endommager, briser ou rendre instable la poussette. Veuillez lire attentivement le mode d’emploi.
! Ne l’utilisez jamais avec des composants d’autres fabricants.
! Veuillez lire toutes les instructions du manuel avant d’utiliser ce produit.
Veuillez garder le mode d’emploi pour consultation dans l’avenir. Manquer de suivre ces mises en garde et ces instructions peut entrainer des
blessures graves ou le décès.
! Les ceintures de sécurité et les systèmes de retenue doivent être utilisés
correctement.
! Afin d’éviter des blessures graves à cause des chutes ou des glisse-
ments, utilisez toujours la ceinture pour le siège.
! Assurez-vous que le corps de votre enfant n’est pas dans la proximité
des parties mobiles lorsque vous réglez la poussette.
! L’enfant peut glisser dans les ouvertures pour les jambes et peut
s’étrangler si le harnais n’est pas utilisé.
! N’utilisez jamais la poussette sur des marches ou des élévateurs.
! Gardez à distance des objets à températures hautes, des liquides et des
objets électroniques.
! Ne permettez jamais à votre enfant de rester debout dans la poussette
ou de rester assis dans la poussette la tête vers la partie avant de la
poussette.
! Ne stationnez jamais la poussette sur les rues, les pentes inclinées ou
les zones dangereuses.
! Assurez-vous que tous les mécanismes sont fixés avant d’utiliser la
poussette.
! Pour éviter l’étranglement, NE mettez pas des objets avec des ficelles
autour du cou de l’enfant, suspendez les ficelles de ce produit ou attachez les ficelles aux jouets.
! Pour prévenir le renversement, NE rangez rien sur la poignée.
! NE levez pas la poussette lorsque l’enfant se trouve dans la poussette.
! N’utilisez pas le porte-bagages pour porter l’enfant.
! Pour prévenir le renversement, ne laissez jamais l’enfant monter dans la
poussette. Levez toujours l’enfant de et dans la poussette.
! Pour éviter de coincer les doigts, prenez soin lorsque vous pliez ou
dépliez la poussette.
! Assurez-vous que le produit est complètement ouvert ou plié avant de
laisser l’enfant dans sa proximité.
! Pour assurer la sécurité de l’enfant, assurez-vous que toutes les com-
posants sont assemblées et enclenchées proprement avant d’utiliser la
poussette.
! Pour éviter l’étranglement, assurez-vous que vous tenez l’enfant loin du
baldaquin.
! Activez toujours les freins lorsque vous parquez la poussette.
! Arrêtez l’usage de la poussette si elle devient endommagée ou brisée.
! La poussette sera utilisée seulement pour la vitesse de la marche. Ce
produit n’est pas conçu pour usage pendant la course à pied.
! Pour éviter l’étouffement, enlever la bourse en plastique et les matériaux
pour l’emballage avant d’utiliser le produit. La bourse en plastique et
les matériaux pour l’emballage doivent puis être tenus hors de la portée
des bébés et des enfants.
! Ce produit n’est pas adéquat pour usage pendant une course à pied ou
pendant une promenade avec les patines.
! La poussette pour les nouveau-nés est recommandée à être utilisé dans
la position inclinée la plus basse pour les nouveau-nés.
! Le dispositif de stationnement doit être activé pour asseoir ou lever
l’enfant.
! La nacelle correspond seulement pour un enfant qui ne peut pas se
tenir droit sans aide, qui ne peut pas rouler et se lever lui-même sur ses
bras et genoux. Le poids maximum de l’enfant: 9 kilos
! La nacelle NE doit pas être utilisée pour dormir à long terme.
! N’utilisez et n’ajoutez pas un matelas autre que celui fourni avec la na-
celle.
Assemblage de la poussette
S’il vous plaît lire toutes les instructions de ce manuel avant l’assemblage et l’utilisation de ce produit.
Ouverture de la poussette
Page 20

37
38
Séparez le loquet de rangement du support du loquet de rangement 1 et puis tirez de la manche vers l’haut 2,
un clic signifie que la poussette est complètement ouverte.
! Vérifiez si la poussette est complètement ouverte avant de continuer.
Assemblage des roues frontales
Assemblez les roues frontales sur les supports frontaux. Vérifiez si les roues frontales sont fixées en toute
sécurité en tirant sur les assemblages de la roue.
3
Pour désassembler la roue frontale, détachez la roue frontale
sur le support frontal
4
- 2 tout en appuyant le bouton de déverrouillage
4
- 1
Assemblage des roues arrière
Assemblez l’assemblage de la freine aux supports arrières 5 , assemblez les roues arrières à l’assemblage de la
freine.
6
Enveloppez le tube de connexion des supports arrière avec le rabat du panier de rangement, et puis
appuyez sur les trois boutons pression.
7
! Vérifiez si les roues sont fixées en toute sécurité en tirant sur les assemblages de la roue.
Pour désassembler la roue arrière, détachez la roue arrière du support de la roue arrière
8
- 2 tout en appuyant
le bouton de déverrouillage.
8
- 1
Assemblage de la capuche
Alignez les agrafes de la capuche au niveau des supports sur les tubes, et puis faites glisser pour assembler la
capuche.
9
S’il vous plaît fixer les 3 fermetures à bouclettes sur la retention arriere de la capuche et les boutons
pression sur les deux côtés.
10
Assemblage de la barre de bras
Alignez les fentes de la barre de bras au niveau des supports de la barre de bras, et puis insérez pour verrouiller 11.
Pour désassembler la barre de bras, appuyez sur le bouton de déverrouillage de la barre de bras
12
- 1 et puis
tirez vers l’haut la barre de bras.
12
- 2
À la figure
13
on est présenté la poussette complètement assemblée.
Utilisation de la poussette
Réglage du dossier
Il y a 4 angles pour le dossier.
Pour l’inclinaison du dossier, resserrez la manche d’inclinaison sur l’arrière du siège
14
- 1 tirez vers le bas le
dossier.
14
- 2
Pour soulever le dossier, faites-le monter.
! Assurez-vous que l’inclinaison est adéquatement réglée pour l’utilisation.
Utilisation de la boucle
Déverrouillage de la boucle
Appuyez sur le bouton central pour déverrouiller la boucle.
15
Verrouillage de la boucle
Assemblez la boucle de la ceinture pour la taille avec la boucle pour l’épaule
16
- 1 et fixez dans la boucle
38
centrale. 16 - 2 Un «clic» signifie le verrouillage complet de la boucle. 16 - 3
! Pour éviter de la blessure grave à cause de la chute ou du glissage, toujours protégez votre enfant avec l’harnais.
! Assurez-vous que l’enfant est bien sécurisé. L’espace entre l’enfant et l’harnais d’épaule est
approximativement de l’épaisseur d’une main.
! Ne faites croiser les ceintures pour l’épaule. Cela causera la pression sur le cou d’enfant.
Utilisation d’harnais d’épaule et pour la taille
! A fin de protéger l’enfant contre la chute, après avoir placé votre enfant dans le siège, vérifiez si l’harnais
d’épaule et pour la taille sont à l’hauteur et à la longueur appropriées.
17
- 1 Dispositif de fixage harnais d’épaule A
17
- 2 Dispositif de fixage harnais d’épaule B
17
- 3 Dispositif de réglage par coulisse
Pour un enfant plus grand, utilisez le dispositif de fixage harnais d’épaule A et les espaces plus longues de l’épaule.
Pour un enfant plus petit, utilisez le dispositif de fixage harnais d’épaule et les espaces plus courtes de l’épaule.
Pour régler la position du dispositif de fixage harnais d’épaule, ouvrez la fermeture à éclair de l’arrière du siège, tournez
le dispositif de fixage au niveau avec la partie orientée vers l’avant. Passez-le par l’espace d’harnais d’épaule à partir
d’arrière vers l’avant.
18
Repassez-le par l’espace qui est le plus proche à l’hauteur d’épaule d’enfant. 19
Utilisez le dispositif de réglage par coulisse pour changer la longueur d’harnais
20
- 1
Appuyez sur le bouton
20
- 2 tout en tirant l’harnais pour la taille à la longueur appropriée. 20 - 3
Réglage du support-jambe
Le support-jambe a 2 positions.
Soulèvement du support-jambe
Pour soulever le support-jambe, seulement tirez-le vers l’haut.
Rebaisse du support-jambe
Appuyez sur les boutons de réglage sur les deux côtés du support-jambe
21
- 1 et faites tourner le support-
jambe vers le bas.
21
- 2
Utilisation du verrou anti-pivotant frontal
Tirez vers le bas les verrous anti-pivotants frontaux pour maintenir la direction de mouvement. 22
Conseil
On est recommandé d’utiliser les verrous anti-pivotants sur des surfaces inégales.
Utilisation de la freine
Pour verrouiller les roues, pressez sur le levier de la freine vers le bas 23
Pour déverrouiller les roues, seulement soulevez le levier de la freine vers l’haut
24
Conseil
Utilisez toujours la freine lorsque la poussette est en position d’arrêt.
Utilisation de la capuche
Pour ouvrir la capuche, tirez la capuche vers l’avant
25
Pour plier la capuche, tirez la capuche vers l’arrière
25
Page 21

39
40
Réglage de la manche
La manche a 3 positions.
Pour régler l’hauteur de la manche, tirez la manche vers l’haut ou vers le bas
26
- 2 tout en appuyant sur le
bouton de réglage de la manche.
26
- 1
Pliage de la poussette
! S’il vous plaît pliez la capuche avant de plier la poussette.
Poussez la poussette vers l’avant pour plier 27 - 2, tout en soulevant les deux boutons de pliage. 27 - 1
La poussette est complètement pliée comme on montre la
28
Accessories
Les accessoires peuvent être vendus séparément ou peuvent ne pas être disponibles selon la région.
Utilisation de l’housse de pied
L’housse de pied douce peut fournir à l’enfant un environnement chaud et confortable.
Assemblez l’housse de pied en suivant ces étapes.
1. Placez l’housse de pied sur le siège après défaire la fermeture éclair, passez l’harnais d’épaule, l’harnais pour la taille et
l’harnais d’entrejambe par les espaces respectives.
30
2. Passez la boucle de fixage sur la partie supérieure de l’housse de pied par le dossier, et puis attachez –le au crochet de
fixage.
31
3. Mettez le bébé dans l’housse de pied, verrouillez la boucle de sécurité, et puis refermez éclair l’housse de pied
L’housse de pied est assemblée comme on montre
32
Utilisation de l’housse de pluie
Pour assembler la housse pour la pluie, rangez-la sur la poussette et puis attachez les 7 paires de bandes Velcro
sur la housse pour la pluie.
33
! Avant d’utiliser la housse de pluie, s’il vous plaît assurez-vous que le dossier a été ajustée à la position la plus
basse et le siège d’auto pour bébé a été fixé.
! Vérifiez toujours la ventilation, lorsque l’housse de pluie est sur la poussette.
! Lors de ne l’utiliser pas, s’il vous plaît vérifier si l’housse de pluie a été nettoyée et séchée avant du pliage.
! Ne pliez pas la poussette avant de retirer l’housse de pluie.
! Ne placez pas votre enfant dans la poussette avec l’housse de pluie pendant le temps chaud.z
Doublure intérieure
voir images
34
-
35
Entretien et maintenance
! Le coussin d’assise détachable doit être lavé avec de l’eau froide et séché de la goutte. Pas d’eau de javel.
! Pour nettoyer le cadre de la poussette, utilisez seulement le savon de ménage et de l’eau chaude. Pas d’eau
de javel ou du détergent.
! De temps en temps, vérifiez votre poussette s’il y a des vis lâchés, des parties usées, du matériel ou de la
couture déchirée. Remplacez ou réparez les pièces si nécessaire.
! Une exposition excessive au soleil ou à la chaleur peut causer la dégradation ou la déformation des parties.
! Si la poussette se mouille, ouvrez la capuche et permettez de se sécher très bien avant le rangement.
! Si les roues grincent, utilisez une huile légère (par exemple, spray avec silicium, huile antirouille, ou huile de machine à
coudre). Il est important de mettre l’huile dans l’essieu et l’assemblage de la roue.
29
! Lors d’utiliser votre poussette à la plage, nettoyez complètement votre poussette après de l’utiliser pour retirer
la sable et le sel des mécanismes et des assemblages de la roue.
Page 22

41
42
DE
Willkommen bei Joie
™
Glückwunsch, dass Sie ein Mitglied der Joie-Familie werden! Wir freuen uns sehr, Ihr kleines Kind
auf Reisen zu begleiten. Beim Reisen mit dem Joie Kixx™ benutzen Sie einen erstklassigen, umfassend zertifizierten Kinderwagen, der gemäß dem europäischen Sicherheitsstandard EN 1888-2012
zugelassen ist. Dieses Produkt eignet sich für Kinder mit einem Gewicht von unter 15 kg. Bitte
lesen Sie diese Anleitung aufmerksam und befolgen die einzelnen Schritte zur Sicherstellung einer
komfortablen Fahrt und einer optimalen Sicherheit Ihres Kindes.
WICHTIG – Bewahren Sie diese Anleitung für eine spätere Bezugnahme auf.
Besuchen Sie uns unter joiebaby.com, um Anleitungen herunterzuladen und weitere aufregende
Joie-Produkte anzuschauen!
Inhalt
Abbildungen 1-8
WARNUNG 43
Montage des Kinderwagens 45
Kinderwagen öffnen 45
Vorderräder montieren 45
Hinterräder montieren 45
Verdeck anbringen 45
Armlehne montieren 45
Bedienung des Kinderwagens 45
Rückenlehne anpassen 45
Schnalle bedienen 45
Schulter- & Taillengurte anlegen 46
Wadenstütze anpassen 46
Vorderen Lenkstopp verwenden 46
Bremse bedienen 47
Verdeck verwenden 47
Griff einstellen 47
Kinderwagen zusammenklappen 47
Zubehör 47
Pflege und Wartung 48
Notfall
Bei einem Notfall oder Unfall ist es am wichtigsten, dass Ihr Kind unverzüglich erste Hilfe bekommt und
medizinisch versorgt wird.
42
Produktinformationen
Lesen Sie alle Hinweise in dieser Anleitung, bevor Sie dieses Produkt verwenden. Bei weiteren Fragen wenden
Sie sich bitte an Ihren Händler. Einige Merkmale können je nach Modell variieren.
Produkt
Geeignet für
Materialien
Patent-Nr.
Hergestellt in
Markenname
Website
Hersteller
Kixx Kinderwagen
Kinder mit einem Gewicht unter 15 kg (Geburt - 36 Monate)
Kunststoff, Metall, Stoffe
Patente angemeldet
China
Joie
www.joiebaby.com
Joie Children’s Product (UK) Limited
19
20
18
17
21
1
2
3
5
x2
x2
6
8
7
9
11
10
14
15
12
13
16
4
1 Kinderwagengestell
2 Vorderrad (X2)
3 Hinterrad (X2)
4 Bremsanlage
5 Verdeck
6 Armlehne
7 Verdeck
8 Sitzkissen
9 Wadenstütze
10 Lenkstopp
11 Vorderrad
12 Hinterrad
13 Verschluss
14 Schultergurt
15
Zusammenklappknopf
16 Griffeinstellknopf
17 Ablagekorb
18 Bremshebel
19 Ablageverschluss
20 Ablageverschlussbe-
festigung
21 Griff
Teileliste
Stellen Sie vor der Montage sicher, dass alle Teile vorhanden sind. Falls etwas fehlen sollte, wenden Sie
sich bitte an Ihren Händler vor Ort. Für die Montage werden keine Werkzeuge benötigt.
Zubehör
(nicht mitgeliefert)
1
Regenschutz
2 Fußsack
3 Sitzkissen
1
2
3
Page 23

43
44
WARNUNGSHINWEISE
! WARNUNG Verwenden Sie immer den Schrittgurt in Kombination mit
dem Taillengurt. Wir empfehlen, dass zusätzlich auch der Schultergurt
verwendet wird.
! WARNUNG Stellen Sie vor der Benutzung sicher, dass alle Ver-
schlussteile verriegelt sind.
! WARNUNG Lassen Sie Ihr Kind nicht mit diesem Produkt spielen.
! WARNUNG Stellen Sie vor der Benutzung sicher, dass die Kinderwagen
und Sitzhaltevorrichtungen richtig verriegelt sind.
! Das Produkt muss von einem Erwachsenen montiert werden.
! Verwenden Sie den Kinderwagen nur für Kinder unter 15 kg. Anderen-
falls kann der Kinderwagen beschädigt werden.
! Legen Sie nie mehr als 4,5 kg in den Aufbewahrungskorb, damit der
Kinderwagen nicht instabil wird.
! Lassen Sie Ihr Kind niemals unbeaufsichtigt zurück. Behalten Sie Ihr
Kind immer in Sichtweite.
! Verwenden Sie den Kinderwagen nur mit einem Kind. Legen Sie nie
Taschen, Einkaufstüten, Pakete oder Zubehörteile auf den Handgriff
oder das Dach.
! Überladung, falsches Zusammenklappen oder die Verwendung von
Teilen anderer Hersteller kann die Sicherheit des Kinderwagens beeinträchtigen oder in beschädigen.Lesen Sie die Bedienungsanleitung
sorgfältig.
! Verwenden Sie ihn nie mit Zubehörteilen anderer Hersteller.
! Lesen Sie alle Hinweise in dieser Anleitung, bevor Sie dieses Produkt
verwenden.
! Bewahren Sie die Anleitung für eine spätere Bezugnahme auf. Nicht-
beachtung dieser Warnungen und Anweisungen könnte zu schweren
Verletzungen oder zum Tode führen.
! Die Sicherheitsgurte und das Rückhaltesystem müssen korrekt verwen-
det werden.
! Verwenden Sie immer die Sitzgurte, um schwere Verletzungen durch
Herausfallen oder -gleiten zu verhindern.
! Achten Sie darauf, dass Ihr Kind nicht mit Teilen in Berührung kommt,
die sich bewegen, wenn Sie den Kinderwagen einstellen.
! Das Kind kann in die Öffnungen der Beine rutschen und sich stranguli-
eren, wenn das Gurtsystem nicht verwendet wird.
! Benutzen Sie mit dem Kinderwagen keine Treppen oder Rolltreppen.
! Halten Sie sich von heißen Objekten, Flüssigkeiten und elektronischen
Geräten fern.
! Erlauben Sie Ihrem Kind nicht auf den Kinderwagen zu klettern oder mit
dem Kopf nach vorn in ihm zu sitzen.
! Stellen Sie den Kinderwagen nicht auf Straßen, abschüssigen oder ge-
fährlichen Bereichen ab.
! Vergewissern Sie sich, dass alle mechanischen Teile arretiert sind,
bevor Sie den Kinderwagen verwenden.
! Um eine Strangulation zu vermeiden, legen Sie KEINE Gegenstände mit
einem Band um den Nacken Ihres Kindes. Entfernen Sie die Bänder von
diesen Gegenständen oder fixieren Sie sie auf andere Weise.
!
Legen Sie NICHTS auf den Handgriff, damit der Kinderwagen nicht kippt.
! Heben Sie den Kinderwagen NICHT an, während Ihr Kind darin sitzt.
!
Verwenden Sie NICHT den Aufbewahrungskorb als Ablageplatz für Ihr Kind.
!
Lassen Sie Ihr Kind nicht auf den Kinderwagen klettern, da er sonst kippen könnte. Heben Sie Ihr Kind immer in den oder aus dem Kinderwagen.
! Klappen Sie den Kinderwagen immer vorsichtig auseinander oder
zusammen, damit nichts eingeklemmt werden kann.
! Achten Sie darauf, dass der Kinderwagen ganz zusammen- oder aus-
geklappt ist, bevor Sie Ihr Kind in die Nähe lassen.
! Prüfen Sie zur Sicherheit Ihres Kindes, dass alle Teile zusammengebaut
und fixiert sind, bevor Sie den Kinderwagen benutzen.
! Halten Sie ihr Kind vom Verdeck fern, damit es sich nicht darin verfan-
gen kann.
!
Aktivieren Sie immer die Bremsen, wenn Sie den Kinderwagen abstellen.
! Verwenden Sie den Kinderwagen nicht, wenn er beschädigt ist.
! Der Kinderwagen darf nur mit Schrittgeschwindigkeit verwendet
werden. Dieses Produkt darf nicht beim Joggen verwendet werden.
! Um Erstickungsgefahren zu vermeiden, entfernen Sie Plastikbeutel und
die Verpackungsmaterialien, bevor Sie dieses Produkt verwenden. Plastikbeutel und Verpackungsmaterialien sollten von Babys und Kindern
ferngehalten werden.
! Dieses Produkt eignet sich nicht zum Jogging oder Skating.
! Der Buggy eignet sich für Babys ab der Geburt. Für ein neugeborenes
Baby wird die am weitesten zurückgelehnte Position empfohlen.
! Nutzen Sie die Feststellbremse, wenn Sie das Kind hineinlegen oder
herausnehmen.
! Die Babyschale eignet sich nur für Kinder, die nicht selbstständig sitzen,
sich drehen und/oder mit Händen und Knien abstützen können. Maximalgewicht des Kindes: 9 kg.
! Die Babyschale eignet sich NICHT für längeres Schlafen.
! Verwenden Sie nur die mit der Babyschale gelieferte Matratze; fügen
Sie KEINE weitere Matratze hinzu.
! Für Autositze in Verbindung mit einem Unterbau, dieses Transportmit-
tel ist kein Ersatz für ein Gitter- bzw. Babybett. Falls Ihr Kind müde ist,
sollten Sie es in einen geeigneten Kinderwagen, ein Gitter- bzw. Babybett legen.
Page 24

45
46
Montage des Kinderwagens
Lesen Sie bitte alle Hinweise in dieser Anleitung, bevor Sie dieses Produkt montieren und verwenden.
Kinderwagen öffnen
Lösen Sie den Aufbewahrungsverschluss von der Befestigung 1 , und heben Sie den Handgriff nach oben 2 ,
hören Sie, wie er einrastet, ist der Kinderwagen vollständig geöffnet.
! Prüfen Sie, ob der Kinderwagen vollständig offen ist, bevor Sie fortfahren.
Vorderräder montieren
Montieren Sie die Vorderräder an der Vorderachse. Prüfen Sie durch Ziehen an den Räder, ob diese sicher
befestigt sind.
3
Entfernen Sie ein Vorderrad, indem Sie es von der Vorderradhalterung
4
- 2 lösen, während
Sie den Freigabeknopf gedrückt halten.
4
- 1
Hinterräder anbringen
Montieren Sie Bremsvorrichtung an der Hinterachse 5 , montieren Sie die Hinterräder an der Bremsvorrichtung
6
. Umwickeln Sie das Verbindungsrohr der Hinterachse mit dem Stoff des Korbs und schließen Sie die drei
Knöpfe.
7
! Prüfen Sie durch Ziehen an den Räder, ob diese sicher befestigt sind.
Entfernen Sie ein Hinterrad, indem Sie es von der Hinterradhalterung
8
- 2 lösen, während Sie den
Freigabeknopf gedrückt halten.
8
- 1
Verdeck anbringen
Richten Sie die Clips des Verdecks zur den Befestigungen am Rohr aus befestigen Sie das Verdeck. 9
Rasten Sie die 3 Haken und Schleifenbefestiger an der rückseitigen Haltevorrichtung des Verdecks und an beiden
Seiten ein.
10
Armlehne montieren
Richten Sie die Schlitze der Armlehnen zu deren Befestigung aus und schieben Sie sie hinein.
11
Zur Entfernung der Armlehne drücken Sie den Freigabeknopf der Armlehne
12
- 1 und ziehen dann die
Armlehne heraus.
12
- 2
Der vollständig montierte Kinderwagen ist in Abbildung
13
dargestellt.
Bedienung des Kinderwagens
Rückenlehne anpassen
Es gibt 4 Neigungswinkel für die Rückenlehne.
Senken Sie die Rückenlehne ab, indem Sie den Griff auf der Rückseite des Sitzes
14
- 1 drücken und ziehen Sie
die Rückenlehne nach unten.
14
- 2
Zum Hochstellen der Rückenlehne drücken Sie sie hoch.
! Vergewissern Sie sich, dass die Lehne korrekt eingestellt ist.
46
Schnalle bedienen
Verschluss öffnen
Drücken Sie die mittlere Taste, um den Verschluss freizugeben.
15
Verschluss verriegeln
Richten Sie Hüft- und Schulterverschluss zueinander aus
16
- 1 und drücken Sie in den mittigen Verschluss.
16
- 2 Ein Klickgeräusch zeigt an, dass der Verschluss eingerastet ist.
16
- 3
! Um schwere Verletzungen aufgrund von Herausfallen oder -gleiten zu verhindern, sichern Sie Ihr Kind stets
mit Gurten ab.
! Vergewissern Sie sich, dass Ihr Kind rutschfest gehalten wird. Der Abstand zwischen dem Kind und dem
Schultergurt sollte etwa die Dicke einer Hand betragen.
! Legen Sie die Schultergurte nicht überkreuz. Dadurch wird Druck im Nacken des Kindes aufgebaut.
Schulter- & Taillengurte anlegen
! Nachdem Sie Ihr Kind in den Sitz gesetzt haben, prüfen Sie, ob die Schulter- und Taillengurte in der richtigen
Höhe verlaufen und lang genug sind, um Ihr Kind vor dem Herausfallen zu schützen.
17
- 1 Schultergurtverankerung A
17
- 2 Schultergurtverankerung B
17
- 3 Gurtversteller
Für ein größeres Kind muss die Schultergurtverankerung A und der oberste Schulterschlitz verwendet werden.
Für ein kleineres Kind muss die Schultergurtverankerung B und der unterste Schulterschlitz verwendet werden.
Zur Verstellung der Position der Schultergurtverankerung öffnen Sie den Reißverschluss auf der Rückseite des
Sitzes, drehen Sie die Verankerung so, dass sie mit der nach vorne weisenden Seite auf einer Ebene liegt.
Führen Sie sie von hinten nach vorne durch den Schultergurtschlitz.
18
Führen Sie sie erneut durch den
Schlitz, der der Schulterhöhe des Kindes am nächsten liegt.
19
Ändern Sie die Gurtlänge mit dem verschiebbaren Gurtversteller.
20
- 1
Betätigen Sie den Knopf
20
- 2 , während Sie den Hüftgurt in die richtige Länge ziehen.
20
- 3
Wadenstütze anpassen
Es gibt 2 Positionen für die Wadenstütze.
Wadenstütze heben
Drücken Sie die Wadenstütze zum Anheben einfach nach oben.
Wadenstütze senken
Zum Absenken der Wadenstütze betätigen Sie die Verstellknöpfe an beiden Seiten der Wadenstütze
21
- 1 1
und drehen die Wadenstütze nach unten.
21
- 2
Vorderen Lenkstopp verwenden
Drücken Sie die vorderen Lenkstopps hoch, um die Bewegungsrichtung beizubehalten.
22
Tipp
Die Lenkstopps empfehlen sich auf unebenem Untergrund.
Page 25

47
48
Bremse bedienen
Zur Arretierung der Räder drücken Sie den Bremshebel mit dem Fuß nach unten. 23
Zur Freigabe der Räder drücken Sie den Bremshebel mit dem Fuß nach vorne.
24
Tipp
Verwenden Sie immer die Bremse, wenn Sie mit dem Kinderwagen anhalten.
Verdeck verwenden
Ziehen Sie das Verdeck zum Öffnen nach vorn.
25
Ziehen Sie das Verdeck zum Zusammenklappen nach hinten.
25
Griff anpassen
Der Griff hat 3 Positionen.
2 Passen Sie die Höhe des Griffs an, indem Sie ihn nach oben oder unten ziehe
26
- 2 während Sie am
Griffeinstellknopf drücken.
26
- 1
Kinderwagen zusammenklappen
! Bitte klappen Sie das Verdeck zusammen, bevor Sie den Kinderwagen zusammenklappen.
Zum Zusammenklappen drücken Sie den Kinderwagen nach vorn
27
- 2 und heben gleichzeitig beide
Faltknöpfe.
27
- 1
Der vollständig gefaltete Kinderwagen ist in Abbildung
28
dargestellt.
Zubehör
Zubehör wird möglicherweise separat verkauft oder ist je nach Region nicht verfügbar.
Verwendung des Fußsacks
Der weiche Fußsack sorgt dafür, dass Ihr Kind warm und komfortabel transportiert werden kann.
Befestigen Sie den Fußsack auf folgende Weise:
1. Legen Sie den Fußsack, nachdem Sie den Reißverschluss geöffnet haben, über den Sitz und ziehen Sie
Schulter-, Hüft- und Schrittgurte durch die entsprechenden Schlitze.
30
2. Ziehen Sie die Klettverschlüsse durch die Rückenlehne und stecken Sie sie in die Hakenhalterung.
31
3. Legen Sie das Baby in den Fußsack, schließen Sie den Sicherheitsverschluss und ziehen den Reißverschluss
wieder zu.
Der montierte Fußsack ist in Abbildung 32 dargestellt.
Regenschutz verwenden
Zur Befestigung des Regenschutzes legen Sie ihn über den Kinderwagen und bringen dann 7 Hakenpaare und
Schlaufenbefestiger wie oben dargestellt an dem Rahmen des Kinderwagens an.
33
! Vergewisser n Sie sich, bevor Sie den Regenschutz verwenden, dass sich die Rückenlehne in der niedrigsten
Position befindet und dass der Kindersitz befestigt wurde.
! Prüfen Sie stets die Belüftung, wenn der Regenschutz am Kinderwagen angebracht ist.
! Wird der Regenschutz nicht mehr verwendet, achten Sie vor dem Zusammenfalten bitte darauf, dass er
sauber und trocken ist.
! Klappen Sie den Kinderwagen nicht zusammen, ehe der Regenschutz entfernt wurde.
! Setzen Sie Ihr Kind bei heißem Wetter nicht in den Kinderwagen, wenn der Regenschutz angebracht wurde.
Sitzkissen verwenden
siehe Abbildungen
34
-
35
Pflege und Wartung
! Das abnehmbare Sitzkissen kann in kaltem Wasser gewaschen und zum Trocknen aufgehängt werden. Nicht
bleichen.
! Reinigen Sie das Kinderwagengestell nur mit handelsüblicher Seife und warmem Wasser. Nicht bleichen oder
mit Reinigungsmitteln bearbeiten.
! Untersuchen Sie Ihren Kinderwagen gelegentlich auf lockere Schrauben, abgenutzte Teile, verschlissene
Materialien oder aufgerissene Nähte. Ersetzen oder reparieren Sie die Teile, falls erforderlich.
! Bei übermäßiger Sonnenbestrahlung oder Hitzeeinwirkung können Teile verblassen oder sich verformen.
! Ist der Kinderwagen nass geworden, öffnen Sie das Verdeck und lassen Sie ihn komplett trocken werden, bevor Sie
ihn verstauen.
! Bei quietschenden Rädern tragen Sie ein leichtes Öl auf (z. B. Silikonspray, Rostschutzöl oder Nähmas
chinenöl). Es ist dabei wichtig, dass das Öl in die Achse und die Radverbindung gelangt. 29
! Gehen Sie mit Ihrem Kinderwagen am Strand spazieren, müssen Sie ihn hiernach komplett reinigen, um
Sand und Salz aus der Mechanik und den Radverbindungen zu entfernen.
Page 26

49
50
NL
Welkom bij Joie
™
Gefeliciteerd dat u een deel van de familie Joie yijn geworden zijn! We zijn erg blij om een
deel van uw reis met uw baby. Tijdens het wandelen met Joie Kixx™ maakt u gebruikt van een
kinderwagen van hoge kwaliteit, volledig gecertificeerd en goedgekeurd volgens de Europese
veiligheidsnormen EN 1888-2012. Dit product is geschikt voor kinderen met een gewicht tot 15 kg.
Lees deze handleiding zorgvuldig en volg elke stap naar een comfortabele rit en de beste bescherming voor uw kind te waarborgen..
BELANGRIJK - Bewaar deze instructies voor toekomstig gebruik
Bezoek ons op joiebaby.com om de handleiding te downloaden en nog meer geweldige producten
van Joie te zien!
Inhoud
Afbeeldingen 1-8
WAARSCHUWINGEN 51
Kinderwagen montage 52
Kinderwagen open 52
Voorwiel montage 53
Achter wiel montage 53
Luifel montage 53
Montage van de handbar 53
Kinderwagen handling 53
Kantelverstelling 53
Gesp gebruik 53
Gebruik van schouder- en tailleharnas 54
Kuitsteun verstelling 54
Geburik van voorasslot 54
Geburik van rem 54
Gebruik van luifel 54
Handvat verstellen 54
Kinderwagen vouwen 55
Accessories 55
Verzorging en onderhoud 55
Nodgeval
In geval van nood of ongeval, het belangrijkste is uw kinderopvang door het verstrekken van eerste hulp of
medische behandeling.
50
Productinformaties
Lees alle instructies in deze handleiding voordat u het product gebruikt. Als u vragen heeft, raadpleeg dan de
dealer. Sommige functies kunnen variëren per model.
Product
Geschikt voor
Materialen
Patent no
Gefrabriceerd in
Merknaam
Website
Fabrikant
Kinderwagen Kixx
kinderen met een gewicht tot 15kg (vanaf gebort tot – 36 maandeni)
Kunststof, metaal, textiel
In afwachting ervan
China
Joie
www.joiebaby.com
JoieChildren’s Product (UK) Limited
19
20
18
17
21
1
2
3
5
x2
x2
6
8
7
9
11
10
14
15
12
13
16
4
1 Kinderwagen ramen
2 Vorwiel (X2)
3 Achterviel (X2)
4 Rem
5 Luifel
6 Handbar
7 Luifel
8 Zitkussen
9 Kuitsteun
10 Asslot
11 Vorwiel
12 Achterwiel
13 Gesp
14 Schouder harnas
15 Vouwknop
16 Knop vor
handvatverstelling
17 Opbergmaand
18 Rempedaal
19 Opbergafsluit
20 Afsluit montage
21 Handvat
Lijst met onderdelen
Vóór de montage, zorg ervoor dat alle onderdelen beschikbaar zijn. Als onderdelen ontbreken, neem dan
contact met uw plaatselijke dealer. Voor de montage zijn er geen gereedschap nodig.
Toebehoren
(zijn mogelijk niet
meegeleverd)
1
Regenhoes
2 Hoes voor benen
3 Hoes van de zitting
1
2
3
Page 27

51
52
AANWIJZINGEN
! ATTENTIEGebruik altijd de combinatie tussen de benen met met een
taille riem. Wij stellen voor ook de schoudergordels te gebruiken.
! ATTENTIE Voor gebruik, zoorg ervoor dat alle vergrendelingen worden
bediend.
! ATTENTIEZorg ervoor dat uw kind niet met dit product speelt.
! ATTENTIEControleer voor gebruik de kinderwagen vegredeling ap-
paraten of zitsysteem correct zijn aangesloten.
! Het is noodzakelijk dat een volwassene de montage verwezenlijkt.
! Gebruik de kinderwagen voor een kind met een gewicht van minder dan
15 kg. Als u hde wagen voor een een kind met een ongepast gewicht
gebruikt, zal dit leiden tot schade aan de wagen.
! Om een gevaarlijke, onstabiele toestand te voorkomen, plaats een ge-
wicht van niet meer dan 4,5 kg in opslag korf.
! Laat uw kind nooit zonder toezicht. Houdt toezicht op het kind terwijl
het kind in kinderwagen is.
! Gebruik de wagen alleen een kind te rijden en niet meer. Plaats nooit
portemonnees, boodschappentassen, pakketten op handgreep of accessoires, verwerken op luifel..
! In geval van een te hoge belasting, verkeerd inklappen of gebruik van
onderdelen van compoente van andere fabrikanten kunt dat de kinderwagen beschadigen of onveilig maken. Lees de gebruiksaanwijzing
aandachtig door.
! Gebruik nooit met componenten van andere fabrikanten.
! Lees alle instructies in de handleiding voordat u dit product ge-
bruikt. Bewaar de handleiding voor toekomstig gebruik. Als u deze
waarschuwingen en instructies niet opvolgen, kunnen de gevolgen
ernstig letsel of de dood zijn.
! Beschermende riemen en bevestigingssystemen moeten correct wor-
den gebruikt.
! Om ernstig letsel als gevolg van uitglijden of vallen van de wagen te
vermijden, gebruik dan altijd de veiligheidsgordels.
! Zorg ervoor dat als u de wagen aanpasst uw baby uit de buurt van be-
wegende delen is.
! Het kind kan vervallen in de been openingen en kan stikken als u geen
gebruik van de gordel maakt.
! Gebruik nooit de kinderwagen op trappen of roltrappen.
! Houd het product uit de buurt van hoge temperatuur voorwerpen, vloe-
istoffen of elektronische artikelen.
! Laat uw kind nooit in de kinderwagen of met hoof gerocht op de
kinderwagen staan.
! Laat de kinderwagen nooit op de straat, hellende of gevaarlijke gebieden.
! Zorg ervoor dat alle mechanismen zijn ingesteld voor het gebruik van
de wagen.
! Om de wurging te voorkomen, plaats GEEN objecten met een touwtje
om de nek van het kind, aan de opgeschort elementen van het product
en touw ggen hechten aan speelgoed.
! Plaats niets op de hendel om kantelen te.
! Tilt niet de kinderwagen met het kind binnen..
! Gebruik de opslagkorf NIET om kinderen de dragen.
! Om kantelen te voorkomen, staan niet toe dat kinderen op de kinderwa-
gen rijden. U moet het kind in en van de kinderwagen tillen.
! Om het vangen van vingers te voorkomen, open en inklapp zorgvuldig
de wandelwagen.
! Zorg ervoor dat de wandelwagen volledig geopend of ingeklapt is,
voordat u een kind benaderen laat..
! Voor de veiligheid van kinderen, zorg ervoor dat alle onderdelen worden
vastgezet voordat u de kinderwagen gebruikt.
! Om verstikking te voorkomen, zorg ervoor dat er een aanzienlijke af-
stand tussen het kind en de luifel is.
! Wanneer u de winkelwagen stoppt altijd activeer de remmen.
!
Stop met het gebruik van de kinderwagen als het defect of beschadigd is.
! De wagen moet worden gebruikt bij een loopsnelheid. Dit product is niet
bestemd voor gebruik bij het lopen
! Om verstikkingsgevaar te voorkomen, , verwijdert de plastic zak en
verpakkingsmaterialen, voordat u dit product gebruikt. Plastic zakken
en verpakkingsmaterialen moeten uit de buurt van baby’s en kinderen
worden bewaard.
! Dit product is niet geschikt voor gebruik tijdens het joggen of een wan-
deling met rolschaatsen.
! Voor de wagen ontworpen viir gebruik vanaf de geboorte i ser anbevo-
len de baby in een gekantelde positie e plaatsen .
! De parkeerrem moet worden geactiveerd wanneer u plaatst of tilt het
kind uit de kinderwagen.
! Draagbare wieg is niet geschikt voor een kind dat kan alleen stijgen, rol-
len en knieën. Maximale kind gewicht: 9 kg.
! Draagbare wieg mag NIET worden gebruikt voor een lange slaap.
! Gebruik NIET of voeg niet toe andere matrassen als die die voor de
draagbare wieg is vorzien.
Kinderwagen montage
Lees alle instructies zorgvuldig in deze handleiding voor montage en gebruik van dit product.
Opening van de kinderwagen
Gescheid de opbergvergredeling van de opslagsteun 1 en til de hendel omhoog, 2 een ratel betekent dat de
wagen nu volledig open is t.
! Alvorens verder te gaan controleer dat de kinderwagen volledig open.
Page 28

53
54
Voorwielmontage
Monteer de voorwielen aan de voorzijde steunen. Controleer of de wielen goed zijn bevestigd door trekken aan
het wiel systemen.
3
Om de voorwiele te demonteren, verwijder het van de voorsteun
4
- 2 door drukken op
de ontgredelingsknop
4
- 1
Achterwielmontage
Monteer de achterwielen aan de achtersteunen 5, bevestig de achterwielen aan de remsysteem 6. Wikkel de
verbindingsslang van de achterpoten met de klep van de opslag mand, en klik de drie knoppen.
7
! Controleer of de wielen goed zijn bevestigd door trekken aan het wiel systemen.
Om achterwiel te demonteren, koppel de achterwiel uit achterwiel bevestiging los
8
- 2 terwijl u de ontspanknop
indrukt.
8
- 1
Luifel montage
Plaats de clips van de luifelaan de houder op de tubes en schuif om de luifel te monteren. 9
Bevestig de 3 klittenband aan de achterzijde van de kap en montage nietjes aan weerszijden.
10
Montage van de handbar
Lijn de uiteinden met de handbar met de handbar mounts, en plaats te vergrendelen.
11
Om de bar te demonteren, druk de ontgredelingsknop
12
- 1 dan trekk aan de handbar.
12
- 2
De compleet gemonteerde kinderwagen wordt getoond als
13
Kinderwagen handling
Kantelen aanpassen
De rugleuning heeft 4 hoeken..
Om kantelen van de rugleuning af te stellen draai de hendel aan de achterkant van de stoel
14
- 1 dan trekk an
en rugleuning.
14
- 2
Om de rugleuning te verhogen, duw omhoog.
! Zorg ervoor dat de leunen goed is ingesteld voor gebruik..
Gebruik van gesp
Gesp loskoppelen
Druk op de middelste knop om de gesp te verkopen.
15
Gesp sluiten
Past de gesp voor de schouder met de gesp voor de taille
16
- 1 en plaats deze in de gesp van het midden
16
- 2 Een ratel betekend dat het nu volledig gesloten is.
16
- 3
! Om ernstig letsel veroorzaakt door vallen of schuiven te voorkomen, altijd bescherm uw kind met de
veiligheidsgordels.
! Zorg ervoor dat het kind stevig vast zit. De ruimte tussen het kind en de gordels is ongeveer een voet
! Steek niet de schouderbanden. Dit veroorzaakt druk op de hals van het kind.
54
Gebuik van schouder en taille harnassen
! Om het kind tegen vallen te beschermen, nadat het kind zitt, controleer dat de schouder en taille harnassen
op de juiste hoogte en lengte zijn.
17
- 1 Bevestiging A voor schoudergordel
17
- 2 Bevestiging B voor schoudergordel
17
- 3 Verstelling door schuiven
Voor een ouder kind gebruik de vergrendeling voor schouder harnas schouder A en de hoogste spaties voor
schouder. Voor een kleiner kind, gebruik de vergrendeling voor schouder harnas schouder B en de lagere
spaties voor schouders.
Om de positie van de schoudergordel anker te passen, draait het anker op niveau met de zijde naar voren. Haal
het door de schoudergordel slot van achter naar voren.
18
Rijg het door de sleuf die het dichtst bij de
kindschouder i.
19
Gebruik de schuifregelaar om de lengte van het harnas te wijzigen
20
- 1
Druk de knop
20
- 2 terwijl u de taille harnass op de gewenste lengte aanpasst.
20
- 3
Beensteun versteling
Het beensteun heeft 2 posities.
Het verhogen van beensteuning
Om de beensteuning te verhogen, stuw het ophoog.
Het verlagen van ondersteuning
Druk de regelingknopen op beide zeijden van de beensteuning
21
- 1 en draai de ondersteuning naar
benede.
21
- 2
Gebruik van voorasvergredeling
Trek de vooras vergrendelingen op de richting van beweging te houden.
22
Advies
Het wordt aanbevolen om de asvergrendeling op oneffen oppervlakken te gebruiken
Gebruik van rem
Om de wielen te vergrendelen, stap op een van de rempedaal.
23
Op de wielen vrij te geven, til de rempedal.
24
Advies
Gebruik de rem altijd als de kinderwagen stilstaat.
Gebruik van luifel
Om de luifel de open, trek het naar voren. 25
Om de luifel tre sluiten, trek het naar achter.
25
Handvat aanpassen
De hanvat heeft 3 posities
Om de hoogte van de handgreep aan te passen, trekt de hendel omhoog of omlaag
26
- 2 terwijl u de
aanpassingknop op het handvat druk.
26
- 1
Page 29

55
56
Kinderwagen inklappen
! Voordat u de kinderwagen inklappen, klapp de luifel in
Til de inklappknop
27
- 2 , terwijl u de bede inklappknopen drukt.
27
- 1
De volledig ingeklappte kinderwagen is als getont op
28
.
Accessories
De accesoires kunne ook seraparat worden gekocht of kunnen niet beschikbaar afhankelijk van de regio zijn.
Gebruik van voetdekking
De zachte voetdekking biedt een warme en comfortabele omgevind voor uw kind.
Monteer de voet zal betrekking hebben op de volgende stappen.
1. Plaats de voetdekking op de stoel been nadat u de rits geopend heeft, ga de schouderharnas, der harnas voor
taille ende harnas met kruis pasvorm tussen de benen door die poort
30
2. Lus de sluiting aan de bovenzijde van de voetenzak door de rugleuning en plak het aan de haak
bevestigingsmiddel 31
3. Plaats de baby in de voetenzak , vergrendelen de veiligheid gesp, en dan rezip de voetenzak.e.
De geassembleerde voetenzak ziet als
32
uit.
Gebruik van de regenhoes
Om de regenhoes monteren, plaatst deze op de trolley en sluit vervolgens de 7 paar klithechting zoals
weergegeven in de bovenstaande afbeelding.
33
! Voordat u de regenhoes gebruikt, moet u ervoor zorgen dat de rugleuning aangepast in de laagste stand en
autozitje is opgelost is.
! Als de regenhoes is op wandelwagen.
! Wanneer niet in gebruik, controleer regenhoes was gereinigd en gedroogd voordat ze worden gevouwen.
! Vouw niet de trolley voor de demontage van de regenhoes.
! Plaats geen baby in kinderwagen, waarop de regenhoes tijdens het warme seizoen geemonteerd is.
Hoes van de zitting
zie afbeeldingen
34
-
35
Verzorging en onderhoud
! Afneembare kussens kunnen worden gewassen met koud water en druppelen-gedroogd. Zonder bleken.
! Om de wagenram schoon te maken, gebruik dan alleen huishoudelijke zeep en warm water.
! Gebruik geen bleekmiddelen of detergentent.
! Af en toe controleer de winkelwagen opdat er losse schroeven, beschadigde onderdelen, materialen
of defecte naden. Vervang of repareer die delen.
! Overmatige blootstelling aan zonlicht of hitte kan tot verkleuring of vervorming van onderdelen leiden.
! Als zich de wagen bevochtigt, open de luifel en laat het goed drogen voordat u het opbergt.
! Als de wielen piepen, gebruik dan een lichte olie (bijv. bespoten met siliconen olie, olie
tegen roest, of naaimachine olie). Het is belangrijk olie in het wiel of as-systeem te brengen.
29
! Bij het gebruik van de kinderwagen op het strand, reinig volledig de kinderwagen na het gebruikt
om zand en zout van de wielen mechanismen en structuren te verwijderen.
Page 30

57
58
IT
Benvenuti a Joie
™
Congratulazioni per aver diventato membro della famiglia Joie! Siamo molto felici di partecipare
al vostro viaggio con il vostro bambino. Passeggiando con Joie Kixx™ utilizzate un passeggino per
bambini di alta qualità, completamente certificato, approvato dagli standard europei di sicurezza
EN 1888-2012. Questo prodotto è idoneo per bambini con peso fino a 15 kg. Leggere attentamente
questo manuale e seguire tutti i passi per assicurare una passeggiata confortevole e la migliore
protezione per il vostro bambino.
IMPORTANTE – Conservare questo manuale di istruzioni per poter vederlo in futuro.
Visitare il nostro sito joiebaby.com per scaricare i manuali e per vedere più prodotti straordinari
Joie!
Contenuto
Figure 1-8
AVVERTENZE 59
Montaggio del passeggino 60
Aprire il passeggino 60
Montaggio ruote anteriori 61
Montaggio ruote posteriori 61
Montaggio baldacchino 61
Montaggio barra per le mani 61
Manovrare il passeggino 61
Regolazione dell’inclinazione 61
Uso della fibbia 61
Uso delle bretelle di sicurezza per spalla e bacino 62
Regolazione del supporto del poggiagambe 62
Uso del dispositivo di blocco dell’asse anteriore 62
Uso del freno 62
Uso del baldacchino 63
Regolazione del manico 63
Piegare il passeggino 63
Accessories 63
Cura e mantenimento 64
Casi di emergenza
Nel caso di un’emergenza o di un accidente, la cosa più importante e la cura del vostro bambino fornendo il
primo soccorso o trattamento immediato.
58
Informazioni sul prodotto
Leggere tutte le istruzioni di questo manuale prima di usare il prodotto. Se ci sono domande, si prega di
rivolgersi al commerciante. Alcune caratteristiche possono variare a secunda del modello.
Prodotto
Idone per
Materiale
No. Brevetto
Fabbricato in
Denominazione marca
Sito internet
Produttore
Passeggino per bambini Kixx
Bambini con peso fino a 15 kg (dalla nascita – 36 mesi)
Materiali plastici, metallo, tessuti
Brevetti in attesa
Cina
Joie
www.joiebaby.com
JoieChildren’s Product (UK) Limited
19
20
18
17
21
1
2
3
5
x2
x2
6
8
7
9
11
10
14
15
12
13
16
4
1 Struttura passeggino
2 Ruota anteriore (X2)
3 Ruota posteriore (X2)
4 Frena
5 Baldacchino
6 Barra per le mani
7 Copertura
8 Cuscino
9 Supporto gamba
10 Dispositivo di blocco
asso
11 Ruota anteriore
12 Ruota posteriore
13 Fibbia
14 Bretelle di sicurezza
per spalla
15 Pulsante piega
16 Pulsante regolazione
manico
17 Cestino deposito
18 Pedale del freno
19 Bloccare il deposito
20 Dispositivo di
montaggio del
blocco
21 Manico
Elenco parti componenti
Assicurare che tutte le parti componenti sono disponibili prima del montaggio. Contattare il distributore se
sono componenti mancanti. Non sono necessari strumenti per il montaggio.
Accessori
(potrebbero non
essere inclusi)
1
Parapioggia
2 Poggiapiedi
3 Fodera del sedile
1
2
3
Page 31

59
60
AVVERTENZE
! ATTENZIONE Usate sempre la combinazione tra le piedi con la cintura
per vita. Si consiglia di utilizzare le bretelle.
! ATTENZIONE Prima di utilizzare assecuratevi che tutti i dispositivi di
bloccaggio vengono azionati.
! ATTENZIONE Non permettere al vostro bambino di giocare con questo
prodotto.
! ATTENZIONE Prima di utilizzare assecuratevi che il corpo del carrello e
i dispositivi di fissaggio del sedile sono gestiti correttamente.
! È necessario che un adulto realizzare il montaggio.
! Utilizzate il carello per un bambino che pesa meno di 15 kg, Si se uti-
lizza per bambini con un peso inadeguato questo può causare danni al
carrello.
! Per evitare una condizione pericolosa, instabile non mettere un peso
maggiore di 4,5 kg nel cestino di stoccaggio.
! Non lasciate il bambino incustodito. Guardate sempre il bambino men-
tre è nel carello.
! Utilizzate il carello solo per passeggiare un solo bambino e non più. Mai
dipositare borse, sacchetti, pacchetti o accessori nel manico o la tenda.
! Il sovraccarico, il piego in un modo improprio o l’uso di componenti di
base di altri produttori può provocare danni al carrello, distruggerlo o
renderlo insicuro . Leggete attentamente il manuale di istruzioni.
! Non utilizzare il passeggino con parti di altri produttori.
! Leggete tutte le istruzioni riportate nel manuale prima di utilizzare
questo prodotto. Conservate il manuale di istruzioni per un riferimento
futuro. Se non seguete queste avvertenze e le istruzioni, le conseguenze
potrebbero essere gravi lesioni o la morte.
! Le cinture di sicurezza e i sistemi di mantenimento dovrebbero essere
usati correttamente.
! Per evitare lesioni gravi da cadute o scivoli, usate sempre la cintura di
sicurezza.
! Assicuratevi che quando regolate il carello il corpo del vostro bambino è
lontano delle parti in movimento.
! Il bambino può scivolare nelle aperture per le gambe e potrebbe essere
strangolato se non si utilizza le imbracature.
! Non utilizzate mai il carello sulle scale o scale mobili.
! Tenete il prodotto lontano da oggetti ad alta temperatura, liquidi o
oggetti elettronici.
! Non permettere al vostro bambino di stare in piedi nel carello o essere
collocato con la testa verso la parte anteriore del carrello.
! Non mettete il carro nelle strade, piste o aree pericolose.
! Asiccuratevi che tutti i meccanismi sono impostati correttamente prima
di usare il carrello.
! Per evitare lo strangolamento, non individuare articoli con una cintura
intorno al collo del vostro bambino, sospendate le cinture di questo
prodotto o allegate quete ai giocattoli.
! Non mettete nulla sul manico per evitare il ribaltamento.
! Non sollevate il carello con il bambino all’interno.
! Non mettete un bambino nel cestino di stoccaggio.
! Per evitare il ribaltamento, non permettete al bambino di cavalcare sul
carrello. Sollevate sempre il bambino del e nel carello.
! Per evitare di schiacciarsi le dita, aprire e piegare il carello attentamente.
! Assicuratevi che il carello è completamente aperto o piegato prima di
consentire a un bambino di essere vicino al carello.
! Per la sicurezza del bambino, assicuratevi che tutti i componenti ven-
gono assemblati e fissati opportunamente prima di usare il carrello.
! Per evitare lo strangolamento, assicuratevi che è un notevole divario tra
il bambino e la tenda.
! Applicate sempre i freni quando parcheggiate il carello.
! Non utilizzate mai il carrello se è difetto o danneggiato.
! Il carrello deve essere utilizzato ad una velocità di passeggio. Questo
prodotto non è destinato ad essere utilizzato per correre.
! Per evitare il soffocamento, prima di utilizzare questo prodotto, rimuove-
te i sacchetti di plastica e i materiali di imballaggio. I sacchetti di plastica e i materiali di imballaggio devono quindi essere tenuti lontano dai
neonati e bambini.
! Questo prodotto non è adatto per l’uso mentre correte o camminate
con i pattini.
! Il carello per neonati è raccomandato di essere utilizzato nella posizione
più incline per i neonati.
! Il dispositivo di parcheggio deve essere attivato nel collocamento o il
solevamento del bambino.
! La culla potabile non è adatta per un bambino che può salire da solo,
rotolarsi e può andare nelle ginocchia. Il peso massimo del bambino: 9 kg.
! La culla portatile NON deve essere utilizzata per un lungo sonno.
! NON usate o aggiungere materassi diversi da quelli forniti per le culle
portatili.
Montaggio del passeggino
Leggere tutte le istruzioni di questo manuale prima di usare il prodotto.
Abertura do carrinho
Separare il blocco del deposito dal supporto di deposito 1 e tirare il manico in su 2, un clic significa che il
passeggino è aperto completalemente.
! Prima di continuare, verificare se il passeggino è aperto completamente.vv
Page 32

61
62
Montaggio ruote anterioriz
Montare le ruote anteriori sui piedi frontali. Verificare se le ruote sono posizionate correttamente, tirando dalla
struttura delle ruote.
3
Per smontare la ruota anteriore, separare la ruota anteriore dal supporto frontale
4
- 2
premendo il pulsante di rilascio
4
- 1
Montaggio ruote posteriori
Montare la frenatura ai piedi posteriori 5, montare le ruoti posteriori alla frenatura 6. Avvolgere il tubo di
collegamento e poi premere i tre pulsanti
7
.
! Verificare se le ruote sono posizionate correttamente, tirando dalla struttura delle ruote.
Per smontare la ruota posteriore, separare la ruota posteriore dal supporto posteriore
8
- 2 premendo il
pulsante di rilascio.
8
- 1
Montaggio del baldacchino
Allineare le mollette del baldacchino con i supporti dei tubi e poi scorrere per montare il baldacchino. 9
Fissare i 3 ganci e gli anelli di fissaggio sulla parte di fissaggio posteriore del baldacchino e le mollette sulle
ambedue parti.
10
Montaggio della barra per le mani
Allineare le margini della barra con i supporti della barra per le mani e poi introdurle per bloccarle 11.
Per smontare la barra per le mani, premere il pulsante di rilascio
12
- 1 e poi tirare la barra per le mani.
12
- 2
Alla figura
13
è presentato il passeggino montato completamente.
Manovrare il passeggino
Regolazione dell’inclinazione
Lo schienale ha 4 angoli.
Per inclinare lo schienale, serrare il manico di regolazione dalla parte posteriore del sedile
14
- 1 poi tirare del
schienale.
14
- 2
Per alzare lo schienale, spingerlo verso l’alto.
! Assicurare che l’inclinazione è impostata correttamente per l’uso.
Uso della fibbia
Rilascio della fibbia
Premere il pulsante centrale per rilasciare la fibbia.
15
Bloccare la fibbia
Reglare la fibbia per il bacino e per la spalla
16
- 1 e introdurle nella fibbia centrale.
16
- 2 Un clic significa il
blocco completto della fibbia.
16
- 3
! Per evitare una lesione grave causata dalla caduta o scivolazione, sempre proteggere il vosto bambino con
le bretelle di protezione.
62
! Offire sicurezza al vostro bambino opportunamente. Lo spazio tra il bambino e le bretelle di protezione per
la spalla è di circa una palma.
! Non incrocciare le cinture per la spalla. Può causare pressione sul collo del bambino.
Uso delle bretelle di sicurezza per spalla e bacino
! Per proteggere il bambino contro la caduta, dopo aver posizionato il bambino sul sedile, verificare se le
bretelle per spalla e bacino sono ad un’altezza e lunghezza corretta.
17
- 1 Dispositivo di fissaggio bretelle di sicurezza spalla A
17
- 2 Dispositivo di fissaggio bretelle di sicurella spalla B
17
- 3 Dispositivo di regolazione scorrevole
Per un bambino più grande usare il dispositivo di fissaggio delle bretelle di sicurezza spalla A e gli spazi per la
spalla le più alte. Per un bambino più piccolo, usare il dispositivo di fissaggio delle bretelle di sicurezza spalla B
e gli spazi più bassi per la spalla.
Per regolare la posizione del dispositivo di fissaggio delle bretelle di sicurezza, aprire la cerniera sulla parte
posteriore del sedile, portare il dispositivo di fissaggio al livello con la parte anteriore. Passarlo tramite lo spazio
delle bretelle di sicurezza spalla indietro avanti.
18
Passarlo ancora una voltra tramite lo spazio più vicino
all’altezza della spalla del bambino.
19
Usare il dispositivo di regolazione scorrevole per cambiare la lunghezza delle bretelle di sicurezza
20
- 1
Premere il pulsante
20
- 2 fissando le bretelle di sicurezza per bacino al livello corretto.
20
- 3
Regolazione del supporto poggiagambe
Il supporto poggiagambe ha 2 posizioni.
Alzare il supporto poggiagamba
Per alzare il supporto poggiagamba alzarlo.
Abbassamento del supporto poggiagambe
Premere i pulsanti di regolazione sulle ambedue parti del supporto poggiagambe
21
- 1 e girare il supporto
poggiagambe in giù.
21
- 2
Uso del dispositivo di blocco dell’asse anteriore
Tirare i dispositivi di blocco dell’asso anteriore per mantenere la direzione di muovimento.
22
Consiglio
Si consiglia l’uso del dispositivo di blocco dell’asso sulle superfici irregolari.
Uso del freno
Per bloccare le ruote, premere il pedale del freno in giù. 23
Per rilasciare le ruote, alzare il pedale del freno.
24
Consiglio
Usare il freno ogni volta il passeggino è fermato
Page 33

63
64
Uso del baldacchino
Per aprire il baldacchino, tirare verso avanti 25
Per piegare il baldacchino, tirare verso indietro
25
Regolazione del manico
Il manico ha 3 posizioni.
Per regolare l’altezza del manico, tirare il manico in su o in giù
26
- 2 premendo il pulsante di regolazione del
manico.
26
- 1
Piegare il passeggino
! Prima di piegare il passeggino, piegare il baldacchino.
Premere il passeggino in avanti per piegarlo,
27
- 2 premendo nello stesso tempo gli entrambi pulsanti per
piegatura.
27
- 1
Il passeggino completamente piegato si presenta come
28
.
Accessories
Gli accessori possono essere commercializzati separatamente o è possibile di non essere disponibile a
seconda della regione.
Uso copertura per i piedi
La copertura per i piedi morbida assicura un ambiente caldo e confortevole per il vostro bambino. Montare la
copertura per i piedi seguendo questi passi.
1. Posizionare la copertura per i piedi sul sedile dopo aver aperto la cerniera, passare le bretelle di sicurezza per
spalla, le bretelle di sicurezza per il bacino e le bretelle di sicurezza con fissaggio tra i piedi attraverso i
rispettivi porti
30
2. Passare l’anello di fissaggio dalla parte superiore della copertura per i piedi attraverso lo schienale e poi
posizionarla all’anello di fissaggio
31
3. Posizionare il bambino nella copertura per i piedi, bloccare la fibbia di sicurezza e chiudere la cerniera della
copertura per i piedi.
L’immagine
32
presenta la copertura per i piedi montata completamente.
Uso della copertura antipioggia
Per montare la parapioggia, posizionatela sopra il carello e quindi fissate 7 paia di ganci e anelli di montaggio
sulla parapioggia.
33
! Prima di usare la copertura antipioggia, si prega di assicurare che lo schienale è stato reglato alla più bassa
posizione e che il seggiolino per i bambini è stato fissato.
! Verificare la ventilazione ogni volta la copertura antipioggia è sul passeggino.
! Quando non è utilizzata, verificare se la copertura antipioggia è stata pulita e asciuta bene prima di ripiegare.
! Non piegare il passeggino dopo il montaggio della copertura antipioggia pliaţi căruciorul înainte de a înlătura
husa pentru ploaie.
! Non posizionare il bambino nel passeggino coperto con la copertura antipioggia in estate.
Fodera del sedile
vedere le immagini
34
-
35
Cura e mantenimento
! IIl cuscino estraibile può essere lavato con acqua fredda e asciuta senza pieghe. Senza sbianchiamento.
! PPer pulire la struttura del passeggino, usare solo sapone e acqua calda. Non usare agenti sbiancanti o
detergente.
! Occasionalmente verificare il passeggino per non esitere viti allentate, pezzi usati, materiale o cuciture
difettose. Sostituire o riparare quei pezzi correttamente.
! O Un’esposione eccessiva alla luce del sole o calore, può causare scolorimento o deformazione dei pezzi.
! DSe bagnato il passeggino, aprire il baldacchino e permettere di asciugare completamente prima di deposi-
tarlo.
! DSe le ruote fanno rumore, usare un olio leggero (per esempio spruzzatura con silicone, olio antiruggine o
olio per macchine da cucire). È importante di mettere l’olio nel sistema di ruote o asso.
29
! CQuando si usa il passeggino sulla spiaggia, pulirlo completamente per rimuovere la sabbia e il sale dai
meccanismi o sistema di ruote.
Page 34

65
66
TR
Joie
™
ye Hosgeldiniz
Joie ailesine girdiginizin icin tebrik ederiz! Sizin cocugunuz seyhatina paylasmak icin cok mutluyuz Joie Kixx™ ile yurudugunuz zaman ve yuksek kaliteli bir cocuk arabasi kullanin, komple
tasdikli, EN 1888-2012 avrupa standartlarina gore onayli. Urun en fazla 15 Kg cocugularin icin
tasarlanmistir. Isbu kilavuz cok dikkatli okunuz ve cocugunuz en iyi korunmasi icin ve rahat bir
gezmekicin tum adimlarin uygulanin.
ONEMLI– Kullanim kilavuzu ileride referans olarak kullanmak uzere saklayiniz. .
Klavuzlarin yuklenmesi icin Joiebaby.com adresine ziyaret edin ve daha fazla Joie ilginc urunlerin
gorun
Icindekiler
Fotograflar 1-8
UYARILAR 67
Cocuk arabasi montaji 68
Cocuk arabasi acilmasi 68
On tekerlekler montaji 68
Arka tekerlekler menotaji 69
Golgelik montaji 69
El cubugu montaji 69
Bebek arabasi kullanmasi 69
Egim ayarmasi 69
Toka kullanimi 69
Omuz ve bel kemerleri kullanimi 70
Destek ayagi ayari 70
On mili bloke kullanimi 70
Fren kullanimi 70
Kol ayarlamasi 70
Bebek arabasi katlanmasi 71
Accessories 71
Bakim ve onarim 71
Acil
Acil ve kaza durumlarda, ilk once cocugunuz bakin ve ilk yardim ve tedavi vermek cok onemlidir
66
Urunile ilgili bilgileri
Urunun kullanmadan once kullanma klavuzundan tum taliatlarin okunun. Eger sorun varsa tucarinin arayin.
Bazen ozellikler modele gore degisir.
Urun
Uygunluk
Malzemeler
Patent no.
Uretilmis ulkede
Marka adini
Site web
Uretici
Kixx cocuk arabasi
15 kG a kadar cocuklari icin( dogumdan -36 ay a kadar)
Plastik, Demir ve kumas
Alinmak durumda
Cin
Joie
www.joiebaby.com
JoieChildren’s Product (UK) Limited
19
20
18
17
21
1
2
3
5
x2
x2
6
8
7
9
11
10
14
15
12
13
16
4
1 Bebek arabasi
cercevesi
2 On tekerlek (X2)
3 Arka tekerlek (X2)
4 Fren toplulugu
5 Golgelik
6 El cubugu
7. Golgelik
8.Minder
9. Ayak destegi
10. Mil kilidi
11. On tekerlek
12 Arka tekerlek
13 Toka
14 Omuz dizgini
15 Katlanma dugmesi
16 Kol ayarlanma
dugmesi
17. Depolanma sepeti
18. Fren pedali
19. Depolanma kilit
20. Depolanma bloke
edilen cihazi
21. Kol
Parca listesi
Montaj icin tum parcaları kullaniabilir oldugundan emin olun. Yerel tucarin ile irtibat kurun. Montaj icin alet
gerekmez.
Aksesuarlar
(Satın alınan urune
dahil olmayabilir)
1
yağmur kapak
2 Ayak ortusu
3 koltuk yastığı
1
2
3
Page 35

67
68
UYARILAR
! DIKKAT Bel ve ayak arasi kemerleri kullanin. Sirt icin kemeri kullanmaya
tevsi ediyoruz
!
DIKKAT Kullanmaktan once, tum mandallarin aktif oldugundan emin olun
! DIKKAT Cocuk urunu ile oynamasini brakmayin.
! DIKKAT Kullanmadan once, koltugun bagalanti cihazlari ve puset gov-
desi sabitlestirmesini dogru olduguna emin olun.
! Montaji yetiskinler tarafindan yapilir.
! Puset maksimum 15 kg a kadar cocuklar icin uretilmis. Yanlis br agrilik
puseti bozabilir
! Telikeli sartlari ve sabitlesme eksikligini onlemesi icin , esya tasinma
sepetinde 4,5 Kg fazla agirli koymain.
! Cocugunuzu yalniz birakmak tehlikeli olabilir. Puset icinden bulundugun
zaman her zaman cocugunuzu bakin.
! Puseti sagdece cocugu icin kullanin. Puset kollarina ve golgeliklerine
cantalar, alisveris ile icinde bulunan posetlerin, paket veya aksesoarlari
koymayin.
! Fazla yuk koyundugun zaman, yanlis katlamadigi zaman veya baska
ureticinin parcalar kullandiginiz zaman puset hasarlanabilir, bozabilir ve
sabit olmayabilir. Kullanma Klavuzua cok dikkatle okunun.
! Baska ureticilerden parcalarini pusetine kullanmayin
! Cocugunuzu yalniz birakmak tehlikeli olabilir. Puset icinden bulundugun
zaman her zaman cocugunuzu bakin. Isbu uyarilarin ve kullanma klavuzunun yazilanlarin uygulanmamasi tehlikeye veya olume yol acabilir.
!
Emniyet kemerlerin ve bagalanma systemleri dogru kullanmasina gerekiyor.
! Kayma veya dusmeden olan agir yaralamalar onlemesi icin, her zaman
emnuytet kemerlerin bagalayin
! Puset ayarlamalari yapildigin zaman , pusetin haraket eden yerlerde
yaninda cocugu olmadigina emin olun.
! Emyet kemerlerin kullanmadiginiz zaman, ayak icin bos yerlerde cocugu
kayabilir ve bogulabilir.
! Merdivenlerin veya yuruyen merdivenlerinde puseti kullanmayin.
! Yuksek sicaklikta, sivi ve elektronk nezmeler uak tutun
! Cocugu, puset icinde ayakta durmasini veya kafasini puset onude dur-
masini brakmayin.
! Sokakta, egim pozisyona ve tehlikeli yerlerde brakmayin
! Puset kullanmadan once tun cihaslar sabitlestigine eminolun.
!
Bogulmasini onlemesi icin, cocugun bogazin yaninda ip ile olan neznel-
er, urun askiya elemanlar, ve ip ile bagalanmis oyuncaklari brakmayin.
! Devirmesini onlemek icin kolda his bir sey koymayin.
! Cocugun icinden ldugun zaman puseti kaldirmayin. .
! Cocugun tasinmasi icin seeti kullanmayin.
! Devirmesi onlemek icin cocugun kendisi pusete girmesine brakmayin.
Icinde vedisariya siz cocugun koyun.
! Parmaklarin sikistirmamasini icin, cok dikkatli puseti acin ve katlanin.
! Cocugun yaninda brakmadan once puset tam acik ve katlanmis oldu-
guna emin olun.
! Cocugun guvenligi saglanmak icin, kullanmadan once pusetin tum
parcalar iyi monte ve sabitlestme yaptiginiza emin olun.
! Bogulmasi onlemesi icin , cocugun golgelik yaninda olamadigina emin olun.
! Puset durdudugunuz zaman , frenleri aktive yapin.
! Puset hasarli veya bozuk olursa ozaman onun kullanmayin
! Normal yurumek hizi ile puseti kullanilacak. Urun kosma amacina yapil-
mamais.
! Dogumdan itibaren tasarlanmis bebek arabasi icin yeni dogan bebekler-
in en fazla yagin pozisyona koymasini tavsi ediyoruz.
! Bir destek ile beraber kullanan oto koltuklerin, bu durulardan otomobiller
bir besik veya bir yatak yerine degil. Sizin cocugu istirahat ihtiyaci oldugun zaman, o zaman bir bebek arabasi veya bir besik veya bir yatak
icinde yatirin.
! Cocugun bogulmamasin icin, isbu urun kullanmadan once plastic
ambalaji cikarin. Plastik torbalari ve ambalajlari bebeklerden ve kucuk
cocuguklarin uzak durmasina gerekiyor
! Kosmak ve kaymak yaptiginiz zaman urunun kullanmayin.
! Dogumdan itibaren hamak tasarlanmis, ve yeni dogan bebekler icin
maksimim egim pozisiyona ayarlanmasini kullanmaktan tavsi ediyoruz.
! Park etme cihazin, cocugun puset icinde koyddugunuz ve cikartiginiz
zamanda aktive edin.
! Kendisi ayaktan duran , yanda kendine civiren ve dizlerin ustunde
yuruyen bir cocuk icin portatif besiik kulanmayin.Cocuguk maksimum
agirlik 9 Kg olmasi gerekiyor.
! Uzun bir uyku icin portatif besik kullanmain.
! Bebek besigin verildigin dosek disindan baska bir dosek kullanmayin
Cocuk arabasi montaji
Urunu monte ve kullanmadan once ulanma klavuzunun talimatlari cok dikkatli okuyun
Cocuk arabasi acmasinio
Depolama kiliti depolama destekten ayirlay 1 ve sonradan kolu yukariya kaldirin 2, bir ses duyduguna zaman
bebek arabasi tamamen acik oldugu anlamina gelir.Arkalik dikey pozisiyona getirin.
! Devam etmeden once, urunun tam acildigina kontrol edin .
On tekerlek montaji
On destegine on tekerlekler montej edin. Tekerlerlerin iyi sabitlestirdigine kontrol etmesi icin , tekerlek toplulugunu
cektirme yaptigin
3
On ayaklarin demonte yapmak icin, on ayaklardan tekerleklerin cikartin
4
- 2 serbest
Page 36

69
70
brakma dugmesini basirdigin zamanda
4
- 1
Arka tekerlekler montaji
Arka ayaklarda fren toplulugu koyun 5, arka tekerlekler fren toplulugua monte edin 6. Sepet borusu arkaya
cekin ve arka ayaklari bagalanma boru depolanma sepeti bandi ile beraber sarin ve sonradan olan uc dugmenin
bastirin.
7
! Tekerlekler dogru montaj edildigine kontrol etmek icin tekerleklerin toplulugu cektirin.
Arka tekerlegin cikartmasi icin tekerlek , arka destekten cikartin
8
- 2 serbest brakma dugmesini bastirin
8
- 1
Golgelik montaji
Golgelik tokalarin ve borulari destekleri ile aine seviye alin ve sonradan katlanin golgeligi montaj etmesi icin 9
Golgeligin arka tarafindan bulunan 3 kancanin ve sabitlesme dongu sabitlestirin ve iki tarftalarin zimbalar.
10
El cubugu montaji
El cubugu sonun destegi ve uygun olan sabitlesme yeri siralayin ve sonradan bloke etmesi icin icinde sokun 11.
El cubugu demonte yapmak icin serbest brakma dugmesini bastirin
12
- 1 sonradan el cubugu cekin 12 - 2
13
Fotograftan monte edilmis bebek arabasini gosteriyor.
Bebek arabasi kullanimi
Agin ayarlanmasi
Arkalik 4 tane acilarin var.
Sirtligin aginmasi icin , ayarlanma dugmesini sikistirin
14
- 1 ve sonradan isedigin acindan arkalidi egin.
14
- 2
Arkaligi kaldirmak icin yukariya itin.
! Kullanmak icin egin sabitlestigine emin olun.
Toka kullanimi
Toka brakmasi
Tokaya serbest brakmasi icin merkezden bulunan dugmenin bastirin.
15
Tokanin blokesi
Omuz ve bel tokasini ayarllayin
16
- 1 ve ortadan bulunan tokasin icinde sokun.
16
- 2 bir ses duydugunuz
zaman komple kapanmis demektir
16
- 3
! Cocugun kaymasin ve dusmesin nedeni ile olan agir yaralar onlemek icin, her zaman bagalana eminiyet
kemerlerin ile korun.
! Cocugun sabit koydugna emin olun. Cocuguk ve kemer arasida bosluklarin yaklasik bir elde olmasini gerekiyor.
! Emniyet keerlerin bir birne gecirmeyin. Boylece cocugun boyunu bastiriyorsunuz.
70
Omuz ve boy kemerlerin kullanimi
! Dusme nedenlerini cocugu korumasi icin, cocugun sandaliyede koyduktan sonra, emniye kemerlerin uygun
yuksekligine ve uzunluguna takildigina kontrol edin.
17
- 1 Omuzlarin bagalanmasi icin eminyet kemeri cihazi A
17
- 2 Omuzlarin bagalanmasi icin eminyet kemeri cihazi B
17
- 3 Ayarlama chazi
Buyuk cocular icin kemerlerin bagalanmak cihazi omuz icin A, ve yukardaki olan delikleri icin kullanin. Kucuk
cocuklari icin kemerlerin bagalanmak cihazi omuz icin ve asagidaki olan delikleri icin kullanin
Pozisyonu ayarlamak icin omu icin emniyet kemerin bagalanmak cihazi kullanin ve on tarafin seviyesini a kadar
kolu cevirin. Arka kemerin deliginden cihazi onunde cektirin
18
Yeniden cocugun en yuksek omuzlarin
pozisyona en yakin delikten cihazin cektirin..
19
Kemerlerin uzunlugunu ayarlanmasi icin yarlanma cihazi kullanin
20
- 1
Dugmeye bastirin
20
- 2 ve ayne zamanda istedigin olcude orta keerin cektirin.
20
- 3
Ayak destegi ayarlanmasi
Ayak icin destegi 2 pozisyonu ver.
Ayak icin destegi kaldirmasi
Ayak icin destegi kaldirmasi icin onun kaldirin.
Ayak destegi indirmesi
Ayak icin destegin ayarlama dugmelerini tum taraftlari bastirin
21
- 1 ve ayak destegi cihazin asagida cevirin.
21
- 2
On mili blokenin kullanimi
Haraket yonu tutmak icin on mili bloke cihazilari cekin.
22
Fikir
Mili bloke cihazi kullanmasini duzgun yuzeylerinde kullanmasina tavsi edilir.
Fren Kullanimi
Tekerlekler bloke etmek icin fren pedallari asagidaki bastirin 23
Tekerlekler serbest brakmasi icin fren pedallarini kaldirin
24
Fikir
Bebek arabazi durdugun zaman her zaman freni kullanin.
Golgelik kullanimi
Golgelik acmasi icin lutfen onunde itin
25
Golgelik kapatmak icin lutfen onu arkaya cekin
25
Kol ayarlanmasi
Kolun 3 pozisyonu var
Kol ayarlanmasi yapmak icin yukari ve asagida cektirin
26
- 2 kolun ayarlanma dugmenin bastirarak
26
- 1
Page 37

71
72
Bebek arabasi katlanmasi
! bebek arabasi katlanmadan once golgeligi katlanin.
Katlanma icin arabaya onunde bastirin
27
- 2, ve aine anda her iki katlanma dugmelerin bastirin
27
- 1
28
fotografina gore bebek arabasi komple katlanmis oluyor.
Aksesuarlar
Satın alınan urune dahil olmayabilir
Ayak ortusu kullanimi
Ayak ortusu yumusak ve sicak ve konforlu bir cevre sizin cocuguna saglaniyor.
Asagidaki yazilan adimlar uygulanan ayak ortusu montaj edilir.
1. Fermoarun acildiktan sonra ayak ortusu yerlestirin, ve omuzlar , boy ve ayaklar arasinda sabitlesmek icin
ustunde kemerlerin cekin
30
2. Sabitlesme buklenin ayak ortusuna ust taraftaya sirtligina gecirin ve sonradan sabitlesme kananina yerlestirin 31
3. Ayak ortusu icinde cocugu sokun, guvenlik tokanin bloke edilin ve sonradan ayak otrunun fermoari kapatin.
32
fotograf montaj edilen bir ayak ortusu gorsterir.
Yagmur ortusu kullanimi
Yagmur ortusu montaji etmesi icin , ilk once bebek arabasina ustunde yerlestirin ve sonradan olan cif 7 adet
zimbalar yapistirin.
33
! Yagmur ortusu kulanmadan once, sirt dayamasi en dusuk pozisyona ayarlanmis ve cocuk icin oto koltugunu
sabitletigine lutfen emin olun.
! Yagmur ortusu bebek arabasi uzerinde oldugun zaman havalandirmaya kontrol edin.
! Yagmur ortusu kullanmadigin zaman, katlanmadan once, uygun sekilde kurulduguna ve temisledigine emin olun.
! Yagmur ortusu monte edildikten sonra bebek arabasi katlanmayin.
! Yaz baharinda uzerinden yagmur ortusu olan beslik cocugu, arabasin icinde koymayin.
Koltuk yastığı
arası gorsellere bakın
34
-
35
Bakim ve onarim
! Cikarilan minderler soguk suyu ile yikanilabilir ve kurutmak icin dogal kurulmasini brakilacak. Camasir suyu kulanmayin
! Puset cercevisi temizlenmek icin normal sabon kullanin ve sicak suyu. Deterjan ve camasir suyu kullanmayin.
! Surekli puset gevsemis vidalar, parcalarin bozulmasina, kumas yirtmasina ve yapistirmis nezneler ve
dikislerine icin kontrol edin. Yedek parcalarin degisirin veya amir edin.
! Sicaktan veya guneste uzun zaman kaldigindan urunun solmasini ve parcalarin deforme olmasini nedeni olabilir.
! Eger pusetin islanmasini olursa , golgeligi acin ve depolamadan once iyi kurutmasina brakin.
! Eger tekerleklerden ses gelirse, hafif bir yag kullanin( ornek olarak silikonlu bir spray, paslanmaya karsi bir yag,
veya dikis makinelerin icin bir yag kullanin). Tekerlek toplugumunda ve aksina yag koymasini onemlidir
29
! Eger puset plajda kullanirsa, ozaman kullanildigiktan sonra kumu ve tuzu tekerleklerin topluluktan ve
mekanizmalardan uzaklastimak icin komple temizlenin .
Page 38

P-IM0078C
Share the joy at joiebaby.com
 Loading...