

Page 1
ECE R129/00
Child height 40cm-85cm/ Child weight≤13kg;
ECE R129/00: C,D
i-Size universal ISOFIX
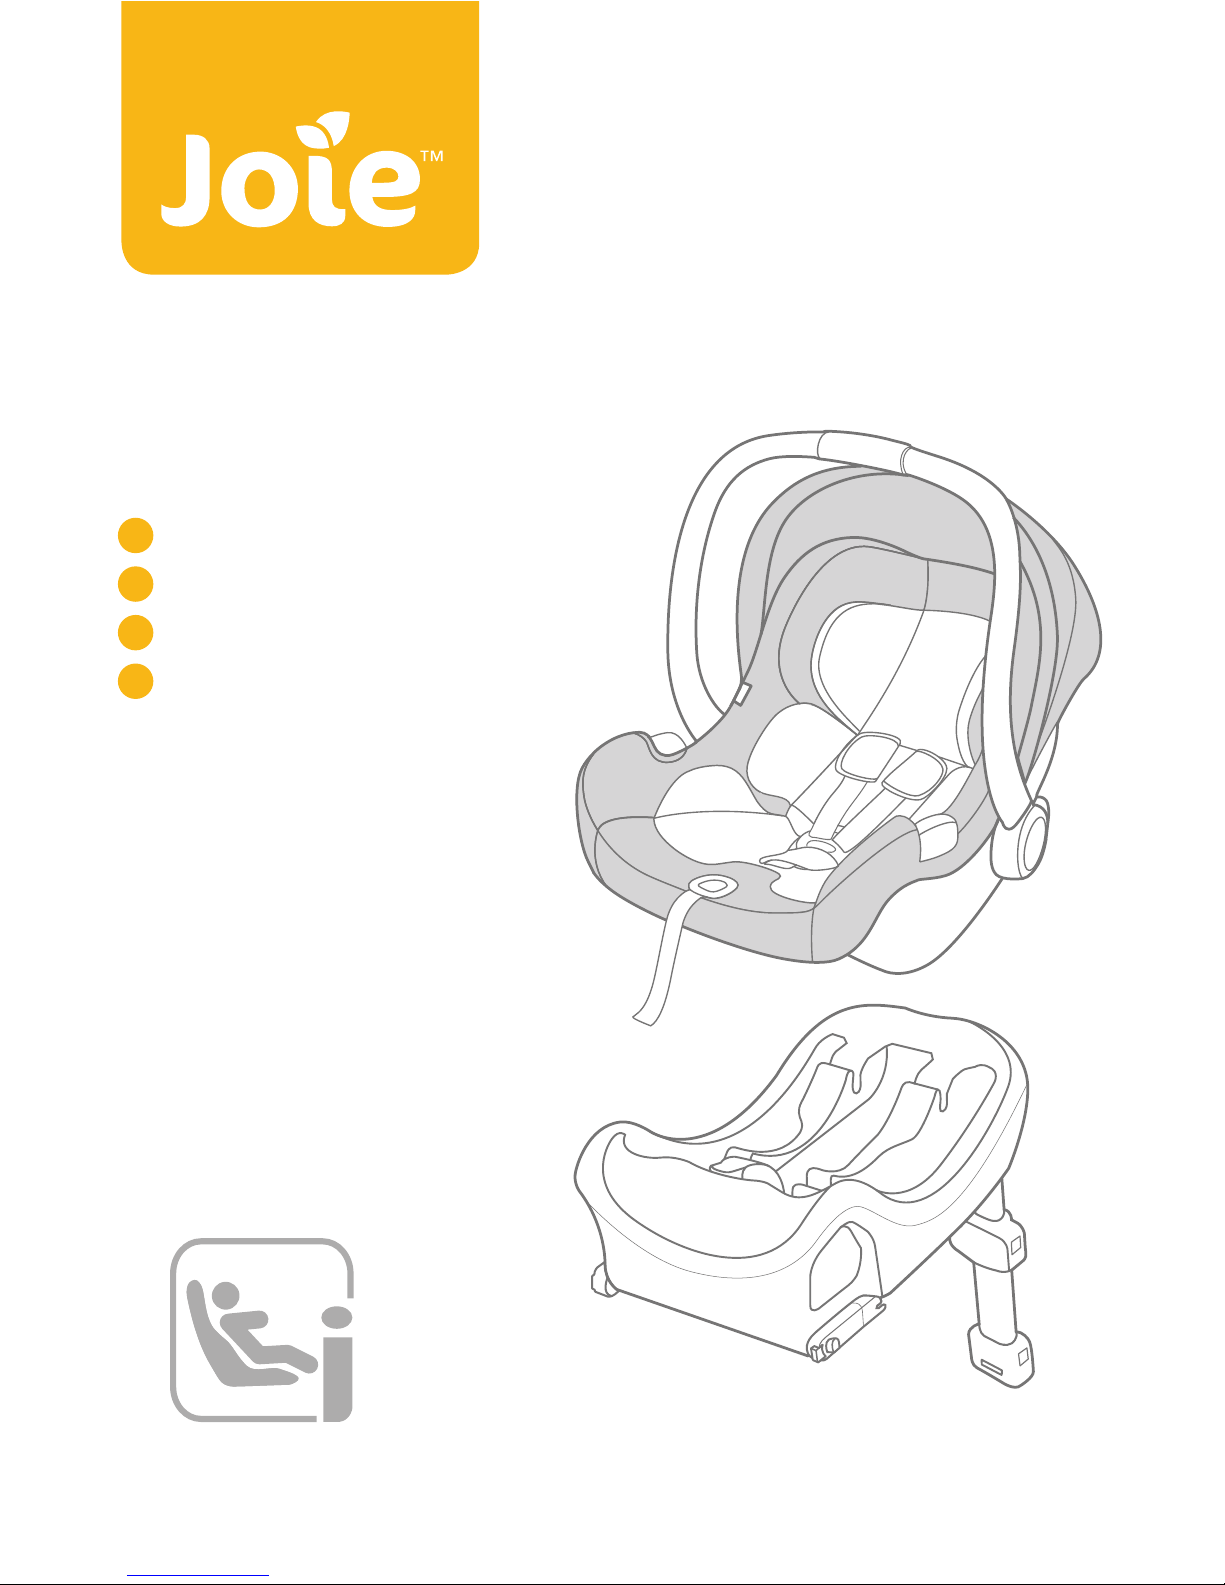
i-Gemm
infant child restraint
™
Instruction Manual
Manual de instruções
Manual de instrucciones
Mode d’emploi
GB
PT
ES
FR
Page 2
1 2
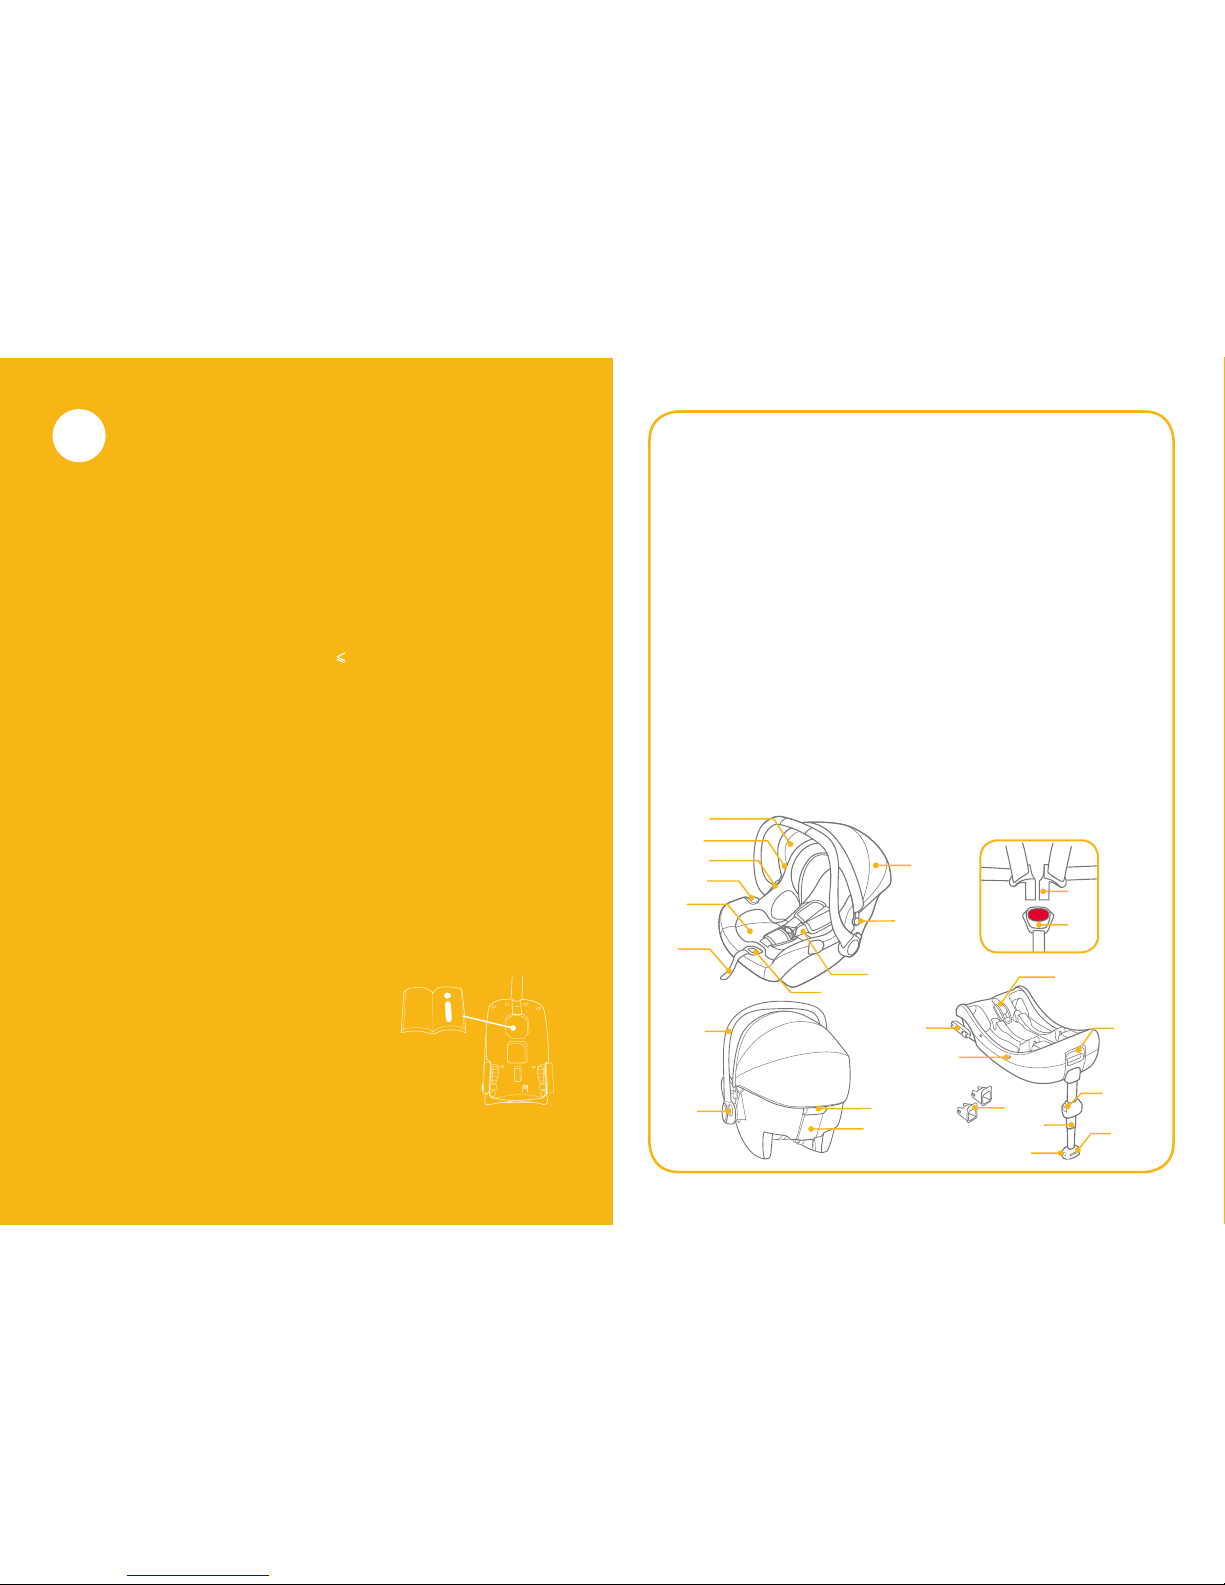
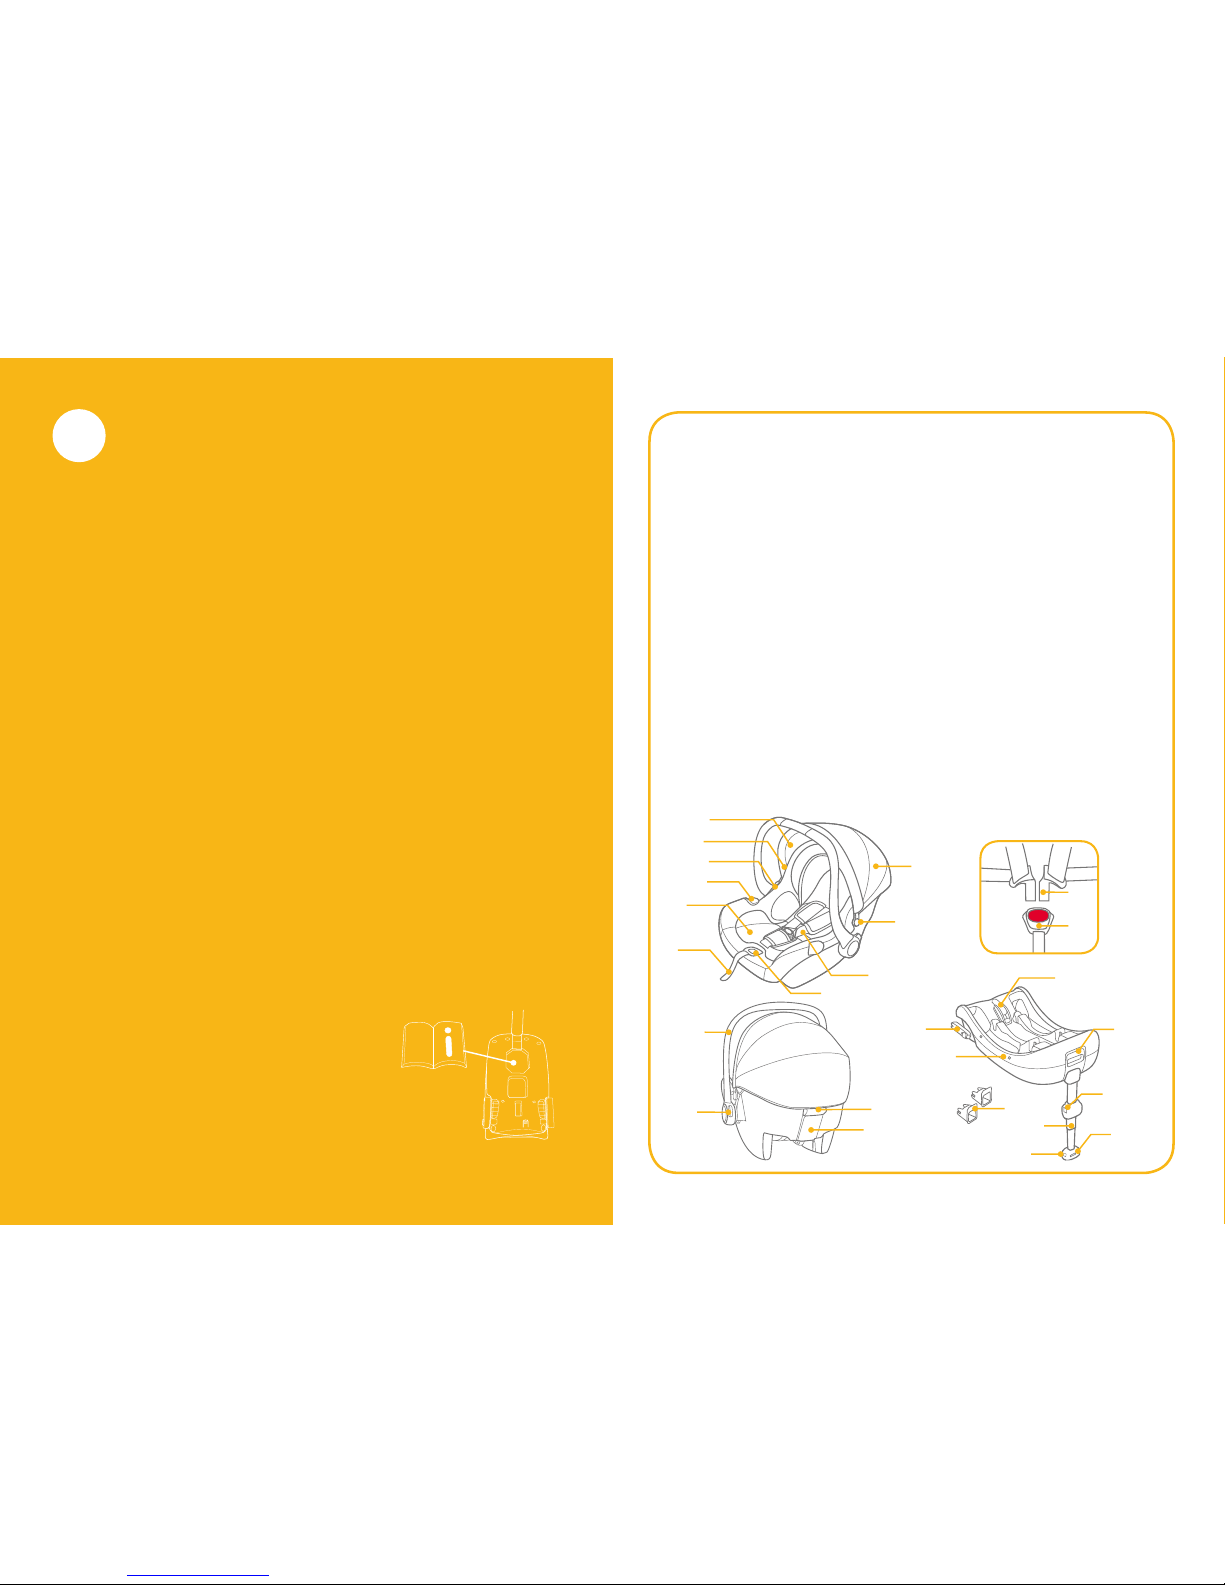
Please make sure there are no missing parts. Please contact the
retailer if anything is missing.
25
17
18
20
22
23
24
2
3
4
5
6
7
8
9
10
11
12
19
13
14
15
16
21
1
Fig. 1.1 Head Support
Fig. 1.2 Seat Pad
Fig. 1.3 Stroller Fix Release
Button A
Fig. 1.4 Side Guide
Fig. 1.5 Infant Insert
Fig. 1.6 Adjustment Webbing
Fig. 1.7 Harness Adjustment
Button
Fig. 1.8 Shoulder Harness
Fig. 1.9 Hood Mount
Fig. 1.10 Hood
Fig. 1.11 Harness Connectors
Fig. 1.12 Harness Buckle
Fig. 1.13 Handle
Fig. 1.14 Handle Button
Parts List
Fig. 1.15 Rear Guide
Fig. 1.16 Stroller Fix Release
Button B
Fig. 1.17 ISOFIX Connector
Fig. 1.18 Shell Indicator
Fig. 1.19 ISOFIX Guides
Fig. 1.20 Load Leg
Fig. 1.21 Load Leg Adjust
Button A
Fig. 1.22 Load Leg Indicator
Fig. 1.23 Load Leg Adjust
Button B
Fig. 1.24 infant carrier module
Release Button
Fig. 1.25 Lock-off
GB
Welcome to Joie
™
Congratulations on becoming part of the Joie family! We are so excited
to be part of your journey with your little one. While traveling with the
Joie igemm™ infant child restraint you are using a high quality, fully certified safety i-Size infant child restraint. Please carefully read this manual and follow each step to ensure a comfortable ride and best protection
for your child.
To use this Joie infant child restraint with the i-Size ISOFIX connections
according to the ECE R129/00 Regulation, your child must meet the following requirements.
Child height 40cm-85cm/ Child weight
13kg; (approximately 1.5 years
old or under).
To use this infant carrier module with vehicle belt, your child must meet
the following requirements.
Child weight≤13kg/ Child age≤15 months.
Base
These instructions show the use of the infant carrier module and the
base. This base can also be used with other certain Joie infant carrier
module. Please read all the instructions in this manual before installing
and using the product.
! IMPORTANT: KEEP FOR FUTURE REFERENCE.
PLEASE READ CAREFULLY.
Please keep the instruction manual in the
storage compartment at the bottom of
the base as right figure.
or
Please keep the instruction manual at the
bottom of the soft goods.
For warranty information, please visit our
website at joiebaby.com
Page 3

3 4
WARNING WARNING
! Please check before you purchase this infant child restraint to make
sure it can be installed properly in your vehicle.
! NO infant child restraint can guarantee full protection from injury in
an accident. However, proper use of this infant child restraint will
reduce the risk of serious injury or death to your child.
! To use this infant child restraint with the ISOFIX connections ac-
cording to the ECE R129/00 Regulation, your child must meet the
following requirements.
Child height 40cm-85cm/ Child weight≤13kg (approximately 1.5
years old or under).
! To use this infant carrier module with vehicle belt, your child
must meet the following requirements.
Child weight≤13kg/ Child age≤15 months.
! Any straps of infant child restraint should be tightened and not
twisted.
! DO NOT install this infant child restraint without following the in-
structions in this manual or you may put your child at serious risk of
injury or death.
! NEVER leave your child unattended with this infant child restraint.
! DO NOT make any modification to this infant child restraint or use it
along with component parts from other manufacturers.
! DO NOT use this infant child restraint if it has damaged or missing
parts.
! DO NOT have your child in large/oversized clothes because this may
prevent your child from being properly and securely fastened by the
shoulder harness straps and the crotch strap between the legs.
! DO NOT leave this infant child restraint or other items unbelted
or unsecured in your vehicle because an unsecured infant child
restraint can be thrown around and may injure occupants in a sharp
turn, sudden stop, or collision.
! DO NOT place a rear-facing infant child restraint on front seat with
air bag. Death or serious injury may occur. Please reference vehicle
owner’s manual for more information.
! NEVER use a second-hand infant child restraint or an infant child
restraint whose history you do not know because it may have structural damage that compromises your child’s safety.
! NEVER use ropes or any other substitutes to secure infant child
restraint in vehicle or to secure child into infant child restraint.
! DO NOT use this infant child restraint without the soft goods.
! The soft goods should not be replaced with any besides the ones
recommended by the manufacturer. The soft goods constitute an
integral part of the infant child restraint performance.
! DO NOT put anything other than the recommended inner cushions in
this infant child restraint.
! Be sure that the infant child restraint is installed in such a way that
no part of it interferes with movable seats or in the operation of
vehicle doors.
! DO NOT continue to use this infant child restraint after it has suffered
any type of crash, even a minor one. Replace immediately as there
may be invisible, structural damage from the crash.
! Remove this infant carrier module and base from the vehicle seat
when it is not in regular use.
! Consult the distributor for issues concerning maintenance, repair
and part replacement.
! To avoid the risk of falling out, always secure the child using the
child harness when the child is placed in infant carrier module, even
when the infant child restraint is not in the vehicle.
! Before carrying the infant carrier module by hand, ensure that the
child is fastened with the child harness, and that the handle is correctly locked in a vertical position.
! To avoid serious injury or death, NEVER place infant carrier module
on elevated surface seat with child in it.
! The parts of this infant child restraint should not be lubricated in any
way.
! Always secure child in infant child restraint, even on short trips, as
this is when most accidents occur.
! DO NOT use this infant child restraint for more than 5 years after the
purchase date as parts may degrade over time, or from exposure to
sunlight, and may not perform adequately in a crash.
! Please keep this infant child restraint away from sunlight, because it
may be too hot for child’s skin. Always touch the infant child restraint
before placing child in it.
Page 4

5 6
WARNING
Figure for
Installation
Child height 40cm-85cm/
Child weight≤13kg
(approximately 1.5 years
old or under)
Suitable for
Child weight≤13kg
Child age≤15 months
Product Information
" i-Size" (Integral Universal ISOFIX Child Restraint Systems) is a
category of Infant Child Restraint System for use in all i-Size seating
position of a vehicle.
Not all vehicle manufacture's handbooks list i-Size compatibility yet.
This seat and base is also approved for use in ISOFIX compatible
vehicles. Please refer to the vehicle manufacturer's website or consult
your dealer.
1. According to the ECE R129/00 Regulation, the infant carrier module
with Base is a Universal ISOFIX Class C, D infant child restraint and
should be fitted using the ISOFIX connections.
2. This is an “i-Size” infant child restraint System. It is approved to
Regulation ECE R129/00, for use in, “i-Size compatible” vehicle
seating positions as indicated by vehicle manufacturers in
the vehicle users’ manual.
3. If in doubt, please consult the infant child restraint manufacturer or
the retailer.This is an i-Size ISOFIX CHILD RESTRAINT SYSTEM.
It is approved to ECE R129/00 series of amendments, not all vehicle
manufacture's handbooks list i-Size compatibility yet. This seat and
base is also approved for use in ISOFIX compatible vehicles. Please
refer to the vehicle manufacturer's website or consult your dealer.
It will fit vehicles with positions approved as i-Size ISOFIX positions (as
detailed in the vehicle handbook), depending on the category of the
infant child restraint and of the fixture.
! Frequently check the ISOFIX guides for dirt and clean them if neces-
sary. Reliability can be effected by ingress of dirt, dust, food particles
etc.
! DO NOT place any objects in the load leg area in front of your base.
! DO NOT use any load bearing contact points other than those de-
scribed in the instructions and marked on the infant child restraint.
! Please do not use this car seat if the car seat has dropped from a
significant height, hit the ground at a considerable speed, or has
visible signs of damage. We are not responsible to replace if the car
seat has been damaged under these abnormal conditions. A new
car seat will need to be purchased when any of the aforementioned
conditions occurs.
Emergency
In case of emergency or accidents, it is most important to have your
child taken care of with first aid and medical treatment immediately.
Page 5

7 8
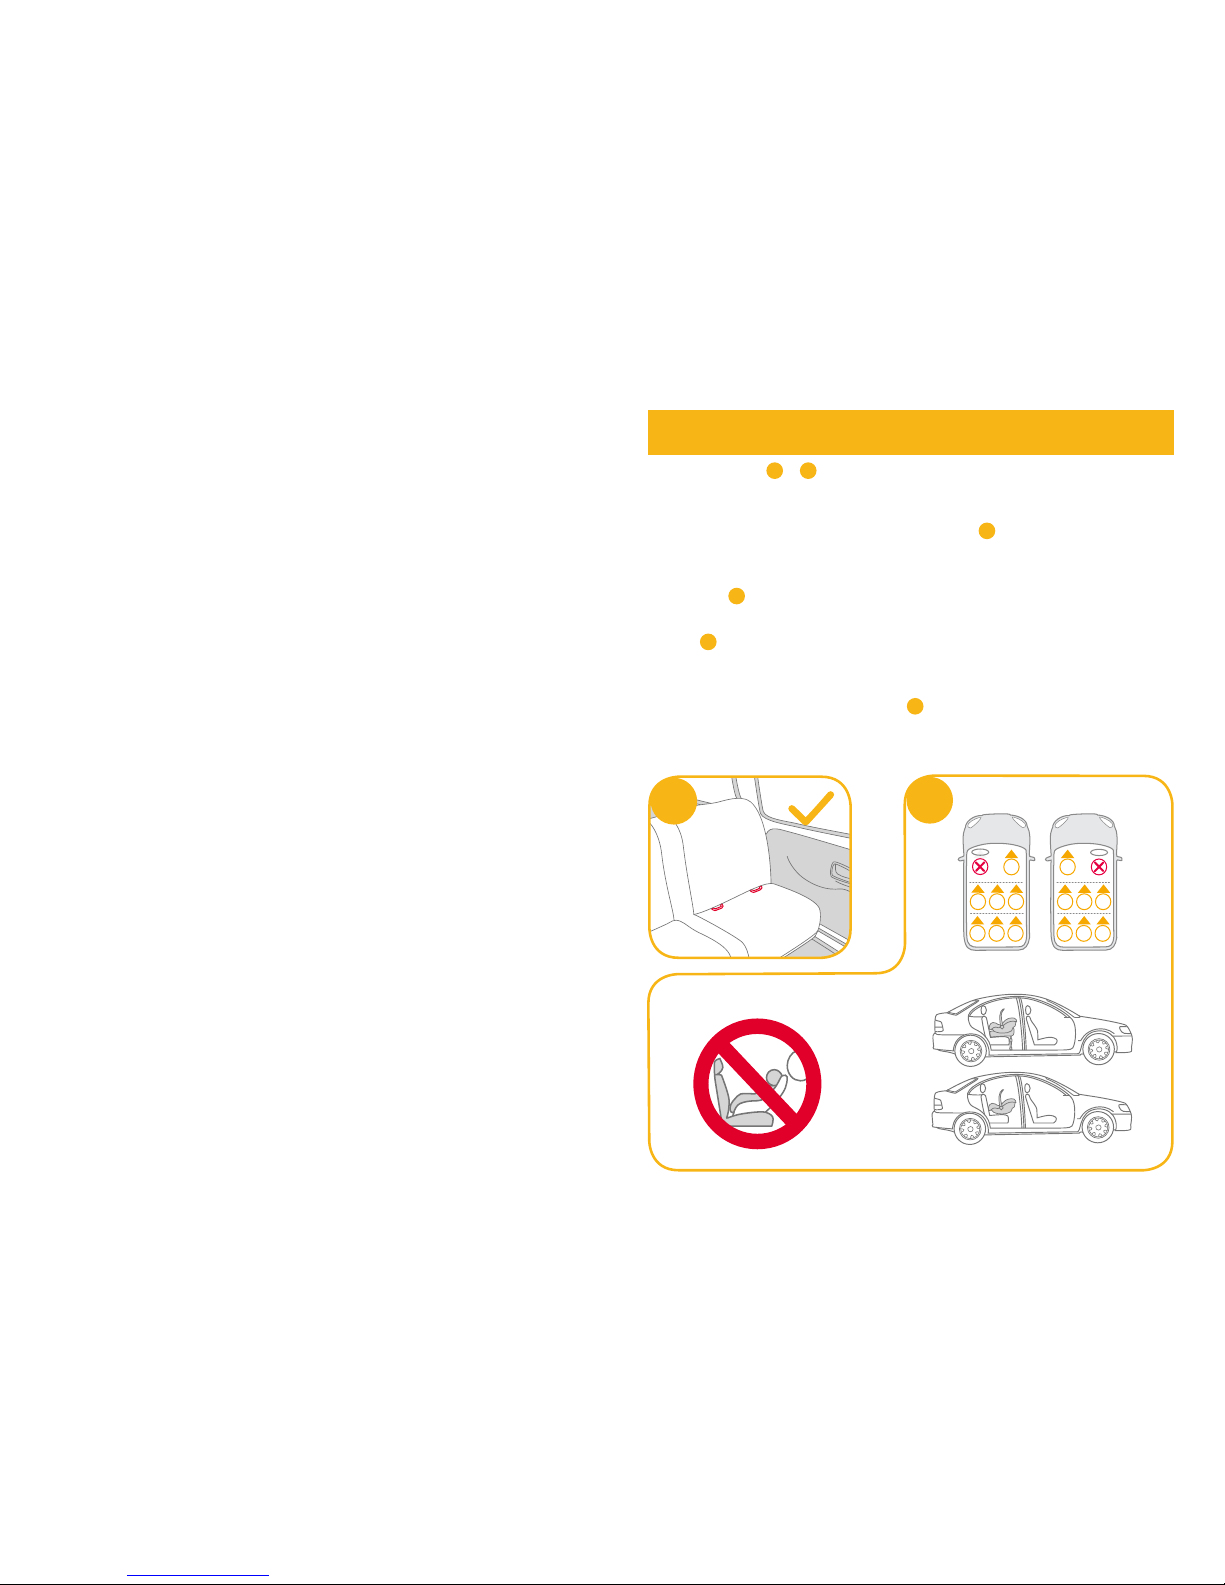
!
This infant carrier module is suitable for vehicle seats with i-Size
ISOFIX anchor points with the Base.
1
!
DO NOT install this infant child restraint on vehicle seats that face
sideways or rearward with respect to the moving direction of the
vehicle.
2
-1
!
DO NOT place rear-facing infant child restraint on front seat with
air bag
2
-2
, because death or serious injury may occur. Please
reference vehicle owner’s manual for more information.
!
It is recommended to install this infant child restraint on the rear
vehicle seat.
2
-3
!
DO NOT install this infant child restraint on vehicle seats movable
during installation.
Concerns on Installation
1
3
214
1
5 7
3
6
2 4
5 7
3
6
2
2
A
I
R
B
A
G
1
see images 1 -
2
Aeroplane lnstallation
see images
3
-
5
3
Note that safety of the child for not
complying with the installation and
instruction manual is not guaranteed.
! Note that the installation of the
infant carrier on an aircraft seat
differs from the installation on a car
seat.
! Note that 2-Point “Lap Belt”
attachment is only permitted in
aircraft.
! Note that the infant carrier must
remain belted on the aircraft seat
even when unoccupied.
! Note that the infant carrier is only
for use on a passenger seat
authorized by the airline.
! Warnings not to use the infant
carrier in the area of airbag
deployment.
2
-2
! Note that Rearward facing infant
carrier should only be installed on
forward facing passenger seats.
3
How to install the baby seat using the
aircraft seat’s safety belt:
1. Place the infant carrier opposite to
the flight direction onto the
passenger seat.
Page 6
9 10
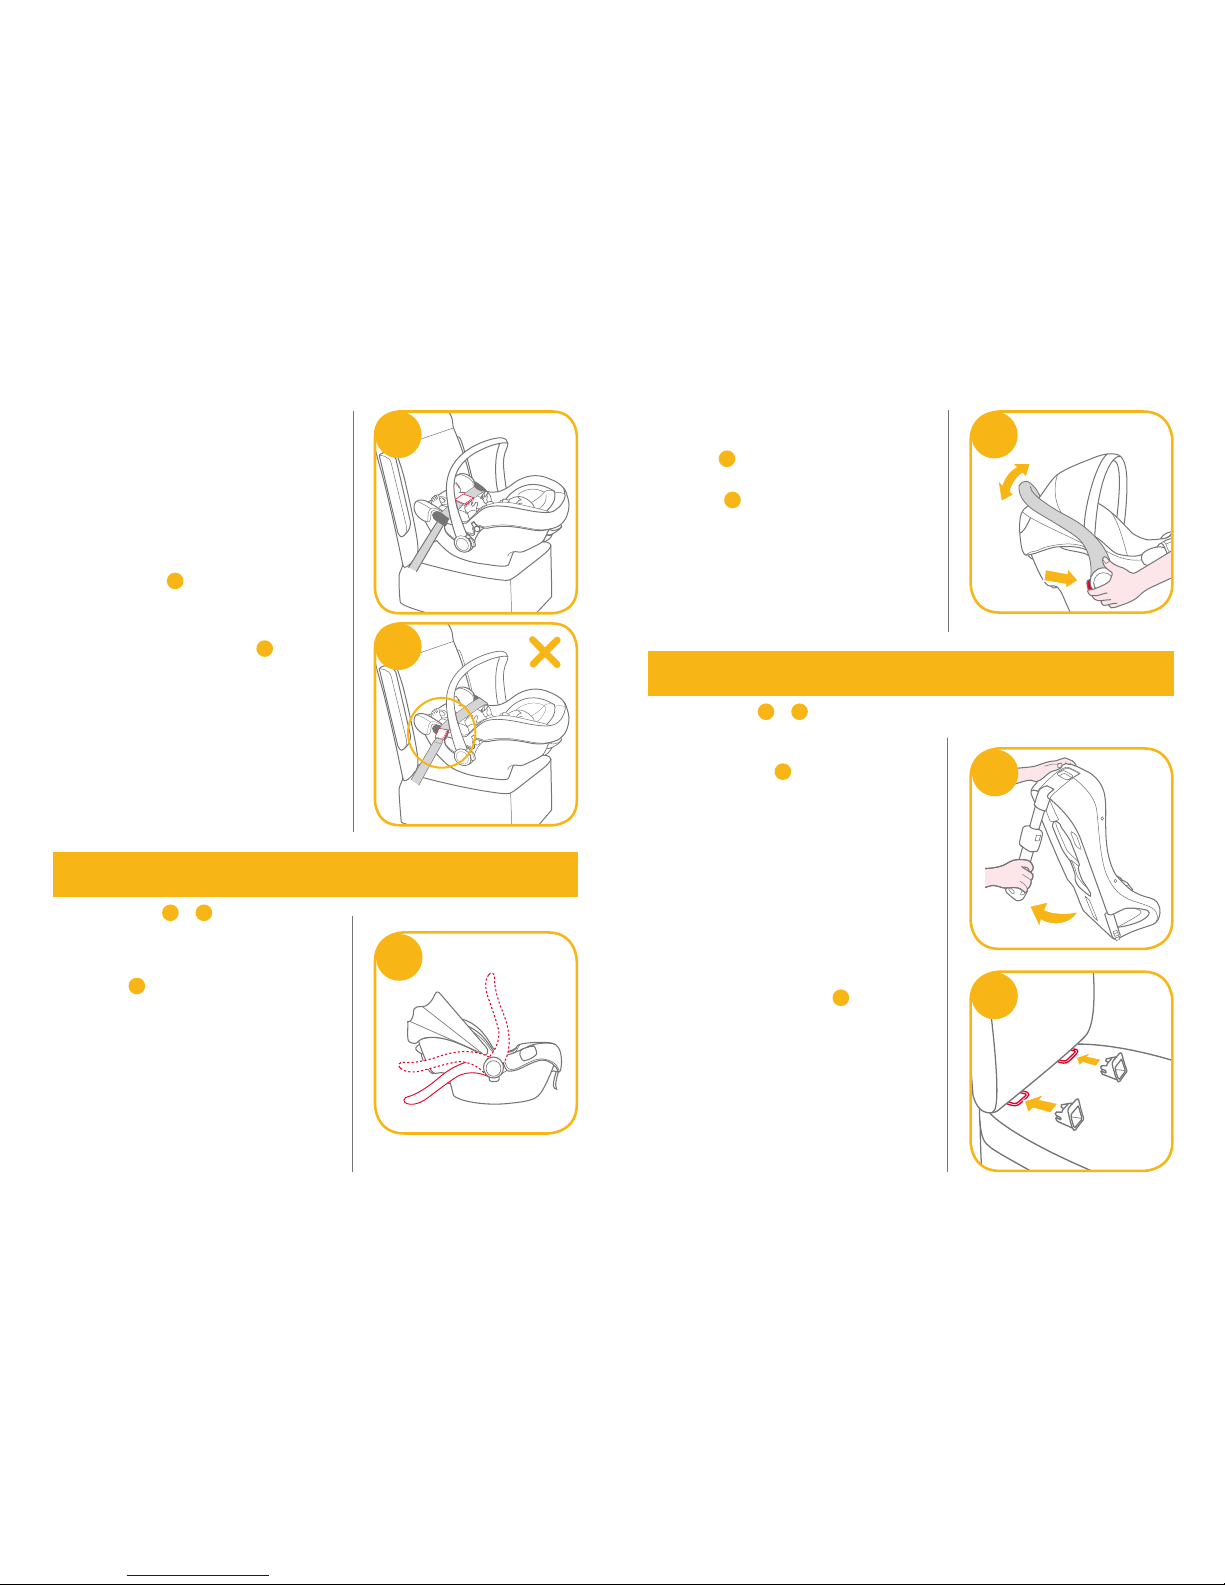
Handle Adjustment
see images
6
-
7
6
3
2
1
The handle of the infant carrier
module can be adjusted to 3
positions.
6
Position 1 Position for car, hand or
stroller transportation.
Position 2 Rocking position.
Position 3 Baby chair position.
2. Ensure that the carry handle is in
the topmost position.
3. Place the safety belt into both light
blue belt guides.
4. Close the safety belt (refer to the
safety instructions by the airline).
5. Tighten the safety belt by pulling
the belt end.
4
! The buckle of the safety belt must
under no circumstances lie within
the light blue belt guides.
5
Removal:
Open the safety belt of the passenger
seat (refer to the safety instructions
by the airline).
Now you can take the baby seat from
the passenger seat.
4
5
1. Unfold the load leg from storage
compartment.
8
2. Fit the ISOFIX guides with the
ISOFIX anchor points. 9
The ISOFIX guides can protect the
surface of the vehicle seat from
being torn. They can also guide the
ISOFIX connectors.
To adjust the handle, squeeze the
handle buttons on both sides to
release it
7
-1
, and then rotate the
handle until it clicks into any of the 3
positions.
7
-2
7
1
2
Installation with base
8
9
see images 8 -
18
Page 7

11 12
3. Rotate the ISOFIX connectors 180
degrees until they are pointing in
the direction of the ISOFIX guides.
10
11
10
1
4. Line up the ISOFIX connectors with
the ISOFIX guides, and then
click both ISOFIX connectors into
the ISOFIX anchor points.
11
!
Make sure that both ISOFIX
connectors are securely attached
to their ISOFIX anchor points.
There should be two audible
clicks and the colors of the
indicators on the both ISOFIX
connectors should be completely
green.
11
-1
!
Check to make sure the base is
securely installed by pulling on
the both ISOFIX connectors.
5. After placing the base on the vehicle seat, extend the load leg to
floor
12
, When the load leg indicator shows green means it is
installed correctly, red means it is installed incorrectly.
12
-3
!
The load leg has 24 positions. When the load leg indicator shows
red this means the load leg is in the wrong position.
!
Make sure the load leg is in full contact with the vehicle floor pan.
!
Squeeze the load leg releasing button, then shorten the load leg
upwards.
12
3
1
2
13
1
2
The completely assembled base is
shown as
13
!
The ISOFIX connectors must be
attached and locked onto the
ISOFIX anchor points.
13
-1
!
The load leg must be installed
correctly with green indicator.
13
-2
Page 8

13 14
14
15
6. Push the infant carrier module
down into the base 14, if the infant
child restraint is secure, the infant
child restraint indicator shows
green.
15
!
Pull up on the infant carrier
module to be sure it is securely
latched into the base.
7. To release the infant carrier, pull
the infant carrier up
16
-2
while
squeezing the infant carrier release
button.
16
-1
18
1
2
2
17
2
1
16
1
2
8. To remove the base, press the
secondary lock button
17
-1
first
and then the button
17
-2
on the
ISOFIX connectors before
removing the base from the vehicle
seat.
17
9. Press the ISOFIX releasing button
to fold the ISOFIX.
18
Page 9
15 16
19
20
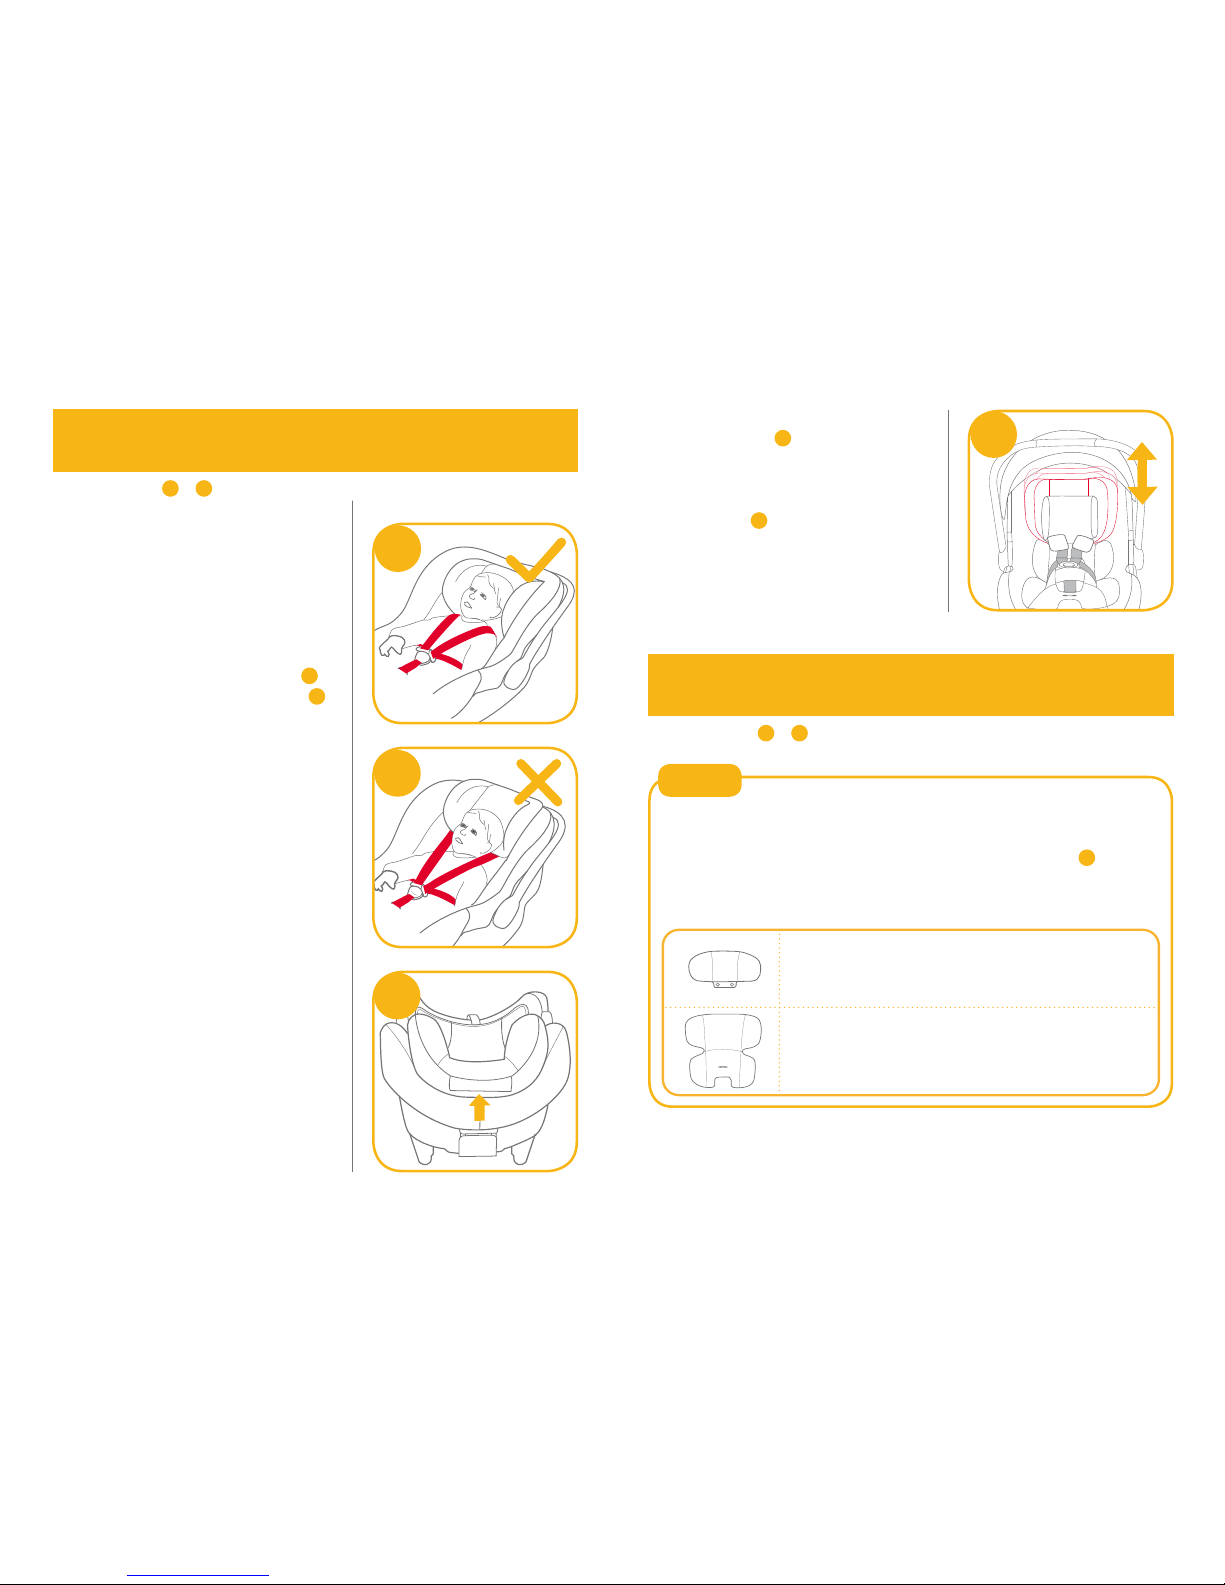
Height Adjustment
for Head Support and Shoulder Harnesses
see images
19
-
22
Check that Shoulder Harness Straps
are set at the proper height. Please
choose the proper pair of shoulder
harness slots according to the child’s
height.
!
The bottom of headrest must be
level with the highest point of
child’s shoulder, it is shown as 19,
but not above the shoulder line.
20
!
If the Shoulder Harness Straps are
not at proper height, the child
might be ejected from the infant
child restraint if there is a crash.
21
Squeeze the head support
adjustment lever 21, meanwhile pull
up or push down the head support
until it snaps into one of the 7
positions. The head support positions
are shown as
22
22
1. Infant insert is for children's protection. Children whose height
is under 60cm are suitable to use the infant insert.
2. Before using the insert, please add the foam wedge.
23
3. After the child is placed in the seat, check if the shoulder
harnesses are set to the correct height.
Note
Remove the head support portion of the infant
insert when the child’s head no longer fits
comfortably. Detach the snaps on the head
support to remove the head portion of the insert.
Remove the body portion of the infant insert
when the infant’s shoulders no longer fit
comfortably.
Securing Child
in the Infant Child Restraint
see images 23 -
28
Page 10

17 18
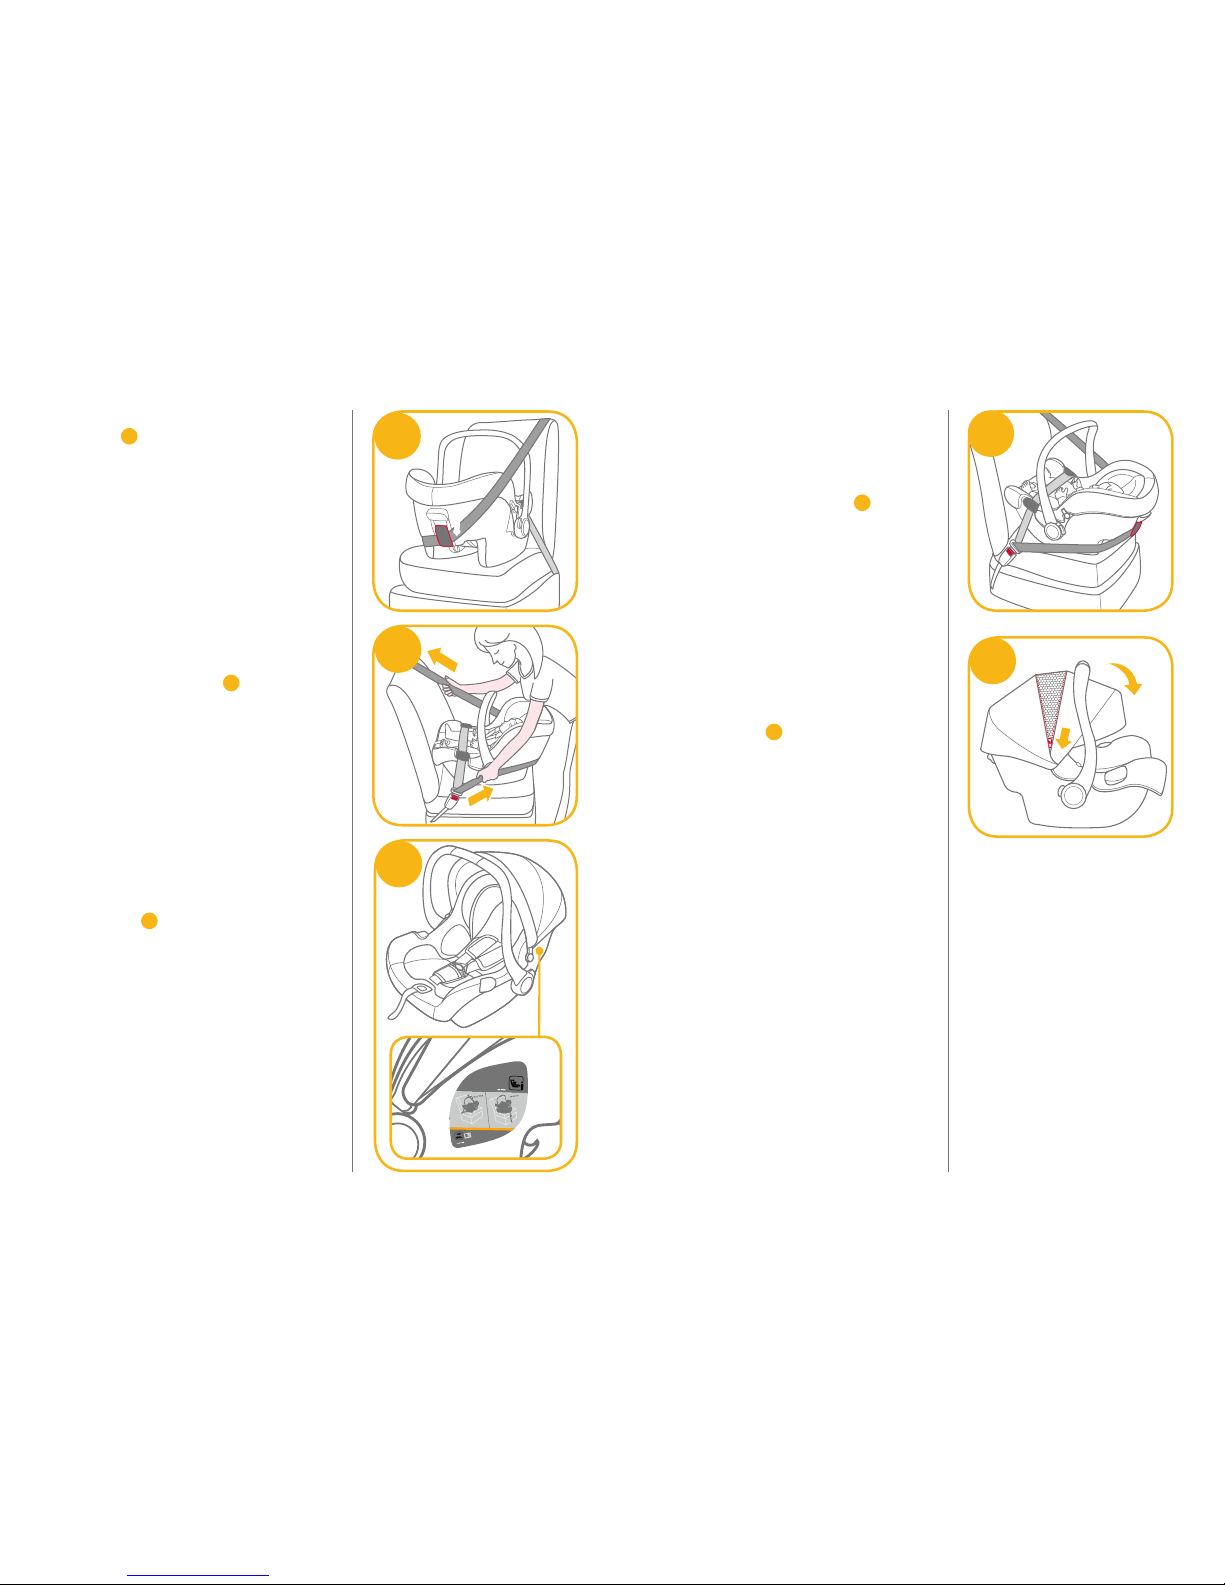
1. While pressing the harness
adjustment button, pull completely
the two shoulder harnesses of the
infant child restraint.
24
2. Unlock the buckle of the harnesses
by pressing the red button.
25
23
24
25
28
28
27
26
3. Place child into the infant carrier
module and lock the buckle.
26 &
27
4. Tighten the shoulder harnesses by
pulling adjustment webbing.
28
Page 11

19 20
29
30
31
To detach the hood, simultaneously
press the button in the hood mount
and pull the hood bow out.
29
To detach the seat pad, you should
refer to the following steps:
1. You must remove the insert first.
To do this simply unlock the
buckle, then unclip the snaps on
both sides of the insert and pull out
away from the seat.
2. The shoulder harness cover or
crotch harness cover can be
removed from the webbing.
3. Detach the elastic bands on the
back of head support to remove
the head support soft goods.
4. Pull out the fastening pieces
underneath the edge of the seat.
30
5. Detach the seat pad from around
the adjustment button as shown in
31
To re-assemble the soft goods,
reverse the aforementioned steps.
Detaching Hood and Seat Pad
see images
29
-
31
Installation without base
!
DO NOT install this infant carrier
module on vehicle seats with Lap
Belts.
32
!
This infant carrier module is
suitable for vehicle seats with a
3-point Retractor Safety Belt only.
33
1. Place the infant carrier module
onto the vehicle seat where you
wish to put it. Pull the vehicle
safety belt out and lock it into the
vehicle buckle, sliding the vehicle
lap belt into the side guides of the
infant carrier module.
34
!
The infant carrier module can not
be used if the vehicle safety belt
buckle (female buckle end) is too
long to anchor the infant carrier
module securely.
34
-1
see images
32
-
39
32
33
!
!
34
1
Page 12
21 22
2. Slide diagonal belt into the rear
guide.
35
3. Pull the vehicle shoulder belt to
fasten the infant carrier module
tightly and securely.
36
4. Level line on infant carrier module
must be level to the ground when
the infant carrier module is
installed.
37
!
Tension the vehicle safety belt as
much as possible, checking that
it is not loose or twisted.
!
35
36
37
!
After installing the infant carrier
module, always check that
the vehicle belts are routed
correctly and securely fastened
into the vehicle buckle.
38
5. The hood can be opened
completely to protect your child
from the sun uttermostly, just unzip
the hook, and then pull the hood
toward front.
39
38
39
Page 13

23 24
see images 40 -
49
Your infant child restraint is designed to attach to certain Joie
stroller models featuring a special tray, armbar or calf support.
!
Please make sure your stroller can fit the infant child
restraint before purchasing it.
!
Never allow more than one baby in the travel system at
one time.
!
Please brake your stroller before assembling the infant
child restraint.
!
Check that the parts used to fix the infant child restraint
are securely fastened on the stroller.
!
Recline the stroller seat back to the lowest position.
Use with Joie Strollers
To assemble the infant child restraint on Joie strollers, please
follow these steps:
1. Place child restraint into stroller so notches in rockers fit over
edge of armbar, tray or calf support. The child restraint will
then automatically click into place.
40
&
41
&
42
&
43
! If armbar has fabric cover, please detach the Velcro on
armbar cover first.
42
-1
! For the stroller with a special calf support, please adjust
the calf support to the vertical position, detach the
Velcro, and then lift the fabric cover.
43
-1
Use with Strollers
2. Use the straps on both sides of stroller to fix the child
restraint.
44
&
45
&
46
! Try pulling the child restraint upwards to check that it is
fitted correctly.
To remove the child restraint, release the straps from the child
restraint, pull up the stroller release handle to release the child
restraint from tray, armbar or calf support, and then lift child
restraint out of stroller. Please refer to
47
&
48
& 49.
40
41
42
1
43
1
Page 14

25 26
!
After removing the foam wedge of insert, please store it somewhere
that the child cannot access it.
!
Please wash the seat cover and inner padding with cold water under
30°C.
!
Do not iron the soft goods.
!
Do not bleach or dry clean the soft goods.
!
Do not use undiluted detergents, gasoline or other organic solvent to
wash the infant carrier module or base. It may cause damage to the
infant child restraint.
!
Do not twist the seat cover and inner padding in an attempt to dry. It
may leave the seat cover and inner padding with wrinkles.
!
Please hang dry the seat cover and inner padding in the shade.
!
Please remove the infant child restraint and base from the vehicle
seat if not in use for a long period of time. Put the infant child
restraint in a cool, dry place and somewhere your child cannot
access it.
Care and Maintenance
44
45
46
47
49
48
Page 15
28
PT
Bem-vindo a Joie
™
Parabéns por ter se tornado parte da família Joie! Estamos muito animados por fazer parte da sua viagem com as crianças. Durante a viagem com a cadeira infantil Joie igemm™ você está usando um auxiliar
de alta qualidade, totalmente certificada em i-tamanho. Por favor, leia
atentamente este manual e siga cada passo para garantir um passeio
confortável e a melhor proteção para o seu filho.
Para usar esta cadeira infantil Joie com o conexões ISOFIX i-Size de
acordo com o Regulamento ECE R129/00, o seu filho deverá atender os
seguintes requisitos.
Altura da criança de 40 cm-85 cm/peso da criança 13 kg; (cerca de 1,5
anos de idade ou menos).
Para usar este módulo carregador infantil com o cinto do veículo, a criança deve atender aos seguintes requisitos.
Peso da criança ≤13kg/ idade da criança ≤15 meses.
Base
Estas instruções mostram o uso da cadeira infantil e da base. Esta base
também pode ser usada com outras cadeirinhas Joie. Leia todas as
instruções neste manual antes de instalar e usar este produto.
! IMPORTANTE: GUARDE PARA REFERÊNCIA FUTURA.
LEIA COM ATENÇÃO.
Guarde o manual de instruções no
compartimento de armazenamento
na parte inferior da base como na
figura à direita.
ou
Guarde o manual de instruções na
parte inferior das peças moles.
Fig. 1.1 Suporte de Cabeça
Fig. 1.2 Almofada do assento
Fig. 1.3 Botão de Liberação do
Carrinho Fixo A
Fig. 1.4 Guia Lateral
Fig. 1.5 Encaixe Infantil
Fig. 1.6 Rede de Ajuste
Fig. 1.7 Botão de Ajuste de Cinto
Fig. 1.8 Arnês de Ombro
Fig. 1.9 Montagem do Capô
Fig. 1.10 Capô
Fig. 1.11 Conector do Cinto
Fig. 1.12 Fivela do Cinto
Fig. 1.13 Alça
Fig. 1.14 Botão da Alça
Lista de Peças
Fig. 1.15 Guia Traseiro
Fig. 1.16 Botão de Liberação do
Carrinho Fixo B
Fig. 1.17 Conector ISOFIX
Fig. 1.18 Indicador de Casco
Fig. 1.19 Conector ISOFIX
Fig. 1.20 Carga da perna
Fig. 1.21 Botão de Ajuste de
Carga da Perna A
Fig. 1.22 Carga da perna
Fig. 1.23 Botão de Ajuste de
Carga da Perna B
Fig. 1.24 Botão de liberação de
trava da retenção infantil
Fig. 1.25 Trava
Por favor certifique-se de que não há nenhuma peça faltando. Entre
em contato com o varejista se faltar alguma coisa.
25
17
18
20
22
23
24
2
3
4
5
6
7
8
9
10
11
12
19
13
14
15
16
21
1
Page 16

29 30
AVISO
! Verifique antes de comprar este sistema de retenção infantil para se
certificar de que pode ser instalado corretamente em seu veículo.
! NENHUMA cadeirinha infantil pode garantir proteção total contra
lesões em um acidente. No entanto,o bom uso deste sistema de retenção infantil vai reduzir o risco de ferimentos graves ou morte para
o seu filho.
! Para usar esta cadeira infantil com o conexões ISOFIX de acordo
com o Regulamento ECE R129/00, o seu filho deverá atender os
seguintes requisitos.
! Altura da criança de 40 cm-85 cm/peso da criança ≤13 kg; (cerca de
1,5 anos de idade ou menos).
! Para usar este módulo de carregador infantil com cinto do veículo, a
criança deve atender os seguintes requisitos. Peso da criança ≤13kg/
idade da criança ≤15 meses.
! Quaisquer tiras da cadeirinha devem estar apertadas e não torcidas.
! NÃO instale ou utilize este sistema de retenção para crianças sem
seguir as instruções deste manual, ou você pode colocar o seu filho
em grave risco de lesão ou morte.
! Nunca deixe a criança sem vigilância com este sistema de retenção
infantil.
! NÃO faça qualquer modificação nesta cadeirinha ou use-a junta-
mente com componentes de outros fabricantes.
! NÃO utilize este assento infantil se houver peças danificadas ou
faltando.
! NÃO use roupas grandes/largas em seu filho visto que isto pode pre-
venir que seu filho esteja apropriada e seguramente preso pelo cinto
de ombro e pela faixa entre as pernas.
! NÃO deixe este sistema de retenção para crianças ou outros itens
soltos em seu veículo porque uma cadeirinha solta pode ser jogada
ao redor e pode ferir os ocupantes em um curva fechada, parada
súbita ou colisão.
AVISO
! NÃO coloque um sistema de retenção infantil voltado para trás no
banco da frente com air bag. Morte ou lesões graves podem ocorrer.
Consulte manual do proprietário do veículo para obter mais informações.
! NUNCA use uma cadeirinha de segunda-mão ou um sistema de re-
tenção para crianças cuja história você não sabe porque elas podem
ter danos estruturais que comprometem a segurança do seu filho.
! NUNCA use cordas ou quaisquer outros substitutos para prender a
retenção infantil em veículos, ou para assegurar a criança na retenção infantil.
! NÃO utilize esta cadeirinha sem as partes macias.
! As partes macias do assento não devem ser substituídas por nenhu-
ma outra além das recomendadas pelo fabricante. As partes macias
constituem parte integrante do desempenho da retenção infantil.
! NÃO coloque nada além das almofadas internas recomendadas
neste assento infantil.
! Certifique-se de que o sistema de retenção infantil é instalado de
tal forma que nenhuma parte interfira com assentos móveis ou na
operação de portas do veículo.
! NÃO continue a usar este sistema de retenção para crianças depois
que ele qualquer acidente, mesmo um pequeno. Substitua imediatamente, pois pode ter danos estruturais invisíveis do acidente.
! Remova esta assento infantil da base do assento do veículo quando
não em uso regular.
! Consulte o distribuidor para assuntos relacionados a manutenção,
reparos e substituição de peças.
! Para evitar o risco de cair, sempre proteger a criança usando o cinto
de criança, quando a criança é colocada na retenção infantil, mesmo
quando o sistema de retenção infantil não está no veículo.
! Antes de levar a retenção infantil com a mão, certifique-se de que
a criança está presa com o cinto de criança, e que a alça fique corretamente travada em uma posição vertical.
Page 17

31 32
AVISO
! Para evitar ferimentos graves ou morte, NUNCA coloque a retenção
infantil no assento e, superfície elevada com a criança dentro.
! As partes deste sistema de retenção infantil não devem ser lubrifica-
das de forma alguma.
! Sempre prenda a criança na retenção infantil, mesmo em viagens
curtas, pois é quando ocorre a maioria dos acidentes.
! NÃO utilize este assento infantil por mais de 5 anos da data da
aquisição, visto que as peças se degradam com o passar do tempo,
ou da exposição a luz do sol, e podem não desempenhar adequadamente em uma colisão.
! Mantenha este sistema de retenção infantil longe da luz solar,pois
pode ficar muito quente para a pele da criança. Sempre toque a
retenção infantil antes de colocar criança na mesma.
! Verifique com frequência as guias ISOFIX para sujeira e limpe-as,
se necessário. A confiabilidade pode ser efetuada pela entrada de
sujeira, poeira, partículas de alimento etc.
!
NÃO coloque objetos na área de carga da perna da frente a sua base.
! Instalação correta só é permitida pelo uso dos conectores ISOFIX.
!
Depois de seu filho ser colocado nessa retenção infantil, o cinto
de criança deve ser utilizado corretamente, e garantir que qualquer
cinto de colo é usado para baixo, de modo que a pelve fique firmemente presa.
! NÃO utilize qualquer pontos de contato de sustentação de carga
além daqueles descritos nas instruções e marcados no cinto infantil.
! Por favor, não use este assento de carro se o assento de carro
caiu de uma altura significativa, atingiu o chão a uma velocidade
considerável, ou tem sinais visíveis de danos. Nós não somos
responsáveis para substituir se o assento de carro foi danificado sob
estas condições anormais. Um assento de carro novo precisará ser
comprado quando qualquer uma das condições acima mencionadas
ocorre.
Imagem para
Instalação
Altura da criança 40cm-85cm/
Peso da criança ≤13kg
(Aproximadamente 1,5 anos
de idade ou menos)
Adequado para
Peso da criança ≤13kg
Idade da criança ≤15 meses
Emergência
Em caso de emergência ou acidentes, é mais importante ter o seu filho
cuidado com primeiros socorros e tratamento médico imediatamente.
Page 18
33 34
Informações do Produto
1. Segundo o Regulamento R129/00, a retenção infantil com Base
ISOFIX Universal é uma cadeirinha classe C, retenção infantil D, e
deverá ser equipada com conexões ISOFIX.
2. Este é um sistema de retenção para crianças i-Tamanho. É
aprovado o Regulamento ECE R129/00, para uso em, "i-tamanho
compatível" veículo assentos conforme indicado pelo fabricante do
veículo, o veículo manual dos usuários.
3. Em dúvida, consulte o fabricante de cadeirinhas infantis ou o
vendedor.
Este é um SISTEMA DE RETENÇÃO PARA CRIANÇAS ISOFIX. É
aprovado para série de alterações ECE R129/00, não lista todos os
manuais do fabricante do veículo compatíveis com i-tamanho ainda.
Este assento e base também está aprovado para uso em veículos
compatível com o sistema ISOFIX. Consulte o site do fabricante do
veículo ou consulte o seu revendedor.
Se encaixará aos veículos com as posições aprovadas como posições
ISOFIX i-tamanho (conforme detalhado no manual de instruções
do veículo), dependendo da categoria do sistema de retenção para
crianças e o encaixe.
!
Este sistema de retenção infantil é adequado para bancos de
veículos com um Cinto de Segurança Retrator de 3 pontos e pontos
de fixação ISOFIX i-tamanho com a base. 1
!
NÃO instale este sistema de retenção para crianças nos bancos do
veículo lateralmente ou para trás no que diz respeito à direção do
veículo. 2 -1
!
NÃO coloque a cadeirinha de costas no banco dianteiro com air
bag 2 -2, pois morte ou lesões graves podem ocorrer. Consulte
manual do proprietário do veículo para obter mais informações.
!
Recomenda-se a instalar este sistema de retenção para crianças no
banco traseiro, virado para trás. 2 -3
!
NÃO instale este sistema de retenção para crianças em veículo nos
bancos movíveis durante a instalação.
Preocupações na Instalação
1
3
214
1
5 7
3
6
2 4
5 7
3
6
2
2
A
I
R
B
A
G
1
ver imagens 1 -
2
Page 19

35 36
Instalação em Avião
ver imagens
3
-
5
3
Observe que a segurança da criança
com a instalação não conformes o
manual de instruções não é garantida.
! Observe que a instalação do
transporte infantil sobre um assento
da aeronave difere da instalação em
um assento de carro.
! Observe que anexar “Cinto de
cintura” de 2 pontos só é permitido
em aeronaves.
! Observe que o transporte infantil
deve permanecer com cinto de
segurança no banco da aeronave
mesmo quando desocupado.
! Observe que o transporte infantil é
apenas para uso em um assento de
passageiro autorizado pela
companhia aérea.
! Avisos para não usar o transporte
infantil na área de implantação de
airbag.
! Observe que o transporte infantil
virado para rás deve ser instalado
virado para os assentos de
passageiro.
3
Como instalar o assento do bebê
usando o cinto de segurança de
aeronaves:
1.Coloque o transporte infantil oposto
ao sentido do voo no assento do
passageiro.
Ajuste da Alça
ver imagens 6 -
7
6
3
2
1
A alça da retenção infantil pode ser
ajustada em 3 posições.
6
Posição 1 Posição para o carro,
transporte manual ou de
carrinho.
Posição 2 Posição de balanço.
Posição 3 Posição da cadeira de
bebê.
2.Verifique se a alça está na posição
superior.
3.Coloque o cinto de segurança em
ambos os guias azul claro do cinto.
4.Feche o cinto de segurança
(consulte as instruções de
segurança pela companhia aérea).
5.Aperte o cinto de segurança
puxando a extremidade do cinto.
4
! Sob nenhuma circunstância a fivela
do cinto de segurança deve ficar
entre as guias azul claro do cinto.
5
Remoção:
Abra o cinto de segurança (consulte
as instruções de segurança pela
companhia aérea).
Agora você pode tirar a cadeira de
bebê do banco do passageiro.
4
5
Page 20

37 38
7
1
2
Instalação com base
8
9
1. Estenda a perna de carga do
compartimento de
armazenamento.
8
2. Encaixe as guias ISOFIX com os
pontos de fixação ISOFIX.
9
As guias ISOFIX podem proteger a
superfície do banco do veículo
contra dano. Elas também podem
guiar os conectores ISOFIX.
Para ajustar a alça, aperte os botões
da alça em ambos os lados para
liberá-la
7
-1
, e em seguida, gire a
manivela até que se encaixe em
qualquer das 3 posições.
7
-2
ver imagens
8
-
18
3. Gire os conectores ISOFIX 180
graus até que fiquem voltados na
direção das guias ISOFIX.
10
11
10
1
4. Alinhe os conectores ISOFIX com
as guias ISOFIX e depois clique
nos conectores ISOFIX nos pontos
de fixação ISOFIX.
11
!
Certifique-se de que ambos os
conectores ISOFIX estão
firmemente conectados aos seus
pontos de fixação ISOFIX. Ouvirá
o som de cliques e as cores dos
indicadores em ambos os
conectores ISOFIX devem ficar
completamente verdes.
11
-1
!
Verifique se a base está
firmemente instalada, puxando
ambos os conectores ISOFIX.
Page 21

39 40
5. Depois de colocar a base no banco do veículo, estenda a perna de
carga até o chão
12
. Quando o indicador da perna de carga ficar
verde, significa que ela foi instalada corretamente. Se ficar vermelho
significa que ela foi instalada incorretamente.
12
-3
!
A perna de carga tem 24 posições. Quando o indicador da perna
de carga aparece vermelho, mostra que a perna da carga está na
posição errada.
!
Certifique-se de que a perna da carga fica totalmente em contato
com o piso do veículo.
!
Aperte o botão de liberação da perna de carga e depois encurte-a
para cima.
12
3
1
2
13
1
2
A base completamente montada é
mostrada como na
13
!
Os conectores ISOFIX devem ficar
presos e travados no pontos de
fixação ISOFIX.
13
-1
!
A perna da carga devem ser
instaladas corretamente com
indicador verde.
13
-2
14
6. Empurre o módulo carregador
infantil para baixo na base 14, se a
cadeirinha infantil ficar presa, o
indicador da cadeirinha infantil
travado fica verde.
15
!
Puxe para cima o módulo
carregador infantil para ter
certeza de que está encaixado na
base.
15
Page 22

41 42
17
2
1
16
1
2
7. Para liberar o transporte infantil,
puxe o transporte para cima
16
-2
enquando aperta o botão de
liberação.
16
-1
8. Para remover o reforço Para
remover o assento,
17
pressione o
botão da trava secundária primeiro
e então o botão nos ISOFIX
conectores da trava antes de
remover o assento do banco do
veículo.
17
-1
&
17
-2
9. Pressione o botão de liberação
ISOFIX para dobrar o ISOFIX.
18
18
1
2
2
19
20
Ajuste de Altura
para Suporte de Cabeça e Faixa de Ombro
ver imagens
19
-
22
Verifique se os cintos de ombro estão
ajustados na altura adequada.
Escolha o par adequado de ranhuras
do cinto de acordo com a altura da
criança.
!
A parte inferior do encosto de
cabeça deve estar nivelada com o
ponto mais alto do ombro da
criança, é mostrado como 19, mas
não acima da linha do ombro.
20
!
Se o Cinto de Ombro não estiver
na altura adequada, a criança pode
ser ejetada do sistema de retenção
infantil se houver um acidente.
21
Page 23

43 44
Aperte a alavanca de ajuste do
suporte de cabeça
21
, enquanto puxa
ou empurra para baixo o suporte da
cabeça até que se encaixe em uma
das 7 posições. As posições de
suporte de cabeça são mostrados
como na
22
22
Protegendo crianças na retenção
infantil
ver imagens
23
-
28
1.
O encaixe infantil é para proteção da criança. As crianças com
altura inferior a 60cm são adequadas para utilizar o encaixe
infantil.
2. Antes de usar o encaixe, adicione a cunha de espuma.
23
3. Depois que a criança tiver sido posicionada no assento,
verifique se o cinto de ombro está na altura correta.
Nota
Retire a parte do suporte da cabeça do bebê
quando a cabeça da criança não se encaixa
confortavelmente. Solte o encaixe no suporte de
cabeça para remover a parte do encaixe infantil
para a cabeça da criança.
Retire a parte do suporte da cabeça do bebê
quando os ombros do bebê não se encaixam
mais confortavelmente.
1.
Enquanto pressiona o botão de
ajuste do cinto, retire
completamente as duas faixas dos
ombros da retenção infantil.
24
2. Desbloqueie o fecho dos cintos
pressionando o botão vermelho.
25
23
24
25
Page 24

45 46
28
2827
26
3. Coloque a criança na cadeirinha e
trave a fivela. 26 &
27
4. Aperte os cintos de ombro,
puxando o ajuste do cinto.
28
!
Certifique que o espaço entre a
criança e o cinto de ombro é de
aproximadamente a espessura
de uma mão.
29
30
31
Para retirar a capa, pressione
simultaneamente o botão na
montagem do capô e puxe a capô
inclinado para fora.
29
Para retirar a almofada do assento,
você deve consultar os seguintes
passos:
1. Você deve remover o encaixe
primeiro. Para isso basta
desbloquear a trava, em seguida
soltar o encaixe de ambos os lados
do encaixe e puxar para fora do
assento.
2. A cobertura ou tampa do cinto da
virilha pode ser removida a partir
da teia.
3. Destaque os elásticos na parte
traseira do apoio de cabeça para
remover as partes macias do apoio
da cabeça.
4. Puxe para fora as peças de
fixação por baixo da borda do
assento.
30
5. Retire a almofada do assento de
ao redor do botão de ajuste, como
mostrado na
31
Para re-montar as partes macias,
inverta os passos acima
mencionados.
Destacar Capô e Almofada do
Assento
ver imagens
29
-
31
Page 25

47 48
Instalação sem base
!
NÃO instale este módulo carrega
dor infantil nos bancos do veículo
com cintos subabdominais.
32
!
Este módulo carregador infantil é
adequado apenas para bancos de
veículo com cinto de segurança de
retrator de 3 pontosde.
33
1. Coloque o módulo carregador
infantil no banco do veículo onde
deseja instalá-lo. Puxe o cinto de
segurança do veículo e trave-o na
fivela deslizando o cinto de
segurança nas guias laterais do
módulo carregador infantil.
34
!
O módulo carregador infantil não
pode ser usado se a fivela do
cinto de segurança do veículo
(final fêmea da fivela) for muito
longa para ancorar o módulo
carregador infantil com
segurança.
34
-1
ver imagens
32
-
39
32
33
!
!
34
1
2. Deslize o cinto diagonal na guia
traseira.
35
3. Puxe o cinto de ombro do veículo
para prender o módulo carregador
infantil firmemente.
36
4. A linha de nível no módulo
carregador infantil deve ficar
nivelada com o chão, ao instalar o
módulo carregador infantil.
37
!
Tencione o cinto de segurança
do veículo tanto quanto possível,
verificando se ele não fica solto
ou retorcido.
!
35
36
37
Page 26

49 50
!
Depois de instalar o módulo
carregador infantil, verifique
sempre se os cintos do veículos
são passados corretamente e
ficam presos com segurança na
fivela do veículo.
38
5. A capota pode ser aberta
completamente para proteger sua
criança por sol, tanto quanto
possível, deve apenas desfazer o
gancho , e após puxe da capota
para a frente.
39
38
39
ver imagens 40 -
49
Your child seat is designed to be attached to certain models of
Joie cart offering special support tray, arm bar or leg support.
!
Verifique se o seu carrinho de criança pode encaixar assento
infantil antes de comprá-lo.
!
Nunca permita mais de um bebê no assento infantil de uma
só vez.
!
Por favor, freie de seu carrinho antes de montar o assento
infantil.
!
Verifique se as peças utilizadas para fixar o assento infantil
estão bem fixadas no carrinho.
!
Reclinar o assento do carrinho de volta para a posição mais
baixa.
Use com Carrinhos Joie Para montar assento infantil em
carrinhos de bebê Joie, por favor siga estes passos:
1. Coloque o assento infantil em carrinhos de modo que os
entalhes nos balanços se encaixem sobre a borda da barra
de braço, bandeja ou apoio da panturrilha. O assento infantil
então se encaixará automaticamente no lugar.
40
&
41
&
42
&
43
! Se a barra de braço tiver cobertura de tecido, por favor,
retire o Velcro na capa primeiro.
42
-1
! Para carrinho com um suporte de panturrilha especial, por
favor ajuste o suporte de panturrilha para a posição vertical,
retire o velcro, e, em seguida, levante a capa de tecido.
43
-1
Use com carrinhos de criança
Page 27

51 52
40
41
42
1
43
1
44
45
46
47
49
48
2. Use as tiras nos dois lados do carrinho para fixar o assento
infantil.
44
&
45
&
46
! Tente puxar o assento infantil para cima, para verificar se ele
está corretamente colocado.
Para remover o assento infantil, solte as tiras do assento
infantil, puxe a alavanca de liberação do carrinho para liberar o
assento infantil da bandeja, barra de braço ou apoio da
panturrilha, e em seguida, levante o assento infantil para fora
do carrinho. Consulte
47
&
48
& 49.
Page 28

53 54
Cuidado e Manutenção
!
Depois de retirar a cunha de espuma do encaixe, guarde-a em um
lugar onde a criança não pode acessá-la.
!
Lave o a cobertura do assento e interior macio e acolchoado com
água fria abaixo de 30°C.
!
Não passe as partes macias.
!
Não aplique água sanitária ou lavagem a seco nas partes macias.
!
Não use detergente neutro não diluído, gasolina ou outro solvente
orgânico para lavar a cadeirinha ou base. Pode danificar a retenção
infantil.
!
Não torça a cobertura do assento e acolchoado interior macio para
tentar secar. Poderá deixar a cobertura do assento e acolchoado
interior macio com rugas.
!
Pendure a cobertura do assento e acolchoado interior macio para
secar à sombra.
!
Remova o assento infantil do assento do veículo quando não estiver
usando-o por um longo período. Coloque o assento infantil em um
local seco e fresco, em algum lugar onde seu filho não pode
acessá-lo.
Page 29

56
ES
Bienvenido a Joie
™
¡Enhorabuena por unirse a la familia Joie! Estamos encantados de formar parte de su viaje y del de su pequeño. Cuando viaje con el dispositivo de sujeción para niños Joie i-Gemm™, estará utilizando un dispositivo de sujeción para niños de alta calidad, totalmente certificado por la
norma de seguridad i-Size. Lea detenidamente este manual y siga cada
paso para garantizar que su bebé viaje cómodamente y esté protegido
de la mejor manera posible.
Para utilizar este dispositivo de sujeción para niños de Joie con las conexiones ISOFIX de i-Size de acuerdo con la Norma ECE R129/00, el niño
deberá cumplir los siguientes requisitos.
Altura del niño: 40-85 cm/Peso del niño: 13 kg (1,5 años aproximadamente o más pequeño).
Para utilizar este módulo de sujeción para niños con el cinturón de un
vehículo, el niño deberá cumplir los siguientes requisitos:
Peso del niño: ≤13 kg / Edad del niño: ≤15 meses.
Base
Estas instrucciones describen el uso del dispositivo de sujeción para niños y de la base. Esta base también puede utilizarse con otros dispositivos de sujeción para niños de Joie. Lea todas las instrucciones incluidas
en este manual antes de instalar y utilizar el producto.
! IMPORTANTE: GUARDE ESTE MANUAL PARA FUTURA CONSULTA.
LEA DETENIDAMENTE ESTAS INSTRUCCIONES.
Guarde el manual de instrucciones en el
compartimento de almacenamiento de la
parte inferior de la base como se muestra
en la figura que aparece a la derecha.
o
Guarde el manual de instrucciones en la
parte inferior del acolchado.
Para información sobre la garantía, por favor
visite nuestra web joiebaby.com
25
17
18
20
22
23
24
2
3
4
5
6
7
8
9
10
11
12
19
13
14
15
16
21
1
Fig. 1.1 Reposacabezas
Fig. 1.2 Acolchado del asiento
Fig. 1.3 Botón A de desbloqueo del
cochecito
Fig. 1.4 Guía lateral
Fig. 1.5 Accesorio para niños
pequeños
Fig. 1.6 Cincha de ajuste
Fig. 1.7 Botón de ajuste de arnés
Fig. 1.8 Arnés de los hombros
Fig. 1.9 Montaje de la capota
Fig. 1.10 Capota
Fig. 1.11 Conectores del arnés
Fig. 1.12 Hebilla del arnés
Fig. 1.13 Asa
Fig. 1.14 Botón del asa
Lista de piezas
Fig. 1.15 Guía trasera
Fig. 1.16 Botón B de desbloqueo
del cochecito
Fig. 1.17 Conector ISOFIX
Fig. 1.18 Indicador de armazón
Fig. 1.19 Guías ISOFIX
Fig. 1.20 Pata de carga
Fig. 1.21 Botón A de ajuste de la
pata de carga
Fig. 1.22 Indicador de la pata de
carga
Fig. 1.23 Botón B de ajuste de la
pata de carga
Fig. 1.24 Botón de desbloqueo del
dispositivo de sujeción
para niños
Fig. 1.25 Cierre
Asegúrese de que no falte ninguna pieza. Póngase en contacto con su
distribuidor si falta alguna pieza.
Page 30

57 58
ADVERTENCIA
!
Antes de comprar este dispositivo de sujeción para niños, asegúrese
de que se pueda instalar correctamente en su vehículo.
! NINGÚN dispositivo de sujeción para niños puede garantizar una
protección total contra lesiones en caso de accidente. Sin embargo,
un uso adecuado de este dispositivo de sujeción para niños reducirá
el riesgo de lesiones graves o, incluso, de muerte del niño.
! Para utilizar este dispositivo de sujeción para niños con las conexiones
ISOFIX de acuerdo con la Norma ECE R129/00, el niño deberá cumplir
los siguientes requisitos:
Altura del niño: 40-85 cm/Peso del niño: ≤ 13 kg (1,5 años aproxima
-
damente o más pequeño).
! Para utilizar este módulo de sujeción para niños con el cinturón de
un vehículo, el niño deberá cumplir los siguientes requisitos: Peso del
niño: ≤13 kg / Edad del niño: ≤15 meses.
! Apriete, sin retorcer, las correas del sistema de sujeción para niños.
! NO instale este dispositivo de sujeción para niños sin seguir las in-
strucciones que se indican en este manual ya que, si las incumple, podría poner a su hijo en peligro de sufrir lesiones o, incluso, de muerte.
! NUNCA deje a su hijo sin supervisión en este dispositivo de sujeción
para niños.
! NO modifique de ninguna manera este dispositivo de sujeción para
niños ni lo utilice con piezas de otros fabricantes.
! NO utilice este dispositivo de sujeción para niños si está dañado o si
falta alguna de sus piezas.
! NO coloque a su hijo con ropa suelta o de una talla mayor, ya que
podría provocar que la sujeción del niño, mediante las correas de los
arneses de los hombros y la correa de la pelvis entre las piernas, no
sea firme y segura.
! NO utilice este dispositivo de sujeción para niños u otros elementos
sin el cinturón puesto o sin fijar a su vehículo, ya que un dispositivo de
sujeción para niños que no esté fijado puede salir despedido y causar
daños a los ocupantes en curvas pronunciadas, frenazos o colisiones.
! NO coloque el dispositivo de sujeción para niños orientado hacia atrás
en un asiento delantero de un vehículo que tenga airbag. Si lo hace,
podrían producirse lesiones graves o, incluso, la muerte. Consulte el
manual de usuario del vehículo para obtener más información.
! NUNCA utilice un dispositivo de sujeción para niños de segunda mano
ni un dispositivo de sujeción para niños del que no sepa el uso que se
le ha dado, ya que podría tener daños estructurales que pondrían en
peligro la seguridad de su hijo.
! NUNCA use cuerdas ni ningún otro sustitutivo para fijar el dispositivo
de sujeción para niños al vehículo o para asegurar al niño al dispositivo de sujeción para niños.
! NO utilice este dispositivo de sujeción para niños sin el acolchado.
! El acolchado no debe sustituirse por uno que no esté recomendado
por el fabricante. El acolchado constituye una parte esencial del funcionamiento del dispositivo de sujeción para niños.
! Utilice exclusivamente los almohadones internos recomendados para
este dispositivo de sujeción para niños.
! Asegúrese de instalar el dispositivo de sujeción para niños de forma
que ninguna de sus partes interfiera en el movimiento de los asientos
o en la apertura de las puertas del vehículo.
! NO siga utilizando este dispositivo de sujeción para niños si ha sufrido
un accidente, incluso si no ha sido un accidente grave. Cámbielo por
otro inmediatamente, ya que podría haber sufrido daños estructurales
no visibles como resultado del accidente.
! Retire este dispositivo de sujeción para niños y la base del asiento del
vehículo cuando no lo use con regularidad.
! Para cualquier cuestión de mantenimiento, reparación o sustitución de
piezas, consulte a su distribuidor.
! Para evitar el riesgo de caídas, asegure siempre al niño con el arnés
de seguridad cuando el niño se encuentre en el dispositivo de sujeción
para niños, incluso cuando el dispositivo de sujeción para niños no
esté dentro del vehículo.
ADVERTENCIA
Page 31

59 60
ADVERTENCIA
! Antes de transportar el dispositivo de sujeción para niños sujetándolo
con la mano, asegúrese de que el niño esté sujeto con el arnés de seguridad y el asa esté correctamente bloqueada en la posición vertical.
! Para evitar lesiones graves o incluso la muerte, NUNCA coloque el dis-
positivo de sujeción para niños en asientos que tengan una superficie
elevada con el niño en el dispositivo.
! Las piezas de este sistema de sujeción para niños no necesitan ningún
tipo de lubricación.
! Asegure siempre al niño en el dispositivo de sujeción para niños,
incluso en trayectos cortos, ya que es en estos donde más accidentes
se producen.
! NO utilice este dispositivo de sujeción para niños durante más de 5
años después de la fecha de compra, ya que las piezas se pueden
deteriorar con el tiempo, o debido a la exposición a los rayos del sol, y
podría no funcionar correctamente en caso de accidente.
! Mantenga el dispositivo de sujeción para niños alejado de la luz
directa del sol ya que, si no lo hace, podría alcanzar temperaturas
demasiado altas para la piel de su hijo. Toque siempre el dispositivo
de sujeción para niños antes de colocar al niño en él.
! Examine periódicamente las guías ISOFIX por si estuvieran sucias y
límpielas si fuera necesario. La fiabilidad podría verse afectada si se
acumula suciedad, polvo, partículas de comida, etc.
! NO coloque ningún objeto en la pata de carga delante de la base.
! Para una correcta instalación, solo está permitido el uso de conectores
ISOFIX.
! Una vez colocado el niño en el dispositivo de sujeción para niños,
deberá utilizar correctamente el arnés del niño y asegurarse de que
ninguna correa de seguridad quede demasiado baja, de forma que la
pelvis quede firmemente sujeta.
! NO utilice ningún punto de contacto de soporte de carga distinto a los
que se describen en las instrucciones y aparecen en el dispositivo de
sujeción para niños.
! Esta silla no debe utilizarse bajo ningún concepto si ha caído desde
una altura considerable, ha golpeado el suelo con fuerza o tiene daños
visibles. La silla no será reemplazada si se ha deteriorado en estas
circunstancias. En cualquiera de estos casos el cliente deberá, a su
cargo, adquirir una nueva silla.
Emergencia
En caso de emergencia o accidente, es muy importante que su hijo
reciba primeros auxilios y tratamiento médico de inmediato.
Figura de la
instalación
Altura del niño: 40-85 cm/
Peso del niño: ≤13 kg
(aprox. 1 año y medio o
menores de esa edad)
Apto para
Peso del niño: ≤13 kg
Edad del niño: ≤15 meses
Page 32

61 62
Informações do Produto
1. Según la Norma ECE R129/00, el dispositivo de sujeción para niños
con base es un dispositivo de sujeción para niños ISOFIX Universal
de clase C, D y deberá colocarse con conectores ISOFIX.
2. Este es un sistema de sujeción para niños "i-Size". Está aprobado
por la Norma ECE R129/00, para el uso en vehículos compatibles
con posiciones de sentado "i-Size", tal y como indican los
fabricantes de vehículos en los manuales de usuario del vehículo.
3. En caso de duda, consulte al fabricante del dispositivo de sujeción
para niños o al distribuidor.
Este es un SISTEMA DE SUJECIÓN PARA NIÑOS ISOFIX "i-Size".
Está aprobado por la serie de enmiendas ECE R129/00, por lo que
algunos manuales de fabricantes de vehículos todavía no indican la
compatibilidad con i-Size. Este asiento y esta base están aprobados
para su uso en vehículos compatibles con ISOFIX. Consulte la página
web del fabricante del vehículo o pregunte a su distribuidor.
El dispositivo encajará en los vehículos con posiciones aprobadas
como posiciones ISOFIX i-Size (como se indica en el manual del
vehículo), dependiendo de la categoría del dispositivo de sujeción para
niños y de la sujeción.
!
Este dispositivo de sujeción para niños está diseñado para asientos
de vehículos con puntos de anclaje ISOFIX i-Size con la base.
1
!
NO instale este dispositivo de sujeción para niños en asientos de
vehículo cuya posición esté orientada hacia un lado o hacia atrás
con respecto a la dirección de conducción del vehículo. 2 -1
!
NO coloque el dispositivo de sujeción para niños mirando hacia
atrás en asientos delanteros con airbag 2 -2, ya que podría
provocar lesiones graves o, incluso, la muerte. Consulte el manual
de usuario del vehículo para obtener más información.
!
Le recomendamos que instale este dispositivo de sujeción para
niños en los asientos traseros. 2 -3
!
NO instale este dispositivo de sujeción para niños en asientos de
vehículo que se muevan durante la instalación.
Consideraciones acerca de la
instalación
1
3
214
1
5 7
3
6
2 4
5 7
3
6
2
2
A
I
R
B
A
G
1
Consulte las imágenes 1 -
2
Page 33

63 64
Consulte las imágenes
3
-
5
Instalación en aviones
3
Tenga en cuenta que la seguridad del niño por no seguir el manual de
instalación e instrucciones no está garantizada.
! Tenga en cuenta que la instalación de la sillita infantil en el asiento
del avión es diferente a la instalación en un asiento de automóvil.
! Tenga en cuenta que el accesorio del “cinturón subabdominal” de 2
puntos solamente se permite en aviones.
! Tenga en cuenta que la sillita infantil debe permanecer con el
cinturón abrochado en el asiento del avión incluso cuando no esté
ocupado.
! Tenga en cuenta que la sillita infantil solo se debe utilizar en el
asiento de un pasajero autorizado por la línea aérea.
! Se advierte no utilizar la sillita infantil en el área de actuación del
airbag.
! Tenga en cuenta que la sillita infantil
orientada hacia atrás solo se debe
instalar en asientos de pasajeros
orientados hacia adelante.
3
Cómo instalar el asiento infantil
utilizando el cinturón de seguridad del
asiento del avión:
1. Coloque la sillita infantil opuesta a la
dirección de vuelo en el asiento del
pasajero.
2.Asegúrese de que el asa de
transporte esté en la posición más
alta.
Ajuste del asa
Consulte las imágenes 6 -
7
6
3
2
1
El asa del dispositivo de sujeción
para niños se puede ajustar a 3
posiciones distintas.
6
Posición 1 Posición para el coche o
para transportar en el
cochecito o
sujetándolo con la mano.
Posición 2 Posición de balanceo.
Posición 3 Posición de silla para
bebé.
3.Coloque el cinturón de seguridad
en ambas guías del cinturón de
color azul claro.
4.Cierre el cinturón de seguridad
(consulte las instrucciones de
seguridad proporcionadas por la
línea aérea).
5.Aprieta el cinturón de seguridad
tirando del extremo del mismo.
4
! La hebilla del cinturón de seguri-
dad no debe situarse bajo ninguna
circunstancia en las guías de
cinturón de color azul claro.
5
Retirada:
Abra el cinturón de seguridad del
asiento del pasajero (consulte las
instrucciones de seguridad proporcionadas por la línea aérea).
Ahora puede retirar la sillita infantil del
asiento de pasajeros.
4
5
Page 34

65 66
7
1
2
Instalación con la base
8
9
1. Extienda la pata de carga desde el
compartimento de
almacenamiento.
8
2. Encaje las guías ISOFIX con los
puntos de anclaje ISOFIX.
9
Las guías ISOFIX pueden proteger
la superficie del asiento del
vehículo contra roturas. También
sirven para guiar los conectores
ISOFIX.
Para ajustar el asa, presione los
botones del asa situados en ambos
lados para desbloquearlo
7
-1
, y a
continuación, mueva el asa a
cualquiera de las 3 posiciones hasta
que oiga un clic.
7
-2
Consulte las imágenes
8
-
18
3. Gire los conectores ISOFIX 180
grados hasta que estén apuntando
en la dirección de las guías ISOFIX.
10
11
10
1
4. Alinee los conectores ISOFIX con
las guías ISOFIX y, a continuación,
introduzca ambos conectores
ISOFIX en los puntos de anclaje
ISOFIX hasta que escuche un clic.
11
!
Asegúrese de que ambos
conectores ISOFIX estén
firmemente sujetos en sus puntos
de anclaje ISOFIX. Deberá
escuchar dos clics y los colores
de los indicadores de ambos
conectores ISOFIX deberán
aparecer completamente en
verde.
11
-1
!
Para asegurarse de que la base
está instalada de forma segura,
tire de ambos conectores ISOFIX.
Page 35

67 68
5. Después de colocar la base en el asiento del vehículo, extienda la
pata de carga hasta el suelo
12
. Cuando el indicador de la pata
de carga aparezca en verde significará que está correctamente
instalada. Si aparece en rojo, significará que no está correctamente
instalada.
12
-3
!
La pata de carga tiene 24 posiciones. Cuando el indicador de la
pata de carga aparece en rojo, significa que la posición de la pata
de carga no es correcta.
!
Asegúrese de que la pata de carga esté totalmente en contacto
con la bandeja del suelo del vehículo.
!
Presione el botón de desbloqueo de la pata de carga y, a
continuación, acorte la pata de carga hacia arriba.
12
3
1
2
13
1
2
La base montada completamente
aparece en la 13.
!
Los conectores ISOFIX deberán
estar acoplados y bloqueados en
los puntos de anclaje ISOFIX.
13
-1
!
La pata de carga debe estar
instalada correctamente con el
indicador en verde.
13
-2
14
6. Empuje el módulo de sujeción para
niños hacia abajo dentro de la base
14
, si el dispositivo de sujeción
para niños está sujeto, el indicador
del dispositivo de sujeción para
niños aparecerá en verde.
15
!
Tire del módulo de sujeción para
niños hacia arriba para
asegurarse de que está
firmemente sujeto a la base.
15
Page 36

69 70
17
2
1
16
1
2
7. Para soltar la sillita infantil, tire de
dicho hacia arriba
16
-2
presionando al mismo tiempo el
botón de desbloqueo del mismo.
16
-1
8. Para sacar el asiento Para sacar el
asiento, pulse primero el botón de
desbloqueo secundario y, 17 a
continuación, pulse el botón de los
conectores ISOFIX de bloqueo
antes de sacar el asiento del
asiento del vehículo.
17
-1
&
17
-2
9. Presione el botón de desbloqueo
ISOFIX para plegar el sistema
ISOFIX.
18
18
1
2
2
19
20
Ajuste de la altura
de los arneses de los hombros y del reposacabezas
Consulte las imágenes
19
-
22
Compruebe que las correas de los
arneses de los hombros estén
colocadas a una altura adecuada.
Elija las dos ranuras adecuadas para
los arneses de los hombros según la
altura del niño.
!
La parte baja del reposacabezas
debe estar a la misma altura que el
punto más alto de los hombros del
niño, como se muestra en 19, pero
no por encima de la línea de los
hombros.
20
!
Si las correas de los arneses de los
hombros no están a la altura
adecuada, el niño podría salir
despedido del dispositivo de
sujeción para niños en caso de
accidente.
21
Page 37

71 72
Presione la palanca de ajuste del
reposacabezas
21
al mismo tiempo
que empuja hacia arriba o hacia abajo
el reposacabezas hasta que quede
fijado en una de las 7 posiciones. Las
posiciones del reposacabezas se
indican en la
22
22
Asegurar al niño en el dispositivo de
sujeción para niños
Consulte las imágenes
23
-
28
1.
El accesorio para niños pequeños está concebido para proteger
a los niños. Los niños cuya altura no llegue a los 60 cm no son
aptos para utilizar el accesorio para niños.
2. Antes de utilizar el accesorio, añada la cuña de espuma.
23
3. Después de colocar al niño en el asiento, compruebe si los
arneses de los hombros están a la altura adecuada.
Nota
Retire el reposacabezas del accesorio para niños
pequeños cuando el niño ya no pueda apoyar su
cabeza en él cómodamente. Suelte las sujeciones
del reposacabezas para retirar el reposacabezas
del accesorio para niños pequeños.
Retire la parte que sujeta el cuerpo del accesorio
para niños pequeños cuando el niño ya no pueda
apoyar sus hombros cómodamente.
1.
Mientras presiona el botón de
ajuste del arnés, tire totalmente de
los dos arneses de los hombros del
dispositivo de sujeción para niños.
24
2. Desbloquee la hebilla de los
arneses presionando el botón rojo.
25
23
24
25
Page 38

73 74
28
2827
26
3. Coloque al niño en el dispositivo
de sujeción para niños y bloquee la
hebilla. 26 &
27
4. Apriete las correas de los arneses
de los hombros tirando de la
cincha de ajuste.
28
!
Asegúrese de que el espacio
entre el niño y el arnés de los
hombros sea del grosor
aproximado de una mano.
29
30
31
Para desmontar la capota, presione el
botón del montaje de la capota y tire
del arco de la capota hacia afuera
simultáneamente.
29
Para desmontar el asiento deberá
seguir los siguientes pasos:
1. Extraiga primero el accesorio. Para
llevar a cabo esta operación
simplemente desbloquee la hebilla,
y a continuación, desacople los
broches de ambos lados del
accesorio y tire del asiento hacia
afuera.
2. La cubierta del arnés del hombro o
del arnés de la pelvis puede
extraerse desde la cincha.
3. Suelte las bandas elásticas de la
parte de atrás del reposacabezas
para extraer el acolchado del
mismo.
4. Tire de las piezas de sujeción
situadas debajo del borde del
asiento hacia afuera.
30
5. Saque el asiento por el botón de
ajuste como se muestra en
31
Para volver a instalar el acolchado,
siga los pasos mencionados en
sentido contrario.
Extraer la capota y el acolchado
del asiento
Consulte las imágenes
29
-
31
Page 39

75 76
Instalación sin la base
!
NO instale este módulo de
sujeción para niños en asientos de
vehículos con cinturones de
seguridad de cintura.
32
!
Este módulo de sujeción para
niños se puede utilizar únicamente
en asientos de vehículos con
Cinturones de Seguridad Retrác
tiles con 3 puntos de sujeción.
33
1. Coloque el módulo de sujeción
para niños en el asiento del
vehículo en el que desee instalarlo.
Tire del cinturón de seguridad del
vehículo y bloquéelo en la hebilla
del vehículo, deslizando el cinturón
de cintura del vehículo por las guías
laterales del módulo de sujeción
para niños.
34
!
El módulo de sujeción para niños
no puede utilizarse si la hebilla
del cinturón de seguridad del
vehículo (extremo hembra de la
hebilla) es demasiado larga para
anclar con seguridad el módulo
de sujeción para niños.
34
-1
Consulte las imágenes
32
-
39
32
33
!
!
34
1
2. Deslice el cinturón diagonal por la
guía trasera.
35
3. Tire del cinturón de los hombros
del vehículo para sujetar el módulo
de sujeción para niños firmemente
para que quede bien sujeto.
36
4. La línea de nivel del módulo de
sujeción para niños deberá estar al
mismo nivel que el suelo cuando
esté instalado el módulo de
sujeción para niños.
37
!
Tense el cinturón de seguridad
del vehículo lo máximo posible,
asegurándose de que no quede
suelto ni retorcido.
!
35
36
37
Page 40

77 78
!
Después de instalar el módulo
de sujeción para niños,
asegúrese siempre de que los
cinturones del vehículo estén
colocados correctamente y estén
bien sujetos en la hebilla del
vehículo.
38
5.
Si necesita que el toldo este
completamente cerrado para
proteger a su hijo, libere el cierre
para cubrir más El toldo cuenta con
una ventanilla que sirve para poder
observar al niño durante el paseo.
39
38
39
consulte las imágenes 40 -
49
El dispositivo de sujeción para niños está diseñado para
acoplarse a ciertos modelos de cochecito de Joie que incluyen
una bandeja especial, reposabrazos o soporte para los gemelos.
!
Asegúrese de que el cochecito encajaba en el dispositivo de
sujeción para niños antes de comprarlo.
!
En el sistema de viaje no se debe dejar más de un bebé en
un momento dado.
!
Frene el cochecito antes de montar el dispositivo de sujeción
para niños.
!
Compruebe que las piezas utilizadas para fijar el dispositivo
de sujeción para niños están sujetas de forma segura en el
cochecito.
!
Recline el asiento del cochecito hacia atrás hasta la posición
más baja posible.
Para montar el dispositivo de sujeción para niños en
cochecitos de Joie, siga estos pasos:
1. Coloque el dispositivo de sujeción para niños en el cochecito
de forma que las muescas del mando reclinable encajen en
el borde del reposabrazos, de la bandeja o del soporte de los
gemelos. De esta forma, el dispositivo de sujeción para niños
quedará fijado en su lugar.
40
&
41
&
42
&
43
! Si el reposabrazos tiene una cubierta de tela, desmonte el
Velcro de dicha cubierta del reposabrazos primero.
42
-1
! Para cochecitos con un soporte de gemelos especial, ajuste
dicho soporte a la posición vertical, desmonte el Velcro y,
por último, levante la cubierta de tela.
43
-1
Uso con cochecitos
Page 41

79 80
40
41
42
1
43
1
44
45
46
47
49
48
2. Utilice las correas de ambos lados del cochecito para fijar el
dispositivo de sujeción para niños.
44
&
45
&
46
! Intente tirar del dispositivo de sujeción para niños hacia
arriba para comprobar que está firmemente encajado.
Para quitar el dispositivo de sujeción para niños, suelte las
correas de dicho dispositivo, tire hacia arriba del asa de
desbloqueo del cochecito para soltar el dispositivo de sujeción
para niños de la bandeja, del reposabrazos o del soporte de
los gemelos y, a continuación, levante el dispositivo de
sujeción para niños extrayéndolo del cochecito. Consulte las
47
& 48 & 49.
Page 42

81 82
Cuidados y mantenimiento
!
Después de retirar la cuña del accesorio, guárdela en un lugar donde
no pueda acceder el niño.
!
Lave la cubierta del asiento y el acolchado interno con agua fría a
menos de 30 °C.
!
No planche el acolchado.
!
No limpie en seco ni utilice lejía para lavar el acolchado.
!
No utilice detergentes sin diluir, gasolina u otros disolventes
orgánicos para limpiar el dispositivo de sujeción para niños y la
base. Si lo hace, puede dañar el dispositivo de sujeción para niños.
!
No retuerza con demasiada fuerza la cubierta del asiento ni el
acolchado interno para secarlos. Podrían quedar arrugas en la
cubierta del asiento y en el acolchado interno.
!
Deje secar la cubierta del asiento y el acolchado interno en un lugar
protegido de la luz directa del sol.
!
Retire este dispositivo de sujeción para niños y la base del asiento
del vehículo cuando no vaya a utilizarlos durante un periodo
prolongado de tiempo. Coloque el dispositivo de sujeción para niños
en un lugar fresco y seco donde su hijo no pueda acceder.
Page 43

84
FR
Bienvenue sur Joie
™
Félicitations pour votre arrivée dans la famille Joie ! Nous sommes ravis de faire partie du voyage de votre petit ange. En voyageant avec le
siège bébé Joie igemm™, vous utilisez un siège de haute qualité i-Size,
avec une sécurité entièrement certifiée. Veuillez lire ce manuel attentivement et suivre chaque étape pour assurer un trajet confortable et la
meilleure protection possible pour votre enfant.
Pour utiliser ce siège bébé Joie avec les connexions i-Size ISOFIX conformément à la réglementation ECE R129/00, votre enfant doit correspondre aux conditions suivantes.
Taille de l’enfant 40 à 85 cm / Poids de l’enfant 13 kg ; (environ 1 an et
demi ou moins).
Pour utiliser ce porte-bébé avec la ceinture de sécurité d’un véhicule,
votre enfant doit répondre aux conditions suivantes.
Poids de l’enfant ≤ 13 kg/ Âge de l’enfant ≤ 15 mois.
Base
Ces instructions présentent l’utilisation du siège bébé et de la base.
Cette base peut aussi être utilisée avec d’autres sièges de bébé Joie.
Veuillez lire toutes les instructions de ce manuel avant d’installer et
d’utiliser le produit.
! IMPORTANT : CONSERVEZ POUR RÉFÉRENCE FUTURE.
VEUILLEZ LIRE ATTENTIVEMENT.
Veuillez conserver le manuel d’instructions
dans le compartiment de stockage en bas
de la base, comme sur l’illustration à droite.
ou
Veuillez conserver ce manuel d’utilisation
dans la base de la partie textile.
Pour plus d’informations sur le service de garantie,
veuillez consulter notre site Web à l’adresse
suivante : www.joiebaby.com
25
17
18
20
22
23
24
2
3
4
5
6
7
8
9
10
11
12
19
13
14
15
16
21
1
Sch. 1.1 Support tête
Sch. 1.2 Coussin du siège
Sch. 1.3 Bouton A de
déverrouillage de fixation
de la poussette
Sch. 1.4 Guide latéral
Sch. 1.5 Support pour bébé
Sch. 1.6 Toile d'ajustement
Sch. 1.7 Bouton d'ajustement du
harnais
Sch. 1.8 Harnais pour épaules
Sch. 1.9 Support de capote
Sch. 1.10 Capote
Sch. 1.11 Connecteurs du harnais
Sch. 1.12 Boucle du harnais
Sch. 1.13 Poignée
Sch. 1.14 Bouton de la poignée
Liste des pièces
Sch. 1.15 Guide arrière
Sch. 1.16 Bouton B de
déverrouillage de
fixation de la poussette
Sch. 1.17 Connecteur ISOFIX
Sch. 1.18 Indicateur de protection
Sch. 1.19 Guides ISOFIX
Sch. 1.20 Piètement de charge
Sch. 1.21 Bouton A d'ajustement
de piètement de charge
Sch. 1.22 Indicateur de piètement
de charge
Sch. 1.23 Bouton B d'ajustement
de piètement de charge
Sch. 1.24 Bouton de
déverrouillage du siège
bébé
Sch. 1.25 Pince d'arrêt
Veuillez vous assurer qu'aucune pièce ne manque. Veuillez contacter le
revendeur en cas de pièces manquantes.
Page 44

85 86
AVERTISSEMENT
! Veuillez vous assurer avant d’acheter ce siège bébé qu’il peut être
installé correctement dans votre véhicule.
! AUCUN siège de bébé ne peut garantir une protection complète con-
tre les blessures en cas d’accident. Cependant, une bonne utilisation
de ce siège bébé réduira les risques de blessures sérieuses ou de
mort pour votre enfant.
! Pour utiliser ce siège de bébé avec les connexions ISOFIX conformé-
ment à la réglementation ECE R129/00, votre enfant doit correspondre aux conditions suivantes.
Taille de l’enfant 40 à 85 cm / Poids de l’enfant ≤ 13 kg (environ 1 an
et demi ou moins).
! Pour utiliser ce porte-bébé avec la ceinture de sécurité d’un véhicule,
votre enfant doit répondre aux conditions suivantes. Poids de l’enfant
≤ 13 kg/ Âge de l’enfant ≤ 15 mois.
! Les sangles du siège de bébé doivent être serrées, sans torsion.
! N’installez et n’utilisez PAS ce siège de bébé sans avoir suivi les
instructions et avertissements de ce manuel, ou vous pourriez mettre
votre enfant en danger de blessures ou de mort.
! Ne laissez JAMAIS votre enfant sans surveillance dans ce siège de
bébé.
! Ne faites AUCUNE modification sur ce siège de bébé et ne l’utilisez
pas avec des pièces d’autres fabricants.
! N’utilisez PAS ce siège de bébé si des pièces sont endommagées ou
manquantes.
! Ne faites PAS porter à votre enfant des vêtements trop amples/
grands, car cela pourrait l’empêcher d’être bien attaché par les
sangles du harnais pour les épaules et le harnais entre les jambes.
! NE laissez PAS ce siège de bébé ou d’autres objets détachés ou non
fixés dans votre véhicule, car un siège bébé non fixé peut basculer et
blesser les passagers lors de virages serrés, d’arrêts soudains ou de
collisions.
AVERTISSEMENT
! NE placez PAS le siège de bébé dos à la route sur un siège avant
avec airbag. Ceci créerait des risques de blessures ou de mort.
Veuillez vous reporter au manuel du propriétaire du véhicule pour
plus d’informations.
! N’utilisez JAMAIS un siège bébé d’occasion ou dont vous ne con-
naissez pas le passé, car il pourrait présenter des dommages structurels compromettant la sécurité de votre enfant.
! N’utilisez JAMAIS de cordes ou autres substituts pour attacher
l’enfant dans son siège ou dans le véhicule.
! N’utilisez PAS ce siège de bébé sans les parties souples.
! Les parties souples ne doivent pas être remplacées par d’autres
que celles recommandées par le fabricant. Les parties souples font
entièrement partie des performances du siège de bébé.
! Ne placez RIEN d’autre que les coussins internes recommandés sur
ce siège de bébé.
! Assurez-vous que le siège de bébé est installé de sorte qu’aucune
partie ne gêne les sièges amovibles ou le fonctionnement des portes
du véhicule.
! Ne continuez PAS à utiliser ce siège de bébé après un accident,
même mineur. Remplacez-le immédiatement car des dommages
structurels invisibles pourraient avoir été causés par le crash.
! Retirez ce siège de bébé du siège du véhicule si vous ne prévoyez
pas de l’utiliser pendant une longue période.
! Consultez le distributeur pour tout problème concernant la mainte-
nance, la réparation et le remplacement de pièces.
! Pour éviter les risques de chute, attachez toujours l’enfant avec le
harnais pour enfant lorsque l’enfant est placé dans le siège bébé,
même lorsque le siège bébé n’est pas dans le véhicule.
! Avant de transporter le siège bébé à la main, vérifiez que l’enfant est
attaché avec le harnais pour enfant et que la poignée est bien verrouillée en position verticale.
Page 45

87 88
AVERTISSEMENT
! Pour éviter les blessures graves ou la mort, ne placez JAMAIS le
siège de bébé sur une surface élevée avec l’enfant dedans.
! Les pièces de ce siège pour enfant ne peuvent en aucune façon être
lubrifiées.
! Attachez toujours l’enfant dans le siège de bébé, même pour de
courts trajets, car c’est précisément lors de ceux-ci que le plus
d’accidents surviennent.
! N’utilisez pas ce siège de bébé pendant plus de 5 ans après l’achat,
car les pièces peuvent se dégrader avec le temps ou à cause de
l’exposition au soleil, et peuvent mal fonctionner en cas d’accident.
! Veuillez conserver ce siège bébé à l’écart de la lumière du soleil,
car il pourrait devenir trop chaud pour la peau de l’enfant. Touchez
toujours le siège de bébé avant de placer l’enfant dedans.
! Vérifiez régulièrement la présence de poussière sur les guides ISO-
FIX et nettoyez-les si nécessaire. La fiabilité peut être affectée par
l’infiltration de poussière, saletés, particules de nourriture, etc.
! Ne placez AUCUN objet dans la zone de piètement de charge en
face de la base.
!
Une bonne installation n’est permise qu’avec des connecteurs ISOFIX.
! Une fois votre enfant placé dans ce siège de bébé, le harnais pour
enfant doit être utilisé correctement, en vérifiant que les lanières à la
taille sont bien placées en bas, afin que le bassin soit bien engagé.
! N’utilisez PAS de charge sur les points de contact autres que ceux
décrits dans les instructions et indiqués sur le siège de bébé.
! Merci de ne pas utiliser ce siège auto si ce dernier a chuté d’une
hauteur importante, a heurté le sol à une vitesse considérable, ou
présente des signes visibles de dommages. Nous ne sommes pas responsable du remplacement si le siège auto a été endommagé dans
de telles conditions. Un nouveau siège de voiture devra être acheté
lorsque l’une des conditions mentionnées ci-dessus se produit.
Urgence
En cas d'urgence ou d'accident, il est important que votre enfant
reçoive des soins de premiers secours et une assistance médicale
immédiatement.
Illustration pour
l'installation
Taille de l'enfant 40 à 85 cm /
Poids de l'enfant ≤ 13 kg
(environ 1 an et demi ou moins)
Convient à
Poids de l'enfant ≤ 13 kg
Âge de l'enfant ≤ 15 mois
Page 46

89 90
Informations sur le produit
1. Conformément à la réglementation ECE R129/00, ce siège de bébé
avec base est un siège de bébé ISOFIX universel de classe C, D et
doit être installé avec des connexions ISOFIX.
2. Il s'agit d'un système de siège bébé « i-Size ». Son utilisation est
approuvée par la réglementation ECE R129/00 pour des positions de
sièges de véhicules « compatibles i-Size » comme indiqué dans le
manuel de l'utilisateur du véhicule fourni par le constructeur.
3. En cas de doute, veuillez consulter le fabricant ou le revendeur du
siège bébé.
Il s'agit d'un SYSTÈME DE RETENUE D'ENFANT ISOFIX i-Size. Il a
été approuvé pour la série d'amendements ECE R129/00, tous les
manuels des constructeurs de véhicule ne mentionnant pas encore une
compatibilité i-Size. Ce siège et cette base sont aussi approuvés pour
une utilisation dans des véhicules compatibles ISOFIX. Veuillez vous
reporter au site Web du constructeur de votre voiture ou consulter
votre revendeur.
Il conviendra aux véhicules avec des positions approuvées en tant que
positions ISOFIX i-Size (comme détaillé dans le manuel du véhicule),
selon la catégorie de siège de bébé et de la fixation.
!
Ce siège de bébé convient aux sièges de véhicules équipés à leur
base de points d'ancrage ISOFIX i-Size.
1
!
N'installez PAS ce siège bébé sur des sièges de véhicule tournés
sur le côté ou vers l'arrière en fonction de la direction de
déplacement du véhicule. 2 -1
!
NE placez PAS un siège bébé dos à la route sur un siège avant avec
airbag 2 -2, car cela peut créer des risques de blessure ou de
mort. Veuillez vous reporter au manuel du propriétaire du véhicule
pour plus d'informations.
!
Il est recommandé d'installer ce siège de bébé sur le siège arrière
du véhicule. 2 -3
!
N'installez PAS ce siège bébé sur des sièges de véhicule amovibles
lors de l'installation.
Précautions lors de l'installation
1
3
214
1
5 7
3
6
2 4
5 7
3
6
2
2
A
I
R
B
A
G
1
voir images 1 -
2
Page 47

91 92
voir images
3
-
5
Installation avion
3
Veuillez noter que la sécurité de l’enfant n’est pas garantie si le manuel
d’installation et d’instruction n’est pas respecté.
! Veuillez noter que l’installation du siège bébé sur un siège d’avion
est différente de l’installation sur un siège de voiture.
! Veuillez noter que la fixation avec une “ceinture ventrale” 2 points
n’est autorisée que dans les avions.
! Veuillez noter que le siège bébé doit rester attaché sur le siège
d’avion avec la ceinture même lorsqu’il est inoccupé.
! Veuillez noter que le siège bébé doit uniquement être utilisé sur un
siège passager autorisé par la compagnie aérienne.
! Avertissement: ne pas utiliser le siège bébé dans la zone de
déploiement de l’airbag.
! Veuillez noter que les sièges bébé
orientés dos à la route doivent
uniquement être installés sur les
sièges passagers orientés face à la
route.
3
Comment installer le siège bébé avec
la ceinture de sécurité du siège de
l’avion:
1. Placez le siège bébé sur le siège
passager, dans la direction opposée
à celle du vol.
2. Assurez-vous que la poignée de
transport est dans la position la plus
relevée.
Ajustement de la poignée
voir images 6 -
7
6
3
2
1
La poignée du siège bébé peut être
réglée sur 3 positions.
6
Position 1 Position pour transport en
voiture, à la main ou en
poussette.
Position 2 Position balancement.
Position 3 Position chaise bébé.
3. Placez la ceinture de sécurité dans
les deux guides de ceinture bleu
clair.
4. Fermez la ceinture de sécurité
(consultez les consignes de
sécurité de la compagnie aérienne).
5. Serrez la ceinture de sécurité en
tirant l'extrémité de la ceinture.
4
! La boucle de la ceinture de sécurité
ne doit en aucun cas se trouver
dans les guides de ceinture bleu
clair.
5
Retrait:
Ouvrez la ceinture de sécurité du
siège passager (consultez les
consignes de sécurité de la compagnie aérienne).
Vous pouvez à présent retirer le siège
bébé du siège passager.
4
5
Page 48

93 94
7
1
2
Installation avec base
8
9
1. Dépliez le piètement de charge du
compartiment de stockage.
8
2. Ajustez les guides ISOFIX sur les
points d'ancrage ISOFIX.
9
Les guides ISOFIX peuvent
protéger la surface du siège du
véhicule contre les déchirures. Ils
peuvent aussi guider les
connecteurs ISOFIX.
Pour ajuster la poignée, appuyez sur
les boutons de la poignée des deux
côtés pour la déverrouiller
7
-1
, puis
tournez la poignée jusqu'à ce qu'elle
s'enclenche dans l'une des 3
positions.
7
-2
voir images
8
-
18
3. Faites tourner les connecteurs
ISOFIX à 180 degrés jusqu'à ce
qu'ils soient dirigés dans la
direction des guides ISOFIX.
10
11
10
1
4. Alignez les connecteurs ISOFIX
avec les guides ISOFIX, puis
insérez les deux connecteurs
ISOFIX dans les points d'ancrage
ISOFIX jusqu'à entendre un déclic.
11
!
Vérifiez que les deux
connecteurs ISOFIX sont fixés
solidement aux points d'ancrage
ISOFIX. Deux clics doivent être
audibles et la couleur des
indicateurs des deux
connecteurs ISOFIX doit être
complètement verte.
11
-1
!
Vérifiez que la base est
solidement installée en tirant sur
les deux connecteurs ISOFIX.
Page 49

95 96
5. Après avoir placé la base sur le siège du véhicule, étendez le
piètement de charge jusqu'au plancher
12
. Si l'indicateur du
piètement de charge devient vert, cela signifie qu'il est correctement
installé. L'indicateur est rouge en cas d'installation incorrecte.
10
-3
!
Le piètement de charge dispose de 24 positions. Lorsque
l'indicateur de piètement de charge est rouge, cela signifie que le
piètement de charge est dans la mauvaise position.
!
Assurez-vous que le piètement de charge est complètement en
contact avec le plancher du véhicule.
!
Appuyez sur le bouton de déverrouillage du piètement de charge,
puis repliez le piètement de charge vers le haut.
12
3
1
2
13
1
2
La base complètement assemblée est
illustrée en 13.
!
Les connecteurs ISOFIX doivent
être fixés et verrouillés sur les
points d'ancrage ISOFIX.
13
-1
!
Le piètement de charge doit être
installé correctement avec
l'indicateur vert.
13
-2
14
6.
Poussez le porte-bébé sur la base
14
. Si le siège-bébé est bien fixé,
l'indicateur de verrouillage du
siège-bébé est vert.
15
!
PTirez sur le porte-bébé pour
vous assurer qu'il est solidement
verrouillé sur la base.
15
Page 50

97 98
18
1
2
2
17
2
1
16
1
2
7. Pour déverrouiller le siège bébé,
tirez le siège bébé vers le haut
16
-2
tout en appuyant sur le bouton de
déverrouillage du siège bébé.
16
-1
8. Pour enlever le réhausseur Pour
retirer le rehausseur,
17
appuyez
d'abord sur le bouton de
déverrouillage secondaire puis sur
le bouton ISOFIX des connecteurs
de verrouillage avant de retirer le
rehausseur du siège du véhicule.
17
-1 &
17
-2
9. Appuyez sur le bouton de
déverrouillage ISOFIX pour plier
l'ISOFIX.
18
19
20
Ajustement de la hauteur
pour le repose-tête et le harnais pour épaules
voir images
19
-
22
Vérifiez que les sangles du harnais
pour épaules sont à la bonne hauteur.
Choisissez la bonne paire
d'emplacements de harnais pour
épaules, conformément à la taille de
l'enfant.
!
Le bas du repose-tête doit être au
niveau du point le plus élevé de
l'épaule de l'enfant, comme
indiqué dans 19, mais ne doit pas
être au-dessus de la ligne des
épaules.
20
!
Si les sangles du harnais pour
épaules ne sont pas à la bonne
hauteur, l'enfant pourrait être
éjecté du siège bébé en cas
d'accident.
21
Page 51

99 100
Appuyez sur le levier d'ajustement du
support pour tête 21 tout en tirant sur
le support vers le haut ou le bas pour
le placer sur l'une des 7 positions. Les
positions du support pour tête sont
illustrées en
22
22
Bien installer votre enfant dans le
siège bébé
voir images
23
-
28
1.
Le support pour bébé sert à la protection des enfants. Le support
pour bébé convient aux enfants de moins de 60 cm.
2. Avant d'utiliser le support, veuillez ajouter l'élément en mousse.
23
3. Une fois l'enfant placé dans le siège, vérifiez si les harnais pour
les épaules sont réglés à la bonne hauteur.
Note
Retirez la portion de tête du support pour nourrisson lorsque la tête de l'enfant ne se place plus
de façon confortable. Détachez les attaches du
support pour la tête afin d'enlever la portion
haute du support pour nourrisson.
Retirez la portion du corps du support pour
nourrisson lorsque les épaules de l'enfant ne se
placent plus de façon confortable.
1.
Tout en appuyant sur le bouton
d'ajustement du harnais, tirez
complètement les deux harnais
d'épaules du siège bébé.
24
2. Déverrouillez la boucle du harnais
en appuyant sur le bouton rouge.
25
23
24
25
Page 52

101 102
28
2827
26
3. Placez l'enfant dans le siège bébé
et verrouillez la boucle. 26 &
27
4. Serrez les harnais pour les épaules
en tirant sur le filet d'ajustement.
28
!
Vérifiez que l'espace entre
l'enfant et les harnais pour
épaules fait environ l'épaisseur
d'une main.
29
30
31
Pour détacher la capote, appuyez
simultanément sur le bouton du
support de la capote et retirez l'arche
de la capote.
29
Pour détacher le coussin du siège,
vous devez vous reporter aux étapes
suivantes :
1. Vous devez d'abord retirer le
support. Pour ce faire, déverrouillez
simplement la boucle, puis
détachez les attaches des deux
côtés du support et retirez-le du
siège.
2. La housse du harnais pour épaules
ou la housse du harnais pour
bassin peuvent être retirées de la
toile.
3. Détachez les bandes élastiques de
l'arrière du support pour tête afin
de retirer les éléments souples du
support pour tête.
4. Retirez les pièces de fixation sous
le bord du siège.
30
5. Détachez le coussin du siège
autour du bouton d'ajustement
comme illustré dans
31
Pour réassembler les éléments
souples, effectuez les étapes
ci-dessus dans l'ordre inverse.
Détacher la capote et le coussin
du siège
voir images
29
-
31
Page 53

103 104
Installation sans base
!
N’installez PAS ce porte-bébé sur
des sièges de véhicule avec
ceinture ventrale.
32
!
Ce porte-bébé est uniquement
adapté aux sièges de véhicule
dotés d’une ceinture de sécurité à
3 points avec enrouleur.
33
1. Placez le porte-bébé sur le siège du
véhicule souhaité. Tirez la ceinture
de sécurité et enclenchez-la dans la
boucle du véhicule, en faisant
glisser la sangle ventrale du
véhicule dans les guides latéraux
du porte-bébé.
34
!
Le porte-bébé ne peut pas être
utilisé si la boucle de la ceinture
de sécurité du véhicule
(extrémité femelle de la boucle)
est trop longue pour retenir le
porte-bébé de façon sûre.
34
-1
voir images
32
-
39
32
33
!
!
34
1
2. Faites glisser la sangle diagonale
dans le guide arrière.
35
3. Tirez la sangle d'épaule du véhicule
pour attacher le porte-bébé de
manière ferme et sûre.
36
4. La ligne de niveau du porte-bébé
doit être droite par rapport au sol
lorsque le porte-bébé est installé.
37
!
Tendez la ceinture de sécurité du
véhicule aussi fort que possible,
en vous assurant qu'elle n'est
pas lâche ou vrillée.
!
35
36
37
Page 54

105 106
!
Après avoir installé le porte bébé, vérifiez toujours que les
ceintures du véhicule sont
disposées correctement et
attachées fermement dans la
boucle du véhicule.
38
5. Le baldaquin peut être
complètement ouvert pour protéger
votre enfant du soleil le plus
possible, simplement ouvrez la
fermeture en éclair du crochet, et
puis tirez le baldaquin en avant.
39
38
39
voir les images 40 -
49
Votre siège bébé est conçu pour se fixer sur certains modèles
de poussettes Joie comportant un plateau spécial, une barre
de sécurité ou un repose-mollet.
!
Veuillez vous assurer que votre poussette peut s'adapter à
votre siège bébé avant de l'acheter.
!
N'autorisez jamais plus d'un bébé dans le système de
voyage à un moment donné.
!
Veuillez mettre le frein sur votre poussette avant d'assembler
le siège bébé.
!
Vérifiez que les pièces utilisées pour fixer le siège bébé sont
solidement serrées sur la poussette.
!
Inclinez la poussette sur la position la plus basse.
Utilisation avec les poussettes Joie Pour assembler le siège
bébé sur les poussettes Joie, veuillez suivre ces étapes:
1. Placez le siège bébé dans la poussette pour que les crans
s'ajustent sur le bord de la barre de retenue, du plateau ou
du repose-mollet. Le siège bébé est alors automatiquement
en place.
40
&
41
&
42
&
43
! Si la barre de retenue est recouverte de tissu, veuillez
d'abord détacher le Velcro du tissu qui recouvre la barre.
42
-1
! Pour la poussette avec un repose-mollet spécial, veuillez
ajuster le repose-mollet à la position verticale, détacher le
Velcro, puis soulever le tissu qui recouvre.
43
-1
Utilisation avec des poussettes
Page 55

107 108
40
41
42
1
43
1
44
45
46
47
49
48
2. Utilisez les sangles des deux côtés de la poussette pour fixer
le siège bébé.
44
&
45
&
46
! Essayez de tirer le siège bébé vers le haut pour vérifier qu'il
est correctement installé.
Pour retirer le siège bébé, relâchez les sangles du siège, tirez
vers le haut la poignée de la poussette pour débloquer le siège
du plateau, de la barre de retenue ou du repose-mollet, puis
soulevez le siège bébé de la poussette. Veuillez vous référer à
47
&
48
& 49.
Page 56

109 110
Entretien et maintenance
!
Après avoir retiré l’élément en mousse du support, veuillez la stocker
hors de portée des enfants.
!
Veuillez laver la couverture du siège et le renforcement interne à l’eau
froide, à moins de 30 °C.
!
Ne repassez pas les pièces souples.
!
Ne nettoyez pas les pièces souples à sec ou à l’eau de Javel.
!
N’utilisez pas de détergents non dilués, d’essence ou d’autres
solvants organiques pour laver le siège bébé ou la base. Ceci
pourrait endommager le siège bébé.
!
N’essorez pas la housse du siège et le rembourrage interne pour
essayer de les sécher. Ceci pourrait laisser des plis sur la couverture
du siège et le renforcement interne.
!
Veuillez laisser sécher la couverture du siège et le renforcement
interne à l’ombre.
!
Veuillez retirer le siège de bébé et la base du siège du véhicule si
vous ne prévoyez pas de l’utiliser pendant une longue période.
Placez le siège bébé dans un lieu frais et sec, hors de portée des
enfants.
Page 57

P-IM0138K_1
Share the joy at joiebaby.com
Joie Children's Products (UK) Limited
Venture Point, Towers Business Park,
Rugeley, Staffordshire, WS15 1UZ, UK
 Loading...