

Page 1
Instruction Manual
Manual de Instruções
Manual de instrucciones
Manuel d’utilisateur
GB
PT
ES
FR
1/2/3(9–36kg)
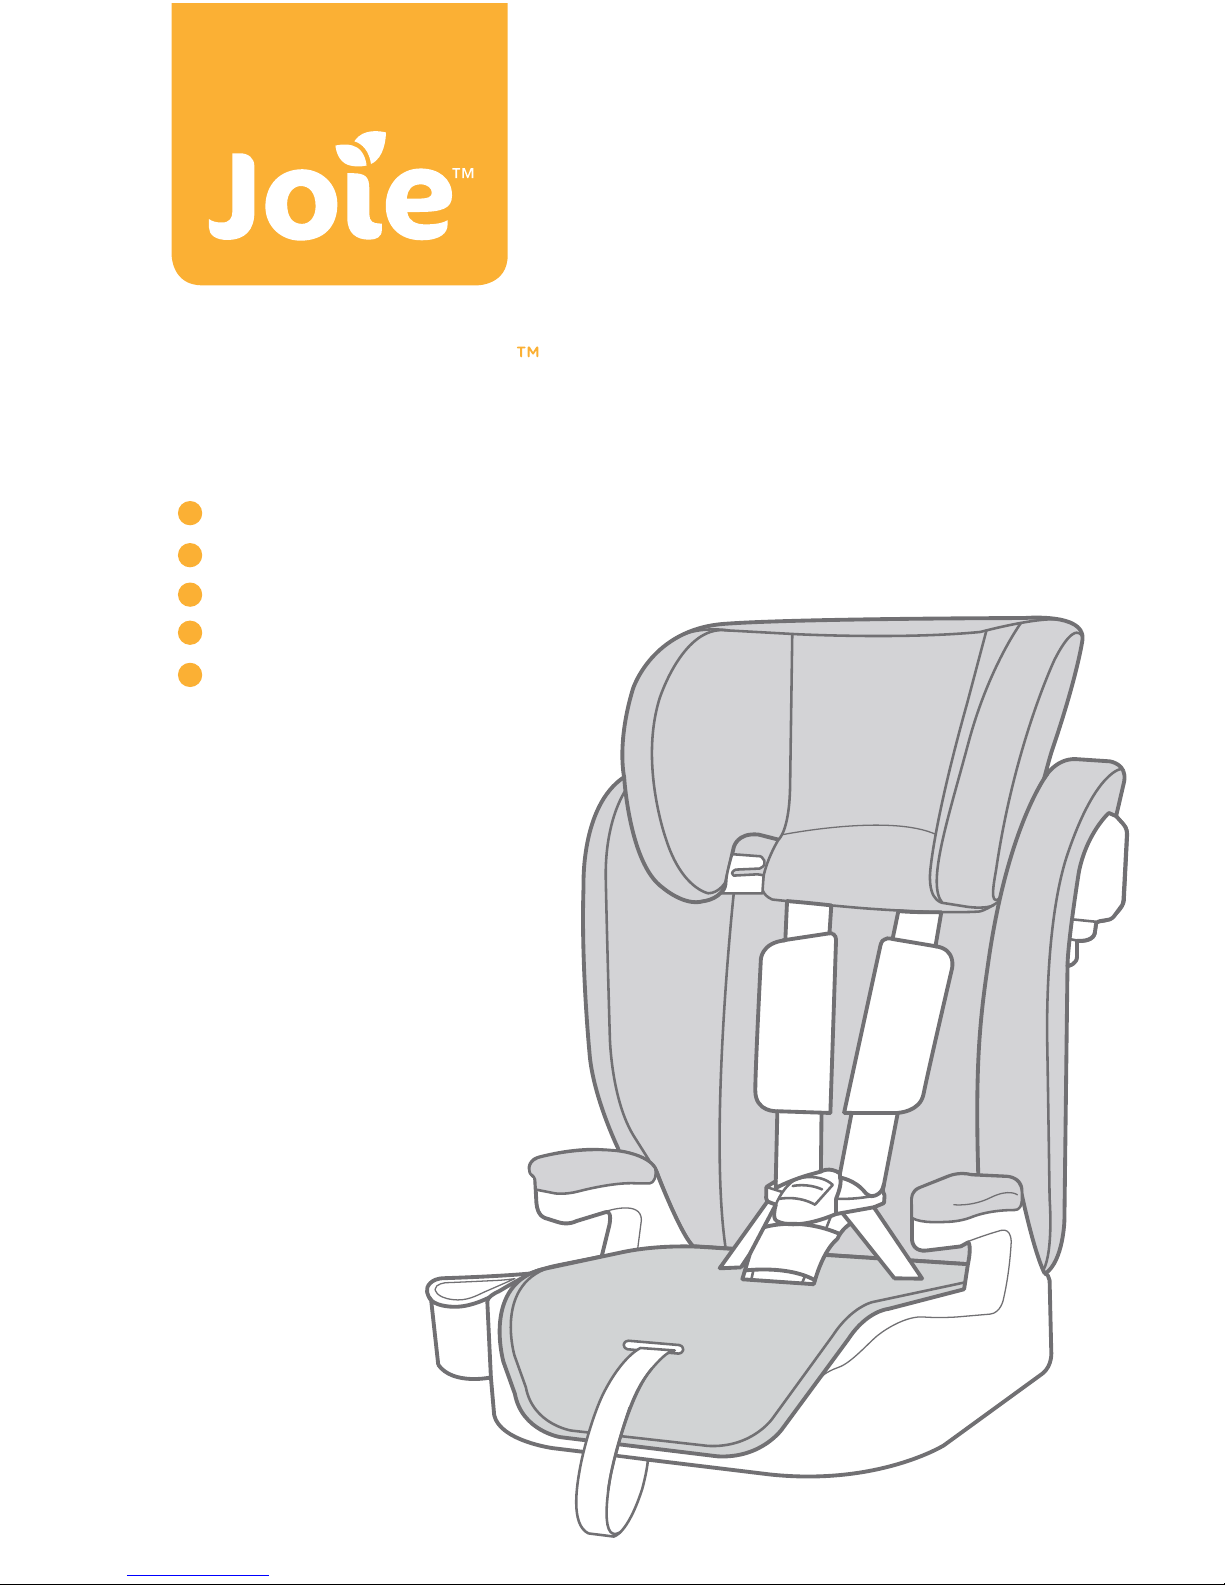
elevate
booster
Instruction Manual
Manual de Instruções
Manual de instrucciones
Manuel d’utilisateur
Bedienungsanleitung
Handleiding
GB
PT
ES
FR
DE
NL
Page 2
2
Welcome to Joie™
Congratulations on becoming part of the Joie family! We are so excited
to be part of your journey with your little one. While traveling with Joie
elevate
TM
series booster you are using a high quality, fully certified
safety Group 1/2/3 booster. This product is suitable for use with children
weighing 9-36kg (approximately 9 months – 12 years). Please carefully
read this manual and follow each step to ensure a comfortable ride and
best protection for your child.
Please confirm
This booster is approved to UN ECE regulation 44, 04 series of amendments. This booster can be installed using a 3 point retractable adult
seat belt approved to UN ECE regulation 16 or other equivalent standards.
Booster
! IMPORTANT: KEEP FOR FUTURE REFERENCE. PLEASE READ
CAREFULLY.
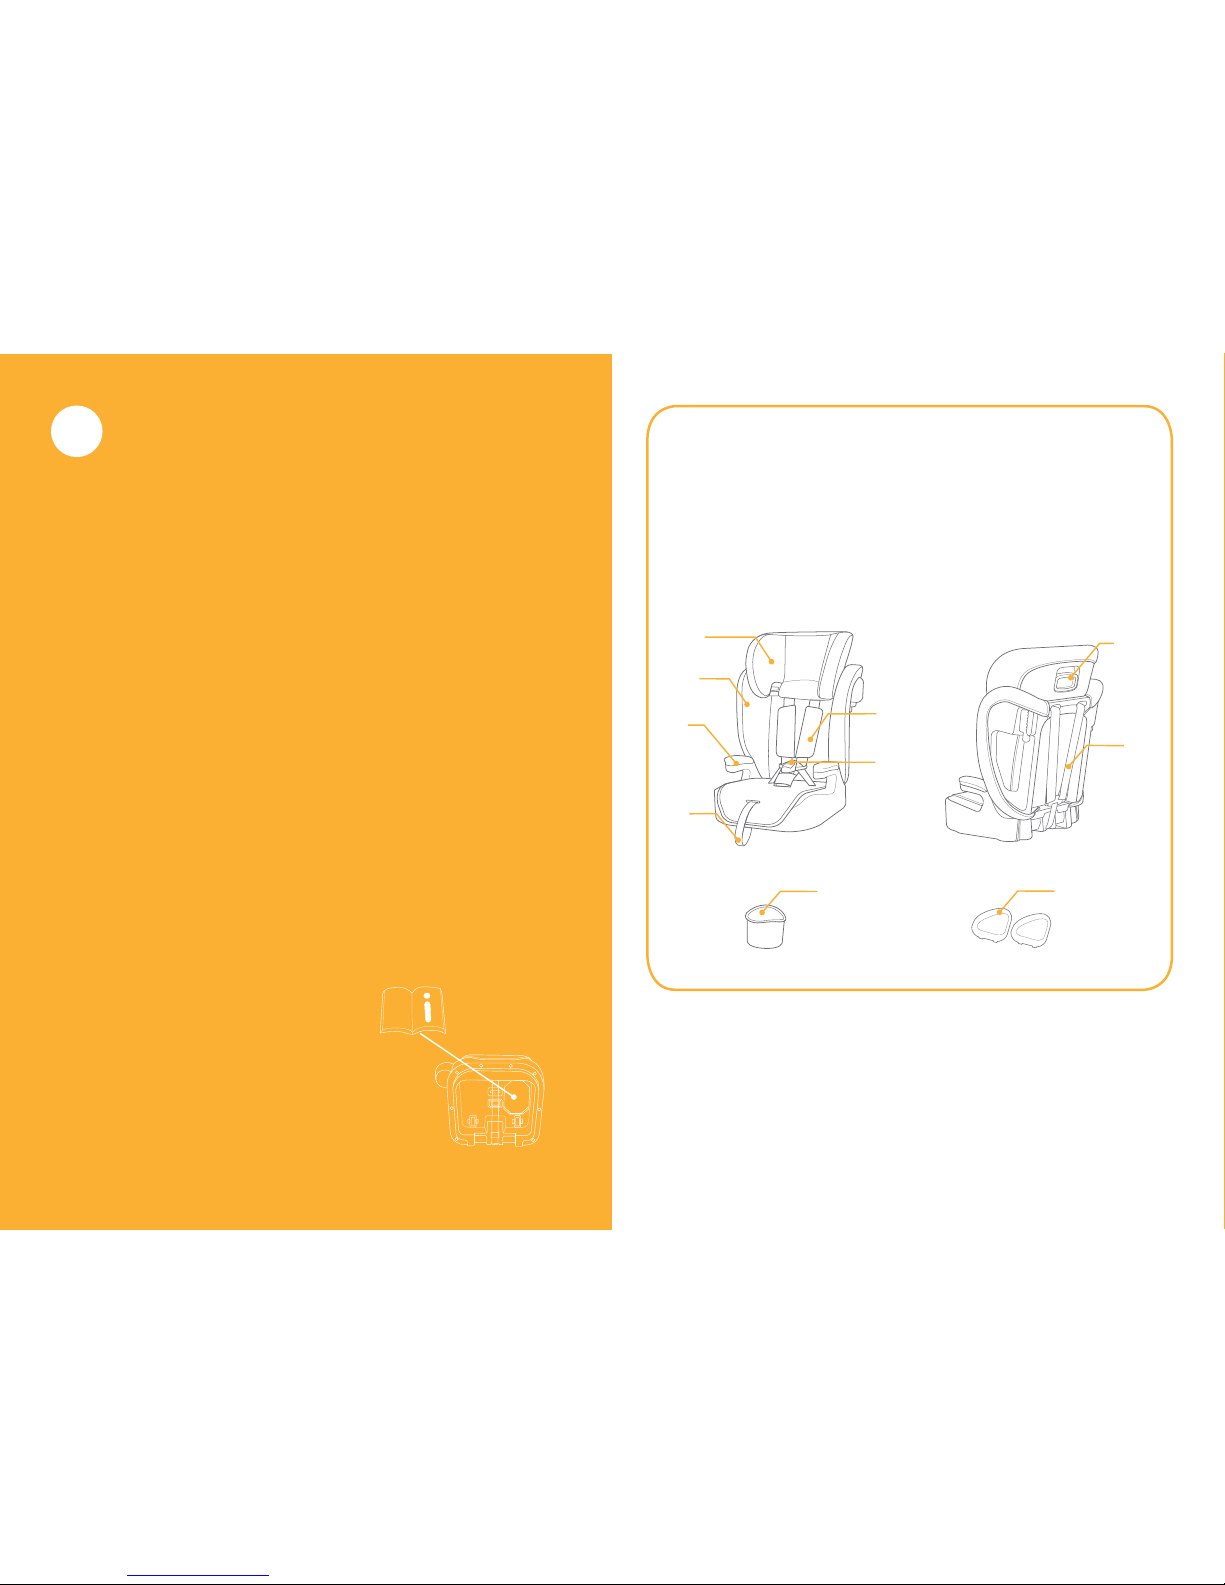
Please keep the instruction manual in the
storage compartment at the bottom of
the booster as right figure.
GB
1
2
3
7
8
Parts List
Make sure all parts are available before assembly. If any part is missing,
please contact local retailer. No tools are required for assembly.
1 Head Support
2 Lower Back Support
3 Armrest
4 Adjustment Webbing
5 Buckle
6 Shoulder Strap Cover
7 Head Support Adjustment Lever
8 Shoulder Strap
9 Cupholder
10 Side Impact Shield
5
4
6
9
10
Page 3

3 4
WARNING
!
Do take care to locate and install the booster so
that it is not liable to become trapped by a moveable seat or in a door of the vehicle.
!
This booster is designed ONLY for child weighing
9-36kg (approximately 9 months – 12 years or
under).
!
Any straps of child restraint and vehicle seat
should be tightened and not twisted.
!
After your child is placed in this booster, the safety
belt must be used correctly, and ensure that any
lap strap is worn low down, so that the pelvis is
firmly engaged.
!
Replace the booster after an accident of any kind.
An accident can cause unseen damage to the
booster.
!
NEVER use a booster if it has damaged or missing
parts. DO NOT use a cut, frayed or damaged
vehicle seat belt.
!
The booster can become very hot if left in the sun.
Contact with these parts can burn your child’s
skin. Always touch the surface of any metal or
plastic parts before putting your child in the
booster.
!
NEVER leave your child unattended with this
booster.
WARNING
!
Failure to properly use this booster increases the
risk of serious injury or death in a sharp turn,
sudden stop or crash.
!
DO NOT use this booster without the soft goods.
!
The soft goods should not be replaced with any
besides the ones recommended by the manufacturer, because the soft goods constitute an integral part of the booster performance.
!
DO NOT use any load bearing contact points other
than those described in the instructions and
marked on the booster.
!
NEVER leave luggage or other objects unsecured
in a vehicle, they are liable to cause injuries in the
event of a collision.
!
DO NOT use in any configuration not shown in the
instructions.
!
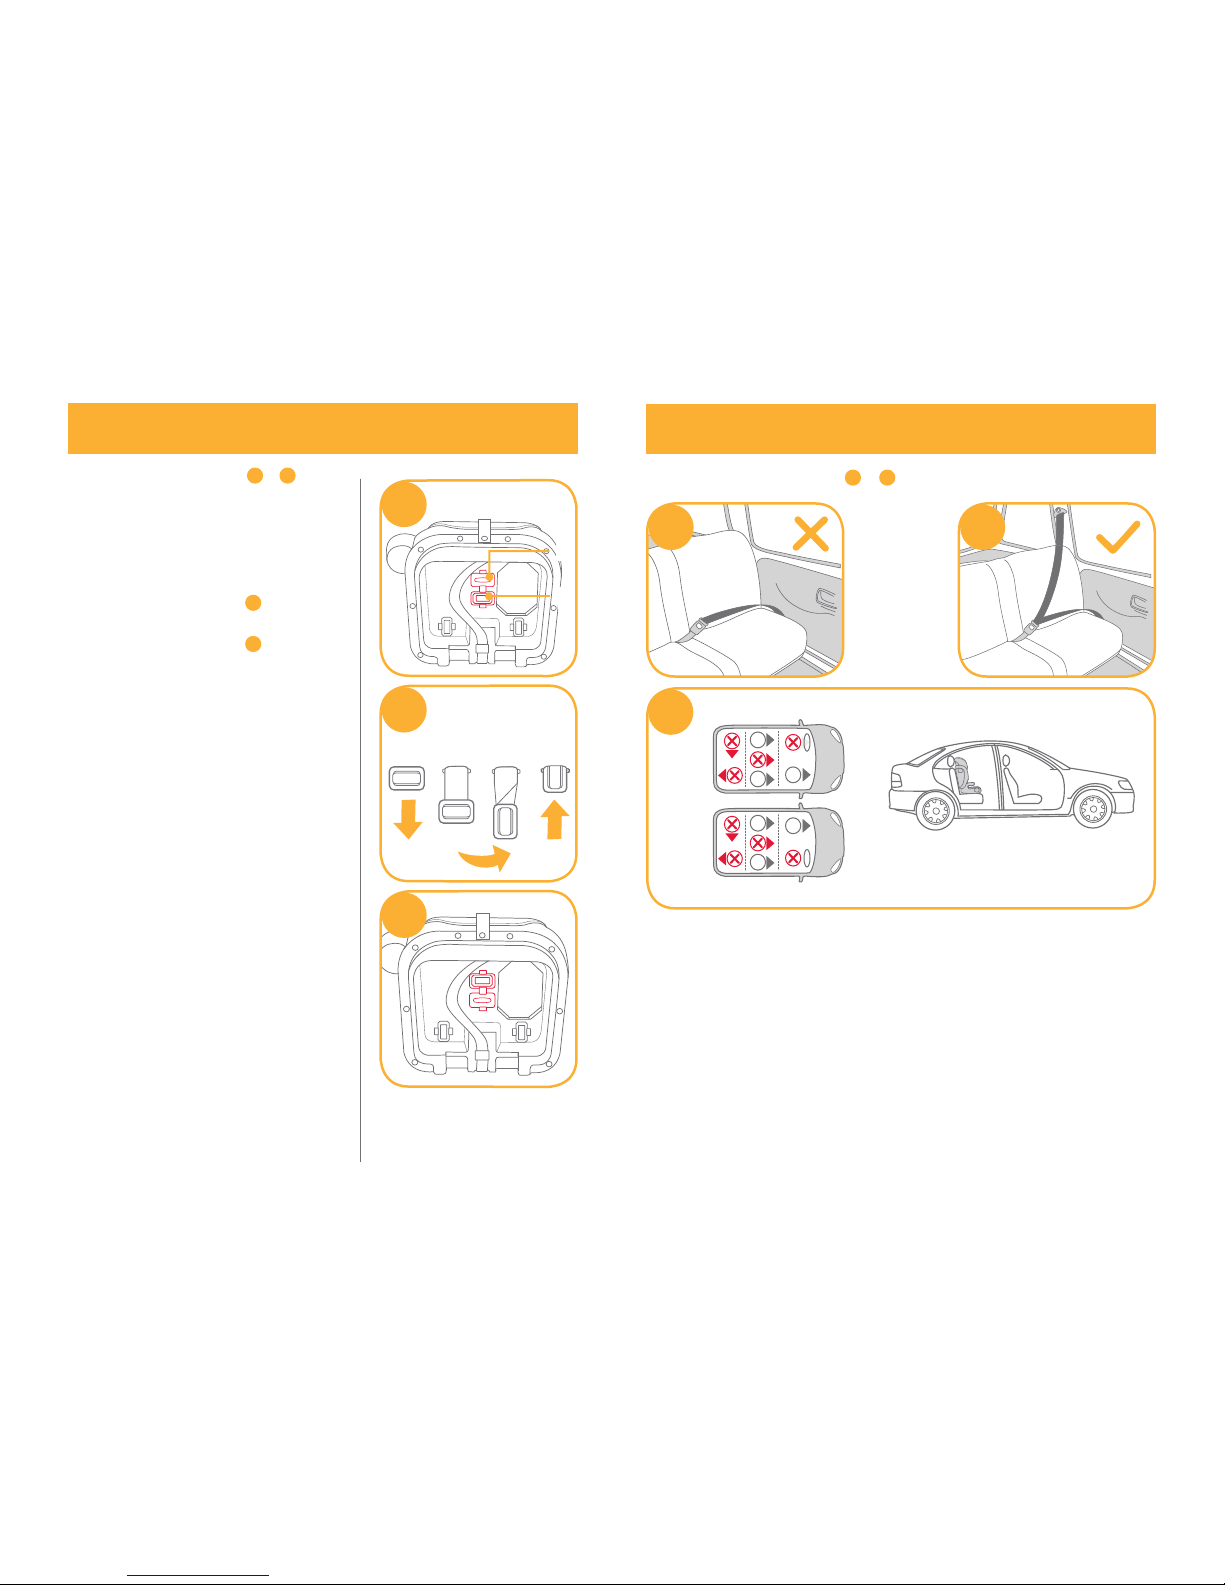
According to accident statistics, children are safer
when properly restrained in rear vehicle seating
positions, rather than front seating positions. For a
vehicle with a front passenger air bag, refer to your
vehicle owner’s manual as well as these instructions for a booster installation.
Page 4

5 6
WARNING
!
NEVER give this booster to someone else without
also giving them this manual.
!
NEVER leave a booster unsecured in your vehicle.
An unsecured booster can be thrown around and
may injure occupants in a sharp turn, sudden stop
or crash. Remove it or make sure that it is securely
belted in the vehicle.
!
DO NOT modify your booster or use any accessories or parts supplied by other manufacturers.
!
NEVER use a second-hand booster or a booster
whose history you do not know.
!
DO NOT face your booster toward the rear of the
vehicle.
!
To avoid burns, never put hot liquids in your
booster’s cupholder.
!
DO NOT have your child in swaddled clothes when
using this booster in forward facing mode, because this may prevent your child from being
properly and securely fastened by the shoulder
harnesses and the harnesses between thighs.
Emergency
In case of emergency or accidents, it is most important to have
your child taken care of with first aid and medical treatment
immediately.
Product Information
Read all the instructions in this manual before using this
product. If in doubt, consult either the booster manufacturer or
the retailer.
1. This booster is a ‘Universal’ child restraint. It is approved
to UN ECE regulation 44, 04 series of amendments, for
general use in vehicles and it will fit most, but not all, car
seats.
2. A correct fit is likely if the vehicle manufacturer has declared
in the vehicle handbook that the vehicle is capable of
accepting a ‘Universal’ for this age group.
3. This booster has been classified as ‘Universal’ under
more stringent conditions than those which applied to earlier
designs which do not carry this notice.
Product Booster
Suitable for
Child weighing 9-36kg
(approximately 9 months – 12 years)
Mass Group Group 1/2/3
Materials Plastics, metal, fabrics
Patent No. Patents pending
Page 5
7 8
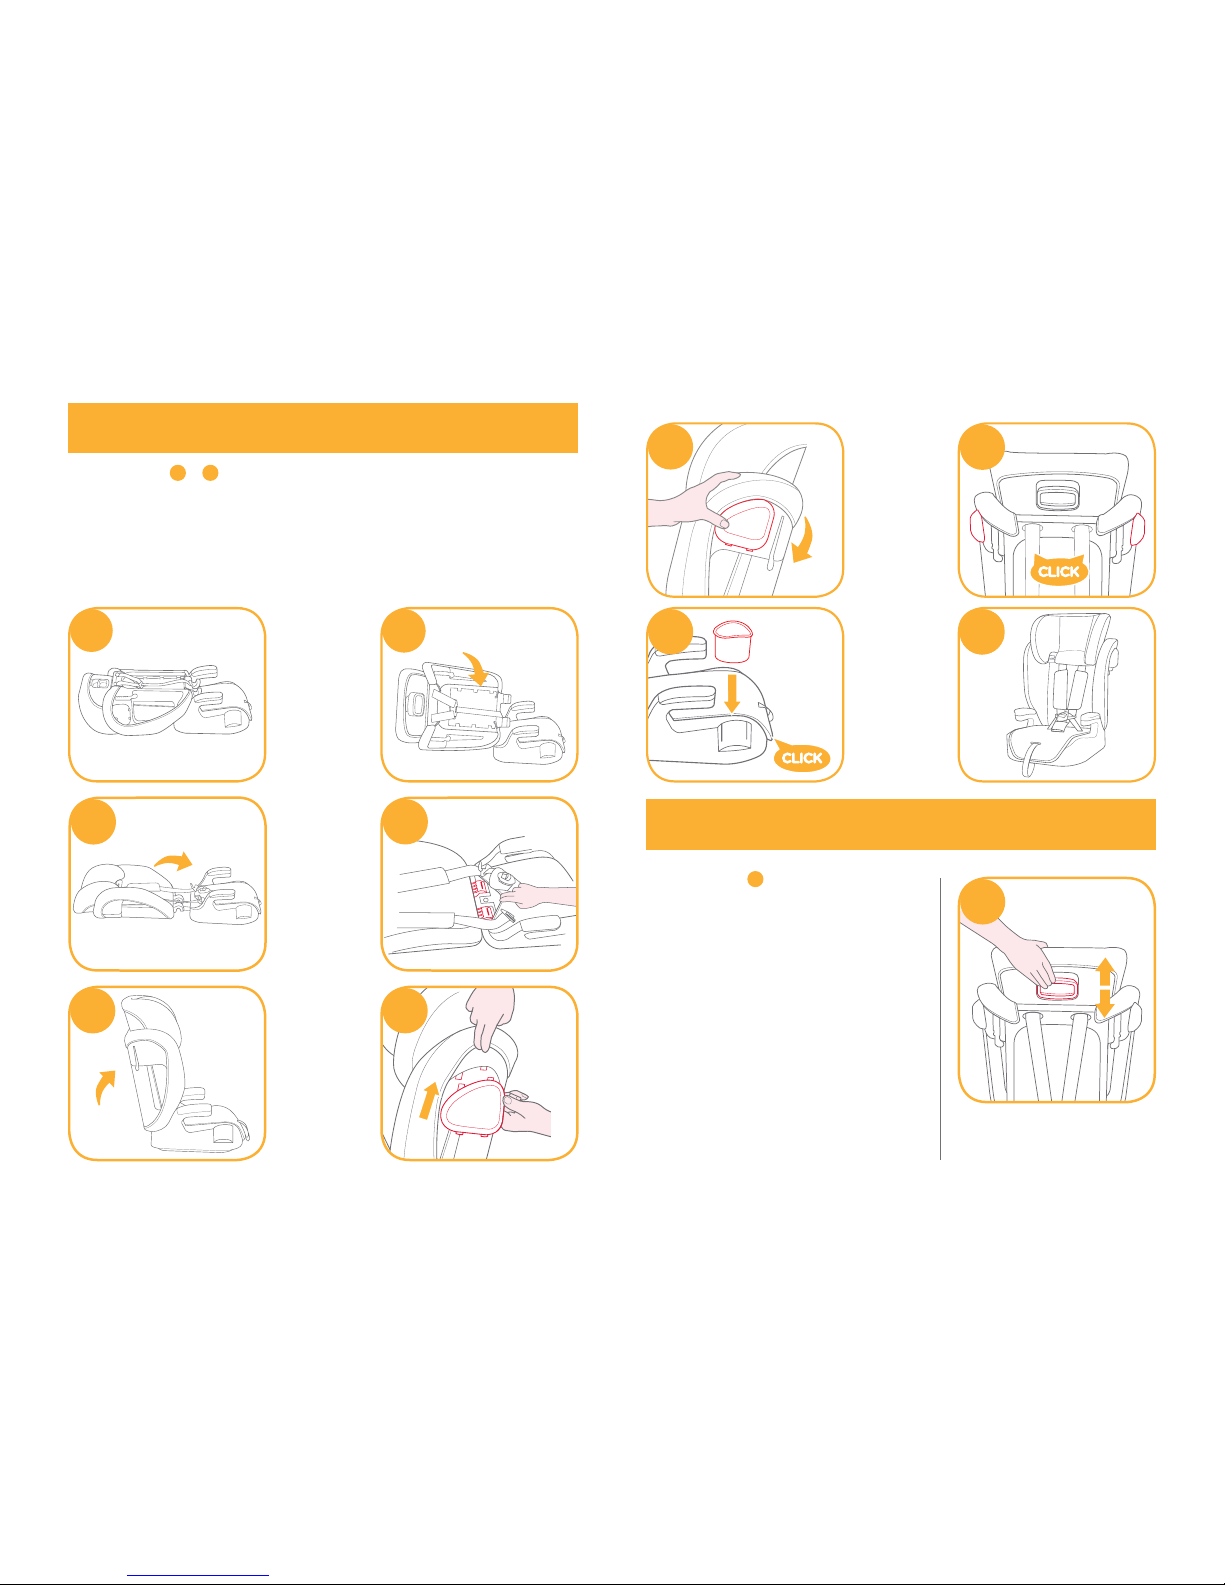
see images 1 -
10
! Must open the side impact shield plastic to protect the child
more safely.
! Make sure that no part of the seat covering interferes when
attaching backrest to the base.
1
2
Booster Assembly
3
4
5
6
7
8
10
9
Height Adjustment – for Head Support
see images 11
1. Please adjust the head support
to proper height according to
the child's height.
2. Squeeze the head support
adjustment lever, meanwhile
pull up or push down the head
support until it snaps into one
of the 10 positions.
! Before adjusting the head
support height have your child
lean forward slightly.
11
Page 6

9 10
see images 12 -
14
1. According to different
requirements, there are 2
positions to which the crotch
harness can be adjusted.
Position 1: Smaller babies use
this position
12
-1
Position 2: Larger babies use
this position
12
-2
2. Pull the crotch harness out
and place it to be level.
3. Rotate the crotch harness
anchor to make the short side
forwards, then thread it
through the crotch harness
slot.
4. Rethread it through the slot
that is closest to child's crotch
from the front of the crotch
harness.
Adjust the Crotch Belts
2
2
3
1
2
3
1
1
17
see images 15 -
17
15 16
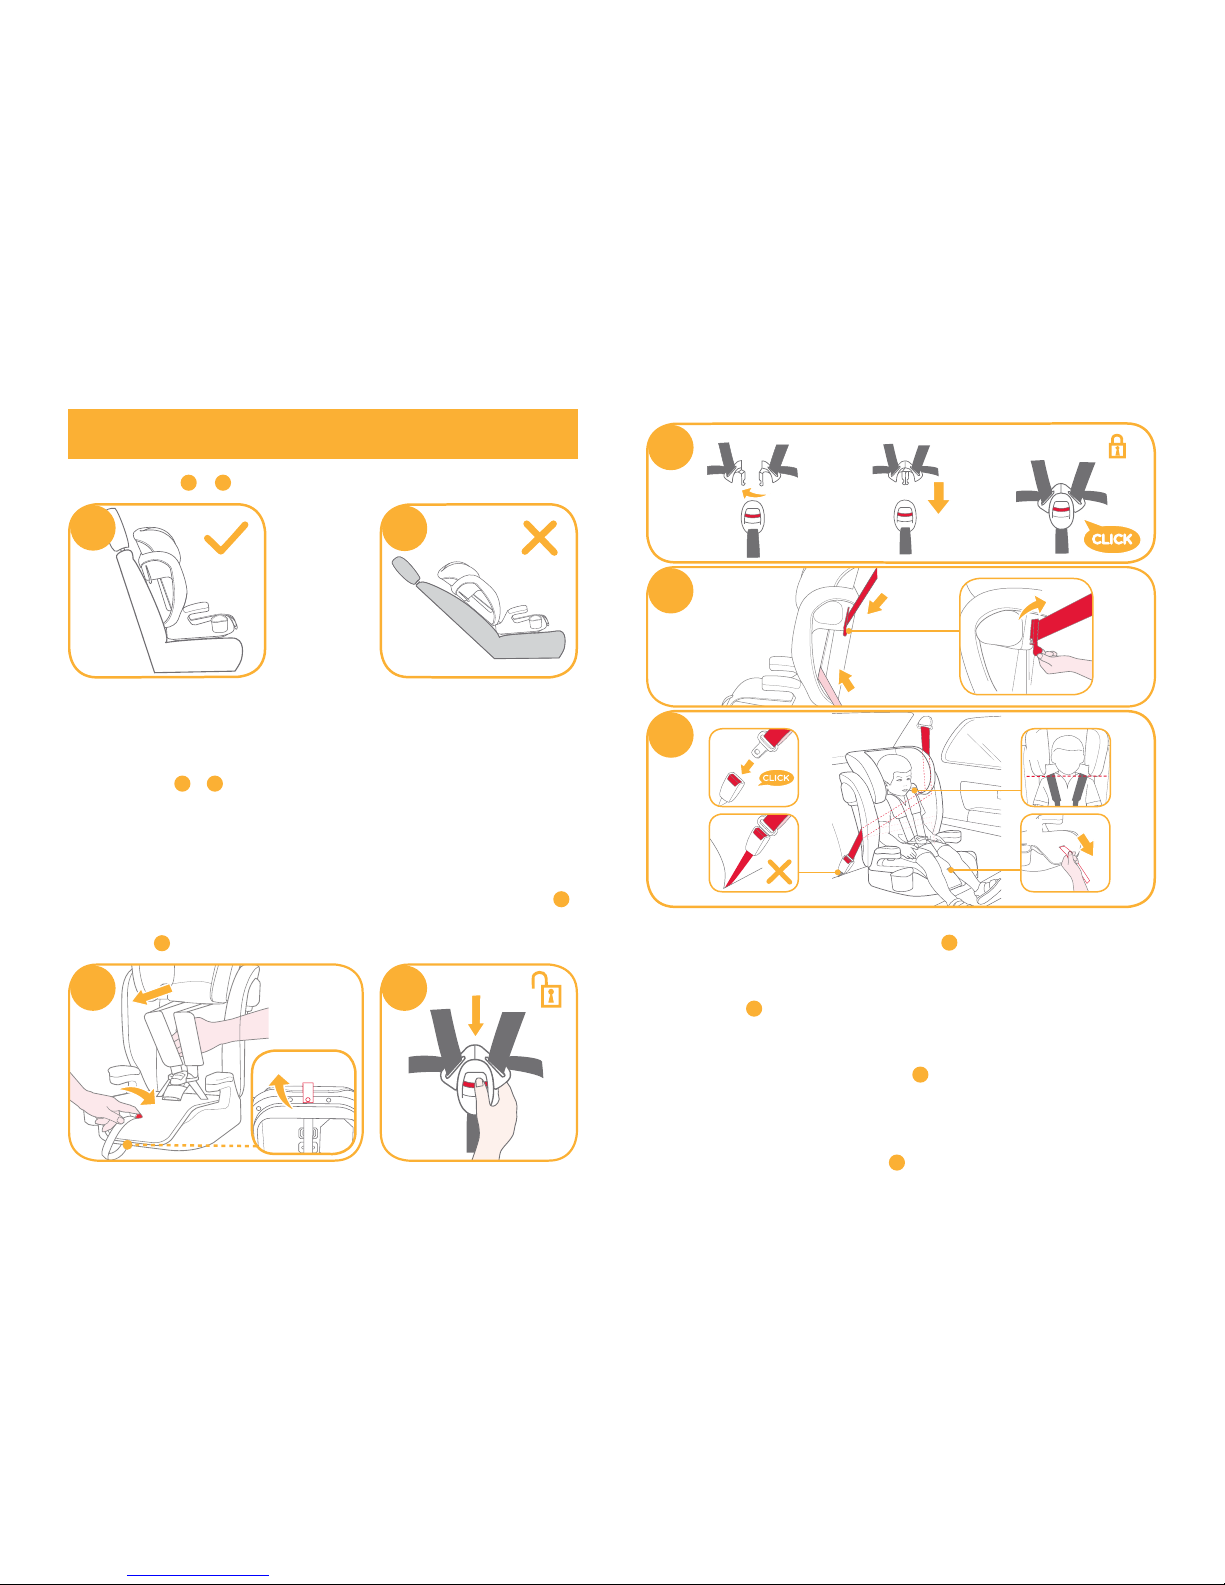
Concerns on Installation
13
1 2 3 4
14
12
2
1
Page 7
11 12
see images 18 -
48
Use Buckle
(Forward Facing Mode/ for Child between 9-18kg /
9 months – 3 years old)
see images 20 -
24
! DO not use the booster with the harness if the child’s
shoulders are above the highest slots in the backrest or if the
child’s weight exceeds 18 kg.
1. While pressing the harness adjustment button, pull the two
shoulder harnesses of the booster as far as they can go.
20
2. Unlock the buckle of the harnesses by pressing the red
button.
21
Installation with 3-point belt
18
19
21
20
22
23
1
2
3
24
4
3. Shoulder belt passes through Lock-off device, confirm the
Lock-off Device is pushed down.
23
4. The child restraint can not be used if the vehicle safety belt
buckle (female buckle end) is too long to anchor the booster
securely.
24
-2
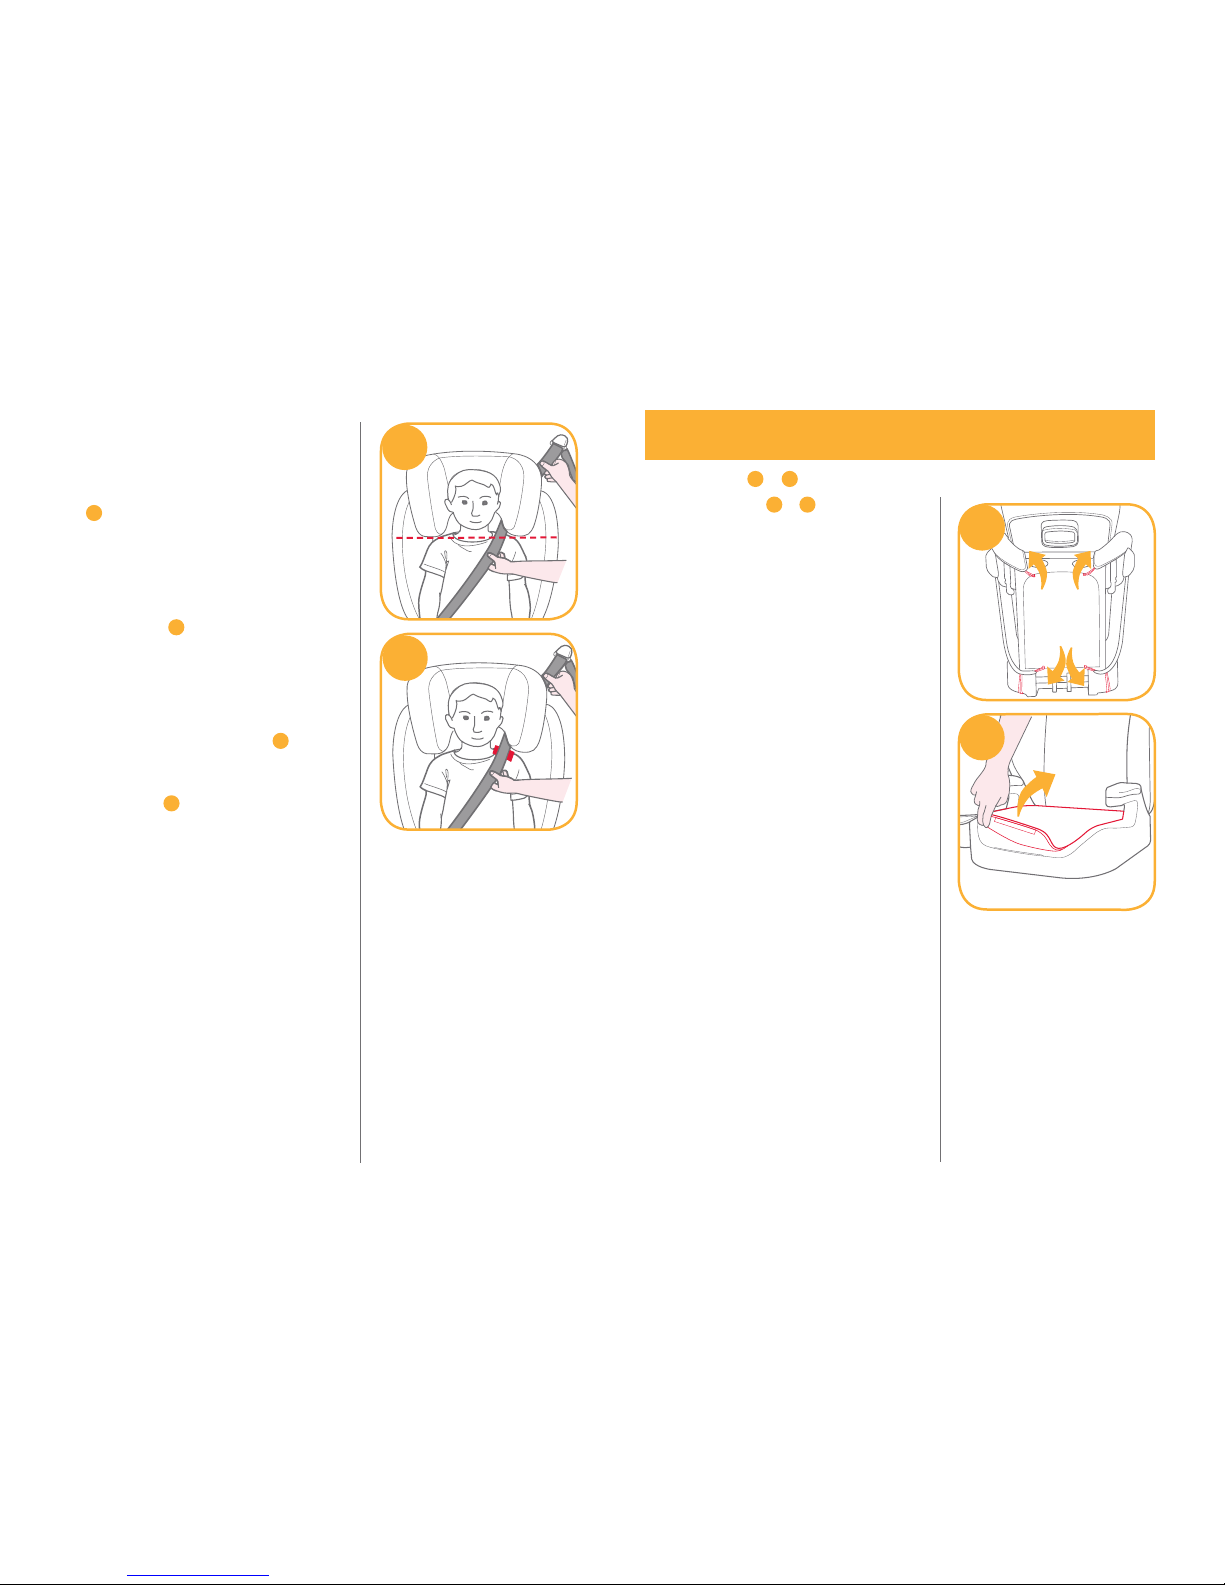
5. To ensure the correct head support height is obtained, the
bottom of the headrest MUST be even with the top of
child’s shoulders as shown in
24
-3
6. Pull down the adjustment webbing and adjust it to the proper
length so that your child is snugly secured. Make sure the
space between the child and the shoulder harness is about
the thickness of one hand.
24
-4
Page 8

13 14
With back support
(Forward Facing Mode/ for Child between 15-36kg /
3 – 12 years old)
see images 25 -
37
!
Store the shoulder strap cover, buckle/crotch strap cover
and harness straps in a safe place.
3
1
2
4
25 26
27
28
29 30
31
32
33
34
35
!
Pull the vehicle safety belt and pass through the belt path
35
, and then buckle it up.
35
-3
!
Position shoulder belt through the shoulder belt guide
shown in
35
-1
!
DO NOT position vehicle belt over top of the armrests. It
must pass underneath the armrests.
35
-2
Page 9
15 16
!
The booster can not be used if
the vehicle safety belt buckle
(female buckle end) is too long
to anchor the booster securely.
35
-4
!
It is very important to ensure
that any lap strap is worn low
down, so that the pelvis is
firmly engaged. The booster is
shown as
35
!
To ensure the correct head
support height is obtained, the
bottom of the headrest MUST
be even with the top of child’s
shoulders as shown in
36
and
the shoulder belt must be
positioned in the red zone as
shown in
37
!
Place the booster firmly
against the back of a forwardfacing vehicle seat equipped
with a lap/shoulder belt.
!
Have your child sit in the
booster with their back flat
against the back of the
booster.
!
If the belt lays across the
child's neck, head or face,
readjust head support height.
!
Belt must not be twisted.
36
37
see images
38
-
39
!
Please refer
25
- 34 to remove
shoulder strap cover, buckle/
crotch strap cover and harness
straps, and keep them properly.
!
To refit the seat pad simply
reverse the steps above.
39
Detach Soft Goods
38
Page 10

17 18
!
Please wash the soft goods and inner padding with cold
water under 30°C.
!
Do not iron the soft goods.
!
Do not bleach or dry clean the soft goods.
!
Do not use undiluted neutral detergent, gasoline or other
organic solvent to wash the booster. It may cause damage
to the booster.
!
Do not twist the soft goods and inner padding to dry with
great force. It may leave the soft goods and inner padding
with wrinkles.
!
Please hang dry the soft goods and inner padding in the
shade.
!
Please remove the booster from the vehicle seat if not in
use for a long period of time. Put the booster in a cool, dry
place and somewhere your child cannot access it.
Care and Maintenance
NOTE
Page 11

20
Bem-vindo a Joie™
Parabéns por ter se tornado parte da família Joie! É um prazer fazer
parte da sua viagem com seu/sua filho/a. Durante a viagem com a série de reforços Joie elevate
TM
você está usando um reforço do grupo
de segurança 1/2/3 auxiliar de alta qualidade, totalmente certificado.
Este produto é indicado para uso infantil de crianças com peso de 9-36
kg (aproximadamente entre 9 meses – 12 anos). Leia atentamente este
manual e siga cada passo para uma viagem confortável e a melhor proteção para o seu filho/a sua filha.
Confirmar
Este reforço é aprovado pelo regulamento UN ECE 44, série 04 de
alterações.
Este reforço pode ser instalado usando um cinto de segurança de 3
pontos retrátil para adultos, aprovado pelo regulamento UNECE 16 ou
outros regulamentos equivalentes.
Reforço
! IMPORTANTE: GUARDE PARA REFERÊNCIA FUTURA. LEIA COM ATENÇÃO.
Guarde o manual de instruções no
compartimento de armazenamento
na parte inferior do reforço como na
figura à direita.
PT
Lista de peças
Certifique-se de que todas as peças estão disponíveis antes da montagem.
Se alguma parte estiver faltando, entre em contato com o representante
local. Não são necessárias ferramentas para a montagem.
1 Suporte de cabeça
2 Suporte inferior das costas
3 Apoio de braço
4 Rede de ajuste
5 Fivela
6 Capa da correia do ombro
7 Alavanca de ajuste do suporte de cabeça
8 Correia de ombro
9 Suporte de copo
10 Proteção de impacto lateral
1
2
3
7
8
5
4
6
9
10
Page 12

21 22
ADVERTÊNCIA
!
Tenha cuidado ao localizar e instalar o reforço de
modo que não fique preso por um assento móvel
ou na porta do veículo.
!
Este retorço é indicado APENAS para crianças
com 9-36 kg (aproximadamente 9 meses-12 anos
de idade ou abaixo).
!
As correias da cadeira e cinto de segurança do
veículo devem estar apertados e não retorcidos.
!
Depois de colocar seu filho neste reforço, o cinto de
criança deve ser utilizado corretamente para garan
tir que qualquer correia de colo seja usada para
baixo de modo que a pelvis fique firmemente presa.
!
Substitua o reforço após um acidente de qualquer
tipo. Um acidente pode causar danos invisíveis ao
reforço.
!
NÃO utilize um reforço se houver peças danificadas ou perdidas. NÃO use um cinto de segurança
cortado, desgastado ou danificado.
!
O reforço pode se tornar muito quente se for
mantido sob temperatura elevada. O contato com
essas peças pode queimar a pele do seu filho.
Toque sempre na superfície de qualquer metal ou
peças de plástico antes de colocar seu filho no
reforço.
!
Nunca deixe a criança sem vigilância com este
reforço.
ADVERTÊNCIA
!
Não usar corretamente este reforço, aumenta o
risco de lesões graves ou morte em uma curva
acentuada, parada súbita ou acidente.
!
NÃO utilize este reforço sem as partes macias.
!
As partes macias não devem ser substituídas por
qualquer uma, a não as recomendadas pelo
fabricante,pois as partes macias constituem uma
parte integral do desempenho do reforço.
!
NÃO utilize qualquer pontos de contato de susten-
tação de carga além dos descritos nas instruções
e marcados no reforço.
!
NUNCA deixe bagagem ou outros objetos não
seguros em um veículo para evitar provocar
ferimentos em caso de colisão.
!
NÃO utilize em qualquer configuração que não
seja a mostrada nas instruções.
!
De acordo com as estatísticas de acidentes, as
crianças estão mais seguras se sentar com segurança no banco de trás do veículo, ao invés de
sentar-se no no banco da frente. Para um veículo
com airbag frontal, consulte o manual do proprietário do veículo e as instruções para a instalação
do reforço.
Page 13

23 24
ADVERTÊNCIA
!
NUNCA passe este reforço para outra pessoa sem
antes também fornecer este manual.
!
NUNCA deixe um reforço solto em seu veículo.
Um reforço solto pode ser jogado aleatoriamente
ao redor e ferir os ocupantes em uma curva
acentuada, parada súbita ou acidente. Remova-o
ou certifique-se de que está bem preso com o
cinto no veículo.
!
NÃO modifique o seu reforço ou use acessórios ou
peças fornecidas por outros fabricantes.
!
NUNCA use um reforço de segunda mão ou cujo
histórico seja desconhecido.
!
NÃO coloque o reforço voltado para a parte
traseira do veículo.
!
Para evitar queimaduras, nunca coloque líquidos
quentes no suporte para copos do seu reforço.
!
NÃO deixe seu filho em roupas enroladas quando
usar este reforço voltado para frente, pois isso
pode impedir que seu filho seja correta e firmemente preso pela correia de ombro e entre as
coxas.
Emergência
Em caso de emergência ou acidentes, é importante aplicar
primeiro-socorro ao seu filho e buscar tratamento médico
imediatamente.
Informações do produto
Leia todas as instruções deste manual antes de utilizar o
produto. Se tiver dúvida, consulte o fabricante ou o vendedor
do reforço.
1. Este é um reforço de segurança infantil universal. Ele
foi aprovado pelo regulamento 44 da UN ECE, série de
alterações 04, para uso geral em veículos e se ajustará em
praticamente em todos os assentos de veículos.
2. Pode fazer um ajuste correto se o fabricante do veículo
incluir no manual do veículo que o veículo pode suportar o
tipo universal neste grupo etário.
3. Este reforço foi classificado como universal sob condições
mais estringentes do que aquelas aplicadas aos designs
anteriores que não levam este aviso.
Produto Reforço
Adequado para Crianças com 9-36 kg
(aproximadamente 9 meses - 12 ano)
Grupo de massa Grupo 1/2/3
Materiais Plásticos, metal, tecido
N.º de patente Patentes pendentes
Page 14

25 26
consulte as imagens 1 -
10
! Abra o plástico de proteção contra impactos para proteger a
criança de forma mais segura.
! Certifique-se de que nenhuma parte do revestimento do
banco interfira quando anexar o encosto à base.
1
2
Montagem do reforço
3
4
5
6
7
8
10
9
Ajuste de altura – Suporte para cabeça
consulte as imagens 11
1. Ajuste o suporte de cabeça na
altura apropriada de acordo
com a altura da criança.
2. Aperte a alavanca de ajuste do
suporte de cabeça ao puxar ou
empurrar o suporte de cabeça
até que se encaixe em uma
das 10 posições.
! Antes de ajustar a altura do
apoio de cabeça, coloque seu
filho inclinado ligeiramente
para a frente.
11
Page 15
27 28
consulte as imagens 12 -
14
1. De acordo com diferentes
requisitos, existem 2 posições
que a correia de coxa pode ser
ajustado.
Posição 1: Bebês pequenos
usam esta posição
12
-1
Posição 2: Bebês maiores
usam esta posição
12
-2
2. Puxe a correia de coxa para
fora e o coloque-a no nível.
3. Gire a âncora do arnês da
correia de coxa para encurtar
o lado para a frente e depois
passe-o através da ranhura da
correia da coxa.
4. Passe-o novamente através da
ranhura que é mais próxima da
coxa da criança da frente da
correia da coxa.
Ajuste das correias de coxa
2
2
3
1
2
3
1
1
17
consulte as imagens 15 -
17
15 16
Observar ao instalar
13
1 2 3 4
14
12
2
1
Page 16

29 30
consulte as imagens 18 -
48
Usar a fivela
(Modo de frente/para criança entre 9-18 kg / 9
meses – 3 anos de idade)
consulte as imagens 20 -
24
! Não use o reforço com a correia se os ombros da criança
ficar acima da ranhura mais alta no encosto ou se o seu
peso for superior a 18 kg.
1. Ao pressionar o botão de ajuste do cinto, puxe os dois
cintos dos ombros do reforço até onde for possível.
20
2. Desbloqueie o fecho dos cintos pressionando o botão
vermelho.
21
Instalação com cinto de 3 pontos
18
19
21
20
22
23
1
2
3
24
4
Page 17

31 32
25 26
27
28
29 30
3. A correia de ombro passa através do dispositivo de
destravamento. Verifique se o dispositivo de destravamento
esteja pressionado.
23
4. O sistema de retenção de criança não pode ser usado se a
fivela da correia de segurança do veículo (estremidade
fêmea da fivela) for muito longa para ancorar o reforço com
segurança.
24
-2
5. Para garantir que a altura do apoio correta da cabeça seja
obtida, a parte inferior do encosto de cabeça DEVE ser a
mesma que a parte superior dos ombros da criança, como
mostrado em
24
-3
6. Puxe a rede de ajuste e ajuste-a no comprimento
apropriado de forma que seu filho fique preso
corretamente. Certifique que o espaço entre a criança e a
correia de ombro é de aproximadamente a espessura de
uma mão.
24
-4
Com suporte de costas
(Modo voltado para frente/para criança entre 15-36
kg / 3 – 12 anos de idade)
consulte as imagens 25 -
37
!
Guarde a capa da correia de ombro, fivela/capa da correia
de coxa e correias de arnês em um lugar seguro.
31
32
Page 18

33 34
3
1
2
4
33
34
35
!
Puxe o cinto de segurança do veículo e passe pelo trajeto
do cinto
35
e depois prenda-o.
35
-3
!
Posicione a correia do ombro através da guia conforme
mostrado em
35
-1
!
NÃO coloque o cinto do veículo por cima dos braços do
assento. Ele deve passar embaixo dos braços do assento.
35
-2
!
O reforço não pode ser usado se a fivela do cinto de
segurança do veículo (extremidade fêmea da fivela) for
muito longo para ancorar a base com segurança.
35
-4
!
É muito importante garantir que qualquer correia de colo
seja usada embaixo, de modo que a pélvis fique presa
firmemente. O reforço é exibido em
35
!
Para garantir que a altura do
encosto de cabeça correta
seja obtida, a parte inferior do
encosto de cabeça DEVE ser a
mesma da parte superior dos
ombros da criança, como
mostrado em
36
e a correia de
ombro deve ficar posicionada
na zona vermelha coimo
exibido em
37
!
Coloque um reforço
firmemente contra a traseira de
um banco do veículo virado
para a frente equipado com um
cinto subabdominal/ombro.
!
Sente seu filho no reforço com
suas costas retas contra o
reforço.
!
Se o cinto ficar atravessado no
pescoço da criança, cabeça
ou o rosto, reajuste a altura do
apoio da cabeça.
!
O cinto não deve ficar
retorcido.
36
37
Page 19

35 36
consulte as imagens
38
-
39
!
Consulte
25
- 34 para remover a
capa da correia do ombro,
fivela/capa da correia de coxas
e correia do arnês e mantenhaos corretamente.
!
Para voltar a colocar a
almofada do assento
simplesmente inverta os
passos acima.
39
Separar as partes macias
38
!
Lave as partes macias e acolchoado interno com água fria
abaixo de 30°C.
!
Não passe a ferro as partes macias.
!
Não use água sanitária ou lavagem a seco nas partes
macias.
!
Não use detergente neutro não diluído, gasolina ou outro
solvente orgânico para lavar o reforço. Isso poderá causar
danos ao reforço.
!
Não retorça as partes macias e acolchoado interior para
secar com grande força. Poderá deixar as partes macias e
acolchoado interior com rugas.
!
Pendure as partes macias e acolchoado interior para secar
à sombra.
!
Retire o reforço do assento do veículo se ele não for
utilizado durante um longo período. Coloque o reforço em
um local seco e fresco e em algum lugar onde seu filho não
pode acessá-lo.
Cuidado e manutenção
Page 20

38
Bem-vindo a Joie™
¡Enhorabuena por haberse unido a la familia de Joie! Estamos encantados de formar parte de su viaje y del de su pequeño. Cuando viaje con
el asiento elevador de la serie elevateTM de Joie, estará utilizando un
asiento de alta calidad, seguro y totalmente certificado de Grupo 1/2/3.
Este producto es adecuado para niños con un peso de entre 9 y 36 kg
(aproximadamente con una edad de 9 meses a 12 años). Lea detenidamente este manual y siga cada paso para garantizar que su bebé viaje
cómodamente y esté protegido de la mejor manera posible.
Por favor, confirme lo siguiente
Este asiento elevador está aprobado por la serie de enmiendas de la
Norma Europea UN ECE 44. 04.
Este asiento elevador puede instalarse utilizando un cinturón retráctil
para adultos de 3 puntos de sujeción aprobado por la norma 16 de UN
ECE u otro estándar equivalente.
Asiento elevador
! IMPORTANTE: GUARDE ESTE MANUAL PARA FUTURAS CONSULTAS.
LEA DETENIDAMENTE ESTAS INSTRUCCIONES.
Guarde el manual de instrucciones en
el compartimento de almacenamiento
de la parte inferior del asiento elevador
como se muestra en la figura que aparece
a la derecha.
ES
Lista de piezas
Asegúrese de que están disponibles todas las piezas antes de montar el
producto. Si falta alguna pieza, póngase en contacto con su proveedor local.
No se necesita ninguna herramienta para el montaje.
1 Reposacabezas
2 Soporte del respaldo inferior
3 Reposabrazos
4 Cincha de ajuste
5 Hebilla
6 Protector de la correa para los
hombros
7 Palanca de ajuste del reposacabezas
8 Correa de los hombros
9 Sujetavasos
10 Placa de protección contra impacto lateral
1
2
3
7
8
5
4
6
9
10
Page 21

39 40
ADVERTENCIA
!
Tenga cuidado para ubicar e instalar el asiento
elevador de forma que no pueda quedar engancha
-
do por un asiento movible o una puerta del vehículo.
!
Este asiento elevador está diseñado para que lo
utilicen ÚNICAMENTE niños con un peso de entre
9 y 36 kg (aproximadamente con una edad de 9
meses a 12 años o menores de esta edad).
!
Apriete, sin retorcer, las correas del sistema de
sujeción del bebé y del asiento del vehículo.
!
Una vez colocado el niño en este asiento elevador,
deberá utilizar correctamente el cinturón de
seguridad y asegurarse de que ninguna correa de
seguridad quede demasiado baja, de forma que la
pelvis quede firmemente sujeta.
!
Sustituya el asiento elevador después de que se
haya producido cualquier tipo de accidente. Un
accidente puede provocar daños en el asiento
elevador que no se pueden ver a simple vista.
!
NUNCA utilice un asiento elevador si está dañado
o si falta alguna de sus piezas. NO utilice un
cinturón de asiento de vehículo que esté dañado,
desgastado o cortado.
!
El asiento elevador puede alcanzar temperaturas
muy elevadas si queda expuesto a la luz solar. El
contacto con dichas piezas puede quemar la piel
de su hijo. Toque siempre la superficie de cualquier pieza de plástico o metal antes de colocar a
su hijo dentro del asiento elevador.
ADVERTENCIA
!
Si no utiliza de forma adecuada este asiento eleva-
dor, aumentará el riesgo de sufrir graves lesiones
o, incluso, la muerte en curvas pronunciadas,
frenazos o colisiones.
!
NO utilice este asiento elevador sin el acolchado.
!
El acolchado no deberá sustituirse por uno que no
esté recomendado por el fabricante, ya que el
acolchado constituye una parte esencial del
funcionamiento del asiento elevador.
!
NO utilice ningún punto de contacto de soporte de
carga distinto a los que se describen en las instrucciones y aparecen en el asiento elevador.
!
NUNCA deje equipaje u otros objetos sueltos
dentro de un vehículo, ya que podrían provocar
lesiones en caso de colisión.
!
NO utilice ninguna configuración que no se espe-
cifique en estas instrucciones.
!
Según las estadísticas de accidentes, los niños
están más seguros cuando están sujetos de forma
adecuada en los asientos traseros de los vehículos, en lugar de en los asientos delanteros. Para
un vehículo con un airbag delantero para el copiloto, consulte el manual de propietario de su
vehículo, además de estas instrucciones, para
instalar un asiento elevador.
!
NUNCA deje a su hijo sin supervisión en este
asiento elevador.
Page 22

41 42
ADVERTENCIA
!
NUNCA entregue este asiento elevador a otra
persona sin entregarle también este manual.
!
NUNCA deje un asiento elevador sin fijarlo de
forma segura al vehículo.
Un asiento que no esté sujeto puede ser lanzado
por los aires y dañar a los ocupantes en curvas
pronunciadas, frenazos o colisiones. Sáquelo o
asegúrese de que está firmemente sujeto con el
cinturón del vehículo.
!
NO modifique el asiento elevador ni utilice accesorios o piezas suministradas por otros fabricantes.
!
NUNCA utilice un asiento elevador de segunda
mano o uno del que desconozca su procedencia.
!
NO coloque el asiento elevador orientado hacia la
parte trasera del vehículo.
!
Para evitar quemaduras, nunca coloque líquidos
calientes en el sujetavasos del asiento elevador.
!
NO coloque a su hijo en pañales cuando utilice
este asiento elevador orientado hacia adelante; ya
que podría provocar que la sujeción del niño,
mediante los arneses de los hombros y los muslos, no sea firme y segura.
Emergencia
En caso de emergencia o accidente, es muy importante que su
hijo reciba primeros auxilios y tratamiento médico de
inmediato.
Información del producto
Lea todas las instrucciones incluidas en este manual antes de
utilizar este producto. En caso de duda, consulte al fabricante
del asiento elevador o al distribuidor.
1. Este asiento elevador es un dispositivo de sujeción para
niños "Universal". Está aprobado por la serie de enmiendas
de la Norma Europea UN ECE 44. 04 para el uso general
en vehículos y se ajusta a la mayoría de los asientos de
vehículos, aunque no a todos.
2. Hay muchas posibilidades de que se ajuste correctamente
si el fabricante del vehículo indica en el manual del vehículo
que se puede utilizar un dispositivo de sujeción para niños
‘Universal’ en dicho vehículo con niños que pertenezcan a
este grupo de edades.
3. Este asiento ha sido clasificado como ‘Universal’ bajo unas
condiciones más estrictas que las que se han aplicado a los
diseños anteriores que no contienen este aviso.
Producto asiento elevador
Adecuado para niños con un peso de 9 a 36 kg
(aproximadamente de 9 meses a 12 años de edad)
Grupo de masa grupo 1/2/3
Materiales plástico, metal, tela
N.º de patente pendiente de patente
Page 23

43 44
Consulte las imágenes 1 -
10
! Abra el plástico de la placa de protección contra impacto
lateral para que su hijo esté más seguro
!
Asegúrese de que no obstaculice ninguna parte del
recubrimiento del asiento cuando monte el respaldo en la base.
1
2
Montaje del asiento
3
4
5
6
7
8
10
9
Ajuste de la altura – para el reposacabezas
Consulte las imágenes 11
1.
Ajuste el reposacabezas de
forma que la altura sea la
correcta, según la altura del niño.
2.
Presione la palanca de ajuste
del reposacabezas, al mismo
tiempo que empuja hacia arriba
o hacia abajo el reposacabezas
hasta que quede fijado en una
de las 10 posiciones.
! Antes de ajustar la altura del
reposacabezas, coloque al
niño ligeramente hacia
adelante.
11
Page 24

45 46
Consulte las imágenes 12 -
14
1. Según las distintas
necesidades, el arnés de la
pelvis puede ajustarse en 2
posiciones.
Posición 1: Esta posición se
utiliza para los bebés más
pequeños
12
-1
Posición 2: Esta posición se
utiliza para los bebés más
grandes
12
-2
2. Saque el arnés de la pelvis y
colóquelo para nivelarlo.
3. Gire el gancho del arnés de la
pelvis de forma que la parte
corta quede orientada hacia
adelante y, a continuación,
pásela por la ranura del arnés
de la pelvis.
4. Vuelva a pasarla por la ranura
más cercana a la pelvis del
niño desde la parte delantera
del arnés de la pelvis.
Ajuste de los cinturones de la pelvis
2
2
3
1
2
3
1
1
17
Consulte las imágenes
15
-
17
15 16
Consideraciones acerca de la instalación
13
1 2 3 4
14
12
2
1
Page 25

47 48
Consulte las imágenes
18
-
48
Uso de la hebilla
(Modo orientado hacia adelante/para niños con
un peso de entre 9 y 18 kg/de 9 meses a 3 años de
edad)
consulte as imagens 20 -
24
! NO utilice el asiento elevador con el arnés si los hombros
del niño están por encima de las ranuras más altas del
respaldo o si el niño pesa más de 18 kg.
1. Mientras presiona el botón de ajuste del arnés, tire tanto
como pueda de los dos arneses de los hombros del
asiento.
20
2. Desbloquee la hebilla de los arneses presionando el botón
rojo.
21
3. El cinturón de los hombros deberá pasar por el dispositivo
de bloqueo; asegúrese de que el dispositivo de bloqueo
esté apretado.
23
Instalación con cinturón de 3 puntos de sujeción
18
19
21
20
22
23
1
2
3
24
4
Page 26

49 50
25 26
27
28
29 30
4. El control del niño no puede utilizarse si la hebilla de
seguridad del vehículo (extremo hembra de la hebilla) es
demasiado larga para anclar con seguridad el asiento
elevador.
24
-2
5. Para asegurarse de que la altura del reposacabezas es
correcta, la parte inferior del reposacabezas DEBE llegar
hasta la parte superior de los hombros del niño, tal y como
se indica en las imágenes
24
-3
6. Empuje hacia abajo la cincha de ajuste y ajústela de forma
que la longitud sea la adecuada para garantizar que su hijo
quede sujeto cómodamente. Asegúrese de que el espacio
entre el niño y el arnés de los hombros sea el del grosor de
una mano más o menos.
24
-4
Con el soporte del respaldo
(Modo orientado hacia adelante/para niños con un
peso de entre 15 y 36 kg/de 3 a 12 años de edad)
Consulte las imágenes 25 -
37
!
Guarde el protector de la correa para los hombros, el
protector de la correa para la pelvis/hebilla y las correas del
arnés en un lugar seguro.
31
32
Page 27

51 52
3
1
2
4
33
34
35
!
Tire del cinturón de seguridad del vehículo siguiendo la
trayectoria del cinturón
35
y, a continuación, abróchelo
35
-3
!
Pase el cinturón de los hombros a través de la guía del
cinturón de los hombros como se indica en la imagen
35
-1
!
NO coloque el cinturón del vehículo sobre la parte superior
de los reposabrazos. Debe pasar por debajo de los
reposabrazos.
35
-2
!
El asiento elevador no puede utilizarse si la hebilla de
seguridad del vehículo (extremo hembra de la hebilla) es
demasiado larga para anclar con seguridad el asiento
elevador.
35
-4
!
Es muy importante que se asegure de que ninguna correa
de seguridad quede demasiado baja, de forma que la pelvis
quede firmemente sujeta. El aspecto del asiento elevador
será el de la imagen
35
!
Para asegurarse de que la
altura del reposacabezas es
correcta, la parte inferior del
reposacabezas DEBE llegar
hasta la parte superior de los
hombros del niño, tal y como
se indica en la imagen
36
y el
cinturón de los hombros debe
estar colocado en la zona roja,
como se muestra en la imagen
37
!
Coloque el asiento elevador
firmemente contra el respaldo
de un asiento de vehículo
equipado con un cinturón para
los hombros/cintura orientado
hacia adelante.
!
Coloque a su hijo sentado en
el asiento elevador con la
espalda recta contra el
respaldo del asiento elevador.
!
Si el cinturón queda a la altura
del cuello, la cabeza o la cara
del niño, vuelva a ajustar la
altura del reposacabezas.
!
No retuerza el cinturón.
36
37
Page 28

53 54
Consulte las imágenes
38
-
39
!
Consulte las imágenes
25
- 34
para quitar el protector de la
correa para los hombros, el
protector de la correa para la
pelvis/hebilla y las correas del
arnés, y guárdelos de forma
adecuada.
!
Para volver a colocar el
acolchado del asiento,
simplemente repita los pasos
anteriores a la inversa.
39
Desmontaje del acolchado
38
!
Lave el acolchado y el cojín interior con agua fría a menos
de 30 °C.
!
No planche el acolchado.
!
No limpie en seco ni utilice lejía para lavar el acolchado.
!
No utilice detergentes neutros sin diluir, gasolina u otros
disolventes orgánicos para limpiar el asiento. Si lo hace,
podría dañar el asiento.
!
No retuerza con demasiada fuerza el acolchado ni el cojín
interior cuando los seque. Podrían quedar arrugas en el
acolchado y el cojín interior.
!
Deje secar el acolchado y el cojín interior en un lugar
alejado de la luz directa del sol.
!
Retire este asiento del asiento elevador del vehículo cuando
no vaya a utilizarlo durante un periodo prolongado de
tiempo. Coloque el asiento elevador en un lugar fresco y
seco donde su hijo no pueda acceder a él.
Cuidados y mantenimiento
Page 29

56
Joie™ En el resto de países
Bienvenue dans la famille Joie ! Nous sommes très heureux de pouvoir
faire partie de votre voyage avec votre petit. Le réhausseur Joie série
elevateTM est un réhausseur Groupe 1/2/3 de haute qualité et à la sécurité entièrement certifiée. Ce produit est adapté à une utilisation avec
des enfants de 9 à 36 kg (environ entre 9 mois et 12 ans). Veuillez lire
ce manuel et suivre chaque étape pour assurer le confort et la meilleure
protection possible pour votre enfant.
Veuillez confirmer
Ce réhausseur est approuvé par la série d’amendements 44, 04 de la
réglementation UN ECE.
Ce réhausseur peut être installé en utilisant une ceinture de sécurité
pour adulte à 3 points homologuée selon le règlement UN ECE n° 16 ou
d’autres normes équivalentes.
Réhausseur
! IMPORTANT : À CONSERVER POUR RÉFÉRENCE FUTURE. VEUILLEZ
LIRE ATTENTIVEMENT.
Veuillez garder le manuel d’instructions
dans le compartiment de rangement en
bas du réhausseur, comme indiqué dans
la figure à droite.
FR
Liste des pièces
Assurez-vous que toutes les pièces sont disponibles avant le montage.
Si une pièce est manquante, veuillez contacter votre revendeur local. Le
montage ne nécessite aucun outil.
1 Appui-tête
2 Support de bas de dos
3 Accoudoir
4 Toile d'ajustement
5 Boucle
6 Housse de la sangle pour épaules
7 Levier d'ajustement du support de tête
8 Sangle pour épaules
9 Porte-gobelet
10 Protecteur d'impact latéral
1
2
3
7
8
5
4
6
9
10
Page 30

57 58
AVERTISSEMENT
!
Prenez soin de choisir l’emplacement et d’installer
le réhausseur de sorte qu’il ne soit pas susceptible
de se coincer sous un siège ou dans une porte du
véhicule.
!
Ce réhausseur est conçu UNIQUEMENT pour les
enfants de 9 à 36 kg (environ entre 9 et 12 ans ou
moins).
!
Les sangles du siège de bébé et du siège de véhicule doivent être serrées, sans torsion.
!
Une fois votre enfant placé dans ce siège
réhausseur, la ceinture de sécurité doit être utilisée
correctement, en vérifiant que les lanières à la taille
sont bien placées en bas, afin que le bassin soit
bien engagé.
!
Remplacez le réhausseur après un accident, quel
qu’il soit. Un accident peut causer des dommages
invisibles au réhausseur.
!
NE JAMAIS utiliser un réhausseur s’il comporte des
pièces endommagées ou manquantes. NE PAS
utiliser une ceinture de sécurité du véhicule si elle
est endommagée, coupée ou effilochée.
!
Le réhausseur peut devenir très chaud s’il est laissé
en plein soleil. Tout contact avec ces parties
chaudes peut brûler la peau de votre enfant. Tou
chez toujours les surfaces en métal ou en plastique
avant de mettre votre enfant dans le réhausseur.
!
Ne laissez JAMAIS votre enfant sans surveillance
avec ce réhausseur.
AVERTISSEMENT
!
Une mauvaise utilisation de ce réhausseur peut
augmenter le risque de blessures graves ou la
mort dans le cas d’un virage serré, d’un arrêt
brusque ou d’une collision.
!
NE PAS utiliser ce réhausseur sans les parties
souples.
!
Les pièces souples ne doivent pas être rempla-
cées par d’autres pièces que celles recommandées par le fabricant, Les pièces souples font
partie intégrante des performances du réhausseur.
!
NE PAS utiliser des points de contact avec charge
autres que ceux décrits dans les instructions et
marqués sur le réhausseur.
!
Ne laissez JAMAIS des bagages ou d’autres objets
non attachés dans un véhicule, ils sont susceptibles de causer des blessures dans le cas d’une
collision.
!
NE PAS utiliser toute autre configuration autre que
celles décrites dans les instructions.
!
Selon les statistiques d’accidents, les enfants sont
plus en sécurité s’ils sont retenus sur les sièges
arrière du véhicule, plutôt que les sièges avant.
Pour un véhicule avec un airbag de passager
avant, reportez-vous au manuel du propriétaire de
votre véhicule ainsi que les instructions pour
l’installation d’un réhausseur.
Page 31

59 60
AVERTISSEMENT
!
Ne donnez JAMAIS ce réhausseur à quelqu’un
d’autre sans aussi donner ce manuel.
!
Ne laissez JAMAIS un réhausseur non attaché
dans votre véhicule.
Un siège réhausseur non attaché peut être projeté
et peut blesser les occupants dans le cas d’un
virage serré, d’un arrêt brusque ou d’une collision.
Retirez-le ou assurez-vous qu’il est bien attaché
dans le véhicule.
!
NE PAS modifier votre réhausseur ou utiliser des
pièces ou des accessoires fournis par d’autres
fabricants.
!
Ne JAMAIS utiliser un réhausseur d’occasion ou
un réhausseur dont vous ne connaissez pas
l’origine.
!
NE PAS installer le réhausseur faisant face à
l’arrière de votre véhicule.
!
Pour éviter les brûlures, ne mettez jamais de
liquides chauds dans le porte-gobelet de votre
réhausseur.
!
NE mettez PAS de vêtements trop serrés à votre
enfant lors de l’utilisation de ce réhausseur en
mode face à la route, car cela pourrait empêcher
votre enfant d’être correctement attaché par le
harnais pour épaules et le harnais au niveau des
cuisses.
Urgence
En cas d'urgence ou d'accident, il est très important d'avoir
votre enfant pris en charge par les premiers secours et des
soins médicaux immédiatement.
Informations sur le produit
Veuillez lire toutes les instructions de ce manuel avant d'utiliser
ce produit. En cas de doute, veuillez consulter le fabricant du
réhausseur ou le magasin.
1. Ce réhausseur est un dispositif de retenue « universel ». Il est
approuvé par la réglementation UN ECE 44, amendements
de série 04, pour utilisation dans un véhicule et il sera
adapté à la plupart des sièges de voiture.
2. Un ajustement correct est probable si le fabricant a déclaré
dans le manuel du véhicule que le véhicule est capable
d’accepter un réhausseur « universel » pour ce groupe
d'âge.
3. Ce réhausseur a été classé comme « universel » dans des
conditions plus sévères que celles qui étaient appliquées
aux modèles antérieurs qui ne portaient pas cette étiquette.
Produit Réhausseur
Convient aux enfants de 9 à 36 kg
(environ 9 mois – 12 ans)
Groupe de masse Groupe 1/2/3
Matériaux Plastique, métaux, tissus
N° brevet Brevets en attente
Page 32

61 62
voir images 1 -
10
! Il faut ouvrir le plastique du protecteur d'impact latéral pour
protéger correctement l'enfant.
! Assurez-vous qu'aucune pièce de la housse de siège
n'interfère lors de la fixation du dossier à la base.
1
2
Assemblage du réhausseur
3
4
5
6
7
8
10
9
Réglage de la hauteur – pour support de tête
voir images 11
1. Veuillez ajuster le support de
tête à la bonne hauteur selon la
taille de votre enfant.
2. Appuyez sur le levier
d’ajustement du support pour
la tête tout en tirant sur le
support vers le haut ou le bas
pour le placer sur l’une des 10
positions.
! Avant de régler la hauteur du
support de tête, penchez
légèrement votre enfant en
avant.
11
Page 33

63 64
voir images 12 -
14
1. En fonction des différentes
exigences, le harnais pour
bassin peut être réglé sur 2
positions.
Position 1 : Les bébés plus
petits utilisent cette position
12
-1
Position 2 : Les bébés plus
grands utilisent cette position
12
-2
2. Retirez le harnais d'entrejambe
et placez-le de sorte qu'il soit
horizontal.
3. Faites tourner l'ancrage du
harnais d'entrejambe pour
passer le côté court vers
l'avant, puis enfilez-le dans la
fente pour le harnais
d'entrejambe.
4. Enfilez-le dans la fente la plus
proche de l'entrejambe de
l'enfant depuis l'avant du
harnais d'entrejambe.
Réglez les sangles d'entrejambe
2
2
3
1
2
3
1
1
17
voir images
15
-
17
15 16
Remarques au sujet de l'installation
13
1 2 3 4
14
12
2
1
Page 34

65 66
voir images
18
-
48
Utilisation de la boucle
(Mode face à la route/ pour les enfants entre 9 et 18
kg / de 9 mois à 3 ans)
voir images 20 -
24
! N’utilisez PAS le réhausseur avec le harnais si les épaules
de l’enfant sont au-dessus des fentes les plus hautes dans
le dossier ou si le poids de l’enfant dépasse 18 kg.
1. Tout en appuyant sur le bouton d'ajustement du harnais,
tirez les deux harnais d'épaules du réhausseur aussi loin
que possible.
20
2. Déverrouillez la boucle du harnais en appuyant sur le
bouton rouge.
21
3. La ceinture pour épaules passe à travers le dispositif de
verrouillage, confirmez que ce dernier est poussé vers le
bas.
23
Installation avec une ceinture 3 points
18
19
21
20
22
23
1
2
3
24
4
Page 35

67 68
25 26
27
28
29 30
4. Le siège de bébé ne peut pas être utilisé si la boucle de
ceinture de sécurité du véhicule (extrémité femelle de la
boucle) est trop longue pour retenir le réhausseur de façon
sûre.
24
-2
5. Pour garantir la hauteur correcte du support de tête, le bas
de l’appui-tête DOIT être même à la même hauteur que les
épaules de l'enfant comme indiqué dans
24
-3
6. Tirez sur la toile d'ajustement et ajustez-la à la bonne
longueur pour vous assurer que votre enfant est bien
attaché. Vérifiez que l'espace entre l'enfant et le harnais
pour épaules fait environ l'épaisseur d'une main.
24
-4
Avec support de dos
(Mode face à la route/ pour les enfants entre 15 et 36
kg / de 3 à 12 ans)
voir images 25 -
37
!
Stockez la housse de la sangle pour épaules, la housse de
boucle / sangle d'entrejambe et les sangles du harnais en
lieu sûr.
31
32
Page 36

69 70
3
1
2
4
33
34
35
!
Tirez sur la ceinture de sécurité du véhicule et faites-la
passer dans le chemin de ceinture
35
puis attachez-la.
35
-3
!
Mettez la ceinture d'épaule à travers le guide de la ceinture
d'épaule comme indiqué dans
35
-1
!
NE PAS faire passer la ceinture de sécurité du véhicule
au-dessus des accoudoirs. Elle doit passer sous les
accoudoirs.
35
-2
!
Le réhausseur ne peut pas être utilisé si la boucle de
ceinture de sécurité du véhicule (extrémité femelle de la
boucle) est trop longue pour retenir la base de façon sûre.
35
-4
!
Il est très important de s’assurer que les sangles sousabdominales sont portées au plus bas, afin que le bassin
soit bien engagé. Le réhausseur est présenté dans
35
!
Pour garantir la hauteur
correcte de l’appui-tête, le bas
de l’appui-tête DOIT être à la
même hauteur que les épaules
de l’enfant comme indiqué
dans
36
et la ceinture d'épaule
doit être placée dans la zone
rouge, comme indiqué dans
37
!
Placez fermement le
réhausseur contre le dossier
d'un siège de véhicule faisant
face à la route et muni d'une
ceinture de sécurité.
!
Faites asseoir votre enfant
dans le réhausseur avec son
dos à plat contre le dossier du
réhaus seur.
!
Si la ceinture s'étend à travers
le cou, la tête ou le visage de
l'enfant, réajustez la hauteur du
support de tête.
!
La ceinture ne doit pas être
tordue.
36
37
Page 37

71 72
voir images
38
-
39
!
Veuillez consulter
25
- 34 pour
retirer la housse de la sangle
pour épaules, la housse de
boucle / sangle d'entrejambe
et les sangles du harnais, et les
conserver correctement.
!
Pour remettre la partie souple
du siège, procédez comme
indiqué ci-dessus mais dans
l'ordre inverse.
39
Détacher les parties souples
38
!
Veuillez laver les parties douces souples et le rembourrage
intérieur avec de l’eau froide, à moins de 30 °C.
!
Ne pas repasser les parties souples.
!
Ne pas utiliser de javel ou nettoyer à sec les parties
souples.
!
N'utilisez pas de détergents neutres non dilués, de
l'essence ou d'autres solvants organiques pour laver le
réhausseur. Cela peut causer des dommages au
réhaus seur.
!
Lorsque vous les séchez, ne tordez pas les parties souples
et le rembourrage intérieur avec une trop grande force. Cela
peut endommager ou laisser des rides sur les parties
souples et le rembourrage intérieur.
!
Veuillez laisser sécher les parties souples et le rembourrage
interne à l'ombre.
!
Veuillez enlever le réhausseur du siège du véhicule s’il n’est
pas utilisé pendant une longue période. Placez le
réhausseur dans un endroit frais, sec et hors de portée de
votre enfant.
Entretien et maintenance
Page 38

74
Welkom bij Joie
™
Gefeliciteerd dat u nu lid bent van de Joie-familie! Het doet ons veel
genoegen om deel te kunnen uitmaken van uw reis met uw kleintje. Tijdens het reizen met het kinderstoeltje uit de Joie elevateTM -reeks gebruikt u een veilig en volledig gecertificeerd Groep 1/2/3-zitje van hoge
kwaliteit. Dit product is geschikt voor gebruik met kinderen met een
gewicht van 9 tot 36 kg (ongeveer 9 maanden tot 12 jaar). Lees deze
handleiding zorgvuldig en volg elke stap om voor een comfortabele rit
en de beste bescherming van uw kind te zorgen.
Bevestigen
Dit kinderstoeltje is goedgekeurd volgens UN ECE-richtlijn 44, reeks
amendementen 04.
U kunt dit stoeltje monteren met een intrekbare veiligheidsgordel met 3
punten voor volwassenen, goedgekeurd volgens UN ECE-regulering 16
of equivalente normen.
Stoeltje
! BELANGRIJK: BEWAREN VOOR LATER GEBRUIK. LEES DIT ZORGVULDIG DOOR.
Bewaar de handleiding in het bewaarvak
onderop het kinderstoeltje zoals rechts
is afgebeeld.
NL
Onderdelenlijst
Zorg dat alle onderdelen voor het opslaan droog zijn. Als er items ontbreken
of beschadigd zijn, kunt u contact opnemen met uw leverancier. Voor de
montage is geen gereedschap nodig.
1 Hoofdsteun
2 Steun voor onderrug
3 Armleuning
4 Instellen gordel
5 Gesp
6 Afdekking schouderriem
7 Instelhendel voor hoofdsteun
8 Schouderriem
9 Bekerhouder
10 Afscherming voor inslag opzij
1
2
3
7
8
5
4
6
9
10
Page 39

75 76
WAARSCHUWING
!
Zorg ervoor dat u het kinderstoeltje zo plaatst, dat
het niet klem kan raken door een verplaatsbare stoel
of in een deur van het voertuig.
!
Dit kinderstoeltje is UITSLUITEND ontworpen voor
een kind dat 9 tot 36 kg weegt (ongeveer 9 maanden
tot 12 jaar oud).
!
Alle riemen van het kinderzitje en de autostoel
moeten worden strakgetrokken maar niet gedraaid.
!
Nadat uw kind in dit kinderstoeltje is geplaatst, moet
u de veiligheidsriem correct gebruiken en ervoor
zorgen dat elke middelriem laag wordt gedragen
zodat het bekken goed vastzit.
!
Vervang het kinderstoeltje na een ongeluk van welke
soort dan ook. Een ongeluk kan onzichtbare schade
aan het kinderstoeltje aanbrengen.
!
Gebruik NOOIT een kinderstoeltje als dit beschadigde of ontbrekende onderdelen heeft. Gebruik
NOOIT een gesneden, gerafelde of beschadigde
veiligheidsgordel.
!
Het zitje in het kinderstoeltje kan heel heet worden
als het in de zon staat. Bij aanraking met deze
onderdelen kan de huid van uw kind verbranden.
Raak altijd het oppervlak van metalen of plastic
onderdelen aan voordat u uw kind in het kinder
-
stoeltje zet.
!
Laat uw kind NOOIT zonder toezicht achter met dit
kinderstoeltje.
WAARSCHUWING
!
Onjuist gebruik van dit kinderstoeltje vergroot de
kans op ernstig letsel of overlijden bij een scherpe
bocht, plotseling remmen of een botsing.
!
Gebruik dit kinderzitje NIET zonder de zachte
onderdelen.
!
Vervang de zachte onderdelen alleen door degene
die door de fabrikant worden aanbevolen, omdat
de zachte onderdelen een belangrijk onderdeel
vormen van de werking van het kinderzitje.
!
Gebruik GEEN lastdragende contactpunten dan
degene die in de aanwijzingen zijn beschreven en
die op het kinderstoeltje zijn aangegeven.
!
Laat NOOIT bagage of andere voorwerpen los
slingeren in een voertuig; de kans is groot dat ze
letsel veroorzaken bij een botsing.
!
NIET gebruiken in een configuratie die niet in de
instructies is afgebeeld.
!
Uit statistieken van ongelukken blijkt dat kinderen
veiliger zijn als ze goed vast zitten in een zittende
positie op de achterbank in plaats van op de
passagiersstoel voorin. Raadpleeg voor een
voertuig met airbag voor de passagier voorin, de
handleiding van uw voertuig en deze instructies
voor de installatie van het kinderstoeltje.
Page 40

77 78
WAARSCHUWING
!
Geef dit kinderstoeltje NOOIT aan iemand anders
zonder ook deze handleiding te geven.
!
Laat een kinderstoeltje NOOIT los staan in de auto.
Een los kinderstoeltje kan alle kanten uit geworpen
worden en kan de inzittenden verwonden bij een
scherpe bocht, plotseling remmen of een botsing.
Haal het weg of zorg ervoor dat het stevig vast zit
in het voertuig.
!
Pas het kinderstoeltje NIET aan en gebruik geen
accessoires of onderdelen die door andere fabrikanten geleverd zijn.
!
Gebruik NOOIT een tweedehands kinderstoeltje of
een waarvan u de afkomst niet kent.
!
Zet het kinderzitje NIET naar de achterkant van het
voertuig gericht.
!
Om brandwonden te voorkomen, nooit hete
vloeistoffen in de bekerhouders plaatsen.
!
Laat uw kind NIET in los omgeslagen kleding in dit
kinderzitje zitten in de baby- of peuterstand,
omdat uw kind hierdoor niet goed en stevig wordt
vastgehouden door de schouderriemen en de
riemen tussen de dijen.
Noodgeval
Bij een noodsituatie of een ongeluk is het heel belangrijk om
uw kind direct te laten verzorgen met eerste hulp en medische
behandeling.
Productinformatie
Lees alle aanwijzingen in deze handleiding voordat u het
product gebruikt. Neem in geval van twijfel contact op met de
fabrikant of de verkoper.
1. Dit kinderstoeltje is een 'Universeel'
kinderbeveiligingssysteem. Het is goedgekeurd volgens
UN ECE-regelgeving 44, 04-serie van amendementen, voor
algemeen gebruik in voertuigen, en het past op de meeste,
maar niet alle, autostoelen.
2. Een juiste pasvorm is waarschijnlijk als de autofabrikant
heeft gesteld in het autohandboek dat de auto een
'universeel' kinderstoeltje voor deze leeftijdsgroep kan
accepteren.
3. Dit kinderstoeltje is geclassificeerd als 'Universeel' onder
strengere omstandigheden dan die van toepassing waren op
eerdere ontwerpen die deze mededeling niet dragen.
Product Kinderstoeltje
Geschikt voor kind van 9-36 kg
(ongeveer 9 maanden – 12 jaar)
Masssagroep Groep 1/2/3
Materiaal Kunststoffen, metaal, geweven stoffen
Patent nr. Patent aangevraagd
Page 41

79 80
zie afbeeldingen
1
-
10
! De plastic bescherming tegen inslag opzij moet geopend zijn
om het kind beter te beschermen.
! Zorg ervoor dat bij het bevestigen van de rugsteun op de
voet geen onderdeel van de zitbekleding in de weg zit.
1
2
Montage kinderstoeltje
3
4
5
6
7
8
10
9
Hoogte-afstelling – voor hoofdsteun
zie afbeeldingen 11
1. Stel de hoofdsteun af op de
juiste hoogte overeenkomstig
de lengte van het kind.
2. Knijp in de hendel voor de
afstelling van de hoofdsteun en
trek tegelijkertijd de hoofdstuk
op of druk het omlaag tot het in
een van de 10 standen klikt.
! Laat uw kind iets naar voren
leunen voordat u de hoogte
van de hoofdsteun afstelt.
11
Page 42

81 82
zie afbeeldingen 12 -
14
1. Overeenkomstig de
verschillende eisen zijn er 2
standen waarin de kruisriemen
kunnen worden afgesteld.
Positie 1: kleinere baby's
gebruiken deze positie
12
-1
Positie 2: grotere baby's
gebruiken deze positie
12
-2
2. Trek de kruisriemen naar
buiten en plaats ze vlak.
3. Draai het anker van de
kruisriemen zodat de korte
kant naar voren komt en steek
het door de sleuf van de
kruisriemen.
4. Steek het nogmaals door de
sleuf die het dichtste bij het
kruis van het kind zit, vanaf de
voorkant van de kruisriemen.
De kruisriemen afstellen
2
2
3
1
2
3
1
1
17
zie afbeeldingen
15
-
17
15 16
Installatiekwesties
13
1 2 3 4
14
12
2
1
Page 43

83 84
zie afbeeldingen
18 -
48
Riem gebruiken
(Vooruitkijkende stand/voor kind tussen 9 en 18 kg /
9 maanden tot 3 jaar oud)
zie afbeeldingen 20 -
24
! Gebruik het kinderzitje NIET met de gordels als de
schouders van het kind boven de hoogste sleuven in de
rugleuning uitkomen of als het kind zwaarder is dan 18 kg.
1. Druk de instelknop voor de gordels in en trek tegelijk de
twee schoudergordels van het kinderzitje zo ver mogelijk
uit.
20
2. Maak de gesp van de gordels los door op de rode knop te
drukken.
21
3. De schoudergordel gaat door het ontgrendelapparaat,
controleer of het ontgrendelapparaat omlaaggedrukt is.
23
Installatie met driepuntsgordel
18
19
21
20
22
23
1
2
3
24
4
Page 44

85 86
25 26
27
28
29 30
4. Het kinderzitje kan niet worden gebruikt als de gesp van de
veiligheidsriem (vrouwelijke gespkant) te lang is om het
kinderzitje veilig vast te zetten.
24
-2
5. Om zeker te zijn van de juiste hoogte van de hoofdsteun,
MOET de onderkant van de hoofdsteun gelijklopen met de
bovenkant van de schouders van het kind als afgebeeld in
24
-3
6. Trek de gordelinstelling omlaag en stel het op de juiste
lengte af om ervoor te zorgen dat uw kind goed vast zit.
Zorg ervoor dat de ruimte tussen het kind en de
schouderriemen ongeveer de dikte van een hand is.
24
-4
Met rugsteun
(Vooruitkijkende stand/voor kind tussen 15 en 36
kg/3 tot 12 jaar oud)
zie afbeeldingen 25 -
37
!
Bewaar de schoudergordelkap, de kap voor de gesp/
kruisgordel en de riemen op een veilige plaats.
31
32
Page 45

87 88
3
1
2
4
33
34
35
!
Trek aan de veiligheidsgordel van het voertuig, steek deze
door de gordelgeleider
35
en gesp hem vast.
35
-3
!
Plaats de schouderriem door de geleider voor de
schouderriem als afgebeeld in
35
-1
!
Plaats de voertuiggordel NIET over de bovenkanten van de
armleuningen. Hij moet onder de armleuningen doorgaan.
35
-2
!
Het kinderstoeltje kan niet worden gebruikt als de gesp van
de veiligheidsriem (vrouwelijke gespkant) te lang is om het
stoeltje veilig vast te zetten.
35
-4
!
Het is heel belangrijk dat elke middelriem laag wordt
gedragen, zodat het bekken stevig vast zit. Het kinderzitje is
afgebeeld als
35
!
Om zeker te zijn dat de juiste
hoogte van de hoofdsteun is
ingesteld, MOET de onderkant
van de hoofdsteun gelijklopen
met de bovenkant van de
schouders van het kind zoals
afgebeeld in
36
en moet de
schouderriem in het rode
gebied zijn geplaatst zoals
afgebeeld in
37
!
Zet het kinderstoeltje stevig
tegen de rugleuning van een
naar voor gerichte autostoel,
uitgerust met een heup/
schoudergordel.
!
Laat uw kind in het stoeltje
zitten met zijn of haar rug plat
tegen de rugleuning van het
stoeltje.
!
Als de riem over hals, hoofd of
gezicht van het kind komt,
moet u de hoogte van de
hoofdsteun aanpassen.
!
De riem mag niet gedraaid zijn.
36
37
Page 46

89 90
zie afbeeldingen
38
-
39
!
Zie
25
- 34 voor het verwijderen
van de schouderriemkap, de
gesp/kruisriemkap en de
riemen, en bewaar ze goed.
!
Om het kussen weer te
plaatsen, gaat u in omgekeerde
volgorde te werk.
39
Zachte voorwerpen losmaken
38
!
Was de zachte voorwerpen en binnenvoering met koud
water onder 30°C.
!
De zachte voorwerpen niet strijken.
!
De zachte voorwerpen niet bleken of laten stomen.
!
Gebruik geen onverdund neutraal schoonmaakmiddel,
benzine of andere organische materialen om het stoeltje te
wassen. Dat kan het stoeltje beschadigen.
!
De zachte voorwerpen en binnenvoering niet uitwringen om
ze te drogen. Daardoor kunnen de zachte voorwerpen en
binnenvoering kreukelen.
!
Hang de zachte voorwerpen en binnenvoering in de
schaduw op.
!
Haal het kinderstoeltje uit de autostoel als het langere tijd
niet wordt gebruikt. Berg het stoeltje op een koele en droge
plaats op, waar uw kind er niet bij kan.
Verzorging en onderhoud
Page 47

P-IM0213E_1
Share the joy at joiebaby.com
Joie Children's Products (UK) Ltd,
Venture Point, Towers Business Park,
Rugeley, Staffordshire, WS15 1UZ
 Loading...