


JLWM 1200
1200 spin washing machine
Instruction manual

 Safety information
It is most important that this instruction book should be retained with the appliance for future reference. Should the appliance be sold or transferred to another owner, or should you move house and leave the appliance, always ensure that the book is supplied with the appliance in order that the new owner can get to know the functioning of the appliance and the relevant warnings.
These warnings have been provided in the interest of safety. You MUST read them carefully before installing or using the appliance. If you are unsure of the meanings of these warnings contact the John Lewis branch from which you purchased the appliance.
Important! Read carefully and keep for future reference.
•The safety of your appliance complies with the industry standards and with legal requirements on the safety of appliances. However, as manufacturers, we feel it is our duty to provide the following safety notes.
•It is most important that this instruction book should be retained with the appliance for future reference. Should the appliance be sold or transferred to another owner, or should you move house and leave the appliance, always ensure that the book is supplied with the appliance in order that the new owner can get to know the functioning of the appliance and the relevant warnings.
•You MUST read them carefully before installing or using the appliance.
•Before first starting up, check the appliance for any damage incurred during transport. Never connect up a damaged appliance . If parts are damaged, contact your supplier.
•If the appliance is delivered in the winter months when there are minus temperatures. Store it at room
temperature for 24 hours before using for the first time.
General safety
•It is dangerous to alter the specifications or attempt to modify this product in any way.
•During high temperature wash programmes the door glass may get hot. Do not touch it!
•Make sure that small children and animals do not climb into the drum. To avoid this, please check into the drum before using.
•Any objects such as coins, safety pins, nails, screws, stones or any other hard, sharp material can cause extensive damage and must not be placed into the machine.
•Only use the advised quantities of fabric softener and detergent. Damage to the fabric can ensue if you over-fill. Refer to the manufacturer’s recommendations of quantities.
•Wash small items such as socks, laces, washable belts etc in a washing bag or pillow case as it is possible for such items to slip down between the tub and the inner drum.
2
•Do not use your washing machine to wash articles with whalebones, material without hems or torn material.
•Always unplug the appliance and turn off the water supply after use and during cleaning and maintenance.
•Under no circumstances should you attempt to repair the machine yourself. Repairs carried out by inexperienced people may cause injury or serious malfunctioning. Contact your local Service Centre. Always insist on genuine spare parts.
Installation
•This appliance is heavy. Care should be taken when moving it.
•When unpacking the appliance, check that it is not damaged. If in doubt, do not use it and contact the Service Centre.
•All packing and transit bolts must be removed before use. Serious damage can occur to the product and to property if this is not adhered to. See relevant section in the user manual.
•After having installed the appliance, check that it is not standing on the inlet and drain hose and the worktop is not pressing the electrical supply cable against the wall.
•If the machine is situated on a carpeted floor, please adjust the feet in order to allow air to circulate freely under the appliance.
•Always be sure, that there is no water leakage from hoses and their connections after the installation.
•If the appliance is installed in a location subject to frost, please read the “dangers of freezing” chapter.
•Any plumbing work required to install this appliance should be carried out by a qualified plumber or competent person.
•Any electrical work required to install this appliance should be carried out by a qualified electrician or competent person.
Use
•This appliance is designed for domestic use. It must not be used for purposes other than those for which it was designed.
•Only wash and dry fabrics which are designed to be machine washed or dried. Follow the instructions on each garment label
•Do not overload the appliance. See the Washing Programme Table.
•Before washing, ensure that all pockets are empty and buttons and zips are fastened. Avoid washing frayed or torn articles and treat stains such as paint, ink, rust, and grass before washing. Underwired bras must NOT be machine washed.
•Garments which have been in contact with volatile petroleum products should not be machine washed. If volatile cleaning fluids are used, care should be taken to ensure that the fluid is removed from the garment before placing in the machine.
•As some duvets and eiderdowns should be washed/dried in large commercial machines because of their bulk, please check with the manufacturer of the item before washing in a domestic machine.
•The users should always check that they have not left their gas lighters (disposable or otherwise) in their clothing.
•Never tumble dry items that have had contact with chemicals such as dry cleaning fluid. These are of a volatile nature and could cause an explosion. Only tumble dry items which have been washed in water or require airing.
3
•Plastic detergent dispensers should not remain in the drum during the drying cycle, as the plastic used is not designed to withstand the heat. If you wish to wash- through-to-dry you should use the conventional detergent dispenser drawer.
•Never pull the power supply cable to remove the plug from the socket; always take hold of the plug itself.
•Never use your new appliance if the power supply cable, the control panel, the working surface or the base are damaged so that the inside of the appliance is accessible.
Child safety
•This appliance is not intended for use by person (including children) with reduced physical sensory or mental capabilities or lack of experience and knowledge unless they have been given supervision or instruction concerning use of the appliance by a person responsible for their safety.
•The packaging components (e.g. plastic film, polystyrene) can be dangerous to children - danger of suffocation! Keep them out of children’s reach.
•Keep all detergents in a safe place out of children’s reach.
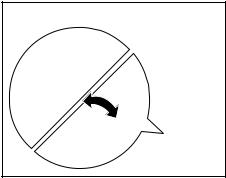
•Make sure that children or pets do not climb into the drum. To prevent children and pets becoming trapped inside the drum the machine incorporates a special feature. To activate this device, rotate the button (without pressing it) inside the door clockwise until the groove is horizontal. If necessary use a coin.
To disable this device and restore the possibility of closing the door, rotate the button counterclockwise until the groove is vertical.
4

Contents
Operating instructions
Safety information
General safety Installation Use
Child safety
Product description
Detergent dispenser drawer
Control panel First use
Installation instructions
2 |
Installation |
22 |
|
2 |
Unpacking |
22 |
|
3 |
Positioning and levelling |
23 |
|
3 |
Plumbing in |
23 |
|
4 |
Water inlet |
24 |
|
6 |
Water drainage |
24 |
|
Special conditions |
26 |
||
7 |
|||
In the interest of the environment |
26 |
||
|
|||
7 |
Electrical connection |
27 |
|
9 |
What to do if… |
28 |
Daily use |
9 |
Load the laundry |
9 |
Measure out the detergent |
10 |
Select the required programme by turning the
programme selector dial |
10 |
Select the spin speed or Rinse Hold option by
pressing button 3 |
11 |
Select the available options by pressing button
4 |
11 |
Start the programme by pressing button 5 |
11 |
Altering an option or a running programme 11
Interrupting a programme |
12 |
Cancelling a programme |
12 |
Opening the door |
12 |
At the end of the programme |
12 |
Helpful hints and tips |
13 |
Washing Programmes |
15 |
Technical data |
17 |
Consumption values |
17 |
Care and cleaning |
18 |
Repairs - After Sales Service |
31 |
Environment concerns |
32 |
Packaging materials |
32 |
Ecological hints |
32 |
Guide to use the instruction manual
The following symbols will be found in the text to guide you throughout the instructions:
Safety instructions
Hints and tips
Environmental information
5
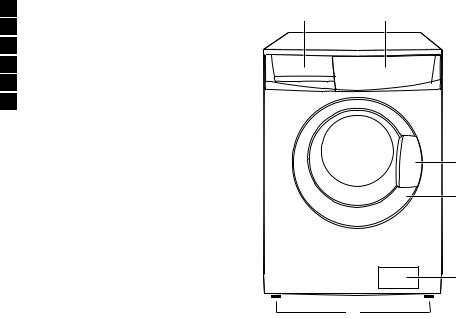
Product description
1 |
Detergent dispenser drawer |
1 |
2 |
|
2 |
Control panel |
|||
|
|
|||
3 |
Door opening handle |
|
|
|
4 |
Rating plate |
|
|
|
5 |
Drain pump |
|
|
|
6 |
Adjustable feet |
|
|
3
4
5
6
6
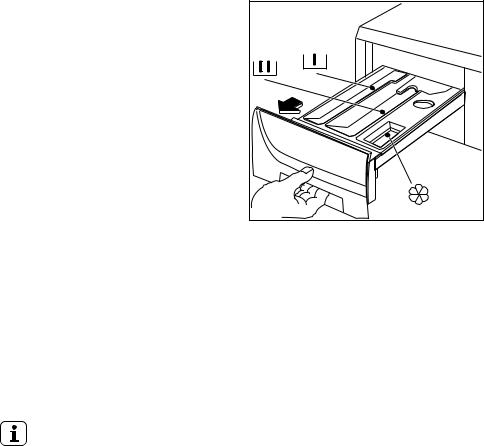
Detergent dispenser drawer
 Compartment for detergent used for prewash and soak phase or for stain remover used during the stain action phase (if available). The prewash and soak detergent is added at the beginning of the wash programme. The stain remover is added during the stain action phase.
 Compartment for powder or liquid detergent used for main wash. If using liquid detergent pour it just before starting the programme.
 Compartment for liquid additives (fabric softener, starch).
Follow the product manufacturer’s recommendations on quantities to use and do not exceed the «MAX» mark in the detergent dispenser drawer. Any fabric softener or starching additives must be poured into the compartment before starting the wash programme.
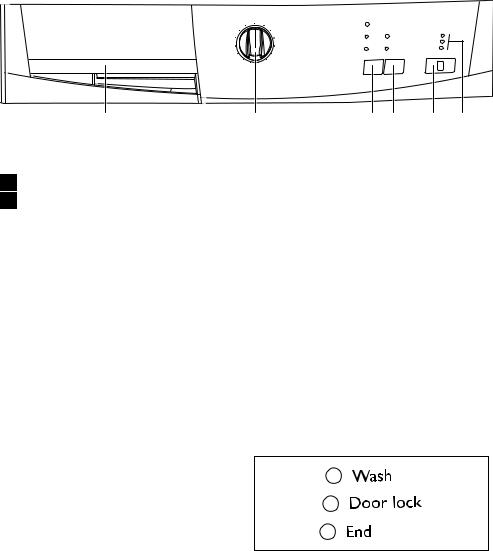
Control panel
Below is a picture of the control panel. It shows the programme selector dial as well as the buttons, pilot lights and the display. These are presented by relevant numbers on the following pages.
7
|
|
1 |
|
2 |
|
|
3 |
|
4 |
|
5 |
|
6 |
|
|
|
|
|
|
|
|
|
|||||||
1 |
Detergent dispenser drawer |
|
5 |
START/PAUSE button |
|
|
|
|||||||
|
|
|
|
|
|
|
|
|||||||
2 |
Programme selector dial |
|
6 |
Indicator pilot lights |
|
|
|
|||||||
3SPIN reduction button
4PREWASH and QUICK options button
Programme Selector Dial
It allows you to switch the appliance on/off and/or to select a programme.
Available options:
Spin
By pressing this button you can change the spin speed of the selected programme or to select Rinse Hold option.
Rinse hold
By selecting this function the water of the last rinse is not emptied out to prevent the fabrics from creasing. Before opening the door it will be necessary to empty out the water. To empty out the water, please read the paragraph «At the end of the programme».
Prewash
By selecting this option the machine performs a prewash cycle before the main wash phase. The washing time will be prolonged. This option is recommended for heavily soiled laundry.
Quick
This option can be used for lightly soiled laundry. The washing time will be reduced according to type of fabric and the selected temperature.
Start Pause
This button allows you to start or to interrupt the selected programme.
Indicator pilot light (6)
The light Wash illuminates after pressing button 5 .
The light Door lock indicates if the door can be opened:
•The light is lit: the door cannot be opened.
•The light is out: the door can be opened.
•The light is flashing: the door is unlocking and soon can be opened.
8

The light End illuminates at the end of the washing cycle.
First use
• Ensure that the electrical and water connections comply with the installation instructions.
•Remove the polystyrene block and any material from the drum.
•Pour 2 litres of water into the main
wash compartment  of the detergent drawer in order to activate the ECO valve. Then run a cotton cycle at the highest temperature without any laundry in the machine, to remove any manufacturing residue from the drum and tub. Pour 1/2 a measure of detergent into the main wash compartment and start the machine.
Daily use
Load the laundry
Open the door by carefully pulling the door handle outwards. Place the laundry in the drum, one item at a time, shaking them out as much as possible. Close the door.
9

Measure out the detergent
Measure out the detergent and the fabric softener
Pull out the dispenser drawer until it stops. Measure out the amount of detergent required, pour it into the main wash compartment  or in the appropriate compartment if it is required by the selected programme or option (see more details in «Detergent dispenser drawer» ).
If required, pour fabric softener into the compartment marked  (the amount used must not exceed the «MAX» mark in the drawer). Close the drawer gently.
Select the required programme by turning the programme selector dial
Turn the programme selector dial to the required programme. The washing machine will automatically select the maximum spin value provided for the programme you have chosen. You can change this value by pressing the corresponding button. The green pilot light of the button 5 starts to flash.
The selector dial can be turned either clockwise or counterclockwise. Turn to position « Off » to reset programme/ Switching the machine off.
At the end of the programme the selector dial must be turned to position «Off» , to switch the machine off.
Caution! If you turn the programme selector dial to another programme when the machine is working, the red pilot light of button 5 will blink 3 times to indicate a wrong selection. The machine will not perform the new selected programme.
10
Select the spin speed or Rinse Hold option by pressing button 3
The relevant light will light up.
For the compatibility among the washing programmes and the options see chapter «Washing Programmes».
When selecting a programme, the light corresponding to the maximum speed allowed for that programme will illuminate.
Select the available options by pressing button 4
Depending on the programme, different functions can be combined. These must be selected after choosing the desired programme and before starting the programme.
When these buttons are pressed, the corresponding pilot lights illuminate. When they are pressed again, the pilot lights go out. If an incorrect option is selected, the integrated red pilot light of the button 5 flashes for 3 times.
Start the programme by pressing button 5
To start the selected programme, press the button 5 , the corresponding green pilot light stops blinking. The pilot light Wash and Door lock illuminate. The appliance starts operating and the door is locked.
To interrupt a programme which is running, press the button 5 : the corresponding green pilot light starts blinking.
To restart the programme from the point at which it was interrupted, press the button 5 again .
If an incorrect option is selected, the red pilot light of the button 5 blinks 3 times.
Altering an option or a running programme
It is possible to change some options before the programme carries them out.
11
 Loading...