


26 inch digital LCD TV
JLP-Model No. JL26
User guide

26 inch LCD TV user guide

Contents
Introduction |
4 |
||
Safety is important |
4 |
||
In the box |
4 |
||
Electrical information |
5 |
||
Mains supply |
5 |
||
Safety information |
5 |
||
Parts identification |
6 |
||
Front and side views |
6 |
||
Rear view |
7 |
||
Remote control |
8 |
||
Connecting the TV |
9 |
||
Connecting the aerial |
9 |
||
Connecting external devices |
9 |
||
HDMI lead |
9 |
||
SCART lead |
9 |
||
VGA cable |
9 |
||
S-Video lead |
9 |
||
Component input (YPbPr cables) |
9 |
||
Wall mounting |
10 |
||
Remote control |
11 |
||
Remote control |
11 |
||
Installing the batteries |
11 |
||
Using the remote control |
11 |
||
Operating the TV |
12 |
||
Switching on |
12 |
||
Switching off |
12 |
||
Tuning the TV |
12 |
||
Analogue tuning |
13 |
||
Basic operation |
13 |
||
Source selection |
13 |
||
TV channel selection |
14 |
||
Return |
14 |
||
Volume |
14 |
||
Mute |
14 |
||
Ratio |
14 |
||
Favourite |
14 |
||
Subtitle |
14 |
||
Information |
15 |
||
Audio |
15 |
||
TV/ |
|
|
15 |
|
|
||
Menus |
15 |
Picture settings |
15 |
Sound settings |
16 |
Channel Setup |
16 |
Channel Edit |
17 |
DTV Setup |
18 |
Lock |
18 |
Function settings |
19 |
Electronic Programme Guide (DTV mode only) |
20 |
The list schedule EPG |
20 |
Teletext (Analogue TV mode only) |
20 |
Mix |
21 |
Cancel |
21 |
Selecting a page |
21 |
Subtitle |
21 |
Reveal information |
21 |
Fast text |
21 |
Page hold |
21 |
Text enlargement |
21 |
Digital text |
22 |
Common Interface Module Slot |
23 |
PC menu operation |
24 |
AV, YPbPr, SCART and HDMI Setup |
25 |
Troubleshooting |
26 |
Care and maintenance |
27 |
Disposal |
27 |
Guarantee |
27 |
Specifications |
28 |
Branch locations |
29 |
26 inch LCD TV user guide |
3 |
|
|

Introduction
Thank you for purchasing this LCD TV.
Please take time to read these instructions and retain for future reference.
Throughout the remainder of this user guide the LCD TV will be referred to as the ‘TV’.
Safety is important
To ensure your safety and the safety of others, please read the Safety precautions before you operate this product.
Keep this information in a safe place for future reference.
In the box
You will find the following:
•26” LCD television
•Power lead
•User guide
•Quick start guide
•Remote control
•2 x AAA batteries
•Cleaning cloth
Note: If any of the items listed are damaged or missing, please contact your local John Lewis branch.
4 |
26 inch LCD TV user guide |
|
|
Safety information
Important safety instructions - read carefully before use
Take note of the following safety information which appears on the back of this TV.
Caution! Risk of electric shock do not open. To reduce the risk of electric shock do not remove this cover.
No user-removable parts inside refer servicing to qualified personnel.
This symbol indicates that there are important operating and maintenance instructions in the literature accompanying this TV.
This symbol indicates that dangerous voltage constituting a risk of electric shock is present within this TV.
WARNING
•Do not use this TV near water.
•Do not install or operate near any heat sources such as radiators, stoves, or other apparatus that produce heat.
•Clean only with a slightly damp cloth.
•Do not block any ventilation openings.
•Install in accordance with the supplied Quick start guide and this User guide.
•Protect the power cord from being walked on or pinched, particularly at plugs, and the point where it exits from the TV.
•Do not allow the power cord to overhang the edge of a table.
•Unplug this TV during lightning storms or when unused for long periods of time.
•To avoid interference, switch this TV off while operating other radio devices in the immediate vicinity.
•Refer all servicing to qualified service personnel. Servicing is required when the TV has been damaged in any way.
Warning! To reduce the risk of fire or electrical shock, do not expose this TV to rain or moisture.The TV must not be exposed to dripping and splashing and no
objects filled with liquids such as a vase of flowers should be placed on the TV.
•No naked flame sources such as candles should be placed on the TV.
Caution! Changes or modifications not expressly approved by the manufacturer could void the user’s authority to operate this device.
Caution! Usage of controls or adjustments or performance of procedures other than those specified herein may result in hazardous exposure.
Electrical information
Mains supply
The mains operating voltage is detailed on the rating plate on the rear of the TV.
The mains lead on this equipment is supplied with a moulded plug incorporating a fuse. Should the fuse need to be replaced, an ASTA or BSI approved BS1362 fuse must be used of the same rating. Never use the plug with the fuse cover removed. If a replacement fuse cover is required, ensure it is of the same colour as that visible on the pin face of the plug. If there is no alternative to cutting off the mains plug, dispose of it immediately, having first removed the fuse, to avoid a possible shock hazard by inadvertent connection to the mains supply.
26 inch LCD TV user guide |
5 |
|
|
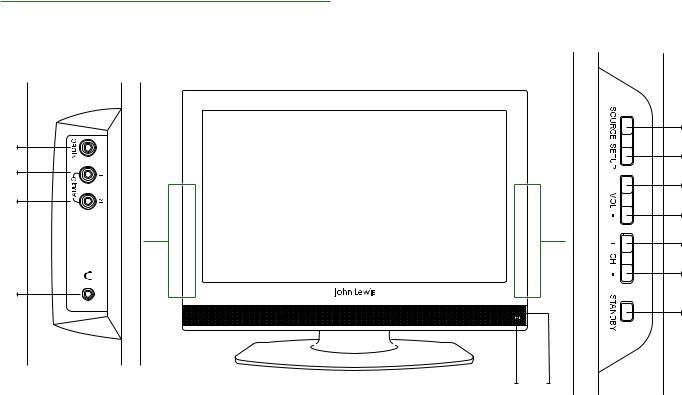
Parts identification
Front and side views
|
1 |
13 |
2 |
|
|
12 |
3 |
|
|
11 |
4 |
|
|
|
5 |
|
6 |
10 |
|
|
7 |
9 |
8 |
1 |
SOURCE |
Accesses the SOURCE menu |
8 |
Standby LED |
2 |
SETUP |
Accesses the SETUP menus |
9 |
Remote control sensor |
3 |
VOL + |
Increases the volume |
10 |
Headphones socket |
4 |
VOL - |
Decreases the volume |
11 |
Right Audio In socket |
5 |
CH + |
Selects the next channel up |
12 |
Left Audio In socket |
6 |
CH - |
Selects the next channel down |
13 |
Video Audio In socket |
7 |
STANDBY |
TV standby mode |
|
|
6 |
26 inch LCD TV user guide |
|
|

Parts identification
Rear view
1 


|
16 |
|
|
|
|
|
|
|
17 |
18 |
19 |
|
|
|
||||||||||||||||||||||||||||||||||||||||
|
|
|
|
|
|
|
|
|
|
|
|
|
|
|
|
|
|
|
|
|
|
|
|
|
|
|
|
|
|
|
|
|
|
|
|
|
|
|
|
|
|
|
|
|
|
|
|
|
|
|
|
|
|
|
|
|
|
|
|
|
|
|
|
|
|
|
|
|
|
|
|
|
|
|
|
|
|
|
|
|
|
|
|
|
|
|
|
|
|
|
|
|
|
|
|
|
|
|
|
|
|
|
|
|
|
|
|
|
|
|
|
|
|
|
|
|
|
|
|
|
|
|
|
|
|
|
|
|
|
|
|
|
|
|
|
|
|
|
|
|
|
|
|
|
|
|
|
|
|
|
|
|
|
|
|
|
|
|
|
|
|
|
|
|
|
|
|
|
|
|
|
|
|
|
|
|
|
|
|
|
|
|
|
|
|
|
|
|
|
|
|
|
|
|
|
|
|
|
|
|
|
|
|
|
|
|
|
|
|
|
|
|
|
|
|
|
|
|
|
|
|
|
|
|
|
|
|
|
|
|
|
|
|
|
|
|
|
|
|
|
|
|
|
|
|
|
|
|
|
|
|
|
|
|
|
|
|
|
|
|
|
|
|
|
|
|
|
|
|
|
|
|
|
|
2 |
3 |
4 |
1On/Off switch
2AC IN power socket
3HDMI 1 socket. Refer to HDMI lead on page 9
4HDMI 2 socket. Refer to HDMI lead on page 9
5SCART socket. Refer to SCART lead on page 9
6PC Audio In socket. Refer to VGA cable on page 9
|
5 |
6 |
7 |
8 |
9 |
10 |
11 |
12 |
13 |
14 |
15 |
7 |
PC VGA socket. Refer to VGA |
|
13 |
Pb socket. Refer to component |
|||||||
|
cable on page 9 |
|
|
|
|
input on page 9 |
|
||||
8 |
S-Video socket. Refer to S-Video |
|
14 |
Pr socket. Refer to component |
|||||||
|
lead on page 9 |
|
|
|
|
input on page 9 |
|
||||
9 |
Video socket |
|
|
|
|
15 |
RF In socket |
|
|
||
10 |
Audio In left socket |
|
|
|
16 |
Common Interface (CI) slot |
|||||
11 |
Audio In right socket |
|
|
|
17 |
Audio left socket |
|
||||
12 |
Component video socket. Refer |
|
18 |
Audio right socket |
|||||||
|
to component input on page 9 |
|
19 |
COAX Out socket |
|||||||
|
|
|
|
|
|
||||||
26 inch LCD TV user guide |
7 |
|
|
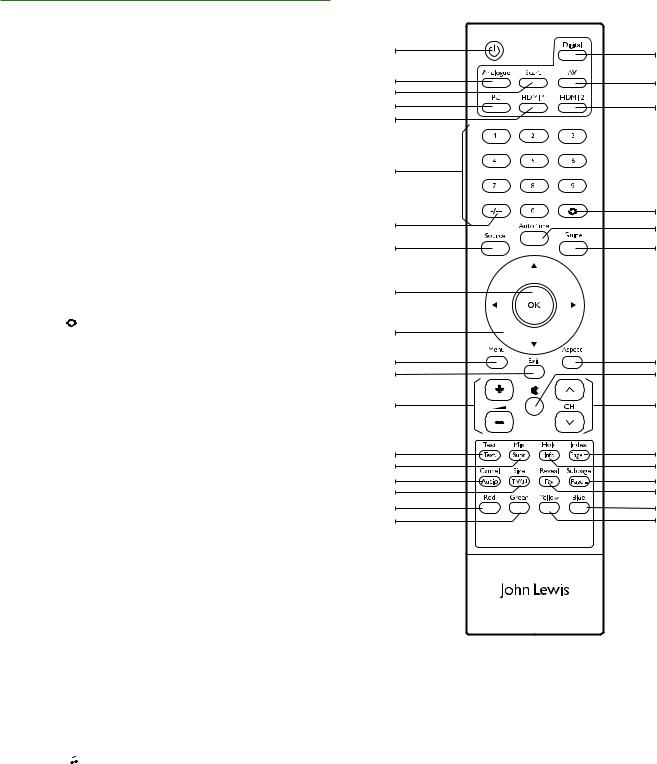
Parts identification
Remote control
When using the remote control, aim it towards the remote control sensor on the TV. The function of some buttons will vary depending on the source being used (e.g. analogue TV, digital TV).
1. Standby
2. Digital
3. Analogue
4. Scart
5. AV
6. PC
7. HDMI 1
8. HDMI 2
9.Numeric buttons
10. |
-/-- |
|
|
|
Digit selector (analogue TV mode only) |
11. |
Return |
Returns back to previous programme |
|||
12. |
Source |
Input source selector |
|||
13. |
Auto tune |
Tunes analogue TV/digital TV channels |
|||
14. |
Guide |
Lists all favourite channels |
|||
15. |
OK button |
Confirms a selection |
|||
16. |
cdef |
Adjusts selected item in the menu |
|||
17. |
Menu |
Displays TV Setup menus |
|||
18. |
Exit |
Exits out of a menu |
|||
19. |
Aspect |
Switches between the |
|||
|
|
|
|
|
different aspect ratios |
20. |
Volume +/- |
Increases and decreases volume level |
|||
21. |
Mute |
Mutes the sound |
|||
22. |
Channel |
Changes the TV channel |
|||
23. |
Text/Text |
Digital text |
|||
24. |
Mix/Subt |
Subtitle on/off |
|||
25. |
Hold/Info |
Programme information |
|||
26. |
Index/Page + |
Displays main content page when in |
|||
|
|
|
|
|
teletext in analogue TV. Goes to the next |
|
|
|
|
|
page in digital text /teletext |
27. |
Cancel/Audio |
Select audio languages |
|||
28. |
Size/TV/ |
|
|
|
Switches between TV and Radio mode |
|
|
|
|||
|
|
|
|||
29. |
Reveal/Fav |
Displays Favourite list |
|||
1 |
2 |
|
|
3 |
5 |
4 |
|
6 |
8 |
7 |
|
9 |
|
|
11 |
10 |
13 |
12 |
14 |
15 |
|
16 |
|
17 |
19 |
18 |
21 |
20 |
22 |
23 |
26 |
24 |
25 |
27 |
30 |
28 |
29 |
31 |
34 |
32 |
33 |
30. Subpage/Page – Displays sub pages when in teletext in analogue TV. Goes back a page in digital text/teletext
31. |
Red |
Fast text option. Digital text shortcut |
32. |
Green |
Fast text option. Digital text shortcut |
33. |
Yellow |
Fast text option. Digital text shortcut |
34. |
Blue |
Fast text option. Digital text shortcut |
8 |
26 inch LCD TV user guide |
|
|
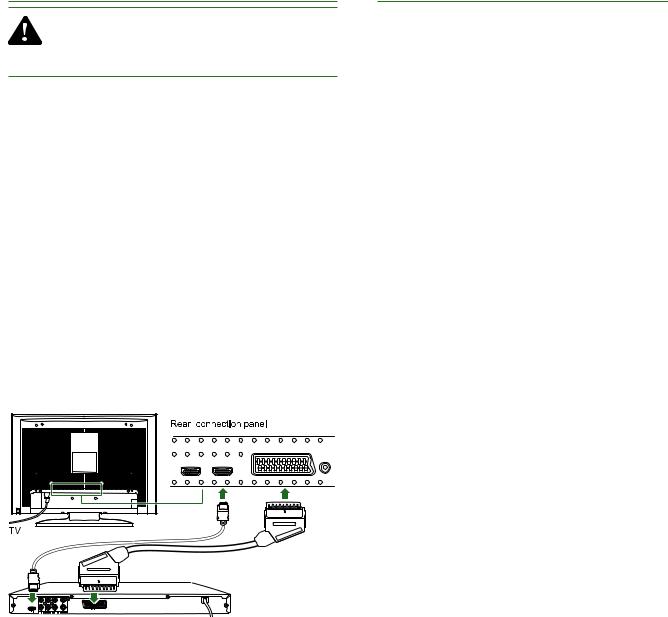
Connecting the TV
Connecting the aerial
Warning! Make sure the TV and all ancillary equipment are unplugged from the mains before making any connections
Place the TV on a stable flat surface, which is out of direct sunlight and away from any heat sources. In order to prevent TV picture distortion, make sure you avoid close proximity to other electrical devices such as microwave ovens.
Connect the aerial cable to the rear of the TV, or connect it directly or through a recording device (DVD recorder)
connect the TV/DVD as shown below. For best results use a high gain TV aerial, preferably roof or loft mounted.
•If in a poor signal area, to improve picture quality, purchase and install a signal amplifier (not supplied).
•If splitting the antenna for two TVs, use a 2-way signal splitter (not supplied).
Connecting external devices
The Quick Start guide shows the simplest and most effective way of connecting to external devices. These and alternate methods are listed below.
HDMI lead
You can connect this TV to a compatible device using a HDMI lead. This method will give the best picture.
Connect the cable from the HDMI equipment to one of the TV HDMI sockets.
SCART lead
You can connect this TV to a compatible device using a SCART lead. The connection uses component video signals, i.e. the red, green and blue (RGB) content of the video are sent on separate signals.
VGA cable
You can use your TV as a monitor for your personal computer by using a VGA cable. The sound from the personal computer can also be played through the TV. This will require the audio output of the
personal computer to be connected to the AUDIO IN connection of the TV.
S-Video lead
You can connect this TV to a compatible device using an S-Video lead.
Component input (YPbPr cables)
You can connect this TV to a compatible device using YPbPr cables. This provides the highest quality analogue video input. Connect the red, green and blue outputs to the matching coloured inputs on the compatible device. An additional audio input is required.
26 inch LCD TV user guide |
9 |
|
|
 Loading...