


JLBIWD 1400
Built-in 1400 spin washer-dryer
Instruction manual
|
|
|
|
Programme time |
|
|
On/Off |
1400 |
Extra dry |
|
|
|
|
|
900 |
Store dry |
|
|
|
|
|
700 |
Iron dry |
|
|
|
|
|
500 |
|
|
|
|
|
|
Rinse hold |
|
|
|
|
|
|
|
Extra |
Automatic |
Time |
Delay |
Start/ |
|
Spin Prewash Quick |
rinse |
dry |
dry |
start |
Pause |
JLBIWD1400
Prewash
Wash |
|
Rinse |
|
Rinse hold |
|
Drain |
|
Spin |
|
Drying |
|
End |
Wool |
|
|
30 Minute wash |
Off |
|
Spin |
||
|
||
Drain |
|
|
Softeners |
|
|
Rinse |
|
|
Soak 30° |
|
|
Cold |
|
|
30° |
|
|
40° |
|
|
Delicates 30° |
|
|
Delicates 40° |
|
90° Economy 60° 60°
 Economy 40°
40°
30°
Drying
60°
Economy 40° 40° Easy iron 40° Drying
Synthetics Cottons

 Important Safety Information
It is most important that this instruction book should be retained with the appliance for future reference. Should the appliance be sold or transferred to another owner, or should you move house and leave the appliance, always ensure that the book is supplied with the appliance in order that the new owner can get to know the functioning of the appliance and the relevant warnings. These warnings have been provided in the interest of safety. You MUST read them carefully before use or installation by a qualified person. If you are unsure of the meanings of these warnings contact the John Lewis branch from which you purchased the appliance.
Installation
●This appliance is heavy. Care should be taken when moving it.
●It is dangerous to alter the specifications or attempt to modify this product in any way.
●All packing and transit bolts must be removed before use. Serious damage can occur to the product and to property if this is not adhered to. See relevant section in instructions.
●Care must be taken to ensure that the appliance does not stand on the electrical supply cable.
●If the machine is situated on a carpeted floor, please adjust the feet in order to allow air to circulate freely.
Child Safety
●This appliance is designed to be operated by adults. Children should not be allowed to tamper with the controls or play with the product.
●Pets and children have been known to climb into washer-dryers. Please check your drum before use.
●The glass door becomes very hot during the washing cycle. Keep children away from the vicinity of the appliance whilst it is in operation.
●Keep all packaging well away from children.
●Keep all detergents in a safe place out of children’s reach.
●Any objects such as coins, safety pins, nails, screws, stones or any other hard, sharp material can cause extensive damage and must not be placed into the machine.
●Garments which have been in contact with volatile petroleum products should not be machine washed. If volatile cleaning fluids are used, care should be taken to ensure that the fluid is removed from the garment before placing in the machine.
●Wash small items such as socks, laces, washable belts etc in a washing bag or pillow case as it is possible for such items to slip down between the tub and the inner drum.
●Only use the advised quantities of fabric softener. Damage to the fabric can ensue if you over-fill. Refer to the manufacturer’s recommendations of quantities.
●As some duvets and eiderdowns should be washed/dried in large commercial machines because of their bulk, please check with the manufacturer of the item before washing in a domestic machine.
●The users should always check that they have not left their gas lighters (disposable or otherwise) in their clothing.
●Never tumble dry items that have had contact with chemicals such as dry cleaning fluid.These are of a volatile nature and could cause an explosion.
Only tumble dry items which have been washed in water or require airing.
Use
●Always unplug the appliance and turn off the water supply after use.
●Do not overload the appliance. See relevant section in the instruction book.
●Only wash and dry fabrics which are designed to be machine washed and dried. If in doubt, consult the care label on the clothes.
●Before washing, ensure that all pockets are empty and buttons and zips are fastened. Avoid washing frayed or torn articles and treat stains such as paint, ink, rust, and grass before washing. Underwired bras must NOT be machine washed.
Maintenance and Cleaning
●Plastic detergent dispensers should not remain in the drum during the drying cycle, as the plastic used is not designed to withstand the heat. If you wish to wash- through-to-dry you should use the conventional detergent dispenser drawer.
●Leave the porthole door slightly ajar between washes to preserve the door seal.
Service
●Under no circumstances should you attempt to repair the machine yourself. Repairs carried out by inexperienced persons may cause injury or serious malfunctioning. Contact your local Service Force Centre. Always insist on genuine spare parts.
2

Contents
Important Safety Information
Your New Washer-Dryer
Description of the Appliance
Detergent dispenser drawer Child safety feature
For the Installer
Installation Instructions
Technical Specifications
Unpacking
Positioning
Installation on a suspended floor Building-in
Water inlet Water drainage Levelling
Special conditions
In the interest of the environment Electrical connection
Permanent connection
For the User
The Control Panel Programme information
Operating Sequence
Load the laundry
Measure out the detergent Measure out the fabric softener Switch the machine on
2 |
Select the desired programme/temperature |
20 |
|
4 |
Select the spin speed or the “Rinse hold” option |
20 |
|
Select the desired options |
20 |
||
5 |
|||
Select the “Delay start” |
20 |
||
5 |
|||
Start the programme |
20 |
||
5 |
|||
How to change an option or a programme |
|
||
|
|
||
|
during its cycle |
20 |
|
|
How to interrupt a programme |
21 |
|
6 |
How to open the door during |
|
|
the cycle of a programme |
21 |
||
6 |
End of programme |
21 |
|
7 |
Drying 2.5 kg of cotton |
22 |
|
7 |
Autodrying 1.5 kg of synthetics |
22-23 |
|
7 |
Washing and Drying |
24 |
|
8-10 |
Wash Care Symbols |
24 |
|
10 |
|||
Washing Programmes |
26-27 |
||
11 |
|||
12 |
Drying Programmes |
28 |
|
12 |
Maintenance and Cleaning |
29-30 |
|
12 |
|||
Descaling |
29 |
||
12-13 |
|||
After each wash |
29 |
||
13 |
|||
Maintenance Wash |
29 |
||
|
|||
|
External cleaning |
29 |
|
|
Cleaning the dispenser drawer |
29 |
|
14-17 |
Cleaning the drawer recess |
29 |
|
18 |
Cleaning the filter |
29-30 |
|
Cleaning the water inlet filter |
30 |
||
19-21 |
|||
The dangers of freezing |
30 |
||
19 |
Emergency emptying out |
30 |
|
19 |
|||
Something Not Working |
31-32 |
||
19 |
|||
Service and Spare Parts |
33 |
||
19 |
This appliance complies with the following E.E.C. Directives:
-73/23 EEC of 19.2.73 (Low Voltage Directive) and subsequent modifications;
-89/336 EEC of 3.5.89 (Electromagnetic Compatibility Directive) and subsequent modifications.
Guide to use the Instruction Book
The following symbols will be found in the text to guide you throughout the instructions:
Safety instructions
Hints and tips
Environmental information
3

 Your New Washer-Dryer
Your new washer-dryer, which is fitted with the Jet System, meets all modern requirements for effective treatment of laundry with low water, energy and detergent consumption.
Even small loads are washed “economically” because the amount of water used is regulated automatically according to the load and type of fabric.
●The programme progress display shows the programme steps selected, the programme phase which is running and the end of the programme.
●The programme selector dial combines the function of programme and temperature selection, making it easier to set the programme.
●Automatic cooling of the wash water to 60°C before draining, with the 90°C programme. This reduces thermal shock to fabrics, helping to prevent creasing.
●The special wool programme with its new delicate wash system treats your woollens with extreme care.
●The balance control device ensures that the washer-dryer remains stable when spinning.
●The two drying programmes will give your wash that soft, relaxed feel whatever the weather.
 Ecological hints
To save water and energy and help protect the environment, we recommend that you follow these hints:
●Normally soiled laundry may be washed without prewashing in order to save detergent, water and time (the environment is protected too!).
●The machine works more economically if it is fully loaded.
●With adequate pre-treatment, stains and limited soiling can be removed; the laundry can then be washed at a lower temperature.
●Measure out detergent according to the water hardness, the degree of soiling and the quantity of laundry being washed.
●Try to load the maximum drying capacity of the machine as small loads are uneconomical.
●Save energy and reduce drying time by ensuring the laundry load has been thoroughly spun before attempting to machine dry.
 Environmental Information
●Materials marked with the symbol  are recyclable.
●Check with your local Council or Environmental Health Office to see if there are facilities in your area for re-cycling this appliance.
●When the appliance is to be scrapped, cut off the power supply cable and make the door lock device unusable to prevent young children from being trapped inside.
●Help to keep your country tidy - use authorised disposal sites for your old appliance.
The symbol  on the product or on its packaging indicates that this product may not be treated as household waste. Instead it shall be handed over to the applicable collection point for the recycling of electrical and electronic equipment. By ensuring this product is disposed of correctly, you will help prevent potential negative consequences for the environment and human health, which could otherwise be caused by inappropriate waste handling of this product. For more detailed information about recycling of this product, please contact your local city office, your household waste disposal service or the shop where you purchased the product.
Important
Your machine is fitted with a balance control device, which ensures the machine is stable during the spin.
If the wash load appears not to have been spun sufficiently at the end of the wash cycle, because it is not evenly distributed in the drum, the balance control device may have operated. It will therefore be necessary to redistribute the wash load manually and select a spin programme. For more detailed information see the section headed “Something Not Working” (See pages 31 to 32).
4

Description of the Appliance
1 Detergent dispenser drawer
2 Control panel
3 Door opening handle
4 Filter
5 Adjustable feet
|
|
|
Programme time |
|
|
|
|
On/Off |
Extra dry |
|
|
|
Prewash |
|
|
|
Store dry |
|
|
|
Wash |
|
|
|
Iron dry |
|
|
|
Rinse |
|
|
|
|
|
|
|
|
Rinse hold |
|
Rinse hold |
|
|
|
|
|
Drain |
|
|
Extra |
Automatic |
Time |
Delay |
Start/ |
Spin |
|
Spin Prewash Quick |
rinse |
dry |
dry |
start |
Pause |
Drying |
|
|
|
|
|
|
|
End |
Wool |
|
|
|
|
|
|
|
|
JLBIWD1400
30 Minute wash
Off
Spin
Drain Softeners Rinse Soak 30° Cold 30° 40°
Delicates 30°
Delicates 40°
90° Economy 60° 60°
Economy 40° 40°
30° Drying 60°
Economy 40° 40° Easy iron 40° Drying
Synthetics Cottons
Detergent dispenser drawer
 Prewash
 Main wash
Fabric softener
C0110 |
Child safety feature
This machine incorporates a special child safety feature to prevent small children from being trapped inside the machine.
To activate this device, rotate the button (without pressing it) inside the door clockwise until the groove is horizontal. If necessary use a coin.
To disable this device and restore the possibility of closing the door, rotate the button anti-clockwise until the groove is vertical.
P1131 |
5

Installation Instructions
It is dangerous to alter the specifications or attempt to modify this product in any way.
Care must be taken to ensure that the appliance does not stand on the electrical supply cable.
Any electrical work required to install this appliance should be carried out by a qualified electrician or competent person.
Any plumbing work required to install this appliance should be carried out by a qualified plumber or competent person.
Technical Specifications
DIMENSIONS |
Height |
82 cm |
|
Width |
60 cm |
|
Depth |
54 cm |
|
|
|
POWER SUPPLY VOLTAGE |
|
230-240 V/50 Hz |
TOTAL POWER ABSORBED |
|
2050 W (10 A) |
|
|
|
WATER PRESSURE |
Minimum |
0.05 MPa (0.5 bar) |
|
Maximum |
0.80 MPa (8. bar) |
|
|
|
|
Washing |
|
MAXIMUM RECOMMENDED LOAD |
Cotton, linen |
5.kg |
|
Synthetics |
2 kg |
|
Delicate fabrics |
2.kg |
|
Wool/Hand wash |
1 kg |
|
Drying |
|
|
Cotton, linen |
2.5.kg |
|
Synthetics |
1.5.kg |
|
|
|
SPIN SPEED |
MaximumZ 16 S |
1400 rpm |
|
|
|
CONSUMPTION DATA FOR WASHING |
Energy |
0.85 kWh |
5 KG NORMALLY SOILED COTTON |
Water |
49 litres |
ITEMS WITH PROGRAMME ” |
|
|
“Cottons Economy 60°” (White Cottons): |
|
|
|
|
|
6

Unpacking
All transit bolts and packing must be removed before using the appliance.
You are advised to keep all the packaging for re-use in case the machine is to be transported again.
Using a spanner unscrew and remove the rear right bolt.
Lay the machine gently on its back, making sure that the hoses are not squashed.
P0255 |
Remove the polystyrene base and take off the bottom panel by unscrewing the central screw.
Carefully slide out the right polythene bag.
P0457 |
P0015 |
Repeat the operation for the left and central polythene bags.
Re-fit the bottom panel using the 4 screws supplied with the door hinges (in the plastic bag) and the previously removed screw.
P0016 |
P0453 |
Set the machine upright and remove the two remaining bolts from the back.
Pull out the three plastic spacers from the holes into which the bolts were fitted.
Plug the open holes with the plugs supplied with the instruction booklet.
P0256 |
Positioning |
P0020 |
Install the machine on a flat hard floor.
Make sure that air circulation around the machine is not impeded by carpets, rugs etc. Check that the machine does not touch the wall or other kitchen units.
Never place cardboard, wood or similar materials under the machine to compensate for any unevenness in the floor.
Your new washer-dryer has been designed to be permanently plumbed in to your home’s water supply and drainage system. However, if this is not possible, it may be connected to a suitable existing tap with the drain hose discharging into a sink.
The appliance has an inlet hose, with female 3/4” BSP thread connector. If this connection is not compatible with the plumbing of the existing installation, a variety of connectors are available from good hardware stores and plumbers merchants to suit most domestic plumbing. Any alteration to your existing plumbing must be carried out by a competent person, or qualified plumber.
Installation on a Suspended Floor
Suspended wooden floors are particularly susceptible to vibration. To help prevent vibration we recommend you place a waterproof wood panel, at least 15 mm thick under the appliance, secured to at least 2 floor beams with screws. If possible install the appliance in one of the corners of the room, where the floor is more stable.
7
Building-in
This appliance has been designed to be built into the kitchen furniture. The recess should have the dimensions shown in picture A.
|
|
600 |
|
|
|
|
|
600 |
|
|
|
|
. |
|
|
515 |
596 |
min |
|
|
570 |
|||
|
|
min |
||
|
176,5 |
|
||
818 |
416 |
120 |
820 |
|
|
|
541 |
195 |
|
|
|
8 |
||
|
|
|
||
|
|
160 |
|
|
|
165 |
90 |
|
|
|
490 |
A |
||
P0965 |
||||
|
||||
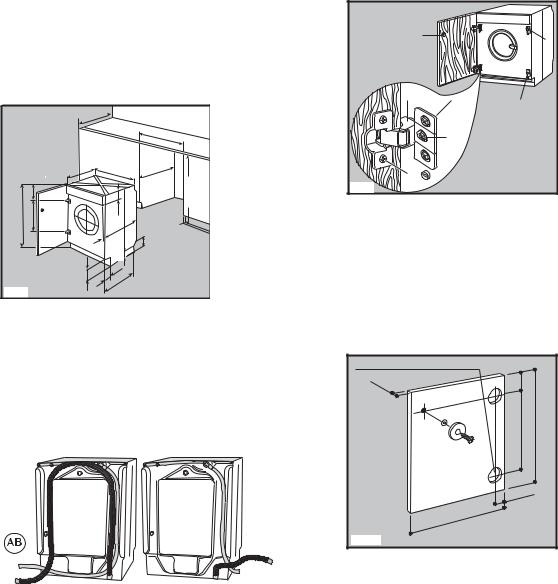
When installing the appliance into the kitchen furniture ensure, if possible, the hoses are placed in either of the two recesses on the back of the appliance. This will help to prevent the hoses from becoming kinked or trapped. Fig. AB.
6 |
|
|
4 |
|
|
|
|
||
1 |
2 |
7 |
5 |
|
1 |
||||
|
||||
|
|
3 |
|
|
23 |
|
|
B |
|
P0982 |
|
|
|
a) Door
The dimensions of the door should be: - width 595-598 mm
- thickness 16-22 mm
The height (C-Fig. C) depends on the height of the adjacent furniture's base.
35 Ø 12.5-14 depth |
|
|
|
16 |
|
B |
|
- |
|
||
|
22 |
|
|
|
|
416 |
C |
|
|
22+1,5 |
|
|
|
-598 |
|
|
|
595 |
|
P0422S |
|
|
C |
Preparation and assembly of the door
The machine is originally pre-arranged for the assembly of a door opening from right to left.
In this case it is sufficient to screw in the hinges (1) and the counter-magnet (6) provided with the appliance, at the right level (Fig. B).
b) Hinges
To mount the hinges it is necessary to drill two holes (dia. 35 mm, depth 12.5-14 mm depending on the depth of door furniture) on the inner side of the door. The distance between the holes hobs fixing centres must be 416 mm.
The distance (B) from upper edge of the door to the centre of the hole depends on the adjacent furniture's dimensions.
The required dimensions are given in the picture C. The hinges will be fixed to the door by means of screws for wood (2-Fig. B) supplied with the appliance.
8

c) Mounting the door
Fix the hinges (1) to the machine by means of the M5x15 screws (3-Fig. B). The hinges can be adjusted to compensate for possible uneven thickness of the door. To align the door perfectly it is necessary to loosen the screw (3-Fig. B), adjust the door and tighten the screw again.
d) Counter-magnet (6)
The appliance is pre-arranged for a magnetic closure of the door. To enable a correct operation of this device, it is necessary to screw the counter-magnet (6) (steel disk + rubber ring) into the inner side of the door.
Its position must correspond to the magnet (4) on the appliance (See fig. D).
|
6 |
|
4 |
P0984 |
D |
|
Recommendations regarding the construction and fitting of a base when the installation requires an integrated appliance to be raised
Where the appliance has been raised by mounting onto a wooden base provided by the installer. The material used to construct the base should have a non slip surface, be water repellent and if possible be one solid piece.
If it is not possible to use one solid piece, due to the additional height required, ensure that any additional strips of timber are glued and screwed to the underside of the base (see Fig. F).
5 mm Hardwood strip
40 mm 


100 mm
600-605 mm
Front view
F
Additional pieces of timber should run from front to back
If the door has to be opened from left to right, invert the position of the plates (7), the magnet (4) and the plate (5) (Fig. B and E). Mount the countermagnet (6) and the hinges (1) as previously described.
|
|
|
E |
4 |
|
|
6 |
|
|
|
|
|
5 |
7 |
1 |
|
|
||
|
|
|
|
|
|
3 |
|
P0983 |
|
|
2 |
|
|
|
Drill four fixing holes see Fig. G
|
600-605 mm |
|
490 mm |
|
95 mm |
|
Front edge |
|
50 mm |
G |
Top view |
|
9

Position the base into the recess with its front edge as far forward as the adjoining plinth line will allow.
The reason for placing the base in this position is to allow a small strip of beading to be fitted in front of the appliance feet.
Fix the base firmly to the floor using four appropriate countersunk screws (see Fig. H).
Hardwood strip |
5 X 25 X 605 |
|
5 mm x 25 mm |
||
490 |
||
|
600-605 |
H
With the appliance installed adjust all four feet ensuring the machine is stable, and a clearance of approximately 5 mm is left between the top of the machine and the underside of the worktop.
A final check for stability should be carried out with the machine on spin with a load, this will identify the need for any further fine adjustment to the feet.
A strip of beading approximately 605 mm W, x 5 mm H, x 25 mm D must be screwed down into the base directly in front of the machine’s feet, this will provide additional security.
If required an additional door magnet, part number 1242394-00/3 and disc, part number 1242393-00/5 are available from spare parts.
Water inlet
Connect the hose to a tap with a 3/4” thread. Always use the hose supplied with the appliance to connect to the water supply.
Do not use previously used hoses for water connection.
The inlet hose is provided with a water stop device, which protects against damage caused by water leaks in the hose which could develop due to natural ageing of the hose. This fault is shown by a red sector in the window “A”. Should this occur, turn the water tap off and refer to your Service Centre to replace the hose.
A
P0352
Installation should comply with local water authority and building regulations’ requirements.
The appliance must be connected to a cold water supply.
A minimum water pressure of 0.05 MPa (0.5 bar) is required for safe operation of the appliance.
If you cannot make the cold water connection direct from the rising mains, you may be able to operate the appliance from your cold water storage system.
There should be a minimum distance of 5.02m
(16.5 ft) between the appliance’s inlet and the bottom of the water storage tank.
Set the hose correctly by loosening the ring nut. After positioning the inlet hose, be sure to tighten the ring nut again to prevent leaks.
P0021 |
10
Water drainage
This appliance is designed to be permanently plumbed into your home's drainage system using one of the following methods.
1. Into a drainage standpipe.
Firstly form a hook in the end of the drain hose using the “U” piece” supplied.
“U” piece supplied
P1199
Place the drain hose into your standpipe, which should have an internal diameter of approximately 38mm thus ensuring there is an air break between the drain hose and standpipe.
38 mm (11.2”) standpipe diameter

 30 cm (12")
When discharging into a standpipe ensure that the top of the standpipe is no more than 90cm (35.4'') and no less than 60cm (23.6'') above floor level.
3 pin |
|
60 cm (23.6”) |
Max. 90 cm (35.4”) |
Min. |
|
P1039 |
|
The drain hose may be extended to a maximum of 4 metres. An additional drain hose and joining piece is available from your local Service Force Centre.
The joining piece must have an internal diameter of 18 mm.
If your drain hose looks like this (see below) you do not require the “U” piece”. Just push the hose firmly into the standpipe.
P1212
2. Onto a sink outlet spigot.
If the outlet spigot has not been used before, remove any blanking plug that may be in place.
P1197 |
Push the drain hose onto the spigot and secure with a clip if required, ensure a loop is formed in the drain hose (see diagram) to prevent waste from the sink entering the washing machine.
Loop |
P1198 |
Important |
Before connecting the machine to new pipework or to pipework that has not been used for some time, run off a reasonable amount of water to flush out any debris that may have collected in the pipes.
11
 Loading...