

Thank You!
Thank you for choosing a Jensen product. We hope you will find the instructions in this owner’s
manual clear and easy to follow. If you take a few minutes to look through it, you’ll learn how to
use all the features of your new Jensen receiver for maximum enjoyment.
System Features . . . . . . . . . . . . . . . . . . . . . . . . . . . . . . . . . . . . . . . . . . . . . . . . . . . . . . . . . . 1
Preparation . . . . . . . . . . . . . . . . . . . . . . . . . . . . . . . . . . . . . . . . . . . . . . . . . . . . . . . . . . . . . . 3
Installation . . . . . . . . . . . . . . . . . . . . . . . . . . . . . . . . . . . . . . . . . . . . . . . . . . . . . . . . . . . . . . . 4
Wiring . . . . . . . . . . . . . . . . . . . . . . . . . . . . . . . . . . . . . . . . . . . . . . . . . . . . . . . . . . . . . . . . . . . 5
Basic Operation. . . . . . . . . . . . . . . . . . . . . . . . . . . . . . . . . . . . . . . . . . . . . . . . . . . . . . . . . . . 6
Radio Operation . . . . . . . . . . . . . . . . . . . . . . . . . . . . . . . . . . . . . . . . . . . . . . . . . . . . . . . . . . 9
PWR
SHIFT
SCAN
MCD4030
Owner’s Manual
VOL
SEL
MENU
VOL
MODE
4 X 30W
SCN
2
1
3
RPT
SHF
4
ASA Electronics Corporation
www.asaelectronics.com
5
MCD4030
6
AMS
DISP
EQ
MONO
AUX IN
MUTE
BAND
LOUD
CD Player Operation . . . . . . . . . . . . . . . . . . . . . . . . . . . . . . . . . . . . . . . . . . . . . . . . . . . . . . .11
Troubleshooting . . . . . . . . . . . . . . . . . . . . . . . . . . . . . . . . . . . . . . . . . . . . . . . . . . . . . . . . . . 13
Specifications . . . . . . . . . . . . . . . . . . . . . . . . . . . . . . . . . . . . . . . . . . . . . . . . . . . . . . . . . . . . 13
System Features
Features of the Jensen MCD4030 mobile audio system include:
• Electronic AM/FM tuner with US/Euro selection
• LED backlit controls, silicone rubber keypad
• Marine-specific features, including corrosion resistant hardware, coated circuit boards and
uV stable plastics
• 4x30W power with two wire power connection (switched 12V and ground)
• Digital compact disc player plays CD, CD-R and CD-R/W
• Front panel auxiliary input
© 2005 ASA Electronics Corporation
v.122705

MCD4030
Manual del Usuario
¡Gracias!
Gracias por elegir los productos Jensen. Esperamos que encuentre en este manual instrucciones
claras y fáciles de seguir. Si se toma unos pocos minutos para leerlo, aprenderá cómo utilizar
todas las funciones de su nuevo radio Jensen para su máximo entretenimiento.
Funciones del Sistema . . . . . . . . . . . . . . . . . . . . . . . . . . . . . . . . . . . . . . . . . . . . . . . . . . . . . 2
Preparación . . . . . . . . . . . . . . . . . . . . . . . . . . . . . . . . . . . . . . . . . . . . . . . . . . . . . . . . . . . . . . 3
Instalación . . . . . . . . . . . . . . . . . . . . . . . . . . . . . . . . . . . . . . . . . . . . . . . . . . . . . . . . . . . . . . . 4
Cableado. . . . . . . . . . . . . . . . . . . . . . . . . . . . . . . . . . . . . . . . . . . . . . . . . . . . . . . . . . . . . . . . . 5
Operación Básica . . . . . . . . . . . . . . . . . . . . . . . . . . . . . . . . . . . . . . . . . . . . . . . . . . . . . . . . . 6
Operación de la Radio. . . . . . . . . . . . . . . . . . . . . . . . . . . . . . . . . . . . . . . . . . . . . . . . . . . . . . 9
Operación del Reproductor de CD . . . . . . . . . . . . . . . . . . . . . . . . . . . . . . . . . . . . . . . . . . . . 11
Corrección de Problemas . . . . . . . . . . . . . . . . . . . . . . . . . . . . . . . . . . . . . . . . . . . . . . . . . . .14
Especificaciones . . . . . . . . . . . . . . . . . . . . . . . . . . . . . . . . . . . . . . . . . . . . . . . . . . . . . . . . . .14
Funciones del Sistema
Las funciones del sistema de audio móvil Jensen MCD4030 son:
• Sintonizador electrónico de AM/FM con la selección de US/euro
• Controles retroiluminados del LED y telclado numérico del caucho del silicón
• Hardware resistente de la corrosión, tableros de circuito revestidos y plásticos estables uV
• Energía 4x30W con la conexión de energía de dos alambres (12V cambiado y tierra)
• Jugador del disco compacto de Digital (CD, CD-R Y CD-R/W )
• Salidas de la función de entrada auxiliar en el panel delantero
Guide d'Utilisateur
Merci!
Merci d'avoir choisi un produit Jensen. Nous espérons que vous allez trouver les instructions dans
ce guide de propriétaire claires et faciles à suivre. Prenez quelques minutes à le consulter, vous
apprendrez à utiliser toutes les fonctions de radio Jensen pour en tirer une jouissance maximum.
Fonctions du système . . . . . . . . . . . . . . . . . . . . . . . . . . . . . . . . . . . . . . . . . . . . . . . . . . . . . 2
Préparation . . . . . . . . . . . . . . . . . . . . . . . . . . . . . . . . . . . . . . . . . . . . . . . . . . . . . . . . . . . . . . 3
Installation. . . . . . . . . . . . . . . . . . . . . . . . . . . . . . . . . . . . . . . . . . . . . . . . . . . . . . . . . . . . . . . 4
Câblage . . . . . . . . . . . . . . . . . . . . . . . . . . . . . . . . . . . . . . . . . . . . . . . . . . . . . . . . . . . . . . . . . 5
Fonctionnement de base . . . . . . . . . . . . . . . . . . . . . . . . . . . . . . . . . . . . . . . . . . . . . . . . . . 6
Fonctionnement de la radio . . . . . . . . . . . . . . . . . . . . . . . . . . . . . . . . . . . . . . . . . . . . . . . . . 9
Fonctionnement du lecteur CD . . . . . . . . . . . . . . . . . . . . . . . . . . . . . . . . . . . . . . . . . . . . . . 11
Dépannage . . . . . . . . . . . . . . . . . . . . . . . . . . . . . . . . . . . . . . . . . . . . . . . . . . . . . . . . . . . . . . 15
Caractéristiques . . . . . . . . . . . . . . . . . . . . . . . . . . . . . . . . . . . . . . . . . . . . . . . . . . . . . . . . . . 15
Fonctions du système
Les fonctions du système audio mobile Jensen MCD4030 comprennent :
• Tuner électronique d'AM/FM avec le choix d'US/euro
• Commandes contre éclairées de LED et bloc de touches en caoutchouc de silicone
• Matériel résistant de corrosion, cartes enduites et plastiques stables UV
• Puissance 4x30W avec le raccordement de puissance de deux fils (12V commuté et terre)
• Joueur de disque compact de digital (CD, CD-R et CD-R/W)
• Sorties de fonction d'entrée auxiliaire sur le panneau plan
2

MCD4030
Preparation
Tools and Supplies
The following tools and supplies are needed to install the unit.
• Torx type, Flat and Phillips screwdrivers
• Wire cutters and strippers
• Tools to remove existing radio (screwdriver, socket wrench set or other tools)
• Electrical tape
• Crimping tool
• Volt meter/test light
• Crimp connections
• 18 gauge wire for power connections
• 16-18 gauge speaker wire
Speaker Requirements: Only connect speakers rated in the load impedance of 4 ohms. Speakers
with a load impedance less than 4 ohms could damage the unit.
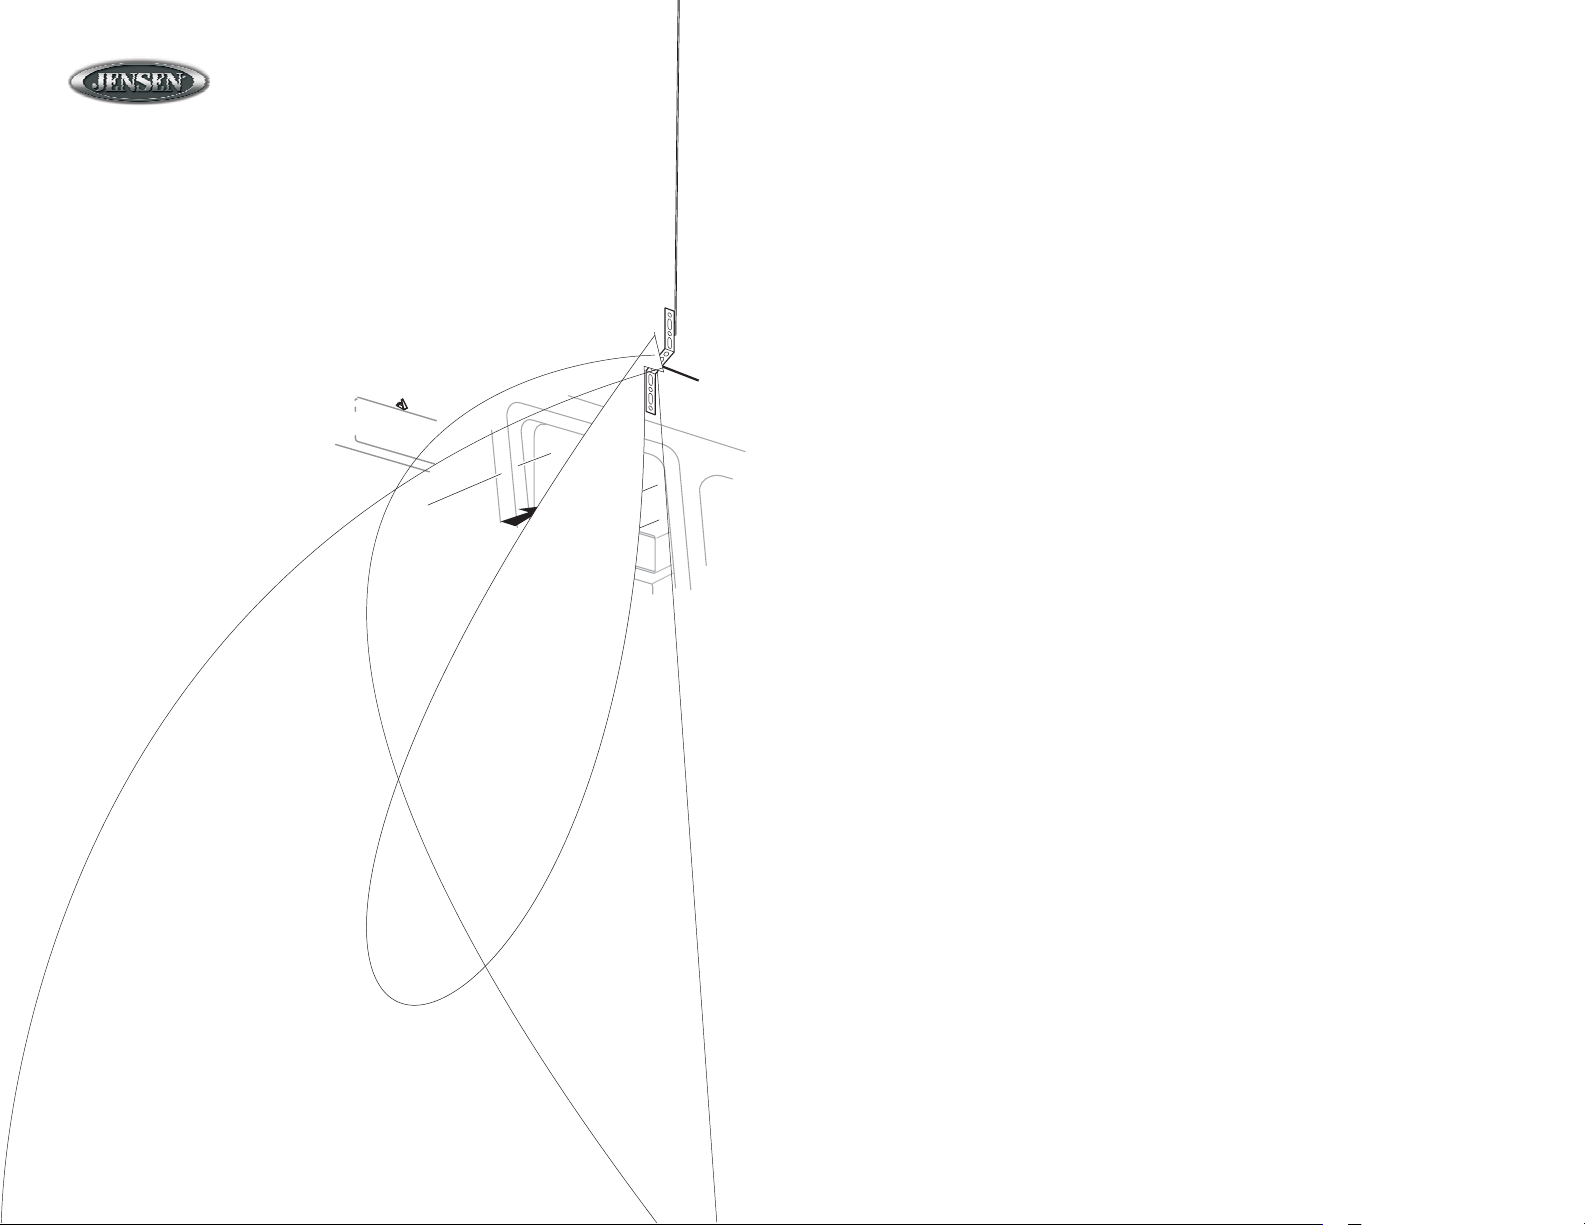
Choosing a Mounting Location
The following tips will help you determine the best location for mounting the unit:
• Select a location that does not interfere with the normal functions of the driver and will not
cause injury to the driver or a passenger in the event of a sudden stop or other emergency.
• Do not install the unit in a location that would subject it to high temperatures (such as in
direct sunlight or next to a heating unit), dust, dirt or excessive vibration.
• Install the unit in a horizontal position if at all possible. If the installation angle exceeds 30
degrees from the horizontal, the unit may not function optimally.
• If the installation requires the drilling of holes or other vehicle modifications, consult the
nearest dealer for assistance.
• Before completing installation of the unit, connect the wiring temporarily to ensure that the
unit operates properly in the selected mounting location.
Preparación
Herramientas y Provisiones
Las siguientes herramientas y provisiones son necesarias para instalar el radio:
• Llave torx, destornilladores plano y Phillips
• Cúter y peladores de cables
• Herramientas para remover la radio existente (destornillador, equipo de llave de casquillo y
otras herramientas)
• Cinta aisladora
• Enganchador
• Voltímetro / luz de prueba
• Conexiones para enganchar,
• Cable de calibre 18 para conexiones eléctricas, cable de altoparlante de calibre 16w[TJeeVgTDbre 1697.8( to hs[TJeeV 97.ueri)-7.5oslonexi4(voz: Solame7.5(dentep)14.erl5(existe2105nexi)]TJ16.3383 0 TD0d)-stric-6.7-7.4(s)4vo[(l)4.5( other-7(l)4.ime)-7.4(ud5.3i(l)4 in the4-7.6(t)-0.2105nha)-8(dor)]TJ0 -1.2556 TD0.0005 ohTw[(•ms. Alt, cable de34vo[Tw[(•sp)14iona.5( s p)15g(l)4.imeeda.3i(lm[Tw[(•nir)ad)-st4 ohm(C)ued5. daTw[(•ñaa)-0.on dad-7.4(6)-14.8(ación)]TJ/TT4 1 T4.92539.1.98 37.62-1.2556 TD375 TD0E4(e)n)-04.8(l)4ltLu-19nIns9n09noltil
3
MCD4030
4
MCD4030
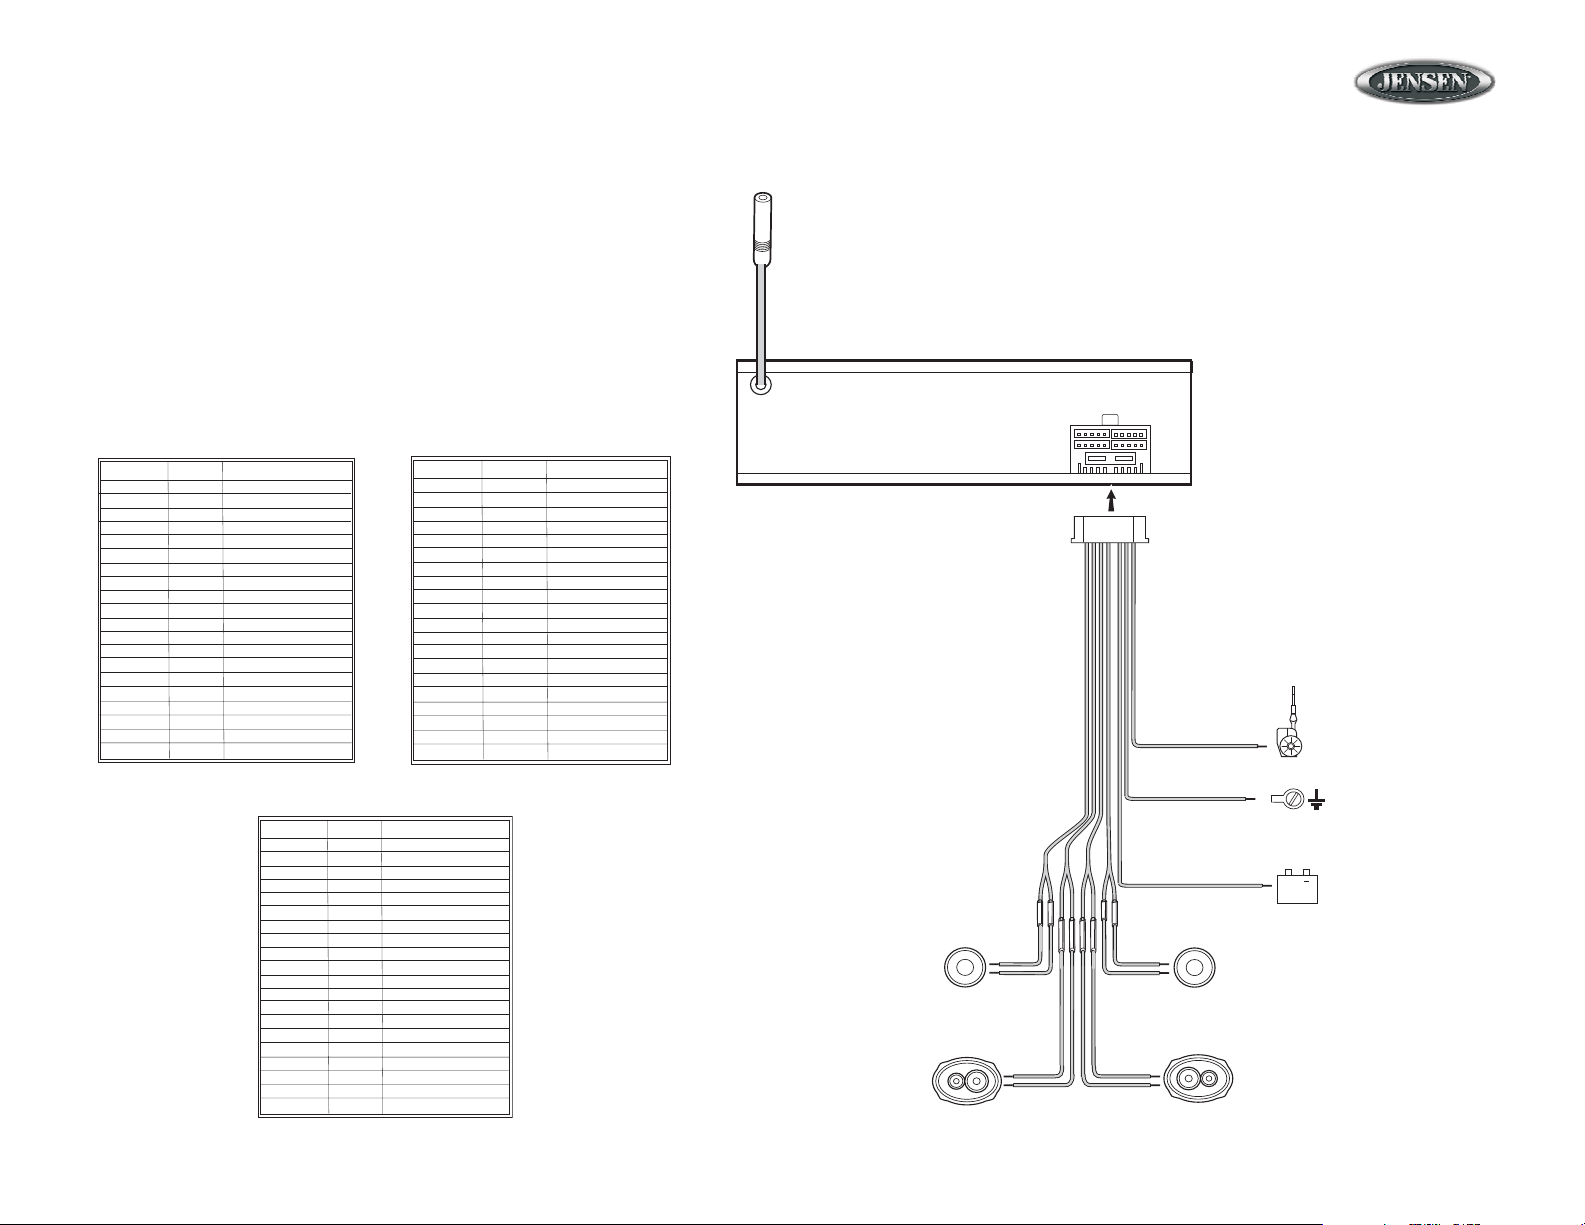
Wiring
The wiring diagram depicts all the wiring connections required for proper operation of
the unit.
Cableado
El diagrama de cableado describe todas las conexiones necesarias para el
funcionamiento de la unidad.
Câblage
Le schéma du câblage dépeint tous les branchements de câble exigés pour l'opération
de l'appareil.
WIRING CHART
Pin Number Wire Color Description
1 Grey/Black
2 Grey
3
4
5 Empty
6 Green
7 Green/Black
8 Empty
9
10
11 White
12 White/Blackr Left front speaker
13
14 Blue Power Antenna
15 Red
16 Black
17 Empty No connection
18 Empty No connection
19 Empty No connection
20 Empty No connection
Violet Right rear speaker (+)
Violet/Black Right reart speaker (-)
Empty No connection
Empty No connection
Right front speaker (-)
Right front speaker (+)
No connection
Left rear speaker (+)
Left rear speaker (-)
No connection
Left front speaker (+)
Empty No connection
+12V Power
Ground
Nro. de Pin Color Función
1
2
3
4
5
6
7
8
9
10
(-)
11
12
13
14 Azul Antena
15 R
16
17
18
19
20
CUADRO DE CABLEADO
Gris / Negro Altavoz trasero derecho (-)
Gris Altavoz delantero derecho (+)
Violeta Altavoz trasero derecho (+)
Violeta / Negro Altavoz trasero derecho (-)
Vacío Sin conexión
Verde Altavoz trasero izquierdo (+)
Verde / Negro Altavoz trasero izquierdo (-)
Vacío Sin conexión
Vacío Sin conexión
Vacío Sin conexión
Blanco Altavoz delantero izquierdo (+)
Blanco / Negro Altavoz delantero izquierdo (-)
Vacío Sin conexión
ojo Ignición12v/Alternado
Negro Toma a tierra en chasis
Vacío Sin conexión
Vacío Sin conexión
Vacío Sin conexión
Vacío Sin conexión
Antenna
Connector
20-Pin
Socket
Power Antenna (blue)
TABLEAU DU CÂBLAGE
Numéro du pin Couleur Fonction
1
2
3
4
5
6V
7
8
9
10 Vide Pas de connexion
11
12 Blanc/Noir
13
14 Bleu Antena
15
16
17 Vide Pas de connexion
18 Vide Pas de connexion
19 Vide Pas de connexion
20 Vide Pas de connexion
Gris/Noir Haut parleur d'avant droite (-)
Gris Haut parleur d'avant droite (+)
Violet Haut parleur d'arrière droite (+)
Violet/Noir Haut parleur d'arrière droite (-)
Vide Pas de connexion
ert Haut parleur d'arrière gauche (+)
Vert/Noir Haut parleur d'arrière gauche (-)
Vide Pas de connexion
Vide Pas de connexion
Blanc Haut parleur d'avant gauche (+)
Haut parleur d'avant gauche (-)
Vide Pas de connexion
Rouge Allumage 12V/Allumé
Noir Châssis terre
Front Left Speaker
Rear Left Speaker
5
White/Black (-)
White (+)
Green/Black (-)
Green (+)
Gray/Black (-)
Gray (+)
Violet/Black (-)
Violet (+)
Ground (black)
+
ACC +12 volt (red)
Front Right Speaker
Rear Right Speaker
MCD4030
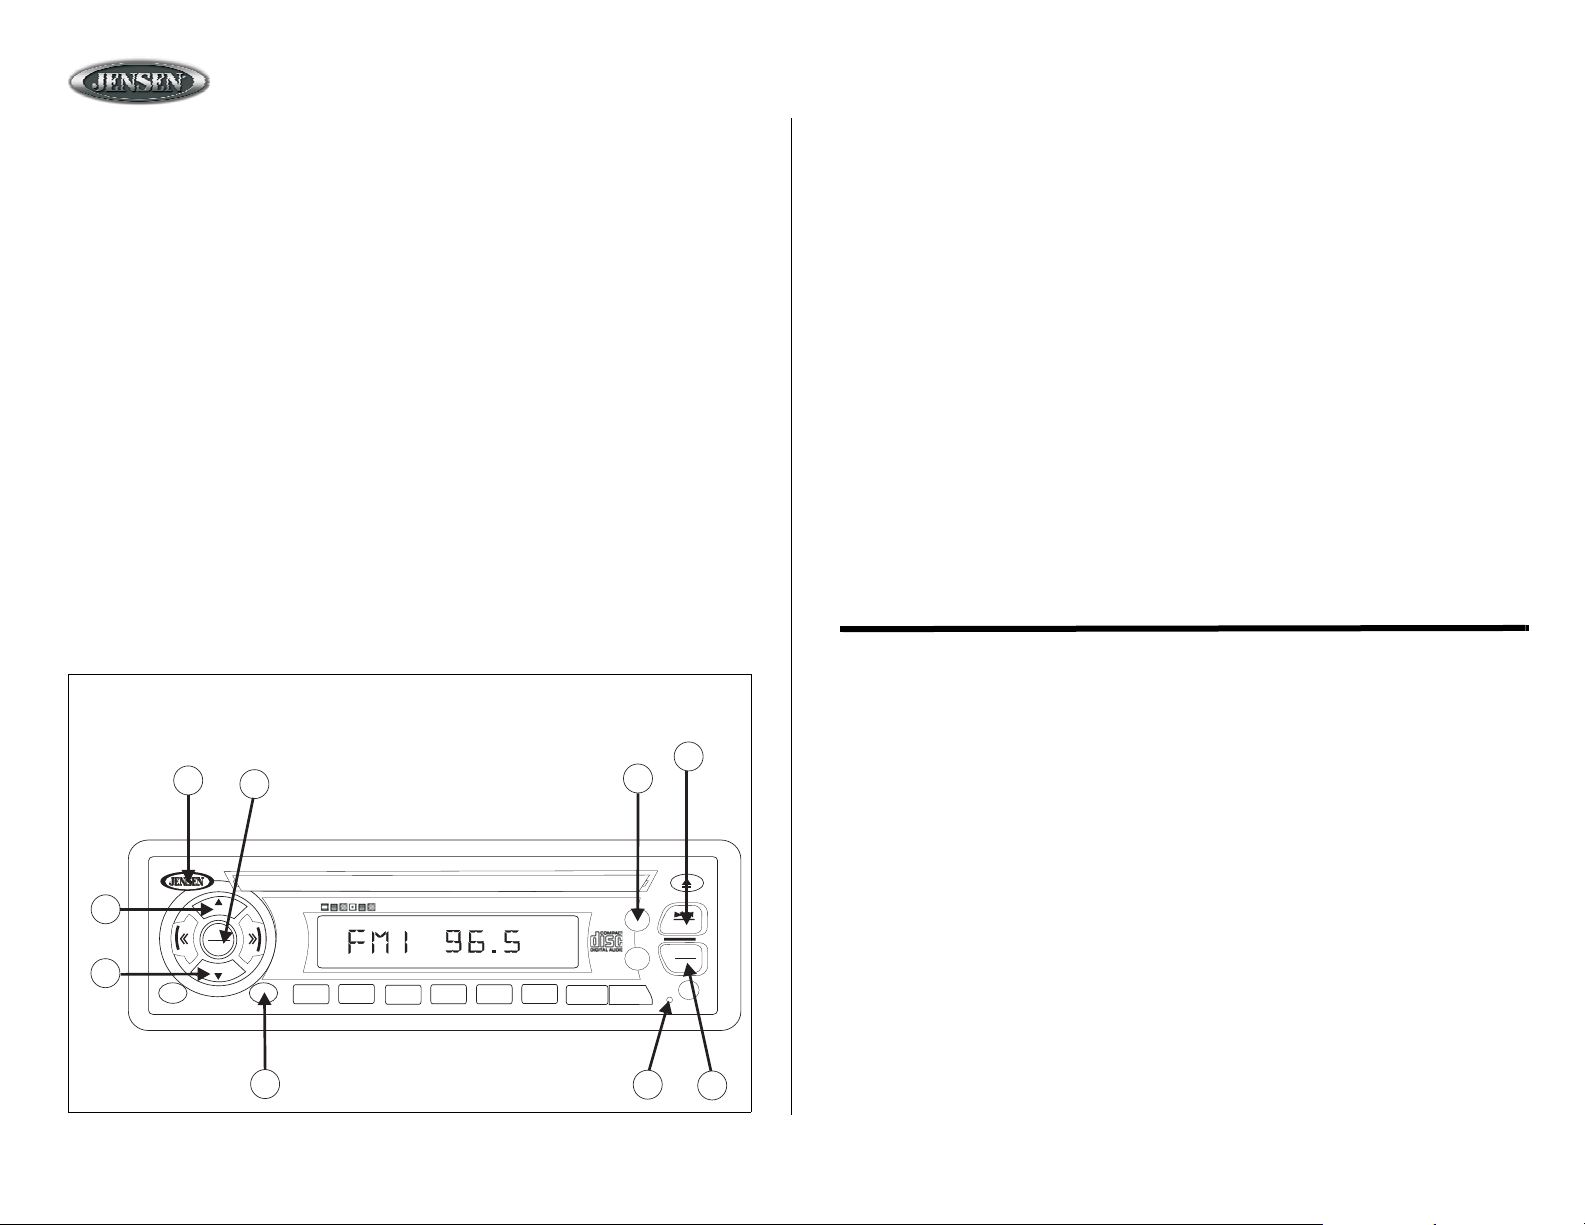
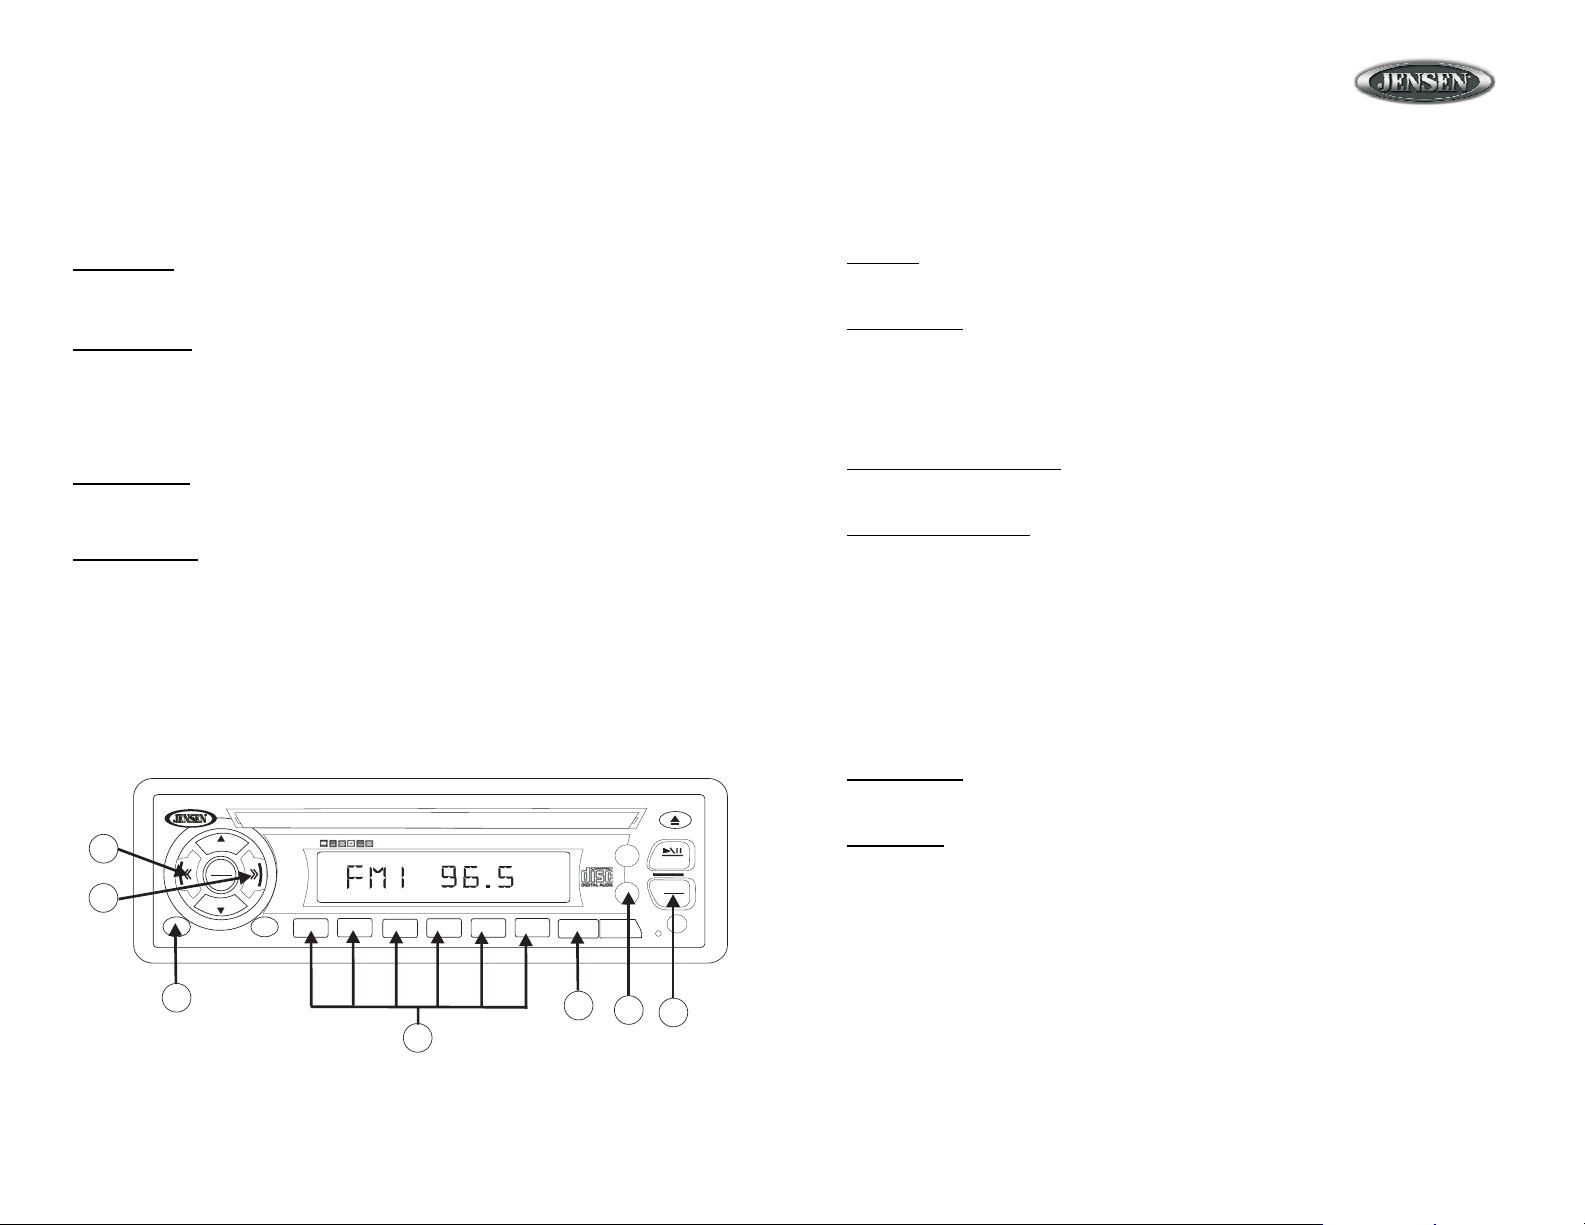
Basic Operation
1. Power
Press the power button (1) or any other button on the front of the radio (except the eject button)
to turn the unit on. Press the power button again to turn the unit off.
2. Mode
Press MODE (2) to select a different mode of operation as indicated on the display panel.
Available modes include Radio, CD and AUX. CD mode will only appear in the menu if a CD is
loaded in the unit.
3. Audio Mute
Press MUTE (3) momentarily to mute the audio volume. Press MUTE again to restore volume to the previous setting.
4. Volume
To adjust the volume, press VOL S (4a) or VOL T (4b).
5. Sound Adjustment
Press SEL/MENU (5) repeatedly to step through the following sound adjustment options:
Volume, Bass, Treble, Balance (left to right) and Fader (front to rear). When the desired option
appears in the display, press VOL S or VOL T to adjust that audio feature. When no
adjustments have been made for five seconds, the unit will resume normal operation.
Basic Operation
Operación Básica
Opération de Base
3
AMS
DISP
MONO
8
EQ
MUTE
BAND
LOUD
AUX IN
9
7
1
5&6
PWR
SHIFT
SCAN
VOL
SEL
MENU
VOL
MODE
4 X 30W
SCN
2
1
2
SHF
RPT
3
4
4a
4b
MCD4030
5
6
Operación Básica
1. Potencia
Presione el botón de la energía (1) o cualquier otro botón en el frente del radio (excepto el botón de
expulsar) para encender la unidad. Presione el botón de la energía nuevamente para apagar el radio.
2. Modo
Presione MODE (2) para seleccionar un modo diferente de operación como se indica en la pantalla.
Los modos disponibles incluyen radio, CD y AUX. El modo CD solamente aparecerá en el menú si un
CD o un cassette ha sido introducido en el equipo previamente.
3. Audio Mudo
Presione MUTE (3) por un momento para enmudecer el volumen del audio. Restablezca el volumen a
la configuración previa presionando MUTE nuevamente.
4. Volumen / Regulador Audio
Para incrementar el volumen, presione VOL S (4a) o VOL T (4b)
5. Ajuste de Sonido
Presione SEL/MENU (5) para optar por los siguientes ajustes de sonido: BAS (bajos), TRE
(agudos), BAL (balance izquierdo - derecho) y FAD (balance delantero - trasero). Cuando la
opción deseada aparece en la pantalla, presione VOL S o VOL T para ajustar la función de
audio. Si no se realiza ningún ajuste por cinco segundos, volverá a operar normalmente.
Opération de base
1. Alimentation
Appuyez sur le bouton de puissance (1) ou sur n'importe quel bouton sur la radio (excepté le
bouton éjection) pour mettre l'appareil en marche lorsque l'allumage est en fonction.
Appuyez de nouveau sur le bouton de puissance pour éteindre la radio.
2. Mode
Appuyez sur MODE (2) pour sélectionner un mode d'opération différent indiqué sur le
panneau d'affichage. Des modes disponibles peuvent comprendre la radio, CD et AUX. La
mode CD n'apparaîtra dans le menu que s'il y a un disque compact dans le lecteur de CD.
3. Mise en Sourdine
Appuyez sur MUTE (3) pour mettre le volume audio en sourdine. Vous pouvez rétablir le
volume en appuyant de nouveau sur ce
4. Volume / Contrôleur Audio
Pour augmenter le volume, appuyez sur VOL S (4a) ou VOL T (4b).
5. Ajustement de son
Appuyez sur SEL/MENU (5) et suivez les options ajustement de son suivants : BAS (bass),
TRE (aigu), BAL (équilibre) et FAD (fader). Lorsque l'option désirée apparaît sur l'affichage,
appuyez sur VOL S ou VOL T pour ajuster cette fonction audio. Lorsque aucun ajustement n'a
été fait pendant cinq secondes, l'appareil reprendra l'opération normale.
6
MUTE mise en sourdine.

MCD4030
Basic Operation (continued)
6. Menu Operation
1. Press SEL/MENU (6) for more than three seconds to access the menu feature.
2. Once this feature is activated, press SEL/MENU momentarily to step though the available menu options.
3. Press VOL S or VOL T to change the setting for that option, if desired.
When no adjustments have been made for five seconds, the unit will resume normal operation.
The following options are controlled through the menu feature:
Audible Beep
Press SEL/MENU for more than three seconds to access the menu feature. When “BEEP ON/
OFF” appears in the display, press VOL S or VOL T to turn the audible beep on or off. When
this feature is turned on, the unit will beep each time a button is pressed. Turning off this
feature disables the audible beep, and no beep will be heard when pressing buttons.
Programmable Turn-on Volume
Press SEL/MENU for more than three seconds to access the menu feature. When “BEEP ON/
OFF” appears in the display, press SEL/MENU one time, then press VOL S or VOL T to
select the volume level for the unit to assume each time it is turned on.
Frequency Spacing
This option allows a selection between USA (200k for FM and 10k for AM) and European (50k
for FM and 9k for AM) radio frequency spacing. Press SEL/MENU for more than three
seconds to access the menu feature. When “BEEP ON/OFF” appears in the display, press
SEL/MENU two times, then press VOL S or VOL T to select USA or European spacing.
Operación Básica (continuado)
6. Operación del Menú
1. Presione SEL/MENU (6) por más de tres segundos para acceder las funciones de menú.
2. Una vez que se activa esta función, presione VOL S o VOL T para seguir las opciones
de menú disponibles.
3. Cuando la opción deseada aparece en pantalla, presione SEL/MENU por más de tres
segundos para acceder al submenú correspondiente, y utilice los botones VOL S o VOL
T para cambiar la configuración si así lo desea.
Si no se realiza ningún ajuste por cinco segundos, la unidad volverá a operar normalmente.
Las siguientes opciones se controlan a través de la función de menú:
Pitido Audible
Cuando esta función se enciende, la unidad emitirá un pitido audible cada vez que se
presione un botón. Apagando la unidad se desactiva el pitido audible, y ya no se escucharán.
Volumen de Encendido Programable
Utilice esta función para especificar un nivel de volumen para la unidad que sea encendida.
Espaciamiento de Frecuencia
Esta opción permite una selección entre el espaciamiento de frecuencia de USA (200k para FM
y 10k para AM) y de Europa (50 k para FM y 9 k para AM).
Opération de base (continué)
6. Opération menu
1. Appuyez sur SEL/MENU (6) pendant plus de 3 secondes pour accéder à la fonction menu.
2. Lorsque cette fonction est activée, appuyez sur VOL S ou VOL T pour traverser les
options menu disponibles.
3. Lorsque l'option souhaitée apparaît sur l'afffichage, appuyez sur SEL/MENU pendant plus
de 3 secondes pour accéder au sous-menu correspondant et utilisez les boutonsVOL S
ou VOL T pour changer la configuration.
Lorsque aucun ajustement n'a été fait pendant cinq secondes, l'appareil reprendra le jeu
normal. Les options suivantes sont contrôlées par la fonction menu :
Bip audible
Lorsque cette fonction est activée, l'appareil émettra un bip chaque fois qu'on appuie sur un
bouton. Lorsque cette fonction est désactivée, le bip audible sera également désactivé et vous
n'entendrez aucun bip lorsque vous appuyez sur les boutons.
Volume de départ programmable
Utilisez cette fonctions pour spécifier le niveau de volume que l'appareil aura chaque fois qu'il
est mis en marche.
L'espacement de fréquence (US/Euro)
Cette option permet un choix entre l'espacement de fréquence de les Etats-Unis (200k pour FM
et 10k pour le AM) et européen (50k pour FM et 9k pour le AM).
7

MCD4030
Basic Operation (continued)
Display Priority
Press and hold SEL/MENU for more than three seconds, then press SEL/MENU five times
until “FRE/TIME/NO PRI” appears in the display. Press VOL S or VOL T to select one of the
following options:
• Frequency Priority - The frequency will be the default display. Pressing DISP will momentarily display the clock, and the unit will return to frequency display after several seconds.
• Clock Priority - The time will be the default display. Pressing DISP will momentarily display the radio frequency, and the unit will return to the clock display after several seconds.
• No Priority: Pressing DISP will switch the unit from displaying the time to displaying the
clock (or vice versa) until DISP is pressed again.
7. Loudness
Press BAND/LOUD (7) for more than three seconds to reinforce the bass output. Press BAND
again for more than three seconds to release this function.
8. Equalization
Press EQ (8) to activate the equalization function and select one of four audio modes: FLAT,
CLASSIC, POP M or ROCK M.
9. Reset
Use a ballpoint pen or other thin metal object to press the reset button (9) under the following
circumstances:
• After the completion of initial installation/wiring.
• If none of the function buttons work or if an error symbol appears in the display.
Operación Básica (continuado)
Prioridad de la exhibición
Esta opción permite una selección de una de las opciones siguientes:
• Prioridad de la frecuencia - Presionar el DISP exhibirá momentáneamente el reloj, y la
unidad volverá a la exhibición de la frecuencia después de varios segundos.
• Prioridad del reloj - Presionar el DISP exhibirá momentáneamente la radiofrecuencia, y la
unidad volverá a la exhibición del reloj después de varios segundos.
• Ninguna Prioridad: Presionar el DISP cambiará la unidad de exhibir el tiempo a exhibir el
reloj (o viceversa) hasta que el DISP se presiona otra vez.
8. Igualación
Presione EQ (8) para activar la función de la igualación y para seleccionar uno de cuatro modos
audio: FLAT, CLASSIC, POP M or ROCK M.
9. Reinicio
Utilice un bolígrafo u otro objeto de metal delgado para presionar el botón "reset" para reiniciar
bajo las siguientes circunstancias:
• Luego de completar la instalación y el cableado inicial.
• Si ninguno de los botones funcionan o si un símbolo de error aparece en pantalla.
Opération de base (continué)
Priorité de l'affichage
Choisir une des options suivantes:
• Priorité de fréquence - La pression de la DISP montrera momentanément l'horloge, et
l'unité reviendra à l'affichage de fréquence après plusieurs secondes.
• Priorité d'horloge - La pression de la DISP montrera momentanément la fréquence par
radio, et l'unité reviendra à l'affichage d'horloge après plusieurs secondes.
• Aucune Priorité : La pression de la DISP commutera l'unité de montrer le temps à montrer
l'horloge (ou vice versa) jusqu'à ce que la DISP soit serrée encore.
7. Intensité du son
Appuyez sur BAND/LOUD (8) momentanément pour renforcer la sortie bass. " LOUD "
apparaîtra sur l'affichage. Appuyez sur LOUD de nouveau pour désactiver cette fonction.
8. Equalization
Appuyez sur EQ (8) pour activer la fonction d'égalization et pour choisir un de quatre modes
audio: FLAT, CLASSIC, POP M or ROCK M.
9. Réglage
Utilisez une bille ou un objet métallique mince quelconque pour appuyez sur le bouton de
réglage dans les circonstances suivantes
• Après la terminaison de l'installation/câblage de départ.
• Si aucun des boutons ne marche ou si un symbole d'erreur apparaît sur l'affichage.
7. Volumen
Presione LOUD (8) momentáneamente para reforzar la salida de los sonidos graves. "LOUD"
aparecerá en pantalla. Presione BAND/LOUD nuevamente para desactivar esta función.
8
MCD4030
Radio Operation
10. Select a Band
Press BAND (10) to change between three FM bands and two AM bands.
11. Tuning
Seek Tuning
Press << (11a) or >> (11b) momentarily, and the unit will automatically tune to the next strong
station.
Manual Tuning
Press << or >> for more than three seconds to enter manual tuning mode. When “MANUAL”
appears on the display, press << or >> to move the radio frequency up or down one step.
12. Preset Stations
Six numbered preset buttons store and recall stations for each FM and AM band.
Store a Station
Select a band (if needed), then select a station. Hold a preset button (12) for three seconds. The
preset number will appear in the display.
Recall a Station
Select a band (if needed). Press a preset button momentarily to select the corresponding stored
station.
11a
11b
SHIFT
PWR
SCAN
VOL
SEL
MENU
VOL
MODE
4 X 30W
SCN
2
1
SHF
RPT
3
4
MCD4030
5
6
AMS
DISP
MONO
EQ
MUTE
BAND
LOUD
AUX IN
Operación de la radio
10. Selección de Banda
Pulse BAND (10) para sintonizar la radio entre las tres bandas FM y dos bandas AM.
11. Selección de Emisora
Búsqueda
Pulse << (11a) o >> (11b) por menos de tres segundos y suéltelo para continuar a la siguiente
estación automáticamente.
Sintonía Manual
Presione << o >> por más de tres segundos para ingresar en modo de sintonía manual. Cuando
"MANUAL" aparece en pantalla, presione << o >> para mover un paso la frecuencia de radio hacia
arriba o hacia abajo.
12. Preselección de Emisoras
Seis botóns numerados de preselección para almacenar o llamar emisoras de cada banda.
Cómo almacenar una emisora
Seleccione una banda (si fuera necesario), y seleccione una emisora. Mantenga pulsado durante tres
segundos un botón de preselección (12). El número programado aparecerá en la pantalla.
Cómo llamar una emisora
Seleccione una banda, (si fuera necesario). Pulse un botón de preselección para seleccionar una
emisora almacenada previamente.
Fonctionnement de la radio
10. Sélection de la bande
Appuyez sur le bouton BAND (10) pour faire passer la radio des trois bandes MF et deux bandes MA.
11. Sélection d’une station
Mode recherche
Appuyez sur << (11a) ou >> (11b) pendant moins trois secondes avant de le relâcher pour passer
automatiquement à la station suivante.
Mode manuel
Appuyez sur << ou >> pendant plus de trois secondes pour entrer dans la mode de syntonisation à la
main. Lorsque MANUAL apparaît sur l'affichage, appuyez sur << ou >> pour déplacer la fréquence
radio un pas vers le haut ou le bas.
12. Stations programmées
14
12
13
15
10
9

MCD4030
Radio Operation (continued)
13. Automatically Store / Preset Scan
Automatically Store
To automatically select six strong stations and store them in the current band, select a band (if
needed) and press AMS (13) for more than three seconds. The six strongest stations are
stored as presets, replacing any preset stations already stored in that band.
Preset Scan
To scan stations stored in the current band, select a band (if needed) and press AMS
momentarily. The unit will pause for five seconds at each preset station. Press AMS again to
stop scanning when the desired station is reached.
14. Scan
Press SCAN (14) to scan all stations in the current band. The unit will play each station for five
seconds. Press SCAN again to stop scanning and listen to the current station.
15. Mono/Stereo
Press MONO (15) to toggle between mono and stereo mode. Mono can often improve the
reception of distant stations.
Preset Stations
Preselección de Emisoras
Stations programmées
Preset Number Appears
ELl número preseleccionado aparecerá
e numéro préréglé apparaîtra
MCD4030
5
6
AMS
EQ
MONO
DISP
AUX IN
MUTE
BAND
LOUD
PWR
SHIFT
SCAN
VOL
SEL
MENU
VOL
MODE
4 X 30W
SCN
2
1
Press and hold
PAresione y mantenga presionado
1
ppuyez et maintenez
2
SHF
RPT
3
4
Operación de la radio (continuado)
13. Almacenamiento Automático / Preselección Mediante Escáner
Almacenamiento Automático de Emisoras
Seleccione seis emisoras de señal fuerte y almacénelas en la banda actual. Seleccione una
banda si fuera necesario. Mantenga pulsado el botón la AMS (13) en forma continua por más
de tres segundos. Las emisoras reemplazarán a aquellas que se habían almacenado
previamente.
Preselección Mediante Escáner
Busque con el escáner las emisoras almacenadas en la banda actual. Seleccione una banda si
fuera necesario. Pulse el botón AMS momentáneamente. La radio hará una pausa de 5
segundos en cada emisora que encuentre. Pulse AMS nuevamente para que el escáner se
detenga cuando haya encontrado la emisora deseada.
14. Exploración (escaneo)
Presione SCAN (14) para explorar todas las estaciones en la banda actual. La unidad pasará
cada estación por cinco segundos. Presione SCAN nuevamente para dejar de explorar las
estaciones y escuchar la actual.
15. Mono/Estéreo
Presione MONO (15) para accionar la palanca entre el modo mono y estéreo. La mono lata
mejora a menudo la recepción de estaciones distantes.
Fonctionnement de la radio (continué)
13. Mémorisation automatique / Balayage programmé
Mémorisation automatique de stations
Sélectionnez six stations pour les mémoriser dans la bande affichée. Sélectionnez une bande
(au besoin). Appuyez sur AMS (13) et maintenez-le enfoncé pendant plus de trois secondes.
Les nouvelles stations remplacent les stations mémorisées pour cette bande.
Balayage programmé
Balayage des stations mémorisées pour la bande affichée. Sélectionnez une bande (au besoin).
Appuyez sur le bouton AMS momentanément. La radio fait une pause de cinq secondes à
chaque station. Appuyez de nouveau sur le bouton AMS pour mettre fin au balayage lorsque
vous avez atteint la station désirée.
14. Balayage
Appuyez sur SCAN (14) pour balayer toutes les stations sur la bande courante. L'appareil va jouer
chaque station pendant cinq secondes. Appuyez de nouveau sur SCAN pour arrêter le balayage et
écouter la station courante.
15. Mono/Stéréo
Appuyez sur MONO (15) pour basculer entre le mode mono et stéréo. Le bidon mono
améliorent souvent la réception des stations éloignées.
10

MCD4030
CD Player Operation
16. Insert and Eject CD
Insert a CD label-side up into the CD slot, and the disc will begin to play. Press the eject button (16)
to stop CD play and eject the CD.
17. Pause
Press the play/pause button (also marked MUTE) (17) to suspend and resume disc play.
18. Track Select
Press << (18a) or >> (18b) momentarily to advance to the next or previous track on the CD. The
selected track number will appear on the display. Press and hold << or >> to fast forward or fast
reverse through the disc. CD play starts when the button is released.
18a
18b
PWR
SHIFT
SCAN
VOL
SEL
MENU
VOL
MODE
4X30W
17
16
MCD4030
SCN
2
1
19
RPT
3
20 21
SHF
4
5
6
AMS
DISP
MONO
EQ
MUTE
BAND
LOUD
AUX IN
11

MCD4030
12

MCD4030
Troubleshooting
Problem Cause Corrective Action
No power. Vehicle ignition switch is not
on.
The fuse is blown. Replace the fuse.
Disc cannot be loaded
or ejected.
No sound. Volume turned down too low. Adjust volume until sound is heard.
Sound skips or sound
quality is poor.
Operation keys do not
work.
Radio does not work Antenna cable not connected. Insert antenna cable firmly.
Automatic station
selection does not work.
There is a disc already inside
the unit.
Inserting disc in wrong
direction.
Disc is defective or dirty. Clean disc or try playing another
Excessive temperature. Cool vehicle to a normal
Condensation has collected. Turn off for an hour, then try again.
Wiring not connected properly. Check wiring connections.
Installation angle exceeds 30
degrees.
Disc is defective or dirty. Clean disc or try playing another
Microcomputer is not operating
properly due to misoperation.
Radio signals are too weak. Select a station manually.
If the power supply is connected to
the vehicle accessory circuits but
the engine is not moving, switch the
ignition key to “ACC”.
Remove the current disc and insert
the new one.
Insert disc with label facing up.
one.
temperature.
Adjust the installation angle to less
than 30 degrees.
one.
Press RESET.
Specifications
General
Power Supply Requirements . . . . . . . . . . . . . . . . . . . . . . . . . DC 12 Volts, Negative Ground
Chassis Dimensions . . . . . . . . . . . . . . . . . . . . . . . . . . . . . . . . . . . 178 (W) x 160 (D) x 50 (H)
Tone Controls . . . . . . . . . . . . . . . . . . . Bass (at 100 Hz), ±10 dB; Treble (at 10 kHz), ±10 dB
Maximum Output Power . . . . . . . . . . . . . . . . . . . . . . . . . . . . . . . . . . . . . . . . . . . . . . 4x30W
Current Drain . . . . . . . . . . . . . . . . . . . . . . . . . . . . . . . . . . . . . . . . . . . . . . . 15 Ampere (max.)
CD Player
Signal to Noise Ratio . . . . . . . . . . . . . . . . . . . . . . . . . . . . . . . . . . . . . . . . . . More than 65 dB
Channel Separation . . . . . . . . . . . . . . . . . . . . . . . . . . . . . . . . . . . . . . . . . . . More than 45 dB
Frequency Response . . . . . . . . . . . . . . . . . . . . . . . . . . . . . . . . . . . . . . . . . . 15 Hz to 22 kHz
FM Tuner
Tuning range . . . . . . . . . . . . . . . . . . . . . . . . . . . . . . . . . . . . . . . . . . . . . . . . .87.5MHz - 108.0MHz
Sensitivity . . . . . . . . . . . . . . . . . . . . . . . . . . . . . . . . . . . . . . . . . . . . . . . . . . . . . . . . . . . . . 2uV
Stereo separation @ 1 kHz. . . . . . . . . . . . . . . . . . . . . . . . . . . . . . . . . . . . . . . . . . . . . . >25dB
AM Tuner
Tuning range . . . . . . . . . . . . . . . . . . . . . . . . . . . . . . . . . . . . . . . . . . . . . . . . . . 530MHz - 1720Mhz
Sensitivity . . . . . . . . . . . . . . . . . . . . . . . . . . . . . . . . . . . . . . . . . . . . . . . . . . . . . . . . . . . . 15uV
Specifications subject to change without notice.
13

MCD4030
Corrección de Problemas
Problema Causa Acción Correctiva
No hay corriente. La llave de la ignición del vehículo
El disco no se puede
introducir ni quitar.
El casete no se puede
insertar ni quitar.
No hay sonido. El volumen fue bajado demasiado. Ajuste el volumen hasta que la unidad se
El sonido salta o la calidad de sonido es muy
baja.
Los botones de operación no funcionan.
El radio no funciona. El cable de la antena no está
La selección automática
de estación no funciona.
está apagada.
El fusible está quemado. Reemplace el fusible.
Hay un disco en la unidad. Quite el disco existente e introduzca el
Insertó el disco en la dirección equivocada.
El disco es defectuoso o está sucio. Limpie el disco o intente utilizar otro.
Temperatura excesiva en el vehículo. Enfríe el vehículo a una temperatura nor-
La condensación se ha acumulado. Apague el reproductor por una hora,
Ya hay un casete en la unidad. Quite el casete existente e introduzca el
Temperatura excesiva en el vehículo. Enfríe el vehículo a una temperatura nor-
La condensación se ha acumulado. Apague el reproductor por una hora,
El cableado no se conectó adecuadamente.
El ángulo de instalación excede los
30 grados.
El disco es defectuoso o está sucio. Limpie el disco o intente utilizar otro.
El casete es defectuoso. Intente utilizar otro casete.
El microcomputador no está operando apropiadamente.
conectado.
Las señales de radio son muy
débiles.
Si la alimentación de energía está
conectada a los circuitos de accesorios
del vehículo, pero el motor no se mueve,
cambie la llave de ignición a "ACC".
nuevo.
Inserte el disco con el sello hacia arriba.
mal.
luego intente nuevamente.
nuevo.
mal.
luego intente nuevamente.
escuche.
Verifique las conexiones de cableado.
Ajuste el ángulo de instalación a menos
de 30 grados.
Presione RESET.
Inserte el cable de la antena firmemente.
Seleccione una estación manualmente.
Especificationes
General
Suministro de corriente . . . . . . . . . . . . . . . . . . . . . . . . . . . . . . . . . . . . . . 12 VDC, negativo a tierra
Dimensiones . . . . . . . . . . . . . . . . . . . . . . . . . . . . . . . . . . . 178mm.(W) x 160mm. (D) x 15mm. (H)
Control de Tonos
- Graves (a 100 Hz) . . . . . . . . . . . . . . . . . . . . . . . . . . . . . . . . . . . . . . . . . . . . . . . . . . . . . . ±10 dB
- Agudos (a 10 kHz) . . . . . . . . . . . . . . . . . . . . . . . . . . . . . . . . . . . . . . . . . . . . . . . . . . . . . . ±10 dB
Poder de Salida Máximo . . . . . . . . . . . . . . . . . . . . . . . . . . . . . . . . . . . . . . . . . . . . . . . . . . . 4x30W
Conducto de Corriente. . . . . . . . . . . . . . . . . . . . . . . . . . . . . . . . . . . . . . . . . . . . 15 Amperios (máx.)
Reproductor de CD
Promedio de ruido/señal . . . . . . . . . . . . . . . . . . . . . . . . . . . . . . . . . . . . . . . . . . . . . . . . . . . .>65 dB
Separación de canales . . . . . . . . . . . . . . . . . . . . . . . . . . . . . . . . . . . . . . . . . . . . . . . . . . . . .>45 dB
Respuesta de frecuencia. . . . . . . . . . . . . . . . . . . . . . . . . . . . . . . . . . . . . . . . . . . . .15 Hz to 22 kHz
Sintonización FM
Alcance de sintonización . . . . . . . . . . . . . . . . . . . . . . . . . . . . . . . . . . . . . . . . .87.5MHz - 108.0MHz
Sensibilidad . . . . . . . . . . . . . . . . . . . . . . . . . . . . . . . . . . . . . . . . . . . . . . . . . . . . . . . . . . . . . . . . 2uV
Separación de estéreo à 1 kHz . . . . . . . . . . . . . . . . . . . . . . . . . . . . . . . . . . . . . . . . . . . . . . . >25dB
Sintonización AM
Alcance de sintonización . . . . . . . . . . . . . . . . . . . . . . . . . . . . . . . . . . . . . . . . . . 530MHz - 1720Mhz
Sensibilidad . . . . . . . . . . . . . . . . . . . . . . . . . . . . . . . . . . . . . . . . . . . . . . . . . . . . . . . . . . . . . . . 15uV
Las especificaciones están sujetas a cambio sin previo aviso.
14

MCD4030
Dépannage
Problème Cause Action corrective
Pas de puissance L'allumage du véhicule n'est pas en
Disque ne peut pas
être chargé ou éjecté
Cassette ne peut pas
être chargé ou éjecté
Pas de son Le volume est trop bas Ajustez le volume jusqu'à ce que vous
Le son saute ou la
qualité du son est
mauvaise
Les clés d'opération
ne fonctionnent pas
La radio ne
fonctionne pas
La sélection des
stations automatique
ne fonctionne pas
marche
Le fusible a sauté Remplacez le fusible
Il y a déjà un disque à l'intérieur de
l'appareil
Insertion du disque dans le mauvais
sens
Disque est défectueux ou sale Nettoyez le disque et essayer d'en jouer un
Température excessive dans le véhicule
De la condensation a accumulé Mettez la platine en arrête pendant une heure
Il y a déjà une cassette à l'intérieur de
l'appareil
Température excessive dans le véhicule
De la condensation a accumulé Mettez la platine en arrêt pendant une heure
Le câblage n'est pas correctement fait Vérifiez le câblage
L'angle d'installation est audessus de
30°
Le disque est défectueux ou sale
La cassette est défectueuse Essayez de jouer une autre cassette
Le micro-ordinateur ne fonctionne pas
bien
Le câble de l'antenne n'est pas
branché
Les signaux de radio sont trop faibles Sélectionnez une station à la main
Si l'alimentation est branchée aux circuits
accessoires du véhicule mais le moteur ne
bouge pas, mettez le clé de contact à 'ACC'.
Enlevez le disque courant et insérez-en un
nouveau
Insérez le disque avec l'étiquette vers le haut
nouveau
Refroidir le véhicule à une température normale
et puis essayez de nouveau
Enlevez la cassette courante et insérez-en un
nouveau
Refroidissez le véhicule à une température
normale
et puis essayez de nouveau
entendiez le son
Ajuster l'angle de l'installation à moins de 30°
Nettoyez le disque ou essayez d’en jouer un
autre
Appuyez sur RESET
Insérez le câble de l'antenne d'une manière
firme
Caractéristiques
Généralités
Alimentation . . . . . . . . . . . . . . . . . . . . . . . . . . . . . . . . . . . . . . . . . .12 VDC, mise à la terre négative
Dimensions . . . . . . . . . . . . . . . . . . . . . . . . . . . . . . . . . . . . 178mm.(W) x 160mm. (D) x 50mm. (H)
Contrôle des tonalités . . . . . . . . . . . . . . . . . . . . . . Bass (à 100 Hz)±10 dB; Aigu (à 10 kHz)±10 dB
Puissance sortie maximum . . . . . . . . . . . . . . . . . . . . . . . . . . . . . . . . . . . . . . . . . . . . . . . . . . 4x30W
Drain courant . . . . . . . . . . . . . . . . . . . . . . . . . . . . . . . . . . . . . . . . . . . . . . . . . . . . 15 ampères (max)
Lecteur CD
Rapport signal/bruit . . . . . . . . . . . . . . . . . . . . . . . . . . . . . . . . . . . . . . . . . . . . . . . . . . . . . . . . >65 dB
Séparation de canal . . . . . . . . . . . . . . . . . . . . . . . . . . . . . . . . . . . . . . . . . . . . . . . . . . . . . . . >45 dB
Réponse de fréquence . . . . . . . . . . . . . . . . . . . . . . . . . . . . . . . . . . . . . . . . . . . . . .15 Hz to 22 kHz
Récepteur MF
Gamme de fréquences . . . . . . . . . . . . . . . . . . . . . . . . . . . . . . . . . . . . . . . . . .87.5MHz - 108.0MHz
Sensibilité. . . . . . . . . . . . . . . . . . . . . . . . . . . . . . . . . . . . . . . . . . . . . . . . . . . . . . . . . . . . . . . . . . 2uV
Séparation stéréo à 1 KHz. . . . . . . . . . . . . . . . . . . . . . . . . . . . . . . . . . . . . . . . . . . . . . . . . . . >25dB
Récepteur MA
Gamme de fréquences . . . . . . . . . . . . . . . . . . . . . . . . . . . . . . . . . . . . . . . . . . . 530MHz - 1720Mhz
Sensibilité. . . . . . . . . . . . . . . . . . . . . . . . . . . . . . . . . . . . . . . . . . . . . . . . . . . . . . . . . . . . . . . . . 15uV
Ces caractéristiques peuvent être modifiées sans préavis.
15
 Loading...