

Page 1

AM/FM DUAL ALARM CLOCK RADIO
Please read and follow this instruction manual carefully
before using the unit and retain it for future reference
WITH NATURE SOUNDS
USER MANUAL
JCR-210
Page 2
WARNING
1. Keep these instructions
2. Heed all warnings.
3. Follow all instructions.
4. Do not use this apparatus near water.
5. Clean only with dry cloth.
6. Do not block any ventilation openings. Install in accordance with the manufacturer's
instructions.
7. Do not install near any heat sources such as radiators, heat registers, stoves, or other
apparatus (including amplifiers) that produce heat.
8. Do not defeat the safety purpose of the polarized or grounding-type plug. A polarized
plug has two blades with one wider than the other. A grounding type plug has two
blades and a third grounding prong. The wider or the third prong is provided for your
safety. If the provided plug does not fit into your outlet, consult an electrician for
replacement of the obsolete outlet.
9. Protect the power cord from being walked on or pinched particularly at plugs,
convenience receptacles, and the point where they exit from the apparatus.
10. Only use attachments / accessories specified by the manufacturer.
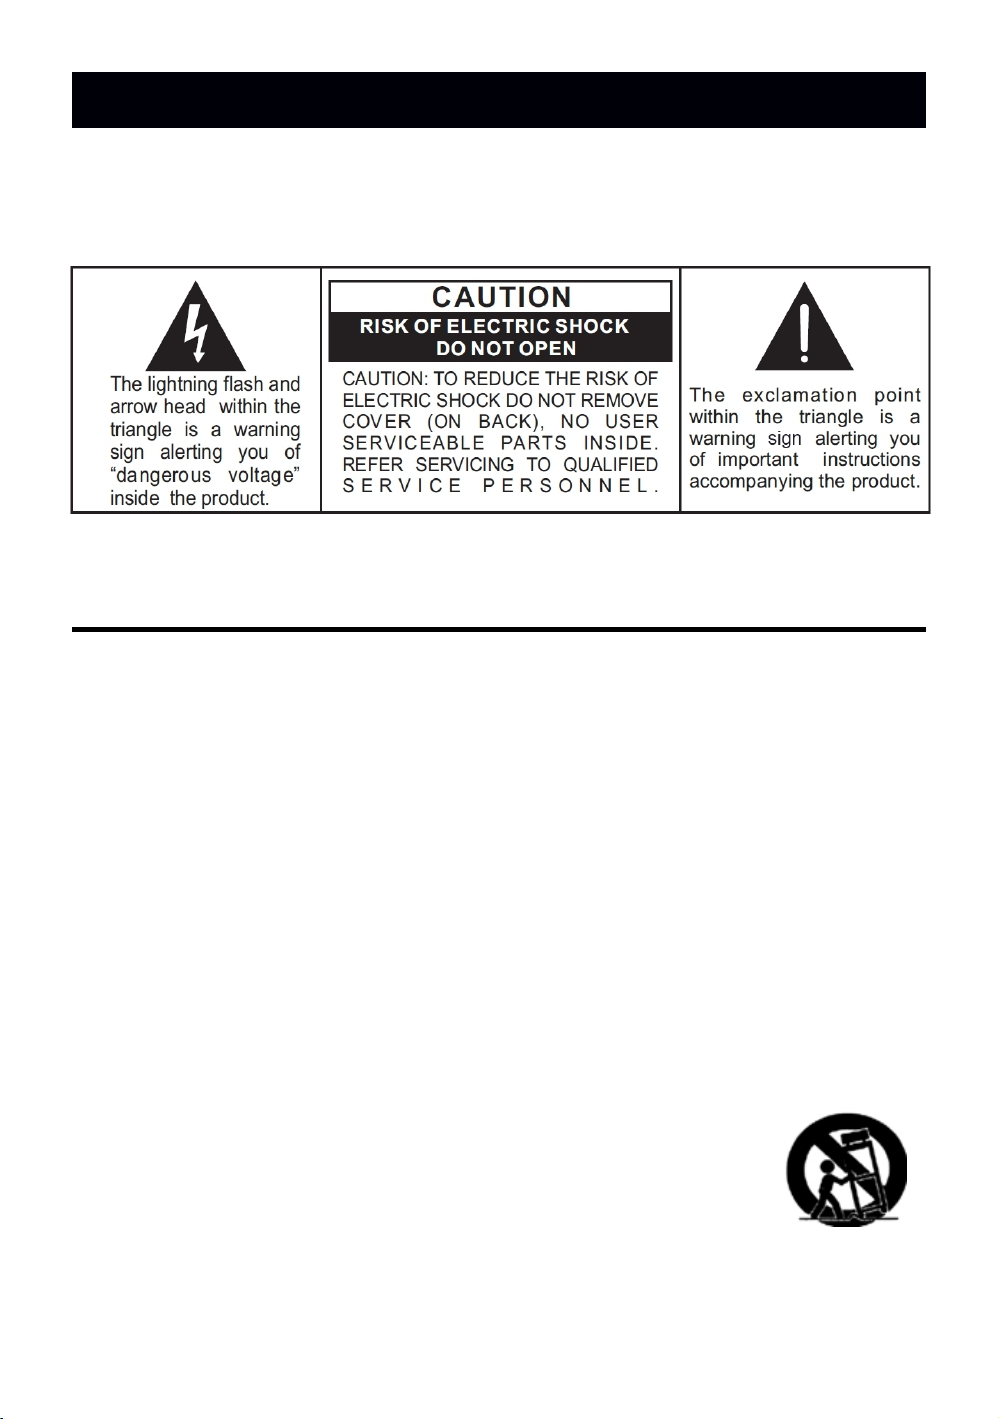
11. Use only with a cart, stand, tripod, bracket, or table specified by the
manufacturer, or sold with the apparatus. When a cart is used, use
caution when moving the cart/apparatus combination to avoid injury
from tip-over.
12. Unplug this apparatus during lightning storms or when unused for
long periods of time.
TO PREVENT FIRE OR SHOCK HAZARD, DO NOT USE THIS PLUG WITH AN
EXTENSION CORD, RECEPTACLE OR OTHER OUTLET UNLESS THE BLADES
CAN BE FULLY INSERTED TO PREVENT BLADE EXPOSURE. TO PREVENT FIRE
OR SHOCK HAZARD, DO NOT EXPOSE THIS APPLIANCE TO RAIN OR
MOISTURE.
IMPORTANT SAFETY INSTRUCTIONS
1
E-
Page 3
13. Refer all servicing to qualified service personnel. Servicing is required when the
apparatus has been damaged in any way, such as power-supply cord or plug is
damaged, liquid has been spilled or objects have fallen into the apparatus, the
apparatus has been exposed to rain or moisture, does not operate normally, or has
been dropped.
14. The apparatus shall not be exposed to dripping or splashing and that no objects filled
with liquids, such as vases, shall be placed on apparatus.
15. Main plug is used as disconnect device and it should remain readily operable during
intended use. In order to disconnect the apparatus from the mains completely, the
mains plug should be disconnected from the mains socket outlet completely.
16. Battery shall not be exposed to excessive heat such as sunshine, fire or the like.
17. Caution marking and nameplate are located at the back of apparatus.
The symbol for Class II (double insulation)
18. CAUTION: Danger of explosion if battery is incorrectly replaced. Replace only with
the same or equivalent type.
19. A Battery subjected to extremely low air pressure that may result in an explosion or
the leakage of flammable liquid or gas.
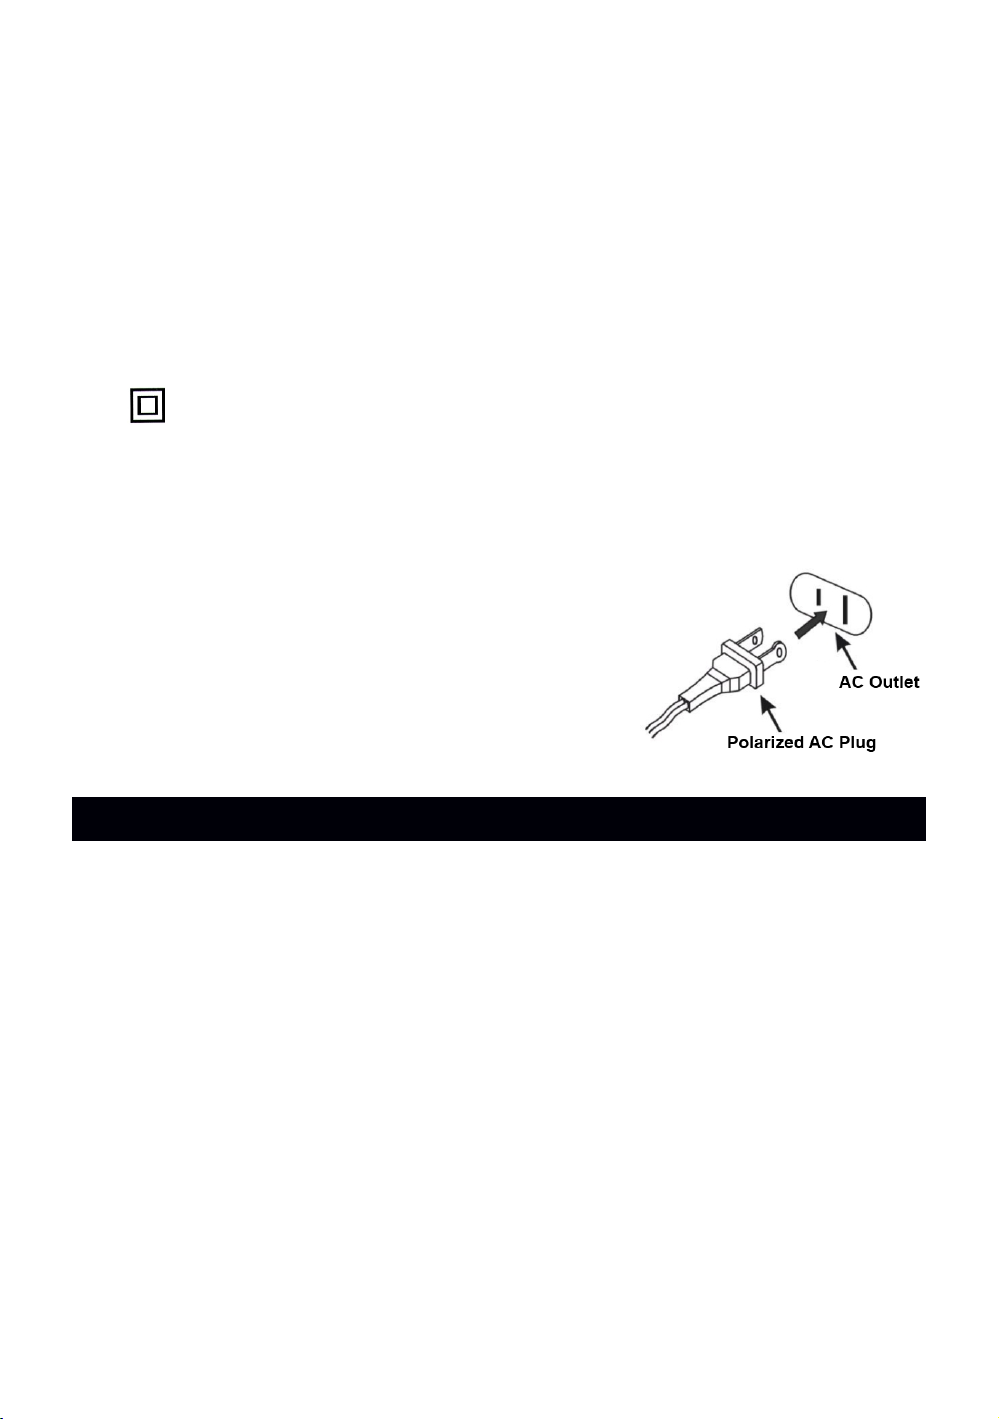
CAUTION:
TO PREVENT ELECTRIC SHOCK,
MATCH WIDE BLADE OF AC PLUG TO WIDE SLOT.
FULLY INSERT THE PLUG TO MAIN POWER SOCKET.
COMPLIANCE WITH FCC REGULATION
This device complies with Part 15 of the FCC Rules. Operation is subject to the following
two conditions:
(1) this device may not cause harmful interference, and
(2) this device must accept any interference received, including interference that may
cause undesired operation.
NOTE : This equipment has been tested and found to comply with the limits for a Class B
digital device, pursuant to Part 15 of the FCC Rules. These limits are designed to provide
reasonable protection against harmful interference in a residential installation. This
equipment generates, uses and can radiate radio frequency energy and, if not installed
and used in accordance with the instructions, may cause harmful interference to radio
communications. However, there is no guarantee that interference will not occur in a
particular installation. If this equipment does cause harmful interference to radio or
television reception, which can be determined by turning the equipment off and on, the
user is encouraged to try to correct the interference by one or more of the following
measures:
- Reorient or relocate the receiving antenna.
2
E-
Page 4

- Increase the separation between the equipment and receiver.
- Connect the equipment into an outlet on a circuit different from that to which the
receiver is connected.
- Consult the dealer or an experienced radio/TV technician for help.
CAUTION: Changes or modifications not expressly approved by the party
responsible for compliance could void the user’s authority to operate the
equipment.
IMPORTANT NOTES
Avoid installing the unit in locations described below:
Places exposed to direct sunlight or close to heat radiating appliances such
as electric heaters.
Dusty places.
Places subject to constant vibration.
Humid or moist places.
This unit is designed to operate on 120V~ 60Hz AC house current. Operating this unit on
any other power source may cause damage to the unit, and such damage is not covered
by your warranty.
It is also equipped with a battery back-up system for the clock that is powered by 2 X AAA
(UM-4) batteries (not included).
BATTERY BACK-UP SYSTEM
The Battery Back-up System ensures the clock and alarm settings will be retained during a
power interruption or power outage (in order to preserve the battery life the Display will not
light). All clock settings will be kept in memory, however, the clock time may require
adjustment for exact accuracy once the power returns. If the batteries are not installed, the
Display will blink”12:00” when the power is restored. This will indicate that you have to reset
the time and alarm settings.
BATTERY INSTALLATION
1. Open the battery compartment door on the bottom of the cabinet.
2. Follow the polarity diagram shown inside the compartment and Install 2 X “AAA” size
batteries (not included).
3. Replace the Battery Compartment Door.
IMPORTANT: Be sure that the batteries are installed correctly. Wrong polarity may
damage the unit.
NOTE: Only use a well-known brand of battery to ensure longest life and best performance.
CAUTIONS
1. Do not mix old and new batteries.
2. Do not mix alkaline, standard (carbon-zinc) or rechargeable (nickel-cadmium) batteries.
POWER SOURCE
3
E-
Page 5

3. If the unit is not to be used for an extended period of time, remove the batteries. Old or
leaking batteries can cause damage to the unit and may void the warranty.
4. Do not dispose of batteries in fire, batteries may explode or leak.
5. Batteries shall not be exposed to excessive heat such as sunshine, fire or the like.
6. Replace all the batteries at the same time, no matter exhausted or not, every 2 years
at the same time to avoid possible battery leakage.
7.
Do not try to recharge batteries not intended to be recharged; they can
overheat,
rupture and leak. (Follow battery manufacturer’s directions).
8. Only an adult should replace the batteries.
POWER FAILURE INDICATOR
If there are no batteries installed in the unit or the batteries installed are weak or dead,
the time and alarm settings will be lost if the power is interrupted. When the AC
power is
restored the display will flash “12:00”. This indicates that the time
displayed is
incorrect and needs to be reset.
IMPORTANT:
After you reset the time, be sure to reset your alarm settings as well.
LOCATION OF CONTROLS AND INDICATORS
4
E-
Page 6
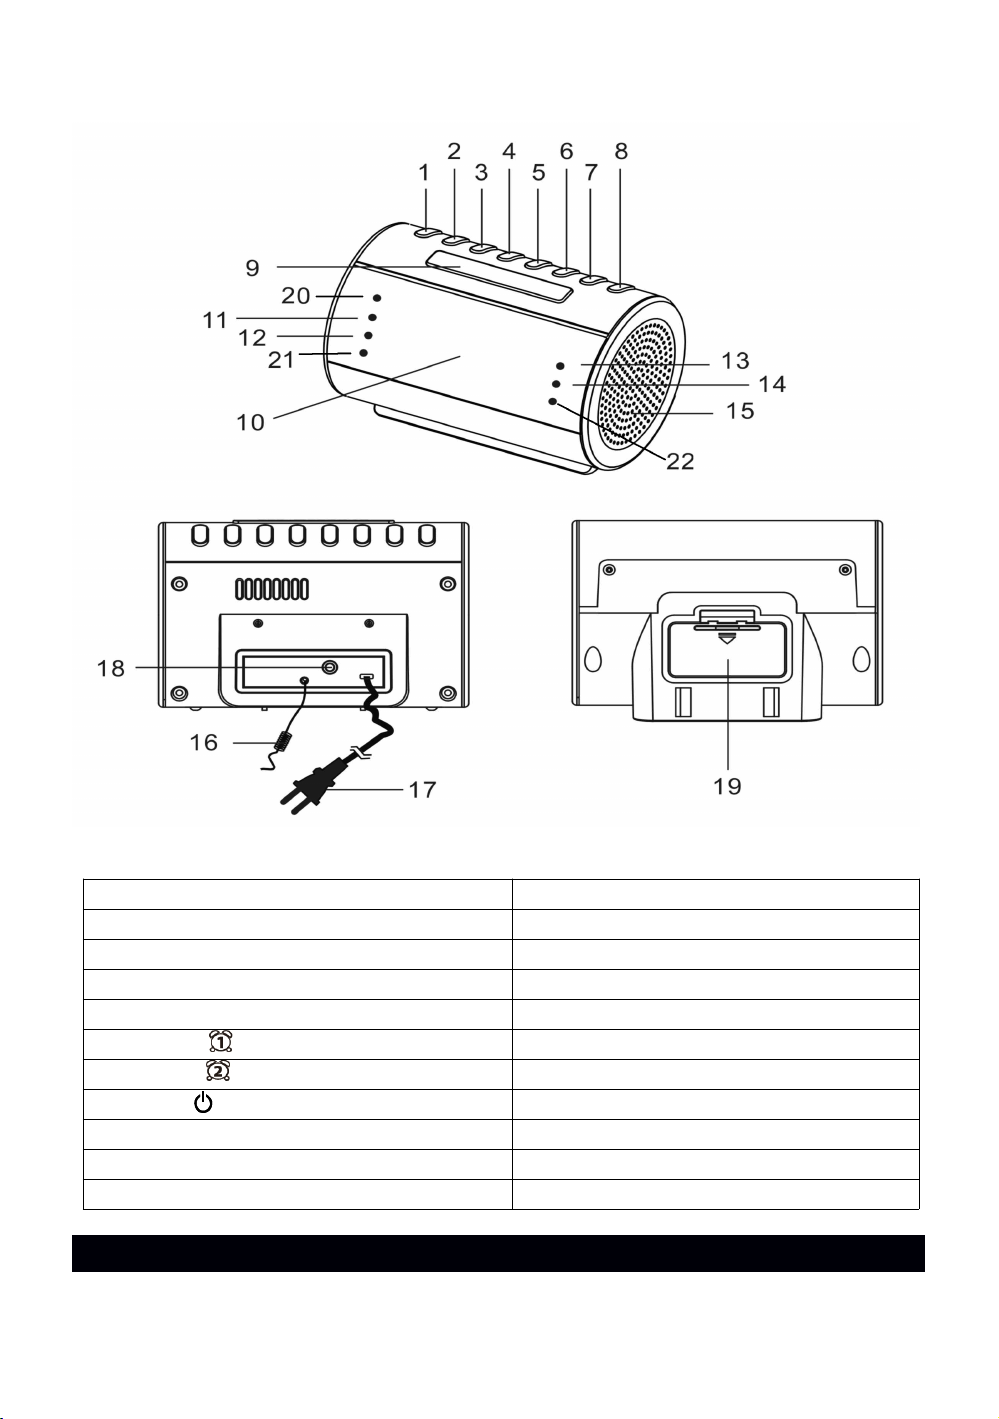
1. TIME SET/MEMORY/M+ BUTTON 12. MUSIC (RADIO) ALARM 1 INDICATOR
2. HOUR SET/ TUNE
BUTTON
13. BEEPING ALARM 2 INDICATOR
3. MINUTE SET/ TUNE
BUTTON
14. MUSIC (RADIO) ALARM 2 INDICATOR
4. NATURE SOUND REPEAT ALL BUTTON 15. SPEAKER
5. NATURE SOUND SELECTION BUTTON 16. FM WIRE ANTENNA
6. ALARM 1
/VOLUME DOWN(-) BUTTON
17. AC POWER CORD
7. ALARM 2
/VOLUME UP(+) BUTTON
18. AUX IN JACK
8. POWER
/ MODE/ALARM OFF BUTTON
19. BATTERY COMPARTMENT
9. SNOOZE/SLEEP/DIMMER BUTTON 20. PM INDICATOR
10. MULTI-FUNCTION LED DISPLAY
21. NATURE SOUND ALARM 1 INDICATOR
11. BEEPING ALARM 1 INDICATOR
22. NATURE SOUND ALARM 2 INDICATOR
STANDBY MODE
5
E-
Page 7

Standby Mode is when the unit is first plugged into an AC power source (display flashing),
1. If clock display is not flashing, press and hold the TIME SET button in unit standby
2. After hour set, tap the MINUTE button repeatedly to set the correct minute. Press
3. Tap the TIME button to finish clock setting. If you do not tap the TIME button within
Note:
The PM INDICATOR is located in the top left corner of the clock
display. Make sure
you check that the PM indicator
is set correctly for AM or PM. If the PM indicator is
'On', the time
displayed is "PM". If the PM indicator is Off, the time displayed is "AM ".
DIMMER OPERATION
Press and hold the SNOOZE/DIMMER button to change the display brightness from bright
to dim, or dim to bright.
Note: The DIMMER function is not available when the alarm is sounding or when the
Snooze mode is activated.
LISTENING TO THE RADIO
Radio Tuning
1. Press the Power
/MODE button to turn on the unit.
2. Tap the MODE button again to select AM or FM radio. Radio frequency will show in
3. To manually tune to a desired station, repeatedly tap the TUNE
/
buttons.
4. To automatically search for stations with strong signals, press and hold either the
5. Press the VOLUME UP (+) and VOLUME DOWN (-) button to the desired listening
6. When you have finished listening, press and hold the
button to turn the radio
off.
Notes:
or after all the settings have been made and the time is showing on the display. The radio
and nature sounds are off, no buttons are pressed and no alarms are sounding.
SETTING THE CLOCK
When you connect the radio to an AC outlet for the first time the clock display will begin
flashing "12:00". The flashing will stop when you set the time.
mode, display will start flashing to enter clock set mode. Tap the HOUR button
repeatedly to set the correct hour. Press and hold the button for fast advance
setting.
and hold the button for fast advance setting.
10 seconds, the unit will automatically save the setting and exit the time set mode.
display.
TUNE or TUNE button until the frequency digits on display begins to scan
then release the button, the tuner will stop on the first strong station it finds.
level.
6
E-
Page 8

- Manual tune to select weaker stations that might be skipped during automatic
tuning.
- If the automatic tuning does not stop on the exact frequency of the station, for
example, it stops on 88.9 MHz instead of 88.8 MHz, use the manual tuning
method to “fine tune” to the exact frequency of the desired station.
TIPS FOR BEST RADIO RECEPTION
AM - The AM antenna is built inside the radio. If AM reception is weak, change
the
position of the unit until the internal antenna picks up the strongest
signal.
FM - If FM reception is weak, fully extend the wire antenna and vary the position and
location of the antenna until you find the strongest signal.
Radio Station Presets
The unit allows you to store up to 10 AM and 10 FM stations for easier recall at any time.
Setting the Preset Stations
1. Tap the
button to turn on the unit.
2. Tap the MODE button to select the AM or FM radio mode.
3. Tune to the radio station you want to store in memory by using manually tune or
automatically search method.
4. Press and hold the TIME SET/MEMORY/M+ button, the preset channel number
“P01” appears on display and blinks.
5. To select desired preset station number, tap the TUNE
/
buttons.
6. To confirm preset location, tap the MEMORY button.
7. Repeat steps 3 to 6 to store other stations if necessary.
Notes:
- There’s about a 10 seconds delay when programming, after 10 seconds, the unit will
automatically switch back to normal tuner mode if you have not tapped the
MEMORY button.
- You can replace a preset station by overwriting and storing the new station
frequency in its place.
Recalling a Preset Station
1. Tap the
button to turn on the unit.
2. Tap the MODE button to select AM or FM radio receiving mode.
3. To select desired preset channel, tap the MEMORY/M+ button repeatedly.
LISTENING TO NATURE SOUND
1. Press the Power
/MODE button to turn on the unit.
2. Tap the MODE button again to select Nature sound mode. Nature sound “N1” will show
3. Press the nature sound selection button N. S. SELECT to select different Nature
Sound.
4. Press the nature sound repeat all button N. S. REPEAT to select all nature Sound in
repeat all play, display will show “NA” before show normal clock, all nature sound will
in display for a few seconds before show normal clock.
N1 (Ocean) N2 (Rain Forest) N3 (White Noise) N4 (Campfire)
7
E-
Page 9

be play one by one repeatedly.
5. Tape the MODE button to change to other operation mode or press and hold the
button to turn off the unit.
ALARM OPERATION
1. In unit standby mode, press and hold the ALARM 1
or ALARM 2
button,
2. Tap the HOUR button repeatedly to set alarm hour. Press and hold the button for
3. Tap the MINUTE button repeatedly to set alarm minute. Press and hold the button
4. Tap the corresponding alarm button
or
to finish the setting.
or
in
standby mode, the display will change from current time to wake up time and flashing
for 10 seconds then return to the current time.
WAKE TO RADIO
1. In unit standby mode, tap the corresponding alarm button
or
repeatedly until
or
turns ON.
2. At the selected wake up time, the radio will turn 'On' automatically. The volume level
3. To stop the music (radio) alarm before it shuts off automatically, tap the
4. If you do not want the music alarm to turn on the following day, tap the
or
repeatedly until associated alarm indicator
or
goes off from display.
WAKE TO ALARM
1. In unit standby mode, tap the corresponding alarm
or
repeatedly until
SETTING THE WAKE UP TIME
corresponding alarm clock display will start flashing.
fast advance setting.
for fast advance setting.
Note:
The PM INDICATOR is located in the top left corner of the clock
you check that the PM indicator
the alarm time will be "PM". If not, the alarm time will be "AM".
CHECKING THE WAKE UP TIME
is set correctly for AM or PM.
If the PM indicator is 'On',
display. Make sure
To check the wake up time, simply press and hold ALARM
associated wake to music (radio) indicator
of the AM or FM radio increases gradually until it reaches the factory preset level.
The radio will play for about one hour and then shut off automatically.
Notes: 1). You must tune to your desired AM or FM radio station first before
starting to set the wake to music (radio) alarm.
2). If you set the wake to music alarm in AUX IN mode, it will
automatically switch to beeping alarm at selected wake up time.
/MODE/ALARM OFF button or the Volume +/- buttons to stop the Radio from
playing. The radio will stop but the music alarm remains set and will turn the radio on
again at the same time on the following day.
corresponding alarm button
BUTTON
8
E-
Page 10

associated beeping alarm indicator
or
turns ON.
2. At the selected wake up time, the beeping alarm will sound and continue for about
3. To stop the alarm, tap the ALARM OFF button once. The alarm will stop but the
4. If you do not want the beeping alarm to turn on the following day, tap the
or
repeatedly until associated alarm indicator
or
goes off from display.
WAKE TO NATURE SOUND
1. In unit standby mode, tap the corresponding alarm button
or
repeatedly until
or
turns ON, either one of
the Nature Sound mode, i.e. “N01”, will also show in LED display.
2. Tape the N.S. SELECT button to select one of the nature sounds that you want to
3. Tape the N.S. REPEAT button if you want to wake to all nature sound in repeat play
4. At the selected wake up time, the unit will turn 'On' automatically. The volume level
5. To stop the Nature Sound alarm before it shuts off automatically, tap the
/ ALARM
6. If you do not want the Nature Sound alarm to turn on the following day, tap the
or
repeatedly until associated alarm indicator
or
goes off from display.
SNOOZE ALARM
After the radio or alarm sounds, you may press the SNOOZE button for a few more
minutes sleep. The alarm will stop for approximately 9 minutes and then turn on again.
The snooze can be repeated again within 50 minutes.
SLEEP OPERATION
The sleep timer allows you to turn the unit off after a designated time is reached.
one hour and then shut off automatically.
alarm remains set and will turn on the alarm on again at the same time the following
day.
corresponding alarm button
associated wake to nature sound indicator
wake to.
N01 (Ocean) N02 (Rain Forest) N03 (White Noise) N04 (Campfire)
mode, display will show “NA”.
of the Nature Sound increases gradually until it reaches the factory preset level.
The nature sound will play for about one hour and then shut off automatically.
Notes: If you set the wake to Nature Sound in AUX IN mode, it will automatically
switch to Nature Sound mode at selected wake up time.
OFF button or the Volume +/- buttons to stop the Nature Sounds from playing. The
nature sound will stop but the Nature Sound alarm remains set and will turn the unit
on again at the same time on the following day.
corresponding alarm button
9
E-
Page 11

1. To activate the sleep timer, turn the unit on and tap the MODE button to select AM, FM
radio, nature sound or listening to music via AUX IN.
2. Tap the SLEEP button and the sleep time appears on the display.
3. Repeatedly tap the SLEEP button to select a sleep time. The unit will turn off after 10,
4. To cancel the sleep timer, press the SLEEP buttons until timer shows “OFF”, the unit
5. To turn the unit off before the selected length of time, press the POWER
button at
1.) If you tap the SLEEP button in unit standby mode, unit will turn on and play for the
2.) To check the remaining sleep time, tap the SLEEP button once.
3.) If you are falling asleep to music from an external device connected to the AUX
This unit provides an auxiliary audio signal input jack for connecting external audio
devices like MP3 players, CD players and iPods (except iPod shuffle 3rd gen) and listen
to your external source through the speakers of this system.
1. Use an audio cable (not included) with one 3.5 mm stereo plug on each end of the
cable.
2. Plug one end into the AUX-IN jack located on the back of the unit and the other end
of the cable into the Line-out Jack or Headphone Jack of your external audio device.
3. Turn on the external audio device.
4. Tap the MODE button to select AUX mode, “AUH” will show on display for few
seconds before show current time.
5. The volume level can now be controlled through the main unit. Operate all other
functions on the auxiliary device as usual.
Notes:
1.) If you connected the Line-out Jack of your external device then you only need to
2.) Remove the audio cable from AUX IN jack when you finish listening. Don't forget
1. If the cabinet becomes dusty, wipe the exterior with a soft dust cloth only.
Never
20, 30, 40, 50, 60, 70, 80 or 90 minutes. Wait for 3 seconds after your selection for the
unit to confirm the selection, the unit will play for the selected length of time then
automatically turn off.
will turn into standby mode immediately.
any time.
Notes:
selected length of time then automatically turn off.
input, the sleep timer will shut off the power to this system but it will not turn off the
external device.
AUX IN OPERATION
adjust the volume control of this system. If you connected the Headphone Jack of
your external device then you may need to adjust both the volume control of your
external device and the volume control of this system to find the most desirable
volume setting.
to switch off the power on your external device as well.
CARE AND MAINTENANCE
10
E-
Page 12

use dusting sprays or polishes on the cabinet.
2. If the cabinet becomes dirty or smudged with fingerprints it may be wiped
with a
soft cloth that has been slightly dampened with a mild soap and water solution.
3. To prevent fire or shock hazard, always disconnect the power cord from the AC outlet
before cleaning.
CAUTION: Never allow any water or other liquids to get inside the unit while cleaning.
If there is no battery in the back-up battery compartment, the Time and Alarm settings
will be lost when the AC power cord is disconnected for cleaning. Reset the clock and
wake up time after reconnecting the AC power cord.
Power Requirement
AC Power Source: 120V~ 60Hz, 5 W
Back up battery for clock: 2 x AAA (UM-4)
Frequency Range
Radio Band: AM 520 - 1710 KHz
FM 87.5 - 108 MHz
At Spectra, environmental and social responsibility is a
core value of our business. We are dedicated to
continuous implementation of responsible initiatives
with an aim to conserve and maintain the environment
through responsible recycling.
Please visit us at http://www.spectraintl.com/green.htm for more information on Spectra’s
green initiatives or to find a recycler in your area.
SPECTRA MERCHANDISING INTERNATIONAL, INC. warrants this unit to be free from
defective
materials or factory workmanship for a period of 90 days from the date of
original customer
purchase and provided the product is utilized within the U.S.A. This
warranty is not assignable or transferable. Our obligation under this warranty is the
repair or replacement of the defective unit or any part thereof, except batteries, when it is
returned to the SPECTRA Service Department, accompanied by proof of the date of
original consumer purchase, such as a duplicate copy of a sales receipt.
You must pay all shipping charges required to ship the product to SPECTRA for warranty
service. If the product is repaired or replaced under warranty, the return charges will be
Note:
SPECIFICATIONS
90 DAY LIMITED WARRANTY AND SERVICE
VALID IN THE U.S.A. ONLY
11
E-
Page 13

12
at SPECTRA’s expense. There are no other express warranties other than those stated
herein.
This warranty is valid only in accordance with the conditions set forth below:
1. The warranty applies to the SPECTRA product only while:
a. It remains in the possession of the original purchaser and proof of purchase is
demonstrated.
b. It has not been subjected to accident, misuse, abuse, improper service, usage
outside the descriptions and warnings covered within the user manual or
non-SPECTRA approved modifications.
c. Claims are made within the warranty period.
2. This warranty does not cover damage or equipment failure caused by electrical
wiring not in compliance with electrical codes or SPECTRA user manual
specifications, or failure to provide reasonable care and necessary maintenance as
outlined in the user manual.
3. Warranty of all SPECTRA products applies to residential use only and is void when
products are used in a nonresidential environment or installed outside the United
States.
This warranty gives you specific legal rights, and you may also have other rights which
vary from
state to state. TO OBTAIN SERVICE please remove all batteries (if any)
and pack the unit
carefully and send it freight prepaid to SPECTRA at the address
shown below. IF THE UNIT IS
RETURNED WITHIN THE WARRANTY PERIOD
shown above, please include a proof of
purchase (dated cash register receipt) so that
we may establish your eligibility for warranty service and repair of the unit without cost.
Also include a note with a description explaining how the unit is defective. A customer
service representative may need to contact you regarding the status of your repair, so
please include your name, address, phone number and email address to expedite the
process.
IF THE UNIT IS OUTSIDE THE WARRANTY PERIOD, please include a check for
$10.00 to cover the cost of repair, handling and return postage. All out of warranty returns
must be sent prepaid.
It is recommended that you contact SPECTRA first at
1-800-777-5331 or by email
at custserv@spectraintl.com for updated information on the unit requiring service. In
some cases the model you have may be discontinued, and SPECTRA reserves the
right to offer alternative options for repair or replacement.
SPECTRA MERCHANDISING INTERNATIONAL, INC
4230 North Normandy Avenue,
Chicago, IL 60634, USA.
1-800-777-5331
To register your product, visit the link on the website below to enter your information.
http://www.spectraintl.com/wform.htm
1120 Printed in China
E-
 Loading...