

Page 1
DV2011
DIGITALAUDIO
COMPACT
MP3
WMA
MODE
MUTE
BAND
LOUD
LOC
EQ
1 2 3 4 5 6
A/PS DISP
INT RPT RDM
AV INAV IN
DV2011
CD / MP3 / WMA / DVD PLAYER / RECEIVER
Installation and Operation Manual
Page 2
INTRODUCTION
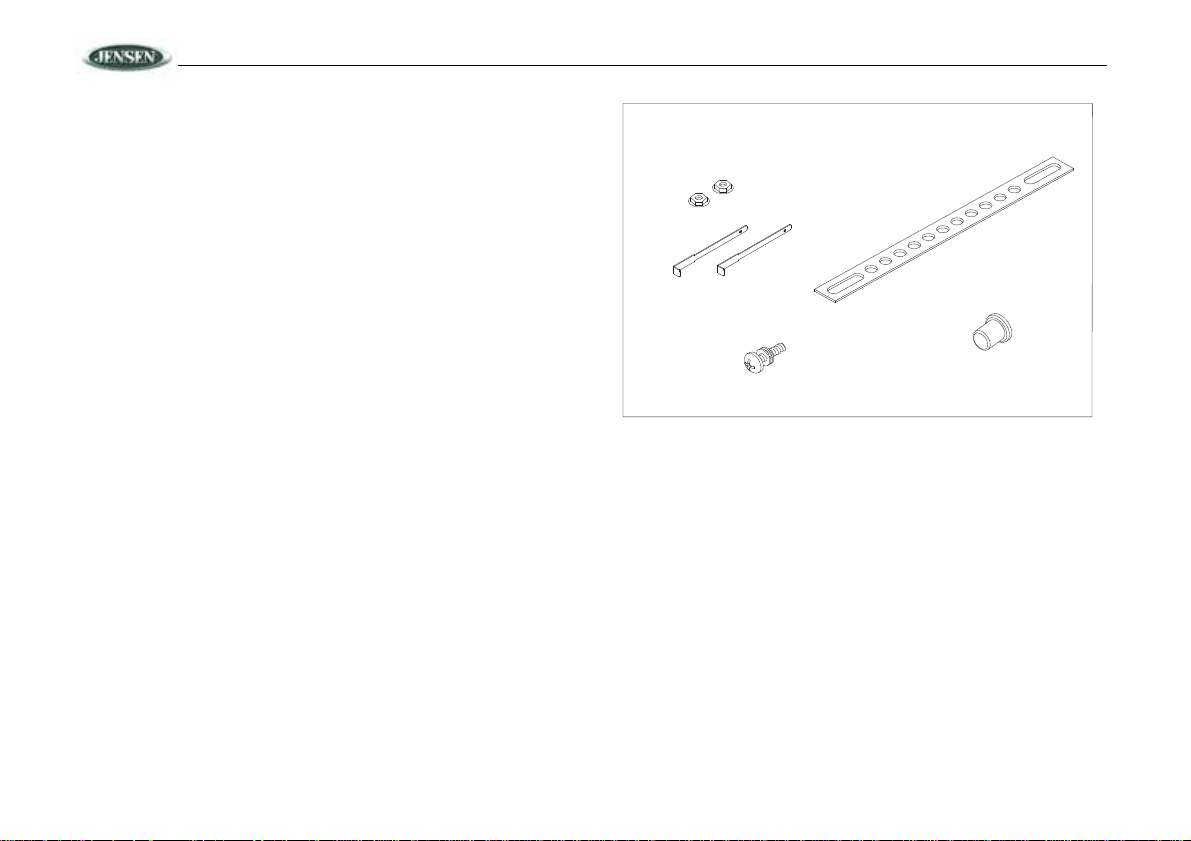
MOUNTING SCREW
REMOVAL TOOL
MOUNTIN G BUSHING
MOUNTING STRAP
DIN SLEEVE
FLANGE NUTS
HARDWARE KIT CONTENTS
System Features
Features of the Jensen DV2011 mobile audio system include:
• 3-Wire power (ACC, Batt, Gnd)
• Detachable faceplate
• 1-DIN (sleeve-mount) chassis design
• Segmented LCD Display
• Blue LED panel illumination
• Electronic AM/FM tuner (US)
• Station presets (18FM, 12AM)
• Auto-Store (AS)/ Preset Scan (PS)
• Single DVD / CD player (Plays DVD, CD-A, CD-R/RW Media)
• Plays MP3 and WMA Encoded Discs
• Electronic Skip Protection (ESP) CD (8 Sec) DVD (3 Sec)
• Front panel Aux Video / Stereo Audio input (3.5mm)
• Encoded rotary volume control
• Audio Mute / Loudness
• Preset EQ (Pop, Rock, Classic)
• Stereo Pre-amp Audio Output (Front and Rear RCA)
• 2 Composite Video Output (RCA)
• 1 Composite Video Input (RCA)
• 4x40W Maximum Audio Power Output
• Subwoofer Output (Pre-amp RCA)
• Wireless (Jensen IR Codes) Credit Card size remote control (included)
• Wired remote ready (MWR75 sold separately)
• IR repeater eye ready (IRPMRPT sold separately)
• Regulatory Certifications: FCC
Content List
• Jensen Heavy Duty Radio
• Hardware Kit
• Installation Manual
• Quick reference Guide
DV2011
2
Page 3

DV2011
SAFETY INFORMATION
When Driving
Keep the volume level Iow enough to be aware of the road and traffic conditions.
When Washing your Vehicle
Do not expose the product to water or excessive moisture. Moisture can cause electrical shorts,
fire or other damage.
When Parked
Parking in direct sunlight can produce very high temperatures inside your vehicle. Give the
interior a chance to cool down before starting playback.
Use the Proper Power Supply
This product is designed to operate with a 12 volt DC negative ground battery syst em (the
standard system in a North American vehicle).
Protect the Disc Mechanism
Avoid inserting any forei gn object s into the dis c slot. Misus e may cause malf unction or pe rmanent
damage due to the precise mechanis m of this unit.
CAUTION:
THIS MOBILE DVD PLAYER IS A CLASS I LASER PRODUCT. THIS UNIT USES A VISIBLE/
INVISIBLE LASER BEAM WHICH COULD CAUSE HAZARDOUS RADIATION IF EXPOSED
DIRECTLY. BE SURE TO OPERATE THE MOBILE DVD PLAYER AS INSTRUCTED.
USE OF CONTROLS OR ADJUSTMENTS OR PERFORMANCE OR PROCEDURES OTHER
THAN THOSE SPECIFIED HEREIN MAY RESULT IN HAZARDOUS RADIATION EXPOSURE.
DO NOT OPEN COVERS AND DO NOT REPAIR BY YOURSELF. PLEASE REFER SERVICING
TO A QUALIFIED TECHNICIAN.
WARNING:
• TO REDUCE THE RISK OF FIRE OR ELECTRIC SHOCK, DO NOT EXPOSE THIS
EQUIPMENT TO RAIN OR MOISTURE.
• TO REDUCE THE RISK OF FIRE OR ELECTRIC SHOCK AND ANNOYING
INTERFERENCE, USE ONLY THE RECOMMENDED ACCESSORIES.
• THIS DEVICE IS INTENDED FOR CONTINUOUS OPERATION.
This product incorporates copyright protection technology that is protected by method claims of
certain U.S. Patents and other in t ell ect ual p rop erty ri g ht s owne d by Mac ro vis ion Co rp ora t ion an d
other rights owners. Use of this copyright protection technology must be authorized by
Macrovision Corporation, and is intended for home and other limited viewing uses only unless
otherwise authorized by Macrovision Corporation. Reverse engineering or disassembly is
prohibited.
Region Management Information
This Mobile DVD Player is designed and manufactured to respond to the Region Management
Information recorded on individual DVD discs. If the Region number described on the DVD disc
does not correspond to the Region number(s) supported by this Mobile DVD Player, the disc will
not play in this unit.
3
Page 4
DISC NOTES
TM
REWRITABLE
Insert label Do not bend.
Never touch
the under side
of the disc.
Wipe clean from
the center to the
edge.
side up.
Compatible Disc Types
DVD Video
DVDs contain excellent sound and video quality due to Dolby Digital and MPEG2 encoding. A
DVD is 12 cm in diameter and can hold more than seven times the data of a CD-ROM. The
maximum playing time can be up to 2 ho urs (a double -sided D VD is up to 4 hours). Th ere are four
types of DVD discs: single-lay er single-sided (1), two-layer single-sided (2), single-layer doublesided (3), and two-layer double-sided (4).
CD-DA
CD-DA discs can play voice data. The playing time of the standard 12 cm CD-DA disc is 74
minutes.
DTS-CD
The DTS digital surround sound uses 6 digital sound tracks to replace the analog voice tracks in
movies.
HDCD
HDCD, or “High Definition Compatible Digital,” is a recording/playing technology that improves
CD audio quality . Based on ful l compl iance with C D speci fica tions , it c an enha nce th e quali ty a nd
quantity of digital sounds in the highest scale. It encodes the required messages that were
deserted by the CD format, and stores the rel ated co mmands int o the LSB. Wit hout ch angi ng the
CD format, it is output through the 24-bit D/A converter, which will ultimately enhance the quality
of playback.
MP3/WMA/JPEG
This unit is compatible with CD-R, CD -RW, and CD-ROM discs containing MP3, WMA, and JPEG
tracks.
CD-R/CD-RW
This unit is compatible with CD-R and CR-RW discs that support ISO9660 specifications. “.MP3”,
“.JPG”, “.JPEG”, “.AC3”, “.PCM”, “.MPG”, “.MPE”, and “.WAV” formats can be included on
ISO9660-compatible discs.
DVD-R / DVD-RW
This unit is compatible with DVD-R and DVD-RW discs that support UDF specifications. “.MP3”,
“.JPG”, “.JPEG”, “.AC3”, ”.PCM”, “.MPG”, “.MPE”, and “.WAV” formats can be included on UDFcompatible discs.
Incompatible Disc Types
• 8 cm disc
• CD ROM
• CDV, CDI, CDG
•LD
•DVD ROM
•DVD RAM
NOTE: DVD-R and DVD-RW discs will not play unless the recording session is closed and
the DVD is finalized.
Table 1: General Disc Information
Disc Type Logo
DVD Video 12 cm single/double
Audio CD 12 cm single side 74 minutes
MP3/MWA Disc CD-Rs or CD-RWs recorded in MP3, MPEG1 or 2, 2.5 Audio Lay er 3 and
WMA Version 7 and 8. The recorded format must be compliant with ISO
9660 Level 1, ISO 9660 Level 2, Romeo , or Joliet.
Diameter/
Playable Sides
side
(1 layer & 2 layer)
Playback Time
133 minutes (4.7 GB)
242 minutes (8.5 GB)
266 minutes (9.4 GB)
484 minutes (17 GB)
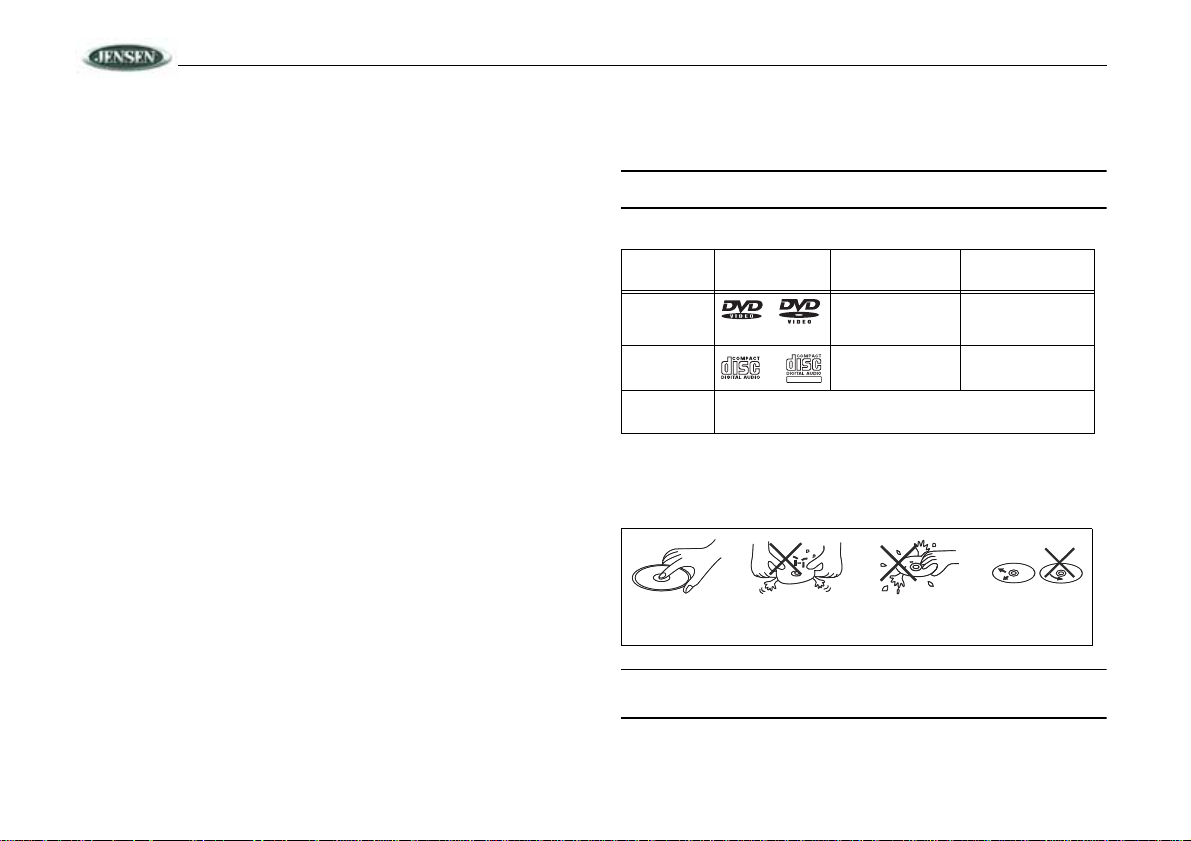
Disc Maintenance
Before playing, wipe the disc using a clean cloth, working from the center hole towards the
outside edge.
Never use benzene, thinners, cleaning fluids, anti-static liquids or any other solvent.
NOTE: A disc may become scratched (although not enough to make it unusable)
depending on how you handle it and other conditions in the usage environment. These
scratches are not an indication of a problem with the player.
4
DV2011
Page 5
182
53
Dashboard
Bend Tabs
Screw Stud
Dashboard
Plain Washer
Screw (5x 25mm)
Hex Nut(5mm)
Screw Stud
Support Strap
Rubber Bushing
DV2011
INSTALLATION
This unit can be property installed with either a “Front” (conventional DIN front mount) or “Rear”
(DIN rear mount installation, utilizing threaded screw holes at the sides of the unit chassis) mount.
For details, refer to installation methods A and B.
Before You Begin
1. Disconnect Battery
Before you begin, always disconnect the battery negative terminal.
2. Remove Transport Screws
Important Notes
• Before final installation, test the wiring connections to make sure the unit is connected
properly and the system works.
• Use only the parts inc luded with the unit to ensure proper inst allation. The use of
unauthorized part s can cause malfunctions.
• Consult with your nearest dealer if installation requires the drilling of holes or other
modifications to your vehicle.
• Install the unit where it does not interfere with driving and cannot injure passengers if there
is a sudden or emergency stop.
• If the installation angle exceeds 30º from horizontal, the unit might not give optimum
performance.
• Avoid installing the unit where it will be subject to high temperatures from direct sunlight, hot
air, or from a heater, or where it would be subject to excessive dust, dirt or vibration.
• Be sure to remove the control panel before installing the unit.
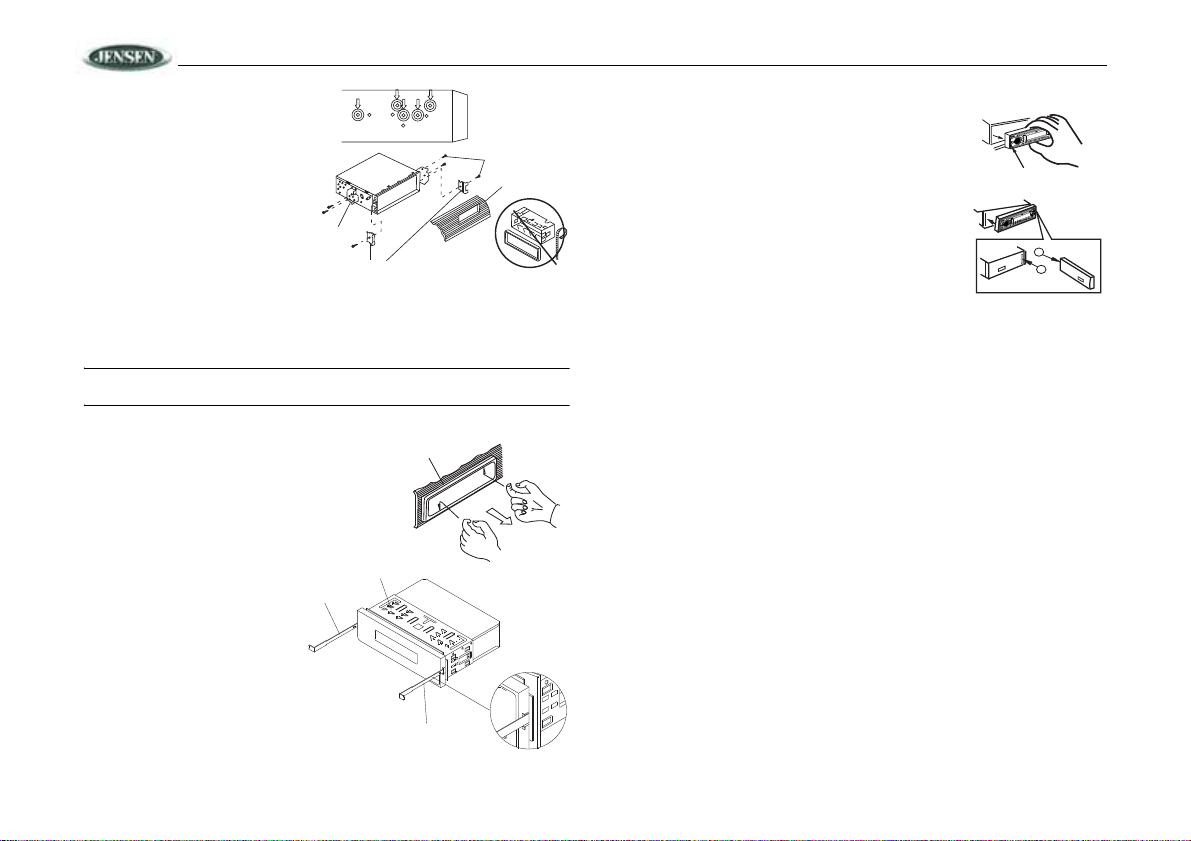
DIN Front Mount (Method A)
1. Slide the mounting sleeve off of the ch assis i f
it has not already been removed. If it is
locked into position, use the removal keys
(supplied) to disengage it. The removal keys
are depicted in “DIN Rear Mount ( Method B)”
on page 5.
2. Check the dashboard opening size by sliding
the mounting sleeve into it. If the opening is
not large enough, carefully cut or file as
necessary until the sleeve easily slides into
the opening. Do not force the sleeve into the
opening or cause it to bend or bow. Check
that there will be sufficient space behind the dashboard for the radio chassis.
3. Locate the series of bend tabs along the top, bottom and sides of the mounting sleeve. With
the sleeve fully inserted into the dashboard opening, bend as many of the tabs outward as
necessary to firmly secure the sleeve to the dashboard.
4. Place the radio in front of the dashboard opening so the wiring can be brought through the
mounting sleeve.
5. Follow the wiring diagram carefully and make certain all connections are secure and
insulated with crimp connectors or electrical tape to ensure proper operation.
6. After completing the wiring connections, turn the unit on to confirm operation (vehicle
accessory switch must be on). If the unit does not operate, recheck all wir ing until the
problem is corrected. Once prop er operation is achieved, turn the accessory switch off and
proceed with final mounting of the chassis.
7. Carefully slide the radio into the mounting sleeve making sure it is right-side-up until it is fully
seated and the spring clips lock it into place.
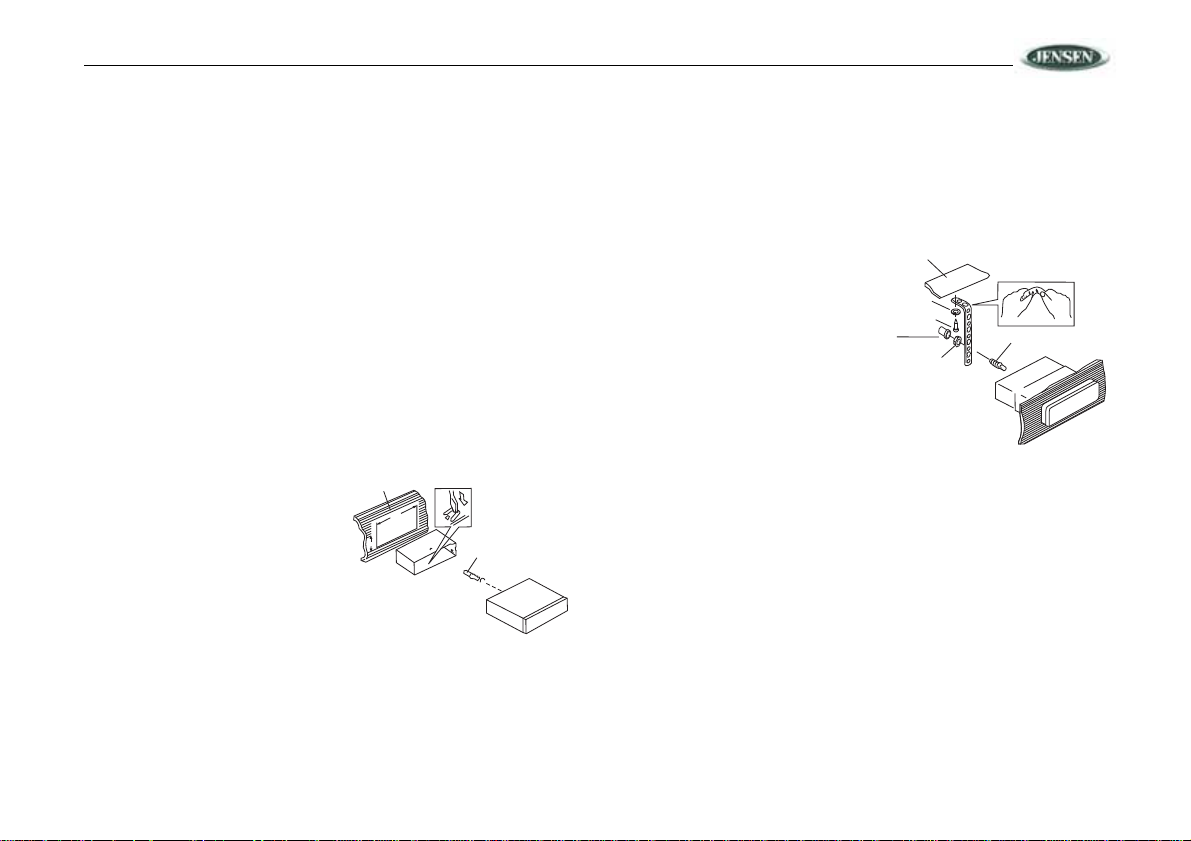
8. Attach one end of the
perforated support strap
(supplied) to the screw st ud
on the rear of the chassis
using the hex nut provided.
Fasten the other end of the
perforated strap to a secure
part of the dashboard either
above or below the radio
using the screw and plain
washer provided. Bend the
strap, as necessary, to
position it. Some vehicle
installations provide cavity
for rear support. In these
applications, place the
rubber bushing over the
screw stud and insert the radi o.
CAUTION: The perforated rear support strap or rear rubber mounting bushing must
be used in the installation of the radio. Installation without either may result in
damage to the radio or the mounting surface and void the manufac turer’s warranty.
9. Test radio opera tion by referring to the operating instructions for the unit.
10. When wiring is complete, reconnect the battery negative terminal.
11. Push the trim plate agains t the c ha ssi s u nt i l i t i s fi t t ed. You must do this before you i nstall
the control panel, otherwise it can't be attached.
DIN Rear Mount (Method B)
This unit has threaded holes in the chassis side panels which may be used with the original
factory mounting brackets of some vehicles to mount the radio to the dashboard. Please consult
with your local mobile stereo shop for assistance on this type of installation.
1. Remove the existing factory radio from the dashboard or center console mounting. Save all
hardware and brackets as they will be used to mount the ne w ra dio .
2. Carefully unsnap the plastic trim ring from the front of the new radio chassis. Remove and
discard the trim ring.
5
Page 6
DV2011
Screws
Dashboard
Factory
Mounting
Bracket
Hook (Remove)
Dashboard
Removal Key
Sleeve
Removal Key
PANELRELEASE
BUTTON
D
V
2
0
1
1D
V2011
D
I
G
I
T
A
L
A
U
D
I
O
D
I
G
I
T
A
L
A
UD
IO
C
O
M
P
C
OMP
A
C
T
A
C
T
M
P
3
M
P3
W
M
A
WMA
M
O
D
E
MODE
M
U
T
E
MUTE
B
A
N
D
BAND
L
O
U
D
LOUD
L
O
C
LOC
EQEQ
1
2
3 4
5 6
A
/
P
S
A/PS
D
I
S
P
D
ISP
I
N
T
INT
R
P
T
RPT
R
D
M
RDM
AVINAV
IN
B
A
2
1
3. Remove the factory mounting
brackets and hardware from the
existing radio and attach them
to the new radio. Select a
position where the screw holes
of the bracket and the screw
holes of the main unit are
aligned (are fitted). Tighten the
screws at 2 places on each
side. Do not exceed M5 x 9 MM
maximum screw size. Longer
screws may damage
components inside the chassis.
4. Wire the new radio to the
vehicle as outlined in the
Universal Installation instructions.
5. When wiring is complete, reconnect the battery negative terminal.
6. Mount the new radio assembly to the dashboard or center console using the reverse
procedure of step 1.
NOTE: The mounting box, outer trim ring, and half-sleeve are not used for method B
installation.
Removing the Unit (Method A Installation)
To remove the radio after installation:
1. Insert fingers into the groove in the front of
frame and pull out to remove the frame.
(When re-attaching the frame, point the side
with a groove downwards and re-attach.)
2. Insert the remo va l key s stra ig ht
back until they click, and then
pull the radio out. If removal k eys
are inserted at an angle, they will
not lock properly to release the
unit.
Detachable Control Panel (DCP)
Removing the Detachable Control Panel (DCP)
1. Turn the power off.
2. Press the REL button.
3. Remove the DCP.
Attaching the DCP
1. Attach the panel at the right side first, with point B on the
main unit touching point A on the DCP (as shown in the
diagram).
2. Press the left side of the DCP onto the main unit until a
“click” is heard.
CAUTION:
• DO NOT insert the DCP from the left side. Doing so may damage it.
• The DCP can easily be damaged if dropped or subjected to a strong shock. When the
release button is pressed and the DCP is unlocked, the vehi cle's vibrations may
cause it to fall. To prevent damage to the DCP, always store it in a protective case
after detaching it.
• The rear connector that connects the main unit and the DCP is a n extremely impo rtan t
part. Be careful not to damage it by pressing on it with fingernails, pens,
screwdrivers, etc.
• If the DCP is dirty , remove debris with a soft, dry cloth only. You can use a cotton
swab soaked in isopropyl alcohol to clean the socket on the back of the DCP.
6
Page 7
DV2011
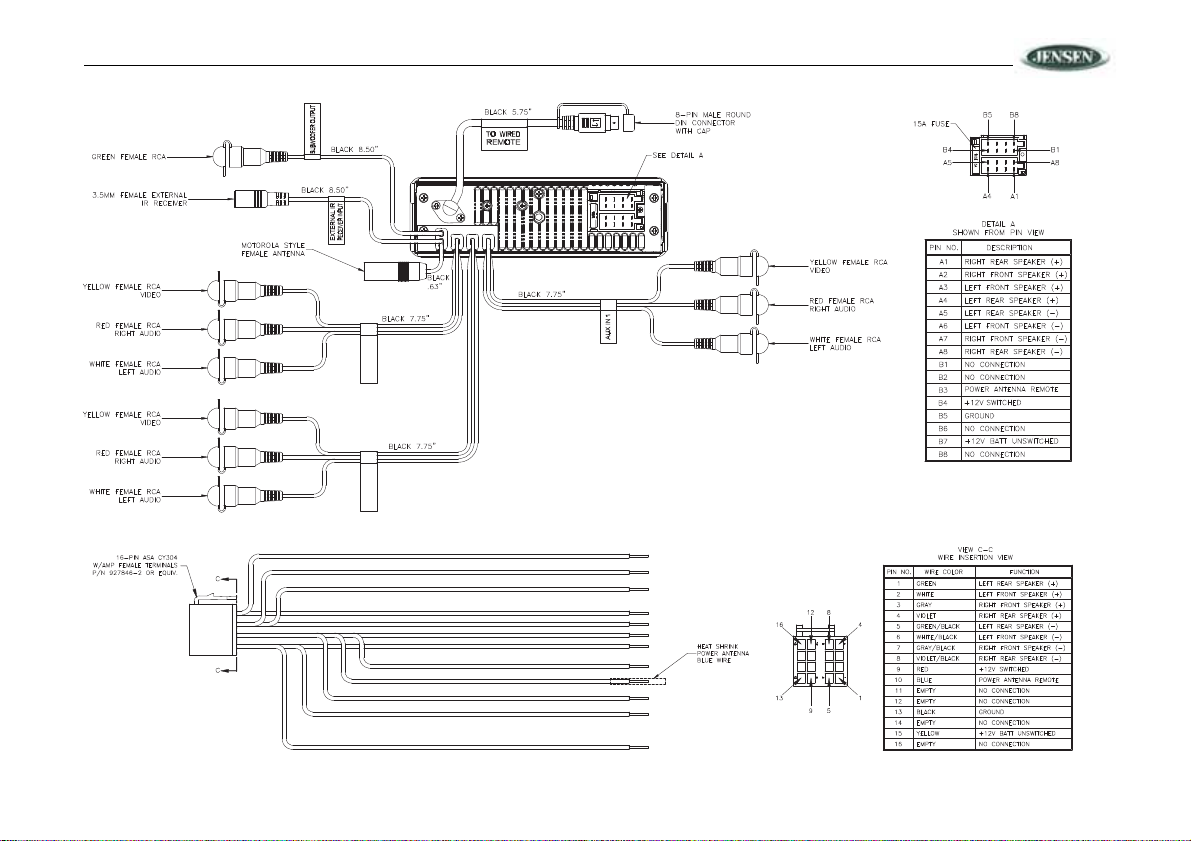
FRONT RCA LINE-OUT
REAR RCA LINE-OUT
WIRING
7
Page 8
CONTROLS AND INDICATORS
DV2011
DIGITALAUDIO
COMPACT
MP3
WMA
MODEMODE
MUTEMUTE
BANDBAND
LOUD
LOC
EQ
1 2 3 4 5 6
A/PS DISP
INT RPT RDM
AV INAV IN
1
11
12
13
14
15
16
17
18
20
3
4
5
6
7
8
9
10
19
21
2
22
2324
VOL
VOL
PROG LANG RPT TITLE
ZOOM
SOURCE
ANGLE
GOTO
AUD
T/F
ENTER
MENU
17
1
21
19
5
20
38
24
27
31
32
36
37
28
34
35
7
4
9
8
33
10
30
29
26
25
23
22
11
3
6
18
TUNE +
TUNE -
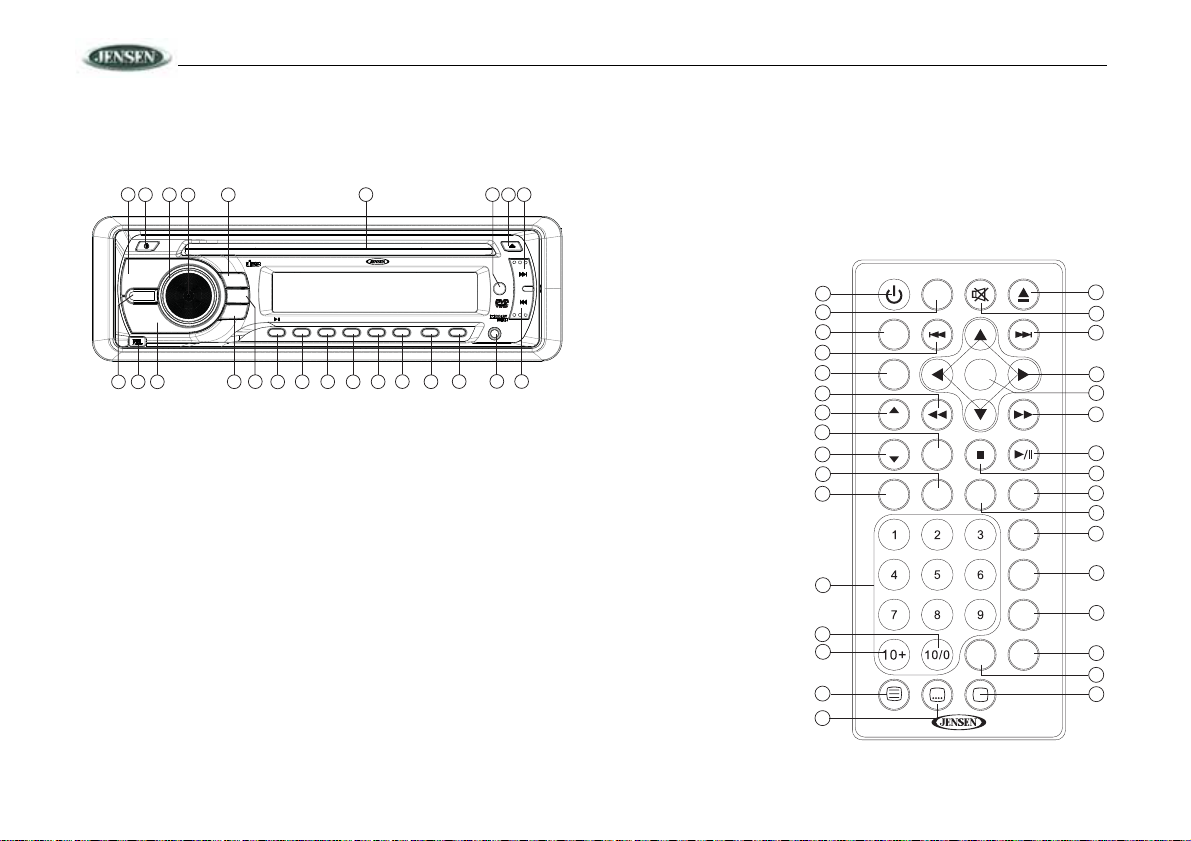
The buttons located on the unit and the remote control that perform the same function are
assigned the same number for reference on the diagrams and in the text.
Front Panel Operation
19. Band Select
20. Fast Forward/Advance Chapter
21. Rewind/Previous Chapter
22. Auxiliary Input (AUX IN2)
23. Infrared Sensor
24. Disc Slot
Remote Control Operation
Using the Remote Control
Point the remote control towards
the player front face remote
sensor IR (2). The operation
angle is approximately 30
degrees in each direction of the
front of the remote sensor.
DV2011
1. Power
2. Eject
3. Front Panel Release
4. Audio Control Button
5. Mode/Sou r ce S e lect
6. Volume Control Knob
7. Mute
8. Preset Equalizer
9. Local/Distant Reception Setting
10. Loudness Boost Setting
11. Auto Store/Preset Scan
12. Preset 1, Play/Pause
13. Preset 2, Intro Scan
14. Preset 3, Repeat Play
15. Preset 4, Random Play
16. Preset 5
17. Preset 6
18. Clock Display
8
Page 9

DV2011
Remote Control Functions
Ref #Button Function
1
/POWER
3
/EJECT
4 >>|/TRACK Skip to the next track/chapter
5 Stop disc playback
6 >|| Play/pause the disc (for disc play mode)
7 |<</TRACK Go to previous track/chapter
8VOL /\ Increase the volume level
9VOL \/ Decrease the volum e lev el
10 AUDIO Select the desired adjustment mode (BASS, TREBLE, BALANCE,
11 SOURCE Change between tuner, disc (DVD/VCD/CD/MP3) play mode and AUX
17 Display statistical disc information during playback
18 PROG Display programmed playback screen, allowing you to enter tracks to
19 TUNE+ Tune up one step
20 RPT Repeat current track/chapter
21 T/F Press and hold to set clock. Use t he audio cont rol knob to adj ust hour s.
22 Change the SUBTITLE language on multi -subtitle language DVD discs
23 ANGLE Change the viewing angle on multi-angle DVD discs
24 MENU (PBC) Display the root menu stored on DVD discs/Switch between PBC ON
25 Display the SETUP menu
26 ZOOM Increase the picture size
27 10+ Feature not used on this model
28 10/0
29 <, > /\, \/ Select items left/right and ahead/back in menu mode
30 ENTER Confirm selection of track/chapter
31 LANG Change the audio sound track on multi-audio sound track DVD discs.
Turn the unit ON or OFF
Eject the disc
FADE).
IN1 or AUX IN2 mode
play in programmed order.
Press to move to minutes and turn to adjust.
and PBC OFF on VCD discs
Change the sound mode of VCD discs
Ref #Button Function
32 TITLE Display the TITLE menu stored on DVD disc
33 TUNE- Tune down one step
34 <</TRACK Search in revers e ra pidl y
35 >>/TRACK Search forw ar d ra pid l y
36 0-9 Enter track/chapter number directly. Use GOTO to search.
37 GOTO Used with numeric buttons to search disc
38 Press to mute/resume audio.
9
Page 10

DV2011
DV2011
DIGITALAUDIO
COMPACT
MP3
WMA
MODEMODE
MUTEMUTE
BAND
LOUD
LOC
EQ
1 2 3 4 5 6
A/PS DISP
INT RPT RDM
AV INAV IN
1
11
12
13
14
15
16
17
18
20
3
4
5
6
7
8
9
10
19
21
2
22
2324
BASIC OPERATION
Control Panel Release (REL)
Press the REL button (3) to remove the control panel.
Power On/Off ( )
Press the button (1) on the front of the unit ON or OFF.
Volume Control
T o increase the volume, rotate the audio control knob (6) clockwise.
T o decrease the volume, rotate the audio control knob counter clockwise. When the volume is
adjusted, the volume level is show n on the displ ay pa nel as a number ra nging fr om “0” (lowes t) to
“39” (highest).
Mute
Press the MUTE button (7) to mute the audio output. “MUTE” will appear on the display. Press
MUTE again to restore the audio output to the previous level.
Mode
Press the MODE button (5) to select a different mode of operation, as indicated on the display
panel. Available modes include Tuner, DVD, AUX IN1 (OP TIONAL) and AUX IN2 (OPTIONAL).
Equalizer (EQ)
The preset equalizer applies preset sound effects to the unit’s audio output signal. To adjust the
preset equalizer, press the EQ button (8). Press repeatedly to choose between the following
modes: OFF, POP, ROCK, CLAS.
Area (EQ)
Press and hold the EQ button (8) to select the appropriate f requency spacing for your area: USA
or EU (Europe).
Loudness (LOUD)
When listening to music at low volume levels, this feature will boost the bass and treble ranges to
compensate for the characteris tics of human heari ng. Pres s the LOUD button (10) to activate this
feature. “LOUD ON” appears on the display panel. P re ss th e LOUD button again to turn the
LOUD function off.
Subwoofer (LOUD)
Press and hold the LOUD button (10) to turn the subwoofer function on/off.
Local/Distant (LOC)
Press the LOC button (9) to choose b et we en Lo cal ( LOC ) or D i st a nc e ( DX) mo de . This f ea tu re is
used to designate the strength of the signals at which the radio will stop during automatic tuning.
“Distance” is the default se tting, allo wing the radi o to stop at a broad er range of signa ls. To set the
unit to select only stron g lo ca l stations during automatic tuning, pres s t he LOC button un til “ LO C”
appears in the display.
Display Selector (DISP)
This unit can display ei ther t he c lock time or r adi o frequ ency /CD p layer fun ction s. Press t he DISP
button (18) to display the time. The correct time of day can be set by pressing and holding the
DISP button.
Setting the Clock (DISP)
To set the clock, perform the following steps:
1. Press the DISP button (18) to display the clock.
2. Press and hold the DISP button (18) until the time di splay flashes.
3. Within 5 seconds, turn the audio control knob (6) to adjust the hour to the desired setting.
4. Press the audio control knob (4) to move to the minutes field.
5. Turn the audio control knob to adjust the minutes to the desired setting.
6. Press the DISP button again to return to radio frequency or disc play and normal operation
will resume automatically.
Auxiliary Input Operation
You can connect another audio/video system to the unit through the AUX IN 1 ter min a ls on the
back (AUX IN1) or front panel AV IN (AUX IN2) of the unit. Once the device is connected, press
the MODE button (5) on the front panel or the SOURCE button on the remote control to select
“AUX IN1” or “AUX IN2” mode.
Reset
After releasing the control panel, use a pencil or any non-metallic object to press and hold the
RESET button for five seconds to reset the main unit. The unit will return to the factory default
settings.
10
Page 11

DV2011
AUDIO MENU
Press the volume control button (4) to access the Audio Menu. You can navigate through the
Audio Menu items by pressing t he vo lume c ontr ol but ton r epeat edly. Once the desired menu item
appears on the display, adjust that option by turning the audio control knob within 10 seconds.
The unit will automatically exit the Audio Menu after six seconds of inactivity. The following menu
items can be adjusted.
Bass Level (BAL)
Use the audio control knob to adjust the Bass level range from “-7” to “+7”.
Treble Level (TRE)
Use the audio control knob to adjust the Treble level range from “-7” to “+7”.
Balance (BAL)
Use the audio control knob to adjust the Balance between the right and left speakers from
“R 7” (full right) to “L 7” (full left). “0” represents an equal balance between the right and left
speakers.
Fader (FAD)
Use the audio control knob to adjust the Fader between the front and rear speakers from “R 7”
(full rear) to “F 7” (full front). “0” represents an equal balance between the front and rear
speakers.
NOTE: When the rear speaker is turned off, the fader option is disabled.
11
Page 12

TUNER OPERATION
DV2011
DIGITALAUDIO
COMPACT
MP3
WMA
MODEMODE
MUTEMUTE
BANDBAND
LOUD
LOC
EQ
1 2 3 4 5 6
A/PS DISP
INT RPT RDM
AV INAV IN
1
11
12
13
14
15
16
17
18
20
3
4
5
6
7
8
9
10
19
21
2
22
2324
Select a Band
Press the BAND button (19) on the control panel (or the SOURCE button on the remote control)
to change between three FM bands and two AM bands. Each band stores up to six preset
stations.
Tuning
Manual Tuning
Press the up >>| (20) or down |<< button (21) for less than three seconds to enter seek tuning
mode. Press the up >>| or down |<< button to change the radio frequency number up or down
one step.
If using the remote control, press the TUNE + or TUNE - buttons to change the radio frequency
number up or down one step.
Auto Seek Tuning
Press the up >>| (20) or down |<< button (21) for more than three seconds to move to the next
station automatically.
Preset Stations
Six numbered preset buttons store and recall stations for each band.
Store a Station
Select a band (if needed), then select a station. Press and hold a preset button (12-17 ) for thr ee
seconds. The preset number will appear in the display.
Recall a Station
Select a band (if needed). Press a preset button (12-17) to select the corresponding stored
station.
Automatically Store / Preset Scan
Automatically Store
Select a band (if needed). Press A/PS (11) for more than three seconds to automatically select
six strong stations and st ore them in the current band. The new statio ns replace any stations
already stored in that band.
Preset Scan
Select a band (if needed). Press A/PS (11) to scan stations store d in the current band. The unit
will pause for ten seconds at each preset station. Press A/PS again to stop scanning when the
desired station is reached.
Stereo
The unit will automatically pick up a stereo signal, when available. When in stereo mode, the “ ”
icon appears in the display. When no stereo signal is available, the unit will automatically revert to
mono operation, and no icon will be displayed.
12
DV2011
Page 13

DV2011
DV2011
DIGITALAUDIO
COMPACT
MP3
WMA
MODE
MUTE
BAND
LOUD
LOC
EQ
1 2 3 4 5 6
A/PS DISP
INT RPT RDM
AV INAV IN
1
11
12
13
14
15
16
17
18
20
3
4
5
6
7
8
9
10
19
21
2
22
2324
AUDIO CD OPERATION
Insert and Eject Disc
Insert a disc into the disc slot (24), label-side up, with the unit turned on. The unit will play the first
track on the disc. Press the eject button (2) to stop disc play and eject the disc. The unit does
not have to be turned on to eject the disc.
Controlling Disc Playback
Track Select
Press the up >>| (20) or down |<< button (21) for less than one second to advance to the next
track on the CD. The selected track number will appear on the display. Press and hold the up >>|
(20) or down |<< button (21) for more than 1 second to fast forward or fast reverse through the
disc.
NOTE: When the last track finishes playing, the unit will automatically play the CD again.
Play/Pause Disc Playback (1/>/||)
Press the 1/>/|| button (12) on the control panel (or >/|| on the remote control) to suspend disc
play. Press the 1/>/|| button again to resume disc Play.
Intro Scan (2 INT)
Press the 2/INT button (13) on the control panel to p lay the first 10 seconds of each track
sequentially. Press 2/INT again to stop Intro Scan and resume normal play at the current track.
Repeat Play (3/RPT)
Press the 3/RPT button (14) on the control pan el (or th e RPT button on the remote con trol) du ring
disc play repeatedly to activ ate Repeat Mode:
•Press 3/RPT once to turn repeat off.
•Press 3/RPT twice to repeat play the current track.
•Press 3/RPT three times to repeat play the whole disc.
Random Play (4/RDM)
Press the 4/RDM button (15) during disc play to pla y all tracks on a C D in ra ndom, shuf fl ed or der.
Press 4/RDM again to stop random play.
13
Page 14

MP3/WMA OPERATION
01:27 03:37 192Kbps
002/004
MP3
MP3
MP3
MP3
MP3
MP3
001 Time Passages
002 Magnificent
003 Yellow
004 Halo
005 Regret
006 Drop it Like It's
Time Passages
Al Stewart
The Year of t
1997
3C11C614
Rock
--
12 3
4
5
6
7
8
9
MP3 and WMA (Windows Media Audio) music files are digital audio files that are compressed to
allow more files on a single CD. This unit can play MP3/WMA directly from files contained on a
CD-R/RW using the buttons on t he rec ei ver (o r op ti o nal r emo te ) as de scr i bed belo w. Many types
of software are available for converting audio files into MP3/WMA formats. Jensen recommends
Nero, MusicMatch Jukebox or Roxio Easy CD Creator. Depending on the media type and
recording method, some CD-R/RW's may be incompatible with this unit. The unit supports
playback of MP3/WMA and CDDA (CDA), Mixed-Mode CDs and CD-Extra (including multisession discs), but discs on which the session has not been closed will not play.
Notes on MP3/WMA Play
This unit can play MP3 (MPEG1, 2, 2.5 Audi o Layer 3) and WMA v er. 7 and 8. However, the MP3
recording media and accepted formats are limited. When writing MP3/WMA, pay attention to the
following restrictions.
Acceptable Media
The MP3/WMA recording media acceptabl e to this unit are CD-ROM, CD-R and CD-RW. When
using CD-RW, use full format rather than quick format to prevent malfunction.
Acceptable Medium Formats
The following formats are available for the media used in this unit. The maximum number of
characters used for file name including the delimiter (".") and three-character extension are
indicated in parentheses.
• ISO 9660 Level 1 (11 characters)
• ISO 9660 Level 2 (31 characters)
• Joliet (31 characters)
Up to 200 characters can be displayed in the long file name format. For a list of available
characters, see the instruction manual of the writing software. The media reproducible on this unit
has the following limitations:
• Maximum number of nested folders: 15
• Maximum number of files per disc: 796 (199 MP3+199 WMA+199 MPG+199 JPG)
• Maximum number of folders per disc: 199
• Maximum number of sessions per disc: 5
MP3/WMA written in formats other than those listed above will not play successfully and their file
names or folder names will not be displayed properly.
MP3/WMA Encoder and CD Writer Settings
Use the following settings when compressing audio data in MP3 data with the MP3 encoder:
• Transfer bit rate : 32 - 320 kbps
• Sampling frequency: 32,44 .1,48 kHz (WMA) 16,22.05,24,32,44.1, 48kHz (Mp3)
When using a CD writer to record MP3/WMA up to t he maxim um dis c cap acit y, disable additional
writing. To record an empty disc up to the maximum capacity at once, select the “disc at once”
option.
DV2011
Entering ID3 Tag
This unit supports ID3 tag versions 1.0 and 1.1.
Controlling Disc Playback
When a video monitor is installed, a screen similar to the following will appear when an MP3 disc
is played.
1. Elapsed playing time
2. Total song length
3. Current transfer bit
rate
4. Current action
5. Main folder
6. Current folder
7. Songs in current
folder
8. Detail of Repeat
mode.
9. Detailed song
information
File Select
Press the up >>| (20) or
down |<< button (21) for less than one second to advance to the next/previous file on the disc.
Press and hold the >>| or |<< button repeatedly to fast forward or fast reverse through the disc at
the rate of 2X, 4x, 8x, 16x, 32x. Normal playback will resume when the >/|| button is pressed.
Play/Pause Disc Playback (1/>/||)
Press the 1/>/|| button (12) on the control panel (or >/|| on the remote control) to suspend disc
play. Press the 1/>/|| button again to resume disc Play.
Repeat Play (3/RPT)
Press the 3/RPT button (14) on the control pan el (or th e RPT button on the remote con trol) du ring
disc play repeatedly to activ ate Repeat Mode:
•Press 3/RPT once to repeat play the current folder.
•Press 3/RPT twice to turn repeat off.
•Press 3/RPT three times to repeat play the current track.
•Press 3/RPT four times to repeat play the whole disc.
Random Play (4/RDM)
Press the 4/RDM button (15) during disc play to play all files on a disc in random, shuffled order.
Press 4/RDM again to turn random play off.
14
Page 15

DV2011
DV2011
DIGITALAUDIO
COMPCOMPACT
MP3
WMA
MODE
MUTE
BAND
LOUD
LOC
EQ
1 2 3 4 5 6
A/PS DISP
INT RPT RDM
AV INAV IN
1
11
12
13
14
15
16
17
18
20
3
4
5
6
7
8
9
10
19
21
2
22
2324
DVD/DISC OPERATION
Once a DVD disc is inserted into the unit, the unit will automatically start playback from the
beginning of the disc. Once the preview tracks have been played, the DVD MENU, ROOT or
TITLE of the DVD disc will appear on the TFT monitor and “ROOT” will be displayed on the LCD
panel. Press the MENU button on the remote control to bypass previews and access the root
menu.
DVD Menu Button Functions
Play/Pause Disc Playback (1/>/||)
Press the 1/>/|| button (12) on the control panel (or the >/|| button on the remote control) to
suspend disc play.
Stop Disc Playback ( )
Press the button on the remote control to enter “RESUME STOP MODE.” Press the >/|| button
to resume playback from the previous location.
Press the button twice consecutively to clear stop mode. With stop mode cleared, if the
1/>/|| button is pressed, the disc will resume playback from the beginning of the disc.
Chapter Select
Press the up >>| (20) or down |<< button (21) on the control panel or remote control to advance to
the next or previous chapter on the disc.
Fast Forward/Reverse
Press the or button on the remote control to fast fo rward or fast reverse through the disc.
Keep pressing and releasing the button to increase the rate from 2X to 4X, 8X, 16X and 32X.
Press >|| on the remote control or 1/>/|| (12) on the control panel to resume normal playback.
NOTE: When playback of the last tra ck ha s co mp le t ed , th e u ni t wil l au to m a ti ca lly en te r
“STOP” mode. Press the >|| or 1/>/|| button to start playback again.
During DVD playback, you can use the follo wing button s to navigate th e DVD, Root, or T itl e menu
of the disc.
Control Panel
• Use the up >>| (20) button to move thr ough introductory chapters and access the DVD
menu.
• Press the 1/>/|| button (12) to choose the highlighted item on the menu.
Remote Control (see “Remote Control Operation” on page8)
• Use the directional buttons ( , , and ) on the remote cont rol to navigate the menu.
• Press the ENTER button to confirm the sele ct ed item .
Controlling Disc Playback
When viewing the DVD or Root Menu, press the 1/>/|| button (12) to choose the highlighted item
on the menu. Once playback begins, the LCD will display the Chapter: Playback Time in the
following format: “001 00:03”.
Repeat Play (3/RPT)
Press the 3/RPT button (14) on the control panel (or the RPT button on the remote control) to
select the repeat mode as follows:
DVD: CHAPTER > TITLE > ALL > REPEAT OFF
VCD/CD: REPEAT > TRACK > ALL
• Select CHAPTER to continuously repeat the current chapter.
• Select TITLE to continuously repeat the current title.
• Select TRACK to continuously repeat the current track.
• Select ALL to continuously repeat all chapters/tracks on the current disc. After playing the
last chapter/track, the unit will stop and display the elapsed time.
NOTE: The REPEAT feature does not support VCD 2.0 (with PBC ON).
Menu Function (DVD Only)
Press the MENU button on the remote control while the disc is playing to display the disc root
menu. You can navigate with the remote control navigation keys and select a feature using the
ENTER button on the remote control.
15
Page 16

DV2011
1 TT: CH: 6 TT: CH:
2 TT: CH: 7 TT: CH:
3 TT: CH: 8 TT: CH:
4 TT: CH: 9 TT: CH:
5 TT: CH: 10 TT: CH:
1TT:
CH: 6TT:CH:
2TT:
CH: 7TT:CH:
3TT:
CH: 8TT:CH:
4TT:
CH: 9TT:CH:
5TT:
CH:
10 TT:
CH:
PROGRAM:TT(08)/CH(--)
EXIT NEXT
Title Menu Function (DVD Only)
If the DVD has multiple titles recorded on the disc, you can select a specific title from the title
menu from which to start playback.
1. Press the TITLE button on the remote control during playback to display the title menu.
2. Select the preferred title using the remote control arrow keys (29) and confirm by pressing
the ENTER button.
PBC (Play Back Control) (VCD Only)
For VCDs with play back functionality, play back control (PBC) provides additional controls for
VCD playback.
Press the MENU button on remote contro l to t oggl e the PBC fun ction “On” /”Off”. Once PBC is on,
playback starts from track one of the play list.
NOTE: During VCD playback you can press t he LANG bu tt on on the re mote co ntro l during
playback to switch the sound between mono and stereo sound in the following order:
MONO LEFT > MONO RIGHT > MIX MONO > STEREO.
Remote Control Direct Track Entry
T o select a track di rectl y, use the number pad on the remote control . For si ngle digi t entri es, pre ss
“0” followed by the single di git track number (for example, track 5 is ente red as “05”).
Goto Search
Perform the following steps to use the GOTO feature to access a specific location on a disc:
DVD Title/Chapter Search
To play a specific title/chapter:
1. Press the GOTO button. The on-screen display information will appear with the CHAPTER
number highlighted (CHAPTER 00/00).
2. Use the arrow (<
fields.
3. Use the numeric buttons on the remote control to enter the desired title/chapter number.
4. Press the ENTER button.
DVD Time Search
T o enter an exact playback starting point:
1. Press the GOTO button twice for TITLE time or three times for CHAPTER time.
2. Use the arrow (<
3. Use the numeric buttons on the remote control to enter the playback starting point.
4. Press the ENTER button.
CD/VCD Disc/Track Search
Press the GOTO button once for DISC GO TO, twice for TRACK GO TO or three times for
SELECT TRACK.
, >, /\, \/) buttons to move the cursor between the TITLE and CHAPTER
, >, /\, \/) buttons to move the cursor through the TIME field (00:00:00).
• Choose DISC GO TO to select an exact playback starting point relative to the total disc
playing time.
• Choose TRACK GO TO to select an exact playback starting time within the current track.
• Choose SELECT TRACK to enter a specific track number for playback.
Use the arrow (<
numeric buttons on the remote control to enter the playback starting p o int and then press the
ENTER button.
, >, /\, \/) buttons to move the cursor through the time field (00:00:00). Use the
Playing in Programmed Order
1. Press the PROG button to access the programmed playback screen. The DVD Program
screen is displayed below:
2. Use the arrow (<
“PROGRAM” screen. Select “NEXT” to view a second screen of program fields (up to 20).
3. Use the number buttons on the remote control to enter a track number in each field.
a. For single digit entries, press “0” followed by the sing le digi t track numb er (for ex ample ,
b. The field will clear if the track or chapter number entered does not exist of the disc.
c. Press the >/|| button on the remote control to clear current program entries and start
4. Choose the “START” option on screen to begin playback in the numbered order indicated.
5. Select “EXIT” to exit the programmed playback screen without beginning programmed
playback.
6. To cancel “PROGRAM” playback, press the PROG button again and select “STOP”.
NOTE: Programmed playback works for DVD, VCD and CD discs. The top bar on the
screen is slightly different but the same instructions apply.
16
, >, /\, \/) buttons on the remote control to access th e field s on the
track 5 is entered as “05”).
over.
Page 17

DV2011
On-Screen Display Function
Press the display ( ) button repeatedly during disc playback to view playback information at
the top of the screen.
DVD Playback Information
Press once: TITLE ELAPSED
Press twice: TITLE Remain
Press three times: CHAPTER Elapsed
TT 01/08 Ch 02/16 0:02:15
Press four times: CHAPTER Remain
• TT 01/08 – “01/08" indicat e s the first of 8 titles on the DVD is currently playing.
• Ch 02/16 – “02/16" indicate s that the second of 16 chapters in the current title is currently
playing.
• 0:41:43 – total elapsed or remaining playing time.
VCD/CD Playback Information
Press once: SINGLE ELAPSED
Press twice: SINGLE REMAIN
Press three times: TOTAL ELAPSED
TT 01/08 Ch 02/16 0:41:43
TT 01/08 Ch 02/16 0:30:00
TT 01/08 Ch 02/16 0:01:55
TRACK 01/08 01:22
TRACK 01/01 35:00
TRACK 01/08 01:22
Display Subtitles (DVD/VCD Only)
If you are watching a disc recorded in multiple languages with subtitles, press the button on
the remote control to choose the language in which you would like the subtitles to appear.
Continue pressing to select “SUBTITLE OFF” and turn off subtitles.
Multi-Language Discs (DVD Only)
If you are watching a disc recorded in multiple languages, press the LANG button on the remote
control to choose a language. If no other languag es are recor ded, “ ” is displayed in the top left
corner of the screen.
Zoom
The Zoom function allows you to increase the picture size. Press the ZOOM button on the remote
control to toggle from 2X to 3X to 4X sc a le and then to 1/2, 1/3 and 1/4 scale. When the scale is
1/4X, press ZOOM again to select OFF and cancel the Zoom function.
During Zoom mode, press the arrow buttons (<, >, /\, \/) to move the picture the up, down, left, or
right.
NOTE: Zooming does not work on subtitles or menu screens included on DVDs.
Viewing an Alternate Picture Angle (DVD Only)
Some DVDs contain scenes that have been shot simultaneously from different
angles. For discs recorded with multiple angles, press the ANGLE button on the
remote control to toggle available angles of the on-screen image. If no other angles
are recorded, “ ” is displayed in the top left corner of the screen.
Press four times: TOTAL REMAIN
• TRACK 01/08 – “01/08" indica tes the first of 8 tracks on the VCD is currentl y playing.
• 01:22 – total elapsed o r remaining playing time.
TRACK 01/01 40:22
17
Page 18

SYSTEM MENU
Press the (setup) button on the remote control to access the SYSTEM SETUP menu. Use
the arrow (<
• General Setup
• Speaker Setup
• Dolby Digital Setup
• Video Setup
• Preference Setup
While in the setup menus, use the (<
1. Use the /\ (up) / \/ (down) buttons to select the setting to be ch anged.
2. Press ENTER to cycle through each possible op tion or display a list of the options. When a
3. Press ENTER again to choose the option and change the setting.
General Setup Page
• TV DISPLAY: The Display Mode can only be modified when the TV Display mode is set to
• ANGLE MARK: Mark multi-angle scenes.
, >) buttons to choose between from the following menu ca te go rie s:
, >, /\, \/) buttons (29) to select options and change settings.
list of options appears, press the /\ (up) / \/ (down) buttons to move amon g th e disp la ye d
options.
TV DISPLAY NORMAL/PS
ANGLE MARK ON/OFF
OSD LANG ENGLISH
CAPTIONS ON/OFF
SCREEN SAVER ON/OFF
4:3.
• NORMAL/PS = Take the maximum value of horizontally fit scale ratio and vertically fit
scale ratio.
• NORMAL/LB: Take the minimum value of horizontally fit scale ratio and vertically fit
scale ratio.
• WIDE: The 16:9 options is used when the DVD player is connected to a wide screen
TV in Full Mode - the screen will display pictures in full size.
NORMAL/LB
WIDE
FRENCH
GERMAN
SPANISH
ITALIAN
PORTUGUESE
DV2011
• OSD LANG: Select the setup menu and OSD (On-screen Display) language used during
the disc playback and instructional operations. The language selection includes: English,
Spanish, Greek, Swedish, Dutch, Italian, and Poland. Some DVDs may not include the preselected language. In t hi s c as e, the pl a ye r aut o mat ica l ly dis pl a ys m enus co ns i ste nt w ith t he
disc's initial language setting.
• CAPTIONS: Turn on-screen captioning on/off.
• SCREEN SAVER: Turn the screen saver on/off. The screen saver activates after 330
seconds.
Speaker Setup Page
DOWNMIX LT/RT
• DOWNMIX: Distinct audio channels are mixed to produce a lower number of channels.
Dolby Digital Setup
DUAL MONO STER EO
• DUAL MONO: Output mono audio to both channels.
Video Setup Page
SHARPNESS HIGH
BRIGHTNESS -20 TO + 20
CONTRAST -16 TO + 16
• SHARPNESS: Adjust the video screen sharpness to a predetermined HIGH, MEDIUM or
LOW setting.
• BRIGHTNESS: Adjust the video screen brightness from -20 (least bright) to +20 (brightest).
• CONTRAST: Adjust the video screen contrast from -20 (least contrast) to +20 (most
contrast).
STEREO
L-MONO
R-MONO
MIX-MONO
MEDIUM
LOW
18
Page 19

DV2011
Preference Page
TV TYPE PAL
AUDIO ENGLISH
SUBTITLE ENGLISH
DISC MENU ENGLISH
PARENTAL See PARENTAL notes.
PASSWORD CHANGE
DEFAULT RESET
• TV TYPE: Select from the following Video output options: PAL, NTSC, or Auto default.
• AUDIO: When DVD disc playback begins, this unit will automatically select the default audio
language of the unit. Please note that if the language recorded in the disc is not available in
AUTO
NTSC
FRENCH
GERMAN
SPANISH
ITALIAN
PORTUGUESE
THAI
FRENCH
GERMAN
SPANISH
ITALIAN
PORTUGUESE
THAI
OTHERS
FRENCH
GERMAN
SPANISH
ITALIAN
PORTUGUESE
THAI
the language list on the disc menu, the language originally recorded on the disc will be used.
If the disc is equipped with a specific playback language, this specific language will be used.
• SUBTITLE: Select a preferred subtitle language (DVD only). Some DVDs may be set to
display subtitles in a different language than selected.
• DISC MENU: Set a default playback language value for the DVD Menu display. Some DVD
menus may appear in a different language than selected.
• PARENTAL: Selecting a Rating allows the user to set the parental control feature of the
player. Rating can only be changed when the password is unlo cked. Press ENTER to cycle
through the following options:
• Kid Safe = Only titles with a parental control setting of 1 are allowed to play
• G = Only titles with a parental control setting of 2 or less are allowed to play
• PG = Only titles with a parental control setting of 3 or less are allowed to play
• PG-13 = Only titles with a parental control setting of 4 or less are allowed to Play
• PG-R = Only titles with a parental control setting of 5 or less are allowed to play
• R = Only titles with a parental control setting of 6 or less are allowed to play
• NC-17 = Only titles with a parental control setting of 7 or less are allowed to play
• Adult = Allow any title to play (factory default)
NOTE: Parental Control functions only if the DVD title ha s it encoded in its program.
Parental control does not work for VCD/SVCD/CVD or CD Audio.
• PASSWORD: The Password item is used to set a new password to lock and unlock the
parental control rating setting into the player. To change the password, use the remote
control number pad to enter the default (1369) or current password and repeat to confirm.
Next, enter the new password and select “OK” to confirm. You must now enter the new
password to view programs blocked by the “PARENTAL” setting or to make changes to
parental settings.
NOTE: If the password is forgotten, the "back-door " p assword 1369 will unlock the
parental control.
Exiting the Setup Menu
Press the (setup) button on the remote control or wait a few seconds to exit the System
Setup menu and resume DVD playback.
19
Page 20

TROUBLESHOOTING SPECIFICATIONS
Symptom Cause Solution
No power The vehicle ignition is not onIf the power supply is prop-
Disc cannot be loaded or
ejected
No sound Volume is too low Adjust volume to audible
The operation keys do
not work
Sound skips The installation angle is
Cannot tune to radio station, auto-seek does not
work
ERROR Mechanism Error Press the eject button to
Disc Error Disc is dirty/scratched/
The fuse is blown Replace the fuse.
Presence of CD disc inside
the player
Inserting the disc in reverse
direction
Compact disc is extremely
dirty or disc is defective
Temperature inside the
vehicle is too high
Condensation Leave the player off for an
Wiring is not properly connected
Control panel not properly
installed
The built-in microcomputer
is not operating properly
due to noise
more than 30 degrees
The disc is dirty or defective Clean the disc and try to
The antenna cable is not
connected
The signals are too weak Select a station manually.
upside down
erly connected to the vehicle accessory terminal,
switch the ignition key to
“ACC”.
Remove the disc in the
player and insert the new
one.
Insert the compact disc with
the label facing upward.
Clean the disc or try to play
a new one.
Wait until the ambient temperature returns to normal.
hour or so, then try again.
level.
Check wiring connections.
Reinstall control panel.
Press the RESET button.
Adjust the installation angle
to less than 30 degrees.
play again or use new disc.
Insert the antenna cable
firmly.
correct the problem.
If the error code does not
disappear, consult your
nearest service dealer.
Replace the disc.
DVD/CD
Signal to Noise Ratio. . . . . . . . . . . . . . . . . . . . . . . . . . . . . . . . . . . . . . . . . . . . . . . . . . >
Dynamic Range. . . . . . . . . . . . . . . . . . . . . . . . . . . . . . . . . . . . . . . . . . . . . . . . . . . . . . >
Frequency Response . . . . . . . . . . . . . . . . . . . . . . . . . . . . . . . . . . . . 20Hz to 20KHz +/- 3dB
Channel Separation. . . . . . . . . . . . . . . . . . . . . . . . . . . . 2 Channel (Stereo) > 60dB @ 1KHz
Video
Color System. . . . . . . . . . . . . . . . . . . . . . . . . . . . . . . . . . . . . . . . . . . . . . . . . . . . . NTSC/PAL
Video Output . . . . . . . . . . . . . . . . . . . . . . . . . . . . . . . .Composite 1.0 Vp-p (+/- 0.2) 75 - ohm
Video Input . . . . . . . . . . . . . . . . . . . . . . . . . . . . . . . . .Composite 1.0 Vp-p (+/- 0.2) 75 - ohm
Audio
Max Output Power . . . . . . . . . . . . . . . . . . . . . . . . . . . . . . . . . . . . . . . . . . .40W x 4 channels
Load Impedance (speakers) . . . . . . . . . . . . . . . . . . . . . . . . . . . . . . . . . . . . . . . . . . . . 4 ohms
Line Out Level/Load . . . . . . . . . . . . . . . . . . . . . . . . . . . . . . . . . . . . . . . 400mV/10k ohm load
Line Out Impedance . . . . . . . . . . . . . . . . . . . . . . . . . . . . . . . . . . . . . . . . . . . . . . . . . 200 ohm
Auxiliary Input
Frequency Response . . . . . . . . . . . . . . . . . . . . . . . . . . . . . . . . . . . . . . 20Hz to 20KHz +
Input Maximum Voltage. . . . . . . . . . . . . . . . . . . . . . . . . . . . . . . . . . . . . . . . . . . . . . . 1200mV
Input Impedance . . . . . . . . . . . . . . . . . . . . . . . . . . . . . . . . . . . . . . . . . . . . . . . . . . . .4.7k ohm
FM Radio
Frequency Range . . . . . . . . . . . . . . . . . . . . . . . . . . . . . . . 87.5-107.9 MHz (200 kHz Space)
Usable Sensitivity . . . . . . . . . . . . . . . . . . . . . . . . . . . . . . . . . . . . . . . . <
Stereo Separation . . . . . . . . . . . . . . . . . . . . . . . . . . . . . . . . . . . . . . . . . . . . >
S/N Ratio. . . . . . . . . . . . . . . . . . . . . . . . . . . . . . . . . . . . . . . . . . . . . . . . . . . . . . . . . . . >
AM/MW
Frequency Range . . . . . . . . . . . . . . . . . . . . . . . . . . . . . . . . . . . . . 530-1710 (10 kHz Space)
Usable Sensitivity . . . . . . . . . . . . . . . . . . . . . . . . . . . . . . . . . . . . . . . . . <
S/N Ratio. . . . . . . . . . . . . . . . . . . . . . . . . . . . . . . . . . . . . . . . . . . . . . . . . . . . . . . . . . . >
General
Operating Voltage . . . . . . . . . . . . . . . . . . . . . . . . . . . . . . . . . . . . . . . . . . . . . . . DC 11 -14.4V
Grounding System . . . . . . . . . . . . . . . . . . . . . . . . . . . . . . . . . . . . . . . . . . . Negative Ground
Fuse . . . . . . . . . . . . . . . . . . . . . . . . . . . . . . . . . . . . . . . . . . . . . . . . . 15-Amp Mini ATM Type
Operating Temperature. . . . . . . . . . . . . . . . . . . . . . . . . . . . . . . . . . . . . . . . . . . . 0ºC to 50ºC
Unit Mounting Angle . . . . . . . . . . . . . . . . . . . . . . . . . . . . . . . . . . . . . . . . . . . . . . . . . . . .< 30º
DV2011
90dB
90dB
3dB
15dB at S/N 30 dBu
25 dB at 1KHz
50dB
40dB at S/N 20dBu
40dB
20
Page 21

DV2011
21
Page 22

DV2011
22
Page 23

ASA Electronics Corporation
www.asaelectronics.com
www.jensenrvdirect.com
©2010 ASA Electronics Corporation
v.123010
Page 24

DV2011
24
 Loading...