

Page 1

Installation . . . . . . . . . . . . . . . . . . . . . . . . . . . . . . . . . . . . . . . . . . . . . . . . . . . . . . . . . . . . . . 3
Wiring . . . . . . . . . . . . . . . . . . . . . . . . . . . . . . . . . . . . . . . . . . . . . . . . . . . . . . . . . . . . . . . . . . 4
Basic Operation. . . . . . . . . . . . . . . . . . . . . . . . . . . . . . . . . . . . . . . . . . . . . . . . . . . . . . . . . . 5
Tuner Operation . . . . . . . . . . . . . . . . . . . . . . . . . . . . . . . . . . . . . . . . . . . . . . . . . . . . . . . . . 7
CD Operation . . . . . . . . . . . . . . . . . . . . . . . . . . . . . . . . . . . . . . . . . . . . . . . . . . . . . . . . . . . . 8
AWM965
Owner’s Manual
Guide du Propriétaire
DVD/VCD Operation . . . . . . . . . . . . . . . . . . . . . . . . . . . . . . . . . . . . . . . . . . . . . . . . . . . . . 10
MP3/USB Operation . . . . . . . . . . . . . . . . . . . . . . . . . . . . . . . . . . . . . . . . . . . . . . . . . . . . . 12
Remote Control Operation . . . . . . . . . . . . . . . . . . . . . . . . . . . . . . . . . . . . . . . . . . . . . . . . 14
Setup Menu . . . . . . . . . . . . . . . . . . . . . . . . . . . . . . . . . . . . . . . . . . . . . . . . . . . . . . . . . . . . 15
Specifications . . . . . . . . . . . . . . . . . . . . . . . . . . . . . . . . . . . . . . . . . . . . . . . . . . . . . . . . . . 17
Installation . . . . . . . . . . . . . . . . . . . . . . . . . . . . . . . . . . . . . . . . . . . . . . . . . . . . . . . . . . . . . 20
Câblage . . . . . . . . . . . . . . . . . . . . . . . . . . . . . . . . . . . . . . . . . . . . . . . . . . . . . . . . . . . . . . . 21
Opération de base. . . . . . . . . . . . . . . . . . . . . . . . . . . . . . . . . . . . . . . . . . . . . . . . . . . . . . . 22
Opération tuner AM/FM . . . . . . . . . . . . . . . . . . . . . . . . . . . . . . . . . . . . . . . . . . . . . . . . . . 24
Opération CD . . . . . . . . . . . . . . . . . . . . . . . . . . . . . . . . . . . . . . . . . . . . . . . . . . . . . . . . . . . 25
Opération DVD/VCD . . . . . . . . . . . . . . . . . . . . . . . . . . . . . . . . . . . . . . . . . . . . . . . . . . . . . 27
Opération MP3/USB . . . . . . . . . . . . . . . . . . . . . . . . . . . . . . . . . . . . . . . . . . . . . . . . . . . . . 29
Opération télécommande . . . . . . . . . . . . . . . . . . . . . . . . . . . . . . . . . . . . . . . . . . . . . . . . . 31
Menu configuration. . . . . . . . . . . . . . . . . . . . . . . . . . . . . . . . . . . . . . . . . . . . . . . . . . . . . . 32
Spécifications . . . . . . . . . . . . . . . . . . . . . . . . . . . . . . . . . . . . . . . . . . . . . . . . . . . . . . . . . . 34
Page 2

AWM965
Thank You!
Thank you for choosing a Jensen product. We hope you will find the instructions in this owner’s
manual clear and easy to follow. If you take a few minutes to look through it, you’ll learn how to
use all the features of your new Jensen receiver for maximum enjoyment.
Features
Features of the Jensen AWM965 mobile audio system include:
• Digital AM/FM Tuner
• Skip Protected Disc Mechanism
• DVD/CD-R/RW and MP3 Compatible
• Time/Alarm Clock
• Backlit Controls
• Auxiliary Audio/Video Input
• USB Input
• 3 Zone / 8 Speaker Output
• Wireless Remote Control Included
Precautions
• Use the Proper Power Supply.
This product is designed to operate with a 12 volt DC, negative ground battery system
(the standard system in a North American vehicle).
• Protect the Disc Mechanism.
Avoid inserting any foreign objects into the slot of this player. Failure to observe this may
cause malfunction due to the precise mechanism of this unit.
• Use Authorized Service Centers.
Do not attempt to disassemble or adjust this precision product; contact a professional for
assistance.
• Avoid Moisture.
To reduce the risk of fire or electric shock, do not expose this equipment to rain or moisture.
• Avoid Cleaning Products.
The front of this unit should only be cleaned with a slightly damp cloth. Do not use cleansers.
• Use Recommended Accessories.
TO REDUCE THE RISK OF FIRE OR ELECTRIC SHOCK AND ANNOYING INTERFERENCE, USE ONLY THE RECOMMENDED ACCESSORIES.
CAUTION: This mobile DVD player is a Class I laser product that uses a visible/invisible
laser beam which could cause hazardous radiation exposure if improperly directed. Be
sure to operate the mobile DVD player as instructed. Use of controls or adjustments or
performance of procedures other than those specified herein may result in hazardous
radiation exposure. Do not open covers and do not attempt to repair the unit yourself.
Refer servicing to qualified personnel.
Tools and Supplies
You will need these tools and supplies to install your AWM965:
• Philips screwdriver
• Wire cutters and strippers
• Tools to remove existing radio (screwdriver, socket wrench set or other tools)
• Electrical tape
• Crimping tool
• Volt meter/test light
• Crimp connections
• 16 gauge wire for power connections
• 16 – 18 gauge speaker wire
Disconnecting the Battery
To prevent a short circuit, be sure to turn off the ignition and remove the negative (-) battery
cable prior to installation.
NOTE: If the AWM965 is to be installed in a vehicle equipped with an on-board drive or
navigation computer, do not disconnect the battery cable. If the cable is disconnected,
the computer memory may be lost. Under these conditions, use extra caution during
installation to avoid causing a short circuit.
2
Page 3

AWM965
AWM965
REMOTE CONTROL
WITH BATTERY
20-PIN POWER/A-B SPEAKER MATING PIGTAIL
AUX AUDIO /
VIDEO CABLE
Packing List
Installation
It’s a good idea to read all of the instructions before beginning the installation. We recommend
having your JENSEN AWM965 installed by a reputable installation shop.
Selecting the Mounting Location
Select a mounting location, taking care to avoid the following:
• Places exposed to heat-radiating appliances such as electric heaters
• Adjacent to other equipment that radiates heat
• Poorly-ventilated or dusty places
• Moist or humid locations
Preparing the Opening
Use the mounting hole diagram (below) to measure and cut a mounting hole, then mount the
unit using four M3x20mm screws.
NOTE: Before cutting the mounting hole, make sure the area behind the mounting
location is clear of wires, fuel and vacuum or brake lines.
Mounting the Radio
Route power, speaker and antenna cables through the hole, and connect them to the unit as
outlined in the wiring diagram. After ensuring correct connections, test operation.
3
Page 4
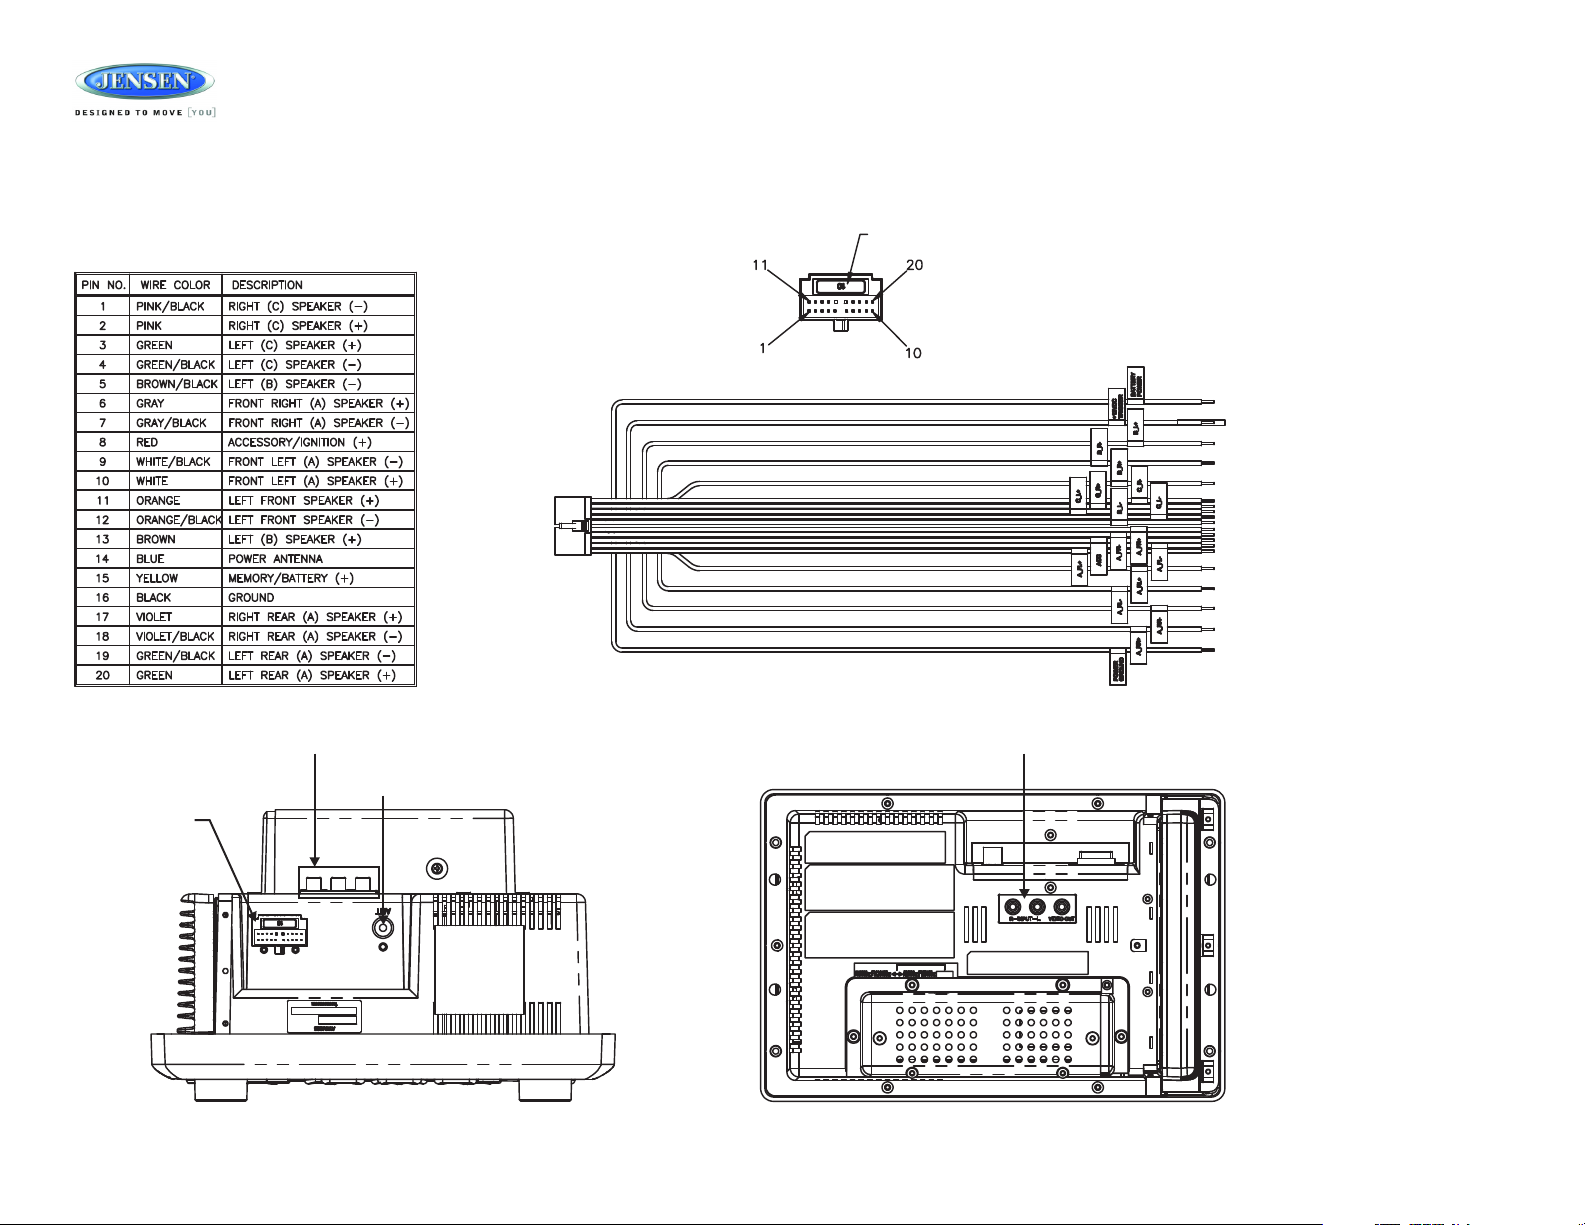
AM/FM MOTOROLA ANTENNA
AUX IN (RIGHT, LEFT, VIDEO)AUX IN (RIGHT, LEFT, VIDEO)
WIRING HARNESS
CONNECTOR
(SEE DETAILA)
DETAILA
SHOWN FROM PIN VIEW
10 AMP FUSE
Wiring
The wiring diagram depicts all the wiring connections required for proper operation of the unit.
AWM965
4
Page 5
AWM965
1
3
11
17
5
13
2
10
22
12
18
19
9
23
20
15
7
6
16
21
24
14
48
3.5 mm A/V Cable
Left Audio
Right Audio
Ground
Video
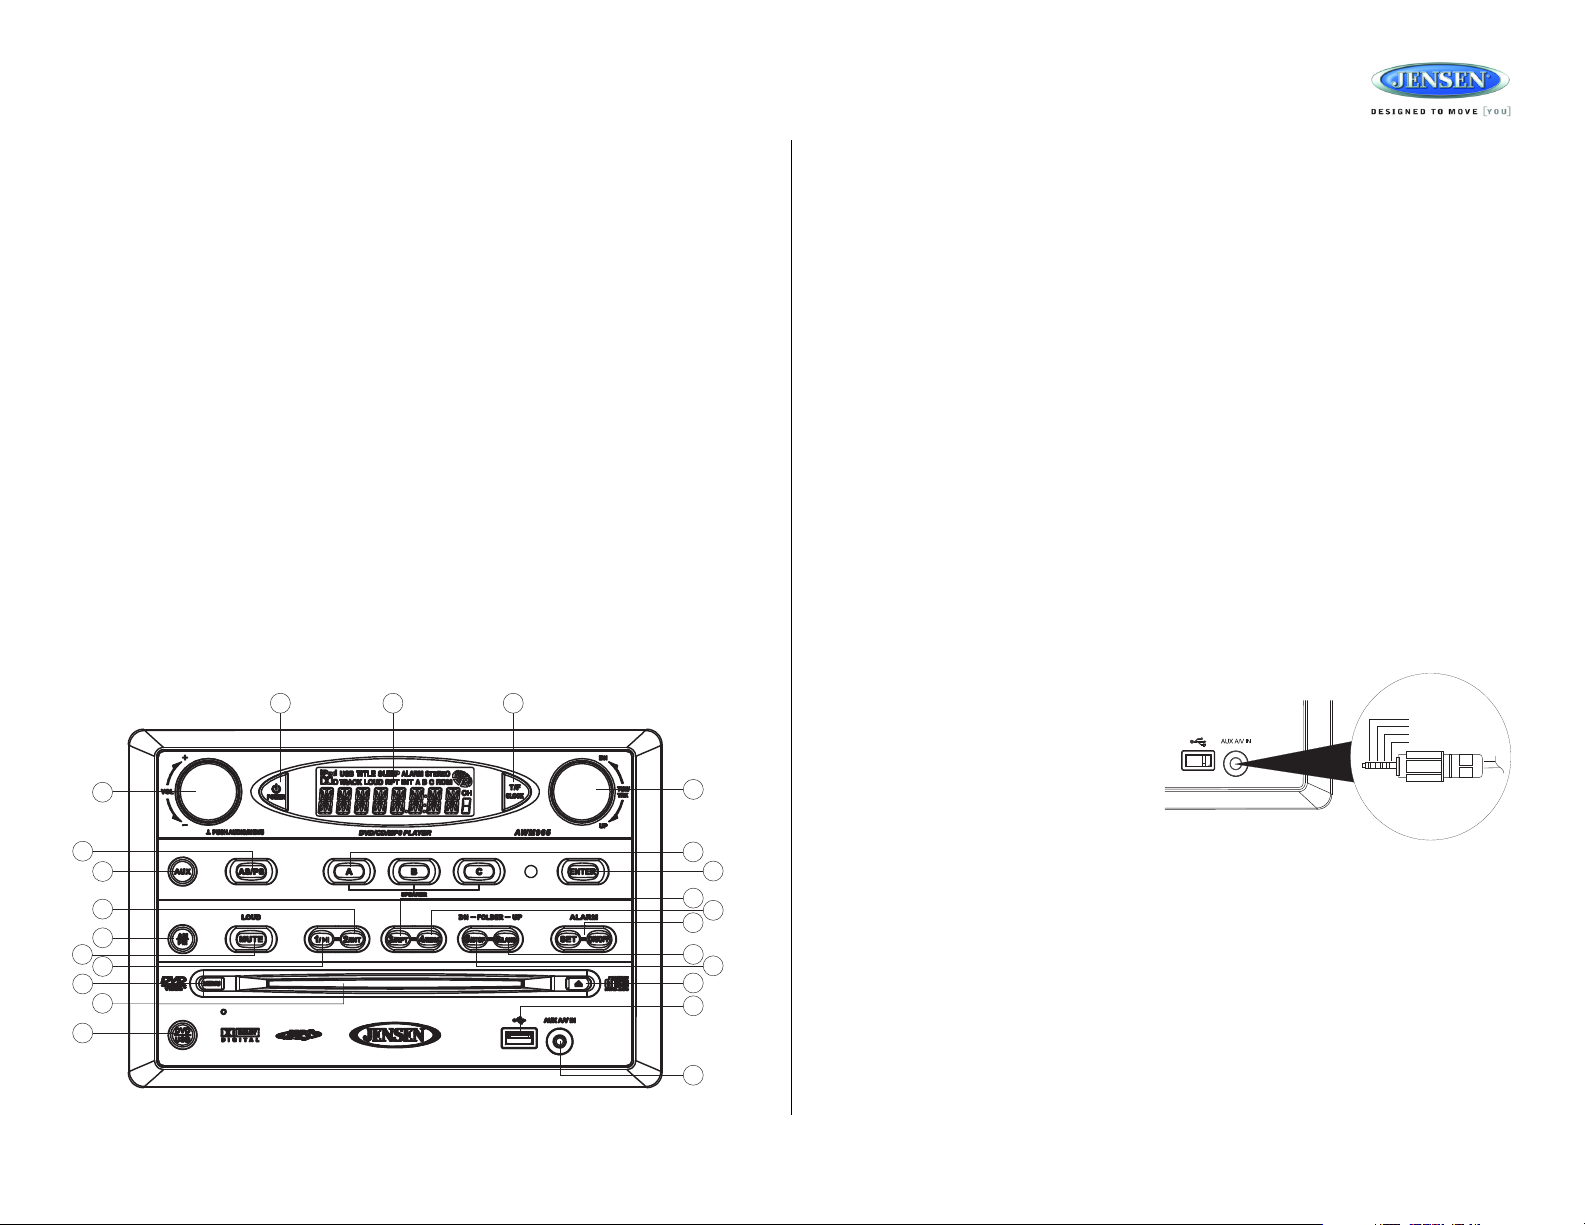
Basic Operation
Power
Press the POWER button (1) to turn the unit on or to enter standy mode.
Volume Control / Audio Adjustment / Menu
• Rotate the VOL control (2) clockwise to increase or counter-clockwise to decrease the
volume output.
• Press the VOL control to step through the following audio adjustment options. Rotate the
VOL control to adjust the selected audio feature.
• BAS: Adjust the Bass level from “-7” to “+7”.
• TRE: Adjust the trable from “-7” to “+7”.
• BAL: Adjust the speaker output balance between “L7” (left) and “R7” (right). “BAL 0”
indicates an equal balance between the left and right speakers.
• FAD: Adjust the speaker fade between “R7” (rear) and “F7” (front). “FAD 0” indicates
and equal balance between the rear and front speakers.
This function will time out after three seconds of inactivity and the unit will resume normal
operation.
• Press and hold the VOL control to access the user menu. Press the VOL control to step
through the menu options. Rotate the VOL control to adjust the selected menu feature.
• LIGHT: Adjust the standby mode LCD brightness from “LIGHT 1” (least bright) to
“LIGHT 3” (brightest).
• BEEP: Turn the audible beep confirmation “ON” or “OFF”.
This function will time out after three seconds of inactivity and the unit will resume normal
operation.
Mute / Loudness
Press the MUTE button (3) to silence the audio output in tuner, CD, DVD, USB or auxiliary
input mode. Press again to restore the previous volume level.
Press and hold the MUTE (LOUD) button to toggle the Loudness function on/off.
Liquid Crystal Display (LCD)
The liquid crystal display (LCD) panel (4) displays the frequency, time and activated functions.
To adjust the brightness of the LCD, press and hold the VOL control to access the user menu.
Press the VOL control to step through the menu options. Rotate the VOL control to adjust the
LCD brightness from “LIGHT 1” (brightest) to “LIGHT 3” (least bright).
NOTE: When subjected to cold temperatures for an extended period of time, LCD panels
will take longer to illuminate and the display visibility may slightly decrease. Optimal
LCD operation will return to normal when the temperature increases to a normal range.
Auxiliary Input Function
Press the AUX button (5) to directly access auxiliary input modes (AUX 1 IN and AUX 2 IN)
from any other mode when a portable audio device is connected to the unit. To connect a
portable audio device, insert a standard 3.5 mm (audio line output or headphone output from
your portable CD / MP3 / iPod or other media player) into the AUX A/V IN (AUX 2 IN)
connector (6) on the front of the unit or the Audio/Video Input (AUX 1 IN) on the back of the unit
(see “Wiring” on page 4).
Auxiliary Input Connector
For front panel A/V input, an external audio/
video (A/V) source such as a video game
player, camera, etc. can be connected to the
front panel A/V input with the provided
3.5mm A/V cable adapter. Connect the
device to the AUX A/V IN connector (6) on
the front panel, and then press AUX to
engage the input circuit to “AUX 2 IN”.
Please note that there are several different
A/V cable "standards". The AWM965 is
designed to support the Apple Video iPod cable type, as shown in the inset drawing.
USB Interface Connector
You can connect a USB device directly to USB interface (7) on the front of the AWM965 for
playback of compatible files. Playback begins automatically. Press the DVD/USB button (24) to
switch to USB mode from another source. Refer to “MP3/USB Operation” on page 12 for
additional operating instructions.
Clock Display
Press the T/F button (8) to alternate between playing time and clock time while in Tuner, CD,
DVD, USB or auxiliary input mode.
5
Page 6

Basic Operation (continued)
Clock Setup
Press and hold the T/F button (8) to access Clock Setup mode. The number representing the
hours will flash. Rotate the TUN/TRK control (12) to adjust the hour. Press T/F again briefly
and the number representing the minutes will flash. Rotate the TUN/TRK control to adjust the
minutes. The new time will be saved five seconds after the last adjustment is made.
Setting the Sleep Time
The Sleep Timer will automatically turn off the AWM965 in the designated number of minutes.
To set the Sleep Time, press the ALARM SET button (9a) and the sleep time will appear in the
display with the number representing the minutes (SLEEP 0). Press ALARM SET repeatedly
to change the sleep time from 15 to 30, 45 or 60 minutes.
Setting the Alarm
To set the alarm, press and hold the ALARM SET button (9a). The number representing the
hours will flash. Rotate the TUN/TRK control (12) to adjust the hour. Press ALARM SET again
briefly and the number representing the minutes will flash. Rotate the TUN/TRK control to
adjust the minutes. Press and hold the ALARM SET button again to store the alarm time.
Once a time is set, press ALARM ON/OFF (9b) to turn the alarm function on or off.
Speaker Output
The three speaker output buttons (10) (SPEAKER A, SPEAKER B and SPEAKER C) control
speaker output from the radio. Press any of the three buttons to turn the corresponding
speaker sets on or off. A, B or C will appear on the display.
AWM965
6
Page 7
AWM965
1
3
11
17
5
13
2
10
22
12
18
19
9
23
20
15
7
6
16
21
24
14
48
AM/FM Tuner Operation
Selecting a Band
Press the AM/FM button (11) to directly access tuner mode from any other function mode or to
change between two AM bands (AM1 and AM2) and three FM bands (FM1, FM2 and FM3).
Tuning / Preset Stations
Manual Tuning
Rotate the TUN/TRK (12) control clockwise or UP to tune the frequency one step higher.
Rotate the TUN/TRK control counter-clockwise or DN to tune the frequency one step lower.
Seek Tuning
Rotate and hold the TUN/TRK control to automatically tune to the next strong station.
Preset Stations
Six numbered preset buttons store and recall stations for each AM and FM band.
To store a station, select a band (if needed), and then select a station. Press and hold a preset
button for three seconds to store the current station. The corresponding preset number will
appear on the right side of the LCD under the letters “CH”.
To recall a station, select the preferred band and then press a preset button. The unit will
automatically tune to the corresponding stored station.
Automatic Store / Preset Scan (AS/PS)
Automatically Store
Press AS/PS (13) for more than three seconds, and the unit will automatically scan for and
store the six strongest stations for all bands. To stop this function before the automatic storing
is complete, briefly press AS/PS again.
Preset Scan
Briefly press AS/PS to scan all preset stations in the current band. The unit will play each
station for five seconds before moving on to the next station. To stop this function and play the
current station, press the AS/PS button again.
7
Page 8

AWM965
1
3
11
17
5
13
2
10
22
12
18
19
9
23
20
15
7
6
16
21
24
14
48
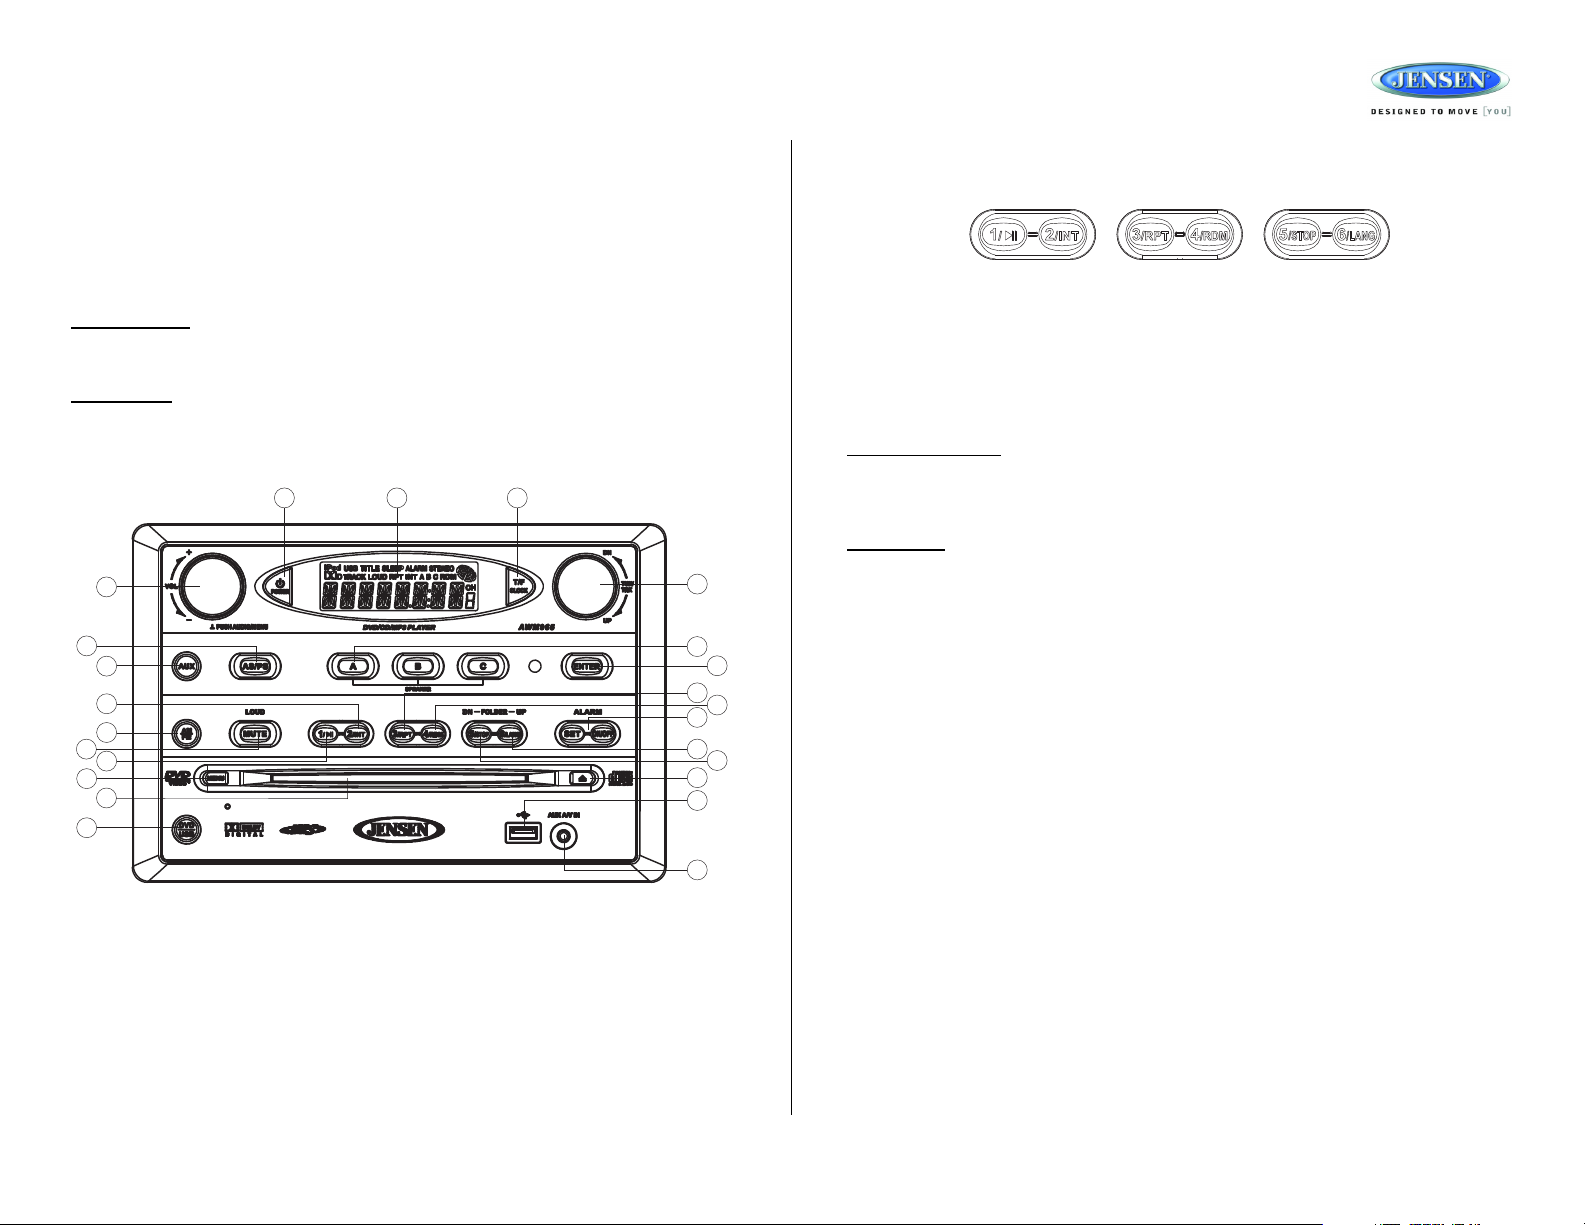
CD Operation
Inserting a CD
Insert a CD label-side up into the disc slot (14) and the disc will begin to play.
Ejecting a CD
Press the eject button (15) to stop CD play and eject the CD.
Pausing Playback
Press the 1/ button (16) to suspend or resume disc play.
Stopping Playback
Press the 5/STOP button (20) to suspend disc play, and “PRE STOP” will appear in the display. Press
the 1/ button (16) to resume disc play from the last position. Press 5/STOP twice and “STOP”
appears.
Track Select
Rotate the TUN/TRK control (12) to advance to the next or previous track on the CD. The selected
track number will appear on the display. Rotate the TUN/TRK control for more than three seconds
to fast forward or fast reverse through the disc. CD play starts when the play/pause button is pressed.
Fast Forward/Reverse
Rotate the TUN/TRK control for more than three seconds or press the >> or << buttons on the
remote control (17) to fast forward or fast reverse. Press and hold once for FORWARD X 2.
Press and hold additional times for FORWARD X 4, X 8, X 20 or PLAY. Press the play/pause /
|| button on the control panel (16) or remote control (18) to end fast forward or reverse and
resume normal playback.
Intro Scan (INT)
Press the 2/INT button (17) during disc play to play the first 10 seconds of each track on the
current disc. Press 2/INT again to end the scan and play the selected track.
Repeat (RPT)
Press the 3/RPT button (18) during disc play to continuously repeat the selected track (REP 1).
Press again to repeat all tracks (REP ALL). Press a third time to stop repeating.
Random Shuffle (RDM)
Press 4/RDM (19) during disc play to play all tracks on a CD in random, shuffled order. Press 4/
RDM again to stop random play.
Programmed Playback
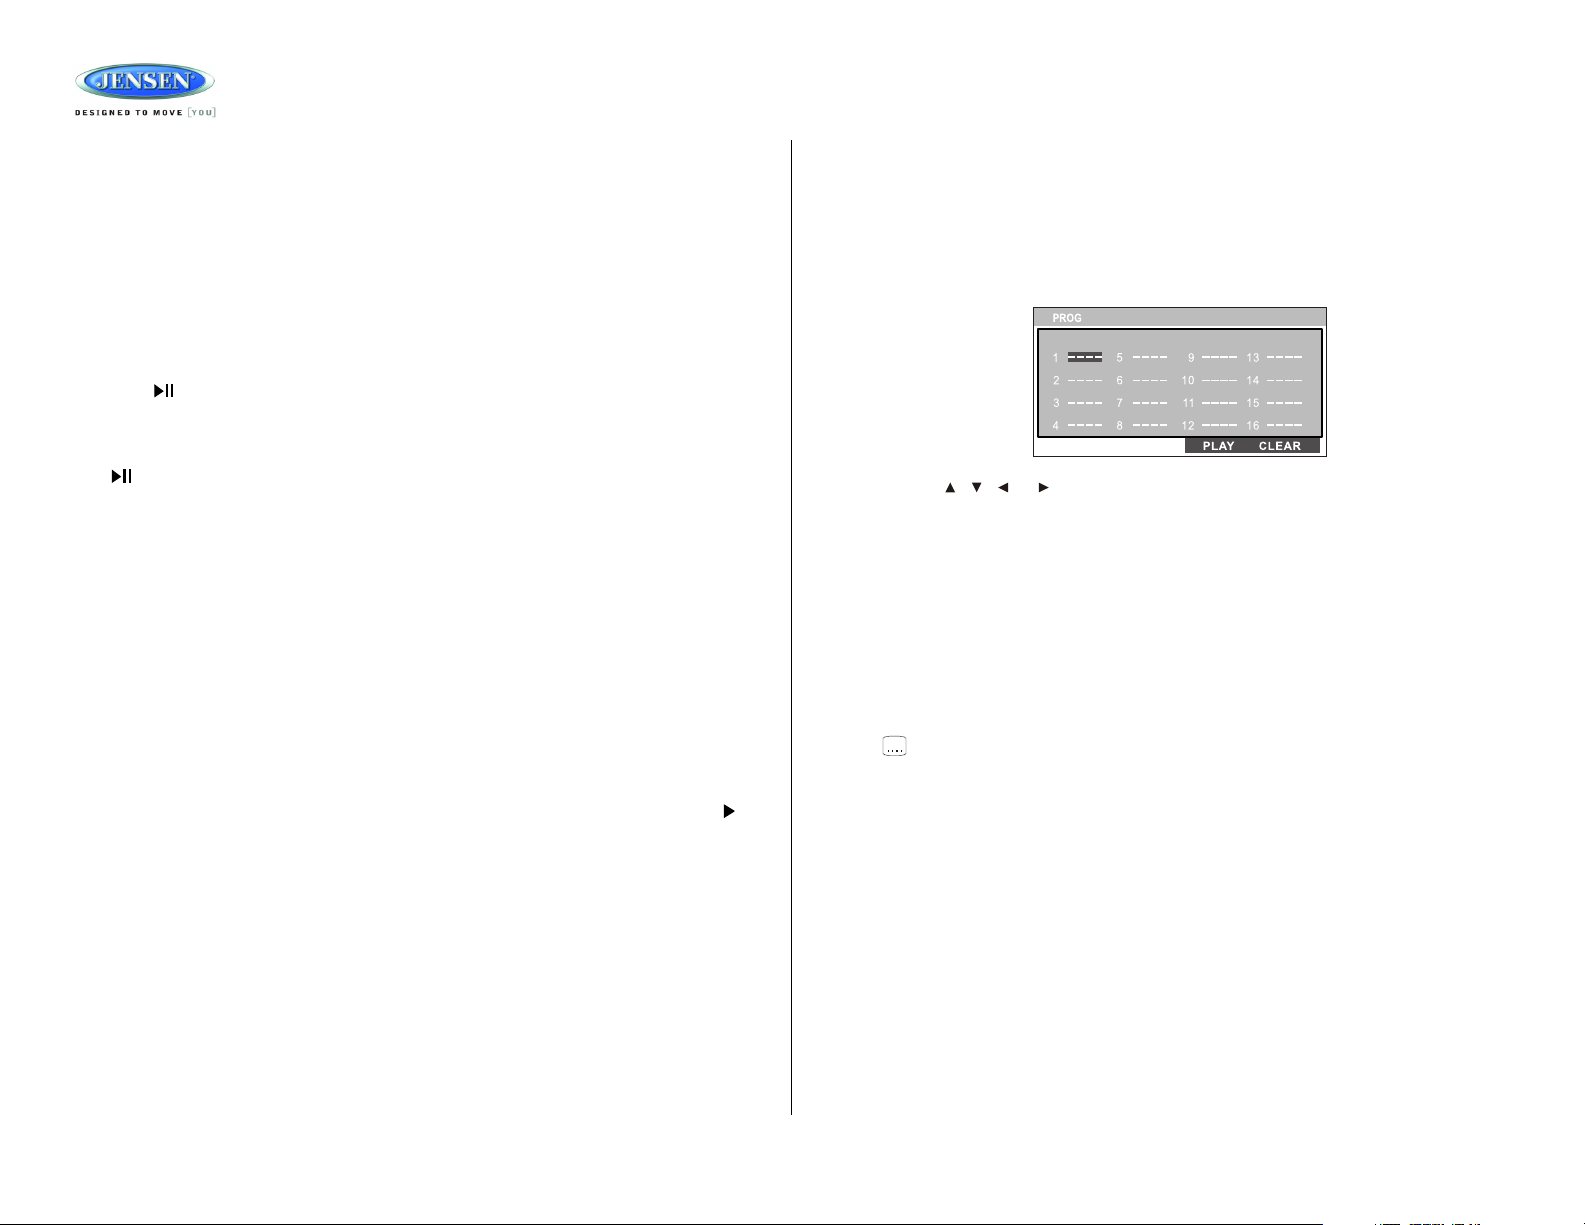
1. Press the PROG button (8) on the remote control to access the programmed playback
screen:
2. Use the , , or cursor buttons (16) on the remote control to access the fields on
the “PROG” screen.
3. Use the number buttons on the remote control to enter a track number in each field.
4. Press the >/|| button (19) on the remote control or highlight “PLAY” on screen and then
press the ENTER button (5) to begin playback in the numbered order indicated.
To delete the list, highlight “CLEAR” and then press ENTER. Press PROG to exit the
programmed playback screen.
Remote Control Direct Track Entry
To select a track directly, use the number pad on the remote control (10). For single digit
entries, press the corresponding number. For two digit entries, press the 10+ button followed
by the last digit (i.e., for track 16, press 10+ and then 6).
GOTO Direct Track/Chapter Access
Use the GOTO function to access a track (chapter) directly.
1. Press the GOTO button (26) on the remote control. The On Screen Display information
will appear with the track number highlighted.
2. Use the number keys on the remote control to enter the 3-digit track number directly (i.e.
for track 10, enter “010”.
3. Press the ENTER button (5) to confirm and begin playback.
8
Page 9
AWM965
1
3
11
17
5
13
2
10
22
12
18
19
9
23
20
15
7
6
16
21
24
14
48
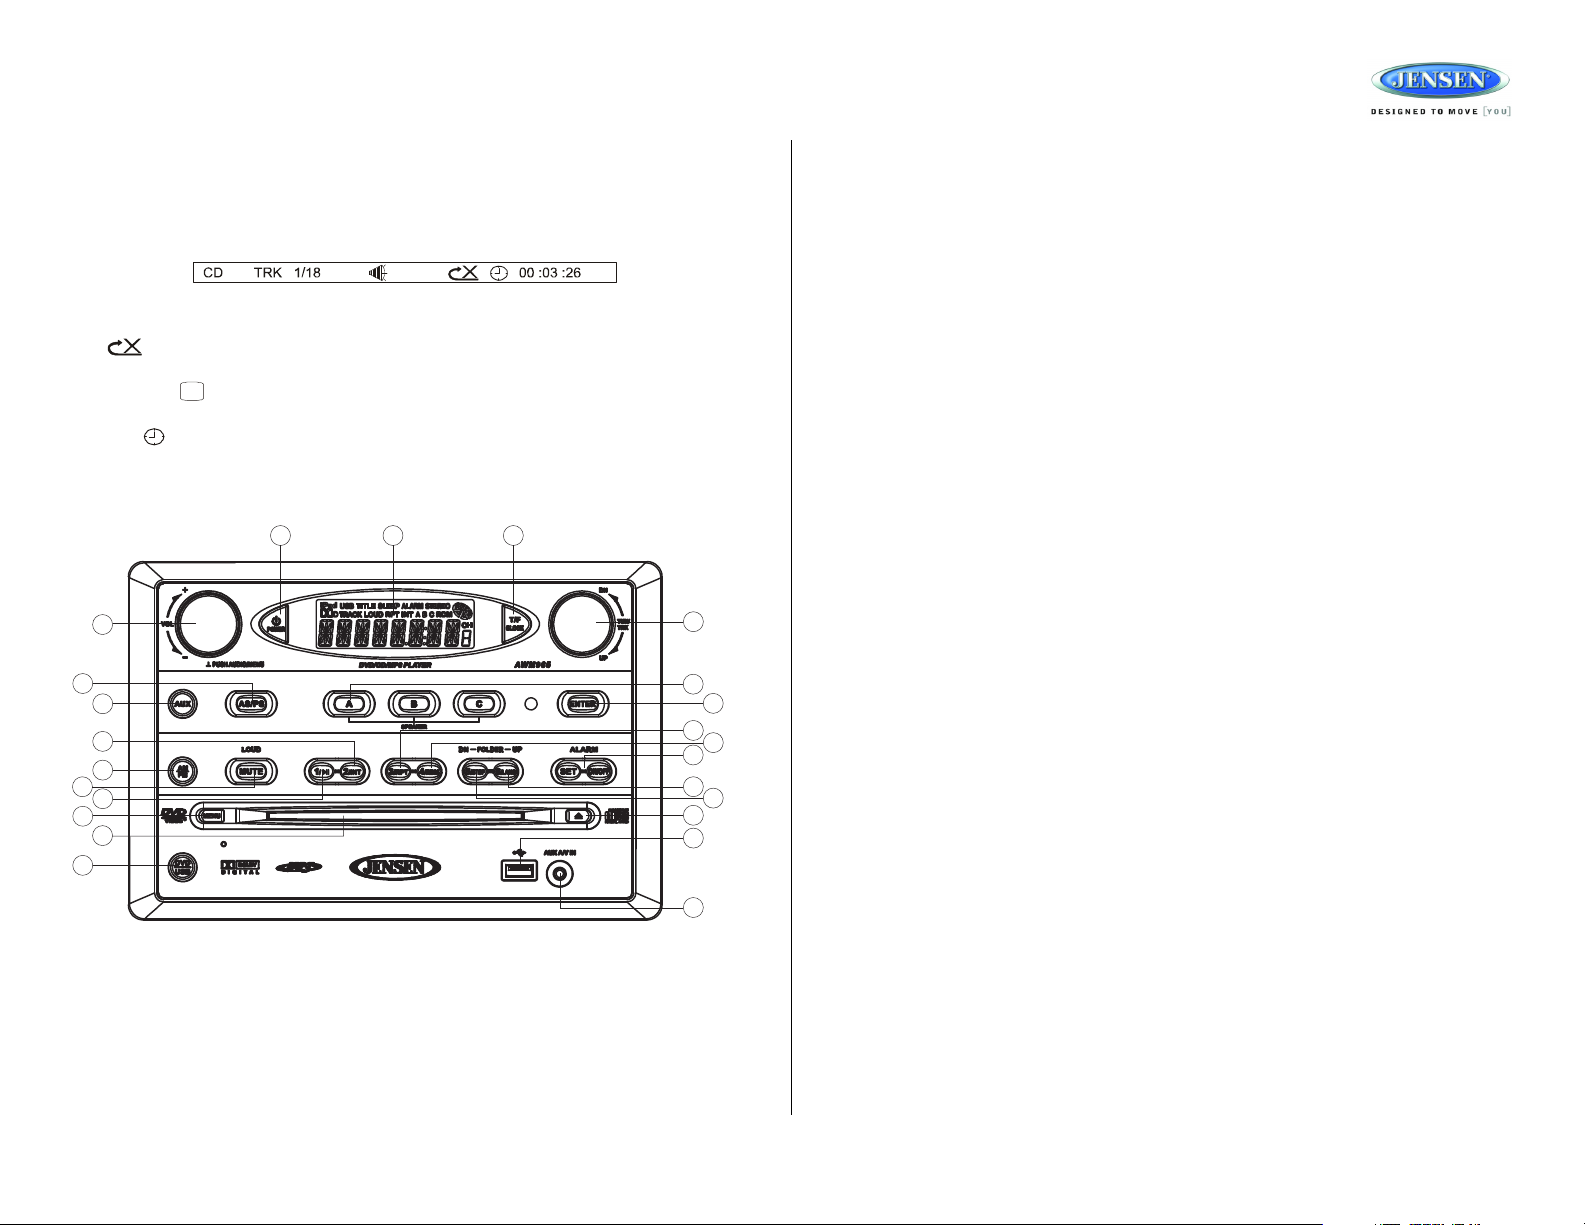
CD Operation (continued)
CD Playback Information
The following information is displayed at the top of the screen during CD playback:
• TRK ##/## – “1/18” indicates the first of 18 tracks on the CD is currently playing.
• – “X” indicates repeat play is OFF, “1” indicates repeat track, and “A” indicates
repeat disc.
• Press the button on the remote control (27) repeatedly to view the following information for elapsed/remaining playing time:
• 00:02:18 – total elapsed playing time for disc
• C –00 :34 :37 – remaining playing time
• T 00:02:18 – total elapsed playing time for current track
• C –00 :34 :37 – remaining playing time for current track
9
Page 10
AWM965
DVD/VCD Operation
Inserting a Disc
Insert a disc label-side up into the disc slot (14) and the disc will begin to play.
NOTE: Press the DVD/USB button (24) to alternate between the USB and DVD source.
Ejecting a DVD
Press the eject button (15) to stop DVD play and eject the DVD.
Pausing Playback
Press the 1/ button (16) to suspend or resume disc play.
Stopping Playback
Press the 5/STOP button (20) to suspend disc play, and “PRE STOP” will appear in the display. Press
the 1/ button (16) to resume disc play from the last position. Press 5/STOP twice and “STOP”
appears.
Track Select
Rotate the TUN/TRK control (12) to advance to the next or previous track on the disc. The selected
track number will appear on the display.
Enter/Select
While in menu mode, press the ENTER button (22) to select a menu option.
Language Selection
While playing a DVD, press the 6/LANG button (23) to change the DVD audio language.
Fast Forward/Reverse
Rotate the TUN/TRK control for more than three seconds or press the >> or << buttons on the
remote control (17) to fast forward or fast reverse. Press and hold once for FORWARD X 2.
Press and hold additional times for FORWARD X 4, X 8, X 20 or PLAY. Press the play/pause /
|| button on the control panel (16) or remote control (18) to end fast forward or reverse and
resume normal playback.
Playback Control (VCD Only)
Press the MENU button (6) on the remote control to turn Playback Control on/off when this
feature is available on your VCD.
Programmed Playback
1. Press the PROG button (8) on the remote control to access the programmed playback
screen:
2. Use the , , or cursor buttons (16) on the remote control to access the fields on
the “PROG” screen.
3. Use the number buttons on the remote control to enter a track number in each field.
4. Press the >/|| button (19) on the remote control or highlight “PLAY” on screen and then
press the ENTER button (5) to begin playback in the numbered order indicated.
To delete the list, highlight “CLEAR” and then press ENTER. Press PROG to exit the
programmed playback screen.
DVD Playback Features
The following remote control features, along with many others, are available during DVD
playback (see “Remote Control Operation” on page 14 for complete functionality):
• LANG: Press to choose an alternate audio language, if available.
• SUBTITLE: Press to select an alternate subtitle language, if available.
• ANGLE: Press to select an alternate viewing angle, if available.
• ZOOM: Press to zoom the picture at ZOOM 2, ZOOM 3, ZOOM 4, ZOOM 1/2, ZOOM 1/3
or ZOOM 1/4, or select OFF to return to normal view.
NOTE: Feature availability is dependent upon DVD embedded information.
Repeat Chapter/Title
Press the 3/RPT button (18) on the control panel or the RPT button (21) on the remote control
multiple times during playback to select from the following repeat play options:
• VCD: REP 1 (track), REP ALL (disc), REP OFF
• DVD: REP Chapter, REP Title, REP All, REP OFF
10
Page 11
AWM965
DVD/VCD Operation (continued)
Playback Information
During DVD and VCD playback, press the button (27) on the remote control to display
playback information on the screen, including the media playing and current playback time.
Continue pressing the button to display additional information, as indicated below.
DVD Playback Information
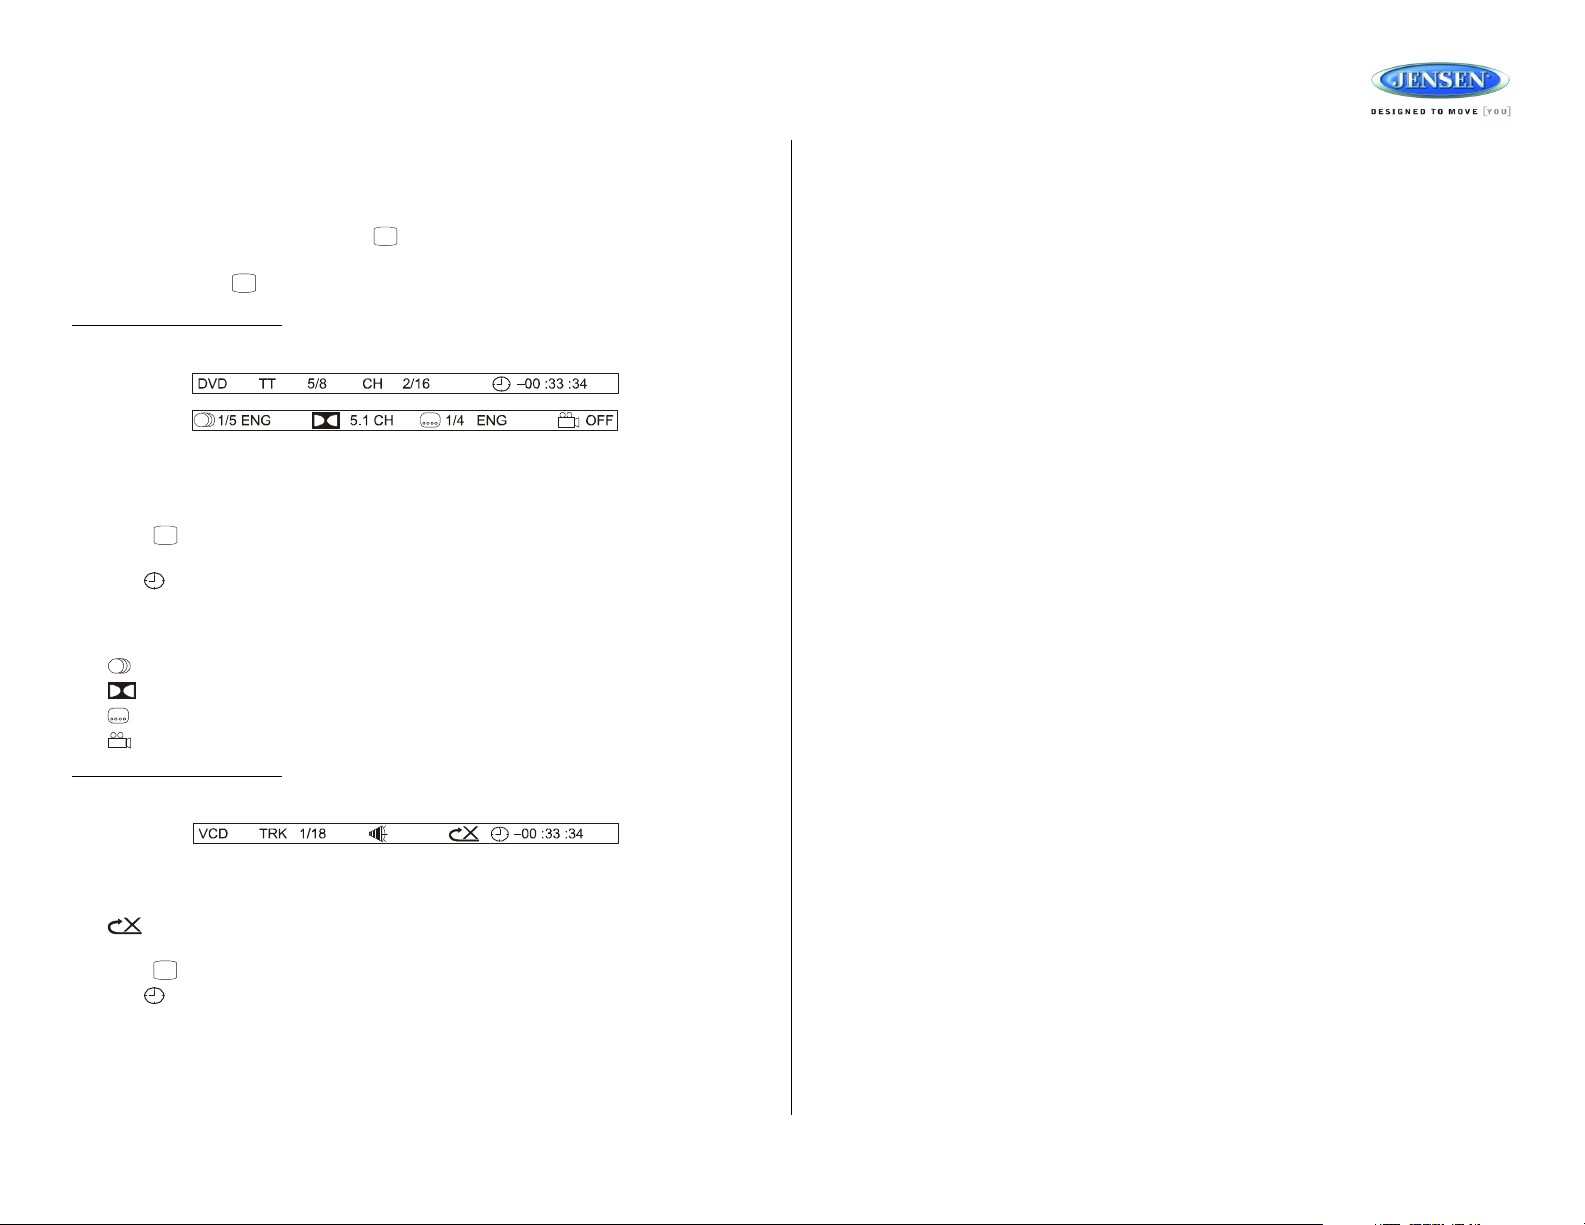
The following information is displayed at the top of the screen during DVD playback:
• TT 5/8 – “5 / 8" indicates the fifth of 8 titles on the DVD is currently playing.
• CH 2/16 – “2 / 16" indicates that the second of 16 chapters on the DVD is currently playing.
• Press repeatedly to view the following information: for elapsed/remaining playing
time:
• 00:02:18 – total elapsed playing time for disc
• C –00 :34 :37 – remaining playing time
• T 00:02:18 – total elapsed playing time for current track
• C –00 :34 :37 – remaining playing time for current track
• 1/5 ENG – English is the selected audio language out of 5 possible choices
• 5.1 CH – The current language is recorded in 5.1 surround sound
• 1/4 ENG – English is the selected subtitle language out of 4 possible choices
• OFF – There are no alternate angles recorded for this scene
VCD Playback Information
The following information is displayed at the top of the screen during VCD playback:
Remote Control Direct Track Entry
To select a track directly, use the number pad on the remote control (10). For single digit
entries, press the corresponding number. For two digit entries, press the 10+ button followed
by the last digit (i.e., for track 16, press 10+ and then 6).
GOTO Direct Track/Chapter Access
Use the GOTO function to access a track (chapter) directly.
1. Press the GOTO button (26) on the remote control. The On Screen Display information
will appear with the track number highlighted.
2. Use the number keys on the remote control to enter the 3-digit track number directly (i.e.
for track 10, enter “010”.
3. Press the ENTER button to confirm and begin playback.
• TRK ##/## – “1/18” indicates the first of 18 tracks on the VCD is currently playing.
• PBC: Indicates when PBC (Playback Control) is turned on.
• – “X” indicates repeat play is OFF, “1” indicates repeat track, “D” indicates repeat
directory, and “A” indicates repeat disc.
• Press repeatedly to view the following information for elapsed/remaining playing time:
• 00:02:18 – total elapsed playing time for disc
• C –00 :34 :37 – remaining playing time
• T 00:02:18 – total elapsed playing time for current track
• C –00 :34 :37 – remaining playing time for current track
11
Page 12

AWM965
1
3
11
17
5
13
2
10
22
12
18
19
9
23
20
15
7
6
16
21
24
14
48
01. CHERRY POP
02. CHRIS ISSA
03. CRAZY TOWN
04. PHISH BI
05. PHISH BO
06. PHISH FR
07. PHISH GI
08. PHISH... GU
09. PHISH CH
—
—
—
—
—
—
01. -
02. 80'S
03. ALLMAN BRO
04. DISCO-FUNK
05. OLDIES
[ - ]PHISH GUMBO.MP3—
MP3/USB Operation
Insert/Eject Disc
Insert a disc label-side up into the disc slot (14), and the disc will begin to play. Press the eject button
(15) to stop playback and eject the disc.
Insert/Remove USB Device
To connect a USB device, locate the USB interface connector (7) located near the bottom right
corner on the front of the radio. Insert the USB device into the USB jack and the unit will read
the files on the USB device automatically. To remove the USB device, press the AM/FM button
(11), DVD/USB button (24) or AUX button (5) to change to another mode and then remove the
USB device from the USB connector.
Press the DVD/USB button (24) to access USB mode from any other mode.
NOTE: MP4 streaming video format is not supported.
MP3 Monitor Display
After loading an MP3 disc or USB device, the following screen will appear on your output
monitor.
Track Select
When playback is stopped, rotate the TUN/TRK control (12) to search in current folder. During
playback,
rotate the TUN/TRK control to access the previous/next file. The selected file number
will appear on the display.
Folder Up/Down
Press the 6/LANG button (23) to access a higher folder level (FOLDER UP).
Press the 5/STOP button (20) to access a lower folder level (FOLDER DN).
Intro Scan (INT)
Press the 2/INT button (17) during playback to play the first 10 seconds of each file in the
current folder. Press 2/INT again to end the scan and play the selected file.
Repeat (RPT)
Press the 3/RPT button (18) on the control panel or the RPT button (21) on the remote control
multiple times during playback to select from the following repeat play options: REP 1 (track),
REP DIR (folder), REP ALL (disc), OFF.
Random Shuffle (RDM)
Press 4/RDM (19) during disc play to play all files in random, shuffled order. Press 4/RDM
again to stop random play.
Select one of these icons to access the corresponding media on your disc or USB device. If the
media type is not present, the icon will not be selectable.
• : Audio
• : Photos
• : Video
Play/Pause
Press the 1/ button (16) to suspend or resume playback.
12
Page 13

AWM965
MP3/USB Operation (continued)
Fast Forward/Reverse
Rotate the TUN/TRK control for more than three seconds or press the >> or << buttons on the
remote control (17) to fast forward or fast reverse. Press and hold once for FORWARD X 2.
Press and hold additional times for FORWARD X 4, X 8, X 20 or PLAY. Press the play/pause /
|| button on the control panel (16) or remote control (18) to end fast forward or reverse and
resume normal playback.
Programmed Playback
1. Press the PROG button (8) on the remote control to access the programmed playback
screen:
2. Use the , , or cursor buttons (16) on the remote control to access the fields on
the “PROG” screen.
3. Use the number buttons on the remote control to enter a track number in each field.
4. Press the >/|| button (19) on the remote control or highlight “PLAY” on screen and then
press the ENTER button (5) to begin playback in the numbered order indicated.
To delete the list, highlight “CLEAR” and then press ENTER. Press PROG to exit the
programmed playback screen.
MP3 Playback Information
The following information is displayed at the top of the screen during CD playback:
• TRK ##/## – “9/150” indicates the ninth of 150 tracks on the disc is currently playing.
• – “X” indicates repeat play is OFF, “1” indicates repeat song, and “D” indicates
repeat directory (folder).
• Press repeatedly to view the following information for elapsed/remaining playing time:
• 00:02:18 – total elapsed playing time for disc
• C –00 :34 :37 – remaining playing time for disc
Remote Control Direct Track Entry
To select a file directly, use the number pad on the remote control (10). For single digit entries,
press the corresponding number. For two digit entries, press the 10+ button followed by the
last digit (i.e., for file 16, press 10+ and then 6).
GOTO Direct Track/Chapter Access
Use the GOTO function to access a track (chapter) directly.
1. Press the GOTO button (26) on the remote control. The On Screen Display information
will appear with the file number highlighted.
2. Use the number keys on the remote control to enter the 3-digit file number directly (i.e. for
file 10, enter “010”.
3. Press the ENTER button to confirm and begin playback.
13
Page 14

AWM965
1
23
4
56
7
89
+10
10/0
MENU
TUNE+
TUNE-
ENTER
VOL
VOL
T/F
PROG
LANG RPT TITLE
SOURCE
ZOOM
ANGLE
GOTO
AUD
....
14
15
16
17
18
19
20
22
21
23
24
25
26
27
1
3
5
7
8
9
10
11
12
13
6
4
2
LOUD
Remote Control Operation
REF DESCRIPTION TUNER CD/MP3/USB DVD
1 Power Turn radio on/standy mode. Turn radio on/standby mode. Turn radio on/standby mode.
2 VOL +/- Adjust volume up/down.
3 TUNE + Search higher station. Stopping State: UP - Search in current folder.
4 TUNE - Search lower station. Stopping State: DN - Search in current folder.
5ENTER Confirm menu selection.
6MENU Access main DVD menu.
7 T/F Press to toggle clock time/playing time. Press
8 PROG Display Setup Program. Display Setup Program.
9 LANG Display MONO/L, MONO/R, or STEREO. Select alternate audio language, if available.
10 Numeric Keypad Use 1-6 to access preset stations. Enter track number to access track directly. For
11 Setup View SETUP menu. View SETUP menu.
12 Subtitle Choose subtitle language, if available.
13 Mute/LOUD Silence Audio output. Press and hold to turn
14 Eject Eject Disc. Eject Disc. Eject Disc.
15 Previous/Next Select next/previous track. Select next/previous chapter.
16 Directional
Buttons
17 Fast Reverse/
18 Play/Pause Pause/resume playback. Pause/resume playback.
19 Stop Stop playback. Stop playback.
20 TITLE Press to view title menu, then use directional
21 RPT Repeat track. Repeat chapter.
22 SOURCE Select source for playback. Select source for playback. Select source for playback.
23 ZOOM Zoom picture or press repeatedly to change
24 ANGLE Select alternate viewing angle, if available.
25 AUD Access Audio Menu options.
26 GOTO Select exact time, track or chapter for playback. Select exact time, track or chapter for playback.
27 Display Display current playback information on the
Forward
Press for Audio Control Setup menu.
and hold to set clock.
LOUDNESS feature on/off.
Adjust volume up/down.
Press for Audio Control Setup menu.
Playing State: UP - Next Track.
Playing State: DN - Prev Track.
Press to toggle clock time/playing time. Press
and hold to set clock.
track number > 10, use 10+ followed by second
digit.
Silence Audio output. Press and hold to turn
LOUDNESS feature on/off.
Move to desired menu item and then press
ENTER to confirm.
Fast Forward 2X, 4X, 8X, 20X.
Fast Reverse 2X, 4X, 8X, 20X.
screen.
Adjust volume up/down.
Press for Audio Control Setup menu.
Stopping State: UP: Next Item.
Playing State: UP: Next Track.
Stopping State: DN: Previous Item.
Playing State: DN: Previous Track.
Press to toggle clock time/playing time. Press
and hold to set clock.
Enter track number to access track directly. For
track number > 10, use 10+ followed by second
digit.
Silence Audio output. Press and hold to turn
LOUDNESS feature on/off.
Use with DVD menu to move to desired menu
item and then press ENTER to confirm.
Fast Forward 2X, 4X, 8X, 20X.
Fast Reverse 2X, 4X, 8X, 20X.
arrows and play button play selected title. May
not be supported by all discs.
magnification level.
Display current playback information on the
screen.
14
Page 15

AWM965
SYSTEM SETUP
TV SYSTEM
SCREEN SAVER
TV TYPE
PASSWORD
RATING
DEFAULT
AUTO
NTSC
PAL
LANGUAGE SETUP
OSD LANGUAGE
AUDIO LANG
SUBTITLE LANG
MENU LANG
ENGLISH
GERMAN
SPANISH
FRENCH
AUDIO SETUP
AUDIO OUT
KEY
SPDIF/OFF
SPDIF/RAW
SPDIF/PCM
Setup Menu
Press the (setup) button (11) on the remote control to access the SETUP menu and adjust
system settings for the following categories:
• System Setup
• Language Setup
• Audio Setup
• Video Setup
• Digital Setup
While in the setup menus, use your directional arrows to select and change settings. The “up”
and “down” arrows highlight the options, and the “right” and “left” arrows will change the setting
for the highlighted option.
System Setup
The System Setup menu controls the
following features:
TV SYSTEM
of the following options: AUTO, NTSC or PAL.
SCREEN SAVER
TV TYPE
selection, and 16:9 is wide screen.
PASSWORD
purposes.
RATING
make changes to this feature.
DEFAULT
: This item is used to select a TV signal system to match your TV set. Select one
: Turn Screen Saver feature On/Off.
: Select one of the following picture formats: 4:3PS, 4:3 LB or 16:9. 4:3 is a letterbox
: This item allows the selection of a new four-digit code to use for security
: Select the parental control level for all DVD play. The security password is required to
: Use this item to restore default settings at any time.
15
Language Setup
On-Screen Display (OSD) Language
Chinese, German, Spanish, French, or Russian.
Audio Language
French, Spanish, Russian, Latin or German.
Subtitle Language
French, Spanish, Russian, German or OFF.
Menu Language
French, Spanish, Russian, German or Latin.
: Set the audio language to one of the following: Chinese, English, Japan,
: Set the subtitle language to one of the following: Chinese, English, Japan,
: Set the menu language to one of the following: Chinese, English, Japan,
: Set the OSD language to one of the following: English,
Audio Setup
Audio Out
Key: This item changes the audio output key.
: This item defines the digital output format.
The Language Setup menu controls the
following features:
The Audio Setup menu controls the
following features:
Page 16

AWM965
VIDEO SETUP
BRIGHTNESS
CONTRAST
HUE
SATURATION
SHARPNESS
12
10
8
6
4
2
0
DIGITAL SETUP
OP MODE
DYNAMIC RANGE
DUAL MONO
LINE OUT
RF REMOD
Setup Menu (continued)
Video Setup
The Video Setup menu controls the
following features:
Brightness
Contrast
Hue
Saturation: Adjust the saturation of the screen from the following levels: 12, 10, 8, 6, 4, 2 or 0.
Sharpness
: Adjust the brightness of the screen from the following levels: 12, 10, 8, 6, 4, 2 or 0.
: Adjust the contrast of the screen from the following levels: 12, 10, 8, 6, 4, 2 or 0.
: Adjust the hue of the screen from the following levels: +6, +4, +2, 0, -2,- 4 or - 6.
: Adjust the sharpness of the screen from the following levels: 8, 6, 4, 2 or 0.
Digital Setup
The Digital Setup menu controls the
following features:
OP Mode
Dynamic Range
Dual Mono: Select STEREO, MONO/L, MONO/R or MIX MONO.
: Select LINE OUT or RF REMOD.
: Select FULL, 6/8, 4/8, 2/8 or OFF.
16
Page 17

AWM965
Specifications
General
Power Supply Requirements. . . . . . . . . . . . . . . . . . . . . . . . . . DC 12 Volts, Negative Ground
Operating Voltage . . . . . . . . . . . . . . . . . . . . . . . . . . . . . . . . . . . . . . . . . . . . . . . . . .10-16VDC
Overall Dimensions . . . . . . . . . . . . . . . . . . . . . . . . . . . . . 265mm(W)x178mm(H)x159mm(D)
Mounting Dimensions . . . . . . . . . . . . . . . . . . . . . . . . . . . 235mm(W)x154mm(H)x133mm(D)
Weight . . . . . . . . . . . . . . . . . . . . . . . . . . . . . . . . . . . . . . . . . . . . . . . . . . . . . . . . . . . . . 5.5 lbs.
FM Tuner
Tuning range . . . . . . . . . . . . . . . . . . . . . . . . . . . . . . . . . . . . . . . . . . . . . . . . . . . 87.5-107.9FM
Sensitivity . . . . . . . . . . . . . . . . . . . . . . . . . . . . . . . . . . . . . . . . . . . . . . . . . . . . . . . . . . . . <4uV
Stereo separation @ 1 kHz . . . . . . . . . . . . . . . . . . . . . . . . . . . . . . . . . . . . . . . . . . . . . . >25dB
AM Tuner
Tuning range . . . . . . . . . . . . . . . . . . . . . . . . . . . . . . . . . . . . . . . . . . . . . . . . . . . . . . 530-1710
Sensitivity . . . . . . . . . . . . . . . . . . . . . . . . . . . . . . . . . . . . . . . . . . . . . . . . . . . . . . . . . . . <63uV
Amplifier
Output Power . . . . . . . . . . . . . . . . . . . . . . . . . . . . . . . . 48 Watts Total (6 Watts, 8 Channel)
Output Impedance. . . . . . . . . . . Compatible with 4-8 Ohm Speakers, 4 Ohm Load Minimum
DVD
Frequency Response . . . . . . . . . . . . . . . . . . . . . . . . . . . . . . . . . . . . . . . . . . . . 20-20,000 Hz
Channel Separation . . . . . . . . . . . . . . . . . . . . . . . . . . . . . . . . . . . . . . . . . . . . . . . . . . . . 50dB
S/N Ratio. . . . . . . . . . . . . . . . . . . . . . . . . . . . . . . . . . . . . . . . . . . . . . . . . . . . . . . . . . . . . 70dB
Distortion . . . . . . . . . . . . . . . . . . . . . . . . . . . . . . . . . . . . . . . . . . . . . . . . . . . . . . . . . . . . . 0.2%
Specifications subject to change without notice.
This device complies with Part 15 of the FCC Rules. Operation is subject to the following two
conditions:
(1) This device may not cause harmful interference, and
(2) This device must accept any interference received, including interference that may cause
undesired operation.
NOTE: The manufacturer is not responsible for any radio or TV interference caused by
unauthorized modifications to this equipment. Such modifications could void the
User’s authority to operate the equipment.”
17
Page 18

AWM965
18
Page 19

AWM965
Merci!
Merci d'avoir acheté un produit Jensen. Nous espérrons que vous trouverez les instructions
dans ce guide du propriétaire facile à suivre. Prenez quelques minutes pour le lire et vous
apprendrez comment utiliser toutes les fonctions de votre récepteur Jensen nouveau pour une
satisfaction d'écoute maximal.
Fonctions
Les fonctions du système audio portatif de Jensen AWM965 comprennent :
• Tuner Digital AM/FM
• Mecanisme du disque anti-saut
• Compatible DVD/CD-R/RW et MP3
• L'heure/l'horloger
• Contrôle rétroéclairage
• Entrée audio/video auxiliaire
• Entrée USB
• Sortie 3 Zone / 8 haut parleur
• Télécommande sans fil fournie
Précautions
• Utilisez la bonne alimentation
Ce produit est conçu pour opérer avec un système de pile terre negative à 12 volt DC (le
système standardize dans un véhicule nord Americain).
• Protéger le mécanisme du disque
Evitez d'insérer un objet étranger dans la fente de la platine. Sinon, il peut y avoir du mauvais fonctionnement dû au mécanis,e précis de cet appareil.
• Utilisez des centres de service autorisés
Ne tentez pas de démonter ni d'ajuster ce produit de precision; prenez contact avec un
professional pour aide.
• Evitez l'humidité
Pour réduire le risqué d'une incendie ou d'un choc électrique, n'exposez pas cet équipement à la pluie ou à l'humidité.
• Evitez des produits de nettoyage
Le devant de cet appareil doit être nettoyé avec un tissue légèrement moite. N'utilisez pas
de nettoyants.
• Utilisez des accessories recommandés
POUR REDUIRE LE RISQUE D'INCENDIE OU DE CHOC ELECTRIQUE ET DES
INTERFERENCES EMBETANT, N'UTILISEZ QUE DES ACCESSOIRES RECOMMANDES.
CAUTION : Cette platine DVD est un produit laser Classe 1 qui se sert d'un rayon laser
visible/invisible qui peut causer une exposition hasardeuse à la radiation s'il est
incorrectement dirigé. Assurez-vous que la platine DVD portative comme indiqué dans
ce guide d'instructions L'utilisation des contrôles ou des ajustements ou de la
performance des procédures autres que celles spécifiées dans ce guide peut résulter
en une exposition hasardeuse à la radiation. N'ouvrez pas les couvercles et n'essayez
pas de dépanner l'appareil vous-même. Référez l'entretien à du personnel qualifié.
Outils et fournitures
Vous aurez besoin des outils et des fournitures suivants pour installer votre AWM965 :
• Tournevis Philips
• Coupes-fil et outils à dénuder
• Des outils pour enlever la radio existante (tournevis, clé à douille ou d'autres outils)
• Ruban isolant
• Outil de sertissage
• Voltmètre/lumière d'essai
• Connexions à sertissage
• Fils de calibre 16 pour les branchements d'alimentation
• Fils de haut parleurs de calibre 16 - 18
Débrancher la pile
Pour éviter un court-circuit soyez sûr de mettre l'allumage en arrêt et d'enlever le câble
negative de la pile avant l'installation.
A NOTER : Si le AWM965 est à installer dans un véhicule équipé d'un lecteur sur bord
ou un ordinateur de navigation, ne débranchez pas le câble pile. Si le câble pile est
débranché, la mémoire de l'ordinateur peut être perdue. Dans ces conditions, soyez
prudent lors de l'installation pour éviter un court-circuit.
19
Page 20

AWM965
AWM965
TÉLÉCOMMANDE
AVEC PILE
20-PIN CONNECTEUR A-B DE CÂBLAGE
HAUT PARLEUR ET PUISSANCE
CÂBLE AUXILIAIRE
AUDIO/VIDEO
Bordereau d'expédition
Installation
C'est une bonne idée de lire toutes les instructions avant de commencer l'installation. Nous
recommandons que vous installiez votre JENSEN AWM965 par une boutique d'installation de
bonne réputation.
Selectionner l'emplacement de montage
Sélectionnez un emplacement de montage en prenant soin d'éviter le suivant :
• Des emplacements exposés aux appareils ménagers qui irradie la chaleur tels que des
chauffeurs électriques.
• Adjacent à d'autres équipemetns qui irradie la chaleur.
• Des endroits malventilés ou poussiéreux.
• Des emplacements humides.
Préparation de l'ouverture
Utilisez le trous de montage dans le diagramme (ci-dessous) pour mesurer et couper un trou
de montage et puis montez l'appareil en utilisant de écrous M3x20mm.
A NOTER : Avant de couper le trous de montage, assurez-vous que la zone derrière
l'emplacement de montage n'a pas de fils, carburants ou des circuits de vide ou des
conduites de frein.
Monter la radio
Faites traverser les cables de puissance; de haut parleur et d'antenne par le trou et les
brancher à l'appareil tel que montré dans le diagramme de câblage. Après avoir assurez la
bonne connexions, essayez pour l'opération.
20
Page 21

AWM965
ANTENNE MOTOROLA AM/FM
ENTREE AUXILIAIRE (DROITE, À GAUCHE, VIDEO)ENTREE AUXILIAIRE (DROITE, À GAUCHE, VIDEO)
CONNECTEUR POUR
HARNAIS DE
CÂBLAGE
(VOIR DÉTAILA)
DÉTAILA
VUE D'PIN
FUSIBLE 10 AMP
Câblage
Le diagramme de câblage dépeint toutes les connexions de câblage exigées pour une bonne operation de l'appareil.
21
Page 22

AWM965
1
3
11
17
5
13
2
10
22
12
18
19
9
23
20
15
7
6
16
21
24
14
48
Câble 3.5mm A/V
Audio Gauche
Audio Droite
Terre
Vidéo
Opération de base
Puissance
Appuyez sur le bouton POWER (1) pour mettre l'appareil en marche ou pour entrer dans la
mode attente.
Contrôle du volume/ajustement audio/menu
• Faites tourner le contrôle VOL (2) dans le sens des aiguilles d'une montre pour augmenter ou contre le sens des aiguilles d'une montrer pour diminuer la sorte volume
• Appuyez sur le contrôle VOL pour passer à travers les options d'ajustements audio suivants. Fiates tourner le contrôle VOL pour ajuster la function audio sélectionnée.
• BAS : Ajuster le niveau de basse de « -7 » à « +7 ».
• TRE : Ajuster l'aigu de « -7 » à « +7 ».
• BAL : Ajuster la balance de sortie haut parleur entree « L7 » (gauche) et « R7 »
(droite). « BAL 0 » indique une balance parfaite entre les hauts parleurs de droite et
de gauche.
• FAD : Ajuster l'équilibre des hauts parleurs entre « R7 » (arrière) and « F7 » (avant).
« FAD 0 » inidque un équilibre parfait entre les haut parleurs d'arrière et d'avant.
Cette function va temporizer après trois secondes d'inaction et l'appareil va reprendre
l'opération normale.
• Appuyez et maintenez l'appui sur le conttrôle VOL pour accéder au menu de l'utilsiateur.
Appuyez sur le contrôle VOL pour passer à travers les options menu. Faites tourner le
contrôle VOL pour ajuster la function menu sélectionnée.
• LIGHT : Ajustez la luminosité d'affichage aux cristaux liquides en mode d'attente de
« LIGHT 1 » (le moins lumineux) à « LIGHT 3 » (le plus lumineux).
• BEEP : Mettez le bip sonore en marche ou en arrêt.
Cette function va temporizer au bout de trois secondes d'inaction et l'appareil va reprendere l'opération normale.
Muet / Intensité
Appuyez sur le bouton MUTE button (3) pour assourdir la sortie audio du Tuner; CD, DVD,
USB ou la mode d'entrée auxiliaire. Appuyez de nouveau pour rétablir le niveau de volume
précédent. Appuyez et maintenez l'appui sur le bouton MUTE (LOUD) pour basculer la
function Intensité en marche/en arrêt.
Affichage aux cristaux liquides (LCD)
Le panneau d'affichage aux cristaux liquides
activiées. Pour ajuster la luminosité de l'affichage aux cristaux liquides, appuyez et maintenez l'appui sur
le conttrôle
VOL
pour accéder au menu de l'utilsiateur. Appuyez sur le contrôle
travers les options menu. Faites tourner le contrôle
cristaux liquides de « LIGHT 1 » (le plus lumineux à « LIGHT 3 » (le moins lumineux).
A NOTER : Les panneaux d'affichage aux cristaux liquides peuvenet mettre du temps
pour s'illuminer et la visibilité d'affichagfe peut diminuer légèrement lorsque l'affichage
aux cristaux liquides est soumis à des temperatures trop basses pendant des périodes
longues. L'opération de l'affichage aux cristaux liquides optimal va revenir à normal
lorsque la température augmente pour atteindre des niveaux normaux.
LCD
(4) affiche la fréquence; l'heure et les fonctions
VOL
pour passer à
VOL
pour ajuster la luminosité de l'affichage aux
Fonction d'entrée auxiliaire
Appuyez sur le bouton AUX (5) pour accéder directement les modes d'entrée auxiliaries (AUX
1 IN et AUX 2 IN) depuis n'importe quelle autre mode lorsqu'uin engin audio portatif est
branché à l'appareil. Pour brancher un engin audio portatif, insérez (un fil de sorite ou de cqse
depuis votre CD/MP3/iPod ou d'autres platines média) de 3.5 mm dans le connecteur AUX A/
V IN (AUX 2 IN) (6) sur le devant de l'appareil ou des entrée Audio/Vidéo (AUX 1 IN) sur le dos
de l'appareil (voir “Câblage” à la page 21).
Connecteur entrée auxiliaire
Pour l'entrée A/V sur le panneau d'avant, une
source Audio/Video externe telle qu'une
platine de jeu video, une camera, etc,
peuvent être branches à l'entrée A/V sur le
panneau d'avant avec le câble adaptateur A/
V 3.5mm fourni. Brachez l'engin au
connecteur AUX A/V IN (6) sur le panneau
d'avant et puis appuyez sur AUX pour
engager le circuit d'entrée à « AUX 2 IN ».
Veuillez noter qu'il y a des cables
standardizes A/V differents. Le AWM965 est conçu pour soutenir des cables de type Apple
Vidéo iPod comme montré dans le dessin que voici.
22
Connecteur interface USB
Vous pouvez b rancher un engine USB directement à l'interface USB (7) sur le devant du
AWM965 pour la reproduction des fichiers compatibles. La reproduction commence
automatiquement. Appuyez le bouton DVD/USB (24) pour basculer vers la mode USB depuis
une autre source. Référez-vous “Opération MP3/USB” à la page 29 pour des instruction
d'opérations supplémentaires.
Page 23

AWM965
Opération de base (continué)
Affichage de l'horloge
Appuyez sur le bouton T/F (8) pour alterner entre le temps de reproduction et l'heure de
l'horloge lorsque vous êtes en mode Tuner ; CD, DVD, USB, ou entrée auxiliaire.
Réglage de l'horloge
Appuyez et maintenez l'appui sur le bouton T/F (8) pour accéder à la mode Réglage Horlogue.
Le numéro représentant les heures va clignoter. Faites tourner le contrôle TUN/TRK (12) pour
ajuster l'heure. Appuyez brièvement de nouveau sur le bouton T/F et le numéro représentant
les minutes va clignoter. Faites tourner le contrôle TUN/TRK pour ajuster les minutes. La
nouvelle heure sera sauvée cinq secondes après le dernier ajustement.
Régler l'heure de sommeil
La minuterie sommeil va arrêter le AWM965 automatiquement dans le nombre de minutes
désigné. Pour régler la minuteirie de sommeil, appuyez sur le bouton ALARM SET (9a) et
ll'heure de sommeil va apparaître dans l'affichage avec le numéro représentant les minutes
(SLEEP 0). Appuyez sur le bouton ALARM SET de manière répétée pour changer l'heure de
sommeil de 15 à 30, 45, 60 minutes.
Régler l'alarme
Pour régler l'alarme, appuyez et maintenez l'appui sur le bouton ALARM SET (9a). Le numéro
representant les heures va clignoter. Fiates tourner le contrôle TUN/TRK (12) pour ajuster
l'heure. Appuyez de nouveau sur le bouton ALARM SET et le numéro représentant les
minutes va clignoter. Faites tourner le contrôle TUN/TRK pour ajuster les minutes. Appuyez et
maintenez l'appui sur le bouton ALARM SET de nouveau pour mettre l'heure de l'alarme en
mémoire.
Lorsque l'heure est réglée, appuyez sur ALARM ON/OFF (9b) pour mettre la function alarme
en marche/ en arrêt.
Sortie haut parleur
Les trois boutons de sortie haut parleur (10) (SPEAKER A, SPEAKER B et SPEAKER C)
contrôle la sortie haut parleur depuis la radio. Appuyez sur n'importe laquelle des trois boutons
pour mettre les ensembles de haut parleurs correspondants en marche ou en arrêt. A, B ou C
apparaîtra à l'écran.
23
Page 24

AWM965
1
3
11
17
5
13
2
10
22
12
18
19
9
23
20
15
7
6
16
21
24
14
48
Opération tuner AM/FM
Sélection d'une bande
Appuyez sur le bouton AM/FM (11) pour accéder directement à la mode tuner depuis n'importe
quelle autre mode de fonction ou pour changer entre deux bandes AM (AM1 and AM2) et trois
bandes FM (FM1, FM2 and FM3).
Syntonisation/stations pré-réglées
Syntonisation à la main
Faites tourner le contrôle TUN/TRK (12) dans le sens des aiguilles d'une montrer ou UP pour
syntoniser la fréquence une étape en-dessus à la fois. Faites tourner le contrôle TUN/TRK
contre le sens des aiguilles d'une montre ou DN pour syntoniser la fréquence une étape
endessous à la fois.
Recherche syntonisation
Faites tourner et puis retenez le niveau sur le contrôle TUN/TRK pour syntoniser
automatiquement à la prochaine station forte.
Station pré-réglées
Six boutons numerates pré-réglés mettent en mémoire et rappellent des stations pour chaque
bande AM et FM.
Pour mettre une stations en mémoire; sélectionnez une bande (si necessaire) et puis
sélectionnez une station. Appuyez et maintenez l'appui sur un bouton pré-réglé pendant trois
secondes pour mettre en mémoire la station courante. Le numéro pré-réglé correspondant va
apparaître à droite de l'affichage aux cristaux liquides sous les letters « CH ».
Pour rappeler une station; sélectionnez la bande préférée et puis appuyez sur le bouton préréglé. L'appareil va automatiquement syntoniser à la station correspondante mise en mémoire.
Mise en mémoire automatique/balayage pré-réglé (AS/PS)
Mise en méoire automatique
Appuyez sur AS/PS (13) pendaqnt plus de trois secondes et l'appareil va automatiquement
balayer et mettre en mémoire les six stations les plus fortes pour toutes les bandes. Pour
arrêter cette fonction avant que la mise en mémoire en soit terminée, appuyez briègement de
nouveau le bouton AS/PS.
Balayage pré-réglé
Appuyez brièvement sur AS/PS pour balayer toutes les stations pré-réglées dans la bande
courante. Pour arrêter cette fonction et jouer la station actuelle, appuyez de nouveau sur le
bouton AS/PS.
24
Page 25

AWM965
1
3
11
17
5
13
2
10
22
12
18
19
9
23
20
15
7
6
16
21
24
14
48
Opération CD
Insérer un CD
Insérez un CD avec l'étiquette en haut dans la fente du disque (14) et le disque se mettra à jouer.
Ejecter un CD
Appuyez sur le bouton ejection (15) pour arrêter la reproduction CD et éjecter le CD.
Faite pause pendant la reproduction
Appuyez sur le bouotn 1/ (16) pour suspendre ou reprendre la reproduction du disque.
Arrêter la reproduction
Appuyez sur le bouton
sur l'affichage. Appuyez se nouveau sur le bouton 1/ (16) pour reprendre la reproduction du disque depuis la
dernière position. Apppuyez deux fois sur
Sélection de piste
Faites tourner le contrôle TUN/TRK (12) pour avancer jusqu'à la piste prochaine ou précédente sur le
CD. Le numéro de la piste sélectionnée apparaîtra dans l'affichage. Faites tourner le contrôle TUN/
TRK pendant plus de trois secondes pour avancer ou reculer rapidement à travers le disque. La
reproduction du CD reprend lorsque le bouton play/pause est appuyé.
Avance et recul rapide
Faites tourner le contrôle TUN/TRK pendant plus de trois secondes ou appuyez sur les
boutons >> ou << buttons sur la télécommande (17) pour avancer ou reculer rapidement.
Appuyez et maintenez l'appui une fois pour AVANCE x 2. Appuyez et maintenez l'appui de
nouveau en nouveau pour AVANCE x 4, X 8, X20 ou PLAY. Appuyez sur le bouton
reproduction/pause /|| sur le panneau de controle (16) ou sur la télécommande (18) pour
terminer l'avance ou recul rapide et pour reprendre la reproduction normale.
5/STOP
(20) pour suspendre la reproduction du disque et « PRE STOP » va apparaître
5/STOP
et « STOP » apparaît.
Balayage (INT)
Appuyez sur le bouton 2/INT (17) pendant la reproduction du disque pour jouer les 10
premières secondes de chaque piste sur le disque courant. Appuyez de nouveau sur 2/INT
pour terminer le balayage et reproduire la piste sélectionnée.
Répéter (RPT)
Appuyez sur le bouton 3/RPT (18) pendant la reproduction du disque pour repeater de manière
continue la piste sélectionnée (REP 1). Appuyez de nouveau pou répéter toutes les pistes
(REP ALL). Appuyez une troisième fois pour arrêter la répétition.
Ordre mélangé (RDM)
Appuyez sur 4/RDM (19) pendant la reproduction du disque pour jouer toutes les pistes sur un
CD dans un ordre mélange au hasard. Appuyez de nouveau sur 4/RDM pour arrêter la
reproduction au hasard.
Reproduction programmée
1. Appuyez sur le bouton PROG (8) sur la télé-
commande pour accéder à l'écran de reproduction programmée.
2. Utilisez les boutons curseurs , , ou
(16) sur la télécommande pour accéder les
champs sur l'écran PROG.
3. Utilisez le pave numérique sur la
télécommande pour entrer un numéro de piste
dans chaque champs.
4. Appuyez sur le bouton >/|| (19) sur la télécommande ou surlignez « PLAY» sur l'écran et
puis appuyez sur le bouton ENTER (5) pour commencer la reproduction dans l'ordre
numéroté indiqué.
Pour effacer la liste, surlignez « CLEAR » et puis appuyez sur ENTER. Appuyez sur PROG
pour sortir de la reproduction programmée.
Entrée de piste directe par télécommande
Pour sélectionnez une piste directement, utilisez le pave numérique sur la télécommande (10).
Pour des entrées à un chiffre appuyez le numéro correspondant. Pour des entrées à deux
chiffres, appuyez sur le bouton 10+ suivi par le dernier chiffre (c'est à dire pour la piste 16
appuyez 10+ et puis sur 6).
Accès piste directe GOTO/Chapitre
25
Utilisez la fonction GOTO pour accéder directement à une piste (chapitre).
1. Appuyez sur le bouton GOTO (26) sur la télécommande. L'information concernant
l'affichage sur l'écran va apparaître avec le numéro de piste surligné.
2. Utilisez le pavé numérique sur la télécommande pour entrer le numéro de piste à trois
chiffres directement (c'est-à-dire pour la piste 10 entrez « 010 ».
3. Appuyez sur le bouton ENTER (5) pour confirmer et commencer la reproduction.
Page 26

Opération CD (continué)
1
3
11
17
5
13
2
10
22
12
18
19
9
23
20
15
7
6
16
21
24
14
48
Information sur la reproduction du CD
L'information suivante est affichée en haut de l'écran pendant la reproduction du CD :
• TRK ##/## – « 1/18 » indique que la première des 18 pistes sur le CD est en train de
jouer.
• – « X » indique qua la reproduction répétée est en arrêt OFF, « 1 » indique la répétition de piste et « A » indique la répétition du disque.
• Appuyez sur le bouton sur la télécommande (27) de manière répétée pour voir l'information suivante pour le temps de reproduction écoulé/restant :
• 00:02:18 – le temps total de reproduction écoulé pour le disque
• C –00 :34 :37 – de reproduction total écoulé pour la piste actuelle
• T 00:02:18 – total elapsed playing time for current track
• C –00 :34 :37 – temps de reproduction qui rest pour la piste actuelle
AWM965
26
Page 27

AWM965
Opération DVD/VCD
Insérez un disque
Insérez un disque l'étiquette en haut dans la fente du disque (14) et le disque va commencer à jouer.
A NOTER : Appuyez sur le bouton DVD/USB (24) pour alterner entre la source USB et
DVD.
Ejecter un DVD
Appuyez sur le bouton d'éjection (15) pour arrêter la reproduction du DVD et éjecter le DVD.
Faisant pause pendant la reproduction
Appuyez sur le bouton 1/ (16) pour suspendre ou reprendre la reproduction du disque.
Arrêter la reproduction
Appuyez sur le bouton 5/STOP (20) pour suspendre la reproduction du disque et « PRE STOP »
apparaîtra dans l'affichage. Appuyez sur le bouton 1/ (16) pour reprendre la reproduction du
disque depuis la dernière position. Appuyez deux fois sur le boouton 5/STOP et « STOP » apparaît.
Sélection de piste
Faites tourner le contrôle TUN/TRK (12) pour avance jusqu'à la piste prochaine ou précédente sur le
disque. Le numéro de la piste sélectionnée va apparaître dans l'affichage.
Entrez/sélectionner
Lorsque vous êtes en mode menu, appuyez sur le bouton ENTER (22) pour sélectionner une options
menu.
Sélection de langue
Lorsque vous jouez un DVD; appuyez sur le bouton 6/LANG (23) pour changer la langue audio du
DVD.
Avance et recul rapide
Faites tourner le contrôle TUN/TRK pour plus de trois secondes ou bien appuyez sur les
boutons >> ou << sur la télécommande (17) pour faire avance ou recul rapide. Appuyez et
maintenez l'appui pour AVANCE X 2. Appuyez et maintenez l'appui plusieurs fois pour
AVANCE x 4, X8, X20 ou PLAY. Appuyez sur le bouton reproduction/pause /|| SUR LA
TELECOMMANDE (16) ou sur la télécommande (18) pour terminer l'avance ou recule rapide
et pour reprendre la reproduction normale.
• VCD : REP 1 (track), REP ALL (disc), REP OFF
• DVD : REP Chapter, REP Title, REP All, REP OFF
Contrôle de reproduction (VCD uniquement)
Appuyez sur le bouton MENU (6) sur la télécommande pour mettre le Contrôle de
Reproduction en marche/.en arrêt lorsque cette fonction est disponible sur votre VCD.
Reproduction programmé
1. Appuyez sur le bouton PROG (8) sur la
télécommande pour accéder à l'écran de
reproduction programmée.
2. Utilisez les boutons curseurs , , ou
(16) sur la télécommande pour accéder
les champs sur l'écran PROG.
3. Utilisez le pave numérique sur la
télécommande pour entrer un numéro de
piste dans chaque champs.
4. Appuyez sur le bouton >/|| (19) sur la télécommande ou surlignez « PLAY » sur l'écran et
puis appuyez sur le bouton ENTER (5) pour commencer la reproduction dans l'ordre
numéroté indiqué.
Pour effacer la liste, surlignez « CLEAR » et puis appuyez sur ENTER. Appuyez sur PROG
pour sortir de la reproduction programmée.
Fonctions de reproduction DVD
Les fonctions de télécommande suivantes avec beaucoup d'autres sont disponible pendant la
reproduction du DVD (voir “Opération télécommande” à la page 31 pour une fonctionnalité
complète) :
• LANG : Appuyez pour choisir une audio alternative; si disponible.
• SUBTITLE : Appuyez pour sélectionnez une langue de sous-titrage alternative, si disponible.
• ANGLE : Appuyez pour sélectionner un angle de visionnement alternative, si disponible.
• ZOOM : Appuyez pour faire zoom sur l'image à ZOOM 2, ZOOM 3, ZOOM 4, ZOOM 1/2,
ZOOM 1/3 ou ZOOM 1/4, ou sélectionner OFF pour retourner à la vue normale.
A NOTER : La disponibilité de fonctions depend de l'information enfoncée du DVD.
Répéter chapitre/titre
Appuyez sur le bouton 3/RPT (18) sur le panneau de contrôle ou le bouton RPT (21) sur la
télécommande plusieurs fois pendant la reproduction pour la sélectionner des options de
reproduction suivantes :
27
Page 28

AWM965
Opération DVD/VCD (continué)
Information sur reproduction
Pendant la reproduction DVD et VCD; appuyez sur le bouton (27) sur la télécommande
pour afficher l'information sur la reproduction sur l'écran; y compris le type de media et le temp
de reproduction courant. Coninuer à appuyer sur le bouton pour afficher des informations
supplémentaires comme indiqué ci-dessous :
Information de reproduction DVD
L'information suivante est affichée en haut de l'écran pendant la reproduction du DVD :
• TT 5/8 – « 5 / 8 » indique le cinquième des huit titres actuellement jouant sur le DVD.
• CH 2/16 – « 2 / 16 » indique le deuxième des 16 chapitres actuellement jouant sur le
DVD.
• Appuyez de manière répétée pour voir l'information suivante pour le temps de reproduction écoulé/ qui reste.
• 00:02:18 – temp de reproduction total écoulé pour le disque
• C -00 :34 :37 – temps de reproduction qui reste
• T 00:02:18 – temps de reproduction total écoulé pour la piste courante
• C -00 :34 :37 – temps de reproduction qui reste pour la piste courante
• 1/5 ENG – Anglais est la langue audio sélectionnée sur 5 choix possibles
• 5.1 CH – La langue courante est enregistrée en audio quadriphonique 5.1
• 1/4 ENG – Anglais est la langue de sous-titrage sélectionnée sur 4 choix possibles
• OFF – Il n ' y a pas d'angles alternatifs enregistrés pour cette scène
L'information de reproduction VCD Playback
L'information suivante est affichée en haut de l'écran pendant la reproduction VCD :
Entrée en piste directe télécommande
Pour sélectionner un fichier directement; utilisez le pave numérique sur la télécommande (10).
Pour des entrées à un seul chiffre, appuyez sur le numéro correspondant. Pour des entrées à
deux chiffres, appuyez sur le bouton 10+ suivi par le dernier chiffre (c'est-à-dire, pour le fichier
16, appuyez 10+ et puis 6).
Accès direct à la piste/chapitre GOTO
Utilisez la fonction GOTO pour accéder une piste (un chapitre) directement.
1. Appuyez sur le bouton GOTO (26) sur la télécommande. L'information d'affichage sur
l'écran va apparaître avec le numéro de fichier sur ligné.
2. Utilisez le pave numérique sur la télécommande pour entrer le numéro de fichier à 3
chiffres directement (c'est à dire, pour le fichier 10 entrer « 010 »).
Appuyez sur le bouton ENTER pour confirmer et commencer la reproduction.
• TRK ##/## – « 1/18 » indique la première des 18 pistes sur un VCD qui est actuellement
en train de jouer
• PBC – Indique que le PBC (contrôle de reproduction) est mis en marche
• – « X » indique que la reproduction répétée est OFF, « 1 » indique la piste répétée, «
D » indique le repertoire répétéé, et « A » indique le disque répété
• Appuyez sur de manière répétée pour voir l'information suivante pour le temps de
reproduction écoulé/qui reste :
• 00:02:18 – le temps de reproduction total écoulé pour le disque
• C -00 :34 :37 – temps de reproduction qui reste
• T 00:02:18 – temps de reproduction total écoulé pour la piste actuelle
• C -00 :34 :37 – le temps de reproduction qui reste pour la piste actuelle
28
Page 29

AWM965
1
3
11
17
5
13
2
10
22
12
18
19
9
23
20
15
7
6
16
21
24
14
48
01. CHERRY POP
02. CHRIS ISSA
03. CRAZY TOWN
04. PHISH BI
05. PHISH BO
06. PHISH FR
07. PHISH GI
08. PHISH... GU
09. PHISH CH
—
—
—
—
—
—
01. -
02. 80'S
03. ALLMAN BRO
04. DISCO-FUNK
05. OLDIES
[ - ]PHISH GUMBO.MP3—
Opération MP3/USB
Insérez/ejecter disque
Insérez un disque etiquette en haut dans la fente du disque (14), et le disque se mettra à jouer.
Appuyez le bouton d'éjection (15) pour arrêter la reproduction et éjecter le disque.
Insérez/enlevez engin USB
Pour brancher un engine USB; trouver le connecteur d'interface USB (7) situé près du coin
droite en bas sur le devant de la radio. Insérez l'engin USB dans la prise USB et l'appareil va
lire les fichiers sur l'engin USB automatiquement. Pour enlever l'engin USB appuyez sur le
bouton AM/FM (11), DVD/USB (24) ou AUX (5) pour changer de mode et puis enlever l'engin
USB du connecteur USB.
Appuyez sur le bouton DVD/USB (24) pour accéder à la mode USB depuis n'importe quell
autre mode.
A NOTER : Vidéo en continu MP4 n'est pas soutenu.
Affichage du moniteur MP3
Après avoir chargé un disque MP3 ou un engin USB, l'écran suivant apparaîtra sur votre
moniteur de sortie.
Sélection de piste
Lorsque la reproduction est arrêtée, faites tourner le contrôle TUN/TRK (12) pour chercher
dans le dossier actuel. Pendant la reproduction faites tourner le contrôle TUN/TRK pour
accéder au fichier prochain ou precedent. Le numéro du fichier sélectionné va apparaître sur
l'affichage.
Dossier vers le haut/vers le bas
Appuyez sur le bouton 5/STOP (20) pour accéder à niveau de dossier plus bas (Dossier vers le bas).
Appuyez sur le bouton 6/LANG (23) pour accéder à niveau de dossier plus haut (dossier vers le
haut).
Intro scan (INT)
Appuyez sur le bouton 2/INT (17) pendant la reproduction pour jouer les 10 premières
secondes de chaque fichier dans le dossier actuel. Appuyez de nouveau sur 2/INT pour
terminer le balayage et jouer le fichier sélectionné.
Répéter (RPT)
Appuyez sur le bouton 3/RPT (18) sur le panneau de contrôle ou le bouton RPT (21) sur la
télécommande plusieurs fois pendant la reproduction pour sélectionner les options de
reproduction à repetition suivantes : REP 1 (piste), REP DIR (dossier), REP ALL (disque),
OFF.
Mélange au hasard (RDM)
Appuyez sur 4/RDM (19) pendant la reproduction du disque pour jouer tous les fichiers au
hasard dans un ordre mélange. Appuyez de nouveau sur 4/RDM pour arrêter la reproduction
au hasard.
Sélectionnez une de ces icons pour accéder à la media correspondante sur votre disque ou
engine USB. Si le type de média n'est pas présent l'icône ne peut être sélectionné.
• : Audio
• : Photos
• : Video
Reproduction/Pause
Appuyez sur le bouton 1/ (16) pour suspendre ou reprendre la reproduction.
29
Page 30

AWM965
Opération MP3/USB (continué)
Avance et recul rapide
Faites tourner le contrôle TUN/TRK pendant plus de trois secondes ou bien appuyez sur les
boutons >> ou << sur la télécommande (17) pour faire avance ou recul rapide. Appuyez et
maintenez l'appui une fois pour AVANCE X 2. Appuyez et maintenez l'appui plusieurs fois pour
AVANCE X 4, X8, X 20 ou bien REPRODUCTION. Appuyez sur le bouton reproduction/pause
/|| button sur le panneau de contrôle (16) ou sur la télécommande (18) pour terminer l'avance
ou recul rapide et reprendre la reproduction normale.
Reproduction programmée
1. Appuyez sur le bouton PROG (8) sur la télécommande pour accéder à l'écran de
reproduction programmée :
2. Utilisez les boutons curseurs , , ou (16) sur la télécommande pour accéder
aux champs sur l'écrant PROG.
3. Utilisez les boutons des numéros sur la télécommande pour entrer un numéro de piste
dans chaque champ.
4. Appuyez sur le bouton >/|| (19) sur la télécommande ou surligner « PLAY » sur l'écran et
puis appuyez le bouton ENTER (5) pour commencer la reproduction dans l'ordre
numéroté indiqué.
Pour effacer la liste, surlignez « CLEAR » et puis appuyez sur ENTER. Appuyez sur PROG
pour sortir de l'écran reproduction programmée.
L'information de reproduction MP3
L'information suivante est affichée en haut de l'écran pendant la reproduction du CD :
• TRK ##/## – « 9/150 » indique le neuvième des 150 pistes sur le disque actuellement
jouant
• – « X » indique que la reproduction répétée est OFF, « 1 » indique la chanson
répétée, et « D » indique le repertoire de répétition (dossier)
• Appuyez sur de manière répétée pour voir l'information suivante pour le temps de
reproduction écoulé/ qui reste :
• 00:02:18 - temps de reproduction total écoulé pour le disque
• C -00 :34 :37 - temps de reproduction qui reste pour le disque
Entrée en piste directe télécommande
Pour sélectionner un fichier directement; utilisez le pave numérique sur la télécommande (10).
Pour des entrées à un seul chiffre, appuyez sur le numéro correspondant. Pour des entrées à
deux chiffres, appuyez sur le bouton 10+ suivi par le dernier chiffre (c'est-à-dire, pour le fichier
16, appuyez 10+ et puis 6).
Accès direct à la piste/chapitre GOTO
Utilisez la fonction GOTO pour accéder une piste (un chapitre) directement.
1. Appuyez sur le bouton GOTO (26) sur la télécommande. L'information d'affichage sur
l'écran va apparaître avec le numéro de fichier sur ligné.
2. Utilisez le pave numérique sur la télécommande pour entrer le numéro de fichier à 3
chiffres directement (c'est à dire, pour le fichier 10 entrer « 010 »).
3. Appuyez sur le bouton ENTER pour confirmer et commencer la reproduction.
30
Page 31

AWM965
1
23
4
56
7
89
+10
10/0
MENU
TUNE+
TUNE-
ENTER
VOL
VOL
T/F
PROG
LANG RPT TITLE
SOURCE
ZOOM
ANGLE
GOTO
AUD
....
14
15
16
17
18
19
20
22
21
23
24
25
26
27
1
3
5
7
8
9
10
11
12
13
6
4
2
LOUD
Opération télécommande
REF DESCRIPTION TUNER CD/MP3/USB DVD
Power Met la radio en mode d'attente. Met la radio en mode d'attente. Met la radio en mode d'attente.
1
VOL +/- Ajuster volume vers le haut/vers le bas. Appuyez pour
2
TUNE + Chercher une station plus haute. Etat d'arrête : vers le haut - chercher dans le dossier
3
TUNE - Chercher une station plus basse. Etat d'arrêt : vers le bas : article précédent. Etat de
4
ENTER Confirmer la selection du menu.
5
MENU Accéder au menu DVD principal
6
T/F Appuyez pour basculer entre le temps de l' horloge/
7
PROG Programme de configuration affichage Programme de configuration afficha ge
8
LANG Afficher MONO/L, MONO/R, ou STEREO. Sélectionnez une langue audio, si disponible.
9
Numéros Utilisez 1-6 pour accéder aux stations pré-réglées. Entrez le numéro de la piste pour accéder directement à
10
Setup Voir le menu SETUP. Voir le menu SETUP.
11
Subtitle Affiche MONO/L, MONO/R, ou STEREO. Choisissez langue de sous-ritrage si disponible.
12
Mute/LOUD Sortie audio complètemen assourdie. Appuyez et
13
Eject Ejecter Disque. Ejecter Disque. Ejecter Disque.
14
Previous/Next Ejecter Disque. Sélectionner la piste prochaine/précédente.
15
Directional
16
Buttons
Fast Reverse/
17
Forward
Play/Pause Faire pause/ reprendre la reproduction. Faire pause/ reprendre la reproduction.
18
Stop Arrêtez la reproduction. Arrêtez la reproduction.
19
TITLE Appuyez pour voir le menu des titres, et puis u tilisez les
20
RPT Répéter la piste Répéter le chapitre
21
SOURCE Sélectionner source pour reproduction. Sélectionner source pour reproduction. Sélectionner source pour reproduction.
22
ZOOM Faire zoom sur l'image ou appuyez plusieurs fois pour
23
24 ANGLE
25 AUD
26 GOTO
27 Display
le menu de Configuration Contrôle Au dio.
temps de reproduction.
Appuyez et maintenez l'appui poru régler l'horloge.
maintenez l'appui pour mettre la fonction INTENSITE
en marche/en arrêt.
Ajuster volume vers le haut/vers le bas. Appuyez pour le
menu de Configuration Contrôle Audio.
actuel. Etat de reproduction : Vers le haut la piste
prochaine.
reproduction : vers le bas : piste précédentes.
Appuyez pour basculer entre le temps de l'horloge/temps
de reproduction.
Appuyez et maintenez l'appui poru régler l'horloge.
la piste : Pour des numéros de piste > 10, utilsiez 10+
suivi par le deuxième chiffre.
Sortie audio complètemen assourdie. Appuyez et
maintenez l'appui pour mettre la fonction INTENSITE en
marche/en arrêt.
Déplacez à l'article de menu desire et puis appuyez sur
ENTER pour confirmer.
Avance rapide2X, 4X, 8X, 20X.
Recul rapide 2X, 4X, 8X, 20X.
Ajuster volume vers le haut/vers le bas. Appuyez pour le
menu de Configuration Contrôle Audio.
Etat d'arrêt : vers le haut Article prochain.
Etat de reproduction : vers le haut : Piste prochaine.
Etat d'arrêt : vers le bas : article précédent. Etat de
reproduction : vers le bas : piste précédentes.
Appuyez pour basculer entre le temps de l'horloge/temps
de reproduction.
Appuyez et maintenez l'appui poru régler l'horloge.
Entrez le numéro de la piste pour accéder directement à
la piste : Pour des numéros de piste > 10, utilsiez 10+
suivi par le deuxième chiffre.
Sortie audio complètemen assourdie. Appuyez et
maintenez l'appui pour mettre la fonction INTENSITE en
marche/en arrêt.
Utilisez avec le menu DVD poru déplacer jusqu'à l'article
de menu dési'ré et puis appuyez sur ENTER pour
confirmer.
Avance rapide2X, 4X, 8X, 20X.
Recul rapide 2X, 4X, 8X, 20X.
fleches de direction et le bouton de reproduction pour
jouer le titre sélectionné. Il peut ne pas être soutenu par
tous les disques.
changer le niveau d'aggrandisement.
Sélectionner un angle de visionnement alternative, si
disponible.
Accéder aux options menu d'audio
Sélectionner l'heure exacte; la piste ou le ch apitre pour
reproduction.
Sélectionner l'heure exacte; la piste ou le ch apitre pour
reproduction.
Affiche l'information de reproduction actuelle sur l'écran. Affiche l'information de reproduction actuelle sur l'écran.
31
Page 32

AWM965
SYSTEM SETUP
TV SYSTEM
SCREEN SAVER
TV TYPE
PASSWORD
RATING
DEFAULT
AUTO
NTSC
PAL
LANGUAGE SETUP
OSD LANGUAGE
AUDIO LANG
SUBTITLE LANG
MENU LANG
ENGLISH
GERMAN
SPANISH
FRENCH
AUDIO SETUP
AUDIO OUT
KEY
SPDIF/OFF
SPDIF/RAW
SPDIF/PCM
Menu configuration
Appuyez sue le bouton (configuration) (11) sur la télécommande pour accéder au menu
SETUP et ajuster les réglages du système pour les categories suivantes :
• System Setup
• Language Setup
• Audio Setup
• Video Setup
• Digital Setup
Lorsque vous êtes dans les menus de configuration, utilisez les fleches de direction pour
sélectionner et changer les réglages. Les fleches haut et bas surlignent les options et les
fleches droite et gauche vont changer le réglage pour l'option surlignée.
Configuration Système
Le menu de la Configuration Système
contrôlennt les fonctions suivantes :
SYSTEME TV
accorder avec votre poste de television. Sélectionnez une des options suivantes : AUTO,
NTSC ou PAL.
ECRAN D'ECONOMIE
Type TV
selection boîte à letter et le 16:9 est un écran large.
MOT DE PASSE
pour des besoins de sécurité.
CLASSEMENT
Le mot de passe de sécurité est exigé pour apporter des changements à cette fonction.
PAR DEFAUT
: Cet article est utilisé pour sélectionner un système de signalement TV pour
: Mettez la fonction Ecran d'économie en marche/en arrêt.
: Sélectionnez l'un des formats image suivants : 4:3PS, 4:3 LB ou 16:9. 4:3 est une
: Cet article permet la selection d'un nouveau code à quatre chiffres à utiliser
: Sélectionnez le niveau de contrôle parental pour toute la reproduction DVD.
: Utilisez cet article pour rétablir les réglages par défaut n'importe quand.
32
Configuration de langue
Le menu de configuration langue
contrôle les fonctions suivantes :
Langue de l'affichage sur l'écran(OSD)
Chinois, Allemand, Espagnol, Français ou Russe.
Langue audio : Réglez la langue d'audio à l'une des suivantes
Français, Espagnol, Russe, Latin ou Allemand.
Langue de sous-titrage : Réglez la langue de sous-titrage à l'une des suivantes
Anglais, Japonais, Français, Espagnol, Russe, Allemand ou OFF.
Langue menu
Français, Espagnol, Russe, Allemand, ou Latin.
: Réglez la langue menu à l'une des suivantes : Chinois; Anglais, Japonais,
: Régler la langue OSD à une des suivantes : Anglais,
: Chinois; Anglais, Japonais,
Configuration audio
Le menu de configuration audio contrôle
les fonctions suivantes :
Audio Out : Cet article définit le format de sortie digitale.
Key : Cet article change la clef de sortie audio.
: Chinois;
Page 33

AWM965
VIDEO SETUP
BRIGHTNESS
CONTRAST
HUE
SATURATION
SHARPNESS
12
10
8
6
4
2
0
DIGITAL SETUP
OP MODE
DYNAMIC RANGE
DUAL MONO
LINE OUT
RF REMOD
Menu de configuration (continué)
Configuration Vidéo
Le menu de configuration video
contrôle les fonctions suivantes :
Brightness
Contrast
Hue
Saturation : Ajustez la saturation de l'écran depuis les niveaux suivants : 12, 10, 8, 6, 4, 2 ou 0.
Sharpness
: Ajustez la luminosité de l'écran depuis les niveaux suivants : 12, 10, 8, 6, 4, 2 or 0.
: Ajustez le contraste de l'écran depuis les niveaux suivants : 12, 10, 8, 6, 4, 2 ou 0.
: Ajustez la teinte de l'écran depuis les niveaux suivants : +6, +4, +2, 0, -2,- 4 ou - 6.
: Ajustez la netteté de l'écran depuis les niveaux suivants : 8, 6, 4, 2 ou 0.
Configuration Digitale
Le menu Configuration Digitale contrôle
les fonctions suivantes :
OP Mode
Dynamic Range
Dual Mono : Selectionnez STEREO, MONO/L, MONO/R ou MIX MONO.
: Sélectionnez LINE OUT ou RF REMOD.
: Selectionnez FULL, 6/8, 4/8, 2/8 ou OFF.
33
Page 34

Spécifications
Général
Exigence d'alimentation . . . . . . . . . . . . . . . . . . . . . . . . . . . . . . . DC 12 Volts, Terre négative
Voltage d'opération . . . . . . . . . . . . . . . . . . . . . . . . . . . . . . . . . . . . . . . . . . . . . . . . .10-16VDC
Dimensions . . . . . . . . . . . . . . . . . . . . . . . . . . . . . . . . . . . 265mm(W)x178mm(H)x159mm(D)
Dimensions de montage . . . . . . . . . . . . . . . . . . . . . . . . . 235mm(W)x154mm(H)x133mm(D)
Poids . . . . . . . . . . . . . . . . . . . . . . . . . . . . . . . . . . . . . . . . . . . . . . . . . . . . . . . . . . . . . . 5.5 lbs.
FM Tuner
Gamme de syntonisation . . . . . . . . . . . . . . . . . . . . . . . . . . . . . . . . . . . . . . . . . 87.5-107.9FM
Sensibilité . . . . . . . . . . . . . . . . . . . . . . . . . . . . . . . . . . . . . . . . . . . . . . . . . . . . . . . . . . . .<4uV
Séparation stéréo @ 1 kHz . . . . . . . . . . . . . . . . . . . . . . . . . . . . . . . . . . . . . . . . . . . . . . >25dB
AM Tuner
Gamme de syntonisation . . . . . . . . . . . . . . . . . . . . . . . . . . . . . . . . . . . . . . . . . . . . 530-1710
Sensibilité . . . . . . . . . . . . . . . . . . . . . . . . . . . . . . . . . . . . . . . . . . . . . . . . . . . . . . . . . . .<63uV
Amplificateur
Sortie PuissanceOutput Power . . . . . . . . . . . . . . . . . . . . .48 Watts Total (6 Watts, 8 Chaîne)
Sortie Impédance . . . . . . . .Compatible avec haut parleurs 4-8 Ohm, 4 Ohm Load Minimum
DVD
Réponse fréquence. . . . . . . . . . . . . . . . . . . . . . . . . . . . . . . . . . . . . . . . . . . . . . 20-20,000 Hz
Séparation des chaînes . . . . . . . . . . . . . . . . . . . . . . . . . . . . . . . . . . . . . . . . . . . . . . . . . 50dB
Rapport signal au bruit . . . . . . . . . . . . . . . . . . . . . . . . . . . . . . . . . . . . . . . . . . . . . . . . . . 70dB
Distorsion . . . . . . . . . . . . . . . . . . . . . . . . . . . . . . . . . . . . . . . . . . . . . . . . . . . . . . . . . . . . 0.2%
AWM965
Les spécifications sont susceptibles à changer sans avis préalable.
Cet engine est en conformité avec la Partie 15 des réglements FCC. L'opération est soumise
aux deux conditions suivantes :
(1) Cet engin ne doit pas cause des interference nuisibles, et
(2) Cet engin doit accepter toute interference reçue, y compris l'interférence qui peut
provoquer des operations indésirables.
A NOTER : Le fabricant n'est pas responsible pour des interferences radio ou television
causes par des modifications non-autorisées à cet équipement. De telles modifications
peuvent annuler l'autorité de l'utilisateur d'opérer l'équipement.
34
Page 35

www.asaelectronics.com
www.jensenrvdirect.com
© 2011 ASA Electronics Corporation
v.102411
 Loading...