

Page 1

Guide de l’utilisateur du téléviseur
Veuillez observer toutes les mesures de sécurité en utilisant ce produit.
Veuillez lire soigneusement ce manuel avant d’utiliser ce produit.
Please observe all safety precautions when using this product.
Please read this manual careful
ly.
15 SERIES
LED TV User’s Guide
LED
hsilgnE
siaçnarF
Page 2

2
Safety Precautions
Important Information
Important Safeguards
3
4 - 5
10 - 11
User Guidance Information
Part identification (Right View) / Accessories 6
Part identification (Back View) 7
Mounting on a Desktop / Installation Precautions 8
9
Installing an Antenna
Remote control
Precautions / How to use the remote control 12
Connection
VCR Connections / Digtial Amplifier Connections / Watching Video Tape 13
Satellite/Cable TV Set-Top Box Connections / Watching Cable TV 14
DVD Connections / USB Connections / Playing the DVD 15
16
Basic Use
Application
Selecting input source / Initial Setup Wizard
17
CONTENTS
Menu Operation 18
19
Customizing the PICTURE Settings
Customizing the TIMER Settings
Customizing the SETUP Settings
Customizing the LOCK Settings
Customizing the CHANNEL Settings
20
22 - 23
24 - 26
27 - 28
..............................................................................
........................................................
.....................................................
....................................................................
............................................................................
....................................................................................
.................................................................................
.......................................................
...............................................................................
............................................
...............................
PC Connections / External Audio Amplifier / How to use as a PC monitor
.....................................
................................
.................................................................
...........................................................
.................................................................
.............................................................
..................................................................
Customizing the AUDIO Settings
21
...................................................................
................................................................
E gn l hsi
USB Settings
29
.....................................................................................
Troubleshooting
Specifications 31
30
.................................................................................
....................................................................................
Maintenance and Service
Page 3

3
WARNING
IMPORTANT SAFETY INSTRUCTIONS
Important Information
To reduce the risk of fire or electric shock,do not expose
this product ot rain or moisture.
This symbol is intended to alert the user to the
presence of uninsulated “ dangerous voltage”
within the product’s enclosure that may be of
sufficient magnitude to constitute a risk of
electric shock to persons.
This symbol is intended to alert the user to
the presence of important operating and
maintenance (servicing) instructions in the
literature accompanying the appliance.
This product utillizes tin-lead solder, and fluorescent lamp
containing a small amount of mercury. Disposal of these
materials may be regulated due to environmental considerations. For disposal or recycling information,please
contact your local authorities or the Electronic Industries
Alliance: www.eia.org.
FCC STATEMENT
FCC CAUTION:
WARNING
This product has been tested and found to comply with
the limits for a Class B digital device, pursuant to part 15
of the FCC Rules. These limits are designed to provide
reasonable protection against harmful interference when
the equipment is operated in a commercial environment.
This product generates, uses, and can radiate radio
frequency energy and, if not installed and
used in accordance
with the instruction manual, may cause harmful interference
to radio communications.Operation of this equipment in a
residential area is likely to cause harmful interference
in which case the user will be required to correct the
interference at his own expense.
Pursuant to 47CFR, Part 15.21 of the FCC rules, any
changes or modifications to this monitor not expressly
approved by the manufacturer could cause harmful
interference and would void the user ’s authority to
operate this device.
This is a CLASS B product. In a domestic encironment,
this product may cause radio interference, in which cause
the user may be required to take adequate measures to
counter interference
1) Read these instructions.
2) Keep these instructions.
3) Heed all warnings.
4) Follow all instructions.
5) Do not use this product near water
.
Apparatus should not be exposed to dripping or
splashing and no objects filled with liquids, such
as vases, should be placed on the product.
6) Clean only with a dry cloth.
7) Do not block any ventilation openings. Install in
accordance with the manufacturer’s instrutions.
8) Do not install near any heat sources
such as radiators, heat registers,
stoves, or other apparatus(including
amplifiers) that produce heat.
9) Do not defeat the safety purpose of the
polarized or grounding-type plug. A polarized
plug has two blades with one wider than the
other. A grounding type plug has two blades
and a third grounding prong. The wide blade
or the third prong are provided for your safety.
If the provided plug does not fit into your outlet,
consult an electrician for replacement of the
obsolete outlet.
10) Protect the power cord from being walked on or
pinched, particularly at plugs, convenience
receptacles, and the point where they exit from
the apparatus.
11) Only use attachments / accessories specified by
the manufacturer.
12) Use only with the cart, stand, tripod, bracket, or
table specified by the manufacturer or sold with
the apparatus.
when a cart is used, use caution when
moving the cart / apparatus combination
to avoid injury from tip-over.
13) Unplug this apparatus during lightning storms
or when unused for long periods of time.
14) Refer all servicing to qualified service
personnel.Servicing is required when the
product has been damaged in any way, such as
power-supply cord or plug is damaged, liquid
has been spilled or objects have fallen into the
product, the product has been exposed to rain
or moisture, does not operate normally, or has
been dropped.
15) Where the mains plug or an appliance coupler is
used as the disconnect device, the disconnect
device shall remain readily operable.
E gn l hsi
Page 4

English
4
Important Safeguards
Before using your TV, please read these instructions
completely, and keep this manual for future reference,
Carefully observe and comply with all warnings,
cautions and instructions placed on the unit or
described in the operating instructions or service
manual.
W
ARNING
Power Sources
Grounding or Polarization
Overloading
Power
Sound
Power Cord
Ventilation
Heat sources
For the unit with a polarlzed AC power cord plug
For the unit with a DC power connector
Wall outlet
Wiring
Electric shock
Cleaning
To guard against injury, the following basic safety
precautions should be observed in the installation,
use and servicing of the unit.
This unit
should be operated only from the type of
power source indicated on the information label.
If you are not sure of the type of electrical power
supplied to your home, consult your dealer or local
power company.
This unit is equipped with a polarized AC power cord
plug (a plug having one blade wider than the other), or
a DC power connection, for use in a vehicle. Follow
the instructions below:
This plug will fit into the power outlet
only one way.This is a safety feature.
If you are unable to insert the plug fully
into the outlet, try reversing the plug.If the plug still fails
to fit, contact your electrician to have a suitable outlet
installed. Do not defeat the safety purpose of the
polarized plug by forcing it in.
For inst
allation in a vehicle, connect the red wire to the
12V accessory line and the black wire to ground terminal.
Do not use a poor fitting outlet.
Insert the plug fully into the outlet. If it is loose, if may
cause arcing and result in fire. Contact your electrician
to have the outlet changed.
For your safety, unplug the power cord when wiring
cables.
Do not tough the AC power cord or the unit with a wet
hand. If you plug / unplug the AC power cord from the
unit with a wet hand, it may cause electric shock.
Never attempt to move the unit unless the AC power
cord is disconnected.
Clean the power plug regularly.
If the plug is covered with dust and it picks
up moisture, its insulation may deteriorate
and result in fire.
Unplug the power plug and clean it regularly.
Unplug the power cord when cleaning this unit. If not,
it may result in electric shock.
Clean the cabinet of the TV with a dry soft cloth. To
remove dust from the screen, wipe it with a soft cloth.
Stubborn stains may be removed with a cloth slightly
dampened with a solution of mild soap and warm water.
Never use strong solvents such as thinner or benzine for
cleaning.
If using a chemically pre-treated cloth, please follow the
instructions provided on the package.
Always turn the unit off when it is not being used.
When the unit is left unattended and unused for long periods
of time, unplug it from the wall outlet as a precaution against
the possibility of an internal malfunction that could create a fire
hazard.
Do not overload wall outlets, extension cords or convenience
receptacles beyond their capacity, since this can result in fire
or electric shock.
If a snapping or popping sound from
the TV is continuous or
f
requent while the TV is operating, unplug the TV and consult
your dealer or service technician. It is normal for TV’s to make
occasional snapping or popping sounds, particularly when
being turned on or off.
If you damage the power cord, it may result in fire or electric
shock.
Do not pinch, bend, or twist the cord excessively.The core
lines may be bared and cut and cause short-circuit, resulting
in fire or electric shock.
Do not convert or damage the power cord.
Do not put anything heavy on the power cord.
Do not pull the power cord.
Keep the power cord away from heat sources.
Be sure to
grasp the plug when disconnecting the power
cord.
If the power cord is damaged, stop using it and replace
with a new one.
The slots and openings in the TV are provided for necessary
ventilation. To ensure reliable operation of the unit, and to
protect it from overheating, these slots and openings must
never be blocked or covered. Unless proper Yentilation is
provided, the unit may gather dust and get dirty. For proper
ventilation, observe the following:
Do not install the unit turned backward or sideways.
Do not install the unit turned over or upside down.
Never cover the slots and openings with a cloth or other
materials.
Never block the slots and openings by placing the unit on a
bed, sofa, rug or other similar surface.
Never place the unit in a confined space, such as a bookcase
or built-in cabinet, unless proper ventilation is provided.
Leave some space around the unit. Otherwise, adequate
air-circulation may be blocked, causing overheating, and
may cause fire or damage the unit.
Do not install near any heat sources such as radiators, heat
registers, stoves, or other apparatus (including amplifiers)
that produce heat.
Page 5

5
Important Safeguards
E gn l hsi
Do not use this product near water
Safety checks
Wall or ceiling mounting
Panel protection
Pixel defect
Antennas
Outdoor Antenna Grounding
WHEN INSTALLING AN OUTDOOR ANTENNA SYSTEM,
EXTREME CARE SHOULD BE TAKEN TO KEEP FROM
CONTACTING POWER LINES OR CIRCUITS AS
CONTACT WITH THEM IS ALMOST INVARIABLY FATAL.
Entering of objects and liguids
Lightning
Servicing
Replacement parts
Attachments
Damage reguiring service
D
o not use near a bathtub, washbowl, kitchen sink, or laundry
tub, in a wet basement, or near a swimming pool.
D
o not use immediately after moving from a low temperture
to high temperature environment, as this cause condensation,
which may result in fire, electric shock, or other hazards.
This product should not be exposed to dripping or splasing
and no objects filled with liquids, such as vases, should be
placed on the product.
Never insert an object into the product through vents or
openings. High voltage flows in the product, and inserting
an object can cause electric shock and / or short internal
parts. For the same reason, do not spill water or liquid on
the product.
Unplug this apparatus during lightning storms or when
unused for long periods of time.
For added protection during a lightning storm, or when
left unattended and unused for long periods of time,
unplug the product from the wall outlet and disconnect
the antenna. This will prevent damage to the equipment
due to lightning and power-line surges.
Refer all servicing to qualified service personnel. Servicing
i
s required when the product has been damaged
in any way,
such as power-supply cord or plug is damaged, liquid has
been spilled or objects have fallen into the apparatus, the
apparatus has been exposed to rain or moisture, does not
operate normally, or has been dropped.
In case the product needs replacement parts, make sure the
service person uses replacement parts specified by the
manufacturer, or those with the same characteristics and
performance as the original parts. Use of unauthorized parts
can result in fire, electric shock and / or other danger.
Only use attachments / accessories specified by the
manufacturer. Do not use attachments not recommended
by the manufacturer. Use of improper attachments can
result in accidents.
If any of the following conditions occurs, unplug the power
cord from the AC outlet and request a qualified service
person to perform repairs.
a. The power cord or plug is damaged.
b. Liquid is spilled on the product or when objects have
fallen into the product.
c. The product has been exposed to rain or water
.
d. The product does not operate properly as described
in the operating instructions.
Do not touch the controls other than those described
in the operating instructions. Improper adjustment of
controls not described in the instructions can cause
damage,which often requires extensive adjustment
work by qualified technician.
e. The product has been dropped or the cabinet has been
damaged in any way
.
f. The product displays an abnormal condition or exhibits
a distinct change in performance. Any noticeable
abnormality in the product indicates that the product
needs servicing.
Upon completion of service or repair work, request the
service technician to perform safety checks to ensure
that the product is in proper operating condition.
When mounting the product on a wall or ceiling, be sure
to install be product according to the method recommended
by the manufacturer.
This pa
nel used in this product is made of glass.
Therefore, it can break when the product is dropped
or impacted upon by other objects. Be careful not to
be injured by broken glass pieces if the panel breaks.
Occasionally, a few non-active pixels may appear on
the screen as a fixed point of blue,green or red. Please
note that this does not affect the performance of your
product.
If an outdoor antenna is installed, follow the precautions
below. An outdoor antenna system should not be located
in the vicinity of overhead power lines or other electric light
or power circuits, or where it c
an come in contact with such
power lines or circuits.
Be sure the antenna system is grounded to provide
some protection against voltage surges and built-up
static charges.Section 810 of the National Electrical
Code ( NEC ) in USA and Section 54 of the Canadian
Electrical Code in Canada provides information with
respect to proper grounding of the mast and supporting
structure, grounding of the lead-in wire to an antenna
discharge unit, size of grounding conductors, locatio
n
of antenna discharge unit,connection to grounding
electrodes, and requirements for the grounding
electrode.
N
EC: National Electrical Code
Antenna Grounding According to the National
Electrical Code, ANSI/NFPA 70
Antenna lead-in wire
Ground clamps
Ground clamps
Antenna discharge unit
( NEC Section 810-20)
Grounding conductors
( NEC Section 810-21)
Power service grounding
electrode system
(NEC Art 250 Part H)
Electric service
equipment
Page 6

Part Identification
Accessories
English
MENU Button-OSD Menu Display Button
CH-/ CH+Button
VOL- / VOL+Button
SOURCE Button
POWER Button
Right View
The configuration of the components may look different from the following illustration.
AV Cable
Remote Control
x
User Guide Information
6
SOURCE
MENU
CH+
CH-
VOL+
VOL-
POWER
DC Po wer Cable
JTV2815DC
Page 7

Part Identification
Accessories
English
MENU Button-OSD Menu Display Button
CH-/ CH+Button
VOL- / VOL+Button
SOURCE Button
POWER Button
POWER
Right View
AV Cable
Remote Control
x
User Guide Information
SOURCE
JE2815
The configuration of the components may look different from the following illustration.
Page 8

Part Identification
Accessories
English
MENU Button-OSD Menu Display Button
CH-/ CH+Button
VOL- / VOL+Button
SOURCE Button
POWER Button
Right View
AV Cable
Remote Control
x
User Guide Information
JE3215
SOURCE
The configuration of the components may look different from the following illustration.
Page 9

Part Identification
Accessories
English
MENU Button-OSD Menu Display Button
CH-/ CH+Button
VOL- / VOL+Button
SOURCE Button
POWER Button
Right View
AV Cable
Remote Control
x
User Guide Information
JE4015
SOURCE
The configuration of the components may look different from the following illustration.
Page 10

Part Identification
Accessories
English
MENU Button-OSD Menu Display Button
CH-/ CH+Button
VOL- / VOL+Button
SOURCE Button
POWER Button
Right View
Remote Control
x
User Guide Information
JE5015
SOURCE
The configuration of the components may look different from the following illustration.
Page 11

Part Identification
Back View
E gn l hsi
8
2
4. HDMI 1 / HDMI 2 INPUT
3. USB Port
5. COMPONENT INPUT
6. AV IN ( VIDEO and AUDIO)
7. SPDIF OUTPUT
8. RF IN
2. AUDIO (L/R) OUT
1. DC 12V
2
1
3 4
4
5
6 7 8
JTV2815DC
7
Page 12

Part Identification
Back View
E gn l hsi
8
2
7. HDMI 1 / HDMI 2 / HDMI 3 INPUT
3. HEADPHONE OUTPUT
10. USB Port
6. COMPONENT INPUT
5. AV IN ( VIDEO and AUDIO)
4. SPDIF OUTPUT
8. PC IN (VGA and AUDIO) INPUT
9. RF IN
2. AUDIO (L/R) OUT
1. AC IN
JE2815
2
1
3
4 75 6
(ARC)
/
/
8
9
10
7
7
Page 13

Part Identification
Back View
E gn l hsi
8
2
3. HEADPHONE OUTPUT
10. USB Port
6. COMPONENT INPUT
5. AV IN ( VIDEO and AUDIO)
4. SPDIF OUTPUT
8. PC IN (VGA and AUDIO) INPUT
9. RF IN
2. AUDIO (L/R) OUT
1. AC IN
JE3215
2
3
4 75 6
8
9
10
7
7
(ARC)
/
/
1
7. HDMI 1 / HDMI 2 / HDMI 3 INPUT
Page 14

Part Identification
Back View
E gn l hsi
8
2
3. HEADPHONE OUTPUT
10. USB Port
6. COMPONENT INPUT
5. AV IN ( VIDEO and AUDIO)
4. SPDIF OUTPUT
8. PC IN (VGA and AUDIO) INPUT
9. RF IN
2. AUDIO (L/R) OUT
1. AC IN
JE4015
2
3
4 75 6
8
9
10
7
7
(ARC)
/
/
1
7. HDMI 1 / HDMI 2 / HDMI 3 INPUT
Page 15

Part Identification
Back View
E gn l hsi
8
2
4. HDMI 1 / HDMI 2 INPUT
3. USB Port
5. COMPONENT INPUT
6. AV IN ( VIDEO and AUDIO)
7. SPDIF OUTPUT
8. RF IN
2. AUDIO (L/R) OUT
1. AC IN
JE5015
2
1
3
4
4
5
6
7
8
Page 16

8
English
User Guide Information
Mounting on a Desktop
Wall Mounting
Using the Stand
Installation Precautions
1 1
1
1
1
Your LED TV can be mounted on a desktop with the base installed.
This is not a floor-standing unit.
Please refer to diagrams A and B.
Please ensure enough space for safe use.
Installation of the LED TV in an improperly ventilated location can cause damage to the LED TV
due to increased temperature.
(Mounting on a wall)
(Using the Stand)
Contact your dealer to purchase the Adjustable-angle wall mount required for wall-mounted installation.
Do not install on an unstable location with a support area smaller than the LED TV.
Please refer to the desktop stand user'
s manual for details of installation.
Page 17

9
Installing an Antenna
Use a coaxial cable to connect the wall jack or external antenna to the RF-IN on the LED TV
Press the SOURCE button on the remote control to select TV, then press RIGHT button to confirm.
Then you can receive the ATSC/NTSC signal.
Wall Jack with
F-Connector
Coaxial (Round) Antenna Cable
Analog+Digital 75
User Guide Information
For connecting to ATSC or NTSC broadcast
E gn l hsi
Page 18

Remote Control
10
English
s i l g n E
Activate TV Mode
POWER
On / off for TV and DVD
PREVIOUS
EJECT (DVD)
FAST REVERSE
STOP
T/F (DVD)
ZOOM (DVD)
AUDIO (DVD)
SET UP (DVD)
F-LIST
Press this button to display the favourite list
Press C-LIST button to display the channel list
C-LIST
SLEEP
Cycles through the LED TV sleep time:off / 5 /
CC
Closed Captions
MENU
Displays the OSD menu on the screen
Move up, down, left or right
NAVIGATION
EPG
Displays the program guide
Exits the current menu.
CH+/CH-
Increase or Decrease channel
NUMERIC KEYS
SOURCE
Displays AV Inputs
DVD
TV
Activate DVD Mode
FAST FORWARD
NEXT
RPT
Repeat Selection
SUB-T (DVD)
Display Time or Chapter information
DISP (DVD)
EQ (DVD)
TITLE (DVD)
MTS/SAP
Press MTS/SAP to select Stereo, SAP or Mono
SOUND
Press SOUND to cycle select sound
Press PICTURE to cycle select picture
PICTURE
INFORMATION
Press INFO to display information
about the current channel.
SCALE
Cycles scale modes: Wide, Zoom, Cinema, Normal.
ENTER
Press ENTER to confirm your opeartion
EXIT
VOL+/VOL-
Increase or Decrease volume
MUTE
Press once mutes audio, press again to restore audio
RETURN
Return to previously viewed channel
Digital channel selection
1
2
3
4
5
6
7
8
9
10
11
12
13
14
15
16
17
18
19
20
21
22
23
24
25
26
27
28
29
30
31
32
33
34
35
36
37
38
39
40
types: Standard / Music / Movie / Personal.
10 / 15 / 30 / 45 / 60 / 90 / 120 / 180 / 240 minutes
types: Standard / Dynamic / Soft / Personal
1
4
5
6 7
9
10
11
8
13
14
15
12
17
18
19
16
21
22
23
20
25
29
31
35
36
38
39 40
26
27
30
24
28
33
37
32
34
2
3
LAY/PAUSEP
Funtions of remote control buttons
User Guide Information
Page 19

Remote Control
11
NOTE: DVD functions are intended for JENSEN DVD players only.
See your JENSEN DVD manual for more information.
POW ER
CH
VOL
RET URN
MUT E
MEN U
INF O
ENT ER
SOUR CE
EXI T
EPG
1
2
3
POWER POWER
CH+
CH-
VOL+
VOL-
VOL+
VOL-
RETURN
MUTE
MENU
INFO
UP UP
DOWN DOWN
LEFT LEFT
RIGHT RIGHT
ENTER OK
SOURCE SOURCE
EXIT
EPG
T F
T-F
1
EJECT
1
2 2
3 3
PICTURE
PICTURE
TITLE
SOUND
SOUND
EQ
F-LIST
F-LIST
AUDIO
C-LIST
C-LIST
SETUP
SLEEP
DISP
CC
SUB-T
SCALE
SCALE
ZOOM
4
5
6
7
8
9
0
0 0
9 9
8 8
7 7
6 6
5 5
4 4
RPT
NEXT
FAST-FORWARD
FAST-REVERSE
PREVIOUS
PLAY-PAUSE
STOP
FAST-REVERSE
PREVIOUS
PLAY-PAUSE
STOP
BUTTON
TV-FUNCTION DVD-FUNCTION TV-FUNCTION DVD-FUNCTION TV-FUNCTION DVD-FUNCTION
BUTTON
ZOOM
SUB T
DISP
SET UP
AUD IO
EQ
TIT LE
SLEEP
CC
RPT
BUTTON
MTS-SAP
MTS/SAP
MUTE
MENU
NEXT
RPT
FAST-FORWARD
User Guide Information
E gn l hsi
Page 20

Precautions
Avoiding Remote Control Problems
Inserting Batteries in the Remote Control
12
How to use the remote control
English
3. Replace the cover.
CAUTION: Risk of explosion if battery is replaced by incorrect type.
Dispose of used batteries according to national code (Recycling program).
Used batteries should be disposed of properly.
The remote control should be operated within 30 feet (7m) and 30
0
to the left and the right of the IR receiver
at the front of the LED TV.
1. Check the polarity (+,-) of the batteries in the remote control.
2. Check that the batteries are good.
1. Open the cover completely.
2. Insert the two supplied batteries (AA, 1.5V). Ensure that the polarities (+ and -) of the batteries are aligned
correctly.
User Guide Information
Page 21

SOU RC E
3.Press to confirm the source selection ,
4.Turn on the VCR, insert the tape and press the play button.
ENTE R
VCR Connections
Watching Video Tape
13
Terminals vary by manufacturer
(Included)
Connect the LED TV’s Composite In terminal to VCR’s Composite OUT terminal using the included Composite cable.
English
will automatically enter the selection mode.
Digital Amplifier
Connecting to a Digital Amplifier
Connecting to the Composite terminal
SPDIF Cable
Digital Amplifier Connections
Terminals vary by manufacturer.
(Make sure the color of the terminals and the colors of the cable are the same.)
(Not Included)
1.Turn on the LED TV and press on the remote control.
2. Use to move to AV.
Page 22

Satellite / Cable TV Set-Top Box Connections
Watching Cable TV
14
Terminals vary by manufacturer
In order to watch Cable TV, Subscribe to your local Cable TV company and install a separate receiver (Set-Top Box)
HDMI Cable (Not Included)
English
Connect the LED TV’s Composite In terminal to the cable broadcasting receiver Composite Out terminal using the
Composite cable. (Make sure the color of the terminals and the color of cables are the same)
(Included)
Connecting to the Composite terminal
Connecting to the HDMI terminal
SOU RC E
3.Press to confirm the source selection.
4.Turn on the cable broadcasting receiver and select the channel you wish to view.
ENTER
1.Turn on the LED TV and press on the remote control.
2. Use to move to AV . If HDMI has been connected, select HDMI .
Page 23

Connection
15
English
USB Connections
Connection to USB.
Note: This USB connection can be used for software up
DVD Connections
Terminals vary by manufacturer
Playing DVDs
4.
3.
Stop operation a few seconds, will automatically enter the selection mode.
Turn on the DVD player, insert the DVD disc and press the Play button.
Turn on the LED TV and press the source button.
HDMI Cable(Not Included)
Connecting to the HDMI terminal
Connecting to the component terminal
1. Connect LED TV’s YPbPr (Component) terminal to DVD’s Video Out terminal.
.lanimret tuO oiduA s’DVD ot slanimret oiduA s’VT DEL tcennoC .2
3. It must match the component connection cable Y, Pb, Pr colors between the LED TV and DVD Player.
grade and using the USB media (Audio + photos) player.
Press Source to cycle and select . If HDMI has been connected, select HDMIComponent .
(Not Included)
Component Video Cable (Not Included)
Page 24

16
English
PC Connections
Terminals vary by manufacturer.
VGA Cable
PC Audio Cable
(Not Included)
(Not Included)
How to use as a PC monitor
External Audio Amplifier
Connecting to an amplifer or home theater system.
Terminals vary by manufacturer.
(Not Included)
Connect the LED TV’s PC Input terminal to the PC’s VGA terminal using a VGA cable.
(Only for PC’s with an Audio terminal)
Connect the LED TV’s AUDIO (L/R) output terminal to Audio Amplifier using an audio patch cable.
Note: The speakers of LED TV still have output audio signal at this time.
You can use the Volume +/- buttons to adjust the audio output level.
Connect the LED TV’s PC Audio terminal to the PC’s Audio terminal using a 3.5mm (Headphone) audio cable.
SOU RC E
3.Press to confirm the source selection.
ENTE R
1.Turn on the LED TV and press on the remote control.
2. Use to move to VGA .
Page 25

17
Selecting Input Source
Note: After you have selected the desired input sorce and pause for a few moments,
then LED TV will automatically enter the seleted mode.
Initial Setup Wizard
Setup Wizard
Air/Cable
Cable System
Auto Scan
English
Cable
STD
Sel ect Mov e Exi t
MENU
Menu Language
After connecting your TV antenna or Coaxial cable, turn the television
The quick setup wizard will display on-screen. Select your preferred
language followed by antenna options and performing Auto Scan to receive
local broadcast channels that will be stored in the TV tuner memory.
dnuof slennahC .nacS otuA lennahC eht nur dna snoitpo annetna tceles ot unem VT eht ot uoy tcerid lliw draziw ehT
will be stored in the TV tuner memory.
How to Navigate:
Press the •
Press the •
arrow button to highlight Menu Language and then press
arrow button to highlight CABLE /
AIR
based on your antenna connection.
Press the • arrow button to select Auto Scan and press (when Cable is selected, ‘AUTO’ is
recommended). Otherwise, press the arrow button to select Cable System .otuA > CRH > CRI > DTS :
button to select OSD Language.
arrow
ON.
Press button on the remote control.
Use to move to the desired input source.
Press to select.
You can select between the TV signal and the input signal of other equipment connected to the TV.
Use this function to switch to the input source you wish to view.
E gn l hsi
Page 26
Setup
Lock
12
6
Time
Pictu re
Chann el
Cha nge Passwo rd
Sys tem Lock
US
Can ada
Res et R RT
RRT Sett ing
Mov e Exi t
MENU
On
TIME MENU:
Allows you to set up a variety of time options.
LOCK MENU:
Allows you to set up a variety of lock options.
SETUP MENU:
Allows you to set up a variety of setup options.
CHANNEL MENU:
Allows you to search channels and set up a variety of channel options.
Allows you to customize the sound options and effects.
Allows you to make adjustments to your picture settings.
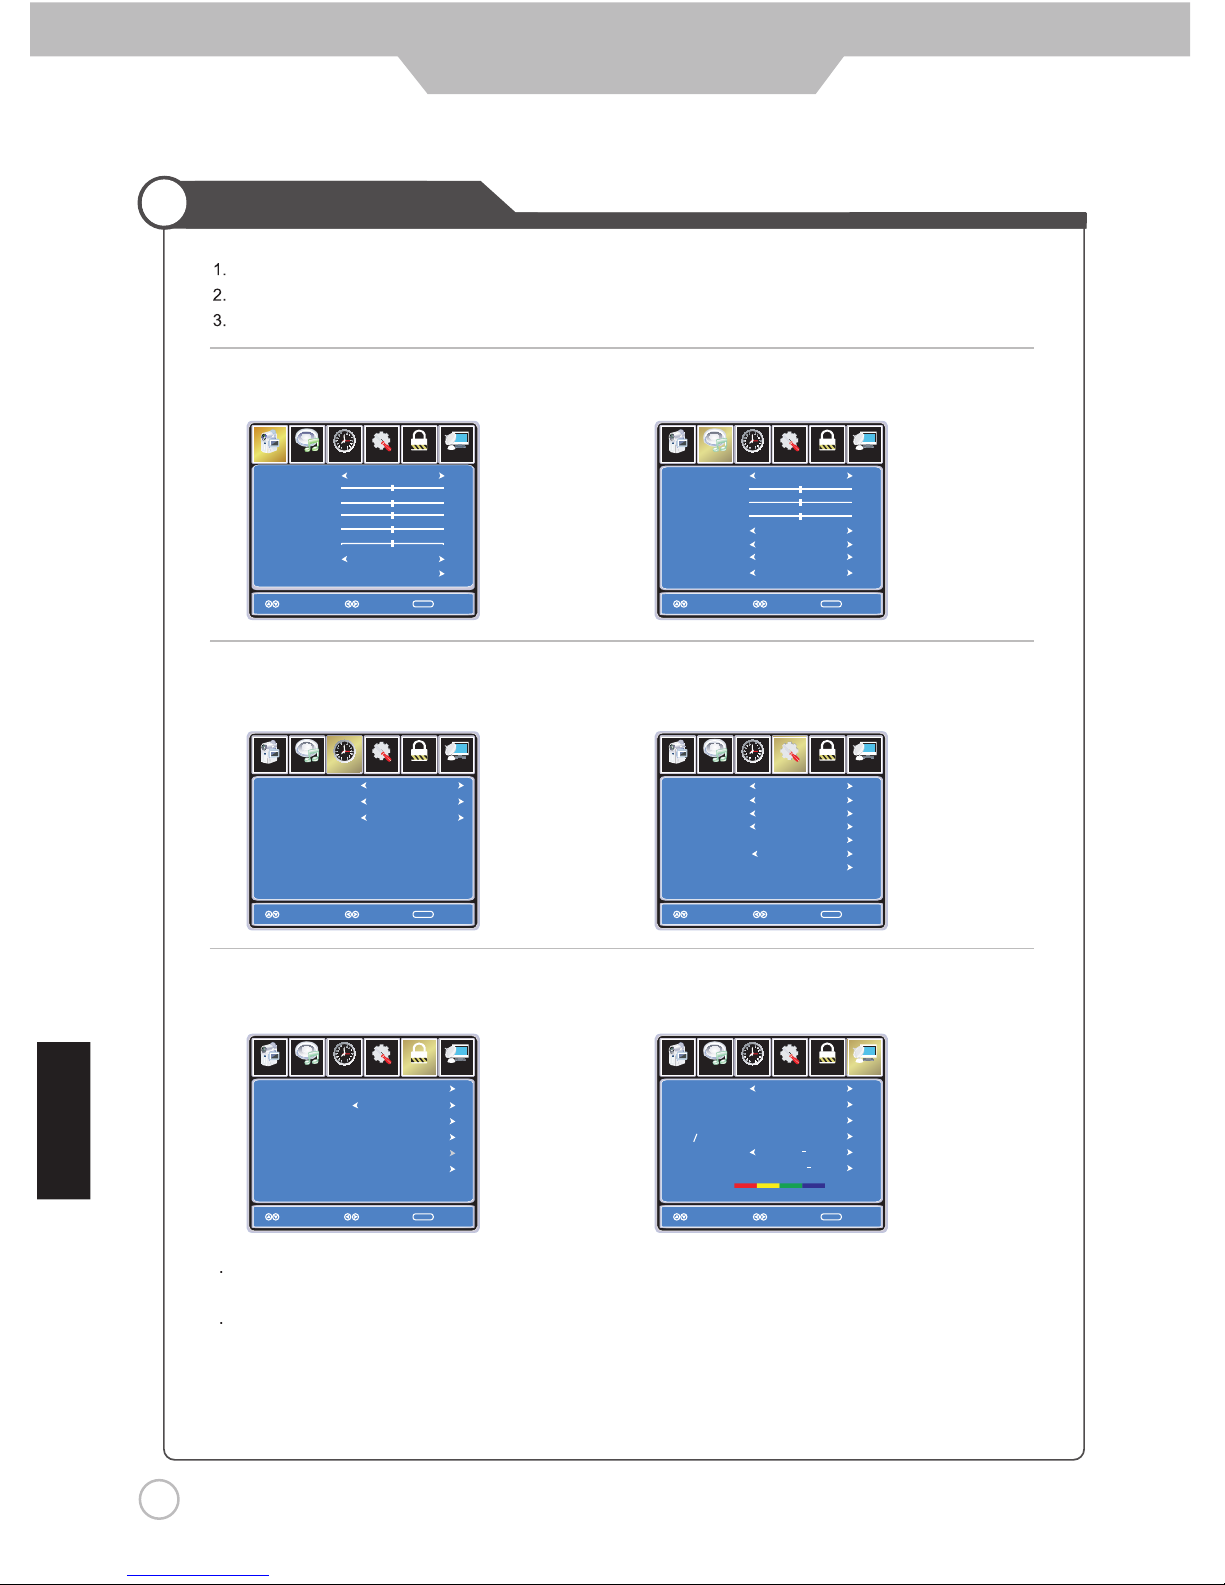
Use the LEFT and RIGHT buttons to select your main menu option.
Press the MENU button to exit submenu to return to the main menu.
Press the MENU button again or EXIT button to exit the main menu.
Menu Operation
Note: Some options are not available for all inputs.
Use the UP / DOWN buttons to select an option of the sub-menu, and press the RIGHT button.
While in adjustment mode, use the LEFT / RIGHT buttons to change the value of the item.
Setup
Lock
12
6
Time
Pictu re
Chann el
Aut o S can
Fav orite
Sho w Hide
Cha nnel No
Cha nnel Label
DTV Sign al
Air
Sel ect Mo ve E xit
MENU
50 3
KOC E
LB
Goo d
Air/Cable
Audio
Audio
AUDIO MENU:PICTURE MENU:
4
5
hsilgnE
Setup
Lock
12
6
Time C hanne l
Sou nd M ode
Bas s
Treb le
Bal ance
AVC
Aud io L angua ge
Sta ndard
Eng lish
Sel ect Mo ve E xit
MENU
50
50
50
Off
Off
Pictu re
Audio
TV Speaker
Setup
Lock
12
6
Time
Pictu re
Chann el
Pic ture Mode
Con trast
Bri ghtne ss
Col or
Tint
Sha rpnes s
Col or
Sta ndard
Nor mal
Sel ect Mo ve E xit
MENU
50
50
50
0
50
Audio
HDMI CEC
Setup
Lock Chann el
Sle ep Ti me
Time Zon e
Day light Savi ng T ime
Sel ect Mo ve E xit
MENU
Pictu re
Off
Pac ific
Off
12
6
Time
Audio
Lock
12
6
Time C hanne l
Men u L angua ge
Tran spare ncy
Zoo m M ode
Noi se R educt ion
Clo sed Cap ation
Aud io
Res tore Defau lt
Eng lish
Sel ect Mo ve E xit
MENU
Pictu re
Off
Nor mal
Off
Setup
Audio
OUT
Fixed
Next
18
SPDIF TypeSPDIF Type PCMPCM
Mo ed
Press the MENU button on the remote control, the on-screen menu will appear.
Press the POWER button to turn the LED TV on.
Application
Page 27

19
Picture Mode Cycles through picture display modes: Standard, Dynamic, Soft, Personal.
Contrast Controls the difference between the brightest and darkest regions of the picture.
Brightness Controls the overall brightness of the picture
Color Controls the color.
Tint Controls the tint.
Sharpness Increase this setting to see crisp edges in the picture; decrease it for soft edges .
Color Mode Cycles through color modes: Normal, Cool, Warm.
Setu p
Loc k
12
6
Time
Pic ture
Chan nel
Pic ture M ode
Co ntr ast
Bri ghtn es s
Co lor
Tin t
Sh arp ness
Co lor
Sta ndar d
Nor mal
Sel ect Move E xit
MENU
50
50
50
0
50
Audio
HDMI CEC
HDMI CEC
Customizing the PICTURE Settings
Mode
Select TV source for example. (Press SOURCE button to select TV mode)
1. Press the POWER button to turn the LED TV on
2. Press the MENU button on the remote control to display the Main menu, and use the LEFT and RIGHT
buttons to select the PICTURE.
3. Use the UP and DOWN buttons to highlight an individual PICTURE options, use the LEFT and RIGHT
buttons to change the setting, and press the MENU or EXIT button to exit.
The PICTURE menu includes the following options :
Application
E gn l hsi
If you turn off the CEC Mode then the following items (TV Auto Power,TV Auto
Switch,Device Auto Standby) will not be used.
On-TV will turn on when compatible CEC device is activated on HDMI
connection.
TV Auto Switch On-TV will switch to HDMI inputs when compatible CEC device
is activated on HDMI connection.
Device Auto Standby
On-When TV turned off, any connected, compatible CEC device will
also turn off.
TV Auto Power
Setup
Lock
12
6
Time
Pictur e
Channe l
Sele ctMove
MENU
Audio
CEC Mode
TV Auto Power
TV Auto Switch
Device Auto Standby
On
On
On
Audio Receiver
On
On
Return
Audio Receiver Enables audio to be sent to an HDMI connected AV receiver.
Page 28

20
Sound Mode Cycles through sound modes: Standard, Music, Movie and Personal.
Bass Controls the relative intensity
of lower pitched sounds.
Treble Controls the relative intensity of higher pitched sounds
Balance To adjust the balance of the left and right sound track, or turn off the volume of the
left and right sound track.
TV Speaker Allows you to select between ON and OFF.
AVC On or off (Automatic Volume Control) to keep volume level steady.
SPDIF Type Allows you to select beteen PCM and RAW (Digital connection to Home Theater system)
Audio Language Allows you to select preferred audio languages: English, French and Spanish.
Setu p
Lock
12
6
Time Chan nel
Sou nd Mod e
Bas s
Tre ble
Bal ance
AVC
Aud io Lan gu ag e
Sta ndar d
Eng lish
Sel ect Mov e Ex it
MENU
50
50
50
Off
Off
Pict ure
Customizing the Audio Settings
Audio
hsilgnE
TV Speaker
SPDIF TypeSPDIF Type PCM
Select TV source for example. (Press SOURCE button to select TV mode)
1. Press the POWER button to turn the LED TV on.
2. Press the MENU button on the remote control to display the Main menu, and use the LEFT and RIGHT
buttons to select the AUDIO.
3. Use the UP and DOWN buttons to highlight an individual Audio options, use the LEFT and RIGHT
buttons to change the setting, and press the MENU or EXIT button to exit.
The SOUND menu includes the following options :
Application
Page 29

21
Application
Customizing the TIME Settings
Select TV source for example. (Press SOURCE button to select TV mode)
1. Press the POWER button to turn the LED TV on.
2. Press the MENU button on the remote control to display the Main menu, and use the LEFT and RIGHT
buttons to select the TIME.
3. Use the UP and DOWN buttons to highlight an individual TIME option, use the LEFT and RIGHT
buttons to change the setting, and press the MENU or EXIT button to exit.
The TIME menu includes the following options :
Sleep Time Allows you to set up the sleep time: 5 Min, 10 Min, 15 Min, 30 Min, 45 Min,
60 Min, 90 Min, 120 Min, 180 Min, 240 Min and off.
Time Zone Allows you to select correct time zone: Pacific, Alaska, Hawaii, Eastern, Central
and Mountain.
Daylight Saving Time Allows you to turn on or off daylight saving time.
Setu p
Lock Chan nel
Sle ep T im e
Tim e Zo ne
Day li gh t Sa vi ng T im e
Sel ec t
Mov e
Exi t
MENU
Pict ure
Off
Pac if ic
Off
12
6
Time
Audio
hsilgnE
Page 30

22
Application
Customizing the SETUP Settings
The SETUP menu includes the following options:
Menu Language Allows you to select menu languages: English, Français and Español.
Transparency Allows you turn on or off the transparency function of on screen menu.
Select TV source for example. (Press SOURCE button to select TV mode)
1. Press the POWER button to turn the LED TV on.
2. Press the MENU button on the remote control to display the Main menu, and use the LEFT or RIGHT
button to select SETUP.
3. Use the UP and DOWN buttons to highlight an individual SETUP option, use the LEFT and RIGHT
buttons to change the setting, and press the MENU or EXIT button to exit.
English
Lock
12
6
Time Cha nne l
Me nu L an gua ge
Tra n sp ar en cy
Zoo m M ode
No i se Red uc tio n
Cl o se d Capat i on
Au d io
Res to re D ef au lt
Eng li sh
Sel ec t Mo ve Exi t
MENU
Pict ure
Off
Nor ma l
Off
Setu p
Audio
OUT
Fixed
Zoom Mode Allows you to select the zoom modes: Normal, Cinema, Wide, Zoom.
Noise Reduction Allows you to select the noise reduction modes: Strong, Off, Weak, Middle.
Page 31

23
Application
Customizing the SETUP Settings
Lock
12
6
Time Channe l
Mode
Font Style
Font Size
Font Edge Sty le
Font Edge Col or
FG Co lor
BG Co lor
FG Op acit y
BG Op acit y
Sele ct
MENU
Pictur e
Setup
Cust om
Defa ult
Defa ult
Defa ult
Defa ult
Defa ult
Defa ult
Defa ult
Defa ult
Use UP and DOWN buttons to highlight the desired item,
and use LEFT and RIGHT buttons to select.
Closed Caption Use Down button to highlight “Closed Caption”, then press RIGHT button
or ENTER to enter into the following menu.
Lock
12
6
Time Chann el
CC Mode
Basi c S ele cti on
Adva nce d S ele cti on
Opti on
On
MENU
Pictu re
CC1
Serv ice 1
Setup
CC Mode Allows you to select the CC Modes: On, Off and
CC on Mute.
Basic Selection Allows you to select the basic selections: CC1, CC2,
CC3, CC4, Text1, Text2, Text3 and Text4.
Advanced Selection Allows you to select the advanced services:
Service1, Service2, Service3,Service4, Service 5 and
Service 6.
Option Use Down button to highlight the “Option” item, then press
RIGHT button to enter into the following menu.
Select
Mov e
Audio Out Allows you to select between Variable and Fixed.
Restore Default
Audio
Move
Audio
Return
Return
Note: The TV Speakers need to be set to Off in the Audio Menu before the Audio Out setting is enabled.
Restores all settings in SETUP menu to factory settings.
Page 32

24
Application
Customizing the LOCK Settings
Select TV source for example. (Press SOURCE button to select TV mode)
1. Press the POWER button to turn the LED TV on
2. Press the MENU button on the remote control to display the Main menu, and use the LEFT and RIGHT
buttons to select the LOCK
3. Use the DOWN button to highlight “Enter Password” , use the numeric keys to input a 4-digit password.
After that, the screen will display the next menu. After setting, press menu or exit button to exit.
NOTE: The factory password is 0000.
The LOCK menu includes the following options :
Change Password Use DOWN button to select “Change Password”, then press RIGHT
or ENTER button to enter into the following menu.
Input the new 4-digit password and confirm it.
System Lock Allows you to turn On or Off the system lock.
If you turn off the system lock, then the following items (US, Canada, RRT Setting
and Reset RRT) will not be used.
Setu p
Loc k
12
6
Time
Pic ture
Chan nel
Ent er Pas sw or d
Exi t
MENU
Setu p
Lock
12
6
Time
Pict ure
Chan nel
Sy ste m Lock
US
Can ada
Res et RRT
RRT Set ti ng
Mov e
MENU
On
input
4-digit password
Setup
Lock
12
6
Time
Pictu re
Chann el
Ent er N ew P asswo rd
Con firm Passw ord
MENU
0-9
Next
Audio
Audio
Audio
hsilgnE
Select Move
Change Password
ReturnReturn
ReturnReturn
Page 33

25
Application
Customizing the LOCK Settings
US Use Down button to highlight “US” , then press RIGHT or ENTER button
to enter into the following menu.
TV Use Down button to highlight “TV” , then press RIGHT
or ENTER button to enter into the following menu.
Use UP and DOWN buttons to select the desired rating and press
ENTER button to block or unblock rating.
MPAA
The Movie rating (System) is used for original movies rated by the
Motion Picture Association of America (MPAA) as broadcasted on
cable TV and not edited for television.
Use UP or DOWN button to select N/A, G, PG, PG-13, R, NC-17
or X.
RATING DESCRIPTION
G General Audiences. Movie is appropriate for all ages.
PG Parental Guidance Suggested. May contain material not suited for
younger viewers.
PG-13 Contains content that may not be appropriate for viewers under the
age of 13.
R Restricted. Contains adult content, no one under 17 admitted without
parent.
NC-17 No one 17 and under admitted.
X Adults only.
Setup
Lock
12
6
Time
Picture
Channel
MPAA
Mov e
MENU
N A
NEXT
Audio
TV
Setup
Lock
12
6
Time
Picture
Chann el
Mov e
MENU
ck
TV RATI NG
TV Y
TV Y7
TV G
TV PG
TV 14
TV MA
ALL FV V S L D
NEXT
Audio
Press ENTER to Lock or Unlock
Return
Return
Lo
Page 34

26
Application
Customizing the LOCK Settings
Canada English Use LEFT and RIGHT buttons to select among: E, C, C8+,
G, PG, 14+ and 18+
Canada French Use LEFT and RIGHT buttons to select among: E, G, 8ans+,
13ans+, 16ans+ and 18ans+
Canada Use the Down button
to highlight “Canada”, then press the RIGHTor ENTER
button to enter into the following menu.
RRT Setting
Reset RRT Allows you to reset the RRT setting.
hsilgnE
Setup
Chann el
Sel ect
Mov e
MENU
Pictu re
12
6
Time Lock
G
Audio
Canada English
Canada French
G
ReturnReturn
Page 35

27
Application
Customizing the CHANNEL Settings
Select TV source for example. (Press SOURCE button to select TV mode)
1. Press the POWER button to turn the LED TV on.
2. Press the MENU button on the remote control to display the Main menu, and use the LEFT and RIGHT
buttons to select the CHANNEL.
3. Use the UP and DOWN buttons to highlight an individual CHANNEL option, use the LEFT and RIGHT
buttons to change the setting, and press the MENU or EXIT button to exit.
The CHANNEL menu includes the following options :
Air/Cable Allows you to select between Air and Cable.
Auto Scan Use Down button to highlight “Auto Scan”, then press RIGHT or
ENTER button to enter into the following menu.
Setu p
Loc k
12
6
Time
Pic ture
Chan nel
Aut o S ca n
Fav or it e
Sho w Hi de
Cha nn el N o
Cha nn el L ab el
DTV Sig na l
Air
Sel ec t Mo ve Exi t
MENU
50 3
KOC E
LB
Go od
Mov e
If you select “Air” as input signal in Antenna , you can press RIGHT or
ENTER button to search the channels automatically.
The receivable channels will be stored automatically.
When searching channels, press MENU to stop.
Setup
Chann el
MENU
Pictu re
12
6
Time Lock
RF CH
Fou nd
7
4
Air/Cable
NEXT
Mov e
Audio
Setup
Lock
12
6
Time
Pictu re
Chann el
Cab le Syste m
Sta rt to S can
Aut o
Sel ectMov e
MENU
Audio
Audio
English
Return
Return
Page 36

28
Application
Customizing the CHANNEL Settings
If you select “Cable” as input signal in Antenna then you can select
Cable Systems: Auto, STD, IRC and HRC.
Use DOWN button to highlight “Start to Scan”, then press the RIGHT or
ENTER button to search the channels automatically.
The receivable channels will be stored automatically.
When searching channels, press MENU to stop.
Use UP and DOWN button to highlight the desired channel, then press the ENTER
button to add or remove the highlighted channel as favorite.
Use the UP and DOWN button to highlight the desired channel, then press ENTER
button to show or hide the highlighted channel.
Favorite Allows you to add these channels as the favorite channels.
Use UP or DOWN button to highlight “Favorite”, then press the RIGHT
or ENTER button to enter into the following menu.
Show / Hide Allows you to show or hide the channels.
Channel No. Displays the number of the current channel.
Channel Label Displays the label of the current channel.
DTV Signal Displays the quality of the current DTV signal.
Setup
Lock
12
6
Time
Pictu re
Chann el
Sel ect
MENU
No Progr am Name Fav ori te
No Progr am Name Fav ori te
ATSC 1
ATSC 2
ATSC 3
KOC E HD
KOC E SD
KOC E LB
2 0
14 1
14 2
14 3
50 1
50 2
66 0
50 3
Use the UP or DOWN button to highlight “Show / Hide”, then press the RIGHT
or ENTER button to enter into the following menu.
Setup
Lock
12
6
Time
Pictu re
Chann el
Sel ect
MENU
No Progr am Name Sho w
No Progr am Name Sho w
ATSC 1
ATSC 2
ATSC 3
KOC E HD
KOC E SD
KOC E LB
2 0
14 1
14 2
14 3
50 1
50 2
50 3
66 0
Audio
Audio
hsilgnE
ReturnReturn
ReturnReturn
Page 37

29
Application
USB Settings
English
This TV is a widescreen TV with USB port. Through the USB port the TV can access USB flash
drives and display pictures or play MP3 files. To use this feature connect a USB flash drive to
the USB port of the TV and press the SOURCE button to select USB to start browsing for
music and pictures.
Sel ect M ove
mblog.jpg
Play File:1
Total size:2.0GB
Unused size:1.8GB
001/001 534 x 800 34.3KB
Repeat
mblog.jpg
Music
C:\
C:
USB
Photo
In the USB Mode, select Photo
In the Photo Mode:
In the Music Mode:
In the USB M
ode, select Music
You can use the
You can use the button to return main menu.
You can use the or button to select the file you want.
You can use the button to select Photo.
▲
▲
or
or
▼
▼
You can use the button to select Music.
▲
or
▼
button to select the file you want and press ENTER to view the file.
You can use the
You can use the button to Stop.
▲ or ▼ button to select the file you want and press ENTER to play the file.
Sel ect M ove
Photo
LOVE.mp3
Play File:1
Total size:2.0GB
Unused size:1.8GB
002/002
Repeat
LOVE.jpg
Title:
Artist:
Album:
Year
Stop
00:00 02:38
Music
C:\
C:
USB
▲
▲
▲
▲
You can use the RPT button to select the file you want.
▲▲▲
▲▲▲
▲
▲
▲
Page 38

Troubleshooting
Maintenance and Service
In case a problem occurs with your LED TV, please take the following steps first.
If you still have the problem, turn the power off and contact your dealer or an authorized service center.
Problem Action
The screen does not appear.
Is the power plug connected? Insert the power plug.
Press the power button of the remote control.
The screen appears too
This problem occurs for a brief time in the process of
slowly after the power is turned on.
image elimination processing in order to hide temporary screen noise
that occurs when the power is turned on. But if the screen does not
come after 1 minute contact your dealer or an authorized service
center.
Screen is too bright or too dark. Adjust the brightness or contrast.
Screen is too large or too small. Adjust the Scale or Zoom Settings.
Stripes appear on the screen
Stop using wireless telephones, hair dryers or electric drills.
and it shakes.
The screen does not move. Press the PAUSE button. Check if the Pause button is pressed on
external equipment.
Screen appears, Voice is not heard
1. Press the "MUTE" button.
2. Increase the sound level by pressing the volume adjustment button.
3. Check if sound terminal of external input is connected properly.
4. Check if audio cables are connected properly.
5. Select and check the other input.
If the sound still does not work and the other channels are the
same after you have done as the above, contact your dealer or
an authorized service center.
Remote control does not work
1. Check if main power is On.
2. Check that the batteries of the remote controller were loaded
properly.
3. Check to see if any obstacle exists between the LED TV and
the remote control, then remove it, if any.
4. If the batteries are low, replace them with two new
batteries.
30
English
Page 39

31
Specifications
Maintenance and Service
The cabinet design and electronics specifications may be modified without prior notice for
performance improvement.
Weight and dimensions are approximate
English
Panel Size
Brightness
Contrast Ratio
Viewing Angle
LED Panel
Max. Resolution
INPUT
OUTPUT
VIDEO
AUDIO (L/R)
PC/AUDIO (L/R)
HDMI
RF
Component (YPbPr)
USB
AUDIO (L/R)
SPDIF
Power Source
Power Consumption
Dimension
Weight
28” TFT LED
200
3000:1
1780/178
0
1366 x 768
1
1
1
2
1
1
1
1
1
DC 12V
50W
25.1” x 16.0” x 1.97”
13lbs
JTV2815DC
Page 40

31
Specifications
Maintenance and Service
The cabinet design and electronics specifications may be modified without prior notice for
performance improvement.
Weight and dimensions are approximate
English
Panel Size
Brightness
Contrast Ratio
Viewing Angle
LED Panel
Max. Resolution
INPUT
T
VIDEO
AUDIO (L/R)
PC/AUDIO (L/R)
HDMI
RF
Component (YPbPr)
USB
AUDIO (L/R)OUTPU
SPDIF
Power Source
Power Consumption
Dimension
Weight
28” TFT LED
200
3000:1
1780/178
0
1366 x 768
1
1
1
3
1
1
1
1
1
AC
60W
25.3” x 15.4” x 3.3”
7.5lbs
JE2815
Page 41

Specifications
Maintenance and Service
The cabinet design and electronics specifications may be modified without prior notice for
performance improvement.
Weight and dimensions are approximate
English
Panel Size
Brightness
Contrast Ratio
Viewing Angle
LED Panel
Max. Resolution
INPUT
OUTPUT
VIDEO
AUDIO (L/R)
PC/AUDIO (L/R)
HDMI
RF
Component (YPbPr)
USB
AUDIO (L/R)
SPDIF
Power Source
Power Consumption
Dimension
Weight
32” TFT LED
200
3000:1
1780/178
0
1366 x 768
1
1
1
3
1
1
1
1
1
AC
65W
29.1” x 17.6” x 3.5”
9.9lbs
JE3215
Page 42

Specifications
Maintenance and Service
The cabinet design and electronics specifications may be modified without prior notice for
performance improvement.
Weight and dimensions are approximate
English
Panel Size
Brightness
Contrast Ratio
Viewing Angle
LED Panel
Max. Resolution
INPUT
OUTPUT
VIDEO
AUDIO (L/R)
PC/AUDIO (L/R)
HDMI
RF
USB
Component (YPbPr)
AUDIO (L/R)
SPDIF
Power Source
Power Consumption
Dimension
Weight
40” TFT LED
200
3000:1
1780/178
0
1920 x 1080
1
1
1
3
1
1
1
1
1
AC
70W
44.6” x 26.3” x 4.0”
14lbs
JE4015
Page 43

Specifications
Maintenance and Service
The cabinet design and electronics specifications may be modified without prior notice for
performance improvement.
Weight and dimensions are approximate
English
Panel Size
Brightness
Contrast Ratio
Viewing Angle
LED Panel
Max. Resolution
INPUT
OUTPUT
VIDEO
AUDIO (L/R)
PC/AUDIO (L/R)
HDMI
RF
USB
Component (YPbPr)
AUDIO (L/R)
SPDIF
Power Source
Power Consumption
Dimension
Weight
50” TFT LED
200
3000:1
1780/178
0
1920 x 1080
1
1
0
2
1
1
1
1
1
AC
90W
44.7” x 26.3” x 3.35”
25lbs
JE5015
Page 44

2
3
4 - 5
6
7
8
9
12
13
14
15
16
17
18
19
20
22 - 23
24 - 26
27
- 28
..............................................................................
...........................................................
.....................................................
.................................................
.........................................
.................................................
..............................................................
....................................................................
....................................................................................
........................................................................
.................................................................................
.......................................................
...............................................................................
16
.......
..............
........................................................
21
.....................................................................
.....................................................................
.................................................
.................................................
.................................................................
10 - 11
CONTENUS
Précautions de Sécurité
Informations importantes
Noms de chaque élément (Vue en face) / Accessoires
Nom
s de chaque élément (Vue arrière)
Mo
ntage sur un ordinateur de bureau / Précautions d’installation
Installation d’une antenne
Télécommande
Précautions
/ Comment utiliser la télécommande
Raccordement
Raccordements de VCR / Raccordement de l’Amplificateur numérique / Voir une cassette vidéo
Connexion des bornes supérieures du téléviseur câble/satellite
/
Regarder la télévision grâce au câble
Raccordements de DVD / Connexions d’USB / reproduire le DVD
Raccordement de l’Ordinateur Personnel / Amplificateur audio à l’extérieur
Comment l'utiliser le moniteur de l’ Ordinateur Personnel
Utilisation de base
Sélectionner la source d’entrée / Assistant de l’installation initiale
Application
Personnalisation des paramètres de L’image
Personnalisation des paramètres AUDIO
Personnalisation des paramètres de SETUP
Personnalisation des paramètres du TIMER
Personnalisation des paramètres de CHANNEL (chaîne)
Opération de menu
Mesures imp
ortantes de sécurité
Information guide de l’utilisateur
saiançrF
Personnalisation des paramètres de verrouillage (LOCK)
29
........................................................................................
30
31
.................................................................................
....................................................................................
Personnalisation des USB
Entretien et Service
Dépannage
Spécifications
Page 45

3
Information Important
Avertissement
Pour diminuer le risque de feu ou décharge électrique,n’exposer
Ce symbole est destiné à avertir l’utilisateur de
l’existence d’un « voltage dangereux » non
isolé au sein du produit, qui peut être assez fort
pour constituer un risque de décharge électrique
sur les personnes.
Ce symbole est destiné à avertir l’utilisateur de
l’existence d’instructions importantes d’opération et
de maintenance dans le guide accompagnant
l'appareil.
Ce produit a été examiné et s´est avéré conforme aux exigences
d’un dispositif numérique de la classe B, conformément à la partie
15 des règles de FCC. Ces limites sont conçues pour assurer la
protection raisonnable contre l'interférence nocive quand
l'équipement est utilisé dans un environnement commercial.
Ce produit crée, utilise et peut émettre des ondes de
radiofréquences et, s´il n´est pas installé et utilisé comme le
manuel d'instruction le préconise, il peut causer des interférences
nocives aux communications radio. Le fonctionnement de cet
équipement dans un secteur résidentiel est susceptible de causer
des interférences nocives, dans ce cas l'utilisateur devra corriger
les interférences à ses propres frais.
AVERTISSEMENT de FC:C
Conformément à 47CFR, partie 15.21 des règles de FCC, tous les
changements ou modifications apportés sur ce moniteur et non
approuvés expressément par le fabricant pourraient causer
l'interférence nocive et annuleraient l'autorité de l'utilisateur pour
faire fonctionner cet appareil.
AVERTISSEMENT :
C'est un produit de CLASSE B. Dans un environnement domestique,
ce produit peut causer des interférences radio, dans ce cas
l'utilisateur peut être requis de prendre des mesures suffisantes
pour les arrêter.
Ce produit utilise de la soudure d’étain et de plomb, et une lampe
fluorescente contenant une petite quantité de mercure. Le rejet
de ces matériaux peut être effectué en tenant compte de
considérations environnementales. Pour la disposition ou
l'information de réutilisation, veuillez prendre contact avec vos
autorités locales ou avec l'alliance électronique d'industries
: www.eia.org
INSTRUCTIONS IMPORTANTES DE SECURITE
1) Lire ces instructions.
2) Garder ces instructions.
3) Observer tous les avertissements.
4) Suivre toutes les instructions.
5) N’utiliser pas ce produit près de l’eau. L'appareil ne devrait
pas être exposé aux projections ou aux éclaboussures et aucun
objet rempli de liquide, tels que des vases, ne devraient être
placé sur le produit.
6) Nettoyer uniquement avec un tissu sec.
7) Ne bloquer aucune ouverture de ventilation. Installer
selon
les instructions du fabricant.
9) N´annulez pas l´objectif de sécurité de la prise de type polarisé
ou de mise à terre. Une prise polarisée a deux lames avec une
plus large que l'autre. Une prise du type de mise à la terre a
deux lames et une troisième fourche à la terre. La lame large
ou la troisième fourche est fournie pour votre sécurité. Si la
prise fournie ne s'adapte pas à votre sortie, veuillez consulter
un électricien pour le remplacement de la prise non actualisée.
10) Protégez le fil d’alimentation contre les piétinements ou les
pincements, en particulier sur les prises, les connecteurs, et
le point où ils sortent de l'appareil.
11) Employez seulement les connexions/accessoires indiqués par
le fabricant.
13) Débrancher cet appareil pendant les tempêtes avec foudre
ou s´il est inutilisé pendant des périodes longues.
14) Remettre tout service aux mains de personnel qualifié.
L'entretien est nécessaire quand le produit a été endommagé
de quelque manière, par exemple si le câble d’alimentation ou
la prise sont endommagés, si du liquide a été renversé ou des
objets sont tombés sur le produit, si le produit a été exposé à
la pluie ou à l'humidité, s´il ne fonctionne pas normalement
ou s´il est tombé.
15) Là où la prise d’alimentation ou l’adaptateur d'appareil sont
utilisés en tant que dispositif de déconnexion, le dispositif de
débranchement doit rester rapidement fonctionnel.
8) Ne pas installer près d'une source
de chaleur telle que des radiateurs,
des bouches de chaleur, des
fourneaux ou d'autres appareils
(amplificateurs y compris) qui
produisent la chaleur.
12) Employez seulement avec le chariot,
le stand, le trépied, le support ou
la table indiquée par le fabricant
ou vendu avec l'appareil. Quand un
chariot est utilisé, faites attention en
déplaçant la combinaison de
chariot/appareil pour éviter les
dommages par basculement.
pas ce produit à la pluie ou à l’humidité.
DECLARATION de FCC
Français
Page 46

Mesures de sécurité importantes
Avant de vous servir de votre téléviseur, veuillez lire entièrement
ces instructions, et gardez ce manuel pour une future référence.
Observez et respectez soigneusement tous les avertissements,
et les instructions placés sur l'unité ou décrits dans les instructions
d’opération ou le manuel d'entretien.s
AVERTISSEMENT
Par mesure de sécurité contre les dommages, il faut respecter les
mesures suivantes de sécurité de base dans l'installation,
l'utilisation et l'entretien de l'unité.
Sources d’alimentation
Cette unité ne doit être actionnée qu’à partir du type de source
d'alimentation indiqué sur l’étiquette d’information.
Si vous n'êtes pas sûr du type de courant électrique chez vous,
consultez votre vendeur ou la compagnie locale d´électricité.
Mettre à terre ou polarisation
Pour l'unité avec une prise polarisée d’alimentation CA
Cette unité est équipée d'une prise polarisée de fil de courant
alternatif (une prise ayant une lame plus large que l'autre) ou
d'une connexion d'alimentation à CC pour utilisation dans un
véhicule. Suivez les instructions suivantes :
Cette prise s'adaptera à la sortie de courant
en un seul sens. C'est un dispositif de
sécurité. Si vous ne pouvez pas insérer la prise entièrement
dans la sortie, essayez d´inverser la prise. Si la prise ne
s'adapte toujours pas, contactez votre électricien pour installer
une sortie appropriée. N´annulez pas la sécurité de la prise
polarisée en la forçant à entrer. de fil de courant
Pour l'unité avec un connecteur d'alimentation CC
Pour l'installation dans un véhicule, reliez le fil rouge à la ligne
d’accessoires de 12V et le fil noir à la prise de terre.
La prise murale
N'utilisez pas une sortie adaptée appauvrie. Insérez le connecteur
entièrement dans la prise. S'il n´est pas fermé, il peut se dilater et
provoquer le feu. Contactez votre électricien pour changer la sortie.
Câblage
Pour votre sécurité, débranchez le câble d’alimentation lors du
câblage.
Décharge électrique
Ne touchez pas le fil d’alimentation de courant alternatif ou l'unité
avec la main humide. Si vous branchez/débranchez le fil de courant
alternatif de l'unité avec la main humide, il peut se produire une
décharge électrique. N'essayez jamais de déplacer l'unité à moins
que le fil de courant alternatif ne soit débranché.
Nettoyage
• Nettoyez la prise d’alimentation régulièrement..
• Si la prise est couverte de poussière et si elle a pris l'humidité,
son isolant peut être détérioré et provoquer un incendie. Débranchez
la prise d´alimentation et nettoyez-la régulièrement.
• Nettoyez le coffret du téléviseur avec un tissu doux et sec. Pour
enlever la poussière de l'écran, essuyez-le délicatement avec un tissu doux.
• Les taches rebelles peuvent être enlevées avec un tissu légèrement
imbibé d’une solution de savon doux et d'eau chaude. N'employez
jamais les dissolvants puissants tels que le diluant ou le benzène
pour le nettoyage.
• En cas d´utilisation d´un tissu chimiquement traité préalablement,
veuillez suivre les instructions données sur le paquet.
Surcharge
Ne surchargez pas les prises murales, les fils de prolongation ou
les broches au-delà de leur capacité, puisque ceci peut causer, en
conséquence, un incendie ou la décharge électrique.
Alimentation
Toujours éteindre l'unité quand elle n'est pas employée.
Quand l'unité est laissée sans surveillance et inutilisée pendant
de longues périodes, débranchez-la de la prise murale en prévention
d'un éventuel défaut de fonctionnement interne qui pourrait créer
un risque d'incendie.
Bruit
S´il se produit un grésillement ou un bruit lorsque le téléviseur
fonctionne, débranchez le téléviseur et consultez votre vendeur
ou votre technicien d’entretien. Il est normal que le téléviseur
produise occasionnellement des grésillements, en particulier lors
de l´allumage ou de la mise hors service.
Fil d'alimentation
Si vous endommagez le câble d’alimentation, il peut causer en
conséquence le feu ou la décharge électrique.
• Ne pas pincer, plier et tordre le câble de manière excessive.
Les lignes centrales peuvent être exposées et coupées et causer
un court-circuit et provoquer un incendie ou une décharge électrique.
• Ne convertissez ou n’endommagez pas le câble d’alimentation.
• Ne mettez rien de lourd sur le câble d’alimentation.
Ne tirez pas sur le câble
• Maintenez le câble d’alimentation loin des sources de chaleur.
• Soyez sûr de saisir la prise en débranchant le fil d’alimentation.
Si le fil d’alimentation est endommagé, arrêtez de l'utiliser et
remplacez-le par un nouveau.
Ventilation
Les fentes et les ouvertures dans le téléviseur sont équipées pour
la ventilation nécessaire. Pour assurer l'opération fiable de l'unité,
et pour la protéger contre la surélévation de température, ces fentes
et ouvertures ne doivent jamais être bloquées ou couvertes. A moins
que la ventilation appropriée soit fournie, l'unité peut recueillir la
poussière et devenir sale. Pour la ventilation appropriée, observez
ce qui suit :
• N'installez pas l'unité tournée vers l´arrière ou sur un côté
• N'installez pas l'unité retournée ou à l'envers.
• Ne couvrez jamais les fentes et les ouvertures avec du tissu ou
d'autres matériaux.
• Ne bloquez jamais les fentes et les ouvertures en plaçant l'unité sur
un lit, un sofa, une couverture ou toute autre surface similaire.
• Ne placez jamais l'unité dans un espace confiné, tel qu'une bibliothèque
ou un coffret intégré, à moins que la ventilation appropriée ne soit fournie.
• Laissez un certain espace autour de l'unité. Autrement, la circulation
d’air nécessaire peut être bloquée, et entraîner la surchauffe, et
provoquer un incendie ou endommager l'unité.
4
Français
Page 47

5
Mesures de sécurité importantes
Sources de chaleur
Ne l’installez près d'aucune source de chaleur telle que des radiateurs,
des bouches de chaleur, des fourneaux ou d'autres appareils
(amplificateurs y compris) qui produisent de la chaleur.
N’utiliser pas ce produit près de l’eau
Ne l’employez pas près d´une baignoire, d´un lavabo, de l´évier de
cuisine ou d´un baquet à laver, dans un sous-sol humide ou près de
la piscine.
Entrée d’objets et liquides
N'insérez jamais d’objet dans le produit par les passages ou les
ouvertures. Il y a de la haute tension dans le produit, et l'insertion
d'un objet peut causer la décharge électrique et/ou le court circuit
de pièces internes. Pour la même raison, ne renversez pas d'eau
ni de liquide sur le produit.
Foudre
Débranchez l’appareil pendant les tempêtes de foudre ou lorsqu´il
est inutilisé pendant des longues périodes.
Pour une protection supplémentaire pendant une tempête de foudre
ou lorsque l´appareil est laissé sans surveillance et sans utilisation
pendant de longues périodes, débranchez le produit de la prise
murale et débranchez l'antenne. Ceci empêchera les dommages à
l'équipement dû à la foudre et aux hausses de tension sur les câbles
d’alimentation.
Ne l’employez pas juste après l´avoir déplacé d´un environnement
de basse température à un autre à haute température, car ça peut
causer
de la condensation, dont le résultat peut être le feu ou une
décharge électrique ou d'autres risques
Ne l’employez pas juste après l´avoir déplacé d´un environnement
de basse température à un autre à haute température, car ça peut
causer de la condensation, dont le résultat peut être le feu ou une
décharge électrique ou d'autres risques
Maintenance
Toute la maintenance doit être réalisée par le personnel qualifié de
service. L'entretien est nécessaire quand le produit a été endommagé
de quelque façon, par exemple si le câble d’alimentation ou la prise sont
endommagées, si du liquide a été renversé ou des objets sont tombés
sur le produit, si le produit a été exposé à la pluie ou à l'humidité, s´il ne
fonctionne pas normalement ou s´il est tombé.
Pièces de Rechange
Au cas où le produit aurait besoin de pièces de rechange,
assurez-vous que la personne de maintenance utilise les pièces
indiquées par le fabricant ou celles qui ont les mêmes caractéristiques
et performances que les pièces originales.
L'utilisation de pièces
non autorisées peut causer le feu, la décharge électrique et/ou tout
autre danger.
Accessoires
Il faut utiliser seulement les fixations/accessoires spécifiés par le
fabricant. N’utilisez pas de fixations non recommandées par le
fabricant. L’utilisation d´accessoires inappropriés peut causer des
accidents.
Les dommages qui exigent une maintenance
Si l’une des informations suivantes se produit, débranchez le fil
d’alimentation de la sortie de courant alternatif et demandez à une
personne qualifiée de maintenance d´effectuer les réparations :
a.Le fil d’alimentation ou la prise sont endommagés.
b.Le liquide a été renversé sur le produit ou lorsque des objets
sont tombés sur le produit.
e. Le produit est tombé ou le coffret a été endommagé de quelque manière.
qui sont décrites dans les consignes d'utilisation. Le réglage inapproprié de
commandes non décrites dans les instructions peut causer des dommages,
ce qui exige souvent à technicien qualifié un long travail de réglage.
f. Le produit montre une condition anormale ou montre un changement
notoire dans ses performances. N'importe quelle anomalie apparente
dans le produit a indiqué que le produit a besoin de maintenance.
Contrôles de sécurité
Pour le travail de maintenance ou de réparation, demandez au technicien
de service d´effectuer des contrôles de sécurité pour s'assurer que le
produit est en conditions appropriées de fonctionnement.
Support de mur ou de plafond
En montant l´appareil sur le mur ou sur le plafond, soyez sûr d'installer le
produit selon la méthode recommandée par le fabricant. C'est une condition
de sécurité.
Protection de Panneau
Le panneau utilisé dans ce produit est fait en verre. Par conséquent, il
peut se casser quand le produit tombe ou reçoit l´impact d'autres objets.
Faites attention à ne pas être blessé par les morceaux de verre cassés s
i le panneau se casse.
Défaut de Pixel
De temps en temps, quelques pixels inactifs peuvent apparaître sur
l'écran comme un point fixe bleu, vert ou rouge. Veuillez noter que
ceci n'affecte pas la performance de votre produit.
Antennes
Mise à la terre d’antenne externe
Si une antenne externe est installée, suivez les précautions ci-dessous.
Le système externe d'antenne ne devrait pas être situé à proximité des
lignes aériennes à haute tension ou d'autres alimentations de puissance
électrique ou près d’un endroit où il peut entrer en contact avec ces lignes
ou circuits à haute tension.
EN INSTALLANT UN SYSTEME EXTERNE D'ANTENNE, IL FAUT PRENDRE
UN SOIN EXTREM
E A NE PAS ENTRER EN CONTACT AVEC LES LIGNES
D´ALIMENTATION A HAUTE TENSION CAR LE CONTACT AVEC ELLES EST
PRESQUE SYSTÉMATIQUEMENT MORTEL
Soyez sûr que le système d'antenne est mis à terre pour offrir des protections
contre les hausses de tension et les charges statiques accumulées. La section
810 du Code Electrique national (NEC) des Etats-Unis et la Section 54 du Code
Electrique Canadien fournissent des informations en ce qui concerne la mise à la
terre appropriée du mât et de la structure porteuse, la mise à la terre du câble
d'entrée à une unité de décharge d'antenne, la grandeur des conducteurs de mise
à la terre, l´emplacement de l'unité de décharge d'antenne, le raccordement aux
électrodes de mise à la terre, et les conditions requises pour l'électrode de mise
à la terre.
c.Le produit a été exposé à la pluie ou à l'eau.
d.Le produit ne fonctionne pas correctement comme décrit dans les
consignes d'utilisation. Ne touchez pas d´autres commandes que celles
Mise à la terre d’antenne selon le Code
Electrique National, ANSI/NFPA 70
Brides à la terre
Fil d’entrée d’antenne
Equipement de
service électrique
Unité de décharge d’antenne
(NEC Section 810-20)
conducteurs mis à la terre
(NEC Section 810-21)
Brides à la terre
Système d’électrode de service
d’alimentation à mettre à la terre
(NEC Art 250 Part H)
Code Electrique National
Français
Page 48

Accessories
Information guide de l’utilisateur
Noms de chaque élément
Vue de face
Bouton de source
Bouton de menu – Bouton d’affichage de Menu OSD
Bouton de Volume +,
-
Bouton de Canal / Programme +,
-
-
Bouton d’alimentation
La configuration des composants peut sembler différente de l’illustration suivante.
Câble AV
Batterie
Télécommande
x
6
SOURCE
MENU
CH+
CH-
VOL+
VOL-
POWER
Câble d’alimentation
JTV2815DC
Page 49

Accessories
Information guide de l’utilisateur
Noms de chaque élément
Vue de face
Bouton de source
Bouton de menu – Bouton d’affichage de Menu OSD
Bouton de Volume +,
-
Bouton de Canal / Programme +,
-
-
Bouton d’alimentation
La configuration des composants peut sembler différente de l’illustration suivante.
Câble AV
Batterie
Télécommande
x
SOURCE
JE2815
POWER
Page 50

Accessories
Information guide de l’utilisateur
Noms de chaque élément
Vue de face
Bouton de source
Bouton de menu – Bouton d’affichage de Menu OSD
Bouton de Volume +,
-
Bouton de Canal / Programme +,
-
-
Bouton d’alimentation
La configuration des composants peut sembler différente de l’illustration suivante.
Câble AV
Batterie
Télécommande
x
JE3215
SOURCE
Page 51

Accessories
Information guide de l’utilisateur
Noms de chaque élément
Vue de face
Bouton de source
Bouton de menu – Bouton d’affichage de Menu OSD
Bouton de Volume +,
-
Bouton de Canal / Programme +,
-
-
Bouton d’alimentation
La configuration des composants peut sembler différente de l’illustration suivante.
Câble AV
Batterie
Télécommande
x
JE4015
SOURCE
Page 52

Accessories
Information guide de l’utilisateur
Noms de chaque élément
Vue de face
Bouton de source
Bouton de menu – Bouton d’affichage de Menu OSD
Bouton de Volume +,
-
Bouton de Canal / Programme +,
-
-
Bouton d’alimentation
La configuration des composants peut sembler différente de l’illustration suivante.
Batterie
Télécommande
x
JE5015
SOURCE
Page 53

Information guide de l’utilisateur
Noms de chaque élément
Vue arrière
Cric de USB
Cric de HDMI1 / HDMI2
AV entre (Video et Audio)
Y P
b
P
r
2
1
3
7
1
5
8
4
Audio (gauche / droit) sortie
DC 12V
RF (ATSC/NTSC)
6
SPDIF
2
1
3 4
4
5
6 7 8
JTV2815DC
7
Page 54

Information guide de l’utilisateur
Noms de chaque élément
Vue arrière
1
JE2815
2
1
3
4 75 6
(ARC)
/
/
8
9
10
7
7
8
2
7. Cric de HDMI1 / HDMI2 / HDMI3
3. HEADPHONE OUTPUT
10. Cric de USB
6. COMPONENT INPUT
5. AV entre (Video et Audio)
4. SPDIF OUTPUT
8. PC IN (VGA and AUDIO) INPUT
9. RF IN
2. Audio (gauche / droit) sortie
1. AC IN
Page 55

Information guide de l’utilisateur
Noms de chaque élément
Vue arrière
1
8
2
3. HEADPHONE OUTPUT
10. Cric de USB
6. COMPONENT INPUT
5. AV entre (Video et Audio)
4. SPDIF OUTPUT
8. PC IN (VGA and AUDIO) INPUT
9. RF IN
2. Audio (gauche / droit) sortie
1. AC IN
JE3215
2
3
4 75 6
8
9
10
7
7
(ARC)
/
/
1
7. Cric de HDMI1 / HDMI2 / HDMI3
Page 56

Information guide de l’utilisateur
Noms de chaque élément
Vue arrière
1
8
2
3. HEADPHONE OUTPUT
10. Cric de USB
6. COMPONENT INPUT
5. AV entre (Video et Audio)
4. SPDIF OUTPUT
8. PC IN (VGA and AUDIO) INPUT
9. RF IN
2. Audio (gauche / droit) sortie
1. AC IN
JE4015
2
3
4 75 6
8
9
10
7
7
(ARC)
/
/
1
7. Cric de HDMI1 / HDMI2 / HDMI3
Page 57

Information guide de l’utilisateur
Noms de chaque élément
Vue arrière
1
8
2
4. Cric de HDMI1 / HDMI2
6. AV entre (Video et Audio)
2. Audio (gauche / droit) sortie
JE5015
2
1
3
4
4
5
6
7
8
8
2
3. Cric de USB
5. COMPONENT INPUT
7. SPDIF OUTPUT
8. RF IN
1. AC IN
Page 58

8
Information guide de l’utilisateur
Montage sur table
Votre téléviseur LED peut être monté sur une table avec le sommier installé.
Ce n’est pas une unité à poser par terre.
Précautions d’installation
Support mural
Veuillez garantir l’espace suffisant pour l’utilisation en sécurité.(Veuillez vous référer à A et B).
L´installation du téléviseur LED dans un endroit incorrectement aéré peut causer endommager le
téléviseur LED en raison de la hausse de température.
Montage sur un mur
Contactez votre vendeur pour acheter le « support mural à angle réglable » requis pour l'installation murale.
Utilisation du socle
Utilisation du socle
Ne pas l’installer à un endroit instable avec une surface de support plus petite que le téléviseur à AC.
Veuillez vous référer au manuel d’utilisateur de support de bureau pour les détails d’installation.
Français
1
11
1
Page 59

9
Information guide de l’utilisateur
Installation d’une antenne
Pour connecter aux transmissions ATSC ou NTSC
Prise murale avec le connecteur F
Câble coaxial (rond) d’antenne
Antenne externe
Analogue + Numérique 75 Ω
Appuyez sur le bouton SOURCE de la télécommande pour sélectionner TV, appuyez ensuite
sur le bouton RIGHT pour confirmer.
Après vous pouvez recevoir le signal d’ATSC/NTSC.
Page 60

10
Information guide de l’utilisateur
Télécommande
Français
Fonctions des boutons de la télécommande
TOUCHES NUMERIQUES
Marche/ Arrêt pour le téléviseur et le DVD
Activez le mode de TV
rapide – retour en arrière
Appuyez sur ce bouton pour afficher la liste préférée
Appuyez sur le bouton C-LIST pour afficher la liste des canaux
Fermer la légende
Alterner entre les temps de repos du téléviseur LED temps de
repos : non/5/10/15/30/45/60/90/120/180/240 minutes)
affichages de menu d’OSD sur l’écran
déplacez vers le haut, vers le bas, à gauche ou à droite
Affichage du guide de programme
affichages d’entrées AV
augmentation ou diminution de chaîne
Choix de chaîne numérique
Appuyez une fois pour le muet acoustique, puis appuyez encore une fois pour enregistrer l’audio
Retourner au canal précédemment vu
Augmentation ou diminution du volume
sortir
Appuyez sur ENTRER pour confirmer votre opération
cycle parmi le mode de balance : au loin, de cinéma, normal, de zoom
Appuyez sur INFO pour afficher une variété
d’informations sur la chaîne en cours
Appuyez sur IMAGE pour le cycle de choix de types
d’image : Standard / Dynamique / Personnel
Appuyez sur la touche SOUND pour alterner entre les
types son à choisir : Standard/ Musique/ Film/ Personnel
Appuyez sur MTS / SAP pour choisir le stéréo, SAP ou mono
Temps d’affichage ou information de chapitre
choix de répétition
Activez le mode DVD
POWER
PREVIOUS
EJECT(DVD)
FAST REVERSE
STOP
T/F(DVD)
ZOOM(DVD)
AUDIO(DVD)
SET UP(DVD)
F-LIST
C-LIST
SLEEP
CC
MENU
NAVIGATION
EPG
CH+/CH-
SOURCE
DVD
TV
FAST FORWARD
NEXT
RPT
SUB-T(DVD)
DISP(DVD)
EQ(DVD)
TITLE(DVD)
MTS/SAP
SOUND
PICTURE
INFORMATION
SCALE
ENTER
EXIT
VOL+/VOL-
MUTE
RETURN
1
2
3
4
5
6
7
8
9
10
11
12
13
14
15
16
17
18
19
20
21
22
23
24
25
26
27
28
29
30
31
32
33
34
35
36
37
38
39
40
1
4
5
6 7
9
10
11
8
13
14
15
12
17
18
19
16
21
22
23
20
25
29
31
35
36
38
39 40
26
27
30
24
28
33
37
32
34
2
3
LAY/PAUSEP
Page 61

Télécommande
11
Note : Les fonctions de DVD sont destinées uniquement au lecteur DVD de JENSEN.
Lire le manuel de votre DVD de JENSEN pour plus d’informations.
Information guide de l’utilisateur
POWE R
CH
VOL
RETU RN
MUTE
MENU
INFO
ENTE R
SOUR CE
EXIT
EPG
1
2
3
ZOOM
SUB T
DISP
SETU P
AUDI O
EQ
TITL E
POWER POWER
CH+
CH-
VOL+
VOL-
VOL+
VOL-
RETURN
MUTE
MENU
INFO
UP UP
DOWN DOWN
LEFT LEFT
RIGHT RIGHT
ENTER OK
SOURCE SOURCE
EXIT
EPG
T F
T-F
1
EJECT
1
2 2
3 3
PICTURE
PICTURE
TITLE
SOUND
SOUND
EQ
F-LIST
F-LIST
AUDIO
C-LIST
C-LIST
SETUP
SLEEP
SLEEP
DISP
CC
CC
SUB-T
SCALE
SCALE
ZOOM
4
5
6
7
8
9
0
0 0
9 9
8 8
7 7
6 6
5 5
4 4
RPT
RPT
NEXT
FAST-FORWARD
FAST-REVERSE
PREVIOUS
PLAY-PAUSE
STOP
BUTTON
TV-FUNCTION DVD-FUNCTION TV-FUNCTION DVD-FUNCTION TV-FUNCTION DVD-FUNCTION
BUTTON
BUTTON
MTS-SAP
MTS/SAP
MENU
MUTE
STOP
PLAY-PAUSE
PREVIOUS
FAST-REVERSE
FAST-FORWARD
NEXT
RPT
Page 62

Précautions
Eviter les problèmes avec la télécommande
Insérer les piles dans la télécommande
12
Information guide de l’utilisateur
1. Vérifier la polarité ( +, -) des piles dans la télécommande.
2. Vérifier que les piles sont bonnes.
1. Ouvrer la couverture complètement.
2. Insérer les deux piles d’alimentation fournies (A
A, 1.5V) Assurez-vous que les polarités (+ et -) des
piles sont alignées correctement.
3. Remettre le couvercle
Précaution : Il y a risque d’explosion si la batte
rie est remplacée par un type incorrect.
Jeter les piles utilisées en vous référant au code national (programme de recyclage)
La télécommande devrait être actionnée à moins de 30 pieds (7 m) et à 30
o
vers la gauche ou la
droite du récepteur IR face au TV LED.
Les piles utilisées devraient être jetées de manière appropriée.
Comment utiliser la télécommande
Français
Page 63

ENTE R
13
Connecter la borne In composite du téléviseur LED à la borne Out en utilisant le câble composé inclus
(s´assurer que la couleur des terminaux et la couleur du câble sont les mêmes)
Raccordement
● Connexion aux composants de sortie
Les bornes peuvent varier en fonction du fabricant
1. Allumer le téléviseur LED et appuyer sur de la télécommande.
2. Utiliser pour se déplacer de « AV ».
3. Presse pour confirmer la sélection source ou l'opération arrête quelques
secondes et le système entreront automatiquement le mode de sélection.
4. Allumer le VCR, insérer la cassette et appuyer sur le bouton PLAY.
Raccordement de VCR
Voir une cassette vidéo
F
R
E
N
C
H
Câble composé (Inclus)
SOUR CE
Français
Raccordement d’amplificateur numérique
Les bornes peuvent varier selon le fabricant
● Raccordement à l’amplificateur numérique
<Amplificateur digital>
Câble SPDIF (non inclus)
Page 64

SOUR CE
ENTE R
Connexion des bornes supérieures du téléviseur câble/satellite
Regarder la télévision grâce au câble
14
Raccordement
● Raccordement aux composants de sortie
Pour regarder le téléviseur à l’aide d’un câble, souscrivez à la société locale du téléviseur de câble et installez
un récepteur séparé (Boîte d’installation en haut)
Les bornes varient selon les fabricants
● Raccordement à la borne HDMI
1. Allumer le téléviseur LED et appuyer sur de la télécommande.
2. Utiliser pour se déplacer à AV . Si HDMI a été raccordé, sélectionner HDMI.
3. Presse pour confirmer la sélection source ou l'opération arrête quelques secondes
et le système entreront automatiquement le mode de sélection.
Français
4. Allumer le récepteur de diffusion par câble et choisir la chaîne que vous voulez regarder.
Câble composé (Inclus)
Récepteur d’annonce de Câble
Récepteur d’annonce de Câble
Câble HDMI (non inclus)
Page 65

15
Connexions d’USB
Raccordement
Français
La connexion au USB
Note: la connexion USB peut être utilisée pour le téléchargement de logiciel et
soutient les lecteurs de média USB.
1.Raccorder la borne de YPbPr du téléviseur LED à la borne de Sortie vidéo de DVD.
2 Raccorder la borne audio dans YPbPr du téléviseur LED à la borne de Sortie audio de DVD.
3.Entre le TÉLÉVISEUR LED et le lecteur de DVD il doit s’accorder avec le câble composé de raccordement de Y, Pb et Pr.
Raccordements de DVD
● Raccorder à au composant de sortie.
Les bornes varient selon le fabricant
● Raccorder à la borne HDMI.
Câble audio (non inclus)
Câble composé de Vidéo (non inclus)
Lecture d’un DVD
SOU RC E
ENTE R
1. Allumer le téléviseur LCD et appuyer sur de la télécommande
2. Utiliser pour se déplacer à YPbPr. Si HDMI a été raccordé, sélectionner HDMI.
3. Appuyer pour confirmer la sélection de source.
4. Allumer le DVD, insérer le disque de DVD et appuyer sur le bouton de Play (Commencer).
Récepteur d’annonce de Câble
Câble HDMI (non inclus)
Page 66

16
Raccordement
Français
Raccordement de l’Ordinateur Personnel
Les bornes peuvent varier selon le fabricant.
Comment l'utiliser le moniteur de l’ Ordinateur Personnel
Câble de VGA (non inclus)
Câble Audio d’ordinateur (non inclus)
• Raccorder la borne d’entrée d’ordinateur du téléviseur LED à la borne VGA d’ordinateur
en utilisant un câble VGA.
• Raccorder la borne audio d’ordinateur du téléviseur LED à la borne audio d’ordinateur en
utilisant un câble audio de 3,5mm (écouteur).
(Seulement pour ordinateurs avec une borne audio)
SOU RC E
Allumer le téléviseur LED et appuyer sur de la télécommande.
Utiliser pour aller au VGA
.
ENTE R
3. Presse pour confirmer la sélection source ou l'opération arrête quelques secondes
et le système entreront automatiquement le mode de sélection.
Amplificateur audio à externe
● Raccorder à un amplificateur ou au système de Home Cinema.
Les bornes peuvent varier selon le fabricant.
• Raccorder la borne de sortie audio (Gauche/Droite) ordinateur du téléviseur LED à l’amplificateur audio
en utilisant un câble audio de pièce rapportée.
Note : Le parleur du téléviseur LED a encore son signal audio de sortie en ce moment.
Vous pouvez utiliser les boutons de Volume +/- pour ajuster le niveau de sortie audio.
Câble audio (non inclus)
<Amplificateur audio>
Page 67

17
Utilisation de Base
Sélection de la source d’entrée
● Vous pouvez choisir entre le signal du téléviseur et le signal d’entrée d’un autre appareil connecté au téléviseur.
● Utiliser cette fonction pour changer la source d’entrée que vous désirez voir.
Appuyer sur la télécommande
Utiliser pour aller à la source d’entrée souhaitée
Appuyer pour sélectionner.
Après vous choisissez la source d'entrée désirée, le système entrera automatiquement
le mode de sélection si l'opération arrête quelques secondes.
Assistant de l’installation initiale
Setup Wizard
Air/Cable
Cable System
Auto Scan
English
Cable
STD
Selec t Move E xit
MENU
Menu Language
Après avoir connecté votre antenne TV ou le fil de câble, éteignez le
téléviseur allumé. L'assistant de l’insatallation rapide s'affichera à l'écran.
Choisissez votre photo préférée, installée suivant les options d'antenne et
effectuant le SCAN Automatique pour recevoir des chaînes locales qui
seront stockées dans la mémoire de l’accordeur de TV.
L'assistant va vous diriger vers le menu du téléviseur pour sélectionner les options de l'antenne et executer le Scan
Automatique de Chaîne. Les chaînes trouvées seront stockées dans la mémoire de l’accordeur du TV.
Comment naviguer:
Appuyez sur la flèche ▲ ▼ pour mettre en surbrillance
la langue du menu et appuyez sur •
Appuyez sur la flèche pour mettre en surbrillance CABLE ou AIR en fonction de votre
raccordement de l'antenne.
•
Appuyez sur la flèche pour sélectionner Scan Automatique et appuyez sur
(lorsque le câble est sélectionné, "AUTO" est recommandé). Sinon, appuyez sur la fleche
pour sélectionner le câble du Système: STD> IRC> HRC> Auto.
•
droit pour sélectionner la langue OSD.
pour
Page 68

Setup
Lock
12
6
Time
Pictu re
Chann el
Auto Scan
Favorite
Show Hide
Channel No
Channel Label
DTV Signal
Air
Select Move Exit
MENU
50 3
KOCE
LB
Good
Setup
Lock
12
6
Time
Pictu re
Chann el
Change Pass wor d
System Lock
US
Canada
Reset RRT
RRT Setting
Select
Move Exit
MENU
On
Menu programmateur :
Vous permet de programmer différentes options de temps.
(choisir la source téléviseur)
Menu de blocage:
Vous permet de bloquer différentes options.
(choisir la source du téléviseur)
Menu d’Installation:
Vous permet de configurer différentes options.
(choisir la source téléviseur)
Vous permet de chaînes et configurer différentes options de chaînes.
(choisir la source du téléviseur)
Vous permette de personnaliser les options et les effets vidéo.
(choisir la source téléviseur par exemple)
18
Opération de menu
Air/Cable
Audio
Audio
Application
1. Appuyer sur le bouton « POWER » pour allumer le téléviseur LED.
2. Appuyer sur le bouton « MENU » de la télécommande, le menu de l’écran apparaît.
3. Utiliser les boutons « LEFT » et « RIGHT » pour sélectionner votre menu principal.
Menu image:
Vous permet d’ajuster les paramètres vidéo.
(choisir la source téléviseur par exemple)
Menu audio:
Menu chaînel:
4. Utiliser les boutons UP / DOWN choisir une option du sous-menu, et appuyer sur le bouton RIGHT.
En mode programmation, utilisez les boutons LEFT /RIGHT pour changer les valeurs.
5. Appuyer sur le bouton MENU pour quitter le sous-menu pour revenir au menu principal.
Appuyer encore une fois sur le bouton de MENU ou le bouton EXIT pour sortir du menu principal.
Note : Certaines options ne sont pas disponibles pour toutes les entrées.
Français
Setup
Lock
12
6
Time
Pictu re
Chann el
Picture Mode
Contrast
Brightness
Color
Tint
Sharpness
Color Mode
Standard
Normal
Select Move Exit
MENU
50
50
50
0
50
Audio
HDMI CEC
Setup
Lock
12
6
Time C hann el
Sound Mode
Bass
Treble
Balance
AVC
Audio Language
Standard
English
Select Move Exit
MENU
50
50
50
Off
Off
Pictu re
Audio
TV Speaker
Setup
Lock C hann el
Sleep Time
Time Zone
Daylight Savin g Time
Select Move Exit
MENU
Pictu re
Off
Pacific
Off
12
6
Time
Audio
Clock
2007/10/31 04:04PM
Lock
12
6
Time C hann el
Menu Langua ge
Transparen cy
Zoom Mode
Noise Reduc tio n
Closed Capt ion
Audio
Restore Defaul t
English
Select Move Exit
MENU
Pictu re
Off
Normal
Off
Setup
Audio
OUT
Fixed
Page 69

19
Personnalisation des paramètres de l’image
Choisir la source téléviseur par exemple. (Appuyer sur le bouton SOURCE pour sélectionner le mode TV)
1. Appuyer sur le bouton de POWER pour allumer le TV à ACL
Appuyer sur le bouton MENU de la télécommande pour montrer le menu principal, et utiliser les boutons
LEFT et RIGHT pour sélectionner l’IMAGE
2.
3.
Utiliser les boutons UP ET DOWN pour surligner une option individuelle d’IMAGE utiliser les boutons LEFT
et RIGHT pour changer les paramètres, et appuyer sur les boutons MENU ou EXIT pour quitter.
Le menu IMAGE inclut les options suivantes :
Mode d’image Cycles dans les modes d’affichage image : standard, dynamique, Doux, Personnel.
Contraste
Contrôle l’écart entre les zones les plus lumineuses et foncées d’image
Luminosité Contrôle la luminosité générale de l’image
Couleur Contrôler la couleur
Teinte Contrôler la teinte
Netteté
Augmenter ce paramètre pour voir les côtés de l’image bien définis; le diminuer pour les fondre
Mode couleur
Cycles dans les modes couleur : normal, froid, chaud
Setu p
Loc k
12
6
Time
Pic ture
Chan nel
Pic ture M ode
Co ntr ast
Bri ghtn es s
Co lor
Tin t
Sh arp ness
Co lor Mod e
Sta ndar d
Nor mal
Sel ect Move E xit
MENU
50
50
50
0
50
Audio
HDMI CEC
HDMI CEC
Si vous arrêtez le mode de CEC, les articles suivants (TV Auto Power, TV Auto Switch, Device Auto
Standby) seront hors d'utilisation.
Cette fonction est activée quand la TV s'est éteinte. N'importe quel appareil
compatible relié de CEC s'éteindra également
Puissance automatique de TV
Commutateur de TV automatique
Réserve automatique de appareil
Marche-TV sera allumée quand le appareil de CEC compatible est
activé sur le raccordement de HDMI.
Marche-TV changera en entrées de HDMI quand le appareil de CEC
compatible est activé sur le raccordement de HDMI
Setup
Lock
12
6
Time
Pictur e
Channe l
Sele ctMove
MENU
Audio
CEC Mode
TV Auto Power
TV Auto Switch
Device Auto Standby
On
On
On
Audio Receiver
On
On
Return
Récepteur audio Permet audio doitêtreenvoyé à unrécepteur AV HDMI connecté.
Page 70

20
Personnalisation des paramètres AUDIO
Choisir source TV par exemple. (Appuyer sur le bouton SOURCE pour sélectionner le mode TV)
1. Appuyer sur le bouton POWER pour allumer le TV à ACL
2. Appuyer sur le bouton MENU de la télécommande pour montrer le m
enu principal, et utiliser les
boutons LEFT et RIGHT pour sélectionner AUDIO
3. Utiliser les boutons UP et DOWN pour surligner une option indiv
iduelle de AUDIO utiliser les
boutons LEFT et RIGHT pour changer le paramètre , et appuyer sur les boutons MENU ou EXIT pour quitter.
Le menu AUDIO inclut les options suivantes :
Mode Audio Cycles dans les modes audio: normal, musique, film, et Personne
l.
Ba
sse Contrôle l’intensité relative des sons graves.
Aigus Contrôle l’intensité relative de sons aigus.
Balance
Pour ajuster l’équilibre des bandes son gauche et droite ou éte
indre le volume des
bandes son gauche et droite.
Haut-parleur TV Permet d'allumer et d'éteindre
AVC
Marche ou Arrêt (contrôle automatique de volume) garde le nivea
u de volume stable.
Langue audio
Vous permet de choisir la langue audio : anglais, français et espagnol
siaçnarF
Setu p
Lock
12
6
Time Chan nel
Sou nd Mod e
Bas s
Tre ble
Bal ance
AVC
Aud io Lan gu ag e
Sta ndar d
Eng lish
Sel ect Mov e Ex it
MENU
50
50
50
Off
Off
Pict ure
Audio
TV Speaker
Page 71

21
Application
Personnalisation des paramètres du TIMER
Sélectionner source TV par exemple. (Appuyer sur le bouton SOURCE pour sélectionner mode TV)
1. Appuyer le bouton POWER pour allumer le TV à ACL
2. Appuyer sur le bouton MENU de la télécommande pour montrer le menu principal, et utiliser les
boutons LEFT et RIGHT pour sélectionner le TIMER
3. Utiliser les boutons UP et DOWN pour surligner une option individuelle de TIMER, utiliser les boutons
LEFT et RIGHT pour changer le paramètre, et appuyer sur les boutons MENU ou EXIT pour quitter.
Le menu TIMER inclut les options suivantes
:
Minuteur de mise en veille
Vous permet d’installer le temps de mise en sommeil :
5min, 10min, 15min, 30min, 45min, 60min, 90min, 120min, 180min,
240min et éteindre.
Zone horaire
Vous permet de choisir la zone horaire correcte : Pacifique, Alaska,
Hawaii, Est, Central et Montagne.
Heure d’été
Vous permet d’allumer ou d’éteindre l’heure d’été.
Setu p
Lock Chan nel
Sle ep T im er
Tim e Zo ne
Day li gh t Sa vi ng T im e
Clo ck
Sel ec t
Mov e
Exi t
MENU
Pict ure
Off
Pac if ic
Off
200 7 10 3 1 04 04PM
12
6
Time
Audio
:
Page 72

22
Application
Personnalisation des paramètres de SETUP
Choisir la source TV par exemple. (Appuyer sur le bouton SOURCE pour sélectionner le mode TV
1. Appuyer sur le bouton POWER pour allumer la TV à ACL
2. Appuyer sur le bouton MENU sur la télécommande pour montrer le
menu principal, et utiliser
les boutons de LEFT ou RIGHT pour sélectionner INSTALLATION
3. Utiliser le bouton UP et DOWN pour surligner une option individ
uelle de SETUP, utiliser les
boutons LEFT et RIGHT pour changer le paramètre, et appuyer sur bouton MENU ou EXIT pour quitter.
Le menu SETUP inclut les options suivantes :
Langue du menu Vous permet de choisir les langues du menu : anglais, français et espagnol.
Transparence Vous permet d’allumer ou d’éteindre la fonction transparence du
menu de l’écran.
siaçnarF
Lock
12
6
Time Chan nel
Me nu L an gu ag e
Tra nsp ar en cy
Zoo m M od e
No ise Red uc ti on
Cl ose d C ap at io n
Au dio
Res to re Def au lt
Eng li sh
Sel ec t M ov e Exi t
MENU
Pict ure
Off
Nor ma l
Off
Setu p
Audio
OUT
Fixed
Mode Zoom Vous permet de choisir les modes de zoom : Normale, Cinéma, Large , Zoom.
Réduction de bruit Vous permet de choisir les modes de réduction de brut : Fort, A
rrêt, Faible, Moyen
Page 73

23
Application
Lock
12
6
Time Channe l
Mode
Font Style
Font Size
Font Edge Sty le
Font Edge Col or
FG Co lor
BG Co lor
FG Op acit y
BG Op acit y
Sele ct
Exit
MENU
Pictur e
Setup
Cust om
Defa ult
Defa ult
Defa ult
Defa ult
Defa ult
Defa ult
Defa ult
Defa ult
Lock
12
6
Time Chann el
CC Mode
Basi c S ele cti on
Adva nce d S ele cti on
Opti on
On
Exit
MENU
Pictu re
CC1
Serv ice 1
Setup
Select
Mov e
Audio
Move
Audio
Personnalisation des paramètres de SETUP
Télétexte (CC)
Utiliser le bouton DOWN pour surligner « Close Caption », appuyer ensuite sur le bouton
RIGHT ou ENTER pour entrer dans le menu suivant.
Mode CC Vous permet de choisir les modes télétexte :
Marche, Arrêt ou CC en muet.
Sélection de Base Vous permet de choisir les sélections de base : CC1, CC2,
CC3, CC4, Texte1, Texte2, Texte3 et Texte4.
Sélection avancée Vous permet de choisir les services avancés : Service1,
Service2, Service3, Service4, Service5 et Service6.
Option Utiliser le bouton DOWN pour surligner « Option », appuyer
ensuite sur le bouton RIGHT pour entrer dans le menu suivant.
Utiliser les boutons UP et DOWN pour surligner l’élément
souhaité et utiliser les boutons LEFT et RIGHT pour sélectionner.
Audio OUT
Remarque: Les haut-parleurs TV doivent être mis sur OFF dans le menu audio befroe réglage ut audio est activé.
Vous permet de choisir entre les variables et le fixé.
Rétablir le paramétrage
par défaut
Rétablit tous les paramètres dans le menu SETUP aux paramètres du fabricant.
Page 74

24
Application
Setup
Lock
12
6
Time
Pictu re
Chann el
Enter New Passwo rd
Confirm Passwo rd
Exit
MENU
0-9
NEXT
Audio
Audio
Personnalisation des paramètres de verrouillage (LOCK)
Choisir la source TV par exemple. (Appuyer sur le bouton SOURCE pour sélectionner le mode TV)
1. Appuyer sur le bouton POWER pour allumer la TV à ACL
2. Appuyer sur le bouton MENU de la télécommande pour montrer le menu principal, et utiliser les
boutons LEFT et RIGHT pour sélectionner LOCK
3. Utiliser le bouton DOWN pour surligner « Saisir mot de passe », utiliser les clés numériques pour
entrer un mot de passe de 4 chiffres. Ensuite l’écran affichera le menu suivant. Après le paramétrage,
appuyer sur les boutons menu ou EXIT pour quitter.
Note : Le mot de passe du fabricant est 0000.
Le mot de passe de 4 chiffres
Entrer
Le menu LOCK inclut les options suivantes :
Changer le mot
de passe
Utiliser le bouton DOWN pour choisir « Changer le mot de passe »,
appuyer ensuite sur le bouton RIGHT ou ENTER pour entrer dans le menu suivant.
Saisir le mot de passe à 4 chiffres et le confirmer.
Verrouillage du système
Vous permet d’activer ou arrêter le verrouillage du système.
Si vous arrêtez le verrouillage du système, alors les éléments suivants
(États-Unis, Canada, paramètre RRT et remise à zéro de RRT) ne seront pas utilisés.
Français
Setu p
Lock
12
6
Time
Picture
Chan nel
Enter Password
Exit
MENU
Audio
Select Move
Setu p
Lock
12
6
Time
Pict ure
Chan nel
System Lock
US
Canada
Reset RRT
RRT Setting
Move
Exit
MENU
On
Next
Audio
Change Password
Page 75

25
Application
Setup
Lock
12
6
Time
Pictu re
Chann el
TV
MPAA
Mov e
Exi t
MENU
N A
G
PG
PG-13
R
NC-17
X
NEXT
Audio
Personnalisation des paramètres de verrouillage (LOCK)
Les
États-Unis
Utiliser le bouton DOWN pour surligner « US » (États-Unis), appuyer
ensuite sur les boutons RIGHT ou ENTER pour entrer dans le menu suivant.
Le
téléviseur
Utiliser le bouton DOWN pour surligner « TV », appuyer ensuite sur
les boutons RRIGHT ou ENTER pour entrer dans le menu suivant.
Utiliser les boutons UP et DOWN pour sélectionner la classification
souhaitée et appuyer sur le bouton ENTER pour bloquer ou débloquer
la classification.
MPAA
La classification de films (MPAA) est utilisée pour les films originaux
évalués par la Motion Picture Association of America pour la diffusion
sur TV câble et non édités pour la télévision.
Utiliser les boutons UP ou DOWN pour choisir N/A, G, PG, PG - 13,
R, NC -17 ou X.
Classification
Description
Grand public. Le film convient pour tous les âges.
Accord parental souhaitable. Son contenu pourrait ne pas convenir aux
jeunes spectateurs.
Le contenu pourrait ne pas convenir aux spectateurs de moins de 13 ans
Pour adultes. Interdit aux moins de 17 ans non accompagnés des parents.
Interdit aux moins de 17 ans.
Seulement pour les adultes
Setup
Lock
12
6
Time
Picture
Channel
Mov e
MENU
ck
TV RATI NG
TV Y
TV Y7
TV G
TV PG
TV 14
TV MA
ALL FV V S L D
NEXT
Audio
Press ENTER to Lock or Unlock
Return
Lo
Page 76

26
Application
Setup
Chann el
Canada Eng
Canada Fre
Select
Move Ex it
MENU
Pictu re
12
6
Time Lock
G
G
Audio
Personnalisation des paramètres de verrouillage (LOCK)
Canada Utiliser le bouton DOWN pour surligner Canada, appuyer ensuite sur le bouton
RIGHT ou ENTER pour entrer dans le menu suivant.
Canada Eng Utiliser les boutons LEFT et RIGHT pour sélectionner :
(anglais) E, C, C8+, G, PG, 14+ et 18+
Canada Fre Utiliser les boutons LEFT et RIGHT pour sélectionner : (français)
E, G, 8ans+, 13ans+, 16ans+ et 18ans+
Arrangements de RRT
Remise à zéro de RRT
Vous permet de remettre à zéro les paramètres de RRT.
Français
Page 77

27
Application
Air/Cable
Setu p
Loc k
12
6
Time
Pic ture
Chan nel
Aut o S ca n
Fav or it e
Sho w Hi de
Cha nn el N o
Cha nn el L ab el
DTV Sig na l
Air
Sel ec t Mo ve Exi t
MENU
50 3
KOC E
LB
Go od
Setup
Lock
12
6
Time
Pictu re
Chann el
Cab le Syste m
Sta rt to S can
Aut o
Sel ectMov e
Mov e
Exi t
MENU
Setup
Chann el
Exi t
MENU
Pictu re
12
6
Time Lock
RF CH
Fou nd
7
4
Air/Cable
NEXT
Mov e
Audio
Audio
Audio
Personnalisation des paramètres de CHANNEL (chaîne)
Choisir la source TV par exemple. (Appuyer sur le bouton SOURCE pour sélectionner le mode TV)
1. Appuyer sur le bouton POWER pour allumer le TV à ACL.
2. Appuyer sur le bouton MENU de la télécommande pour afficher le menu principal, et utilisez les boutons
LEFT et RIGHT pour choisir la chaîne (Channel).
3.
Utiliser les boutons UP et DOWN pour surligner une option de chaîne individuelle, utiliser les boutons
LEFT et RIGHT pour changer le paramétrage, et appuyer sur les boutons MENU ou EXIT pour quitter.
Le menu CHANNEL inclut les options suivantes :
Vous permet de choisir entre antenne (air) et câble.
Auto scan Utiliser le bouton DOWN pour surligner « Auto Scan », appuyer ensuite sur les
boutons RIGHT ou ENTER pour entrer dans le menu suivant :
Si vous choisissez « Air » comme signal d’entrée dans Antenna, vous pouvez
appuyer sur le bouton RIGHT ou ENTER pour chercher les chaînes automatiquement.
Les chaînes pouvant être reçues seront gardées automatiquement.
Lors de la recherche des chaînes, appuyez sur MENU pour arrêter
Page 78

28
Application
Setup
Lock
12
6
Time
Pictu re
Chann el
Select Exit
MENU
No Program Name Favorite
No Progr am Name Favorite
ATSC 1
ATSC 2
ATSC 3
KOCE HD
KOCE SD
KOCE LB
2 0
14 1
14 2
14 3
50 1
50 2
66 0
50 3
Setup
Lock
12
6
Time
Pictu re
Chann el
Select Exit
MENU
No Program Name Show
No Progr am Name Show
ATSC 1
ATSC 2
ATSC 3
KOCE HD
KOCE SD
KOCE LB
2 0
14 1
14 2
14 3
50 1
50 2
50 3
66 0
Audio
Audio
Personnalisation des paramètres de CHANNEL (chaîne)
Si vous choisissez « Câble » comme signal d’entrée dans Antenna, vous pouvez
choisir les systèmes de câble : Auto, STD, IRC et HRC
Utilisez le bouton DOWN pour surligner ‘ »Start to Scan » (commencer le scan), appuyer
ensuite sur les boutons RIGHT ou ENTER pour chercher automatiquement les chaînes
Les chaînes pouvant être reçues seront gardées automatiquement.
Lors de la recherche des chaînes, appuyez sur MENU pour arrêter.
Favoris
Vous permet d’ ajouter ces chaînes comme les chaînes favorites.
Utiliser le bouton UP ou DOWN pour surligner « Favorite », appuyez ensuite sur le
bouton RIGHT ou ENTER pour entrer dans le menu suivant.
Utilisez les boutons UP et DOWN pour surligner la chaîne souhaitée, appuyer
ensuite sur le bouton ENTER pour ajouter ou enlever la chaîne des favoris.
Show / Hide
(Montrer /
Cacher)
Vous permet de montrer ou cacher les chaînes.
Utiliser le bouton UP ou DOWN pour surligner « Show / Hide »,
appuyer ensuite sur les boutons RIGHT ou ENTER pour entrer dans le menu suivant.
Utiliser le bouton UP ou DOWN pour surligner la chaîne souhaitée, appuyer
ensuite sur le bouton ENTER pour montrer ou cacher la chaîne surlignée.
Channel Nº
Nº de chaîne
Affiche le numéro de chaîne en cours.
Channel Label
Étiquette de canal
Affiche l’étiquette de la chaîne en cours.
Signal DTV
Affiche la qualité du signal DTV en cours.
Français
Page 79

Application
Configuration USB
Le téléviseur est un téléviseur à grand écran avec un port USB. Avec ce port USB, le téléviseur peut accepter
les lecteurs flash USB et afficher les photos ou lire les fichiers MP3. Pour utiliser cette fonction, il faut connecter
un lecteur flash USB au port USB du téléviseur et appuyer sur le bouton SOURCE pour sélectionner le mode USB
afin de commencer la navigation de la musique et des photos.
Dans la fonction USB, sélectionnez Photo
Selec t M ove
mblog.jpg
Play File:1
Total size:2.0GB
Unused size:1.8GB
001/001 534 x 800 34.3KB
Repeat
mblog.jpg
Music
C:\
C:
USB
Photo
Dans la fonction USB, sélectionnez Musique.
Dans le mode de télécommande de TV :
Vous pouvez utiliser le bouton ◄ ou ► pour sélectionner Photo.
Vous pouvez utiliser le bouton ▲ ou ▼ pour sélectionner le fichier que vous voulez et utiliser le bouton
ENTER pour lire le fichier.
Vous pouvez utiliser le bouton pour retourner au menu principal.
Vous pouvez utiliser le bouton |◄◄ ou ►►| pour sélectionner le fichier que vous voulez.
Dans le mode de télécommande de TV :
Vous pouvez utiliser le bouton ◄ ou ► pour sélectionner Musique.
Vous pouvez utiliser le bouton ▲ ou ▼ pour sélectionner le fichier que vous voulez et utiliser le bouton
ENTER pour lire le fichier.
Vous pouvez utiliser le bouton Pour s’arrêter.
Vous pouvez utiliser le bouton RPT |◄◄ ►►| ►► ◄◄ ►|| pour sélectionner le fichier que vous voulez.
Selec t M ove
Photo
LOVE.mp3
Play File:1
Total size:2.0GB
Unused size:1.8GB
002/002
Repeat
LOVE.jpg
Title:
Artist:
Album:
Year
Stop
00:00 02:38
Music
C:\
C:
USB
29
Page 80

30
Entretien et Service
Dépannage
Si votre TV à ACL présente un problème, veuillez avant tout suivre les étapes suivantes.
Si vous avez encore le problème, éteignez l’appareil et contactez votre revendeur ou un centre de service autorisé.
Problème
Action
L’écran n’apparaît pas.
Est ce que la prise est branchée? Branchez la prise.
Appuyez sur le bouton d’allumage de la télécommande.
L’écran apparaît trop lentement
après avoir allumé l’appareil.
Ce problème dure peu de temps lors du processus d’élimination
d’image afin de cacher temporairement le bruit d’écran qui existe
quand l’appareil est allumé. Mais si l’écran n’apparaît pas en 1
minute, contactez votre revendeur ou centre de service autorisé.
L’écran est trop lumineux ou
trop foncé.
Réglez la luminosité ou le contraste
L’écran est trop grand ou trop petit.
Ajuster la dimension d’écran.
Des lignes apparaissent sur l’écran
et l’écran bouge.
Arrêter l’utilisation de téléphone sans fil, sèche-cheveux et
perceuses électriques.
-
L’écran ne bouge pas.
Appuyez sur le bouton PAUSE. Vérifiez si le bouton PAUSE est
appuyé sur l’équipement externe.
L’écran apparaît, mais on n’entend
pas le son.
1. Appuyez sur le bouton « MUTE » .
2.
Augmentez le son en appuyant sur le bouton du volume.
3.
Vérifiez si la borne de son d’entrée externe est correctement
connectée.
.
4.
Vérifiez si les câbles audio sont correctement connectés.
5.
Choisir et vérifier l’autre entrée.
Si le son ne fonctionne toujours pas et que pour les autres chaînes
c’est pareil après avoir fait ce qui est indiqué ci-dessus, contactez
votre revendeur ou un centre de service autorisé
La télécommande ne
fonctionne pas.
1. Vérifier si la source d’énergie principale est allumée.
2.
Vérifier que les piles de la télécommande sont
correctement installées.
3.
4.
Vérifier s’il existe des obstacles entre le TV à ACL et la
télécommande, enlevez-les le cas échéant.
Si les piles sont peu chargées, remplacez-les avec deux
nouvelles piles
Français
Page 81

31
Le design de la caisse et les spécifications électroniques seront modifiés sans préavis pour l’amélioration
des performances.
Le poids et les dimensions sont approximatifs.
Entretien et Service
Spécifications
Grandeur de panneau
L'éclat
Rapport contrasté
L'angle de observation
Panneau de LED
Max. résolution
Entre
Sortie
Vidéo
Audio (gauche / droit)
PC/Audio (gauche / droit)
HDMI
RF
YPbPr
USB
Audio (gauche/droit)
SPDIF
Source d'alimentation
Consommation d'alimentation
Dimension
Poids
28” TFT LED
200
3000:1
178º/178º
1366 x 768
1
1
1
2
1
1
1
1
1
DC 12V
50W
25.1” x 16.0” x 1.97”
13lbs
JTV2815DC
Page 82

Le design de la caisse et les spécifications électroniques seront modifiés sans préavis pour l’amélioration
des performances.
Le poids et les dimensions sont approximatifs.
Entretien et Service
Spécifications
Grandeur de panneau
L'éclat
Rapport contrasté
L'angle de observation
Panneau de LED
Max. résolution
Entre
Sortie
Vidéo
Audio (gauche / droit)
PC/Audio (gauche / droit)
HDMI
RF
YPbPr
USB
Audio (gauche/droit)
SPDIF
Source d'alimentation
Consommation d'alimentation
Dimension
Poids
28” TFT LED
200
3000:1
178º/178º
1366 x 768
1
1
1
3
1
1
1
1
1
AC
60W
25.3” x 15.4” x 3.3”
7.5lbs
JE2815
Page 83

Le design de la caisse et les spécifications électroniques seront modifiés sans préavis pour l’amélioration
des performances.
Le poids et les dimensions sont approximatifs.
Entretien et Service
Spécifications
Grandeur de panneau
L'éclat
Rapport contrasté
L'angle de observation
Panneau de LED
Max. résolution
Entre
Sortie
Vidéo
Audio (gauche / droit)
PC/Audio (gauche / droit)
HDMI
RF
YPbPr
USB
Audio (gauche/droit)
SPDIF
Source d'alimentation
Consommation d'alimentation
Dimension
Poids
32” TFT LED
200
3000:1
178º/178º
1366 x 768
1
1
1
3
1
1
1
1
1
AC
65W
29.1” x 17.6” x 3.5”
9.9lbs
JE3215
Page 84

Le design de la caisse et les spécifications électroniques seront modifiés sans préavis pour l’amélioration
des performances.
Le poids et les dimensions sont approximatifs.
Entretien et Service
Spécifications
Grandeur de panneau
L'éclat
Rapport contrasté
L'angle de observation
Panneau de LED
Max. résolution
Entre
Sortie
Vidéo
Audio (gauche / droit)
PC/Audio (gauche / droit)
HDMI
RF
YPbPr
USB
Audio (gauche/droit)
SPDIF
Source d'alimentation
Consommation d'alimentation
Dimension
Poids
40” TFT LED
200
3000:1
178º/178º
1920 x 1080
1
1
1
3
1
1
1
1
1
AC
70W
44.6” x 26.3” x 4.0”
14lbs
JE4015
Page 85

Le design de la caisse et les spécifications électroniques seront modifiés sans préavis pour l’amélioration
des performances.
Le poids et les dimensions sont approximatifs.
Entretien et Service
Spécifications
Grandeur de panneau
L'éclat
Rapport contrasté
L'angle de observation
Panneau de LED
Max. résolution
Entre
Sortie
Vidéo
Audio (gauche / droit)
PC/Audio (gauche / droit)
HDMI
RF
YPbPr
USB
Audio (gauche/droit)
SPDIF
Source d'alimentation
Consommation d'alimentation
Dimension
Poids
50” TFT LED
200
3000:1
178º/178º
1920 x 1080
1
1
0
2
1
1
1
1
1
AC
90W
44.7” x 26.3” x 3.35”
25lbs
JE5015
Page 86

www.asaelectronics.com
www.jensenrvdirect.com
 Loading...