

Jenn-Air JEA8120ADW12, JEA8120ADB13, JEA8120ADB12, JEA8000ADB12, JEA7000ADW13 Owner’s Manual
...
JENN-AIR
Form No. A/06/06 Part No. 8111P499-60
Important Safety Instructions ................................................1-2
Cooktop Cartridges ...................................................................3-5
Cleaning ........................................................................................6-7
Accessories ..................................................................................7-9
Warranty ..........................................................................................11
Guide de I'utilisateur ..................................................................12
Gufa del Usuario ..........................................................................24
@2006 Maytag Appliances Sales Co. All rights reserved.
Litho U.S.A.

PORTANT SAF Y NSTRU IONS I
READ BEFORE OPERATING
Installer: Pleaseleave this manual
with this appliance.
Consumer: Please read and keep
this manual for future reference.
Keep sales receipt and/or cancelled
check as proof of purchase.
Model Number
Serial Number
Date of Purchase
If you have questions, call:
Jenn-Air Customer Assistance
1-800-JENNAIR 0-800-536-6247)
1-800-688-2080 ( U.S.TTY for
hearing or speech impaired)
(Mon.-Fri., 8 am-8 pm Eastern Time)
Internet: http://www.m aytag.com
Forservice information, see
page 1I.
iiiiiiiiiiiiiiiiiiiiiiiiiiiiiiiiiiiiiiiiiiiii_!i:i_:i_i!_i_!i!!i!!i!!i!!i!!i!!i!!i!!i!!i!!i!_iii_i_i_i_iii_iiiiiiiiiiiiiiiiiiiiiiiiiiiiiiiii_i_i_iiiiiiiiiiiiiiiiiiii!i_!i!!i!!i!!i_!i!!i!i_!i_!!!i!!i!!i!!i!!i!_i!!i!!i!!i!!i!!i_!i_!i_!_¸i_,i_i_i!;_ii!i'ii!i'ii!i_i_!i_!i_!i_!i_!i_!i_!i_!i_!i_!_!_!_!i_i_ii_ii_i_ii_ii_ii_ii_!_!_i_!_i!i!i_ii_ii_ii_ii_iiiiiiiiiiii_iiiiiiiiiiiiiiiiiiiiiiiiiiiiiiiiiiiiiiiiiiiiiiiiiiiiiiiiiiiiiiiiiiiiiiiiiii
i
All appliances = regardless of the
manufacturer = have the potential
through improper or careless use to
create safety problems. Therefore the
following safety precautions should be
observed when operating your Jenn=
Air accessories and cartridges:
NEVER use your appliance for warming
or heating the room.
Wear proper apparel. Loose-fitting or
hanging garments should never be worn
while using the appliance.
Do not repair or replace any part of the
appliance unless specifically
recommended in this manual. All other
servicing should be referred to an
authorized Jenn-Air Servicer.
Flammable materials should not be stored
near surface units.
Use only dry potholders. Moist or damp
potholders on hot surfaces may result in
burns from steam. Do not let potholder
touch hot heating elements. Do not use a
towel or other bulky cloth.
NEVER leave surface units unattended at
high heat settings. Boil over causes
smoking and greasy spillovers that may
ignite.
Keep all switches "OFF" when unit is not
in use.
INCASEOFFmRE
Turnoff appliance and ventilating hood to
avoid spreading the flame. Extinguish
flame then turn on hood to remove smoke
and odor.
• Smother fire or flame in a pan with a lid
or cookie sheet.
NEVER pick up or movea flaming pan.
YOUR COOKTOP OR RANGE
Do not use water on grease fires. Use
baking soda, a dry chemical or foam-type
extinguisher to smother fire or flame.
CHILD SAFETY
NEVER leave children alone or
unsupervised near the appliance when it
is in use or is still hot.
NEVER allow children to sit or stand on
any part of the appliance as they could
be injured or burned.
NEVER store items of interest to children
in cabinets above an appliance. Children
climbing on the appliance to reach items
could be seriously injured.
COiL ELEMENTS
On conventional element cooktops, make
sure that drip pans are in place. Absence
of these pansduring cooking maysubject
wiring or components underneath to
damage.
NEVER use aluminum foil to line surface
unit drip pans or grill basin. Installation
of these liners may result in an electric
shock or fire hazard.
Glazed cookware - only certain types of
glass, glass-ceramic, ceramic,
earthenware, or other glazed cookware
are suitable for cooktop surface without
breaking due to the sudden change in
temperature. Follow utensil
manufacturer's instructions when using
glass.
Cookware handles should be turned
inward and not extend over adjacent
surface heating elements to avoid burns,
ignition of flammable materials and
spillage due to unintentional contact with
the cookware.
Do not soak or immerse removable
heating elements in water.

RADIANT AND
HALOGEN ELEMENTS
NEVER cook on glass-ceramic cooking
surface if the cooktop isbroken. Cleaning
solutions and spillovers maypenetrate the
broken cooktop and create a shock
hazard. Contact a qualified technician
immediately.
Clean glass-ceramic cooktops with
caution. Ifwet sponge or cloth is used to
wipe spills on a hot cooking area, be
careful to avoid steam burns. Some
cleansers can produce noxious fumes if
applied to a hot surface.
UTENSIL SAFETY
Use proper pan size. Many appliances
are equipped with one or more surface
units of different size. Select cookware
having flat bottoms large enough to cover
the surface unit heating element. The
use of undersized cookware will expose
a portion of the heating element to direct
contact and may result in ignition of
clothing. Proper relationship of cookware
to heating element will also improve
efficiency and performance.
GAS BURNERS
Have the installer show you the location
of the gas shut off valve and how to shut
it off in an emergency.
A faint gas odor may indicate a gas leak.
If a gas odor is detected, shut off gas
supply to the appliance. Call your installer
or local gascompany to havethe possible
leak checked. Never use a match or
other flame to locate a gas leak.
WARNING: ff the
information in this manual is
not followed exactly, a fire or
explosion may result causing
property damage, personal
injury or death.
Do not store or use gasoline or
other flammable vapors and
liquids in the vicinity of this or
any appliance.
IF YOU SMELL GAS:
• Do not try to light any
appliance.
• Do not touch any electrical
switch.
• Do not use any phone in your
building.
• Immediately call your gas
supplier from a neighbor's
phone. Follow the gas
supplier's instructions.
• If you cannot reach your gas
supplier, call the fire
department.
Installation and service must be
performed by a qualified
installer, service agency or the
gas supplier.
COOKmNG SAFETY
Always place a pan on a surface burner
before turning it on. Be sure you know
which knob controls which surface
burner. Make sure the correct burner is
turned on and that the burner has ignited.
When cooking is completed, turn burner
off before removing pan to prevent
exposure to burner flame.
Alwaysadjust surface burner flame sothat
it does not extend beyond the bottom
edge of the pan. An excessive flame is
hazardous, wastes energy and may
damage the appliance, pan or cabinets
above the appliance.
_MPORTANT SAFETY
NOTICE AND
WARNmNG
The California Safe Drinking Water and
Toxic Enforcement Act of 1986
(Proposition 65:)requires the Governor of
California to publish a list of substances
known to the State of California to cause
cancer or reproductive harm,and requires
businesses towarn customers of potential
exposures to such substances.
Usersofthis appliance are herebywamed
that the burning of gas can result in low-
level exposure to some of the listed
substances, including benzene,
formaldehyde and soot, due primarily to
the incomplete combustion of natural gas
or liquid petroleum (LP) fuels. Properly
adjusted burnerswill minimize incomplete
combustion. Exposure to these
substances can also be minimized by
properly venting the burners to the
outdoors.
IMPORTANT NOTICE REGARDING
PET BIRDS: Never keep pet birds in the
kitchen or inrooms where the fumes from
the kitchen could reach. Birds have a very
sensitive respiratory system. Fumes
released during an oven self-cleaning
cycle may be harmful or fatal to birds.
Fumes released due to overheated
cooking oil,fat, margarine and overheated
non-stick cookware may be equally
harmful.
NSTRUOTIONS FOR
THESE
RE EFERENOE
2

CCoo
CONVENTIONALCOIL:
JEA7000ADB (black)
JEA7000ADW (white)
JEAT000ADS (stainless}
Expressions®Collection:
KTOP
AC110B/W
OOIL _LEMENTS
HALOGEN:
JEA8130ADB (black}
JEA8130ADW {white}
Expressions® Collection:
AH151B/W
O
RADIANT:
JEA8120ADB {black}
JEA8120ADW {white}
Expressions® Collection:
AR141B/W
SELECTING PROPER
Select heavy gauge cookware.
Generally, heavy gauge cookware wiii
not change shape when heated.
Use cookware with fiat, smooth
bottoms. Todetermine if the cookware
is flat, place the edge of a ruler on the
bottom. Hold up to the light. No light
should be visible between the edge of
the ruler and the pan. Rejectany pans
that do not fit flush against ruler's edge.
Match the size of the cookware to
the size of the element. Cookware
should be the same size or slightly
larger.
iIvIPROPE R COO KWARE
• DO NOT use cookwarethatextends
more than one inch beyondthe cooking
area.
Theconventional coil cartridge is the most
versatile of the cartridges. When an
element is on, it will cycle on and off to
maintain the heat setting.
DmANT AN D
HALOGENELEMENTS
The two cooking areas are identified by
circles on the glass-ceramic cooktop.
When an element is turned on, the
cooktop will heat up and the red glow of
the heating element can be seenthrough
the glass-ceramic top. _NOTE: On
halogen model, a circular halogen bulb
will glow instantly.:)It is normal to seethe
red glow of the element whenever it cycles
on. The element will cycle on and off for
all control settings except Hi. However, it
mayalso cycleon Hi if improper cookware
is used.
Cookware that is smaller in diameter
than the cooking area should not be
used. Not only can this cause the
element to require more energy and
time, but can also result in spillovers
burning onto the cooking arearesulting
in a cleaning chore.
DO NOT use specialty items that are
nonfiat, oversized, uneven or do not
meet proper cookware specifications
such as round bottom woks with rings,
griddles, rippled bottom canners,
lobster pots, large pressure canners,
etc. Large utensils, such as pressure
canners or oversized skillets, should be
used only on conventional coil
cartridges.
Glass-ceramic, earthenware, heat proof
glass or glazed cookware may scratch
the glass-ceramic cooktop and
therefore are not recommended.
NOTE: On halogen cartridge only,
aluminum pans may cause the element
to cycle even when the control setting
is Hi.
COOKING PROCEDURES
All Cartridges:
• Beforefirst useclean cooktop cartridge.
(Seedetailed instructions, pg. 6.)
• For best results, always use
recommended cookware.
• Different cooktops and different
amounts of food being prepared will
influence the control settings needed
for best results. (See cooktop or range
use and care manual for typical control
settings.) Forfastest cooking, start with
the surface control on Hi for one minute;
then turn the control to the desired
setting. Covering pans, whenever
possible, speeds cooking and is more
energy efficient.
Radiant and Halogen Cartridges:
• Theglass-ceramic cooking area retains
heat for a period of time after the
elements have been turned off. Put this
retained heat to good use. Turn
elements off afew minutes before food
is completely cooked and use the
retained heat to complete the cooking.
Because of this heat retention
characteristic, the elements will not
respond to changes in heat settings as
quickly as coil elements. In the event
of a potential boilover, remove the pan
from the cooking area.
• When preparing foods which can be
easily scorched or over-cooked, start
cooking at a lower temperature setting
and gradually increase temperature as
needed.
• A higher setting than normal may be
necessary when using cookware made
with material that is slow to conduct
heat, such as cast iron.
• A lower setting can be used when
cooking small quantities of foods or
when using a pan that conducts heat
quickly.
To AVOID DAMAGE TO THE
GLASS=CERANIIC COOl(TOP -
Radiant and Halogen Cartridges Only:
• Do not use glass pans.They may scratch
the surface.
Do not allow plastic, sugar or foods with
high sugar content to melt onto the hot
cooktop. Should this happen, clean
immediately. (See Cleaning, pages 6
& 7.]
• Never let a pan boil dry as this will
damage the surface and pan.
• Never use cooktop as a work surface or
cutting board. Never cook food directly
on the surface.
• Do not slide aluminum pansacross a hot
surface.The pans may leavemarkswhich
need to be removed promptly. (See
Cleaning, pages 6 & 7]
• Make sure the surface and the pan
bottom are clean before turning on to
prevent scratches.
• Toprevent scratching or damage to the
glass-ceramic top, do not leave sugar,
salt or fats on the cooking area. Wipe
the cooktop surface with a clean cloth
or paper towel before using.
• Do not slide heavy metal pans acrossthe
surface since these may scratch.
• Do not use foil or foil-type containers.
Foil may melt onto the glass. If metal
melts on the cooktop, do not use. Call
an authorized Jenn-Air Servicer.
If a spillover occurs while cooking,
immediately clean the spill from the
cooking area while it is hot to prevent a
tough cleaning chore later. Using
extreme care, wipe spill with a clean dry
towel.
• Do not use abrasive cleansing powders
or scouring pads which will scratch the
cooktop.
• Do not use chlorine bleach, ammonia or
other cleansers not specifically
recommended for useonglass-ceramic.
4
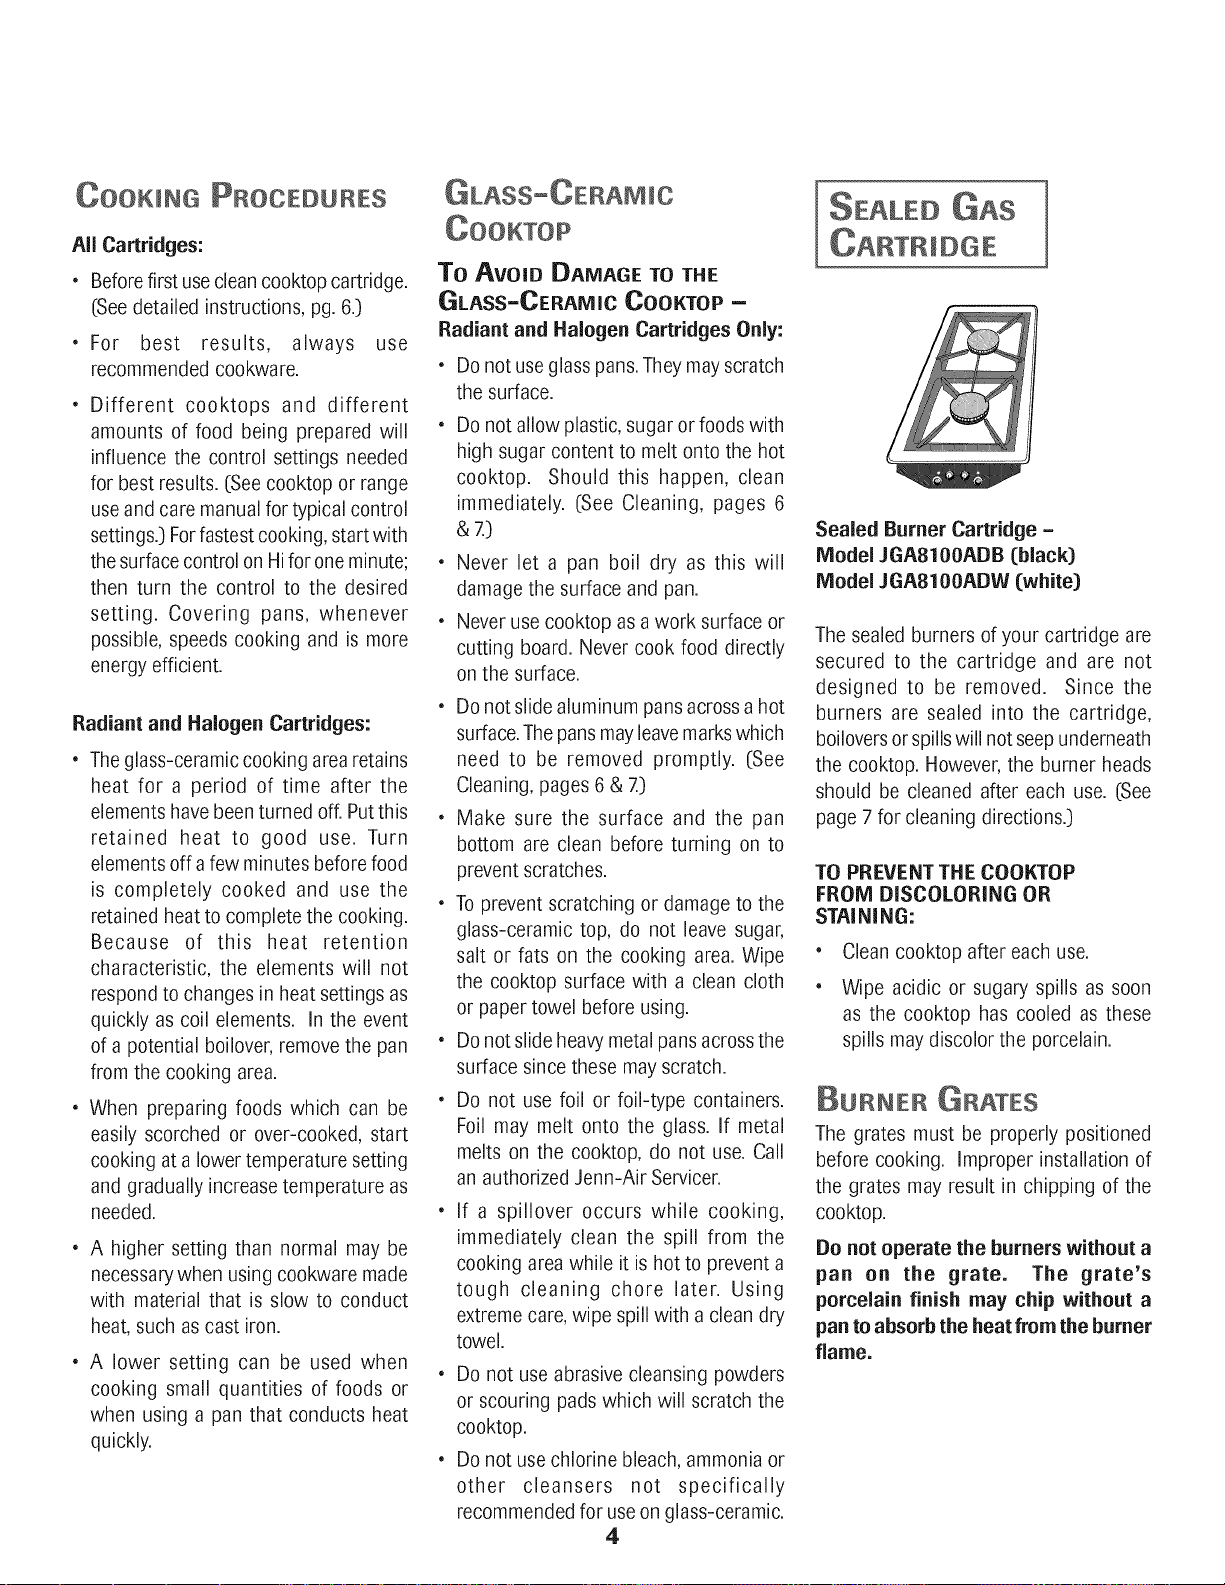
Sealed Burner Cartridge =
Model JGA8100ADB (black)
Model JGA8100ADW (white)
The sealed burners of your cartridge are
secured to the cartridge and are not
designed to be removed. Since the
burners are sealed into the cartridge,
boilovers or spills will not seepunderneath
the cooktop. However, the burner heads
should be cleaned after each use. (See
page 7 for cleaning directions.)
TO PREVENT THE COOKTOP
FROM DISCOLORING OR
STAINING:
e
Clean cooktop after each use.
e
Wipe acidic or sugary spills as soon
as the cooktop has cooled as these
spills may discolor the porcelain.
_URNER _RATES
The grates must be properly positioned
before cooking, Improper installation of
the grates may result in chipping of the
cooktop.
Do not operate the burners without a
pan on the grate. The grate's
porcelain finish may chip without a
pan to absorb the heat from the burner
flame.
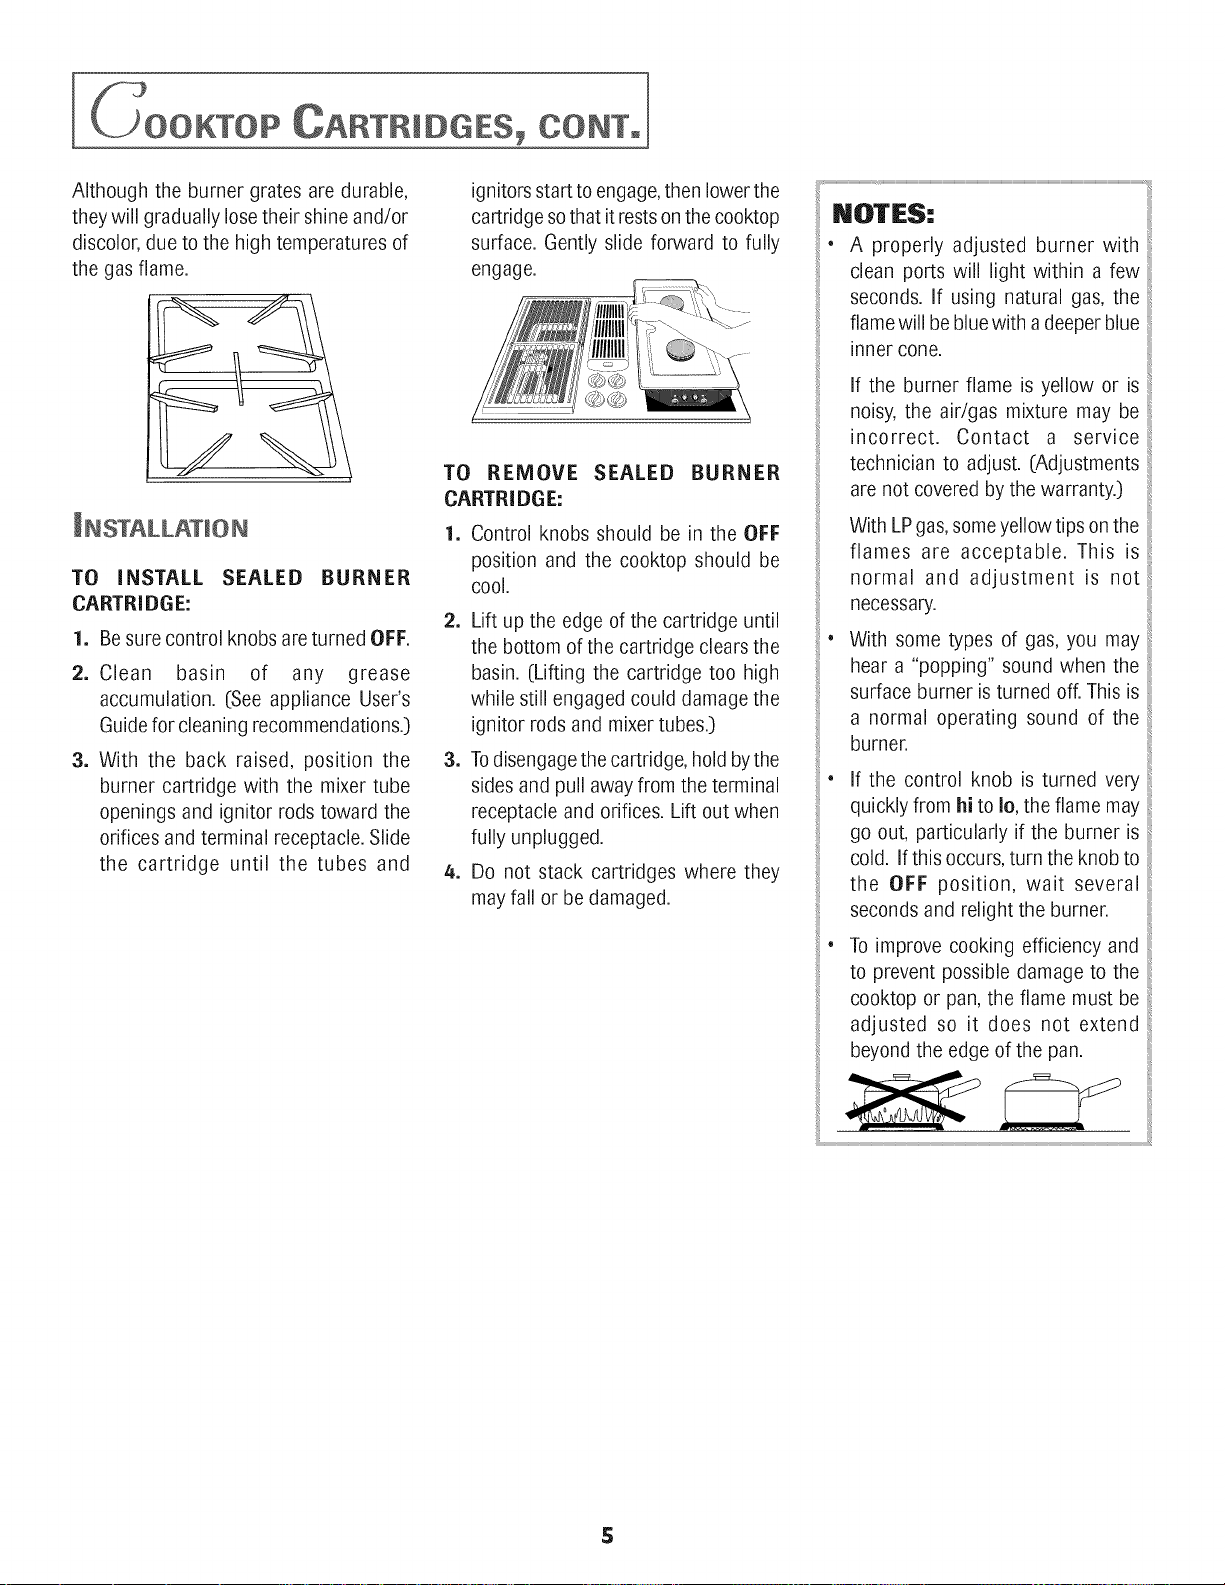
KTOP
Although the burner grates are durable,
they will gradually lose their shine and/or
discolor, due to the high temperatures of
the gas flame.
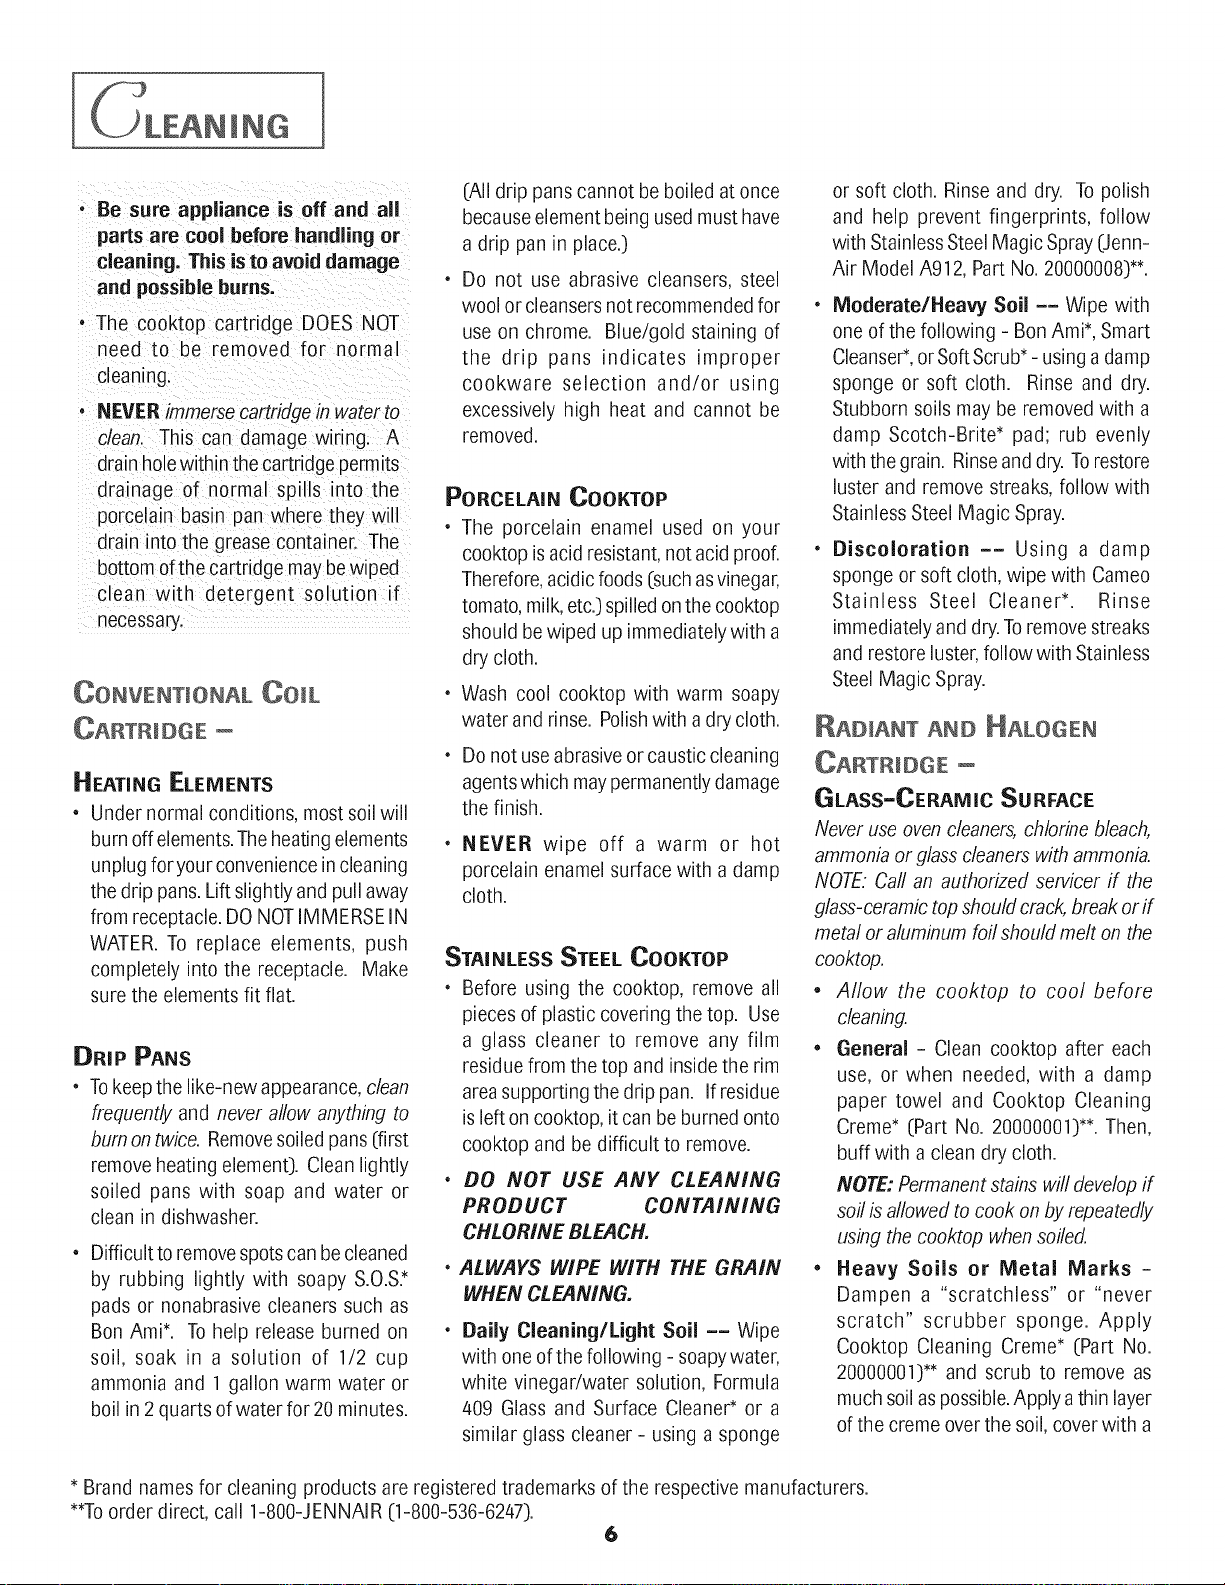
TO iNSTALL SEALED BURNER
CARTRIDGE:
1. Besure control knobs are turned OFF.
2. Clean basin of any grease
accumulation. (See appliance User's
Guide for cleaning recommendations.)
3. With the back raised, position the
burner cartridge with the mixer tube
openings and ignitor rods toward the
orifices and terminal receptacle. Slide
the cartridge until the tubes and
ignitors start to engage, then lower the
cartridge sothat itrests on the cooktop
surface. Gently slide forward to fully
engage.
TO REMOVE SEALED BURNER
CARTRI DG E:
1. Control knobs should be in the OFF
position and the cooktop should be
cool.
2_
Lift up the edge of the cartridge until
the bottom of the cartridge clears the
basin. (Lifting the cartridge too high
while still engaged could damage the
ignitor rods and mixer tubes.:)
3_
Todisengage the cartridge, hold bythe
sides and pull away from the terminal
receptacle and orifices. Lift out when
fully unplugged.
4_
Do not stack cartridges where they
may fall or be damaged.
A properly adjusted burner with
clean ports will light within a few
seconds. If using natural gas, the
flame will be blue with adeeper blue
inner cone.
If the burner flame is yellow or is
noisy, the air/gas mixture may be
incorrect. Contact a service
technician to adjust. (Adjustments
are not covered by the warranty.)
With LPgas,some yellow tips onthe
flames are acceptable. Th_s _s
normal and adjustment is not
necessary.
With some types of gas, you may
hear a "popping" sound when the
surface burner is turned off. This is
a normal operating sound of the
burner.
If the control knob is turned very
quickly from hi to Io, the flame may !:
go out, particularly if the burner is ;_i
cold. If this occurs, turn the knob to
the OFF position, wait several ,:
seconds and relight the burner.
To improve cooking efficiency and
to prevent possible damage to the
cooktop or pan, the flame must be
adjusted so it does not extend i
beyond the edge of the pan.
%
5
ING
]
• Be sure appliance is off and all
parts are cool before handling or
cleaning. This is to avoid damage
and possible burns.
• The cooktop cartridge DOES NOT
need to be removed for normal
cleaning.
, NEVER immerse cartridge in water to
clean. This can damage wiring. A
drain hole within the cartridge permits
drainage of normal spills into the
porcelain basin pan where they will
drain into the grease container. The
bottom of the cartridge may bewiped
clean with detergent solution if
necessary.
CONVENTIONAL OO_L
CARTmDGE --
H EATING ELENIENTS
• Under normal conditions, most soil will
burn off elements.The heatingelements
unplug for your convenience in cleaning
the drip pans. Lift slightly and pull away
from receptacle. DO NOTIMMERSE IN
WATER. To replace elements, push
completely into the receptacle. Make
sure the elements fit flat.
DRIP PANS
* Tokeep the like-new appearance, clean
frequently and never allow anything to
burn on twice. Removesoiled pans (first
remove heating element). Clean lightly
soiled pans with soap and water or
clean in dishwasher.
• Difficult to remove spots can be cleaned
by rubbing lightly with soapy S.O.S._
pads or nonabrasive cleaners such as
Bon AmP. To help release burned on
soil, soak in a solution of 1/2 cup
ammonia and 1 gallon warm water or
boil in 2 quarts of water for 20 minutes.
(All drip pans cannot be boiled at once
because element being used must have
a drip pan in place.)
Do not use abrasive cleansers, steel
wool or cleansersnot recommended for
use on chrome. Blue/gold staining of
the drip pans indicates improper
cookware selection and/or using
excessively high heat and cannot be
removed.
PORCELAIN COOKTOP
• The porcelain enamel used on your
cooktop is acid resistant, not acid proof.
Therefore,acidic foods (such asvinegar,
tomato, milk, etc.) spilled onthe cooktop
should be wiped up immediatelywith a
dry cloth.
• Wash cool cooktop with warm soapy
water and rinse. Polishwith a dry cloth.
• Do not use abrasive or caustic cleaning
agents which maypermanently damage
the finish.
• NEVER wipe off a warm or hot
porcelain enamel surface with a damp
cloth.
STAINLESS STEEL COOKTOP
* Before using the cooktop, remove all
pieces of plastic covering the top. Use
a glass cleaner to remove any film
residue from the top and inside the rim
area supporting the drip pan. If residue
is left on cooktop, it can be burned onto
cooktop and be difficult to remove.
* DO NOT USE ANY CLEANING
PRODUCT CONTAINING
CHLORINE BLEACH.
* ALWAYS WIPE WITH THE GRAIN
WHEN CLEANING.
Daily Cleaning/Light Soil == Wipe
with one of the following - soapywater,
white vinegar/water solution, Formula
409 Glass and Surface Cleaner* or a
similar glass cleaner - using a sponge
or soft cloth. Rinse and dry. To polish
and help prevent fingerprints, follow
with Stainless SteelMagic Spray (Jenn-
Air Model A912, Part No. 20000008)**.
Moderate/Hea_ Soil == Wipe with
one of the following - Bon AmP, Smart
Cleanse€, or SoftScrub* - usingadamp
sponge or soft cloth. Rinse and dry.
Stubborn soils may be removed with a
damp Scotch-Brite* pad; rub evenly
with the grain. Rinseand dry. Torestore
luster and remove streaks, follow with
Stainless Steel Magic Spray.
Discoloration -- Using a damp
sponge or soft cloth, wipe with Cameo
Stainless Steel Cleaner*. Rinse
immediately and dry.To remove streaks
and restore luster, follow with Stainless
Steel Magic Spray.
RADIANT AND HALOGEN
OARTmDGE--
GLASS=CERAM IC Su RFACE
Never use oven cleaners, chlorine bleach,
ammonia or glass cleaners with ammonia.
NOTE. Call an authorized servicer if the
glass-ceramic top should crack, break or if
metal or aluminum foil should melt on the
cooktop.
• Aflow the cooktop to cool before
cleaning.
• General - Clean cooktop after each
use, or when needed, with a damp
paper towel and Cooktop Cleaning
Creme* (Part No. 20000001)**. Then,
buff with a clean dry cloth.
NOTE: Permanent stains will develop if
soilis allowed to cook on by repeatedly
using the cooktop when soiled.
• Heavy Soils or Metal Marks -
Dampen a "scratchless" or "never
scratch" scrubber sponge. Apply
Cooktop Cleaning Creme* (Part No.
20000001)** and scrub to remove as
much soilaspossible.Apply a thin layer
of the creme overthe soil, cover with a
* Brand names for cleaning products are registered trademarks of the respective manufacturers.
**Toorder direct, call 1-800-JENNAIR (1-800-536-6247).
6
OONTo
damp paper towel and let stand 30 to
45 minutes (2-3 hours for very heavy
soil). Keep moist bycovering the paper
towel with plastic wrap. Scrub again,
then buff with a clean dry cloth.
NOTE: Only use a CLEAN, DAMP
"scratchless" pad that is safe for non-
stick cookware. The pattern and glass
will be damaged if thepad isnot damp,
ff the pad b soiled, or ff another type of
pad is used.
Burned=on or Crusty Soils - Scrub
with a "scratchless" or "never scratch"
scouring pad and Cooktop Cleaning
Creme*.
* Brand names for cleaning products are registered trademarks of the respective manufacturers.
**Toorder direct, call 1-800-JENNAIR (1-800-536-6247).
Do not use the razor blade for daily
cleaning as it may wear the pattern on
the gbss.
Melted Sugar or Plastic - Immediately
turn element to LOW and scrape sugar
or plasticfrom hot surface to a cool area.
Thenturn element OFFand allow to cool.
Clean residue with razor blade scraper
and Cooktop Cleaning Creme*.
SEALED GAS BU RN ERS/GRATES
• Allow burner and grates to cool. Washwith
soapy water and a plastic scouring pad. For
stubborn soils, clean with a soap-filled,
nonabrasive pad or a sponge and a
commercial Cooktop Cleaning Creme (Part
#20000001)**.
• Clean gas ports with a soft bristle brush or
a straight pin especially the port below the
ignitor. Do not enlarge or distort holes.
• Becareful not toget water into burner ports.
• Whencleaning, usecare toprevent damage
to the ignitor. If the ignitor is soiled, wet or
damaged the surface burner will not light.
I, CCESSOR! ES
Bm PoT
OANNING ELEMENT
Model A145A
The canning element ;_ .-.,,., ,
possible to use large or
accessory makes itS.,
oversized flanged or
rippled bottom canners
with the conventional coil cartridge.
Follow these procedures when
canning:
* Bring water to boil at Hi setting; after
boiling has begun, reduce heat to
lowest setting that will maintain boiling.
* Make certain canner fits over center of
surface unit.
* Flat-bottomed canners give the best
canning results.
Use canning recipes from a reputable
source such as the manufacturer of
your canner and manufacturers of
canning jars.
Canning isa process that creates large
amounts of steam. Follow equipment
instructions to avoid burns from steam
or hot canners.
ii
If your area has low voltage at times,
canning maytake longer than indicated
by the directions.
Model AO142
Use Jenn-Air's
flat bottom wok
accessory for
optimum results.It has
a nonstick finish, wood handles, cover,
steaming rack, rice paddles, cooking tips
and recipes.
ELEOTRmO _RMLL
Model JEASOOOADB
Includes grill element, twogrill grates and
basin liner pan.
GRILL COVER
Model A341 (electric)
Model AG341 (gas)
The grill cover protects
the grill when not in use.
It is available in textured
steel in black or white
with molded handles.
RIGHT WRONG WRONG
7
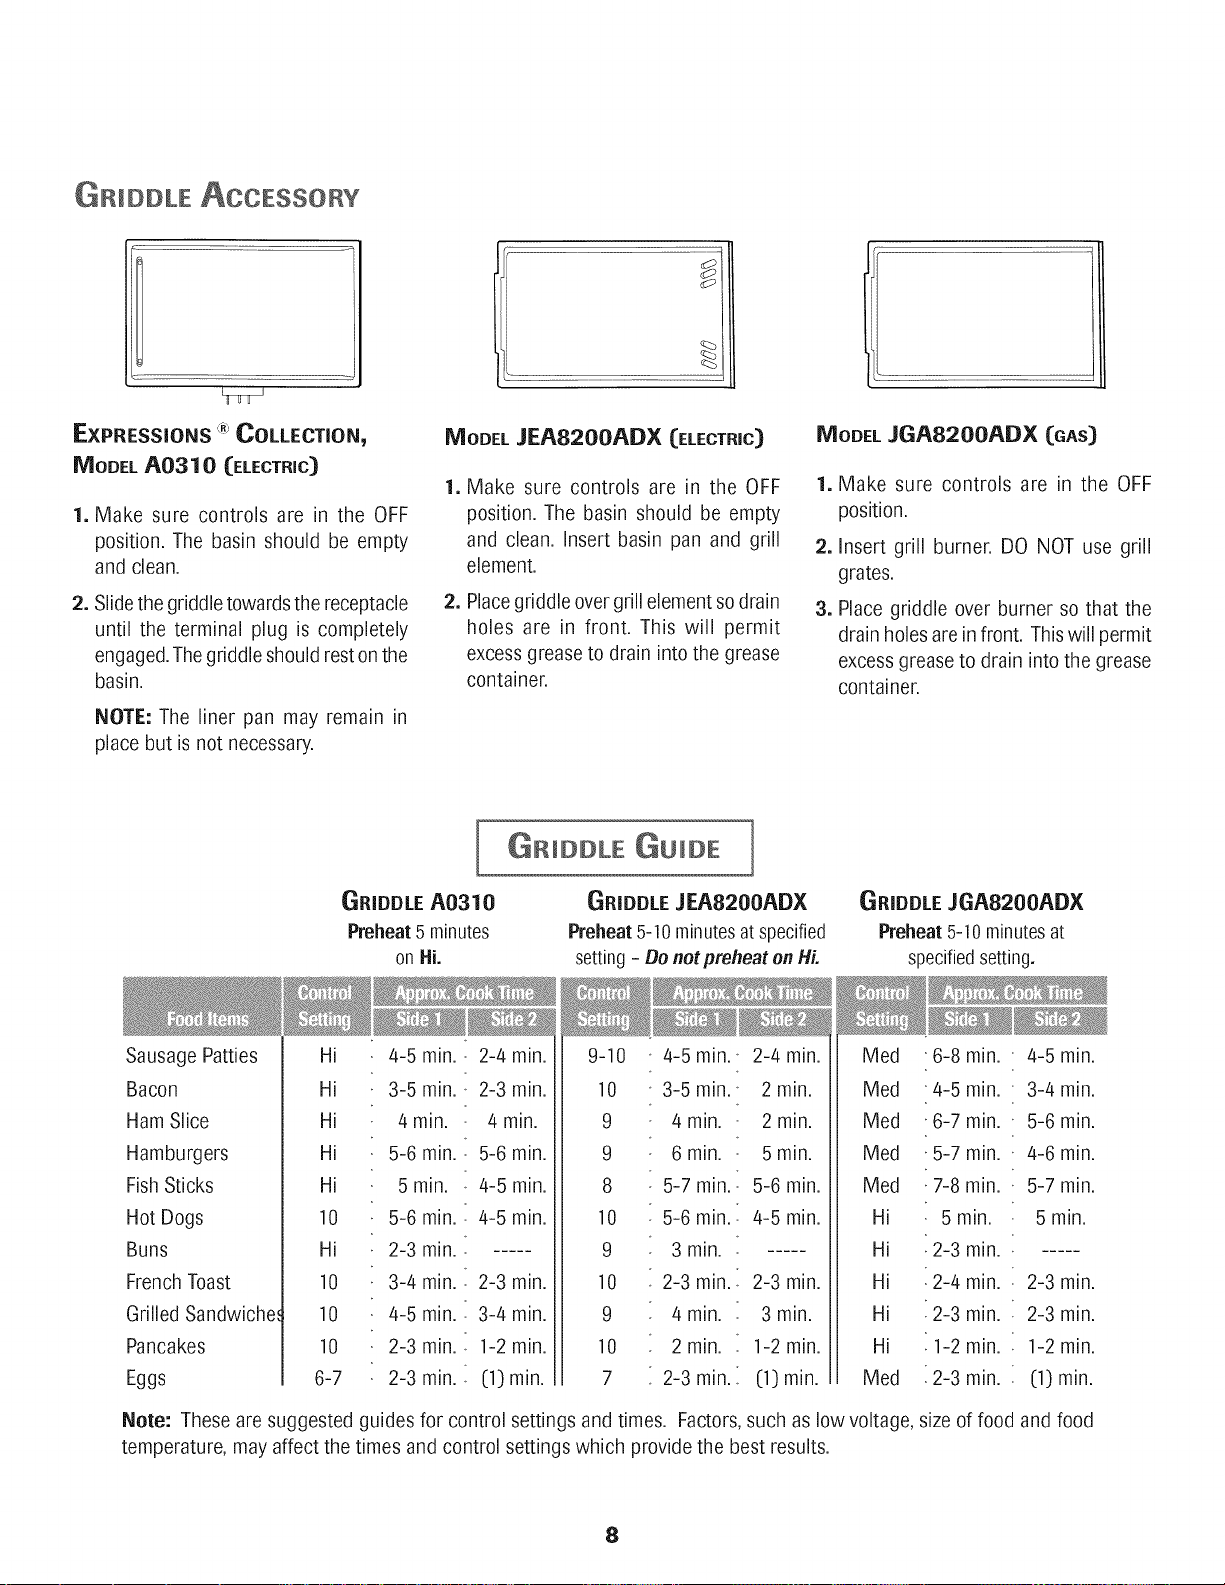
GRIDDLE ACCESSORY
EXPRESS|ONS '_;'COLLECTION_
MODEL A0310 (ELECTRIC)
1. Make sure controls are in the OFF
position. The basin should be empty
and clean.
2. Slidethe griddle towards the receptacle
until the terminal plug is completely
engaged.The griddle should rest on the
basin.
NOTE: The liner pan may remain in
place but is not necessary.
_RIDDLE A0310
Preheat5 minutes
MODELJEA8200ADX (ELECTRIC)
1. Make sure controls are in the OFF
position. The basin should be empty
and clean. Insert basin pan and grill
element.
2. Placegriddle over grill element sodrain
holes are in front. This will permit
excess grease to drain into the grease
container.
GRmDDLE _U_DE ]
6RIDDLE JEAB200ADX
Preheat5-10 minutesat specified
on Hi.
setting- De netpreheat en Hi.
MODELJGA8200ADX (GAS)
1. Make sure controls are in the OFF
position.
2. insert grill burner. DO NOT use grill
grates.
3. Place griddle over burner so that the
drain holes are infront. This will permit
excess grease to drain intothe grease
container.
_RIDDLE JGA8200ADX
Preheat 5-10minutesat
specifiedsetting.
Sausage Patties
Bacon
Ham Slice
Hamburgers
Fish Sticks
Hot Dogs
Buns
French Toast
Grilled Sandwiche_
Pancakes
Eggs
Note: These are suggested guides for control settings and times. Factors, such as low voltage, size of food and food
temperature, may affect the times and control settings which provide the best results.
Hi
Hi
Hi
Hi
Hi
10
Hi
10
10
10
6-7
4-5 min.
3-5 min.
4min.
5-6 min.
5 min.
5-6 min.
2-3 min.......
3-4 min.
4-5 min.
2-3 min.
2-3 min.
2-4 min.
2-3 min.
4 min.
5-6 min.
4-5 min.
4-5 min.
2-3 min.
3-4 min.
1-2 min.
(1) min.
9-10
10
9
9
8
10
9
10
9
10
7
8
4-5 min. . 2-4 min.
3-5 min. ' 2 min.
4min.. 2min.
6min.. 5min.
5-7 min. i 5-6 min.
5-6 min. i 4-5 min.
3 min.
2-3 min. i 2-3 min.
4min.. 3min.
2 min.. 1-2 min.
2-3 min. i (1) min.
Med
Med
Med
Med
Med
Hi
Hi
Hi
Hi
Hi
Med
6-8 min.
4-5 min.
6-7 min.
5-7 min.
7-8 min.
5 min.
2-3 min.. .....
2-4 min.
2-3 min.
1-2 min.
2-3 min.
4-5 mm.
3-4 mm.
5-6 mm.
4-6 mm.
5-7 mm.
5 mm.
2-3 min.
2-3 min.
1-2 min.
(1) min.
C ooossoo0os,oooTo]
_S|NG THE _RIDDLE _LEAN ING
1. Before the first use, wash your new
griddle in hot soapy water, rinse and
dry. Then "condition" the surface by
wiping on a thin coating of cooking oil
or shortening. Remove excess oil or
shortening by wiping again with
another paper towel. DO NOT use
cooking sprays on the griddle surface.
2. Preheat the griddle as noted in the
charts.
3. Use nonmetallic spatulas or utensils
while cooking to prevent damaging the
finish.
4. When cooking meats, use the
downdraft fan or range hood to capture
smoke.
NOTE: DO NOT IMMERSE THE
TERMINAL PLUG IN WATER (MODEL
A0310 ONLY). SEE BOTTOM OF
GRIDDLE FOR FURTHER
INSTRUCTIONS.
.
Once the griddle has cooled (DO NOT
IMMERSE A HOTGRIDDLE IN COLD
WATER),wash with soap or detergent
in hot water in the sink, Be sure to
removeall food residue beforecooking
on the griddle again.
.
Remove stubborn spots with a plastic
mesh puffor pad. For best results, use
only those cleaning products which
state they are recommended for use
when cleaning nonstick surfaces. De
not use steel wool or coarse
scouring pads.
3. DO NOT wash in dishwasher
9

iO
 Loading...