

Page 1

PROFESSIONAL
4.6kW POWERED
DMX 4-BAR
WWW.BRITEQ-LIGHTING.COM
Copyright © 2007 by BEGLEC cva.
Reproduction or publication of the content, even portions, in any manner, without express permission of the publisher, is prohibited.
R
R
P 01 ... 06 English
P 07 ... 12 Français
P 13 ... 18 Nederlands
P 19 ... 24 Deutsch
P 25 ... 30 Espagñol
V1.0
TFM
e
a
d
T
his
Fi
n
e M
a
nual
Page 2

EN - DISPOSAL OF THE DEVICE
Dispose of the unit and used batteries in an environment friendly manner
according to your country regulations.
FR - DÉCLASSER L’APPAREIL
Débarrassez-vous de l’appareil et des piles usagées de manière écologique
Conformément aux dispositions légales de votre pays.
NL - VERWIJDEREN VAN HET APPARAAT
Verwijder het toestel en de gebruikte batterijen op een milieuvriendelijke
manier conform de in uw land geldende voorschriften.
DU - ENTSORGUNG DES GERÄTS
Entsorgen Sie das Gerät und die Batterien auf umweltfreundliche Art und
Weise gemäß den Vorschriften Ihres Landes.
ES - DESHACERSE DEL APARATO
Reciclar el aparato y pilas usadas de forma ecologica conforme a las
disposiciones legales de su pais.
PT - COMO DESFAZER-SE DA UNIDADE
Tente reciclar a unidade e as pilhas usadas respeitando o ambiente e em
conformidade com as normas vigentes no seu país.
Page 3

Thank you for buying this BriTeQ®product. To take full advantage of all possibilities, please read these
operatinginstructions verycarefully.
This unit is radio-interferencesuppressed. This product meetsthe requirements of the current European and
national guidelines.Conformityhas been established and therelevant statementsand documents have been
deposited by themanufacturer.
Professional aluminium Powered4-bar: 4x1,8kW (Max
Sliding mechanism: you can distribute yourprojectors evenly overthe bar.
= 4,6kW/20A)
tot
Locking DMX in/outputswith POWER/DMX-presentindicator
4 Digit LED displaywith 4 buttons foreasy menu navigation:
DMX address setting: eachchannel canhave its ownaddress
Each channel canbe separately switched in dimmer or switch mode
Separatedimmer presetswith memory functionfor each channel (no controllerneeded)
4 High qualitymains sockets(schuko)
Standard28mm TV-spigot+ 35mm topsectionadapter included
Mains powerinput withNeutrik Powerconand automatic fuse
Individual channel fuses with “blown fuse” detectors
All channels equipped with40A triacsfor increasedreliability
Check thecontents:
Check that the carton containsthe following items:
DB-46 powered bar
4 sets of bolts andnuts used to installprojectors
1 TV-spigot 28mm
1 Top section adapter35mm
1 Lifting eye bold
User manual
Some important instructions:
Before you start using this unit, please check if there’s no transportation damage. Should there beany, do
notuse the device and consultyour dealerfirst.
Important:
This device left our factory in perfect condition and well packaged. It is absolutely necessary
for theuser to strictly follow the safety instructions and warnings in this user manual. Any damage caused
bymishandling is not subjectto warranty. The dealerwill not accept responsibility for any resulting defects
orproblems caused bydisregarding this usermanual.
Keep this booklet in a safe place for future consultation. If you sell the fixture, be sure to add this user
manual.
To protect theenvironment,please try torecycle the packing material asmuch as possible.
CAUT ION
CAUTION: To reduce the risk of electric shock, do not remove the top cover.
No user-serviceable parts inside. Refer servicing to qualified service
personnelonly.
The lightning flash with arrowhead symbol within the equilateral triangle is intended to alert the use
or the presence of un-insulated “dangerous voltage” within the product’s enclosure that may be of
sufficientmagnitude to constitutea risk of electric shock.
The exclamation point within the equilateral triangle is intended to alert the user to the presence of
important operation and maintenance (servicing) instructions in the literature accompanying this
appliance.
This symbol means:indoor useonly.
This symbolmeans: Readinstructions.
To prevent fire orshock hazard, do notexpose this applianceto rain ormoisture.
To avoid condensation to be formed inside, allow the unit to adapt to the surrounding temperatures when
bringing it into a warm room after transport. Condense sometimes prevents the unit from working at full
performance or mayeven cause damages.
Thisunit is forindooruse only.
Don’t place metalobjects orspillliquid inside the unit. Noobjects filledwith liquids, such as vases,shall be
placed on this appliance. Electric shock or malfunction may result. If a foreign object enters the unit,
immediately disconnectthe mains power.
No naked flamesources,such as lightedcandles, should beplaced on theappliance.
Prevent use industy environments and clean the unit regularly.
Keep the unit awayfrom children.
Inexperienced personsshould not operatethis device.
Maximum saveambient temperatureis 40°C. Don’t use this unit athigher ambienttemperatures.
Always unplug the unit when it is notused for a longer time orbeforeyou start servicing.
The electrical installation should be carried out by qualified personal only, according to the regulations for
electricaland mechanical safetyin your country.
Check that the available voltageis not higher than theone stated on the rear panelof the unit.
The socket inletshall remain operable fordisconnection fromthe mains.
The power cord should alwaysbe in perfect condition: switch the unit immediately off when thepower cord
is squashedor damaged.
Never let the power-cord come into contact with other cables!
Thisunit must be earthed to in ordercomply with safety regulations.
In order to prevent electric shock, do not open the cover. Apart from the mains fuse there are no user
serviceableparts inside.
Never repair a fuse or bypass the fuse holder. Always replace a damaged fuse with a fuse of the same
type and electrical specifications!
In the eventof serious operatingproblems, stop using the applianceand contactyour dealerimmediately.
Please usethe original packing whenthe device is tobe transported.
Due to safetyreasons it is prohibitedto make unauthorized modifications tothe unit.
Clean by wiping with a polished cloth slightly dipped with water. Avoid getting water inside the unit. Do not
use volatile liquids such asbenzeneor thinner which willdamage theunit.
Page 4

Important: The installation must be carried out by qualified service personal only. Improper
installation can result in serious injuries and/or damage to property. Overhead rigging requires
extensive experience! Working load limits should be respected, certified installation materials
shouldbe used, theinstalled device shouldbe inspected regularlyfor safety.
Make sure the area below the installation place is free from unwanted persons during rigging, de-rigging
andservicing.
Locate the fixture in a well ventilated spot, far away from any flammable materials and/or liquids. The
fixturemust be fixed
at least50cm
fromsurrounding walls.
The device should be installed out ofreach of peopleand outside areas where persons may walk by or be
seated.
Before rigging make sure that the installation area can hold a minimum point load of 10times thedevice’s
weight.
Always use a certified safety cable that can hold 12times the weight of the device wheninstalling the unit.
This secondary safety attachment should be installed in a way that no part of the installation can drop
more than 20cm if the main attachmentfails.
The device should be well fixed;a free-swinging mounting isdangerous and may notbe considered!
Don’t coverany ventilation openingsas this mayresult in overheating.
The operator hasto make sure that the safety-relating andmachine-technicalinstallations areapproved by
an expertbefore using them for the first time. The installations should be inspected everyyear by a skilled
person tobe sure that safety is still optimal.
1. CHANNEL OUTPUTS: Each channel output has its own output socket to connect any resistive and/or
inductive projector(s) orsmall light effects.
2. CHANNELFUSES: Each channel is equipped with afuse and “blown fuse” detector. The detectorlights
up when the channel fuse is blown. Always replace the blown fuse with a fuse that has the same
characteristics! (250V/8A).
IMPORTANT NOTE: It’s very important to know that the maximumload for each channel is rated at 8A or
1850Watts. Howeverthe totalload for all 4 channels may not exceed 20A or 4600Watts!
3. POWER INPUT: mains input, equipped witha Neutrik Powercon®, makesure the localvoltage is 230Vac
and the projectors (and/or light effects) are properly connected to the channel output sockets (1) before
you connect an earthed mains cable to this input. The maximumtotalload is 20A or 4600Watts.
4. INPUT FUSE: This is an automatic circuit breaker. When the fuse is blown, first locate and solve the
problem that caused the fuse to blow. When the problem is solved, simply push the button to reset the
circuit breaker.
5. DMX OUTPUT: 3pin female XLR-connector used to connect the DB-46 with the next unit in the DMX
chain.
6. DMX INPUT: 3pin male XLR-connector used to connect universal DMX-cables. This input receives
instructionsfrom a DMX-controller.
7. STAND ADAPTER: used to put the DB-46 easily on top of a light stand. Two different stand adapters
areincluded (also see number 9 formore information):
35mmadapter: tobe used onstands witha standard 35mm topsection.
28mmTV-Spigot: tobe used on standsequipped with aTV-spigotadapter on top.
8. SLIDINGMECHANISM: used to distribute yourprojectors evenly overthe DB-46. Also see number 9 for
more information.
9. ENDCAP: To install the bolts/nuts (needed to fixthe projectors) and stand adapter you have to remove
this end capon one side ofthe unit: simplyunscrew the 4 screws remove the cap put thenuts/bolts
and/or standadapter in thesliding rail put the cap back in place fix the 4screws done!
10. CONTROL PANEL: multifunctional display + 4 buttons to navigate the setup menu. See the numbers
below.
11. DISPLAY: shows the information related to the selected function or working mode. The left digit shows
thechannel number, the 3other digits showthe channel status:
In the address menu: channeladdress is shown, ranging from001 to 512
In the mode menu: working modeis shown. (“d” = dimmer mode * “S” = switch mode)
In the dimmenu and standard display: channeloutput statusis shown.
Channel indimmer mode:dimmer percentage,ranging from 0% to100%
12. MENU BUTTON: Please refer to the menu structure to understand the different menus. These are the
Channel in switchmode: “oN” =output 100% * “oFF”= output 0%
differentpossibilities:
Browse the main menu: Press the MENU buttontogetherwith the UP/DOWNbuttons.
Return to the mainmenu: Press the MENU buttonto return to the main menu. (escape function)
Display blackout function: Press the MENU button together with the ENTER button to switch the
13. DOWN BUTTON: Please refer to the menu structure to understand the different menus. These are the
display on/off.
differentpossibilities:
Browse the main menu: Press the MENU buttontogetherwith the UP/DOWN buttons.
In the addressmenu: Press the DOWN button to lower the DMX address of theselected channel.
(press the button for alonger time to increase the speed)
In the mode menu: Pressthe DOWN buttonto put theselected channel in switch mode.
In the dim menu: Pressthe DOWN button to lower the dimmer value (0~100%) when the selected
channel is in dimmer mode. (press the button for a longer time to increase the speed). When the
14. UP BUTTON: Please refer to the menu structure to understand the different menus. These are the
selectedchannel is set to switch mode, you can turn the output off.
differentpossibilities:
Browse the main menu: Press the MENU buttontogetherwith the UP/DOWN buttons.
In the address menu: Press the UP button to increase the DMX address of the selected channel.
(press the buttonfor a longertime to increase the speed)
In the mode menu: Press the UP buttonto put theselected channelin dimmermode.
In the dim menu: Press the UP button to increase the dimmervalue (0~100%) when the selected
channel is in dimmer mode. (press the button for a longer time to increase the speed). When the
selected channel is set to switch mode,you can turnthe output on.
15. ENTER BUTTON: Please refer to the menu structure to understand the different menus. These are the
differentpossibilities:
In the main menu: Pressthe ENTERbutton to select the desired sub menu.
In a sub menu: Pressthe ENTER buttonto browsethrough the 4 channels.
Display blackout function: Press the MENU button together with the ENTER button to switch the
16. DMX PRESENTLED: this LED indicates if the unit receives a DMX-signal onthe DMX-input(n°6):
display on/off.
LED is on: no DMX-signaldetected onthe input.
LED is blinking: DMX-signaldetected onthe input
Page 5

Once youselected thedesired channel, pressthe UP/DOWN buttons toset the working mode.
Press theMENU buttonto return to themain menu.
DIM MENU:
This is the standalone mode, all output levels can be set directly on the control panel so you don’t need a
controller. It’s important to know that the output settings are preserved when the unit is disconnected from
themains. Thismakes the DB-46very useful to illuminate exhibition booths etc.
Press theENTERbuttonto browsethrough themenu.
Once youselected the desired channel, press the UP/DOWN buttons toset the output level.
Press theMENU buttonto return to themain menu.
Power Input: 230Vac / 20A maximum (4600Watts)
Power outputs: 4x 230Vac/ max. 8A (1850Watts)
ChannelFuses: 250V/8A (size 20x5mm)
Inputfuse: 20A “auto reset” thermal circuit breaker
DMX input: 3pin XLR male
DMX output: 3pinXLR female
Size: 152 x 9 x 7 cm
Weight: 5,5 kg
You can download the latestversion of thisuser manual on our website: www.briteq-lighting.com
Every informationis subject to change withoutprior notice
MAINMENU:
This menuis used to selectone ofthe 3 sub menus.
Press theMENU buttontogether with the UP/DOWN buttons tobrowse the menu.
Press theENTERbuttonto selectthe desired submenu.
ADDRESSMENU:
This menu is used to set the DMX address of the 4 output channels. Each channel can be set to a unique
DMX-address. You can even give2 or morechannels the sameDMXaddress.
Press theENTERbuttonto browsethrough themenu.
Once youselected the desired channel, press the UP/DOWN buttons toset theaddress
Press theMENU button to returnto themain menu.
MODEMENU:
This menuis used to set the working mode ofthe4 outputchannels.
DIM mode: use this mode when you connect lamps (projectors) to this output channel. You will be able to
dim theoutput smoothly between 0% and 100%.
SWITCH mode: use thismode when youconnect small light effects tothis output channel. You can toggle
the output between ON (100% output) and OFF (0% output). Now you can switch small light effects on/off
with yourDMX-controller.
Press theENTERbuttonto browsethrough themenu.
Page 6

Nous vous remercions d’avoir acheté ce produit BriTeQ®. Veuillez lire ce mode d’emploi très attentivement
afin de pouvoirexploitertoutes lespossibilités de cet appareil.
Cet appareil ne produit pas d’interférences radio. Il répond aux exigences nationales et européennes. La
conformité aété établieet les déclarations et documentscorrespondants ont étédéposés par le fabricant.
Barre d'alimentationprofessionnelle enaluminium, à 4 sorties: 4 x 1,8 kW (Max
= 4,6 kW/20A)
tot
Mécanisme coulissant: vous pouvezrépartir vos projecteurs sur toute la longueur de labarre.
Entrées/sorties DMXavec verrouillage et indicateurs de présencede tension secteuret designaux DMX.
Affichage LEDavec 4 boutonspour une navigationfacile dans le menu:
AdressageDMX : chaque canal peut avoir sapropre adresse
Chaque canal peutêtre commuté séparémenten modegradateur ou interrupteur on/off.
Préréglage du gradateur pour chaque canal avec fonction mémoire (un contrôleur externe n'est pas
nécessaire)
4 prises dehaute qualité (schuko)
Ergot TV standardde 28 mm + adaptateurpour haut de statif de 35mm inclus.
Alimentationéquipée d’un connecteurNeutrik Powerconet d'un fusibleautomatique.
Un fusible pour chaquecanal, avecdétecteurs de fusiblesayant disjoncté.
Tousles canaux sont équipés de triacs de 40Aafin d'améliorer lafiabilité.
Vérifiez le contenu:
Vérifiezsi la boite contientles articles suivants :
Barre d'alimentation DB-46
Mode d’emploi
4 paires deboulonset d'écrous pourinstallerles projecteurs
1 Ergot TV 28mm
1 adaptateur pour hautde statif de 35mm
1 boulon à oeil
Quelquesinstructionsimportantes:
Avant d’utiliser cet appareil, assurez-vous de l’absence de dommage lié au transport. En cas
d’endommagement,n’utilisez pas l’appareil etcontactez levendeur.
Important: Cet appareil a quitté notre usine en parfaite condition et bien emballé. Il est primordial que
l’utilisateur suive les instructions de sécurité et avertissements inclus dans ce manuel. La garantie ne
s’applique pas en cas de dommage lié à une utilisation incorrecte. Le vendeur ne prend pas la
responsabilité des défauts ou de tout problème résultant du fait de n’avoir pas tenu compte des mises en
garde dece manuel.
Conservez ce manuel dans un endroit sûr pour toute consultation future. Si vous vendez l’appareil,
assurez-vous d’yjoindrece manuel également.
Afin deprotéger l’environnement, merci de recycler les emballagesautant quepossible.
CAUTION
ATTENTION: afin de réduire le risque d’électrocution, n’enlevez jamaisle
couvercle de l’appareil. Il n’y a aucune pièce à l’intérieur de l’appareil que
vous pouvez remplacer vous-même. Confiezl’entretien uniquement à des
techniciensqualifiés.
La flèche dans un triangle met l'utilisateur en garde contre la présence de haute tension sans
isolationdans l'appareilqui peutcauser un risqued'électrocution.
Un point d'exclamation dans un triangle prévient de la présence d'instructions de fonctionnement et
de maintenancese trouvantdans le manuel, fourni avec l'appareil.
Ce symbolesignifie : uniquementpour usageà l'intérieur
Ce symbolesignifie : Lire lemode d’emploi.
Afin d’éviter tout risque d’incendie ou de choc électrique, ne pas exposer cet appareil à la pluie ou
l’humidité.
Pour éviter laformation de condensation à l’intérieur de l’appareil, patientezquelquesminutes pour laisser
l’appareil s’adapter à la température ambiante lorsqu’il arrive dans une pièce chauffée après le transport.
La condensation empêche l’unité de fonctionner en performance optimale et peut même causer des
dommages.
Cette unité est destinée à uneutilisation à l’intérieuruniquement.
Ne pas insérer d’objet métallique ouverser un liquide dans l’appareil. Aucun objet rempli de liquides, tels
que des vases,ne peut être placé sur cetappareil. Risque dechoc électrique ou dedysfonctionnement. Si
un corpsétranger est introduitdans l’unité, déconnectezimmédiatement dela sourced’alimentation.
Aucune source deflamme nue, telleque les bougiesallumées, ne peutêtre placée sur l'appareil.
Ne pas utiliserdans un environnementpoussiéreux et nettoyezl’unité régulièrement.
Ne pas laisserl’unité àportée des enfants.
Les personnes non expérimentées nedoivent pasutiliser cet appareil.
La température ambiantemaximumd’utilisation de l’appareil estde 40°C. Ne pas l’utiliser au-delà de cette
température.
Débranchez toujours l’appareil si vous ne l’utilisezpas demanière prolongée ouavant d’entreprendredes
réparations.
Les installations électriques ne peuvent être faites que par du personnel qualifié et conformément aux
régulations desécurité électriqueet mécanique envigueur dans votre pays.
Assurez-vousque la tension d’alimentationde la source d’alimentation de la zone danslaquelle vous vous
trouveznedépassepas celui indiqué à l’arrièrede l’appareil.
La prise seratoujours accessiblepour que le cordonsecteur puisse êtreenlevé à chaque moment.
Le cordon d’alimentationdoit toujours être en condition parfaite.Mettez immédiatementl’unitéhors tension
si le cordon est écrasé ou endommagé.
Ne laissez jamaisle cordon d’alimentationentrer en contactavec d’autrescâbles !
L’appareil doit êtreà la masseselon lesrègles de sécurités.
Utilisez toujours lescâbles appropriés etcertifiéslorsque vous installezl’unité.
Pour éviter tout choc électrique, ne pas ouvrir l’appareil. En dehors du fusible principal, il n’y a pas de
pièces pouvantêtre changées par l’utilisateurà l’intérieur.
Nejamais
réparer oucourt-circuiter un fusible. Remplacez
systématiquement
un fusibleendommagé par
un fusible demême type et ayant lesmêmes spécifications électriques !
En cas de problèmes de fonctionnement sérieux, arrêtez toute utilisation de l’appareil et contactez votre
revendeurimmédiatement.
Utilisez l’emballaged’origine si l’appareildoit êtretransporté.
Pour des raisons de sécurité, il est interdit d’apporter toute modification à l’unité non spécifiquement
autoriséepar les partiesresponsables.
Nettoyez l’appareil à l’aide d’un chiffon doux,légèrement humide. Evitez d’introduire de l’eau à l’intérieur de
l’appareil. N’utilisez pas de produits volatiles tels que le benzène ou le thinner qui peuvent endommager
l’appareil.
Page 7

1. SORTIES DES CANAUX : Chaque sortie de canal a sa propre prise de sortie, à laquelle on peut
raccordern'importe quelprojecteur ou depetits effets lumineux, qu'il soit de type inductif et/ourésistif.
2. FUSIBLES DE CANAL: chaque canal est équipé d'un fusible et d'un détecteur de fusible ayant
disjoncté. Le détecteur s'allume lorsque le fusible du canal concerné a disjoncté. Il faut toujours
remplacer le fusible qui a sauté par un fusible qui possède les mêmes caractéristiques ! (250V/8A
rapide)
Remarque : Il est très important de savoirque la chargemaximum pour chaquecanal est limitée à 8A
ou 1850 watts. Cependant,la charge totale pour l'ensembledes 4 canaux nepeut pas dépasser 20Aor
3. ALIMENTATION : arrivée générale de l'alimentation secteur, équipée d'uneprise Neutrik Powercon®, il
est impératif de s'assurer que latension de service locale estde 230 V (CA) et que les projecteurs (et/ou
les petits effets lumineux) sont correctement raccordés aux prises de sortie des canaux (1) avant de
raccorderun cordon d'alimentation secteur avec prise de terre à cette entrée. La charge totalemaximum
est de20A ou 4600 watts.
4. FUSIBLE PRINCIPAL : il s'agit d'un coupe-circuit automatique. Quand le fusible a disjoncté, il faut
d'abord localiser le problème et apporter une solution à ce qui a provoqué le déclenchement du fusible.
Quand ce problème a trouvé sa solution, poussez simplement sur le bouton pour remettre le coupecircuit enfonction.
5. SORTIE DMX: connecteur XLR mâle à 3 broches qui permetde connecter une barre d'alimentation DB46 à l'unité suivantede la chaîneDMX.
6. ENTREE DMX: connecteur XLRmâle à 3 broches qui permetde connecter des câbles XLR universels.
Cetteentrée reçoitdes instructionsprovenant d'un contrôleurDMX.
7. ADAPTATEUR DE STATIF : est utilisé pour fixerfacilement la barre d'alimentation DB-46 en haut d'un
statif pour projecteurs. Deux adaptateurs de statif sont inclus dans la livraison (se reporter aussi au
numéro 9pour plus d'informations):
4600 watts!
adaptateur de 35mm : doit être utilisé avec des statifs dont le sommet est équipé au standard 35
mm ;
Ergot TVde 28 mm : doit êtreutilisé avec des statifs dont lesommet estéquipé d'un ergotTV.
8. MECANISME COULISSANT : ce mécanisme vous permet de répartir au mieux vos projecteurs sur
toute la longueur de la barre d'alimentation DB-46. Se reporter aussi au numéro 9 pour plus
d'informations.
9. COUVERCLES LATERAUX : Pour installer les boulons et les écrous (nécessaires pour fixer les
projecteurs), ainsi que l'adaptateur de statif, vous devez enlever un couvercle latéral de l'un des deux
côtés de l'appareil : dévissez simplement les 4 vis enlevez le couvercle latéral introduisez les
écrous et le boulons et/ou l'adaptateur de statif dans le rail en les faisant coulisser remettez le
couvercle latéral en place remettezles 4 vis c'est terminé!
10. PANNEAU DE CONTROLE : écran à fonctions multiples + 4 boutons pour naviguer dans le menu de
configuration. Sereporter aux numérosci-dessous.
11. ECRAN : il montre les informations en rapport avec la fonction sélectionnée ou le mode actif. Le
caractèrede gauche affichele numéro de canal, les3 autres affichentle statut du canal :
dans le menu d'adressage : l'adresse du canal est affichée, la plage de chiffres pouvant aller de
001 à 512 ;
dans le menumode : le modeactif estaffiché. (“d” = modegradateur * “S” = modeswitch) ;
dans le menu du gradateur et dansl'écran standard : le statutdu canal de sortieest affiché :
si le canal est en mode gradateur : affichage du pourcentage de puissance du gradateur
allantde 0% à 100% ;
12. BOUTON DE MENU : s'il vous plaît, se référer à la structure du menu pour comprendre les différents
menus. Voici les différentes possibilités :
si le canal esten mode switch :“oN” = sortie 100% * “oFF”= sortie0%.
si l'on parcourt le menu principal : appuyez sur le bouton du MENU en même temps que sur les
boutonsUP/DOWN ;
pour retourner au menu principal : appuyez sur le bouton du MENU pour retourner vers le menu
principal (fonctionescape) ;
pour afficher les fonctions de blackout : appuyez sur le boutondu MENU en même temps que sur
13. BOUTON DOWN : s'il vous plaît, se référer à la structure du menu pour comprendre les différents
le boutonENTER pour allumerou éteindre l'écran.
menus. Voici les différentes possibilités :
si l'on parcourt le menu principal : appuyez sur le bouton du MENU en même temps que sur les
boutonsUP/DOWN ;
dans le menu d'adressage : appuyez sur le bouton DOWN pour donner au canal une adresse
DMX qui correspond à un nombre plus petit (appuyez plus longtemps sur le bouton pour
augmenter lavitessede défilement) ;
dans le menu mode : appuyez sur le bouton DOWN pour faire passer le canal sélectionné en
mode switch;
dans le menu dim : appuyez sur le boutonDOWN pour diminuer la valeur du gradateur (0~100%)
quand le canal sélectionné est en mode gradateur (appuyez plus longtemps sur le bouton pour
augmenter lavitesse de défilement); quand le canal sélectionné esten mode switch,vous pouvez
14. BOUTON UP : s'il vous plaît, se référer à la structure du menu pour comprendre les différents menus.
l'éteindre.
Voiciles différentespossibilités :
si l'on parcourt le menu principal : appuyez sur le bouton du MENU en même temps que sur les
boutonsUP/DOWN ;
dans le menu d'adressage : appuyez sur le bouton UP pour donner au canal une adresse DMX
qui correspond à un nombreplus élevé (appuyezplus longtemps sur le bouton pour augmenter la
vitesse dedéfilement) ;
dans le menu mode : appuyez sur le bouton UP pour faire passer le canal sélectionné en mode
gradateur ;
dans le menu dim : appuyez sur le bouton UP pour augmenter lavaleur du gradateur (0~100%)
quand le canal sélectionné est en mode gradateur (appuyez plus longtemps sur le bouton pour
augmenter lavitessede défilement); quand le canal sélectionné est enmode switch, vous pouvez
15. BOUTON ENTER : s'il vous plaît, se référer à la structure du menu pour comprendre les différents
l'allumer.
menus. Voici les différentes possibilités :
dans le menuprincipal : appuyez surle bouton ENTERpour sélectionner lesous-menudésiré ;
Page 8

dansun sous-menu : appuyez sur lebouton ENTER pournaviguer entre les 4 canaux ;
pour afficher les fonctions de blackout : appuyez sur le boutondu MENU en même temps que sur
16. LED DETECTRICE DE SIGNAL DMX : cette LED indique si l'appareil reçoit bien un signal DMX sur
le boutonENTER pour allumerou éteindre l'écran.
l'entrée DMX(n°6) :
si laLED est éclairée : aucun signalDMX n'estdécelé sur l'entrée.
si la LED clignote : un signalDMX est bien décelé sur l'entrée.
une fois quevous avez sélectionnéle canal désiré, appuyezsur les boutonsUP/DOWN pour enfixer
l'adresse;
appuyez surle bouton MENU pour retournerversle menu principal.
MENU MODE:
ce menu estutilisé pour fixer le mode de fonctionnement des4 canaux de sortie :
mode DIM : ce mode est à utiliser quand vous connectez des lampes (projecteurs) à ce canal de sortie.
Vous serez en mesurede tamiser la puissancede sortie en continu, de 0 %à 100 %.
mode SWITCH : ce mode est à utiliser quand vous connectez de petits effets lumineux à ce canal de
sortie. Vous pourrez ainsi inverser la sortie entre ON (100 % de la puissance) et OFF (0 % de la
puissance). Vous serez ainsi en mesure de mettre en ou hors service de petits effets lumineux via votre
contrôleurDMX.
appuyezsur le bouton ENTERpour naviguer dansle menu ;
une foisque vous avezsélectionné le canal désiré,appuyez sur lesboutons UP/DOWN pour enfixer
le modede fonctionnement ;
appuyez surle bouton MENU pour retournerversle menu principal.
MENU DIM:
il s'agit du mode indépendant ('stand alone') : tous les niveaux de sortie peuvent être réglés à même le
panneau de contrôle, de sorteque l'on n'a pas besoin d'un contrôleur externe.Il est importantde savoir que
ces réglages des niveaux de sortie sont gardés en mémoire même quand l'appareil est déconnecté du
réseau. Cette caractéristique fait de la barre d'alimentation DB-46 un outil très utile pour éclairer desstands
d'expositions,etc …
appuyez surle bouton ENTERpour naviguer dans lemenu ;
une fois quevous avez sélectionné le canal désiré, appuyez sur lesboutons UP/DOWN pour enfixer
le niveaude sortie ;
appuyez surle bouton MENU pour retournerversle menu principal.
Alimentation: 230Vac/20A minimal(4600Watts)
Sorties depuissance : 4 x 230V CA/ max. 8A(1850 watts)
Fusibles decanal : 250V/8A (taille20 x 5 mm)
Fusible principal : 20A,coupe-circuit thermiqueavec fonction 'auto reset'
Entrée DMX: prise XLRmâle à 3broches
Sortie DMX: prise XLRfemelle à 3 broches
Dimensions: 152 x 9 x 7 cm
Poids: 5,5kg
MENU PRINCIPAL :
cemenu est utilisépour sélectionner l'un des3 sous-menus :
appuyez sur le bouton du MENU en même temps que sur les boutons UP/DOWN pour parcourir le
menu ;
appuyez surle bouton ENTERpour sélectionnerle sous-menudésiré.
MENU D'ADRESSAGE:
ce menu est utilisé pour fixer l'adresse DMX des 4 canaux de sortie. Chaque canal peut être réglé sur une
adresseDMX unique. Vous pouvezmême attribuer la même adresse DMXà 2 canaux ou plus.
appuyez surle bouton ENTERpour naviguer dans lemenu ;
Chacune deces informationspeutêtre modifiéesans avertissement préalable. Vous pouvez
télécharger la dernière versionde cemode d’emploide notre site Web: www.briteq-lighting.com
Page 9

Hartelijk dank voor de aankoop van dit BriTeQ®product. Om ten volle te kunnen profiteren van alle
mogelijkheden en voor uw eigen veiligheid, gelieve de aanwijzingen zeer zorgvuldig te lezen voor U begint
het apparaat tegebruiken.
In dit apparaat is radio-interferentie onderdrukt. Dit product voldoet aan de gangbare Europese en nationale
voorschriften. Het is vastgesteld dat het apparaat er zich aan houdt en de desbetreffende verklaringen en
documenten zijn door defabrikant afgegeven.
Professionele aluminium 4-barvoorzienvan internedimmerpacks:4x1,8kW (Max
Schuifmechanisme zorgt steedsvoor een perfecteverdeling van deprojectoren opde bar.
= 4,6kW/20A)
tot
DMX in/uitgangenvoorzien vanvergrendeling enPOWER/DMX-presentindicator.
4 Digit LED displaymet 4 toetsenvoor gemakkelijkemenu navigatie:
DMX adresinstellingen:individueelDMX adresvoor elkkanaal mogelijk!
Elk kanaalkan afzonderlijkals dimmerof switchpackworden ingesteld
Dimmer niveausinstelbaar per kanaal metgeheugenfunctie (geenexterne controllernodig)
Voorzien van 4 degelijkestopcontacten.
Standaard 28mm TV-spigot en35mm adapterinbegrepen
Stroomvoorziening dmv Neutrik Powerconen automatischezekering.
Individuele kanaalzekeringen met “blown fuse”detectie.
Alle kanalenzijn uitgerust met 40Atriacs voor verhoogde betrouwbaarheid.
Controleer deinhoud:
Kijk naof de verpakkingvolgende onderdelen bevat:
DB-46 powered bar
Gebruiksaanwijzing
4 sets bouten en moeren om projectoren te installeren
1 TV-spigot 28 mm
1 35 mm adapter voorTopsectie
1 oogbout
Belangrijkeinstructies:
Controleer voorhet eerste gebruik van het apparaat of hettijdens het transport beschadigd werd.Mocht er
schade zijn, gebruikhet dan niet, maarraadpleeg eerstuw dealer.
Belangrijk: Dit apparaat verliet de fabriek in uitstekende staat en goed verpakt. Het is erg belangrijk dat
de gebruiker de veiligheidsaanwijzingen en raadgevingen in deze gebruiksaanwijzing uiterst nauwkeurig
volgt. Elke schade veroorzaakt door verkeerd gebruik van het apparaat valt niet onder de garantie. De
dealer aanvaardt geen verantwoordelijkheid voor mankementen en problemen die komen door het
veronachtzamenvandezegebruiksaanwijzing.
Bewaar deze brochure op een veilige plaats om hem in de toekomst nogmaals te kunnen raadplegen.
Indien U hetapparaat verkoopt,denkt U erwel aan om de gebruiksaanwijzingbij te voegen.
Om het milieu tebeschermen, probeerzoveel mogelijk het verpakkingsmateriaalte recycleren.
CAUTION
WAARSCHUWING: Om het risico op elektrocutie zoveel mogelijk te
vermijden mag u nooit de behuizing verwijderen. Er bevinden zich geen
onderdelen in het toestel die u zelf kan herstellen. Laat de herstellingen
De bliksempijl diezich in een gelijkbenige driehoek bevindtis bedoeld om u tewijzen op het gebruik
enkeluitvoeren door een bevoegde technicus.
of de aanwezigheid van niet-geïsoleerde onderdelen met een “gevaarlijke spanning” in het toestel
die voldoende krachtheeft om eenrisico vanelektrocutiein te houden.
Het uitroepteken binnen de gelijkbenigedriehoek is bedoeld om degebruikererop te wijzendat er in
de meegeleverde literatuur belangrijke gebruik en onderhoudsinstructies vermeld staan betreffende
dit onderdeel.
Dit symboolbetekent: het apparaat magenkel binnenhuis wordengebruikt.
Dit symboolbetekent: Leesde handleiding!
Stel dit apparaat niet bloot aan regen of vocht, dit om het risico op brand en elektrische schokken te
voorkomen.
Om de vorming van condensatie binnenin te voorkomen,laat het apparaat aande omgevingstemperatuur
wennen wanneer het, na het transport, naar een warm vertrek is overgebracht. Condensatie kan het
toestel soms verhinderen perfect te functioneren. Het kan soms zelfs schade aan het apparaat
toebrengen.
Gebruik dit apparaatuitsluitendbinnenshuis.
Plaats geen stukken metaal en mors geen vocht binnen in het toestel om elektrische schokken of storing
te vermijden. Objecten gevuld met water, zoals bvb. Vazen, mogen op dit apparaat worden geplaatst.
Indien er toch een vreemd voorwerp of water in het apparaat geraakt, moet U het direct van het lichtnet
afkoppelen.
Open vuur, zoals brandendekaarsen, mogenniet op hetapparaat geplaatst worden.
Zorg dat het toestel nietin een stoffigeomgeving wordtgebruikt en maak het regelmatig schoon.
Houd het apparaatuit debuurt vankinderen.
Dit apparaatmag niet dooronervaren personenbediend worden.
De maximum veilige omgevingstemperatuur is 40°C. Gebruik het apparaat dus niet bij hogere
temperaturen.
Trek altijd de stekker uit wanneer het apparaat gedurende langere tijd niet wordt gebruikt of alvorens met
deonderhoudsbeurt tebeginnen.
De elektrische installatie behoort uitsluitend uitgevoerd te worden door bevoegd personeel,volgens de in
uw landgeldende regels betreffendeelektrische enmechanische veiligheid.
Controleer dat de beschikbare spanning niet hoger is dan die aangegeven op de achterzijde van het
toestel.
Het stopcontact zal steeds vrij toegankelijk blijven zodat de stroomkabel op elk moment kan worden
uitgetrokken.
De elektrische kabel behoort altijd in uitstekende staat te zijn. Zet het apparaat onmiddellijk af als de
elektrischekabel gekneusdof beschadigd is.
Laat de elektrische draad nooit incontact komen metandere draden.
Volgens de veiligheidsvoorschriften moet dezeinstallatie geaard worden.
Om elektrische schokken te voorkomen, moet U de behuizing niet openen. Afgezien van de zekering
zittener geen onderdelenin die doorde gebruiker moeten wordenonderhouden.
Repareer nooit een zekering en overbrug de zekeringhouder nooit. Vervang een beschadigde zekering
steeds dooreen zekering van hetzelfdetype en met dezelfde elektrische kenmerken.
Ingeval van ernstige problemen met het bedienen van het toestel, stopt U onmiddellijk het gebruik ervan.
Contacteeruw dealer vooreen eventuele reparatie.
Gebruik best deoriginele verpakking als hettoestel vervoerdmoet worden.
Om veiligheidsredenen is hetverboden om ongeautoriseerdemodificatiesaan het toestel aan te brengen.
Reinig het toestel met een zacht, lichtjes bevochtigd doek. Vermijd water te morsen in het toestel. Gebruik
nooitvluchtige productenzoals benzeenof thinner,dit kan hettoestel beschadigen.
Page 10
Belangrijk: De installatie van het toestel mag uitsluitend door bekwaam onderhoudspersoneel
uitgevoerd worden. Onjuiste plaatsing kan ernstige letsels en/of schade aan eigendommen tot
gevolg hebben. Het ophangen vergt veel ervaring. U behoort de grenzen te respecteren aan de
werklast; erkende installeringmaterialen moeten worden gebruikt; de veiligheid van het
geïnstalleerde toestel moetregelmatigworden gecontroleerd.
Overtuig U ervan dat het gebied onder installatieplaats vrij is van ongewenste personen tijdens het
plaatsen,het weghalenen het onderhoud.
Installeer het toestel op een goed geventileerde plaats, ver van brandbare stoffen en/of vloeistoffen. Het
toestelmoet wordenbevestigd op
minstens 50 cm
van deomringende muren.
Het toestel moetworden geïnstalleerd buiten het bereikvan iedereen en weg van plaatsen waar men mag
lopen en zitten.
Alvorens tot plaatsen over te gaan, moet men controleren dat de minimum puntbelasting van de
installatieplaats 10 keer het gewicht van hettoestel bedraagt.
Gebruik bij het installeren van het toestel altijd een gewaarmerkteveiligheidskabel die 12 keerhet gewicht
van het toestel kan dragen. Deze bijkomende veiligheidsbevestiging moet zo worden aangebracht dat
geen deelvan het toestel meerdan 20 cm vallen kan als de hoofdbeveiliging faalt.
Het apparaat moet goed worden vastgezet; aan een vrij zwaaiende montage mag zelfs niet gedacht
worden.
Bedek geenventilatieopeningen,anders zouditoververhitting tot gevolg kunnen hebben.
De gebruiker moet er zich van verzekeren dat de installaties met betrekking tot de veiligheid en de
technische mechaniek dooreen expertzijn goedgekeurd alvorens ze voor de eerste keerte gebruiken. Elk
jaar moeten deinstallaties worden gekeurddoor een vakman om tecontrolerenof de veiligheid nog steeds
perfectis.
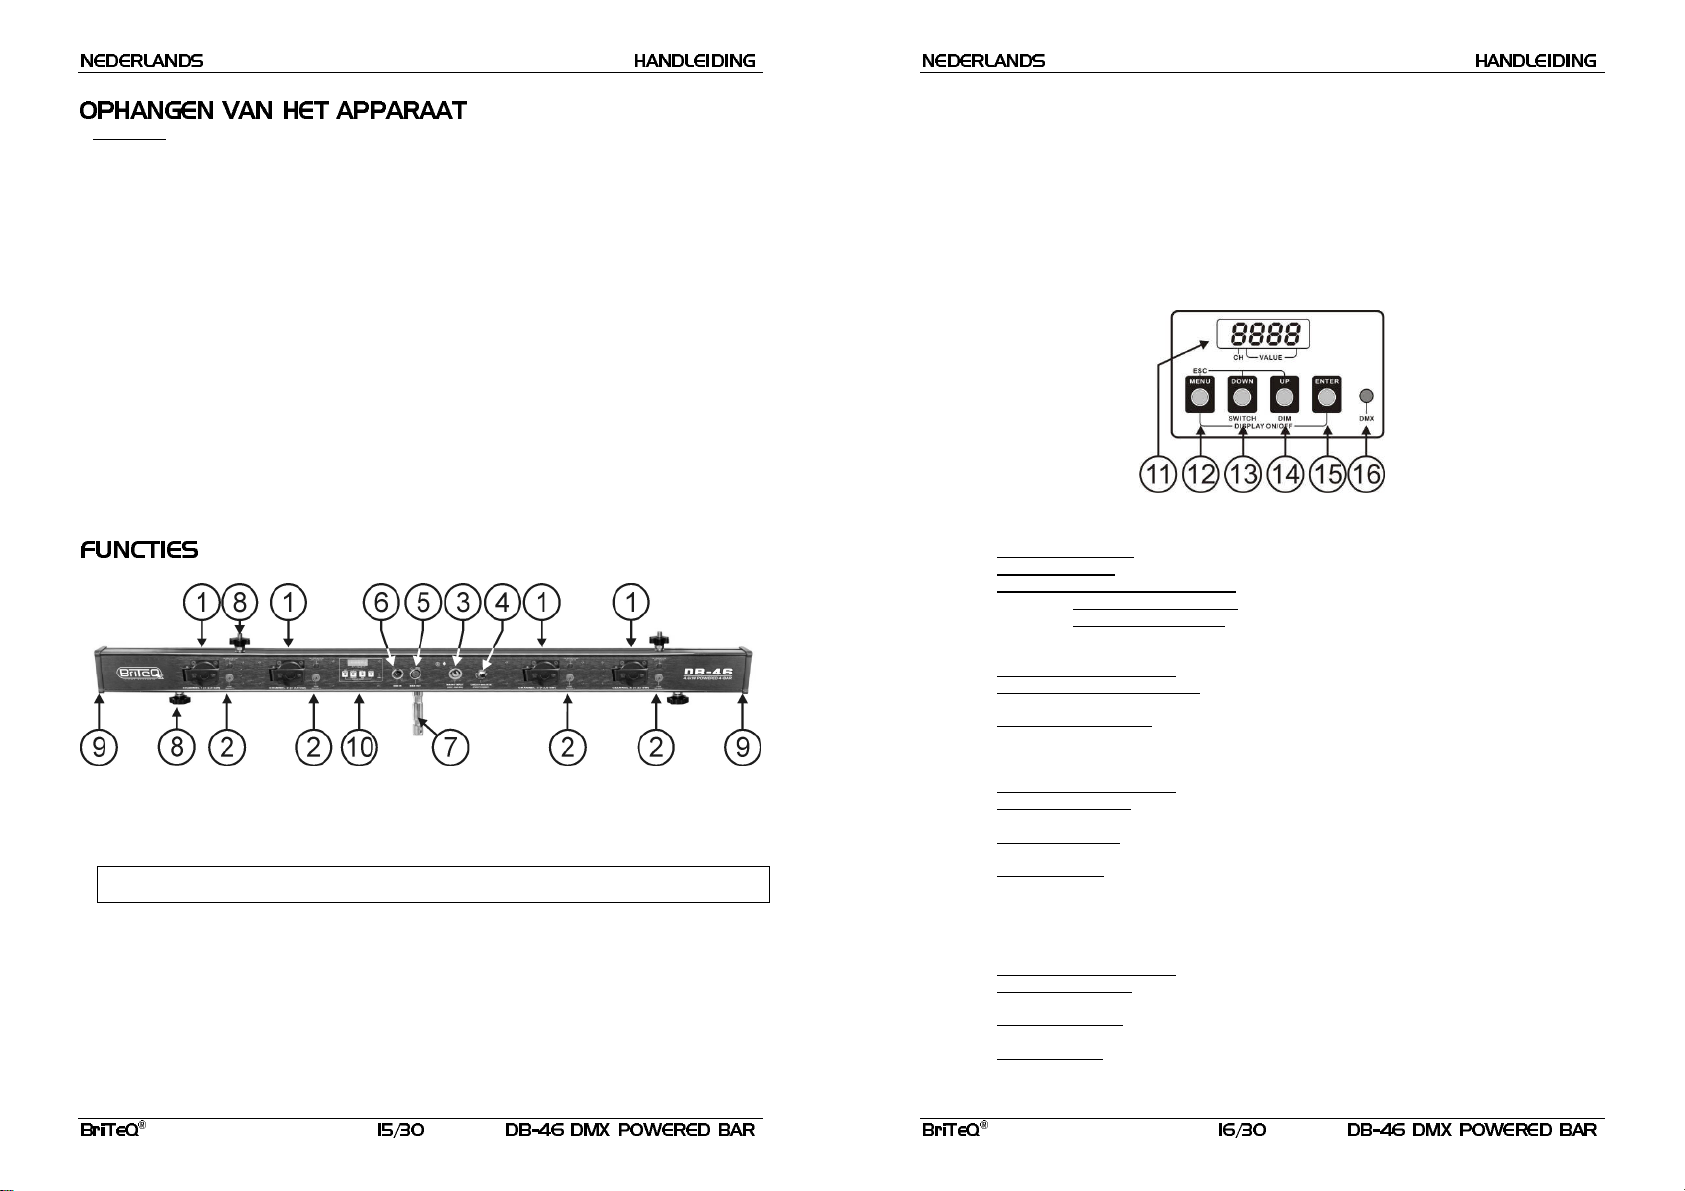
1. KANAALUITGANGEN: Elk kanaal heeft zijn eigen stopcontact waarop U resistieve of inductieve
projectorenof kleinelichteffecten kanaansluiten.
2. KANAALZEKERINGEN : Elk kanaal heeft tevens zijn eigen zekering en een “blown fuse” detector.
Deze detector licht op wanneer de kanaalzekering is gesprongen. Vervang deze gesprongen zekering
steeds dooreen exemplaarmet dezelfdeelektrische eigenschappen! (250V/8Asnel)
Opmerking:Het is erg belangrijkte weten dat elk kanaal eenmaximaal vermogenvan 8A of 1850W kan
leveren. Het totalevermogen mag 20Aof 3600Watts nooit overstijgen!
3. POWER INGANG: netsnoer, uitgerust met een Neutrik Powercon®, verzeker U ervan dat het
beschikbare stopcontact 230Vac levert en de projectoren (en/of lichteffecten ) correct op de uitgangen
(1) werdenaangesloten voorU de geaarde netsnoer aandeze ingang verbindt. Hetmaximaal toegelaten
totalevermogen is 20A of 4600Watt.
4. HOOFDZEKERING: Dit is een automatische zekering. Wanneer de zekering is gesprongen, lokaliseer
en los dan eerst het probleem op dat ervoor gezorgdheeft dat de zekering gesprongen is. Wanneer het
probleem opgelostis, druk dansimpelweg op de knop om de zekering te resetten.
5. DMX UITGANG: deze 3pin vrouwelijke XLR-aansluiting wordt gebruikt om de DB-46 met het volgende
DMX-apparaat in de keten teverbinden.
6. DMX INGANG: deze3pinmannelijkeXLR-aansluiting wordt gebruikt voor het aansluitenvan universele
DMX-kabels.Deze ingangontvangt zijninstructies van eenDMX-controller.
7. STATIEFADAPTER: wordt gebruiktom de DB-46 gemakkelijk te plaatsen op detop van een lichtstatief.
2 verschillende statief adapterszijn inclusief (zie ookn°9 voormeer informatie)
35mm adapters:wordt gebruikt bijstatievenmet een standaard 35mm Topsectie
28mm TV-Spigot: wordt gebruikt bij statieven die uitgerust zijn met een TV-Spigot adapterop de
8. GLIJMECHANISME: wordt gebruikt om uw projectoren gelijk te verdelen over de DB-46. Kijk ook naar
9. AFSLUITKAP: Om de bouten/moeren (noodzakelijk om de projectoren te bevestigen) en de statief
top.
n°9 voor meerinformatie.
adapter te installeren dient u deze afsluitkap te verwijderen aan één zijde van het toestel: schroef
simpelweg de 4 schroeven weg verwijder de afsluitkap plaats de bouten/moeren en/of statief
adapterin het glijprofiel plaats de afsluitkap terug op zijn plaats bevestig de4 schroeven klaar!
10. CONTROLEPANEEL: Multifunctioneledisplay + 4 toetsen om tenavigerenin hetsetup menu. Bekijk de
nummershieronder
11. DISPLAY: Toont de informatieomtrent de geselecteerdefunctie of werkingmodus. Het linkse cijfer toont
het kanaalnummer, de 3 andere cijferstonen de statusvan dit kanaal:
In hetaddress menu: Het adresvan het kanaalwordt getoond,gaande van 001 tot 512
In het mode menu: Werking moduswordt getoond (“d”=dimmermodus * ”S”=switch modus)
In het dim menu en standaard display: Kanaaluitgangwordtgetoond.
Kanaal indimmer modus: Dimmerpercentage,gaande van0% tot 100%
12. MENU TOETS: Bekijk de structuur van het menu om de verschillende menu’s te begrijpen. Dit zijn de
Kanaal in switch modus: “oN”= output100% * “oFF”= output0%
volgendemogelijkheden
Het mainmenu doornemen: Druk op deMENU toets tezamen metde UP/DOWN toetsen.
Teruggaan naar het mainmenu: Druk op de MENU toetsom terug te keren naar hetmain menu
(escapefunctie)
Display blackout functie: Druk op de MENU toets tezamen met de ENTER toets om de display
13. DOWN TOETS: Bekijk de structuur van het menu om de verschillende menu’s te begrijpen. Dit zijn de
AAN/UIT te schakelen.
volgendemogelijkheden:
Het mainmenu doornemen: Druk opde MENU toets tezamen met de UP/DOWNtoetsen.
In het address menu: Druk op de DOWN toets om het DMXadres van het geselecteerde kanaal
te verlagen.(druk de toetsin voor een langere tijdom de snelheid te verhogen)
In het mode menu: Druk op de DOWN toets om het geselecteerde kanaal in switch modus te
plaatsen.
In het dim menu: Druk op de DOWN toets om de dimmer waardete verlagen (0-100%)wanneer
het geselecteerde kanaal in dimmer modus is geplaatst. (druk de toets voor een langere tijd in
om de snelheid te verhogen). Wanneer het geselecteerde kanaal geplaatst is in switch modus,
14. UP TOETS: Bekijk de structuur van het menu om de verschillende menu’s te begrijpen. Dit zijn de
kunt u de uitgangskanaal UIT zetten.
volgendemogelijkheden:
Het mainmenu doornemen: Druk opde MENU toets tezamenmet de UP/DOWN toetsen.
In het address menu: Druk op de UP toets om het DMX adres van het geselecteerde kanaal te
verhogen. (drukde toetsin vooreen langere tijd om de snelheid te verhogen)
In het mode menu: Druk op de UP toets om het geselecteerde kanaal in dimmer modus te
plaatsen.
In het dim menu: Druk op deUP toets om de dimmerwaarde teverhogen (0-100%)wanneerhet
geselecteerde kanaal in dimmer modus is geplaatst. (druk de toets voor een langere tijd in om
Page 11
de snelheid te verhogen). Wanneer het geselecteerde kanaal geplaatst is in switch modus, kunt
15. ENTER TOETS: Bekijk de structuur van het menu om de verschillende menu’s te begrijpen. Dit zijn de
16. DMX DETECTIE LED: deze LED geeft aan of het toestel een DMX-signaal ontvangt aan de DMX-
u de uitgangskanaalAAN zetten.
volgendemogelijkheden:
In het main menu: Druk op deENTER toetsom het verlangde submenu te selecteren.
In hetsub menu: Druk op de ENTER toetsom de4 kanalen door te nemen.
Display blackoutfunctie: Druk op de MENU toets tezamen met de ENTER toets om de display
AAN/UIT te schakelen.
input(n°6).
LED aan:geenDMX-signaalgedetecteerd aan de input
LED knippert: DMX-signaalgedetecteerd aan deinput
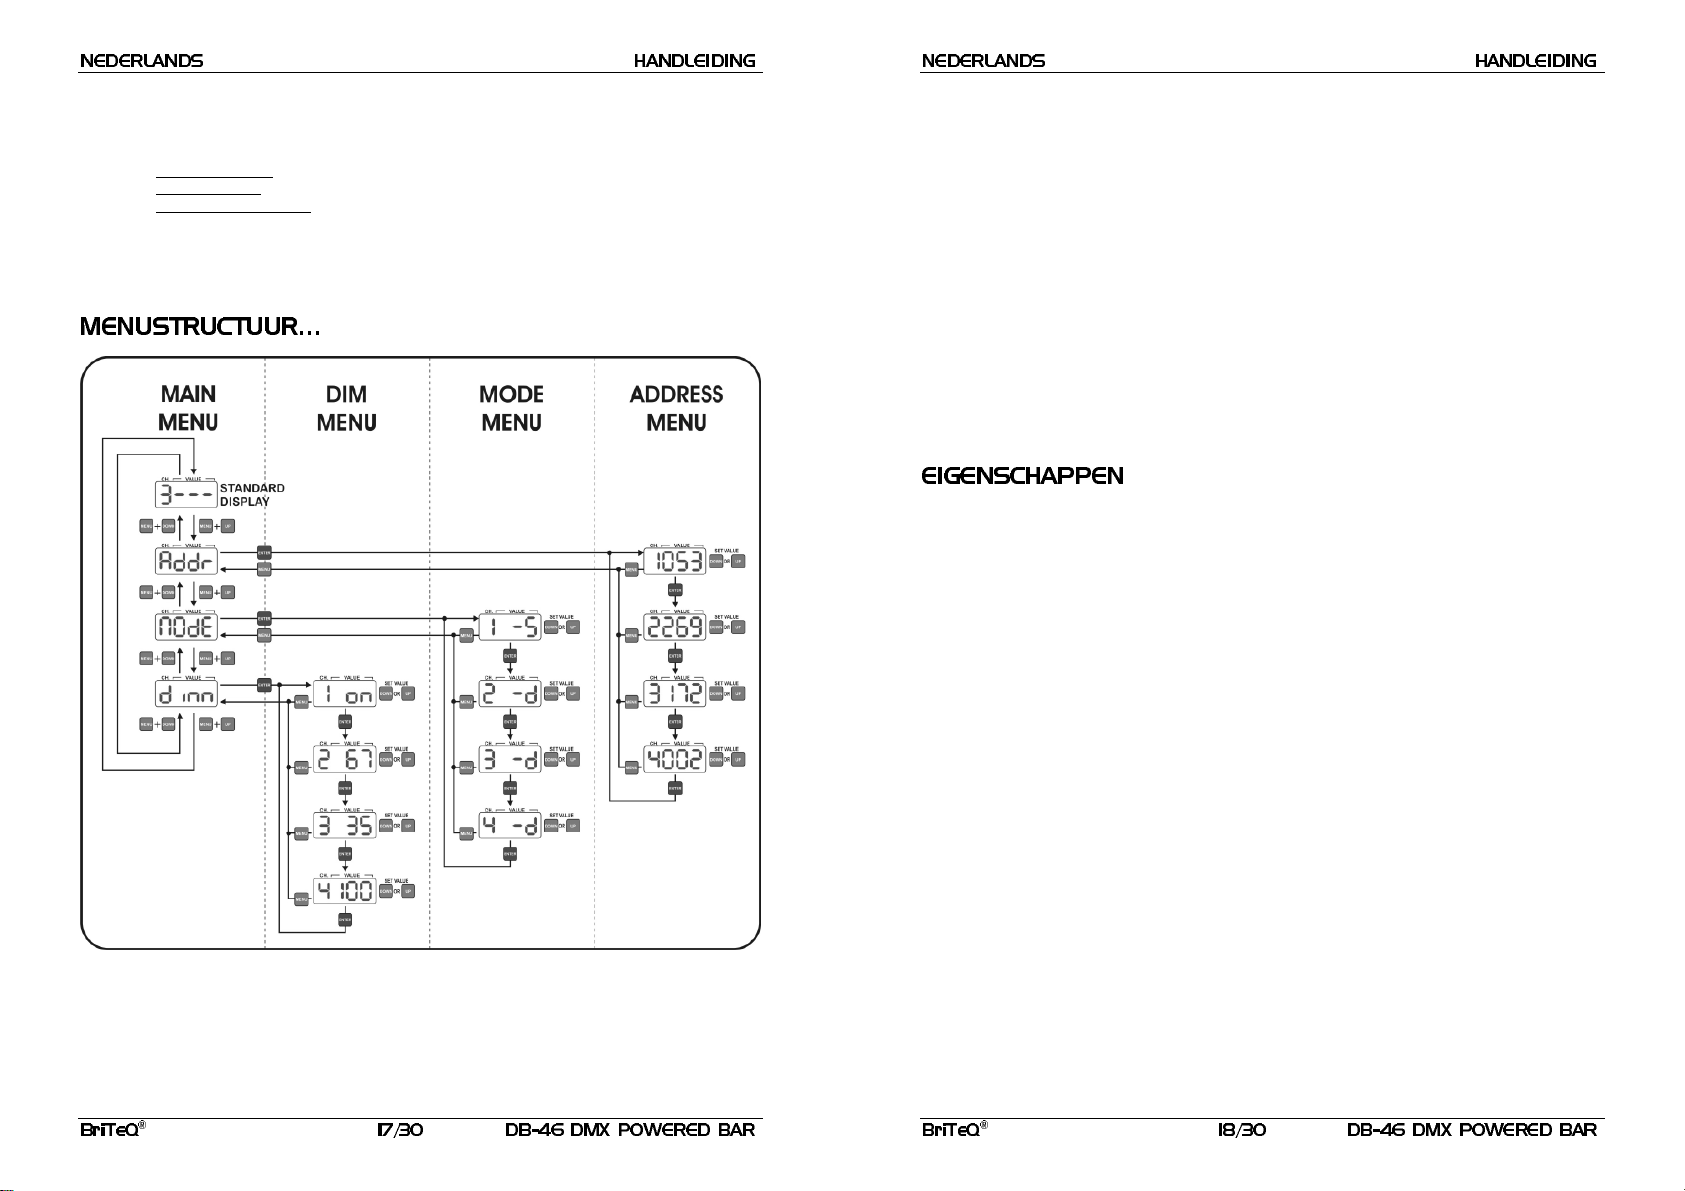
MODEMENU:
Deze menuwordt gebruiktom de werking modus vande 4 kanaaluitgangen in testellen.
DIM modus: gebruikdeze modus wanneer jelampen (projectoren)aansluit aan ditoutput kanaal. Je
zal in staat zijnom de output vloeiend te dimmentussen 0% en 100%.
SWITCH modus: gebruik dezemodus wanneer je kleine ligt effecten verbindt met dit output kanaal.
Je kuntde output tussen AAN(100% output) en UIT (0% output)omschakelen. Nu kun jekleine licht
effecten aan- en uitschakelen metuw DMX-controller .
Druk op de ENTER toets omhet menu doorte nemen.
Wanneer u hetverlangde kanaal heeft geselecteerd, druk dan op de UP/DOWN toetsen om de
werkingmodus inte stellen
Druk op de MENU toets om terugte kerennaar het main menu
DIM MENU
Dit is een standalonemodus, alle uitgangniveaus kunnen dan direct op het controlepaneel ingesteld worden
zodat u geen controller hoeft te hebben. Het is belangrijk te weten dat de instellingen van de uitgangen
opgeslagen worden wanneer het toestel losgekoppeld wordt van het net. Dit maakt dat de DB-46 zeer
bruikbaar is omtentoonstellingsruimten te verlichten, etc.
Druk op de ENTERtoets omhet menu door te nemen
Wanneer u het verlangde kanaal heeft geselecteerd, druk dan op de UP/DOWN toetsen om het
niveau van deuitgang in testellen
Druk op de MENU toets om terugte keren naarhet main menu.
Stroomtoevoer: 230Vac/20Amaximum (4600Watt)
Stroomuitgangen: 4x230Vac/max. 8A(1850Watt)
Kanaalzekeringen: 250V/8A (afmeting20x5mm)
Hoofdzekering: 20A“auto reset”thermische zekering
DMX ingang: 3pin XLRmannelijk
DMX uitgangen: 3pin XLRvrouwelijk
Afmetingen: 152 x 9 x 7 cm
Gewicht: 5,5kg
MAINMENU:
Dezemenu wordt gebruiktom één van de 3 submenu’s teselecteren.
Druk op de MENU toets tezamen met deUP/DOWN toetsenom het menu doorte nemen.
Druk op de ENTERtoets omhet verlangde sub menute selecteren.
ADDRESSMENU:
Deze menu wordt gebruikt om het DMX adres van de 4 kanaaluitgangen in te stellen. Elke kanaal kan
ingesteld wordenop een uniek DMX adres. U kan ook2 of meerderekanalen hetzelfde DMXadres geven.
U kan de laatste versie van dezehandleiding downloaden via onze website: www.briteq-lighting.com
Elkeinlichtingkan veranderenzonder waarschuwing vooraf.
Page 12
Vielen Dank,dass Sie sich für den Erwerb dieses BriTeQ®-Produkt entschieden haben. Bitte lesen siediese
Bedienungsanleitung sorgfältig vor der Inbetriebnahme durch, zur vollen Ausschöpfung der Möglichkeiten,
die dieses Gerätbietet sowiezu Ihrer eigenen Sicherheit.
Das Gerät ist funkentstört und erfüllt die Anforderungen der europäischen und nationalen Bestimmungen.
Entsprechende Dokumentationliegt beimHersteller vor.
Professionelle4-fach AluminiumT-Bar: 4x1,8kW (max. Leistung = 4,6kW/20A)
Schiebemechanismus: SiekönnenIhre Projektorengleichmäßig überdie T-Bar verteilen.
Verriegelung der DMX-Ein-/Ausgängeund POWER/DMX„present“Anzeige
4-stelligesLED-Displaymit 4 Tastenfür die einfache Menünavigation:
DMX-Adresseinstellung: Jeder Kanal kann seine eigene Adresse haben
Jeder Kanalkann separat im Dimmer-oder Schaltermodusgeschaltet werden
Verschiedene Dimmer-Voreinstellungen für jeden Kanal mit Speicherfunktion (kein externer
Controllernötigt)
4 qualitativhochwertige Netzsteckdosen(Schuko)
EinschließlichStandard 28mmTV-Spigot+ 35mm Adapter
Netzspannungseingang mitNeutrikPowerconund Sicherungsautomat.
Einzelne Kanalsicherungenmit“blownfuse”Erkennung
Alle Kanälesind mit 40AZweirichtungsthyristoren fürerhöhteZuverlässigkeit bestückt
ÜberprüfenSie den Inhalt:
FolgendeTeile müssensich in derGeräteverpackung befinden:
DB-46 PoweredBar
Bedienungsanleitung
4 Set´s SchraubenundMuttern zur Installation desProjektors
1 TV-Zapfenadapter 28mm
1 Stativ mit 35mm Aufnahme
1Ringschraube
WichtigeHinweise:
Vor der Erstbenutzung bitte das Gerät zuerst auf Transportschäden überprüfen. Sollte das Gerät einen
Schaden aufweisen, Gerät bitte nicht benutzen, sondern unverzüglich mit ihrem Händler in Verbindung
setzen.
Wichtiger Hinweis:
Das Gerät hat das Werk unbeschädigt und gut verpackt verlassen. Es ist wichtig,
dass der Benutzer sich streng an die Sicherheitshinweise und Warnungen in der Bedienungsanleitung
hält. Schäden durch unsachgemäße Handhabung sind von der Garantie ausgeschlossen. Der Händler
übernimmt keine Verantwortung für Schäden, die durch Nichtbeachtung der Bedienungsanleitung
hervorgerufenwurden.
Die Bedienungsanleitung, für zukünftiges Nachschlagen, bitte aufbewahren. Bei Verkauf oder sonstiger
WeitergabedesGerätes, bitteBedienungsanleitung beifügen.
Aus Umweltschutzgründen,Verpackung bittewiederverwenden,oder richtig trennen.
CAUTION
ACHTUNG: Um sich nicht der Gefahr eines elektrischen Schlags
auszusetzen, entfernen Sie keines der Gehäuseteile. Im Geräteinneren
befinden sich keine vom Benutzer reparierbaren Teile. Überlassen Sie
Reparaturendem qualifiziertenKundendienst.
Das Blitzsymbol im Dreieck weist den Benutzer darauf hin, dass eine Berührungsgefahr mit nicht
isolierten Teilen im Geräteinneren, welche eine gefährliche Spannung führen, besteht. Die
Spannung ist sohoch, dasshier die Gefahreines elektrischenSchlages besteht.
Das Ausrufezeichen im Dreieck weist den Benutzer auf wichtige Bedienungs- und
Wartungshinweise inden Dokumenten hin,die demGerät beiliegen.
DiesesSymbol bedeutet:Nur innerhalbvonRäumen verwenden.
DiesesSymbol bedeutet: Achtung! Bedienungsanleitung lesen!
Zur Vermeidung von Stromschlag oderFeuer,Gerät bittenicht Regen oder Feuchtigkeit aussetzen.
Zur Vermeidung von Kondensation, lassen sie bitte nach Transport in eine warme Umgebung das Gerät
einige Zeit zum Temperaturausgleich stehen. Kondensation kann zu Leistungsverlust des Gerätes oder
garBeschädigung führen.
Gerät nichtim Freienund infeuchten Räumen undUmgebungen verwenden.
Keine Metallgegenständeoder Flüssigkeitenins Innere des Geräts gelangen lassen.Keine mit Flüssigkeit
gefüllten Gegenstände z.B. Vasen, auf das Gerät stellen. Kurzschluß oder Fehlfunktion können die Folge
sein. Falls es doch einmal vorkommen sollte, bitte sofort Netzstecker ziehenundvom Stromkreis trennen.
Offene Brandquellen,wie z.B. brennendeKerzen, solltennichtauf das Gerätgestellt werden.
Nicht in staubigerUmgebung verwenden und regelmäßigreinigen.
Für Kinderunerreichbaraufbewahren.
Unerfahrene Personen sollendas Gerät nichtbedienen.
Umgebungstemperaturdarf40ºC nichtüberschreiten.
Stets Netzsteckerziehen, wennGerät für längeren Zeitraum nicht genutzt,oder es gewartet wird.
Elektrische Anschlüssenur durch qualifiziertesFachpersonalüberprüfenlassen.
Sicherstellen, daßNetzspannung mitGeräteaufkleberübereinstimmt.
Die Netzsteckdosesollte immergut erreichbar sein um das Gerätvom Netz zu trennen.
Gerät nichtmit beschädigtem Netzkabelbetreiben.
Netzkabel nicht mitanderen Kabelnin Berührung kommenlassen!
Ausschließlich vorschriftsmäßige Kabel zurInstallationverwenden.
Gerät nicht öffnen. Abgesehen vom Tausch der Sicherung sind keine zu wartenden Bauteile im Gerät
enthalten.
Sicherung
niemals
reparieren oderüberbrücken, sondern
immer
mit gleichartigerSicherung ersetzen!
Bei FehlfunktionGerät nichtbenutzen und mitHändler in Verbindung setzen.
Bei Transport bitteOriginalverpackung verwenden,um Schäden amGerät zu vermeiden.
Aus Sicherheitsgründen dürfenan demGerät keineunbefugten Veränderungenvorgenommenwerden.
Die Reinigung der Gerätes erfolgt mit einem leicht mit Wasser angefeuchteten Tuch. Vermeiden Sie, dass
Wasser in das Gerätinnere gelangt. Verwenden Sie keine brennbaren Flüssigkeiten wie Benzin oder
Verdünner,welchedas Gerätbeschädigen würden.
Page 13

1. KANALAUSGÄNGE: Jeder Kanalausgang hat seine eigene Ausgangsbuchse zum Anschluss jeglicher
resistiverund/oder induktiver Projektoren oder kleine Lichteffekte.
2. SICHERUNG: Jeder Kanal ist mit einer Sicherung und “blown fuse” Erkennung bestückt, Die Anzeige
leuchtet auf, wenn die Kanalsicherung durchgebrannt ist. Beim Auswechseln der durchgebrannten
Sicherung achten Sie bittedarauf, dass sie diegleichen Eigenschaften(250V/8Aflink) hat.
Hinweis: Es istvon größterWichtigkeit zuwissen, dass dieHöchstbelastungpro Kanal8A oder1850
Watt ist.Die Gesamtbelastung aller 4Kanäle darf jedoch 20Aoder 4600 Watt nicht überschreiten!
3. NETZEINGANG: Ausgestattet mit Neutrik Powercon®, vergewissern Sie sich davon, dass Ihre
Netzspannung 230V~ ist und die Projektoren (und/oder kleine Lichteffekte) korrekt an den
Kanalausgangsbuchsen (1) angeschlossen sind, bevor Sie ein geerdetes Netzkabel anschließen. Die
Höchstbelastung ist20A oder4600 Watt.
4. EINGANGSSICHERUNG: Sicherungsautomat.Bei durchgebrannterSicherungfinden Sie bittezunächst
das Problem, das zum Durchbrennen der Sicherung geführt hat. Anschließend drücken Sie den
RückstellknopfdesSicherungsautomaten.
5. DMX OUTPUT: Der 3pin female XLR-Stecker verbindet den DB-46 mit der nächsten Einheit der DMXKette.
6. DMX INPUT: Der 3pin male XLR-Stecker verbindet das Gerät mit universalen DMX-Kabeln. Dieser
Eingang empfängtdie Signaleeines DMX-Contollers.
7. STATIVADAPTER: Einfache Montage des DB-46 oben auf einem Beleuchtungsstativ. Zwei
unterschiedliche Stativadapter werden mitgeliefert (sieheauch Nr. 9 für weitere Informationen):
35mmAdapter: Benutzungauf Stativen mit Standard35mm Oberteil.
28mmTV-Zapfenadapter: Benutzung auf Stativen mit TV-ZapfenadapterOberteil.
8. SCHIEBEMECHANISMUS: Wird benutzt um dieScheinwerferauf der Barzu positionieren.
9. ENDABDECKUNG: Zur Installation der Schrauben/Muttern (zur Montage des Projektors) und des
Stativadapters muss diese Endabdeckung auf einer Seite des Geräts abgenommen werden: lösen Sie
die 4 Schrauben nehmen Sie die Endabdeckung ab setzen Sie die Schrauben/Muttern und/oder
Stativadapter in die Schiene ein setzen Sie die Endabdeckung zurück schrauben Sie die 4
Schrauben wiederan fertig!
10. BEDIENFELD: Multifunktions-Display + 4 Tasten zur Navigation im Setup-Menü. Siehe nachstehende
Ausführungen.
12. MENU TASTE: Bittelesen SieEinzelheiten zurMenüstruktur nach,nachstehend die Optionen:
Kanal in Switchmodus: “oN” =Ausgang 100% * “oFF” =Ausgang 0%
Browsen desMainmenüs: Drücken Siegleichzeitig MENUund UP/DOWN.
Rückkehrins Mainmenü: Drücken SieMENU zurRückkehrinsHauptmenü (Escapefunktion).
Anzeige der Blackoutfunktion: Drücken Sie gleichzeitig MENU und ENTER zum on/off schalten
13. DOWN TASTE: BittelesenSie Einzelheiten zurMenüstruktur nach, nachstehenddie Optionen:
desDisplays.
Browsen desMainmenüs: Drücken Siegleichzeitig MENUund UP/DOWN.
Im Addressmenü: Drücken Sie DOWN zur Herabsetzung der DMX-Adresse des ausgewählten
Kanals(mitlängeremTastendruckErhöhungder Geschwindigkeit).
Im Modemenü: Drücken SieDOWN zum Umschaltendes gewählten Kanals in Switchmodus.
Im Dimmenü: Drücken Sie DOWN zur Verringerung des Dimmerwerts (0~100%), sofern sich der
gewählte Kanal in Dimmermodus befindet (mit längerem Tastendruck Erhöhung der
Geschwindigkeit). Istder gewählte Kanal auf Schaltmodus eingestellt,dann kann derAusgang auf
14. UP TASTE:Bitte lesenSie Einzelheitenzur Menüstrukturnach, nachstehenddieOptionen:
off eingestellt werden..
Browsen desMainmenüs: Drücken Siegleichzeitig MENUund UP/DOWN.
Im Addressmenü: DrückenSie UP zur Erhöhung der DMX-Adresse des ausgewählten Kanals(mit
längeremTastendruck ErhöhungderGeschwindigkeit).
Im Modemenü: Drücken Sie UP zum Umschaltendes gewählten Kanals inDimmermodus.
Im Dimmenü: Drücken Sie UP zur Erhöhung des Dimmerwerts (0~100%), sofern sich der
gewählte Kanal in Dimmermodus befindet (mit längerem Tastendruck Erhöhung der
Geschwindigkeit).Ist der gewählteKanal aufSwitchmodus eingestellt,dann kann derAusgang auf
15. ENTER TASTE: Bitte lesenSie Einzelheiten zurMenüstruktur nach, nachstehend dieOptionen:
on eingestelltwerden.
Im Mainmenü: DrückenSie ENTERzur Auswahldes gewünschtenUntermenüs.
Im Untermenü: Drücken Sie ENTERzum Browsen durchdie4 Kanäle.
Anzeige der Blackoutfunktion: Drücken Sie gleichzeitig MENU und ENTER zum on/off schalten
16. DMX PRESENTLED: Die LED zeigt denDMX Statusam Eingang (n°6) an:
desDisplays.
LED ist an: esliegt kein DMX Signalam Eingang an.
LED blinkt: es liegtein DMX Signal am Eingang an.
11. DISPLAY: Anzeige der Informationen zur ausgewählten Funktion oder zum Betriebsmodus. Die linke
Zifferzeigt die Kanalnummer, die 3 anderen Ziffern zeigen den Kanalstatusan:
Im Addressmenü: Anzeige derKanaladressevon 001 bis512
Im Modemenü: Anzeigedes Betriebsmodus.(“d” = Dimmermodus *“S” = Schaltmodus)
Im Dimmenü und Standard-Display: Anzeigedes Kanal-Ausgangsstatus.
Kanal in Dimmermodus:Dimmerprozentzahl von0% bis100%
Page 14

Nach Auswahl desgewünschtenKanals drücken Sie UP/DOWNzum Einstellendes Betriebsmodus..
Drücken SieMENU zurRückkehr ins Hauptmenü.
DIMMENÜ:
Unabhängiger Modus, alle Ausgangspegelkönnen direkt im Bedienfeld eingestelltwerden, es wird also kein
Controller benötigt. Die Ausgangseinstellungen bleiben nach dem Ziehen des Netzsteckers erhalten.
Hierdurch istder DB-46 beider Beleuchtung von Ausstellungsständen usw.besonders hilfreich.
Drücken SieENTERzumBrowsen des Menüs.
Nach Auswahl des gewünschten Kanals drücken Sie UP/DOWN zum Einstellen des
Ausgangspegels.
Drücken SieMENU zurRückkehr ins Hauptmenü.
Netzspannung: 230Vac / 20A max.(4600Watts)
Schaltleistung: 4x 230Vac /max. 8A (1850Watts)
Kanalsicherungen: 250V/8A (Größe20x5mm)
Eingangssicherung: 20A “auto reset” Sicherungsautomat
DMX Eingang: 3pin XLR Stecker
DMX Ausgang: 3pinXLRBuchse
Abmessungen: 152x 9 x 7cm
Gewicht: 5,5kg
TechnischeÄnderungen könnenauch ohneVorankündigungvorgenommenwerden!
Sie können sichdie neuesteVersion dieses Benutzerhandbuchesvon unserer Website
herunterladen: www.briteq-lighting.com
MAINMENÜ:
Menüzur Auswahl einesder 3 Untermenüs.
Drücken Siegleichzeitig MENUund UP/DOWNzum Browsendes Menüs.
Drücken SieENTER zurAuswahl einesgewünschten Untermenüs.
ADDRESSMENÜ:
Menü zum Einstellender DMX-Adresseder 4 Ausgangskanäle. Jeder Kanal kann auf eine spezifische DMXAdresseeingestellt werden.Sie können ebenfalls 2 odermehr Kanälen diegleiche DMX-Adressezuteilen.
Drücken SieENTERzumBrowsen des Menüs.
Nach Auswahl desgewünschtenKanals drücken SieUP/DOWN zum Einstellender Adresse.
Drücken SieMENU zurRückkehr insHauptmenü.
MODEMENÜ:
Menü zumEinstellendes Betriebsmodus der4 Ausgangskanäle.
DIM Modus: Nutzen sie diesen Modus, wenn sie z.B. Scheinwerfer an diesem Ausgangs Kanal
anschließenmöchten.Sie können diesenKanal von 0% - 100%dimmen.
SWITCH Modus: Nutzen sie diesen Modus, wenn sie z.B. Lichteffekte an diesen Ausgangskanal
anschließenmöchten.Sie können nun diesen Ausgang zwischen ANund AUS schalten. Nun können sie
über ihr DMXSteuergerät Lichteffektean und ausschalten.
Drücken SieENTER zumBrowsen des Menüs.
Page 15

Gracias por comprar este producto BriTeQ®. Para sacar el máximo partido a todas las funciones, lea
detenidamenteestasinstruccionesde funcionamiento.
Esta unidad está a prueba de interferencias de radio. Esteproducto cumple los requisitos de las directrices
nacionales y europeas actuales. Se ha establecido la conformidad y las instrucciones y documentos
correspondienteshan sido depositadospor el fabricante.
Barra motorizada de aluminioprofesional de4 tomas: 4x1,8kW (Max
Mecanismo deslizante:puede distribuirsus proyectores uniformemente en la barra.
= 4,6kW/20A)
tot
Entradas/salidas DMXde bloqueocon indicador depresencia dePOWER/DMX
Pantalla LED de4 dígitos con 4 botones parafacilitar la navegacióna través de los menús
Ajuste de direcciónDMX: cada canal puedetener su propia dirección
Cada canal puede activarse por separado en modalidad de regulación de intensidad luminosa
(dimmer) oswitch
Preajustes separados para el regulador de intensidad luminosa con función de memoria para cada
canal (no es necesarioun controlador)
4 tomas de red eléctrica dealta calidad (schuko)
Se incluye adaptador macho paraTVestándar de 28 mm + adaptadorde sección superiorde 35 mm
Entrada de alimentaciónde red eléctrica conNeutrik Powercony fusibleautomático
Fusibles decanalindividuales con detectores de“fusible fundido”
Todos loscanales están equipados contriacs de 40Apara optimizarla fiabilidad
Compruebeel contenido:
Compruebequela caja contienelos siguientes elementos:
Barra motorizada DB-46
4 conjuntos de pernosy tuercas arainstalar losproyectores
1 adaptador macho de TV de 28 mm
1 adaptadorde sección superior de35 mm
1 cáncamo para izar
Manual de usuario
Instruccionesimportantes:
Antes de comenzar autilizar estaunidad, compruebeque no haya habido daños durante el transporte.Si
observaalgún daño, no utiliceel dispositivosy consulteprimero asu distribuidor.
Importante: Este dispositivo ha salido de nuestras instalaciones en perfecto estado y bien embalado. Es
absolutamente necesario que el usuario siga estrictamente estas instrucciones y advertencias de
seguridad que aparecen en este manual de usuario. Cualquier daño producido por unmanejo innecesario
queda excluidode la garantía. El distribuidor no asumirá ninguna responsabilidad por cualquier defecto o
problemaque surja por nohaber seguido el manual de usuario.
Guarde este folleto en un lugar seguro para consultarlo en el futuro. Si vende esteaparato más adelante,
asegúresede incluir estemanual de usuario.
Para proteger elmedio ambiente, recicle elmaterial de embalajeen la medidade lo posible.
CAUT ION
PRECAUCIÓN: Para reducir el riesgo de descarga eléctrica, no quite la
cubierta superior. No existen piezas en el interior que pueda mantener o
reparar el usuario. Asigne el mantenimiento y las reparaciones a personal
cualificado.
El símbolo en forma de rayo con cabeza deflecha dentro de un triángulo equilátero se emplea para
alertar sobre el uso o presencia de "voltaje peligroso" no aislado dentro de la carcasa del producto
con lamagnitud suficientepara constituir unriesgo de descargaeléctrica.
El signo de exclamación dentro del triángulo equilátero se emplea para alertar al usuario de la
presencia de instrucciones de funcionamiento y mantenimiento importantes en el texto que
acompaña a esteaparato.
Este símboloindica: Usarsóloen el interior.
Estesímbolo indica: Leerlas instrucciones.
Para evitar incendioso riesgos de descarga,no expongala unidad a la lluvia o a la humedad.
Para evitar que se forme condensación en el interior, deje que la unidad se adapte a la temperatura
exterior cuando la lleve a una habitación cálida después del transporte. A veces la condensación impide
que launidadfuncione a pleno rendimientoy puede inclusoprovocardaños.
Esta unidad sólo sepuede usar en el interior.
No coloque objetos metálicos ni derrame líquidos dentro del reproductor de la unidad. No deberá colocar
en la unidad objetos con líquidos, como jarrones. Se pueden producir descargas eléctricas o fallos de
funcionamiento. Si algún objeto extraño entra en la unidad, desconecte inmediatamente el suministro
eléctrico.
No coloque enel aparatofuentes de llamas, comovelasencendidas.
Evite eluso en ambientescon polvo y limpiela unidad regularmente.
Mantenga la unidadlejos de losniños.
Las personas sin experienciano deben utilizareste aparato.
La máxima temperatura ambiente para un funcionamiento seguro es de 40°C. No utilice la unidad a
temperaturasambientesuperiores.
Desenchufe siempre la unidad cuando no vaya a serutilizada durante un largo periodo de tiempo o antes
de comenzarel mantenimiento.
La instalación eléctrica sólo debe ser llevada a cabo por personal cualificado, de acuerdo con la
regulacionessobre seguridad eléctricay mecánicade su país.
Compruebe que elvoltajedisponible nosupera el que seindica en el paneltrasero dela unidad.
La entrada de toma deberá permanecer operativa parala desconexión de lared eléctrica.
El cable de alimentación siempre debe estar en perfecto estado: Apague la unidad inmediatamente
cuando observedaños o desperfectos en elcable de alimentación.
¡Nunca deje que el cablede alimentación entre encontacto con otroscables!
Este aparatodebe conectarsea tierra paracumplir con las regulaciones sobreseguridad.
Para evitar descargas eléctricas, no abra la cubierta. Aparte del fusible de red no hay piezas en el interior
de esteaparato que puedamantener el usuario.
Nunca repare un fusible ni derive el soporte del fusible. ¡Reemplace siempre el fusible dañado por un
fusible delmismo tipo y especificación eléctrica!
En caso de que ocurran problemas de funcionamiento serios, deje de utilizar el aparato y póngase en
contactocon su distribuidor inmediatamente.
Utilice el embalajeoriginalcuando tenga que transportarel dispositivo.
Por razonesde seguridad se prohibe realizar modificacionesno autorizadasen la unidad.
Limpie con un paño pulido ligeramente empapado en agua. No deje entrar agua en la unidad. No utilice
líquidos volátiles comobencina o diluyente,puesto quedañarán la unidad.
Page 16

Importante: La instalación sólo debe llevarse a cabo por personal técnico cualificado. Una
instalación incorrecta puede provocar lesiones graves y/o daños en la propiedad. ¡El montaje
superior requiere mucha experiencia! Deben respetarse los límites de carga de funcionamiento,
deben utilizarse materiales de instalación homologados, el dispositivo instalado debe
inspeccionarse regularmentepor su seguridad.
Asegúrese de que debajo del área del lugar de instalación no hay personas durante el montaje,
desmontajeo mantenimiento.
Coloque el aparato en un lugar bien ventilado, lejos de materiales y/o líquidos inflamables. El aparato
debecolocarse
a al menos 50 cm
de lasparedes.
El dispositivo debe instalarse lejos del alcance de las personas y de las áreas exteriores donde éstas
puedan andaro sentarse.
Antes del montaje asegúrese de que el área de la instalación puede soportar una carga mínima de 10
veces elpeso de la unidad.
Utilice siempre un cable de seguridad homologado que pueda soportar 12 veces el peso del dispositivo
cuando instale la unidad. Este accesorio de seguridad secundario debe instalarse de forma que ninguna
pieza dela instalación pueda caersemás 20 cm si fallael accesorioprincipal.
El dispositivo debe fijarse correctamente; ¡unmontaje con giro libre es peligroso y no debeconsiderarse!
No cubra ninguna abertura de ventilación puesto que podría producirse un sobrecalentamiento de la
unidad.
El operariodebe asegurarse deque las instalacionesrelacionadascon la seguridad sonaprobadas porun
experto antes de utilizarlas por primera vez. Las instalaciones deberán inspeccionarse anualmente por
una personacualificada paraasegurar que laseguridad es óptima.
1. SALIDAS DE CANAL: Cada salida de canal dispone de su propia toma de salida para conectar
cualquier proyector resistivo o inductivo ypequeños efectos luminosos.
2. FUSIBLES DE CANAL: Cada canal está equipado con un fusible y un detector de "fusible fundido". El
detector ser enciende cuando detecta que se ha fundido el fusible. Sustituya siempre el fusible fundido
por un fusiblede las mismascaracterísticas. (250V/8A).
NOTA IMPORTANTE: Es muy importante saber que la carga máxima para cada canal es 8A o 1850 W. No
obstante, puedeque la cargatotal paralos4 canales no exceda de 20A o4600W.
3. ENTRADADE ALIMENTACIÓN: Entradade red eléctrica,equipada con Neutrik Powercon®,asegúrese
de que el voltaje local esde 230Vcay de que los proyectores(y/efectos luminosos)están correctamente
conectados a las tomas de salida del canal (1) antes de conectarun cable de red conectado a tierra en
estaentrada. La máximacarga totales de 20A o 4600W.
4. FUSIBLE DE ENTRADA: Se trata de un disyuntor automático. Cuando se funda el fusible, localice y
solucione primero el problema que ha provocado que se funda el fusible. Cuando haya solucionado el
problema, pulsesimplemente elbotón para restaurar eldisyuntor.
5. SALIDA DMX: El conector hembra XLR de 3 clavijas se utiliza para conectar el DB-46 con la siguiente
unidad en lacadena DMX.
6. ENTRADA DMX: El conector macho XLR de 3 clavijas se utiliza para conectar cables DMX
universales.Esta entradarecibe instruccionesdel controladorDMX.
7. ADAPTADOR DE SOPORTE: Se utiliza para colocar fácilmente la unidad DB-46 en un soporte de luz.
Se incluyen dos adaptadores de soporte diferentes (consulte también el número 9 para más
información):
Adaptador de 35 mm:Se utilizaen soportescon una sección estándarde 35 mm.
Soporte macho de TV de 28 mm: Se utilizaen soportes equipados con un adaptador macho de
8. MECANISMO DESLIZANTE: Se utiliza para distribuir uniformemente los proyectores en el DB-46.
9. TAPA DE EXTREMO: Para instalar los pernos/tuercas (necesarios para instalar los proyectores) y el
TV en laparte superior.
Consulte el número9 paraobtener más información.
adaptador de soporte, debe retirar esta tapa de extremo en un lado de la unidad: desenrosque
simplementelos 4 tornillos retirela tapa coloque lastuercas/pernos y/o adaptador de soporte enel
raíl deslizante vuelva a colocarla tapa en su sitio instale los 4 tornillo ¡ya está!
10. PANEL DE CONTROL: Pantalla multifuncional + 4 botones para navegar por el menú de configuración.
Consulte losnúmerosabajo.
11. PANTALLA: Muestra la información relacionada con la función o modalidad de trabajo seleccionadas.
El dígitoa la izquierda muestra el número de canal,los 3 otrosdígitos muestran elestado de canal::
En el menú dedirección: Se muestrala dirección decanal que va de 001 a 512
En el menú de modalidad: Se muestra la modalidad de trabajo. (“d” = modalidad dimmer
(reguladorde intensidad luminosa)* “S” = modalidad switch(interruptor)).
En el menú dim ypantalla estándar: Semuestra el estadodela salida de canal.
Canal en modalidad dimmer: porcentaje del regulador de intensidad luminosa, que va de
0% a 100%
12. BOTÓN MENU: Consulte la estructura del menú para conocer los diferentes menús. Estas son las
Canalen modalidadswitch: “oN” = salida 100% *“oFF” = salida 0%
distintasposibilidades:
Explorar el menúprincipal: Pulseel botón MENU juntocon los botonesUP/DOWN.
Volver al menú principal:Para volveral menú principal,pulse el botónMENÚ. (Funciónescape)
Mostrar función de oscurecimiento: Pulse el botón MENU junto con el botón ENTER para
13. BOTÓN DOWN: Consulte la estructura del menú para conocer los diferentes menús. Estas son las
encender/apagar la pantalla.
distintasposibilidades:
Explorar el menúprincipal: Pulseel botón MENU juntocon los botonesUP/DOWN.
En el menú de dirección: Pulse el botón DOWN para reducir la dirección DMX del canal
seleccionado.(Pulse elbotón durante más tiempo para aumentarla velocidad).
En el menú de modalidad: Pulse el botón DOWN para establecer el canal deseado en modalidad
switch.
En el menú dim: Pulse el botón DOWN para reducir elvalor del regulador de intensidad luminosa
(0~100%) cuando el canal seleccionado esté en modalidad dimmer. (Pulseel botón durante más
tiempo para aumentar la velocidad). Cuando establezca el canal deseado en modalidad switch,
14. BOTÓNUP: Consulte la estructura del menú para conocerlos diferentes menús. Estas son lasdistintas
puede desactivarla emisión.
posibilidades:
Explorar el menúprincipal: Pulseel botón MENU juntocon los botonesUP/DOWN.
En el menú de dirección: Pulse el botón UP para aumentar la dirección DMX del canal
seleccionado.(Pulse elbotón durante más tiempo para aumentarla velocidad).
En el menú de modalidad: Pulse el botón UP para establecer el canal deseado en modalidad
dimmer.
Page 17

En el menú dim: Pulse el botón UP para aumentar el valor del regulador de intensidad luminosa
(0~100%) cuando el canal seleccionado esté en modalidad dimmer. (Pulseel botón durante más
tiempo para aumentar la velocidad). Cuando establezca el canal deseado en modalidad switch,
15. BOTÓN ENTER: Consulte la estructura del menú para conocer los diferentes menús. Estas son las
16. LED DEDMX PRESENTE: Este LED indica si launidadrecibe señal DMXen la entradaDMX (n°6):
puede activar la emisión.
distintasposibilidades:
En el menú principal:Pulse el botónENTER para seleccionar el submenú que desee.
En un submenú: Pulseel botón ENTER paraexplorara través de los 4 canales.
Mostrar función de oscurecimiento: Pulse el botón MENU junto con el botón ENTER para
encender/apagar la pantalla.
LED encendido: No sedetecta señal DMX en la entrada.
LED parpadeando: Se detecta señalDMX en la entrada.
MENÚ DEDIRECCIÓN:
Este menú se utiliza para establecer la dirección DMX de los 4 canales de salida. Cada canal puede
establecerseen unadirección DMXúnica. Puede inclusoproporcionar 2 o más canalesa lamisma dirección
DMX.
Pulse el botón ENTERpara explorara través delmenú.
Una vez que haya seleccionadoel canal deseado,pulse los botones UP/DOWN paraestablecer una
dirección.
Para volver almenú principal, pulseel botónMENU.
MENÚ DEMODALIDAD :
Este menú se utiliza para establecer la modalidadde trabajode los 4 canales desalida.
Modalidad DIM: Utilice esta modalidad cuando conecte lámparas (proyectores) en este canal de salida.
Podrá regularsuavementela intensidad luminosaentre 0%y 100%.
Modalidad SWITCH: Utilice esta modalidad cuando conecte pequeños efectos luminosos en este canal
de salida. Puede cambiar la salida entre ON (100% salida) y OFF (0% salida). Ahora puede activar o
desactivarpequeños efectos luminosos con su controladorDMX.
Pulse el botón ENTERpara explorara través delmenú.
Una vez que haya seleccionadoel canal deseado,pulse los botones UP/DOWN paraestablecer una
modalidad detrabajo.
Para volveral menú principal,pulseel botónMENU.
MENÚ DIM:
Esta es la modalidad independiente, todos los niveles de salida pueden establecerse directamente en el
panel de controlpor lo que no es necesario un controlador. Es importante saber que los ajustes de salida se
conservan cuando la unidad se desconecta de la red eléctrica. Estohace que la unidad DB-46 sea muy útil
para iluminarpuestos deexhibición.
Pulse el botón ENTERpara explorara través delmenú.
Una vez que haya seleccionado el canal deseado, pulse los botones UP/DOWN paraestablecer un
nivel de salida.
Para volveral menú principal, pulse el botón MENU.
Entrada de alimentación: 230Vca/ 20A máximo(4600W)
Salidasde potencia: 4x 230Vca/ máx. 8A(1850W)
Fusibles de canal: 250V/8A (tamaño 20x5mm)
Fusible de entrada: Disyuntor térmicode restauraciónautomática de20A
Entrada DMX: XLR macho 3 clavijas
SalidaDMX: XLR hembra 3 clavijas
Tamaño: 152 x 9 x7 cm
Peso: 5,5kg
Puededescargar la última versión deeste manual de usuario en nuestra página Web: www.briteq-
Toda la informaciónestá sujeta a cambios sin previo aviso
lighting.com
MENÚ PRINCIPAL:
Estemenú se utiliza paraseleccionaruno de los 3 submenús.
Pulse elbotón MENU junto con losbotones UP/DOWNpara explorar el menú.
Pulse el botónENTER para seleccionar elsubmenú que desee.
 Loading...