


Operation Manual EN
Mode d'emploi FR
Gebruiksaanwijzing NL
Bedienungsanleitung DU
Manual de instrucciones ES
Manual do utilizador PT
WWW.BEGLEC.COM
Copyright © 2005 by BEGLEC cva.
Reproduction or publication of the content in any manner, without express permission of the publisher, is prohibited. |
Version: 1.1 |
The Power Source for DJ’s |

EN - DISPOSAL OF THE DEVICE
Dispose of the unit and used batteries in an environment friendly manner according to your country regulations.
FR - DÉCLASSER L’APPAREIL
Débarrassez-vous de l’appareil et des piles usagées de manière écologique Conformément aux dispositions légales de votre pays.
NL - VERWIJDEREN VAN HET APPARAAT
Verwijder het toestel en de gebruikte batterijen op een milieuvriendelijke manier conform de in uw land geldende voorschriften.
DU - ENTSORGUNG DES GERÄTS
Entsorgen Sie das Gerät und die Batterien auf umweltfreundliche Art und Weise gemäß den Vorschriften Ihres Landes.
ES - DESHACERSE DEL APARATO
Reciclar el aparato y pilas usadas de forma ecologica conforme a las disposiciones legales de su pais.
PT - COMO DESFAZER-SE DA UNIDADE
Tente reciclar a unidade e as pilhas usadas respeitando o ambiente e em conformidade com as normas vigentes no seu país.
ENGLISH |
OPERATION MANUAL |
OPERATION MANUAL
Thank you for buying this JB Systems product. To take full advantage of all possibilities, please read these operating instructions very carefully.
FEATURES
•Middle Torque direct drive motor
•Fast start / stop
•2 speeds: 33, 45 rpm
•Pitch adjustment range: +/-10%
•Forward / reverse play
•2 Start / stop buttons for maximum flexibility
•Phono level output via cinch connectors
•Unbreakable white LED target light
•Audio Technica cartridge included
•All metal S-shaped tone arm assembly with:
•Counterweight
•Anti-skating adjustment
•Lever lift with height adjustment
•Adjustable large feet for perfect leveling
BEFORE USE
Check the contents:
Check that the carton contains the following items:
•Turntable platter
•Slip mat
•45-rpm adapter
•Counterweight
•Head shell
•Operating instructions
•Cartridge
•Connecting cord cinch/cinch
•Mains power cable.
ENGLISH |
OPERATION MANUAL |
Some important instructions:
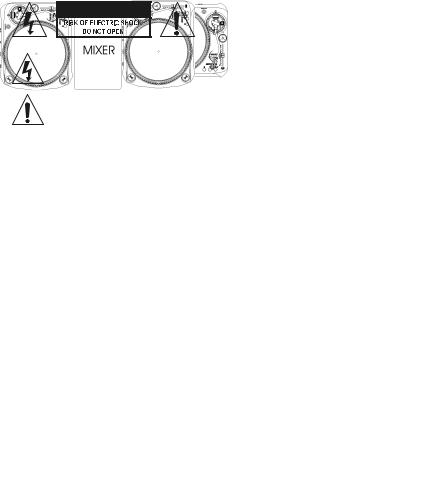
CAUTION: To reduce the risk of electric shock, CAUTION do not remove any cover. No user-serviceable
parts inside. Refer servicing to qualified service personnel only.
The lightning flash with arrowhead symbol within the equilateral triangle is intended to alert the use or the presence of un-insulated “dangerous voltage” within the product’s enclosure that may be of sufficient magnitude to constitute a risk of electric shock.
The exclamation point within the equilateral triangle is intended to alert the user to the presence of important operation and maintenance (servicing) instructions in the literature accompanying this appliance.
To prevent fire or shock hazard, do not expose this appliance to rain or moisture. Do not place metal objects or spill liquid inside the turntable. Electric shock or malfunction may result.
INSTALLATION GUIDELINES:
•Install the turntable in a well-ventilated location where it will not be exposed to high temperatures or humidity.
•Placing and using the turntable for long periods near heat-generating sources such as amplifiers, spotlights, etc. will affect its performance.
•When the turntable is used in a loud-sound environment, for example near speakers, sound skip and feedback may occur.
•Install the unit on a perfectly horizontal and very stable surface. A concrete or marble surface is perfect. A wooden surface is a bad choice while it amplifies vibrations.
•Be sure the turntable, including its audio and mains cords, does not touch any vibrating materials. Take special care when using the unit while it is installed in a carrying case.
•Because of its two start/stop buttons the T2 turntable can be used in both traditional and battle style setups:
|
|
|
|
|
|
Traditional setup: |
|
Battle style setup: |
Mostly used in discotheques. |
|
Mostly used for scratching and |
Best for allround mixing. |
|
other aggressive mixing techniques |
CLEANING THE TURNTABLE:
Clean by wiping with a cloth slightly dipped with water. Avoid getting water inside the unit. Do not use volatile liquids such as benzene or thinner which will damage the unit.
JB SYSTEMS® |
1/30 |
T2 TURNTABLE |
|
JB SYSTEMS® |
2/30 |
T2 TURNTABLE |

ENGLISH |
OPERATION MANUAL |
CONTROLS AND FUNCTIONS
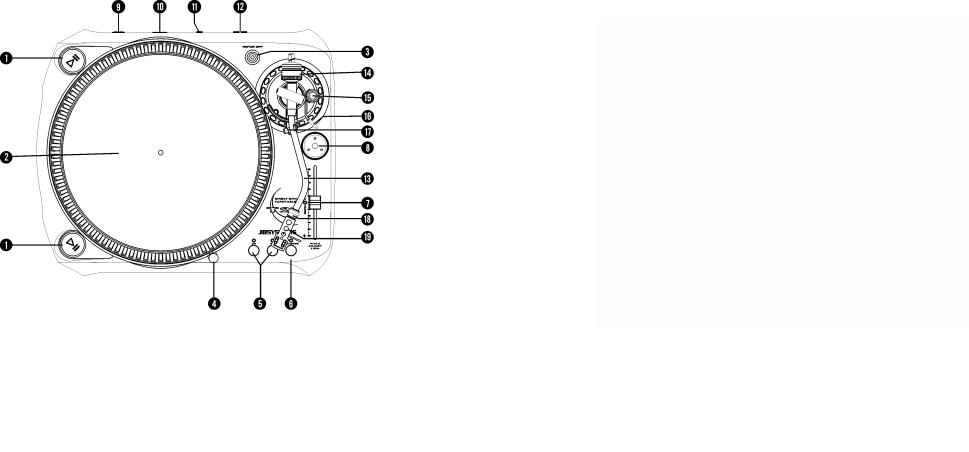
1.START / STOP BUTTONS: Press one of these buttons to start or stop the platter.
2.PLATTER: The platter is equipped with a slip mat. This makes it easier to manipulate the record for scratch performances.
3.MOTOR OFF BUTTON: Normally the platter stops while you press the start/stop button (1). In this case the platter stops quite fast due to the electronic brake. Press the “motor off” button if you want the platter to slow down more smoothly. As long as the motor is switched off, the led of the button flashes. Press the button again to switch the motor back on.
4.TARGET LIGHT: White led target light used to locate the exact place on your record when used in a dark place.
5.SPEED SELECT BUTTONS: Used to select the desired speed.
•Press the “33” button to select the 33rpm speed.
•Press the “45” button to select the 45rpm speed.
6.REVERSE BUTTON: Press this button to reverse the platter rotation, press this button again to end the reverse mode.
7.PITCH SLIDER: Use the pitch slider to change the actual speed of the platter. When the slider is in its middle position, the blue led next to the pitch slider will turn on to indicate that the turntable is locked to the exact center speed.
8.45RPM ADAPTER: Place this adapter on the platter for playing 7” records with large center holes.
9.POWER ON/OFF SWITCH: Used to turn the turntable on an off.
10.POWER CORD CONNECTOR: Used to connect to the mains, using the supplied power cord.
JB SYSTEMS® |
3/30 |
T2 TURNTABLE |
ENGLISH |
OPERATION MANUAL |
11.GND CONNECTION: Ground wire connection post. In most cases you need to install a wire between the GND connection on the turntable and the corresponding GND connector on the DJ-mixer. When you forget to make this connection you may encounter problems with humming noises.
12.PHONO OUTPUT: Connect the turntable to any phono input, using the supplied cinch/cinch cable.
13.TONE ARM: This is a fully manual S-shaped tone arm. To start playback, gently place the stylus on the record using the head shell finger support. Do not drop the stylus onto the record as this may cause damage to the diamond tip and to the record.
14.COUNTERWEIGHT: Use the counterweight to balance the tone arm and to adjust the stylus pressure. For the correct stylus pressure, please refer to the user manual of your cartridge.
Setting up the stylus pressure:
Make sure the cartridge is well fitted and its needle protector is removed. Put a record on the platter and make sure the anti-skate is set to zero. Put the tone arm lever in “down” position. Take the tone arm and turn the counterweight until the tone arm is in perfect balance Æ It floats horizontally above the record surface, see “OK” picture at the right. Now set the “stylus pressure ring”
(front section of the counterweight with markings) to zero by turning the ring while you take care that the counterweight doesn’t move. Next, turn the complete counterweight clockwise until the “stylus pressure ring” indicates the correct needle pressure. Don’t forget to put the anti-skate back in place.
15.ANTI-SKATE KNOB: When a record is playing, side forces are generated, pushing the stylus towards the center or the outside of the record. You can use the anti-skate knob to offset this force and keep the needle centered in the groove. For standard playback simply turn the anti-skate knob to the same number as the stylus pressure reads in grams. (Stylus pressure = 3gr. Æ anti-skate = 3)
16.TONE ARM LIFT: Controls the up and down action of the tone arm.
17.TONE ARM CLAMP & REST: Use this rest for the tone arm while changing a record. Attach the tone arm to the rest using the clamp when the turntable is not used or when it is transported. This prevents the tone arm from accidentally turning towards the platter and damaging the needle of the cartridge.
18.HEAD SHELL LOCKING NUT: Attach the head shell by inserting it into the front end of the tone arm and then turn the locking nut clockwise.
19.HEAD SHELL: Install the cartridge
here. When installing a cartridge, refer to the installation instructions supplied by the manufacturer of that cartridge. During installation, attach the stylus protector to guard the stylus tip from damage.
Attach wires as follows: |
|
|
White (L+) |
Left channel + |
|
Blue (L-) |
Left channel - |
|
Red (R+) |
Right channel + |
|
Green (R-) |
Right channel - |
|
|
|
|
JB SYSTEMS® |
4/30 |
T2 TURNTABLE |

ENGLISH OPERATION MANUAL
SPECIFICATIONS
Motor: |
8 pole, 2phase, brushless DC motor |
Driving Method: |
Direct Drive |
Starting Torque: |
More than 1kgf / cm |
Starting Time: |
less than 1sec second |
Braking Time: |
less than 1sec second |
Speed selection: |
331/3 ~ 45 RPM |
Speed adjustment: |
+/-10% |
Wow & Flutter: |
less than 0,13% WRMS (JIS WTD) |
Tone arm type: |
Static balanced S-shaped tone arm. |
Tracking Error angle: |
Less than 3° |
Cartridge weight: |
13~18g. |
Anti-skate range: |
0~4g. |
Power supply: |
230V~ 50Hz. |
Power consumption: |
7 Watts |
Dimensions: |
450 x 370 x 86mm (WxDxH) |
Weight: |
6,5kg. |
MODE D'EMPLOI |
FRANCAIS |
MODE D’EMPLOI
Nous vous remercions et félicitons pour l'achat de ce produit JB SYSTEMS. Nous vous prions de lire ce mode d'emploi afin d'utiliser cet appareil convenablement. Apres l'avoir lu gardez-le pour une éventuelle future consultation.
CARACTERISTIQUES
•Moteur à entraînement direct sur couple moyen
•Démarrage / arrêt rapide
•2 vitesses: 33, 45 rpm
•gamme de vitesse: +/-10%
•Lecture des disques inversée
•2 boutons Start / Stop assurent un maximum de flexibilité
•Eclairage blanc de la cellule (led incassable)
•Cellule Audio Technica incluse
•Bras métallique en forme de 'S' assemblé avec :
•Contrepoids
•Contrôle Anti-skating
•Lève-bras
•Pieds de support réglables pour mettre la platine à niveau
AVANT L’UTILISATION
Vérifier la présence des composants suivants:
•Plateau
•Feutrine
•Adaptateur 45 tours
•Contrepoids
•Porte cellule
•Mode d'emploi
•Cellule
•Câbles de connexion cinch/cinch
•Cordon secteur
JB SYSTEMS® |
5/30 |
T2 TURNTABLE |
|
JB SYSTEMS® |
6/30 |
T2 TURNTABLE |
MODE D'EMPLOI |
FRANCAIS |
CONSEILS DE SECURITE:
ATTENTIÓN: Afin d'éviter tout risque CAUTION d'électrocution, ne pas ouvrir l'appareil. En cas de
problème, mettez-vous en contact avec votre revendeur.
Cette flèche dans un triangle met l'utilisateur en garde de la présence dans l'appareil de haut voltage sans isolation qui peut causer un risque d'électrocution.
Un point d'exclamation dans un triangle prévient de la présence d'instructions de fonctionnement et de maintenance fournies avec l'appareil.
Afin d'éviter tout risque d'électrocution ou d'incendie, n'exposez pas la platine aux intempéries ou à l'humidité.
Ne pas insérer d'objets métalliques et ne pas laisser couler de liquide dans l'appareil. Des électrocutions ou disfonctionnements peuvent s'en suivre.
INSTALLATION:
•Installer la platine dans un endroit bien ventilé afin de ne pas l'exposer a des températures trop élevées ou a de l'humidité.
•Utiliser la platine pendant une longue période dans un endroit chaud (à coté d'amplificateurs, spots,…) peut diminuer son rendement.
•Evitez les vibrations sonores (haut-parleurs,…) pour ne pas avoir d'effet de feed-back.
•Installer la platine sur une surface stable et horizontale. Préférer des surfaces en béton ou en marbre plutôt que le bois qui amplifierait les vibrations.
•S'assurer que ni la platine, ni ses câbles n'entrent en contact avec des sources provocant des vibrations. Soyez particulièrement prudent lors de l'utilisation avec un flight case.
•Grâce à ses 2 boutons de démarrage, la platine T2 peut être utilisée de manière traditionnelle ou lors de compétitions.
|
|
|
|
|
|
Installation traditionnelle: |
|
Installation pour concours: |
La plus part du temps en discothèques. |
|
Plus aisé pour scratcher et pour les |
Convient pour des mixages passifs. |
|
Techniques de mix's plus agressifs. |
NETTOYAGE DE LA PLATINE:
Nettoyer avec un tissu légèrement humide. Ne pas renverser d'eau à l'intérieur de la platine. Ne pas utiliser de produits abrasifs (alcool,…) qui puissent endommager la platine.
JB SYSTEMS® |
7/30 |
T2 TURNTABLE |
MODE D'EMPLOI |
FRANCAIS |
CONTROLES ET FONCTIONS
1.BOUTON START / STOP: Pousser pour démarrer ou arrêter le plateau.
2.LE PLATEAU: Le plateau est équipé d'une feutrine. Cela facilite la manipulation du disque pour scratcher.
3.BOUTON MOTEUR OFF: Normalement le plateau s'arrête quand vous appuyez sur start/stop (1). Dans ce cas-ci le plateau s'arrête très vite grâce au frein électronique. Appuyez sur "motor off" si vous désirez que le plateau s'arrête plus doucement. Tant que le moteur est coupé, la lumière du bouton s'illumine. Appuyez une nouvelle fois pour redémarrer le moteur.
4.ECLAIRAGE DE LA CELLULE: Lumière blanche très utile pour localiser un endroit précis sur le disque dans un environnement sombre.
5.BOUTONS DE SELECTION DE VITESSE: Sélection de la vitesse souhaitée.
•Pousser sur le bouton “33” pour sélectionner la vitesse de 33 tours.
•Pousser sur le bouton “45” pour sélectionner la vitesse de 45 tours.
6.BOUTON DE LECTURE INVERSEE: Pousser pour inverser le sens de rotation du plateau. Pousser une deuxième fois pour revenir en mode de lecture normal.
7.CURSEUR PITCH: Le curseur permet d'ajuster la vitesse du plateau. Quand le curseur est positionné au centre, le LED s'allume pour indiquer que la vitesse est juste.
8.ADAPTATEUR DE SIMPLES: Placez cet adaptateur sur le plateau pour écouter des disques 7" ayant de larges trous centraux.
9.INTERRUPTEUR ON/OFF: Allumer / éteindre la platine.
10.CABLE SECTEUR: brancher sur du 230V AC avec le câble fourni.
11.CONNECTION GND:Raccordement fil de masse. Dans la plupart des cas, vous devrez placer un câble entre la connexion GND de la platine et le connecteur GND
JB SYSTEMS® |
8/30 |
T2 TURNTABLE |
 Loading...