


User’s Guide Mode d’emploi Gebruiksaanwijzing Bedienungsanleitung Instrucciones para el uso

ENGLISH
Introduction
Congratulations on purchasing your new scene setter.
It is a microprocessor controlled system that is fully DMX-512 and MIDI compatible. The scene setter is a 24 channel DMX-512 and standard MIDI controller. 48 sets of programs can be programmed in 4 pages with a total of maximum 4500 steps.
We strongly recommend that you take the time to read this manual completly before you attempt to use the controller. We are sure that it’s the most advanced unit for its price and it will provide you easy operation and tremendous control power.
Technical Specifications
Power Input ....................... |
DC 12V-18V 500mA |
DMX Output ....................... |
3 pin female XLR |
Midi Single ......................... |
5 pin DIN |
Fuse (internal).................... |
F 0,5A / 250V / 5x20mm |
Dimensions ........................ |
482 x 264 x 85 mm |
Adaptor.............................. |
AC~230V 50 Hz, DC 12V, 500mA |
......................................... |
AC~120V 60 Hz, DC 12V, 500mA |
Weight............................... |
4,8 Kg |
CMX 24 |
2 |

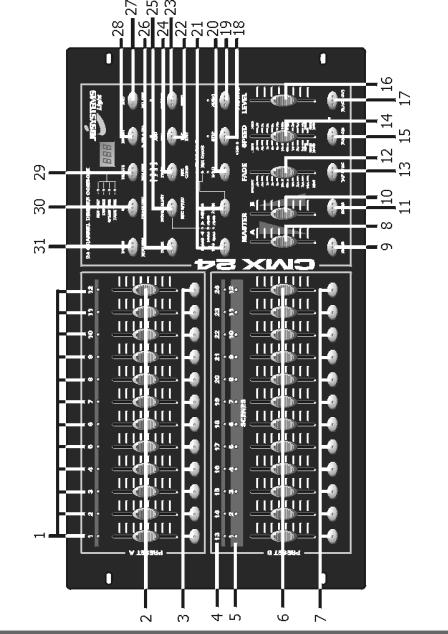
FRONT PANEL
3 |
CMX 24 |

Controller description
1.PRESET A LEDS
2.CHANNEL SLIDERS 1-12
These sliders will adjust the output of channel 1-12 from 0% to 100% or from 0 to 255.
3.FLASH keys 1-12
Activates the maximum output level of the selected channel.
4.PRESET B LEDS
5.SCENE LEDS
6.CHANNEL SLIDERS 13-24
These sliders will adjust the output of channel 13-24 from 0% to 100% or from 0 to 255.
7.FLASH keys 13-24
Activates the maximum output level of the selected channel.
8.MASTER A Slider
Adjusts the output level of Master A.
9.BLIND key
When you select this key in CHASE//SCENES mode, the output of each channel can only be controlled by de sliders or by the FLASH keys.
10.MASTER B slider
Adjusts the output level of Master B.
11.HOME toets
When you select this key in CHASE//SCENES mode, the output level will return from manual control (by sliders or flash keys) to program control.
12.FADE TIME Slider
Adjusts the fade time.
13.TAP SYNC
In AUTO CHASE press it twice to define the speed of the CHASER.
14.SPEED Slider
Adjusts the speed of the CHASER.
CMX 24 |
4 |

15.FULL ON KEY
Activates the maximum output level of all channels and disables BLACK OUT.
16.AUDIO LEVEL Slider
Adjusts the sensitivity of the audio signal.
17.BLACK OUT ey
18.STEP key
Press it once to move the program one step further.
19.AUDIO key
Press this key to go to audio control.
20.HOLD key
Press and hold the key and all output levels will remain the same.
21.PARK
This key allows you to select SINGLE CHASE or MIX CHASE (in CHASE//SCENES mode).
22.REC EXIT
When the Led lights up, KILL Mode is activated. When you press a Flash key, all output levels will go to ‘0’ except the selected channel.
23.RECORD key
Press this key to record the step in the program.
24.PAGE key
Press this key to select a Scene program in a certain page.
25.MODE SELECT
This key allows you to select CHASE//SCENES, Double Preset or Single Preset.
26.DARK key
Press this key to pause the whole output, including Full On and Flash.
27.ALL REV
This key allows you to change the direction of all Scene programs.
28.0% or 0-255 key
5 |
CMX 24 |

Press this key to select 0% or 0-255 on the display.
29.REV ONE
When you press this key and then press on one of the Preset B keys, the direction of the selected Scene program is reversed.
30.CHASE REV
This key changes the direction of the Scene program that is controlled by the Speed slider.
31.BEAT REV
This key changes the direction of the Scene program that is controlled by a Beat.
REAR PANEL
1.POWER INPUT
DC 12-18V, 500 mA Min.
2.MIDI THRU
Used to transmit MIDI data received through the MIDI IN connector.
3.MIDI OUT
Transmits data from the CMX-24 itself.
4.MIDI IN
Used to receive Midi data from an external source.
5.DMX OUT
DMX Output.
6.DMX POLARITY SELECT
Selects the polarity of the DMX output.
CMX 24 |
6 |

7.AUDIO INPUT
Line audio input 100mV—1Vpp.
8.REMOTE CONTROL
Full on and Black out remote control connection using 1/4" Stereo Jack.
OPERATING INSTRUCTIONS
1.ENABLE RECORD
1)Press and hold the Record key.
2)Press Flash1, Flash 5, Flash 6 and Flash 8 in sequence.
3)Release Record, the led is lighting, recording is ready.
2.ERASE ALL PROGRAMS
1)Press and hold the Record key.
2)Press Flash 1, Flash 3, Flash 2, Flash 3 in sequence.
3)Release Record.
3.CLEAR MEMORY
1)Press the Record key and press the REC CLEAR key.
2)Release Record and Rec Clear at the same time.
4a. Record SCENE program
•Enable Record (see N° 1)
•Press MODE SELECT until the green led is on. (1-24 single/ preset park)
•Choose a page (1, 2, 3 or 4)
•Bring both MASTER faders fully up (A=open, B=closed)
•Prepare your scene, adjusting faders 1 to 24
•Press RECORD: the scene is memorised but has no number yet
•Bring both MASTER faders fully down (A=closed, B=open)
•Press and hold RECORD
•Choose a Scene number (1 to 12) by pressing one of the bottom FLASH buttons
•Release the RECORD button
•The SCENE is recorded
7 |
CMX 24 |

•To exit the recording mode:
1.Press RECORD, then press EXIT
2.Release both buttons at the same time.
4b. Record CHASE program
•Enable Record (see N°1)
•Press MODE SELECT until the green led is on. (1-24 single/ preset park)
•Choose a page (1, 2, 3 or 4)
•Bring both MASTER faders fully up (A=open, B=closed)
•Prepare your first scene, adjusting faders 1 to 24
•Press RECORD: the first scene is memorised
•Prepare your second scene, adjusting faders 1 to 24
•Press RECORD: the second scene is memorised
•Keep on doing this until all your chase scenes are memorised
•Bring both MASTER faders fully down (A=closed, B=open)
•Press and hold RECORD
•Choose a Chase number (1 to 12) by pressing one of the bottom FLASH buttons
•Release the RECORD button
•The CHASE is recorded
•To exit the recording mode:
1.Press RECORD, then press EXIT
2.Release both buttons at the same time
5.DELETE A PROGRAM
1)Press the Page key to select the desired Page Led.
2)Press the Record key and hold it, then press twice on the Flash 16 key.
3)Release the Record key.
6.ENABLE SCENE EDIT
1)Press the Page key to select a page.
2)Press Mode Select to select Chase//Scenes.
3)Press Edit and the desired Scene Flash key.
4)Release both keys, the selected Scene Led lights up and all the others are out. Now editing is enabled.
CMX 24 |
8 |

Example: Enter Scene program n°11 in Edit mode.
1)Press the Page key and select Page 1 (Led).
2)Press Mode Select and select Chase//Scenes (Led).
3)Press Edit and Flash 23.
4)Release both keys.
7.EXIT EDIT MODE
1)Press Record then press Exit.
2)Release both keys at the same time.
8.DELETE A STEP
1)In Edit Mode: press Step to start the program until you reach the step that you want to delete.
2)Press Delete, the step is deleted.
9.ADD A STEP
1)In Edit mode: record the step that you want to add.
2)Press Step to start the program until you reach the step where you want to insert the new step (before).
3)Press insert.
10.MODIFY A STEP
1)In Edit Mode: press Step to start the program until you reach the step that you want to modify.
2)Press Up or Down and on the desired Flash key. You can read the output level on the display.
3)When the level is adjusted, release the Flash key.
11.CHANGE THE DIMMER DISPLAY
1)Press and hold the Record key and press the 0% or the 0-255 key.
12.SELECT AND ACTIVATE A PROGRAM
1)Press the Mode Select key to select Chase//Scenes Led.
2)Select a Page.
3)Move Master B slider to max. position.
4)Move the slider of the desired scene to its min. position and then move it up again. The program is selected and activated.
9 |
CMX 24 |

13.ACTIVATE A PROGRAM WITH A REGULAR BEAT
1)Press Audio. The audio led must be off.
2)Press the Park key and select MIX mode (Led on).
3)Select a program.
4)Adjust the Speed slider or press twice on Tap Sync to define the beat.
5)Press Rec Speed and the desired Flash key.
The program will run with the programmed beat.
14.ACTIVATE A PROGRAM WITH THE SPEED SLIDER
1)Press Audio. The audio led must be off.
2)Press the Park key and select MIX mode (Led on).
3)Select a program.
4)Move the Speed slider to Show mode position.
5)Press Rec Speed and the desired Flash key.
Example: Run Scene program n°14 with a speed of 1 step per second and adjust it so it can be controlled with the Speed slider.
1)Press Mode Select and select Chase//Scenes (Led).
2)Press Audio (Led off).
3)Press the Park key and select the MIX mode (Led).
4)Move all sliders to minimum position.
5)Move Master B to maximum position.
6)Select Page 1 (Page 2 Led).
7)Move slider of channel 14 to maximum position.
8)Adjust the Speed slider until 1:00 appears on the display and the Speed led lights up.
9) Press Rec Speed and Flash 14. Release both keys. Scene program 14 is adjusted to 1 step per second.
10) Move the Speed slider to Show mode position. Press Rec Speed and Flash 14. Scene program 14 is ready to be controlled by the Speed slider. Move the Speed slider until 0.10 appears on the display. Program 14 will run with 10 steps per second.
15.SPEED
A. Slowest Speed (5 min.)
1)Press the Record key and hold it.
2)Press 3 times on the 5th Flash key, release Record.
3)The 5 minutes Led lights up.
CMX 24 |
10 |
B. Highest Speed (10 min.)
1)Press the Record key and hold it.
2)Press 3 times on the 10th Flash key, release Record.
3)The 10 minutes Led lights up.
16.MIDI IN
1)Press and hold the Record key.
2)Press 3 times on the 1st Flash key, release Record. When CHI appears on the display, you can select the MIDI IN channel with Flash keys 1 to 16.
3)After selecting the Flash key the Led will light up.
4)Press Record and Exit to leave the MIDI IN settting.
17.MIDI OUT
1)Press and hold the Record key.
2)Press 3 times on the 2nd Flash key, release Record. When CHO appears on the display, you can select the MIDI OUT channel with Flash keys 1 to 16.
3)After selecting the Flash key the Led will light up.
4)Press Record and Exit to leave the MIDI OUT settting.
18.RECEIVING DATA
1)Press and hold the Record key.
2)Press 3 times on the 3rd Flash key, release Record. When IN appears on the display it is ready to receive data.
3)You can’t perform any other actions while the data is loading. It will leave this mode automatically when all data is loaded or when a failure occurs. Turning the apparatus on or off will interrupt the loading of data.
19.TRANSMITTING DATA
1)Press and hold the Record key.
2)Press 3 times on the 4th Flash key, release Record. When OUT appears on the display it is ready to transmit data.
3)You can’t perform any other actions while the data is transmitting. It will leave this mode automatically when all data is transmitted or when a failure occurs. Turning the apparatus on or off will interrupt the transmitting of data.
11 |
CMX 24 |
20.DETAILED DISCRIPTION
1)Fade Time: the time that is needed to go from 0% to 100% or from 100% to 0%.
2)Single Mode: the program is executed step by step. The number of each step appears on the display. The speed is controlled by the Speed slider.
3)Mix Mode: all selected programs will run simultaneously, each at their respective speed.
4)When the CHASE//SCENES led lights up, you can select a program by using the sliders of Preset B. When you put one of the Preset B channels in BLIND MODE then its slider and the slider of Master A will control its output level. The maximum level of the program is maintained until you switch back the channel with the HOME key.
5)Fade Time & Speed Time:
A. When time is more than 1 minute, two dots appear.
E.g.: |
1 minute and 15 seconds = 1.15. |
|
10 minutes = 10.0. |
B.When time is less than 1 minute, one dot appears. E.g.: 11,5 seconds = 11.5
0,55 seconds = 0.55
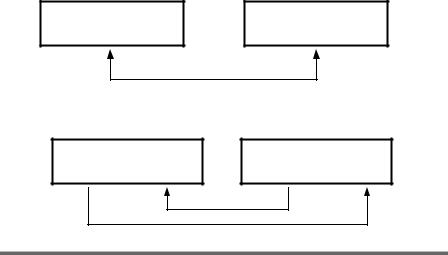
6)Transmit and receive data
A.Open loop
TRANSMITTER
MIDI OUT
B. Closed loop
RECIEVER MIDI IN
TRANSMITTER
MIDI OUT MIDI IN
RECEIVER
MIDI OUT MIDI IN
CMX 24 |
12 |

NOTE: When transmitting data in open loop mode, you should set up the receiving mode of the receiver, otherwise receiving data is impossible.
7)When the power voltage is too low, LOP will appear on the display for a short while just after you have turned on the power.
21.MIDI RUN
1)When MIDI data is not received within 10 minutes than the channel and the program put on by MIDI will be erased.
2)This program receives or transmits data by musical notes. Functions are:
NOTE N° |
VELOCITY |
FUNCTION |
22-69 |
Program Master |
Turn On/Off Program 1-48 |
70-93 |
Channel Dimmer |
Turn On/Off Channel 1-24 |
94 |
|
Full On |
95 |
|
Dark |
96 |
|
Hold |
97 |
|
Turn On/Off Audio Chase |
98 |
|
Chase//Scenes |
99 |
|
Double Preset Mode |
100 |
|
Single Preset Mode |
101 |
|
Step Change |
102 |
|
Black Out |
13 |
CMX 24 |

FRANÇAIS
Introduction
Nous ne pouvons que vous féliciter d’avoir fait l’acquisition du CMX-24. C’est un système contrôlé par microprocesseur qui est entièrement compatible DMX-512 et MIDI.
Le CMX-24 est un contrôleur 24 canaux DMX-512 et MIDI.
48 programmes peuvent être crées dans quatre pages avec un total de 4500 pas au maximum.
NOUS VOUS RECOMMENDONS FORTEMENT DE LIRE CE MODE D’EMPLOI AVANT DE PROCEDER A TOUTE MANIPULATION. Nous sommes sûr que c’est l’appareil le plus performant dans sa catégorie et sa gamme de prix et qu’il vous donnera entière satisfaction par sa facilité d’emploi et son impressionnant pouvoir de contrôle.
Spécifications Techniques
Alimentation....................... |
DC 12V-18V 500mA |
Sortie DMX......................... |
XLR femelle 3 broches |
Connections MIDI ............... |
DIN 5 broches |
Fusible (interne) ................. |
F 0,5A / 250V / 5x20mm |
Dimensions ........................ |
482 x 264 x 85 mm |
Adaptateur ......................... |
AC~230V 50 Hz, DC 12V, 500mA |
......................................... |
AC~120V 60 Hz, DC 12V, 500mA |
Poids ................................. |
4,8 Kg |
CMX 24 |
14 |
PANEL FRONTAL
15 |
CMX 24 |

DESCRIPTION DU CONTRÔLEUR
1.Leds PRESET A
2.CURSEURS 1-12
Ces curseurs ajustent le niveau de sortie de 1 à 12 canaux de 0 à 100% ou de 0 à 255.
3.Touches FLASH 1-12
Active le niveau de sortie maximal du canal sélectionné.
4.Leds PRESET B
5.Leds SCENE
6.CURSEURS 13-24
Ces curseurs ajustent le niveau de sortie de 1 à 12 canaux de 0 à 100% ou de 0 à 255.
7.Touches FLASH 13-24
Active le niveau de sortie maximal du canal selectionné.
8.Curseur MASTER A
Ce curseur ajuste le niveau de sortie du preset A.
9.Touche BLIND
Si cette touche est activée en mode CHASE//SCENES le niveau de sortie de chaque canal pourra uniquement être réglé par un curseur ou une touche flash.
10.Curseur MASTER B
Ce curseur ajuste le niveau de sortie du preset B.
11.Touche HOME
Si cette touche est activée en mode CHASE//SCENES le réglage du niveau de sortie repassera du contrôle manuel (par curseur ou touche flash) en contrôle programmé.
12.Curseur FADE
Règle la durée du fader.
13.TAP SYNC
En mode AUTO CHASE, actionner 2 x cette touche pour définir la vitesse du CHASER.
14.Curseur SPEED
Ajuste la vitesse du CHASER.
CMX 24 |
16 |

15.Touche FULL ON
Active le niveau maximal de tous les canaux et déverrouille le mode BLACK OUT.
16.Curseur AUDIO LEVEL
Permet d’ajuster la sensibilité du signal audio.
17.Touche BLACK OUT
18.Touche STEP
Fait avancer le programme d’un pas.
19.Touche Audio
Permet de passer en mode audio.
20.Touche Hold
Tant que vous gardez cette touche enfoncée, tous les niveaux de sortie seront maintenus.
21.PARK
Permet de selectionner SINGLE CHASE ou MIX CHASE (en mode CHASE//SCENES).
22.REC EXIT
Si le LED est allumé, la console est en mode KILL. Si vous appuyez sur une des touches FLASH tous les niveaux de sortie sont mis à zéro, excepté celui de la touche sélectionnée.
23.Touche RECORD
Appuyez sur la touche pour sélectionner le pas du programme.
24.Touche PAGE
Appuyez sur la touche pour sélectionner le programme de scène désiré dans la page appropriée.
25.MODE SELECT
Permet de sélectionner CHASE//SCENES, DOUBLE PRESET ou SINGLE PRESET.
26.Touche DARK
Tant que vous appuyez sur la touche, toutes les sorties sont coupées, FULL ON et FLASH inclus.
27.ALL REV
Inverse la direction de défilement de tous les programmes.
28.Touche 0% ou 0-255
17 |
CMX 24 |

Permet de sélectionner le mode d’affichage 0-100% ou 0-255.
29.REV ONE
Tenir la touche enfoncée et appuyez sur une touche du PRESET B. Le programme SCENE défilera en sens inverse.
30.CHASE REV
La touche inverse le sens de défilement du programme SCENE, controlé par le curseur SPEED.
31.BEAT REV
La touche inverse le sens de défilement du programme SCENE controlé par un beat régulier.
FACE ARRIERE
1.PRISE D’ALIMENTATION
DC 12-18V, 500 mA Min.
2.MIDI THRU
Transmet les informations MIDI recus par le connecteur MIDI IN.
3.MIDI OUT
Transmet les informations MIDI venant du CMX-24.
4.MIDI IN
Réception d’informations MIDI externes.
5.DMX OUT
Sortie DMX.
6.DMX POLARITY SELECT
Permet de sélectionner la polarité de la sortie DMX.
CMX 24 |
18 |

7.AUDIO INPUT
Entrée audio 100mV-1Vpp.
8.REMOTE CONTROL
Connection jack stéréo 1/4" pour commande à distance FULL ON et BLACK OUT.
ENREGISTREMENT
1.Rendre possible l’enregistrement
1)Tenez enfoncé la touche RECORD.
2)Appuyez sur FLASH 1 FLASH 5 FLASH 6 FLASH 8 dans l’ordre.
3)Relâchez RECORD. Le LED s’allume, le mode enregistrement est prêt.
2.Effacer tous les programmes
1)Tenez enfoncé la touche RECORD.
2)Appuyez sur FLASH 1, FLASH 3, FLASH 2, FLASH 3, dans l’ordre.
3)Relâchez RECORD.
3.Effacer la mémoire
1)Appuyez sur la touche RECORD, puis sur la touche REC CLEAR.
2)Relâchez RECORD et REC CLEAR en même temps.
4.a Programmer une SCENE
•Préparez la CMX 24 pour l’enregistrement (voir N° 1)
•Appuyez sur la touche MODE SELECT jusqu'à ce que le Led vert s’allume. (1-24 single/preset park)
•Choisissez une page (page 1, 2, 3 ou 4)
•Amenez les 2 curseurs MASTER totalement vers le haut (A=ouvert, B=fermé)
•Préparez votre scène en utilisant les curseurs 1 à 24
•Appuyez sur RECORD : la scène est enregistrée mais n’est pas encore attribuée à un numéro de scène.
•Ramenez les 2 curseurs MASTER totalement vers le bas ( A=fermé, B=ouvert)
•Appuyez sur la touche RECORD et tenez-la enfoncée
•Choisissez un numéro de scène (1 à 12) en appuyant sur une des touches flash du dessous
•Relâchez la touche Record
•La scène est enregistrée
19 |
CMX 24 |
 Loading...