


ENGLISH |
OPERATION MANUAL |
|
|
OPERATION MANUAL
Thank you for buying this JB Systems® product. To take full advantage of all possibilities and for your own safety, please read these operating instructions very carefully before you start using this unit.
FEATURES
This unit is radio-interference suppressed. This product meets the requirements of the current European and national guidelines. Conformity has been established and the relevant statements and documents have been deposited by the manufacturer. This device was designed to produce decorative effect lighting and is used in light show systems.
Powerful quadruple LED moonflower.
Based on 2x 9 pieces of 1Watt LEDs (4 x Red, 4 x Green, 4 x Blue, 6x White)
Plug and play: No controller needed, the shows run automatically to the rhythm of the music
Master / Slave functionality for nice synchronized shows when several units are linked together
Excellent built-in programs for wonderful, ever changing, light shows
Very strong and sharp white, blue, red and green beams
Equipped with big optical lenses for a maximum of light output
Can be controlled via:
1 DMX channel: to select different sound controlled shows
3 DMX channels: show selection + speed/audio control + strobe control
An optional CA-8 hand controller
No moving parts inside: Long lifetime
BEFORE USE
Before you start using this unit, please check if there’s no transportation damage. Should there be any, do not use the device and consult your dealer first.
Important: This device left our factory in perfect condition and well packaged. It is absolutely necessary for the user to strictly follow the safety instructions and warnings in this user manual. Any damage caused by mishandling is not subject to warranty. The dealer will not accept responsibility for any resulting defects or problems caused by disregarding this user manual.
Keep this booklet in a safe place for future consultation. If you sell the fixture, be sure to add this user manual.
Check the contents:
Check that the carton contains the following items:
Operating instructions
SUPER BOOGIE unit
Mains cable
SAFETY INSTRUCTIONS:
CAUTION: To reduce the risk of electric shock, do not remove the top cover. No user-serviceable parts inside. Refer servicing to qualified service personnel only.
The lightning flash with arrowhead symbol within the equilateral triangle is intended to alert the use or the presence of un-insulated “dangerous voltage” within the product’s enclosure that may be of sufficient magnitude to constitute a risk of electric shock.
The exclamation point within the equilateral triangle is intended to alert the user to the presence of important operation and maintenance (servicing) instructions in the literature accompanying this appliance.
This symbol means: indoor use only
JB SYSTEMS® |
1/49 |
SUPER BOOGIE |

ENGLISH |
OPERATION MANUAL |
|
|
This symbol means: Read instructions
This symbol means: Safety Class I appliance
This symbol determines: the minimum distance from lighted objects. The minimum distance between light-output and the illuminated surface must be more than xxx meters
The device is not suitable for direct mounting on normally flammable surfaces. (suitable only for mounting on non-combustible surfaces)
CAUTION: Do not stare at operating lamp. May be harmful to the eyes.
To protect the environment, please try to recycle the packing material as much as possible.
To prevent fire or shock hazard, do not expose this appliance to rain or moisture.
To avoid condensation to be formed inside, allow the unit to adapt to the surrounding temperatures when bringing it into a warm room after transport. Condense sometimes prevents the unit from working at full performance or may even cause damages.
This unit is for indoor use only.
Don’t place metal objects or spill liquid inside the unit. Electric shock or malfunction may result. If a foreign object enters the unit, immediately disconnect the mains power.
Locate the fixture in a well ventilated spot, away from any flammable materials and/or liquids. The fixture must be fixed at least 50cm from surrounding walls.
Don’t cover any ventilation openings as this may result in overheating.
Prevent use in dusty environments and clean the unit regularly.
Keep the unit away from children.
Inexperienced persons should not operate this device.
Maximum safe ambient temperature is 40°C. Don’t use this unit at higher ambient temperatures.
Make sure the area below the installation place is free from unwanted persons during rigging, de-rigging and servicing.
Allow the device about 10 minutes to cool down before to start servicing.
Always unplug the unit when it is not used for a longer time or before to start servicing.
The electrical installation should be carried out by qualified personal only, according to the regulations for electrical and mechanical safety in your country.
Check that the available voltage is not higher than the one stated on the unit.
The power cord should always be in perfect condition. Switch the unit immediately off when the power cord is squashed or damaged. It must be replaced by the manufacturer, its service agent or similarly qualified persons in order to avoid a hazard.
Never let the power-cord come into contact with other cables!
This fixture must be earthed in order to comply with safety regulations.
Don’t connect the unit to any dimmer pack.
Always use an appropriate and certified safety cable when installing the unit.
In order to prevent electric shock, do not open the cover. There are no user serviceable parts inside.
Never repair a fuse or bypass the fuse holder. Always replace a damaged fuse with a fuse of the same type and electrical specifications!
In the event of serious operating problems, stop using the fixture and contact your dealer immediately.
The housing and the lenses must be replaced if they are visibly damaged.
Please use the original packing when the device is to be transported.
Due to safety reasons it is prohibited to make unauthorized modifications to the unit.
Important: Never look directly into the light source! Don’t use the effect in the presence of persons suffering from epilepsy.
JB SYSTEMS® |
2/49 |
SUPER BOOGIE |

ENGLISH |
OPERATION MANUAL |
|
|
DESCRIPTION:
1.DMX LED: is lit when the unit receives a DMX-signal
2.Master LED: is lit when the unit is switched as master
3.Slave LED: is lit when the unit is in slave mode
4.Sound LED: blinks to the rhythm of the music while the unit is in audio mode
5.DISPLAY shows the various menus and the selected functions.
6.MENU button: used to select the different menu items
7.DOWN button: to go back in the menu and to lower the values shown on the display.
8.UP button: to go up in the menu and to increase the values shown on the display.
9.ENTER button: used to confirm your choice.
10.Hanging bracket with 2 knobs to fasten the unit and a mounting hole to fix a mounting hook.
11.FUSE: Always replace the fuse by a model with exactly the same specifications
12.Mains input with IEC socket. Connect the supplied mains cable here.
13.Mains output with IEC socket: you can use a special IEC power cable to connect this output with the mains input of the next SUPER BOOGIE for easier linking. (max 10A @ 230V, 50Hz)
14.DMX input: 3pin male XLR-connector used to connect universal DMX-cables. This input receives instructions from a DMX-controller or from another SUPER BOOGIE in master/slave mode.
15.DMX output: 3pin female XLR-connector used to connect the SUPER BOOGIE with the next unit in the DMX chain or with another SUPER BOOGIE when used in master/slave mode.
16.Internal microphone
17.¼” Jack input for the optional CA-8 hand controller
18.Safety eye: here you can attach the optional safety cable
OVERHEAD RIGGING
Important: The installation must be carried out by qualified service personal only. Improper installation can result in serious injuries and/or damage to property. Overhead rigging requires extensive experience! Working load limits should be respected, certified installation materials should be used, the installed device should be inspected regularly for safety.
Make sure the area below the installation place is free from unwanted persons during rigging, de-rigging and servicing.
Locate the fixture in a well ventilated spot, far away from any flammable materials and/or liquids. The fixture must be fixed at least 50cm from surrounding walls.
The device should be installed out of reach of people and outside areas where persons may walk by or be seated.
Before rigging make sure that the installation area can hold a minimum point load of 10times the device’s weight.
Always use a certified safety cable that can hold 12times the weight of the device when installing the unit. This secondary safety attachment should be installed in a way that no part of the installation can drop more than 20cm if the main attachment fails.
JB SYSTEMS® |
3/49 |
SUPER BOOGIE |
ENGLISH |
OPERATION MANUAL |
|
|
The device should be well fixed; a free-swinging mounting is dangerous and may not be considered!
Don’t cover any ventilation openings as this may result in overheating.
The operator has to make sure that the safety-relating and machine-technical installations are approved by an expert before using them for the first time. The installations should be inspected every year by a skilled person to be sure that safety is still optimal.
ELECTRICAL INSTALLATION + ADDRESSING
Important: The electrical installation should be carried out by qualified personal only, according to the regulations for electrical and mechanical safety in your country.
Electrical installation for 1 standalone unit:
Insert the mains cable. The unit starts working immediately in the last selected mode.
Refer to chapter HOW TO SETUP to learn how to switch between the different working modes.
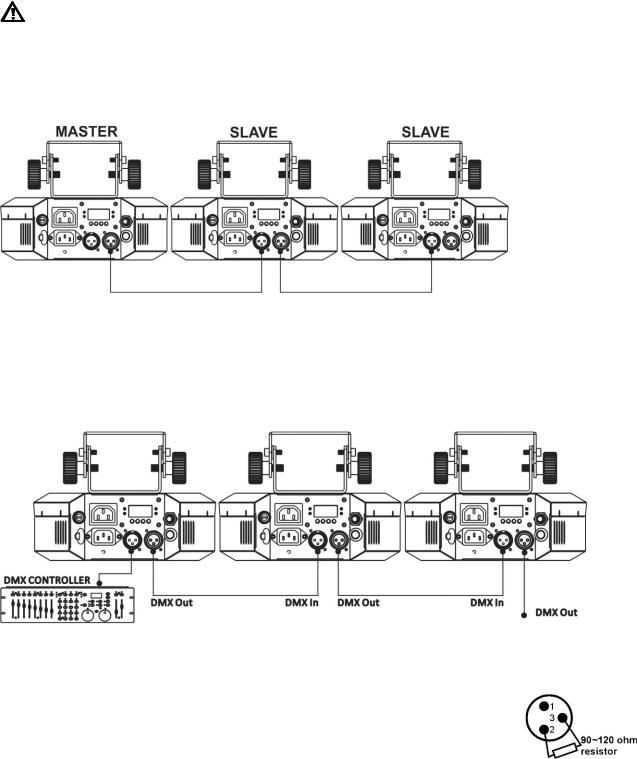
Electrical installation for two or more units in master/slave:
Connect several units together using good quality balanced microphone cables. The unit that has no cable connected to its DMX-input is the “master”, the others are the slave units.
Make sure that all units are connected to the mains.
Refer to chapter HOW TO SETUP for more information.
Done!
Electrical installation for two or more units in DMX-mode:
The DMX-protocol is a widely used high speed signal to control intelligent light equipment. You need to
“daisy chain” your DMX controller and all the connected units with a balanced cable of good quality.
Pin layout XLR-3pin: Pin1 = GND ~ Pin2 = Negative signal (-) ~ Pin3 = Positive signal (+)
To prevent strange behavior of the light effects, due to interferences, you must use a 90Ω to 120Ω terminator at the end of the chain. Never use Y-splitter cables, this simply won’t work!
Make sure that all units are connected to the mains.
Each light effect in the chain needs to have its proper starting address so it knows
which commands from the controller it has to decode. In the next section you will learn how to set the DMX addresses.
JB SYSTEMS® |
4/49 |
SUPER BOOGIE |

ENGLISH |
OPERATION MANUAL |
|
|
HOW TO SETUP:
MAIN MENU:
To select any of the menu options, press the MENU button up to when the required option is shown on the display.
Select the function with the ENTER button. The display will blink.
Use DOWN and UP button to choose the desired menu option.
Once the required menu option is selected, press the ENTER button to select.
Press the MENU button for about 2 seconds to store the setting and to return to running mode. If you don’t do this, the setting will not be stored and after about 8 seconds, the fixture will return to the previous running mode.
DMX512 Address Setting
Used to set the start address in a DMX setup.
Press the MENU button until 


 is shown on the display.
Press the ENTER button to select.
Use DOWN and UP buttons to change the DMX512 address.
Once the correct address is shown on the display, press the ENTER button to confirm.
Press the MENU button for about 2 seconds to store the setting and to return to running mode.
Channel Mode
The unit has 2 different channel modes. Refer to the DMX-chart to see the differences.
Press the MENU button until  is shown on the display.
Press the ENTER button to select.
Use DOWN and UP button to select one of the available channel modes.
Once the mode is selected, press the ENTER button to confirm.
Press the MENU button for about 2 seconds to store the setting and to return to running mode.
Show Mode
Used to select one of the preprogrammed shows when used in standalone or master/slave mode.
Press the MENU button until 


 is shown on the display.
Press the ENTER button to select.
Use DOWN and UP buttons to select one of the preprogrammed shows:
 all shows played at random.
 to
to  12 different built-in shows.
Once the right show is selected, press the ENTER button to confirm.
Press the MENU button for about 2 seconds to store the setting and to return to running mode.


 Slave Mode
By choosing the right slave mode you can improve the impact of the shows.
Press the MENU button until 


 is shown on the display.
Press the ENTER button to select.
Use DOWN and UP button to select slave mode 1 or slave mode 2.
SL I: the device will run 100% sinchronously with the master device.
JB SYSTEMS® |
5/49 |
SUPER BOOGIE |

ENGLISH |
OPERATION MANUAL |
|
|
SL 2: the device will run sinchronously with the master device, but from time to time the effects will be inverted to create more diversity in the show.
Once the right mode is selected, press the ENTER button to confirm.
Press the MENU button for about 2 seconds to store the setting and to return to running mode.
 Sound Mode
Used to activate or to deactivate the sound mode to trigger the shows.
Press the MENU button until 


 is shown on the display.
Press the ENTER button to select.
Use DOWN and UP button to select one of the available modes:


 (sound mode OFF) the shows runs at slow speed.
Once the right mode is selected, press the ENTER button to confirm.
Press the MENU button for about 2 seconds to store the setting and to return to running mode.
Blackout Mode
Blackout mode: when no DMX-signal is detected, the unit goes in blackout.
No blackout mode: when no DMX-signal is detected, the unit automatically switches to master mode.
ALWAYS set to “No Blackout” when the unit is used in standalone or master (master/slave) mode!!!
Press the MENU button until 


 is shown on the display.
Press the ENTER button.
Use DOWN and UP button to select 


 (blackout) or


 (no blackout).
Once the mode is selected, press the ENTER button to confirm.
Press the MENU button for about 2 seconds to store the setting and to return to running mode.
Led Display
Display on: display is always on.
Display off: display is off when not used.
Press the MENU button until the display shows  .
.
Press the ENTER button.
Use DOWN and UP buttons to select  (display always on) or
  (display off when not used).
Once the mode is selected, press the ENTER button to confirm.
Press the MENU button for about 2 seconds to store the setting and to return to running mode.
Display Inversion
Display inversion: display is readable when the unit is mounted upside down.
Press the MENU button until the display shows 
Press the ENTER button, the display starts blinking.
Use DOWN and UP buttons to select the display inversion or the normal display.
Once the mode is selected, press the ENTER button to confirm.
Press the MENU button for about 2 seconds to store the setting and to return to running mode.


 Self-Test
Used to activate the internal “self-test” program that runs continuously.
Press the MENU button until the display shows  .
.
Press the ENTER button to start the internal self-test program.
The unit will run continuously in sequence each individual LED
This self-test allow the user to check if all the LEDs are working perfectly.
If you want to go back to normal running mode: press the MENU button for about 2 seconds.
JB SYSTEMS® |
6/49 |
SUPER BOOGIE |

ENGLISH |
OPERATION MANUAL |
|
|
Fixture Hours
Used to show the number of working hours of the unit.
Press the MENU button until  is shown on the display.
Press the ENTER button to show the number of working hours in the display.
Press the MENU button for about 2 seconds to return to running mode.
 Software version:
Used to show the software version of the unit.
Press the MENU button until  is shown on the display.
Press the ENTER button to show the software version of the unit.
Press the MENU button for about 2 seconds to return to running mode.
OPERATING INSTRUCTIONS
A.Standalone 1unit:
Just connect the projector to the mains.
Select one of the automatic show modes
Don’t forget to set the Blackout mode to ‘NO Blackout’ or nothing will happen.
Refer to chapter HOW TO SETUP to learn how to make the previous settings.
Remark: You can connect a CA-8 remote controller to the unit if you want to have more control.
B.Two or more units in master/slave setup:
Connect 2 or more units together. Refer to the chapter “electrical installation” to learn how to do this.
Set the master mode for the first unit and select one of the shows.
Set the slave mode for all the other units: each slave projector can be set to its specific slave mode (see chapter HOW TO SETUP the slave mode)
Connect all units to the mains and put on some music. The units will start working automatically to the rhythm of the music and show the internal programs.
Don’t forget to set the Blackout mode to ‘NO Blackout’ or nothing will happen.
Remark: You can connect a CA-8 remote controller to the master unit if you want to have more control over the master/slave operation.
C.Connect the optional CA-8 controller for more control:
The CA-8 controller can only be used in standalone or master/slave mode. Connect the controller to the CA-8 input of the first unit (master). Now you can control all the connected units:
|
BUTTON |
|
|
|
ACTIONS |
|
|
|
|
|
|
|
|||
|
STANDBY |
|
|
|
To blackout all the fixtures |
||
|
|
|
|
1.Synchronous strobe |
|
|
|
|
|
|
|
2.Sound strobe in white |
|
Select one of the different show modes. |
|
|
FUNCTION |
|
|
3.Sound strobe in color |
|
|
|
|
|
|
|
|
|
|
|
|
|
|
|
|
|
|
|
|
MODE |
|
|
Strobe |
|
Show |
|
|
|
|
(LED OFF) |
|
(LED ON) |
||
|
|
|
|
|
|||
|
|
|
|
|
|
|
|
D.Controlled by universal DMX-controller:
Connect all the units together. Refer to the chapter “Electrical installation for two or more units in DMXmode”. To learn how to do this (don’t forget to address all the units properly!)
Connect all the units to the mains and turn on the DMX controller.
Since each unit has its own DMX-address, you can control them individually. Remember that each unit uses 1 or 3 DMX-channels as shown in the DMX charts below:
JB SYSTEMS® |
7/49 |
SUPER BOOGIE |

ENGLISH |
OPERATION MANUAL |
|
|
1 CHANNEL MODE
SHOW
VALUE |
FUNCTION |
|
|
248-255 |
RANDOM |
|
|
218-247 |
SHOW 8 |
|
|
188-217 |
SHOW 7 |
|
|
158-187 |
SHOW 6 |
|
|
128-157 |
SHOW 5 |
|
|
098-127 |
SHOW 4 |
|
|
068-097 |
SHOW 3 |
|
|
038-067 |
SHOW 2 |
|
|
008-037 |
SHOW 1 |
|
|
000-007 |
OFF |
|
|
3 CHANNEL MODE
1 - SHOW |
2 - SPEED |
3 - STROBE |
||||
|
|
|
|
|
|
|
VALUE |
FUNCTION |
VALUE |
FUNCTION |
VALUE |
FUNCTION |
|
|
|
|
|
|
|
|
248-255 |
RANDOM |
248-255 |
AUDIO |
255 |
FAST STROBE |
|
TRIGGER |
||||||
|
|
|
|
|
||
218-247 |
SHOW 8 |
247 |
FAST |
|
|
|
|
|
|
|
|
|
|
188-217 |
SHOW 7 |
|
|
|
|
|
|
|
|
|
|
|
|
158-187 |
SHOW 6 |
|
|
|
|
|
|
|
|
|
|
|
|
128-157 |
SHOW 5 |
008-247 |
MANUAL |
|
|
|
|
|
|
|
|
|
|
098-127 |
SHOW 4 |
|
SPEED |
|
|
|
|
CHANGE |
|
|
|||
|
|
|
|
|
||
068-097 |
SHOW 3 |
|
|
068 |
SLOW STROBE |
|
|
|
|
|
|
|
|
038-067 |
SHOW 2 |
|
|
038-067 |
SOUND |
|
|
|
STROBE |
||||
|
|
|
|
|
||
008-037 |
SHOW 1 |
008 |
VERY SLOW |
008-037 |
RANDOM |
|
STROBE |
||||||
|
|
|
|
|
||
000-007 |
OFF |
000-007 |
HOLD (stop) |
000-007 |
NO STROBE |
|
|
|
|
|
|
|
|
Important: Never look directly into the light source! Don’t use the effect in the presence of persons suffering from epilepsy.
MAINTENANCE
Make sure the area below the installation place is free from unwanted persons during servicing.
Switch off the unit, unplug the mains cable and wait until the unit has been cooled down.
During inspection the following points should be checked:
All screws used for installing the device and any of its parts should be tightly fastened and may not be corroded.
Housings, fixations and installations spots (ceiling, truss, suspensions) should be totally free from any deformation.
When an optical lens is visibly damaged due to cracks or deep scratches, it must be replaced.
The mains cables must be in impeccable condition and should be replaced immediately when even a small problem is detected.
In order to protect the device from overheat the cooling fans (if any) and ventilation openings should be cleaned monthly.
The interior of the device should be cleaned annually using a vacuum cleaner or air-jet.
JB SYSTEMS® |
8/49 |
SUPER BOOGIE |
ENGLISH |
OPERATION MANUAL |
|
|
The cleaning of internal and external optical lenses and/or mirrors must be carried out periodically to optimize light output. Cleaning frequency depends on the environment in which the fixture operates: damp, smoky or particularly dirty surroundings can cause greater accumulation of dirt on the unit’s optics.
Clean with a soft cloth using normal glass cleaning products.
Always dry the parts carefully.
Attention: We strongly recommend internal cleaning to be carried out by qualified personnel!
SPECIFICATIONS
Mains Input: |
|
|
|
|
|
|
|
|
|
|
|
|
|
|
AC 100-240V, 50/60Hz |
|||||||||||||||||||||||||||||||||||||||||||||||||||||||||
Mains Output: |
|
|
|
|
|
|
|
|
|
|
|
|
|
|
Max. 10A |
|||||||||||||||||||||||||||||||||||||||||||||||||||||||||
Power consumption: |
|
|
|
|
|
|
|
|
|
|
|
|
|
|
35 Watt |
|||||||||||||||||||||||||||||||||||||||||||||||||||||||||
Fuse: |
|
|
|
|
|
|
|
|
|
|
|
|
|
|
250V 3.15A slow blow (20mm glass) |
|||||||||||||||||||||||||||||||||||||||||||||||||||||||||
Sound Control: |
|
|
|
|
|
|
|
|
|
|
|
|
|
|
Internal microphone |
|||||||||||||||||||||||||||||||||||||||||||||||||||||||||
DMX connections: |
|
|
|
|
|
|
|
|
|
|
|
|
|
|
3pin XLR male / female |
|||||||||||||||||||||||||||||||||||||||||||||||||||||||||
DMX channels used: |
|
|
|
|
|
|
|
|
|
|
|
|
|
|
1 & 3 channels |
|||||||||||||||||||||||||||||||||||||||||||||||||||||||||
Light source: |
|
|
|
|
|
|
|
|
|
|
|
|
|
|
18 x 1Watt LEDs (4 x Red, 4 x Green, 4 x Blue, 6 x White) |
|||||||||||||||||||||||||||||||||||||||||||||||||||||||||
Size: |
|
|
|
|
|
|
|
|
|
|
|
|
|
|
246 x 230 x 164 mm |
|||||||||||||||||||||||||||||||||||||||||||||||||||||||||
Weight: |
|
|
|
|
|
|
|
|
|
|
|
|
|
|
2.6kg |
|||||||||||||||||||||||||||||||||||||||||||||||||||||||||
|
|
|
|
|
|
|
|
|
|
|
|
|
|
|
|
|
|
|
|
|
|
|
|
|
|
|
|
|
|
|
|
|
|
|
|
|
|
|
|
|
|
|
|
|
|
|
|
|
|
|
|
|
|
|
|
|
|
|
|
|
|
|
|
|
|
|
|
|
|
|
|
|
|
|
|
|
|
|
|
|
|
|
|
|
|
|
|
|
|
|
|
|
|
|
|
|
|
|
|
|
|
|
|
|
|
|
|
|
|
|
|
|
|
|
|
|
|
|
|
|
|
|
|
|
|
|
|
|
|
|
|
|
|
|
|
|
|
|
|
|
|
|
|
|
|
|
|
|
|
|
|
|
|
|
|
|
|
|
|
|
|
|
|
|
|
|
|
|
|
|
|
|
|
|
|
|
|
|
|
|
|
|
|
|
|
|
|
|
|
|
|
|
|
|
|
|
|
|
|
|
|
|
|
|
|
|
|
|
|
|
|
|
|
|
|
|
|
|
|
|
|
|
|
|
|
|
|
|
|
|
|
|
|
|
|
|
|
|
|
|
|
|
|
|
|
|
|
|
|
|
|
|
|
|
|
|
|
|
|
|
|
|
|
|
|
|
|
|
|
|
|
|
|
|
|
|
|
|
|
|
|
|
|
|
|
|
|
|
|
|
|
|
|
|
|
|
|
|
|
|
|
|
|
|
|
|
|
|
|
|
|
|
|
|
|
|
|
|
|
|
|
|
|
|
|
|
|
|
|
|
|
|
|
|
|
|
|
|
|
|
|
|
|
|
|
|
|
|
|
|
|
|
|
|
|
|
|
|
|
|
|
|
|
|
|
|
|
|
|
|
|
|
|
|
|
|
|
|
|
|
|
|
|
|
|
|
|
|
|
|
|
|
|
|
|
|
|
|
|
|
|
|
|
|
|
|
|
|
|
|
|
|
|
|
|
|
|
|
|
|
|
|
|
|
|
|
|
|
|
|
|
|
|
|
|
|
|
|
|
|
|
|
|
|
|
|
|
|
|
|
|
|
|
|
|
|
|
|
|
|
|
|
|
|
|
|
|
|
|
|
|
|
|
|
|
|
|
|
|
|
|
|
|
|
|
|
|
|
|
|
|
|
|
|
|
|
|
|
|
|
|
|
|
|
|
|
|
|
|
|
|
|
|
|
|
|
|
|
|
|
|
|
|
|
|
|
|
|
|
|
|
|
|
|
|
|
|
|
|
|
|
|
|
|
|
|
|
|
|
|
|
|
|
|
|
|
|
|
|
|
|
|
|
|
|
|
|
|
|
|
|
|
|
|
|
|
|
|
|
|
|
|
|
|
|
|
|
|
|
|
|
|
|
|
|
|
|
|
|
|
|
|
|
|
|
|
|
|
|
|
|
|
|
|
|
|
|
|
|
|
|
|
|
|
|
|
|
|
|
|
|
|
|
|
|
|
|
|
|
|
|
|
|
|
|
|
|
|
|
|
|
|
|
|
|
|
|
|
|
|
|
|
|
|
|
|
|
|
|
|
|
|
|
|
|
|
|
|
|
|
|
|
|
|
|
|
|
|
|
|
|
|
|
|
|
|
|
|
|
|
|
|
|
|
|
|
|
|
|
|
|
|
|
|
|
|
|
|
|
|
|
|
|
|
|
|
|
|
|
|
|
|
|
|
|
|
|
|
|
|
|
|
|
|
|
|
|
|
|
|
|
|
|
|
|
|
|
|
|
|
|
|
|
|
|
|
|
|
|
|
|
|
|
|
|
|
|
|
|
|
|
|
|
|
|
|
|
|
|
|
|
|
|
|
|
|
|
|
|
|
|
|
|
|
|
|
|
|
|
|
|
|
|
|
|
|
|
|
|
|
|
|
|
|
|
|
|
|
|
|
|
|
|
|
|
|
|
|
|
|
|
|
|
|
|
|
|
|
|
|
|
|
|
|
|
|
|
|
|
|
|
|
|
|
|
|
|
|
|
|
|
|
|
|
|
|
|
|
|
|
|
|
|
|
|
|
|
|
|
|
|
|
|
|
|
|
|
|
|
|
|
|
|
|
|
|
|
|
|
|
|
|
|
|
|
|
|
|
|
|
|
|
|
|
|
|
|
|
|
|
|
|
|
|
|
|
|
|
|
|
|
|
|
|
|
|
|
|
|
|
|
|
|
|
|
|
|
|
|
|
|
|
|
|
|
|
|
|
|
|
|
|
|
|
|
|
|
|
|
|
|
|
|
|
|
|
|
|
|
|
|
|
|
|
|
|
|
|
|
|
|
|
|
|
|
|
|
|
|
|
|
|
|
|
|
|
|
|
|
|
|
|
|
|
|
|
|
|
|
|
|
|
|
|
|
|
|
|
|
|
|
|
|
|
|
|
|
|
|
|
|
|
|
|
|
|
|
|
|
|
|
|
|
|
|
|
|
|
|
|
|
|
|
|
|
|
|
|
|
|
|
|
|
|
|
|
|
|
|
|
|
|
|
|
|
|
|
|
|
|
|
|
|
|
|
|
|
|
|
|
|
|
|
|
|
|
|
|
|
|
|
|
|
|
|
|
|
|
|
|
|
|
|
|
|
|
|
|
|
|
|
|
|
|
|
|
|
|
|
|
|
|
|
|
|
|
|
|
|
|
|
|
|
|
|
|
|
|
|
|
|
|
|
|
|
|
|
|
|
|
|
|
|
|
|
|
|
|
|
|
|
|
|
|
|
|
|
|
|
|
|
|
|
|
|
|
|
|
|
|
|
|
|
|
|
|
|
|
|
|
|
|
|
|
|
|
|
|
|
|
|
|
|
|
|
|
|
|
|
|
|
|
|
|
|
|
|
|
|
|
|
|
|
|
|
|
|
|
|
|
|
|
|
|
|
|
|
|
|
|
|
|
|
|
|
|
|
|
|
|
|
|
|
|
|
|
|
|
|
|
|
|
|
|
|
|
|
|
|
|
|
|
|
|
|
|
|
|
|
|
|
|
|
|
|
|
|
|
|
|
|
|
|
|
|
|
|
|
|
|
|
|
|
|
|
|
|
|
|
|
|
|
|
|
|
|
|
|
|
|
|
|
|
|
|
|
|
|
|
|
|
|
|
|
|
|
|
|
|
|
|
|
|
|
|
|
|
|
|
|
|
|
|
|
|
|
|
|
|
|
|
|
|
|
|
|
|
|
|
|
|
|
|
|
|
|
|
|
|
|
|
|
|
|
|
|
|
|
|
|
|
|
|
|
|
|
|
|
|
|
|
|
|
|
|
|
|
|
|
|
|
|
|
|
|
|
|
|
|
|
|
|
|
|
|
|
|
|
|
|
|
|
|
|
|
|
|
|
|
|
|
|
|
|
|
|
|
|
|
|
|
|
|
|
|
|
|
|
|
|
|
|
|
|
|
|
|
|
|
|
|
|
|
|
|
|
|
|
|
|
|
|
|
|
|
|
|
|
|
|
|
|
|
|
|
|
|
|
|
|
|
|
|
|
|
|
|
|
|
|
|
|
|
|
|
|
|
|
|
|
|
|
|
|
|
|
|
|
|
|
|
|
|
|
|
|
|
|
|
|
|
|
|
|
|
|
|
|
|
|
|
|
|
|
|
|
|
|
|
|
|
|
|
|
|
|
|
|
|
|
|
|
|
|
|
The information might be modified without prior notice
You can download the latest version of this user manual on our website: www.beglec.com
JB SYSTEMS® |
9/49 |
SUPER BOOGIE |

FRANÇAIS |
GUIDE D'UTILISATION |
|
|
GUIDE D'UTILISATION
Nous vous remercions d'avoir acheté ce produit JB Systems®. Pour tirer pleinement profit de toutes les possibilités du produit et pour votre propre sécurité, lisez ces instructions très attentivement avant d'utiliser cet appareil.
CARACTÉRISTIQUES
Cet appareil ne produit pas d'interférences radio. Ce produit répond aux exigences des directives européennes et nationales actuelles. La conformité a été établie et les déclarations et documents correspondants ont été déposés par le fabricant. Cet appareil a été conçu pour produire un effet d'éclairage décoratif et est utilisé dans les systèmes de jeu de lumière.
Puissant projecteur multifaisceaux « moonflower » à LED.
Doté de 2 jeux de 9 LED de 1 watt (4 x rouges, 4 x vertes, 4 bleues, 6 x blanches)
Prêt à l'emploi : Aucun contrôleur nécessaire, les jeux de lumière se déroulent automatiquement au rythme de la musique
Fonction maître/esclave pour de beaux jeux de lumière synchronisés quand plusieurs unités sont mises en chaîne
D'excellents programmes intégrés offrant de fabuleux jeux de lumière en perpétuels changements
Faisceaux lumineux blanc, bleu, rouge et vert très intenses et vifs
Muni d'une grosse lentille optique pour une sortie de lumière maximale
Contrôlable via :
1 canal DMX : pour sélectionner différents effets à commande sonore
3 canaux DMX : choix de l'effet + contrôle sonore/vitesse + contrôle stroboscopique
Télécommande CA-8 en option
Aucune pièce mobile à l'intérieur : Durée de vie prolongée
AVANT UTILISATION
Avant d'utiliser cet appareil, vérifiez s'il n'a pas été endommagé durant le transport. En cas de dommages, n'utilisez pas l'appareil et consultez immédiatement votre revendeur.
Important : Cet appareil est expédié de notre usine en parfait état et bien emballé. Il est absolument nécessaire que l'utilisateur suive strictement les instructions et les avertissements de sécurité se trouvant dans ce manuel. Tout dommage dû à une mauvaise manipulation n'est pas garanti. Le revendeur n'accepte aucune responsabilité pour tous les défauts et problèmes dus au non-respect de ce manuel.
Conservez ce manuel dans un endroit sûr pour toute consultation future. Si vous vendez l'appareil, assurez-vous de joindre ce manuel.
Vérifiez le contenu :
Vérifiez que le carton contient les éléments suivants :
Instructions d'utilisation
Projecteur SUPER BOOGIE
Câble d'alimentation secteur
INSTRUCTIONS DE SÉCURITÉ :
ATTENTION : Pour réduire le risque de choc électrique, ne retirez pas le panneau supérieur. L'appareil ne contient aucun composant réparable par l'utilisateur. Confiez toute réparation à un personnel qualifié uniquement.
Le symbole de l'éclair à l'intérieur d'un triangle équilatéral est destiné à alerter l'utilisateur de la présence de « tensions dangereuses » non isolées à l'intérieur de l'appareil, d'une magnitude pouvant constituer un risque d'électrocution.
JB SYSTEMS® |
10/49 |
SUPER BOOGIE |
FRANÇAIS |
GUIDE D'UTILISATION |
|
|
Le symbole du point d'exclamation dans un triangle équilatéral sert à avertir l'utilisateur que d'importants conseils d'utilisation et de maintenance sont fournis dans la documentation accompagnant l'appareil.
Ce symbole signifie : pour un usage intérieur uniquement
Ce symbole signifie : Lisez les instructions
Ce symbole signifie : Appareil de classe de sécurité I
Ce symbole définit : la distance minimale requise avec les objets éclairés. La distance minimale entre la sortie de lumière et la surface éclairée doit être supérieure à xxx mètre
Cet appareil n'est pas adapté pour un montage direct sur des surfaces normalement inflammables. (ne convient que pour le montage sur surfaces non combustibles)
ATTENTION : Ne fixez pas votre regard sur une lampe allumée.
Peut être nocif pour les yeux.
Pour protéger l'environnement, essayez de recycler autant que possible les matériaux d'emballage.
Pour éviter tout incendie ou électrocution, n'exposez pas cet appareil à la pluie ou à l'humidité.
Pour éviter une formation de condensation interne, laissez l'appareil s'adapter à la température ambiante quand vous le mettez dans une pièce chaude après le transport. La condensation empêche parfois l'appareil de fonctionner à plein rendement ou peut même causer des dommages.
Cet appareil est destiné à un usage intérieur seulement.
Ne placez pas d'objets métalliques et ne renversez pas de liquides à l'intérieur de l'appareil. Un choc électrique ou un dysfonctionnement peut en résulter. Si un corps étranger pénètre dans l'appareil, débranchez immédiatement le cordon d'alimentation de la prise secteur.
Placez l'appareil dans un endroit bien aéré, loin de tout matériau et/ou liquide inflammable. L'appareil doit être fixé à au moins 50 cm des murs environnants.
Ne couvrez pas les ouvertures de ventilation, cela pourrait entraîner une surchauffe.
Évitez une utilisation dans des environnements poussiéreux et nettoyez l'appareil régulièrement.
Gardez l'appareil loin de la portée des enfants.
Les personnes inexpérimentées ne doivent pas utiliser cet appareil.
La température ambiante de fonctionnement maximale est de 40°C. N'utilisez pas cet appareil à des températures ambiantes plus élevées.
Assurez-vous qu'aucune personne étrangère ne se trouve dans la zone en dessous de l'emplacement d'installation durant le montage, le démontage et l'entretien.
Laissez environ 10 minutes à l'appareil pour refroidir avant de commencer l'entretien.
Débranchez toujours l'appareil lorsqu'il ne va pas être utilisé pendant une longue période ou avant de commencer l'entretien.
L'installation électrique doit être effectuée par du personnel qualifié, conformément à la réglementation en matière de sécurité électrique et mécanique dans votre pays.
Vérifiez que la tension secteur n'est pas supérieure à celle indiquée sur l'appareil.
Le cordon d'alimentation doit toujours être en parfait état. Éteignez immédiatement l'appareil dès que le cordon d'alimentation est écrasé ou endommagé. Il doit être remplacé par le fabricant, son agent de service ou une personne de même qualification afin d'éviter tout danger.
Ne laissez jamais le cordon d'alimentation entrer en contact avec d'autres câbles !
Ce luminaire doit être mis à la terre pour être conforme à la réglementation en matière de sécurité.
Ne connectez pas l'appareil à un variateur de lumière.
Utilisez toujours un câble de sécurité approprié et certifié lors de l'installation de l'appareil.
Afin d'éviter un choc électrique, n'ouvrez aucun panneau. L'appareil ne contient aucun composant réparable par l'utilisateur.
Ne réparez jamais un fusible et ne court-circuitez jamais le porte-fusible. Remplacez toujours un fusible endommagé par un fusible du même type ayant les mêmes spécifications électriques !
En cas de sérieux problèmes de fonctionnement, cessez d'utiliser l'appareil et contactez immédiatement votre revendeur.
Le boîtier et les lentilles optiques doivent être remplacés s'ils sont visiblement endommagés.
Utilisez l'emballage d'origine pour transporter l'appareil.
Pour des raisons de sécurité, il est interdit d'apporter des modifications non autorisées à l'appareil.
JB SYSTEMS® |
11/49 |
SUPER BOOGIE |

FRANÇAIS |
GUIDE D'UTILISATION |
|
|
Important : Ne regardez jamais directement la source de lumière ! N'utilisez pas le jeu de lumière en présence de personnes souffrant d'épilepsie.
DESCRIPTION :
1.Voyant DMX : s'allume lorsque l'appareil reçoit un signal DMX
2.Voyant maître : s'allume lorsque l'appareil est en mode maître
3.Voyant esclave : s'allume lorsque l'appareil est en mode esclave
4.Voyant son : clignote au rythme de la musique lorsque l'appareil est en mode audio
5.L'écran affiche les différents menus et les fonctions sélectionnées.
6.Touche MENU : utilisée pour sélectionner les différents éléments de menu
7.Touche BAS : pour descendre dans le menu et pour diminuer les valeurs affichées à l'écran.
8.Touche HAUT : pour monter dans le menu et pour augmenter les valeurs affichées à l'écran.
9.Touche ENTER : pour confirmer votre choix.
10.Support de suspension avec 2 verrous pour fixer l'appareil et un trou de montage pour un crochet de fixation.
11.FUSIBLE : Remplacez toujours un fusible grillé par un fusible avec les mêmes caractéristiques.
12.Entrée d'alimentation secteur par connecteur CEI. Connectez le câble d'alimentation secteur fourni ici.
13.Sortie d'alimentation secteur par connecteur CEI : vous pouvez utiliser un câble d'alimentation CEI spécial pour connecter cette sortie avec l'entrée d'alimentation secteur du projecteur SUPER BOOGIE suivant pour une interconnexion plus simple. (10 A max. sous 230 V, 50 Hz)
14.Entrée DMX : connecteur XLR 3 broches mâle utilisé pour les câbles DMX universels. Cette entrée reçoit les instructions d'un contrôleur DMX ou d'une autre unité SUPER BOOGIE en mode maître/esclave.
15.Sortie DMX : connecteur XLR femelle 3 broches utilisé pour relier une unité SUPER BOOGIE à la suivante dans la chaîne DMX ou avec une autre unité SUPER BOOGIE en cas d'utilisation en mode maître/esclave.
16.Microphone interne
17.connecteur à prise jack 6,35 mm pour la télécommande CA-8 en option.
18.Œilleton de sécurité : attachez ici le câble de sécurité en option.
MONTAGE AU PLAFOND
Important : L'installation ne doit être effectuée que par un personnel qualifié. Une mauvaise installation peut entraîner des blessures et/ou dommages graves. Un montage au plafond exige une grande expérience ! Les limites de charge de fonctionnement doivent être respectées, des matériels d'installation certifiés doivent être utilisés, l'appareil installé doit être inspecté régulièrement pour vérifier les conditions de sécurité.
Assurez-vous qu'aucune personne étrangère ne se trouve dans la zone en dessous de l'emplacement d'installation durant le montage, le démontage et l'entretien.
Fixez l'appareil dans un endroit bien aéré, loin de tout matériau et/ou liquide inflammable. L'appareil doit être fixé à au moins 50 cm des murs environnants.
JB SYSTEMS® |
12/49 |
SUPER BOOGIE |

FRANÇAIS |
GUIDE D'UTILISATION |
|
|
L'appareil doit être installé hors de portée des personnes, loin des passages et des endroits où des personnes peuvent aller et venir, ou s'asseoir.
Avant de lever l'appareil, assurez-vous que le point de suspension peut supporter une charge d'au moins 10 fois le poids de l'appareil.
Lors de l'installation de l'appareil, utilisez toujours un câble de sécurité certifié qui peut supporter 12 fois le poids de l'appareil. Ce support de suspension de sécurité secondaire doit être installé de manière à ce qu'aucune partie de l'installation ne puisse tomber de plus de 20 cm si le support principal lâche.
L'appareil doit être bien fixé, un montage balançant est dangereux et ne doit pas être envisagé !
Ne couvrez pas les ouvertures de ventilation, cela pourrait entraîner une surchauffe.
L'opérateur doit s'assurer que la sécurité relative à l'installation et les conditions techniques sont approuvées par un expert avant d'utiliser l'appareil pour la première fois. Les installations doivent être inspectées chaque année par une personne qualifiée pour être sûr que la sécurité est toujours optimale.
INSTALLATION ÉLECTRIQUE + ADRESSAGE
Important : L'installation électrique doit être effectuée par du personnel qualifié, conformément à la réglementation en matière de sécurité électrique et mécanique dans votre pays.
Installation électrique d'une unité autonome :
Insérez le câble d'alimentation secteur. L'appareil démarre immédiatement avec le dernier mode sélectionné.
Reportez-vous au chapitre COMMENT CONFIGURER pour apprendre comment basculer entre les différents modes de fonctionnement.
Installation électrique de deux ou plusieurs unités en maître/esclave :
Connectez plusieurs unités entre elles en utilisant de bons câbles de qualité microphone symétrique. L'unité qui n'a pas de câble connecté à son entrée DMX est l'unité « maître », les autres sont des unités « esclave ».
Assurez-vous que toutes les unités sont branchées au secteur.
Reportez-vous au chapitre COMMENT CONFIGURER pour plus d'informations.
C'est fait !
Installation électrique de deux ou plusieurs unités en mode DMX :
JB SYSTEMS® |
13/49 |
SUPER BOOGIE |

FRANÇAIS |
GUIDE D'UTILISATION |
|
|
Le protocole DMX est largement utilisé pour contrôler des équipements lumineux multifonctions au moyen d'un signal à haute vitesse. Vous devez mettre en chaîne votre contrôleur DMX avec toutes les unités connectées par un câble symétrique de bonne qualité.
Disposition du connecteur XLR à 3 broches : Broche 1 = terre ~ Broche 2 = signal négatif (-) ~ Broche 3 = signal positif (+)
Pour éviter un comportement anormal des effets de lumière, à cause des interférences, vous devez utiliser un terminateur de 90 à 120 Ω à la fin de la chaîne. N'utilisez jamais de séparateurs de câbles en Y, cela ne fonctionne pas !
Assurez-vous que toutes les unités sont branchées au secteur.
Chaque effet de lumière dans la chaîne doit avoir sa propre adresse de début afin qu'il sache quelles commandes du contrôleur à décoder. Dans la section suivante, vous allez apprendre comment définir les adresses DMX.
COMMENT CONFIGURER :
MENU PRINCIPAL :
Pour sélectionner l'une des options du menu, appuyez sur la touche MENU jusqu'à ce que l'option souhaitée soit affichée à l'écran.
Utilisez la touche ENTER pour sélectionner la fonction. L'affichage se met à clignoter.
Utilisez les touches BAS et HAUT pour choisir l'option souhaitée.
Une fois l'option souhaitée est sélectionnée, appuyez sur la touche ENTER pour sélectionner.
Appuyez sur la touche MENU pendant environ 2 secondes pour mémoriser les réglages et revenir en mode de fonctionnement normale. Si vous ne le faites pas, le réglage ne sera pas mémorisé et au bout de 8 secondes, l'appareil revient au mode de fonctionnement précédent.


 Configuration de l'adresse DMX512
Permet de définir l'adresse de début dans une configuration DMX.
Appuyez sur la touche MENU jusqu'à ce que
 soit affiché à l'écran.
Appuyez sur la touche ENTER pour sélectionner.
Utilisez les touches BAS et HAUT pour changer l'adresse DMX512.
Une fois la bonne adresse apparaît à l'écran, appuyez sur la touche ENTER pour confirmer.
Appuyez sur la touche MENU pendant environ 2 secondes pour mémoriser les réglages et revenir en mode de fonctionnement normale.


 Mode Canal
L'unité offre 2 différents modes canal. Reportez-vous au tableau DMX pour voir les différences.
Appuyez sur la touche MENU jusqu'à ce que  soit affiché à l'écran.
Appuyez sur la touche ENTER pour sélectionner.
Utilisez les touches BAS et HAUT pour sélectionner un des modes canal disponibles.
Une fois le mode sélectionné, appuyez sur la touche ENTER pour confirmer.
Appuyez sur la touche MENU pendant environ 2 secondes pour mémoriser les réglages et revenir en mode de fonctionnement normale.
JB SYSTEMS® |
14/49 |
SUPER BOOGIE |
 Loading...