

JBL Simply Cinema ESC340 Owner's Manual
Simple setup guide
Bedienungs- und Installationsanleitung
Simple guide d’installation
Guía básica de configuración
Eenvoudige installatiehandleiding
Semplice guida d’installazione
kort brugsvejledning
Asennus- ja käyttöohje
Manual de Instruções
TM
®
ESC340
TM
®
ESC340
Simple
setup guide
Thank youfor choosing JBL. For over 50 years, JBL has been
involved in every aspect of music and film recording and reproduction,
from live performances to monitoring the recordings you play in your
home, car or office.
We’re confident that the JBL system you have chosen will provide every
note of enjoyment that you expected – and that when you think about
purchasing additional audio equipment for your home, car or office,
you will once again choose JBL.
JBL Consumer Products

-3-
The ESC340 offers two unique
user-convenience features:
Automatic Turn-On/Shut-Down
and Automatic Digital-Input
Selection.
The Automatic Turn-On feature
will turn the ESC340 on as soon
as a source connected to its
digital inputs (such as DVD, CD
player with digital output, or
any other device featuring a
coaxial or optical digital output)
is switched on, or as soon as the
unit connected to its last-used
analog input starts outputting
sound.
When using digital inputs, the
Automatic Turn-On can be
activated by turning on either
one of the connected digital
sources such as a DVD player or
a CD player with digital output.
When using analog inputs (TV or
AUX), Automatic Turn-On is
available only for the device
that was last listened to before
the ESC340 shut down. In order
to listen to the other device, the
ESC340 input needs to be
manually selected by using the
Input button on the product and
on the remote, which, in turn,
disables the Automatic DigitalInput Selector until the ESC340
is shut down.
The Automatic Turn-Off shuts
the unit down five minutes after
all sources connected to its
digital inputs are powered down
and the device connected to its
selected analog input stops
playing.
The Automatic Digital-Input
Selector automatically selects
the source connected to its
digital inputs when that source
is powered on. Upon power
down of this digital unit, if no
other source is on, the ESC340
will switch itself off after five
minutes. If the analog source
that was selected prior to the
digital source turning on is still
playing, the ESC340 will switch
back to that other source. Once
a digital source is powered on
and selected as an input,
turning on a device connected
to the other digital input will
not switch the input until the
selected digital device is first
powered off.
These two features can only be
used if the customer does not
manually turn the ESC340 on or
off, and does not manually
select an input source. Once
either of these selections is
made manually, the automatic
features are disabled as follows:
1. If the ESC340 is turned off
manually, it will not turn back
on automatically for at least five
minutes. During these five
minutes, it can be turned on
either from the front panel or
via the remote control.
2. Once an input source is
selected manually, the
Automatic Source-Selection
feature will remain disabled
until the ESC340 shuts down.
3. Once any one of the two
devices connected to the ESC340
digital inputs is powered on and
its input is selected by the
ESC340, the device connected to
the other digital input of the
ESC340 cannot be automatically
selected until the alreadyselected digital device is
powered down.
Important Note
Automatic On/Off and Automatic Digital-Input Selection
-4-
• Complete, self-powered DTS,
Dolby* Digital surround
processor with four satellite
speakers, a center channel
loudspeaker, subwoofer,
remote control, and all
amplification built-in.
(Just Add TV!)
• Dolby Digital, DTS, Dolby Pro
Logic*, including Phantom
and 3-Stereo, and Stereo
listening modes.
• Automatic Turn-On and TurnOff.
• Automatic Source Switching
for the digital inputs.
• Two digital (one optical and
one coaxial) inputs and two
analog inputs.
• 2-Way video-shielded microsatellites with titaniumlaminate tweeters and
common voicing for all five
channels, and an 8-inch,
long-throw, floor-firing
subwoofer.
• Late Night compression for
nighttime listening without
unexpected and objectionably
loud passages.
• All amplification and controls
are mounted in the
subwoofer, eliminating the
need for a separate control
unit.
• Remote controllable via
outboard remote eye that can
be mounted with the center
channel or separately, so that
the subwoofer can be hidden
away.
Features
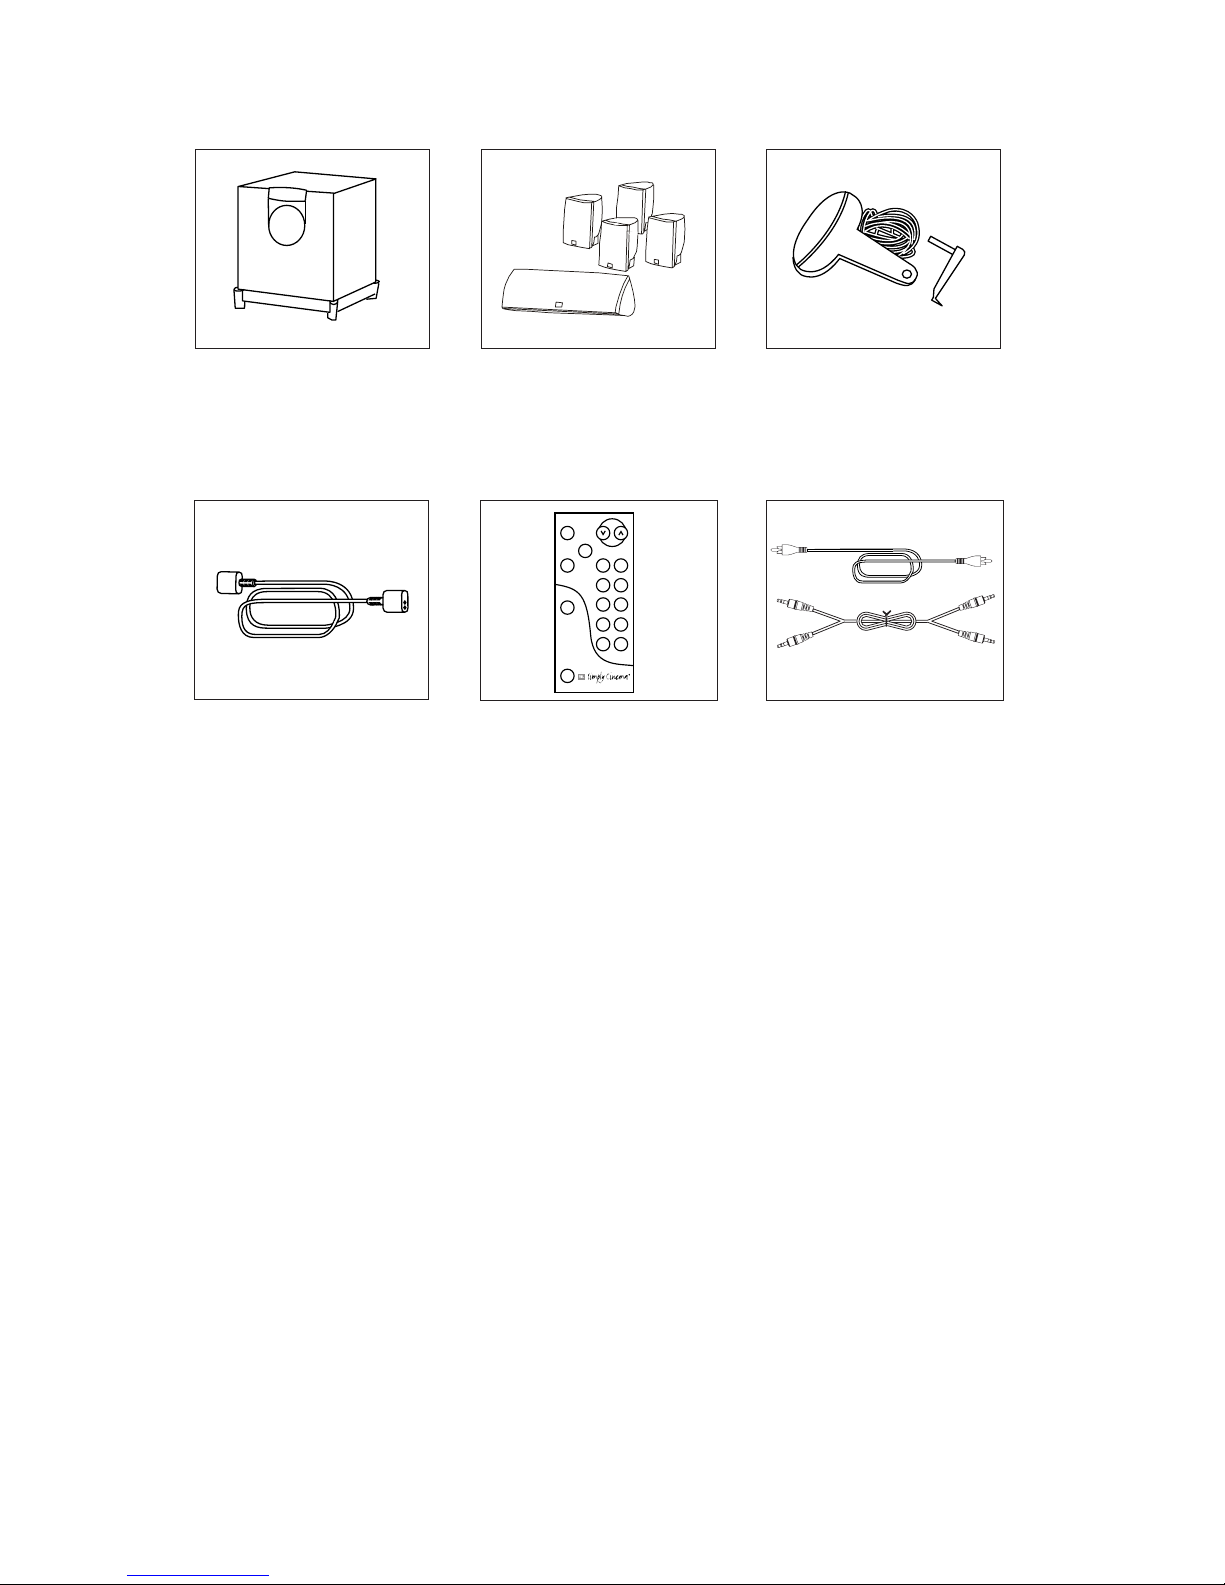
4 satellites and a center channel
loudspeaker.
“Smart” powered
subwoofer/controller.
included
JBL”error free“ speaker cables.
Extension cable XC300 available
in 10-foot lengths in either
white or black.
Foot for horizontal placement of
center speaker. Versatile remote
sensor and double-sided tape
provided.
Remote control.
Bass
Treble
Delay Level
0 dB Test
Adjustment
Late Night
Power
Mute
Surround
Mode
Input
–
+
–
+
–
+
Volume
Digital coax input cable and
analog RCA input cable.

-5-
About Dolby Digital
The ESC340 features Dolby
Digital (also unofficially known
as AC-3) multichannel signal
processing, a system developed
by Dolby Laboratories.
Dolby Digital, unlike “matrixed”
systems (such as Dolby Pro
Logic) that derive multichannel
sound from a two-channel
source, is capable of delivering
information for one subwoofer
and five full-range channels as
discrete and individual channels
in digital AC-3 data format from
sources such as a DVD player.
The result is clear and accurate
digital sound to each speaker,
along with availability of stereosurround effects (Dolby Pro
Logic features mono surrounds).
Dolby Digital is capable of
delivering several different
formats of surround sound, the
most robust one being the 5.1channel mode, which provides
separate signals for five
satellite speakers as well as for
a subwoofer. The ESC340
features a “5.1-Ch” indicator
that illuminates when a Dolby
Digital 5.1-channel encoded
signal is present. Dolby Digital
can also provide other AC-3
digital multichannel signals, as
well as 2-channel signals, which
can be decoded via Dolby Pro
Logic processing into
multichannel surround sound.
About DTS
DIGITAL SURROUND
THE FINEST 5 .1 SURROUND
SOUND TECHNOLOGY ON THE
MARKET TODAY!
An amazing new technology for
surround-sound entertainment,
DTS Digital Surround is an
encode/decode system that
delivers six channels (5.1) of
master-quality,20-bit audio.
In the encoding process, the
DTS algorithm encrypts six
channels of 20-bit digital audio
imformation in the space
previously allotted for ouly two
channels of 16-bit linear PCM.
Then during playback, the DTS
decoder reconstructs the
original six channels of 20-bit
digital audio.
Each of these six channels is
audibly superior to the 16-bit
linear PCM audio found on
conventional compact discs.
• Wall-mount brackets and floor
stands available separately
for the satellites.
• Credit-card-type, fullfunction remote control.
• JBL “error free” speaker
cables simplify connection
and eliminate possibility of
out-of-phase wiring.
• Center foot for horizontal
placement of the center
channel.
• Rotatable JBL logos to allow
for vertical or horizontal
placement of the satellites.

-6-
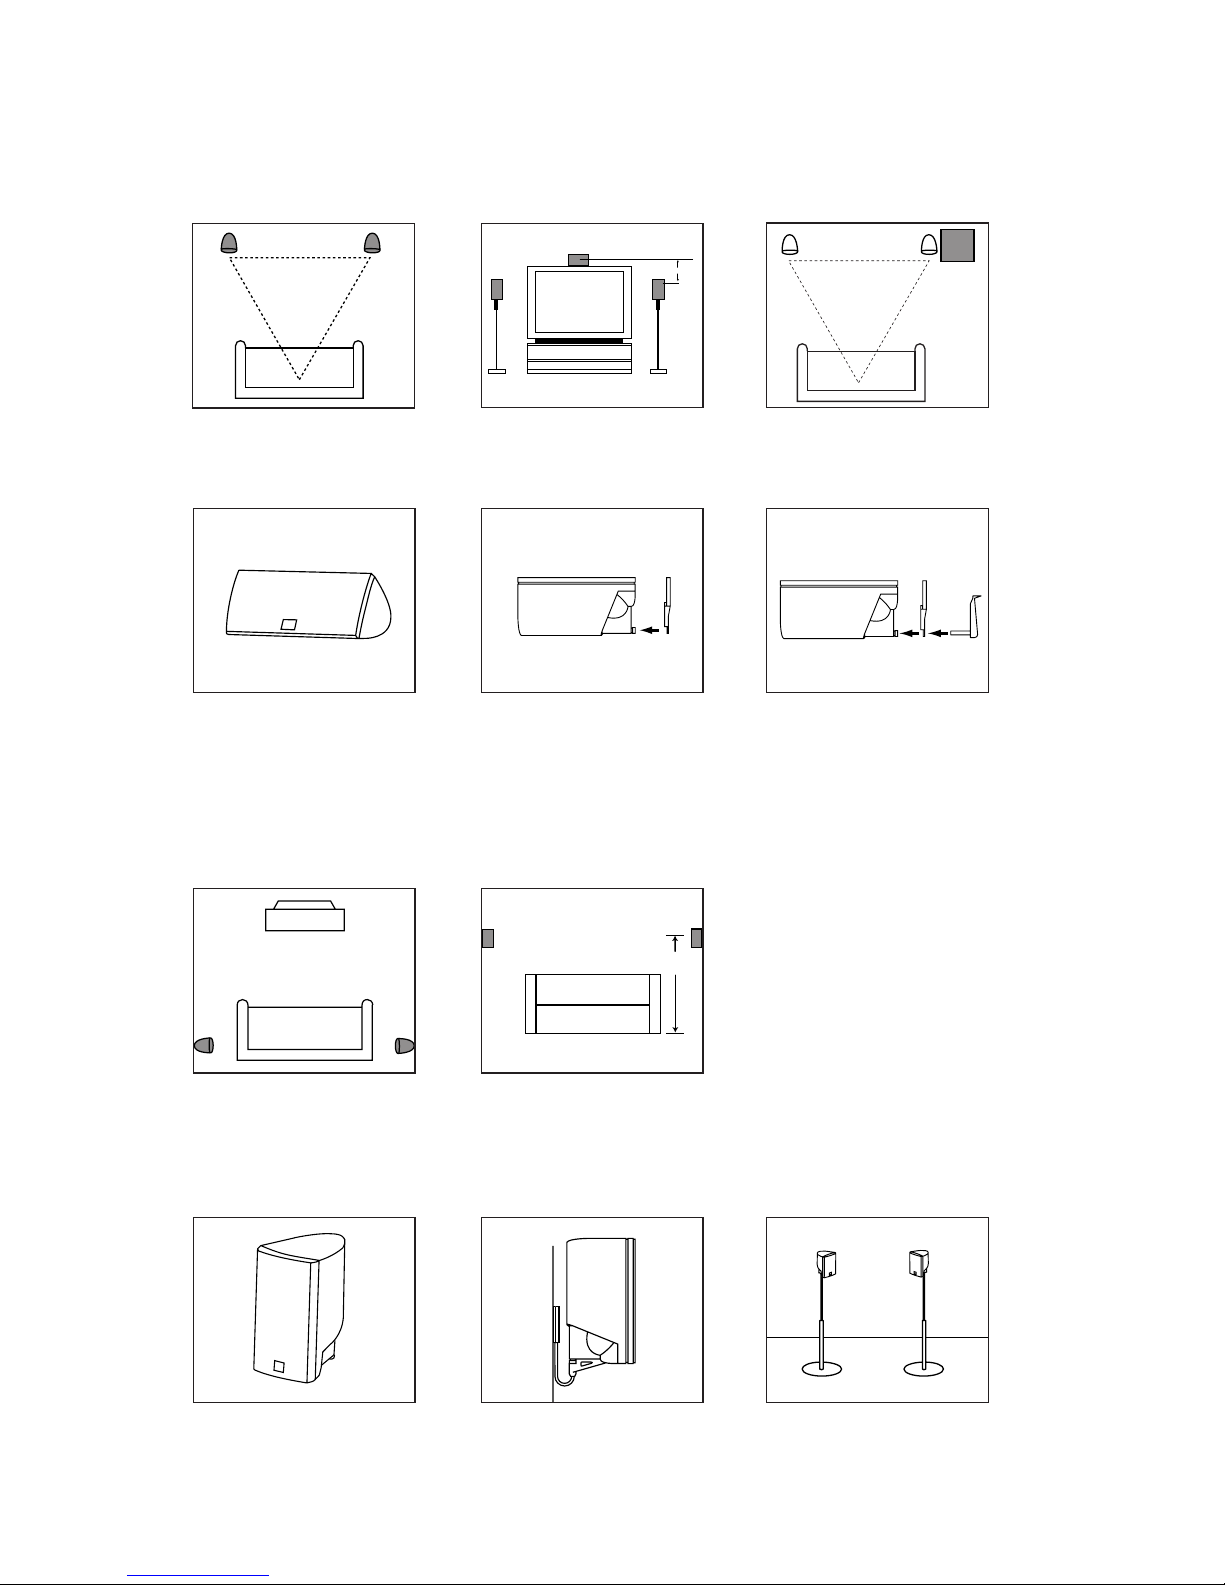
On shelves.
On the wall. Optional bracket,
WB300 or WB300WHT (white).
Mounting Options
On optional stands, FS300
or FS300WHT (white).
Subwoofer
Surround Speakers
5
-6ft.
(150-180cm)
Front and Surrounds Speakers
one. Speaker Placement
Satellites
0-60cm
Mounting Remote Sensor to Center Speaker.
Place remote sensor at bottom
of center speaker.
Insert support leg through
remote sensor and into
speaker.
Center speaker.
The remote sensor may be placed anywhere using the supplied double-sided tape.
-7-
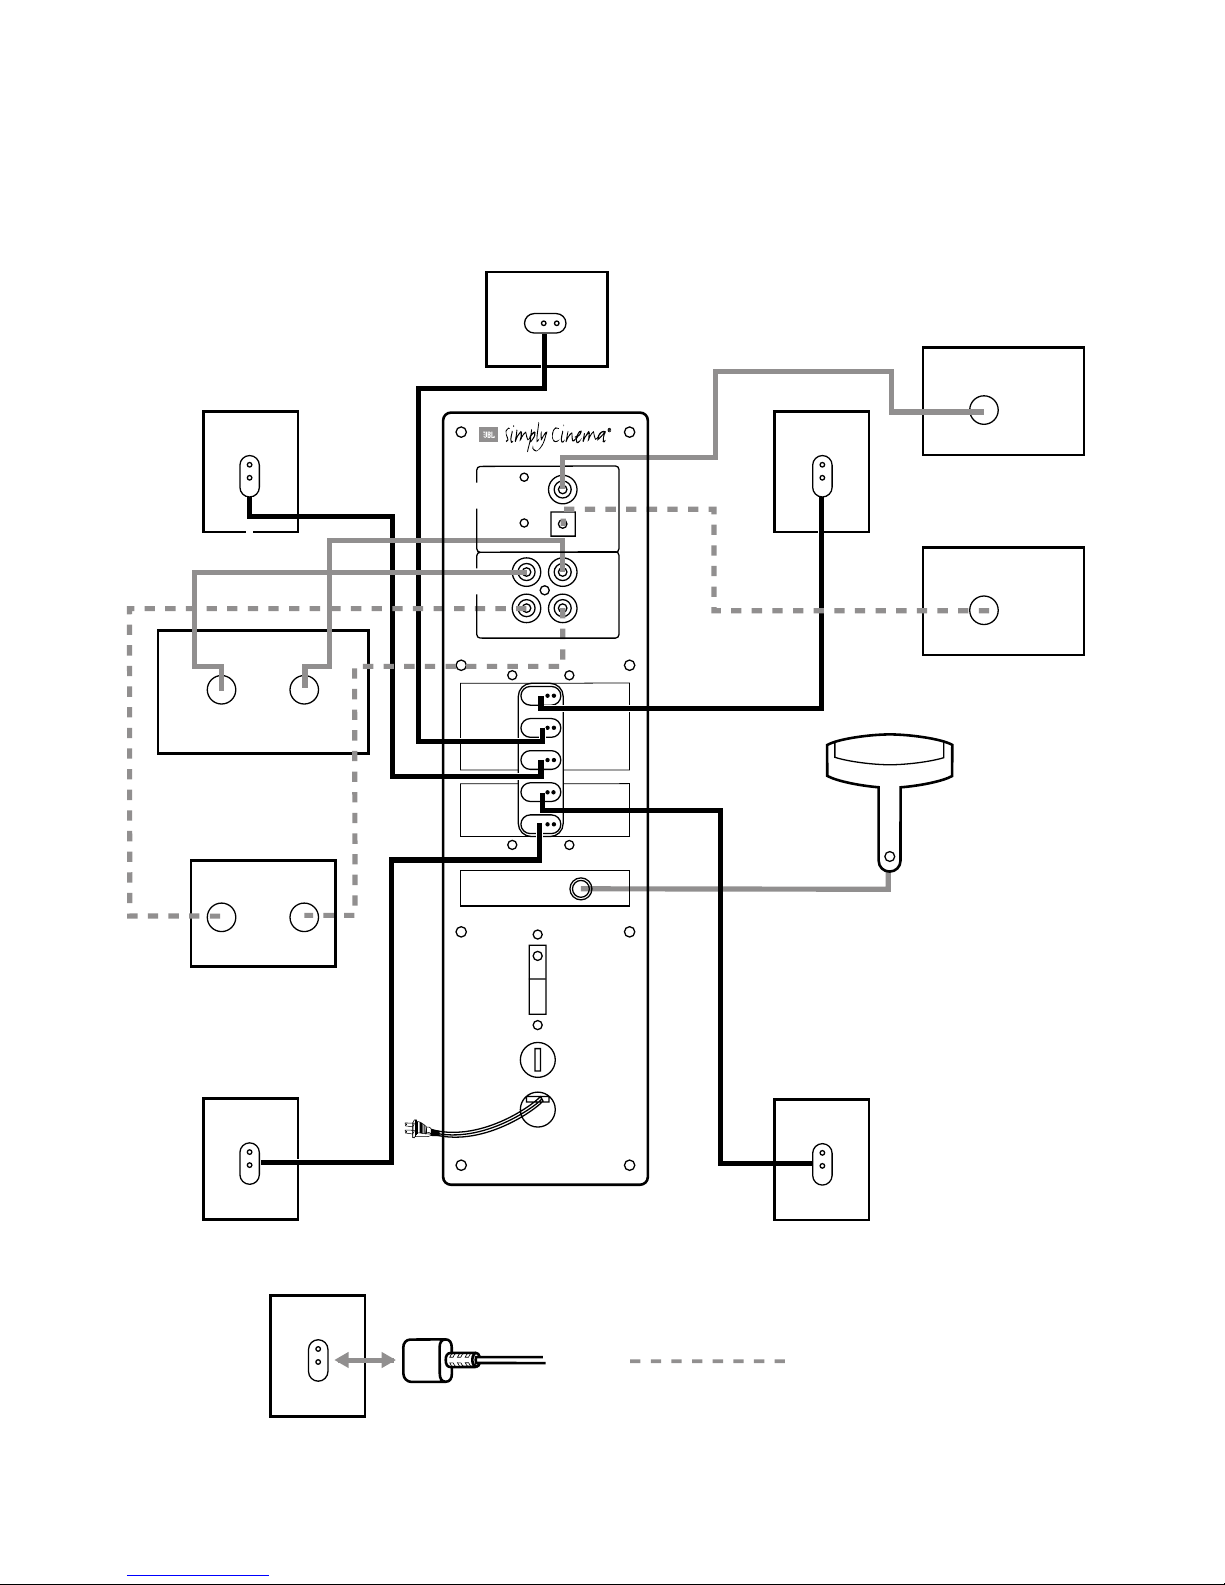
two. Speaker, Source, and Remote-Sensor Connectors
(rear panel of subwoofer)
Speaker and Amplifier Connection
Dashed lines indicate that
wire is not included
Extension cables, XC300, available in
10-foot lengths from your JBL dealer.
Left Front
TV
Audio Output
OPTICAL
Right Left
Center
Right Front
Remote Sensor
COAXIAL
TV
AUX
COAXIAL
OPTICAL
Right Surround
Left Surround
FRONT
SPEAKERS
SURROUND
SPEAKERS
RIGHT
CENTER
LEFT
RIGHT
LEFT
AC POWER
ON / STANDBY
OFF
REMOTE SENSOR
INPUT
RIGHT
AUX
(Additional Audio Source)
Audio Output
Right Left
ANALOG
INPUTS
DIGITAL
INPUTS
Digital Source A
DVD or CD
Digital Output
Digital Source B
DVD or CD
Digital Output
LEFT
-8-
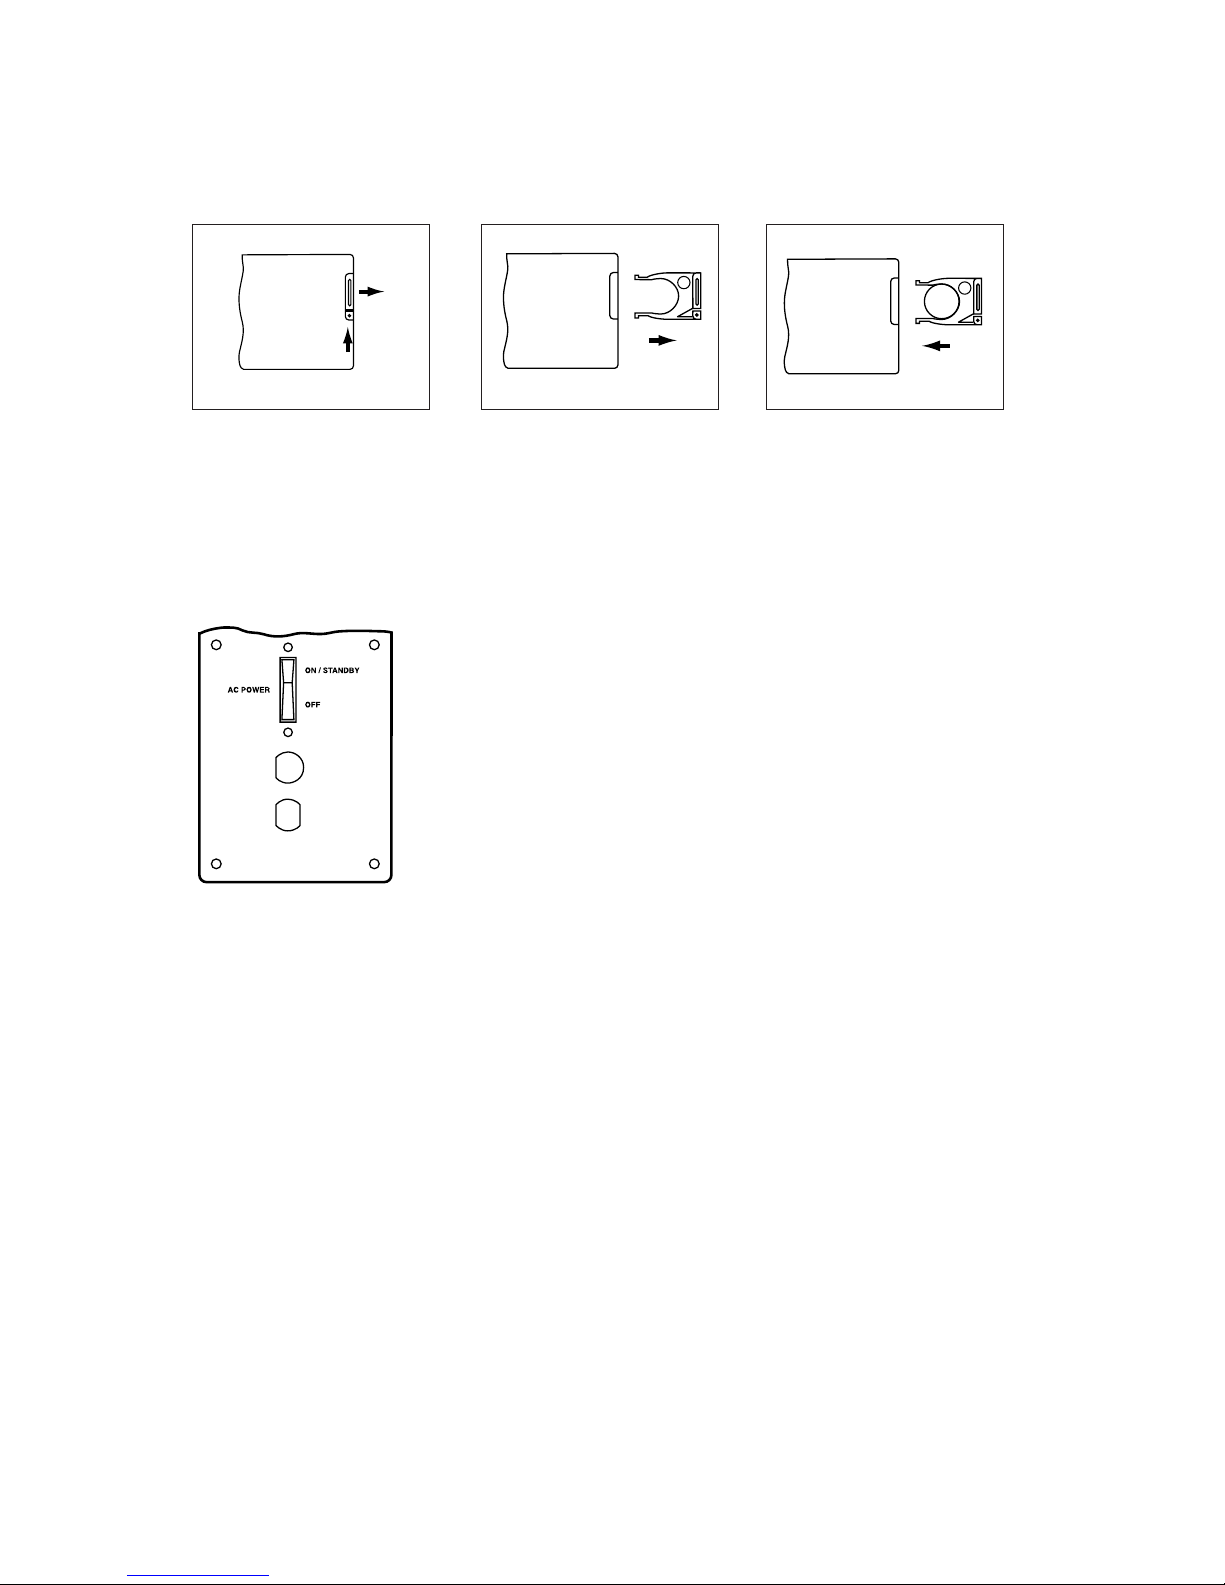
three. Operation
Master On/Off Switch
To operate unit, place this switch
in the On/Standby position. The
system will go into standby when
no signal has been received and
when no unit connected to any of
its two digital inputs has been on
for approximately five minutes.
Rear-Panel Control
Remote-Control-Battery Installation.
+
+
+
Push small tab towards
battery slot and pull battery
drawer out.
Remove old battery. Insert new battery with “+”
side up, and slide battery
drawer back into remote.
-9-
Bass
Treble
Delay Level
0 dB Test
Adjustment
Late Night
Power
Mute
Surround
Mode
Input
–
+
–
+
–
+
Volume
8
10
11
12
13
5
4
9
7
3
2
1
6
Volume
Surround Mode
Input
Mute
STANDBY
ON
SUB
LVL
DLY
RSRFCLFLS
AUX
PCM
3 - St
Late NightPhantom
Digital ProLogic
Surround
DIG. OPT
DIG. COAX
TV
31
32
33
2
6
5
4
18
16
15
14
22
23
24 25
19
21
26
17
27
28
29
30
20
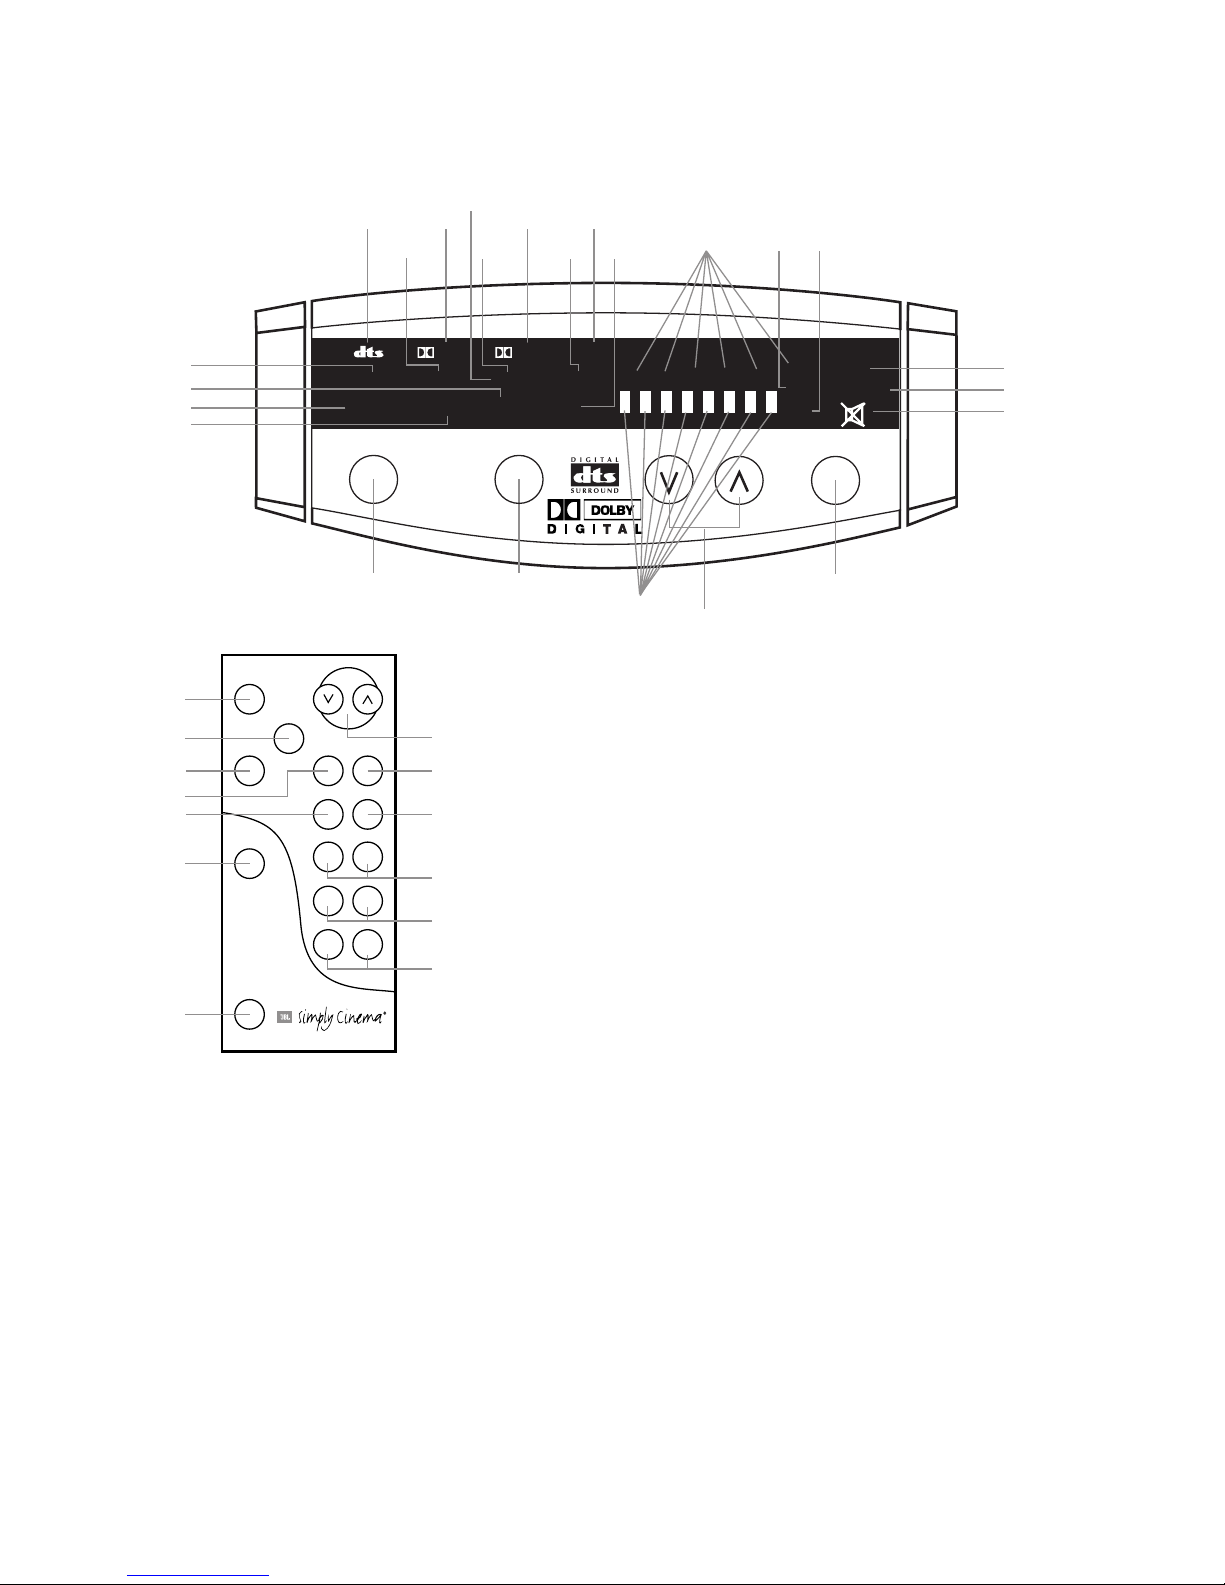
Remote and Front-Panel Controls and Indicators
Front Panel
Remote Control
1. Power
This button, located only on the
remote control, allows the user
to manually turn on or off the
ESC340. Please note that the
ESC340 features Automatic TurnOn/Off, and the power switch is
not normally used unless it is
necessary to override this
automatic feature, or in case the
analog input to be used is not
the last one that was used and
so Automatic Turn-On is not
available for that input. Please
read the details regarding
Automatic Turn-On/Off on page
3 of this manual, and keep in
mind that the ESC340 automatic
turn-on feature will be disabled
for five minutes if the ESC340 is
shut down manually. The ESC340
can also be powered on by using
the Input button (4) on the
front panel of the subwoofer or
on the remote control. Please
note that if input selection is
done by pressing the Input
button, the Automatic Digital
Input Selection of the ESC340
will be disabled until the ESC340
shuts down.
When the ESC340 is plugged into
a working electrical outlet and
its master switch on the back
panel is set to On/Standby, the
Standby (32) indicator will
illuminate. The ON (31) indicator
will light as soon as the ESC340
is turned on either automatically
or via the pressing of the Power
or Input buttons.
2. Mute
From either the front panel or
the remote control, press (Mute)
to lower the volume completely.
The mute symbol indicator (33)
will illuminate. When you press
either of the mute buttons
again, the volume will return to
its previous setting.
Note: The mute function can
also be turned off by pressing
either of the volume buttons on
the front panel or the remote
control.
3. Late Night
This feature is available for
Dolby Digital only. It compresses
the inherently dynamic digital
sound so that the quiet and loud
passages are not quite as
different in sound levels as they
ordinarily are. This feature
allows the user to watch movies
and listen to dialogue at toneddown levels so as not to disturb
others by the loud sound effects
that may be present. The Late
Night indicator (26) illuminates
when this feature is active.

-10-
4. Input
This control is available on both
the front panel and the remote
control. It allows manual selection when the user repeatedly
presses and releases the button
for any of the ESC340’s four
inputs. The ESC340 features an
Automatic Digital Input Selection feature that automatically
switches the ESC340 to the
source connected to one of its
two digital inputs as soon as
that device is powered on.
Please read the section on page
3 to thoroughly familiarize
yourself with the conveniences
and conditions of using the
Automatic Digital Input
Selection feature. The Input
switch is also used when the
source connected to the
ESC340’s analog input is not the
analog source that was listened
to the last time the ESC340 was
on (and hence the Automatic
Turn-On feature is not
available). The Input switch also
turns on the ESC340 when
pressed (see item 1 earlier in
this section). Whenever a
specific input is selected either
manually or automatically, its
indicator (14, 15, 16 or 17) on
the ESC340’s unit’s front panel
will be illuminated.
5. Surround Mode
Pressing and releasing this
button allows the selection of
different listening modes.
Surround (18), Phantom (19)
and 3-Stereo (20) are available
listening options for Dolby Pro
Logic. Stereo (21) bypasses the
surround processing and outputs sound through the rightand left-front speakers only.
In Surround mode, all five
satellites and the subwoofer will
play. In Phantom mode, all
speakers except the center
channel will play. In 3-Stereo,
all speakers except for the two
surround speakers will be active.
6. Volume
Press (∧) on the remote control
or the front panel to raise the
system’s volume. Press (∨) on
the remote control or the front
panel to lower the system’s
volume. The volume setting is
indicated on the status-bar
indicator (27).
7. 0 dB
Press this button to reset the
Center, Surround, Balance,
Treble and Bass controls to their
default positions.
8. Test
Press this button to activate the
Test Tone mode (see Test Tone
section).
9. Delay
The relative timing of sounds
coming from the center and/or
surround speakers compared to
the front-left and front-right
speakers can be adjusted. The
first press of this button allows
adjustment of the center
channel, all the way from the
default setting of 0 ms (milliseconds), which means no delay
(all status bars off), to a
maximum of 5 ms (5 status bars
on). The indicators C (28) and
DLY (30) will be on. The second
press of the Delay button allows
adjustments of the surround
speakers; indicators LS (28) and
RS (28) and DLY (30) will be on.
The delay can be adjusted from
zero (all status bars off) to
15 ms (all status bars on) in
DTS and Dolby Digital and from
15 ms (all status bars off) to 30
ms (all status bars on) in Dolby
Pro Logic (there is an inherent
and fixed 15 ms of delay added
in the “matrixed” Dolby Pro
Logic to re-create the proper
surround effect). The center and
surround adjustments can be
done in either DTS, Dolby
Digital or Dolby Pro Logic
“matrixed” modes. There are no
separate delay adjustments for
the individual modes of
operation. During adjustments,
the audio mutes momentarily
every time the Adjustment +/–
button (11) is pressed. Please
note that the status-bar
indicator (27) will not display
unless Adjustment +/– buttons
are pressed. Also, while the
status-bar indicator (27) is on,
channel indicators (28) and DLY
(30) will not be displayed. And,
if adjustments are done in a mode where
a certain channel is not
available, the adjustment step
for that channel is skipped. For
example, in Phantom mode, the
center-channel delay cannot be
adjusted since Phantom does
not have a center channel. In
Stereo, neither the center nor
the surround delay can be
adjusted since Stereo does not
feature surround speakers or a
center speaker. A third press of
the Delay button will exit the
ESC340 from its delayadjustment mode.
10. Level
The relative level of sounds
coming from each of the
ESC340’s speakers can be adjusted while listening to
program material on the
ESC340. Repeated pressing and
releasing of the Level button
allows access to each channel.
The display will indicate LVL
(29), and the channel indicators
(28) LF (Left Front), C (Center),
RF (Right Front), LS (Left
Surround), RS (Right Surround)
and SUB (subwoofer) will
illuminate to indicate the active
speaker. The level for the

-11-
selected channel can then be
changed using the Adjustment
+/– buttons (11). Levels set in
one mode will stay valid for all
other modes and are not independent. Please note that the
status-bar indicator (27) will
not display unless Adjustment
+/– buttons are pressed. And,
while the status-bar indicator
(27) is on, channel indicators
(28) and LVL (29) will not be
displayed. Also, if adjustments
are done in a mode where a
certain channel is not available,
the adjustment step for that
channel is skipped. For example, in Phantom mode the centerchannel level cannot be adjusted since Phantom does not
have a center channel. In
stereo, neither the center nor
the surround levels can be
adjusted since Stereo does not
feature surround speakers or a
center speaker.
A seventh press of the Level
button will exit the ESC340 from
its level-adjustment mode.
11. Adjustment
These buttons are used in
conjunction with Test (8), Delay
(9), and Level (10) to increase
or decrease a setting.
12. Bass
Press (+) to increase the level of
low-frequency information.
Press (–) to decrease the level
of low-frequency information.
13. Treble
Press (+) to increase the level of
high-frequency information.
Press (–) to decrease the level
of high-frequency information.
14–17. Input
One of these four indicators will
illuminate, depending on which
input is selected.
18–21. Surround
One of these will illuminate,
depending on which surround
mode is chosen.
22. Dolby Digital
Indicates the presence of a
Dolby Digital-encoded AC-3
digital signal.
23. DTS
Indicates the presence of DTS
encoded digital signal.
24. Dolby Pro Logic
Illuminates when Dolby Pro
Logic decoding of a 2-channel
signal is taking place. This
indicator may be on by itself
(when analog inputs are used),
in conjunction with Dolby
Digital (when using a digital
input where the AC-3 format
signal contains two channels
and needs to be decoded into
multichannel) or together with
PCM (when using a digital input
where 2-channel PCM-format
data is being decoded into
multichannel).
25. PCM
Illuminates when the signal
supplied through the selected
digital input is in PCM format.
26. Late Night
Illuminates when the Late Night
compression is selected.
27. Status-Bar Indicator
These LEDS show the relative
setting of volume, bass, treble,
speaker level and speaker delay.
28. Speaker Indicator
Identifies the speaker that’s
being adjusted. LS is Left
Surround, LF is Left Front, C is
Center, RF is Right Front, RS is
Right Surround, and SUB is
Subwoofer.
29. Level
Illuminates when the ESC340 is
in speaker-level adjustment
mode.
30. Delay
Illuminates when the ESC340 is
in speaker-delay adjustment
mode.
31. On
Indicates that the ESC340 is
fully powered up.
32. Standby
Indicates that the ESC340 is
plugged into an active wall
outlet and the master switch on
the back panel is in On/Standby
position, but the unit is not
powered on.
33. Mute
Illuminates when the mute
function is activated (the
ESC340 will be on but will not
produce any sound).
-12-
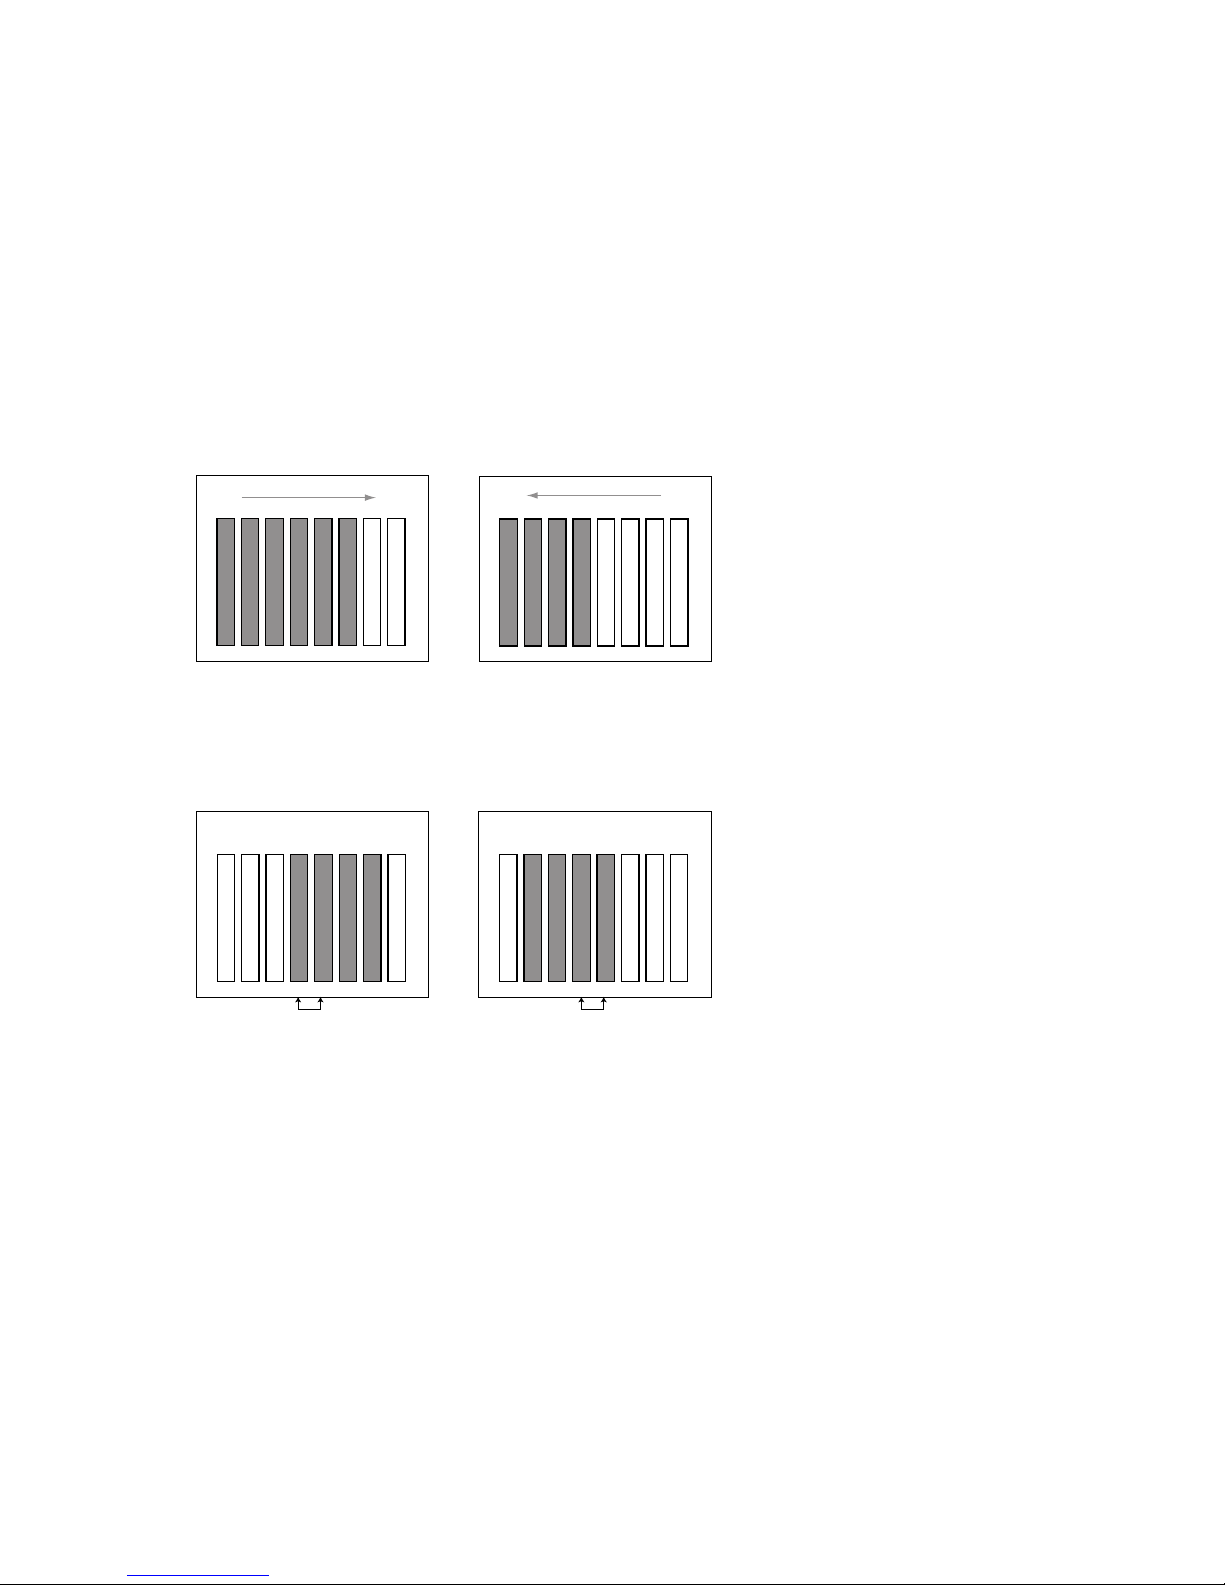
LED Bar Indicators illuminate in
response to adjustments in
volume, delay, level, bass and
treble controls.
Status-Bar Indicators
Increase Decrease
Volume, Level, Delay
0dB
0dB
Increase Decrease
Bass, Treble

-13-
Surround
Use this mode for films recorded
using Dolby Digital or Dolby Pro
Logic Surround.
Phantom
This mode creates surround
sound from stereo recordings.
The center channel is not used
and the surround channels have
a 20-ms delay.
3-Stereo Mode
Use this mode to play back Pro
Logic-encoded films when you
do not want the surround
channels to play.
Stereo
This mode plays a recording in
traditional two-channel stereo.
Surround Modes
The Test Tone is used to
calibrate the volume settings of
each of the speakers in the
ESC340. It is dependent on the
room where the system is set up
and the relative distances and
positions of each speaker to the
listening position. In all modes,
a static-like noise will be heard
cycling, in order: left front,
center, right front, right
surround, left surround,
subwoofer. In modes other than
Dolby Digital, the sound from
the two surrounds will be
coming at the same time, since
the surrounds in all available
modes, except in Dolby Digital,
are in mono. When the Test
Tone is heard coming from a
specific channel, pressing the
Adjustment +/– (11) buttons
will increase or decrease the
level of sound coming from that
channel. The display status-bar
indicator (27) provides visual
indication of the adjustment as
the adjustment is being made.
The default adjustment level of
0 dB is indicated by five statusbar indicators illuminated.
If adjustments are done in a
mode where a certain channel is
not available, the adjustment
step for that channel is skipped.
For example, in Phantom mode,
the center-channel level cannot
be adjusted since Phantom does
not have a center channel. In
stereo, neither the center nor
the surround levels can be
adjusted since Stereo does not
feature surround speakers or a
center speaker.
Using the remote control,
adjust each channel’s levels
until the volume of all the
speakers is the same during the
test. To make sure all channels
are properly adjusted, do the
test twice, once in Dolby Digital
or DTS (Dolby Digital or DTS is
automatically selected when the
ESC340 is connected to a DVD
player playing Dolby Digitalencoded or DTS-encoded
material) and once again in
Dolby Pro Logic.
Note: The Test Tone is used to
calibrate the system to
reproduce all program materials
at the correct relative levels, as
was determined by the recording engineers. When
listening to actual surroundencoded program material, the
volume level of the surround
channels is generally lower than
that of the front channels. In
fact, virtually all of the dialogue
and a substantial number of the
effects in a movie are reproduced through the center
channel.
Test Tone

-14-
If there is no sound from any
of the speakers:
• Make sure the subwoofer is
plugged into an active AC
wall outlet.
• Make sure the Master Power
Switch, located on the rear of
the subwoofer, is in the
On/Standby position.
• Make sure there is a source –
for example, a DVD Player, CD
Player, VCR or television –
hooked up to one of the four
input jacks.
• Make sure that the program
material is playing.
• Recheck the hookup
connections, referring to the
Speaker Connections section.
If there is no sound from the
surround speakers or
sound is very low:
• Check all connections
between processor/amplifier
and each of the speakers.
• Raise the surround volume
from the remote control (see
Operation section).
• Make sure the TV show or
movie you are watching is
recorded in surround, try the
Phantom or Simulated
Surround mode.
• Increase the surroundspeakers’ level, using the
level-adjustment instructions
found earlier in this manual.
If there is no sound from the
center speaker:
• Make sure that the processor
is in the Surround or
3-Stereo mode. If it is in
Phantom or Stereo mode, the
center speaker will not play.
• Increase the level of the
center channel, using the
level-adjustment instructions
earlier in this manual.
• Check the connections
between the subwoofer and
the center speaker.
If you have low bass output:
• Experiment with placement
of the subwoofer. Remember,
place the subwoofer in a
corner to get maximum bass
output from the system.
• Increase the subwoofer level,
using the level-adjustment
instructions found earlier in
this manual.
• Increase the level of bass,
using the remote control.
Troubleshooting

-15-
Specifications
ESC340 System
Power Output
Satellites:
35 Watts x 5 @ 0.1% THD
Subwoofer:
100 Watts x 1 @ 1% THD
Signal-to-Noise Ratio
80 dBA
Input Impedance
(analog inputs)
20k Ohms
Input Sensitivity
(analog inputs)
400mV
Auto Turn-On Sensitivity
(analog inputs)
2mV
Frequency Response (–6 dB)
35Hz – 20kHz
Dimensions (H x W x D)
Satellites (each):
111 x 81 x 92mm
Subwoofer:
384 x 330 x 368mm
Occasional refinements may
be made to existing products
without notice, but will always
meet or exceed original
specifications unless otherwise
stated.
JBL Consumer Products
250 Crossways Park Drive, Woodbury, NY 11797
8500 Balboa Boulevard, Northridge, CA 91329
1-800-336-4JBL (4525) (USA only)
International: 2, route de Tours, 72500 Château-du-Loir, France
www.jbl.com
©2000 JBL, Incorporated. JBL and Simply Cinema are
registered trademarks of JBL, Incorporated.
*Trademarks of Dolby Laboratories.
Part No. ESC340 OM
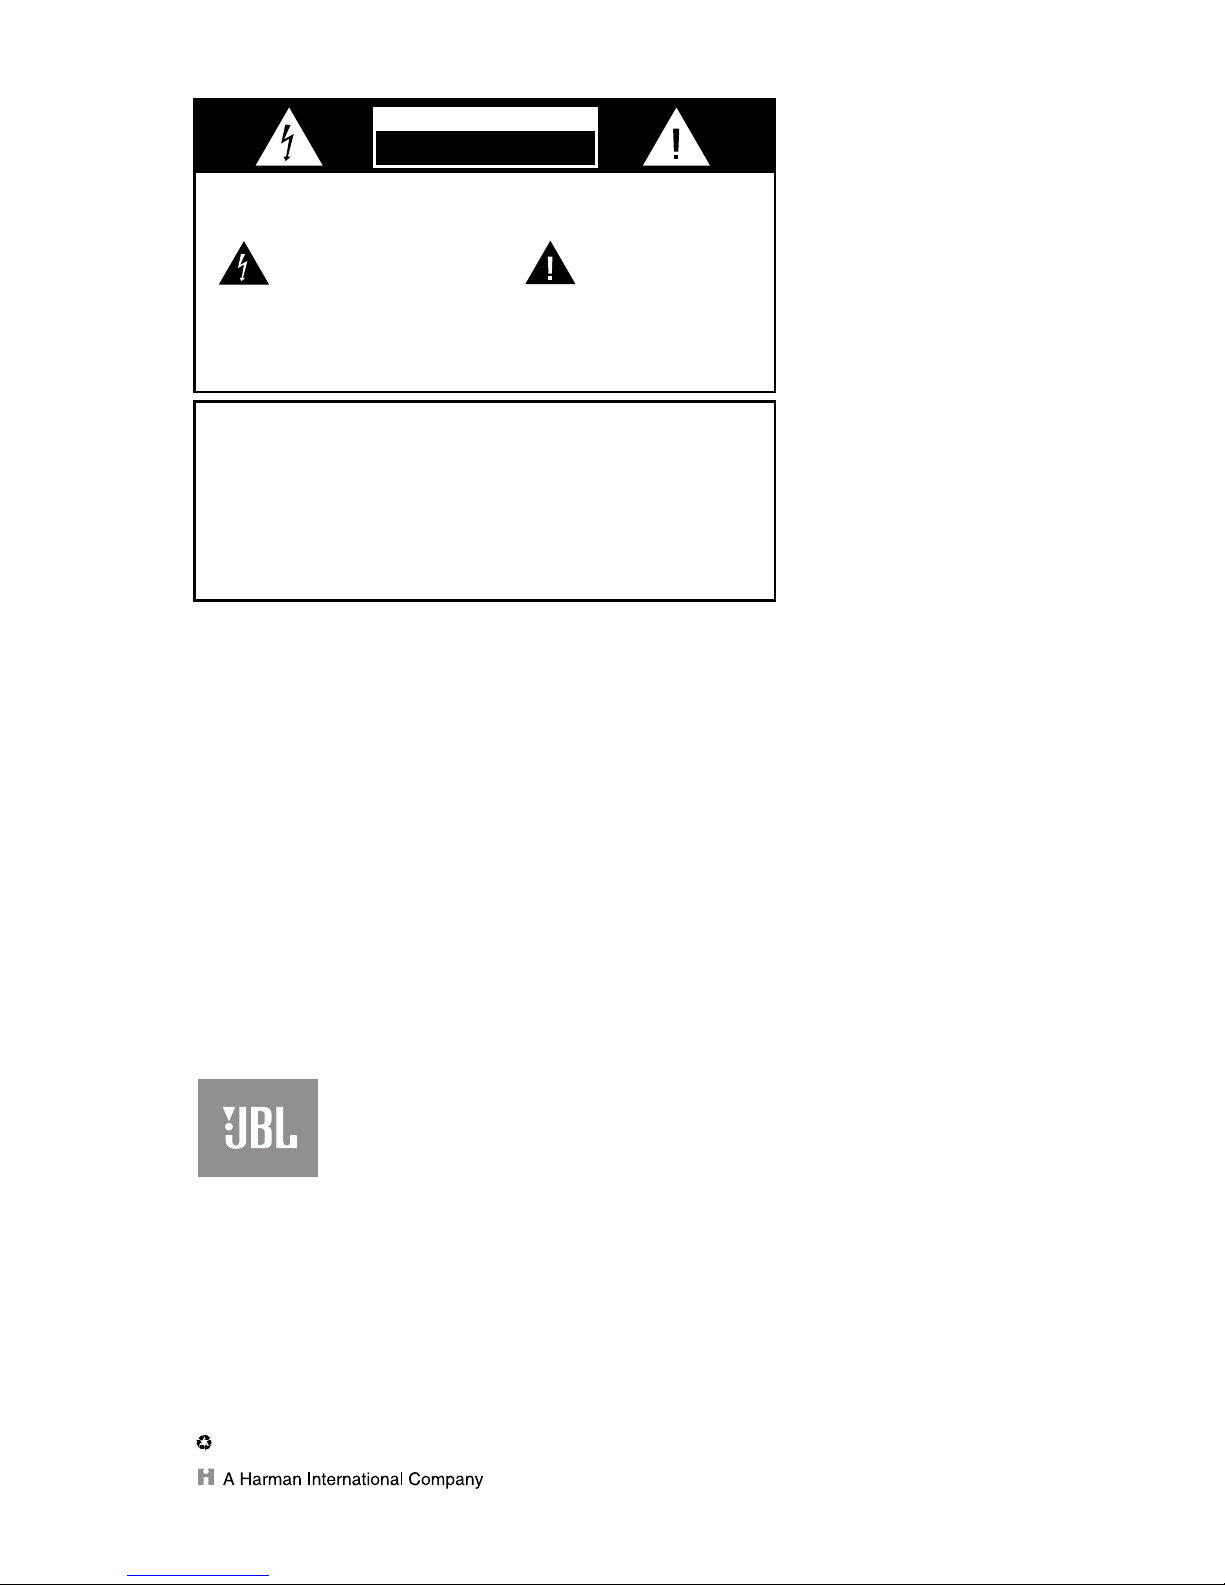
CAUTION:
TO REDUCE THE RISK OF ELECTRIC SHOCK, DO NOT REMOVE
COVER (OR BACK). NO USER-SERVICEABLE PARTS INSIDE. REFER
SERVICING TO QUALIFIED SERVICE PERSONNEL.
WARNING:
TO REDUCE THE RISK OF FIRE OR ELECTRIC SHOCK,
DO NOT EXPOSE THIS APPLIANCE TO RAIN OR MOISTURE.
Handle the Power Cord Gently
• To disconnect the plug from the AC outlet, pull on the plug itself,
not on the cord. Pulling the cord may break the wire.
• Disconnect the plug from the AC outlet whenever the unit is to be
left unused for an extended period of time.
• Do not place furniture or other heavy objects on the cord, and
avoid dropping heavy objects on it. Also, do not make a knot
in the cord; this can damage it and cause a fire hazard.
The lightning flash with arrowhead
symbol, within an equalateral triangle,
is intended to alert the user to the
presence of uninsulated “dangerous voltage”
within the product’s enclosure that may be of
sufficient magnitude to constitute a risk of
electric shock to persons.
The exclamation point within an
equilateral triangle is intended to
alert the user to the presence of
important operating and maintenance
(servicing) instructions in the literature
accompanying the appliance.
CAUTION
RISK OF ELECTRIC SHOCK
DO NOT OPEN

TM
®
ESC340
Bedienungsund
Installationsanleitung
Vielen Dank, daß Sie sich für JBL entschieden haben! Seit
über 50 Jahren befasst sich JBL mit allen Aspekten von Musik und Film,
seit es nun Aufnahme oder Wiedergabe, vom Live-Konzert bis hin zu
Aufnahmen, die Sie Zuhause spielen, im Auto oder bei der Arbeit.
Wir sind sicher, daß das JBL-Produkt Ihrer Wahl Ihren musikalischen
Erwartungen bis zur letzten Note entspricht. Und sollten Sie eines
Tages an zusätzliche Lautsprecher für Ihr Wohnzimmer oder Ihr Auto
denken, werden Sie sich sicher wieder für JBL entscheiden.

-3-
Das Heimkinosystem ESC340
bietet zwei einzigartige
Bedienungserleichterungen:
automatisches Ein/Ausschalten
und automatische Wahl eines
Digitaleingangs.
Die Einschaltautomatik setzt das
ESC340 in Betrieb, sobald eine
an einen der Digitaleingänge
angeschlossene Signalquelle
(beliebige Geräte mit digitalem
Ausgang und Koaxial- oder
Lichtleiteranschluß, zum Beispiel DVD- oder CD-Spieler)
eingeschaltet wird oder sobald
die am zuletzt benutzten Analogeingang angeschlossene Signalquelle ein Tonsignal abgibt.
Bei Nutzung der Digitaleingänge
reagiert die Einschaltautomatik
auf das Einschalten einer
beliebigen angeschlossenen
digitalen Signalquelle, z. B.
eines DVD- oder CD-Spielers mit
Digitalausgang. Bei Nutzung der
Analogeingänge (TV oder AUX)
reagiert die Einschaltautomatik
nur auf das Gerät, das vor dem
Ausschalten des ESC340 als
letztes als Signalquelle genutzt
wurde; für die Wiedergabe vom
jeweils anderen Gerät müssen
Sie den Eingang des ESC340
manuell durch Betätigung der
Taste Input (am Subwoofer oder
an der Fernbedienung) umschalten. Dadurch wird gleichzeitig
die Digitaleingangs-Wahlautomatik bis zum Abschalten des
ESC340 deaktiviert.
Die Ausschaltautomatik schaltet
das ESC340 nach einer Wartezeit
von fünf Minuten aus, wenn alle
an die digitalen Eingänge
angeschlossenen Signalquellen
abgeschaltet sind und die am
gewählten Analogeingang
angeschlossene Quelle kein
Signal mehr abgibt.
Die Digitaleingangs-Wahlautomatik schaltet automatisch
auf diejenige der Signalquellen,
die an die Digitaleingänge
angeschlossen sind, die als erste
eingeschaltet wird. Sobald diese
abgeschaltet und keine andere
eingeschaltet wird, schaltet sich
das ESC340 nach einer Wartezeit
von fünf Minuten aus.
Falls die vor dem Einschalten der
digitalen Signalquelle gewählte
analoge Signalquelle jedoch
spielt, schaltet das ESC340 auf
diese analoge Quelle zurück,
statt sich auszuschalten.
Nachdem eine digitale Signalquelle einmal eingeschaltet und
gewählt worden ist, bewirkt das
Einschalten einer anderen
Digitalquelle erst dann eine
automatische Umschaltung,
wenn die erste Digitalquelle
ausgeschaltet wird.
Die Ein/Ausschaltautomatik
kann nur genutzt werden, wenn
Sie das ESC340 nicht manuell
ein- oder ausschalten und auch
die Wahl eines Eingangs nicht
manuell vornehmen. Ist eine
solche manuelle Auswahl
erfolgt, arbeiten die Automatikfunktionen nur noch eingeschränkt nach folgenden Regeln:
1. Wenn das ESC340 manuell
ausgeschaltet wurde, wird die
Schaltautomatik erst fünf
Minuten nach Abschalten der
Signalquelle aktiv. Während
dieser Zeit kann es jedoch
manuell mit Hilfe der Bedienelemente an der Gerätevorderseite oder per Fernbedienung
eingeschaltet werden.
2. Nachdem eine Signalquelle
manuell gewählt wurde, steht
die Digitaleingangs-Wahlautomatik bis zum nächsten Abschalten des ESC340 nicht zur
Verfügung.
3. Nachdem eine der beiden am
ESC340 angeschlossenen digitalen Signalquellen eingeschaltet wurde und die Digitaleingangs-Wahlautomatik
daraufhin auf diese umgeschaltet hat, reagiert sie bis zum
nächsten Ausschalten dieser
Signalquelle nicht mehr auf die
jeweils andere.
Important Note
Automatic On/Off and Automatic Digital-Input Selection

-4-
• Aktives komplettsystem mit
integriertem DTS- und Dolby*
Digital-Decoder, bestehend
aus vier Satelliten- und einem
Center-Lautsprecher sowie
einem Subwoofer und einer
Fernbedienung (nur der Fernseher fehlt noch!).
• Betriebsmodi: Dolby Digital ,
DTS (AC-3®, 5+1 Kanäle),
Dolby ProLogic®
(einschließlich Phantom- und
3-Kanal-Stereo), normales
Stereo.
• Automatisches Ein- und
Ausschalten
• Automatische Wahl des
Digitaleingangs
• Zwei digitale (1x Lichtleiter,
1x Koaxial) und zwei analoge
Eingänge
• 2-Weg-Kleinsatelliten mit
Titanlaminat-Hochtönern,
Videoabschirmung und
identischer Abstimmung für
alle 5 Kanäle; ein 8-ZollSubwoofer mit großem
Membranhub, zum Fußboden
hin abstrahlend
• Nachtmodus mit Unterdrückung plötzlicher lauter
Passagen
• Alle Verstärker und Bedienungsorgane sind im
Subwoofer-Gehäuse untergebracht, so daß ein separates Steuergerät entfällt.
• Fernbedienung über einen
separaten Sensor, der am
Center-Lautsprecher oder frei
montiert werden kann; somit
kann der Subwoofer außer
Sicht plaziert werden.
Eigenschaften
Vier Satelliten- und ein CenterLautsprecher.
Vollaktiver Subwoofer/Controller
Lieferumfang
JBL-Lautsprecher Kabel mit
verpolungssicheren Spezialsteckern. Verlängerungskabel
XC300 (2 x 3 m) in verfügbar.
Standfuß für die horizontale
Plazierung des Center-Lautsprechers inklusive beweglichem
Infrarotsensor und beidseitig
klebendem Band.
Fernbedienung
Bass
Treble
Delay Level
0 dB Test
Adjustment
Late Night
Power
Mute
Surround
Mode
Input
–
+
–
+
–
+
Volume
Kabel für digitale Eingänge mit
Koaxialstecker; Kabel für
analoge Eingänge mit RCAStecker

-5-
Was ist Dolby Digital
Das Heimkino ESC340 kann ein
digitales Mehrkanalsignal nach
Dolby Digital-Standard
(inoffiziell auch AC-3 genannt)
verarbeiten; dieser Standard
wurde von den Dolby
Laboratories entwickelt.
Im Gegensatz zu Matrixsystemen wie etwa Dolby
ProLogic, die den Mehrkanalton
durch geschickte Dekodierung
aus nur zwei echten Kanälen
erzeugen, arbeitet Dolby Digital
mit einem Subwoofer- und fünf
Breitbandkanälen, alle völlig
getrennt und im digitalen AC-3-
Format. Solche Signale werden
zum Beispiel von DVD-Spielern
geliefert. Das Ergebnis ist ein
sauberes Tonsignal mit digitaler
Präzision für jeden einzelnen
Lautsprecher, zusätzlich mit der
Möglichkeit von StereoSurround-Effekten (Dolby
ProLogic liefert Mono-SurroundEffekte).
Dolby Digital kann SurroundKlang in mehreren unterschiedlichen Modi liefern. Der
effektvollste davon ist der 5.1Kanal-Modus, in dem separate
Signale für fünf Satelliten-
lautsprecher und einen
Subwoofer erzeugt werden. Das
ESC340 besitzt eine 5.1-Ch-LED,
die aufleuchtet, wenn ein im
Dolby Digital 5.1-Kanal-Format
kodiertes Signal anliegt. Dolby
Digital kann aber auch andere
AC-3-Mehrkanalsignale liefern,
außerdem 2-Kanalsignale, die
per Dolby ProLogic-Verfahren in
Mehrkanal-Surround-Klang
umgesetzt werden.
Was ist DTS
DIGITAL SURROUND
DIE ZUR ZEIT BESTE
5.1-SURROUND-TECHNOLOGIE
AUF DEM MARKT!
Diese neue Surround-Technologie erzeugt aus entsprechend
codiertem Material (Film bzw.
Musik-CD muss mit dem DTSLogo versehen sein) sechs (5.1)
voneinander unabhängige,
digitale Tonkanäle in hervorragender Qualität (20 Bit Auflösung).
Während der Codierung komprimiert der leistungsstarke DTSAlgorithmus die Information
von sechs 20-Bit-Audio-Kanälen
so stark, dass sie den gleichen
Speicherraum belegt wie ein
konventionelles 20-Bit-StereoPCM-Signal (Audio-CD).
Dabei ist die Klangqualität jedes
einzelnen dieser Tonkanäle
höher als die einer konvetionellen Audio-CD. Dies liegt
daran, weil die Auflösung bei
DTS mit 20 Bit Datenbreite
höher liegt als bei der Audio-CD
mit nur 16 Bit Datenbreite.
• Wandhalterungen und Bodenständer für die Satelliten als
Zubehör erhältlich
• Fernbedienung im
Kreditkartenformat für
sämtliche Funktionen
• JBL-Lautsprecherkabel mit
Spezialsteckern für einfachen
Anschluß und zur Vermeidung
der Möglichkeit, daß
versehentlich Adern
vertauscht werden
• Lautsprecherfuß zum waagerechten Aufstellen des
Center-Lautsprechers
• Drehbare JBL-Logos für
waagerechte oder senkrechte
Plazierung der Satelliten
-6-
Auf einem Regalbrett
An der Wand. Wandhalter WB300
optional erhältlich.
Montageoptionen
Passende Standfüße FS300
optional erhältlich.
Subwoofer
Surround-Lautsprecher
5
-6ft.
(150-180cm)
Front- und Surround-Lautsprecher
Eins. Aufstellung der Lautsprecher
Satellitenlautsprecher
0-60cm
Montage des Infrarotsensors an den Center-Lautsprecher
Plazieren Sie den Infrarotsensor
an der Unterseite des Center
Lautsprechers
Führen Sie den Standfuß
durch die Öffnung des Infrarotsensors in den Center
Lautsprecher
Center-Lautsprecher
Sie können den Infrarotsensor mit dem mitgelieferten doppelseitigen Klebeband beliebig im Raum plazieren.

-7-
Zwei. Anschlüsse für Lautsprecher, Signalquellen und
Fernbedienungssensor (rückseitiges Anschlußfeld des Subwoofers)
Speaker and Amplifier Connection
Dashed lines indicate that
wire is not included
Extension cables, XC300, available in
10-foot lengths from your JBL dealer.
Left Front
TV
Audio Output
OPTICAL
Right Left
Center
Right Front
Remote Sensor
COAXIAL
TV
AUX
COAXIAL
OPTICAL
Right Surround
Left Surround
FRONT
SPEAKERS
SURROUND
SPEAKERS
RIGHT
CENTER
LEFT
RIGHT
LEFT
AC POWER
ON / STANDBY
OFF
REMOTE SENSOR
INPUT
RIGHT
AUX
(Additional Audio Source)
Audio Output
Right Left
ANALOG
INPUTS
DIGITAL
INPUTS
Digital Source A
DVD or CD
Digital Output
Digital Source B
DVD or CD
Digital Output
LEFT
Verlängerungskabel XC300 der Länge 3 m,
bei Ihrem JBL-Händler erhältlich
Eine gestrichelte Linien bedeutet,
daß das jeweilige Kabel nicht zum
Lieferumfang gehört.
Verbindung zwischen Lautsprecher und Verstärker
Digitalsignalqelle A
Digitaler Ausgang eines
DVD- oder CD-Laufwerks
Center Lautsprecher
Frontlautsprecher
rechts
Fernbedienungssensor
Surround-Lautsprecher
rechts
Surround-Lautsprecher
links
AUX (Alternative
Audiosignalquelle)
Frontlautsprecher links
Digitalsignalqelle B
Digitaler Ausgang eines
DVD- oder CD-Laufwerks
LICHTLEITERAUSGANG
KOAXIALAUSGANG

-8-
Drei. Betrieb
In der Stellung On/Standby ist das
Gerät betriebsbereit. Es schaltet
sich nach etwa fünf Minuten selbst
in den Standby-Zustand, wenn an
den Analogeingängen kein
Audiosignal anliegt und keine der
an die Digitaleingänge
angeschlossenen Signalquellen
eingeschaltet ist.
Bedienfeld auf der Rückseite
Einlegen der Batterie in die Fernbedienung.
+
+
+
Drücken Sie die kleine Lasche in
Richtung Batteriehalter und
ziehen Sie ihn aus der
Fernbedienung heraus.
Entfernen Sie die verbrauchte
Batterie
Klemmen Sie eine neue
Batterie mit dem Pluspol nach
oben in den Batteriehalter
und führen Sie ihn wieder in
die Fernbedienung ein.

-9-
Bass
Treble
Delay Level
0 dB Test
Adjustment
Late Night
Power
Mute
Surround
Mode
Input
–
+
–
+
–
+
Volume
8
10
11
12
13
5
4
9
7
3
2
1
6
Volume
Surround Mode
Input
Mute
STANDBY
ON
SUB
LVL
DLY
RSRFCLFLS
AUX
PCM
3 - St
Late NightPhantom
Digital ProLogic
Surround
DIG. OPT
DIG. COAX
TV
31
32
33
2
6
5
4
18
16
15
14
22
23
24 25
19
21
26
17
27
28
29
30
20
Remote and Front-Panel Controls and Indicators
Front Panel
Fernbedienung
1. Power (Ein/Aus)
Diese Taste, die nur an der Fernbedienung vorhanden ist, dient
zum manuellen Ein- und Ausschalten des ESC340. Da das Gerät über
eine Ein/Ausschaltautomatik verfügt, wird diese Taste normalerweise nicht benutzt. In einer
Situation müssen Sie das Gerät
jedoch mit dieser Taste manuell
einschalten: Wenn der Analogeingang, der benutzt werden soll,
nicht derselbe ist, der vor dem
letzten Ausschalten benutzt wurde;
in diesem Fall schaltet die Automatik das Gerät nicht ein.
Außerdem können Sie diese Taste
benutzen, um die Ein/Ausschaltautomatik zu übergehen. Bitte
entnehmen Sie die genaue Funktionsweise der Ein/Ausschaltautomatik dem Abschnitt auf Seite 3
.
Bitte beachten Sie, dass die
Einschaltautomatik fünf Minuten
lang nicht reagieren wird,
sollten Sie den ESC340 manuell
ausschalten.
Eine andere Möglichkeit, das ESC340 einzuschalten,
bietet die Taste Input (4) an der
Frontplatte des Subwoofers oder an
der Fernbedienung. Beachten Sie
dabei, daß das Wählen eines
Eingangs mit Hilfe dieser Taste
auch bewirkt, daß die Digitaleingangs-Wahlautomatik bis zum
nächsten Ausschalten des ESC340
deaktiviert ist.
Wenn das Netzkabel des ESC340 in
eine stromführende Steckdose gesteckt und der Hauptschalter auf
der Rückseite in der Stellung
On/Standby steht, leuchtet die
Standby-LED (32) auf. Die On-LED
(31) leuchtet, sobald das ESC340
entweder automatisch oder durch
Betätigung der Taste Power oder
der Taste Input eingeschaltet wird.
2. Mute (Stummschaltung)Durch
Drücken der Taste Mute wird die
Lautstärke vorübergehend auf null
abgesenkt; dieser Zustand wird
durch Leuchten der Mute-LED (33)
angezeigt. Durch nochmalige
Betätigung der Mute-Taste schaltet
das ESC340 wieder auf die vorher
eingestellte Lautstärke zurück.
Hinweis: Die Betätigung einer der
Volume-Tasten (6) bewirkt ebenfalls
ein Zurückschalten auf die vorher
eingestellte Lautstärke.
3. Late Night (Nachtbetrieb)
Diese Funktion, die nur mit der
Fernbedienung eingeschaltet
werden kann, ist ausschließlich für
Tonmaterial im Dolby DigitalFormat verfügbar. Sie bewirkt eine
Kompression der bei der Musikproduktion ins digitale Signal »einkomponierten« Dynamik, so daß
sich die Pegel der leisesten und der
lautesten Passagen weniger stark
voneinander unterscheiden als im
Normalmodus. Damit können Sie
Kinofilme und Gespräche bei
gedämpfter Lautstärke noch gut
verfolgen, ohne andere Personen
durch plötzliche laute Passagen zu
stören. Ist diese Funktion aktiviert,
leuchtet die Late Night-LED (26).

-10-
4. Input (Eingang)
Die Input-Taste (Frontplatte und
Fernbedienung) ermöglicht die
manuelle Auswahl jedes der vier
Signaleingänge des ESC340; mit
jedem Tastendruck wird vom
gerade aktiven Eingang zum
nächsten weitergeschaltet.
Beachten Sie auch, daß das
ESC340 über eine DigitaleingangsWahlautomatik verfügt, die
automatisch auf einen der beiden
Digitaleingänge schaltet, sobald
die dort angeschlossene Signalquelle eingeschaltet wird. Bitte
lesen Sie den Abschnitt zur
Digitaleingangs-Wahlautomatik
auf Seite 3, um sich mit den
Vorteilen und der Funktion der
Automatik vertraut zu machen. In
bestimmten Situationen dient die
Input-Taste außerdem zum manuellen Einschalten des ESC340. Dies
ist dann der Fall, wenn Sie einen
der Analogeingänge benutzen und
nach zwischenzeitlichem
Ausschalten des ESC340 den
anderen Analogeingang benutzen
wollen. Die Ein/Ausschaltautomatik schaltet das ESC340
dann ja nicht ein, so daß Sie dies
manuell mit Hilfe der Input-Taste
tun müssen (siehe Punkt 1 in
diesem Abschnitt). Welcher
Eingang gerade gewählt ist, egal
ob manuell oder automatisch, wird
durch Leuchten der entsprechenden LED (14, 15, 16 oder 17) an
der Frontplatte angezeigt.
5. Surround Mode
(Surround-Modus)
Durch wiederholte Betätigung
dieser Taste können Sie zwischen
unterschiedlichen Wiedergabemodi umschalten. Für Dolby
Digital- und für Dolby ProLogicSignale können Sie zwischen den
Modi Surround (18), Phantom (19)
und 3-Stereo (20) wählen. Im
Stereo-Modus (21) findet keine
Surround-Signalverarbeitung
statt, und es werden nur der
rechte und der linke Frontlautsprecher angesteuert. Im
Surround-Modus sind alle fünf
Satellitenlautsprecher und der
Subwoofer aktiv. Im PhantomModus bleibt nur der CenterLautsprecher stumm. Im 3-StereoModus werden alle Lautsprecher
außer den beiden SurroundLautsprechern angesteuert.
6. Volume (Lautstärke)
Mit der Taste (^) wird die
Lautstärke aller Lautsprecher
erhöht, mit der Taste (v)
verringert. Die LED-Balkenanzeige
(27) zeigt die momentan
eingestellte Lautstärke an.
7. 0dB
Mit dieser Taste können Sie durch
einen einzigen Druck die
voreingestellten Werte für Center,
Surround, Balance, Treble und
Bass wiederherstellen.
8. Test
Mit dieser Taste können Sie den
Testton-Modus aktivieren (siehe
Abschnitt »Testton«).
9. Delay (Verzögerung)
Mit dieser Taste können Sie die
Verzögerungszeit der Centerund/oder Surround-Kanäle
gegenüber dem linken und
rechten Frontkanal einstellen.
Nach einmaliger Betätigung dieser
Taste kann die Verzögerungszeit
des Center-Kanals eingestellt
werden, und zwar von der Grundeinstellung 0 ms (keine Verzögerung, alle Segmente der LEDBalkenanzeige aus) bis zu 5 ms (5
Segmente der LED-Balkenanzeige
leuchten). Dabei leuchten die
LEDs C (28) und DLY (30). Nach
zweimaliger Betätigung der DelayTaste kann in entsprechender
Weise die Verzögerungszeit der
Surround-Kanäle eingestellt
werden; dabei leuchten die LEDs
LS (28), RS (28) und DLY (30). Die
einstellbare Verzögerung reicht
bei Dolby Digital und DTS (5.1Kanal) von 15 ms (alle Segmente
aus) bis zu 30 ms (alle Segmente
an). Dolby Pro Logic arbeitet mit
einer fixen Einstellung von 15 ms,
um den gewünschten Raumklang
zu erzeugen. Die Kalibrierung der
Surround-Lautsprecher und des
Center lassen sich sowohl im DTSund Dolby Digital-Modus als auch
im Dolby Pro Logic-Modus
vornehmen.
Während dieser
Einstellungen wird das Audiosignal bei jedem Druck auf eine
der Einstelltasten + oder - (11)
kurzzeitig stummgeschaltet.
Beachten Sie, daß die LEDBalkenanzeige (27) erst
leuchtet, wenn eine der Einstelltasten (11) gedrückt wird.
Beachten Sie auch, daß die
Kanalanzeige-LEDs (28) und die
DLY-LED (30) nicht leuchten,
während die LED-Balkenanzeige
leuchtet. Wenn Sie eine Einstellung in einem Modus vornehmen, in dem ein bestimmter
Kanal nicht verwendet wird, so
wird der Einstellschritt für
diesen Kanal automatisch
übersprungen. So können Sie
beispielsweise im PhantomModus die Verzögerung des
Center-Kanals nicht einstellen,
weil der Center-Kanal im
Phantom-Modus stumm ist. Im
Stereo-Modus kann weder die
Verzögerungszeit für den
Center-Kanal noch die für die
Surround-Kanäle eingestellt
werden, weil im Stereo-Modus
weder die Surround-Lautsprecher noch der Center-Lautsprecher angesteuert werden.
Die dritte Betätigung der Taste
Delay bewirkt, daß das ESC340
die Betriebsart »Verzögerungseinstellung« wieder verläßt.
10. Level (Pegel)
Das ESC340 bietet Ihnen die
Möglichkeit, die relativen Pegel
der einzelnen Lautsprecher
während des Hörens von »echtem«
Tonmaterial zu justieren. Durch
wiederholte Betätigung der Taste
Level gelangen Sie nacheinander
in den Justiermodus jedes einzelnen Kanals. Dabei leuchtet die
LVL-LED (29), während eine der
Kanal-LEDs (28) den jeweiligen

-11-
Kanal anzeigt (LF = Front, links;
RF = Front rechts; C = Center; LS =
Surround links; RS = Surround
rechts; SUB = Subwoofer). Der
Pegel für den betreffenden Kanal
kann dann mit Hilfe der Einstelltasten + und - (11) justiert
werden. Die so eingestellten Pegel
bleiben beim Wechsel zu einem
anderen Modus unverändert; die
einzelnen Modi sind nicht getrennt justierbar. Beachten Sie,
daß die LED-Balkenanzeige (27)
erst leuchtet, wenn eine der Einstelltasten (11) gedrückt wird.
Beachten Sie auch, daß die
Kanalanzeige-LEDs (28) und die
LVL-LED (29) nicht leuchten,
während die LED-Balkenanzeige
leuchtet. Wenn Sie eine Einstellung in einem Modus vornehmen,
in dem ein bestimmter Kanal nicht
verwendet wird, so wird der
Justierschritt für diesen Kanal
automatisch übersprungen. So
können Sie beispielsweise im
Phantom-Modus den Pegel des
Center-Kanals nicht justieren, weil
der Center-Kanal im PhantomModus stumm ist. Im StereoModus können weder der Pegel
des Center-Kanals noch die Pegel
der Surround-Kanäle justiert
werden, weil im Stereo-Modus
weder die Surround-Lautsprecher
noch der Center-Lautsprecher
angesteuert werden. Der siebte
Druck auf die Taste Delay bewirkt,
daß das ESC340 die Betriebsart
»Pegeljustage« wieder verläßt.
11. Adjustment (Einstellung)
Diese beiden mit + und - gekennzeichneten Tasten werden in
Verbindung mit den Tasten Test
(8), Delay (9) und Level (10) zum
Erhöhen oder Verringern eines
Einstellwerts verwendet.
12. Bass (Baß)
Durch Drücken der Taste + können
Sie den Pegel der tiefen Töne
erhöhen, durch Drücken der Taste
- vermindern.
13. Treble (Sopran)
Durch Drücken der Taste + können
Sie den Pegel der hohen Töne
erhöhen, durch Drücken der Taste
- vermindern.
14. bis 17. Input (Eingang)
Von diesen LEDs leuchtet jeweils
nur eine und zeigt den momentan
gewählten Eingang an.
18. bis 21. Surround
Von diesen LEDs leuchtet jeweils
nur eine und zeigt den momentan
gewählten Surround-Modus an.
22. Dolby Digital
Das Leuchten dieser LED zeigt an,
daß ein nach Dolby Digital
kodiertes AC-3-Signal anliegt.
23. dts
Leuchtet, wenn ein DTScodiertes Signal anliegt.
24. Dolby ProLogic
(Dolby ProLogic)
Diese LED leuchtet, wenn ein 2Kanal-Signal anliegt und im Dolby
ProLogic-Verfahren dekodiert
wird. Kommt dieses 2-KanalSignal von einem Analogeingang,
so leuchtet die LED allein. Kommt
es von einem Digitaleingang, so
leuchtet zusätzlich die Dolby
Digital-LED (22), falls ein AC-3Signal mit zwei Kanälen anliegt,
die in mehrere Kanäle dekodiert
werden, oder die PCM-LED (25),
falls ein PCM-Signal mit zwei
Kanälen anliegt, die in mehrere
Kanäle dekodiert werden.
25. PCM (Pulscode-Modulation)
Diese LED leuchtet, wenn es sich
bei dem am gewählten
Digitaleingang anliegenden Signal
um ein PCM-Signal handelt.
26. Late Night (Nachtbetrieb)
Diese LED leuchtet, wenn die
Kompression für Nachtbetrieb
eingeschaltet ist.
27. Status-Bar Indicator
(LED-Balkenanzeige)
Diese LEDs zeigen die relative
Einstellung für Volume, Bass,
Treble, Level bzw. Delay an.
28. Speaker Indicator
(Lautsprecher)
Diese LED zeigt während der
Pegeljustage den gerade
gewählten Lautsprecher an (LF =
Front, links; RF = Front rechts; C =
Center; LS = Surround links; RS =
Surround rechts; SUB =
Subwoofer).
29. Level (Pegel)
Diese LED leuchtet, wenn sich das
ESC340 in der Betriebsart
»Pegeljustage« befindet.
30. Delay (Verzögerung)
Diese LED leuchtet, wenn sich das
ESC340 in der Betriebsart
»Verzögerungseinstellung«
befindet.
31. On (Ein)
Diese LED leuchtet, wenn das
ESC340 voll eingeschaltet (nicht
nur im Standby-Modus) ist.
32. Standby
Diese LED leuchtet, wenn das
Netzkabel des ESC340 in eine
stromführende Steckdose gesteckt
ist und sich der Hauptschalter auf
der Rückseite des Subwoofers in
der Stellung On/Standby befindet,
das Gerät aber nicht eingeschaltet
ist.
33. Mute (Stummschaltung)
Diese LED leuchtet, wenn die
Stummschaltfunktion aktiviert ist;
das ESC340 ist dann eingeschaltet, die Lautsprecher
bleiben aber stumm.

-12-
Die LEDs der Balkenanzeige
zeigen symbolisch die
momentane Einstellung für
Volume, Bass, Treble, Level bzw.
Delay an.
LED-Balkenanzeige
Mehr Weniger
Volume, Level, Delay
0dB
0dB
Mehr Weniger
Bass, Treble

-13-
Surround
Verwenden Sie diesen Modus zur
Wiedergabe von Tonmaterial,
das im Dolby Digital- oder im
Dolby ProLogic-Format vorliegt.
Phantom
Dieser Modus macht aus einer
normalen Stereo-Aufnahme ein
Surround-Signal. Der CenterLautsprecher wird nicht benutzt,
die Surround-Tonkanäle spielen
mit 20 ms Verzögerung.
3-Stereo-Modus
Nutzen Sie diesen Modus, wenn
Sie Pro Logic-codierte Filme
ohne Surround-Lautsprecher
abspielen wollen.
Stereo
In diesem Modus können Sie
herkömmliche Stereo-Musik
abspielen.
Surround-Modi
Der Testton ist dazu bestimmt,
die Pegel der einzelnen
Lautsprecher des ESC340 genau
zu justieren. Die richtigen
Pegeleinstellungen hängen von
den Eigenschaften des Raums,
in dem das ESC340 aufgestellt
ist, ab. Außerdem spielen die
Abstände der Lautsprecher
untereinander und zum Hörplatz
eine Rolle, ebenso ihre
Plazierung. In allen RaumklangModi besteht der Testton aus
einem konstanten Rauschen,
das in kurzen Abständen
zyklisch wechselnd aus jeweils
einem anderen Lautsprecher
kommt; die Reihenfolge ist
dabei wie folgt: Front links,
Center, Front rechts, Surround
rechts, Surround links,
Subwoofer. In den anderen Modi
ist es ähnlich, doch wird dabei
nicht zwischen den beiden
Surround-Lautsprechern
unterschieden (aus beiden
kommt der Testton gleichzeitig),
weil der Surround-Klang in allen
verfügbaren Modi außer Dolby
Digital nur ein Monoklang ist.
Während der Testton aus einem
bestimmten Lautsprecher
kommt, können Sie den Pegel
dieses Kanals mit Hilfe der
Tasten + und – (11) höher oder
niedriger einstellen. Die LEDBalkenanzeige (27) zeigt
während des Justiervorgangs
den Pegel an; bei der
Standardeinstellung von 0 dB
leuchten fünf der Segmente.
Wenn Sie eine Einstellung in
einem Modus vornehmen, in
dem ein bestimmter Kanal nicht
verwendet wird, so wird der
Justierschritt für diesen Kanal
automatisch übersprungen. So
können Sie beispielsweise im
Phantom-Modus den Pegel des
Center-Kanals nicht justieren,
weil der Center-Kanal im
Phantom-Modus stumm ist. Im
Stereo-Modus können weder der
Pegel für den Center-Kanal noch
die Pegel für die SurroundKanäle justiert werden, weil im
Stereo-Modus weder die
Surround-Lautsprecher noch der
Center-Lautsprecher
angesteuert werden.
Justieren Sie mit Hilfe der
Fernbedienung den Pegel jedes
Kanals so, daß der Testton aus
jedem Lautsprecher gleich laut
erscheint. Um sicherzustellen,
dass alle Kanäle korrekt eingestellt sind, sollten Sie den
Kalibrierprozess mit dem Testton zwei mal durchführen:
einmal für Dolby Digital und DTS
(Dolby Digital und DTS werden
beim Abspielen von DVDs über
den Digitaleingang automatisch
angewählt) und einmal für
Dolby Pro Logic.
Hinweis: Der Testton dient
dazu, das System so zu
justieren, daß es jedes
Tonmaterial mit den korrekten,
d. h. den vom Toningenieur bei
der Aufnahme festgelegten,
Pegeln wiedergibt. Beim Hören
von Surround-Tonmaterial sind
die Pegel der Surround-Kanäle
normalerweise kleiner als die
der Frontkanäle. Tatsächlich ist
es so, daß praktisch alle Dialoge
und ein bedeutender Anteil der
Effekte eines Films über den
Center-Kanal wiedergegeben
werden.
Testton

-14-
Alle Lautsprecher sind stumm:
• Vergewissern Sie sich, daß
das ESC340 an eine stromführende Netzsteckdose
angeschlossen ist.
• Vergewissern Sie sich, daß
sich der Hauptschalter (an
der Rückseite des
Subwoofers) in der Stellung
On/Standby befindet.
• Vergewissern Sie sich, daß an
eine der vier Eingangsbuchsen eine Audiosignalquelle, zum Beispiel ein DVDoder CD-Spieler, ein Videorecorder oder ein TV-Gerät
angeschlossen ist.
• Vergewissern Sie sich, daß
die Audiosignalquelle
Tonmaterial wiedergibt.
• Prüfen Sie alle Kabelverbindungen an Hand des
Abschnitts »Anschlüsse für
Lautsprecher, Signalquellen
und Fernbedienungssensor«.
Surround-Lautsprecher sind
sehr leise oder stumm:
• Prüfen Sie die Verbindungen
zwischen dem Subwoofer und
allen anderen Lautsprechern.
• Erhöhen Sie die SurroundLautstärke mit Hilfe der
Fernbedienung
• Vergewissern Sie sich, daß
das Bild/Ton-Material im
Dolby Digital- oder DTSModus codiert ist. Ist dies
nicht der Fall, versuchen Sie
es mit dem Phantom-Modus
(simulierter SurroundKlang).
• Erhöhen Sie die Pegel der
Surround-Lautsprecher mit
den weiter oben beschriebenen PegeljustageMaßnahmen.
Center-Lautsprecher ist
stumm:
• Vergewissern Sie sich, daß
das ESC340 in den Surroundoder in den 3-Stereo-Modus
geschaltet ist. Im Phantomund im Stereo-Modus wird
der Center-Lautsprecher nicht
genutzt.
• Erhöhen Sie den Pegel des
Center-Lautsprechers mit den
weiter oben beschriebenen
Pegeljustage-Maßnahmen.
• Prüfen Sie die Verbindungen
zwischen dem Subwoofer und
dem Center-Lautsprecher.
Bässe sind zu schwach:
• Experimentieren Sie mit der
Plazierung des Subwoofers.
Beachten Sie dabei, daß das
Plazieren in einer Raumecke
zu einer starken Erhöhung
des Baßpegels des Gesamtsystems führt.
• Erhöhen Sie den Pegel des
Subwoofers mit den weiter
oben beschriebenen Pegeljustage-Maßnahmen.
• Heben Sie die Bässe mit Hilfe
der Taste Bass der
Fernbedienung an.
Fehlerbeseitigung

-15-
Technische Daten
Heimkinosystem ESC340
Ausgangsleistung
Satelliten:
5 x 35 Watt, bei 0,1% Klirrfaktor
Subwoofer:
1 x 100 Watt bei 1% Klirrfaktor
Geräuschabstand
80 dBA
Eingangsimpedanz
(Analogeingänge)
20 kOhm
Eingangsempfindlichkeit
(Analogeingänge)
400 mV
Empfindlichkeit der
Einschaltautomatik
(Analogeingänge)
2 mV
Frequenzgang
35 Hz bis 20 kHz, bei -6 dB
Abmessungen (H x B x T)
Satelliten (einzeln):
111 x 81 x 92mm
Subwoofer:
384 x 330 x 368mm
JBL-Produkte werden ständig
weiterentwickelt und können
deshalb in einigen Details von
den veröffentlichten
technischen Daten abweichen.
Sofern nicht anders angegeben,
werden diese aber stets erfüllt
oder übertroffen.
 Loading...