

Page 1
Page 2

1
CONTENTS
1. Introduction ................................................................................................................................................................2
1.1 Safety Application Prevention Measures..............................................................................................................2
1.2 Begin to Know Your JA Y-BOOK...........................................................................................................................4
1.3 Main Features....................................................................................................................................................13
2. Start to Use ..............................................................................................................................................................13
2.1 Touch Control Pad (Touch Pad) .........................................................................................................................13
2.2 Emergency Shut-down.......................................................................................................................................15
3. Using Your Notebook Computer...............................................................................................................................15
3.1 Basic Operation .................................................................................................................................................15
3.1-1 Start-up/Shut Down ................................................................................................................................15
3.1-2 Reset......................................................................................................................................................16
3.1-3 Charging.................................................................................................................................................16
3.2 Network..............................................................................................................................................................16
3.2-1 Wireless Network ...................................................................................................................................16
3.2-2 3G Network ............................................................................................................................................20
3.2-3 10/100MB LAN Network.........................................................................................................................24
3.3 Application of Office Software............................................................................................................................27
3.3-1 SoftMaker TextMaker..............................................................................................................................28
3.3-2 SoftMaker PlanMaker.............................................................................................................................29
3.3-3 SoftMaker Presentations........................................................................................................................30
3.3-4 Foxit PDF Reader...................................................................................................................................31
3.4 Media Player......................................................................................................................................................31
3.4-1 Media Player..........................................................................................................................................31
3.4-2 Player.....................................................................................................................................................34
3.4-3 Audio Recorder.......................................................................................................................................34
3.5 Games ...............................................................................................................................................................35
3.6 Files Management..............................................................................................................................................36
3.6-1 Built-in Flash...........................................................................................................................................37
3.6-2 SD Card..................................................................................................................................................38
3.6-3 USB Disk................................................................................................................................................39
3.7 Short-Cut Key ....................................................................................................................................................41
4. Points for Attention...................................................................................................................................................41
Page 3

2
1. Introduction
The materials provided by this manual are applied to a series of machine of 7 inch Windows CE, thus, the
machine that you bought probably fails to own some functions described in this manual and it is also possible
that the pictures differ from the actual ones. The introduction a nd relevant informati on in the manual are just
for reference. It is hereby explained that it is subject to the latest official materials once there are some
changes.
1.1 Safety Application Prevention Measures
The service life of the computer will be prolonged when abiding by the following safety prevention measures.
Except that mentioned in the manual, please consult with the personnel with related qualification for
maintenance service. Never use the damaged wires, fittings and other p eripheral equipme nt. It is prohibited
to utilize such strong solvent as diluents, benzene compounds and other chemicals on the laptop or near it.
Before cleaning, please power off the alternati ve current and take out of batter y pack. The fiber
cotton or soft feather cloths are utilized to wipe the product by dipping non-grinding detergent or
several drops of warm water and then the dry cloth is adopted to wipe off the residual moisture.
Never place it in the unstable or unfixed working platform. Please consult for maintenance on
condition that the packing is damaged.
Page 4
3
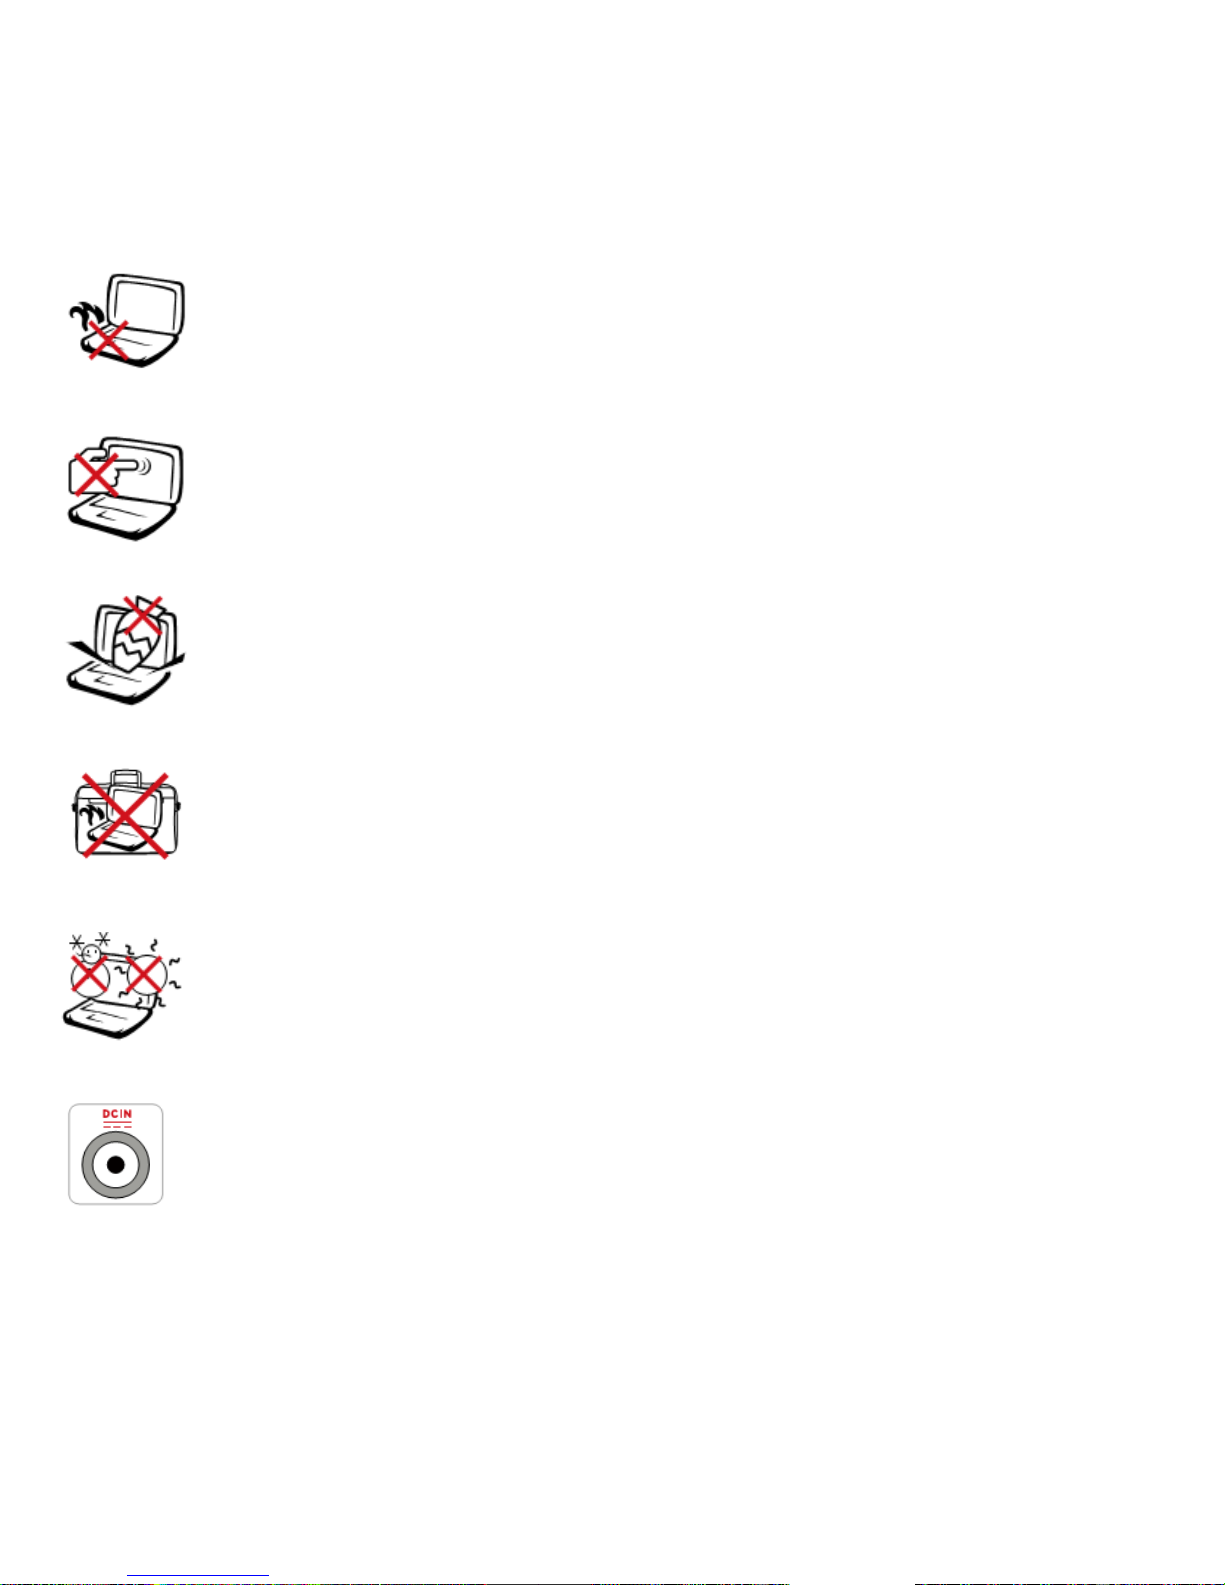
Never place computer on your legs or any parts of your body in order to prevent discomfort
or injury raised by heat.
Never press or touch display screen. Never place it together with small articl es with view to
avoid pushing forward the object in front.
Never place or fall object on the computer, neither use computer to push forward the object
in front.
Never use such materials as portable belt etc. or cover computer under the status of start-up
for the purpose of lowering air circulation.
Safe temperature: the computer is only applied to the environment with surrounding
temperature from 5°C to 40°C.
Input power: refer to the power logo at the bottom of computer to ensure the ada pter of your
computer complies with the demonstrated power.
Page 5

4
Transportation Pre vention
Before transporting your computer, you shall shut down power and power off all the peripheral equipments to
avoid damaging connector. Therefore, never remove your computer under electrifying status. Close displa y
screen and inspect the top cover latch is under locked status to protect keyboard and display screen.
If the surface of computer is n ot proper, it will easily become unsmooth. When transporting your computer
and rub or push over the surface, you can buy a portable belt to prevent dust, water, vibration as well as
bruise.
Battery Charging Measures
If you intend to utilize battery to offer power, you shall carry out your long-distance travel after making sure
that your battery pack and any selectable battery pack are in full power. Always bear in mind that upon the
power adaptor connects with computer, AC power and battery pack, it starts to charge. It shall be noticed that
during the charging process, your ultra-convenien t mobil e personal com puter is als o under applica tion, thus ,
it entails more time to finish charging.
Prevention for Taking Planes
If you intend to use your ultra-convenient mobile personal co m puter on the plane, p lease contact with Airline
Company that you ride to consult relevant information. Since most airline companies will not allow to use cel l
phone, radio, portable computer and other electronic equipments on the plane. T o use the products above will
interrupt the connection between the plane and ground wireless signal, which probably results in accidents.
1.2 Begin to Know Your JAY-BOOK
Your JAY-BOOK is a set of exquisite equipment which integrates communication and digital multi-media
entertainment and accesses with low-cost broad band with the f eatures of ligh t and s mall mac hine bod y and
convenience to take with. In addition, it offers multi-media entertainment, high-speed broad band internet
access and equipped with various business and application functions which can offer perfect user experience!
Please refer to the help granted by linking or network linking t o make your ne w product e xert utmost fu n ction
to help you when using it.
Page 6
5
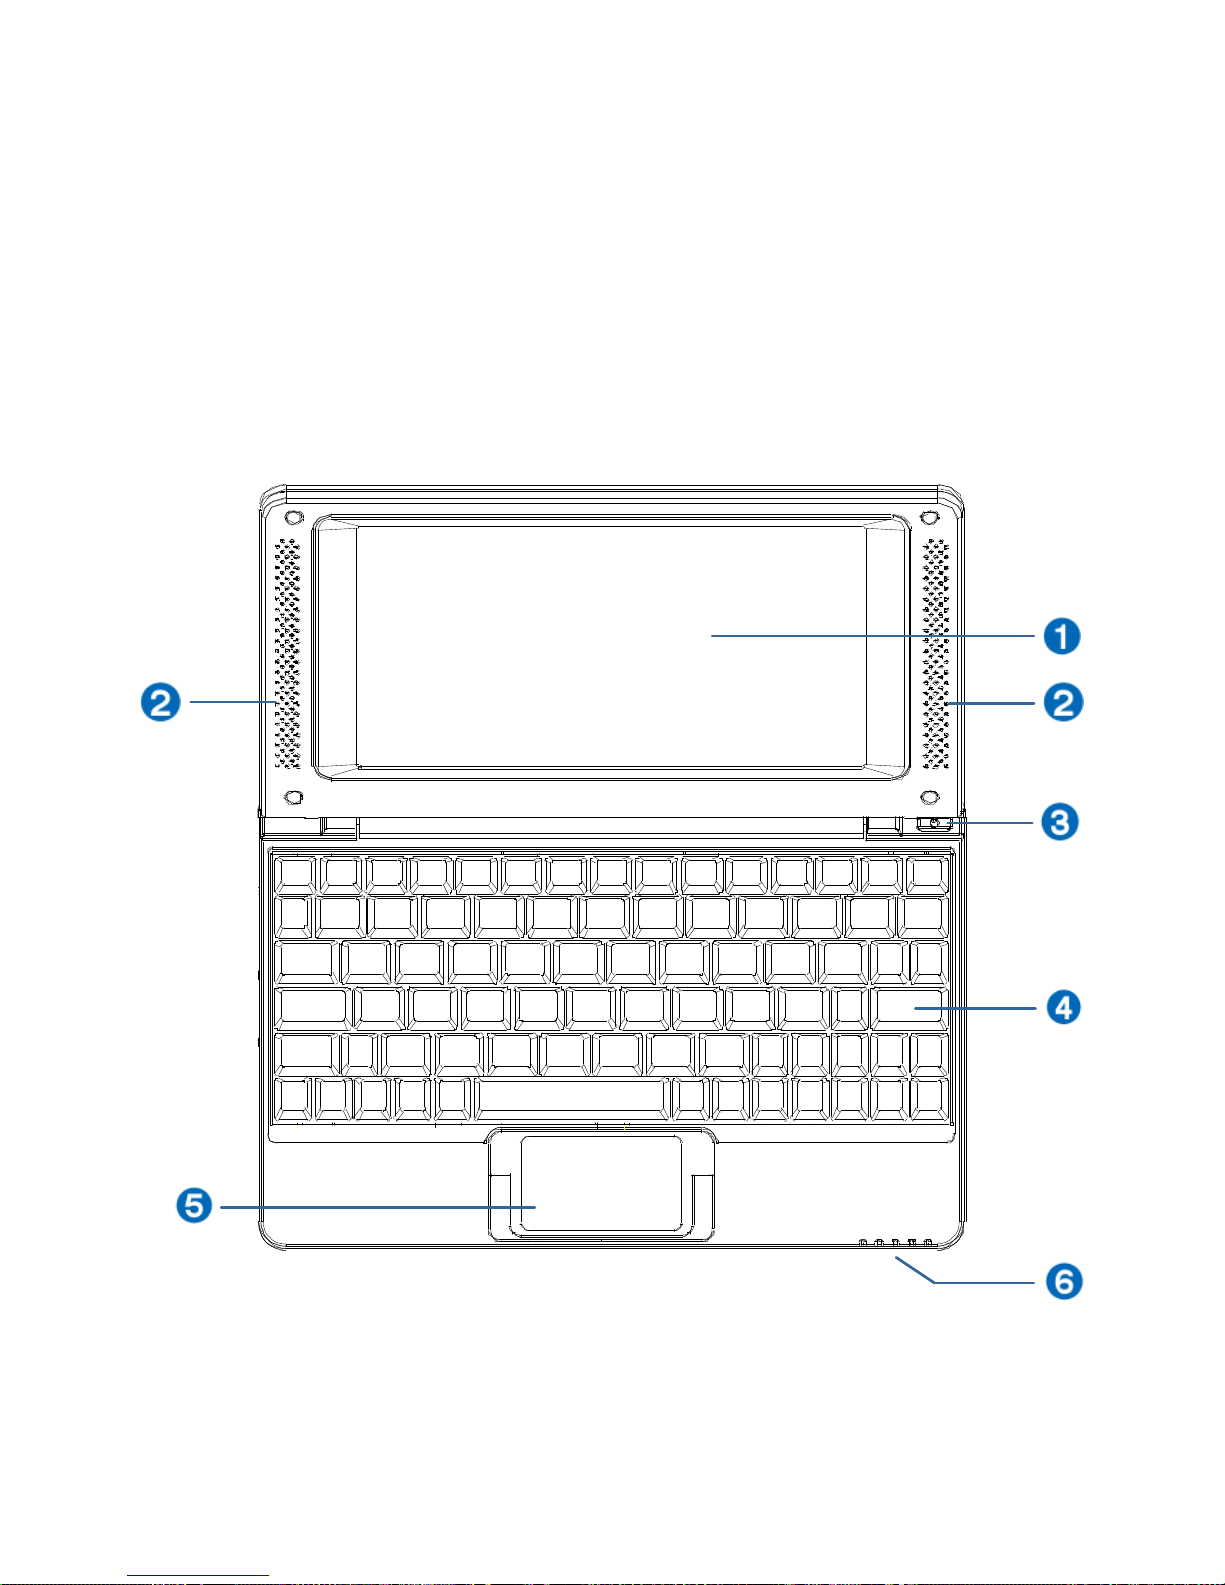
Front-End Internal
The design of JAY-BOOK is exceptional and you can understand more appearance function featur es of it by
reading the manual. Pointed in the following fig ure, different parts of JAY-BOOK front-end will be introd uced
to you.
Page 7

6
Crystal Display Screen
The function of crystal display screen complies wi th the scree n of desktop c omput er. What computer uses is
LCD crystal display screen which can pro vide with the sam e p erfect visual effect as deskt op cr ystal indicato r
which is wiped with soft cloths without chemical liquid (fresh water is adopted when necessary).
Audio System
The stereophonic sound system which is built in can make you hear the voice without any additional
equipment. Multi-media audio sign al system owns the feature s of perfect digital audio controller, which can
produce clear sound vibrating sound (due to the improved stereo earphone and microphone). The audio
effect is controlled by software.
Power Switch
Power switch can start up and shut down computer as well as recover from the stand by status. Pressing
switch softly once means starting up; pressing power switch for a long time indicates to shut down.
Keyboard
Keyboard offers comfortable key-pressing of typing arbitrarily (the depth is in the extent that every key can be
pressed down) as well as the support station to put hands.
Touch Pad and Buttons
Touch pad and button are com posed of a pointing device which o wns the same function as mouse o n the
desktop computer.
Scroll function area facilitates browsing of network page and documents.
Page 8

7
Status Indication (Front View)
Battery charging indication lamp
The display status of battery charging indication lamp (LED) is as follows:
Light on: after connecting AC power, the red lamp means the b attery is b eing char ged while the yellow l amp
indicates it is in full power.
Light off: it means without connecting AC power and the battery is not charged.
Power indication lamp
When turning on the power of your personal computer, the power indication lamp (yellow lamp) will be br ight
and when data is needed to save in the memory mode (pause), the power indication lamp be gins to flash.
After shutting down your personal computer, the power indication lamp will be off automatically.
Digital lock indication lamp
When the green lamp is on, it indicates that the digital keys of digital keyboard are activated and after
pressing button to start up, you can use the embedded digital keyboard. While on the opposite side, it means
the function of digital keyboard is shut down and the digital keyboard can not be used any more.
Letter capitalized indication lamp
When the green light is on, it indicates the letter capitalizati on function on the keyboard is activated. After
activating the button, all the letters output from the display screen will be capitalized.
Page 9

8
Bottom View
Recognize different parts at the bottom of computer by referring to the figure below. The
computer bottom can be very hot and please take care when operating computer or accessing to
the operation status. It is normal with a high temperature when charging or operatin g. Ne ver use
it in such soft surface as bed or sofa, since it will block off heat emission hole. Never place
computer on your legs or other parts of your body to avoid being injured by excessive heat.
Page 10

9
Battery Cover
Manual battery cover is used to protect battery pack.
Battery Pack
The battery pack will charge automatically after connecting with alternative current and continue supplying
power to computer after powering off alternative current, which can be used in sh ort-time transaction zone.
The service life of battery will differ according to the usage condition and the specification of computer.
Reset Button (Emergency)
On condition that your operation can not normall y shut do wn or res tart, you can a dopt a pin o r straight paper
clip to press reset button to restart computer.
Page 11
10
Right View
Recognize different parts on the right side of computer by referring to the figure below.
USB Socket (2.0)
2 USB sockets here are used to connect USB disk, mouse and other equipment.
Page 12
11
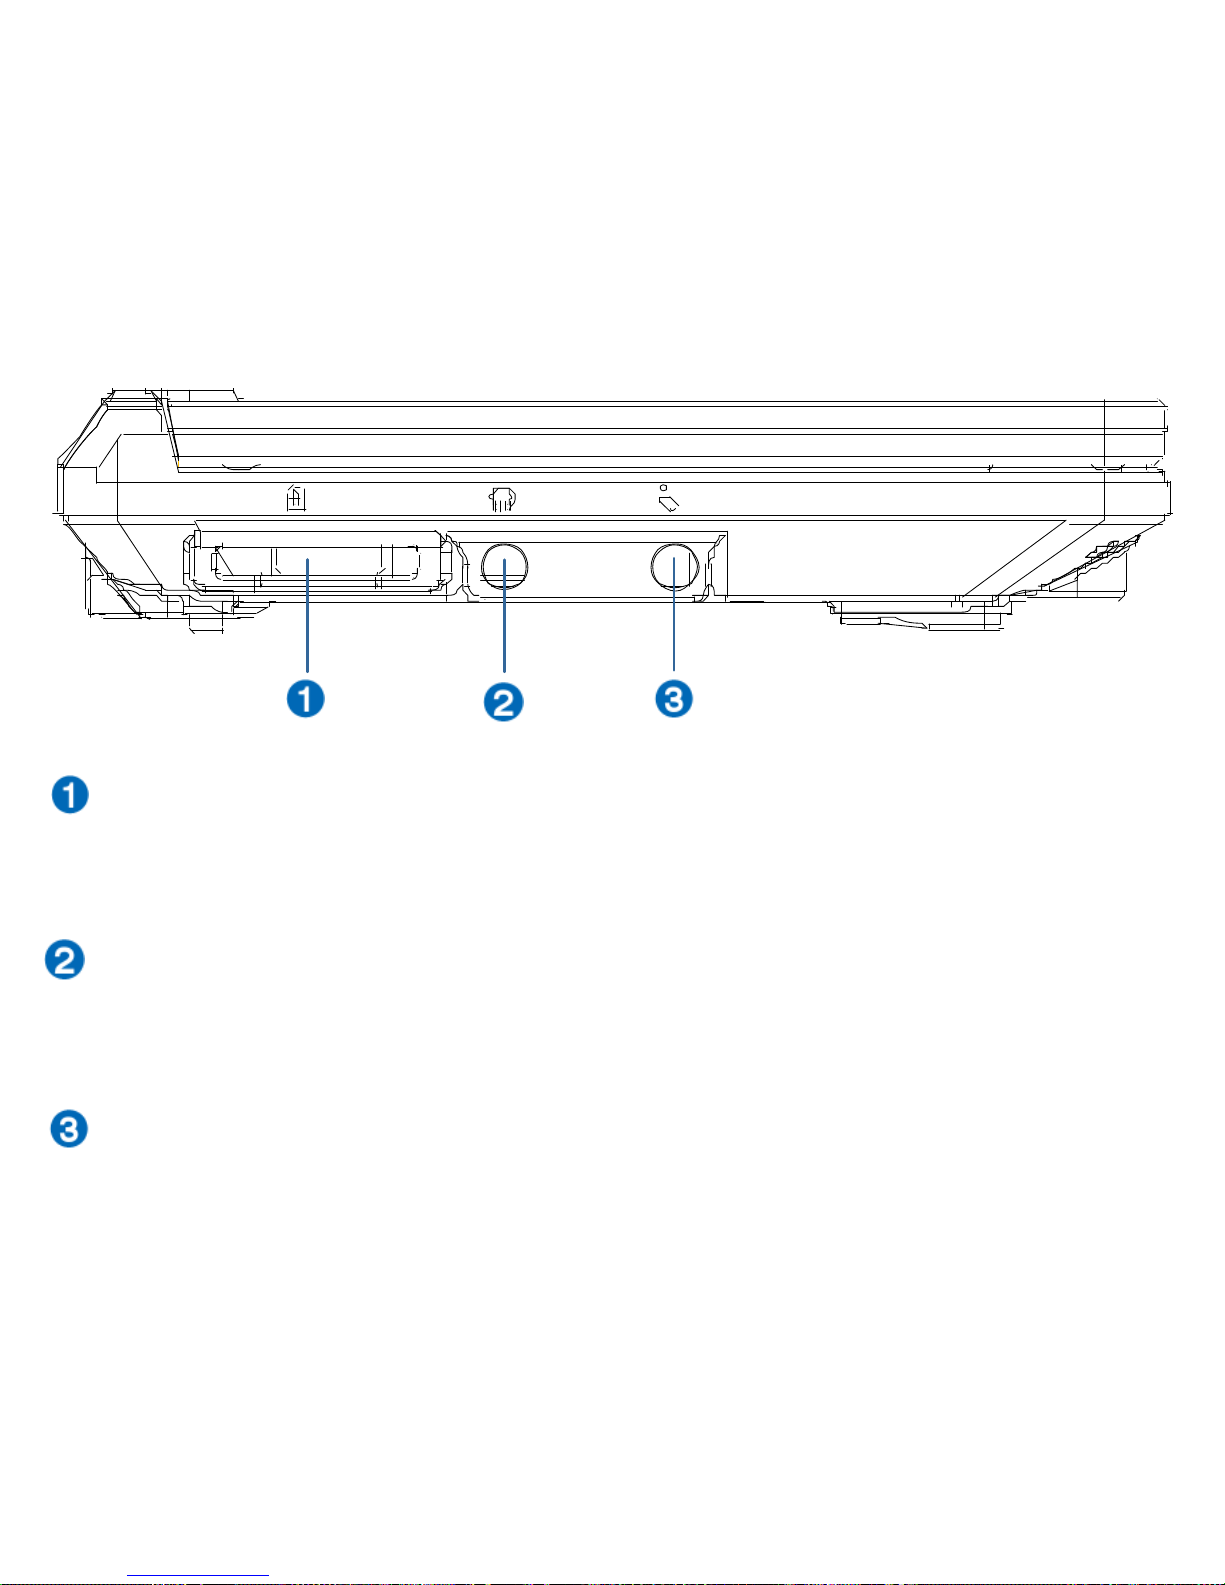
Left View
Recognize different parts on the left side of computer by referring to the figure below.
Storage Card Slot
The reader which is imbedded in the storage card can read MMC/SD card from the equipment, such as digital
camera, MP3 player, mobile phone and PDA.
Earphone Output Jack
Stereo earphone jack (3.5 mm) connects with the audio output signal of the computer. The built-in
loudspeaker will stop playing automatically if inserting the jack.
Microphone Jack
The microphone jack intends to connect the microphone which is used to transfer sound or carr y out simple
audio record.
Page 13
12
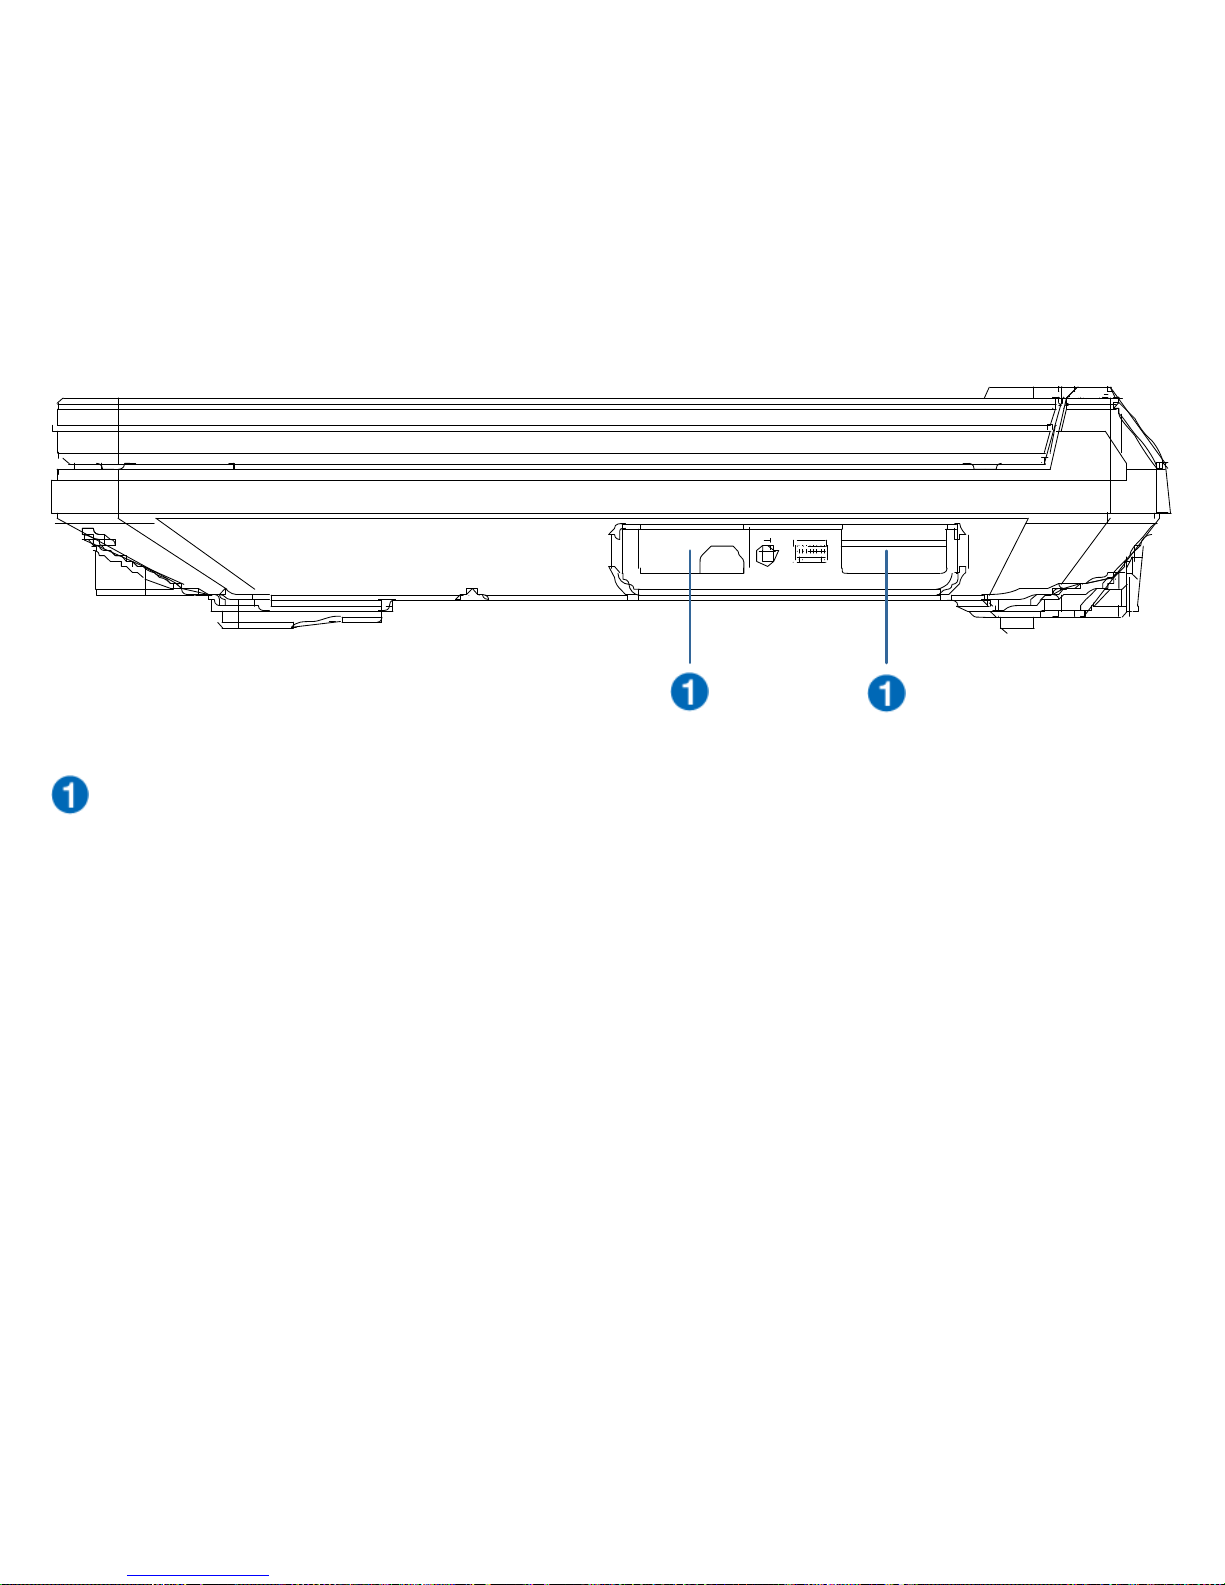
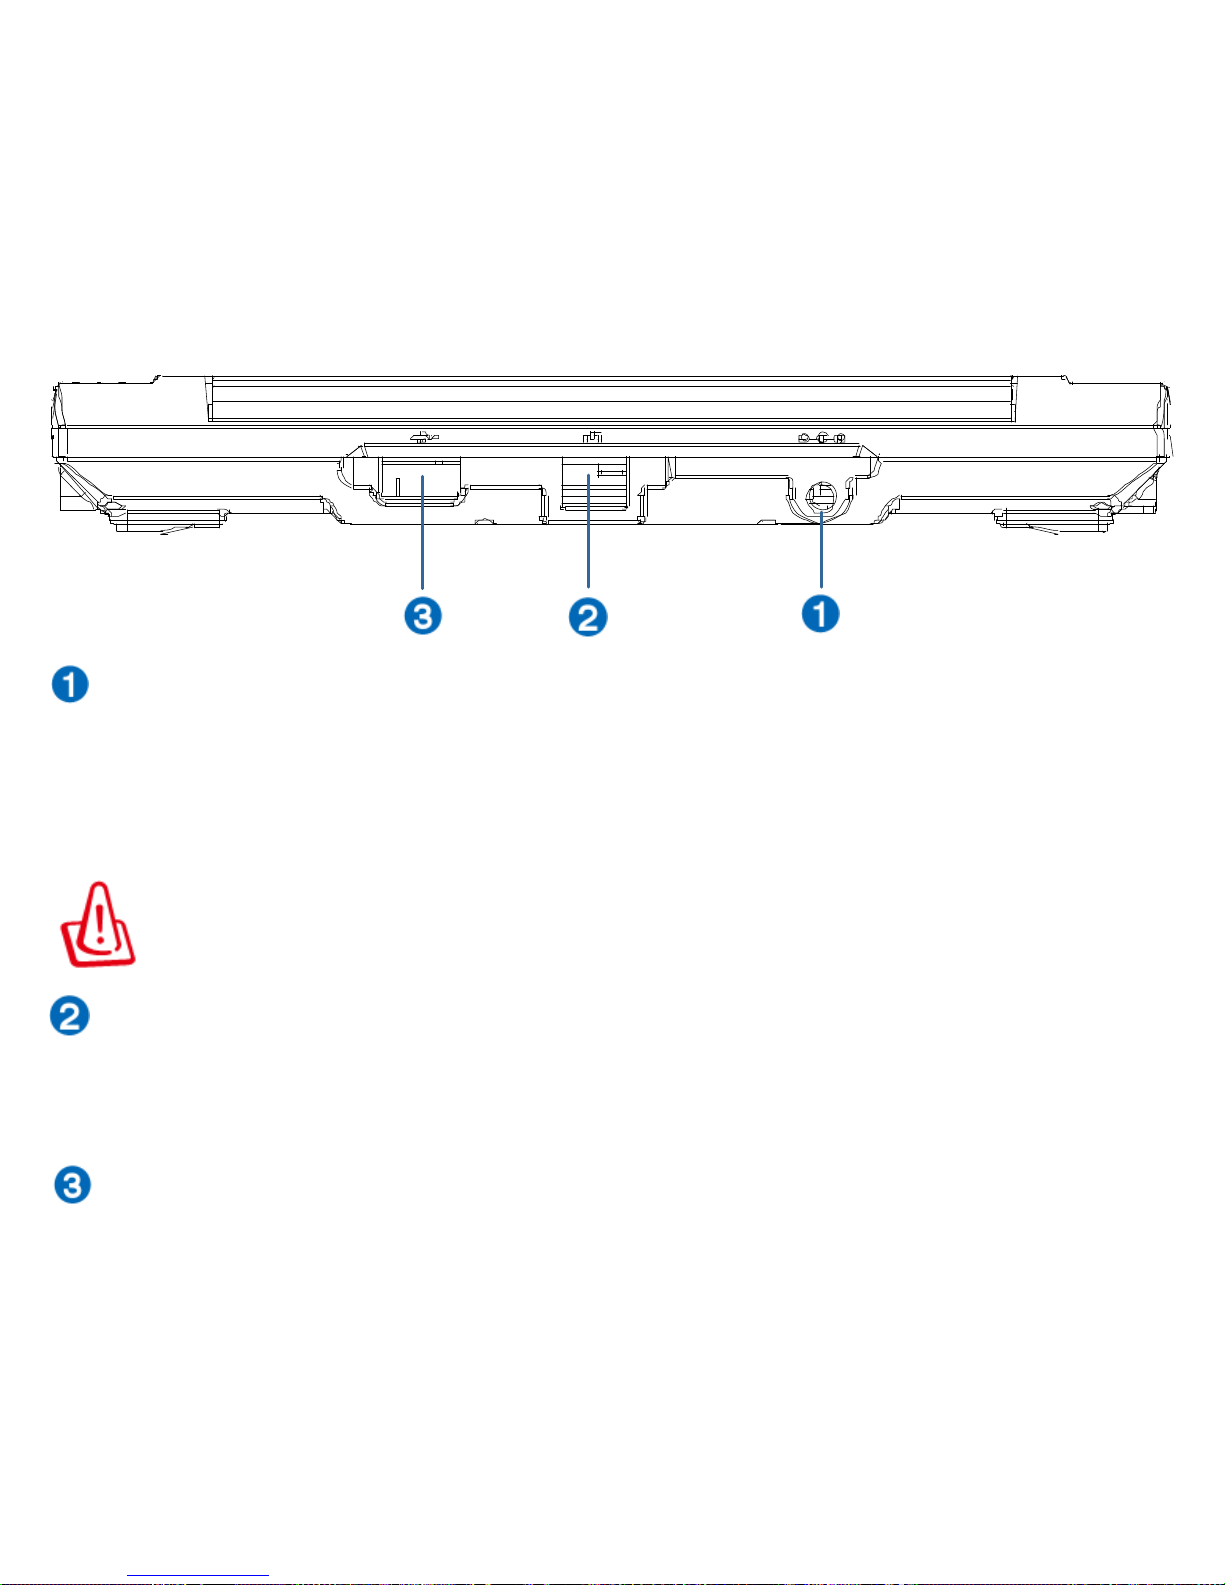
Back view
Recognize different parts on the back side of computer by referring to the figure below.
Direct Current Input
The power-supply adaptor will transfer from the alternati ve current to direct curr ent by this hole. The power
will supply power to computer and charge the lithium battery by this hole. In order to avoid damage the
computer and battery pack, please use the power-supply adaptor on an often basis.
Warning: It will become hot from being warm when using. Please determine whether the DC
socket inserts with adaptor and be far away from your body.
Network Interface (RJ-45)
RJ-45 network interface supports standard Ethernet wire to connect with the local network. The built-in
connector can be used where additional adaptor is not applied.
USB Host Port (2.0)
Just like the 2 USB ports in the right view, USB port can also connect with such equipments as keyboard and
accumulator.
Page 14

z
1.3 Main Features
Display Screen: 7 inch 800*480 high-definition TFT crystal digital display screen.
z Input: Standard keyboard and mouse.
z Sound Card: AC97 sound card.
z Communication: Surfing the internet with Wi-Fi broad band or 10/100MB Ethernet port.
z System: Embedded Windows CE 6.0 operation system - high safety & virus free.
2. Start to Use
2.1 Touch Control Pad (Touch Pad)
Click/knock-cursor to one item and press left key or use finger tip to touch the touc h pad softly. The fingertip
can not leave the touch pad before selecting the i tem. T he selected item will change color. The following two
graphical interpretations will produce the same effect.
13
Page 15

14
Double-click/knock-this is a very common skill to make the se lected corresponding icon to start its program
directly. The following two graphical interpretations will produce the same effect.
Drag-dragging means selecting the item you want and put it i n the place where you intend to. The follo wing
two graphical interpretations will produce the same effect.
Page 16

15
2.2 Emergency Shut-down
When your operation system can not normally shut d own, please press p ower button until the system shuts
down automatically.
3. Using your Notebook Computer
3.1 Basic operation
3.1-1 Start-up/shut-down
Start-up
We must start up for operation first when using laptop. The computer will enter JAY-BOOK desktop after
pressing power switch and then waiting for dozens of seconds. Just like the other WINDOWS, “my computer”
can be entered here.
Remark: Clicking the image twice means double-click while clicking for clicking once means
single-click.
Shut-down
Click the
icon on the lower left side of the mouse desktop an d the content will be popped out to select
Shutdown to shut down your computer, which is illustrated in the following figure.
Page 17

16
Single-click
3.1-2 Reset
If the system appears “deal halt”, please adopt a pen nib or other slender object to stick to the reset hole near
the battery cover and then the system will restart automatically.
3.1-3 Charging
When the computer owns no power or the power quantity is not sufficient, it is necessary to charge it, or it will
be shut down automatically. Charging can be carried out by inserting external charger and the charging
indication lamp will be bright. After finishing charging, the charging indication lamp will be off.
3.2 Network
3.2-1 Wireless Network
Remark: If Wi-Fi icon does not appear on the lower right side of the desktop after starting up, it
indicates that Wi-Fi has not opened. At this ti me, the follow ing operation is entailed (click the po wer
icon on the lower right side of the desktop and then dialogue box interface will be popped out, select
Page 18

17
Option to enter submenu to select “Wi-Fi Power On”. After clicking, Wi-Fi icon will appear and then
open it, or the Wi-Fi short-cut icon on t he desktop can be also o pened), Wi-Fi can als o be op ened b y
press short-cut key [F9].
1. Wi-Fi settings: click Wi-Fi icon on the l ower right side of W INDOWS CE desktop and th e figure illustrate d
below will be popped out:
Select
Double-click
Page 19

18
2. Then click “wireless information” to switch to what is illustrated in the following figure:
Select
3. The computer will explore wireless n etwork automaticall y. Please select the wireless network which fit for
you according to the actual situation.
If Wi-Fi network needs code, please consult the n etwork manager, since it can not be connected until codes
are input.
Double-click the Wi-Fi network you select and the figure illustrated in the following will be popped out:
Page 20

19
Input
Select
Select “encryption” way and then input code in “network secret key”. It will be OK by pressing enter.
Note: 1) The settings of “encryption” “identity authorization” and “network secrete key” must be
matched with wireless router you want to connect with, or it can not connect with the
network.
2) Some individual router may probably not be connected after using for sometime.
Connection shall be carried out after deletion. Explore wireless netw ork agai n and carry out
corresponding wireless connection settings.
4. After setting user name and code etc. click [OK ] to explore wireless network connection and the n it will
indicate it has been connected, (when the network is not found, it needs to wait for some time. It also can not
surf the internet when failing to connect). It is illustrated in the following figure:
Page 21

20
Display the connection
5. Internet webpage browsing
Under the circumstance that network has been connected, double-click the icon
on the desktop to
browse webpage and utmost enjoy the happiness of surfing online.
3-2-2 3G Network
Insert 3G Modern into the U SB port of the computer first and then it en tails several minutes to rec ognize
Modern. Then open 3G Modern dialer, the specific steps are illustrated as follows:
Page 22

21
1. Select start-settings-network connection interface, which is illustrated in the figure:
Double-click
2. Double-click mouse 3G Modern di aler and the dialing dialogue box will be popped out. It is able to c lick
directly for connection without inputting user name and code. The tip sound “Gee” will be released after
several seconds, which indicates 3G wireless network has been connected and surfing internet can be
allowed. It is illustrated in the following figure:
Page 23

22
Single-click
3. “Gee” sound will be released after several minutes, which means 3G wireless network has been connected
and surfing the internet is allowed. It is illustrated as follows:
Page 24

23
Single-click
When you need not surf the internet, the connection can be disconnected, which can facilitate application.
Remark: The machine has installed 3G Modem drive and only supports HUAWEI (E180, E220 and 770)
Modem; in addition, the card it supports is GSM card and WCDMA card. (GSM card is the mobile
phone standard which is most widely used at present while WCDMA card is the mobile
communication technology in 3G times).
Page 25

24
3.2-3 10/100MB LAN Network
Only the wire LAN that the user has connected with Internet network can adopt two ways to connect to
Internet.
1) Dynamic IP way
When inserting the wire network interface, the computer will connect with the broad band wire network
automatically.
2) Static IP way
If the current LAN router adopts static distribution IP way, it is illustrated as follows:
Double-click
1. Open “network and dialing connection”
Page 26

25
Double-click
2. Select “GETCE6B1” to enter network settings.
Page 27

26
Input
Select “IP address” item, select “point an IP address”
Please refer to the figure above for input of IP address, subnet mask, and default gateway. The specific
settings are established according to the configuration of router. If something unclear exists, please consul t
the network manager.
Page 28

27
3. After setting parameter and inserting net wire, it will connect to the network automatically.
Display the connection
3.3 Application of Office Software
The Mini notebook computer system in th e office is composed of Microsoft WordPad, SoftMaker TextMaker,
SoftMaker PlanMaker, SoftMaker Presentations and Foxit PDF viewer which are illustrated in the following
figure.
Page 29

28
3.3-1 SoftMaker TextMaker
Page 30

29
3.3-2 SoftMaker PlanMaker
Page 31

30
3.3-3 SoftMaker Presentations
Page 32

31
3.3-4 Foxit Reader PDF Viewer
3.4 Media Player
3.4-1 Video Play
1. Double-click Media Player icon in the mouse desktop and the dialogue box illustrated in the following will
be popped out:
Page 33

32
Select
2. Select File in the menu to open the files you need to play (when sel ecting file, only All Files type file ca n
display all file materials), which is illustrated as follows:
Page 34

33
Single-click
Select
Select
3. Click mouse [OK] and the video file starts to play and the icon in the menu will play in full screen. Press
ESC key to exit full screen. Such player is in hard decoding t ype, which can play on a fast and clear
basis; in addition, it supports video with 7 20X480 resolution s. W hat needs mentioning is t he decodin g
format of the player own MJPEG only.
Press
to start or stop and press or to come into the next path. It works under the same type
with standard windows media player.
Page 35

34
3.4-2 PALYER
Double-click “Player” media player in the desktop and then it will utilize software for decoding; in addition, the
supported media file format is much m ore than the “Media Player”. But due to the application of software
decoding, the speed to play video file is not as fast as that of “Media Player”.
Remark: the video formats that the machine supports are: AVI, ASF, WMV, MPG, PMP, 3GP, H.263
3.4-3 Radio
Double-click the record fast icon on the desktop to enter reco rd interface and the n click Record to selec t the
record you need and save it in the catalogue. Record can be carried out after confirmation.
Page 36

35
Single-click
Remark: 1. Record can be carried out only connecting with external microphone.
2. Record can not be carried out when playing audio/video.
3.5 Games
Double-click desktop icon “Gam es” on the desktop and the game fast icon will be popped out. The games
operation can be carried out by double-clicking the icon, which is illustrated as follows:
Page 37

36
Select
3.6 Files Management
My computer
Double-click “my computer” icon on the desktop and the files management interface will be popped out. Files
management include: control panel, Flash Disk, application sys tem and operation s ystem etc. it is illustrated
as follows:
Note: the files in the system can not b e d eleted and th e f ailure oper ation of com put er ma y b e c ause d o n ce i t
is deleted.
Page 38

37
3.6-1 Built-in Flash
Open my computer and enter source manager. You can see t hat a file belongs to “Flash Disk” disk symbo l
which is a built-in Flash and used for materials storage.
Page 39

38
Flash
3.6-2 SD Card
After inserting SD card, the disk symbol of it can be seen in the source manager. Double-click “Storage Card”
to browse the files in SD card.
Page 40

39
SD
3.6-3 USB Disk
Insert an USB disk and the di sk symbol of it c an be seen in the sou rce mana ger. Double-click “USB Disk” t o
browse files in USB disk.
Page 41

40
USB
Page 42

41
3.7 Short-cut Key
Serial
number
Short-cut Function Remark
1 F4 IE browser Opening IE with one key
2 F6 Backlight- Back light fades down
3 F7 Backlight+ Back light fades up
4 F9 Wi-Fi switch Starting Wi-Fi
5 Fn+F11 Volume- Volume decrease
6 Fn+F12 Volume+ Volume increase
4. Points for Attention
1) The system software is in successive upgradin g, thus, the pictures used in the document may
differ with the actual products and it is subject to the content of actual product of the user’s.
2) The product is a “Mini computer” w hich adopts Windows CE 6.0 operation system and it ow ns
some difference with the PC owning Windows XP operation s ystem. The main advantages of it
are “low power consumption” “small volume” a nd “light weight”. Please never measure it with
the function of Windows XP.
Page 43

 Loading...